1
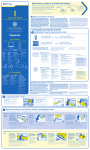
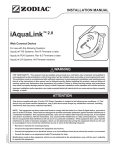
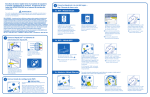
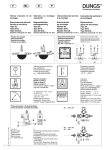
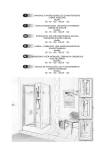
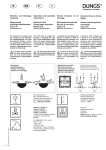
How It Works Comment cela fonctionne-t-il? | Cómo funciona
INternet
Quick Start Guide
Guide de démarrage rapide | Guía de inicio rápido
Interface
Internet User Account
Your Internet Router
Votre routeur Internet
FR Internet User
Account
Votre routeur Internet
Su enrutador de Internet
Important | Important | Importante
Give doorhanger directly to pool owner or hang on door
Su enrutador de Internet Appareil de connexion Web iAquaLink
SP Internet User
Account
Dispositivo de conexión
a Internet iAquaLink
Aqualink® Power Center Pools System
Bloc d’alimentation
Aqualink
Alimentación eléctrica Aqualink
Système pour piscine
Sistema para piscinas
1•2•3 Installation Installation 1•2•3 | Instalación 1•2•3
Donner l’affichette de porte directement au propriétaire de la piscine ou l’accrocher sur la porte
1. Network the iAquaLink device
Entregue el gancho para la puerta directamente al propietario
de la piscina o cuélguelo en la puerta
2. Install the iAquaLink device to the power center 3. Create a user account at iAquaLink.com , log in
and begin enjoying iAquaLink
Configurer Intégration de l’appareil dans le
Se connecter Brancher l’iAqualink à son bloc
d’alimentation
réseau du cliente
Conexión Conecte iAqualink al tablero de alimentación eléctrica de iAqualink
WARNING ⁄ AVERTISSEMENT ⁄ ADVERTENCIA
FOR YOUR SAFETY - This product must be installed and serviced by a contractor who is
licensed and qualified in pool equipment by the jurisdiction in which the product will be
installed where such state or local requirements exist, the maintainer must be a professional
with sufficient experience in pool equipment installation and maintenance so that all of the
instructions in this manual can be followed exactly. Before installing this product, read and
follow all warning notices and instructions that accompany this product. Failure to follow
warning notices and instructions may result in property damage, personal injury, or death.
Improper installation and/or operation will void the warranty. Improper installation and/or
operation can create unwanted electrical hazard which can cause serious injury, property
damage, or death. Turn off power at the main circuit feeding the AquaLink power center to
disconnect the power center from the system.
caution ⁄ MISE EN GARDE ⁄ PRECAUCIÓN
If replacing the CPU board go to Clear Memory in the System Setup menu and clear the memory.
To avoid damages caused by static electricity, handle the PCB by its edges only. Avoid touching
any electronics components with your fingertips. Do not replace the PCB in the rain.
!
iAquaLink Web
Connect Device
Installation manual (H0364100) and owners manual
(H0364200), available online at www.iAquaLink.com or by
calling: USA: 1-800-822-7933 | Canada: 1-888-647-4004 |
Australia 1800.688.552
Configurer votre nom d’utilisateur et mot de passe
au www.iAquaLink.com
ConfiguraciónIncorporación del dispositivo en la
red del consumidor
Configure el nombre de usuario y la contraseña
en www.iAquaLink.com
POUR VOTRE SÉCURITÉ - ce produit doit être pris en charge par une entreprise qui est autorisée et qualifiée pour
la réparation des équipements de piscine par la juridiction où le dit produit est installé lorsque de telles exigences
locales ou provinciales sont édictées, la personne responsable de l’entretien doit être un professionnel avec
une expérience suffisante dans l’installation et l’entretien d’équipement de piscine pour suivre exactement les
instructions contenues dans ce guide. Avant d’installer ce produit, lisez et respectez toutes les consignes de
mise en garde et les instructions incluses avec ce produit. Le non-respect des avertissements et des instructions
pourrait résulter en des dommages matériels, des blessures graves ou même la mort. L’installation ou l’utilisation
inappropriée annulera la garantie. L’installation ou l’utilisation inappropriée peuvent créer un danger électrique
indésirable qui peut provoquer des blessures graves, des dommages à la propriété ou la mort. Coupez l’électricité
au niveau de l’alimentation principale de l’AquaLink pour débrancher le tableau d’alimentation du système.
PARA SU SEGURIDAD - Este producto se debe ser instalado y mantenido por un contratista que sea autorizado
y calificado en el equipo de la piscina por la jurisdicción en la cual el producto será instalado donde existen
requisitos estatales o locales. En el caso que ningun requisito del estado o local exista, el instalador o el personal
de mantenimiento debe ser un profesional con suficiente experiencia en la instalación y el mantenimiento de
equipo de piscina para poder seguir todas las instrucciones de este manual exactamente. Antes de instalar este
producto, lea y siga todos los avisos e instrucciones que acompañen este producto. La falta de seguir avisos e
instrucciones puede dar lugar a daños materiales, a daños corporales, o a muerte. La incorrecta instalación y/o
la operación anularán la garantía. La incorrecta instalación y/o la operación pueden crear el peligro eléctrico
indeseado que puede causar lesión, daños materiales, o muerte. Apague la energía electrica en el circuito
principal que alimenta el centro de control AquaLink para desconectar el centro de control del sistema.
Pour éviter des dommages causés par l’électricité statique, manipuler uniquement la carte de circuit imprimé par
les extrémités. Éviter de toucher les composants électroniques avec vos doigts. Ne pas remplacer la carte de circuit
imprimé sous la pluie.
Para evitar los daños causados por la electricidad estática, manipule el PCB sosteniéndolo únicamente por sus
bordes. Evite tocar cualquier componente electrónico con las puntas de los dedos. No cambie el PCB bajo la lluvia.
Manuel d’installation complet (H0364100) et Manuel du propriétaire
(H0364200), disponible en ligne au www.iAquaLink.com ou en appelant
au: USA: 1-800-822-7933 | Canada: 1-888-647-4004 | Australia 1800.688.552
El Manual de Instalación (H0364100) y el Manual del Usuario
(H0364100), están disponibles en la pagina web www.iAquaLink.com o llamando: USA: 1-800-822-7933 | Canada: 1-888-647-4004 |
Australia 1800.688.552
1 Network the iAquaLink Device Go to step 1.1 or 1.2
FR Network the iAquaLink Device Go to step 1.1 or 1.2 | SP Network the iAquaLink Device Go to step 1.1 or 1.2
1.1
WiFi Network Connection Option | Sans fil — configuration à l’aide d’un ordinateur | Inalámbrica, configuración mediante computadora
iAquaLink.com/SSID
Wi-Fi
setup tool
A
B
C
D
E
Remove the device lid by removing the
two screws.
Locate the WiFi/WIRED switch and ensure
it is in the WiFi position.
Attach the iAquaLink device to an internet
connected PC or Mac® with a USB cable.
Retirer le couvercle de l’appareil en
enlevant les deux vis.
Localiser l’interrupteur WI-FI/WIRED et
s’assurer qu’il est à la position WI-FI.
Attach the iAquaLink device to an internet
connected PC or Mac® with a USB cable.
With a web browser, download & run the
WiFi setup tool from iAquaLink.com/SSID
With a web browser download & run the
WiFi setup tool from iAquaLink.com /SSID
Attach the iAquaLink device to an internet
connected PC or Mac® with a USB cable.
With a web browser download & run the
WiFi setup tool from iAquaLink.com/SSID
Retire la tapa del dispositivo al quitar los
dos tornillos.
i
Ubique el interruptor WI-FI/WIRED
(inalámbrico/por cable) y asegúrese de que
esté en la posición WI-FI (inalámbrico).
After programming the device with the
network SSID & Key, replace the rubber
gasket & cover.
After programming the device with the
network SSID & Key, replace the rubber
gasket & cover.
Helpful hints | Conseils pratiques | Consejos útiles
Wi-Fi installs only
Wi-Fi
setup tool
iAquaLink.com/SSID
1.2
After programming the device with the
network SSID & Key, replace the rubber
gasket & cover.
Wi-Fi installe uniquement
Wi-Fi se instala únicamente
• MS Windows only: close any popup windows • MS Windows only: close any popup windows • MS Windows only: close any popup windows
that open after connecting the iAquaLink
that open after connecting the iAquaLink
that open after connecting the iAquaLink
device to the computer (step 1.1-C)
device to the computer (step 1.1-C)
device to the computer (step 1.1-C)
• A security warning may pop up. Ignore it and • A security warning may pop up. Ignore it and • A security warning may pop up. Ignore it and
proceed.
proceed.
proceed.
• After step D (above), the tool should indicate
• After step 1.1-D (above), the setup tool should • After step 1.1-D (above), the tool should
indicate successful programming of the
successful programming of the iAquaLink. If
indicate successful programming of the
iAquaLink. If not, repeat steps 1.1-C and 1.1-D.
not, repeat steps 1.1-C and 1.1-D.
iAquaLink. If not, repeat steps 1.1-C and 1.1-D.
Wi-Fi installs only
Wi-Fi installe uniquement
Wi-Fi se instala únicamente
The iAquaLink device uses Wi-Fi standard
802.11b for maximum range and broadest
compatibility with most residential Wi-Fi
routers and wireless access points. Some
Wi-Fi routers or access points may require “b”
mode be enabled in order to communicate with
the iAquaLink Device. Every router is different
– please see router instructions for help.
Wired (Ethernet) Network Connection Option | FR Wired (Ethernet) Network Connection | SP Wired (Ethernet) Network Connection
A
Remove the device lid by removing the two
screws. Locate the WiFi/WIRED switch and
ensure it is in the WIRED position.
B
Using an Ethernet cable, connect the device to
the home network’s router.
Retirer le couvercle de l’appareil en enlevant les
deux vis. Localiser l’interrupteur WI-FI/WIRED et
s’assurer qu’il est à la position WIRED.
À l’aide d’un câble Ethernet standard, brancher
l’une des extrémités du câble au raccord sur
le panneau de l’appareil. Connecter l’autre
extrémité au routeur de réseau domestique.
Retire la tapa del dispositivo al quitar los dos
tornillos. Ubique el interruptor WI-FI/WIRED
(inalámbrico/por cable) y asegúrese de que esté
en la posición WIRED (por cable).
Con el cable de Ethernet estándar, conecte un
extremo del cable al conector del tablero del dispositivo. Conecte el otro extremo al enrutador de red local.
C
Remove device lid and gasket by removing
the two screws.
Pour permettre au câble de sortir de l’appareil,
empoigner la partie détachable et effectuer un
mouvement de va-et-vient jusqu’à ce qu’elle cède.
Para permitir que el cable salga del dispositivo,
sujete la pieza separable y muévala hacia
adelante y atrás hasta que se quiebre.
D
Wrap the cable as shown inside the device and
use the break-away as an exit hole. Replace the
rubber gasket & cover.
Enrouler le câble comme illustré à l’intérieur
de l’appareil, puis utiliser la partie détachée
comme trou de sortie. Repositionner le boîtier
d’étanchéité et les deux vis.
Enrolle el cable como se muestra dentro del
dispositivo y utilice la separación como orificio de
salida. Vuelva a colocar la cubierta de la junta y
los dos tornillos.
2 Install the iAquaLink Device Pictures are for general guidance—some power centers may look different.
FR Install the iAquaLink Device Pictures are for general guidance—some power centers may look different. | SP Install the iAquaLink Device Pictures are for general guidance—some power centers may look different.
1 = Red
Rouge, Rojo
2 = Black
Noir, Negro
3 = Yellow
Jaune, Amarillo
A
B
All power to the power center
must be OFF! Route the 4-wire
cable through the bottom access
hole into the low-voltage raceway.
The red 4-wire connector may not
be required for all installations.
FR All power to the power center
must be OFF! Route the 4-wire
cable through the bottom access
hole and low-voltage raceway. The
red 4-pin connector may need to
be removed first.
C
Route the 4-wire cable toward the
red 4-wire connector.
FR Route the 4-wire cable toward
the red 4-Pin socket .
SP Route the 4-wire cable toward
the red 4-Pin socket .
4 = Green
Vert, Verde
Ensure that all wires are properly
attached to the red 4-wire
connector. Some connectors may
look different.
S’assurer que tous les câbles sont
correctement reliés au connecteur
rouge à 4 broches.
Asegúrese de que todos los cables
estén correctamente conectados
al conector rojo de 4 clavijas.
E
Up to two devices can be
connected to each 4-wire
connector (two wires per hole).
If more capacity is needed, a 6584
multiplex board can be installed.
See “helpful hints” section.
La prise à 4 broches peut relier
jusqu’à 2 appareils (deux câbles
par trou). En cas de besoin, un
panneau multiplexé 6584 peut être
installé. Voir la section « Conseils
pratiques.
Pueden conectarse hasta dos
dispositivos a un enchufe de 4
clavijas (dos cables por orificio). Si se necesita más capacidad, se
puede instalar un tablero multiplex
6584. Consulte la sección
“sugerencias prácticas”.
SP All power to the power center
must be OFF! Route the 4-wire
cable through the bottom access
hole and low-voltage raceway. The
red 4-pin connector may need to
be removed first.
i
D
F
Reassemble the power center,
making sure no wires are pinched.
Replace all panels or screws
before returning electrical power
to the power center.
FR Reassemble the power center,
making sure no wires are pinched.
Replace all panels or screws
before returning electrical power
to the power center.
Ensure all LED’s (Red, Amber, &
Green) are illuminated before
proceeding to step 3.
FR Ensure all LED’s (Red, Amber,
& Green) are illuminated before
proceeding to step 3.
SP Ensure all LED’s (Red, Amber,
& Green) are illuminated before
proceeding to step 3.
SP Reassemble the power center,
making sure no wires are pinched.
Replace all panels or screws
before returning electrical power
to the power center.
Helpful hints | Conseils pratiques | Consejos útiles
w
10' from any motor
3 m (10 pi) de tout moteur
10 pies (3 m) de cualquier motor
6' | 2 m | 6 pi
When and how to use a 6584 multiplex board
What the LEDs mean
If you have more than two sets of wires that need to be connected
to the red four pin connectors, install a 6584 Multiplex board. For
installation instructions see instruction sheet included with 6584.
Red = Power
Yellow = Connected to Network
Green = Connected to Internet
LED’s may flicker—this is normal.
A. Attach the Web Connect Device as close to the home’s router as
possible
Que signifient les DEL
C. Always mount the iAquaLink device with the antenna on the right
side, pointing up toward the sky.
Quand et comment utiliser un panneau multiplexé 6584
Si vous possédez des jeux de câbles supplémentaires à relier aux
connecteurs à 4 broches rouges, installez un panneau multiplexé 6584.
Pour les instructions d’installation, consulter la feuille de consignes
fournie.
Rouge = Alimentation
Jaune = Connecté au réseau
Vert = Connecté à l’Internet
Cuándo y cómo utilizar un tablero multiplex 6584
Rojo = Encendido
Amarillo = Conectado a la red
Verde = Conectado a Internet
Si tiene conjuntos de cables adicionales que deben conectarse a
conectores rojos de cuatro clavijas, instale un tablero multiplex 6584.
Para conocer las instrucciones de instalación, consulte la hoja de
instrucciones incluida.
For best performance (Wi-Fi installs only)
B. Mount the antenna at least 6 ft. (2m) high and 10 ft. (3m) from any
electric motor, device, or metal object
Installation sans fil seulement (Wi-Fi installs only)
A. Placer l’appareil de connexion à Internet aussi près du routeur
domestique que possible
Qué significan los LED
B. Monter l’antenne à une distance d’au moins 2 m (6 pi) de haut et à
3 m (10 pi) de tout moteur électrique, appareil ou objet métallique .
C. FRENCH
Instalaciones inalámbricas únicamente (Wi-Fi installs only)
A. Conecte el Dispositivo de conexión a Internet lo más cerca posible
del enrutador local
B. Monte la antena por lo menos a 6 pies (2 m) de altura y a 10 pies (3
m) de cualquier motor eléctrico, dispositivo u objeto de metal
C. SPANISH
3 Create & Setup Account
3.1 Download the Free App (optional)
Créez et configurez le compte | Cree y configure la cuenta
Télécharger l’application libre (optional) | Descargue la aplicación gratis (optional)
Device number location
FR Device number location
SP Device number location
Door hanger
L’affichette de porte
El gancho para la puerta
A. Before starting, find the
iAquaLink 12 digit Device
number found on the device
or door hanger. The number
starts with “Q” & looks like:
QXX-XXX-XXX-XXX
B. On the same network the
iAquaLink device is connected
to, use a computer to go to
iAqualink.com
C. Click the link to sign-up &
create a user account. If user
already has an account, skip to
step 3E –“add location”
D. Follow the directions to create
the user account, then proceed
to Sign-in to the account
E. Click the “Add Location”
button to add the device into
the user account. You can now
use iAquaLink
Device
L’appareil El dispositivo
A. FR Before starting, find the
iAquaLink 12 digit Device
numberFound on the device or
door hanger. Starts with “Q” &
looks like: QXX-XXX-XXX-XXX
A. SP Before starting, find the
iAquaLink 12 digit Device
numberFound on the device or
door hanger. Starts with “Q” &
looks like: QXX-XXX-XXX-XXX
B. FR Through the same network
the iAquaLink device is
connected to, using a computer
go to iAquaLink.com
B. SP Through the same network
the iAquaLink device is
connected to, using a computer
go to iAquaLink.com
C. FR If user has an account, have
them sign-in, then proceed
to step 3E– “add location”.
Otherwise, find the Link to
sign-up & create a new user
account
C. SP If user has an account, have
them sign-in, then proceed
to step 3E– “add location”.
Otherwise, find the Link to
sign-up & create a new user
account
D. FR Follow the directions to
create the user account, then
proceed to Sign-in to the account
D. SP Follow the directions to
create the user account, then
proceed to Sign-in to the
account
E. FR Click the “Add Location”
button to add the device into the
user account. You can now use
iAquaLink
E. SP Click the “Add Location”
button to add the device into the
user account. You can now use
iAquaLink
A. iPhone®/iPad®/iPod Touch®
app available on iTunes®;
search for “iAquaLink”
A. L’application iPhone/iPad/iPod
Touch est disponible sur iTunes;
Chercher « iAquaLink »
B. Android app available from
Google Play; search for
“iAquaLink”
B. L’application Android est
disponible sur l’Android
Market; Chercher « iAquaLink »
C. A mobile web app may be used
with most other smart devices.
Go to: iAquaLink.com/mobile
C. Une application Web par
navigateur pour les appareils
mobiles est également
disponible au www.iAquaLink.
com/mobile
A. Aplicaciones para iPhone/
iPad/iPod Touch disponibles en
iTunes; simplemente busque
“iAquaLink”
B. Aplicación para Android
disponible en Android Market;
busque “iAquaLink”
C. También hay disponible una
aplicación web basada en
navegador para dispositivos
móviles en www.iAquaLink.
com/mobile
www.iAquaLink.com
i Helpful hints | Conseils pratiques | Consejos útiles
Wi-Fi installs only
Wi-Fi installe uniquement
Wi-Fi se instala únicamente
1.All the LED’s (Red, Amber, & Green) must all be lit on the
iAquaLink device before proceeding to step 3.
2.For security reasons, the account server only allows a
Location (iAquaLink device) to be added to an iAquaLink
account when the accessing computer is logged into the
same network as the iAqualink device being added.
1.Tous les LED (rouge, orange, et vert) doivent tous
être allumésur le périphérique iAquaLink pour
effectuer l’étape 3.
2.Pour des raisons de sécurité, le serveur de
compte ne permet qu’une Lieu (DispositifiAquaLink) à
ajouter lorsque l’appareil est connecté au serveur via le
même réseau quel’ordinateur de configuration.
1.Todos los LED (rojo, ámbar, y verde) todo debe estar
encendido en el dispositivo iAquaLink para llevar a
cabo el paso 3.
2.Por razones de seguridad, el servidor cuenta
sólo permite una posición (DispositivoiAquaLink) que
se añade cuando el dispositivo está conectado al
servidor a través de lamisma red que el ordenador de
configuración.
©2012 Zodiac Pool Systems, Inc. ZODIAC® is a registered trademark of Zodiac International, S.A.S.U., used under license. All trademarks used herein are the property of their respective owners. Apple Inc. is not a participant in or sponsor of this promotion. HO364300 Rev A 0612