1
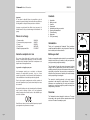
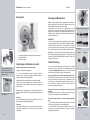
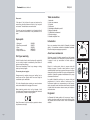
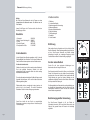
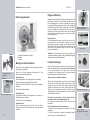
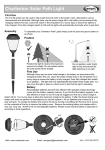
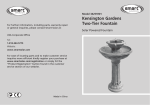
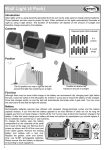
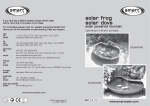
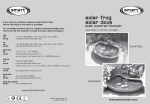
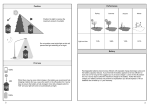
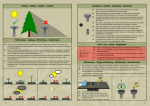
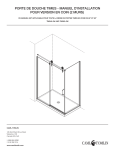
If you have any problems, please contact Smart Solar
before returning to the place of purchase.
For
or immediate answers visit our website www.smartsolar.com
where you will find extensive trouble shooting, FAQs and support.
usa
tel :
email:
uk
tel :
email :
germany
tel :
email :
france
tel :
email :
chatsworth
solar
olar powered fountain
operates in direct sunlight
+1 813 343 5775 Mon-Sat 9am-7pm (EST)
[email protected]
+44 (0) 8448 009 163 Mon-Sat 9am-7pm (GMT)
[email protected]
+49 (0) 180 5294365
(0,12 € pro Minute aus dem Festnetz der T-Com)
[email protected]
smart solar ltd, Ruenhorst 24, 46395 Bocholt
+33 344 600 862
[email protected]
smart solar ltd, 14 rue du Beau Larris, 60260 Lamorlaye
europe
email :
[email protected]
australia
tel :
+61 03 9512 0680
email :
[email protected]
asia/ pan pacific
email :
[email protected]
www.smartsolar.com
2008 smart solar ltd
rev. 66080115_1a
www.smartsolar.com
Page 2
Page 15
ENGLISH
Chatsworth Manuel d'instructions
Important :
Si l’eau dans le dispositif d’eau est susceptible a geler la
pompe et le panneau doivent être stockés dans un endroit sec
et incongelable. Le dispositif d’eau peut rester a l’extérieur.
La pompe ne peut jamais être utilisée à sec (sans eau). Un
fonctionnement à sec peut endommager irréversiblement la
pompe.
Pièces de rechange
1
2
3
4
5
Panneau solaire
Panneua solaire/ pompe connecteur
Pompe
Pompe turbine
Base de la pompe avec filtre
2060AS01
2090KIT2
20020P01
IMPELLER
PCOVER07
Contents
1.
2.
3.
4.
5.
6.
7.
8.
9.
Introduction
Before you start
Overview
Components
Assembling and using your product
Cleaning and maintenance
Trouble shooting
Spare parts
Full 2 year warranty
Introduction
Thank you for purchasing the Chatsworth. These instructions
contain important information for using this product. Please keep
them in a safe place for future reference.
Garantie complète de 2 ans
Before you start
Si au cours d’une période de 24 mois à partir de la date
d’achat, ce produit devient défectueux à la suite d’un défaut
des pièces ou de fabrication, Smart Solar le remplacera ou le
réparera sans frais supplémentaires.
Decide on an appropriate outdoor location for your water feature.
Ideally this should be on a flat surface. A solar panel powers the
pump by converting sunlight into electricity.
La garantie ne s’applique pas pour :
Les dommages causés par un accident, un traitement
mauvais, une manipulation incorrecte, le gel ou l’usure
normale. Les produits qui ont été soumis à des réparations ou
à des modifications non autorisées perdent leur garantie.
Pour de plus amples renseignements, veuillez contacter le
centre de réparations le plus proche comme indiqué au verso
de ce manuel.
Des produits électriques de rebut devraient pas être débarassés
avec la perte de ménage. Veuillez, la où les équipements
existent, contacter vôtre autorité locale ou vôtre détaillant pour
conseil de réutilisation.
The solar panel will power the pump when exposed to direct
sunlight. If the sun passes behind a cloud then the amount of
electricity produced by the panel will decrease and the pump will
stop working or slow down. As soon as the sun reappears from
behind the cloud the amount of electricity will increase instantly
and the pump will begin to work again.
PANEL PERFORMANCE
CONDITION FUNCTIONALITY
The amount of electricity produced by the solar panel is
proportional to the strength of sunlight received. For optimum
performance we recommend that your solar panel should be
exposed to as much direct sunlight as possible and away from
shady areas e.g. under trees.
Overview
SEASONAL FUNCTIONALITY
The Chatsworth has been designed for outdoor use. The pump
drives water to the upper tier and then cascades down into the
resin bowl. The water is constantly re-cycled.
Smart Solar se réserve le droit de modifier n'importe quel produit
pour augmenter son performance et concept.
Page 14
Page 3
FRANÇAIS
Chatsworth Instruction Manual
Components
Nettoyage et entretien
Pompe :
Si, après un certain temps, la pompe perd de l’énergie ou cesse de
fonctionner, vérifiez s’il y a une accumulation de saleté ou de tartre
au fond du boîtier de la pompe. Sortez soigneusement la rangée
supérieure. Tournez-l'à l'envers sur une surface molle. Séchez le
connecteur et le débranchez.
Séparez la pompe de l'unité en plastique et ouvrez la pompe à sa
base. Retirez la turbine et enlevez la saleté et le tartre accumulés,
puis fermez.
Remarque :
Pour assurer que le joint reste imperméable ensemblez les
connecteurs de la pompe et du panneaux solaire par torsion plutôt
que par pression seulement. Vérifiez que le petit anneau en
caoutchouc jeaune "o" demeure dans sa cannelure pendant
l’assemblage. Si cet anneau se déplace il n'y aura pas de propre
joint d’eau et la pompe et le panneau serront finallement cassée.
1 Upper tier with attached solar module and pump unit
2 Resin bowl
3 Resin Stand
Assembling and Using Your Product
How pump and panel connect
together in top tier.
(make sure rubber bung is
securely fitted into the hole)
Unpack all components carefully.
Please ensure that you check all parts have been removed from
the packaging.
Decide on a suitable location, bearing in mind there will be some
water splashes when the product is in use.
Panneau solaire : Le panneau doit être nettoyé périodiquement
avec un tissu mou et une nettoyant pour verre industrielle. Le
nettoyage régulier du panneau est conseillé pour obtenir la
conversion optimal de l'énergie solaire en courant continu.
Retournez à l’envers sur une surface
douce et fixez la pompe au tube
Assurez-vous que le connecteur
est bien étanche
Turbine
Base de la pompe
Problèmes de fonctionnement
En cas de problèmes contactez Smart Solar avant de renvoyer
votre produit à l´endroit de l´achat s.v.p. Pour des réponses
immédiates visitez notre site Web www.smartsolar.com ou vous
trouverez une section de dépannage étendue avec des questions
fréquemment posées, formes d´enquête par email instantanées
et ou vous pouvez passer des commandes de pièces de
rechange.
La pompe est bruyante et l’eau ne passe pas par le tuyau
First assemble the resin bowl onto the resin stand.
Then place the upper tier with solar module and pump unit into the
resin bowl (make sure the pump is attached to the tube).
Screw the second tier to the stand
Fill the main bowl with water and align the upper tier so water
flows equally through all spouts.
Please Note: We recommend you use distilled or rain water to
prevent scale build up.
Please note: On first use there may be air in the pump. It can take
up to 5 minutes until all the air is expelled and water begins to flow
from the upper tier.
Page 4
Enlevez la base de la pompe et enlevez la turbine. Quant la
pompe est toujours bruyante sens turbine, la pompe doit être
remplacée. Si la pompe n’est plus bruyante, nettoyez la pompe
et la turbine et replacez la turbine et la base de la pompe.Cette
problème peut se répéter quant l’eau est salle, on conseille de
remplacer l’eau régulièrement.
Enlevez la base de la pompe
La pompe ne fonctionne pas, bien que le module solaire
soit complètement dans la lumière du soleil.
La turbine est bloquée ou le boîtier du filtre/de la pompe est
sale - Nettoyez la pompe.
La pompe fonctionne, mais l’eau ne coule pas dans la tête
de la fontaine.
1) Vérifiez s’il y a accumulation de saleté ou de tartre dans la
tube ou le filtre – Nettoyez la tube et le filtre.
2) Vérifiez si la base de la pompe est fixée correctement. Si elle
n’est pas bien fixée, la pompe ne pourra pas envoyer l’eau dans
la fontaine.
Retirez la turbine pour la nettoyer
Page 13
Chatsworth d'Instruction Manual
Composants
ENGLISH
Cleaning and Maintenance
Pump: If, after a period of time, the pump starts to lose power or
stops working check for the build up of sediment, scale or dirt in
the filter and in the bottom of the pump housing.
Carefully take out the top tier. Turn it upside down on a soft
surface. Dry the solar pump connector and disconnect. Remove
the pump cover at its’ base. Take out the impeller and remove any
sediment, scale or dirt that has built up. Replace the impeller and
replace the pump cover.
IMPORTANT
To ensure the seal remains water-tight twist the pump and panels
connectors together rather than merely pressing them together.
Check that the small yellow rubber "o" ring remains in its' groove
and is not pushed out when connecting. If this ring moves there
will be no water seal and the pump and panel will eventually fail
1 La rangée supérieure avec la module solaire et la pompe
2 La cuvette en résine
3 Le stand en résine
Assemblage et utilisation du produit
Comment la pompe et le panneau se
relient ensemble dans la rangée
supérieure. (assurez-vous que le
bondon en caoutchouc est solidement
adapté dans le trou)
Déballez soigneusement tous les composants.
Choisissez un emplacement approprié.
Il y aura des éclaboussures quand le produit fonctionne.
Assurez-vous que la surface sur laquelle la fontaine solaire pour
oiseaux est placée n’en sera pas affectée.
Assemblez d'abord la cuvette en résine sur le stand en résine.
Placez alors la rangée supérieure avec la module solaire et la
pompe dans la cuvette en résine (assurez-vous que la pompe est
fixée a la tube).
Vissez la partie supérieure dans
partie inférieure
Remplissez la cuvette principale avec de l'eau et possisionez la
rangée supérieure ainsi que l’eau écoule également par tous les
becs.
Remarque :
Nous recommandons d’utiliser de l’eau distillée ou de l’eau de
pluie pour prévenir l’accumulation de tartre.
Remarque :
A la première utilisation, il peut y avoir de l’air dans la pompe. Il
faut parfois compter jusqu’à 5 minutes pour que l’air puisse
s’échapper.
Page 12
Solar panel: The panel should be cleaned periodically with a soft
tissue and proprietary glass cleaning solution. Regular cleaning of
the panel is advised to maintain optimum conversion of the sun’s
energy into direct current.
Turn upside down on a soft
surface and remove the pump unit
Ensure the underwater connector
is water tight.
impeller
pump cover
Trouble Shooting
If you have any problems please contact Smart Solar before
returning to the place of purchase. For immediate answers visit
our website www.smartsolar.com where you will find extensive
trouble shooting, FAQs and be able to order spare parts.
Pump is noisy and there is no water running through the tube
Take off the pump cover and remove the impeller. If the pump is
still noisy without the impeller then seek a replacement. If the
noise stops, clean the pump and replace the impeller and cover.
This problem may repeat if the water contains debris, we
recommend regular water changing.
Remove pump cover
Pump does not operate even though the solar panel is in full
sunlight
Check whether the impeller is blocked by removing the pump
cover. If it is, then clean the pump as detailed above.
Pump does operate but there is no water running through the
hose
1) Check for the build up of sediment, scale or dirt in the filter and
in the bottom of the pump housing as detailed above.
2) Check whether the pump cover is attached properly. If the
pump cover is not pushed down tightly, the pump will not push
water through the fountain.
Take out impeller to clean
Page 5
FRANÇAIS
Chatsworth Instruction Manual
Table des matières
Please note:
If the water is likely to freeze the pump and panel must be
removed from the water feature and stored in a dry frost proof
environment. The water feature can remain outside.
The pump must never be operated dry (out of water) as this will
have a permanent adverse affect on the performance of the
pump.
Spare parts
1. Solar panel
2. Panel/Pump connector kit
3. Pump
4. Pump impeller
5. Pump cover with filter
2060AS01
2090KIT2
20020P01
IMPELLER
PCOVER07
1. Introduction
2. Avant vous commencez
3. En général
4. Composants
5. Assemblage et utilisation du produit
6. Nettoyage et entretien
7. Problèmes de fonctionnement
8. Pièces de rechange
9. Garantie complète de 2 ans
Introduction
Nous vous remercions d’avoir acheté la Chatsworth (la fontaine
solaire). Ces instructions contient des informations importantes.
Elles doivent toujours accompagner ce produit si.
Avant vous commencez
Full 2 year warranty
If within 24 months from the date of purchase this product fails
due to a defect in material or workmanship, Smart Solar will
replace or repair free of charge.
Please report immediately if there is any damage or missing
pieces upon receipt of goods.
The warranty does not apply to:
Damage caused by accidents, abuse, poor handling, frost or
normal wear and tear. Products which have been subject to
unauthorized repair or modification.
For further information please contact your nearest customer
service centre detailed on the last page of this manual.
Waste electrical products should not be disposed of with
household waste. Please recycle where facilities exist. Check with
your local authority or retailer for recycling advice.
Smart Solar reserve the right to modify any product to enhance
its’ performance and design.
Page 6
Choisissez un endroit à l’extérieur approprié pour vôtre fountaine
solaire de préférence sur une surface plat. Un panneau solaire met
la pompe en route (en convertissant la lumière solaire en
électricité).
PERFORMANCE DU PANNEAU
Exposé à la lumière solaire directe, le panneau solaire fait
functioner la pompe. Si la soleil se cache derrière un nuage la
quantité d'électricité produit par le panneau diminuera et la pompe
cessera de fonctionner ou ralentira. Dès que le soleil réapparaîtra la
quantité de l'électricité augmentera immédiatement et la pompe
commencera à fonctionner.
La quantité d'électricité produite par le panneau solaire est
proportionnelle à la force de lumière du solaire reçue. Pour
functionement optimal nous recommandons que vôtre panneau
solaire est exposé à autant de lumière solaire directe que possible
et placé distant des secteurs ombreux comme par exemple en
desous des arbres.
PERFORMANCE / METEO
En général
La Chatsworth (la fontaine solaire) a été conçue pour l'usage à
l’extérieur. La pompe conduit l'eau vers le niveau supérieure et puis
l’eau cascade dans la cuvette de résine. L'eau est constamment
réutilisée.
PERFORMANCE / SAISON
Page 11
DEUTSCH
Chatsworth Bedienungsanleitung
Wichtig:
Bei Frost muß das Solarmodul und die Pumpe an einem
frostgeschützten Ort aufbewahrt werden. Der Brunnen kann im
Freien bleiben.
Lassen Sie die Pumpe nie im Trockenen laufen, dies könnte zu
Beschädigungen führen.
Ersatzteile
1. Solarmodul
2. Modul-Pumpen Verbindungskit
3. Pumpe
4. Pumpen-Flügelrad
5. Pumpendeckel mit Filter
2060AS01
2090KIT
20020P01
IMPELLER
PCOVER07
2 Jahre Garantie
Ab dem Zeitpunkt Ihres Erwerbes garantieren wir für 2 Jahre die
Funktionsfähigkeit Ihres Produktes. Im Falle eines Defektes wird
Smart Solar Ihnen diesen reparieren oder das Produkt ersetzen.
Inhaltsverzeichnis
1. Einführung
2. Vor dem ersten Betrieb
3. Bestimmungsgemäße Verwendung
4. Bedienungselemente
5. Montage und Inbetriebnahme
6. Pflege und Wartung
7. Funktionsstörungen
8. Ersatzteile
9. 2 Jahre Garantie
Einführung
Sehr geehrter Kunde, wir bedanken uns für den Kauf des Solar
Brunnen Chatsworth. Diese Bedienungsanleitung bezieht sich nur
auf den Solar Brunnen Chatsworth und enthält wichtige
Informationen bezüglich der erstmaligen Benutzung dieses
Produkts. Bitte verwahren Sie diese Anleitung sorgfältig auf.
LEISTUNG DES MODULS
Vor dem ersten Betrieb
Die Garantie beinhaltet nicht:
Schäden, die durch einen Unfall verursacht wurden; Missbrauch;
Frost oder natürliche Abnutzung; Schäden, die durch
unberechtigten Eingriff verursacht worden oder durch sonstige
Modifikationen entstanden sind.
Für weitere Informationen kontaktieren Sie bitte die Ihnen am nahe
liegendste Service-Adresse, die Sie auf der letzten Seite dieser
Bedienungsanleitung finden.
Elektroprodukte müssen umweltgerecht entsorgt werden und
gehören nicht in den Hausmüll. Für weitere Informationen
kontaktieren Sie bitte Ihr lokales Entsorgungsunternehmen.
Suchen Sie sich einen geeigneten Aufstellungsort
Idealerweise sollte der Untergrund eben sein.
aus.
Das Solarmodul wandelt Sonnenlicht in Strom um und betreibt die
Pumpe. Das Solarmodul muss der direkten Sonneneinstrahlung
ausgesetzt sein. Wenn eine Wolke die Sonne bedeckt verliert die
Pumpe teilweise oder ganz Ihre Leistung (abhängig von der
verbleibenden Helligkeit). Sobald die Sonne wieder scheint nimmt
die Pumpe wieder ihre Leistung auf.
Die Stromproduktion des Solarmoduls ist poportional abhängig von
der Intensität der Sonnenstrahlen sowie vom Winkel in der die
Sonnenstrahlen auftreffen. In jedem Fall sollte das Solarmodul
keinem Schatten ausgesetzt sein.
Bestimmungsgemäße Verwendung
Smart Solar behält sich das Recht vor unangekündigte
Änderungen vorzunehmen, solange diese zur Verbesserung des
Produkts beitragen.
Page 10
FUNKTIONS-BEDINGUNGEN
SAISONALE FUNKTIONALITAT
Der Solar Brunnen Chatsworth ist für den Einsatz im
Außenbereich konstruiert. Die Pumpe fördert Wasser durch das
Steigrohr. Das gesamte Wasser im Reservoir wird vollständig
umgewälzt.
Page 7
Bedienungsanleitung
Chatsworth Bedienungsanleitung
Chatsworth
Bedienungselemente
DEUTSCH
Pflege und Wartung
Pumpe: Wenn nach einiger Zeit die Pumpe an Leistung verliert oder
ganz aufhört zu arbeiten, muß das Oberteil mit Solarmodul und
Pumpe herausgenommen und mit der Solarseite nach unten auf
eine weiche Oberfläche gelegt werden. Trocknen Sie sorgfältig die
Kabelverbindung und ziehen Sie den Stecker ab. Ziehen Sie die
Pumpe vom Plastikrohr und öffnen Sie den Deckel der Pumpe.
Reinigen sie den Filter auf dem Deckel. Ziehen Sie das Flügelrad
heraus, entfernen Sie die Ablagerungen in der Pumpe und setzen
das Flügelrad wieder ein.
Bitte beachten Sie:
Die Unterwasserstecker müssen absolut trocken sein bevor Sie
verbunden werden. Um die Dichtheit zu garantieren muss die
Kabelverbindung zusammen gedreht und nicht gesteckt werden.
Stellen Sie sicher das der gelbe O-Ring nicht aus der Nut rutscht, da
sonst Wasser in den Stecker eindringt und dazu führt, das die
Pumpe unbrauchbar wird.
1 Oberteil mit Solarmodul und Pumpe
2 Mittelteil
3 Unterteil
Stellen Sie sicher, das der
Dichtring sauber in das Loch
eingepasst ist
Montage und Inbetriebnahme
Funktionsstörungen
Packen Sie alle Teile sorgfältig aus. Stellen Sie sicher, das nichts in
der Verpackung zurückbleibt.
Sollte Sie Probleme haben, dann wenden Sie sich bitte zuerst an
Smart Solar. Besuchen Sie unsere Internet Seite www.smartsolar.com
wo Sie sofort Antworten auf Ihre Fragen finden sowie eine
Service-email an uns absenden können. Sie erhalten umgehend
Unterstützung und können Ersatzteile anfordern.
Suchen Sie sich einen geeigneten Aufstellungsort für ihren
Solarbrunnen der idealerweise eben ist.
Bitte beachten Sie:
Es kann Spritzwasser in der Umgebung des Brunnen auftreten.
Schrauben Sie das Brunnenmittelteil auf das Unterteil.
Stellen Sie das Oberteil mit Solarmodul und Pumpe in die Mitte des
Brunnens.
Füllen Sie die Schale mit Wasser.
Mittelteil auf Unterteil schrauben
Bitte beachten Sie:
Wir empfehlen destilliertes oder Regenwasser zu benutzen, um
Kalkablagerungen zu verhindern.
Der Solarbrunnen ist nun betriebsbereit.
Bitte beachten Sie:
Bei der ersten Benutzung kann sich noch Luft in der Pumpe
befinden. Es kann bis zu 5 Minuten dauern, bis die Luft komplett
entweicht.
Page 8
Solarmodul: Das Solarmodul sollte nur mit einem weichen Tuch
und etwas Glasreiniger gereinigt werden. Regelmäßige Reinigung
verbessert die Leistung Ihres Solarmoduls.
Modul auf weiche Oberfläche legen
Pumpe vorsichtig abnehmen
Stecker eindrehen
Flügelrad
Pumpendeckel
Die Pumpe ist laut und fördert kein Wasser
Nehmen Sie den Pumpendeckel ab und ziehen Sie das Flügelrad
heraus. Wenn die Pumpe ohne Impeller immer noch laut ist, dann
benötigen Sie eine neue Pumpe. Wenn nach Herausnahme des
Impellers kein Geräusch mehr zu hören ist dann reinigen Sie die
Pumpe wie oben beschrieben. Wenn diese Problem mehrmals
auftritt deutet dies auf schmutziges Wasser hin und wir empfehlen
das Wasser öfter zu wechseln.
Entfernen Sie den Pumpendeckel
Die Pumpe hört auf Wasser zu fördern, obwohl sich das
Solarmodul in voller Sonneneinstrahlung befindet:
Das Flügelrad ist blockiert: Reinigen Sie die Pumpe wie oben
beschrieben.
Die Pumpe funktioniert, aber fördert kein Wasser:
1) Nehmen Sie den Pumpendeckel ab und reingen Sie wie oben
beschrieben.
2) Sitz des Pumpendeckel überprüfen. Pumpendeckel sauber
einrasten lassen, da sonst kein Wasserdruck.
Reinigen Sie die Pumpe
(bitte Flügelrad dazu herausnehmen)
Page 9