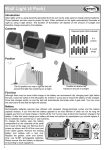
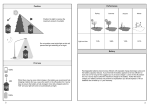
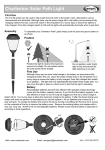
1
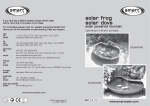
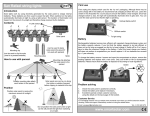
If you have any problems, please contact Smart Solar
before returning to the place of purchase.
For
or immediate answers visit our website www.smartsolar.com
where you will find extensive trouble shooting, FAQs and support.
usa
tel :
email:
uk
tel :
email :
germany
tel :
email :
france
tel :
email :
solar frog
solar
dove
solar powered fountain
operates in direct sunlight
+1 877 550 8840 Mon-Sat 9am-7pm (EST)
[email protected]
+44 (0) 8448 009 163 Mon-Sat 9am-7pm (GMT)
[email protected]
+49 (0) 151 12744268
[email protected]
smart solar ltd, Ruenhorst 24, 46395 Bocholt
+33 344 600 862
[email protected]
smart solar ltd, 14 rue du Beau Larris, 60260 Lamorlaye
europe
email :
[email protected]
australia
tel :
+61 03 9512 0680
[email protected]
email :
asia/ pan pacific
email :
[email protected]
www.smartsolar.com
2007 smart solar ltd
rev. 66071024_1a
www.smartsolar.com
ENGLISH
Solar Frog/ Solar Dove Instruction Manual
Please note:
In winter the Solar Frog/ Solar Dove must be stored in a dry and
frost proof environment. Alternatively, an optional adapter can be
purchased for occasional indoor use.
impeller
pump cover
The pump must never be operated dry (out of water) as this will
have a permanent adverse affect on the performance of the
pump.
Spare parts
1.
2.
3.
4.
5.
6.
Solar panel
Solar Mounting Kit
Pump
Pump impeller
Pump cover with filter
Optional 4.5 volt adapter
for indoor use
7. Dove
8. Frog
9. Main bowl dove
10. Main bowl frog
11. Tube kit with bung
Remove pump cover
21310AS01
MTGKIT
20500P01
IMPELLER
PCOVER07
4.5V-AC (specify country)
21300DOVE
22300FROG
21300BOWL
22300BOWL
TUBEKIT
Full 2 year warranty
If within 24 months from the date of purchase this product fails
due to a defect in material or workmanship, Smart Solar will
replace or repair free of charge.
Please report immediately if there is any damage or missing
pieces upon receipt of goods.
Take out impeller to clean
The warranty does not apply to:
Damage caused by accidents, abuse, poor handling, frost or
normal wear and tear. Products which have been subject to
unauthorized repair or modification.
For further information please contact your nearest customer
service centre detailed on the last page of this manual.
Waste electrical products should not be disposed of with
household waste. Please recycle where facilities exist. Check
with your local authority or retailer for recycling advice.
Contents
1.
2.
3.
4.
5.
6.
7.
8.
9.
Introduction
Before you start
Overview
Components
Assembling and using your product
Cleaning and maintenance
Trouble shooting
Spare parts
Full 2 year warranty
Introduction
Thank you for purchasing a Solar Frog / Solar Dove. These
instructions contain important information for using this product.
Please keep them in a safe place for future reference.
Before you start
Decide on an appropriate outdoor location for your water
feature. Ideally this should be on a flat surface. A solar panel
powers the pump by converting sunlight into electricity.
The solar panel will power the pump when exposed to direct
sunlight. If the sun passes behind a cloud then the amount of
electricity produced by the panel will decrease and the pump
will stop working or slow down. As soon as the sun reappears
from behind the cloud the amount of electricity will increase
instantly and the pump will begin to work again.
The amount of electricity produced by the solar panel is
proportional to the strength of sunlight received. For optimum
performance we recommend that your solar panel should be
exposed to as much direct sunlight as possible and away from
shady areas e.g. under trees. The panel can also be angled
towards the sun to maximise the amount of light received.
Overview
The Solar Frog/ Solar Dove has been designed for outdoor use.
The pump drives water to the Frog/ Dove and finally pours into
the main bowl. The water is constantly re-cycled.
Smart Solar reserve the right to modify any product to enhance
its’ performance and design.
Page 6
Page 3
Solar Frog/ Solar Dove Instruction Manual
ENGLISH
Please Note: We recommend you use distilled or rain water to
prevent scale build up.
Components
Select a suitable location for you solar panel and fix the mounting
as shown. Connect the panel and pump together.
IMPORTANT
To ensure the seal remains water-tight twist the pump and panels
connectors together rather than merely pressing them together.
Check that the small yellow rubber "o" ring remains in its' groove
and is not pushed out when connecting. If this ring moves there
will be no water seal and the pump and panel will eventually fail.
Feed the cable connector
through the hole
Solar panel & Stand Kit
The Solar Frog/ Solar Dove is now ready to use.
6
Please note: On first use there maybe air in the pump. It can take
up to 5 minutes until all the air is expelled and water begins to
pour from Frog/ Dove ledge.
Fixing The Panel Holder
Cleaning and Maintenance
Place the pump under the ledge
1 Solar panel
2 Pump with filter housing
3 Dove/ Frog
4 Main bowl
5 Solar panel mounting kit
6 Tube kit
Assembling and Using Your Product
Raise the pump and insert
into Dove/Frog
Unpack all components carefully.
Please ensure that you check all parts have been removed from
the packaging especially the solar panel, which is stored in the
bottom of the box.
Decide on a suitable location, bearing in mind there will be some
water splashes when the product is in use.
First unroll the pump cable and feed the pump cable connector
through the hole at the back of the main bowl.
Lower Dove/Frog
Place the pump under Frog/ Dove ledge by inserting the pump
outlet tube through the hole in the ledge.
Position the Frog/ Dove and pump facing into the mainbowl.
Raise the pump slightly and insert the pump outlet tube into the
base of the Frog/ Dove. Lower the Frog/ Dove and swivel gently to
the left.
A click-lock mechanism secures the Frog/ Dove and pump
connection.
Swivel to the left
Fill the main bowl with water.
Pump: If, after a period of time, the pump starts to lose power or
stops working check for the build up of sediment, scale or dirt in
the filter and in the bottom of the pump housing. Remove the
pump cover at its’ base. Take out the impeller and remove any
sediment, scale or dirt that has built up. Replace the impeller and
replace the pump cover.
Solar panel: The panel should be cleaned periodically with a soft
tissue and proprietary glass cleaning solution. Regular cleaning of
the panel is advised to maintain optimum conversion of the sun’s
energy into direct current.
Wall Mounted Solar Panel
Trouble Shooting
If you have any problems please contact Smart Solar before
returning to the place of purchase. For immediate answers visit our
website www.smartsolar.com where you will find an extensive
trouble shooting section with frequently asked questions, instant
email enquiry forms and place spare part orders.
Pump is noisy and there is no water running through the tube.
Take off the pump cover and remove the impeller. If the pump is still
noisy without the impeller then seek a replacement. If the noise
stops, clean the pump and replace the impeller and cover.
Stand Mounted Solar Panel
Pump does not operate even though the solar panel is in full
sunlight.
Check whether the impeller is blocked by removing the pump cover.
If it is, then clean the pump as detailed above.
Pump does operate but there is no water running through the
tube.
1) Check for the build up of sediment, scale or dirt in the filter and
in the bottom of the pump housing as detailed above.
2) Check whether the pump cover is attached properly. If the
pump cover is not pushed down tightly, the pump will not push
water through the tube.
Standing Solar Panel
Page 5