1
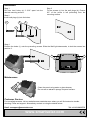
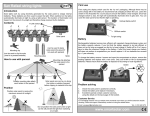
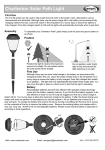
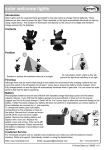
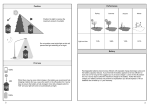
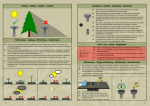
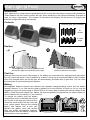
Wall Light (4 Pack)
Introduction
Solar lights work by using electricity generated from the sun by the solar panel to charge internal batteries.
These batteries are then used to power the light. When switched on the lights automatically illuminate at
night by using a light sensor. The duration of illumination will depend on the amount of sunlight and
therefore charge received by the batteries.
Contents
Required parts (Not Included)
8x
screws
8 x wall
plugs
Position
û
û
Do not position too near a light as this will
prevent the light from switching on at night.
Position to receive the
maximum amount of sunlight.
First Use
Although there may be some initial charge in the battery we recommend fully charging each light before
first use. Leave the switch in the off position for at least 1 sunny day to ensure the battery is fully charged.
Once fully charged switch on and the light will automatically illuminate when it gets dark. You can cover
the solar panel to test that the light will operate.
Battery
Rechargeable batteries become less efficient with repeated charge-discharge cycles and the battery
capacity reduces. If you find that the battery appears to be less efficient or does not run for long we
suggest you first try to boost charge it. Switch off for 3 to 5 sunny days to allow the maximum charge to the
battery. If after this boost charge your battery still does not perform to expectations you should replace it.
All our batteries are covered by a 1 year warranty.
To change the battery open the battery
compartment on the underside of the small
owl or back of the large owl. Remove the 6
screws as shown and lift off the cover and
inner rubber gasket. Remove the existing
battery and replace with a new one.
AUTO
OFF
Replace the gasket, cover and screws.
AUTO
OFF
Only use Ni-MH rechargeable batteries.
Please ensure that the battery is disposed
of according to local regulations.
ü
1
Installation
Step 1
Drill two level holes (a) 2 3/16" apart into the
desired mounting surface.
Step 2
Insert wall plugs (b) into the holes.
c
b
c
Step 3
Fit the screws (c) into the wall plugs (b). Ensure
0.5" of the screw is left protruding from the
mounting surface.
a
b
a
Step 4
Position the holes (1) onto the protruding screws. Slide the Wall light downwards, to lock the screws into
position 2.
2 3/16" (58mm)
2
2
1
1
AUTO
OFF
Maintenance
Clean the panel using water or glass cleaner.
Do not use an abrasive sponge on panel surface.
Customer Service
For immediate answers visit our website www.smartsolar.com where you will find extensive trouble
shooting, FAQs and support. Alternatively contact us using the details below:
Email: [email protected]
Tel: +1 813 343 5775
www.smartsolar.com
2