Transcript
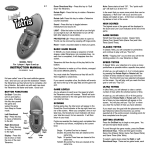
RC73240 Manual (GLOBAL )-Back
P/N: 82381300 Rev.A
Date: July 25, 2003
RC73240 Manual (GLOBAL )-Front
P/N: 82381300 Rev.A
Date: July 25, 2003
INTRODUCTION
Congratulations on choosing the Gamester FPS Master, the
ultimate controller for your Xbox video game console.
CONTENTS
1 x FPS Master
1 x Instruction Manual
IMPORTANT
Before using this product, read the Console Instruction
Manual for safety, health and other information.
Using your FPS Master
The default button placement is shown here. Hold the
controller in two hands with index fingers wrapped around
the triggers. Additional action buttons can be activated using
your middle and/or ring fingers.
LEFT
TRIGGER
RIGTH
TRIGGER
INTRODUCTION
Merci d'avoir choisis la manette FPS Master de Gamester,
l'accessoire ultime pour votre console de jeu Xbox.
EINFÜHRUNG
CONTIENT
1 x manette FPS Master
1 x Manuel d'instructions
INHALT
IMPORTANT
Avant d'utiliser ce produit, veuillez vous reporter au manuel
d'instruction de votre console pour le mode d'utilisation et les
précautions habituelles d'emploi.
WICHTIG
LEFT
TRIGGER
RIGTH
TRIGGER
B
Y
A
X
INTRODUCCIÓN
90-DAY LIMITED WARRANTY
Felicidades por elegir el Gamester FPS Master, lo último en
controladores para tu sistema de videojuegos Xbox™.
(This product warranty is valid in the United States
and Canada only)
CONTENIDOS
1 x FPS-Master
1 x Bedienungsanleitung
Comment utiliser votre manette FPS Master
L'emplacement de bouton par défaut est montré ici. Prendre
la manette à deux mains avecles indexs placés sur la
gâhettes. Les autres boutons d'action peuvent être utilisés et
activés avec vos autres doigts.
B
Y
Wir gratulieren Ihnen zur Wahl des FPS-Masters, des
neuesten Controllers für Ihr Xbox Videospielsystem.
1 x FPS Master
1 x Manual de instrucciones
Vor der Verwendung dieses Produkts bitte die Hinweise zu
Sicherheit und Gesundheit und die sonstigen Informationen
in dem Handbuch des Xbox Videospielsystems lesen.
Verwenden Ihres FPS-Masters
Hier wird die Standardtastenplatzierung gezeigt. Halten Sie
den Controller in beiden Händen und legen Sie die
Zeigefinger um die Auslöser. Weitere Aktionstasten können
mit Mittel- und/oder Ringfinger aktiviert werden.
LEFT
TRIGGER
RIGTH
TRIGGER
IMPORTANTE
Antes de utilizar este producto, por seguridad, salud y para
información adicional lee atentamente el manual de
instrucciones Xbox.
Utilización de tu FPS Master
La colocación del botón predeterminado se muestra aquí.
Sostén el controlador con las dos manos y coloca los dedos
Ìndices sobre el disparador. Se pueden activar botones de
acción adicionales anular.
B
Y
B
Y
A
X
LEFT
TRIGGER
RIGTH
TRIGGER
A
X
A
X
RC73240
RADICA: ®
GAMESTER ®
FPS MASTER AND "THE UNFAIR
ADVANTAGE" ARE EITHER
TRADEMARKS OR REGISTERED
TRADEMARKS OF RADICA GAMES LTD.
©2003 RADICA GAMES LTD.
PRODUCT SHAPE™
ALL RIGHTS RESERVED
Distributed in the U.K. by:
RADICA U.K. Ltd.
The Old Stables, Munns Farm,
Cole Green, Hertfordshire,
SG14 2NL, England
P/N 82381300
Rev.A
Distributed in the U.S. by:
RADICA USA, Ltd.
13628 - A Beta Road, Dallas,
Texas 75244 - 4510, U.S.A
All other product and company names mentioned are
the trademarks of their respective owners.
Not suitable for children under 8 years of age.
Nicht für Kinder unter 8 Jahren geeignet.
Ne convient pas aux enfants de moins de 8 ans.
No apto para niños menores de 8 años.
Microsoft, Xbox, and the Xbox logos are either
registered trademarks or trademarks of Microsoft
Corporation in the U.S. and/or other countries and
are used with permission from Microsoft.
Please retain this for future reference
US Player Helpline
1.800.803.9611
UK Player Helpline
+44 (0)906 213 0001
Calls are charged at £0.25 per minute and will show up on your
standard telephone bill. Helpline hours 8am-11pm 7 days a week
LCD PROGRAM
PROGRAMME LCD
The LCD Program feature lets you remap the buttons on the
FPS Master to your preference. When the console is
activated with the FPS Master plugged in, the LCD will
display the Gamester logo and which preset is currently
being used.
Ce programme vous permet de reconfigurer les boutons
selon vos préférences. Lorsque votre console est allumée et
votre manette FPS Master branchée, le programme LCD
affichera le logo Gamester et la configuration actuellement
utilisée.
Programming Presets
1. Press Menu button to activate programming feature.
2. Select desired function from the next display:
A. Program Buttons - Remaps action buttons. The
display will have two rows of letters representing each
action button (A, B, X, Y, etc.). The top row represents
the default button placement, the bottom row
represents that button's current function. By changing
the bottom row, the corresponding button from the top
row will perform that function. For example, if the top
row reads A and the bottom row reads X, the A button
will now function as the X button. Hitting the Enter
button will exit this menu.
B. Invert Sticks - Inverts the up/down function of either
thumbstick. D stands for Default. IN stands for Invert.
Hitting the Enter button exits this menu.
3. A confirmation screen will ask if you Accept the changes,
selecting "Yes" brings you to the Save menu. Selecting
"No" turns off programming feature.
4. Save Menu lets you choose which preset to save your new
button mapping to. There are three presets corresponding
to the three preset buttons on the top of the FPS Master.
Configurer vos préférences
1. Presser le bouton du menu pour activer le programme
2. Sélectionner la fonction désirée comme suit :
A. Programmation des boutons et de leurs emplacement.
L'affichage comprend deux rangées de lettres
représentant chacun des boutons d'action (A, B, X, Y,
etc.). La rangée du haut concerne l'emplacement des
boutons par défaut ; la rangée du bas concerne les
fonctions attribuées aux boutons. En modifiant la
rangée du bas, le bouton correspondant dans la rangée
supérieure intègrera ce changement. Par exemple, si la
rangée du haut affiche A et que celle du bas affiche X,
alors le bouton A fonctionnera désormais comme le
bouton X. Appuyer sur le bouton Entrée pour sortir du
menu.
B. Inverser les Sticks : inverser la fonction haut/bas. D
correspond à la configuration par défaut. IN correspond
à l'inversion. Appuyer sur le bouton Entrée pour sortir
du menu.
3. Un écran de confirmation vous demandera si vous
acceptez les changements opérés, sélectionnez " Oui "
vous ramènera au menu d e sauvegarde. Choisir " Non "
annulera toutes les modifications.
4. Le menu de sauvegarde vous permet de choisir quelle
configuration vous désirez conserver. Il existe trois
configurations correspondant aux trois boutons sur le haut
de votre manette FPS Master.
To access a preset, simply press the desired preset button
and your previously programmed button setup will activate.
TROUBLE SHOOTING
www.theunfairadvantage.com
The controller is not working:
• Make sure the controller is firmly connected to the Xbox
controller port.
• Make sure the Quick Release Connector is firmly
connected.
• Reset your game console.
• If problem persists, contact Radica customer support
MAINTENANCE
• Store this product away from dusty or dirty areas.
• Keep this product away from moisture or temperature
extremes.
• Do not disassemble this product. If a problem occurs
contact the retailer where the item was purchased.
Pour sélectionner une configuration, appuyez simplement sur
le bouton de programmation correspondant, et cette
configuration sera activée.
PROBLEMES RENCONTRES
La manette ne marche pas :
• Vérifiez que la manette soit correctement connectée à
votre console Xbox.
• Vérifiez que le connecteur soit correctement inséré.
• Redémarrez votre console.
• Si le problème persiste, veuillez contacter le support
consommateur de Radica.
MAINTENANCE
• Conservez ce produit à l'écart de la poussière ou de
salissures.
• Ne pas utiliser ce produit dans des conditions d'humidité
ou d'extrÍme chaleur.
• Ne pas démonter ce produit. Si des problèmes persistent,
veuillez contacter le magasin où ce produit a été acheté.
LCD-PROGRAMM
Mit der LCD-Programm-Funktion können Sie die Tasten des
FPS-Masters nach Wunsch neu belegen. Wird die Konsole
mit angeschlossenem FPS-Master eingeschaltet, dann wird
auf der LCD-Anzeige das Gamester-Logo und die derzeit
verwendete Voreinstellung angezeigt.
Programmieren von Voreinstellungen
1. Zum Aktivieren der Programmierfunktion die Menütaste
drücken.
2. In der nächsten Anzeige die gewünschte Funktion
auswählen:
A. Program Buttons (Tasten programmieren): Ändert die
Belegung der Aktionstasten. Auf der Anzeige sind zwei
Reihen von Buchstaben für die einzelnen Aktionstasten
(A, B, X, Y usw.) zu sehen. Die obere Reihe stellt die
Standardposition der Tasten dar, und die untere Reihe
zeigt die aktuelle Funktion jeder Taste an. Wird die
Einstellung in der unteren Reihe geändert, dann führt
die zugehörige Taste in der oberen Reihe die
entsprechende Funktion aus. Wenn beispielsweise in
der oberen Reihe A steht und in der unteren Reihe X,
dann funktioniert die A-Taste jetzt als X-Taste. Dieses
Menü wird durch Drücken der Eingabetaste verlassen.
B. Invert Sticks (Sticks invertieren): Kehrt die Auf/AbFunktion jedes Ministicks um. "D" steht für "Default"
(Vorgabe). "IN" steht für "Invertieren". Dieses Menü
wird durch Drücken der Eingabetaste verlassen.
3. In einem Bestätigungsbildschirm werden Sie gefragt, ob
Sie die Änderungen akzeptieren. Wenn Sie "Yes" (Ja)
wählen, kommen Sie ins Speichern-Menü. Wenn Sie "No"
(Nein) wählen, wird die Programmierfunktion deaktiviert.
4. Im Speichern-Menü können Sie wählen, für welche
Voreinstellung Ihreneue Tastenbelegung gespeichert
werden soll. Es gibt dreiVoreinstellungen, die den drei
Voreinstellungstasten auf dem FPS-Master entsprechen.
Um eine Voreinstellung zu laden, drücken Sie einfach die
gewünschte Voreinstellungstaste, und Ihre zuvor
programmierte Tastenbelegung wird aktiviert.
FEHLERBEHEBUNG
Der Controller funktioniert nicht:
• Stellen Sie sicher, dass der Controller ordnungsgemäß
am Xbox Controller-Anschluss angeschlossen ist.
• Stellen Sie sicher, dass der Quick Release-Stecker
ordnungsgemäß angeschlossen ist.
• Setzen Sie Ihr Xbox Videospielsystem zurück.
• Sollte das Problem weiterhin auftreten, dann wenden Sie
sich an den Kundendienst von Radica.
WARTUNG
• Das Produkt an einem vor Staub und Schmutz
geschützten Ort aufbewahren.
• Das Produkt vor Feuchtigkeit und extremen Temperaturen
schützen.
• Das Produkt nicht auseinandernehmen. Sollte ein
Problem auftreten, dann wenden Sie sich an den Händler,
bei dem Sie das Produkt geka
Radica Games Limited warrants this product for a
period of 90 days from the original purchase date under
normal use against defective workmanship and
materials (batteries excluded). This warranty does not
cover damage resulting from accident, unreasonable
use, negligence, improper service or other causes not
arising out of defects in material or workmanship.
Radica Games Limited will not be liable for any costs
incurred due to loss of use of this product or other
incidental or consequential costs, expenses or damages
incurred by the purchaser. Some states do not allow the
exclusion or limitation of incidental or consequential
damages, so the above limitations may not apply to you.
This warranty gives you specific legal rights and you
may also have other legal rights, which vary from state
to state.
During this 90-day warranty period, the game will either
be repaired or replaced (at our option) without charge to
the purchaser when returned prepaid with proof of date
of purchase to: Radica USA, Ltd., 13628-A Beta Road,
Dallas, Texas 75244, USA. Please remove the
batteries and wrap the unit carefully before shipping.
Please include a brief description of the problem along
with your return address and mail it postage prepaid.
PROGRAMA LCD
El elemento del Programa LCD te permite redefinir los botones
en el FPS Master según tu preferencia. Cuando se activa la
consola con el FPS Master enchufado, el LCD mostrará el
logo Gamester y la preconfiguración que se está utilizando en
ese momento.
Preconfiguraciones de programación
1. Presiona el botón de Menú para activar el elemento del
programa
2. Selecciona la función deseada de la siguiente pantalla:
A. Botones del Programa - Redefine botones de acción. La
pantalla tendrá dos filas de letras representando cada
botón de acción (A, B, X, Y, etc.). La fila superior
representa la colocación del botón predeterminado; la
fila inferior representa la función actual de ese botón.
Cambiando la fila inferior, el botón correspondiente a la
fila superior realizará esa función. Por ejemplo, si la fila
superior es A y la fila inferior X, el botón A funcionará
ahora como el botón X. Presionando el botón Enter se
sale de este menú.
B. Invertir sticks - Invierte la función arriba/abajo del stick
analógico. D significa predeterminado. IN significa
Invertir. Para salir del menú se presiona el botón Enter.
3.Una pantalla de confirmación te preguntará si aceptas los
cambios, seleccionando "SÌ" llegarás al menú Guardar. Si
seleccionas "No" se cierra el elemento de programación.
4. El Menú Save te permite elegir la preconfiguración con la
que guardar tu nuevo botón de redefinición. Hay tres
preconfiguraciones correspondientes a tres botones de
preconfiguración en la parte superior del FPS Master.
Para acceder a una preconfiguración, presiona simplemente el
botón de preconfiguración deseado y tu botón de
configuración previamente programado se activará.
RESOLUCIÓN DE PROBLEMAS
El controlador no funciona:
• Asegúrate que el controlador está bien conectado al puerto
de controlador.
• Asegúrate que el Conector de Expulsión Rápida está
firmemente conectado.
• Reinicia tu consola.
• Si el problema persiste, contacta con el soporte de atención
al cliente de Radica.
MANTENIMIENTO
• Guarda este producto lejos de ambientes sucios o
polvorientos.
• Mantén este producto a salvo de la humedad o
temperaturas extremas.
• No desmontes este producto. Si tienes problemas, contacta
con el distribuidor donde adquiriste el artículo.
PRODUCT WARRANTY
(This product warranty is valid in the United
Kingdom only)
All products in the RADICA® range are fully guaranteed
for a period of 3 months from the original purchase date
under normal use, against defective workmanship and
materials (batteries excluded). This warranty does not
cover damage resulting from accident, unreasonable
use, negligence, improper service or other causes not
arising out of defects in material or workmanship.
In the unlikely event that you do experience a problem
within the first 3 months, please telephone the UK
Technical Support team: Tel. 0906 213 0001 (call cost
25p a minute).
YOUR STATUTORY RIGHTS ARE NOT EFFECTED.