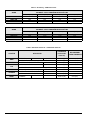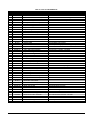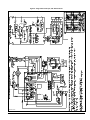
1
CBLAAA
CBLAAR
LOW BOY OIL FURNACE
INPUT CAPACITIES 70,000---154,000
Installation Instructions
THIS BOOKLET CONTAINS
IMPORTANT INFORMATION
INSTALLER:
Use the information in this
booklet to install the appliance and affix this
booklet adjacent to the appliance after
installation.
USER: Keep this booklet of information for
future reference.
SERVICER: Use the information in this booklet
to service the appliance and affix the booklet
adjacent to the appliance after servicing.
A11539
C
US
Copyright 2012 CAC / BDP D 7310 W. Morris St. D Indianapolis, IN 46231
Use of the AHRI Certified TM Mark indicates a
manufacturer’s participation in the program. For
verification of certification for individual products,
go to www.ahridirectory.org.
Printed in U.S.A.
Edition Date: 01/12
Manufacturer reserves the right to change, at any time, specifications and designs without notice and without obligations.
Catalog No: IM---CBL---01 / X40192 Rev. B
Replaces: New
TABLE OF CONTENTS
1.0
FIGURES
Figure 1 : Wiring diagram, BVSO ......................................... 9
SAFETY REGULATIONS ......................................... 4
Figure 2 : Wiring for blocked vent shut-off (size 105) ........... 9
1.1
DANGER, WARNING AND CAUTION ................. 4
Figure 3 : Wiring for blocked vent shut-off (size 120) ........... 9
1.2
SAFETY INSTALLATION REQUIREMENTS........ 4
Figure 4 : BVSO switch installation....................................... 9
INSTALLATION ........................................................ 4
Figure 5 : Fan OFF time dip switch settings ....................... 11
2.0
Figure 6 : Model CBL, SIZE 105......................................... 17
2.1
GENERAL ............................................................ 4
2.2
SAFE INSTALLATION REQUIREMENTS............ 5
2.3
SAFETY RULES................................................... 5
2.3.1
Detector........................................................ 5
2.3.2
Freezing temperatures and your building ..... 5
2.4
Air for combustion and ventilation ................ 6
2.4.2
Duct recommendations................................. 6
2.4.3
Venting instructions (chimney installation).... 7
2.4.4
Draft Regulator ............................................. 8
2.4.5
Blocked vent shut-off (BVSO)....................... 8
2.4.6
Oil burner...................................................... 9
2.4.7
Electrical..................................................... 10
2.4.8
Air filter ....................................................... 10
2.4.9
Air Conditioner (or Heat Pump) .................. 10
Figure 9 : Wiring diagram CBL, Riello burner ..................... 19
Figure 10 : Parts list - CBLAAA036105 .............................. 20
Figure 11 : Parts list - CBLAAA060120 .............................. 22
Figure 12 : Parts list - CBLAAR036105 .............................. 24
Figure 13 : Parts list - CBLAAR060120 .............................. 26
TABLES
Table 1 : Minimum ventilation openings dimensions required
in a closet or enclosure .......................................... 6
Table 2 : Air filter dimensions for return air duct ................. 10
Table 3 : Adjustments for fan speed selection.................... 11
Table 4 : Technical specifications....................................... 15
OPERATION ........................................................... 10
3.1
FAN ADJUSTMENT CHECK .............................. 10
3.2
OPERATIONAL CHECKLIST ............................. 11
3.3
PURGING THE OIL LINE ................................... 11
3.4
COMBUSTION CHECK...................................... 11
3.5
LIMIT CONTROL CHECK................................... 12
3.6
YEAR ROUND AIR CONDITIONING ................. 12
3.7
HEATING ........................................................... 12
3.8
COOLING........................................................... 12
3.9
CONSTANT BLOWER SWITCH ........................ 12
4.0
Figure 8 : Wiring diagram CBL Beckett burner ................... 18
LOCATION ........................................................... 6
2.4.1
3.0
Figure 7 : Model CBL, SIZE 120......................................... 17
Table 5 : Air delivery - CFM with air filter............................ 16
Table 6 : Minimum clearances - combustible materials ...... 16
Table 7 : Parts list - CBLAAA036105.................................. 21
Table 8 : Parts list- CBLAAA060120................................... 23
Table 9 : Parts list - CBLAAR036105 ................................. 25
Table 10: Parts list - CBLAAR060120 ................................ 27
MAINTENANCE ...................................................... 12
4.1
HEAT EXCHANGER CLEANING ....................... 12
4.2
BLOWER REMOVAL.......................................... 13
4.3
BLOCKED VENT SHUT OFF (BVSO)
CLEANING ......................................................... 13
5.0
FURNACE INFORMATION..................................... 14
3
1.0
SAFETY REGULATIONS
IMPORTANT: All local and national code requirements
governing the installation of oil burning equipment, wiring
and flue connections MUST be followed. Some of the codes
that may be applicable are:
CSA B139
Installation code for oil burning
equipment
NFPA 31
Installation of oil burning equipment
FOR YOUR SAFETY
DO NOT STORE OR USE GASOLINE OR OTHER
FLAMMABLE VAPORS AND LIQUIDS IN THE VICINITY
OF THIS OR ANY OTHER APPLIANCE.
ANSI/NFPA 90B
DO NOT ATTEMPT TO START THE BURNER WHEN
EXCESS OIL HAS ACCUMULATED, WHEN THE
FURNACE IS FULL OF VAPOUR OR WHEN THE
COMBUSTION CHAMBER IS VERY HOT.
1.1
ANSI/NFPA 211
ANSI/NFPA 70
CSA C22.1
DANGER, WARNING AND CAUTION
Warm air heating and air conditioning
systems
Chimneys, fireplaces, vents and solid
fuel burning appliances
National electrical code
Canadian electrical code
Only the latest issues of the above codes should be used,
and are available from either:
The National Fire Protection Agency
Batterymarch Park
Quincy, MA 02269
or
The Canadian Standards Association
178 Rexdale Blvd.
Rexdale, Ontario
M9W 1R3
The words DANGER, WARNING and CAUTION are used to
identify the levels of seriousness of certain hazards. It is
important that you understand their meaning. You will notice
these words in the manual as follows:
DANGER
Immediate hazards which WILL result in death or
serious bodily and/or material damage.
CAUTION
WARNING
ENVIRONMENTAL HAZARD
Hazards or unsafe practices which CAN result in death
or serious bodily and /or material damage.
Failure to follow this
environmental pollution.
caution
may
result
in
Remove and recycle all components or materials (i.e.
oil, electrical and electronic components, insulation,
etc.) before unit final disposal.
CAUTION
Hazards or unsafe practices which CAN result in minor
bodily and /or material damage.
1.2
SAFETY INSTALLATION REQUIREMENTS
WARNING
2.0
INSTALLATION
2.1
GENERAL
This furnace is a Low-Boy unit and may be operated in an
upflow configuration only.
For use with grade 2 fuel oil maximum. Do NOT use
gasoline, crankcase oil or any oil containing gasoline.
It is shipped as a packaged unit, complete with burner and
controls. It requires a line voltage (115 VAC) connection to
the control box, a thermostat hook-up as shown on the
wiring diagram, oil line connection(s), suitable ductwork, and
connection to a properly sized vent.
WARNING
Never burn garbage or paper in the heating system and
never leave rags or paper around the unit.
The air handling capacity of this furnace is also designed for
cooling. Refer to Table 5 for the expected airflow at various
external duct static pressures, based on the model selected.
CAUTION
These instructions are intended for the sole use of
qualified personnel trained in installing this type of
furnace. Installation of this furnace by an unqualified
person can lead to hazardous conditions, resulting in
bodily harm and/or equipment damage.
4
2.2
2.3
SAFE INSTALLATION REQUIREMENTS
SAFETY RULES
Your unit is built to provide many years of safe and
dependable service, provided it is properly installed and
maintained. However, abuse and/or improper use can
shorten the life of the unit and create hazards for you, the
owner.
WARNING
Installation or repairs performed by unqualified persons
can result in hazards to them and others. Installation
MUST conform to local codes or, in the absence of
same, to codes of the country having jurisdiction.
2.3.1
The information contained in this manual is intended for
use by a qualified service technician familiar with safety
procedures and quipped with the proper tools and test
instruments.
a.
Failure to carefully read and follow all instructions in
this manual can result in death, furnace malfunction
and/or property damage.
WARNING
FIRE HAZARD
The furnace must be installed in a level position, never
where it will slope toward the front. If the furnace is not
installed level, oil will drain into the furnace vestibule
and create a fire hazard.
b.
NOTE: It is the personal responsibility and obligation of the
customer to contact a qualified installer to ensure that the
installation conforms to governing local and/or national
Detector
The U.S. Consumer Product Safety Commission
recommends that users of oil-burning appliances install
carbon monoxide detectors. There can be various
sources of carbon monoxide in a building or dwelling.
The sources could be gas-fired clothes dryers, gas
cooking stoves, water heaters, furnaces, gas-fired
fireplaces, wood fireplaces, and several other items.
Carbon monoxide can cause serious bodily injury and/or
death. Therefore, to help alert people to potentially
dangerous carbon monoxide levels, you should have
carbon monoxide detectors listed by a nationally
recognised agency (ex. Underwriters Laboratories or
International
Approval
Services)
installed
and
maintained in the building or dwelling (see Note below).
There can be numerous sources of fire or smoke in a
building or dwelling. Fire or smoke can cause serious
bodily injury, death, and/or property damage. Therefore,
in order to alert people to potentially dangerous fire or
smoke, you should have fire and smoke detectors listed
by Underwriters Laboratories installed and maintained in
the building or dwelling (see Note below).
codes and ordinances
NOTE: The manufacturer of your furnace does not test any
detectors and makes no representations regarding any
brand or type of detector.
a.
This furnace is NOT approved for installation in mobile
homes, trailers or recreational vehicles;
b. Do NOT use this furnace as a construction heater or to
heat a building under construction;
c. There must be a sufficient supply of fresh air for
combustion as well as ventilation in the area where the
furnace is located;
d. Use only the type of fuel oil approved for this furnace
(see section 1.2 of this manual). Overfiring will result in
heat exchanger failure and cause dangerous operating
conditions;
e. Visually check all oil line joints for signs of leakage;
f. Connect furnace to the chimney;
g. The points in Part 3 “Operation” are vital to the proper
and safe operation of the heating system. Take the time
to ensure that all steps were followed;
h. Follow the regulations of the NFPA No.31 (in the USA)
and CSA B-139 (in Canada) or local codes for placing
and installing the oil storage tank;
i. Follow a regular service and maintenance schedule for
efficient and safe operation;
j. Before servicing, allow furnace to cool down. Always
shut off electricity and fuel to furnace when servicing.
This will prevent electrical shock or burns;
k. Seal supply and return air ducts;
l. The vent system MUST be checked to determine that it
is the correct type and size;
m. Install correct filter type and size;
n. Unit MUST be installed so that electrical components
are protected from direct contact with water.
CAUTION
Ensure that the area around the combustion air
intake is free of snow, ice and debris.
2.3.2
Freezing temperatures and your building
WARNING
FREEZING TEMPERATURE WARNING
Turn off water supply.
If your heater remains shut off during cold weather, the
water pipes could freeze and burst, resulting in serious
water damage.
If the structure is unattended during cold weather you should
take the following precautions:
a. Turn off main water supply into the structure and drain
the water lines if possible. Open faucets in appropriate
areas;
b. Have someone check the structure frequently during
cold weather to make sure it is warm enough to prevent
pipes from freezing. Contact a qualified service agency,
if required.
5
2.4
Chimney installation only
LOCATION
The barometric draft regulator shall be installed in the same
room or enclosure as the furnace, in such a manner as to
prevent any difference in pressure between the regulator
and the combustion air supply.
CAUTION
This furnace is not watertight and is not designed for
outdoor installation. This furnace shall be installed in
such a manner as to protect the electrical components
from water. Outdoor installation will lead to hazardous
electrical conditions and to premature furnace failure.
Air requirements for the operation of exhaust fans, kitchen
ventilation systems, clothes dryers, and fireplaces shall be
considered in determining the adequacy of the space to
provide the required combustion air.
The unit must be installed in a location where the ambient
and return air temperatures are above 15°C (60°F).
In unconfined spaces, in buildings of conventional frame,
brick or stone construction, infiltration may be adequate to
provide air for combustion, ventilation and dilution of flue
gases. This determination must be made on an individual
installation basis and must take into consideration the overall
volume of the unconfined space, the number of windows and
ventilation openings, the number of doors to the outside,
internal doors which can close off the unconfined space and
the overall tightness of the building construction.
This furnace is approved for reduced clearances to
combustible construction; therefore, it may be installed in a
closet or similar enclosure. This unit may be located in a
basement or on the same level as the area to be heated.
Whichever the case, the unit must always be installed level.
In a basement, or when installed on the floor, as in a
crawlspace, it is recommended that the unit be installed on a
concrete pad that is 2.54 to 5.08 cm (1 to 2") thick.
Many new buildings and homes (even older ones that have
been weatherized) must be considered as being of tight
construction and, therefore, infiltration will not be sufficient to
supply the necessary air for combustion and ventilation.
The required minimum clearances for this furnace are
specified in Table 6
The furnace should be positioned as closely as possible to
the chimney or vent in order to keep vent connections short
and direct. It should also be as close as possible to the
centre of the air distribution system.
2.4.1
A building can be considered as being of tight construction
when:
a.
Walls and ceilings exposed to the outside have a
continuous water vapour retarder with a rating of one
perm or less, with openings hermetically sealed and/or;
b. Weather-stripping has been added on operable
windows and doors, and/or;
c. Caulking or sealant have been applied to areas such as
joints around window and door frames, between sole
plates and floors, between wall-ceiling joints, between
wall panels, at penetrations for plumbing, electrical and
fuel lines and at other openings.
If combustion and ventilation air must be supplied to an
unconfined space from the outside, an opening with a free
2
2
area of not less than 6.45 cm (one inch ) per 1,000 BTU
per hour of total input of all appliances within the unconfined
2
2
space, but not less than 645.16 cm (100 inches ) must be
provided. This opening must be located such a way that it
cannot be blocked in any way, at any time.
Air for combustion and ventilation
This furnace should be installed in a location in which the
facilities for ventilation permit satisfactory combustion of oil,
proper venting and the maintenance of ambient
temperatures at safe limits under normal conditions of use.
The location should not interfere with the proper circulation
of air within the confined space.
Refer to the CAN/CSA-B139 installation code for complete
regulations, and for guidance on retrofit applications.
When this furnace is installed in a closet or enclosure, 2
ventilation openings are required for combustion air. The
openings should be located about 15.24 cm (6") from the top
and the bottom of the enclosure at the front of the furnace.
Table 1 indicates the minimum dimensions required for each
of these two ventilation openings.
2.4.2
CAUTION
Table 1 : Minimum ventilation openings dimensions
required in a closet or enclosure
Input
(BTU/h)
Width
Height
75,000 – 105,000
120,000 – 155,000
0.4 mm (16")
0.5 mm (20")
0.20 mm (8")
0.25 mm (10")
Duct recommendations
When ducting supplies air to a space other than where
the furnace is located, the return air ducts must be
sealed and also be directed to the space other than
where the furnace is located. Incorrect ductwork
termination and sealing will create a hazardous
condition that can lead to bodily harm.
CAUTION
WARNING
Do not block the combustion air openings in the
furnace. Any blockage will result in improper
combustion and may result in a fire hazard and/or cause
bodily harm.
Return air grilles and warm air registers must not be
obstructed.
6
2.4.3
IMPORTANT: The dampers should be adequate to prevent
cooled air from entering the furnace, and if manually
operated, must be equipped with the means to prevent
operation of either the cooling unit or the furnace, unless the
damper is in the full cool or heat position.
Venting instructions (chimney installation)
The furnace must be vented to the outside, in accordance
with local codes and other authorities having jurisdiction.
CAUTION
The proper sizing of warm air ducts is necessary to ensure
satisfactory furnace operation. Ductwork should be in
accordance with the latest editions of ANSI / NFPA-90A
(Installation of Air Conditioning and Ventilating Systems) and
NFPA-90B (Warm Air Heating and Air Conditioning
Systems) or Canadian equivalent.
Oil fired appliances must be connected to flues having
sufficient draft at all times to ensure safe and proper
combustion.
The supply air ductwork should be attached to the flanged
front opening provided at the discharge end of the furnace
and the return air ductwork should be attached to the flanged
rear opening of the furnace. See Figures 6 and 7, for the
dimensions of these openings, based on the model selected.
This furnace is certified for use with a Type “L” vent.
For additional venting information refer to ANSI / NFPA 211
Chimneys, Fireplaces, Vents and Solid Fuel Burning
Appliances and/or CSA B139 Installation Code.
Pre-installation inspection of vent system
The following recommendations should be followed when
installing ductwork:
a. Install locking type dampers in all branches of the
individual ducts to balance out the system. Dampers
should be adjusted to achieve the desired static
pressure at the outlet of the furnace;
b. A flexible duct connector of non-combustible material
should be installed on both the supply and return air
sections of the unit. On applications where an extremely
quiet operation is necessary, the first 3 m (10') of supply
and return ducts should be internally lined with
acoustical material, if possible;
c. In cases where the return air grille is located close to the
o
fan inlet, there should be at least one 90 air turn
between the fan inlet and grille. Further reduction in
noise levels can be achieved by installing acoustical air
turning vanes or by lining the duct as described in b.
above;
d. When a single air grille is used, the duct between the
grille and the furnace must be the same size as the
return opening in the furnace.
This inspection should include the following:
a. Inspection for any deterioration in the chimney or vent. If
deterioration is discovered, the chimney must be
repaired or the vent must be replaced;
b. Inspection to ascertain that the vent system is clear and
free of obstructions. Any blockages must be removed
before installing this furnace;
c. Cleaning the chimney or vent if previously used for
venting a solid fuel burning appliance or fireplace;
d. Confirming that all unused chimney or vent connections
are properly sealed;
e. Verification that the chimney is properly lined and sized
per the applicable codes (refer to list of codes in section
1.2).
When installing the furnace with cooling equipment for year
round operation, the following recommendations must be
followed for tandem or parallel air flow:
This furnace can be vented into an existing masonry
chimney. However, it must not be vented into a chimney
servicing a solid fuel burning appliance. Before venting this
furnace into a chimney, the chimney must be checked for
deterioration and repaired if necessary. The chimney must
be properly lined and sized per local or national codes.
Before installing this furnace, it is highly recommended that
any existing vent system be completely inspected.
Masonry Chimney
WARNING
If the furnace is vented into a common chimney, the chimney
must be of sufficient area to accommodate the total flue
products of all appliances vented into the chimney.
POISONOUS CARBON MONOXIDE GAS HAZARD
Install the evaporator coil on the supply side of the
furnace ducting ONLY.
Following are the preconditions for a safe venting system:
a. Ensure that the chimney flue is clear of any dirt or
debris;
b. Ensure that the chimney is not servicing an open
fireplace;
c. Never reduce the pipe size below the outlet size of the
furnace;
d. All pipes should be supported using the proper clamps
and/or straps. These supports should be at least every
1.2 m (4');
An evaporator coil installed on the return air side of the
ducting can cause condensation to form inside the heat
exchanger, resulting in heat exchanger failure. This in
turn can result in death, bodily injury.
a.
b.
On tandem airflow applications, the coil is mounted after
the furnace in an enclosure in the supply air stream. The
furnace blower is used for both heating and cooling
airflow;
On parallel airflow installation, dampers must be
provided to direct air over the furnace heat exchanger
when heat is desired and over the cooling coil when
cooling is desired.
e.
7
All horizontal runs of pipe should have an upward slope
of at least 2 cm per 1 m (1/4" per 1');
f.
g.
h.
i.
j.
All runs of pipe should be as short as possible with as
few turns as possible;
Seams should be tightly joined and checked for leaks;
The flue pipe must not extend into the chimney but be
flush with the inside wall;
The chimney must extend 0.9 m (3') above the highest
point where it passes through a roof of a building and at
least 0.6 m (2') higher than any portion of a building
within a horizontal distance of 3 m (10'). It shall also be
extended at least 1.5 m (5') above the highest
connected equipment flue collar;
Check local codes for any variances.
WARNING
FIRE, CARBON MONOXIDE POISONINC HAZARD
Failure to follow this warning could result in personal
injury, death, and/or property damage.
DO NOT reset the device or restart the furnace unless
the cause of the interruption has been identified and
corrected by a qualified agency. Ensure that the blocked
vent shut-off has been cleaned by a qualified agency
before placing into service.
For more details, refer to the instructions supplied with the
device itself, as well as section 4 of this manual.
Factory Built Chimneys
The furnace may be used with an approved factory built
chimney. Refer to chimney manufacturer’s instructions for
proper installation.
2.4.4
WARNING
FIRE, CARBON MONOXIDE POISONINC HAZARD
Draft Regulator
Failure to follow this warning could result in personal
injury, death, and/or property damage.
The draft regulator supplied with the furnace must be used
for proper functioning. Installation instructions are included
with the control.
2.4.5
The blocked vent shut-off MUST be inspected and
maintained annually by a qualified agency.
Blocked vent shut-off (BVSO)
For chimney venting
It is also essential that the BVSO be maintained annually.
For more details please refer to the instructions supplied with
the device itself, as well as Section 4 of this Manual.
All oil furnaces installed in Canada must have a blocked vent
shut-off.
WARNING
WARNING
ELECTRICAL SHOCK HAZARD
Failure to follow this warning could result in personal
injury or death.
It is imperative that this device be installed by a
qualified agency.
Disconnect electrical power supply to the furnace before
wiring the blocked vent shut-off.
This device is designed to detect the insufficient evacuation
of combustion gases in the event of a vent blockage. In such
a case the thermal switch will shut down the oil burner. The
device will then need to be re-armed MANUALLY.
CAUTION
CUT HAZARD
Refer to figure 1, 2 and 3, and the installation instructions
supplied with the blocked vent shut-off for installation and
wiring procedures. Disconnect the red wire from the limit
switch that comes from terminal #9 of the fan control board.
Connect this red wire to one of the red wires of the BVSO.
Connect the other red wire of the BVSO to the limit switch.
Connect the green wire of the BVSO to cabinet ground.
Failure to follow this caution may result in personal
injury.
Sheet metal parts may have sharp edges or burrs. Use
care and wear appropriate protective clothing, safety
glasses, and gloves when handling parts and servicing
furnaces.
The blocked vent shut-off must be installed in the flue
between 2 inches and 12 inches from the furnace outlet and
between the furnace outlet and draft regulator (See figure 4).
8
Figure 1 : Wiring diagram, BVSO
DNS-01340 Rev A
Beckett Burner
Riello Burner
Figure 2 : Wiring for blocked vent shut-off (size 105)
Figure 4 : BVSO switch installation
The BVSO must be installed
between the furnace outlet and
the draft control
The BVSO must
be installed
between 2” and
12” from the
furnace outlet
Figure 3 : Wiring for blocked vent shut-off (size 120)
2.4.6
Oil burner
This furnace is supplied with a high pressure atomizing
retention head type burner (for use with not heavier than
grade 2 fuel oil). If the burner model is a Beckett AFG, the
mounting flange is fixed to the burner air tube and no
adjustment is required for insertion length. If a Riello burner
is used, refer to the Technical Specifications, Table 4 for the
insertion length.
CAUTION
NEVER use the “interrupted ignition” function if a
Beckett AFG burner is installed on the furnace.
9
Oil Connections
Metallic conduit (where required/used) may terminate at the
side panel of the unit. It is not necessary to extend the
conduit inside the unit from the side panel to the control box.
Complete instructions for the installation of the fuel oil piping
can be found in the oil burner installation instructions
included with the furnace.
o
When replacing any original furnace wiring, use only 105 C,
16 AWG copper wire.
Oil line entry holes are provided in the side panels, so that a
two-pipe system may be used, if desired.
Instructions for wiring the thermostat are enclosed in the
thermostat carton (field supplied). Make the thermostat
connections as shown in Figures 8 and 9, based on the
selected model at the 24 Volt terminal board on the primary
relay.
A 10 (or finer) micron oil filter should be used with all oil
burners and installed as closely as possible to the burner.
2.4.7
Electrical
When installing optional accessories on this appliance,
follow the manufacturer’s installation instructions included
with the accessory. Other than wiring for the thermostat, wire
o
o
with a minimum of type “T” insulation (17 C rise (63 F)) must
be used for accessories.
CAUTION
The furnace cabinet must have an uninterrupted or
unbroken electrical ground to minimize personal injury
if an electrical fault should occur. A green ground screw
is provided in the control box for this connection.
2.4.9
Air filter
An internal filter rack, located in the blower compartment, is
provided as standard equipment with this furnace. A
sufficient clearance should be provided for air filter access.
Refer to Table 2 for filter rack flange dimensions for the
return air duct.
The appliance must be installed in accordance with the
current ANSI / NFPA 70 National Electrical Code / CSA
C22.1 Canadian Electrical Code Part 1 and/or local codes.
The control system depends on the correct polarity of the
power supply. Connect “HOT” wire (H) and “NEUTRAL” wire
(N) as shown in Figures 8 and 9, based on the model
selected.
DANGER
Do not use this furnace as a construction heater. Use of
this furnace as a construction heater exposes it to
abnormal conditions, contaminated combustion air and
the lack of air filters. Failure to follow this warning can
lead to premature furnace failure and/or vent failure that
could result in a fire hazard and/or bodily harm.
A separate line voltage supply should be used with fused
disconnect switch or circuit breaker between the main power
panel and the unit.
Use only copper wire for 115V power supply to the unit.
Table 2 : Air filter dimensions for return air duct
Furnace
Model
Air Filter
Quantity and Size
Supply Opening Size
Return Opening Size
CBLAAA036105 & CBLAAR036105
(2) 12" x 20"
0.5 m x 0.5 m (20" x 20")
0.5 m x 0.5 m (20" x 20")
CBLAAA060120 & CBLAAR060120
(2) 16" x 20"
0.6 m x 0.5 m (24" x 20")
0.55 m x 0.5 m (22" x 20")
2.4.8
If a coil blower compartment is used, install air tight,
motorized and automatic air dampers. Cold air coming from
the coil and passing across the furnace can cause
condensation and shorten the life of the heat exchanger.
Air Conditioner (or Heat Pump)
An air conditioning coil may be installed on the supply air
side ONLY.
WARNING
POISONOUS CARBON MONOXIDE GAS HAZARD
3.0
OPERATION
Install the evaporator coil on the supply side of the
furnace ducting ONLY.
3.1
FAN ADJUSTMENT CHECK
An evaporator coil installed on the return air side of the
ducting can cause condensation to form inside the heat
exchanger, resulting in heat exchanger failure. This in
turn can result in death, bodily injury.
This furnace is equipped with a 4 speed direct drive motor to
deliver a temperature rise within the range specified on the
rating plate.
Adjust the fan speed ACCORDING TO THE OIL INPUT
SELECTED, so that the temperature rise is within the range
specified on the rating plate (see Table 3). Consult the wiring
diagram for speed changes on the direct drive motor.
No minimum clearance is required between the bottom of
the coil drain pan and the top of the heat exchanger. If a
heat pump is installed, a “dual-energy” thermostat, or other
control is required, in order to prevent the simultaneous
operation of the furnace and the heat pump. It also prevents
a direct transition from heating by way of the heat pump to
heating with oil. Refer to the thermostat instructions or those
of another control used for the proper wiring.
10
Table 3 : Adjustments for fan speed selection
UNIT SIZE
105
120
FURNACE INPUT
RECOMMENDED
(BTUH)
BLOWER SPEED
70,000 / 119,000
Med – Low
91,000 / 140,000
Med - High
105,000 / 154,000
High
CAUTION
Do not tamper with the unit or its controls. Call a
qualified service technician.
3.3
1.
A 10-micron (or less) oil filter should be installed as
closely to the burner as possible with all oil burners, but
it is essential for burners with a low firing rate. We
recommend the use of a low pressure drop oil filter with
a capacity greater than that of the fuel pump;
2.
On a new installation, the air trapped in the oil line
leading from the tank to the nozzle must be thoroughly
purged in order to prevent excessive after drip. The oil
pump is equipped with a special fitting that facilitates the
purging of any air between it and the tank. The proper
procedure for performing this operation is as follows:
a. Place a piece of 1/4” diameter clear plastic tubing
over the purge fitting on the oil pump;
b. Start the oil burner, then open the purge fitting and
allow the burner to run until the purge tube is
completely free of air bubbles;
c. At this point tighten the purge fitting, which will
allow the oil to run to the nozzle and fire the burner.
If the purging takes longer than 15 seconds and no
flame has been established the burner will stop.
Push the reset button on top of the Primary Control
to restart the burner.
For detailed information on the operation of the Primary
Control please refer to the instructions included with the
furnace or the burner.
To adjust fan off time, set DIP switches on control board to
obtain desired timing. (See Figure 5).
Figure 5 : Fan OFF time dip switch settings
3.2
PURGING THE OIL LINE
OPERATIONAL CHECKLIST
3.4
Before starting up the unit, be sure to check that the
following items are in compliance:
COMBUSTION CHECK
IMPORTANT: The heat exchanger metal surfaces may
have oil and the baffle insulation also contains binders.
These products will burn or evaporate when the unit
operates for the first time. Because of this, the smoke
reading may be inexact during the first minutes of operation.
Therefore, the unit must operate during at least 60 minutes
before taking any readings to adjust the combustion quality.
Let the unit cool down before making any adjustments.
1.
The electrical installation, the oil supply system, the
venting system, combustion air supply and ventilation;
2. The blower access door is in place and the blower rail
locking screws are well tightened;
3. The Blocked Vent Shut-Off (BVSO), if used, is installed
according to instructions (for chimney venting);
4. The oil supply valve is open;
5. The flame observation door (located in front of the unit)
is well closed;
6. The burner ‘’Reset’’ button is well pushed in or rearmed;
7. The preliminary air adjustments on the burner comply
with the technical specifications in this manual;
8. The blower speed adjustments for heating and air
conditioning are appropriate and according to the
specifications in this manual;
9. The blower start/stop delays are satisfactory;
10. The thermostat of the room is in the heating mode and
is set higher than the ambient temperature.
IMPORTANT: The combustion check verification MUST be
performed after the nozzle replacement or the burner
cleaning. After these manipulations, the combustion
parameters are necessarily modified. Refer also to the
burner instruction manual.
In order to obtain optimum performance from the oil burner,
the following set-up procedures must be followed by
referring to the Technical Specifications, Table 5 in this
manual:
1. A test kit to measure the smoke, flue draft and over-fire
pressure should be used in order to obtain the proper air
band setting. Although all of the above measurements
are required for optimum set up and efficiency, the most
important reading that must be taken is the smoke
number in the flue pipe, downstream from the regulator;
2. The proper smoke number, as established by way of
engineering tests, is between 0 and 1. This degree of
smoke emission is commonly referred to as a “trace”. It
To start the unit, turn the main electrical switch on.
11
3.
4.
5.
6.
3.5
however, the fan motor speed may need to be changed to
obtain the necessary cooling airflow.
is recommended that a Bacharach True Spot Smoke
Test kit or equivalent be used;
Follow the next steps to do the combustion check
verification:
a. Drill a minimum proper diameter (about 9/32”) test
hole in the flue pipe, approximately 18 inches from
the furnace breech;
b. From a cold start, let the unit operate for about 5
minutes;
c. Set the burner air setting until you have between 0
and 1 on the Bacharach Scale (or a “trace”);
d. Take a CO2 sample at the same test location where
the smoke reading was taken and make note of it;
e. Adjust the burner air setting to obtain a CO2 reading
1.5% lower (or a O2 reading 2.0% higher) than the
reading associated with the “trace” of smoke;
f. This method of adjusting the burner will result in
clean combustion (Bacharach smoke scale
between 0 and a trace) and ensure the proper
functioning of the system.
A barometric draft regulator, supplied with the furnace,
must be installed, in order to ensure proper draft
through the furnace. The barometric damper must be
mounted with the hinge pins in a horizontal position and
the face of the damper vertical for proper functioning,
(see instructions included with damper). After the
furnace has been firing for at least five minutes, the draft
regulator should be set to between -0.025" W.C. and 0.035" W.C.;
The over fire pressure that is taken through the
observation door located in the centre of the front panel
above the burner is a measurement that is necessary to
determine if there is a blockage in the heat exchanger or
the flue pipe. Please refer to the Technical
Specifications in this manual for over fire pressure
values. A high pressure condition may be caused by
excessive combustion air due to the air band being too
wide open or a lack of flue draft (chimney effect) or
some other blockage, such as soot in the secondary
section of the heat exchanger or the use of an oversize
nozzle input or high pressure pump;
After all the set up procedures mentioned above have
been completed, the burner should be fired and an
inspection mirror should be used to observe the flame
pattern at the tip of the nozzle. Any irregularities such as
burning to one side or pulsating flame patterns should
be corrected by changing the nozzle.
3.7
The blower speed is factory set to deliver the required airflow
at normal duct static pressure.
3.8
COOLING
The blower speed may be adjusted in the field to deliver the
required airflow for cooling applications, as outlined in
Table 5.
3.9
CONSTANT BLOWER SWITCH
This furnace is equipped with a constant low speed blower
option. Whenever the room thermostat is not calling for
heating or cooling, the blower will run on low speed in order
to provide air circulation. If this constant blower option is not
desired, the rocker switch on the side of the control box can
be used to turn it off.
4.0
MAINTENANCE
WARNING
Be sure to turn all power “OFF” upstream from the unit
when servicing the furnace, unless power is required for
specific operations. Failure to comply with this
CAUTION can result in bodily harm and/or cause a fire
hazard.
This furnace should never be operated without an air filter.
Disposable filters should be replaced at least once a year. If
equipped to provide cooling, filters should be replaced at a
minimum of twice a year.
To avoid personal injury, make sure the power is “OFF”
before servicing.
ALWAYS KEEP THE OIL VALVE CLOSED IF THE
BURNER IS SHUT DOWN FOR AN EXTENDED PERIOD
OF TIME.
For optimum performance, the oil burner nozzle should be
replaced at least once a year.
The procedure for the installation and/or replacement of a
nozzle is outlined in the oil burner instruction manual which
is supplied with the furnace.
LIMIT CONTROL CHECK
After the furnace has been in operation for at least 15
minutes, restrict the return air supply by blocking the filters or
closing the return registers and allow the furnace to shut
down on high limit. The burner will shut OFF and the main
blower should continue to run.
After replacing the nozzle, the burner should be adjusted in
accordance with the “COMBUSTION CHECK” section of this
manual.
4.1
Remove the restriction and the burner should come back on
in a few minutes.
3.6
HEATING
HEAT EXCHANGER CLEANING
Normally, it is not necessary to clean the heat exchanger or
flue pipe every year, but it is advisable to have a qualified
service technician check the unit before each heating
season to determine whether cleaning or replacement of
parts is required.
YEAR ROUND AIR CONDITIONING
The furnace is designed for use in conjunction with cooling
equipment, to provide year round air conditioning. The
blower has been sized for both heating and cooling;
12
If cleaning is necessary, the following steps should be
followed:
1. Turn “OFF” all power upstream from the furnace;
2.
3.
4.
5.
6.
7.
8.
4.2
WARNING
ELECTRICAL SHOCK HAZARD
Disconnect the flue pipe and breach plate;
Remove the radiator baffle;
Disconnect the oil line and remove the oil burner from
the furnace;
Clean the secondary tubes and the primary cylinder with
a stiff brush and remove debris with a vacuum cleaner;
Before reassembling the furnace, the heat exchanger
and combustion chamber should be inspected to
determine if replacement is required;
After cleaning, replace the radiator baffle, flue collar
plate and oil burner;
Readjust burner for proper operation.
Failure to follow this warning could result in personal
injury or death.
Disconnect electrical power supply to the furnace before
servicing the blocked vent shut-off.
1.
2.
3.
4.
BLOWER REMOVAL
To remove the blower from the furnace:
1. Turn “OFF” all power upstream from the furnace;
2. Remove blower access door;
3. Remove the 4 blower retaining wing-nuts;
4. Slide the blower on the rails toward the rear of the unit;
5. Reverse the above steps to reinstall the blower. (Refer
to wiring diagram Figures 6, 7 and 8 of this instruction
manual or the diagram located on the inside of the
blower door to properly rewire the unit.
4.3
Remove the two screws holding down the BVSO
assembly cover;
Remove the cover;
Remove the two screws holding the control box to the
heat transfer tube assembly. Sliding the control box in the
appropriate direction will unlock it form the heat transfer
tube assembly;
Carefully remove any build-up from the thermal switch
surface;
CAUTION
Do not dent or scratch the surface of the thermal switch.
If the thermal switch is damaged, it must be replaced.
5.
6.
7.
BLOCKED VENT SHUT OFF (BVSO) CLEANING
8.
For continued safe operation, the Blocked Vent Shut-Off
System (BVSO) needs to be inspected and maintained
annually by a qualified service technician.
13
Clear and remove any build-up or obstruction inside the
heat transfer tube;
Re-mount, lock and fasten the control box with the 2
screws removed in step 3;
Re-attach the assembly cover with the screws removed in
step 1;
Re-establish power to the appliance.
5.0
FURNACE INFORMATION
Model:
Serial number:
Furnace installation date:
Service telephone #-Day:
Night:
Dealer name and address:
START-UP RESULTS
Nozzle:
2
Pressure:
Burner adjustments:
lb/po
Primary air
Fine air
Drawer Assembly
CO2 :
%
scale:
Smoke
(Bacharach)
Gross stack temperature:
°F
Ambient temperature:
°F
Chimney draft :
" W.C.
Overfire draft :
" W.C.
Test performed by:
14
Table 4 : Technical specifications
Model: CBL
75
90
105
120
140
155
RATING AND PERFORMANCE
Firing rate (USGPH)
Input (BTU/h)
Heating capacity (BTU/h)
Heating temperature rise
Flue draft minimum (W.C.) (chimney)
Overfire pressure (W.C.) (chimney)
Flue draft minimum (W.C.) (direct vent)
Overfire pressure (W.C.) (direct vent)
BECKETT BURNER; MODEL AFG (3450 rpm)
0.50
70 000
57 000
0.65
0.75
91 000
105 000
74 000
85 000
13 - 29°C (55 - 85°F)
(-0.06" to -0.025")
(+0.010" to 0.025")
0.85
119 000
97 000
1.00
1.10
140 000
154 000
114 000
123 000
13 - 29°C (55 - 85°F)
(-0.06" to -0.025")
(max +0.025")
(+0.10" to +0.25")
(+0.12" to +0.27")
AFG-F3 (tube insertion 2 7/8")
AFG-F3 (ins. 2 7/8")
AFG-F6(2 7/8")
Low firing rate baffle
Static disc, model
Nozzle (Delavan)
Pump pressure (PSIG)
Combustion air adjustment (band/shutter)
AFUE % (From CSA B212 standard and Canadian regulation)
AFUE % (From ASHRAE 103 standard and US regulation)
APPLICABLE
3 3/8" # 31646
0.50 - 70W 0.55 - 70B 0.65 - 70B
100
140
130
0/5
0/7
0/8
82.4%
80.9%
81.1%
82.6%
81.1%
81.4%
APPLICABLE
2 3/4" # 3383
0.75 - 70B 0.85 - 70B
130
140
1/8
4/4
81.4%
80.3%
81.5%
80.6%
APPLICABLE
2 3/4" # 3383
0.85 - 70B
170
2/8
80.1%
80.3%
RIELLO BURNER 40-F (Chimney vent)
F3 (tube insertion 3 9/16")
0.40 - 70A 0.50 - 70W 0.65 - 70W
155
170
135
0/3
0 / 3.5
0/4
84.4%
82.9%
83.1%
80.5%
80.5%
80.5%
F5 (tube insertion 3 9/16")
0.75 - 70B 0.85 - 70W 1.00 - 70W
130
140
125
0/3
0 / 3.5
0/4
84.7%
83.9%
83.1%
80.0%
80.0%
80.0%
115 - 60 - 1
115 - 60 - 1
104 - 132
104 - 132
Rated current (Amps)
12.2
15.7
Minimum ampacity for w iring sizing
13.7
18.1
Max. w ire lenght
26'
26'
Max. fuse size (Amps)
15
20
Nozzle (Delavan)
Pump pressure (PSIG)
Combustion air adjustment (turbulator/damper)
AFUE % (From CSA B212 standard and Canadian regulation)
AFUE % (From ASHRAE 103 standard and US regulation)
ELECTRICAL SYSTEM
Volts - Hertz - Phase
Operating voltage range
Control transformer
External control pow er available
40 VA
40 VA
Heating
40 VA
40 VA
Cooling
30 VA
30 VA
BLOWER DATA
Blow er speed at 0.50" W.C. static pressure
Blow er speed at 0.25" W.C. static pressure
Motor HP / Speeds
Blow er w heel size
MED-LOW
MED-LOW
MED-HIGH
MED-HIGH
1/3 - 4
HIGH
HIGH
MED-LOW
LOW
MED-HIGH
MED-LOW
3/4 - 4
HIGH
MED-HIGH
10" x 8"
12" x 10"
21¼" x 55" x 32"
20" x 20"
20" x 20"
(2) 12" x 20"
86 kg (190 lbs)
3 tons
21¼" x 61½" x 35¼"
24" x 20"
20" x 22"
(2) 16" x 20"
97 kg (215 lbs)
5 tons
GENERAL INFORMATION
Overall dimensions (w idth x depth x height)
Supply air opening
Return air opening
Filter quantity and size
Shipping w eight
Air conditioning, maximum output
15
Table 5 : Air delivery - CFM with air filter
CBL, SIZE 75 TO 105 (1/3 HP MOTOR)
SPEED
EXTERNAL STATIC PRESSURE WITH AIR FILTER
0.2" (W.C.)
1425
1130
840
725
HIGH
MED-HIGH
MED-LOW
LOW
0.3" (W.C.)
1350
1045
810
730
0.4" (W.C.)
1305
1000
770
740
0.5" (W.C.)
1250
950
740
745
CBL, SIZE 120 TO 155 (3/4 HP MOTOR)
EXTERNAL STATIC PRESSURE WITH AIR FILTER
SPEED
HIGH
MED-HIGH
MED-LOW
LOW
0.2" (W.C.)
0.3" (W.C.)
0.4" (W.C.)
0.5" (W.C.)
2080
1892
1556
1221
2041
1859
1475
1164
1965
1770
1394
1081
1864
1675
1318
998
Table 6 : Minimum clearances - combustible materials
CLEARANCES
(com bustible
m aterials)
RECOMMENDED
ACCESS FOR SERVICE
FURNACE
2.54 cm (1")
0.6 m (24")
SUPPLY PLENUM WITHIN 1.8 M (6') OF FURNACE
2.54 cm (1")
LOCATION
SIDES
BACK
TOP
BOTTOM
FLUE PIPE
FRONT
APPLICATION
ACCESS PANEL TO BLOWER
10.16 cm (4")
FURNACE OR PLENUM
50.8 mm (2")
HORIZONTAL WARM AIR DUCT WITHIN 1.8 m (6') OF FURNACE
50.8 mm (2")
FURNACE (COMBUSTIBLE FLOOR)
0.6 m (24")
0"
HORIZONTALLY OR BELOW FLUE PIPE
10.16 cm (4")
VERTICALLY ABOVE FLUE PIPE
22.86 cm (9")
FURNACE
20.32 cm (8")
16
0.6 m (24")
Figure 6 : Model CBL, Size 105
DNS-0173 Rev D
Figure 7 : Model CBL, Size 120
DNS-0172 Rev D
17
Figure 8 : Wiring diagram CBL Beckett burner
DNS-0989 Rev C
18
Figure 9 : Wiring diagram CBL, Riello burner
DNS-0991 Rev D
19
Figure 10 : Parts list - CBLAAA036105
B50070 Rev B
20
Table 7 : Parts list - CBLAAA036105
ITEM
1
2
3
4
5
6
7
8
9
10
11
12
13
14
15
16
17
18
19
20
21
22
23
24
25
26
27
28
29
30
31
32
33
34
35
36
37
38
39
40
41
42
43
44
45
46
47
48A
48B
49
50
51
PART #
B01701
B01708
B01725
B01707
B03196-02
B01723-02
B01709-02
B03203-01
Z04F008
Z99F050
B03192
B01214
F07O001
B01697
B01826-01
J06L001
B01710
B01709-01
B03196-01
B01723-01
R02R003
A00284
F07F011
B01208
B01716-01
K03009
B01719
B01154
B01220
B01716-02
B03091-01
B02111
B01827-02
B01722
B01014
B01720
B01733
B03720-02
B01403-01
B01024
L01I001
B01890-01
B01724
B01888
B01664
L07F003
N04Z026
R99G002
R99G004
L01F009
B01717
B01662
DESCRIPTION
Heat Exchanger
Floor Baffle
Bottom Divider Plate Assembly
Side Baffle
Panel Assembly, Left Side
Panel Insulation, Left Side
Filter Support, Left Side
Fan Compartment Door Assembly
Air Filter, 12 x 20 x 1, Paper
Door Handle
Back Top Panel
Outlet Cover Gasket
3/8-16 Brass Nut
Outlet Cover
Flow Baffle Assembly
Extruded Gasket 1/2 x 1/8
Top Divider Plate
Filter Support, Right Side
Panel Assembly, Right Side
Panel Insulation, Right Side
Therm-o-disc, Hight Limit
Protection Plate for Therm-o-disc
3/8-16 Nut
Electrical Panel, Top
Burner Casing, Right Side
Thumbscrew Kit
Electrical Panel, Interior
Burner Casing Access Panel
Corner Conduit
Burner Casing, Left Side
Beckett Burner AFG
Observation Door Kit
Front Panel Assembly
Front Divider Panel Insulation
Observation Door Gasket
High Limit Plate
Floor Assembly
Blower 100-8R DD
Blower Assembly
Capacitor Holder
Capacitor 5 MF
1/3 HP Direct Drive Motor
Fan Support
Motor mount assembly
Electric blower kit
SPST Rocker Switch
Burner Flange Gasket
Electronic Board
Electronic Board
Transformer, 120V / 24V / 40VA
Electrical Mounting Panel
Electrical Kit
COMMENTS
Exchanger only
Includes Panel, 3 Gaskets and 3 Bolting Plates
Includes Panel, Insulation and Baffle
Includes Door, Door Handle and Labels
Includes Baffle and Insulation
Order required lenght (28" for one application)
Includes Panel, Insulation and Baffle
Panel only
Includes 2 Thumbscrews, Springs, Locknuts and Washers
Panel only
Includes Door, Spring and Bolt
Includes Panel, Insulation,Observation Door Gasket and Retaining Clips
Includes Floor, Deflector and Screws
Includes Wheel and Housing
Includes Blower, Motor and Capacitor
Includes Motor and Legs
For units manufactured before June 2004
Substitute for R99G002
Panel only
B50070 Rev B
21
Figure 11 : Parts list - CBLAAA060120
B50066 Rev B
22
Table 8 : Parts list- CBLAAA060120
ITEM
1
2
3
4
5
6
7
8
9
10
11
12
13
14
15
16
17
18
19
20
21
22
23
24
25
26
27
28
29
30
31
32
33
34
35
36
37
38
39
40
41
42
43
44
45
46
47
48A
48B
49
50
51
PART #
B01741
B01708
B01764
B01750
B01406-02
B03205-02
B01766-02
B01761-02
L01I005
B01024
B03201-04
Z04F010
Z99F050
B03195
B00205
F07O001
B01747
B01751
J06L001
B01754
B01761-01
B03205-01
B01766-01
R02R003
A00284
F07F011
L07F003
B01208
B01716-01
B01719
K03009
B01154
B01220
B01716-02
B03092-01
N04Z026
B02111
B01768-01
B01767
B01014
B01763
B01769
B03720-05
B01664-01
B01891-01
B01756
B01889
R99G002
R99G004
L01F009
B01717
B01662
DESCRIPTION
Heat Exchanger
Floor Baffle
Blower Divider Panel Assembly
Side Baffle
Blower Assembly
Casing Left Panel Assembly
Left Side Casing Insulation
Left Air Filter Support
Capacitor 15 MF
Capacitor Support
Blower Compartment Door Assembly
Air Filter, 16 x 20 x 1, Paper
Door Handle
Casing Back Panel
Flue Collar Gasket
Hexagon Nut 3/8-16NC Brass
Flue Collar Cover
Radiator Baffle
Extruded Gasket 1/2 x 1/8
Top Divider Panel
Right Air Filter Support
Casing Right Panel Assembly
Right Side Casing Insulation
High Limit 1 3/4'' Lg - 195 F - 30 F
Electrical Insulating Barrier
Hexagon Nut 3/8-16NC Zinc
ON / OFF Low Speed Fan Switch
Junction Box Cover
Burner Compartment Right Side Panel
Bottom Electrical Panel
Thumbscrew Kit
Front Access Door
Electrical Wire Raceway
Burner Compartment Left Side Panel
Beckett Burner AFG
Burner Flange Gasket
Observation Door Assembly
Casing Front Panel Assembly
Front Panel Insulation
Observation Tube Gasket
Electrical Wire Raceway
Floor Assembly
Blower 120-10T DD
Electrical kit Blower
3/4 HP Direct Drive Blower Motor
Blower Support
Blower Motor Mount Support Assembly
Electronic Fan Timer ST9103A
Electronic Fan Timer 1158-110
Transformer, 120V / 24V / 40VA
Electrical Mounting Panel
Electrical Kit
COMMENTS
Exchanger only
Includes Panel, Gaskets and 3 Bolting Plates
Includes Blower, Motor and Capacitor
Includes Panel Insulation and Baffle
Includes Door, Door Handle and Labels
Includes Baffle and Insulation
Order Required Lenght (28" for one Appliance)
Includes Panel, Insulation and Baffle
Includes 2 Thumbscrews, Springs, Locknuts and Washers
Door only
Includes Panel and Insulation
Includes Floor, Deflector and Screws
Includes Wheel and Housing
Includes Motor Legs
For Units Manufactured before June 2004
Substitute for R99G002
Panel only
B50066 Rev B
23
Figure 12 : Parts list - CBLAAR036105
B50069 Rev B
24
Table 9 : Parts list - CBLAAR036105
ITEM
1
2
3
4
5
6
7
8
9
10
11
12
13
14
15
16
17
18
19
20
21
22
23
24
25
26
27
28
29
30
31
32
33
34
35
36
37
38
39
40
41
42
43
44
45
46
47
48A
48B
49
50
51
PART #
B01701
B01708
B01725
B01707
B03196-02
B01723-02
B01709-02
B03203-01
Z04F008
Z99F050
B03192
B01214
F07O001
B01697
B01826-01
J06L001
B01710
B01709-01
B03196-01
B01723-01
R02R003
A00284
F07F011
B01208
B01716-01
K03009
B01719
B01154
B01220
B01716-02
N01F011
B02111
B01827-02
B01722
B01014
B01720
B01733
B03720-02
B01403-01
B01024
L01I001
B01890-01
B01724
B01888
B01664
L07F003
L01H009
R99G002
R99G004
L01F009
B01717
B02329
DESCRIPTION
Heat Exchanger
Floor Baffle
Bottom Divider Plate Assembly
Side Baffle
Panel Assembly, Left Side
Panel Insulation, Left Side
Filter Support, Left Side
Fan Compartment Door Assembly
Air Filter, 12 x 20 x 1, Paper
Door Handle
Back Top Panel
Outlet Cover Gasket
3/8-16 Brass Nut
Outlet Cover
Flow Baffle Assembly
Extruded Gasket 1/2 x 1/8
Top Divider Plate
Filter Support, Right Side
Panel Assembly, Right Side
Panel Insulation, Right Side
Therm-o-disc, Hight Limit
Protection Plate for Therm-o-disc
Hexagon Nut 3/8-16NC ZINC
Electrical Top Panel
Burner Casing, Right Side
Thumbscrew Kit
Electrical Panel, Interior
Burner Casing Access Panel
Corner Conduit
Burner Casing, Left Side
Riello Burner 40-F3
Observation Door Kit
Front Panel Assembly
Front Divider Panel Insulation
Observation Door Gasket
Hight Limit Plate
Floor Assembly
Blower 100-8R
Blower Assembly
Capacitor Holder
Capacitor 5 MF
Direct Drive Motor, 1/3 HP
Fan Support
Motor mount assembly
Electric blower kit
SPST Rocker Switch
Relay 24 vac SPDT
Electronic Board ST9103A
Electronic Board 1158-110
Transformer, 120V / 24V / 40VA
Electrical pannel
Electrical Kit
COMMENTS
Exchanger Only
Includes Panel, 3 Gaskets and 3 Bolting Plates
Includes Panel, Insulation and Baffle
Includes Door, Door Handle and Labels
Includes Baffle and Insulation
Order required lenght (28" for one application)
Includes Panel, Insulation and Baffle
Panel only
Includes 2 Thumbscrews, Springs, Locknuts and Washers
Panel only
Includes Door, Spring and Bolt
Includes Panel, Insulation, Observation Door Gasket and Retaining Clips
Includes Floor, Deflector and Screws
Includes Wheel and Housing
Includes Blower, Motor and Capacitor
Includes Motor and Legs
For Units Manufactured before June 2004
Substitute for R99G002
Riello only
B50069 Rev B
25
Figure 13 : Parts list - CBLAAR060120
B50068 Rev B
26
Table 10 : Parts list - CBLAAR060120
ITEM
1
2
3
4
5
6
7
8
9
10
11
12
13
14
15
16
17
18
19
20
21
22
23
24
25
26
27
28
29
30
31
32
33
34
35
36
37
38
39
40
41
42
43
44
45
46
47
48A
48B
49
50
51
PART #
B01741
B01708
B01764
B01750
B01406-02
B03205-02
B01766-02
B01761-02
L01I005
B01024
B03201-04
Z04F010
Z99F050
B03195
B00205
F07O001
B01747
B01751
J06L001
B01754
B01761-01
B03205-01
B01766-01
R02R003
A00284
F07F011
L07F003
B01208
B01716-01
B01719
K03009
B01154
B01220
B01716-02
N01F012
L01H009
B02111
B01768-01
B01767
B01014
B01763
B01769
B03720-05
B01664-01
B01891-01
B01756
B01889
R99G002
R99G004
L01F009
B01717
B02329
DESCRIPTION
Heat Exchanger
Floor Baffle
Blower Divider Panel Assembly
Side Baffle
Blower Assembly
Casing Left Panel Assembly
Left Side Casing Insulation
Left Air Filter Support
Capacitor 15 MF
Capacitor Support
Blower Compartment Door Assembly
Air Filter, 16 x 20 x 1, Paper
Door Handle
Casing Back Panel
Flue Collar Gasket
Hexagon Nut 3/8-16NC Brass
Flue Collar Cover
Radiator Baffle
Extruded Gasket 1/2 x 1/8
Top Divider Panel
Right Air Filter Support
Casing Right Panel Assembly
Right Side Casing Insulation
High Limit 1 3/4'' Lg - 195 F - 30 F
Electrical Insulating Barrier
Hexagon Nut 3/8-16NC Zinc
ON / OFF Low Speed Fan Switch
Junction Box Cover
Burner Compartment Right Side Panel
Bottom Electrical Panel
Thumbscrew Kit
Front Access Door
Electrical Wire Raceway
Burner Compartment Left Side Panel
Riello Burner
Relay 24 VAC SPDT
Observation Door Assembly
Casing Front Panel Assembly
Front Panel Insulation
Observation Tube Gasket
Electrical Wire Raceway
Floor Assembly
Blower 120-10T DD
Electrical kit Blower
3/4 HP Direct Drive Blower Motor
Blower Support
Blower Motor Mount Support Assembly
Electronic Fan Timer ST9103A
Electronic Fan Timer 1158-110
Transformer, 120V / 24V / 40VA
Electrical Mounting Panel
Electrical Kit
COMMENTS
Exchanger only
Includes Panel, Gas kets and 3 Bolting Plates
Includes Blower, Motor and Capacitor
Includes Panel Insulation and Baffle
Includes Door, Door Handle and Labels
Includes Baffle and Insulation
Order Required Lenght (28" for one Appliance)
Includes Panel, Insulation and Baffle
Includes 2 Thumbscrews, Springs, Locknuts and Washers
Door only
Riello only
Includes Panel and Insulation
Includes Floor, Deflector and Screws
Includes Wheel and Housing
Includes Motor Legs
For Units Manufactured before June 2004
Substitute for R99G002
Panel only
B50068 Rev B
27
CBLAAA
CBLAAR
Fournaise au mazout Low Boy
Puissance de l’entrée 70,000---154,000
Instructions d’installation
CE MANUEL CONTIENT DES
INFORMATIONS IMPORTANTES
INSTALLATEUR: Utiliser l’information
contenue dans ce manuel afin de procéder à
l’installation de l’unité. Garder ce manuel près
de l’unité pour références ultérieures.
UTILISATEUR: Conserver ce manuel
d’information pour références ultérieures.
TECHNICIEN DE SERVICE: Utiliser
l’information contenue dans ce manuel afin
d’effectuer l’entretien de l’appareil. Garder ce
manual près de l’unité pour références
ultérieures.
A11539
C
US
Copyright 2012 CAC / BDP D 7310 W. Morris St. D Indianapolis, IN 46231
Use of the AHRI Certified TM Mark indicates a
manufacturer’s participation in the program. For
verification of certification for individual products,
go to www.ahridirectory.org.
Printed in Canada.
Edition Date: 01/12
Le manufacturier se réserve le droit de modifier, à tout moment, les spécifications et design sans préavis ni obligation.
Catalog No: IM---CBL---01FR / X40192 Rev. B
Remplace: New
TABLE DES MATIÈRES
4.2
DÉMONTAGE DU VENTILATEUR .......................13
4.3
NETTOYAGE DU DISPOSITIF D’ARRÊT ANTIREFOULEMENT (BVSO) .....................................13
1.0
SÉCURITÉ ............................................................... 3
1.1
5.0
FICHE TECHNIQUE DE L’APPAREIL...................14
DANGER, MISE EN GARDE ET
AVERTISSEMENT ................................................. 3
1.2
2.0
RÈGLES DE SÉCURITÉ GÉNÉRALES ................. 3
FIGURES
INSTALLATION ....................................................... 3
Figure 1 : Diagramme électrique, BVSO...............................8
2.1
GÉNÉRALITÉS ...................................................... 3
2.2
RECOMMANDATIONS POUR UNE
Figure 2 : Branchement du dispositif d’arrêt anti-refoulement
(modèle 105) ........................................................9
INSTALLATION SÉCURITAIRE............................. 4
2.3
Figure 3 : Branchement du dispositif d’arrêt anti-refoulement
RÈGLES DE SÉCURITÉ À L’INSTALLATION ....... 4
(modèle 120) ........................................................9
2.3.1
Détecteurs .................................................... 4
Figure 4 : Pose du dispositif BVSO.......................................9
2.3.2
Température froide et votre bâtiment ........... 5
Figure 5 : Réglages de temps pour ventilateur ...................10
EMPLACEMENT .................................................... 5
Figure 6 : Modèle CBL, capacité 105..................................17
2.4
2.4.1
Air pour la combustion et la ventilation ......... 5
Figure 7 : Modèle CBL, capacité 120..................................17
2.4.2
Recommandations pour les conduits............ 6
Figure 8 : Diagramme électrique, CBL brûleur Beckett.......18
2.4.3
Instructions d’évacuation (cheminée) ........... 6
Figure 9 : Diagramme électrique, CBL brûleur Riello..........19
2.4.4
Régulateur de tirage ..................................... 7
Figure 10 : Liste de pièces - CBLAAA036105 ....................20
2.4.5
Dispositif d’arrêt anti-refoulement (BVSO).... 7
Figure 11 : Liste de pièces - CBLAAA060120 ....................22
2.4.6
Brûleur au mazout ........................................ 9
Figure 12 : Liste de pièces - CBLAAR036105 ....................24
2.4.7
Système électrique ....................................... 9
Figure 13 : Liste de pièces - CBLAAR060120 ....................26
2.4.8
Filtre à air.................................................... 10
2.4.9
Unité de climatisation (ou thermopompe) ... 10
3.0
3.1
TABLEAUX
OPÉRATION .......................................................... 10
VÉRIFICATION DE L’AJUSTEMENT DU
Tableau 1 : Dimensions minimales requises pour les
VENTILATEUR .................................................... 10
ouvertures de ventilation ...................................5
3.2
VÉRIFICATION DU FONCTIONNEMENT............ 11
Tableau 2 : Dimensions des filtres à air..............................10
3.3
PURGE DE LA LIGNE DE MAZOUT .................... 11
Tableau 3 : Ajustements de vitesse du ventilateur .............10
3.4
VÉRIFICATION DE LA COMBUSTION ................ 11
Tableau 4 : Spécifications techniques ................................15
3.5
VÉRIFICATION DES LIMITEURS DE
Tableau 5 : Débits d'air - CFM avec filtre à air....................16
TEMPÉRATURE .................................................. 12
Tableau 6 : Dégagements minimums - matériaux
3.6
AIR CONDITIONNÉ À L’ANNÉE.......................... 12
combustibles ...................................................16
3.7
CHAUFFAGE ....................................................... 12
Tableau 7 : Liste de pièces - CBLAAA036105....................21
3.8
CLIMATISATION.................................................. 12
Tableau 8 : Liste de pièces - CBLAAA060120....................23
3.9
INTERRUPTEUR DE VENTILATION
Tableau 9 : Liste de pièces - CBLAAR036105 ...................25
CONTINUE .......................................................... 12
Tableau 10 : Liste de pièces - CBLAAR060120 .................27
4.0
4.1
ENTRETIEN ........................................................... 12
NETTOYAGE DE L’ÉCHANGEUR DE
CHALEUR ............................................................ 12
2
1.0
SÉCURITÉ
AVERTISSEMENT
Ces instructions devraient être utilisées par des
techniciens qualifiés et formés pour installer ce type
d’appareils de chauffage central. L’installation de cet
appareil par une personne non qualifiée peut
endommager l’équipement et/ou conduire à des
conditions hasardeuses susceptibles d’entraîner des
dommages corporels.
POUR VOTRE SÉCURITÉ
NE PAS ENTREPOSER OU UTILISER D’ESSENCE, DE
LIQUIDES OU DE VAPEURS INFLAMMABLES À
PROXIMITÉ DE CET APPAREIL OU DE TOUT AUTRE
APPAREIL.
IMPORTANT : Toutes les exigences requises par les codes
locaux et nationaux concernant l’installation d’équipement de
chauffage au mazout, les installations électriques et les
raccordements de conduits doivent être respectées. Certains
codes (émis par l’Institut des standards canadiens) qui
pourraient s’appliquer sont :
CSA B139
Code d'installation d'équipements
de chauffage au mazout
NFPA 31
Installation d'équipements de chauffage
au mazout
ANSI/NFPA 90B
Systèmes de chauffage à air chaude et
système d'air climatisé
ANSI/NFPA 211
Cheminées, foyers, évents et appareils
de chauffage au combustible solide
ANSI/NFPA 70
Code national d'électricité
CSA C22.1
Code canadien d'électricité
NE PAS TENTER DE DÉMARRER LE BRÛLEUR SI UN
EXCÉDENT DE MAZOUT S’EST ACCUMULÉ, SI
L’APPAREIL DE CHAUFFAGE CENTRAL EST REMPLI
DE VAPEUR OU SI LA CHAMBRE DE COMBUSTION EST
TRÈS CHAUDE.
1.1
DANGER, MISE EN GARDE ET
AVERTISSEMENT
Comprenez bien la portée des mots suivant : DANGER, MISE
EN GARDE ou AVERTISSEMENT. Ces mots sont associés
aux symboles de sécurité. Vous les retrouverez dans le
manuel de la façon suivante :
DANGER
Seule l’édition la plus récente des codes doit être utilisée.
Les codes sont disponibles aux adresses suivantes, selon le
cas :
The National Fire Protection Agency
Batterymarch Park
Quincy, MA 02269
ou
L’association des standards canadiens
178, boulevard Rexdale
Rexdale, Ontario M9W 1R3
Le mot DANGER indique les plus graves dangers, ceux
qui provoqueront la mort ou des dommages corporels
et/ou matériels sérieux.
MISE EN GARDE
L’expression MISE EN GARDE signifie un danger qui
peut entraîner la mort ou des dommages corporels et/ou
matériels.
AVERTISSEMENT
AVERTISSEMENT
RISQUE ENVIRONNEMENTAL
Quant au mot AVERTISSEMENT, il est utilisé pour
indiquer les pratiques dangereuses qui peuvent
provoquer des dommages corporels et/ou matériels
mineurs.
1.2
Ne pas suivre
l’environnement.
cet
avertissement
peut
polluer
Retirer et recycler toutes les composantes et les
matériaux (i.e. huile, composantes électriques et
électroniques, isolation, etc.) avant la disposition de
l’unité.
RÈGLES DE SÉCURITÉ GÉNÉRALES
MISE EN GARDE
N’utiliser qu’avec du mazout #2 maximum. Ne pas
utiliser d’essence, d’huile à moteur ou toute autre huile
contenant de l’essence.
MISE EN GARDE
2.0
INSTALLATION
2.1
GÉNÉRALITÉS
Cet appareil de chauffage central est de type LOW-BOY et
fonctionne en débit ascendant (Upflow) seulement.
Ne jamais faire brûler de déchets ou de papier dans le
système de chauffage. Ne jamais laisser de chiffons ou
de papier à proximité de l’unité.
L’unité est expédiée avec le brûleur et les contrôles. Elle
requiert un circuit électrique (115 VAC) connecté à la boîte
de contrôle, un raccordement pour le thermostat tel
qu’indiqué sur le schéma électrique, un ou plusieurs
3
raccordements à la ligne de mazout, des conduits adéquats
et un raccordement à un évent de dimensions adéquates.
système de chauffage. S’assurer qu’ils ont tous étés bien
suivis ;
h. Suivre les règlements des codes d’installation
ANSI/NFPA No.31 (États-Unis) et CSA B139 (au
Canada) ou des codes locaux pour l’installation du
réservoir de mazout ;
i. Le service d’entretien et l’inspection doivent être fait
régulièrement pour un rendement optimum et sécuritaire;
j. Avant le service d’entretien, permettre à l’appareil de
refroidir. Toujours couper l’alimentation en mazout et
l’électricité avant le service. Ceci préviendra les
décharges électriques et les brûlures ;
k. Sceller les conduits d’alimentation et de retour d’air ;
l. Le système d’évacuation DOIT être vérifié pour s’assurer
qu’il est de la dimension et du type requis ;
m. Installer le format adéquat et le bon type de filtre ;
n. L’appareil DOIT être installé de telle sorte que les
composantes électriques soient protégées de tout
contact direct avec l’eau.
La capacité d’air de cet appareil de chauffage central est
conçue pour permettre le refroidissement du débit d’air. Se
référer au tableau 5, selon le modèle choisi, pour connaître
les débits d’air prévus selon la pression statique externe des
conduits.
2.2
RECOMMANDATIONS POUR UNE
INSTALLATION SÉCURITAIRE
MISE EN GARDE
L’installation ou les réparations par du personnel non
qualifié peuvent entraîner des risques pour vous et les
autres. L’installation DOIT être conforme aux codes
locaux ou, dans le cas d’absence de codes locaux, elle
doit être conforme aux codes nationaux qui
s’appliquent.
Les renseignements contenus dans ce manuel
s’adressent à un technicien qualifié, expérimenté dans
ce type de travail, au courant des précautions à prendre,
des règles de sécurité à respecter et muni des outils
appropriés ainsi que des instruments de vérification
adéquats.
2.3
Votre appareil de chauffage est bâti pour vous procurer de
nombreuses années de service en toute sécurité à la
condition qu’il soit installé et entretenu adéquatement.
Cependant, un usage abusif ou inadéquat peut raccourcir sa
longévité et provoquer des risques de danger pour le
propriétaire.
Ne pas suivre soigneusement les instructions de ce
manuel peut causer un mauvais fonctionnement de la
fournaise, entraîner la mort ou des dommages corporels
et/ou matériels.
2.3.1
MISE EN GARDE
a.
RISQUE D’INCENDIE
L’appareil doit être installé au niveau. Ne jamais installer
avec une inclinaison vers l’avant.
Si l’appareil est installé dans cette position, le mazout
peut couler dans le vestibule et créer un risque
d’incendie.
NOTE : Il est de la responsabilité et de l’obligation du
consommateur de contacter un technicien qualifié pour
s’assurer que l’installation est conforme aux règlements
locaux et nationaux.
a.
b.
c.
d.
e.
f.
g.
RÈGLES DE SÉCURITÉ À L’INSTALLATION
b.
Cette fournaise N’EST PAS conçue pour être installée
dans des maisons mobiles, des caravanes ou des
véhicules récréatifs ;
NE PAS utiliser cette fournaise comme chaufferette de
construction ou pour chauffer un bâtiment en
construction ;
Utiliser uniquement le type de mazout autorisé pour cette
fournaise (voir la section 1.2 de ce manuel). Une
surchauffe provoquera une défectuosité de l’échangeur
de chaleur et un fonctionnement dangereux ;
Vérifier les lignes au mazout pour tout signe d’humidité
indiquant une fuite ;
S’assurer que la fournaise dispose d’une alimentation
adéquate d’air de combustion et de ventilation ;
L’évacuation des gaz de combustion doit s’effectuer par
la cheminée ;
Les points énumérés à la section 3 “Opération” sont
essentiels au fonctionnement normal et sécuritaire du
Détecteurs
La U.S. Consumer Product Safety Commision
(Commission américaine pour la sécurité des biens de
consommation) recommande que les usagers d’appareils
de chauffage au gaz ou au mazout se munissent de
détecteurs de monoxyde de carbone. Le monoxyde de
carbone peut entraîner la mort ou des dommages
corporels. Ainsi, afin d’être averti à temps d’un niveau de
monoxyde de carbone potentiellement dangereux, vous
devriez faire installer dans votre édifice ou résidence des
détecteurs de monoxyde de carbone autorisés par une
agence reconnue sur le plan national (ex. :Underwriters
Laboratories ou International Approval Services) et les
maintenir en bon état (voir la note plus bas).
Il existe plusieurs sources possibles de flammes ou de
fumée dans un édifice ou une résidence. Les flammes ou
la fumée peuvent entraîner la mort ou des dommages
corporels et/ou matériels. Ainsi, afin d’être averti à temps
d’un début de feu potentiellement dangereux, vous
devriez vous procurer des extincteurs et faire installer
dans votre édifice ou résidence des détecteurs de fumée
autorisés par une agence reconnue sur le plan national
comme Underwriters Laboratories et les maintenir en bon
état (voir la note plus bas).
NOTE : Nous ne vérifions aucun détecteur et ne faisons la
promotion d’aucune marque ou type de détecteur.
AVERTISSEMENT
S’assurer que l’espace autour de l’entrée d’air de
combustion est libre de débris, neige ou glace.
4
2.3.2
Température froide et votre bâtiment
maintien d’une température ambiante sécuritaire, sous des
conditions normales d’utilisation. L’emplacement ne devrait
pas interférer avec la circulation de l’air dans l’espace
confiné.
MISE EN GARDE
RISQUE DE GEL
Consulter le code d’installation CAN/CSA-B139 pour obtenir
les règlements concernant l’approvisionnement en air de
combustion et de ventilation.
Couper l’alimentation en eau.
Si votre appareil demeure fermé durant la saison froide,
les conduites d’eau peuvent geler, éclater et provoquer
des dégâts d’eau importants.
Si l’appareil de chauffage central est installé dans un placard
ou autre espace fermé, 2 ouvertures de ventilation sont
requises pour l’air de combustion. Les ouvertures devraient
être situées à l’avant de l’appareil de chauffage central, à
environ 152.4 mm (6") du plafond et du plancher de l’espace
fermé. Le tableau 1 indique les dimensions minimales
requises pour chacune des deux ouvertures de ventilation.
Si le système de chauffage est laissé sans surveillance
durant la saison froide, prendre les précautions suivantes :
a.
b.
Fermer l’entrée d’eau principale de la maison ou édifice
et vider les conduites d’eau si cela est possible. Ouvrir
les robinets aux endroits requis;
Demander à une personne de vérifier fréquemment
durant la saison froide s’il y a suffisamment de chaleur
dans la maison ou édifice pour éviter que les tuyaux
gèlent. Suggérer à cette personne d’appeler une agence
de service qualifiée si cela est requis.
2.4
Tableau 1 : Dimensions minimales requises pour les
ouvertures de ventilation
EMPLACEMENT
Consommation
(BTU/h)
Longueur
Hauteur
75,000 – 105,000
120,000 – 155,000
0.4 mm (16")
0.5 mm (20")
0.20 mm (8")
0.25 mm (10")
AVERTISSEMENT
AVERTISSEMENT
Cet appareil de chauffage central n’est pas étanche et
n’est donc pas conçu pour l’extérieur. L’appareil doit
être installé de façon à protéger les composants
électriques de l’eau. Une installation à l’extérieur peut
entraîner des conditions électriques hasardeuses et
conduire à une défaillance prématurée de l’appareil de
chauffage central.
Ne pas obstruer les ouvertures d’air de combustion de
l’appareil de chauffage central. Toute obstruction
résultera en une combustion inadéquate et accroîtra les
risques d’incendie et/ou de dommages corporels.
Installation avec cheminée seulement
Le régulateur de tirage barométrique, inclus avec l’appareil
de chauffage central, devrait être installé dans la même
pièce ou espace que l’appareil, de façon à éviter toute
différence de pression entre le régulateur et l’alimentation en
air de combustion.
L’unité doit être installée dans un endroit où la température
de l’air ambiant et de l’air de retour est supérieure à 15°C
(60°F).
Cet appareil de chauffage central est approuvé pour un
dégagement réduit entre l’appareil et des constructions
combustibles : il peut donc être installé dans un placard ou
un espace fermé similaire. Dans tous les cas, il doit être
installé au niveau.
L’air requis pour faire fonctionner le ventilateur d’évacuation,
les systèmes de ventilation des cuisines, les sécheuses et
les foyers doit être considéré pour déterminer un endroit
capable d’approvisionner la quantité d’air requise pour la
combustion.
Si l’appareil de chauffage central est installé sur le sol (dans
un vide sanitaire par exemple), il est recommandé d'installer
l’unité sur une base en béton de 2.54 cm à 5.08 cm (1" à 2")
d’épaisseur.
Si l’espace confiné est situé dans un bâtiment de charpente
conventionnelle, dont la construction en briques ou en
pierre, les infiltrations pourraient être suffisantes pour fournir
l’air requis pour la combustion, la ventilation et la dilution des
gaz de combustion. Cette décision doit être prise sur une
base individuelle des installations, en considérant le volume
total d’espace non confiné, le nombre de fenêtres et
d’ouvertures de ventilation, le nombre de portes menant à
l’extérieur, les portes intérieures qui peuvent renfermer
l’espace non confiné et l’étanchéité totale du bâtiment.
Le dégagement minimum requis pour chacune des
positions de l’appareil de chauffage central est spécifié
dans le tableau 6.
L’appareil de chauffage central devrait être situé aussi près
que possible de la cheminée ou de l’évent, de façon à
maintenir les raccordements courts et directs. L’appareil de
chauffage central devrait également être situé le plus près
possible du centre de distribution d’air du système.
2.4.1
Plusieurs nouvelles constructions (et certaines plus vieilles,
qui ont été isolées) doivent être considérées comme des
constructions étanches. Par conséquent, les infiltrations d’air
y sont insuffisantes pour approvisionner l’air requis pour la
combustion et la ventilation.
Air pour la combustion et la ventilation
Les facilités de ventilation à l’emplacement de l’appareil de
chauffage central devraient permettre une combustion
satisfaisante du mazout, une ventilation adéquate et le
Une construction devrait être considérée comme étanche si :
5
a.
Les murs et plafonds exposés à l’air extérieur sont
munis d’un retardateur continu de vapeur d’eau dont le
taux est d’une perm ou moins et dont les ouvertures
sont fermées hermétiquement ou scellées et/ou ;
b. Des bandes isolantes ont été ajoutées aux portes et
fenêtres utilisées et/ou ;
c. Du calfeutrant ou du scellant ont été appliqués où il y
avait infiltration d’air, comme autour des portes et
fenêtres, entre les seuils de porte et les planchers, entre
les panneaux de mur, aux ouvertures électriques, de
plomberie, de mazout ou autres.
Lorsqu’un apport en air frais est requis pour la combustion,
2
(pour un espace non confiné), une ouverture de 6.45 cm
2
(1 po ) par 1000 BTU par heure pour le total des inputs de
tous les appareils présents dans cet espace, mais d’au
2
2
moins 645.16 cm (100 po ), doit être disponible. Cette
ouverture se doit d’être positionnée de sorte qu’elle ne
puisse être obstruée.
a.
b.
c.
d.
2.4.2
Recommandations pour les conduits
AVERTISSEMENT
Pour équilibrer le système, installer des clapets
verrouillant dans chacun des branchements des
conduits individuels. Ajustez les clapets de façon à
assurer la pression statique désirée à la sortie de
l’appareil de chauffage central ;
Un raccord fait de conduit flexible non combustible
devrait être installé sur l’appareil pour les systèmes
d’alimentation et de retour d’air. Si l’application
nécessite un fonctionnement extrêmement silencieux,
l’intérieur des 3 premier mètres (10') des conduits (si
possible) d’alimentation et de retour d’air devait être
isolé d’un matériau acoustique ;
Si la grille de retour d’air est installée à proximité de
l’entrée du ventilateur, l’air devrait parcourir un angle
o
minimum de 90 entre l’entrée du ventilateur et la grille.
Pour réduire davantage le niveau de bruit, il est possible
d’installer des pales acoustiques rotatives ou d’isoler les
conduits ;
Si une seule grille d’air est utilisée, les conduits entre la
grille et l’appareil de chauffage central doivent être de la
même dimension que l’ouverture de retour d’air de
l’appareil.
Lorsque l’appareil de chauffage central est installé avec de
l’équipement de climatisation pour fonctionner à l’année,
suivre les recommandations de la section 2.4.9.
Lorsque les conduits d’alimentation d’air transportent
l’air dans un autre espace que celui où la fournaise est
installée, les conduits de retour doivent être étanches et
aussi dirigés dans un autre espace que celui de
l’appareil. Un conduit scellé ou terminé incorrectement
crée des conditions hasardeuses pouvant conduire à
des dommages corporels.
MISE EN GARDE
RISQUE
D’INTOXICATION
CARBONE
AU
MONOXYDE
DE
MISE EN GARDE
Installer un serpentin de climatisation (évaporateur) du
côté des conduits d’alimentation en air chaud.
Les grilles de retour d’air et les registres d’air chaud ne
doivent pas être obstrués.
Un serpentin installé du côté du retour d’air peut causer
de la condensation et un bris prématuré de l’échangeur
de chaleur. Ceci peut entraîner la mort, des blessures
et/ou des dommages matériels.
IMPORTANT : Les clapets doivent pouvoir empêcher
l’air refroidi de s’introduire dans l’appareil de chauffage
central. En cas d’opération manuelle, ils doivent être
capables d’empêcher le fonctionnement de l’unité de
refroidissement ou de l’appareil de chauffage central si
le clapet n’est pas entièrement dans une position de
climatisation ou de chauffage.
a.
b.
Pour assurer un fonctionnement satisfaisant de l’appareil de
chauffage central, il est nécessaire que la dimension des
conduits soit adéquate. Les conduits doivent se conformer à
la dernière édition de ANSI / NFPA-90A («Installation of Air
Conditioning and Ventilating Systems») et de NFPA-90B
(«Warm Air Heating and Air Conditioning Systems») ou leur
équivalent canadien.
Dans les applications où l’air circule en série, le
serpentin est monté après l’appareil de chauffage
central, dans un espace fermé situé dans le courant
d’air d’alimentation. Le ventilateur de l’appareil de
chauffage central est utilisé à la fois pour la circulation
de l’air de chauffage et de refroidissement ;
Dans les installations où l’air circule en parallèle, des
clapets doivent être installés pour diriger l’air au-dessus
de l’échangeur d’air de l’appareil de chauffage central
quand le chauffage est demandé et au-dessus du
serpentin de refroidissement si la climatisation est
désirée.
2.4.3
Le conduit d’alimentation devrait être attaché à la bride
d’ouverture qui se trouve sur le dessus, à l’avant de
l’appareil de chauffage central. Se référer aux figures 6 et 7
pour les dimensions de cette ouverture. L’ouverture requise
pour l’installation des conduits de retour d’air est située sur
le dessus, à l’arrière de l’appareil. Se référer aux figures 6 et
7, selon le modèle choisi, pour l’emplacement et les
dimensions.
Instructions d’évacuation (cheminée)
L’évacuation de l’appareil de chauffage central devrait se
faire à l’extérieur en respectant les codes locaux ou les
exigences des services locaux.
AVERTISSEMENT
Pour assurer un fonctionnement sécuritaire et
satisfaisant, les appareils fonctionnant au mazout
devraient toujours être raccordés à des tuyaux dont le
tirage est suffisant en tout temps.
Les recommandations suivantes devraient être suivies lors
de l’installation des conduits :
6
Pour des informations supplémentaires sur l’évacuation, se
référer à ANSI/NFPA 211 Cheminées, foyers, évents et
appareils de chauffage au combustible solide et/ou CSA
B139 Code d’installation.
f.
Cet appareil de chauffage central est homologué pour être
utilisé avec un évent de type “L”.
h.
Inspection préalable
d’évacuation
i.
à
l’installation
du
g.
système
Avant d’installer cet appareil de chauffage central, il est
fortement recommandé de faire une inspection complète de
tous les systèmes d’évacuation déjà existants.
j.
Pour toutes les cheminées ou évents, cette inspection
comprend :
a. L’inspection de toute détérioration de la cheminée ou de
l’évent. En cas de détérioration, la cheminée doit être
réparée ou l’évent remplacé ;
b. La vérification du système d’évacuation pour s’assurer
qu’il est exempt de toute obstruction. Toute obstruction
doit être dégagée avant d’installer l’appareil de
chauffage central ;
c. Le débouchage de la cheminée ou de l’évent s’ils
étaient préalablement utilisés pour l’évacuation d’un
foyer ou d’un appareil de chauffage au combustible
solide ;
d. La vérification que tous les raccordements inutilisés de
la cheminée ou de l’évent sont convenablement
scellés ;
e. La vérification du revêtement et des dimensions de la
cheminée en fonction des codes applicables. (Se référer
à la liste de codes de la section 1.2).
La distance parcourue par les tuyaux devrait être la plus
courte et la plus droite possible ;
Les soudures doivent être hermétiques et vérifiées pour
éviter les fuites ;
Le rebord du tuyau de fumée doit arriver vis-à-vis la
paroi interne de la cheminée et ne doit pas dépassé à
l’intérieure de la cheminée ;
La cheminée doit dépasser de 0.9 m (3') à sa sortie du
toit du bâtiment. Elle doit dépasser d’au moins 0.6 m (2')
toute partie d’édifice se situant dans un rayon horizontal
de 3.0 m (10') de la cheminée. Elle doit se prolonger
d’au moins 1.5 m (5') au-dessus de la dernière bride à
fumée connectée ;
Vérifiez les codes locaux pour toutes divergences.
Cheminées fabriquées en usine
Il est possible d’utiliser les cheminées fabriquées en usine
qui sont homologuées. Se référer aux instructions du
manufacturier de cheminées pour une installation adéquate.
2.4.4
Régulateur de tirage
Le régulateur de tirage fourni avec la fournaise DOIT être
utilisé pour assurer un fonctionnement adéquat. Les
instructions d’installation sont incluses avec le régulateur.
2.4.5
Dispositif d’arrêt anti-refoulement (BVSO)
Pour évacuation par cheminée
Toutes les fournaises installées au Canada doivent avoir un
dispositif d’arrêt anti-refoulement (BVSO).
MISE EN GARDE
Cheminée de maçonnerie
Le dispositif doit obligatoirement être installé par une
agence qualifiée.
Cet appareil de chauffage central peut être évacué dans une
cheminée de maçonnerie existante. Toutefois, l’appareil de
chauffage central ne doit pas être évacué dans une
cheminée évacuant déjà un appareil de chauffage au
combustible solide. Avant d’évacuer l’appareil dans une
cheminée, vérifier l’état de la cheminée et effectuer les
réparations nécessaires. Le recouvrement et les dimensions
de la cheminée doivent respecter les normes des codes
locaux ou nationaux.
Le dispositif est conçu pour détecter une mauvaise
évacuation des gaz de combustion lorsque le tuyau
d’évacuation est bouché. Dans un tel cas, l’interrupteur
thermique arrêtera le fonctionnement du brûleur au mazout.
Le dispositif requière une remise en fonction manuelle.
Référez-vous aux figures 1, 2 et 3, ainsi qu’aux instructions
d'installation fournies avec le dispositif d’arrêt antirefoulement. Débranchez le fil rouge de l'interrupteur de
limite qui vient du terminal #9 de la carte de contrôle de
ventilateur. Branchez ce fil rouge à un des fils rouges du
BVSO. Branchez l'autre fil rouge du BVSO à l'interrupteur de
limite. Branchez le fil vert du BVSO à la mise à terre du
cabinet.
La superficie sans obstruction de la cheminée doit être
suffisamment grande pour contenir tous les produits de
combustion évacués dans cette cheminée.
Les exigences suivantes sont fournies pour assurer un
système d’évacuation sécuritaire :
a. S’assurer que la fumée de la cheminée est exempte de
saletés ou débris ;
b. S’assurer que la cheminée ne dessert pas de foyers ;
c. Les tuyaux ne doivent jamais être plus petits que le
diamètre de sortie de l’appareil de chauffage central ;
d. Tous les tuyaux doivent être soutenus par des brides de
serrage et/ou des courroies. Compter au moins un
support par 1.2 m (4') ;
e. Les tuyaux horizontaux doivent être installés avec une
pente ascendante d’au moins 20 mm par 1 m (1/4" par
1') ;
Le dispositif d’arrêt anti-refoulement doit être installé dans le
tuyau à fumée, entre 2 pouces et 12 pouces de la sortie de
la fournaise, mais avant le contrôle barométrique du tirage.
(Voir la figure 4).
Pour plus de détails, référez-vous aux instructions fournies
avec le dispositif, ainsi que la section 4 de ce manuel
7
Le dispositif d’arrêt doit aussi faire l’objet d’un entretien
annuel. Référer aux instructions fournies avec le dispositif
ainsi que la section 4 de ce manuel pour plus de détails.
AVERTISSEMENT
RISQUE DE FEU ET D’EMPOISONNEMENT
MONOXYDE DE CARBONE
PAR
AVERTISSEMENT
Ne pas respecter cet avertissement pourrait entraîner
des blessures corporelles, la mort, et/ou des dommages
matériels.
RISQUE DE CHOC ÉLECTRIQUE
Ne pas respecter cet avertissement pourrait entraîner
des blessures corporelles ou la mort.
Ne redémarrez pas l’appareil ou la fournaise si la cause
de l'interruption n'a pas été identifiée et corrigée par un
technicien qualifié. Assurez que le dispositif d’arrêt antirefoulement a été nettoyé avant de mettre en service.
Débranchez l'alimentation électrique de la fournaise
avant d’effectuer le câblage du dispositif d’arrêt antirefoulement.
AVERTISSEMENT
RISQUE DE FEU ET D’EMPOISONNEMENT
MONOXYDE DE CARBONE
AVERTISSEMENT
PAR
RISQUE DE BLESSURE
Ne pas respecter cet avertissement pourrait entraîner
des blessures corporelles.
Ne pas respecter cet avertissement pourrait entraîner
des blessures corporelles, la mort, et/ou des dommages
matériels.
Les pièces de métal peuvent avoir des bords tranchants
ou des bavures. Portez des vêtements protecteurs, des
verres de sécurité et des gants lorsque vous manipulez
des pièces de métal et entretenez la fournaise.
Le dispositif d’arrêt anti-refoulement DOIT être
inspectée et entretenue annuellement par une agence
qualifiée.
Figure 1 : Diagramme électrique, BVSO
DNS-01340 Rev A
Brûleur Riello
Brûleur Beckett
8
Figure 2 : Branchement du dispositif d’arrêt antirefoulement (modèle 105)
2.4.6
Brûleur au mazout
Cet appareil de chauffage central vient avec un brûleur à
tête de rétention à atomisation haute pression (Ne pas
utiliser du mazout plus lourd que du mazout #2). Si le brûleur
utilisé est le modèle Beckett AFG, la bride de montage est
fixée au tube d’air du brûleur et aucun ajustement n’est
requis pour la longueur d’insertion. Si un brûleur Riello est
utilisé référez-vous aux spécifications techniques pour la
longueur d’insertion (tableau 4).
AVERTISSEMENT
Si le brûleur est un modèle Beckett AFG, NE JAMAIS
utiliser la fonction d’allumage / ignition interrompue.
Raccordements pour le mazout
Des instructions complètes pour l’installation des tuyaux de
mazout se trouvent dans les instructions d’installation du
brûleur au mazout, incluses avec l’appareil de chauffage
central.
Figure 3 : Branchement du dispositif d’arrêt antirefoulement (modèle 120)
Des ouvertures se situent sur chaque panneau pour qu’un
système à deux tuyaux puisse être utilisé si désiré.
Un filtre au mazout 10 microns (ou moins) devrait être utilisé
avec tous les brûleurs au mazout et devrait être installé
aussi près que possible du brûleur.
2.4.7
Système électrique
AVERTISSEMENT
L’extérieur de l’unité doit posséder une mise à la terre
ininterrompue pour minimiser les risques de blessures
corporelles, si jamais un problème électrique se
produisait. Une vis verte de mise à la terre est incluse
dans la boîte de contrôle pour effectuer cette connexion.
L’appareil doit être installé en respectant la dernière édition
ANSI/NFPA 70 du Code électrique national, la Section 1 du
Code électrique canadien CSA C22.1 et/ou les codes
locaux.
Figure 4 : Pose du dispositif BVSO
Le dispositif BVSO doit être installé
entre la sortie de la fournaise et le
contrôle barométrique du tirage.
Le système de contrôle repose sur la bonne polarité de
l’alimentation électrique. Connecter le fil “HOT” (H) et le fil
“NEUTRE” (N) tels qu’indiqué aux figures 8 et 9, selon le
modèle choisi.
Le dispositif
BVSO doit être
installé entre 2”
et 12” de la sortie
de la fournaise
Un circuit électrique distinct muni d’un interrupteur à fusible
ou d’un coupe-circuit devrait être utilisé entre le panneau
électrique principal et l’unité.
Utiliser uniquement du fil de cuivre pour du courant de 115V
avec cette unité.
Les conduits métalliques (si requis/utilisé) peuvent se
terminer directement sur le panneau de côté de l’unité. Il
n’est pas nécessaire de les prolonger à l’intérieur de l’unité
entre le panneau de côté et la boîte de contrôle.
Si vous remplacez des fils d’origine de l’appareil de
chauffage central, utilisez seulement du fil de cuivre 16
o
AWG, 105 C.
9
Les instructions pour l’installation électrique du thermostat
sont emballées dans la boîte du thermostat (fourni sur
place). Effectuer les connexions du thermostat telles
qu’indiqué sur les figures 8 et 9, selon le modèle choisi, aux
bornes du panneau 24 volts du relais primaire.
l’arrière de l’appareil pour le remplacement de ceux-ci. Voir
le tableau 2 pour les dimensions des filtres.
DANGER
Ne pas utiliser l’appareil de chauffage central comme
appareil de chauffage de construction. Une telle
utilisation expose l’appareil à des conditions anormales,
comme de l’air de combustion contaminé et l’absence
de filtres à air. Le non-respect de cet avertissement peut
conduire à une défaillance prématurée de l’appareil de
chauffage central et/ou une défaillance du ventilateur ce
qui accroît les risques d’incendie et/ou de dommages
corporels.
Si vous installez des accessoires optionnels sur cet appareil,
suivez les instructions d’installation du manufacturier inclus
avec l’accessoire. À part pour le thermostat, utilisez du fil
o
avec une isolation de type “T” minimum (hausse de 17 C
o
(63 F)) pour les accessoires.
2.4.8 Filtre à air
Un support de filtre et les filtres sont inclus dans le
compartiment du ventilateur de chaque appareil.
Un
dégagement suffisant (minimum 0.5 m (18") doit être prévu à
Tableau 2 : Dimensions des filtres à air
Modèle de fournaise
Filtre à air
Qte et dimensions
Alimentation, dimensions
Retour, dimensions
CBLAAA036105 & CBLAAR036105
(2) 12" x 20"
0.5 m x 0.5 m (20" x 20")
0.5 m x 0.5 m (20" x 20")
CBLAAA060120 & CBLAAR060120
(2) 16" x 20"
0.6 m x 0.5 m (24" x 20")
0.55 m x 0.5 m (22" x 20")
2.4.9 Unité de climatisation (ou thermopompe)
température tel que spécifiée sur la plaque signalétique.
Ajuster la vitesse du ventilateur SELON LE DÉBIT DE
MAZOUT SÉLECTIONNÉ pour que la hausse de
température se situe dans l’étendue précisée au tableau 3.
Consulter le schéma électrique pour connaître les
changements de vitesse du moteur à entraînement directe.
Un serpentin pour la climatisation peut être installé sur
l’alimentation d’air chaud SEULEMENT.
MISE EN GARDE
RISQUE
D’INTOXICATION
CARBONE
AU
MONOXYDE
DE
Tableau 3 : Ajustements de vitesse du ventilateur
Installer un serpentin de climatisation (évaporateur) du
côté des conduits d’alimentation en air chaud.
MODÈLE
Un serpentin installé du côté du retour d’air peut causer
de la condensation et un bris prématuré de l’échangeur
de chaleur. Ceci peut entraîner la mort, des blessures
et/ou des dommages matériels.
105
120
Aucun espace minimum n’est requis entre le dessous du
serpentin de climatisation et le dessus de l’échangeur de
chaleur. Si une thermopompe est installée, un thermostat
« bi-énergie » ou un autre contrôle est requis pour prévenir
l’opération simultanée de la fournaise et de la thermopompe.
Il prévient aussi la transition directe du mode de chauffage
thermopompe au mode de chauffage au mazout. Se référer
aux instructions du thermostat ou du contrôle pour un
branchement adéquat.
OPÉRATION
3.1
VÉRIFICATION DE L’AJUSTEMENT DU
VENTILATEUR
VITESSE
(BTUH)
RECOMMANDÉE
70,000 / 119,000
Med – Low
91,000 / 140,000
Med - High
105,000 / 154,000
High
Pour ajuster le délai de fermeture du ventilateur, régler les
interrupteurs de la boîte de contrôle pour obtenir le choix du
temps désiré. (Voir la figure 5).
Figure 5 : Réglages de temps pour ventilateur
Si un cabinet souffleur avec serpentin de climatisation
(évaporateur) est utilisé, installer des volets de contrôle de
débit d’air étanche, motorisé et automatique. L’air froid
venant de l’évaporateur et passant à travers la fournaise
peur causer de la condensation et réduire la durée de vie de
l’échangeur de chaleur.
3.0
CONSOMATION
Cet appareil de chauffage central est équipé d’un moteur à
entraînement direct à 4 vitesses, qui permet une hausse de
10
3.2
VÉRIFICATION DU FONCTIONNEMENT
prend plus de 15 secondes et qu’aucune flamme
n’a été allumée, le brûleur va s’arrêter. Pousser le
bouton de remise à zéro sur le dessus du contrôle
primaire pour redémarrer le brûleur).
Pour plus d’informations sur le fonctionnement du
contrôle primaire, se référer aux instructions incluses
avec l’appareil de chauffage central ou de brûleur.
Avant de démarrer l’unité de chauffage s’assurer que les
requis suivants sont rencontrés :
1. De la conformité de l’installation électrique, du système
de distribution d’huile, du système d’évacuation des
gaz, d’admission d’air et du système de ventilation ;
2. La porte d’accès au ventilateur et les vis de blocage
sont bien en place ;
3. Si utilisé, le système d’arrêt anti-refoulement BVSO est
installé conformément aux instructions (évacuation par
cheminée) ;
4. La valve pour l’alimentation en huile est ouverte ;
5. La porte d’observation de la flamme (située à l’avant de
l’unité) est bien fermée ;
6. Le bouton ‘’Reset’’ du brûleur est bien enfoncer ou
réarmer ;
7. L’ajustement d’air préliminaire du brûleur est conforme
aux tableaux des spécifications de ce manuel ;
8. L’ajustement des vitesses de ventilation en chauffage et
climatisation sont adéquats et selon les spécifications
de ce manuel ;
9. Les délais de départ et d’arrêt du ventilateur sont réglés
de façon satisfaisante ;
10. Le thermostat de la pièce est en mode chauffage et est
réglé à une température supérieure à la température
ambiante.
3.4
IMPORTANT : Les surfaces métalliques de l’échangeur
peuvent contenir de l’huile et l’isolation des déflecteurs
contient des liants. Ces produits brûlent ou s’évaporent
lorsque l’unité fonctionne pour la première fois. Pour cette
raison, la lecture de fumée peut être faussée durant les
premières minutes de fonctionnement. Il est donc important
que l’unité fonctionne durant au moins 60 minutes avant de
prendre des lectures permettant l’ajustement de la qualité de
combustion.
IMPORTANT : La vérification de la combustion DOIT être
effectuée après un remplacement du gicleur ou après un
nettoyage du brûleur. Après ces manipulations, les
paramètres de combustion sont nécessairement modifiés.
Référer aussi au manuel d’instructions accompagnant le
brûleur.
Pour obtenir des performances optimales du brûleur au
mazout, suivre les procédures d’installation suivantes.
Référer au tableau 4, spécifications techniques.
Pour démarrer l’unité mettre l’interrupteur électrique principal
à "ON".
1.
AVERTISSEMENT
Ne pas altérer l’unité ou ses contrôles. Appelez un
technicien qualifié.
3.3
1.
2.
VÉRIFICATION DE LA COMBUSTION
PURGE DE LA LIGNE DE MAZOUT
2.
Un filtre au mazout 10 microns (ou moins) devrait être
installé aussi près que possible du brûleur dans le cas
de tous les brûleurs au mazout et est essentiel avec les
brûleurs à faible taux d’allumage. Nous recommandons
l’utilisation d’un filtre à l’huile à faible chute de pression
avec une capacité supérieure à celle de la pompe à
combustible ;
Dans une installation neuve, l’air se trouvant dans la
conduite de mazout qui va du réservoir au gicleur doit
être totalement purgé pour prévenir un égouttement
excessif. La pompe de mazout est munie d’un raccord
spécial permettant de purger tout air se trouvant entre le
réservoir et la pompe de mazout. La procédure à suivre
pour cette opération est la suivante :
a. Placer un bout de tube de plastique transparent de
6.4mm (1/4") de diamètre sur le raccord de purge
de la pompe au mazout ;
b. Démarrer le brûleur au mazout, puis ouvrir le
raccord de purge. Faire fonctionner le brûleur
jusqu’à ce que le tube de purge soit complètement
exempt de bulles d’air ;
c. Quand il n’y a plus de bulles d’air, serrer le raccord
de purge, ce qui va permettre au mazout de circuler
jusqu’au gicleur et d’allumer le brûleur. (Si la purge
3.
11
À l’aide de la trousse de test, mesurer la densité de la
fumée, le tirage au tuyau d’évacuation et la pression (ou
le tirage) au-dessus de la flamme afin d’obtenir un bon
ajustement de la bande d’air. Même si toutes ces
mesures sont requises pour un ajustement optimal et
des données efficaces, la lecture la plus importante est
le niveau de fumée qui doit être mesuré dans le tuyau
d’évacuation avant le régulateur de tirage ;
Le niveau de fumée désiré a été établi entre 0 et 1 par
des tests d’ingénierie. Ce degré d’émission de fumée
est souvent appelé “trace” de fumée. Il est recommandé
d’utiliser la trousse du test de fumée Bacharach ou un
équivalent ;
Afin d’effectuer la vérification de la combustion, suivre
les étapes suivantes :
a. Percer un orifice d’analyse des gaz de diamètre
minimum appropriée (environ 9/32") dans le tuyau
de raccordement à environ 18 pouces de la bride
d’évacuation de la fournaise ;
b. Suite à un départ à froid, laisser fonctionner l’unité
environ 5 minutes ;
c. Ajuster l’air au brûleur pour avoir une lecture de
fumée sur l’échelle Bacharach entre 0 et 1 (ou une
‘’trace’’) ;
d. Faire le test de CO2 à la même localisation et
prendre en note la lecture ;
e. Ajuster la quantité d’air pour obtenir une lecture du
CO2 de 1.5% de moins (ou O2 de 2% de plus) que
la lecture correspondant à une lecture de fumée
Bacharach de une ‘’trace’’ ;
f. Cette méthode d’ajustement du brûleur permet une
combustion propre (lecture de fumée de 0 à une
4.
5.
6.
3.5
3.9
‘’trace’’) et assure un bon fonctionnement du
système.
Afin d’assurer un tirage adéquat dans l’appareil de
chauffage central, installer le régulateur de tirage
barométrique fourni avec l’appareil. Pour que ce
régulateur fonctionne correctement, monter les goupilles
(“pins”) à l’horizontale et le devant du régulateur à la
verticale (voir les instructions incluses avec le
régulateur). Ajuster le régulateur de tirage après que
l’appareil de chauffage central ait fonctionné au moins 5
minutes et régler entre -.025" W.C. et -.035" W.C. ;
La pression au-dessus de la flamme, mesurée à travers
la porte d’observation (située au centre, au-dessus du
brûleur, dans le panneau avant de l’appareil de
chauffage central), est requise pour déterminer s’il y a
un blocage dans l’échangeur de chaleur ou le tuyau.
Les valeurs des pressions sont inscrites dans le tableau
4 spécifications techniques. Une pression excessive
peut être causée soit par une combustion d’air
excessive due à une bande d’air trop ouverte, par un
manque de tirage de fumée (effet cheminée), par un
blocage quelconque, comme de la suie dans la section
secondaire de l’échangeur de chaleur, par l’utilisation
d’un gicleur d’entrée trop grand ou par une pression de
pompe au mazout trop élevée ;
Une fois que toutes les procédures d’installation
mentionnées ci-dessus ont été complétées, faire
fonctionner le brûleur et, à l’aide d’un miroir
d’inspection, observer le motif de la flamme à l’extrémité
du gicleur. Toute irrégularité, comme une flamme qui
brûle d’un côté ou des patrons de pulsations dans la
flamme, devrait être corrigée en changeant le gicleur.
Cet appareil de chauffage central est muni d’une option de
ventilation continue à vitesse réduite. Dès que le thermostat
de la pièce ne demande ni chauffage ni refroidissement, le
ventilateur va fonctionner à vitesse réduite de façon à
permettre la circulation de l’air. Si l’option de ventilation
continue n’est pas désirée, utiliser le bouton situé sur le côté
de la boîte de contrôle pour enlever la vitesse constante.
4.0
Avant de commencer l’entretien, s’assurer que tous les
appareils en amont de l’appareil de chauffage central
sont éteints (position “OFF”), à moins que les
réparations ne requièrent expressément que le courant
soit allumé.
Le non-respect de cet avertissement
augmente les risques d’incendie ou de dommages
corporels.
Ne jamais faire fonctionner l’appareil de chauffage central
sans filtre à air. Les filtres jetables devraient être remplacés
au moins une fois par année. Si l’appareil de chauffage
central est équipé pour la climatisation, les filtres devraient
être remplacés au moins deux fois par année.
Pour éviter des blessures, s’assurer que le courant
électrique est coupé AVANT de commencer la maintenance.
TOUJOURS FERMER LA VALVE DU RESERVOIR AU
MAZOUT QUAND LE BRÛLEUR EST ARRÊTÉ POUR DE
LONGUES PÉRIODES.
VÉRIFICATION DES LIMITEURS DE
TEMPÉRATURE
Pour obtenir une performance optimale, le gicleur du brûleur
au mazout devrait être remplacé au moins une fois par
année. Contactez le technicien de votre fournisseur pour
cette procédure.
La procédure d’installation et/ou de changement du gicleur
est résumée dans le manuel d’instructions du brûleur au
mazout inclus avec l’appareil de chauffage central.
Enlever la restriction et le brûleur devrait se rallumer en
quelques minutes.
Une fois le gicleur remplacé, le brûleur doit être ajusté en
suivant les directives de la section “VÉRIFICATION DE LA
COMBUSTION” du manuel d’instructions.
AIR CONDITIONNÉ À L’ANNÉE
Cet appareil de chauffage central est conçu pour être utilisé
avec de l’équipement de climatisation et pouvoir fournir de
l’air conditionné à l’année. Le ventilateur est donc
dimensionné pour le chauffage et pour le refroidissement ;
toutefois, il est possible que les vitesses du moteur à
entraînement direct du ventilateur doivent être changées
pour obtenir le débit d’air de refroidissement requis.
3.7
ENTRETIEN
MISE EN GARDE
Après que l’appareil de chauffage central a fonctionné
durant au moins 15 minutes, restreindre l’entrée d’air en
bloquant les filtres ou en fermant les registres de retour d’air
et laisser l’appareil de chauffage central s’éteindre en limite
élevée. Le brûleur va s’éteindre (OFF) et le ventilateur
principal devrait continuer à fonctionner.
3.6
INTERRUPTEUR DE VENTILATION CONTINUE
4.1
NETTOYAGE DE L’ÉCHANGEUR DE CHALEUR
En général, il n’est pas nécessaire de nettoyer l’échangeur
de chaleur ou le tuyau à fumée tous les ans, mais il est
recommandé faire vérifier votre unité par le technicien de
brûleurs au mazout avant chaque saison de chauffage afin
de déterminer si le nettoyage ou le remplacement de
certains composants est requis.
CHAUFFAGE
La vitesse du ventilateur a été ajustée en usine pour fournir
le débit d’air requis à une pression statique normale des
conduites.
Si un nettoyage est nécessaire, les étapes suivantes
devaient être effectuées :
3.8
1. Éteindre (position “OFF”)
CLIMATISATION
tous les appareils en
amont de l’appareil de chauffage central ;
La vitesse du ventilateur peut être ajustée sur place afin de
fournir le débit d’air requis pour la climatisation, tel
qu’indiqué dans le tableau 5.
2. Déconnecter le tuyau à fumée et enlever la bride
d’évacuation ;
12
3. Enlever le déflecteur du radiateur ;
4. Déconnecter la ligne de mazout et sortir le brûleur au
mazout de l’appareil de chauffage central ;
5. Nettoyer le tuyau secondaire et le cylindre principal à
l’aide d’une brosse rigide et d’un aspirateur ;
6. Avant le réassemblage, inspecter l’échangeur de chaleur
et la chambre de combustion afin de déterminer s’ils ont
besoin d’être remplacés ;
7. Après le nettoyage, replacer le déflecteur du radiateur, la
bride à fumée, le brûleur au mazout. Reconnecter le
tuyau à fumée et le conduit de mazout ;
8. Réajuster le brûleur pour qu’il fonctionne adéquatement.
4.2
AVERTISSEMENT
RISQUE DE CHOC ÉLECTRIQUE
Ne pas respecter cet avertissement pourrait entraîner
des blessures corporelles ou la mort.
Débranchez l'alimentation électrique de la fournaise
avant d’effectuer l’entretien du dispositif d’arrêt antirefoulement.
1.
2.
3.
DÉMONTAGE DU VENTILATEUR
Pour sortir le ventilateur de l’appareil de chauffage central :
1. Éteindre (position “OFF”) tous les appareils en amont de
l’appareil de chauffage central ;
2. Enlever la porte d’accès du ventilateur ;
3. Desserrer les quatre vis de retenue du ventilateur (située
sur le support de ventilateur) ;
4. Glisser le ventilateur sur les rails vers l’arrière de l’unité ;
5. Refaire toutes ces opérations en ordre inverse pour
réinstaller le ventilateur (Se référer aux schémas
électriques des figures 6, 7 et 8 de ce manuel ou au
schéma situé à l’intérieur de la porte du ventilateur pour
effectuer la réinstallation électrique de l’unité).
4.3
4.
Dévisser les deux vis qui fixent le couvercle du dispositif
d’arrêt ;
Enlever le couvercle ;
Enlever les deux vis qui maintiennent le boîtier de
commande à l'ensemble du tube de transfert de chaleur.
En glissant le boîtier de commande dans la bonne
direction, le tube de transfert de chaleur se détachera ;
Enlevez soigneusement n’importe quelle accumulation de
la surface de commutateur thermique;
AVERTISSEMENT
Ne pas érafler ou égratigner la surface de l’interrupteur
thermique. Un interrupteur thermique endommagé doit
être remplacé.
5.
6.
NETTOYAGE DU DISPOSITIF D’ARRÊT
ANTI-REFOULEMENT (BVSO)
7.
Pour un fonctionnement continu et sûr, le dispositif d’arrêt doit
être inspecté et entretenu chaque année par un technicien
qualifié.
8.
13
Nettoyer et enlever toute accumulation de saleté ou
obstruction de l’intérieur du tube de transfert de chaleur ;
Remonter, verrouiller et refixer le boîtier de commande à
l'aide de 2 vis qui avaient été enlevées à l'étape 3 ;
Remettre en place le couvercle de l’ensemble avec les
vis enlevées à l’étape 1 ;
Remettre l’alimentation électrique.
5.0
FICHE TECHNIQUE DE L’APPAREIL
Modèle :
Numéro de série :
Date d’installation de la fournaise :
Nos. tél. service – Jour :
Soir :
Nom et adresse du technicien de service :
RÉSULTAT DU TEST DE MISE EN MARCHE
Gicleur :
lb/po2
Pression :
Ajustements du brûleur :
Bande principale
Bande fine
Position de la tête
CO2 :
%
Indice de fumée :
(Bacharach)
Température des gaz à la sortie de l’unité :
°F
Température ambiante :
°F
Tirage dans la cheminée :
" C.E.
Tirage au-dessus du feu :
" C.E.
Examiné par :
14
Tableau 4 : Spécifications techniques
Modèle : CBL
75
90
105
120
140
155
TAUX ET PERFORMANCE
Allure de chauffe (USGPH)
Consommation (BTU/h)
Puissance de chauffage (BTU/h)
Hausse de température de chauffage
Pression tuyau fumée (C.E.) (cheminée)
Pression dessus feu ( C.E.) (cheminée)
0.50
70 000
57 000
0.65
0.75
91 000
105 000
74 000
85 000
13 - 29°C (55 - 85°F)
(-0.06" à -0.025")
0.85
119 000
97 000
1.00
1.10
140 000
154 000
114 000
123 000
13 - 29°C (55 - 85°F)
(-0.06" à -0.025")
(+0.010" à +0.025")
(max +0.025")
Pression tuyau fumée (C.E.) (Évacuation directe)
(+0.10" à +0.25")
Pression dessus feu ( C.E.) (Évacuation directe)
(+0.12" à +0.27")
F3 (insertion du tube 2 7/8")
F3 (ins.tube 2 7/8")
Déflecteur bas régime
UTILISÉ
UTILISÉ
UTILISÉ
Disque statique, modèle
3 3/8" # 31646
2 3/4" # 3383
2 3/4" # 3383
BRÛLEUR BECKETT; MODÈLE AFG (3450 rpm)
F6 (2 7/8")
Gicleur (Delavan)
0.50 - 70W 0.55 - 70B 0.65 - 70B
Pression de la pompe (PSIG)
100
140
130
Ajustement air de combustion (bande/obturateur)
0/5
0/7
0/8
AFUE % (À partir du standard CSA B212 et des lois canadiennes)
82.4%
80.9%
81.1%
AFUE % (À partir du standard ASHRAE 103 et des lois américaines)
82.6%
81.1%
81.4%
F3
(insertion
du
tube
3
9/16")
BRÛLEUR RIELLO 40-F (Évacuation cheminée)
0.75 - 70B 0.85 - 70B
0.85 - 70B
130
140
170
1/8
4/4
2/8
81.4%
80.3%
80.1%
81.5%
80.6%
80.3%
F5
(insertion du tube 3 9/16")
Gicleur (Delavan)
0,40 - 70A
Pression de la pompe (PSIG)
155
Ajustement air de combustion (turbulateur/volet)
0/3
AFUE % (À partir du standard CSA B212 et des lois canadiennes)
84.4%
AFUE % (À partir du standard ASHRAE 103 et des lois américaines)
80.5%
0.75 - 70B
130
0/3
84.7%
80.0%
0,50 - 70W
170
0/3.5
82.9%
80.5%
0,65 - 70W
135
0/4
83.1%
80.5%
0.85 - 70W
140
0/3.5
83.9%
80.0%
1.00 - 70W
125
0/4
83.1%
80.0%
SYSTÈME ÉLECTRIQUE
115 - 60 - 1
115 - 60 - 1
104 - 132
104 - 132
Amp. minimum p/r grosseur du fil
12.2
13.7
15.7
18.1
Longueur max. du fil
26'
26'
Fusibles max. (Amps)
15
20
40 VA
40 VA
Chauffage
40 VA
40 VA
Climatisation
30 VA
30 VA
Volts - Hertz - Phase
Tensions de fonctionnement (volts)
Consommation (Amps)
Contrôle du transformateur
Courant disp. contrôles externes
DONNÉES TECHNIQUES DU VENTILATEUR
Vit. du ventilateur à une pression statique de 0.50"
Vit. du ventilateur à une pression statique de 0.25"
Moteur HP/ vitesses
Dim. de la roue du ventilateur
INFORMATIONS GÉNÉRALES
MED-LOW
MED-LOW
Dimension hors tout (larg. x long. x haut.)
Dimension de l'alimentation
Dimension du retour
Quantité et dimension des filtres
Poids à l'expédition
Capacité maximum en climatisation
15
MED-HIGH
MED-HIGH
1/3 - 4
10" x 8"
HIGH
HIGH
MED-LOW
LOW
MED-HIGH
MED-LOW
3/4 - 4
12" x 10"
HIGH
MED-HIGH
21¼" x 55" x 32"
21¼" x 61½" x 35¼
20" x 20"
24" x 20"
20" x 20"
(2) 12" x 20"
86 kg (190 lbs)
3 tonnes
20" x 22"
(2) 16" x 20"
97 kg (215 lbs)
5 tonnes
Tableau 5 : Débits d'air - CFM avec filtre à air
CBL, GRANDEUR 75 À 105
PRESSION STATIQUE EXTERNE AVEC FILTRE À AIR
0.3" (C.E.)
0.4" (C.E.)
1350
1305
1045
1000
810
770
730
740
VITESSE
HIGH
MED-HIGH
MED-LOW
LOW
0.2" (C.E.)
1425
1130
840
725
0.5" (C.E.)
1250
950
740
745
CBL, GRANDEUR 120 À 155
VITESSE
HIGH
MED-HIGH
MED-LOW
LOW
PRESSION STATIQUE EXTERNE AVEC FILTRE À AIR
0.2" (C.E.)
2080
1892
1556
1221
0.3" (C.E.)
2041
1859
1475
1164
0.4" (C.E.)
1965
1770
1394
1081
0.5" (C.E.)
1864
1675
1318
998
Tableau 6 : Dégagements minimums - matériaux combustibles
DÉGAGEMENT
(m atériaux
com bustibles)
ACCÈS RECOMMANDÉ
POUR L'ENTRETIEN
FOURNAISE
2.54 cm (1")
0.6 m (24")
PLÉNUM D'ALIMENTATION JUSQU'À 1.8 M (6') DE LA FOURNAISE
2.54 cm (1")
PORTE D'ACCÈS AU VENTILATEUR
10.16 cm (4")
FOURNAISE OU PLÉNUM
5.08 cm (2")
HORIZONTALE À LA CONDUITE PREMIERS 1.8 m (6')
5.08 cm (2")
APPLICATION
EMPLACEMENT
CÔTÉ
ARRIÈRE
DESSUS
DESSOUS
FOURNAISE (PLANCHER COMBUSTIBLE)
CONDUIT DE
HORIZONTALE OU SOUS LE CONDUIT DE RACCORDEMENT
10.16 cm (4")
RACCORDEMENT
VERTICALE DESSUS LE CONDUIT DE RACCORDEMENT
22.86 cm (9")
DEVANT
FOURNAISE
20.32 cm (8")
0.6 m (24")
0"
16
0.6 m (24")
Figure 6 : Modèle CBL, capacité 105
DNS-0173 Rev D
Figure 7 : Modèle CBL, capacité 120
DNS-0172 Rev D
17
Figure 8 : Diagramme électrique, CBL brûleur Beckett
DNS-0989 Rev C
18
Figure 9 : Diagramme électrique, CBL brûleur Riello
DNS-0991 Rev D
19
Figure 10 : Liste de pièces - CBLAAA036105
B50070 Rev B
20
Tableau 7 : Liste de pièces - CBLAAA036105
ITEM
1
2
3
4
5
6
7
8
9
10
11
12
13
14
15
16
17
18
19
20
21
22
23
24
25
26
27
28
29
30
31
32
33
34
35
36
37
38
39
40
41
42
43
44
45
46
47
48A
48B
49
50
51
No DESSIN
B01701
B01708
B01725
B01707
B03196-02
B01723-02
B01709-02
B03203-01
Z04F008
Z99F050
B03192
B01214
F07O001
B01697
B01826-01
J06L001
B01710
B01709-01
B03196-01
B01723-01
R02R003
A00284
F07F011
B01208
B01716-01
K03009
B01719
B01154
B01220
B01716-02
B03091-01
B02111
B01827-02
B01722
B01014
B01720
B01733
B03720-02
B01403-01
B01024
L01I001
B01890-01
B01724
B01888
B01664
L07F003
N04Z026
R99G002
R99G004
L01F009
B01717
B01662
DESCRIPTION
ASS ECHANG CHALEUR
DEFLECTEUR DE PLANCHER
ASS SEPARATEUR BAS
DEFLECTEUR
ASS PANNEAU COTE GAUCHE
ISOLATION PANNEAU DE COTE
SUPPORT DE FILTRE
ASS PORTE ARRIERE
FILTRE PAPIER 12X20X1
POIGNE ENCASTRE NOIR
PANNEAU HAUT ARRIERE
GARNITURE, COUVERCLE DE TUYAU A FUMEE
ECROU HEXAGONAL A BRIDE 3/8-16NC LAITON
SORTIE A FUMEE
ASS DEFLECTEUR COMPLET
JOINT EXTRUDE 1/2 X 1/8
DIVISEUR HAUT
SUPPORT DE FILTRE
ASS PANNEAU COTE DROIT
ISOLATION PANNEAU DE COTE
HAUT.LIMIT 195-30F 1.75''
PLAQUE DE PROTECTION POUR HAUTE LIMIT
ECROU HEXAGONAL 3/8-16NC ZINC
PANNEAU DESSUS, COMPARTIMENT ELECTRIQUE
COTE DROIT COMPARTIMENT BRULEUR
EMSEMBLE DE VIS CLE
PANNEAU ELECTRIQUE BAS
PORTE D'ACCES
CONDUIT DE COIN
COTE GAUCHE COMPARTIMENT BRULEUR
ASS BRULEUR
ASS PORTE D'OBSERVATION
ASS PANNEAU AVANT
ISOLATION PANNEAU AVANT
GARNITURE, TUBE D'OBSERVATION
PLAQUE DE HAUTE LIMITE
ASS PLANCHER
ASS VENTILATEUR 100-8R DD
ASS VENTILATEUR DE REMPLACEMENT
SUPPORT DE CONDENSATEUR
CONDENSATEUR 5 MF
ASS MOTEUR SUPPORT 1/3 HP COMPLET
SUPPORT DE VENTILATEUR DD
ASS BELLY BAND
KIT ELECTRIQUE VENTILATEUR
COMMUT. BASC. SPST
GARNITURE, BRIDE FIXE
CARTE ELECTRONIQUE ST9103A
CARTE ELECTRONQIUE UTEC 1158-110
TRANSFORMATEUR 120-24Volts, 40VA
PANNEAU DE MONTAGE ELECTRIQUE
KIT ELECTRIQUE RIELLO
COMMENTAIRES
Échangeur seul
Comprend Panneau et 3 Bandes Scellantes
Comprend Panneau et Isolation et Déflecteur
Comprend Porte, Poignés et Libelles
Comprend Déflecteur et Isolation
Comprend 28" pour une application
Comprend Panneau et Isolation et Déflecteur
Panneau seul
Comprend 2 Vis à Clé, Ressorts, Écrous et Rondelle
Panneau seul
Comprend Porte, Ressort et Boulon
Comprend Panneau, Isolation et Garniture de Porte
Comprend Plancher, Déflecteur et Vis
Comprend la roue et le bati
Comprend ventilateur, moteur et condensateur
Comprend moteur et les pattes
Pour les unités fabriquées avant juin 2004
Substitue à R99G002
Panneau seul
B50070 Rev B
21
Figure 11 : Liste de pièces - CBLAAA060120
B50066 Rev B
22
Tableau 8 : Liste de pièces - CBLAAA060120
ITEM
1
2
3
4
5
6
7
8
9
10
11
12
13
14
15
16
17
18
19
20
21
22
23
24
25
26
27
28
29
30
31
32
33
34
35
36
37
38
39
40
41
42
43
44
45
46
47
48A
48B
49
50
51
No DESSIN
B01741
B01708
B01764
B01750
B01406-02
B03205-02
B01766-02
B01761-02
L01I005
B01024
B03201-04
Z04F010
Z99F050
B03195
B00205
F07O001
B01747
B01751
J06L001
B01754
B01761-01
B03205-01
B01766-01
R02R003
A00284
F07F011
L07F003
B01208
B01716-01
B01719
K03009
B01154
B01220
B01716-02
B03092-01
N04Z026
B02111
B01768-01
B01767
B01014
B01763
B01769
B03720-05
B01664-01
B01891-01
B01756
B01889
R99G002
R99G004
L01F009
B01717
B01662
DESCRIPTION
ASS ECHANG CHALEUR
DEFLECTEUR DE PLANCHER
ASS SEPARATEUR BAS
DEFLECTEUR LATERAL
ASS VENTILATEUR DE REMPLACEMENT
ASS PANNEAU COTE GAUCHE
ISOLATION PANNEAU DE COTE GAUCHE
SUPPORT DE FILTRE
CONDENSATEUR 15 MF
SUPPORT DE CONDENSATEUR
ASS PORTE ARRIERE
FILTRE PAPIER 16X20X1
POIGNE ENCASTRE NOIR
PANNEAU HAUT ARRIERE
GARNITURE, COUVERCLE TUYAU DE FUMEE
ECROU HEXAGONAL A BRIDE 3/8-16NC LAITON
SORTIE A FUMEE
ASS PIEGE A SON
JOINT EXTRUDE 1/2 X 1/8
DIVISEUR HAUT
SUPPORT DE FILTRE
ASS PANNEAU COTE DROITE
ISOLATION PANNEAU DE COTE DROIT
HAUT.LIMIT 195-30F 1.75
PLAQUE DE PROTECTION POUR HAUTE LIMIT
ECROU HEXAGONAL 3/8-16NC ZINC
COMMUT. BASC. SPST
PANNEAU DESSUS, COMPARTIMENT ELECTRIQUE
COTE DROIT COMPARTIMENT BRULEUR
PANNEAU ELECTRIQUE BAS
EMSEMBLE DE VIS CLE
PORTE D'ACCES
CONDUIT DE COIN
COTE GAUCHE COMPARTIMENT BRULEUR
BRULEUR AFG-F3
GARNITURE, BRIDE FIXE
ASS PORTE D'OBSERVATION
ASS PANNEAU AVANT
ISOLATION PANNEAU AVANT
GARNITURE, TUBE D'OBSERVATION
CACHE FIL
ASS PLANCHER
VENTILATEUR 120-10T DD
KIT ELECTRIQUE VENTILATEUR
ASS MOTEUR SUPPORT 3/4 HP
SUPPORT DE VENTILATEUR DD
ASS BELLY BAND
CARTE ELECTRONIQUE ST9103A
CARTE ELECTRONQIUE 1158-110
TRANSFORMATEUR120-24Volts, 40VA
PANNEAU DE MONTAGE ELECTRIQUE
KIT ELECTRIQUE
COMMENTAIRES
ECHANGEUR SEULEMENT
COMPREND PANNEAU ET 3 BANDES SCELLANTES
COMPREND VENTILATEUR, MOTEUR, CONDENSATEUR
COMPREND PANNEAU, ISOLATION ET DÉFLECTEUR
COMPREND PORTE, POIGNÉE ET LIBELLES
COMPREND DÉFLECTEUR ET ISOLATION
COMPREND 28" POUR UNE APPLICATION
COMPREND PANNEAU, ISOLATION ET DÉFLECTEUR
COMPREND 2 VIS À CLÉ, RESSORTS, ÉCROUS ET RONDELLES
PORTE SEULEMENT
COMPREND PANNEAU ET ISOLATION
COMPREND PLANCHER, DÉFLECTEUR ET VIS
COMPREND ROUE ET BATI
COMPREND MOTEUR ET PATTE
POUR LES UNITÉS FABRIQUÉES AVANT JUIN 2004
SUBSTITUTION A R99G002
PANNEAU SEULEMENT
B50066 Rev B
23
Figure 12 : Liste de pièces - CBLAAR036105
B50069 Rev B
24
Tableau 9 : Liste de pièces - CBLAAR036105
ITEM
1
2
3
4
5
6
7
8
9
10
11
12
13
14
15
16
17
18
19
20
21
22
23
24
25
26
27
28
29
30
31
32
33
34
35
36
37
38
39
40
41
42
43
44
45
46
47
48A
48B
49
50
51
No DESSIN
B01701
B01708
B01725
B01707
B03196-02
B01723-02
B01709-02
B03203-01
Z04F008
Z99F050
B03192
B01214
F07O001
B01697
B01826-01
J06L001
B01710
B01709-01
B03196-01
B01723-01
R02R003
A00284
F07F011
B01208
B01716-01
K03009
B01719
B01154
B01220
B01716-02
N01F011
B02111
B01827-02
B01722
B01014
B01720
B01733
B03720-02
B01403-01
B01024
L01I001
B01890-01
B01724
B01888
B01664
L07F003
L01H009
R99G002
R99G004
L01F009
B01717
B02329
DESCRIPTION
ASS ECHANG CHALEUR
DEFLECTEUR DE PLANCHER
ASS SEPARATEUR BAS
DEFLECTEUR
ASS PANNEAU COTE GAUCHE
ISOLATION PANNEAU DE COTE
SUPPORT DE FILTRE
ASS PORTE ARRIERE
FILTRE PAPIER 12X20X1
POIGNE ENCASTRE NOIR
PANNEAU HAUT ARRIERE
GARNITURE, COUVERCLE DE TUYAU A FUMEE
ECROU HEXAGONAL A BRIDE 3/8-16NC LAITON
SORTIE A FUMEE
ASS DEFLECTEUR COMPLET
JOINT EXTRUDE 1/2 X 1/8
DIVISEUR HAUT
SUPPORT DE FILTRE
ASS PANNEAU COTE DROIT
ISOLATION PANNEAU DE COTE
HAUT.LIMIT 195-30F 1.75''
PLAQUE DE PROTECTION POUR HAUTE LIMIT
ECROU HEXAGONAL 3/8-16NC ZINC
PANNEAU DESSUS, COMPARTIMENT ELECTRIQUE
COTE DROIT COMPARTIMENT BRULEUR
EMSEMBLE DE VIS CLE
PANNEAU ELECTRIQUE BAS
PORTE D'ACCES
CONDUIT DE COIN
COTE GAUCHE COMPARTIMENT BRULEUR
BRULEUR RIELLO 40-F3
ASS PORTE D'OBSERVATION
ASS PANNEAU AVANT
ISOLATION PANNEAU AVANT
GARNITURE, TUBE D'OBSERVATION
PLAQUE DE HAUTE LIMITE
ASS PLANCHER
VENTILATEUR 100-8R
ASS VENTILATEUR DE REMPLACEMENT
SUPPORT DE CONDENSATEUR
CONDENSATEUR 5 MF
ASS MOTEUR SUPPORT 1/3 HP COMPLET
SUPPORT DE VENTILATEUR DD
ASS BELLY BAND
KIT ELECTRIQUE VENTILATEUR
COMMUT. BASC. SPST
RELAIS SPDT 24 VAC
CARTE ELECTRONIQUE HON ST9103A
CARTE ELECTRONQIUE UTEC 1158-110
TRANSFORMATEUR 120-24Volts, 40VA
PANNEAU DE MONTAGE ELECTRIQUE
KIT ELECTRIQUE RIELLO
COMMENTAIRES
Échangeur seul
Comprend Panneau et 3 Bandes Scellantes
Comprend Panneau et Isolation et Déflecteur
Comprend Porte, Poignés et Libelles
Comprend Déflecteur et Isolation
Comprend 28" pour une application
Comprend Panneau et Isolation et Déflecteur
Panneau seul
Comprend 2 Vis à Clé, Ressorts, Écrous et Rondelle
Panneau seul
Comprend Porte, Ressort et Boulon
Comprend Panneau, Isolation et Garniture Porte
Comprend Plancher, Déflecteur et Vis
Comprend l'aube et le bati
Comprend ventilateur, moteur et condensateur
Comprend moteur et les pattes
Pour les unités fabriquées avant juin 2004
Substitution à R99G002
Riello seulement
B50069 Rev B
25
Figure 13 : Liste de pièces - CBLAAR060120
B50068 Rev B
26
Tableau 10 : Liste de pièces - CBLAAR060120
ITEM
1
2
3
4
5
6
7
8
9
10
11
12
13
14
15
16
17
18
19
20
21
22
23
24
25
26
27
28
29
30
31
32
33
34
35
36
37
38
39
40
41
42
43
44
45
46
47
48A
48B
49
50
51
No DESSIN
B01741
B01708
B01764
B01750
B01406-02
B03205-02
B01766-02
B01761-02
L01I005
B01024
B03201-04
Z04F010
Z99F050
B03195
B00205
F07O001
B01747
B01751
J06L001
B01754
B01761-01
B03205-01
B01766-01
R02R003
A00284
F07F011
L07F003
B01208
B01716-01
B01719
K03009
B01154
B01220
B01716-02
N01F012
L01H009
B02111
B01768-01
B01767
B01014
B01763
B01769
B03720-05
B01664-01
B01891-01
B01756
B01889
R99G002
R99G004
L01F009
B01717
B02329
DESCRIPTION
ASS ECHANG CHALEUR
DEFLECTEUR DE PLANCHER
ASS SEPARATEUR BAS
DEFLECTEUR LATERAL
ASS VENTILATEUR DE REMPLACEMENT
ASS PANNEAU COTE GAUCHE
ISOLATION PANNEAU DE COTE GAUCHE
SUPPORT DE FILTRE
CONDENSATEUR 15 MF
SUPPORT DE CONDENSATEUR
ASS PORTE ARRIERE
FILTRE PAPIER 16X20X1
POIGNE ENCASTRE NOIR
PANNEAU HAUT ARRIERE
GARNITURE, COUVERCLE TUYAU DE FUMEE
ECROU HEXAGONAL A BRIDE 3/8-16NC LAITON
SORTIE A FUMEE
ASS PIEGE A SON
JOINT EXTRUDE 1/2 X 1/8
DIVISEUR HAUT
SUPPORT DE FILTRE
ASS PANNEAU COTE DROITE
ISOLATION PANNEAU DE COTE DROIT
HAUT.LIMIT 195-30F 1.75
PLAQUE DE PROTECTION POUR HAUTE LIMIT
ECROU HEXAGONAL 3/8-16NC ZINC
COMMUT. BASC. SPST
PANNEAU DESSUS, COMPARTIMENT ELECTRIQUE
COTE DROIT COMPARTIMENT BRULEUR
PANNEAU ELECTRIQUE BAS
EMSEMBLE DE VIS CLE
PORTE D'ACCES
CONDUIT DE COIN
COTE GAUCHE COMPARTIMENT BRULEUR
BRULEUR RIELLO 40 F5
RELAIS SPDT 24 VAC
ASS PORTE D'OBSERVATION
ASS PANNEAU AVANT
ISOLATION PANNEAU AVANT
GARNITURE, TUBE D'OBSERVATION
CACHE FIL
ASS PLANCHER
VENTILATEUR 120-10T DD
KIT ELECTRIQUE VENTILATEUR
ASS MOTEUR SUPPORT 3/4 HP
SUPPORT DE VENTILATEUR DD
ASS BELLY BAND
CARTE ELECTRONIQUE ST9103A
CARTE ELECTRONQIUE 1158-110
TRANSFORMATEUR120-24Volts, 40VA
PANNEAU DE MONTAGE ELECTRIQUE
KIT ELECTRIQUE RIELLO
COMMENTAIRES
ECHANGEUR SEULEMENT
COMPREND PANNEAU ET 3 BANDES SCELLANTES
COMPREND VENTILATEUR, MOTEUR, CONDENSATEUR
COMPREND PANNEAU, ISOLATION ET DÉFLECTEUR
COMPREND PORTE, POIGNÉE ET LIBELLES
COMPREND DÉFLECTEUR ET ISOLATION
COMPREND 28" POUR UNE APPLICATION
COMPREND PANNEAU, ISOLATION ET DÉFLECTEUR
COMPREND 2 VIS À CLÉ, RESSORTS, ÉCROUS ET RONDELLES
PORTE SEULEMENT
RIELLO ONLY
COMPREND PANNEAU ET ISOLATION
COMPREND PLANCHER, DÉFLECTEUR ET VIS
COMPREND ROUE ET BATI
COMPREND MOTEUR ET PATTE
POUR LES UNITÉS FABRIQUÉES AVANT JUIN 2004
SUBSTITUTION A R99G002
PANNEAU SEULEMENT
B50068 Rev B
27