1
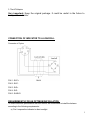
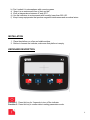
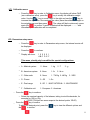
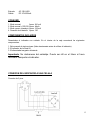
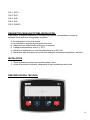
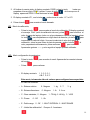
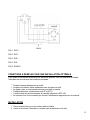
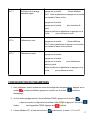
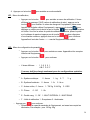
USER MANUAL MANUAL DE UTILIZACION MANUEL D´UTILISATION Indicator model K1 Indicador modelo K1 Indicateur modèle K1 REV. 02A11M09 1 INDEX Specifications 4 2 Power source 4 Power consumption 4 Components included 4 Connection of indicator K1 to a loadcell 5 Requirements for an optimum installation 5 Installation 6 Keyboard description 6 Piece-counting function 7 Tare function 7 Weights accumulation 7 Functions setting 8 Advanced functions setting 9 Setting parameters 10 Guarantee 11 EC Conformity declaration 29 INDICE Especificaciones 12 Alimentación 12 Consumo 12 Componentes incluidos 12 Conexión del indicador a una célula de carga 13 Requisitos para una óptima instalación 13 Instalación 13 Descripción del teclado 14 Función cuentapiezas 15 Función Tara 15 Acumulación de pesadas 15 Configuración de funciones 15 Configuración de funciones avanzadas 17 Configuración de parámetros 18 Garantía 19 Declaración CE de conformidad 29 SOMMAIRE Caractéristiques 20 Alimentation 20 Consommation 20 Matériel inclus 20 Connexion de l´indicateur à un capteur 21 3 Conditions à remplir pour une installation optimale 21 Installation 22 Description du clavier 22 Fonction compte-pièces 23 Fonction Tare 23 Accumulation de pesées 23 Configuration de fonctions 24 Configuration de fonctions avancées 25 Configuration de paramètres 26 Garantie 28 Déclaration CE de conformité 29 SPECIFICATIONS Model Accuracy K1 III Sensitivity 1.5~3.0mV/V ≤0.01%F.S Linear ≤0.01%F.S DC: 5V 1/2/5 option 20 times per second 1/2 Voltage Division Speed Internal resolution POWER SOURCE Input: Output AC 120~240V DC 10V/600mA POWER CONSUMPTION 1. Main system: 2. Main system (RS-232): 3. Standby: 4. Battery duration: Approx. 24.1mA Approx. 44mA Approx. 19.2mA Approx. 120 COMPONENTS INCLUDED 1. This user manual (please read it carefully before to use the indicador). 2. The indicator Series K1 4 3. The AC/Adaptor. Very important: Keep the original package. It could be useful in the future to transport the indicator. CONNECTION OF INDICATOR TO A LOADCELL Connector of 5 pins. PIN 1 : EXC+ PIN 2 : EXCPIN 3 : SIG+ PIN 4 : SIGPIN 5 : SHIELD REQUIREMENTS FOR AN OPTIMUM INSTALLATION To obtain maximum performance and best results, we recommend to install the balance according to the following requirements: a) Don´t expose the indicator to direct sunlight. 5 b) c) c) e) f) Don´t submit it to atmospheres with corrosive gases. Keep it in an environment free of dust and dirt. Work at temperatures between 0º and 40º C. Use the indicators in environments with humidity lower than 95% HR. Keep it away equipments that produce magnetic interferences and acoustical noise. INSTALLATION 1. Place the platform on a firm and stable surface. 2. Before to connect the indicator, make sure that platform is empty. KEYBOARD DESCRIPTION Function 1. Press this key for 2 seconds to turn off the indicator. Function 2. Press this key to confirm data in setting parameters mode. 6 Function 1. Press this key to turn on the indicator. Function 2. To reset the weight to 0. The displayed weight value has to be less than +/-2% of maximum capacity. Function 3. To subtract the weight of a container and then obtain the net weight of product (Tare function). The container´s weight must be higher than 2% of maximum capacity. Function 1. To enter to piece-counting function. Function 2. To change the parameters in setting parameter mode. Function 1. To accumulate weights. Function 2. To print data. PIECE-COUNTING FUNCTION 1. 2. 3. 4. 5. 6. 7. 8. Press the key for 2 seconds, the display will show “0” “kg” Press again the key, the display will show “C 10” To select the sample value, press the key Put on the platform the selected number of pieces. Press the to confirm. Display will show the number of pieces placed on platform. Add the rest of pieces to be counted, the display will show the total number of pieces. Press the key for 2 seconds, the indicator will return to normal weighing mode. Note: The sample unit weight must be higher than 0,2d. TARE FUNCTION 1. 2. 3. 4. 5. Place a container on the platform. Press the key. The balance will subtract the weight of container, display will show 0 Put the product to be weighed in the container. Display will show the product´s weight (net weight) 7 Note: The container´s weight must be higher than 2% of maximum capacity. WEIGHTS ACCUMULATION 1. Place the product on the platform. 2. Press the key to save in memory his weight. 3. Display will show the weighing number and weight´s product. 4. Remove the product from platform, display will show “0” 5. Place a new product on the platform. 6. Press again the key to accumulate the weighing. 7. Repeat this operation as many times as it is necessary. 8. Once finished the accumulation, press the key, to read the total weight. 9. Display will show : weighing times and total weight accumulated. 10. To clear, press the key for 2 seconds. FUNCTIONS SETTING 1. To access to Functions setting, press the key and without release it press the key, display will show the message “UF __1”. 2. Press the key to select the desired parameter, from “UF—1” to “UF---9” Parameter Function Operation UF-1 Check internal value and battery voltage Press , display will show the internal value, pressing again this key, display will show the battery voltage. Press to exit. UF-2 Parameter not available UF-3 Auto power off setting Press Press Press , display will show AOFF 00. to change the parameter. . to select the desired mode: AOFF00 – Auto-power off disable. AOFF01 – The indicator will auto power off in 1 minute if not use it. . Press to exit. 8 UF-4 Standby setting UF-5 Parameter not available UF-6 Output RS-232 Optional UF-7 Speed adjustment Press key Press to select: 1. Fast speed 2. Normal speed 3. Slow speed Press to exit. UF-8 Division range display Press Press Press UF-9 Gravity value Press the key, display will show the G value of factory. If you want to change it according to new place (Country), press and to select the desired value. Press to exit. Press Press Press Press key to change the parameter. to select the desired mode. to exit. key. to select the desired value. to exit. ADVANCED FUNCTIONS SETTING 1. To access to advanced functions setting, press the key and without release it press the key, display will show “ECF __1”. 2. Press to select the desired parameter, from “ECF—1” to “ECF---3” Parameter Function Operation 9 ECF-1 Check maximal load (span) Press , display will show CALZ, empty the platform and press again the key to put display reading to zero Press key Press to enter the value. Put a weight on the platform and press key to confirm and exit. ECF-2 Zero calibration ECF-3 Span calibration Press key, display will show CALZ, empty the platform and press again the l key to put display reading to zero and exit. + Press key Press key. Press to enter the value of calibration weight. . Put the calibration weight on the platform and press to confirm and exit. SETTING PARAMETERS 1. To access to setting parameters, with indicator turned off, press and hold the without release it, press the key continuously during the initial countdown. a and 2. When countdown is finished, the display will show P0000, press the key until the third digit flashes P0000, then press two times the key, the display will show P0020. 3. Press the 4. Use the key key, the display will show LF1. to select the LF1 or LF2 modes and press to enter to desired mode. 10 LF1; Calibration menu o Press the key to enter to Calibration menu, the display will show CALZ (zero calibration value), press the key to modify the calibration weight value. Use the key to move a digit to the right and use the key to increase the digit value. Once entered the value, place the calibration weight on the weighing pan and then press . The value will flash continuously, press again the to confirm. A series of dashed will be displayed - - - - - - and immediately the calibration will be completed. LF2; Parameters setup menu o Press the be displayed. key to enter to Parameters setup menu, the internal counts will o Press the to continue. o Display will show: 1 0 0 0 0 1 ABC D E F This menu, should only be modified for special configurations. If necessary to modify: o A : Metrical system 0 : None 1 : kg 2:T 2 : lb oz 3:g o B : American system 0 : None 1 : lb o C : Other units 0 : None 1 : TW Kg 2 :HK Kg o D : Pieces 0 : Off o E : Dual range 0 : Off 1 : MULTI INTERVAL 2 : MULTIRANGE o F : Calibration unit 1 : European 2 : American - Press the 3 : VISS 1 : On key to continue o Select the maximal capacity of the balance, taking in mind the decimals, for exemple for 150 kg -20g 015000 (The last two zeros respecte the decimal points 150.00) key to confirm - Press the To select the decimal point, press the key to view the different options and the to confirm. 11 to confirm. - Press the - To configurate the resolution of the balance, press the options and the to confirm. key to view the different GUARANTEE This indicator is guaranteed for one year from the delivery date. The guarantee cobres any fabrication defect of the material. During this period, SOLVO cobres the manpower and the spare parts for the reparation of the scale. This guarantee does not cover the failures caused by an inappropriate use or overload. The guarantee does not cover the freight cost (transport) necessary to repair the balance. ESPECIFICACIONES Modelo Clase K1 III Sensibilidad 1.5~3.0mV/V Linealidad Voltaje Escalón Velocidad Resolución interna ≤0.01%F.S ≤0.01%F.S DC: 5V 1/2/5 opción 20 veces por segundo 1/2 ALIMENTACION 12 Entrada: Salida: AC 120~240V DC 10V/600mA CONSUMO 1. Modo normal: Aprox. 24.1mA 2. Modo normal + RS-232: Aprox. 44mA 3. Modo reposo (stanbye): Aprox. 19.2mA 4. Duración de la batería: Aprox. 120 COMPONENTES INCLUIDOS Desembalar el indicador con cuidado. En el interior de la caja encontrará los siguientes componentes: 1. Este manual de instrucciones (léalo atentamente antes de utilizar el indicador). 2. El indicador de la Serie K1 3. El alimentador/cargador de batería. Importante: No deshacerse del embalaje. Puede ser útil en el futuro si fuera necesario transportar el indicador. CONEXION DEL INDICADOR A UNA CELULA Conector de 5 pins. 13 PIN 1 : EXC+ PIN 2 : EXCPIN 3 : SIG+ PIN 4 : SIGPIN 5 : SHIELD REQUISITOS PARA UNA ÓPTIMA INSTALACIÓN Para obtener el máximo rendimiento y los mejores resultados, recomendamos instalar el indicador de acuerdo con los siguientes requisitos: d) e) c) f) e) f) No exponerlo a la luz solar directa. No someterlo a atmósferas con gases corrosivos. Mantenerlo en ambientes libres de polvo o suciedad Trabajar a temperaturas entre 0º y 40º C. Utilizarlo en ambientes con una humedad inferior a un 95% HR. Mantenerlo lejos de equipos que produzcan cualquier interferencia magnética o acústica. INSTALACION 1. Situar la plataforma sobre una superficie plana y firme. 2. Antes de conectar el indicador, asegurarse de que la plataforma esté vacía. DESCRIPCION DEL TECLADO 14 Función 1. Pulsar esta tecla durante 2 segundos para apagar el indicador. Función 2. Tecla de confirmación dentro del modo de programación. Función 1. Pulsar esta tecla para encender el indicador. Función 2. En el caso de no haber ningún objeto sobre la plataforma, el indicador no muestra la lectura a cero, pulsar esta tecla para corregir dicha desviación y poner el display a cero. Función 3. Para sustraer el peso de un recipiente (función de tara). El peso del recipiente debe ser mayor al 2% de la capacidad máxima de la balanza. Función 1. Para activar la función a la función de cuentapiezas. Función 2. Dentro del modo de configuración, pulsar esta tecla para cambiar de parámetros. Función 1. Para acumular pesadas Función 2. Para transmitir los datos a una impresora (función opcional) FUNCION CUENTAPIEZAS 9. Pulsar la tecla durante 2 segundos, el display mostrará “0” “kg” 10. Pulsar de nuevo la tecla , el display visualizará “C 10” 11. Para seleccionar los distintos valores de la muestra, pulsar la tecla 12. Colocar sobre la plataforma el número de piezas que corresponda a la muestra seleccionada. 13. Pulsar la tecla para confirmar. 14. El display mostrará el número de piezas depositadas. 15. Añadir el resto de piezas y la balanza visualizará el número total de ellas. 16. Pulsar la tecla durante 2 segundos para volver al modo normal de pesaje. Nota: El peso de la muestra debe ser superior a 0,2d. FUNCION DE TARA 6. Colocar un recipiente sobre la plataforma. 15 7. Pulsar la tecla 8. La balanza sustraerá el peso del recipiente y el display marcará 0 9. Introducir dentro del recipiente el producto a pesar. 10. El indicador mostrará el peso del producto (peso neto) Nota: El peso del recipiente debe ser mayor al 2% de la capacidad máxima de la balanza. ACUMULACION DE PESADAS 11. Colocar el producto sobre la plataforma. 12. Pulsar la tecla para memorizar su peso. 13. El display mostrará el peso y el número de pesada. 14. Retirar el producto de la plataforma, el display mostrará “0” 15. Colocar un nuevo producto sobre la plataforma. 16. Pulsar nuevamente la tecla para acumular la pesada. 17. Repetir esta operación tantas veces como sea necesario. 18. Una vez finalizadas las pesadas, pulsar la tecla para visualizar el peso total. 19. El display mostrará el número de pesadas efectuadas y el peso total acumulado. 20. Para borrar la acumulación efectuada, pulsar la tecla durante 2 segundos. CONFIGURACION DE FUNCIONES 3. Para acceder a la configuración de funciones, pulsar la tecla tecla , liberar ambas teclas y el display mostrará “UF __1”. 4. Pulsar la tecla y sin soltarla pulsar la para seleccionar el parámetro deseado “UF—1” a “UF---9” Parámetro Función Operación UF-1 Verificación del valor interno y Pulsar la tecla , el display mostrará el valor del voltaje de la batería interno, pulsar de nuevo la tecla y el display mostrará el voltaje de la batería. Pulsar la tecla para salir. UF-2 Parámetro no disponible 16 UF-3 Programación de la Autodesconexión Pulsar la tecla , el display mostrará AOFF 00. Pulsar la tecla para cambiar el parámetro. Pulsar la tecla para seleccionar el modo deseado: AOFF00 – El indicador no se desconectará AOFF01 – El indicador se desconectará automáticamente transcurrido 1 minuto sin ser utilizado. Pulsar la tecla para salir UF-4 Modo reposo (stantby) Pulsar la tecla Pulsar la tecla Pulsar la tecla deseado. Pulsar la tecla para cambiar el parámetro. para seleccionar el modo para salir UF-5 Parámetro no disponible UF-6 RS-232 Opcional UF-7 Ajuste de la velocidad Pulsar la tecla Pulsar la tecla para seleccionar: 1. Velocidad rápida 2. Velocidad normal 3. Velocidad lenta Pulsar la tecla para salir UF-8 Rango de división Pulsar la tecla Pulsar la tecla Pulsar la tecla UF-9 para el valor deseado. para salir Valor de la gravedad Pulsar la tecla , el indicador mostrará el valor g por defecto. Si se desea cambiar el valor dependiendo del país dónde va a trabajar la balanza, pulsar la tecla y seguidamente la tecla para seleccionar el valor deseado. Pulsar la tecla para salir. 17 CONFIGURACION DE FUNCIONES AVANZADAS 1. Para acceder a la configuración de funciones avanzadas, pulsar la tecla y sin soltarla pulsar la tecla , liberar ambas teclas y el display mostrará “ECF __1”. 3. Pulsar la tecla para seleccionar el parámetro deseado “ECF—1” a “ECF---3” Parámetro Función Operación ECF-1 Verificación de la carga máxima (span) Pulsar la tecla , el display mostrará CALZ, vaciar la plataforma y pulsar la tecla para poner a cero el display. Pulsar la tecla Pulsar la tecla para introducir el valor. Colocar el peso sobre la plataforma y pulsar la tecla para confirmar y salir. ECF-2 Calibración del cero Pulsar la tecla , el display mostrará CALZ, vaciar la plataforma y pulsar la tecla para poner a cero el display y salir. ECF-3 Calibración del span Pulsar la tecla Pulsar la tecla Pulsar la tecla para introducir el valor de la pesa. Colocar la pesa sobre la plataforma y pulsar la tecla para confirmar y salir. CONFIGURACION DE PARAMETROS 1. Para acceder al modo configuración de parámetros, con el indicador apagado, pulsar la tecla y sin soltarla pulsar la tecla de forma continúa durante la cuenta atrás inicial. 18 2. Al finalizar la cuenta atrás, el display mostrará P0000, pulsar la tecla hasta que parpadee el tercer dígito P0000 y pulsar 2 veces la tecla de forma que en el display aparecerá P0020. Pulsar entonces la tecla 3. El display mostrará LF1, con la tecla 4. Pulsar la tecla seleccionar el modo: LF1 o LF2 para acceder al modo deseado. LF1; Menú de calibración; o Pulsar la tecla para acceder al menú de calibración. El display mostrará el mensaje CALZ (valor de calibración de cero), pulsar para modificar el valor de carga del equipo (valor con el que deseamos calibrar el equipo), pulsar la tecla para desplazarse un dígito hacía la derecha y la tecla para incrementar el valor del dígito. Una vez introducido el valor de la pesa de calibración, situar la pesa sobre el plato de pesada y pulsar la tecla , el valor parpadeará continuamente, pulsar entonces para confirmar. Aparecerán guiones ------- y acto seguido el equipo quedará calibrado. LF2; Menú configuración de parámetros; o Pulsar la tecla del equipo. o Pulsar para acceder al menú. Aparecerán las cuentas internas para continuar o El display mostrará: 1 0 0 0 0 1 ABC D E F Este menú, únicamente debe de variarse para configuraciones especiales. En caso de modificar: o A : Sistema métrico o B : Sistema Americano 0 : Ninguno 0 : Ninguno o C : Otras unidades; 0 : Ninguno o D : Piezas 0 : Off o E : Doble rango 1 : kg 1 : lb 2:T 3:g 2 : lb oz 1 : TW Kg 2 :HK Kg 3 : VISS 1 : On 0 : Off 1 : MULTI INTERVAL 2 : MULTIRANGE o F : Unidad de calibración 1 : Europeo 2 : Americano 19 para continuar. - Pulsar o Seleccionar la capacidad máxima del equipo, teniendo en cuenta los decimales; Por ejemplo: para 150 kg -20g 015000 (los dos últimos ceros respetarían los puntos decimales 150.00) para continuar. - Pulsar Para seleccionar el punto decimal. Pulsar opciones y pulsar para confirmar. para continuar. - Pulsar - Para configurar la resolución del equipo. Pulsar opciones y pulsar para confirmar. para visualizar las distintas para visualizar las distintas GARANTIA Esta balanza está garantizada contra todo defecto de fabricación y de material, por un periodo de 1 año a partir de la fecha de entrega. Durante este periodo, , se hará cargo de la reparación de la balanza. Esta garantía no incluye los daños ocasionados por uso indebido o sobrecargas. La garantía no cubre los gastos de envío (portes) necesarios para la reparación de la balanza. CARACTÉRISTIQUES Modèle K1 20 Classe III Sensibilité 1.5~3.0mV/V ≤0.01%F.S Linéarité Voltage Échellon Vitesse Résolution interne ≤0.01%F.S DC: 5V 1/2/5 option 20 fois par seconde 1/2 ALIMENTATION Entrée: Sortie: AC 120~240V DC 10V/600mA CONSOMMATION 1. Mode normal: 2. Mode normal + RS-232: 3. Mode veille (standby): 4. Durée de vie de la batterie: Approx. 24.1mA Approx. 44mA Approx. 19.2mA Approx. 120 heures MATÉRIEL INCLUS Déballez soigneusement l'indicateur. À l'intérieur de la boîte se trouvent les éléments suivants: 1. Ce manuel d’instructions (à lire avant d’utiliser l’indicateur) 2. L’indicateur de la série K1 3. Le chargeur de batterie. Important: Ne jetez pas l'emballage. Il peut être utile s’il vous faut l’indicateur. transporter CONECTION DE L’INDICATEUR À UN CAPTEUR Connecteur de 5 pins. 21 PIN 1 : EXC+ PIN 2 : EXCPIN 3 : SIG+ PIN 4 : SIGPIN 5 : SHIELD CONDITIONS À REMPLIR POUR UNE INSTALLATION OPTIMALE Pour obtenir le rendement maximal et les meilleurs résultats, il est recommandé d’installer l’indicateur en accord avec les conditions suivantes: • • • • • • Ne pas l’exposer directement au soleil. Ne pas le soumettre à des ambiances avec des gaz corrosifs Le garder dans un environnement sans poussière ou saleté. Travailler dans des températures entre 0º et 40º C. L’utiliser dans des environnements à humidité inférieure à 95% HR. Le mantenir loin du tout materiel qui produit l’intérférence magnetique ou acoustique. INSTALLATION 1. Placer la plate-forme sur une surface plate et stable. 2. Avant de connecter l’indicateur, s’assurer que la plateforme soit vide. 22 DESCRIPTION DU CLAVIER Fonction 1. Rester appuyé sur cette touche pendant 2 secondes pour éteindre l’indicateur. Fonction 2. Touche de confirmation dans le mode de programmation. Fonction 1. Appuyer sur cette touche pour allumer l’indicateur. Fonction 2. Dans le cas où il n’y a aucun objet sur la plateforme et l’indicateur n’affiche pas zéro, appuyer sur cette touche pour corriger la déviation et pour remettre l’écran à zéro. Fonction 3. Pour soustraire le poids d’un récipient (fonction de tare). Le poids du récipient doit être supérieur à 2% de la capacité maximale de la balance. Fonction 1. Pour activer la fonction compte-pièces. Fonction 2. Dans le mode de configuration, appuyer sur cette touche pour changer les paramètres. Fonction 1. Pour accumuler des pesées Fonction 2. Pour transmettre les données à une imprimante (fonction optionnelle) 23 FONCTION COMPTE-PIÈCES 1. Appuyer sur la touche pendant 2 secondes, l’écran affichera “0” “kg” 2. Appuyer de nouveau sur la touche , l’écran affichera “C 10” 3. Pour sélectionner les différentes valeurs de l’échantillon, appuyer sur la touche 4. Mettre sur la plateforme la quantité de pièces qui correspond à l’échantillon sélectionné. 5. Appuyer sur la touche pour confirmer. 6. L’écran affichera la quantité des pièces déposées. 7. Ajouter le reste de pièces et la balance affichera la quantité totale déposée. 8. Rester appuyé sur la touche pendant 2 secondes pour revenir au mode normal de pesage. Remarque: Le poids de l’échantillon doit être supérieur à 0,2d. FONCTION DE TARE 1. Mettre le récipient sur la plateforme. 2. 3. 4. 5. Appuyer sur la touche La balance soustraira le poids du récipient et l’écran affichera 0 Introduire dans le récipient le produit à peser. L’indicateur affichera le poids du produits (poids net) Remarque: Le poids du récipient doit être supérieur à 2% de la capacité maximale de la balance. ACCUMULATION DE PESÉES 1. Mettre le produit sur la plateforme. 2. Appuyer sur la touche pour mémoriser son poids. 3. L’écran affichera le poids et le numéro de pesée. 4. Retirer le produit de la plateforme, l’écran affichera “0” 5. Mettre un autre produit sur la plateforme. 6. Appuyer de nouveau sur la touche pour accumuler la pesée. 7. Répéter cette operation autant de fois qu’il soit nécessaire. 8. Une fois les pesées sont terminées, appuyer sur la touche pour visualiser le poids total. 24 9. L’écran affichera la quantité de pesées effectuées et le poids total accumulé. 10. Pour effacer l’accumulation effectuée rester appuyé sur la touche pendant 2 secondes. CONFIGURATION DE FONCTIONS 1. Pour accéder à la configuration de fonctions, appuyer sur la touche et sans la relâcher, appuyer sur la touche , libérer les deux touches et l’écran affichera “UF __1”. 2. Appuyer sur la touche pour sélectionner le paramètre souhaité “UF—1” à “UF---9” Paramètre Fonction Opération UF-1 Vérification de la valeur interne et du voltaje de la batterie Appuyer sur la touche , l’écran affichera la valeur interne, appuyer de nouveau sur la touche et l’écran affichera le voltaje de la batterie. Appuyer sur la touche pour sortir. UF-2 Paramètre pas disponible UF-3 Programmation de l’Autodéconnection Appuyer sur la touche l’écran affichera AOFF 00. Appuyer sur la touche pour changer le paramètre. Appuyer sur la touché pour sélectionner le mode souhaité: AOFF00 – L’indicateur ne se déconnectera pas AOFF01 – L’indicateur se déconnectera automatiquement après 1 minute sans être utilize . Appuyer sur la touche pour sortir UF-4 Mode veille (standby) Appuyer sur la touche . Appuyer sur la touche paramètre. Appuyer sur la touche le mode souhaité. Appuyer sur la touche UF-5 pour changer le pour sélectionner pour sortir Paramètre pas disponible 25 UF-6 RS-232 Optionnel UF-7 Ajustement de la vitesse Appuyer sur la touche Appuyer sur la touche 1. Vitesse rapide 2. Vitesse normale 3. Vitesse lente Appuyer sur la touche pour sortir Appuyer la touche Appuyer sur la touche Appuyer sur la touche la valeur souhaitée. pour surtir UF-8 UF-9 Rang de division Valeur de la gravité pour sélectionner: Appuyer sur la touche , l’indicateur affichera la valeur par défaut. Si l’on souhaite changer la valeur en fonction du pays où la balance sera utilisée, appuyer sur la touche et ensuite sur la touche pour sélectionner la valeur souhaitée. Appuyer sur la touche pour sortir. CONFIGURATION DE FONCTIONS AVANCÉES 1. Pour accéder à la configuration de fonctions avancées, appuyer sur la touche et sans la relâcher, appuyer sur la touche libérer les deux touches et l’écran affichera “ECF __1”. 2. Appuyer sur la touche pour sélectionner le paramètre souhaité “ECF—1” à “ECF---3” Paramètre Fonction Operation 26 ECF-1 Vérification de la charge maximale (span) Appuyer sur la touche , l’écran affichera CALZ. Vider la plateforme et appuyer sur la touche pour remettre l’écran à zéro. Appuyer sur la touche Appuyer sur la touche pour introduire la valeur. Mettre le poids sur la plateforme et appuyer sur la touche pour confirmer et sortir. ECF-2 Calibration du zéro ECF-3 Calibration du span Appuyer sur la touche , l’écran affichera CALZ, vider la plateforme et appuyer sur la touche pour remettre l’écran à zéro et sortir. Appuyer sur la touche Appuyer sur la touche Appuyer sur la touche pour introduire la valeur du poids. Mettre le poids sur la plateforme et appuyer sur la touche pour confirmer et sortir. CONFIGURATION DE PARAMÈTRES 1. Avec l’indicateur éteint, accéder au mode de configuration des paramètres, appuyer sur la touche et sans la relâcher, appuyer en continue sur la touche pendant le décomptage. 2. Un fois le décomptage terminé, l’écran affichera P0000, appuyer sur la touche jusqu’au moment où clignotera le troisième chiffre P0000 et appuyer 2 fois sur la touche ainsi apparaîtra P0020. Appuyer alors sur la touche 3. L’écran affichera LF1, à l’aide de la touche sélectionner le mode: LF1 ou LF2 27 4. Appuyer sur la touche pour accèder au mode souhaité. LF1; Menu de calibration; o Appuyer sur la touche pour accèder au menu de calibration. L’écran affichera le message CALZ (valeur de calibration de zéro), appuyer sur la touche pour modifier la valeur de charge de l’équipement (valeur avec laquelle on souhaite calibrer l’équipement), appuyer sur la touche pour déplacer un chiffre vers la droite et sur la touche pour augmenter la valeur du chiffre. Une fois la valeur du poids de calibration introduite, placer le poids sur le plateau de pesée et appuyer sur la touche , la valeur clignotera d’une manière continue, appuyer alors sur la touche pour confirmer. Apparaîtront les traits d’union ------- ensuite l’équipement sera calibré. LF2; Menu de configuration de paramètres; o Appuyer sur la touche internes de l’équipement. pour accèder au menu. Apparaîtront les comptes o Appuyer sur la touche o L’écran affichera : pour continuer. 1 0 0 0 0 1 ABC D E F Ce menu, doit être changé seulement pour des configurations spéciales. En cas de modification: o A : Système métrique o B : Système Américain 0 : Aucun 0 : Aucun o C : Autres unités; 0 : Aucun o D : Pièces 0 : Off o E : Double rang 1 : kg 1 : lb 2:T 3:g 2 : lb oz 1 : TW Kg 2 :HK Kg 3 : VISS 1 : On 0 : Off 1 : MULTI INTERVAL 2 : MULTIRANG o F : Unité de calibration 1 : Européenne 2 : Américaine pour continuer. - Appuyer sur o Sélectionner la capacité maximale de l’équipement, en tenant en compte les décimales; Par exemple: pour 150 kg -20g 28 015000 (les deux derniers zéros respecteront les points décimaux 150.00) pour continuer. - Appuyer sur Pour sélectionner le point décimal. Appuyer sur options et appuyer sur pour confirmer. pour visualiser les différentes pour continuer. - Appuyer sur - Pour configurer la résolution de l’équipement. Appuyer sur différentes options et appuyer sur pour confirmer. pour visualiser les GARANTIE Cette balance est garantie contre tout défaut de fabrication et de materiel, pour une période de 1 an à partir de la date de la livraison. Pendant cette période, , se chargera de la réparation de la balance. Cette garantie n’inclut pas les dommages causés par une mauvaise manipulation ou surcharge. La garantie ne couvre pas les frais de transport de retour nécessaire pour réparer la balance. 29 EC CONFORMITY DECLARATION DECLARACION CE de CONFORMIDAD DECLARATION CE de CONFORMITÉ FABRICANTE / FABRICANT: DIRECCIÓN / ADRESSE / ADDRESS: C/ORFEBRERÍA , 26 08184 (PALAU SOLITA I PLEGAMANS) BARCELONAPRODUCT: PRODUCTO: PRODUIT : Electronical indicator model K1 Indicador electrónico modelo K1 Indicateur électronique modèle K1 The indicator above mentioned meets with the following European Standards: El indicador indicado anteriormente cumple las siguientes Normas Europeas: L´indicateur indiqué ci-après respecte les Normes Européennes suivantes: Electromagnetic compatibility Compatibilidad electromagnética Compatibilité électromagnétique 2004/108/CE 2004/108/CE 2004/108/CE Electrical safety Seguridad eléctrica Sécurité électrique 2006/95/CE 2006/95/CE 2006/95/CE 30 Setember/Septiembre/Setembre 2011 31