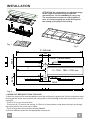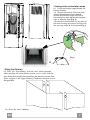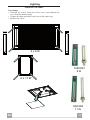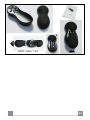
1
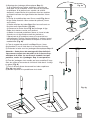
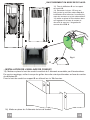
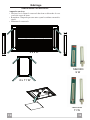
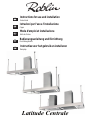
GB
IT
FR
DE
NL
Instructions for use and installation
Cooker Hood
Istruzioni per l’uso e l’installazione
Cappa
Mode d’emploi et installazione
Hotte de Cuisine
Bedienungsanleitung und Einrichtung
Dunstabzugshaube
Instructies voor het gebruik en installeren
Dampkap
Latitude Centrale
(#
Instructions Manual
INDEX
RECOMMENDATIONS AND SUGGESTIONS .....................................................................................................................2
CHARACTERISTICS .............................................................................................................................................................3
INSTALLATION......................................................................................................................................................................4
USE ........................................................................................................................................................................................8
MAINTENANCE .....................................................................................................................................................................9
*5
Libretto di Istruzioni
INDICE
CONSIGLI E SUGGERIMENTI............................................................................................................................................12
CARATTERISTICHE............................................................................................................................................................13
INSTALLAZIONE .................................................................................................................................................................14
USO......................................................................................................................................................................................18
MANUTENZIONE ................................................................................................................................................................19
'3
Manuel d’Instructions
SOMMAIRE
CONSEILS ET SUGGESTIONS..........................................................................................................................................22
CARACTERISTIQUES.........................................................................................................................................................23
INSTALLATION....................................................................................................................................................................24
UTILISATION .......................................................................................................................................................................28
ENTRETIEN.........................................................................................................................................................................29
%&
Bedienungsanleitung
INHALTSVERZEICHNIS
EMPFEHLUNGEN UND HINWEISE ...................................................................................................................................32
CHARAKTERISTIKEN .........................................................................................................................................................33
MONTAGE ...........................................................................................................................................................................34
BEDIENUNG........................................................................................................................................................................38
WARTUNG...........................................................................................................................................................................39
NL
Gebruiksaanwijzing
INHOUDSOPGAVE
ADVIEZEN EN SUGGESTIES.............................................................................................................................................42
EIGENSCHAPPEN...............................................................................................................................................................43
INSTALLATIE.......................................................................................................................................................................44
GEBRUIK .............................................................................................................................................................................48
ONDERHOUD......................................................................................................................................................................49
EN
2
1
RECOMMENDATIONS AND SUGGESTIONS
The Instructions for Use apply to several versions of this appliance. Accordingly,
you may find descriptions of individual features that do not apply to your specific
appliance.
INSTALLATION
• The manufacturer will not be held liable for any damages resulting from incorrect or
improper installation.
• The minimum safety distance between the cooker top and the extractor hood is 650
mm.
• Check that the mains voltage corresponds to that indicated on the rating plate fixed
to the inside of the hood.
• For Class I appliances, check that the domestic power supply guarantees adequate
earthing.
Connect the extractor to the exhaust flue through a pipe of minimum diameter 120
mm. The route of the flue must be as short as possible.
• Do not connect the extractor hood to exhaust ducts carrying combustion fumes
(boilers, fireplaces, etc.).
• If the extractor is used in conjunction with non-electrical appliances (e.g. gas burning appliances), a sufficient degree of aeration must be guaranteed in the room in
order to prevent the backflow of exhaust gas. The kitchen must have an opening
communicating directly with the open air in order to guarantee the entry of clean air.
USE
• The extractor hood has been designed exclusively for domestic use to eliminate
kitchen smells.
• Never use the hood for purposes other than for which it has been designed.
• Never leave high naked flames under the hood when it is in operation.
• Adjust the flame intensity to direct it onto the bottom of the pan only; making sure
that it does not engulf the sides.
• Deep fat fryers must be continuously monitored during use: overheated oil can burst
into flames.
• Do not flambé under the range hood; risk of fire
• This appliance is not intended for use by persons (including children) with reduced
physical, sensory or mental capabilities, or lack of experience and knowledge,
unless they have been given supervision or instruction concerning use of the appliance by a person responsible for their safety.
• Children should be supervised to ensure that they do not play with the appliance.
650 mm min.
MAINTENANCE
• Switch off or unplug the appliance from the mains supply before carrying out any
maintenance work.
• Clean and/or replace the Filters after the specified time period.
• Clean the hood using a damp cloth and a neutral liquid detergent.
• This appliance complies with European regulations on low voltages Directive 2006/95/CE on electrical safety, and with the
following European regulations: Directive 2004/108/CE on electromagnetic compatibility and Directive 93/68 on EC marking.
is attached to a product it means the product is covered by the European
When this crossed-out wheeled bin symbol
directive 2002/96/EC.Your product is designed and manufactured with high quality materials and components, which can be
recycled and reused.Please inform yourself about the local separate collection system for electrical and electronic product.
Please act according to your local rules and do not dispose of your old products with your normal household waste. The correct
disposal of your old product will help prevent potential negative consequences for the environment and human health.
EN
2
CHARACTERISTICS
Dimensions
AVANT HOTTE (COTE CDE)
AVANT HOTTE (COTE CDE)
1006.75
408.25
37
9
10
220
301.5
645
180
37
343.5
10
10
131
343.5
220
645
5
5
926.4
10
301.5
9
0.2
926.4
0.2
210
926.4
5
210
37
5
926.4
9
0.2
180
131
1500
0.2
9
37
1415
1415
1800
AVANT HOTTE (COTE CDE)
AVANT HOTTE (COTE CDE)
1156.75
558.25
500
1073
1073
343.5
220
301.5
210
10
301.5
220
645
131
343.5
10
180
.59
500
645
10
10
1073
180
131
.59
210
500
.59
1073
.59
500
1715
1715
2200
AVANT HOTTE (COTE CDE)
544
.89
544
.89
10
131
220
301.5
645
343.5
10
180
210
544
.89
.89
544
606.75
901.5
606.75
2115
EN
8
3
INSTALLATION
ATTENTION: Do not forget to use adequate plugs
to the support brackets. Enquire after the
manufacturers. Do an embedding if necessary.
The manufacturer accepts no responsibility in
case of a faulty hanging due to the drilling and
the setting up of plugs in the ceiling.
Fig. 1
Fig. 3
X - 85 mm
210
180
131
343.5
FRONT ( Control Panel)
X = 1500 - 1800 - 2200 mm
89
301.5
Y
180
210
REAR
Fig. 2
• LAYING OUT BEFORE FITTING THE HOOD
1) Mark the centre of the cooking appliance onto the ceiling with a plumb line. Draw the horizontal axes
running parallel to the stove top onto the ceiling and as illustrated Fig. 1 & 2 mark the positions on the
ceiling for :
- The 4 for Ø 10 mm nuts and bolts.
- The cut-out Ø 170 mm for the ducting Ø 150 mm in the extraction mode when ducting runs through
the ceiling and for the 3-core mains cable.
- The 4 hole centres of the chimney bracket item D.
2) Drill the different holes with the appropriate masonry bit.
EN
4
• FITTING THE HOOD
3) Fitting the telescopic pins (Fig. 8):
a) When fixing the telescopic pins to a plasterboard
ceiling ensure it is reinforced as illustrated in Fig. 3
and attach using 4 Ø10mm nuts and bolts ensuring
the bolts as sleeved between the plasterboard and
the joist supports to prevent the ceiling being damaged
when the bolts are tightened up. If the ceiling is
concrete, use Ø 10 mm steel rawl bolts or anchors plugs
with external threads (Not provided). Plastic rawl plugs
must not be used.
b) Screw the nuts onto the Ø 10 mm rod exceeding the
ceiling, the welding washers upon as illustrated Fig. 4a.
c) Slide the tubes item O around the tubes with the rod
(Fig. 4b).
d) Unscrew the lock nuts (Fig 4c) and expand the rods
to the require length.
e) Place the second washers, screw the upper tubes onto
the Ø 10 mm rod exceeding the ceiling and then tighten
the upper tubes giving a quarter turn by hand. Adjust the
lenght of the rods ensuring the canopy aligns horizontally
and vertically with the cooking appliance Fig. 4e and then
tighten the lock nuts with moderation.
4)Fix the chimney bracket item D onto the ceiling using
the 4 fixing holes Ø 12 mm (Fig. 3).
5) Place the hood under the pins item O for hanging the
canopy to the ceiling .
Attention: 3 persons are necessary to secure this operation.
The bracket D of the chimney is not a carrying element, only
the 4 telescopic pins.
Fig. 4a
Fig. 4b
Fig 4c
6) Fix the telescopic pins to the corners of the canopy with
the washer 5 holes with the 4 screws as illustrated Fig. 4f.
7) Finish by expanding the upper tubes slightly around the
rods to the bottom Fig. 4g.
8) Check the vertical and parallelism of the chimney and the
canopy
Fig. 4g
Fig. 4f.
Fig. 4e
EC EL
HE 2L 1
/
EN
51
1
• DUCTING IN THE EXTRACTION MODE:
The hood is more effective when used in the extraction mode (ducted to the outside). When the cooker
hood is ducted to the outside, charcoal filters are not required.
The ducting used must be 150 mm (6 INS), rigid circular pipe and must be manufactured from fire
retard-ant material, produced to BS.476 or DIN 4102-B1. Wherever possible utilise rigid circular pipe
which has a smooth interior, rather than the expanding concertina type ducting.
Maximum length of ducting run: - 4 metres with 1 x 90° bend.
- 3 metres with 2 x 90° bends.
- 2 metres with 3 x 90° bends.
The above assumes our 150 mm (6 INS) ducting is being installed. Please note ducting components
and ducting kits are optional accessories and have to be ordered, they are not automatically supplied
with the chimney hood.
9) Fit the noise-reduction tube item I over the round outlet
item 6 on top of the canopy while pressing down until they
snap into position, place the non-return backflow flaps item J
and secure the connections with appropriate clamping rings
or adhesive tape (Fig. 6 ).
10) Connect the ducting 150mm (6 INS) and secure the connections with appropriate clamping rings or adhesive tape
(Fig. 6).
J
6
11) Before fitting the chimney to the canopy make the electrical
connection as described in the section titled ELECTRICAL.
• Connect the hood to the mains through a two-pole switch having a contact gap of at least 3 mm.
• Remove the grease filters (see paragraph Maintenance) being
sure that the connector of the feeding cable is correctly inserted
in the socket placed on the side of the fan.
• Join the connectors.
• Install the odour filter and the charcoal filter in case the hood is
to be used in recycling version.
• Install the grease filter again.
EN
6
• Ducting in the recirculation mode
12) Fit the recirculation spigot R onto the
chimney bracket.
13) Connect the ducting 150mm (6 INS)
not provided between motors item 6
and the recirculation spigot and secure
the connections with appropriate clamping
rings or adhesive tape (Fig. 6).
14) Insert the charcoal filter into the base of
the motor housing and secure the filter with
two securing straps A as illustrated Fig. 6.
Fig. 6
A
• Fitting
the Chim ney
15) Place the Top chimney with the slots facing upwards
when installing the recirculation version, or vice versa with the
slots facing downwards when installing the ducting version, then
fix the top part to the Upper Chimney Connector using the screws
12c provided.
16) Place the lower chimney.
EN
7
USE
A
B
C
E
D
F
G
H
Control panel
Button
A
B
C
D
E
Function
Display
Turns the suction motor on and off at the last Displays the speed set
speed used.
Decrease the working speed.
Increase the working speed.
Activates intensive speed from any other
speed even with the motor off. This speed is
timed to run for 10 minutes, after which the
system returns to the previous speed. Suitable
to deal with maximum cooking fumes.
Activates the motor at a speed that allows
extraction of 100 m3/h for 10 minutes every
hour, after which the motor stops.
When the filter alarm is on, press the button
for approximately 3 seconds to reset the
alarm. These indications are only visible
when the motor is turned off.
F
Activates automatic shutdown after 30’. Suitable to complete elimination of residual
odours. Can be activated from any position,
and is turned off by pressing the button or
switching the motor off.
G
Turns the main lighting system on and off.
H
Turns the ambiance lighting system on and off.
EN
Displays HI and the bottom right hand spot
flashes once a second.
Displays 24 and the bottom right hand spot
flashes, while the motor is turned on
On completing the procedure the previous
indicator is turned off:
FF indicates that the metal grease filters
need washing. The alarm is triggered
after the Hood has been in operation
for 100 hours.
EF indicates that the activated charcoal
filter needs changing and the metal
grease filters need washing. The
alarm is triggered after the Hood has
been in operation for 200 hours.
Alternately displays the working speed and
the time remaining before the hood turns
off. The bottom right hand spot flashes.
8
MAINTENANCE
Metal grease ÿlte rs
Filters can be washed in the dish machine. They need to be
washed when FF-sign appears on the display or in any case every
2 months, or even more frequently in case of particularly intensive use of the hood.
Alarm reset
• Switch off the hood and the lights. If the 24h-function has been
activated this has to be deactivated.
• Press the E-key till the display is unlit.
Cleaning the filters
• Unhook filters one by one. supporting the filters with one hand,
act on the knob (pull and rotate) and then take off the security
spring.
• Wash the filters, taking care not to bend them. Allow them to
dry before refitting.
• Reassemble the filters, paying attention on replacing the security spring.
1500 (x 3)
1800 (x 4)
2200 (x 6)
EN
9
Charcoal filter (recycling version)
• This filter cannot be washed or regenerated. It must be replaced when the EF appears on the
display or at least once every 4 months.
Activation of the alarm signal
• In the recycling version hoods the filter saturation alarm must be activated during the installation or later.
• Switch off the hood and the lights.
• Disconnect the hood from the mains supply.
• When restoring the connection press and hold B-key.
• When releasing the key two rotating rectangles appear on the display.
• Within 3 seconds press the B-key until a flashing confirmation appears on the dispaly:
• 2 flashes with EF - charcoal filter saturation alarm ACTIVATED
• 1 flash with EF - charcoal filter saturation alarm DEACTIVATED.
REPLACING THE CHARCOAL FILTER
Reset of the alarm signal
• Switch off the hood and the lighting. If the 24h-function has
been activated this has to be deactivated.
• Press the E-key until the display is unlit.
Replacing of the filter
• Remove the metal grease filters.
• Remove the saturated charcoal filter by releasing the fixing
hooks
• Fit the new filter and fasten it in its correct position.
• Put the metal grease filters in their seats.
EN
10
Lighting
CHANGING THE LAMPS
Neon lamps
• Unfasten the screw fixing the Neon cover, and unhook the
cover from the hood canopy.
• Change the lamp and insert a new one of the same type.
• Replace the Cover.
4x9W
12EC003
9W
4 x 11 W
12EC004
11 W
EN
11
CONSEILS ET SUGGESTIONS
La présente notice d'emploi vaut pour plusieurs versions de l'appareil.
Elle peut contenir des descriptions d'accessoires ne figurant pas dans votre appareil.
INSTALLATION
• Le fabricant décline toute responsabilité en cas de dommage dû à une installation
non correcte ou non conforme aux règles de l’art.
• La distance minimale de sécurité entre le plan de cuisson et la hotte doit être de
650 mm au moins.
• Vérifier que la tension du secteur correspond à la valeur qui figure sur la plaquette apposée à l’intérieur de la hotte.
• Pour les Appareils appartenant à la Ière Classe, veiller à ce que la mise à la terre
de l’installation électrique domestique ait été effectuée conformément aux normes en vigueur.
• Connecter la hotte à la sortie d’air aspiré à l’aide d’une tuyauterie d’un diamètre
égal ou supérieur à 120 mm. Le parcours de la tuyauterie doit être le plus court
possible.
• Eviter de connecter la hotte à des conduites d’évacuation de fumées issues
d’une combustion tel que (Chaudière, cheminée, etc…).
• Si vous utilisez des appareils qui ne fonctionnent pas à l’électricité dans la pièce
ou est installée la hotte (par exemple: des appareils fonctionnant au gaz), vous
devez prévoir une aération suffisante du milieu. Si la cuisine en est dépourvue,
pratiquez une ouverture qui communique avec l’extérieur pour garantir l’infiltration
de l’air pur.
UTILISATION
• La hotte a été conçue exclusivement pour l’usage domestique, dans le but
d’éliminer les odeurs de la cuisine.
• Ne jamais utiliser abusivement la hotte.
• Ne pas laisser les flammes libres à forte intensité quand la hotte est en service.
• Toujours régler les flammes de manière à éviter toute sortie latérale de ces dernières par rapport au fond des marmites.
• Contrôler les friteuses lors de l’utilisation car l’huile surchauffée pourrait
s’enflammer.
• Ne pas préparer d’aliments flambés sous la hotte de cuisine : risque d’incendie
• Cet appareil ne doit pas être utilisé par des personnes (y compris les enfants)
ayant des capacités psychiques, sensorielles ou mentales réduites, ni par des
personnes n’ayant pas l’expérience et la connaissance de ce type d’appareils, à
moins d'être sous le contrôle et la formation de personnes responsables de leur
sécurité.
• Les enfants doivent être surveillés pour s'assurer qu'ils ne jouent pas avec l'appareil.
650 mm min.
ENTRETIEN
• Avant de procéder à toute opération d’entretien, retirer la hotte en retirant la fiche
ou en actionnant l’interrupteur général.
• Effectuer un entretien scrupuleux et en temps dû des Filtres, à la cadence
conseillée.
• Pour le nettoyage des surfaces de la hotte, il suffit d’utiliser un chiffon humide et
détersif liquide neutre.
• Cet équipement est conforme à la norme européenne sur la basse tension 2006/95/CE relative à la sécurité électrique
et aux normes européennes: 2004/108/CE relative à la compatibilité électromagnétique et 93/68 relative au marquage CE.
d’une poubelle à roue barrée est attaché à un produit, cela signifie que le produit est
Lorsque ce symbole
couvert par la Directive Européenne 2002/96/EC. Votre produit est conçu et fabriqué avec des matériaux et des composants
de haute qualité, qui peuvent être recyclés et utilisés de nouveau. Veuillez vous informer du système local de séparation
des déchets électriques et électroniques. Veuillez agir selon les règles locales et ne pas jeter vos produits usagés avec
les déchets domestiques usuels. Jeter correctement votre produit usagé aidera à prévenir les conséquences négatives
potentielles contre l’environnement et la santé humaine.
FR
2
23
CARACTERISTIQUES
Encombrement
AVANT HOTTE (COTE CDE)
AVANT HOTTE (COTE CDE)
1006.75
408.25
37
9
10
220
301.5
645
180
37
343.5
10
10
131
343.5
220
645
5
5
926.4
10
301.5
9
0.2
926.4
0.2
210
926.4
5
210
37
5
926.4
9
0.2
180
131
1500
0.2
9
37
1415
1415
1800
AVANT HOTTE (COTE CDE)
AVANT HOTTE (COTE CDE)
1156.75
558.25
500
1073
1073
343.5
220
301.5
210
10
301.5
220
645
131
343.5
10
180
.59
500
645
10
10
1073
180
131
.59
210
500
.59
1073
.59
500
1715
1715
2200
AVANT HOTTE (COTE CDE)
544
.89
544
.89
10
131
220
301.5
645
343.5
10
180
210
544
.89
.89
544
606.75
901.5
606.75
2115
FR
3
24
INSTALLATION
Montage et raccordement doivent être réalisés par un
installateur* qualifié(*) Le non-respect de cette
condition entraîne la suppression de la garantie du
constructeur et tout recours en cas d’accident.
Attention: prendre bien soin d’employer les chevilles
adaptées au support, se renseigner au près des
fabricants, effectuer un scellement si nécessaire. La
société décline toute responsabilité en cas d’accrochage
défectueux dû au perçage et chevillage au plafond.
Fig. 3
Fig. 1
X - 85 mm
210
180
131
343.5
FRONT ( Control Panel)
X = 1500 - 1800 - 2200 mm
89
301.5
Y
180
210
REAR
Fig. 2
• PERCAGE ET FIXATION AU PLAFOND :
1) A l’aide d’un fil à plomb reporter au plafond le centre du plan de cuisson. Tracer les axes parallèlement au plan de cuisson et positionner comme indiqué Fig. 1 & 2:
- Les 4 points de fixations pour la fixation des jambes télescopiques Rep. O.
- Le trou Ø 170 mm pour passer la gaine d'évacuation d'un diamètre de 150 mm et le passage du
cordon d’alimentation.
- 4 trous pour la fixation de support de haut de conduit Rep. D.
2) Percer le plafond à l’endroit de la pose.
FR
3
25
3) Montage des jambages télescopiques Rep. O :
a) Si le plafond est en béton, employer 4 chevilles en
fonte pour vis de diamètre 10 mm, exclure les chevilles
en plastique. Si le plafond vous semble de solidité
douteuse, ne pas hésiter à le renforcer dans les combles
en faisant traverser des tiges filetées de diamètre 10mm.
(Fig. 3)
b) Visser la rondelle plate avec l’écrou soudé Fig. 4a sur
la tige filetée diamètre 10mm sortant du plafond (l’écrou
vers le bas).
c) Mettre en place les tubes Rep. O en les coulissant sur
les tubes avec tiges filetées (Fig. 4b).
d) Desserrer le contre écrou Fig. 4c et allonger la tige
filetée de la hauteur voulue sous plafond.
e) Mettre la seconde rondelle en place, et visser le tube
supérieur sur la tige filetée sortant du plafond en
l’approchant de la rondelle et serrer d’un quart de tour
manuellement. Parfaire l’horizontalité de la hotte en jouant
sur la longueur des tiges filetées et bloquer le contre écrou
modérément (Fig. 4e).
4) Fixer le support de conduit haut Rep. D aux 4 trous
de diamètre 12 mm à l’aide des vis et chevilles fournies.
5) Présenter la hotte sous les jambages télescopiques Rep. O.
Fig. 4a
Fig. 4b
Attention : Cette phase du montage doit être réalisée à
3 personnes compte tenu du poids et de la forme dissymétrique de la hotte. La structure du conduit n'est pas
porteuse, seules les 4 jambages Rep. O sont porteurs.
6) Fixer les jambages ainsi montés par leurs rondelles 5 trous
dans les angles et au centre de la hotte à l’aide des 4 vis déjà
en place (Fig. 4f).
7) Finir en faisant glisser doucement les tubes supérieurs
(Fig. 4g) vers le bas.
8) Vérifier l’aplomb et le parallélisme de la hotte.
Fig 4c
Fig. 4g
Fig. 4f.
Fig. 4e
EC EL
HE 2L 1
/
FR
3
26
• RACCORDEMENT EN MODE EVACUATION EXTERIEUR:
9) Mettre le silencieux ( Rep. I) sur la sortie de l’appareil (Rep. 6). Puis le clapet anti retour (Rep. J) et
fixer l’ensemble à l’aide de colliers ou de ruban adhésif appropriés (Fig. 6).
10) Raccorder le tuyau flexible à l’évacuation extérieure et à la sortie de l’appareil. Fixer l’ensemble à
l’aide de colliers ou de ruban adhésif appropriés (Fig. 8).
11) Raccorder électriquement la hotte (Voir paragraphe Raccordement Electrique).
• Raccorder la hotte à l'alimentation électrique au travers d'un interrupteur
ayant un jeu en position ouvert d'au moins 3 mm entre ses pôles.
• Enlever les filtres métalliques (Voir paragraphe Service) et vérifier
que les connecteurs du faisceau électrique sont bien insérés dans
les prises de chaque coté du moteur.
• Raccorder les connecteurs.
• Mettre en place le filtre charbon dans le cas ou la hotte est
utilisée en version recyclage.
• Remettre en place les filtres .métalliques
J
6
FR
3
27
• RACCORDEMENT EN MODE RECYCLAGE :
12) Fixer le déflecteur R sur le support
de conduit D.
13) Raccorder le tuyau 150 mm non
fourni entre la sortie du moteur Rep 6 et
le déflecteur R et sécuriser la connection
avec des anneaux ou et du ruban adhesif.
14) mettre en place le filtre charbon dans
son logement à la base du moteur et
vérrouillé le avec les 2 languettes A
comme décrit FIG. 6.
Fig. 6
A
•
INSTALLATION DE L'ABILLAGE DE CONDUIT:
15) Mettre en place le haut de conduit constitué de 2 éléments assemblés par 6 boutonnières.
En version recyclage, veiller à ce que les grilles de sortie soient positionnées en face des sorties
du déflecteur R.
Fixer le haut de conduit au support D en utilisant les vis 12c fournies.
16) Mettre en place les 2 éléments du bas de conduit.
FR
3
28
UTILISATION
A
B
C
D
E
F
G
H
Tableau de comm andes
Touche
Fonction
A
Allume et éteint le moteur d’aspiration à la dernière vitesse d’utilisation.
B
Réduit la vitesse d’exercice.
C
Augmente la vitesse d’exercice.
D
Active le régime intensif à partir de n’importe
quelle vitesse, même à moteur éteint ce régime
est temporisé à 10 minutes, terme au bout duquel
le système retourne à la vitesse spécifiée en précédence. Fonction indiquée pour faire face aux
pointes d’émission de fumées de cuisson.
E
Active le moteur à une vitesse qui permet une
aspiration de 100 m3/h pendant 10 minutes par
heure, après quoi le moteur s’arrête.
Pour remettre à zéro l’alarme de filtre une fois
déclenchée, appuyez sur la touche pendant environ 3 secondes. Ces signalisations ne sont visibles qu’à moteur éteint.
F
G
Active l’extinction automatique avec un délai de
30
minutes.
Indiqué
pour
compléter
l’élimination des odeurs résiduelles. Peut être
activé à partir de n’importe quelle position; désactivé en appuyant sur la touche ou en éteignant
le moteur.
Allume et éteint l’éclairage principal.
H
Allume et éteint l'éclairage d'ambiance.
FR
Affichage
Indique la vitesse de réglage.
Affiche HI et le point en bas à droite clignote une fois par seconde.
Affiche 24 et le point en bas à droite clignote tandis que le moteur est en service.
Une fois la procédure terminée, la signalisation visualisée en précédence s’éteint.
FF signale la nécessité de laver les filtres
anti-gras métalliques. L’alarme entre en
fonction au bout de 100 heures de travail
effectif de la hotte.
EF signale la nécessité de remplacer les
filtres au charbon actif et indique que les
filtres anti-gras métalliques doivent également être lavés. L’alarme entre en fonction
au bout de 200 heures de travail effectif de
la hotte.
Affiche
alternativement
la
vitesse
d’exercice et le temps restant jusqu’à
l’extinction de la hotte. Le point en bas à
droite clignote.
3
29
ENTRETIEN
Filtres à graisse métalliques
Ils sont lavables même en lave-vaisselle et doivent être lavés
chaque fois que le symbole FF s’affiche ou environ tous les 2
mois ou plus souvent même, en cas d’utilisation particulièrement
intensive.
Rétablissement du signal d’alarme
• Eteindre les lumières et le moteur d’aspiration; au cas où la fonction 24h est active, il convient de la désactiver.
• Appuyer sur la touche E jusqu’à ce que l’afficheur s’éteigne.
Nettoyage Filtres
• Décrochez un filtre à la fois. En le soutenant avec la main bougez la pomme (tirer et tourner) aprés ça, relachez le ressort de
securité.
• Laver les filtres en évitant de les plier et les laisser sécher avant
de les remonter.
• Remontez les en faisant attention à bien repositionner le ressort
de securité.
1500 (x 3)
1800 (x 4)
2200 (x 6)
FR
3
30
Filtre anti-odeu r au charbon actif (version ÿlt rante)
• Il ne peut être ni lavé ni récupéré, il faut le changer quand EF s’affiche ou au moins tous les
4 mois.
Déclenchement du signal d’alarme
• Pour les Hottes en Version Filtrante, l’alarme indiquant la saturation des Filtres doit être
activée au moment de l’installation ou ultérieurement.
• Éteindre les lumières et le moteur d’aspiration.
• Débrancher la hotte du réseau électrique.
• Rétablir le branchement en appuyant sur la touche B.
• Lâcher la touche et deux rectangles en rotation apparaissent sur l’afficheur.
• Dans les 3 secondes qui suivent, appuyer sur la touche B jusqu’à ce que s’affichent :
• EF clignotant deux fois – Alarme saturation filtre charbon active VALIDEE.
• EF clignotant un fois – Alarme saturation filtre charbon active INVALIDEE.
REMPLACEMENT DU FILTRE ANTI-ODEUR AU CHARBON ACTIF
Rétablissement du signal d’alarme
• Eteindre les lumières et le moteur d’aspiration; au cas où la fonction 24h est active, il convient de la désactiver.
• Appuyer sur la touche E jusqu’à ce que l’afficheur s’éteigne.
Changement des Filtres
• Retirer les filtres à graisse métalliques.
• Retirer le filtre anti-odeur au charbon actif saturé en agissant
sur les crochets qui le tiennent en place.
• Mettre le nouveau filtre en l’accrochant bien en place.
• Remonter les filtres à graisse métalliques.
FR
3
31
Eclairage
REMPLACEMENT DES AM POULES
Ampoules au néon
• Dévisser la vis fixant le couvercle du néon et décrocher le couvercle du corps de hotte.
• Remplacer l’ampoule par une autre ayant les mêmes caractéristiques.
• Remonter le couvercle.
4x9W
12EC003
9W
4 x 11 W
12EC004
11 W
FR
3
32
6
A1
L2 = 4 x 11 W (1500)
L2 = 4 x 11 W (1800)
L2 = 4 x 9 W (2200)
ECLAIRAGE
LIGHTING
White
Brown
Blue
L2 L1 F
Green-Yellow
L1
BELEUCHTUNG
Purple
Red
Orange
Pink
L1 = 4 x 9 W
N
L2
Red
Yellow
Blue
MULTI-FLACH KABEL
LIMANDE COMMANDE
FLAT CABLE
1 3 5
FERNBEDIENUNG
RECEPTEUR INFRAROUGE
REMOTE CONTROL
ELEKTRONISCHE STEUERUNG
BOITIER COMMANDE
PUSCH BUTTON PANEL
M
230 W
Blue
1 3 5
Red
Yellow
Brown
Green-Yellow
Blue
A - AZUR - AZUR - AZUR BLAU
BK - BLACK - NOIR- SCHWARZ
B - BLUE - BLEU - BLAU
Br - BROWN - BRUN - BRAUN
G-Y - GREEN YELLOW - VERT JAUNE - GRÜN GELB
Gr - GREY - GRIS - GRAU
L B - LIGHT BLUE - BLEU CLAIR - HELL BLAU
P - PINK - ROSE - ROSA
V - PURPLE - MAUVE - MALVER FARBIG
R - RED - ROUGE - ROT
W - WHITE - BLANC - WEISS
W-P - WHITE PINK - BLANC ROSE - WEISS ROSA
Y - YELLOW - JAUNE - GELB
Maj (Update)
12/05/11
Page
1/1
Désignation
LATITUDE Centrale depuis : MAI 2012
(From)
3S_Latitude_C_150_180_220_V2012-05
6
A2
UK ELECTRICAL CONNECTION
The wires in this mains
lead are coloured in
accordance with the
following code:
ELECTRICAL REQUIREMENTS
Any permanent electrical installation must comply
with the latest I.E.E. Regulations and local Electricity
Board regulations. For your own safety this should be
undertaken by a qualified electrician e.g. your local
Electricity Board, or a contractor who is on the roll of
the National Inspection Council for Electrical
Installation Contracting (NICEIC).
ELECTRICAL CONNECTION
Before connecting to the mains supply ensure that
the mains voltage corresponds to the voltage on the
rating plate inside the cooker hood.
This appliance is fitted with a 2 core mains cable and
must be permanently connected to the electricity supply
via a double-pole switch having 3mm minimum contact
gap on each pole. A Switched Fuse Connection Unit
to BS.1363 Part 4, fitted with a 3 Amp fuse, is a
recommended mains supply connection accessory to
ensure compliance with the Safety Requirements
applicable to fixed wiring instructions.
Green & Yellow
Earth
Blue
Neutral
Brown
Live
As the colours of the wires
in the mains lead of this
appliance may not
correspond with the
coloured markings
identifying the terminals in
your connection unit,
proceed as follows:The wire which is coloured blue must be connected
to the terminal which is marked with the letter ‘N’ or
coloured black.
The wire which is coloured brown must be connected
to the terminal which is marked with the letter ‘L’ or
coloured red.
CH
Fiche de sécurité class 1, 250 V~ 10A
2 poles + terre.
Stecker der Schutzklasse 1, 250 V~ 10A
Zweipolig mit Schutzkontakt (Erde).
Spira di sicurezza classe 1, 250 V~ 10A
2 poli + terra
SEV 1011, SN416534-2, CH-Typ 12
6
A3
2
1
LR03 / AAA / 1,5V
3
8
A4
198
800
1415
1498
347
210
8
A5
mini.780
maxi.980
400
120
50
22
650 mini
mini.780
maxi.980
728
343
220
35
120
1415
1498
337
479
645
400
273
220
728
198
364
347
364
337
35
800
364
210
364
220
273
479
50
22
650 mini
343
1500
645
220
50
150
50
150
650 mini
198
347
210
22
728
1100
1715
1798
8
A6
mini.780
maxi.980
120
400
337
35
50
mini 780
maxi 980
120
400
343
364
479
645
220
364
35
198
364
728
479
1100
273
220
210
364
347
343
150
22
337
50
650 mini
273
220
1800
645
220
50
1715
1798
50
150
8
A7
50
210
347
901.5
2115
2198
150
337
35
479
273
800
102
800
198
50
mini.780
maxi.980
120
198
343
364
364
728
645
220
2200
650 mini
22
FRANKE France S.A.S.
25 Rue des Rosiers - Sainte Cécile
B. P. 60056
50800 VILLEDIEU-LES-POËLES - France
Tél. 02 33 91 26 50 - Fax 02 33 51 54 79 - e-mail : [email protected]
For outside France : Tel. +33 (0)2 33 91 26 57 - Fax. : +33 (0)2 33 51 54 79
e-mail : [email protected]
20NO351 - 120511