Download EZ Command Remote Programmer Model 8600 - Do-It
Transcript
EZ Command Remote Programmer Model 8600 INSTALLATION AND PROGRAMMING GUIDE English.................................................... 1 - 11 Español................................................. 12 - 21 Francais................................................ 22 - 30 Italiano .......................................................... 31 - 39 Deutsch......................................................... 40 - 48 Portuguese ................................................... 49 - 57 THANK YOU for purchasing the EZ Command Remote Programmer. The EZ Command Remote Programmer is capable of controlling all EZ Pro controller functions including programming and manual zone operation via a secure radio link. There can be a tremendous timesaving when installing, servicing and operating a Nelson EZ Pro irrigation system by using this technology. If you have questions, problems or comments on your new EZ Command Remote Programmer please call our Technical Services Department toll-free at 888-NELSON-8. Leaders in Turf Irrigation Since 1911 NOTE: In our efforts to continually improve and update our products, features and specifications in this manual may change without notice. TABLE OF CONTENTS Battery Installation . . . . . . . . . . . . . . . . . . . . . . . . . . . . . . . . . . . . . . . . . . . . . . . . . . . . . . . . . . 4 Low Battery Indicator . . . . . . . . . . . . . . . . . . . . . . . . . . . . . . . . . . . . . . . . . . . . . . . . . . . . . 4 Turning the EZ Command Remote Programmer On and Off . . . . . . . . . . . . . . . . . . . . . . . . 4 EZ Pro Radio Setup . . . . . . . . . . . . . . . . . . . . . . . . . . . . . . . . . . . . . . . . . . . . . . . . . . . . . . . . . 4-7 Controller ID . . . . . . . . . . . . . . . . . . . . . . . . . . . . . . . . . . . . . . . . . . . . . . . . . . . . . . . . . . . 4 Programmer Access Code . . . . . . . . . . . . . . . . . . . . . . . . . . . . . . . . . . . . . . . . . . . . . . . . . 5 Setting a Controller ID and Programmer Code . . . . . . . . . . . . . . . . . . . . . . . . . . . . . . . . . . 5 Connecting by Radio . . . . . . . . . . . . . . . . . . . . . . . . . . . . . . . . . . . . . . . . . . . . . . . . . . . . . 6 Connection Screen. . . . . . . . . . . . . . . . . . . . . . . . . . . . . . . . . . . . . . . . . . . . . . . . . . . . . . . 7 Range of Radio Signal . . . . . . . . . . . . . . . . . . . . . . . . . . . . . . . . . . . . . . . . . . . . . . . . . . . . 7 Connected Operation . . . . . . . . . . . . . . . . . . . . . . . . . . . . . . . . . . . . . . . . . . . . . . . . . . . . . 7 Programming and Operating Instructions . . . . . . . . . . . . . . . . . . . . . . . . . . . . . . . . . . . . . . . . 8 Disconnecting from the Ez Pro . . . . . . . . . . . . . . . . . . . . . . . . . . . . . . . . . . . . . . . . . . . . . . 8 Care of the EZ Command . . . . . . . . . . . . . . . . . . . . . . . . . . . . . . . . . . . . . . . . . . . . . . . . . 8 Troubleshooting/Service . . . . . . . . . . . . . . . . . . . . . . . . . . . . . . . . . . . . . . . . . . . . . . . . . . . . . 9 Technical Data/Specifications . . . . . . . . . . . . . . . . . . . . . . . . . . . . . . . . . . . . . . . . . . . . . . . . . 10 FCC Rules. . . . . . . . . . . . . . . . . . . . . . . . . . . . . . . . . . . . . . . . . . . . . . . . . . . . . . . . . . . . . . . . . 10 Warranty . . . . . . . . . . . . . . . . . . . . . . . . . . . . . . . . . . . . . . . . . . . . . . . . . . . . . . . . . . . . . . . . . . 11 3 BATTERIES Battery Installation Remove the screw on the battery cover and remove the battery cover. Install two new "C" (LR14 in Europe) size alkaline batteries. Replace the battery cover and screw. Low Battery Indicator There is a Low Battery Warning symbol must be installed in your EZ Command. on the EZ Command LCD. When this is displayed and flashing, new batteries NOTE: When radio connected to the EZ Pro if the Low Battery Warning symbol is displayed it means new batteries must be installed in the EZ Pro. Turn the EZ Command Remote Programmer On and Off Turn on the EZ Command Remote Programmer by pressing any key or moving the dial to any position. After 1 minute of non-use the unit will automatically turn off. To turn the unit off when radio connected press the Radio On/Off key. EZ PRO RADIO SETUP A four digit Controller ID and a four digit Programmer Code must be programmed into the EZ Pro controller prior to making a radio connection. Once set, the controller will store these in memory and a radio connection can be made at any time. Controller ID (0000 to 9999) Programmer Code (0000 to 9999) 4 EZ PRO RADIO SETUP Controller ID- Every controller must have a unique ID. This will prevent a conflict if more than one controller is within range of the radio signal. Write down the Controller ID for future reference. WARNING: Do not select the same Controller ID for two controllers within 1 mile of each other. Improper radio operation may result. Programmer Access Code- Use the same Programmer Code for all of your EZ Pro controllers and EZ Command Remote Programmers. This Code provides the security to prevent unwanted radio access. REMINDER: Use the same Programmer Code on all of your EZ Pro controllers and EZ Command Programmers Set a Controller ID and Programmer Code on the EZ Pro Controller Set the Mode dial on the EZ Pro controller to the Program position. Turn the large dial on the EZ Pro controller to the Radio Setup position. Use the SELECT to move between Controller ID and Programmer Code. Use the ADJUST keys to set these as you choose. Return the Mode dial to the OFF or Auto position 5 EZ PRO RADIO SETUP Connecting by Radio with the EZ Command Remote Programmer When the EZ Command Remote Programmer is turned on, the LCD screen displays the last Controller ID and Programmer Access Code used. Use the SELECT and ADJUST keys to choose the Controller ID and Programmer Code to match the controller you wish to connect to. Press the Radio ON /OFF button to make the connection. NOTE: There must be AC power to the EZ Pro controller in order to make a radio connection. 6 EZ PRO RADIO SETUP Connection Screen When connected, the Radio Connected symbol will show on both the EZ Command unit and on the EZ Pro. The LCD display will show the current status of the EZ Pro. The LCD screen will display the EZ Pro’s Mode Dial position (Auto, Program, or Off) and Program Dial position (A, B, or C). If there are any zone problem messages these will be displayed on the LCD. If there is a Rain Delay Programmed or the Rain Sensor is activated these will be displayed. The EZ Command LCD will display all programming or operation commands exactly as seen on the EZ Pro controller. This instant feedback assures that the EZ Pro controller retains any changes you make. While radio connected, the EZ Command will temporarily override dial settings and status of the EZ Pro. All manual and programming functions of the EZ Pro can be controlled from the EZ Command Remote Programmer. Range of Radio Signal Radio signal range is greatest when there is a clear line of sight between the EZ Pro and the EZ Command. The type and size of structure that the EZ Pro is located in as well as the local terrain may effect performance. Connected Operation After one minute of use without a dial turn or a button press, the EZ Command will enter a "sleep" mode. This is to extend battery life. The unit will "wake" once a minute and update the LCD screen. Pressing any button or turning the dial will also "wake" the EZ Command. After 15 minutes of non-use the radio connection will stop and the EZ Command will turn off. You will need to connect to the EZ Pro again. 7 PROGRAMMING AND OPERATING INSTRUCTIONS While radio connected use the Large dial, SELECT buttons, ADJUST buttons, A,B,C button and the AUTO, PROG, OFF button on the EZ Command to program and operate the EZ Pro controller as desired. See the EZ Pro Instruction book for all programming and operating instructions. NOTE: Program changes made while radio connected are retained by the EZ Pro. Disconnecting from the EZ PRO To disconnect from the EZ Pro press the Radio On/Off key. The radio will disconnect and the EZ Command unit will turn off. Once disconnected the EZ Pro will return to the previous status. Any program changes made will be saved in the EZ Pro. NOTE: A manual zone run, a Cycle, or a 3 Minute Test started by the EZ Command will continue after the radio is disconnected. The EZ Pro will return to its previous status after the operation is finished. Care of the EZ Command Avoid letting the EZ Command get wet. While it is water-resistant it is not waterproof. Water inside the unit will damage the circuitry. Do not drop the EZ Command. This may damage the unit. 8 TROUBLESHOOTING/SERVICE SYMPTOM POSSIBLE CAUSE SOLUTION Unable to radio connect • Controller ID and or Programmer Code do not match the EZ Pro controller • Check that the Controller ID and Programmer Code match exactly Unable to radio connect • Two EZ Pro controllers in range with the same Controller ID • Change the Controller ID on one of the EZ Pro controllers. Unable to radio connect • EZ Pro does not have a model 8602 Radio module installed • Install a model 8602 Radio Module Unable to radio connect • No AC power to the EZ Pro controller • Connect AC power to the EZ Pro Controller Poor radio connection • Out of range or signal blocked by obstruction • Move closer to the EZ Pro controller Poor radio connection • Weak batteries • Install new alkaline C batteries Unit will not turn on • Dead batteries • Install new alkaline C batteries Low Battery Warning flashing on LCD • Weak batteries in the EZ Command • Install two new alkaline C batteries in the EZ Command Low Battery Warning displayed on LCD while radio connected • Weak batteries in the EZ Pro • Install two new alkaline AA batteries in the EZ Pro 9 TECHNICAL DATA 1. Temperature Range Operating: -5 to +55 °C Storage: -30 to +85 °C 2. Batteries Two (2) Size C (LR14 in Europe) Alkaline batteries 3. Frequency 2.4 Ghz Spread Spectrum @ 10mw FCC RULES This equipment complies with PART 15 of the FCC rules. Operation is subject to the following two conditions: (1) This device may not cause harmful interference, and (2) this device must accept any interference recieved, including interference that may cause undesired operation. No user serviceable parts inside. Any changes or modifications could void the Nelson warranty and the user’s authority to operate the equipment. IMPORTANT NOTE: To comply with FCC RF exposure compliance requirements, the following antenna installation and device operating configurations must be satified - The antenna used for this treatment must be installed to provide a seperation distance of at least 5 cm from all persons and must not be co-located or operating in conjunction with any other antenna or transmitter. CANADIAN RADIO INTERFERENCE REGULATIONS NOTE: This digital apparatus does not exceed the Class B limits for radio noise emissions from digital apparatus set out in the radio interference regulations of the Canadian Department of Communications. 10 WARRANTY Limited Warranty L.R. Nelson Corporation (“Nelson”) warrants all electronic products to be free of defects in material and workmanship for a period of two (2) years from the original date of purchase. In the event of such defects, Nelson will repair or replace, at its option, the product or the defective part. This warranty does not extend to damage to a Nelson product or part resulting from accident, misuse, alteration, neglect, abuse, improper installation or normal wear and tear, or to exterior appearance and color. This warranty extends only to the original user of the Nelson product. If defect arises in a Nelson product or part within the warranty period, you should contact your installing contractor, Nelson retailer, distributor, or L.R. Nelson Corporation at one of the following locations: One Sprinkler Lane 4780 Eucalyptus Ave. 5660 Commerce Drive; Units 2,3 Peoria, IL 61615 Chino, CA 91710 Orlando, FL 32839-2978 888-NELSON-8 (800) 800-0993 (800) 743-1020 Fax (309) 692-5847 Fax (909) 631-5025 Fax (407) 648-0924 Nelson may, at its option, require that the product or part be returned to a Nelson service point or your retailer or distributor. Nelson will determine whether the claimed defect is covered by the warranty. If coverage is found, the product will be repaired or replaced. Please allow 4 to 6 weeks for completion of repairs or replacement and return of the product or part. If a product or part is replaced, the replacement is warranted only for the remainder of the original product or part warranty period. This warranty gives you specific legal rights, and you may also have other rights which vary from state to state. L.R. Nelson Corporation does not authorize any person to create for it any other obligation or liability in connection with Nelson products. TO THE EXTEND ALLOWED BY LAW, ANY IMPLIED WARRANTY OR MERCHANTABILITY OR FITNESS FOR A PARTICULAR PURPOSE APPLICABLE TO THE NELSON PRODUCTS IS LIMITED IN DURATION TO THE DURATION OF THESE WRITTEN WARRANTIES. NEITHER L.R. NELSON CORPORATION NOR ITS DISTRIBUTORS OR DEALERS SHALL BE LIABLE FOR LOSS OF TIME, INCONVENIENCE, ECONOMIC LOSS, OR INCIDENTAL OR CONSEQUENTIAL DAMAGES ARISING FROM THE SALE OR DISTRIBUTION OF NELSON PRODUCTS WHETHER FOR BREACH OF WARRANTY HEREUNDER OF FOR NEGLIGENCE OR IN TORT. Some states do not allow limitations on how long an implied warranty will last of the exclusion or limitation on incidental or consequential damages, so the above limitations or exclusions may not apply to you. If you have any questions concerning the warranty or its application, please write to L.R. Nelson Corporation, One Sprinkler Lane, Peoria, Illinois 61615, U.S.A. Attention: Customer Service. CLAIMED DEFECTIVE MERCHANDISE POLICY Products returned to the retailer or distributor and claimed defective must be inspected by the Nelson sales representative to determine warranty compliance. If approval is granted, products will be repaired or replaced or a credit memorandum covering 11 the net purchase price will be issued. Consola de programación EZ por control remoto Modelo 8600 GUÍA DE INSTALACIÓN Y PROGRAMACIÓN La Consola de programación EZ por control remoto puede dirigir todas las funciones del controlador EZ Pro, incluidas la programación y el funcionamiento manual por zonas mediante un enlace radioeléctrico seguro. Los mandos de la Consola de programación EZ por control remoto realizan las mismas funciones Select y Adjust™ que los del EZ Pro posibilitando todas las operaciones “EZ”. La utilización de esta tecnología permite un importante ahorro de tiempo en la instalación, el mantenimiento y el funcionamiento de un sistema de riego Nelson EZ Pro. Líderes en irrigación de césped desde 1911 NOTA: Estamos continuamente mejorando y actualizando nuestros productos, con lo cual las características y especificaciones técnicas de este manual pueden variar sin previa notificación. 12 ÍNDICE Instalación de las pilas . . . . . . . . . . . . . . . . . . . . . . . . . . . . . . . . . . . . . . . . . . . . . . . . . . . . . . .14 Indicador de pila gastada . . . . . . . . . . . . . . . . . . . . . . . . . . . . . . . . . . . . . . . . . . . . . . . . . . 14 Conexión y desconexión de la Consola de programación por control remoto EZ . . . . . . . . . 14 Instalación del EZ Pro Radio . . . . . . . . . . . . . . . . . . . . . . . . . . . . . . . . . . . . . . . . . . . . . . . . . . 14-17 Código de indentificación del Controlador. . . . . . . . . . . . . . . . . . . . . . . . . . . . . . . . . . . . . . 14 Código de acceso a la consola. . . . . . . . . . . . . . . . . . . . . . . . . . . . . . . . . . . . . . . . . . . . . . 15 Asignación de un Código de identificación del Controlador y de un Código de la consola en el Controlador EZ Pro . . . . . . . . . . . . . . . . . . . . . . . . . . . . . . . . . . . . . 15 Conexión pro Radio . . . . . . . . . . . . . . . . . . . . . . . . . . . . . . . . . . . . . . . . . . . . . . . . . . . . . . 16 Pantalla de conexión . . . . . . . . . . . . . . . . . . . . . . . . . . . . . . . . . . . . . . . . . . . . . . . . . . . . . 17 Alcance de la señal de radio . . . . . . . . . . . . . . . . . . . . . . . . . . . . . . . . . . . . . . . . . . . . . . . 17 Funcionamiento de la conexión . . . . . . . . . . . . . . . . . . . . . . . . . . . . . . . . . . . . . . . . . . . . . 17 Instrucciones de Programación y Funcionamiento . . . . . . . . . . . . . . . . . . . . . . . . . . . . . . . . 18 Desconexión del EZ Pro. . . . . . . . . . . . . . . . . . . . . . . . . . . . . . . . . . . . . . . . . . . . . . . . . . . 18 Cuidados de la Consola EZ . . . . . . . . . . . . . . . . . . . . . . . . . . . . . . . . . . . . . . . . . . . . . . . . 18 Solución de Problemas y Mantenimiento . . . . . . . . . . . . . . . . . . . . . . . . . . . . . . . . . . . . . . . . 19 Datos Técnicos . . . . . . . . . . . . . . . . . . . . . . . . . . . . . . . . . . . . . . . . . . . . . . . . . . . . . . . . . . . . . 19 Normas FCC . . . . . . . . . . . . . . . . . . . . . . . . . . . . . . . . . . . . . . . . . . . . . . . . . . . . . . . . . . . . . . . 20 Garantía . . . . . . . . . . . . . . . . . . . . . . . . . . . . . . . . . . . . . . . . . . . . . . . . . . . . . . . . . . . . . . . . . . 20-21 13 PILAS Instalación de las pilas Quite el tornillo que está en la tapa del alojamiento de las pilas y retire la tapa. Coloque dos pilas alcalinas tamaño “C” (LR14 en Europa) nuevas. Vuelva a colocar la tapa y el tornillo. Indicador de pila gastada En la pantalla (LCD) de la consola EZ aparece un símbolo indicando que las pilas están gastadas . Cuando aparece este símbolo en forma intermitente debe procederse a colocar pilas nuevas en la consola EZ. NOTA: Cuando esté conectado por radio al EZ Pro, si aparece el símbolo de advertencia de pila gastada indica que deben colocarse pilas nuevas en el EZ Pro. Conexión y desconexión de la Consola de programación por control remoto EZ Conecte la Consola de programación por control remoto EZ presionando cualquier tecla o llevando el dial de posición a cualquier punto. Al cabo de un minuto de inactividad la unidad se desconectará automáticamente. Para desconectar la unidad cuando tenga una conexión por radio, pulse la tecla Radio On/Off. INSTALACIÓN DEL EZ PRO RADIO Antes de establecer la conexión radioeléctrica debe programarse en el EZ Pro un Código de Identificación (ID) del Controlador y un Código de la consola, ambos de cuatro dígitos. Una vez que se ha programado el controlador, el dato quedará guardado en la memoria y la conexión por radio podrá establecerse en cualquier momento. Código de Identificación del Controlador (0000 – 9999) Código del programador (0000 – 9999) 14 INSTALACIÓN DEL EZ PRO RADIO Código de identificación del Controlador – Cada controlador debe tener un único código de identificación (ID). De esta manera se evitarán conflictos en caso de que haya más de un controlador dentro del alcance de la señal radioeléctrica. Tome nota del ID del Controlador como referencia futura. ADVERTENCIA: No seleccione el mismo ID para dos controladores que estén a una distancia de hasta 1,6 Km. aproximadamente (1 milla), pues puede alterar el funcionamiento del enlace radioeléctrico. Código de acceso a la consola – Use el mismo Código de programador para todos los controladores EZ Pro y Consolas de programación por control remoto EZ. Este Código ofrece la seguridad de impedir accesos no deseados al enlace radioeléctrico. NOTA: Use el mismo Código de programador en todos los Controladores EZ Pro y en las Consolas de programación por control remoto EZ. Asignación de un Código de identificación del Controlador y de un Código de la consola en el Controlador EZ Pro Lleve el dial Mode (Modo) del controlador EZ Pro hasta la posición Program (Programa). Lleve el dial grande del controlador EZ Pro hasta la posición Radio Setup (Sistema de radio). Use las teclas SELECT (SELECCIONAR) para cambiar del ID del Controlador al Código del Programador. Use las teclas ADJUST (Ajuste) para componer los códigos que haya elegido. Vuelva a llevar el dial Mode a la posición OFF (desconectado) o Auto (Automático). 15 INSTALACIÓN DEL EZ PRO RADIO Conexión por radio con la Consola de programación por control remoto EZ Cuando la Consola de programación por control remoto EZ está conectada, en la pantalla de cristal líquido (LCD) aparecen los últimos códigos de Identificación del controlador y de Acceso a la Consola de programación utilizados. Use las teclas Select & Adjust™ para elegir los códigos de identificación del Controlador y de la Consola de programación que coincidan con el controlador al que desea conectarse. Pulse el botón Radio ON /OFF para establecer la conexión. NOTA: Para poder establecer la conexión radioeléctrica es necesario que el EZ Pro esté alimentado con corriente alterna. 16 INSTALACIÓN DEL EZ PRO RADIO Pantalla de conexión Cuando esté conectado por radio, en la Consola de programación EZ y en el EZ Pro aparecerá el símbolo Radio Connected (Conectado por radio) . La Pantalla LCD mostrará la hora y el estado actual del EZ Pro, la posición Mode Dial del EZ Pro (Auto, Program, o Off) y la posición Program Dial (A, B, o C). Si hay algún mensaje de problema de zona, aparecerá en la pantalla LCD. También se mostrará si está programado un Riego diferido o si está activado el Sensor de humedad. La Pantalla LCD de la Consola EZ mostrará todas las órdenes de programación o de funcionamiento exactamente como pueden verse en el Controlador EZ Pro. Esta retroacción instantánea asegura que el Controlador EZ Pro mantiene cualquier cambio que realice. Mientras esté conectado por radio, la Consola EZ anulará temporalmente la situación actual y los ajustes del EZ Pro. Todas las funciones manuales y programadas del EZ Pro pueden controlarse a partir de la Consola de programación por control remoto EZ. Alcance de la señal de radio El alcance de la señal de radio es mayor cuando existe una línea visual sin obstáculos entre el EZ Pro y la Consola EZ. El tipo y el tamaño de la estructura en la que se instala el EZ Pro, así como el terreno, puede afectar al rendimiento. Funcionamiento de la conexión La Consola EZ entrará en el modo de “dormida” después de un minuto de uso si no se gira el dial ni se pulsa algún botón. Esta característica prolonga la duración de las pilas. La unidad “despertará” una vez por minuto y actualizará la pantalla LCD. También se “despertará” al pulsar cualquier botón o girar el dial. Después de 15 minutos sin usar, la conexión de radio se interrumpirá y la Consola EZ se desconectará. Será necesario volver a conectar el EZ Pro. 17 INSTRUCCIONES DE PROGRAMACIÓN Y FUNCIONAMIENTO Mientras esté conectado por radio utilice el dial grande, los botones SELECT, ADJUST y A,B,C y los botones AUTO, PROG y OFF de la Consola EZ para programar y hacer funcionar al controlador EZ Pro como desee. Véase el Manual de instrucciones EZ Pro™ para toda indicación sobre la programación y el funcionamiento. NOTA: El EZ Pro mantiene los cambios de programa realizados durante la conexión por radio. Desconexión del EZ PRO Para desconectarse del EZ Pro pulse la tecla Radio On/Off. Se producirá la desconexión y la Consola EZ se apagará. Una vez desconectado, el EZ Pro volverá a su estado anterior. Todo cambio de programa realizado se guardará en el EZ Pro. NOTA: Un funcionamiento manual de zona, un ciclo, o un ensayo de 3 minutos iniciado por la Consola EZ continuará después de la interrupción de la conexión por radio. Una vez finalizada la operación, el EZ Pro volverá a su estado anterior. Cuidados de la Consola EZ Evite que la Consola EZ se moje. Aunque es resistente al agua, no es impermeable. El agua en el interior de la unidad perjudicará los circuitos. No deje que la Consola EZ se caiga, ya que podría sufrir daños. 18 SOLUCIÓN DE PROBLEMAS Y MANTENIMIENTO DE LA CONSOLA EZ PROBLEMA No es posible establecer la conexión por radio No es posible establecer la conexión por radio No es posible establecer la conexión por radio Conexión por radio deficiente Conexión por radio deficiente La unidad no se enciende Señal de pilas gastadas destellandoen la pantalla Señal de pilas gastadas destellando en la pantalla durante la conexión por radio CAUSAS POSIBLES • El ID del Controlador y/o el código de la Consola de programación no coinciden con el controlador EZ Pro • El EZ Pro no lleva instalado un Módulo de radio modelo 8602 • El controlador EZ Pro no tiene suministro de corriente alterna • Fuere del alkcance o señal bloqueda por alguna obstrucción • Pilas gastadas • Pilas agotadas • Pilas gastadas en la Consola EZ • Pilas gastadas en el EZ Pro SOLUCIÓN • Compruebe que el ID del Controlador y el código de la Consola de programción coinceden exactamente • Instale un Módulo de radio modelo 8602 • Conecte el controlador EZ Pro a la corriente • Acérquese al lugar en que está el EZ Pro • Instale pilas LR14 (C) nuevas • Instale pilas LR14 (C) nuevas • Instale dos pilas LR14 (C) en la Consola EZ • Instale dos pilas AA nuevas en el EZ Pro DATOS TÉCNICOS 1. Intervalo de temperatura Funcionamiento: de -5 a +55 °C Almacenamiento: de -30 a +85 °C 2. Pilas Dos (2) pilas alcalinas tamaño C (LR14 en Europe) 3. Frecuencia 2,4 Ghz Intervalo de espectro @ 10mw 19 NORMAS FCC Este controlador electrónico de riego genera y utiliza energía radioeléctrica y si no se instala y utiliza de la manera debida, es decir, respetando estrictamente las instrucciones del fabricante, puede producir interferencias en la recepción de la radio y la televisión. Este aparato ha sido sometido a pruebas que demostraron que cumple con los límites para un dispositivo de programación de Clase B de acuerdo con las especificaciones de la Subparte J de la Parte 15 de las normas de la FCC destinadas a ofrecer una protección razonable contra esa interferencia en una instalación residencial. Sin embargo, no hay ninguna garantía de que no se producirán interferencias en una instalación determinada. Si este controlador produce interferencias en la recepción de la radio o la televisión, que pueden detectarse apagándolo y encendiéndolo, se sugiere al usuario que pruebe a corregirlas mediante una o más de las siguientes medidas: Reoriente la antena de recepción. Cambie la posición del controlador en relación con la del receptor. Aleje el controlador del receptor. Conecte el controlador en otro enchufe para que el controlador y el receptor estén en conexiones diferentes. Si es necesario, el usuario debería consultar al representante o a un técnico en radio/televisión con experiencia para que le indique otras medidas. El siguiente folleto, preparado por la Federal Communications Commission, puede ser de utilidad para el usuario: "Cómo identificar y resolver problemas de ruido radioeléctrico en radio y TV" Este folleto está disponible en la U.S. Government Printing Office, Washington, DC 20402. Stock No. 004-000-00345-4. AVISO IMPORTANTE: Para cumplir con la normativa de la FCC sobre exposición a la radiofrecuencia, deben tenerse en cuenta las siguientes instrucciones para la instalación de la antena y el funcionamiento de los dispositivos: La antena utilizada debe instalarse de manera que quede a un mínimo de 5 cm de separación de las personas, y en ningún caso debe usarse conjuntamente con otra antena o transmisor. NORMATIVA CANADIENSE SOBRE RUIDO RADIOELÉCTRICO NOTA: Este aparato digital no supera los límites de Clase B para emisiones de ruido radioeléctrico de aparatos digitales expuestas en las normativas de ruido radioeléctrico del Canadian Department of Communications. GARANTÍA Garantía limitada L.R. Nelson Corporation (“Nelson”) garantiza que ninguno de los productos electrónicos presentará defectos en lo que respecta a materiales y mano de obra durante un período de dos (2) años a partir de la fecha original de compra. En caso de que aparezcan defectos, Nelson procederá a realizar las reparaciones necesarias o a sustituir, según su criterio, el producto o la pieza defectuosa. Esta garantía no se hace extensiva al daño ocasionado a un producto o a una pieza de Nelson debido a accidente, utilización indebida, modificación, negligencia, mal trato, instalación incorrecta o desgaste normal a causa del uso, o a su aspecto exterior y su color. Esta garantía sólo se hace extensiva al usuario original del producto Nelson. Si el defecto aparece en un producto o en una pieza Nelson dentro del período de garantía, el usuario debe ponerse en contacto con el contratista instalador, el comerciante minorista de Nelson, el distribuidor o L.R. Nelson Corporation en una de las siguientes localidades: One Sprinkler Lane 4780 Eucalyptus Ave. 5660 Commerce Drive; Units 2,3 Peoria, IL 61615 Chino, CA 91710 Orlando, FL 32839-2978 888-NELSON-8 800-800-0993 (800) 743-1020 Fax (309) 692-5847 Fax 909-631-5025 Fax (407) 648-0924 Nelson puede, según su criterio, exigir que el producto o la pieza sean devueltos a un centro de reparaciones Nelson o al minorista o distribuidor. Nelson determinará si el supuesto defecto está cubierto por la garantía. Si está cubierto, el producto será reparado o sustituido. Deberá concederse un período de 4 a 6 semanas para llevar a cabo la reparación o sustitución y la devolución del producto o pieza. Si se ha sustituido un producto o una pieza, este producto o pieza sólo estará cubierto por la garantía durante el período de garantía restante del producto o pieza original. Esta garantía le otorga derechos legales específicos; también pueden asistirle otros derechos, que varían de un estado a otro. L.R. Nelson Corporation no autoriza a ninguna persona a determinar en su nombre ninguna otra obligación o responsabilidad en relación con sus productos. DE ACUERDO CON EL ALCANCE DE LO PERMITIDO POR LA LEY, TODA GARANTÍA, VENTA O APTITUD PARA UN PROPÓSITO PARTICULAR APLICABLE A LOS PRODUCTOS NELSON ESTÁ LIMITADA EN CUANTO A SU DURACIÓN A LA VIGENCIA DE ESTA GARANTÍA POR ESCRITO. NI L.R. NELSON CORPORATION NI SUS DISTRIBUIDORES O REPRESENTANTES SERÁN RESPONSABLES DE LA PÉRDIDA DE TIEMPO, LAS MOLESTIAS CAUSADAS, LA PÉRDIDA ECONÓMICA O LOS DAÑOS MENORES O DE IMPORTANCIA RESULTANTES DE LA VENTA O DISTRIBUCIÓN DE PRODUCTOS NELSON, YA SEA POR INCUMPLIMIENTO DE LA PRESENTE GARANTÍA, POR NEGLIGENCIA O PORQUE NO ESTÉN CUBIERTOS POR ESTA GARANTÍA. Algunos estados no permiten limitaciones respecto de la exclusión o limitación de los daños menores o de importancia durante el tiempo de duración de una garantía, por lo que las limitaciones mencionadas anteriormente tal vez no se apliquen en su caso. Si tiene alguna duda en relación con la garantía o su aplicación, escriba a L.R. Nelson Corporation, One Sprinkler Lane, Peoria, Illinois 61615, U.S.A. Atención: Customer Service (Servicio al cliente). PÓLIZA DE SEGURO DE LA MERCANCÍA CONSIDERADA DEFECTUOSA Los productos devueltos al comerciante o distribuidor y considerados defectuosos deben ser inspeccionados por el representante de ventas de Nelson para determinar la conformidad con la garantía. Si se admite que son defectuosos, los productos serán reparados o sustituidos o se emitirá una nota de crédito que cubra el precio de compra neto. Programmateur de commande à distance EZ Modèle 8600 GUIDE D’INSTALLATION ET DE PROGRAMMATION Le programmateur de commande à distance EZ est capable de contrôler toutes les fonctions de régulation du EZ Pro, y compris la programmation et le fonctionnement manuel de zone, via une liaison radio sécurisée. Les boutons du programmateur de commande à distance EZ commandent le même Select and Adjust™ que les touches du EZ Pro, ce qui facilite l’utilisation de chacune des opérations. Vous pouvez gagner énormément de temps en installant, en révisant et en faisant fonctionner un système d’irrigation EZ Pro Nelson à l’aide de cette technologie. Leaders dans l’irrigation de parcs et jardins depuis 1911 NOTE : Dans nos efforts pour améliorer et mettre à jour nos produits d'une manière continue, nous pouvons modifier les caractéristiques et spécifications présentées dans ce manuel sans notification. 22 TABLE DES MATIERES Installation de la batterie . . . . . . . . . . . . . . . . . . . . . . . . . . . . . . . . . . . . . . . . . . . . . . . . . . . . . 24 Indicateur de Décharge . . . . . . . . . . . . . . . . . . . . . . . . . . . . . . . . . . . . . . . . . . . . . . . . . . . 24 Allumer et éteindre le programmateur de commande à distance EZ . . . . . . . . . . . . . . . . . . 24 Installation de la Radio EZ Pro. . . . . . . . . . . . . . . . . . . . . . . . . . . . . . . . . . . . . . . . . . . . . . . . . 24-27 Numéro d’identification de contrôle. . . . . . . . . . . . . . . . . . . . . . . . . . . . . . . . . . . . . . . . . . . 24 Code d’accès programmateur. . . . . . . . . . . . . . . . . . . . . . . . . . . . . . . . . . . . . . . . . . . . . . . 25 Déterminer un numéro d’identification de contrôle et un code de programmateur sur le Contrôleur EZ Pro . . . . . . . . . . . . . . . . . . . . . . . . . . . . . . . . . . . . . . . . . . . . . . . . 25 Se connecter par radio . . . . . . . . . . . . . . . . . . . . . . . . . . . . . . . . . . . . . . . . . . . . . . . . . . . . 25 Écran de liaison . . . . . . . . . . . . . . . . . . . . . . . . . . . . . . . . . . . . . . . . . . . . . . . . . . . . . . . . . 26 Portée du signal radio . . . . . . . . . . . . . . . . . . . . . . . . . . . . . . . . . . . . . . . . . . . . . . . . . . . . 27 Opération en connexion . . . . . . . . . . . . . . . . . . . . . . . . . . . . . . . . . . . . . . . . . . . . . . . . . . . 27 Instructions de Fonctionnement et de Programmation . . . . . . . . . . . . . . . . . . . . . . . . . . . . . 27 Se déconnecter du Ez Pro . . . . . . . . . . . . . . . . . . . . . . . . . . . . . . . . . . . . . . . . . . . . . . . . . 27 Précautions . . . . . . . . . . . . . . . . . . . . . . . . . . . . . . . . . . . . . . . . . . . . . . . . . . . . . . . . . . . . 27 Diagnostic des Anomalies et Service pour la Commande EZ . . . . . . . . . . . . . . . . . . . . . . . . 28 Données Techniques . . . . . . . . . . . . . . . . . . . . . . . . . . . . . . . . . . . . . . . . . . . . . . . . . . . . . . . . 28 Régles de la Commission Fédérale des Communications . . . . . . . . . . . . . . . . . . . . . . . . . . . 29 Garantie . . . . . . . . . . . . . . . . . . . . . . . . . . . . . . . . . . . . . . . . . . . . . . . . . . . . . . . . . . . . . . . . . . 29-30 23 BATTERIE Installation de la batterie Ôtez la vis du couvercle de la batterie et enlevez celui-ci. Installez deux nouvelles piles alcalines de taille “C” (LR14 en Europe). Remettez le couvercle de la batterie et vissez. Indicateur de décharge Il y a un avertisseur de décharge sur l’écran à cristaux liquides de la commande EZ. Lorsque celui-ci s’affiche et clignote, vous devez placer de nouvelles piles dans votre Commande EZ. REMARQUE : lorsque la radio est connectée à l’EZ Pro, si l’avertisseur de décharge s’affiche, cela signifie que vous devez placer de nouvelles piles dans votre EZ Pro Allumer et éteindre le programmateur de commande à distance EZ Allumez le Programmateur de commande à distance EZ en appuyant sur une touche ou en déplaçant le cadran sur n’importe quelle position. Après une minute de non-utilisation, l’appareil s’éteindra automatiquement. Pour éteindre l’appareil quand la radio est connectée, appuyez sur la touche Radio On/ Off. INSTALLATION DE LA RADIO EZ PRO Vous devez programmer un numéro d’identification de contrôle à quatre chiffres et un code de programmateur à quatre chiffres dans le contrôleur EZ Pro avant d’effectuer une liaison radio. Une fois ceux-ci déterminés, le contrôleur les enregistre et une liaison radio peut s’effectuer à n’importe quel moment. Numéro d’identification de contrôle (0000 – 9999) Code de programmateur (0000 – 9999) 24 INSTALLATION DE LA RADIO EZ PRO Numéro d’identification de contrôle - Tout contrôleur doit avoir un numéro d’identification unique. Ceci évitera un conflit si plus d’un contrôleur est dans la portée du signal radio. Notez le numéro d’identification de contrôle pour une référence ultérieure. Avertissement : Ne pas sélectionner le même numéro d’identification de contrôle pour deux contrôleurs à moins d’1,5 km l’un de l’autre. Un mauvais fonctionnement radio pourrait en résulter. Code d’accès programmateur - Utilisez le même code de programmateur pour tous vos contrôleurs EZ Pro et programmateurs de commande à distance EZ. Ce code assure la sécurité pour éviter un accès radio non désiré. Rappel : Utilisez le même code de programmateur sur tous vos contrôleurs EZ Pro et programmateurs de commande EZ Déterminer un numéro d’identification de contrôle et un code de programmateur sur le Contrôleur EZ Pro Réglez le cadran Mode du contrôleur EZ Pro sur la position Program. Placez le grand cadran du contrôleur EZ Pro sur la position Radio Setup. Utilisez le SELECT pour vous déplacer entre le numéro d’identification de contrôle et le code de programmateur. Utilisez les touches ADJUST pour régler ceux-ci comme vous le souhaitez. Ramenez le cadran Mode sur la position OFF ou Auto. Se connecter par radio au programmateur de commande à distance EZ Lorsque le programmateur de commande à distance EZ est allumé, l’écran à cristaux liquides affiche les derniers numéro d’identification de contrôle et code d’accès programmateur utilisés. Utilisez les touches Select et Adjust pour choisir le numéro d’identification de contrôle et code de programmateur afin de les faire correspondre avec le contrôleur auquel vous voulez vous connecter. Appuyez sur le bouton radio ON /OFF pour faire la liaison. Remarque : il doit y avoir du courant sur le EZ Pro afin d’établir une liaison radio. 25 INSTALLATION DE LA RADIO EZ PRO Écran de liaison Lorsqu’il y a connexion, le symbole radio connectée apparaît à la fois sur l’appareil de commande EZ et sur le EZ Pro. L’écran affiche l’heure et la position du EZ Pro. L’écran à cristaux liquides affiche la position Mode Dial du EZ Pro (Auto, Program, ou Off) et la position Program Dial (A, B, ou C). L’écran affichera tout message de problème de la zone. Si un Rain Delay est programmé ou si le capteur de plui est activé, ces données s’affichent. L’écran de la commande EZ affiche toutes les commandes de fonctionnement ou de programmation exactement comme sur le contrôleur EZ Pro. Ce feed-back immédiat garantit que le contrôleur EZ Pro garde en mémoire tous les changements que vous faites. Lorsque la radio est branchée, la commande EZ annule temporairement les réglages du cadran et la position du EZ Pro. On peut contrôler toutes les fonctions manuelles et de programmation du EZ Pro à partir du programmateur de commande à distance EZ. 26 INSTALLATION DE LA RADIO EZ PRO Portée du signal radio La portée du signal radio est la plus grande lorsqu’il n’y a pas d’obstacle entre le EZ Pro et la Commande EZ. La taille et le genre de la structure dans laquelle est placé le EZ Pro ainsi que l’environnement local peuvent avoir un effet sur le fonctionnement. Opération en connexion Après une minute d’utilisation sans avoir tourné le cadran ou appuyé sur un bouton, la Commande EZ se mettra en mode « veille », afin de prolonger la durée de vie de la pile. L’unité se « réveillera » toutes les minutes et mettra à jour l’écran à cristaux liquides. Appuyer sur une touche ou tourner le cadran « réveillera » également la commande EZ. Après 15 minutes de non-utilisation, la liaison radio s’arrêtera et la commande EZ s’éteindra. Vous devez alors vous connecter à nouveau au EZ Pro. INSTRUCTIONS DE FONCTIONNEMENT ET DE PROGRAMMATION Lorsque la radio est connectée, utilisez le grand cadran, les boutons SELECT, les boutons ADJUST, le bouton A,B,C et le bouton AUTO, PROG, OFF de la commande EZ pour programmer et mettre en marche le contrôleur EZ Pro comme vous le souhaitez. Consultez le manuel d’instructions du EZ Pro™ pour toutes les instructions de fonctionnement et de programmation. REMARQUE: Les changements de programme effectués lorsque la radio est connectée sont enregistrés par le EZ Pro. Se déconnecter du EZ PRO Pour vous déconnecter du EZ Pro, appuyez sur la touche Radio On/Off. La radio se déconnecte et l’appareil de commande EZ s’éteind. Une fois déconnecté, le EZ Pro retourne à la position précédente. Tous les changements de programme effectués seront sauvegardés dans le EZ Pro. REMARQUE : Un fonctionnement manuel de zone, un cycle ou un test de 3 minutes entamé par la commande EZ continue après que la radio est déconnectée. Le EZ Pro retourne à sa position précédente après que l’opération est terminée. Précautions Évitez de mouiller la commande EZ. Même si elle résiste à l’eau, elle n’est pas étanche. De l’eau dans l’appareil endommagerait le circuit. Ne faites pas tomber la commande EZ. Cela pourrait endommager l’appareil. 27 DIAGNOSTIC DES ANOMALIES ET SERVICE POUR LA COMMANDE EZ PROBLÈME Impossible de connecter la radio Impossible de connecter la radio Impossible de connecter la radio Mauvaise liaison radio Mauvaise liaison radio L'appareil ne s'allume pas L'avertisseur de décharge clignote sur l'écran L'avertisseur de décharge affiché sur l'écran lorsque la radio est connectée CAUSE POSSIBLE • Le numéro d'identification de contrôle et ou le code de programmateur ne correspond pas au contrôleur EZ Pro • Le module radio modèle 8602 n'est pas installé sur le EZ Pro • Pas de courant alternatif au contrôleur EZ Pro • Hors de portée ou signal bloqué par un obstacle • Piles faibles • Pile plates • Piles faibles dans la commande EZ SOLUTION • Vérifiez que le numéro d'identification contrôleur et le code programmateur correspondent exactement • Installez un module radio modèle 8602 • Connectez le contrôleur EZ Pro à du courant alternatif • Rapprochez-vous de l'endroit où est placé le EZ Pro • Installez de nouvelles piles alcalines C • Installez de nouvelles piles alcalines C • Installez deux nouvelles piles alcalines C dans la commande EZ • Piles faibles dans le EZ Pro • Installez deux nouvelles piles alcalines AA dans le EZ Pro DONNÉES TECHNIQUES 1. Fourchette de températures En fonctionnement: de -5 à +55 °C Stockage: de -30 à +85 °C 2. Piles Deux (2) piles alcalines de taille C (LR14 en Europe) 3. Fréquence Étalement du spectre 2,4 Ghz à 10mw 28 RÈGLES DE LA COMMISSION FÉDÉRALE DES COMMUNICATIONS Ce contrôleur d’irrigation électronique génère et utilise l’énergie de la fréquence radio ; si celui-ci n’est pas installé et utilisé correctement, c’est-à-dire en suivant strictement les instructions du fabricant, il peut causer des interférences avec la réception radio et la réception des programmes de télévision. Un essai de type a été effectué et s’est révélé conforme aux limites pour un appareil de calcul de classe B en respect des spécifications du paragraphe J du 15ème chapitre des Règles FCC, qui sont conçues pour assurer une protection correcte contre de telles interférences dans une installation résidentielle. Néanmoins, il n’est pas garanti que cette interférence ne se produise pas dans une installation particulière. Si ce contrôleur cause une interférence avec la réception radio ou la réception des programmes de télévision, ce qu’on peut déterminer en allumant et éteignant le contrôleur, nous incitons l’utilisateur à essayer de corriger l’interférence en prenant une ou plusieurs des mesures suivantes : Réorientez l’antenne de réception. Déplacez le contrôleur en fonction du récepteur. Éloignez le contrôleur du récepteur. Branchez le contrôleur à une prise de courant différente, pour que le contrôleur et le récepteur soient sur des circuits de dérivation différents. Si nécessaire, l’utilisateur doit consulter le fournisseur ou un technicien radio/télévision expérimenté pour des suggestions supplémentaires. La brochure suivante, préparée par la Commission fédérale des communications, pourrait être utile à l’utilisateur : « How to Identify and Resolve Radio-TV Interference Problems » (Comment repérer et résoudre les problèmes d’interférences radio/télévision) Cette brochure est disponible au U.S. Government Printing Office, Washington, DC 20402. Stock N° 004-000-00345-4. NOTE IMPORTANTE: Pour satisfaire aux exigences de conformité de la FCC RF en matière d'exposition, il faut répondre aux configurations suivantes pour l'installation de l'antenne et le fonctionnement de l'appareil - L'antenne utilisée pour cet usage doit être installée à une distance d'au moins 5 cm de toute personne et ne doit pas être installée avec ou fonctionner conjointement avec quelque autre antenne ou transmetteur que ce soit RÈGLEMENTATIONS CANADIENNES SUR LE BROUILLAGE RADIOÉLECTRIQUE REMARQUE : Cet appareil numérique ne dépasse pas les limites de la classe B pour les émissions de bruit radioéletrique d’un appareil numérique fixées dans les règlementations sur le brouillage radioélectrique du ministère canadien des Communications. 29 GARANTIE Garantie limitée La L.R. Nelson Corporation (« Nelson ») garantit que tous les produits électroniques sont exempts de défauts en ce qui concerne les matériaux et la fabrication pour une période de deux (2) ans à partir de la date d’achat initiale. Si de tels défauts devaient survenir, Nelson remplacerait ou réparerait, au choix, le produit ou la partie défectueuse. Cette garantie ne s’applique pas aux dégâts faits à un produit Nelson ou à une partie de celui-ci et dus à un accident, à une utilisation inappropriée, à une modification, à la négligence, à de mauvais traitements, à une installation incorrecte, à l’usure normale ou à l’aspect extérieur et à la couleur. Cette garantie ne s’applique qu’au premier utilisateur du produit Nelson. Si un défaut apparaît dans un produit Nelson ou une partie de celui-ci dans la période de la garantie, vous devriez contacter votre entrepreneur d’installation, votre détaillant Nelson, votre distributeur, ou la L.R. Nelson Corporation à l’un des endroits suivants : One Sprinkler Lane 4780 Eucalyptus Ave. 5660 Commerce Drive; Units 2,3 Peoria, IL 61615 Chino, CA 91710 Orlando, FL 32839-2978 888-NELSON-8 800-800-0993 (800) 743-1020 Fax :(309) 692-5847 Fax : 909-631-5025 Fax : (407) 648-0924 Nelson peut, comme il le souhaite, exiger que le produit ou une partie de celui-ci soit renvoyé à un point de service Nelson ou à votre détaillant ou distributeur. Nelson déterminera si la garantie couvre le défaut déclaré. Si la couverture est constatée, le produit sera réparé ou remplacé. Veuillez compter 4 à 6 semaines pour la réparation ou le remplacement, et le renvoi du produit ou de la partie de celui-ci. Si un produit ou une partie de celui-ci est remplacé, ce remplacement n’est garanti que pour le reste de la période de garantie du produit ou de la partie de celui-ci. Cette garantie vous donne des droits juridiques spécifiques, et vous pouvez en outre avoir d’autres droits qui varient d’un État à l’autre. la L.R. Nelson Corporation n’autorise personne à créer tout autre obligation ou engagement en rapport avec les produits Nelson. DANS LA MESURE AUTORISÉE PAR LA LOI, TOUTE GARANTIE IMPLICITE, VALEUR COMMERCIALE OU UTILISATION APPROPRIÉE DANS UN BUT PRÉCIS APPLICABLE AUX PRODUITS NELSON, EST LIMITÉE DANS LE TEMPS À LA DURÉE DE CES GARANTIES ÉCRITES. NI LA L.R. NELSON CORPORATION NI SES DISTRIBUTEURS OU FOURNISSEURS NE SERONT RESPONSABLES DE LA PERTE DE TEMPS, DU DÉRANGEMENT, DE LA PERTE FINANCIÈRE, OU DES DÉGÂTS ACCIDENTELS OU INDIRECTS PROVENANT DE LA VENTE OU DE LA DISTRIBUTION DES PRODUITS NELSON SOIT POUR INOBSERVATION D’UNE GARANTIE CI-DESSOUS OU POUR NÉGLIGENCE OU DANS UN DÉLIT. Certains États ne permettent pas de restrictions sur la durée d’une garantie implicite en matière d’exclusion ou de limitation de dégâts indirects ou consécutifs, par conséquent les restrictions ou exclusions ci-dessus peuvent ne pas vous concerner. Pour toute question concernant la garantie ou son application, écrivez à la L.R. Nelson Corporation, One Sprinkler Lane, Peoria, Illinois 61615, U.S.A. Attention : Customer Service (service clientèle). POLICE SUR LES MARCHANDISES DÉFECTUEUSES RÉCLAMÉES Les produits renvoyés au détaillant ou disributeur et déclarés défectueux doivent être inspectés par le représentant commercial de Nelson afin de déterminer la conformité de la garantie. Si l’approbation est accordée, les produits seront réparés ou remplacés, ou bien un protocole de crédit couvrant le prix net d’achat sera délivré. Programmatore a distanza EZ Modello 8600 GUIDA ALL’INSTALLAZIONE E ALLA PROGRAMMAZIONE Il programmatore a distanza EZ è in grado di comandare tutte le funzioni della centralina EZ Pro, ivi compresi la programmazione e l’avvio manuale di una zona, mediante collegamento radio. Con il programmatore a distanza EZ è inoltre possibile gestire la programmazione Select and Adjust™, la stessa che viene controllata dai comandi della centralina EZ Pro, la quale rende tutte le funzioni “EZ”, ossia ‘easy’ (facili) da utilizzare. L’impiego di questa tecnologia comporta un notevole risparmio di tempo durante le operazioni di installazione, manutenzione e gestione degli impianti di irrigazione Nelson EZ Pro. LEADER NELL’IRRIGAZIONE DEL MANTO ERBOSO SIN DAL 1911 NOTA: A causa dei continui sforzi per migliorare e aggiornare i nostri prodotti, le caratteristiche e le specifiche contenute in questo manuale possono variare senza preavviso. 31 INDICE Installazione della Batteria . . . . . . . . . . . . . . . . . . . . . . . . . . . . . . . . . . . . . . . . . . . . . . . . . . . . 33 Indicatore Batterie Scariche . . . . . . . . . . . . . . . . . . . . . . . . . . . . . . . . . . . . . . . . . . . . . . . . 33 Accensione e Spegnimento del Programmatore a Distanza EZ. . . . . . . . . . . . . . . . . . . . . . 33 Regolazione per il Collegamento Radio Dell’EZ Pro . . . . . . . . . . . . . . . . . . . . . . . . . . . . . . . . 33-36 Identificavo Centralina . . . . . . . . . . . . . . . . . . . . . . . . . . . . . . . . . . . . . . . . . . . . . . . . . . . . 33 Codice de Accesso del Programmatore . . . . . . . . . . . . . . . . . . . . . . . . . . . . . . . . . . . . . . . 34 Impostazione dell’identificavo Centralalina e del Codice Programmatore nella Centralina EZ Pro . . . . . . . . . . . . . . . . . . . . . . . . . . . . . . . . . . . . . . . . . . . . . . . . . 34 Collegamento Radio con il Programmatore a Distanza EZ . . . . . . . . . . . . . . . . . . . . . . . . . 34 Stato del Display in fase di Collegamento . . . . . . . . . . . . . . . . . . . . . . . . . . . . . . . . . . . . . . 35 Portata del Segnale Radio . . . . . . . . . . . . . . . . . . . . . . . . . . . . . . . . . . . . . . . . . . . . . . . . . 36 Funzionamento in fase di Collegamento . . . . . . . . . . . . . . . . . . . . . . . . . . . . . . . . . . . . . . . 36 Istruzioni per la Programmazione el il Funzionamento. . . . . . . . . . . . . . . . . . . . . . . . . . . . . . 36 Scollegamento dalla Centralina EZ Pro . . . . . . . . . . . . . . . . . . . . . . . . . . . . . . . . . . . . . . . 36 Manutenzione del Programmatore EZ . . . . . . . . . . . . . . . . . . . . . . . . . . . . . . . . . . . . . . . . 36 Soluzione dei Problemi e Manutenzione del Programmatore EZ . . . . . . . . . . . . . . . . . . . . . . 37 Dati Tecnici . . . . . . . . . . . . . . . . . . . . . . . . . . . . . . . . . . . . . . . . . . . . . . . . . . . . . . . . . . . . . . . . 38 Norme FCC . . . . . . . . . . . . . . . . . . . . . . . . . . . . . . . . . . . . . . . . . . . . . . . . . . . . . . . . . . . . . . . . 38 Garanzia . . . . . . . . . . . . . . . . . . . . . . . . . . . . . . . . . . . . . . . . . . . . . . . . . . . . . . . . . . . . . . . . . . 39 32 BATTERIA Installazione della batteria Rimuovete il coperchio del comparto batterie svitando la vite che lo trattiene. Inserite due pile alcaline “C” (LR14 in Europa), quindi rimettete il coperchio e riavvitate. Indicatore batterie scariche Sul display a cristalli liquidi del programmatore EZ appare un simbolo che segnala l’esaurimento delle pile . Quando questo simbolo appare e inizia a lampeggiare è necessario sostituire le batterie all’interno del programmatore EZ. NOTA: Se il programmatore è collegato via radio alla centralina EZ Pro, la comparsa del simbolo batterie scariche significa che è necessario sostituire le pile all’interno della centralina Accensione e spegnimento del programmatore a distanza EZ Il programmatore a distanza EZ può essere acceso premendo un tasto qualunque o girando la manopola su una qualsiasi posizione. Trascorso un minuto di inattività, l’unità si spegne automaticamente. Per spegnere l’unità quando è radiocollegata, premete il tasto Radio On/Off. REGOLAZIONE PER IL COLLEGAMENTO RADIO DELL’EZ PRO Prima di effettuare il radiocollegamento, l’EZ Pro deve essere programmato con un identificativo centralina e un codice programmatore, entrambi di quattro cifre. Una volta regolata, la centralina memorizza questi numeri in modo tale che in qualsiasi momento è possibile effettuare il collegamento radio. Identificativo centralina (0000 – 9999) Codice programmatore (0000 – 9999) 33 REGOLAZIONE PER IL COLLEGAMENTO RADIO DELL’EZ PRO Identificativo centralina – Ogni centralina deve avere il proprio identificativo. Tale misura è volta a prevenire un eventuale conflitto nel caso in cui ci siano più centraline nel raggio d’azione del segnale radio. È consigliabile prendere nota dell’identificativo centralina per futuri utilizzi. ATTENZIONE: Evitate di scegliere lo stesso identificativo per due centraline che si trovano a una distanza pari o inferiore a un miglio l’una dall’altra, in quanto ciò potrebbe compromettere il collegamento radio. Codice di accesso del programmatore – Utilizzate lo stesso codice per tutte le centraline EZ Pro e i programmatori a distanza EZ da voi utilizzati. Tale codice impedisce che vengano effettuati collegamenti indesiderati. N. B.: Utilizzate lo stesso codice programmatore per tutte le centraline EZ Pro e i programmatori EZ da voi utilizzati Impostazione dell’identificativo centralina e del codice programmatore nella centralina EZ Pro Girate la manopola Modalità della centralina EZ Pro fino alla posizione Programmazione. Girate la manopola grande della centralina fino alla posizione Regolazione radio. Utilizzate i tasti SELEZIONARE per scegliere Identificativo centralina o Codice programmatore. Utilizzate i tasti REGOLARE per impostare le cifre desiderate. Girate la manopola Modalità su OFF o Auto. Collegamento radio con il programmatore a distanza EZ Quando il programmatore a distanza EZ è attivato, il display a cristalli liquidi mostra l’ultimo identificativo e l’ultimo codice di accesso utilizzati. Usate i tasti Selezionare e Regolare per scegliere l’Identificativo centralina e il Codice programmatore corrispondenti alla centralina a cui volete collegarvi. Per effettuare il collegamento premete quindi il tasto Radio ON /OFF. NOTA: Per effettuare il collegamento radio è necessario che la centralina EZ Pro sia alimentata a corrente CA. 34 
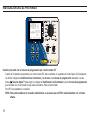
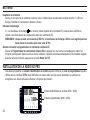
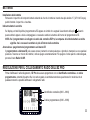
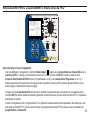
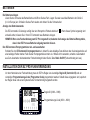
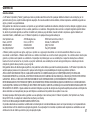
REGOLAZIONE PER IL COLLEGAMENTO RADIO DELL’EZ PRO Stato del display in fase di collegamento Una volta effettuato il collegamento, il simbolo Radiocollegato appare sia sul programmatore a distanza EZ sia sulla centralina EZ Pro. Il display a cristalli liquidi mostra l’ora e lo stato corrente dell’EZ Pro nonché le posizioni della manopola della Modalità dell’EZ Pro (Auto, Programmazione o Off) e della manopola del Programma (A, B o C). Il display segnalerà inoltre la presenza di messaggi relativi a problemi di zona nonché l’eventuale programmazione di una pausa pioggia o l’attivazione del sensore pioggia. Il display LCD del programmatore EZ riporterà tutti i comandi di programmazione o funzionamento che appaiono sulla centralina EZ Pro. Questo feedback istantaneo garantisce la memorizzazione, da parte della centralina EZ Pro, di qualsiasi modifica da voi operata. Durante il collegamento radio il programmatore EZ si sostituisce temporaneamente alle impostazioni delle manopole e allo stato della centralina EZ Pro. Tutte le funzioni manuali e di programmazione dell’EZ Pro possono essere comandate dal programmatore a distanza EZ. 35 REGOLAZIONE PER IL COLLEGAMENTO RADIO DELL’EZ PRO Portata del segnale radio La portata del segnale radio è maggiore quando esiste una linea ottica ben distinta tra la centralina EZ Pro e il programmatore EZ. Il tipo e le dimensioni della struttura in cui si trova ubicata la centralina EZ Pro, nonché il terreno del luogo, possono influire sulle prestazioni del collegamento. Funzionamento in fase di collegamento Se entro un minuto dall’accensione non viene girata alcuna manopola né premuto alcun tasto, il programmatore EZ passa automaticamente alla modalità ‘sleep’ al fine di evitare un eccessivo consumo delle batterie. L’unità si “risveglia” una volta al minuto e aggiorna il display a cristalli liquidi. È anche possibile ‘svegliare’ il programmatore premendo un tasto qualsiasi o girando la manopola. Trascorsi 15 minuti di inattività, il collegamento radio si interrompe e il programmatore EZ si spegne. Sarà quindi necessario ricollegarsi alla centralina EZ Pro. ISTRUZIONI PER LA PROGRAMMAZIONE E IL FUNZIONAMENTO Durante il collegamento radio la programmazione e la gestione della centralina EZ Pro avviene mediante la manopola grande, i tasti SELEZIONARE, i tasti REGOLARE, la manopola A,B,C e quella AUTO, PROG, OFF presenti sul programmatore EZ. Per le istruzioni relative alla programmazione e al funzionamento fate riferimento al manuale della centralina EZ Pro™. La centralina EZ Pro memorizza le eventuali modifiche ai programmi effettuate durante il collegamento radio. Scollegamento dalla centralina EZ PRO Per scollegarsi dalla centralina EZ Pro, premete il tasto Radio On/Off. Il collegamento radio si interrompe e il programmatore EZ si spegne. Una volta scollegata, la centralina EZ Pro ritorna allo stato precedente il collegamento conservando le eventuali modifiche apportate ai programmi. NOTA: Le procedure Manuale, Ciclo o Prova di 3 minuti avviate mediante il programmatore EZ continuano anche dopo l’interruzione del collegamento. La centralina EZ Pro ritornerà allo stato precedente il collegamento a conclusione delle procedure. Manutenzione del programmatore EZ Benché resistente all’acqua, l’unità non è stagna ed è quindi necessario evitare che si bagni. L’infiltrazione d’acqua all’interno del programmatore danneggia i circuiti. L’unità può inoltre riportare danni da un’eventuale caduta. 36 SOLUZIONE DEI PROBLEMI E MANUTENZIONE DEL PROGRAMMATORE EZ SINTOMO CAUSA PROBABILE SOLUZIONE Non è possibile effettuare il collegamento radio • L'identificativo centralina e/o il codice programmatore non corrispondono alla centralina EZ Pro • Controllate che indentificativo e codice corrispondano esattamente Non è possiblile effettuare il collegamento radio • La centralina EZ Pro è priva del radiomodulo modello 8602 • Installate un radiomodulo modello 8602 Non è possibile effettuare il collegamento radio • La centralina EZ Pro non è alimentata con corrente CA • Alimentate la centralina EZ Pro con corrente CA La qualità del collegamento radio è scadente • Siete fuori dalla portata del segnale oppureil segnale è bloccato da qualche ostacolo • Avvicinatevi al luogo in cui si trova la centralina EZ Pro La qualità del collegamento radio è scadente • Le batterie sono quasi esaurite • Sostituite le batterie utilizzando pile alcaline C L'unità non si accende • Le batterie sono quasi scariche • Sostitute le batterie con pile alcaline C Sul display a cristalli liquidi lampeggia il simbolo batterie scariche • Le batterie del programmatore EZ si stano esaurendo • Inserite due nuove pile alcaline C nel programmatore EZ Sul display a cristalli liquidi appare • Le batterie della centralina EZ Pro il simbolo batterie scariche durante si stanno esaurendo il collegamento radio • Inserite due nuove pile alcaline AA nella centralina EZ Pro 37 DATI TECNICI 1. Gamma della temperatura Operativa: da -5 a +55 °C Non operativa: da -30 a +85 °C 2. Batterie Due (2) pile alcaline C (LR14 in Europa) 3. Frequenza Spread Spectrum 2.4 Ghz @ 10mw NORME FCC Questa centralina elettronica per l’irrigazione emana e usa energia di radiofrequenza e se non viene installata e usata in modo appropriato, cioè seguendo le istruzioni del costruttore, può causare interferenza alla ricezione radiotelevisiva. È stata provata per determinare il tipo a cui appartiene ed è stata dichiarata conforme ai limiti imposti per un dispositivo elaboratore della Classe B, secondo le specificazioni contenute nella sottosezione J della Parte 15 delle norme FCC, istituite per offrire una ragionevole protezione contro tali interferenze nelle installazioni residenziali. Non è tuttavia garantito che non si avranno tali interferenze in una particolare installazione. Se questo dispositivo dovesse effettivamente causare interferenze alla ricezione radiotelevisiva, cosa che può avvenire accendendo e spegnendo la centralina, si consiglia all’utente di provare ad eliminare l’interferenza con uno o più dei seguenti provvedimenti: Riorientare l’antenna di ricezione. Sistemare la centralina in luogo diverso da quello del ricevitore. Spostare la centralina lontano dal ricevitore. Collegare la centralina a un’altra presa in modo che si trovi su un circuito diverso rispetto al ricevitore In caso siano necessari ulteriori suggerimenti, l’utente può rivolgersi al rivenditore o a un tecnico radiotelevisivo. Può inoltre risultare utile la consultazione del seguente opuscolo redatto dalla Federal Communications Commission (Commissione Federale delle Comunicazioni): “How to Identify and Resolve Radio-TV Interference Problems” (come identificare e risolvere i problemi delle interferenze radiotelevisive). Questo libretto è distribuito da U.S. Government Printing Office, Washington, DC 20402. Stock no. 004-000-00345-4. AVVERTENZA IMPORTANTE: Nel rispetto delle norme FCC RF in materia di esposizione, è necessario seguire le istruzioni per l'installazione dell'antenna e la configurazione operativa del dispositivo descritte qui di seguito - L'antenna utilizzata per questa apparecchiatura deve essere installata a una distanza di almeno 5 cm dalle persone e non deve essere collocata insieme né tanto meno funzionare insieme a qualsiasi altra antenna o trasmettitore. REGOLAMENTI SULLE INTERFERENZE RADIO IN CANADA NOTA: Questo dispositivo digitale rientra nei limiti della Classe B concernenti i radiodisturbi delle apparecchiature digitali stabiliti nei regolamenti sulle interferenze radio del Ministero delle Telecomunicazioni canadese. 38 GARANZIA Limitazione di garanzia La L.R. Nelson Corporation (“Nelson”) garantisce che tutti i prodotti elettronici sono esenti da difetti di materiale e di fabbrica per un periodo di due (2) anni dalla data di acquisto. Nel caso in cui si riscontrassero tali difetti, la Nelson riparerà o sostituirà, a propria discrezione, il prodotto o la parte difettosa. La presente garanzia non copre danni ai prodotti o a parti delle unità Nelson derivanti da incidente, uso improprio, modifiche, negligenza, incuria, installazione impropria o normale usura, né è applicabile all’aspetto esteriore o al colore. La presente garanzia s’intende valida solo nei confronti dell’utente originale del prodotto Nelson. Se durante il periodo di garanzia si riscontrasse un difetto in un prodotto Nelson o in una sua parte, contattare il tecnico installatore, il rivenditore Nelson, il distributore oppure la L.R. Nelson Corporation presso una delle seguenti località: One Sprinkler Lane 4780 Eucalyptus Ave. 5660 Commerce Drive; Units 2,3 Peoria, IL 61615 Chino, CA 91710 Orlando, FL 32839-2978 888-NELSON-8 (800) 800-0993 (800) 743-1020 Fax (309) 692-5847 Fax (909) 631-5025 Fax (407) 648-0924 La Nelson può, a propria discrezione, richiedere che il prodotto o la parte difettosa vengano portati presso un centro di assistenza Nelson o presso il rivenditore o distributore. La Nelson provvederà quindi a stabilire se il difetto oggetto di reclamo sia coperto dalla garanzia, nel qual caso il prodotto sarà riparato o sostituito. Occorrono 4/6 settimane per completare gli interventi di riparazione o sostituzione e restituire il prodotto o la parte. In caso di sostituzione del prodotto o di una parte di esso, la garanzia relativa al prodotto o alla parte sostituita sarà valida solo per il restante periodo di garanzia del prodotto o parte originale. Questa garanzia accorda all’utente specifici diritti legali, ai quali possono aggiungersi altri diritti che variano da stato a stato. La L.R. Nelson proibisce a chiunque di definire a nome suo ulteriori obblighi o responsabilità relativamente ai prodotti Nelson. PER LEGGE UNA QUALSIASI GARANZIA IMPLICITA DI COMMERCIABILITÀ O IDONEITÀ PER UNO SCOPO PARTICOLARE APPLICABILE AI PRODOTTI NELSON VIENE LIMITATA ALLA DURATA DEL PERIODO DI GARANZIA. NÉ LA L.R. NELSON CORPORATION NÉ I SUOI DISTRIBUTORI O RIVENDITORI SONO RESPONSABILI PER LA PERDITA DI TEMPO, INCONVENIENTI, PERDITA ECONOMICA, OPPURE DANNI INCIDENTALI O CONSEGUENTI DERIVANTI DALLA VENDITA O DISTRIBUZIONE DEI PRODOTTI NELSON, SIA PER VIOLAZIONE DELLA PRESENTE GARANZIA SIA PER NEGLIGENZA O COLPA. Alcuni stati non ammettono limitazioni sulla durata di una garanzia implicita o sull’esclusione o limitazione di responsabilità per danni incidentali o conseguenti. In tali casi le suddette limitazioni o esclusioni potrebbero non essere applicabili. Eventuali domande riguardanti la garanzia o la sua applicazione vanno inviate alla L.R. Nelson Corporation, One Sprinkler Lane, Peoria, Illinois 61615. U.S.A., all’attenzione del Customer Service. PRASSI PER LA MERCE RITENUTA DIFETTOSA I prodotti che sono stati restituiti al rivenditore o al distributore perché difettosi devono essere ispezionati dal rappresentante Nelson per verificare se il difetto è coperto da garanzia. Se viene data l'approvazione, i prodotti saranno riparati o sostituiti oppure verrà emessa una nota di accredito per il valore del prezzo netto d’acquisto. 39 EZ Command-Fernprogrammierer Modell 8600 INSTALLATIONS- UND PROGRAMMIERUNGSANLEITUNG Mit dem EZ Command-Fernprogrammierer können alle Funktionen des EZ Pro-Reglers über eine sichere Funkverbindung eingestellt werden, einschließlich der Programmierung und des manuellen Zonenbetriebs. Die Regulierung mit Hilfe des EZ Command-Fernprogrammierers funktioniert mit den gleichen Select and Adjust™ Funktionen wie der EZ Pro, was eine äußerst benutzerfreundliche Bedienung ermöglicht. Die Installation und Bedienung eines Nelson EZ ProBewässerungssystems mit Hilfe dieser Technologie kann zu einer gewaltigen Zeiteinsparung führen. Seit 1911 in der Rasenbewässerung führend HINWEIS: Im Rahmen unserer Bemühungen, unsere Produkte ständig zu verbessern und zu aktualisieren, können sich Eigenschaften und technische Daten dieses Handbuchs ohne Hinweis ändern. 40 INHALT Die Batterien einlegen . . . . . . . . . . . . . . . . . . . . . . . . . . . . . . . . . . . . . . . . . . . . . . . . . . . . . . . 42 Anzeige des Batteriezustands . . . . . . . . . . . . . . . . . . . . . . . . . . . . . . . . . . . . . . . . . . . . . . 42 Den EZ Command-Fernprogammierer ein- und ausschalten . . . . . . . . . . . . . . . . . . . . . . . . 42 Installationm der EZ Pro-Funkverbindung. . . . . . . . . . . . . . . . . . . . . . . . . . . . . . . . . . . . . . . . 42-45 Regler-ID . . . . . . . . . . . . . . . . . . . . . . . . . . . . . . . . . . . . . . . . . . . . . . . . . . . . . . . . . . . . . . 42 Programmierungs-Access-Code . . . . . . . . . . . . . . . . . . . . . . . . . . . . . . . . . . . . . . . . . . . . . 43 Eine Regler-ID und einen Programmierungs-Code in den EZ Pro-Regler eingeben. . . . . . . 43 Eine Funkverbindung mit dem EZ Command-Fernprogrammierer herstellen . . . . . . . . . . . . 43 Verbindungs-Bildschirm . . . . . . . . . . . . . . . . . . . . . . . . . . . . . . . . . . . . . . . . . . . . . . . . . . . 44 Reichweite der Funksignale . . . . . . . . . . . . . . . . . . . . . . . . . . . . . . . . . . . . . . . . . . . . . . . . 45 Betrieb bei Funkverbindung . . . . . . . . . . . . . . . . . . . . . . . . . . . . . . . . . . . . . . . . . . . . . . . . 45 Programmierungs- Und Betriebsanweisungen . . . . . . . . . . . . . . . . . . . . . . . . . . . . . . . . . . . . 45 Die Verbindung mit dem EZ Pro unterbrechen . . . . . . . . . . . . . . . . . . . . . . . . . . . . . . . . . . 45 Umgang mit dem EZ Command . . . . . . . . . . . . . . . . . . . . . . . . . . . . . . . . . . . . . . . . . . . . . 45 Problemlösung und Service für den EZ Command. . . . . . . . . . . . . . . . . . . . . . . . . . . . . . . . . 46 Technische Daten . . . . . . . . . . . . . . . . . . . . . . . . . . . . . . . . . . . . . . . . . . . . . . . . . . . . . . . . . . . 47 FCC-Regelin . . . . . . . . . . . . . . . . . . . . . . . . . . . . . . . . . . . . . . . . . . . . . . . . . . . . . . . . . . . . . . . 47 Garantie . . . . . . . . . . . . . . . . . . . . . . . . . . . . . . . . . . . . . . . . . . . . . . . . . . . . . . . . . . . . . . . . . . 48 41 BATTERIEN Die Batterien einlegen Lösen Sie die Schraube des Batteriefachs und öffnen Sie das Fach. Legen Sie zwei neue Alkali-Batterien der Größe C (L14 in Europa) ein. Schließen Sie das Fach wieder und drehen Sie die Schraube fest. Anzeige des Batteriezustands Die EZ Command-LCD-Anzeige verfügt über ein Warnsymbol "Batterie bald leer" . Wenn dieses Symbol angezeigt wird und aufleuchtet, müssen Sie in Ihren EZ Command neue Batterien einlegen. HINWEIS: Wenn eine Funkverbindung zum EZ Pro hergestellt ist, bedeutet die Anzeige des Batterie-Warnsymbols, dass in den EZ Pro neue Batterien eingelegt werden müssen. Den EZ Command-Fernprogrammierer ein- und ausschalten Schalten Sie den EZ Command-Fernprogrammierer ein, indem Sie eine beliebige Taste drücken oder die Anzeigescheibe auf eine beliebige Position drehen. Falls Sie den Fernprogrammierer mehr als 1 Minute nicht verwenden, schaltet er automatisch aus. Zum Ausschalten bei bestehender Funkverbindung drücken Sie die Taste Radio On/Off (Funkverbindung ein/ aus). INSTALLATION DER EZ PRO-FUNKVERBINDUNG Vor dem Herstellen einer Funkverbindung muss im EZ Pro-Regler eine vierstellige Regler-ID (Controller ID) und ein vierstelliger Programmierungs-Code (Programmer Code) programmiert werden. Sobald diese eingegeben sind, speichert der Regler diese und es kann jederzeit eine Funkverbindung hergestellt werden. Regler-ID (0000 – 9999) Programmierungs-Code (0000 – 9999) INSTALLATION DER EZ PRO-FUNKVERBINDUNG Regler-ID: Jeder Regler muss über eine einmalige ID verfügen. Dies verhindert Konflikte, wenn sich innerhalb der Reichweite des Funksignals mehr als ein Regler befinden. Warnung: Wählen Sie nicht die gleiche Regler-ID für zwei Regler, die weniger als eine Meile (1,6 km) voneinander entfernt sind. Dies kann zu fehlerhaftem Funkbetrieb führen. Programmierungs-Access-Code: Verwenden Sie für all Ihre EZ Pro-Regler und EZ Command-Fernprogrammierer den gleichen Programmierungs-Code. Dieser Code sichert vor ungewolltem Zugang zur Funkverbindung. Erinnerung: Verwenden Sie für all Ihre EZ Pro-Regler und EZ Command-Fernprogrammierer den gleichen Programmierungs-Code Eine Regler-ID und einen Programmierungs-Code in den EZ Pro-Regler eingeben Stellen Sie die Mode-Anzeigescheibe des EZ Pro-Reglers auf die Position Program. Drehen Sie die große Anzeigescheiben des EZ Pro-Reglers auf die Position Radio Setup (Funkverbindung installieren). Wechseln Sie mit den Tasten SELECT zwischen der Regler-ID und dem Programmierungs-Code. Stellen Sie mit den Tasten ADJUST die gewünschte Zahl ein. Stellen Sie die Mode-Anzeigescheibe auf die Position OFF oder Auto zurück. Eine Funkverbindung mit dem EZ Command-Fernprogrammierer herstellen Wenn der EZ Command-Fernprogrammierer eingeschalten ist, werden auf dem LCD-Bildschirm die zuletzt verwendete Regler-ID und der zuletzt verwendete Programmierungs-Access-Code angezeigt. Stellen Sie mit den Tasten Select und Adjust die Regler-ID und den Programmierungs-Code so ein, dass er mit den den entsprechenden Zahlen des Reglers übereinstimmt, zu dem Sie eine Verbindung herstellen wollen. Drücken Sie den Knopf Radio ON /OFF, um die Verbindung herzustellen. HINWEIS: Um eine Funkverbindung herstellen zu können, muss der EZ Pro an Wechselstrom angeschlossen sein. 43 INSTALLATION DER EZ PRO-FUNKVERBINDUNG Verbindungs-Bildschirm Wenn eine Verbindung besteht, erscheint sowohl auf dem EZ Command als auch auf dem EZ Pro das Symbol Radio Connected (Funkverbindung hergestellt) . Die LCD-Anzeige zeigt die Zeit und den derzeitigen Status des EZ Pro. Der LCD-Bildschirm zeigt die Position der Mode-Anzeigescheibe des EZ Pro (Auto, Program oder Off) und die Position der Program-Anzeigescheibe (A, B oder C). Im Falle irgendwelcher Mitteilungen über Zonenprobleme erscheinen diese auf der LCD-Anzeige. Falls eine Verzögerung bei Regen programmiert oder der Regensensor aktiviert ist, werden diese angezeigt. Die LCD-Anzeige des EZ Command zeigt alle Programmierungs- oder Betriebsbefehle genau so an, wie sie auf dem EZ Pro-Regler zu sehen sind. Dieses unmittelbare Feedback stellt sicher, dass der EZ Pro-Regler alle vorgenommenen Änderungen festhält. Solange eine Funkverbindung besteht, setzt der EZ Command vorübergehend die Einstellungen der Anzeigescheiben und den Status des EZ Pro außer Kraft. Alle manuellen Funktionen und Programmierungsfunktionen können mit dem EZ Command-Fernprogrammierer geregelt werden. 44 INSTALLATION DER EZ PRO-FUNKVERBINDUNG Reichweite der Funksignale Die Reichweite des Funksignals ist am größten, wenn zwischen dem EZ Pro und dem EZ Command eine klare Sichtlinie besteht. Die Art und Größe der Anlage, wo sich der EZ Pro befindet, sowie die örtlichen Gegebenheiten können die Leistung beeinflussen. Betrieb bei Funkverbindung Falls eine Minute keine Anzeigescheibe gedreht oder kein Knopf gedrückt wird, schaltet der EZ Command in den "Ruhemodus". So wird die Batterie geschont. Die Einheit wird jede Minute "aufwachen" und den LCD-Bildschirm aktualisieren. Das Drücken irgendeines Knopfes oder das Drehen der Anzeigescheibe führen ebenfalls zu einem "Aufwachen". Wird das Gerät 15 Minuten nicht verwendet, wird die Funkverbindung abgebrochen, und der EZ Command schaltet aus. Sie müssen erneut eine Verbindung zum EZ Pro herstellen. PROGRAMMIERUNGS- UND BETRIEBSANWEISUNGEN Während eine Funkverbindung besteht, können Sie mit Hilfe der Knöpfe SELECT, ADJUST, der Knöpfe A,B,C und der Knöpfe AUTO, PROG, OFF auf dem EZ Command den EZ Pro-Regler wie gewünscht programmieren und betreiben. Die kompletten Programmierungs- und Betriebsanleitungen finden Sie in der Gebrauchsanweisung des EZ Pro™. Während der Funkverbindung vorgenommene Programmänderungen werden vom EZ Pro gespeichert. Die Verbindung mit dem EZ Pro unterbrechen Um die Verbindung mit dem EZ Pro zu unterbrechen, drücken Sie die Taste Radio On/Off. Die Funkverbindung wird unterbrochen, und die EZ Command-Einheit schaltet aus. Sobald die Verbindung unterbrochen ist, kehrt der EZ Pro zu seinem ursprünglichen Status zurück. Vorgenommene Programmänderungen werden im EZ Pro gespeichert. Hinweis: Ein mit dem EZ Command gestarteter manueller Durchlauf, Programmzyklus oder 3-Minuten-Test läuft auch nach Unterbrechung der Funkverbindung weiter. Der EZ Pro kehrt nach Abschluss des jeweiligen Durchlaufs wieder zu seinem ursprünglichen Status zurück. Umgang mit dem EZ Command Den EZ Command nicht nass werden lassen. Das Gerät ist zwar wasserabweisend, nicht aber wasserdicht. In die Einheit geratenes Wasser kann den Stromkreis beschädigen. Den EZ Command nicht fallen lassen. Dies kann die Einheit beschädigen. 45 PROBLEMLÖSUNG UND SERVICE FÜR DEN EZ COMMAND STÖRUNG MÖGLICHE URSACHE LÖSUNG Funkverbindung lässt sich nicht herstellen • Die Regler-ID oder der Programmierungs- Code stimnt nicht mit dem EZ Pro-Regler überein • Vergewissern Sie sich, dass die Regler-ID und der ProgrammierungsCode übereinstimmen Funkverbindung lässt sich nicht herstellen • Im EZ Pro ist kein Funkmodul Modell 8602 installiert • Installieren Sie ein Funkmodul Modell 8602 Funkverbindung lässt sich nicht herstellen • Der EZ Pro-Regler ist nicht an Wechselstrom angeschlossen • Schließen Sie den EZ Pro-Regler an Wechselstrom an Schlechte Funkverbindung • Außerhalb der Reichweite oder Signal durch Hindernisse blockiert • Gehen Sie näher an Ort, wo sich der EZ Pro befindet Schlechte Funkverbindung • Schwache Batterien • Legen Sie zwei neue Alkali-Batterien der Größe LR14 ein Gerät schaltet nicht ein • Batterien leer • Legen Sie zwei neue Alkali-Batterien der Größe LR14 ein Warnung “Batterie bald leer” leuchtet auf der LCD-Anzeige auf • Schwache Batterien im EZ Command • Legen Sie im EZ Command zwei neue Alkali-Batterien der Größe LR14 ein Warnung “Batterie bald leer” leuchtet während bestehender Funkverbindung auf der LCD-Anzeige auf • Schwache Batterien im EZ Pro • Legen Sie im EZ Pro zwei neue Alkali-Batterien ein 46 TECHNISCHE DATEN 1. Temperaturbereich Betrieb: -5 to +55 °C Stillstand: -30 to +85 °C 2. Batterien Zwei (2) Alkali-Batterien der Größe C (LR14 in Europa) 3. Frequenz 2.4 Ghz Spread Spectrum @ 10mw FCC-REGELN Dieser elektronische Bewässerungsregler erzeugt und verwendet Funkfrequenzenergie und kann bei nicht fachgemäßer - d.h. entsprechend den Anweisungen des Herstellers – Montage zu Störungen des Radio- und Fernsehempfangs führen. Der Regler wurde auf seinen Typ hin getestet und erwies sich als konform mit den Grenzwerten für ein Datenverarbeitungsgerät der Klasse B gemäß den Spezifikationen in Unterteil J, Teil 15 der FCCRegeln, die dazu bestimmt sind, entsprechenden Schutz vor Störungen von einer Heiminstallation zu bieten. Es besteht jedoch keine Garantie, dass es in einer konkreten Installation nicht zu einer Störung kommt. Wenn dieser Regler zu Störungen des Radio- oder Fernsehempfanges führt, was sich durch Aus- und Anschalten des Reglers erkennen lässt, sollte der Verwender versuchen, diese Störung durch eine oder mehrere der folgenden Maßnahmen zu beheben: Richten Sie die Empfängerantenne neu aus. Bringen Sie den Regler hinsichtlich des Empfängers an einen anderen Ort Entfernen Sie den Regler vom Empfänger. Stecken Sie den Regler in eine andere Steckdose, so dass der Regler und der Empfänger an verschiede Zweige des Stromkreises angeschlossen sind. Falls nötig sollte sich der Verwender an den Händler oder an einen erfahrenen Radio-/Fernsehtechniker um zusätzlichen Rat wenden. Weitere Hinweise für den Benutzer finden sich auch in der von der Federal Communications Commission herausgegebenen Broschüre: “How to Identify and Resolve Radio-TV Interference Problems” Diese Broschüre ist erhältlich bei: U.S. Government Printing Office, Washington, DC 20402. Stock No. 004-000-00345-4. WICHTIGER HINWEIS: Um die Konformität mit den FCC RF Expositions-Regeln zu gewährleisten, müssen die folgenden Konfigurationen der Antennenmontage und des Gerätebetriebs erfüllt werden - Die zu diesem Zweck verwendete Antenne muss mit einen Abstand von mindestens 5 cm von allen Personen installiert werden und darf nicht zusammen mit einer anderen Antenne oder einem anderen Transmittor aufgestellt oder betrieben werden. KANADISCHE FUNKSTÖRREGULATIONEN HINWEIS: Dieses digitale Gerät überschreitet nicht die Grenzwerte der Klasse B für Funklärmemissionen aus digitalen Geräten, wie diese in den Funkstörregulationen der Kanadischen Kommunikationsabteilung dargelegt sind. 47 GARANTIE Beschränkte Garantie Die L.R. Nelson Corporation (“Nelson”) garantiert, dass alle elektronischen Produkte für einen Zeitraum von zwei (2) Jahren, gerechnet vom ursprünglichen Verkaufsdatum an, frei von Material- und Verarbeitungsfehlern sind. Im Falle von solchen Schäden oder Mängeln repariert oder ersetzt Nelson, nach seinem Ermessen, das Produkt oder den fehlerhaften Teil. Diese Garantie umfasst nicht Schäden an einem Nelson-Produkt oder einem Teil, die auf Unfall, zweckfremde Verwendung, Änderungen, Fahrlässigkeit, Missbrauch, unsachgemäße Montage oder normale Abnutzung zurückzuführen sind. Diese Garantie umfasst nur den ursprünglichen Verwender des Nelson-Produktes. Wenn während des Garantiezeitraums ein Schaden oder Fehler an einem Nelson-Produkt oder Teil auftritt, wenden Sie sich bitte an die Montage-Vertragspartner, den Nelson-Händler, -Vertreiber oder die L.R. Nelson Corporation an einem der folgenden Orte: One Sprinkler Lane 4780 Eucalyptus Ave. 5660 Commerce Drive; Units 2,3 Peoria, IL 61615 Chino, CA 91710 Orlando, FL 32839-2978 888-NELSON-8 800 800-0993 (800) 743-1020 Fax (309) 692-5847 Fax (909) 631-5025 Fax (407) 648-0924 Nelson kann, nach seinem Ermessen, verlangen, dass das Produkt oder ein Teil an einen Nelson-Kundendienst oder Ihren Händler oder Vertreiber zurückgeschickt wird. Nelson bestimmt, ob der angebliche Schaden oder Mangel von der Garantie abgedeckt ist. Wenn eine Deckung eintritt, wird das Produkt repariert oder ersetzt. Bitte kalkulieren Sie für die Vollendung der Reparatur oder für die Ersetzung etwa 4 bis 6 Wochen ein. Die Garantiefrist für ersetzte Geräte oder Teile endet mit der Garantiefrist für das ursprüngliche Gerät oder Teil. Diese Garantie gewährt Ihnen spezifische Rechte; außerdem haben Sie möglicherweise noch weitere Rechte, die von Staat zu Staat verschieden sind. Die L.R. Nelson Corporation ermächtigt keine Person dazu, weitere Verpflichtungen oder Haftung in Verbindung mit NelsonProdukten zu schaffen. SOWEIT RECHTLICH ZULÄSSIG, IST JEDE AUF DIE NELSON-PRODUKTE ANWENDBARE IMPLIZIERTE GARANTIE ODER HANDELBARKEIT ODER EIGNUNG IN IHRER DAUER AUF DIESE SCHRIFTLICHEN GARANTIEN BESCHRÄNKT. WEDER DIE L.R. NELSON CORPORATION NOCH IHRE VERTREIBER ODER HÄNDLER HAFTEN FÜR ZEITVERLUST, UNANNEHMLICHKEITEN, WIRTSCHAFTLICHEN VERLUST ODER NEBENSCHÄDEN ODER FOLGESCHÄDEN, DIE SICH AUS DEM VERKAUF ODER DEM VERTRIEB DER NELSON-PRODUKTE ERGEBEN, SEI ES AUFGRUND EINES BRUCHS DIESER GARANTIE ODER AUS FAHRLÄSSIGKEIT ODER DELIKTMÄSSIG. Einige Staaten gestatten keine Beschränkungen des Ausschlusses bezüglich der Dauer einer implizierten Garantie oder Beschränkungen bezüglich Neben- oder Folgeschäden. Die oben genannten Beschränkungen oder Ausschlüsse betreffen Sie somit möglicherweise nicht. VORGEHEN IM FALLE EINER ANGEBLICH DEFEKTEN WARE Produkte, die an den Händler oder Verteiler zurückgebracht werden und angeblich defekt sind, müssen vom Verkaufsvertreter von Nelson untersucht werden, der bestimmt, ob der Garantiefall eintritt. Wenn dieser zustimmt, werden die Produkte repariert oder ersetzt oder eine Gutschrift in der Höhe des Netto-Kaufpreises ausgestellt. O EZ Command Remote Programmer Modelo 8600 GUIA DE INSTALAÇÃO E DE PROGRAMAÇÃO O EZ Command Remote Programmer (Programador Remoto de Comando EZ) tem a capacidade de controlar todas as funções do controlador EZ Pro incluindo a programação e o funcionamento manual das zonas, por meio de uma segura ligação via rádio. Os controlos do EZ Command Remote Programmer operam os mesmos Select and Adjust™ como os controlos no EZ Pro fazendo funcionar todas as operações “EZ”. Poderá beneficiar de uma extraordinária economia de tempo na instalação, manutenção e funcionamento de um sistema de irrigação Nelson EZ Pro se utilizar esta tecnologia. Líderes na Irrigação de Relva Desde 1911 NOTA: Devido aos nossos contínuos esforços na melhoria e actualização dos nossos produtos, as características e especificações neste manual poderão ser alteradas sem aviso prévio. 49 ÍNDICE Instalação das Baterias . . . . . . . . . . . . . . . . . . . . . . . . . . . . . . . . . . . . . . . . . . . . . . . . . . . . . . 51 Indicator de Bateria Fraca . . . . . . . . . . . . . . . . . . . . . . . . . . . . . . . . . . . . . . . . . . . . . . . . . 51 Ligar e Desligar o EZ Command Remote Programmer . . . . . . . . . . . . . . . . . . . . . . . . . . . . 51 Montagem do Rádio EZ Pro . . . . . . . . . . . . . . . . . . . . . . . . . . . . . . . . . . . . . . . . . . . . . . . . . . . 51-54 ID do Controlador. . . . . . . . . . . . . . . . . . . . . . . . . . . . . . . . . . . . . . . . . . . . . . . . . . . . . . . . 51 Código de Acesso ao Programdor . . . . . . . . . . . . . . . . . . . . . . . . . . . . . . . . . . . . . . . . . . . 52 Montagem da ID de Controlador e do Código de Programador no Controlador EZ Pro . . . . 52 Ligação via Rádio . . . . . . . . . . . . . . . . . . . . . . . . . . . . . . . . . . . . . . . . . . . . . . . . . . . . . . . 52 Ecrã de Ligaçã. . . . . . . . . . . . . . . . . . . . . . . . . . . . . . . . . . . . . . . . . . . . . . . . . . . . . . . . . . 53 Alcance do Sinal de Rádio . . . . . . . . . . . . . . . . . . . . . . . . . . . . . . . . . . . . . . . . . . . . . . . . . 54 Operação Ligada . . . . . . . . . . . . . . . . . . . . . . . . . . . . . . . . . . . . . . . . . . . . . . . . . . . . . . . . 54 Instruções de Programação e de Funcionamento . . . . . . . . . . . . . . . . . . . . . . . . . . . . . . . . . 54 Desligar do EZ Pro. . . . . . . . . . . . . . . . . . . . . . . . . . . . . . . . . . . . . . . . . . . . . . . . . . . . . . . 54 Cuidados a ter com o EZ Command. . . . . . . . . . . . . . . . . . . . . . . . . . . . . . . . . . . . . . . . . . 54 Resolução de Problemas e Serviço de Assistência do EZ Command . . . . . . . . . . . . . . . . . . 55 Dados Técnicos . . . . . . . . . . . . . . . . . . . . . . . . . . . . . . . . . . . . . . . . . . . . . . . . . . . . . . . . . . . . 55 Regulamentação FCC. . . . . . . . . . . . . . . . . . . . . . . . . . . . . . . . . . . . . . . . . . . . . . . . . . . . . . . . 56 Garantia . . . . . . . . . . . . . . . . . . . . . . . . . . . . . . . . . . . . . . . . . . . . . . . . . . . . . . . . . . . . . . . . . . 56-57 50 BATERIAS Instalação das Baterias Desaperte o parafuso da tampa da bateria e retire a tampa. Instale duas novas baterias alcalinas tamanho “C” (LR14 na Europa). Volte a colocar a tampa e o parafuso. Indicador de Bateria Fraca Existe um símbolo de Aviso de Bateria Fraca no LCD do EZ Command. Quando este símbolo aparece a piscar, devem ser instaladas novas baterias no seu Comando EZ. NOTA: Se estiver ligado via rádio ao EZ Pro e aparecer o símbolo de Aviso de Bateria Fraca, isto quer dizer que devem ser instaladas novas baterias no EZ Pro. Ligar e Desligar o EZ Command Remote Programmer Ligue o EZ Command Remote Programmer premindo qualquer tecla ou movendo o regulador para qualquer posição. Após 1 minuto sem ser utilizada, a unidade desliga automaticamente. Para desligar a unidade quando estiver ligada via rádio, prima a tecla Rádio On/Off (Ligar/Desligar). MONTAGEM DO RÁDIO EZ PRO A ID do Controlador e o Código Programador, ambos com quatro dígitos, devem ser programados no controlador EZ Pro antes de se efectuar a ligação via rádio. Uma vez montado, o controlador memorizá-los-á e poderá efectuar-se uma ligação via rádio sempre que se queira. ID do Controlador (0000 – 9999) Código Programador (0000 – 9999) 51 MONTAGEM DO RÁDIO EZ PRO ID do controlador - Todos os controladores devem possuir uma única Identificação. Assim evitar-se-á qualquer conflito se existir mais do que um controlador dentro do alcance do sinal de rádio. Tome nota da ID do Controlador para qualquer referência futura. Aviso: Não seleccione a mesma ID de Controlador para dois controladores a uma distância de 2 km um do outro. Poderá causar mau funcionamento do rádio. Código de Acesso ao Programador - Utilize o mesmo Código de Programador para todos os seus controladores EZ Pro e EZ Command Remote Programmers. Este Código proporciona a necessária segurança para evitar o acesso não autorizado à via rádio. Atenção: Utilize o mesmo Código de Programador em todos os seus controladores EZ Pro e EZ Command Programmers Montagem da ID de Controlador e do Código de Programador no Controlador EZ Pro Defina o regulador Modo no controlador EZ Pro para a posição Programa. Rode o regulador grande no controlador EZ Pro para a posição Montagem do Rádio. Utilize a tecla SELECCIONAR para se movimentar entre ID Controlador e Código Programador. Utilize as teclas AJUSTAR para os definir conforme desejar. Volte com o regulador Modo para a posição OFF (Desligar) ou Auto. Ligação via Rádio com o EZ Command Remote Programmer Quando se liga o EZ Command Remote Programmer, o ecrã LCD apresenta a última ID do Controlador e o último Código de Acesso ao Programador utilizados. Utilize as teclas Seleccionar e Ajustar para escolher a ID do Controlador e o Código do Programador que correspondem ao controlador que pretende ligar. Prima o botão Rádio ON /OFF (Ligar/Desligar) para efectuar a ligação. NOTA: Deve haver uma energia CA para o EZ Pro a fim de se efectuar uma ligação via rádio. 52 MONTAGEM DO RÁDIO EZ PRO Ecrã de Ligaçã Após a ligação, aparecerá o símbolo Rádio Ligado tanto na unidade EZ Command como no EZ Pro. O ecrã LCD indicará as horas e o estado actual do EZ Pro. O ecrã LCD indicará a posição do Regulador Modo do EZ Pro (Auto, Programa, ou Off (desligado)) e a do Regulador do Programa (A, B, ou C). Se houver quaisquer mensagens de problemas de zonas, estas serão apresentadas no LCD. Se houver um Retardamento de Chuva Programado ou se o Sensor de Chuva estiver activado, essas indicações aparecerão no ecrã. O LCD do EZ Command indicará todos os comandos de programação ou de funcionamento exactamente como são vistos no controlador EZ Pro. Esta informação imediata permite que o controlador EZ Pro retenha quaisquer alterações que efectue. Enquanto estiver ligado via rádio, o EZ Command ignorará, temporariamente, as configurações do regulador e o estado do EZ Pro. Todas as funções manuais e de programação do EZ Pro podem ser controladas a partir do EZ Command Remote Programmer. 53 MONTAGEM DO RÁDIO EZ PRO Alcance do Sinal de Rádio O alcance do sinal de rádio é maior quando existe uma perfeita linha de visão entre o EZ Pro e o EZ Command. O tipo e o tamanho da estrutura em que se encontra instalado o EZ Pro, assim como o terreno local, podem afectar o seu desempenho. Operação Ligada Após um minuto de utilização sem se rodar um regulador ou premir um botão, o EZ Command entrará no modo “inactividade”. Isto permite aumentar a duração das baterias. A unidade voltará a “acordar” uma vez por minuto e actualizará o ecrã LCD. Se premir qualquer botão ou rodar o regulador também “acordará” o EZ Command. Após 15 minutos sem ser utilizado, a ligação via rádio parará e o EZ Command desligará. Precisará de ligar novamente ao EZ Pro. INSTRUÇÕES DE PROGRAMAÇÃO E DE FUNCIONAMENTO Sempre que estiver ligado via rádio, utilize o regulador Grande, os botões SELECCIONAR, os botões AJUSTAR, o botão A,B,C e o botão AUTO, PROG, OFF no EZ Command para programar e operar o controlador EZ Pro como desejar. Consulte o livro de Instruções EZ Pro™ para todas as instruções sobre a programação e o funcionamento. As alterações de programa efectuadas durante a ligação via rádio são memorizadas pelo EZ Pro. Desligar do EZ PRO Para desligar do EZ Pro prima a tecla Rádio On/Off. O rádio e a unidade EZ Command desligarão ambos. Uma vez desligado, o EZ Pro voltará ao seu estado primitivo. Quaisquer alterações de programa efectuadas serão guardadas no EZ Pro. NOTA: A execução de uma zona manual, um Ciclo, ou um Teste de 3 Minutos iniciado pelo EZ Command, continuará após o rádio ser desligado. O EZ Pro voltará ao seu estado primitivo depois da operação ter terminado. Cuidados a ter com o EZ Command Evite que o EZ Command se molhe. Apesar de ser resistente à água, não é à prova de água. A água dentro da unidade danificará os circuitos. Não deixe cair o EZ Command. Isso poderá danificar a unidade. 54 RESOLUÇÃO DE PROBLEMAS E SERVIÇO DE ASSISTÊNCIA DO EZ COMMAND SIMTOMAS POSSÌVEL CAUSA SOLUÇÃO Impossibilidade de ligação via rádio • A ID do Controlador e/ou o Código do Programador não correspondem ao controlador EZ Pro • Verifique se a ID do Controlador e o Código do Programador correspondem Impossibilidade de ligação via rádio • O EZ Pro não tem um Módulo Rádio modelo 8602 instalado • Instale um Módulo Rádio modelo 8602 Impossibilidade de ligação via rádio • Sem energia CA para o controlador EZ Pro • Ligue a energia CA ao controlador EZ Pro Fraca ligação via rádio • Fora de alcance ou sinal bloqueado por qualquer obstáculo • Aproxime do local do EZ Pro Fraca ligação via rádio • Baterias fracas • Instale novas baterias alcalinas C A unidade não liga • Baterias mortas • Instale novas baterias alcalinas C O Aviso de Baterias Fracas pisca no LCD • Baterias fracas no EZ Command • Instale duas novas baterias alcalinas C no EZ Command O Aviso de Baterias Fracas • Baterias fracas no EZ Pro aparece no LCD com o rádio ligado • Instale duas novas baterias alcalinas AA no EZ Pro DADOS TÉCNICOS 1. Temperaturas Funcionamento: -5 a +55 °C Armazenagem: -30 a +85 °C 2. Baterias Duas (2) baterias alcalinas tamanho C (LR14 na Europa) 3. Frequência Espectro Expandido 2.4 Ghz a 10mw 55 REGULAMENTAÇÃO FCC Este controlador de irrigação electrónica gera e utiliza energia com frequência de rádio e, se não for devidamente instalado e utilizado, isto é, estritamente de acordo com as instruções do fabricante, poderá causar interferências à recepção de ondas de rádio e televisão. Foi submetido a um teste de homologação de tipo e considerado como obedecendo aos limites impostos para um dispositivo de computação da Classe B de acordo com as especificações na Sub-secção J da Secção 15 da Regulamentação FCC, concebidas para garantirem uma razoável protecção contra tais interferências dentro de instalações residenciais. Contudo, não se garante que não poderão ocorrer interferências numa específica instalação. Se este controlador causar quaisquer interferências à recepção de rádio ou televisão, o que se poderá confirmar ao ligar e desligar o controlador, aconselha-se o seu utilizador a tentar corrigir essas interferências através de uma das seguintes medidas: Reoriente a antena receptora. Altere a colocação do controlador com referência ao receptor. Afaste o controlador do receptor Ligue o controlador a uma tomada diferente, de forma a que o controlador e o receptor fiquem em circuitos diferentes Caso seja necessário, o utilizador deverá consultar o representante ou qualquer técnico de rádio/televisão para obter outras sugestões. O utilizador pode achar útil consultar o seguinte folheto preparado pela Federal Communications Commission (Comissão Federal de Comunicações): “How to Identify and Resolve Radio-TV Interference Problems” (“Como Identificar e Resolver os Problemas de Interferências de Rádio-TV” Este folheto pode ser pedido ao Departamento de Impressão do Governo dos EUA, Washington, DC 20402. Stock Nº. 004-000-00345-4. NOTA IMPORTANTE: Para obedecer aos requisitos exigidos pela orientação FCC RF, devem ser cumpridas as seguintes configurações na instalação da antena e no funcionamento do aparelho - A antena a utilizar deve ser instalada de forma a proporcionar uma distância de separação não inferior a 5 cm de todas as pessoas e não deve ser colocada nem funcionar em conjunção com qualquer outra antena ou transmissor. REGULAMENTAÇÃO CANADIANA SOBRE INTERFERÊNCIAS DE RÁDIO NOTA: Este aparelho digital não ultrapassa os limites da Classe B para as emissões de ruídos de rádio provenientes de aparelhos digitais, definidos na regulamentação para as interferências de rádio, pelo Canadian Department of Communications. 56 GARANTIA Garantia Limitada A L.R. Nelson Corporation (“Nelson”) garante que todos os produtos electrónicos não têm quaisquer defeitos de material e de construção, por um período de dois (2) anos, a partir da data original de aquisição. No caso da existência de tais defeitos, a Nelson reparará ou substituirá, segundo sua opção, o produto ou a peça defeituosa. Esta garantia não cobre danos causados a um produto ou peça da Nelson resultantes de acidentes, utilização incorrecta, alteração, negligência, abuso, instalação incorrecta ou desgaste normal, ou ainda, aparência e cor exteriores. Esta garantia cobre somente o comprador original do produto Nelson. Se, dentro do período da garantia, se verificar um defeito num produto ou peça da Nelson, deverá contactar a empresa ou agente instalador, um revendedor Nelson, o distribuidor, ou a L.R. Nelson Corporation, em qualquer dos seguintes endereços: One Sprinkler Lane 4780 Eucalyptus Ave. 5660 Commerce Drive, Units 2,3 Peoria, IL 61615 Chino, CA 91710 Orlando, FL 32839-2978 888-NELSON-8 800-800-0993 (800) 743-1020 Fax (309) 692-5847 Fax 909-631-5025 Fax (407) 648-0924 A Nelson poderá, segundo sua opção, exigir que o produto ou a peça sejam devolvidos a um local de assistência Nelson ou ao seu revendedor ou distribuidor. A Nelson determinará se o defeito reivindicado se encontra coberto pela garantia. Se o defeito estiver coberto pela garantia, o produto será reparado ou substituído. A reparação do produto/peça ou a sua substituição e respectiva devolução ao utilizador, levará entre 4 a 6 semanas. Se um produto ou peça for substituído, essa substituição somente será garantida para o restante período de duração da garantia desse produto ou peça original. Esta garantia oferece-lhe direitos legais específicos, mas poderá ter outros direitos que variam de estado para estado. A L.R. Nelson Corporation não autoriza qualquer pessoa a criar, para esse fim, qualquer outra obrigação ou responsabilidade em relação aos produtos da Nelson. ATÉ AO LIMITE AUTORIZADO POR LEI, QUALQUER GARANTIA OU COMERCIALIZAÇÃO OU COMPETÊNCIA IMPLÍCITA PARA UMA FINALIDADE ESPECÍFICA, APLICÁVEL AOS PRODUTOS NELSON, ESTÁ LIMITADA NA SUA DURAÇÃO À DURAÇÃO POR ESCRITO DESTAS GARANTIAS. NEM A L.R. NELSON CORPORATION NEM OS SEUS DISTRIBUIDORES OU REVENDEDORES PODERÃO SER RESPONSABILIZADOS POR PERDAS DE TEMPO, INCONVENIENTES, PERDAS ECONÓMICAS,DANOS ACIDENTAIS OU CONSEQUENCIAIS CAUSADOS PELA VENDA OU DISTRIBUIÇÃO DOS PRODUTOS NELSON, QUER PELA CESSAÇÃO DA GARANTIA MENCIONADA QUER POR NEGLIGÊNCIA OU DANOS. Alguns estados não autorizam limitações ao período de duração de uma garantia explícita pela exclusão ou limitação dos danos acidentais ou consequênciais, pelo que as limitações ou exclusões acima poderão não se aplicar no seu caso. Se desejar quaisquer informações sobre a garantia ou a sua aplicação, é favor escrever para L.R. Nelson Corporation, One Sprinkler Lane, Peoria, Illinois 61615, EUA. Ao cuidado do: Customer Service (Serviço ao Cliente). POLÍTICA DE RECLAMAÇÃO DE MERCADORIA DEFEITUOSA Os produtos devolvidos ao revendedor ou distribuidor sob reclamação de mercadoria defeituosa, devem ser inspeccionados por um representante de vendas da Nelson a fim de determinar a aplicação da garantia. Se a aprovação for concedida, os produtos serão reparados ou substituídos ou será emitida uma nota de crédito que cobrirá o preço de aquisição líquido. 57 L.R. Nelson Corporation One Sprinkler Lane Peoria, Illinois 61615 309-690-2200 1-800-635-7668 FAX 309-693-0363 900-07552 Printed in U.S.A. © 2001, L.R. Nelson Corporation