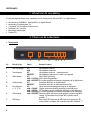
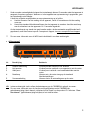
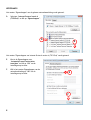
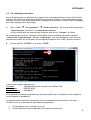
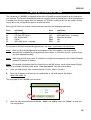
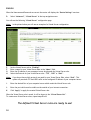
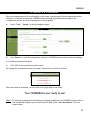
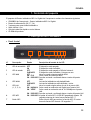
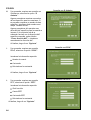
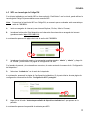
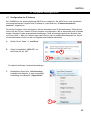
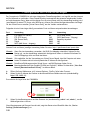
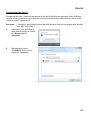
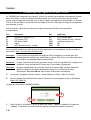
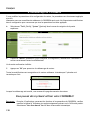
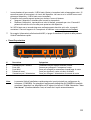
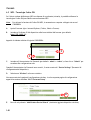
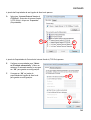
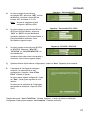
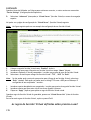
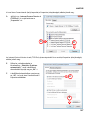
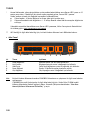
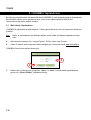
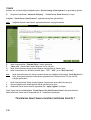
1
NEDERLANDS
Conceptronic C300GBRS4
Snelstartgids
Gefeliciteerd met uw nieuwe
Conceptronic Wireless 802.11n Gigabit Router
In deze snelstartgids vindt u stap-voor-stap instructies voor de installatie van de Conceptronic C300GBRS4.
Als u meer informatie of ondersteuning voor uw product nodig heeft, kunt u het beste naar onze Service &
Support website op www.conceptronic.net gaan en een van de volgende mogelijkheden kiezen:
• FAQ
• Downloads
• Contact
: Database met veel gestelde vragen
: Gebruiksaanwijzingen, stuurprogramma's, firmware en overige downloads
: Contact opnemen met Conceptronic Support
Voor algemene informatie over Conceptronic producten gaat u naar de Conceptronic website op
www.conceptronic.net.
De hieronder beschreven apparaatconfiguratie kan enigszins afwijken, afhankelijk van uw computer. Dit
hangt samen met het gebruikte besturingssysteem.
Inhoud
1. Inhoud van de verpakking
2. Plaats van de onderdelen
3. Hardware installeren
3.1. WAN netwerkverbinding
3.2. LAN/draadloze netwerkverbinding
4. Computer configureren
4.1. Uw IP-adres instellen
4.2. Uw verbinding controleren
5. C300GBRS4 configureren
5.1. Configuratie via internetbrowser
5.2. Installatiewizard
6. De WPS-functie gebruiken
6.1. WPS – Verbinden met een druk op de
knop
6.2. WPS – Verbinden met een pincode
7. Regels instellen voor virtuele servers
8. Opnieuw opstarten
1
NEDERLANDS
1. Inhoud van de verpakking
U vindt de volgende items in de verpakking van de Conceptronic Wireless 802.11n Gigabit Router:
•
•
•
•
•
•
Conceptronic C300GBRS4 - Wireless 802.11n Gigabit Router
Netvoeding 5V gelijkstroom, 2A
3 antennes voor draadloze connectiviteit
LAN-kabel van 1,8 meter
Meertalige snelstartgids
Product-CD
2. Plaats van de onderdelen
• Voorpaneel
7
6
5
4 3 2 1
Nr.
Beschrijving
Status
1.
Aan/uit lampje
2.
Statuslampje
3.
WAN-lampje
4.
WLAN-lampje
5.
LAN-lampjes
(1, 2, 3, 4)
6
WPS-lampje
7
WPS-knop
UIT
Het apparaat staat uit
AAN
Het apparaat staat aan
UIT
Het apparaat staat uit / systeemstoring *
KNIPPERT
Het apparaat staat aan en is klaar voor gebruik
UIT
Geen WAN-verbinding
AAN - CONTINU WAN-verbinding gemaakt
AAN - KNIPPERT Er worden gegevens ontvangen/verzonden via de WAN-poort
UIT
Draadloze interface is uitgeschakeld
KNIPPERT
Draadloze interface is ingeschakeld en actief
UIT
Geen netwerkverbinding aanwezig op de LAN-poort
AAN - ORANJE Gigabit netwerkverbinding aanwezig op de LAN-poort
AAN – GROEN
10/100 Mbps netwerkverbinding aanwezig op de LAN-poort
AAN - KNIPPERT Er worden gegevens ontvangen/verzonden via de LAN-poort
AAN – KNIPPERT Wanneer op de WPS-toets wordt gedrukt, knippert het WPSlampje 120 seconden terwijl naar WPS-cliënten wordt
gezocht. **
Druk op de WPS-knop om de WPS-functie te activeren. De
router zoekt vervolgens 120 seconden naar WPS-cliënten. **
2
Betekenis status
NEDERLANDS
*
Onder normale omstandigheden knippert het statuslampje binnen 15 seconden nadat het apparaat is
aangezet of opnieuw opgestart. Wanneer er in het apparaat een systeemstoring is opgetreden, gaat
het statuslampje niet branden.
U heeft de volgende mogelijkheden om een systeemstoring op te heffen:
a.
Haal de connector van de voeding uit het apparaat, wacht 10 seconden en sluit de voeding
weer aan.
b.
Herstel de standaard fabrieksinstellingen door het apparaat te resetten: houd de reset-knop
aan de achterkant van het apparaat ca. 15 seconden ingedrukt.
Als het statuslampje nog steeds niet gaat branden nadat u de bovenstaande mogelijkheden heeft
geprobeerd, neem dan contact op met Conceptronic Support via www.conceptronic.net/support
**
Zie voor meer informatie over de WPS-functie hoofdstuk 6 van deze snelstartgids.
• Achterpaneel
1
2
1
3
4
5
1
Nr.
Beschrijving
Betekenis
1
2
3
Antenne-aansluiting
LAN-poorten
WAN-poort
4
Resetknop
5
Stroomaansluiting
Vrouwelijke SMA-connector voor antenne
Via deze poorten verbindt u uw computer(s) met de router
Via deze poort verbindt u uw breedbandmodem met de
router
Hiermee zet u de router terug op de standaard
fabrieksinstellingen
Hiermee sluit u de netvoeding aan op de router
NB: In deze snelstartgids vindt u alleen de basisstappen om de C300GBRS4 in gebruik te nemen.
Zie voor meer informatie over de functies en mogelijkheden van de C300GBRS4 de
gebruiksaanwijzing (User's Manual, uitsluitend in het Engels!) op de product-CD. Selecteer “View
User Manual” (gebruiksaanwijzing bekijken) in het Autorun-menu.
3
NEDERLANDS
3. Hardware installeren
Monteer de 3 antennes op de antenne-aansluitingen aan de achterkant van de C300GBRS4.
Sluit de netvoeding aan op de stroomaansluiting aan de achterkant van de C300GBRS4 en op een vrij
stopcontact. Het aan/uit-lampje aan de voorkant van de C300GBRS4 gaat aan.
3.1 WAN netwerkverbinding
Verbind de C300GBRS4 via een LAN-kabel met uw kabel/dsl/fiber-modem.
Het WAN-lampje aan de voorkant van de C300GBRS4 gaat aan.
NB: Als het WAN-lampje aan de voorkant van de C300GBRS4 niet aan gaat, moet u ervoor zorgen dat:
- de C300GBRS4 aan staat (aan/uit-lampje brandt),
- uw kabel/dsl/fiber-modem aan staat,
- de LAN-kabel tussen de twee apparaten goed is aangesloten.
3.2 LAN/draadloze netwerkverbinding
Aansluiten via een LAN-netwerkkabel:
Sluit de LAN-kabel aan op een van de vier LAN-poorten aan de achterkant van de C300GBRS4 en op de
netwerkaansluiting van de computer.
Het LAN-lampje van de gebruikte LAN-poort gaat branden om aan te geven dat er verbinding is met de
computer. (Uw computer moet zijn opgestart en de LAN-aansluiting van de computer moet zijn
ingeschakeld.)
Aansluiten op draadloos netwerk:
U kunt op twee manieren draadloos verbinding maken met de C300GBRS4:
Handmatig.
Automatisch via de WPS-functie.
Als u een of meer cliëntcomputers heeft die geen WPS ondersteunen, raden we u aan handmatig
verbinding te maken met de C300GBRS4.
NB: De C300GBRS4 is standaard voorzien van WPA-PSK/WPA2-PSK (mixed mode) beveiliging. De WPA
toegangscode voor uw C300GBRS4 kunt u vinden op de productsticker, welke u kunt vinden op de
onderzijde van de C300GBRS4.
In dit hoofdstuk vindt u de stappen die nodig zijn om handmatig verbinding te maken met uw draadloze
netwerk. Zie voor meer informatie over de WPS-functie en de configuratiestappen hoofdstuk 6 van deze
snelstartgids.
4
NEDERLANDS
Handmatig draadloos verbinden:
Vrijwel alle merken/types draadloze netwerkkaarten gebruiken een andere cliënt-applicatie. Zie de
gebruiksaanwijzing van uw draadloze netwerkkaart voor informatie over hoe u verbinding maakt met een
draadloos netwerk.
NB: In het volgende voorbeeld wordt gebruik gemaakt van de standaard Microsoft Wireless Client, zoals
ingebouwd in Windows Vista met Service Pack 1.
A
Klik met de rechter muisknop op
het netwerkpictogram in de
systeembalk en klik op “Er zijn
draadloze netwerken
beschikbaar”.
B
Selecteer het netwerk
“C300GBRS4” in de lijst en klik
op “Verbinden”.
5
NEDERLANDS
C
Voer de standaard WPA
toegangscode in (deze kunt u
vinden op de productsticker van
de C300GBRS4) bij het veld
“Security Key” en klik op
“Connect”.
D
Nadat verbinding is gemaakt,
kunt u ervoor kiezen om dit
netwerk vast te leggen en er
voortaan automatisch verbinding
mee te maken zodra uw
computer wordt aangezet. Klik
op “Sluiten” om de
verbindingwizard af te sluiten.
E
Om de status van de draadloze
verbinding te controleren, kunt u
op het netwerkpictogram in de
systeembalk klikken. U ziet dan
met welk netwerk u momenteel
verbonden bent, informatie over
de verbinding, en de sterkte van
het signaal.
6
NEDERLANDS
4. Computer configureren
4.1 Uw IP-adres instellen
De C300GBRS4 heeft een ingebouwde DHCP-server. De DHCP-server kent automatisch een IP-adres toe aan
iedere aangesloten computer als de netwerkverbinding van de betreffende computer staat ingesteld op
“Automatisch een IP-adres laten toewijzen”.
De meeste computers zijn standaard zo geconfigureerd dat ze zich automatisch een IP-adres laten
toewijzen. Wanneer dit niet het geval is, moet u de computer configureren om automatisch een IP-adres
te laten toewijzen door de onderstaande aanwijzingen op te volgen. Deze instructies zijn gebaseerd op
Windows Vista met Service Pack 1. Als uw computer een andere Windows-versie of een ander
besturingssysteem heeft, is het mogelijk dat de benodigde stappen hiervan afwijken.
Æ “Uitvoeren”.
A.
Klik op “Start”
B.
Geef de opdracht “NCPA.CPL” in en klik
op “OK”.
B
B
Het venster “Netwerkverbindingen” wordt getoond.
C.
Klik met de rechter muisknop op “LANverbinding” of “Draadloze netwerkverbinding”
(afhankelijk van de gebruikte aansluiting) en
selecteer “Eigenschappen”.
C
7
NEDERLANDS
Het venster “Eigenschappen" van de gekozen netwerkaansluiting wordt getoond.
D.
Selecteer “Internet Protocol versie 4
(TCP/IPv4)” en klik op “Eigenschappen”.
D
D
Het venster "Eigenschappen van Internet Protocol version 4 (TCP/IPv4)" wordt getoond.
E.
Kies in de Eigenschappen voor
“Automatisch een IP-adres laten
toewijzen” en klik op “OK” om de
instellingen op te slaan.
F.
Klik in het venster Eigenschappen van de
netwerkverbinding op “OK” om de
instellingen op te slaan.
E
F
8
NEDERLANDS
4.2 Uw verbinding controleren
Met de opdrachtprompt van Windows kunt u nagaan of uw netwerkaansluiting een correct IP-adres heeft
gekregen. Dit voorbeeld is gebaseerd op Windows Vista met Service Pack 1. Om de onderstaande stappen
te kunnen uitvoeren, moet u over administrator-toegangsrechten beschikken. Daarom wordt ook uitgelegd
hoe u deze toegangsrechten kunt krijgen.
Æ
A.
Æ
Klik op “Start”
“Alle programma's”
“Bureau-accessoires”, klik met de rechter muisknop op
“Opdrachtprompt” en selecteer “Als administrator uitvoeren”.
U krijgt waarschijnlijk een waarschuwing; accepteer deze door op “Doorgaan” te klikken.
De opdrachtprompt verschijnt. Controleer of de titelbalk van het opdrachtpromptvenster aangeeft:
“Administrator: Opdrachtprompt”. Wanneer “Administrator” niet wordt aangegeven, heeft u niet de
administrator-rechten die u nodig heeft voor de volgende stappen en moet u stap A opnieuw uitvoeren.
B.
Geef de opdracht “IPCONFIG” in en druk op “ENTER”.
B
U moet nu de volgende informatie zien:
IPv4-adres
: 192.168.0.xxx (xxx is een getal tussen 100 en 199).
: 255.255.255.0
Subnetmasker
Standaardgateway
: 192.168.0.1
Als de getoonde informatie overeenkomt met het bovenstaande, kunt u verdergaan met de configuratie
van het apparaat in hoofdstuk 5.
Als de getoonde informatie niet overeenkomt met het bovenstaande (bijvoorbeeld als uw IP-adres
169.254.xxx.xxx is), probeer dan de onderstaande mogelijkheden:
1.
2.
Zet het apparaat uit en vervolgens weer aan.
Sluit de LAN-kabel tussen het apparaat en de computer opnieuw aan.
9
NEDERLANDS
3.
Vernieuw het IP-adres van uw computer door middel van de volgende opdrachten:
- “IPCONFIG /RELEASE” om een incorrect IP-adres weer vrij te geven.
- “IPCONFIG /RENEW” om een nieuw IP-adres te krijgen van het apparaat.
3
3
Als u het probleem met het IP-adres niet kunt oplossen met de bovenstaande stappen, kunt u de
standaard fabrieksinstellingen herstellen met behulp van de reset-knop aan de achterkant van het
apparaat.
Houd de reset-knop ca. 15 seconden ingedrukt om de standaard fabrieksinstellingen te herstellen.
Wanneer het statuslampje weer brandt, herhaalt u stap B om uw IP-adres te vernieuwen.
NB:
10
Als het probleem blijft terugkomen, controleer dan of alle kabels goed zijn aangesloten. De WANpoort hoort op uw breedbandmodem te zijn aangesloten en de LAN-poort op de computer. Als u
de kabels niet goed aansluit, krijgt u geen correct IP-adres.
NEDERLANDS
5. C300GBRS4 configureren
In dit hoofdstuk leest u hoe u de C300GBRS4 kunt configureren met de ingebouwde installatiewizard.
Nadat u de stappen uit dit hoofdstuk heeft uitgevoerd, zijn de primaire functies van uw router ingesteld,
zoals de beveiliging van het draadloze netwerk.
5.1 Configuratie via internetbrowser
De configuratie van de C300GBRS4 is webgebaseerd: u maakt hiervoor gebruik van een internetbrowser.
NB:
We raden u aan om tijdens het configureren van de router gebruik te maken van een LAN-kabel
en niet van een draadloze verbinding.
A.
Start uw internetbrowser (zoals Internet Explorer, Firefox, Safari of Chrome).
B.
Geef het IP-adres van het apparaat in in de adresbalk van uw internetbrowser (standaard:
http://192.168.0.1/).
Nu verschijnt de login-pagina van de C300GBRS4.
C
C
C.
Geef de User Name (gebruikersnaam) en het Password (wachtwoord) in; standaardwaarden: “admin”
en “admin” en klik op “Submit” (verzenden) om de webgebaseerde configuratie te starten.
11
NEDERLANDS
Wanneer de gebruikersnaam en het wachtwoord correct zijn, toont de router het overzicht “Device
Settings” (apparaatinstellingen):
Het overzicht “Device Settings” bevat alle geconfigureerde instellingen voor de LAN-, WAN- en draadloze
componenten van de router.
12
NEDERLANDS
5.2 Installatiewizard
U kunt de C300GBRS4 instellen met de ingebouwde wizard. Deze wizard helpt u om de basisinstellingen
van de C300GBRS4 stap voor stap te configureren.
NB:
Voordat u de configuratie uitvoert met de wizard, moet u zorgen dat u alle informatie over uw
internetinstellingen bij de hand heeft (accountgegevens, verbindingstype, etc.).
A.
Klik op de “Wizard” knop in het linkermenu van de webconfiguratie.
B.
Klik op de knop “Run Wizard” (wizard
uitvoeren).
C.
Het welkomvenster van de wizard bevat
vijf stappen. Klik op “Volgende” om door
te gaan.
D.
We raden u aan om hier een adminwachtwoord in te stellen. Geef het nieuwe
wachtwoord in; ter bevestiging moet u het
wachtwoord een keer herhalen.
Klik vervolgens op “Volgende”.
13
NEDERLANDS
E.
Uit het oogpunt van systeembeheer is het
buitengewoon belangrijk dat bij de
gebeurtenissen in het logbestand de juiste
datum/tijd wordt aangegeven.
In deze stap stelt u de juiste tijdzone in.
Klik vervolgens op “Volgende”.
F.
Selecteer de internetverbindingmethode
die overeenkomt met de gegevens van uw
provider.
Als u niet weet welke instelling u moet
kiezen voor uw internetverbinding, moet u
de documentatie van uw internetprovider
raadplegen of contact opnemen met de
helpdesk van de provider.
Klik vervolgens op “Volgende”.
G.
Wanneer uw provider heeft aangegeven dat
u een statisch IP-adres moet gebruiken,
selecteert u de optie “Static IP”.
Geef de gevraagde informatie in:
•
•
•
•
•
IP-adres
Subnetmasker
Gateway-adres ISP
Primaire DNS-server
Secundaire DNS-server (optioneel)
Klik vervolgens op “Volgende”.
14
Verbinding - statisch IP-adres
NEDERLANDS
H.
Wanneer uw provider heeft aangegeven dat
u een dynamisch IP-adres moet gebruiken,
selecteert u de optie “Dynamic IP”.
Verbinding - dynamisch IP-adres
Sommige providers hebben een specifieke
Host Name voor hun verbindingen. Als uw
provider gebruik maakt van een bepaalde
Host Name, moet u deze naam ingeven in
het betreffende veld.
Sommige providers staan slechts 1 specifiek
MAC-adres toe verbinding met internet te
maken. Als de netwerk-aansluiting van uw
pc het juiste MAC-adres heeft, klikt u op de
knop “Clone MAC Address” (MAC-adres
klonen); u kunt het MAC-adres ook
handmatig ingeven.
Klik vervolgens op “Volgende”.
I.
Wanneer uw provider heeft aangegeven dat u
een PPPoE-verbinding moet gebruiken,
selecteert u de optie “PPPoE”.
Verbinding - PPPoE
Geef de gevraagde informatie in:
• User Name (gebruikersnaam)
• Password (wachtwoord)
• Retype Password (herhaal wachtwoord)
Klik vervolgens op “Volgende”.
15
NEDERLANDS
J.
Wanneer uw provider heeft aangegeven dat u
een PPTP-verbinding moet gebruiken,
selecteert u de optie “PPTP”.
Verbinding - PPTP
Geef de gevraagde informatie in:
• Server IP (IP-adres server)
• PPTP Account
• PPTP Password (wachtwoord)
• Retype Password (herhaal wachtwoord)
Klik vervolgens op “Volgende”.
K.
Wanneer uw provider heeft aangegeven dat u
een L2TP-verbinding moet gebruiken,
selecteert u de optie “L2TP”.
Verbinding – L2TP
Geef de gevraagde informatie in:
• Server IP (IP-adres server)
• L2TP Account
• L2TP Password (wachtwoord)
• Retype Password (herhaal wachtwoord)
Klik vervolgens op “Volgende”.
Wanneer de WAN-configuratie is voltooid, gaat de wizard verder met de configuratie van het draadloze
netwerk:
16
NEDERLANDS
L.
U kunt de SSID van de router wijzigen. De
SSID is de naam van de draadloze verbinding
van uw router. Wanneer uw computer
draadloze netwerken vindt, is dit de naam die
u zoekt.
U kunt het gebruikte radiokanaal instellen
tussen 1 en 13. Als u last heeft van een trage
verbinding of de verbinding regelmatig wordt
verbroken, is het mogelijk dat het signaal
wordt gestoord door een ander access point
in de buurt. In dat geval kunt u een ander
kanaal proberen.
Klik vervolgens op “Volgende”.
U kunt uw draadloze netwerk beveiligen door middel van encryptie. De draadloze verbinding is standaard
niet beveiligd. Om ongeoorloofde toegang tot uw netwerk te voorkomen, moet u het beveiligingsniveau
instellen met behulp van de installatiewizard.
Als u gebruik wilt maken van de WPS-functie van de C300GBRS4, kunt u de configuratie van het draadloze
netwerk overslaan en zonder encryptie verdergaan met de installatiewizard. Voor het instellen van WPSbeveiliging gaat u verder met hoofdstuk 6 van deze snelstartgids.
NB:
Hoewel alle beveiligingsopties van de installatiewizard worden uitgelegd, raden we u aan om uw
netwerk te beveiligen met “WPA-PSK/WPA2-PSK” als uw cliëntcomputers geen WPS
ondersteunen. WPA2 is het hoogste beveiligingsniveau, en het is neerwaarts compatibel met
cliënten die alleen over WPA beschikken.
NB:
Onthoud de door u ingegeven beveiligingsinformatie goed, of noteer deze ergens. U heeft deze
informatie nodig wanneer u een computer of andere cliënt draadloos wilt verbinden met de
C300GBRS4!
M.
Selecteer een beveiligingsniveau voor uw
draadloze netwerk.
Nadat u een beveiligingsniveau heeft
gekozen, toont de wizard de bijbehorende
velden voor de benodigde informatie.
17
NEDERLANDS
N.
Als u uw netwerk wilt beveiligen met WEPencryptie, selecteert u “WEP” in het
afrolmenu. Geef een WEP-sleutel van vijf
tekens in (gebruik het ASCII-formaat: A-Z, 09).
Beveiliging – WEP-encryptie
NB: Met de wizard kunt u alleen 64-bits
WEP-encryptie instellen.
O.
Als u uw netwerk wilt beveiligen met WPA of
WPA2 (met Radius Server), selecteert u
“WPA” of “WPA2” in het afrolmenu.
Beveiliging – WPA/WPA2-encryptie
Geef het IP-adres van de Radius-server en de
Shared Key (gedeelde sleutel) in, en herhaal
de gedeelde sleutel in het tweede veld ter
bevestiging.
P.
Als u uw netwerk wilt beveiligen met WPAPSK of WPA2-PSK, selecteert u “WPA-PSK”,
“WPA2-PSK” of “WPA-PSK/WPA2-PSK” in het
afrolmenu.
Beveiliging – WPA-PSK / WPA2-PSK
Geef een Passphrase (wachtzin) voor uw
encryptie in en bevestig deze in het tweede
veld.
Q.
Wanneer alle draadloze instellingen zijn ingevuld, klikt u op “Volgende” om door te gaan.
R.
De installatiewizard is nu voltooid. Als u uw
instellingen wilt opslaan en in gebruik nemen,
klikt u op “Save & Take Effect”.
Als u een instelling wilt aanpassen, klikt u op
“Back” (terug) om naar het vorige venster
terug te gaan.
Als u de installatiewizard wilt afsluiten
zonder de instellingen te wijzigen, klikt u op
“Exit” (einde).
Als u “Save & Take Effect” selecteert, past de router de geconfigureerde instellingen toe. Wacht dan op
de melding “Save Complete” (instellingen opgeslagen).
18
NEDERLANDS
S.
De configuratie is nu voltooid. Klik op “Close” (sluiten) om de installatiewizard af te sluiten.
U komt nu weer in het overzicht “Device Settings” met de geconfigureerde instellingen voor uw WAN- en
draadloze verbindingen.
Uw C300GBRS4 Router is nu klaar voor gebruik!
NB:
Zie voor een gedetailleerde beschrijving van de functies en mogelijkheden van de C300GBRS4 de
gebruiksaanwijzing (User's Manual, uitsluitend in het Engels!) op de product-CD. Selecteer “View
User Manual” (gebruiksaanwijzing bekijken) in het Autorun-menu.
19
NEDERLANDS
6. De WPS-functie gebruiken
De Conceptronic C300GBRS4 ondersteunt WPS (Wi-Fi Protected Setup, beveiligde instelling draadloos
netwerk). WPS is een standaard waarmee u eenvoudig en veilig een draadloos netwerk kunt opzetten. Met
WPS zet u een draadloos netwerk op en beveiligt u het in slechts enkele eenvoudige stappen.
NB:
Om op de C300GBRS4 gebruik te kunnen maken van WPS, moeten uw draadloze cliënten (zoals
pc's) zelf ook WPS ondersteunen. Als u een of meer draadloze cliëntcomputers heeft die geen WPS
ondersteunen, raden we u aan handmatig verbinding te maken met behulp van de
installatiewizard, zoals beschreven in hoofdstuk 5.2.
NB:
Ga voor meer (technische) informatie over WPS naar de volgende website:
http://en.wikipedia.org/wiki/Wi-Fi_Protected_Setup
U kunt op twee manieren een WPS-verbinding maken met de C300GBRS4:
Verbinden met een druk op de knop
Verbinden met een pincode
6.1 WPS – Verbinden met een druk op de knop
Voor deze methode moet uw draadloze cliënt over een (virtuele) knop beschikken om verbinding te
kunnen maken met de C300GBRS4. Sommige draadloze cliënten hebben een echte knop waarmee WPS
wordt gestart; andere draadloze cliënts hebben software met een virtuele WPS-knop.
Volg de onderstaande stappen om via een WPS-knop verbinding te maken met de router:
A.
Houd de WPS-knop aan de voorkant van de C300GBRS4 ingedrukt tot het WPS-lampje begint te
knipperen.
B.
Druk op de WPS-knop van uw draadloze cliënt. Dit kan een hardwareknop zijn of een virtuele knop in
de software van uw draadloze cliënt.
De C300GBRS4 activeert nu WPA-beveiliging op uw draadloze netwerk en accepteert de verbinding van uw
draadloze cliënt.
NB:
De C300GBRS4 houdt de WPS-functie 120 seconden lang actief. Tijdens dit proces knippert het
WPS-lampje. Als er gedurende deze 120 seconden geen verbinding tot stand komt, gaat het
lampje uit en wordt het WPS-authenticatieproces beëindigd.
Als de WPS-functie nog niet eerder is gebruikt, is het draadloze netwerk nog niet beveiligd.
Wanneer er verbinding is gemaakt met de draadloze cliënt, gaat het WPS-lampje uit.
Uw draadloze cliënt is nu verbonden met de C300GBRS4 en uw draadloze netwerk is beveiligd met WPAencryptie. U kunt meer draadloze WPS-cliënten toevoegen zonder dat de bestaande verbinding met eerder
aangesloten cliënten verloren gaat. Als u draadloze WPS-cliënten wilt toevoegen, herhaalt u de stappen A
en B.
NB:
20
Hierbij genereert de C300GBRS4 een willekeurige WPA-sleutel.
NEDERLANDS
6.2 WPS – Verbinden met een pincode
Als uw draadloze WPS-cliënt geen (virtuele) WPS-knop heeft, kunt u een WPS-verbinding maken met een
pincode.
NB:
Om de WPS-pincodefunctie te activeren, heeft u een computer nodig die via een netwerkkabel
met de C300GBRS4 verbonden is.
A.
Open uw internetbrowser (zoals Internet Explorer, Firefox, Safari of Chrome).
B.
Geef het IP-adres van het apparaat in in de adresbalk van uw internetbrowser (standaard:
http://192.168.0.1/).
Nu verschijnt de login-pagina van de C300GBRS4.
C
C
C.
Geef de User Name (gebruikersnaam) en het Password (wachtwoord) in (standaardwaarden: “admin”
en “admin”) en klik op “Submit” (verzenden) om de webgebaseerde configuratie te starten.
Wanneer de gebruikersnaam en het wachtwoord correct zijn, toont de router het overzicht “Device
Settings” (apparaatinstellingen).
D.
Selecteer “Wireless” (draadloos) in het linkermenu.
De Wireless Configuration pagina wordt getoond. Onderaan deze configuratiepagina vindt u het gedeelte
“Wi-Fi Protected Setup”.
E
E.
Klik in dit venster op de knop “Add Wireless Device Wizard” (wizard draadloos apparaat
toevoegen).
21
NEDERLANDS
De WPS-wizard wordt op uw scherm weergegeven:
Met behulp van deze wizard kunt u de pincodefunctie activeren. Om de pincode-authenticatie te starten,
heeft u een pincode nodig die door uw cliënt is gegenereerd.
F.
Ga op uw draadloze cliënt naar de WPS-pincodefunctie. De draadloze cliënt genereert een pincode
en toont deze op uw scherm.
[Software draadloze cliënt]
G.
Æ
G
[C300GBRS4 WPS-wizard]
Geef de door uw draadloze cliënt gegenereerde pincode in in de WPS-wizard van de C300GBRS4 en
klik op “Connect” (verbinden).
De C300GBRS4 activeert nu met de ingegeven pincode de WPA-beveiliging van uw draadloze netwerk en
accepteert de verbinding van de draadloze cliënt.
De C300GBRS4 houdt de WPS-functie 120 seconden lang actief. Tijdens dit proces knippert het WPSlampje. Als er gedurende deze 120 seconden geen verbinding tot stand komt, gaat het lampje uit en wordt
het WPS-authenticatieproces beëindigd.
22
NEDERLANDS
Klik op “Continue” (doorgaan) om terug te gaan naar het venster WPS-wizard.
NB:
Als de WPS-functie nog niet eerder is gebruikt, is het draadloze netwerk nog niet beveiligd.
Na succesvolle authenticatie van de draadloze cliënt geeft de wizard aan: “WPS - Adding Wireless Device
Success” (WPS - apparaat succesvol toegevoegd) en gaat het WPS-lampje uit.
Klik op “Continue” (doorgaan) om terug te gaan naar de pagina Wireless Configuration.
Uw draadloze cliënt is nu verbonden met de C300GBRS4 en uw draadloze netwerk is beveiligd met WPAencryptie. Als u meer draadloze WPS-cliënten wilt toevoegen, herhaalt u de stappen E t/m G.
23
NEDERLANDS
7. Regels instellen voor virtuele servers
De C300GBRS4 heeft een ingebouwde firewall om internetaanvallen op uw netwerk af te weren. Deze
firewall blokkeert automatisch al het inkomende verkeer op ongebruikte poorten. Wanneer u een
geblokkeerde poort nodig heeft voor een toepassing (zoals een FTP-server of webserver) kunt u op de
configuratiepagina's een Virtual Server Rule (regel voor virtuele server) aanmaken om het verkeer aan de
server te kunnen doorgeven.
Hieronder vindt u een lijstje met veel gebruikte poortnummers en de bijbehorende applicaties:
Poort
Applicatie
Poort
Applicatie
20
21
22
23
25
FTP Data (FTP Server)
FTP Data (FTP Server)
SSH (Secure Shell)
Telnet
SMTP (Mail Server – uitgaand)
80
110
2000
5800
5900
HTTP (Web Server)
POP3 (Mail Server – inkomend)
Remotely Anywhere
VNC
VNC
Zie voor meer poorten en bijbehorende applicaties: http://portforward.com/cports.htm
NB:
Wanneer u gebruik maakt van een applicatie die UPnP Port Mapping ondersteunt, kan de router zo
nodig automatisch door de applicatie worden geconfigureerd. In dat geval hoeft u niet handmatig
een regel voor de poort aan te maken.
NB:
Als u gebruik maakt van virtuele-serverregels raden we u aan om de computer(s) een vast
(statisch) IP-adres te geven in plaats van een dynamisch IP-adres.
NB:
Zie voor een gedetailleerde beschrijving van de opties voor virtuele servers en DMZ de
gebruiksaanwijzing (User's Manual, uitsluitend in het Engels!) op de product-CD. Selecteer “View
User Manual” (gebruiksaanwijzing bekijken) in het Autorun-menu.
A.
B.
Open uw internetbrowser (zoals Internet Explorer, Firefox, Safari of Chrome).
Geef het IP-adres van het apparaat in in de adresbalk van uw internetbrowser (standaard:
http://192.168.0.1/).
Nu verschijnt de login-pagina van de C300GBRS4.
C
C
C.
24
Geef de User Name (gebruikersnaam) en het Password (wachtwoord) in; standaardwaarden: “admin”
en “admin” en klik op “Submit” (verzenden) om de configuratie te starten.
NEDERLANDS
Wanneer de gebruikersnaam en het wachtwoord correct zijn, toont de router het overzicht “Device
Settings” (apparaatinstellingen).
D.
Selecteer “Advanced” (geavanceerd), “Virtual Server” (virtuele server) in het bovenste
navigatiemenu.
U ziet nu de volgende “Virtual Server” configuratiepagina.
NB:
E.
F.
G.
H.
NB:
I.
J.
K.
In de onderstaande afbeelding ziet u een voorbeeld van een Virtual Server configuratie.
Zet de Virtual Server rule (virtuele-serverregel) op “Enabled” (ingeschakeld).
Vul een naam voor uw regel in in het veld “Name” (naam).
Geef het IP-adres in van de computer/server die van deze regel gebruik mag maken.
Selecteer het protocol voor uw regel: “TCP”, “UDP” of “Both” (beide).
Als u niet weet welk protocol u nodig heeft voor deze virtuele-serverregel, selecteert u “Both”.
Met deze optie wordt zowel TCP- als UDP-verkeer doorgegeven aan het hier voor uw
computer/server ingestelde IP-adres.
Geef het gewenste poortnummer in waarvan de computer/server gebruik mag maken.
Geef de poort in die van buitenaf (op internet) zichtbaar moet zijn.
Klik op “Apply” (toepassen) om de virtuele-serverregel in gebruik te nemen.
Opgeslagen regels worden getoond in de “Virtual Server List” (overzicht virtuele servers).
Als u meer virtuele-serverregels wilt maken, herhaalt u de stappen E t/m K.
Uw virtuele-serverregels zijn nu klaar voor gebruik!
25
NEDERLANDS
8. C300GBRS4 opnieuw opstarten
Wanneer u de instellingen van de router verandert, worden de nieuwe instellingen direct toegepast en
geactiveerd. Wanneer u grote of belangrijke wijzigingen in de configuratie aanbrengt, raden we u aan om
de C300GBRS4 bovendien een keer opnieuw op te starten om ervoor te zorgen dat alle wijzigingen correct
worden toegepast.
A.
Selecteer “Tools” (extra), “System” (systeem) in het bovenste navigatiemenu.
B.
Klik op “Reboot” (opnieuw opstarten) om de configuratie op te slaan, de C300GBRS4 opnieuw op te
starten en alle wijzigingen correct te activeren.
Nu verschijnt een bevestigingsvenster op uw scherm.
C.
Klik op “OK” om de router opnieuw op te starten.
Alle wijzigingen worden opgeslagen en de router start opnieuw op. Wacht tot de timer is afgelopen:
Wanneer de router opnieuw is opgestart, keert u terug naar de login-pagina van de router.
Uw C300GBRS4 is nu klaar voor gebruik!
NB:
26
Zie voor een gedetailleerde beschrijving van de mogelijkheden en instellingen van de C300GBRS4
de gebruiksaanwijzing (User's Manual, uitsluitend in het Engels!) op de product-CD. Selecteer
“View User Manual” (gebruiksaanwijzing bekijken) in het Autorun-menu.
ENGLISH
Conceptronic C300GBRS4
Quick Installation Guide
Congratulations on the purchase of your
Conceptronic Wireless 802.11n Gigabit Router.
This Quick Installation Guide gives you a step-by-step explanation of how to install and use the
Conceptronic C300GBRS4.
When you need more information or support for your product, we advise you to visit our Service &
Support website at www.conceptronic.net/support and select one of the following options:
• FAQ
• Downloads
• Contact
: Frequently Asked Questions database
: Manuals, Drivers, Firmware and more downloads
: Contact Conceptronic Support
For general information about Conceptronic products visit the Conceptronic website at
www.conceptronic.net.
The Hardware configuration as described below may be slightly different on your computer. This depends
on the Operating System you are using.
Contents
1. Package Contents
2. The C300GBRS4 Explained
3. Hardware Installation
3.1. WAN Connection
3.2. LAN / Wireless LAN Connection
4. Computer Configuration
4.1. Configure your IP address
4.2. Checking your Connection
5. C300GBRS4 Configuration
5.1. Web-based Configuration
5.2. Setup Wizard
6. Using the WPS Feature
6.1. WPS – Push Button technology
6.2. WPS – Pin Code technology
7. Setting up Virtual Server rules
8. Rebooting
27
ENGLISH
1. Package Contents
The following items are present in the package of the Conceptronic Wireless 802.11n Gigabit Router:
•
•
•
•
•
•
Conceptronic C300GBRS4 - Wireless 802.11n Gigabit Router
Power supply 5V DC, 2A
3 antennas for wireless connectivity
LAN cable 1.8m
Multi Language Quick Installation Guide
Product CD-ROM
2. The C300GBRS4 Explained
• Front Panel
7
6
5
4 3 2 1
Nr
Description
Status
Status Explanation
1
Power LED
2
Status LED
3
WAN LED
4
WLAN LED
5
LAN LED’s
(1, 2, 3, 4)
6
WPS LED
OFF
ON
OFF
BLINK
OFF
ON - STEADY
ON - BLINK
OFF
BLINK
OFF
ON - ORANGE
ON – GREEN
ON - BLINK
ON – BLINK
7
WPS Button
The device is turned off
The device is turned on
The device is turned off / System Failure*
The device is turned on and ready for use
No WAN Connection is created
A WAN Connection is created
Data is sent or received through the WAN Port
Wireless interface is disabled
Wireless interface enabled and active
No Network Link is created to the LAN Port
A Gigabit Network Link is created on the LAN Port
A 10/100 Mbps Network Link is created on the LAN Port
Data is sent or received through the LAN Port
When the WPS Button is pressed, the WPS LED will blink for
120 seconds while searching for WPS Clients. **
Press the WPS Button to activate the WPS feature. The
router will search for WPS Clients for 120 seconds. **
28
ENGLISH
*
In normal use, the Status LED will turn on and blink within 15 seconds after the device is powered on
or restarted. When a system failure happens with the device, the Status LED will not turn on.
You can use the following options to solve the system failure:
c.
Power down the device, wait 10 seconds and reconnect the power to the device.
d.
Reset the device to factory defaults by pressing the reset button on the back of the device for
+/- 15 seconds.
If the Status LED does not turn on after you tried above options, please contact Conceptronic
Support through www.conceptronic.net/support
**
For more information about the WPS feature, see Chapter 6 of this Quick Installation Guide.
• Back Panel
1
2
1
3
4
5
1
Nr
Description
Explanation
1
2
3
4
5
Antenna Connection
LAN Ports
WAN Port
Reset Button
Power Connection
Reverse-SMA Connector for Wireless Antenna
Connect your Computer(s) to the router
Connect your Broadband connection to the router
Reset the router to the Factory Default Settings
Connect the Power Supply to the router
Note:
This Quick Installation Guide only explains the basic steps to get the C300GBRS4 up and running.
For more info about the various functions of the C300GBRS4, please refer to the User Manual
(English only!) on the Product CD-ROM. Select “View User Manual” from the Autorun Menu.
29
ENGLISH
3. Hardware Installation
Connect the 3 antennas to the antenna connections on the back of the C300GBRS4.
Connect the power supply to the power connection on the back of the C300GBRS4 and to a free wall
power outlet. The Power LED on the front of the C300GBRS4 will turn on.
3.1 WAN Connection
Use a LAN cable to connect the C300GBRS4 to your Cable, DSL or Fibre Modem.
The WAN LED on the front of the C300GBRS4 will turn on.
Note:
If the WAN LED on the front does not turn on, make sure that:
- The C300GBRS4 is powered (the Power LED should burn).
- The Cable, DSL or Fibre Modem is turned on.
- The LAN cable between both devices is correctly connected.
3.2 LAN / Wireless LAN Connection
For LAN Cable Users:
Connect the LAN Cable to 1 of the 4 LAN ports on the back panel of the C300GBRS4 and to the Network
Card of your computer.
The LAN LED of the used LAN port will turn on, indicating that the computer is connected. (Your computer
must be turned on and the LAN Connection must be enabled).
For Wireless Users:
You can connect wireless to the C300GBRS4 in 2 different ways:
Manually.
Automatically with the WPS feature.
If you have one or more clients which do not support WPS, it is advised to manually connect to the
C300GBRS4.
Note:
The C300GBRS4 is secured with WPA-PSK/WPA2-PSK (mixed mode) by default. The WPA
passphrase for your C300GBRS4 can be found on the productsticker on the bottom of your
C300GBRS4.
In this chapter you will find the steps on how to manually connect to your wireless network.
For more information about the WPS feature and the configuration steps, see Chapter 6 of this Quick
Installation Guide.
30
ENGLISH
Manual Wireless Connection:
Almost every brand/type wireless card uses a different Client application. Please refer to the manual of
your wireless network card for information how to create a connection with a wireless network.
Note:
The following example is using the standard Microsoft Wireless Client, which is integrated in
Windows Vista with Service Pack 1.
A
Click on the Network Icon in your
System tray and click on
“Wireless networks are
available”.
B
Select the network
“C300GBRS4” from the list and
click “Connect”.
31
ENGLISH
C
Enter the default WPA
passphrase (which is written on
the bottom of the C300GBRS4) in
the “Security key” field and click
on “Connect”.
D
When the connection has been
established, you can choose to
save the network and have it
start automatically each time
your computer is turned on. Click
on “Close” to exit the
connection wizard.
E
To check the status of the
wireless connection, you can
click on the Network Icon in the
system tray. You will then see
which network you are currently
connected to, the access you
have and the signal strength of
the connection.
32
ENGLISH
4. Computer Configuration
4.1 Configure your IP address
The C300GBRS4 is equipped with a built-in DHCP Server. The DHCP Server will automatically assign an IP
address to each connected computer if the connected computer is set to “Obtain an IP address
automatically”.
Most computers are by default configured to automatically obtain an IP address. When this is not the case,
you will need to configure your computer to obtain an IP address automatically by following the
instructions below. These instructions are based on Windows Vista with Service Pack 1. If your computer
has a different version or operaring system, the steps needed might be different.
A.
Click “Start” Æ “Run”.
B.
Enter the command “NCPA.CPL” and
press “OK”.
B
B
The Network Connections window will appear.
C.
Right click your “Local Area Connection” (Wired
or Wireless, depending on the connection you use)
and select “Properties”.
C
33
ENGLISH
The Properties window of your Local Area Connection will appear.
D.
Select the “Internet Protocol Version 4
(TCP/IPv4)” and click “Properties”.
D
D
The Properties window of the Internet Protocol Version 4 (TCP/IPv4) will appear.
E.
Set the properties to “Obtain an IP
address automatically” and press “OK” to
save the settings.
F.
Press “OK” in the properties window of
the Local Area Connection to save the
settings.
E
F
34
ENGLISH
4.2 Checking your connection
With the Command prompt of Windows you can verify if you have received a correct IP address on your
Local Area Connection. This example is based on Windows Vista with Service Pack 1. Vista needs
administrative rights to perform the steps below. There is an explanation on how to gain administrative
rights.
A.
Click “Start” Æ “All programs” Æ “Accessories”, right click “Command Prompt” and select “Run
as administrator”.
You might get a warning message, which you accept by clicking “Continue”.
The Command Prompt will appear. Make sure the Command Prompt title bar mentions “Administrator:
Command Prompt”. When “Administrator” is not mentioned, you do not have the needed administrative
rights for these steps and you will need to perform step A again.
B.
Enter the command “IPCONFIG” and press ENTER.
B
You should see the following information
: 192.168.0.xxx (Where xxx can vary between 100 ~ 199).
IPv4 Address
Subnet Mask
: 255.255.255.0
: 192.168.0.1
Default Gateway
If the information shown above matches your configuration you can continue the configuration of the
device in Chapter 5.
If the information shown above does not match your configuration (i.e. your IP address is 169.254.xxx.xxx)
please check the options below:
35
ENGLISH
1.
2.
3.
Power OFF and Power ON the device.
Reconnect the LAN Cable to the device and to your computer.
Renew the IP address of your computer with the following commands:
- “IPCONFIG /RELEASE” to release the wrong IP address.
- “IPCONFIG /RENEW” to receive a new IP address from the device.
3
3
If above steps do not solve the IP address problem, you can reset the device to the factory default settings
with the Reset Button on the back of the device.
Press and hold the Reset Button for +/- 15 seconds to load the Factory Default Settings. When the Status
LED is active again, repeat step B to renew your IP address.
Note:
36
If the problem remains, check if all cables are correctly connected. The WAN port should be
connected to the Modem and the LAN port to the computer. Connecting them in the wrong way
will also result in not getting a correct IP address.
ENGLISH
5. C300GBRS4 Configuration
This chapter describes how to configure the C300GBRS4 using the built-in Setup Wizard. After completing
the steps in this chapter your router has been set up for its primary functions, including wireless security.
5.1 Web-based Configuration
The configuration of the C300GBRS4 is web based. You will need a web browser for the configuration of
the device.
Note:
For configuration of the router it is advised to use a LAN cable connection to the device instead of
a Wireless connection.
A.
Start your web browser (like: Internet Explorer, Firefox, Safari or Chrome).
B.
Enter the IP address of the device in the address bar of your web browser (By default:
http://192.168.0.1/).
The Login page of the C300GBRS4 will be shown.
C
C
C.
Enter the User Name and Password (Default: ‘admin’ and ‘admin’) and click “Submit” to enter the
web-based configuration.
37
ENGLISH
When the User Name and Password are correct the router will display the “Device Settings” overview:
The “Device Settings” overview shows all configured settings for the LAN, WAN and Wireless part of the
router.
38
ENGLISH
5.2 Setup Wizard
You can setup the C300GBRS4 through the built-in Wizard. This Wizard will help you configuring the basic
settings of the C300GBRS4 step by step.
Note:
Before you begin with the Wizard Configuration, make sure you have all information about your
internet settings available. (For example: Account information, connection type, etc.)
A.
Click the “Wizard” button shown in the left menu of the web configuration.
B.
Click the button “Run Wizard”.
C.
The welcome screen lists five steps of the
wizard. Click “Next” to continue.
D.
It is recommended to set an admin
password here. Enter the new password
and re-enter it for confirmation.
When completed, click “Next”.
39
ENGLISH
E.
For system management purpose, a correct
time setting is critical to have accurate
time stamps in the system logs.
Set an appropriate Time Zone in this step.
When completed, click “Next”.
F.
Select the Internet Connection method
which corresponds with your provider
settings.
If you don’t know which option you need
for your internet connection, please refer
to the documentation of your provider or
contact your provider helpdesk.
When completed, click “Next”.
G.
When your provider requires a Static IP
connection, select the “Static IP” option.
Enter the requested information:
•
•
•
•
•
IP Address
Subnet Mask
ISP Gateway Address
Primary DNS
Secondary DNS (Optional)
When completed, click “Next”.
40
Connection - Static IP
ENGLISH
H.
When your provider requires a Dynamic IP
connection, select “Dynamic IP”.
Connection – Dynamic IP
Some providers require a specific Host
Name for their connections. If your
provider requires a specific Host Name,
enter the Host Name in the field.
Some providers only allow 1 specific MAC
address to connect to the internet. If your
PC Network Card works with the specific
required MAC address, press the “Clone
MAC Address” button or enter the MAC
Address manually.
When completed, click “Next”.
I.
When your provider requires a PPPoE
connection, select the “PPPoE” option.
Connection - PPPoE
Enter the requested information:
• User Name
• Password
• Retype Password
When completed, click “Next”.
J.
When your provider requires a PPTP
connection, select the “PPTP” option.
Connection - PPTP
Enter the requested information:
• Server IP
• PPTP Account
• PPTP Password
• Retype Password
When completed, click “Next”.
41
ENGLISH
K.
When your provider requires a L2TP
connection, select the “L2TP” option.
Connection – L2TP
Enter the requested information:
• Server IP
• L2TP Account
• L2TP Password
• Retype Password
When completed, click “Next”.
When the WAN configuration is complete, the Wizard will continue with the Wireless configuration:
L.
You can change the SSID of the router. The
SSID is the name of the wireless connection to
your router. When searching for wireless
networks on your computer, this is the name
you will be looking for.
You can change the channel between channel
1 and 13. If you experience slow connections
or break-downs, there can be another
accesspoint in your area which can interfere
with your wireless channel. In that case, you
can try another channel.
When completed, click “Next”.
You can secure your Wireless Connection with encryption. By default, the Wireless Connection is not
secured. To prevent unauthorized access to your network, set a security level through the Setup Wizard.
If you want to use the WPS feature of the C300GBRS4, you can skip the wireless configuration and
continue the Setup Wizard without encryption. To setup your WPS security, please proceed to Chapter 6
of this Quick Installation Guide.
42
ENGLISH
Note:
All security options of the Setup Wizard are explained, but it is advised to secure your network
with “WPA-PSK/WPA2-PSK” security if your Clients do not support WPS. WPA2 is the highest
security level, with backwards compatibility to WPA only clients.
Note:
Remember or write down the entered wireless security information. You will need it when you
want to configure a Wireless Client to connect to the C300GBRS4!
M.
Select a security level for your Wireless
Network.
When a security level is chosen, the Wizard
will show fields for the required information.
N.
If you want to secure your network with WEP
encryption, select “WEP” from the dropdown list. Enter the WEP key in ASCII format
(input: A-Z, 0-9).
Note:
O.
Security – WEP Encryption
Through the Wizard you can only
configure WEP 64-bit.
If you want so secure your network with WPA
or WPA2 (with Radius Server), select “WPA”
or “WPA2” from the drop-down list.
Security – WPA / WPA2 Encryption
Enter the IP Address of the Radius Server, the
Shared Key and confirm the Shared Key in the
second field.
43
ENGLISH
P.
If you want to secure your network with WPAPSK or WPA2-PSK, select “WPA-PSK”, “WPA2PSK” or “WPA-PSK/WPA2-PSK” from the
drop-down list.
Security – WPA-PSK / WPA2-PSK
Enter the Passphrase for your encryption and
confirm the Passphrase in the second field.
Q.
When all Wireless settings are made, click “Next” to continue.
R.
The Setup Wizard is now complete. If you
want to apply your settings, click “Save &
Take Effect”.
If you want to change a setting, click “Back”
to return to the previous screen.
If you want to close the Setup Wizard without
any changes, click “Exit”.
When you select “Save & Take Effect”, the router will apply the configured settings. Please wait for the
message “Save Complete”.
S.
The configuration is now complete. Click “Close” to exit the Setup Wizard.
You will return to the “Device Settings” overview which will show you the configured settings for your
WAN and Wireless connection.
Your C300GBRS4 Router is now ready to use!
Note:
44
For detailed explanation of the features and settings available for the C300GBRS4 please read the
User Manual (English only!) on the Product CD-ROM. Select “View User Manual” from the Autorun
Menu.
ENGLISH
6. Using the WPS Feature
The Conceptronic C300GBRS4 supports WPS (Wi-Fi Protected Setup). WPS is a standard for easy and secure
establishment of a wireless network. With WPS you can setup and protect your wireless network in just a
few easy steps.
Note:
To use WPS with the C300GBRS4, you need to have Wireless Clients which support WPS. If you
have one or more Wireless Clients without WPS support, it is advisable to secure your network
manually using the Setup Wizard, explained in Chapter 5.2.
Note:
For more (technical) information about WPS, you can visit the following website:
http://en.wikipedia.org/wiki/Wi-Fi_Protected_Setup
The C300GBRS4 supports two ways to activate and establish a WPS connection:
Push Button technology
Pin Code technology
6.1 WPS – Push Button technology
The WPS Push Button technology requires a (virtual) button on your Wireless Client to establish a
connection between the C300GBRS4 and your Wireless Client.
Some Wireless Clients work with a real button to activate the WPS Push Button technology; some Wireless
Clients use a virtual button in their software.
Follow the steps below to activate and establish a WPS connection with the Push Button technology:
A.
Press the WPS Button on the front of the C300GBRS4 until the WPS LED starts to blink.
B.
Press the WPS Button on your Wireless Client. This can be a hardware button or a virtual button in
the software of your Wireless Client.
The C300GBRS4 will activate WPA security over your wireless network and accepts the wireless connection
of your Wireless Client.
Note:
The C300GBRS4 will keep the WPS authentication active for 120 seconds. During this process, the
WPS LED will blink. If there is no connection in these 120 seconds, the LED will turn off and the
WPS authentication process is stopped.
If the WPS feature has not been used before, the wireless network will still be unsecured.
If the authentication of the Wireless Client is successful, the WPS LED will turn off.
Your Wireless Client is now connected to the C300GBRS4 and your network is secured with WPA
Encryption.
You can add more Wireless WPS Clients without losing the connection to previous Wireless WPS Clients.
If you want to add more Wireless WPS clients, repeat step A and B.
Note:
The WPA Key generated by the C300GBRS4 is random.
45
ENGLISH
6.2 WPS – Pin Code technology
If your WPS enabled Wireless Client does not have a (virtual) Push Button, you can use the Pin Code
technology to establish a WPS connection.
Note:
To activate the WPS Pin Code feature, you need a computer which is wired connected to the
C300GBRS4.
A.
Open your web browser (like: Internet Explorer, Firefox, Safari or Chrome).
B.
Enter the IP address of the device in the address bar of your web browser (By default:
http://192.168.0.1/).
The Login page of the C300GBRS4 will be shown.
C
C
C.
Enter the User Name and Password (Default: ‘admin’ and ‘admin’) and click “Submit” to enter the
web configuration.
When the User Name and Password are correct the router will display the “Device Settings” overview.
D.
Select “Wireless” in the left Menu.
The Wireless Configuration pages will be shown. At the bottom of this configuration page, you can find the
“Wi-Fi Protected Setup” section.
E
E.
46
Click the “Add Wireless Device Wizard” button on the screen.
ENGLISH
The WPS Wizard will be shown on your screen:
In this Wizard, you can activate the Pin Code feature. To start with the Pin Code authentication, you need
the Pin Code generated by your Wireless Client.
F.
Select the WPS Pin Code feature in the software of your Wireless Client. The Wireless Client will
generate a Pin Code and show it on your screen.
[Wireless Client Software]
G.
Æ
G
[C300GBRS4 WPS Wizard]
Enter the Pin Code given by your Wireless Client in the WPS Wizard of the C300GBRS4 and press
“Connect”.
The C300GBRS4 will activate WPA Security on your wireless network and accept the wireless connection of
your Wireless Client with the entered Pin Code.
The C300GBRS4 will keep the WPS authentication active for 120 seconds. During this process, the WPS LED
will blink. If there is no connection in these 120 seconds, the LED will turn off and the WPS authentication
process is stopped.
47
ENGLISH
Click “Continue” to return to the WPS Wizard screen.
Note:
If the WPS feature has not been used before, the wireless network will still be unsecured.
If the authentication of the Wireless Client is successful, the Wizard will show “WPS - Adding Wireless
Device Success” and the WPS LED will turn off.
Click “Continue” to return to the Wireless Configuration page.
Your Wireless Client is now connected to the C300GBRS4 and your network is secured with WPA
Encryption.
If you want to add more Wireless Clients with the WPS feature, repeat steps E to G.
48
ENGLISH
7. Setting up Virtual Server rules
The Conceptronic C300GBRS4 is equipped with a built-in Firewall to prevent attacks from the Internet on
your network. This Firewall automatically blocks all incoming traffic on unused ports. When a blocked port
is needed for a service or application (for example: a FTP Server or WEB Server) you can create a Virtual
Server Rule in the Configuration Pages to forward the traffic.
Below you will find a list of some common used ports and their corresponding application:
Poort
Application
Poort
Application
20
21
22
23
25
FTP Data (FTP Server)
FTP Data (FTP Server)
SSH (Secure Shell)
Telnet
SMTP (Mail Server – outgoing)
80
110
2000
5800
5900
HTTP (Web Server)
POP3 (Mail Server – incoming)
Remotely Anywhere
VNC
VNC
For more ports and their corresponding applications, see: http://portforward.com/cports.htm
Note:
When you are using an application which supports UPnP Port Mapping, the router can be
automatically configured by the application when needed. In that case, you don’t need to setup
your port mappings manually.
Note:
When using Virtual Server rules, it is advised to configure the computer(s) with a Fixed IP Address
instead of a Dynamic IP Address.
Note: For detailed information about the Virtual Server and DMZ options, see the User Manual (English
only!) on the Product CD-ROM. Please select “View User Manual” from the Autorun Menu.
A.
Open your web browser (like: Internet Explorer, Firefox, Safari or Chrome).
B.
Enter the IP address of the device in the address bar of your web browser (By default:
http://192.168.0.1/).
The Login page of the C300GBRS4 will be shown.
C
C
C.
Enter the Username and Password (Default: ‘admin’ and ‘admin’) and click “Submit” to enter the
web configuration.
49
ENGLISH
When the Username and Password are correct the router will display the “Device Settings” overview.
D.
Select “Advanced”, “Virtual Server” in the top navigation menu.
You will see the following “Virtual Server” configuration page.
Note:
E.
F.
G.
H.
Note:
In the picture below you will see an example of a Virtual Server configuration.
Set the Virtual Server rule to “Enabled”.
Enter a name for your Virtual Server Rule in the “Name” field.
Enter the IP Address of your computer/server which needs the Virtual Server rule.
Select the Protocol for your Virtual Server rule: “TCP”, “UDP” or “Both”.
If you do not know which protocol you need for your Virtual Server Rule, select “Both”. This
option will pass both TCP and UDP traffic to the configured IP Address of your computer/server.
I.
Enter the desired Port of your computer/server which needs the Virtual Server rule.
J.
Enter the port which must be visible on the outside of your internet connection.
K.
Click “Apply” to apply the created Virtual Server rule.
When the Virtual Server rule is saved, it will be shown in the “Virtual Server List”.
To create more Virtual Server rules, repeat steps E to K.
The defined Virtual Server rules are ready to use!
50
ENGLISH
8. Reboot the C300GBRS4
When you change settings in the configuration of the router, the settings are directly applied and active.
However, it is advised to reboot the C300GBRS4 after you made big and important changes in the
configuration to make sure that all settings are correctly applied.
A.
Select “Tools”, “System” in the top navigation menu.
B.
Click “Reboot” to save the configuration, reboot the C300GBRS4 and correctly activate all changes.
A confirmation popup will be shown.
C.
Click “OK” to proceed with the router restart.
All changes are saved and the router will restart. Please wait for the timer to finish:
When the reboot is completed, you will return to the login page of the router.
Your C300GBRS4 is now ready to use!
Note:
For detailed explanation of the features and settings available for the C300GBRS4, please refer to
the User Manual (English only!) on the Product CD-ROM. Select “View User Manual” from the
Autorun Menu.
51
ESPAÑOL
C300GBRS4 de Conceptronic
Guía de instalación rápida
Felicidades por la compra de su
router inalámbrico 802.11n Gigabit de Conceptronic
Esta guía de instalación rápida le ofrece una descripción paso a paso acerca de cómo instalar y utilizar el
router C300GBRS4 de Conceptronic.
Si necesita más información o soporte técnico acerca de su producto, le recomendamos que visite nuestra
página web de Servicio y Soporte www.conceptronic.net/support y seleccione una de las siguientes
opciones:
• FAQ
• Descargas
• Contacto
: Base de datos con las preguntas más frecuentes (FAQ)
: Manuales, drivers, firmware y otras descargas
: Contactar con el soporte técnico de Conceptronic
Para información general sobre los productos de Conceptronic, visite la página web de Conceptronic
www.conceptronic.net.
La configuración de hardware que se detalla a continuación puede diferir ligeramente en su ordenador.
Ello dependerá del sistema operativo que utilice.
Contenido
1. Contenido del paquete
2. Descripción del C300GBRS4
3. Instalación del hardware
3.1. Conexión WAN
3.2. Conexión LAN / LAN inalámbrica
4. Configuración del ordenador
4.1. Configurar la dirección IP
4.2. Comprobar la conexión
52
5. Configuración del C300GBRS4
5.1. Configuración vía web
5.2. Asistente de configuración
6. Utilización de la función WPS
6.1. WPS con la tecnología “Push Button”
6.2. WPS con la tecnología de Código PIN
7. Creación de reglas del Servidor Virtual
8. Reinicio
ESPAÑOL
1. Contenido del paquete
El paquete del Router inalámbrico 802.11n Gigabit de Conceptronic contiene los elementos siguientes:
•
•
•
•
•
•
C300GBRS4 de Conceptronic - Router inalámbrico 802.11n Gigabit
Fuente de alimentación (5V CC, 2 A)
3 antenas para conectividad inalámbrica
Cable LAN de 1,8 m
Guía de instalación rápida en varios idiomas
CD-ROM del producto
2. Descripción del C300GBRS4
• Panel frontal
7
6
Nº
Descripción
Estado
1
LED de encendido
2
LED de estado
3
LED WAN
OFF
ON
OFF
PARPADEO
OFF
ON - FIJO
ON – PARPADEO
4
LED WLAN
5
LED LAN
(1, 2, 3, 4)
6
LED WPS
7
Botón WPS
5
4 3 2 1
Descripción del estado de los LED
El dispositivo está apagado.
El dispositivo está encendido.
El dispositivo está apagado o Fallo del sistema*.
El dispositivo está encendido y listo para su uso.
No se ha creado ninguna conexión WAN.
Se ha creado una conexión WAN
Se están enviando o recibiendo datos a través del puerto
WAN.
OFF
La interfaz inalámbrica está deshabilitada.
PARPADEO
La interfaz inalámbrica está habilitada y activa.
OFF
No se ha creado ningún enlace de red en el puerto LAN.
ON - NARANJA Se ha creado un enlace de red Gigabit en el puerto LAN.
ON - VERDE
Se ha creado un enlace de red de 10/100 Mbps en el puerto
LAN.
ON – PARPADEO Se están enviando o recibiendo datos a través del puerto LAN
ON – PARPADEO Al pulsar el botón WPS, el LED WPS parpadeará durante 120
segundos mientras el router busca clientes WPS. **
Pulse el botón WPS para activar la función WPS. El router
buscará clientes WPS durante 120 segundos. **
53
ESPAÑOL
*
Durante su uso normal, el LED de estado se encenderá y parpadeará durante 15 segundos cada vez
que encienda o reinicie el dispositivo. Si se produce un fallo del sistema en el dispositivo, el LED de
estado no se encenderá.
Puede utilizar cualquiera de estas dos opciones para resolver un fallo del sistema:
e.
Desenchufe el dispositivo, espere 10 segundos y vuelva a enchufarlo.
f.
Haga un “reset” para que el dispositivo vuelva a la configuración de fábrica; para ello, pulse el
botón “Reset” durante unos 15 segundos.
Si el LED de estado no se enciende después de haber probado las opciones anteriores, póngase en
contacto con el servicio técnico de Conceptronic a www.conceptronic.net/support
**
Para más información sobre la función WPS, consulte el apartado 6 de esta Guía de Instalación
Rápida.
• Panel posterior
1
2
1
3
4
5
1
Nº
Descripción
Explicación:
1
2
3
4
5
Conexión de antena
Puertos LAN
Puerto WAN
Botón “Reset”
Conexión de alimentación
Conector SMA inverso para antenas inalámbricas.
Para conectar el o los ordenadores al router.
Para conectar la conexión de banda ancha al router.
Hace que el router vuelva a la configuración de fábrica.
Para enchufar la fuente de alimentación al router.
Nota:
Esta guía de instalación rápida sólo explica los pasos básicos para configurar y hacer funcionar el
C300GBRS4.
Para más información acerca de las diferentes funciones del C300GBRS4, consulte el Manual de
Usuario (sólo en inglés) que encontrará en el CR-ROM del producto. Seleccione “Ver el Manual de
Usuario” en el menú autoejecutable.
54
ESPAÑOL
3. Instalación del hardware
Conecte las 3 antenas a las conexiones de antena que se encuentran en la parte trasera del C300GBRS4.
Conecte la fuente de alimentación al conector de la parte trasera del C300GBRS4 y a una toma de
corriente de pared. El LED de alimentación de la parte frontal del C300GBRS4 se encenderá.
3.1 Conexión WAN
Utilice un cable LAN para conectar el C300GBRS4 a su módem por cable, DSL o fibra.
Se encenderá el LED WAN de la parte frontal del C300GBRS4.
Nota:
Si el LED WAN de la parte frontal no se enciende, asegúrese de que:
- El C300GBRS4 está enchufado y encendido (el LED de encendido debería estar encendido).
- El módem por cable, DSL o fibra está encendido.
- El cable LAN entre ambos dispositivos está bien conectado.
3.2 Conexión LAN / LAN inalámbrica
Para su uso con cable LAN:
Conecte el cable LAN a uno de los cuatro puertos LAN del panel posterior del C300GBRS4 y a la tarjeta de
red de su ordenador.
El LED LAN del puerto LAN utilizado se encenderá, indicando que el ordenador está conectado. (Su
ordenador tiene que estar encendido y la conexión LAN habilitada).
Para su uso con conexión inalámbrica:
Puede realizar la conexión inalámbrica con el C300GBRS4 de 2 maneras diferentes:
- Manualmente.
- Automáticamente con la función WPS.
Si tiene uno o más clientes no compatibles con WPS, se recomienda realizar la conexión con el C300GBRS4
manualmente.
Nota:
El C300GBRS4 está protegido con WPA-PSK/WPA2-PSK (modo mixto) de forma predeterminada.
Encontrará la frase secreta WPA para su C300GBRS4 en la pegatina del producto, en la parte
inferior de su C300GBRS4.
En ese apartado encontrará los pasos para conectarse manualmente a su red inalámbrica.
Para más información sobre la función WPS y los pasos de configuración, consulte el apartado 6 de esta
Guía de Instalación Rápida.
55
ESPAÑOL
Conexión inalámbrica manual:
Casi todas las marcas o tipos de tarjetas inalámbricas utilizan aplicaciones de cliente distintas. Consulte la
información del manual de su tarjeta de red inalámbrica acerca de cómo crear una conexión con una red
inalámbrica.
Nota:
El ejemplo siguiente utiliza el Cliente Inalámbrico estándar de Microsoft, integrado en el sistema
operativo Windows Vista con Service Pack 1.
A
Haga clic en el icono de red de la
bandeja del sistema y haga clic
en “Hay disponibles redes
inalámbricas”.
B
Seleccione la red “C300GBRS4”
de la lista y haga clic en
“Conectar”.
56
ESPAÑOL
C
Introduzca la frase secreta WPA
(que encontrará en la parte
inferior del C300GBRS4) en el
campo “Security key” (Clave de
seguridad) y haga clic en
“Connect” (Conectar).
D
Una vez se ha establecido la
conexión, puede guardar la red y
hacer que se inicie
automáticamente cada vez que
encienda el ordenador. Haga clic
en “Cerrar” para salir del
asistente de conexión.
E
Para comprobar el estado de la
conexión inalámbrica, puede
hacer clic en el icono de red de
la bandeja del sistema. Podrá ver
a qué red está actualmente
conectado, el tipo de acceso y el
nivel de la señal de conexión.
57
ESPAÑOL
4. Configuración del ordenador
4.1 Configurar la dirección IP
El C300GBRS4 está equipado con un servidor DHCP incorporado. El servidor DHCP asignará
automáticamente una dirección IP a cada ordenador conectado que esté configurado en el modo "Obtener
dirección IP automáticamente".
La mayoría de ordenadores están configurados de forma predeterminada para que obtengan la dirección IP
automáticamente. Si éste no fuera su caso, necesitará configurar su ordenador para que obtenga la
dirección IP automáticamente; para ello, siga las instrucciones siguientes. Estas instrucciones están
basadas en Windows Vista con Service Pack 1. Si su ordenador tiene un sistema operativo o una versión
diferente, los pasos a seguir podrían variar.
A.
Haga clic en “Inicio” y a continuación en
“Ejecutar”
B.
Introduzca el comando “NCPA.CPL” y
pulse “OK”.
B
B
Aparecerá la ventana de conexiones de red.
C.
Haga clic con el botón derecho en su “Conexión
de área local” (por cable o inalámbrica,
dependiendo del tipo de conexión que utilice) y
seleccione “Propiedades”.
C
58
ESPAÑOL
Aparecerá la ventana de propiedades de su conexión de área local.
D.
Seleccione la “Versión 4 del protocolo de
Internet (TCP/IPv4)” y haga clic en
“Propiedades”.
D
D
Aparecerá la ventana de propiedades de la Versión 4 del protocolo de Internet (TCP/IPv4).
E.
Seleccione la opción “Obtener la
dirección de IP automáticamente” y
pulse “OK” para guardar la configuración.
F.
Pulse “OK” en la ventana de propiedades
de la conexión de área local para guardar
la configuración.
E
F
59
ESPAÑOL
4.2 Comprobar la conexión
Haciendo uso de la línea de comandos de Windows puede verificar si ha recibido una dirección de IP
correcta en su conexión de área local. Este ejemplo está basado en Windows Vista con Service Pack 1. Con
Vista se necesitan derechos de administrador para poder realizar los pasos explicados más abajo. Los
derechos de administrador se pueden conseguir de la siguiente manera:
A.
Haga clic en “Inicio” Æ “Todos los programas” Æ “Accesorios”, haga clic con el botón derecho en
“Línea de comandos” y seleccione “Utilizar como administrador”.
Puede que aparezca un mensaje de aviso, en el que deberá hacer clic en “Continuar”.
A continuación aparecerá la línea de comandos. Asegúrese que en la barra de título ponga
“Administrador: línea de comandos”. Si no se menciona “Administrador”, significa que no tiene los
derechos de administrador y no podrá seguir con los pasos siguientes; realice de nuevo el paso A.
B.
Introduzca el comando “IPCONFIG” y pulse “ENTER”.
B
Debería ver la información siguiente:
: 192.168.0.xxx (donde xxx puede ser un número entre 100 y 199).
Dirección IPv4
Máscara de subred
: 255.255.255.0
Puerta de enlace predeterminada : 192.168.0.1
Si la información mostrada arriba concuerda con su configuración, puede continuar con la configuración
del dispositivo en el apartado 5.
Si la información mostrada arriba no concuerda con su configuración (por ejemplo, si su dirección IP es
169.254.xxx.xxx), pruebe las opciones siguientes:
1.
2.
60
Desconecte la corriente del dispositivo y vuelva a conectarla.
Vuelva a conectar el cable LAN al dispositivo y al ordenador.
ESPAÑOL
3.
Renueve la dirección IP de su ordenador con los comandos siguientes:
- “IPCONFIG /RELEASE” para prescindir de la dirección IP incorrecta.
- “IPCONFIG /RENEW” para recibir una nueva dirección IP desde el dispositivo.
3
3
Si los pasos de arriba no solucionan el problema con la dirección IP, puede hacer un “reset” para que el
dispositivo vuelva a la configuración de fábrica pulsando el botón “Reset” de la parte posterior del
dispositivo.
Mantenga pulsado el botón “Reset” durante unos 15 segundos para cargar la configuración de fábrica.
Cuando el LED de estado esté activo de nuevo, repita el paso B para renovar la dirección IP.
Nota:
Si el problema continúa, compruebe que todos los cables estén correctamente conectados. El
puerto WAN debe estar conectado al módem y al puerto LAN del ordenador. Si se conectan
incorrectamente puede provocar que no se obtenga la dirección IP correcta.
61
ESPAÑOL
5. Configuración del C300GBRS4
Este apartado describe cómo configurar el C300GBRS4 mediante el asistente de configuración incorporado.
Cuando haya completado los pasos de este apartado, su router estará listo para sus funciones básicas,
incluyendo la protección inalámbrica.
5.1 Configuración vía web
La configuración del C300GBRS4 se realiza vía web. Necesitará utilizar un navegador de Internet para
realizar la configuración del dispositivo.
Nota:
Para la configuración del router se recomienda utilizar una conexión con cable LAN en vez de una
conexión inalámbrica.
A.
Inicie su navegador de Internet (como Internet Explorer, Firefox, Safari o Chrome).
B.
Introduzca la dirección IP del dispositivo en la barra de direcciones de su navegador de Internet
(predeterminado: http://192.168.0.1/).
A continuación aparecerá la página de inicio de sesión del C300GBRS4.
C
C
C.
62
Introduzca el nombre de usuario y la contraseña (predeterminados: “admin” y “admin”) y haga clic
en “Enviar” para acceder a la página de configuración vía web.
ESPAÑOL
Si el nombre de usuario y la contraseña son correctos, el router mostrará el resumen de la “Configuración
del dispositivo”:
El resumen de la “Configuración del dispositivo” muestra todos los parámetros configurados de los
apartados LAN, WAN, e Inalámbrico del router.
63
ESPAÑOL
5.2 Asistente de configuración
Puede configurar el C300GBRS4 utilizando el asistente incorporado. Este asistente le ayudará a configurar
paso a paso los parámetros básicos del C300GBRS4.
Nota:
A.
Antes de iniciar la configuración con el asistente, asegúrese de que tiene a mano toda la
información acerca de su configuración de Internet. (Por ejemplo, información de su cuenta, tipo
de conexión, etc.)
Haga clic en el botón “Asistente” situado en el menú de la izquierda de la página de configuración
vía web.
B.
Haga clic en el botón “Iniciar asistente”.
C.
La pantalla de bienvenida muestra los cinco
pasos del asistente. Haga clic en
“Siguiente” para continuar.
D.
En este punto se le recomienda que
establezca una contraseña de
administrador. Introduzca la nueva
contraseña y vuélvala a introducir como
confirmación.
Al finalizar, haga clic en “Siguiente”
64
ESPAÑOL
E.
A efectos de gestión del sistema, es muy
importante que la configuración horaria sea
la correcta para que las etiquetas horarias
de las entradas del registro del sistema
sean también correctas.
Indique aquí su zona horaria.
Al finalizar, haga clic en “Siguiente”
F.
Seleccione el tipo de conexión a Internet
que le proporciona su proveedor.
Si no sabe qué opción corresponde a su
conexión a Internet, consulte la
documentación de su proveedor o contacte
con su servicio de atención al cliente.
Al finalizar, haga clic en “Siguiente”
G.
Si su proveedor requiere una conexión con
IP estática, seleccione la opción “IP
estática”.
Conexión con IP estática
Introduzca la información requerida:
• Dirección IP
• Máscara de subred
• Dirección de la puerta de entrada de su
proveedor
• DNS primario
• DNS secundario (opcional)
Al finalizar, haga clic en “Siguiente”
65
ESPAÑOL
H.
Si su proveedor requiere una conexión con
IP dinámica, seleccione la opción “IP
dinámica”.
Conexión con IP dinámica
Algunos proveedores requieren un nombre
de host específico para sus conexiones. Si
su proveedor requieren un nombre de host
específico, introduzca dicho nombre en el
campo “Nombre de host”.
Algunos proveedores sólo permiten una
dirección MAC específica para la conexión a
Internet. Si la tarjeta de red de su
ordenador funciona con la dirección MAC
específica requerida, pulse el botón
“Clonar dirección MAC” o introduzca
manualmente la dirección MAC.
Al finalizar, haga clic en “Siguiente”
I.
Si su proveedor requiere una conexión
PPPoE, seleccione la opción “PPPoE”.
Conexión con PPPoE
Introduzca la información requerida:
• Nombre de usuario
• Contraseña
• Reintroduzca la contraseña
Al finalizar, haga clic en “Siguiente”
J.
Si su proveedor requiere una conexión
PPTP, seleccione la opción “PPTP”.
Introduzca la información requerida:
• IP del servidor
• Cuenta PPTP
• Contraseña PPTP
• Reintroduzca la contraseña
Al finalizar, haga clic en “Siguiente”
66
Conexión con PPTP
ESPAÑOL
K.
Si su proveedor requiere una conexión L2TP,
seleccione la opción “L2TP”.
Conexión con L2TP
Introduzca la información requerida:
• IP del servidor
• Cuenta L2TP
• Contraseña L2TP
• Reintroduzca la contraseña
Al finalizar, haga clic en “Siguiente”
Una vez finalizada la configuración de la WAN, el asistente procederá con la configuración inalámbrica:
L.
Puede cambiar el SSID del router. El SSID es
el nombre de la conexión inalámbrica con su
router. Al buscar redes inalámbricas en su
ordenador, éste es el nombre que deberá
buscar.
Puede cambiar de canal y seleccionar un
canal del 1 al 13. Si experimenta conexiones
lentas o interrupciones, puede que otro punto
de acceso de su zona esté provocando
interferencias en su canal inalámbrico. En ese
caso, puede probar con otro canal.
Al finalizar, haga clic en “Siguiente”
Puede proteger la conexión inalámbrica mediante un sistema de cifrado. De forma predeterminada, la
conexión inalámbrica no está protegida. Para impedir accesos no autorizados a su red, establezca un nivel
de seguridad con el asistente de configuración.
Si desea utilizar la función WPS del C300GBRS4, puede ignorar la configuración inalámbrica y continuar
con el Asistente de Configuración sin cifrado. Para configurar la seguridad WPS, vaya al apartado 6 de
esta Guía de Instalación Rápida.
67
ESPAÑOL
Nota:
Se explican todas las opciones de seguridad del asistente de configuración, pero es recomendable
proteger su red con seguridad “WPA-PSK/WPA2-PSK” si sus clientes no son compatibles con la
función WPS. WPA2 es el nivel más alto de seguridad, con retrocompatibilidad únicamente con
clientes WPA.
Nota:
Recuerde o anote la información de seguridad inalámbrica introducida. ¡La necesitará cuando
quiera configurar un cliente inalámbrico para conectar con el C300GBRS4!
M.
Seleccione un nivel de seguridad para su red
inalámbrica.
Cuando haya escogido un nivel, el asistente
mostrará los campos para introducir la
información requerida.
N.
Si desea proteger su red con un cifrado WEP,
seleccione " WEP” en la lista desplegable.
Introduzca la clave WEP en formato ASCII (AZ, 0-9).
Nota:
O.
Con el asistente sólo se puede
configurar WEP de 16 bits.
Si desea proteger su red con un cifrado WPA o
WPA2 (con servidor Radius), seleccione
“WPA” o “WPA2” en la lista desplegable.
Introduzca la dirección IP del servidor Radius,
la clave compartida, y reintroduzca la clave
compartida en el segundo campo.
68
Protección con cifrado WEP
Protección con cifrado WPA o WPA2
ESPAÑOL
P.
Si desea proteger su red con un cifrado WPAPSK o WPA2-PSK, seleccione “WPA-PSK” o
“WPA2-PSK” en la lista desplegable.
Protección con cifrado WPA-PSK o WPA2-PSK
Introduzca la frase secreta para su cifrado, y
confírmela en el segundo campo.
Q.
Una vez realizada la configuración inalámbrica, haga clic en "Siguiente" para continuar.
R.
Ha finalizado la configuración con el
asistente. Si quiere aplicar su configuración,
haga clic en “Guardar y aplicar”.
Si desea modificar algún parámetro, haga clic
en “Atrás” para volver a la pantalla anterior.
Si quiere cerrar el asistente sin guardar los
cambios, haga clic en "Salir".
Al seleccionar “Guardar y aplicar”, el router aplica la configuración establecida. Por favor, espere a que
aparezca el mensaje “Cambios guardados”.
S.
Cuando aparezca, la configuración se habrá completado. Haga clic en “Cerrar” para salir del
asistente.
Volverá al resumen de la “Configuración del dispositivo”, que mostrará la configuración actual de su
conexión WAN e inalámbrica.
¡Su router C300GBRS4 ya está listo para ser utilizado!
Nota:
Para información más detallada acerca de las funciones y configuraciones del C300GBRS4,
consulte el Manual de Usuario (sólo en inglés) que encontrará en el CR-ROM del producto.
Seleccione “Ver el Manual de Usuario” en el menú autoejecutable.
69
ESPAÑOL
6. Utilización de la característica WPS
El C300GBRS4 de Conceptronic es compatible con la función WPS (configuración Wi-Fi protegida). La
función WPS es un procedimiento para establecer una red inalámbrica de forma fácil y segura. Con esta
función podrá configurar y proteger su red inalámbrica siguiendo tan sólo unos pasos muy sencillos.
Nota:
Para usar la función WPS con el C300GBRS4, deberá tener clientes inalámbricos compatibles con
dicha función. Si tiene uno o más clientes inalámbricos que no son compatibles con la función
WPS, se recomienda que proteja su red manualmente utilizando el asistente de configuración, tal
como se indica en el apartado 5.2.
Nota:
Si desea información (técnica) adicional sobre la función WPS, puede visitar el sitio web
siguiente:
http://en.wikipedia.org/wiki/Wi-Fi_Protected_Setup
El C300GBRS4 ofrece dos maneras para activar y establecer una conexión WPS:
Tecnología “Push Button”
Tecnología de Código PIN
6.1 WPS con la tecnología “Push Button”
La tecnología “Push Button” para WPS requiere un botón (o botón virtual) en su cliente inalámbrico para
establecer una conexión entre el C300GBRS4 y su cliente inalámbrico.
Algunos clientes inalámbricos funcionan con un botón real para activar la tecnología Push Button para
WPS, mientras que otros emplean un botón virtual basado en software.
Siga los pasos siguientes para activar y establecer una conexión WPS con la tecnología Push Button:
A.
B.
Pulse el botón WPS de la parte delantera del C300GBRS4 hasta que el LED WPS empiece a parpadear.
Pulse el botón WPS de su cliente inalámbrico. Puede tratarse de un botón real o de un botón virtual
en el software de su cliente inalámbrico.
El C300GBRS4 activará la seguridad WPA para la red inalámbrica y aceptará la conexión inalámbrica de su
cliente inalámbrico.
Nota:
El C300GBRS4 mantendrá activa la autenticación WPS durante 120 segundos. Durante este
proceso, el LED WPS parpadeará. Si no hay conexión durante estos 120 segundos, el LED se
apagará y el proceso de autenticación WPS se detendrá.
Si la función WPS no se ha utilizado antes, la red inalámbrica seguirá sin estar protegida.
Si la autenticación del cliente inalámbrico es correcta, el LED WPS se apagará.
Ahora su cliente inalámbrico ya está conectado al C300GBRS4 y su red está protegida mediante cifrado
WPA. Puede añadir más clientes inalámbricos con la función WPS sin perder la conexión con los clientes
inalámbricos WPS anteriores. Si desea añadir más clientes inalámbricos WPS, repita los pasos A y B.
Nota:
70
La clave WPA que genera el C300GBRS4 es aleatoria.
ESPAÑOL
6.2 WPS con tecnología de Código PIN
Si su cliente inalámbrico con función WPS no tiene un botón “Push Button” real o virtual, puede utilizar la
tecnología de Código PIN para establecer una conexión WPS.
Nota:
Para activar la función de WPS con Código PIN, es necesario que su ordenador esté conectado por
cable al C300GBRS4.
A.
Inicie su navegador de Internet (como Internet Explorer, Firefox, Safari o Chrome).
B.
Introduzca la dirección IP del dispositivo en la barra de direcciones de su navegador de Internet
(predeterminado: http://192.168.0.1/).
A continuación aparecerá la página de inicio de sesión del C300GBRS4.
C
C
C.
Introduzca el nombre de usuario y la contraseña (predeterminados: “admin” y “admin”) y haga clic
en “Enviar” para acceder a la página de configuración vía web.
Si el nombre de usuario y la contraseña son correctos, el router mostrará el resumen de la “Configuración
del dispositivo”.
D.
Seleccione “Inalámbrico” en el menú de la izquierda.
A continuación, aparecerá la página de Configuración Inalámbrica. En la parte inferior de esta página de
configuración encontrará la sección “Configuración Wi-Fi protegida”.
E
E.
Haga clic en el botón “Asistente para añadir de dispositivos inalámbricos” que aparece en la
pantalla.
A continuación aparecerá en pantalla el asistente para WPS:
71
ESPAÑOL
En este asistente podrá activar la función de Código PIN. Para empezar su autenticación, necesitará el
código PIN que ha generado su cliente inalámbrico.
F.
Seleccione la función de Código PIN para WPS en el software de su cliente inalámbrico. El cliente
inalámbrico generará un código PIN y lo mostrará en pantalla.
[Software del cliente inalámbrico]
G.
Æ
G
[Asistente WPS del C300GBRS4]
Introduzca el código PIN que ha generado su cliente inalámbrico en el asistente WPS del C300GBRS4
y pulse “Conectar”.
El C300GBRS4 activará la protección WPA para la red inalámbrica y aceptará la conexión inalámbrica de su
cliente inalámbrico con el código PIN introducido.
El C300GBRS4 mantendrá activa la autenticación WPS durante 120 segundos. Durante este proceso, el LED
WPS parpadeará. Si no hay conexión durante estos 120 segundos, el LED se apagará y el proceso de
autenticación WPS se detendrá.
72
ESPAÑOL
Haga clic en “Continuar” para volver a la pantalla del asistente WPS.
Nota:
Si la función WPS no se ha utilizado antes, la red inalámbrica seguirá sin estar protegida.
Si la autenticación del cliente inalámbrico se ha realizado correctamente, el asistente mostrará el
mensaje “WPS – El dispositivo inalámbrico se ha añadido satisfactoriamente” y el LED WPS se apagará.
Haga clic en “Continuar” para volver a la página de configuración Inalámbrica.
Ahora su cliente inalámbrico ya está conectado al C300GBRS4 y su red está protegida mediante cifrado
WPA.
Si desea añadir más clientes inalámbricos con la función WPS, repita los pasos de E a G.
73
ESPAÑOL
7. Creación de reglas del Servidor Virtual
El C300GBRS4 de Conceptronic está equipado con un cortafuegos para impedir ataques a su red desde
Internet. Este cortafuegos bloqueará automáticamente todo tráfico entrante por puertos no utilizados.
Cuando un puerto bloqueado se necesite para algún servicio o aplicación (por ejemplo: un servidor FTP o
un servidor web), puede crear una regla de servidor virtual en la página de configuración para redirigir el
tráfico.
A continuación encontrará una lista de los puertos más utilizados y sus correspondientes aplicaciones:
Puerto
Aplicación
Puerto
Aplicación
20
21
22
23
25
Datos FTP (servidor FTP)
FTP (servidor FTP)
SSH (Secure Shell)
Telnet
SMTP (servidor de correo saliente)
80
110
2000
5800
5900
HTTP (servidor web)
POP3 (servidor de correo entrante)
Remotely Anywhere
VNC
VNC
Para información sobre otros puertos y sus correspondientes aplicaciones, visite:
http://portforward.com/cports.htm
Nota:
Si utiliza una aplicación compatible con mapeado de puerto UPnP, el router puede ser
configurado automáticamente por la aplicación cuando sea necesario. En ese caso, no tendrá que
configurar el mapeado de los puertos manualmente.
Nota:
Cuando utilice reglas de servidor virtual, se recomienda configurar el ordenador o ordenadores
para que obtengan una IP fija en vez de una IP dinámica.
Nota:
Para información más detallada acerca del servidor virtual y las opciones de DMZ, consulte el
Manual de Usuario (sólo en inglés) que encontrará en el CR-ROM del producto. Seleccione “Ver el
Manual de Usuario” en el menú autoejecutable.
A.
Inicie su navegador de Internet (como Internet Explorer, Firefox, Safari o Chrome).
B.
Introduzca la dirección IP del dispositivo en la barra de direcciones de su navegador de Internet
(predeterminado: http://192.168.0.1/).
A continuación aparecerá la página de inicio de sesión del C300GBRS4.
C
C
74
ESPAÑOL
C.
Introduzca el nombre de usuario y la contraseña (predeterminados: “admin” y “admin”) y haga clic
en “Enviar” para acceder a la página de configuración vía web.
Si el nombre de usuario y la contraseña son correctos, el router mostrará el resumen de la “Configuración
del dispositivo”.
D.
Seleccione “Avanzado” y “Servidor Virtual” en el menú horizontal superior.
A continuación aparecerá la siguiente página de configuración del “Servidor virtual”:
Nota:
E.
F.
G.
H.
En “Servidor virtual”, seleccione la opción “Activado”.
Introduzca un nombre para la regla de servidor virtual en el campo “Nombre”.
Introduzca la dirección IP del ordenador o servidor que necesite una regla de servidor virtual.
Seleccione el protocolo para la regla de servidor virtual: “TCP”, “UDP” o “Ambos”.
Nota:
I.
J.
K.
En la imagen de abajo verá un ejemplo de configuración de un servidor virtual.
Si no sabe qué protocolo necesita para la regla de servidor virtual, seleccione “Ambos”. Esta
opción redireccionará tanto el trafico TCP como el UDP hacia la dirección IP configurada de su
ordenador o servidor.
Introduzca el puerto del ordenador o servidor que necesite la regla de servidor virtual.
Introduzca el puerto que debe estar visible en el exterior de su conexión a Internet.
Haga clic en “Aplicar” para aplicar la regla de servidor virtual creada.
Cuando haya guardado la regla de servidor virtual, ésta se mostrará en la “Lista de servidor virtual”.
Para crear más reglas de servidor virtual, repita los pasos de E a K.
¡Las reglas de servidor virtual ya están listas para ser utilizadas!
75
ESPAÑOL
8. Reiniciar el C300GBRS4
Cuando usted cambia cualquier parámetro de configuración del router, la nueva configuración se aplica y
queda activada directamente.
No obstante, es recomendable reiniciar el C300GBRS4 después de haber hecho algún cambio importante
en la configuración para asegurarse de que la nueva configuración se aplique correctamente.
A.
Seleccione “Herramientas” en el menú horizontal superior y luego “Sistema”.
B.
Haga clic en “Reiniciar”: se guardará la configuración y se reiniciará el C300GBRS4 con todos los
cambios correctamente activados.
Aparecerá un mensaje de confirmación.
C.
Haga clic en “OK” para proseguir con el reinicio.
Se guardarán todos los cambios y se reiniciará el router. Por favor, espere a que el temporizador acabe la
cuenta atrás:
Una vez reiniciado, volverá a la página de inicio de sesión del router.
¡Su C300GBRS4 ya está listo para ser utilizado!
Nota:
76
Para información más detallada acerca de las funciones y configuraciones del C300GBRS4,
consulte el Manual de Usuario (sólo en inglés) que encontrará en el CR-ROM del producto.
Seleccione “Ver el Manual de Usuario” en el menú autoejecutable.
DEUTSCH
Conceptronic C300GBRS4
Schnellinstallationsanleitung
Wir gratulieren Ihnen zum Kauf Ihres
Conceptronic Wireless 802.11n Gigabit Routers.
In beiliegender Schnellinstallationsanleitung wird Ihnen Schritt für Schritt gezeigt, wie der Conceptronic
C300GBRS4 installiert und verwendet werden muss.
Wenn Sie weitere Informationen oder Support für Ihr Produkt benötigen, besuchen Sie unsere Service &
Support-Webseite www.conceptronic.net/support und wählen Sie eine der folgenden Optionen:
• FAQ
• Downloads
• Kontakt
: Datenbank mit den häufig gestellten Fragen
: Handbücher, Treiber, Firmware und weitere Downloads
: Kontakt für den Conceptronic-Support
Allgemeine Informationen über Conceptronic-Produkte finden Sie auf der Conceptronic-Webseite unter
www.conceptronic.net.
Möglicherweise weicht die Hardware-Konfiguration auf Ihrem Computer von der im Folgenden
beschriebenen etwas ab. Dies hängt vom Betriebssystem ab, das Sie verwenden.
Inhaltsverzeichnis
1. Packungsinhalt
2. Erläuterungen zum C300GBRS4
3. Hardwareinstallation
3.1. WAN-Anschluss
3.2. LAN- / Wireless LAN-Anschluss
4. Computer-Konfiguration
4.1. Konfiguration der IP-Adresse
4.2. Überprüfen der Verbindung
5. C300GBRS4-Konfiguration
5.1. Webbasierende Konfiguration
5.2. Einrichtungsassistent
6. Verwenden der WPS-Funktion
6.1. WPS – Knopfdruck-Methode
6.2. WPS – Pin-Code-Methode
7. Konfigurieren von Virtual Server-Regeln
8. Neustart
77
DEUTSCH
1. Packungsinhalt
In der Verpackung des Conceptronic Wireless 802.11g Gigabit Routers ist Folgendes enthalten:
•
•
•
•
•
•
Conceptronic C300GBRS4 - Wireless 802.11n Gigabit Router
Netzteil 5V Gleichstrom 2A
3 Antennen für drahtlose Konnektivität
1,8 m LAN-Kabel
Mehrsprachige Schnellinstallationsanleitung
Produkt-CD-ROM
2. Erläuterungen zum C300GBRS4
• Vorderseite
7
Nr.
Beschreibung
1
Power LED-Anzeige AUS
EIN
Status-LED-Anzeige AUS
BLINKT
WAN LED-Anzeige AUS
DAUERLICHT
BLINKLICHT
WLAN LED-ANZEIGE AUS
BLINKT
LAN LED-ANZEIGEN AUS
(1, 2, 3, 4)
ORANGE
2
3
4
5
Status
GRÜN
BLINKLICHT
6
WPS-LED-Anzeige
7
WPS-Taste
78
BLINKEND
6
5
4 3 2 1
Status-Erklärung
Das Gerät ist ausgeschaltet
Das Gerät ist eingeschaltet
Das Gerät ist ausgeschaltet / Systemstörung*
Das Gerät ist eingeschaltet und betriebsbereit
Es wurde keine WAN-Verbindung hergestellt
Es wurde eine WAN-Verbindung hergestellt
Es werden Daten über den WAN-Port gesendet / empfangen
Die Wireless-Schnittstelle ist deaktiviert
Die Wireless-Schnittstelle ist aktiviert und aktiv
Es besteht keine Netzwerkverbindung zum LAN-Port
Es besteht eine Gigabit-Netzwerkverbindung auf dem LANPort
Es besteht eine 10/100 Mbps - Netzwerkverbindung auf dem
LAN-Port
Es werden Daten über den LAN-Port gesendet oder
empfangen
Wenn die WPS-Taste gedrückt wird, blinkt die WPS-LEDAnzeige während der Suche nach WPS-Clients für 120
Sekunden. **
Drücken Sie die WPS-Taste, um die WPS-Funktion zu
aktivieren. Daraufhin sucht der Router für 120 Sekunden
nach WPS-Clients. **
DEUTSCH
*
Bei normaler Verwendung schaltet die Status-LED-Anzeige ein und blinkt während 15 Sekunden,
nachdem das Gerät eingeschaltet oder neu gestartet wurde. Bei einer Systemstörung des Geräts
schaltet die Status-LED-Anzeige nicht ein.
Sie haben folgende Möglichkeiten, die Systemstörung zu beheben:
g.
Schalten Sie das Gerät aus, warten Sie 10 Sekunden und schalten dann das Gerät wieder ein.
h.
Setzen Sie das Gerät auf seine Werkseinstellungen zurück, indem Sie die Reset-Taste auf der
Rückseite des Geräts während + / - 15 Sekunden gedrückt halten.
Wenn die Status-Led-Anzeige danach immer noch nicht einschaltet, kontaktieren Sie bitte den
Support von Conceptronic: www.conceptronic.net/support
**
Weitere Informationen über die WPS-Funktion finden Sie in Kapitel 6 dieser
Schnellinstallationsanleitung.
• Rückseite
1
2
1
3
4
5
1
Nr.
Beschreibung
Erklärung
1
2
3
4
5
Antennenanschluss
LAN-Anschlüsse
WAN-Anschluss
Reset-Taste
Stromanschluss
Reverse-SMA-Anschluss für drahtlose Antenne
Anschluss Ihres Computers/Ihrer Computer an den Router
Anschluss Ihrer Breitbandverbindung an den Router
Zurücksetzen des Routers auf die Werkseinstellungen
Anschluss des Routers an die Stromversorgung
Hinweis: Diese Schnellinstallationsanleitung erklärt lediglich die Grundschritte, die durchgeführt werden
müssen, um den C300GBRS4 betriebsbereit zu machen.
Weitere Informationen über die verschiedenen Funktionen des C300GBRS4 finden Sie im
Benutzerhandbuch auf der im Lieferumfang enthaltenen CD-ROM (nur Englisch!). Wählen Sie dazu
„View User Manual [Benutzerhandbuch öffnen]” im Autorun-Menü.
79
DEUTSCH
3. Hardwareinstallation
Schließen Sie die drei Antennen an die Antennenanschlüsse auf der Rückseite des C300GBRS4 an.
Stecken Sie das Netzteil am Stromanschluss auf der Rückseite des C300GBRS4 ein und schließen Sie es an
der Stromversorgung an. Daraufhin leuchtet die Power-LED-Anzeige auf der Vorderseite des C300GBRS4.
3.1 WAN-Anschluss
Verwenden Sie ein LAN-Kabel für den Anschluss Ihres C300GBRS4 an Ihr Kabel-, DSL- oder Glasfasermodem.
Daraufhin leuchtet die WAN-LED-Anzeige auf der Vorderseite des C300GBRS4.
Hinweis:
-
Wenn die WAN-LED-Anzeige auf der Vorderseite nicht leuchtet, vergewissern Sie sich, dass:
der C300GBRS4 eingeschaltet ist (die Power-LED-Anzeige sollte leuchten),
das Kabel-, DSL- oder Glasfasermodel eingeschaltet ist,
das LAN-Kabel zwischen den beiden Geräten korrekt angeschlossen ist.
3.2 LAN- / Wireless LAN-Anschluss
Bei Verwendung eines LAN-Kabels:
Schließen Sie das LAN-Kabel an einen der vier LAN-Ports auf der Rückseite des C300GBRS4 und an die
Netzwerkkarte Ihres Computers an.
Die LAN-LED-Anzeige des verwendeten LAN-Ports schaltet ein und zeigt damit an, dass der Computer
angeschlossen ist. (Ihr Computer muss eingeschaltet und die LAN-Verbindung muss aktiviert sein.)
Bei drahtlosen Netzwerken:
Sie können die drahtlose Verbindung mit dem C300GBRS4 auf zwei verschiedene Arten herstellen:
Manuell.
Automatisch mithilfe der WPS-Funktion.
Wenn Sie einen oder mehrere Clients haben, die WPS nicht unterstützen, empfehlen wir die manuelle
Verbindung mit dem C300GBRS4.
Hinweis: Der C300GBRS4 ist standardmäßig mit WPA-PSK/WPA2-PSK (gemischter Modus) geschützt. Die
WPA-Passphrase für Ihren C300GBRS4 finden Sie auf dem Produktaufkleber auf der Unterseite
Ihres C300GBRS4.
In diesem Kapitel wird Ihnen Schritt für Schritt erklärt, wie Sie eine manuelle Verbindung mit Ihrem
drahtlosen Netzwerk herstellen können.
Weitere Informationen über die WPS-Funktion und die Konfigurationsschritte finden Sie in Kapitel 6 dieser
Schnellinstallationsanleitung.
80
DEUTSCH
Manuelle drahtlose Verbindung:
Für die verschiedenen Marken/Arten von Wireless-Karten werden unterschiedliche Client-Anwendungen
verwendet. Informationen über das Erstellen einer Verbindung mit einem drahtlosen Netzwerk finden Sie
im Handbuch Ihrer Wireless-Netzwerkkarte.
Hinweis: Im folgenden Beispiel wird der Standard Microsoft Wireless Client verwendet, der in Windows
Vista mit Service Pack 1 enthalten ist.
A
Klicken Sie auf das
Netzwerksymbol in Ihrer
Kontrollleiste und dann auf
„Wireless networks are
available [Drahtlose Netzwerke
verfügbar]”.
B
Wählen Sie das Netzwerk
„C300GBRS4” aus der Liste und
klciken Sie auf „Connect
[Verbinden]”.
81
DEUTSCH
C
Geben Sie die Standard-WPAPassphrase (diese findet sich auf
dem Aufkleber auf der Unterseite
des C300GBRS4) im Feld
„Security key
[Sicherheitsschlüssel]” ein und
klicken Sie auf „Connect
[Verbinden]”.
D
Sobald die Verbindung
hergestellt wurde, können Sie die
Optionen „Save this network
[Dieses Netzwerk speichern]“
und „Start this connection
automatically [Diese Verbindung
automatisch starten]“ aktivieren.
Klicken Sie auf „Close
[Schließen]“, um den
Verbindungsassistenten zu
schließen.
E
Zur Überprüfung des Status der
drahtlosen Verbindung können
Sie auf das Netzwerksymbol in
der Kontrollleiste klicken.
Daraufhin wird Ihnen angezeigt,
mit welchem Netzwerk
gegenwärtig eine Verbindung
besteht, welchen Zugriff Sie
haben und welche Signalstärke
die Verbindung hat.
82
DEUTSCH
4. Computer-Konfiguration
4.1 Konfiguration der IP-Adresse
Der C300GBRS4 ist mit einem eingebauten DHCP-Server ausgerüstet. Der DHCP-Server weist automatisch
einem angeschlossenen Computer eine IP-Adresse zu, wenn dieser auf „IP-Adresse automatisch
beziehen“ eingestellt ist.
Die meisten Computer sind so konfiguriert, dass sie automatisch eine IP-Adresse beziehen. Sollte dies bei
Ihnen nicht der Fall sein, müssen Sie Ihren Computer so konfigurieren, dass er automatisch eine IP-Adresse
bezieht. Befolgen Sie dazu untenstehende Anweisungen. Diese Anweisungen basieren auf Windows Vista
mit Service Pack 1. Wenn Ihr Computer eine andere Version oder ein anderes Betriebssystem hat, können
die auszuführenden Schritte von den im Folgenden beschriebenen abweichen.
A.
Klicken Sie auf „Start” Æ „Ausführen”.
B.
Geben Sie den Befehl „NCPA.CPL” ein
und klicken Sie auf „OK”.
B
B
Es erscheint das Fenster ‚Netzwerkverbindungen’.
C.
Rechtsklicken Sie auf Ihre „LAN-Verbindung”
(verkabelt oder kabellos, je nach verwendeter
Verbindung) und wählen Sie „Eigenschaften”.
C
83
DEUTSCH
Es erscheint das Fenster ‚Eigenschaften von LAN-Verbindung’.
D.
Wählen Sie das „Internetprotokoll
Version 4 (TCP/IPv4)“ und klicken Sie auf
„Eigenschaften“.
D
D
Es erscheint das Fenster ‚Eigenschaften von Internetprotokoll Version 4 (TCP/IPv4)’.
E.
Aktivieren Sie das Feld „IP-Adresse
automatisch beziehen“ und klicken Sie
auf „OK“, um die Einstellungen zu
speichern.
F.
Klicken Sie im Fenster ‚Eigenschaften von
LAN-Verbindung’ auf „OK“, um die
Einstellungen zu speichern.
E
F
84
DEUTSCH
4.2 Überprüfen der Verbindung
Über die Eingabeaufforderung von Windows können Sie überprüfen, ob Sie für Ihre LAN-Verbindung eine
korrekte IP-Adresse erhalten haben. Dieses Beispiel basiert auf Windows Vista mit Service Pack 1. Sie
müssen über Administratorrechte verfügen, um die folgenden Schritte durchführen zu können. Diese
Administratorrechte können Sie wie folgt erlangen.
A.
Klicken Sie auf „Start” Æ „Alle Programme” Æ „Zubehör”, rechtsklicken Sie auf
„Eingabeaufforderung” und wählen Sie “Als Administrator ausführen”.
Möglicherweise wird eine Warnmeldung angezeigt. Akzeptieren Sie diese, indem Sie auf „Weiter”
klicken.
Es erscheint die Eingabeaufforderung. Stellen Sie sicher, dass die Titelleiste der Eingabeaufforderung den
Text „Administrator: Eingabeaufforderung” aufweist. Wenn “Administrator” nicht erwähnt ist, haben
Sie die erforderlichen Administratorrechte nicht und müssen erneut den Schritt A durchführen.
B.
Geben Sie den Befehl „IPCONFIG” ein und drücken Sie die „ENTER”-Taste.
B
Es sollten die folgenden Informationen angezeigt werden:
IPv4-Adresse
: 192.168.0.xxx (wobei xxx eine Zahl zwischen 100 ~ 199 sein kann).
Subnetzmaske
: 255.255.255.0
Standardgateway
: 192.168.0.1
Wenn Ihre Konfiguration mit obigen Informationen übereinstimmt, können Sie weitergehen zu Kapitel 5,
um mit der Konfiguration des Gerätes fortzufahren.
Wenn Ihre Konfiguration nicht mit obigen Informationen übereinstimmt (z.B. wenn Ihre IP-Adresse
169.254.xxx.xxx lautet), gehen Sie bitte folgendermaßen vor:
85
DEUTSCH
1.
2.
3.
Schalten Sie das Gerät aus und wieder ein.
Trennen Sie das LAN-Kabel vom Gerät und von Ihrem Computer und schließen Sie es erneut an.
Erneuern Sie die IP-Adresse Ihres Computers mit den folgenden Befehlen:
- „IPCONFIG /RELEASE”, um die falsche IP-Adresse zu löschen.
- „IPCONFIG /RENEW”, um eine neue IP-Adresse vom Gerät zu erhalten.
3
3
Wenn diese Maßnahmen das Problem mit der IP-Adresse nicht lösen, können Sie durch Betätigen der ResetTaste auf der Rückseite das Gerät auf die Werkseinstellungen zurücksetzen.
Drücken Sie die Reset-Taste und halten Sie diese während + / - 15 Sekunden gedrückt, um die
Werkseinstellungen zu laden. Sobald die Status-LED-Anzeige wieder aktiv ist, wiederholen Sie den Schritt
B, um die IP-Adresse zu erneuern.
Hinweis:
86
Wenn das Problem weiterhin besteht, überprüfen Sie, ob alle Kabel korrekt angeschlossen sind.
Der WAN-Port sollte mit dem Modem und der LAN-Port mit dem Computer verbunden sein.
Wenn diese Verbindungen falsch sind, kann dies dazu führen, dass Sie eine falsche IP-Adresse
erhalten.
DEUTSCH
5. C300GBRS4-Konfiguration
In diesem Kapitel wird die Konfiguration des C300GBRS4 mit dem integrierten Einrichtungsassistenten
beschrieben. Nachdem Sie die in diesem Kapitel beschriebenen Schritte durchgeführt haben, ist Ihr Router
für seine primären Funktionen einschließlich der Wireless-Sicherheit eingestellt.
5.1 Webbasierende Konfiguration
Die Konfiguration des C300GBRS4 ist webbasierend. Für die Konfiguration des Gerätes benötigen Sie einen
Webbrowser.
Hinweis:
Wir empfehlen, für die Konfiguration des Routers eine LAN-Kabelverbindung statt einer
drahtlosen Verbindung zum Gerät zu verwenden.
A.
Starten Sie Ihren Webbrowser (z.B. Internet Explorer, FireFox, Safari oder Chrome).
B.
Geben Sie die IP-Adresse des Gerätes in das Adressfeld Ihres Webbrowsers ein (standardmäßig:
http://192.168.0.1/).
Es erscheint die Login-Seite des C300GBRS4.
C
C
C.
Geben Sie den Benutzernamen und das Passwort ein (standardmäßig ‚admin“ und ‚admin’) und
klicken Sie auf „Submit [Anmelden]“, um die webbasierenden Konfigurationsseiten zu öffnen.
87
DEUTSCH
Wenn Benutzername und Passwort korrekt sind, zeigt der Router einen Überblick über die „Device
Settings [Geräteinstellungen]“ an.
Im Überblick über die „Device Settings [Geräteinstellungen]” werden alle konfigurierten LAN-, WAN- und
Wireless-Einstellungen des Routers angezeigt.
88
DEUTSCH
5.2 Einrichtungsassistent
Sie können den C300GBRS4 mit dem integrierten Assistenten einrichten. Der Assistent führt Sie Schritt für
Schritt durch die Konfiguration der Grundeinstellungen des C300GBRS4.
Hinweis:
Bevor Sie die Konfiguration mithilfe des Assistenten beginnen, stellen Sie sicher, dass Sie alle
Informationen über Ihre Interneteinstellungen zur Hand haben. (Zum Beispiel:
Kontoinformationen, Verbindungsart usw.)
A.
Klicken Sie auf die Schaltfläche „Wizard [Assistent]“ im linken Menü in der Web-Konfiguration.
B.
Klicken Sie auf die Schaltfläche „Run
Wizard [Assistent ausführen]”.
C.
Im Willkommensfenster werden die fünf
Schritte des Assistenten angezeigt. Klicken
Sie auf „Next [Weiter]“.
D.
Wir empfehlen Ihnen, hier ein AdminPasswort einzurichten. Geben Sie das neue
Passwort ein und bestätigen Sie es im Feld
„Confirm Password [Passwort bestätigen]“.
Klicken Sie danach auf „Next [Weiter]".
89
DEUTSCH
E.
Eine korrekte Zeiteinstellung ist aus
Systemverwaltungsgründen unerlässlich,
damit die Systemprotokolle die korrekten
Zeitstempel enthalten.
Stellen Sie die korrekte Zeitzone ein.
Klicken Sie danach auf „Next [Weiter]".
F.
Wählen Sie die Methode der
Internetverbindung, die den Einstellungen
Ihres Anbieters entspricht.
Wenn Sie nicht wissen, welche Option Sie
für Ihre Internetverbindung benötigen,
sehen Sie bitte in der Dokumentation Ihres
Anbieters nach oder kontaktieren Sie das
Helpdesk Ihres Anbieters.
Klicken Sie danach auf „Next [Weiter]".
G.
Wenn Ihr Anbieter eine statische IPVerbindung erfordert, wählen Sie die
Option „Static IP [Statische IP]“.
Geben Sie die erforderlichen Informationen
ein:
•
•
•
•
•
IP-Adresse
Subnetzmaske
ISP-Gateway-Adresse
Primäre DNS
Sekundäre DNS (optional)
Klicken Sie danach auf „Next [Weiter]".
90
Verbindung – statische IP
DEUTSCH
H.
Wenn Ihr Anbieter eine dynamische IPVerbindung erfordert, wählen Sie die
Option „Dynamic IP [Dynamische IP]“.
Verbindung – dynamische IP
Bei einigen Anbietern ist ein bestimmter
Hostname für die Verbindung erforderlich.
Wenn bei Ihrem Anbieter ein bestimmter
Hostname erforderlich ist, geben Sie diesen
in das entsprechende Feld ein.
Bei einigen Anbietern darf nur eine
bestimmte MAC-Adresse für die Verbindung
mit dem Internet verwendet werden. Wenn
Ihre PC-Netzwerkkarte mit dieser
bestimmten MAC-Adresse arbeitet, klicken
Sie auf die Schaltfläche „Clone MAC
Address [MAC-Adresse klonen)“ oder
geben Sie die MAC-Adresse im
entsprechenden Feld ein.
Klicken Sie danach auf „Next [Weiter]".
I.
Wenn Ihr Anbieter eine PPPoE-Verbindung
erfordert, wählen Sie die Option „PPPoE“.
Verbindung - PPPoE
Geben Sie die erforderlichen Informationen
ein:
• Benutzername
• Passwort
• Passwort erneut eingeben
Klicken Sie danach auf „Next [Weiter]".
91
DEUTSCH
J.
Wenn Ihr Anbieter eine PPTP-Verbindung
erfordert, wählen Sie die Option „PPTP“.
Verbindung - PPTP
Geben Sie die erforderlichen Informationen
ein:
• Server IP
• PPTP Konto
• PPTP Passwort
• Passwort erneut eingeben
Klicken Sie danach auf „Next [Weiter]".
K.
Wenn Ihr Anbieter eine L2TP-Verbindung
erfordert, wählen Sie die Option „L2TP“.
Verbindung – L2TP
Geben Sie die erforderlichen Informationen
ein:
• Server IP
• L2TP-Konto
• L2TP Passwort
• Passwort erneut eingeben
Klicken Sie danach auf „Next [Weiter]".
Sobald die WAN-Konfiguration abgeschlossen ist, setzt der Assistent die Wireless-Konfiguration fort.
92
DEUTSCH
L.
Sie können die SSID des Routers ändern. Die
SSID ist der Name der drahtlosen Verbindung
zu Ihrem Router. Wenn Sie nach drahtlosen
Netzwerken auf Ihrem Computer suchen,
suchen Sie nach diesem Namen.
Sie können den Kanal ändern (zwischen 1 und
13). Wenn die Verbindung langsam ist oder
unterbrochen wird, befindet sich
möglicherweise ein anderer Access Point in
Ihrem Gebiet, der Störungen in Ihrem
Wireless-Kanal verursacht. Versuchen Sie es
in diesem Fall mit einem anderen Kanal.
Klicken Sie danach auf „Next [Weiter]".
Sie können Ihre Wireless-Verbindung mit Verschlüsselung sichern. Standardmäßig ist die WirelessVerbindung nicht gesichert. Um den unberechtigten Zugriff auf Ihr Netzwerk zu verhindern, stellen Sie
über den Einrichtungsassistenten eine Sicherheitsstufe ein.
Wenn Sie die WPS-Funktion des C300GBRS4 verwenden möchten, können Sie die Wireless-Konfiguration
überspringen und mit dem Einrichtungsassistenten ohne Verschlüsselung fortfahren. Für die Einrichtung
Ihrer WPS-Sicherheit gehen Sie bitte weiter zu Kapitel 6 dieser Schnellinstallationsanleitung.
Hinweis:
Alle Sicherheitsoptionen des Einrichtungsassistenten werden erklärt. Es ist jedoch
empfehlenswert, Ihr Netzwerk mit „WPA-PSK/WPA2-PSK”-Sicherheit zu schützen, wenn Ihre
Clients WPS nicht unterstützen. WPA2 ist die höchste Sicherheitsstufe, die rückwärts
kompatibel ist mit WPA only-Clients.
Hinweis:
Notieren Sie sich die eingegebenen Informationen über die Wireless-Sicherheit. Sie werden
diese benötigen, wenn Sie einen drahtlosen Client für die Verbindung mit dem C300GBRS4
konfigurieren möchten!
M.
Wählen Sie eine Sicherheitsstufe für Ihr
Wireless-Netzwerk.
Nachdem Sie die Sicherheitsstufe gewählt
haben, zeigt der Assistent die Felder an, in
denen die entsprechenden Informationen
eingegeben werden müssen.
93
DEUTSCH
N.
Wenn Sie Ihr Netzwerk mit WEPVerschlüsselung sichern möchten, wählen Sie
„WEP“ aus der Dropdown-Liste. Geben Sie
den WEP-Schlüssel im ASCII-Format ein
(Eingabe: A-Z, 0-9).
Hinweis:
O.
Sicherheit – WEP-Verschlüsselung
Mit dem Assistenten können Sie
nur WEP 64Bits konfigurieren.
Wenn Sie Ihr Netzwerk mit WPA oder WPA2
(mit Radius-Server) verschlüsseln möchten,
wählen Sie „WPA“ oder „WPA2“ aus der
Dropdown-Liste.
Sicherheit - WPA-/WPA2-Verschlüsselung
Geben Sie die IP-Adresse des Radius-Servers
sowie den Shared Key ein und geben Sie den
Shared Key zur Bestätigung erneut im zweiten
Feld ein.
P.
Wenn Sie Ihr Netzwerk mit WPA-PSK oder
WPA2-PSK schützen wollen, wählen Sie
„WPA-PSK”, „WPA2-PSK” oder „WPAPSK/WPA2-PSK” aus der Dropdown-Liste.
Sicherheit - WPA-PSK-/WPA2-PSK
Geben Sie die Passphrase für Ihre
Verschlüsselung ein und bestätigen Sie die
Passphrase im zweiten Feld.
Q.
Klicken Sie auf „Next [Weiter]“, nachdem Sie alle Wireless-Einstellungen vorgenommen haben.
R.
Damit ist die Konfiguration mit dem
Einrichtungsassistenten abgeschlossen.
Klicken Sie auf „Save & Take Effect
[Speichern und Übernehmen]“, wenn Sie
möchten, dass die vorgenommenen
Einstellungen übernommen werden.
Wenn Sie Einstellungen ändern möchten,
klicken Sie auf „Back [Zurück]”, um zur
vorherigen Anzeige zurückzukehren.
Wenn Sie den Einrichtungsassistenten
schließen möchten, ohne Änderungen
vorzunehmen, klicken Sie auf „Exit
[Beenden]“.
Wenn Sie „Save & Take Effect [Speichern und Übernehmen]“ gewählt haben, übernimmt der Router die
konfigurierten Einstellungen. Warten Sie bitte, bis die Meldung „Save Complete [Speichern
abgeschlossen]“ erscheint.
94
DEUTSCH
S.
Damit ist die Konfiguration abgeschlossen. Klicken Sie auf „Close [Schließen]“, um den
Einrichtungsassistenten zu schließen.
Damit kehren Sie zurück zum Überblick über die „Device Settings [Geräteinstellungen]“, wo die
konfigurierten Einstellungen für Ihre WAN- und Wireless-Verbindung angezeigt werden.
Damit ist ihr C300GBRS4 Router betriebsbereit!
Hinweis:
Detaillierte Erklärungen zu den für den C300GBRS4 verfügbaren Funktionen und Einstellungen
finden Sie im Benutzerhandbuch auf der im Lieferumfang enthaltenen CD-ROM (nur Englisch!).
Wählen Sie dazu „View User Manual [Benutzerhandbuch öffnen]” im Autorun-Menü.
95
DEUTSCH
6. Verwenden der WPS-Funktion
Der C300GBRS4 von Conceptronic unterstützt WPS (Wi-Fi-geschützte Einstellung). WPS ist ein Standard für
die einfache und sichere Einrichtung eines drahtlosen Netzwerks. Mit WPS können Sie mit ein paar
wenigen einfachen Schritten Ihr drahtloses Netzwerk einrichten und schützen.
Hinweis:
Um WPS mit dem C300GBRS4 verwenden zu können, benötigen Sie einen Wireless Client, der
WPS unterstützt. Wenn Sie einen oder mehrere Wireless Clients haben, die WPS nicht
unterstützen, empfehlen wir, Ihr Netzwerk mithilfe des Einrichtungsassistenten manuell zu
sichern. Erläuterungen dazu finden Sie in Kapitel 5.2.
Hinweis:
Weitere (technische) Informationen über WPS finden Sie auf folgender Website:
http://de.wikipedia.org/wiki/Wi-Fi_Protected_Setup
Der C300GBRS4 unterstützt zwei Arten der Aktivierung und Einrichtung einer WPS-Verbindung:
Knopfdruck-Methode
PIN-Code-Methode
6.1 WPS – Knopfdruck-Methode
Für die WPS-Knopfdruck-Methode ist eine (virtuelle) Taste an Ihrem Wireless Client erforderlich, um eine
Verbindung zwischen dem C300GBRS4 und Ihrem Wireless Client herzustellen.
Einige Wireless Clients verfügen über eine reale Taste für die Verwendung der WPS-Knopfdruck-Methode
und bei anderen wird eine virtuelle Taste in deren Software verwendet.
Führen Sie die folgenden Schritte für die Aktivierung und Einrichtung einer WPS-Verbindung mit der
Knopfdruck-Methode aus:
A.
Drücken Sie die WPS-Taste auf der Vorderseite des C300GBRS4 so lange, bis die WPS-LED-Anzeige
blinkt.
B.
Drücken Sie die WPS-Taste an Ihrem Wireless Client. Dies kann eine Hardware-Taste oder eine
virtuelle Taste in der Software Ihres Wireless Clients sein.
Der C300GBRS4 aktiviert die WPA-Sicherheit über Ihr drahtloses Netzwerk und akzeptiert die drahtlose
Verbindung mit Ihrem drahtlosen Client.
Hinweis:
Der C300GBRS4 behält die WPS-Authentifizierung während 120 Sekunden aktiv. Während
diesem Prozess blinkt die WPS-LED-Anzeige. Wenn in diesen 120 Sekunden keine Verbindung
zustande kommt, schaltet die LED-Anzeige aus und der WPS-Authentifizierungsprozess wird
abgebrochen.
Wenn die WPS-Funktion noch nie verwendet wurde, ist das drahtlose Netzwerk nach wie vor
ungesichert.
Wenn die Authentifizierung des Wireless Clients erfolgreich ist, schaltet die WPS-LED-Anzeige aus.
Damit ist Ihr Wireless Client mit dem C300GBRS4 verbunden und Ihr Netzwerk ist mit WPA-Verschlüsselung
gesichert.
96
DEUTSCH
Sie können weitere Wireless WPS Clients hinzufügen, wobei die Verbindung der zuvor eingerichteten
Wireless WPS Clients bestehen bleibt.
Wenn Sie weitere Wireless WPS Clients hinzufügen möchten, wiederholen Sie die Schritte A und B.
Hinweis:
Der C300GBRS4 erzeugt den WPA-Schlüssel nach dem Zufallsprinzip.
6.2 WPS – Pin-Code-Methode
Wenn Ihr WPS-fähiger Wireless Client keinen (virtuellen) Druckknopf hat, können Sie mithilfe der PinCode-Methode eine WPS-Verbindung herstellen.
Hinweis: Um die WPS-Pin-Code-Funktion zu aktivieren, muss Ihr Computer mit einem Kabel mit dem
C300GBRS4 verbunden sein.
A.
Öffnen Sie Ihren Webbrowser (z.B. Internet Explorer, FireFox, Safari oder Chrome).
B.
Geben Sie die IP-Adresse des Gerätes in das Adressfeld Ihres Webbrowsers ein (standardmäßig:
http://192.168.0.1/).
Es erscheint die Login-Seite des C300GBRS4.
C
C
C.
Geben Sie den Benutzernamen und das Passwort ein (standardmäßig ‚admin“ und ‚admin’) und
klicken Sie auf „Submit [Anmelden]“, um die Webkonfiguration zu öffnen.
Wenn Benutzername und Passwort korrekt sind, zeigt der Router einen Überblick über die „Device
Settings [Geräteinstellungen]“ an.
D.
Wählen Sie im linken Menü „Wireless [Drahtlos]“.
Die Wireless-Konfigurationsseite wird angezeigt. Unten auf dieser Konfigurationsseite finden Sie das „WiFi Protected Setup [Wi-Fi-geschützte Einrichtung]“.
97
DEUTSCH
E
E.
Klicken Sie auf die Schaltfläche „Add Wireless Device Wizard [Einrichtungsassistent für das
Hinzufügen eines drahtlosen Geräts]”.
Daraufhin öffnet sich der WPS-Einrichtungsassistent:
Mithilfe dieses Assistenten können Sie die Pin-Code-Funktion aktivieren. Bevor Sie mit der Pin-CodeAuthentifizierung beginnen können, muss Ihr Wireless Client den Pin-Code erzeugen.
F.
Wählen Sie die WPS-Pin-Code-Funktion in der Software Ihres Wireless Clients. Der Wireless Client
erzeugt einen Pin-Code und zeigt diesen auf Ihrem Bildschirm an.
[Wireless Client-Software]
G.
Æ
G
[C300GBRS4 WPS-Assistent]
Geben Sie den Pin-Code, den Sie von Ihrem Wireless Client erhalten haben, im WPSEinrichtungsassistenten des C300GBRS4 ein und klicken Sie auf „Connect [Verbinden]”.
Der C300BRS4 aktiviert die WPA-Sicherheit auf Ihrem drahtlosen Netzwerk und akzeptiert die drahtlose
Verbindung mit Ihrem drahtlosen Client mit dem eingegebenen Pin-Code.
98
DEUTSCH
Der C300GBRS4 behält die WPS-Authentifizierung während 120 Sekunden aktiv. Während diesem Prozess
blinkt die WPS-LED-Anzeige. Wenn in diesen 120 Sekunden keine Verbindung zustande kommt, schaltet die
LED-Anzeige aus und der WPS-Authentifizierungsprozess wird abgebrochen.
Klicken Sie auf „Continue [Weiter]“, um zum WPS-Einrichtungsassistenten zurückzukehren.
Hinweis: Wenn die WPS-Funktion noch nie verwendet wurde, ist das drahtlose Netzwerk nach wie vor
ungesichert.
Wenn die Authentifizierung des Wireless Clients erfolgreich war, zeigt der Assistent das Fenster „WPS Adding Wireless Device Success [WPS – drahtloses Gerät erfolgreich hinzugefügt]” an und die WPS-LEDAnzeige schaltet aus.
Klicken Sie auf „Continue [Weiter]“, um zur Wireless-Konfigurationsseite zurückzukehren.
Damit ist Ihr Wireless Client mit dem C300GBRS4 verbunden und Ihr Netzwerk ist mit WPA-Verschlüsselung
gesichert.
Wenn Sie weitere Wireless Clients mit der WPS-Funktion hinzufügen wollen, wiederholen Sie die Schritte E
bis G.
99
DEUTSCH
7. Konfigurieren von Virtual Server-Regeln
Der Conceptronic C300GBRS4 ist mit einer integrierten Firewall ausgerüstet, um Angriffe aus dem Internet
auf Ihr Netzwerk zu verhindern. Diese Firewall blockiert automatisch den gesamten eingehenden Verkehr
auf nicht benutzten Ports. Wenn ein blockierter Port für einen Dienst oder eine Anwendung benötigt wird
(zum Beispiel für einen FTP-Server oder WEB-Server), können Sie auf den Konfigurationsseiten eine Regel
für den Virtual Server erstellen [Virtual Server Rule], um den Verkehr weiterzuleiten.
Folgendes ist eine Liste einiger häufig verwendeter Ports und deren entsprechenden Anwendungen:
Port
Anwendung
Port
Anwendung
20
21
22
23
25
FTP Daten (FTP Server)
FTP (FTP Server)
SSH (Secure Shell)
Telnet
SMTP (Mail Server – Ausgang)
80
110
2000
5800
5900
HTTP (Web Server)
POP3 (Mail Server – Eingang)
Remotely Anywhere
VNC
VNC
Weitere Ports und deren jeweilige Anwendung finden Sie unter: http://portforward.com/cports.htm
Hinweis:
Wenn Sie eine Anwendung verwenden, die UPnP Port Mapping unterstützt, können Sie den
Router ggf. von der Anwendung automatisch konfigurieren lassen. In diesem Fall müssen Sie
Ihre Port Mappings nicht von Hand einrichten.
Hinweis:
Wir empfehlen, bei der Verwendung von Virtual Server Regeln, den/die Computer mit einer
festen IP-Adresse statt mit einer dynamischen IP-Adresse zu konfigurieren.
Hinweis:
Detaillierte Erklärungen zu den Virtual Server- und DMZ-Optionen finden Sie im
Benutzerhandbuch auf der Produkt-CD-ROM (nur Englisch!). Wählen Sie dazu bitte „View User
Manual [Benutzerhandbuch öffnen]” im Autorun-Menü.
A.
B.
Öffnen Sie Ihren Webbrowser (z.B. Internet Explorer, FireFox, Safari oder Chrome).
Geben Sie die IP-Adresse des Gerätes in das Adressfeld Ihres Webbrowsers ein (standardmäßig:
http://192.168.0.1/).
Es erscheint die Login-Seite des C300GBRS4.
C
C
C.
Geben Sie den Benutzernamen und das Passwort ein (standardmäßig ‚admin“ und ‚admin’), um die
Webkonfiguration zu öffnen.
Wenn Benutzername und Passwort korrekt sind, zeigt der Router einen Überblick über die „Device
Settings [Geräteinstellungen]“ an.
100
DEUTSCH
D.
Wählen Sie im oberen Navigationsmenü „Advanced [Erweitert]“ und „Virtual Server“.
Es erscheint die folgende „Virtual Server”-Konfigurationsseite.
Hinweis:
E.
F.
G.
H.
Die folgende Abbildung zeigt ein Beispiel einer Virtual Server-Konfiguration.
Stellen Sie die Virtual Server-Regel auf „Enabled [Aktiviert]” ein.
Geben Sie im Feld „Name“ einen Namen für Ihre Virtual Server-Regel ein.
Geben Sie die IP-Adresse Ihres Computers/Servers ein, für den die Virtual Server-Regel gelten soll.
Wählen Sie das „Protocol [Protokoll]“ für Ihre Virtual Server-Regel. „TCP”, „UDP” oder „Both
[Beide]”.
Hinweis:
Wenn Sie nicht wissen, welches Protokoll Sie für Ihre Virtual Server-Regel benötigen, wählen
Sie „Both [Beide]”. Mit dieser Option werden sowohl der TCP- als auch der UDP-Verkehr auf die
konfigurierte IP-Adresse Ihres Computers/Servers geleitet.
I.
Geben Sie den gewünschten Port Ihres Computers/Servers ein, für den die Virtual Server-Regel
gelten soll.
J.
Geben Sie den Port ein, der von außerhalb Ihrer Internet-Verbindung sichtbar sein muss.
K.
Klicken Sie auf „Apply [Übernehmen]“, um die erstellte Virtual Server-Regel zu übernehmen.
Sobald die Virtual Server-Regel gespeichert wurde, wird Sie in der „Virtual Server List [Virtual ServerListe]” angezeigt.
Um weitere Virtual Server-Regeln zu erstellen, wiederholen Sie die Schritte E bis K.
Die definierten Virtual Server-Regeln können jetzt verwendet werden!
101
DEUTSCH
8. Neustart des C300GBRS4
Wenn Sie Einstellungen in der Konfiguration des Routers ändern, werden diese Einstellungen direkt
übernommen und aktiv. Es ist jedoch empfehlenswert, den C300GBRS4 neu zu starten, nachdem Sie große
und wichtige Änderungen in der Konfiguration vorgenommen haben, um sicherzustellen, dass alle
Einstellungen korrekt übernommen werden.
A.
Wählen Sie im oberen Navigationsmenü „Tools [Extras]“, „System“.
B.
Klicken Sie auf „Reboot [Neustart]” , um die Konfiguration zu speichern und starten Sie den
C300GBRS4 neu, damit alle Änderungen korrekt aktiviert werden.
Danach wird eine entsprechende Bestätigung angezeigt.
C.
Klicken Sie auf „OK“, um den Neustart des Routers fortzusetzen.
Alle Änderungen werden gespeichert und der Router wird neu gestartet. Warten Sie bitte, bis der Timer
abgelaufen ist:
Nach dem Neustart erscheint wieder die Login-Seite des Routers.
Damit ist ihr C300BRS4 betriebsbereit!
Hinweis:
102
Detaillierte Erklärungen zu den für den C300GBRS4 verfügbaren Funktionen und Einstellungen
finden Sie im Benutzerhandbuch auf der Produkt-CD-ROM (nur Englisch!). Wählen Sie dazu
„View User Manual [Benutzerhandbuch öffnen]” im Autorun-Menü.
FRANÇAIS
C300GBRS4 de Conceptronic
Guide d'installation rapide
Nous vous félicitons d'avoir acheté votre
Routeur Sans fil 802.11n Gigabit de Conceptronic.
Ce Guide d'Installation Rapide vous indiquera de manière détaillée comment installer le C300GBRS4 de
Conceptronic.
Pour plus d'informations ou pour obtenir de l'aide concernant votre produit, nous vous conseillons de
visiter notre site web de Service & Support sur www.conceptronic.net/support et de sélectionner l'une
des options suivantes :
• Foire aux Questions : Base de Données de Questions les plus Fréquemment Posées
• Téléchargements
: Manuels, Drivers, Microprogramme et plus de téléchargements
• Contact
: Pour contacter le Service support de Conceptronic
Pour plus d'informations générales concernant les produits Conceptronic, visitez le site web de
Conceptronic sur www.conceptronic.net.
La configuration du Hardware décrite ci-après peut être légèrement différente de l’installation sur votre
ordinateur. Cela dépendra de la version du Système d’Exploitation que vous utilisez.
Index
1. Contenu du Coffret
2. Explication du C300GBRS4
3. Installation du hardware
3.1. Connexion WAN
3.2. Connexion LAN / LAN Sans fil
4. Configuration de l'Ordinateur
4.1. Configuration de votre adresse IP
4.2. Vérification de votre Connexion
5. Configuration du C300GBRS4
5.1. Configuration basée sur Internet
5.2. Setup Wizard
6. Utilisation de la Fonction WPS
6.1. Technologie WPS - de Bouton
6.2. WPS – Technologie avec Code Pin
7. Paramétrage des règles du Serveur Virtuel
8. Redémarrage
103
FRANÇAIS
1. Contenu du Coffret
Les éléments suivants sont fournis dans le paquet avec le Routeur Sans fil 802.11n Gigabit de
Conceptronic:
•
•
•
•
•
•
Routeur C300GBRS4 Sans fil 802.11n Gigabit de Conceptronic.
Alimentation électrique 5V CC, 2 A
3 antennes pour la connectivité sans fil
Câble LAN 1,8 m
Guide d'Installation Rapide en Plusieurs Langues
CD-ROM sur le produit
2. Explication du C300GBRS4
• Façade Avant
7
6
5
4 3 2 1
Nº
Description
État
Explication de l’État
1
Led d'Alim.
2
LED d´état
3
LED WAN
ÉTEINTE
ALLUMÉE
ÉTEINTE
CLIGNOTANTE
ÉTEINTE
FIXE
CLIGNOTANTE
4
LED WLAN
5
LEDS de LAN
(1, 2, 3, 4)
6
LED WPS
7
Bouton WPS
L'appareil est éteint.
L'appareil est allumé.
L'appareil est éteint / Erreur du Système *
L’appareil est allumé et prêt à être utilisé
Aucune Connexion WAN n’est créée
Une Connexion WAN est créée
Des données sont envoyées ou reçues par le Port
WAN
L’interface sans fil n’est pas active
L’interface sans fil est active
Aucune Liaison avec un Réseau n’est créée sur le Port LAN
Une Liaison avec un Réseau Gigabit est créée sur le Port LAN
Une Liaison avec un Réseau 10/100 Mbps est créée sur le
Port LAN
Des données sont envoyées ou reçues par le Port LAN
Lorsque le Bouton WPS est enfoncé, la LED WPS clignote
pendant 120 secondes pendant que le système recherche les
Clients WPS **
Appuyez sur le Bouton WPS pour activer la fonction WPS. Le
routeur recherche les Clients WPS pendant 120 secondes. **
104
ÉTEINTE
CLIGNOTANTE
ÉTEINTE
ORANGE
VERTE
CLIGNOTANTE
CLIGNOTANTE
FRANÇAIS
*
En conditions normales d’utilisation, la LED d’État s’allume et clignote pendant 15 secondes
lorsque l'appareil est allumé ou redémarré. En cas d’erreur de système sur l’appareil, la LED d’État
ne s’allume pas.
Vous pouvez résoudre l’erreur de système en utilisant les options suivantes :
a.
Éteignez l’appareil, attendez 10 secondes puis rallumez-le.
b.
Réinitialisez l’appareil aux paramètres par défaut en appuyant sur le bouton reset à l'arrière
de l’appareil pendant +/- 15 secondes.
Si la LED d’État ne s’allume toujours pas, prenez contact avec le Service Technique de
Conceptronic : www.conceptronic.net/support
**
Pour plus d'informations concernant la caractéristique WPS, consultez le Chapitre 6 de ce Guide
d'Installation Rapide.
• Façade arrière
1
2
1
3
4
5
1
Nº
Description
Explication
1
2
3
4
5
Connexion de l’Antenne
Ports LAN
Port WAN
Bouton de Réinitialisation
Connexion d’alim. électrique
Connecteur SMA inversé pour Antenne Sans fil
Pour connecter votre(vos) Ordinateur(s) sur le routeur
Pour connecter votre connexion bande large sur le routeur
Pour réinitialiser l’appareil aux Paramètres par Défaut
Pour brancher l’alimentation électrique sur le routeur
Remarque : Ce Guide d’Installation Rapide n’explique que les opérations de base pour mettre en
service le C300GBRS4 et le faire fonctionner.
Pour plus d’informations sur les différentes fonctions du C300GBRS4 veuillez consulter le
Manuel d’Utilisateur (en anglais uniquement !) présent sur le Cd-Rom de Produit.
Sélectionnez "View User Manual" [Voir Manuel d'Utilisateur] dans le Menu à Lancement
Automatique.
105
FRANÇAIS
3. Installation du hardware
Branchez les 3 antennes sur les prises de connexion d'antenne à l'arrière du C300GBRS4.
Connectez l'alimentation électrique fournie sur la prise d'alimentation électrique à l'arrière du C300GBRS4
et sur une prise électrique murale disponible. La LED d'alimentation à l'avant du C300GBRS4 s'allume.
3.1 Connexion WAN
Utilisez un câble LAN pour brancher le C300GBRS4 sur votre Modem de Câble, DSL ou de Fibre.
La LED WAN à l'avant du C300GBRS4 s'allume.
Remarque :
Si la LED WAN sur la façade avant ne s'allume pas, vérifiez que :
- Le C300GBRS4 est bien allumé (La LED d'Alimentation doit être allumée).
- Le Modem de Câble, DSK ou de Fibre est allumé.
- Le câble LAN entre les deux appareils est bien connecté.
3.2 Connexion LAN / LAN Sans fil
Pour les Utilisateurs de Câble LAN :
Connectez le Câble LAN sur l’un des 4 ports LAN de la façade arrière du C300GBRS4 et sur la Carte de
Réseau de votre ordinateur.
La LED LAN du port LAN utilisé s’allume pour indiquer que l’ordinateur est connecté. (Votre ordinateur
doit être allumé et la Connexion LAN doit être activée).
Pour les Utilisateurs Sans fil :
Vous pouvez activer la connexion sans fil du C300GBRS4 de 2 manières différentes :
- Manuellement.
- Automatiquement avec la fonction WPS.
Si un ou plusieurs de vos clients ne supportent pas WPS, il est recommandé de se connecter au C300GBRS4
manuellement.
Remarque : Le C300GBRS4 est protégé par WPA-PSK/WPA2-PSK (mode mixte) par défaut. La phrase code
WPA de votre C300GBRS4 se trouve sur l’étiquette collée sous votre C300GBRS4.
Vous trouverez dans ce chapitre les instructions pour vous connecter manuellement à votre réseau sans fil.
Pour plus d'informations concernant la fonction WPS et les étapes de la configuration, consultez le
Chapitre 6 de ce Guide d'Installation Rapide.
106
FRANÇAIS
Connexion Manuelle Sans fil :
Presque tous les types / toutes les marques de Cartes Sans fil utilisent une application Client différente.
Veuillez vérifier le manuel de votre carte sans fil pour plus d’informations concernant la création d’une
connexion avec un réseau sans fil.
Remarque : L’exemple ci-après utilise la norme Microsoft Wireless Client qui est intégrée dans Windows
Vista avec Service Pack 1.
A
Cliquez sur l'Icône de Réseau de
votre plateau Système et cliquez
sur "Réseaux sans fil
disponibles".
B
Sélectionnez le réseau
"C300GBRS4" dans la liste et
cliquez sur "Connecter".
107
FRANÇAIS
C
Entrez la phrase code WPA par
défaut (inscrite dans la partie
inférieure du C300GBRS4) dans le
champ "Security key" (Code de
sécurité) et cliquez sur "Connect"
(Connecter).
D
Lorsque la connexion est établie,
vous pouvez choisir d'enregistrer
le réseau et de le faire démarrer
automatiquement chaque fois
que votre ordinateur est allumé.
Cliquez sur "Fermer" pour sortir
de l'assistant de configuration.
E
Pour vérifier l'état de la
connexion sans fil, vous pouvez
cliquer sur l'Icône de Réseau dans
le plateau système. Vous pouvez
y voir sur quel réseau vous êtes
actuellement connecté, l'accès
dont vous disposez et la force du
signal de la connexion.
108
FRANÇAIS
4. Configuration de l'Ordinateur
4.1 Configuration de votre adresse IP.
Le C300GBRS4 est équipé d’un Serveur DHCP intégré. Le Serveur DHCP affectera automatiquement une
adresse IP à un ordinateur connecté si l’ordinateur connecté est réglé sur l’option "Obtenir
automatiquement une adresse IP".
La plupart des ordinateurs sont configurés par défaut pour obtenir automatiquement une adresse IP. Si ce
n'est pas le cas, vous devez configurer votre ordinateur pour obtenir une adresse IP automatiquement en
suivant les instructions données ci-après : Ces instructions sont basées sur Windows Vista avec Service
Pack 1. Si votre ordinateur a une version différente ou fonctionne avec un système d'exploitation
différent, il se peut que vous deviez procéder différemment.
A.
Cliquez sur "Commencer" -> "Exécuter".
B.
Entrez la commande "NCPA.CPL" et
appuyez sur "OK".
B
B
La fenêtre de Connexions de Réseau s’affiche.
C.
Cliquez avec le bouton de droite sur votre
"Connexion Locale" (Avec ou sans fil, en fonction
de la connexion que vous utilisez) et sélectionnez
"Propriétés".
C
109
FRANÇAIS
La Fenêtre Propriétés de votre Connexion de Réseau Local s’affiche.
D.
Sélectionnez "Internet Protocol Version 4
(TCP/IPv4)" et cliquez sur "Propriétés".
D
D
La fenêtre Propriétés du Protocole Internet Version 4(TCP/IPv4) s'affiche.
E.
Réglez les propriétés sur "Obtenir
automatiquement une adresse IP" et
appuyez sur "OK" pour enregistrer les
paramètres.
F.
Appuyez sur "OK" dans la fenêtre de
propriétés de la Connexion de Réseau
Local pour enregistrer les paramètres.
E
F
110
FRANÇAIS
4.2 Vérification de votre connexion
Avec le message de Commande de Windows, vous pouvez vérifier si vous avez reçu une adresse IP correcte
sur votre Connexion de Réseau Local. Cet exemple est basé sur Windows Vista avec Service Pack 1. Vous
devez avoir les droits d'administrateur sur Vista pour pouvoir réaliser les opérations suivantes. Voici
comment avoir les droits d'administrateur.
A.
Cliquez sur "Démarrer" -> "Tous les programmes" –> "Accessoires", cliquez avec la touche de droite
sur "Invite de Commande" et sélectionnez "Exécuter en tant qu'administrateur".
Le système affiche un message d'avertissement que vous devez accepter en cliquant sur "Continuer".
L’Invite suivante apparaît. Vérifiez que le titre de l'Invite mentionne bien "Administrateur : Invite". Si
"Administrateur" n'est pas indiqué, cela signifie que vous n'avez pas les droits d'administration nécessaires
pour réaliser ces opérations ; vous devez alors recommencer à partir de l'étape A.
B.
Entrez la commande "IPCONFIG" et appuyez sur ENTER.
B
Vous verrez s’afficher les informations suivantes
: 192.168.0.xxx (Où xxx peut être un nombre entre 100 ~ 199).
IPv4 Address
Masque de Sous-réseau
: 255.255.255.0
Passerelle par Défaut
: 192.168.0.1
Si les informations présentées ci-dessus correspondent à votre configuration, vous pouvez poursuivre la
configuration de votre appareil au Chapitre 5.
Si les informations présentées ci-dessus ne correspondent pas à votre configuration (par ex. votre adresse
IP est 169.254.xxx.xxx), procédez comme indiqué ci-après :
111
FRANÇAIS
1.
2.
3.
Éteignez et rallumez l’appareil.
Rebranchez le Câble LAN sur l’appareil et sur votre ordinateur.
Réécrivez l’adresse IP de votre ordinateur avec les commandes suivantes :
- "IPCONFIG/RELEASE" pour renoncer à l’adresse IP incorrecte.
- "IPCONFIG/RENEW" pour recevoir une nouvelle adresse IP du dispositif.
3
3
Si les actions ci-dessus ne suffisent pas à résoudre votre problème d’adresse IP, vous pouvez réinitialiser
l’appareil sur les paramètres par défaut avec le Bouton Reset situé sur la façade arrière de l’appareil.
Appuyez sur le Bouton Reset pendant +/- 15 secondes pour charger les Paramètres par Défaut. Lorsque la
LED d’état est de nouveau active, recommencez l’opération B pour renouveler votre adresse IP.
Remarque : Si le problème persiste, vérifiez que tous les câbles sont bien connectés. Le port WAN doit
être connecté au Modem et au port LAN à l'ordinateur. Une mauvaise connexion vous
empêchera d'obtenir une bonne adresse IP.
112
FRANÇAIS
5. Configuration du C300GBRS4
Ce chapitre décrit les opérations nécessaires pour configurer le C300GBRS4 avec l'Assistant de
Configuration intégré. Une fois les opérations de ce chapitre réalisées, votre routeur est bien paramétré
pour ses fonctions primaires, dont la sécurité sans fil.
5.1 Configuration basée sur Internet
La configuration de votre C300GBRS4 est basée sur Internet. Vous aurez donc besoin d’un navigateur
Internet pour configurer le dispositif.
Remarque :
Pour configurer le routeur, nous vous conseillons d’utiliser une connexion par Câble LAN
pour ce dispositif au lieu d’une Connexion Sans fil.
A.
Lancez votre navigateur Internet (par ex. : Internet Explorer, FireFox, Safari ou Chrome).
B.
Entrez l’adresse IP du dispositif dans la barre d’adresse de votre navigateur Internet (Par défaut :
http://192.168.0.1/).
La page de connexion du C300GBRS4 s'affiche.
C
C
C.
Entrez le Nom d’utilisateur et le Mot de passe (Par défaut : 'admin’ et 'admin') et cliquez sur
“Submit” [soumettre] pour entrer dans les pages de configuration basées sur Internet.
113
FRANÇAIS
Lorsque le Nom d’utilisateur et le Mot de passe sont corrects, le routeur affiche un aperçu "Device
Settings" [Paramètres du Dispositif] :
L'aperçu "Device Settings" vous présente tous les paramètres configurés pour la partie LAN, WAN et Sans
fil du routeur.
114
FRANÇAIS
5.2 Assistant de Configuration
Vous pouvez configurer le C300GBRS4 grâce à l'Assistant intégré. Cet Assistant vous aidera à configurer les
paramètres de base du C300GBRS4 pas à pas.
Remarque : Avant de commencer avec l'Assistant de Configuration, vérifiez que vous disposez bien de
toutes les informations disponibles sur les paramètres Internet. (Par Exemple : Information
sur le Compte, type de connexion, etc.)
A.
Cliquez sur la touche "Wizard" [Assistant] dans le menu de gauche de la page de Configuration.
B.
Cliquez sur la touche "Run Wizard" [Lancer
Assistant].
C.
L'écran d'accueil indique les cinq premières
étapes de l'assistant. Cliquez sur "Next"
pour continuer.
D.
Le système vous recommande de définir ici
un mot de passe d'administrateur. Entrez le
nouveau mot de passe et entrez-le de
nouveau pour confirmer.
Lorsque vous avez terminé, cliquez sur
"Next".
115
FRANÇAIS
E.
Pour gérer le système, il est essentiel que
l'heure du système soit bien à jour pour
obtenir l'heure précise sur les fichiers
journaux du système.
Déterminez la Zone Horaire correspondante
dans cette étape.
Lorsque vous avez terminé, cliquez sur
"Next".
F.
Sélectionnez la méthode de connexion à
Internet qui correspond aux paramètres de
votre fournisseur.
Si vous ne savez pas de quelle option vous
avez besoin pour votre connexion à
Internet, veuillez consulter la
documentation de votre fournisseur ou
prenez contact avec le service technique
de votre fournisseur.
Lorsque vous avez terminé, cliquez sur
"Next".
G.
Si votre fournisseur a besoin d'une
connexion IP Statique, sélectionnez l'option
"Static IP".
Entrez les informations demandées :
• IP Address [Adresse IP]
• Subnet Mask [Masque de Sous-réseau]
• ISP Gateway Address [Adresse de
Passerelle ISP]
• Primary DNS [DNS Primaire]
• Secondary DNS [DNS Secondaire] (en
option)
Lorsque vous avez terminé, cliquez sur
"Next".
116
Connexion - IP Statique
FRANÇAIS
H.
Si votre fournisseur a besoin d'une
connexion IP Dynamique, sélectionnez
l'option "Dynamic IP".
Connexion - IP Dynamique
Certains fournisseurs ont besoin d'un Nom
d'Hôte particulier pour leurs connexions. Si
votre fournisseur a besoin d'un Nom d'Hôte
particulier, entrez le Nom d'Hôte dans ce
champ.
Certains fournisseurs n'autorisent qu'une
adresse MAC spécifique pour se connecter à
Internet. Si votre Carte de Réseau PC
travaille avec l'adresse MAC spécifique
requise, appuyez sur la touche "Clone MAC
Address" [Copier adresse MAC] ou entrez
l'Adresse MAC manuellement.
Lorsque vous avez terminé, cliquez sur
"Next".
I.
Si votre fournisseur a besoin d'une connexion
PPPoE sélectionnez l'option "PPPoE".
Connexion PPPoE
Entrez les informations demandées :
• User Name [Nom d’Utilisateur]
• Password [Mot de Passe]
• Indiquez à nouveau votre mot de passe
Lorsque vous avez terminé, cliquez sur
"Next".
117
FRANÇAIS
J.
Si votre fournisseur a besoin d'une connexion
PPTP, sélectionnez l'option "PPTP".
Connexion - PPTP
Entrez les informations demandées :
• Server IP [IP Serveur]
• PPTP Account [Compte PPTP]
• PPTP Password [Mot de Passe PPTP]
• Indiquez à nouveau votre mot de passe
Lorsque vous avez terminé, cliquez sur
"Next".
K.
Si votre fournisseur a besoin d'une connexion
L2TP, sélectionnez l'option "L2TP".
Connexion - L2TP
Entrez les informations demandées :
• Server IP [IP Serveur]
• L2TP Account [Compte L2TP]
• L2TP Password [Mot de passe L2TP]
• Indiquez à nouveau votre mot de passe
Lorsque vous avez terminé, cliquez sur
"Next".
Lorsque la configuration WAN est terminée, l'Assistant poursuit la configuration Sans fil :
118
FRANÇAIS
L.
Vous pouvez changer le SSID du routeur. Le
SSID est le nom de la connexion sans fil à
votre routeur. Lorsque vous cherchez les
réseaux sans fil sur votre ordinateur, il s'agit
du nom que vous recherchez.
Vous pouvez passer entre les canaux 1 et 13.
Si la vitesse de votre connexion est lente ou a
des coupures, il se peut qu'un autre point
d'accès dans votre zone interfère avec votre
canal sans fil. Dans ce cas, vous pouvez
essayer un autre canal.
Lorsque vous avez terminé, cliquez sur
"Next".
Vous pouvez sécuriser votre Connexion Sans fil avec le cryptage. Par défaut, la Connexion Sans fil n'est pas
sécurisée. Pour empêcher tout accès non autorisé à votre réseau, vous pouvez déterminer un niveau de
sécurité grâce à l'Assistant de Configuration.
Si vous souhaitez utiliser la fonction WPS du C300GBRS4, vous pouvez ignorer la configuration sans fil et
poursuivre l'Assistant de Configuration sans cryptage. Pour paramétrer votre sécurité WPS, veuillez
poursuivre au Chapitre 6 de ce Guide d'Installation Rapide.
Remarque : Toutes les options de sécurité de l'Assistant de Configuration sont expliquées, mais nous
vous conseillons de sécuriser votre réseau avec la sécurité “WPA-PSK/WPA2-PSK” si vos
Clients ne supportent pas WPS. Il s'agit du niveau de sécurité WPA2 le plus fort, avec une
compatibilité de retour vers les clients uniquement WPA.
Remarque : Souvenez-vous de toutes les informations de sécurité sans fil indiquées ou notez-les. Vous
en aurez besoin pour configurer un Client Sans fil à connecter au C300GBRS4 !
M.
Déterminer un niveau de sécurité pour votre
Réseau Sans fil.
Lorsqu'un niveau de sécurité est choisi,
l'Assistant présente les champs où entrer les
informations requises.
119
FRANÇAIS
N.
Si vous souhaitez sécuriser votre réseau avec
le cryptage WEP, sélectionnez "WEP" dans la
liste déroulante. Entez le code WEP en
format ASCII (entrée : A-Z, 0-9).
Remarque :
O.
Sécurité - Cryptage WEP
Avec l'Assistant, vous ne pouvez
que configurer WEP 64 Bits.
Si vous souhaitez sécuriser votre réseau avec
le WEP ou WPA2 (avec Serveur Radius),
sélectionnez "WPA" ou "WPA2 dans la liste
déroulante.
Sécurité - Cryptage WPA/WPA2
Entrez l'adresse IP du Serveur Radius, le Code
Pré-partagé et confirmez le Code Pré-partagé
dans le second champ.
P.
Si vous souhaitez sécuriser votre réseau avec
le WPA-PSK ou WPA2-PSK sélectionnez "WPAPSK" "WPA2-PSK" ou "WPA-PSK/WPA2-PSK"
dans la liste déroulante.
Sécurité - WPA-PSK/WPA2-PSK
Entrez la phrase de mot de passe pour votre
cryptage et confirmez la phrase de mot de
passe dans le second champ.
Q.
Lorsque tous les paramétrages sans fil sont faits, cliquez sur "Next" pour continuer.
R.
La configuration est à présent terminée. Si
vous voulez que vos réglages s'appliquez,
cliquez sur "Save & Take Effect"[Enregistrer
et appliquer].
Si vous souhaitez modifier un paramètre,
cliquez sur "Back" [Retour] pour revenir à
l'écran précédent.
Si vous voulez fermer l'Assistant de
Configuration sans modification, cliquez sur
"Exit".
Lorsque vous sélectionnez "Save & Take Effect", le routeur applique les paramètres configurés. Attendez
le message "Save Complete" [Enregistrement terminé].
S.
120
La configuration est à présent terminée. Cliquez sur "Close" pour sortir de l'Assistant de
Configuration.
FRANÇAIS
Vous revenez à "Device Settings" [Paramètres du dispositif] qui vous présente tous les paramètres
configurés pour votre connexion WAN et Sans fil.
Vous pouvez dès à présent utiliser votre Routeur C300GBRS4 !
Remarque :
Pour plus d’explications concernant les fonctions et les paramètres du C300GBRS4,
veuillez consulter le Manuel d’Utilisateur (en anglais uniquement) présent sur le Cd-Rom.
Sélectionnez "View User Manual" [Voir Manuel d'Utilisateur] dans le Menu à Lancement
Automatique.
121
FRANÇAIS
6. Utilisation de la Fonction WPS
Le C300GBRS4 de Conceptronic supporte WPS (Configuration de Wi-Fi Protégée). WPS est une norme pour
paramétrer facilement et sécuriser un réseau sans fil. Avec WPS vous pouvez paramétrer et protéger votre
réseau sans fil en quelques petits clics seulement.
Remarque : Pour utiliser WPS avec le C300GBRS4, vous devez disposer de Clients Sans fil qui supportent
WPS. Si un ou plusieurs de vos Clients Sans fil n'ont pas de support WPS, il est conseillé de
sécuriser manuellement votre réseau avec l'Assistant de Configuration expliqué au Chapitre
5.2.
Remarque : Pour plus d'informations (techniques) sur WPS, vous pouvez consulter le site web suivant :
http://fr.wikipedia.org/wiki/Wi-Fi_Protected_Setup
Le C300GBRS4 supporte deux manières d'activer et d'établir une connexion WPS :
Technologie Bouton
Technologie de Code Pin
6.1 Technologie WPS - de Bouton
La technologie de Bouton WPS nécessite un bouton (virtuel) sur votre Client Sans fil pour établir une
connexion entre le C300GBRS4 et votre Client Sans fil.
Certains Clients Sans Fil travaillent avec un bouton réel pour activer la technologie de Bouton de SPW ;
certains Clients Sans Fil utilisent un bouton virtuel dans leur software.
Procédez comme indiqué ci-après pour activer et définir une connexion WPS avec la technologie Bouton :
A.
Appuyez sur le Bouton WPS à l'avant du C300GBRS4 jusqu'à ce que la LED WPS commence à clignoter.
B.
Appuyez sur le Bouton WPS de votre Client Sans Fil. Il peut s'agit d'un bouton de hardware ou d'un
bouton virtuel dans le software de votre Client Sans Fil.
Le C300GBRS4 active la sécurité WPA sur votre réseau sans fil et accepte la connexion sans fil de votre
Client Sans Fil.
Remarque : Le C300GBRS4 laisse l'authentification WPS active pendant 120 secondes. Pendant ce
processus, la LED WPS clignote. S'il n'y a pas de connexion pendant ces 120 secondes, la LED
s'éteint et le processus d'authentification WPS s'arrête.
Si la fonction WPS n'a pas encore été utilisée, le réseau sans fil n'est pas encore sécurisé.
Si l'authentification du Client Sans Fil est réussie, la LED WPS s'éteint.
Votre Client Sans Fil est à présent connecté au C300GBRS4 et votre réseau est sécurisé avec le Cryptage
WPA. Vous pouvez ajouter d'autres Clients Sans Fil WPS sans perdre la connexion aux Clients Sans Fil WPS
précédents. Si vous souhaitez ajouter d'autres clients Sans Fil WPS, répétez les opérations A et B.
Remarque : Le Code WPA créé par le C300GBRS4 est aléatoire.
122
FRANÇAIS
6.2 WPS – Technologie avec Code Pin.
Si votre Client Sans Fil WPS n'a pas de Bouton (virtuel), vous pouvez utiliser la technologie de Code Pin
pour établir une connexion WPS.
Remarque : Pour activer la fonction de Code Pin de WPS, vous avez besoin d'un ordinateur connecté au
C300GBRS4.
A.
Ouvrez votre navigateur internet (comme : Internet Explorer, Firefox, Safari ou Chrome).
B.
Entrez l’adresse IP du dispositif dans la barre d’adresse de votre navigateur Internet (Par défaut :
http://192.168.0.1/).
La page de connexion du C300GBRS4 s'affiche.
C
C
C.
Entrez le Nom d’utilisateur et le Mot de passe (Par défaut : 'admin’ et 'admin') et cliquez sur
“Submit” [soumettre] pour entrer dans les pages de configuration basées sur Internet.
Lorsque le Nom d’utilisateur et le Mot de passe sont corrects, le routeur affiche un aperçu "Device
Settings" [Paramètres du Dispositif] :
D.
Sélectionnez "Wireless" [Sans Fil] dans le menu de navigation de gauche.
Les Pages de Configuration Sans Fil s'affichent. En bas de cette page de configuration vous trouverez la
section "Wi-Fi Protected Setup" [Configuration Wi-Fi Protégée].
E
E.
Cliquez sur le bouton "Add Wireless Device Wizard" [Ajouter Assistant de Dispositif Sans Fil]
affiché à l'écran.
123
FRANÇAIS
L'Assistant WPS s'affiche à l'écran :
Dans cet Assistant vous pouvez activer la fonction de Code Pin. Pour lancer l'authentification du Code Pin,
vous avez besoin du Code Pin créé par votre Client Sans Fil.
F.
Sélectionnez la fonction de Code Pin de WPS dans le software de votre Client Sans Fil. Le Client Sans
Fil produit un Code Pin et l'affiche à votre écran.
[Software de Client Sans Fil]
G.
Æ
G
[Assistant WPS de C300GBRS4]
Indiquez le Code Pin donné par votre Client Sans Fil dans l'Assistant WPS du C300GBRS4 et appuyez
sur "Connect" [Connecter].
Le C300GBRS4 active la Sécurité WPA sur votre réseau sans fil et accepte la connexion sans fil de votre
Client Sans Fil avec le Code Pin indiqué.
Le C300GBRS4 laisse l'authentification WPS active pendant 120 secondes. Pendant ce processus, la LED
WPS clignote. S'il n'y a pas de connexion pendant ces 120 secondes, la LED s'éteint et le processus
d'authentification WPS s'arrête.
124
FRANÇAIS
Cliquez sur "Continue" pour revenir à l'écran d'Assistant WPS.
Remarque : Si la fonction WPS n'a pas encore été utilisée, le réseau sans fil n'est pas encore sécurisé.
Si l'authentification du Client Sans Fil est réussie, l'Assistant affiche "WPS - Adding Wireless Device
Success" [WPS - Ajout du Dispositif Sans Fil Réussi] et la LED WPS s'éteint.
Cliquez sur "Continue" pour revenir à la page de Configuration Sans Fil.
Votre Client Sans Fil est à présent connecté au C300GBRS4 et votre réseau est sécurisé avec le Cryptage
WPA. Si vous voulez ajouter d'autres Clients Sans Fils avec la fonction WPS, répétez les opérations E à G.
125
FRANÇAIS
7. Paramétrage des règles du Serveur Virtuel
Le C300GBRS4 de Conceptronic est équipé d’un Pare-feu intégré pour empêcher les attaques d’Internet
dans votre réseau. Ce Pare-feu bloque automatiquement tout le trafic entrant de ports non utilisés.
Lorsqu’un port bloqué est nécessaire pour un service ou pour une application (par exemple : un Serveur
FTP ou un Serveur WEB), vous pouvez créer une Règle de Serveur Virtuel dans les Pages de Configuration
pour autoriser le trafic.
Vous trouverez ci-après une liste des ports les plus couramment utilisés et leur application
correspondante:
Port
Application
Port
Application
20
21
22
23
25
Données FTP (Serveur FTP)
FTP (Serveur FTP)
SSH (Secure Shell)
Telnet
SMTP (Serveur de mail - sortant)
80
110
2000
5800
5900
HTTP (Serveur Web)
POP3 (Serveur de mail - entrant)
À distance n'importe où
VNC
VNC
Pour connaître les détails sur d'autres ports et leurs applications correspondantes, veuillez consulter le
site suivant : http://portforward.com/cports.htm
Remarque : Si vous utilisez une application qui supporte UPnP Port Mapping, le routeur peut être
automatiquement configuré par l'application au besoin. Dans ce cas, vous n'avez pas besoin
de configurer vos mappages de port manuellement.
Remarque : Lorsque vous utilisez des règles de Serveur Virtuel, nous vous conseillons de configurer le/s
ordinateur/s avec une Adresse IP Fixe au lieu d’une Adresse IP Dynamique.
Remarque : Pour plus d’explications sur le Serveur Virtuel et les options DMZ, veuillez consulter le
Manuel d’Utilisateur (en anglais uniquement) présent sur le Cd-Rom du Produit.
Sélectionnez "View User Manual" dans le Menu à Lancement Automatique.
A.
Ouvrez votre navigateur Internet (comme : Internet Explorer, Firefox, Safari ou Chrome).
B.
Entrez l’adresse IP du dispositif dans la barre d’adresse de votre navigateur Internet (Par défaut :
http://192.168.0.1/).
La page de connexion du C300GBRS4 s'affiche.
C
C
C.
126
Entrez le Nom d’utilisateur et le Mot de passe (par défaut : 'admin’ et 'admin') et cliquez sur
“Submit” [soumettre] pour entrer dans les pages de configuration basées sur Internet.
FRANÇAIS
Lorsque le Nom d’utilisateur et le Mot de passe sont corrects, le dispositif affiche un aperçu "Device
Settings" [Paramètres du Dispositif] :
D.
Sélectionnez "Advanced" [Avancé], “Virtual Server” [Serveur Virtuel] dans le menu de navigation de
la partie supérieure.
Vous voyez s’afficher la page de configuration "Virtual Server".
Remarque :
E.
F.
G.
H.
L'image ci-après vous présente un exemple de la configuration d'un Serveur Virtuel.
Réglez le Serveur Virtuel sur "Enabled" [Activé].
Indiquez un nom pour votre règle de Serveur Virtuel dans le champ "Name" [Nom].
Entrez l'adresse IP de votre ordinateur/serveur qui a besoin de la règle de Serveur Virtuel.
Sélectionnez le Protocole de votre Règle de Serveur Virtuel : TCP”, “UDP” ou “Both”.
Remarque : Si vous ne savez pas de quel protocole vous avez besoin pour votre Règle de Serveur Virtuel,
sélectionnez "Both". Cette option passera les deux trafics, TCP et UDP à l'adresse IP
configurée sur votre ordinateur / serveur.
I.
J.
K.
Entrez le port de votre ordinateur/serveur qui a besoin de la règle de Serveur Virtuel.
Entrez le port ou la gamme de ports qui doit être visible à l'extérieur de votre connexion Internet.
Cliquez sur "Apply" pour appliquer la Règle de Serveur Virtuel créée.
Lorsque la règle de Serveur Virtuel est enregistrée, elle s'affiche dans la "Virtual Server List" [Liste de
Serveurs Virtuels].
Pour créer d'autres règles de Serveur Virtuels, répétez les étapes E à K.
Les règles de Serveur Virtuel définies sont prêtes à fonctionner !
127
FRANÇAIS
8. Redémarrage du C300GBRS4
Si vous modifiez les paramètres de la configuration du routeur, les paramètres sont directement appliqués
et actifs.
Néanmoins nous vous conseillons de redémarrer le C300GBRS4 après avoir fait d'importantes modifications
dans la configuration pour vous assurer que tous les paramètres sont bien appliqués.
A.
Sélectionnez "Tools" [Outils], "System" [Système] dans le menu de navigation de la partie
supérieure.
B.
Cliquez sur "Reboot" [Redémarrer] pour enregistrer la configuration, redémarrez le C300GBRS4 et
activez correctement toutes les modifications.
Un écran de confirmation s'affiche.
C.
Appuyez sur "OK" pour poursuivre le redémarrage du routeur.
Toutes les modifications sont enregistrées et le routeur redémarre. Attendez que l’opération soit
terminée pour finir :
Lorsque le redémarrage est terminé, vous revenez à la page de connexion du routeur.
Vous pouvez dès à présent utiliser votre C300GBRS4 !
Remarque : Pour plus d’explications concernant les fonctions et les paramètres du C300GBRS4, veuillez
consulter le Manuel d’Utilisateur (en anglais uniquement) présent sur le Cd-Rom de produit.
Sélectionnez "View User Manual" dans le Menu à Lancement Automatique.
128
ITALIANO
Conceptronic C300GBRS4
Guida d’installazione rapida
Vi ringraziamo per aver acquistato
questo Router wireless 802.11n Gigabit di Conceptronic.
La presente Guida d’installazione rapida spiega passo a passo come installare e usare il Conceptronic
C300GBRS4.
Per maggiori informazioni o supporto riguardanti il prodotto, vi consigliamo di consultare la nostra pagina
web di assistenza e supporto collegandovi con www.conceptronic.net/support e selezionando una delle
seguenti opzioni:
• FAQ
• Downloads
• Contact
: Database delle domande e risposte più frequenti
: Manuali, Driver, Firmware e altri download
: Contatto con il Servizio di Assistenza Conceptronic
Per informazioni generali riguardanti i prodotti di Conceptronic vi preghiamo di vistare il sito web
www.conceptronic.net.
La configurazione dell’hardware così come viene descritta qui di seguito potrebbe essere leggermente
diversa da quella del computer in uso, poiché ciò dipende dal sistema operativo utilizzato.
Sommario
1. Contenuto della confezione
2. Spiegazione del C300GBRS4
3. Installazione dell’hardware
3.1. Connessione WAN
3.2. Connessione LAN / LAN wireless
4. Configurazione del computer
4.1. Configurazione dell’indirizzo IP
4.2. Verifica della connessione
5. Configurazione del C300GBRS4
5.1. Configurazione via web
5.2. Assistente per la configurazione
6. Come usare la funzionalità WPS
6.1. WPS – Tecnologia Touch Button
6.2. WPS – Tecnologia Codice PIN
7. Configurazione regole server virtuale
8. Riavvio
129
ITALIANO
1. Contenuto della confezione
La confezione contenente il router wireless 802.11n di Conceptronic è composta dai seguenti elementi:
•
•
•
•
•
•
Router Wireless 802.11n Gigabit C300GBRS4 di Conceptronic
Alimentatore di corrente 5V DC, 2A
3 antenne per connettività senza fili
Cavo LAN 1,8 metri
Manuale d’installazione rapida multilingue
CD-ROM del prodotto
2. Spiegazione del C300GBRS4
• Pannello frontale
7
6
5
4 3 2 1
N.
Descrizione
Stato
1
LED Power
2
LED Status
3
LED WAN
4
LED WLAN
5
LED LAN
(1, 2, 3, 4)
6
LED WPS
7
Pulsante WPS
SPENTO
Il dispositivo è spento
ACCESO
Il dispositivo è acceso
SPENTO
Il dispositivo è spento / Errore di sistema*
LAMPEGGIA
Il dispositivo è acceso ed è pronto per essere usato
SPENTO
Non è stata creata nessuna connessione WAN
ACCESO - FISSO Connessione WAN creata
ACCESO – LAMP. Dati inviati o ricevuti mediante la porta WAN
SPENTO
L’interfaccia wireless è disattivata
LAMPEGGIA
L’interfaccia wireless è attivata e funzionante
SPENTO
Non è stato creato nessun link di rete con la porta LAN
ACCESO - ARAN È stato creato un link di rete Gigabit con la porta LAN
ACCESO – VERD È stato creato un link di rete 10/100 Mbps con la porta LAN
ACCESO – LAMP Dati inviati o ricevuti mediante la porta LAN
ACCESO – LAMP Quando viene premuto il pulsante WPS, il LED WPS
lampeggerà per 120 secondi mentre cerca clients WPS. **
Premere il pulsante WPS per attivare la funzionalità WPS. Il
router cercherà clients WPS per 120 secondi. **
130
Spiegazione dello stato
ITALIANO
*
In una situazione di uso normale, il LED di stato (Status) si accende e inizia a lampeggiare entro i 15
secondi successivi all’accensione o al riavvio del dispositivo. Nel caso in cui si verifichi un errore di
sistema nel dispositivo, il LED di stato non si accenderà.
È possibile ricorrere alle seguenti opzioni per risolvere l’errore di sistema:
a.
Spegnere il dispositivo, attendere dieci secondi e riaccenderlo.
b.
Resettare il dispositivo, riportandolo sui valori di default, premendo per circa 15 secondi il
pulsante di reset che si trova sulla parte posteriore del dispositivo.
Se il LED di stato non si accende dopo aver realizzato quanto descritto qui in alto, si prega di
contattare il Centro di supporto di Conceptronic all’indirizzo: www.conceptronic.net/support
**
Per maggiori informazioni sulla funzionalità WPS, si prega di consultare il Capitolo 6 della presente
Guida d’installazione rapida.
• Pannello posteriore
1
2
1
3
4
5
1
N
Descrizione
Spiegazione
1
2
3
4
5
Connessione per l’antenna
Porte LAN
Porta WAN
Pulsante di reset
Connessione per l’alimentatore
Connettore Reverse-SMA per antenna wireless
Servono per collegare il/i computer al router
Serve per collegare la connessione a banda larga al router
Serve per riportare il router sui valori di default
Serve per collegare l’alimentatore di corrente al router
Nota:
La presente Guida d’installazione rapida spiega solo i punti principali per configurare a far
funzionare il C300GBRS4. Per spiegazioni maggiormente dettagliate del C300GBRS4 è possibile
consultare il Manuale d’uso (disponibile solo in inglese!) incluso nel CD-ROM. Selezionare “View
User Manual” (Visualizza Manuale d’uso) nel menu che si aprirà automaticamente.
131
ITALIANO
3. Installazione dell’hardware
Collegare le tre antenne alle apposite connessioni poste sulla parte posteriore del C300GBRS4.
Collegare l’alimentatore di corrente accluso all’apposita connessione posta sulla parte posteriore del
C300GBRS4 e a una presa a muro disponibile. Il LED di alimentazione (Power) nella zona frontale del
C300GBRS4 si accenderà.
3.1 Connessione WAN
Usare un cavo LAN per collegare il C300GBRS4 al modem via cavo, DSL o a fibra ottica.
Il LED WAN posto sulla parte frontale del C300GBRS4 si accenderà.
Nota:
Se il LED WAN posto sulla parte frontale non si accende, assicurarsi che:
Il C300GBRS4 sia collegato all’alimentatore (dovrebbe essere acceso il LED Power).
Il modem via cavo, DSL o a fibra ottica sia acceso.
Il cavo LAN che unisce entrambi i dispositivi sia collegato correttamente.
3.2 Connessione LAN / LAN wireless
Per utenti via cavo LAN:
Collegare il cavo LAN a una delle quattro porte LAN che si trovano sul pannello posteriore del C300GBRS4
e alle scheda di rete del computer.
Il LED LAN della porta LAN usata si accenderà, stando a indicare che il computer è collegato (la
connessione LAN deve essere attivata e il computer deve essere acceso).
Per gli utenti wireless:
È possibile collegarsi senza cavi al C300GBRS4 in due modi diversi:
Manualmente
Automaticamente grazie alla funzionalità WPS
Se esistono uno o più client che non supportano la funzionalità WPS, è consigliabile collegarsi
manualmente al C300GBRS4.
Nota:
Il C300GBRS4 è protetto per default con cifratura WPA-PSK/WPA2-PSK (mixed mode). La
passphrase WPA del C300GBRS4 appare nell’etichetta del prodotto posta nella zona inferiore del
C300GBRS4.
In questo capitolo si spiega passo a passo come collegarsi manualmente alla rete senza fili.
Per maggiori informazioni sulla funzionalità WPS e la procedura di configurazione, consultare il Capitolo 6
di questa Guida d’installazione rapida.
132
ITALIANO
Connection wireless manuale:
Praticamente ogni marca e tipo di scheda wireless usa un’applicazione di client diversa. Consultare il
manuale della scheda di rete wireless per sapere come creare una connessione con una rete senza fili.
Nota:
Nell’esempio riportato qui di seguito si fa uso dello standard Wireless Client di Microsoft,
integrato in Windows Vista con Service Pack 1.
A
Fare clic sull’icona della Rete nel
vassoio di sistema e selezionare “
“Wireless networks are
available” (Esistono reti wireless
disponibili).
B
Selezionare la rete
“C300GBRS4” dall’elenco e fare
clic su “Connect” (Connetti).
133
ITALIANO
C
Introdurre la passphrase WPA di
default (che appare nella zona
inferiore del C300GBRS4) nel
campo “Security key” (Chiave di
sicurezza), dopo di che fare clic
su “Connect” (Collega).
D
Una volta stabilita la
connessione, si può decidere se
memorizzare la rete a collegarsi
a essa automaticamente ogni
volta che si accende il computer.
Fare clic su “Close” (Chiudi) per
chiudere l’assistente di
connessione.
E
Per verificare lo stato della
connessione wireless, basta fare
clic sull’icona di Rete nel vassoio
di sistema, dove apparirà la rete
a cui siete collegati in quel
momento, il tipo di accesso di
cui si dispone e la potenza del
segnale.
134
ITALIANO
4. Configurazione del computer
4.1 Configurazione dell’indirizzo IP
Il C300GBRS4 è provvisto di un server DHCP integrato, che assegnerà automaticamente un indirizzo IP a
ogni computer collegato, sempre e quando quest’ultimo sia impostato su “Obtain an IP address
automatically” (Ottieni indirizzo IP automaticamente).
Per default, la maggior parte dei computer è configurate in modo tale da ottenere automaticamente un
indirizzo IP. In caso contrario, sarà necessario configurare il computer affinché questo ottenga
automaticamente un indirizzo IP, seguendo le istruzioni qui riportate. Queste istruzioni si basano su
Windows Vista con Service Pack 1. Se il computer dispone di una versione o di un sistema operativo
diversi, i passi da seguire potrebbero essere altri.
A.
Fare clic su “Start” Æ “Esegui”.
B.
Introdurre il comando “NCPA.CPL” e
premere “OK”.
B
B
Apparirà la videata relativa alle Connessioni di rete.
C.
Fare clic con il pulsante destro del mouse su
“Local Area Connection” (Connessione alla rete
locale)(via cavo o senza fili a seconda della
connessione in uso) e selezionare “Proprietà”.
C
135
ITALIANO
Apparirà la videata relativa alle Proprietà della connessione di rete locale
D.
Selezionare il “Internet Protocol Version
4 (TCP/IPv4)” (Protocollo Internet
Versione 4 (TCP/IPv4)) e fare clic su
“Proprietà”.
D
D
Apparirà la videata relativa alle Proprietà del Protocollo Internet Versione 4 (TCP/IPv4).
E.
Impostare le proprietà su “Obtain an IP
address automatically” (Ottieni indirizzo
IP automaticamente)e premere “OK” per
salvare le opzioni.
F.
Premere “OK” nella videata relativa alle
proprietà della connessione di rete locale,
per salvare la configurazione.
E
F
136
ITALIANO
4.2 Verifica della connessione
Nel prompt dei comandi di Windows e possibile verificare di aver ricevuto un indirizzo IP corretto per la
connessione di rete locale. L’esempio qui riportato si basa su Windows Vista con Service Pack 1. Vista ha
bisogno di determinati diritti amministrativi per realizzare i passi qui riportati. Ecco una spiegazione di
come ottenere tali diritti amministrativi.
A.
Fare clic su “Start” Æ “Tutti i programmi” Æ “Accessori”, fare clic con il pulsante destro del
mouse su “Command Prompt” e selezionare “Run as administrator” (Esegui come amministratore).
Potrebbe apparire un messaggio di avviso, che dovrete accettare facendo clic su “Continue”
(Continua).
Apparirà il prompt dei comandi. Accertarsi che nella barra del titolo del prompt dei comandi appaia
“Administrator: Command Prompt” (Amministratore: prompt dei comandi). Se non appare la parola
“Administrator”, ciò significherà che non disponete dei diritti amministrativi necessari per realizzare
questi passi e dovrete di nuovo tornare al punto A.
B.
Introdurre il comando “IPCONFIG” e premere ENTER.
B
Dovrebbero apparire le seguenti informazioni:
Indirizzo IPv4
: 192.168.0.xxx (dove xxx può variare fra 100 ~ 199).
Maschera di sottorete : 255.255.255.0
Gateway di default : 192.168.0.1
Nel caso in cui le informazioni riportate qui in alto corrispondano con la configurazione, è possibile
procedere alla configurazione del dispositivo andando al Capitolo 5.
Se invece le informazioni riportate qui in alto non corrispondano a quelle della configurazione realizzata
(se ad esempio l’indirizzo IP è 169.254.xxx.xxx) seguire una delle opzioni qui riportate:
137
ITALIANO
1.
2.
3.
Spegnere e riaccendere il dispositivo
Ricollegare il cavo LAN al dispositivo e al computer
Rinnovare l’indirizzo IP del computer con i seguenti comandi:
- “IPCONFIG /RELEASE” per rinunciare all’indirizzo IP sbagliato.
- “IPCONFIG /RENEW” per ricevere un nuovo indirizzo IP dal dispositivo.
3
3
Se nemmeno con questi passi si riesce a risolvere il problema dell’indirizzo IP, è possibile resettare il
dispositivo riportandolo sui valori di default, mediante il pulsante di reset che appare nella parte
posteriore del dispositivo.
Mantenere premuto il pulsante di reset per 15 secondi circa per riportare il dispositivo sui parametri di
fabbrica. Quando il LED di stato sarà di nuovo attivo, ripetere il passo B per rinnovare l’indirizzo IP.
Nota:
138
Se il problema persiste, assicurarsi che tutti i cavi sono collegati correttamente. La porta WAN
deve essere collegata al modem e la porta LAN al computer. Se queste vengono collegate male,
non sarà possibile ottenere un indirizzo IP.
ITALIANO
5. Configurazione del C300GBRS4
Questo capitolo spiega come configurare il C300GBRS4 usando l’Assistente per la configurazione integrato.
Dopo aver realizzato tutti i passi di questo capitolo, il router sarà configurato per realizzare le funzioni
primarie, compresa la sicurezza wireless.
5.1 Configurazione via web
La configurazione del C300GBRS4 si realizza via web, per cui sarà necessario un browser per configurare il
dispositivo.
Nota:
Per configurare il router si consiglia di utilizzare una connessione LAN via cavo invece di una
connessione senza fili.
A.
Aprire il browser (tipo: Internet Explorer, Firefox, Safari o Chrome).
B.
Introdurre l’indirizzo IP del dispositivo nella barra indirizzi del browser (per default:
http://192.168.0.1/).
Apparirà la videata di login del C300GBRS4.
C
C
C.
Introdurre il Nome utente e la Password (per default: ‘admin’ e ‘admin’) e fare clic su “Submit” per
accedere alla configurazione via web.
139
ITALIANO
Quando il Nome utente e la Password sono corretti, il router mostrerà i “Device Settings” (Parametri di
configurazione del dispositivo):
La pagina dei “Device Settings” mostra tutti i parametri configurati per le sezioni LAN, WAN e Wireless
del router.
140
ITALIANO
5.2 Assistente per la configurazione
È possibile configurare il C300GBRS4 mediante l’Assistente all’installazione integrato, che aiuterà a
configurare passo a passo i parametri di base del C300GBRS4.
Nota:
prima di procedere alla configurazione assistita assicurarsi di disporre di tutte le informazioni
relative ai parametri di Internet (ad esempio informazioni sull’account, tipo di connessione, ecc.)
A.
Fare clic sul pulsante dell’Assistente “Wizard” che appare nel menu a sinistra della configurazione
web
B.
Fare clic sul pulsante “Run Wizard” (Esegui
Assistente).
C.
Apparirà la schermata di benvenuto con
cinque passi. Fare clic su “Next” (Avanti)
per continuare.
D.
In questo riquadro si consiglia di applicare
una password admin. Introdurre la nuova
password e reintrodurla per confermarla
Una volta terminato, fare clic su “Next”
(Avanti).
141
ITALIANO
E.
Per motivi di gestione del sistema, è
importantissimo configurare correttamente
l’orario, per ottenere così il timestamp nei
log del sistema.
Impostare correttamente la zona oraria in
questo passo
Una volta terminato, fare clic su “Next”
(Avanti).
F.
Selezionare il metodo di connessione a
Internet che corrisponde ai parametri di
configurazione del provider
Nel caso in cui non si conosca l’opzione
necessaria per la connessione a Internet,
consultare la documentazione del provider
o mettersi in contatto con il Centro di
assistenza clienti del provider.
Una volta terminato, fare clic su “Next”
(Avanti).
G.
Se il provider richiede una connessione con
IP statico, selezionare l’opzione “Static
IP”.
Introdurre le informazioni richieste:
• Indirizzo IP
• Maschera di sottorete
• Indirizzo gateway ISP
• DNS primario
• DNS secondario (opzionale)
Una volta terminato, fare clic su “Next”
(Avanti).
142
Connessione – IP statico
ITALIANO
H.
Se il provider richiede una connessione con
IP dinamico, selezionare l’opzione
“Dynamic IP”.
Connessione –IP dinamico
Alcuni provider richiedono un Nome host
specifico per le loro connessioni. Se è
questo il caso del provider utilizzato,
introdurre il Nome host nell’apposito
campo.
Alcuni provider accettano solo un indirizzo
MAC specifico per collegarsi a internet. Se
la scheda di rete del PC funziona mediante
indirizzo MAC specifico, premere il pulsante
“Clone MAC Address” (Clona Indirizzo
MAC) per introdurre manualmente
l’indirizzo MAC.
Una volta terminato, fare clic su “Next”
(Avanti).
I.
Se il provider richiede una connessione
PPPoE selezionare l’opzione “PPPoE”.
Connessione - PPPoE
Introdurre le informazioni richieste:
• Nome utente
• Password
• Scrivere di nuovo la password
Una volta terminato, fare clic su “Next”
(Avanti).
J.
Se il provider richiede una connessione PPTP
selezionare l’opzione “PPTP”.
Connessione - PPTP
Introdurre le informazioni richieste:
• IP Server
• Account PPTP
• Password PPTP
• Scrivere di nuovo la password
Una volta terminato, fare clic su “Next”
(Avanti).
143
ITALIANO
K.
Se il provider richiede una connessione L2TP
selezionare l’opzione “L2TP”.
Connessione – L2TP
Introdurre le informazioni richieste:
• IP Server
• Account L2TP
• Password L2TP
• Scrivere di nuovo la password
Una volta terminato, fare clic su “Next”
(Avanti).
Dopo aver terminato la configurazione WAN, l’Assistente continuerà con la configurazione wireless:
L.
È possibile cambiare il SSID del router. Per
SSID si intende il nome della connessione
wireless al router. Quando viene realizzata
una ricerca di reti sul computer, questo è il
nome che dovrete cercare.
È possibile modificare il canale, scegliendone
uno fra il canale 1 e il 13. Se si nota una
connessione lenta o interruzioni nella
trasmissione, potrebbe esserci un altro Access
Point nella zona che sta interferendo con il
canale senza fili. In tal caso si può provare
con un altro canale.
Una volta terminato, fare clic su “Next”
(Avanti).
È possibile rendere sicura la connessione wireless mediante cifratura. Per default la connessione senza fili
non è sicura. Per prevenire un accesso non autorizzato alla rete, impostare un livello di sicurezza
mediante l’Assistente per la configurazione.
Se si desidera utilizzare la funzionalità WPS del C300GBRS4, si può saltare la parte relativa alla
configurazione wireless e continuare l’Assistente per la configurazione senza cifratura. Per configurare la
sicurezza WPS, consultare il Capitolo 6 di questa Guida d’installazione rapida.
144
ITALIANO
Nota:
sebbene ogni opzione di sicurezza dell’Assistente per la configurazione sia accompagnata
dall’apposita spiegazione, si consiglia di rendere sicura la rete mediante cifratura “WPAPSK/WPA2-PSK” nel caso in cui i client non supportino la funzionalità WPS. Il WPA2 è il livello di
sicurezza più alto, compatibile all’indietro con i client esclusivamente di WPA.
Nota:
ricordare o annotare le informazioni di sicurezza wireless introdotte, poiché saranno necessarie
nel caso in cui si desideri configurare un client wireless da collegare al C300GBRS4!
M.
Selezionare un livello di sicurezza per la rete
senza fili.
Quando viene scelto un livello di sicurezza,
l’Assistente mostrerà i relativi campi per
introdurre le informazioni necessarie.
N.
Se si desidera rendere sicura la rete mediante
cifratura WEP, selezionare “WEP” dal menu a
comparsa. Introdurre il codice WEP in
formato ASCII (introdurre: A-Z, 0-9).
Nota:
O.
Sicurezza – cifratura WEP
Con l’Assistente è possibile
configurare esclusivamente la
cifratura WEP a 64 Bits..
Se si desidera rendere sicura la rete mediante
cifratura WPA o WPA2 (con server Radius),
selezionare “WPA” o “WPA2” dal menu a
comparsa.
Sicurezza – cifratura WPA / WPA2
Introdurre l’indirizzo IP del server Radius, la
chiave condivisa e confermare la chiave
condivisa nel secondo campo.
145
ITALIANO
P.
Se si desidera rendere sicura la rete mediante
cifratura WPA-PSK o WPA2-PSK, selezionare
“WPA-PSK”, “WPA2-PSK” o “WPAPSK/WPA2-PSK” dal menu a comparsa
Sicurezza – cifratura WPA-PSK / WPA2-PSK
Introdurre la Passphrase della cifratura e
confermarla nel secondo campo.
Q.
Una volta realizzata la configurazione di tutti i parametri wireless, fare clic su “Next” (Avanti) per
continuare.
R.
L’Assistente per la configurazione è stato
terminato. Se si desidera applicare i
parametri, fare clic su “Save & Take Effect”
(Salva e applica).
Se si desidera modificare alcuni parametri,
fare clic su “Back” (Indietro) per tornare alla
videata precedente.
Se si desidera chiudere l’Assistente per la
configurazione senza nessun cambio, fare clic
su “Exit” (Esci).
Quando viene selezionata l’opzione “Save & Take Effect” (Salva e applica), il router applicherà i
parametri configurati. Attendere fino a quando apparirà il messaggio “Save Complete” (Memorizzazione
completata).
S.
La configurazione è stata completata. Fare clic su “Close” (Chiudi) per uscire dall’Assistente per la
configurazione
Apparirà di nuovo la videata relativa ai parametri di configurazione del dispositivo (Device Settings) che
mostrerà i parametri configurati per la connessione WAN e Wireless.
Il router C300GBRS4 è pronto per essere usato!
Nota:
146
per spiegazioni maggiormente dettagliate delle caratteristiche e dei parametri del C300GBRS4
è possibile consultare il Manuale d’uso (disponibile solo in inglese!) incluso nel CD-ROM.
Selezionare “View User Manual” (Visualizza Manuale d’uso) nel menu che si aprirà
automaticamente.
ITALIANO
6. Come usare la funzionalità WPS
Il C300GBRS4 di Conceptronic supporta la funzionalità WPS (Wi-Fi Protected Setup), uno standard per
stabilire in modo facile e sicuro una rete senza fili. Con WPS è possibile configurare e proteggere la rete
wireless in uso in pochissimi passi.
Nota:
Per usare WPS con il C300GBRS4, i client wireless devono essere in grado di supportare WPS. Nel
caso in cui esistano uno o più client wireless privi di supporto per WPS, è consigliabile rendere
sicura la rete in modo manuale, usando l’Assistente per la configurazione, spiegato nel Capitolo
5.2.
Nota:
Per ulteriori informazioni (tecniche) sul WPS, si può consultare il sito web qui riportato:
http://en.wikipedia.org/wiki/Wi-Fi_Protected_Setup
Il C300GBRS4 supporta due sistemi per attivate e stabilire una connessione con WPS:
Tecnologia Touch Button
Tecnologia Codice PIN
6.1 WPS – Tecnologia Touch Button
La tecnologia Push Button WPS richiede l’uso di un pulsante (virtuale) sul client wireless per stabilire una
connessione fra il C300GBRS4 e il client wireless.
Alcuni client wireless operano con un pulsante vero e proprio per attivare la tecnologia Push Button WPS,
mentre altri usano un pulsante virtuale nel loro software.
Seguire i passi qui riportati per attivare e stabilire una connessione con WPS utilizzando la tecnologia Push
Button:
A.
B.
Premere il pulsante WPS sito nella parte frontale del C300GBRS4 fino a quanto il LED WPS inizierà a
lampeggiare.
Premere il pulsante WPS sul client wireless. Potrebbe essere un tasto hardware o un tasto virtuale
nel software del client wireless.
Il C300GBRS4 attiverà la sicurezza WPA sulla rete senza fili e accetta la connessione senza fili del client
wireless.
Nota:
Il C300GBRS4 manterrà la cifratura WPS attiva per 120 secondi. Durante questo processo, il LED
WPS lampeggerà. Nel caso in cui non ci sia nessuna connessione durante i 120 secondi, il LED si
spegnerà e il processo di cifratura WPS verrà interrotto.
Se la funzionalità WPS non è mai stata usata prima, la rete senza fili resterà senza sicurezza.
Se la cifratura del client wireless viene realizzata con successo, il LED WPS si spegnerà.
Il client wireless sarà così collegato al C300GBRS4 e la rete sarà protetta mediante cifratura WPA.
È possibile aggiungere altri client wireless WPS senza perdere la connessione con i client wireless WPS
precedenti. Se si desidera aggiungere altri client wireless WPS, ripetere i passi A e B.
Nota:
La chiave WPA generata dal C300GBRS4 è aleatoria.
147
ITALIANO
6.2 WPS – Tecnologia Codice PIN
Se il client wireless abilitato per WPS non dispone di un pulsante (virtuale), è possibile utilizzare la
tecnologia a Codice PIN per stabilire una connessione WPS.
Nota:
Per attivare la funzione di Codice PIN WPS, è necessario un computer collegato via cavo al
C300GBRS4.
A.
Aprire il browser (tipo: Internet Explorer, Firefox, Safari o Chrome).
B.
Introdurre l’indirizzo IP del dispositivo nella barra indirizzi del browser (per default:
http://192.168.0.1/).
Apparirà la videata relativa al login del C300GBRS4.
C
C
C.
Introdurre il Nome utente e la Password (per default: ‘admin’ e ‘admin’) e fare clic su “Submit” per
accedere alla configurazione web.
Quando il Nome utente e la Password sono corretti, il router mostrerà i “Device Settings” (Parametri di
configurazione del dispositivo).
D.
Selezionare “Wireless” nel menu a sinistra.
Verranno mostrate le pagine di configurazione wireless. In calce a questa pagina di configurazione
apparirà la sezione chiamata “Wi-Fi Protected Setup”.
E
E.
148
Fare clic sul pulsante “Add Wireless Device Wizard” (Assistente Aggiunta dispositivo wireless).
ITALIANO
Sullo schermo apparirà l’Assistente WPS:
In questo assistente è possibile attivare l’opzione di Codice PIN. Per operare con la cifratura via codice PIN
sarà necessario il codice PIN generato dal client wireless.
F.
Selezionare la funzione di Codice PIN per WPS nel software del client wireless. Il client wireless
genererà un codice PIN de lo mostrerà sullo schermo.
[Software Client Wireless]
G.
Æ
G
[Assistente WPS C300GBRS4]
Introdurre il codice PIN fornito dal client wireless nell’assistente WPS del C300GBRS4 e premere
“Connect” (Collega).
Il C300GBRS4 attiverà la sicurezza WPA sulla rete senza fili e accetterà la connessione senza fili del client
wireless, attraverso il codice PIN introdotto.
Il C300GBRS4 manterrà la cifratura WPS attiva per 120 secondi. Durante questo processo, il LED WPS
lampeggerà. Nel caso in cui non ci sia nessuna connessione durante i 120 secondi, il LED si spegnerà e il
processo di cifratura WPS verrà interrotto.
149
ITALIANO
Fare clic su “Continue” (Continua) per tornare alla videata relativa all’assistente WPS.
Nota:
Se la funzionalità WPS non è mai stata usata prima, la rete senza fili resterà senza sicurezza.
Se la cifratura del client wireless viene realizzata con successo, l’assistente mostrerà “WPS - Adding
Wireless Device Success” (WPS – Aggiunta dispositivo wireless con successo), e il LED WPS si spegnerà.
Fare clic su “Continue” (Continua) per tornare alla pagina di configurazione wireless.
Il client wireless sarà così collegato al C300GBRS4 e la rete sarà protetta mediante cifratura WPA.
Se si desidera aggiungere altri client wireless con la funzione WPS, ripetere i passi da E a G.
150
ITALIANO
7. Configurazione regole per server virtuale
Il C300GBRS4 di Conceptronic è dotato di un firewall integrato per evitare attacchi alla rete provenienti
da Internet. Tale firewall blocca automaticamente tutto il traffico in entrata delle porte non utilizzate.
Quando è necessaria una porta bloccata per un servizio o per un’applicazione (ad esempio un server FTP o
un server web) è possibile creare una regola per server virtuale nelle pagine di configurazione per dirigere
il traffico.
Qui di seguito appare un elenco di alcune delle porte usate più comunemente, con l’applicazione
corrispondente:
Porta
Applicazione
Porta
Applicazione
20
21
22
23
25
Dati FTP (Server FTP)
FTP (Server FTP)
SSH (Secure Shell)
Telnet
SMTP (Mail Server – in uscita)
80
110
2000
5800
5900
HTTP (Server web)
POP3 (Mail Server – in entrata)
Remotely Anywhere
VNC
VNC
Per altre porte, corredate dall’apposita applicazione, consultare: http://portforward.com/cports.htm
Nota:
Quando si usa un’applicazione che supporta il Port Mapping UPnP, è possibile configurare
automaticamente il router mediante l’applicazione, quando richiesto. In tal caso non è
necessario impostare manualmente la mappatura delle porte.
Nota:
Quando si fa uso di regole per server virtuale, si consiglia di configurare il/i computer con un
indirizzo IP fisso e non con uno dinamico.
Nota:
Per spiegazioni maggiormente dettagliate sul server virtuale e sulle opzioni DMZ è possibile
consultare il Manuale d’uso (disponibile solo in inglese!) incluso nel CD-ROM. Selezionare “View
User Manual” (Visualizza Manuale d’uso) nel menu che si aprirà automaticamente.
A.
Aprire il browser (tipo: Internet Explorer, Firefox, Safari or Chrome).
B.
Introdurre l’indirizzo IP del dispositivo nella barra indirizzi del browser (per default:
http://192.168.0.1/).
Apparirà la videata relativa al login del C300GBRS4.
C
C
C.
Introdurre il Nome utente e la Password (per default: ‘admin’ e ‘admin’) e fare clic su “Submit” per
accedere alla configurazione web.
151
ITALIANO
Quando il Nome utente e la Password sono corretti, il router mostrerà i “Device Settings” (Parametri di
configurazione del dispositivo).
D.
Selezionare “Advanced”, “Virtual Server” nel menu di navigazione posto nella parte superiore.
Apparirà la seguente pagina di configurazione del “Virtual Server”.
Nota:
E.
F.
G.
H.
nell’immagine in basso appare un esempio di configurazione del server virtuale.
Impostare l’opzione di regola del server virtuale su “Enabled” (Attivata).
Introdurre un nome per la regola del server virtuale nel campo “Name” (Nome).
Introdurre l’indirizzo IP del computer/server che ha bisogno di una regola di server virtuale.
Selezionare il protocollo della regola di server virtuale: “TCP”, “UDP” o “Both” (Entrambe).
Nota:
I.
J.
K.
se non si sa qual è il protocollo di cui ha bisogno la regola di server virtuale, selezionare “Both”.
Con questa opzione sia il traffico TCP che quello UDP passeranno attraverso l’indirizzo IP
configurato del computer/server.
Introdurre la porta desiderata del computer/server che ha bisogno di una regola di server virtuale.
Introdurre la porta che deve essere visibile al di fuori della connessione a Internet.
Fare clic su “Apply” (Applica) per applicare la regola di server virtuale creata.
Dopo aver memorizzato la regola di server virtuale, questa apparirà nell’Elenco Server Virtuale (“Virtual
Server List”).
Per creare altre regole di server virtuale, ripetere i passi E - K.
Le regole di server virtuale definite, sono pronte per essere usate!
152
ITALIANO
8. Riavvio del C300GBRS4
Quando vengono modificati i parametri di configurazione del router, questi vengono applicati
direttamente e sono funzionanti già dall’inizio.
Ad ogni modo si consiglia di riavviare il C300GBRS4 dopo aver realizzato un gran numero di modifiche
importanti alla configurazione, per accertarsi che tutti i parametri verranno applicati correttamente.
A.
Selezionare “Tools” (Strumenti), “System” (Sistema) nel menu di navigazione posto in alto.
B.
Fare clic su “Reboot” (Riavvia) per salvare la configurazione, riavviare il C300GBRS4 e attivare
correttamente tutte le modifiche.
Una finestra a comparsa confermerà la procedura.
C.
Fare clic su “OK” per procedere al riavvio del router.
Verranno salvati tutti i cambiamenti e il router verrà riavviato. Aspettare fino a quando il contatore
arriverà a zero:
Una volta riavviato il dispositivo, apparirà di nuovo la pagina di login del router.
Il C300GBRS4 è pronto per essere usato!
Nota:
per spiegazioni maggiormente dettagliate sulle caratteristiche e sui parametri di configurazione
del C300GBRS4 è possibile consultare il Manuale d’uso (disponibile solo in inglese!) incluso nel
CD-ROM. Selezionare “View User Manual” (Visualizza Manuale d’uso) nel menu che si aprirà
automaticamente.
153
PORTUGUÊS
Conceptronic C300GBRS4
Manual de Instalação Rápida
Parabéns pela compra do seu
Router Wireless 802.11n Gigabit da Conceptronic.
Este Manual de Instalação Rápida fornece-lhe uma explicação passo a passo sobre como instalar e utilizar
o Conceptronic C300GBRS4.
Se precisar de mais informação ou suporte para o seu produto, aconselhamo-lo a visitar a nossa página
Web Service & Support em www.conceptronic.net/support e seleccionar uma das seguintes opções:
• FAQ
• Downloads
• Contact
: Base de dados das Perguntas Mais Frequentes
: Manuais, controladores, firmware e mais transferências
: Contacte o suporte da Conceptronic
Para informações gerais sobre os produtos da Conceptronic visite a página Web da Conceptronic em
www.conceptronic.net.
A configuração do hardware tal como se descreve a seguir pode ser ligeiramente diferente no seu
computador. Depende do Sistema Operativo que estiver a usar.
Conteúdo
1. Conteúdo da embalagem
2. O C300GBRS4
3. Instalação do hardware
3.1. Ligação WAN
3.2. Ligação LAN / LAN Sem Fios
4. Configuração do computador
4.1. Configuração do seu endereço IP
4.2. Verificar a sua ligação
154
5. Configuração do C300GBRS4
5.1. Configuração com base na web
5.2. Assistente de Configuração
6. Usar a Função WPS
6.1. WPS – Tecnologia de botão
6.2. WPS – Tecnologia de Código Pin
7. Configuração das regras do Servidor Virtual
8. Reiniciar
PORTUGUÊS
1. Conteúdo da embalagem
Existem os seguintes elementos na embalagem do Router Sem Fios 802.11n Gigabit da Conceptronic:
•
•
•
•
•
•
Router sem fios 802.11n Gigabit – Conceptronic C300GBRS4.
Fonte de alimentação 5 V DC, 2 A
3 antenas para conectividade sem fios
Cabo LAN com 1,8 m
Guia de Instalação Rápida Multilingue
CD-ROM do produto
2. O C300GBRS4
• Painel Frontal
7
Nº
Descrição
1
Luz de alimentação APAGADA
ACESA
Luz de estado
APAGADA
INTERMITENTE
Luz WAN
APAGADA
CONTÍNUA
INTERMITENTE
2
3
4
Luz WLAN
5
Luzes LAN
(1, 2, 3, 4)
6
Luz WPS
7
Botão WPS
Estado
6
5
4 3 2 1
Explicação do estado
O aparelho está desligado
O aparelho está ligado
O aparelho está desligado / Falha do sistema*
O aparelho está ligado e pronto a usar
Não existe nenhuma ligação WAN
Existe uma ligação WAN
Estão a ser enviados ou recebidos dados através
da Porta WAN
APAGADA
A interface sem fios está desactivada
INTERMITENTE A interface sem fios está activada e activa
APAGADAS
Não está criada uma ligação de rede na porta LAN
LARANJA
Existe uma ligação de rede Gigabit na Porta LAN
VERDE
Existe uma ligação de rede de 10/100 Mbps na porta LAN
INTERMITENTE Os dados são enviados ou recebidos através da porta LAN
INTERMITENTE Quando se carrega no botão WPS, a luz WPS pisca durante
120 segundos enquanto procura Clientes WPS. **
Carregue no botão WPS para activar a função WPS. O router
vai procurar Clientes WPS durante 120 segundos. **
155
PORTUGUÊS
*
Numa utilização normal, a Luz de Estado acende e pisca 15 segundos depois do dispositivo ser ligado
ou reiniciado. Quando ocorre uma falha do sistema com o aparelho, a Luz de Estado não acende.
Tem as seguintes opções para resolver a falha do sistema:
•
Desligue o aparelho, aguarde 10 segundos e volte a ligá-lo.
•
Reponha as definições de fábrica no aparelho carregando no botão Reset na parte de trás do
aparelho durante +/- 15 segundos.
Se a luz de Estado não acender depois de tentar estas opções, contacte o Apoio da Conceptronic em:
www.conceptronic.net/support
**
Para mais informações acerca da função WPS, consulte o Capítulo 6 deste Manual de Instalação
Rápida.
• Painel Traseiro
1
2
1
3
4
5
1
Nº
Descrição
Explicação
1
2
3
4
Ligação da antena
Portas LAN
Porta WAN
Botão de reiniciar
5
Ficha de alimentação
Ficha SMA Invertida para Antena Sem Fios
Para ligar os/s seu/s computador/es ao router
Para ligar a sua ligação de banda larga ao router
Para repor o router com as Configurações Predefinidas de
Fábrica
Para ligar a Fonte de Alimentação ao router
Nota:
Este Manual de Instalação Rápida só explica ao passos básicos para pôr o C300GBRS4 a funcionar.
Para mais informações sobre as várias funções do C300GBRS4, consulte o Manual do Utilizador (só
em inglês!) no CD-ROM do produto. Seleccione “View User Manual” (Ver Manual do Utilizador) no
Menu de Execução Automática.
156
PORTUGUÊS
3. Instalação do hardware
Ligue as 3 antenas às ligações de antena na parte de trás do C300GBRS4.
Ligue a fonte de alimentação à entrada de alimentação na parte de trás do C300GBRS4 e a uma tomada de
parede disponível. A luz de alimentação na parte da frente do C300GBRS4 acende.
3.1 Ligação WAN
Use um cabo LAN para ligar o C300GBRS4 ao seu modem por cabo, DSL ou de fibra óptica.
A luz WAN na parte da frente do C300GBRS4 acende.
Nota:
Se a luz WAN na parte da frente não acender, assegure-se de que:
- O C300GBRS4 está ligado (a luz de alimentação deve estar acesa).
- O modem por cabo, DSL ou de fibra óptica está ligado.
- O cabo LAN entre os dois aparelhos está bem ligado.
3.2 Ligação LAN / LAN Sem Fios
Para utilizadores de Cabo LAN:
Ligue o cabo LAN a uma das quatro portas LAN no painel traseiro do C300GBRS4 e à placa de rede do seu
computador.
A luz LAN da porta LAN utilizada acende, indicando que o computador está ligado. (O seu computador
deve estar ligado e a ligação LAN deve estar activada.)
Para utilizadores sem fios:
Pode ligar-se sem fios ao C300GBRS4 de duas formas diferentes:
Manualmente.
Automaticamente através da função WPS.
Se tiver um ou mais clientes que não suportem WPS, é aconselhável ligar-se manualmente ao C300GBRS4.
Nota:
Por defeito, o C300GBRS4 está protegido com WPA-PSK/WPA2-PSK (modo misto). Pode encontrar
a frase-chave WPA para o seu C300GBRS4 no autocolante do produto que se encontra na base do
C300GBRS4.
Neste capítulo explicam-se os passos a seguir para ligar manualmente à sua rede sem fios.
Para mais informações acerca da função WPS e os passos de configuração, consulte o Capítulo 6 deste
Manual de Instalação Rápida.
157
PORTUGUÊS
Ligação sem fios manual:
Quase todas as marcas / tipos de placas sem fios usam uma aplicação de Cliente diferente. Consulte o
manual da sua placa sem fios para obter informações sobre como criar uma ligação com uma rede sem
fios.
Nota:
O exemplo a seguir usa o Cliente Sem Fios standard da Microsoft, que vai integrado no Windows
Vista com o Service Pack 1.
A
Clique no ícone de Rede na sua
bandeja de sistema e clique em
“Wireless networks are
available” (Estão disponíveis
redes sem fios).
B
Seleccione a rede “C300GBRS4”
nessa lista e clique em
“Connect” (Ligar).
158
PORTUGUÊS
C
Introduza a frase-chave WPA
predefinida (que pode encontrar
na base do C300GBRS4) no campo
“Security key” (Chave de
segurança) e clique em
“Connect” (Ligar).
D
Depois de a ligação ser
estabelecida, pode escolher
guardar a rede e iniciá-la
automaticamente sempre que
ligar o computador. Clique em
“Close” (Fechar) para sair do
Assistente de Ligação.
E
Para verificar o estado da ligação
sem fios pode clicar no ícone de
Rede na bandeja de sistema. Aí
vai ver a que rede está ligado
nesse momento, o acesso que
tem e a força do sinal da ligação.
159
PORTUGUÊS
4. Configuração do computador
4.1 Configuração do seu endereço IP
O C300GBRS4 está equipado com um servidor DHCP incorporado. O Servidor DHCP atribui
automaticamente um endereço IP a cada computador ligado se esse computador estiver configurado para
“Obtain an IP address automatically” (Obter um endereço IP automaticamente).
A maioria dos computadores está predefinida para obter um endereço IP automaticamente. Quando não
for esse o caso, tem de configurar o seu computador para obter um endereço IP automaticamente
seguindo as instruções seguintes. Estas instruções baseiam-se no Windows Vista com o Service Pack 1. Se o
seu computador tiver uma versão ou um sistema operativo diferente, os passos que se devem seguir
podem ser ligeiramente diferentes.
A.
Clique em “Start” (Iniciar) Æ “Run”
(Executar).
B.
Introduza o comando “NCPA.CPL” e
carregue em “OK”.
B
B
A janela de Ligações de Rede aparece.
C.
Clique com o botão direito do rato em “Local Area
Connection” (Ligação de Área Local) (com ou sem
fios, dependendo da ligação que você usar) e
seleccione “Properties” (Propriedades).
C
160
PORTUGUÊS
A janela das Propriedades da sua Ligação de Área Local aparece.
D.
Seleccione “Internet Protocol Version 4
(TCP/IPv4)” (Protocolo de Internet Versão
4 (TCP/IPv4)) e clique em “Properties”
(Propriedades).
D
D
A janela de Propriedades do Protocolo de Internet Versão 4 (TCP/IPv4) aparece.
E.
Configure as propriedades para “Obtain
an IP address automatically” (Obter um
endereço IP automaticamente) e carregue
em “OK” para guardar as configurações.
F.
Carregue em “OK” na janela de
propriedades de Ligação de Área Local
para guardar as configurações.
E
E
161
PORTUGUÊS
4.2 Verificar a sua ligação
Com a Linha de Comandos do Windows pode verificar se recebeu um endereço IP correcto na sua Ligação
de Área Local. Este exemplo baseia-se no Windows Vista com o Service Pack 1. No Vista precisa de ter
direitos de administrador para realizar os passos seguintes. Há uma explicação sobre como conseguir
direitos de administrador.
A.
Clique em “Start” (Iniciar) Æ “All programs” (Todos os programas) Æ “Accessories” (Acessórios), e
depois clique com o botão direito do rato em “Command Prompt” (Linha de comandos) e seleccione
“Run as administrator” (Executar como administrador).
É possível que apareça uma mensagem de aviso, que deve aceitar clicando em “Continue”
(Continuar).
A Linha de Comandos aparece. Certifique-se de que no título da Linha de Comandos está escrito
“Administrator: Command Prompt” (Administrador: Linha de comandos). Quando não aparecer a palavra
“Administrator” (Administrador), significa que você não tem os direitos de administrador necessários para
realizar estes passos e deve voltar a realizar o passo A.
B.
Introduza o comando “IPCONFIG” e carregue em “ENTER”.
B
Deverá ver a seguinte informação:
Endereço IPv4
: 192.168.0.xxx (em que xxx pode variar entre 100 ~ 199).
Máscara Subnet
: 255.255.255.0
Porta de ligação predefinida
: 192.168.0.1
Se a informação mostrada antes coincidir com a sua configuração, pode prosseguir com a configuração do
aparelho no Capítulo 5.
Se a informação apresentada não coincidir com a sua configuração (i.e., o seu endereço IP for o
169.254.xxx.xxx), por favor verifique as opções seguintes:
162
PORTUGUÊS
1.
2.
3.
Desligue e volte a ligar o aparelho.
Volte a ligar o Cabo LAN ao aparelho e ao seu computador.
Renove o endereço IP do seu computador com os seguintes comandos:
- “IPCONFIG /RELEASE” para libertar o endereço IP errado.
- “IPCONFIG /RENEW” para receber um novo endereço IP do aparelho.
3
3
Se os passos anteriores não resolverem o problema do endereço IP, pode repor as configurações
predefinidas de fábrica no aparelho com o botão Reset na parte de trás do aparelho.
Pressione e segure o botão Reset durante +/- 15 segundos para repor as Configurações Predefinidas de
Fábrica. Quando a luz de Estado estiver novamente activa, repita o passo B para renovar o seu
endereço IP.
Nota:
Se o problema persistir, verifique se todos os cabos estão correctamente ligados. A porta WAN
deveria estar ligada ao Modem e a porta LAN ao computador. Se as ligar de forma errada também
não vai conseguir obter um endereço IP correcto.
163
PORTUGUÊS
5. Configuração do C300GBRS4
Este capítulo descreve a configuração do C300GBRS4 através do Assistente de Configuração incluído.
Depois de levar a cabo os passos descritos neste capítulo, o seu router está configurado para as suas
funções principais, incluindo a segurança sem fios.
5.1 Configuração com base na web
A configuração do seu C300GBRS4 é com base na web. Vai precisar de um navegador para configurar o
aparelho.
Nota:
Para configurar o router é aconselhável usar uma ligação por cabo LAN para o aparelho em vez de
uma ligação sem fios.
A.
Inicie o seu navegador (como por exemplo: Internet Explorer, FireFox, Safari ou Chrome).
B.
Introduza o endereço IP do aparelho na barra de endereços do seu navegador (por defeito:
http://192.168.0.1/).
A página de início de sessão do C300GBRS4 aparece.
C
C
C.
164
Introduza o Nome de Utilizador e a Palavra-passe (por defeito: ‘admin’ e ‘admin’) e clique em
“Submit” (Enviar) para entrar na configuração com base na web.
PORTUGUÊS
Quando o Nome de Utilizador e a Palavra-passe estiverem correctos, o router mostra um resumo das
“Device Settings” (Configurações do Dispositivo):
O resumo das “Device Settings” (Configurações do dispositivo) mostra todas as definições configuradas
para as partes LAN, WAN e Sem Fios do router.
165
PORTUGUÊS
5.2 Assistente de Configuração
Pode configurar o C300GBRS4 através do Assistente incorporado. Este Assistente vai ajudá-lo a configurar
as definições básicas do C300GBRS4 passo a passo.
Nota:
Antes de começar com a Configuração do Assistente, assegure-se de que tem todas as
informações disponíveis sobre a sua configuração de Internet. (Por exemplo: informação de conta,
tipo de ligação, etc.)
A.
Clique no botão “Wizard” (Assistente) que aparece no menu esquerdo da configuração web.
B.
Clique no botão “Run Wizard” (Executar
Assistente).
C.
O ecrã de boas-vindas apresenta uma lista
dos cindo passos do assistente. Clique em
“Next” (Seguinte) para continuar.
D.
Recomenda-se definir aqui uma palavrapasse de administrador. Introduza a nova
palavra-passe e volte a introduzi-la para
confirmar.
Quando terminar, clique em “Next”
(Seguinte).
166
PORTUGUÊS
E.
Por motivos de gestão do sistema, é muito
importante uma correcta definição da hora
nos registos do sistema.
Defina neste passo o Fuso Horário
apropriado.
Quando terminar, clique em “Next”
(Seguinte).
F.
Seleccione o método de Ligação à Internet
que corresponde às configurações do seu
fornecedor.
Se não souber qual é a opção que precisa
para a sua ligação à Internet, consulte a
documentação do seu fornecedor ou
contacte o apoio do seu fornecedor.
Quando terminar, clique em “Next”
(Seguinte).
G.
Quando o seu fornecedor necessitar de uma
ligação com IP Fixo, seleccione a opção
“Static IP” (IP fixo).
Ligação – IP fixo
Introduza a informação pedida:
•
•
•
•
•
Endereço IP
Máscara Subnet
Endereço da Porta de Ligação do ISP
DNS Primário
DNS Secundário (opcional)
Quando terminar, clique em “Next”
(Seguinte).
167
PORTUGUÊS
H.
Quando o seu fornecedor necessitar de uma
ligação com IP Dinâmico, seleccione
“Dynamic IP” (IP dinâmico).
Ligação – IP Dinâmico
Alguns fornecedores precisam de um nome
do sistema anfitrião (Host Name) específico
para as suas ligações. Se o seu fornecedor
necessitar de um nome de sistema anfitrião
específico, introduza-o no campo.
Alguns fornecedores só permitem 1
endereço MAC específico para ligar à
Internet. Se a Placa de Rede do seu PC
funcionar com o endereço MAC específico
necessário, carregue no botão “Clone MAC
Address” (Copiar Endereço MAC) ou
introduza o Endereço MAC manualmente.
Quando terminar, clique em “Next”
(Seguinte).
I.
Quando o seu fornecedor necessitar de uma
ligação PPPoE, seleccione a opção “PPPoE”.
Introduza a informação pedida:
• Nome de Utilizador
• Password (Palavra-passe)
• Confirmar palavra-passe
Quando terminar, clique em “Next”
(Seguinte).
168
Ligação - PPPoE
PORTUGUÊS
J.
Quando o seu fornecedor necessitar de uma
ligação PPTP, seleccione a opção “PPTP”.
Ligação - PPTP
Introduza a informação pedida:
• Servidor IP
• Conta PPTP
• Palavra-passe PPTP
• Confirmar palavra-passe
Quando terminar, clique em “Next”
(Seguinte).
K.
Quando o seu fornecedor necessitar de uma
ligação L2TP, seleccione a opção “L2TP”.
Ligação – L2TP
Introduza a informação pedida:
• Servidor IP
• Conta L2TP
• Palavra-passe L2TP
• Confirmar palavra-passe
Quando terminar, clique em “Next”
(Seguinte).
Quando a configuração WAN estiver concluída, o Assistente vai prosseguir com a configuração Sem Fios:
169
PORTUGUÊS
L.
Pode alterar o SSID do router. O SSID é o
nome da ligação sem fios ao seu router.
Quando estiver a procurar redes sem fios no
seu computador, é este o nome que vai
procurar.
Pode alterar o canal entre o canal 1 e o 13.
Se sentir que a ligação está lenta ou a falhar,
pode existir outro ponto de acesso na sua
área que pode estar a interferir com o seu
canal sem fios. Nesse caso, pode
experimentar outro canal.
Quando terminar, clique em “Next”
(Seguinte).
Pode proteger a sua ligação sem fios com encriptação. Por defeito, a ligação sem fios não está protegida.
Para prevenir o acesso não autorizado à sua rede, defina um nível de segurança através do Assistente de
Configuração.
Se quiser usar a função WPS no C300GBRS4, pode passar à frente a configuração sem fios e continuar o
Assistente de Configuração sem encriptação. Para configurar a sua segurança WPS, prossiga para o
Capítulo 6 deste Manual de Instalação Rápida.
Nota:
Todas as opções de segurança do Assistente de Configuração são explicadas, mas é aconselhável
proteger a sua rede com segurança “WPA-PSK/WPA2-PSK” se os seus Clientes não suportarem
WPS. WPA2 é o nível de segurança mais alto, compatível com versões anteriores apenas para
clientes WPA.
Nota:
Não esqueça ou aponte a informação de segurança sem fios introduzida. Vai precisar dela quando
quiser configurar um cliente sem fios para se ligar ao C300GBRS4!
M.
Seleccione um nível de segurança para a sua
Rede Sem Fios.
Quando tiver escolhido um nível de
segurança, o Assistente vai mostrar campos
para a informação pedida.
170
PORTUGUÊS
N.
Se quiser proteger a sua rede com
encriptação WEP, seleccione “WEP” na lista
desdobrável. Introduza a chave WEP em
formato ASCII (introduza: A-Z, 0-9).
Nota:
O.
Segurança – Encriptação WEP
Através do Assistente só pode
configurar a WEP de 64 Bits.
Se quiser proteger a sua rede com WPA ou
WPA2 (com Servidor Radius), seleccione
“WPA” ou “WPA2” na lista desdobrável.
Segurança – Encriptação WPA / WPA2
Introduza o Endereço IP do Servidor Radius, a
Chave Partilhada e confirme a Chave
Partilhada no segundo campo.
P.
Se quiser proteger a sua rede com WPA-PSK
ou WPA2-PSK, seleccione “WPA-PSK”,
“WPA2-PSK” ou “WPA-PSK/WPA2-PSK” na
lista desdobrável.
Segurança – WPA-PSK / WPA2-PSK
Introduza a frase chave para a encriptação e
confirme a frase chave no segundo campo.
Q.
Quando estiverem feitas todas as configurações, clique em “Next” (Seguinte) para continuar.
R.
O Assistente de Configuração está agora
concluído. Se quiser aplicar as suas
configurações, clique em “Save & Take
Effect” (Guardar e Aplicar).
Se quiser alterar alguma configuração, clique
em “Back” (Voltar) para regressar ao ecrã
anterior.
Se quiser sair do Assistente de Configuração
sem guardar as alterações, clique em “Exit”
(Sair).
Quando seleccionar “Save & Take Effect” (Guardar e Aplicar), o router vai aplicar as definições
configuradas. Espere pela mensagem “Save Complete” (Guardar concluído).
171
PORTUGUÊS
S.
A configuração está agora concluída. Clique em “Close” (Fechar) para sair do Assistente de
Configuração.
Vai regressar ao resumo das “Device Settings” (Configurações do dispositivo) onde aparecem as definições
configuradas para a sua WAN e ligação sem fios.
O seu router C300GBRS4 já está pronto a usar!
Nota:
172
Para uma explicação detalhada sobre as características e configurações disponíveis no
C300GBRS4, leia o Manual do Utilizador (só em inglês!) no CD-ROM do produto. Seleccione “View
User Manual” (Ver Manual do Utilizador) no Menu de Execução Automática.
PORTUGUÊS
6. Usar a Função WPS
O C300GBRS4 da Conceptronic suporta a especificação WPS (Wi-Fi Protected Setup). O WPS é um standard
para montar uma rede sem fios de forma fácil e segura. Com o WPS pode configurar e proteger a sua rede
sem fios em apenas alguns passos.
Nota:
Para usar o WPS com o C300GBRS4, tem de ter Clientes Sem Fios que suportem WPS. Se tiver um
ou mais Clientes Sem Fios que não suportem WPS, é aconselhável proteger a sua rede
manualmente usando o Assistente de Configuração que se explica no Capítulo 5.2.
Nota:
Para mais informação (técnica) acerca do WPS, pode visitar a seguinte página web:
http://en.wikipedia.org/wiki/Wi-Fi_Protected_Setup
O C300GBRS4 suporta duas formas de activar e estabelecer uma ligação WPS:
Tecnologia por Botão
Tecnologia por Código Pin
6.1 WPS – Tecnologia por Botão
A tecnologia WPS por Botão requer um botão (virtual) no seu Cliente Sem Fios para estabelecer uma
ligação entre o C300GBRS4 e o seu Cliente Sem Fios.
Alguns Clientes Sem Fios funcionam com um botão real para activar a tecnologia WPS por Botão; alguns
Clientes Sem Fios usam um botão virtual no respectivo software.
Siga os passos seguintes para activar e estabelecer uma ligação WPS com a tecnologia por Botão:
A.
Carregue no Botão WPS na parte da frente do C300GBRS4 até a luz WPS começar a piscar.
B.
Carregue no Botão WPS no seu Cliente Sem Fios. Isto pode ser um botão no hardware ou um botão
virtual no software do seu Cliente Sem Fios.
O C300GBRS4 vai activar a segurança WPA na sua rede sem fios e aceita a ligação sem fios do seu Cliente
Sem Fios.
Nota:
O C300GBRS4 vai manter a autenticação WPS activa durante 120 segundos. Durante este processo,
a luz WPS vai piscar. Se não existir qualquer conexão durante esses 120 segundos, a luz desliga-se
e o processo de autenticação WPS é interrompido.
Se a função WPS ainda não tiver sido usada antes, a rede sem fios vai continuar desprotegida.
Se a autenticação do Cliente Sem Fios for bem sucedida, a luz WPS apaga-se.
O seu Cliente Sem Fios está agora ligado ao C300GBRS4 e a sua rede está protegida com encriptação WPA.
Pode adicionar mais Clientes WPS Sem Fios sem perder a ligação aos Clientes WPS Sem Fios anteriores.
Se quiser adicionar mais Clientes WPS Sem Fios, repita os passos A e B.
Nota:
A Chave WPA gerada pelo C300GBRS4 é aleatória.
173
PORTUGUÊS
6.2 WPS – Tecnologia por Código Pin
Se o seu Cliente Sem Fios com WPS não tiver um Botão (virtual), pode usar a tecnologia por Código Pin
para estabelecer uma ligação WPS.
Nota:
Para activar a função WPS por Código Pin, precisa de um computador que esteja ligado por cabo
ao C300GBRS4.
A.
Abra o seu navegador (como por exemplo: Internet Explorer, FireFox, Safari ou Chrome).
B.
Introduza o endereço IP do aparelho na barra de endereços do seu navegador (por defeito:
http://192.168.0.1/).
A página de início de sessão do C300GBRS4 aparece.
C
C
C.
Introduza o Nome de Utilizador e a Palavra-passe (por defeito: ‘admin’ e ‘admin’) e clique em
“Submit” (Enviar) para entrar na configuração com base na web.
Quando o Nome de Utilizador e a Palavra-passe estiverem correctos, o router mostra um resumo das
“Device Settings” (Configurações do Dispositivo).
D.
Seleccione “Wireless” (Sem Fios) no menu esquerdo.
As páginas da Configuração Sem Fios são apresentadas. Na parte de baixo desta página de configuração,
pode encontrar a secção “Wi-Fi Protected Setup”.
E
E.
174
Clique no botão “Add Wireless Device Wizard” (Assistente para adicionar dispositivo sem fios) do
ecrã.
PORTUGUÊS
O Assistente WPS aparece no seu ecrã:
Neste Assistente, pode activar a função de Código Pin. Para dar início à autenticação por Código Pin,
precisa que o seu Cliente Sem Fios gere o Código Pin.
F.
Seleccione a função WPS por Código Pin no software do seu Cliente Sem Fios. O Cliente Sem Fios vai
gerar um Código Pin e apresentá-lo no seu ecrã.
[Software de Cliente Sem Fios]
G.
Æ
G
[Assistente WPS do C300GBRS4]
Introduza o Código Pin fornecido pelo seu Cliente Sem Fios no Assistente WPS do C300GBRS4 e
carregue em “Connect” (Ligar).
O C300GBRS4 vai activar a segurança WPA na sua rede sem fios e aceitar a ligação sem fios do seu Cliente
Sem Fios com o Código Pin introduzido.
O C300GBRS4 vai manter a autenticação WPS activa durante 120 segundos. Durante este processo, a luz
WPS vai piscar. Se não existir qualquer conexão durante esses 120 segundos, a luz desliga-se e o processo
de autenticação WPS é interrompido.
175
PORTUGUÊS
Clique em “Continue” (Continuar) para regressar ao ecrã do Assistente WPS.
Nota:
Se a função WPS ainda não tiver sido usada antes, a rede sem fios vai continuar desprotegida.
Se a autenticação do Cliente Sem Fios tiver sido bem sucedida, o assistente vai mostrar a mensagem “WPS
- Adding Wireless Device Success” (WPS – Sucesso ao adicionar dispositivo sem fios) e a luz WPS desligase.
Clique em “Continue” (Continuar) para regressar à página da Configuração Sem Fios.
O seu Cliente Sem Fios está agora ligado ao C300GBRS4 e a sua rede está protegida com encriptação WPA.
Se quiser adicionar mais Clientes Sem Fios com a função WPS, repita os passos E a G.
176
PORTUGUÊS
7. Configuração das regras do Servidor Virtual
O C300GBRS4 da Conceptronic está equipado com um Firewall incorporado para impedir ataques da
Internet à sua rede. Este Firewall bloqueia automaticamente todo o tráfego de entrada nas portas não
usadas. Quando uma porta bloqueada é necessária para um serviço ou aplicação (por exemplo: um
Servidor FTP ou um Servidor WEB), pode criar uma Regra para o Servidor Virtual nas Páginas de
Configuração para reencaminhar o tráfego.
A seguir pode ver uma lista das portas mais usadas e a correspondente aplicação:
Porta
Aplicação
Porta
Aplicação
20
21
22
23
25
FTP Data (Servidor FTP)
FTP (Servidor FTP)
SSH (Secure Shell)
Telnet
SMTP (Servidor de correio – Saída)
80
110
2000
5800
5900
HTTP (Servidor Web)
POP3 (Servidor de correio – Entrada)
Remotely Anywhere
VNC
VNC
Para mais portas e as suas correspondes aplicações, consulte: http://portforward.com/cports.htm
Nota:
Quando estiver a usar uma aplicação que suporta UPnP Port Mapping, o router pode ser
automaticamente configurado pela aplicação quando for necessário. Nesse caso, não precisa de
configurar manualmente os mapeamentos da sua porta.
Nota:
Quando usar regras de Servidor Virtual, é aconselhável configurar o(s) computador(s) com um
Endereço IP Fixo em vez de um Endereço IP Dinâmico.
Nota:
Para uma explicação detalhada sobre o Servidor Virtual e as opções DMZ, consulte o Manual do
Utilizador (só em inglês!) no CD-ROM do produto. Seleccione “View User Manual” (Ver Manual do
Utilizador) no Menu de Execução Automática.
A.
Abra o seu navegador (como por exemplo: Internet Explorer, FireFox, Safari ou Chrome).
B.
Introduza o endereço IP do aparelho na barra de endereços do seu navegador (por defeito:
http://192.168.0.1/).
A página de início de sessão do C300GBRS4 aparece.
C
C
C.
Introduza o Nome de Utilizador e a Palavra-passe (por defeito: ‘admin’ e ‘admin’) e clique em
“Submit” (Enviar) para entrar na configuração com base na web.
177
PORTUGUÊS
Quando o Nome de Utilizador e a Palavra-passe estiverem correctos, o router mostra um resumo das
“Device Settings” (Configurações do Dispositivo).
D.
Seleccione “Advanced” (Avançadas) e “Virtual Server” (Servidor Virtual) no menu de navegação
superior.
Vai poder ver a página de configuração do “Virtual Server” (Servidor Virtual) seguinte.
Nota:
E.
F.
G.
H.
Nota:
I.
J.
K.
Na figura seguinte pode ver um exemplo de configuração de um Servidor Virtual.
Coloque a regra do Servidor Virtual como “Enabled” (Activo).
Introduza um nome para a Regra do seu Servidor Virtual no campo “Name” (Nome).
Introduza o Endereço IP do seu computador / servidor que precisa da regra de Servidor Virtual.
Seleccione o Protocolo para a Regra de Servidor Virtual: “TCP”, “UDP” ou “Both”.
Se não souber qual o protocolo que precisa para a Regra do seu Servidor Virtual, seleccione
“Both” (Ambas). Esta opção vai passar tanto o tráfego TCP como o UDP para o Endereço IP
configurado do seu computador / servidor.
Introduza a porta desejada do seu computador / servidor que precisa da regra de Servidor Virtual.
Introduza a porta que deve estar visível fora da sua ligação à Internet.
Clique em “Apply” (Aplicar) para aplicar a regra de Servidor Virtual criada.
Quando a regra de Servidor Virtual for guardada, aparece na “Virtual Server List” (Lista de Servidor
Virtual).
Para criar mais regras de Servidor Virtual, repita os passos E a K.
As regras de Servidor Virtual definidas estão prontas a usar!
178
PORTUGUÊS
8. Reiniciar o C300GBRS4
Quando alterar as definições da configuração do router, estas são directamente aplicadas e activadas.
No entanto, é aconselhável reiniciar o C300GBRS4 depois de fazer alterações grandes e importantes na
configuração de modo a assegurar-se de que todas as configurações são correctamente aplicadas.
A.
Seleccione “Tools” (Ferramentas) e “System” (Sistema) no menu de navegação superior.
B.
Clique em “Reboot” (Reiniciar) para guardar a configuração, reiniciar o C300GBRS4 e activar
correctamente todas as alterações.
Aparece uma mensagem de confirmação.
C.
Clique em “OK” para prosseguir com a reinicialização do router.
Todas as alterações são guardadas e o router vai reiniciar. Aguarde que o contador termine:
Quando terminar de reiniciar, vai regressar à página de login do router.
O seu C300GBRS4 já está pronto a usar!
Nota:
Para uma explicação detalhada sobre as características e configurações disponíveis no
C300GBRS4, consulte o Manual do Utilizador (só em inglês!) no CD-ROM do produto. Seleccione
“View User Manual” (Ver Manual do Utilizador) no Menu de Execução Automática.
179
MAGYAR
Conceptronic C300GBRS4
Gyorstelepítési útmutató
Köszönjük, hogy a Conceptronic vezeték nélküli, 802.11n gigabites
útválasztóját választotta.
Ez a gyorstelepítési útmutató lépésről lépésre elmagyarázza, miként kell a Conceptronic C300GBRS4-et
telepítenie és használnia.
Ha a termékkel kapcsolatban további adatokra vagy támogatásra volna szüksége, azt tanácsoljuk, keresse
fel a szolgáltatások és terméktámogatás (Service & Support) c. oldalt a www.conceptronic.net/support
honlapon, majd ott válassza ki az alábbi opciók valamelyikét:
• FAQ
• Downloads
• Contact
: A gyakran ismétlődő kérdések (GYIK) adatbázisa
: Használati utasítások, illesztőprogramok, firmware és további letöltések
: Kapcsolatfelvétel a Conceptronic terméktámogatásával
A Conceptronic termékekkel kapcsolatos általános tájékozódás végett keresse fel a Conceptronic
honlapját: www.conceptronic.net.
Az alább ismertetett hardverkonfiguráció az adott számítógép esetében kicsit más is lehet. Mindez függ az
éppen használt operációs rendszertől.
Tartalomjegyzék
1. A csomag tartalma
2. A C300GBRS4 magyarázata
3. A hardver telepítése
3.1. WAN-csatlakozás
3.2. LAN-/vezeték nélküli LAN-csatlakozás
4. A számítógép konfigurálása
4.1. Saját IP-cím konfigurálása
4.2. Saját csatlakozás ellenőrzése
180
5. A C300GBRS4 konfigurálása
5.1. Webalapú konfiguráció
5.2. Telepítővarázsló
6. A WPS-funkció alkalmazása
6.1. WPS — Nyomógombos technológia
6.2. WPS — Pinkódos technológia
7. A virtuális szerver szabályainak telepítése
8. Újraindítás
MAGYAR
1. A csomag tartalma
A Conceptronic vezeték nélküli, 802.11n gigabites útválasztóját tartalmazó csomagban az alábbiak
találhatók:
•
•
•
•
•
•
A Conceptronic C300GBRS4-es, vezeték nélküli, 802.11n gigabites útválasztója
5 V-os egyenáramú, 2 A-es tápegység
3 antenna a vezeték nélküli csatlakoztathatósághoz
1,8 m-es LAN-kábel
Többnyelvű gyorstelepítési útmutató
Termékismertető CD-ROM
2. A C300GBRS4 magyarázata
• Előlap
7
6
5
4 3 2 1
Szám
Leírás
Állapot
1.
Power LED
2.
Status LED
3.
WAN LED
4.
WLAN LED
5.
LAN LED-ek
KI
A berendezés ki van kapcsolva
BE
A berendezés be van kapcsolva
KI
A berendezés ki van kapcsolva/Rendszerhiba*
VILLOG
A berendezés be van kapcsolva és használatkész
KI
Nincs előállítva semmilyen WAN-csatlakozás
FOLYAMATOSAN
VILÁGÍT
WAN-csatlakozás előállítva
VILLOG
Adatküldés vagy -fogadás a WAN-porton keresztül
KI
A vezeték nélküli interfész kikapcsolva
VILLOG
A vezeték nélküli interfész bekapcsolva és aktív
KI
Nincs előállítva semmilyen hálózat kapcsolat a LAN-port
felé
BE — NAGigabites hálózati
RANCSSÁRGA
kapcsolat előállítva a LAN-porton
BE — ZÖLD
10/100 Mb/s hálózati kapcsolat előállítva a LAN-porton
BE — VILLOG
Adatküldés vagy -fogadás a LAN-porton keresztül
BE — VILLOG
Ha a WPS-gombot megnyomták, a WPS LED 120 mp-ig villog,
amíg a WPS-ügyfeleket keresi.**
A WPS-funkció bekapcsolásához nyomja meg a WPS gombot.
Az útválasztó 120 mp-ig keresi a WPS-ügyfeleket.**
(1, 2, 3, 4)
6.
WPS LED
7.
WPS-gomb
Az állapot magyarázata
181
MAGYAR
*
Szokásos alkalmazásnál az állapotjelző LED kigyullad és 15 mp-ig villog azután, hogy az eszközt
bekapcsolták vagy újraindították. Ha az eszköz esetében rendszerhibára került sor, az állapotjelző
LED nem gyullad ki.
A rendszerhiba kiküszöbölésére az alábbiak valamelyike alkalmazható:
a.
Kapcsolja ki az eszközt, várjon 10 mp-ig és újból csatlakoztassa az eszköz tápellátását.
b.
Az eszköz hátoldalán lévő visszaállító gombnak a +/- 15 mp-ig történő megnyomásával állítsa
vissza az eszközt a gyári alapértelmezett értékekre.
Ha az állapotjelző nem gyullad ki a fenti lehetőségek kipróbálása után, forduljon a Conceptronic
terméktámogatásához a következő e-mail címen: www.conceptronic.net/support
**
A WPS-funkcióval kapcsolatos további tájékozódás végett lásd ennek a gyorstelepítési útmutatónak a
6. fejezetét.
• Hátlap
1
2
1
3
4
5
1
Szám
Leírás
Magyarázat
1.
Antennacsatlakozás
2.
3.
LAN-portok
WAN-port
4.
Visszaállító gomb
5.
Hálózati csatlakozás
Ellentétes irányú SMA-csatlakozó a vezeték nélküli
antennához
A számítógép(ek)nek az útválasztóhoz való csatlakoztatására
A széles sávú csatlakozásnak az útválasztóhoz való
csatlakoztatására
Az útválasztónak a gyári alapértelmezett beállításokra való
visszaállítására
A tápegységnek az útválasztóhoz való csatlakoztatására
Megjegyzés: Ez a gyorstelepítési útmutató csak a C300GBRS4 telepítésével és működtetésével
kapcsolatos alapvető lépéseket magyarázza el. A C300GBRS4 különböző funkcióival
kapcsolatos további tájékozódás végett lásd a használati utasítást (kizárólag angol nyelvű!)
a termékismertető CD-ROM-on. Jelölje ki a „View Use Manual”-t az Autorun menün.
182
MAGYAR
3. A hardver telepítése
Csatlakoztassa a 3 antennát az antennacsatlakozásokhoz a C300GBRS4 hátoldalán.
Csatlakoztassa a tápegységet a C300GBRS4 hátoldalán lévő hálózati csatlakozáshoz, valamint szabad
falicsatlakozóhoz. Az áramellátást jelző LED kigyullad a C300GBRS4 előlapján.
3.1 WAN-csatlakozás
LAN-kábel segítségével csatlakoztassa a C300GBRS4-et saját kábeléhez, DSL-éhez vagy Fibre-modemjéhez.
A WAN LED kigyullad a C300GBRS4 elején.
Megjegyzés:
Ha az előlapon lévő WAN LED nem gyullad ki, ellenőrizze, hogy:
- a C300GBRS4 áram alatt van-e (az áramellátást jelző LED-nek világítania kell).
- a kábel, a DSL vagy a Fibre-modem be van-e kapcsolva.
- a két eszköz közötti LAN-kábel megfelelően van-e csatlakoztatva.
3.2 LAN-/vezeték nélküli LAN-csatlakozás
LAN-kábeles felhasználóknál:
Csatlakoztassa a C300GBRS4 hátlapján lévő 4 LAN-port valamelyikéhez, valamint az adott számítógép
hálózati kártyájához a LAN-kábelt.
Az igénybe vett LAN-port LAN LED-je kigyullad jelezve, hogy a számítógép csatlakoztatva lett. (A
számítógépet be kell kapcsolni, a LAN-csatlakozást engedélyezni kell.)
Vezeték nélküli felhasználók esetén:
A C300GBRS4-re kétféleképpen lehet vezeték nélkül rácsatlakozni:
Manuálisan.
Automatikusan, a WPS-funkció segítségével.
Ha Önnek egy vagy több ügyfele nem támogatja a WPS-t, tanácsos manuálisan rácsatlakozni a C300GBRS4re.
Megjegyzés:
A C300GBRS4 biztonságáról — alapértelmezésben — a WPA-PSK/WPA2-PSK (vegyes mód)
gondoskodik. A C300GBRS4-nél alkalmazott WPA-jelszó a termékismertető matricán
látható, a 300GBRS4 alján.
183
MAGYAR
Vezeték nélküli csatlakozás manuális kialakítása:
Szinte minden vezeték nélküli kártyamárka vagy -típus eltérő ügyfélalkalmazást használ. Arra nézve,
hogyan kell csatlakozást kialakítani vezeték nélküli hálózattal, lásd az adott, vezeték nélküli hálózati
kártya leírását.
Megjegyzés:
Az alábbi példa esetében a Microsoft szabványos, vezeték nélküli ügyfelét alkalmazzuk,
amely beépül a Service Pack 1 segítségével a Windows Vistába.
A
Kattintson a hálózat ikonjára az
adott tálcán, majd kattintson a
következőkre: „Wireless
networks are available”.
B
Jelölje ki a listán a
„C300GBRS4” hálózatot, majd
kattintson a „Connect”-re.
184
MAGYAR
C
Ez a fejezet ismerteti a
szükséges lépéseket azzal
kapcsolatban, miként kell
manuálisan rácsatlakozni saját,
vezeték nélküli hálózatára.
A WPS-funkcióval, valamint a
konfigurálás lépéseivel
kapcsolatos további tájékozódás
végett lásd ennek a
gyorstelepítési útmutatónak a 6.
fejezetét.
D
Amikor a csatlakozás már
létrejött, dönthet a hálózat
elmentése mellett, így azt
minden egyes alkalommal,
amikor a számítógépet
bekapcsolják, automatikusan
elindíthatja. A csatlakoztatás
varázslójából való kilépéshez
kattintson a „Close”-ra.
E
A vezeték nélküli csatlakozás
állapotának ellenőrzése
érdekében rákattinthat a hálózat
ikonjára a tálcán. Utána
láthatjuk, hogy éppen melyik
hálózatra vagyunk rácsatlakozva,
hogy milyen az adott elérés, és
hogy milyen a kapcsolat
jelerőssége.
185
MAGYAR
4. A számítógép konfigurálása
4.1 Saját IP-cím konfigurálása
A C300GBRS4-hez tartozik egy beépített DHCP-szerver is. A DHCP-szerver automatikusan hozzárendel egy
IP-címet minden egyes csatlakoztatott számítógéphez, ha a csatlakoztatott számítógép beállítása a
következő: „Obtain an IP address automatically”.
A legtöbb számítógép alapértelmezésben úgy van konfigurálva, hogy automatikusan kérjen IP-címet. Ha
nem ez a helyzet, az alábbi utasítások betartásával konfigurálni kell a számítógépet, hogy automatikusan
kérjen IP-címet. Ezek az utasítások a Service Pack 1-gyel kiegészített Windows Vistán alapulnak. Ha az
adott számítógép más verziójú vagy operációs rendszerű, a szükséges lépések mások is lehetnek.
A.
Kattintson a következőkre: „Start” Æ
„Run”.
B.
Írja be a „NCPA.CPL” parancsot, majd
nyomja meg az „OK”-t.
B
B
A Network Connections (hálózati kapcsolatok) ablak jelenik meg.
C.
Kattintson az egér jobb oldali gombjával a „Local
Area Connection”-re (vezetékes vagy vezeték
nélküli, az éppen használt kapcsolattól függően),
majd jelölje ki a „Properties”-t.
C
186
MAGYAR
A Local Area Connectionnek (helyi kapcsolat) a Properties (tulajdonságok) ablaka jelenik meg.
D.
Jelölje ki az „Internet Protocol Version 4
(TCP/IPv4)”-et, majd kattintson a
„Properties”-re.
D
D
Az Internet Protocol Version 4-nek (TCP/IPv4) (internetprotokoll 4-es verzió)a Properties (tulajdonságok)
ablaka jelenik meg.
E.
Állítsa be a tulajdonságokat a
következőkre: „Obtain an IP address
automatically”, majd a beállítások
elmentéséhez nyomja meg az „OK”-t.
F.
A beállítások elmentéséhez nyomja meg
az „OK”-t a Local Area Connectionnek a
Properties ablakában.
E
E
187
MAGYAR
4.2 Saját csatlakozás ellenőrzése
A Windowsnak a Command üzenetével ellenőrizheti, vajon helyes IP-címet kapott-e az adott helyi
kapcsolat kialakításához. Ez a példa a Service Pack 1-gyel kiegészülő Windows Vistán alapul. A Vistának
rendszergazdai jogosultsággal kell rendelkeznie az alábbi lépések végrehajtásához. Azt is elmagyarázzuk,
miként kell rendszergazdai jogosultságot szerezni.
A.
Kattintson a következőkre: „Start” Æ „All programs” Æ „Accessories”, majd kattintson az egér
jobb oldali gombjával a „Command Prompt”-ra, végül pedig jelölje ki a „Run as administrator”-t.
Figyelmeztető üzenet érkezhet, amelyet a „Continue”-ra kattintva elfogadhat.
A Command Prompt (parancssor) jelenik meg. Bizonyosodjon meg róla, hogy a Command Prompt
címsorban a következő szerepel: „Administrator: Command Prompt”. Ha az „Administrator” nem
szerepel, Ön nem rendelkezik az ezekhez a lépésekhez szükséges rendszergazdai jogosultsággal, és ismét
végre kell hajtania az A. lépést.
B.
Írja be az „IPCONFIG” parancsot, majd nyomja meg az ENTER-t.
B
Az alábbi adatoknak kell megjelenniük:
IPv4 Address (IPv4-cím)
Subnet Mask (alhálózati maszk)
Default Gateway (alapértelmezettátjáró)
: 192.168.0.xxx (ahol az xxx bármely szám lehet 100 ~ 199
között).
: 255.255.255.0
: 192.168.0.1
Ha a fentebb közölt adatok megfelelnek az adott konfigurációnak, folytathatja az eszköz konfigurálását az
5. fejezetben említettek szerint.
Ha a fenti adatok nem felelnek meg az adott konfigurációnak (azaz az adott IP-cím 169.254.xxx.xxx),
akkor menjen végig az alábbi lehetőségeken:
188
MAGYAR
1.
2.
3.
Kapcsolja KI, majd újból BE az eszközt.
Csatlakoztassa újból a LAN-kábelt az eszközhöz és a számítógéphez.
Újítsa meg az adott számítógép IP-címét az alábbi parancsokkal:
- „IPCONFIG/RELEASE” a rossz IP-cím feloldására.
- „IPCONFIG/RENEW”, ha új IP-címet kíván kapni az eszköztől.
3
3
Ha a fenti lépések nem oldják meg az IP-cím problémáját, az eszközt visszaállíthatja a gyári
alapértelmezett beállításokra az eszköz hátoldalán lévő visszaállító gomb segítségével.
Tartsa lenyomva +/- 15 mp-ig a visszaállító gombot a gyári alapértelmezett beállítások betöltéséhez.
Amikor az állapotjelző LED ismét aktív, az IP-cím megújításához ismételje meg a B. lépést.
Megjegyzés:
Ha a probléma továbbra is fennáll, ellenőrizze, vajon minden kábel megfelelően lett-e
csatlakoztatva. A WAN-portot a modemhez, a LAN-portot pedig a számítógéphez kell
csatlakoztatni. Ezeknek a rosszul történő csatlakoztatása azt is eredményezheti, hogy
nem a megfelelő IP-címet kapják.
189
MAGYAR
5. A C00GBRS4 konfigurálása
Ez a fejezet azt ismerteti, miként kell a C300GBRS4-et a beépített telepítővarázsló segítségével
konfigurálni. Az ebben a fejezetben közölt lépések végrehajtása után az adott útválasztó már be van
állítva az elsődleges feladatok ellátására beleértve a vezeték nélküli biztonságot is.
5.1 Webalapú konfiguráció
A C300GBRS4 konfigurációja webalapú. Webböngészőre lesz szüksége az eszköz konfigurálásához.
Megjegyzés: Az útválasztó konfigurálásához tanácsos a vezeték nélküli kapcsolat helyett LAN-kábeles
kapcsolatot kialakítani az eszköz felé.
A.
Indítsa el a webböngészőt (például: Internet Explorer, Firefox, Safari vagy Chrome).
B.
Írja be az eszköz IP-címét a webböngésző címsorába (alapértelmezés: http://192.168.0.1/).
A C300GBRS4-nek a bejelentkezési oldala jelenik meg.
C
C
C.
190
Írja be a felhasználónevet és a jelszót (alapértelmezés: „admin” és „admin”), majd kattintson a
„Submit”-re, ha be kíván lépni a webalapú konfigurációba.
MAGYAR
Ha a felhasználónév és a jelszó helyes, az útválasztó a „Device Settings” áttekintést fogja felkínálni:
A „Device Settings” áttekintés minden konfigurált beállítást tartalmaz az útválasztónak a LAN-, WAN-,
illetve vezeték nélküli elemével kapcsolatban.
191
MAGYAR
5.2 Telepítővarázsló
A C300GBRS4 a beépített varázslón keresztül telepíthető. Ez a varázsló segít majd lépésről lépésre
konfigurálni a C300GBRS4-nek az alapbeállításait.
Megjegyzés: Mielőtt a konfigurációs varázslóval kezdene dolgozni, bizonyosodjon meg róla, hogy az
internetbeállításokkal kapcsolatos összes adat a rendelkezésére áll. (Például: fiókadatok, a
kapcsolat típusa stb.)
A.
Kattintson a „Wizard” gombra a webkonfiguráció bal oldali menüjén.
B.
Kattintson a „Run Wizard” gombra.
C.
A köszöntő képernyőn a varázsló
tevékenysége öt lépésben van felsorolva. A
folytatáshoz kattintson a „Next”-re.
D.
Itt ajánlatos beállítani a rendszergazda
jelszóját. Írja be az új jelszót, majd írja be
még egyszer megerősítés végett.
Amikor végzett, kattintson a „Next”-re.
192
MAGYAR
E.
Rendszerkezelési megfontolásból az idő
megfelelő beállítása kritikus jelentőségű,
ha a rendszernaplókban pontos
időbélyegzőkre van szükség.
Ebben a lépésben a megfelelő időzónát
állítsa be.
Amikor végzett, kattintson a „Next”-re.
F.
Jelölje ki az adott szolgáltató
beállításainak megfelelő Internet
Connection (internetkapcsolat) módszert.
Ha nem tudja, melyik opcióra van szüksége
az internetkapcsolathoz, nézzen utána a
szolgáltató dokumentációjában vagy
forduljon szolgáltatójának a Súgójához.
Amikor végzett, kattintson a „Next”-re.
G.
Ha szolgáltatója statikus IP-kapcsolatot
igényel, jelölje ki a „Static IP” opciót.
Kapcsolat — Statikus IP
Írja be a szükséges adatokat:
•
•
•
•
•
IP-cím
Alhálózati maszk
Az ISP-átjáró címe
Elsődleges DNS
Másodlagos DNS (tetszőleges)
Amikor végzett, kattintson a „Next”-re.
193
MAGYAR
H.
Ha a szolgáltató dinamikus IP-kapcsolatot
igényel, jelölje ki a „Dynamic IP”-t.
Kapcsolat — Dinamikus IP
Vannak szolgáltatók, amelyek a kapcsolat
kialakításához specifikus állomásnevet
igényelnek. Ha az adott szolgáltató specifikus
állomásnevet kér, írja be azt a megfelelő
mezőre.
Vannak szolgáltatók, amelyek csak 1 specifikus
MAC-címet engedélyeznek az internetkapcsolat
kialakításához. Ha az Ön PC-jének hálózati
kártyája működik a szükséges specifikus MACcímmel, nyomja meg a „Clone MAC Address”
gombot vagy írja be kézzel az MAC-címet.
Amikor végzett, kattintson a „Next”-re.
I.
Ha a szolgáltató PPPoE-kapcsolatot igényel,
jelölje ki a „PPPoE” opciót.
Írja be a szükséges adatokat:
• Felhasználónév
• Jelszó
• Jelszó megerősítése
Ha végzett, kattintson a „Next”-re.
194
Kapcsolat — PPPoE
MAGYAR
J.
Ha a szolgáltató PPTP-kapcsolatot igényel,
jelölje ki a „PPTP” opciót.
Kapcsolat — PPTP
Írja be a szükséges adatokat:
• A szerver IP-je
• PPTP-fiók
• PPTP-jelszó
• A jelszó megerősítése
Ha végzett, kattintson a „Next”-re.
K.
Ha a szolgáltató L2TP-kapcsolatot igényel,
jelölje ki az „L2TP” opciót.
Kapcsolat — L2TP
Írja be a szükséges adatokat:
• A szerver IP-je
• L2TP-fiók
• L2TP-jelszó
• A jelszó megerősítése
Ha végzett, kattintson a „Next”-re.
Ha a WAN-konfiguráció teljes, a varázsló a vezeték nélküli konfigurációval folytatja:
195
MAGYAR
L.
Az útválasztó SSID-jét meg is lehet
változtatni. Az SSID az útválasztó vezeték
nélküli kapcsolatának a neve. Ha a
számítógépen vezeték nélküli hálózatokat
keresnek, ezt a nevet fogják majd keresni.
A csatornaszám 1 és 13 között változtatható.
Ha lassú kapcsolatot vagy a kapcsolat
megszakadását tapasztalja, másik elérési
pont is lehet az adott területen, amelyik
zavarhatja az adott, vezeték nélküli
csatornát. Ebben az esetben próbálkozzon
másik csatornával.
Ha végzett, kattintson a „Next”-re.
Vezeték nélküli kapcsolatát titkosítással is biztonságossá teheti. Alapértelmezésben a vezeték nélküli
kapcsolat nem biztonságos. Ahhoz, hogy a hálózathoz való jogosulatlan hozzáférést megakadályozhassa,
állítson be valamilyen biztonsági szintet a telepítővarázslón keresztül.
Ha a C300GBRS4-nek a WPS-funkcióját kívánja használni, kihagyhatja a vezeték nélküli konfigurációt és
folytathatja titkosítás nélkül a telepítővarázslóval. A WPS-biztonság telepítéséhez folytassa ennek a
gyorstelepítési útmutatónak a 6. fejezetével.
Megjegyzés:
A telepítővarázsló minden biztonsági opcióját elmagyarázzuk, de tanácsos az adott
hálózatot „WPA-PSK/WPA2-PSK” biztonság mellett biztosítani, ha a szóba jöhető
ügyfeleknél a WPS nem támogatott. A WPA2 a legmagasabb biztonsági szint, amely
visszafelé kompatibilis a csak WPA-s ügyfelekkel.
Megjegyzés:
Ne felejtse el vagy írja fel a vezeték nélküli biztonságra nézve beírt adatokat. Szüksége
lesz ugyanis rá, ha — a C300GBRS4-hez való csatlakoztatás érdekében — konfigurálni
kíván egy vezeték nélküli ügyfelet!
M.
Jelöljön ki valamilyen biztonsági szintet a
vezeték nélküli hálózathoz.
Ha a biztonsági szintet már kiválasztották, a
varázsló megjeleníti a szükséges adatok
bevitelére szolgáló mezőket.
196
MAGYAR
N.
Ha a hálózatát WEP-titkosítással kívánja
biztosítani, jelölje ki a „WEP”-t a legördülő
listán. Írja be a WEP-kulcsot ASCIIformátumban (beadott karakterek: A-Z, 0-9).
Biztonság — WEP-titkosítás
Megjegyzés: A varázsló segítségével csak
WEP 64 bitest konfigurálhat.
O.
Ha a hálózatot WPA-val vagy WPA2-vel (amely
Radius szerverrel egészül ki) kívánja
biztonságossá tenni, jelölje ki a „WPA”-t vagy
a „WPA2”-t a legördülő listán.
Biztonság — WPA-/WPA2-titkosítás
Írja be a Radius szerver IP-címét és a
megosztott kulcsot, majd erősítse meg a
megosztott kulcsot a második mezőn.
P.
Ha a hálózatot WPA-PSK-val vagy WPA2-PSKval kívánja biztonságossá tenni, jelölje ki a
„WPA-PSK”-t, a „WPA2-PSK”-t vagy a „WPAPSK/WPA2-PSK”-t a legördülő listán.
Biztonság — WPA-PSK/WPA2-PSK
Írja be a titkosításhoz szükséges jelszót, majd
erősítse meg ezt a második mezőn.
Q.
Ha az összes, vezeték nélküli beállítással végzett, a folytatáshoz kattintson a „Next”-re.
R.
Ezzel a telepítővarázsló befejezte
tevékenységét. Ha saját beállításait kívánja
alkalmazni, kattintson a „Save & Take
Effect”-re.
Amennyiben valamelyik beállítást meg
kívánja változtatni, kattintson a „Back”-re,
ha vissza kíván térni az előző képernyőhöz.
Ha változtatás nélkül kívánja bezárni a
telepítővarázslót, kattintson az „Exit”-re.
Ha a „Save & Take Effect”-et jelölte ki, az útválasztó a konfigurált beállításokat fogja alkalmazni. Várjon
a következő üzenetre: „Save Complete” (Az elmentés befejeződött).
197
MAGYAR
S.
Ezzel a konfigurálásnak vége. A telepítővarázslóból való kilépéshez kattintson a „Close”-ra.
Ekkor a gép visszaküldi Önt a „Device Settings” áttekintéséhez, amelyen a WAN-, valamint a vezeték
nélküli kapcsolatra nézve konfigurált beállítások láthatók.
Ezzel a C300GBRS4 útválasztó használatkész!
Megjegyzés: A C300GBRS4 esetében rendelkezésre álló funkciók és beállítások részletes áttekintéséhez
olvassa el a használati útmutatót (kizárólag angol nyelvű!) a termékismertető CD-ROM-on.
Jelölje ki a „View User Manual”-t az Autorun menün.
198
MAGYAR
6. A WPS-funkció alkalmazása
A Conceptronic C300GBRS4 támogatja a WPS-t (Wi-Fi-vel védett telepítés). A WPS egy a vezeték nélküli
hálózatok könnyű és biztonságos kialakítására szolgáló szabvány. A WPS segítségével néhány egyszerű
lépés keretében telepítheti és védheti saját, vezeték nélküli hálózatát.
Megjegyzés:
Ahhoz, hogy a WPS-t a C300GBRS4-gyel együtt használhassa, a WPS-t támogató, vezeték
nélküli ügyfelekkel kell rendelkeznie. Ha van egy vagy több olyan, vezeték nélküli
ügyfele, amelyeknél a WPS nem támogatott, tanácsos a hálózatot a telepítővarázsló
segítségével manuálisan biztonságossá tenni; erre nézve részleteket az 5.2. fejezetben
olvashat.
Megjegyzés:
A WPS-sel kapcsolatos további (műszaki) tájékoztatás végett ellátogathat az alábbi
honlapra:
http://en.wikipedia.org/wiki/Wi-Fi_Protected_Setup
A C300GBRS4 kétféleképpen támogatja WPS-kapcsolat aktiválását és kialakítását:
Nyomógombos technológia
Pinkódos technológia
6.1 WPS — Nyomógombos technológia
A WPS nyomógombos technológia (virtuális) gombot igényel a vezeték nélküli ügyfelek esetében, hogy
kapcsolatot lehessen kialakítani a C300GBRS4 és az adott, vezeték nélküli ügyfél között.
Bizonyos, vezeték nélküli ügyfelek valóságos gomb alkalmazásával működnek a WPS nyomógombos
technológia bekapcsolása érdekében; bizonyos, vezeték nélküli ügyfelek viszont virtuális gombot
alkalmaznak a program keretében.
Az alábbi lépések segítségével — a nyomógombos technológia alkalmazása mellett — lehet WPSkapcsolatot aktiválni, illetve kialakítani:
A.
Addig nyomja a WPS gombot a C300GBRS4 előlapján, amíg a WPS LED-je villogni nem kezd.
B.
Nyomja meg a WPS gombot a vezeték nélküli ügyfél esetében. Ez lehet hardvergomb vagy
virtuális gomb a vezeték nélküli ügyfél programjában.
A C300GBRS4 aktiválja a WPA-biztonságot az adott, vezeték nélküli hálózat esetében, majd elfogadja a
vezeték nélküli ügyfélnek a vezeték nélküli kapcsolatát.
Megjegyzés:
A C300GBRS4 120 mp-ig tartja aktívan a WPS hitelesítését. Ezalatt a WPS LED-je villog.
Ha ez alatt a 120 mp alatt nem jön létre kapcsolat, a LED kialszik és a WPS hitelesítési
folyamata leáll.
Ha a WPS-funkciót előtte nem használták még, a vezeték nélküli hálózat továbbra sem
lesz biztonságos.
Ha a vezeték nélküli ügyfél hitelesítése sikeres, a WPS LED-je kialszik.
199
MAGYAR
Az adott, vezeték nélküli ügyfél innentől fogva rá van csatlakozva a C300GBRS4-re, az Ön hálózata pedig
WPA-titkosítás mellett biztonságos.
Anélkül, hogy a korábbi, vezeték nélküli WPS-ügyfelek felé kialakított kapcsolatot elveszítené, további,
vezeték nélküli WPS-ügyfeleket is hozzáadhat.
Ha további, vezeték nélküli WPS-ügyfeleket kíván hozzáadni, ismételje meg az A. és B. lépést.
Megjegyzés:
A C300GBRS4 által generált WPA-kulcs véletlenszerű.
6.2 WPS — Pinkódos technológia
Ha a WPS-sel engedélyezett, vezeték nélküli ügyfélnek nincs (virtuális) nyomógombja, WPS-kapcsolat
kialakítására használható a pinkódos technológia.
Megjegyzés:
Ahhoz, hogy a WPS-nek a pinkódos funkcióját bekapcsolhassa, olyan számítógép
szükséges, amely a C300GBRS4-hez kapcsolódó huzalozású.
A.
Nyissa meg a webböngészőt (például: Internet Explorer, Firefox, Safari vagy Chrome).
B.
Írja be az eszköz IP-címét a webböngészőnek a címsorába (alapértelmezett: http://192.168.0.1/).
A C300GBRS4 bejelentkezési oldala jelenik meg.
C
C
C.
Írja be a felhasználónevet és a jelszót (alapértelmezett: „admin” és „admin”), majd kattintson a
„Submit”-re, ha be kíván lépni a webkonfigurációba.
Ha a felhasználónév és a jelszó helyes, az útválasztó a „Device Settings” áttekintést fogja megjeleníteni.
D.
Jelölje ki a „Wireless”-t a bal oldali menün.
A vezeték nélküli konfiguráció elnevezésű oldalak jelennek meg. Ennek a konfigurációs oldalnak az alján
található a „Wi-Fi Protected Setup” rész.
200
MAGYAR
E
E.
Kattintson a képernyőn az „Add Wireless Device Wizard” gombra.
A WPS-varázsló jelenik meg a képernyőn:
Ennek a varázslónak a segítségével lehet bekapcsolni a Pin Code funkciót. Ahhoz, hogy a Pin Codejogosultsággal dolgozni kezdhessen, szüksége lesz az adott, vezeték nélküli ügyfél által generált pinkódra.
F.
Jelölje ki a WPS-nek a Pin Code funkcióját az adott, vezeték nélküli ügyfél programjában. A vezeték
nélküli ügyfél pinkódot generál, amely megjelenik majd a képernyőn is.
[A vezeték nélküli ügyfél programja]
G.
Æ
G
Írja be a vezeték nélküli ügyfél által megadott pinkódot a C300GBRS4-nek a WPS-varázslójába, majd
nyomja meg a „Connect”-et.
A C300GBRS4 bekapcsolja a WPA-biztonságot az adott, vezeték nélküli hálózaton, majd elfogadja a beírt
pinkóddal az adott, vezeték nélküli ügyfélnek a vezeték nélküli kapcsolatát.
201
MAGYAR
A C300GBRS4 120 mp-ig tartja aktívan a WPS hitelesítését. Ezalatt a WPS LED-je villog. Ha nem jön létre
kapcsolat 120 mp-en belül, a LED kialszik és a WPS hitelesítési folyamata leáll.
Ha vissza kíván térni a WPS varázslójának a képernyőjéhez, kattintson a „Continue”-ra.
Megjegyzés:
Ha a WPS-funkciót korábban még nem használták, a vezeték nélküli hálózat továbbra sem
lesz biztonságos.
Ha a vezeték nélküli ügyfél hitelesítése sikeres, a varázsló a következőket jeleníti meg: „WPS - Adding
Wireless Device Success” (WPS — A vezeték nélküli eszköz hozzáadása sikeres), majd a WPS LED-je
kialszik.
Ha vissza kíván térni a Wireless Configuration (vezeték nélküli konfiguráció) oldalhoz, kattintson a
„Continue”-ra.
Az adott, vezeték nélküli ügyfél innentől fogva rá van csatlakozva a C300GBRS4-re, az adott hálózat pedig
— WPA-titkosítás mellett — biztonságos.
Ha további, WPS-funkciójú, vezeték nélküli ügyfeleket kíván hozzáadni, ismételje meg az E-től G-ig jelölt
lépéseket.
202
MAGYAR
7. A virtuális szerver szabályainak telepítése
A Conceptronic C300GBRS4-hez tartozik egy beépített tűzfal is, amely segít megakadályozni az internetről
az adott hálózat felé irányuló támadásokat. Ez a tűzfal automatikusan blokkol minden bejövő forgalmat az
éppen nem használt portokon. Ha valamelyik blokkolt portra szükség lenne szolgáltatás vagy alkalmazás
céljából (például: FTP-szerver vagy WEB-szerver), a forgalom továbbítása érdekében előállíthat egy
virtuális szerverre érvényes szabályt a konfigurációs oldalakon.
Alább látható egy lista bizonyos gyakran használt portokról, illetve azok megfelelő alkalmazásáról:
Port
Alkalmazás
Port
Alkalmazás
20
21
22
23
25
FTP-adatok (FTP-szerver)
FTP (FTP-szerver)
SSH-protokoll (Secure Shell)
Telnet
SMTP (levelezőszerver — kimenő)
80
110
2000
5800
5900
HTTP (webszerver)
POP3 (levelezőszerver — bejövő)
Távoli, bárhol
VNC
VNC
A további portokkal, illetve azok megfelelő alkalmazásával kapcsolatban lásd:
http://portforward.com/cports.htm
Megjegyzés:
Ha éppen olyan alkalmazást használ, amely támogatja az UPnP portleképezést, az
útválasztó — ha szükséges — automatikusan konfigurálható az alkalmazás segítségével.
Ebben az esetben nincs szükség a portleképezések manuális telepítésére.
Megjegyzés:
Ha éppen Virtual Server szabályokat alkalmaz, tanácsos a számítógépe(ke)t — dinamikus
IP-cím helyett — fix IP-címmel konfigurálni.
Megjegyzés:
A Virtual Server, illetve DMZ opciókkal kapcsolatos részletes tájékozódás végett lásd a
használati utasítást (kizárólag angol nyelvű!) a termékismertető CD-ROM-on. Jelölje ki a
„View User Manual”-t az Autorun menün.
A.
Nyissa meg a webböngészőt (például: Internet Explorer, Firefox, Safari vagy Chrome).
B.
Írja be az eszköz IP-címét a webböngésző címsorába (alapértelmezésben: http://192.168.0.1/).
A C300GBRS4-nek a bejelentkezési oldala jelenik meg.
C
C
C.
Írja be a felhasználónevet és a jelszót (alapértelmezett: „admin” és „admin”), majd kattintson a
„Submit”-re, ha be kíván lépni a webkonfigurációba.
203
MAGYAR
Ha a felhasználónév és a jelszó helyes, az útválasztó a „Device Settings” áttekintést fogja megjeleníteni.
D.
Jelölje ki az „Advanced”-et, majd a „Virtual Server”-t a felső navigációs menün.
Az alábbi „Virtual Server” konfigurációs oldal válik láthatóvá.
Megjegyzés:
E.
F.
G.
H.
Állítsa be a Virtual Server szabályt az „Enabled”-re.
Írjon be valamilyen nevet a Virtual Server szabályra nézve a „Name” mezőre.
Írja be az Virtual Server szabályt igénylő számítógépnek/szervernek az IP-címét.
Jelölje ki a protokollt a Virtual Server szabály esetében: „TCP”, „UDP” vagy „Both”.
Megjegyzés:
I.
J.
K.
Az alábbi képen látható egy példa a Virtual Server konfigurációra.
Ha nem tudja, melyik protokoll szükséges az adott Virtual Server szabály alkalmazásához,
jelölje ki a „Both”-ot. Ennek az opciónak a segítségével mind a TCP-, mind az UDPforgalom továbbítható az adott számítógépnek/szervernek a konfigurált IP-címére.
Írja be a Virtual Server szabályt igénylő számítógépnek/szervernek a kívánt portját.
Írja be a portot, amelynek látszania kell az internetkapcsolaton kívül.
Az előállított Virtual Server szabály alkalmazásához kattintson az „Apply”-ra.
Amikor a Virtual Server szabályt elmentette, az megjelenik a „Virtual Server List”-en.
További Virtual Server szabályok előállításához ismételje meg az E-től K-ig jelzett lépéseket.
A definiált Virtual Server szabályok ezzel használatkészek!
204
MAGYAR
8. A C300GBRS4 újraindítása
Ha az útválasztó konfigurációjában megváltoztatják a beállításokat, a beállítások közvetlenül kerülnek
alkalmazásra, egyszersmind aktívak is.
Tanácsos azonban a C300GBR4-et újraindítani, ha nagyobb és fontos változtatásokat végeztek a
konfiguráción, mert így lehet biztosítani, hogy minden beállítást helyesen alkalmazzanak.
A.
Jelölje ki a „Tools”-t, majd a „System”-et a felső navigációs menün.
B.
A konfiguráció elmentéséhez kattintson a „Reboot”-ra, indítsa újra a C300GBRS4-et, majd a
megfelelő módon aktiváljon minden változtatást.
Előugró megerősítő üzenet jelenik meg.
C.
Ha folytatni kívánja az útválasztó újraindítását, kattintson az „OK”-ra.
Minden változtatás elmentődik, az útválasztó pedig újraindul. Várjon, amíg az időzítő nem számlál már
tovább:
Amikor az újraindítás befejeződött, a gép visszaküldi Önt az útválasztó bejelentkezési oldalához.
A C300GBRS4 ezzel használatkész!
Megjegyzés: A C300GBRS4 esetében rendelkezésre álló funkciók és beállítások részletes magyarázatát
megtalálhatja a használati útmutatóban (kizárólag angol nyelvű!) a termékismertető CDROM-on. Jelölje ki a „View User Manual”-t az Autorun menün.
205
TURKCE
Conceptronic C300GBRS4
Hızlı Kurulum Kılavuzu
Conceptronic Wireless 802.11n Gigabit Router
Satın Aldığınız İçin Tebrikler.
Bu Hızlı Kurulum Kılavuzu, Conceptronic C300GBRS4 kurulumunun ve kullanımının adım adım nasıl
yapılacağı konusunda bilgi içermektedir.
Ürününüzle ilgili daha fazla bilgi veya destek almak istediğinizde, www.conceptronic.net/support web
sitemizin Service & Support (Servis ve Destek) bölümünü ziyaret etmenizi ve aşağıdaki seçeneklerden
birini seçmenizi öneririz:
• FAQ
• Downloads
• Contact
: Sıkça Sorulan Sorular veritabanı
: Kullanım Kılavuzları, Sürücüler, Ürün Bilgisi ve diğer yüklemeler
: Conceptronic Destek İletişim Bilgileri
Conceptronic ürünleri hakkında genel bilgi almak için www.conceptronic.net Conceptronic web sitesini
ziyaret edebilirsiniz.
Aşağıda açıklanan Donanım yapılandırması bilgisayarınızdaki yapılandırmadan biraz daha farklı olabilir. Bu
durum kullandığınız İşletim Sistemine bağlıdır.
İçindekiler
1. Paket İçeriği
2. C300GBRS4 Tanıtımı
3. Donanım Kurulumu
3.1. WAN Bağlantısı
3.2. LAN / Kablosuz LAN Bağlantısı
4. Bilgisayarın Yapılandırılması
4.1. IP adresinizin Yapılandırılması
4.2. Bağlantınızın Kontrolü
206
5. C300GBRS4 Yapılandırması
5.1. Web Tabanlı Yapılandırma
5.2. Kurulum Sihirbazı
6. WPS Özelliğinin Kullanımı
6.1. WPS – Push Button (Puş Buton)
teknolojisi
6.2. WPS – Pin Kodu teknolojisi
7. Sanal Sunucu kurallarının oluşturulması
8. Yeniden başlatma
TURKCE
1. Paket İçeriği
Conceptronic Kablosuz 802.11n Gigabit Router paketinin içeriği aşağıdaki gibidir:
•
•
•
•
•
•
Conceptronic C300GBRS4 - Kablosuz 802.11n Gigabit Router
Güç kaynağı 5V DC, 2A
Kablosuz bağlantı için 3 anten
LAN kablosu 1,8 m
Çok Dilli Hızlı Kurulum Kılavuzu
Ürün CD-ROM’u
2. C300GBRS4 Tanıtımı
• Ön Panel
7
6
5
4 3 2 1
Nr
Tanım
Durum
Durum Açıklaması
1
Güç LED’i
2
Durum LED’i
3
WAN LED’i
4
WLAN LED’i
5
LAN LED’leri
(1, 2, 3, 4)
KAPALI
AÇIK
KAPALI
YANIP SÖNME
KAPALI
AÇIK - SABİT
AÇIK – YANIP SÖNME
KAPALI
YANIP SÖNME
KAPALI
AÇIK - TURUNCU
AÇIK - YEŞİL
6
WPS LED’i
7
WPS Düğmesi
Cihaz kapalı
Cihaz açık
Cihaz kapalı / Sistem Hatası*
Cihaz açık ve kullanıma hazır
WAN Bağlantısı oluşturulamadı
WAN Bağlantısı oluşturuldu
WAN Portundan veri gönderiliyor ya da alınıyor
Kablosuz ara yüzü devre dışı
Kablosuz ara yüzü devrede ve aktif
LAN Portunda hiçbir Ağ Linki oluşturulmadı
LAN Portunda bir Gigabit Ağ Linki oluşturuldu
LAN Portunda bir 10/100 Mbps Ağ Linki
oluşturuldu
LAN Portundan veri gönderiliyor ya da alınıyor
WPS Düğmesine basıldığında WPS İstemcileri
taranırken WPS LED’i 120 saniye boyunca yanıp
söner. **
WPS özelliğini etkinleştirmek için WPS Düğmesine
basın. Router 120 saniye boyunca WPS
İstemcilerini tarar. **
AÇIK – YANIP SÖNME
AÇIK – YANIP SÖNME
207
TURKCE
*
Normal kullanımda, cihaz çalıştırıldıktan ya da yeniden başlatıldıktan sonra Durum LED’i yanar ve 15
saniye yanıp söner. Cihazla ilgili bir sistem arızası meydana gelirse, Durum LED’i yanmaz.
Sistem arızasını çözmek için aşağıdaki seçenekleri kullanabilirsiniz.
•
Cihazı kapatın, 10 saniye bekleyin ve cihaza giden gücü yeniden açın.
•
Cihazın arkasındaki reset düğmesine +/- 15 saniye basarak cihazı fabrika varsayılan değerlerine
sıfırlayın.
Yukarıdaki seçenekleri denedikten sonra Durum LED’i yanmazsa, lütfen Conceptronic Destek birimi
ile irtibata geçin: www.conceptronic.net/support
**
WPS özelliği ile ilgili daha fazla bilgi için, bu Hızlı Kurulum Kılavuzu’nun 6.Bölümüne bakınız.
• Arka Panel
1
2
1
3
4
5
1
Nr
Tanım
Açıklama
1
2
3
4
5
Anten Bağlantısı
LAN Portları
WAN Portu
Reset Düğmesi
Güç Bağlantısı
Kablosuz Anten için ters-SMA Konnektörü
Bilgisayar(lar)ınızı router’a bağlamak için kullanılır
Geniş bant bağlantınızı router’a bağlamak için kullanılır
Router’ı Fabrika Varsayılan Ayarlarına sıfırlar
Güç Kaynağını router’a bağlamak için kullanılır
Not:
Bu Hızlı Kurulum Kılavuzunda sadece C300GBRS4’ü hazırlama ve çalıştırma ile ilgili temel adımlar
açıklanmıştır.
C300GBRS4’ün çeşitli fonksiyonları ile ilgili daha fazla bilgi için, lütfen Ürün CD-ROM’undaki
Kullanıcı Kılavuzuna (Sadece İngilizce!) bakın. Otomatik Çalıştırma Menüsünden “View User
Manual (Kullanıcı Kılavuzunu Görüntüle)” yi seçin.
208
TURKCE
3. Donanım Kurulumu
3 adet anteni C300GBRS4’ün arkasında bulunan anten bağlantılarına takın.
Güç kaynağını C300GBRS4’ün arkasındaki güç bağlantısına ve boş bir duvar prizine takın. C300GBRS4’ün ön
tarafındaki Güç LED’i yanar.
3.1 WAN Bağlantısı
C300GBRS4’ü Kablolu, DSL veya Fiber Modeminize bağlamak için bir LAN kablosu kullanın.
C300GBRS4’ün ön tarafındaki WAN LED’i yanar.
Not:
Ön taraftaki WAN LED’i yanmazsa:
- C300GBRS4’e güç geldiğinden (Güç LED'i yanmalı),
- Kablolu, DSL veya Fiber Modemin açık olduğundan,
- Her iki cihaz arasındaki LAN kablosunun doğru olarak bağlandığından emin olun.
3.2 LAN / Kablosuz LAN Bağlantısı
LAN Kablosu Kullanıcıları için:
LAN Kablosunu C300GBRS4’ün arka panelindeki 4 LAN porttan birine ve bilgisayarınızdaki Ağ Kartına
bağlayın.
Kullanılan LAN portunun LAN LED’i yanar, bu da bilgisayarın bağlandığını gösterir. (Bilgisayarınız açık
olmalı ve LAN Bağlantısı etkin olmalıdır).
Kablosuz Kullanıcılar İçin:
C300GBRS4’e kablosuz bağlantıyı 2 farklı şekilde yapabilirsiniz:
Manuel olarak.
WPS özelliği ile otomatik olarak.
WPS desteği olmayan bir veya daha fazla istemciniz varsa, C300GBRS4’e manuel olarak bağlanmanız
önerilir.
Not:
C300GBRS4 varsayılan olarak WPA-PSK/WPA2-PSK korumalıdır (karma mod). C300GBRS4’e ait WPA
parolası C300GBRS4’ün alt tarafında yer alan ürün etiketinde bulunabilir.
Bu bölümde, kablosuz ağa manuel bağlantının nasıl yapılacağı adım adım anlatılmaktadır.
WPS özelliği ve yapılandırma adımları ile ilgili daha fazla bilgi için, bu Hızlı Kurulum Kılavuzunun
6.Bölüm’üne bakınız.
209
TURKCE
Manuel Kablosuz Bağlantı:
Hemen hemen marka/tür kablosuz kartların tamamı farklı bir İstemci uygulaması kullanır. Lütfen kablosuz
ağ bağlantısının nasıl oluşturulacağı ile ilgili bilgi için kablosuz kartınızın kullanım kılavuzuna müracaat
edin.
Not:
Aşağıdaki örnekte Windows Vista SP1'li sisteme tümleşik olan standart Microsoft Kablosuz İstemci
kullanılmaktadır.
A
Sistem tepsisindeki Ağ Simgesine
ve “Wireless networks are
available (Kablosuz ağlar var)”
yazısı üzerine tıklayın.
B
Listeden “C300GBRS4” ağını
seçin ve “Connect (Bağlan)”
düğmesine tıklayın.
210
TURKCE
C
“Security key (Güvenlik
anahtarı)” alanındaki varsayılan
WPA parolasını (C300GBRS4’ün
alt tarafında yazılıdır) girin ve
“Connect (Bağlan)” düğmesine
tıklayın.
D
Bağlantı gerçekleştirildiğinde ağı
kaydetmeyi seçebilir ve
bilgisayarınızı her açışta bu ağı
otomatik olarak başlatabilirsiniz.
Bağlantı sihirbazından çıkmak
için “Close (Kapat)” düğmesine
tıklayın.
E
Kablosuz bağlantının durumunu
kontrol etmek için, sistem
tepsisindeki Ağ Simgesi üzerine
tıklayabilirsiniz. Hangi ağa bağlı
olduğunuzu, sahip olduğunuz
erişimi ve bağlantının sinyal
gücünü görebilirsiniz.
211
TURKCE
4. Bilgisayarın Yapılandırılması
4.1 IP adresinizin Yapılandırılması
C300GBRS4, yerleşik bir DHCP Sunucu ile donatılmıştır. Bağlantı kuran bilgisayar “Otomatik olarak bir IP
adresi al” şeklinde ayarlandıysa DHCP Sunucu tarafından her bilgisayara otomatik olarak bir IP adresi
atanacaktır.
Çoğu bilgisayar varsayılan olarak otomatik IP adresi alacak şekilde yapılandırılmıştır. Böyle değilse,
aşağıdaki talimatları izleyerek bilgisayarınızı otomatik IP adresi alacak şekilde yapılandırmanız
gerekecektir. Bu talimatlar Windows Vista Service Pack 1 için geçerlidir. Bilgisayarınızda farklı bir işletim
sistemi varsa, bu adımlar farklı olabilir.
A.
“Start (Başlat)” Æ “Run (Çalıştır)”a
tıklayın.
B.
“NCPA.CPL” komutunu girin ve “OK
(Tamam)” düğmesine basın.
B
B
Ağ Bağlantıları penceresi ekrana gelecektir.
C.
“Local Area Connection (Yerel Ağ Bağlantısı)”
üzerine (Kullandığınız bağlantıya göre Kablolu ya
da Kablosuz) sağ tıklayın ve “Properties
(Özellikler)”i seçin.
C
212
TURKCE
Yerel Ağ Bağlantınızın Özellikler penceresi ekrana gelecektir.
D.
“Internet Protocol Version 4 (TCP/IPv4)”
seçeneğini seçin ve “Properties
(Özellikler)” düğmesine tıklayın.
D
D
“Internet Protokolü sürüm 4 (TCP/IPv4) Özellikleri” penceresi ekrana gelir.
E.
“Obtain an IP address automatically
(Otomatik olarak bir IP adresi al)”
seçeneğini seçin ve ayarları kaydetmek
için “OK (Tamam)” düğmesine basın.
F.
Ayarları kaydetmek için Yerel Ağ
Bağlantısının özellikler penceresinde “OK
(Tamam)” düğmesine basın.
E
E
213
TURKCE
4.2 Bağlantınızın kontrolü
Windows Komut istemi ile Yerel Ağ Bağlantınızda doğru IP adresi alıp almadığınızı doğrulayabilirsiniz. Bu
örnek Windows Vista Service Pack 1 için geçerlidir. Vista’da aşağıdaki adımları gerçekleştirmek için
yönetici haklarına sahip olmalısınız. Yönetici haklarına sahip olma konusunda bir açıklama mevcuttur.
A.
“Start (Başlat)” Æ “All programs (Tüm programlar)” Æ “Accessories (Donatılar)”ı seçin,
“Command Prompt (Komut İstemi)”ne sağ tıklayın ve “Run as administrator (Yönetici olarak
çalıştır)”ı seçin.
Bir uyarı mesajı alırsanız, “Continue (Devam)”a tıklayarak kabul edin.
Komut İstemi ekrana gelir. Komut İstemi başlık çubuğunda “Administrator: Command Prompt (Yönetici:
Komut İstemi)” yazdığından emin olun. “Administrator (Yönetici)” yazısı yoksa, bu adımlar için gerekli
yönetici haklarına sahip değilsiniz demektir. A adımını tekrar gerçekleştirmeniz gerekir.
B.
“IPCONFIG” komutunu girin ve “ENTER”a basın.
B
Aşağıdaki bilgileri görmelisiniz
IPv4 Address (IPv4 Adresi)
Subnet Mask (Alt Ağ Maskesi)
Default Gateway (Varsayılan Ağ Geçidi)
: 192.168.0.xxx (xxx değeri 100 ~ 199 arasında değişebilir).
: 255.255.255.0
: 192.168.0.1
Yukarıda gösterilen bilgiler yapılandırmanızla eşleşiyorsa Bölüm 5’teki cihaz yapılandırmasına devam
edebilirsiniz.
Yukarıda gösterilen bilgiler yapılandırmanızla eşleşmiyorsa (örn. IP adresiniz 169.254.xxx.xxx) lütfen
aşağıdaki seçenekleri kontrol edin:
214
TURKCE
1.
2.
Cihazı KAPATIN ve AÇIN.
LAN Kablosunu cihaza ve bilgisayarınıza yeniden bağlayın.
3.
Aşağıdaki komutlarla bilgisayarınızın IP adresini yenileyin:
- Yanlış IP adresini terk etmek için “IPCONFIG /RELEASE”.
- Cihazdan yeni bir IP adresi almak için “IPCONFIG /RENEW”.
3
3
Yukarıdaki adımlar IP adresi sorununu çözmezse, cihazın arkasında bulunan Reset Düğmesiyle cihazı
fabrika varsayılan değerlerine sıfırlayabilirsiniz.
Fabrika Varsayılan Ayarlarını yüklemek için Reset Düğmesine +/- 15 saniye süreyle basılı tutun. Durum
LED’i tekrar aktif iken, IP adresinizi yenilemek için adım B’yi tekrarlayın.
Not:
Sorun devam ederse, tüm kabloların doğru olarak takılı olduğunu kontrol edin. WAN portu
Modeme ve LAN portu bilgisayara bağlı olmalıdır. Yanlış bağlarsanız doğru IP adresi de
alamazsınız.
215
TURKCE
5. C300GBRS4 Yapılandırması
Bu bölümde yerleşik Kurulum Sihirbazı kullanılarak C300GBRS4’ün nasıl yapılandırılacağı açıklanmaktadır.
Bu bölümdeki adımları yerine getirdikten sonra, router’ınızın kablosuz güvenlik dahil birincil
fonksiyonlarının kurulumu yapılmış olacaktır.
5.1 Web tabanlı Yapılandırma
C300GBRS4’ün yapılandırması web tabanlıdır. Cihazın yapılandırması için bir web tarayıcısına ihtiyacınız
olacaktır.
Not:
Router’ın yapılandırması için Kablosuz bağlantı yerine cihaza LAN kablosu bağlamanız tavsiye
edilir.
A.
Web tarayıcısını başlatın (örn: Internet Explorer, FireFox, Safari veya Chrome).
B.
Cihazın IP adresini web tarayıcınızın adres çubuğuna girin (Varsayılan olarak: http://192.168.0.1/).
C300GBRS4 Oturum Açma sayfası ekrana gelir.
C
C
C.
216
Kullanıcı Adı ve Parolayı girin (Varsayılan: ‘admin’ ve ‘admin’) ve web tabanlı yapılandırmaya
girmek için “Submit (Gönder)” düğmesine tıklayın.
TURKCE
Kullanıcı Adı ve Parola doğru olduğunda router “Device Settings (Cihaz Ayarları)”na genel bakışı gösterir:
“Device Settings (Cihaz Ayarları)”na genel bakış router’a ait tüm yapılandırılmış LAN, WAN ve Kablosuz
ayarlarını gösterir.
217
TURKCE
5.2 Kurulum Sihirbazı
C300GBRS4 kurulumunu yerleşik Sihirbaz ile yapabilirsiniz. Bu Sihirbaz adım adım C300GBRS4’ün temel
ayarlarını yapılandırmanıza yardım edecektir.
Not:
Sihirbaz Yapılandırmasına başlamadan önce, internet ayarlarınız ile ilgili mevcut tüm bilgilere
sahip olduğunuzdan emin olun. (Örneğin: Hesap bilgileri, bağlantı tipi vb.)
A.
Web yapılandırmasının sol menüsünde gösterilen “Wizard (Sihirbaz)” düğmesine tıklayın.
B.
“Run Wizard (Sihirbazı Çalıştır)”
düğmesine tıklayın.
C.
Hoş geldiniz ekranı sihirbaza ait beş adımı
listelemektedir. Devam etmek için “Next
(İleri)”ye tıklayın.
D.
Burada bir admin (yönetici) parolası
belirlemeniz tavsiye edilir. Yeni parolayı
girin ve onay için parolayı tekrar girin.
Tamamlandığında “Next (İleri)”ye tıklayın.
218
TURKCE
E.
Sistem yönetimi amacıyla sistem
kayıtlarında doğru zaman damgalarına
(time stamps) sahip olmak için doğru saat
ayarı çok önemlidir.
Bu adımda uygun bir Saat Dilimi seçin.
Tamamlandığında “Next (İleri)”ye tıklayın.
F.
İnternet sağlayıcı ayarlarınıza tekabül eden
İnternet bağlantısı yöntemini seçin.
İnternet bağlantınız için hangi seçeneğe
ihtiyacınız olduğunu bilmiyorsanız, lütfen
servis sağlayıcınıza ait dokümanlara
müracaat edin ya da sağlayıcınızın yardım
masası ile temasa geçin.
Tamamlandığında “Next (İleri)”ye tıklayın.
G.
Sağlayıcınız Statik IP bağlantısı
gerektirdiğinde “Statik IP” seçeneğini
seçin.
Bağlantı – Statik IP
İstenen bilgileri girin:
• IP Address (IP Adresi)
• Subnet Mask (Alt Ağ Maskesi)
• ISP Gateway Address (ISP Ağ Geçidi
Adresi)
• Primary DNS (Birincil DNS)
• Secondary DNS (İkincil DNS-İsteğe bağlı)
Tamamlandığında “Next (İleri)”ye tıklayın.
219
TURKCE
H.
Sağlayıcınız bir Dinamik IP bağlantısı
gerektirdiğinde “Dynamic IP (Dinamik IP)”
seçeneğini seçin.
Bağlantı – Dinamik IP
Bazı sağlayıcılar bağlantı için özel bir Host
Name (Ana bilgisayar) adı gerektirir.
Sağlayıcınız özel bir Ana bilgisayar (Host
Name) adı gerektirirse ilgili alana ana
bilgisayar adını girin.
Bazı sağlayıcılar İnternete bağlanmak için
sadece 1 özel MAC adresine izin verir. PC
Ağ Kartınız özel MAC adresi ile çalışıyorsa,
“Clone MAC Address (MAC Adresi Klonla”
düğmesine basın ya da MAC adresini manuel
olarak girin.
Tamamlandığında “Next (İleri)”ye tıklayın.
I.
Sağlayıcınız bir PPPoE bağlantısı
gerektirdiğinde “PPPoE” seçeneğini seçin.
İstenen bilgileri girin:
• User Name (Kullanıcı Adı)
• Password (Parola)
• Retype Password (Parolayı Tekrar Girin)
Tamamlandığında “Next (İleri)”ye tıklayın.
220
Bağlantı - PPPoE
TURKCE
J.
Sağlayıcınız bir PPTP bağlantısı
gerektirdiğinde “PPTP” seçeneğini seçin.
Bağlantı PPTP
İstenen bilgileri girin:
• Server IP (Sunucu IP’si)
• PPTP Account (PPTP Hesabı)
• PPTP Password (PPTP Parolası)
• Retype Password (Parolayı Tekrar Girin)
Tamamlandığında “Next (İleri)”ye tıklayın.
K.
Sağlayıcınız L2TP bağlantısı gerektirdiğinde
“L2TP” seçeneğini seçin.
Bağlantı – L2TP
İstenen bilgileri girin:
• Server IP (Sunucu IP’si)
• L2TP Account (L2TP Hesabı)
• L2TP Password (L2TP Parolası)
• Retype Password (Parolayı Tekrar Girin)
Tamamlandığında “Next (İleri)”ye tıklayın.
WAN yapılandırması tamamlandığında Sihirbaz tarafından Kablosuz yapılandırmasına devam edilecektir:
221
TURKCE
L.
Router’ın SSID’sini değiştirebilirsiniz. SSID,
router’ınıza yapılan kablosuz bağlantı adıdır.
Bilgisayarınızda kablosuz ağ taraması
yaparken, arayacağınız ad budur.
Kanal 1 ve 13 arasında kanal
değiştirebilirsiniz. Yavaş bağlantı ya da
kesilmelerle karşılaşırsanız, bölgenizde
kablosuz kanala karışan başka bir erişim
noktası olabilir. Bu durumda başka bir kanal
deneyebilirsiniz.
Tamamlandığında “Next (İleri)”ye tıklayın.
Kablosuz Bağlantınızı şifreleme ile güven altına alabilirsiniz. Varsayılan olarak, Kablosuz Bağlantı güvenli
değildir. Ağınıza gelecek yetkisiz erişimleri engellemek için Setup Wizard (Kurulum Sihirbazı) içinden bir
güvenlik seviyesi belirleyin.
C300GBRS4’ün WPS özelliğini kullanmak isterseniz kablosuz yapılandırmayı atlayabilir, şifrelemesiz
Kurulum Sihirbazına devam edebilirsiniz. WPS güvenlik ayarları için lütfen bu Hızlı Kurulum Kılavuzunun
6.Bölüm'üne müracaat ediniz.
222
TURKCE
Not:
Kurulum Sihirbazının tüm güvenlik seçenekleri açıklanmıştır ancak istemcilerinizin WPS desteği
yoksa ağınızın güvenliğini “WPA-PSK/WPA2-PSK” ile sağlamanız tavsiye edilir. WPA2, sadece WPA
istemcileri ile geriye doğru uyumluluğu olan en yüksek güvenlik seviyesidir.
Not:
Girilen kablosuz güvenlik bilgilerini unutmayın ya da bir yere not edin. C300GBRS4’e bağlanmak
için bir Kablosuz İstemci yapılandırması yapmak istediğinizde bu bilgilere ihtiyacınız olacaktır!
M.
Kablosuz Ağınız için bir güvenlik seviyesi
seçin.
Bir güvenlik seviyesi seçildiğinde Sihirbaz
tarafından istenen bilgiler için alanlar
gösterilecektir.
N.
Ağınızın güvenliğini WEP şifreleme ile yapmak
isterseniz, açılır listeden “WEP”i seçin. WEP
şifresini ASCII formatında girin (giriş: A-Z, 09).
Güvenlik – WEP Şifreleme
Not: Sihirbaz ile sadece WEP 64-bit
yapılandırması yapabilirsiniz.
O.
Ağınızın güvenliğini WPA ya da WPA2 (Radius
Server-Yarıçap Sunuculu) ile sağlamak
isterseniz açılır listeden “WPA” ya da
“WPA2” seçin.
Güvenlik – WPA / WPA2 Şifreleme
Radius Server (Yarıçap Sunucusu) IP Adresini,
Shared Key (Paylaşımlı Anahtar) girin ve ikinci
alanda bu değeri tekrar girin.
223
TURKCE
P.
Ağınızın güvenliğini WPA-PSK ya da WPA2-PSK
ile yapmak isterseniz, açılır listeden “WPAPSK”, “WPA2-PSK” ya da “WPA-PSK/WPA2PSK” seçin.
Güvenlik – WPA-PSK / WPA2-PSK
Şifrelemeniz için Passphrase (Parola cümlesi)
girin ve ikinci alanda parola cümlesini
onaylayın.
Q.
Tüm Kablosuz ayarlar yapıldığında devam etmek için “Next (İleri)”ye tıklayın.
R.
Kurulum Sihirbazı tamamlanmıştır.
Ayarlarınızı kaydetmek ve uygulamak
isterseniz, “Save & Take Effect (Kaydet &
Etkili Kıl)”ı tıklayın.
Bir ayarı değiştirmek isterseniz, önceki
ekrana dönmek için “Back (Geri)” düğmesine
tıklayın.
Değişiklik yapmadan Kurulum Sihirbazını
kapatmak isterseniz “Exit (Çıkış)” düğmesine
tıklayın.
“Save & Take Effect (Kaydet & Etkili Kıl)” düğmesini seçtiğinizde yapılandırılan ayarlar router tarafından
uygulanacaktır. Lütfen “Save Complete (Kaydetme İşlemi Tamam)” mesajını bekleyin.
S.
Yapılandırma işlemi tamamlanmıştır. Kurulum Sihirbazından çıkmak için “Close (Kapat)”a tıklayın.
WAN ve Kablosuz bağlantınız için yapılandırılmış olan ayarları gösteren “Device Settings (Cihaz Ayarları)”
genel bakış ekranına geri döneceksiniz.
C300GBRS4 Router’ınız artık kullanıma hazırdır!
Not:
224
C300GBRS4 özellikleri ve ayarları ile ilgili ayrıntılı açıklama için lütfen Ürün CD-ROM’undaki
Kullanıcı Kılavuzunu (Sadece İngilizce!) okuyun. Otomatik Çalıştırma Menüsünden “View User
Manual (Kullanıcı Kılavuzunu Görüntüle)” yi seçin.
TURKCE
6. WPS Özelliğinin Kullanımı
Conceptronic C300GBRS4 WPS (Wi-Fi Protected Setup-Kablosuz Korumalı Kurulum) desteklidir. WPS,
kablosuz ağların kolay ve güvenli bir biçimde oluşturulması için bir standarttır. WPS ile kablosuz ağınızı
birkaç kolay adımda kurabilir ve koruyabilirsiniz.
Not:
WPS’in C300GBRS4 ile kullanılması için WPS destekli Kablosuz İstemcilere sahip olmanız gerekir.
WPS desteği olmayan bir ya da daha fazla Kablosuz İstemciniz varsa Bölüm 5.2’te açıklanan
Kurulum Sihirbazı ile ağınızın manuel olarak güvenliğini sağlamanız tavsiye edilir.
Not:
WPS hakkında daha fazla (teknik) bilgi için aşağıdaki web sitesini ziyaret edebilirsiniz:
http://en.wikipedia.org/wiki/Wi-Fi_Protected_Setup
C300GBRS4, bir WPS bağlantısını etkinleştirmek ve oluşturmak için iki yol kullanır:
Puş Buton teknolojisi
Pin Kodu teknolojisi
6.1 WPS – Push Button (Puş Buton) teknolojisi
WPS Puş Buton teknolojisi, C300GBRS4 ve Kablosuz İstemciniz arasında bir bağlantı kurmak için Kablosuz
İstemcinizde bir (sanal) butona ihtiyaç duyar.
Bazı Kablosuz İstemciler WPS Puş Buton teknolojisini etkinleştirmek için gerçek bir butonla çalışırlarken,
bazı Kablosuz İstemciler yazılım tabanlı bir sanal buton kullanırlar.
Puş Buton teknolojili bir WPS bağlantısı oluşturmak ve etkinleştirmek için aşağıdaki adımları izleyin:
A.
C300GBRS4’ün önünde bulunan WPS Butonuna WPS LED’i yanıp sönmeye başlayıncaya kadar basın.
B.
Kablosuz İstemcinizdeki WPS Butonuna basın. Bu buton donanımsal bir buton ya da Kablosuz
İstemcinizin yazılımındaki sanal bir buton olabilir.
C300GBRS4, kablosuz ağınızda WPA güvenliğini etkinleştirir ve Kablosuz İstemcinizin kablosuz bağlantısını
kabul eder.
Not:
C300GBRS4 tarafından WPS kimlik doğrulama işlemi 120 saniye boyunca aktif tutulacaktır. Bu
işlem sırasında WPS LED’i yanıp sönecektir. 120 saniye içinde bağlantı olmazsa LED sönecek ve
WPS kimlik doğrulama işlemi durdurulacaktır.
WPS özelliği daha önce kullanılmamışsa, kablosuz ağ güvensiz olacaktır.
Kablosuz İstemcinin kimlik doğrulaması başarılı olursa, WPS LED’i sönecektir.
Kablosuz İstemciniz artık C300GBRS4’e bağlıdır ve ağınızın güvenliği WPA Şifrelemesi ile sağlanmış olur.
Önceki Kablosuz WPS İstemcilerle olan bağlantınızı kaybetmeden daha fazla Kablosuz WPS İstemci
eklemeniz mümkündür.
Daha fazla Kablosuz WPS istemci eklemek isterseniz, A ve B adımlarını tekrarlayın.
Not:
C300GBRS4 ile üretilen WPA Şifresi rastgeledir.
225
TURKCE
6.2 WPS – Pin Kodu teknolojisi
WPS'i etkin Kablosuz İstemcinizin bir (sanal) Puş Butonu yoksa, WPS bağlantısı oluşturmak için Pin Kodu
teknolojisini kullanabilirsiniz.
Not:
WPS Pin Kodu özelliğini etkinleştirmek için, C300GBRS4’e kablolu olarak bağlı bir bilgisayara
ihtiyacınız olacaktır.
A.
Web tarayıcınızı açın (örn: Internet Explorer, FireFox, Safari veya Chrome).
B.
Cihazın IP adresini web tarayıcınızın adres satırına girin (Varsayılan olarak: http://192.168.0.1/).
C300GBRS4 Oturum Açma sayfası ekrana gelir.
C
C
C.
Kullanıcı Adı ve Parolayı girin (Varsayılan: ‘admin’ ve ‘admin’) ve web yapılandırmasına girmek için
“Submit (Gönder)” düğmesine tıklayın.
Kullanıcı Adı ve Parola doğru olduğunda router “Device Settings (Cihaz Ayarları)”na genel bakışı gösterir.
D.
Sol menüden “Wireless (Kablosuz)”u seçin.
Kablosuz Yapılandırma sayfaları gösterilecektir. Bu yapılandırma sayfasının altında “Wi-Fi Protected
Setup (Kablosuz Korumalı Kurulum)” bölümünü bulabilirsiniz.
E
E.
226
Ekrandaki “Add Wireless Device Wizard (Kablosuz Cihaz Ekleme Sihirbazı)” butonuna tıklayın.
TURKCE
Ekranınızda WPS Sihirbazı görüntülenecektir:
Bu Sihirbazda Pin Kodu özelliğini etkinleştirebilirsiniz. Pin Kodu kimlik doğrulamasına başlamak için
Kablosuz İstemciniz tarafından üretilen Pin Koduna ihtiyacınız olacaktır.
F.
Kablosuz İstemcinizin yazılımında bulunan WPS Pin Kodu özelliğini seçin. Kablosuz İstemci tarafından
bir Pin Kodu üretilecek ve bu kod ekranınızda gösterilecektir.
[Kablosuz İstemci Yazılımı]
G.
Æ
G
[C300GBRS4 WPS Sihirbazı]
C300GBRS4’ün WPS Sihirbazında Kablosuz İstemciniz tarafından verilen Pin Kodunu girin ve “Connect
(Bağlan)”a basın.
C300GBRS4, kablosuz ağınızda WPA Güvenliğini etkinleştirir ve girilen Pin Kodu ile Kablosuz İstemcinizin
kablosuz bağlantısını kabul eder.
C300GBRS4 tarafından WPS kimlik doğrulama işlemi 120 saniye boyunca aktif tutulacaktır. Bu işlem
sırasında WPS LED’i yanıp sönecektir. 120 saniye içinde bağlantı olmazsa LED sönecek ve WPS kimlik
doğrulama işlemi durdurulacaktır.
227
TURKCE
WPS Sihirbazı ekranına dönmek için “Continue (Devam Et)”e tıklayın.
Not:
WPS özelliği daha önce kullanılmamışsa, kablosuz ağ güvensiz olacaktır.
Kablosuz İstemci kimlik doğrulaması başarılı olursa Sihirbaz “WPS - Adding Wireless Device Success (WPS
– Kablosuz Cihaz Ekleme İşlemi Başarılı)” yazısını gösterecek ve WPS LED’i sönecektir.
WPS Yapılandırma sayfasına dönmek için “Continue (Devam Et)”e tıklayın.
Kablosuz İstemciniz artık C300GBRS4’e bağlıdır ve ağınızın güvenliği WPA Şifrelemesi ile sağlanmış olur.
WPS özellikli daha fazla Kablosuz İstemci eklemek isterseniz E ila G adımlarını tekrarlayın.
228
TURKCE
7. Sanal Sunucu Kurallarının Oluşturulması
Ağınızda İnternetten gelen saldırıları önlemek için Conceptronic C300GBRS4’te yerleşik bir Güvenlik Duvarı
bulunmaktadır. Bu Güvenlik Duvarı kullanılmayan portlardaki tüm gelen trafiğini otomatik olarak engeller.
Bir servis ya da uygulama için engellenen bir porta ihtiyaç duyulduğunda (örneğin: FTP Sunucu ya da WEB
Sunucu) trafiği ilerletmek için Yapılandırma Sayfalarında bir Sanal Sunucu Kuralı oluşturabilirsiniz.
Aşağıda en yaygın kullanılan portların bir listesini ve bu portlara karşılık gelen uygulamayı bulacaksınız:
Port
Uygulama
Port
Uygulama
20
21
22
23
25
FTP Verisi (FTP Sunucu)
FTP (FTP Sunucu)
SSH (Secure Shell-Güvenli Kabuk)
Telnet
SMTP (Mail Sunucusu – Giden)
80
110
2000
5800
5900
HTTP (Web Sunucusu)
POP3 (Mail Sunucusu – Gelen)
Remotely Anywhere (Uzaktan Erişim)
VNC
VNC
Daha fazla port ve portlara karşılık gelen uygulamalar için aşağıdaki adresi ziyaret ediniz:
http://portforward.com/cports.htm
Not:
UPnP Port Eşleme destekli bir uygulama kullandığınızda ihtiyaç halinde uygulama tarafından
router otomatik olarak yapılandırılabilir. Bu durumda, port eşlemelerinizi manuel olarak
yapmanıza gerek yoktur.
Not:
Sanal Sunucu kurallarını kullanırken, bilgisayar(lar)ın Dinamik IP Adresi yerine Sabit IP Adresi ile
yapılandırılması tavsiye edilir.
Not:
Sanal Sunucu ve DMZ seçenekleri ile ilgili ayrıntılı açıklama için, Ürün CD-ROM’undaki Kullanıcı
Kılavuzuna (Sadece İngilizce!) bakın. Lütfen Otomatik Çalıştırma Menüsünden “Kullanıcı
Kılavuzunu Görüntüle”yi seçin.
A.
Web tarayıcınızı açın (örn: Internet Explorer, FireFox, Safari veya Chrome).
B.
Cihazın IP adresini web tarayıcınızın adres satırına girin (Varsayılan olarak: http://192.168.0.1/).
C300GBRS4 Oturum Açma sayfası ekrana gelir.
C
C
C.
Kullanıcı adı ve Parolayı girin (Varsayılan: ‘admin’ ve ‘admin’) ve web yapılandırmasına girmek için
“Submit (Gönder)” düğmesine tıklayın.
229
TURKCE
Kullanıcı adı ve Parola doğru olduğunda router “Device Settings (Cihaz Ayarları)”na genel bakışı gösterir.
D.
Üst gezinti menüsünde “Advanced (Gelişmiş)”, “Virtual Server (Sanal Sunucu)”yu seçin .
Aşağıdaki “Virtual Server (Sanal Sunucu)” yapılandırma sayfasını göreceksiniz.
Not:
E.
F.
G.
H.
Not:
I.
J.
K.
Aşağıdaki resimde Sanal Sunucu yapılandırmasına bir örnek göreceksiniz.
Sanal Sunucu kuralını “Enabled (Etkin)” olarak işaretleyin.
“Name (Ad)” alanına Sanal Sunucu Kuralınız için bir ad girin.
Sanal Sunucu kuralına ihtiyaç duyan bilgisayar/sunucunuzun IP Adresini girin.
Sanal Sunucu kuralı için Protokol seçimini yapın: “TCP”, “UDP” ya da “Both (Her ikisi)”.
Sanal Sunucu Kuralınız için hangi protokola ihtiyacınız olduğunu bilmiyorsanız “Both (Her ikisi)”ni
seçin. Bu seçenek bilgisayar/sunucunuzun yapılandırılan IP Adresine hem TCP hem de UDP
trafiğini geçirecektir.
Sanal Sunucu kuralına ihtiyaç duyan bilgisayar/sunucunuzun arzu edilen Portunu girin.
İnternet bağlantınızın dışında görünür olması gereken portu girin.
Oluşturulan Sanal Sunucu kuralını uygulamak için “Apply (Uygula)”yı tıklayın.
Sanal Sunucu kuralı kaydedildiğinde “Virtual Server List (Sanal Sunucu Listesi)”nde gösterilecektir.
Daha fazla Sanal Sunucu kuralı oluşturmak için E – K adımlarını tekrarlayın.
Tanımlanan Sanal Sunucu kuralları kullanıma hazırdır!
230
TURKCE
8. C300GBRS4’ün Yeniden Başlatılması
Router’ın yapılandırmasındaki ayarları değiştirdiğinizde ayarlar doğrudan uygulanır ve aktiftir.
Bununla birlikte, tüm ayarların doğru olarak uygulandığından emin olmak için yapılandırmada büyük ve
önemli değişiklikler yaptıktan sonra C300GBRS4’ün yeniden başlatılması tavsiye edilir.
A.
Üst gezinti menüsünden “Tools (Araçlar)”, “System (Sistem)”i seçin.
B.
Yapılandırmayı kaydetmek için “Reboot (Yeniden Başlat)”a tıklayın, C300GBRS4’ü yeniden başlatın
ve tüm değişiklikleri doğru olarak etkinleştirin.
Bir onay penceresi açılacaktır.
C.
Router’ın yeniden başlatılmasına devam etmek için “OK (Tamam)”a tıklayın.
Tüm değişiklikler kaydedilir ve router yeniden başlatılır. Lütfen zamanlayıcının bitmesini bekleyin:
Yeniden başlatma işlemi tamamlandığında, router’ın oturum açma sayfasına döneceksiniz.
C300GBRS4’ünüz artık kullanıma hazırdır!
Not:
C300GBRS4 özellikleri ve ayarları ile ilgili ayrıntılı açıklama için lütfen Ürün CD-ROM’undaki
Kullanıcı Kılavuzunu (Sadece İngilizce!) okuyun. Otomatik Çalıştırma Menüsünden “View User
Manual (Kullanıcı Kılavuzunu Görüntüle)” yi seçin.
231
LICENSING INFORMATION
Licensing Information
This Conceptronic product C300BRS4A includes copyrighted third-party software licensed under the terms of the GNU
General Public License.
Please see The GNU General Public License for the exact terms and conditions of this license.
Specially, the following parts of this product are subject to the GNU GPL:
1.
2.
3.
4.
5.
6.
7.
8.
9.
10.
11.
12.
13.
14.
15.
16.
Linux kernel 2.4.25
buildroot
busybox-1.00
vconfig
iptable-1.2.9
mathopd
pppd-2.4.2
dnrd-2.10
klogd
syslogd
telnetd
wireless tools
bpalogin
hostapd-0.3.7
smtpclient
ntpclient
All listed software packages are copyright by their respective authors. Please see the source code for detailed information.
Availability of source code
Conceptronic. has exposed the full source code of the GPL licensed software, including any scripts to control compilation
and installation of the object code. All future firmware updates will also be accompanied with their respective source code.
For more information on how you can obtain our open source code, please visit our web site.
232
LICENSING INFORMATION
GNU GENERAL PUBLIC LICENSE
Version 2, June 1991
Copyright (C) 1989, 1991 Free Software Foundation, Inc.
Temple Place, Suite 330, Boston, MA 02111-1307 USA
Everyone is permitted to copy and distribute verbatim copies
of this license document, but changing it is not allowed.
Preamble
The licenses for most software are designed to take away your freedom to share and change it. By contrast, the GNU
General Public License is intended to guarantee your freedom to share and change free software--to make sure the software
is free for all its users. This General Public License applies to most of the Free Software Foundation's software and to any
other program whose authors commit to using it. (Some other Free Software Foundation software is covered by the GNU
Library General Public License instead.) You can apply it to your programs, too.
When we speak of free software, we are referring to freedom, not price. Our General Public Licenses are designed to
make sure that you have the freedom to distribute copies of free software (and charge for this service if you wish), that you
receive source code or can get it if you want it, that you can change the software or use pieces of it in new free programs;
and that you know you can do these things.
To protect your rights, we need to make restrictions that forbid anyone to deny you these rights or to ask you to surrender
the rights. These restrictions translate to certain responsibilities for you if you distribute copies of the software, or if you
modify it.
For example, if you distribute copies of such a program, whether gratis or for a fee, you must give the recipients all the
rights that you have. You must make sure that they, too, receive or can get the source code. And you must show them
these terms so they know their rights.
We protect your rights with two steps: (1) copyright the software, and (2) offer you this license which gives you legal
permission to copy, distribute and/or modify the software.
Also, for each author's protection and ours, we want to make certain that everyone understands that there is no warranty
for this free software. If the software is modified by someone else and passed on, we want its recipients to know that what
they have is not the original, so that any problems introduced by others will not reflect on the original authors' reputations.
Finally, any free program is threatened constantly by software patents. We wish to avoid the danger that redistributors of
a free program will individually obtain patent licenses, in effect making the program proprietary. To prevent this, we have
made it clear that any patent must be licensed for everyone's free use or not licensed at all.
The precise terms and conditions for copying, distribution and modification follow.
GNU GENERAL PUBLIC LICENSE
TERMS AND CONDITIONS FOR COPYING, DISTRIBUTION AND MODIFICATION
0. This License applies to any program or other work which contains a notice placed by the copyright holder saying it may
be distributed under the terms of this General Public License. The "Program", below, refers to any such program or work,
and a "work based on the Program" means either the Program or any derivative work under copyright law: that is to say, a
work containing the Program or a portion of it, either verbatim or with modifications and/or translated into another
language. (Hereinafter, translation is included without limitation in the term "modification".) Each licensee is addressed as
"you".
Activities other than copying, distribution and modification are not covered by this License; they are outside its scope. The
act of running the Program is not restricted, and the output from the Program is covered only if its contents constitute a
work based on the Program (independent of having been made by running the Program). Whether that is true depends on
what the Program does.
233
LICENSING INFORMATION
1. You may copy and distribute verbatim copies of the Program's source code as you receive it, in any medium, provided
that you conspicuously and appropriately publish on each copy an appropriate copyright notice and disclaimer of warranty;
keep intact all the notices that refer to this License and to the absence of any warranty; and give any other recipients of
the Program a copy of this License along with the Program.
You may charge a fee for the physical act of transferring a copy, and you may at your option offer warranty protection in
exchange for a fee.
2. You may modify your copy or copies of the Program or any portion of it, thus forming a work based on the Program, and
copy and distribute such modifications or work under the terms of Section 1 above, provided that you also meet all of these
conditions:
a) You must cause the modified files to carry prominent notices stating that you changed the files and the date of any
change.
b) You must cause any work that you distribute or publish, that in whole or in part contains or is derived from the
Program or any part thereof, to be licensed as a whole at no charge to all third parties under the terms of this License.
c) If the modified program normally reads commands interactively when run, you must cause it, when started running for
such interactive use in the most ordinary way, to print or display an announcement including an appropriate copyright
notice and a notice that there is no warranty (or else, saying that you provide a warranty) and that users may redistribute
the program under these conditions, and telling the user how to view a copy of this License. (Exception: if the Program
itself is interactive but does not normally print such an announcement, your work based on the Program is not required to
print an announcement.)
These requirements apply to the modified work as a whole. If identifiable sections of that work are not derived from the
Program, and can be reasonably considered independent and separate works in themselves, then this License, and its terms,
do not apply to those sections when you distribute them as separate works. But when you distribute the same sections as
part of a whole which is a work based on the Program, the distribution of the whole must be on the terms of this License,
whose permissions for other licensees extend to the entire whole, and thus to each and every part regardless of who wrote
it.
Thus, it is not the intent of this section to claim rights or contest your rights to work written entirely by you; rather, the
intent is to exercise the right to control the distribution of derivative or collective works based on the Program.
In addition, mere aggregation of another work not based on the Program with the Program (or with a work based on the
Program) on a volume of a storage or distribution medium does not bring the other work under the scope of this License.
3. You may copy and distribute the Program (or a work based on it, under Section 2) in object code or executable form
under the terms of Sections 1 and 2 above provided that you also do one of the following:
a) Accompany it with the complete corresponding machine-readable source code, which must be distributed under the
terms of Sections 1 and 2 above on a medium customarily used for software interchange; or,
b) Accompany it with a written offer, valid for at least three years, to give any third party, for a charge no more than
your cost of physically performing source distribution, a complete machine-readable copy of the corresponding source code,
to be distributed under the terms of Sections 1 and 2 above on a medium customarily used for software interchange; or,
c) Accompany it with the information you received as to the offer to distribute corresponding source code. (This
alternative is allowed only for noncommercial distribution and only if you received the program in object code or
executable form with such an offer, in accord with Subsection b above.)
The source code for a work means the preferred form of the work for making modifications to it. For an executable work,
complete source code means all the source code for all modules it contains, plus any associated interface definition files,
plus the scripts used to control compilation and installation of the executable. However, as a special exception, the source
code distributed need not include anything that is normally distributed (in either source or binary form) with the major
components (compiler, kernel, and so on) of the operating system on which the executable runs, unless that component
itself accompanies the executable.
234
LICENSING INFORMATION
If distribution of executable or object code is made by offering access to copy from a designated place, then offering
equivalent access to copy the source code from the same place counts as distribution of the source code, even though third
parties are not compelled to copy the source along with the object code.
4. You may not copy, modify, sublicense, or distribute the Program except as expressly provided under this License. Any
attempt otherwise to copy, modify, sublicense or distribute the Program is void, and will automatically terminate your
rights under this License. However, parties who have received copies, or rights, from you under this License will not have
their licenses terminated so long as such parties remain in full compliance.
5. You are not required to accept this License, since you have not signed it. However, nothing else grants you permission
to modify or distribute the Program or its derivative works. These actions are prohibited by law if you do not accept this
License. Therefore, by modifying or distributing the Program (or any work based on the Program), you indicate your
acceptance of this License to do so, and all its terms and conditions for copying, distributing or modifying the Program or
works based on it.
6. Each time you redistribute the Program (or any work based on the Program), the recipient automatically receives a
license from the original licensor to copy, distribute or modify the Program subject to these terms and conditions. You may
not impose any further restrictions on the recipients' exercise of the rights granted herein. You are not responsible for
enforcing compliance by third parties to this License.
7. If, as a consequence of a court judgment or allegation of patent infringement or for any other reason (not limited to
patent issues), conditions are imposed on you (whether by court order, agreement or otherwise) that contradict the
conditions of this License, they do not excuse you from the conditions of this License. If you cannot distribute so as to
satisfy simultaneously your obligations under this License and any other pertinent obligations, then as a consequence you
may not distribute the Program at all. For example, if a patent license would not permit royalty-free redistribution of the
Program by all those who receive copies directly or indirectly through you, then the only way you could satisfy both it and
this License would be to refrain entirely from distribution of the Program.
If any portion of this section is held invalid or unenforceable under any particular circumstance, the balance of the section
is intended to apply and the section as a whole is intended to apply in other circumstances. It is not the purpose of this
section to induce you to infringe any patents or other property right claims or to contest validity of any such claims; this
section has the sole purpose of protecting the integrity of the free software distribution system, which is implemented by
public license practices. Many people have made generous contributions to the wide range of software distributed through
that system in reliance on consistent application of that system; it is up to the author/donor to decide if he or she is willing
to distribute software through any other system and a licensee cannot impose that choice.
This section is intended to make thoroughly clear what is believed to be a consequence of the rest of this License.
8. If the distribution and/or use of the Program is restricted in certain countries either by patents or by copyrighted
interfaces, the original copyright holder who places the Program under this License may add an explicit geographical
distribution limitation excluding those countries, so that distribution is permitted only in or among countries not thus
excluded. In such case, this License incorporates the limitation as if written in the body of this License.
9. The Free Software Foundation may publish revised and/or new versions of the General Public License from time to time.
Such new versions will be similar in spirit to the present version, but may differ in detail to address new problems or
concerns.
Each version is given a distinguishing version number. If the Program specifies a version number of this License which
applies to it and "any later version", you have the option of following the terms and conditions either of that version or of
any later version published by the Free Software Foundation. If the Program does not specify a version number of this
License, you may choose any version ever published by the Free Software Foundation.
10. If you wish to incorporate parts of the Program into other free programs whose distribution conditions are different,
write to the author to ask for permission. For software which is copyrighted by the Free Software Foundation, write to the
Free Software Foundation; we sometimes make exceptions for this. Our decision will be guided by the two goals of
preserving the free status of all derivatives of our free software and of promoting the sharing and reuse of software
generally.
235
LICENSING INFORMATION
NO WARRANTY
11. BECAUSE THE PROGRAM IS LICENSED FREE OF CHARGE, THERE IS NO WARRANTY FOR THE PROGRAM, TO THE EXTENT
PERMITTED BY APPLICABLE LAW. EXCEPT WHEN OTHERWISE STATED IN WRITING THE COPYRIGHT HOLDERS AND/OR OTHER
PARTIES PROVIDE THE PROGRAM "AS IS" WITHOUT WARRANTY OF ANY KIND, EITHER EXPRESSED OR IMPLIED, INCLUDING, BUT
NOT LIMITED TO, THE IMPLIED WARRANTIES OF MERCHANTABILITY AND FITNESS FOR A PARTICULAR PURPOSE. THE ENTIRE
RISK AS TO THE QUALITY AND PERFORMANCE OF THE PROGRAM IS WITH YOU. SHOULD THE PROGRAM PROVE DEFECTIVE,
YOU ASSUME THE COST OF ALL NECESSARY SERVICING, REPAIR OR CORRECTION.
12. IN NO EVENT UNLESS REQUIRED BY APPLICABLE LAW OR AGREED TO IN WRITING WILL ANY COPYRIGHT HOLDER, OR ANY
OTHER PARTY WHO MAY MODIFY AND/OR REDISTRIBUTE THE PROGRAM AS PERMITTED ABOVE, BE LIABLE TO YOU FOR
DAMAGES, INCLUDING ANY GENERAL, SPECIAL, INCIDENTAL OR CONSEQUENTIAL DAMAGES ARISING OUT OF THE USE OR
INABILITY TO USE THE PROGRAM (INCLUDING BUT NOT LIMITED TO LOSS OF DATA OR DATA BEING RENDERED INACCURATE OR
LOSSES SUSTAINED BY YOU OR THIRD PARTIES OR A FAILURE OF THE PROGRAM TO OPERATE WITH ANY OTHER PROGRAMS),
EVEN IF SUCH HOLDER OR OTHER PARTY HAS BEEN ADVISED OF THE POSSIBILITY OF SUCH DAMAGES.
END OF TERMS AND CONDITIONS
How to Apply These Terms to Your New Programs
If you develop a new program, and you want it to be of the greatest possible use to the public, the best way to achieve
this is to make it free software which everyone can redistribute and change under these terms.
To do so, attach the following notices to the program. It is safest to attach them to the start of each source file to most
effectively convey the exclusion of warranty; and each file should have at least the "copyright" line and a pointer to where
the full notice is found.
, 1 April 1989
Ty Coon, President of Vice
This General Public License does not permit incorporating your program into proprietary programs. If your program is a
subroutine library, you may consider it more useful to permit linking proprietary applications with the library. If this is
what you want to do, use the GNU Library General Public License instead of this License.
236