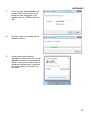
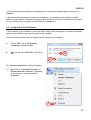
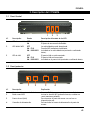
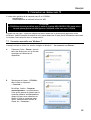
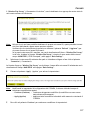
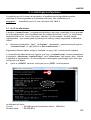
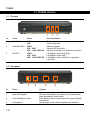
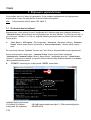
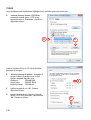
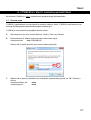
1
NEDERLANDS
Conceptronic C150APM
Snelstartgids
Gefeliciteerd met uw nieuwe
Conceptronic 150N Wireless Access Point
In deze snelstartgids vindt u stap-voor-stap instructies voor de installatie van de Conceptronic C150APM.
Als u meer informatie of ondersteuning voor uw product nodig heeft, kunt u het beste naar onze Service &
Support website op www.conceptronic.net gaan en een van de volgende mogelijkheden kiezen:
• FAQ
• Downloads
• Contact
: Database met veel gestelde vragen
: Gebruiksaanwijzingen, stuurprogramma's, firmware en overige downloads
: Contact opnemen met Conceptronic Support
Voor algemene informatie over Conceptronic producten gaat u naar de Conceptronic website op
www.conceptronic.net.
De informatie in deze snelstart installatiegids is gebaseerd op Windows 7 en Windows Vista en kan dus
afwijken van het gebruik op uw computer als deze een ander besturingssysteem heeft.
NB:
In deze snelstartgids vindt u alleen de basisstappen om de C150APM in gebruik te nemen.
Zie voor meer informatie over de functies en mogelijkheden van de C150APM de
gebruiksaanwijzing (User's Manual, uitsluitend in het Engels) op de meegeleverde product-cd.
Wacht tot het automatische menu is gestart en selecteer ‘View User Manual’ (gebruiksaanwijzing
bekijken).
Om de Engelstalige gebruiksaanwijzing te kunnen bekijken, moet het programma Adobe Reader
op uw computer zijn geïnstalleerd. Als dit niet zo is, selecteert u ‘Install Adobe Reader’ in het
automatische menu (alleen voor Windows).
Inhoud
1. Inhoud verpakking
2. Standaardinstellingen
3. De onderdelen van de C150APM
3.1. Voorkant
3.2. Achterkant
4. Mogelijkheden van de C150APM
4.1. Gebruik als access point
4.2. Gebruik als bridge (brug)
5. Computer configureren
5.1. IP-adres controleren
5.2. Vast IP-adres instellen
6. C150APM configureren als bridge (brug)
6.1. Aanmelden
6.2. Een brugverbinding maken
7. Verbinden met draadloos netwerk
7.1. Handmatig verbinden in Windows 7
7.2. Handmatig verbinden in Windows Vista
7.3. Automatisch verbinden met behulp van
WPS
8. Geavanceerde instellingen
1
NEDERLANDS
1. Inhoud verpakking
U vindt de volgende items in de verpakking van de Conceptronic 150N Wireless Access Point:
•
•
•
•
•
•
•
Conceptronic C150APM – 150N Wireless Access Point
Netvoeding 5V gelijkstroom, 1A
Antenne voor draadloze connectiviteit
LAN netwerkkabel
Product-cd
Deze meertalige snelstart installatiegids
Garantiekaart en boekje CE-verklaring
2. Standaardinstellingen
De volgende instellingen van de C150APM zijn standaard al ingevuld:
: 192.168.0.2
IP-adres
Subnetmasker
: 255.255.255.0
Standaardgateway
: 192.168.0.1
Username (Gebruikersnaam)
: admin
Password (Wachtwoord)
: admin
NB:
We raden u sterk aan het wachtwoord te veranderen wanneer u de C150APM voor de eerste keer
configureert. Wanneer u bent aangemeld via de stappen uit paragraaf 6.1 kunt u het wachtwoord
wijzigen bij de optie “System Settings” (Systeeminstellingen).
SSID (Naam draadloos netwerk)
: C150APM
Security level (Beveiligingsniveau)
: WPA/WPA2 Mixed Mode met AES/TKIP
Security passphrase (Wachtwoordzin): zie het productetiket aan de onderkant van de C150APM
2
NEDERLANDS
3. De onderdelen van de C150APM
3.1 Voorpaneel
1
2
3
Nr.
Beschrijving
Status
Betekenis status
1.
Aan/uit-lampje
UIT
AAN
Het access point staat uit
Het access point staat aan
2
WLAN/WPS-lampje UIT
Draadloos netwerk staat uit
AAN - CONTINU WPS-functie voor draadloos netwerk staat aan
AAN - KNIPPERT Er worden gegevens ontvangen/verzonden via de draadloze
verbinding
3
LAN-lampje
UIT
LAN-netwerkpoort (locaal netwerk) is niet verbonden
AAN - CONTINU LAN-netwerkpoort is verbonden
AAN - KNIPPERT Er worden gegevens ontvangen/verzonden via de LANnetwerkpoort
3.2 Achterpaneel
1
2
3
4
Nr.
Beschrijving
Betekenis
1
2
Antenne-aansluiting
Reset/WPS-knop
3
LAN-netwerkpoort
4
Stroomingang
R-SMA-connector voor antenne
WPS-functie aanzetten (kort indrukken)
of resetten (ingedrukt houden)
Via deze poort verbindt u uw access point met uw netwerk
of met een apparaat met netwerkaansluiting
Hier sluit u de netvoeding aan op het access point
3
NEDERLANDS
4. Mogelijkheden van de C150APM
Voordat u goed verbinding kunt maken met de C150APM, moet u instellen welke mogelijkheden van de
C150APM u wilt gebruiken.
De C150APM kan in verschillende omgevingen worden gebruikt en elke omgeving vereist zijn eigen speciale
configuratie:
4.1 Gebruik als access point
Als u de C150APM wilt gebruiken om uw bestaande netwerk draadloos te maken, moet u hem verbinden
(en instellen) als ‘access point’.
- Sluit de netvoeding aan op de stroomingang aan de achterkant van de C150APM en op een stopcontact.
Het aan/uit-lampje aan de voorkant van de C150APM gaat aan.
- Sluit de LAN-netwerkkabel aan op de LAN-poort aan de achterkant van de C150APM en op uw netwerk.
Het LAN-lampje gaat branden om aan te geven dat de netwerkkabel goed is aangesloten en dat de
verbinding actief is.
De C150APM werkt nu als ‘access point’ voor uw netwerk. Ga verder met hoofdstuk 7 om een draadloze
cliënt met de C150APM te verbinden.
NB:
Het draadloze netwerk van de C150APM wordt standaard beveiligd met WPA-PSK/WPA2-PSK
encryptie (Mixed Mode). Dit betekent dat u het draadloze netwerk niet handmatig hoeft te
beveiligen. Zie voor meer informatie over de functies en mogelijkheden van de C150APM de
gebruiksaanwijzing (User's Manual, uitsluitend in het Engels) op de meegeleverde product-cd als u
de beveiligingsinstellingen van de C150APM handmatig wilt aanpassen.
4.2 Gebruik als brug (bridge mode)
Als u de C150APM wilt gebruiken om verbinding te leggen tussen een apparaat met een netwerkaansluiting
(zoals een netwerkprinter, netwerkopslagapparaat, mediaspeler of spelconsole) en een draadloos
netwerk, moet u de C150APM verbinden (en instellen) als ‘bridge’.
NB:
Voor de eerste configuratie van de C150APM als ‘bridge’ raden we u sterk aan het access point
met uw bestaande netwerk te verbinden (router, switch, enz.) of rechtstreeks met uw computer.
- Sluit de netvoeding aan op de stroomingang aan de achterkant van de C150APM en op een stopcontact.
Het aan/uit-lampje aan de voorkant van de C150APM gaat aan.
- Sluit de LAN-netwerkkabel aan op de LAN-poort aan de achterkant van de C150APM en op uw netwerk
of computer. Het LAN-lampje gaat branden om aan te geven dat de netwerkkabel goed is aangesloten
en dat de verbinding actief is.
De C150APM is nu actief, maar werkt (nog) als ‘access point’.
Ga verder met hoofdstuk 5 om de C150APM via uw computer te configureren.
Ga verder met hoofdstuk 6 om de C150APM als brug te configureren (‘bridge mode’).
4
NEDERLANDS
5. Computer configureren
Het access point staat ingesteld op een vast ip-adres. Om het access point te kunnen configureren, moet
uw computer een IP-adres hebben dat in hetzelfde bereik ligt als het IP-adres van het access point (het
bereik wordt aangegeven door de eerste drie getallen van het IP-adres).
NB: Het IP-adres van het access point staat standaard op: 192.168.0.2
5.1 IP-adres controleren
Met de ‘Opdrachtprompt’ van Windows kunt u kijken of het IP-adres van uw computer in hetzelfde bereik
ligt als dat van het access point. Het volgende voorbeeld is gebaseerd op Windows 7 en op Vista met
Service Pack 1. Om de onderstaande stappen te kunnen uitvoeren, moet u onder Windows 7 en Vista over
administrator-toegangsrechten beschikken.
A.
Klik op de ‘Start’-knop van Windows en selecteer ‘Alle programma's’ gevolgd door ‘Bureauaccessoires’, klik met de rechter muisknop op ‘Opdrachtprompt’ en selecteer ‘Als administrator
uitvoeren’.
Als u een waarschuwing krijgt, moet u deze accepteren door op ‘Verder gaan’ of ‘Ja’ te klikken.
Het venster Opdrachtprompt verschijnt. Controleer of de titelbalk van het ‘Opdrachtprompt’ venster
aangeeft: “Administrator: Opdrachtprompt”. Wanneer “Administrator” niet wordt aangegeven, heeft u
niet de administrator-rechten die u nodig heeft voor de volgende stappen en moet u stap A opnieuw
uitvoeren.
B.
Geef de opdracht ‘IPCONFIG’ in en druk op ‘ENTER’ op uw toetsenbord.
B
U moet nu de volgende informatie zien:
IPv4-adres
: 192.168.0.xxx (xxx is een getal tussen 3 en 254)
Subnetmasker
: 255.255.255.0
5
NEDERLANDS
Als de getoonde informatie overeenkomt met het bovenstaande, kunt u verdergaan met de configuratie
van het access point in hoofdstuk 5.
Als de bovenstaande informatie niet overeenkomt met uw configuratie, moet u tijdelijk een IP-adres aan
uw computer toewijzen dat in hetzelfde bereik ligt als het IP-adres van het access point, om het access
point te kunnen configureren.
U vindt de stappen om een vast IP-adres in te stellen in paragraaf 5.2.
5.2 Vast IP-adres instellen
Als het IP-adres van uw computer niet in hetzelfde bereik als dat van het access point ligt, moet u uw
computer tijdelijk een IP-adres geven dat wel in dat bereik ligt.
Met behulp van de onderstaande aanwijzingen kunt u uw computer een vast IP-adres geven.
A.
Klik op de ‘Start’-knop van Windows en
selecteer ‘Alle programma's’, ‘Bureauaccessoires’, ‘Uitvoeren’.
B.
Geef de opdracht ‘NCPA.CPL’ in en klik op
‘OK’.
B
B
Het venster “Netwerkverbindingen” wordt
getoond.
C.
Klik met de rechter muisknop op ‘LANverbinding’ of ‘Draadloze
netwerkverbinding’ (afhankelijk van de
gebruikte aansluiting) en selecteer
‘Eigenschappen’.
C
6
NEDERLANDS
Het eigenschappenvenster van de gekozen netwerkaansluiting (LAN of draadloos) wordt getoond.
D.
Selecteer ‘Internet Protocol versie 4
(TCP/IPv4)’ en klik op ‘Eigenschappen’.
D
D
Het eigenschappenvenster van Internet Protocol
versie 4 (TCP/IPv4) wordt getoond.
E.
Selecteer ‘Het volgende IP-adres gebruiken:’
en geef in de beschikbare velden de volgende
informatie in:
IP-adres:
192.168.0.99
Subnetmasker:
255.255.255.0
Standaardgateway: 192.168.0.2
F.
Klik op ‘OK’ om de instellingen op te slaan.
G.
Klik in het eigenschappenvenster van Internet
Protocol versie 4 (TCP/IPv4) op ‘OK’ om de
instellingen op te slaan.
E
F
7
NEDERLANDS
6. C150APM configureren als bridge (brug)
In dit hoofdstuk 6 leest u hoe u de C150APM als brug kunt configureren (‘bridge mode’).
6.1 Aanmelden
Om de instellingen van de C150APM te configureren, wordt een webgebaseerde interface gebruikt. Dit
betekent dat u de instellingen van de C150APM kunt veranderen vanaf iedere ermee verbonden computer
die over een internetbrowser beschikt.
Om u bij de C150APM aan te melden, voert u de volgende stappen uit:
A.
Start uw internetbrowser (zoals Internet Explorer, Firefox, Safari of Chrome).
B.
Geef het IP-adres van het access point in in de adresbalk van uw internetbrowser.
Standaard
: http://192.168.0.2/
Nu verschijnt een aanmeldvenster waarin om een gebruikersnaam en een wachtwoord wordt
gevraagd.
C
C.
8
Geef de gebruikersnaam en het wachtwoord in en klik op ‘OK’ om de webgebaseerde configuratie te
starten.
Standaard gebruiksersnaam : admin
Standaard wachtwoord
: admin
NEDERLANDS
Wanneer de gebruikersnaam en het wachtwoord correct zijn, toont de C150APM de hoofdpagina:
Op de hoofdpagina kunt u gemakkelijk de opties van de C150BRS4 webconfiguratie kiezen:
-
Home (Startpagina)
Basic Settings (Basisinstellingen)
WPS Settings (WPS-instellingen)
Advanced Settings (Geavanceerde instellingen)
Security Settings (Beveiligingsinstellingen)
Radius Server
MAC Filtering (MAC-adresssen filteren)
System Settings (Systeeminstellingen)
Manage Settings (Instellingen beheren)
- F/W Upgrade (Firmware bijwerken)
- Restart (Herstarten)
: Hoofdconfiguratiepagina tonen
: De basisinstellingen van het access point aanpassen
: WPS-instellingen aanpassen
: Geavanceerde draadloze instellingen aanpassen
: Draadloze beveiligingsinstellingen aanpassen
: Instellingen voor een Radius Server
: Filterregels MAC-adressen inschakelen/configureren
: Systeeminstellingen van de C150APM aanpassen
: Reservekopie van uw instellingen maken of de
C150APM op de standaardinstellingen terugzetten
: Firmware bijwerken
: Het access point opnieuw opstarten
NB: In deze snelstartgids vindt u alleen de instellingen voor gebruik als ‘bridge’ en de basisinstellingen
voor gebruik als ‘access point’. Alle overige opties worden toegelicht in de gebruiksaanwijzing
(uitsluitend in het Engels). Doe hiervoor de meegeleverde product-cd in de computer, wacht tot het
automatische menu is gestart en selecteer ‘View User Manual’ (gebruiksaanwijzing bekijken).
9
NEDERLANDS
6.2 Brugverbinding maken (bridge)
Dit hoofdstuk leidt u stap voor stap door de instellingen van de C150APM die moeten worden
geconfigureerd voor gebruik als brug.
NB: Voordat u verder kunt gaan met configureren van de C150APM in de ‘bridge’ stand, heeft u de
volgende informatie nodig over uw bestaande draadloze netwerk:
- Netwerknaam (SSID)
- Encryptietype
- Beveiligingssleutel (encryption key ) of wachtwoordzin (passphrase)
A.
Klik op de knop ‘Basic Settings’ (Basisinstellingen) in het linkermenu van de webconfiguratie.
De pagina “Basic Settings” (Basisinstellingen) wordt op uw scherm weergegeven.
B.
C.
10
Verander de ‘Mode’ (Stand) in ‘Station-Infrastructure’ (Station-infrastructuur).
Klik op de knop ‘Select Site Survey’ (Beschikbare draadloze netwerken) om uw bestaande draadloze
netwerk te zoeken.
NEDERLANDS
Het venster “Wireless Site Survey” (Beschikbare draadloze netwerken) wordt geopend.
NB: Als uw bestaande draadloze netwerk hier niet bij staat, is het mogelijk dat u buiten bereik bent, dat
het andere access point uit staat of dat het netwerk verborgen is.
Zorg dat uw bestaande draadloze netwerk aan staat en gebruik de knop ‘Refresh’ (Vernieuwen) om
opnieuw naar draadloze netwerken te zoeken.
Als uw draadloze netwerk verborgen is, wordt het niet weergegeven bij “Wireless Site Survey”.
Sluit in dat geval het venster “Wireless Site Survey” en geef de netwerknaam exact in in het veld
‘MAIN ESSID’ op de pagina “Basic Settings” (Basisinstellingen).
D.
Selecteer het bestaande draadloze netwerk waarmee u verbinding wilt maken en klik op de knop
‘Connection’ (Verbinden).
Het venster “Wireless Site Survey” wordt gesloten en de gekozen netwerknaam verschijnt in het veld
‘MAIN ESSID’ op de pagina “Basic Settings”.
E.
Klik op de knop ‘Apply’ (Toepassen) om de instellingen in gebruik te nemen.
NB: Nadat u instellingen van de C150APM heeft gewijzigd, moet u altijd tussen twee mogelijkheden
kiezen:
- Continue (Verder gaan): Doorgaan met wijzigen van instellingen (nieuwe instellingen worden nog
niet vastgelegd in het geheugen).
- Apply (Toepassen): Alle wijzigingen in gebruik nemen door de instellingen in het geheugen op te
slaan en de C150APM opnieuw op te starten.
F.
Klik op de knop ‘Continue’ (Verder gaan) om nog meer instellingen te wijzigen.
11
NEDERLANDS
G.
Klik op de knop ‘Security Settings’ (Beveiligingsinstellingen) in het linkermenu van de
webconfiguratie.
De pagina “Security Settings” (Beveiligingsinstellingen) wordt op uw scherm weergegeven.
H.
Selecteer het encryptietype van uw bestaande draadloze netwerk in het afrolmenu ‘Encryption’
(Encryptie).
Als uw bestaande draadloze netwerk is beveiligd met WPA:
- Selecteer het type WPA beveiliging in het gedeelte “WPA Unicast Cipher Suite”.
- Selecteer het type beveiligingssleutel bij “Pre-shared Key Format” (Indeling vooraf gedeelde
sleutel).
- Geef de beveiligingssleutel (encryption key) in bij “Pre-shared Key” (Vooraf gedeelde sleutel).
Als uw bestaande draadloze netwerk is beveiligd met WEP:
- Geef de lengte van de beveiligingssleutel in bij “Key Length” (Lengte sleutel).
- Geef de indeling van de beveiligingssleutel in bij “Key Format” (Indeling sleutel).
- Geef de beveiligingssleutel in bij “Encryption Key” (Vooraf gedeelde sleutel).
I.
Klik op de knop ‘Apply’ (Toepassen) om de instellingen in gebruik te nemen.
12
NEDERLANDS
NB: Nadat u instellingen van de C150APM heeft gewijzigd, moet u altijd tussen twee mogelijkheden
kiezen:
- Continue (Verder gaan): Doorgaan met wijzigen van instellingen (nieuwe instellingen worden nog
niet vastgelegd in het geheugen).
- Apply (Toepassen): Alle wijzigingen in gebruik nemen door de instellingen in het geheugen op te
slaan en de C150APM opnieuw op te starten.
J.
Klik op de knop ‘Apply’ (Toepassen) om de instellingen vast te leggen in het geheugen en de
C150APM opnieuw op te starten.
Tijdens de herstart is de knop ‘OK’ grijs (niet beschikbaar) en wordt hier afgeteld tot de herstart is
voltooid. Klik na afloop van de herstart op ‘OK’ om terug te gaan naar de webgebaseerde configuratie van
de C150APM.
De configuratie van de ‘bridge’ stand is nu voltooid. U kunt de C150APM nu van uw computer loskoppelen
en aansluiten op het netwerkapparaat waarvoor u de brug heeft geconfigureerd.
NB:
Als u uw computer in paragraaf 5.2 een tijdelijk vast IP-adres heeft gegeven, moet u de
computer terugzetten op de oorspronkelijke instellingen. Volg hiervoor de stappen in paragraaf
5.2. Bij stap E selecteert u ‘Automatisch een IP-adres laten toewijzen’.
Uw Conceptronic 150N Wireless Access Point
is nu klaar voor gebruik als draadloze bridge!
13
NEDERLANDS
7. Verbinden met draadloos netwerk
Er zijn twee verschillende manieren om draadloos verbinding te maken met de C150APM:
Handmatig.
Automatisch met behulp van de WPS-functie.
! BELANGRIJKE OPMERKING !
De C150APM is standaard beveiligd met WPA-PSK/WPA2-PSK encryptie (Mixed Mode).
U vindt de unieke WPA wachtwoordzin (passphrase) op het productetiket aan de onderkant van
uw C150APM.
Vrijwel alle merken/types draadloze netwerkkaarten gebruiken een andere cliënt-applicatie. Zie de
gebruiksaanwijzing van uw draadloze netwerkkaart voor informatie over hoe u verbinding maakt met een
draadloos netwerk.
7.1 Handmatig verbinden in Windows 7
In het volgende voorbeeld wordt gebruik gemaakt van de standaardfunctie “Verbinding met een netwerk
maken” die aanwezig is in Windows 7.
A
Klik op het ‘Netwerk’ pictogram in het
Windows systeemvak voor een lijst met
beschikbare draadloze netwerken.
B
Selecteer het netwerk “C150APM” in de
lijst en klik op ‘Verbinding maken’.
Standaard is de optie “Automatisch
verbinding maken” geselecteerd. Dit
zorgt ervoor dat de verbinding steeds
automatisch wordt gestart wanneer uw
computer wordt aangezet. Als u dit niet
wilt, kunt u dit vakje uitschakelen
voordat u op ‘Verbinding maken’ klikt.
14
NEDERLANDS
C
Geef in het veld “Wachtwoordzin” de
standaard WPA wachtwoordzin in (de
passphrase zoals aangegeven op de
onderkant van uw C150APM) en klik op
‘OK’.
D
De cliënt maakt nu verbinding met het
draadloze netwerk.
E
Om de status van de draadloze
verbinding te controleren, kunt u op het
‘Netwerk’ pictogram in het systeemvak
klikken. U ziet hier met welk netwerk u
momenteel verbonden bent, informatie
over de verbinding, en de sterkte van
het signaal.
15
NEDERLANDS
7.2 Handmatig verbinden in Windows Vista
In het volgende voorbeeld wordt gebruik gemaakt van de standaardfunctie “Verbinding met een netwerk
maken” die aanwezig is in Windows Vista met Service Pack 1.
A
Klik op het ‘Netwerk’ pictogram
in het systeemvak en klik op “Er
zijn draadloze netwerken
beschikbaar”.
B
Selecteer het netwerk
“C150APM” in de lijst en klik op
‘Verbinding maken’.
16
NEDERLANDS
C
Geef in het veld
“Beveiligingssleutel of
wachtwoordzin” de standaard
WPA passphrase in (zoals
aangegeven op de onderkant van
uw C150APM) en klik op
‘Verbinding maken’.
D
Nadat verbinding is gemaakt,
kunt u ervoor kiezen om dit
netwerk vast te leggen en er
voortaan automatisch verbinding
mee te maken zodra uw
computer wordt aangezet. Klik
op ‘Sluiten’ om de
verbindingwizard af te sluiten.
E
Om de status van de draadloze
verbinding te controleren, kunt u
op het ‘Netwerk’ pictogram in
het systeemvak klikken. U ziet
hier met welk netwerk u
momenteel verbonden bent,
informatie over de verbinding, en
de sterkte van het signaal.
17
NEDERLANDS
7.3 Automatisch verbinden met behulp van WPS
De Conceptronic C150APM ondersteunt WPS (Wi-Fi Protected Setup, beveiligde instelling draadloos
netwerk). WPS is een standaard waarmee u in enkele eenvoudige stappen veilig een draadloos netwerk
kunt opzetten.
NB:
Om op de C150APM gebruik te kunnen maken van WPS, moeten uw draadloze cliënten (zoals pc's)
zelf ook WPS ondersteunen. Als u een of meer draadloze cliëntcomputers heeft die geen WPS
ondersteunen, raden we u aan handmatig verbinding te maken met de C150APM en de WPAwachtwoordzin te gebruiken die aan de onderkant van het apparaat staat aangegeven. Zie
paragraaf 7.1 of 7.2 voor handmatige aansluiting op het draadloze netwerk.
NB:
Ga voor meer (technische) informatie over WPS naar de volgende website:
http://en.wikipedia.org/wiki/Wi-Fi_Protected_Setup
U kunt op twee manieren een WPS-verbinding maken met de C150APM:
Verbinden met een druk op de knop
Verbinden met een pin-code
WPS – verbinden met een druk op de knop
Voor deze methode moet uw draadloze cliënt over een (virtuele) knop beschikken om verbinding te
kunnen maken met de C150APM.
Sommige draadloze cliënten hebben een echte knop waarmee WPS wordt gestart; andere draadloze
cliënten hebben software met een virtuele WPS-knop.
Volg de onderstaande stappen om via een WPS-knop verbinding te maken met het access point:
A.
Druk aan de achterkant van de C150APM op de WPS-knop; het WLAN/WPS-lampje brandt continu om
aan te geven dat de WPS-procedure is gestart.
B.
Druk op de WPS-knop van uw draadloze cliënt. Dit kan een hardware-knop zijn of een virtuele knop
in de software van de draadloze cliënt.
NB:
De C150APM houdt de WPS-functie 120 seconden lang actief. Tijdens dit proces brandt het
WLAN/WPS-lampje continu. Als er tijdens deze 120 seconden geen verbinding tot stand komt,
gaat het lampje naar zijn oorspronkelijke status en wordt het WPS-proces afgebroken.
Wanneer de WPS-verbinding is gelukt, krijgt het WLAN/WPS-lampje meteen zijn oorspronkelijke status
terug.
De draadloze cliënt heeft nu verbinding met het beveiligde draadloze netwerk van de C150APM.
U kunt meer draadloze WPS-cliënten toevoegen zonder dat de bestaande verbinding met eerder
aangesloten cliënten verloren gaat. Als u meer draadloze WPS-cliënten wilt toevoegen, herhaalt u de
stappen A en B.
18
NEDERLANDS
WPS – verbinden met een pin-code
Als uw draadloze WPS-cliënt geen (virtuele) WPS-drukknop heeft, kunt u een WPS-verbinding maken met
een pin-code.
NB: Om de WPS pin-codefunctie te activeren, heeft u eerst een computer nodig die via een
netwerkkabel met de C150APM verbonden is.
A.
B.
Meld u aan bij de C150BRS4 zoals beschreven in paragraaf 6.1.
Selecteer ‘General Setup’ (Algemene instellingen) gevolgd door ‘Wireless’ (Draadloos) en ‘WPS’.
De “WPS” configuratiepagina wordt getoond.
Op de WPS-configuratiepagina kunt u kiezen voor de drukknop methode (‘Push Button’) of de ‘PIN Code’
methode.
De ‘PIN Code’ methode kan op twee verschillende manieren worden gestart:
1.
De draadloze cliënt genereert een pin-code die in het access point wordt ingevoerd.
In dit geval is de draadloze cliënt de ‘Enrollee’ (aangemeld apparaat) en het access point is de
‘Registrar’ (registrerend apparaat).
A.
Start de draadloze cliënt en zoek de gegenereerde pin-code op, zoals in het onderstaande
voorbeeld:
19
NEDERLANDS
B.
C.
D.
Zorg dat de “Config Mode” (Config. stand) op de WPS-configuratiepagina op ‘Registrar’ staat.
Geef de door uw draadloze cliënt gegenereerde pin-code in in het veld “Enter Client PIN
Code” (PIN-code van cliënt ingeven).
Klik op de knop ‘Start PIN’.
De C150APM houdt de WPS-functie voor inkomende verbindingen met de aangegeven pin-code 120
seconden lang actief.
E.
Start op uw draadloze cliënt de verbinding met pin-code.
Uw draadloze cliënt maakt nu verbinding met het beveiligde draadloze netwerk van de C150APM.
Wanneer verbinding is gemaakt, sluit de C150APM het WPS-proces af en verandert de WPS Status op
de WPS-configuratiepagina in “Configured” (Geconfigureerd).
Als u meer draadloze WPS-cliënten wilt toevoegen, herhaalt u de stappen A t/m E.
2.
Het access point genereert een pin-code die in de draadloze cliënt moet worden ingevoerd.
In dit geval is de het access point de ‘Enrollee’ (aangemeld apparaat) en de draadloze cliënt is de
‘Registrar’ (registrerend apparaat).
A.
B.
Zorg dat de “Config Mode” op de WPS-configuratiepagina staat ingesteld op ‘Enrollee’ en
noteer de pin-code die wordt aangegeven bij “PIN Code”.
Klik op de knop ‘Start PIN’.
De C150APM houdt de WPS-functie voor inkomende verbindingen met de aangegeven pin-code 120
seconden lang actief.
C.
Geef de door de C150APM gegenereerde pin-code in in de software van uw draadloze cliënt,
stel deze software in op ‘Registrar’ en start de pin-code verbindingsmethode.
Uw draadloze cliënt maakt nu verbinding met het beveiligde draadloze netwerk van de C150APM.
Wanneer verbinding is gemaakt, sluit de C150APM het WPS-proces af en verandert de WPS Status op
de WPS-configuratiepagina in “Configured”.
Als u meer draadloze WPS-cliënten wilt toevoegen, herhaalt u de stappen A t/m C.
20
NEDERLANDS
8. Geavanceerde instellingen
In deze snelstartgids vindt u alleen de basisstappen om uw C150APM in gebruik te nemen. Zie voor
geavanceerde instellingen en uitgebreide uitleg de gebruiksaanwijzing (User's Manual, uitsluitend in het
Engels) op de meegeleverde product-cd.
Doe de product-cd in uw cd/dvd-station, wacht tot het automatische menu verschijnt en selecteer ‘View
User Manual’ (Gebruiksaanwijzing bekijken).
NB:
Om de Engelstalige gebruiksaanwijzing te kunnen bekijken, moet het programma Adobe Reader
op uw computer zijn geïnstalleerd. Als dit niet zo is, selecteert u ‘Install Adobe Reader’ in het
automatische menu (alleen voor Windows).
Veel plezier met uw
Conceptronic 150N Wireless Access Point!
21
ENGLISH
Conceptronic C150APM
Quick Installation Guide
Congratulations on the purchase of your
Conceptronic 150N Wireless Access Point
This quick installation guide gives you a step-by-step explanation of how to install and use the
Conceptronic C150APM.
When you need more information or support for your product, we advise you to visit our Service &
Support website at www.conceptronic.net/support and select one of the following options:
• FAQ
• Downloads
• Contact
: Frequently Asked Questions database
: Manuals, Drivers, Firmware and more downloads
: Contact Conceptronic Support
For general information about Conceptronic products visit the Conceptronic website at
www.conceptronic.net.
The information in this quick installation guide is based on Windows 7 and Vista, but can differ from your
computer when you are using a different operating system.
Note:
This quick installation guide only explains the basic steps to get the C150APM up and running.
For more info about the various functions of the C150APM, please refer to the user manual
(English only) on the included product CD-ROM. Wait for the autorun menu to appear and select
‘View User Manual’.
In order to view the user manual, you will have to have Adobe Reader installed. If you do not
have this installed on your computer, you can select ‘Install Adobe Reader’ from the autorun
menu (Windows only).
Table of contents
1. Package contents
2. Preconfigured settings
3. The C150APM explained
3.1. Front panel
3.2. Back panel
4. Defining the usage of the C150APM
4.1. Access point mode
4.2. Bridge mode
5. Configuring the computer
5.1. Checking the IP address
5.2. Configuring a fixed IP address
22
6. Configuring the C150APM in ‘bridge’ mode
6.1. Logging in
6.2. Create a bridge connection
7. Connecting to the wireless network
7.1. Connecting manually in Windows 7
7.2. Connecting manually in Windows Vista
7.3. Connecting automatically using WPS
8. Advanced configuration settings
ENGLISH
1. Package contents
The following items are present in the package of the Conceptronic 150N Wireless Access Point:
•
•
•
•
•
•
•
Conceptronic C150APM – 150N Wireless Access Point
Power supply 5V DC, 1A
Antenna for wireless connectivity
Network (LAN) cable
Product CD-ROM
This multi language quick installation guide
Warranty card & CE declaration booklet
2. Preconfigured settings
The C150APM is preconfigured with the following settings:
IP address
: 192.168.0.2
Subnet mask
: 255.255.255.0
Default gateway
: 192.168.0.1
Username
: admin
Password
: admin
Note:
We strongly advise to change the password when you configure the C150APM for the first time.
When you are logged in with the steps described in chapter 6.1, you can adjust the password at
the “System Settings” option.
SSID (Wireless network name) : C150APM
Security level
: WPA/WPA2 Mixed mode with AES/TKIP
Security passphrase
: < printed on the productsticker on the bottom of the C150APM >
23
ENGLISH
3. The C150APM explained
3.1 Front panel
1
2
3
Nr
Description
Status
Status Explanation
1
Power LED
OFF
ON
The access point is switched off
The access point is switched on
2
WLAN/WPS LED
OFF
Wireless network is switched off
ON - STEADY
Wireless WPS function is enabled
ON - FLASHING Wireless network activity (sending or receiving data)
3
LAN LED
OFF
LAN port is not connected
ON - STEADY
LAN port is connected
ON - FLASHING LAN port activity (sending or receiving data)
3.2 Back panel
1
2
3
4
Nr
Description
Explanation
1
2
3
Wireless antenna connector
Reset/WPS button
NETWORK (LAN) port
4
Power connection
R-SMA connector for wireless antenna connection
Activate WPS function (short press) or perform a reset (hold)
Connect the access point to your network or to a network
equipped device
Connect the power supply to the access point
24
ENGLISH
4. Defining the usage of the C150APM
Before you can connect the C150APM properly, you need to define the usage of the C150APM.
The C150APM can be used in different environments and each environment requires its own special
configuration:
4.1 Access point mode
If you want to use the C150APM to make your existing wired network wireless, you need to connect (and
configure) the device as ‘access point’.
- Connect the power supply to the power connection on the back of the C150APM and to an available
wall socket. The power LED on the front of the C150APM will lit up .
- Connect the network (LAN) cable to the LAN port on the back panel of the C150APM and to your
network.The LAN LED will light up, indicating that the network cable is connected correctly and the
connection is active.
The C150APM is now running as ‘access point’ in your network. Proceed to chapter 7 to connect a wireless
client to the C150APM.
Note:
By default, the wireless network of the C150APM is secured with WPA-PSK/WPA2-PSK (mixed
mode) encryption. This means you will not have to manually secure the wireless network. Refer
to the user manual (English only) on the included product CD-ROM if you want to manually change
the (security) settings of the C150APM.
4.2 Bridge mode
If you want to use the C150APM to connect a network equipped device (for example: a network printer,
network storage device, mediaplayer or game console) to a wireless network, you need to connect (and
configure) the device as ‘bridge’.
Note:
For the initial configuration of the C150APM as ‘bridge’, we strongly suggest to connect the access
point to your existing network (router, switch, etc.) or directly to your computer.
- Connect the power supply to the power connection on the back of the C150APM and to an available
wall socket. The power LED on the front of the C150APM will lit up.
- Connect the network (LAN) cable to the LAN port on the back panel of the C150APM and to your
network or computer. The LAN LED will light up, indicating that the network cable is connected
correctly and the connection is active.
The C150APM is now active, but running in ‘access point’ mode.
Proceed to chapter 5 to prepare your computer to configure the C150APM.
Proceed to chapter 6 to configure the C150APM in ‘bridge’ mode.
25
ENGLISH
5. Configuring the computer
The access point is configured with a fixed IP address. In order to configure the access point, your
computer needs to have an IP addres in the same IP range as the access point.
Note:
The fixed IP address of the access point is: 192.168.0.2
5.1 Checking the IP address
You can check if your computer is having an IP address in the same IP range as the access point with the
‘Command Prompt’ of Windows. This example is based on Windows 7 and Vista with Service Pack 1.
Windows 7 and Vista need administrative rights to perform the steps below, which are explained in the
following steps.
A.
Click on ‘Start’, ‘All Programs’, ‘Accessories’, right click on ‘Command Prompt’ and select ‘Run as
administrator’.
You might get a warning message, which you will need to accept by clicking ‘Continue’ or ‘Yes’.
The Command Prompt window will appear. Make sure the ‘Command Prompt’ title bar mentions
“Administrator: Command Prompt”. When “Administrator” is not mentioned, you do not have the
necessary administrative rights for these steps and you will need to perform step A again.
B.
Enter the command ‘IPCONFIG’ and press ‘ENTER’ on your keyboard.
B
You should see the following information:
IPv4 Address
: 192.168.0.xxx (where xxx can vary between 3 ~ 254).
Subnet Mask
: 255.255.255.0
26
ENGLISH
If the information above matches your configuration you can continue configuring the access point in
chapter 5.
If the information above does not match your configuration, you temporary need to assign a fixed IP
address to your computer in the same IP range as the access point, in order to configure the access point.
You can find the steps to configure a fixed IP address in chapter 5.2.
5.2 Configuring a fixed IP address
If the IP address of your computer is not in the same IP range as the access point, you need to temporary
assign a fixed IP address in the same IP range to your computer.
With the instructions below you can assign a fixed IP address to your computer.
A.
Click on ‘Start’, go to ‘All Programs’,
‘Accessories’ and choose ‘Run’.
B.
Enter the command ‘NCPA.CPL’ and click on
‘OK’.
B
B
The “Network Connections” window will appear.
C.
Right click on ‘Local Area Connection’ or
‘Wireless Network Connection’ (depending
on the connection you use) and select
‘Properties’.
C
27
ENGLISH
The properties window of your Local Area Connection or Wireless Network Connection will appear.
D.
Select ‘Internet Protocol Version 4
(TCP/IPv4)’ and click on ‘Properties’.
D
D
The properties window of Internet Protocol Version 4
(TCP/IPv4) will appear.
E.
Set the properties to ‘Use the following IP
address:’ and enter the following values in the
available fields:
IP address:
192.168.0.99
Subnet mask:
255.255.255.0
Default gateway: 192.168.0.2
F.
Click on ‘OK’ to save the settings.
G.
Click on ‘OK’ in the Internet Protocol Version 4
(TCP/IPv4) Properties window to save the
settings.
E
F
28
ENGLISH
6. Configuring the C150APM in ‘bridge’ mode
This chapter describes how to configure the C150APM in ‘bridge’ mode.
6.1 Logging in
To configure the C150APM a web based interface is being used. This means you are able to configure the
C150APM on any computer with a web browser.
To log in to the C150APM, follow these steps:
A.
Start your web browser (like: Internet Explorer, Firefox, Safari or Chrome).
B.
Enter the IP address of the access point in the address bar of your web browser.
By default
: http://192.168.0.2/
A pop-up window will be shown asking you for the user name and password.
C
C.
Enter the user name and password and click on ‘OK’ to enter the web based configuration.
Default user name : admin
Default password
: admin
29
ENGLISH
When the user name and password are correct the C150APM will show the main configuration page:
From the main page you can easily choose one of the options in the C150APM web configuration:
-
Home
Basic Settings
WPS Settings
Advanced Settings
Security Settings
Radius Server
MAC Filtering
System Settings
Manage Settings
F/W Upgrade
Restart
Note:
30
: Show the main configuration page
: Adjust the basic access point settings
: Adjust the WPS settings
: Adjust the advanced wireless settings
: Adjust the wireless security settings
: Radius server configuration options
: Enable and configure MAC filtering rules
: Adjust the system settings of the C150APM
: Backup your settings, or set the C150APM to the default settings
: Upgrade the firmware
: Restart the access point
This quick installation guide only explains the required settings for ‘bridge’ mode and the basic
settings for ‘access point’ mode. All other options are explained in the user manual (English only)
on the included product CD-ROM. Wait for the autorun menu to appear and select ‘View User
Manual’.
ENGLISH
6.2 Create a bridge connection
This chapter will guide you step-by-step through the settings of the C150APM which require configuration
for a bridge connection.
Note:
Before you can continue to configure the C150APM in ‘bridge’ mode, you need the following
information of your existing wireless network:
- Network name (SSID)
- Type of used encryption
- Encryption key / passphrase
A.
Click on ‘Basic Settings’ in the left menu of the web configuration.
The “Basic Settings” will be shown on your screen.
B.
C.
Change the ‘Mode’ to ‘Station-Infrastructure’.
Click on the ‘Select Site Survey’ button to find your existing wireless network.
31
ENGLISH
The “Wireless Site Survey” will be shown in a popup window, displaying all found networks in your area.
Note:
D.
If your existing wireless network is not shown, it can be out of range, turned off or hidden.
Check if your existing wireless network is running and use the ‘Refresh’ button to scan again for
wireless networks.
If your wireless network is hidden, it will not be shown in the “Wireless Site Survey”. In that
case, close the “Wireless Site Survey” window and enter the exact network name in the field
‘MAIN ESSID’ at the “Basic Settings” page.
Select your existing wireless network where you want to connect to and click the ‘Connection’
button.
The “Wireless Site Survey” popup will be closed and the selected wireless network name will be shown in
the field ‘MAIN ESSID’ at the “Basic Settings” page.
E.
Note:
F.
32
Click on the ‘Apply’ button to apply the settings.
When changing settings in the configuration of the C150APM you will always be asked to choose
between two options:
- Continue
: Continue to make changes (the changes are not yet saved in the memory).
- Apply
: Apply all changes by saving them to the memory and restart the C150APM.
Click on the ‘Continue’ button to proceed with changing settings.
ENGLISH
G.
Click on ‘Security Settings’ in the left menu of the web configuration.
The “Security Settings” will be shown on your screen.
H.
Select the type of encryption used for your existing wireless network at the ‘Encryption’ dropdown
menu.
If your existing wireless network is secured with WPA:
- Select the type of WPA security at the “WPA Unicast Cipher Suite” section.
- Select the type of encryption key at the “Pre-shared Key Format” section.
- Enter the encryption key at the “Pre-shared Key” section.
If your existing wireless network is secured with WEP:
- Select the encryption key length at the “Key Length” section.
- Select the corresponding key format at the “Key Format” section.
- Enter the encryption key at the “Encryption Key” section.
I.
Click on the ‘Apply’ button to apply the settings.
33
ENGLISH
Note:
J.
When changing settings in the configuration of the C150APM you will always be asked to choose
between two options:
- Continue
: Continue to make changes (the changes are not yet saved in the memory).
- Apply
: Apply all changes by saving them to the memory and restart the C150APM.
Click on the ‘Apply’ button to save the settings in the memory and restart the C150APM.
During the restart, the ‘OK’ button is grayed out and shows a countdown timer. When the restart is
complete, click ‘OK’ to return to the web configuration of the C150APM.
The ‘bridge’ mode configuration is now complete. You can now disconnect the C150APM from your
computer and connect it to the network device where you configured the bridge for.
Note:
If you assigned a temporary fixed IP address to your computer in chapter 5.2, you need to set
your computer back to the original settings. You can follow the steps in chapter 5.2. At step E,
select ‘Obtain an IP address automatically’.
Your Conceptronic 150N Wireless Access Point
is now ready to use as wireless bridge!
34
ENGLISH
7. Connecting to the wireless network
There are two different ways of wirelessly connecting to the C150APM:
Manually.
Automatically using the WPS function.
! IMPORTANT NOTE !
The C150APM is secured with WPA-PSK/WPA2-PSK (mixed mode) encryption by default.
The unique WPA passphrase can be found on the product sticker at the bottom of your C150APM.
Almost every brand/type wireless card uses a different client application. Please refer to the manual of
your wireless network card for information on how to create a connection with a wireless network.
7.1 Connecting manually in Windows 7
In the following example the integrated “Connect to a Network” option from Windows 7 is used.
A
Click on the ‘Network’ icon in the
taskbar to view the list of available
wireless network connections.
B
Select the network “C150APM” from the
list and click on ‘Connect’.
By default the option “Connect
automatically” is selected. This makes
sure the connection is automatically
started each time your computer is
turned on. If you do not want this, you
can unselect this option before clicking
on ‘Connect’.
35
ENGLISH
C
Enter the default WPA passphrase (which
is mentioned on the bottom of the
C150APM) in the “Security key” field
and click on ‘OK’.
D
The client will now start connecting to
the wireless network.
E
To check the status of the wireless
connection, you can click on the
‘Network’ icon in the taskbar. You will
see which network you are currently
connected to, the access you have and
the signal strength of the connection.
36
ENGLISH
7.2 Connecting manually in Windows Vista
In the following example the integrated “Connect to a Network” option from Windows Vista with Service
Pack 1 is used.
A
Click on the ‘Network’ icon in
the system tray and click on
“Wireless networks are
available”.
B
Select the network “C150APM”
from the list and click on
‘Connect’.
37
ENGLISH
C
Enter the default WPA
passphrase (which is mentioned
on the bottom of the C150APM)
in the “Security key or
passphrase” field and click on
‘Connect’.
D
When the connection has been
established, you can choose to
save the network and have it
start automatically each time
your computer is turned on. Click
on ‘Close’ to exit the connection
wizard.
E
To check the status of the
wireless connection, you can
click on the ‘Network’ icon in
the system tray. You will see
which network you are currently
connected to, the access you
have and the signal strength of
the connection.
38
ENGLISH
7.3 Connecting automatically using WPS
The Conceptronic C150APM supports WPS (Wi-Fi Protected Setup). WPS is a standard for easy and secure
establishment of a wireless network. With WPS you can setup and protect your wireless network in just a
few easy steps.
Note:
To use WPS with the C150APM, you need to have a wireless client that supports WPS. If you have
one or more wireless clients without WPS support, it is advised to manually connect to the
C150APM using the preconfigured WPA key as mentioned on the bottom. Refer to chapter 7.1 or
7.2 on how to manually connect to the wireless network.
Note:
For more (technical) information about WPS, refer to the following website:
http://en.wikipedia.org/wiki/Wi-Fi_Protected_Setup
The C150APM supports two ways of activating and establishing a WPS connection:
Push Button technology
PIN Code technology
WPS – Push Button technology
The WPS Push Button technology requires a (virtual) button on the wireless client to establish a
connection between the C150APM and the wireless client.
Some wireless clients use an actual button for activating the WPS Push Button technology; other wireless
clients use a virtual button in their software.
Follow the steps below to activate and establish a WPS connection with the Push Button technology:
A.
Press the WPS button on the back of the C150APM, the WLAN/WPS LED will burn steady indicating
that WPS authentication has started.
B.
Press the WPS button on the wireless client. This can be either a hardware button or a virtual button
in the software of the wireless client.
Note:
The C150APM will keep the WPS authentication active for 120 seconds. During this process, the
WLAN/WPS LED will burn steady. If there is no WPS connection established within 120 seconds,
the LED will return to its original state and WPS authentication will be stopped.
If the WPS authentication is successful, the WLAN/WPS LED will return to its original state.
The wireless client is now connected to the secured wireless network of the C150APM.
You can add more wireless clients without losing the connection to previously connected wireless clients.
If you want to add more wireless clients, you will need to repeat step A and B.
39
ENGLISH
WPS – PIN Code technology
If your wireless client supports WPS but does not have a (virtual) Push button, you can use the PIN Code
technology to establish a WPS connection.
Note:
C.
D.
To activate the WPS PIN Code function, you need a computer with a wired connection to the
C150APM.
Login to the web interface as explained in chapter 6.1.
First select ‘General Setup’, then ‘Wireless’ and finally ‘WPS’.
The “WPS” configuration page will be shown.
In the WPS configuration page, you can trigger the virtual ‘Push Button’ or the ‘PIN Code’ authentication.
The ‘PIN Code’ authentication can be initiated in 2 different ways:
1.
The wireless client will provide the PIN code, which will be entered in the access point.
In this situation, the wireless client will be the ‘Enrollee’ and the access point will be the
‘Registrar’.
A.
40
Start the wireless client and search for the provided PIN code, like shown in below example:
ENGLISH
B.
C.
D.
Make sure the “Config Mode” at the WPS configuration page is set to ‘Registrar’.
Enter the PIN Code given by your wireless client in the “Enter Client PIN Code” field.
Click the ‘Start PIN’ button.
The C150APM will keep the WPS authentication for incoming connections with the given PIN code
active for 120 seconds.
E.
Initiate the PIN code connection on your wireless client.
Your wireless client will now connect to the secured wireless network of the C150APM. When the
connection is established, the C150APM will stop the WPS authentication check and the WPS Status
in the WPS configuration page will be set to “Configured”.
If you want to add more Wireless Clients with the WPS feature, repeat steps A to E.
2.
The access point will provide the PIN code, which will be entered in the wireless client.
In this situation, the access point will be the ‘Enrollee’ and the wireless client will be the
‘Registrar’.
A.
B.
Set the option “Config Mode” in the WPS configuration page to ‘Enrollee’ and write down the
PIN code mentioned at the section “PIN Code”.
Click the ‘Start PIN’ button.
The C150APM will keep the WPS authentication for incoming connections with the generated PIN
code active for 120 seconds.
C.
Enter the PIN code provided by the C150APM in your wireless client software, set the wireless
client software to ‘Registrar’ and initiate the PIN code connection.
Your wireless client will now connect to the secured wireless network of the C150APM. When the
connection is established, the C150APM will stop the WPS authentication check and the WPS Status
in the WPS configuration page will be set to “Configured”.
If you want to add more Wireless Clients with the WPS feature, repeat steps A to C.
41
ENGLISH
8. Advanced configuration settings
This quick installation guide explains the basic settings to get your C150APM up and running. For advanced
settings or a more detailed explanation, please refer to the user manual (English only) on the included
product CD-ROM.
Place the product CD-ROM into your optical drive, wait for the autorun menu to appear and select ‘View
User Manual’.
Note:
In order to view the user manual, you will have to have Adobe Reader installed. If you do not
have this installed on your computer, you can select ‘Install Adobe Reader’ from the autorun
menu (Windows only).
Enjoy the use of your
Conceptronic 150N Wireless Access Point!
42
ESPAÑOL
C150APM de Conceptronic
Guía de instalación rápida
Felicidades por la compra de su
punto de acceso inalámbrico 150N de Conceptronic
Esta guía de instalación rápida le ofrece una descripción paso a paso acerca de cómo instalar y utilizar el
C150APM de Conceptronic.
Si necesita más información o soporte técnico acerca de su producto, le recomendamos que visite nuestra
página web de Servicio y Soporte www.conceptronic.net/support y seleccione una de las siguientes
opciones:
• FAQ
• Descargas
• Contacto
: Base de datos con las preguntas más frecuentes (FAQ)
: Manuales, drivers, firmware y otras descargas
: Contactar con el servicio técnico de Conceptronic
Para información general sobre los productos de Conceptronic, visite la página web de Conceptronic
www.conceptronic.net.
La información de este manual está basada en Windows 7 y Vista, y las indicaciones podrían no coincidir
exactamente con su caso si utiliza un sistema operativo diferente.
Nota:
Esta guía de instalación rápida sólo explica los pasos básicos para configurar y hacer funcionar el
C150APM.
Para más información acerca de las diferentes funciones del C150APM, consulte el Manual de
usuario (sólo en inglés) que encontrará en el CR-ROM del producto. Espere a que aparezca el
menú autoejecutable y seleccione ‘View User Manual’ (Ver el Manual de usuario).
Para poder ver este manual, deberá tener Adobe Reader instalado. Si no lo tiene instalado en su
ordenador, puede seleccionar “Install Adobe Reader” (Instalar Adobe Reader) en el menú
autoejecutable (sólo Windows).
Contenidos
1. Contenido del paquete
2. Parámetros preconfigurados
3. Descripción del C150APM
3.1. Panel frontal
3.2. Panel posterior
4. Definir el uso del C150APM
4.1. Modo punto de acceso
4.2. Modo puente
5. Configuración del ordenador
5.1. Comprobar la dirección IP
5.2. Configurar una dirección IP
determinada
6. Configurar el C150APM en modo puente
6.1. Iniciar sesión
6.2. Crear una conexión puente
7. Conexión a la red inalámbrica
7.1. Conexión manual con Windows 7
7.2. Conexión manual con Windows Vista
7.3. Conexión automática utilizando WPS
8. Opciones avanzadas de configuración
43
ESPAÑOL
1. Contenido del paquete
El paquete del punto de acceso inalámbrico 150N de Conceptronic contiene los elementos siguientes:
•
•
•
•
•
•
•
C150APM, punto de acceso inalámbrico 150N de Conceptronic
Fuente de alimentación (5V CC, 1 A)
Antena para conectividad inalámbrica
Cable de red (LAN)
CD-ROM del producto
Esta guía de instalación rápida en varios idiomas
Tarjeta de garantía y folleto de declaración de conformidad CE
2. Parámetros preconfigurados
El C150APM está preconfigurado con los siguientes parámetros:
Dirección IP
: 192.168.0.2
Máscara de subred
: 255.255.255.0
Puerta de enlace predeterminada : 192.168.0.1
Nombre de usuario
: admin
Contraseña
: admin
Nota:
Se recomienda encarecidamente cambiar la contraseña cuando configure el C150APM por primera
vez. Una vez haya iniciado sesión siguiendo los pasos descritos en el apartado 6.1, podrá cambiar
la contraseña en la opción “System Settings” (Configuración del sistema).
SSID (nombre de la red inalámbrica) : C150APM
Nivel de seguridad
: Modo mixto WPA/WPA2 con AES/TKIP
Frase secreta
: < Impresa en la etiqueta del producto situada en la parte inferior del
C150APM >
44
ESPAÑOL
3. Descripción del C150APM
3.1 Panel frontal
1
2
3
Nº
Descripción
Estado
Descripción del estado de los LED
1
LED de encendido
OFF
ON
El punto de acceso está apagado.
El punto de acceso está encendido.
2
LED WLAN/WPS
OFF
ON - FIJO
ON - PARPADEO
La red inalámbrica está desactivada.
Función WPS inalámbrica habilitada.
Actividad en la red inalámbrica (enviando o recibiendo
datos).
3
LED de LAN
OFF
ON - FIJO
ON - PARPADEO
El puerto LAN no está conectado.
El puerto LAN está conectado.
Actividad en el puerto LAN (enviando o recibiendo datos).
3.2 Panel posterior
1
2
3
4
Nº
Descripción
Explicación
1
2
Conector de la antena inalámbrica
Botón reset/WPS
3
Puerto de red (LAN)
4
Conexión de alimentación
Conector R-SMA para conectar la antena inalámbrica.
Activar la función WPS (pulsación breve) o realizar un
reset (mantener pulsado).
Para conectar el punto de acceso a su red o a un
dispositivo de red.
Para enchufar la fuente de alimentación al punto de
acceso.
45
ESPAÑOL
4. Definir el uso del C150APM
Antes de poder realizar la conexión adecuada del C150APM, deberá determinar el uso que le dará.
El C150APM puede utilizarse en diferentes entornos y cada entorno requiere su propia configuración
especial:
4.1 Modo punto de acceso
Si desea utilizar el C150APM para convertir su red por cable actual en una red inalámbrica, deberá
conectar (y configurar) el dispositivo como “punto de acceso”.
-
Conecte la fuente de alimentación al conector de la parte trasera del C150APM y a un enchufe de pared
disponible. Se encenderá el LED de encendido de la parte frontal del C150APM.
Conecte el cable de red (LAN) al puerto LAN del panel posterior del C150APM y a su red. El LED de LAN
se encenderá, indicando que el cable de red está conectado correctamente y que la conexión está
activa.
El C150APM funciona ahora como punto de acceso en su red. Prosiga con el apartado 7 para conectar un
cliente inalámbrico al C150APM.
Nota:
De forma predeterminada, la red inalámbrica del C150APM está protegida con cifrado WPAPSK/WPA2-PSK (modo mixto). Esto significa que no tendrá que proteger manualmente la red
inalámbrica. Si desea cambiar manualmente los parámetros (incluyendo la protección) del
C150APM, consulte el Manual de usuario (sólo en inglés) que encontrará en el CR-ROM del
producto.
4.2 Modo puente
Si desea utilizar el C150APM para conectar un dispositivo de red (como por ejemplo una impresora o un
dispositivo de almacenamiento en red, un reproductor multimedia o una videoconsola) a una red
inalámbrica, deberá conectar (y configurar) el dispositivo en modo “puente”.
Nota:
-
Para la configuración inicial del C150APM como puente, recomendamos encarecidamente
conectar el punto de acceso a su red existente (router, switch, etc.) o directamente a su
ordenador.
Conecte la fuente de alimentación al conector de la parte trasera del C150APM y a un enchufe de pared
disponible. Se encenderá el LED de encendido de la parte frontal del C150APM.
Conecte el cable de red (LAN) al puerto LAN del panel posterior del C150APM y a su red u ordenador. El
LED de LAN se encenderá, indicando que el cable de red está conectado correctamente y que la
conexión está activa.
El C150APM se encuentra ahora activo, pero funcionando en modo punto de acceso.
Prosiga con el apartado 5 para preparar su ordenador para la configuración del C150APM.
Prosiga con el apartado 6 para configurar el C150APM en modo puente.
46
ESPAÑOL
5. Configuración del ordenador
El punto de acceso está configurado con una dirección IP determinada. Para configurar el punto de
acceso, su ordenador deberá tener una dirección IP que esté dentro del mismo rango que la del punto de
acceso.
Nota:
La dirección IP determinada del punto de acceso es: 192.168.0.2
5.1 Comprobar la dirección IP
Puede comprobar si su ordenador tiene una dirección IP dentro del mismo rango que la del punto de
acceso utilizando la línea de comandos de Windows. Este ejemplo está basado en Windows 7 y Windows
Vista con Service Pack 1. Con Windows 7 y Vista se necesitan derechos de administrador para poder
realizar los pasos siguientes, lo cual se explica a continuación:
A.
Haga clic en “Inicio”, “Todos los programas”, “Accesorios”, haga clic con el botón derecho en
“Línea de comandos” y seleccione “Utilizar como administrador”.
Puede que aparezca un mensaje de aviso, en el que deberá hacer clic en “Continuar” o “Sí”.
A continuación aparecerá la ventana de la línea de comandos. Asegúrese que en la barra de título ponga
“Administrador: línea de comandos”. Si no se menciona “Administrador”, significa que no tiene los
derechos de administrador y no podrá seguir con los pasos siguientes, y deberá realizar el paso A de
nuevo.
B.
Introduzca el comando “IPCONFIG” y pulse la tecla “ENTER” del teclado.
B
Debería ver la información siguiente:
Dirección IPv4
: 192.168.0.xxx (donde xxx puede ser un número entre 3 y 254).
Máscara de subred
: 255.255.255.0
47
ESPAÑOL
Si la información mostrada arriba concuerda con su configuración, puede continuar con la configuración
del punto de acceso en el apartado 5.
Si la información anterior no concuerda con su configuración, para poder configurar el punto de acceso
deberá asignar temporalmente una dirección IP determinada a su ordenador que esté dentro del mismo
rango que la del punto de acceso.
Encontrará los pasos para configurar una dirección IP determinada en el apartado 5.2 siguiente.
5.2 Configurar una dirección IP determinada
Si la dirección IP de su ordenador no está dentro del mismo rango que la del punto de acceso, deberá
asignar temporalmente una dirección IP determinada a su ordenador que sí lo esté.
Con las instrucciones siguientes podrá asignar una dirección IP determinada a su ordenador.
A.
Haga clic en “Inicio”, “Todos los programas”,
“Accesorios” y haga clic en “Ejecutar”.
B.
Introduzca el comando “NCPA.CPL” y pulse
“OK”.
B
B
Aparecerá la ventana de conexiones de red.
C.
Haga clic con el botón derecho en “Conexión
de área local” o en “Conexión de red
inalámbrica” (dependiendo del tipo de
conexión que utilice) y seleccione
“Propiedades”.
C
48
ESPAÑOL
Aparecerá la ventana de propiedades de la conexión de área local o de la conexión de red inalámbrica.
D.
Seleccione la “Versión 4 del protocolo de
Internet (TCP/IPv4)” y haga clic en
“Propiedades”.
D
D
Aparecerá la ventana de propiedades de la Versión 4
del protocolo de Internet (TCP/IPv4).
E.
En la página de propiedades, seleccione
“Utilizar la siguiente dirección IP:”
Dirección IP:
192.168.0.99
Máscara de subred: 255.255.255.0
Puerta de enlace predeterminada:
192.168.0.2
F.
Haga clic en “OK” para guardar la
configuración.
G.
Haga clic en “OK” en la ventana de
propiedades del Protocolo de Internet Versión 4
(TCP/IPv4) para guardar la configuración.
E
F
F
49
ESPAÑOL
6. Configurar el C150APM en modo “puente”
Este capítulo describe cómo configurar el C150APM en modo “puente”.
6.1 Iniciar sesión
La configuración del C150APM se realiza a través de Internet. Esto significa que deberá configurar el
C150APM con un ordenador que disponga de navegador de Internet.
Para iniciar sesión en el C150APM, siga los siguientes pasos:
A.
Inicie su navegador de Internet (como Internet Explorer, Firefox, Safari o Chrome).
B.
Introduzca la dirección IP del punto de acceso en la barra de direcciones de su navegador de
Internet.
Predeterminado:
: http://192.168.0.2/
Aparecerá una ventana que le pedirá que introduzca el nombre de usuario y la contraseña.
C
C.
50
Introduzca el nombre de usuario y la contraseña y haga clic en “OK” para acceder a la página de
configuración vía web.
Nombre de usuario predeterminado
: admin
Contraseña predeterminada
: admin
ESPAÑOL
Si el nombre de usuario y la contraseña son correctos, el C150APM mostrará la página de configuración
principal:
Desde la página principal podrá escoger fácilmente una de las opciones de la configuración vía web del
C150APM:
-
Home (Principal)
Basic Settings (Configuración básica)
WPS Settings (Configuración WPS)
Advanced Settings (Configuración avanzada)
Security Settings (Configurar protección)
Radius Server (Servidor Radius)
MAC Filtering (Filtrado de MAC)
System Settings (Configuración del sistema)
Manage Settings (Gestión de configuración)
- F/W Upgrade (Actualización de firmware)
- Reiniciar
Nota:
:
:
:
:
:
:
:
:
:
Muestra la página de configuración principal.
Ajustar los parámetros básicos del punto de acceso.
Ajustar los parámetros de WPS.
Ajustar la configuración inalámbrica avanzada.
Ajustar los parámetros de seguridad inalámbrica.
Configurar las opciones del servidor Radius.
Habilitar y configurar las reglas de filtrado de MAC.
Ajustar los parámetros de sistema del C150APM.
Realizar copia de seguridad de la configuración, o
restaurar la configuración predeterminada del C150APM.
: Realizar la actualización del firmware.
: Reiniciar el punto de acceso.
En esta guía de instalación rápida sólo se explican los parámetros necesarios para configurar el
modo “puente" y los parámetros básicos de la configuración del modo “punto de acceso”. Todas
las demás opciones se explican en el manual del usuario (sólo en inglés) que encontrará en el CDROM del producto. Espere a que aparezca el menú autoejecutable y seleccione ‘View User
Manual’ (Ver el Manual de usuario).
51
ESPAÑOL
6.2 Crear una conexión puente
Este apartado le guiará paso a paso para configurar los parámetros del C150APM necesarios para realizar
una conexión puente.
Nota:
Antes de poder continuar con la configuración del C150APM en modo puente, necesitará la
siguiente información sobre su red inalámbrica actual:
- Nombre de la red (SSID)
- Tipo de cifrado utilizado
- Clave de cifrado / frase secreta
A.
Haga clic en “Basic Settings” (Configuración básica) en el menú de la izquierda de la página de
configuración vía web.
Aparecerá en su pantalla el menú de configuración básica.
B.
C.
Cambie el “Mode” a “Station-Infrastructure” (Estación-Infraestructura).
Haga clic en el botón “Select Site Survey” para buscar su red inalámbrica existente.
Aparecerá el apartado “Wireless Site Survey” en una ventana emergente, donde se mostrarán todas las
redes encontradas en su área.
52
ESPAÑOL
Nota:
D.
Si su red inalámbrica actual no aparece, puede ser que esté fuera de alcance, apagada u oculta.
Compruebe que su red inalámbrica actual esté activada y después pulse el botón “Refresh”
(Actualizar) para volver a buscar redes inalámbricas.
Si su red inalámbrica está oculta, no aparecerá en el apartado “Wireless Site Survey”. En ese
caso, cierre la ventana “Wireless Site Survey” e introduzca el nombre exacto de la red en el
campo “MAIN ESSID” (ESSID PRINCIPAL) en la página “Basic Settings” (Configuración básica).
Seleccione la red inalámbrica existente a la que quiera conectarse y haga clic en el botón
“Connection” (Conexión).
La ventana emergente “Wireless Site Survey” se cerrará y en el campo “MAIN ESSID” (ESSID PRINCIPAL)
de la página “Basic Settings” (Configuración básica) se mostrará el nombre de la red inalámbrica
seleccionada.
E.
Nota:
F.
Haga clic en el botón “Apply” para aplicar la configuración.
Cuando realice cambios en la configuración del C150APM, siempre se le pedirá que escoja una de
las siguientes dos opciones:
- Continue
: Continuar realizando cambios (los cambios todavía no están guardados en la
memoria).
- Apply
: Aplicar todos los cambios guardándolos en la memoria y reiniciar el C150APM.
Para continuar realizando cambios, haga clic en el botón “Continue” (Continuar).
53
ESPAÑOL
G.
Haga clic en “Security Settings” (Configurar protección) en el menú de la izquierda de la página de
configuración vía web.
Aparecerá en su pantalla el menú “Security Settings”.
H.
En el menú desplegable “Encryption” (Cifrado), seleccione el tipo de cifrado utilizado en su red
inalámbrica actual.
Si su red inalámbrica actual está protegida mediante WPA:
- Seleccione el tipo de protección WPA en la sección “WPA Unicast Cipher Suite”.
- Seleccione el tipo de clave de cifrado en la sección “Pre-shared Key Format” (Formato de la
clave pre-compartida).
- Introduzca la clave de cifrado en la sección “Pre-shared Key” (Clave pre-compartida).
Si su red inalámbrica actual está protegida mediante WEP:
- Seleccione la longitud de la clave de cifrado en la sección “Key Length” (Longitud de la clave).
- Seleccione el formato de clave correspondiente en la sección “Key Format” (Formato de la
clave).
- Introduzca la clave de cifrado en la sección “Encryption Key” (Clave de cifrado).
I.
Haga clic en el botón “Apply” (Aplicar) para aplicar la configuración.
54
ESPAÑOL
Nota:
Cuando realice cambios en la configuración del C150APM siempre se le pedirá que escoja una de
las siguientes dos opciones:
- Continue
: Continuar realizando cambios (los cambios todavía no están guardados en la
memoria).
- Apply
: Aplicar todos los cambios guardándolos en la memoria y reiniciar el C150APM.
J. Haga clic en el botón “Apply” para guardar la configuración en la memoria y reiniciar el C150APM.
Durante el reinicio, el botón “OK” aparecerá en gris y se mostrará el tiempo restante de reinicio. Una vez
finalizado el reinicio, haga clic en “OK” para volver a la configuración vía web del C150APM.
Se ha completado la configuración del modo bridge. Ahora puede desconectar el C150APM de su ordenador
y conectarlo al dispositivo de red para el cual ha configurado el modo puente.
Nota:
Si ha asignado una dirección IP determinada temporal a su ordenador en el apartado 5.2, deberá
volver a configurar su ordenador con la configuración original. Siga los mismos pasos que en el
apartado 5.2. En el paso E, seleccione “Obtener la dirección de IP automáticamente”.
¡Su punto de acceso inalámbrico 150N de Conceptronic
ya está listo para ser utilizado como puente inalámbrico!
55
ESPAÑOL
7. Conexión a la red inalámbrica
Existen dos formas de conectarse de forma inalámbrica al C150APM:
Manualmente.
Automáticamente utilizando la función WPS.
¡ NOTA IMPORTANTE !
De forma predeterminada el C150APM está protegido con cifrado WPA-PSK/WPA2-PSK (modo
mixto). Encontrará la frase secreta WPA en la etiqueta situada en la parte inferior de su C150APM.
Casi todas las marcas o tipos de tarjetas inalámbricas utilizan aplicaciones de cliente distintas. Consulte la
información del manual de su tarjeta de red inalámbrica acerca de cómo crear una conexión con una red
inalámbrica.
7.1 Conexión manual con Windows 7
En el siguiente ejemplo se utiliza la opción integrada “Conectarse a una red” de Windows 7.
A
Haga clic en el icono “Red” de la barra
de tareas para ver la lista de conexiones
a redes inalámbricas disponibles.
B.
Seleccione la red “C150APM” de la lisa y
haga clic en “Conectar”.
De forma predeterminada estará
seleccionada la opción "Conectarse
automáticamente". Esto hace que la
conexión se realice automáticamente
cada vez que encienda el ordenador. Si
no desea que esto ocurra, desactive esta
opción antes de hacer clic en
“Conectar”.
56
ESPAÑOL
C.
Introduzca la frase secreta WPA
predeterminada (que encontrará en la
parte inferior del C150APM) en el campo
“Clave de seguridad” y haga clic en
“OK”.
D.
El cliente iniciará ahora su conexión a la
red inalámbrica.
E.
Para comprobar el estado de la conexión
inalámbrica, puede hacer clic en el
icono “Red” de la barra de tareas. Podrá
ver a qué red está actualmente
conectado, el tipo de acceso y el nivel
de la señal de conexión.
57
ESPAÑOL
7.2 Conexión manual con Windows Vista
En el siguiente ejemplo se utiliza la opción “Conectarse a una red” de Windows Vista con Service Pack 1.
A
Haga clic en el icono de red de la
bandeja del sistema y haga clic
en “Hay disponibles redes
inalámbricas”.
B.
Seleccione la red “C150APM” de
la lisa y haga clic en “Conectar”.
58
ESPAÑOL
C.
Introduzca la frase secreta WPA
predeterminada (que encontrará
en la parte inferior del C150APM)
en el campo “Clave o frase de
seguridad” y haga clic en
“Conectar”.
D.
Una vez se ha establecido la
conexión, puede guardar la red y
hacer que se inicie
automáticamente cada vez que
encienda el ordenador. Haga clic
en “Cerrar” para salir del
asistente de conexión.
E.
Para comprobar el estado de la
conexión inalámbrica, puede
hacer clic en el icono de red de
la bandeja del sistema. Podrá ver
a qué red está actualmente
conectado, el tipo de acceso y el
nivel de la señal de conexión.
59
ESPAÑOL
7.3 Conexión automática utilizando WPS
El C150APM de Conceptronic es compatible con la función WPS (configuración Wi-Fi protegida). La función
WPS es un procedimiento para establecer una red inalámbrica de forma fácil y segura. Con esta función
podrá configurar y proteger su red inalámbrica siguiendo tan sólo unos pasos muy sencillos.
Nota:
Para usar la función WPS con el C150APM, deberá tener un cliente inalámbrico compatible con
dicha función. Si tiene uno o más clientes inalámbricos que no son compatibles con la función
WPS, se recomienda que se conecte al C150APM manualmente utilizando la clave WPA
preconfigurada que aparece en la base del C150APM . Consulte el apartado 7.1 ó 7.2 para más
información sobre cómo conectarse manualmente a la red inalámbrica.
Nota:
Si desea más información (general o técnica) sobre la función WPS, puede visitar el sitio web
siguiente:
http://en.wikipedia.org/wiki/Wi-Fi_Protected_Setup
El C150APM ofrece dos maneras para activar y establecer una conexión WPS:
Tecnología “Push Button”
Tecnología de código PIN
WPS con la tecnología “Push Button”
La tecnología “Push Button” para WPS requiere un botón (real o virtual) en el cliente inalámbrico para
establecer una conexión entre el C150APM y el cliente inalámbrico.
Algunos clientes inalámbricos utilizan un botón real para activar la tecnología Push Button para WPS,
mientras que otros emplean un botón virtual basado en software.
Siga los pasos siguientes para activar y establecer una conexión WPS con la tecnología “Push Button”:
A.
Pulse el botón WPS en la parte posterior del C150APM; el LED WLAN/WPS se encenderá sin
parpadear, lo que indicará que se ha iniciado la autenticación WPS.
B.
Pulse el botón WPS del cliente inalámbrico. Puede tratarse de un botón real o de un botón virtual en
el software del cliente inalámbrico.
Nota:
El C150APM mantendrá activa la autenticación WPS durante 120 segundos. Durante este proceso,
el LED WLAN/WPS se encenderá sin parpadear. Si no hay conexión WPS durante estos 120
segundos, el LED volverá a su estado inicial y la autenticación WPS se detendrá.
Si la autenticación WPS se ha realizado correctamente, el LED WLAN/WPS volverá a su estado inicial.
El cliente inalámbrico se encuentra ahora conectado a la red inalámbrica protegida del C150APM.
Puede añadir más clientes inalámbricos sin perder la conexión con los clientes inalámbricos anteriores. Si
desea añadir más clientes inalámbricos, deberá repetir los pasos A y B.
60
ESPAÑOL
WPS con tecnología de Código PIN
Si su cliente inalámbrico es compatible con WPS pero no tiene ningún botón “Push Button” real o virtual,
puede utilizar la tecnología de Código PIN para establecer una conexión WPS.
Nota:
A.
B.
Para activar la función Código PIN WPS, necesitará un ordenador con conexión por cable al
C150APM.
Entre en la página de configuración vía web tal como se describe en el apartado 6.1.
Seleccione “General Setup" (Configuración general), luego “Wireless” (Inalámbrica) y finalmente
“WPS”.
A continuación, aparecerá la página de configuración WPS.
En la página de configuración WPS, podrá activar la autenticación con “Push Button” virtual o con código
PIN.
La autenticación con código PIN puede iniciarse de 2 formas diferentes:
1.
El cliente inalámbrico proporcionará el código PIN, el cual deberá ser introducido en el punto de
acceso.
En este supuesto, el cliente inalámbrico será el “Enrollee” (Inscrito) y el punto de acceso será el
“Registrar” (Registrador).
A.
Inicie el cliente inalámbrico y busque el código PIN proporcionado, tal como se muestra en el
ejemplo siguiente:
61
ESPAÑOL
B.
C.
D.
Asegúrese de que el modo de configuración (“Config Mode”) de la página de configuración WPS es
"Registrar”.
Introduzca el código PIN proporcionado por el cliente inalámbrico en el campo “Enter Client PIN
Code” (Introducir código PIN del cliente).
Haga clic en el botón “Start PIN” (Iniciar PIN).
El C150APM mantendrá activa la autenticación WPS para conexiones entrantes con ese código PIN
durante 120 segundos.
E.
Inicie la conexión con código PIN de su cliente inalámbrico.
El cliente inalámbrico se conectará a la red inalámbrica protegida del C150APM. Cuando se haya
establecido conexión, el C150APM detendrá la búsqueda de autenticación WPS y en el estado WPS de
la configuración WPS aparecerá “Configured” (Configurado).
Si desea añadir más clientes inalámbricos con la función WPS, repita los pasos de A a E.
62
ESPAÑOL
2.
El punto de acceso proporcionará el código PIN, el cual deberá ser introducido en el cliente
inalámbrico.
En este supuesto, el punto de acceso será el “Enrollee” (Inscrito) y el cliente inalámbrico será el
“Registrar” (Registrador).
A.
B.
En la página de configuración WPS, en la opción “Config Mode” (Modo de configuración),
escoja “Enrollee” (Inscrito) y anote el código PIN que aparece en la sección “PIN Code”
(Código PIN).
Haga clic en el botón “Start PIN” (Iniciar PIN).
El C150APM mantendrá activa la autenticación WPS para conexiones entrantes con el código
PIN generado durante 120 segundos.
C.
Introduzca el código PIN proporcionado por el C150APM en el software del cliente inalámbrico,
establezca el cliente inalámbrico como “Registrar” (Registrador) e inicie la conexión por
código PIN.
El cliente inalámbrico se conectará a la red inalámbrica protegida del C150APM. Cuando se haya
establecido conexión, el C150APM detendrá la búsqueda de autenticación WPS y en el estado WPS de
la configuración WPS aparecerá “Configured” (Configurado).
Si desea añadir más clientes inalámbricos con la función WPS, repita los pasos de A a C.
63
ESPAÑOL
8. Opciones avanzadas de configuración
Esta guía de instalación rápida explica los pasos básicos para configurar y hacer funcionar el C150APM.
Para una configuración avanzada o para encontrar información más detallada, consulte el Manual de
usuario (sólo en inglés) que encontrará en el CR-ROM del producto.
Introduzca el CD-ROM del producto en la unidad de CD-ROM, espere a que aparezca el menú
autoejecutable y seleccione ‘View User Manual’ (Ver el Manual de usuario).
Nota:
Para poder ver este manual, deberá tener Adobe Reader instalado. Si no lo tiene instalado en su
ordenador, puede seleccionar “Install Adobe Reader” (Instalar Adobe Reader) en el menú
autoejecutable (sólo Windows).
¡Disfrute del uso de su
punto de acceso inalámbrico 150N de Conceptronic!
64
DEUTSCH
Conceptronic C150APM
Schnellinstallationsanleitung
Wir gratulieren Ihnen zum Erwerb Ihres neuen Conceptronic 150N
Wireless Access Point
In dieser Schnellinstallationsanleitung wird Ihnen Schritt für Schritt gezeigt, wie der Conceptronic
C150APM installiert und verwendet wird.
Wenn Sie weitere Informationen oder Support für Ihr Produkt benötigen, besuchen Sie unsere Service &
Support-Website unter www.conceptronic.net/support und wählen Sie eine der folgenden Optionen:
• FAQ
• Downloads
• Kontakt
: Datenbank mit häufig gestellten Fragen
: Anleitungen, Treiber, Firmware und weitere Downloads
: Kontakt mit dem Conceptronic-Support
Allgemeine Informationen über Conceptronic-Produkte finden Sie auf der Conceptronic-Website unter
www.conceptronic.net.
Die Informationen in dieser Anleitung basieren auf Windows 7 und Windows Vista und können variieren,
wenn Sie ein anderes Betriebssystem auf Ihrem Computer verwenden.
Hinweis:
Diese Schnellinstallationsanleitung erklärt lediglich die Grundschritte, die durchgeführt
werden müssen, um den C150APM betriebsbereit zu machen.
Weitere Informationen über die verschiedenen Funktionen des C150APM finden Sie im
Bedienungsanleitung auf der im Lieferumfang enthaltenen CD-ROM (nur in Englisch). Klicken
Sie dazu im Autorun-Menü auf ‚View User Manual [Benutzerhandbuch öffnen]’
Um die komplette Bedienungsanleitung anzuzeigen, brauchen Sie den Adobe Reader. Wenn der
Adobe Reader nicht auf Ihrem Rechner installiert ist, können Sie das Programm installieren,
indem Sie im Autorun-Menü ‚Install Adobe Reader’ wählen (nur für Windows).
Inhaltsverzeichnis
1. Packungsinhalt
2. Voreinstellungen
3. Beschreibung des C150APM
3.1. Vorderseite
3.2. Rückseite
4. Einstellung des Modus für den C150APM
4.1. Access-Point-Modus
4.2. Brücken-Modus
5. Konfiguration des Rechners
5.1. Überprüfen der IP-Adresse
5.2. Konfiguration einer festen IP-Adresse
6. Konfiguration des C150APM im Brücken-Modus
6.1. Anmelden
6.2. Brückenverbindung herstellen
7. Verbindung mit dem Drahtlosnetz
7.1. Manuelle Verbindung unter Windows 7
7.2. Manuelle Verbindung unter Windows Vista
7.3. Automatische Verbindung mit WPS
8. Erweiterte Einstellungen
65
DEUTSCH
1. Packungsinhalt
Der Lieferumfang des Conceptronic 150N Wireless Access Point enthält die folgenden Teile:
•
•
•
•
•
•
•
Conceptronic C150APM – 150N Wireless Access Point
Netzteil 5V GS, 1A
Antenne für drahtlose Konnektivität
Netzwerkkabel (LAN)
Produkt-CD-ROM
Diese mehrsprachige Schnellinstallationsanleitung
Garantiekarte und Broschüre mit CE-Erklärung
2. Voreinstellungen
Der C150APM wird mit den folgenden werkseitigen Voreinstellungen geliefert:
IP-Adresse
Subnet-Maske
Standardgateway
Benutzername
Kennwort
: 192.168.0.2
: 255.255.255.0
: 192.168.0.1
: admin
: admin
Hinweis: Wir empfehlen Ihnen, das Kennwort zu ändern, wenn Sie den C150APM zum ersten Mal
konfigurieren. Wenn Sie sich entsprechend dem in Kapitel 6.1 beschriebenen Verfahren
angemeldet (eingeloggt) haben, können Sie das Kennwort unter der Option „System Settings
[Systemeinstellungen]” ändern.
SSID (Name des Drahtlosnetzes) : C150APM
Sicherheitsstufe
: WPA/WPA2 gemischter Modus mit AES/TKIP
Sicherheits-Passphrase
: < Steht auf dem Produktaufkleber an der Unterseite des C150APM >
66
DEUTSCH
3. Beschreibung des C150APM
3.1 Vorderseite
1
2
3
Nr.
Beschreibung
Status
Status-Erklärung
1
Power LED
AUS
EIN
Der Access Point ist ausgeschaltet.
Der Access Point ist eingeschaltet.
2
WLAN/WPS LED
AUS
Das Drahtlosnetz ist ausgeschaltet.
EIN - DAUERLICHT Die Drahtlos-WPS-Funktion ist aktiviert.
EIN - BLINKT
Aktivität des Drahtlosnetzes (Senden oder Empfangen von
Daten)
3
LAN LED
AUS
LAN-Port ist nicht verbunden
EIN - DAUERLICHT LAN-Port ist verbunden
EIN - BLINKT
Aktivität von LAN-Port (Senden oder Empfangen von
Daten)
3.2 Rückseite
1
2
3
4
Nr.
Beschreibung
Erläuterung
1
2
Stecker f. Drahtlosantenne
Reset/WPS-Schalter
3
Netzwerkanschluss (LAN)
4
Stromanschluss
R-SMA-Stecker für Übertragung via Drahtlosantenne
Zum Aktivieren von WPS-Funktion (kurz drücken) Reset
(gedrückt halten)
Stellt eine Verbindung zwischen dem Access Point zum
Netz oder zu einem mit Netz ausgerüsteten Gerät her
Zum Anschluss des Geräts an die Stromversorgung-
67
DEUTSCH
4. Einstellung des Modus für den C150APM
Bevor Sie mit dem C150APM eine Verbindung aufbauen können, muss der Modus des C150APM festgelegt
werden.
Der C150APM kann in verschiedenen Umgebungen verwendet werden. Jede Umgebung erfordert eine
spezifische Konfiguration:
4.1 Access-Point-Modus
Wenn Sie den C150APM verwenden wollen, um ein bestehendes drahtgebundenes Netz in ein Drahtlosnetz
zu verwandeln, muss das Gerät als ‚Access Point’ konfiguriert und verbunden werden.
- Schließen Sie den Netzanschluss an den Stromanschluss an der Rückseite des C150APM an und stecken
Sie den Stecker in die Steckdose. Die Stromanzeige-LED an der Vorderseite des C150APM leuchtet auf.
- Schließen Sie das LAN-Kabel an den LAN-Port an der Rückseite des C150APM und an das Netzwerk an.
Die LAN-LED leuchtet auf und zeigt damit an, dass das LAN-Kabel korrekt angeschlossen ist und die
Verbindung aktiv ist.
Der C150APM arbeitet jetzt als ‚Access Point’ in dem Netzwerk. Gehen Sie weiter zu Kapitel 7 zum
Anschluss eines Drahtlosclients an den C150APM.
Hinweis: Das Drahtlosnetz des C150APM wird standardmäßig mit der Verschlüsselung WPA-PSK/WPA2PSK (gemischter Modus) abgesichert. Das bedeutet, dass Sie das Drahtlosnetz nicht manuell
abzusichern brauchen. Um die Sicherheitseinstellungen oder andere Einstellungen des C150APM
manuell zu ändern, konsultieren Sie bitte die Bedienungsanleitung auf der mitgelieferten CD-ROM
(nur auf Englisch).
4.2 Brücken-Modus
Wenn Sie den C150APM zum Anschluss eines Geräts mit Netzwerk (zum Beispiel einen Netzwerkdrucker,
ein Netzwerk-Speichermedium, einen Mediaplayer oder eine Spielekonsole) an ein Drahtlosnetz verwenden
wollen, müssen Sie das Gerät als ‚Brücke’ konfigurieren und anschließen.
Hinweis: Für die erste Konfiguration des C150APM als ‚Brücke’ wird unbedingt empfohlen, den Access
Point an Ihr bestehendes Netzwerk (Access Point, Schalter usw.) oder direkt an den Rechner
anzuschließen.
- Schließen Sie den Netzanschluss an den Stromanschluss an der Rückseite des C150APM an und stecken
Sie den Stecker in die Steckdose. Die Stromanzeige-LED an der Vorderseite des C150APM leuchtet auf.
- Schließen Sie das LAN-Kabel an den LAN-Port an der Rückseite des C150APM und an das Netzwerk an.
Die LAN-LED leuchtet auf und zeigt damit an, dass das LAN-Kabel korrekt angeschlossen ist und die
Verbindung aktiv ist.
Der C150APM ist jetzt aktiv, arbeitet aber im ‚Access-Point-Modus’.
Gehen Sie zu Kapitel 5, um den Rechner für die Konfiguration des C150APM vorzubereiten.
Gehen Sie zu Kapitel 6, um den C150APM im ‚Brücken-Modus’ zu konfigurieren.
68
DEUTSCH
5. Konfiguration des Rechners
Für den Access Point wurde eine feste IP-Adresse eingestellt. Um den Access Point zu konfigurieren, muss
die IP-Adresse des Rechners in demselben Bereich wie die IP-Adresse des Access Point liegen.
Hinweis:
Die feste IP-Adresse des Access Point lautet: 192.168.0.2
5.1 Überprüfen der IP-Adresse
Über die ‚Eingabeaufforderung’ von Windows können Sie überprüfen, ob die IP-Adresse des Rechners in
demselben Bereich wie die IP-Adresse des Access Point liegt. Dieses Beispiel basiert auf Windows 7 und
Vista mit Service Pack 1. Bei Windows 7 und Vista benötigen Sie die Administratorrechte, um die im
folgenden Schritte durchzuführen.
A.
Klicken Sie auf ‚Start’, ‚Alle Programme’, ‚Zubehör’, rechtsklicken Sie auf ‚Eingabeaufforderung’
und wählen Sie ‚Als Administrator ausführen’ aus.
Möglicherweise wird eine Warnmeldung angezeigt. Akzeptieren Sie diese, indem Sie auf ‚Weiter’ oder ‚Ja’
klicken.
Es erscheint das Fenster der Eingabeaufforderung. Stellen Sie sicher, dass die Titelleiste der
‚Eingabeaufforderung’ den Text ‚Administrator: Eingabeaufforderung’ aufweist. Wenn ‚Administrator’
nicht aufgeführt wird, haben Sie die erforderlichen Administratorrechte nicht und müssen erneut Schritt A
durchführen.
B.
Geben Sie den Befehl ‚IPCONFIG’ ein und drücken Sie die ‚ENTER’-Taste auf der Tastatur.
B
Es sollten die folgenden Informationen angezeigt werden:
IPv4-Adresse
: 192.168.0.xxx (wobei xxx zwischen 3 ~ 254 liegen kann).
Subnet-Maske
: 255.255.255.0
69
DEUTSCH
Wenn Ihre Konfiguration mit obigen Informationen übereinstimmt, können Sie weitergehen zu Kapitel 5,
um mit der Konfiguration des Access Point fortzufahren
Wenn Ihre Konfiguration nicht mit obigen Informationen übereinstimmt, müssen Sie zur Konfiguration des
Access Point dem Rechner vorübergehend eine feste IP-Adresse zuweisen, die in demselben Bereich wie
die IP-Adresse des Access Point liegen muss:
Die Beschreibung der Schritte zum Konfigurieren einer festen IP-Adresse finden Sie in Kapitel 5.2.
5.2 Konfiguration einer festen IP-Adresse
Wenn die IP-Adresse des Rechners nicht in demselben Bereich wie die des Access Point liegt, müssen Sie
zur Konfiguration des Access Point dem Rechner vorübergehend eine feste IP-Adresse zuweisen, die in
demselben Bereich wie die IP-Adresse des Access Point liegen muss.
Um dem Rechner eine feste IP-Adresse zuzuweisen, befolgen Sie bitte die folgenden Schritte.
A.
Klicken Sie auf ‚Start’, ‚Alle Programme’,
‚Zubehör’ und wählen Sie ‚Ausführen’ aus.
B.
Geben Sie den Befehl ‚NCPA.CPL’ ein und
klicken Sie auf ‚OK’.
B
B
Das Fenster ‚Netzwerkverbindungen’ wird
geöffnet.
C.
Rechtsklicken Sie auf ‚LAN-Verbindung’ oder
‚Drahtlose Netzwerkverbindung’ (je nach
verwendeter Verbindungsart) und wählen Sie
‚Eigenschaften’.
C
70
DEUTSCH
Das Eigenschaftenfenster der LAN-Verbindung bzw. Drahtlosverbindung wird angezeigt.
D.
Wählen Sie ‚Internet Protocol Version 4
(TCP/IPv4)’ und klicken Sie auf
‚Eigenschaften’.
D
D
Das Eigenschaftenfenster der Internet Protocol
Version 4 (TCP/IPv4) wird angezeigt.
E.
Markieren Sie die Option ‚Folgende IP-Adresse
verwenden:’ und geben Sie die folgenden
Werte in die entsprechenden Felder ein:
IP-Adresse:
192.168.0.99
Subnet-Maske:
255.255.255.0
Standardgateway: 192.168.0.2
F.
Klicken Sie auf ‚OK’, um die Einstellungen zu
speichern.
G.
Klicken Sie im TCP/IPv4-Eigenschaftenfenster
auf ‚OK’, um die Einstellungen zu speichern.
E
F
71
DEUTSCH
6. Konfiguration des C150APM im Brücken-Modus
Dieses Kapitel beschreibt die Konfigurieren des C150APM im ‚Brücken-Modus’.
6.1 Anmelden
Für die Konfiguration des C150APM wird eine webbasierende Oberfläche verwendet. Das bedeutet, dass
Sie den C150APM auf einem beliebigen Rechner konfigurieren können, der am C150APM angeschlossen ist
und über einen Internetbrowser verfügt.
Führen Sie folgende Schritte aus, um sich auf dem C150APM anzumelden
A.
Starten Sie den Internetbrowser (z. B. Internet Explorer, Firefox, Safari oder Chrome).
B.
Geben Sie die IP-Adresse des Access Point in die Adresszeile des Internetbrowsers ein.
Standardadresse
: http://192.168.0.2/
Ein Fenster wird angezeigt, in dem Sie aufgefordert werden, Benutzernamen (Username) und
Passwort einzugeben.
C
C.
72
Geben Sie den Benutzernamen und das Passwort ein und klicken Sie auf ‚OK’, um zur
webbasierenden Konfiguration zu gelangen.
Voreingestellter Benutzername:
admin
Voreingestelltes Kennwort :
admin
DEUTSCH
Wenn Benutzername und Passwort korrekt sind, zeigt der C150APM die folgende Startseite an:
Auf der Startseite können Sie eine der vier Möglichkeiten der Webkonfiguration für den C150APM
auswählen:
-
Home (Start)
:
Basic Settings (Grundeinstellungen)
:
WPS Settings (WPS-Einstellungen)
:
Advanced Settings (Erweiterte Einstellungen):
Security Settings (Sicherheitseinstellungen) :
Radius Server
:
MAC Filtering (MAC-Filter)
:
System Settings (Systemeinstellungen)
:
Manage Settings (Einstellungen verwalten) :
- F/W Upgrade
- Restart (Neustart)
Zeigt die Startseite des Konfigurationsportals
Ändern der Grundeinstellungen des Access Point
Ändern der WPS-Einstellungen
Ändern der erweiterten Drahtloseinstellungen
Ändern der Drahtlos-Sicherheitseinstellungen
Optionen zur Radius-Server-Konfiguration
Aktivieren und konfigurieren von MAC-Filterregeln
Ändern der Systemeinstellungen des C150APM
Sicherheitskopie der Einstellungen anlegen oder
C150APM auf Standardeinstellungen zurücksetzen.
: Aktualisieren der Firmware
: Neustart des Access Point
Hinweis: Diese Schnellinstallationsanleitung enthält nur Erläuterungen zu den erforderlichen Einstellungen
für den‚Brücken-Modus' und die Grundeinstellungen für den ‚Access-Point-Modus'. Ausführliche
Erläuterungen zu den anderen Optionen finden Sie in der Bedienungsanleitung auf der
mitgelieferten CD-ROM (nur auf Englisch). Klicken Sie dazu im Autorun-Menü auf ‚View User
Manual [Benutzerhandbuch öffnen]’
73
DEUTSCH
6.2 Brückenverbindung herstellen
Dieses Kapitel erläutert alle Schritte zur Einstellung des C150APM für eine Brücken-Verbindung.
Hinweis: Bevor Sie mit der Konfiguration des C150APM im ‚Brücken-Modus’ beginnen können, benötigen
Sie die folgenden Angaben des bestehenden Drahtlosnetzes:
- Netzwerkname (SSID)
- Art der verwendeten Verschlüsselung
- Verschlüsselungscode / Passphrase
A.
Klicken Sie im linken Menü auf ‚Basic Settings (Grundeinstellungen)’ .
Die ‚Basic Settings (Grundeinstellungen)’ werden angezeigt.
B.
C.
74
Ändern Sie den ‚Modus’ auf ‚Station-Infrastructure’.
Klicken Sie auf die Schaltfläche ‚Select Site Survey (Standortübersicht wählen)’, um das
bestehende Drahtlosnetz auszuwählen.
DEUTSCH
Das Popup-Fenster ‚Wireless Site Survey’ mit den in der Umgebung bestehenden Netzen wird angezeigt.
Hinweis:
D.
Wenn Ihr Drahtlosnetz nicht angezeigt wird, liegt es möglicherweise außerhalb des Bereichs,
ist ausgeschaltet oder ausgeblendet.
Prüfen Sie, ob Ihr Drahtlosnetz eingeschaltet ist und klicken Sie auf die Schaltfläche ‚Refresh
(Aktualisieren)’, um erneut nach bestehenden Drahtlosnetzen zu suchen.
Wenn Ihr Drahtlosnetz ausgeblendet ist, wird es nicht unter ‚Wireless Site Survey’ angezeigt.
Schließen Sie in dem Fall das Fenster ‚Wireless Site Survey’ und geben Sie im Feld ‚MAIN
ESSID’ unter ‚Basic Settings’ den exakten Namen des Netzes ein.
Wählen Sie das bestehende Drahtlosnetz, mit dem eine Verbindung hergestellt werden soll und
klicken Sie auf die Schaltfläche ‚Connection (Verbindung)’.
Das Fenster ‚Wireless Site Survey’ wird geschlossen und der gewählte Netzwerkname wird im Feld ‚MAIN
ESSID’ auf der Seite ‚Basic Settings’ angezeigt.
E.
Klicken Sie auf die Schaltfläche ‚Apply (Übernehmen)’, um die Einstellungen zu übernehmen.
Hinweis:
F.
Bei Änderung der Konfigurationseinstellungen des C150APM werden Sie jedes Mahl zur Wahl
zwischen zwei Optionen aufgefordert:
- Continue (Weiter)
: Weitere Änderungen vornehmen (die Änderungen wurden noch
nicht gesichert).
- Apply (Übernehmen) : Alle Änderungen übernehmen, indem Sie im Speicher gesichert
werden, und den C150APM neu starten.
Klicken Sie auf die Schaltfläche ‚Continue’, um mit der Änderung der Einstellungen fortzufahren.
75
DEUTSCH
G.
Klicken Sie im linken Menü auf ‚Security Settings (Sicherheitseinstellungen)’ .
Die ‚Security Settings (Sicherheitseinstellungen)’ werden angezeigt.
H.
Wählen Sie die Verschlüsselungsart, die für die bestehende Drahtlosnetz verwendet wird, aus der
Liste ‚Encryption (Verschlüsselung)’ aus.
Wenn das bestehende Drahtlosnetz mit WPA gesichert ist:
- Wählen Sie die Art der WPA-Sicherheit unter ‚WPA Unicast Cipher Suite’.
- Wählen Sie die Art des Verschlüsselungscodes unter ‚Pre-shared Key Format’.
- Geben Sie die Art des Verschlüsselungscodes unter ‚Pre-shared Key’ ein.
Wenn das bestehende Drahtlosnetz mit WEP gesichert ist
- Wählen Sie die Länge des Verschlüsselungscodes unter ‚Key Length’.
- Wählen Sie das entsprechende Codeformat unter ‚Key Format’.
- Geben Sie den Verschlüsselungscode unter ‚Encryption Key’ ein.
I.
Klicken Sie auf die Schaltfläche ‚Apply (Übernehmen)’, um die Einstellungen zu übernehmen.
76
DEUTSCH
Hinweis:
J.
Bei Änderung der Konfigurationseinstellungen des C150APM werden Sie jedes Mahl zur Wahl
zwischen zwei Optionen aufgefordert:
Continue (Weiter)
: Weitere Änderungen vornehmen (die Änderungen wurden noch
nicht gesichert).
Apply (Übernehmen) : Alle Änderungen übernehmen, indem Sie im Speicher gesichert
werden, und den C150APM neu starten.
Klicken Sie auf die Schaltfläche ‚Apply (Übernehmen)’, um die Einstellungen zu übernehmen und
den C150APM neu zu starten.
Während des Neustarts wird die ‚OK’-Schaltfläche grau angezeigt und enthält einen Zähler. Wenn der
Neustart abgeschlossen ist, klicken Sie auf ‚OK, um zur Konfigurationsseite des C150APM zurückzukehren.
Die Konfiguration des ‚Brücke-Modus’ ist damit abgeschlossen. Sie können jetzt den C150APM vom Rechner
abnehmen und an das Netzwerkgerät anschließen, für das die Brücke konfiguriert wurde.
Hinweis:
Wenn dem Rechner vorrübergehend eine feste IP-Adresse zugewiesen wurde, wie in Kapitel
5.2 erklärt, muss der Rechner auf die ursprüngliche Einstellungen zurückgesetzt werden.
Befolgen Sie dazu die Schritte, die in Kapitel 5.2 beschrieben werdem. Bei Schritt E wählen
Sie die Option ‚IP-Adresse automatisch beziehen’.
Ihr Conceptronic 150N Wireless Access Point
kann jetzt als Drahtlosbrücke verwendet werden!
77
DEUTSCH
7. Verbindung mit dem Drahtlosnetz
Die drahtlose Verbindung mit dem C150APM kann auf zwei verschiedene Arten eingerichtet werden:
Manuell
Automatisch mit der WPS-Funktion
! WICHTIGER HINWEIS!
Der C150APM ist standardmäßig mit WPA-PSK/WPA2-PSK (gemischter Modus) verschlüsselt.
Die für jedes Gerät spezifische WPA-Passphrase steht auf dem Produktaufkleber an der Unterseite
des C150APM.
Für die verschiedenen Marken/Arten von Wireless-Karten werden unterschiedliche Client-Anwendungen
verwendet. Informationen über das Erstellen einer Verbindung mit einem drahtlosen Netzwerk finden Sie
im Handbuch Ihrer Wireless-Netzwerkkarte.
7.1 Manuelle Verbindung unter Windows 7
Im folgenden Beispiel wird die in Windows 7 integrierte Option „Connect to a Network [Verbindung mit
einem Netzwerk]” verwendet.
A
Klicken Sie auf das Symbol ‚Network
[Netzwerk]’ in der Taskleiste. Daraufhin
wird eine Liste der verfügbaren
drahtlosen Netzwerkverbindungen
angezeigt.
B
Wählen Sie aus dieser Liste das Netzwerk
„C150APM” und klicken Sie auf
‚Connect [Verbinden]’.
Standardmäßig wird die Option
„Connect automatically [Automatisch
verbinden]” ausgewählt. Damit wird
sichergestellt, dass die Verbindung jedes
Mal automatisch hergestellt wird, wenn
der Rechner eingeschaltet wird. Wenn
Sie dies nicht möchten, können Sie diese
Option deaktivieren, bevor Sie auf
‚Connect [Verbinden]’ klicken.
78
DEUTSCH
C
Geben Sie die Standard-WPA-Passphrase
(auf dem Aufkleber an der Unterseite
des C150APM) im Feld „Security key
[Sicherheitsschlüssel]” ein und klicken
Sie auf ‚OK’.
D
Der Client beginnt jetzt, eine
Verbindung mit dem Drahtlosnetz
aufzubauen.
E
Um den Status der drahtlosen
Verbindung zu überprüfen, können Sie
auf das Netzwerksymbol in der
Taskleiste klicken. Daraufhin wird
angezeigt, mit welchem Netzwerk
gegenwärtig eine Verbindung besteht,
welchen Zugriff Sie haben und welche
Signalstärke die Verbindung hat
79
DEUTSCH
7.2 Manuelle Verbindung unter Windows Vista
Im folgenden Beispiel wird die in Windows Vista mit Service Pack 1 integrierte Option „Connect to a
Network [Verbindung mit einem Netzwerk]” verwendet.
A
Klicken Sie auf das
Netzwerksymbol in der
Systemablage und dann auf
„Wireless networks are
available [Drahtlose Netzwerke
verfügbar]”.
B
Wählen Sie aus dieser Liste das
Netzwerk „C150APM” und
klicken Sie auf ‚Connect
[Verbinden]’.
C
Geben Sie die Standard-WPAPassphrase (auf dem Aufkleber
an der Unterseite des C150APM)
im Feld „Security key or
passphrase
[Sicherheitsschlüssel oder
Passphrase]” ein und klicken Sie
auf ‚Verbinden’.
80
DEUTSCH
D
Sobald die Verbindung
hergestellt wurde, können Sie
das Netzwerk speichern und die
Option einstellen, sie jedes Mal
automatisch herzustellen, wenn
der Rechner gestartet wird.
Klicken Sie auf ‚Close
[Schließen]’, um den
Verbindungsassistenten zu
schließen.
E
Um den Status der drahtlosen
Verbindung zu überprüfen,
können Sie auf das
Netzwerksymbol in der
Taskleiste klicken. Daraufhin
wird angezeigt, mit welchem
Netzwerk gegenwärtig eine
Verbindung besteht, welchen
Zugriff Sie haben und welche
Signalstärke die Verbindung hat
81
DEUTSCH
7.3 Automatische Verbindung mit WPS
Der C150BRS4 von Conceptronic unterstützt WPS (Wi-Fi geschützte Einstellung). WPS ist ein Standard für
die einfache und sichere Einrichtung eines drahtlosen Netzwerks. Mit WPS können Sie mit wenigen
einfachen Schritten ein drahtloses Netzwerk einrichten und schützen.
Hinweis:
Um WPS mit dem C150APM verwenden zu können, benötigen Sie einen Drahtlosclient, der WPS
unterstützt Wenn Sie einen oder mehrere Wireless Clients haben , die WPS nicht unterstützen,
empfehlen wir, die Verbindung mit dem C150BRS4 mithilfe des vorkonfigurierten WPASchlüssels, der auf der Unterseite angegeben ist, manuell herzustellen. Lesen Sie im Kapitel
7.1 oder 7.2 nach, wie Sie die Verbindung mit dem Drahtlosnetz manuell herstellen können.
Hinweis:
Technische Einzelheiten zu WPS finden Sie im Internet auf folgendem Link:
http://en.wikipedia.org/wiki/Wi-Fi_Protected_Setup
Der C150APM unterstützt zwei Arten zu Aktivierung und Aufbau einer WPS-Verbindung:
Knopfdruck-Methode
PIN-Code-Methode
WPS – Mit Knopfdruck-Methode
Für die WPS-Knopfdruck-Methode ist eine (virtuelle) Taste an Ihrem Drahtlosclient erforderlich, um eine
Verbindung zwischen dem C150APM und dem Drahtlosclient herzustellen.
Einige Drahtlosclients haben eine Taste für die Aktivierung der WPS-Knopfdruck-Methode; andere
verwenden dazu eine virtuelle Taste in ihrer Software.
Führen Sie die folgenden Schritte für die Aktivierung und Einrichtung einer WPS-Verbindung mit der
Knopfdruck-Methode aus:
A.
Drücken Sie die WPS-Taste auf der Rückseite des C150APM. Daraufhin leuchtet die WLAN-/WPS-LEDAnzeige kontinuierlich, was bedeutet, dass die WPS-Authentifizierung gestartet wurde.
B.
Drücken Sie die WPS-Taste am Drahtlosclient. Dies kann eine Hardware-Taste oder eine virtuelle
Taste in der Software des Drahtlosclients sein.
Hinweis:
Der C150APM behält die WPS-Authentifizierung während 120 Sekunden aktiv. Während des
Prozesses leuchtet die WLAN-/WPS-LED-Anzeige kontinuierlich. Wird innerhalb von 120
Sekunden keine WPS-Verbindung hergestellt, kehrt die LED-Anzeige in ihren ursprünglichen
Status zurück und die WPS-Authentifizierung wird gestoppt.
Wenn die WPS-Authentifizierung erfolgreich ist, kehrt die WLAN-/WPS-LED-Anzeige wieder in ihren
ursprünglichen Status zurück.
Jetzt ist der Drahtlosclient mit dem gesicherten drahtlosen Netzwerk des C150APM verbunden.
Sie können weitere Drahtlosclients hinzufügen, wobei die Verbindung der zuvor eingerichteten
Drahtlosclients bestehen bleibt. Wenn Sie weitere Drahtlosclients hinzufügen möchten, wiederholen Sie
die Schritte A und B.
82
DEUTSCH
WPS – Pin-Code-Verfahren
Wenn der Drahtlosclient WPS unterstützt, jedoch keine (virtuelle) Taste hat, können Sie mit der PIN-CodeMethode eine WPS-Verbindung herstellen.
Hinweis:
A.
B.
Um die WPS-PIN-Code-Funktion zu aktivieren, muss der C150APM über ein Kabel mit einem
Rechner verbunden sein.
Melden Sie sich gemäß den Anweisungen im Kapitel 6.1 für die Web-Konfiguration an.
Wählen Sie zuerst ‚General Setup [Allgemeine Einstellungen]’, dann ‚Wireless [Drahtlos]’ und
schließlich ‚WPS’ aus.
Daraufhin wird die WPS-Konfigurationsseite angezeigt.
Auf der WPS-Konfigurationsseite können Sie die virtuelle ‚Knopfdruck’ oder die ‚PIN-Code’Authentifizierung starten.
Die ‚PIN-Code’-Authentifizierung kann auf zwei verschiedene Arten gestartet werden:
1.
Der Drahtlosclient liefert den PIN-Code, der im Access Point eingegeben werden muss.
In dieser Situation ist der Drahtlosclient der ‚Enrollee’ und der Access Point der ‚Registrar’.
A.
Starten Sie den Drahtlosclient und suchen Sie nach dem angegebenen PIN-Code (siehe Beispiel
unten):
83
DEUTSCH
B.
C.
D.
Vergewissern Sie sich, dass „Config Mode” auf der WPS-Konfigurationsseite auf ‚Registrar’
eingestellt ist.
Geben Sie im Feld „Enter Client PIN Code [Client PIN-Code eingeben]“ den PIN-Code ein,
den Sie von dem Drahtlosclient erhalten haben.
Klicken Sie auf die Schaltfläche ‚Start PIN [PIN starten]’.
Der C150APM hält die WPS-Authentifizierung für eingehende Verbindungen mit dem eingegebenen
PIN-Code während 120 Sekunden aktiv.
E.
Initiieren Sie die PIN-Code-Verbindung auf dem Drahtlosclient.
Daraufhin verbindet sich der Drahtlosclient mit dem gesicherten drahtlosen Netzwerk des C150APM.
Sobald die Verbindung hergestellt ist, stoppt der C150APM die Prüfung der WPS-Authentifizierung
und der WPS-Status auf der WPS-Konfigurationsseite wird auf „Configured [Konfiguriert]“ gesetzt.
Wenn Sie weitere Drahtlosclients mit der WPS-Funktion hinzufügen wollen, wiederholen Sie die
Schritte A bis E.
2.
Der Access Point liefert den PIN-Code, der im Drahtlosclient eingegeben werden muss.
In dieser Situation ist der Access Point der ‚Enrollee’ und der Drahtlosclient der ‚Registrar’.
A.
B.
Setzen Sie die Option „Config Mode” auf der WPS-Konfigurationsseite auf ‚Enrollee’ und
notieren Sie sich den unter „PIN Code” aufgeführten PIN-Code.
Klicken Sie auf die Schaltfläche ‚Start PIN [PIN starten]’.
Der C150APM hält die WPS-Authentifizierung für eingehende Verbindungen mit dem eingegebenen
PIN-Code während 120 Sekunden aktiv.
C.
Geben Sie den vom C150APM ausgegebenen PIN-Code in der Software Ihres Wireless Clients ein,
setzten Sie die Wireless-Client-Software auf ‚Registrar’ und starten Sie die PIN-CodeVerbindung.
Daraufhin verbindet sich der Drahtlosclient mit dem gesicherten drahtlosen Netzwerk des C150APM.
Sobald die Verbindung hergestellt ist, stoppt der C150APM die Prüfung der WPS-Authentifizierung
und der WPS-Status auf der WPS-Konfigurationsseite wird auf „Configured [Konfiguriert]“ gesetzt.
Wenn Sie weitere Drahtlosclients mit der WPS-Funktion hinzufügen wollen, wiederholen Sie die Schritte A
bis C.
84
DEUTSCH
8. Erweiterte Einstellungen
Diese Schnellinstallationsanleitung erklärt lediglich die Grundschritte, die durchgeführt werden müssen,
um den C150APM betriebsbereit zu machen. Ausführliche Erläuterungen zu den verfügbaren Funktionen
und erweiterten Einstellungen finden Sie in der Bedienungsanleitung auf der mitgelieferten CD-ROM (nur
auf Englisch).
Legen Sie die CD-ROM in das Optiklaufwerk ein und wählen Sie „View User Manual [Benutzerhandbuch
öffnen]” im Autorun-Menü.
Hinweis: Um die komplette Bedienungsanleitung anzuzeigen, brauchen Sie den Adobe Reader. Wenn der
Adobe Reader nicht auf Ihrem Rechner installiert ist, können Sie das Programm installieren,
indem Sie im Autorun-Menü ‚Install Adobe Reader’ wählen (nur für Windows).
Viel Spaß mit Ihrem neuen
Conceptronic 150N Wireless Access Point!
85
FRANÇAIS
C150APM de Conceptronic
Guide d’installation rapide
Nous vous félicitons d’avoir acheté votre
point d’accès sans fil 150N de Conceptronic
Ce guide d'installation rapide vous indiquera de manière détaillée comment installer et utiliser le
C150APM de Conceptronic.
Pour plus d'informations ou pour obtenir de l'aide concernant votre produit, nous vous conseillons de
visiter notre site web de Service et support technique sur www.conceptronic.net/support et de
sélectionner l'une des options suivantes :
• FAQ
• Téléchargements
• Contact
: Foire aux Questions
: Manuels, drivers, microprogramme et autres téléchargements
: Pour contacter le Service Support technique de Conceptronic
Pour plus d'informations générales concernant les produits Conceptronic, visitez le site web de
Conceptronic www.conceptronic.net
Les informations contenues dans ce manuel sont basées sur Windows Vista et Windows 7, et peuvent donc
être différentes de votre ordinateur si vous utilisez un système d’exploitation différent.
Remarque : Ce guide d’installation rapide n’explique que les opérations de base pour mettre en marche
le C150APM et le faire fonctionner. Pour plus d’informations sur les différentes fonctions du
C150APM, veuillez consulter le manuel d’utilisateur (en anglais uniquement) présent sur le
CD-ROM du produit. Attendez que le menu à lancement automatique apparaisse puis
choisissez « View User Manual » [Voir manuel d'utilisateur].
Pour pouvoir visualiser le manuel d’utilisateur, le programme Adobe Reader doit être
installé sur votre ordinateur. S’il n’est pas déjà installé, vous pouvez sélectionner « Install
Adobe Reader » depuis le menu à lancement automatique (uniquement sous Windows).
Table des matières
1. Contenu du coffret
2. Paramètres pré-configurés
3. Explication du C150APM
3.1. Face avant
3.2. Face arrière
4. Détermination du mode de
fonctionnement du C150APM
4.1. Mode « point d’accès »
4.2. Mode « pont »
5. Configuration de l'ordinateur
5.1. Vérification de l’adresse IP
5.2. Configuration d’une adresse IP fixe
86
6. Configuration du C150APM en mode
« pont »
6.1. Connexion
6.2. Créer une connexion « pont »
7. Connexion au réseau sans fil
7.1. Connexion manuelle sous Windows 7
7.2. Connexion manuelle sous Windows
Vista
7.3. Connexion automatique WPS
8. Paramètres de configuration avancée
FRANÇAIS
1. Contenu du coffret
Les éléments suivants sont fournis dans le paquet avec le point d’accès sans fil 150N de Conceptronic :
•
•
•
•
•
•
•
Point d’accès sans fil C150APM – 150N de Conceptronic
Alimentation électrique 5 V CC, 1 A
Antenne pour la connectivité sans fil
Câble de réseau (LAN)
CD-ROM du produit
Guide d'Installation rapide en plusieurs langues
Carte de garantie et brochure de déclaration CE
2. Paramètres pré-configurés
Le C150APM est pré-configuré avec les paramètres suivants :
Adresse IP
: 192.168.0.2
Subnet Mask [Masque de sous-réseau]
: 255.255.255.0
Default Gateway [Passerelle par Défaut]
: 192.168.0.1
Nom d’utilisateur
: admin
Mot de passe
: admin
Remarque : Nous vous recommandons vivement de changer le mot de passe lors de la première
configuration du C150APM. Si vous avez accédé à l’aide des instructions figurant au Chapitre 6.1,
vous pouvez modifier le mot de passe dans l’option « System Settings » [Paramètres du système].
SSID [nom du réseau sans fil]
: C150APM
Niveau de sécurité
: Mode mixte WPA/WPA2 avec AES/TKIP
Phrase génératrice
: < imprimée sur l’étiquette du produit collée sous le C150APM >
87
FRANÇAIS
3. Explication du C150APM
3.1 Face avant
1
Nº Description
État
2
3
Explication de l’état
1 Voyant LED d'alimentation Éteint
Allumé
Le point d’accès est éteint
Le point d’accès est allumé
2 Voyant LED WLAN/WPS
Éteint
Allumé – FIXE
Allumé – CLIGNOTANT
Le réseau sans fil est éteint
Fonction sans fil WPS activée
Activité du réseau sans fil (données en cours
d'envoi ou de réception)
3 Voyant LED LAN
Éteint
Allumé - FIXE
Allumé - CLIGNOTANT
Port LAN déconnecté
Port LAN connecté
Activité du port LAN (données en cours d'envoi ou
de réception)
1
3
3.2 Face arrière
2
4
Nº
Description
Explication
1
2
Connecteur de l’antenne sans fil
Touche de réinitialisation WPS
3
Port Réseau (LAN)
4
Connexion alimentation électrique
Connecteur R-SMA pour le branchement de l’antenne sans fil
Pour activer la fonction WPS (pression rapide) ou réinitialiser
(pression prolongée)
Pour connecter le point d’accès à votre réseau ou à un
dispositif réseau
Pour brancher l'alimentation électrique sur le point d’accès
88
FRANÇAIS
4. Détermination du mode de fonctionnement du C150APM
Avant de connecter correctement le C150APM, vous devrez définir le mode de fonctionnement de ce
dernier.
Le C150APM peut être utilisé dans différents environnements informatiques et chacun exige sa propre
configuration :
4.1 Mode en « point d’accès »
Si vous voulez utiliser le C150APM pour convertir votre réseau câblé existant en un réseau sans fil, vous
devrez connecter (et configurer) le dispositif en mode « point d’accès ».
- Branchez le cordon électrique au connecteur d’alimentation de l’arrière du C150APM et à une prise de
courant disponible. Le voyant LED de la face avant du C150APM s’allumera.
- Connectez le câble de réseau (LAN) au port LAN de la face arrière du C150APM et à votre réseau. Le
voyant LED LAN s’allumera pour indiquer que le câble de réseau est correctement connecté et que la
connexion est active.
Le C150APM fonctionne alors en mode « point d’accès » sur votre réseau. Consultez le chapitre 7 pour
connecter un poste client sans fil au C150APM.
Remarque : Par défaut, le réseau sans fil du C150APM est sécurisé par un cryptage WPA-PSK/WPA2-PSK
(mode mixte). Cela signifie que vous n’aurez pas à sécuriser manuellement votre réseau sans fil.
Consultez le manuel (uniquement en anglais) sur le CD-ROM fourni si vous préférez modifier
manuellement les paramètres (de sécurité) du C150APM.
4.2 Mode « pont »
Si vous voulez utiliser le C150APM pour connecter un dispositif réseau (par exemple, une imprimante
réseau, un dispositif de stockage en réseau, un lecteur multimédia ou une console de jeux) à un réseau
sans fil, vous devrez connecter (et configurer) le dispositif en mode « pont ».
Remarque : Pour la configuration initiale du C150APM en mode « pont », nous vous recommandons
vivement de connecter le point d’accès à votre réseau déjà existant (router, commutateur, etc.)
ou directement à votre ordinateur.
- Branchez le cordon électrique au connecteur d’alimentation de l’arrière du C150APM et à une prise de
courant disponible. Le voyant LED de la face avant du C150APM s’allumera.
- Connectez le câble de réseau (LAN) au port LAN de la face arrière du C150APM et à votre réseau ou
ordinateur. Le voyant LED LAN s’allumera pour indiquer que le câble de réseau est correctement
connecté et que la connexion est active.
Votre C150APM est alors activé, mais il fonctionne en mode « point d’accès ».
Consultez le chapitre 5 pour configurer le C150APM à travers votre ordinateur.
Consultez le chapitre 6 pour configurer le C150APM en mode « pont ».
89
FRANÇAIS
5. Configuration de l'ordinateur
Le point d’accès est configuré avec une adresse IP fixe. Pour pouvoir configurer le point d’accès, votre
ordinateur doit disposer d’une adresse IP dans le même rang IP que le point d’accès.
Remarque : l’adresse IP fixe de votre point d’accès est 192.168.0.2
5.1 Vérification de l’adresse IP
Vous pouvez vérifier si votre ordinateur dispose d’une adresse IP située dans le même rang IP que le point
d’accès à l’aide de la commande « Invite de commande » de Windows. Cet exemple est extrait de
Windows 7 et de Windows Vista avec Service Pack 1. Windows 7 et Windows Vista requièrent des droits
d’administrateur pour accéder aux écrans figurant ci-dessous et dont les instructions sont les suivantes :
A.
Cliquez sur « Démarrer », « Tous les programmes », « Accessoires », cliquez avec la touche droite
de la souris sur « Invite de Commande » et sélectionnez « Exécuter en tant qu’administrateur ».
Un avis apparaîtra peut-être à l’écran ; vous devrez l’accepter en cliquant sur « Continuer » ou sur
« Oui ».
La fenêtre « Invite de commande » apparaîtra. Vérifiez que la barre supérieure de la fenêtre « Invite de
commande » indique bien « Administrateur : Invite de commande ». Si « Administrateur » n’est pas
indiqué, vous ne disposez pas des droits d’administrateurs nécessaires pour effectuer ces opérations, et
vous devrez recommencer depuis le point A.
B.
Entrez la commande « IPCONFIG » et tapez sur la touche « INTRO » de votre clavier.
B
L’information suivante devrait apparaître à l’écran :
IPv4 Address
: 192.168.0.xxx (xxx pouvant aller de 3 à 254).
Subnet Mask [Masque de sous-réseau]
: 255.255.255.0
90
FRANÇAIS
Si ces données correspondent à votre configuration, vous pouvez continuer à configurer votre point
d’accès au chapitre 5.
Si ces données ne correspondent pas à votre configuration, vous devrez assigner provisoirement à votre
ordinateur une adresse IP fixe dans le même rang IP que le point d’accès afin de pouvoir configurer ce
dernier. Vous pouvez consulter les instructions de configuration d’une adresse IP fixe au chapitre 5.2.
5.2 Configuration d’une adresse IP fixe
Si l’adresse IP de votre ordinateur ne se trouve pas dans le même rang IP que celle du point d’accès, vous
devrez assigner provisoirement à votre ordinateur une adresse IP fixe dans le même rang IP.
Les instructions ci-dessous vous expliquent comment affecter une adresse IP fixe à votre ordinateur.
A.
Cliquez sur « Démarrer », puis « Tous les
Programmes », « Accessoires », et choisissez
« Exécuter ».
B.
Entrez la commande « NCPA.CPL » et appuyez
sur « OK ».
B
B
La fenêtre de « Connexions de Réseau » s’affiche.
C.
Cliquez avec la touche de droite sur «
Connexion de réseau local » ou sur
« Connexion de réseau sans fil » (en fonction
de la connexion que vous utilisez) et
sélectionnez « Propriétés ».
C
91
FRANÇAIS
La fenêtre de propriétés de votre Connexion de Réseau Local ou la Connexion de Réseau Sans Fil s’affiche.
D.
Sélectionnez « Protocole Internet version
4(TCP/IPv4) » et cliquez sur « Propriétés ».
D
D
La fenêtre de propriétés du Protocole Internet Version 4 (TCP/IPv4) s'affiche.
E.
Activez l’option « Utiliser l’adresse IP
suivante » et introduisez les valeurs suivantes
dans les champs disponibles :
IP address :
192.168.0.99
Subnet mask :
255.255.255.0
Default gateway : 192.168.0.2
F.
Cliquez sur « OK » pour garder la configuration.
G.
Cliquez sur « OK » dans la fenêtre de
Propriétés du Protocole Internet Version 4
(TCP/IPv4) pour enregistrer les paramètres.
E
F
92
FRANÇAIS
6. Configuration du C150APM en mode « pont »
Ce chapitre explique comment configurer le C150APM en mode « pont ».
6.1 Connexion
La configuration du C150APM utilise une interface basée sur Internet. Cela signifie que vous pouvez
configurer le C150APM depuis n'importe quel ordinateur disposant d'un navigateur Internet.
Pour vous connecter au C150APM, procédez comme suit :
A.
Lancez votre navigateur Internet (par exemple Internet Explorer, Firefox, Safari ou Chrome).
B.
Indiquez l'adresse IP du point d’accès dans la barre d'adresses de votre navigateur Internet.
L’adresse IP par défaut est : http://192.168.0.2/
Une fenêtre pop-up s'affiche pour vous demander le nom d'utilisateur et le mode de passe.
C
C.
Introduisez le nom d'utilisateur et le mot de passe et cliquez sur « OK » pour entrer dans la
configuration basée sur Internet.
Default user name [Nom d'utilisateur par défaut] : admin
Default password [Mot de passe par défaut] :
admin
93
FRANÇAIS
Si le nom d'utilisateur et le mot de passe sont corrects, le C150APM fera apparaître la page de
configuration suivante :
Depuis la page principale, vous pouvez facilement choisir l'une des options de la configuration Internet du
C150APM :
-
Home [Accueil]
Basic Settings
WPS Settings
Advanced Settings
Security Settings
Radius Server
MAC Filtering
System Settings
Manage Settings
- F/W Upgrade
- Restart
Remarque :
94
:
:
:
:
:
:
:
:
:
Page principale de configuration.
Configuration de base du point d’accès.
Configuration WPS.
Configuration avancée sans fil.
Configuration de sécurité sans fil.
Configuration du serveur Radius.
Activation et configuration des règles de filtre MAC.
Paramètres de système du C150APM.
Sauvegarde de la configuration ou récupération de la configuration par défaut du
C150APM.
: Actualisation du microprogramme.
: Réinitialisation du point d’accès.
Ce guide d’installation rapide explique uniquement les configurations nécessaires pour le
mode « pont » et les configurations basiques pour le mode « point d’accès>. Toutes les
autres options sont expliquées dans le manuel d’utilisateur (uniquement en anglais) inclus
sur le CD-ROM fourni. Attendez que le menu à lancement automatique apparaisse et
sélectionnez « View User Manual » [« Voir manuel d’utilisateur »].
FRANÇAIS
6.2 Créer une connexion « pont »
Ce chapitre vous guide étape par étape dans les paramètres du C150APM nécessaires pour une connexion
configurée en mode « pont ».
Remarque :
Avant de continuer dans la configuration du mode « pont » du C150APM, vous avez besoin de
l’information suivante de votre réseau sans fil existant :
- Network name (SSID) [Nom de réseau (SSID)]
- Type of used encryption [Type de cryptage utilisé]
- Encryption key / passphrase [Code de cryptage / phrase génératrice]
A.
Cliquez sur « Basic Settings » [Configuration de base] du menu de gauche de la page web.
Les paramètres de cette configuration de base apparaîtront à l’écran.
B.
C.
Fixez le « Mode » sur « Station-Infrastructure ».
Cliquez sur la touche « Select Site Survey » [Sélection une détection de site] pour localiser votre
réseau sans fil existant.
95
FRANÇAIS
La détection « Wireless Site Survey » apparaîtra dans une fenêtre pop-up, avec la liste de tous les
réseaux détectés.
Remarque :
D.
Si votre réseau sans fil existant ne figure pas dans la liste, il peut être hors de portée,
éteint ou caché.
Vérifiez si votre réseau sans fil existant est bien allumé et utilisez la touche « Refresh »
[Rafraîchir] pour détecter à nouveau les réseaux sans fil.
Si votre réseau sans fil est caché, il n’apparaîtra pas dans la liste. Dans ce cas, refermez la
fenêtre « Select Site Survey » [Sélection une détection de site] et saisissez le nom exact du
réseau dans le champ « MAIN ESSID » de la page « Basic Settings » [Configuration de base].
Sélectionnez là où vous voulez connecter votre réseau sans fil existant et cliquez sur la touche
« Connection ».
La fenêtre pop-up Select Site Survey » [Sélection une détection de site] se refermera et le nom du réseau
sans fil sélectionné apparaîtra dans le champ « MAIN ESSID » de la page « Basic Settings » [Configuration
de base].
E.
Cliquez sur la touche « Apply » [Appliquer] pour garder la configuration.
Remarque :
F.
96
Chaque fois que les paramètres de configuration du C150APM sont modifiés, l’application
vous demande de choisir parmi ces deux options :
- Continue : Continuez pour faire les modifications (les modifications ne sont pas
encore enregistrées en mémoire).
- Apply
: Appliquez toutes les modifications en les mémorisant et en redémarrant le
C150APM.
Cliquez sur la touche « Continue » pour garder les modifications.
FRANÇAIS
G.
Cliquez sur « Security Settings » [Configuration de sécurité] du menu se trouvant à gauche de la
page web.
Les paramètres de la configuration de sécurité apparaîtront à l’écran.
H.
Sélectionnez le type de cryptage utilisé par votre réseau sans fil existant dans le menu déroulant
« Encryption » [Cryptage].
Si votre réseau sans fil existant est sécurisé avec WPA :
- Sélectionnez le type de sécurité WPA dans le champ « WPA Unicast Cipher Suite ».
- Sélectionnez le type de code de cryptage dans le champ « Pre-shared Key Format ».
- Saisissez le code de cryptage dans le champ « Pre-shared Key ».
Si votre réseau sans fil existant est sécurisé avec WEP :
- Sélectionnez la longueur du code de cryptage dans le champ « Key Length ».
- Sélectionnez le format du code correspondant dans le champ « Key Format ».
- Saisissez le code de cryptage dans le champ « Encryption Key ».
I.
Cliquez sur la touche « Apply » [Appliquer] pour garder la configuration.
97
FRANÇAIS
Remarque :
J.
Chaque fois que les paramètres de configuration du C150APM sont modifiés, l’application
vous demande de choisir parmi ces deux options :
- Continue : Continuez pour faire les modifications (les modifications ne sont pas
encore enregistrées en mémoire).
- Apply
: Appliquez toutes les modifications en les mémorisant et en redémarrant le
C150APM.
Cliquez sur la touche « Apply » [Appliquer] pour mémoriser les paramètres et redémarrer le
C150APM.
Pendant le redémarrage, la touche « OK » apparaît en grisé avec un compte à rebours. Au terme du
redémarrage, cliquez sur « OK » pour revenir au mode de configuration web du C150APM.
La configuration du mode « pont » est maintenant terminée. Vous pouvez déconnecter le C150APM de
votre ordinateur et le connecter au dispositif réseau pour lequel vous avez configuré le pont.
Remarque :
Si vous avez affecté une adresse IP provisoire à votre ordinateur au chapitre 5.2, vous
devez reconfigurer votre ordinateur selon ses paramètres d’origine. Vous pouvez suivre les
instructions du chapitre 5.2. Au point E, sélectionnez « Obtenir automatiquement une
adresse IP ».
Vous pouvez dès à présent utiliser votre point d’accès sans fil 150N de
Conceptronic comme un « pont » sans fil !
98
FRANÇAIS
7. Connexion au réseau sans fil
Il existe deux manières de se connecter sans fil au C150APM :
Manuellement.
Automatiquement en utilisant la fonction WPS.
ATTENTION !
Le C150APM est sécurisé par défaut avec un mode de cryptage WPA-PSK/WPA2-PSK (mode mixte) .
La seule phrase génératrice WPA figure sur l’étiquette collée sous votre C150APM.
Presque tous les types / toutes les marques de cartes réseau sans fil utilisent une application client
différente. Veuillez consulter le manuel de votre carte réseau sans fil pour plus d’informations concernant
la création d’une connexion avec un réseau sans fil.
7.1 Connexion manuelle sous Windows 7
L'exemple suivant se réfère à la fonction intégrée de Windows 7 « Se connecter à un Réseau ».
A
Cliquez sur l'icône « Réseau » dans la
barre des tâches pour voir la liste des
connexions de réseau sans fil
disponibles.
B
Sélectionnez le réseau « C150APM »
dans la liste et cliquez sur
« Connecter ».
Par défaut, l'option « Connecter
automatiquement » est sélectionnée.
Cette option permet de garantir que la
connexion démarre automatiquement
chaque fois que votre ordinateur est
allumé. Si vous ne voulez pas cette
option, désélectionnez-la avant de
cliquer sur « Connecter ».
99
FRANÇAIS
C
Entrez la phrase génératrice WPA par
défaut (indiquée sur l’étiquette collé
sous le C150APM) dans le champ « Code
de sécurité » et cliquez sur « OK ».
D
Le client commence alors à se connecter
au réseau sans fil.
E
Pour vérifier l'état de la connexion sans
fil, vous pouvez cliquer sur l'Icône
« Réseau » dans la barre des tâches.
Vous pouvez y voir sur quel réseau vous
êtes actuellement connecté, l'accès dont
vous disposez et l’intensité du signal de
la connexion.
100
FRANÇAIS
7.2 Connexion manuelle sous Windows Vista
L’exemple suivant se réfère à la fonction intégrée de Windows Vista avec Service Pack 1« Se connecter à
un Réseau ».
A
Cliquez sur l'icône « Réseau » de
votre plateau système et cliquez
sur « Réseaux sans fil
disponibles ».
B
Sélectionnez le réseau
« C150APM » dans la liste et
cliquez sur « Connecter ».
C
Entrez la phrase génératrice WPA
par défaut (indiquée sur
l’étiquette collé sous le
C150APM) dans le champ « Code
de sécurité ou phrase
génératrice » et cliquez sur
« Connecter ».
101
FRANÇAIS
D
Lorsque la connexion est établie,
vous pouvez choisir d'enregistrer
le réseau et de le faire démarrer
automatiquement chaque fois
que votre ordinateur est allumé.
Cliquez sur « Fermer » pour
sortir de l'assistant de connexion.
E
Pour vérifier l'état de la
connexion sans fil, vous pouvez
cliquer sur l'Icône « Réseau »
dans le plateau système. Vous
pouvez y voir sur quel réseau
vous êtes actuellement
connecté, l'accès dont vous
disposez et l’intensité du signal
de la connexion.
102
FRANÇAIS
7.3 Connexion automatique avec WPS
Le C150APM de Conceptronic est compatible avec le standard WPS (Configuration Wi-Fi Protégée). WPS est
une norme pour paramétrer facilement et sécuriser un réseau sans fil. Avec WPS, vous pouvez paramétrer
et protéger votre réseau sans fil en quelques simples clics.
Remarque : Pour utiliser WPS avec le C150APM, vous devez disposer d'un client sans fil compatible avec
la norme WPS. Si vous disposez d'un ou de plusieurs clients sans fil non compatibles avec
WPS, nous vous conseillons de connecter manuellement le C150APM à l'aide du code WPA
pré-configuré indiqué sous le dispositif. Consultez les chapitres 7.1 ou 7.2 pour savoir
comment se connecter manuellement au réseau sans fil.
Remarque : Pour de plus amples informations (techniques) concernant WPS, veuillez consulter le site
web suivant : http://en.wikipedia.org/wiki/Wi-Fi_Protected_Setup
Le C150APM permet d'activer et d'établir une connexion WPS de deux manières :
Technologie de Bouton poussoir (Push Button).
Technologie de Code PIN.
WPS - Technologie de Bouton poussoir (Push Button)
La technologie de Bouton WPS requiert l’existence d’un bouton (réel ou virtuel) sur votre client sans fil
pour établir une connexion entre le C150APM et votre client sans fil.
Certains clients sans fil utilisent un bouton réel pour activer la technologie de Bouton poussoir WPS ;
d'autres clients sans fil utilisent un bouton virtuel dans leur software.
Procédez comme indiqué ci-après pour activer et établir une connexion WPS avec la technologie de
Bouton poussoir :
A.
Appuyez sur le bouton WPS de la face arrière du C150APM, le voyant LED WLAN/WPS s'allume en
continu pour indiquer que l'authentification WPS a commencé.
B.
Appuyez sur le bouton WPS de votre client sans fil. Il peut s'agir soit d'un bouton réel, soit d'un
bouton virtuel du software de votre client sans fil.
Remarque : Le C150APM garde l'authentification WPS active pendant 120 secondes. Pendant ce temps,
le voyant LED WLAN/WPS s'allume en continu. Si aucune connexion WPS n’est établie dans
les 120 secondes, le voyant LED revient à son état d'origine et l’étape d'authentification
WPS s'arrête.
Si l'authentification WPS est réussie, le voyant LED WLAN/WPS revient à son état d'origine.
Le client sans fil est à présent connecté au réseau sans fil sécurisé du C150APM.
Vous pouvez ajouter d'autres clients sans fils sans perdre la connexion avec les clients sans fils déjà
connectés. Si vous souhaitez ajouter d'autres clients sans fil, répétez les étapes A et B.
103
FRANÇAIS
WPS – Technologie de Code Pin.
Si votre client sans fil est compatible avec WPS mais n'a pas de Bouton poussoir réel ou virtuel, vous
pouvez utiliser la technologie de Code Pin pour établir une connexion WPS.
Remarque : Pour activer la fonction de Code Pin WPS, vous aurez besoin d'un ordinateur avec une
connexion câblée vers le C150APM.
A.
B.
Connectez-vous à l'interface web comme indiqué au chapitre 6.1.
Sélectionnez d'abord « General Setup » [Configuration générale], puis « Wireless » [Sans fil], puis
« WPS ».
La page de configuration WPS suivante apparaîtra :
Dans la page de configuration WPS, vous pouvez choisir soit le « Push Button » [Bouton poussoir] virtuel,
soit l'authentification par « PIN Code ».
L'authentification par « PIN Code » peut être lancée de deux manières :
1.
Le client sans fil fournit le code PIN qui sera saisi dans le point d’accès. Dans ce cas, le client sans fil
sera « l’Enrollee » et le point d’accès sera le « Registrar ».
A.
104
Lancez le client sans fil et recherchez le code PIN fourni, comme illustré dans l'exemple ciaprès :
FRANÇAIS
B.
C.
D.
Vérifiez que le « Mode Config » de la page de configuration WPS est bien réglé sur
« Registrar ».
Saisissez le code PIN indiqué par votre client sans fil dans le champ « Enter Client PIN Code »
[Entrer Code PIN de Client].
Cliquez sur la touche « Start PIN ».
Le C150APM conserve l'authentification WPS pour les connexions entrantes avec le code actif PIN
créé pendant 120 secondes.
E.
Initiez la connexion par code PIN sur votre client sans fil.
Votre client sans fil se connecte à présent au réseau sans fil sécurisé du C150APM. Lorsque la
connexion est établie, le C150APM arrête la vérification d'authentification du WPS et le statut WPS
dans la page de configuration WPS est fixé sur « Configured » [Configuré].
Si vous voulez ajouter d'autres clients sans fil dans la fonction WPS, répétez les opérations A à E.
2.
Le point d’accès vous fournit le code PIN qui est saisi dans le client sans fil.
Dans ce cas, le point d’accès sera « l’Enrollee » et le client sans fil sera le « Registrar ».
A.
B.
Fixez l'option « Config Mode » dans la configuration WPS sur « Enrollee » et saisissez le code
PIN indiqué dans le champ « PIN Code ».
Cliquez sur la touche « Start PIN ».
Le C150APM conserve l'authentification WPS pour les connexions entrantes avec le code actif PIN
créé pendant 120 secondes.
C.
Indiquez le code PIN fourni par le C150APM dans votre software client sans fil, fixez le software
client sans fil sur « Registrar » et lancez la connexion de code PIN.
Votre client sans fil se connecte à présent au réseau sans fil sécurisé du C150APM. Lorsque la
connexion est établie, le C150APM arrête la vérification d'authentification du WPS et le statut WPS
dans la page de configuration de WPS est fixé sur « Configured » [Configuré].
Si vous voulez ajouter d'autres clients sans fil avec la fonction WPS, répétez les étapes A à C.
105
FRANÇAIS
8. Paramètres de configuration avancée
Ce guide d’installation rapide explique les opérations de configuration de base et de mise en marche du
C150APM. Pour plus d’explications concernant les paramètres de configuration, veuillez consulter le
manuel d’utilisateur (en anglais uniquement) présent sur le CD-ROM du Produit.
Insérez le CD-ROM du produit dans votre lecteur de CD-ROM, attendez que le menu à lancement
automatique s'affiche puis sélectionnez « View User Manual » [Voir le manuel d'utilisateur].
Remarque : Pour pouvoir visualiser le manuel d’utilisateur, le programme Adobe Reader doit être installé
sur votre ordinateur. S’il n’est pas déjà installé, vous pouvez sélectionner « Install Adobe
Reader » depuis le menu à lancement automatique (uniquement sous Windows).
Vous pouvez dès à présent utiliser
votre point d’accès sans fil 150N de Conceptronic !
106
ITALIANO
Conceptronic C150APM
Manuale di installazione rapida
Complimenti per aver acquistato il punto di accesso wireless 150N
Conceptronic
Il presente manuale di installazione rapida è una guida passo dopo passo per l’installazione e l'uso di
Conceptronic C150APM.
Per maggiori informazioni o assistenza relativamente al prodotto, consultare il sito Web Service &
Support all’indirizzo www.conceptronic.net/support, selezionando una delle seguenti opzioni:
• FAQ
• Download
• Contact
: Archivio delle risposte alle domande più frequenti
: Manuali, driver, firmware e altri prodotti scaricabili
: Contattare il servizio di assistenza Conceptronic
Per informazioni generali sui prodotti Conceptronic, visitare il sito di Conceptronic all’indirizzo
www.conceptronic.net.
Le informazioni contenute in questo manuale per l'installazione rapida si riferiscono a Windows 7 e Vista,
e possono variare in maniera significativa in computer in cui sia installato un sistema operativo differente.
Nota:
Il presente manuale per l’installazione rapida illustra le operazioni basilari per installare e avviare
il C150APM.
Per maggiori informazioni sulle varie funzioni del C150APM, consultare il manuale d’uso (solo in
inglese) nel CD-ROM allegato al prodotto. Aspettare che appaia il menu di avvio automatico e
selezionare ‘Visualizza manuale d’uso’.
Per visualizzare il manuale dell’uso, è necessario che sul computer sia installato Adobe Reader.
Qualora il programma non fosse installato sul computer, è possibile selezionare ‘Installa Adobe
Reader’ dal menu di avvio automatico (solo per Windows).
Indice
1. Contenuto della confezione
2. Impostazioni predefinite
3. Descrizione del C150APM
3.1. Pannello frontale
3.2. Pannello posteriore
4. Impostazione modalità d’uso del C150APM
4.1. Modalità “punto di accesso”
4.2. Modalità “ponte”
5. Configurazione del computer
5.1. Verifica dell’indirizzo IP
5.2. Configurazione di un indirizzo IP fisso
6. Configurazione del C150APM in modalità
‘ponte’
6.1. Registrazione
6.2. Creare una connessione “ponte”
7. Connessione alla rete senza fili
7.1. Connessione manuale a Windows 7
7.2. Connessione manuale a Windows Vista
7.3. Conessione automatica con WPS
8. Impostazioni avanzate di configurazione
107
ITALIANO
1. Contenuto della confezione
La confezione del punto di accesso wireless 150N di Conceptronic contiene le seguenti unità:
•
•
•
•
•
•
•
Conceptronic C150APM – Punto di accesso wireless 150N
Alimentazione elettrica da 5V DC, 1A
Antenne per connettività senza fili
Cavo di rete (LAN)
CD-ROM del prodotto
Il presente manuale di installazione rapida multilingue
Certificato di garanzia e libretto dichiarazione di conformità CE
2. Impostazioni predefinite
Il dispostivo C150APM è configurato in maniera predefinita con le seguenti impostazioni:
Indirizzo IP
: 192.168.0.2
Maschera di sottorete
: 255.255.255.0
Gateway predefinito
: 192.168.0.1
Nome utente
: admin
Password
: admin
Nota:
Si consiglia di cambiare la password in occasione della prima configurazione del C150APM. Una
volta registrati seguendo le indicazioni illustrate nel capitolo 6.1, è possibile modificare la
password, selezionando l’opzione “Impostazioni del sistema”.
SSID (nome della rete senza fili) : C150APM
Livello di sicurezza
: Modalità mista WPA/WPA2 con AES/TKIP
Password di sicurezza
: < riportata sull’adesivo del prodotto apposto sul retro del C150APM >
108
ITALIANO
3. Descrizione del C150APM
3.1 Pannello frontale
1
2
3
N
Descrizione
Stato
Illustrazione dello stato
1
LED accensione
OFF
ON
Il punto di accesso è spento
Il punto di accesso è acceso
2
LED WLAN/WPS
OFF
ON - FISSO
ON – LAMPEGGIANTE
La rete senza fili non è attiva
La funzione WPS senza fili è attiva
Attività della rete senza fili (invio/ricezione dati)
3
LED LAN
OFF
ON - FISSO
ON – LAMPEGGIANTE
La porta LAN è scollegata
La porta LAN è collegata
Attività della porta LAN (invio/ricezione dati)
3.2 Pannello posteriore
1
2
3
4
N
Descrizione
Illustrazione
1
2
Connettore antenna wireless
Ripristino/Pulsante WPS
3
Porta RETE (LAN)
4
Collegamento elettrico
Connettore R-SMA per il collegamento dell’antenna wireless
Attivare la funzione WPS (premere brevemente) o eseguire
un ripristino (tenere premuto)
Collegare il punto di accesso alla rete o a un dispositivo
provvisto di rete
Collegare l’alimentazione elettrica al punto di accesso
109
ITALIANO
4. Impostazione modalità d’ uso del C150APM
Prima di collegare in maniera adeguata il C150APM, è necessario impostare la modalità d’uso del
C150APM.
Il C150APM è adatto per essere utilizzato in diversi ambienti, che è necessario configurare appositamente:
4.1 Modalità “punto di accesso”
Se si desidera utilizzare il C150APM per convertire la propria rete via cavo esistente in una rete senza fili,
è necessario collegare (e configurare) il dispositivo in modalità ‘punto di accesso’.
- Collegare l’alimentazione elettrica all'apposita presa posta sul retro del C150APM e a una presa a muro
disponibile. Il LED di accesione sul lato frontale del C150APM si illuminerà.
- Collegare il cavo di rete (LAN) alla porta LAN posta sul retro del C150APM e alla rete. IL LED LAN si
illuminerà indicando che il cavo di rete è stato collegato correttamente e che la connessione è attiva.
Il C150APM sta funzionando in modalità ‘punto di accesso’ all’interndo della rete. Consultare la sezione 7
per collegare un client senza fili al C150APM.
Nota:
La rete senza fili del C150APM è protetta in maniera predefinita dal sistema di criptaggio WPAPSK/WPA2-PSK (modalità mista). Non è pertanto necessario proteggere in maniera manuale la
rete senza fili. Si rimanda al manuale d’uso (solo in inglese) nel CD-ROM allegato al prodotto se si
desidera cambiare manualmente le impostazioni di sicurezza del C150APM.
4.2 Modalità “ponte”
Se si desidera utilizzare il C150APM per collegare un dispositivo provvisto di rete (per esempio: una
stampante di rete, un dispositivo di archiviazione di rete, un lettore multimediale o una consolle per
videogiochi) a una rete senza fili, è necessario collegare (e configurare) il dispositivo in modalità ‘ponte’.
Nota:
Per configurare la prima volta il C150APM in modalità ‘ponte’, si consiglia di collegare il punto di
accesso alla rete esistente (router, switch, ecc.) o direttamente al computer.
- Collegare l’alimentazione elettrica all'apposita presa posta sul retro del C150APM e a una presa a muro
disponibile. Il LED di accesione sul lato frontale del C150APM si illuminerà.
- Collegare il cavo di rete (LAN) alla porta LAN posta sul retro del C150APM e alla rete o al computer. Il
LED LAN si illuminerà indicando che il cavo di rete è stato collegato correttamente e che la connessione
è attiva.
Il C150APM è ora attivo, ma funzionante in modalità ‘punto di accesso’.
Si rinvia alla sezione 5 per preparare il computer per la configurazione del C150APM.
Si rinvia alla sezione 6 per configurare il C150APM in modalità ‘ponte’.
110
ITALIANO
5. Configurazione del computer
Il punto di accesso è configurato con un indirizzo IP fisso. Per configuare il punto di accesso, è necessario
che il computer che si desidera utilizzare disponga di un indirizzo IP nella stessa banda IP del punto di
accesso.
Nota:
L’indirizzo IP fisso del punto di accesso è: 192.168.0.2
5.1 Verifica dell’indirizzo IP
É possible verificare se il computer dispone di un indirizzo IP della stessa banda IP del punto di accesso
mediante il ‘prompt dei comandi’ di Windows. L’esempio sotto riportato si riferisce a Windows 7 e Vista,
Service Pack 1. Per eseguire le istruzioni riportate in Windows 7 e Vista, è necessario disporre dei requisiti
di amministratore, così come di seguito illustrato.
A.
Fare click su ‘Avvio’, ‘Programmi’, ‘Accessori’, cliccare col tasto destro su ‘Prompt dei comandi’e
selezionare ‘Esegui come amministratore’.
Il sistema potrebbe visualizzare un messaggio di avvertimento che è necessario accettare cliccando su
‘Continua’ o ‘Sì’.
Verrà visualizzata la finestra del prompt dei comandi. Accertarsi che la barra del titolo del ‘Prompt dei
comandi’ rechi la scritta “Amministratore: prompt dei comandi”. Se la scritta “Amministratore” non è
presente significa che non si dispongono dei requisiti necessari di amministratore per andare avanti. In tal
caso è necessario ripetere la procedura illustrata nel punto A.
B.
Inserire il comando ‘IPCONFIG’ e premere ‘INVIO’ sulla tastiera.
B
Il sistema dovrebbe visualizzare le seguenti informazioni:
Indirizzo IPv4
: 192.168.0.xxx (dove xxx può assumere valori da 3 ~ 254).
Maschera di sottorete : 255.255.255.0
111
ITALIANO
Se le informazioni sopra riportate corrispondono alla configurazione del computer è possibile proseguire
installando il punto di accesso come illustrato nella sezione 5.
Nel caso in cui dette informazioni non corrispondessero alla configurazione del computer, è necessario
assegnare temporaneamente un indirizzo IP fisso al computer con banda analoga a quella del punto di
accesso per potere configurare quest'ultimo.
É possibile trovare le indicazioni su come configurare una indirizzo IP fisso nella sezione 5.2.
5.2 Configurazione di un indirizzo IP fisso
Qualora l’indirizzo IP sul computer non appartenga alla stessa banda dell'indirizzo del punto di accesso, è
necessario assegnare temporaneamente un indirizzo IP fisso della stessa banda al computer.
Seguendo le istruzioni sotto riportate, è possibile assegnare un indirizzo IP fisso al computer.
A.
Cliccare su ‘Avvio’, andare su “Programmi’,
‘Accessori’, e selezionare ‘Esegui’.
B.
Inserire il comando ‘NCPA.CPL’ e cliccare su
‘OK’.
B
B
Verrà visualizzata la finestra “Connessioni di rete”.
C.
Fare click su ‘Connessione alla rete locale’ o
‘Connessione rete senza fili’ (in base alla
connessione utilizzata) e selezionare
‘Proprietà’.
C
112
ITALIANO
Verrà visualizzata la finestra delle proprietà della connessione alla rete locale o della connessione alla
rete senza fili.
D.
Selezionare ‘Protocollo Internet Versione 4
(TCP/IPv4)’ e fare click su ‘Proprietà’.
D
D
Verrà visualizzata la finestra delle proprietà del
protocollo Internet, versione 4 (TCP/IPv4).
E.
Impostare le proprietà ‘Utilizza il seguente
indirizzo IP:’ e inserire i seguenti valori nei
rispettivi campi:
Indirizzo IP:
192.168.0.99
Maschera di sottorete:
255.255.255.0
Gateway predefinito:
192.168.0.2
F.
Fare click su ‘OK’ per salvare le impostazioni.
G.
Fare click su ‘OK’ nella finestra delle proprietà
del protocollo Internet, versione 4 (TCP/IPv4),
per salvare le impostazioni.
E
F
113
ITALIANO
6. Configurazione del C150APM in modalità ‘ponte’
Questa sezione descrive come configurare il C150APM in modalità ‘ponte’.
6.1 Registrazione
Per configurare il C150APM viene utilizzata un’interfaccia Web. È pertanto possible configurare il C150APM
sa qualsiasi computer provvisto di un browser Web.
Per collegarsi al C150APM, è necessario seguire le seguenti istruzioni:
A.
Avviare il browser Web (per es.: Internet Explorer, Firefox, Safari o Chrome).
B.
Inserire l’indirizzo IP del punto di accesso nella barra degli indirizzi del browser Web.
Indirizzo predefinito : http://192.168.0.2/
Verrà visualizzato un pop-up in cui è necessario inserire il nome utente e la password.
C
C.
114
Inserire il nome utente e la password e cliccare su ‘OK’ per entrare nella configurazione Web.
Nome utente predefinito : admin
Password predefinita:
admin
ITALIANO
Se il nome utente e la password sono corretti, il C150APM visualizzerà la pagina di configurazione
principale:
Dalla pagina principale è possibile selezionare una delle opzioni principali della configurazione Web del
C150APM :
-
Home (pagina principale)
Basic Settings (impostazioni di base)
WPS Settings (impostazioni WPS)
Advanced Settings(impostazioni avanzate)
Security Settings (impostazioni di sicurezza)
Radius Server (server radius)
MAC Filtering (filtraggio MAC)
System Settings (impostazioni del sistema)
Manage Settings (impostazioni di gestione)
- F/W Upgrade (aggiornamento F/W)
- Restart (riavvio)
Nota:
:
:
:
:
:
:
:
:
:
Visualizzare la pagina di configurazione principale
Modificare le impostazioni di base del punto di accesso
Modificare le impostazioni WPS
Modificare le impostazioni avanzate wireless
Modificare le impostazioni di sicurezza wireless
Opzioni di configurazione del server radius
Attivare e configurare le regole di filtraggio MAC
Modificare le impostazioni di sistema del C150APM
Eseguire il backup delle impostazioni o ripristinare le
impostazioni predefinite del C150APM
: Aggiornare il firmware
: Riavviare il punto di accesso
Il presente manuale di installazione rapida illustra unicamente le impostazioni necessarie per
eseguire la modalità ‘ponte’ e le impostazioni inziali per avviare la modalità “punto di accesso”.
Le altre opzioni sono descritte nel manuale d’uso (solo in inglese) nel CD-ROM allegato al
prodotto. Aspettare che venga visualizzato il menu di avvio automatico e selezionare ‘Visualizza
manuale d’uso’.
115
ITALIANO
6.2 Creare una connessione “ponte”
Questa sezione vi guiderà passo dopo passo attraverso le impostazioni del C150APM da configurare per
ottenere una connessione "ponte".
Note:
Prima di continuare la configurazione del C150APM in modalità ‘ponte’, accertarsi di disporre di
tutte le informazioni di seguito riportate circa la rete senza fili esistente:
- Nome dalla rete (SSID)
- Sistema di criptaggio utilizzato
- Chiave/password di criptaggio
A.
Cliccare su ‘Basic Settings’ nel menu a sinistra della configurazione Web.
Le impostazioni di base (“Basic Settings”) saranno visualizzate a schermo.
B.
C.
116
Cambiare la ‘Mode’(‘modalità’) selezionado ‘Station-Infrastructure’(‘stazione-infrastruttura’)
Cliccare sul pulsante ‘Select Site Survey’ (‘seleziona rilevamento siti') per ricercare la rete senza fili
esistente.
ITALIANO
Il “Wireless Site Survey” (“rilevamento siti wireless”) verrà visualizzato in un pop-up che mostra tutte le
reti trovate nell'aera di riferimento.
Nota:
D.
Nel caso in cui non fosse possibile visualizzare la propria rete senza fili, questa potrebbe trovarsi
al di fuori della banda, oppure essere spenta o nascosta.
Verificare che la rete esistente sia operativa e utilizzare il pulsante ‘Refresh’ (“Aggiorna”) per
ricercare di nuovo le reti senza fili presenti.
Se la propria rete senza fili è nascosta, non verrà visualizzata nell’elenco “Wireless Site Survey”.
In tal caso, chiudere la finestra “Wireless Site Survey” e inserire il nome esatto della rete nel
campo ‘MAIN ESSID’ (‘ESSID Principale’) nella pagina “Basic Settings”.
Selezionare la rete senza fili esistente alla quale ci si desidera collegare e fare click sul pulsante
‘Connection’ (‘Connessione').
La finestra di pop-up “Wireless Site Survey” verrà chiusa e il nome delle rete senza fili selezionata verrà
visualizzato nel campo ‘MAIN ESSID’ nella pagina “Basic Settings”.
E.
Nota:
F.
Cliccare sul pulsante ‘Apply’ (‘Applica’) per salvare le impostazioni.
Modificando le impostazioni di configurazione del C150APM, il sistema richiederà sempre di
selezionare una delle due opzioni:
- Continue (Continua) : Continuare ad apportare modifiche (le modifiche non sono ancora
state salvate nella memoria).
- Apply (Applica)
: Applicare tutte le modifiche salvandole nella memoria e riavviando il
C150APM.
Fare click sul pulsante ‘Continue’ per continuare a modificare le impostazioni.
117
ITALIANO
G.
Cliccare su ‘Security Settings’ (‘Impostazioni di sicurezza’) nel menu a sinistra della configurazione
Web.
La finestra “Security Settings” verrà visualizzata a schermo.
H.
Selezionare il sistema di criptaggio utilizzato per la propria rete senza fili dal menu a tendina
‘Encryption’ (‘Criptaggio’).
Se la rete senza fili è protetta con WPA:
- Selezionare il tipo di sicurezza WPA nella sezione “WPA Unicast Cipher Suite”.
- Selezionare il tipo di chiave di criptaggio nella sezione “Pre-shared Key Format” (‘formato di
chiavo predefinita’).
- Inserire la chiave di criptaggio nella sezione “Pre-shared Key” (‘chiave predefinitaa’).
Se la rete senza fili è protetta con WEP:
- Selezionare la lunghezza della chiave di criptaggio nella sezione “Key Length” (‘lunghezza della
chiave’).
- Selezionare il formato della chiave corrispondente nella sezione “Key Format” (’formato della
chiave’).
- Inserire la chiave di criptaggio nella sezione “Encryption Key” (‘chiave di criptaggio’).
I.
Fare click sul pulsante ‘Apply’ per salvare le impostazioni.
118
ITALIANO
Nota:
J.
Modificando le impostazioni di configurazione del C150APM, il sistema chiederà sempre di
selezionare una delle due opzioni:
- Continue (Continua) : Continuare ad apportare modifiche (le modifiche non sono ancora
state salvate nella memoria).
- Apply (Applica)
: Applicare tutte le modifiche salvandole nella memoria e riavviando il
C150APM.
Fare click sul pulsante ‘Apply’ per salvare le impostazioni nella memoria e riavviare il C150APM.
Durante il riavvio, il pulsante ‘OK’ diventa grigio e mostra un timer di conto alla rovescia. Una volta
completato il riavvio, cliccare su ‘OK’ per tornare alla configurazione Web del C150APM.
La configuazione della modalità ‘ponte’ è stata completata. É ora possibile scollegare il C150APM dal
computer e collegarlo al dispositivo di rete per il quale è stato configurato il ponte.
Nota:
Se è stato assegnato un indirizzo IP fisso al computer, come indicato nella sezione 5.2, è
necessario ripristinare le impostazioni iniziali del computer. Seguire le indicazioni della sezione
5.2. Al punto E, selezionare ‘Ottieni un indirizzo IP in maniera automatica’.
Buon utilizzo del tuo punto di accesso wireless 150N Conceptronic in
modalità ponte wireless !
119
ITALIANO
7. Connessione alla rete senza fili
Ci sono due modalità per collegare senza fili il C150APM:
Manualmente
Automaticamente, utilizzando la funzione WPS.
! IMPORTANTE !
Il C150APM è reso sicuro in maniera predefinita dal sistema di criptaggio WPA-PSK/WPA2-PSK
(modalità mista). L’unica password WPA si trova sull’etichetta del prodotto sul retro del C150APM.
Quasi tutte le schede wireless, a prescindere dal marchio e dal tipo, utilizzano un’applicazione client
diversa. Si rinvia al manuale della scheda di rete senza fili per informazioni su come creare una
connessione a una rete senza fili.
7.1 Connessione manuale a Windows 7
Nel seguente esempio si utilizza l'opzione integrata di Windows 7 “Connessione a una rete”.
A
Cliccare sull’icona ‘Rete’ sulla barra
delle applicazioni per visualizzare
l'elenco delle connessioni di rete senza
fili disponibili.
B
Selezionare la rete “C150APM”
dall’elenco e fare click su ‘Connetti’.
In maniera predefinita viene selezionata
l’opzione “Connetti automaticamente”.
Ciò permette che la connessione sia
lanciata automaticamente all’avvio del
computer. Per impedire che ciò
avvenga, è possibile deselezionare
l'opzione, prima di fare click su
‘Connetti’.
120
ITALIANO
C
Inserire la password WPA predefinita
(presente nella parte inferiore del
C150APM) nel campo “Chiave di
sicurezza” e fare click su ‘OK’.
D
Il client inizierà a connettersi alla rete
senza fili.
E
Per verificare lo stato della connessione
senza fili, è possibile cliccare sull’icona
‘Rete’ sulla barra delle applicazioni.
Sarà possibile vedere a quale rete ci si
sta connettendo, il tipo di accesso di cui
si dispone, e la forza del segnale della
connessione.
121
ITALIANO
7.2 Connessione manuale a Windows Vista
Nell'esempio che segue viene utilizzata l'opzione integrata di Windows Vista con Service Pack 1
“Connessione a una rete”.
A
Cliccare sull’icona ‘rete’ sulla
barra delle applicazioni e su
“Elenco reti senza fili
disponibili”.
B
Selezionare la rete “C150APM”
dall’elenco e cliccare su
‘Connetti’.
C
Inserire la password WPA
predefinita (presente nella parte
inferiore del C150APM) nel
campo “Chiave di sicurezza” e
fare click su ‘OK’.
122
ITALIANO
D
Una volta stabilita la
connessione, è possibile salvare
la rete come predefinita e
consentire che si avvii
automaticamente all'accensione
del computer. Cliccare su
‘Chiudi’ per uscire dalla guida
alla connessione.
E
Per verificare lo stato della
connessione senza fili, è possibile
cliccare sull’icona ‘Rete’ sulla
barra delle applicazioni. Sarà
possibile vedere a quale rete ci si
sta connettendo, il tipo di
accesso di cui si dispone, e la
forza del segnale della
connessione.
123
ITALIANO
7.3 Connessione automatica con WPS
Il C150APM di Conceptronic supporta il sistema WPS (installazione protetta Wi-Fi). Il sistema WPS è uno
strandard per l’installazione facile e sicura di reti senza fili. Con il sistema WPS è possibile installare e
proteggere facilmente la rete senza fili in pochi semplici passi.
Nota:
Per utilizzare il sistema WPS con il C150APM, è necessario disporre di un client senza fili che
supporti il WPS. Se si dispone di uno o più client senza fili sprovvisti di WPS, è consigliabile
collegarsi manualmente al C150APM utilizzando la chiave WPA preconfigurata indicata nella parte
inferiore del punto di accesso. Consultare la sezione 7.1 o 7.2 per collegare manualmente la rete
senza fili.
Nota:
Per ulteriori informazioni (tecniche) sul WPS, visitare il sito Web:
http://en.wikipedia.org/wiki/Wi-Fi_Protected_Setup
Il C150APM supporta due modalità di attivazione e installazione di una connessione WPS :
Tecnologia con Push Button
Tecnologia con Codice PIN
WPS – Tecnologia con Push Button
La tecnologia WPS con Push Button richiede un tasto (reale o virtuale) sul client senza fili per stabilire una
connessione tra il C150APM e il client senza fili.
Alcuni client senza fili utilizzano un tasto reale per attivare la tecnologia WPS con Push Button; altri client
senza fili utilizzano un tasto virtuale nel loro software.
Seguire le istruzioni sotto riportate per attivare e stabilire una connessione WPS con tecnologia Push
Button :
A.
Premendo il tasto WPS sulla parte inferiore del C150APM, si accenderà il LED WLAN/WPS in modalità
fissa per indicare che l’autenticazione WPS è stata avviata.
B.
Premere il tasto WPS sul client senza fili. Può trattarsi sia di un tasto fisico sia di un tasto virtuale
nel software del client senza fili.
Nota:
Il C150APM manterrà l’autenticazione WPS attiva per 120 secondi. Durante questo processo, il LED
WLAN/WPS si accenderà in modalità fissa. Se la connessione WPS non viene stabilita entro 120
secondi, il LED ritornerà al suo stato originale e l’autenticazione WPS si interromperà.
Se l’autenticazione WPS è avvenuta con successo, il LED WLAN/WPS ritornerà al suo stato originale.
Il client senza fili è ora connesso alla rete senza fili sicura del C150APM.
È possibile aggiungere altri client senza fili senza perdere la conessione precedentemente creata per altri
client. Per aggiungere ulteriori client senza fili, ripetere le istruzioni della sezione A e B.
124
ITALIANO
WPS – Tecnologia con Codice PIN
Se il client senza fili supporta il WPS ma non ha un tasto Push reale o virtuale, è possibile utilizzare la
tecnologia con codice PIN per stabilire una connessione WPS.
Nota:
A.
B.
Per attivare la funzione del codice PIN WPS, è necessario disporre di un computer collegato
tramite una connessione con fili al C150APM.
Collegarsi all’interfaccia Web come illustrato nella sezione 6.1.
Selezionare prima ‘General Setup’ (‘impostazioni generali’), poi ‘Wireless’ (‘senza fili’) e infine
‘WPS’.
Verrà visualizzata la pagina di configurazione “WPS”.
Dalla pagina di configurazione WPS, è possibile selezionare l'autenticazione virtuale‘Push Button’ o ‘PIN
Code’ (‘codice PIN’).
L’autenticazione mediante ‘PIN Code’ può essere effettuata in due modi diversi:
1.
Il client senza fili fornisce il codice PIN da inserire nel punto di accesso.
In tal caso, il client senza fili rappresenta l' ‘Enrollee’ e il punto di accesso il ‘Registrar’.
A.
Avviare il client senza fili e ricercare il codice PIN fornito, come illustrato nell’esempio:
125
ITALIANO
B.
C.
D.
Accertarsi che l’opzione “Config Mode” (‘modalità di configurazione’) nella pagina di
configurazione WPS sia impostata su ‘Registrar’.
Inserire il codice PIN fornito dal client senza fili nel campo “Enter Client PIN Code” (‘Inserisci
Codice PIN del client’).
Fare click sul tasto “Start PIN’(‘avvia Pin’).
Il C150APM manterrà attiva l’autenticazione WPS per le connessioni in entrata con il codice PIN
fornito per 120 secondi.
E.
Avviare la connessione mediante codice PIN sul client senza fili.
Il client senza fili si connetterà alla rete senza fili sicura del C150APM. Una volta stabilita la
connessione, il C150APM interromperà la verifica di autenticazione WPS e lo stato WPS nella pagina
di configurazione WPS sarà impostato su “Configured” (“configurato”).
Se si vogliono aggiungere altri client senza fili con il sistema WPS, ripetere le istruzioni dal punto A
al punto E.
2.
Il punto di accesso fornisce il codice PIN da inserire nel client senza fili. In tal caso, il punto di
accesso rappresenta l'‘Enrollee’ e il client senza fili il ‘Registrar’.
A.
B.
Impostare l’opzione “Config Mode” nella pagina di configurazione WPS su ‘Enrollee’ e
trascrivere il codice PIN menzionato nella casella “Codice PIN”.
Fare click sul tasto ‘Start PIN’.
Il C150APM manterrà attiva l’autenticazione WPS per le connessioni in entrata con il codice PIN
fornito per 120 secondi.
C.
Inserire il codice PIN fornito dal C150APM nel software del client senza fili, impostare il
software del client senza fili su ‘Registrar’ e avviare la connessione con codice PIN.
Il client senza fili si connetterà alla rete senza fili sicura del C150APM. Una volta stabilita la
connessione, il C150APM interromperà la verifica di autenticazione WPS e lo stato WPS nella pagina
di configurazione WPS sarà impostato su “Configured”.
Se si vogliono aggiungere altri client senza fili con il sistema WPS, ripetere le istruzioni dal punto A
al punto C.
126
ITALIANO
8. Impostazioni avanzate di configurazione
Il presente manuale di installazione rapida illustra le impostazioni basilari per installare e utilizzare il
C150APM. Per impostazioni avanzate o un’illstrazione più dettagliata del prodotto, si rimanda al manuale
d’uso (solo in inglese) nel CD-ROM allegato al prodotto.
Collocare il CD-ROM del prodotto nel lettore ottico, aspettare che appaia il menu di avvio automatico e
selezionare ‘Visualizza manuale d’uso’.
Nota:
Per visualizzare il manuale d’uso, è necessario che sul computer sia installato Adobe Reader.
Qualora il programma non fosse installato sul computer, è possibile selezionare ‘Installa Adobe
Reader’ dal menu di avvio automatico (solo per Windows).
Buon utilizzo del punto di accesso wireless
150N Conceptronic!
127
PORTUGUÊS
Conceptronic C150APM
Manual de Instalação Rápida
Parabéns pela compra do seu
Ponto de Acesso Sem Fios 150N da Conceptronic
Este manual de instalação rápida fornece-lhe uma explicação passo a passo sobre como instalar e utilizar o
Conceptronic C150APM.
Se precisar de mais informação ou suporte para o seu produto, aconselhamo-lo a visitar a nossa página
Web Service & Support em www.conceptronic.net/support e a seleccionar uma das seguintes opções:
• FAQ
• Downloads
• Contact
: Base de dados das Perguntas Mais Frequentes
: Manuais, controladores, firmware e mais transferências
: Contacte o suporte da Conceptronic
Para informações gerais sobre os produtos da Conceptronic visite a página Web da Conceptronic em
www.conceptronic.net.
A informação contida neste manual baseia-se no Windows 7 e no Windows Vista, mas pode ser diferente do
seu computador se estiver a usar um sistema operativo diferente.
Nota:
Este manual de instalação rápida só explica ao passos básicos para pôr o C150APM a funcionar.
Para mais informações sobre as várias funções do C150APM, consulte o manual do utilizador (só
em inglês) no CD-ROM do produto incluído. Espere que o menu de execução automática apareça e
seleccione ‘View User Manual’ (Ver Manual do Utilizador).
Para poder ver o manual do utilizador tem de ter instalado o Adobe Reader. Se não tiver este
programa instalado no seu computador, pode seleccionar a opção ‘Install Adobe Reader’ (Instalar
Adobe Reader) no menu de execução automática (apenas para Windows).
Índice
1. Conteúdo da embalagem
2. Pré-configurações
3. O C150APM
3.1. Painel frontal
3.2. Painel traseiro
4. Definição da utilização do C150APM
4.1. Modo de ponto de acesso
4.2. Modo de ponte
5. Configuração do computador
5.1. Verificar o endereço IP
5.2. Configuração de um endereço IP fixo
128
6. Configurar o C150APM no modo de ponte
6.1. Início de sessão
6.2. Criar uma ligação em ponte
7. Ligação à rede sem fios
7.1. Ligar manualmente no Windows 7
7.2. Ligar manualmente no Windows Vista
7.3. Ligar automaticamente com WPS
8. Definições das configurações avançadas
PORTUGUÊS
1. Conteúdo da embalagem
Existem os seguintes elementos na embalagem do Ponto de Acesso Sem Fios 150N da Conceptronic:
•
•
•
•
•
•
•
Ponto de Acesso Sem Fios 150N da Conceptronic – C150APM
Fonte de alimentação 5 V CC, 1 A
Antena para conectividade sem fios
Cabo de rede (LAN)
CD-ROM do produto
Este manual de instalação rápida multilingue
Garantia e Declaração de conformidade CE
2. Pré-configurações
O C150APM vem pré-configurado com as seguintes definições:
Endereço IP
: 192.168.0.2
Máscara de sub-rede
: 255.255.255.0
Porta de ligação predefinida
: 192.168.0.1
Nome de utilizador
: admin
Palavra-passe
: admin
Nota:
Aconselha-se vivamente alterar a palavra-passe quando configurar o C150APM pela primeira vez.
Depois de iniciar a sessão através dos passos descritos no capítulo 6.1, pode alterar a palavrapasse na opção “System Settings” (Configurações do sistema).
SSID (nome da rede sem fios)
: C150APM
Nível de segurança
: Modo misto WPA/WPA2 com AES/TKIP
Frase chave de segurança
: < impressa no autocolante do produto na parte inferior do C150APM >
129
PORTUGUÊS
3. O C150APM
3.1 Painel frontal
1
2
3
Nº
Descrição
Estado
Explicação do estado
1
Luz de alimentação
DESLIGADA
LIGADA
O ponto de acesso está desligado
O ponto de acesso está ligado
2
Luz WLAN/WPS
DESLIGADA
LIGADA – CONTÍNUA
LIGADA – A PISCAR
A rede sem fios está desligada
A função WPS sem fios está activada
Actividade de rede sem fios (a enviar ou a
receber dados)
3
Luz LAN
DESLIGADA
LIGADA – CONTÍNUA
LIGADA – A PISCAR
A Porta LAN não está ligada
A Porta LAN está ligada
Actividade de porta LAN (a enviar ou a receber
dados)
3.2 Painel traseiro
1
2
3
4
Nº
Descrição
Explicação
1
2
Ficha para antena sem fios
Botão Reset / WPS
3
Porta de rede (LAN)
4
Ficha de alimentação
Ficha R-SMA para ligação de antena sem fios
Activa a função WPS (pressão breve) ou faz uma
reinicialização (pressão longa)
Para ligar o ponto de acesso à sua rede ou a um
equipamento de rede
Para ligar a fonte de alimentação ao ponto de acesso
130
PORTUGUÊS
4. Definição da utilização do C150APM
Antes de poder ligar devidamente o C150APM, tem de definir a forma como o vai utilizar.
O C150APM pode ser usado em ambientes diferentes e cada ambiente requer a sua própria configuração
especial:
4.1 Modo de ponto de acesso
Caso queira usar o C150APM para converter a sua rede com fios existente numa rede sem fios, tem de ligar
(e configurar) o dispositivo como ‘ponto de acesso’.
- Ligue a fonte de alimentação à ficha de alimentação na parte de trás do C150APM e a uma tomada de
parede disponível. A luz de alimentação na parte da frente do C150APM acende.
- Ligue o cabo de rede (LAN) à porta LAN no painel traseiro do C150APM e à sua rede. A luz LAN acende,
indicando que o cabo de rede está correctamente ligado e que a ligação está activa.
O C150APM está agora a funcionar como ‘ponto de acesso’ na sua rede. Avance para o capítulo 7 para
ligar um cliente sem fios ao C150APM.
Nota:
Por defeito, a rede sem fios do C150APM está protegida por encriptação WPA-PSK/WPA2-PSK
(modo misto). Isto significa que não precisa de proteger manualmente a rede sem fios. Consulte o
manual do utilizador (apenas em inglês) no CD-ROM do produto incluído se quiser alterar
manualmente as definições (de segurança) do C150APM.
4.2 Modo de ponte
Caso queira usar o C150APM para ligar a um equipamento de rede (por exemplo: uma impressora de rede,
um dispositivo de armazenamento de rede, um leitor multimédia ou uma consola de jogos) a uma rede
sem fios, tem de ligar (e configurar) o dispositivo como ‘ponte’.
Nota:
Para a configuração inicial do C150APM como ‘ponte’, recomendamos vivamente ligar o ponto de
acesso à sua rede existente (router, switch, etc.) ou directamente ao seu computador.
- Ligue a fonte de alimentação à ficha de alimentação na parte de trás do C150APM e a uma tomada de
parede disponível. A luz de alimentação na parte da frente do C150APM acende.
- Ligue o cabo de rede (LAN) à porta LAN no painel traseiro do C150APM e à sua rede ou computador. A
luz LAN acende, indicando que o cabo de rede está correctamente ligado e que a ligação está activa.
O C150APM está agora activo, mas a funcionar em modo de ‘ponto de acesso’.
Avance para o capítulo 5 para preparar o seu computador para configurar o C150APM.
Avance para o capítulo 6 para configurar o C150APM no modo de ‘ponte’.
131
PORTUGUÊS
5. Configuração do computador
O ponto de acesso está configurado com um endereço IP fixo. Para configurar o ponto de acesso, o seu
computador tem de ter um endereço IP dentro da mesma gama de IP que o ponto de acesso.
Nota:
O endereço IP fixo do ponto de acesso é: 192.168.0.2
5.1 Verificar o endereço IP
Pode verificar se o seu computador tem um endereço IP dentro da mesma gama de IP que o ponto de
acesso com a ‘Command Prompt’ (Linha de comandos) do Windows. Este exemplo baseia-se no Windows 7
e no Windows Vista com o Service Pack 1. No Windows 7 e no Windows Vista necessita de direitos de
administrador para levar a cabo os passos que se explicam a seguir.
A.
Clique em ‘Start’ (Iniciar), ‘All Programs’ (Todos os programas), ‘Accessories’ (Acessórios), clique
com o botão direito do rato em ‘Command Prompt’ (Linha de comandos) e seleccione ‘Run as
administrator’ (Correr como administrador).
É possível que apareça uma mensagem de aviso, que deve aceitar clicando em ‘Continue’ (Continuar) ou
em ‘Yes’ (Sim).
A janela da Linha de Comandos aparece. Certifique-se de que no título da ‘Command Prompt’ (Linha de
comandos) está escrito “Administrator: Command Prompt”. Quando não aparecer a palavra
“Administrator” (Administrador), significa que você não tem os direitos de administrador necessários para
realizar estes passos e deve voltar a realizar o passo A.
B.
Introduza o comando ‘IPCONFIG’ e prima ‘ENTER’ no seu teclado.
B
Deverá ver a seguinte informação:
Endereço IPv4
: 192.168.0.xxx (em que xxx pode variar entre 3 ~ 254).
Máscara Subnet
: 255.255.255.0
132
PORTUGUÊS
Se a informação mostrada antes coincidir com a sua configuração, pode prosseguir com a configuração do
ponto de acesso no capítulo 5.
Caso a informação anterior não coincidir com a sua configuração, deve atribuir temporariamente um
endereço IP fixo ao seu computador dentro da mesma gama de IP que o ponto de acesso, de modo a
configurar o ponto de acesso.
Pode encontrar os passos para configurar um endereço IP fixo no capítulo 5.2.
5.2 Configuração de um endereço IP fixo
Se o endereço IP do seu computador não estiver na mesma gama de IP que o ponto de acesso, deve
atribuir temporariamente um endereço IP fixo ao seu computador dentro da mesma gama de IP.
Seguindo as instruções seguintes pode atribuir um endereço IP fixo ao seu computador.
A.
Clique em ‘Start’ (Iniciar), vá a ‘All Programs’
(Todos os programas), ‘Accessories’
(Acessórios) e seleccione ‘Run’ (Executar).
B.
Introduza o comando ‘NCPA.CPL’ e clique em
‘OK’.
B
B
A janela “Network Connections” (Ligações de Rede) aparece.
C.
Clique com o botão direito do rato em ‘Local
Area Connection’ (Ligação de área local) ou
‘Wireless Network Connection’ (Ligação de
rede sem fios) - dependendo da ligação que
usar - e seleccione ‘Properties’
(Propriedades).
C
133
PORTUGUÊS
A janela das propriedades da sua Ligação de Área Local ou da Ligação de Rede em Fios aparece.
D.
Seleccione ‘Internet Protocol Version 4
(TCP/IPv4)’ (Protocolo de Internet versão 4
(TCP/IPv4)) e clique em ‘Properties’
(Propriedades).
D
D
A janela de propriedades do Protocolo de Internet
Versão 4 (TCP/IPv4) aparece.
E.
Configure as propriedades para ‘Use the
following IP address:’ (Usar o seguinte
endereço IP:) e introduza os valores seguintes
nos campos disponíveis:
Endereço IP:
192.168.0.99
Máscara de sub-rede:
255.255.255.0
Porta de ligação predefinida: 192.168.0.2
F.
Clique em ‘OK’ para guardar as configurações.
G.
Clique em ‘OK’ na janela de propriedades do
Protocolo de Internet Versão 4 (TCP/IPv4) para
guardar as configurações.
134
E
F
PORTUGUÊS
6. Configurar o C150APM no modo de ponte
Este capítulo descreve como configurar o C150APM no modo de ‘ponte’.
6.1 Início de sessão
Para configurar o C150APM, usa-se uma interface com base na web. Isto significa que pode configurar o
C150APM em qualquer computador que tenha um navegador.
Para iniciar a sessão do C150APM, siga estes passos:
A.
Abra o seu navegador (como por exemplo: Internet Explorer, Firefox, Safari ou Chrome).
B.
Introduza o endereço IP do ponto de acesso na barra de endereços do seu navegador.
Por defeito
: http://192.168.0.2/
Aparece uma janela de contexto a pedir o nome de utilizador e a palavra-passe.
C
C.
Introduza o nome de utilizador e a palavra-passe e clique em ‘OK’ para entrar na configuração com
base na web.
Nome de utilizador predefinido
: admin
Palavra-passe predefinida
: admin
135
PORTUGUÊS
Depois de introduzir o nome de utilizador e a palavra-passe correctos, o C150APM mostra a página inicial
de configuração:
Na página inicial pode facilmente escolher uma das opções da configuração web do C150APM:
-
Home
Basic Settings
WPS Settings
Advanced Settings
Security Settings
Radius Server
MAC Filtering
System Settings
Manage Settings
- F/W Upgrade
- Restart
Nota:
136
:
:
:
:
:
:
:
:
:
Mostra a página de configuração inicial
Para ajustar as definições básicas do ponto de acesso
Para ajustar as configurações WPS
Para ajustar as configurações avançadas sem fios
Para ajustar as configurações de segurança sem fios
Opções de configuração do servidor Radius
Activar e configurar as regras de filtragem MAC
Ajustar as configurações do sistema do C150APM
Fazer uma cópia de segurança das suas configurações ou repor as configurações
predefinidas do C150APM
: Actualização do firmware
: Reiniciar o ponto de acesso
Este manual de instalação rápida explica apenas as configurações necessárias para o modo de
‘ponte’ e as configurações básicas para o modo de 'ponto de acesso'. Todas as outras opções são
explicadas no manual do utilizador (apenas em inglês) do CD-ROM do produto incluído. Espere que
o menu de execução automática apareça e seleccione ‘View User Manual’ (Ver Manual do
Utilizador).
PORTUGUÊS
6.2 Criar uma ligação em ponte
Este capítulo vai guiá-lo passo a passo através das definições do C150APM que requerem a configuração
para uma ligação em ponte.
Nota:
Antes de prosseguir com a configuração do C150APM no modo de ‘ponte’, precisa da seguinte
informação sobre a sua rede sem fios existente:
- Nome de rede (SSID)
- Tipo de encriptação usada
- Chave de encriptação / frase chave
A.
Clique em ‘Basic Settings’ (Configurações básicas) no menu à esquerda da configuração web.
As “Basic Settings” (Configurações básicas) aparecem no seu ecrã.
B.
C.
Altere o ‘Mode’ (Modo) para ‘Station-Infrastructure’ (Estação – Infra-estrutura).
Clique no botão ‘Select Site Survey’ (Seleccionar pesquisa de site) para procurar a sua rede sem
fios.
137
PORTUGUÊS
A “Wireless Site Survey” (Pesquisa de redes sem fios) aparece numa janela de contexto, mostrando todas
a redes encontradas na sua área.
Nota:
D.
Se a sua rede sem fios não aparecer, pode estar fora do alcance, desligada ou escondida.
Verifique se a sua rede sem fios está a funcionar e use o botão ‘Refresh’ (Actualizar) para voltar
a procurar redes sem fios.
Se a sua rede sem fios estiver escondida, não vai aparecer na janela “Wireless Site Survey”
(Pesquisa de redes sem fios). Nesse caso, feche a janela “Wireless Site Survey” (Pesquisa de
redes sem fios) e introduza o nome de rede exacto no campo ‘MAIN ESSID’ da página “Basic
Settings” (Configurações básicas).
Seleccione a rede sem fios existente a que se quer ligar e prima o botão ‘Connection’ (Ligação).
A janela “Wireless Site Survey” (Pesquisa de redes sem fios) fecha-se e o nome da rede sem fios
seleccionada aparece no campo ‘MAIN ESSID’ da página “Basic Settings” (Configurações básicas).
E.
Nota:
F.
138
Clique no botão ‘Apply’ (Aplicar) para aplicar as configurações.
Quando alterar as definições da configuração do C150APM, vai-lhe ser sempre pedido para
escolher entre duas opções:
- Continue : Continuar a fazer alterações (as alterações ainda não foram gravadas na
memória).
- Apply
: Aplicar todas as alterações gravando-as na memória e reiniciar o C150APM.
Clique no botão ‘Continue’ (Continuar) para prosseguir com a alteração das configurações.
PORTUGUÊS
G.
Clique em ‘Security Settings’ (Configurações de segurança) no menu à esquerda da configuração
web.
As “Security Settings” (Configurações de segurança) aparecem no seu ecrã.
H.
Seleccione o tipo de encriptação usado para a sua rede sem fios existente no menu desdobrável
‘Encryption’ (Encriptação).
Se a sua rede sem fios estiver protegida por WPA:
- Seleccione o tipo de segurança WPA na secção “WPA Unicast Cipher Suite”.
- Seleccione o tipo de chave de encriptação na secção “Pre-shared Key Format” (Formato de
chave pré-partilhada).
- Introduza a chave de encriptação na secção “Pre-shared Key” (Chave pré-partilhada).
Se a sua rede sem fios estiver protegida por WEP:
- Seleccione o comprimento da chave de encriptação na secção “Key Length” (Comprimento de
chave).
- Seleccione o formato da chave de encriptação correspondente na secção “Key Length” (Formato
de chave).
- Introduza a chave de encriptação na secção “Encryption Key” (Chave de encriptação).
I.
Clique no botão ‘Apply’ (Aplicar) para aplicar as configurações.
139
PORTUGUÊS
Nota:
J.
Quando alterar as definições da configuração do C150APM, vai-lhe ser sempre pedido para
escolher entre duas opções:
- Continue : Continuar a fazer alterações (as alterações ainda não foram gravadas na
memória).
- Apply
: Aplicar todas as alterações gravando-as na memória e reiniciar o C150APM.
Clique no botão ‘Apply’ (Aplicar) para guardar as configurações na memória e reiniciar o C150APM.
Durante o reinício, o botão ‘OK’ fica cinzento e mostra uma contagem decrescente. Depois de reiniciar,
clique em ‘OK’ para regressar à configuração web do C150APM.
A configuração do modo ‘bridge’ (ponte) está agora concluída. Já pode desligar o C150APM do seu
computador e ligá-lo ao dispositivo de rede para o qual configurou a rede.
Nota:
Caso tenha atribuído um endereço IP fixo temporário ao seu computador no capítulo 5.2, tem de
voltar a repor as configurações originais do seu computador. Pode seguir os passos do capítulo
5.2. No passo E, seleccione ‘Obtain an IP address automatically’ (Obter um endereço IP
automaticamente).
O seu Ponto de Acesso Sem Fios 150N da Conceptronic
já está pronto a usar como ponte sem fios!
140
PORTUGUÊS
7. Ligação à rede sem fios
Existem duas formas diferentes de se ligar sem fios ao C150APM:
Manualmente.
Automaticamente através da função WPS.
NOTA IMPORTANTE!
Por defeito, o C150APM está protegido com encriptação WPA-PSK/WPA2-PSK (modo misto).
Pode encontrar a frase chave WPA única no autocolante do produto que se encontra na parte
inferior do seu C150APM.
Quase todas as marcas / tipos de placas sem fios usam uma aplicação de cliente diferente. Consulte o
manual da sua placa de rede sem fios para obter informações sobre como criar uma ligação com uma rede
sem fios.
7.1 Ligar manualmente no Windows 7
No exemplo seguinte, usa-se a opção integrada “Connect to a Network” (Ligar a uma rede) do Windows 7.
A
Clique no ícone ‘Network’ (Rede) na
barra de tarefas para ver a lista de
ligações de rede sem fios disponíveis.
B
Seleccione a rede “C150APM” na lista e
clique em ‘Connect’ (Ligar).
Por defeito, a opção “Connect
automatically” (Ligar automaticamente)
já está seleccionada. Isto assegura que a
ligação é estabelecida automaticamente
sempre que ligar o seu computador. Se
não quiser que isso aconteça, pode
desseleccionar esta opção antes de
clicar em ‘Connect’ (Ligar).
141
PORTUGUÊS
C
Introduza a frase chave WPA predefinida
(que pode encontrar na base do
C150APM) no campo “Security key”
(Chave de segurança) e clique em “Ok”.
D
O cliente vai agora iniciar a ligação à
rede sem fios.
E
Para verificar o estado da ligação sem
fios, pode clicar no ícone ‘Network’
(Rede) na bandeja de sistema. Aí vai ver
a que rede está ligado nesse momento, o
acesso que tem e a força do sinal da
ligação.
142
PORTUGUÊS
7.2 Ligar manualmente no Windows Vista
No exemplo seguinte, usa-se a opção integrada “Connect to a Network” (Ligar a uma rede) do Windows
Vista com o Service Pack 1.
A
Clique no ícone ‘Network’
(Rede) na bandeja de sistema e
clique em “Wireless networks
are available” (Estão disponíveis
redes sem fios).
B
Seleccione a rede “C150APM” na
lista e clique em ‘Connect’
(Ligar).
C
Introduza a frase chave WPA
predefinida (que pode encontrar
na base do C150APM) no campo
“Security key or passphrase”
(Chave de segurança ou frase
chave) e clique em “Connect”
(Ligar).
143
PORTUGUÊS
D
Depois de a ligação ser
estabelecida, pode escolher
guardar a rede e iniciá-la
automaticamente sempre que
ligar o computador. Clique em
‘Close’ (Fechar) para sair do
assistente de ligação.
E
Para verificar o estado da ligação
sem fios, pode clicar no ícone
‘Network’ (Rede) na bandeja de
sistema. Aí vai ver a que rede
está ligado nesse momento, o
acesso que tem e a força do sinal
da ligação.
144
PORTUGUÊS
7.3 Ligar automaticamente com WPS
O C150APM da Conceptronic suporta a especificação WPS (Wi-Fi Protected Setup). O WPS é um standard
para montar uma rede sem fios de forma fácil e segura. Com o WPS pode configurar e proteger a sua rede
sem fios em apenas alguns passos.
Nota:
Para usar o WPS com o C150APM tem de ter um cliente sem fios que suporte WPS. Se tiver um ou
mais clientes sem fios que não suportem WPS, é aconselhável ligar manualmente o C150APM
usando a chave WPA pré-configurada tal como se vê na base. Consulte os capítulos 7.1 ou 7.2
sobre como ligar à rede sem fios de forma manual.
Nota:
Para mais informação (técnica) acerca do WPS, visite a seguinte página web:
http://en.wikipedia.org/wiki/Wi-Fi_Protected_Setup
O C150APM suporta duas formas de activar e estabelecer uma ligação WPS:
Tecnologia por Botão
Tecnologia por Código PIN
WPS – Tecnologia por Botão
A tecnologia WPS por Botão requer um botão (real ou virtual) no seu cliente sem fios para estabelecer
uma ligação entre o C150APM e o cliente sem fios.
Alguns clientes sem fios usam um botão real para activar a tecnologia WPS por Botão; outros clientes sem
fios usam um botão virtual no respectivo software.
Siga os passos seguintes para activar e estabelecer uma ligação WPS com a tecnologia por Botão:
A.
Prima o botão WPS na parte detrás do C150APM, e a luz WLAN/WPS acende indicando que a
autenticação WPS começou.
B.
Carregue no botão WPS no cliente sem fios. Este botão pode ser real no hardware ou pode ser um
botão virtual no software do cliente sem fios.
Nota:
O C150APM vai manter a autenticação WPS activa durante 120 segundos. Durante este processo, a
luz WLAN/WPS fica acesa. Se não se estabelecer uma ligação WPS dentro de 120 segundos, a luz
volta ao seu estado original e a autenticação WPS é interrompida.
Se a autenticação WPS for bem sucedida, a luz WLAN/WPS regressa ao seu estado original.
O cliente sem fios está agora ligado à rede sem fios protegida do C150APM.
Pode adicionar mais clientes sem fios sem perder a ligação aos clientes sem fios ligados anteriormente. Se
quiser adicionar mais clientes sem fios, tem de repetir os passos A e B.
145
PORTUGUÊS
WPS – Tecnologia por Código PIN
Se o seu cliente sem fios suportar WPS mas não tiver um Botão real ou virtual, pode usar a tecnologia por
Código PIN para estabelecer uma ligação WPS.
Nota:
A.
B.
Para activar a função WPS por Código PIN, precisa de um computador com uma ligação por cabo
ao C150APM.
Entre na interface web tal como se explica no capítulo 6.1.
Primeiro seleccione ‘General Setup’ (Configuração geral), depois ‘Wireless’ (Sem fios) e por fim
‘WPS’.
A página de configuração “WPS” é apresentada.
Na página de configuração WPS, pode activar o ‘Push Button’ (Botão) virtual ou a autenticação por ‘PIN
Code’ (Código PIN).
A autenticação por ‘PIN Code’ (Código PIN) pode ser iniciada de 2 formas diferentes:
1.
O cliente sem fios fornece o código PIN, que será introduzido no ponto de acesso.
Nesta situação, o cliente sem fios será o ‘Enrollee’ (Registado) e o ponto de acesso será o
‘Registrar’ (Registador).
A.
146
Inicie o cliente sem fios e procure o código PIN fornecido, tal como se mostra no exemplo:
PORTUGUÊS
B.
C.
D.
Certifique-se se o “Config Mode” (Modo de configuração) na página de configuração do WPS
está definido como ‘Registrar’ (Registador).
Introduza o Código PIN fornecido pelo seu cliente sem fios no campo “Enter Client PIN Code”
(Introduzir código PIN do cliente).
Clique no botão ‘Start PIN’ (Iniciar PIN).
O C150APM vai manter a autenticação WPS para ligações de entrada com o código PIN fornecido
activo durante 120 segundos.
E.
Inicie a ligação por código PIN no seu cliente sem fios.
O seu cliente sem fios vai agora ligar à rede sem fios protegida do C150APM. Quando a ligação tiver
sido estabelecida, o C150APM vai parar a verificação da autenticação WPS e o Estado WPS na página
de configuração WPS vai passar a estar “Configured” (Configurado).
Se quiser adicionar mais clientes sem fios com a função WPS, repita os passos A a E.
2.
O ponto de acesso fornece o código PIN, que será introduzido no cliente sem fios.
Nesta situação, o ponto de acesso será o ‘Enrollee’ (Registado) e o cliente sem fios será o
‘Registrar’ (Registador).
A.
B.
Defina a opção “Config Mode” (Modo de configuração) na página de configuração WPS como
‘Enrollee’ (Registado) e escreva o código PIN referido na secção “PIN Code” (Código PIN).
Clique no botão ‘Start PIN’ (Iniciar PIN).
O C150APM vai manter a autenticação WPS para ligações de entrada com o código PIN gerado activo
durante 120 segundos.
C.
Introduza o código PIN fornecido pelo C150APM no software do seu cliente sem fios, defina o
software do cliente sem fios como ‘Registrar’ (Registador) e inicie a ligação por código PIN.
O seu cliente sem fios vai agora ligar à rede sem fios protegida do C150APM. Quando a ligação tiver
sido estabelecida, o C150APM vai parar a verificação da autenticação WPS e o Estado WPS na página
de configuração WPS vai passar a estar “Configured” (Configurado).
Se quiser adicionar mais clientes sem fios com a função WPS, repita os passos A a C.
147
PORTUGUÊS
8. Definições das configurações avançadas
Este manual de instalação rápida explica os passos básicos para pôr o C150APM a funcionar. Para as
configurações avançadas ou uma explicação mais detalhada, consulte o Manual do Utilizador (só em inglês)
no CD-ROM do produto incluído.
Coloque o CD-ROM do produto numa unidade óptica, espere que o menu de execução automática apareça
e seleccione ‘View User Manual’ (Ver Manual do Utilizador).
Nota:
Para poder ver o manual do utilizador tem de ter instalado o Adobe Reader. Se não tiver este
programa instalado no seu computador, pode seleccionar a opção ‘Install Adobe Reader’ (Instalar
Adobe Reader) no menu de execução automática (apenas para Windows).
Divirta-se com o seu
Ponto de Acesso Sem Fios 150N da Conceptronic!
148
MAGYAR
Conceptronic C150APM
Gyorstelepítési útmutató
Köszönjük, hogy a Conceptronic 150N, vezeték nélküli
hozzáférési pontját választotta
Ez a gyorstelepítési útmutató lépésről lépésre elmagyarázza, miként kell a Conceptronic C150APM-jét
telepítenie és használnia.
Ha a termékkel kapcsolatban további adatokra vagy támogatásra volna szüksége, azt tanácsoljuk, keresse
fel a Szolgáltatások és terméktámogatás (Service & Support) c. oldalt a www.conceptronic.net/support
honlapon, majd ott válassza ki az alábbi opciók valamelyikét:
• FAQ
• Downloads
• Contact
: A gyakran ismétlődő kérdések (GYIK) adatbázisa
: Használati utasítások, illesztőprogramok, firmware és további letöltések
: Kapcsolatfelvétel a Conceptronic terméktámogatásával
A Conceptronic termékekkel kapcsolatos általános tájékozódás végett keresse fel a Conceptronic
honlapját: www.conceptronic.net.
Az ebben a gyorstelepítési útmutatóban közöltek a Windows 7-en és a Vistán alapulnak, de mindez
eltérhet az adott számítógép esetében, ha Ön éppen más operációs rendszert használ.
Megjegyzés:
Ez a gyorstelepítési útmutató csak az alaplépéseket magyarázza el a C150APM
telepítésével és üzemeltetésével kapcsolatban. A C150APM különböző funkcióival
kapcsolatos további tájékozódás végett lásd a használati utasítást (kizárólag angol
nyelvű!) a mellékelt termékismertető CD-ROM-on. Várjon az Autorun menü
megjelenéséig, majd jelölje ki a „View User Manual”-t.
A használati utasítás megtekintéséhez telepítenie kell az Adobe Readert. Ha azt még
nem telepítette, kijelölheti az „Install Adobe Reader”-t az Autorun menün (kizárólag
Windows esetén!).
Tartalomjegyzék
1. A csomag tartalma
2. Előre konfigurált beállítások
3. A C150APM magyarázata
3.1. Előlap
3.2. Hátlap
4. A C150APM alkalmazásának definiálása
4.1. Hozzáférési pont üzemmód
4.2. Híd üzemmód
5. A számítógép konfigurálása
5.1. Az IP-cím ellenőrzése
5.2. Fix IP-cím konfigurálása
6. A C150APM konfigurálása „híd”
üzemmódban
6.1. Bejelentkezés
6.2. Hídkapcsolás kialakítása
7. Csatlakoztatás a vezeték nélküli
hálózathoz
7.1. Manuális csatlakoztatás Windows 7
esetén
7.2. Manuális csatlakoztatás Windows Vista
esetén
7.3. Automatikus csatlakoztatás WPS
segítségével
8. Speciális konfigurációs beállítások
149
MAGYAR
1. A csomag tartalma
A Conceptronic 150N, vezeték nélküli hozzáférési pontot tartalmazó csomagban az alábbiak találhatók:
•
•
•
•
•
•
•
Conceptronic C150APM – 150N, vezeték nélküli hozzáférési pont
5 V-os egyenáramú, 1 A-es tápegység
Antenna a vezeték nélküli csatlakoztathatósághoz
Hálózati (LAN) kábel
Termékismertető CD-ROM
Ez a többnyelvű gyorstelepítési útmutató
Jótállási jegy és a CE-nyilatkozatot tartalmazó füzet
2. Előre konfigurált beállítások
A C150APM-et a következő beállításokkal előre konfiguráltuk:
IP-cím
: 192.168.0.2
Alhálózati maszk
: 255.255.255.0
Alapértelmezett átjáró
: 192.168.0.1
Felhasználónév
: admin
Jelszó
: admin
Megjegyzés:
Nyomatékosan javasoljuk a jelszó megváltoztatását, amikor első alkalommal konfigurálja
a C150APM-et. Ha a 6.1. fejezetben ismertetett lépések segítségével már
bejelentkezett, beállíthatja a jelszót a „System Settings” opciónál.
SSID (a vezeték nélküli hálózat neve)
: C150APM
Biztonsági szint
: WPA/WPA2 vegyes mód, AES/TKIP-vel
Biztonsági jelmondat
: < a C150APM alján lévő termékismertető címkén látható >
150
MAGYAR
3. A C150APM magyarázata
3.1 Előlap
1
Sz.
Leírás
2
3
Állapot
Az állapotra vonatkozó magyarázat
1. Az áramellátást
jelző LED
NEM VILÁGÍT
VILÁGÍT
A hozzáférési pont ki van kapcsolva
A hozzáférési pont be van kapcsolva
2. WLAN/WPS LED
NEM VILÁGÍT
FOLYAMATOSAN VILÁGÍT
VILLOG
A vezeték nélküli hálózat kikapcsolva
A vezeték nélküli WPS-funkció bekapcsolva
A vezeték nélküli hálózat aktív (adatok küldése
vagy fogadása)
3. LAN LED
NEM VILÁGÍT
FOLYAMATOSAN VILÁGÍT
VILLOG
A LAN-port nincs csatlakoztatva
A LAN-port csatlakoztatva
A LAN-port aktív (adatok küldése vagy fogadása)
3.2 Hátlap
1
2
3
4
Sz.
Leírás
Magyarázat
1.
2.
Vezeték nélküli antennacsatlakozó
Visszaállító/WPS-gomb
3.
NETWORK (LAN)-port
4.
Hálózati csatlakozás
R-SMA csatlakozó a vezeték nélküli antennacsatlakozáshoz
A WPS-funkció aktiválására (röviden megnyomva), vagy
visszaállítás végrehajtására (lenyomva tartva)
A hozzáférési pontnak saját hálózathoz vagy hálózattal
felszerelt eszközhöz való csatlakoztatására
A tápegység csatlakoztatására a hozzáférési ponthoz
151
MAGYAR
4. A C150APM alkalmazásának definiálása
Mielőtt a C150APM-et megfelelő módon csatlakoztatná, definiálnia kell a C150APM használatát.
A C150APM különböző környezetekben használható, és mindegyik környezet saját, különleges konfigurációt
igényel:
5.1 Hozzáférési pont üzemmód
Ha a C150APM-et már meglévő, vezetékes hálózat vezeték nélkülivé való átalakítására kívánja használni,
az eszközt „hozzáférési pontként” kell csatlakoztatnia (és konfigurálnia).
- Csatlakoztassa a tápegységet a C150APM hátoldalán lévő hálózati csatlakozóhoz, és szabad
falicsatlakozóhoz. A C150APM előlapján lévő áramellátásjelző LED kigyullad.
- Csatlakoztassa a hálózati (LAN) kábelt a C150APM hátlapján található LAN-porthoz és a saját
hálózathoz. A LAN LED kigyullad jelezve, hogy a hálózati kábelt megfelelően csatlakoztatták, a
kapcsolat pedig aktív.
A C150APM innentől fogva „hozzáférési pontként” működik az adott hálózaton belül. Vezeték nélküli
ügyfélnek a C150APM-hez való csatlakoztatása érdekében folytassa a 7. fejezettel.
Megjegyzés:
Alapértelmezésben a C150APM vezeték nélküli hálózatának biztonságáról a WPAPSK/WPA2-PSK (vegyes módú) titkosítás gondoskodik. Ez azt jelenti, hogy nem kell
manuálisan gondoskodni a vezeték nélküli hálózat biztonságáról. Lásd a használati
utasítást (kizárólag angol nyelvű!) a mellékelt termékismertető CD-ROM-on, ha
manuálisan kívánja megváltoztatni a C150APM (biztonsági) beállításait.
5.2 Híd üzemmód
Ha a C150APM-et hálózattal felszerelt eszköznek (például: hálózati nyomtató, hálózati tárolóeszköz,
médialejátszó vagy játékkonzol) vezeték nélküli hálózathoz való csatlakoztatására kívánja használni, az
eszközt „hídként” kell csatlakoztatnia (és konfigurálnia).
Megjegyzés:
Ha a C150APM-et eredetileg „hídként” kívánja konfigurálni, nyomatékosan javasoljuk,
hogy a hozzáférési pontot saját, már meglévő hálózatához (útválasztó, kapcsoló stb.)
vagy közvetlenül a számítógéphez csatlakoztassa.
- Csatlakoztassa a tápegységet a C150APM hátlapján lévő hálózati csatlakozóhoz, és szabad
falicsatlakozóhoz. A C150APM előlapján látható áramellátásjelző LED kigyullad.
- Csatlakoztassa a hálózati (LAN) kábelt a C150APM hátlapján lévő LAN-porthoz, és saját hálózatához
vagy számítógépéhez. A LAN LED kigyullad jelezve, hogy a hálózati kábelt megfelelően csatlakoztatták,
a kapcsolat pedig aktív.
A C150APM innentől fogva aktív, de „hozzáférési pont” üzemmódban működik.
A számítógépnek a C150APM konfigurálásához való előkészítéséhez folytassa az 5. fejezettel.
A C150APM-nek „híd” üzemmódban való konfigurálásához folytassa a 6. fejezettel.
152
MAGYAR
5. A számítógép konfigurálása
A hozzáférési pont fix IP-címmel van konfigurálva. A hozzáférési pont konfigurálásához az adott
számítógép IP-címének ugyanabba az IP-tartományba kell esnie, mint a hozzáférési pont.
Megjegyzés:
A hozzáférési pont fix IP-címe a következő: 192.168.0.2
5.1 Az IP-cím ellenőrzése
A Windows „Command Prompt”-ja segítségével ellenőrizheti, hogy vajon a számítógép IP-címe ugyanabba
az IP-tartományba esik-e, mint a hozzáférési pont. Ez a példa a Service Pack 1-gyel (1. sz. javítócsomag)
kiegészülő Windows 7-en, illetve Vistán alapul. A Windows 7 és Vista esetében – az alábbi lépések
végrehajtásához – olyan rendszergazdai jogosultságra van szükség, amelyek magyarázata az alábbiakban
látható.
A.
Kattintson a következőkre: „Start”, „All Programs”, „Accessories”, majd kattintson jobb egérrel a
„Command Prompt”-ra, végül jelölje ki a „Run as administrator”-t.
Figyelmeztető üzenetet kaphat, amelyet a „Continue”-ra vagy a „Yes”-re kattintva kell elfogadnia.
A Command Prompt ablak jelenik meg. Ügyeljen arra, hogy a „Command Prompt” címsoron szerepeljenek
a következők: „Administrator: Command Prompt”. Ha az „Administrator” nem szerepel, akkor – ezeknek
a lépéseknek a végrehajtásához – Ön nem rendelkezik a rendszergazdai jogosultsággal, ezért ismét végre
kell hajtania az A. lépést.
B.
Írja be az „IPCONFIG” parancsot, majd nyomja le az „ENTER”-t a billentyűzeten.
B
Az alábbiakat kell látnia:
IPv4-cím
: 192.168.0.xxx (ahol az xxx bármi lehet 3 ~ 254 között).
Alhálózati maszk
: 255.255.255.0
153
MAGYAR
Ha a fenti információ megegyezik a konfigurációval, folytathatja a hozzáférési pontnak az 5. fejezet
szerinti konfigurálását.
Ha a fenti információ nem egyezik az adott konfigurációval, ideiglenesen fix IP-címet kell hozzárendelnie
a számítógéphez a hozzáférési pontéval egyező IP-tartományban, hogy aztán a hozzáférési pontot
konfigurálhassa.
A fix IP-cím konfigurálásához szükséges lépéseket megtalálja az 5.2. fejezetben.
5.2 Fix IP-cím konfigurálása
Ha az adott számítógép IP-címe nem a hozzáférési pontéval megegyező IP-tartományba esik, akkor a
számítógéphez az ugyanabba az IP-tartományba eső, fix IP-címet kell ideiglenesen hozzárendelni.
Az alábbi utasítások segítségével fix IP-címet rendelhet hozzá a számítógéphez.
A.
Kattintson a „Start”-ra, lépjen a
következőkhöz: „All Programs”,
„Accessories”, majd válassza a „Run”-t.
B.
Írja be a „NCPA.CPL” parancsot, majd
kattintson az „OK”-ra.
B
B
A „Network Connections” ablak jelenik meg.
C.
Jobb egérrel kattintson a „Local Area
Connection”-re vagy a „Wireless Network
Connection”-re (attól függően, milyen
kapcsolatot használ), majd jelölje ki a
„Properties”-t.
C
154
MAGYAR
A Local Area Connectionnek vagy a Wireless Network Connectionnek a Properties ablaka jelenik meg.
D.
Jelölje ki az „Internet Protocol Version 4
(TCP/IPv4)”-et, majd kattintson a
„Properties”-re.
D
D
Az Internet Protocol Version 4 (TCP/IPv4)-nek a
Properties ablaka jelenik meg.
E.
Állítsa be a Propertiest (tulajdonságok) a
következőre: „Use the following IP address:”,
majd írja be az alábbi értékeket a
rendelkezésre álló mezőkre:
IP address:
192.168.0.99
Subnet mask:
255.255.255.0
Default gateway: 192.168.0.2
F.
A beállítások elmentéséhez kattintson az „OK”ra.
G.
A beállítások elmentéséhez kattintson az „OK”ra az Internet Protocol Version 4 (TCP/IPv4)nek a Properties ablakában.
E
F
155
MAGYAR
6. A C150APM konfigurálása „híd” üzemmódban
Ebben a fejezetben azt ismertetjük, miként kell a C150APM-et „híd” üzemmódban konfigurálni.
6.1 Bejelentkezés
Ahhoz, hogy a C150APM-et konfigurálhassuk, web alapú felületet kell használnunk. Ez azt jelenti, hogy a
C150APM-et bármelyik számítógépen konfigurálni lehet webböngésző segítségével.
Ahhoz, hogy a C150APM-be be lehessen jelentkezni, az alábbiak végrehajtására van szükség:
A.
Indítsa el az adott webböngészőt (például: Internet Explorer, Firefox, Safari vagy Chrome).
B.
Írja be a hozzáférési pont IP-címét a webböngésző címsorába.
Ez alapértelmezésben a következő
: http://192.168.0.2/
Előugró ablak jelenik meg, amely kéri a felhasználónevet és a jelszót.
C
C.
156
Írja be a felhasználónevet és a jelszót, majd kattintson az „OK”-ra, hogy beléphessen a web alapú
konfigurációba.
Alapértelmezett felhasználónév
: admin
Alapértelmezett jelszó
: admin
MAGYAR
Ha a felhasználónév és a jelszó helyes, a C150APM a fő konfigurációs oldalt jeleníti meg:
A főoldalról könnyen kiválasztható a négy főopció bármelyike a C150APM-nek a web alapú
konfigurációjában:
-
Home
Basic Settings
WPS Settings
Advanced Settings
Security Settings
Radius Server
MAC Filtering
System Settings
Manage Settings
- F/W Upgrade
- Restart
Megjegyzés:
: A fő konfigurációs oldal megjelenítésére
: A hozzáférési pont alapbeállításainak az igazítására
: A WPS-beállítások igazítására
: A speciális, vezeték nélküli beállítások igazítására
: A vezeték nélküli biztonsági beállítások igazítására
: A Radius-kiszolgáló konfigurációs opciói
: Az MAC-szűrési szabályok engedélyezésére és konfigurálására
: A C150APM rendszerbeállításainak az igazítására
: Biztonsági másolat készítésére a beállításokról, vagy a C150APM-nek az
alapértelmezett beállításokra történő visszaállítására
: A firmware frissítésére
: A hozzáférési pont újraindítására.
Ez a gyorstelepítési útmutató csak a „híd” üzemmódhoz szükséges beállításokat, valamint
a „hozzáférési pont” mód alapbeállításait magyarázza el. Minden további opció
magyarázata a mellékelt termékismertető CD-ROM-on található használati utasításban
(kizárólag angol nyelvű!) olvasható. Várjon, amíg az Autorun menü meg nem jelenik,
majd jelölje ki a „View User Manual”-t.
157
MAGYAR
6.2 Hídkapcsolás kialakítása
Ez a fejezet lépésről lépésre végigvezet a C150APM azon beállításain, amelyek konfigurálást igényelnek a
hídkapcsolat kialakításához.
Megjegyzés:
Mielőtt a C150APM-nek a „híd” üzemmódban történő konfigurálásával folytatná, a
meglévő, vezeték nélküli hálózat vonatkozásában az alábbi adatokra van szüksége:
-
A.
A hálózat neve (SSID)
Az alkalmazott titkosítás típusa
Titkosítási kulcs/jelmondat
Kattintson a „Basic Settings”-re a webkonfiguráció bal oldali menüjén.
A képernyőn a „Basic Settings” jelenik meg.
B.
C.
158
Változtassa meg a „Mode”-ot a következőre: „Station-Infrastructure”.
Kattintson a „Select Site Survey” gombra a meglévő, vezeték nélküli hálózat megkereséséhez.
MAGYAR
A „Wireless Site Survey” jelenik meg egy előugró ablakban, amelyen az adott területen található összes
hálózat látható.
Megjegyzés:
D.
Ha a már meglévő, vezeték nélküli hálózat nem látható, akkor lehet, hogy az adott
tartományon kívül esik, ki van kapcsolva vagy rejtett.
Ellenőrizze, vajon a meglévő, vezeték nélküli hálózat működik-e, majd a „Refresh”
gomb segítségével ismét próbálkozzon a vezeték nélküli hálózatok megkeresésével.
Ha a vezeték nélküli hálózat rejtett, akkor nem jelenik meg a „Wireless Site Survey”-n.
Ebben az esetben zárja be a „Wireless Site Survey” ablakot, majd írja be a pontos
hálózatnevet a „MAIN ESSID” mezőre a „Basic Settings” oldalon.
Jelölje ki a meglévő, vezeték nélküli hálózatot, amelyhez csatlakozni kíván, majd kattintson a
„Connection” gombra.
A „Wireless Site Survey” előugró ablak becsukódik, a kijelölt, vezeték nélküli hálózat neve pedig
megjelenik a „MAIN ESSID” mezőn a „Basic Settings” oldalon.
E.
Kattintson az „Apply” gombra a beállítások alkalmazásához.
Megjegyzés:
A beállításoknak a C150APM konfigurációjában való megváltoztatásakor mindig üzenet
kéri majd, hogy válasszanak az alábbi két opció közül:
- Continue: A változtatások végrehajtásának folytatására (a változtatások még
nincsenek elmentve a memóriába).
- Apply:
Előbb az összes változtatás alkalmazására oly módon, hogy azokat a
memóriába mentik el, majd a C150APM-et újraindítására.
F.
Ha a beállítások megváltoztatásával kívánja folytatni, kattintson a „Continue” gombra.
G.
Kattintson a „Security Settings”-re a webes konfiguráció bal oldali menüjén.
159
MAGYAR
A képernyőn a „Security Settings” jelenik meg.
H.
Jelölje ki a meglévő, vezeték nélküli hálózathoz használt titkosítás típusát az „Encryption”
legördülő menün.
Ha a meglévő, vezeték nélküli hálózat biztonságáról WPA gondoskodik:
- Jelölje ki a WPA-biztonság típusát a „WPA Unicast Cipher Suite” résznél.
- Jelölje ki a titkosítási kulcs típusát a „Pre-shared Key Format” résznél.
- Írja be a titkosítási kulcsot a „Pre-shared Key” résznél.
Ha a meglévő, vezeték nélküli hálózat biztonságáról WEP gondoskodik:
- Jelölje ki a titkosítási kulcs hosszát a „Key Length” résznél.
- Jelölje ki a megfelelő kulcsformátumot a „Key Format” résznél.
- Írja be a titkosítási kulcsot az „Encryption Key” résznél.
I.
A beállítások alkalmazásához kattintson az „Apply” gombra.
160
MAGYAR
Megjegyzés:
J.
A beállításoknak a C150APM konfigurációjában való megváltoztatásakor mindig
megjelenik egy üzenet, amely a következő két opció közül történő választást kéri:
- Continue
: A változtatások végrehajtásának folytatására (a változtatások még
nincsenek elmentve a memóriába).
- Apply
: Előbb az összes változtatás alkalmazására oly módon, hogy azokat a
memóriába mentik el, majd a C150APM-et újraindítására.
A beállításoknak a memóriába való elmentéséhez, és a C150APM újraindításához kattintson az
„Apply” gombra.
Az újraindítás során az „OK” gomb kiszürkül, és egy visszaszámláló időzítőt mutat. Amikor az újraindítás
befejeződött, az „OK”-ra kattintva visszatérhet a C150APM webes konfigurációjához.
Ezzel a „híd” üzemmód konfigurálása befejeződött. Innentől fogva a C150APM leválasztható a
számítógépről, egyszersmind csatlakoztatható ahhoz a hálózati eszközhöz, amely számára a hidat
konfigurálták.
Megjegyzés:
Ha ideiglenes fix címet hozzárendelt már az adott számítógéphez az 5.2. fejezetben,
akkor vissza kell állítania a számítógépet az eredeti beállításokra. Kövesse az 5.2.
fejezetben megadott lépéseket. Az E. lépésben jelölje ki a következőt: „Obtain an IP
address automatically”.
A Conceptronic 150N, vezeték nélküli hozzáférési pontja
ezzel – mint vezeték nélküli híd – használatkész!
161
MAGYAR
7. Csatlakoztatás a vezeték nélküli hálózathoz
Két különböző mód kínálkozik a C150APM-hez vezeték nélkül való csatlakoztatásra:
manuálisan.
automatikusan, a WPS-funkció segítségével.
! FONTOS MEGJEGYZÉS !
A C150APM biztonságáról alapértelmezésben a WPA-PSK/WPA2-PSK (vegyes módú) titkosítás
gondoskodik. Az egyedi WPA-jelmondat megtalálható a C150APM alján lévő matricán.
Szinte minden márkájú/típusú, vezeték nélküli kártya más ügyfélalkalmazást használ. Ha tájékozódni
kíván arra nézve, hogyan kell kapcsolatot kialakítani vezeték nélküli hálózattal, lásd a vezeték nélküli
hálózati kártya leírását.
7.1 Manuális csatlakoztatás Windows 7 esetén
Az alábbi példa esetében a Windows 7-hez tartozó, integrált „Connect to a Network” opciót használjuk.
A.
Kattintson a „Network” ikonra a Tálcán,
ha meg kívánja tekinteni az elérhető,
vezeték nélküli hálózati kapcsolatok
listáját.
B.
Jelölje ki a „C150APM” hálózatot a
listán, majd kattintson a „Connect”-re.
Alapértelmezésben a „Connect
automatically” opció van kijelölve. Ez
biztosítja, hogy a kapcsolat minden
egyes alkalommal automatikusan
elinduljon, amikor a számítógépet
bekapcsolják. Ha erre nincs szükség,
ennek az opciónak a kijelölése
visszavonható, mielőtt rákattintanának a
„Connect”-re.
162
MAGYAR
C.
Írja be az alapértelmezett WPAjelmondatot (amely a C150APM alján
látható) a „Security key” mezőre, majd
kattintson az „OK”-ra.
D.
Az ügyfél ezután megkezdi a
rácsatlakozást a vezeték nélküli
hálózatra.
E.
A vezeték nélküli kapcsolat állapotának
az ellenőrzése érdekében rákattinthat a
„Network” ikonra a Tálcán. Látni fogja,
hogy melyik hálózatra van éppen
rácsatlakozva, milyen a hozzáférés,
egyszersmind milyen a kapcsolat
jelerőssége.
163
MAGYAR
7.2 Manuális csatlakoztatás Windows Vista esetén
Az alábbi példa esetében a Service Pack 1-gyel (1. sz. javítócsomag) kiegészített Windows Vistából
származó, integrált „Connect to a Network” opciót alkalmazzuk.
A.
Kattintson a „Network” ikonra a
Tálcán, majd kattintson a
következőre: „Wireless
networks are available”.
B.
Jelölje ki a „C150APM”
hálózatot a listán, majd
kattintson a „Connect”-re.
C.
Írja be az alapértelmezett WPAjelmondatot (amely a C150APM
alján látható) a „Security key or
passphrase” mezőre, majd
kattintson a „Connect”-re.
164
MAGYAR
D.
Amikor a kapcsolat már létrejött,
dönthet amellett, hogy a
hálózatot elmenti és
automatikusan elindítja minden
egyes alkalommal, amikor a
számítógépet bekapcsolják. A
„Close”-ra kattintva kiléphet a
Csatlakozás varázslóból.
E.
Ha ellenőrizni kívánja a vezeték
nélküli kapcsolat állapotát,
rákattinthat a „Network” ikonra
a Tálcán. Látni fogja majd, hogy
melyik hálózatra van éppen
rácsatlakozva, milyen a
hozzáférés, és milyen a kapcsolat
jelerőssége.
165
MAGYAR
7.3 Automatikus csatlakoztatás WPS segítségével
A Conceptronic C150APM támogatja a WPS-t (Wi-Fi-vel védett Setup). A WPS egy a vezeték nélküli hálózat
könnyű és biztonságos kialakításához szükséges szabvány. A WPS segítségével pár egyszerű lépésben
telepíthető és védhető a vezeték nélküli hálózat.
Megjegyzés:
Ha a WPS-t kívánja alkalmazni a C150APM-nél, akkor a WPS-t támogató, vezeték nélküli
ügyfélre van szükség. Ha egy vagy több olyan, vezeték nélküli ügyfele van, amelyeknek
nincs WPS-támogatása, akkor tanácsos manuálisan rácsatlakozni a C150APM-re a készülék
alján látható, előre konfigurált WPA-kulcs segítségével. A vezeték nélküli hálózatra való
manuális rákapcsolódással kapcsolatban lásd a 7.1. vagy a 7.2. fejezetet.
Megjegyzés:
A WPS-re vonatkozó további (műszaki) adatokkal kapcsolatban lásd az alábbi honlapot:
http://en.wikipedia.org/wiki/Wi-Fi_Protected_Setup
A C150APM kétféleképpen támogatja a WPS-kapcsolat aktiválását és kialakítását:
Push Button technology (nyomógombos technológia)
PIN Code technology (PIN-kódos technológia)
WPS — Nyomógombos technológia
A WPS nyomógombos technológia (virtuális) gombot igényel a vezeték nélküli ügyfél esetében, hogy
kapcsolatot lehessen létesíteni a C150APM és a vezeték nélküli ügyfél között.
Bizonyos, vezeték nélküli ügyfelek igazi gombot alkalmaznak a WPS nyomógombos technológiának az
aktiválására; más, vezeték nélküli ügyfelek pedig virtuális gombot használnak a programjukban.
Az alábbi lépések segítségével lehet — a nyomógombos technológia alkalmazása mellett — a WPSkapcsolatot aktiválni, illetve kialakítani:
A.
Nyomja meg a WPS-gombot a C150APM alján; a WLAN/WPS LED innentől fogva folyamatosan világít
jelezve, hogy a WPS-hitelesítés elindult.
B.
Nyomja meg a WPS-gombot a vezeték nélküli ügyfélen. Ez vagy egy hardvergomb, vagy egy a vezeték
nélküli ügyfél programjának részét képező, virtuális gomb.
Megjegyzés:
A C150APM 120 mp-ig biztosítja a WPS-hitelesítés aktiváltságát. Ezalatt a WLAN/WPS LED
folyamatosan világít. Ha 120 mp-en belül nem jön létre WPS-kapcsolat, a LED visszatér
eredeti állapotába, és a WPS-hitelesítés leáll.
Ha a WPS-hitelesítés sikeres, a WLAN/WPS LED visszatér eredeti állapotába.
Innentől fogva a vezeték nélküli ügyfél rá van csatlakoztatva a C150APM-nek a biztonságos, vezeték
nélküli hálózatára.
A kapcsolat elvesztése nélkül további, vezeték nélküli ügyfelekkel is kiegészítheti a korábban már
csatlakoztatott, vezeték nélküli ügyfeleket. Ha egynél több, vezeték nélküli ügyfelet kíván hozzáadni,
ismételje meg a fenti A. és B. lépést.
166
MAGYAR
WPS — PIN-kódos technológia
Ha a vezeték nélküli ügyfél olyan WPS-t támogat, amelynek nincs (virtuális) nyomógombja, akkor a PINkódos technológia használható a WPS-kapcsolat kialakítására.
Megjegyzés:
A.
B.
A WPS PIN-kódos funkciójának az aktiválásához olyan számítógépre van szükség, amely
vezetékesen csatlakozik a C150APM-hez.
Jelentkezzen be a webes felületre a 6.1. fejezetben elmagyarázottak szerint.
Előbb jelölje ki a „General Setup”-ot, majd a „Wireless”-t, végül pedig a „WPS”-t.
A „WPS” konfigurációt feltüntető oldal jelenik meg.
A WPS-konfigurációt tartalmazó oldalon bekapcsolhatja a virtuális „nyomógombos” vagy a „PIN-kódos”
hitelesítést.
A „PIN-kódos” hitelesítés kétféleképpen kezdeményezhető:
1.
A vezeték nélküli ügyfél megadja a PIN-kódot, amelyet majd beírnak a hozzáférési pontba.
Ebben a helyzetben a vezeték nélküli ügyfél az „Enrollee” lesz, a hozzáférési pont pedig a
„Registrar”.
A.
Indítsa el a vezeték nélküli ügyfelet, és keresse meg az adott PIN-kódot az alábbi példában
közöltek szerint:
167
MAGYAR
B.
C.
D.
Ellenőrizze, hogy a „Config Mode” a WPS-konfigurációt tartalmazó oldalon „Registrar”-ra vane beállítva.
Írja be a vezeték nélküli ügyfél által megadott PIN-kódot az „Enter Client PIN Code” mezőre.
Kattintson a „Start PIN” gombra.
A C150APM 120 mp-ig gondoskodik a WPS-hitelesítés aktívan tartásáról a megadott PIN-kóddal bíró,
bejövő kapcsolatok szempontjából.
E.
Indítsa el a PIN-kódos kapcsolatot a vezeték nélküli ügyfélnél.
Az adott, vezeték nélküli ügyfél innentől fogva rá van csatlakoztatva a C150APM biztonságos,
vezeték nélküli hálózatára. Amikor a kapcsolat már létrejött, a C150APM leállítja a WPS-hitelesítés
ellenőrzését, a WPS-konfigurációs oldalon pedig a WPS állapota a következőre lesz beállítva:
„Configured”.
Ha további, a WPS-funkcióval bíró, vezeték nélküli ügyfeleket kíván hozzáadni, ismételje meg az A.tól E.-ig terjedő lépéseket.
2.
A hozzáférési pont megadja a PIN-kódot, amelyet majd beírnak a vezeték nélküli ügyfélnél.
Ebben a helyzetben a hozzáférési pont az „Enrollee” lesz, a vezeték nélküli ügyfél pedig a
„Registrar”.
A.
B.
Állítsa be a WPS konfigurációs oldalán a „Config Mode” opciót a következőre: „Enrollee", majd
írja le a „PIN Code” c. fejezetben említett PIN-kódot.
Kattintson a „Start PIN” gombra.
A C150APM 120 mp-ig gondoskodik a WPS-hitelesítés aktívan tartásáról a generált PIN-kóddal bíró,
bejövő kapcsolatok esetében.
C.
Írja be a C150APM-hez mellékelt PIN-kódot a vezeték nélküli ügyfél programjába, állítsa be a
vezeték nélküli ügyfél programját „Registrar”-ra, majd végül indítsa el a PIN-kódos
kapcsolatot.
Az adott, vezeték nélküli ügyfél innentől fogva rá van csatlakoztatva a C150APM-nek a biztonságos,
vezeték nélküli hálózatára. Ha a kapcsolat már létrejött, a C150APM leállítja a WPS-hitelesítés
ellenőrzését, a WPS konfigurációs oldalán látható WPS-állapot beállítása pedig a következő lesz:
„Configured”.
Ha WPS-funkcióval bíró további, vezeték nélküli ügyfeleket kíván hozzáadni, ismételje meg az A.-tól C.-ig
jelölt lépéseket.
168
MAGYAR
8. Speciális konfigurációs beállítások
Ez a gyorstelepítési útmutató azokat az alapbeállításokat magyarázza el, amelyekre a C150APM
telepítéséhez és üzemeltetéséhez van szükség. A speciális beállításokat vagy a részletesebb magyarázatot
illetően lásd a használati utasítást (kizárólag angol nyelvű!) a mellékelt termékismertető CD-ROM-on.
Tegye be a termékismertető CD-ROM-ot az optikai meghajtóba, várjon az Autorun menü megjelenéséig,
majd jelölje ki a „View User Manual”-t.
Megjegyzés:
A használati utasítás megtekintéséhez előbb telepítenie kell az Adobe Readert. Ha még
nem telepítette, kijelölheti az „Install Adobe Reader”-t az Autorun menün (kizárólag
Windows esetén!).
Kívánjuk, hogy örömmel használja a
Conceptronic 150N, vezeték nélküli hozzáférési pontot!
169
TÜRKÇE
Conceptronic C150APM
Hızlı Kurulum Kılavuzu
Conceptronic 150N Kablosuz Erişim Noktası
Satın Aldığınız İçin Tebrikler
Bu hızlı kurulum kılavuzu Conceptronic C150APM kurulumunun ve kullanımının adım adım nasıl yapılacağı
konusunda bilgi içermektedir.
Ürününüzle ilgili daha fazla bilgi veya destek almak istediğinizde, www.conceptronic.net/support web
sitemizin Service & Support (Servis ve Destek) bölümünü ziyaret etmenizi ve aşağıdaki seçeneklerden
birini seçmenizi öneririz:
• FAQ
• Downloads
• Contact
: Sıkça Sorulan Sorular veritabanı
: Kullanım Kılavuzları, Sürücüler, Ürün Bilgisi ve diğer yüklemeler
: Conceptronic Destek İletişim Bilgileri
Conceptronic ürünleri hakkında genel bilgi almak için www.conceptronic.net Conceptronic web sitesini
ziyaret edebilirsiniz.
Bu hızlı kurulum kılavuzundaki bilgiler Windows 7 ve Vista işletim sistemlerine göre verilmiştir ancak farklı
bir işletim sistemi kullandığınızda farklılık gösterebilir.
Not:
Bu hızlı kurulum kılavuzunda sadece C150APM’yi hazırlama ve çalıştırma ile ilgili temel adımlar
açıklanmıştır.
C150APM’nin çeşitli fonksiyonları ile ilgili daha fazla bilgi için, lütfen Ürün CD-ROM’undaki
kullanıcı kılavuzuna (sadece İngilizce) bakın. Otomatik çalıştırma menüsünün ekrana gelmesini
bekleyin ve ‘View User Manual’ (Kullanıcı Kılavuzunu Görüntüle)’yi seçin.
Kullanıcı kılavuzunu görüntülemek için, Adobe Reader programının kurulu olması gerekir. Bu
program bilgisayarınızda yüklü değilse, otomatik çalıştırma menüsünden ‘Install Adobe Reader’
(Adobe Reader Programını Kur) seçeneğini seçebilirsiniz.
İçindekiler
1. Paket içeriği
2. Önyapılandırılmış ayarlar
3. C150APM tanıtımı
3.1. Ön panel
3.2. Arka panel
4. C150APM kullanımının tanımlanması
4.1. Erişim noktası modu
4.2. Köprü modu
5. Bilgisayarın yapılandırılması
5.1. IP adresinin kontrol edilmesi
170
5.2. Sabit bir IP adresinin yapılandırılması
6. C150APM’nin ‘köprü’ modunda
yapılandırılması
6.1. Oturum açma
6.2. Bir köprü bağlantısı oluşturma
7. Kablosuz ağ bağlantısı
7.1. Windows 7’de manuel bağlantı
7.2. Windows Vista’da manuel bağlantı
7.3. WPS kullanarak otomatik bağlantı
8. Gelişmiş yapılandırma ayarları
TÜRKÇE
1. Paket İçeriği
Conceptronic 150N Kablosuz Erişim Noktası paketinin içeriği aşağıdaki gibidir:
•
•
•
•
•
•
•
Conceptronic C150APM – 150N Kablosuz Erişim Noktası
Güç kaynağı 5V DC, 1A
Kablosuz bağlantı için 1 anten
Ağ (LAN) kablosu
Ürün CD-ROM’u
Çok dilli hızlı kurulum kılavuzu
Garanti belgesi ve CE uygunluk beyanı
2. Önyapılandırılmış ayarlar
C150APM aşağıdaki ayarlarla önceden yapılandırılmıştır:
IP address (IP adresi)
: 192.168.0.2
Subnet mask (Alt ağ maskesi)
: 255.255.255.0
Default gateway (Varsayılan ağ geçidi)
: 192.168.0.1
Username (Kullanıcı adı)
: admin
Password (Parola)
Not:
: admin
C150APM’yi ilk kez yapılandırdığınızda parolayı değiştirmenizi kesinlikle tavsiye ederiz. Bölüm
6.1’de açıklanan adımlarla oturum açtığınızda, parolayı “System Settings” (Sistem Ayarları)
seçeneğinde ayarlayabilirsiniz.
SSID (Kablosuz ağ adı)
: C150APM
Security level (Güvenlik düzeyi)
: AES/TKIP’li WPA/WPA2 Karma mod
Security passphrase (Güvenlik parolası)
: < C150APM’nin altındaki ürün etiketinde basılıdır >
171
TÜRKÇE
3. C150APM tanıtımı
3.1 Ön panel
1
2
3
Nr
Tanım
Durum
Durum Açıklaması
1
Güç LED’i
KAPALI
AÇIK
Erişim noktası kapalı
Erişim noktası açık
2
WLAN/WPS LED’i
KAPALI
AÇIK - SABİT
AÇIK – YANIP SÖNÜYOR
Kablosuz ağ kapalı
Kablosuz WPS işlevi etkin
Kablosuz ağ etkinliği (veri gönderme veya alma)
3
LAN LED’i
KAPALI
AÇIK - SABİT
AÇIK – YANIP SÖNÜYOR
LAN bağlantı noktası bağlı değil
LAN bağlantı noktası bağlı
LAN bağlantı noktası etkinliği (veri gönderme
veya alma)
3.2 Arka panel
1
2
3
4
Nr
Tanım
Açıklama
1
2
Kablosuz anten konnektörü
Reset/WPS düğmesi
3
AĞ (LAN) bağlantı noktası
4
Güç bağlantısı
Kablosuz anten bağlantısı için R-SMA konnektörü
WPS işlevini etkinleştirir (kısa basış) veya sıfırlama (reset)
işlemi gerçekleştirir (basılı tutma)
Erişim noktasını ağa veya ağ donanımlı bir aygıta bağlamak
için kullanılır
Güç kaynağını erişim noktasına bağlamak için kullanılır
172
TÜRKÇE
4. C150APM kullanımının tanımlanması
C150APM’yi doğru olarak bağlamadan önce C150APM’nin kullanımını tanımlamanız gerekir.
C150APM farklı ortamlarda kullanılabilir ve her ortama ait özel yapılandırma yapılmalıdır.
4.1 Erişim noktası modu
C150APM’yi, mevcut kablolu ağınızı kablosuz yapmak için kullanmak isterseniz, aygıtı ‘erişim noktası’
olarak bağlamanız (ve yapılandırmanız) gerekir.
-
Güç kaynağını C150APM’nin arkasındaki güç bağlantısına ve boş bir duvar prizine takın. C150APM’nin ön
tarafındaki Güç LED’i yanar.
Ağ (LAN) kablosunu C150APM’nin arka panelindeki LAN bağlantı noktasına ve ağınıza bağlayın. LAN LED’i
yanar, bu da ağ kablosunun düzgün bağlandığını ve bağlantının etkin olduğunu gösterir.
Böylece C150APM ağınızda ‘erişim noktası’ olarak çalışır hale gelir. C150APM’ye bir kablosuz istemci
bağlamak için bölüm 7’ye geçin.
Not:
Varsayılan olarak, C150APM’nin kablosuz ağ güvenliği WPA-PSK/WPA2-PSK (karma mod) şifreleme
ile sağlanır. Bu da, kablosuz ağ güvenliğini manuel olarak sağlamak zorunda kalmayacağınız
anlamına gelir. C150APM’nin (güvenlik) ayarlarını manuel olarak değiştirmek isterseniz, ürünle
birlikte verilen CD-ROM’daki kullanıcı kılavuzuna (sadece İngilizce) müracaat edin.
4.2 Köprü modu
C150APM’yi, bir ağ donanımlı aygıtı (örneğin: ağ yazıcısı, ağ depolama aygıtı, mediaplayer veya oyun
konsolu) bir kablosuz ağa bağlamak için kullanmak isterseniz, aygıtı ‘köprü’ olarak bağlamanız (ve
yapılandırmanız) gerekir.
Not:
-
C150APM’nin ‘köprü’ olarak ilk yapılandırılması için erişim noktasını mevcut ağınıza (yönlendirici,
switch vb.) veya doğrudan bilgisayarınıza bağlamanızı özellikle öneririz.
Güç kaynağını C150APM’nin arkasındaki güç bağlantısına ve boş bir duvar prizine takın. C150APM’nin ön
tarafındaki güç LED’i yanar.
Ağ (LAN) kablosunu C150APM’nin arka panelindeki LAN bağlantı noktasına ve ağınıza veya bilgisayarınıza
bağlayın. LAN LED’i yanar, bu da ağ kablosunun düzgün bağlandığını ve bağlantının etkin olduğunu
gösterir.
C150APM artık aktiftir ancak ‘erişim noktası’ modunda çalışır.
C150APM’yi yapılandırmak amacıyla bilgisayarınızı hazırlamak için bölüm 5’e geçin.
C150APM’yi ‘köprü’ modunda yapılandırmak için bölüm 6’ya geçin.
173
TÜRKÇE
5. Bilgisayarın yapılandırılması
Erişim noktası sabit bir IP adresi ile yapılandırılır. Erişim noktasını yapılandırmak için bilgisayarınızın,
erişim noktası ile aynı IP aralığındaki bir IP adresine sahip olması gerekir.
Not:
Erişim noktasının sabit IP adresi: 192.168.0.2
5.1 IP adresinin kontrol edilmesi
Bilgisayarınızın, erişim noktası ile aynı IP aralığındaki bir IP adresine sahip olup olmadığını Windows’un
‘Command Prompt’ (Komut İstemi) ile kontrol edebilirsiniz. Bu örnek Windows 7 ve Vista Service Pack 1’e
göre verilmiştir. Windows 7 ve Vista’nın, aşağıdaki adımları gerçekleştirmek için yönetici haklarına sahip
olması gerekir.
A.
‘Start’ (Başlat), ‘All Programs’ (Tüm Programlar), ‘Accessories’ (Donatılar)’a tıklayın, ‘Command
Prompt’ (Komut İstemi) üzerine sağ tıklayın ve ‘Run as administrator’ (Yönetici olarak çalıştır)’ı
seçin.
Bir uyarı mesajı alırsanız ‘Continue’ (Devam) veya ‘Yes’ (Evet)’e tıklayarak kabul etmeniz gerekecektir.
Komut İstemi penceresi ekrana gelir. ‘Command Prompt’ (Komut İstemi) başlık çubuğunda
“Administrator: Command Prompt (Yönetici: Komut İstemi)” yazdığından emin olun. “Administrator
(Yönetici)” yazmıyorsa, bu adımlar için gerekli yönetici haklarına sahip değilsiniz demektir ve A adımını
tekrar gerçekleştirmeniz gerekir.
B.
“IPCONFIG” komutunu girin ve klavyenizde “ENTER” tuşuna basın.
B
Aşağıdaki bilgileri görmelisiniz:
IPv4 Address (IPv4 Adresi)
Subnet Mask (Alt Ağ Maskesi)
174
: 192.168.0.xxx (buradaki xxx değeri 3 ~ 254 arasında değişebilir).
: 255.255.255.0
TÜRKÇE
Yukarıdaki bilgiler yapılandırmanızla eşleşiyorsa, bölüm 5’te erişim noktasının yapılandırılması konusuna
geçebilirsiniz.
Yukarıdaki bilgiler yapılandırmanızla eşleşmiyorsa, erişim noktasını yapılandırmak için bilgisayarınıza
erişim noktası ile aynı IP aralığında geçici olarak sabit bir IP adresi atamanız gerekir.
Bölüm 5.2’de sabit bir IP adresi yapılandırmak için gerekli adımları bulabilirsiniz.
5.2 Sabit bir IP adresinin yapılandırılması
Bilgisayarınızın IP adresi erişim noktası ile aynı IP aralığında değilse, bilgisayarınıza geçici olarak aynı IP
aralığında sabit bir IP adresi atamanız gerekir.
Aşağıdaki adımları izleyerek bilgisayarınıza sabit bir IP adresi atayabilirsiniz.
A.
‘Start’ (Başlat)’a tıklayın, ‘All Programs’ (Tüm
Programlar), ‘Accessories’ (Donatılar)’a gidin
ve ‘Run’ (Çalıştır)’ı seçin.
B.
‘NCPA.CPL’ komutunu girin ve ‘OK’ (Tamam)
düğmesine tıklayın.
B
B
“Network Connections” (Ağ Bağlantıları) penceresi ekrana gelir.
C.
‘Local Area Connection’ (Yerel Ağ Bağlantısı)
veya ‘Wireless Network Connection’
(Kablosuz Ağ Bağlantısı) üzerine (kullandığınız
bağlantıya göre) sağ tıklayın ve ‘Properties’
(Özellikler)’i seçin.
C
175
TÜRKÇE
Yerel Ağ Bağlantınızın veya Kablosuz Ağ Bağlantınızın özellikler penceresi ekrana gelir.
D.
‘Internet Protocol Version 4 (TCP/IPv4)’
(Internet Protokolü sürüm 4 (TCP/IPv4))
seçeneğini seçin ve ‘Properties’ (Özellikler)
düğmesine tıklayın.
D
D
Internet Protokolü Sürüm 4 (TCP/IPv4) özellikler
penceresi ekrana gelir.
E.
‘Use the following IP address:’ (Aşağıdaki IP
adresini kullan:) seçeneğini seçin ve ilgili
alanlara aşağıdaki değerleri girin:
IP address:
192.168.0.99
Subnet mask:
255.255.255.0
Default gateway: 192.168.0.2
F.
Ayarları kaydetmek için ‘OK’ (Tamam)
düğmesine tıklayın.
G.
Ayarları kaydetmek için ‘Internet Protokolü
Sürüm 4 (TCP/IPv4) Özellikleri’ penceresinde
‘OK’ (Tamam)’a tıklayın.
176
E
F
TÜRKÇE
6. C150APM’nin ‘köprü’ modunda yapılandırılması
Bu bölümde C150APM’nin ‘köprü’ modunda nasıl yapılandırılacağı açıklanmaktadır.
6.1 Oturum açma
C150APM’yi yapılandırmak için web tabanlı bir arabirim kullanılır. Bu da, C150APM’yi web tarayıcısı olan
herhangi bir bilgisayardan yapılandırabileceğiniz anlamına gelir.
C150APM’ye oturum açmak için aşağıdaki adımları izleyin:
A.
Web tarayıcısını açın (örn: Internet Explorer, FireFox, Safari veya Chrome).
B.
Erişim noktasının IP adresini web tarayıcınızın adres satırına girin.
Varsayılan olarak
: http://192.168.0.2/
Kullanıcı adı ve parola soran bir açılır pencere ekrana gelecektir.
C
C.
Kullanıcı adı ve parolayı yazdıktan sonra web tabanlı yapılandırmaya girmek için ‘OK’ (Tamam)’a
tıklayın.
Varsayılan kullanıcı adı
: admin
Varsayılan parola
: admin
177
TÜRKÇE
Kullanıcı adı ve parola doğru olduğunda C150APM ana yapılandırma sayfası ekrana gelir:
Ana sayfadan C150APM web yapılandırmasındaki seçeneklerden birini kolayca seçebilirsiniz:
-
Home (Ana Sayfa)
Basic Settings (Temel Ayarlar)
WPS Settings (WPS Ayarları)
Advanced Settings (Gelişmiş Ayarlar)
Security Settings (Güvenlik Ayarları)
Radius Server (Radius Sunucusu)
MAC Filtering (MAC Filtreleme)
System Settings (Sistem Ayarları)
Manage Settings (Ayarları Yönet)
- F/W Upgrade (Ürün Bilgisi Yükselt)
- Restart (Yeniden Başlat)
Not:
178
: Ana yapılandırma sayfasını gösterir
: Temel erişim noktası ayarları yapılır
: WPS ayarları yapılır
: Gelişmiş kablosuz ayarları yapılır
: Kablosuz güvenlik ayarları yapılır
: Radius sunucusu yapılandırma seçenekleri
: MAC filtreleme kurallarını etkinleştirir ve yapılandırır
: C150APM’nin sistem ayarlarını yapar
: Ayarlarınızı yedekler veya C150APM’yi varsayılan ayarlara
getirir
: Ürün bilgisini yükseltir
: Erişim noktasını yeniden başlatır
Bu hızlı kurulum kılavuzu sadece ‘köprü’ modu için gerekli ayarları ve ‘erişim noktası’ modu için
temel ayarları açıklar. Diğer tüm seçenekler ürünle birlikte verilen CD-ROM’daki kullanıcı
kılavuzunda (sadece İngilizce) açıklanmıştır. Otomatik çalıştırma menüsünün ekrana gelmesini
bekleyin ve ‘View User Manual’ (Kullanıcı Kılavuzunu Görüntüle)’yi seçin.
TÜRKÇE
6.2 Bir köprü bağlantısı oluşturma
Bu bölümde, bir köprü bağlantısı için yapılandırma gerektiren C150APM’nin ayarlarını adım adım nasıl
yapacağınız açıklanmıştır.
Not:
C150APM’yi ‘köprü’ modunda yapılandırmaya başlamadan önce, mevcut kablosuz ağınıza ait
aşağıdaki bilgilere ihtiyacınız vardır:
- Network name (SSID) (Ağ kimliği)
- Kullanılan şifreleme türü
- Şifreleme anahtarı / parola
A.
Web yapılandırma sayfasının sol menüsünden ‘Basic Settings’ (Temel Ayarlar)’a tıklayın.
“Basic Settings” (Temel Ayarlar) sayfası ekrana gelir.
B.
C.
‘Mode’ (Mod) ayarını ‘Station-Infrastructure’ (İstasyon-Altyapı) olarak değiştirin.
Mevcut kablosuz ağınızı bulmak için ‘Select Site Survey’ (Site Araştırması Seç) düğmesine tıklayın.
179
TÜRKÇE
Açılır bir pencerede “Wireless Site Survey” (Kablosuz Site Araştırması) altında bölgenizde bulunan tüm
ağlar gösterilir.
Not:
D.
Mevcut kablosuz ağınız gösterilmiyorsa menzil dışında, kapalı veya gizli olabilir.
Mevcut kablosuz ağınızın çalışır durumda olup olmadığını kontrol edin ve kablosuz ağları tekrar
taramak için ‘Refresh’ (Yenile) düğmesini kullanın.
Kablosuz ağınız gizliyse, “Wireless Site Survey” (Kablosuz Site Araştırması)’nda gösterilmez.
Bu durumda, “Wireless Site Survey” (Kablosuz Site Araştırması) penceresini kapatın ve “Basic
Settings” (Temel Ayarlar) sayfasında ‘MAIN ESSID’ alanına tam ağ adını girin.
Bağlanmak istediğiniz mevcut kablosuz ağınızı seçin ve ‘Connection’ (Bağlantı) düğmesine tıklayın.
“Wireless Site Survey” (Kablosuz Site Araştırması) açılır penceresi kapatılır ve seçilen kablosuz ağ adı
“Basic Settings” (Temel Ayarlar) sayfasındaki ‘MAIN ESSID’ alanında gösterilir.
E.
Not:
F.
180
Ayarları uygulamak için ‘Apply’ (Uygula) düğmesine tıklayın.
C150APM’nin yapılandırmasındaki ayarları değiştirirken şu iki seçenek arasında seçim yapmanız
istenir:
- Continue (Devam) : Değişiklikleri yapmaya devam et (değişiklikler bellekte henüz
kaydedilmez).
- Apply (Uygula)
: Tüm değişiklikleri belleğe kaydederek uygula ve C150APM’yi yeniden
başlat.
Ayarları değiştirmeye devam etmek için ‘Continue’ (Devam) düğmesine tıklayın.
TÜRKÇE
G.
Web yapılandırma sayfasının sol menüsünden ‘Security Settings’ (Güvenlik Ayarları)’na tıklayın.
“Security Settings” (Güvenlik Ayarları) sayfası ekrana gelir.
H.
‘Encryption’ (Şifreleme) açılır menüsünde mevcut kablosuz ağınız için kullanılan şifreleme türünü
seçin.
Mevcut kablosuz ağınızın güvenliği WPA ile sağlanıyorsa:
- “WPA Unicast Cipher Suite” (WPA Tek Yönlü Şifre Paketi) bölümünde WPA güvenlik türünü seçin.
- “Pre-shared Key Format” (Önceden Paylaşılmış Anahtar Biçimi) bölümünde şifreleme anahtarının
türünü seçin.
- “Pre-shared Key” (Önceden Paylaşılmış Anahtar) bölümünde şifreleme anahtarını girin.
Mevcut kablosuz ağınızın güvenliği WEP ile sağlanıyorsa:
- “Key Length” (Anahtar Uzunluğu) bölümünde şifreleme anahtarı uzunluğunu seçin.
- “Key Format” (Anahtar Biçimi) bölümünde karşılık gelen anahtar biçimini seçin.
- “Encryption Key” (Şifreleme Anahtarı) bölümünde şifreleme anahtarını girin.
I.
Ayarları uygulamak için ‘Apply’ (Uygula) düğmesine tıklayın.
181
TÜRKÇE
Not:
J.
C150APM’nin yapılandırmasındaki ayarları değiştirirken şu iki seçenek arasında seçim yapmanız
istenir:
- Continue (Devam) : Değişiklikleri yapmaya devam et (değişiklikler bellekte henüz
kaydedilmez).
- Apply (Uygula)
: Tüm değişiklikleri belleğe kaydederek uygula ve C150APM’yi yeniden
başlat.
Ayarları belleğe kaydetmek için ‘Apply’ (Uygula) düğmesine tıklayın ve C150APM’yi yeniden başlatın.
Yeniden başlatma sırasında, ‘OK’ (Tamam) düğmesi silikleşir ve bir geri sayma zamanlayıcısı gösterir.
Yeniden başlatma işlemi tamamlandığında, C150APM’nin web yapılandırmasına dönmek için ‘OK’
(Tamam)’a tıklayın.
Böylece ‘köprü’ modu yapılandırması tamamlanmış olur. Artık C150APM’nin bilgisayarınızla olan
bağlantısını kesebilir ve köprüyü yapılandırdığınız ağ aygıtına bağlayabilirsiniz.
Not:
Bilgisayarınıza bölüm 5.2’de geçici bir sabit IP adresi atadıysanız, bilgisayarınızı orijinal
ayarlarına getirmeniz gerekir. Bölüm 5.2’deki adımları izleyebilirsiniz. E adımında, ‘Obtain an IP
address automatically’ (Otomatik olarak bir IP adresi al) seçeneğini seçin.
Conceptronic 150N Kablosuz Erişim Noktanız
kablosuz köprü olarak kullanıma hazırdır!
182
TÜRKÇE
7. Kablosuz ağ bağlantısı
C150APM’ye kablosuz bağlanmak için iki farklı yol vardır:
Manuel olarak.
WPS işlevini kullanarak otomatik.
! ÖNEMLİ NOT!
C150APM’nin güvenliği varsayılan olarak WPA-PSK/WPA2-PSK (karma mod) şifreleme ile
sağlanmaktadır. Benzersiz WPA parolası C150APM’nin altında yer alan ürün etiketinde bulunabilir.
Hemen hemen tüm marka/tür kablosuz kartlar farklı bir istemci uygulaması kullanır. Lütfen kablosuz ağ
bağlantısının nasıl oluşturulacağı ile ilgili bilgi için kablosuz ağ kartınızın kullanım kılavuzuna müracaat
edin.
7.1 Windows 7’de manuel bağlantı
Aşağıdaki örnekte Windows 7’de tümleşik “Connect to a Network” (Bir Ağa Bağlan) seçeneği
kullanılmıştır.
Kullanılabilir kablosuz ağ bağlantılarının
A
listesini görüntülemek için görev
çubuğundaki ‘Network’ (Ağ) simgesine
tıklayın.
B
Listeden “C150APM” ağını seçin ve
‘Connect’ (Bağlan) düğmesine tıklayın.
Varsayılan olarak “Connect
automatically” (Otomatik olarak bağlan)
seçeneği işaretlidir. Böylece
bilgisayarınızı her açtığınızda bağlantının
otomatik olarak yapılması sağlanmış
olur. Bunu istemiyorsanız, ‘Connect’
(Bağlan) düğmesine tıklamadan önce bu
seçeneğin işaretini kaldırın.
183
TÜRKÇE
C
“Security key” (Güvenlik anahtarı)
alanına varsayılan WPA parolasını
(C150APM’nin alt tarafında yazılıdır)
girin ve ‘OK’ (Tamam) düğmesine
tıklayın.
D
İstemci, kablosuz ağa bağlanmaya
başlayacaktır.
E
Kablosuz bağlantının durumunu kontrol
etmek için, görev çubuğundaki
‘Network’ (Ağ) simgesi üzerine
tıklayabilirsiniz. Hangi ağa bağlı
olduğunuzu, sahip olduğunuz erişimi ve
bağlantının sinyal gücünü görebilirsiniz.
184
TÜRKÇE
7.2 Windows Vista’da manuel bağlantı
Aşağıdaki örnekte Windows Vista Service Pack 1’de tümleşik “Connect to a Network” (Bir ağa bağlan)
seçeneği kullanılmıştır.
A
Sistem tepsisindeki ‘Network’
(Ağ) simgesine ve “Wireless
networks are available”
(Kablosuz ağlar var) yazısı
üzerine tıklayın.
B
Listeden “C150APM” ağını seçin
ve ‘Connect’ (Bağlan) düğmesine
tıklayın.
C
“Security key or passphrase”
(Güvenlik anahtarı veya parola)
alanına varsayılan WPA parolasını
(C150APM’nin alt tarafında
yazılıdır) girin ve ‘Connect’
(Bağlan) düğmesine tıklayın.
185
TÜRKÇE
D
Bağlantı gerçekleştirildiğinde, ağı
kaydetmeyi seçebilir ve
bilgisayarınızı her açışta bu ağı
otomatik olarak başlatabilirsiniz.
Bağlantı sihirbazından çıkmak
için ‘Close’ (Kapat) düğmesine
tıklayın.
E
Kablosuz bağlantının durumunu
kontrol etmek için, sistem
tepsisindeki ‘Network’ (Ağ)
simgesi üzerine tıklayabilirsiniz.
Hangi ağa bağlı olduğunuzu,
sahip olduğunuz erişimi ve
bağlantının sinyal gücünü
görebilirsiniz.
186
TÜRKÇE
7.3 WPS kullanarak otomatik bağlantı
Conceptronic C150APM, WPS (Wi-Fi Protected Setup-Kablosuz Korumalı Kurulum)’u destekler. WPS,
kablosuz ağların kolay ve güvenli bir biçimde oluşturulması için kullanılan bir standarttır. WPS ile kablosuz
ağınızı birkaç kolay adımda kurabilir ve koruyabilirsiniz.
Not:
WPS’yi C150APM ile kullanmak için, WPS desteği olan kablosuz bir istemciye sahip olmanız
gerekir. WPS desteği olmayan bir veya daha çok kablosuz istemcilere sahipseniz, alt kısımda
bahsedilen ön yapılandırmalı WPA anahtarını kullanarak C150APM’ye manuel olarak bağlanmanız
önerilir. Kablosuz ağa manuel olarak nasıl bağlanacağınız ile ilgili olarak bölüm 7.1 veya 7.2’ye
bakın.
Not:
WPS hakkında daha fazla (teknik) bilgi için, aşağıdaki web sitesini ziyaret edin:
http://en.wikipedia.org/wiki/Wi-Fi_Protected_Setup
C150APM, bir WPS bağlantısını etkinleştirmek ve oluşturmak için iki yol kullanır:
Puş Buton teknolojisi
PIN Kodu teknolojisi
WPS – Push Button (Puş Buton) teknolojisi
WPS Puş Buton teknolojisi, C150APM ve kablosuz istemci arasında bir bağlantı oluşturmak için kablosuz
istemcide bir (sanal) butona ihtiyaç duyar.
Bazı kablosuz istemciler WPS Puş Buton teknolojisini etkinleştirmek için gerçek bir buton kullanır; diğer
kablosuz istemciler yazılımlarında sanal buton kullanırlar.
Puş Buton teknolojili bir WPS bağlantısı oluşturmak ve etkinleştirmek için aşağıdaki adımları izleyin:
A.
C150APM’nin arkasındaki WPS düğmesine basın, WLAN/WPS LED’i sabit olarak yanacak ve WPS kimlik
doğrulamasının başladığını gösterecektir.
B.
Kablosuz istemcideki WPS butonuna basın. Bu buton, donanımsal bir buton ya da kablosuz istemcinin
yazılımındaki sanal bir buton olabilir.
Not:
C150APM tarafından WPS kimlik doğrulama işlemi 120 saniye boyunca aktif tutulacaktır. Bu işlem
sırasında WLAN/WPS LED’i sabit olarak yanacaktır. 120 saniye içinde WPS bağlantısı kurulamazsa,
LED orijinal durumuna döner ve WPS kimlik doğrulaması durdurulur.
WPS kimlik doğrulaması başarılı olursa, WLAN/WPS LED’i orijinal durumuna döner.
Kablosuz istemci böylece C150APM’nin güvenli kablosuz ağına bağlanmış olur.
Önceden bağlanan kablosuz istemcilerle olan bağlantınızı kaybetmeden daha fazla kablosuz istemci
eklemeniz mümkündür. Daha fazla kablosuz istemci eklemek isterseniz, A ve B adımlarını tekrarlayın.
187
TÜRKÇE
WPS – PIN Kodu teknolojisi
Kablosuz istemci WPS'yi destekliyorsa fakat (sanal) Puş butona sahip değilse, WPS bağlantısı oluşturmak
için PIN Kodu teknolojisini kullanabilirsiniz.
Not:
A.
B.
WPS PIN Kodu işlevini etkinleştirmek için, C150APM’ye kablolu olarak bağlı bir bilgisayara
ihtiyacınız olacaktır.
Bölüm 6.1’de açıklandığı gibi web arabirimine oturum açın.
Önce ‘General Setup’ (Genel Kurulum)’u, ardından ‘Wireless’ (Kablosuz)’u ve ‘WPS’yi seçin.
“WPS” yapılandırma sayfası ekrana gelecektir.
WPS yapılandırma sayfasında, sanal ‘Push Button’ veya ‘PIN Code’ kimlik doğrulamasını tetikleyebilirsiniz.
‘PIN Code’ kimlik doğrulaması 2 farklı şekilde başlatılabilir:
1.
Kablosuz istemci PIN kodunu sağlar, bu kod yönlendiriciye girilecektir.
Bu durumda, kablosuz istemci ‘Enrollee’ (Kaydolan) ve yönlendirici ‘Registrar’ (Kaydeden) olacaktır.
A.
188
Kablosuz istemciyi başlatın ve aşağıdaki örnekte gösterildiği gibi sağlanan PIN kodunu arayın:
TÜRKÇE
B.
C.
D.
WPS yapılandırma sayfasındaki “Config Mode” ayarının ‘Registrar’ yapıldığından emin olun.
Kablosuz istemciniz tarafından verilen PIN Kodunu “Enter Client PIN Code” alanına girin.
‘Start PIN’ düğmesine tıklayın.
C150APM, verilen PIN kodu ile 120 saniye boyunca gelen bağlantılar için WPS kimlik doğrulamasını
aktif tutacaktır.
E.
Kablosuz istemcinizde PIN kodu bağlantısını başlatın.
Kablosuz istemciniz böylece C150APM’nin güvenli kablosuz ağına bağlanacaktır. Bağlantı
kurulduğunda, C150APM WPS kimlik doğrulama kontrolünü durdurur ve WPS yapılandırma
sayfasındaki WPS Durumu “Configured” (Yapılandırıldı) olarak ayarlanır.
WPS özellikli daha fazla Kablosuz İstemci eklemek isterseniz, A ila E adımlarını tekrarlayın.
2.
Yönlendirici PIN kodunu sağlar, bu kod kablosuz istemciye girilecektir.
Bu durumda, yönlendirici ‘Enrollee’ (Kaydolan) ve kablosuz istemci ‘Registrar’ (Kaydeden) olacaktır.
A.
B.
WPS yapılandırma sayfasında “Config Mode” seçeneğini ‘Enrollee’ olarak ayarlayın ve “PIN
Code” bölümünde bahsedilen PIN kodunu yazın.
‘Start PIN’ düğmesine tıklayın.
C150APM, üretilen PIN kodu ile 120 saniye boyunca gelen bağlantılar için WPS kimlik doğrulamasını
aktif tutacaktır.
C.
C150APM tarafından sağlanan PIN kodunu kablosuz istemci yazılımınıza girin, kablosuz istemci
yazılımını ‘Registrar’ (Kaydeden) olarak ayarlayın ve PIN kodu bağlantısını başlatın.
Kablosuz istemciniz böylece C150APM’nin güvenli kablosuz ağına bağlanacaktır. Bağlantı
kurulduğunda, C150APM WPS kimlik doğrulama kontrolünü durdurur ve WPS yapılandırma
sayfasındaki WPS Durumu “Configured” (Yapılandırıldı) olarak ayarlanır.
WPS özellikli daha fazla Kablosuz İstemci eklemek isterseniz, A ila C adımlarını tekrarlayın.
189
TÜRKÇE
8. Gelişmiş yapılandırma ayarları
Bu hızlı kurulum kılavuzunda C150APM’yi hazırlama ve çalıştırma ile ilgili temel ayarlar açıklanmaktadır.
Gelişmiş ayarlar veya daha ayrıntılı bilgi için, lütfen birlikte verilen ürün CD-ROM’undaki kullanıcı
kılavuzuna (Sadece İngilizce) bakın.
Ürün CD-ROM’unu optik sürücünüze yerleştirin, otomatik çalıştırma menüsünün ekrana gelmesini bekleyin
ve ‘View User Manual’ (Kullanıcı Kılavuzunu Görüntüle)’yi seçin.
Not:
Kullanıcı kılavuzunu görüntülemek için, Adobe Reader programının kurulu olması gerekir. Bu
program bilgisayarınızda yüklü değilse, otomatik çalıştırma menüsünden ‘Install Adobe Reader’
(Adobe Reader Programını Kur) seçeneğini seçebilirsiniz.
Conceptronic 150N Kablosuz Erişim Noktası
Kullanmanın Keyfini Çıkarın!
190
LICENSING INFORMATION
Licensing Information
This Conceptronic product C150APM includes copyrighted third-party software licensed under the terms of the GNU General
Public License.
Please see The GNU General Public License for the exact terms and conditions of this license.
All used software packages are copyright by their respective authors. Please see the source code for detailed information.
Availability of source code
Conceptronic. has exposed the full source code of the GPL licensed software, including any scripts to control compilation
and installation of the object code. All future firmware updates will also be accompanied with their respective source code.
For more information on how you can obtain our open source code, please visit our web site.
GNU GENERAL PUBLIC LICENSE
Version 2, June 1991
Copyright (C) 1989, 1991 Free Software Foundation, Inc.
Temple Place, Suite 330, Boston, MA 02111-1307 USA
Everyone is permitted to copy and distribute verbatim copies
of this license document, but changing it is not allowed.
Preamble
The licenses for most software are designed to take away your freedom to share and change it. By contrast, the GNU
General Public License is intended to guarantee your freedom to share and change free software--to make sure the software
is free for all its users. This General Public License applies to most of the Free Software Foundation's software and to any
other program whose authors commit to using it. (Some other Free Software Foundation software is covered by the GNU
Library General Public License instead.) You can apply it to your programs, too.
When we speak of free software, we are referring to freedom, not price. Our General Public Licenses are designed to
make sure that you have the freedom to distribute copies of free software (and charge for this service if you wish), that you
receive source code or can get it if you want it, that you can change the software or use pieces of it in new free programs;
and that you know you can do these things.
To protect your rights, we need to make restrictions that forbid anyone to deny you these rights or to ask you to surrender
the rights. These restrictions translate to certain responsibilities for you if you distribute copies of the software, or if you
modify it.
For example, if you distribute copies of such a program, whether gratis or for a fee, you must give the recipients all the
rights that you have. You must make sure that they, too, receive or can get the source code. And you must show them
these terms so they know their rights.
We protect your rights with two steps: (1) copyright the software, and (2) offer you this license which gives you legal
permission to copy, distribute and/or modify the software.
Also, for each author's protection and ours, we want to make certain that everyone understands that there is no warranty
for this free software. If the software is modified by someone else and passed on, we want its recipients to know that what
they have is not the original, so that any problems introduced by others will not reflect on the original authors' reputations.
Finally, any free program is threatened constantly by software patents. We wish to avoid the danger that redistributors of
a free program will individually obtain patent licenses, in effect making the program proprietary. To prevent this, we have
made it clear that any patent must be licensed for everyone's free use or not licensed at all.
The precise terms and conditions for copying, distribution and modification follow.
191
LICENSING INFORMATION
GNU GENERAL PUBLIC LICENSE
TERMS AND CONDITIONS FOR COPYING, DISTRIBUTION AND MODIFICATION
0. This License applies to any program or other work which contains a notice placed by the copyright holder saying it may
be distributed under the terms of this General Public License. The "Program", below, refers to any such program or work,
and a "work based on the Program" means either the Program or any derivative work under copyright law: that is to say, a
work containing the Program or a portion of it, either verbatim or with modifications and/or translated into another
language. (Hereinafter, translation is included without limitation in the term "modification".) Each licensee is addressed as
"you".
Activities other than copying, distribution and modification are not covered by this License; they are outside its scope. The
act of running the Program is not restricted, and the output from the Program is covered only if its contents constitute a
work based on the Program (independent of having been made by running the Program). Whether that is true depends on
what the Program does.
1. You may copy and distribute verbatim copies of the Program's source code as you receive it, in any medium, provided
that you conspicuously and appropriately publish on each copy an appropriate copyright notice and disclaimer of warranty;
keep intact all the notices that refer to this License and to the absence of any warranty; and give any other recipients of
the Program a copy of this License along with the Program.
You may charge a fee for the physical act of transferring a copy, and you may at your option offer warranty protection in
exchange for a fee.
2. You may modify your copy or copies of the Program or any portion of it, thus forming a work based on the Program, and
copy and distribute such modifications or work under the terms of Section 1 above, provided that you also meet all of these
conditions:
a) You must cause the modified files to carry prominent notices stating that you changed the files and the date of any
change.
b) You must cause any work that you distribute or publish, that in whole or in part contains or is derived from the
Program or any part thereof, to be licensed as a whole at no charge to all third parties under the terms of this License.
c) If the modified program normally reads commands interactively when run, you must cause it, when started running for
such interactive use in the most ordinary way, to print or display an announcement including an appropriate copyright
notice and a notice that there is no warranty (or else, saying that you provide a warranty) and that users may redistribute
the program under these conditions, and telling the user how to view a copy of this License. (Exception: if the Program
itself is interactive but does not normally print such an announcement, your work based on the Program is not required to
print an announcement.)
These requirements apply to the modified work as a whole. If identifiable sections of that work are not derived from the
Program, and can be reasonably considered independent and separate works in themselves, then this License, and its terms,
do not apply to those sections when you distribute them as separate works. But when you distribute the same sections as
part of a whole which is a work based on the Program, the distribution of the whole must be on the terms of this License,
whose permissions for other licensees extend to the entire whole, and thus to each and every part regardless of who wrote
it.
Thus, it is not the intent of this section to claim rights or contest your rights to work written entirely by you; rather, the
intent is to exercise the right to control the distribution of derivative or collective works based on the Program.
In addition, mere aggregation of another work not based on the Program with the Program (or with a work based on the
Program) on a volume of a storage or distribution medium does not bring the other work under the scope of this License.
3. You may copy and distribute the Program (or a work based on it, under Section 2) in object code or executable form
under the terms of Sections 1 and 2 above provided that you also do one of the following:
a) Accompany it with the complete corresponding machine-readable source code, which must be distributed under the
terms of Sections 1 and 2 above on a medium customarily used for software interchange; or,
192
LICENSING INFORMATION
b) Accompany it with a written offer, valid for at least three years, to give any third party, for a charge no more than
your cost of physically performing source distribution, a complete machine-readable copy of the corresponding source code,
to be distributed under the terms of Sections 1 and 2 above on a medium customarily used for software interchange; or,
c) Accompany it with the information you received as to the offer to distribute corresponding source code. (This
alternative is allowed only for noncommercial distribution and only if you received the program in object code or
executable form with such an offer, in accord with Subsection b above.)
The source code for a work means the preferred form of the work for making modifications to it. For an executable work,
complete source code means all the source code for all modules it contains, plus any associated interface definition files,
plus the scripts used to control compilation and installation of the executable. However, as a special exception, the source
code distributed need not include anything that is normally distributed (in either source or binary form) with the major
components (compiler, kernel, and so on) of the operating system on which the executable runs, unless that component
itself accompanies the executable.
If distribution of executable or object code is made by offering access to copy from a designated place, then offering
equivalent access to copy the source code from the same place counts as distribution of the source code, even though third
parties are not compelled to copy the source along with the object code.
4. You may not copy, modify, sublicense, or distribute the Program except as expressly provided under this License. Any
attempt otherwise to copy, modify, sublicense or distribute the Program is void, and will automatically terminate your
rights under this License. However, parties who have received copies, or rights, from you under this License will not have
their licenses terminated so long as such parties remain in full compliance.
5. You are not required to accept this License, since you have not signed it. However, nothing else grants you permission
to modify or distribute the Program or its derivative works. These actions are prohibited by law if you do not accept this
License. Therefore, by modifying or distributing the Program (or any work based on the Program), you indicate your
acceptance of this License to do so, and all its terms and conditions for copying, distributing or modifying the Program or
works based on it.
6. Each time you redistribute the Program (or any work based on the Program), the recipient automatically receives a
license from the original licensor to copy, distribute or modify the Program subject to these terms and conditions. You may
not impose any further restrictions on the recipients' exercise of the rights granted herein. You are not responsible for
enforcing compliance by third parties to this License.
7. If, as a consequence of a court judgment or allegation of patent infringement or for any other reason (not limited to
patent issues), conditions are imposed on you (whether by court order, agreement or otherwise) that contradict the
conditions of this License, they do not excuse you from the conditions of this License. If you cannot distribute so as to
satisfy simultaneously your obligations under this License and any other pertinent obligations, then as a consequence you
may not distribute the Program at all. For example, if a patent license would not permit royalty-free redistribution of the
Program by all those who receive copies directly or indirectly through you, then the only way you could satisfy both it and
this License would be to refrain entirely from distribution of the Program.
If any portion of this section is held invalid or unenforceable under any particular circumstance, the balance of the section
is intended to apply and the section as a whole is intended to apply in other circumstances. It is not the purpose of this
section to induce you to infringe any patents or other property right claims or to contest validity of any such claims; this
section has the sole purpose of protecting the integrity of the free software distribution system, which is implemented by
public license practices. Many people have made generous contributions to the wide range of software distributed through
that system in reliance on consistent application of that system; it is up to the author/donor to decide if he or she is willing
to distribute software through any other system and a licensee cannot impose that choice.
This section is intended to make thoroughly clear what is believed to be a consequence of the rest of this License.
8. If the distribution and/or use of the Program is restricted in certain countries either by patents or by copyrighted
interfaces, the original copyright holder who places the Program under this License may add an explicit geographical
distribution limitation excluding those countries, so that distribution is permitted only in or among countries not thus
excluded. In such case, this License incorporates the limitation as if written in the body of this License.
193
LICENSING INFORMATION
9. The Free Software Foundation may publish revised and/or new versions of the General Public License from time to time.
Such new versions will be similar in spirit to the present version, but may differ in detail to address new problems or
concerns.
Each version is given a distinguishing version number. If the Program specifies a version number of this License which
applies to it and "any later version", you have the option of following the terms and conditions either of that version or of
any later version published by the Free Software Foundation. If the Program does not specify a version number of this
License, you may choose any version ever published by the Free Software Foundation.
10. If you wish to incorporate parts of the Program into other free programs whose distribution conditions are different,
write to the author to ask for permission. For software which is copyrighted by the Free Software Foundation, write to the
Free Software Foundation; we sometimes make exceptions for this. Our decision will be guided by the two goals of
preserving the free status of all derivatives of our free software and of promoting the sharing and reuse of software
generally.
NO WARRANTY
11. BECAUSE THE PROGRAM IS LICENSED FREE OF CHARGE, THERE IS NO WARRANTY FOR THE PROGRAM, TO THE EXTENT
PERMITTED BY APPLICABLE LAW. EXCEPT WHEN OTHERWISE STATED IN WRITING THE COPYRIGHT HOLDERS AND/OR OTHER
PARTIES PROVIDE THE PROGRAM "AS IS" WITHOUT WARRANTY OF ANY KIND, EITHER EXPRESSED OR IMPLIED, INCLUDING, BUT
NOT LIMITED TO, THE IMPLIED WARRANTIES OF MERCHANTABILITY AND FITNESS FOR A PARTICULAR PURPOSE. THE ENTIRE
RISK AS TO THE QUALITY AND PERFORMANCE OF THE PROGRAM IS WITH YOU. SHOULD THE PROGRAM PROVE DEFECTIVE,
YOU ASSUME THE COST OF ALL NECESSARY SERVICING, REPAIR OR CORRECTION.
12. IN NO EVENT UNLESS REQUIRED BY APPLICABLE LAW OR AGREED TO IN WRITING WILL ANY COPYRIGHT HOLDER, OR ANY
OTHER PARTY WHO MAY MODIFY AND/OR REDISTRIBUTE THE PROGRAM AS PERMITTED ABOVE, BE LIABLE TO YOU FOR
DAMAGES, INCLUDING ANY GENERAL, SPECIAL, INCIDENTAL OR CONSEQUENTIAL DAMAGES ARISING OUT OF THE USE OR
INABILITY TO USE THE PROGRAM (INCLUDING BUT NOT LIMITED TO LOSS OF DATA OR DATA BEING RENDERED INACCURATE OR
LOSSES SUSTAINED BY YOU OR THIRD PARTIES OR A FAILURE OF THE PROGRAM TO OPERATE WITH ANY OTHER PROGRAMS),
EVEN IF SUCH HOLDER OR OTHER PARTY HAS BEEN ADVISED OF THE POSSIBILITY OF SUCH DAMAGES.
END OF TERMS AND CONDITIONS
How to Apply These Terms to Your New Programs
If you develop a new program, and you want it to be of the greatest possible use to the public, the best way to achieve
this is to make it free software which everyone can redistribute and change under these terms.
To do so, attach the following notices to the program. It is safest to attach them to the start of each source file to most
effectively convey the exclusion of warranty; and each file should have at least the "copyright" line and a pointer to where
the full notice is found.
, 1 April 1989
Ty Coon, President of Vice
This General Public License does not permit incorporating your program into proprietary programs. If your program is a
subroutine library, you may consider it more useful to permit linking proprietary applications with the library. If this is
what you want to do, use the GNU Library General Public License instead of this License.
194
LICENSING INFORMATION
GNU LESSER GENERAL PUBLIC LICENSE
Version 2.1, February 1999
Copyright (C) 1991, 1999 Free Software Foundation, Inc. 51 Franklin Street, Fifth Floor, Boston, MA 02110-1301 USA
Everyone is permitted to copy and distribute verbatim copies of this license document, but changing it is not allowed.
[This is the first released version of the Lesser GPL. It also counts as the successor of the GNU Library Public License,
version 2, hence the version number 2.1.]
Preamble
The licenses for most software are designed to take away your freedom to share and change it. By contrast, the GNU
General Public Licenses are intended to guarantee your freedom to share and change free software--to make sure the
software is free for all its users.
This license, the Lesser General Public License, applies to some specially designated software packages--typically libraries-of the Free Software Foundation and other authors who decide to use it. You can use it too, but we suggest you first think
carefully about whether this license or the ordinary General Public License is the better strategy to use in any particular
case, based on the explanations below.
When we speak of free software, we are referring to freedom of use, not price. Our General Public Licenses are designed
to make sure that you have the freedom to distribute copies of free software (and charge for this service if you wish); that
you receive source code or can get it if you want it; that you can change the software and use pieces of
it in new free programs; and that you are informed that you can do these things.
To protect your rights, we need to make restrictions that forbid distributors to deny you these rights or to ask you to
surrender these rights. These restrictions translate to certain responsibilities for you if you distribute copies of the library
or if you modify it.
For example, if you distribute copies of the library, whether gratis or for a fee, you must give the recipients all the rights
that we gave you. You must make sure that they, too, receive or can get the source code. If you link other code with the
library, you must provide complete object files to the recipients, so that they can relink them with the library after making
changes to the library and recompiling it. And you must show them these terms so they know their rights.
We protect your rights with a two-step method: (1) we copyright the library, and (2) we offer you this license, which gives
you legal permission to copy, distribute and/or modify the library.
To protect each distributor, we want to make it very clear that there is no warranty for the free library. Also, if the
library is modified by someone else and passed on, the recipients should know that what they have is not the original
version, so that the original author's reputation will not be affected by problems that might be introduced by others.
Finally, software patents pose a constant threat to the existence of any free program. We wish to make sure that a
company cannot effectively restrict the users of a free program by obtaining a restrictive license from a patent holder.
Therefore, we insist that any patent license obtained for a version of the library must be consistent with the full freedom of
use specified in this license.
Most GNU software, including some libraries, is covered by the ordinary GNU General Public License. This license, the GNU
Lesser General Public License, applies to certain designated libraries, and is quite different from the ordinary General
Public License. We use this license for certain libraries in order to permit linking those libraries into non-free programs.
When a program is linked with a library, whether statically or using a shared library, the combination of the two is legally
speaking a combined work, a derivative of the original library. The ordinary General Public License therefore permits such
linking only if the entire combination fits its criteria of freedom. The Lesser General Public License permits more lax
criteria for linking other code with the library.
195
LICENSING INFORMATION
We call this license the "Lesser" General Public License because it does Less to protect the user's freedom than the
ordinary General Public License. It also provides other free software developers Less of an advantage over competing nonfree programs. These disadvantages are the reason we use the ordinary General Public License for many libraries.
However, the Lesser license provides advantages in certain special circumstances.
For example, on rare occasions, there may be a special need to encourage the widest possible use of a certain library, so
that it becomes a de-facto standard. To achieve this, non-free programs must be allowed to use the library. A more
frequent case is that a free library does the same job as widely used non-free libraries. In this case, there is little to gain
by limiting the free library to free software only, so we use the Lesser General Public License.
In other cases, permission to use a particular library in non-free programs enables a greater number of people to use a
large body of free software. For example, permission to use the GNU C Library in non-free programs enables many more
people to use the whole GNU operating system, as well as its variant, the GNU/Linux operating system.
Although the Lesser General Public License is Less protective of the users' freedom, it does ensure that the user of a
program that is linked with the Library has the freedom and the wherewithal to run that program using a modified version
of the Library.
The precise terms and conditions for copying, distribution and modification follow. Pay close attention to the difference
between a "work based on the library" and a "work that uses the library". The former contains code derived from the
library, whereas the latter must be combined with the library in order to run.
GNU LESSER GENERAL PUBLIC LICENSE
TERMS AND CONDITIONS FOR COPYING, DISTRIBUTION AND MODIFICATION
0. This License Agreement applies to any software library or other program which contains a notice placed by the
copyright holder or other authorized party saying it may be distributed under the terms of this Lesser General Public License
(also called "this License"). Each licensee is addressed as "you".
A "library" means a collection of software functions and/or data prepared so as to be conveniently linked with application
programs (which use some of those functions and data) to form executables.
The "Library", below, refers to any such software library or work which has been distributed under these terms. A "work
based on the Library" means either the Library or any derivative work under copyright law: that is to say, a work containing
the Library or a portion of it, either verbatim or with modifications and/or translated straightforwardly into another
language. (Hereinafter, translation is included without limitation in the term "modification".)
"Source code" for a work means the preferred form of the work for making modifications to it. For a library, complete
source code means all the source code for all modules it contains, plus any associated interface definition files, plus the
scripts used to control compilation and installation of the library.
Activities other than copying, distribution and modification are not covered by this License; they are outside its scope.
The act of running a program using the Library is not restricted, and output from such a program is covered only if its
contents constitute a work based on the Library (independent of the use of the Library in a tool for writing it). Whether
that is true depends on what the Library does and what the program that uses the Library does.
1. You may copy and distribute verbatim copies of the Library's complete source code as you receive it, in any medium,
provided that you conspicuously and appropriately publish on each copy an appropriate copyright notice and disclaimer of
warranty; keep intact all the notices that refer to this License and to the absence of any warranty; and distribute a copy of
this License along with the Library.
You may charge a fee for the physical act of transferring a copy, and you may at your option offer warranty protection in
exchange for a fee.
196
LICENSING INFORMATION
2. You may modify your copy or copies of the Library or any portion of it, thus forming a work based on the Library, and
copy and distribute such modifications or work under the terms of Section 1 above, provided that you also meet all of these
conditions:
a) The modified work must itself be a software library.
b) You must cause the files modified to carry prominent notices stating that you changed the files and the date of any
change.
c) You must cause the whole of the work to be licensed at no charge to all third parties under the terms of this License.
d) If a facility in the modified Library refers to a function or a table of data to be supplied by an application program that
uses the facility, other than as an argument passed when the facility is invoked, then you must make a good faith effort
to ensure that, in the event an application does not supply such function or
table, the facility still operates, and performs whatever part of its purpose remains meaningful.
(For example, a function in a library to compute square roots has a purpose that is entirely well-defined independent of
the application. Therefore, Subsection 2d requires that any application-supplied function or table used by this function
must be optional: if the application does not supply it, the square root function must still compute square roots.)
These requirements apply to the modified work as a whole. If identifiable sections of that work are not derived from the
Library, and can be reasonably considered independent and separate works in themselves, then this License, and its terms,
do not apply to those sections when you distribute them as separate works. But when you distribute the same sections as
part of a whole which is a work based on the Library, the distribution of the whole must be on the terms of this License,
whose permissions for other licensees extend to the entire whole, and thus to each and every part regardless of who wrote
it.
Thus, it is not the intent of this section to claim rights or contest your rights to work written entirely by you; rather, the
intent is to exercise the right to control the distribution of derivative or collective works based on the Library.
In addition, mere aggregation of another work not based on the Library with the Library (or with a work based on the
Library) on a volume of a storage or distribution medium does not bring the other work under the scope of this License.
3. You may opt to apply the terms of the ordinary GNU General Public License instead of this License to a given copy of
the Library. To do this, you must alter all the notices that refer to this License, so that they refer to the ordinary GNU
General Public License, version 2, instead of to this License. (If a newer version than version 2 of the ordinary GNU General
Public License has appeared, then you can specify that version instead if you wish.) Do not make any other change in
these notices.
Once this change is made in a given copy, it is irreversible for that copy, so the ordinary GNU General Public License
applies to all subsequent copies and derivative works made from that copy.
This option is useful when you wish to copy part of the code of the Library into a program that is not a library.
4. You may copy and distribute the Library (or a portion or derivative of it, under Section 2) in object code or executable
form under the terms of Sections 1 and 2 above provided that you accompany it with the complete corresponding machinereadable source code, which must be distributed under the terms of Sections 1 and 2 above on a medium customarily used
for software interchange.
If distribution of object code is made by offering access to copy from a designated place, then offering equivalent access
to copy the source code from the same place satisfies the requirement to distribute the source code, even though third
parties are not compelled to copy the source along with the object code.
197
LICENSING INFORMATION
5. A program that contains no derivative of any portion of the Library, but is designed to work with the Library by being
compiled or linked with it, is called a "work that uses the Library". Such a work, in isolation, is not a derivative work of the
Library, and therefore falls outside the scope of this License.
However, linking a "work that uses the Library" with the Library creates an executable that is a derivative of the Library
(because it contains portions of the Library), rather than a "work that uses the library". The executable is therefore covered
by this License.Section 6 states terms for distribution of such executables.
When a "work that uses the Library" uses material from a header file that is part of the Library, the object code for the
work may be a derivative work of the Library even though the source code is not. Whether this is true is especially
significant if the work can be linked without the Library, or if the work is itself a library. The threshold for this to be true is
not precisely defined by law.
If such an object file uses only numerical parameters, data structure layouts and accessors, and small macros and small
inline functions (ten lines or less in length), then the use of the object file is unrestricted, regardless of whether it is legally
a derivative work. (Executables containing this object code plus portions of the Library will still fall under Section 6.)
Otherwise, if the work is a derivative of the Library, you may distribute the object code for the work under the terms of
Section 6. Any executables containing that work also fall under Section 6, whether or not they are linked directly with the
Library itself.
6. As an exception to the Sections above, you may also combine or link a "work that uses the Library" with the Library to
produce a work containing portions of the Library, and distribute that work under terms of your choice, provided that the
terms permit modification of the work for the customer's own use and reverse engineering for debugging such modifications.
You must give prominent notice with each copy of the work that the Library is used in it and that the Library and its use
are covered by this License. You must supply a copy of this License. If the work during execution displays copyright
notices, you must include the copyright notice for the Library among them, as well as a reference directing the user to the
copy of this License. Also, you must do one of these things:
a) Accompany the work with the complete corresponding machine-readable source code for the Library including
whatever changes were used in the work (which must be distributed under Sections 1 and 2 above); and, if the work is an
executable linked with the Library, with the complete machine-readable "work that uses the Library", as object code
and/or source code, so that the user can modify the Library and then relink to produce a modified executable containing
the modified Library. (It is understood that the user who changes the contents of definitions files in the Library will not
necessarily be able to recompile the application to use the modified definitions.)
b) Use a suitable shared library mechanism for linking with the Library. A suitable mechanism is one that (1) uses at run
time a copy of the library already present on the user's computer system, rather than copying library functions into the
executable, and (2) will operate properly with a modified version of the library, if the user installs one, as long as the
modified version is interface-compatible with the version that the work was made with.
c) Accompany the work with a written offer, valid for at least three years, to give the same user the materials
specified in Subsection 6a, above, for a charge no more than the cost of performing this distribution.
d) If distribution of the work is made by offering access to copy from a designated place, offer equivalent access to copy
the above specified materials from the same place.
e) Verify that the user has already received a copy of these materials or that you have already sent this user a copy.
For an executable, the required form of the "work that uses the Library" must include any data and utility programs
needed for reproducing the executable from it. However, as a special exception, the materials to be distributed need not
include anything that is normally distributed (in either source or binary form) with the major components (compiler, kernel,
and so on) of the operating system on which the executable runs, unless that component itself accompanies
the executable.
198
LICENSING INFORMATION
It may happen that this requirement contradicts the license restrictions of other proprietary libraries that do not normally
accompany the operating system. Such a contradiction means you cannot use both them and the Library together in an
executable that you distribute.
7. You may place library facilities that are a work based on the Library side-by-side in a single library together with other
library facilities not covered by this License, and distribute such a combined library, provided that the separate distribution
of the work based on the Library and of the other library facilities is otherwise permitted, and provided that you do these
two things:
a) Accompany the combined library with a copy of the same work based on the Library, uncombined with any other
library facilities. This must be distributed under the terms of the Sections above.
b) Give prominent notice with the combined library of the fact that part of it is a work based on the Library, and
explaining where to find the accompanying uncombined form of the same work.
8. You may not copy, modify, sublicense, link with, or distribute the Library except as expressly provided under this
License. Any attempt otherwise to copy, modify, sublicense, link with, or distribute the Library is void, and will
automatically terminate your rights under this License. However, parties who have received copies, or rights, from you
under this License will not have their licenses terminated so long as such parties remain in full compliance.
9. You are not required to accept this License, since you have not signed it. However, nothing else grants you permission
to modify or distribute the Library or its derivative works. These actions are prohibited by law if you do not accept this
License. Therefore, by modifying or distributing the Library (or any work based on the Library), you indicate your
acceptance of this License to do so, and all its terms and conditions for copying, distributing or modifying the Library or
works based on it.
10. Each time you redistribute the Library (or any work based on the Library), the recipient automatically receives a
license from the original licensor to copy, distribute, link with or modify the Library subject to these terms and conditions.
You may not impose any further restrictions on the recipients' exercise of the rights granted herein. You are not responsible
for enforcing compliance by third parties with this License.
11. If, as a consequence of a court judgment or allegation of patent infringement or for any other reason (not limited to
patent issues), conditions are imposed on you (whether by court order, agreement or otherwise) that contradict the
conditions of this License, they do not excuse you from the conditions of this License. If you cannot distribute so as to
satisfy simultaneously your obligations under this License and any other pertinent obligations, then as a consequence you
may not distribute the Library at all. For example, if a patent license would not permit royalty-free redistribution of the
Library by all those who receive copies directly or indirectly through you, then the only way you could satisfy both it and
this License would be to refrain entirely from distribution of the Library.
If any portion of this section is held invalid or unenforceable under any particular circumstance, the balance of the section
is intended to apply, and the section as a whole is intended to apply in other circumstances.
It is not the purpose of this section to induce you to infringe any patents or other property right claims or to contest validity
of any such claims; this section has the sole purpose of protecting the integrity of the free software distribution system
which is implemented by public license practices. Many people have made generous contributions to the wide range of
software distributed through that system in reliance on consistent application of that system; it is up to the author/donor to
decide if he or she is willing to distribute software through any other system and a licensee cannot impose that choice.
This section is intended to make thoroughly clear what is believed to be a consequence of the rest of this License.
12. If the distribution and/or use of the Library is restricted in certain countries either by patents or by copyrighted
interfaces, the original copyright holder who places the Library under this License may add an explicit geographical
distribution limitation excluding those countries, so that distribution is permitted only in or among countries not thus
excluded. In such case, this License incorporates the limitation as if written in the body of this License.
199
LICENSING INFORMATION
13. The Free Software Foundation may publish revised and/or new versions of the Lesser General Public License from time
to time. Such new versions will be similar in spirit to the present version, but may differ in detail to address new problems
or concerns.
Each version is given a distinguishing version number. If the Library specifies a version number of this License which applies
to it and "any later version", you have the option of following the terms and conditions either of that version or of any later
version published by the Free Software Foundation. If the Library does not specify a license version number, you may
choose any version ever published by the Free Software Foundation.
14. If you wish to incorporate parts of the Library into other free programs whose distribution conditions are incompatible
with these, write to the author to ask for permission. For software which is copyrighted by the Free Software Foundation,
write to the Free Software Foundation; we sometimes make exceptions for this. Our decision will be guided by the two
goals of preserving the free status of all derivatives of our free software and of promoting the sharing and reuse of software
generally.
NO WARRANTY
15. BECAUSE THE LIBRARY IS LICENSED FREE OF CHARGE, THERE IS NO WARRANTY FOR THE LIBRARY, TO THE EXTENT
PERMITTED BY APPLICABLE LAW. EXCEPT WHEN OTHERWISE STATED IN WRITING THE COPYRIGHT HOLDERS AND/OR OTHER
PARTIES PROVIDE THE LIBRARY "AS IS" WITHOUT WARRANTY OF ANY KIND, EITHER EXPRESSED OR IMPLIED, INCLUDING, BUT
NOT LIMITED TO, THE IMPLIED WARRANTIES OF MERCHANTABILITY AND FITNESS FOR A PARTICULAR PURPOSE. THE ENTIRE
RISK AS TO THE QUALITY AND PERFORMANCE OF THE LIBRARY IS WITH YOU. SHOULD THE LIBRARY PROVE DEFECTIVE, YOU
ASSUME THE COST OF ALL NECESSARY SERVICING, REPAIR OR CORRECTION.
16. IN NO EVENT UNLESS REQUIRED BY APPLICABLE LAW OR AGREED TO IN WRITING WILL ANY COPYRIGHT HOLDER, OR ANY
OTHER PARTY WHO MAY MODIFY AND/OR REDISTRIBUTE THE LIBRARY AS PERMITTED ABOVE, BE LIABLE TO YOU FOR
DAMAGES, INCLUDING ANY GENERAL, SPECIAL, INCIDENTAL OR CONSEQUENTIAL DAMAGES ARISING OUT OF THE USE OR
INABILITY TO USE THE LIBRARY (INCLUDING BUT NOT LIMITED TO LOSS OF DATA OR DATA BEING RENDERED INACCURATE OR
LOSSES SUSTAINED BY YOU OR THIRD PARTIES OR A FAILURE OF THE LIBRARY TO OPERATE WITH ANY OTHER SOFTWARE),
EVEN IF SUCH HOLDER OR OTHER PARTY HAS BEEN ADVISED OF THE POSSIBILITY OF SUCH DAMAGES.
END OF TERMS AND CONDITIONS
200
LICENSING INFORMATION
BSD LICENSE
Redistribution and use in source and binary forms, with or without modification, are permitted provided that the following
conditions are met:
*
*
*
Redistributions of source code must retain the above copyright notice, this list of conditions and the following
disclaimer.
Redistributions in binary form must reproduce the above copyright notice, this list of conditions and the following
disclaimer in the documentation and/or other materials provided with the distribution.
Neither the name of Conceptronic nor the names of its contributors may be used to endorse or promote products derived
from this software without specific prior written permission.
THIS SOFTWARE IS PROVIDED BY CONCEPTRONIC ''AS IS'' AND ANY EXPRESS OR IMPLIED WARRANTIES, INCLUDING, BUT NOT
LIMITED TO, THE IMPLIED WARRANTIES OF MERCHANTABILITY AND FITNESS FOR A PARTICULAR PURPOSE ARE DISCLAIMED.
IN NO EVENT SHALL CONCEPTRONIC BE LIABLE FOR ANY DIRECT, INDIRECT, INCIDENTAL, SPECIAL, EXEMPLARY, OR
CONSEQUENTIAL DAMAGES INCLUDING, BUT NOT LIMITED TO, PROCUREMENT OF SUBSTITUTE GOODS OR SERVICES; LOSS OF
USE, DATA, OR PROFITS; OR BUSINESS INTERRUPTION) HOWEVER CAUSED AND ON ANY THEORY OF LIABILITY, WHETHER IN
CONTRACT, STRICT LIABILITY, OR TORT (INCLUDING NEGLIGENCE OR OTHERWISE) ARISING IN ANY WAY OUT OF THE USE OF
THIS SOFTWARE, EVEN IF ADVISED OF THE POSSIBILITY OF SUCH DAMAGE.
REVISED BSD LICENSE
Redistribution and use in source and binary forms, with or without modification, are permitted provided that the following
conditions are met:
*
*
*
Redistributions of source code must retain the above copyright notice, this list of conditions and the following
disclaimer.
Redistributions in binary form must reproduce the above copyright notice, this list of conditions and the following
disclaimer in the documentation and/or other materials provided with the distribution.
Neither the name of Conceptronic nor the names of its contributors may be used to endorse or promote products derived
from this software without specific prior written permission.
THIS SOFTWARE IS PROVIDED BY CONCEPTRONIC ``AS IS'' AND ANY EXPRESS OR IMPLIED WARRANTIES, INCLUDING, BUT NOT
LIMITED TO, THE IMPLIED WARRANTIES OF MERCHANTABILITY AND FITNESS FOR A PARTICULAR PURPOSE ARE DISCLAIMED. IN
NO EVENT SHALL CONCEPTRONIC BE LIABLE FOR ANY DIRECT, INDIRECT, INCIDENTAL, SPECIAL, EXEMPLARY, OR
CONSEQUENTIAL DAMAGES (INCLUDING, BUT NOT LIMITED TO, PROCUREMENT OF SUBSTITUTE GOODS OR SERVICES; LOSS OF
USE, DATA, OR PROFITS; OR BUSINESS INTERRUPTION) HOWEVER CAUSED AND ON ANY THEORY OF LIABILITY, WHETHER IN
CONTRACT, STRICT LIABILITY, OR TORT (INCLUDING NEGLIGENCE OR OTHERWISE) ARISING IN ANY WAY OUT OF THE USE OF
THIS SOFTWARE, EVEN IF ADVISED OF THE POSSIBILITY OF SUCH DAMAGE.
201