1
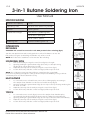
V3.0
8493678
3-in-1 Butane Soldering Iron
User Manual
SPECIFICATIONS
Butane Fuel Capacity
15 ml
Operating Time
45 to 60 mins (when fully fueled)
Ignition
Peizo Ignition
Temperature Range
200 to 400°C (soldering iron)
up to 450°C (heat gun)
up to 1,300°C (torch)
Soldering Iron
Conical Soldering Iron Tip
OPERATION
Fig. 1
REFUELING
CAUTION! The control lever must be in the OFF position before refueling (fig.2).
Turn the unit upside down and securely push the nozzle of the butane can into the
filling valve (see figure 1). Refueling should take only a few seconds.
Fig. 2
NOTE: Allow the fuel to stabilize for a few minutes after refueling.
Fig. 3
SOLDERING IRON
1.
2.
3.
4.
Turn on the fuel by moving the control lever (fig.2) to the right.
Ignite by pushing the ignition button (fig.3) You may see the tip housing
window glow orange after a few seconds.
Adjust the intensity of the heat by moving the control lever (fig.2).
To turn off the unit, slide the control lever (fig.2) all the way to the left.
NOTE: The soldering iron tips are shaped from a copper bar, then coated with
protective iron plating. Though the coating is thick for improved durability, it has good heat
conductivity for more efficient thermal recovery.
HEAT BLOWER
1.
2.
3.
4.
TORCH
1.
2.
3.
4.
To convert the unit to a heat blower, remove the soldering tip by unscrewing it..
The catalytic heat chamber now becomes a heat blower tip (fig.4).
Ignite by pushing the ignition button (fig.3). You may see the tip housing window glow
for a few seconds.
Adjust the intensity of the heat by moving the control lever (fig.2).
To turn off the unit, slide the control lever (fig.2) all the way to the left.
Fig. 4
Fig. 5
Fig. 6
To convert the unit to a torch (fig.6), remove the catalytic heat chamber tip by
unscrewing the knurled nut (fig.5) and removing the catalytic heat chamber tip.
Ignite by pushing the ignition button (fig.3). You may see the blue flame immediately.
Adjust the intensity of the heat by moving the control lever (fig.2).
To turn off the unit, slide the control lever (fig.2) all the way to the left.
Please read and understand all instructions before use.
Retain this manual for future reference.
Fig. 7
V3,0
8493678
Fer à souder au butane 3-en-1
Manuel d'utilisateur
SPÉCIFICATIONS
Capacité de butane
15 mL
Durée d’utilisation
45 à 60 minutes (lorsque rempli de carburant)
Allumage
Allumage piézo
Plage de température
200 à 400 °C (fer à souder)
Jusqu’à 450 °C (pistolet thermique)
Jusqu’à 1 300 °C (chalumeau)
Fer à souder
Embout de fer à souder conique
REMPLISSAGE DE CARBURANT
ATTENTION ! Le levier de commande doit être placé à la position OFF (arrêt) avant
de procéder au remplissage de carburant (fig. 2).
Fig. 1
Retournez l’appareil et enfoncez solidement la buse de la boîte de butane dans la soupape
de remplissage (voir la figure 1). Le remplissage ne devrait prendre que quelques secondes.
REMARQUE : Laissez le carburant se stabiliser pendant quelques minutes après avoir procédé
au remplissage.
Fig. 2
FER À SOUDER
Fig. 3
1.
2.
3.
4.
Ouvrez le carburant en déplaçant le levier de commande (fig. 2) vers la droite.
Allumez le carburant en appuyant sur le bouton d’allumage (fig. 3). Vous pouvez
voir la fenêtre du logement d’extrémité s’allumer de couleur orange après
quelques secondes.
Ajustez l’intensité de la chaleur en déplaçant le levier de commande (fig. 2).
Pour fermer l’appareil, glissez le levier de commande (fig. 2) jusqu’au bout vers la gauche.
REMARQUE : Les embouts du fer à souder sont fabriqués de cuivre et enduits d’un placage
de protection en fer. Même si le revêtement est épais pour assurer sa durabilité, il permet une
conductivité efficace de la chaleur pour assurer ainsi une récupération thermique plus efficace.
SOUFFLANTE DE CHALEUR
1.
2.
3.
4.
Pour convertir l’unité en une soufflante de chaleur, enlevez l’embout de soudage en la
Fig. 5
dévissant tout simplement. La chambre de chauffage catalytique devient maintenant
un embout de soufflante de chaleur (fig. 4).
Allumez le carburant en appuyant sur le bouton d’allumage (fig. 3). Vous pouvez voir
la fenêtre du logement d’extrémité s’allumer de couleur orange après
quelques secondes.
Ajustez l’intensité de la chaleur en déplaçant le levier de commande (fig. 2).
Pour fermer l’appareil, glissez le levier de commande (fig. 2) jusqu’au bout vers la gauche.
Fig. 4
Fig. 6
CHALUMEAU
1.
2.
3.
4.
Pour convertir l’appareil en un chalumeau (fig. 6), retirez l’embout de la chambre de
chauffage catalytique en dévissant l’écrou moleté (fig. 5).
Allumez le carburant en appuyant sur le bouton d’allumage (fig. 3). La flamme bleue
deviendra immédiatement visible.
Ajustez l’intensité de la chaleur en déplaçant le levier de commande (fig. 2).
Pour fermer l’appareil, glissez le levier de commande (fig. 2) jusqu’au bout vers la gauche.
Vous devez lire et comprendre toutes les instructions avant d'utiliser l'appareil.
Conservez ce manuel afin de pouvoir le consulter plus tard.
Fig. 7