1
MANUEL
D’UTILISATION
Moteur hors-bord
F8
Conseils importants
Au propriétaire
L’équipe Nimarine vous remercie gentiment de votre achat et confiance. Ce manuel d’utilisation comprend des
informations et instructions sur le utilisation, l’entretien et les soins corrects de votre moteur hors-bord. Familiarisezvous avec ces instructions de base puisque cela vous garantit la certitude de profiter au mieux des plaisirs que votre
moteur hors-bord peut vous procurer. Au cas où vous désirez de plus amples informations ou d’autres réponses à vos
questions, n’hésitez pas à contacter votre concessionnaire. Des informations importantes sont accentuées comme suite:
ce symbole réfère à une situation potentiellement dangereuse. SOYEZ ATTENTIF ET VIGILANT! VOTRE SÉCURITÉ
PEUT ETRE MISE EN CAUSE!
AVERTISSEMENT
En cas de non-respect d’un AVERTISSEMENT, l’usage, l’entretien ou la réparation du hors-bord peut causer des blessures
graves, voire mortelles.
ATTENTION
ATTENTION indique des mesures ou démarches à prendre pour éviter des dégâts mécaniques éventuels.
REMARQUE
Une REMARQUE vous donne des renseignements pour vous faciliter ou expliquer certaines procédures. Pour garantir
une longévité maximale de votre hors-bord, il importe d’observer et de respecter minutieusement les instructions et les
conseils dans ce manuel d’utilisation. Le non-respect des directives, instructions et conseils peut provoquer des dégâts
matériels qui ne seront plus couverts par la garantie.
REMARQUE
Le moteur hors-bord F8 et ses accessoires sont exemplaires des textes et illustrations dans ce manuel. Certaines pièces ou
procédures dans ce manuel pourraient s’appliquer à des modèles similaires.
Index
Informations générales
Sécurité
Vignettes d’identification importantes
Logos de sécurité
Avertissements
Instructions carburant
Carburant
Huile moteur
Choix de l’hélice
Pièces de base
Pièces principales
Bouchon de carburant
Vis de mise à l’air
Commande de sélection
Poignée des gaz
Réglage poignée des gaz
Interrupteur d’arrêt d’urgence
Interrupteur d’arrêt du moteur
Bouton de starter
Poignée de démarrage
Réglage traction de direction
Blocage inclinaison
Témoin d’huile moteur
Prise en main
Montage du moteur
Positionnement du moteur
Fixation du moteur
Rodage
Procédures moteur quatre-temps
Contrôles avant démarrage
Carburant
Commandes
Moteur
Niveau d’huile
Faire le plein d’essence
Vis de mise à l’air
Démarrage moteur
Chauffage moteur
Démarrage manuel
Commande de sélection
Marche avant, marche arrière
Arrêter le moteur
Procédure
Déterminer angle d’arcasse
Réglage angle d’arcasse
Ancrage angle d’arcasse
Basculer le moteur
Basculer en haut
Basculer en bas
1
1
3
3
4
5
5
5
6
7
7
8
8
8
8
9
9
9
10
10
10
11
11
13
13
14
14
15
15
15
15
15
15
15
16
16
17
19
19
20
20
20
20
21
21
21
22
23
24
Index
Entretien
Spécifications
Transport et stockage
Vis de serrage
Stockage du hors-bord
Procédure
Graissage
Nettoyage
Surfaces peints
Entretien périodique
Pièces détachées
Schéma d’entretien
Points de graissage
Entretien bougie d’allumage
Contrôle système d’alimentation
Ralenti de régime
Vidange d’huile
Contrôle prises et réseau électrique
Fuite système d’échappement
Fuite d’eau
Fuite d’huile
Contrôle hélice
Démontage hélice
Montage hélice
Vidange huile queue
Contrôle et remplacement anode(s)
Coating de la coque
Recherche de pannes
Diagnose
Mesures provisoires d’urgence
Dommages après collision
Démarreur en défaut
Démarrage improvisé
Moteur submergé
Procédure
25
25
27
27
27
28
28
29
29
29
29
30
31
32
32
33
34
36
36
36
36
36
36
37
37
38
38
39
39
42
42
43
43
45
45
eneral information
Informations générales
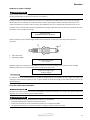
entification numbers record (HDF15)
utboard motor
serialde
number(SN:)
Le numéro
série est gravé dans la plaquette métallisée sur le flanc gauche de la barre d’arcasse. Indiqués sont SN
e outboard(‘Serial
motor
serial number
is stamped
onetthe
label
to the de
port
side
clamp ci-dessous
Number’),
le type moteur,
puissance
poids
à sec.attached
Notez le numéro
série
dansoflesthe
illustrations
acket.
pour faciliter l’identification du moteur, par exemple pour la commande éventuelle de pièces détachées.
cord you outboard motor serial number in the spaces provided to assist you in ordering spare
rts from our dealer or for reference in case your outboard motor is stolen.
ha
●
ca
●
un
O
ca
1 Outboard motor serial number location Safety information
●
●
●
●
pr
●
sp
1. Numéro
de série
Outboard motor
serial
number location Safety information
● Before mounting or operating the outboard motor, read th
ne
●
you an understanding of the motor and its operation.
● Before operating the boat, read any owner's or operator
th
labels. Be sure you understand each item before operating.
R
●Do not overpower the boat with this outboard motor. Overp
• Lisez attentivement ce manuel avant la première prise en main de votre moteur hors-bord. Ainsi, vous vous
Be
of control.
The rated power of the outboard should be equal
familiarisez avec son fonctionnement et les directives de sécurité
et d’entretien.
R
capacity
of
the
boat.
If
the
rated
horsepower
capacity
of
the
• Avant tout usage, assurez-vous d’une bonne compréhension des renseignements dans ce manuel d’utilisation et des
Re
or boat manufacturer.
vignettes, autocollants ou autres repères des composants diverses.
Re
●Do not
Modifications
could make the
If
• N’utilisez pas votre moteur quand la puissance maximale dépasse
cellemodify
autoriséethe
suroutboard.
votre bateau.
Un moteur
Incorrect propeller selection and incorrect use may not only c
surpuissant risque de mettre en cause la sécurité à bord. Si vous n’êtes pas au courant de la puissance maximale
Before mounting
or operating the outboard motor, read this entire
manual.
Read
should give Consult your dealer for W
adversely
affect
fuel itconsumption.
co
admissible de votre bateau, veuillez consulter votre concessionnaire ou le fabricant du bateau.
u an understanding of the motor and its operation.
● Never operate after drinking alcohol or taking drugs. IfA
•
N’appliquez
pas
de
modifications
ou
changements
au
hors-bord.
Ceux-là
risquent
d’endommager
ou
mettre
hors
Before operating the boat, read any owner's or operator's involve
manualsintoxication.
supplied with it and all
F9
la machine. Le montage d’une hélice inappropriée ou usage maladroit peuvent provoquer des dégâts
bels. Be sure fonction
you understand
each item before operating.
● Have an approved personal flotation device (PFD) on bo
au
moteur
ou
augmenter
la
consommation
de
carburant.
Consultez
votre
concessionnaire
pour
apprendre
les
Do not overpower the boat with this outboard motor. Overpowering
boat
could
result in boating.
loss
idea to the
wear
a PFD
whenever
At a minimum, childr
control. Theprocédures.
rated power of the outboard should be equal towear
or less
than the
rated
horsepower
PFDs,
and
everyone
should
wear PFDs when there
• N’utilisez jamais le hors-bord après usage d’alcool, de stupéfiants ou de drogues. La moitié des accidents sur l’eau est
pacity of the boat. If the rated horsepower capacity of the boat
is unknown, consult the dealer
conditions.
due à la consommation d’alcool ou de stupéfiants.
boat manufacturer.
●Gasoline is highly flammable, and its vapors are flammable
• Soyez sûr d’être muni d’un gilet de sauvetage pour chaque passager. Il est recommandé de le porter pendant
Do not modify
the outboard. Modifications could make the motor
unfitcarefully.
or unsafeMake
to use.sure there are no gas fumes or leakin
gasoline
chaque
excursionand
en bateau.
Enfants
autres
personnes
qui neengine
savent pas
nager sont
un gilet de
correct propeller
selection
incorrect
useetmay
not
only cause
damage,
butobligés
also de porter
● This product
emits
exhaust
gases which contain carbon
Toute personne
à bord doit
avoir
recours
gilet durant
des conditions météorologiques dangereuses.
versely affectsauvetage.
fuel consumption.
Consult
your
dealer
foraucorrect
use.
which may cause brain damage or death when inhaled. Symp
• L’essence
particulièrement
inflammable
vapeurs
peuvent
facilement
Never operate
after est
drinking
alcohol
or takinget ses
drugs.
About
50%
of all s’exploser.
boating Entreposez
fatalitiesl’essence avec
drowsiness.
Keep cockpit and cabin areas well ventilated. Av
précaution.
Assurez-vous
qu’il
n’y
a
pas
de
fuites
d’essence
ou des vapeurs quand le moteur est mis en marche.
volve intoxication.
●Check throttle, shift, and steering for proper operation befo
• Cet hors-bord
produit
des gaz d’échappement
dont
mono carbone
toxique,
un gaz incolore
inodore, et son
Have an approved
personal
flotation
device (PFD)
onleboard
every
It switch
is aetgood
●for
Attach
theoccupant.
engine stop
lanyard cord to a secure plac
inhalation
puissent
provoquer
des
nausées,
évanouissements,
la mort. Les symptômes
d’empoisonnement par
ea to wear a PFD whenever boating. At a minimum, children while
andvoire
non-swimmers
should
always
operation. If you accidentally leave the helm, the cord
mono
carbone sont
entre autres
nausées
graves,
vertiges
et la somnolence.
Assurez-vousboating
d’une bonne ventilation
ar PFDs, and
everyone
should
wear des
PFDs
when
there
are
hazardous
the potentially
engine.
de la cabine et de la position de direction. Evitez toute obstruction du système d’échappement.
1
nditions.
●Know the marine laws and regulations where you will be bo
Avant de
démarrer le and
moteur,
bonflammable
fonctionnement
la poignée
des
gaz,
deand
la
commande
sens avant
Gasoline is•highly
flammable,
its vérifiez
vaporsleare
and
explosive.
Handle
store
●de
Stay
informed
about
the
weather.deCheck
weather forecasts
ou arrière
des composants
de direction.
soline carefully.
Makeetsure
there are no
gas fumes or leaking fuel before starting the engine.
• Rattachez
la corde de
sécurité
au bras,
jambe ou
une partie
solide de vêtement.
vous vousgas
éloignez de la
This product
emits exhaust
gases
which
contain
carbon
monoxide,
a colorless,
odorless
1Lorsque
position
direction,or
la corde
détachera
de l›interrupteur
d›arrêt
d›urgence
et ledizziness,
moteur calera.
ich may cause
braindedamage
deathsewhen
inhaled.
Symptoms
include
nausea,
and
• Soyez
au courant
code législatif
relatif
à votre usage
et munissez-vous
éventuellement
d›un certificat de conduite
owsiness. Keep
cockpit
andducabin
areas well
ventilated.
Avoid
blocking exhaust
outlets.
et navigation,
pourproper
naviguer
votre bateau.
Check throttle,
shift, andnécessaires
steering for
operation
before starting the engine.
Inspectez
préalable
la prévision
Evitezon
de your
naviguer
par un temps
défavorable.
Attach the •
engine
stopauswitch
lanyard
cordmétéorologique.
to a secure place
clothing,
or your
arm or leg
• Signalez
à vos
proches ou amis
votre
Laissez
un pull
plan de
trajetthe
envisagé
auprès
d’une personne
ile operation.
If you
accidentally
leave
theparcours
helm, prévu.
the cord
will
from
switch,
stopping
W
responsable et mettez-le au courant de votre retour.
e engine.
D
F9.9 -F8-F6
•
Respectez
les
capacités
et
qualités
de
votre
bateau
sous
des
conditions
diverses.
Observez
toujours
les
limites
de
Know the marine laws and regulations where you will be boating ------and obey them.
ot
Tuesday, January 15, 2002 3:59:14 PM
Stay informedvitesse
about
the weather.
weathertoujours
forecasts
before boating.
Avoid
maximale
en tout Check
sûreté. Surveillez
minutieusement
la présence
deboating
personnesinou objets autour de
vous.
1
1
General information
hazardous weather.
● Tell someone where you are going: leave a Float Plan with a responsible person. Be sure to
Informations générales
cancel the Float Plan when you return.
● Use common sense and good judgment when boating. Know your abilities, and be sure you
• Faites surtout attention à la présence éventuelle de baigneurs ou d’autres personnes.
understand how your boat handles under the different boating conditions you may encounter.
• Observez une distance importante aux endroits populaires parmi les baigneurs ou estivants.
Operate
within your limits, and the limits of your boat. Always operate at safe speeds, and keep a
• En cas de la présence proche d’un baigneur ou d’une autre personne, neutralisez la commande de sélection et
careful
watch
for obstacles and other traffic.
arrêtez
le moteur.
●Always watch carefully for swimmers during the engine operation.
• Ramenez les bidons d’huile vides chez votre concessionnaire ou triez-les en tant que déchet chimique auprès d’une
●Stay away from swimming areas.
déchetterie.
●When a swimmer is in the water near you shift into neutral and shut off the engine.
toujours undiscard
entonnoirempty
pour le containers
rajout d’huile.used
Essuyez
toute tache oil.
en casFor
d’huile
essence
● •
DoUtilisez
not illegally
toimmédiatement
replace or replenish
theoucorrect
renversée.
processing of empty containers, consult the dealer where you purchased the oil.
• En cas
de doute, oils
consultez
concessionnaire
pour apprendre
ou any
bidons.
●When
replacing
usedvotre
to lubricate
the product
(enginelesorprocédures
gear oil),d’évacuer.
be sureles
tocontenants
wipe away
Ne
les
jetez
jamais
illégalement.
spilt oil. Never pour oil without using a funnel or similar device. If necessary, verify the
necessary replacement procedure with the dealer.
Lectureillegally
de ce manuel
des vignettes
● Never
discardet(dump)
the product. Recommends consulting the dealer on discarding
tout usage ou prise en main, veuillez observer expressément nos recommandations.
theAvant
product.
Lisez
attentivement
ce manuel
Read
manuals
and labels
Before
working
on this
motor:
Faites operation
la lecture duor
manuel
de votre
bateau
avant le montage du moteur.
Read
this manual.
Comprenez
les vignettes, étiquettes et plaques attachées au hors-bord.
Read
any reste
manuals
suppliedn’hésitez
with the
S’il vous
des questions,
pasboat.
à consulter votre concessionnaire.
Read all label on the outboard motor and the boat.
If you need any additional information, contact our dealer.
VIGNETTES D’AVERTISSEMENT
En cas d’absence
ou illisibilité des vignettes d’avertissement, veuillez contacter votre concessionnaire.
WARNING
LABELS
If F8
these labels are damaged or missing, contact our dealer for replacements.
F9.9/F8/F6.8
1
Warning:
Do notAVERTISSEMENT
smoke when refueling or connecting fuel supply, and keep away from sparks, flames, or
other
sources
of ignition.
Ne fumez
jamais
pendant le rajout d’essence ou l’installation de l’alimentation de carburant. Restez à l’écart d’étincelles,
flammes ou d’autres sources d’inflammation.
2
2
General
General
information
information
2
2 General information
Informations générales
2
2
Warning
Warning
Make
Make
suresure
people
people
are clear
are clear
of the
of outboard
the outboard
motor
motor
when
when
tilting
tilting
up and
up and
down,
down,
alsoalso
be careful
be careful
not to
not to
AVERTISSEMENT
Warning
pinch
pinch
any
any
body
body
parts
parts
between
between
the drive
thethe
drive
unit
unit
and and
engine
engine
bracket.
bracket.
Make
sure
people
are
clear
of
outboard
motor
when
tilting up and down, also be careful not to
3
Assurez-vous qu’il n’y a personne aux alentours du moteur lorsque celui-ci est basculé vers le haut ou vers le bas. Veillez à
bodyou
parts
between
drive
unit
and engine
que lesany
membres
autres
parties duthe
corps
ne se
coincent
entre le bracket.
moteur hors-bord et la barre d›arcasse.
3ce pinch
3 3
Make
Make
suresure
the outboard
the outboard
is out
is of
outgear
of gear
and and
stopstop
the engine
the engine
when
when
closeclose
to anyone
to anyone
in the
in water
the water
e.g. e.g.
AVERTISSEMENT
swimmer,
swimmer,
water
water
skier,
skier,
rescue.
rescue.
Make sure the outboard is out of gear and stop the engine when close to anyone in the water e.g.
Mettez la commande de sélection en position neutre (point mort) et arrêtez le moteur en cas de personnes proches, telles
4 4 swimmer, water skier, rescue.
que baigneurs, skieurs nautiques ou secouristes/ambulanciers.
4
4
Avertissement températures élevées.
Warning
Warning
of high
of high
temperature.
temperature.
Warningd’avertissement
of high temperature.
Vignettes
importantes
Important
Important
labels
labels
Warning
Warning
labels
labels
Important
labels
AVERTISSEMENT
Label
Label
Warning labels
Mettez la commande de sélection en position neutre avant le démarrage (hormis moteur 2,5 chevaux). Ne touchez ou
Label
Be sure
Be sure
shiftshift
control
control
is inisneutral
in neutral
before
before
starting
starting
engine.(except
engine.(except
2.5hp)
2.5hp)
enlevez pas des pièces électriques pendant l’utilisation avec moteur démarré. Gardez les mains, cheveux et vêtements à
Do not
Do
touch
notdu
touch
or remove
ord›entraînement
remove
electrical
electrical
parts
parts
when
when
starting
starting
or
during
or
operation.
operation.
lݎcart
volant
autres
éléments
rotatifs
dès
queduring
le moteur
est
mis en marche.
Be hands,
sure
shift
control
is away
in ou
neutral
before
starting
engine.(except
2.5hp)
KeepKeep
hands,
hair,
hair,
and
and
clothes
clothes
away
fromfrom
flywheel
flywheel
and and
other
other
rotating
rotating
parts
parts
while
while
engine
engine
is is
Do not touch or remove electrical parts when starting or during operation.
running.
running.
AVERTISSEMENT
Keep
hands, hair, and clothes away from flywheel and other rotating parts while engine is
Le running.
moteur est fourni d’un blocage de démarrage. Le moteur ne démarre qu’avec la commande de sélection en position
Label
Label
neutre.
Label
ThisThis
engine
engine
is equipped
is equipped
withwith
a neutral
a neutral
starting
starting
device.
device.
AVERTISSEMENT
The The
engine
engine
will will
not start
not start
unless
unless
the shift
the shift
control
control
is inisneutral
in neutral
position.
position.
engine
is equipped
withPROVOQUER
a neutral starting
device.
LESThis
FUITES
DE CARBURANT
PEUVENT
DES INCENDIES
The engine will not start unless the shift control is in neutral position.
Label
Label
Avant de basculer ou poser le moteur sur le côté, veillez à
• Label
* fermez le robinet d’essence en position ‘Closed’
LEAKING
LEAKING
FUEL
COULD
FIRE.
Ale FIRE.
• * fermez
laFUEL
visCOULD
de mise
àCAUSE
l’air, CAUSE
situé A
dans
bouchon de remplissage d’essence.
Before
Before
tilting
tilting
up the
up engine
the engine
or laying
or laying
it onitits
onside:
its side:
LEAKING FUEL COULD CAUSE A FIRE.
·Turn
·Turn
the fuel
the fuel
cockcock
to the
to "closed"
the "closed"
position.
position.
Before
tilting
upscrew
thescrew
engine
laying
itcap.
on cap.
its side:
·Tighten
·Tighten
the air-vent
the air-vent
on the
onor
fuel
the
fuel
tanktank
·Turn the fuel cock to the "closed" position.
·Tighten the air-vent screw on the fuel tank cap.
3 3
3
3
Caution labels
Caution labels
General information
General information
Informations générales
Cautiond’avertissement
labels
Vignettes
Be sure shift control is in neutral
before starting engine.(except 2HP)
Do
removeiselectrical
parts
Be not
suretouch
shiftorcontrol
in neutral
when
during operation.
beforestarting
startingor engine.(except
2HP)
awayparts
from flywheel
Be Keep
sure
shift
isclothes
inelectrical
neutral
Do
nothands,hair,and
touchcontrol
or remove
and
other
rotating
parts
engine
is running
before
starting
2HP)
Mettez
la commande
deengine.(except
sélection
enwhile
position
neutre avant
le démarrage (hormis moteur 2,5 chevaux). Ne touchez ou
when
starting
or during
operation.
Do Keep
not
touch
or électriques
remove electrical
parts
enlevez
pas des
pièces
pendantaway
l’usage
avec moteur
démarré. Gardez les mains, cheveux et vêtements à
hands,hair,and
clothes
from
flywheel
when
starting
or during
operation.
and
other
rotating
parts
whileéléments
enginerotatifs
is running
l’écart du
volant
d’entraînement
ou autres
dès que le moteur est mis en marche.
Keep hands,hair,and clothes away from flywheel
and other rotating parts while engine is running
This engine is equipped with a neutral starting device.
The engine will not start unless the shift control is
in
neutral
position
This
engine
is equipped with a neutral starting device.
Le moteur est fourni d’un blocage de démarrage. Le moteur ne démarre qu’avec la commande de sélection en position
neutre. The engine will not start unless the shift control is
This
equipped with a neutral starting device.
inengine
neutralisposition
The engine will not start unless the shift control is
Label
in neutral position
Label
ATTENTION
Notice
This side up.
Label
Notice
This side up.
Notice
This side up.
Label
Côté supérieur
4
4
4
4
Informations générales
General information
Instructions
essence
Fueling
instructions
GASOLINE AND ITS VAPORS ARE HIGHLY FLAMMABLE AND EXPLOSIVE!
L’ESSENCE·Do
ET SESnot
VAPEURS
EXTREMEMENT
INFLAMMABLES
EXPLOSIVES!
smokeSONT
when
refueling, and
keep awayETfrom
sparks, flames, or other sources of ignition.
·Stop engine before refueling.
·Refuel
in a well-ventilated
area.
Refuel portable
fuel tanks
off the boat.
• Ne fumez
jamais pendant
le rajout d’essence
ou l’installation
de l’alimentation
de carburant.
Restez à l’écart
·Take
care not
to spillsources
gasoline.
If gasoline spills, wipe it up immediately with dry rags.
d’étincelles,
flammes
ou d’autres
d’inflammation.
·Do not overfill the fuel tank.
• Arrêtez le moteur avant le rajout de carburant.
·Tighten the filler cap securely after refueling.
• N’ajoutez le carburant que dans un espace bien ventilé. Remplissez des contenants de carburant séparés en dehors
·If you should swallow some gasoline, inhale a lot of gasoline vapor, or get gasoline in your
du bateau.
eyes, get immediate medical attention.
• Ne tachez
débordez
pas l’essence.
Essuyez
taches
immédiatement
avecwith
un chiffon
·Ifouany
gasoline
spills onto
yourdes
skin,
immediately
wash
soapsec.
and water. Change clothing if
• Evitez un réservoir trop rempli.
gasoline spills on it.
• Après ·Touch
le rajout, fermez
biennozzle
le bouchon
de remplissage
d’essence.
the fuel
to the
filler opening
or funnel to help prevent electrostatic sparks.
• Au cas où le carburant est avalé, respiré ou qu’elle est entré dans les yeux, contactez de suite de l’assistance médicale.
• Enlevez directement des taches de carburant sur la peau avec du savon et de l’eau. Ne portez pas de vêtements
only new clean gasoline which has been stored in clean containers and is not contaminated
tachésUse
de carburant.
water
orverseur
foreign
• Laissezwith
reposer
le bec
surmatter.
l’entonnoir ou sur l’orifice du réservoir pour éviter des chocs électrostatiques.
ATTENTION
Recommended gasoline:
Regular
gasoline
Utilisez seulement de l’essence fraîche
et propre unleaded
qui a été stocké
dans des contenants ou bidons propres, à l’écart d›eau
ou de polluants.
Gasoline
If knocking or pinging occurs, use a different brand of gasoline or premium unleaded fuel.
Essence recommandé
Essence
Euro 95 sans plomb
Engine oil
engine
Quand le moteurRecommended
cliquette, servez-vous
d’uneoil:
autre marque d’essence ou de Super 98.
4-stroke motor oil with a combination of the following SAE and API oil classifications
oil type SAE:
Huile moteur Engine
Huiles recommandées:
10W-30 or 10W-40
Engine
oilquatre-temps
grade API:qui répondent aux qualifications SAE et API suivantes:
Huiles
Classification
SAE: SAE 10W-30 ou 10W-40
SE, SF,
SG, SH,SJ,SL
Classification
API: SE, SF, SG, SH, oil
SJ, SL
Engine
oil quantity(excluding
filter):
Quantité d’huile (sans filtre à huile): 1,0 litre of 0,8 liter
0.8L(0.85 US qt) (0.70 lmp.qt )
REMARQUE
NOTE:
If the recommended
engine oil grades
are notun
available,
select
alternative
from the
following
En cas d’indisponibilité
de l’huile recommandée,
vous trouverez
alternatif selon
les an
températures
extérieures
pendant
chart
according
tolethe
average
temperatures in your area.
l’utilisation,
en vous
basant sur
tableau
suivant:
10W-40
ATTENTION
All 4-stroke
engines
are shipped
factory without engine oil.
Tous les moteurs
sont délivrés
par l’usine
sans huilefrom
dans the
le moteur.
5
5
General information
Propeller selection
Pièces de base
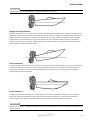
The performance of your outboard motor will be critically affected by your choice of propeller, as
an incorrect choice could adversely affect performance and could also seriously damage the
Les performances de tout moteur hors-bord dépendent en grande partie d’une hélice appropriée. Une hélice
motor. Engine speed depends on the propeller size and boat load. If engine speed is too high or
inappropriée peut non seulement nuire aux performances, mais aussi causer des dégâts considérables au moteur. Le
too low for good engine performance, this will have an adverse effect on the engine.
régime du moteur hors-bord est déterminé par les dimensions de l›hélice, le pas de l›hélice et la charge du bateau.
For a greater operating load, a smaller-pitch propeller is more suitable as it enables the correct
Quand le régime maximal du moteur est trop bas ou trop élevé, ses performances seront perfectibles. En général, un
engine speed to be maintained. Conversely, a larger-pitch propeller is more suitable for a smaller
pas réduit convient mieux aux charges lourdes car le moteur atteindra plus facilement son régime maximale. Une hélice
operation load.
à pas plus grand est plus convenable en cas de charges légères.
Choix de l’hélice
1. Diamètre de l’hélice
2. Pas de l’hélice
3. NOTE:
Type de hélice
If the recommended engine oil grades are not available, select an alternative temperatures in your
REMARQUE
area.
Choisissez une hélice qui permettra au moteur de monter aisément aux mi-régime et plus quand la poignée des gaz est
1. Propeller
diameter
in inches
maximalement
ouverte
et le bateau
est pleinement chargé. Lorsque le régime dépasse le régime maximal du moteur
2. Propeller pitch in inches
(par exemple en cas de bateau légèrement chargé), fermez la poignée pour rentrer le moteur dans son régime autorisé.
3. Type of propeller ( propeller mark )
NOTE:
Select a propeller which will allow the engine to reach the middle or upper half of the operation
rage at full throttle with the maximum boat load. If operation conditions such as light boat loads
then allow the engine r/min to rise above the maximum recommended range, reduce the throttle
setting to maintain the engine in the proper operation range.
6
6
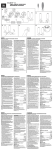
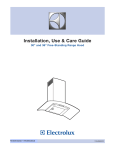
Pièces de base
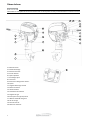
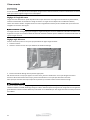
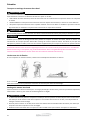
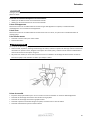
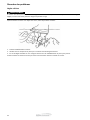
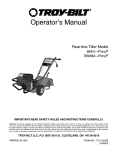
OPMERKING
L’illustration est susceptible de s’écarter du moteur réel. Certaines pièces ne sont pas standardisées sur toutes les versions.
11
12
13
14
15
6
7
16
5
17
8
4
3
18
9
19
10
2
1
1. Hélice
2. Admission d’eau
3. Cheville de blocage
4. Armature d’arcasse
5. Pivot de bascule
6. Capot supérieure
7. Verrouillage capot
8. Couverture
9. Bouchon de vidange huile moteur
10. Queue
11. Poignée démarrage manuel
12. Bouton de starter
13. Témoin d’alerte
14. Commande de sélection
15. Poignée des gaz
16. Interrupteur d’urgence/d’arrêt
17. Attache cordelette d’urgence
18. Vis de serrage
19. Pivot de bascule
20. Réservoir carburant
7
20
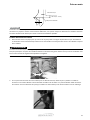
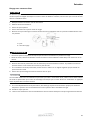
Fuel tank cap
Pièces de base
Basic
Basic components
components
Fuel de
tank
cap
Bouchon
remplissage
This cap
seals the fueld’essence
tank. When removed, the tank can be filled with fuel. To remove the cap,
This cap
seals theOuvrir:
fuel tank.
When
removed,
the Fermer:
tank can
be filled
with fuel. To remove the cap,
Le réservoir
de carburant.
tourner
le bouchon
à gauche.
tourner
à droite.
turn it counterclockwise.
turn it counterclockwise.
Vis de
mise
à l’air
Air
vent
screw
Air
vent
screw
En vue
de désaérer
réservoir.
Pour
ouvrir,
tourner
à gauche.
This
screw isle on
the fuel
tank
cap.
To loosen
the screw, turn it counterclockwise.
This screw is on the fuel tank cap. To loosen the screw, turn it counterclockwise.
Tiller handle
Tiller handle
Commande
de direction,
direction move the tiller handle to the left or right as necessary.
To change
To change direction, move the tiller handle to the left or right as necessary.
Manipuler à gauche ou à droite pour changer de direction.
Gear shift
lever
Commande
de sélection
Gear shift
lever
Your outboard has three gear shift positions to provide operation: Forward (F), Neutral (N), and
Yourhors-bord
outboard
has three
gear shift
positions
provideneutre
operation:
Forward
(F),arrière
Neutral
Le moteur
connaît
trois positions:
sens
avant (F =to
‘Forward’),
(N = ‘Neutral’)
et sens
(R = (N), and
Reverse (R).
‘Reverse’).
Pour(R).
changer de sélection, fermez le gaz pour réduire le régime jusqu’au ralenti. Sélectionnez par un geste
Reverse
Reduce throttle
speed to idle speed.
Reduce throttle
speed to
idle
speed.
rapide.
Always
shift outboard
into
gear
with a quick motion.
Always shift outboard into gear with a quick motion.
Poignée des gaz
La poignée
des gazgrip
se trouve sur la commande de direction. Pour accélérer tournez dans le sens inverse des aiguilles
Throttle
Throttle
grip
d’horloge,
réduire
vitesse
dans
sens des
aiguilles
d’horloge.
The pour
throttle
grip
is on
theletiller
handle.
Turn
the grip counterclockwise to increase speed and
The throttle grip is on the tiller handle. Turn the grip counterclockwise to increase speed and
clockwise to decrease speed.
clockwise to decrease speed.
88
8
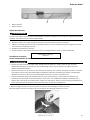
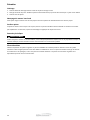
Throttle friction adjuster
A friction device provides adjustable resistance to movement of the throttle grip or the remote
Basic
components
Pièces control
de
base
lever, and can be set according to operator preference.
Throttle
adjuster
To
increase friction
resistance,
turn the adjuster clockwise. To decrease resistance, turn the adjuster
A friction
device
provides
adjustable resistance to movement of the throttle grip or the remote
Écrou-papillon
réglage
traction
de poignée
counterclockwise.
lever,
can
set according
to operator
La poignée control
des gaz peut
êtreand
réglée
enbe
souplesse
de manipulation
par unpreference.
écrou. Tournez l’écrou dans le sens des
To increase
turn the
adjuster
To decrease
resistance, turn the adjuster
aiguilles d’horloge
pour unresistance,
cours plus lourde,
contre
ce sens clockwise.
pour une rotation
plus souple.
counterclockwise.
1. Ecrou de réglage
2. Corde de contacteur d’arrêt d’urgence
Do not over tighten the friction adjuster. If there is too much resistance, it could be difficult to
move
throttle lever or grip, which could result in an accident.
AVERTISSEMENT
When constant speed is desired, tighten the adjuster to maintain the desired throttle setting.
Ne tournezDo
pasnot
l’écrou
de tighten
réglage trop
Uneadjuster.
friction de If
poignée
gaz much
trop serrée
peut obstruer
sa fermeture
et to
over
the serré.
friction
there des
is too
resistance,
it could
be difficult
causer un accident.
Quand vous
désirez
une vitesse
croisière,
fixezinl’écrou
sur la position désirée de la poignée.
move throttle
lever
or grip,
whichdecould
result
an accident.
Engine
stop lanyard
switch
When
speedmust
is desired,
tighten
the engine
adjusterstop
to maintain
the
desired
The
stopconstant
switch lock
be attached
to the
switch for
the
enginethrottle
to run. setting.
The hook
Interrupteur
d’urgence,
corde
sécurité
should
be attached
to ade
secure
place on the operators clothing, or arm or leg. Should the operator
Le moteur fonctionne
seulement
quand le contacteur d’arrêt d’urgence est fixée à l’agrafe de la corde de sécurité.
Engine
stop
fall
overboard
orlanyard
leave theswitch
helm, the hook will pull out the stop switch lock, stopping ignition to
Attachez la The
cordestop
de sécurité
une partie
de vêtements,
à une
jambestop
ou àswitch
un bras.for
Quand
quittez
switchà lock
mustsolide
be attached
to the
engine
thevous
engine
to votre
run. The hook
the engine. This will prevent the boat from running away under power.
position oushould
que vousbe
tombez
par-dessus
bord, l›agrafe
de l›interrupteur
parleg.
la corde
et l›arrêt
attached
to a secure
place se
ondétachera
the operators
clothing,d›urgence
or arm or
Should
the operator
d›urgence entrera
en fonction.
évite
que
le bateau
sans
opérateur.
fall overboard
orCela
leave
the
helm,
the continue
hook will
pull
out the stop switch lock, stopping ignition to
Attach
the engine
stopprevent
switch lanyard
a secure
place
on your
the engine.
This will
the boat to
from
running
away
underclothing,
power. or your arm or leg while
AVERTISSEMENT
operating.
Attachez la
de sécurité
une partie
solide de vêtements,
une loose.
jambe ou
un bras.
une partiewhere
de vosis could
Docorde
not attach
the àlanyard
to clothing
that couldà tear
Doà not
routeEvitez
the lanyard
Attach
the engine
stop
switch it
lanyard
to
a secure
place onà your
clothing,
or your
arm or
leg while
vêtementsbecome
qui se déchire
facilement.
Assurez-vous
que lafunctioning.
corde
reste accrochée
vous ou
le contacteur
d’urgence
pour
entangled,
preventing
from
operating.
garantir son
fonctionnement.
Evitez
que la corde
se détache
involontairement
pendant usage
La perte
soudaine
Avoid
accidentally
pulling
the lanyard
during
normal operation.
Lossnormal.
of engine
power
means the
Doduof
not
attach
the de
lanyard
toinvolontairement
clothing
that la
could
tear
loose.
DoLe
not
route
the
lanyard
where
could
de puissance
moteur
risque
changer
direction
du
bateau.
freinage
soudaine
et la perte
de is
loss
most
steering
control.
Also, without
engine
power,
the
boat
could
slow
rapidly.
This
could
become
entangled,
it
from
functioning.
vitesse peuvent
faire
cambrioler
lespreventing
passagers
objets
le bateau.forward.
cause
people
and objects
in theetboat
todans
be
thrown
Avoid accidentally pulling the lanyard during normal operation. Loss of engine power means the
NOTE:
REMARQUE
loss of most steering control. Also, without engine power, the boat could slow rapidly. This could
engine
cannot
be la
started
with
thesont
stop
switch
lock
removed.
cause
people
and que
objects
in et
the
boat
to
befixés
thrown
forward.
Le moteurThe
ne
démarre
pas
sans
corde
l’agrafe
au contacteur
d’arrêt d’urgence.
NOTE:stop button
Engine
The
engine
cannot be
started
switch
lock
removed.
To
open
the ignition
circuit
andwith
stopthe
thestop
engine,
push
this
button.
Engine stop button
To open the ignition circuit and stop the engine, push this button.
Bouton d’arrêt
Appuyez sur le bouton d’arrêt pour arrêter le moteur hors-bord. En appuyant, l’allumage est déconnecté et le moteur
s’arrête.
9
9
9
F9.9 -F8-F6
de base
BasicPièces
components
Basic components
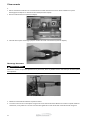
Choke
for pull type
Boutonknob
de starter
Choke
for pull
To
supplyknob
the engine
withtype
the rich fuel mixture required start, pull out this knob.
le bouton
de starter
pourthe
enrichir
mélange
du carburant
pendant
démarrage
ToTirez
supply
the engine
with
rich lefuel
mixture
required
start, lepull
out this(froid).
knob.
Poignéestarter
de démarrage
Manual
handle
Afin
de the
démarrer
le moteur,
tirez doucement
poignéeout
de démarrage
jusqu’auis
moment
de sentir
résistance.
Puis
Manual
starter
handle
To
start
engine,
first gently
pull thelahandle
until resistance
felt. From
thatune
position,
then
d’un
coup
sec
la poignée
en
ligne
droite
vers
vous.
Totirez
start
the
engine,
firstout
gently
pull
thecrank
handle
until resistance is felt. From that position, then
pull
the
handle
straight
quickly
to
theout
engine.
pull the handle straight out quickly to crank the engine.
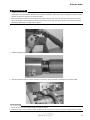
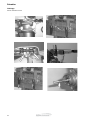
Steering friction adjuster
Steering
friction
adjuster
Réglage
de
traction
de laadjustable
direction resistance to the steering mechanism, and can be set
A
friction device
provides
La
friction,
donc
la
résistance
avec
laquelle
moteur tourne
de or
droite
se laisse
régler.
En
A
friction
device
provides
adjustable
resistance
to the
steering
and
canserrant
be
setou en
according to operator preference.
An leadjusting
screw
boltà gauche
is mechanism,
located
on the
swivel
bracket.
according
operator
preference.
An adjusting
screwà volonté.
or bolt is located on the swivel bracket.
desserrantto
le réglage,
la traction
de direction
peut être variée
A
A
B
B
To increase resistance, turn the adjuster clockwise.
To
increase
resistance,
turndes
theaiguilles
adjuster
clockwise.
Tournez
le réglage
dans le sens
d’horloge
pour augmenter la traction.
To
decrease
resistance,
turn
the
adjuster
counterclockwise.
ToTournez
decrease
resistance,
turninverse
the adjuster
counterclockwise.
le réglage
dans le sens
des aiguilles
d’horloge pour réduire la traction.
Do notAVERTISSEMENT
over tighten the friction adjuster. If there is too much resistance, it could be difficult to
Do not over tighten the friction adjuster. If there is too much resistance, it could be difficult to
steer,
which
result inle an
accident.
Ne serrez
pascould
excessivement
réglage.
Si la traction est excessive, le changement de direction peut être obstrué ce qui
steer, which could result in an accident.
peut causer un accident.
Thrust rod
Thrust
rod of the thrust rod determines the minimum trim angle of the outboard motor in
The
position
Cheville
de of
blocage
The
position
the thrust rod determines the minimum trim angle of the outboard motor in
relation
to la
the
transom.
A l’aide de
cheville
de blocage, l’angle d’arcasse minimal peut être réglé par rapport à l›arcasse du bateau.
relation
to the
transom.
10
10
10
Basic components
PiècesBasic
de base
components
Tilt support
lever
To
keep
the outboard
Tilt
support
levermotor in the tilted up position, lock the tilt support lever to the clamp
bracket.
Pour fixer le hors-bord en position inclinée vers le haut, attachez le levier de blocage inclinaison sur la barre d’arcasse.
bracket.
BlocageTo
inclinaison
keep the outboard motor in the tilted up position, lock the tilt support lever to the clamp
Top cowling lock lever
Top cowling lock lever
(Dé)verrouillage
capot
To remove
the engine top cowling, pull up the lock lever and lift off the cowling. When installing
Pour déverrouiller le capot supérieur, tirez le verrouillage en haut et détachez-le de la couvercle. Veillez, en verrouillant,
To remove
the
engine
topsure
cowling,
up the
lever and
liftThen
off the
cowling.
Whenbyinstalling
the
cowling,
check
to be
it fits pull
properly
inlock
the rubber
seal.
lock
the cowling
moving
au bon placement et fixation de la couvercle dans le joint d’étanchéité en caoutchouc.
the lever
cowling,
check to be sure it fits properly in the rubber seal. Then lock the cowling by moving
antrorse.
the lever antrorse.
Engine oil warning lamp
Oil
pressure
is requiredlamp
to lubricate internal engine parts. When the warning lamp (Red) is off, it
Engine
oil warning
Avertisseur
lumineux
de
pression
d’huile
Oil pressure
required
to is
lubricate
indicates
thatisoil
pressure
present.internal engine parts. When the warning lamp (Red) is off, it
Quand le indicates
témoin rouge
estoil
éteint,
la pression
d’huile est correcte.
that
pressure
is present.
11
11
11
Pièces de base
AVERTISSEMENT
Ne jamais laisser tourner le moteur quand le témoin rouge brûle ou clignote.
Arrêtez immédiatement le hors-bord quand l’avertisseur lumineux brûle ou clignote. Vérifiez le niveau d’huile.
• quand le niveau d’huile est inférieur au niveau minimal de repère sur la jauge: rajoutez de l’huile.
• quand le niveau est correct: contactez votre concessionnaire.
12
Prise en main
Operation
Installation
Installation
ATTENTION
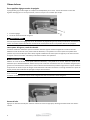
Incorrect engine height or obstructions to smooth water flow (such as the design or condition of
Un tirant d’eau limité du moteur hors-bord ou des obstructions dans le courant d’eau vers la coque d’embarcation (par
the boat, or accessories such as transom ladders or depth finder transducers) can create airborne
exemple par des accessoires comme escaliers, jauge de profondeur ou la construction de la coque elle-même) peuvent
water spray while the boat is cruising. Severe engine damage may result if the motor is operated
causer des éclaboussements d’eau. Si le moteur y est exposé en permanence, ceux-ci peuvent causer des dégâts au moteur.
continuously in the presence of airborne water spray.
REMARQUE
NOTE:
Contrôlezwater
la position
du check
moteurthe
hors-bord
sur leofbateau
en charge
maximale.
ceci quand
bateauthat
est en
During
testing
buoyancy
the boat,
at rest,
with itsVérifiez
maximum
load. le
Check
repos
dans water
l’eau calme.
si le moteur
ne se trouve
en position
tellement
basse
que l’échappement
d’eau
the
static
levelContrôlez
on the exhaust
housing
is lowpas
enough
to prevent
water
entry
into the
refroidissant sewhen
trouvewater
sous lerises
niveau
d’eau
que des
vagues
toucher
ou running
envahir le moteur hors-bord.
powerhead,
due
to ou
waves
when
thepeuvent
outboard
is not
Installationthe
duoutboard
moteur hors-bord
Mounting
motor
AVERTISSEMENT
·Overpowering
a boat
could
cause se vere
instability.
not install
an outboard
motor
withpas
• * Une puissance du
moteur
trop importante
peut provoquer
uneDo
instabilité
dangereuse
du bateau.
N’utilisez
more
horsepower
than
thela maximum
ratinglaon
the capacity
plate
of thepour
boat.
If the boat
does not
un moteur
hors-bord
dont
puissance dépasse
puissance
maximale
approuvée
le bateau.
Si la puissance
have
a capacity
manufacturer.
maximale,
avec plate,
laquelleconsult
le bateauthe
est boat
approuvée,
est inconnue, consultez le fabricant du bateau.
·The
presented
in thispurement
section informatif.
is intended
reference
is not
possible
totoutes
• * Cesinformation
renseignements
ont un caractère
Il estasimpossible
de only.
donnerItdes
instructions
pour
provide
completepossibles
instructions
for avec
every
possible
boatUne
andinstallation
motor combination.
Proper
mounting
les combinaisons
de bateau
moteur
hors-bord.
correcte dépend
de l’expérience
et
depends
in part onspécifique
experience
and the
specific
boatUne
and
motor combination.
de la combinaison
du bateau
avec
son moteur.
installation
incorrecte peut avoir des conséquences
Improper
mounting
ofmauvais
the outboard
motor de
could
resultperte
in hazardous
poor
dangereuses
telles que
comportement
navigation,
de contrôleconditions
du bateau et such
risqueas
d’inflammation
handling,
loss of control, or fire hazards. Observe the following:
ou incendie.
·For
permanently
your
dealer
orinstallés
other person
experienced ou
in un
proper
rigging
• * Moteurs
hors-bordmounted
installés enmodels,
permanence
doivent
être
par un concessionnaire
technicien
should
mount the
motor.
If you
mounting
the motor
yourself,
you should
be trained
by an
expérimenté.
En cas
que vous
faitesare
l’installation
vous-même,
faites-vous
instruire
au préalable
par un technicien
experienced
expérimenté.person.
·For
models,
your le
dealer
or other person
experienced
in proper
outboard
motor les
• * Enportable
cas de modèles
portables,
concessionnaire
ou un technicien
expérimenté
est tenu
de vous apprendre
mounting
should
show
you
how
to
mount
your
motor.
procédures correctes.
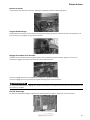
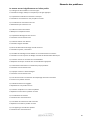
Mount the outboard motor on the center line(keel line) of the boat, and ensure that the boat itself
Installez le moteur hors-bord sur la ligne de quille du bateau en respectant le balance du bateau. En cas d’instabilité, le
is well balanced. Otherwise the boat will be hard to steer. For boats without a keel or which are
bateau sera difficile à manier. Consultez votre concessionnaire en cas de bateau sans ligne de quille ou qui sont pourvu
asymmetrical,
consult your dealer.
d’une coque asymétrique.
1
1. Ligne
de quille
1.Center
line(keel line)
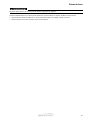
Mounting height
Hauteur
d’arcasse
To
run your
boat at optimum efficiency, the water resistance (drag) of the boat and outboard
Pour une
navigation
efficace,
la traction
de la coque
et du
moteur doivent
La hauteur
la poupe et la
motor
must
be made
as little
as possible.
The
mounting
heightêtre
of minimales.
the outboard
motordegreatly
position the
du moteur
une grandeIfinfluence
sur cetteheight
résistance.
En cas
d’installation
troptends
élevéetoduoccur,
moteur,thus
l’hélice
affects
water ont
resistance.
the mounting
is too
high,
cavitation
risque de perdre traction et le moteur peut tourner en surrégime, ce qui cause une perte de vitesse et la surchauffe du
reducing
the propulsion; and if the propeller tips cut the air, the engine speed will rise abnormally
moteur. En cas d’installation trop basse du moteur hors-bord, la résistance de l’eau sera trop importante et nuira à la
and cause the engine to overheat. If the mounting height is too low, the water resistance will
vitesse maximale. Le moteur doit être installé de sorte que la plaque d’anti cavitation soit à 0 à 25 mm sous le bas du
increase and thereby reduce engine efficiency. Mount the outboard motor so that the antibateau.
13
13
Operation
cavitation plate is between the bottom of the boat and a level 30-50mm (1.2-2 in.) below
it.
Operation
Prise
enit.main
cavitation plate is between the bottom of the boat and a level 30-50mm (1.2-2 in.)
below
0-25mm
0 -de1 in
Bas
la coque
0-25mm
0 - 10-25
in mm (0 - 1 inch)
NOTE:
Plaque anti cavitation
·The optimum mounting height of the outboard motor is affected by the boat and motor
NOTE:
combination and the desired use. Test runs at different heights can help determine the optimum
·The optimum mounting height of the outboard motor is affected by the boat and motor
REMARQUE
mounting height. Consult your boat manufacturer for further information on determining the
combination
and the
desired use. Test runs at different heights can help determine the optimum
Laproper
hauteur mounting
d’installationheight.
optimale du hors-bord dépend de la combinaison de moteur hors-bord, bateau et l’utilisation
height.leConsult
boat manufacturer
forpouvez
further
information
on determining
the
dumounting
bateau. En plaçant
moteur àyour
des hauteurs
différentes, vous
essayer
et déterminer
les meilleurs résultats.
proper
mounting
height.
Contactez le fabricant du bateau pour savoir la hauteur d’installation optimale.
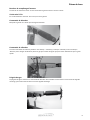
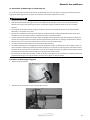
Clamping the outboard motor
1. Placeduthe
outboard
motor on the transom so that it is positioned as close to the center as
Fixation
moteur
hors-bord
Clamping the outboard motor
possible.
Tighten
the
transom
clamp
screws
and
Occasionally
the clamp
1. Placez
hors-bord
sur la
poupe
pour qu’il
se trouve
au evenly
plus précis
sursecurely.
la ligne de quille
de la coque.check
Verrouillez
1. Placele the
outboard
motor
on the transom
so
that
it is positioned
as close
to the center
as les
vis
de fixation
fond. Contrôlez
fréquemment
lesthe
vis de
fixation sont
toujours
bien serrées.
Des vibrations
screws
for àtightness
during
operationsiof
outboard
motor
because
they could
becomerisquent
loose
possible. Tighten the transom clamp screws evenly and securely. Occasionally check the clamp
de
les to
relâcher.
due
engine vibration.
screws for tightness during operation of the outboard motor because they could become loose
due
to engine vibration.
AVERTISSEMENT
Loose
clamp
screws
allow
outboard
motor
to fall off
or movequand
on the
could
Le moteur hors-bord
risquecould
de changer
dethe
position
ou même
se détacher
de l’arcasse
lestransom.
fixations seThis
relâchent.
cause
loss
of control
anddeserious
injury.
Make
sure
the transom
screws
are tightened
securely.
Cela
peut
provoquer
une
perte
contrôle
du
bateau
ou
des
blessures
graves.
Assurez-vous
que
les
vis
de
fixation
sont
Loose clamp screws could allow the outboard motor to fall off or move on the transom. This could
Occasionally
checkrégulièrement
the screws pendant
for tightness
during operation.
bien
serrésloss
et vérifiez-les
la navigation.
cause
of control
and serious injury.
Make sure the transom screws are tightened securely.
Occasionally check the screws for tightness during operation.
2. If the engine restraint cable attachment is equipped on your engine, an engine restraint cable or
2. Enchain
cas que
le hors-bord
est muni
d’unone
orifice
pour
de sécurité,
utilisez-le
y attacherand
un câble
de
should
be used.
Attach
end
to un
thecâble
engine
restraint
cable pour
attachment
the other
to a
2.sécurité
If the engine
restraint
cable
attachment
your engine,
cable or
ou une chaîne.
Attachez
l›autre
extrémitéis
duequipped
câble ou deon
la chaîne
à un pointan
deengine
fixation restraint
stable au bateau.
secure mounting point on the boat. Otherwise the engine could be completely lost if it
should
Attach
end
to theouengine
restraint
attachment
andetthe
other to a
Sichain
le moteur
vient be
à seused.
détacher
de la one
poupe,
le câble
la chaîne
évite quecable
le moteur
tombe à l›eau
submerge.
accidentally falls off the transom.
secure mounting point on the boat. Otherwise the engine could be completely lost if it
accidentally falls off the transom.
14
14
14
Prise en main
Période de rodage
Votre nouveau moteur hors-bord doit être rodé pour que les diverses pièces s’adaptent aux formes. Un bon rodage est
essentiel pour garantir la longévité et les performances du moteur.
Operation
ATTENTION
Breaking in engine
Le non-respect des instructions pendant la période de rodage peut causer des dommages sévères au moteur et nuire à sa
Your new engine requires a period of break-in to allow mating surfaces of moving parts to wear in
durabilité. Ces dommages ne sont pas couverts par la garantie.
evenly. Correct break-in will help ensure proper performance and longer engine life.
Procédure pour moteurs quatre-temps
follow the
break-in
procedure
could
result
in reduced
engine life or even severe engine
Chargez leFailure
moteurto
hors-bord
(engagé
en vitesse
et pourvu
d’une
hélice)
comme suite:
damage.
1. Première
heure de fonctionnement: laissez tourner le moteur à un régime maximal de 3.000 tours, c’est-à-dire la
poignée des gaz à moitié ouverte;
Procedure for 4-stroke models
2. Seconde
de fonctionnement:
laissez
moteur àinstalled)
un régime as
maximal
de 4.000 tours, c’est-à-dire la
Runheure
the engine
under load (in
geartourner
with alepropeller
follows.
poignée
à trois
quarts;
1. des
Forgaz
theouverte
first hour
of operation:
thesuivantes:
engine atévitez
3000que
r/min
or at approximately
half throttle.
3. Les huit Run
heures
le moteur
est chargé maximalement
à plein gaz durant cinq minutes;
2. For the second hour of operation:
4. Après les premières dix heures: le hors-bord peut être chargé normalement.
Run the engine at 4000 r/min or at approximately three-quarter throttle.
3. For the next eight hours of operation:
Avant le démarrage
Avoid continuous operation at full throttle for more than five minutes at a time.
4. After the first 10 hours:
Operate the engine normally.
AVERTISSEMENT
En cas oùPreoperation
une ou plusieurschecks
pièces mentionnées ci-dessous ne fonctionnent pas correctement, faites-les contrôler ou
réparer avant utilisation du moteur. Un fonctionnement défectueux peut causer un accident.
ATTENTION
If any item in the preoperation check is not working properly, have it inspected and repaired
before
operating
theenoutboard
Otherwise
an accident
could
Ne démarrez
jamais
le moteur
dehors demotor.
l’eau. Cela
peut causer
la surchauffe
et occur.
dees au moteur.
Carburant
Do not start the engine out of water. Overheating and serious engine damage can occur.
Assurez-vous avant la navigation d’une quantité suffisante de carburant.
Assurez-vous
que le moteur est sans fuites et vapeurs de carburant.
Fuel
·Check to be sure you have plenty of fuel for your trip.
Commandes
·Make sure there are no feel leaks or gasoline fumes.
Avant le démarrage, vérifiez le bon fonctionnement de la poignée des gaz et de la direction.
Controls
Elles doivent
tournerthrottle,
en souplesse,
avec
un cours
souple et
libre. starting the engine.
·Check
shift, sans
and blocage
steeringetfor
proper
operation
before
• Vérifiez·The
la présence
éventuelle
fixations
relâchées
ou cassées.
controls
shouldde
work
smoothly,
without
binding or unusual free play.
for loose ordes
damaged
connections.
• Vérifiez·Look
le fonctionnement
contacteurs
et boutons de démarrage et d’arrêt quand le moteur est dans l’eau.
Moteur ·Check operation of the starter and stop switches when the outboard motor is in the water.
Engine
• Vérifiez le moteur et ses supports et arcasse
·Check the engine and engine mounting.
• Vérifiez·Look
la présence
éventuelle
de fixations
relâchés ou cassés
for loose
or damaged
fasteners.
• Vérifiez·Check
que l’hélice
sans dommages
theest
propeller
for damage.
Checking
the engine oil level
Niveau d’huile
moteur
1.moteur
Put thedans
outboard
motorverticale
in an upright
position (not tilted).
• Posez le
une position
(non inclinée).
2. Check the oil level using the oil filler cap to be sure the level falls between the upper and lower
• Vérifiez le niveau d’huile par la jauge d’huile. Le niveau doit se trouver entre le repères gravées. Rajoutez de l’huile
marks. Fill with oil if it is below the lower mark, or drain to the specified level if it is abovethe
si le niveau se trouve au-dessous de l’indication minimale. En rajoutant, ne jamais dépasser le niveau maximal. Un
uppper mark.
surplus d’huile doit être vidangé.
15
15
Prise en main
Operation
Operation
wear in
engine
d
d lower
ovethe
1. Niveau minimal
2. Niveau maximal
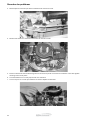
Filling fuel for built-in tank
Rajout de carburant
Gasoline and its vapors are highly flammable and explosive. Keep away from sparks, cigarettes,
AVERTISSEMENT fuel for built-in tank
flames, or otherFilling
sources of ignition.
L’essence et les vapeur d’essence sont très inflammables et explosives. Respectez une distance par rapport aux étincelles,
cigarettes,
ouvert
et autres
sources
d’inflammation.
1.Withfeu
the
outboard
motor
tilted
down (in the vertical running position), remove the fuel tank
Gasoline and its vapors are highly flammable and explosive. Keep away from sparks, cigarettes,
cap.
flames,
or other sources
of
ignition.
a funnel
if vers
the nozzle
the fuel
can
orOuvrez
pump le
is bouchon
not small
long enough to fit
1.2.Use
Basculez
le moteur
le bas enon
position
verticale.
duenough
réservoiror
d’essence.
into
the
mouth
of
the
fuel
tank.
2. Utilisez un entonnoir
quand
la bouche
de motor
la pompe
d’essence
pas vertical
suffisamment
large position),
ou longue pour
accéder
1.With
the
outboard
tilted
downn’est
(in the
running
remove
the fuel tank
3.Fill
the fuel
tank carefully.
dans l’orifice
de cap.
remplissage
d’essence.
4.Securely close
the cap after refueling. Wipe up any spilled fuel.
3. Remplissez prudemment
réservoir.
2.Use alefunnel
if the nozzle on the fuel can or pump is not small enough or long enough to fit
4. Fermez le bouchon
réservoir
fermement,
intoduthe
mouth
ofcapatity:
the fuelessuyez
tank. immédiatement des taches ou essence débordée.
Fuel
tank
3.Fill the
fuel tankUS
carefully.
12.0L(3.17
gal)(2.64lmp.gal)
4.Securely close the cap
after refueling.
Wipe up any spilled fuel.
Contenance
du réservoir
Operation
Procédures
duengine
moteur
Feeding
fuel
Ouvrir
l’alimentation
de carburant
12,0 litres
Fuel tank capatity:
12.0L(3.17 US gal)(2.64lmp.gal)
AVERTISSEMENT
Operation
·Before
starting
the engine,engine
make sure that the boat is tightly moored and that you can steer
• clear
Assurez-vous
queFeeding
le bateau fuel
est
bien are
attaché
avant de démarrer
le moteur.
of any obstructions.
Bestable
sureet
there
no swimmers
in the water
nearSoyez
you.sûr que vous avez
suffisamment
d’espace
pour manœuvrer
avant
le démarrage.
de l’absence
de nageurs
et autres
·When
the air
vent screw
is loosened,
gasoline
vaporAssurez-vous
will be released.
Gasoline
is highly
passants à proximité
bateau.
flammable,
and·Before
its du
vapors
are
flammable
and
explosive.
Refrain
from
smoking,
and
keep
starting the engine, make sure that the boat is tightly moored andaway
that you can steer
• from
Quand
vousflames
ouvrez la
vis sparks
misewhile
à l›air sur
le bouchon
réservoir,
il va y émaner des vapeurs d›essence. L›essence
open
and
loosening
thedu
air
vent
clear
ofdeany
obstructions.
Be sure
there
arescrew.
no
swimmers in the water near you.
·This
product
emits
exhaust
gases
which
contain
carbon
monoxide,
a
colorless,
odorless
gas
et les vapeur d›essence
sontthe
très
distance
rapport à des
étincelles,
·When
airinflammables
vent screwetisexplosives.
loosened,Respectez
gasolineune
vapor
will par
be released.
Gasoline
is highly
which
could
brain
damage
death when
inhaled.
Symptoms
include
nausea,
dizziness,
cigarettes,
feucause
ouvert
et autres
sources
d›inflammation
quand vous
ouvrez
la vis
deRefrain
mise
à l›air.
flammable,
and
itsorvapors
are flammable
and
explosive.
from
smoking,and
and keep away
cockpit
and
cabin
well
ventilated.
blocking
exhaust
• drowsiness.
Cet hors-bordKeep
produit
des
gazflames
de combustion
dont
le
mono
carboneAvoid
toxique,
un
gaz screw.
incolore
et outlets.
inodore et son
from
open
andareas
sparks
while
loosening
the air
vent
inhalation puisse ·This
provoquer
des évanouissements,
la which
mort. Les
symptômes
d›empoisonnement
par monoodorless gas
product
emits exhaustvoire
gases
contain
carbon
monoxide, a colorless,
1. For the built-in tank, loosen the air vent screw on the fuel tank cap by one turn. For the external
carbone sont entre
autrescould
des nausées
graves,damage
vertiges et
somnolence.
Assurez-vous
d›une bonne
ventilation
dedizziness,
la
which
cause brain
orladeath
when inhaled.
Symptoms
include
nausea,
and
fuel tank, loosen it on the fuel tank cap by 2 or 3 turns.
cabine et de la position
de direction.
touteand
obstruction
du système
dݎchappement.
drowsiness.
KeepEvitez
cockpit
cabin areas
well ventilated.
Avoid blocking exhaust outlets.
loosen
the airde
vent
screw ond›essence
the fueld›un
tanktour.
cap by one turn. For the externa
1. R
éservoir intégré:1.For
ouvrez the
la visbuilt-in
de mise tank,
à l’air sur
le bouchon
remplissage
fuel
tank,
loosen
it
on
the
fuel
tank
cap
by
2
or
3
turns.
Réservoir séparé: ouvrez la vis de mise à l›air sur le bouchon de remplissage d›essence 2-3 tours.
16
16
16
Prise enOperation
main
2.
·Attach the fuel connector to the engine connector. The arrow mark on the primer bulb
Operation
Operation
2.
should be
facing
the engine.
(Separate
fuel
tank) The arrow mark on the primer bulb
2.
·Attach
the
fuel
connector
to
engine
connector.
• Fixez la conduite
de carburant
sur
le connecteur
conduite
d’essence
sur leThe
hors-bord.
flècheon
surthe
la poire
2. ·Open
·Attach
thefuel
fuel
connector
todethe
the
engine
connector.
arrowLamark
primer bulb
the
cock.
(Integral
fuel
tank)
should
be
the
(Separate
fuel
d’amorçage doit
indiquer
direction
hors-bord
(réservoir séparé).
should
beenfacing
facing
theduengine.
engine.
(Separate
fuel tank)
tank)
·Open
the
cock.
(Integral
·Open
the fuel
fuel
cock.intégré).
(Integral fuel
fuel tank)
tank)
• Ouvrez le robinet
d’essence
(réservoir
3.Feed fuel to the carburetor by squeezing the primer bulb till it is firm. (Separate fuel tank)
3. KPincez 3.Feed
dans la poire
d’amorçage
jusqu’au moment
de sentir une
(réservoir
3.Feed
fuel
to
by
the
primer
till
is
fuel
to the
the carburetor
carburetor
by squeezing
squeezing
therésistance
primer bulb
bulb
till it
itséparé).
is firm.
firm. (Separate
(Separate fuel
fuel tank)
tank)
Starting engine
Démarrage du moteur
Starting
engine
Starting
engine
Manual start
models
AVERTISSEMENT
1.Place the gear shift lever in neutral.
Manual
start
start models
models
Démarrez leManual
moteur uniquement
quand il est au point mort, donc en position neutre. Cela évite que le bateau partira
1.Place the gear shift lever in neutral.
1.Place the gear shift lever in neutral.
sans opérateur.
Always start the engine in neutral to avoid accidentally moving the boat.
Always
Always start
start the
the engine
engine in
in neutral
neutral to
to avoid
avoid accidentally
accidentally moving
moving the
the boat.
boat.
2.If the engine stop switch lanyard is equipped, attach it to a secure place on your clothing, or
your
arm or leg.stop
Then installlanyard
the lockisplate
on the other it
end of
the lanyard into
the engine stop
2.If
the
2.If
the engine
engine
stop switch
switch
lanyard
is equipped,
equipped, attach
attach it to
to aa secure
secure place
place on
on your
your clothing,
clothing, or
or
1. Mettez la
commande
de sélection
en position
neutre.
switch.
your arm
arm or
or leg.
leg. Then
Then install
install the
the lock
lock plate
plate on
on the
the other
other end
end of
of the
the lanyard
lanyard into
into the
the engine
engine stop
stop
your
2. Le moteur est muni d’un interrupteur d’urgence et d’une corde de sécurité. Attachez la corde à une partie solide de
switch.
switch.
vêtements,
à une jambe ou à un bras. Fixez ensuite l’agrafe de la corde de sécurité au bouton d’arrêt d’urgence.
·Attach the engine stop switch lanyard to a secure place on your clothing, or your arm or leg
·Attach
·Attach the
the engine
engine
stop switch
switch lanyard
lanyard to
to aa secure
secure place
place on
on your
your clothing,
clothing, or
or your
your arm
arm or
or leg
leg
17 stop
17
17
17
Prise en main
AVERTISSEMENT
Operation
while
operating.
• Attachez
la corde
de sécurité à une partie solide de vêtements, à une jambe ou à un bras. Ne fixez pas la cordelette
·Do not attach the lanyard to clothing that could tear loose. Do not route the lanyardOperation
where it
de sécurité à une partie de vos vêtements qui se déchire facilement. Evitez que la corde s’empêtre ou reste accrochée
could
become
entangled, preventing it from functioning.
while
operating.
derrière
un objet
pour garantir son fonctionnement.
·Avoid
pullingtothe
lanyard
during
operation.
engine
power
means
·Do notaccidentally
attach the lanyard
clothing
that
couldnormal
tear loose.
Do notLoss
routeofthe
lanyard
where
it
• Evitez que la corde se détache involontairement pendant usage normal. La perte soudaine de puissance du moteur
the loss
of mostentangled,
steering control. Also,
without
engine power, the boat could slow rapidly. This
become
it from
risque could
de changer
involontairement lapreventing
direction du bateau.
Lefunctioning.
freinage soudaine et la perte de vitesse peuvent faire
·Avoid
accidentally
pulling
the
normalforward.
operation. Loss of engine power means
could
cause
people and
objects
inlanyard
the boatduring
to be thrown
cambrioler les passagers et objets dans le bateau.
the loss of most steering control. Also, without engine power, the boat could slow rapidly. This
could cause people and objects in the boat to be thrown forward.
3. Place the throttle grip in the "START" (start) position.
3.laPlace
the
grip in‘START’.
the "START" (start) position.
3. Mettez
poignée
desthrottle
gaz en position
4.Place the choke knob in the "START" (start) position. After the engine starts, return the knob to
4. Ouvrez
la "RUN"
tirette du (run)
starter.position.
Une fois le moteur en marche, reculez la tirette graduellement en position ‘RUN’.
the
4.Place the choke knob in the "START" (start) position. After the engine starts, return the knob to
the "RUN" (run) position.
OPMERKING
NOTE:
• En cas ·When
de moteurrestarting
chaud, inutile
d’utiliser
la tiretteplace
de starter.
a warm
engine,
the choke knob in the 'RUN" (run) position.
• Quand·If
le starter
reste enknob
position
‘START’
pendant
que le moteur
celui-ci
tournera
irrégulièrement
ou calera.
the choke
is left
in the
"START"
(start)tourne,
position
while
the engine
is running,
the engine
NOTE:
will
run poorly
or stall.
·When
restarting
a warm engine, place the choke knob in the 'RUN" (run) position.
·If the choke knob is left in the "START" (start) position while the engine is running, the engine
18
will run poorly or stall.
18
Operation
Prise en main
Operation
5. Pull
the manual starter handle slowly until you feel resistance. Then give a strong pull straight
outdeto
start
the
engine.
Repeat
if necessary.
5. Afin
le manual
moteur, tirez
doucement
laslowly
poignéeuntil
de démarrage
moment
de sentir
résistance.
5.démarrer
Pull the
starter
handle
you feeljusqu’au
resistance.
Then
giveune
a strong
pull straight
Puis tirez
coup sec
poignée Repeat
en ligne droite
vers vous.
outd’un
to start
thelaengine.
if necessary.
6. After the engine starts, slowly return the manual starter handle to the original position before
releasing
it.
6. After
the
engine
slowly
thedoucement
manual starter
the original
6. Ne relâchez
pas la
poignée
de starts,
démarrage,
maisreturn
reculez-la
pour quehandle
la cordetopuisse
s’enrouler.position before
7. Slowly
returnit.
the throttle grip to the fully closed position.
releasing
7. Retournez la poignée des gaz doucement vers la position entièrement close.
7. Slowly return the throttle grip to the fully closed position.
NOTE:
REMARQUE
·When
the engine is cold, it needs to be warmed up. For further information, see page 16.
NOTE:
• Un·If
moteur
doit être
chauffé.
thefroid
engine
notisstart
onitthe
firsttotry,
theup.
procedure.
If the
engine fails
start16.
after
·When
thedoes
engine
cold,
needs
be repeat
warmed
For further
information,
seetopage
• Quand
le moteur
neopen
démarre
pas
après le
premieramount
répétez
la procédure
de1/4)
démarrage.
cas où le
moteur
4 or
5 tries,
the
throttle
a small
(between
1/8procedure.
and
and
tryEnengine
again.
Also
iftothe
·If
the engine
does
not
start
on theeffort,
first try,
repeat
the
If the
fails
start after
refuse
de démarrer
aprèsand
quatre
outo
cinq
efforts,
ouvrez
poignéeades
gaz jusqu’à
unand
quarttry
deto
sonstart
cours.
engine
is warm
fails
start,
open
the lathrottle
same
amount
the engine
4 or 5 tries, open the throttle a small amount (between 1/8 and 1/4) and try again. Also if the
again.
engine is warm and fails to start, open the throttle a same amount and try to start the engine
En cas où un moteur chauffé ne démarre pas, répétez la même procédure de démarrage.
again.
Warming up engine
ChaufferWarming
le moteur up engine
Manual start models
1. After
starting
engine,
return
the choke
knob
to theChauffez
halfway
position.
For cinq
approximately
the
1. Après
le
démarrage
duthe
moteur,
reculez
la bouton
du starter
à moitié.
le moteur
pendant
minutes
Manual
start
models
first
5
minutes
after
starting,
warm
up
the
engine
by
operating
at
one
fifth
throttle
or
less.
After
en ouvrant
la
poignée
des
gaz
un
cinquième
de
son
cours
au
maximum.
Une
fois
le
moteur
à
température
1. After starting the engine, return the choke knob to the halfway position. For approximately the
the engine
has warmed
pushà fond.
the
choke
knob
in fully.
Failure
to at
doone
so will
shorten
d’exploitation,
la tirette
deup,
starter
Quand
le bouton
de by
starter
reste entrouverte,
la durabilité
du
first reculez
5 minutes
after
starting,
warm
up the
engine
operating
fifth
throttleengine
or less. After
life.souffrira.
moteur
the engine has warmed up, push the choke knob in fully. Failure to do so will shorten engine
2. Vérifiez silife.
l’eau coule de l’échappement d’eau.
NOTE:
·IfNOTE:
the choke knob is left pulled out after the engine starts, the engine will stall.
REMARQUE
·In temperatures of -5°C or less, leave the choke knob pulled out fully for approximately 30
·If
the du
choke
knob
left
pulled
out afterlethe
engine
starts, the engine will stall.
• Quand la
bouton
starter
n’estispas
reculée
entièrement,
moteur
calera
seconds
after
starting.
·In temperatures
-5°C
or less,
leave
the
choke
knob pulled
out
fully trente
for approximately
30
• Aux températures
extérieures of
moins
que -5º
Celsius,
laissez
ouvert
le bouton
du starter
pendant
secondes
seconds after starting.
après démarrage.
2. Check for a steady flow of water from the cooling water pilot hole.
2. Check for a steady flow of water from the cooling water pilot hole.
ATTENTION
Un courant
d’eau constante
s’échappe
de the
l’échappement
fait preuve
d’eau
refroidissement
A continuous
flow qui
of water
from
cooling water
pilotd’une
hole circulation
shows that
thedewater
pump is par
la pompe
d’eau.
Quand
n’y
a pas
d’eau
coulante
de l’échappement
pendant
que leshows
moteur
tourne,
celui-ci
risque
de
pumping
water ilthrough
cooling
If water
ispilot
not flowing
out that
of
the
at all
times
A continuous
flow
ofthe
water
frompassages.
the
cooling
water
hole
thehole
water
pump
is
surchauffer,
causant
des dégâts
importants.
Dans ce cas,and
arrêtez
immédiatement
le moteur
et vérifiez
sithe
l’entrée
d’eauand
est
while
the
engine
is
running,
overheating
serious
damage
could
occur.
Stop
engine
pumping water through the cooling passages. If water is not flowing out of the hole at all times
obstruée
ou bloquée.
non,cooling
contactezwater
votre concessionnaire.
check
whetherSi the
inlet on the lower case or the cooling water pilot hole is blocked.
while the engine is running, overheating and serious damage could occur. Stop the engine and
Consult
your
dealerthe
if the
problem
cannot
be the
located
and
corrected.
check
whether
cooling
water
inlet on
lower
case
or the cooling water pilot hole is blocked.
Consult your dealer if the problem cannot be located and corrected.
19
Shifting
Prise en main
Operation
Operation
Changer deShifting
sélection
AVERTISSEMENT
Before shifting, make sure there are no swimmers or obstacles in the water near you.
Before
shifting,
make
there
no swimmers
or obstacles
in the water near you.
Assurez-vous de
l’absence
de nageurs,
de sure
passants
ou are
d’objets
avant de changer
de sélection.
ATTENTION
To change the boat direction or shifting position from forward to reverse or viceversa, first close
the throttle so that the engine idles (or runs at low speeds).
the throttle so that the engine idles (or runs at low speeds).
Sens avant et sens arrière
Forward or reverse
1. Fermez la Forward
poignée
gazthrottle
en position
fermée.
or
reverse
1. Placedesthe
grip
in the fully closed position.
1. Place the throttle grip in the fully closed position.
Fermez toujours
poignée des
au régime
ralenti
de changer
la sélection
‘sens avant’
en ‘sens inverse’
vice versa.first close
Tolachange
thegaz
boat
direction
oravant
shifting
position
fromde
forward
to reverse
or viceversa,
2. Changez décidément la commande de sélection du point mort (neutre) dans le ‘sens avant’.
2.
2.
Move the gear shift lever quickly and firmly from neutral to forward or reverse.
Move the gear shift lever quickly and firmly from neutral to forward or reverse.
AVERTISSEMENT
Quand vous naviguez en sens arrière, réduisez votre vitesse jusqu’à moitie gaz. Sinon, le bateau risque de perdre stabilité
operating
in reverse, go slowly. Do not open the throttle more than half. Otherwise the boa
et contrôle, ceWhen
qui peut
causer un accident.
When
operating
in reverse, go slowly. Do not open the throttle more than half. Otherwise the boa
could become unstable, which could result in loss of control and an accident.
could become unstable, which could result in loss of control and an accident.
Arrêter le moteur
Laissez tourner le moteur au ralenti ou naviguez-le à pas pendant quelques minutes avant d’arrêter le moteur. Il n’est
Stopping
engine
pas recommandé
de couperengine
le contact directement après avoir navigué à haut régime.
Stopping
Before stopping the engine, first let it cool off for a few minutes at idle or Iow speed. Stopping th
Before stopping the engine, first let it cool off for a few minutes at idle or Iow speed. Stopping th
engine immediately after operating at high speed is not recommended.
Procédure engine immediately after operating at high speed is not recommended.
1. Appuyez le coupe-contact jusqu’à l’arrêt complet du moteur.
2. Après arrêt
du moteur, fermez la vis de mise à l’air sur le bouchon de remplissage d’essence et fermez le robinet
Procedure
d’essence,Procedure
présent.
1.si Push
and hold the engine stop button until the engine comes to a complete stop.
1.
Push and
hold (en
the
engine
stop
button
the screw
engineon
comes
to atank
complete
stop.
3. Enlevez la2.
conduite
d’essence
de réservoir
séparé).
After
stopping
thecas
engine,
tighten
theuntil
air vent
the fuel
cap and
set the fuel cock
2. After stopping the engine, tighten the air vent screw on the fuel tank cap and set the fuel cock
lever or knob to the closed position, if equipped.
lever or knob
tofuel
the closed
position,
if equipped.
3. Disconnect
the
line if you
are using
an external fuel tank.
3. Disconnect the fuel line if you are using an external fuel tank.
20
20
20
Operation
Prise en
main
NOTE:
If the outboard motor is equipped with an engine stop switch lanyard, the engine can also be
REMARQUE
the interrupteur
lanyard andd’urgence
removing
lock
from
the engine
En cas oùstopped
le moteurby
estpulling
pourvu d’un
avecthe
corde
de plate
sécurité,
le moteur
s’arrêtestop
aussiswitch.
en tirant la
corde pour enlever l’agrafe d’urgence sur l’interrupteur.
Trimming outboard motor
trim angle
of the outboard motor helps determine the position of the bow of the boat in the
RéglageThe
de l’angle
d’arcasse
water.détermine
Correct trim
angle
will help
performance
and
fuel economy
reducing strain
L’angle d’arcasse
en partie
la position
de laimprove
coque dans
l’eau. Une angle
correcte
favorise leswhile
performances,
on the engine.
Correct trim
angle
depends
the combination
boat, engine,
and propeller.
réduit la consommation
et amoindrit
la charge
du moteur.
Unupon
angle correcte
dépend de laofcombinaison
bateau,
Correctettrim
is also
affected
bycorrecte
variables
such as the
lead par
in the
seatels
conditions,
and
moteur hors-bord
l’hélice.
L’angle
d’arcasse
est également
influencé
des boat,
variables
que la vitesse
de running
navigationspeed.
et la hauteur des vagues.
AVERTISSEMENT
Excessive trim for the operating conditions (either trim up or trim down) can cause boat
Une angle d’arcasse mal réglée (trop peu d’angle ou angle excessif) peut nuire à la stabilité et la direction du bateau. Cela
instability and can make steering the boat more difficult. This increases the possibility of an
augmente le risque d’un accident. Réduit la vitesse du moment le bateau perd sa stabilité et sa facilité de direction et
accident.
If the boat begins to feel unstable or is hard to steer, slow down and/or readjust the trim
rajustez l’angle d’arcasse.
angle.
Réglage angle d’arcasse
Adjusting trim angle
La barre d’arcasse a quatre ou cinq trous qui permettent de régler l’angle d’assiette
There are 4 or 5 holes provided in the clamp bracket to adjust the outboard motor trim angle.
1. Arrêtez le moteur.
1. Stop the engine.
2. Inclinez
moteur et
levez-le
Relâchez
la cheville
de blocage.
2. le
Remove
the
trim un
rodpeu.
from
the clamp
bracket
while slightly tilting the outboard motor up.
3. Reposition the rod in the desired hole.
To raise the bow ("trim-out"), move the rod away from the transom.
3. Placez la cheville de blocage dans la position appropriée
To lower the bow ("trim-in'), move the rod toward the transom.
Afin de faire
monter
coquewith
par rapport
au set
niveau
d’eau, placez
la cheville
dansthe
un trou
plus éloigné
de la barre
Make
testlaruns
the trim
to different
angles
to find
position
that works
best for your
d’arcasse. Afin de faire descendre la coque, placez la cheville dans un trou plus près de la barre d’arcasse.
boat and operating conditions.
Faites quelques tournées d’essai pour éprouver la position qui convient le mieux à votre bateau et usage.
AVERTISSEMENT
Stop the engine before adjusting the trim angle.
careavant
to avoid
beingl’angle
pinched
whenSoyez
removing
installing
thecorporelle
rod.
Arrêtez leUse
moteur
de changer
d’arcasse.
vigilantorqu’aucune
partie
puisse se coincer en
caution
when
trying aNaviguez
trim position
for the first
Increase
gradually
and watch for
relâchantUse
et fixant
la cheville
de blocage.
à allure modérée
aprèstime.
le changement
despeed
l’angle d’arcasse.
Augmentez
any signs
of instability
or control
problems.
Improperpas.
trim
cause
loss of peut
control.
graduellement
la vitesse
et faites attention
que le bateau
ne se déstabilise
Uneangle
angle can
d’arcasse
incorrecte
nuire
à la stabilité.
NOTE:
The outboard motor trim angle can be changed approximately 4 degrees by shifting the trim rod
one hole.
Adjusting boat trim
When the boat is on plane, a bow-up attitude results in less drag, greater stability and efficiency.
This is generally when the keel line of the boat is up about 3 to 5 degrees. With the bow up, the
boat may have a greater tendency to steer to one side or the other. Compensate for this as you
steer. The trim tab can also be adjusted to help offset this effect. When the bow of the boat is
21
21
down, it is easier to accelerate from a standing start onto plane.
down,
REMARQUE
down, it
it is
is easier
easier to
to accelerate
accelerate from
from aa standing
standing start
start onto
onto plane.
plane.
Operation
Prise en main
Operation
Operation
L’angle change d’environ quatre degrés en changeant la cheville d’une position.
Bow Up
Bow
Up
Too
much
trim-out puts the bow of the boat too high in the water. Performance and economy are
Bow
Up d’arcasse
Réglage de
l’angle
Too
puts
the
bow
the
boat
too
the
Performance
economy
are
decreased
because the
theof
pushing
the in
water
and there
is more airand
drag
. Excessive
Too much
much trim-out
trim-out
putshull
the of
bow
ofboat
the is
boat
too high
high
in
the water.
water.
Performance
and
economy
are
Quand un bateau
planebecause
sur le surface
d’eau,of
la position
ascendante
de l’étrave
garantit
une réduction
de air
résistance,
decreased
the
the
boat
pushing
the
water
and
is more
drag
. une
Excessive
trim-out
canetalso
cause
the
propeller
tois
which
reduces
performance
further,
and the
decreased
the hull
hull
of
the de
boat
isventilate,
pushing
the
water
andlathere
there
drag
stabilité plus
importantebecause
une efficacité
optimale
la puissance
moteur.
En
général,
quilleis
dumore
bateauair
doit
avoir. Excessive
un
trim-out
can
also
cause
the
propeller
to
ventilate,
which
reduces
performance
further,
and the
boat
may
(hop
the
which
throw
thea operator
and passengers
trim-out
also cause
theinpropeller
to ventilate,
which
reduces
performance
further,
angle ascendant
de 3 can
à"porpoise"
5 degrés.
En naviguant
avecwater),
lݎtrave
pointuecould
en l›air,
le bateau
vivement
tendance
à perdreand the
boat
may
"porpoise"
(hop
in
the
water),
which
could
throw
the
operator
and
passengers
overboard.
boat
may
"porpoise"
(hop
in
the
water),
which
could
throw
the
operator
and
passengers
sa ligne droite et à tirer vers la droite ou la gauche. Le bateau se cabre. Compensez cette tendance en corrigeant la
overboard.
overboard.
direction. On
peut réduire cet effet en réglant la position de la plaque d›arcasse. Une étrave positionnée plutôt basse
facilite l›effet de planage après départ arrêté.
Bow Down
Bow Down
Un angle trop important remonte l’étrave trop en l’air et pousse la partie arrière trop en bas. Cela nuit aux performances
Etrave trop
haute
Bow
Down
Too
much
trim-in causes the boat to "plow" through the water, decreasing fuel economy and
Too
trim-in
causes
boat
to
the
decreasing
fuel
economy
making
it hard
to increase
speed.
with excessive
trim-in
at higher
speeds
also and
makes
Too much
much
trim-in
causes the
the
boat Operating
to "plow"
"plow" through
through
the water,
water,
decreasing
fuel
economy
and
et la consommation
dehard
carburantincrease
parce quespeed.
la coque
doit déplacer
trop d’eau et la résistance
à l’air s’agrandit.
Puis,
making
Operating
with
trim-in
at
makes
the
boat it
Resistance
at tile
bow is greatly
increased,
heightening
thespeeds
dangeralso
of "bow
making
itunstable.
hard to
to increase
speed.
Operating
with excessive
excessive
trim-in
at higher
higher
speeds
also
makes
l’hélice peut
avaler
deunstable.
l’air ce qui Resistance
cause des rebondissements
sur
la surface
d’eau. Le conducteur
et lesthe
passagers
the
boat
at
tile
bow
is
greatly
increased,
heightening
danger
of
"bow
steering"
and making
operation
difficult
and
dangerous.
the
boat
unstable.
Resistance
at
tile
bow
is
greatly
increased,
heightening
the
danger
of
"bow
risquent d’être
jetés par-dessus
bord. operation difficult and dangerous.
steering"
and making
steering" and making operation difficult and dangerous.
Etrave trop basse
Un angle trop réduit peut faire ‘labourer’ la coque dans l’eau car l’étrave a tendance à plonger sous l’eau. Le bateau
pique. Cela amoindrit l’accélération et fait monter la consommation. A haute allure, le bateau perd sa stabilité. La
résistance NOTE:
dans l’eau augmente ce qui déstabilise le bateau et réduit la facilité de changer de direction.
Depending
the type of boat, the outboard motor trim angle may have little effect on the trim of
NOTE:
NOTE: on
Depending
on
the
the
boat when
Depending
on operating.
the type
type of
of boat,
boat, the
the outboard
outboard motor
motor trim
trim angle
angle may
may have
have little
little effect
effect on
on the
the trim
trim of
of
the
boat
when
operating.
REMARQUE
the boat when operating.
Tilting
up leand
down
Selon le type
de bateau,
réglage
de l’angle d’arcasse du moteur hors-bord peut avoir peu d’effet sur l’angle d’arcasse
Tilting
up
and
If
the engine
will down
be stopped for some time or if the boat is moored in shallows , the outboard
Tilting
up
and
down
du bateau If
même.
the engine will be stopped for some time or if the boat is moored in shallows , the outboard
If the engine will be stopped for some time or if the boat is moored in shallows , the outboard
22
22
22
22
Prise en main
Operation
Basculer
haut,be
entilted
bas up to protect the propeller and casing from damage by collision with
motoren
should
Operation
Uneobstructions
fois le moteur
arrêté
le bateau
garé en
eau
peu profonde, le hors-bord doit être incliné pour protéger l’hélice et
, andou
also
to reduce
salt
corrosion.
la queue contre
la corrosion
salée up
et letorisque
d’accrochages.
motor
shouldd’eau
be tilted
protect
the propeller and casing from damage by collision with
obstructions , and also to reduce salt corrosion.
Be sure all people are clear of the outboard motor when tilting up and down, also be careful not to
pinch
any body parts between the drive unit and engine bracket.
AVERTISSEMENT
Be sure all people are clear of the outboard motor when tilting up and down, also be careful not to
Assurez-vous qu’il n’y a pas de personnes aux environs du moteur et que des parties corporelles ne peuvent pas se coincer
pinch any body parts between the drive unit and engine bracket.
entre le moteur et la barre d’arcasse.
Leaking fuel is a fire hazard. Tighten the air vent screw and place the fuel cock in the closed
AVERTISSEMENT
position if the outboard motor will be tilted for more than a few minutes.Otherwise fuel may leak.
Des fuites deLeaking
carburantfuel
peuvent
provoquer
uneTighten
incendie.the
Serrez
vis de
mise and
à l’airplace
quandthe
le moteur
est incliné
is a fire
hazard.
air lavent
screw
fuel cock
in thepour
closed
éviter que leposition
carburant if
s’échappe.
the outboard motor will be tilted for more than a few minutes.Otherwise fuel may leak.
ATTENTION
·Before
tilting‘Arrêter
the outboard
motor,
follow
theleprocedure
engine''
in thisavec
• Suivez
la procédure
le moteur’
avant de
basculer
moteur vers under
le haut."Stopping
N’inclinez jamais
le hors-bord
chapter.
NeverCela
tiltpeut
the causer
outboard
motor while
the engine
is running.
Severe damage from
moteur
tournant.
des dommages
au moteur
importants
et la surchauffe.
·Before
tilting
the outboard motor, follow the procedure under "Stopping engine'' in this
overheating
can
result.le
• Ne
jamais essayer
à basculer
moteur par la poignée des gaz. Celui-ci risquerait de se casser.
chapter.
Never
tilt the
outboard
motor
while
the because
engine isthis
running.
Severe
damage
from
·Do
not
tilt
up
the
engine
pushing
the
tiller
handle
could
break
handle.
• Assurez-vous que la partie moteurby
se trouve
toujours
dans une
position
plus haute que
l’hélice.
Celathe
évite
que l’eau
Keep the
power unitcan
higher
than the propel let at all times. Otherwise water could run into the
overheating
result.
coule dans le cylindre et que le moteur s’abîme.
·Do
tiltdamage.
up the engine by pushing the tiller handle because this could break the handle.
cylinder
andnot
cause
• Le
moteur hors-bord
ne peut pas basculer avec la sélection en position ‘Reverse’ (sens arrière).
Keep the power
unit higher
thanwhen
the propel
let at all times. Otherwise water could run into the
·The outboard
motor cannot
be tilted
in reverse.
cylinder and cause damage.
Procédure
d’inclinaison
enmotor
haut
·The
outboard
Procedure
for
tilting
up cannot be tilted when in reverse.
1. 1.Stop
Arrêtez le
moteur.
Placez
la commande
de
sélection
mort (Neutral).
the
engine.
Place
the gearup
shift
leverau point
in forward
Procedure
for
tilting
1.Stop the engine. Place the gear shift lever in forward
23
23
23
Operation
Prise en
main
Operation
Operation
2. Tighten
Tighten the
the air
air vent
vent screw.
screw. On
On models
models equipped
equipped with
with aa fuel
fuel joint, disconnect
disconnect the
the fuel
fuel line
line from
from
2.
2. Tighten
airà l’air
ventquiscrew.
Onsur
models
equipped
with Modèles
a fueljoint,
joint,
disconnect
theenlevez
fuel line
2. Fermez
la vis dethe
mise
se trouve
le bouchon
du réservoir.
avec réservoir
séparé:
la from
the outboard
outboard
motor.
the
motor.
the outboard
motor.
conduite
de carburant
du moteur hors-bord.
3. Prenez
la poignée
surthe
le couvercle
inclinez
moteur
hors-bordto
enthe
avant.
3. Take
hold of
top cowletgrip
andleraise
outboard
full up position.
3.3.Take
Takehold
holdof
ofthe
thetop
topcowl
cowlgrip
gripand
andraise
raiseoutboard
outboardtotothe
thefull
fullup
upposition.
position.
4. Le verrouillage se fera automatiquement et verrouille le moteur hors-bord en position inclinée.
4. The
The spring loaded
loaded tilt lock
lock lever will
will engage automatically
automatically and look
look the outboard
outboard in full up
up
4.
4. Thespring
spring loadedtilt
tilt locklever
lever willengage
engage automaticallyand
and lookthe
the outboardininfull
full up
position.
position.
position.
Procédure
d’inclinaison
en basdown
Procedure
for tilting
Procedure for tilting down
Procedure
1. Approchez
le moteur
untilting
peu versdown
vous.
1.
Slightly
tiltfor
the
outboard
motor up.
up.
1.
tilt
the
outboard
motor
1.Slightly
Slightly
outboard
motor
up. baisser
2. Tirez
le levier
en
haut et laisse
le moteur
2.
Pull
up d’ancrage
ontilt
thethe
tilt
release
lever.
Gently
lowergraduellement.
outboard down.
2.2.Pull
Pullup
upon
onthe
thetilt
tiltrelease
releaselever.
lever.Gently
Gentlylower
loweroutboard
outboarddown.
down.
24
24
24
24
Entretien
Spécifications techniques
Dimensions
Longueur
Largeur
Hauteur
Hauteur d’arcasse
Poids
Performances
Régime plein gaz
Puissance maximale
Régime au ralenti (neutre)
Type moteur
Cylindrée
Alésage x course
Allumage
Bougie
Distance électrode
Système d‘échappement
Système de refroidissement
Système de démarrage
Carburation
Jeu aux soupapes (moteur froid)
Boîte de vitesses
Trois positions
Transmission
Arcasse et inclinaison
Carburant et huile
Essence recommandée
Contenu carburant (contenant séparé)
25
869 mm
372 mm
1031 mm
557 mm
40,0 kg
5.000 - 6.000 rpm
5,9 kW/8 ch./6.000 rpm
900 - 1.000 rpm
quatre-temps
212 cc
56 x 43 mm
CDI
NGK BR6HS-10/Denso W20FSR-U
0,8 - 1,0 mm
axe d‘hélice
par eau
manuel
avec starter
admission: 0,15 - 0,20 mm
échappement: 0,20 - 0,25 mm
en avant-point mort- en arrière
2,08 (27/13)
manuel
sans plomb 95
12 litres (réservoir intégré)
12 litres (contenant séparé)
Entretien
Huile recommandée
Classification API
API SE, SF, SG, SJ, SL
Classification SAE
SAE 10W30 ou SAE 10W40
Lubrification pompe à huile
Contenance huile moteur
Huile queue recommandée
Contenance huile queue
0,8 litre
hypoïde SAE90
250 cc
Couples de serrage
Bougie
Fixation hélice
Vis de vidange huile moteur 25 Nm (2,5 kgm)
17 Nm (1,73 kgm)
28,0 Nm (2,86 kgm)
26
Entretien
Maintenance
Transport
et stockage du moteur hors-bord
Transporting and storing outboard motor
AVERTISSEMENT
DES FUITES DE CARBURANT RISQUENT DE CAUSER UN INCENDIE
is ahors-bord
fire hazard.
transporting
Avant·Leaking
d’basculer lefuel
moteur
vers leWhen
haut ou
le poser sur leand
côté:storing the outboard motor, close the air
• * Afin
fuites
d’essence,
la vis
de mise
et le robinet d’essence quand le moteur est transporté
ventd’éviter
screwdes
and
fuel
cock tofermer
prevent
fuel
fromà l’air
leaking.
ou·USE
stocké. CARE when transporting fuel tank, whether in a boat or car.
·DOVIGILANT
NOT fill
container
maximum
capacity.
Gasoline
will expand
as it
• * SOYEZ
enfuel
transportant
des to
contenants
d’essence
séparés
dans le bateau,
la voitureconsiderably
ou autres véhicules.
warms
and can
build up pressure
in themaximale.
fuel container.
canencause
fueletleakage
a
• * Ne
jamaisup
remplir
des contenants
à leurs capacité
L’essenceThis
se dilate
chauffant
peut faireand
remonter
fireunhazard.
la potential
pression dans
contenant. Ceci peut causer une fuite et un risque de feu éventuel.
AVERTISSEMENT
Never get under the lower unit while it is tilted, even if a motor support bar is used. Severe injury
could occur if the outboard motor accidentally falls.
Ne vous mettez jamais au-dessous du moteur hors-bord. La chute éventuelle du moteur peut provoquer des blessures graves.
ATTENTION
N’utilisez
pas use
la système
blocagelever
d’inclinaison
pendant le transport
moteur
hors-bord,
attaché
aushake
bateau.loose
Les
Do not
the tiltdesupport
when trailering
the boat.du
The
outboard
motor
could
mouvements de transport peuvent déverrouiller l’ancrage du moteur. Quand le moteur hors-bord ne peut pas être
from the tilt support and fall. If the motor cannot be trailered in the normal running position, use
transporté en position normale, servez-vous d’un soutien supplémentaire pour transporter le moteur en position inclinée.
an additional support device to secure it in the tilt position.
De buitenboordmotor
moet vervoerd
in de normale
verticalerunning
positie. Wanneer
er onvoldoende
The outboard motor
shoulden
beopgeslagen
traileredworden
and stored
in the normal
position.
If there is
afstand
is tot de wegroad
in deze
positie, mag
de buitenboordmotor
alleen inthe
de outboard
gekantelde motor
positie vervoerd
worden
insufficient
clearance
in this
position, then trailer
in the tilt
position
wanneer de buitenboordmotor voorzien wordt van extra daarvoor bedoelde ondersteuning.
using a motor support device such as a transom saver bar.
Clamp screw mounting models
Version
avec
vis de fixation
When
transporting
or toring the outboard motor while removed from a boat, keep the outboard
Si vous
transportez
stockez shown.
le moteur, veuillez suivre l’exemple des illustrations ci-dessous:
motor
in theou
attitude
NOTE:
REMARQUE
a towelouorautre
something
under
the outboard
motor
protect it from damage.
PosezPlace
une serviette
protectionsimilar
en dessous
du hors-bord
pour éviter
destodommages.
Storing outboard motor
Stockage du moteur hors-bord
When storing your outboard motor for prolonged periods of time (2 months or longer), several
Quand le moteur hors-bord sera stocké pour une longue période (plus de deux mois), suivez les procédures importantes,
important procedures must be performed to prevent excessive damage.
mentionnées ci-dessous, pour éviter des endommagements ou dégâts.
AVERTISSEMENT
·To
prevent problems which can be caused by oil entering the cylinder from the sump, keep the
• leoutboard
moteur hors-bord
être transporté
ou when
stocké que
dans les positions
comme it.
indiquées
dans or
lestransporting
illustrations.
motorne
inpeut
the attitude
shown
transporting
and storing
If storing
Cela
que l’huile
moteur
dans(not
le cylindre.
Si vous
hors-bordalter
sur ledraining
côté, il est the
indispensable
de
theévite
outboard
motor
on coule
its side
upright),
putstockez
it on alecushion
engine oi1.
vidanger
le moteur
stockage. motor on its side before the cooling water has drained from it
·Do not
placeavant
the outboard
• Avant
de poser leotherwise
moteur sur le
côté, may
laissezenter
coulerthe
toutcylinder
d’abord l’eau
de refroidissement
moteur
éviter
que
completely,
water
through
the exhaustduport
andpour
cause
engine
letrouble.
liquide coule dans le cylindre et cause des dégâts.
• Stockez
le moteur
hors-bordmotor
dans uninespace
et bien ventilé. Evitez
que
le moteur
soitsunlight.
exposé au soleil direct.
·Store
the outboard
a dry,sec
wellventilated
place,
not
in direct
27
27
Procedure
Maintenance
Entretien
Flushing
in a test tank
Rinçage
avec contenant
d’eau
ATTENTION
Do not run the engine without supplying it with cooling water. Either the engine water pump will
Ne démarrez jamais le moteur sans admission d’eau refroidissante. La pompe à eau s’abîmera et la surchauffe qui en
be damaged or the engine will be damaged from overheating. Befor starting the engine, be sure to
résulte risquera des dégâts mécaniques au moteur. Avant de démarrer le moteur, assurez-vous qu’il se trouve de l’eau
water to
the cooling water passages.
dans supply
les canalisations
d’eau.
1.
2.
3.
4.
5.
1. Wash the outboard motor body using fresh water.
Nettoyez
l’extérieur
moteur
de l’eau position.
douce.
2. Place
the fuelducock
in avec
the closed
Tighten the air vent screw on the fuel tank cap.
Détachez
le réservoir
d’essence.
3. Remove
the engine
top cowling
Enlevez
le capotplug
supérieur.
4. Remove
and gasket and flushing attachment.
5. Attach
a water
flushing
attachment. Turn on the water gently and flush the cooling
Enlevez
le bouchon
et lehose
jointto
authe
canal
de rinçage.
Branchez
au canal de rinçage. Rincez les canalisations avec une pression modérée durant trois à
systemun
fortuyau
3 ord’arrosage
5 minutes.
cinq minutes.
a = joint
b = canal de rinçage
AVERTISSEMENT
·Do not touch or remove electrical parts when starting or during operation.
• Ne touchez pas des composants électriques quand le moteur est démarré ou pendant son usage.
·Keep hands, hair, and clothes away from the flywheel and other rotating parts while the engine
• Gardez les mains, cheveux et vêtements à l’écart du volant ou autres éléments rotatifs dès que le moteur est mis en
is running.
marche.
6. Just prior to turning off the engine, quickly spray "Fogging Oil" into each carburetor. When
6. Atomisez
de done,
l’huile de
dans
le carburateur
juste avant
le moteur. La procédure sera réussie
properly
thepréservation
engine will
smoke
excessively
and d’arrêter
almost stall.
quand
moteur se Oil"
met àis
fumer
et se trouve au
caler at a fast idle until the fuel system empties and
7. If le"Fogging
not available,
runpoint
thede
engine
7. En
casengine
d’absence
d’huile de préservation, laissez tourner le moteur sur un régime augmenté jusqu’à il tombe en
the
stops.
panne
sèche et the
s’arrête
8. Remove
flushing attachment and reinstall plug and gasket.
8. Enlevez le tuyau d’arrosage et montez le bouchon avec son joint.
NOTE:
Cooling system flushing is essential to prevent the cooling system from dogging up with salt,
REMARQUE
orde
dirt.
addition,
foggingpour
of the
engine
is mandatory
to de
prevent
excessive
engineUtilisez
damage
Il est sand,
essentiel
bienIn
rincer
les canalisations
éviter
que celles-ci
se bouchent
sel, sable
ou autres saletés.
due to
Perform
theéviter
flushing
and fogging
at the same
de l’huile
de rust.
préservation
pour
des dommages
mécaniques
par la time.
rouille. Rincez les canalisations et appliquez
l’huile de préservation au même moment.
9. Remove the gasoline from the integral fuel tank.
10. If "Fogging Oi1" is not available, remove the spark plug. Pour a teaspoonful of clean engine
9. En cas d’indisponibilité d’huile de préservation, ôtez la bougie. Ajoutez de l’huile moteur propre (une cuillère de
oil into
cylinder.
Crank
several times
manually.
the spark
plug.
café)
dans the
le cylindre.
Tournez
manuellement
le moteur
plusieursReplace
fois et réinstallez
la bougie.
11. Install the top cowling.
10. Installez le capot supérieur.
12. Drain the cooling water completely out of the motor. Clean the body thoroughly.
11. Laissez couler entièrement l’eau de refroidissement hors du moteur. Nettoyez et essuyez soigneusement l’extérieur.
Lubrication
1. Grease the spark plug threads and install the spark plug(s) and torque to proper specification.
2. Change the gear oil.Inspect the oil for the presence of water that indicates a leaky seal.
3. Grease all grease fittings.
28
28
Entretien
Graissage
1. Graissez le filet de la bougie et fixez-la avec le couple de serrage correct.
2. Changez l’huile de la queue. Vérifiez la présence éventuelle d’eau qui pourrait être causée par un joint usé ou abîmé.
3. Graissez tous les pivots.
Nettoyage du moteur hors-bord
Lavez après usage le moteur avec de l’eau propre. Rincez le système de refroidissement avec de l’eau propre.
Surfaces peints
Inspectez le moteur hors-bord pour les rayures, bosses ou peinture écaillée. Surfaces abîmés ont tendance à corroder
plus rapidement. Si nécessaire, réparez les dommages et appliquez de la peinture neuve.
Entretien périodique
AVERTISSEMENT
Arrêtez toujours le moteur en cas d’entretien, sauf si indiqué explicitement. Quand vous ou le propriétaire manque de
maîtrise technique, laissez l’entretien à votre concessionnaire ou un technicien qualifié.
Pièces détachées
Utilisez uniquement des pièces originales ou pièces semblables de la même qualité et matériau. Pièces de qualité
inférieure à celle d’origine peuvent causes des défauts ou défaillances. Ceux-ci risquent de mettre en danger la sécurité
du conducteur et les passagers, suite à une perte de contrôle du bateau. Les pièces et accessoires originales sont
disponibles auprès de votre concessionnaire.
29
Entretien
Intervalles d’entretien
La fréquence d’entretien peut s’adapter à l’usage du moteur hors-bord. Le tableau ci-dessous sert d’indication générale.
Référez-vous aux chapitres correspondants pour les procédures d›entretien que vous pouvez faire vous-même.
Après usage du moteur hors-bord dans l›eau salée ou boueuse, il doit être rincé avec de l›eau propre.
Le symbole l s›applique à une action que vous pouvez exécuter vous-même
Le symbole ¡ s›applique à une action destinée à votre concessionnaire
Premières
Pièce
Action
Anode(s)
contrôler/remplacer
Canalisations d’eau
nettoyer
Barre d’arcasse
contrôler
Filtre de carburant
contrôler/nettoyer
10 heures
(1 mois)
Tous les
50 heures
(3 mois)
100 heures
(6 mois)
l/¡
l/¡
l
l
l
¡
(réservoir intégré)
Système de carburant
contrôler
Réservoir de carburant
contrôler/nettoyer
200 heures
(1 an)
l
l
l
¡
(réservoir intégré)
Huile queue
vidange
Pivots/points de graissage
graisser
Régime au ralenti
contrôler
Goupille fendue
contrôler/remplacer
Système sélection vitesse
contrôler/ajuster
¡
Thermostat
contrôler/ajuster
¡
Poignée/câble des gaz
contrôler/ajuster
¡
Pompe à eau
nettoyer/ajuster/
l
l
l
l/¡
l/¡
l
l
¡
remplacer
Huile moteur
contrôler/vidange
Bougie
contrôler/ajuster/
remplacer
Jeu de soupapes
contrôler/ajuster
Embranchement
contrôler/remplacer
l
l
l
¡
l
¡
¡
30
Maintenance
Entretien
Greasing
Water resistant grease
Graissage
Graisse résistante à l’eau
31
31
Entretien
Nettoyer et ajuster la bougie
AVERTISSEMENT
Veillez à ne pas abîmer l’isolateur en porcelaine pendant le déverrouillage et serrage de la bougie. Un isolateur abîmé peut
produire des étincelles et causer un incendie ou une explosion.
La bougie constitue un élément important du moteur et est facilement contrôlable. L’état et la couleur de la bougie
donnent ensuite une indication sur la santé du moteur. Quand, par exemple, l’intérieur de l’électrode central a une
couleur très blanche, la cause peut être une fuite dans l’admission d’air ou un problème de carburation. Dans ce cas,
contactez votre concessionnaire. Dévissez régulièrement la bougie, vérifiez des restes de carbone et contrôlez l ‘état des
électrodes. Si usée, remplacez la bougie.
Bougie originale
NGK BR6HS-10/Denso W20FSR-U
Maintenance
Avant
le montage
nouvelle
bougie,
vérifiez l’écart
dݎlectrode
à l›aide
cale
de précision.
Ajustez
si
Before
fittingd’une
the spark
plug,
measure
the electrode
gap
withd›une
a wire
thickness
gauge;
adjust
the
nécessaire.
gap to specification if necessary.
1. Ecart d’électrode
1. Spark plug gap
2.2.Type
bougie
(NGK)
Spark
plug
I.D. mark (NGK)
Ecart d’électrode bougie:
0,9 - 1,0 mm
Appliquez toujours un nouveau joint et nettoyez l’endroit de contact de la bougie sur la culasse avant le montage.
Nettoyez le filet de vis et serrez la bougie avec le couple de serrage correct.
When fitting the plug, always clean the gasket surface and use a new gasket. Wipe off any dirt
Couple
bougie torque
from the threads and screw in the spark
plugdetoserrage
the correct
25 Nm (2,5 kgm)
REMARQUE
Spark plug torque:
2 5 . 0 Nm(18.4 ft-lb) (2.55 kgf-m)
En l’absence d’une clé dynamométrique, la procédure suivante donne une indication du bon couple de serrage: fixez
la bougie à force de main et ajoutez un 1/4 - 1/2 tour. Vérifiez le couple de serrage correct ultérieurement avec une clé
dynamométrique.
If a torque-wrench is not available when you are fitting a spark plug, a good estimate of the
cerrect torque is 1/4 to 1/2 a turn past fingertight. Have the spark plug adjusted to the correct
Contrôle
système
carburation
torque as
soon asde
possible
with a torque wrench.
AVERTISSEMENT
Checking
fuel system
L’essence et les vapeur d’essence sont très inflammables et explosives. Respectez une distance par rapport à étincelles,
cigarettes, feu ouvert et autres sources d’inflammation.
Gasoline and its vapors are highly flammable and explosive. Keep away from sparks, cigarettes,
flames,
or other sources of ignition.
AVERTISSEMENT
Une fuite de carburant risque de provoquer un incendie ou une explosion
• Contrôlez fréquemment la présence éventuelle de fuites.
Leaking fuel can result in fire or explosion.
• ·Check
Quand vous
une fuite,
elle doit être réparée par un technicien qualifié.
forconstatez
fuel leakage
regularly.
• ·If
Des réparations
défectueuses
risquent
defuel
mettre
en danger
l’usage
du moteurbyhors-bord.
any fuel leakage
is found,
the
system
must
be repaired
a qualified mechanic.
Improper repairs can make the outboard unsafe to operate.
Check the fuel lines for leaks, crack, or maifunction. If a problem is found, our dealer or other
qualified mechanic should repair it immediately.
32
·Check for fuel leakage regularly.
·If any fuel leakage is found, the fuel system must be repaired by a qualified mechanic.
Improper repairs can make the outboard unsafe to operate.
Entretien
Check
the fuel
lines for leaks,
crack,
If a de
problem
found,
Contrôlez les
conduites
et canalisations
de carburant
suror
la maifunction.
présence éventuelle
fuites ouisfissures
et our
sur ledealer or other
qualified
mechanic
should
repair
it immediately.
fonctionnement
en général.
Une fois
un défaut
constaté,
laissez-le réparer immédiatement par votre concessionnaire ou
un technicien spécialisé.
Points deCheckpoints
contrôle
•
•
•
•
Fuites ·Fuel system parts leakage
·Fuel
linede
joint
leakage
Fuites des
conduites
carburant
·Fuel line cracks or other damage
Fissures ou autres dommages aux conduites
·Fuel connector leakage
Fuites aux raccords de carburant
Inspecting idling speed
Contrôle régime au ralenti
Do not touch or remove electrical parts when starting or during operation.
AVERTISSEMENT
Keep hands, hair, and clothes away from the flywheel and other rotating parts while the engine is
Ne touchezrunning.
ou enlevez pas des pièces électriques pendant l’usage avec moteur démarré. Gardez les mains, cheveux et
vêtements à l’écart du volant ou autres éléments rotatifs dès que le moteur est mis en marche.
This procedure must be performed while the outboard motor is in the water. A flushing
ATTENTION
attachment
test tank
can
used.
Cette opération
doit êtreor
exécutée
quand
le be
moteur
est dans l’eau, un contenant d’eau ou est connecté à réservoir d’essai
ou à une installation de rinçage.
A diagnostic tachometer should be used for this procedure. Results may vary depending on
whether testing is conducted with the flushing attachment, in a test tank, or with the outboard
Afin d’effectuer la procédure, un compte-tours est indispensable. Les résultats peuvent différer selon un essai dans l’eau
motor in the water.
ou dans un réservoir d’essai
1. Start the engine and allow it to warm up fully in neutral until it is running smoothly.
1. Démarrez le moteur et chauffe-le en position neutre (point mort), jusqu’au moment de tourner bien rond.
NOTE:
REMARQUE
Correct idling speed inspection is only possible if the engine is fully warmed up. If not warmed
Het correcte
kan alleen
worden
wanneer
de motor
op have
bedrijfstemperatuur
is. Wanneer
upstationaire
fully, thetoerental
idle speed
will gecontroleerd
measure higher
than
normal.
If you
difficulty verifying
the idle
Le régime speed,
au ralentiornethe
peut
être
correctement
vérifié
que
quand
le
moteur
est
en
température
d’exploitation.
cas de
idle speed requires adjustment, consult our dealer or other qualified En
mechanic.
moteur froid, le régime sera automatiquement plus élevé. En cas que vous avez des problèmes à déterminer ou régler le
régime au 2.
ralenti,
contactez
votrethe
concessionnaire
ouset
un technicien
qualifié. For idle speed specifications, see page 23.
Verify
whether
idle speed is
to specification.
Changing engine oil
2. Vérifiez si le régime correspond à la recommandation. Voir paginae 24 pour voir le régime de ralenti correct.
draining the engine oil immediately after stopping the engine. The oil is hot and should
Vidange ·Avoid
du moteur
be handled with care to avoid burns.
·Be sure the outboard motor is securely fastened to the transom or a stable stand.
AVERTISSEMENT
• Ne vidangez pas l’huile juste après l’arrêt du moteur. L’huile est chaude et peut causer des brûlures
• Assurez-vous que le moteur hors-bord est bien ancré sur l’arcasse ou un soutien solide.
33
33
F9.9 -F8-F6
Tuesday, January 15, 2002 3:59:20 PM
Maintenance
Entretien
·DoAVERTISSEMENT
not overfill the oil, and be sure the outboard motor is upright (not tilted) when checking and
oil.
• changing
Ne rajoutezthe
pas engine
davantage
d’huile que prescrit. Vérifiez si le moteur se trouve en position verticale (non inclinée) en
·Ifcontrôlant
the oil level
is above
upper
level mark, drain until the level meets the specified capacity.
le niveau
d’huile the
ou en
vidangeant.
thed’huile
oil could
cause
leakage
or damage.
• Overfilling
Quand le niveau
dépasse
le niveau
maximal,
le surplus d’huile doit être vidangé. Un niveau trop élevé peut
causer des fuites et des dégâts mécaniques.
Change
the engine oil after the first 10 hours of operation, and every 100 hours or at 6-rnonth
AVERTISSEMENT
intervals
thereafter. Otherwise the engine will wear quickly.
Effectuez la vidange au bout de 10 heures de marche du moteur. Ensuite, vidangez toutes les 100 heures ou six mois afin
d’éviter de l’usure accéléré du moteur.
NOTE:
Change the engine oil when the oil is still warm.
REMARQUE
quand
l’huile est
tiède-chaude,
mais pas
brûlante.( not tilted ).
1.Vidangez
Put the
outboard
motor
in an upright
position
2. Prepare a suitable container that holds a larger amount than the engine oil capacity. Loosen
1.and
Placez
le moteur
position
verticale,
remove
the en
drain
screw
whilenon-inclinée.
holding the container under the drain hole. Then remove the
2.oil
Mettez
portéeLet
de the
mainoil
un drain
récipient
suffisamment
grandup
pour
contenir
l’huile
usé. Desserrez le vis de vidange et
fillerà cap.
completely.
Wipe
any
spilled
oil immediately.
recueillez l’huile dans le récipient. Ensuite, enlevez le bouchon et laissez couler le reste de l’huile dans le récipient.
Essuyez immédiatement des taches d’huile.
3. Placez un nouveau joint sur le bouchon de vidange. Graissez légèrement le joint avant le montage et serrez le
bouchon de vidange à fond.
3. Put a new gasket on the oil drain screw.
Apply a light coat of oil to the gasket and install the drain screw.
34
34
Maintenance
Maintenance
Entretien
NOTE:
NOTE:
Drain Drain
screwscrew
tightening
torquetorque
tightening
24.0Nm(17.7ft-lb)(2.45kgf-m)
Couple de serrage bouchon de vidange
24.0Nm(17.7ft-lb)(2.45kgf-m)
24,0 Nm (2,45 kgm)
If a torque
wrench
is not is
available
when when
you are
installing
the drain
fingerfinger
tighten
the the
If a torque
wrench
not available
you
are installing
the screw,
drain screw,
tighten
screw
just until
gasket
comescomes
into contact
with the
surface
of the of
drain
1/4 1/4
REMARQUE
screw
justthe
until
the gasket
into contact
with
the surface
the hole.
drain Then
hole. tighten
Then tighten
toEn1/2
turn
more.
Tighten
the
drain
screw
to
the
correct
torque
with
a
torque
wrench
as
soon
as
l’absence
d’unemore.
clé dynamométrique
pour le
montage
du correct
bouchon torque
de vidange,
suivanteasdonne
to 1/2 turn
Tighten the drain
screw
to the
withlaaprocédure
torque wrench
soonune
as
possible.
indication
du bon couple de serrage: fixez le bouchon à force de main et ajoutez un 1/4 - 1/2 tour. Vérifiez le couple de
possible.
serrage correct ultérieurement avec une clé dynamométrique.
4. Add
correct
amount
of oil of
through
the filler
the filler
4.the
Add
the correct
amount
oil through
the hole.
filler Install
hole. Install
the cap.
filler cap.
4. Rajoutez la quantité correcte d›huile dans le bouchon de remplissage d›huile.
Recommended
engineengine
oil: oil:
Recommended
4-stroke
outboard
motor
oil oil
Aanbevolen
motorolie:
4-stroke
outboard
motor
buitenboordmotor
motorolie
Engine
oil quantity(excluding
oil filter):
Engine
oil 4-takt
quantity(excluding
oil
filter):
Hoeveelheid
(zonder
oliefilter)
0.8L(0.85
US
qt)(0.70lmp.qt)
0.8L(0.85 US qt)(0.70lmp.qt)
0,8 liter
5.Start
the engine
andhors-bord
watch
toetmake
sure the
iow
oiliow
pressure
warning
indicator
turns off.
Make
5. Démarrez
le
moteur
assurez-vous
que
lethe
témoin
rouge
pour
la pression
d’huile
s’éteint.
Contrôlez
5.Start
the
engine
and watch
to make
sure
oil pressure
warning
indicator
turns
off.la Make
sure présence
that
there
are
no
oil
leaks.
éventuelle
de fuites.
sure that
there are
no oil leaks.
ATTENTION
If the If
Iow
oil
pressure
warning
indicator does not
turn
or off
if there
oil leaks,
stop the
engineengine
thetémoin
Iow
oil
pressure
warning
does
notoff
turn
orou
if are
there
oil leaks,
Quand le
d’avertissement
pour la indicator
pression d’huile
ne
s’éteint
pas,
si vousare
constatez
des stop
fuites,the
arrêtez
and find
cause.
Continued
operation
with awith
problem
could could
cause cause
severesevere
engineengine
damage.
andthe
find
the cause.
Continued
operation
a problem
damage.
immédiatement le moteur pour éviter des dégâts mécaniques considérables.
6. Turn
theoff
engine
and wait 3wait
minutes.Recheck
the oil level
using using
the oilthe
filler
cap
tocap
be sure
6. off
Turn
theetengine
3 minutes.Recheck
filler
to be sure
6. Arrêtez
le moteur
attendezand
trois minutes.
Vérifiez une nouvellethe
foisoil
si lelevel
niveau d’huile
se oil
trouve
entre
indication
the
level
falls
between
the upper
and lower
marks.marks.
Fill with
oil
if it
is ifbelow
the
lower
mark,or
the
level
falls
between
the
upper
and
lower
Fill
with
oil
it
is
below
the
lower
mark,or
minimale et maximale. Si nécessaire, rajoutez de l’huile si le niveau est au-dessous du minimum ou vidanger
le
drain to
the to
specified
level if
it is ifabove
the uppermark.
drain
the specified
level
it is above
the uppermark.
surplus l’huile si le niveau est supérieur au maximum.
1. Niveau minimal
2. Niveau maximal
7. Evacuez l’huile
35usée en tant que déchet chimique ou conformément aux directives en vigueur.
35
35
·Check that each connector is engaged secured.
Exhaust leakage
Start the engine and check that no exhaust leaks from the joints between the exhaust cover,
Entretien
cylinder head, and body cylinder.
Water leakage
Start the engine and check that no water leaks from the joints between the exhaust cover, cylinder
REMARQUE
head, and body cylinder.
Vidangez plus fréquemment si le moteur est utilisé sous des conditions lourdes ou exhaustives, par exemple pendant la
Engine oil leakage
pêche au chalut.
Check for oil leaks on the around the engine.
Checking propeller
Contrôle du réseau électrique et ses connections
• Vérifiez que le câble de masse est correctement branché
You
be seriously
if theattaché
engine accidentally starts when you are near the propeller.
• Vérifiez
quecould
tout branchement
estinjured
correctement
·Before inspecting, removing, or installing the propeller, remove the spark plugcaps from the
Fuites d’échappement
plugs.
Also, l’absence
place the
in neutral, turn
the main
switch to "OFF" (Off) and
Démarrez lespark
moteur
et contrôlez
deshift
fuitescontrol
de gaz d’échappement
au cylindre,
à l’embranchement
remove
key; and
remove the lanyard from the engine stop switch.
d’échappement
ou authe
couvercle
de l’échappement.
·Do not use your hand to hold the propeller when loosening or tightening the propeller nut. Put a
Fuites d’eau
wood
block
between
the anti-cavitation
plate
and theaupropeller
the propeller
from
Démarrez le
moteur
et contrôlez
l’absence
de fuites d’eau entre
la culasse,
cylindre etto
à laprevent
embranchement
de
turning.
l’échappement.
Fuite d’huile moteur
• Contrôlez le moteur entier pour fuites d’huile
• Contrôle de l’hélice
AVERTISSEMENT
Vous risquez des blessures graves quand le moteur démarre involontairement ou vous vous trouvez près de l’hélice.
• Avant contrôle, inspection, montage et démontage de l’hélice, enlevez le capuchon de la bougie. Placez la commande
de sélection en position neutre, éteignez l’interrupteur de contact (‘OFF’), enlevez la clé de contact et débranchez la
corde de sécurité de l’interrupteur d’urgence.
• Ne jamais tenir l’hélice par votre main quand vous serrez ou relâchez le verrouillage de l’hélice. Placez un bout de
bois entre la plaque anti cavitation et l’hélice pour bloquer l’hélice.
35
Points de contrôle
• Inspectez chaque pale d’hélice pour usure ou érosion à cause de cavitation ou d›autres dédommagements.
• Contrôlez des dommages éventuels à l›axe d›hélice et les goupilles.
• Contrôlez des dommages éventuels au goupille fendue.
• Contrôlez la présence éventuelle de lignes de pêche, enroulées autour l›axe de l›hélice.
F2-5
• Contrôlez l›étanchéité du joint de l›axe de l›hélice.
Tuesday, January 15, 2002 3:19:54 PM
36
Entretien
·Check the propeller shaft oil seal for damage.
Removing the propeller
Maintenance
Spline
models
Démontage de l’hélice
propeller.
1. Straighten
the
split
pin andnut
pull
it out
using a pair of pliers.
Version
avec
rainure
de
goupille
2.
Remove
the
propeller
and
washer.
from the
Off) and
2. Remove the propeller nut and washer.
1. Redressez la goupille fendue et enlevez-la avec une pince.
2. Enlevez la fixation de l’hélice et la rondelle de base.
er nut. Put a
ller from
1
1.
2.
3.
4.
5.
Goupille fendue
Fixation hélice
Rondelle de base
Hélice
Rondelle intercalaire
1 . Cotter pin
2.Propeller nut
3.Washer
4.propeller
5.Thrust washer2
3
4
5
13.. Cotter
pinthe propeller and thrust holder.
Remove
2.Propeller
3. Enlevez l’hélice et la rondelle intercalaire
de l’axenut
d’hélice.
Installing the Propeller
Montage de l’hélice
AVERTISSEMENT
3.Washer
Spline models
4.propeller
5.Thrust washer
·Be sure to install the thrust holder before installing the propeller, otherwise the
3. Remove the propeller and thrust holder.
• Assurez-vous de placer la rondelle intercalaire
avant
montage
pour éviter des dégâts à l’queue et le boîtier
propeller
boss
coulddebel’hélice
damaged.
Installing
the
Propeller
·Be
sure to use a new cotter pin and bend the ends over securely. Otherwise the p
de l’hélice.
Spline
models
offrepliez
during
operationpour
andéviter
be lost.
• Montez toujours une goupille fendue come
neuve et
les extrémités
le relâchement et la perte de
l’hélice.
Apply
corrosion
resistant
grease
to the
propeller
·Be1.sure
to install
the thrust
holder
before
installing
theshaft.
propeller, otherwise the low
2. Install the thrust holder, and propeller on the propeller shaft.
1. Graissez l’axe de l’hélice par la graisse
résistant
à l’eau
et anticorrosion.
propeller
boss
could
be damaged.
Install
theawasher.
Tighten
thebend
propeller
nut over
until securely.
there is noOtherwise
forward-and-back
·Be3.
sure
to
use
new
cotter
pin and
the ends
the prop
2. Placez d’abord la pièce de calage,
ensuite
l’hélice
sur
l’axe.
movement.
come
off during
operation
and
3. Placez la rondelle de base. Serrez
la fixation
de l’hélice
au point de
nebe
pluslost.
sentir du jeu entre l’hélice et l’axe,
4. Align the propeller nut with the propeller shaft hole. Insert a new cotter pin in
même en bougeant l’hélice sur l’axe.
bend
the cotter
pin ends.
1.
Apply
corrosion
4. Serrez la fixation de l’hélice sur l’axe jusqu’au
point oùresistant
les trous grease to the propeller shaft.
2. Install the thrust holder, and propeller on the propeller shaft.
de la fixation et l’axe correspondent. Placez une goupille fendue
3. Install the washer. Tighten the propeller nut until there is no forward-and-backwar
neuve dans le trou et repliez les bouts.
movement.
4. Align the propeller nut with the propeller shaft hole. Insert a new cotter pin in the h
36
REMARQUE
NOTE:
Vidange huile queue
Changing gear oil
propeller
nut does
therelâchez
propeller
shaft un
hole
Quand, après verrouillage, la fixation If
de the
l’hélice
ne correspond
pas not
avecalign
le trouwith
de l’axe,
la fixation
peuafter
pour tightening it,
until it aligns with the hole.
l’aligner.
AVERTISSEMENT
• * Assurez-vous que le moteur hors-bord
bien
ancré
sur l’arcasse
ou un
soutien solide.
·Beest
sure
the
outboard
motor
is securely
fastened to the transom or a stable stand
• * Ne vous mettez jamais au-dessous du moteur hors-bord quand il est en position inclinée, même si la cheville de
severely injured if the outboard motor falls on you.
blocage d’inclinaison est engagée. ·Never
La chute éventuelle
du the
moteur
peutunit
provoquer
graves.when the tilt support leve
get under
lower
whiledes
it isblessures
tilted, even
locked. Severe injury could occur i1' the outboard motor accidentally tails.
37
37
Entretien
Maintenance
Maintenance
1.
1.
2.
2.
3.
3.
Basculez
hors-bord
afin que
le bouchon
vidange
se trouve
au
point
plus
bas.lowest
Tilt
1. Tilt
theleoutboard
the
outboard
motor
motor
so
that
so that
the de
gear
the
gear
oil drain
oil
drain
screw
screw
is atle
isthe
at lowest
the
pointpoint
possible.
possible.
Placez
un
récipient
avec
suffisamment
dethe
capacité
au-dessous
Place
2. Place
a suitable
a suitable
container
container
under
under
gear
the gear
case.case. de la queue.
Remove
3. Remove
gear
the gear
oilvidange.
drain
oil drain
screw.
screw.
Dévissez
le the
bouchon
de
1
1.Gear
1.Gear
oil de
drain
oil
drain
screw
screw
1.
Bouchon
remplissage
d’huile queue
2.Oil
2.Oil
levelde
level
plug
plug
2.
Bouchon
niveau
d’huile
2
1
2
NOTE:
NOTE:
REMARQUE
Always
Always
use new
use new
gaskets.
gaskets.
DonDon
not reuse
not reuse
the remove
the remove
gaskets.
gaskets.
Renouvelez toujours les joints des bouchons de remplissage et vidange.
4. Remove
4. Remove
the oil
thelevel
oil level
plugplug
to allow
to allow
the oil
thetooildrain
to drain
completely.
completely.
4. Enlevez le bouchon et laissez couler le reste de l’huile dans le récipient.
ATTENTION
Inspect
Inspect
the used
thedeused
oil after
oil
after
itde
has
it queue.
been
has been
drained.
drained.
If oil
theis
oil
milky,
is milky,
is getting
into
the
the
gear
case
case
Vérifiez
la qualité
l’huile
usée
la
Si elle
est If
de the
couleur
laiteuse,
dewater
l’eauwater
yis
estgetting
entrée,
ce
quiinto
peutgear
causer
des
which
which
can cause
can cause
geargear
damage.
damage.
Consult
Consult
a yours
a yours
dealer
for repair
for
of the
oflalower
the
lower
unit unit
seals.
seals.
dégâts
mécaniques.
Consultez
votre
concessionnaire
pour
faire dealer
contrôler
lesrepair
joints
de
queue.
5.With
5.With
the outboard
the
outboard
motor
motor
in a in
vertical
vertical
position,
position,
andremplissage
and
using
using
a flexible
a flexible
or pressurized
or pressurized
filling
filling
5.
Servez-vous
d’un
entonnoir
flexible
ouad’une
installation
de
d’huile
pour
rajouter
de l’huile
fraîche
dans
device,
device,
inject
inject
the gear
the gear
oil into
oil into
the gear
the gear
oil drain
oil drain
screw
screw
hole.hole.
l’orifice
de
remplissage.
Huile queue recommandée
Hypoïde SAE90
Quantité d’huile: 195 cc
6. Au
When
6.moment
When
the où
oil
thel’huile
begins
oil begins
to flow
to flow
out of
out
of oil
thede
level
oil
level
plug
hole,
hole,
insert
insert
and
and
tighten
tighten
the oil
the
oil level
plug.plug.
6.
fraîche
commence
àthe
couler
l’orifice
duplug
niveau
d’huile,
vissez
et verrouillez
le level
bouchon.
7. Serrez
Insert
7. Insert
and
tighten
tighten
the gear
the gear
oil drain
oil drain
screw.
screw.
7.
leand
bouchon.
Inspecting
Inspecting
andand
replacing
replacing
anode(s)
anode(s)
HIDEA
HIDEA
outboard
outboard
motors
motors
are protected
are protected
fromfrom
corrosion
corrosion
by sacrificial
by sacrificial
anodes.
anodes.
Inspect
Inspect
the external
the external
anodes
anodes
periodically.
periodically.
Remove
Remove
scales
scales
from
from
the
surfaces
the
surfaces
of
the
of
anodes.
the
anodes.
Votre moteur hors-bord est protégé contre la corrosion par des anodes. Contrôlez-les régulièrement et enlevez des
Contrôle et remplacement des anodes
écailles et irrégularités.
Do not
Do paint
not paint
anodes,
anodes,
as this
as this
would
would
render
render
themthem
ineffective.
ineffective.
AVERTISSEMENT
Ne
jamais
utiliser
la peinture.
Les anodes perdront leur fonctionnement.
Coating
Coating
thede
the
boat
boat
bottom
bottom
A clean
A clean
hull hull
improves
improves
boatboat
performance.
performance.
The The
boatboat
bottom
bottom
should
should
be kept
be kept
as clean
as clean
of marine
of marine
Coating
de
laascoque
growth
growth
as possible.
possible.
If necessary,
If necessary,
the boat
the boat
bottom
bottom
can be
cancoated
be coated
withwith
an anti-fouling
an anti-fouling
paintpaint
Une
coque
propre
et lisse
augmente
performances
de
votre bateau. Gardez la partie sous-marine de la coque aussi
approved
approved
for your
for
your
area
area
to inhibit
to les
inhibit
marine
marine
growth.
growth.
propre
que
possible
et enlevezpaint
les organismes.
Utilisez
un
coating
antifouling
pour
empêcher
la création
croûtes.
Do not
Do
use
not
anti-fouling
use anti-fouling
paint
which
which
includes
includes
copper
copper
or
graphite.
or graphite.
These
These
paints
paints
can cause
candecause
moremore
Evitez
les
produits
antifouling
contenant du cuivre ou graphite; ceux-ci accélèrent la corrosion du moteur hors-bord.
rapidrapid
engine
engine
corrosion.
corrosion.
38 38
38
Résoudre des problèmes
Dépister des pannes
Un problème dans le système de carburation, allumage ou combustion peut causer un démarrage difficile, perte de
puissance ou d’autres problèmes. Ci-dessous vous trouverez les contrôles de base et solutions possibles en cas de
problèmes.
Le démarreur ne fonctionne pas
Q: Pièces défectueuses à repérer?
R: Contactez votre concessionnaire
Q: Commande de sélection en position neutre?
R: Engagez en position neutre
Le démarreur fonctionne, moteur ne démarre pas
Q: Panne sèche?
R: Rajoutez de l’essence
Q: Carburant pollué ou vieux?
R: Remplacez par essence fraîche
Q: Filtre à essence bouché?
R: Remplacez ou nettoyez le filtre
Q: Vous suivez la bonne procédure de démarrage?
R: Vérifiez à la page 17
Q: La pompe à carburant pose des problèmes?
R: Contactez votre concessionnaire
Q: La bougie est-elle propre et appropriée?
R: Contrôlez la bougie, nettoyez ou remplacez par un exemplaire correct
Q: L’écart de l’électrode est-il correct?
R: Vérifiez l’écart et ajustez si nécessaire
Q: Les câbles de l’allumage sont-ils abîmés ou en mauvais état de connexion?
R: Contrôlez usure et coupures des câbles. Contrôlez les branchements électriques, remplacez les câbles cassés ou usés
Q: Le composant d›allumage est en panne?
R: Consultez votre concessionnaire
Q: La corde de sûreté et son agrafe de contacteur d›arrêt d›urgence sont bien fixées?
R: Rattachez le verrouillage et la corde
Q: Il est question de dégâts mécaniques internes?
R: Contactez votre concessionnaire
39
Résoudre des problèmes
Le moteur tourne irrégulièrement et s’arrête parfois
Q: La bougie est-elle mouillée ou d’un faux type?
R: Contrôlez la bougie, nettoyez ou remplacez par le type approprié
Q: Le système de carburation est bouché ou bloqué?
R: Contrôlez si les conduites ne sont pas pliés ou coincés
Q: Le carburant est d’une date inconnue?
R: Rafraîchissez par carburant neuf
Q: Le filtre à essence est bouché?
R: Nettoyez ou remplacez le filtre
Q: Le système d’allumage est hors service?
R: Contactez votre concessionnaire
Q: Le témoin d’alerte s’est allumé?
R: Contrôlez l’origine du défaut
Q: L’écart de l’électrode de la bougie est-elle correcte?
R: Contrôlez et ajustez, si nécessaire
Q: Les câbles de l’allumage sont-ils abîmés ou en mauvais état de connexion?
R: Contrôlez usure et coupures du câblage. Contrôlez les branchements électriques
Q: Le moteur tourne sur une huile non recommandée?
R: Remplacez l’huile par une huile avec une classification appropriée
Q: Le thermostat est bouché ou ne fonctionne pas proprement?
R: Contactez votre concessionnaire
Q: La pompe à essence a des dommages?
R: Contactez votre concessionnaire
Q: La vis de mise à l’air sur le bouchon de remplissage d’essence est fermée?
R: Tournez-la en position ouverte.
Q: La tirette de starter est engagée?
R: Repositionne-la en position neutre.
Q: Le moteur est placé sur un niveau trop élevé?
R: Replacez le moteur dans la position correcte
Q: Le carburateur est bouché?
R: Consultez votre concessionnaire
Q: La conduite de carburant est mal connecté?
R: Replacez la conduite en position correcte
Q: La soupape à gaz est-elle bien ajustée?
R: Consultez votre concessionnaire
40
Résoudre des problèmes
Q: Le câble de la batterie est débranché?
R: Connectez le câble correctement
Avertisseurs lumineux
Q: Le niveau d’huile est trop bas?
R: Rajoutez de l’huile recommandée
Q: Le moteur tourne sur une huile non recommandée?
R: Remplacez l’huile par une huile avec une classification appropriée
Q: L’huile moteur est sale ou d’une date inconnue?
R: Faites la vidange
Q: Le filtre à huile est bouché?
R: Contactez votre concessionnaire
Q: La pompe à huile fonctionne correctement?
R: Contactez votre concessionnaire
Perte de puissance
Q: L’hélice est-elle endommagée?
R: Réparez ou remplacez l’hélice
Q: Le pas et diamètre de l’hélice sont-ils corrects?
R: Installez une hélice aux dimensions appropriées
Q: L’angle d’arcasse est bien défini?
R: Réglez l’angle pour de meilleures performances
Q: Le moteur est fixé à la hauteur correcte de l’arcasse?
R: Positionnez le moteur à une hauteur correcte
Q: Le système d’avertissement ou d’urgence est-il activé?
R: Cherchez la cause de l’avertissement
Q: La partie sous-marine de la coque est-elle croûtée?
R: Nettoyez la coque
Q: La bougie est mouillée ou d’une spécification incorrecte?
R: Nettoyez la bougie ou remplacez-la par une bougie d’une classification correcte
Q: L’axe de l’hélice est-il obstrué par algues ou autres obstructions?
R: Enlevez algues et les autres matériaux
Q: Le système de carburant est bloqué?
R: Inspectez des conduites coincés ou pliés
Q: Le filtre à essence est bouché?
R: Nettoyez ou remplacez le filtre
41
Résoudre des problèmes
Q: Le carburant est daté?
R: Remplissez le réservoir par carburant frais
Q: L’écart de l’électrode est-il correct?
R: Vérifiez l’écart et ajustez si nécessaire
Q: Les câbles de l’allumage sont-ils abîmés ou en mauvais état de connexion?
R: Contrôlez usure et coupures des câbles. Contrôlez les branchements électriques
Q: L›essence est de classification correcte?
R: Remplissez le réservoir avec de l›essence appropriée
Q: Le moteur tourne sur une huile non recommandée?
R: Remplacez l›huile par une huile avec une classification appropriée
Q: Le thermostat est bouché ou ne fonctionne pas proprement?
R: Contactez votre concessionnaire
Q: La pompe à essence est-elle abîmée?
R: Contactez votre concessionnaire
Q: La vis de mise à l›air sur le bouchon de remplissage d›essence est fermée?
R: Tournez-la en position ouverte
Q: La conduite d›essence est mal installé?
R: Placez la conduite correctement
Q: La bougie est d›une spécification correcte?
R: Remplacez par une bougie correcte
Q: Le moteur ne réagit pas correctement en changeant de sélection?
R: Contactez votre concessionnaire
Vibrations excessives du moteur
Q: L’hélice est-elle endommagée?
R: Réparez ou remplacez l’hélice
Q: L’arbre de l’hélice est endommagé?
R: Contactez votre concessionnaire
Q: L’axe de l’hélice est-il entouré d’algues ou autres obstructions?
R: Enlevez algues et les autres matériaux
Q: Les vis et boulons de l’attache moteur sont-ils tous bien fixés?
R: Serrez les vis et boulons
Q: Le système de direction est endommagé ou a un jeu trop important?
R: Contactez votre concessionnaire
42
Q. Is steering pivot loose or damaged?
A. Tighten or have serviced by our dealer.
Résoudre des problèmes
Temporary action in emergency
Dégâts collision
Impact damage
AVERTISSEMENT
Le moteur hors-bord peut être bien endommagé en cas de collision ou pendant son transport. Suite aux dommages et
The outboard motor can be seriously damaged by a collision while operating or trailering.
dégâts, le moteur hors-bord peut être dangereux pendant l’usage.
Damage could make the outboard motor unsafe to operate.
Quand le moteur se heurte à un objet sous-marin, suivez la procédure suivante:
If the outboard motor hits an object in the water, follow the procedure below.
1. Stop the engine immediately.
1. Arrêtez immédiatement le moteur.
2. Inspect the control system and all components for damage. Also inspect the boat for damage.
2. Vérifiez tous les composants et pièces pour constater des dommages éventuels.
3. Whether damage is found or not, return to the nearest harbor slowly and carefully.
3. 4.
En cas
de dégâts
constatés
ou non:
naviguez
dansmotor
tous le before
cas immédiatement
le plus proche.
Have
our dealer
inspect
the
outboard
operatingau
it port
again.
4.Faites contrôler le moteur hors-bord par votre concessionnaire avant de remettre en service.
43
F2-5
Tuesday, January 15, 2002 3:19:56 PM
43
Trouble Recovery
Starter will not operate
Résoudre des problèmes
If the starter mechanism does not operate (the engine cannot be cranked with the starter), the
Le mécanisme
nean
fonctionne
pas
engine candebedémarrage
started with
emer
En cas de non-fonctionnement du mécanisme de démarrage (c’est-à-dire le moteur ne peut pas être démarré avec la
·Use
this procedure
only
in être
an emergency
and onlyimprovisée
to return suivante:
to port for repairs.
poignée
de démarrage)
le hors-bord
peut
activé par la procédure
Basic
components
·When
the emergency starter rope is used to start the engine, the start-in-gear protection device
AVERTISSEMENT
does not operate. Make sure the remote control lever is in neutral. Otherwise the boat could
unexpectedly
start tod’urgence
move, which
could
result
inunanport
accident.
• N’appliquez
cette procédure
que pour
naviguer
dans
pour faire exécuter une réparation.
·Attach
engine
stop switch
lanyard
to a secure
place on
your clothing,
or your arm
• Cette
procédurethe
élimine
le blocage
de sécurité
du mécanisme
de sélection.
Assurez-vous
que la commande
de or leg
whileest
operating.
sélection
au point mort (neutre) pour éviter que le bateau navigue involontairement et cause un accident
·Do not attach the lanyard to clothing that could tear loose. Do not route the cord where it could
éventuel.
become
entangled,
it from
functioning.
• Fixez
l’agrafe de
contacteur preventing
d’arrêt d’urgence
et attachez
ensuite la cordelette de sécurité à une partie solide de
·Avoid
accidentally
pulling
vêtements,
à une
jambe ou à un
bras. the lanyard during normal operation. Loss of engine power means
the loss
most steering
control.
Also,dewithout
engine
thefacilement.
boat could
slow
• Ne fixez
pas laofcordelette
de sécurité
à une partie
vos vêtements
quipower,
se déchire
Evitez
querapidly.
la corde This
could ou
cause
and
objects
in thepour
boat
to beson
thrown
forward.
s’empêtre
restepeople
accrochée
derrière
un objet
garantir
fonctionnement.
·Besoudaine
sure nodeone
is standing
behind
you
when pulling
lhe starter
rope. Itducould
whip
• La perte
puissance
du moteur
risque
de changer
involontairement
la direction
bateau
et debehind
perdre you
and injure
someone.
contrôle.
Le freinage
soudaine et la perte de vitesse peuvent faire cambrioler les passagers et objets dans le bateau.
·An unguarded,
rotatingderrière
flywheel
loose clothing and other objects
• Assurez-vous
qu’il n’y a personne
vous is
envery
tirantdangerous.
sur la corde deKeep
démarrage.
awaypeut
when
the engine.
Use
emergency
starter rope only as instructed. Do not touch
• La corde
fairestarting
le mouvement
d’un fouet
et the
blesser
des personnes.
the flywheel
or other
parts
when
the engineGardez
is running.
Do notetinstall
the starter
• Un volant
d’entraînement
nonmoving
protégé peut
être
très dangereux.
des vêtements
autres objets
à l’écart du
mechanism
top cowling
after
the engine
is running.
moteur
pendant leor
démarrage.
Utilisez
la procédure
d’urgence
et la poignée et corde d’urgence uniquement selon la
·Do not
touch
the ignition
coil,
plug
wire, objets
sparktournants
plug cap,
otherquand
electrical
components
procédure
écrite
ci-dessous.
Ne touchez
passpark
le volant
ou autres
ou or
mobiles
le moteur
tourne.
when starting
or operating
the motor.
You could
get
an electrical
N’installez
pas le mécanisme
de démarrage
ou le capot
quand le
moteur
tourne. shock.
• Ne touchez pas la bobine de l’allumage, le câble et capuchon de bougie ou tout autre pièce ou composant électrique
Emergency
Starting
Engine
pendant
le démarrage
ou l’usage du
moteur tournant. Vous risquez un choc électrique.
1. Remove the top cowling.
Procédure de démarrage d’urgence
1. Enlevez le capot supérieur..
2. Shift outboard
to neutral
position.
2. Sélectionnez
la commande
au point mort
(position neutre).
.
43
44
3. Disconnect
linkage from rewind starter assembly.
Résoudre
des problèmes
3. Disconnect linkage from rewind starter assembly.
Trouble Recovery
Trouble Recovery
Trouble Recovery
3. Désaccouplez
la connexion
active
le mécanisme
recul de la corde.
3. Disconnect
linkagequifrom
rewind
starterdeassembly.
4. Remove three bolts and rewind starter assembly.
4. Remove three bolts and rewind starter assembly.
4. Dévissez
trois boulons
enlevez
mécanisme
de recul
de la corde.
4. Remove
three et
bolts
andlerewind
starter
assembly.
5. Placez le nœud de la corde de démarrage dans la rainure de la poulie en enroulez la corde dans le sens des aiguilles
5. Place the starter rope knot into the starter cup notch and wind the rope clockwise around the
d’horloge autour de la poulie.
5. Place the starter rope knot into the starter cup notch and wind the rope clockwise around the
cup.
6. Tirez discrètement sur la corde jusqu’à sentir une résistance.
6.
thethe
rope
slowly
until
resistance
is felt.cup notch and wind the rope clockwise around the
cup.
5.Pull
Place
starter
rope
knot
into themoteur.
starter
7. Tirez
à coup
sur
laslowly
corde
pour
démarrer
Répétez
nécessaire.
7.
a sec
strong
pull
straight
out tolecrank
and
start sithe
engine. Repeat it necessary.
6. Give
Pull
the
rope
until
resistance
is felt.
cup.
7. Give a strong pull straight out to crank and start the engine. Repeat it necessary.
6. Pull the rope slowly until resistance is felt.
7. Give a strong pull straight out to crank and start the engine. Repeat it necessary.
45
44
44
44
Résoudre des problèmes
Dégâts à cause de l’eau
Lorsque le moteur a involontairement submergé dans l’eau, il doit immédiatement être traité et soigné par votre
concessionnaire pour réduire ou empêcher une invasion de corrosion quasi-immédiate. Quand vous êtes dans
l’impossibilité d’amener le moteur directement chez votre concessionnaire, suivez la procédure ci-dessous pour limiter
tant bien que mal des dégâts.
Procédure
1. Nettoyez profondément le moteur avec de l’eau douce et propre et enlevez de la boue, du sable, des algues et
autres inconvénients.
2. Enlevez la bougie et laisse couler l’eau dans le cylindre par l’orifice de bougie.
3. Vidangez l’essence du carburateur, des conduites et du filtre de carburant. Vidangez l’huile moteur entièrement.
4. Rajoutez de l’huile fraîche.
Quantité d’huile moteur
0,8 litre
5. Versez de l’huile moteur dans l’orifice de bougie et dans le carburateur. Faites tourner le moteur pendant quelques
tours par la poignée manuelle de démarrage ou la corde d’urgence
6. Amenez le moteur au plus vite à votre concessionnaire.
ATTENTION
N’essayez pas de redémarrer avant que moteur a été révisé par votre concessionnaire.
46
Tel: +31 (0)347-349 749 WWW.NIMARINE.EU
99920-NMARI-OFR3
im p o rtat e u r :