1
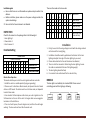
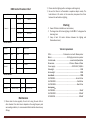
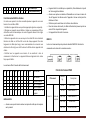
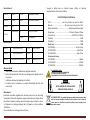
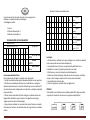
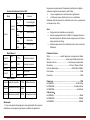
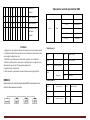
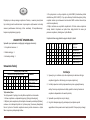
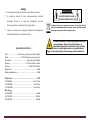
GB FAT BEAM LASER SHOW SYSTEM SYSTEME LASER « LASTUBE » SISTEM LASER « LASTUBE » LASERY TUBOWE LASTUBE80G/LASTUBE200R/LASTUBE300B INSTRUCTION MANUAL MANUEL D’INSTRUCTION MANUAL DE UTILIZARE INSTRUKCJA OBSŁUGI ©Copyright Lotronic LASTUBE80G / LASTUBE200R / LASTUBE300B Thanks for your purchasing, please read this manual carefully before operating the system. It gives you general information for your safe and better operation. Safety Recommendations Before any installation and repair, please do cut off the power supply. For safety reasons, install the unit firmly to avoid injury and damage. Do not cover the unit. The product should be installed by professional technician. Do not touch the unit with wet hands or pull the power wire forcefully. The system should be kept dry .Please don’t use the system in the condition of rain, wet or dust. For indoor use only. Do not turn on or off the system frequently, and avoid keeping it working for a long time. Fixed Installation prevents the system from strong shaking or striking. Prevent objects to get into the system, or there will be malfunction. Leave at least 1m distance between the unit and other objects. Please don’t connect the power supply or turn on the system before installation. Before switching on power, please make sure the power wire is in good condition. Where the MAINS plug or an appliance coupler is used as the disconnect device, the disconnect device shall remain readily operable. When transport the system again, please use the original package to avoid shaking. Statement The user should comply with the instructions and warnings above. Any damage, which is caused by incorrect operation or not following the manual, is not covered by the warranty. LASTUBE80G / LASTUBE200R / LASTUBE300B Page 1 Installation guide Be sure that there are no inflammable or explosive objects within 1.5m distance. Before installation, please make sure the power voltage matches the system rated voltage. Be sure that the fan and exhaust is not blocked. INSPECTION Check for the contents in the package refer to the following list: 1. Laser lighting: 1 2. Power cable: 1 3. User’s manual: 1 Function Setting 0=OFF 1=ON DIPSWITCH CHART #1 #2 #3 #4 #5 #6 #7 #8 #9 0 0 0 0 0 0 0 0 0 0 0 0 0 0 0 0 0 1 0 0 0 0 0 0 0 0 0 FUNCTION #10 1 SOUND ACTIVE 1 AUTO MODE 0 DMX (slave mode) Master-Slave Operation This mode will allow you to link the units together without controller. 1. Install the units in a suitable position (laying or appending). 2. Choose a unit to function as Master mode, set dipswitch to select Sound Active or AUTO mode. The others must be set to Slave mode, set dipswitch to select Slave mode. 3. Use standard XLR microphone cable chain your units together via the XLR connector on the rear of the units. For longer cable runs we suggest a terminator at the last fixture. 4. Turn on all units' power, the units begins reset, and then the unit begins working. The slave units will react like the master unit. ©Copyright Lotronic LASTUBE80G / LASTUBE200R / LASTUBE300B There are five modes in the slave units: # 1 0 1 0 1 1 # 2 0 0 1 1 1 # 3 0 0 0 0 1 # 4 0 0 0 0 0 # 5 0 0 0 0 0 # 6 0 0 0 0 0 # 7 0 0 0 0 0 # 8 0 0 0 0 0 # 9 0 0 0 0 0 #10 Slave effect 0 0 0 0 0 Flow master Same as master Y-axis contrary X-axis contrary Both X-axis and Y-axis contrary Installation 1、Firstly, be sure that the using voltage is match with the voltage marked on the base of the laser lighting; 2、Installation should be made by professional technician. Fix the laser lighting and adjust the angle of the laser lighting to you need; 3、Please check whether the fan and the exhaust are blocked; 4、There is a hole for connection. When hang the laser lighting, be sure the cable can undertake 10 times of the lighting weight; 5、The laser lighting should be fixed; 6、It is essential to be earthed well for the sake of safety. DMX512 This laser light is controlled by the standard DMX. Please connect controlling panel with the lighting as following LASTUBE80G / LASTUBE200R / LASTUBE300B Page 2 DMX Control Parameter Chart Channel No Channel 1 DMX512 fig. Control mode Content 0--49 Laser off 50--99 Manual mode 1 100--149 Manual mode 2 150--199 Auto mode 200--255 Sound active Manual mode 1 Channel 2 X axis 0~255 Manual move Channel 3 Y axis 0-255 Manual move 0 No strobe 1-255 strobe Channel 4 No special Channel 5 strobe Manual Mode 2 Channel 2 Pattern selection 0~255 Channel 3 Motor speed 0-255 Channel 4 Patterns moving 0-255 Patterns different From fast to slow Maintenance ☆ Please clean the lighting surface and engine outlet regularly. ☆ Be sure that there is no flammable or explosive subject nearby. The least distance is 0.5 meters. at the same time, keep more than 15cm between the wall and laser lighting; Warning Power off before installation or maintenance; The danger class of this laser lighting is CLASS Ⅲ B. It’s dangerous for observing laser. Keep at least 0.5 meters distance between the lighting and flammable material; Technical parameters Effect: ................................... fat beam laser net with 18mm pointer Motor: .............................................. N1.8 high precision step motor Control mode: .......................................... sound control/auto/dmx Dimensions: ........................................... 215mm x 70mm x 147mm Power supply: .............................................. AC100-240V, 50/60Hz Net weight: ........................................................................... 1.5KG Gross weight: ......................................................................... 2.0KG Laser diode: .......................................................................... DPSS LASTUBE80G ................................................................. Green 532nm LASTUBE200R....................................................................Red 650nm LASTUBE300B................................................................... Blue 450nm Laser power: LASTUBE80G ............................................................................ 80mW LASTUBE200R: ....................................................................... 200mW LATUBE300B: ......................................................................... 300mW ☆ Please clean the lens regularly. Do not do it using the wet cloth or other chemical. the clean times is depend on the using frequency and surrounding condition; it is recommended that should be cleaned every 20 days; ©Copyright Lotronic LASTUBE80G / LASTUBE200R / LASTUBE300B LASTUBE80G / LASTUBE200R / LASTUBE300B Page 3 DANGER LASER RADIATION AVOIR EYE EXPOSURE TO BEAM LASER PRODUCT CLASS 3B Electric products must not be put into household waste. Please bring them to a recycling centre. Ask your local authorities or your dealer about the way to proceed. This LASER effect is built for professional use. It must be installed by a professional in a sufficient height above the floor so that it can never hit the eye of the audience. Never create a fixed point. F Lire attentivement le manuel avant la première mise en service Vérifiez le contenu à l’ouverture de l’emballage L’emballage doit contenir les pièces suivantes : 1 Effet laser IBIZA LIGHT 1 cordon d’alimentation 1 manuel d’utilisation Consignes de Sécurité Ne pas démonter ni réparer l’appareil vous-mêmes. En cas de problème, contactez votre revendeur ou un technicien qualifié. Avant l’installation ou une réparation, débranchez l’appareil du secteur. ©Copyright Lotronic LASTUBE80G / LASTUBE200R / LASTUBE300B Pour des raisons de sécurité, l’appareil doit être installé solidement. Ne pas couvrir l’appareil. L’installation doit être faite par un technicien qualifié. Ne pas toucher l’appareil les mains mouillées, ni tirer sur le câble électrique. Tenir au sec. Ne pas utiliser sous la pluie, dans un environnement humide ou poussiéreux. Uniquement pour utilisation à l’intérieur. Ne pas mettre le système sous/hors tension à répétition. Ne pas le faire fonctionner pendant une période prolongée. Une installation fixe empêche des chocs et des vibrations fortes. Ne pas laisser d’objets ou de liquides pénétrer dans le boîtier. Laisser une distance de sécurité de 1m minimum entre l’appareil et d’autres objets. Ne pas brancher sur une source d’alimentation ni mettre sous tension avant d’avoir terminé l’installation. Avant de mettre l’appareil sous tension, assurez-vous que le fil électrique est en bon état. Dispositifs de coupure du réseau a) lorsque le cordon d'alimentation ou un coupleur d'appareil est utilisé comme dispositif de déconnexion, ce dispositif doit rester facilement accessible; b) Si un interrupteur omnipolaire est utilisé comme dispositif de déconnexion, l'emplacement sur l'appareil et la fonction de l'interrupteur doit être décrite, et le commutateur doit rester facilement accessible; L’appareil est conçu pour une utilisation dans des climats modérés. Transportez le système dans son emballage d’origine afin de minimiser les secousses. Réglage des Fonctions 0=ARRET 1=MARCHE CHARTE DES COMMUTATEURS DIP FONCTION #1 #2 #3 #4 #5 #6 #7 #8 #9 #10 0 0 0 0 0 0 0 0 0 1 ACTIVATION AUDIO LASTUBE80G / LASTUBE200R / LASTUBE300B Page 4 0 0 0 0 0 0 0 0 0 0 0 0 0 0 0 0 1 0 1 0 AUTOMATIQUE DMX (Mode esclave) Fonctionnement Maître-Esclave Ce mode vous permet de relier ensemble plusieurs appareils sans avoir besoin d’un contrôleur DMX. 1. Installez les appareils dans une position appropriée (posé ou suspendu). 2. Désignez un appareil comme Maître et réglez son commutateur DIP sur Activation audio ou Automatique. Les autres appareils doivent être réglés sur mode ESCLAVE. 3. Reliez les appareils entre eux au moyen d’un cable XLR micro standard. Branchez le câble sur la fiche XLR au dos de chaque appareil. Pour des longueurs de câbles plus longs, nous recommandons de connecter une résistance de fin de ligne sur la fiche de sortie XLR du dernier appareil de la chaîne. 4. Mettez tous les appareils sous tension. Ils se remettent à zéro et commencent à fonctionner. Les appareils Esclaves réagissent de la même façon que le Maître. o L’appareil doit être installé par un spécialiste, fixé solidement et ajusté sur le bon angle de radiation. o Assurez-vous qu’aucun matériau inflammable ne se trouve à moins de 1m de l’appareil. La distance entre l’appareil et le mur ne doit pas être inférieure à 15cm. o N’obstruez pas le ventilateur et les fentes de ventilation. o Pour des raisons de sécurité, le câble de fixation doit pouvoir porter au moins 10 fois le poids de l’appareil. o Cet appareil doit être relié à la masse. DMX512 Le laser est commandé par le protocole standard DMX512. Branchez la commande sur le laser de la manière suivante : Les esclaves offrent 5 modes de fonctionnement #1 #2 #3 #4 #5 #6 #7 #8 #9 #10 Effet esclave 0 1 0 1 1 0 0 1 1 1 0 0 0 0 1 0 0 0 0 0 0 0 0 0 0 0 0 0 0 0 0 0 0 0 0 0 0 0 0 0 0 0 0 0 0 0 0 0 0 0 Flow master Comme le maître Axe Y à l’opposé Axe X à l’opposé Axes X & Y à l’opposé Charte des Canaux DMX Canal 1 INSTALLATION o Assurez-vous que la tension secteur correspond à celle qui est marquée sur le produit. ©Copyright Lotronic LASTUBE80G / LASTUBE200R / LASTUBE300B DMX512 fig. N° du canal Mode de contrôle Description 0--49 Laser éteint 50--99 mode Manuel 1 100--149 mode Manuel 2 150--199 Mode Auto 200--255 Activation audio LASTUBE80G / LASTUBE200R / LASTUBE300B Page 5 Mode Manual 1 Essuyez le boîtier avec un torchon propre. Vérifiez et nettoyez régulièrement les fentes de ventilation. Canal 2 Axe-X 0~255 Mouvement manuel Canal 3 Y axis 0-255 Mouvement manuel 0 Pas d’effet strobo 1-255 Stroboscope Caractéristiques techniques Canal 4 N.A. Stroboscope Canal 5 Mode Manuel 2 Canal 2 Sélection du motif 0~255 Canal 3 Vitesse du moteur 0-255 Canal 4 Déplacement des motifs 0-255 Choix du motif Rapide vers lent Mises en Garde Avant toute intervention, débranchez l’appareil du secteur. Ce laser fait partie de la classe IIIB. Il est dangereux de regarder dans le rayon laser. La distance minimum de radiation est de 50cm. La distance entre la lumière et un objet inflammable doit être d’au moins 0,5m. Maintenance Entretenez ce produit régulièrement. Nettoyez le verre avec un coton-tige trempé dans l’alcool afin d’optimiser la puissance lumineuse. Ne pas utiliser de torchons humides ou autres solvants chimiques pour nettoyer le verre. La fréquence de nettoyage dépend de la fréquence et des conditions d’utilisation. Nous conseillons un nettoyage tous les 20 jours. ©Copyright Lotronic LASTUBE80G / LASTUBE200R / LASTUBE300B Effet: ..................................Laser à rayon épais avec pointeur 18mm Moteur: ...................................... Moteur à pas haute précision N1.8 Mode de contrôle: ............................... Activation audio/auto/dmx Dimensions: ........................................... 215mm x 70mm x 147mm Alimentation: ............................................... AC100-240V, 50/60Hz Poids net: .............................................................................. 1.5KG Poids brut .................................................................................. 2.0KG Diode Laser: .......................................................................... DPSS LASTUBE80G ................................................................. Green 532nm LASTUBE200R....................................................................Red 650nm LASTUBE300B................................................................... Blue 450nm Puissance du Laser: LASTUBE80G ............................................................................ 80mW LASTUBE200R: ....................................................................... 200mW LATUBE300B: ......................................................................... 300mW RAYONNEMENT LASER ! EXPOSITION AU FAISCEAU DANGEREUSE APPAREIL À LASER DE CLASSE 3B UNIQUEMENT POUR UTILISATION PAR DES PROFESSIONNELS DANGER RADIATION LASER NE PAS EXPOSER VOS YEUX AU RAYON PRODUIT LASER DE CLASSE 3B NOTE IMPORTANTE : Les produits électriques ne doivent pas être mis au rebut avec les ordures ménagères. Veuillez les faire recycler là où il existe des centres pour cela. Consultez les autorités locales ou votre revendeur sur la façon de les recycler. LASTUBE80G / LASTUBE200R / LASTUBE300B Page 6 PT Leia este manual de instruções antes de usar o equipamento Verifique o conteúdo ao abrir a embalagem A embalagem contém: 1. Laser: 1 2. Cabo de Alimentação: 1 3. Manual de Instruções: 1 1 CONFIGURAÇÕES DE FUNCIONAMENTO 0=OFF 1=ON MAPA DIPSWITCH FUNÇÃO # # # # # # # # # # 2 3 4 5 6 7 8 9 10 0 0 0 0 0 0 0 0 0 1 ACTIVAÇÃO SOM 0 0 0 0 0 0 0 0 1 1 MODO AUTO 0 0 0 0 0 0 0 0 0 0 DMX (modo slave) Funcionamento Master-Slave Este modo permite-lhe ligar as unidades sem controlador. 1. Instale as unidades numa posição adequada (deitado ou em suspenso). 2. Escolha uma unidade para funcionar em modo Master e configure o dipswitch para seleccionar o modo de Activação por som ou modo AUTO. As outras devem estar configuradas em modo Slave, configure o dipswitch para modo Slave. 3. Utilize cabo de microfone XLR para interligar as unidades através das ligações XLR localizadas na parte traseira. Para ligações mais longas, sugerimos um terminal na última ligação. 4. Ligue todas as unidades e as mesmas irão reiniciar. Depois as unidades vão começar a funcionar. As unidades slave vão reagir tal como a unidade master. ©Copyright Lotronic LASTUBE80G / LASTUBE200R / LASTUBE300B Existem 5 modos nas unidades slave: 1 # # # # # # # # # 2 3 4 5 6 7 8 9 10 0 0 0 0 0 0 0 0 0 1 0 0 0 0 0 0 0 0 0 1 0 0 0 0 0 0 0 1 1 0 0 0 0 0 0 0 1 1 1 0 0 0 0 0 0 # Efeito Slave 0 Flow master 0 Igual a master 0 Contrário a eixo Y 0 Contrário a eixo X 0 Contrário a eixo X e Y Instalação 1. Primeiramente, certifique-se de que a voltagem a ser usada é compatível com a mencionada na base desta unidade laser; 2. A instalação deve ser feita por um profissional qualificado. Fixe a unidade laser e ajuste o ângulo de projecção a seu modo; 3. Verifique se a ventoinha e aberturas estão bloqueadas; 4. Existe um orifício para ligação. Quando montar em suspenso, certifiquese que o cabo consegue suportar até 10 vezes o peso da unidade; 5. A unidade deve estar bem fixa; 6. Para sua segurança a unidade deve ter ligação terra. DMX512 Esta unidade é controlada por uma unidade padrão DMX. Ligue a unidade ao painel de controlo de acordo com as seguintes especificações LASTUBE80G / LASTUBE200R / LASTUBE300B Page 7 Controlo de Parâmetros Gráficos DMX DM Canal Conteúdo X512 fig. 0-Laser desligado 49 Modo de 50-Modo manual controlo 99 1 100Modo manual Canal 1 -149 2 150Modo Auto -199 200Activação por -255 som Modo Manual 1 Eixo X Canal 2 Canal 3 Eixo Y Canal 4 No special Canal 5 strobe 0~255 Movimento manual 0-255 Movimento manual 0 1-255 Sem strobe strobe limpeza deve ser proporcional à frequência de utilização e condições ambientais. Sugerimos uma limpeza a cada 20 dias; ☆ Limpe o equipamento e a saída do motor regularmente. ☆ Certifique-se de que a distância entre a luz e substâncias inflamáveis é de pelo menos 0,5m. A distância entre a luz e a parede deve ser de pelo menos 15cm; Aviso Desligue antes da instalação ou manutenção; A classe de perigo deste laser é CLASSE III B. É perigoso observar o laser directamente. A distância mínima de segurança é de 13cm e o tempo máximo é de 10 seg. Mantenha pelo menos 0,5 m de distância entre o laser e materiais inflamáveis; Parâmetros Técnicos Efeito: ...............................rede fat beam laser com ponteiro de 18mm Motor: ................................................ Motor step N1.8de alta precisão Modo de Controlo:................................. Controlo por som/auto/dmx Dimensões: ................................................ 215mm x 70mm x 147mm Fonte de Alimentação: ...................................... AC100-240V, 50/60Hz Peso Liquido: ..............................................................................1.5KG Peso Bruto: ..................................................................................2.0KG Modo Manual 2 Canal 2 Selecção de padrão 0~255 Padrões diferentes Canal 3 Velocidade de motor 0-255 Canal 4 Movimentos padrão 0-255 De rápido para lento Manutenção ☆ Faça a manutenção do equipamento com regularidade. Não use panos molhados ou outros químicos para limpar a unidade. A frequência de ©Copyright Lotronic LASTUBE80G / LASTUBE200R / LASTUBE300B Díodo Laser: ............................................................................. DPSS LASTUBE80G ..................................................................... Verde 532nm LASTUBE200R.............................................................. Vermelho 650nm LASTUBE300B....................................................................... Azul 450nm Potência Laser: LASTUBE80G ................................................................................ 80mW LASTUBE200R:............................................................................ 200mW LATUBE300B: .............................................................................. 300mW LASTUBE80G / LASTUBE200R / LASTUBE300B Page 8 Produtos eléctricos não deverão ser postos em contentores de lixo caseiros. Por favor, deposite-os em contentores para reciclagem. Questione as autoridades locais ou onde adquiriu o produto sobre como deverá proceder. PERIGO RADIAÇÃO LASER EVITE EXPOSIÇÃO AOS OLHOS PRODUTO LASER DE CLASSE 3B Esta unidade laser foi construída apenas para uso profissional. Deve ser instalada por um profissional numa posição suficientemente elevada para que não deva atingir os olhos dos espectadores. Nunca crie um ponto fixo. RO Multumim pentru achizitionarea dispozitivului, va rugam cititi cu atentie manualul inainte de utilizare. Va ofera informatii generale atat pentru siguranta dumneavoastra cat si pentru o functionare mai buna. INSPECTIE Verificati continutul pachetului: Setarea Functiei 0=OPRIT 1=PORNIT TABEL COMUTATOR DIP #1 #2 #3 #4 #5 #6 #7 #8 #9 #10 0 0 0 0 0 0 0 0 0 1 0 0 0 0 0 0 0 0 1 1 0 0 0 0 0 0 0 0 0 0 Functionare Master-Slave Acest mod va permite sa faceti legatura dintre unitati fara dispozitiv de control. 1. Instalati unitatile intr-o pozitie convenabila (montate sau atasate). 2. Alegeti o unitate care sa functioneze ca mod Master , setati comutatorul DIP pentru a selecta optiunea de Sunet Activ sau modul AUTO. Celelalte trebuie setate pe modul Slave, setati comutatorul DIP pentru a selecta modul Slave. 3. Folositi cablu standard XLR de microfon, legati unitatile impreuna prin intermediul conectorului XLR pe partea din spate a unitatilor. Pentru cablu mai lung sugeram o cutie terminala pentru cablu la ultimul dispozitiv de fixare. 4. Porniti toate unitatile,unitatile incep resetarea, si apoi pornesc. Unitatile auxiliare vor reactiona la fel ca unitatea principala. Exista cinci moduri ale unitatilor auxiliare: 1. Laser: 1 2. Cablu de alimentare: 1 3. Ghid de utilizare: 1 ©Copyright Lotronic LASTUBE80G / LASTUBE200R / LASTUBE300B # 1 # 2 # 3 # 4 # 5 # 6 # 7 # 8 # 9 #10 Efect auxiliar 0 0 0 0 0 0 0 0 0 0 Flux principal LASTUBE80G / LASTUBE200R / LASTUBE300B Page 9 1 0 0 0 0 0 0 0 0 0 Identic cu master Tabel pentru controlul parametrilor DMX Nr. Canal 0 1 0 0 0 0 0 0 0 0 DMX512 fig. Axa-Y inversa 1 1 0 0 0 0 0 0 0 0 Axa-X inversa 1 1 1 0 0 0 0 0 0 0 Atat axa- X cat si axa Ysunt inverse Instalare 1. Asigurati-va ca tensiunea utilizata corespunde cu cea inscrisa pe aparat; 2. Instalarea trebuie efectuata de catre un profesionist. Fixati lumina laserului si reglati unghiul laser-ului; 3. Verificati ca ventilatorul sau orificiul de evacuare sa nu fie blocat; 4. Exista un orificiu pentru conexiune. Cand fixati laser-ul, asigurati-va ca, cablul poate suporta de 10 ori greutatea aparatului ; 5. Aparatul laser trebuie fixat; 6. Este esentiala o pamantare corespunzatoare pentru siguranta dvs. Mod Canal 1 DMX512 0--49 Laser oprit 50--99 Mod Manual 1 100--149 Mod Manual 2 150--199 Mod Auto 200--255 Sunet activ Mod Manual 1 Canal 2 Axa X 0~255 Mutare manuala Canal 3 Axa Y 0-255 Mutare manuala Canal 4 Fara efecte speciale 0 Fara stroboscop 1-255 Stroboscop Canal 5 Stroboscop Mod Manual 2 Aparatul laser este controlat de standardul DMX. Conectati panoul de control la laser dupa cum urmeaza: ©Copyright Lotronic Descriere LASTUBE80G / LASTUBE200R / LASTUBE300B Canal 2 Selectare model 0~255 Canal 3 Viteza motor 0-255 Canal 4 Deplasare modele 0-255 Modele diferite De la viteza mare la viteza mica LASTUBE80G / LASTUBE200R / LASTUBE300B Page 10 LASTUBE200R:........................................................................ 200mW LATUBE300B: .......................................................................... 300mW Intretinere Curatati lentilele in mod regulat. Nu folositi o bucata de material umed sau alti produsi chimici. Frecventa curatarii depinde de frecventa folosirii aparatului si de conditiile ambiante; se recomanda curatarea aparatului la fiecare 20 de zile; Curatati suprafata laser-ului si orificiul de evacuare in mod regulat. Asigurati-va ca nu exista obiecte inflamabile sau explozivi in apropiere. Distanta cea mai mica fata de obstacole este de 0.5 m. In acelasi timp, pastrati minim 15cm intre perete si laser. Avertisment Opriti alimentarea aparatului inainte de instalare sau efectuarea intretinerii; Clasa aparatului laser este CLASA 3 B. Distanta minima de siguranta este de 13cm, durata maxima de observare este de 10 sec.; Pastrati cel putin 0.5 m distanta intre laser si materialele inflamabile Produsele electrice nu trebuie reciclate impreuna cu gunoiul menajer. Va rugam sa le transportati la un centru de reciclare. Adresati-va autoritatilor locale sau furnizorului local despre procedura. DANGER LASER RADIATION AVOIR EYE EXPOSURE TO BEAM LASER PRODUCT CLASS 3B Acest efect LASER este conceput pentru uz profesional. Acesta trebuie sa fie instalat de catre un profesionist la o inaltime suficienta deasupra podelei, astfel incat acesta sa nu poata lovi publicul. Niciodata nu creati un punct fix. Parametrii tehnici Efect: .................................................... raza laser cu indicator 18mm Motor: ............................ Motor pas cu pas (8pasi) de inalta precizie Mod de control: ............................. controlat prin sunet/auto/dmx Dimensiuni: ........................................... 215mm x 70mm x 147mm Alimentare:....................................................AC100-240V, 50/60Hz Greutate neta: ....................................................................... 1.5KG Greutate bruta: ...................................................................... 2.0KG Dioda laser: ........................................................................... DPSS LASTUBE80G ................................................................. Verde 532nm LASTUBE200R .................................................................. Rosu 650nm LASTUBE300B ............................................................ Albastru 450nm Putere laser: LASTUBE80G ............................................................................ 80mW ©Copyright Lotronic LASTUBE80G / LASTUBE200R / LASTUBE300B LASTUBE80G / LASTUBE200R / LASTUBE300B Page 11 PL Dziękujemy za zakup naszego urządzenia. Prosimy o uważne przeczytanie tej instrukcji przed uruchomieniem i rozpoczęciem użytkowania. Instrukcja zawiera podstawowe informacje, które umożliwią Ci bezproblemową i bezpieczną eksploatację sprzętu. ZAWARTOŚD OPAKOWANIA Sprawdź czy w opakowaniu znajdują się następujące elementy: 1. Urządzenie laserowe: 1 2. Kabel zasilający: 1 3. Instrukcja obsługi: 1 3. Do połączenia ze sobą urządzeo użyj kabli DMX (standardowy kabel mikrofonowy XLR M-XLR F). Przy użyciu dłuższych kabli lub większej liczby urządzeo zaleca się zastosowanie terminatora DMX na koocu łaocucha (w ostatnim urządzeniu). 4. Włącz zasilanie we wszystkich urządzeniach. Po fazie resetu urządzenia zaczną działad. Urządzenia w trybie Slave będą działad tak samo jak pierwsze urządzenie, działające w trybie Master. Urządzenia Slave mogą działad w pięciu różnych trybach: # 1 0 1 0 1 1 # 2 0 0 1 1 1 # 3 0 0 0 0 1 # 4 0 0 0 0 0 # 5 0 0 0 0 0 # 6 0 0 0 0 0 # 7 0 0 0 0 0 # 8 0 0 0 0 0 # 9 0 0 0 0 0 #10 0 0 0 0 0 Specyfika działania Flow Master Taki jak Master Odwrotnie/oś Y Odwrotnie/oś X Odwrotnie (XY) Ustawienia funkcji 0=Wył. (OFF) 1=Wł. (ON) Ustawienia mikroprzełączników #1 #2 #3 #4 #5 #6 #7 #8 #9 #10 0 0 0 0 0 0 0 0 0 1 0 0 0 0 0 0 0 0 1 1 0 0 0 0 0 0 0 0 0 0 FUNKCJA TRYB MUZYCZNY TRYB AUTO DMX (slave) Tryb master/slave Ten tryb pozwoli Ci połączyd ze sobą kilka urządzeo bez sterownika. 1. Ustaw urządzenia w odpowiedniej pozycji (leżącej lub wiszącej). 2. Wybierz jedno urządzenie, które będzie sterowało pozostałymi (Master), ustaw w nim mikroprzełączniki na tryb muzyczny (sterowany dźwiękiem) lub na tryb auto. Pozostałe urządzenia muszą zostad ustawione w trybie Slave za pomocą mikroprzełączników. ©Copyright Lotronic LASTUBE80G / LASTUBE200R / LASTUBE300B Instalacja 1、Upewnij się, że zasilanie użyte do urządzenia jest właściwe dla tego urządzenia (zgodne z informacją na samym urządzeniu); 2、Instalacja powinna zostad przeprowadzona przez wyspecjalizowaną osobę. Zamocuj urządzenie w stabilny sposób I ustaw kąt świecenia urządzenia odpowiednio do swoich potrzeb; 3、Sprawdź czy wentylator nie jest zakryty; 4、Użyj linki zabezpieczającej by zabezpieczyd urządzenie przed wypadkiem. Linka powinna mied wytrzymałośd 10 razy wyższą od wagi LASTUBE80G / LASTUBE200R / LASTUBE300B Page 12 Tryb manualny 1 urządzenia; 5、Urządzenie powinno byd zamocowane; Kanał 2 Oś X 0~255 Ruch manualny Kanał 3 Oś Y 0-255 Ruch manualny 0 Brak stroboskopu 1-255 Stroboskop 6、Należy koniecznie I bezwzględnie używad instalacji z uziemieniem – ze względów bezpieczeostwa. Kanał 4 Sterowanie DMX512 Nd. Kanał 5 stroboskop To urządzenie laserowe posiada sterowanie DMX. Urządzenia należy podłączyd do sterownika (konsoli DMX) szeregowo, jedno za drugim, zgodnie z poniższym schematem. Tryb manualny 2 Kanał 2 Wybór wzoru 0~255 Kanał 3 Prędkośd silnika 0-255 Kanał 4 Ruch wzorów 0-255 Kanał 1 Tryb sterowania Wartośd dla DMX512 Od szybkiego do wolnego Obsługa i użytkowanie Parametry sterowania DMX Numer kanału Różne wzory ☆ Obiektyw należy czyścid regularnie. Do czyszczenia nie należy używad Wynik mokrej tkaniny ani środków chemicznych. Częstotliwośd czyszczenia 0--49 Laser wyłączony jest zależna między innymi od częstotliwości używania i warunków 50--99 Tryb manualny 1 otoczenia. Generalnie zalecane jest czyszczenie co 20 dni; 100--149 Tryb manualny 2 150--199 Tryb Auto 200--255 Tryb muzyczny ☆ Wyjście chłodzenia (wentylator) powinno byd regularnie czyszczone; ☆ Należy upewnid się, że w okolicy pracy urządzenia (w odległości mniejszej niż 0,5m) nie ma żadnych łatwopalnych I wybuchowych substancji czy obiektów. Minimalna odległośd urząrzenia od ściany to 15 cm; ©Copyright Lotronic LASTUBE80G / LASTUBE200R / LASTUBE300B LASTUBE80G / LASTUBE200R / LASTUBE300B Page 13 Uwaga Przed podłączeniem lub czyszczeniem należy odłączyd zasilanie; To urządzenie posiada III klasę niebezpieczeostwa urządzeo laserowych. Oznacza to, że może byd niebezpieczne dla osób obserwujących laser i wpatrujących się w jego światło; Upewnij się koniecznie, czy odległośd urządzenia od łatwopalnych NIEBEZPIECZEOSTWO PROMIENIOWANIE LASERA NIE PATRZ W ŚWIATŁO LASERA PRODUKT LASEROWY KLASY 3B Urządzenia elektryczne nie mogą byd wyrzucane do śmietnika. Należy je przynieśd do odpowiedniego punkty recyklingu. Zapytaj swoje lokalne władze lub swojego sprzedawcę co zrobid ze zużytym sprzętem. materiałów/obiektów wynosi minimum 50 cm. Specyfikacja techniczna Ten efekt LASEROWY został przygotowany do użytku profesjonalnego. Musi zostać zainstalowany na odpowiedniej wysokości nad ziemią, tak by promień lasera nie mógł nigdy świecić w oczy publiczności. Nigdy nie ustawiaj stałego (nieruchomego) punktu świecenia. Efekt: ............................. laser tubowy z grubym promieniem 18mm Silnik: ...................................... N1.8 silnik krokowy wysokiej precyzji Sterowanie: ............................................. tryb muzyczny/auto/dmx Wymiary: ............................................... 215mm x 70mm x 147mm Zasilanie: ...................................................... AC100-240V, 50/60Hz Waga netto: ........................................................................... 1.5KG Waga z opakowaniem: .............................................................. 2.0KG Dioda lasera: ......................................................................... DPSS LASTUBE80G .................................................................Green 532nm LASTUBE200R ................................................................... Red 650nm LASTUBE300B .................................................................. Blue 450nm Moc lasera: LASTUBE80G ............................................................................ 80mW LASTUBE200R: ........................................................................ 200mW LATUBE300B:.......................................................................... 300mW ©Copyright Lotronic LASTUBE80G / LASTUBE200R / LASTUBE300B LASTUBE80G / LASTUBE200R / LASTUBE300B Page 14