1
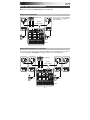
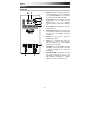
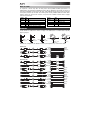
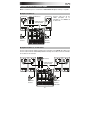
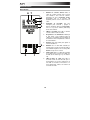
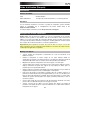
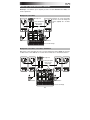
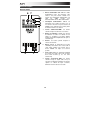
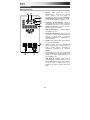
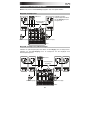
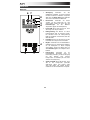
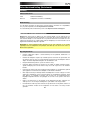
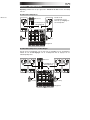
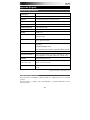
User Guide
English ( 3 – 6 )
Guía del usuario
Español ( 7 – 10 )
Guide d'utilisation
Français ( 11 – 14 )
Guida per l'uso
Italiano ( 15 – 18 )
Benutzerhandbuch
Deutsch ( 19 – 22 )
Gebruikershandleiding
Nederlands ( 23 – 26 )
Appendix
English ( 27 )
User Guide (English)
Introduction
Box Contents
TX10
User Guide
Power Cable
Safety & Warranty Manual
Support
For the latest information about this product (system requirements, compatibility information,
etc.) and product registration, visit altoprofessional.com/tx10.
For additional product support, visit altoprofessional.com/support.
Important Safety Precautions
Please note: Alto Professional and inMusic are not responsible for the use of its products or
the misuse of this information for any purpose. Alto Professional and inMusic are not
responsible for the misuse of its products caused by avoiding compliance with inspection and
maintenance procedures. Please also refer to the included safety and warranty manual for
more information.
Important: Do not suspend a TX Series loudspeaker. It is not designed for suspended
applications. We recommend our Truesonic Series or Black Series loudspeakers for
suspended applications instead.
Stand-Mounting
•
Always install loudspeakers in accordance with applicable electrical and building codes.
•
Install the loudspeaker according to its maximum weight. Check the specifications of your
stand or pole to ensure it can support the loudspeaker's weight. Also, observe all safety
precautions specified by the manufacturer.
•
Do not mount multiple loudspeakers on the same stand or pole.
•
Always verify that the stand or pole is on a flat, level, and stable surface. Also, fully extend
the legs of tripod-style stands, and ensure its legs do not present a trip hazard.
•
Inspect the stand (or pole and associated hardware) before each use and do not use
equipment with worn, damaged, or missing parts.
•
Always be cautious in windy, outdoor conditions. You may need to place additional weight
(e.g., sandbags) on stand's base to improve stability. Do not attach banners or similar
items to any part of a loudspeaker system. Such attachments could act as a sail and
topple the system.
•
Unless you are confident that you can handle the loudspeaker's weight, ask another
person to help you lift it onto the stand or pole.
•
Make sure your cables are out of the way of performers, production crew, and audience so
they will not trip over them, pulling the loudspeaker off the stand or pole.
3
Sound Level
Permanent hearing loss may be caused by exposure to extremely high noise levels. The U.S.
Occupational Safety and Health Administration (OSHA) has specified permissible exposures to
certain noise levels. According to OSHA, exposure to high sound pressure levels (SPL) in
excess of these limits may result in hearing loss. When using equipment capable of generating
high SPL, use hearing protection while such equipment is under operation.
Hours per day
8
6
4
3
2
SPL (dB)
90
92
95
97
100
Example
Small gig
Train
Subway train
High level desktop monitors
Classical music concert
Hours per day
1.5
1
.50
.25 or less
SPL (dB) Example
102
Riveting machine
105
Machine factory
110
Airport
115
Rock concert
Wire Connections
You can wire your XLR or 1/4" TRS cables as balanced or unbalanced. Here are some
examples:
(Pin2)
(Pin2)
(Pin3)
Tip
Sleeve
Ring
Tip
Sleeve
Ring
Tip
Sleeve
(Pin3)
(Pin1, linked to Pin3)
(Pin1)
Determine the wiring configuration you need for your application and audio connections:
3
3
2
2
1
1
Balanced
1
3
2
Unbalanced
1
3
2
Tip
Ring
Sleeve
1
2
3
1
2
3
Tip
Ring
Sleeve
Tip
1
2
3
1
2
3
Center
1
Tip
Ring
Sleeve
1
2
3
Tip
Ring
Sleeve
3
2
3
3
1
2
3
1
1
2
3
1
2
2
Sleeve
4
Screen
Tip
Sleeve
Tip
Sleeve
Tip
Ring
Sleeve
Tip
Ring
Sleeve
Tip
Sleeve
Center
Screen
Tip
Ring
Sleeve
Center
1
2
3
Screen
1
2
3
Quick Start / Connection Diagrams
Note: Items not listed in the Box Contents are sold separately.
Example A: 2 loudspeakers
Connect each of your mixer's
main outputs to the Input on a
TX loudspeaker.
Microphones
(mixer's
main outputs)
Power
Power
Mixer
Example B: 2 loudspeakers, 2 extensions
Connect each of your mixer's main outputs to the Input on a TX loudspeaker. Connect each of
your TX loudspeakers' Link Outputs to the inputs of your extension loudspeakers.
Microphones
(mixer's
main outputs)
Power
Power
Mixer
5
Features
Rear Panel
6 7
8
5
3
4
4
2
1
1.
AC Input: Use the included power cable to
connect this input to a power outlet. Make
sure the Power Switch is set to off when
connecting or disconnecting the cable.
2.
Power Switch: Use this switch to power the
loudspeaker on or off. Make sure the
Volume knob is set to its minimum
(counterclockwise) position before turning it
on.
3.
Power LED: This LED lights up when the
loudspeaker is on.
4.
Cooling Vent: Keep the area in front of this
vent clear from obstructions. The fan behind
the vent cools the amplifier, preventing
overheating.
5.
Volume: Turn this knob to adjust the
loudspeaker's volume.
6.
Input: Use a standard XLR cable (not
included) to connect your audio source to
this input. Make sure to set the Volume
knob to the correct position.
7.
Link Output: Use a standard XLR cable (not
included) to connect this output to the input
of another loudspeaker (i.e., another TX
loudspeaker).
8.
Signal Limit LED: This LED lights up when
the audio signal being sent to the
loudspeaker is "clipping" or distorting. If this
LED illuminates frequently or steadily,
reduce the volume of your audio source.
6
Guía del usuario (Español)
Introducción
Contenido de la caja
TX10
Guía del usuario
Cable de alimentación
Manual sobre la seguridad y garantía
Soporte
Para obtener la información más completa acerca de este product (los requisitos del sistema,
compatibilidad, etc) y registro del producto, visite altoprofessional.com/tx10.
Para soporte adicional del producto, visite altoprofessional.com/support.
Precauciones importantes para la seguridad
Para tener en cuenta: Alto Professional e inMusic no son responsables del uso de sus
productos o el mal uso de esta información para cualquier propósito. Alto Professional e
inMusic no son responsables del mal uso de sus productos causados por la omisión del
cumplimiento de los procedimientos de inspección y mantenimiento. Para más información,
consulte también el manual de seguridad y garantía incluido.
Importante: No suspenda los altavoces TX Series. No se diseñaron para funcionar
suspendidos. Recomendamos los altavoces Truesonic Series o Black Series para ese
propósito.
Montaje en soporte
•
Instale siempre los altavoces de acuerdo con los códigos de electricidad y construcción
aplicables.
•
Instale el altavoz de acuerdo a su peso máximo. Compruebe las especificaciones de su
soporte o columna para asegurarse de que pueda soportar el peso del altavoz.
Asimismo, observe todas las precauciones para la seguridad especificadas por el
fabricante.
•
No monte varios altavoces en el mismo soporte o columna.
•
Verifique siempre que el soporte o columna esté sobre una superficie plana, nivelada y
estable. Asimismo, extienda totalmente las patas de los soportes tipo trípode y
asegúrese de que las patas no representen un riesgo de tropiezo.
•
Inspeccione el soporte (o columna y elementos de fijación asociados) antes de cada uso
y no utilice equipos con piezas desgastadas, dañadas o faltantes.
•
Tenga siempre cuidado en condiciones de viento a la intemperie. Es posible que deba
colocar peso adicional (como bolsas de arena) en la base del soporte para mejorar la
estabilidad. No fije pancartas o elementos similares a ninguna parte del sistema de
altavoces. Tales agregados pueden funcionar como velas y hacer volcar el sistema.
•
Salvo que tenga confianza de que puede manejar el peso del altavoz, solicite a otra
persona que le ayude a levantarlo para colocarlo en el soporte o columna.
•
Asegúrese de que los cables estén fuera del camino de los intérpretes, personal de
producción y audiencia, de modo que no tropiecen con ellos y hagan caer el altavoz del
soporte o columna.
7
Nivel de sonido
La exposición a niveles muy altos de ruido puede causar pérdidas auditivas permanentes. La
Administración de Seguridad y Salud Ocupacional de EE.UU. (OSHA) ha especificado los niveles de
exposición permisibles a ciertos niveles de ruido. Según la OSHA, la exposición a niveles de presión
sonora (SPL) elevados que excedan estos límites puede causar pérdidas auditivas. Cuando utilice
equipos capaces de generar SPL elevados, use protecciones auditivas mientras dichos equipos
están en funcionamiento.
Horas
diarias
8
6
4
3
2
SPL
(dB)
90
92
95
97
100
Horas
diarias
1,5
1
0,50
0,25 o menos
Ejemplo
Música de bajo volumen
Tren
Tren subterráneo
Monitores de escritorio de alto nivel
Concierto de música clásica
SPL
(dB)
102
105
110
115
Ejemplo
Remachadora
Máquina fabril
Aeropuerto
Concierto de rock
Cableado
Puede cablear sus cables XLR o TRS de 1/4 pulg. como balanceados o no balanceados. Aquí hay
algunos ejemplos:
(Patilla 2)
(Patilla 3)
Punta
Nuca
Manguito
Punta
Manguito
Nuca
Punta
Manguito
(Patilla 2)
(Patilla 1, unida
a Patilla 3)
(Patilla 3)
(Patilla 1)
Determine la configuración del cableado necesario para su aplicación y conexiones de audio:
3
3
2
2
1
1
Balanceado
1
3
2
No balanceado
1
3
2
1
Punta
Nuca
Manguito
1
2
3
1
2
3
Punta
Nuca
Manguito
Punta
1
2
3
1
2
3
Centro
3
Punta
Nuca
Manguito
1
2
3
Punta
Nuca
Manguito
2
3
3
1
2
3
1
1
2
3
1
2
2
Manguito
8
Anillo
Punta
Manguito
Punta
Manguito
Punta
Nuca
Manguito
Punta
Nuca
Manguito
Punta
Manguito
Centro
Anillo
Punta
Nuca
Manguito
1
2
3
Centro
Anillo
1
2
3
Diagrama de inicio / conexión rápida
Nota: Los elementos que no se enumeran en Contenido de la caja se venden por separado.
Ejemplo A: 2 altavoces
Conecte cada una de las
salidas principales de su
mezclador a una entrada de
un altavoz TX.
Micrófonos
(salidas principals
del mezclador)
Suministro
eléctrico
Suministro
eléctrico
Mezclador
Ejemplo B: 2 altavoces, 2 extensiones
Conecte cada una de las salidas principales de su mezclador a una entrada de un altavoz TX.
Conecte cada una de las salidas Link (Salida de la mezcla) de sus altavoces TX a las entradas
de sus altavoces de extensión.
Micrófonos
(salidas principals
del mezclador)
Suministro
eléctrico
Suministro
eléctrico
Mezclador
9
Características
Panel trasero
6 7
8
5
3
4
4
2
1.
Entrada de corriente alterna: Utilice el
cable de corriente incluido para conectar
esta entrada a una toma de corriente.
Asegúrese de que el interruptor Power
(Encendido) esté en la posición off
(apagado) cuando conecte o desconecte el
cable.
2.
Interruptor de encendido: Use este
interruptor para encender y apagar el
altavoz. Asegúrese de que la perilla Volume
esté en su posición mínima (antihoraria)
antes de encenderlo.
3.
LED de encendido: Este LED se ilumina
cuando el altavoz está encendido.
4.
Respiraderos de enfriamiento: Mantenga
el área frente a esta ventilación libre de
obstáculos. El ventilador que está detrás de
la ventilación enfría el amplificador, evitando
el recalentamiento.
5.
Volumen: Gire esta perilla para ajustar el
volumen del altavoz.
6.
Entrada: Use un cable XLR estándar (no
incluido) para conectar su fuente de audio a
esta entrada. Asegúrese de colocar la perilla
Volume en la posición correcta.
7.
Salida Link: Utilice un cable XLR estándar
(no incluido) para conectar esta salida a la
entrada de otro altavoz (por ej. otro altavoz
TX).
8.
LED de límite de señal: Este LED se
enciende cuando la señal de audio que se
envía al altavoz se "recorta" o distorsiona. Si
este LED se enciende con frecuencia o en
forma permanente, reduzca el volumen de
su fuente de sonido.
1
10
Guide d'utilisation (Français)
Introduction
Contenu de la boîte
TX10
Guide d'utilisation
Câble d'alimentation
Consignes de sécurité et informations concernant la garantie
Assistance
Pour les dernières informations concernant ce produit (la configuration système minimale
requise, la compatibilité, etc) et l’enregistrement du produit, veuillez visitez le site
altoprofessional.com/tx10.
Pour de plus amples informations, visitez altoprofessional.com/support.
Consignes de sécurité importantes
Veuillez noter : Alto Professional et inMusic ne sont pas responsables de la mauvaise
utilisation de leurs produits ou de l'utilisation faite de ces informations. Alto Professional et
inMusic ne sont pas responsables de la mauvaise utilisation de leurs produits causés par le
non-respect des procédures d'entretien et d'inspection. Veuillez également consulter le guide
des consignes de sécurité et informations concernant la garantie inclus.
Important : Ne pas suspendre les enceintes de la série TX. Elles ne sont pas conçues afin
d'être suspendues. Nous recommandons plutôt d'utiliser nos enceintes des séries Truesonic
ou Black pour les applications suspendues.
Montage sur support
•
Toujours installer des haut-parleurs conformément aux codes de l'électricité et du
bâtiment en vigueur.
•
Installer le haut-parleur en tenant compte de son poids maximal. Vérifier les
spécifications du support ou du pied pour faire en sorte qu'il peut supporter le poids du
haut-parleur. Observer toutes les consignes de sécurité spécifiées par le fabricant.
•
Ne pas monter plusieurs haut-parleurs sur le même support ou le même pied.
•
Toujours vérifier que le support ou le pied est sur une surface plane, stable et au niveau.
Déployer entièrement les pieds des supports de style trépied et vérifier qu'ils ne
présentent pas un risque de trébuchement.
•
Vérifier le support (ou pied et la quincaillerie) avant chaque utilisation et ne pas utiliser de
l'équipement avec des pièces usées, endommagées ou manquantes.
•
Faire preuve de prudence lorsqu'utilisé à l'extérieur dans des conditions venteuses. Il
peut être nécessaire de placer un poids supplémentaire (p. ex., des sacs de sable) sur la
base du support afin d'améliorer sa stabilité. Ne pas fixer de bannières ou autres objets
similaires au système de haut-parleur. Ces objets pourraient prendre dans le vent et
renverser le système.
•
À moins d'être certain de pouvoir gérer le poids du haut-parleur, demander à une autre
personne de vous aider afin de le placer sur le support ou le pied.
•
Toujours s'assurer que les câbles sont tenus éloignés des artistes, de l'équipe de
production et du public afin qu'ils ne puissent trébucher sur le câble et faire tomber le
haut-parleur de son support.
11
Niveau sonore
L'exposition aux niveaux extrêmement élevés de bruit peut causer une perte d'audition permanente. Le
comité de santé et de sécurité au travail des États-Unis (OSHA) a établi des durées d'exposition
acceptables pour certains niveaux de bruit. Selon la OSHA, une exposition à des niveaux de pression
acoustique (NPA) au-dessus de ces limites peut avoir comme conséquence une perte d'audition. Lors de
l'utilisation d'équipement capable de générer des niveaux de pression acoustique élevés, il faut prendre des
mesures afin de protéger son ouïe lorsque cette unité est en fonction.
Heures
par jour
8
6
4
3
2
NPA
(dB)
90
92
95
97
100
Exemple
Petite salle de spectacle
Train
Rame de métro
Moniteurs de table à niveaux élevés
Concert de musique classique
Heures
par jour
1,5
1
0,50
moins de 0,25
NPA
(dB)
102
105
110
115
Exemple
Riveteuse
Usine de fabrication
Aéroport
Concert rock
Connectiques
Vous pouvez brancher vos câbles XLR ou TRS 6,35 mm (¼ po) de manière symétrique ou asymétrique.
Voici quelques exemples :
(Broche2)
(Broche2)
(Broche3)
Pointe
Corps
Bague
Pointe
Corps
Bague
Pointe
Corps
(Broche3)
(Broche1, connectée
à la broche3)
(Broche1)
Déterminez la configuration de câblage dont vous avez besoin selon votre application et connexions audio :
3
3
2
2
1
1
Symétrique
1
3
2
Asymétrique
1
3
2
1
Pointe
Bague
Corps
1
2
3
1
2
3
Pointe
Bague
Corps
Pointe
1
2
3
1
2
3
Centre
3
Pointe
Bague
Corps
1
2
3
Pointe
Bague
Corps
2
3
3
1
2
3
1
1
2
3
1
2
2
Corps
12
Anneau
Pointe
Corps
Pointe
Corps
Pointe
Bague
Corps
Pointe
Bague
Corps
Pointe
Corps
Centre
Anneau
Pointe
Bague
Corps
1
2
3
Centre
Anneau
1
2
3
Démarrage rapide/Schéma de connexion
Remarque : Les éléments qui ne figurent pas dans l’encadré Contenu de la boîte sont
vendus séparément.
Exemple A : 2 enceintes
Branchez les sorties principales
de votre console de mixage aux
entrées (Input) des enceintes
TX.
Microphones
(sorties principales
de la console
de mixage)
Alimentation
Alimentation
Console de mixage
Exemple B : 2 enceintes, 2 enceintes d’extension
Branchez les sorties principales de votre console de mixage aux entrées (Input) des enceintes
TX. Branchez les sorties Link de vos enceintes TX aux entrées de vos enceintes d'extension.
Microphones
(sorties principales
de la console
de mixage)
Alimentation
Alimentation
Console de mixage
13
Caractéristiques
Panneau arrière
6 7
8
5
3
4
4
2
1
1.
Entrée d'alimentation CA : Utilisez le câble
d’alimentation inclus pour brancher cette
entrée à une prise secteur. Veuillez vous
assurer que l’interrupteur d’alimentation soit
réglé
sur
« Off »
lorsque
vous
branchez/débranchez le câble d’alimentation.
2.
Interrupteur d'alimentation : Utilisez cet
interrupteur pour mettre l’enceinte sous et
hors tension. Assurez-vous que le bouton du
volume soit au minimum (sens horaire) avant
de mettre l’enceinte sous tension.
3.
Témoin d'alimentation DEL : Ce témoin
s’allume lorsque l’enceinte est sous tension.
4.
Orifice de ventilation : Veuillez vous assurer
de maintenir cet orifice non obstrué en tout
temps. Le ventilateur se trouvant derrière
permet de refroidir l’amplificateur afin qu’il ne
surchauffe pas.
5.
Volume : Ce bouton permet d’ajuster le
volume de l’enceinte.
6.
Entrée : Utilisez un câble XLR (non inclus)
standard pour brancher une source audio à
cette entrée. Veuillez vous assurer que le
bouton volume soit réglé sur la bonne
position.
7.
Sortie Link : Utilisez un câble XLR standard
(non inclus) pour relier cette sortie à l'entrée
d'une autre enceinte (p. ex., une autre
enceinte TX).
8.
Témoin d’écrêtement DEL : Ce témoin
s’allume lorsque le signal audio envoyé à
l’enceinte est déformé (écrêtage). Si le témoin
clignote ou s’allume de façon constante,
diminuez le volume de la source audio.
14
Guida per l'uso (Italiano)
Introduzione
Contenuti della confezione
TX10
Guida per l'uso
Cavo di alimentazione
Istruzioni di sicurezza e garanzia
Assistenza
Per conoscere le ultime informazioni in merito a questo prodotto (i requisiti di sistema
complete, compatibilità, ecc) e per la registrazione del prodotto, recarsi alla pagina
altoprofessional.com/tx10.
Per ulteriore assistenza, recarsi alla pagina altoprofessional.com/support.
Importanti precauzioni di sicurezza
Nota bene: Alto Professional e inMusic declinano qualsiasi responsabilità per l'uso dei loro
prodotti o per l'utilizzo errato delle presenti informazioni a qualsiasi scopo. Alto Professional e
inMusic non sono responsabili per il cattivo utilizzo dei loro prodotti causato dalla mancata
conformità con le procedure di ispezione e manutenzione. Fare riferimento al manuale di
sicurezza e garanzia per maggiori informazioni.
Importante: non sospendere gli altoparlanti TX Series. Non sono concepiti per applicazioni
sospese. Per applicazioni sospese consigliamo i nostri altoparlanti Truesonic Series o Black
Series.
Installazione su supporto
•
A Installare sempre gli altoparlanti in conformità con i codici elettrici ed edilizi in vigore.
•
Installare gli altoparlanti in base al loro peso massimo. Verificare le specifiche del palco
per assicurarsi che sia in grado di sostenere il peso dell'altoparlante. Inoltre, rispettare
tutte le indicazioni di sicurezza specificate dal produttore.
•
Non montare più altoparlanti sullo stesso supporto o palo.
•
Assicurarsi sempre che il supporto o il palo si trovi su una superficie piana, uniforme e
stabile. Inoltre, estendere al massimo le gambe dei supporti a treppiede e assicurarsi che
non rappresentino rischio di inciampo.
•
Ispezionare il supporto (o il palo o la minuteria ad esso associata) prima di ciascun
utilizzo e non servirsi dell'apparecchio con parti usurate, danneggiate o mancanti.
•
Prestare sempre cautela in condizioni ventose all'aperto. Potrebbe essere necessario
aggiungere ulteriore peso (ad es. sacchi di sabbia) sulla base del supporto per
migliorarne la stabilità. Non fissare striscioni o articoli simili a qualsiasi parte di un sistema
di altoparlanti. Questi potrebbero fare da vela e far rovesciare l'impianto.
•
A meno di non essere sicuri di essere in grado di sostenere il peso dell'altoparlante,
chiedere aiuto a un'altra persona per sollevarlo sul supporto o sul palo.
•
Assicurarsi che i cavi non intralcino gli artisti, lo staff di produzione e il pubblico, in modo
che non vi sia il rischio che questi ci inciampino, facendo cadere l'altoparlante dal
supporto o dal palo.
15
Livello dell'audio
L'esposizione a livelli di rumore estremamente elevati può causare danni permanenti all'udito.
L'OSHA americana (Occupational Safety and Health Administration) ha specificato le esposizioni
ammissibili a determinati livelli di rumore. Secondo l'OSHA, l'esposizione a elevati livelli di pressione
sonora (SPL) in eccesso rispetto ai limiti indicati può causare la perdita dell'udito. Quando si
utilizzano attrezzature in grado di generare elevati SPL, servirsi di dispositivi di protezione dell'udito
quando tali attrezzature sono in uso.
Ore al
giorno
8
6
4
3
2
SPL
(dB)
90
92
95
97
100
Esempio
Piccolo concerto
Treno
Metropolitana
Casse da tavolo ad alto volume
Concerto di musica classica
Ore al
giorno
1,5
1
0,50
0,25 o meno
SPL
(dB)
102
105
110
115
Esempio
Macchina ribaditrice
Fabbrica di macchinari
Aeroporto
Concerto Rock
Collegamenti cablati
Si possono cablare i fili XLR o TRS da 1/4" come bilanciati o non bilanciati. Ecco alcuni esempi:
(Pin2)
(Pin2)
(Pin3)
(Pin3)
Punta Anello
Manica
Punta
Manica
Anello
Punta
Manica
(Pin1, collegato
a Pin3)
(Pin1)
Stabilire la configurazione di cablaggio necessaria per le proprie applicazioni e i propri collegamenti
audio:
3
3
2
2
1
1
Bilanciato
1
3
2
Non bilanciato
1
3
2
1
Punta
Anello
Manica
1
2
3
1
2
3
Punta
Anello
Manica
Punta
1
2
3
1
2
3
Centro
3
Punta
Anello
Manica
1
2
3
Punta
Anello
Manica
2
3
3
1
2
3
1
1
2
3
1
2
2
Manica
16
Anello
Punta
Manica
Punta
Manica
Punta
Anello
Manica
Punta
Anello
Manica
Punta
Manica
Centro
Anello
Punta
Anello
Manica
1
2
3
Centro
Anello
1
2
3
Guida rapida / Schema dei collegamenti
Nota bene: elementi non elencati sotto Contenuti della confezione sono venduti
separatamente.
Esempio A: 2 altoparlanti
Collegare ciascuna delle uscite
main del mixer all'Ingresso di
un altoparlante TX.
Microfoni
(uscite main
del mixer)
Alimentazione
Alimentazione
Mixer
Esempio B: 2 altoparlanti, 2 estensioni
Collegare ciascuna delle uscite main del mixer all'Ingresso di un altoparlante TX. Collegare
ciascuna delle uscite Link degli altoparlanti del TX agli ingressi degli altoparlanti di estensione.
Microfoni
(uscite main
del mixer)
Alimentazione
Alimentazione
Mixer
17
Caratteristiche
Pannello posteriore
6 7
8
5
3
4
4
2
1
1.
Ingresso CA: servirsi del cavo di
alimentazione in dotazione per collegare
questo
ingresso
ad
una
presa
di
alimentazione. Assicurarsi che l'interruttore
di alimentazione dell'altoparlante sia su "off"
al momento di collegare e scollegare il cavo.
2.
Interruttore di alimentazione: servirsi di
questo interruttore per accendere e spegnere
l'altoparlante. Assicurarsi che la manopola
Volume sia impostata al minimo (in senso
antiorario) prima di accenderlo.
3.
LED di alimentazione: si illumina quando
l'altoparlante è acceso.
4.
Ventola di raffreddamento: mantenere l'area
di fronte a questa bocchetta libera da
ostacoli. La ventola dietro la bocchetta
raffredda l'amplificatore, impedendone il
surriscaldamento.
5.
Volume: girare questa manopola per regolare
il volume dell'altoparlante.
6.
Ingresso: servirsi di un cavo standard XLR
(non in dotazione) per collegare una fonte
audio a questo ingresso. Assicurarsi di
posizionare correttamente la manopola
Volume.
7.
Uscita Link: servirsi di un cavo standard XLR
(non in dotazione) per collegare questa uscita
all'ingresso di un altro altoparlante (ad es. un
altro altoparlante TX).
8.
LED limite di segnale: questo LED si
accende quando il segnale audio che viene
inviato all'altoparlante "salta" o viene distorto.
Se questa spia si accende spesso o in
maniera fissa, ridurre il volume della fonte
audio.
18
Benutzerhandbuch (Deutsch)
Einführung
Lieferumfang
TX10
Benutzerhandbuch
Netzkabel
Sicherheitshinweise und Garantieinformationen
Kundendienst
Die neuesten Informationen zu diesem Produkt (Systemanforderungen, Kompatibilitätsinformationen
usw.) und die Registrierung Ihres Produkts finden Sie auf altoprofessional.com/tx10.
Für zusätzlichen Produkt-Support besuchen Sie altoprofessional.com/support.
Wichtige Sicherheitshinweise
Bitte beachten Sie: Alto Professional und inMusic sind weder für die Verwendung ihrer Produkte
noch für den Missbrauch dieser Informationen für beliebige Zwecke verantwortlich. Alto Professional
und inMusic sind nicht für die missbräuchliche Verwendung ihrer Produkte verantwortlich, die durch
verabsäumte Inspektions- und Wartungsarbeiten verursacht wurde. Bitte beachten Sie auch das
mitgelieferte Handbuch für Sicherheitshinweise und Garantieinformationen.
Wichtig: Hängen Sie den TX Series Lautsprecher nicht auf. Er eignet sich nicht für den hängenden
Einsatz. Für den hängenden Einsatz empfehlen wir unsere Truesonic Series oder Black Series
Lautsprecher.
Montage am Ständer
•
Installieren Sie Lautsprecher stets laut geltenden Elektro- und Bauvorschriften.
•
Installieren Sie den Lautsprecher in Übereinstimmung mit seinem maximalen Gewicht.
Überprüfen Sie die Spezifikationen des Ständers oder des Masts, um sicherzustellen, dass er
das Gewicht des Lautsprechers halten kann. Beachten Sie außerdem alle Sicherheitshinweise
des Herstellers.
•
Montieren Sie niemals mehrere Lautsprecher am selben Ständer oder Mast.
•
Sorgen Sie stets dafür, dass die Ständer oder Maste auf einer flachen, ebenen und stabilen
Fläche stehen. Ziehen Sie die Standbeine des stativähnlichen Ständers vollständig heraus und
sorgen Sie dafür, dass die Beine keine Stolpergefahr darstellen.
•
Überprüfen Sie den Ständer (oder Mast samt zugehörigen Komponenten) vor jedem Einsatz
und verwenden Sie nie Geräte mit verschlissenen, beschädigten oder fehlenden Teilen.
•
Lassen Sie bei windigen Verhältnissen im Freien besondere Vorsicht walten. Möglicherweise
müssen Sie zusätzliche Gewichte (z.B. Sandsäcke) auf der Ständerbasis platzieren, um die
Stabilität zu gewährleisten. Bringen Sie keine Transparente oder ähnliches an irgendwelchen
Teilen eines Lautsprechersystems an. Solche Konstruktionen könnten wie ein Segel wirken und
das System zu Fall bringen.
•
Wenn Sie sich nicht sicher sind, ob Sie den Lautsprecher alleine heben können, bitten Sie eine
andere Person beim Heben auf einen Ständer/Mast um Hilfe.
•
Sorgen Sie dafür, dass die Kabel den Künstlern, der Produktions-Crew oder dem Publikum
nicht im Weg sind, so dass niemand über Kabel stolpern kann und den Lautsprecher vom
Ständer oder Mast reißen kann.
19
Schallpegel
Eine Exposition gegenüber extrem hohen Lärmpegeln kann zu bleibenden Hörschäden führen. Die
Occupational Safety and Health Administration (OSHA) der US-Regierung hat zulässige Expositionswerte für
bestimmte Lärmpegel festgelegt. Laut OSHA können Belastungen durch Schalldruckpegel (SPL), die diese
Grenzwerte überschreiten, zu Hörverlust führen. Tragen Sie beim Einsatz von Geräten, die einen hohen
Schalldruck erzeugen können, stets einen Gehörschutz.
Stunden
pro Tag
8
6
4
3
2
SPL
(dB)
90
92
95
97
100
Stunden
pro Tag
1,5
1
0,50
0,25 oder weniger
Beispiel
Kleines Konzert
Zug
U-Bahn
Leistungsstarke Desktop-Monitore
Konzert mit klassischer Musik
SPL
(dB)
102
105
110
115
Beispiel
Nietmaschine
Maschinenfabrik
Flughafen
Rock-Konzert
Kabelverbindungen
Sie können Ihr XLR oder 1/4" TRS-Kabel symmetrisch oder unsymmetrisch verdrahten. Hier sind einige
Beispiele:
(Pin2)
(Pin2)
(Pin3)
(Pin3)
Spitze
Ring
Manschette
Spitze
Ring
Manschette
Spitze
Manschette
(Pin1 mit Pin3
verbunden)
(Pin1)
Bestimmen Sie die Verdrahtungskonfiguration, die Sie für Ihren Einsatz und Ihre Audio-Verbindungen
benötigen:
Symmetrisch
3
3
2
2
1
1
Spitze
Ring
Manschette
1
3
2
Unsymmetrisch
1
2
3
Spitze
Ring
Manschette
1
3
2
Spitze
Ring
Manschette
1
Spitze
3
2
3
3
1
2
3
1
1
2
3
1
2
2
Manschette
20
Spitze
Ring
Manschette
1
2
3
1
2
3
1
2
3
1
2
3
Stift
Abschirmung
Spitze
Manschette
Spitze
Manschette
Spitze
Ring
Manschette
Spitze
Ring
Manschette
Spitze
Manschette
Stift
Abschirmung
Spitze
Ring
Manschette
Stift
1
2
3
Abschirmung
1
2
3
Schnellstart / Anschlussdiagramme
Hinweis: Teile, die nicht im Lieferumfang angegeben sind, sind separat erhältlich.
Beispiel A: 2 Lautsprecher
Verbinden Sie jeden
Hauptausgang Ihres Mixers
mit dem Eingang eines TX
Lautsprechers.
Mikrofone
(Hauptausgänge
des Mixers)
Stromversorgung
Stromversorgung
Mixer
Beispiel B: 2 Lautsprecher, 2 Erweiterungen
Verbinden Sie jeden Hauptausgang Ihres Mixers mit dem Eingang eines TX Lautsprechers.
Verbinden Sie alle Link-Ausgänge Ihrer TX Lautsprecher mit den Eingängen Ihrer
Erweiterungslautsprecher.
Mikrofone
(Hauptausgänge
des Mixers)
Stromversorgung
Stromversorgung
Mixer
21
Funktionen
Rückseite
6 7
8
5
3
4
4
2
1
1.
AC-Eingang:
Verwenden
Sie
das
mitgelieferte Netzkabel, um diesen Eingang
mit einer Steckdose zu verbinden. Sorgen Sie
dafür, dass der Netzschalter beim Verbinden
oder Trennen des Kabels auf Aus steht.
2.
Netzschalter:
Verwenden
Sie
diesen
Schalter, um den Lautsprecher ein- oder
auszuschalten. Stellen Sie sicher, dass der
Lautstärkeregler
auf
das
Minimum
eingestellt ist (gegen den Uhrzeigersinn).
3.
Power-LED: Diese LED leuchtet auf, wenn
der Lautsprecher eingeschaltet ist.
4.
Lüftungsöffnung: Der Bereich vor dieser
Lüftungsöffnung darf nie blockiert werden.
Der Ventilator hinter der Lüftungsöffnung
kühlt den Verstärker und verhindert, dass das
Gerät überhitzt.
5.
Lautstärke: Drehen Sie diesen Knopf, um die
Lautstärke des Lautsprechers einzustellen.
6.
Eingabe: Verwenden Sie ein handelsübliches
XLR-Kabel (nicht im Lieferumfang enthalten),
um die Audioquelle an diesen Eingang
anzuschließen. Achten Sie darauf, dass sich
der Lautstärkeregler in der richtigen Position
befindet.
7.
Link-Ausgang:
Verwenden
Sie
ein
handelsübliches
XLR-Kabel
(nicht
im
Lieferumfang enthalten), um diesen Ausgang
mit
dem
Eingang
eines
weiteren
Lautsprechers zu verbinden (z.B. mit einem
anderen TX-Lautsprecher).
8.
Signal Limit-LED: Diese LED leuchtet, wenn
das an den Lautsprecher gesendete
Audiosignal "clippt" oder verzerrt. Sollte
diese LED häufig oder ständig leuchten,
reduzieren Sie die Lautstärke Ihrer Tonquelle.
22
Gebruikershandleiding (Nederlands)
Inleiding
Inhoud van de doos
TX10
Gebruikershandleiding
Netsnoer
Veiligheidsvoorschriften en handleiding
Ondersteuning
Voor de laatste informatie over dit product (systeemvereisten, informatie over compatibiliteit,
enz.) en productregistratie, bezoek altoprofessional.com/tx10.
Voor aanvullende productondersteuning surft u naar altoprofessional.com/support.
Belangrijke veiligheidsvoorschriften
Opgelet: Alto Professional en inMusic zijn niet verantwoordelijk voor het gebruik van hun
producten of het misbruik van deze informatie voor enig doel. Alto Professional en inMusic zijn
niet verantwoordelijk voor het misbruik van hun producten dat wordt veroorzaakt door nietnaleving van de inspectie- en onderhoudsprocedures. Raadpleeg voor meer informatie ook de
bijgeleverde handleiding veiligheid en garantie.
Belangrijk: TX Series luidsprekers niet ophangen. Ze zijn niet ontworpen om te worden
opgehangen. Als u de luidsprekers wilt ophangen, dan raden wij u aan de Truesonic Series of
Black Series te gebruiken.
Op stang monteren
•
Installeer luidsprekers altijd in overeenstemming met de geldende elektriciteits- en
bouwvoorschriften.
•
Installeer de luidspreker volgens zijn maximale gewicht. Controleer de specificaties van
uw statief of stang om ervoor te zorgen dat deze het gewicht van de luidspreker kunnen
dragen. Houd alle veiligheidsmaatregelen van de fabrikant in acht.
•
Hang nooit meerdere speakers op aan een statief of stang.
•
Controleer altijd of het statief of de stang op een vlakke en stabiele ondergrond staan.
Spreid volledig de poten van het statief en zorg ervoor dat er geen risico van struikelen
bestaat.
•
Controleer het statief (of de stang en bijbehorende hardware) voor elk gebruik en gebruik
geen apparatuur met versleten, beschadigde of ontbrekende onderdelen.
•
Wees altijd voorzichtig in winderige buitenomstandigheden. Het kan nodig zijn om extra
gewicht (bv. zandzakken) op het voetstuk te leggen om de stabiliteit te verbeteren. Hang
geen banners of soortgelijke voorwerpen aan een deel van een luidsprekersysteem.
Dergelijke hulpstukken kunnen zich gedragen als een zeil en het systeem omver doen
waaien.
•
Indien u niet zeker weet of u het gewicht van de luidspreker kan tillen, vraag dan een
andere persoon om u te helpen de luidspreker op het statief of de stang te heffen.
•
Houd de kabels uit de weg van de artiesten, de productiecrew en het publiek, zodat ze er
niet over struikelen. Anders kan de luidspreker van het statief of de stang worden
getrokken.
23
Geluidsniveau
Blootstelling aan extreem hoge geluidsniveaus kan permanent gehoorverlies veroorzaken. De Amerikaanse
Occupational Safety and Health Administration (OSHA) heeft voor bepaalde geluidsniveaus toelaatbare
risico's vastgelegd. Volgens OSHA kan blootstelling aan een geluidsdruk (SPL) die hoger ligt dan deze
grenzen tot gehoorverlies leiden. Bij het gebruik van een apparaat dat hoge SPL genereert, draagt u het
best gehoorbescherming.
Uren per
dag
8
6
4
3
2
SPL
(dB)
90
92
95
97
100
Voorbeeld
Kleine bijeenkomst
Trein
Metro
Desktopmonitoren op hoog volume
Concert van klassieke muziek
Uren per
dag
1,5
1
0,50
0,25 of minder
SPL
(dB)
102
105
110
115
Voorbeeld
Klinkmachine
Machinefabriek
Vliegveld
Rockconcert
De kabels aansluiten
U kunt uw XLR- of 1/4”-TRS-kabels gebalanceerd of ongebalanceerd aansluiten. Hierna volgen enkele
voorbeelden:
(Pin2)
(Pin2)
(Pin3)
(Pin3)
Tip
Mantel
Ring
Tip
Mantel
Ring
Tip
Mantel
(Pin1, gekoppeld
aan Pin3)
(Pin1)
Bepaal de bedradings- en audioconfiguratie die u nodig hebt voor uw toepassing:
3
3
2
2
1
1
Gebalanceerd
1
3
2
Ongebalanceerd
1
3
2
1
Tip
Ring
Mantel
1
2
3
1
2
3
Tip
Ring
Mantel
Tip
1
2
3
1
2
3
Midden
3
Tip
Ring
Mantel
1
2
3
Tip
Ring
Mantel
2
3
3
1
2
3
1
1
2
3
1
2
2
Mantel
24
Afscherming
Tip
Mantel
Tip
Mantel
Tip
Ring
Mantel
Tip
Ring
Mantel
Tip
Mantel
Midden
Afscherming
Tip
Ring
Mantel
Midden
1
2
3
Afscherming
1
2
3
Snelstart- / Aansluitschema's
Opmerking: Artikelen die niet zijn opgesomd in Inhoud van de doos worden afzonderlijk
verkocht.
Voorbeeld A: 2 luidsprekers
Microfoons
Sluit elk van de
hoofduitgangen van uw
mixer aan op de Ingang van
een TX-luidspreker.
Microfoons
(hoofduitgangen van
het mengpaneel)
Voeding
Voeding
Mengpaneel
Voorbeeld B: 2 luidsprekers, 2 uitbreidingen
Sluit elk van de hoofduitgangen van uw mixer aan op de Ingang van een TX-luidspreker.
Verbind elk van de Link-uitgangen van uw TX-luidsprekers met de ingangen van uw
uitbreidingsluidsprekers.
Microfoons
(hoofduitgangen van
het mengpaneel)
Voeding
Voeding
Mengpaneel
25
Kenmerken
Achterpaneel
6 7
8
5
3
4
4
2
1
1.
Stroomingang: Gebruik de meegeleverde
kabel om deze ingang aan te sluiten op een
stopcontact. Controleer of de Aan/uitschakelaar op uit staat bij het aansluiten of
afkoppelen van de kabel.
2.
Aan/uit-schakelaar: Gebruik deze schakelaar
om de luidspreker aan of uit te zetten.
Controleer of de Volumeknop op de laagste
stand staat (tegen de klok) voor u de
luidspreker aanzet.
3.
Stroom-LED: Deze LED gaat
wanneer de luidspreker aan staat.
4.
Koelopening: Houd de ruimte voor deze
opening vrij van obstakels. De ventilator
achter deze opening koelt de versterker af en
voorkomt oververhitting.
5.
Volume: Draai aan deze knop om het
luidsprekervolume aan te passen.
6.
Invoer: Gebruik een standaard XLR-kabel (niet
meegeleverd) om uw audiobron met deze
ingang te verbinden. Controleer of de
Volumeknop in de juiste stand staat.
7.
Link-uitgang: Gebruik een standaard XLRkabel (niet meegeleverd) om deze uitgang te
verbinden met de ingang van een andere
luidspreker (bv. een andere TX-luidspreker).
8.
LED signaallimiet: Deze LED gaat branden
wanneer
het
audiosignaal
dat
wordt
verzonden naar de luidspreker wordt
'afgesneden' of vervormd. Als deze LED
frequent of gestaag brandt, verlaag dan het
volume van uw audiobron.
26
branden
Appendix (English)
Technical Specifications
System Type
2-way active ported loudspeaker
LF Driver
10" (254 mm) woofer, 1.5" (38 mm) voice coil
HF Driver
1" (25 mm) ferrite driver, 1" (25 mm) voice coil
Amplifier
Class D SMPS, 280 Watts peak
Horn Coverage
90° H x 45° V
Frequency Response
75 Hz – 20 kHz (-3 dB)
Crossover Frequency
2.5 kHz
Max SPL
116 dB at 1 m
Connectors
1 XLR Line/Mic input
1 XLR Link output
External Controls
Power switch with green LED, volume control, Line/Mic input
switch, clip limiter red LED
Power
Power Supply: 100 V, 110-120 V, or 220-240 V; 50/60 Hz,
switchable
Power Consumption: 150 W
Fuse: 110-120V T1.6AL AC250V or 220-240V T800mAL AC250V
Electronic Protection
Thermal, overload, analog limiter, compressor
Enclosure Construction
Injection-molded propylene enclosure, multi-angle for main or
monitor applications, metal grille, rubber feet, 1 handle on top
Mounting
36 mm standard pole mount
Dimesions
17.2" x 10.7" x 9.6"
(height x width x depth)
Weight
438 mm x 272 mm x 245 mm
26.6 lbs.
12.1 kg
Specifications are subject to change without notice.
Trademarks and Licenses
Alto Professional is a trademark of inMusic Brands, Inc., registered in the U.S. and other
countries.
All other product or company names are trademarks or registered trademarks of their
respective owners.
27
altoprofessional.com
Manual Version 1.0