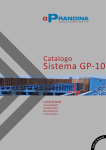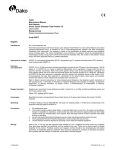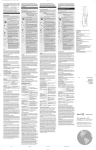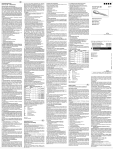
1
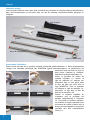
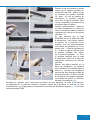
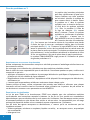
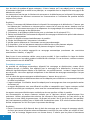
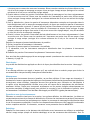
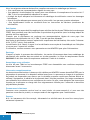
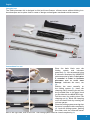
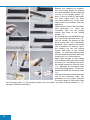
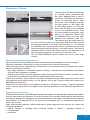
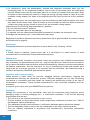
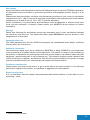
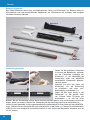
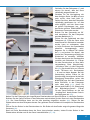
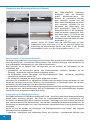
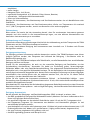
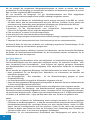
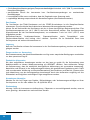
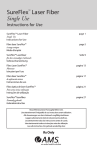
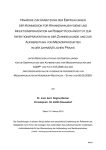
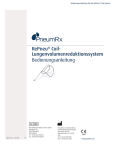
Mode d’emploi Instructions for Use Anwendungshinweise Pose-prothèse TONN / NOVATECH Stent Applicator Stent Platzierset et Bronchoscope STORZ and STORZ Bronchoscope und STORZ Bronchoskop Read these Instructions prior to use! NO105-0 — 2009/08 Français Utilisation prévue Le kit de pose TONN est conçu pour plier et insérer les prothèses en silicone Dumon® sans déviation dans les bronchoscopes et les poser dans les cas de sténoses trachéobronchiales bénignes et malignes. bloc de base tige pusher système repliable barre de chargement tube d’introduction Instructions d’utilisation Placer le bloc de base sur le système repliable et lubrifier généreusement (1). Nous recommandons l’usage d’un lubrifiant développé par NOVATECH (grade pharmaceutique). La lubrification est essentielle pour faciliter la pose et 1 2 pour éviter d’abîmer la prothèse. Lubrifier la prothèse également (2). Placer la prothèse au milieu du système repliable (3). Insérer la tige de maintien en insérant son extrémité dans le trou prévu dans le bloc de base (du côté avec le logo NOVATECH). Plier la prothèse 3 4 en baissant la tige de maintien (4). Verrouiller la tige dans le bloc de base en la tournant à 90°. Fermer le système repliable en s’assurant que la prothèse est poussée complètement à l’intérieur (5). Verrouiller le système repliable, 5 6 en poussant le clapet coulissant avec un bouton de couleur d’abord vers la droite, puis vers la gauche. Le système repliable doit être complètement fermé (6). 2 7 Enlever la tige de maintien en même temps que le système repliable en tournant la tige à 90°. Retirer la tige de maintien du système repliable (8). Note : En cas de manque de lubrification la prothèse pourrait sortir avec la tige de maintien. Dans 9 10 ce cas, simplement recommencer la procédure depuis le début. Lubrifier généreusement l’intérieur du tube d’introduction (9). Insérer le tube d’introduction dans le système repliable (voir repère sur le système repliable, 10). En vous assurant que le logo 11 12 NOVATECH est sur le dessus du tube d’introduction, vous pouvez repérer la position de la prothèse à tout moment. Ceci est particulièrement utile quand des prothèses en Y sont posées (voir : « Pose de prothèses en Y »). Insérer la tige de maintien dans le système repliable (voir repère sur le système repliable, 12). Tenir le système repliable avec le tube d’introduction inséré et la barre de chargement (bourreur) en position verticale. 14 15 13 Exercer une légère pression sur la barre de chargement, en poussant avec précaution la prothèse dans le tube (13). La barre de chargement ne peut pas être poussée au-delà du point de sécurité (14). Retirer le tube d’introduction du système repliable. 17 18 La prothèse est placée à l’intérieur 16 du tube d’introduction (15). Introduire le pousseur dans l’extrémité proximale (la plus éloignée) du tube d’introduction. La graduation sur le pousseur indique la longueur exacte de la prothèse à l’intérieur du tube d’introduction (16). En appuyant sur le pousseur, la prothèse est facilement larguée (17, 18) à travers un bronchoscope STORZ. 8 3 Pose de prothèses en Y 19 21 23 24 La position des bronches principales peut être vérifiée avant la pose et le risque d’abîmer une telle prothèse est minimisé. Lubrifier le système de pose comme décrit ci-dessus. Placer la prothèse en Y dans le système 20 repliable avec sa branche droite sur le côté droit du système repliable (19). Plier la prothèse à l’aide de la tige de maintien (20) comme décrit ci-dessus. Fermer le système repliable en y enfermant la prothèse (21). Important : s’assurer que le 22 logo NOVATECH est sur le dessus lors de l’insertion du tube d’introduction (22). Ceci assure que la branche droite de la prothèse sera placée à droite du logo et sera par conséquent insérée dans la bronche principale droite (23, 24). Conserver le logo NOVATECH sur le dessus assure le placement correct de la prothèse dans la trachée avant de la placer dans la carène principale. Ce résultat est obtenu avec toutes les prothèses en Y et les prothèses trachéales d’un diamètre de 18 et 20 car ces prothèses n’ont pas de picots dans la partie postérieure. Le système TONN/NOVATECH rouge permet à l’utilisateur de placer de grandes prothèses en Y. Avertissement et mesures de précaution Utiliser uniquement des instruments nettoyés et stérilisés provenant d’emballages stériles intacts ou de conteneurs stériles. Un nettoyage et une désinfection véritables sont des conditions préalables vitales. Dans le cadre de votre responsabilité pour la stérilité de l’instrument pendant sa pose, veuillez tenir compte de ce qui suit : • Appliquer uniquement les procédures de nettoyage/désinfection spécifiques d’équipement et de produits qui ont été validées de façon adéquate. • Régulièrement réviser et contrôler l’équipement utilisé (dispositif de nettoyage et de désinfection, stérilisateur) et • s’assurer que les paramètres validés sont maintenus durant chaque cycle. Comme principe de base, utiliser uniquement des produits sans défaut et effectuer pour chaque instrument un bref contrôle visuel et fonctionnel avant utilisation sur le patient. Ne pas utiliser en cas de doute et contacter votre partenaire service NOVATECH. Restrictions de réutilisation Le kit de pose TONN et le bronchoscope STORZ sont adaptés pour des utilisations multiples conformément aux instructions exposées ci-dessous. La fin de vie d’un produit est normalement déterminée par usure et déchirure au fur et à mesure de l’utilisation. Des instruments ou des parties d’instruments abîmés ou usés doivent être retirés et mis au rebut. La responsabilité pour un usage prolongé de dispositifs abîmés et/ou contaminés repose uniquement sur l’utilisateur. Lors du choix des agents nettoyants ou désinfectants, s’ assurer qu’ils ne contiennent pas les ingrédients suivants : • acides organiques, minéraux ou oxydants (liquides corrosifs) ; un nettoyant neutre, enzymatique est recommandé. • détergents forts 4 • halogènes (chlorite, iodine, bromine) • solvants organiques (c’est-à-dire alcools, éthers, ketones, benzines) • hydrocarbones aromatiques/halogénés • sels de métaux lourds Ne jamais nettoyer les instruments, plateaux de stérilisation et conteneurs de stérilisation avec des brosses métalliques ou des tampons métalliques. Les instruments, plateaux de stérilisation et conteneurs de stérilisation peuvent seulement être exposés à une température maximum de 141° C (286° F) sauf avis différent du fabricant. Lieu d’utilisation. Veuillez vous assurer que les instruments contaminés et les produits sont collectés séparément et non renvoyés vers les plateaux d’instruments pendant la pose, pour éviter une contamination ultérieure des plateaux d’instruments chargés. Stockage et transport. Pas d’exigences spéciales ne s’appliquent pour le stockage et le transport. Les instructions pour le nettoyage de l’instrument décrites ci-dessous doivent être exécutées dans les 2 heures après utilisation de l’instrument. Préparatifs de nettoyage Pour le nettoyage, les instruments doivent d’abord être démontés : Ouvrir le kit de pose TONN et s’assurer que le système repliable est retiré du bloc de base pendant l’opération de nettoyage/stérilisation. Retirer tous les accessoires du bronchoscope STORZ et nettoyer séparément les éléments démontés. Des mesures de prétraitement doivent être effectuées avant nettoyage et désinfection automatique et manuel. Utiliser de l’eau courante ou un désinfectant pour enlever le plus gros de la contamination. Le désinfectant utilisé devra être sans aldéhyde, son efficacité devra être documentée et il devra être indiqué pour les instruments et compatible avec ceux-ci. Pour enlever manuellement les contaminations, toujours utiliser une brosse douce ou un chiffon doux propre réservé à ce seul usage. Ne jamais utiliser de brosses métalliques ou de tampons métalliques ! Rincer tous les conduits de l’instrument au moins cinq fois – plus encore si nécessaire – au moyen d’une seringue à usage unique d’au moins 10 ml). De plus, tous les conduits du bronchoscope devront être soigneusement brossés. Noter que le désinfectant utilisé pour le prétraitement sert seulement à protéger la personne en charge de la procédure. Il ne peut pas remplacer des procédures de désinfection ultérieures après le nettoyage. L’ensemble est réassemblé sous conditions aseptiques directement avant l’intervention. Dans cet assemblage, noter les instructions sous « Assemblage avant utilisation ». Procédure de nettoyage automatique. Noter ce qui suit lors de la sélection du dispositif de nettoyage et de désinfection : • L’efficacité du dispositif de nettoyage et de désinfection doit toujours être documentée (par conséquent, vous conformer avec les recommandations légales de votre pays). • Un programme certifié de désinfection thermique doit être utilisé (pour un minimum de 10 mn à 93°C). • Il faut s’assurer que le programme appliqué est adapté pour les instruments et contient un nombre adéquat de cycles de rinçage. • Il faut s’assurer qu’uniquement de l’eau stérile ou de l’eau avec une teneur faible en germes (max. 10 germes/ml) et de l’eau avec une teneur faible en endotoxines (c’est-à-dire eau purifiée/eau hautement purifiée avec max. 0,25 unités d’endotoxines/ml) est utilisée pour le cycle médian ou les rinçages finaux. • Il faut s’assurer que seul de l’air filtré est utilisé pour le processus de séchage et • que le dispositif de nettoyage ou de désinfection est régulièrement entretenu et contrôlé. 5 Lors du choix du système d’agent nettoyant, il faut s’assurer qu’il est adapté pour le nettoyage d’instruments fabriqués en métal et en plastique, et compatible avec le dispositif de nettoyage et de désinfection utilisé. Les instructions fournies par le fabricant du nettoyant et du désinfectant ou le dispositif de nettoyage et de désinfection du fabricant concernant les concentrations et l’utilisation des produits doivent toujours être jointes. Procédure: 1.Placer l’instrument déjà démonté dans le dispositif de nettoyage et de désinfection. S’assurer que les éléments de l’instrument ne viennent pas en contact les uns avec les autres. Attacher tous les conduits de l’instrument au moyen d’un adaptateur de rinçage adapté à la connexion de rinçage du dispositif de nettoyage et de désinfection. 2. Commencer le programme (désinfection pour un minimum de 10 minutes à 93°). 3. Retirer les éléments de l’instrument du dispositif de nettoyage et désinfection après le déroulement complet du programme. Exécuter les étapes suivantes immédiatement si possible : 4. Sécher les éléments de l’instrument si nécessaire. 5.Vérifier que les éléments de l’instrument ne sont pas endommagés. 6.Si nécessaire, trier les instruments nettoyés et désinfectés sur des plateaux adaptés. 7.Emballer les éléments de l’instrument/les plateaux chargés d’instrument. Pour une liste de produits appropriés au nettoyage automatique (nonobstant des restrictions mentionnées ci-dessus), cf page 23. Dans le cas où vous souhaitez valider votre propre procédé, il faut considérer le risque de résidus de désinfectant sur le produit pendant la désinfection chimique. En cas de doute, veuillez contacter votre partenaire service NOVATECH. Procédé de nettoyage manuel Un procédé de nettoyage automatique (dispositif de nettoyage et désinfection) comme décrit ci-dessus devrait, si possible, être appliqué pour le nettoyage et la désinfection. A cause de son efficacité significativement réduite et sa répétition, un procédé manuel – incluant l’usage d’un bain aux ultra-sons - devra être appliqué uniquement si une méthode de nettoyage automatique n’est pas disponible. Lors du choix des agents nettoyants et désinfectants, s’assurer de ce qui suit : • Les agents nettoyant et désinfectant devront être adaptés pour utilisation sur instruments fabriqués en métal et plastique. •L’agent nettoyant –si utilisable- devra être adapté pour le nettoyage aux ultra-sons (pas de formation de mousse) et • un agent désinfectant avec une efficacité certifiée et compatible avec l’agent nettoyant utilisé devra être utilisé (par conséquent, noter aussi les recommandations légales de votre pays). Les agents nettoyants/désinfectants combinés ne devront pas être utilisés si possible. Les concentrations et temps d’attente indiqués par le fabricant doivent impérativement être maintenus. Utiliser uniquement des solutions qui viennent d’être préparées, de l’eau stérile ou de l’eau avec un taux faible de germes (max. 10 germes/ml) et de l’eau (c’est-à-dire de l’eau purifiée/ de l’eau hautement purifiée) avec un faible taux d’endotoxines (max. 0,25 unités d’endotoxines/ml). Utiliser uniquement de l’air filtré pour le processus de séchage. Procédure : 1.Placer l’instrument déjà démonté dans le bain de nettoyage pour le temps de trempage stipulé, de façon que toutes les parties soient suffisamment couvertes (on peut utiliser soit un bain à ultrasons, soit un brossage soigneux avec une brosse douce). S’assurer que les pièces d’instruments 6 n’entrent pas en contact les unes avec les autres. Rincer tous les conduits cinq fois au début et cinq fois à la fin du temps de trempage au moyen d’une seringue à usage unique (seringue d’un volume minimum de 10 ml) et un raccord de rinçage adapté. 2.Ensuite enlever toutes les parties d’instrument du bain de nettoyage et les rincer soigneusement à l’eau au moins trois fois. Rincer tous les conduits de l’instrument au moins cinq fois au moyen d’une seringue à usage unique (seringue d’un volume minimum de 10 ml) et un raccord de rinçage adapté. 3.Pour la désinfection, placer les parties d’instrument démontées nettoyées et inspectées dans le bain désinfectant pour le temps de trempage stipulé, de façon que toutes les parties d’instrument soient suffisamment couvertes. S’assurer que les parties d’instrument n’entrent pas en contact les unes avec les autres. Rincer tous les conduits de l’instrument au moyen d’une seringue à usage unique (volume de seringue d’au moins 10 ml) et un raccord de rinçage adapté, cinq fois au début et cinq fois à la fin du temps de trempage. 4.Ensuite, enlever les parties d’instrument du bain désinfectant et les rincer soigneusement à l’eau au moins trois fois. Rincer tous les conduits de l’instrument au moins cinq fois au moyen d’une seringue à usage unique (seringue d’un volume minimum de 10 ml) et un raccord de rinçage adapté. Exécuter les étapes suivantes immédiatement si possible : 5.Sécher les parties d’instrument si nécessaire 6.Contrôler qu’aucune partie d’instrument n’est abîmée 7. Si nécessaire, trier les instruments nettoyés et désinfectés dans les plateaux à instruments adaptés 8.Emballer les parties d’instrument/les plateaux d’instruments chargés. Pour une liste de produits appropriés au nettoyage manuel (nonobstant des restrictions mentionnées ci-dessus), cf page 24. Désinfection Le procédé de désinfection appliqué est décrit de façon plus détaillée dans la section “Nettoyage”. Séchage Si un séchage ultérieur est requis, s’assurer qu’il est exécuté dans un endroit propre pour éviter la recontamination des parties déjà nettoyées et désinfectées. Maintenance Les huiles pour instruments devront si possible, ne pas être utilisées. Si leur usage est nécessaire, il faudra alors s’assurer que seules des huiles pour instruments (huile blanche pharmaceutique/lubrifiants chirurgicaux) soient utilisées, lesquelles devront être garanties pour utilisation en stérilisation à la vapeur et de biocompatibilité vérifiée, avec prise en compte de la température de stérilisation maximum. Utiliser l’huile pour instrument uniquement sur les parties chargées mécaniquement et les parties amovibles (l’usage intensif pour prévenir la corrosion n’est ni nécessaire ni permis). Nous recommandons l’utilisation d’un lubrifiant développé par NOVATECH (grade pharmaceutique). Contrôle et test de fonctionnement Effectuer un contrôle visuel pour la corrosion, les surfaces abîmées, les déformations, les éclats et contaminations suivant le processus de désinfection. Eliminer les instruments ou parties d’instruments abîmées ne fonctionnant pas parfaitement et répéter le processus de nettoyage et désinfection dans le cas d’instruments contaminés. Contrôler les composants amovibles pour leur capacité fonctionnelle et leur complète mobilité. Si nécessaire, contacter votre partenaire service NOVATECH. Emballage Emballer les instruments ou les plateaux de stérilisation avec instruments en utilisant un emballage stérile à usage unique (simple ou double emballage) et/ou des conteneurs de stérilisation. Pour ce 7 faire, les exigences suivantes doivent être remplies concernant les emballages qui doivent : • être conformes aux recommandations légales de votre pays. • être adaptés à la stérilisation à la vapeur (avec une résistance à la température d’au moins 141°C (286°F) et d’une perméabilité adéquate à la vapeur. • protéger de façon adéquate les instruments et emballages de stérilisation contre les dommages mécaniques. • être de la taille adéquate pour assurer que le joint scellé n’est pas sous pression mécanique. • être régulièrement révisés en conformité avec les instructions du fabricant (conteneurs de stérilisation). Stérilisation La stérilisation à la vapeur doit être appliquée pour stériliser les kits de pose TONN et les bronchoscopes STORZ. Une procédure sous vide fractionnée ou procédure de gravitation (avec le séchage adapté du produit) doit être appliquée. S’assurer que le stérilisateur est conforme aux recommandations légales de votre pays. Une température de stérilisation de 141°C (286°F) ne doit pas être dépassée. Une durée de stérilisation (temps d’exposition à température de stérilisation) d’au moins 5 minutes1 à 134°C (273°F) doit y être attachée. La stérilisation à air chaud, à rayons X et la stérilisation avec oxyde de formaldéhyde ou d’éthylène n’ont pas pour l’instant été validées. Si nécessaire, veuillez contacter votre partenaire service NOVATECH pour plus d’informations. Stockage S’assurer qu’après le processus de stérilisation, les parties d’instruments dans leurs emballages de stérilisation sont stockées dans un endroit sec et sans poussière. Le filtre de remplacement media BM90KNMS12 doit être stocké à température ambiante à l’abri de la lumière. Assemblage avant utilisation Les kits de pose TONN et les bronchoscopes STORZ sont réassemblés sous conditions aseptiques directement avant l’intervention. Informations supplémentaires Les instructions mentionnées ci-dessus ont été validées par NOVATECH comme étant ADAPTEES pour la préparation du processus d’un dispositif médical avant pose. La personne en charge de la procédure du produit est responsable pour assurer que le véritable processus conduit aux résultats désirés en utilisant l’équipement, le matériel et le personnel dans l’unité de procédure. Ceci exige normalement une validation de procédure et une surveillance de routine. De plus, toute déviation des instructions fournies par la personne en charge doit être soigneusement évaluée pour l’efficacité et des effets préjudiciables possibles. Contact avec le fabricant Contacter votre partenaire service local ou nous joindre via www.novatech.fr si vous avez des questions concernant le produit, un compte-rendu ou des suggestions pour l’amélioration. Retours N.B.: Un instrument doit être nettoyé, décontaminé et stérilisé avant de nous être renvoyé pour traitement/réparation. 1 ou au moins 18 minutes pour l‘inactivation des prions 8 English Intended use The TONN placement kit is designed to fold and insert Dumon® silicone stents without kinking into bronchoscopes and to place them in cases of benign and malignant tracheobronchial stenoses. basic block clamping rod pusher folding system loading rod introducer tube Instructions for use Place the basic block onto the folding system and lubricate generously (1). We recommend using a lubricant developed by NOVATECH (pharmaceutical grade). Lubrication is essential in order to facilitate placement and to avoid stent damage. Lubricate the stent, too 3 4 (2). Position the stent centrally on the folding system (3). Insert the clamping rod by inserting its end into the provided hole in the basic block (on the side with the NOVATECH logo). Fold the stent by pushing down the clamping rod (4). Block the clamping 5 6 rod in the basic block by rotating the rod one quarter. Close the folding system ensuring that the stent is pushed inside completely (5). Lock the folding system, pushing the slider with the coloured button first to the right side, then to the left. The folding system must be closed completely (6). 1 2 9 7 Remove the clamping rod together with the folding system by rotating the rod one quarter. Pull the clamping rod out of the folding system (8). Note: In case of a lack of lubrication the stent might come out along with the clamping rod. In this case, 9 10 simply start the procedure from the beginning. Lubricate the inside of the introducer tube generously (9). Insert the introducer tube into the folding system (see mark on the folding system, 10). By assuring that the NOVATECH logo 11 12 is on top of the introducer tube (11), you can identify the position of the stent at any time. This is especially beneficial when Y-stents are placed (see „Placement of Y-stents“). Insert the loading rod into the folding system (see mark on the folding system, 12). Hold the folding system with the inserted introducer tube and loading rod in a vertical position. Apply light pressure to the loading rod, carefully pushing the stent inside the tube (13). The loading rod cannot 14 15 13 be pushed beyond the security point (14). Withdraw the introducer tube from the folding system. The stent is positioned inside the introducer tube (15). Introduce the pusher into the proximal end of the introducer tube. The 17 18 graduation on the pusher indicates 16 the exact length of the stent inside the introducer tube (16). By applying pressure onto the pusher, the stent is easily released (17, 18) through a STORZ bronchoscope. 10 8 Placement of Y-Stents 19 21 23 24 The position of the main branches can be checked before placement and the risk of damaging such a stent is minimised. Lubricate the applicator system as described above. Place the Y-stent in the folding system with 20 its right branch on the upper side of the folding system (19). Fold the stent with the help of the clamping rod (20) as described above. Close the folding system locking the stent inside (21). Important: Ensure that the NOVATECH logo is on top when 22 inserting the introducer tube (22). This ensures that the right branch of the stent will be placed on the right hand side of the logo and will therefore be inserted in the main right bronchus (23, 24). Keeping the NOVATECH logo on top assures correct placement of the stent within the trachea before placing it in the main carina. This result is obtained with all Y-stents and tracheal stents with diameters of 18 and 20 as those stents have no studs on the posterior part. The red TONN/NOVATECH system enables the user to place large Y-stents. Warning and precautionary measures Use only cleaned and sterilised instruments from intact sterile packaging or sterile containers. Effective cleaning and disinfection is a vital prerequisite for effective sterilisation. Within the scope of your responsibility for the sterility of the instrument during its application, please take the following into account: • Only apply equipment- and product-specific cleaning / disinfection and sterilisation procedures that have been adequately validated. • Regularly service and check the equipment used (cleaning and disinfection device, sterilizer) and • ensure that the validated parameters are maintained during each cycle. Please only use defect-free products as a matter of principle and give each instrument a brief visual and functional check before using it on the patient. Do not use in case of doubt and contact your NOVATECH service partner. Please also note the statutory and hygiene provisions of the doctor’s surgery / hospital applicable in your country, particularly with regard to the different guidelines on the effective inactivation of prions. Reprocessing restrictions The TONN placement kit and STORZ bronchoscopes are suitable for multiple reprocessing in accordance with the instructions set out below. The end of product life is normally determined by wear and tear and damage through use. Damaged and worn instruments or instrument parts have to be sorted out and discarded. The responsibility for the further use of damaged and / or contaminated devices lies solely with the user. When selecting the cleaning or disinfecting agents, please make sure that they do not contain the following ingredients: • organic, mineral or oxidising acids (corrosive liquids); a neutral / enzymatic cleaner is recommended • strong lyes 11 • halogens (chlorine, iodine, bromine) • organic solvents (e.g. alcohols, ethers, ketones, benzines) • aromatic / halogenated hydrocarbons • heavy metal salts. Never clean the instruments, sterilisation trays and sterilisation containers with metal brushes or wire wool. Instruments, sterilisation trays and sterilisation containers may only be exposed to a maximum temperature of 141°C (286°F) unless stated otherwise by the manufacturer. Place of use Please ensure that contaminated instruments and products are collected separately and not returned to the instrument trays during the application to avoid further contamination of the loaded instrument trays. Storage and transport No special requirements apply for storage and transport. The instructions for the cleaning of the instrument set out below have to be performed within 2 hours after the use of the instrument. Cleaning preparations For cleaning, instruments must be disassembled first: Open the TONN placement kit and ensure that the folding system is removed from the basis block during cleaning / sterilisation. Remove all accessories from the STORZ bronchoscope and clean the disassembled components separately. Pre-treatment measures must be performed before automatic and manual cleaning and disinfection. Please use running water or a disinfectant to remove gross contamination. The applied disinfectant should be aldehyde-free, its effectiveness should be documented and it should be suitable for and compatible with the instruments. To manually remove contaminations, please always use a soft brush or a clean soft cloth which you only use for this purpose. Never use metal brushes or wire wool! Rinse all lumina of the instrument at least five times ‑ more often if required ‑ by means of a singleuse syringe (syringe volume at least 10 ml). In addition, all lumina of the bronchoscope should be carefully brushed. Please note that the disinfectant used for pre-treatment only serves to protect the person in charge of the processing. It cannot replace subsequent disinfection procedures after cleansing. The bone dust collector is reassembled under aseptic conditions directly before the intervention. In this connection, please note the instructions under “Assembly before use”. Automatic cleaning process Please note the following when selecting the cleaning and disinfection device: • The effectiveness of the cleaning and disinfection device must always be documented (in this respect, please comply with the statutory provisions of your country). • A certified thermal disinfection program must be used (for a minimum of 10 min at 93°C). • It must be ensured that the applied program is suitable for the instruments and contains an adequate number of rinsing cycles. • It must be ensured that only sterile water or water with low germ content (max. 10 germs/ml) and water with low endotoxin content (e.g. purified water / highly purified water with max. 0.25 endotoxin units/ml) is used for mid-cycle or final rinses. • It must be ensured that only filtered air is used for the drying process and • that the cleaning or disinfection device is regularly serviced and checked. When selecting the cleaning agent system, it must be ensured that it is suitable for the cleaning of instruments made of metal and plastic materials, and compatible with the cleaning and disinfection device that you use. 12 The instructions issued by the cleaner / disinfectant manufacturer or the cleaning and disinfection device manufacturer with regard to concentrations and the use of the products must be adhered to at all times. Procedure: 1.Place the already disassembled instrument into the cleaning and disinfection device. Please ensure that the instrument parts do not come into contact with each other. Attach all lumina of the instrument by means of a suitable rinse adaptor to the rinsing connection of the cleaning and disinfecting device. 2.Start the program (disinfection for a minimum of 10 minutes at 93°C). 3.Remove the instrument parts from the cleaning and disinfection device after the successful completion of the program. Please execute the following steps immediately if possible: 4.Dry the instrument parts if required. 5.Check the instrument parts for any damage. 6.If required, sort the cleaned and disinfected instruments in suitable the instrument trays. 7.Package the instrument parts / the loaded instrument trays. Regardless of the above indicated restrictions, please find a list of agents suitable for automatic cleaning and disinfection on page 23. In case you wish to validate your own process, please consider the risk of disinfectant residues on the product during chemical disinfection. In case of doubt, please contact your NOVATECH service partner. Manual cleaning process An automatic cleaning process (cleaning and disinfection device) as described above should, if possible, be applied for cleaning and disinfection. Due to its significantly reduced effectiveness and repeatability, a manual process - including the use of an ultrasound bath - should only be applied if an automatic cleaning method is not available. When selecting the cleaning and disinfecting agents, please ensure the following: • The cleaning and disinfecting agents should be suitable for use on instruments made of metal and plastic materials. • The cleaning agent - if applicable - should be suitable for ultrasonic cleaning (no foam formation) and • a disinfecting agent with a certified effectiveness and compatible with the applied cleaning agent should be used (in this connection, please also note the statutory provisions in your country). Combined cleaning / disinfecting agents should not be used if possible. The concentrations and residence times stated by the manufacturer must be maintained without fail. Please only use freshly prepared solutions, sterile water or water with low germ content (max. 10 germs/ml) and water (e.g. purified water / highly purified water) with low endotoxin content (max. 0.25 endotoxin units/ml). Use only filtered air for the drying process. Procedure: 1.Place the already disassembled instrument into the cleaning bath for the stipulated residence time so that all parts are sufficiently covered (possibly with ultrasonic support or careful brushing using a soft brush). Please ensure that the instrument parts do not come into contact with each other. Rinse all lumina five times at the beginning and five times at the end of the residence time by means of a single-use syringe (syringe volume at least 10 ml) and a suitable rinsing adapter. 2.Subsequently remove all instrument parts from the cleaning bath and thoroughly rinse them with water at least three times. Rinse all lumina of the instruments at least five times by means of a single-use syringe (syringe volume at least 10 ml) and a suitable rinsing adapter. 13 3.For disinfection, place the disassembled, cleaned and inspected instrument parts into the disinfecting bath for the stipulated residence time so that all instrument parts are sufficiently covered. Please ensure that the instrument parts do not come into contact with each other. Rinse all lumina of the instrument by means of a single-use syringe (syringe volume at least 10 ml) and a suitable rinsing adapter five times at the beginning and five times at the end of the residence time. 4.Subsequently remove the instrument parts from the disinfecting bath and thoroughly rinse them with water at least three times. Rinse all lumina of the instrument at least five times by means of a single-use syringe (syringe volume at least 10 ml) and a suitable rinsing adapter. Please execute the following steps immediately if possible: 5.Dry the instrument parts if required. 6.Check the instrument parts for any damage. 7.If required, sort the cleaned and disinfected instruments in suitable the instrument trays. 8.Package the instrument parts / the loaded instrument trays. Regardless of the above indicated restrictions, please find a list of agents suitable for manual cleaning and disinfection on page 24. Disinfection The applied disinfection process is described in more detail in the “Cleaning” section. Drying If further drying is required, please ensure that it is performed in a clean location to avoid recontamination of the already cleaned and disinfected parts. Maintenance Instrument oils should, if possible, not be used. If their use is required, then it should be ensured that only instrument oils (pharmaceutical white oil / surgical lubricants) are used which are licensed for use in vapour sterilisation and which have verified biocompatibility, taking into account the maximum sterilisation temperature. Use the instrument oil only on mechanically loaded and movable parts (large-scale use to prevent corrosion is not necessary and not permitted). We recommend using a lubricant developed by NOVATECH (pharmaceutical grade). Inspection and functional testing Please perform a visual check for corrosion, damaged surfaces, deformations, chipping and contaminations following the disinfection process. Eliminate damaged and not fully functioning instruments or instrument parts and repeat the cleaning and disinfection process in the case of contaminated instruments. Check movable components for their functional capability and free movement. If required, get in touch with your NOVATECH service partner. Packaging Package the instruments or the sterilisation trays with the instruments using single-use sterile packaging (single or double packaging) and / or sterilisation containers. To do this the following requirements must be met: • They conform to the statutory provisions of your country. • They are suitable for vapour sterilisation (with a temperature resistance of at least 141°C (286°F) and adequate vapour permeability). • They adequately protect the instruments / sterilisation packages against mechanical damage. • They are adequately sized to ensure that the sealed seam is not under mechanical strain. • They are regularly maintained in accordance with manufacturer’s instructions (sterilisation containers). 14 Sterilisation Vapour sterilisation must be applied to sterilise the TONN placement kits and the STORZ bronchoscopes. A fractionated vacuum procedure or gravitation procedure (with adequate product drying) is to be applied. Please ensure that the sterilizer conforms with the statutory provisions of your country. A sterilisation temperature of 141°C (286°F) may not be exceeded. A sterilisation time (exposure time at sterilisation temperature) of at least 5 min1 at 134°C (273°F) must be adhered to. Hot-air sterilisation, X-ray sterilisation and sterilisation with formaldehyde or ethylene oxide have so far not been validated. If required, please contact your NOVATECH service partner for further information. Storage Ensure that following the sterilisation process the instrument parts in their sterilisation packages are stored dry and dust-free. The replacement filter media BM90KNMS12 must be stored at room temperature in a dark place. Assembly before use The TONN placement kits and the STORZ bronchoscopes are reassembled under aseptic conditions directly before the intervention. Additional information The instructions stated above were validated by NOVATECH as being SUITABLE for the preparation of the processing of a medical device before application. The person in charge of the processing of the product is responsible for ensuring that the actual process leads to the desired results using the equipment, materials and staff in the processing unit. This normally requires process validation and routine monitoring. In addition, any deviation from the instructions provided by the person in charge must be evaluated carefully for effectiveness and possible detrimental effects. Contact to manufacturer Please contact your local service partner or get in touch with us via www.novatech.fr if you have any queries with regard to the product, any feedback or suggestions for improvement. Return consignment N.B.: An instrument must be cleaned, decontaminated and sterilised before it is sent back to us for processing / repair. 1 or at least 18 min (prion inactivation) 15 Deutsch Bestimmungszweck Das TONN-Platzierset dient dem verwindungsfreien Falten und Einbringen von Dumon®-Stents in Bronchoskope und zum anschließenden Applizieren der Silikonstents bei malignen und benignen tracheobronchialen Stenosen. Basisblock Spannstab Pusher Faltsystem Stent-Einführer Platziertubus Anwendungshinweise Setzen Sie das geöffnete Faltsystem in die Nut des Basisblocks. Versehen Sie das Faltsystem großzügig mit Gleitmittel (1). Wir empfehlen die Verwendung eines von NOVATECH entwickelten Gleitmittels (pharmaceutical grade). Versehen Sie auch den Stent mit Gleitmittel, um die Platzierung 3 4 zu erleichtern und einer evtl. Beschädigung vorzubeugen (2). Legen Sie den Stent mittig in das Faltsystem (3). Die dorsale Seite von Y-Stents sowie TD-Stents mit Durchmesser > 16 mm hat keine Noppen. Bei der Verwendung solcher Stents muss die dorsale (glatte) Seite im Faltsystem nach unten zeigen, damit im weiteren Verlauf der Platzierung die korrekte Lage des Stents überprüfbar ist. Setzen Sie den Spannstab in die vorgesehene Bohrung im Basisblock (auf der Seite mit dem NOVATECHLogo). Drücken Sie den Spannstab herunter und falten Sie so den Stent (4). Fixieren Sie den Spannstab, indem Sie ihn mit waagerecht stehendem Griffteil in den Schlitz des Basisblocks einsetzen und um ca. 90° drehen. 1 16 2 Schließen Sie das Faltsystem (5) und achten Sie darauf, dass der Stent vollständig eingeschlossen ist. Schieben Sie die Verriegelung mit dem farbigen Punkt (im Bild rot) erst nach rechts, dann nach links (6). Stellen Sie sicher, dass das Faltsystem vollständig geschlossen ist. Ist dies 7 8 nicht möglich, weil der Stent einen zu großen Durchmesser hat, muss das nächst größere TONN/NOVATECH Platzierset verwendet werden. Drehen Sie den Spannstab um 90° und entnehmen Sie das Faltsystem aus dem Basisblock (7). 9 10 Ziehen Sie den Spannstab aus dem Faltsystem (8). Falls der Stent nicht ausreichend mit Gleitmittel versehen wurde, kann es vorkommen, dass er beim Entfernen des Spannstabes ebenfalls herausgezogen wird. Beginnen Sie in diesem Fall wieder 11 12 bei (1) und achten Sie darauf, das Innere des Faltsystems großzügig mit Gleitmittel zu versehen. Versehen Sie dann das Innere des Platziertubus reichlich mit Gleitmittel (9). Führen Sie den Platziertubus an dem dafür vorgesehenen Ende (Beschriftung: „Introducer Tube“) in das Faltsystem ein (10). Die dorsale Seite von Y-Stents sowie TD-Stents mit Durchmesser > 16 mm hat keine Noppen. Bei der Verwendung solcher Stents ist die korrekte Lage im weiteren Verlauf der 14 15 Platzierung überprüfbar, sofern das 13 NOVATECH-Logo auf dem Platzierset beim Einführen in das Faltsystem nach oben zeigt (11). Lesen Sie hierzu auch Punkt 19-24 „Platzierung von Bifurkations-Stents“. Führen Sie den Stent-Einführer an der mit 17 18 „Loading Rod“ beschrifteten Seite in 16 das Faltsystem ein (12). Halten Sie das Faltsystem mit eingeführtem Platziertubus und Stent-Einführer in vertikaler Position. Drücken Sie den Stent-Einführer in das Faltsystem und schieben Sie den Stent so in den Platziertubus (13). Der Stent-Einführer kann nur bis zum Anschlag eingeführt werden (14). Ziehen Sie den Platziertubus aus dem Faltsystem heraus. Der gefaltete Stent befindet sich komplett im Platziertubus (15). Führen Sie den Pusher in den Platziertubus ein. Die Skala auf dem Pusher zeigt die genaue Länge des Stents an (16). Durch ein Storz Bronchoskop kann der Stent jetzt platziert werden, indem Sie den Pusher in den Platziertubus drücken und so den Stent herausschieben (17, 18). 5 6 17 Platzierung von Bifurkations-Stents (Y-Stents) 19 21 23 Das TONN/NOVATECH Platzierset ermöglicht auch das Einsetzen großer Bifurkations-Stents. Die Position der bronchialen Schenkel kann überprüft werden und das Risiko einer Beschädigung des Stents 20 wird minimiert. Versehen Sie das Platzierset mit Silikon-Spray wie oben beschrieben. Legen Sie den Bifurkations-Stent in das Faltsystem, wobei die dorsale, noppenfreie, Seite nach unten zeigt (19). Falten Sie den Stent mithilfe des Spannstabs und 22 schließen Sie das Faltsystem wie oben beschrieben (20, 21). Wichtig: Achten Sie darauf, dass das NOVATECH-Logo auf dem Platziertubus nach oben zeigt (22), um im weiteren Verlauf der Platzierung die seitenrichtige Position des Stents in der Trachea sicherzustellen, bevor er in der Carina platziert wird (23, 24). 24 Warnhinweise und Vorsichtsmaßnahmen Verwenden Sie grundsätzlich nur gereinigte und sterilisierte Instrumente sowie Produkte in unversehrter Sterilverpackung bzw. unversehrtem Sterilcontainer. Eine wirksame Reinigung und Desinfektion ist eine unabdingbare Voraussetzung für eine effektive Sterilisation. Bitte beachten Sie im Rahmen Ihrer Verantwortung für die Sterilität der Instrumente bei der Anwendung, dass • grundsätzlich nur ausreichend geräte- und produktspezifisch validierte Verfahren für die Reinigung / Desinfektion und Sterilisation eingesetzt werden, • die eingesetzten Geräte (Reinigungs- und Desinfektionsgerät (RDG), Sterilisator) regelmäßig gewartet und überprüft werden und • die validierten Parameter bei jedem Zyklus eingehalten werden. Verwenden Sie grundsätzlich nur mängelfreie Produkte und unterziehen Sie das Instrument vor dem Einsatz am Patienten einer kurzen Funktions- und Sichtkontrolle. Im Zweifelsfall sehen Sie von einer Verwendung ab und kontaktieren Sie Ihren bess Servicepartner. Bitte beachten Sie zusätzlich die in Ihrem Land gültigen Rechtsvorschriften sowie die Hygienevorschriften der Arztpraxis bzw. des Krankenhauses. Dies gilt insbesondere für die unterschiedlichen Vorgaben hinsichtlich einer wirksamen Prioneninaktivierung. Einschränkung der Wiederaufbereitung Das TONN Platzierset und STORZ Bronchoskope (REF 10318 ..) sind für die mehrfache Wiederaufbereitung gemäß dieser Anleitung geeignet. Das Ende der Produktlebensdauer wird normalerweise von Verschleiß und Beschädigung durch Gebrauch bestimmt. Beschädigte und verschlissene Instrumente bzw. Instrumententeile sind auszusortieren. Jede darüber hinausgehende Weiterverwendung bzw. die Verwendung von beschädigten und / oder verschmutzten Instrumenten liegt in der Verantwortung des Anwenders. Achten Sie bei der Auswahl der Reinigungs- und Desinfektionsmittel bitte darauf, dass folgende Bestandteile nicht enthalten sind: • organische, mineralische und oxidierende Säuren (ein neutraler / enzymatischer Reiniger wird 18 empfohlen) • starke Laugen • Halogene (Chlor, Jod, Brom) • organische Lösungsmittel (z.B. Alkohole, Ether, Ketone, Benzine) • aromatische / halogenierte Kohlenwasserstoffe • Salze von Schwermetallen. Reinigen Sie Instrumente, Sterilisationstrays und Sterilisationscontainer nie mit Metallbürsten oder Stahlwolle. Instrumente, Sterilisationstrays und Sterilisationscontainer dürfen nur Temperaturen bis maximal 141°C (286°F) ausgesetzt werden, soweit vom Hersteller nicht anders angegeben. Gebrauchsort Bitte achten Sie bereits bei der Anwendung darauf, dass Sie verschmutzte Instrumente getrennt sammeln und nicht zurück in die Instrumententrays legen, um eine stärkere Kontamination der bestückten Instrumententrays zu vermeiden. Aufbewahrung und Transport Es sind keine besonderen Anforderungen hinsichtlich der Aufbewahrung und des Transportes des TONN Platziersets und der STORZ Bronchoskope zu beachten. Die unten beschriebene Reinigung des Instrumentes muss innerhalb von 2 Stunden nach Einsatz durchgeführt werden. Reinigungsvorbereitung Zur Reinigung müssen Instrumente zunächst demontiert werden: Das TONN-Platzierset muss hierzu lediglich geöffnet werden, das Faltsystem darf während der Reinigung / Sterilisation nicht im Basisblock eingesetzt sein. Entfernen Sie von STORZ Bronchoskopen alle Zubehörteile, um alle Bestandteile einer anschließenden Reinigung zuführen zu können. Sowohl vor der automatischen, als auch vor der manuellen Reinigung und Desinfektion ist eine Vorbehandlung durchzuführen. Verwenden Sie dabei zur Entfernung grober Verunreinigungen fließendes Wasser oder eine Desinfektionsmittellösung. Das eingesetzte Desinfektionsmittel sollte aldehydfrei sein, eine geprüfte Wirksamkeit besitzen, für die Desinfektion der Instrumente geeignet und mit den Instrumenten kompatibel sein. Nutzen Sie zur manuellen Entfernung von Verunreinigungen ausschließlich eine weiche Bürste oder ein sauberes weiches Tuch, die sie nur für diesen Zweck verwenden, nie aber Metallbürsten oder Stahlwolle. Spülen Sie alle Lumina des Instruments mindestens fünfmal – im Bedarfsfalle häufiger – unter Verwendung einer Einmalspritze (Spritzenvolumen mind. 10 ml). Alle Lumina des Bronchoskops sollten zusätzlich durchgebürstet werden. Bitte beachten Sie, dass das bei der Vorbehandlung eingesetzte Desinfektionsmittel nur dem Schutz des Bearbeiters dient und den späteren – nach erfolgter Reinigung – durchzuführenden Desinfektionsschritt nicht ersetzen kann. Reinigung: Automatisch Bei der Auswahl des Reinigungs- und Desinfektionsgerätes (RDG) ist darauf zu achten, dass • das RDG grundsätzlich eine geprüfte Wirksamkeit besitzt (beachten Sie hierzu insbesondere die in Ihrem Land gültigen Rechtsvorschriften), • ein geprüftes Programm zur thermischen Desinfektion (mind. 10 min bei 93°C) eingesetzt wird, • das eingesetzte Programm für Instrumente aus Metallen und Kunststoffen geeignet ist und ausreichende Spülzyklen enthält, • zum Nachspülen nur steriles oder keimarmes (max. 10 Keime/ml) sowie endotoxinarmes (max. 0,25 Endotoxineinheiten/ml) Wasser (z.B. purified water / highly purified water) eingesetzt wird, • die zum Trocknen eingesetzte Luft gefiltert wird und • das RDG regelmäßig gewartet und überprüft wird. 19 Bei der Auswahl des eingesetzten Reinigungsmittelsystems ist darauf zu achten, dass dieses grundsätzlich für die Reinigung von Instrumenten aus Metallen und Kunststoffen geeignet ist und mit dem von Ihnen eingesetzten RDG kompatibel ist. Die vom Hersteller des Reinigungs- und ggf. Desinfektionsmittels bzw. RDGs angegebenen Konzentrationen und Anwendungshinweise müssen unbedingt eingehalten werden. Ablauf: 1.Legen Sie das im Rahmen der Vorbehandlung bereits zerlegte Instrument in das RDG ein. Achten Sie dabei darauf, dass die Instrumententeile sich nicht berühren. Schließen Sie alle Lumina des Instruments unter Verwendung eines geeigneten Spüladapters am Spülanschluss des RDGs an. 2.Starten Sie das Programm (Desinfektion mind. 10 min bei 93°C). 3.Entnehmen Sie die Instrumententeile nach erfolgreichem Programmende dem RDG. Führen Sie die folgenden Schritte möglichst umgehend aus: 4.Falls erforderlich, trocknen Sie die Instrumententeile. 5.Kontrollieren Sie die Instrumententeile auf Beschädigungen. 6.Sortieren Sie die gereinigten und desinfizierten Instrumententeile ggf. in geeignete Sterilisationstrays ein. 7.Verpacken Sie die Instrumententeile bzw. Sterilisationstrays mit den Instrumententeilen. Auf Seite 23 finden Sie eine Liste von Mitteln, die, unabhängig vorgenannter Einschränkungen, für die maschinelle Reinigung und Desinfektion geeignet sind. Sollten Sie eigene Verfahren validieren, beachten Sie insbesondere, dass bei chemischer Desinfektion die Gefahr von Desinfektionsmittelrückständen auf den Instrumenten besteht. Kontaktieren Sie im Zweifelsfall Ihren bess Servicepartner. Reinigung: Manuell Für die Reinigung und Desinfektion sollte nach Möglichkeit ein maschinelles Verfahren (Reinigungsund Desinfektionsgerät) wie oben beschrieben eingesetzt werden. Ein manuelles Verfahren – auch unter Verwendung eines Ultraschallbads – sollte aufgrund der deutlich geringeren Wirksamkeit und Reproduzierbarkeit nur bei Nichtverfügbarkeit eines maschinellen Verfahrens zur Anwendung kommen. Bei der Auswahl der eingesetzten Reinigungs- und Desinfektionsmittel ist darauf zu achten, dass • diese grundsätzlich für die Reinigung bzw. Desinfektion von Instrumenten aus Metallen und Kunststoffen geeignet sind, • das Reinigungsmittel – falls anwendbar – für die Ultraschallreinigung geeignet ist (keine Schaumentwicklung), • ein Desinfektionsmittel mit geprüfter Wirksamkeit eingesetzt wird und • dieses mit dem eingesetzten Reinigungsmittel kompatibel ist (beachten Sie hierzu insbesondere die in Ihrem Land gültigen Rechtsvorschriften). Kombinierte Reinigungs- / Desinfektionsmittel sollten nach Möglichkeit nicht eingesetzt werden. Die vom Hersteller der Reinigungs- und Desinfektionsmittel angegebenen Konzentrationen und Einwirkzeiten müssen unbedingt eingehalten werden. Verwenden Sie nur frisch hergestellte Lösungen, nur steriles oder keimarmes (max. 10 Keime/ml) sowie endotoxinarmes (max. 0,25 Endotoxineinheiten/ ml) Wasser (z.B. purified water / highly purified water) bzw. zum Trocknen nur gefilterte Luft. Ablauf: 1.Legen Sie das im Rahmen der Vorbehandlung bereits zerlegte Instrument für die vorgegebene Einwirkzeit in das Reinigungsbad ein, so dass die Instrumententeile ausreichend bedeckt sind (ggf. Ultraschallunterstützung oder vorsichtiges Bürsten mit einer weichen Bürste). Achten Sie dabei darauf, dass die Instrumententeile sich nicht berühren. Spülen Sie alle Lumina des Instruments fünfmal zu Beginn und fünfmal am Ende der Einwirkzeit unter Verwendung einer Einmalspritze (Spritzenvolumen mind. 10 ml) und eines geeigneten Spüladapters. 2.Entnehmen Sie die Instrumententeile anschließend dem Reinigungsbad und spülen Sie sie 20 mindestens dreimal gründlich mit Wasser nach. Spülen Sie alle Lumina des Instruments mindestens fünfmal unter Verwendung einer Einmalspritze (Spritzenvolumen mind. 10 ml) und eines geeigneten Spüladapters. 3.Legen Sie das zerlegte, gereinigte und kontrollierte Instrument zur Desinfektion für die vom Hersteller des Desinfektionsmittels vorgegebene Einwirkzeit in das Desinfektionsbad ein, so dass die Instrumententeile ausreichend bedeckt sind. Achten Sie dabei darauf, dass Instrumententeile sich nicht berühren. Spülen Sie alle Lumina des Instruments fünfmal zu Beginn und fünfmal am Ende der Einwirkzeit unter Verwendung einer Einmalspritze (Spritzenvolumen mind. 10 ml) und eines geeigneten Spüladapters. 4.Entnehmen Sie die Instrumententeile anschließend dem Desinfektionsbad und spülen Sie sie mindestens dreimal gründlich mit Wasser nach. Spülen Sie alle Lumina des Instruments unter Verwendung einer Einmalspritze (Spritzenvolumen mind. 10 ml) und eines geeigneten Spüladapters mindestens fünfmal. Führen Sie die folgenden Schritte möglichst unmittelbar nach der Desinfektion aus: 5.Falls erforderlich, trocknen Sie die Instrumententeile. 6.Kontrollieren Sie die Instrumententeile auf Beschädigungen. 7.Sortieren Sie die gereinigten und desinfizierten Instrumententeile ggf. in geeignete Sterilisationstrays ein. 8.Verpacken Sie die Instrumententeile bzw. Sterilisationstrays mit den Instrumententeilen. Auf Seite 24 finden Sie eine Liste von Mitteln, die, unabhängig vorgenannter Einschränkungen, für die manuelle Reinigung und Desinfektion geeignet sind. Desinfektion Das anwendbare Verfahren zur Desinfektion ist unter der Rubrik Reinigung beschrieben. Trocknung Sofern eine Nachtrocknung erforderlich ist, achten Sie darauf, dass diese an einem sauberen Ort erfolgt, um eine erneute Kontamination der gereinigten und desinfizierten Instrumente zu verhindern. Wartung Instrumentenöle sollten nach Möglichkeit nicht eingesetzt werden. Ist ein Einsatz dennoch gewünscht, sollte darauf geachtet werden, dass nur Instrumentenöle (Weissöl / Chirurgie-Schmieröl) eingesetzt werden, die – unter Berücksichtigung der maximal angewandten Sterilisationstemperatur – für die Dampfsterilisation zugelassen sind und eine geprüfte Biokompatibilität besitzen. Wenden Sie das Instrumentenöl nur an mechanisch belasteten und beweglichen Teilen an (ein großflächiger Einsatz aus Korrosionsschutzgründen ist nicht erforderlich und nicht zulässig). Wir empfehlen die Verwendung eines von NOVATECH entwickelten Gleitmittels (pharmaceutical grade). Kontrolle und Funktionsprüfung Führen Sie nach der Desinfektion sowie vor dem Einsatz eine Sichtprüfung auf Korrosion, beschädigte Oberflächen, Verformungen, Absplitterungen und Verschmutzungen durch. Sondern Sie beschädigte und nicht voll funktionsfähige Instrumente aus und führen Sie verschmutzte Instrumente einer erneuten Reinigung und Desinfektion zu. Prüfen Sie bewegliche Komponenten auf ihre Funktionsfähigkeit und Leichtgängigkeit. Wenden Sie sich im Bedarfsfall an Ihren bess Servicepartner. Verpackung Verpacken Sie die Instrumententeile bzw. die Sterilisationstrays mit den Instrumententeilen in Einmalsterilisationsverpackungen (Einfach- oder Doppelverpackung) und / oder Sterilisationscontainer. Dabei sind die folgenden Anforderungen einzuhalten: Dabei sind folgenden Anforderungen einzuhalten: • Konformität mit den in Ihrem Land gültigen Rechtsvorschriften 21 • für die Dampfsterilisation geeignet (Temperaturbeständigkeit bis mind. 143°C (286°F), ausreichende Dampfdurchlässigkeit) • ausreichender Schutz der Instrumente bzw. Sterilisationsverpackungen vor mechanischen Beschädigungen • hinreichende Größe um zu verhindern, dass die Siegelnaht unter Spannung steht • regelmäßige Wartung entsprechend den Herstellervorgaben (Sterilisationscontainer). Sterilisation Zur Sterilisation des TONN Platziersets und der STORZ Bronchoskope ist die Dampfsterilisation einzusetzen. Es sollte hierbei das fraktionierte Vakuumverfahren angewendet werden. Achten Sie auf Konformität des Sterilisators mit den in Ihrem Land gültigen Rechtsvorschriften. Eine Sterilisationstemperatur von 141°C (286°F) darf nicht überschritten werden. Eine Sterilisationszeit (Expositionszeit bei der Sterilisationstemperatur) von mindestens 5 min1 bei 134°C (270°F) muss eingehalten werden. Heißluftsterilisation, Strahlensterilisation, Plasmasterilisation sowie Formaldehydoder Ethylenoxidsterilisation sind bislang nicht validiert. Sprechen Sie im Bedarfsfall Ihren bess Servicepartner auf weitere Informationen an. Lagerung Nach der Sterilisation müssen die Instrumente in der Sterilisationsverpackung trocken und staubfrei gelagert werden. Zusammenbau vor Anwendung Das Zusammensetzen des Knochenmehlsammlers erfolgt unter aseptischen Bedingungen unmittelbar vor dem operativen Eingriff. Zusätzliche Information Die oben aufgeführten Anweisungen wurden von der bess pro gmbh für die Vorbereitung eines Medizinprodukts zu dessen Wiederverwendung als GEEIGNET validiert. Dem Aufbereiter obliegt die Verantwortung, dass die tatsächlich durchgeführte Aufbereitung mit verwendeter Ausstattung, Materialien und Personal in der Aufbereitungseinrichtung die gewünschten Ergebnisse erzielt. Dafür sind normalerweise Validierung und Routineüberwachung des Verfahrens erforderlich. Ebenso sollte jede Abweichung von den bereitgestellten Anweisungen durch den Aufbereiter sorgfältig auf ihre Wirksamkeit und möglichen nachteiligen Folgen ausgewertet werden. Kontakt zum Hersteller Wenden Sie sich bei Fragen zum Produkt, Rückmeldungen oder Verbesserungsvorschlägen an Ihren Servicepartner vor Ort oder wählen Sie +49‑(0)30–816 909–0. Rücksendung Achtung: Sollte ein Instrument zur Aufbereitung / Reparatur an uns zurückgesandt werden, muss es zuvor gereinigt, dekontaminiert und sterilisiert werden. 1 bzw. mindestens 18 min (Prioneninaktivierung) 22 Produits appropriés au nettoyage automatique Agents suitable for automatic cleaning Geeignete Mittel für die automatische Reinigung Fabricant Manufacturer Hersteller BHT Hygiene Technik GmbH Bode Chemie GmbH Borer Chemie AG Deppe, Laboratorium Dr. rer. nat. DiverseyLever Ecolab GmbH & Co. OHG IMS Medisafe UK, Ltd. Merz+Co. Ruhof Corporation Schülke & Mayr GmbH Schuhmacher, Dr. GmbH Steris Weigert, Dr. GmbH & Co. Nom commercial Trade name Handelsname BHT Scope Cleaner BHT Scope Desinfectant Dismoclean 24 Vario Dismoclean 28 alka one Korsolex-Endo-Cleaner Korsolex-Endo-Desinfectant Deconex 23 Neutrazym Deconex 28 Alka One Deconex 55 endo Endomax Plus Sumotox E Sekumatic FD Sekumatic FRE Sekumatic FR (nur in Kombination mit Sekumatic FNZ) Adaspor Ready To Use 3E-Zyme/HS-Zyme Mucapur ED Mucapur ER Endozime AW Thermosept ED Thermosept ER Thermosept RKN-zym Thermosept DK Thermoton Endo Instru-Klenz neodisher FA neodisher FA forte neodisher mediclean neodisher mediclean forte neodisher medizym neodisher Septo DA neodisher Septo DN Type Type Typ 1 2 1 1 1 2 1 1 2 1, 2 1 2 1 1 2 1 2 1 1 2 1 1 2 2 1, 3 1 1, 3 1 1 1 2 2 Type: 1 = produit de nettoyage, 2 = désinfectant, 3 = apte au nettoyage ultrasonique Type: 1 = cleaning agent, 2 = disinfectant, 3 = suitable for ultrasonic cleaning Type: 1 = Reiniger, 2 = Desinfektionsmittel, 3 = geeignet für Ultraschallbäder 23 Produits appropriés au nettoyage manuel Agents suitable for manual cleaning Geeignete Mittel für die manuelle Reinigung Fabricant Manufacturer Hersteller Acto GmbH Advanced Sterilization Products Alkapharm Alpro Dental-Produkte GmbH Anios Antiseptica chem.phar.Prod. GmbH Bandelin electronic GmbH B.Braun Medical GmbH Bode Chemie GmbH Borer Chemie AG Deppe, Laboratorium Dr. rer. nat. Ecolab GmbH & Co. OHG Esteer GmbH Fresenius AG Indeba Industria E Commercio LTDA Jose Collado S.A. 24 Nom commercial Trade name Handelsname Actosed Endo Terra Cidezyme Cidex Cidex OPA Enzol NU Cidex Peralkan BIB forte Aniosyme P.L.A. Anioxyde 1000 Octanius basique BIB forte Stammopur DR Stammopur DR 8 Stammopur GR Stammopur R Stabimed Aseptisol Korsolex AF Korsolex Basic Deconex 36 Intensiv Deconex 50 FF Deconex 53 Plus Superborat EndoStar InstruPlus InstruPlus N InstruStar InstruZym Sekusept easy Sekusept extra N Sekusept forte Sekusept Plus Sekusept Pulver Classic Sekusept Pulver Classic + Aktivator Ultrades mit AF Ultraseptin Aktiv Ultraseptin Classic Afid Afid plus (neu) Sporcid FF Lethadeido Darador 4000 Liquido Darador 9000 Darador Sinaldehyd 2000 Type Type Typ 2 1, 3 2 2 1, 3 2 2 1, 2, 3 1, 2, 3 2 1, 2 1, 2, 3 1, 2, 3 1, 2, 3 1, 3 1, 3 2 2, 3 2, 3 2, 3 1, 3 2 2 1 2 1, 2, 3 1, 2, 3 1, 2, 3 2, 3 2 1, 2, 3 2, 3 1, 2, 3 1, 2, 3 1, 2, 3 2, 3 1, 2, 3 1, 2, 3 1, 2 1, 2 1, 2 2 1 2 2 Lysoform Dr. Rosemann GmbH Merz+Co. Orochemie Promagent AB Schülke & Mayr GmbH Schuhmacher, Dr. GmbH Steris Weigert, Dr. GmbH & Co. Whiteley Industries PTY.Ltd Aldasan 2000 Almyrol Desoform Lysoformin 3000 Edisonite Super Mucadont-IS Mucadont-Zymaktiv Mucocit-T A 10 ID 210 Wavacide Gigasept Gigasept FF Gigasept Instru AF Lysetol V Descoton forte Perfektan Endo EnzyCare 2 neodisher LM 2 neodisher mediclean neodisher mediclean forte neodisher medizym Aidal Plus 1, 1, 1, 1, 3 2, 1, 1, 2 2 2 2, 2, 1, 2 2 2 1, 1 1 1, 1, 2 2 2 2 2 3 3 2, 3 3 3 2, 3 3 3 3 Type: 1 = produit de nettoyage, 2 = désinfectant, 3 = apte au nettoyage ultrasonique Type: 1 = cleaning agent, 2 = disinfectant, 3 = suitable for ultrasonic cleaning Type: 1 = Reiniger, 2 = Desinfektionsmittel, 3 = geeignet für Ultraschallbäder 25 NOVATECH SA société anonyme au capital de 160.000 € 398 941 260 RCS Marseille TVA CEE FR59398941260 EN ISO 13485:2003 (snch CE0499) Siège social / Adresse postale Z.I. Athélia III - 1058, Voie Antiope 13705 La Ciotat cedex France Tel +33 (0) 442 98 15 60 Fax +33 (0) 442 98 15 63 [email protected] www.novatech.fr