1
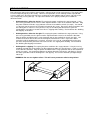
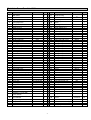
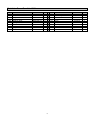
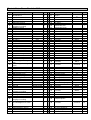
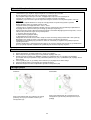
POWER RUN 4.8
EN
DE
FR
PL
Table of contents - Inhaltsverzeichnis - Table des matières - Spis treści
EN
DE
FR
PL
1. English
P. 3
2. Deutsch
P. 9
3. Français
P. 15
4. Polski
P. 21
© The owner’s manual is only for the customer reference. ENERGETICS can not guarantee for mistakes occurring due to
translation or change in technical specification of the product.
© Die Gebrauchsanweisung dient nur zur Referenz für den Kunden. ENERGETICS übernimmt keine Haftung für Fehler die durch
Übersetzung oder technische Änderungen des Produkts entstehen.
© Le manuel d'utilisation ne sert que d'information au consommateur. ENERGETICS ne peut être tenu responsable pour
d'éventuelles erreurs de traduction, ou pour d'éventuelles modifications techniques du produit.
© Instrukcja obsługi jest informacja dla klienta. ENERGETICS nie ponosi odpowiedzialności za usterki powstałe w wyniku
tłumaczenia lub technicznych zmian produktu.
© Copyright by ENERGETICS
2
EN
Dear Customer,
Congratulations on your purchase of an ENERGETICS home exerciser. This product has been designed and
manufactured to meet the needs and requirements of in-home use. Please carefully read the instructions
prior to assembly and first use. Be sure to keep the instructions for reference and/ or maintenance. If you
have any further questions, please contact us. We wish you lots of success and fun while training.
Your
- Team
Warranty
ENERGETICS offers high quality home exercisers that have been tested and certified according to
European Norm EN 957.
Safety Instructions
•
This training equipment is not suitable for therapeutic purposes.
•
Consult your physician before starting with any exercise programs to receive advice on the optimal
training.
•
Warning: incorrect/excessive training can cause health injuries. Stop using the home exerciser when
•
Please follow the advice for correct training as detailed in the training instructions.
•
Ensure that training only starts after correct assembly, adjustment and inspection of the home exerciser.
•
Always start with a warm-up session.
feeling uncomfortable.
•
Only use original ENERGETICS parts as delivered (see checklist).
•
Follow the steps of the assembly instruction carefully.
•
Only use suitable tools for assembly and ask for assistance if necessary.
•
Place the home exerciser on an even, non-slippery surface for immobilization, reducing noise and
•
For all adjustable parts be aware of the maximum position to which they can be adjusted.
•
Tighten all adjustable parts to prevent sudden movement while training.
•
This product is designed for adults. Please ensure that children only use it under the supervision of an
•
Advised correct biomechanical position: Running straight on the treadmill is made easier by focusing on
vibration.
adult.
a fixed object in front of you in the room. Run as if you wanted to approach the object.
•
Ensure that those present are aware of possible hazards, e.g. movable parts during training.
•
The resistance level can be adjusted to your personal preference: see training instructions.
•
Do not use the home exerciser without shoes or loose shoes.
•
Ensure that sufficient space is available to use the home exerciser.
•
Be aware of non-fixed or moving parts whilst mounting or dismounting the home exerciser.
3
Safety Instructions
-
-
-
To protect the floor or carpet from damage, place a mat under the treadmill.
Turn off the power whilst the treadmill is not in use and remove the safety key.
In case of emergency please place both feet at the same time on the side reins.
To activate an emergency stop, please detach the safety key from the console.
Ensure that an area of 2000 x 1000 mm behind the treadmill is free from any obstacles.
This product is made for home use only and tested up to a maximum body weight of 100 kilograms.
We take no responsibility for personal injury or damage sustained by or through the use of this
treadmill.
The noise creation of treadmill is under 70 db.
The unit requires a power supply of 220V – 230V / 50 HZ.
The function of the immobilization method: the purpose of immobilizing the treadmill is to prevent
unauthorized use. This can be accomplished by removing the safety key from the console,
unclipping it from the cord and putting it in a non-accessible place.
The emergency dismount: Follow the steps listed below if you experience pain, feel faint or need to
stop your treadmill in an emergency situation:
1.) Grip handrails for support.
2.) Step onto the lateral platform.
3.) Pull the Safety key off the console.
The function of the emergency stop: The safety key functions as the emergency stop. In an
emergency situation, remove the safety key from the console and the treadmill will come to a stop.
Noise compliance: This treadmill meets the requirements of the noise pollution standards.
Search for noisy parts: If you should notice unusual noises, like grinding, clacking etc. try to locate it
and have it repaired by a professional. Make sure the treadmill is not used until after repairs have
been made.
Assembly
1. Open the carton, put the main frame on the ground.
2. Fix the computer basket on the uprights using screws (70) then push up the computer and uprights..
3. Fold and move up the computer together with the uprights. IMPORTANT: When you upfoald the
computer and the uprights, make sure the metal does not damage the inside wires! Fix the upright
onto the base frame with the allen wrench using the screws (70) ,screw(67)and washers (86).
Repeat the same on the other side.
4. Fix the base right & left cover on each upright by allen wrech ,screw(77)
5. cover the right&left handbar cover on the computer frame
6. Attach the safety key to the computer (49).
Handling
Upfolding
Unfolding
Catch the rear end or the running belt (A) and
gently lift the running deckt into an upright position
until you hear that the air pressure bar is locked
into the round tube (B).
Hold the rear end of the running deck (A) and
press on the air pressure bar (B). The running
deck will lower gently to the ground.
4
Cleaning
Routine cleaning of your treadmill will extend the product’s life.
Warning : To prevent electrical shock, be sure the power to the treadmill is OFF and the power cord is
unplugged from the wall electrical outlet before attempting and cleaning or maintenance.
Important : Nover use abrasives or solvents to clean the treadmill. To prevent damage to the computer,
keep liquids away and keep it out of direct sunlight.
After each workout : Wipe off the console and other treadmill surfaces with clean, water dampened soft
cloth to remove excess perspiration.
Weekly : Use of a treadmill mat is recommended for ease of cleaning. Dirt from your shoes contacts the belt
and eventually makes it to underneath the treadmill. Vacuum underneath treadmill once a week .
Deck Lubrication
The walking belt has been pre-lubricated at the factory. However , it is recommended that the warking board
be checked periodically for lubrication to ensure optimal treadmill performance. Usually your treadmill should
not have to be lubricated usually within the first year or 500 hours of use.
Every 30 days or 30 hours of operation lift the sides of the walking belt and feel the top surface of the
walking board as far as you can reach. If there are signs of silicone, no further lunrication is required. If it
feels dry to the touch, follow the instructions below. Please use a non-pertroleum based silicone.
To apply luburicant to the walking belt:
1.
2.
3.
4.
Position the walking belt so that the seam is located on top and in center of the walking board.
Insert the spray nozzle into the spray head of the luburicant can.
While lifting the side of the walking belt, position the spary nozzle between the walking belt and the
board approximately 6 cm from the front of the treadmill. Apply the silicone spary to the walking
board, moving from the front of treadmill to the rear. Repeat this on the other side of the belt. Spary
approximately 4 seconds on each side.
Allow the silicone to “set” for 1 minute before using the treadmill.
Please keep children and pets away from the silicone oil in case of eating
Care and Maintenance
-
The home exerciser should not be used or stored in a moist area because of possible corrosion.
Check at least every 4 weeks that all connecting elements are tightly fitted and in good condition.
In case of repair please ask your dealer for advice.
Replace defective components immediately and/or keep the equipment out of use until repair.
Only use original spare parts for repair.
After exercising, immediately wipe off the sweat; perspiration can ruin the appearance and proper
function of the Home Exerciser.
Use a damp cloth to clean the Home Exerciser. Never use abrasives or solvents to clean the Home
Exerciser. To prevent damage to the computer, keep liquids away and keep it out of direct sunlight.
Inspect and tighten all parts of the treadmill regularly. Replace any worn parts immediately.
5
BELT ADJUSTMENT
Belt adjustment and tension performs two functions: adjustment for tension and centering. The running belt
has been adjusted properly at the factory. However transportation, uneven flooring or other unpredicted
reasons could cause the belt to shift off center resulting in the belt rubbing with the plastic side rail or end
caps and possibly causing damage. To adjust the belt back to it’s proper position please follow the
directions below:
•
Walking belt has shifted to the left: First unplug the power cord from the surge protector. Using
the hex key provided, turn the left rear roller adjustment bolt 1/4 turn in the clockwise direction. Plug
the power cord back into the surge protector and run the treadmill at 4 km/h (2.5 mph). You should
see the belt start to correct itself, moving back towards the center. Repeat the above procedure until
the walking belt is centered. It may be necessary to set walking belt tension once you have
completed this procedure if the belt feels like it is slipping while walking. Refer below to the "Walking
belt slipping" instructions.
•
Walking belt has shifted to the right: First unplug the power cord from the surge protector. Using
the hex key provided, turn the right rear roller adjustment bolt 1/4 turn in the clockwise direction.
Plug the power cord back into the surge protector and run the treadmill at 4 km/h (2.5 mph). You
should see the belt start to correct itself, moving back towards the center. Repeat the above
procedure until the walking belt is centered. It may be necessary to set walking belt tension once
you have completed this procedure if the belt feels like it is slipping while walking. Refer below to
the "Walking belt slipping" instructions.
•
Walking belt is slipping: First unplug the power cord from the surge protector. Using the hex key
provided, turn both the left and right rear roller adjustment bolts the same distance, usually a 1/4 turn
in the clockwise direction. Plug the power cord back into the surge protector and run the treadmill at
4 km/h (2.5 mph). You should now walk on the belt to determine if the belt is still slipping. Repeat
the above procedure until the walking belt is not slipping. The tension should be just tight enough
not to slip.
WARNING! Do not over tighten rollers! This will cause premature roller bearing failure!
Right and left tension bolts are located at the rear of the treadmill.
6
Part List – Power Run 4.8 – 2012
NR
NAME
SPEC
QTY
NR
NAME
1
Main frame
1
51
Magnetic Ring
2
3
Base frame
Right upright tube
1
1
52
53
4
Left upright tube
1
54
5
6
7
8
9
10
11
12
13
14
15
16
17
18
19
20
21
22
23
24
25
26
27
28
29
30
31
32
33
34
35
36
37
38
39
40
41
42
43
44
Computer bracket
Incline frame bracket
Motor bracket
Rotating tube
Air Pressure Bar
Front roller
Back roller
Cross wrench
5# Allen Wrench
6# Allen Wrench
Casing pipe
Running Board
Left end cap
Right end cap
Motor bottom cover
Side staps
Running belt
Motor cover
Rubber cushion
Rubber foot pad
Roller cover
Left handbar cover
Right handbar cover
Adjust Wheel
Tapered cushion
Computer up cover
Base right cover
Base left cover
Cable plug retaining ring
Plug
Transport wheel
Screw
Drive belt
Foam grip
Foam grip
Support tube
Incline motor
DC motor
EVA washer
Control circuit board
Handpulse sensor with
incline button
Handpulse sensor with
speed button
Computer Up Wire
Computer Bottom Wire
Safety Key
Light sensor
1
1
1
2
1
1
1
1
1
1
2
1
1
1
1
2
1
1
4
4
2
1
1
2
2
1
1
1
2
2
2
2
1
2
1
1
1
1
3
1
55
56
57
58
59
60
61
62
63
64
65
66
67
68
69
70
71
72
73
74
75
76
77
78
79
80
81
82
83
84
85
86
87
88
89
90
91
92
93
94
Power Switch
Standard power cord
Overload protection
switch
AC Single-Line
Blue Single-Line
Brown Single-Line
Power line deduction
I - Hexagon nuts
I-Hexagon nuts
Hexagon head screw
Silicone oil
Cross pan had screw
Cross pan had screw
Hexagon cap screw
Hexagon cap screw
Hexagon cap screw
Hexagon cap screw
Hexagon cap screw
Hexagon cap screw
Hexagon cap screw
Hexagon cap screw
Hexagon cap screw
Hexagon cap screw
Hexagon cap screw
Cross pan had screw
Screw
Screw
Screw
Screw
Screw
Lock Washer
Flat Washer C Class
Spring washer
Lock Washer
Lock Washer
Light sensor holder
I-Hexagonal look nut
Hexagonal bolt
Screw
Screw
Frame reinforce tube
Screw
Button keyboard
1
95
Computer circuit board
1
96
Screw
1
1
1
1
97
98
99
100
Sound rear Cover
Polar chest transm.(Opt)
Sound net
Safety key inductor
45
46
47
48
49
50
S=13,14,15
5mm
6mm
M4*10
φ31*φ39*250
φ24*φ32*660
7
SPEC
QTY
Φ28*Φ16*2
8
1
1
1
1
M10
M8
M8*35
M6*16
M6*35
M8*55
M8*12
M8*20
M8*32
M8*25
M8*45
M10*42
M10*55
M8*40
M10*20
M10*60
M5*8
ST4.2*19
ST2.9*6.5
ST4.2*12
ST4.2*28
M5*15
10
8
8
5
8
M6
M8*30
ST4.2*19
M6*22
ST2.9*9.5
1
1
1
1
2
4
2
1
4
8
3
2
2
4
1
8
1
1
8
2
2
4
4
2
5
2
2
4
4
6
2
21
1
8
2
6
6
2
25
1
1
ST4.2*12
18
2
1
2
1
Part List – Power Run 4.8 – 2012
NR
101
102
103
104
105
106
107
108
109
110
NAME
Safety key metal plate
Button sticker
Computer face sticker
Computer face plate
Magnetic Ring
Spring washer
Pulse bottom wire
Pulse up wire
Computer lead wire
Filter
SPEC
QTY
NR
Φ28*Φ16*13
5
1
1
1
1
2
2
2
2
1
1
111
112
113
114
115
Inductance
Brown single wire
Flat washer C class
Ground wire
screw
116
Spring washer
117
118
119
Wire rope assemblies
Computer back cover
Flat washer C class
120
Flat washer C class
8
NAME
SPEC
QTY
4
1
1
2
1
4
ST4.2*12
4
2
φ8*24*2
1
1
1
10
2
Sehr geehrte Kundin, sehr geehrter Kunde,
DE
wir gratulieren Ihnen zum Kauf eines ENERGETICS Heimtrainers. Dieses Produkt ist für den Heimbereich
konzipiert um den Wünschen und Anforderungen dieses Bedarfs gerecht zu werden. Bitte lesen Sie vor dem
Aufbau und dem ersten Gebrauch zunächst sorgfältig diese Anleitung. Bitte bewahren Sie die Anleitung als
Referenz und für den richtigen Umgang mit Ihrem Fitness-Gerät auf. Bei weiteren Fragen dazu stehen wir
Ihnen selbstverständlich gerne zur Verfügung. Wir wünschen Ihnen viel Spaß und Erfolg bei Ihrem Training.
Ihr-
Team
Garantie
ENERGETICS Qualitätsprodukte werden konstruiert und getestet um für ein engagiertes Fitness-Training
eingesetzt zu werden. Dieses Gerät entspricht der europäischen Norm EN 957.
Sicherheitshinweise
•
•
•
•
•
•
•
•
•
•
•
•
•
•
•
•
•
•
Bei gesundheitlichen Einschränkungen oder für individuelle und persönliche Trainingsparameter
konsultieren Sie bitte zunächst Ihren Arzt. Er kann Ihnen sagen, welche Art des Trainings und welche
Belastung für Sie geeignet sind.
Achtung: Falsches oder exzessives Training kann Ihre Gesundheit gefährden.
Für ein sicheres und effektives Training folgen Sie bitten den Hinweisen in der Trainingsanleitung.
Beginnen Sie erst mit dem Training, nachdem Sie sichergestellt haben, dass der Heimtrainer korrekt
aufgebaut und eingestellt ist.
Starten Sie immer mit einer Aufwärm-Phase.
Verwenden Sie nur die der Lieferung beigelegten ENERGETICS Originalteile (siehe Check-Liste)
Gehen Sie beim Aufbau des Geräts exakt nach der Montageanweisung vor.
Verwenden Sie nur geeignetes Werkzeug für die Montage und lassen Sie sich ggf. von einer zweiten
Person helfen.
Platzieren Sie das Gerät auf einem ebenen, rutschfesten Untergrund, um einen festen Stand zu
gewähren sowie Geräuschentwicklung und Vibrationen zu reduzieren.
Stellen Sie bei allen verstellbaren Teilen sicher, dass die Maximalpositionen, in die sie verstellt werden
können, richtig eingestellt sind.
Schrauben Sie vor dem Training alle verstellbaren Teile fest, um eine Lockerung während des Trainings
zu vermeiden.
Das Gerät ist für das Training erwachsener Personen konzipiert. Stellen Sie sicher, dass eine Nutzung
des Geräts von Kindern nur unter Aufsicht von Erwachsenen erfolgt.
Die richtige biomechanische Position: Um eine gerade Lauflinie auf dem Band zu vereinfachen wird
empfohlen dass Sie einen Punkt im Raum vor Ihnen visuell fixieren und sich vorstellen, diesen erreichen
zu wollen.
Weisen Sie anwesende Personen auf Gefährdung, z.B. durch bewegliche Teile, hin.
Der Widerstand kann auf Ihre persönlichen Bedürfnisse eingestellt werden: siehe auch
Trainingsanleitung.
Verwenden Sie den Heimtrainer nicht ohne Schuhe oder losem Schuhwerk.
Stellen Sie sicher, dass ausreichend Platz vorhanden ist, um den Heimtrainer zu benutzen.
Beachten Sie die nicht fixierten oder beweglichen Teile während der Montage/Demontage des
Heimtrainers.
9
Sicherheitshinweise
-
-
Um den Fußboden oder den Teppich vor eventuellen Schäden zu schützen, legen Sie eine Matte unter das
Laufband.
Wenn das Laufband nicht in Benutzung ist, schalten Sie das Gerät ab und entfernen die Sicherheitsleine.
Im Falle eines Unfalls stellen Sie bitte beide Beine auf die seitlichen Flächen.
Um den Notschalter zu aktivieren, ziehen Sie bitte die Sicherheitsleine am Computer.
Stellen Sie sicher, dass im Bereich von 2 m x 1 m keine Gegenstände hinter dem Laufband sind.
Dieses Gerät ist ausschließlich für den Heimanwendungsbereich konzipiert und einem maximalen
Körpergewicht von 100 Kilogramm getestet.
Wir übernehmen keine Haftung für Verletzungen oder Schäden bei Gebrauch dieses Laufbandes.
Das Laufband läuft mit einer Geräuschentwicklung von unter 70 db.
Das Gerät benötigt einen Netzanschluss von 220V – 230 V / 50 Hz.
Wenn Sie das Gerät nicht nutzen: Das Laufband kann vor unbefugten Gebrauch geschützt werden indem der
Sicherheitsschlüssel herausgezogen wird und an einem sicheren Ort aufbewahrt wird.
Absteigen im Notfall: Beachten Sie die folgenden Anweisungen: Sollten während des Laufens Schmerzen
auftreten, ein Schwächegefühl aufkommen oder wenn Sie das Laufband in einem Notfall plötzlich anhalten
müssen:
1.) Halten Sie sich an den seitlichen Stützen fest.
2.) Treten Sie auf die seitliche Abdeckung.
3.) Ziehen Sie den Sicherheitsschlüssel aus der Halterung.
Die Funktion des Nothalts: Der Sicherheitsschlüssel hat die Funktion des Nothalts. Im Notfall ziehen Sie den
Sicherheitsschlüssel aus der Halterung und das Laufband wird sofort angehalten.
Einhalten der Vorschriften zur Lärmbelästigung: Das Laufband entspricht allen Vorschriften zur Vermeidung von
Lärmbelästigung.
Suchen nach Geräuschquellen: Sollten sich unübliche Geräusche entwickeln, wie schleifen, klappern etc.,
versuchen Sie diese zu lokalisieren und von einem Fachmann reparieren zu lassen. Das Gerät sollte bis nach
der Reparatur nicht wieder benutzt werden.
Aufbau
1.
2.
3.
4.
5.
6.
Öffnen Sie die Kartonage, nehmen Sie das Gerät heraus uns stellen es auf den Boden.
Drehen Sie den Computer nach oben und befestigen Sie diesen an den Ständern unter der Verwendung der
Schrauben (70)
Klappen Sie die beiden Ständer mit dem Computer auf. WICHTIG: Achten Sie beim aufklappen, dass Sie die
Kabel nicht beschädigen bzw. quetschen. Fixieren Sie die beiden Ständer am Grundrahmen mit den Schrauben
(70), (67), und Unterlegscheiben (86) unter Verwendung eines Imbuss-Schlüssels.
Befestigen Sie die Abdeckkappen (32, 31) auf jeder Seite mit den Schrauben (77) mit einem Imbuss-Schlüssel)
Befestigen Sie die Abdeckkappen (26,27) am Holm der Computerbefestigung.
Stecken Sie den Sicherheitsschlüssel in die vorgesehene Öffnung am Computer (49)
Handhabung
Zusammenklappen
Aufklappen
Nehmen Sie das Ende des Laufbandes (A) und heben
Nehmen Sie das Ende des Laufbandes (A) und drücken
Sie dieses an und bringen es in eine aufrechte Position,
Sie am Knopf des Dämpfers (B). Das Laufband senkt
bis Sie hören, dass das Laufband am Dämpfer (B)
sich langsam auf den Boden.
einrastet.
10
Reinigung
Regelmäßige Reinigung Ihres Laufbandes erhöht die Lebensdauer Ihres Laufbandes.
Warnung: Um einen Stromschlag zu vermeiden, vergewissern Sie sich vor der Reinigung oder Pflege, dass
das Laufband ausgeschalten ist und das Stromkabel aus der Steckdose ausgesteckt ist.
Wichtig: Verwenden Sie niemals Polier- oder Reinigungsmittel um das Laufband zu reinigen. Um den
Computer vor Beschädigung zu schützen, halten Sie Ihn von Flüssigkeiten fern und vermeiden Sie direkte
Sonneneinstrahlung.
Nach jedem Training: Wischen Sie Trainingsschweiß vom Computer und der Oberfläche der Laufbandes.
Verwenden Sie dafür einen sauberen, feuchten und weichen Lappen.
Wöchentlich: Es wird Empfohlen, das Laufband auf eine Laufbandmatte zu stellen. Das erleichtert die
Reinigung. Schmutz von den Schuhen kann unter das Laufband geraten. Staubsaugen Sie wöchentlich
unter dem Laufband.
Laufbandschmierung
Das Band des Laufbandes wurde von der Fabrik geschmiert. Es wird jedoch empfohlen, das Brett des
Laufbandes regelmäßig auf Schmierung zu überprüfen, um eine optimale Funktion Ihres Laufbandes zu
gewährleisten. Das Laufband braucht im ersten Jahr oder nach 500 Trainingsstunden kein Schmiermittel.
Heben Sie alle 30 Tage oder 30 Trainingsstunden das Laufband an und fühlen die Oberfläche des
Laufbrettes. Gehen Sie so weit wie möglich in die Fläche. Wenn Sie das Silikon fühlen, ist keine Schmierung
notwendig. Wenn sich das Brett trocken anfühlt, folgen Sie bitte den unten aufgeführten Anweisungen. Bitte
benutzen Sie ein Silikon, das keine Erdölkomponenten enthält.
Durchführung der Laufband-Schmierung:
1. Positionieren Sie das Band des Laufbandes so, dass der Saum auf der Oberseite und in der Mitte
des Laufbandes ist.
2. Setzen Sie den Sprühkopf auf den Kopf der Sprühdose.
3. Heben Sie das Band an und halten Sie die Sprühdose zwischen Laufband und Laufbrett (ca. 6 cm
vom Anfang des Bandes). Sprühen Sie das Silikon auf das Brett, in dem Sie die Dose von vorne
nach hinten ziehen (bis ca. 6 cm zum Ende des Bandes) Wiederholen Sie diesen Schritt auf der
anderen Seite. Die Sprühdauer beträgt auf jeder Seite ca. 4 Sekunden.
4. Lassen Sie das Silikon für ca. 1 Minute einwirken, bevor Sie das Laufband wieder verwenden.
Bitte halten Sie Kinder und Tiere von Silikon fern.
Sorgfalt und Wartung
-
-
Um die Gefahr von Korrosionsschäden zu vermeiden, verwenden oder lagern Sie dieses HeimFitness-Gerät nicht in feuchten Räumen.
Überprüfen Sie spätestens alle 4 Wochen, dass alle Verbindungen fest angezogen und in einem
guten Zustand sind.
Im Falle einer Reparatur kontaktieren Sie bitte Ihren Händler.
Ersetzen Sie beschädigte Teile sofort und/oder verwenden Sie diese nicht bis sie repariert sind.
Bitte verwenden Sie für Reparaturen nur original Ersatzteile
Wischen Sie unmittelbar nach dem Training den Schweiß ab. Schweiß kann zu Schäden führen und
die Funktion des Heim-Fitness-Gerätes beeinträchtigen.
Verwenden Sie zum Reinigen einen feuchten Lappen. Verwenden Sie niemals scharfe oder
chemische Reinigungsmittel. Um eine Beschädigung des Computers zu vermeiden, halten Sie
Feuchtigkeit fern und vermeiden Sie direkte Sonneneinstrahlung.
Überprüfen Sie alle Teile regelmäßig. Ziehen Sie die Schrauben fest. Ersetzen Sie verschlissene
Teile sofort.
11
LAUFBAND-EINSTELLUNG
Die Laufband-Einstellung hat zwei Funktionen: Laufband spannen und zentrieren. Das Laufband wurde
bereits von Werk aus eingestellt. Durch Transport, unebenen Untergrund oder anderen Gründen kann es
jedoch passiere, dass das Band aus der Zentrierung läuft und die seitliche Begrenzung oder Endkappen
berührt und dadurch beschädigt wird. Um das Laufband neu zu justieren, folgen Sie bitte den folgenden
Anweisungen:
•
Laufband läuft auf die linke Seite: Zuerst ziehen Sie das Netzkabel. Drehen Sie mit einem
geeigneten Inbusschlüssel die linke Verstellschraube um eine viertel Umdrehung im Uhrzeigersinn.
Stecken Sie das Netzkabel wieder ein und lassen das Laufband auf 4 km/h (2,5 mph) hochlaufen.
Das Laufband richtet sich selbst aus und zentriert sich. Wiederholen Sie diesen Schritt bis das
Laufband zentriert ist. Es kann sein, dass das Laufband nach diesem Vorgang „rutscht“. Folgen Sie
dann der Anweisung „Laufband rutscht“.
•
Laufband läuft auf die rechte Seite: Zuerst ziehen Sie das Netzkabel. Drehen Sie mit einem
geeigneten Inbusschlüssel die rechte Verstellschraube um eine viertel Umdrehung im Uhrzeigersinn.
Stecken Sie das Netzkabel wieder ein und lassen das Laufband auf 4 km/h (2,5 mph) hochlaufen.
Das Laufband richtet sich selbst aus und zentriert sich. Wiederholen Sie diesen Schritt bis das
Laufband zentriert ist. Es kann sein, dass das Laufband nach diesem Vorgang „rutscht“. Folgen Sie
dann der Anweisung „Laufband rutscht“.
•
Laufband rutscht: Zuerst ziehen Sie das Netzkabel. Drehen Sie mit einem geeigneten
Inbusschlüssel die rechte und linke Verstellschraube um die gleiche Umdrehung, normalerweise um
eine viertel Umdrehung im Uhrzeigersinn. Stecken Sie das Netzkabel wieder ein und lassen das
Laufband auf 4 km/h (2,5 mph) hochlaufen. Gehen Sie auf dem Laufband um das Rutschen zu
überprüfen. Wenn das der Fall ist, wiederholen Sie die vorher genannten Schritte. Die Spannung ist
ausreichend, wenn das Laufband nicht mehr rutscht.
ACHTUNG: Überspannen Sie die Rollen nicht. Das kann die Lager der Laufrollen
beschädigen.
Rechte und linke Verstellschraube zur Laufbandspannung befinden sich am Ende des Laufbandes.
12
Ersatzteilliste – Power Run 4.8 – 2012
Nr.
Bezeichung
Größe
QTY
Nr.
Bezeichnung
Größe
QTY
Φ28*Φ16*2
8
1
1
Grundrahmen
1
51
Magnet
2
3
4
5
Grundrahmen, vordere
Ständer, rechts
Ständer, links
Computer Rahmen
Rahmen für
Neigungsverstellung
Motorbefestigung
Hülse
Dämpfer
Rolle, vordere
Rolle,. hintere
Schlüssel
5# Imbuss
6# Imbuss
Hülse
Laufband-Brett
Endkappe, links
Endkappe, rechts
Motorenabdeckung, untere
Seitliche Abdeckung
Laufband
Motorabdeckung
Dämpfer
Dämpfer
Rollenabdeckung
Abdeckkappe Haltebügel,
links
Abdeckkappe Haltebügel,
rechts
Rolle
Dämpfer
Computerabdeckung, obere
Abdeckkappe, rechts
Abdeckkappe, links
Kabelschutz (Ring)
Abdeckkappe
Transportrolle
Schraube
Riemen
Überzug
Überzug
Querstrebe
Motor zur
Neigungsverstellung
Motor für Geschwindigkeit
Unterlegscheibe
Controller
Handpulssensor,
Neigungsverstellung
Handpulssensor,
Geschwindigkeitsverstellun
g
Computerkabel, oberes
Computerkabel, unteres
Sicherheitsschlüssel
Sensor
1
1
1
1
52
53
54
55
Stromanschluss
Stromkabel
Überlastungsschutz
AC-Kabel
1
1
1
1
1
56
Stromkabel, blau
1
1
2
1
1
1
1
1
1
2
1
1
1
1
2
1
1
4
4
2
57
58
59
60
61
62
63
64
65
66
67
68
69
70
71
72
73
74
75
Stromkabel, braun
Stromkabel
Mutter
Mutter
Mutter
Silikon
Schraube
Schraube
Schraube
Schraube
Schraube
Schraube
Schraube
Schraube
Schraube
Schraube
Schraube
Schraube
Schraube
M6*16
M6*35
M8*55
M8*12
M8*20
M8*32
M8*25
M8*45
M10*42
M10*55
M8*40
M10*20
M10*60
1
1
2
4
2
1
4
8
3
2
2
4
1
8
1
1
8
2
2
1
76
Schraube
M5*8
4
1
77
Schraube
ST4.2*19
4
2
2
1
1
1
2
2
2
2
1
2
1
1
78
79
80
81
82
83
84
85
86
87
88
89
90
Schraube
Schraube
Schraube
Schraube
Unterlegscheibe
Unterlegscheibe
Unterlegscheibe
Unterlegscheibe
Unterlegscheibe
Sensor-Befestigung
Mutter
Schraube
Schraube
ST2.9*6.5
ST4.2*12
ST4.2*28
M5*15
10
8
8
5
8
M6
M8*30
ST4.2*19
2
5
2
2
4
4
6
2
21
1
8
2
6
1
91
Schraube
M6*22
6
1
3
1
92
93
94
Querstrebe
Schraube
Tastenfeld
ST2.9*9.5
2
25
1
1
95
Computerplatine
1
96
Schraube
1
1
1
1
97
98
99
100
Abdeckung Lautsprecher
Brustgurt (optional)
Lautsprechgitter
Sicherheitsschalter
6
7
8
9
10
11
12
13
14
15
16
17
18
19
20
21
22
23
24
25
26
27
28
29
30
31
32
33
34
35
36
37
38
39
40
41
42
43
44
45
46
47
48
49
50
S=13,14,15
5mm
6mm
M4*10
φ31*φ39*250
φ24*φ32*660
13
M10
M8
M8*35
1
ST4.2*12
18
2
1
2
1
Ersatzteilliste – Power Run 4.8 – 2012
Nr.
Bezeichung
Größe
QTY
Nr.
1
111
Induktor
1
1
1
2
2
2
112
113
114
115
Stromkabel, braun
Unterlegscheibe
Erdungskabel
Schraube
Unterlegscheibe
Stromkabel
Computerabeckung,
untere
Unterlegscheibe
Unterlegscheibe
102
103
104
105
106
107
Metallplatte
Sicherheitsschalter
Aufkleber
Computeraufkleber
Computerabdeckung
Magnet-Ring
Unterlegscheibe
Pulskabel, unteres
108
Pulskabel,oberes
2
118
109
110
Computerkabel
Filter
1
1
119
101
Φ28*Φ16*13
5
116
117
120
14
Bezeichnung
Größe
QTY
1
4
ST4.2*12
4
1
2
1
4
2
1
1
φ8*24*2
1
10
2
FR
Chère cliente, cher client,
Nous vous félicitons pour l’achat d’un appareil ENERGETICS. Cet appareil est conçu pour l’entraînement à
domicile et assure les vœux et les demandes de l’utilisateur. Veuillez lire soigneusement le mode d’emploi
avant le montage et la première utilisation. Veuillez garder cette instruction comme référence pour
l’utilisation correcte de cet appareil. Nous sommes volontiers à votre disposition pour vous fournir des
renseignements supplémentaires. Nous vous souhaitons beaucoup de plaisir et de succès avec cet appareil.
Votre équipe
Garantie
Les produits ENERGETICS sont conçus, fabriqués, testés et garantis pour l’entraînement fitness. Ces
produits correspondent à la Norme Européenne NE 957.
Conseils d´utilisation de Sécurité
•
•
•
•
•
•
•
•
•
•
•
•
•
•
•
•
•
•
•
•
•
Cet équipement d’entraînement n’est pas destiné à des fins thérapeutiques.
En cas de restrictions de santé ou des paramètres individuels et personnels d´entraînement, veuillez
consulter d´abord votre médecin: il pourra vous indiquer les types d’exercices qui vous conviennent
ainsi que le niveau de difficulté.
Attention: l’entraînement excessif/incorrect peut mettre en danger votre santé.
Pour une réussite effective et sécurisée de l´entraînement, suivez les instructions de la description
d’entraînement.
Avant tout entraînement, assurez-vous que le montage est conforme et que l’appareil est correctement
réglé.
Veuillez toujours commencer par une phase d´échauffement.
N’utilisez que des pièces originales d’ENERGETICS contenues dans la livraison (Voir la liste de
contrôle).
Procédez au montage de l´appareil d´après les instructions de montage.
N’utilisez que des outils appropriés de montage et faites-vous, le cas échéant, aider par une seconde
personne lors du montage.
Placez l’appareil sur une surface plane et non glissante pour l’immobiliser et réduire le bruit et les
vibrations.
Veuillez utiliser le clapet pour réglage de la hauteur se trouvant sur la barre transversale arrière pour
garantir une position idéale de votre appareil.
Assurez-vous que les roulettes de transport devant sont montées de manière correcte (voir mode
d’emploi)
Pour toutes les pièces ajustables rassurez-vous que les positions maximales auxquelles elles peuvent
être ajustées sont correctement réglées.
Vissez solidement toutes les pièces ajustables avant l´entraînement pour éviter un desserrage
pendant l´entraînement.
L´appareil est conçu pour l´entraînement d´adultes. Assurez-vous que les enfants ne puissent l´utiliser
sans la surveillance des adultes.
Position biomécanique correcte conseillée : courir droit sur le tapis est plus facile en se focalisant sur
un objet fixe en face de soi dans la pièce. Courez comme si vous vouliez atteindre cet objet
Avertissez les personnes présentes des dangers, liés par exemple aux pièces détachables/mobiles.
L´intensité de l´entraînement peut être réglée suivant vos besoins personnels: voir aussi le mode
d’emploi d´entraînement.
N´utilisez pas l´appareil sans chaussures.
Assurez-vous qu´il y a suffisamment de place disponible pour l´utilisation de l´appareil.
Faites attention aux pièces non fixées ou détachables pendant le montage/démontage de l´appareil.
15
Conseils d´utilisation de Sécurité
-
-
Placez une natte en dessous du tapis roulant pour protéger le sol ou le tapis contre d´éventuels
dommages.
Eteignez l´appareil et enlevez le fil de sécurité si le tapis roulant n´est pas en utilisation.
En cas d´accident, posez vos deux jambes sur les surfaces latérales.
Pour activer l´interrupteur d´urgence, connectez le fil de sécurité à l´ordinateur.
Rassurez-vous qu´aucun objet ne se trouve pas derrière le tapis roulant sur une étendue de 2 m x 1
m.
Cet appareil est conçu et testé uniquement pour un entraînement à domicile et pour un poids
corporel maximal de 100 kg.
Aucune responsabilité n´est endossée pour des dommages corporels et autres dommages survenus
à travers l´utilisation du tapis roulant.
Le bruit généré par le tapis est inférieur à 70 db.
L’unité requiert une alimentation en énergie de 220V-230V / 50 Hz.
La fonction de la méthode d’immobilisation : le but d’immobiliser le tapis est de prévenir une
utilisation non autorisée. Cela peut être réalisé en retirant la clé de sûreté de la console, en la
retirant du fil et en la mettant dans un endroit non accessible
La descente d’urgence : suivez les indications listées ci-dessous si vous ressentez de la douleur, un
malaise ou si vous avez besoin d’arrêter le tapis dans une situation d’urgence :
1.) agrippez-vous aux poignées.
2.) placez-vous sur la plateforme latérale.
3.) retirez la clé de sûreté de la console.
La fonction d’arrêt d’urgence : les fonctions de la clé de sûreté comme l’arrêt d’urgence. En cas
d’urgence, retirez la clé de sûreté de la console et le tapis s’arrêtera.
Normes de bruit : ce tapis correspond aux exigences des standards de pollution sonore.
Recherche de pièces sonores : si vous remarquez un bruit inhabituel, comme un grincement, un
claquement etc., essayez de le localiser et faites-le réparer par un professionnel. Assurez-vous que
le tapis ne soit pas utilisé tant que les réparations ne sont pas faites.
Assemblage
1. Ouvrez le carton, placez le châssis sur le sol.
2. Fixez l'ordinateur sur les barres verticales avec des vis (70) puis levez l'ordinateur et les barres.
3. Pliez et déplacez l'ordinateur avec les barres. IMPORTANT : Quand vous dépliez l'ordinateur et les
barres, assurez-vous que le métal n'endommage pas les câbles internes ! Fixez les barres sur le
châssis avec le tournevis et les vis (70) et (67) et les rondelles (86). Faites la même chose de l'autre
côté.
4. Fixez les couvercles droit et gauche sur chaque barre avec le tournevis et les vis (77).
5. Placez les couvercles du guidon sur le cadre de l'ordinateur.
6. Attachez la clé de sûreté à l'ordinateur (49).
Maniement
Pliage
Dépliage
Attrapez l'arrière du tapis de course (A) et levez
doucement le tapis à la verticale jusqu'à ce que
vous entendiez que la barre de pression à air est
verrouillée dans le tube rond (B).
Tenez l'arrière du tapis de course (A) et appuyez
sur la barre de pression à air (B). Le tapis
s'abaissera doucement vers le sol.
16
Nettoyage
Un nettoyage régulier de votre tapis roulant allongera sa durée de vie.
Attention: Pour éviter de recevoir une décharge électrique, assurez-vous que l’appareil soit débranché
avant de commencer le nettoyage ou la réparation.
Important: Ne jamais utiliser de produits solvants ou abrasifs. Pour éviter d’abîmer l’ordinateur, ne l’exposer
pas à la lumière directe et aux liquides.
Après chaque utilisation: Essuyez la console et les autres surfaces du tapis roulant avec un tissu propre et
humide pour éliminer la transpiration excessive.
Une fois par semaine: L’utilisation d’une serviette spéciale pour tapis roulant est recommandée. La saleté
de vos chaussures en contact avec le tapis peut passer dessous. Passez l’aspirateur sous le tapis une fois
par semaine.
Lubrication du tapis
Le tapis de marche est pré lubrifié à l’usine. Cependant, il est recommandé de vérifier sa lubrification
régulièrement pour assurer une performance optimale. Normalement cela ne devrait pas être nécessaire
durant la première année ou avant 500 heures d’utilisation.
Tous les 30 jours ou 30 heures d’utilisation, soulevez les côtés du tapis et touchez la surface aussi loin que
vous pouvez. Si vous sentez de la silicone, il n’y pas besoin de lubrification supplémentaire. Si vous sentez
une sécheresse, suivez les instructions ci-dessous. Veuillez utiliser de la silicone sans pétrole.
Application du lubrifiant sur le tapis:
1. Positionnez le tapis de façon à ce que la couture soit sur le dessus et au centre.
2. Insérez le pistolet sur le dessus de la bouteille de lubrifiant.
3. Tout en soulevant le côté sur tapis, positionnez le pistolet entre le tapis et la console à environ 15
cm de l’avant du tapis. Appliquez la silicone sur le tapis, roulant de l’avant à l’arrière. Répétez cette
opération de l’autre côté du tapis. Vaporisez pendant environ 4 secondes de chaque côté.
4. Laissez la silicone s’imprégner pendant 1 minute avant d’utiliser le tapis.
Veuillez éloigner les enfants et les animaux de l'huile de silicone.
Soin et Maintenance
-
Pour éviter le danger de dommage à cause de corrosion, utilisez ou posez cet appareil dans des
endroits non humides.
-
Vérifiez toutes les 4 semaines au moins que toutes les pièces sont bien montées /serrées et en bon
état.
-
Si une réparation est nécessaire, contactez votre vendeur spécialisé.
-
Veuillez immédiatement remplacer les pièces dégradées et/ou ne plus utiliser l’appareil jusqu’à ce
qu’elles soient réparées.
-
N’utilisez pour les réparations que des pièces de rechange originales.
-
Pour le nettoyage, n´utilisez que des chiffons humides et évitez l’utilisation de produits de nettoyage
agressifs.
-
Essuyez immédiatement la sueur après l’entraînement. La sueur peut causer des dommages et
entraver le fonctionnement de l´appareil.
17
Reglage du tapis
Le réglage du tapis se fait de deux manières: réglage de la tension et centrage. Le tapis est déjà ajusté à
l’usine. En revanche le transport, un sol inégal ou d’autres raisons, peuvent le décentrer et engendrer un
contact entre le tapis et les barres latérales ou les embouts de fermeture et causer des dommages. Pour
ajuster de nouveau l’appareil, suivez les instructions suivantes:
•
Le tapis roulant se déplace sur la gauche: Débranchez d’abord la prise électrique. A l’aide de la
clé fournie, tournez le bouton gauche de réglage d’un quart de tour dans le sens des aiguilles d’une
montre. Rebranchez l’appareil et faites rouler le tapis à 4 km/h. Le tapis s’ajuste automatiquement et
se recentre. Répétez cette démarche jusqu’à ce que le tapis soit bien centré. Il peut arriver que le
tapis roulant “glisse” après cette opération. Il faut alors régler la tension. Voir plus bas « le tapis
roulant glisse ».
•
Le tapis roulant se déplace sur la droite: Débranchez d’abord la prise électrique. A l’aide de la clé
fournie, tournez le bouton de réglage droit d’un quart de tour dans le sens des aiguilles d’une
montre. Rebranchez l’appareil et faites rouler le tapis à 4 km/h. Le tapis s’ajuste automatiquement et
se recentre. Répétez cette démarche jusqu’à ce que le tapis soit bien centré. Il peut arriver que le
tapis roulant “glisse” après cette opération. Il faut alors régler la tension. Voir plus bas « le tapis
roulant glisse ».
•
Le tapis roulant « glisse »: Débranchez d’abord la prise électrique. A l’aide de la clé fournie,
tournez les boutons de réglage gauche et droit de la même façon, normalement d’un quart de tour
dans le sens des aiguilles d’une montre. Rebranchez l’appareil et faites rouler le tapis à 4 km/h.
Testez le tapis en marchant dessus et répétez cette démarche si nécessaire. Le tapis ne glisse plus
quand la tension est suffisante.
ATTENTION: Ne serrez pas trop les boulons. Cela peut endommager les protections.
Les boulons de tension gauche et droite sont situés à l’arrière du tapis roulant.
18
Pièces de rechange – Power Run 4.8 – 2012
N°
1
Châssis principal
1
46
2
Cadre de base
1
47
3
Tube vertical droit
1
48
4
5
Tube vertical gauche
Potence ordinateur
1
1
49
50
NOM
Capteur pouls avec
touche vitesse
Câble supérieur
ordinateur
Câble inférieur
ordinateur
Clé de sûreté
Capteur de lumière
6
Potence cadre incliné
1
51
Anneau Magnétique
7
Potence moteur
1
52
8
Tube rotatif
2
53
9
Barre de pression à air
1
54
10
11
12
13
14
15
16
17
18
19
20
21
22
23
24
25
26
27
28
29
1
1
1
1
1
2
1
1
1
1
2
1
1
4
4
2
1
1
2
2
55
56
57
58
59
60
61
62
63
64
65
66
67
68
69
70
71
72
73
74
M6*16
M6*35
M8*55
M8*12
M8*20
M8*32
M8*25
M8*45
M10*42
M10*55
M8*40
M10*20
1
1
1
1
2
4
2
1
4
8
3
2
2
4
1
8
1
1
8
2
1
75
Vis bouchon Hexa
M10*60
2
1
1
76
77
Vis cruciforme
Vis
M5*8
ST4.2*19
4
4
2
78
Vis
ST2.9*6.5
2
34
35
36
37
38
39
40
41
Rouleau avant
Rouleau arrière
Tournevis cruciforme
Tournevis n°5
Tournevis n°6
Tubage
Panneau de course
Bouchon gauche
Bouchon droit
Couvercle fond moteur
Repose-pieds
Tapis de course
Couvercle moteur
Coussinet caoutchouc
Coussinet pied caoutchouc
Couvercle rouleau
Couvercle poignée gauche
Couvercle poignée droite
Roue d'ajustement
Coussinet conique
Couvercle dessus
ordinateur
Couvercle droit base
Couvercle gauche base
Anneau de maintien prise
câble
Prise
Roue de Transport
Vis
Courroie de transmission
Poignée mousse
Poignée mousse
Tube Support
moteur Inclinaison
Bouton d'allumage
Câble d'alimentation
standard
Bouton protection
surcharge
Câble AC
Câble bleu
Câble marron
Câble de retenue
Ecrou hexa-I
Ecrou hexa-I
Vis tête Hexa
Huile Silicone
Vis cruciforme
Vis cruciforme
Vis bouchon Hexa
Vis bouchon Hexa
Vis bouchon Hexa
Vis bouchon Hexa
Vis bouchon Hexa
Vis bouchon Hexa
Vis bouchon Hexa
Vis bouchon Hexa
Vis bouchon Hexa
Vis bouchon Hexa
2
2
2
1
2
1
1
1
79
80
81
82
83
84
85
86
ST4.2*12
ST4.2*28
M5*15
10
8
8
5
8
5
2
2
4
4
6
2
21
42
Moteur DC
1
87
43
Rondelle EVA
3
88
44
Panneau de contrôle circuit
Capteur pouls avec touche
d'inclinaison
1
89
Vis
Vis
Vis
Rondelle de verrouillage
Rondelle plate Classe C
Rondelle ressort
Rondelle de verrouillage
Rondelle de verrouillage
Support Capteur de
lumière
Ecrou de verrouillage
Hexa- I
Boulon Hexagonal
1
90
Vis
30
31
32
33
45
NOM
SPEC
S=13,14,15
5mm
6mm
M4*10
φ31*φ39*250
φ24*φ32*660
Q.
N°
19
SPEC
Φ28*Φ16*2
8
Q.
1
1
1
1
1
1
1
1
1
M10
M8
M8*35
1
M6
8
M8*30
2
ST4.2*19
6
Pièces de rechange – Power Run 4.8 – 2012
N°
91
99
100
101
NOM
Vis
Tube de renforcement du
cadre
Vis
Touche clavier
Panneau circuit ordinateur
Vis
Couvercle arrière son
Transmetteur de poitrine
(Optionnel)
Filet son
Inducteur Clé de sûreté
Plaque métal Clé de sûreté
102
Autocollant touche
1
117
103
Autocollant ordinateur
1
118
104
105
Plaque ordinateur
Anneau Magnétique
1
2
119
120
92
93
94
95
96
97
98
SPEC
M6*22
ST2.9*9.5
ST4.2*12
Φ28*Φ16*13
Q.
6
N°
106
NOM
Rondelle ressort
2
107
Câble inférieur pouls
2
25
1
1
18
2
108
109
110
111
112
Câble supérieur pouls
Câble ordinateur
Filtre
Inductance
Câble marron
2
1
1
1
1
1
113
Rondelle plate Classe C
2
1
1
114
115
116
Prise de terre
Vis
Rondelle ressort
Assemblages corde
câble
Couvercle arrière
ordinateur
Rondelle plate Classe C
Rondelle plate Classe C
20
SPEC
5
Q.
2
4
2
ST4.2*12
4
1
4
2
1
1
φ8*24*2
10
1
2
PL
Szanowna Klientko, szanowny kliencie,
gratulujemy zakupu trenera domowego ENERGETICS. Produkt ten został opracowany do uŜytku
domowego, aby sprostać wymaganiom treningowym w tym zakresie. Przed montaŜem urządzenia i
pierwszym zastosowaniem przeczytaj dokładnie instrukcję i zachowaj ją, aby właściwie korzystać ze sprzętu.
W razie pytań pozostajemy do Twojej dyspozycji. śyczymy przyjemności i powodzenia podczas treningu.
Twój
- Team
Gwarancja
Produkty ENERGETICS są konstruowane i testowane w celu stosowania ich do zaangaŜowanego treningu
fitness. Urządzenie odpowiada europejskiej normie EN 957.
Wskazówki bezpieczeństwa
•
•
•
•
•
•
•
•
•
•
•
•
•
•
•
•
•
•
•
•
To urządzenie treningowe nie zostało skonstruowane z myślą o zastosowaniu terapeutycznym.
W przypadku ograniczeń zdrowotnych lub indywidualnych parametrów treningu, skonsultuj się najpierw z
lekarzem, który doradzi jaki sposób i rodzaj treningu będzie dla Ciebie właściwy.
Uwaga: Niewłaściwy lub nadmierny trening moŜe zagraŜac zdrowiu.
Aby Twój trening był bezpieczny i efektywny, postępuj zgodnie ze wskazówkami instrukcji dot. treningu.
Rozpocznij trening dopiero wtedy, gdy upewnisz się, Ŝe trener domowy jest prawidłowo złoŜony i
właściwie nastawiony.
Rozpoczynaj zawsze rozgrzewką.
UŜywaj tylko oryginalnych części ENERGETICS znajdujących się w zestawie (patrz lista kontrolna).
Podczas montaŜu urządzenia postępuj dokładnie ze wskazówkami podanymi w instrukcji montaŜu.
UŜywaj tylko odpowiednich do montaŜu narzędzi, w razie potrzeby z pomocą drugiej osoby.
Umieść urządzenie na równej, nieśliskiej powierzchni, aby zapewnić stabilną pozycję, jak równieŜ
zmniejszającą rozwój hałasu i wibracji.
Postaw urządzenie na płaskiej, nieśliskiej powierzchni.
Upewnij się, Ŝe maksymalne pozycje, do których mogą być ustawiane wszystkie regulowane części, są
właściwie ustawione.
Przykreć przed treningiem wszystkie regulowane części, aby uniknąć obluzowania podczas treningu.
Urządzenie zostało skonstruowane do treningu osób dorosłych. Zapewnij, aby korzystanie ze sprzętu
przez dzieci odbywało się tylko pod nadzorem osób dorosłych.
Właściwa biomechaniczna pozycja: Aby ułatwić prostą linię biegu na taśmie polecane jest wizualne
wybranie i skonzentrowanie się na jeden punkt w pomieszczeniu i wyobraŜenie sobie, Ŝe chce się go
osiągnąć.
Zwróć uwagę obecnych osób na zagroŜenie np. przez części ruchome.
Opór moŜe być ustawiony do Twoich indywidualnych potrzeb: zobacz instrukcję treningu.
Nie korzystaj z trenera domowego bez obuwia, ani w obuwiu luźnym.
Zapewnij wystarczająco duŜo miejsca, aby moŜna było korzystać z trenera domowego.
UwaŜaj na niezamocowane i ruchome części podczas montaŜu/demontaŜu trenera domowego.
21
Wskazówki bezpieczeństwa
-
-
Aby zabezpieczyć podłogę lub dywan przed ewentualnym uszkodzeniem, podłóŜ pod bieŜnią matę.
Jeśli bieŜnia nie jest uŜywana, wyłącz urządzenie i usuń linkę bezpieczeństwa.
W razie wypadku postaw obie nogi na zewnętrznych powierzchniach.
Aby uaktywnić wyłącznik bezpieczeństwa, odciągnij linkę bezpieczeństwa od komputera.
Upewnij się Ŝe w obrębie 2 m x 1 m za bieŜnią nie znajdują się Ŝadne przedmioty.
Urządzenie jest przeznaczone tylko do uŜytku domowego i testowane na maksymalnej wadze ciała 100
kilogramów.
Nie ponosimy odpowiedzialności za urazy lub szkody powstałe w wyniku korzystania z tej bieŜni.
BieŜnia wytwarza hałas na poziomie poniŜej 70 dB.
Urządzenie działa pod napięciam 220V – 230 V / 50 Hz.
Jeśli Państwo nie uŜywają urządzenia: BieŜnia moŜe być chroniona przed nieuprawnionym uŜytkowaniem
wyciągając klucz bezpieczeństwa i przechowując go w bezpiecznym miejscu.
Zejść w razie konieczności: Weź pod uwagę następujące wskazówki: Wystąpią podczas biegu bule, uczucie
słabości albo jeśli bieŜnia nagle musi być zatrzymana:
1.) Trzymaj się bocznych poręczy
2.) Stań na bocznej pokrywie taśmy
3.) Wyciągnij klucz bezpieczeństwa
Zatrzymanie w razie konieczności: Klucz bezpieczeństwa ma funkcję zatrzymania bieŜni w razie potrzeby.
Wyciągając klucz bezpieczeństwa z konsoli bieŜnia zostanie natychmiast zatrzymana.
Zachowanie przepisów dotyczących zakłuceń hałasem: Ta bieŜnia jest zgodna z wszystkimi przepisami
zapobiegania hałasu.
Szukanie źródła hałasu: Powstają nietypowe odgłosy, jak ocieranie stukanie itd. Postaraj się je zlokalizować i
przez specjalistę naprawić. Urządzenie nie powinno być do momentu naprawy uŜywane.
MontaŜ
1.
2.
3.
4.
5.
6.
Otwórz opakowanie, wyciągnij urządzenie i ustaw je na podłodze.
Obróć komputer do góry i zamocuj go na wspornikach uŜywając śrub (70)
RozłóŜ wsporniki z komputerem. WAśNE: UwaŜaj przy rozkładaniu aby nie uszkodzić czy zmiaŜdŜyć
przewodów. Zamocuj wsporniki do ramy podstawowej śrubami (70), (67), i podkładkami (86) uŜywając klucza
imbusowego.
Zamocuj pokrywy (32, 31) po kaŜdej stronie śrubami (77) uŜywając klucza imbusowago
Zamocuj pokrywy (26,27) na podstawie mocowania komputera.
WłóŜ klucz beszpieczeństwa w odpowiednie gniazdo na komputerze (49)
Obsługa sprzętu
Składenie
Rozkładanie
Złap za końcówkę bieŜni (A) i naciśnij przycisk na
amortyzatorze (B). BieŜnia powoli opuszcza się na
podłogę
Złap za końcówkę bieŜni (A) i podnieś ją do pozycji
pionowej, aŜ usłyszysz Ŝe bieŜnia zaskoczy na
amortyzatorze (B).
22
Czyszczenie urządzenia
Regularne czyszczenie bieŜni wydłuŜa okres jej uŜytkowania.
OstrzeŜenie: Aby uniknąć poraŜenia prądem, upewnij się przed czyszczeniem lub konserwacją, Ŝe bieŜnia
jest wyłączona i kabel zasilający wyciągnięty jest z gniazda sieciowego
Uwaga: Nigdy nie uŜywaj środków polerujących ani czyszczących aby umyć bieŜnię. Aby zabezpieczyć
komputer przed uszkodzeniem, trzymaj go z dala od płynów i unikaj bezpośredniego wpływu promieni
słonecznych.
Po kaŜdym treningu: Zetrzyj po treningu pot z komputera i powierzchni bieŜni. UŜyj w tym celu czystej,
wilgotnej i miękkiej szmatki.
Tygodniowo: Zaleca się postawić bieŜnię na odpowiedniej macie. Ułatwia to jej czyszczenie. Zabrudzenia z
obuwia mogą dostać się pod bieŜnię. Raz w tygodniu odkurzaj powierzchnię pod bieŜnią.
Smarowanie bieŜni
Taśma bieŜni została fabrycznie nasmarowana. Zaleca się jednak, regularne sprawdzanie platformy bieŜni
pod kątem nasmarowania, aby zapewnić jej optymalną funkcjonalność. W pierwszym roku lub po 500
godzinach treningu bieŜnia nie potrzebuje smaru.
Co 30 dni lub 30 godzin treningowych podnoś taśmę bieŜni i sprawdź powierzchnię platformy. Sięgnij
moŜliwie głęboko. Jeśli poczujesz silikon na platformie, smarowanie nie jest konieczne. Jeśli platforma jest
wyczuwalnie sucha, zastosuj się do poniŜej podanych wskazówek. UŜywaj silikonu, który nie zawiera
składników ropy naftowej.
Przeprowadzenie smarowania bieŜni:
1. Ustaw taśmę bieŜni tak, aby brzeg znajdował się po górnej stronie i w środku bieŜni.
2. ZałóŜ główkę rozpryskową na górze rozpylacza.
3. Podnieś taśmę i trzymaj rozpylacz między taśmą a deską. (ok. 6cm od początku taśmy).
Rozpyl silikon na desce przesuwając puszkę z przodu do tyłu. (do ok. 6 cm do końca
taśmy). Powtórz tą czynność po drugiej stronie. Czas spryskiwania wynosi po kaŜdej stronie
4 sekundy.
4. Zanim ponownie uŜyjesz bieŜni, odczekaj ok. minuty do zadziałania silikonu.
Dopilnuj aby dzieci i zwierzęta nie miały dostępu do silikonu.
Pielęgnacja i konserwacja
-
-
Aby uniknąć niebezpieczeństwa uszkodzenia przez korozję, nie uŜywaj ani nie przechowuj
urządzenia fitness w wilgotnych pomieszczeniach.
Sprawdzaj przynajmniej co 4 tygodnie, czy wszystkie łączenia są stabilne i znajdują się w dobrym
stanie.
W razie naprawy skontaktuj się z punktem sprzedaŜy.
Uszkodzone części wymieniaj natychmiast i/lub nie uŜywaj ich do momentu naprawy.
Do naprawy uŜywaj tylko oryginalnych części zamiennych.
Bezpośrednio po treningu zetrzyj pot z urządzenia. Pot moŜe doprowadzić do uszkodzenia
urządzenia fitness i jego funkcji.
Do czyszczenia uŜywaj tylko wilgotnej szmatki, unikaj stosowania ostrych lub chemicznych środków
czyszczących. Aby uniknąć uszkodzenia komputera, trzymaj go z dala od wilgoci i unikaj
bezpośredniego wpływu promieni słonecznych.
Regularnie sprawdzaj wszystkie części. Przykręć mocno śruby. Wymień niezwłocznie zuŜyte/
zniszczone części.
23
REGULACJA BIEśNI:
Regulacja bieŜni ma dwie funkcje: napręŜanie i środkowanie taśmy bieŜni. BieŜnia została nastawiona
fabrycznie. Podczas transportu, przez nierówne podłoŜe lub inne przyczyny moŜe się jednak zdarzyć, Ŝe
taśma nie będzie wyśrodkowana i będze dotkać bocznych granic lub pokrywy tylnej i przez co zostanie
uszkodzona. Aby na nowo wyśrodkować taśmę, postępuj według następujących wskazówek:
•
Taśma przesuwa się na lewą stronę: Najpierw wyciągnij kabel zasilający z sieci. Przekręć
odpowiednim kluczem imbusowym lewą śrubę regulującą o ¼ obrotu zgodnie z kierunkiem
wskazówek zegara. WłóŜ ponownie kabel zasilający i uruchom taśmę na 4 km/h (2,5mph). Taśma
sama się wyreguluje i wyśrodkuje. Powtórz tą czynność aŜ taśma zostanie wyśrodkowana. MoŜliwe,
Ŝe taśma po tej czynności będzie się ześlizgiwać. Postąp w tym przypadku według wskazówki
„Taśma ześlizguje się“.
•
Taśma przesuwa się na prawą stronę: Najpierw wyciągnij kabel zasilający z sieci. Przekręć
odpowiednim kluczem imbusowym prawą śrubę regulującą o ¼ obrotu zgodnie z kierunkiem
wskazówek zegara. WłóŜ ponownie kabel zasilający i uruchom taśmę na 4 km/h (2,5mph). Taśma
sama się wyreguluje i wyśrodkuje. Powtórz tą czynność aŜ taśma zostanie wyśrodkowana. MoŜliwe,
Ŝe taśma po tej czynności będzie się ześlizgiwać. Postąp w tym przypadku według wskazówki
„Taśma ześlizguje się“.
•
Taśma ześlizguje się: Najpierw wyciągnij kabel zasilający z sieci. Przekręć odpowiednim kluczem
imbusowym prawą i lewą śrubę regulującą o taki sam obrót, ¼ obrotu zgodnie z kierunkiem
wskazówek zegara. WłóŜ ponownie kabel zasilający i uruchom taśmę na 4 km/h (2,5mph). Chodź po
bieŜni, aby sprawdzić czy się ślizga. Jeśli tak, powtórz wcześniejsze czynności. NapręŜenie jest
wystarczające, jeśli taśma przestanie się ślizgać.
UWAGA: Nie napręŜaj nadmiernie rolek. ŁoŜysko rolek prowadniczych moŜe zostać
uszkodzone.
Prawa i lewa śruba regulująca napręŜenie bieŜni znajduje się na końcu taśmy.
24
Lista części zamiennych – Power Run 4.8 – 2012
Nr.
Oznaczenie
Rozmiar
Ilość
Nr.
Oznaczenie
1
Rama podstawowa
1
51
Magnes
2
3
Rama podstawowa, przód
Wspornik, prawy
1
1
52
53
4
Wspornik, lewy
1
54
5
Rama komputera
1
55
6
Rama zmiany nachylenia
1
56
7
Zamocowanie silnika
1
57
8
9
10
11
12
13
14
15
16
17
18
19
20
21
22
23
24
25
26
27
28
29
30
31
32
2
1
1
1
1
1
1
2
1
1
1
1
2
1
1
4
4
2
1
1
2
2
1
1
1
58
59
60
61
62
63
64
65
66
67
68
69
70
71
72
73
74
75
76
77
78
79
80
81
82
2
83
34
35
36
37
38
39
40
41
42
43
44
45
46
47
Tuleja
Amortyzator
Rolka, przednia
Rolka, tylnia
Klucz
5# Imbus
6# Imbus
Tuleja
Płyta pod taśmą
Pokrywa końcowa, lewa
Pokrywa końcowa, prawa
Osłona silnika, dolna
Osłona boczna
Taśma
Pokrywa silnika
Amortyzator
Amortyzator
Pokrywa rolki
Pokrywa poręczy, lewa
Pokrywa poręczy, prawa
Rolka
Amortyzator
Pokrywa komputera, górna
Pokrywa, prawa
Pokrywa, lewa
Zabezpieczenie kabli
(pierścień)
Pokrywa
Rolka transportowa
Śruba
Pas
Powłoka
Powłoka
DrąŜek poprzeczny
Silnik do zmiany nachylenia
Silnik prędkości
Podkładka
Kontroler
Czujnik, zmiana nachylenia
Czujnik, zmiana prędkości
Kabel do komputera, górny
Połączenie zasilania
Kabel zasilający
Zabezpieczenie przed
przeciąŜeniem
AC-Kabel
Kabel zasilający,
niebieski
Kabel zasilający,
brązowy
Kabel zasilający
Nakrętka
Nakrętka
Nakrętka
Silikon
Śruba
Śruba
Śruba
Śruba
Śruba
Śruba
Śruba
Śruba
Śruba
Śruba
Śruba
Śruba
Śruba
Śruba
Śruba
Śruba
Śruba
Śruba
Śruba
Podkładka
2
2
2
1
2
1
1
1
1
3
1
1
1
1
84
85
86
87
88
89
90
91
92
93
94
95
96
97
48
Kabel do komputera, dolny
1
98
49
Klucz bezpieczeństwa
1
99
50
Czujnik
1
100
33
S=13,14,15
5mm
6mm
M4*10
φ31*φ39*250
φ24*φ32*660
25
Rozmiar
Ilość
Φ28*Φ16*2
8
1
1
1
1
1
1
1
M6*16
M6*35
M8*55
M8*12
M8*20
M8*32
M8*25
M8*45
M10*42
M10*55
M8*40
M10*20
M10*60
M5*8
ST4.2*19
ST2.9*6.5
ST4.2*12
ST4.2*28
M5*15
10
1
2
4
2
1
4
8
3
2
2
4
1
8
1
1
8
2
2
4
4
2
5
2
2
4
Podkładka
8
4
Podkładka
Podkładka
Podkładka
Zamocowanie czujnika
Nakrętka
Śruba
Śruba
Śruba
DrąŜek poprzeczny
Śruba
Klawiatura
Płytka komputera
Śruba
Osłona głośnika
Pas na klatkę piersiową
(opcjonalnie)
Kratka głośnika
Wyłącznik
bezpieczeństwa
8
5
8
6
2
21
1
8
2
6
6
2
25
1
1
18
2
M10
M8
M8*35
M6
M8*30
ST4.2*19
M6*22
ST2.9*9.5
ST4.2*12
1
2
1
Lista części zamiennych – Power Run 4.8 – 2012
Nr.
Ilość
Nr.
101
Płyta metalowa wyłącznik
bezpieczeństwa
Oznaczenie
Rozmiar
1
111
102
Naklejka
1
112
103
104
105
106
107
108
109
110
Naklejka na komputer
Osłona komputera
Magnes pierścieniowy
Podkładka
Kabel pulsu, dolny
Kabel pulsu, górny
Kabel do komputera
Filtr
1
1
2
2
2
2
1
1
113
114
115
Φ28*Φ16*13
5
116
117
118
119
120
26
Oznaczenie
Rozmiar
Cewka
Kabel zasilający,
brązowy
Podkładka
Kabel uziemiający
Śruba
Podkładka
Kabel zasilający
Osłona komputera, dolna
Podkładka
Podkładka
Ilość
1
1
4
ST4.2*12
2
1
4
4
2
φ8*24*2
1
1
1
10
2
Woelflistrasse 2
CH-3006 Bern
Switzerland
www.energetics.eu
© Copyright ENERGETICS 2012