1
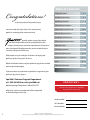
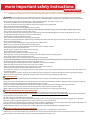
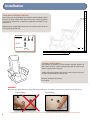
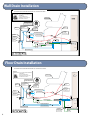
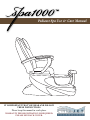
Pedicure Spa Use & Care Manual IT IS IMPORTANT THAT YOU READ AND FOLLOW THESE INSTRUCTIONS. Please keep this manual in a safe place. Warranty Pre-Registration is required. Please see back cover. Congratulations! on your purchase of our pedicure spa. You have made the right choice. Our revolutionary products are designed to meet your needs. proudly makes our goal to provide the Pedicure Spa Industry with quality products that surpass the minimum sanitation requirements of your local area state boards. We pride ourselves on our commitment to customer safety and satisfaction. With proper care, you and your customers can enjoy your pedicure spa for many years to come. Before installation and use of your pedicure spa, please read the entire manual thoroughly. Table of Contents: Safety Information 4-5 Installation Information 6-7 Plumbing Installation 8 HT-1000 Chair Installation 9 Replacing the Controller PCB 10-11 HT-1000 Remote Features 12-13 Installing the New Armrest 14 Liner™ Jet & Liner Instructions 15 Basin Operation 16 Cleaning Instructions 17 Use, Care, & Maintenance 18 - 19 Parts Identification / Specifications 20 - 21 Parts 22 - 23 Warrranty Information 25 If you encounter any questions or problems in regards to your pedicure spa, please contact : Spa1000’s Technical Support Department at 1-225-236-0289 or [email protected] Monday through Friday from 9 AM to 5 PM CST. After hours calls are recorded and will be responded to the following business day. I M P O R TA N T: Please fill out and return warranty registration on back cover. Registration is required. (not applicable in some states) Serial Number: W/O Number: Purchase Date: 2 Copyright © 2010 Spa1000™. All Rights Reserved. All brand and/or product names and logos are trademarks or registered trademarks of their respective owner(s). keep it safe I M P O RTA N T SAFET Y INSTRUCTIONS S AV E T H E S E I N S T R U C T I O N S A N D P L E A S E K E E P I N A S A F E P L A C E . Read all instructions before using this pedispa. DANGER: Risk of Electric Shock. Connect only to a circuit protected by a ground fault circuit interrupter. Grounding is required. The unit should be installed by a qualified service representative and grounded. Install to permit access for servicing. CAUTION: Risk of electric shock. Disconnect electric power before servicing. WARNING: Risk of accidental injury or drowning. Children should not use hydro massage bathtub without adult supervision. WARNING: Risk of accidental injury or drowning. Do not use hydro massage bathtub unless all suction guards are installed to prevent body and hair entrapment. WARNING: To avoid injury, exercise care when entering or exiting the hydro massage bathtub. WARNING: Risk of accidental injury or drowning: do not use drugs or alcohol before or during the use of a hydro massage bathtub equipped with heater to avoid unconsciousness and possible drowning. WARNING: Risk of fetal injury; pregnant or possibly pregnant women should consult a physician before using a hydro massage bathtub equipped with heater. WARNING: Risk of hyperthermia and possible drowning; do not use a hydro massage bathtub equipped with heater immediately following a strenuous exercise. WARNING: Risk of electric shock; do not permit electric appliances (such as a hair dryer, lamp, telephone, radio, or television) within 1.5m (5 feet) of this hydro massage bathtub. CAUTION: Test the ground fault circuit interrupter protecting this appliance periodically in accordance with the manufacturer’s instructions. WARNING: Risk of hyperthermia and possible drowning; water temperature in excess of 38° C (100.4° F) may be injurious to your health. Check and adjust water temperature before use. WARNING: Risk of hyperthermia; people using medications and/or having an adverse medical history should consult a physician before using a hydro massage bathtub equipped with heater. Important Requirements All outlets connected to pedicure spas must include a GFCI device (Ground Fault Circuit Interrupter) This will reduce the risk of electric shock. It is important that you contact a local, licensed plumber and licensed electrician to install your new pedicure spa. Installation must be in compliance with all your local and state building codes. Your pedicure spa cannot operate efficiently or safely unless it is provided with adequate electrical power, sufficient water pressure, proper water temperature, and required drainage capabilities. Contact your local building inspector for information and local code compliance procedures that need to be followed when having your pedicure spa installed. Subsequent inspections and approvals that may be required are the responsibility of the purchaser. IL EST IMPORTANT DE LIRE ET DE SUIVRE ATTENTIVEMENT CES CONSIGNES DE SÉCURITÉ. VEUILLEZ CONSERVER CE MANUEL DANS UN ENDROIT SÛR DANGER : Risque de choc électrique. Connecter seulement à un circuit protégé par un disjoncteur de fuite à la terre. UNE MISE À LA TERRE EST INDISPENSABLE : L’unité doit être installée par un technicien qualifié; elle doit être mise à la terre. Elle doit être installée de manière à permettre l’accès pour l’entretien. ATTENTION : Risque de choc électrique. Déconnecter l’alimentation électrique avant tout entretien. MISE EN GARDE : Risque de blessure ou de noyade accidentelle; ne pas laisser des enfants utiliser la baignoire d’hydromassage sans la surveillance d’un adulte. MISE EN GARDE : Risque de blessure ou de noyade accidentelle; pour éviter le happement de membres ou de cheveux, utiliser la baignoire d’hydromassage uniquement lorsque les prises d’aspiration sont toutes munies d’une grille de protection. MISE EN GARDE : Pour éviter les blessures, user de prudence en entrant dans la baignoire d’hydromassage ou en la quittant. MISE EN GARDE : Risque de blessure ou de noyade accidentelle; afin d’éviter l’évanouissement et le risque de noyade, ne pas prendre de médicaments ni consommer de l’alcool avant ou pendant l’utilisation d’une baignoire d’hydromassage équipée d’un système de chauffage. MISE EN GARDE : Danger pour le fœtus; les femmes enceintes, que leur grossesse soit confirmée ou non, doivent consulter un médecin avant d’utiliser une baignoire d’hydromassage équipée d’un système de chauffage. MISE EN GARDE : Risque d’hyperthermie et de noyade; ne pas utiliser une baignoire d’hydromassage équipée d’un système de chauffage juste après un exercice intense. MISE EN GARDE : Risque de choc électrique; ne pas placer d’appareils électriques (tels qu’un sèche-cheveux, un luminaire, un téléphone, une radio ou un téléviseur) à moins de 1,5 m (5 pieds) de cette baignoire d’hydromassage. ATTENTION : Vérifier régulièrement le fonctionnement du disjoncteur de fuite à la terre, conformément aux instructions du fabricant. MISE EN GARDE : Risque d’hyperthermie et de noyade; une température de l’eau supérieure à 38 °C (100,4 °F) peut présenter un risque pour la santé. Vérifier et régler la température de l’eau avant d’utiliser la baignoire. MISE EN GARDE : Risque d’hyperthermie; les personnes qui prennent des médicaments ou qui ont des problèmes de santé doivent consulter un médecin avant d’utiliser une baignoire d’hydromassage équipée d’un système de chauffage. 3 more important safety instructions SAVE THESE INSTRUCTIONS Before using your new pedicure spa, please read and observe these safety instructions carefully to reduce the possibility of injury, serious bodily harm, death, fire, and/or other property damage. For additional questions, please call our Technical Support Department at: 1-225-236-0289 WARNING: It is very important that you carefully follow the basin cleaning procedures on page 17 to ensure that the spa is sanitized after each use. Spa1000 is not liable for any infections or disease that may result from improper cleaning or failure to adhere to sanitation requirements. · This pedicure spa unit should only be operated in a room temperature between 40°F (4°C) and 100°F (38°C). · Do not use unit outdoors or in excessively humid or dusty environments. · Do not use unit where aerosol (spray) products are being used or oxygen is being administered. · Do not operate unit if it has been damaged. · Always connect this unit to a properly grounded electrical outlet. ·This unit is designed only to operate on a standard 110Volt 60Hz current.Exceeding this standard may cause injury and/or serious bodily harm and/or damage to property. · Do not use this unit if noise above normal sound is heard. · To reduce the risk of burns, fires, and electrical shock, never leave this unit unattended if plugged in and always unplug when not in use for an extended period, before installation, cleaning, or removal of parts. · Keep the power cord away from heated surfaces. · Do not operate unit if the power cord or plug has been damaged. · If this unit is operating abnormally or malfunctioning, immediately turn off the power and disconnect the power cord from the outlet; do not operate unit if it is not working properly. · In the event of a power failure, always turn the power switch to its OFF position. · When not in use, always turn the power switch to its OFF position. · To disconnect unit, turn all controls to OFF position and remove power cord from the outlet. · Keep all electrical devices away from this unit. · This unit only has a weight capacity of 300 pounds (136.06 kg). · Enter and exit the unit slowly and carefully. · Never drop or insert any object into any opening of the unit. · Close supervision is necessary when this unit is used by, on, or near children, invalids, and disabled persons. · Do not stand or allow anyone to stand in the spa basin. · Please be aware that a spa basin filled with water is a potential drowning hazard. · Check the water temperature before each use;water temperature should not exceed 105°F (41°C) and water temperature in heater should not exceed 150°F (65°C). · Disinfect the spa basin and jets, after each use with an approved cleaner. · Do not massage any area of the body that is swollen, inflamed, or covered with skin eruptions. · Before operating the massage chair, make sure the chair arms are down. · If there is severe discomfort during the massage, discontinue use and consult a physician. · Do not use the massage chair for more than 15 minutes at one time. · Do not put hands or fingers near massage mechanism or rollers while the chair is operating; touching the mechanism can result in injury from the rollers squeezing together. · Keep the massage chair and its air openings clean and free of lint, hair, and dust; never operate the massage chair if the air openings are blocked. · Misuse or failure to properly clean pedicure spa unit may result in serious health issues , bodily injury, and/or death. Health Risk Warning Use of the pedicure spa unit should be pleasant and comfortable; if there is any pain or discomfort, stop use of the pedicure spa immediately. A physician should be consulted before use of the massage chair by anyone with the following conditions: Malignant tumor, heart disease, pregnancy, Conditions requiring rest, and back disease or trouble from an injury or accident. A physician should be consulted before use of the spa basin and jets, by anyone with diabetes, swelling, fracture, or persistent pain. Anyone with inflamed legs or feet, open wounds, or fungal infections should not use the spa basin and jets. Misuse or failure to properly clean pedicure spa unit may result in serious health issues , bodily injury, and/or death. WARNING: GROUNDING INSTRUCTIONS AND METHODS This unit must be grounded. If it should malfunction or break down, grounding provides a path of least resistance for electrical current to reduce the risk of electric shock. All outlets connected to pedicure spas must include a GFCI device (Ground Fault Circuit Interrupter). This will reduce the risk of electric shock. This unit is for use on a standard 110 Volt 60Hz current. This unit is equipped with a cord having an equipment grounding conductor and a grounding plug. The plug must be plugged into an appropriate outlet that is properly installed and grounded in accordance with all local codes and ordinances. If you are in doubt as to whether this unit is properly grounded, check with a qualified electrician or serviceman. Fatal electric shock and fire could occur with improper connection of the equipment-grounding conductor. Do not modify the plug provided with the product for any reason; if it will not fit the outlet, have a proper outlet installed by a qualified electrician. 4 WARNING: THERMAL RESETTING PROTECTION DEVICE The massage chair is equipped with a thermal resetting protection device. This is a safety feature to protect it from overheating. If the chair should suddenly stop and will not start, turn the main power switch off, and do not operate the chair for at least 30 minutes. Failure to turn the chair off may result in the chair starting unexpectedly when the device cools. Information sur la sécurité CONSERVER CE MODE D’EMPLOI Avant d’utiliser votre nouveau spa de pédicure, veuillez lire et respecter attentivement ces consignes de sécurité afin de réduire les risques de blessures, de dommages corporels graves, de mort accidentelle, d’incendie et/ou d’autres dégâts matériels. Pour des questions supplémentaires, veuillez vous adresser à notre service de soutien technique au :1-225-236-0289 MISE EN GARDE : Il est très important de suivre scrupuleusement les procédures de nettoyage de la cuve, à la page 17, afin d’assurer que le spa soit aseptisé après chaque utilisation. Spa1000 ne peut, en aucun cas, être tenue responsable de cas d’infections ou de maladie pouvant découler d’un mauvais nettoyage ou d’un manquement aux exigences de désinfection. • Ce spa de pédicure doit fonctionner uniquement à des températures ambiantes comprises entre 40 °F (4 °C) et 100 °F (38 °C). • Ne pas utiliser le spa en extérieur ou dans les milieux très humides ou poussiéreux. • Ne pas utiliser le spa dans des endroits où l’on emploie des produits en aérosol (pulvérisateur) ou dans des endroits où on administre de l’oxygène. • Ne pas faire fonctionner le spa s’il a été endommagé. • Connecter toujours ce spa à une prise électrique correctement mise à la terre. • Ce spa est conçu pour fonctionner seulement sur alimentation secteur de 110 Volts à 60 Hz. Le faire fonctionner à des tensions supérieures risque d’entraîner de graves blessures et/ou dommages corporels, ou encore de sérieux dommages matériels. • Ne pas utiliser ce spa s’il produit un bruit supérieur à la normale. • Afin de réduire les risques de brûlures, d’incendie et de choc électrique, ne jamais laisser ce spa sans surveillance s’il branché sur l’alimentation. On doit tou jours le débrancher : s’il n’est pas utilisé pendant une longue période de temps, avant son installation, avant tout nettoyage, ou avant un démontage. • Maintenir le cordon d’alimentation loin des surfaces chauffées. • Ne pas faire fonctionner le spa si le cordon d’alimentation ou la fiche a été endommagé. • Si ce spa fonctionne anormalement ou fonctionne mal, couper le courant immédiatement et débrancher le cordon d’alimentation de la prise murale; ne pas faire fonctionner le spa s’il ne fonctionne pas correctement. • En cas de panne électrique, placer toujours l’interrupteur d’alimentation sur la position ARRÊT (OFF). • Lorsque le spa n’est pas utilisé, placer toujours l’interrupteur d’alimentation sur la position ARRÊT. • Pour déconnecter le spa, placer toutes les commandes sur la position ARRÊT et débrancher le cordon d’alimentation de la prise murale. • Garder tous les appareils électriques loin du spa. • Ce spa a une capacité de 300 livres (136 kg) seulement. • Les personnes traitées dans le spa doivent s’y installer et le quitter lentement et prudemment. • Ne jamais insérer ou laisser tomber un objet, quel qu’il soit, dans une des ouvertures du spa. • Une stricte surveillance est nécessaire lorsque ce spa est utilisé pour traiter des enfants, des personnes invalides ou handicapées, ou qu’il est utilisé par ou proche d’eux • Ne pas se tenir debout (en ne laisser personne se tenir debout) dans la cuve du spa. • On doit tenir compte du fait qu’une cuve de spa remplie d’eau constitue un risque possible de noyade. • Vérifier la température de l’eau avant chaque utilisation; la température de l’eau ne doit pas dépasser 105 °F (41 °C) et celle de l’eau dans le réchauffeur ne doit pas dépasser 150 °F (65 °C). • Désinfecter la cuve et les buses du spa après chaque usage, à l’aide d’un agent de nettoyage approuvé. • Éviter de masser toute région du corps qui est enflée, irritée ou couverte d’éruptions cutanées. • Avant de mettre en marche la chaise de massage, s’assurer que les bras de la chaise sont abaissés. • En cas de malaise grave pendant le massage, arrêter le traitement et consulter un médecin. • Ne pas utiliser la chaise de massage pendant plus de 15 minutes à la fois. • Éviter de mettre les mains ou les doigts près du mécanisme ou des galets de massage pendant que la chaise fonctionne; un contact avec ce mécanisme risque d’entraîner des blessures résultant de l’action de pincement des galets. • S’assurer que la chaise de massage et ses ouvertures d’air sont propres et exemptes de peluche, de cheveux et de poussière; ne jamais faire fonctionner la chaise de massage si les ouvertures d’air sont obturées ou bloquées. • Une mauvaise utilisation, un abus ou un manquement à nettoyer correctement le spa de pédicure, peut se traduire par de graves problèmes de santé, des bles sures et/ou même une mort accidentelle. Mise en garde relative au risque pour la santé L’usage du spa de pédicure devrait procurer des effets plaisants et de bien-être; en cas d’apparition de douleur ou de malaise, on doit interrompre immédiatement l’utilisation du spa. Toute personne qui souhaiterait utiliser la chaise de massage doit consulter un médecin si elle est enceinte ou si elle souffre des troubles suivants : tumeur maligne, maladie cardiaque, conditions exigeant le repos, maux de dos chroniques ou problèmes imputables à une blessure ou un accident. Toute personne qui souhaite utiliser la cuve ou les buses du spa doit consulter un médecin si elle souffre des troubles suivants : diabète, enflures, fracture ou douleurs persistantes. Il est recommandé à toute personne présentant une irritation des pieds, des plaies ouvertes ou des infections fongiques, de ne pas utiliser la cuve et les buses du spa. Une mauvaise utilisation, un abus ou un manquement à nettoyer correctement le spa de pédicure, peut se traduire par de graves problèmes de santé, des blessures et/ou même une mort accidentelle. MISE EN GARDE – DIRECTIVES ET MÉTHODES DE MISE À LA TERRE : Ce spa doit être mis à la terre. En cas de défaillance ou de panne éventuelles, la mise à la terre fournit au courant électrique un chemin de moindre résistance qui réduit le danger de choc électrique. Toutes les prises connectées aux spas de pédicure doivent comprendre un disjoncteur de fuite à la terre (ou GFCI). Ce dispositif réduira les risques de choc électrique. Ce spa est conçu pour fonctionner sur une alimentation standard de 110 Volts à 60 Hz. Ce spa comporte un cordon d’alimentation muni d’un conducteur de mise à la terre de l’équipement et d’une fiche avec broche de terre. La fiche doit être branchée dans une prise murale appropriée correctement installée et mise à la terre conformément à tous les règlements et ordonnances municipaux. En cas de doute quant à la mise à la terre adéquate de l’équipement, communiquer avec un électricien ou technicien agréé. Une mauvaise connexion du conducteur de mise à la terre de l’équipement risque de provoquer une électrocution ou un incendie. Ne modifier en aucun cas la fiche à trois broches fournie avec l’équipement; si elle n’entre pas dans la prise murale, faire installer une prise appropriée par un électricien agréé. MISE EN GARDE : DISPOSITIF DE RÉINITIALISATION THERMIQUE DE PROTECTION La chaise de massage est équipée d’un dispositif de réinitialisation thermique de protection. Il s’agit d’une fonction de sécurité qui protège l’appareil contre la surchauffe. Si la chaise s’arrête soudainement et ne peut être remise en marche, mettre l’interrupteur principal à la position ARRÊT (OFF), et ne pas faire fonctionner la chaise pendant au moins 30 minutes. L’omission de couper l’alimentation électrique peut causer un démarrage inattendu de la chaise pendant que 5 dispositif refroidit. Installation Licensed Installation Required Please check your local plumbing and electrical codes. Installation of this pedicure spa must comply with both. You must hire a licensed plumber and a licensed electrician to complete the applicable connections to your pedicure spa. Wall NOTE: Failure to comply with federal, state, or local codes will result in the warranty being null and void. Parts Included: 3 (2 1/2”) bolts 1 (2”) bolt 19” 1 Allen Wrench See above for proper dimension. Location and Support The pedicure spa must be on a level location. The floor structure of that location must be capable of supporting both the pedicure spa and its occupant at the same time. To fully recline the pedicure chair, the base of the unit must be positioned to a minimum of 19” from the wall. Minimum installation dimensions: L 70” x W 30” WARNING! When moving or lifting pedicure spa, always lift from the bottom of spa. Do not lift by control mixer or chair. Doing so will damage spa. Incorrect Lifting! 6 Correct Lifting. For installation procedures on custom spas, please see insert provided for information related to your custom order. Installation (Fig 1.) Important Installation & Utility Information: Electrical Service: A 110V, 60 Hz, 15 Amp GFCI protected grounded circuit must be used to supply power Back Flow Preventer to the pedicure spa. Water Supply: · Observe and follow all local codes in regards to plumbing connections. · 30 to 80 PSI water pressure is needed to correctly fill the basin a correct level. · The hot water supply temperature must not exceed 150° F (65° C); exceeding this temperature may cause damage to your unit and injury. If the temperature is higher than this, then please lower your water heater to the correct and acceptable temperature. · Carefully connect the incoming water supply lines to the appropriate fittings located on the back of the pedicure spa. For hot and cold water supply fittings (see figure 2) below. For power drain/floor drain fittings location, page 8. ASME A112.18.1-2005/CSA B125.1-05 · Shut-off valves are recommended. · To prevent the water supply contamination, our shower head includes a back flow (Fig 2.) preventer. (see figure 1) We also highly recommend you to install a Reduced Pressure Attach hose with red markings to hot water line. Back Flow (RPBP) for each hot & cold water supply line. Please check with your local plumbing code requirements. You are responsible for your valves, connections, and compliance to local codes. Our Hot & Cold 8’ Stainless Steel Hoses are UPC Approved Installing the Rear Left-hand Bolt 1. Place the chair into position on top of the tub. 2. Place the lock washer, then the at washer, onto the bolt. 3. From beneath the tub, thread the hex-headed bolt upward, through the rear left-hand tub/bolt hole (Fig.3). 4. Install the wing nut onto the end of the bolt, then use a wrench to secure it (Fig.3). Chair Wing nut Chair bar Tub Flat washer Lock washer Hex-headed Bolt Tub (Fig 3.) 7 Wall Drain Installation TSPA1000 4 SPA CONCEPTS & DESIGNS CONCEPTS & DESIGNS PEDICURE CHAIR PIPING & INSTRUMENTATION DIAGRAM. PIPE-LESS SYSTEM WITH WALL DRAIN PEDICURE CHAIR PIPING & INSTRUMENT DIAGRAM. PIPE-LESS SYSTEM WITH WALL DRAIN NOTES: POWER SOURCE: 110V AC/ 6 AMP 60 HZ (GFI PROTECTED) CONFORMS TO UL STD 1795 AND UL STD 73 CERTIFIED TO CSA C 22.2 NO. 218.1 AND CAN/CSA C 22.2 NO. 68 3128265 MASSAGE CHAIR WALL ZURN BACKFLOW PREVENTER (VACUUM BREAKER) Installed to spas shipped to MA & CA(Los Angeles area) AIR CONTROL KNOB FILLER/ SHOWER HEAD w/ BACK FLOW PREVENTER FIBERGLASS SHELL MANUAL DRAIN ACTUATOR/ OVERFLOW AIR SWITCH POWER SUPPLY WITH TIMER (15 AMP RATED) MAX. WATER LEVEL @ 5 GAL. JET/LIGHT AIR SWITCH JET 12 VOLT LED LIGHT TRX DRAIN PUMP AIR SWITCH FILL / MIX VALVE 1½” CONNECTION DRAIN CAP ¾” SUCTION GFI 2 MIN TIMER ½” CHECK VALVES ½” DISCHARGE TO S.S. 3/8” COMP. VALVES DRAIN PUMP 1½” x ¾” RED P-TRAP 12” to 14” ABOVE FINISHED FLOOR T4 SPA CONCEPTS & DESIGNS, LLC 5150 FLORIDA BLVD BATON ROUGE, LA 70806 Floor Drain Installation SPA1000 CONCEPTS&&DESIGNS DESIGNS T 4 SPA CONCEPTS PEDICURE DIAGRAM. PIPE-LESS SYSTEM WITHWITH FLOOR DRAIN PEDICURECHAIR CHAIRPIPING PIPING & & INSTRUMENT INSTRUMENTATION DIAGRAM. PIPE-LESS SYSTEM FLOOR DRAIN NOTES: POWER SOURCE: 110V AC/ 6 AMP 60 HZ (GFI PROTECTED) CONFORMS TO UL STD 1795 AND UL STD 73 CERTIFIED TO CSA C 22.2 NO. 218.1 AND CAN/CSA C 22.2 NO. 68 3128265 MASSAGE CHAIR WALL ZURN BACKFLOW PREVENTER (VACUUM BREAKER) Installed to spas shipped to MA & CA(Los Angeles area) AIR CONTROL KNOB FILLER/ SHOWER HEAD w/ BACK FLOW PREVENTER FIBERGLASS SHELL MANUAL DRAIN ACTUATOR/ OVERFLOW AIR SWITCH POWER SUPPLY WITH TIMER (15 AMP RATED) MAX. WATER LEVEL @ 5 GAL. JET/LIGHT AIR SWITCH JET 12 VOLT LED LIGHT TRX DRAIN PUMP AIR SWITCH GFI DRAIN CAP SLOPE at 1/4” per foot 3/8” COMP. VALVES 1 1/2 “ DISCHARGE TO S.S. P-TRAP 3/8” HOT WATER SUPPLY ABOVE FINISHED FLOOR 12”-14” 3/8” COLD WATER SUPPLY 12” 3” HUB DRAIN WITH AIR GAP or FLOOR SINK 8 T4 SPA CONCEPTS & DESIGNS, LLC 5150 FLORIDA BLVD BATON ROUGE, LA 70806 2” to 3” DRAIN TO SEWER SYSTEM P-TRAP HT-1000 Chair Installation NOTE: 2 people are required to attach the chair to the spa basin. Please do not attempt to do it by yourself. Doing so may result in serious injuries or damage to the products. 2 1 Remove chair out of the box carefully, make sure that you do not grab the armrest. Lifting the chair incorrectly may cause damage to the chair. Place chair on the tub. Lift the bottom cover. Plug chair in. Move chair forward / backward with remote control to clear the holes. Align bolt holes in chair with holes in spa. Begin to install 3 regular bolts into holes. (red arrows) 4 3 While one person holds the chair in place, the second person flips up the bottom cover. 6 Wing nut 5 Wing Nut Chair Tub Chair Tub Flat Washer Lock Washer Flat washer Bolt Chair bar Lock washer Bolt Wing Nut Install bolt and washers in order shown here. Tighten wing nut to end of bolt by reaching underneath the chair. Use a wrench to secure. Tub 7 After placing the screws, lock the backrest of chair by pushing the back until it locks. To unlock the chair, pull down lever. 9 Replacing the Controller PCB To ensure that Human Touch™ products are repaired in a manner that is consistent with the practices used during the manufacturing process, Human Touch requires that all product repairs are performed using only factory-new parts in accordance with these product repair instructions. TOOLS REQUIRED: Long handled Phillips-head screwdrive Utility blade 5mm Allen key Controller Label 1. Power off the chair, then unplug it. 2. Using the utility blade, peel the controller label off the left-hand arm rest (Fig.1). 3. Using a Phillips-head screwdriver, remove the two screws located beneath the controller label (Fig.2). Left-hand Armrest (Fig.2) (Fig.1) Manicure tray Remove two Allen Screws 4. Using a 5mm Allen key, remove the two Allen screws located beneath the controller label (Fig.3) 5. Remove the manicure tray. (Fig.3) Phillips-head Screw 6. Using a Phillips-head screwdriver, remove the Phillips-head screw located on the underneath of the armrest, where the manicure tray was mounted (Fig.4). (Fig.4) 10 Replacing the Controller PCB 7. Using two hands, pull outward on the rear side panel to remove it (Fig.5) (Fig.5) Rear side panel (Fig.6) 8. Using a long-handled Phillips-head screwdriver, remove the screw located on the rear underside of the armrest. IMPORTANT: You must insert the screwdriver at an angle as shown (Fig.6) 9. Placing one hand on each end of the armrest, pull the top armrest panel slightly forward and upward to detach it from the armrest and expose the PCB connector, then disconnect the connector (Fig.7). IMPORTANT: The upper armrest is connected with a series of tabs that will break if you lift (Fig.7) straight up on the armrest. (Fig.8) Controller PCB 10. Remove the upper armrest. 11. Using a Phillips-head screwdriver, remove the five screws that secure the PCB to the upper armrest panel (Fig.8). 12. Remove the PCB. 11 HT-1000 Massage Chair Remote Stop - Stops the massage and parks the massage rollers at the top of the brackets. Power - Lights to indicate that master power switch is on. Power Recline - Effortlessly adjust the backrest to a reclined or upright position. Position (up/down arrows) - Use these buttons along with any massage technique to target the massage to the desired area of your back. You can press this button before or after selecting the massage technique Forward - Slides the chair foarward. Backward - Slides the chair backwards. Massage Techniques - Four massage techniques let you customize your massage. Massage Programs massage the specific area of your back for 15 minutes, using a variety of techniques. The corresponding LED lights on the remote indicate which massage mode is currently in use. Full - Massages your entire back. Upper - Massages your upper back. Lower - Massages your lower back. 12 Massage Techniques Now choose a massage technique to suit your mood. Your Human Touch™ massage chair lets you customize your massage using a wide variety of massage techniques. Choose from three stationary massage techniques and a rolling massage, or combine them! Use the Position and Zone buttons to target your massage to a specific area, or select one of the three auto massage programs and let the chair take control. No matter how you use it, your Human Touch™ massage chair offers maximum massage flexibility and refreshing benefits. Alternative rapid-tapping strokes along the spine to stimulate both spinal muscles and spinal joint areas, emulating the percussive massage technique used in sports medicine for deep muscle therapy. Flexes spinal joints and relieves pressure on the spinal column, invigorating the entire back area. Presses on spinal muscles and spinal joint areas using alternating strokes and a gentle rocking motion, emulating a technique used in sports medicine and in spinal therapy by chiropractors. Spreads and applies pressure to deep muscle tissue , forcing it to relax, while the rocking motion loosens spinal joints. Aides in muscle and joint repair due to strain from exercise, long hurs bent over a desk, or just day-to-day stress, and can improve mobility and overall posture. Kneads your back in a small circular motion on both sides of your spine at the same time. Relieves tension and soreness by lifting and stretching muscles. Improves circulation and helps bring vital nutrients to the spinal area. Rolls gently up and down your back near your spine. Warms and loosens your muscles, preparing your back for deeper massage. Helps relieves muscle tension, improves circulation, and relaxes the back. 13 Installing the New Armrest 1. Place the new controller PCB into position on the underside of the upper armrest panel, then replace the five screws to secure it. 2. Connect the armrest connector to the PCB connector. 3. Align the upper armrest panel tabs with the corresponding slots on the armrest, then slide the upper armrest panel backward and down to secure it (Fig.9) Armrest (Fig.9) Controller label 4. Using a Phillips-head screwdriver, replace the two screws on the control panel (Fig.10). 5. Apply the new controller label to the control panel (Fig.11). (Fig.10) (Fig.11) 6. Using a Phillips-head screwdriver, replace the screw on the underside Phillips-head screw of the armrest, where the manicure tray was mounted (Fig.12). 7. Place the manicure tray into position, then use the 5mm Allen key to replace the two Allen screws on the underside of the armrest, securing the tray (Fig.13). (Fig.12) Rear side panel Remove two Allen Screws Manicure tray (Fig.13) 8. Using a long-handled Phillips-head screwdriver, replace the screw on the rear underside of the armrest. IMPORTANT: You must insert the screwdriver at an angle as shown in (Fig.14). (Fig.14) 14 9. Using two hands, snap the rear side into place (Fig.15). (Fig.15) Rear side panel Liner™ Jet and Liner Instructions ® ATTENTION! • Do not run Liner™ Jet without water. This will void your warranty. • Do not place two wet ends into same bowl when cleaning. The jet’s strong magnets could cause injury. • Do not attach two wet ends to each other. Doing so will cause breakage to wet ends and will void the warranty. 1. Insert SaniSmart® disposable liner Patent Pending The wet-ends of the Liner™ Jet need to be taken apart and soaked each week. Patent Pending 2. Cradle Liner™ Jet wet-end in your palm. Do not hold with your thumb. Jet will attach itself to dry-end. Adjust to align accordingly. 3. Fill water to 2 inches above Liner™ Jet wet-end. 4. Press jet button. Light and Liner™ Jet will turn on. Patent Pending Troubleshooting: Why is Liner™ Jet not on? 1. Make sure water is above the wet end. 2. Turn off for 3 seconds to reset the Liner™ Jet, then turn on again. 3. Make sure the magnetic disk is freely rotating. 4. Make sure all power connections are connected properly. 5. Make sure you have 110V-120V power from your wall outlet. 6. Make sure clear air tube from push button labeled Jet is connected to the power supply (black box) 7. Wet-end must be in place. Liner™ Jet® dry-end (motor) will automatically turn off if wet end is not detected. Why is Liner™Jet making noise or vibrating? The alignment is not correct. Remove Liner™ Jet wet-end and reattach. Adjust to align accordingly. 5. After completing pedicure, dissasemble and drop wet end into concentrated disinfectant solution. 6. Each day, clean impeller with a soft brush. All brand and/or product names and logos are trademarks or registered trademarks of their respective owner(s) 15 Spa Basin Front View Drain On/Off Tub Top View Spa Jet On/Off Spray Nozzle & Spout (Above water line to prevent back flow) Hot & Cold Control Mixer Overflow (Controls Drain) Jet Drain LED Light Preparing the Pedicure Spa for Operation: Clean and disinfect the basin following the instructions on page 17 before initial use. Operating the Pedicure Spa: Add Water to the Pedicure Spa Basin: 1. Turn the overflow knob counter-clockwise until it stops to close drain. 2. Lift upward on the hot & cold control mixer to add water to the basin. Turn the handle in a counter-clockwise direction for cold water or clockwise for warm water as indicated by the red (hot) and blue (cold) markings under the handle. Continue to add water until the fill line is reached. The fill line is indicated by the wavy (~~~~) line in the basin. CAUTION: Always check water temperature before use; hot water can burn skin and can cause serious injuries. Water temperature should not exceed 105° F (41° C). 3. Turn the off water by pushing the handle downward. Start or stop the whirlpool by pressing the jet button. Remove water from the Pedicure Spa Basin: Make certain the whirlpool jets are turned off by pressing the jet button. For use with a floor drain, simply open the drain by turning the overflow knob in a clockwise direction until it stops. You should see the water level lowering as water exits the basin. For use with the optional drain pump feature, open the drain by turning the overflow knob in a clockwise direction until it stops. Press the silver button marked “Drain” on the front panel. The water level will lower as water is pumped out of the basin. Turn the pump off by pressing the “Drain” button on the front panel once the basin is fully drained (NOTE: the drain pump will automatically shut off after 2 minutes.) We recommend turning off the pump manually if all water has drained before automatic shut-off. Drain pump may overheat if operated more than 10 minutes. NOTE: If you are using a wall drain, it is very important that you close the drain cap for each use. Failure to do so will result in contamination of the system. Warning! It is extremely important to follow the cleaning instructions located on page 17. Failure to clean the pedicure spa adequately may result in serious health issues for your clients as well as the nail technician. Failing to clean your pedicure spa may also cause the pedicure spa to not work properly. Please consult your local and state codes concerning pedicure spa cleaning for further requirements. 16 Basin Cleaning Procedure (Using D29 Jet) WARNING! Please check with your state board and city codes in your area for specific spa disinfectant procedures. In addition to local requirements, it is important that you carefully follow the basin cleaning procedures below to ensure that the spa is sanitized after each use. Spa1000™ is not liable for any infections or disease that may result from improper cleaning or failure to adhere to sanitation requirements. After Each Customer 1. Ensure the unit is off and clean the head one at a time. 2. Use a screwdriver to remove the screw that locks the Jet head with the tub mounting housing. 3. Spray Sanitex disinfectant on impeller. 4. Spray Sanitex disinfectant on both sides of suction cover. 5. Thoroughly clean inside surface of spa tub , foot rest, and arm rest with Sanitex disinfectant wipes. 6. Thoroughly clean rest of the spa basin surface with Sanitex disinfectant wipes. 7. Allow 10 minutes for disinfecting time to complete. 1 2 Remove suction cover by turning counter-clockwise. Spray impeller. 3 Spray suction cover on both sides Every Night 4 5 Replace suction cover by turning clockwise. Clean inside basin with disinfectant wipes Clean the rest of the spa tub, footrest, and armrest with disinfectant wipes. 1. Ensure the unit is off and clean the head one at a time. 2. Use a screwdriver to remove the screw that locks the Jet head with the tub mounting housing. 3. Use a soft brush and water to clean suction cover. 4. Use a soft brush and water to clean impeller. Put suction cover back in its place by turning clockwise. 5. Fill tub. Add 1 level scoop of Pedi-Clear disinfectant crystals or other EPA Approved cleaner. (follow manufacturer’s instructions) 6. Circulate for 10 minutes and let it soak overnight. 7. The next morning, drain water and thoroughly clean inside surface of spa basin with Sanitex disinfectant wipes. 8. Thoroughly clean rest of the spa tub surface with Sanitex disinfectant wipes. The unit is now ready for the first customer of the day. 1 2 3 4 5 Note: DO NOT clean pedicure spa with pure chlorine solution. DO NOT soak overnight with pure chlorine or chlorine solution. This may lead to premature deterioration and rusting of the pedicure spa and its component parts and will result in void of limited warranty. Recommended EPA Approved Hospital Grade Items: Sanitex Spray EPA Approved & Hospital Grade Sanitex Wipes EPA Approved & Hospital Grade Pedi-Clear Disinfectant Liquid or Crystals EPA Approved 17 Use & Care Note: Failure to follow these necessary maintenance instructions will void warranty. Chair Maintenance: Lubrication is required on the drive shaft every 6 months. Yellow or white grease sold at auto part stores can be used. Please refer to pages 19 and 20, “Greasing Drive Shaft” for further instructions. Remove dust on the backrest or armrest with a vacuum. Do not use benzene, thinner or any other solvents on your massage chair. If the backrest or a armrests become soiled, wipe with a damp cloth, then a dry cloth. (Common vinyl cleaners may be used for tough stains.) Use a dry cloth only to clean the controller and around the power switch. Foreign objects should not be inserted between the massage nodes or the unit housing. Cover the chair when not in use for a long period of time. If chair will be out of use for a long period of time, unplug and coil the power cord and cover the chair or place in an environment free for dust and moisture. Prolonged exposure to direct sunlight can cause color fading and/or damage to the massage chair. Pedicure Product Guidelines: Please follow these guidelines when choosing products to use in your pedicure spa. Always use pedicure products and cleaning solutions in accordance with each manufacturer’s directions. Understand and follow your state regulations regarding proper product use and disinfecting requirements. This is solely your responsibility. • Avoid products that contain a foaming agent; this will cause excessive foam. • Products containing non-dissolving abrasives (such as sand and sea salts) will not harm the internal component structure of your pedicure spa as long as the spa cleaning requirements are followed after each use and each night. Refer to page 17. • Oil based products may be used in your pedicure spa as long as the cleaning requirements are followed after each use and each night. Refer to page 17. If you follow the operating, cleaning, and maintenance procedures, this pedicure spa can give you many years of service. If you experience problems with your spa, please contact our Technical Support line at 1-225-236-0289 or email [email protected]. 18 HT-1000 Greasing Drive Shaft We recommend greasing the drive shaft every 6 months - more if in dusty conditions. Failure to follow this procedure will void warranty. 1 2 First, remove chair cushions. Locate zipper pull on bottom of chair. Carefully cut off plastic zip tie blocking zipper. 3 4 suggested item: Use white or yellow colored grease. DO NOT use black. Grease can be bought at any hardware or auto parts store. Unzip cover to expose roller mechanism Top view: 5 6 Also apply grease at the joints of robotic arms. Apply grease along coiled pole and at the very bottom of pole. Use remote to move mechanism down, and grease top of pole. 7 Replace mechanism cover and cushions. 19 Parts Identification Floor Drain Control Mixer Jet & Light Air Switch Air Control Pipe Free Jet To Shower Head Overflow Swivel P-Trap Wall Drain Drain Pump Control Air Switch Mixer Jet & Light Air Switch 12 V LED Light LED Light Transformer Jet T4-3S1C Power Supply To Shower Head Overflow Swivel P-Trap 12 V LED Light Jet Transformer To Outlet 8” SS. Braided 1½ PVC to Hose - Hot floor drain 3/8” compression T4-2S1T1C Wall Drain Power Supply 8’ S.S. Braided Hose - Cold 3/8” compression T4-DPH Drain Pump with check valve 8” SS. Braided Hose - Hot 3/8” compression To Outlet 20 8’ S.S. Braided Hose - Cold 3/8” compression 1½ PVC Coupling to wall drain Specifications HT-1000 Chair Specifications Massage Robot: Operating Voltage: Power Consumption: Size: Chair (reclined) Recline Angle: Forward/Backward: 2 Motor/ 4 Roller AC110 -120 V 60 Hz 50 Watts 45” L x 28” W x 32” H 165 Degrees 5” distance Chair Weight: Maximum load weight: 80 lbs 285 lbs Number of Massage Functions: Four (4) (Rolling, Kneading, Compression, Percussion) Automatic Timer Shut-Off: 15 minutes Cover Fabric Material: Polyurethane Hand-held low voltage remote control for massage chair. *Specifications are subject to change without prior notice. Basin Specifications Hot and cold water supply lines required (hot and cold shut offs may be installed under or behind pedicure spa basin) see pg 7. Drain installation: Reference note on page 8; can be installed with optional drain pump for wall drain or a gravity drain. Capacity of basin: 4.5 U.S. Gallons (17.03L) = Traditional Whirlpool (with Jets)* Power source: 110V AC / 15 Amp, 60 Hz (GFCI Protected) Caution: Pedicure spa must be installed by a licensed electrician and a licensed plumber, conforming to all local and national electrical codes. Jet System: Jets: Geni Jet Motor: D-29 Jet: Sanismart Jet: Liner™ Jet: Shipping Weights: (Total) Buffalo - 213 lb Cartier - 213 lb Jet - 233 lb Vel - 337 lb Crenza- 332 lb Pipe free whirlpool pedicure spas: 1 jet, LED lights, optional drain pump. (May contain either) 120V AC, 60Hz, 1.2A 120V, 85W, 60Hz, 1A 110V AC, 60 Hz 120V, 30W, 60Hz Drain Pump Motors: (May contain either) Little Giant: Model # 3E-34N, 115V, 60 Hz, 2.5A, T4-DPH: 120 V AC, 85W, 60Hz, 1 A LED Lights: T4-L18: Input: T4-L18C: Input: (May contain either) 120V AC, 60Hz, 28VA Output: 12V, 60 Hz, 1.67A 120V AC, 60Hz, 28 VA, Output: 12V Ac 1.67A, 20VA, Class 2 Electrical switches: On/Off air switch for Geni Jet & Led Light. On/Off air switch for drain pump. Limited warranty: One (1) year from date of purchase. Due to our policy of continuous improvements, all specifications are subject to change without notice. *Note: All dimensions and weights are approximate 21 Parts Spa Jets SaniSmart ™ 2.0 Jet Liner™ Jet Wet End Dry End D29 Jet 120V/85W T4-D29 T4-SS Dry End Bubble Maker Transformer Wet End (includes motor and board) T4-SSD New Technology. Works with spa liners. No drilling necessary. Drain Pump Assemblies T 4 Drain Pump Assembly Little Giant Drain Pump Assembly T4-DP T4-DPH Includes check valve & P-Trap 110V 1A Includes check valve & P-Trap 110V 2.5A Hardware Check Valves Dual Check Valve ½” Check Valve T4-DCV ½” Diverter Tee 1/2” NPSM T4-1/2 CV 1/2” NPSM 1/2” compression Jets are angled to 29° for precise whirlpool action. T4-DT 1/2” NPSM 3/8” compression Some cities require a backflow preventer to be installed on hot/cold water line. CSA approved. Allows 1 direction flow to spray nozzle or filler spout. (for older spa designs) Use with drain pump. Power Supply Push Button Floor Drain Power Supply Wall Drain Power Supply T4-3S1C T4-2S1T1C Engraved Metal Push Button T4-PBM 3 on/off,1 continuous Activate by air switch. 2 on/off, 1 timer (2 minutes), 1 continuous. Activate by air switch. Push Button Tube T4-PBT 1/8” Clear tubing. 500’ Roll LED Lights LED Light set T4-L18 Set includes: 18 LED bulbs, AC 12V transformer, reflector housing, nut & gasket, light holder. Bulb (T4L18B) and transformer (T4-L18T) also available separately. 22 LED Light Set PRC T4-L18C Set includes: 18 LED bulbs, AC 12V transformer, reflector housing, nut & gasket, light holder. Bulb (T4L18BC) and transformer (T4-L18TC) also available separately. Parts Shower Head and Hose Shower Head Complete Stainless Steel Hose Only Shower Head Only T4-SH2 T4-SH2HH T4-SH2H Includes shower head, angle holder & stainless steel hose. Air Control Silent Air Control T4-AC Air Control Barbs Air Control Tube T4-ACT For use with Geni Jet. Controls air mixed with water jet. a. 3/8” 100’ roll b. a. 3/8 barb x 1/2 spg T4-ACB½ b. 3/8 barb tee T4-ACBT Plumbing Accessories Level Controller with Solenoid Valve T4-LCSV 1 ½” Swivel P-Trap T4-SPT 8’ Stainless Steel Braided Hoses Overflow Assembly T4-OFC T4-BHH - Hot Eliminates odors from drain. T4-BHC - Cold 1/2 NPSF x 3/8 compression Flexible Tube. UPC Approved. Control Mixer Control Mixer Single lever Control Mixer Clock wise T4-LCM T4-CCM ½” NPSM Connections Single Lever Replacement Cartridge T4-LCMC Econo Control Mixer T4-ECM ½” NPSM Connections Clockwise Replacement Cartridge T4-CCMC ½” NPSM Connections Econo Replacement Cartridge T4-ECMC 23 Limited Warranty - Pre-Registration Required Spa1000™ Pedicure spas are manufactured with the highest standards for quality and workmanship. Accordingly, Spa1000 warrants its products as follows: To the original owner of the Spa1000™ pedicure spas, Spa1000 may repair or replace at its option any pedicure spa deemed to be defective in material or workmanship upon inspection by an authorized representative of Spa1000™. This warranty covers only the listed components for the following time periods: • Recirculating Pump: One (1) year from date of shipment • All other components: One (1) year from date of shipment • There are no other warranties, express or implied. Owner must pay all labor and shipping charges necessary to replace or repair the pedicure spa. Spa1000 will not be liable for any consequential, incidental, or contingent damages. Some states do not allow the exclusion or limitation of incidental or consequential damages, so the above limitation or exclusion may not apply to you. If a pedicure spa needs to be exchanged, it will be limited to supplying a replacement pedicure spa of comparable style and size. Spa1000 may at its own discretion use refurbished parts or pedicure spas for repair and replacement purposes. This warranty is null and void if the pedicure spa is removed from its place of initial installation or is not installed in accordance with federal, state, or local codes and ordinances. Furthermore, this warranty does not apply if the pedicure spa has been subject to misapplication, misuse, improper installation or maintenance, negligence, improper cleaning, or other circumstances beyond Spa1000’s control. Spa1000™ Pedicure spas have a maximum weight capacity of 300 lbs. Any use exceeding this limit voids the warranty. The following are examples of what is not covered by the warranty: 1) Natural wear and tear 2) Staining, fading, or discoloration of the vinyl seat, armrests, or footrest. 3) Damage resulting from standing in the basin. 4) Damage to pump parts and/or motor parts due to obstruction in plumbing lines, etc. 5) Staining, fading, or discoloration of plastic surfaces due to exposure and/or the use of harmful cleaning agents or chemicals. 6) Staining, fading, or discoloration caused by improper or poor water additives not related to maintenance of proper water. 7) Malfunctions or damage caused by improper installation, including not meeting local and state plumbing, electrical, and building codes. 8) Freight damage, misuse, neglect, abuse, and natural disaster 9) Unauthorized repairs. 10) Repair service. Some states do not allow limitations on how long an implied warranty lasts, so the above limitations may not apply to you. Should service be required for defect or malfunction during the warranty period, please contact: Spa1000™ Customer Service 5902 Sovereign Dr. Houston, TX 77036 Toll Free: 1-888-317-0467 • Fax: 225-236-0290 • [email protected] • www.spa1000.net By using this pedicure spa, Owner agrees that the obligation of Spa1000 shall not extend to indirect or consequential damage, injury or serious bodily harm, which may result from pedicure spa use. Owner agrees that the obligations of Spa1000 are limited to those set herein and that there are no other obligations except those expressly agreed to in writing by Spa1000. No dealer or other person has any authority to bind Spa1000 to changes or additions to this warranty or its products; accordingly, Spa1000™ is not responsible for any such warranties or representations. Terms and Conditions: All returned or exchanged items must be in new condition, in their original packaging, and must include all packing material, blank warranty cards, manuals and all accessories. Defective items may, at Spa1000’s option, be repaired or exchanged for the same model or manufacturer’s equivalent model. Spa1000 is not responsible for any consequential or incidental damage resulting from use of any merchandise bought from us. No refunds are given on shipping and handling charges. Spa1000 is not responsible for lost or damaged packages. To register for your warranty, please copy this page, fill out section below, attach a copy of your sales receipt, and mail to us. Warranty will not be honored without prior registration. (Some states do not allow registration to be a requisite of warranty, so the above may not apply to you.) Company: Address: City/State/Zip: Telephone: Contact: Email: Yes, Please send me updates and news on the latest Spa1000™ Products and promotions PediSpa Model: Spa Serial #: Chair Model: Tub Color: Place of Purchase: Address: City/State/Zip: Purchase Date: Sink Color: Chair Serial #: Telephone: Purchase Price: