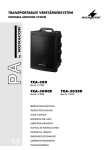
1
ELA-MISCHVERSTÄRKER
MIT CD-SPIELER
PA MIXING AMPLIFIER WITH CD PLAYER
PA-910CD
Best.-Nr. 17.1870
BEDIENUNGSANLEITUNG
INSTRUCTION MANUAL
MODE D’EMPLOI
ISTRUZIONI PER L’USO
MANUAL DE INSTRUCCIONES
INSTRUKCJA OBSŁUGI
VEILIGHEIDSVOORSCHRIFTEN
SIKKERHEDSOPLYSNINGER
SÄKERHETSFÖRESKRIFTER
TURVALLISUUDESTA
®
D
Bevor Sie einschalten ...
A
Wir wünschen Ihnen viel Spaß mit Ihrem neuen Gerät
von MONACOR. Dabei soll Ihnen diese Bedienungsanleitung helfen, alle Funktionsmöglichkeiten kennen zu
lernen. Die Beachtung der Anleitung vermeidet außerdem Fehlbedienungen und schützt Sie und Ihr Gerät vor
eventuellen Schäden durch unsachgemäßen Gebrauch.
Den deutschen Text finden Sie auf den Seiten 4 – 7.
CH
F
Avant toute mise en service ...
B
Nous vous remercions d’avoir choisi un appareil
MONACOR et vous souhaitons beaucoup de plaisir à
l’utiliser. Cette notice a pour objectif de vous aider à
mieux connaître les multiples facettes de l’appareil et à
vous éviter toute mauvaise manipulation .
CH
GB
We wish you much pleasure with your new unit by
MONACOR. With these operating instructions you will
be able to get to know all functions of the unit. By following these instructions false operations will be avoided,
and possible damage to you and your unit due to improper use will be prevented.
You will find the English text on the pages 4 – 7.
I
Antes de cualquier instalación
Prima di accendere ...
Vi auguriamo buon divertimento con il Vostro nuovo apparecchio MONACOR. Le istruzioni per l’uso Vi possono
aiutare a conoscere tutte le possibili funzioni. E
rispettando quanto spiegato nelle istruzioni, evitate di
commettere degli errori, e così proteggete Voi stessi, ma
anche l’apparecchio, da eventuali rischi per uso improprio.
Il testo italiano lo potete trovare alle pagine 8 – 11.
La version française se trouve pages 8 – 11.
E
Before you switch on ... ...
PL
Przed uruchomieniem ...
Życzymy zadowolenia z nowego produktu MONACOR.
Dzięki tej instrukcji obsługi będą Państwo w stanie
poznać wszystkie funkcje tego urządzenia. Stosując się
do instrukcji unikną Państwo błędów i ewentualnego
uszkodzenia urządzenia na skutek nieprawidłowego
użytkowania.
Tekst polski znajduje się na stronach 12 – 15.
Tenemos de agradecerle el haber adquirido un equipo
MONACOR y le deseamos un agradable uso. Este
manual quiere ayudarle a conocer las multiples facetas
de este aparato. La observación de las instrucciones evita operaciones erróneas y protege Vd. y vuestro aparato
contra todo daño posible por cualquier uso inadecuado.
La versión española se comienza en las páginas 12 – 15.
NL
Voordat u inschakelt ...
B
Wij wensen u veel plezier met uw nieuw toestel van
MONACOR. Lees de veiligheidsvoorschriften, alvorens
het toestel in gebruik te nemen. Door de veiligheidsvoorschriften op te volgen zal een slechte werking vermeden
worden, en zal een eventueel letsel aan uzelf en schade
aan uw toestel tengevolge van onzorgvuldig gebruik
worden voorkomen.
U vindt de veiligheidsvoorschriften op pagina 16.
S
Förskrift
Vi önskar dig mycket nöje med din nya enhet från
MONACOR. Läs gärna säkerhetsinstruktionerna innan
du använder enheten. Genom att följa säkerhetsinstruktionerna kan många problem undvikas, vilket annars kan
skada enheten.
Du finner säkerhetsinstruktionerna på sidan 17.
2
DK
Inden De tænder for apparatet ...
Vi ønsker Dem god fornøjelse med Deres nye MONACOR
apparat. Læs oplysningerne for en sikker brug af apparatet før ibrugtagning. Følg sikkerhedsoplysningerne for at
undgå forkert betjening og for at beskytte Dem og Deres
apparat mod skade på grund af forkert brug.
Sikkerhedsoplysningerne finder De på side 16.
FIN
Ennen virran kytkemistä …
Toivomme, että uusi MONACOR-laitteesi tuo sinulle paljon iloa ja hyötyä. Ole hyvä ja lue käyttöohjeet ennen laitteen käyttöönottoa. Luettuasi käyttöohjeet voit käyttää
laitetta turvallisesti ja vältyt laitteen väärinkäytöltä.
Käyttöohjeet löydät sivulta 17.
INPUT 1
INPUT 2
INPUT 3
INPUT 4
0
0
0
0
AUX
®
STOP
PLAY / PAUSE
10
10
10
TREBLE
BASS
MASTER
AUX
CD
10
POWER
+3
ALL
PA-910CD
PLAY
REPEAT
PROGRAM REPEAT
2
3 4 5
6 7
-3
UP
DOWN
8
-10
24V DC
+
–
dB
-10
+10
9
dB
+10
10
PRE OUT
230 V~ / 50Hz
ON
0 dB
AMPLIFIER
120 WATT
TRACK
PROGRAM
1
0
10
OPEN / CLOSE
LINE OUT
0
10
11
AUX IN
-8
-13
➀
12
13
14 15
INPUT 4
INPUT 3
INPUT 2
INPUT 1
2
2
2
2
16 17
AUTO
TALK
+21V
PHANTOM
POWER
OFF
ON
OFF
ON
OUTPUT
COM
L
4Ω 70V 100V
L
GND
1
3
R
R
AMP IN
MIC
LINE
1
3
MIC
LINE
1
3
MIC
LINE
1
3
MIC
LINE
+
–
GND
T1.6 AL
➁
OUTPUT
COM
4Ω 70V 100V
20
21
22
23
24
25 26
OUTPUT
➂
100V
27
COM
4Ω 70V 100V
28
➃
70V
+
+
100 V
-
70 V
-
+
+
max. Belastung
max. load
120 W RMS
OUTPUT
COM
4Ω 70V 100V
+
+
100 V
-
70 V
-
4Ω
+
-
➄
4Ω
120 WRMS
OUTPUT
COM
4Ω 70V 100V
+
-
4Ω
➅
8Ω
60 WRMS
+
-
OUTPUT
COM
8Ω
60 WRMS
4Ω 70V 100V
+
-
+
-
3
max. Belastung
max. load
120 W RMS
70 V
-
...
100 V
-
29 30
...
18 19
4Ω
4Ω
30 WRMS
4Ω
30 WRMS
➆
+
-
+
-
4Ω
30 WRMS
4Ω
30 WRMS
D
A
Bitte klappen Sie die Seite 3 heraus. Sie sehen
dann immer die beschriebenen Bedienelemente
und Anschlüsse.
9
CH
1
Übersicht der Bedienelemente und
Anschlüsse
1.1 Frontseite
1 CD-Schublade
2 Statusanzeigen
ALL
leuchtet, wenn „Wiederholung aller
Titel“ aktiviert ist
PLAY
leuchtet während der Wiedergabe,
blinkt im Pausenmodus
REPEAT
leuchtet, wenn „Wiederholung des
gerade laufenden Titels“ oder „Wiederholung aller Titel“ aktiviert ist
PROGRAM blinkt bei der Programmierung einer
Titelfolge und ihrer Wiedergabe
3 2-stelliges Display zur Anzeige der Titelanzahl der
CD (im Stopp-Modus) bzw. der Nummer des aktuellen Titels (im Wiedergabe- und Pausenmodus)
4 Taste STOP zum Beenden des Abspielens
5 Taste PROGRAM zum Programmieren einer
beliebigen Titelfolge
6 Taste REPEAT für die Wiederholfunktion
1. Tastendruck: Wiederholung des gerade laufenden Titels
2. Tastendruck: Wiederholung aller Titel der CD
bzw. einer selbst programmierten Titelfolge
3. Tastendruck: Abschalten der Wiederholfunktion
7 Taste PLAY/PAUSE zum Umschalten zwischen
Wiedergabe und Pause
8 Taste UP zum Anwählen des nächsten Titels
Taste DOWN zum Sprung an den Anfang des laufenden Titels. Durch mehrfaches Drücken der
Taste wird immer ein Titel weiter zurückgesprungen.
Die jeweilige Taste gedrückt halten, um den
GB
Please unfold page 3. Then you can always see
the operating elements and connections described.
1
Operating Elements
1.1 Front panel
1 CD tray
2 Status LEDs
ALL
lights up if “repeat of all titles” has
been activated
PLAY
lights up during the replay, flashes in
the pause mode
REPEAT
lights up if “repeat of the currently
playing title” or “repeat of all titles”
has been activated
PROGRAM flashes while programming a title
sequence and during its replay
3 2-digit display to show the title number of the CD
(in the stop mode) or the number of the current
title (in the replay mode and pause mode)
4 Button STOP to stop the replay
5 Button PROGRAM to programme any desired
title sequence
6 Button REPEAT for the repeat function
1st pressing of button: repeat of the currently
playing title
2nd pressing of button: repeat of all titles of the
CD or repeat of an individually programmed title
sequence
3rd pressing of button: switching off the repeat
function
7 Button PLAY/PAUSE for switching between replay and pause
8 Button UP for selecting the next title
Button DOWN to go to the beginning of the current
title. By pressing the button several times, the
unit always reverses one title.
4
10
11
12
13
14
15
16
17
schnellen Vorlauf (UP)/ Rücklauf (DOWN) zu
aktivieren.
Taste OPEN/CLOSE zum Öffnen und Schließen
der CD-Schublade
Klangregler
BASS
= Bassregler, ±10 dB/100 Hz
TREBLE = Höhenregler, ±10 dB/10 kHz
Regler zum Einstellen der Lautstärke für die
Mono-Kanäle INPUT 1 bis INPUT 4
Regler MASTER für die Gesamtlautstärke
Pegelanzeige
Betriebsanzeige
Ein-/Ausschalter POWER
Regler zum Einstellen der Lautstärke für die am
Eingang AUX IN (26) angeschlossene Signalquelle [Taste AUX/CD (17) nicht gedrückt] bzw.
für die Lautstärke des internen CD-Spielers
[Taste AUX/CD gedrückt]
Taste AUX/CD
Taste gedrückt interner CD-Spieler ist angewählt
(die LED über der Taste leuchtet)
nicht gedrückt der Eingang AUX IN (26) ist angewählt
1.2 Rückseite
18 Netzbuchse zum Anschluss an eine Steckdose
(230 V~/50 Hz) über das beiliegende Netzkabel
19 Halterung für die Netzsicherung;
eine durchgebrannte Sicherung nur durch eine
gleichen Typs ersetzen
20 Klemmschraube für einen eventuellen Masseanschluss (z. B. bei Brummproblemen)
21 Schraubklemmen* für eine Notversorgungsspannung (24 V )
22 Schraubklemmen* für den Anschluss der Lautsprecher
23 XLR-Eingangsbuchsen der Mono-Kanäle INPUT 1 bis INPUT 4 für den Anschluss von Mikrofonen oder Mono-Geräten mit Line-Ausgang
9
10
11
12
13
14
15
16
17
Keep the respective button pressed to activate
the fast forward (UP)/reverse (DOWN).
Button OPEN/CLOSE to open and close the CD
tray
Tone controls
BASS control, ±10 dB/100 Hz
TREBLE control, ±10 dB/10 kHz
Control for adjusting the volume for the mono
channels INPUT 1 to INPUT 4
Control MASTER for the total volume
Level display
POWER LED
POWER switch
Control for adjusting the volume for the signal
source connected to the input AUX IN (26)
[button AUX/CD (17) not pressed] or for the
volume of the internal CD player [button
AUX/CD pressed]
Button AUX/CD
button pressed internal CD player is selected
(the LED above the button lights
up)
not pressed
the input AUX IN (26) is selected
1.2 Rear panel
18 Mains jack for connection to a mains socket
(230 V~/50 Hz) via the supplied mains cable
19 Support for the mains fuse;
replace a blown fuse only by one of the same
type
20 Clamping screw for a possible ground connection (e. g. in case of hum problems)
21 Screw terminals* for an emergency supply voltage (24 V )
22 Screw terminals* for the connection of the speakers
23 XLR input jacks of the mono channels INPUT 1
to INPUT 4 for connecting microphones or mono
units with line output
Vorsicht! Bei eingeschalteter Phantomspeisung [Taste +21 V PHANTOM POWER (30) eingerastet] werden die XLR-Buchsen mit 21-VPhantomspeisung versorgt. Es dürfen in diesem
Fall keine Mikrofone oder Audiogeräte mit asymmetrischem Ausgang angeschlossen sein, da
diese beschädigt werden können.
24 Durchschleifanschlüsse PRE OUT und AMP IN
zum Zwischenschalten eines Gerätes (z. B.
Equalizer);
der Ausgangspegel der Buchse PRE OUT ist
unabhängig vom Regler MASTER (12)
25 Ausgang LINE OUT zum Anschluss weiterer
Verstärker;
der Ausgangspegel ist unabhängig vom Regler
MASTER (12)
26 Eingang AUX IN zum Anschluss von Audiogeräten, z. B. CD-Spieler, Tuner, Kassettenrecorder etc.
27 Umschalter für die Mono-Kanäle INPUT 1 – 4
zwischen Mikrofonpegel (Taste nicht gedrückt)
und Line-Pegel (Taste gedrückt)
28 Schraubklemmen zum Anschluss eines Mikrofons oder eines Audiogerätes mit Line-Ausgang;
parallel zur XLR-Buchse INPUT 1 geschaltet
29 Taste AUTOTALK zum Ein-/Ausschalten der
Talkover-Funktion des Kanals 1
30 Taste +21 V PHANTOM POWER zum Einschalten der 21-V-Phantomspeisung für die XLRBuchsen INPUT 1 bis INPUT 4 (23); erforderlich
beim Anschluss von Kondensator- bzw. Elektretmikrofonen, die mit Phantomspeisung arbeiten
Vorsicht! Den Schalter nur bei ausgeschaltetem Verstärker betätigen, um Schaltgeräusche
zu vermeiden. Bitte beachten Sie auch den Vorsichtshinweis der Position 23.
* Die Schraubklemmen lassen sich zur besseren Handhabung aus ihrer Steckverbindung herausziehen.
Caution! With phantom power connected [button +21 V PHANTOM POWER (30) locked] the
XLR jacks are supplied with 21 V phantom power. In this case no microphones or audio units
with unbalanced output must be connected as
they may be damaged.
24 Feed-through connections PRE OUT and AMP
IN for inserting a unit (e. g. equalizer);
the output level of jack PRE OUT is independent
of control MASTER (12)
25 Output LINE OUT for connection of further amplifiers;
the output level is independent of control
MASTER (12)
26 Input AUX IN for the connection of audio units,
e. g. CD player, tuner, cassette recorder, etc.
27 Selector switches for the mono channels INPUT
1 – 4 between microphone level (button not
pressed) and line level (button pressed)
28 Screw terminals for connecting a microphone or
an audio unit with line output; connected in parallel to the XLR jack INPUT 1
29 Button AUTOTALK for switching on/off the talkover function of channel 1
30 Button +21 V PHANTOM POWER for switching
on the 21 V phantom power for the XLR jacks
INPUT 1 to INPUT 4 (23); required for connecting capacitor or electret microphones operating
with phantom power
Caution! Only actuate the switch with the
amplifier switched off to prevent switching
noise. Please pay attention to the cautionary
note under item 23.
* To facilitate handling, the screw terminals can be pulled out
of their plug-in connections.
2
Hinweise für den sicheren Gebrauch
Dieses Gerät entspricht der Richtlinie für elektromagnetische Verträglichkeit 89/336/EWG und der Niederspannungsrichtlinie 73/23/EWG.
Das Gerät wird mit lebensgefährlicher Netzspannung (230 V~) versorgt. Nehmen Sie
deshalb nie selbst Eingriffe im Gerät vor.
Durch unsachgemäßes Vorgehen besteht
die Gefahr eines elektrischen Schlages.
Außerdem erlischt beim Öffnen des Gerätes
jeglicher Garantieanspruch.
Vorsicht! Im Betrieb liegt an den Lautsprecheranschlüssen (22) berührungsgefährliche
Spannung bis 100 V an. Alle Anschlüsse nur
bei ausgeschalteter ELA-Anlage vornehmen
bzw. verändern.
Beachten Sie unbedingt die folgenden Punkte:
● Vorsicht! Blicken Sie bei geöffneter CD-Schublade nicht in den CD-Schacht. Eventuell austretende Laserstrahlen können zu Augenschäden
führen.
● Das Gerät ist nur zur Verwendung im Innenbereich geeignet. Schützen Sie es vor Tropf- und
Spritzwasser, hoher Luftfeuchtigkeit und Hitze
(zulässiger Einsatztemperaturbereich 0 – 40 °C).
● Stellen Sie keine mit Flüssigkeit gefüllten Gefäße,
z. B. Trinkgläser, auf das Gerät.
● Die im Gerät entstehende Wärme muss durch
Luftzirkulation abgegeben werden. Decken Sie
die Lüftungsöffnungen nicht ab.
● Stecken Sie nichts durch die Lüftungsöffnungen.
Dies kann zu einem elektrischen Schlag führen!
● Nehmen Sie das Gerät nicht in Betrieb bzw. ziehen
Sie sofort den Netzstecker aus der Steckdose:
1. wenn sichtbare Schäden am Gerät oder an der
Netzanschlussleitung vorhanden sind,
2. wenn nach einem Sturz oder Ähnlichem der
Verdacht auf einen Defekt besteht,
3. wenn Funktionsstörungen auftreten.
Lassen Sie das Gerät in jedem Fall in einer Fachwerkstatt reparieren.
B
2
Safety Notes
This unit corresponds to the directive 89/336/EEC
for electromagnetic compatibility and to the low voltage directive 73/23/EEC.
The unit is supplied with hazardous mains
voltage (230 V~). Leave servicing to skilled
personnel only. Inexpert handling may cause
an electric shock hazard. Furthermore, any
guarantee claim will expire if the unit has
been opened.
Caution! During operation there is a hazard
of contact at the speaker connections (22)
with a dangerous voltage up to 100 V. All
connections must only be carried out or
changed with the PA system switched off.
It is essential to observe the following items:
● Caution! Never look into the CD compartment
with the CD tray opened. Laser beams can be
emitted which may cause eye damage.
● The unit is suitable for indoor use only. Protect it
against dripping water and splash water, high air
humidity, and heat (admissible ambient temperature range 0 – 40 °C).
● Do not place any vessels filled with liquid, e. g.
drinking glasses, on the unit.
● The heat being generated in the unit has to be
removed via air circulation. Therefore, the air
vents at the housing must not be covered.
● Do not insert anything into the air vents! This
could result in an electric shock!
● Do not set the unit into operation, and immediately
disconnect the mains plug from the mains socket if
1. there is visible damage to the unit or to the
mains cable,
2. a defect might have occurred after a drop or
similar accident,
3. there are malfunctions.
The unit must in any case be repaired by skilled
personnel.
● Never pull the mains cable to disconnect the mains
plug from the mains socket, always seize the plug.
B
●
●
●
Ziehen Sie den Netzstecker nie an der Zuleitung
aus der Steckdose, fassen Sie immer am Stecker
an.
Verwenden Sie zum Reinigen nur ein trockenes,
weiches Tuch, niemals Wasser oder Chemikalien.
Wird das Gerät zweckentfremdet, nicht richtig
angeschlossen, falsch bedient oder nicht fachgerecht repariert, kann keine Haftung für daraus
resultierende Sach- oder Personenschäden und
keine Garantie für das Gerät übernommen
werden.
Soll das Gerät endgültig aus dem
Betrieb genommen werden, übergeben
Sie es zur umweltgerechten Entsorgung
einem örtlichen Recyclingbetrieb.
3
Einsatzmöglichkeiten
Dieser Verstärker mit integriertem CD-Spieler ist
speziell für den Einsatz in ELA-Beschallungsanlagen konzipiert. Er kann 120 W Sinus an 100-Vund 70-V-Lautsprecher abgeben oder an eine Lautsprechergruppe mit einer Gesamtimpedanz von
4 Ω. An die fünf miteinander mischbaren Eingangskanäle lassen sich Mikrofone (Kanäle 1 – 4) oder
Geräte mit Line-Pegel (Kanäle 1 – 4 und AUX) anschließen. Der Kanal 1 ist mit einer Talkover-Funktion ausgestattet, die bei einer Durchsage die anderen Kanäle in der Lautstärke um 40 dB reduziert.
4
Aufstellen des Verstärkers
4.1 Rackeinbau
Für den Einbau in ein Rack die beiden mitgelieferten
Montagewinkel an die Geräteseiten anschrauben.
Im Rack werden für den Verstärker 2 Höheneinheiten benötigt (1 Höheneinheit HE = 44,5 mm).
Damit das Rack nicht kopflastig wird, muss der
Verstärker im unteren Bereich des Racks eingeschoben werden. Für eine sichere Befestigung reichen die Montagewinkel allein nicht aus. Zusätzlich
müssen Seitenschienen oder eine Bodenplatte das
Gerät halten.
5
ELA-Verstärker anschließen
5.1 Lautsprecher
Es können ELA-Lautsprecher oder Lautsprecher
bzw. Lautsprechergruppen mit einer Gesamtimpedanz von mindestens 4 Ω angeschlossen werden.
Die Anschlussmöglichkeiten für die Lautsprecher
sind in den Abb. 3 – 7 dargestellt. Je nach Lautsprechertyp die entsprechenden Kontakte der Klemmleiste OUTPUT (22) verwenden. Die Klemmleiste
lässt sich zur besseren Handhabung aus ihrer
Steckverbindung herausziehen.
Beim Anschluss auf die richtige Einzel- bzw.
Gesamtimpedanz der Lautsprecher und auf ihre
richtige Polung achten (Plus- und Minusanschlüsse
wie in Abb. 3 – 7 gezeigt). Der Plusanschluss der
Lautsprecher ist immer besonders gekennzeichnet.
Vorsicht!
Bei ELA-Lautsprechern mit 70-V- oder 100-VAudiotransformator (Abb. 3 und 4) darf die Gesamtbelastung durch die Lautsprecher nicht mehr
als 120 W Sinus betragen, sonst wird der Verstärker überlastet und eventuell beschädigt.
For cleaning only use a dry, soft cloth, by no
means chemicals or water.
No guarantee claims for the unit and no liability for
any resulting personal damage or material damage will be accepted if the unit is used for purposes other than originally intended, if it is not correctly connected, operated, or not repaired in an
expert way.
Important for U. K. Customers!
The wires in the mains lead of the power supply unit
are coloured in accordance with the following code:
green/yellow = earth
blue = neutral
brown = live
As the colours of the wires in the mains lead of this
appliance may not correspond with the coloured
markings identifying the terminals in your plug,
proceed as follows:
1. The wire which is coloured green and yellow
must be connected to the terminal in the plug
which is marked with the letter E or by the earth
symbol
, or coloured green or green and
yellow.
2. The wire which is coloured blue must be connected to the terminal which is marked with the
letter N or coloured black.
3. The wire which is coloured brown must be connected to the terminal which is marked with the
letter L or coloured red.
Warning - This appliance must be earthed.
another, microphones (channels 1 – 4) or units with
line level (channels 1 – 4 and AUX) can be connected. Channel 1 is equipped with a talkover function
which attenuates the volume of the other channels
by 40 dB in case of an announcement.
●
●
If the unit is to be put out of operation
definitively, take it to a local recycling
plant for a disposal which is not harmful
to the environment.
3
Applications
This amplifier with integrated CD player has especially been designed for use in PA systems. It is able
to supply 120 WRMS to 100 V or 70 V speakers or to
a speaker group with a total impedance of 4 Ω. To
the five input channels which can be mixed with one
CH
Alle Anschlüsse sollten nur durch eine qualifizierte
Fachkraft und unbedingt bei ausgeschaltetem Verstärker vorgenommen werden!
Der Verstärker ist für den Einschub in ein Rack
(482 mm/19") vorgesehen, kann aber auch als
Tischgerät verwendet werden. In jedem Fall muss
Luft ungehindert durch alle Lüftungsöffnungen strömen können, damit eine ausreichende Kühlung der
Endstufe gewährleistet ist.
●
D
A
4
GB
Setting up the Amplifier
The amplifier has been designed for installation into
a rack (482 mm/19"), however, it can also be used
as a table top unit. In any case, air must be allowed
to pass through all air vents without obstruction to
ensure sufficient cooling of the power amplifier.
4.1 Rack installation
For rack installation screw the two supplied mounting
brackets to the sides of the unit. For the amplifier
2 rack spaces are required (1 rack space = 44.5 mm).
To prevent top-heaviness of the rack, the amplifier must be inserted into the lower part of the rack.
The mounting brackets alone will not be able to
secure the unit. Side rails or a base plate must additionally be provided.
5
Connecting the PA Amplifier
All connections should only be made by qualified,
specialized personnel and with the amplifier
switched off in any case!
5.1 Speakers
It is possible to connect PA speakers or speakers/
speaker groups with a total impedance of at least
4 Ω. The possibilities of connection for the speakers
are shown in figures 3 – 7. Depending on the speaker
type, use the corresponding contacts of the terminal
strip OUTPUT (22). To facilitate handling, the terminal strip can be pulled out of its plug-in connection.
When connecting, observe the correct individual
or total impedance of the speakers and their correct
polarity (positive and negative connections as
5
D
A
CH
5.2 Mikrofone
5.5 Zusätzlicher Verstärker
Bis zu vier Mikrofone lassen sich an die Eingänge
INPUT 1 bis INPUT 4 (23) anschließen. Anstelle der
XLR-Buchse INPUT 1 können auch die Schraubanschlüsse (28) verwendet werden.
Werden mehr Lautsprecher benötigt als für den Verstärker zulässig sind, ist ein weiterer Verstärker
erforderlich. Den Eingang des zusätzlichen Verstärkers mit der Buchse LINE OUT (25) verbinden. Der
Ausgangspegel der Buchse ist unabhängig vom
Regler MASTER (12).
1) Bei Anschluss eines Mikrofons den dazugehörigen Schalter MIC/LINE (27) ausrasten.
2) Bei Verwendung phantomgespeister Mikrofone
die 21-V-Phantomspannung mit der Taste +21 V
PHANTOM POWER (30) einschalten.
Vorsicht!
Bei zugeschalteter Phantomspannung dürfen an
den Eingängen keine Mikrofone oder Audiogeräte
mit asymmetrischem Ausgang angeschlossen
sein, da diese beschädigt werden können.
5.3 Geräte mit Line-Ausgang
Bis zu fünf Geräte mit einem Line-Ausgang (z. B.
CD-Spieler, Kassettenrecorder) lassen sich an die
Eingänge INPUT 1 bis INPUT 4 (23) und an den Eingang AUX IN (26) anschließen. Beim Anschluss an
die Eingänge INPUT 1 bis INPUT 4 den dazugehörigen Schalter MIC/LINE (27) einrasten.
5.4 Equalizer oder anderes Gerät einschleifen
Zur externen Klangbeeinflussung lässt sich z. B. ein
Equalizer über die Buchsen PRE OUT und AMP IN
(24) einschleifen.
1) Die Brücke zwischen den Anschlüssen PRE OUT
und AMP IN herausziehen. Der Vor- und der Endverstärker werden dadurch getrennt.
2) Den Eingang des Gerätes an die Buchse PRE
OUT anschließen.
3) Den Ausgang des Gerätes mit der Buchse AMP
IN verbinden.
Hinweis: Der Verstärker gibt kein Signal ab, wenn
das eingeschleifte Gerät nicht eingeschaltet, defekt
oder nicht richtig angeschlossen ist.
GB
shown in figs. 3 – 7). The positive connection of the
speakers is always especially coded.
Caution!
In case of PA speakers with a 70 V or 100 V audio
transformer (figs. 3 and 4), the total load by the
speakers must not exceed 120 WRMS, otherwise the
amplifier will be overloaded and possibly damaged.
5.2 Microphones
Up to four microphones may be connected to the inputs INPUT 1 to INPUT 4 (23). Instead of the XLR jack
INPUT 1 also the screw terminals (28) may be used.
1) When connecting a microphone, unlock the corresponding switch MIC/LINE (27).
2) When using phantom-powered microphones,
switch on the 21 V phantom power with the button +21 V PHANTOM POWER (30).
Caution!
With phantom power switched on, no microphones or audio units with unbalanced output
must be connected to the inputs as these units
may be damaged.
5.3 Units with line output
Up to five units with a line output (e. g. CD player,
cassette recorder) can be connected to the inputs
INPUT 1 to INPUT 4 (23) and to the input AUX IN
(26). When connecting to the inputs INPUT 1 to INPUT 4, lock the corresponding switch MIC/LINE (27).
5.4 Inserting an equalizer or another unit
For external effects on the sound, e. g. an equalizer
can be inserted via the jacks PRE OUT and AMP IN
(24).
1) Remove the jumper between the connections
PRE OUT and AMP IN. Thus, the preamplifier
and the power amplifier are separated.
2) Connect the input of the unit to the jack PRE OUT.
3) Connect the output of the unit to the jack AMP IN.
6
5.6 Strom- und Notstromversorgung
1) Soll der Verstärker bei einem eventuellen
Netzausfall weiterarbeiten, an die Klemmleiste
24 V DC (21) eine 24-V-Notstromeinheit (z. B.
PA-24ESP von MONACOR) anschließen. Die
Klemmleiste lässt sich zur besseren Handhabung aus ihrer Steckverbindung herausziehen.
Hinweis: Bei anliegender 24-V-Spannung ist der
Verstärker sofort in Betrieb und die LED ON (14)
leuchtet. Der Verstärker kann nicht mit dem
Schalter POWER (15) ausgeschaltet werden. Es
wird lediglich zwischen Netz- und Notstromversorgung umgeschaltet.
2) Zum Schluss das beiliegende Netzkabel zuerst in
die Netzbuchse (18) und dann in eine Steckdose
(230 V~/50 Hz) stecken.
6
Bedienung
1) Vor dem ersten Einschalten zunächst die Regler
INPUT 1 bis 4 (11) sowie die Regler AUX (16)
und MASTER (12) in die Position „0“ stellen.
2) Mit dem Schalter POWER (15) den Verstärker
einschalten. Nach dem Einschalten leuchtet die
LED ON (14).
Ist eine Notstromversorgung angeschlossen,
leuchtet die Anzeige LED ON ständig und der
Verstärker ist immer in Betrieb. Mit dem Schalter
POWER lässt sich dann lediglich zwischen Netzversorgung und Notstromversorgung umschalten.
Für den normalen Betrieb den Schalter POWER
in die Position „Ein“ stellen. Bei einem Netzausfall schaltet der Verstärker dann automatisch auf
die Notstromversorgung um.
3) Mit der Taste AUX/CD (17) für den AUX-Kanal
die gewünschte Signalquelle wählen:
Für die interne CD-Wiedergabe die Taste drücken; die LED über der Taste leuchtet.
Zum Anwählen des Eingangs AUX IN (26) die
Taste ausrasten; die LED über der Taste darf
nicht leuchten.
4) Den Regler MASTER (12) so weit aufdrehen,
dass die nächsten Einstellungen zu hören sind.
5) Die Eingangsregler INPUT 1 bis 4 (11) und den
Regler AUX (16) auf den gewünschten Wert einstellen. Die Regler der nicht benutzten Kanäle
auf Null drehen.
6) Die Klangregler BASS und TREBLE (10) auf optimalen Klang einstellen.
7) Die Gesamtlautstärke mit dem Hauptregler
MASTER (12) einstellen. Die 5-stufige LED-Kette
(13) zeigt den Ausgangspegel an. Für eine optimale Aussteuerung den Regler so einstellen,
dass die rote LED +3 gerade noch nicht leuchtet.
6.1 Talkover-Funktion des Kanals 1
Über den Kanal INPUT 1 können Durchsagen über
ein laufendes Musikprogramm gesprochen werden.
Dabei wird die Lautstärke der anderen Kanäle automatisch um 40 dB abgesenkt. Zum Einschalten dieser Funktion die Taste AUTOTALK (29) einrasten.
6.2 CD-Spieler
Es können Audio-CDs und selbst gebrannte CDs
(nur Audio CD-Rs, keine CD-RWs) abgespielt werden. Befindet sich keine CD im Laufwerk, zeigt das
Display (3) „– –“ an.
6.2.1 CD abspielen
1) Für die CD-Wiedergabe die Taste AUX/CD (17)
drücken: Die LED über der Taste leuchtet.
2) Die Taste OPEN/CLOSE (9) drücken. Die CDSchublade (1) fährt heraus. Eine CD mit der
Beschriftung nach oben einlegen. Zum Schließen der Schublade die Taste erneut drücken.
Note: The amplifier does not emit a signal if the unit
inserted is not switched on, if it is defective, or not
correctly connected.
5.5 Additional amplifier
If the number of the required speakers is higher than
the number admissible for the amplifier, an additional amplifier will be required. Connect the input of the
additional amplifier to the jack LINE OUT (25). The
output level of the jack is independent of the control
MASTER (12).
5.6 Power supply and emergency power supply
1) For continued operation of the amplifier after a
possible mains failure, connect a 24 V emergency
power supply unit (e. g. MONACOR PA-24ESP)
to the terminal strip 24 V DC (21). To facilitate
handling, the terminal strip can be removed from
its plug-in connection.
Note: With the 24 V voltage applied, the amplifier
is immediately in operation and the LED ON (14)
lights up. The amplifier cannot be switched off with
the POWER switch (15). It is only switched between mains supply and emergency power supply.
2) Finally connect the supplied mains cable to the
mains jack (18) first and then to a mains socket
(230 V~/50 Hz).
6
Operation
1) Prior to switching on the amplifier for the first
time, set the controls INPUT 1 to 4 (11) and the
controls AUX (16) and MASTER (12) to position
“0” for the time being.
2) Switch on the amplifier with the POWER switch
(15). After switching-on, the LED ON (14) lights up.
With an emergency power supply connected,
the indication LED ON lights permanently and the
amplifier is always in operation. With the POWER
switch it is only possible to switch between mains
supply and emergency power supply in this case.
3)
4)
5)
6)
7)
For normal operation set the POWER switch
to position “On”. In case of mains failure the
amplifier automatically switches to emergency
power supply.
With the button AUX/CD (17) select the desired
signal source for the AUX channel:
For the internal CD replay press the button; the
LED above the button lights up.
To select the input AUX IN (26), unlock the button;
the LED above the button must not light up.
Turn up the control MASTER (12) so that the next
adjustments are audible.
Adjust the input controls INPUT 1 to 4 (11) and
the control AUX (16) to the desired value. Turn
the controls of the channels not used to zero.
Adjust the tone controls BASS and TREBLE (10)
to optimum sound.
Adjust the total volume with the main control
MASTER (12). The 5-step LED row (13) shows the
output level. For an optimum level adjust the control so that the red LED +3 does not yet light up.
6.1 Talkover function of channel 1
Via the channel INPUT 1 announcements can be
made during a current musical programme. Then
the volume of the other channels is automatically
attenuated by 40 dB. To switch on this function, lock
the button AUTOTALK (29).
6.2 CD player
It is possible to replay audio CDs and CDs which
you have burnt yourself (only audio CD-Rs, no CDRWs). If no CD is in the player mechanism, the display (3) shows “– –”.
6.2.1 Replaying a CD
1) For the CD replay press the button AUX/CD (17):
The LED above the button lights up.
2) Press the button OPEN/CLOSE (9). The CD tray
(1) opens. Insert a CD with the lettering facing
upwards. To close the tray, press the button
again. After retracting the tray, the CD player is
3)
4)
5)
6)
7)
Nach dem Einfahren der Schublade steht der
CD-Spieler auf Stopp und das Display zeigt die
Gesamttitelanzahl der CD.
Zum Starten des ersten Titels die Taste PLAY/
PAUSE (7) drücken. Zum Starten mit einem
anderen Titel diesen mit der Taste UP oder
DOWN (8) anwählen (siehe Kap. 6.2.2) und die
Wiedergabe mit der Taste PLAY/PAUSE starten,
solange die Nummer des angewählten Titels im
Display (3) blinkt. Während der Wiedergabe
leuchtet die LED PLAY (2).
Die Lautstärke der CD-Wiedergabe mit dem
Regler AUX (16) einstellen.
Mit der Taste PLAY/PAUSE kann zwischen Wiedergabe und Pause gewechselt werden. Im Pausenmodus blinkt die LED PLAY.
Nach dem Abspielen der CD oder nach dem Drücken der Taste STOP (4) erlischt die LED PLAY
und der CD-Spieler schaltet in den Stopp-Modus.
Nach jedem Betrieb immer mit der Taste OPEN/
CLOSE die CD-Schublade hereinfahren, um
das Laser-Abtastsystem vor Verschmutzung zu
schützen.
6.2.2 Titelanwahl / Schneller Vor- und Rücklauf
Während des Abspielens oder im Pausenmodus ist
es möglich, mit den Tasten UP und DOWN (8) einen
anderen Titel anzuwählen oder schnell auf der CD
vor- oder zurückzufahren.
Titelanwahl
Mit jedem Drücken der Taste UP wird auf den
nächsten Titel weitergesprungen.
Durch einmaliges Drücken der Taste DOWN wird
an den Anfang des gerade laufenden Titels gesprungen. Durch mehrfaches Drücken dieser Taste wird immer ein Titel weiter zurückgesprungen.
schneller Vor-/Rücklauf
Für den schnellen Vorlauf der CD die Taste UP
gedrückt halten, für den schnellen Rücklauf die
Taste DOWN gedrückt halten. Der schnelle Vor-/
Rücklauf fährt auch über mehrere Titel, stoppt
jedoch am Ende und am Anfang der CD.
3)
4)
5)
6)
7)
set to stop and the display shows the total title
number of the CD.
To start the first title, press the button PLAY/
PAUSE (7). To start with another title, select it
with the button UP or DOWN (8) [see chapter
6.2.2] and start the replay with the button PLAY/
PAUSE as long as the number of the selected
title flashes in the display (3). During the replay
the LED PLAY (2) lights up.
Adjust the volume of the CD replay with the control AUX (16).
With the button PLAY/PAUSE it is possible to
change between replay and pause. In the pause
mode the LED PLAY flashes.
After playing the CD or after pressing the button
STOP (4), the LED PLAY will be extinguished
and the CD player will switch to the stop mode.
After each operation always retract the CD tray
with the button OPEN/CLOSE to protect the
laser system against impurities.
6.2.2 Title selection/Fast forward and reverse
While replaying or in the pause mode it is possible to
select another title with the buttons UP and DOWN
(8) or to go fast forward or reverse on the CD.
Title selection
With each pressing of the button UP the unit goes
to the next title.
By pressing the button DOWN once, the unit
goes to the beginning of the currently playing
title. By pressing this button several times, the
unit always reverses one title.
Fast forward/reverse
For the fast forward of the CD keep the button UP
pressed, for the fast reverse keep the button
DOWN pressed. The fast forward/reverse also
goes beyond several titles, however, it stops at
the end and at the beginning of the CD.
6.2.3 Compiling an individual title sequence
1) For the title programming the CD player must be
set to stop, if necessary, press the button STOP
(4).
6.2.3 Eigene Titelfolge zusammenstellen
1) Für die Titelprogrammierung muss der CD-Spieler
auf Stopp stehen, ggf. die Taste STOP (4) drücken.
2) Die Taste PROGRAM (5) drücken. Die LED
PROGRAM (2) und das Display (3) blinken.
3) Mit der Taste UP oder DOWN (8) den ersten Titel
für die gewünschte Titelfolge anwählen.
4) Die Taste PROGRAM (5) drücken.
5) Die Bedienschritte 3 und 4 für alle weiteren gewünschten Titel wiederholen, bis die gesamte
Titelfolge (max. 19 Titel) programmiert ist.
6) Zum Starten der Titelfolge die Taste PLAY/
PAUSE (7) drücken: Die LED PLAY (2) leuchtet,
das Display hört auf zu blinken und zeigt die
aktuelle Titelnummer an. Die LED PROGRAM
blinkt weiterhin während des Abspielens.
7) Nach dem Abspielen der Titelfolge oder nach dem
Drücken der Taste STOP erlöschen alle LEDs
und der CD-Spieler schaltet in den Stopp-Modus.
8) Solange das Gerät nicht ausgeschaltet oder die
CD-Schublade nicht geöffnet wird, bleibt die Titelfolge gespeichert. Um sie erneut abzuspielen, im
Stopp-Modus die Taste PROGRAM drücken und
die Wiedergabe mit der Taste PLAY/ PAUSE starten.
6.2.4 Wiederholfunktion einschalten
1) Zum ständigen Wiederholen eines Titels die
Taste REPEAT (6) einmal drücken: Der gerade
angewählte Titel wird endlos wiederholt. Die LED
REPEAT (2) leuchtet.
2) Zur ständigen Wiederholung der gesamten CD
oder einer selbst programmierten Titelfolge die
Taste REPEAT ein zweites Mal drücken. Zusätzlich zur LED REPEAT leuchtet die LED ALL (2).
3) Zum Ausschalten der Wiederholfunktion die
Taste REPEAT ein drittes Mal drücken. Die beiden LEDs REPEAT und ALL erlöschen.
6.2.5 Hinweis zu Tonaussetzern und Lesefehlern
Zigarettenrauch dringt leicht durch alle Geräteöffnungen und setzt sich auch auf der Optik des LaserAbtastsystems ab. Dieser Belag kann zu Lesefehlern
und Tonaussetzern führen. Da sich Zigarettenrauch
nicht immer vermeiden lässt (z. B. in der Discothek),
muss das Gerät dann in einer Fachwerkstatt gereinigt werden. Diese Reinigung ist kostenpflichtig,
auch während der Garantiezeit!
7
D
A
CH
Technische Daten
Ausgangsleistung: . . . . . .
Ausgänge
Lautsprecher*: . . . . . . .
Line Out: . . . . . . . . . . . .
Pre Out: . . . . . . . . . . . .
Eingänge
Input 1 – 4: . . . . . . . . . .
Aux: . . . . . . . . . . . . . . .
Amp In: . . . . . . . . . . . . .
Frequenzbereich: . . . . . . .
Klirrfaktor: . . . . . . . . . . . .
Störabstand: . . . . . . . . . .
Klangregelung
Tiefen: . . . . . . . . . . . . .
Höhen: . . . . . . . . . . . . .
Einsatztemperatur: . . . . . .
Stromversorgung
Netzspannung: . . . . . . .
Leistungsaufnahme: . . .
Notstromversorgung: . .
Abmessungen (B x H x T):
Gewicht: . . . . . . . . . . . . . .
120 WRMS, 160 WMAX
min. 4 Ω, 70 V, 100 V
1 V/600 Ω
1 V/600 Ω
Mic 1,5 mV/1,1 kΩ
umschaltbar auf
Line 300 mV/14 kΩ;
XLR, symmetrisch
300 mV/ 50 kΩ; Cinch, asym.
1 V/14 kΩ; Cinch, asym.
50 – 15 000 Hz, ±3 dB
1 % bei 120 WRMS
> 92 dB
±10 dB/100 Hz
±10 dB/10 kHz
0 – 40 °C
230 V~/50 Hz
300 VA
24 V /10 A
430 x 89 x 380 mm, 2 HE
12,2 kg
* Entweder die 70-V- und 100-V-Ausgänge oder den 4-ΩAusgang verwenden!
Änderungen vorbehalten.
Diese Bedienungsanleitung ist urheberrechtlich für MONACOR ® INTERNATIONAL GmbH & Co. KG
geschützt. Eine Reproduktion für eigene kommerzielle Zwecke – auch auszugsweise – ist untersagt.
2) Press the button PROGRAM (5). The LED PROGRAM (2) and the display (3) flash.
3) With the button UP or DOWN (8) select the first
title for the desired title sequence.
4) Press the button PROGRAM (5).
5) Repeat the operating steps 3 and 4 for all further
desired titles until the entire title sequence (19 titles max.) has been programmed.
6) To start the title sequence, press the button
PLAY/PAUSE (7): The LED PLAY (2) lights up,
the display stops flashing and shows the current
title number. The LED PROGRAM continues to
flash while playing.
7) After playing the title sequence or after pressing
the button STOP, all LEDs will be extinguished
and the CD player will switch to the stop mode.
8) As long as the unit is not switched off or the CD
tray is not opened, the title sequence will remain
memorized. To replay it again, press the button
PROGRAM in the stop mode and start the replay
with the button PLAY/PAUSE.
6.2.4 Switching on the repeat function
1) For permanent repeat of a title, press the button
REPEAT (6) once: The just selected title is continuously repeated. The LED REPEAT (2) lights up.
2) For continuous repeat of the entire CD or of an
individually programmed title sequence press the
button REPEAT a second time. In addition to the
LED REPEAT the LED ALL (2) lights up.
3) To switch off the repeat function, press the button
REPEAT a third time. The two LEDs REPEAT
and ALL will be extinguished.
and sound interruptions. As cigarette smoke cannot
always be avoided (e. g. in a discothèque), the unit
must in this case be cleaned by authorized personnel. There is a charge on this cleaning, even during
the warranty time!
7
GB
Specifications
Output power: . . . . . . . . .
Outputs
Speakers*: . . . . . . . . . .
Line Out: . . . . . . . . . . . .
Pre Out: . . . . . . . . . . . .
Inputs
Input 1 – 4: . . . . . . . . . .
Aux: . . . . . . . . . . . . . . .
Amp In: . . . . . . . . . . . . .
Frequency range: . . . . . . .
THD: . . . . . . . . . . . . . . . .
S/N ratio: . . . . . . . . . . . . .
Tone control
Bass: . . . . . . . . . . . . . .
Treble: . . . . . . . . . . . . .
Ambient temperature: . . .
Power supply
Mains voltage: . . . . . . .
Power consumption: . . .
Emergency
power supply: . . . . . . . .
Dimensions (W x H x D): .
Weight: . . . . . . . . . . . . . . .
120 WRMS, 160 WMAX
min 4 Ω‚ 70 V, 100 V
1 V/600 Ω
1 V/600 Ω
Mic 1.5 mV/1.1 kΩ switchable to Line 300 mV/14 kΩ;
XLR, balanced
300 mV/50 kΩ; phono,
unbalanced
1 V/14 kΩ; phono,
unbalanced
50 – 15 000 Hz, ±3 dB
1% at 120 WRMS
> 92 dB
±10 dB/100 Hz
±10 dB/10 kHz
0 – 40 °C
230 V~/50 Hz
300 VA
24 V /10A
430 x 89 x 380 mm, 2 rs
12.2 kg
* Either use the 70 V and 100 V outputs or the 4 Ω output!
6.2.5 Note on sound interruptions and reading
errors
Cigarette smoke easily penetrates through all openings of the unit and also settles on the optics of the
laser system. This deposit may cause reading errors
Subject to technical modification.
All rights reserved by MONACOR ® INTERNATIONAL GmbH & Co. KG. No part of this instruction manual
may be reproduced in any form or by any means for any commercial use.
7
F
B
Ouvrez le présent livret page 3 de manière à
visualiser les éléments et branchements
9
CH
1
Eléments et branchements
1.1 Face avant
1 Tiroir CD
2 LEDs, témoins d’affichage
ALL
brille lorsque la “répétition de tous les
titres” est activée
PLAY
brille pendant la lecture, clignote en
mode pause
REPEAT
brille si la “répétition du titre en
cours” ou “répétition de tous les
titres” est activée
PROGRAM clignote lors de la programmation
d’une suite de titres et pendant leur
lecture
3 Affichage 2 positions pour indiquer le nombre de
titres du CD (en mode Stop) ou le numéro actuel
du titre sélectionné (en mode lecture et en mode
pause)
4 Touche STOP pour terminer la lecture
5 Touche PROGRAM pour programmer une suite
de titres comme souhaité
6 Touche REPEAT pour la fonction répétition
1ère pression : répétition du titre en cours
2ème pression : répétition de tous les titres du CD
ou d’une suite programmée personnellement
3ème pression : déconnexion de la fonction répétition
7 Touche PLAY/PAUSE pour commuter entre lecture et pause
8 Touche UP pour sélectionner le prochain titre
Touche DOWN pour sauter au début du titre en
cours. Par plusieurs pressions sur la touche, on
revient toujours en arrière d’un titre.
Maintenez la touche correspondante enfoncée
I
Vi preghiamo di aprire completamente la pagina 3.
Così vedrete sempre gli elementi di comando e i
collegamenti descritti.
1
Elementi di comando e collegamenti
1.1 Pannello frontale
1 Cassetto CD
2 Spie di stato
ALL
accesa se è attivata “Ripetizione di
tutti i titoli”
PLAY
accesa durante la riproduzione,
lampeggia in modalità di pausa
REPEAT
accesa se è attivata “Ripetizione del
titolo attuale” o “Ripetizione di tutti i
titoli”
PROGRAM accesa durante la programmazione
di una sequenza di titoli e durante la
loro riproduzione
3 Display a 2 cifre per indicare il numero dei titoli
del CD (in Stop) oppure del numero del titolo
attuale (durante la riproduzione o in pausa)
11
12
13
14
15
16
17
1.2 Face arrière
18 Prise pour brancher à une prise secteur (230 V~/
50 Hz) via le cordon secteur livré
19 Porte-fusible ;
tout fusible fondu ne doit être remplacé que par
un fusible de même type
20 Vis d’arrêt pour une connexion masse possible
(p. ex. en cas de problèmes de ronflement)
21 Bornes* pour une tension d’alimentation de secours (24 V )
22 Bornes* pour brancher des haut-parleurs
23 Prises d’entrée XLR des canaux mono INPUT 1
à INPUT 4 pour brancher des microphones ou
des appareils mono à sortie Ligne
Tenere premuto il relativo tasto per attivare l’avanzamento (UP) o il ritorno veloce (DOWN).
9 Tasto OPEN/CLOSE per aprire e chiudere il cassetto del CD
10 Regolatori toni
BASS
= regolatore bassi, ±10 dB/100 Hz
TREBLE = regolatore alti, ±10 dB/10 kHz
11 Regolatori per impostare il volume dei canali
mono INPUT 1 a INPUT 4
12 Regolatore MASTER per il volume globale
13 Indicazione livello
14 Spia di funzionamento
15 Interruttore on/off POWER
16 Regolatore per impostare il volume della sorgente collegata all’ingresso AUX IN (26) [tasto
AUX/CD (17) non premuto] oppure per il volume
del lettore CD interno [tasto AUX/CD premuto]
17 Tasto AUX/CD
tasto premuto è selezionato il lettore CD interno
(il LED sopra il tasto è acceso)
non premuto è selezionato l’ingresso AUX IN (26)
4 Tasto STOP per terminare la riproduzione
1.2 Pannello posteriore
5 Tasto PROGRAM per programmare una sequenza di titoli
18 Presa rete per il collegamento con una presa
(230 V~/50 Hz) servendosi del cavo rete in dotazione
6 Tasto REPEAT per la funzione di ripetizione
1. pressione del tasto: ripetizione del titolo attuale
2. pressione del tasto: ripetizione di tutti i titoli del
CD o di una sequenza programmata
3. pressione del tasto: disattivazione della funzione di ripetizione
7 Tasto PLAY/PAUSE per passare fra riproduzione
e pausa
8 Tasto UP per selezionare il titolo successivo
Tasto DOWN per saltare all’inizio del titolo attuale.
Premendo più volte, si salta indietro ogni volta
di un altro titolo.
8
10
pour activer l’avance rapide (UP)/retour rapide
(DOWN).
Touche OPEN/CLOSE pour ouvrir et fermer le
tiroir CD
Egaliseur
BASS
= réglage des graves, ±10 dB/100 Hz
TREBLE = réglage des aigus, ±10 dB/10 kHz
Potentiomètres de réglage du volume pour les
canaux mono INPUT 1 à INPUT 4
Potentiomètre de réglage MASTER pour le
volume total
Témoin de fonctionnement
Affichage du niveau
Interrupteur MARCHE/ARRET
Potentiomètre de réglage du volume pour la
source de signal reliée à l’entrée AUX IN (26)
[touche AUX/CD (17) non enfoncée] ou pour le
volume du lecteur interne de CD (touche AUX/
CD enfoncée)
Touche AUX/CD
touche enfoncée :
le lecteur CD interne est
sélectionné (la LED audessus de la touche brille)
touche non enfoncée : l’entrée AUX IN (26) est
sélectionnée
19 Supporto per il fusibile di rete;
sostituire un fusibile difettoso solo con uno dello
stesso tipo
20 Morsetto per un eventuale collegamento con la
massa (p. es. nel caso di problemi di ronzio)
21 Morsetti a vite* per un’alimentazione di emergenza (24 V )
Attention ! Si l’alimentation fantôme est connectée [touche +21 V PHANTOM POWER (30)
enclenchée], les prises XLR sont alimentées
par une alimentation fantôme de 21 V. Dans ce
cas, il ne faut pas brancher de microphones ou
appareils audio avec sortie asymétrique car ils
peuvent être endommagés.
24 Prises de repiquage PRE OUT et AMP IN pour
insérer un appareil (par exemple égaliseur) ;
le niveau de sortie de la prise PRE OUT est indépendant du réglage MASTER (12)
25 Sortie LINE OUT pour brancher d’autres amplificateurs ;
le niveau de sortie est indépendant du réglage
MASTER (12)
26 Entrée AUX IN pour brancher des appareils audio,
p. ex. lecteur CD, tuner, magnétophone, etc.
27 Sélecteurs pour les canaux mono INPUT 1 – 4
entre niveau du microphone (touche non enfoncée) et niveau Ligne (touche enfoncée)
28 Bornes pour brancher un microphone ou un
appareil audio à sortie Ligne ; branchées en parallèle à la prise XLR INPUT 1
29 Touche AUTOTALK pour allumer/éteindre la fonction talkover du canal 1
30 Touche +21 V PHANTOM POWER pour connecter l’alimentation fantôme 21 V pour les prises
XLR INPUT 1 à INPUT 4 (23) ; nécessaire pour
brancher des microphones condensateur ou
électret fonctionnant avec une alimentation
fantôme.
Attention ! Actionnez la touche uniquement si
l’amplificateur est éteint pour éviter des bruits
de commutation. Respectez les conseils mentionnés dans le point 23.
* Il est possible de retirer les bornes de leur emplacement
pour faciliter l’accès.
Attenzione! Se è attivata l’alimentazione phantom [tasto +21 V PHANTOM POWER (30) premuto fino allo scatto] tutte le prese XLR vengono
alimentate con l’alimentazione phantom 21 V. In
questo caso non devono essere collegati microfoni o apparecchi audio con uscita asimmetrica
in quanto potrebbero subire dei danni.
24 Contatti di attraversamento PRE OUT e AMP IN
per inserire un apparecchio (p. es. equalizer);
il livello d’uscita della presa PRE OUT è indipendente dal regolatore MASTER (12)
25 Uscita LINE OUT per il collegamento di ulteriori
amplificatori;
il livello d’uscita è indipendente dal regolatore
MASTER (12)
26 Ingresso AUX IN per il collegamento di apparecchi audio, p. es. lettore CD, tuner, registratore
a cassette ecc.
27 Commutatore per i canali mono INPUT 1 – 4 fra
livello microfono (tasto non premuto) e livello
Line (tasto premuto)
28 Morsetti per il collegamento di un microfono o di
un apparecchio audio con uscita Line; collegato
in parallelo con la presa XLR INPUT 1
29 Tasto AUTOTALK per attivare/disattivare la funzione talkover del canale 1
30 Tasto +21 V PHANTOM POWER per attivare
l’alimentazione phantom per le prese XLR
INPUT 1 a INPUT 4 (23); è necessario quando si
collegano microfoni a condensatore o a elettrete
che funzionano con alimentazione phantom
Attenzione! Attivare il tasto solo con l’amplificatore spento, per evitare rumori di commutazione. Da notare anche la nota al punto 23.
22 Morsetti a vite* per il collegamento degli altoparlanti
23 Prese d’ingresso XLR dei canali mono INPUT 1
a INPUT 4 per il collegamento di microfoni o di
apparecchi mono con uscita Line
* Per maggiore comodità, i morsetti a vite possono essere
sfilati dai connettori.
2
Conseils d’utilisation et de sécurité
Cet appareil répond à la norme européenne
89/336/CEE relative à la compatibilité électromagnétique et à la norme européenne 73/23/CEE portant sur les appareils à basse tension.
L’appareil est alimenté par une tension dangereuse 230 V~. Ne touchez jamais l’intérieur car en cas de mauvaise manipulation,
vous pourriez subir une décharge électrique.
En outre, l’ouverture de l’appareil rend tout
droit à la garantie caduque.
Attention ! Pendant le fonctionnement, une
tension dangereuse de contact de 100 V au
plus est présente aux bornes haut-parleurs
(22). L’ensemble des branchements ne peut
être effectué ou modifié que si l’installation
PA est déconnectée.
Respectez scrupuleusement les points suivants:
● Attention ! Ne regardez jamais dans le compartiment CD lorsque le compartiment CD est ouvert.
Des rayons laser rayonnants pourraient engendrer des troubles de la vision.
● L’appareil n’est conçu que pour une utilisation en
intérieur. Protégez-le de tout type de projections
d’eau, des éclaboussures, d’une humidité élevée
et de la chaleur (plage de température de fonctionnement autorisée 0 – 40 °C).
● En aucun cas, vous ne devez poser d’objet contenant du liquide ou un verre sur l’appareil.
● La chaleur dégagée par l’appareil doit être évacuée
par une circulation d’air correcte. En aucun cas les
ouïes de ventilation ne doivent être obturées.
● Ne faites rien tomber dans les ouïes de ventilation, vous pourriez subir une décharge électrique !
● Ne faites jamais fonctionner l’appareil et débranchez-le immédiatement lorsque :
1. des dommages sur l’appareil ou sur le cordon
secteur apparaissent.
2. après une chute ou accident similaire, vous
avez un doute sur l’état de l’appareil.
3. des défaillances apparaissent.
B
2
Avvertenze di sicurezza
Quest’apparecchio è conforme alle direttive CE
89/336/CEE sulla compatibilità elettromagnetica e
73/23/CEE per apparecchi a bassa tensione.
Quest’apparecchio funziona con tensione di
rete di 230 V~. Non intervenire mai al suo
interno; la manipolazione scorretta può provocare delle scariche pericolose. Se l’apparecchio viene aperto, cessa ogni diritto di
garanzia.
Attenzione! Durante il funzionamento, ai
contatti per gli altoparlanti (22) è presente
una tensione fino a 100 V, pericolosa al contatto. Eseguire o modificare tutti i collegamenti solo con l’impianto PA spento.
Si devono osservare assolutamente i seguenti punti:
● Attenzione! Non guardare mai nel pozzetto CD
mentre il cassetto è aperto. I raggi laser che potrebbero uscire possono danneggiare gli occhi.
● Lo strumento è previsto solo per l’uso all’interno di
locali. Proteggerlo dall’acqua gocciolante e dagli
spruzzi d’acqua, da alta umidità dell’aria e dal
calore (temperatura d’impiego ammessa fra 0 e
40 °C).
● Non depositare sull’apparecchio dei contenitori
riempiti di liquidi, p. es. bicchieri.
● Dev’essere garantita la libera circolazione dell’aria per dissipare il calore che viene prodotto all’interno dell’apparecchio. Non coprire le fessure
d’aerazione.
● Non inserire oggetti nelle fessure d’aerazione. Altrimenti si potrebbe provocare una scarica elettrica!
● Non mettere in funzione l’apparecchio e staccare
subito la spina rete se:
1. l’apparecchio o il cavo rete presentano dei
danni visibili;
2. dopo una caduta o dopo eventi simili sussiste il
sospetto di un difetto;
3. l’apparecchio non funziona correttamente.
Per la riparazione rivolgersi sempre ad un’officina
competente.
B
●
●
●
Dans tous les cas, les dommages doivent être
réparés par un technicien spécialisé.
Ne débranchez jamais l’appareil en tirant sur le
cordon secteur ; retirez toujours le cordon secteur
en tirant la fiche.
Pour nettoyer l’appareil, utilisez uniquement un
chiffon sec et doux, en aucun cas de produits chimiques ou d’eau.
Nous déclinons toute responsabilité en cas de dommages corporels ou matériels résultants si l’appareil
est utilisé dans un but autre que celui pour lequel il
a été conçu, s’il n’est pas correctement branché, utilisé, s’il n’est pas réparé par une personne habilitée ; de même, la garantie deviendrait caduque.
Lorsque l’appareil est définitivement
retiré du service, vous devez le déposer
dans une usine de recyclage à proximité
pour contribuer à son élimination non
polluante.
4.1 Installation en rack
Pour un montage en rack, vissez les deux étriers de
montage livrés sur les côtés de l’appareil. Dans le
rack, pour l’amplificateur, 2 unités sont nécessaires
(1 unité = 44,5 mm).
Afin que le rack ne se renverse pas, vous devez
placer l’amplificateur dans la partie inférieure du
rack. Pour une fixation solide, les étriers de montage
seuls ne suffisent pas. Utilisez également des rails
latéraux ou une plaque inférieure pour le maintenir
correctement en place.
5
F
B
CH
Branchement de l’amplificateur Public
Adress
Tous les branchements ne doivent être effectués
que par un technicien qualifié et uniquement lorsque
l’amplificateur est éteint !
5.1 Haut-parleurs
3
Possibilités d’utilisation
Cet amplificateur avec lecteur CD intégré est spécialement conçu pour une utilisation dans des installations de sonorisation Public Adress. Il peut délivrer
120 WRMS à des haut-parleurs 100 V et 70 V ou à un
groupe de haut-parleurs avec une impédance totale
de 4 Ω. Il est possible de brancher des microphones
(canaux 1 – 4) ou des appareils à niveau Ligne (canaux 1 – 4 et canal AUX) aux cinq canaux d’entrée
mixables entre eux. Le canal 1 est doté d’une fonction talkover qui diminue le volume des autres canaux de 40 dB pendant une annonce.
4
Positionnement de l’appareil
L’amplificateur est prévu pour être placé dans un
rack (482 mm/19"), il peut également être placé
directement sur une table. Dans tous les cas, l’air
doit pouvoir circuler librement via toutes les ouïes de
ventilation afin de garantir un refroidissement suffisant de l’amplificateur.
●
●
●
Staccare il cavo rete afferrando la spina, senza tirare il cavo.
Per la pulizia usare solo un panno morbido,
asciutto; non impiegare in nessun caso prodotti
chimici o acqua.
Nel caso d’uso improprio, di collegamenti sbagliati, d’impiego scorretto o di riparazione non a
regola d’arte dell’apparecchio non si assume nessuna responsabilità per eventuali danni consequenziali a persone o a cose e non si assume
nessuna garanzia per lo strumento.
Se si desidera eliminare l’apparecchio
definitivamente, consegnarlo per lo
smaltimento ad un’istituzione locale per
il riciclaggio.
3
Possibilità d’impiego
Il est possible de brancher des haut-parleurs Public
Adress ou des haut-parleurs ou des groupes de
haut-parleurs avec une impédance totale de 4 Ω au
moins. Les possibilités de branchement pour les
haut-parleurs sont indiquées sur les schémas 3 – 7.
Selon le type de haut-parleur, utilisez les contacts
correspondants des bornes OUTPUT (22). Il est
possible de retirer les bornes de leur emplacement
pour faciliter l’accès.
Lors du branchement, veillez à respecter l’impédance individuelle ou l’impédance totale des hautparleurs et leur polarité (branchements plus et
moins comme indiqués sur les schémas 3 – 7). Le
branchement plus des haut-parleurs est toujours
spécialement repéré.
Attention !
Dans le cas de haut-parleurs Public Adress avec
transformateur audio 70 V ou 100 V (schémas 3 et
4), la puissance totale par les haut-parleurs ne doit
pas être supérieure à 120 WRMS, sinon l’amplificateur serait en surcharge et pourrait être endommagé.
4.1 Montaggio in un rack
5
Collegare l’amplificatore PA
Fare eseguire tutti i collegamenti solo da un esperto
qualificato e con l’amplificatore assolutamente
spento!
5.1 Altoparlanti
Questo amplificatore con lettore CD integrato è
stato realizzato specialmente per l’impiego in impianti di sonorizzazione PA. Fornisce 120 W eff. ad
altoparlanti con ingresso audio 100 V e 70 V oppure
ad un gruppo di altoparlanti con impedenza globale
di 4 Ω. Ai cinque canali d’ingresso miscelabili fra di
loro si possono collegare dei microfoni (canali 1 – 4)
oppure apparecchi con livello Line (canali 1 – 4 e
AUX). Il canale 1 possiede una funzione Talkover,
che durante un avviso riduce il volume degli altri
canali di 40 dB.
Si possono collegare altoparlanti PA oppure altoparlanti/gruppi di altoparlanti con un’impedenza globale non inferiore a 4 Ω. Le possibilità di collegamento degli altoparlanti sono illustrate nelle figg.
3 – 7. A seconda del tipo di altoparlante usare i contatti della morsettiera OUTPUT (22). Per maggiore
comodità, la morsettiera può essere sfilata dal connettore.
Durante il collegamento fare attenzione alla corretta impedenza singola o globale degli altoparlanti
(positivo e negativo come illustrato nelle figg. 3 – 7).
Il positivo degli altoparlanti è sempre quello contrassegnato.
4
Attenzione!
Nel caso di altoparlanti PA con trasformatore audio
70 V o 100 V (figg. 3 e 4), il carico globale degli altoparlanti non deve superare 120 W eff. per non sovraccaricare ed eventualmente danneggiare l’amplificatore.
Collocamento dell’amplificatore
L’amplificatore è previsto per il montaggio in un rack
(482 mm/19"), ma può essere collocato anche su un
tavolo. In ogni caso deve essere garantita la libera
circolazione dell’aria attraverso le fessure di aerazione per ottenere una raffreddamento sufficiente
dello stadio finale.
I
Per il montaggio in un rack avvitare ai lati dell’apparecchio i due angoli di montaggio in dotazione. L’amplificatore richiede due unità di altezza (1 unità di
altezza RS = 44,5 mm).
Per evitare che il rack risulti con troppi pesi in alto
occorre che l’amplificatore venga sistemato in
basso. Per un fissaggio sicuro non bastano i soli
angoli di montaggio. L’apparecchio deve essere
sostenuto da guide laterali o da un piano sul quale
poggia.
9
F
B
CH
5.2 Microphones
5.5 Amplificateur supplémentaire
Il est possible de relier jusqu’à quatre microphones
aux entrées INPUT 1 à INPUT 4 (23). Il est également possible d’utiliser les bornes (28) à la place de
la prise XLR INPUT 1.
Si le nombre de haut-parleurs nécessaires est
supérieur au nombre autorisé pour l’amplificateur, il
est nécessaire de connecter un autre amplificateur.
Reliez l’entrée de l’amplificateur supplémentaire à la
prise LINE OUT (25). Le niveau de sortie de la prise
est indépendant du réglage MASTER (12).
1) Lors du branchement d’un microphone, désenclenchez le sélecteur correspondant MIC/LINE
(27).
2) Si des microphones à alimentation fantôme sont
utilisés, activez l’alimentation fantôme 21 V avec
la touche +21 V PHANTOM POWER (30).
Attention !
Si l’alimentation fantôme est connectée, il ne
faut pas brancher des microphones ou des
appareils audio avec sortie asymétrique aux
entrées, car ils peuvent être endommagés.
5.3 Appareils à sortie Ligne
Il est possible de relier jusqu’à cinq appareils à sortie
Ligne (p. ex. lecteur CD, magnétophone) aux entrées
INPUT 1 à INPUT 4 (23) et à l’entrée AUX IN (26). Si
les entrées INPUT 1 à INPUT 4 sont reliées, enclenchez le sélecteur correspondant MIC/LINE (27).
1) Si l’amplificateur doit continuer à fonctionner en
cas de coupure d’alimentation secteur, reliez une
unité d’alimentation de secours 24 V (p. ex. PA24ESP de MONACOR) aux bornes 24 V DC (21).
Il est possible de retirer les bornes de leur emplacement pour faciliter l’accès.
Conseil : Si l’alimentation 24 V est branchée,
l’amplificateur est immédiatement en fonctionnement et la LED ON (14) brille. L’amplificateur ne
peut pas être éteint avec l’interrupteur POWER
(15). Il y a uniquement commutation entre alimentation de secours et alimentation secteur.
2) Pour finir, reliez le cordon secteur livré tout d’abord à la prise (18) et puis à une prise secteur
(230 V~/50 Hz).
5.4 Insérer un égaliseur ou un autre appareil
6
Pour une modification externe de la tonalité, il est
possible d’insérer par exemple un égaliseur via les
prises PRE OUT et AMP IN (24).
Conseil : L’amplificateur ne fournit pas de signal si
l’appareil inséré n’est pas allumé, s’il est défectueux
ou n’est pas correctement branché.
1) Avant la première mise sous tension, mettez tout
d’abord les réglages INPUT 1 à 4 (11) ainsi que
les réglages AUX (16) et MASTER (12) sur la
position “0”.
2) Allumez l’amplificateur avec l’interrupteur POWER (15). Après la mise sous tension, la LED ON
(14) brille.
Si une alimentation de secours est connectée,
la LED ON brille en continu et l’amplificateur est
toujours en fonctionnement. Avec l’interrupteur
POWER, on peut uniquement commuter entre
alimentation secteur et alimentation de secours.
Pour un fonctionnement normal, mettez l’interrupteur POWER sur la position “Marche”. En cas
5.2 Microfoni
5.5 Amplificatore supplementare
Agli ingressi INPUT 1 a INPUT 4 (23) si possono collegare fino a 4 microfoni. Al posto della presa XLR
INPUT 1 si possono usare anche i contatti a vite (28).
Se sono richiesti più altoparlanti di quanto ammessi
per l’amplificatore, è necessario un amplificatore
supplementare. Collegare l’ingresso dell’amplificatore supplementare con la presa LINE OUT (25). Il
livello d’uscita della presa è indipendente dal regolatore MASTER (12).
1) Retirez le cavalier entre les connexions PRE
OUT et AMP IN. Ainsi, le préamplificateur et l’amplificateur de puissance sont séparés.
2) Branchez l’entrée de l’appareil à la prise PRE
OUT.
3) Reliez la sortie de l’appareil à la prise AMP IN.
I
5.6 Alimentation secteur et alimentation de
secours
1) Se è collegato un microfono sbloccare il relativo
commutatore MIC/LINE (27).
2) Nel caso di microfoni con alimentazione phantom, attivare l’alimentazione phantom 21 V con il
tasto PHANTOM POWER (30).
5.6 Alimentazione e alimentazione di emergenza
Attenzione!
Se è attivata l’alimentazione phantom, agli ingressi non devono essere collegati dei microfoni
oppure degli apparecchi audio con uscita asimmetrica perché potrebbero subire dei danni.
1) Se l’amplificatore deve continuare a funzionare
anche in caso di un’eventuale caduta di rete, alla
morsettiera 24 V DC (21) si deve collegare un’unità di alimentazione d’emergenza 24 V (p. es. PA24ESP della MONACOR). Per maggiore comodità, la morsettiera può essere sfilata dal connettore.
N.B.: Se è presente un’alimentazione 24 V, l’amplificatore entra subito in funzione e il LED ON
(14) rimane acceso. Non è possibile spegnere
l’amplificatore con l’interruttore POWER (15).
Con esso si cambia solo fra alimentazione di rete
e di emergenza.
5.3 Apparecchi con uscita Line
Agli ingressi INPUT 1 a INPUT 4 (23) e all’ingresso
AUX IN (26) si possono collegare fino a cinque
apparecchi con uscita Line (p. es. lettore CD, registratore a cassette). Nel caso di collegamento agli
ingressi INPUT 1 a INPUT 4 premere fino allo scatto
il relativo commutatore MIC/LINE (27).
2) Alla fine inserire il cavo rete in dotazione dapprima nella presa (18) e quindi in una presa di
rete (230 V~/50 Hz).
5.4 Inserire un equalizzatore o un altro apparecchio
6
Per una regolazione esterna dei toni è possibile
inserire, attraverso le prese PRE OUT e AMP IN
(24), p. es. un equalizzatore.
1) Prima della prima accensione portare i regolatori
INPUT 1 a 4 (11) nonché i regolatori AUX (16) e
MASTER (12) in posizione “0”.
1) Sfilare il ponticello fra i contatti PRE OUT e AMP
IN. In questo modo si separano il preamplificatore e l’amplificatore finale.
2) Accendere l’amplificatore con l’interruttore
POWER (15). Dopo l’accensione si accende il
LED ON (14).
Se è collegata l’alimentazione d’emergenza, il
LED ON rimane acceso e l’amplificatore è sempre in funzione. Con l’interruttore POWER si
cambia solo fra alimentazione di rete e di emergenza. Per il funzionamento normale portare l’interruttore POWER in posizione “On”. Nel caso di
caduta rete, l’amplificatore passa automaticamente all’alimentazione d’emergenza.
2) Collegare l’ingresso dell’apparecchio con la
presa PRE OUT.
3) Collegare l’uscita dell’apparecchio con la presa
AMP IN.
N.B.: L’amplificatore rimane muto se l’apparecchio
inserito non è acceso, se è difettoso o non collegato
correttamente.
10
Fonctionnement
Funzionamento
3)
4)
5)
6)
7)
de coupure de courant, l’amplificateur commute
automatiquement sur l’alimentation de secours.
Avec la touche AUX / CD (17), sélectionnez la
source de signal voulue pour le canal AUX :
pour la lecture interne de CD, enfoncez la touche; la LED au-dessus de la touche brille.
pour sélectionner l’entrée AUX IN (26), désenclenchez la touche ; la LED au-dessus de la touche ne doit pas briller.
Tournez le réglage MASTER (12) jusqu’à ce que
les réglages suivants puissent être écoutés.
Mettez les réglages d’entrée INPUT 1 à 4 (11) et
le réglage AUX (16) sur la valeur souhaitée. Tournez sur zéro les réglages des canaux inutilisés.
Réglez les réglages de l’égaliseur BASS et
TREBLE (10) pour obtenir une tonalité optimale.
Réglez le volume total avec le réglage principal
MASTER (12). La chaîne des LEDs à 5 niveaux
(13) indique le niveau de sortie. Pour un réglage
optimal, tournez le réglage de telle sorte que la
LED +3 rouge ne brille pas.
6.1 Fonction talkover du canal 1
Via le canal INPUT 1, il est possible d’effectuer des
annonces pendant la diffusion d’un programme de
musique. Le volume des autres canaux est automatiquement diminué de 40 dB. Pour allumer cette fonction, enclenchez la touche AUTOTALK (29).
6.2 Lecteur CD
Il est possible de lire des CDs audio, des CDs gravés (uniquement CD-R audio, pas de CD-RW réinscriptibles). S’il n’y a pas de CD dans le lecteur, l’affichage (3) indique “– –”.
6.2.1 Lecture de CD
1) Pour la lecture de CD, enfoncez la touche AUX/
CD (17) : la LED au-dessus de la touche brille.
2) Appuyez sur la touche OPEN/CLOSE (9) : le
tiroir CD (1) s’ouvre. Placez un CD, inscription
sur le dessus. Pour fermer le tiroir, enfoncez une
3) Con il tasto AUX/CD (17) si seleziona la sorgente
per il canale AUX:
Per la riproduzione interna di un CD premere il
tasto; il LED sopra il tasto si accende.
Per selezionare l’ingresso AUX IN (26) sbloccare
il tasto; il LED sopra il tasto non deve essere
acceso.
4) Aprire il regolatore MASTER (12) al punto da
poter sentire le impostazioni più vicine.
5) Portare i regolatori degli ingressi INPUT 1 a 4
(11) nonché il regolatore AUX (16) sul valore
desiderato. Portare i regolatori dei canali liberi
sullo zero.
6) Impostare il tono ottimale con i regolatori BASS e
TREBLE (10).
7) Impostare il volume globale con il regolatore principale MASTER (12). La catena dei 5 LED (13)
indica il livello d’uscita. Per una regolazione ottimale impostare il regolatore in modo tale che il
LED rosso +3 per poco non si accende.
6.1 Funzione Talkover del canale 1
Attraverso il canale INPUT 1 si possono fare degli
avvisi durante un programma di musica. In questo
caso, il volume degli altri canali viene abbassato automaticamente di 40 dB. Per attivare tale funzione,
premere fino allo scatto il tasto AUTOTALK (29).
6.2 Lettore CD
Si possono riprodurre CD audio e CD masterizzati
in proprio (solo CD-R audio, non CD-RW). Se nel
lettore non è inserito nessun CD, il display (3) indica
“– –”.
6.2.1 Riproduzione di un CD
1) Per la riproduzione di un CD premere il tasto
AUX/CD (17): il LED sopra il tasto si accende.
2) Premere il tasto OPEN/CLOSE (9). Il cassetto
CD (1) si apre. Inserire un CD con la scritta rivolta
verso l’alto. Per chiudere il cassetto premere di
nuovo il tasto. Dopo la chiusura del cassetto, il
3)
4)
5)
6)
7)
nouvelle fois la touche. Une fois le tiroir rentré, le
lecteur CD se met alors sur Stop et l’affichage
indique le nombre total de titres du CD.
Pour démarrer le premier titre, enfoncez la touche PLAY/PAUSE (7). Pour démarrer avec un
autre titre, sélectionnez-le avec la touche UP ou
DOWN (8) [voir chap. 6.2.2] et démarrez la lecture avec la touche PLAY/PAUSE tant que le numéro du titre sélectionné clignote sur l’affichage
(3). Pendant la lecture, la LED PLAY (2) brille.
Réglez le volume de la lecture du CD avec le
réglage AUX (16).
Avec la touche PLAY/PAUSE, il est possible de
passer du mode lecture au mode pause et inversement ; en mode pause, la LED PLAY clignote.
Après la lecture du CD ou après une pression sur
la touche STOP (4), la LED PLAY s’éteint et le
lecteur CD passe en mode Stop.
Après chaque fonctionnement, fermez toujours le
tiroir CD avec la touche OPEN/CLOSE pour protéger le système laser de lecture des poussières.
6.2.2 Sélection de titres/Avance et retour rapides
Pendant la lecture ou en mode pause, il est possible
de sélectionner un autre titre avec les touches UP et
DOWN (8) ou d’avancer ou reculer rapidement sur
le CD.
Sélection de titres
A chaque pression sur la touche UP, on saute au
titre suivant.
Par une seule pression sur la touche DOWN, on
revient au début du titre en cours, par plusieurs
pressions, on recule toujours d’un titre.
Avance et retour rapides
Pour une avance rapide du CD, maintenez la touche UP enfoncée, pour un retour rapide, la touche DOWN. L’avance/retour rapide se fait également sur plusieurs titres, mais s’arrête à la fin et
au début du CD.
6.2.3 Création d’une suite de titres
1) Pour une programmation de titres, le lecteur CD
doit être sur Stop, si besoin, enfoncez la touche
STOP (4).
2) Enfoncez la touche PROGRAM (5). La LED
PROGRAM (2) et l’affichage (3) clignotent.
3) Avec la touche UP ou DOWN (8), sélectionnez le
premier titre de la suite de titres souhaitée.
4) Enfoncez la touche PROGRAM (5).
5) Répétez les points 3 et 4 pour tous les autres titres souhaités jusqu’à complète programmation
de la suite de titres (19 titres maximum).
6) Pour démarrer la suite de titres, enfoncez la touche PLAY/PAUSE (7) : la LED PLAY (2) brille,
l’affiche cesse de clignoter et indique le numéro
du titre actuel. La LED PROGRAM continue à clignoter pendant la lecture.
7) Après la lecture de la suite de titres ou après une
pression sur la touche STOP, toutes les LEDs
s’éteignent et le lecteur CD passe en mode Stop.
8) Tant que l’appareil n’est pas éteint ou que le tiroir
CD n’est pas ouvert, la suite de titres reste
mémorisée. Pour la lire à nouveau, en mode
stop, enfoncez la touche PROGRAM et démarrez la lecture avec la touche PLAY/PAUSE.
6.2.4 Activation de la fonction répétition
1) Pour une répétition continue d’un titre, enfoncez
une fois la touche REPEAT (6) : le titre déjà
sélectionné est répété en continu. La LED
REPEAT (2) brille.
2) Pour une répétition continue de tout le CD ou
d’une suite déjà programmée personnellement,
enfoncez une deuxième fois la touche REPEAT.
La LED ALL (2) brille en plus de la LED REPEAT.
3) Pour désactiver la fonction répétition, enfoncez
une troisième fois la touche REPEAT. Les deux
LEDs REPEAT et ALL s’éteignent.
Notice d’utilisation protégée par le copyright de MONACOR ® INTERNATIONAL GmbH & Co. KG. Toute
reproduction même partielle à des fins commerciales est interdite.
3)
4)
5)
6)
7)
lettore CD si trova su Stop e il display indica il
numero totale dei titoli del CD.
Per avviare il primo titolo premere il tasto PLAY/
PAUSE (7). Per iniziare con un altro titolo, selezionarlo con il tasto UP o DOWN (8) [vedi cap.
6.2.2] e avviare la riproduzione con il tasto PLAY/
PAUSE mentre il numero del titolo selezionato
sta ancora lampeggiando sul display (3). Durante
la riproduzione è acceso il LED PLAY (2).
Impostare il volume con il regolatore AUX (16).
Con il tasto PLAY/PAUSE si può passare fra
riproduzione e pausa. Nella modalità di pausa, il
LED PLAY lampeggia.
Dopo la riproduzione del CD oppure dopo aver
premuto il tasto STOP (4), il LED PLAY si spegne
e il lettore passa nella modalità di Stop.
Dopo l’uso chiudere sempre il cassetto CD con il
tasto OPEN/CLOSE per proteggere il sistema di
scansione laser dallo sporco.
6.2.2 Scelta dei titoli/avanzamento e ritorno veloce
Durante la riproduzione o nella modalità di pausa è
possibile selezionare un altro titolo con l’aiuto dei
tasti UP e DOWN (8) oppure muoversi velocemente
in avanti o indietro sul CD.
Selezione di un titolo
Con ogni pressione del tasto UP si salta al titolo
successivo.
Premendo una volta il tasto DOWN si ritorna all’inizio del titolo attuale. Premendo più volte, si
torna indietro sempre di un altro titolo.
Avanzamento/ritorno veloce
Per l’avanzamento veloce, tenere premuto il tasto UP, per il ritorno veloce tener premuto il tasto
DOWN. L’avanzamento/ritorno veloce passa sopra più titoli, ma si ferma all’inizio e alla fine del
CD.
6.2.3 Compilare una propria sequenza di titoli
1) Per la programmazione dei titoli, il lettore CD
deve trovarsi su Stop; eventualmente premere il
tasto STOP (4).
2) Premere il tasto PROGRAM (5). Lampeggiano il
LED PROGRAM (2) nonché il display (3).
3) Con il tasto UP o DOWN (8) selezionare il primo
titolo della sequenza.
4) Premere il tasto PROGRAM (5).
5) Ripetere i passi 3 e 4 per gli altri titoli desiderati
fino ad aver completato la programmazione
(max. 19 titoli).
6) Per avviare la riproduzione della sequenza, premere il tasto PLAY/PAUSE (7): il LED PLAY (2) si
accende, il display smette di lampeggiare e
indica il numero del titolo attuale. Il LED PROGRAM continua a lampeggiare durante la riproduzione.
7) Dopo la riproduzione della sequenza oppure
dopo aver premuto il tasto STOP, tutti i LED si
spengono e il lettore va nella modalità di Stop.
8) Finché l’apparecchio rimane acceso e senza che
il cassetto CD venga aperto, la sequenza rimane
memorizzata. Per riprodurla un’altra volta, premere il tasto PROGRAM nella modalità di Stop e
avviare la riproduzione con il tasto PLAY/PAUSE.
6.2.4 Attivare la funzione di ripetizione
1) Per ripetere continuamente un titolo, premere
una volta il tasto REPEAT (6): il titolo attuale
viene ripetuto senza fine. Il LED REPEAT (2) si
accende.
2) Per ripetere continuamente l’intero CD o una sequenza programmata, premere il tasto REPEAT
una seconda volta. Oltre al LED REPEAT si
accende il LED ALL (2).
3) Per disattivare la funzione di ripetizione, premere
il tasto REPEAT per la terza volta. I due LED
REPEAT e ALL si spengono.
La MONACOR INTERNATIONAL GmbH & Co. KG si riserva ogni diritto di elaborazione in qualsiasi forma
delle presenti istruzioni per l’uso. La riproduzione – anche parziale – per propri scopi commerciali è vietata.
6.2.5 Conseils sur les coupures du son et les
erreurs de lecture
La fumée de cigarettes s’introduit dans les ouvertures du lecteur et se dépose également sur l’optique
du système laser. Cela peut générer des erreurs de
lecture et des coupures de son. On ne peut pas toujours éviter la fumée de cigarettes (p. ex. en discothèque), confiez impérativement le nettoyage du
lecteur à un technicien spécialisé. Cette opération
est à la charge de l’utilisateur, même lorsque l’appareil est sous garantie.
7
F
B
CH
Caractéristiques techniques
Puissance de sortie : . . . .
Sorties
Haut-parleurs* : . . . . . .
Line Out : . . . . . . . . . . .
Pre Out : . . . . . . . . . . . .
Entrées
Input 1 – 4 : . . . . . . . . . .
Aux : . . . . . . . . . . . . . . .
Amp In : . . . . . . . . . . . .
Bande passante : . . . . . . .
Taux de distorsion : . . . . .
Rapport signal/bruit : . . . .
Réglage de tonalité
Graves : . . . . . . . . . . . .
Aigus : . . . . . . . . . . . . .
Température de fonc. : . . .
Alimentation
Tension secteur : . . . . .
Consommation : . . . . . .
Alimentation de secours :
Dimensions (L x H x P) : .
Poids : . . . . . . . . . . . . . . .
120 WRMS, 160 WMAX
min. 4 Ω, 70 V, 100 V
1 V/600 Ω
1 V/600 Ω
Mic 1,5 mV/1,1 kΩ
commutable sur
Ligne 300 mV/14 kΩ;
XLR, symétrique
300 mV/50 kΩ;
RCA, asymétrique
1 V/14 kΩ RCA, asymétrique
50 – 15 000 Hz, ±3 dB
1 % à 120 WRMS
> 92 dB
±10 dB/100 Hz
±10 dB/10 kHz
0 – 40 °C
230 V~/50 Hz
300 VA
24 V /10 A
430 x 89 x 380 mm, 2 unités
12,2 kg
* Utilisez soit les sorties 70 V ou 100 V soit la sortie 4 Ω!
Tout droit de modification réservé.
6.2.5 Note su possibili errori di lettura
Il fumo di sigarette penetra facilmente fra tutte le
aperture dell’apparecchio e si deposita sul sistema
ottico della scansione ai raggi laser. Ciò può provocare errori di lettura e buchi nella riproduzione.
Poiché non si può escludere sempre il fumo di sigarette (p. es. in una discoteca), l’apparecchio deve
eventualmente essere pulito in un laboratorio specializzato. Una tale pulizia è a pagamento, anche
durante il periodo di garanzia!
7
I
Dati tecnici
Potenza d’uscita: . . . . . . .
Uscite
Altoparlanti*: . . . . . . . . .
Line Out: . . . . . . . . . . . .
Pre Out: . . . . . . . . . . . .
Ingressi
Input 1 – 4: . . . . . . . . . .
Aux: . . . . . . . . . . . . . . .
Amp In: . . . . . . . . . . . . .
Gamma passante: . . . . . .
Fattore di distorsione: . . .
Rapporto S/R: . . . . . . . . .
Regolazione toni
bassi: . . . . . . . . . . . . . .
alti: . . . . . . . . . . . . . . . .
Temperatura d’esercizio: .
Alimentazione
Tensione di rete . . . . . .
Assorbimento: . . . . . . .
Alimentazione
d’emergenza: . . . . . . . .
Dimensioni (l x h x p): . . .
Peso: . . . . . . . . . . . . . . . .
120 WRMS, 160 WMAX
min. 4 Ω, 70 V, 100 V
1 V/600 Ω
1 V/600 Ω
Mic 1,5 mV/1,1 kΩ
commutabile a Line
300 mV/14 kΩ; XLR,
simmetrico
300 mV/50 kΩ; RCA,
asimmetrico
1 V/14 kΩ; RCA,
asimmetrico
50 – 15 000 Hz, ±3 dB
1 % a 120 WRMS
> 92 dB
±10 dB/100 Hz
±10 dB/10 kHz
0 – 40 °C
230 V~/50 Hz
300 VA
24 V /10 A
430 x 89 x 380 mm, 2 RS
12,2 kg
* Usare o le uscite 70 V e 100 V oppure l’uscita 4 Ω!
®
Con riserva di modifiche tecniche.
11
E
Abrir el presente libro página 3 de manera a
visualizar los elementos y las conexiones
1
Elementos y conexiones
1.1 Parte delantera
1 Bandeja CD
2 LEDs, testigo de pantalla
ALL
brilla cuando la “repetición de todas
las canciones” está activada
PLAY
brilla durante la lectura, parpadea en
modo pausa
REPEAT
brilla si la “repetición de una canción
en curso” o “repetición de todas las
canciones” está activada
PROGRAM parpadea durante la programación
de una lista de canciones y durante
la lectura de estas mismas.
3 Pantalla 2 posiciones para indicar la cantidad de
canciones del CD (en modo Stop) o el número
de la canción seleccionado (en modo lectura y
en modo pausa)
4 Tecla STOP para acabar la lectura
5 Tecla PROGRAM para programar una lista de
canciones como lo desea
6 Tecla REPEAT para la función repetición
1ª presion: repetición de la canción en curso
2ª presion: repetición de todas las canciones del
CD o de una lista programada personalmente
3ª presion: desconexión de la función repetición
7 Tecla PLAY/PAUSA para conmutar entre lectura
y pausa
8 Tecla UP para seleccionar la próxima canción
Tecla DOWN para saltar al principio de una canción en curso. Con varias presiones en la tecla,
vuelve siempre hacia atrás de una canción.
Mantenga la tecla pulsada para activar el avance
rápido (UP)/retorno rápido (DOWN).
PL
9 Tecla OPEN/CLOSE para abrir y cerrar la bandeja del CD
10 Ecualizador
BASS = reglaje de graves, ±10 dB/100 Hz
TREBLE = reglaje de los agudos, ±10 dB/10 kHz
11 Potenciómetros de reglaje del volumen para los
canales mono INPUT 1 a INPUT 4
12 Potenciómetro de reglaje MASTER para el volumen total
13 Pantalla de nivel
14 Testigo de funcionamiento
15 Interruptor POWER (marcha/paro)
16 Potenciómetro de reglaje del volumen para la
fuente de señal conectada a la entrada AUX IN
(26) [tecla AUX/CD (17) no pulsada] o para el
volumen del lector interno de CD [tecla AUX/CD
pulsada]
17 Tecla AUX/CD
tecla pulsada:
el lector CD interno está seleccionado (el LED encima de la
tecla brilla)
tecla no pulsada: la entrada AUX IN (26) está seleccionada
1.2 Parte trasera
18 Toma para conectar a un enchufe (230 V~/
50 Hz) vía el cable de conexión entregado
19 Porta-fusible; todo fusible dañado debe cambiarse sólo por un fusible de mismo tipo
20 Tuerca para una conexión masa posible (por
ejemplo en caso de problemas de zumbidos)
21 Bornes* para una tensión de alimentación de
socorro (24 V )
Elementy sterujące i gniazda
połączeniowe
23 Tomas de entrada XLR de los canales mono
INPUT 1 a INPUT 4 para conectar micros o aparatos mono con salida Línea
9
10
1.1 Panel przedni
1 Szuflada
2 Wskaźniki LED trybu pracy
ALL
zapalony przy powtarzaniu wszystkich utworów
PLAY
zapalony podczas odtwarzania,
miga przy włączonej pauzie
REPEAT
zapalony przy powtarzaniu wybranych utworów lub powtarzaniu
wszystkich utworów
PROGRAM zapalony przy programowaniu odtwarzania utworów oraz przy ich odtwarzaniu
3 2 cyfrowy wyświetlacz – pokazuje liczbę utworów (przy wyłączonym odtwarzaniu), lub numer
aktualnie odtwarzanego utworu (w trakcie odtwarzania lub pauzy).
4 Przycisk STOP – zatrzymanie odtwarzania.
5 Przycisk PROGRAM – programowanie sekwencji utworów.
6 Przycisk REPEAT – powtórne odtwarzanie:
pierwsze naciśnięcie: aktualnie odtwarzanego
utworu
drugie naciśniecie:
całej płyty lub zaprogramowanej sekwencji
trzecie naciśnięcie: wyłączenie funkcji powtarzania
7 Przycisk PLAY/PAUSE – przełączanie pomiędzy
odtwarzaniem a pauzą.
8 Przycisk UP – przełączanie do następnego
utworu.
Przycisk DOWN – przełączanie do początku odtwarzanego utworu lub przez kilkukrotne
naciśnięcie do poprzednich utworów.
12
24 Tomas de grabación PRE OUT y AMP IN para
insertar un aparato (por ejemplo ecualizador);
el nivel de salida de la toma PRE OUT es independiente del reglaje MASTER (12)
25 Salida LINE OUT para conectar más amplificadores;
el nivel de salida es independiente del reglaje
MASTER (12)
26 Entrada AUX IN para conectar aparatos audio,
por ejemplo lector CD, tuner, video, cassette,
etc.
27 Selectores para los canales mono INPUT 1 – 4
entre nivel del micro (tecla no pulsada) y nivel
línea (tecla pulsada)
28 Bornes para conectar un micro o un aparato
audio con salida línea; conectado en paralelo a
la toma XLR INPUT 1
29 Tecla AUTOTALK para conectar/desconectar la
función talkover del canal 1
30 Tecla +21 V PHANTOM POWER para conectar
la alimentación phantom 21 V para las tomas
XLR INPUT 1 a INPUT 4 (23); necesaria para
conectar micros con condensador o micros electret que funcionan con una alimentación phantom.
¡Atención! Active la tecla únicamente si el
amplificador está apagado para evitar ruidos
fuertes durante la conmutación. Respecte el
consejo mencionado en el punto 23.
22 Bornes* para conectar altavoces
Proszę otworzyć instrukcję obsługi na stronie 3,
gdzie znajdą Państwo opisywane elementy
użytkowe i gniazda połączeniowe.
1
¡Atención! Si la alimentación phantom está
conectada [tecla +21 V PHANTOM POWER
(30) conectada], las tomas XLR están alimentadas por una alimentación phantom de 21 V. En
este caso no conecte micros o aparatos audio
con salida asimétrica, pueden dañarse.
11
12
13
14
15
16
17
Przytrzymując wyżej opisywane przyciski
można uruchomić szybkie przewijanie odtwarzanego utworu: do przodu (UP) lub do
tyłu (DOWN).
Przycisk OPEN/CLOSE – wysuwanie lub chowanie szuflady
Regulatory barwy:
Regulator tonów niskich = BASS ±10 dB/100 Hz
Regulator tonów
wysokich TREBLE = ±10 dB/10 kHz
Regulatory głośności dla kanałów monofonicznych INPUT 1 do INPUT 4
Regulator całkowitej głośności MASTER
Wskaźnik wysterowania
Wskaźnik zasilania POWER
Włącznik zasilania POWER
Regulator głośności dla źródła podłączonego
do gniazda AUX IN (26) [przycisk AUX/CD (17)
nie wciśnięty] lub też regulacja głośności dla
zintegrowanego odtwarzacza CD [przycisk
AUX/CD wciśnięty]
Przycisk AUX/CD
Przycisk wciśnięty: wybrany jest zintegrowany
odtwarzacz CD (zapalony
wskaźnik nad przyciskiem)
Przycisk nie
wciśnięty:
wybrane jest wejście AUX IN
(26)
1.2 Panel tylni
18 Gniazdo do podłączenia kabla zasilającego do
sieci energetycznej (230 V~/50 Hz).
19 Gniazdo bezpiecznika
Uszkodzony bezpiecznik należy zastępować
jedynie bezpiecznikiem tego samego typu.
20 Zacisk zakręcany do podłączenia masy (np.: w
przypadku występowania przydźwięków).
21 Zaciski* do podłączenia zasilania awaryjnego
(24 V )
22 Gniazda* do podłączenia głośników
* Es posible sacar los bornes para facilitar el acceso.
23 Wejścia monofoniczne typu XLR: INPUT 1 do
INPUT 4 do podłączenia mikrofonów lub urządzeń monofonicznych o poziomie liniowym
Uwaga! W momencie włączenia zasilania
phantomowego [przycisk +21 V PHANTOM
POWER (30) wciśnięty] do gniazd wejściowych XLR jest dostarczane napięcie 21 V. W
takim przypadku nie wolno podłączać do tych
gniazd mikrofonów oraz urządzeń audio niezbalansowanych, aby uniknąć ich uszkodzenia.
24 Gniazda przepustowe PRE OUT i AMP IN do
podłączenia urządzenia insertowego (np.
korektora);
Poziom na wyjściu PRE OUT jest niezależny od
regulatora MASTER (12).
25 Gniazdo wyjściowe LINE OUT do podłączania
kolejnego wzmacniacza;
Poziom na wyjściu LINE OUT jest niezależny od
regulatora MASTER (12).
26 Gniazdo wejściowe AUX IN do podłączania
urządzeń audio, np.: odtwarzacza CD, radia,
magnetofonu, itd.
27 Selektory czułości dla gniazd wejściowych
INPUT 1 – 4; dla sygnału mikrofonowego (włącznik nie wciśnięty), sygnału liniowego (włącznik wciśnięty).
28 Gniazda śrubowe do podłączenia mikrofonu lub
urządzenia z wyjściem o poziomie liniowym;
zrównoleglone z wejściem INPUT1 (typu XLR).
29 Przycisk AUTOTALK do włączania i wyłączania
funkcji talkover dla kanału 1.
30 Przycisk +21 PHANTOM POWER do włączenia
zasilania phantomowego +21 V dla gniazd
wejściowych INPUT 1 do INPUT 4 (23); wymagane przy podłączaniu mikrofonów pojemnościowych lub elektretowych.
Uwaga! Aby uniknąć trzasków, włączać jedynie przy wyłączonym wzmacniaczu. Należy
pamiętać o uwadze pod podpunktem 23.
* Dla ułatwienia podłączania przewodów można odłączyć
terminale od urządzenia.
2
Consejos de utilización y seguridad
Este aparato cumple con la normativa europea
89/336/CEE relativa a la compatibilidad electromagnética y con la normativa 73/23/CEE relacionada
con los aparatos de baja tensión.
El aparato está alimentado por una tensión
peligrosa de 230 V~. No manipule nunca el
interior del aparato, en caso de manipulación
inadecuada, podría sufrir una descarga eléctrica mortal. Además la apertura del aparato
niega todo tipo de garantía.
B
●
●
El aparato está fabricado únicamente para una
utilización en interior. Protéjalo de todo tipo de
proyección de agua, de salpicaduras, de una
humedad elevada y del calor (zona de temperatura de funcionamiento autorizada: 0 – 40 °C).
●
No deposite en ningún caso objetos que contiene
líquidos encima del aparato.
●
El calor destacado por el aparato debe evacuarse
mediante una circulación de aire suficiente. No obstruya en ningún caso los agujeros de ventilación.
●
¡No deje caer nada en los agujeros de ventilación,
podría sufrir una descarga eléctrica!
●
No haga nunca funcionar el aparato y desconéctelo inmediatamente cuando:
1. aparecen daños en el aparato o en el cable de
conexión.
2. después de una caída o accidente similar, tiene
una duda sobre el estado del aparato.
3. aparecen desperfectos.
2
Środki ostrożności
Urządzenie jest zgodne z wymaganiami normy o
zgodności elektromagnetycznej 89/336/EEC oraz
normy dotyczącej urządzeń niskonapięciowych
73/23/EEC.
Urządzenie jest zasilane niebezpiecznym
dla życia napięciem zmiennym 230 V. Aby
uniknąć porażenia elektrycznego nie wolno
otwierać urządzenia. Jego naprawą powinien zajmować się tylko przeszkolony personel. Samodzielne otwieranie urządzenia
spowoduje wygaśnięcie gwarancji.
Uwaga! Podczas pracy na wyjściach
głośnikowych (22) jest obecne niebezpieczne napięcie 100 V. Przed wykonywaniem jakichkolwiek połączeń należy zawsze
wyłączyć system PA.
Należy zawsze przestrzegać następujących zasad:
● Uwaga! Nie wolno patrzeć do środka odtwarzacza przy wysuniętej szufladzie. Promień lasera
może spowodować uszkodzenie wzroku.
● Urządzenie jest przeznaczone tylko do użytku
wewnątrz pomieszczeń. Należy chronić przed dostaniem się jakiejkolwiek cieczy do środka urządzenia, dużą wilgotnością oraz ciepłem (temperatura otoczenia powinna wynosić od 0 – 40 °C).
● Nie wolno kłaść na urządzeniu żadnych pojemników z cieczą (butelek, itd.).
● Aby zapewnić dobre chłodzenie urządzenia nie
wolno zasłaniać otworów wentylacyjnych.
● Nie wolno wkładać niczego do otworów wentylacyjnych. Może to spowodować porażenie elektryczne.
● Nie wolno używać urządzenia lub natychmiast
odłączyć główną wtyczkę zasilającą z gniazda:
1. Jeśli występują widoczne uszkodzenia urządzenia lub kabla zasilającego.
2. Uszkodzenie urządzenia może wystąpić w wyniku upadku lub innego podobnego zdarzenia.
3. Jeśli urządzenie działa nieprawidłowo.
W takim przypadku naprawą urządzenia powinien zajmować się tylko przeszkolony personel.
B
No desconecte nunca el aparato tirando directamente del cable de conexión; saque siempre el
cable sujetándolo por la extremidad.
4.1 Instalación en rack
Para limpiar el aparato, utilice únicamente un
trapo seco y suave, no utilice nunca productos
químicos o agua.
●
Declinamos cualquier responsabilidad en caso de
desperfectos materiales o corporales resultandos
si el aparato es utilizado para otro fin que no sea
por el que ha sido concebido, si no están correctamente conectado, utilizado o reparado por una
persona debidamente habilitada; por estos mismos motivos carecería de todo tipo de garantía
Cuando el aparato se retira definitivamente del servicio, debe depositarse en
una fábrica de reciclaje adaptada para
su eliminación no contaminante.
Respecte escrupulosamente los puntos siguientes:
¡Atención! No mire nunca directamente dentro
de la bandeja del CD cuando está abierta. Los
rayos láser podrían causarle problemas de vista.
jeros de ventilación, para garantizar un enfriamiento
suficiente del amplificador.
●
¡Atención! durante el funcionamiento, una
tensión peligrosa de contacto de 100 V como
mucho está presente en los bornes de altavoz (22). Efectué o modifique las conexiones
únicamente cuando la instalación completa
de PA está desconectada.
●
En todos los casos los daños deben ser reparados por un técnico especializado.
3
Posibilidades de utilización
Este amplificador con lector CD integrado está
especialmente fabricado para una utilización en
instalaciones de sonorización Public Address.
Puede suministrar 120 WRMS a altavoces de 100 V y
70 V o a un grupo de altavoces con una impedancia
total de 4 Ω. Es posible conectar micros (canales
1 – 4) o aparatos a nivel línea (canales 1 – 4 y canal
AUX) a los 5 canales de entrada mezclables entre
ellos. El canal 1 dispone de una función talkover que
disminuye el volumen de los otros canales de 40 dB
durante un anuncio.
4
Instalación del aparato
El amplificador está previsto para una instalación en
rack (482 mm/19"), también lo puede instalar directamente sobre una mesa. En los dos casos, el aire
debe ser suficiente y circular libremente en los agu-
●
●
●
Nie wolno ciągnąć za kabel zasilający, chcąc go
odłączyć należy trzymać za wtyczkę.
Do czyszczenia obudowy należy używać tylko
suchej, miękkiej ściereczki. Nie wolno używać
wody lub innych środków chemicznych.
Nie ponosi się odpowiedzialności za wynikłe uszkodzenia sprzętu lub obrażenia użytkownika w
przypadku, gdy urządzenie jest wykorzystywane
w innych celach niż to się przewiduje lub jeśli jest
nieodpowiednio zainstalowane, użytkowane lub
naprawiane.
Aby nie zaśmiecać środowiska po
całkowitym zakończeniu eksploatacji
urządzeń należy je oddać do punktu
recyklingu.
3
Zastosowanie
PA-910CD jest wzmacniaczem z zintegrowanym
odtwarzaczem CD przeznaczonym do stosowania w
systemach radiowęzłowych PA. Jest w stanie dostarczyć 120 WRMS mocy do głośników 100 V lub 70 V
lub grupy głośników o wypadkowej impedancji 4 Ω.
Do urządzenia można podłączyć niezależnie do
czterech mikrofonów (wejścia 1 – 4) lub urządzeń z
wyjściem o poziomie liniowym (kanały 1 – 4 i wejście
AUX). Kanał 1 posiada funkcję talkover, która pozwala na wyciszenie pozostałych kanałów o 40 dB w
przypadku zapowiedzi przez mikrofon.
4 Instalacja wzmacniacza
Wzmacniacz jest przeznaczony do montażu rackowego (482 mm/19"). Można go także ustawić na
półce. W każdym przypadku należy zapewnić
dobrą cyrkulację powietrza wokół wzmacniacza,
pozwalającą na schłodzenie elementów czynnych.
4.1 Instalacja rackowa
W celu instalacji wzmacniacza w szafie rackowej
należy przymocować do jego boków dwa uchwyty
montażowe. Urządzenia zajmuje przestrzeń montażową 2 U (1 U = 44,5 mm).
E
Para un montaje, atornille los dos soportes de montaje entregados en los lados del aparato. En el rack,
para el amplificador, 2 unidades de rack son
necesarias (1 unidad = 44,5 mm).
Para que el rack no se caiga, instale el amplificador en la parte inferior del rack. Para una fijación
sólida, los soportes de montaje solo no son suficientes. Utilice también raíles laterales o una placa inferior para mantenerlo correctamente en su sitio.
5
Conexión del amplificador
Public Adress
Todas las conexiones deben efectuarse por un técnico calificado y especializado y únicamente cuando
el amplificador está desconectado!
5.1 Altavoces
Es posible conectar altavoces Public Address o altavoces o grupos de altavoces con una impedancia
total de 4 Ω como mínimo. Las posibilidades de
conexión para los altavoces están indicadas en los
esquemas 3 – 7. Según el tipo de altavoces, utilice
los contactos correspondientes de los bornes OUTPUT (22). Es posible sacar los bornes para facilitar
el acceso.
Durante la conexión, respete la impedancia individual o la impedancia total de los altavoces y la polaridad (conexiones negativas y positivas como indicadas en los esquemas 3 – 7). La conexión positiva de
los altavoces siempre está señalada especialmente.
¡Atención!
En el caso de altavoces Public Adress con transformador audio 70 V o 100 V (esquemas 3 y 4), la
potencia total por los altavoces no debe ser superior a 120 WRMS, si no el amplificador estará en
sobrecarga y podrá dañarse.
Ze względu na wagę wzmacniacza, powinien on
być montowany na dole półki rackowej. Z tego
samego względu urządzeniu należy zapewnić
dodatkowe podparcie (oprócz mocowania za
przedni panel).
5
PL
Podłączanie wzmacniacza
Wszelkie podłączenia mogą być wykonywane jedynie przez wyszkolony personel i zawsze przy
wyłączonym wzmacniaczu!
5.1 Głośniki
Istnieje możliwość podłączenia głośników radiowęzłowych lub głośników/grup głośników o wypadkowej impedancji co najmniej 4 Ω. Możliwości
różnych konfiguracji podłączeń głośników pokazane są na rysunkach 3 – 7. W zależności od typów
głośników należy podłączyć je do odpowiednich
wyjść głośnikowych OUTPUT (22). Dla ułatwienia
podłączania przewodów głośnikowych szyna
gniazd może być odłączona od urządzenia.
Podczas podłączania głośników należy zwrócić
uwagę na wartość impedancji poszczególnych
głośników lub ich grup oraz prawidłową biegunowość połączenia (patrz rysunki 3 – 7). Biegun
dodatni głośnika jest zawsze wyróżniony.
Uwaga!
Całkowita moc podłączonych głośników radiowęzłowych PA z transformatorami 70 V lub 100 V
(rys. 3 i 4), nie może przekroczyć 120 WRMS, w
przeciwnym przypadku wzmacniacz zostanie
przeciążony i może ulec uszkodzeniu.
5.2 Mikrofony
Do wejść INPUT 1 do INPUT 4 (23) można
podłączyć do 4 mikrofonów. Zamiast gniazd XLR
do po-dłączenia mikrofonu do kanału 1 można
również użyć gniazd śrubowych (28).
1) Podłączając mikrofon, należy ustawić przełącznik MIC/LINE (27) w odpowiedniej pozycji.
2) Podczas podłączania mikrofonów wymagających zasilania phantomowego, należy włączyć
13
E
5.2 Micros
Es posible conectar hasta 4 micros en las entradas
INPUT 1 a INPUT 4 (23). También es posible utilizar
los bornes (28) en vez de la toma XLR INPUT 1.
1) Durante la conexión de un micro, desencaje el
selector correspondiente MIC/LINE (27).
2) Si utiliza micros con alimentación phantom,
active la alimentación phantom 21 V con la tecla
+21 V PHANTOM POWER (30).
¡Atención!
Si la alimentación phantom está conectada, no
conecte micros o aparatos audio con salida
asimétrica a las entradas, pueden dañarse.
5.3 Aparatos con salida linea
Es posible conectar hasta 5 aparatos con salida
línea (por ejemplo lector CD, video, cassette) a las
entradas INPUT 1 a INPUT 4 (23) y a la entrada
AUX IN (26). Si las entradas INPUT 1 a INPUT 4
están conectadas, encaje el selector correspondiente MIC/LINE (27).
5.4 Insertar un ecualizador u otro aparato
Para una modificación externa de la tonalidad, es
posible insertar por ejemplo un ecualizador via las
tomas PRE OUT y AMP IN (24).
1) Saque la grapa entre las conexiones PRE OUT y
AMP IN. Y así, el preamplificador y el amplificador de potencia están separados.
2) Conecte la entrada del aparato a la toma PRE
OUT.
3) Conecte la salida del aparato a la toma AMP IN.
Consejo: el amplificador no entrega señal si el aparato insertado no está conectado, si es defectuoso o
no correctamente conectado.
5.5 Amplificador suplementario
Si la cantidad de altavoces necesaria es superior a
la cantidad autorizada para el amplificador, es
necesario conectar otro amplificador. Conecte la entrada del amplificador suplementario a la toma LINE
PL
zasilanie phantomowe 21 V za pomocą przycisku +21 V PHANTOM POWER (30).
Uwaga!
Przy włączonym zasilaniu phantomowym nie
wolno podłączać mikrofonów oraz urządzeń
audio niezbalansowanych, aby uniknąć ich
uszkodzenia.
5.3 Urządzenia z wyjściem o poziomie liniowym
Do wzmacniacza można podłączyć do 5 urządzeń z
wyjściem o poziomie liniowym (np.: odtwarzacz
CD, magnetofon). Do podłączenia można użyć
wejść INPUT 1 do INPUT 4 (23) oraz wejścia AUX IN
(26). Podczas podłączania urządzeń do wejść
INPUT 1 do INPUT 4 należy włączyć odpowiednie
przyciski MIC/LINE (27).
OUT (25). El nivel de salida de la toma es independiente del reglaje MASTER (12).
5.6 Alimentación de red y alimentación de
socorro
4)
1) Si el amplificador debe continuar a funcionar en
caso de corte de alimentación, conecte una
unidad de alimentación de socorro de 24 V (por
ejemplo PA-24ESP de MONACOR) a los bornes
24 V DC (21). Es posible sacar los bornes para
facilitar el acceso.
Consejo: Si la alimentación 24 V está conectada,
el amplificador está inmediatamente en funcionamiento y el LED ON (14) brilla. El amplificador
no se puede apagar con el interruptor POWER
(15). Sólo hay conmutación entre alimentación
de socorro y alimentación de red.
2) Para acabar, conecte el cable de conexión entregado a la toma (18) y después a un enchufe de
230 V~/50 Hz.
5)
6
Funcionamiento
1) Antes de la primera puesta en marcha, ponga
antes de todo los reglajes INPUT 1 a 4 (11) y los reglajes AUX (16) y MASTER (12) en la posición “0”.
2) Conecte el amplificador con el interruptor
POWER (15). Después de la puesta en marcha,
el LED ON (14) brilla.
Si una alimentación de socorro está conectada,
el LED ON brilla en continuo y el amplificador está
siempre en funcionamiento. Con el interruptor
POWER, puede únicamente conmutar entre alimentación de red y alimentación de socorro. Para
un funcionamiento normal, ponga el interruptor
POWER en la posición “Marcha”. En caso de corte
de corriente el amplificador conmuta automáticamente sobre la alimentación de socorro.
3) Con la tecla AUX/CD (17), seleccione la fuente
de señal para el canal AUX:
para la lectura interna de CD, pulse la tecla; el
LED encima de la tecla brilla.
5.6 Zasilanie i zasilanie awaryjne
1) Aby zapewnić stałą nieprzerwaną pracę wzmacniacza nawet przy awarii zasilania sieciowego należy podłączyć moduł zasilania awaryjnego 24 V
(np. MONACOR PA-24ESP) do zacisków 24 V DC
(21). W celu ułatwienia podłączania urządzenia
można odłączyć szynę gniazd z urządzenia.
Uwaga: Jeżeli do urządzenia podłączane jest
zasilanie awaryjne 24 V, pozostaje ono przez
cały czas włączone a wskaźnik zasilania LED ON
(14) jest aktywny. Wzmacniacz nie może być
wtedy wyłączony za pomocą włącznika zasilania
POWER (15). Włącznik zasilania działa jedynie
wtedy, kiedy urządzenie jest zasilane tylko za
pomocą sieci elektrycznej.
2) Podłączyć kabel zasilający do gniazda (18) a następnie do gniazda sieciowego (230 V~/50 Hz).
5.4 Podłączanie korektora lub innych urządzeń
Aby włączyć w tor dodatkowe urządzenie efektowe
np. korektor należy wykorzystać gniazda PRE OUT
oraz AMP IN (24):
1) Usunąć połączenie pomiędzy gniazdami PRE
OUT i AMP IN. W tym momencie przedwzmacniacz i wzmacniacz są rozłączone.
2) Podłączyć wejście urządzenia efektowego do
gniazda PRE OUT.
3) Podłączyć wyjście urządzenia efektowego do
gniazda AMP IN.
Uwaga: W przypadku, jeżeli urządzenie efektowe
włączone w tor wzmacniacza będzie wyłączone lub
uszkodzone, do głośników nie będzie dochodził
żaden sygnał.
5.5 Dodatkowy wzmacniacz
W przypadku, kiedy całkowite obciążenie przez
głośniki będzie większe aniżeli wydajność mocowa
wzmacniacza, należy zastosować dodatkowy wzmacniacz. Podłączyć wejście dodatkowego wzmacniacza do gniazd LINE OUT (25). Poziom sygnału na tych wyjściach jest niezależny od położenia
regulatora MASTER (12).
14
6
Obsługa
1) Przed włączeniem wzmacniacza po raz pierwszy, ustawić wstępnie regulatory kanałów
INPUT 1 do 4 (11), AUX (16) oraz regulator głośności MASTER (12) w pozycji “0”.
2) Włączyć wzmacniacz włącznikiem POWER (15).
Zapali się wskaźnik zasilania ON (14).
Przy podłączonym zasilaniu awaryjnym wskaźnik ON będzie ciągle zapalony, a wzmacniacz
cały czas gotowy do pracy. W takim przypadku
włącznik POWER będzie służył do przełączania
zasilania pomiędzy sieciowym a awaryjnym. Dla
normalnej pracy włącznik POWER należy ustawić na pozycję “ON”, a w przypadku awarii zasilania sieciowego, wzmacniacz sam automatycznie przełączy się na zasilanie awaryjne.
3) Przyciskiem AUX/CD (17) wybrać żądane źródło
sygnału dla kanału AUX:
Przycisk wciśnięty: wybrany jest zintegrowany
odtwarzacz CD (zapalony wskaźnik nad przyciskiem)
Przycisk nie wciśnięty: wybrane jest wejście AUX
IN (26)
6)
7)
para seleccionar la entrada AUX IN (26), desencaje la tecla; el LED encima de la tecla no debe
brillar.
Gire el potenciómetro MASTER (12) hasta que
los reglajes siguientes se puedan escuchar.
Ponga los reglajes de entrada INPUT 1 a 4 (11) y
el reglaje AUX (16) sobre el valor deseado. Gire
sobre cero los reglajes de los canales no utilizados.
Regule los reglajes del ecualizador BASS y
TREBLE (10) para obtener una tonalidad óptima.
Regule el volumen total con el reglaje principal
MASTER (12). La cadena de los LEDs a 5 niveles (13) indica el nivel de salida. Para un reglaje
óptimo, gire el reglaje de manera a que el LED +3
rojo no brille.
6.1 Función talkover del canal 1
Vía el canal INPUT 1, es posible efectuar anuncios
durante la difusión de un programa musical, el volumen de los 4 canales disminuye automáticamente
de 40 dB. Para conectar esta función, encaje la tecla
AUTOTALK (29).
6.2 Lector CD
Es posible leer CDs audio, CDs gravados (únicamente CD-R audio, no CD-RW reinscriptibles). Si no
hay CD dentro del lector la pantalla indica (3) “– –”.
6.2.1 Lectura de CD
1) Para la lectura de CD, pulse la tecla AUX/CD
(17): el LED encima de la tecla brilla.
2) Pulse la tecla OPEN/CLOSE (9): la bandeja CD
(1) se abre. Coloque un CD, inscripción hacia
arriba. Para cerrar la bandeja, pulse de nuevo la
tecla. Una vez la bandeja cerrada, el lector CD se
pone entonces en modo Stop y la pantalla indica
la cantidad total de canciones del CD.
3) Para arrancar la primera canción, pulse la tecla
PLAY/PAUSE (7). Para arrancar con otro canción, selecciónela con la tecla UP o DOWN (8)
4) Ustawić regulator głośności MASTER (12) tak,
aby następne ustawienia były słyszalne.
5) Wyregulować poziom sygnału kanałów INPUT 1
do 4 (11) i wejścia AUX (16) do wymaganej
wartości. Dla kanałów nieużywanych regulatory
ustawić na 0.
6) Ustawić barwę dźwięku za pomocą regulatorów
tonów niskich i wysokich: BASS i TREBLE (10).
7) Ustawić ogólny poziom głośności za pomocą
regulatora głośności MASTER (12). Wskaźnik
wysterowania (13) pokazuje poziom wyjściowy
sygnału. Optymalny poziom jest uzyskany, gdy
czerwony wskaźnik +3 dB nie jest aktywny.
6.1 Funkcja talkover
Kanał INPUT 1 daje możliwość wygłaszania zapowiedzi w momencie, kiedy wzmacniacz odtwarza
inne sygnały. W momencie zapowiedzi głośność
sygnałów pozostałych kanałów obniżana jest o
40 dB. Aby uaktywnić tę funkcję należy włączyć
przycisk AUTOTALK (29).
6.2 Odtwarzacz CD
PA-910CD daje możliwość odtwarzania płyt CD
oraz płyt CD-R (bez CD-RW). Jeśli w szufladzie nie
ma płyty CD, na wyświetlaczu (3) pojawi się napis
“– –“.
6.2.1 Odtwarzanie płyt CD
1) Aby włączyć odtwarzacz CD, nacisnąć przycisk
AUX/CD (17): zapali się wskaźnik LED nad przyciskiem.
2) Nacisnąć przycisk OPEN/CLOSE (9). Szuflada
(1) wysunie się. Włożyć płytę nadrukiem do góry.
Zamknąć szufladę. Odtwarzacz CD jest gotowy
do pracy, a na jego wyświetlaczu pojawi się liczba
utworów zamieszczonych na włożonej płycie CD.
3) Aby odtworzyć pierwszy utwór, nacisnąć przycisk PLAY/PAUSE (7). Aby odtworzyć inny,
wybrać go przyciskami UP lub DOWN (8) [patrz
rozdz. 6.2.2] i nacisnąć przycisk PLAY/PAUSE
(na wyświetlaczu pojawi się numer wybranego
4)
5)
6)
7)
[vea capítulo 6.2.2] y arranque la lectura con la
tecla PLAY/PAUSE mientras que el número de la
canción seleccionada parpadea en la pantalla
(3). Durante la lectura, el LED PLAY (2) brilla.
Regule el volumen de la lectura del CD con el
reglaje AUX (16).
Con la tecla PLAY/ PAUSE, es posible pasa del
modo lectura al modo pausa y inversamente; en
modo pausa, el LED PLAY parpadea.
Después de la lectura del CD o después de una
presión en la tecla STOP (4), el LED PLAY se
apaga y el lector CD pasa en modo Stop.
Después de cada funcionamiento, siempre cierre
la bandeja CD con la tecla OPEN/CLOSE para
proteger el sistema láser de lectura del polvo.
6.2.2 Selección de canción/Avance y retorno
rápido
Durante la lectura o en modo pausa, es posible seleccionar otra canción con las teclas UP y DOWN
(8) o avanzar o retroceder rápidamente en el CD.
Selección de canciones
A cada presión en la tecla UP, salta a la canción
siguiente.
Por una solo presión en la tecla DOWN, vuelve al
principio de la canción en curso, con varias presiones, retrocede siempre de una canción.
Avance y retorno rápidos
Para una avance rápido del CD, mantenga la
tecla UP pulsada, para un retorno rápido, la tecla
DOWN. El avance/retorno rápido también se
puede hacer en varias canciones, pero se detiene al final y al principio del CD.
6.2.3 Creación de una lista de canciones
1) Para una programación de canciones, el lector
CD debe estar en modo Stop, si es necesario,
pulse la tecla STOP (4).
2) Pulse la tecla PROGRAM (5). El LED PROGRAM (2) y la pantalla (3) parpadean.
3) Con la tecla UP o DOWN (8), seleccione la primera canción de la lista.
4)
5)
6)
7)
utworu). Podczas odtwarzania zapalony będzie
wskaźnik LED PLAY (2).
Ustawić głośność odtwarzania za pomocą regulatora AUX (16).
Przycisk PLAY/PAUSE służy do przełączania
pomiędzy odtwarzaniem a pauzą.
Po odtworzeniu całej płyty CD lub naciśnięciu
przycisku STOP (4), wskaźnik PLAY zgaśnie, a
odtwarzacz zatrzyma się.
Przy otwieraniu szuflady należy zwrócić uwagę
aby do środka nie dostały się jakiekolwiek
zanieczyszczenia.
6.2.2 Wybieranie utworów/szybkie przewijanie do przodu i do tyłu
W trakcie odtwarzania lub pauzy możliwe jest za
pomocą przycisków UP lub DOWN (8) wybieranie
innych utworów lub szybkie przewijanie do przodu
lub tyłu.
Wybieranie utworów:
Każde naciśnięcie przycisku UP spowoduje
przełączenie odtwarzacza do kolejnego utworu.
Naciskając jeden raz przycisk DOWN odtwarzacz przeskoczy do początku aktualnie odtwarzanego utworu. Naciskając ten przycisk kilkukrotnie,
przeskoczymy
do
poprzednich
utworów.
Szybkie przewijanie do przodu/do tyłu:
Aby szybko przewinąć utwór do przodu należy
przytrzymać przycisk UP, natomiast aby przewinąć do tyłu: przytrzymać przycisk DOWN.
Można w ten sposób oczywiście przeskoczyć do
kolejnego lub poprzedniego utworu (przewijanie zatrzyma się na początku i na końcu płyty).
6.2.3 Kompilowanie własnej sekwencji utworów
1) Aby zaprogramować utwory, odtwarzacz musi
być zatrzymany: jeśli to konieczne nacisnąć
przycisk STOP (4).
2) Nacisnąć przycisk PROGRAM (5). Zapali się
wskaźnik LED PROGRAM (2) i zacznie migać
wyświetlacz (3).
3) Za pomocą przycisków UP oraz DOWN (8)
wybrać pierwszy utwór sekwencji.
4) Pulse la tecla PROGRAM (5).
5) Repita los puntos 3 y 4 para todas las canciones
seleccionadas hasta completar la programación
de la lista de canciones (19 canciones como
máximo).
6) Para arrancar la lista de canciones, pulse la tecla
PLAY/PAUSE (7): el LED PLAY (2) brilla, la pantalla deja de parpadear e indica el número de la
canción actual. El LED PROGRAM continúa a
parpadear durante la lectura.
7) Después de la lectura de la lista de canciones o
después de una presión en la tecla STOP, todos
los LEDs se apagan y el lector CD pasa en modo
Stop.
8) Mientras que el aparato no esté apagado o que
la bandeja CD no esté abierta, la lista queda
memorizada. Para reproducir de nuevo la lista,
en modo stop, pulse la tecla PROGRAM y arranque la lectura con la tecla PLAY/PAUSE.
6.2.4 Activación de la función repetición
1) Para efectuar una repetición continua de una
canción, pulse de nuevo la tecla REPEAT (6): la
canción seleccionada se repite en continuo. El
LED REPEAT (2) brilla.
2) Para una repetición continua de todo el CD o de
una lista ya programada personalmente, pulse
una segunda vez la tecla REPEAT. El LED ALL
(2) brilla a más del LED REPEAT.
3) Para desactivar la función repetición, pulse por
tercera vez la tecla REPEAT. Los dos LEDs
REPEAT y ALL se apagan.
6.2.5 Consejos para los cortes de sonido y los
errores de lectura
El humo de cigarro se introduce fácilmente en las
aperturas del lector y se deposita también en el
sistema láser. Los que generar errores de lectura y
cortes de sonido. Siempre no se puede evitar el
humo de cigarros (p. ej. en discoteca), confié imperativamente la limpieza del lector a un técnico especializado. Esta operación está bajo la carga del utilizador, mimos cuando el aparato está bajo garantía.
7
E
Características técnicas
Potencia de salida: . . . . .
Salidas
Altavoces*: . . . . . . . . . .
Line Out: . . . . . . . . . . . .
Pre Out: . . . . . . . . . . . .
Entradas
Input 1 – 4: . . . . . . . . . .
Aux: . . . . . . . . . . . . . . .
Amp In: . . . . . . . . . . . . .
Banda pasante: . . . . . . . .
Tasa de distorsión: . . . . . .
Relación señal/ruido: . . .
Reglaje de tonalidad
Graves: . . . . . . . . . . . . .
Agudos: . . . . . . . . . . . .
Temperatura de func.: . . .
Alimentación
Tensión de red: . . . . . . .
Consumo: . . . . . . . . . . .
Alimentación de socorro:
Dimensiones (L x A x P): .
120 WRMS, 160 WMAX
min. 4 Ω, 70 V, 100 V
1 V/600 Ω
1 V/600 Ω
Mic 1,5 mV/1,1 kΩ
conmutable en
Línea 300 mV/14 kΩ;
XLR, simétrica
300 mV/50 kΩ;
RCA, asimétrica
1 V/14 kΩ; RCA, asimétrica
50 – 15 000 Hz, ±3 dB
1 % a 120 WRMS
> 92 dB
±10 dB/100 Hz
±10 dB/10 kHz
0 – 40 °C
230 V~/50 Hz
300 VA
24 V /10 A
430 x 89 x 380 mm,
2 unidades
Peso: . . . . . . . . . . . . . . . . 12,2 kg
* Utilice o las salidas 70 V y 100 V o la salida 4 Ω!
Todo derecho de modificación reservado.
Manual de instrucciones protegido por el copyright de MONACOR ® INTERNATIONAL GmbH & Co. KG.
Toda reproducción incluida parcial con fines comerciales está prohibida.
4) Nacisnąć przycisk PROGRAM (5).
5) Powtarzać kroki 3 oraz 4 do momentu złożenia
całej sekwencji (maksymalnie 19 utworów).
6) Aby odtworzyć sekwencję, nacisnąć przycisk
PLAY/PAUSE (7): zapali się wskaźnik LED PLAY
(2), wyświetlacz przestanie migać i pokaże
numer aktualnie odtwarzanego utworu. Wskaźnik LED PROGRAM będzie migał podczas odtwarzania.
7) Po zakończeniu odtwarzania całej sekwencji lub
po naciśnięciu przycisku STOP zgasną wszystkie wskaźniki LED: odtwarzacz zatrzyma się.
8) Sekwencja utworów będzie pamiętana dopóki
odtwarzacz nie zostanie wyłączony lub nie
zostanie wysunięta szuflada. Aby ponownie
rozpocząć odtwarzanie nacisnąć podczas zatrzymania przycisk PROGRAM a następnie przycisk PLAY/STOP.
6.2.4 Funkcja powtarzania utworów
1) Aby w nieskończoność powtarzać wybrany
utwór, nacisnąć jeden raz przycisk REPEAT (6):
zapali się wskaźnik REPEAT (2).
2) Aby powtórzyć odtwarzanie całej płyty CD lub
zaprogramowanej sekwencji, nacisnąć przycisk
REPEAT drugi raz. Dodatkowo zapali się wskaźnik ALL (2).
3) Aby wyłączyć funkcję powtarzania utworów
nacisnąć przycisk REPEAT trzeci raz. Zapalone
wskaźniki REPEAT oraz ALL zgasną.
6.2.5 Uwagi dotyczące niepoprawnego odtwarzania dźwięku oraz błędów odczytu
Dym papierosowy w łatwy sposób przechodzi
przez wszelkie otwory urządzenia osadzając się na
elementach optycznych odtwarzacza. Może to
powodować błędy odczytu płyt CD oraz niepoprawne odtwarzanie dźwięku. Ponieważ nie można
zagwarantować użytkowania urządzenia w po-
mieszczeniach bez dymu papierosowego (np. dyskoteka), należy w tym przypadku zadbać o czyszczenie układu optycznego przez odpowiedni personel. Takie operacje należy wykonywać nawet w
okresie trwania gwarancji!
7
PL
Dane techniczne
Moc wyjściowa: . . . . . . . .
Wyjścia
Głośnikowe*: . . . . . . . .
Line Out: . . . . . . . . . . . .
Pre Out: . . . . . . . . . . . .
Wejścia
Wejścia 1 do 4: . . . . . . .
AUX: . . . . . . . . . . . . . . .
AMP IN: . . . . . . . . . . . .
Pasmo przenoszenia: . . .
THD: . . . . . . . . . . . . . . . . .
Współczynnik S/N: . . . . .
Regulacja barwy
Tony niskie: . . . . . . . . .
Tony wysokie: . . . . . . . .
Temp. otoczenia pracy: . .
Zasilanie
Sieciowe: . . . . . . . . . . .
Pobór mocy: . . . . . . . . .
Zasilanie awaryjne: . . .
Wymiary (S x W x G): . . . .
Waga: . . . . . . . . . . . . . . . .
120 WRMS, 160 WMAX
min 4 Ω, 70 V, 100 V
1 V/600 Ω
1 V/600 Ω
Mikrofonowe
1,5 mV/1,1 kΩ przełączane
na wejścia liniowe 300 mV/
14 kΩ; XLR, symetryczne
300 mV/50 kΩ;
chinch, niesymetryczne
1 V/14 kΩ;
chinch, niesymetryczne
50 – 15 000 Hz, ±3 dB
1 % przy 120 WRMS
> 92 dB
±10 dB/100 Hz
±10 dB/10 kHz
0 – 40 °C
230 V~/50 Hz
300 VA
24 V /10 A
430 x 89 x 380 mm, 2 U
12,2 kg
* Należy używać albo wyjść głośnikowych 70 V i
100 V, albo wyjść 4 Ω!
Z zastrzeżeniem do możliwych zmian.
Instrukcje obsługi są chronione prawem copyright for MONACOR ® INTERNATIONAL GmbH & Co. KG.
Przetwarzanie całości lub części instrukcji dla osobistych korzyści finansowych jest zabronione.
15
NL
B
PA-910CD
Lees aandachtig de onderstaande veiligheidsvoorschriften, alvorens het toestel in gebruik te nemen.
Mocht u bijkomende informatie over de bediening
van het toestel nodig hebben, lees dan de Engelse
tekst van deze handleiding.
Veiligheidsvoorschriften
Dit toestel is in overeenstemming met de EU-richtlijn
89/336/EEG voor elektromagnetische compatibiliteit en 73/23/EEG voor toestellen op laagspanning.
De netspanning (230 V~/50 Hz) van het toestel is levensgevaarlijk. Open het toestel
niet, want door onzorgvuldige ingrepen loopt
u het risico van elektrische schokken.
Bovendien vervalt elke garantie bij het eigenhandig openen van het toestel.
Opgelet! Tijdens het gebruik staan de luidsprekeraansluitingen (22) onder een levensgevaarlijke spanning tot 100 V. De in- en uitgangen mogen enkel aangesloten en
gewijzigd worden, wanneer de 100 V-versterker is uitgeschakeld.
Let eveneens op het volgende:
● Opgelet! Kijk bij geopende cd-lade niet in het binnenwerk van de cd-speler, want eventueel actieve
laserstralen kunnen oogletsels veroorzaken.
● Het toestel is enkel geschikt voor gebruik binnenshuis. Vermijd druip- en spatwater, uitzonderlijk warme plaatsen en plaatsen met een hoge
vochtigheid (toegestaan omgevingstemperatuurbereik: 0 – 40 °C).
Plaats geen bekers met vloeistof zoals drinkglazen etc. op het toestel.
● De warmte die in het toestel ontstaat, moet door
ventilatie afgevoerd worden. Dek de ventilatieopeningen niet af.
B
DK
●
●
●
●
●
Zorg ervoor dat u niets in de ventilatieopeningen
steekt. Er bestaat immers gevaar voor elektrische
schokken!
Schakel het toestel niet in resp. trek onmiddellijk
de stekker uit het stopcontact:
1. wanneer het toestel of het netsnoer zichtbaar
beschadigd zijn,
2. wanneer er een defect zou kunnen optreden
nadat de module bijvoorbeeld gevallen is,
3. wanneer de module slecht functioneert.
Het apparaat moet in elk geval hersteld worden
door een gekwalificeerd vakman.
Trek de stekker nooit met het snoer uit het stopcontact, maar met de stekker zelf.
Verwijder het stof enkel met een droge doek.
Gebruik zeker geen chemicaliën of water.
In geval van ongeoorloofd of verkeerd gebruik,
verkeerde aansluiting resp. bediening of van herstelling door een niet-gekwalificeerd persoon vervalt de garantie en de verantwoordelijkheid voor
hieruit resulterende materiële of lichamelijke
schade.
Wanneer het toestel definitief uit bedrijf
genomen wordt, bezorg het dan voor
milieuvriendelijke verwerking aan een
plaatselijk recyclagebedrijf.
PA-910CD
Læs nedenstående sikkerhedsoplysninger opmærksomt igennem før ibrugtagning af enheden. Bortset
fra sikkerhedsoplysningerne henvises til den engelske tekst.
Vigtige sikkerhedsoplysninger
Denne enhed overholder EU-direktivet vedrørende
elektromagnetisk kompatibilitet 89/336/EØF og lavspændingsdirektivet 73/23/EØF.
Enheden benytter livsfarlig netspænding
(230 V~). For at undgå fare for elektrisk stød
må kabinettet ikke åbnes. Overlad servicering til autoriseret personel. Desuden bortfalder enhver reklamationsret, hvis enheden
har været åbnet.
Forsigitg! Under drift er der farlig spænding
op til 100 V på højtaler terminalerne (22).
Husk altid at slukke for PA-anlægget før tilslutning eller en hvilken som helst ændring af
tilslutningerne.
Vær altid opmærksom på følgende:
● Advarsel! Undlad at kigge ind i CD-mekanismen,
når CD-skuffen er åben. Der kan udsendes laserstråler, som kan forårsage øjenskader.
● Enheden er kun beregnet til indendørs brug. Beskyt
den mod vanddråber og -stænk, høj luftfugtighed
og varme (tilladt omgivelsestemperatur 0 – 40 °C).
● Undgå at placere væskefyldte genstande, som
f. eks. glas, ovenpå enheden.
● Varmen, der udvikles i enheden, skal kunne slippe
ud ved hjælp af luftcirkulation. Enhedens ventilationshuller må derfor aldrig tildækkes.
B
16
●
Undlad at indføre noget i ventilationshullerne!
Dette kan forårsage fare for elektrisk stød.
●
Tag ikke enheden i brug og tag straks stikket ud af
stikkontakten i følgende tilfælde:
1. hvis der er synlig skade på enheden eller netkablet,
2. hvis der kan være opstået skade, efter at enheden er tabt eller lignende,
3. hvis der forekommer fejlfunktion.
Enheden skal altid repareres af autoriseret personel.
●
Tag aldrig stikket ud af stikkontakten ved at
trække i kablet, tag fat i selve stikket.
●
Til rengøring må kun benyttes en tør, blød klud;
der må under ingen omstændigheder benyttes kemikalier eller vand.
●
Hvis enheden benyttes til andre formål, end den
oprindeligt er beregnet til, hvis den ikke er korrekt
tilsluttet, hvis den betjenes forkert, eller hvis den
ikke repareres af autoriseret personel, omfattes
eventuelle skader ikke af garantien.
Hvis enheden skal tages ud af drift for
bestandigt, skal den bringes til en lokal
genbrugsstation for bortskaffelse.
PA-910CD
S
Innan enheten tas i bruk, läs först igenom säkerhetsföreskrifterna. Om ytterligare information önskas,
läs igenom den engelska texten som medföljer.
Säkerhetsföreskrifter
Enheten uppfyller EG-direktiv 89/336/EWG avseende elektromagnetiska störfält samt EG-direktiv
73/23/EWG avseende lågspänningsapplikationer.
Enheten använder hög spänning internt
(230 V~). För att undvika elskador, öppna
aldrig chassiet på egen hand utan överlåt all
service till auktoriserad verkstad. Alla garantier upphör att gälla om egna eller oauktoriserade ingrepp görs i enheten. I dessa fall
tas heller inget ansvar för skada på person
eller materiel.
Varning! Vid drift så finns det mycket farliga
spänningar, upp till 100 V förekommer på
högtalarterminalerna (22). Stäng alltid av PA
systemet innan man gör några inkopplings
förändringar.
Ge även akt på följande:
● Varning! Titta aldrig in i spelmekanismen då
luckan är öppen. Laserstrålen kan skada ögonen.
● Enheten är endast avsedda för inomhusbruk. Skydda enheten mot vätskor, hög luftfuktighet och hög
värme (tillåten omgivningstemperatur 0 – 40 °C).
● Placera inte föremål innehållande vätskor, t. ex.
dricksglass, på enheten.
● Värmen som alstras vid användning leds bort
genom självcirkulering. Täck därför aldrig över
B
●
●
●
●
●
enheten eller ställ den så att luftcirkuleringen
försämras.
Stoppa inte in något i ventilations hållen! Risk for
elchock.
Använd inte enheten och tag omedelbart ut kontakten ur elurtaget om något av följande uppstår:
1. Enheten eller elsladden har synliga skador.
2. Enheten är skadad av fall ed.
3. Enheten har andra felfunktioner.
Enheten skall lämnas till auktoriserad verkstad för
service.
Dra aldrig ut kontakten genom att dra i sladden
utan ta tag i kontaktkroppen.
Rengör endast med en mjuk och torr trasa, använd aldrig kemikalier eller vatten vid rengöring.
Om enheten används på annat sätt än som avses,
om den inte kopplas in ordentligt, om den används
på fel sätt eller inte repareras av auktoriserad personal upphör alla garantier att gäll. I dessa fall tas
inget ansvar för uppkommen skada på person
eller materiel.
Om enheten skall kasseras bör den lämnas till återvinning.
PA-910CD
FIN
Ole hyvä ja huomioi aina seuraavat turvallisuutta
koskevat ohjeet ennen laitteen käyttöönottoa. Katso
käyttöön liittyviä ohjeita Englanninkielisistä ohjeista,
jos tarvitset lisää tietoa laitteen käytöstä.
Turvallisuudesta
Tämä laite vastaa direktiiviä 89/336/EEC sähkömagneettisesta yhteensopivuudesta sekä matalajännitedirektiiviä 73/23/EEC.
B
Tämä laite toimii hengenvaarallisella 230 V~
jännitteellä. Välttääksesi sähköiskun, älä
avaa laitteen koteloa. Jätä huoltotoimet valtuutetulle, ammattitaitoiselle huoltoliikkeelle.
Huomioi myös, että takuu raukeaa, jos laite
on avattu.
Varoitus! Käytön aikana kaiutinterminaaleissa (22) on vaarallinen jopa 100 V jännite.
Sammuta aina PA-laitteisto kaikkien kytkentöjen suorittamisen ajaksi.
Huomioi seuraavat seikat:
●
Huomio! Älä katso CD mekanismiin, kun CD
kelkka on ulkona. Lasersäteiden säteily voi vahingoittaa silmiä.
●
Tämä laite soveltuu vain sisätilakäyttöön. Suojele
laitetta kosteudelta, vedeltä ja kuumuudelta (sallittu ympäröivä lämpötila 0 – 40 °C).
●
Älä sijoita laitteen päälle mitään nestettä sisältävää, kuten vesilasia tms.
●
Laitteessa kehittyvä lämpö poistetaan ilmanvaihdolla. Tämän vuoksi laitteen tuuletusaukkoja ei
saa peittää.
●
●
●
●
●
Älä työnnä mitään esinettä tuuletusaukosta sisään! Sähköiskun vaara.
Irrota virtajohto pistorasiasta, äläkä käynnistä laitetta jos:
1. virtajohdossa on havaittava vaurio
2. putoaminen tai muu vastaava vahinko on saattanut aiheuttaa vaurion
3. laitteessa esiintyy toimintahäiriöitä
Kaikissa näissä tapauksissa laite tulee toimittaa
valtuutettuun huoltoliikkeeseen.
Älä koskaan irrota virtajohtoa pistorasiasta johdosta vetämällä.
Käytä puhdistamiseen pelkästään kuivaa, pehmeää kangasta. Älä käytä kemikaaleja tai vettä.
Laitteen takuu raukeaa, eikä valmistaja, maahantuoja tai myyjä ota vastuuta mahdollisista välittömistä tai välillisistä vahingoista, jos laitetta on
käytetty muuhun kuin alkuperäiseen käyttötarkoitukseen, laitetta on taitamattomasti käytetty tai
kytketty tai jos laitetta on huollettu muussa kuin
valtuutetussa huollossa.
Kun laite poistetaan lopullisesti käytösta,
vie se paikalliseen kierrätyskeskukseen
jälkikäsittelyä varten.
17
®
Copyright © by MONACOR INTERNATIONAL GmbH & Co. KG, Bremen, Germany. All rights reserved. A-0337.99.01.12.2004