1
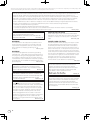
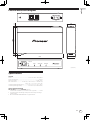
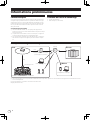
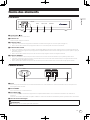
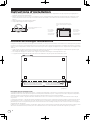
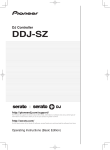
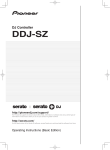
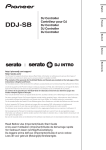
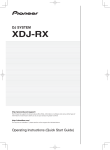
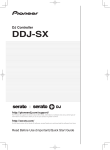
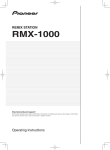
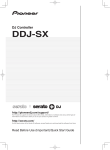
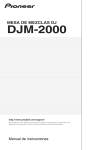
English
NXS-GW
http://pioneerdj.com/support/
The Pioneer DJ support site shown above offers FAQs, information on software and various other types of
information and services to allow you to use your product in greater comfort.
Le site de support DJ de Pioneer indiqué ci-dessus propose une FAQ, des informations sur le logiciel et divers
types d’informations et de services qui permettent une utilisation plus confortable de ce produit.
Operating Instructions
Mode d’emploi
Français
NETWORK GATEWAY
PASSERELLE DE RÉSEAU
Thank you for buying this Pioneer product. Please read through these operating instructions so you will know how to operate your model properly. After
you have finished reading the instructions, put them away in a safe place for future reference.
NOTE:
This equipment has been tested and found to comply with the limits for a Class B digital device, pursuant to Part 15
of the FCC Rules. These limits are designed to provide reasonable protection against harmful interference in a
residential installation. This equipment generates, uses, and can radiate radio frequency energy and, if not installed
and used in accordance with the instructions, may cause harmful interference to radio communications. However,
there is no guarantee that interference will not occur in a particular installation. If this equipment does cause
harmful interference to radio or television reception, which can be determined by turning the equipment off and on,
the user is encouraged to try to correct the interference by one or more of the following measures:
— Reorient or relocate the receiving antenna.
— Increase the separation between the equipment and receiver.
— Connect the equipment into an outlet on a circuit different from that to which the receiver is connected.
D8-10-1-2_A1_En
— Consult the dealer or an experienced radio/TV technician for help.
NOTE
THE NO USER-SERVICEABLE PARTS
COMPARTMENT WARNING IS LOCATED ON THE
APPLIANCE BOTTOM.
D3-7-13-68_A1_En
WARNING
This equipment is not waterproof. To prevent a fire or
shock hazard, do not place any container filled with
liquid near this equipment (such as a vase or flower
pot) or expose it to dripping, splashing, rain or
moisture.
D3-4-2-1-3_A1_En
WARNING
This product equipped with a three-wire grounding
(earthed) plug - a plug that has a third (grounding) pin.
This plug only fits a grounding-type power outlet. If you
are unable to insert the plug into an outlet, contact a
licensed electrician to replace the outlet with a properly
grounded one. Do not defeat the safety purpose of the
grounding plug.
D3-4-2-1-6_A1_En
Information to User
Alterations or modifications carried out without
appropriate authorization may invalidate the user’s
right to operate the equipment.
D8-10-2_A1_En
IMPORTANT NOTICE
THE MODEL NUMBER AND SERIAL NUMBER OF
THIS EQUIPMENT ARE ON THE REAR OR BOTTOM.
RECORD THESE NUMBERS ON PAGE 12 FOR
D36-AP9-3*_A1_En
FUTURE REFERENCE.
CAUTION
The /ON switch on this unit will not completely
shut off all power from the AC outlet. Since the power
cord serves as the main disconnect device for the
unit, you will need to unplug it from the AC outlet to
shut down all power. Therefore, make sure the unit
has been installed so that the power cord can be
easily unplugged from the AC outlet in case of an
accident. To avoid fire hazard, the power cord should
also be unplugged from the AC outlet when left
unused for a long period of time (for example, when
on vacation).
D3-4-2-2-2a*_A1_En
2
En
VENTILATION CAUTION
When installing this unit, make sure to leave space
around the unit for ventilation to improve heat radiation
(at least 1 cm at top, 3 cm at rear, and 1 cm at each
D3-4-2-1-7d*_A1_En
side).
POWER-CORD CAUTION
Handle the power cord by the plug. Do not pull out the
plug by tugging the cord and never touch the power
cord when your hands are wet as this could cause a
short circuit or electric shock. Do not place the unit, a
piece of furniture, etc., on the power cord, or pinch the
cord. Never make a knot in the cord or tie it with other
cords. The power cords should be routed such that they
are not likely to be stepped on. A damaged power cord
can cause a fire or give you an electrical shock. Check
the power cord once in a while. When you find it
damaged, ask your nearest PIONEER authorized
service center or your dealer for a replacement.
S002*_A1_En
WARNING: Handling the cord on this product or
cords associated with accessories sold with the
product may expose you to chemicals listed on
proposition 65 known to the State of California and
other governmental entities to cause cancer and
birth defect or other reproductive harm.
D36-P5_B1_En
CAUTION
This product satisfies FCC regulations when shielded
cables and connectors are used to connect the unit
to other equipment. To prevent electromagnetic
interference with electric appliances such as radios
and televisions, use shielded cables and connectors
for connections.
D8-10-3a_A1_En
Contents
How to read this manual
In this manual, names of channels and buttons indicated on the product, names of menus in the software, etc., are indicated within square
brackets ([ ]). (e.g. [MASTER] channel, [ON/OFF], [File] menu)
Before start
Features........................................................................................................ 4
What’s in the box......................................................................................... 4
System setup example................................................................................ 4
Names of Parts
Front panel................................................................................................... 5
Rear panel.................................................................................................... 5
Installation guidelines
Installation on an EIA standard rack shelf board..................................... 6
Connections
Connecting to Pioneer DJ devices............................................................. 7
Registering the club information
Registration procedure............................................................................... 9
Additional information
Troubleshooting......................................................................................... 10
About trademarks and registered trademarks....................................... 10
External dimensions diagram.................................................................. 11
Specifications............................................................................................ 11
En
3
Before start
Features
What’s in the box
This product is a network gateway device for installation in a club to use
a club network system operated by Pioneer. When installed, information
on the club, its DJs’ playback information, etc., can be distributed to
people throughout the world via the Internet.
! Power cord
! Operating instructions (this document)
Main features
1 Playback information, etc., sent from Pioneer DJ devices is received
via PRO DJ LINK and sent in real time to the web server.
2 The product offers both the robustness needed to withstand even the
rough club environment and high reliability.
3 Connection is simple and can be done by anyone, and because of its
compact size the product can be installed anywhere.
System setup example
Internet
Club
Pioneer
LAN
NXS-GW
Router for Internet connection
(commercially available product)
Web server
LAN
LAN hub
Management computer
Home
0
9
9
9
9
0
0
12
12
12
12
-26 /
6
-26 /
6
-26 /
6
-26 /
6
-26 /
6
-26 /
6
-26 /
6
-26 /
6
-26 /
6
-26 /
6
-26 /
6
-26 /
6
TALK
OFF ON OVER
Smartphone or computer
Smartphones
1
1
PRO DJ LINK compatible Pioneer DJ devices
1 Customers at the club or other people interested in club music can see the information on the club, its DJs’ playback information, etc., on their
smartphones.
For detailed information on the system, see our website below.
http://djclubnetwork.com/
4
En
English
Names of Parts
Front panel
NXS-GW
ON
1
2
ALERT
PRO DJ LINK
INTERNET
3
4
5
1 /ON switch
Press to turn the power on and off.
2ON indicator
Lights when this unit’s power is on.
3ALERT indicator
! Flashing: This unit’s functions are restricted. Contact your store of purchase or a service center (page 10).
! Off: The indicator is off when the power is off, or when the power is on and the unit is operating normally.
4PRO DJ LINK indicator
! Lit: This indicator lights when a PRO DJ LINK compatible DJ device is connected to this unit and this system can be used.
! Flashing: The indicator flashes when a PRO DJ LINK compatible DJ device is connected to this unit but this system cannot be used (page 10).
! Off: The indicator is off when nothing is connected or when the power of the device connected to this unit is off.
5INTERNET indicator
! Lit: This indicator lights when communications with the web server have been verified and this system can be used.
! Flashing: The indicator flashes when communications with the web server have been verified but registration of the club information has not
been completed (page 10).
! Off: The indicator is off when nothing is connected or communications with the web server cannot be verified.
Rear panel
AC IN
1
INTERNET
PRO DJ LINK
2
3
4
1AC IN
Connects to a power outlet using the included power cord. Wait until all connections between the equipment are completed before connecting the
power cord.
2INTERNET terminal
Connect to a router, etc., that is connected to the Internet.
3PRO DJ LINK terminal
Connect to the [LINK] terminal of a PRO DJ LINK compatible Pioneer DJ mixer or to a switching hub (commercially available).
Use a 100Base-TX-compatible switching hub. Some switching hubs may not operate properly.
4Kensington security slot
CAUTION
Do not connect the LAN port to any network which are subject to overvoltages.
En
5
Installation guidelines
! Do not place this unit on objects radiating heat, such as an amplifier, or expose it to a spotlight for an extended period of time, as this may damage
this unit.
! Install this unit away from a tuner or a TV. Otherwise, image distortion or noise may result. Also, image distortion or noise can easily occur if an
indoor antenna is used. In such cases, use an outdoor antenna or turn off the power of this unit.
! Place this unit on a level surface and a stable platform.
! Do not place heavy objects on top of this unit.
To assure proper heatdissipation, be
sure to maintain this open space.
Do not allow contact with vibrating
surfaces.
To assure proper
heatdissipation, be
sure to maintain
this open space.
To assure proper
heatdissipation, be
sure to maintain
this open space.
Installation on an EIA standard rack shelf board
9
This unit is half the size of an EIA standard rack (1U). When mounting it on a rack, install it on general purpose rack mount shelf or the like. Holes (for
M3 meter screws 6 mm or less in length) for fixing this unit onto a mount shelf are provided on the bottom panel, as shown on the diagram below. Use
these holes to fix this unit by screw to the shelf. Note that this unit has a depth of 138.6 mm.
! Do not install this unit directly above a power amplifier. Heat radiating from the power amplifier may damage this unit. Also, noise (hum noise, etc.)
may be generated.
! When transporting this unit, remove it from the rack. Transporting this unit without removing it from the rack may damage this unit.
! If you transport this unit without removing it from the rack, make sure vibration or shock is not applied to this unit.
Rack mount screw hole (M3)
6
Rack mount screw hole (M3)
198
6
(unit:mm)
Rack Mount Instructions
A) Elevated Operating Ambient - If installed in a closed or multi-unit rack assembly, the operating ambient temperature of the rack environment may
be greater than room ambient. Therefore, consideration should be given to installing the equipment in an environment compatible with the maximum
ambient temperature (Tma) specified by the manufacturer.
B) Reduced Air Flow - Installation of the equipment in a rack should be such that the amount of air flow required for safe operation of the equipment is
not compromised.
C) Mechanical Loading - Mounting of the equipment in the rack should be such that a hazardous condition is not achieved due to uneven mechanical
loading.
D) Circuit Overloading - Consideration should be given to the connection of the equipment to the supply circuit and the effect that overloading of the
circuits might have on overcurrent protection and supply wiring. Appropriate consideration of equipment nameplate ratings should be used when
addressing this concern.
E) Reliable Earthing - Reliable earthing of rack-mounted equipment should be maintained. Particular attention should be given to supply connections
other than direct connections to the branch circuit (e.g. use of power strips).
6
En
English
Connections
Be sure to turn off the power and unplug the power cord from the power outlet whenever making or changing connections.
Refer to the operating instructions for the component to be connected.
Connect the power cord after all the connections between devices have been completed.
Connecting to Pioneer DJ devices
This unit can be connected to PRO DJ LINK compatible Pioneer DJ devices equipped with a [LINK] terminal (e.g. DJM-900NXS, DJM-2000NXS).
For details on connections, also refer to the respective DJ devices’ operating instructions.
! A separate contract with and payment to a provider offering Internet services is required.
Example of connection with the DJM-900NXS
Internet
LAN cable
Router for
Internet connection
Rear panel
AC IN
To power outlet
INTERNET
PRO DJ LINK
LAN cable
Power cord
Switching hub
CH 4
CH 3
PHONO CD/ LINE
OFF
ON
R
POWER
LINE
L
RETURN
L (MONO)
CD/ LINE
L
CH 2
LINE
PHONO CD/ LINE
L
L
MIC2
SIGNAL GND
R
R
MASTER1
R
SEND
L (MONO)
L
MASTER2 REC OUT
L
L
R
AC IN
1 GND
MIDI OUT
SIGNAL GND
R
R
CH 1
CD/ LINE
R
BOOTH
CH2
TRS
R
L
R
LINK
DIGITAL
MASTER
OUT
IN
CH4
2 HOT
3 COLD
rekordbox
CH1
CH3
Computer
DJM-900NXS
POWER
CONTROL
AUDIO OUT
R
CONTROL
L
DIGITAL
OUT
LINK
CDJ-2000NXS
CDJ-2000NXS
CDJ-2000NXS
CDJ-2000NXS
! Set the DJ player’s player number to the same number as the channel to which the audio cable is connected.
CAUTION
Risk of major electromagnetic interference. Use an STP cable for the LAN cable.
En
7
Example of connection with the DJM-2000NXS
To this unit’s [PRO DJ LINK] terminal
Switching hub
CH4
PHONO
L
CD
CH3
SIGNAL GND
LINE
L
CH2
CD
LINE
L
CH1
CD
PHONO
L
CD
SIGNAL GND
DIGITAL
OFF
ON
POWER
R
OUT
CONTROL
CD DIGITAL
CD DIGITAL
CH4
CH3 IN CH2
CH1
CONTROL
CD DIGITAL
R
R
MASTER2 REC OUT
L
MASTER1
R
L
MASTER
ATT.
AC IN
BOOTH
R
TRS
SEND
L
R
L(MONO)
RETURN
R
CH 1
COMPUTER 1
CH 4
CH 2
COMPUTER 2
L(MONO)
MIDI OUT
USB
LINK
-6dB -3dB 0dB
R
1GND
rekordbox
CD DIGITAL
R
CH 3
2HOT
rekordbox
3COLD
DJM-2000NXS
Computer
POWER
CONTROL
AUDIO OUT
R
CONTROL
L
DIGITAL
OUT
LINK
CDJ-2000NXS
CDJ-2000NXS
CDJ-2000NXS
! To connect two computers to the [LINK] terminal for computer connection, use a switching hub.
! Set the channel number of the audio cable or coaxial digital cable and the player number to the same number.
8
En
CDJ-2000NXS
In order to distribute information to clubbers throughout the world, this unit’s main feature, it is necessary to register this unit’s customer ID and the
club information (club name, location information, e-mail address, etc.).
! A separate contract with and payment to a provider offering Internet services is required.
English
Registering the club information
Registration procedure
Before registering the club information, make the preparations below.
! Prepare a computer that can be connected to the Internet.
! Make a note of the customer ID attached to this unit’s side panel.
Once preparations are completed, access the website below and register the club information.
http://djclubnetwork.com/clubsignup
NXS-GW
ON
ALERT
PRO DJ LINK
INTERNET
CUSTOMER ID :
En
9
Additional information
Troubleshooting
! Incorrect operation is often mistaken for trouble or malfunction. If you think that there is something wrong with this component, check the points
below. Sometimes the trouble may lie in another component. Inspect the other components and electrical appliances being used. If the trouble
cannot be rectified after checking the items below, ask your nearest Pioneer authorized service center or your dealer to carry out repair work.
! The player may not operate properly due to static electricity or other external influences. In such cases, normal operation may be restored by
unplugging the power cord then plugging it back in.
Problem
Check
Remedy
The power is not turned on.
Is the power cord properly connected?
Plug in the power cord to an AC outlet.
The [INTERNET] indicator is flashing.
Have you completed registration of the club
information?
Register the club information. (page 9)
The [INTERNET] indicator is off.
Are the Internet side LAN terminal and the router
for Internet connection properly connected?
Properly connect the Internet side LAN terminal and the router for Internet
connection.
Is a DJ mixer connected to the Internet side LAN
terminal?
Properly connect the Internet side LAN terminal and the router for Internet
connection.
Is the power of the switching hub connected to the
Internet side or the router for Internet connection
turned on?
Turn on the power of the switching hub connected to the Internet side or the
router for Internet connection.
Is the firmware of the connected router for Internet Update the firmware of the connected router for Internet connection to the latest
connection the latest version?
version.
The [PRO DJ LINK] indicator is
flashing.
The [PRO DJ LINK] indicator is off.
The [ALERT] indicator is flashing.
Are you using a LAN cable of Cat 5 or greater for
connection?
Use a LAN cable of Cat 5 or greater for connection.
Is the connected DJ device a PRO DJ LINK compatible Pioneer DJ device?
Connect a PRO DJ LINK compatible Pioneer DJ device.
Is the firmware of the connected DJ device the
latest version?
Update the firmware of the connected DJ device to the latest version.
Are you using a LAN cable of Cat 5 or greater for
connection?
Use a LAN cable of Cat 5 or greater for connection.
Is the PRO DJ LINK compatible DJ player connected directly to the [PRO DJ LINK] terminal?
Connect the DJ player to a switching hub or a PRO DJ LINK compatible DJ mixer
with a built-in hub.
Are both a PRO DJ LINK compatible DJ player
and DJ mixer connected to the [PRO DJ LINK]
terminal?
Operation will not be normal if only the DJ player or only the DJ mixer is connected. Connect both.
Are the PRO DJ LINK side LAN terminal and DJ
mixer or switching hub properly connected?
Properly connect the PRO DJ LINK side LAN terminal and DJ mixer or switching
hub.
Is the router for Internet connection connected to
the PRO DJ LINK side LAN terminal?
Properly connect the PRO DJ LINK side LAN terminal and DJ mixer or switching
hub.
Is the power of the PRO DJ LINK side LAN terminal and the DJ mixer or switching hub turned on?
Turn on the power of the PRO DJ LINK side LAN terminal and the DJ mixer or
switching hub.
—
This unit’s functions are restricted.
Contact your store of purchase or a service center to request repairs.
About trademarks and registered
trademarks
! Pioneer is a registered trademark of PIONEER CORPORATION.
The names of companies and products mentioned herein are the trademarks of their respective owners.
10
En
English
External dimensions diagram
INTERNET
PRO DJ LINK
AC IN
5.4
138.6
127
6.2
40
41.3
42.5
210
NXS-GW
ON
ALERT
PRO DJ LINK
INTERNET
(unit:mm)
Specifications
General
Power............................................................. AC 100 V to 240 V, 50 Hz/60 Hz
Power consumption.............................................................................. 60 mA
Main unit weight........................................................................0.8 kg (1.8 lb)
Max. dimensions.................... 210 mm (W) × 42.5 mm (H) × 138.6 mm (D)
(8.3 in. (W) × 1.7 in. (H) × 5.5 in. (D))
Tolerable operating temperature.......... +5 °C to +35 °C (+41 °F to +95 °F)
Tolerable operating humidity....................... 5 % to 85 % (no condensation)
Input / Output terminals
PRO DJ LINK terminal and INTERNET terminal
LAN terminal (100Base TX), (LAN cable: Cat 5 or greater)............ 2 sets
! The specifications and design of this product are subject to change
without notice.
! © 2013 PIONEER CORPORATION. All rights reserved.
En
11
PIONEER ELECTRONICS (USA) INC.
LIMITED WARRANTY
WARRANTY VALID ONLY IN THE U.S.A. AND CANADA
WARRANTY
Pioneer Electronics (USA) Inc. (PUSA) warrants that products distributed by PUSA in the U.S.A. and Canada that fail to function properly under normal use due to a manufacturing
defect when installed and operated according to the owner ’s manual enclosed with the unit will be repaired or replaced with a unit of comparable value, at the option of PUSA,
without charge to you for parts or actual repair work. Parts supplied under this warranty may be new or rebuilt at the option of PUSA.
THIS LIMITED WARRANTY APPLIES TO THE ORIGINAL OR ANY SUBSEQUENT OWNER OF THIS PIONEER PRODUCT DURING THE WARRANTY PERIOD PROVIDED THE
PRODUCT WAS PURCHASED FROM AN AUTHORIZED PIONEER DISTRIBUTOR/DEALER IN THE U.S.A. OR CANADA. YOU WILL BE REQUIRED TO PROVIDE A SALES
RECEIPT OR OTHER VALID PROOF OF PURCHASE SHOWING THE DATE OF ORIGINAL PURCHASE OR, IF RENTED, YOUR RENTAL CONTRACT SHOWING THE PLACE
AND DATE OF FIRST RENTAL. IN THE EVENT SERVICE IS REQUIRED, THE PRODUCT MUST BE DELIVERED WITHIN THE WARRANTY PERIOD, TRANSPORTATION
PREPAID, ONLY FROM WITHIN THE U.S.A. AS EXPLAINED IN THIS DOCUMENT. YOU WILL BE RESPONSIBLE FOR REMOVAL AND INSTALLATION OF THE PRODUCT.
PUSA WILL PAY TO RETURN THE REPAIRED OR REPLACEMENT PRODUCT TOYOU WITHIN THE U.S.A.
PRODUCT WARRANTY PERIOD
DJ Audio and Video
...................................................................................................................................................................................
Parts
Labor
1 Year
1 Year
The warranty period for retail customers who rent the product commences upon the date product is first put into use (a) during the rental period or (b) retail sale, whichever occurs first.
WHAT IS NOT COVERED
IF THIS PRODUCT WAS PURCHASED FROM AN UNAUTHORIZED DISTRIBUTOR, THERE ARE NO WARRANTIES, EXPRESS OR IMPLIED, INCLUDING THE IMPLIED WARRANTY
OF MERCHANTABILITY AND THE IMPLIED WARRANTY OF FITNESS FOR A PARTICULAR PURPOSE AND THIS PRODUCT IS SOLD STRICTLY “AS IS” AND “WITH ALL FAULTS".
PIONEER SHALL NOT BE LIABLE FOR ANY CONSEQUENTIAL AND/OR INCIDENTAL DAMAGES.
THIS WARRANTY DOES NOT APPLY IF THE PRODUCT HAS BEEN SUBJECTED TO POWER IN EXCESS OF ITS PUBLISHED POWER RATING.
THIS WARRANTY DOES NOT COVERTHE CABINET OR ANY APPEARANCE ITEM, USER ATTACHED ANTENNA, ANY DAMAGETO RECORDS OR RECORDINGTAPES OR DISCS, ANY
DAMAGE TO THE PRODUCT RESULTING FROM ALTERATIONS, MODIFICATIONS NOT AUTHORIZED IN WRITING BY PIONEER, ACCIDENT, MISUSE OR ABUSE, DAMAGE DUE TO
LIGHTNING ORTO POWER SURGES, SUBSEQUENT DAMAGE FROM LEAKING, DAMAGE FROM INOPERATIVE BATTERIES, ORTHE USE OF BATTERIES NOT CONFORMINGTOTHOSE
SPECIFIED INTHE OWNER’S MANUAL.
THIS WARRANTY DOES NOT COVER THE COST OF PARTS OR LABOR WHICH WOULD BE OTHERWISE PROVIDED WITHOUT CHARGE UNDER THIS WARRANTY OBTAINED FROM
ANY SOURCE OTHERTHAN A PIONEER AUTHORIZED SERVICE COMPANY OR OTHER DESIGNATED LOCATION. THISWARRANTY DOES NOT COVER DEFECTS OR DAMAGE CAUSED
BYTHE USE OF UNAUTHORIZED PARTS OR LABOR OR FROM IMPROPER MAINTENANCE.
ALTERED, DEFACED, OR REMOVED SERIAL NUMBERS VOID THIS ENTIRE WARRANTY
NO OTHER WARRANTIES
PIONEER LIMITS ITS OBLIGATIONS UNDER ANY IMPLIED WARRANTIES INCLUDING, BUT NOT LIMITED TO, THE IMPLIED WARRANTIES OF MERCHANTABILITY AND
FITNESS FOR A PARTICULAR PURPOSE, TO A PERIOD NOT TO EXCEED THE WARRANTY PERIOD. NO WARRANTIES SHALL APPLY AFTER THE WARRANTY PERIOD.
SOME STATES DO NOT ALLOW LIMITATIONS ON HOW LONG AN IMPLIED WARRANTY LASTS AND SOME STATES DO NOT ALLOW THE EXCLUSIONS OR LIMITATIONS
OF INCIDENTAL OR CONSEQUENTIAL DAMAGES, SO THE ABOVE LIMITATIONS OR EXCLUSIONS MAY NOT APPLY TO YOU. THIS WARRANTY GIVES YOU SPECIFIC LEGAL
RIGHTS AND YOU MAY HAVE OTHER RIGHTS WHICH MAY VARY FROM STATE TO STATE.
TO OBTAIN SERVICE
PUSA has appointed a number of Authorized Service Companies throughout the U.S.A. and Canada should your product require service. To receive warranty service you
need to present your sales receipt or, if rented, your rental contract showing place and date of original owner’s transaction. If shipping the unit you will need to package it
carefully and send it, transportation prepaid by a traceable, insured method, to an Authorized Service Company. Package the product using adequate padding material to
prevent damage in transit. The original container is ideal for this purpose. Include your name, address and telephone number where you can be reached during business
hours.
On all complaints and concerns in the U.S.A. and Canada call Customer Support at 1-800-872-4159.
For hook-up and operation of your unit or to locate an
Authorized Service Company, please call or write:
CUSTOMER SUPPORT
PIONEER ELECTRONICS (USA) INC.
P.O. BOX 1720
LONG BEACH, CALIFORNIA 90801
1-800-872-4159
http://www.pioneerelectronics.com
DISPUTE RESOLUTION
Following our response to any initial request to Customer Support, should a dispute arise between you and Pioneer, Pioneer makes available its Complaint Resolution Program
to resolve the dispute. The Complaint Resolution Program is available to you without charge. You are required to use the Complaint Resolution Program before you exercise
any rights under, or seek any remedies, created by Title I of the Magnuson-Moss Warranty-Federal Trade Commission Improvement Act, 15 U.S.C. 2301 et seq.
To use the Complaint Resolution Program call 1-800-872-4159 and explain to the customer service representative the problem you are experiencing, steps you have taken
to have the product repaired during the warranty period and the name of the authorized Distributor/Dealer from whom the Pioneer product was purchased. After the complaint
has been explained to the representative, a resolution number will be issued. Within 40 days of receiving your complaint, Pioneer will investigate the dispute and will either:
(1) respond to your complaint in writing informing you what action Pioneer will take, and in what time period, to resolve the dispute; or (2) respond to your complaint in writing
informing you why it will not take any action.
RECORD THE PLACE AND DATE OF PURCHASE FOR FUTURE REFERENCE
Model No. ____________________________________________ Serial No. _________________________________________ Purchase Date ______________________
Purchased From _____________________________________________________________________________________________________________________________
KEEP THIS INFORMATION AND YOUR SALES RECEIPT IN A SAFE PLACE
UCP0212
12
En
Nous vous remercions d’avoir acquis un produit Pioneer. Veuillez lire attentivement ce mode d’emploi afin de connaître la manière d’utiliser l’appareil
comme il convient. Cela fait, conservez le mode d’emploi de façon à pouvoir vous y référer en cas de nécessité.
REMARQUE
L’AVERTISSEMENT DE PIÈCES NON RÉPARABLES
PAR L’UTILISATEUR SE TROUVE SUR LE DESSOUS
DE L’APPAREIL.
D3-7-13-68_A1_Fr
PRÉCAUTION DE VENTILATION
Lors de l’installation de l’appareil, veillez à laisser un
espace suffisant autour de ses parois de manière à
améliorer la dissipation de chaleur (au moins 1 cm sur
le dessus, 3 cm à l’arrière et 1 cm de chaque côté).
D3-4-2-1-7d*_A1_Fr
AVERTISSEMENT
Cet appareil n’est pas étanche. Pour éviter les risques
d’incendie et de décharge électrique, ne placez près de
lui un récipient rempli d’eau, tel qu’un vase ou un pot
de fleurs, et ne l’exposez pas à des gouttes d’eau, des
éclaboussures, de la pluie ou de l’humidité. D3-4-2-1-3_A1_Fr
AVERTISSEMENT
Cet appareil est muni d’une fiche de mise à la terre
(masse) à trois fils. Comme la fiche présente une
troisième broche (de terre), elle ne peut se brancher
que sur une prise de courant, prévue pour une mise à
la terre. Si vous n’arrivez pas à insérer la fiche dans la
prise de courant, contactez un électricien qualifié pour
faire remplacer la prise par une qui soit mise à la terre.
N’annulez pas la fonction de sécurité que procure cette
fiche de mise à la terre.
D3-4-2-1-6_A1_Fr
NOTE IMPORTANTE SUR LE CABLE
D’ALIMENTATION
Tenir le câble d’alimentation par la fiche. Ne pas
débrancher la prise en tirant sur le câble et ne pas
toucher le câble avec les mains mouillées. Cela risque
de provoquer un court-circuit ou un choc électrique. Ne
pas poser l’appareil ou un meuble sur le câble. Ne pas
pincer le câble. Ne pas faire de noeud avec le câble ou
l’attacher à d’autres câbles. Les câbles d’alimentation
doivent être posés de façon à ne pas être écrasés. Un
câble abîmé peut provoquer un risque d’incendie ou un
choc électrique. Vérifier le câble d’alimentation de
temps en temps. Contacter le service après-vente
PIONEER le plus proche ou le revendeur pour un
remplacement.
S002*_A1_Fr
2
Fr
ATTENTION
L’interrupteur /ON de cet appareil ne coupe pas
complètement celui-ci de sa prise secteur. Comme le
cordon d’alimentation fait office de dispositif de
déconnexion du secteur, il devra être débranché au
niveau de la prise secteur pour que l’appareil soit
complètement hors tension. Par conséquent, veillez à
installer l’appareil de telle manière que son cordon
d’alimentation puisse être facilement débranché de
la prise secteur en cas d’accident. Pour éviter tout
risque d’incendie, le cordon d’alimentation sera
débranché au niveau de la prise secteur si vous
prévoyez une période prolongée de non utilisation
(par exemple avant un départ en vacances).
D3-4-2-2-2a*_A1_Fr
REMARQUE IMPORTANTE
LE NUMÉRO DE MODÈLE ET LE NUMÉRO DE SÉRIE
SE TROUVENT À L’ARRIÈRE OU SUR LE FOND DE
CET APPAREIL. NOTEZ CES NUMÉROS À LA PAGE
12 POUR VOUS Y RÉFÉRER ULTÉRIEUREMENT.
D36-AP9-3*_A1_Fr
Sommaire
Comment lire ce manuel
Dans ce manuel, les noms de canaux et de touches indiqués sur le
produit, les noms de menus dans le logiciel, etc. sont indiqués entre
crochets ([ ]). (ex. canal [MASTER], menu [ON/OFF], menu [File])
Informations préliminaires
Caractéristiques........................................................................................... 4
Contenu du carton d’emballage................................................................ 4
Exemple de configuration du système...................................................... 4
Noms des éléments
Face avant.................................................................................................... 5
Panneau arrière........................................................................................... 5
Instructions d’installation
Installation sur une étagère rack standard EIA........................................ 6
Raccordements
Raccordement à des appareils DJ Pioneer............................................... 7
Enregistrement des informations du nightclub
Procédure d’enregistrement...................................................................... 9
Informations supplémentaires
En cas de panne........................................................................................ 10
À propos des marques commerciales et des marques déposées........ 10
Schéma des dimensions externes........................................................... 11
Spécifications............................................................................................ 11
Fr
3
Informations préliminaires
Caractéristiques
Contenu du carton d’emballage
Ce produit est une passerelle de réseaux destinée à être installée dans
un nightclub pour permettre d’utiliser un système de réseaux de nightclubs géré par Pioneer. Lorsque cette passerelle est installée, les informations du nightclub, les informations concernant les réalisations des
DJ, etc. peuvent être distribuées à d’autres personnes dans le monde
entier par Internet.
! Cordon d’alimentation
! Mode d’emploi (ce document)
Caractéristiques principales
1 Les informations de lecture, etc. envoyées par des appareils DJ
Pioneer sont reçues via la liaison PRO DJ LINK et envoyées en temps
réel au serveur web.
2 Ce produit est à la fois robuste, comme il se doit pour un nightclub,
un environnement très exigeant, et extrêmement fiable.
3 Son raccordement est simple et peut être effectué par n’importe qui,
et du fait de sa compacité, cet appareil peut être installé n’importe
où.
Exemple de configuration du système
Internet
Club
Pioneer
LAN
NXS-GW
Routeur pour connexion Internet
(en vente dans le commerce)
Serveur web
LAN
Concentrateur LAN
Ordinateur de gestion
Maison
0
9
9
9
9
0
0
12
12
12
12
-26 /
6
-26 /
6
-26 /
6
-26 /
6
-26 /
6
-26 /
6
-26 /
6
-26 /
6
-26 /
6
-26 /
6
-26 /
6
-26 /
6
TALK
OFF ON OVER
Smartphone ou ordinateur
Smartphones
1
1
Appareils DJ Pioneer compatibles PRO DJ LINK
1 Les clients du nightclub, ou les personnes s’intéressant à la musique disco, peuvent voir les informations du nightclub, les réalisations des DJ, etc.
sur leurs smartphones.
Pour plus de détails sur le système, consultez le site web suivant.
http://djclubnetwork.com/
4
Fr
Noms des éléments
Face avant
Français
NXS-GW
ON
1
2
ALERT
PRO DJ LINK
INTERNET
3
4
5
1Commutateur /ON
Sert à mettre le lecteur en ou hors service.
2Indicateur ON
S’éclaire lorsque cet appareil est allumé.
3Indicateur ALERT
! Clignotant : Les fonctions de cet appareil sont restreintes. Contactez votre magasin ou un service après vente (page 10).
! Éteint : Cet indicateur est éteint lorsque l’appareil est éteint, ou s’il est éclairé quand il fonctionne normalement.
4Indicateur PRO DJ LINK
! Éclairé : Cet indicateur s’allume lorsqu’un appareil DJ compatible PRO DJ LINK est raccordé à cet appareil et que ce système peut être utilisé.
! Clignotant : Cet indicateur clignote lorsqu’un appareil DJ compatible PRO DJ LINK est raccordé à cet appareil mais que ce système ne peut pas
être utilisé (page 10).
! Éteint : Cet indicateur est éteint lorsque rien n’est raccordé ou lorsque l’appareil raccordé à cet appareil est éteint.
5Indicateur INTERNET
! Éclairé : Cet indicateur s’allume lorsque les communications avec le serveur web ont été vérifiées et que ce système peut être utilisé.
! Clignotant : Cet indicateur clignote lorsque les communications avec le serveur web ont été vérifiées mais que l’enregistrement des informations du nightclub n’est pas terminé (page 10).
! Éteint : Cet indicateur est éteint lorsque rien n’est raccordé ou que les communications avec le serveur web n’ont pas pu être vérifiées.
Panneau arrière
AC IN
1
INTERNET
PRO DJ LINK
2
3
4
1AC IN
À relier à une prise d’alimentation avec le cordon d’alimentation fourni. Avant de brancher le cordon d’alimentation, assurez-vous que tous les
autres appareils sont raccordés.
2Prise INTERNET
À relier à un routeur, etc. connecté à Internet.
3Prise PRO DJ LINK
À relier à la prise [LINK] d’une table de mixage DJ Pioneer compatible PRO DJ LINK ou à un concentrateur-commutateur (en vente dans le
commerce).
Utilisez un concentrateur-commutateur compatible 100Base-TX. Certains concentrateurs-commutateurs peuvent ne pas fonctionner correctement.
4Fente de sécurité Kensington
ATTENTION
Ne pas relier le port LAN à un réseau exposé à des surtensions.
Fr
5
Instructions d’installation
! Ne pas placer cet appareil sur des objets dégageant de la chaleur, par exemple sur un amplificateur, et ne pas l’exposer trop longtempas à un
projecteur, sous peine de l’endommager.
! Installer cet appareil à l’écart d’un tuner ou d’un téléviseur. Sinon, l’image présentera de la distorsion ou des parasites. De la distorsion ou des
parasites se produisent facilement lorsqu’une antenne intérieure est utilisée. Le cas échéant, utiliser une antenne extérieure ou éteindre cet
appareil.
! Posez cet appareil sur une surface plane et stable.
! Ne posez pas d’objets lourds sur cet appareil.
Pour une meilleure dissipation de la
chaleur, veillez à maintenir cet espace
libre.
Ne posez pas cet appareil sur une
surface vibrante.
Pour une meilleure dissipation
de la chaleur,
veillez à maintenir
cet espace libre.
Pour une meilleure dissipation
de la chaleur,
veillez à maintenir
cet espace libre.
Installation sur une étagère rack standard EIA
9
Cet appareil correspond à la moitié d’une étagère rack standard EIA (1U). Lorsque vous le montez en rack, installez-le sur une étagère rack polyvalente
ou similaire. Les trous (pour vis métriques M3 6 mm ou moins de longueur) pour la fixation de cet appareil sur une étagère se trouvent sur le panneau
inférieur, comme indiqué dans le schéma suivant. Utilisez ces trous pour fixer cet appareil à l’étagère avec les vis. La profondeur de cet appareil est de
138,6 mm.
! Ne pas installer cet appareil directement au-dessus d’un amplificateur de puissance. La chaleur dégagée par l’amplificateur de puissance peut
endommager cet appareil. De plus, du bruit (ronflement, etc.) peut se produire.
! Pour transporter cet appareil, le retirer du rack. L’appareil risque d’être endommagé s’il est transporté avec le rack.
! Si l’appareil doit être transporté sans être retiré du rack, faire attention de ne pas l’exposer à des vibrations ou chocs.
Trou de vis de montage en rack (M3)
6
Trou de vis de montage en rack (M3)
198
6
(unité:mm)
Instructions pour le montage en rack
A) Température ambiante de fonctionnement élevée - Si l’appareil est installé dans un rack fermé ou comportant d’autres appareils, la température
ambiante de l’intérieur du rack risque d’être supérieure à la température ambiante de la pièce. C’est pourquoi il faut tenir compte de la température
ambiante maximale (Tma) spécifiée par le fabricant et installer l’équipement dans un environnement compatible.
B) Circulation d’air réduite - L’équipement doit être installé dans un rack où la circulation d’air requise pour un fonctionnement correct n’est pas
compromise.
C) Chargement mécanique - L’équipement doit être installé dans le rack de façon qu’un chargement mécanique instable n’expose pas à des risques.
D) Surcharge des circuits - Au moment de raccorder l’équipement au circuit électrique, soyez particulièrement attentif à l’effet que la charge supplémentaire peut avoir sur le dispositif de protection contre les surtensions et sur le câblage. Vérifiez pour cela les valeurs nominales sur les plaques
d’identification de l’équipement.
E) Mise à la terre - L’équipement monté en rack doit faire l’objet d’une mise à la terre fiable. Une attention toute particulière doit être portée aux raccordements de l’alimentation électrique autres que les raccordements directs au circuit de dérivation (utilisation de multiprises, par exemple).
6
Fr
Raccordements
Veillez à toujours éteindre les appareils et à débrancher le cordon d’alimentation de la prise secteur avant de raccorder un appareil ou de changer les
liaisons.
Reportez-vous au mode d’emploi de l’appareil devant être raccordé.
Lorsque tous les appareils ont été raccordés, vous pouvez brancher le cordon d’alimentation.
Cet appareil peut être raccordé à des appareils DJ Pioneer compatibles PRO DJ LINK pourvus d’une prise [LINK] (ex. DJM-900NXS, DJM-2000NXS).
Pour plus de détails sur les raccordements, reportez-vous aussi aux modes d’emploi des appareils DJ utilisés.
! Il est nécessaire de contracter un abonnement auprès d’un fournisseur de services Internet.
Français
Raccordement à des appareils DJ Pioneer
Exemple de raccordement avec la DJM-900NXS
Internet
Câble LAN
Routeur pour
connexion Internet
Panneau arrière
AC IN
À une prise
d’alimentation
INTERNET
Câble LAN
Cordon d’alimentation
CH 4
CH 3
PHONO CD/ LINE
OFF
ON
PRO DJ LINK
R
POWER
LINE
L
RETURN
L (MONO)
CD/ LINE
L
CH 2
LINE
CD/ LINE
PHONO CD/ LINE
L
L
MIC2
SIGNAL GND
R
R
MASTER1
R
SEND
L (MONO)
L
MASTER2 REC OUT
L
L
R
AC IN
1 GND
MIDI OUT
SIGNAL GND
R
R
Concentrateur
commutateur
CH 1
R
BOOTH
CH2
TRS
R
L
R
LINK
DIGITAL
MASTER
OUT
IN
CH4
2 HOT
3 COLD
rekordbox
CH1
CH3
Ordinateur
DJM-900NXS
POWER
CONTROL
AUDIO OUT
R
CONTROL
L
DIGITAL
OUT
LINK
CDJ-2000NXS
CDJ-2000NXS
CDJ-2000NXS
CDJ-2000NXS
! Réglez le numéro du lecteur DJ sur le même numéro que le canal auquel le câble audio est raccordé.
ATTENTION
Risque d’interférence électromagnétique majeure. Utiliser un câble STP comme câble LAN.
Fr
7
Exemple de raccordement avec la DJM-2000NXS
À la prise [PRO DJ LINK] de cet appareil
Concentrateur
commutateur
CH4
PHONO
L
CD
CH3
SIGNAL GND
LINE
L
CH2
CD
LINE
L
CH1
CD
PHONO
L
CD
SIGNAL GND
DIGITAL
OFF
ON
POWER
R
OUT
CONTROL
CD DIGITAL
CD DIGITAL
CH4
CH3 IN CH2
CH1
CONTROL
CD DIGITAL
R
R
MASTER2 REC OUT
L
MASTER1
R
L
MASTER
ATT.
AC IN
BOOTH
R
TRS
SEND
L
R
L(MONO)
RETURN
R
CH 1
COMPUTER 1
CH 4
CH 2
COMPUTER 2
L(MONO)
MIDI OUT
USB
LINK
-6dB -3dB 0dB
R
1GND
rekordbox
CD DIGITAL
R
CH 3
2HOT
rekordbox
3COLD
DJM-2000NXS
Ordinateur
POWER
CONTROL
AUDIO OUT
R
CONTROL
L
DIGITAL
OUT
LINK
CDJ-2000NXS
CDJ-2000NXS
CDJ-2000NXS
CDJ-2000NXS
! Pour raccorder deux ordinateurs à la prise [LINK], utilisez un concentrateur-commutateur.
! Réglez le numéro de canal du câble audio ou du câble coaxial numérique et le numéro de lecteur sur le même numéro.
8
Fr
Enregistrement des informations du
nightclub
Français
Pour pouvoir distribuer des informations aux clubbers du monde entier, la principale fonctionnalité de cet appareil, le numéro d’identification de
l’appareil et les informations du nightclub (nom, lieu, adresse email, etc.) doivent être enregistrées.
! Il est nécessaire de contracter un abonnement auprès d’un fournisseur de services Internet.
Procédure d’enregistrement
Avant d’enregistrer les informations du nightclub, effectuez les préparatifs suivants.
! Préparez un ordinateur pouvant être connecté à Internet.
! Notez le numéro d’identification de l’appareil sur le panneau latéral de cet appareil.
Lorsque ceci est fait, accédez au site web suivant et enregistrez les informations du nightclub.
http://djclubnetwork.com/clubsignup
NXS-GW
ON
ALERT
PRO DJ LINK
INTERNET
NUMÉRO D’IDENTIFICATION DE L’APPAREIL (CUSTOMER ID) :
Fr
9
Informations supplémentaires
En cas de panne
! Une erreur de commande est souvent prise pour une anomalie de fonctionnement ou une panne. Si vous estimez que cet appareil ne fonctionne
pas correctement, vérifiez les points ci-dessous. Parfois, le problème peut provenir d’un autre composant. Examinez les autres composants et les
appareils électriques utilisés. Si le problème persiste malgré les vérifications des points suivants, confiez les réparations au service après-vente
Pioneer le plus proche ou à votre revendeur.
! De l’électricité statique ou des interférences externes ont peut être déréglé le lecteur. Dans ce cas, il suffit probablement de débrancher puis de
rebrancher le cordon d’alimentation pour que le lecteur fonctionne de nouveau.
Problème
Vérification
Solution
L’appareil ne s’allume pas.
Est-ce que le cordon d’alimentation est correctement raccordé ?
Branchez le cordon d’alimentation sur une prise secteur.
L’indicateur [INTERNET] clignote.
Est-ce que les informations du nightclub ont
toutes été enregistrées ?
Enregistrez toutes les informations du nightclub. (page 9)
L’indicateur [INTERNET] est éteint.
Est-ce que la prise LAN côté Internet et le routeur
pour la connexion Internet sont correctement
reliés ?
Reliez correctement la prise LAN côté Internet et le routeur pour la connexion
Internet.
Est-ce qu’une table de mixage DJ est raccordée à
la prise LAN côté Internet ?
Reliez correctement la prise LAN côté Internet et le routeur pour la connexion
Internet.
Est-ce que le concentrateur-commutateur
raccordé au côté Internet ou le routeur pour la
connexion Internet est allumé ?
Allumez le concentrateur-commutateur raccordé au côté Internet ou le routeur
pour la connexion Internet.
Est-ce que vous possédez la dernière version du
prologiciel du routeur raccordé pour la connexion
Internet ?
Faites la mise à jour du prologiciel du routeur raccordé pour la connexion
Internet.
Est-ce que vous utilisez un câble LAN de Cat 5 ou
plus pour la connexion ?
Utilisez un câble LAN de Cat 5 ou plus pour la connexion.
Est-ce que l’appareil DJ raccordé est un appareil
DJ Pioneer compatible PRO DJ LINK ?
Raccordez un appareil DJ Pioneer compatible PRO DJ LINK.
Est-ce que vous possédez la dernière version du
prologiciel de l’appareil DJ raccordé ?
Mettez à jour le prologiciel de l’appareil DJ raccordé.
Est-ce que vous utilisez un câble LAN de Cat 5 ou
plus pour la connexion ?
Utilisez un câble LAN de Cat 5 ou plus pour la connexion.
Est-ce que le lecteur DJ compatible PRO DJ LINK
est raccordé directement à la prise [PRO DJ LINK] ?
Raccordez le lecteur DJ à un concentrateur-commutateur ou à une table de
mixage DJ compatible PRO DJ LINK pourvue d’un concentrateur.
Est-ce qu’un lecteur DJ et une table de mixage
DJ compatibles PRO DJ LINK sont raccordés à la
prise [PRO DJ LINK] ?
Le fonctionnement ne sera pas normal si le lecteur DJ ou la table de mixage DJ
seulement est raccordé. Raccordez les deux.
Est-ce que la prise LAN côté PRO DJ LINK et la
table de mixage DJ ou le concentrateur-commutateur sont correctement reliés ?
Reliez correctement la prise LAN côté PRO DJ LINK et la table de mixage DJ ou
le concentrateur-commutateur.
Est-ce que le routeur pour la connexion Internet
est raccordé à la prise LAN côté PRO DJ LINK ?
Reliez correctement la prise LAN côté PRO DJ LINK et la table de mixage DJ ou
le concentrateur-commutateur.
Est-ce que la prise LAN côté PRO DJ LINK et la
table de mixage DJ ou le concentrateur-commutateur sont alimentés ?
Alimentez la prise LAN côté PRO DJ LINK et la table de mixage DJ ou le
concentrateur-commutateur.
—
Les fonctions de cet appareil sont restreintes.
Contactez votre magasin ou un service après vente pour les réparations.
L’indicateur [PRO DJ LINK] clignote.
L’indicateur [PRO DJ LINK] est éteint.
L’indicateur [ALERT] clignote.
À propos des marques commerciales
et des marques déposées
! Pioneer est une marque déposée de PIONEER CORPORATION.
Les noms de sociétés et de produits mentionnés ici sont des marques
commerciales de leurs détenteurs respectifs.
10
Fr
Schéma des dimensions externes
INTERNET
Français
PRO DJ LINK
AC IN
5,4
138,6
127
6,2
40
41,3
42,5
210
NXS-GW
ON
ALERT
PRO DJ LINK
INTERNET
(unité:mm)
Spécifications
Général
Alimentation................................................... CA 100 V à 240 V, 50 Hz/60 Hz
Consommation...................................................................................... 60 mA
Poids de l’appareil principal.................................................................. 0,8 kg
Dimensions maximales........... 210 mm (L) × 42,5 mm (H) × 138,6 mm (P)
Température de fonctionnement tolérée.............................. +5 °C à +35 °C
Humidité de fonctionnement tolérée........5 % à 85 % (sans condensation)
Prises d’entrée/sortie
Prise PRO DJ LINK et prise INTERNET
Prise LAN (100Base-TX), (Câble LAN : Cat 5 ou supérieur)........... 2 jeux
! Les caractéristiques et la présentation peuvent être modifiées, sans
avis préalable, dans un souci d’amélioration.
! © 2013 PIONEER CORPORATION. Tous droits de reproduction et de
traduction réservés.
Fr
11
PIONEER ELECTRONICS (USA) INC.
GARANTIE LIMITÉE
GARANTIE VALABLE UNIQUEMENT AUX ÉTATS-UNIS ET AU CANADA
GARANTIE
Pioneer Electronics (USA) Inc. (PUSA) garantie que les produits distribués par PUSA aux États-Unis ou au Canada qui, bien qu’étant installés et utilisés conformément au Manuel
de l’utilisateur fourni avec le produit, ne fonctionneraient pas correctement dans le cadre d’une utilisation normale en raison d’un défaut de fabrication seront réparés ou remplacés
par un produit de valeur équivalente, au choix de PUSA, sans frais à votre charge pour les pièces et/ou la main d’œuvre de réparation. Les pièces incluses en vertu de la présente
garantie peuvent être neuves ou remises à neuf, au choix de PUSA.
LA PRÉSENTE GARANTIE LIMITÉE S’APPLIQUE AU PROPRIÉTAIRE ORIGINAL AINSI QU’À TOUT PROPRIÉTAIRE SUCCESSIF DE CE PRODUIT PIONEER PENDANT LA
PÉRIODE DE GARANTIE À CONDITION QUE LE PRODUIT AIT ÉTÉ ACHETÉ AUPRÈS D’UN DISTRIBUTEUR/DÉTAILLANT PIONEER AGRÉÉ AUX ÉTATS-UNIS OU AU CANADA.
VOUS DEVREZ FOURNIR UN RELEVÉ DE CAISSE OU UNE AUTRE PREUVE D’ACHAT VALIDE INDIQUANT LA DATE DE L’ACHAT INITIAL OU, SI VOUS LOUEZ LE
PRODUIT, VOTRE CONTRAT DE LOCATION INDIQUANT L’ENDROIT ET LA DATE DE LA PREMIÈRE LOCATION. EN CAS DE BESOIN DE RÉPARATION, LE PRODUIT
DOIT ÊTRE RENVOYÉ ET LIVRÉ AU COURS DE LA PÉRIODE DE GARANTIE, FRAIS DE PORT PAYÉS ET UNIQUEMENT DEPUIS L’INTÉRIEUR DES ÉTATS-UNIS. COMME
EXPLIQUÉ DANS LE PRÉSENT DOCUMENT. VOUS ÊTES RESPONSABLE DU DÉMONTAGE ET DE L’INSTALLATION DU PRODUIT. PUSA PREND À SA CHARGE LES
FRAIS D’EXPÉDITION DU PRODUIT RÉPARÉ OU REMPLACÉ JUSQU’À VOTRE ADRESSE À L’INTÉRIEUR DES ÉTATS-UNIS.
PÉRIODE DE GARANTIE DES PRODUITS
DJ Audio et Vidéo
Pièces
............................................................................................................................................................................... 1 an
Main-d’oeuvre
1 an
La période de garantie pour les clients qui louent le produit commence le jour où le produit est utilisé pour la première fois (a) pendant la période de location ou (b) après la
vente au détail, selon ce qui se produit en premier.
ÉLÉMENTS NON COUVERTS PAR LA GARANTIE
UN PRODUIT ACHETÉ CHEZ UN DISTRIBUTEUR NON AUTORISÉ N’EST COUVERT PAR AUCUNE GARANTIE EXPRESSE OU IMPLICITE, Y COMPRIS QUELQUE GARANTIE
IMPLICITE DE QUALITÉ MARCHANDE OU D’ADAPTATION À UN USAGE PARTICULIER QUE CE SOIT. DE PLUS, CE PRODUIT EST STRICTEMENT VENDU « TEL QUEL » ET
« AVEC TOUS SES DÉFAUTS ÉVENTUELS ».
PIONEER NE PEUT PAS ÊTRE TENU RESPONSABLE DES DOMMAGES INDIRECTS ET/OU ACCESSOIRES ÉVENTUELS.
LA PRÉSENTE GARANTIE NE S’APPLIQUE PAS SI LE PRODUIT A ÉTÉ SOUMIS À UNE PUISSANCE NOMINALE EXCÉDANT LA PUISSANCE INDIQUÉE DANS LES
SPÉCIFICATIONS FOURNIES.
LA PRÉSENTE GARANTIE NE COUVRE PAS LE BOÎTIER OU LES ÉLÉMENTS ESTHÉTIQUES, LES ANTENNES INSTALLÉES PAR L’UTILISATEUR, LES DOMMAGES AUX DISQUES
OU AUX RUBANS OU DISQUES D’ENREGISTREMENT, LES DOMMAGES AU PRODUIT DÉCOULANT D’UNE RETOUCHE, D’UNE MODIFICATION NON AUTORISÉE PAR ÉCRIT
PAR PIONEER, D’UN ACCIDENT, D’UN USAGE INAPPROPRIÉ OU D’UN USAGE ABUSIF, LES DOMMAGES PRODUITS PAR LA FOUDRE OU LA SURTENSION, LES DOMMAGES
SUBSÉQUENTS DÉCOULANT DE FUITES, LES DOMMAGES DÉCOULANT DE PILES DÉFECTUEUSES OU DE L’UTILISATION DE PILES NON CONFORMES À CELLES QUI SONT
SPÉCIFIÉES DANS LE MANUEL DE L’UTILISATEUR.
LA PRÉSENTE GARANTIE NE COUVRE PAS LE COÛT DES PIÈCES OU DE LA MAIN-D’OEUVRE QUI SERAIENT AUTREMENT OFFERTES SANS FRAIS EN VERTU DE LA
PRÉSENTE GARANTIE, SI ELLES SONT OBTENUES AUPRÈS D’UNE SOURCE AUTRE QU’UNE SOCIÉTÉ DE SERVICE OU AUTRE AUTORISÉE OU DÉSIGNÉE PAR PIONEER.
LA PRÉSENTE GARANTIE NE COUVRE PAS LES DÉFECTUOSITÉS OU LES DOMMAGES CAUSÉS PAR L’UTILISATION D’UNE MAIN-D’OEUVRE OU DE PIÈCES NON AUTORISÉES, ET/
OU D’UN ENTRETIEN INADÉQUAT.
LES NUMÉROS DE SÉRIE MODIFIÉS, OBLITÉRÉS OU ENLEVÉS ANNULENT LA PRÉSENTE GARANTIE DANS SA TOTALITÉ.
EXCLUSION DE TOUTE AUTRE GARANTIE
PIONEER LIMITE SES OBLIGATIONS EN VERTU DE TOUTE GARANTIE IMPLICITE QUE CE SOIT, Y COMPRIS ENTRE AUTRES LES GARANTIES IMPLICITES DE QUALITÉ
MARCHANDE OU D’ADAPTATION À UN USAGE PARTICULIER, À UNE PÉRIODE N’EXCÉDANT PAS LA PÉRIODE DE GARANTIE. AUCUNE GARANTIE NE S’APPLIQUE APRÈS LA
PÉRIODE DE GARANTIE. CERTAINS ÉTATS NE PERMETTENT PAS LA LIMITATION DE LA DURÉE D’UNE GARANTIE IMPLICITE, ET CERTAINS NE PERMETTENT PAS L’EXCLUSION
OU LA LIMITATION DES DOMMAGES CONSÉCUTIFS OU INDIRECTS. LES LIMITATIONS ET EXCLUSIONS ÉTABLIES CI-DESSUS PEUVENT DONC NE PAS S’APPLIQUER À VOUS.
LA PRÉSENTE GARANTIE VOUS DONNE DES DROITS LÉGAUX SPÉCIFIQUES. VOUS POUVEZ JOUIR D’AUTRES DROITS, QUI PEUVENT VARIER D’UN ÉTAT À L’AUTRE.
SERVICE APRÈS-VENTE
PUSA a autorisé un certain nombre de sociétés de service après-vente agréées à travers les États-Unis et le Canada pour le cas où votre produit
aurait besoin d’être réparé. Pour profiter d’un tel service en vertu de la garantie, vous devez présenter votre ticket de caisse ou, si vous louez
le produit, votre contrat de location indiquant l’endroit et la date de la transaction par le premier propriétaire. Si vous expédiez le produit, vous
devez l’emballer soigneusement et l’envoyer à une société de service autorisée, en port prépayé et selon une méthode de transport incluant un
suivi et une assurance. Emballez le produit au moyen de matériaux de rembourrage appropriés pour éviter tout dommage pendant le transport.
L’emballage d’origine est idéal pour cela. Indiquez votre nom, votre adresse et un numéro de téléphone où nous pouvons vous joindre pendant les heures de bureau.
Pour toute réclamation et/ou question à l’intérieur des États-Unis ou du Canada, appelez le Service Consommateurs au 1-800-872-4159.
RÉSOLUTION DES LITIGES
Pour toute question concernant la mise en service ou l’utilisation de votre produit,
ou pour trouver une société de service autorisée, appelez ou écrivez à :
CUSTOMER SUPPORT
PIONEER ELECTRONICS (USA) INC.
P.O. BOX 1720
LONG BEACH, CALIFORNIA 90801
1-800-872-4159
http://www.pioneerelectronics.com
Si un litige se produit entre vous et Pioneer après la réponse à une demande initiale faite au Service Consommateurs, vous pouvez avoir recours au Programme de résolution des
plaintes de Pioneer pour résoudre le litige. Le Programme de résolution des plaintes vous est offert gratuitement. Vous devez avoir recours au Programme de résolution des plaintes
avant de vous prévaloir de vos droits ou de chercher réparation en vertu du Titre I de la loi Magnuson-Moss Warranty-Federal Trade Commission Improvement Act, 15 U.S.C. 2301 et seq.
Pour utiliser le Programme de résolution des plaintes, appelez le 1-800-872-4159 et expliquez au représentant du Service Consommateurs
le problème que vous rencontrez ainsi que les démarches que vous avez effectuées pour faire réparer le produit pendant la période
d e g a r a n t i e , p u i s c o m m u n i q u e z - l u i l e n o m d u d i s t r i b u t e u r / d é t a i l l a n t a u t o r i s é a u p r è s d u q u e l v o u s a v e z a c h e t é l e p r o d u i t P i o n e e r.
Une fois que votre plainte a été expliquée au représentant, un numéro de résolution vous sera communiqué. Pioneer étudiera votre plainte et, dans un délai de quarante (40) jours
après la réception de votre plainte, (1) répondra à votre plainte par écrit pour vous aviser des démarches qui seront entreprises pour résoudre le conflit, et indiquera combien de
temps ces démarches prendront ; ou (2) répondra à votre plainte par écrit pour vous indiquer les raisons pour lesquelles aucune démarche ne sera entreprise.
NOTEZ ET CONSERVER LE LIEU ET LA DATE D’ACHAT POUR RÉFÉRENCE ULTÉRIEURE
N° de modèle : _______________________________________
Date d’achat : ________________________________________
N° de Série : ________________________________________________________________________
Nom du distributeur/détaillant ___________________________________________________________
PRENEZ SOIN DE CONSERVER CES INFORMATIONS ET VOTRE REÇU D’ACHAT EN LIEU SÛR POUR RÉFÉRENCE ULTÉRIEURE
UCP0212
12
Fr
To register your product, find the nearest authorized service location, to
purchase replacement parts, operating instructions, or accessories,
please go to one of following URLs :
Pour enregistrer votre produit, trouver le service après-vente agréé le plus
proche et pour acheter des pièces de rechange, des modes d’emploi ou
des accessoires, reportez-vous aux URL suivantes :
In the USA & Canada/Aux Etats-Unis & Canada
http://www.pioneerelectronics.com
S018_B1_EnFr_PSV
© 2013 PIONEER CORPORATION.
All rights reserved.
© 2013 PIONEER CORPORATION.
Tous droits de reproduction et de traduction réservés.
PIONEER CORPORATION
1-1, Shin-ogura, Saiwai-ku, Kawasaki-shi, Kanagawa 212-0031, Japan
PIONEER ELECTRONICS (USA) INC.
P.O. BOX 1720, Long Beach, California 90801-1720, U.S.A. TEL: (800) 421-1404
K002_PSV_CU
Printed in
Imprimé
<DRB1679-C>