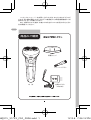
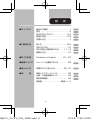
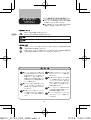
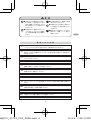
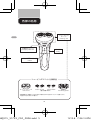
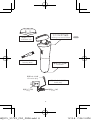
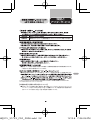
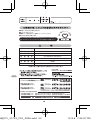
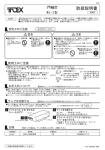
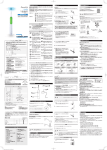
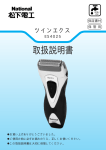
1
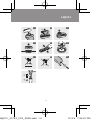
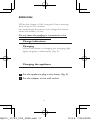
約束するものです。
提示のうえ、お買
フィリップス 電動シェーバー
品番
ィリップスエレクト
されている
「お客
理いたします。
HQ915
シ、充電アダプタを除く)
責任を明確にする
にお渡しください。
6268)
1432
タイル事業部
社
町3-3-7
話 048
(718)
3340
角1190
話 06
(6613)
3145
港中1丁目3番98号
中1丁目3番98号
始を除く)
4222.002.5404.1
取 扱 説 明 書
保証書付
保証書はこの取扱説明書の最
終ページについておりますので
販売店で記入を受けてください。
HQ915_55*99_CS2_0906.indd 1
12.9.6 7:36:11 PM
フィリップス シェーバーをお買い上げいただき、まことにありがとうござ
います。長い間ご愛用いただくために、ご使用前にこの取扱説明書をよくお
読みのうえ、正しくお使いください。
また、お読みになった後は、お使いになる方がいつでも見られるところに
必ず保管してください。
●は じ め
商品のご確認
●ご使用方
保護キャップ
●英 文 解
●廃棄につ
クリーニングブラシ
●困ったと
●保 本 体
HQ915_55*99_CS2_0906.indd 1
充電アダプタ
(HQ850)
12.9.6 7:36:12 PM
ありがとうござ
説明書をよくお
目 次
られるところに
ングブラシ
●は じ め に
商品のご確認
………………………… 1
目次
…………………………………… 2
必ずお守りください
………………… 3・4
各部の名称
………………………… 5・6
充電の仕方
…………………………… 7
●ご使用方法
使い方
……………………………… 8・9
お手入れ方法
………………………… 10
刃の交換と分解掃除の仕方
…… 11・12
保管の仕方
…………………………… 12
●英 文 解 説
Guidance
in English ………13∼27
●廃棄について
シェーバーを廃棄するとき
………… 29
●困ったとき
故障かな?
と思ったら ………… 30・31
●保 証
保証とアフターサービス
…………… 32
仕様/お客様情報センター
………… 33
無料修理規定
………………………… 34
保証書
最終ページ
……………………… ダプタ
50)
HQ915_55*99_CS2_0906.indd 2
12.9.6 7:36:12 PM
必ずお守り
ください
安 全 上 の ご 注 意
●ここに示した注意事項は、安全に関する重要
な内容ですので、必ず守ってください。
●誤った取扱いをしたときに想定される内容を
「警告」
と
「注意」
とに区分けしています。
●充電ア
きは、電
先端の
抜く。感
とがあり
●充電時
ントから
化によ
なります
記号は、
「危険、警告、注意」
を示します。
図の中や近くに具体的な注意内容を示します。
人が死亡または重傷を負う可能性が想定される内容。
人が傷害を負う可能性及び物的損害のみの発生が想定される内容。
・記号は、
してはいけない「禁止」
を示します。図の中や近くに具体的な禁止内容
(左図の場合は分解禁止)
を示します。
・記号は、必ずしていただく
「強制」
を示します。図の中や近くに具体的な強制内容
(左図の場合は電源プラグをコンセントから抜くこと)
を示します。
●シェーバー本体ならびに充電アダプ
タは分解や改造などしない。
また、修
理技術者以外の人は、分解したり
修理をしない。火災、感電、
けがの
原因となります。修理はお買い上げ
の販売店または小泉成器修理セン
ターにご相談ください。
●お手入れの際は必ず電源プラグを
コンセントから抜く。
また、濡れた手で
抜き差ししない。感電やけがをするこ
とがあります。
●充電アダプタが傷んだり、
コンセン
トの差込みが緩いときは使用しな
い。感電・ショート・発火の原因にな
ります。
HQ915_55*99_CS2_0906.indd 3
●充電アダプタを水につけたり、水を
かけたりしない。ショート・感電の原
因になります。
●充電アダプタを傷付けたり、電源
コードを無理に曲げたり、
引っ張った
り、
ねじったり、
たばねたり、重い物を
載せたり、挟み込んだり、加工したり
しない。電源コードが破損し、火災・
感電の原因となります。
●シェービングユニット部以外の水洗
いや浴室での使用は絶対にしない。
故障・感電の原因となります。
●シェーバー本体を水につけたり、水を
かけたりしない。
ショート・感電のおそ
れがあります。
1.
電動シェ
いになって
2.
充電池の
電も5∼
命が短く
3.
外刃は、
ていねい
4.
刃の着脱
5.
刃の寿命
破損した
6.
極端に高
夏場、車
7.
乳幼児の
8.
シェービン
9.
ドライヤー
ります)
。
10.
ご使用後
結露や錆
11.
充電が完
12.
充電アダ
13.
シェービン
12.9.6 7:36:13 PM
注 意
全に関する重要
ください。
想定される内容を
しています。
●充電アダプタの電源プラグを抜くと
きは、電源コード部を持たずに必ず
先端の電源プラグ部を持って引き
抜く。感電やショートして発火するこ
とがあります。
●充電時以外は、電源プラグをコンセ
ントから抜く。ケガややけど、絶縁劣
化による感電・漏電・火災の原因に
なります。
●刃は強く押さえない。破損して皮膚
を傷つけることがあります。
●ご使用の前に刃の破れや変形がな
いかを確認する。皮膚を傷つけるこ
とがあります。
●電源コネクタ受部にピンやごみを付
着させない。感電・ショート・発火の
原因になります。
される内容。
使 用 上 の ご 注 意
体的な禁止内容
1.
電動シェーバーのご使用が初めての方や、
フィリップス以外の電動シェーバーをお使
いになっていた方は、剃り方に慣れるまで2∼3週間かかることがあります。
体的な強制内容
。
2.
充電池の性能を保つため周囲の温度は、5∼35℃以内で使用してください
(尚、充
電も5∼35℃以内の環境で行ってください。低温や高温で充電すると、充電池の寿
命が短くなります)
。
3.
外刃は、薄く仕上げてありますので、刃部を強く押さえたり、硬いものに当てないよう、
ていねいに扱ってください。
4.
刃の着脱、清掃は必ずスイッチを切ってから行ってください。
5.
刃の寿命は使い方やヒゲの状態により異なりますので切れ味が衰えてきたり、刃が
破損した場合は、必ず新しい刃と交換してください。
6.
極端に高温または低温の場所、直射日光の当たる場所には保管しないでください。
夏場、車の中に放置しないでください。
につけたり、水を
ート・感電の原
付けたり、電源
たり、
引っ張った
ねたり、重い物を
だり、加工したり
が破損し、火災・
す。
部以外の水洗
は絶対にしない。
なります。
につけたり、水を
ート・感電のおそ
7.
乳幼児の手の届かないところに保管してください。
8.
シェービングユニット部についてはなるべく使用の都度掃除をしてください。
9.
ドライヤーやファンヒーター等で乾燥しないでください
(部品の変形・故障の原因にな
ります)
。
10.
ご使用後は、湿気の少ない所に保管してください
(浴室などに放置すると本体内部で
結露や錆が発生して故障の原因になります)
。
11.
充電が完了したら電源プラグを抜いてください。
12.
充電アダプタは付属の専用アダプタを使用してください。
13.
シェービングユニット部の水洗いは約一週間に一度が目安となります。
HQ915_55*99_CS2_0906.indd 4
12.9.6 7:36:13 PM
各部の名称
シェービング
ユニット
Shaving unit
充電表示ランプ
保護キャッ
Protection c
本 体
Charging indicator
Body
ON/OFFスイッチ
Switch
クリーニング
Cleaning
電源
Co
シェービングユニット分解部品
ユニットフレーム
Unit frame
外 刃
Cutter guard
内 刃
Cutter blade
(替刃品番HQ56)
保持板
電源プラ
Retaining plate
Plug
分解掃除される場合は、内刃と外刃の組み合わせを変えないようにご注意ください。
※替刃は内刃と外刃で1組です。
HQ915_55*99_CS2_0906.indd 5
12.9.6 7:36:14 PM
ェービング
ユニット
having unit
保持板
aining plate
シェービングユニット
リリースボタン(裏面)
保護キャップ
Shaving unit release button
Protection cap
クリーニングブラシ
Cleaning brush
電源コネクタ受部
Connector
電源コネクタ部
Connector plug
充電アダプタ
(HQ850)
Power plug
電源プラグ部
Plug
電源コード部
Cord
ください。
HQ915_55*99_CS2_0906.indd 6
12.9.6 7:36:14 PM
充電の仕方
初めてお使いの時や半年以上使われなかった
ときは、連続24時間の充電を行ってください。
充電開始後数分間、本体の充電中の表示が
点灯しないことがありますが、
そのまま充電する
と充電表示ランプが点灯します。
初めてお使いの
ときは、連続24
充電開始後数分
点灯しないことが
と充電表示ランプ
通常の充電時間は8時間です。
電源コネクタ部を本体につ
ないで、
ご家庭のコンセント
から充電してください。
●肌が乾いた状
●ほこりなどで肌
●ご使用の前に
(外刃に破れや
●ヒゲ剃り以外の
*目安として満充電で約30分間
(1日3分のご使
用で約10日間)
ご使用できます。
*ヒゲの濃さ、肌へ当てる力、周囲の温度により
使用日数は異なります。
• 充電残量が少なくなると、モーターの
回転が遅くなり運転がストップします。
• 充電完了表示はありません。
通常の充
1
保護キャップ
保護シール
2
スイッチを押
電源をONに
3
刃を肌に軽
円を描くよう
シェーバー充電中は、緑色の充電
ランプが点灯します。充電が完了
しても、
充電ランプは点灯のままです。
ポイント
●充電・ご使用中、
テレビ等に雑音が入る場合、別のコンセントで充電してください。
●充電・ご使用中は本体・充電アダプタが多少熱くなりますが、異常ではありません。
●充電池の寿命は使用・保管などの状態により大きく変化します。
●当社専用の充電アダプタ
(HQ850)
以外での充電はしないでください。
●長期間使用しない場合や、使ったり使わなかったりして保管しておく
と充電池が過放電か液漏れして使えなくなります。
●本製品を24時間以上電源に接続したままにしないでください。
HQ915_55*99_CS2_0906.indd 7
ご注意: スイッ
部品の
12.9.6 7:36:16 PM
上使われなかった
を行ってください。
充電中の表示が
そのまま充電する
す。
初めてお使いの時や半年以上使われなかった
ときは、連続24時間の充電を行ってください。
充電開始後数分間、本体の充電中の表示が
点灯しないことがありますが、
そのまま充電する
と充電表示ランプが点灯します。
時間です。
●肌が乾いた状態でご使用ください。
●ほこりなどで肌が汚れている場合、
ふきとってからご使用ください。
●ご使用の前に外刃の破れや変形がないか確認してください。
(外刃に破れや変形があると皮膚を傷つける原因になります)
●ヒゲ剃り以外の目的
(頭髪など)
には、使用しないでください。
1
保護キャップをはずし、
保護シールをはがします。
4
剃り終わったら、
スイッチを押して
電源をOFFにします。
2
スイッチを押して、
電源をONにします。
5
ご使用後はなるべくクリーニング
ブラシで刃を掃除してください。
6
シェービングヘッドの破損を防ぐ
ため、保護キャップをかぶせます。
は、緑色の充電
す。充電が完了
は点灯のままです。
してください。
はありません。
使い方
通常の充電時間は8時間です。
※保護キャップの耳の部分でリリースボタ
ンを覆うようにしてください。
3
刃を肌に軽く押しあて、
円を描くように動かしながら剃ります。
しないでください。
て保管しておく
ください。
ご注意: スイッチONの状態でシェービングユニットの開閉をしないでください。
部品の破損や故障の原因となります。
HQ915_55*99_CS2_0906.indd 8
12.9.6 7:36:16 PM
HQ915_55*99_CS2_0906.indd 9
12.9.6 7:36:17 PM
HQ915_55*99_CS2_0906.indd 10
12.9.6 7:36:18 PM
HQ915_55*99_CS2_0906.indd 11
12.9.6 7:36:19 PM
HQ915_55*99_CS2_0906.indd 12
12.9.6 7:36:19 PM
English
1
2
3
4
5
6
7
8
9
10
11
12
HQ915_55*99_CS2_0906.indd 13
13
12.9.6 7:36:24 PM
HQ915
13
14
15
16
17
18
19
20
21
22
HQ915_55*99_CS2_0906.indd 14
14
12.9.6 7:36:27 PM
English
English
introduction
Congratulations on your purchase and welcome
to Philips! To fully benefit from the support that
Philips offers, register your product at www.philips.
com/welcome.
-
important
Read this user manual carefully before you use the
appliance and save it for future reference.
-
-
-
-
Warning
This appliance is not intended for use by
persons (including children) with reduced
physical, sensory or mental capabilities, or lack
of experience and knowledge, unless they
have been given supervision or instruction
concerning use of the appliance by a person
responsible for their safety.
Children should be supervised to ensure that
they do not play with the appliance.
Caution
Use and store the appliance at a temperature
between 5°C and 35°C.
HQ915_55*99_CS2_0906.indd 15
-
-
-
The sh
approv
safely c
Be care
water i
hands.
This w
in the s
Do no
Make s
adapte
figure)
Comp
This Ph
standar
(EMF).
instruc
is safe
availabl
Charg
When you
or after a lo
continuous
approx. 8 h
15
12.9.6 7:36:27 PM
welcome
ort that
ww.philips.
ou use the
e.
e by
uced
es, or lack
they
uction
person
sure that
mperature
English
English
-
-
The shaver complies with the internationally
approved IEC safety regulations and can be
safely cleaned under the tap (Fig. 1).
Be careful with hot water. Always check if the
water is not too hot, to avoid burning your
hands.
This washable shaver is not suitable for shaving
in the shower.
Do not immerse the shaver in water (Fig. 2).
Make sure the adapter does not get wet (your
adapter may differ from the one shown in the
figure) (Fig. 3).
Compliance with standards
This Philips appliance complies with all
standards regarding electromagnetic fields
(EMF). If handled properly and according to the
instructions in this user manual, the appliance
is safe to use based on scientific evidence
available today.
Charging
When you charge the shaver for the first time
or after a long period of disuse, let it charge
continuously for 24 hours. Charging normally takes
approx. 8 hours.
HQ915_55*99_CS2_0906.indd 16
16
12.9.6 7:36:27 PM
English
English
When the shaver is fully charged, it has a shaving
time of up to 30 minutes.
For optimal performance, only charge the shaver
when the battery is low.
Do not leave the appliance connected to the
mains for more than 24 hours.
The ch
applian
Note: Charg
more than
3 Remov
pull the
the bat
Charge indications
Charging
When the shaver is charging, the charging light
lights up green continuously (Fig. 4).
-
,
Using
The shaver
mains.
1 Remov
2 Press t
shaver
-
3 Move t
Charging the appliance
both st
Note: Shavi
1 Put the appliance plug in the shaver (Fig. 5).
2 Put the adapter in the wall socket.
HQ915_55*99_CS2_0906.indd 17
Note:Your s
accustomed
4 When
off but
17
12.9.6 7:36:28 PM
English
English
shaving
e shaver
o the
rging light
(Fig. 5).
,
The charging light goes on to indicate that the
appliance is charging (Fig. 4).
Note: Charge the shaver for at least 8 hours but not
more than 24 hours.
3 Remove the adapter from the wall socket and
pull the appliance plug out of the shaver when
the battery is fully charged.
Using the appliance
The shaver cannot be used directly from the
mains.
1 Remove the protection cap.
2 Press the on/off button to switch on the
shaver (Fig. 6).
3 Move the shaving heads over your skin. Make
both straight and circular movements (Fig. 7).
Note: Shaving on a dry face gives the best results.
Note:Your skin may need 2 or 3 weeks to get
accustomed to the Philips shaving system.
4 Whenyouhavefinishedshaving,presstheon/
off button again to switch off the appliance.
HQ915_55*99_CS2_0906.indd 18
18
12.9.6 7:36:28 PM
English
English
5 Clean the shaver after every use (see chapter
‘Cleaning’).
6 Put the protection cap on the shaver to
prevent damage to the shaving heads (Fig. 8).
Note: Make sure that the lug of the protection cap
covers the release button.
Cleaning
Never use scouring pads, abrasive cleaning agents
or aggressive liquids such as petrol or acetone to
clean the appliance.
After
chamb
1 Switch
from th
plug ou
2 Rinse t
hot tap
3 Press t
shaving
off the
Be careful with hot water. Always check if the
water is not too hot, to avoid burning your hands.
4 Rinse t
Regular cleaning guarantees better shaving
performance.
The easiest and most hygienic way to clean the
appliance is to rinse the shaving unit and the hair
chamber with hot water every time you have used
the appliance.
5 Rinse t
HQ915_55*99_CS2_0906.indd 19
a hot t
some t
6 Put the
shaver
Every
Note: Do no
the shaving
19
12.9.6 7:36:28 PM
e chapter
r to
s (Fig. 8).
tion cap
English
English
After every use: shaving unit and hair
chamber
1 Switchofftheshaver,removetheadapter
from the wall socket and pull the appliance
plug out of the shaver.
2 Rinse the outside of the shaving unit under a
hot tap for some time (Fig. 9).
ing agents
cetone to
3 Press the release button (1) and pull the
if the
our hands.
4 Rinse the inside of the shaving unit under
g
5 Rinse the hair chamber under a hot tap for
an the
the hair
have used
shaving unit in a straight upward movement
off the shaver (2). (Fig. 10)
a hot tap for some time (Fig. 11).
some time (Fig. 12).
6 Put the shaving unit back onto the
shaver (Fig. 13).
Every two months: shaving heads
Note: Do not use cleaning agents or alcohol to clean
the shaving heads.
HQ915_55*99_CS2_0906.indd 20
20
12.9.6 7:36:28 PM
English
English
1 Switchofftheshaver,removetheadapter
from the wall socket and pull the appliance
plug out of the shaver.
2 Press the release button and pull the shaving
unit off the shaver (Fig. 10).
3 Turn the orange wheel anticlockwise (1) and
remove the retaining frame (2) (Fig. 14).
4 Remove the shaving heads from the shaving
unit one by one (Fig. 15).
Note: Do not clean more than one cutter and
guard at a time, since they are all matching sets.
If you accidentally mix up the cutters and guards,
it may take several weeks before optimal shaving
performance is restored.
5 Remove the guard from the cutter (Fig. 16).
6 Clean the cutter with the short-bristled side
of the brush. Brush carefully in the direction
of the arrows (Fig. 17).
7 Clean the guard with the brush (Fig. 18).
8 Put the shaving heads back into the shaving
unit.
HQ915_55*99_CS2_0906.indd 21
9 Put the
unit an
10 Put the
-
storag
Put the
to prev
Note: Make
covers the r
Repla
Replace the
optimal sha
Replace da
Philips HQ
For instruc
heads, see
heads’ in ch
-
Enviro
Do no
norma
but han
21
12.9.6 7:36:29 PM
English
English
dapter
pliance
e shaving
e (1) and
14).
shaving
nd
g sets.
guards,
having
(Fig. 16).
stled side
direction
. 18).
shaving
9 Put the retaining frame back into the shaving
unit and turn the orange wheel clockwise.
10 Put the shaving unit back onto the shaver.
-
storage
Put the protection cap on the shaver after use
to prevent damage to the shaving heads (Fig. 8).
Note: Make sure that the lug of the protection cap
covers the release button.
Replacement
Replace the shaving heads every two years for
optimal shaving results.
Replace damaged or worn shaving heads with
Philips HQ56 shaving heads.
For instructions on how to remove the shaving
heads, see section ‘Every two months: shaving
heads’ in chapter ‘Cleaning’.
-
Environment
Do not throw away the appliance with the
normal household waste at the end of its life,
but hand it in at an official collection point for
HQ915_55*99_CS2_0906.indd 22
22
12.9.6 7:36:29 PM
English
English
-
recycling. By doing this, you help to preserve
the environment (Fig. 19).
The built-in rechargeable battery
contains substances that may pollute the
environment. Remove the battery before you
discard and hand in the appliance at an official
collection point. Dispose of the battery at an
official collection point for batteries. If you have
trouble removing the battery, you can also take
the appliance to a Philips service centre. The
staff of this centre will remove the battery for
you and will dispose of it in an environmentally
safe way (Fig. 20).
Removing the rechargeable battery
Only remove the rechargeable battery when it is
completely empty.
1 Make sure the appliance is disconnected from
the mains.
2 Let the shaver run until it stops.
3 Undo the screw at the bottom of the
shaver (Fig. 21).
HQ915_55*99_CS2_0906.indd 23
4 Remov
remov
Do not co
after you h
guara
If you need
a problem,
philips.com
Centre in y
in the worl
Consumer
local Philips
guara
The shavin
not covere
guarantee b
Troub
This chapte
problems y
appliance. I
with the in
Care Centr
23
12.9.6 7:36:30 PM
reserve
the
fore you
an official
ry at an
f you have
n also take
tre. The
attery for
onmentally
ttery
when it is
cted from
he
English
English
4 Remove the battery compartment (1) and
remove the battery (2) (Fig. 22).
Do not connect the shaver to the mains again
after you have removed the battery.
guarantee & service
If you need service or information or if you have
a problem, please visit the Philips website at www.
philips.com or contact the Philips Consumer Care
Centre in your country (you find its phone number
in the worldwide guarantee leaflet). If there is no
Consumer Care Centre in your country, go to your
local Philips dealer.
guarantee restrictions
The shaving heads (cutters and guards) are
not covered by the terms of the international
guarantee because they are subject to wear.
Troubleshooting
This chapter summarises the most common
problems you could encounter with the
appliance. If you are unable to solve the problem
with the information below, contact the Consumer
Care Centre in your country.
HQ915_55*99_CS2_0906.indd 24
24
12.9.6 7:36:30 PM
English
English
Problem
Possible cause
Solution
The
shaver
does not
shave as
well as it
used to.
The shaving
heads are
dirty.
Clean the shaving
heads thoroughly
before you
continue shaving
(see chapter
‘Cleaning’).
Long
hairs obstruct
the shaving
heads.
Clean the cutters
and guards properly
with the brush
supplied (see
chapter ‘Cleaning’).
The shaving
heads are
damaged or
worn.
Replace the shaving
heads (see chapter
‘Replacement’).
The battery
is low.
Recharge the
shaver (see chapter
‘Charging’).
HQ915_55*99_CS2_0906.indd 25
Problem
The
shaver
does not
go on
when I
press the
on/off
button.
My skin is
irritated
after
shaving.
25
12.9.6 7:36:30 PM
shaving
oughly
u
having
er
cutters
properly
rush
ee
eaning’).
e shaving
chapter
ent’).
English
English
Problem
Possible cause
Solution
The
shaver
does not
go on
when I
press the
on/off
button.
The battery is
empty.
Recharge the
shaver (see chapter
‘Charging’).
My skin is
irritated
after
shaving.
Your skin
needs time
to get used
to the Philips
shaving
system.
Skin irritation
during the first
2-3 weeks of use is
normal. After this
period, the skin
irritation usually
disappears.
he
e chapter
.
HQ915_55*99_CS2_0906.indd 26
26
12.9.6 7:36:30 PM
English
English
Problem
Possible cause
Solution
The
appliance
becomes
warm
during
charging.
This is normal.
No action required.
HQ915_55*99_CS2_0906.indd 27
27
12.9.6 7:36:30 PM
required.
HQ915_55*99_CS2_0906.indd 28
28
12.9.6 7:36:31 PM
HQ915_55*99_CS2_0906.indd 29
故障かな?
だんだん切
悪くなっ
充電しても
時間が極端
29
12.9.6 7:36:32 PM
故障かな?
と思ったら
故障かな?と思ったら、お調べください。
だんだん切れ味が
悪くなった
●シェービングユニット部が汚れていません
か?
●外刃と内刃が損傷または摩耗していません
か?
損傷または摩耗しているときは、刃を交換してく
ださい。
(交換用替刃品番:HQ55 有料となります)
●ヒゲが 引っ張られ痛 みを感じる場 合 は、
シェーバーを肌から少し浮かして長いヒゲ
をカットしてから肌に軽く当てて剃ってくだ
さい。
充電しても使用
時間が極端に短い
充電でき
●外刃と内刃の間に長い毛が入り込んでいた
り、内刃に皮脂がこびりついていませんか?
P.10「お手入れ方法」、P.11「刃の交換と分
解掃除の仕方」の項をお読みいただき、掃除を
してください。
スイッチを
作動し
●シェーバーが完全に止まるまで作動させて
からもう一度8時間以上の充電をしてくだ
さい。
●満充電後の使用時間が3分の2程度になっ
たら、充電池の交換時期です。お買い求め
の販売店へ充電池の交換を依頼してくださ
い(有料となります)
。
HQ915_55*99_CS2_0906.indd 30
以上の処置
トで点検を
せ願います
12.9.6 7:36:33 PM
な?
たら
ていません
充電できない
込んでいた
ませんか?
の交換と分
だき、掃除を
●充電アダプタの電源コードが断線していま
せんか?
新しい充電アダプタをお買い求めください。
保証期間
対象部分
●充電アダプタの電源プラグ部はコンセント
にきちんと差し込まれていますか?
本体の電源コネクタ受部に充電アダプタの
コードがきちんと差し込まれていますか?確認し
てください。
ていません
を交換してく
となります)
る場 合 は、
て長いヒゲ
て剃ってくだ
スイッチを押しても
作動しない
●充電はしましたか?
連続24時間の充電をしてください。
●修理によって
ご希望により
作動させて
電をしてくだ
程度になっ
。お買い求め
頼してくださ
以上の処置により正常な状態に戻らない場合は、本体と充電アダプタをセッ
トで点検を、お買い求めの販売店または小泉成器修理センターへお問い合わ
せ願います。
HQ915_55*99_CS2_0906.indd 31
●本製品の保証
Philips Consume
The Netherlands
【お客様の個人
●お受けしまし
ホームページ
扱いについ
12.9.6 7:36:35 PM
断線していま
めください。
保証と
アフターサービス
●本体にさわる
●こげくさい臭
●電源コード部
●その他の異常
保証期間
お買上げ日から2年間
対象部分
本体(刃、ユニットフレーム、保持板、保護キャップ、クリーニングブラシ、充電アダプタを除く)
このような症状
電アダプタをコ
はコンセント
すか?
電アダプタの
ますか?確認し
品
い。
ダプタをセッ
へお問い合わ
電
源
方
消
費
電
定
格
電
本
体
質
充
電
時
替 刃 の
●修理によって商品の機能が維持できる場合は、
補修用性能部品の保有期間内であれば、
ご希望により有料で修理させていただきます。
※
●本製品の保証は海外においても有効です。
(同シリーズ製品の取り扱いがある国に限ります)
製品に関するお
Philips Consumer Lifestyle Service Department P.O.Box 20100 9200 CA DRACHTEN
The Netherlands Fax:+31 51 259 2785
【お客様の個人情報のお取り扱いについて】
修理に関するお
●お受けしましたお客様の個人情報は、株式会社フィリップスエレクトロニクスジャパンの
ホームページ http://www.philips.co.jp/ に掲載されている
「お客様の個人情報の取り
扱いについての当社の方針」
に基づき適切に管理いたします。
HQ915_55*99_CS2_0906.indd 32
フィリップスお
小泉成器修
部品に関するお
小泉成器部
■ ナビダイヤル
小泉成器東日本
小泉成器西日本
12.9.6 7:36:36 PM
期間内であれば、
ニクスジャパンの
の個人情報の取り
1.取扱説明書、本
故障した場合に
このような症状の時は、故障や事故防止のため、スイッチを切り、充
電アダプタをコンセントから外して、必ず販売店にご相談ください。
番
HQ915
電
源
方
式
充電式
(専用充電アダプタHQ850使用)
消
費
電
力
1.2W
定
格
電
圧
AC100-240V
(50/60Hz)
本
体
質
量
155g
充
電
時
間
8時間
替 刃 の 品 番
HQ56
品
※改良の為、仕様を予告なく変更することがあります。
フィリップス
コンシューマー ライフスタイル事業部
ある国に限ります)
DRACHTEN
シェーバー
用の
を!
点検
の
、充電アダプタを除く)
●本体にさわると時々電気を感じる。
●こげくさい臭いがする。
●電源コード部を動かすと通電したり、
しなかったりする。
●その他の異常、
故障がある。
長年ご
使
証と
サービス
製品に関するお問い合わせ:
ナビダイヤル
(全国共通番号)
修理に関するお問い合わせ:
ナビダイヤル
(全国共通番号)
部品に関するお問い合わせ:
ナビダイヤル
(全国共通番号)
フィリップスお客様情報センター
小泉成器修理センター
小泉成器部品センター
■ ナビダイヤルにかからない時は
小泉成器東日本修理センター 電話 048(718)3340 〒344-0127 埼玉県春日部市水角1190
小泉成器西日本修理センター 電話 06(6613)3145 〒559-0033 大阪市住之江区南港中1丁目3番98号
HQ915_55*99_CS2_0906.indd 33
*お客様にご記入
びその後の安全
い。また個人情
http://www.ph
ての当社の方針
12.9.6 7:36:37 PM
シェーバー
用の
を!
点検
の
使
無料修理規定
1.取扱説明書、本体貼付ラベル等の注意書に従った正常な使用状態で保証期間内に
故障した場合には、無料修理します。
0使用)
)
ます。
ライフスタイル事業部
角1190
南港中1丁目3番98号
*お客様にご記入いただいた個人情報
(保証書の控え)
は保証期間内のサービス活動及
びその後の安全点検活動のために利用させていただく場合がございます。
ご了承くださ
い。また個人情報は、株式会社フィリップスエレクトロニクスジャパンのホームページ
http://www.philips.co.jp/ に掲載されている
「お客様の個人情報の取り扱いについ
ての当社の方針」
に基づき適切に管理いたします。
HQ915_55*99_CS2_0906.indd 34
12.9.6 7:36:38 PM
フィリップス 電動シェーバー保証書
フィリップス 品番
この保証書は、
「無料修理規定」記載内容で無料修理を行うことをお約束するものです。
お買い上げの日から下記期間中に故障が発生した場合は、本書をご提示のうえ、お買
い上げの販売店に修理をご依頼ください。
お客様にご記入いただいた個人情報
(保証書の控え)
は、株式会社フィリップスエレクト
ロニクスジャパンのホームページhttp://www.philips.co.jp/に掲載されている
「お客
様の個人情報の取り扱いについての当社の方針」
に基づき適切に管理いたします。
HQ9
電動シェーバー
HQ915
本体(刃、ユニットフレーム、保持板、保護キャップ、クリーニングブラシ、充電アダプタを除く)
★ 保証書は再発行しませんので、大切に保管してください。
★ ご販売店様へ この保証書はお客様へのアフターサービスの実施と責任を明確にする
ものです。贈答品、記念品の場合も含めて必ず記入捺印してお客様にお渡しください。
★ 製品に関するお問い合わせ
フィリップスお客様情報センター ナビダイヤルにかからない時は
電話 06
(6261)
8230 FAX 06
(6268)
1432
ナビダイヤル(全国共通)
フィリップスコンシューマーライフスタイル事業部
日本販売代理店 小泉成器株式会社
〒541-0051 大阪市中央区備後町3-3-7
0570
(07)
6666
★ 修理に関するお問い合わせ
小泉成器修理センター
ナビダイヤル(全国共通)
0570
(09)
8888
★ 部品に関するお問い合わせ
小泉成器部品センター
ナビダイヤル(全国共通)
0570
(09)
2222
ナビダイヤルにかからない時は
小泉成器東日本修理センター 電話 048
(718)
3340
〒344-0127 埼玉県春日部市水角1190
小泉成器西日本修理センター 電話 06
(6613)
3145
〒559-0033 大阪市住之江区南港中1丁目3番98号
ナビダイヤルにかからない時は
電話 06
(6613)
3211
〒559-0033 大阪市住之江区南港中1丁目3番98号
取 扱
受付時間:平日9:00∼17:30 (土・日・祝日・夏期休暇・年末年始を除く)
HQ915_55*99_CS2_0907.indd 4
4222.002.5404.2
保証書付
12.9.7 1:48:16 PM