1
S252
BSBS252-A1010
I N S T R U C T I O N S
S252 歩数計機能つき
R-1
全国共通フリーダイヤル
0120-612-911
お客様相談室
〒100-0005 東京都千代田区丸の内 3-1-1 国際ビル
〒550-0013 大阪市西区新町 1-4-24 大阪四ツ橋新町ビルディング
本社 〒105-8467 東京都港区虎ノ門 2-8-10
http://www.seiko-watch.co.jp/
この度は弊社製品をお買い上げいただき、
誠にありがとうございました。
ご使用の前にこの説明書をよくお読みの上、
正しくご愛用くださいますよう、お願い申し上げます。
なお、この説明書はお手元に保管し、必要に応じてご覧ください。
※ 金属バンドの調整は、お買い上げ店にご依頼ください。
ご贈答、ご転居などにより、お買い上げ店での調整が受けられない場合は、
弊社お客様相談窓口へご依頼ください。お買い上げ店以外では有料もしくは
お取扱いいただけない場合があります。
※ お買い上げ時の電池は、機能や性能を検査するための電池(モニター電池)
です。保証期間内でも電池交換は有料となります。
目次
2
製品取扱上のご注意……………………………………………………………………4
本商品の特長
●各部の名称とおもな役割 ………………………………………………………8
● 5 つの機能について ……………………………………………………………9
●歩数計測機能について ……………………………………………………… 12
まず最初に
●個人データを入力しましょう ……………………………………………… 14
さあ、歩いて歩数を測ってみましょう!
●「TIME 時刻表示」での歩数計測について ………………………………… 21
●「WALK 歩数計測表示」での歩数計測について ………………………… 23
過去データの見かた
●「DAY 日別記録表示」について …………………………………………… 27
●「WEEK 週別記録表示」について ………………………………………… 29
●記録のクリア(消去)について …………………………………………… 33
「TIME 時刻表示」
(時計機能)について
●表示の見かた ………………………………………………………………… 34
●内部照明(LED)機能について …………………………………………… 34
●時刻の修正方法について …………………………………………………… 35
システムリセットについて ……………………………………………………
困ったときは?(故障かな?と思ったら)
●歩数計測について ……………………………………………………………
●その他 …………………………………………………………………………
液晶パネルの交換 ………………………………………………………………
電池についてのお願いとご注意 ………………………………………………
お手入れについて……………………………………………………………………
性能と型式について…………………………………………………………………
防水性能について……………………………………………………………………
バンドについて………………………………………………………………………
ルミブライトについて………………………………………………………………
アフターサービスについて…………………………………………………………
製品仕様………………………………………………………………………………
38
39
41
42
42
44
44
45
47
49
50
51
3
製品取扱上のご注意
注意
取り扱いを誤った場合に、軽症を負う危険性や物質的損害をこうむることが想定されることを示します。
警告
・以下の場所での携帯・保管は避けてください
取り扱いを誤った場合に、重症を負うなどの重大な結果になる危険性が想定されることを示します。
・次のような場合、ご使用を中止してください
○時計本体やバンドが腐食などにより鋭利になった場合
○バンドのピンが飛び出してきた場合
※ すぐに、お買い上げ店・弊社お客様相談窓口にご連絡ください。
・乳幼児の手の届くところに、時計本体や部品・電池を置かないでください
部品や電池を乳幼児が飲み込んでしまうおそれがあります。
万が一飲み込んだ場合は、身体に害があるため、ただちに医師にご相談ください。
・時計から電池を取り出さないでください
電池の交換には専門知識・技能が必要ですので、お買い上げ店にご依頼ください。
電池は充電しないでください。
破裂・発熱・液漏れ・破損などのおそれがあります。
○揮発性の薬品が発散しているところ(除光液などの化粧品、防虫剤、シンナーなど)
○ 5℃∼ 35℃から外れる温度に長期間なるところ
○高湿度なところ
○磁気や静電気の影響があるところ
○ホコリの多いところ
○強い振動のあるところ
※ 電池が切れた状態で長時間放置しないでください。電池が漏液するおそれがあります。
・アレルギーやかぶれを起こした場合
ただちに時計の使用をやめ、皮膚科など専門医にご相談ください。
・その他のご注意
○金属バンドの調整は専門知識・技能が必要ですので、お買い上げ店にご依頼ください。
手や指などにけがをする可能性があるほか、部品を紛失する可能性があります。
○商品の分解・改造はしないでください。
○乳幼児に時計が触れないようにご注意ください。
けがやアレルギーをひき起こすおそれがあります。
○使用済み電池の処理は自治体の指示に従ってください。
○提げ時計やペンダント時計の場合、ひもやチェーンの取り扱いにご注意ください。
衣類や手・首などを傷つけたり、首を締めたりするおそれがあります。
4
5
警告
この時計はスキューバダイビングや飽和潜水には
絶対に使用しないでください
スキューバダイビングや飽和潜水用の時計に必要とされる
過酷な環境を想定した様々な厳しい検査を行っていません。
専用のダイバーズウオッチをご使用ください。
注意
水分のついたまま、りゅうずやボタンを
操作しないでください
時計内部に水分が入ることがあります。
※ 万が一、ガラス内面にくもりや水滴が発生し、長時間消えない場合は防水不良です。
お早めに、お買い上げ店・弊社お客様相談窓口にご相談ください。
水や汗、汚れが付着したままにしておくのは
避けてください
注意
直接蛇口から水をかけることは避けてください
水道水は非常に水圧が高く、日常生活用強化防水の
時計でも防水不良になるおそれがあります。
6
防水時計でもガラスの接着面・パッキンの劣化やステンレスが
さびることにより、防水不良になるおそれがあります。
入浴やサウナの際はご使用を避けてください
蒸気や石けん、温泉の成分などが防水性能の劣化を早める
ことがあります。
7
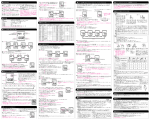
本商品の特長 ●各部の名称とおもな役割
本商品は、歩数計測機能、時計機能を備えたウオーキング用ウオッチです。
ウオーキングの結果(歩数など)は過去 12 週間分記録・呼び出しができます。本取扱説明書をよくお読みいただ
き正しくご使用くださいますようお願いいたします。
●5つの機能について
Aボタンを押すごとに、下記イラストの順番で各機能を切替えることができます。
下記のイラストは、各機能表示に切替わったときの最初の画面です。画面は約 2 秒後に各機能の内容表示に変わり
ます。
TIME
時刻表示
左右合計 4 つのボタンで操作します。
Bボタン
おもに設 定 値 の 変 更 、
歩数などの記録クリア
(消去)の役割です。
Cボタン
夜など暗いときにこの
ボタンを押すとライト
が緑に点灯します。
INPUT
個人データ入力表示
WALK
歩数計測表示
“ ”歩数計測中マーク
Aボタン
おもに各 機 能 表 示 の
切替えの役割です。
8
Dボタン
おもに歩行計測機能の
O F F(オフ)設 定や 表
示切替えに使います。
※表示例は「TIME 時刻表示」です。
※お買い上げいただいたときには、時計本体のガラ
ス部に傷防止のための透明シールが貼ってありま
すので、はがしてからお使いください。
Aボタン
DAY
日別記録表示
WEEK
週別記録表示
●「TIME 時刻表示」と「WALK 歩数計測表示」のときに歩数が計測できる状況になっているときは上記イラスト
の「歩数計測中マーク」が点灯します。お買い上げいただいた最初の状態では、歩数計測機能が OFF(オフ)に
なっており、上記イラストの最下段部分は「OFF」表示になっています。詳しくは 12 ページの「歩数計測のし
くみ」をご参照ください。
TIME 時刻表示
WALK 歩数計測表示
2秒後
9
INPUT 個人データ入力表示
2秒後
2秒後
上段 曜日、日付(例:月曜日、17日)
中段 現在時刻(例:午前10時58分56秒)
下段 歩数(例:7,333歩)
DAY 日別記録表示
上段 STEPS(歩数の単位表示)
中段 歩数(例:7,333歩)
下段 歩行時間(例:58分)
WEEK 週別記録表示
1秒周期で切替わる
2秒後
2秒後
上段 7DAYS
(7日間合計の意味の表示)
中段 歩数(例:51,331歩)
下段 歩行距離(例:38.5キロメートル)
上段 12W(12週間合計の意味の表示)
中段 歩数(例:615,972歩)
下段 歩行距離(例:462.0キロメートル)
上段 MEMO⇔DAY(入力した日付の意味の表示)
中段 入力日付 年(例:2004年)
下段 入力日付 (例:1月1日)
●お買い上げいただいたときの最初の状態で「DAY 日別記録表示」と「WEEK 週別記録表示」の歩数の値が「0」
でない場合は、33 ページをご参照いただき、データの消去を行ってください。
10
11
●歩数計測機能について
歩数計測のしくみ
本商品は「TIME 時刻表示」と「WALK 歩数計測表示」のときにのみ、歩数を計測・表示します。
両足を交互に踏み込みながら歩くことで起こる上下振動をセンサーで感知し、歩数として計測・表示します。本商
品が地面に対して完全に水平方向になっている場合などを除けば、ほぼどのような姿勢でも歩行の振動を感知し計
測・表示できます。
●本商品はウオーキング専用です。走っているときや極端に遅い速度で歩く場合には正しく計測できません。
●座って作業する、立ち止まって本商品を装着した
手だけを動かす、などの場合は手の動きを歩数で
あると認識して計測・表示する場合があります。
このような場合には「TIME 時刻表示」と「WALK
歩数計測表示」のときにDボタンを 2 秒以上押し
つづけて計測機能を「OFF(オフ)
」にしてくだ
さい。歩数の表示部分に「OFF(オフ)」と表示
されます。歩くときだけ計測機能を働かせること
でほぼ正しく歩数を計測できます。「OFF(オフ)」
状態からまた計測を再開させるときは D ボタンを
2 秒以上押し続けてください。
Dボタン長押し
(2秒以上)
●歩き始めからしばらくの間は、動きが歩行であるかどうかを本商品が見極めている段階なので歩数を表示しませ
ん。しばらく歩きつづけるとその間の歩数を一気にまとめて表示し、その後は歩きにあわせて一歩ずつプラスで
表示していきます。
●左手に装着したときに正しく計測できるように設計してありますので、右手に装着された場合は正しく歩数を計
測・表示しない場合があります。
●本商品を左手に正しく装着しているにもかかわらず、歩数を正しく計測・表示できない場合としては以下のよう
な状況が想定されます。いずれも一歩一歩の歩行による上下振動が本商品に正しく伝わりにくい場合の例です。
※サンダル、草履などを履いている場合
※ステッキ、杖などをついて歩いている場合
※傘をさして歩いている場合
※スーパーの買い物カート、乳母車などを押しながら歩いている場合
※角度が急な坂道を登り降りしている場合
※階段を複数段とばして昇り降りしている場合
*表示例は
「WALK 歩数計測表示」です。
12
13
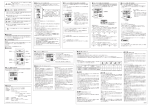
まず最初に ●個人データを入力しましょう
歩いた距離、速度、消費カロリーなどを表示するために必要なので、必ずご入力ください。入力方法は以下のとお
りです。イラストに沿って操作してください。
表示のイラストで薄くなっている箇所は、点滅表示していることをあらわしています。
点滅表示している箇所が入力設定できる箇所になります。
Bボタン長押し
(2秒以上)
① A ボタンを押して、
「INPUT 個人データ入力表示」にします。
② B ボタンを 2 秒以上押し続けて「KG 体重(キログラム)
」の入力可能状態にします。
③ A ボタンで設定する項目表示を選び、C ボタン(数値が増える)と D ボタン(数値が減る)で設定する値を決定
します。
④すべての項目の入力が終わったら B ボタンを押して入力可能状態を終了させ「INPUT 個人データ入力表示」に戻
します。
Aボタン
Aボタン
2秒後
INPUT
個人データ入力表示
体重の設定
1秒周期で切替わる
歩幅の設定
年齢の設定
各設定表示でCボタンまた
はDボタンを押すと、点滅部
の数値の加算や減算、文字を
修正できます。
Aボタン
Bボタン
Aボタン
前回個人データを入力した
日付が表示されます。
最初に行うときは、2004年
1月1日になっています。
14
歩行レベルの設定
性別の設定
15
60cm
体重の設定
歩幅のはかりかた
設定可能範囲は 20 キログラム∼ 120 キログラムとなっております。C ボタンを押すと数値が増え、D ボタンを押
すと数値が減ります。いずれも押し続けると数値が早送りされます。
つま先からつま先(または、かかとからかかと)
10
8
6
4
2
までがあなたの歩幅です。
6m
60cm
歩幅の目安は「身長− 100cm」ですが、歩き方や歩 <例>
6m(合計距離)
10歩歩いた距離が6mならば
=0.6m=60cm(平均歩幅)
く速さによって変わりますのでご注意ください。
10歩(歩数)
正確に平均歩幅を計算するには、右図のように 10 平均歩幅は60cmとなります。
歩歩き、その合計距離を 10 で割ってください。
あなたの歩幅は? (記録しておくと便利です)
その数値があなたの平均歩幅です。
Cボタン
Dボタン
Cボタンを押すと、
数値が増えます。
Dボタンを押すと、
数値が減ります。
歩幅の設定
9
7
m(合計距離)
年齢の設定
10歩(歩数)
5
3
1
= m= cm(平均歩幅)
設定可能範囲は 16 歳∼ 99 歳となっております。
C ボタンを押すと数値が増え、D ボタンを押すと数値が減ります。
いずれも押し続けると数値が早送りされます。
設定可能範囲は 30 センチメートル∼ 120 センチメートルとなっております。C ボタンを押すと数値が増え、D ボ
タンを押すと数値が減ります。いずれも押し続けると数値が早送りされます。
Cボタン
Dボタン
Cボタン
Dボタン
Cボタンを押すと、
数値が増えます。
Dボタンを押すと、
数値が減ります。
Cボタンを押すと、
数値が増えます。
Dボタンを押すと、
数値が減ります。
16
17
性別の設定
歩行レベルの設定
「LADY 女性」か「MAN 男性」の選択をします。
C ボタン、D ボタンどちらを押しても、
「LADY 女性」か「MAN 男性」かいずれかが表示されます。
Cボタン
歩行レベルを「− 1」
、「0」、
「1」のいずれかから選択していただきます。
お買い上げいただいたときの設定は「0」になっています。
通常は「0」で OK ですが、しばらくご使用いただいた結果で、歩数が少なく計測される傾向のときは「1」を、歩
数が多く計測される傾向のときは「− 1」を選択してください。
C ボタンを押すと数値が増えて「1」で停止し、D ボタンを押すと数値が減って「− 1」で停止します。
Dボタン
Cボタン
Dボタン
Cボタンを押すと、
数値が増えます。
18
Dボタンを押すと、
数値が減ります。
19
さあ、歩いて歩数を測ってみましょう! ●「TIME 時刻表示」での歩数計測について
個人データ入力の終了について
本商品は「TIME 時刻表示」と「WALK 歩数計測表示」のときに、歩数を計測・表示します。
すべての項目の設定が終了しましたら、B ボタンを押して入力可能状態を終了させて「INPUT 個人データ入力表示」
に戻してください。
どのデータの入力設定中であっても B ボタンを押すことで入力可能状態を終了させ「INPUT 個人データ入力表示」
に戻すことができます。
これで設定は完了です。
A ボタンを押して「TIME 時刻表示」に
してください。この表示で左手に本商
品を装着して歩くと歩数を計測・表示
します。
Bボタン
1秒周期で切替わる
Dボタン
歩数をメインにした表示の他に、「消費
カロリー表示」、「歩行距離表示」につ
いても D ボタンで選択が可能で、いず
れも歩きながら見ることができます。
座って作業する、立ち止まって本商品
を装着した手だけを動かす、などの場
合は D ボタンを 2 秒以上押し続けて歩
数計測を「OFF(オフ)
」にしていただ
くことで歩いた歩数のみを計測表示さ
せることができます。
※入力完了後、B ボタンを押しますと、上記イラストのように入力した日付が表示された状態に戻ります。
TIME
時刻表示
Dボタン長押し
(2秒以上)
2秒後
歩数
(例:7,333歩)
※消費カロリー、歩行距離については
歩数を元に計算する目安表示です。
Dボタン
歩数表示
20
21
●「WALK 歩数計測表示」での歩数計測について
消費カロリー表示
(単位としてkcalが表示されます。)
消費カロリー
(例:246.5kcal)
A ボタンを押して「WALK 歩数計測表示」にしてください。
この表示で左手に本商品を装着して歩くと歩数を計測・表示
します。
歩数をメインにした表示では、歩行時間も表示し、この他に
「歩行速度表示」
、
「消費カロリー表示」
、
「歩行距離表示」に
ついても D ボタンで選択が可能で、いずれも歩きながら見
ることができます。
座って作業する、立ち止まって本商品を装着した手だけを動
かす、などの場合は D ボタンを 2 秒以上押し続けて歩数計
測を「OFF(オフ)
」にしていただくことで歩いた歩数のみ
を計測表示させることができます。
Dボタン長押し
(2秒以上)
Dボタン
歩行計測オフ表示
歩行距離表示
(単位としてkmが表示されます。)
WALK
歩数計測表示
Dボタン長押し
(2秒以上)
2秒後
※歩行速度、消費カロリー、歩行距離については歩数を元に
計算する目安表示です。
※歩行速度については自動車のスピードメーターのように歩
いているときにのみ表示され、止まっているときには常に
「0.0Km」の表示になります。
歩数
(例:7,333歩)
歩行時間
(例:58分)
歩数表示
歩行距離
(例:5.5km)
22
23
歩数、その他のデータの記録について
Dボタン
歩行速度
(例:5.5km/h)
歩数
(例:7,333歩)
歩行速度表示
日別の歩行記録を記憶するため、日付が変わる毎日午前 0 時に「WALK 歩数計測表示」の各記録表示は「0」にリセッ
トされます。当日の記録は午前 0 時を過ぎると前日の記録として歩数と消費カロリーを「DAY 日別記録表示」にて見
ることができるようになります。
詳しくは 27 ページ「DAY 日別記録表示について」をご参照ください。
当日の各記録データのクリア(消去)について
Dボタン
消費カロリー
「WALK 歩数計測表示」のときにはどの表示であっても、B ボタンを 3 秒以上押し続けると、当日の歩数、その他の記録
をクリア(消去)することができます。その日の歩数を「0」からやりなおしたいときなどはこの操作を行ってください。
Bボタンを3秒以上
押し続ける
(例:246.5Kcal)
Dボタン長押し
(2秒以上)
歩行計測オフ表示
歩数
(例:7,333歩)
消費カロリー表示
Dボタン
歩行距離
歩数
(例:7,333歩)
歩行距離表示
24
歩数が0になるまで
押し続けてください
Bボタンを押している間は
「CLEAR クリア」表示が点
滅します。
イラストで薄くなっている箇
所は点滅していることをあら
わしています。
(例:5.5km)
Dボタン
25
過去データの見かた ●「DAY 日別記録表示」について
本商品はウオーキングの記録を過去 7 日間分の日別記録と過去 12 週間分の週別記録として記憶し、いつでも呼び
出して見ることができます。
●手ぶれ防止のウラ技
ウオーキング中に立ち止まって本商品を見るときに、表示
を見るための腕の動きで歩数がいくつかプラスでカウント
される場合があります。
B ボタンを 1 回押すことで歩数計測を一旦止めることがで
きますので、立ち止まったときのプラスカウントが気にな
る場合は是非お試しください。
本商品は、前日を先頭に、過去 7 日間分の「歩数」
、「消
費カロリー」
、「歩行記録」を記憶しています。日付が変
わる毎日午前 0 時に、最も古い 7 日前の記録が削除され、
かわりに当日の記録が前日の記録として新たに記憶され
ます。
Bボタン
DAY
日別記録表示
Dボタン
操作方法は以下のとおりです。
1回押す
WALK
歩数計測表示
●歩行計測のしくみと注意事項については 12 ページをご参照ください。
●歩数を多く計測・表示してしまったり、少なく計測してしまう場合には、感度レベルを変更することができます。
19 ページの「歩行レベルの設定」をご参照ください。
26
① A ボタンを押して「DAY 日別記録表示」にします。
② D ボタンを押すごとに 1 日ずつ前の日の記録にさか
のぼり 7 日前まで表示させることができます。
2秒後
※各日の表示は、下段で「消費カロリー」と「歩行距離」
とを交互に表示します。
中段 直近7日間合計の歩数
(例:51,331歩)
下段 直近7日間合計の距離
(例:38.5キロメートル)
27
●「WEEK 週別記録表示」について
本商品は、今週を先頭に過去 12 週間分の「歩数」
、
「消費カロリー」
、
「歩行距離」を記憶しています。
前日の記録
週は月曜日を先頭に「何月の第何週」という考え方で記憶していきます。たとえば 8 月 30 日が 8 月としては 5 回目の
月曜日だった場合、8 月 30 日∼ 9 月 5 日までの週が、
「8 月の第 5 週」として記憶されます。
Dボタン
2日前の 3日前の 4日前の 5日前の
記録
記録
記録
記録
6日前の 7日前の
記録
記録
この例で上段の[8-5W]は「8月の第5週」をあ
らわしています。
1秒周期で切り替わる
上段 月日(例は11月17日)
中段 歩数(例は7,333歩)
下段 消費カロリーと距離と
を一秒ごとに繰り返し表示
(例:消費カロリー246.5
キロカロリー、距離5.5キロ
メートル)
今週の記録は、今週の月曜日から前日までの記録の合計となります。
Dボタン
毎日午前 0 時に当日の記録が今週の記録に加算されていくしくみになっています。
毎週日曜日深夜の午前 0 時には一番古い 12 週前の記録が削除され、かわりに新しく月曜日から始まる最新週(今週)
の記録ができます。
28
29
例:今日が9月5日(日)
とした場合、6月の第4週までのデータを記憶しています。
(表示)
6-4W
6月20日
(月)
6月21日
(火)
6月22日
(水)
6月23日
(木)
6月24日
(金)
6月25日 6月26日
(土)
(日)
8-1W
8月2日
(月)
8月3日
(火)
8月4日
(水)
8月5日
(木)
8月6日
(金)
8-2W
8月9日
(月)
8月10日
(火)
8月11日
(水)
8月12日
(木)
8月13日
(金)
8月14日 8月15日
(土)
(日)
8-3W
8月16日
(月)
8月17日
(火)
8月18日
(水)
8月19日
(木)
8月20日
(金)
8月21日 8月22日
(土)
(日)
8-4W
8月23日
(月)
8月24日
(火)
8月25日
(水)
8月26日
(木)
8月27日
(金)
8月28日 8月29日
(土)
(日)
8-5W
8月30日
(月)
8月31日
(火)
9月1日
(水)
9月2日
(木)
9月3日
(金)
8月7日
(土)
9月4日
(土)
8月8日
(日)
9月5日
(日)
日付が9月6日(月)
に変わった時点で、6月の第4週のデータは削除され、9月6日の
週の記録が「9月の第1週」=
[9-1W]
として追加されます。
30
操作方法は以下のとおりです。
① A ボタンを押して「WEEK 週別記録表示」にします。
② D ボタンを押すごとに今週を先頭に 1 週ずつ前の週の記録
にさかのぼり 11 週前まで表示させることができます。
WEEK
週別記録表示
Dボタン
※各週の表示は、下段で「消費カロリー」と「歩行距離」とを
交互に表示します。
2秒後
中段 12週間合計の歩数
(例:615,972歩)
下段 12週間合計の距離
(例:462.0キロメートル)
31
●記録のクリア(消去)について
今週の記録
Dボタン
先週の
記録
2週前の 3週前の
記録
記録
10週前の 11週前の
記録
記録
「DAY 日別記録表示」
、
「WEEK 週別記録表示」のときに B ボタンを 3 秒間以上押し続けると、日別、週別すべて
の記録を一気にクリア(消去)することができます。
家族の中で別の人が使う場合などで、過去の記録を消したいときにこの操作により記録を消してください。
B ボタンを押し続けると上段が「ALL オール」→「CLEAR クリア」と順に表示され、日別、週別の記録すべてを
消去し、「INPUT 個人データ入力表示」の体重設定入力の状態(16 ページで使いかたをご参照ください)に表示が
自動的に切替わります。
Bボタンを3秒以上
押し続ける
1秒周期で切り替わる
上段 月日(例は5月第3週)
中段 歩数(例は51,331歩)
下段 消費カロリーと距離と
を一秒ごとに繰り返し表示
(例:消費カロリー1725.4
キロカロリー、距離38.5キロ
メートル)
Bボタンを押している間は「
CLEARクリア」表示が点滅
します。
イラストで薄くなっている箇
所は点滅していることをあら
わしています。
Dボタン
体重設定入力の状態になる
まで押し続けてください。
●別な人が使う場合は、
まず新たな使用者のかたの個人データをきちんと入れ直していただく必要があることから
「INPUT
個人データ入力表示」の入力の状態に切替わります。入力方法については 14 ページ∼ 20 ページをご参照ください。
●日別記録の一部、週別記録の一部だけをクリア(消去)することはできません。
32
33
「TIME 時刻表示」
(時計機能)について ●表示の見かた
本商品の時計機能は、現在時刻の他に日・曜日・歩数(または消費カロリー、歩行距離)を見やすく一括表示します。
また、年・月・日についてはうるう年の 2 月も含めて月末の修正が不要なフルオートカレンダー機能を搭載してあります。
A ボタンを押して、
「TIME 時刻表示」にしてください。
約 2 秒経過すると下記イラストのとおり日・曜日・歩数(または消費カロリー、歩行距離)と現在時刻がすべて表
示されます。ウオーキング以外の日常生活でお使いいただく表示として最適です。
2秒後
上段 曜日、日付(例:月曜日、17日)
中段 現在時刻(例:午前10時58分56秒)
下段 歩数(例:7,333歩)
●内部照明(LED)機能について
C ボタンを押すと内部照明が約 3 秒間点灯します。
夜など暗くて表示が見にくいときにお使いくださ
「TIME 時刻表示」
い。(C ボタンによる内部照明は、
以外でも修正時や設定時などを除いてすべての表示
で機能します。
)
※発光ダイオード(LED)の光を導光板により、均
一に拡散発光させる方式を採用しています。
※電池寿命切れが近づいて電圧が低下すると、輝度
34 (明るさ)が低下します。
●時刻の修正方法について
① A ボタンを押して「TIME 時刻表示」にします。
② B ボタンを 2 秒以上押し続けると上段に年、下段に月・
日が表示され秒が点滅して修正が可能になります。
③ A ボタンを押して修正箇所を選択し、C ボタン(数値が
増える)と D ボタン(数値が減る)を使って時刻を修正
します。
④修正が完了したところで B ボタンを押すと元の「TIME
時刻表示」に戻ります。
修 正 が 途 中 で あ っ て も B ボ タ ン が 押 さ れ る と 表 示 は
「TIME 時刻表示」に戻ります。
(ある修正箇所が点滅している状態で操作をしないで放置
しておいた場合でも数分すると元の「TIME 時刻表示」に
戻ります。)
TIME
時刻表示
Bボタン長押し
(2秒以上)
2秒後
Bボタン
表示のイラストで薄くなっている箇所は、点滅表示してい
ることをあらわしています。点滅表示している箇所が入力
設定できる箇所になります。
Cボタン
3秒間点灯
35
秒修正
C ボタン、D ボタンのどちらを押しても、30 秒未満であれば単に 0 秒に戻り、30 秒以上であれば分を 1 分繰り上げて
0 秒に修正します。テレビや電話の時報を聞きながら合わせると正確に合わせることができます。
Aボタン
分修正、時修正、日修正、月修正、年修正
Aボタン
秒修正
分修正
Aボタン
時修正
各設定表示で、Cボタンを
押すと加算、Dボタンを押
すと減算で数値を修正で
きます。
Aボタン
C ボタンを押すと、数値が増え、D ボタンを押すと数値が減る方向で修正できます。尚、曜日は年月日が決まれば自動
的に設定されますので修正箇所として出てきません。
●日付を変更されますと、過去の日別、週別の歩行記録データは整合性がなくなってしまいますのでご了承ください。
12 時間制/ 24 時間制表示選択
12時間制/
24時間制表示選択
月修正
年修正
日修正
Aボタン
Aボタン
C ボタン、D ボタンのどちらを押しても、
「12H 12 時間制」か「24H 24 時間制」が交互に点滅します。どちらかを選
んでください。
Aボタン
● 12 時間制表示を選択された場合、午前=「AM」、午後=「PM」と時刻表示の
左側に表示されます。お買い上げいただいたときはこの設定になっています。
24 時間制表示を選択された場合は、AM / PM マークは点灯せず、午後 1 時
= 13 時、午後 2 時= 14 時・・・と表示されます。
36
37
困ったときは?(故障かな?と思ったら) ●歩数計測について
全点灯表示について
いずれかの箇所を修正、選択しているときに A ボタン
と D ボタンを同時に押された場合、イラストのような
全点灯表示状態になります。これは、点検時などに技
術者が表示の具合を確かめるための状態で故障ではあ
りません。いずれかのボタンを押しますと「TIME 時刻
表示」に戻ります。
システムリセットについて
一時的にご使用環境の中で強い静電気を受けた場合などに表示が一部欠けるなどの異常表示となる場合があります。
下記の操作で内部 IC が初期状態にリセットされ、表示や動作が正常に戻る場合がありますのでお試しください。
A∼Dボタンを同時
に押し続ける
一旦表示が消え、
ボタンを離すと
「TIME 時刻表示」
の初期状態となり
動作を開始します。
●システムリセット操作を行いますと、入力していた個人データや日付・時刻、さらには過去の日別・週別の歩行記
録も含め、すべてのデータが消去されます。時刻・日付合わせや個人データの再入力が必要となりますのでご了承
ください。
38
Q.
A.
歩数が多く計測・表示される
Q.
A.
歩数が少なく計測・表示される
Q.
A.
Q.
A.
■歩いていないときの腕の動きが歩数として計測されている場合が想定されます。
→本書 12 ページ、
「歩数計測のしくみ」の中の「 」をご参照ください。
■お客様の歩行状態と本商品の感度レベルが合っていない場合が想定されます。
→本書 19 ページ、
「歩行レベルの設定」をご参照ください。
■お客様の歩行状態と本商品の感度レベルが合っていない場合が想定されます。
→本書 19 ページ、
「歩行レベルの設定」をご参照ください。
歩数計測・表示が合わない
■サンダルや草履などをはいて歩いている場合など、本商品に歩行振動が正しく伝わりにくい状況が想定
されます。
→本書 12 ページ、
「歩数計測のしくみ」の中の「 」をご参照ください。
歩数計測がリセット(0 にもどる)された
■午前 0 時を過ぎた時点であることが想定されます。
→午前 0 時を過ぎる時点で当日の歩行記録などは前日の記録として記憶され「WALK 歩数計測表示」に
おいては「0」にリセットされます。詳しくは本書 25 ページ、
「歩数、
その他のデータの記録について」
をご参照ください。
39
●その他
Q.
A.
Q.
A.
Q.
A.
歩数がまったく計測・表示されない
■歩き始めてからまだ間もない場合が想定されます。
→歩き始めからしばらくは、歩行による動きかどうかを本商品が見極めており、歩数表示しません。し
ばらくするとその間の分もまとめて歩数を表示します。詳しくは本書 12 ページ、
「歩数計測のしくみ」
の中の「 」をご参照ください。
■電池寿命切れ予告機能が働いており、近日中に電池寿命が切れることが想定されます。
→本書 42 ページ、
「 電池についてのお願いとご注意」をご参照いただき、電池交換を行ってください。
歩数が突然 10 ∼ 15 歩プラスで表示された
■歩き始めてからまだ間もない場合が想定されます。
→歩き始めからしばらくは、歩行による動きかどうかを本商品が見極めており、歩数表示しません。し
ばらくするとその間の分もまとめて歩数を表示します。詳しくは本書 12 ページ、
「歩数計測のしくみ」
の中の「 」をご参照ください。
歩行距離・歩行速度が合わない
■「INPUT 個人データ入力表示」における歩幅の設定があっていない場合が想定されます。
→本書 16 ページ、
「歩幅の設定」をご参照ください。
Q.
A.
表示が消えてしまった
Q.
A.
表示が点滅している
Q.
A.
内部照明がつかない
■電池寿命が切れたことが想定されます。
→本書 42 ページ、
「 電池についてのお願いとご注意」をご参照いただき、電池交換を行ってください。
■電池寿命切れ予告機能が働いており、近日中に電池寿命が切れることが想定されます。
→本書 42 ページ、
「 電池についてのお願いとご注意」をご参照いただき、電池交換を行ってください。
■電池寿命切れ予告機能が働いており、近日中に電池寿命が切れることが想定されます。
→本書 42 ページ、
「 電池についてのお願いとご注意」をご参照いただき、電池交換を行ってください。
以上の Q & A で、問題が解決しない場合は、巻末のお客様相談室にお問い合わせください。
40
41
液晶パネルの交換
この時計の液晶パネルは、7 年を過ぎますと、コントラストが低下して数字が読みにくくなることがあります。お買い
上げ店に交換をお申しつけください。実費にて申し受けます。
電池についてのお願いとご注意
電池について
(1)電池寿命
この時計は、新しい正常な電池 SB-T51(CR2032)を組み込んだ場合、その後約 2 年間作動します。
・内部照明(LED)機能の使用頻度を 1 日 3 回として計算していますので、それ以上の頻度でご使用された場合は、
2 年以内に電池寿命が切れます。
(4)電池寿命切れ予告機能
本商品には、電池の交換時期をお知らせする電池寿命切れ予告機能が付いています。電池の消耗程度に応じて二
段階でお知らせします。
・第一段階では
「TIME 時刻表示」において、すべての表示が 1 秒周期で点滅します。
この状態では C ボタンを押しても内部照明が点灯しなくなります。
・第二段階では
「TIME 時刻表示」において、すべての表示が 0.5 秒周期で点滅します。
この状態では歩数計測もできなくなります。
これらの状態になったら速やかに電池をご交換ください。
警告
(2)最初の電池
お買い上げの時計にあらかじめ組み込まれている電池は、機能・性能をみるためのモニター用です。お買い上げ後上
記の期間に満たないうちに電池寿命が切れることがありますのでご了承ください。
(3)電池交換
①電池交換は、必ずお買い上げ店または、セイコー取扱店で「セイコー純正 SB」とご指名の上、ご用命ください。
②電池寿命切れの電池をそのまま長時間放置しますと、
漏液などで故障の原因になりますので、
お早めに交換してください。
③電池交換は、保証期間内でも有料になります。
④電池交換等で裏ぶたを開閉しますと当初の防水性能を維持できなくなる場合があります。電池交換の際には、お客
様の時計の防水性能にあった防水検査をご依頼ください。
42
1.お客様は、時計から電池を取り出さないでください。
2.やむを得ずお客様が時計から電池を取り出した場合は、電池は直ちに幼児の手の届かないところに保管してください。
3.万一飲み込んだ場合は、身体に害があるため直ちに医師とご相談ください。
注意
1.破裂、発熱、発火などのおそれがありますので、電池を絶対にショート、分解、加熱、火に入れるなどしないでください。
2.この時計に使用している電池は、充電式ではないので、充電すると液漏れ、破損のおそれがあります。絶対に充電しないでください。
3.「常温(5℃∼ 35℃)からはずれた温度」下で長時間放置すると、電池が漏液したり、電池寿命が短くなることがあります。
43
お手入れについて
防水性能について
お買い上げいただいた時計の防水性能を
下記の表でご確認の上ご使用ください。
●日ごろからこまめにお手入れしてください
・ 水分や汗、汚れはこまめに柔らかい布でふき取るように心がけてください。
(「P.44」をご覧ください)
・ 海水につけた後は、必ず真水でよく洗ってからふき取ってください。
その際、直接蛇口から水をかけることは避け、容器に水をためるなどしてから洗ってください。
※「非防水」、「日常生活用防水」の場合は、おやめください。
→ 性能と型式について P.44 防水性能について P.45
裏ぶた表示
防水性能表示なし
性能と型式について
時計の裏ぶたで性能と型式の確認ができます。
防水性能
P.45
を参照ください
WATER RESISTANT
防水性能
非防水です。
WATER RESISTANT
日常生活用防水です。 WATER RESISTANT
5 BAR
日常生活用強化防水で 5 気圧防水です。
WATER RESISTANT
10(20)BAR
日常生活用強化防水で 10(20)気圧防水です。
型式番号
10BAR
お客様の時計の
種類を示す番号
S252-00A0 A0 T51
MADE IN CHINA
000000
※上の図は例であり、
お買い上げいただいた時計とは異なる場合があります。
44
45
バンドについて
バンドは直接肌に触れ、汗やほこりで汚れます。そのため、お手入れが悪いと
バンドが早く傷んだり、肌のかぶれ・そで口の汚れなどの原因になります。
長くお使いになるためには、こまめなお手入れが必要です。
●金属バンド
お取扱方法
水滴がかかったり、汗を多くかく場合には、使用しないで下さい。
日常生活での「水がかかる」程度
の環境であれば使用できます。
警告 水泳には使用しないで下さい。
水泳などのスポーツに使用できます。
空気ボンベを使用しないスキンダイビングに使用できます。
46
・
・
・
・
ステンレスバンドも水や汗・汚れをそのままにしておくと、さびやすくなります。
手入れが悪いと、かぶれやワイシャツのそで口が黄色や金色に汚れる原因になります。
水や汗・汚れは、早めに柔らかな布でふき取ってください。
バンドのすき間の汚れは、水で洗い、柔らかな歯ブラシなどで取り除いてください。
(時計本体は水にぬれないように、台所用ラップなどで保護してください。)
残った水分は柔らかな布でふき取ってください。
・ チタンバンドでも、ピン類には強度に優れたステンレスが使用されているものがあり、ステンレスからさび
が発生することがあります。
・ さびが進行すると、ピンの飛び出しや抜けが発生し、時計を脱落させてしまうことがあります。また、逆に
中留が外れなくなることがあります。
・ 万が一、ピンが飛び出している場合は、けがをするおそれがありますので、ただちに使用をやめて修理をご
依頼ください。
47
●皮革バンド
・
・
・
・
・
水や汗、直射日光に弱く、色落ちや劣化の原因になります。
水がかかったときや汗をかいた後は、すぐに乾いた布などで、吸い取るように軽くふいてください。
直接日光にあたる場所には放置しないでください。
色の薄いバンドは、汚れが目立ちやすいので、ご使用の際はご注意ください。
時計本体が日常生活用強化防水 10(20)気圧防水になっているものでも、アクアフリーバンド以外の皮革
バンドは、水泳・水仕事などでのご使用はお控えください。
●ポリウレタンバンド
・ 光で色があせたり、溶剤や空気中の湿気などにより劣化する性質があります。
・ 特に半透明や白色・淡い色のバンドは、他の色を吸着しやすく、また変色をおこします。
・ 汚れたら水で洗い、乾いた布でよくふき取ってください。
(時計本体は水にぬれないように、台所用ラップなどで保護してください。)
・ 弾力性がなくなったら取り換えてください。そのまま使い続けるとひび割れが生じバンドが切れやすくなり
ます。
かぶれやアレルギー
について
バンドサイズの
めやすについて
バンドによるかぶれは、金属や皮革が原因となるアレルギー反応や、汚れ、もしくはバ
ンドとのすれなどの不快感が原因となる場合など、いろいろな発生原因があります。
バンドは多少余裕をもたせ、通気性をよくしてご使用ください。
時計をつけた状態で、指一本入る程度が適当です。
ルミブライトについて
お買い上げの時計がルミブライトつきの場合
ルミブライトは、太陽光や照明のあかりを短時間(約 10 分間:500 ルクス以上)で吸収して蓄え、暗い
中で長時間(約 3 時間∼ 5 時間)発光します。光が当たらなくなってから輝度(明るさ)は、時間の経過
とともに弱まります。なお、光を蓄える際の光の強さや光の吸収度合いとルミブライトの面積によって、発
光する時間や見え方に差が生じます。
※ 一般的には明るい所から暗い所へ入った場合、人の目はすぐには順応しません。初めはものが見にくいですが、時間の経過と共に見やすくなっ
てきます。(目の暗順応)
※ ルミブライトは、放射能などの有害物質をまったく含んでいない環境・人に安全な蓄光(蓄えた光を放出する)塗料です。
<照度のめやすについて>
環 境
明るさ(照度)のめやす
晴れ
太陽光
くもり
晴れ
屋内(昼間窓際)
くもり
雨
1m
照明
3m
(白色蛍光灯 40W の下で)
4m
100,000 ルクス
10,000 ルクス
3,000 ルクス以上
1,000 ∼ 3,000 ルクス
1,000 ルクス以下
1,000 ルクス
500 ルクス(通常室内レベル)
250 ルクス
48
49
アフターサービスについて
●保証と修理について
・ 修理や点検調整のための分解掃除(オーバーホール)の際は、お買い上げ店、または弊社お客様相
談窓口にご依頼ください。
・ 保証期間内に不具合が生じた場合は、必ず保証書を添えてお買い上げ店へお持ちください。
・ 保証内容は保証書に記載したとおりです。
保証書をよくお読みいただき、大切に保管してください。
・ 保証期間終了後については、修理によって機能が維持できる場合には、ご要望により有料修理させ
ていただきます。
●修理用部品について
製品仕様
1.水晶振動数・・・・・
2.精度・・・・・・・・
3.作動温度範囲・・・・
4.表示体・・・・・・・
5.使用電池・・・・・・
6.電池寿命・・・・・・
7.内部照明・・・・・・
8.電子回路・・・・・・
32,768Hz(Hz = 1 秒間の振動数)
平均月差± 30 秒(気温 5℃∼ 35℃において腕につけた場合)
− 5℃∼+ 50℃ ただし表示機能については 0℃∼+ 40℃
FE(電界効果)型ネマチック液晶
小型リチウム電池 SB − T51(CR2032)
:1 個
約2年
LED(発光ダイオード)
C − MOS − LSI 1 個
※上記の製品仕様は改良のため、予告なく変更することがあります。
・ この時計の修理用部品の保有期間は、通常 7 年を基準としています。
・ 修理の際、一部代替品を使用させていただくことがありますので、ご了承ください。
●点検調整のための分解掃除(オーバーホール)について
・ 長くご愛用いただくために、3 年∼4年に 1 度程度の点検調整のための分解掃除(オーバーホール)
をおすすめします。
ご使用状況によっては、漏液により表示消えが生じることがあります。
またパッキンなどの部品の劣化が進み、汗や水分の浸入などで防水性能が損なわれる場合があります。
点検調整のための分解掃除(オーバーホール)は、
「純正部品」とご指定の上、お買い上げ店にご依
頼ください。その際、パッキンやばね棒の交換もあわせてご依頼ください。
・ 点検調整のための分解掃除(オーバーホール)の際には、ムーブメント交換となる場合もあります。
50
51
Thank you very much for choosing a SEIKO watch.
For proper and safe use of your SEIKO watch,
please read carefully the instructions in this
booklet before using.
Keep this manual handy for easy reference.
※ Length adjustment service for metallic bands is avaisable at the
retailer from whom the watch was purchased or SEIKO CUSTOMER
SERVICE CENTER.
The service may also be available on a chargeable basis at other
retailers, however, some retailers may not undertake the service.
※ The preinstalled battery is used to check the function and performance
of the watch. You will be charged for battery replacement even if the
battery runs down within the guarantee period.
Contents
54
Handling cautions …………………………………………………………………
Features
● Buttons & their function ……………………………………………………
● 5 function modes ……………………………………………………………
● Step counting function ………………………………………………………
Before first use
● How to input your personal data …………………………………………
Let’
s start walking and count your steps!
● Step counting in the TIME <current time> mode ………………………
● Step counting in the WALK <step count> mode ………………………
How to use the memory function
● How to read the DAY <daily log> mode …………………………………
● How to read the WEEK <WEEKLY log> mode …………………………
● How to delete the stored data ……………………………………………
Time <current time> mode (watch function)
● How to read the display ……………………………………………………
● Built-in illuminating (led) light ………………………………………………
● How to set the time …………………………………………………………
56
60
61
64
66
71
72
How to reset the built-in IC ……………………………………………………
Troubleshooting
● Step counting …………………………………………………………………
● Other problems ………………………………………………………………
● Liquid crystal panel …………………………………………………………
Battery change …………………………………………………………………
● Daily care ……………………………………………………………………
● Performance and type ………………………………………………………
● Water resistance ……………………………………………………………
● Band ……………………………………………………………………………
● Lumibrite ………………………………………………………………………
● After-sale service ……………………………………………………………
Specifications ……………………………………………………………………
83
84
86
87
87
88
89
90
92
94
95
96
75
76
79
80
80
81
55
Handling cautions
WARNING
To indicate the risks of serious consequences such as severe injuries unless the
following safety regulations are strictly observed.
・Immediately stop wearing the watch in following cases.
○ If the watch body or band becomes edged by corrosion etc.
○ If the pins protrude from the band
※ Immediately consult the retailer from whom the watch was purchased or SEIKO CUSTOMER SERVICE CENTER.
・Keep the watch and accessories out of the reach of babies and children.
Care should be taken to prevent a baby or a child accidentally swallowing the
accessories.
If a baby or a child swallows the battery or accessories, immediately consult a doctor,
as it will be harmful to the health of the baby or child.
・Do not remove the battery from the watch.
Replacement of the battery requires professional knowledge and skill. Please ask a
watch retailer for replacement of the battery.
Installation of an ordinary silver oxide battery can generate heat that can cause
bursting and ignition.
CAUTION
To indicate the risks of light injuries or material damages unless the following safety
regulations are strictly observed.
・Avoid wearing or storing the watch in the following places.
○ Places where volatile agents(cosmetics such as polish remover, bug repellent, thinners etc.)are
vaporizing ○ Places where the temperature drops below 5℃ or rises above 35℃ for a long time
○ Places of high humidity ○ Places affected by strong magnetism or static electricity ○ Dusty places ○ Places affected by strong vibrations
※ For watches with batteries, do not leave a dead battery compartment for a long time as
it may cause battery leakage.
・If you observe any allergic symptoms or skin irritation
Stop wearing the watch immediately and consult a specialist such as a dermatologist or an allergist.
・Other cautions
○ Replacement of the metal band requires professional knowledge and skill. Please ask a watch retailer
for replacement of the metal band, as there is a risk of hand or finger injury and fear of losing parts.
○ Do not disassemble or tamper with the watch.
○ Keep the watch out of the reach of babies and children. Extra care should be taken to avoid
risks of any injury or allergic rash or itching that may be caused when they touch the watch.
○ When disposing of used batterise, follow the instructions of your local authorities.
○ If your watch is of the fob or pendant type, the strap or chain attached to the watch
may damage your clothes, or injure the hand, neck, or other parts of your body.
56
57
WARNING
Do not use the watch in scuba diving or
saturation diving.
The various tightened inspections under simulated harsh environment, which
are usually required for watches designed for scuba diving or saturation
diving, have not been conducted on the water-resistant watch with the BAR
(barometric pressure) display. For diving, use special watches for diving.
CAUTION
Do not pour running water directly from faucet.
The water pressure of tap water from a faucet is high enough to
degrade the water resistant performance of a water resistant watch
for everyday life.
58
CAUTION
Do not turn or pull out the crown when the watch is wet.
Water may get inside of the watch.
※ If the inner surface of the glass is clouded with condensation or water droplets
appear inside of the watch for a long time, the water resistant performance of the
watch is deteriorated. Immediately consult the retailer from whom the watch was
purchased or SEIKO CUSTMER SERVICE CENTER (listed on the end of a book).
Do not leave moisture, sweat and dirt on the watch
for a long time.
Be aware of a risk that a water resistant watch may lessen its water
resistant performance because of deterioration of the adhesive on
the glass or gasket, or the development of rust on stainless steel.
Do not wear the watch while taking a bath or a sauna.
Steam, soap or some components of a hot spring may accelerate the
deterioration of water resistant performance of the watch.
59
Features ● Buttons & Their function
This watch is ideally designed for walking, featuring a step counting function. Your walking log for
the last 12 weeks, including the number of steps, can be stored in the memory and recalled on
demand. Please read the instructions carefully to ensure proper use before using the watch.
● 5 function modes
With each pressing of Button A, the display changes to each function mode in the following order.
The illustration below shows the initial display of each mode, which appears right after the display
is changed.
TIME
<current time> mode
The watch features four buttons.
Button B
Button C
To adjust preset values,
To delete walking log
To turn the illuminating light
on
WALK
<step count> mode
INPUT
<personal data input> mode
" "Step Counting Indicator
Button D
Button A
To turn the step counting
function off,
To switch the display of the
step counting function
To change function modes
※ The illustration above is the
watch in the TIME <current
time> mode.
※ Remove the protective film on
the glass of the watch before
using the watch.
Button A
DAY
<daily log> mode
WEEK
<weekly log> mode
60
● The Step Counting Indicator appears on the display as illustrated above when the watch is ready to
count the number of steps while in the TIME <current time> mode or WALK <step count> mode. In the
default setting of the watch, the step counting function is turned off, and“OFF”will appear at the bottom
of the display. For further details, refer to“MECHANISM OF STEP COUNTING FUNCTION”on page 64.
WEEK <weekly log> mode
TIME <current time> mode
After 2 seconds
61
After 2 seconds
Day of the week, date (example : Monday, 17th.)
12W (12-week total)
Number of steps (example: 615,972 steps)
Current time (example :10:58’
56”
)
Walking distance (example: 462.0 km)
Number of steps (example : 7,333 steps)
INPUT <personal data input> mode
WALK <step count> mode
After 2 seconds
MEMO DAY (date of input)
After 2 seconds
STEPS ("step count" display)
Number of steps (example : 7,333 steps)
Walking time (example :58 minutes)
Year of input (example :2004)
Date of input (example :January 1)
Switches every 1 second
DAY <daily log> mode
After 2 seconds
7 DAYS (7-day total)
Number of steps (example :51,331 steps)
Walking distance (example : 38.5km)
62
● If the watch does not show“0”in the DAY <daily log> mode or WEEK <weekly log> mode when first
turned on, it is necessary to erase the existing data. Refer to page 79 on“HOW TO DELETE THE
STORED DATA.”
63
● Step counting function
MECHANISM OF STEP COUNTING FUNCTION
This watch counts and displays the number of steps only in the TIME <current time> mode or WALK
<step count> mode.
The watch can count and display the number of steps by sensing the impact of each foot contacting the
ground as a step is taken while you are walking. The internal sensor of the watch ensures reliable operation
in almost any position except in a case that the watch is horizontally positioned against the ground.
● This watch is specially designed for walking. It may not correctly count steps if you are running
or walking at an extremely slow pace.
● The watch may count and display non-step
movements such as your arm motion while
being seated or standing still. To avoid this,
press and hold Button D for 2 seconds or more
in the TIME <current time> mode or WALK
<step count> mode to turn the step counting
function off. Make sure that“OFF”appears in
place of the number of steps on the display. By
activating the step counting function only
while walking, the watch can count the number
of steps more accurately. To turn the step
counting function on again, press and hold
Button D for 2 seconds or more.
64
Press and hold Button D
(for 2 seconds or more)
● It takes a while for the watch to recognize your movement as walking. After you walk for a while,
the watch displays the total number of steps taken up to that point, and subsequently starts to
display the number of steps by adding the number one step at a time in accordance with each
step taken.
● The watch is designed to count steps correctly if it is worn on your left wrist. It may not correctly
count and display the number of steps if it is worn on your right wrist.
● The watch may not be able to correctly count and display the number of steps in the following
conditions even though it is correctly worn on your left wrist.
※ When
※ When
※ When
※ When
※ When
※ When
you
you
you
you
you
you
are
are
are
are
are
are
wearing sandals
walking with a cane
holding an umbrella
pushing a shopping cart or baby carriage etc.
ascending or descending a steep slope
skipping stairs while ascending or descending
*The illustration shows the display
in the WALK <step count> mode.
65
Before first use ● How to input your personal data
In order to calculate the walking distance, pace and calories burned, you have to input
your personal data such as weight, stride length, age etc. The gray digits in the illustration indicate that they are flashing and adjustable.
HOW TO INPUT YOUR BODY WEIGHT
The setting range is from 20 Kg to 120 Kg.
Press Button C to increase the value and press Button D to decrease the value.
Press and hold each button to quickly increase or decrease the value.
Button C
Press and hold Button B
for 2 seconds or more
Button A
Button D
Button A
After 2 seconds
INPUT
<personal data input>
mode
BODY WEIGHT
AGE
STRIDE LENGTH
Switches every 1 second
The most recent date that
you input your personal
data is displayed.
When you first turn the watch
on, Jan. 1, 2004 appears
as the default setting.
Pressing Button C will
increase the value.
Pressing Button D will
decrease the value.
HOW TO INPUT YOUR STRIDE LENGTH
Button A
The setting range is from 30 cm to 120 cm.
Press Button C to increase the value and press Button D to decrease the value.
Press and hold each button to quickly increase or decrease the value.
Button C
By pressing Button C or
D, you can increase or decrease the value or change
characters.
SENSITIVITY LEVEL
Button C
Button D
SEX
Button B
Button D
Button A
1. Press Button A to show the INPUT <personal data input> mode.
2. Press and hold Button B to show“KG”on the display. Now the watch is in the SETTING mode.
3. Press Button A to select your input item and set the values by using Button C (to increase) or Button D (to decrease).
66 4. Upon completion of all input items, press Button B to finish the SETTING mode and return to the INPUT <personal data input> mode.
Pressing Button C will
increase the value.
Pressing Button D will
decrease the value.
67
HOW TO MEASURE YOUR STRIDE LENGTH
HOW TO INPUT YOUR AGE
The length between the toes (or heels) of your front foot and back foot as you take one normal
step is your stride length. Your approximate stride length can be calculated by subtracting 100
from your height (in cm). But this can vary widely depending on such factors as your manner of
walking or speed of walking.
To accurately calculate your stride length, simply walk 10 steps as illustrated below and measure
the distance. Then divide this distance by 10 to determine your average stride length.
The setting range is from 16 to 99.
Press Button C to increase the value and press Button D to decrease the value.
Press and hold each button to quickly increase or decrease the value.
Button C
Button D
60cm
9
10
7
8
5
6
6m
3
4
1
2
60cm
Pressing Button C will
increase the value.
<Example>
If you walk 6 meters in 10 steps, your average stride length is calculated as below.
Pressing Button D will
decrease the value.
HOW TO INPUT YOUR GENDER
6 m (total distance walked)
= 0.6 m = 60 cm (average stride length)
10 steps (number of steps taken)
Select either“LADY”or“MAN”by pressing either Button C or D.
Your average stride length is 60 cm.
Button C
How long is your stride length? (Write it down for convenience.)
m (total distance)
10 steps
(number of steps)
=
m=
Button D
cm (average stride length)
68
69
HOW TO ADJUST THE SENSITIVITY LEVEL
Select the sensitivity level among“-1,”
“0”
or“1.”
When you fi rst turn the watch on,“0”is displayed as the default setting.
If you fi nd the watch tend to undercount the
number of steps, select “1,” if the watch
tends to overcount the number of steps, select“-1”for more accurate step counting.
Press Button C to increase the sensitivity
level to“1”
, and press Button D to decrease
the sensitivity level to“-1”
.
Let’s start walking and count your steps! ● Step counting in the TIME <current time> mode
The watch can count and display the number of steps either in the TIME <current time> mode or in
the WALK <step count> mode .
Button C
Button D
Press Button A to show the TIME <current time> mode.
Wear the watch on your left wrist and start walking.
The watch starts counting and displays the number of
steps.
You can switch the display mode by pressing Button D from the "step count”display to the“calories
burned”display or to the“walking distance”display.
Pressing Button C will
increase the value.
Pressing Button D will
decrease the value.
In order to avoid false counting of non-step movement
such as arm motion while you are seated or standing
still, press and hold Button D for 2 seconds or more to
turn the step counting function off. Doing this allows
the watch to count your steps more accurately.
※ Calories burned and walking distance are calculated
based on the number of steps.
“calories burned”display
(calories are displayed in kcal)
TIME
<current time>
mode
Button D
TERMINATION OF YOUR PERSONAL DATA INPUT
Upon completion of all input items, press Button B to fi nish the SETTING mode, and return to
the INPUT <personal data Button B
Switches every 1 second
input> mode.
Doing this at any time while
setting any item can fi nish
the SETTING mode and return to the INPUT <personal
data input> mode.
All watch input settings are
※ By pressing Button B after completing all input settings, the display returns to the
now completed.
70
calories burned
(example: 246.5 kcal
Press and hold Button D
(for 2 seconds or more)
After
2 seconds
Press and hold Button D
(for 2 seconds or more)
Button D
Number of steps
(Example: 7,333 steps)
"step count" display
Step counting function
turned off
walking distance
(example: 5.5 km)
initial display which shows the input date of your personal data.
Button D
“walking distance”display
(distance is displayed in km)
71
● Step counting in the WALK <step count> mode
Press Button A to show the WALK <step count>
mode.
Wear the watch on your left wrist and start walking.
The watch starts counting and displays the number of
steps.
In order to avoid false counting of non-step movement
such as arm motion while you are seated or standing
still, press and hold Button D for 2 seconds or more to
turn the step counting function off. Doing this allows
the watch to count your steps more accurately.
In addition to the“step count”display, which shows
the walking time along with the number of steps, the
“calories burned,”
“walking distance,” and“walking
speed”displays are selectable by pressing Button D.
You can view the display while you are walking.
※ Walking speed, calories burned and walking distance are
calculated based on the number of steps.
※ The watch displays the walking speed only while you are
walking, just like a car speedometer. While you are not walking,“0.0 Km”is displayed.
“walking speed”display
walking speed
(example: 5.5 km/h)
WALK
<step count>
mode
number of steps
(example: 7,333 steps)
Button D
Press and hold Button D
for 2 seconds or more
“calories burned”display
LOCATION OF YOUR WALKING LOG
Everyday at midnight, the watch automatically transfers today’s walking log to the memory.
When this is completed, the results shown in the WALK <step count> mode are automatically
reset to“0.”
Anytime past midnight, your walking log of the day including number of steps and calories burned
can be viewed in the DAY <daily log> mode as a record of the previous day.
For further details, refer to“HOW TO READ THE DAY <DAILY LOG> MODE”on page 75.
HOW TO DELETE TODAY’S WALKING LOG
I f you press and hold Button B for 3 seconds or more in any display mode in the WALK <step
count> mode, you can completely delete today’s walking log including number of steps. If you
wish to start counting your steps of the day from“0,”this function is useful.
Press Button B for 3
seconds or more.
Button D
calories burned
(example: 246.5 kcal)
After
2 seconds
Press and hold Button D
for 2 seconds or more
Number of steps
(Example: 7,333 steps)
number of steps
(example: 7,333 steps)
Step counting function
turned off
Walking time
(Example: 58 minutes)
“walking distance”display
While holding down Button B,
“CLEAR”flashes on the display.
Digits in gray in this illustration
are flashing.
Button D
walking distance
(example: 5.5 km)
"step count" display
number of steps
(example: 7,333 steps)
72
Keep holding down Button B until“0”
appears on the display.
73
Button D
How to use the memory function ● How to read the DAY <daily log> mode
The watch can store your daily walking log for the last 7 days and weekly walking log for the last
12 weeks. The stored data can be recalled at any time on demand.
● Tips on avoiding false steps caused by jiggling of the watch
When you stop walking to view the display, the watch may add some false counts due to arm
movement in attempting to view the display. To avoid this, press Button B once to temporarily
stop the step counting function. If you wish to eliminate any false counts of non-step
movements, this function is useful.
Button B
Starting from the previous day, the watch stores in the memory the“number of steps,”
“calories
burned”and“walking distance”for the last seven days. Everyday at midnight when the date
changes, the watch automatically deletes the oldest data, which is of 7 days old, and stores
the previous day’s data in the memory as the newest data.
1. Press Button A to change the display to the DAY <daily log> mode.
2. Each time you press Button D, the watch displays the stored data day by day from the previous day back to 7 days before.
※ The display of each daily walking log will alternately show the“calories burned”and“walking distance”
at the bottom of the display.
Previous day’
s log
DAY
<daily log>
mode
Button D
Press just once
2-day old
log
3-day old
log
4-day old
log
5-day old
log
6-day old
log
7-day old
log
Button D
WALK
<step count> mode
● For further details on the step counting mechanism and precautions on using the watch, refer to
“MECHANISM OF STEP COUNTING FUNCTION”on page 64.
● If you find the watch tend to undercount or overcount the steps than are actually taken, you can
manually adjust the sensitivity level. Refer to“HOW TO ADJUST THE SENSITIVITIY LEVEL”on
page 70.
74
Switches
every
1 second
After
2 seconds
Month and date
(example: November 17)
Total number of steps
for the last 7 days
(example: 51,331 steps)
Number of steps
(example: 7,333 steps)
Total walking distance
for the last 7 days
(example: 38.5 km)
Calories burned and walking distance
appear in turn every 1 second
(example:calories burned 246.5 kcal,
walking distance 5.5 km)
Button D
75
● How to read the WEEK <weekly log> mode
Starting from the previous week, the watch stores in the memory the“number of steps,”“calories
burned”and“walking distance”for the last 12 weeks.
Example:
If today is Sunday, September 5th, the watch stores data back to the 4th week of June.
(display)
6-4W
Jun 20
(Mon.)
Jun 21
(Tue.)
Jun 22
(Wed.)
Jun 23
(Thur.)
Jun 24
(Fri.)
Jun 25
(Sat.)
Jun 26
(Sun.)
8-1W
Aug 2
(Mon.)
Aug 3
(Tue.)
Aug 4
(Wed.)
Aug 5
(Thur.)
Aug 6
(Fri.)
Aug 7
(Sat.)
Aug 8
(Sun.)
8-2W
Aug 9
(Mon.)
Aug 10
(Tue.)
Aug 11
(Wed.)
Aug 12
(Thur.)
Aug 13
(Fri.)
Aug 14
(Sat.)
Aug 15
(Sun.)
8-3W
Aug 16
(Mon.)
Aug 17
(Tue.)
Aug 18
(Wed.)
Aug 19
(Thur.)
Aug 20
(Fri.)
Aug 21
(Sat.)
Aug 22
(Sun.)
8-4W
Aug 23
(Mon.)
Aug 24
(Tue.)
Aug 25
(Wed.)
Aug 26
(Thur.)
Aug 27
(Fri.)
Aug 28
(Sat.)
Aug 29
(Sun.)
8-5W
Aug 30
(Mon.)
Aug 31
(Tue.)
Sep 1
(Wed.)
Sep 2
(Thur.)
Sep 3
(Fri.)
Sep 4
(Sat.)
Sep 5
(Sun.)
The watch records the weekly log by the week that starts on a Monday and is identified by its original
week number within the month. For instance, if August 30th is the 5th Monday of August, the week
from August 30th to September 5th will be recorded as the 5th week of August.
In this illustration, "8-5W" stands for
"the 5th week of August"
This week’
s log is the total sum of the daily walking log from the last Monday to the previous day.
Everyday at midnight, today’
s log is added to this week’
s log.
Every Sunday at midnight, the watch automatically deletes the oldest data, which is 12 weeks old, and
stores in the memory this week’
s log which starts from the last Monday as a new weekly log.
76
1. Press Button A to change the display to the WEEK <weekly log> mode.
2. Each time you press Button D, the watch displays the stored data week by week from the current week back to 12 weeks before.
※ The display of each weekly walking log will alternately show the“calories burned”and“walking distance”
at the bottom of the display.
Thisweek’
s log
WEEK
<weekly log>
mode
At midnight when the date changes to September 6th, the data of the 4th week of June is automatically deleted, and the weekly data of the week starting from September 6th will be added in
the memory as
“9-1W.”
77
● How to delete the stored data
If you press and hold Button B for 3 seconds or more in either the DAY <daily log> mode or WEEK
<weekly log> mode, all the stored data in the memory including the daily and weekly log will be
deleted at one time.
While pressing down Button B,“ALL”appears atop of the display, followed by“CLEAR.” When data
erasing is completed, the display automatically returns to the INPUT <personal data input> mode,
ready for input of a new user's body weight entry.
Press Button B for
3 seconds or more
Button D
Last week’
s 2-week old 3-week old
log
log
log
10-week old 11-week old
log
log
Button D
Switches
every
1 second
After
2 seconds
Week
(example: 3rd week of May)
Total number of steps for
the last 12 weeks
(example: 615,972 steps)
Total walking distance
for the last 12 weeks
(example: 462.0 km)
Number of steps
(example: 51,331 steps)
Calories burned and walking distance appear in turn every 1 second
(example: calories burned 1725.4
kcal, walking distance 38.5 km)
Button D
While continually pressing down Button B,
“CLEAR”flashes on the display.
The gray digits in the illustration indicate that they are flashing.
Keep pressing down Button B until the display returns to the“KG”
display in the INPUT <personal
data input> mode.
● The display returns to the INPUT <personal data input> mode, as it is necessary for a new user to input his or
her personal data before using the watch. Refer to“HOW TO INPUT YOUR PERSONAL DATA”on page 66.
● It is not possible to partially delete the daily log or weekly log.
78
79
Time <current time> mode (watch function) ● How to read the display
The watch displays the current time, date, day of the week as well as the number of steps (or
calories burned, walking distance). It also features a full-automatic calendar which requires no
calendar adjustment at month ends including Februaries of leap years.
Press Button A to show the TIME <current time> mode.
After approximately 2 seconds,
the current time, date, day of the
After 2 seconds
week and number of steps (or
calories burned, walking distance)
are all displayed as illustrated
below. For everyday use other
than walking, it is best to set the
watch to the TIME <current
time> mode.
Day of the week, date
(Example: Monday,17th)
Current time
(Example: 10:58’56”)
Number of steps
(Example: 7,333 steps)
● How to set the time
1. Press Button A to show the TIME <current time> mode.
2. Press and hold Button B for 2 seconds or more until the year appears atop of the display and the month
and date appear at the bottom of the display. The second digits start fl ashing indicating that the watch
is now in the SETTING mode.
3. Press Button A to select the item to be adjusted, and press Button C (increasing digits) or Button D (decreasing digits) to set the time.
4. After all the adjustments are completed, press Button B to return to the TIME <current time> mode. If
you press Button B while you are setting the watch, the display returns to the TIME <current time> mode. (If
the watch is left untouched while any of the items are fl ashing for adjustment, the display returns to the
TIME <current time> mode within a few minutes.)
The gray digits in the illustration indicate that they are flashing and adjustable.
Press and hold Button B
for 2 seconds or more
Minute setting
Second setting
TIME
<current time>
mode
Hour setting
Button A
Button A
● Built-in illuminating (led) light
Each time you press Button C, the built-in illuminating light illuminates the display for approximately 3 seconds for easy viewing in darkness.
Except when you are adjusting or setting the
watch, you can turn the light on by pressing Button C not only in the TIME <current time> mode
but also in any other mode.
Button A
Button C
※ Through the light guide panel, the lightgenerated by the LED
(Light-emitting diode) is evenly projected on the display.
80
※ When the voltage becomes low as the battery nears its end, the light becomes dim.
Date setting
After 2 seconds
Button A
To set each item, you can
increase the digits by pressing
Button C, or decrease the
digits by pressing Button D.
Button C
Button D
Button A
Button A
Button A
Illuminated for 3 seconds
SECOND SETTING
To reset the second digits to“00,”press either Button C or D. While the second digits count any number
between“00”and“29”the second digits are reset to“00,”while the second digits count any number between
“30”and“59”one minute is added and the digits return to“00.”To set the second digits accurately, a time
signal by a television or by a telephone is convenient.
MINUTE, HOUR, DATE, MONTH AND YEAR SETTINGS
Press Button C to increase the digits, and press Button D to decrease the digits.
There is no need to set the day of the week, as once the year, month and date are set; the day of the week is automatically set.
Button B
12H-/24H-indication
Year setting
Month setting
81
How to reset the built-in IC
When an abnormal display (broken digits, etc.) appears, follow the procedure below. The built-in
IC will be reset and the watch will resume its normal operation.
Press and hold all the Buttons A,
B, C and D at the same time
Once the display becomes blank, and when the
Buttons are released, the display returns to
the default setting in the TIME <current time>
mode, and immediately starts operating.
● Changing the date of the watch may cause discrepancies in the stored daily walking log and weekly walking log.
SELECTION OF 12-/24-HOUR INDICATION
Press either Button C or D to select either“12H”for the 12-hour indication or“24H”
for the 24-hour indication.
● When the 12-hour indication is selected, the“AM”indicator for the morning and the
“PM”indicator for the afternoon will appear at the left side of the display, which is the
default setting. If you select the 24-hour indication, no“AM”or“PM”indicator appears
on the display, but“13:00”for“PM 1:00”and“14:00”for“PM 2:00”etc. will appear.
● After the IC is reset, all the stored data including personal data, date, current time, daily and
weekly walking log are completely erased. And it will be necessary to input the time, date and
personal data once again.
ALL INDICATORS LIGHT
82
If you press Button A and D at the same time while adjusting or selecting any item of
the display for any adjustments, all the indicators of the display light. This is not a
malfucntion. In such a case, press any of Button A, B, C or D to return to the TIME
current time display.
83
Troubleshooting ● Step counting
Q.
A.
The watch counts and displays the number of steps more than actually taken.
Q.
A.
The watch does not count or display the number of steps.
Q.
A.
The number of steps suddenly appears on the display with 10 to 15 steps added.
Q.
A.
The walking distance and speed are not correct.
■ The watch may have counted your non-step movements such as arm motion.
→ Refer to in“MECHANISM OF STEP COUNTING FUNCTION”on page 64.
■ The sensitivity level of the watch may not fit your manner of walking.
→ Refer to“HOW TO ADJUST THE SENSITIVITY LEVEL”on page 70.
Q.
A.
The watch counts and displays the number of steps less than actually taken.
Q.
A.
The number of steps displayed is not correct.
Q.
A.
The number of steps shown on the display has been reset to“00”
.
84
■ The sensitivity level of the watch may not fit your manner of walking.
→ Refer to“HOW TO ADJUST THE SENSITIVITY LEVEL”on page 70.
■ The watch may have failed to count the number of steps correctly due to the condition in
which the watch is worn, for example, you were wearing sandals while walking etc.
→ Refer to in“MECHANISM OF STEP COUNTING FUNCTION”on page 64.
■ You looked at the watch at a time past midnight.
→ When the time reaches midnight, the data of the day including your walking log is
stored in the memory and the display in the WALK <step counting> mode will be reset
to“00.”For further details, refer to“LOCATION OF YOUR WALKING LOG”on page 73.
86
The display has become blank.
■ The battery has run down.
→ Replace the battery with a new one as soon as possible. Refer to“BATTERY CHANGE”
on page 87.
Q.
A.
The display is blinking.
Q.
A.
The built-in illuminating light does not turn on.
■ The battery life indicator may have been activated as the battery will run down within a
few days.
→ Replace the battery with a new one as soon as possible. Refer to“BATTERY CHANGE”
on page 87.
■ The battery life indicator function may have been activated as the battery will run down
within a few days.
→ Replace the battery with a new one as soon as possible. Refer to“BATTERY CHANGE”
on page 87.
■ This symptom may be observed at the very beginning of your walking.
→ It takes a while for the watch to recognize your movement as walking and display the
number of steps. After you walk for a while, the watch displays the total number of
steps taken during that period. Refer to in“MECHANISM OF STEP COUNTING
FUNCTION”on page 64.
■ The stride length you set in the INPUT <personal data input> mode is not correct.
→ Refer to“HOW TO MEASURE YOUR STRIDE LENGTH”on page 67.
85
● Other problems
Q.
A.
■ At the beginning of walking, the watch does not display the number of steps.
→ It takes a while for the watch to recognize your movement as walking and display the
number of steps. After you walk for a while, the watch displays the total number of
steps taken during that period. Refer to in“MECHANISM OF STEP COUNTING
FUNCTION”on page 64.
■ The battery life indicator may have been activated as the battery will run down within a
few days.
→ Replace the battery with a new one as soon as possible. Refer to“BATTERY CHANGE”
on page 87.
Liquid crystal panel
The normal life expectancy for the liquid crystal panel of the watch is approximately 7 years. After
that, it may decrease in contrast, becoming difficult to read. Please contact the retailer from whom
the watch was purchased to have the liquid crystal panel replaced with a new one.It will be replaced
at your cost.
Battery change
2
Years
(1) Battery life
The miniature battery which powers your watch should last approximately 2 years, if a new normal battery SB-T51
(CR2032) is installed.
● If the built-in illuminating light is turned on more than three times a day, the battery life may be less than the
specified period.
(2) Monitor battery
The battery in your watch may run down in less than 2 years after the date of purchase, as it is a monitor battery
which is inserted at the factory to check the function and performance of the watch.
(3) Battery change
1. For battery replacement, be sure to have the battery replaced with a new one at the retailer from whom
the watch was purchased or an SEIKO DEALER, and request the battery for exclusive use with the SEIKO
watches.
2. If the old battery is left in the watch for a long time, a malfunction may be caused due to battery leakage,
etc. Have it replaced with a new one as soon as possible.
3. Battery replacement is charged even if it runs down within the guarantee period.
4. Once the case back is opened for battery replacement or other purposes, the original water resistant quality designed for the watch may deteriorate when it is closed. When you have the battery replaced with a
new one, also request the water resistance test pertaining to the water resistant quality of your watch.
(4) BATTERY LIFE INDICATOR
This watch is equipped with a battery life indicator, which lets you know when to change the battery.
• In the first stage, all the items in the TIME <current time> mode start blinking every 1 second. The illuminating
light cannot be turned on even if Button C is pressed at this stage.
• In the second stage, all the items in the TIME <current time> mode start blinking every half a second. In this
stage, the step counting funciton also becomes disabled.
When you find these symptoms, immediately replace the battery with a new one.
87
Daily care
● The watch requires good daily care
Performance and type
The case back shows the caliber and performance of your watch
・ Do not wash the watch when its crown is at the extended position.
・ Wipe away moisture, sweat or dirt with a soft cloth
・ After soaking the watch in seawater, be sure to wash the watch in clean pure water
and wipe it dry carefully.
※ If your watch is rated as“non-water resistant”or“water resistant for daily use,”do
not wash the watch.
→ Performance and type P.89.
Water resistance P.90.
water resistant
performance
Refer to pages 90
Caliber number
The number to identify
the type of your watch
WATER RESISTANT 10BAR
S252-00A0 A0 T51
MADE IN CHINA
000000
※ The figure above is one example. Performance of your watch is different from above sample.
88
89
Water resistance
Refer the table below for the description of each degree of
water resistant performance of your watch before using.
(Refer to " P.89 ")
Indication on the case back
No indication
90
Water resistant performance
Non-water resistance
Condition of use
Avoid drops of water or sweat
The watch withstands accidental
contact with water in everyday life.
WARNING
Not suitable for
swimming.
WATER RESISTANT
Water resistance for everyday life
WATER RESISTANT
5 BAR
Water resistance for everyday life at
5 barometric pressures
The watch is suitable for sports such as swimming.
WATER RESISTANT
10 (20) BAR
Water resistance for everyday life at
10(20) barometric pressures.
The watch is suitable for diving not using an air cylinder.
91
● Leather band
Band
The band touches the skin directly and becomes dirty with sweat or dust.
Therefore, lack of care may accelerate deterioration of the band or cause skin
irritation or stain on the sleeve edge. The watch requires a lot of attention for
long usage.
● Metallic band
・Moisture, sweat or soil will cause rust even on a stainless steel band if they are left for a long
time.
・Lack of care may cause a yellowish or gold stain on the lower sleeve edge of shirts.
・Wipe off moisture, sweat or soil with a soft cloth as soon as possible
・To clean the soil around the joint gaps of the band, wipe it out in water and then brush it off
with a soft toothbrush.
(Protect the watch body from water splashes by wrapping it up in plastic wrap etc.)
・Because some titan bracelets use pins made of stainless steel, which has outstanding
strength, rust may form in the stainless steel parts.
・If rust advances, pins may poke out or drop out, and the watch case may fall off the bracelet,
or the clasp may not open.
・If a pin is poking out, personal injury may result. In such a case, refrain from using the watch
and request repair.
・A leather band is susceptible to discoloration and deterioration from moisture, sweat and
direct sunlight.
・Wipe off moisture and sweat as soon as possible by gently blotting them up with a dry cloth.
・Do not expose the watch to direct sunlight for a long time.
・Please take care when wearing a watch with light-colored band, as dirt is likely to show up.
・Refrain from wearing a leather band watch other than Aqua Free bands while bathing,
swimming, and when working with water even if the watch itself is water-resistant enforced for
daily use(10-BAR water resistant)
.
● Polyurethane band
・A polyurethane band is susceptible to discoloration from light, and may be deteriorated by
solvent or atmospheric humidity.
・Especially a translucent, white, or pale colored band easily adsorbs other colors, resulting in
color smears or discoloration.
・Wash out dirt in water and clean it off with a dry cloth.
(Protect the watch body from water splashes by wrapping it up in plastic wrap etc.)
・When the band becomes less flexible, have the band replaced with a new one. If you continue
to use the band as it is, the band may develop cracks or become brittle over time.
Notes on skin
irritation and allergy
Skin irritation caused by a band has various reasons such as allergy to metals or
leathers, or skin reactions against friction on dust or the band itself.
Notes on the
length of the band
Adjust the band to allow a little clearance with your wrist to ensure
proper airfl ow. When wearing the watch, leave enough room to insert a
fi nger between the band and your wrist.
92
93
Lumibrite
After-sale service
● Notes on guarantee and repair
If your watch has Lumibrite
Lumibrite is a luminous paint that is completely harmless to human beings and natural
environment, containing no noxious materials such as radioactive substance.
Lumibrite is a newly-developed luminous paint that absorbs the light energy of the sunlight
and lighting apparatus in a short time and stores it to emit light in the dark.
For example, if exposed to a light of more than 500 lux for approximately 10 minutes,
Lumibrite can emit light for 3 to 5 hours.
Please note, however, that, as Lumibrite emits the light it stores, the luminance level of the
light decreases gradually over time. The duration of the emitted light may also differ slightly
depending on such factors as the brightness of the place where the watch is exposed to
light and the distance from the light source to the watch.
※ In general, when coming from a place that is bright to a place that is dark, it takes human eyes
some time to adapt to the darkness making it difficult to see objects initially. (Dark adaptation)
※ LumiBrite is luminous paint that stores and emits light, which is harmless to human beings and
the environment, containing no toxic materials such as radioactive substances.
Condition
Illumination
Fine weather
Cloudy weather
Fine weather
Indoor (Windowside during
Cloudy weather
daytime)
Rainy weather
Lighting apparatus Distance to the watch: 1 m
(40-watt daylight Distance to the watch: 3 m
fluorescent light)) Distance to the watch: 4 m
100,000 lux
10,000 lux
more than 3,000 lux
1,000 to 3,000 lux
less than 1,000 lux
1,000 lux
500 lux (average room luminance)
250 lux
Sunlight
94
・ Contact the retailer the watch was purchased from or SEIKO CUSTOMER SERVICE CENTER
for repair or overhaul.
・Within the guarantee period, present the certificate of guarantee to receive repair services.
・Guarantee coverage is provided in the certificate of guarantee. Read carefully and retain it.
・For repair services after the guarantee period has expired, if the functions of the watch can be
restored by repair work, we will undertake repair services upon request and payment.
● Repair parts
・The repair parts of this watch will be retained usually for 7 years.
・Some alternative parts may be used for repair if necessary.
● Inspection and adjustment by disassembly and cleaning (overhaul)
・Periodic inspection and adjustment by disassembly and cleaning (overhaul) are recommended
approximately once every 3 to 4 years in order to maintain optimal performance of the watch for a long
time.
・According to use conditions, the digital display may go out due to liquid leakage.
・As the parts such as the gasket may deteriorate, water-resistant performance may be impaired due to
intrusion of perspiration and moisture.
Please contact the retailer from whom the watch was purchased for inspection and adjustment by
disassembly and cleaning (overhaul). For replacement of parts, please specify“SEIKO GENUINE
PARTS.” When asking for inspection and adjustment by disassembly and cleaning (overhaul), make sure
that the gasket and push pin are also replaced with new ones.
When your watch is inspected and adjusted by disassembly and cleaning (overhauled), the movement of
your watch may be replaced.
95
Specifications
1. Frequency of crystal oscillator ....
2. Accuracy ..............................................
3.
4.
5.
6.
7.
8.
Operational temperature range ...
Display medium ..................................
Battery ...................................................
Battery life ............................................
Illuminating light ................................
IC (Integrated Circuit) .......................
32,768Hz (Hz = Hertz … Cycles per second)
± 30 seconds per month (at normal temperatures between
5º C and 35º C)
‒5º C - +50º C (between 0º C and + 40º C for the display)
Nematic Liquid Crystal, FEM (Field Effect Mode)
Lithium battery SB-T51 (CR2032), 1 piece
Approx. 2 years
LED (light-emitting diode)
C-MOS-IC, 1 pieces
※ The specifications are subject to change without prior notice for product improvement.
96