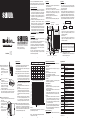
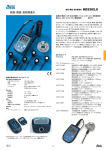
1
本社〒101-0021東京都千代田区外神田2-4-4・電波ビル
TEL. 03-3253-4871
(代) FAX. 03-3251-7022
レーザパワーメータ
[2]用途
本器はレーザ光のパワー測定用に設計されたポケットサイズの
レーザパワーメータです。
携帯性、操作性、
コストパフォーマンスに優れておりレーザ使用機
器の光パワーレベルのチェックやメンテナンスに適しています。
He-Neレーザの633 nmを校正波長としており可視レーザポイン
タやDVDプレーヤーの光ピックアップなど可視レーザ域の光パ
ワーを直読測定できます。
またCDプレーヤ、MDプレーヤ、
レーザプリンタなど校正波長以外
の場合でも分光感度特性表
(代表値)
を目安にして換算すること
が可能です。
本社〒101-0021東京都千代田区外神田2-4-4・電波ビル
TEL. 03-3253-4871(代) FAX. 03-3251-7022
大阪営業所〒556-0003大阪市浪速区恵美須西2-7-2
TEL. 06-6631-7361(代) FAX. 06-6644-3249
http://www.sanwa-meter.co.jp/
取扱説明書
06-1201 2040 2040
◎ 光センサプローブの固定方法
本体左上部の固定位置にセン
サプローブを図のように差し込
みます。
◎ 本体蓋の開閉方法
1. 保護カバーを開ける場合は本体
左側にあるボタンを図に示す方
向へ押しながら保護カバーを開
けます。
2. 閉める場合は光センサプローブを下記の方法に従い収納した
後、保護カバーを閉じロックさせます。
◎ 光センサプローブの収納方法
下図のように光センサプローブを本体に収納してください。
1. 光センサプローブの受光面を上にして収納スペースに入れま
2. す。光センサプローブの右横のスペースにコードのカール部を
収めます。
[6]測定方法
測定手順
(40 mW)
に設定します。
1. 測定レンジを最大レンジ
2.レーザ光をセンサプローブの受光部に当てます
3. 光パワーを確認後、最適なレンジに切り替えて測定をします。
レンジスイッチを
「OFF」
に戻します。
4. 測定終了後、
● 本器は操作終了30分後にオー
トパワーセーブとなります。
注)
オートパワーセーブ後に電源を入れ直す場合は一度レンジ
切替えスイッチを1秒以上OFFの位置に戻してから操作を
行ってください。
● 設定の測定レンジの最大値を越える光パワーを入射すると
表示がオーバー表示となります。
オーバー表示:
「4000」最上位桁の「4」点滅
●レーザ光の測定は受光面の中心に直角に当たるようにし
てセンサプローブを徐々に上下、左右に動かし位置合わせ
をおこないます。一般的にその最大値が真値となることが
多いようです。本器のMAXホールド機能を使用すると測定
し易くなります。
●レーザの種類により受光面からの
「もどり光」
でレーザ出力
が変動してしまうことがあります。このような場合は受光面
の角度を少し変え、反射光が直接レーザ出射口に戻らない
ようにしてください。
● 弱いレーザ光
(1mW以下)
を測定する場合には特に周囲
の光
(外乱光)
の影響を受け易くなりますので暗室で測定
するなど外乱光対策が必要です。
◎ 光センサの波長感度補正方法
本器の直読校正波長は633 nmです。
633 nm以外の波長光
を測定する場合には受光部フォトダイオードの分光感度特性
(代表値)
から得られた感度補正係数を目安に換算してください。
-4-
-5-
-1-
波長換算値
(W)
=表示値
(W)
×補正係数
波長(nm) 補正係数
400
442
450
488
500
515
550
600
150
×10.4
×3.86
×3.29
×2.08
×1.93
×1.71
×1.39
×1.12
波長(nm) 補正係数
633
650
670
700
750
780
800
830
×1.00
×0.95
×0.90
×0.84
×0.77
×0.73
×0.72
×0.70
波長(nm) 補正係数
850
900
940
950
1000
1050
1060
1100
×0.69
×0.68
×0.72
×0.74
×0.96
×2.25
×2.70
×5.40
分光感度特性
(代表特性)
140
130
120
110
100
相対感度
(%)
植物油インキを使用しています。
90
80
70
60
50
40
30
20
10
0
400 450 500 550 600 650 700 750 800 850 900 950 1000 10501100
633
波長λ
(nm)
例)
測定レーザ光780nmで本体表示が「2.
44 mW」
であった場合
表示値 補正係数 換算値
2.
44
(mW)
x0.
73≒1.
78
(mW)
となります。
-6-
[7]保守管理について
確度維持のため年に1回以上は校正、点検を実施してください。
1.保守点検
外観
1)
・落下などにより、外観が壊れてないか?
光センサプローブ
2)
・受光面がキズ付いていたり破損していないか?
・センサプローブのコードが傷んでいないか?
以上の項目に該当するものはそのまま使用せず修理をご
依頼ください。
2.校正
校正、点検については三和電気計器(株)
サービス課までお
問い合わせください。
3.内蔵電池の交換
交換方法
1 電池蓋のネジをプラスドライバではずす。
2 電池蓋をはずし消耗した電池を取り出す。
−の極性を間違えないように注意し新品の電池と交換
3 +、
します。
4 電池蓋を取り付けネジ止めします。
4.保管について
● パネル、
ケース等は揮発性溶液や熱に弱いためシンナーや
アルコール等で拭いたり高熱を発するもの
(はんだごて等)
の
近くに置かないでください。
● 振動の多い場所や落下の恐れがある場所には保管しない
でください。
● 直射日光下や高温または低温、
多湿、結露のある場所での
保管は避けてください。
● 長期間使用されない場合は内蔵電池を必ず抜いてください。
[8]アフターサービスについて
1.保証期間について
本品の保証期間はお買い上げ日より3年間です。
-7-
[4]各部の名称
光センサプローブ
収納場所
保護カバー
[5]機能説明
● 電源スイッチ兼レンジ切替スイッチ
このロータリースイッチで電源のON/OFFおよび40 μW、
400
μW、
4 mW、
40 mWレンジの切り替えをおこないます。
● 電池消耗警告表示
内部電池が消耗し電池電圧が低下すると表示器に マーク
が点灯します。 マークが点灯したら新しい電池と交換して
ください。
●M
IN/MAXホールドボタン
(保護カバーロック兼用)
このボタンを押すと表示器の数値表示部がMINホールド、
MAXホールド状態になります。
押す
液晶表示部
[1]使用上の注意
● 測定時にレーザ光を直視したりその反射光が目に入らないよう
に注意してください。
レーザ光が目に入ると視力低下や失明す
る恐れがあります。特に赤外光は肉眼で見ることが出来ないの
でより注意が必要です。
● 過大な光入力は受光部フォ
トダイオードの破壊につながります
ので測定範囲
(40 mW)
を超える光を入力しないでください。
● 受光面をキズ付けたり直接素手で触れて汚したりしないでくだ
さい。キズや汚れにより感度が低下することがあります。
もし受
光面が汚れてしまった場合にはエチルアルコールを用いて軽く
拭き取ってください。
● 本器は操作終了30分後にオー
トパワーセーブとなります。オー
トパワーセーブ後に電源を入れ直す場合は一度レンジ切替え
スイッチを1秒以上OFFの位置に戻してから操作を行ってくだ
さい。
● 使用後は必ずレンジスイッチを
「OFF」
に戻してください。
[3]特長
・携帯に便利なポケットサイズ。
・受光センサプローブを本体に収納可能。
・3999カウント、バーグラフ表示付き。
他波長は分光感度特性表により換算。
・直読校正波長633 nm、
01μW∼39.
99 mW
・測定範囲0.
・最小値/最大値ホールド機能付き。
・無駄な電池消耗を防ぐオートパワーセーブ機能付き。
波長換算値
(W)
=表示値
(W)
×補正係数
波長(nm) 補正係数
400
442
450
488
500
515
550
600
MIN/
MAX
ホールド
ボタン
×10.4
×3.86
×3.29
×2.08
×1.93
×1.71
×1.39
×1.12
150
波長(nm) 補正係数
633
650
670
700
750
780
800
830
×1.00
×0.95
×0.90
×0.84
×0.77
×0.73
×0.72
×0.70
波長(nm) 補正係数
850
900
940
950
1000
1050
1060
1100
×0.69
×0.68
×0.72
×0.74
×0.96
×2.25
×2.70
×5.40
分光感度特性
(代表特性)
140
130
120
110
100
90
80
50
40
30
0
400 450 500 550 600 650 700 750 800 850 900 950 1000 10501100
633
波長λ
(nm)
光センサプローブ
MAXホールド
・MINホールド:
表示器の数値表示部の最小値を保持。表示器に
「DH」
「MIN」
が点灯。
・MAXホールド:
表示器の数値表示部の最大値を保持。表示器に
「DH」
「MAX」
が点灯。
MAXホールド機能を使用することにより常に測定最大値を表
示させることが出来るためセンサ受光面にビーム光が当たる
位置や距離、角度により測定値が異なってしまう問題を解消
できます。
注)
・バーグラフ表示はホールドされません。
・測定レンジを切り替えるとMAX/MINホールドは解除され
ます。
-2-
2.
修理について
修理依頼前に次の項目をご確認ください。
1)
・内蔵電池の容量はありますか?
・電池の極性は正しいですか?
保証期間中の修理
2)
・保証書の記載内容に基づき修理させていただきます。
保証期間経過後の修理
3)
・修理により本来の機能が維持できる場合ご要望により有料
で修理させていただきます。
・修理費用や輸送費が製品価格より高くなる場合もあります
ので事前にお問い合わせください。
・本品の補修用性能部品の最低保有期間は製造打切後6
年間です。
この補修用性能部品保有期間を修理可能期間
とさせていただきます。
ただし購買部品の入手が製造会社の
製造中止等により不可能になった場合は保有期間が短くな
る場合もありますのでお含みおきください。
修理品の送り先
4)
・製品の安全輸送のため製品の5倍以上の容積の箱に入
れ、十分なクッションを詰めてお送りください。
・箱の表面に「修理品在中」と明記してください。
・輸送にかかる往復の送料はお客様ご負担とさせていただきます。
[送り先] 三和電気計器株式会社 羽村工場サービス課
〒205-8604 東京都羽村市神明台4-7-15
TEL(042)554-0113 FAX(042)555-9046
5)お問い合せ先
三和電気計器株式会社
東京本社 :TEL(03)3253-4871 FAX(03)3251-7022
大阪営業所 :TEL(06)6631-7361 FAX(06)6644-3249
お客様計測相談室 0120-51-3930
受付時間 9:30∼12:00 13:00∼17:00(土日祭日を除く)
ホームページ :http://www.sanwa-meter.co.jp
-8-
押す
押す
60
10
受光部
通常測定
70
20
電源スイッチ兼
レンジ切替
スイッチ
MINホールド
レーザパワーメータ
本器LP1はHe-Neレーザ
(633nm)
の波長に感度校正されて
います。他の波長光を測定する場合は下記の感度補正係数を
目安にして換算してください。
相対感度
(%)
このたびはsanwaレーザパワーメータLP1をお買い上げいただき
誠にありがとうございます。
ご使用前にはこの取扱説明書をよく
読んでいただき正しく安全にご使用ください。
また常にご覧いただ
けるように製品と一緒に大切に保存してください。
-3-
[9]仕様
iフォトダイオード
(受光径φ9 mm)
受 光 素 子 S
測 定 波 長 範 囲 400nm∼1100nm
633nm
(He-Neレーザ)
直読校正波長
その他の波長の場合は代表の補正係数を用いて換算
数値部:
3999カウントデジタル表示
表
示
バーグラフ部:
42セグメント表示
オ ー バ ー 表 示 「4000」最上位桁の「4」点滅
内部電池が消耗し電池電圧が低下したとき
電池消耗表示
表示器に マークが点灯
数値部:約2回/秒
サ ン プ ル レ ート
バーグラフ部:約20回/秒
01μW∼39.
99 mW
光パワー測定範囲 0.
40μWレンジ
(0.
01μW∼39.
99μW)
400μWレンジ
(0.
1μW∼399.
9μW)
測 定 レ ン ジ
4 mWレンジ
(0.
001 mW∼3.
999 mW)
40 mWレンジ
(0.
01 mW∼39.
99 mW)
±5 %
(4 mWレンジ:校正波長633nm、
1 mWにて)
測 定 確 度
23 ℃±2 ℃において
MINホールド機能、
MAXホールド機能、
機
能
オートパワーセーブ機能
(操作終了30分後)
E M C 指 令 IEC61326-1
電
源 LR-44 ボタン電池x2
消 費 電 力 約6 mW
使 用 環 境 条 件 高度2000 m以下・環境汚染度Ⅱ
使 用 温 湿 度 範 囲 温度0 ℃∼40 ℃湿度80 %RH以下 結露のないこと
保 存 温 湿 度 範 囲 温度−10 ℃∼50 ℃湿度80 %RH以下結露のないこと
本 体 寸 法・質 量 117
(H)
x76
(W)
x18
(D)
mm、約120g
光センサプローブ 84
(H)
x16
(W)
x10
(D)
mm
コ ー ド 長 伸長0.
5m
付
属
品 取扱説明書 1
ここに記載された製品の仕様や外観は改良等の理由により予告なしに変更
することがありますのでご了承ください。
-9-
[1] Operating Precautions
•
•
•
•
•
Do not stare directly at the laser light or allow its reflections
enter your eyes during measurement. Laser light incident to
your eyes may lead to degradation or loss of eyesight. Special
care is required for the IV light which is invisible for naked eyes.
An excessive optical input may damage the photodiode in
the light sensor. Do not apply light that is stronger than the
measurable range (40 mW).
Be careful not to damage the light sensor surface or stain it
by douching with a bare hand. Scratches or stain may
deteriorate the sensitivity of the instrument. If the light
sensor surface gets dirty, wipe lightly with ethyl alcohol.
This instrument incorporates the auto power save function, which
turns it off in 30 minutes after an operation. To turn the instrument
on after it has been turned off by the auto power save function, set
the Power/Range switch to OFF and keep it in the OFF position
for more than 1 second before setting it to another position.
Be sure to set the Power/Range switch to OFF after use.
[2] Applications
Dempa Bldg, Sotokanda 2-Chome,Chiyoda-ku, Tokyo, Japan
TEL.: 81-3-3251-0941 FAX.: 81-3-3256-9740
Web site: www.sanwa-meter.co.jp
e-mail: [email protected]
Instructions
This instrument is a pocket-sized laser power meter featuring
excellent portability and operability.
It can be applied easily in check and maintenance of the
optical power levels of equipment using laser light.
Using 633 nm of a He-Ne laser as the reference wavelength,
this instrument enables direct reading of the optical power of
visible-range laser light from a visible laser pointer, DVD
player’s optical pickup, etc.
The power of other wavelength can also be measured by
converting the reading according to the spectral sensitivity
characteristic table (typical values).
[3] Features
• Pocket size.
• Separate light sensor probe can be integrated with the main
[5] Functions
• 3999 full-scale count with a bar graph display.
• Direct reading of the laser power of the reference
•
body for measurement.
wavelength of 633 nm, while the laser power of other
wavelengths can be read by converting it according to the
spectral sensitivity characteristic table.
• Wide measuring range from 0.01 μW to 39.99 mW.
• MIN/MAX hold functions.
• Auto power save function prevents wasting of battery power.
[4] Nomenclature
LCD display panel
How to open or close the
protective cover
1. To open the protective cover,
push and hold the button on the
left side of main body into the
direction shown in the figure,
and open the protective cover.
2. To close the protective cover, first store the light sensor
probe in the storage position of the main body as described
below, and then close the protective cover until it is locked.
How to store the light sensor probe
The light sensor probe can be stored in the main body as
shown below.
1. Fit the light sensor probe
into the storage position so
that the light sensor surface
faces up.
2. Bend the cord and store it
in the space on the right of
the light sensor probe.
-4-
Notes)
Wavelength (nm)
400
442
450
488
500
515
550
600
auto power save function of the instrument turns
• The
it off in 30 minutes after an operation. To turn the
•
•
•
•
instrument on after it has been turned off by the auto
power save function, set the Range switch to OFF and
keep it in the OFF position for more than 1 second
before setting it to another position.
When over range, "4000" displays with "4" in the
highest digit blinking.
Laser should be received on the center of the sensor at
right angle.
With certain lasers, the laser power may vary due to
“return light” from the light sensor surface. In this case,
change the angle of the light sensor surface so that the
reflected light does not return directly to the laser light
outlet.
Measurement of weak laser power (below 1 mW) tends
to be affected by ambient light (disturbance). In this
case, it is required to take a countermeasure against
disturbance, by performing measurement in a dark room.
How to correct the wavelength sensitivity of the light sensor
The reference wavelength that can be read directly with this
instrument is 633 nm. To measure light with wavelengths
other than 633 nm, convert the reading using the sensitivity
correction coefficient obtained from the photodiode’s spectral
sensitivity characteristics (typical values).
-5-
150
Correction
coefficient
X 10.4
X 3.86
X 3.29
X 2.08
X 1.93
X 1.71
X 1.39
X 1.12
Correction
coefficient
Wavelength (nm)
Wavelength (nm)
X 1.00
X 0.95
X 0.90
X 0.84
X 0.77
X 0.73
X 0.72
X 0.70
633
650
670
700
750
780
800
830
850
900
940
950
1000
1050
1060
1100
Correction
coefficient
X 0.69
X 0.68
X 0.72
X 0.74
X 0.96
X 2.25
X 2.70
X 5.40
Spectral sensitivity characteristic (representing value)
140
130
120
110
100
90
80
70
60
50
40
30
20
10
0
400 450
500
550
600
650
633
700
750
800
850
Wavelengthλ(nm)
900
950 1000 1050
Example)
When the measured laser light wavelength is 780 nm and the
power meter reading is 2.44 mW:
Reading Correction coefficient Wavelength-converted value
2.44 (mW) x 0.73≒1.78 (mW)
-6-
Push
Protective cover
The meter uses 633nm of He-Ne laser reference wavelength.
Using the below conversion table of spectral sensitivity
characteristic (representing value), measurement of wavelengths
from 400nm to 1100nm can be made as rough readings.
Conversion readings (W) = reading (W) x correction coefficient
Correction
Wavelength(nm) coefficient
×10.4
×3.86
×3.29
×2.08
×1.93
×1.71
×1.39
×1.12
400
442
450
488
500
515
550
600
MIX/
MAX
Hold
button
Correction
Wavelength(nm) coefficient
633
650
670
700
750
780
800
830
×1.00
×0.95
×0.90
×0.84
×0.77
×0.73
×0.72
×0.70
Correction
Wavelength(nm) coefficient
850
900
940
950
1000
1050
1060
1100
×0.69
×0.68
×0.72
×0.74
×0.96
×2.25
×2.70
×5.40
Spectral sensitivity characteristic (representing value)
150
140
130
120
110
100
90
80
70
60
50
40
30
20
10
0
400 450
500
550
600
650
633
700
750
800
850
900
Wavelengthλ(nm)
950 1000 1050 1100
Power/Range
switch
Light sensor window
Conversion readings (W) = reading (W) x correction coefficient
Relative sensitivity (%)
How to integrate the light sensor
probe with the main body for
measurement
Insert the light sensor probe in
the position on the top left of the
main body as shown in the
figure.
Measurement Procedure
1. Set the measuring range to the maximum range (40 mW).
2. Apply the laser beam to the light sensor surface.
3. After measuring the current power, set the measuring range
to the optimum range.
4. After completing measurement, set the Power/Range switch to OFF.
•
on-off and switch the measurement range to the 40 μW, 400
μW, 4 mW or 40 mW range.
Battery warning indicator
When the internal batteries are nearly exhausted and the
supply voltage drops, blinking “BT” appears in the display. If
this happens, please replace both batteries with new ones.
MIN/MAX Hold button (Also used as the protection cover lock)
Push this button during measurement to set the digital value
display to the MIN Hold or MAX Hold mode as shown below.
MIN Hold
-1-
[6] Measurement
switch
• Power/Range
This rotary switch is used to turn the illuminance meter
Normal measurement
Light sensor probe
storage position
Relative sensitivity (%)
Thank you for purchasing SANWA laser power meter LP1.
Read this manual carefully before use for safe use of the instrument.
Retain this manual together with the instrument for future reference.
-2-
Light sensor probe
[7] Maintenance and Administration
To maintain accuracy, perform calibration and inspection at least once an year.
1. Maintenance check
1) External finish
• Check if the external finish is damaged by dropping the
instrument, etc.
2) Light sensor
• Check if the light sensor surface is damaged.
• Check if the light sensor cord is damaged.
If any of the above parts is damaged, do not use the instrument
but have it repaired.
2. Calibration
For calibration and inspection of the instrument, please
contact dealer, sole agent and maker.
3. Battery replacement
Replacement Procedure:
1 Remove the screw retaining the battery compartment
cover using a screwdriver.
2 Remove the battery compartment cover and take out the
exhausted batteries.
3 Insert new batteries without mistaking the + and – polarity.
4 Attach the battery compartment cover and clamp it with the screw.
4. Storage
The panel and case are little resistant to volatile solutions and heat. Do
not wipe the thermometer using lacquer thinner or alcohol and do not
place it heat a source of high temperatures (soldering iron, for example).
Do not store the instrument in a place subject to vibrations
or in a place which it may drop.
Do not store the instrument under direct sunlight or in a
place with low temperatures, high humidity or condensation.
Be sure to remove the batteries when the instrument is not
to be used for an extended period.
•
•
•
•
[8] After-Sale Servicing
For information of repair, please contact the dealer, selling
agent or maker.
-7-
• MIN Hold mode:
Push
Push
MAX Hold
Holds the minimum value during measurement
displays it in the digital display. Indicated by “DH”
“MIN” shown in the display.
• MAX Hold mode:
Holds the maximum value during measurement
displays it in the digital display. Indicated by “DH”
“MIN” shown in the display.
and
and
and
and
Using the MAX Hold function makes it possible display
always the maximum value measured. This solves the
problem in the meter reading, that varies depending on the
position, distance and angle of the incidence of laser beam
into the light sensor surface.
Notes) • The bar graph display is not held.
• The MIN/MAX Hold mode is canceled when the
measurement range is changed.
-3-
[9] Specifications
Light sensor element
Measurable wavelength
range
Directly-readable
wavelength
Display
“Over” display
Low battery indication
Sampling rate
Measuring ranges
Measuring accuracy
Functions
Si photodiode (Light sensor surface diameter Ø 9 mm)
400 nm to 1100 nm
633 nm (He-Ne laser)
Other wavelengths should be converted using typical
correction coefficient
Digital display: 3999 full scale
Bar graph display: 42-segment display
“4000” with “4” in the highest digit blinking
Blinking “BT” appears in the display when the built-in batteries
are nearly exhausted and battery supply voltage drops
Digital display: Approx. 2 times/sec.
Bar graph display: Approx. 20 times/sec.
40 μW range: 0.01 μW to 39.99 μW
400 μW range: 0.1 μW to 399.9 μW
4 mW range: 0.001 mW to 3.999 mW
40 mW range: 0.01 mW to 39.99 mW
±5 % (in the 4 mW range, at the reference wavelength of
633 nm and 1 mW)
Temperature: 23 ℃ ±2 ℃
MIN Hold function, MAX Hold function
Auto power save function (30 min. after operation)
IEC61326-1
LR-44, x 2
Approx. 6 mW
Altitude 2000 m or below, pollution degree Ⅱ.
Temperature 0 to 40 ℃, humidity 80 %RH or less
(without condensation)
Temperature -10 to +50 ℃, humidity 80 %RH or less
(without condensation)
117(H) x 76(W) x 18(D) mm, approx. 120 grams
EMC Directive
Power supply
Power consumption
Environmental condition
Operating temperature
/humidity range
Storage temperature
/humidity range
Main body dimensions
& mass
Light sensor probe 84(H) x 16(W) x 10(D) mm
Sensor cord length Approx. 0.5 m when extended
Provided accessories Instruction manual x 1
Design and specifications are subject to change for reasons of
improvement, etc.
-8-