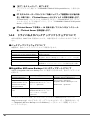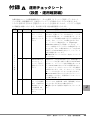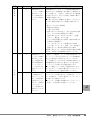
1
B7FY-1581-01 内蔵 LTO2 ユニット取扱説明書 Tape Drv LTO2 Ultrium2 200GB User’s Guide (PG-LT201) J E はじめに このたびは、弊社の内蔵 LTO2 ユニット(PG-LT201 / PGBLT201)をお買い上げいただ き、誠にありがとうございます。 本書は、内蔵 LTO2 ユニット(以降、本製品)の取り扱いの基本的なことがらについて説 明しています。ご使用になる前に、本書をよくお読みになり、正しい取り扱いをされます ようお願いいたします。 本製品のサーバへの取り付け方法は、サーバ本体に添付の「PRIMERGY ドキュメント& ツール CD」内の『ユーザーズガイド』を参照してください。 『ユーザーズガイド』に本製品の記載がない場合は、内蔵 LTO ユニット PG-LT101 の記載 を参照してください。 2005 年 10 月 安全にお使いいただくために 本書には、本製品を安全に正しくお使いいただくための重要な情報が記載されています。 本製品をお使いになる前に、本書を熟読してください。特に、本書の「安全上のご注意」をよくお読みにな り、理解されたうえで本製品をお使いください。 また本書は、本製品の使用中にいつでもご覧になれるよう大切に保管してください。 本製品のハイセイフティ用途での使用について 本製品は、一般事務用、パーソナル用、家庭用、通常の産業用等の一般的用途を想定して設計・製造されて いるものであり、原子力施設における核反応制御、航空機自動飛行制御、航空交通管制、大量輸送システム における運行制御、生命維持のための医療器具、兵器システムにおけるミサイル発射制御など、極めて高度 な安全性が要求され、仮に当該安全性が確保されない場合、直接生命・身体に対する重大な危険性を伴う用 途(以下「ハイセイフティ用途」という)に使用されるよう設計・製造されたものではございません。お客 様は、当該ハイセイフティ用途に要する安全性を確保する措置を施すことなく、本製品を使用しないでくだ さい。ハイセイフティ用途に使用される場合は、弊社の担当営業までご相談ください。 当社のドキュメントには「外国為替および外国貿易管理法」に基づく特定技術が含まれていることがありま す。特定技術が含まれている場合は、当該ドキュメントを輸出または非居住者に提供するとき、同法に基づ く許可が必要となります。 2 本書の表記 ■ 警告表示 本書ではいろいろな絵表示を使っています。これは装置を安全に正しくお使いいただき、 あなたや他の人々に加えられるおそれのある危害や損害を未然に防止するための目印と なるものです。その表示と意味は次のようになっています。内容をよくご理解の上、お 読みください。 警告 この表示を無視して、誤った取り扱いをすると、人が死亡する可能性 または重傷を負う可能性があることを示しています。 注意 この表示を無視して、誤った取り扱いをすると、人が損害を負う可能 性があること、および物的損害のみが発生する可能性があることを示 しています。 また、危害や損害の内容がどのようなものかを示すために、上記の絵表示と同時に次の 記号を使用しています。 △で示した記号は、警告・注意を促す内容であることを告げるもので す。記号の中やその脇には、具体的な警告内容が示されています。 で示した記号は、してはいけない行為(禁止行為)であることを告 げるものです。記号の中やその脇には、具体的な禁止内容が示されて います。 ●で示した記号は、必ず従っていただく内容であることを告げるもの です。記号の中やその脇には、具体的な指示内容が示されています。 ■ 本文中の記号 本文中に記載されている記号には、次のような意味があります。 記号 意味 お使いになる際の注意点や、してはいけないことを記述しています。 必ずお読みください。 ハードウェアやソフトウェアを正しく動作させるために必要なことが 書いてあります。必ずお読みください。 → 参照ページや参照マニュアルを示しています。 ■ コマンド入力(キー入力) CD-ROM ドライブのドライブ名を、 [CD-ROM ドライブ]で表記しています。入力の際 は、お使いの環境に合わせて、ドライブ名を入力してください。 J [CD-ROMドライブ]:\Setup.exe 3 ■ 製品の呼び方 本文中の製品名称を次のように略して表記します。 製品名称 本文中の表記 Microsoft® Windows Server™ 2003, Standard Edition Windows Server 2003, Standard Edition Microsoft® Windows Server™ 2003, Enterprise Edition Windows Server 2003, Enterprise Edition Microsoft® Windows Server™ 2003, Standard x64 Edition Microsoft® Windows Server™ 2003, Enterprise x64 Edition Windows Server 2003 x64 Microsoft® Windows Server™ 2003, Enterprise Edition for itanium-based Systems Windows Server 2003, Enterprise Edition for itaniumbased Systems Microsoft® Windows® 2000 Server Windows 2000 Server Red Hat ® ® Enterprise Linux ES (v.3 for x86) Red Hat® Enterprise Linux® AS (v.3 for x86) Red Hat® Enterprise Linux® ES (v.2.1 for x86) Red Hat® Enterprise Linux® AS (v.2.1 for x86) 内蔵 LTO2 ユニット(PG-LT201) Windows Server 2003 Linux v.3 Linux Linux v.2.1 本製品 安全上のご注意 本製品を安全にお使いいただくために、以降の記述内容を必ずお守りください。 ■ 本製品の取り扱いについて 警告 ・ 梱包に使用しているビニール袋はお子様が口に入れたり、かぶって遊んだりし ないよう、ご注意ください。窒息の原因となります。 ・ 異物(水・金属片・液体など)が装置の内部に入った場合は、ただちにサーバ 本体の電源スイッチを切り、電源プラグをコンセントから抜いてください。 その後、担当営業員または担当保守員にご連絡ください。 そのまま使用すると、感電・火災の原因となります。特にお子様のいるご家庭 ではご注意ください。 ・ 開口部(通風孔など)から内部に金属類や燃えやすいものなどの異物を差し込 んだり、落としたりしないでください。感電・火災の原因となります。 4 警告 ・ 本製品をお客様自身で改造しないでください。感電・火災の原因となります。 注意 ・ 本製品を分解したり、解体したりしないでください。 ・ 本製品は次の環境で動作させたり、保管したりしないでください。 - 極端な低温環境 - 極端な高温/多湿環境 - 温湿度変化の激しい環境 - 磁気の影響を受けやすい場所 - 衝撃や振動の加わる場所 - ゴミやほこり(煙草の煙、土埃、排気ガスなど)の多い環境 - 直射日光のあたる場所 - 発熱器具のそば ・ 寒い場所から暖かい場所に移動したり、室温を急に上げたりした直後は、内部 が結露する場合がありますので、使用しないでください。 結露したままお使いになると、本製品やデータカートリッジを損傷することが あります。大きな温度変化があったときは、1 時間以上待ってから電源を入れ てください。 ・ サーバ本体の電源を切るときは、データカートリッジを取り出してください。 データカートリッジを装置に挿入すると、磁気テープの記録面が露出されます。 本状態が長く続くと、記録面へのほこりの付着やキズ発生の可能性があり、 データカートリッジが永久的に使用できなくなることがあります。 ・ ご使用しない場合は、本製品からデータカートリッジを取り出してください。 ・ データカートリッジを入れたまま本製品を持ち運ばないでください。 ・ データカートリッジを挿入時、無理に押し込まないでください。 ・ 内部に液体や金属など異物が入った状態で使用しないでください。 何か異物が入った場合は、お買い求めの販売店または弊社担当保守員にご相談 ください。 ・ 本製品前面の汚れは、柔らかい布でからぶきするか、布に水または中性洗剤を 含ませて、軽くふいてください。ベンジンやシンナーなど揮発性のものは避け てください。 ■ リサイクルについて 本製品を廃棄する場合、担当営業員または担当保守員に相談してください。本製品は産業 廃棄物として処理する必要があります。 J 5 梱包物の確認 お使いになる前に、次のものが梱包されていることをお確かめください。 万一足りないものがございましたら、担当営業員または担当保守員までご連絡ください。 ・ 内蔵 LTO2 ユニット(本製品) ・ クリーニングカートリッジ ・ 保証書 ・ 取扱説明書(本書) ・ 電源延長ケーブル ・ ドライバフロッピーディスク「PRIMERGY LTO2 UNIT Device Driver for Windows」 ・ ネジ(4本) ・ ワッシャー(4個) Microsoft、Windows、Windows Server は、米国 Microsoft Corporation の米国およびその他の国におけ る登録商標または商標です。 本取扱説明書に記載されている会社名、製品名は、各社の登録商標または商標です。 Linux は、Linus Torvalds 氏の米国およびその他の国における登録商標あるいは商標です。Red Hat およ び Red Hat をベースとしたすべての商標とロゴは、米国およびその他の国における Red Hat, Inc. の商 標または登録商標です。 All Rights Reserved, Copyright© FUJITSU LIMITED 2005 6 目次 1 サーバ本体への搭載 . . . . . . . . . . . . . . . . . . . . . . . . . . . . . . . . . . 1.1 設置環境の確認 . . . . . . . . . . . . . . . . . . . . . . . . . . . . . . . . . . . . . . . . . . 8 8 1.2 ジャンパの設定について . . . . . . . . . . . . . . . . . . . . . . . . . . . . . . . . . . . 9 1.3 電源延長ケーブルについて . . . . . . . . . . . . . . . . . . . . . . . . . . . . . . . . . 10 1.4 ドライバのインストール . . . . . . . . . . . . . . . . . . . . . . . . . . . . . . . . . . . 11 1.5 Tape Maintenance Advisor について . . . . . . . . . . . . . . . . . . . . . . . . . . 17 2 各部の名称と働き . . . . . . . . . . . . . . . . . . . . . . . . . . . . . . . . . . . . 18 2.1 イジェクトボタンおよび LED について . . . . . . . . . . . . . . . . . . . . . . . 2.2 データカートリッジの操作 . . . . . . . . . . . . . . . . . . . . . . . . . . . . . . . . . 3 データカートリッジについて . . . . . . . . . . . . . . . . . . . . . . . . . . . 3.1 使用できるデータカートリッジ . . . . . . . . . . . . . . . . . . . . . . . . . . . . . 18 21 23 23 3.2 データカートリッジの取り扱い . . . . . . . . . . . . . . . . . . . . . . . . . . . . . 23 4 クリーニングについて . . . . . . . . . . . . . . . . . . . . . . . . . . . . . . . . 26 4.1 使用できるクリーニングカートリッジ . . . . . . . . . . . . . . . . . . . . . . . . 26 4.2 ヘッドクリーニングについて . . . . . . . . . . . . . . . . . . . . . . . . . . . . . . . 27 5 サプライ品 . . . . . . . . . . . . . . . . . . . . . . . . . . . . . . . . . . . . . . . . . 28 6 バックアップ運用上の注意 . . . . . . . . . . . . . . . . . . . . . . . . . . . . . 29 7 仕様 . . . . . . . . . . . . . . . . . . . . . . . . . . . . . . . . . . . . . . . . . . . . . . 30 8 トラブルシューティング . . . . . . . . . . . . . . . . . . . . . . . . . . . . . . . 31 付録 A 運用チェックシート(設置・運用確認編). . . . . . . . . . . . . . . 33 付録 B Tape Maintenance Advisor について . . . . . . . . . . . . . . . . . 36 B.1 はじめに . . . . . . . . . . . . . . . . . . . . . . . . . . . . . . . . . . . . . . . . . . . . . . . . 36 B.2 TMA 導入のメリット . . . . . . . . . . . . . . . . . . . . . . . . . . . . . . . . . . . . . . 36 J 7 1 サーバ本体への搭載 この章では、サーバ本体への搭載方法について説明しています。 次の手順でインストールしてください。 1 設置環境を確認します。 →「1.1 設置環境の確認」 (P.8) 2 ジャンパの設定を行います。 →「1.2 ジャンパの設定について」(P.9) 3 本製品をサーバ本体に搭載し、SCSI ケーブルと電源ケーブルを接続しま す。 サーバ本体に添付の「ドキュメント&ツール CD」内の『ユーザーズガイド』を参 照してください。取り付けには、必ず本製品に添付のネジとワッシャーを使用して ください。 →「1.3 電源延長ケーブルについて」(P.10) 4 必要なバックアップソフトウェアやドライバをインストールします。 →「1.4 ドライバのインストール」(P.11) 1.1 設置環境の確認 サーバの設置環境については、サーバ本体に添付の『安全上のご注意』および『はじめに お読みください』を参照してください。 本製品は、データ記録面が装置内部で露出するため、設置環境(特に塵埃)の影響を受け やすい装置です。一般的に、床面に近いほど塵埃濃度は高くなるので、机上など床面より 離れた場所への設置をお勧めします。次の「避けて頂きたい設置例」を参考に、よりホコ リの少ない環境に設置するよう配慮をお願いいたします。 ■ 避けていただきたい設置例 ・ 装置を床に直置き ・ 人通りの多い場所 ・ 開放されるドアや窓の近く。特に土埃や車の排気ガス、などの外部の影響を受ける場所 ・ 空気の取り込み口、吹き出し口の近く。(空調、エアコン、換気扇、などに注意) ・ タバコの煙の影響を受ける場所(装置が設置された部屋での喫煙禁止) ・ プリンタの近くでトナーの影響を受ける場所 ・ コピー機、シュレッダー、FAX、など、紙を扱う装置の近くで、紙の粉の影響を受ける 場所 ・ 設置後、数か月でテープ投入口や周囲に塵埃が堆積するような場合には設置場所を見直 してください。 「 安全上のご注意」 (→ P.4)も併せて参照してください。 8 1.2 ジャンパの設定について サーバ本体に本製品を搭載する場合、SCSI-ID 番号の設定が必要です。 SCSI-ID 番号は、本製品背面(下図)のショートジャンパで設定できます。 サーバ本体に添付の「PRIMERGY ドキュメント&ツール CD」内の『ユーザーズガイド』 の「内蔵オプションの取り付け」の章に従って、SCSI-ID 番号を設定してください。 ・ 本製品背面 0 1 2 3 ジャンパ取り付け禁止 SCSI ID ` SCSI ID 以外の場所にジャンパを取り付けないでください。 次の表のように設定できます。 SCSI ID 番号 ショートジャンパ 3 2 1 0 0 オープン オープン オープン オープン 1 オープン オープン オープン ショート 2 オープン オープン ショート オープン 3 オープン オープン ショート ショート 4 オープン ショート オープン オープン 5(*) 6 オープン ショート オープン ショート オープン ショート ショート オープン 7 ショート ショート ショート ショート 8 ショート オープン オープン オープン 9 ショート オープン オープン ショート 10 ショート オープン ショート オープン 11 ショート オープン ショート ショート 12 ショート ショート オープン オープン 13 ショート ショート オープン ショート 14 ショート ショート ショート オープン 15 ショート ショート ショート J ショート *):ご購入時の設定 1 サーバ本体への搭載 9 1.3 電源延長ケーブルについて サーバ本体の電源ケーブルを本製品に直接取り付けた場合、本製品が正しく搭載できない 場合があります。その場合、本製品に添付の電源延長ケーブルを使用して接続してくださ い(PRIMERGY RX600 S2 に搭載した場合、サーバ本体の電源ケーブルを本製品に直接取 り付けると、サーバの上部送風ダクトと干渉し正しく取り付けできないため、必ず本製品 に添付の電源延長ケーブルをご使用ください)。 㔚Ḯᑧ㐳ࠤࡉ࡞ 㧔ᧄⵝ⟎ᷝઃ㧕 ᧄຠ㧔⢛㕙㧕 ࠨࡃߩ㔚Ḯࠤࡉ࡞ 10 1.4 ドライバのインストール Windows Server 2003 / Windows 2000 Server の各 Windows Backup(*)を使用する場合、本 製品に添付のドライバフロッピーを使用し、次の手順でドライバをインストールしてくだ さい。なお、Linux の場合はドライバをインストールする必要はありません。 *「スタート」ボタン→「プログラム」→「アクセサリ」→「システムツール」→「バッ クアップ」の順にクリックしてください。 1.4.1 ドライバのインストール(PRIMERGY FT モデル以外 に搭載の場合) ■ Windows Server 2003 の場合 1 Administrator 権限で Windows Server 2003 にログオンします。 2 「スタート」ボタン→「コントロールパネル」→「システム」の順にク リックします。 3 「ハードウェア」タブを選択し、[デバイスマネージャ]をクリックしま す。 4 「その他のデバイス」をダブルクリックし、「TANDBERG TS400 SCSI Sequential Device」をダブルクリックします。 5 「ドライバ」タブを選択し、[ドライバの更新]をクリックします。 「ハードウェアの更新ウィザードの開始」というメッセージが表示されます。 6 「ソフトウェア検索のため、Windows Update に接続しますか?」と表 示されているので、「いいえ、今回は接続しません」をクリックし、[次 へ]をクリックします。 7 「一覧または特定の場所からインストールする」をクリックし、[次へ]を クリックします。 8 「次の場所で最適のドライバを検索する」をクリックします。 9 「次の場所を含める」にチェックを入れ、[参照]ボタンを押してコピー元 にドライバを復元したフォルダを指定し、[次へ]をクリックします。 ・ 添付のドライバフロッピーを使用する場合(またはダウンロードしたドライバを フロッピーに復元した場合) ・ Windows Server 2003, Standard Edition または Windows Server 2003,Enterprise Edition の場合 J A:\lto2\i386 ・ Windows Server 2003,Enterprise Edition for itanium-based Systems の場合 A:\lto2\ia64 1 サーバ本体への搭載 11 ・ Windows Server 2003 x64 の場合 A:\lto2\x64 ・ Server Start などの CD にあるものを使用する場合 ・ Windows Server 2003, Standard Edition または Windows Server 2003,Enterprise Edition の場合 [CD-ROMドライブ]:\DRIVERS\Tape\LTO2\i386 ・ Windows Server 2003,Enterprise Edition for itanium-based Systems の場合 [CD-ROMドライブ]:\DRIVERS\Tape\LTO2\ia64 ・ Windows Server 2003 x64 の場合 [CD-ROMドライブ]:\DRIVERS\Tape\LTO2\x64 10 「TANDBERG TS400 SCSI Sequential Device」をダブルクリックしま す。 「ハードウェアの更新ウィザードの完了」というメッセージが表示されます。 11 [完了]をクリックし、[閉じる]をクリックします。 12 サーバを再起動します。 ■ Windows 2000 Server の場合 1 Administrator 権限で Windows 2000 Server にログオンします。 2 「スタート」ボタン→「設定」→「コントロールパネル」の順にクリック します。 3 「システム」のアイコンをダブルクリックします。 4 「ハードウェア」タブを選択し、[デバイスマネージャ]をクリックしま す。 5 「その他のデバイス」をダブルクリックし、「TANDBERG TS400 SCSI Sequential Device」をダブルクリックします。 6 「ドライバ」タブを選択し、[ドライバの更新]をクリックします。 「デバイスドライバのアップグレードウィザードの開始」というメッセージが表示 されます。 7 [次へ]をクリックします。 8 「デバイスに最適なドライバを検索する」を選択し、[次へ]をクリックし ます。 12 9 「場所を指定」を選択し、[次へ]をクリックし、コピー元を次のように設 定し、[OK]をクリックします。 ・ 添付のドライバフロッピーを使用する場合(またはダウンロードしたドライバを フロッピーに復元した場合) A:\lto2\i386 ・ Server Start などの CD にあるものを使用する場合 [CD-ROMドライブ]:\DRIVERS\Tape\LTO2\i386 「次のデバイスのドライバが検索されました」というメッセージが表示されます。 10 [次へ]をクリックします。 「デバイスドライバのアップグレードウィザードの完了」というメッセージが表示 されます。 11 [完了]をクリックし、[閉じる]をクリックします。 12 サーバを再起動します。 1.4.2 ドライバのインストール(PRIMERGY FT モデルに搭 載の場合) ■ 注意事項 ・ 本製品は、FT1 にのみ搭載可能です。FT2 には搭載できません。 ・ 本製品を同時に 2 つ搭載できません。 ・ CoServer からは本製品を使用できません。 ・ FT モデルでは、自動システム回復(ASR)セット、システム復旧ディスクを使用した システムの復旧はできません。復旧には、サーバに添付のリカバリ CD を使用してくだ さい。 ・ 内蔵 5 インチオプションの取り付けについては、必ず FT モデルのユーザーズガイドを 参照して作業をしてください。 ■ Windows Server 2003 の場合 1 本製品を FT1 に搭載します。 2 FT1、FT2 の電源を入れ、CoServer を Online モードで起動します。 3 Administrator 権限で CoServer1 にログオンします。 J 4 「スタート」ボタン→「コントロールパネル」→「システム」の順にク リックします。 5 「ハードウェア」タブを選択し、[デバイスマネージャ]をクリックしま す。 デバイスマネージャが起動します。 1 サーバ本体への搭載 13 6 「その他のデバイス」をダブルクリックし、「TANDBERG TS400 SCSI Sequential Device」をダブルクリックします。 7 「ドライバ」タブを選択し、[ドライバの更新]をクリックします。 セットアップウィザードが表示されます。 8 「ソフトウェア検索のため、Windows Update に接続しますか?」と表 示されているので、「いいえ、今回は接続しません」をクリックし、[次 へ]をクリックします。 ウィザードに従ってインストールを行ってください。 9 インストール方法で「一覧または特定の場所からインストールする」をク リックし、[次へ]をクリックします。 10 検索とインストールのオプションで、「次の場所で最適のドライバを検索 する」を選択して、次のオプションを設定します。 ・「リムーバブルメディア(フロッピー、CD-ROM など)を検索」のチェックを外 します。 ・「次の場所を含める」にチェックを入れ、ドライバを復元したフォルダを指定し ます。 ・ A ドライブのフロッピーに復元した場合 A:\lto2\i386 ・ C ドライブの Temp フォルダに復元した場合 C:\Temp\lto2\i386 ・ CD-ROM にあるものを使用する場合 [CD-ROMドライブ]:\DRIVERS\tape\lto2\i386 11 [次へ]をクリックします。 「ハードウェアの更新ウィザードの完了」メッセージが表示されます。 12 [完了]をクリックして、終了します。 「テープドライブ」配下に「TANDBERG TS400 SCSI Sequential Device」と表示され ます。 13 FT モデルのユーザーズガイドの「内蔵バックアップ装置取り付け後の操 作」の章に従い、FTvirtual Server へのリダイレクト作業を実施します。 FTvirtual Server へのリダイレクト作業が完了すると、FTvirtual Server 上の[デバイ スマネージャ]に「その他のデバイス」として「TANDBERG TS400 SCSI Sequential Device」が表示されます。 14 FTvirtual Server で手順 4 ~ 12 を繰り返してドライバをインストール 後、FTvirtual Server を再起動します。 14 ■ Windows 2000 Server の場合 1 本製品を FT1 に搭載します。 2 FT1、FT2 の電源を入れ、CoServer を Online モードで起動します。 3 Administrator 権限で CoServer1 にログオンします。 4 「スタート」ボタン→「設定」→「コントロールパネル」の順にクリック します。 5 「システム」のアイコンをダブルクリックします。 6 [デバイスマネージャ]をクリックします。 デバイスマネージャが起動します。 7 「その他のデバイス」をダブルクリックし、「TANDBERG TS400 SCSI Sequential Device」をダブルクリックします。 8 「ドライバ」タブを選択し、[ドライバの更新]をクリックします。 「デバイスドライバのアップグレードウィザードの開始」が表示されます。 9 [次へ]をクリックします。 ウィザードに従ってインストールを行ってください。 10 検索方法の選択で「デバイスに最適なドライバを検索する」を選択して、 [次へ]をクリックします。 11 検索場所のオプションで「場所を指定」のみを選択して[次へ]をクリッ クします。 12 「製造元のファイルのコピー元を」が要求されるので、ドライバを復元し たフォルダを指定します。 ・ A ドライブのフロッピーに復元した場合 A:\lto2\i386 ・ C ドライブの Temp フォルダに復元した場合 C:\Temp\lto2\i386 J ・ CD-ROM にあるものを使用する場合 [CD-ROMドライブ]:\DRIVERS\tape\lto2\i386 13 [OK]をクリックします。 「デバイスドライバのアップグレードウィザードの完了」が表示されます。 14 [次へ]をクリックします。 「ハードウェアの更新ウィザードの完了」メッセージが表示されます。 1 サーバ本体への搭載 15 15 [完了]をクリックして、終了します。 「テープドライブ」配下に「TANDBERG TS400 SCSI Sequential Device」と表示され ます。 16 FT モデルのユーザーズガイドの「内蔵バックアップ装置取り付け後の操 作」の章に従い、FTvirtual Server へのリダイレクト作業を実施します。 FTvirtual Server へのリダイレクト作業が完了すると、FTvirtual Server 上の[デバイ スマネージャ]に「その他のデバイス」として「TANDBERG TS400 SCSI Sequential Device」が表示されます。 17 FTvirtual Server で手順 4 ~ 14 を繰り返してドライバをインストール 後、FTvirtual Server を再起動します。 1.4.3 ドライバおよびバックアップソフトウェアについて 本章の情報は、2005 年 10 月現在のものです。内容が変わることがありますがご了承くだ さい。 ■ バックアップソフトウェアについて 本製品は、次のバックアップソフトウェアで使用できます。 OS バックアップソフトウェア Windows 2000 Server(SP4 以降) Windows Server 2003, Standard Edition BrightStor ARCserve Backup r11.1 以降(アップデートが必要) Windows Backup Windows Server 2003, Enterprise Edition BrightStor ARCserve Backup r11.1 以降(アップデートが必要) Windows Server 2003 x64 Windows Backup RedHat Enterprise Linux AS(v3)/ES(v3) OS 標準コマンド NetVault 7.1.1(デバイステンプレートの更新が必要)以降 ■ BrightStor ARCserve Backup r11.1 のアップデートについて 本製品を BrightStor ARCserve Backup r11.1 でご使用になるためには、次のアップデートが 必要です。 OS Windows 2000 Server Windows Server 2003, OS ごとに必要なアップデート - BrightStor ARCserve Backup r11.1 Standard Edition または Windows Server 2003, Enterprise Edition Windows 2003 SP 1 サポートアッ プデート(QO68139) Windows Server 2003 x64 BrightStor ARCserve Backup r11.1 すべての OS で必要なアップデート BrightStor ARCserve Backup r11.1 Device Patch3(QO66072) BrightStor ARCserve Backup r11.1 for Windows SP1 (QO63732) Windows 2003 SP 1 サポートアッ プデート 64 ビット対応版 (QO71537) アップデートモジュールは、コンピュータ・アソシエイツ株式会社のホームページ (http://www.caj.co.jp/)内の『サポート』→『テクニカルサポート』→『製品別サポート』 →『BrightStor ARCserve Backup r11.1 for Windows』→『ダウンロード情報』からダウン ロードしてください。 16 ■ NetVault7.1.1(Linux 版)のデバイステンプレートの更新について 本製品を NetVault7.1.1 でご使用になるためには、デバイステンプレートの更新が必要で す。デバイステンプレートは、次のいずれかのホームページよりダウンロードしてくださ い。 ・ バックボーン・ソフトウエア株式会社のホームページ(http://www.bakbone.co.jp/)内 の『製品』→『製品一覧』→『バックアップ/リストア・ソフトウェア - NetVault』→ 『NetVault 対応デバイス』の『NetVault 最新デバイス・テンプレートのダウンロード』→ 『Tandberg 420LTO』の『TS42000.npk』をダウンロードしてください。 ・ タンベルグデータ株式会社のホームページ(http://www.tandberg.co.jp/)内の『製品紹介』 →『LTO Drive』→『Tandberg 420LTO』→『SUPPORT』→『SOFTWARE』の『BakBone NetVault Patch.zip』をダウンロードしてください。 ■ Windows2000 Server / Windows Server2003 用ドライバについて 本製品のドライバの最新版は、富士通パソコン情報サイト FMWORLD.NET の PRIMERGY 向けホームページ(http://www.fmworld.net/biz/primergy/)内の 『ダウンロード』→『ダウ ンロード検索』でサーバの製品名および型名を選択し、検索してください。 1.5 Tape Maintenance Advisor について サーバ本体に「Tape Maintenance Advisor」をインストールすることにより、3 か月ごとの ヘッドクリーニングの時期を通知することができます。 「Tape Maintenance Advisor」をご使 用になり、定期的なヘッドクリーニングを行ってください。 →「4.2 ヘッドクリーニングについて」 (P.27) 「Tape Maintenance Advisor」は、富士通パソコン情報サイト FMWORLD.NET の PRIMERGY 向けホームページ (http://www.fmworld.net/biz/primergy/) 内の『ダウンロード』 →『ダウンロード検索』で、サーバの製品名および型名を選択して検索しダウンロードし てください。 「Tape Maintenance Advisor」については、 「付録 B Tape Maintenance Advisor について」(→ P.36)を参照してください。 J 1 サーバ本体への搭載 17 2 各部の名称と働き この章では、本製品の各部の名称と働きについて説明しています。 2.1 イジェクトボタンおよび LED について イジェクトボタン LED ■ イジェクトボタン ドライブに入っているデータカートリッジを取り出すときに押します。 →「3 データカートリッジについて」(P.23) 本製品が動作中の場合(ACTIVITY LED が点滅し、ロード/アンロードやデータの書き込 み/読み込みを行なっている場合) 、イジェクトボタンを押さないでください。動作が終 わるまで待ってからイジェクトボタンを押してください。 ■ LED 下図のように4つの LED があり、電源投入時の自己診断、使用中の状態やエラーを示し ます。 READY LED (緑色) ACTIVITY LED (緑色) CLEAN LED (オレンジ色) FAULT LED (オレンジ色) 各 LED の状態の主な意味は、次のとおりです。詳しくは、P.19 の表を参照してください。 ・ READY LED カートリッジがロードされているときに点灯します。 ・ ACTIVITY LED 主に、カートリッジが動作しているときに点滅します。 ・ CLEAN LED クリーニングが必要な場合に点灯します。 18 ・ FAULT LED 回復不可能なエラーが発生した場合に点滅し、ドライブ内の温度が設置温度条件を超え た場合は点灯します。 ` FAULT LED と ACTIVITY LED が同時に点滅している場合は、メディアエラーが発生 しています。「8 トラブルシューティング」(→ P.31)を参照し、対処してくださ い。 ■ LED の表示の意味 ・ 電源投入時の自己診断テストの LED の変化 本製品に電源が入ると、LED が次の表のように変化します。 自己診断テストが完了し、本製品が使用可能となるまで約 30 秒かかります。 状態 LED の点灯テスト 自己診断テスト中 Ready 状態 READY LED ACTIVITY (緑色) LED(緑色) CLEAN LED FAULT LED (オレンジ色) (オレンジ色) ON ON ON ON 点滅 OFF ON / OFF[注] OFF OFF 点滅 ON / OFF[注] OFF OFF OFF ON / OFF[注] OFF ON:LED が点灯 OFF:LED が消灯 ・ 使用中の LED 表示 READY LED ACTIVITY (緑色) LED(緑色) カートリッジがロードさ れていない OFF OFF ON / OFF[注] OFF カートリッジがロードさ れている(動作はしてい ない) ON OFF ON / OFF[注] OFF カートリッジがロードさ れている(書き込み・読 み取りなどの動作中) ON 点滅 ON / OFF[注] OFF カートリッジをロードま たはアンロード中 OFF 点滅 ON / OFF[注] OFF ON / OFF OFF /点滅 ON OFF 状態 クリーニングが必要 クリーニング中 回復不可能なエラー 推奨動作温度を超えてい る (カートリッジがイジェ クトされます) メディアエラー CLEAN LED FAULT LED (オレンジ色) (オレンジ色) OFF 点滅 ON OFF ON / OFF OFF ON / OFF[注] 点滅 OFF OFF ON / OFF[注] ON OFF 点滅 ON / OFF[注] 点滅 J ON:LED が点灯 OFF:LED が消灯 2 各部の名称と働き 19 [注]:CLEAN LED について CLEAN LED の点灯は、クリーニングが必要であることを示します。 CLEAN LED が点灯するのは、次の場合です。 - 本製品自身がクリーニングが必要と判断した場合 - リードエラーまたはライトエラーが発生した場合 - テープの動作時間が 100 時間を越えた場合 ` CLEAN LED が点灯すると、クリーニングが正しく行なわれるまで消灯しません(電源を オフオンしても消灯しません) 。CLEAN LED が点灯した場合は、クリーニングカート リッジを使用してクリーニングを行なってください。 ` 20 READY LED が高速に点滅しているときは、データカートリッジを挿入しないでく ださい。データが破壊する場合があります。15 秒程度待ち、高速点滅が消えてか ら操作を行なってください。 2.2 データカートリッジの操作 データカートリッジは、「3 データカートリッジについて」(→ P.23)を参照して正しく取 り扱ってください。 ■ セット方法 データカートリッジは矢印がついている面を上に向け、ラベル貼り付け面が手前になるよ うにし、本製品にゆっくりと挿入してください。止まるまで挿入すると、自動的にロード が開始されます。 ` 本製品およびデータカートリッジの損傷を避けるため、次のことに注意してくださ い。 ・力を加えすぎないでください。 ・データカートリッジが正しい方向で、正しい位置にまっすぐ挿入してください。 挿入方向を示す矢印 ラベル貼り付け面 ` データカートリッジをセットした直後にバックアップまたはリストアなどの操作を行う場 合、データカートリッジのロードが完了(READY LED が点灯)してから行ってくださ い。 J 2 各部の名称と働き 21 ■ 取り出し方法 READY LED のみ点灯していることを確認し、イジェクトボタンを押します。 取り出したデータカートリッジは、ケースに入れて保管してください。 ` ` ` ` 22 データカートリッジが出てくるときに指で押さえたり、押し込んだりしないでくだ さい。またデータカートリッジが完全にイジェクトされる前にデータカートリッジ を引き抜いたりしないでください。本製品が故障する原因となります。 取り出しは、ドライブがテープを動かしていないとき(ACTIVITY LED が消えている状態) に行なってください。 バックアップソフトウェアによっては、イジェクトボタンによるデータカートリッジの取 り出しをできないようにしていることがあります(NetVault など) 。この場合、イジェク トボタンを押してもカートリッジが排出されません。バックアップソフトウェアからの操 作でカートリッジを取り出してください。 サーバ本体の電源が入っていない状態で、データカートリッジのセット/取り出しはでき ません。 3 データカートリッジについて この章では、本製品で使用できるデータカートリッジについて説明しています。 3.1 使用できるデータカートリッジ 本製品には、次の富士通純正品を使用されることをお勧めします。サプライ品について は、「5 サプライ品」 (→ P.28)を参照してください。 商品番号 記憶容量[*] Ultrium1 データカートリッジ 0160210 100GB 5巻 Ultrium2 データカートリッジ 0160310 200GB 5巻 品名 出荷単位 * データ圧縮機能を使わない場合の値。記憶容量は、1GB=10003byte 換算です。 媒体の消耗によるバックアップ失敗を防止するため、媒体は次のどちらか早い方を目安に 交換してください。 データカートリッジの交換周期(どちらか早いほう) ・ 使用期間で1年 ・ 使用回数で 1000 回 媒体の寿命は、装置の設置環境(温度、湿度、塵埃など)や動作状況により大きく変化し ます。 ` 3.2 データカートリッジは消耗品です。消耗した媒体は、テープ表面の損傷、ヘッド汚 れの増加、メディアエラー多発など不具合の原因となります。 データカートリッジの取り扱い 本製品で使用するデータカートリッジの取り扱い方法および注意事項について説明しま す。 データカートリッジを取り扱うときは、通常、次の事項をお守りください。 ・ データカートリッジは、清潔に保ってください。 ・ データカートリッジは、使用前に以下の確認を行ってください。 - データカートリッジの割れや破損のないこと - ラベルが正しくセットされていること ・ 壊れたデータカートリッジを、本製品に絶対に入れないでください。 ・ データカートリッジを開いてテープ部分を取り出したりしないでください。 ・ テープ部分を直接手で触らないでください。 ・ データカートリッジを、直射日光の当たる場所や湿気のある場所に放置しないでくださ い。 ・ データカートリッジを磁界のある場所(ディスプレイやスピーカーの近くなど)に放置 しないでください。 ・ 落下などにより強い衝撃が加わった媒体は、使わないでください。 J 3 データカートリッジについて 23 3.2.1 データカートリッジラベルのセット データカートリッジには、データカートリッジに貼り付けるためのラベルがされていま す。ラベルは、次の図に示す位置に貼ってください。ラベルには使用開始日を記入し、使 用期限が分かるようにしてください。 ` ` 必ず添付のラベルを使用してください。 ラベル貼り付け位置以外には、ラベルを貼らないでください。 ラベル貼り付け位置 使用開始日:2005年10月31日 ラベルの記入例 3.2.2 データの書き込み保護 データカートリッジを書き込み禁止にする場合は、ライトプロテクトスイッチを右側にス ライドしてください。 ライトプロテクトスイッチ 書き込み禁止 24 3.2.3 データカートリッジの保管 データカートリッジを保管するときは、次の注意事項に従ってください。 ・ 保管する場所は清潔にし、使用条件を守ってください。 ・ データカートリッジは、24 時間以上使用環境に置いて、環境に慣らしてください。 ・ データカートリッジに記録されたデータを長期保管する場合は、データカートリッジの プラスチック容器に入れて、次に示す保管環境の温度、湿度条件を守って保管してくだ さい。 温度 16 ~ 32 ℃ 湿度 20 ~ 80%(ただし、結露しないこと) 最大湿球温度 26 ℃以下 3.2.4 データカートリッジのリーダーピンの状態確認 ご使用前に、データカートリッジのリーダーピン(テープ先頭に取り付けられたピン)の 状態を確認してください。 注意 ・ ピンが外れている媒体、データカートリッジが変形している媒体、衝撃が加 わった媒体などの異常媒体を使用するとドライブが故障しますので、絶対に使 用しないでください。 ` ` カートリッジ・ドアをスライドして、リーダーピンが正しく固定されていることを 確認してください。 リーダーピン、テープには絶対に触らないでください。また、ほこりなどがデータ カートリッジ内部に入らないように注意してください。 カートリッジ・ドア ○リーダーピンが正しく固定されている ×リーダーピンが外れている J カートリッジ・ドアをスライドし、リーダーピンの状態を確認してください。 3 データカートリッジについて 25 4 クリーニングについて この章では、本製品のクリーニングについて説明しています。 本製品にクリーニングカートリッジを挿入すると、自動的に磁気ヘッドのクリーニングが 行われます。クリーニング動作が完了すると、クリーニングカートリッジは排出されま す。 クリーニングは、約 3 ~ 5 分かかります。 ` 4.1 本製品は、データの書き込みや読み取りに磁気ヘッドを使用しています。ヘッドがほこり やゴミで汚れていると、データの書き込みや読み取りが正常に行われません。 また、データ・データカートリッジの寿命が短くなる、テープ表面に傷がつき使用できな くなるなどの不具合が発生します。このようなことを未然に防ぐために、クリーニング カートリッジで清掃してください。 使用できるクリーニングカートリッジ 本製品には次のクリーニングカートリッジをお使いください。サプライ品については、 「5 サプライ品」 (→ P.28)を参照してください。 品名 Ultrium 1 クリーニングカートリッジ U ` ` ` 26 商品番号 0160280 購入単位 1巻 備考 ユニバーサルクリーニング カートリッジ CLEAN LED が点滅している場合、クリーニングが必要です。クリーニングカートリッジ を挿入し、クリーニングを行ってください。 クリーニングカートリッジは、50 回まで使用できます。使用回数が 50 回に満たない場合で も、購入後 5 年以上経過したクリーニングカートリッジは、新しいクリーニングカート リッジと交換してください。 クリーニングカートリッジをセットしても、CLEAN LED が点灯してすぐに(約 40 秒)排 出されてしまう場合には、新しいクリーニングカートリッジと交換してください。 4.2 ヘッドクリーニングについて ■ クリーニングカートリッジの使用回数の管理 クリーニングカートリッジには寿命があり、使用可能回数は 50 回です。クリーニング媒 体に添付されているラベルなどを活用して、使用回数を管理してください。 寿命が過ぎたクリーニングカートリッジを使用した場合、すぐに(約 40 秒)排出され CLEAN LED が点灯し、クリーニング効果はありません。 使用開始日:2005年10月31日 使用回数 : クリーニングカートリッジラベル記入例 ■ 定期クリーニング 磁気ヘッドへの汚れの堆積の予防処置として定期的なヘッドクリーニング(3 か月に 1 回程 度または使用時間 100 時間のどちらか早いほう)をお勧めします。本製品をまったく使用し ていない場合でも、動作確認を兼ねて定期的なクリーニングをお勧めします。 ■ ヘッドクリーニング要求 本製品は、次の場合にヘッドクリーニング要求状態(CLEAN LED が点灯)となることが あります。 クリーニング要求状態になった場合、クリーニングカートリッジを挿入してクリーニング を行なってください。 ・ 突発的にヘッドにゴミが付いた場合 クリーニング実施後、設置環境の再確認をお願いします。 →「1.1 設置環境の確認」(P.8) ・ テープが痛んでいる場合 クリーニング実施後、新しいデータカートリッジと交換してください。 ・ 一定時間(100 時間)、バックアップ/リストアなどの動作を行なった場合 クリーニングを行なってください。 J 4 クリーニングについて 27 5 サプライ品 本製品のサプライ品について説明します。 サプライ品には次のものがあり、富士通純正品を使用されることをお勧めします。 品名 商品番号 出荷単位 備考 Ultrium 1 データカートリッジ 0160280 5巻 容量 100GB[*1] Ultrium 2 データカートリッジ 0160310 5巻 容量 200GB[*1] Ultrium 1 クリーニングカートリッジ U 0160280 1巻 ユニバーサルクリーニング カートリッジ[*2] [*1]:データ圧縮機能を使わない場合の値です。記憶容量は、1GB=10003byte 換算です。 [*2] :本製品では、Ultrium1 クリーニングカートリッジ(商品番号:0160290 は使用できません)。 富士通サプライ品は、富士通コワーコ株式会社の取り扱い品です。 問い合せ先:富士通コワーコ株式会社 お客様総合センター:0120-505-279 月~金 9:00 ~ 17:30(祝日、年末年始除く) http://jp.fujitsu.com/coworco また、カートリッジの取り扱いについては、上記ホームページ内の『サプライ商品』→ 『データメディア』→『LTO テープ』の『LTO Ultrium カートリッジテープ説明書』も参照 してください。 28 6 バックアップ運用上の注意 この章では、本製品のバックアップ運用上の注意事項について説明しています。 ■ バックアップ後のデータカートリッジの排出について データカートリッジを本製品内に入れたままにしないでください。データカートリッジは 使用する時間に応じて消耗しますので、傷みが早くなります。バックアップ運用直前に データカートリッジを入れ、バックアップ運用が終了したらすぐにデータカートリッジを 取り出してください。 ■ データの圧縮率について データの圧縮率は、目安として 2 倍程度としておりますが、データの内容により圧縮率は 変化します。ソフトウェアにより圧縮処理されたデータでは、本製品による圧縮効果は期 待できません。 ■ バックアップ性能/容量について 次の要因により、バックアップ性能および 1 巻あたりに記録できるバックアップ容量が変 化します。 ・ ご使用されるデータカートリッジの記録面の状態(消耗、汚れなど) ・ 本製品のヘッドの汚れ状態 ・ データの圧縮率 ・ サーバの負荷状況 ■ システム構築時の留意事項 同一データカートリッジ 1 巻によるバックアップ運用では、バックアップに失敗した場 合、全データが失われる危険があります。複数のデータカートリッジによるバックアップ 運用を行うことにより、トラブル発生時の被害を最小限にできます。 例)曜日ごとのデータカートリッジを準備しバックアップ運用する。 J 6 バックアップ運用上の注意 29 7 仕様 この章では、本製品の仕様と設置環境を示しています。 項目 機能・仕様 品名 内蔵 LTO2 ユニット 型名 PG-LT201 PGBLT201 PGBLT201C データ記憶容量(非圧縮) 200GB(Ultrium2 データカートリッジの場合) 100GB(Ultrium1 データカートリッジの場合) 実行デ-タ転送速度(非圧縮) 24MB/s (Ultrium2 データカートリッジを使用した場合) Ultrium1、Ultrium2 フォーマット (使用するデータカートリッジによる) データ・フォーマット インタフェース Ultra 320 SCSI 質量 1.4kg 消費電力 最大 49W(平均 25W) 発熱量 最大 176.4kJ/h(平均 90kJ/h) 最高湿球温度 26 ℃ 設置環境条件を次に示します。 項目 設置条件 10 ~ 35 ℃ 温度 動作時 休止時 -5 ~ 55 ℃ 湿度 動作/休止時 20 ~ 80%RH(ただし、結露しないこと) 温度勾配 動作/休止時 浮遊ほこり 15 ℃ /hr 以下(ただし、結露しないこと) 0.15mg/m3 以下 設置環境については、「1.1 設置環境の確認」 (→ P.8)も併せて参照してください。 30 8 トラブルシューティング 本製品を使用していて、正常に動作しない場合の対処方法について説明します。 本対処方法で回復しない場合は、担当保守員または担当営業員にご連絡くださ い。 LED の状態については、 「2.1 イジェクトボタンおよび LED について」 (→ P.18)を参照し てください。 現象 対処方法 本製品が動作しない (カートリッジを挿入 してもロードしない、 カートリッジが挿入さ れているのに Ready LED が点灯しない、な ど) 。 電源ケーブル・SCSI ケーブルが正しく取り付けられているか確 認してください。 →「1 サーバ本体への搭載」(P.8) 本製品が OS、バック アップソフトウェアで 認識されない。 ・ 電源ケーブル、SCSI ケーブルが正しく取り付けられているこ と、SCSI ケーブルに SCSI 終端抵抗が正しく取り付けられて いることを確認してください。また、本製品の SCSI ID が正 しく設定されているか確認してください(同じバス上の他の 装置と同じ SCSI ID に設定されていないこと)。 →「1 サーバ本体への搭載」 (P.8) ・ SCSI カード、SCSI ケーブル、SCSI 終端抵抗が本製品および SCSI バスの種類と互換性があるか確認してください。 ・ 本製品が SCSI BIOS やオペレーティングシステムで認識され ているか確認してください(Windows のデバイスマネージャ などで確認。"TANDBERG TS400" として認識されます)。 ・ SCSI カードと本製品がバックアップソフトウェアでサポート されているか確認してください。また、デバイスドライバが 必要な場合、正しいデバイスドライバがインストールされて いることを確認してください。 →「1.4.3 ドライバおよびバックアップソフトウェアについ て」(P.16) カートリッジを挿入し てもすぐに排出され る。 ・ 使用可能なデータカートリッジか確認してください。 →「3.1 使用できるデータカートリッジ」(P.23) →「4.1 使用できるクリーニングカートリッジ」(P.26) ・ カートリッジが正しい向きか確認してください。 ・ カートリッジに破損がないこと、リーダーピンが正しく固定 されていることを確認してください。 →「3.2.4 データカートリッジのリーダーピンの状態確認」 (P.25) ・ 別の新しいカートリッジを使ってみてください。問題ない場 合は元のカートリッジを使わないようにしてください。 J 8 トラブルシューティング 31 32 現象 対処方法 カートリッジが排出さ れない。 ・ イジェクトボタンを押してください。テープの巻き戻しに数 分かかることがあります。ACTIVITY LED が点滅している間 はそのまま待ってください。 ・ バックアップソフトウェアからイジェクトを行なってくださ い。バックアップソフトウェアによってはイジェクトボタン による取り出しをできないようにしていることがあります。 ・ サーバをシャットダウンし、再起動してください。その後、 イジェクトボタンを押してみてください(電源オフ/オンし た場合、データが正しく記録されていないことがあります) 。 ACTIVITY LED が消灯 し、FAULT LED が点 滅している(回復不可 能なエラー) 。 可能な場合、サーバをシャットダウンし再起動してください。 ACTIVITY LED と FAULT LED がともに 点滅している(メディ アエラー)。 ・ カートリッジが正しいものか確認してください。 ・ カートリッジのライトプロテクトスイッチが正しい位置にあ るか確認してください(書込み禁止または書き込み許可のど ちらかの位置にあること) 。 ・ カートリッジに破損などがないか確認してください。 ・ クリーニングを実施し、別の新しいカートリッジを使用して ください。 付録 A 運用チェックシート (設置・運用確認編) 内蔵 LTO2 ユニットは精密機器であり、日々の運用(クリーニング運用・データカート リッジ管理・設置環境など)を誤るとバックアップ失敗などのトラブルが発生します。 トラブルを防止するために『運用チェックシート』を設けましたので、バックアップ運用 のご確認をお願いいたします。次の項目が富士通の推奨運用になります。 分類 ク リ | ニ ン グ 運 用 No. チェック チェック項目 1 □ 3 か月に一度の割 合で、ヘッドク リーニングを行う 運用になっていま すか? 本製品は、使用・未使用に関わらず磁気ヘッドが汚 れるため、定期クリーニングが必要です。ヘッドな どが汚れた状態では、テープ表面を傷つけ、データ カートリッジが短期間で使用できなくなる場合があ ります。なお、メンテナンス時期を忘れないため に、バックアップ環境支援ツール『Fujitsu Tape Maintenance Advisor』をご使用していただき、メン テナンス時期をオペレータの方へ自動通知すること ができます。なお、本製品自体にもテープ走行 100 時間ごとに CLEAN LED を点灯して、クリーニング を促す機能を持っています。 ●内蔵 LTO2 ユニット 3 か月に一度はクリーニング してください。 2 □ CLEAN LED が点 灯したとき、ク リーニングを行う 運用になっていま すか? 本製品はテープ走行 100 時間ごとや、動作状態から クリーニングが必要と判断した場合に CLEAN LED を点灯して、クリーニングを促す機能を持っていま す。CLEAN LED が点灯したままで使用を続けると、 データカートリッジやバックアップデータを損傷す る場合があります。また、データカートリッジが消 耗しヘッドなどを汚していることが考えられます。 ● CLEAN LED が点灯したときはすぐにクリーニン グを実施してください。再発時はデータカートリッ ジ交換を検討願います。 3 □ クリーニングカー トリッジの交換周 期は、ご使用の内 蔵 LTO2 ユニット の交換周期(50 回)になっていま すか? クリーニングカートリッジは、ご使用の内蔵 LTO2 ユニットでは、使用回数:50 回、使用期間:5 年の どちらか早い方を目安に交換が必要です。 ●運用に合わせて定期的に交換するようにしてくだ さい。 解説/作業内容(●) J 付録 A 運用チェックシート (設置・運用確認編) 33 分類 No. チェック チェック項目 解説/作業内容(●) ク リ | ニ ン グ 運 用 4 □ クリーニングカー トリッジを入れ て、自動排出後 に、CLEAN LED が点灯のままのと き、クリーニング カートリッジを交 換する運用になっ ていますか? 本製品にクリーニングカートリッジを入れてから 30 秒くらいで自動的に排出され、CLEAN LED が点灯 のままのときは、クリーニングカートリッジを使い 切っています。 ●上記のような場合は新しいクリーニングカート リッジに交換してください。 5 □ データカートリッ ジに使用開始日を 書いていますか? (交換目安:1年) データカートリッジは消耗品です。消耗したデータ カートリッジはテープ表面が傷つき、ヘッド汚れの 増加、媒体エラー多発などの不具合の原因となりま す。データカートリッジの消耗によるバックアップ 失敗防止するため、富士通純正品で、使用期間:1 年、使用回数:1000 回のどちらか早い方を目安に交 換が必要です。 ●上記に該当する場合は、新しいデータカートリッ ジに交換してください。データカートリッジは富士 通純正品を使用されることをお勧めします。 6 □ バックアップ時、 すぐに CLEAN LED が点灯するよ うな場合や、デー タカートリッジ排 出遅延/ロード不 可の際は、データ カートリッジを交 換する運用になっ ていますか? データカートリッジが寿命に達している場合、バッ クアップ中にヘッド汚れなどを検出し、CLEAN LED 点灯または点滅しやすくなります。また、デー タカートリッジの排出に時間がかかったり、データ カートリッジがロードできなくなる場合がありま す。 ●このような現象の場合、使用回数/期間に関わら ず、データカートリッジを新しいものに交換し様子 を見てください。その際、他のデータカートリッジ の使 用回数/期間をチェックし、交換周期に近づいてい るデータカートリッジは傷みが進行している場合が ありますのですべて交換することをお勧めします。 7 □ バックアップ直前 にデータカート リッジを投入し、 バックアップ直後 にデータカート リッジを取り出し て専用ケースに入 れて保管する運用 ですか? データカートリッジのデータ記録面は、内蔵 LTO2 ユニット内で露出し、テンション(張力)により ヘッドなどと接触しています。この状態が長く続く と浮遊塵埃やテンションの影響を受けやすく、デー タカートリッジの寿命低下/バックアップ時のエ ラー発生/内蔵 LTO2 ユニット故障などの原因とな ることがあります。 ●データカートリッジは使用前に本製品にセット し、使用後はただちに取り出して、ケースに入れて 保管してください。 デ | タ カ | ト リ ッ ジ 管 理 34 分類 No. チェック チェック項目 設 置 環 境 8 □ 内蔵 LTO2 ユニッ ト(サーバ内蔵の 場合はサーバ本 体)の周囲はほこ りの少ない環境で すか? 解説/作業内容(●) 内蔵 LTO2 ユニットは、データ記録面が装置内部で 露出するため、設置環境(特に塵埃)の影響を受け やすい装置です。一般的に、床面に近いほど塵埃濃 度は高くなるので、机上など床面より離れた場所へ の設置をお勧めします。 ● " 避けて頂きたい設置例 " を参考に、よりほこり の少ない環境に設置するよう配慮をお願い致しま す。 [避けていただきたい設置例] ・ 装置を床に直置き ・ 人通りの多い場所 ・ 開放されるドアや窓の近く。特に土埃や車の排気 ガス、などの外部の影響を受ける場所 ・ 空気の取り込み口、吹き出し口の近く。(空調、 エアコン、換気扇、などに注意) ・ タバコの煙の影響を受ける場所(装置が設置され た部屋での喫煙禁止) ・ プリンタの近くでトナーの影響を受ける場所 ・ コピー機、シュレッダー、FAX、など、紙を扱う 装置の近くで、紙の粉の影響を受ける場所 設置後、数か月でテープ投入口や周囲に塵埃が堆積 するような場合には設置場所を見直してください。 そ の 他 9 □ 内蔵 LTO2 ユニッ ト(サーバ内蔵の 場合はサーバ本 体)の電源を切る 場合や再起動時に は、データカート リッジを取り出す 運用になっていま すか? 一般にテープ装置は、テープ(LTO の場合はデータ カートリッジ)取り出し時のみテープに管理情報の 書き込み処理を行う場合があります。このため、 テープ装置にテープを入れたまま電源を切断すると 管理情報が書き込まれない異常テープが生成され、 データリストア失敗などの問題に繋がります。 ●テープ装置(サーバ本体)の電源を切るときは、 あらかじめテープ(LTO の場合はデータカートリッ ジ)を取り出してから電源を切断してください。 10 □ バックアップ業務 には複数本のデー タカートリッジを 用い、世代管理す る運用になってい ますか?(毎回同 じデータカート リッジを使用する 運用になっていま せんか?) 1巻のテープ(LTO の場合はデータカートリッジ) でバックアップを繰り返すような運用では、バック アップ失敗時に、一時的に重要なバックアップデー タが無くなる状態になります。 ●バックアップ業務には複数本のデータカートリッ ジを用い、世代管理する運用にしてください。 J 付録 A 運用チェックシート (設置・運用確認編) 35 付録 B B.1 Tape Maintenance Advisor について はじめに 近年では、テープ装置をデータのバックアップのために使用されるお客様も非常に増えて きています。テープ装置はハードディスクなどと異なり、定期的なメディアの交換やバッ クアップ装置のクリーニングなどメンテナンスが必要な装置です。このことが認識されな いまま使用され、 「バックアップ作業が失敗する」「いざという時にデータが復元できな い」といったトラブルが生じる事例が散見されます。 そこで、Fujitsu Tape Maintenance Advisor(以降「TMA」と表記します)は、このようなト ラブルを起こさないために、サーバに接続されているテープ装置のメンテナンス時期をオ ペレータにお知らせする機能を提供いたします。 ※本ソフトウェアは、「Tape Maintenance Checker」の後継製品です。 B.2 TMA 導入のメリット B.2.1 提供する主な機能 ・ PRIMERGY に接続しているテープ装置の決められたメンテナンス時期に、オペレータ の端末(Windows)に Messenger 通知し、メンテナンス作業を促します。 ・ オペレータがメンテナンス作業を実施しない場合には、翌日もメンテナンスを促す Messenger が通知されます。 ・ オペレータが一週間以上メンテナンス作業を実施しない場合には、Messenger 通知とと もに、イベントログに「警告」のログを残します。 以上の機能により、システム管理者は当該サーバのイベントログ監視を行うだけで、テー プ装置のクリーニング運用の実態を把握することができます(弊社ソフトウェア:System Walker などを併用すると効果的です) 。 36 B.2.2 メリット 本ソフトウェアを導入すると、次のような利点があります。 分類 導入前 導入後 ・ テープ装置の定期的なクリーニ ング作業を行っていない。 ・ あらかじめ設定された周期で、 クリーニングを促すメッセージ がポップアップするので、ク リーニング作業を忘れない。 ・ 週に一度、クリーニングをする ことになっているが忘れてしま い、クリーニングしなくなって しまう。 ・ クリーニング作業を怠ると翌日 もメッセージが通知される。 システム管理 者は? ・ 現地のオペレータがクリーニン グ運用を実施しているかを把握 できない。 ・ システム管理者が、定期的なク リーニングの必要性を理解して いない。 クリーニングしていないと当該 サーバのイベントログに残るの で、イベントログを監視すれば、 現地オペレータのクリーニング作 業の実施具合が把握できる。 バックアップ 業務は? テープ装置のヘッド周囲に塵埃が 堆積 結果として ・ バックアップ業務がたびたび失 敗する。 ・ バックアップしたテープ媒体を 傷つけてしまい、データの復元 ができない事象も発生。 テープ装置はメンテナンスされた 状態 結果として ・ バックアップ業務の安定度が向 上する。 現地のオペ レータは? B.2.3 製品概要 ■ 製品名 使用する OS に応じて、2 つの製品があります。 ・ Fujitsu Tape Maintenance Advisor for Windows V1.0L30 ・ Fujitsu Tape Maintenance Advisor for Linux V1.0L30 ■ 動作環境 J ・ OS - Windows の場合 ・ Microsoft® Windows® 2000 operating system Service Pack4 以降 ・ Microsoft® Windows ServerTM 2003[*] [*]:Windows Server 2003,Enterprise Edition for Itanium-Based Systems では動作しま せん。 - Linux の場合 ・ Red Hat Enterprise Linux AS(v2.1/ v. 3) ・ Red Hat Enterprise Linux ES(v2.1/ v. 3) 付録 B Tape Maintenance Advisor について 37 ・ 動作ハードウェア PRIMERGY シリーズ ・ 対象テープ装置 製品名 型番 DAT72 ユニット PG-DT501/PGBDT501/PGBDT501C DAT72 ユニット PG-DT502/PGBDT502/PG-DT502D/PGBDT502D /PG-DT502D2/PGBDT502D2 DAT72 オートローダ PG-DTA103/PGBDTA103 DDS4 ユニット PG-DT401/PGBDT401/GP5SDT401/PG-DT402/PGBDT402/ PG-DT402D/PGBDT402D DDS4 オートローダ PG-DTA102/PGBDTA102/GP5SDTA102 VXA2 ユニット PG-VX201/PGBVX201 LTO ユニット PG-LT101/PGBLT101/PGBLT101C /PGSLT101 LTO2 ユニット PG-LT201/PGBLT201/PGBLT201C LTO ライブラリ装置 PG-LTL102 LTO2 ライブラリ装置 PG-LTL201 ・ 対応サーバ RX100S2、RX200S2、RX300S2、RX600S2、TX150S2、TX200S2、TX600、ECONEL40 ・ メモリ使用量 5MB 以下 ・ CPU 使用率 1%以下 ` ` Windows では、本ソフトウェアはサービスを1つ使用します。 Linux では、X-Window(GNOME)が導入され、ログインされている必要がありま す。 ■ 主な機能 ・ メンテナンス時期の通知 - 接続されているテープ装置のメンテナンス時期を通知します。 - テープ装置が複数接続されている場合でも、それぞれの装置ごとに通知できます。 - テープ装置があらたに接続された場合も自動的に認識して通知します。 ・ 通知方法の設定 テープ装置ごとにメンテナンスの通知周期と通知方法を設定できます。設定可能な通知 周期と通知方法は、次のとおりです。 - 通知周期 ・ 日単位 ・ 週単位 ・ 月単位(日付での設定と曜日での設定のいずれかを選択可) 38 - 通知方法 ・ ポップアップメッセージ ・ アイコン(タスクトレイ) ・ イベントログ ・ 他の端末へのメッセージ - ログの記録 TMA の起動から終了までのイベント発生履歴を記録します。主な記録イベントは、次 の通りです。 ・ テープ装置の検出 ・ メンテナンス時期の通知 ・ 通知に対する確認操作の実施操作 ・ 発生したエラーの情報 - 特長 ・ 本ソフトウェアはテープ装置に対してアクセスしないため、バックアップソフト ウェアなど他のソフトウェアとの競合を気にする必要がありません。 ・ Windows Messenger の機能を使用して、離れた端末へメッセージ送信が可能です。 ■ 配付形式 富士通パソコン情報サイト FMWORLD.NET の PRIMERGY 向けホームページ(http:// www.fmworld.net/biz/primergy/)内『ダウンロード』→『添付ソフト/ドライバ検索』でお 使いのサーバの製品名を選択し、カテゴリに「添付ソフト」を指定して、検索してくださ い。(2005 年 10 月末公開予定) 同時にダウンロードされるソフトウェアの操作説明書をよくご覧になり使用してくださ い。 J 付録 B Tape Maintenance Advisor について 39 40 Before Reading This Manual Thank you for purchasing the Fujitsu Tape Drv LTO2 Ultrium2 200GB (PG-LT201/PGBLT201). This manual explains the basic usage of the Tape Drv LTO2 Ultrium2 200GB (hereafter referred to as "this product" or "the drive"). Before using this product, read this manual in order to handle it properly. For details about the installation procedures for this product, refer to "User's Guide" in "PRIMERGY Document & Tool CD" provided with this server. If "User's Guide" includes no description of this product, refer to the description of Tape Drv LTO Ultrium 100GB. October 2005 For Your Safety This manual contains important information, required to operate this product safely. Thoroughly review the information in this manual before using this product. Especially note the points under "Safety", and only operate this product with a complete understanding of the material provided. This manual should be kept in an easy-to-access location for quick reference when using this product. High Safety The Products are designed, developed and manufactured as contemplated or general use, including without limitation, general office use, personal use, household use, and ordinary industrial use, but are not designed, developed and manufactured as contemplated for use accompanying fatal risks or dangers that, unless extremely high safety is secured, could lead directly to death, personal injury, severe physical damage, or other loss (hereinafter "High Safety Required Use"), including without limitation, nuclear reaction control in nuclear facility, aircraft flight control, air traffic control, mass transport control, medical life support system, missile launch control in weapon system. You shall not use this Product without securing the sufficient safety required for the High Safety Required Use. If you wish to use this Product for High Safety Required Use, please consult with our sales representatives in charge before such use. E 41 Remarks Warning Descriptions Various symbols are used throughout this manual. These are provided to emphasize important points for your safety and that of others. The symbols and their meanings are as follows. Be sure to fully understand these before reading this manual. WARNING Ignoring this symbol could be potentially lethal. CAUTION Ignoring this symbol may lead to injury and/or damage to the device or hardware options. The following symbols are used to indicate the type of warning or cautions being described. The triangle mark emphasizes the urgency of the WARNING and CAUTION. Urgency is detailed inside the triangle or above it. A barred circle ( ) warns against certain actions (Do Not).These actions are detailed inside the circle and above it. A black circle indicates actions that must be taken. These actions are detailed inside the black circle and above it. Symbols The following are symbols used throughout this manual. Symbols Meaning These sections explain prohibited actions and points to note when using this device. Make sure to read these sections. These sections explain information needed to operate the hardware and software properly. Make sure to read these sections. → This mark indicates reference pages or manuals. Entering commands (Keys) CD-ROM drive names are shown as [CD-ROM drive]. Enter your drive name according to your environment. [CD-ROM drive]:\Setup.exe 42 Abbreviations The following expressions and abbreviations are used to describe the product names used in this manual. Product names Expressions and abbreviations Microsoft® Windows Server™ 2003, Standard Edition Windows Server 2003, Standard Edition Microsoft® Windows Server™ 2003, Enterprise Edition Windows Server 2003, Enterprise Edition Microsoft® Windows Server™ 2003, Standard x64 Edition Microsoft® Windows Server™ 2003, Enterprise x64 Edition Windows Server 2003 x64 Microsoft® Windows Server™ 2003, Enterprise Edition for itanium-based Systems Windows Server 2003, Enterprise Edition for itanium-based Systems Microsoft® Windows® 2000 Server Windows 2000 Server Tape Drv LTO2 Ultrium2 200GB (PG-LT201/PGBLT201) "This product" or "the unit" Windows Server 2003 Safety For your safety and that of others, follow the guidelines provided on the following pages concerning the use of this product. Handling this product WARNING • Be careful of the plastic bag used to package the product. Make sure children do not play with it, put it over their heads or put it in their mouth. This could suffocate them. • If a foreign object (water, pieces of metal, liquid) falls into the device, immediately turn off the server and unplug from the power source. Then, contact an office listed in "Appendix B Contact Information" (Jpg.73). If you continue using the server without taking any action, it can cause an electric shock or fire. Extreme care should be taken in households with young children. • Do not insert or drop foreign objects such as metals or inflammable objects into openings in the device (ventilating holes, etc.). Doing so may cause an electric shock or fire. E 43 WARNING • Do not tinker this product yourself. Doing so may cause an electric shock or fire. CAUTION • Do not disassemble this product or take it apart. • Do not use or store this product in the following environments. - Extreme low temperature environments - Extreme high temperature and high humidity environments - Environments where temperature and humidity change greatly and rapidly. - Places where a magnetic field may affect the device - Places that are subject to shock or vibration - Dusty or smoky environments (e.g. cigarette smoke, cloud of dust, exhaust gas, etc.) - Places exposed to direct sunlight - Places near any heat generating devices • Moving the unit from a cold place to a warm place, or increasing the room temperature quickly would cause condensation inside it. To avoid damage to the product or data cartridge, do not use the product if condensation occurs. If the product is exposed to a significant temperature change, wait for at least 1 hour before turning it on. • Remove the data cartridge from this product whenever turning the server off. After inserting the data cartridge in this product, the tape recording surface is exposed. If this situation continues for a long time, dust may stick to the recording surface or the tape may be damaged. This might destroy the data cartridge permanently. • Remove the data cartridge from this product whenever it is not in use. • Do not carry this product with the data cartridge left in it. • When inserting the data cartridge, do not force. • Do not use this product when liquids or metal objects have fallen in it. If some foreign objects have fallen in this product, contact an office listed in "Appendix B Contact Information" (Jpg.73). • If the front surface of this product is stained, wipe with a soft, dry cloth or a clothwet with water or mild detergent. Do not use volatile material such as benzine or paint thinner. Recycle To dispose of this product, contact an office listed in "Appendix B Contact Information" (Jpg.73). This product must be disposed of as industrial waste. 44 Checking the Items Supplied Before using the product, check that no supplied or attached items are missing. If any items are missing, contact an office listed in "Appendix B Contact Information" (Jpg.73). • • • • • • • Tape Drv LTO2 Ultrium2 200GB (this product) Cleaning cartridge User's Guide (this document) Extension power cable Driver floppy disk "PRIMERGY LTO2 UNIT Device Driver for Windows" Screws (x4) Washer (x4) Microsoft, Windows, and Windows Server are trademarks or registered trademarks of Microsoft Corporation in the USA and other countries. Other product names used are trademarks or registered trademarks of their respective manufacturers. Other products are copyrights of their respective manufacturers. E All Rights Reserved, Copyright© FUJITSU LIMITED 2005 45 Contents 1 Installing the Unit to a Server . . . . . . . . . . . . . . . . . . . . . . . . Checking the Installation Environment . . . . . . . . . . . . . . . . . . . . . . . . 1.2 Setting Jumpers . . . . . . . . . . . . . . . . . . . . . . . . . . . . . . . . . . . . . . . . . 48 1.3 Extension Power Cable . . . . . . . . . . . . . . . . . . . . . . . . . . . . . . . . . . . . 49 1.4 Installing the Driver . . . . . . . . . . . . . . . . . . . . . . . . . . . . . . . . . . . . . . . 2 Componet Names and Functions . . . . . . . . . . . . . . . . . . . . . 2.1 Eject Button and LED . . . . . . . . . . . . . . . . . . . . . . . . . . . . . . . . . . . . . 2.2 Inserting/Ejecting the Data Cartridge . . . . . . . . . . . . . . . . . . . . . . . . . 3 About the Data Cartridge . . . . . . . . . . . . . . . . . . . . . . . . . . . . 47 49 55 55 57 59 3.1 Data Cartridges That can be Used . . . . . . . . . . . . . . . . . . . . . . . . . . . 59 3.2 Handling the Data Cartridge . . . . . . . . . . . . . . . . . . . . . . . . . . . . . . . . 60 4 Cleaning . . . . . . . . . . . . . . . . . . . . . . . . . . . . . . . . . . . . . . . . . . 4.1 Cleaning Cartridge That can be Used . . . . . . . . . . . . . . . . . . . . . . . . 4.2 Head Cleaning . . . . . . . . . . . . . . . . . . . . . . . . . . . . . . . . . . . . . . . . . . 5 Cautions Concerning Backup . . . . . . . . . . . . . . . . . . . . . . . . 6 Specifications . . . . . . . . . . . . . . . . . . . . . . . . . . . . . . . . . . . . . 7 Troubleshooting . . . . . . . . . . . . . . . . . . . . . . . . . . . . . . . . . . . Appendix A Check Sheet (Installation/Operation Check) . . Appendix B Contact Information . . . . . . . . . . . . . . . . . . . . . . 46 47 1.1 63 63 64 65 66 67 69 73 1 Installing the Unit to a Server This chapter explains how to install the unit to a server. Install the unit in accordance with the following procedures. 1 Check the setting environment. J"1.1 Checking the Installation Environment"(pg.47) 2 Set jumpers. J"1.2 Setting Jumpers"(pg.48) 3 Install the unit to the server and connect SCSI cable and power cable. For details, refer to the "User's Guide" in "Document & Tool CD" provided with the server. For installation, make sure to use the screws and washers provided with this product. J"1.3 Extension Power Cable"(pg.49) 4 Install the required backup software and driver. J"1.4 Installing the Driver"(pg.49) 1.1 Checking the Installation Environment For details about the server installation environment, refer to "Safety Precautions" and "Start Guide". This product is susceptible to its installation environment (especially dust) because the data recording surface is exposed inside the device. The closer to the floor, the higher the dust level is in general, so it is recommended to install this product away from the floor, such as on a desk. Install this product in less dusty environments, referring to the "Example of installation places to avoid". example of installation places to avoid • On the floor. • High-traffic areas • Areas close to open door/window, especially, where affected by outside environment, such as sandy dust, car exhaust emission, etc. • Areas close to air ventilating duct (attention to air conditioner, exhaust fan, etc.) • Areas where affected by cigarette smoke (No smoking in the room where this product is installed) • Areas close to a printer and affected by the toner • Areas close to a paper-handling device, such as copy machine, shredder, or fax machine, and affected by paper particles. • Reconsider the installation place if dust accumulates at the tape slot and around the product in a few months after installation. E See " Safety" (Jpg.43). 1 Installing the Unit to a Server 47 1.2 Setting Jumpers When installing the unit to the server, a SCSI-ID must be set. The SCSI-ID can be set using the short jumpers on the rear of the unit. Follow "Installing Internal Options" in "User's Guide" in "PRIMERGY Document & Tool CD" provided with the server to set SCSI-ID number. • The rear of the unit 0 1 2 3 No jumper installation SCSI ID ` Do not install jumpers other than SCSI-ID locations. The SCSI-ID can be set as shown in the following table. Short jumper SCSI-ID 3 2 1 0 0 Open Open Open Open 1 Open Open Open Short 2 Open Open Short Open 3 Open Open Short Short 4 Open Short Open Open 5[*] Open Short Open Short 6 Open Short Short Open 7 Short Short Short Short 8 Short Open Open Open 9 Short Open Open Short 10 Short Open Short Open 11 Short Open Short Short 12 Short Short Open Open 13 Short Short Open Short 14 Short Short Short Open 15 Short Short Short Short *: Settings at the time of purchase 48 1.3 Extension Power Cable When connecting the power cable of the server directly to this product, there is a possibility that this product cannot be installed correctly.In this case, use the Extension power cable supplied with this product. (When installing to PRIMERGY RX600 S2, because attaching the power cable of the server to this product will interfere with the ventilation ducts on top of the server, make sure to use the power extension cable supplied with this product). Extension power cable (supplied with this product) Tape Drv LTO2 Ultrium2 200GB (rear) Power cable of the server 1.4 Installing the Driver To use Windows Backup(*) for Windows Server 2003 or Windows 2000 Server, install the driver according to the following procedures using the driver floppy provided with the device. *: Click the [Start]button → [Programs] → [Accessories] → [System tools] → [Backup] 1.4.1 Driver Installation (For any model other than PRIMERGY FT) For Windows Server 2003 1 Log on to the Windows Server 2003 with administrator privileges. 2 Click the [Start] button → [Control Panel] → [System] in this order. 3 Select the [Hardware] tab and click [Device Manager]. 4 Double click [Other devices], and then double click [TANDBERG TS400 SCSI Sequential Device]. E 5 Select the [Driver] tab and click [Update Driver]. The "Welcome to the Hardware Update Wizard" message appears. 1 Installing the Unit to a Server 49 6 When the "Can Windows connect to Windows Update to search for software?" message appears, click [No, not this time] and then click [Next >]. 7 Click [Install from a list or a specific location] and click [Next >]. 8 Click [Search for the best driver in these locations]. 9 Check [Include this location in the search], press the [Browse] button to specify the folder which restored the driver in the copy source, and click [Next >]. • Example: When using the supplied driver floppy (or when the downloaded driver was restored in a floppy) • For Windows Server 2003, Standard Edition, or Windows Server 2003, Enterprise Edition A:\lto2\i386 • For Windows Server 2003, Enterprise Edition for itanium-based Systems A:\lto2\ia64 • For Windows Server 2003 x64 A:\lto2\x64 • Example: When using CD such as ServerStart • For Windows Server 2003, Standard Edition, or Windows Server 2003, Enterprise Edition [CD-ROM drive]:\DRIVERS\tape\lto2\i386 • For Windows Server 2003, Enterprise Edition for itanium-based Systems [CD-ROM drive]:\DRIVERS\tape\lto2\ia64 • For Windows Server 2003 x64 [CD-ROM drive]:\DRIVERS\tape\lto2\x64 10 Double click [TANDBERG TS400 SCSI Sequential Device]. The "Completing the Hardware Update Wizard" message appears. 11 Click [Finish], and click [Close]. 12 Restart the server. For Windows 2000 Server 1 Log on to the Windows 2000 Server with administrator privileges. 2 Click the [Start] button → [Settings] → [Control Panel] in this order. 3 Double click the [System] icon. 50 4 Select the [Hardware] tab and click [Device Manager]. 5 Double click [Other devices], and then double click [TANDBERG TS400 SCSI Sequential Device]. 6 Select the [Driver] tab and click [Update Driver]. The "Welcome to the Device Driver Upgrade Wizard" message appears. 7 Click [Next]. 8 Select [Find the best driver for the device], and click [Next]. 9 Select [Specify the location], click [Next], set the folder which restored the driver in the copy source, and click [OK]. • Example: When using the supplied driver floppy (or when the downloaded driver was restored in a floppy) A:\lto2\i386 • Example: When using a CD such as ServerStart (When CD-ROM is E drive) [CD-ROM drive]:\DRIVERS\tape\lto2\i386 The "The following device driver is found" message appears. 10 Click [Next]. The "Completing the Device Driver Upgrade Wizard" message appears. 11 Click [Complete], and click [Close]. 12 Restart the server. 1.4.2 Driver Installation (For PRIMERGY FT) Notes • • • • This product can be installed only to FT1. It cannot be installed to FT2. Two of this product cannot be installed at the same time. This product cannot be used from CoServer. FT model cannot restore the system using Automated System Recovery (ASR) set or system recovery disk. For restoration, use the recovery CD supplied with the server. • For installation of the internal 5-inch option, refer to the User’s Guide of the FT model. For Windows Server 2003 1 Install this product to FT1. 2 Turn on the power of FT1 and FT2, and start the CoServer in online mode. E 3 Log on to the CoServer1 with administrator privileges. 1 Installing the Unit to a Server 51 4 Click the [Start] button → [Control Panel] → [System] in this order. 5 Select the [Hardware] tab and click [Device Manager]. The device manager starts. 6 Double click [Other devices], and then double click [TANDBERG TS400 SCSI Sequential Device]. 7 Select the [Driver] tab and click [Update Driver]. The Setup Wizard appears. 8 When the "Can Windows connect to Windows Update to search for software?" message appears, click [No, not this time] and then click [Next >]. Follow the wizard for installation. 9 For installation methods, click [Install from a list or a specific location] and click [Next >]. 10 For search and installation options, select [Search for the best driver in these locations] and set the following options. • Uncheck [Search removable media (floppy, CD-ROM, etc.)]. • Check [Include this location in the search] and specify the folder which restored the driver. • When restored in the floppy disk drive A A:\lto2\i386 • When restored in Temp folder of the drive C C:\Temp\Ito2\i386 • When using CD-ROM [CD-ROM drive]:\DRIVERS\tape\lto2\i386 11 Click [Next >]. The "Completing the Hardware Update Wizard" message appears. 12 Click [Finish] to exit. Under [Tape Drive], [TANDBERG TS400 SCSI Sequential Device] appears. 13 According to the chapter about "Operation after installing internal backup device" in the FT model User’s Guide, perform redirect operation to FTvirtual Server. 14 After installing the driver by repeating steps 4 - 12 to FTvirtual Server, restart FTvirtual Server. 52 For Windows 2000 Server 1 Install this product to FT1. 2 Turn on the power of FT1 and FT2, and start the CoServer in online mode. 3 Log on to the CoServer1 with administrator privileges. 4 Click the [Start] button → [Settings] → [Control Panel] in this order. 5 Double click the [System] icon. 6 Click [Device Manager]. The device manager starts. 7 Double click [Other devices], and then double click [TANDBERG TS400 SCSI Sequential Device]. 8 Select the [Driver] tab and click [Update Driver]. The "Welcome to the Device Driver Upgrade Wizard" message appears. 9 Click [Next]. Follow the wizard for installation. 10 For search methods, select [Find the best driver for the device], and click [Next]. 11 For search location, select [Specify the location] only, and click [Next]. 12 When [File copy source of manufacturer] is requested, specify the folder which restored the driver. • When restored in the floppy disk drive A A:\lto2\i386 • When restored in Temp folder of the drive C C:\Temp\Ito2\i386 • When using CD-ROM [CD-ROM drive]:\DRIVERS\tape\lto2\i386 13 Click [OK]. The "Completing the Device Driver Upgrade Wizard" message appears. 14 Click [Next]. E The "Completing the Hardware Update Wizard" message appears. 1 Installing the Unit to a Server 53 15 Click [Complete] to exit. Under [Tape Drive], [TANDBERG TS400 SCSI Sequential Device] appears. 16 According to the chapter about "Operation after installing internal backup device" in the FT model User’s Guide, perform redirect operation to FTvirtual Server. 17 After installing the driver by repeating steps 4 - 14 to FTvirtual Server, restart FTvirtual Server. 54 2 Componet Names and Functions This chapter explains the component names and functions of this product. Eject button LED 2.1 Eject Button and LED Eject button Press this button to eject the cartridge from the drive. J"3.1 Data Cartridges That can be Used"(pg.59) When the device is running (when the ACTIVITY LED blinks and when loading/unloading or writing/reading data), do not press the eject button. Wait until the operation finishes before pressing the eject button. LED There are 4 LEDs as shown below, indicating self-diagnostic test when the power is on, and status and error during operation. READY LED (Green) ACTIVITY LED (Green) CLEAN LED (Amber) FAULT LED (Amber) The general meaning of each LED status is as follows. For details, refer to the list on (pg.56). • READY LED When this is on, it indicates that a cartridge is loaded. • ACTIVITY LED This blinks mainly when a cartridge is operating. 2 Componet Names and Functions E 55 • CLEAN LED This turns on when cleaning is required. • FAULT LED This blinks when an unrecoverable error occurs and turns on when the internal temperature of the drive exceeds the temperature conditions for installation. ` When the FAULT LED and the ACTIVITY LED blink at the same time a media error has occurred.Refer to " Troubleshooting" and perform recovery procedures. The meaning of LED display • LED display during Power-On Self-Test When this device is turned on, LEDs change as indicated in the table below. It takes about 30 seconds until the self diagnostic test completes and the device is available. Status LED lighting test READY LED (Green) ACTIVITY LED (Green) CLEAN LED (Amber) FAULT LED (Amber) ON ON ON ON Blinking OFF ON/OFF* OFF OFF Blinking ON/OFF* OFF OFF OFF ON/OFF* OFF READY LED (Green) ACTIVITY LED (Green) CLEAN LED (Amber) FAULT LED (Amber) No cartridge is loaded OFF OFF ON/OFF* OFF Cartridge is loaded (Not operating) ON OFF ON/OFF* OFF Cartridge is loaded (Operating to write, read, etc.) ON Blinking ON/OFF* OFF Cartridge is being loaded/ unloaded OFF Blinking ON/OFF* OFF ON/OFF OFF/Blinking ON OFF OFF Blinking ON OFF Self diagnostic test Ready • LED display during use Status Cleaning required Cleaning Unrecoverable error ON/OFF OFF ON/OFF* Blinking Recommended operation temperature exceeded(Cartridge is ejected) OFF OFF ON/OFF* ON Media error OFF Blinking ON/OFF* Blinking *: CLEAN LED When CLEAN LED turns on, it indicates cleaning is required. CLEAN LED turns on in the following cases. - When the device judges cleaning is required - When a read error or write error occurs 56 - When the tape operating time exceeds 100 hours ` Once CLEAN LED turns on, it does not turn off until cleaning is performed correctly. (The LED does not turn off even when the power is turned off.) When CLEAN LED turns on, perform cleaning using the cleaning cartridge. ` 2.2 When READY LED is blinking rapidly, do not insert a data cartridge. Doing so may destroy data. Wait for 15 seconds, and perform operations after the rapid blinking has stopped. Inserting/Ejecting the Data Cartridge Handle the data cartridge properly referring to "3 About the Data Cartridge" (Jpg.59). How to insert Insert the data cartridge slowly into the product, with the arrow mark facing up and the label panel facing you. When the cartridge is fully inserted, it starts loading automatically. ` To avoid damaging the product and the cartridge, note the following points. • Do not use too much force. • Insert the cartridge straight at the correct position in correct direction. Arrow mark (insert direction) Label area ` If you want to perform backup or restore operations immediately after inserting the data cartridge, wait until the data cartridge is completely loaded (until the READY LED turns on). E 2 Componet Names and Functions 57 How to eject Check that only the READY LED is on, and press the eject button. Put the ejected data cartridge in the cartridge case to store. ` ` ` ` 58 When ejecting the data cartridge, do not stop or push it back. Also, do not pull out the data cartridge before it is fully ejected. Doing so may cause device failure. Eject the data cartridge when the drive is not operating the tape (when the ACTIVITY LED is turned off). Depending on the backup software, the cartridge cannot be ejected using the eject button (NetVault, etc.). In this case, pressing the eject button does not eject the cartridge. Eject the cartridge by operating the backup software. When the server is turned off, the data cartridge cannot be inserted or ejected. 3 About the Data Cartridge This chapter explains the data cartridge used for this product. 3.1 Data Cartridges That can be Used Use the following data cartridges for this product. Supplier Remarks[*] LTO Ultrium 1 Data Cartridge (LTO FB UL-1 100G E) FUJI PHOTO FILM Co.,LTD. Storage capacity: 100GB LTO Ultrium 2 Data Cartridge (LTO FB UL-2 200G E) FUJI PHOTO FILM Co.,LTD. Storage capacity: 200GB Product name *: Capacity when data compression function is not used. Memory capacity is calculated as 1GB =10003 bytes. To avoid a miss-backup due to worn media, replace the media (data cartridge) at the earlier timing of the following. Data cartridge replacement cycle: (whichever is earlier) • after one year of use • after being used 1000 times The lifespan of media varies depending on the environment (temperature, humidity, dust, etc.) and operating conditions of the device. ` The data cartridge is a consumable part. Worn media can cause troubles such as tape surface damage, dirty head, many media errors, etc. E 3 About the Data Cartridge 59 3.2 Handling the Data Cartridge This section describes the points to note when handling the data cartridge used for this product. Follow the notes below when handling the data cartridge. • Keep the data cartridge clean. • Check the following points before using the data cartridge. - There is no damage to or cracks in the data cartridge. - The label is correctly attached to the data cartridge. • Do not insert a damaged data cartridge into this product. • Do not open the data cartridge to take the tape out. • Do not directly touch the tape. • Do not expose the data cartridge to direct sunlight or place it in a humid place. • Do not leave the data cartridge near a strong magnetic field (e.g. near a display device or speaker). • Do not use a data cartridge that has had a strong shock such as being dropped or falling. 3.2.1 Setting the Data Cartridge Label A label to be attached to the data cartridge is provided with the data cartridge. Attach the label at the location shown in the following figure. Write the starting date of the data cartridge use to specify the expiration date. ` ` Be sure to use the provided label. Do not attach the label to a place other than the specified place. Area for the label to be attached Starting date: Oct 31 2005 <Example of the label> 60 3.2.2 Data Write Protection To make the data cartridge write-protected, slide the write-protect switch to the right. Write-protect switch Write-protect 3.2.3 Storing the Data Cartridge When storing the data cartridge, follow the notes below: • Make the storage area clean, and comply with the usage rules. • Put the data cartridge in the operation environment for more than 24 hours before using it. This period is required to accustom the data cartridge to the environment. • When storing data in a data cartridge for a long time, store the data cartridge in its plastic case and keep it under the following temperature and humidity conditions: Temperature 16 - 32 °C Humidity 20%RH - 80%RH (non-condensing) Maximum wet-bulb temperature Below 26 °C E 3 About the Data Cartridge 61 3.2.4 Checking the Condition of the Leader Pin on the Data Cartridge Check the condition of the leader pin (the pin attached to the top of the tape) on the data cartridge before use. CAUTION • Do not use a defective media whose pin is detached, whose cartridge is deformed, or which had a shock, because such defective media can damage the drive. ` ` Slide the cartridge door to check that the leader pin is attached properly. Do not touch the leader pin and tape. Be careful that dust does not get into the cartridge. Cartridge door Leader pin is attached properly Leader pin is unfastened Slide the cartridge door and check the leader pin. 62 4 Cleaning This chapter explains cleaning for this product. Head cleaning will be performed automatically when a cleaning cartridge is inserted into this product.The cleaning cartridge is ejected when cleaning operations are complete. Cleaning takes about three to five minutes. ` 4.1 This product uses a magnetic head to write and read data. If soiled with dust or dirt, the magnetic head does not read or write data correctly. Also, it could reduce the life of the data / data cartridge, scratch the magnetic surface of the tape, or cause other kinds of trouble making it impossible to use. To avoid trouble, clean the head occasionally using a cleaning cartridge. Cleaning Cartridge That can be Used Use the following cleaning cartridge for this product. Product name Ultrium Universal Cleaning Cartridge (LTO FB UL-1 CL UCC E) ` ` ` Supplier FUJI PHOTO FILM Co.,LTD. The CLEAN LED blinks on when cleaning is required. If this LED is on, insert a cleaning cartridge into the drive to clean it. The cleaning cartridge can be used 50 times maximum. Five years after purchasing the cleaning cartridge, replace it with a new one even when it is used less than 50 times. If the CLEAN LED turns on and the cleaning cartridge is ejected immediately (approx. 40 seconds) after it is inserted, replace the cleaning cartridge with a new one. E 4 Cleaning 63 4.2 Head Cleaning Managing the number of times for the uses of a cleaning cartridge The cleaning cartridge has a lifetime, and it can be used 50 times maximum. Use the label attached to the cleaning media to manage the number of times for its use. If a cleaning cartridge that has exceeded its lifetime is used, it will be quickly ejected (approx. 40 seconds), the CLEAN LED will light up and cleaning will not take place. Starting date: Oct 31 2005 Times used: <Example of Cleaning cartridge label> Periodical cleaning It is recommended to perform periodical head cleaning (every three months or after every 100 hours of use, whichever is quicker) as a preventive measure to prevent dust from accumulating on the head. It is recommended to perform periodical cleaning for checking purpose even when this product is not used at all. Head cleaning request This product may reach head cleaning request status (CLEAN LED lights up) if the following occurs. If this product reaches cleaning request status, insert the cleaning cartridge and perform cleaning. • If dust or dirt accumulates on the head unexpectedly After cleaning, check the installation environment again. J"1.1 Checking the Installation Environment"(pg.47) • If the tape is damaged After cleaning, replace the damaged cartridge with a new data cartridge. • If operations such as backup/restoration are performed for a certain amount of time (100 hours) Perform cleaning. 64 5 Cautions Concerning Backup This chapter explains the points to note about backup operations for this product. Ejecting the data cartridge after backup Do not leave the data cartridge in this product. Doing so makes the data cartridge wear faster, because the longer it is used, the faster it wears. Insert the data cartridge just before the backup operation, and remove it immediately after the operation. Data compression rate Although the data compression rate is estimated to be approximately 200%, it varies depending on the data contents. For the data that was already compressed by software, the compression effects by this product cannot be expected. Backup performance/capacity The backup performance and backup capacity that can be used in one data cartridge varies depending on the following factors: • The conditions (attrition, dust, etc.) of the recording surface of the data cartridge to be used. • The dust and dirt condition of this product head • Data compression rate • The workload on the server Points to note during system configuration When using a single data cartridge over and over, all the data can be lost in the event the backup fails. The damage in the event of trouble can be minimized if two or more data cartridges are used for backup operation. Example: Using different data cartridges for each day of the week. E 5 Cautions Concerning Backup 65 6 Specifications This chapter describes the specifications for this product. Item Functions and Specifications Product name Tape Drive LTO2 Ultrium2 200GB Product ID PG-LT201 PGBLT201 PGBLT201C Data memory capacity (no compression) 200GB (Ultrium2 data cartridge) 100GB (Ultrium1 data cartridge) Actual data transmission rate (no compression) 24MB/s (When using Ultrium2 data cartridge) Data format Ultrium1, Ultrium2 format (depending on the data cartridge to be used) Interface Ultra 320 SCSI Weight 1.4kg Power consumption Maximum 49W (Average 25W) Heat dissipation Maximum 176.4 kJ/h (Average 90kJ/h) Maximum wet-bulb temperature 26 °C The following shows the installation environment conditions Item Installation conditions Operating 10 - 35°C Resting -5 - 55°C Humidity Operating/Resting 20%RH - 80%RH (non-condensing) Temperature ramp Operating/Resting Temperature Dust Below 15 °C/hr (non-condensing) Below 0.15mg/m3 For details about the installation environment refer to "1.1 Checking the Installation Environment" (Jpg.47)". 66 7 Troubleshooting This chapter explains the troubleshooting methods when this product is not running properly during use. If the problem is not resolved after performing the following troubleshooting, contact an office listed in "Appendix B Contact Information" (Jpg.73). For details about LED status, refer to "2.1 Eject Button and LED" (Jpg.55). Phenomenon Troubleshooting method This product does not operate. (It does not load after a cartridge is inserted, Ready LED does not turn on when a cartridge is inserted, etc.) Check that the power cables/ SCSI cables are connected correctly. J"1 Installing the Unit to a Server"(pg.47) This product is not recognized on the OS or the backup software. • Check that the power cables and SCSI cables are connected correctly, and the SCSI terminator is connected to the SCSI cables correctly. Also, check that the SCSI ID of this product is set correctly (the setting value should not be the same as other SCSI ID of other devices on the same bus). J"1 Installing the Unit to a Server"(pg.47) • Check that the SCSI card, SCSI cables, and SCSI terminator are compatible with this product and SCSI bus type. • Check that this product is recognized on the SCSI BIOS and the operating system (check on the Windows Device Manager. It will be recognized as "TANDBERG TS400"). • Check that the backup software supports the SCSI card and this product. Also, if a device driver is required, check that the correct device driver is installed. The cartridge is ejected right after insertion. • Check that the data cartridge can be used. J"3.1 Data Cartridges That can be Used"(pg.59) J"4.1 Cleaning Cartridge That can be Used"(pg.63) • Check that the direction of the cartridge is correct. • Check that the cartridge is not damaged and the leader pin is attached correctly. J"3.2.4 Checking the Condition of the Leader Pin on the Data Cartridge"(pg.62) • Use a new cartridge. If it has no problem, do not use the old cartridge. E 7 Troubleshooting 67 Phenomenon 68 Troubleshooting method The cartridge is not ejected. • Press the eject button. It may take several minutes to rewind the tape. Wait if the ACTIVITY LED is blinking. • Eject from the backup software. Eject using the eject button is set to be disabled depending on the backup software. • Shutdown and restart the server. Then, press the eject button (Data may not be recorded correctly when the power on/off). ACTIVITY LED turns off and FAULT LED is blinking (Unrecoverable error). If possible, shutdown the server and restart. Both ACTIVITY LED and FAULT LED are blinking (Media error). • Check that the cartridge is correct. • Check that the write-protect switch of the cartridge is set at the correct position (either write inhibit or write enable). • Check that there is no damage to the cartridge. • Perform cleaning and use a new cartridge. Appendix A Check Sheet (Installation/Operation Check) Tape Drv LTO2 Ultrium2 200GB is a precision instrument and improper daily operation (cleaning/ data cartridge management/ installation environment, etc.) will lead to troubles such as backup failure. We provide here an "Operation Check Sheet" to avoid troubles. The following items are recommended operations by Fujitsu. Make sure to check backup operations. Classific ation No Check Check item 1 ❑ Is head cleaning performed once every three months? Periodical cleaning is required as the magnetic head accumulates dust or dirt regardless of the use of this product. If soiled with dust or dirt, the magnetic head may scratch the surface of the tape or reduce the life of the data cartridge. This product provides a function that causes the CLEAN LED to light up after 100 hours of use urging you to perform cleaning. * Clean this product every three months. 2 ❑ Is cleaning performed when the CLEAN LED turns on? This product provides a function that causes the CLEAN LED to light up after 100 hours of use or when it judges that cleaning is required, urging you to perform cleaning. If the product is used while the CLEAN LED is on, the data cartridge and backup data may be damaged. It is also possible that the worn-out data cartridge will soil the head, etc. * When the CLEAN LED turns on, immediately perform cleaning. If the CLEAN LED turns on again, consider replacing the data cartridge. 3 ❑ Is the replacement cycle of the cleaning cartridge set to the replacement cycle of the product (per 50)? The cleaning cartridge is required to be replaced at the earlier timing of either after being used 50 times or after five years of use. * Replace the cleaning cartridge periodically according to the operations. Cleaning Description / tasks (*) E Appendix A Check Sheet (Installation/Operation Check) 69 Classific ation No Check Check item Description / tasks (*) 4 ❑ When the inserted cleaning cartridge is automatically ejected and the CLEAN LED is on, is the cleaning cartridge replaced? When the cleaning cartridge is automatically ejected after approx. 40 seconds and the CLEAN LED is on, the cleaning cartridge is run down. * In this case, replace the cleaning cartridge with a new one. 5 ❑ Is the commencing date for use written on the data cartridge? (Approximate replacement: after one year) The data cartridge is a consumable part. Worn data cartridge will cause troubles such as tape surface damage, dirty head, many media errors, etc. To avoid miss-backup due to worn data cartridge, replacement is required for Fujitsu authorized product at the earlier timing of either after one year of use or after being used 1000 times. * In this case, replace the cartridge with a new one. It is recommended to use the Fujitsu authorized data cartridge. 6 ❑ When the CLEAN LED turns on immediately during backup, or in the case of data cartridge eject delay/ unloadable, is the data cartridge replaced? When the data cartridge life is over, it detects head dirt during backup and the CLEAN LED tends to turn on or blink. Also, ejecting the data cartridge may take a long time, or the data cartridge may be unloadable. * In these cases, replace the data cartridge with a new one regardless of the number of times/period that used, and see how it works. It is recommended to check the number of times/period that used of other data cartridges and replace them all since the cartridges close to the end of the replacement cycle may have serious damage. 7 ❑ Is the data cartridge inserted right before backup and ejected right after backup, and stored in its case? The data recording surface of the data cartridge is exposed in this product and contacts the head under tension. If this situation continues for a long time, the effect of suspended particles of dust and tension on the data cartridge may cause reduction of data cartridge life, errors during backup, or failure in this product, etc. * Insert the data cartridge before use, and eject right after use and store in its case. Cleaning Data cartridge manage ment 70 Classific ation Installati on environ ment No Check Check item Description / tasks (*) 8 ❑ Is the environment of this product (the server if it is built in the server) dustfree? This product is susceptible to its installation environment (especially dust) because the data recording surface is exposed inside the device. The closer to the floor, the higher the dust level is in general, so it is recommended to install this product away from the floor, such as on a desk. * Install this product in less dusty environments, referring to the "Example of installation places to avoid". [example of installation places to avoid] • On the floor. • High-traffic areas • Areas close to open door/window, especially, where affected by outside environment, such as sandy dust, car exhaust emission, etc. • Areas close to air ventilating duct (attention to air conditioner, exhaust fan, etc.) • Areas where affected by cigarette smoke (No smoking in the room where this product is installed) • Areas close to a printer and affected by the toner • Areas close to a paper-handling device, such as copy machine, shredder, or fax machine, and affected by paper particles. Reconsider installation place in case that dust accumulates at the tape slot and around the product in a few months after installation. E Appendix A Check Sheet (Installation/Operation Check) 71 Classific ation Others 72 No Check Check item Description / tasks (*) 9 ❑ When this product (the server if it is built in the server) is turned off or restarted, is the data cartridge ejected? Generally, the tape device may write the tape management data only when the tape (the data cartridge for LTO) is ejected. Therefore, if the power of the tape device is turned off while the tape is inside, an error tape where no management data can be written will be created and problems such as data restore failure will occur. * Before turning off the tape device (the server), eject the tape (the data cartridge for LTO). 10 ❑ Are two or more data cartridges used for backup and generation management? (Is the different data cartridge used for every time?) When using a single tape (data cartridge for LTO) over and over for backup, an important backup data can be lost temporarily in the event the backup fails. * Use two or more data cartridges for backup and perform generation management. Appendix B Contact Information • Australia: Fujitsu Australia Limited Tel: +61-2-9776-4555 Fax: +61-2-9776-4556 Address: 2 Julius Avenue (Cnr Delhi Road) North Ryde, Australia N.S.W. 2113 • China: Fujitsu (China) Holdings Co., Ltd. Tel: +86-21-5292-9889 Fax: +86-21-5292-9566 Address: 18F, Citic Square, 1168 West Nanjing Road Shanghai, China 200041 • Hong Kong: Fujitsu Hong Kong Limited Tel: +852-2827-5780 Fax: +852-2827-4724 Address: 10/F., Lincoln House, 979 King's Road Taikoo Place, Island East, Hong Kong • Indonesia: PT. Fujitsu Systems Indonesia Offices Headquarters Tel: +62-21-570-9330 (Hunting) Fax: +62-21-573-5150 Address: Wisma Kyoei Prince 10th Floor Jl. Jend. Sudirman Kav 3-4 Jakarta, Indonesia 10220 • Korea: Fujitsu Korea Ltd. Tel: +82-2-3787-6000 Fax: +82-2-3787-6066 Address: Susong Tower Building, 83-1 Susong-Dong Jongno-Gu, Seoul, Republic of Korea 110-140 • Malaysia: Fujitsu (Malaysia) Sdn. Bhd. Tel: +60-3-8318-3700 Fax: +60-3-8318-8700 Address: 1st Floor, No.3505 Jalan Technokrat 5 63000 Cyberjaya, Selangor Darul Ehsan Malaysia • Philippines: Fujitsu Philippines, Inc. Tel: +63-2-812-4001 Fax: +63-2-817-7576 Address: 2nd Floor, United Life Building, A. Arnaiz Legaspi Village, Makati, Metro Manila Philippines Appendix B Contact Information E 73 • Singapore: Fujitsu Asia Pte. Ltd. Tel: +65-6777-6577 Fax: +65-6771-5502 Address: 20, Science Park Road, #03-01 TeleTech Park, Singapore Science Park II, Singapore 117674 • Taiwan: Fujitsu Taiwan Limited Tel: +886-2-2311-2255 Fax: +886-2-2311-2277 Address: 19F, No.39, Section 1, Chung hwa Road Taipei, Taiwan • Thailand: Fujitsu Systems Business (Thailand) Ltd. Tel: +66-2-500-1500 Fax: +66-2-500-1555 Address: 12th Floor, Olympia Thai Tower, 444 Rachadapisek Road Samsennok, Huaykwang, Bangkok, Thailand 10310 • Vietnam: Fujitsu Vietnam Limited Tel: +84-4-831-3895 Fax: +84-4-831-3898 Address: Unit 802-8th floor, Fortuna Tower Hanoi 6B Lang ha Street, Ba dinh District, Hanoi Socialist Republic of Vietnam • United States: Fujitsu Computer Systems Corporation Tel: +1-800-831-3183 Fax: +1-408-496-0575 Address: 1250 East Arques Avenue, Sunnyvale, CA USA 94088-3470 For the latest information, refer to the Fujitsu PRIMERGY website (http://primergy.fujitsu.com). 74 PRIMERGY 内蔵 LTO ユニット (PG-LT201) 取扱説明書 Tape Drv LTO2 Ultrium2 200GB (PG-LT201) User’s Guide B7FY-1581-01-00 発行日 発行責任 2005 年 10 月 富士通株式会社 Issued on Issued by October, 2005 FUJITSU LIMITED Printed in Japan ● 本書の内容は、改善のため事前連絡なしに変更することがあります。 ● 本書に記載されたデータの使用に起因する、第三者の特許権およびその他の 権利の侵害については、当社はその責を負いません。 ● 無断転載を禁じます。 ● 落丁、乱丁本は、お取り替えいたします。 • The contents of this manual may be revised without prior notice. • Fujitsu assumes no liability for damages to third party copyrights or other rights arising from the use of any information in this manual. • No part of this manual may be reproduced in any form without the prior written permission of Fujitsu. • Any manual which has missing pages or which is incorrectly collated will be replaced. こ のマ ニ ュ アルは リ サイ ク ルに配慮 し て製本 さ れています。 不要にな っ た際は、 回収 ・ リ サイ ク ルに出 し て く だ さ い。 * B 7 F Y 1 5 8 1 0 1 *