1
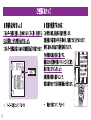
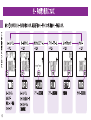
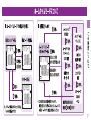
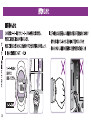
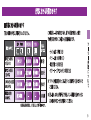
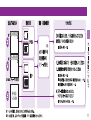
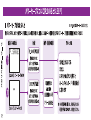
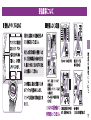
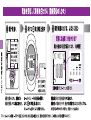
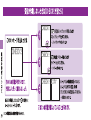
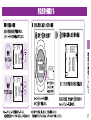
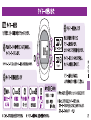
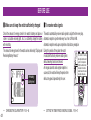
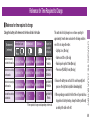
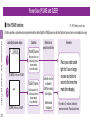
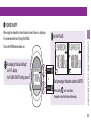
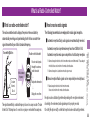
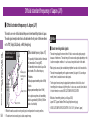
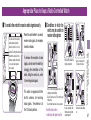
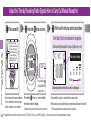
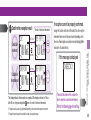
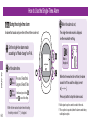
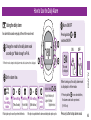
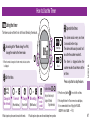
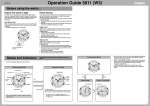
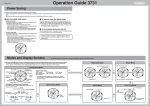
Consult the retailer from where you purchased the watch for repair or assistance with SEIKO products.
Should you have any questions, please contact the SEIKO CUSTOMER SERVICE CENTER listed below.
● SE IK O CUSTOME R SE RV I C E C EN T ER
・
・
・
・
・
・
・
・
・
・
・
・
・
・
・
・
・
・
・
・
・(03)3535-2211
2-1-10, Kaji-cho, Chiyoda-ku, Tokyo ・
・
・
・
・
・
・
・
・
・
・
・(06)6538-6541
8th floor, Osaka Yotsubashi Shinmachi building ・
4-24, Shinmachi 1-Chome, Nishi-ku, Osaka-shi
SEIKO CUSTOMER SERVICE CENTER:
0120-612-911
(toll free in Japan, automatically connected to one of the above listed Seiko Service Centers, close to where you are)
Head Office
2-1, Shibaura 1-chome, Minato-ku, Tokyo 105-8467
D IG I T A L
WIRED W36 Series
Thank you very much for choosing a WIRED DIGITAL W36 Series Watch.
Please read carefully the instructions in this booklet for proper and safe use of your WIRED watch
before start using it, and keep this manual handy for easy reference.
CONTENTS
ABOUT THIS WATCH
CHARGING THE SOLAR BATTERY
SETTING THE TIME BY RECIEVING RADIO SIGNAL
WORLD TIME
ALARM
STOPWATCH
TIMER
TROUBLESHOOTING
BEFORE USE
■ Make sure to keep the watch sufficiently charged
■ To receive radio signals
Check the amount of energy stored in the watch's battery and place or
store in a location receiving light, etc., to sufficiently charge the battery
with electricity.
The amount of energy stored in the watch can be checked by "Display and
Remaining Battery Amount."
This watch automatically receives radio signals to adjust the time every day.
Automatic reception is performed every hour from 2 AM to 4 AM.
Automatic reception ends upon completion of satisfactory reception.
During this period of time, place the watch
The antenna for receiving
in a location that easily receives radio signals
radio signals inside the watch
is at the 12 o'clock position.
without wearing it and do not move it.
Turning the antenna toward
the outside of the window
As long as automatic radio signal reception is
enables the watch to receive
successful, the watch will keep the precise time
radio signals more easily.
without any special operation by the user.
Remaining
battery level
→ CHARGING THE SOLAR BATTERY P.45∼ 54
42
→ SETTING THE TIME BY RECEIIVING RADIO SIGNAL P.55∼61
CONTENTS
42
SETTING THE TIME BY RECEIIVING RADIO SIGNAL・・ 55
WORLD TIME・・・・・・・・・・・・・・・・・・・・・・・・・・・・・・ 62
TROUBLESHOOTING
43
What is a Radio-Controlled Watch ?
・
・
・
・
・
・
55
World Main Area Time Zone List ・・・・・・ 62
When the Following Messages are Displayed 70
・
・
・
・
・
・
・
・
・
・
・
・
・
・
・
・
・
・
・
・
44
What is a radio-controlled watch?
・
・
・
・
・
・
・
・
55
How to Use World Time
・
・
・
・
・
・
・
・
・
・
・
・
・
・
・
・
・
・
・
・
・
・
・
・
・
・
・
・
・
・
・
・
・
44
How to receive radio signals
・
・
・
・
・
・
・
・
・
・
・
・
・
・
55
ALARM
45
Official standard frequency of Japan (JJY) ・・・ 56
CONTENTS
ABOUT THIS WATCH
Features
Name and Function of Each Part
・
・
・
・
・
・
・
・
・
・
・
・
・
・
・
・
・
・
・
・
63
Troubleshooting
64
Abnormal Display or Improper Function 74
How to Use the Daily Alarm
47
Appropriate Place to Keep a Radio-Controlled Watch 57
・
・
・
・
48
・
・
・
・
・
・
・
・
・
・
・
・
・
・
・
・
・
・
・
・
・
・
・
・
・
48
Reference for Time Required to Charge ・・・ 49
To enable the watch to receive radio signals easily 57
in which the watch
Conditions
may be unable to receive radio signals ・・・・・・ 57
Adjust the Time by Receiving Radio Signals 58
Display and Remaining Battery Amount ・・・ 50
How to Carry Out Manual Reception ・・・・・・ 58
About Massage Display
52
When reception is not operated ・・・・・・・・・・・ 60
Specifications
P.SAVE and SLEEP ・・・・・・・・・・・・・・・・・・・・ 52
If CHECK! is displayed ・・・・・・・・・・・・・・・・・・・・ 60
Built-in Illuminating Light
Overcharge Prevention Function and Power Source 54
Confirm Reception Result ・・・・・・・・・・・・・・・・・ 61
Home time mode
・
・
・
・
・
・
・
・
・
・
・
・
・
・
・
・
・
・
・
・
・
・
・
CHARGING THE SOLAR BATTERY
How to Charge
Power Save
・
・
・
・
・
・
・
・
・
・
・
・
・
・
・
・
・
・
・
・
・
・
・
・
・
・
・
・
・
・
・
64
・
・
・
・
・
・
・
・
・
・
・
65
How to Use the Single-Time Alarm
Reception range of each standard frequency 56
・
・
・
・
・
・
・
・
・
・
・
・
・
・
・
・
・
・
・
・
・
・
・
・
・
STOPWATCH ・・・・・・・・・・・・・・・・・・・・・・・・・・・・・ 66
How to Use the Stopwatch ・・・・・・・・・・・・・ 66
TIMER
70
・
・
・
・
・
・
・
・
・
・
・
・
・
・
・
・
・
・
・
・
・
・
・
・
・
・
・
・
・
・
・
・
・
・
・
・
46
Mode switching
・
・
・
・
・
・
・
・
・
・
・
・
・
・
・
・
・
・
・
・
・
・
・
・
・
・
・
・
・
・
・
・
・
・
・
・
・
・
・
・
・
・
・
・
・
・
・
・
・
・
・
・
・
・
・
・
67
How to Use the Timer ・・・・・・・・・・・・・・・・・・ 67
・
・
・
・
・
・
・
・
・
・
・
・
・
・
・
・
・
・
・
・
・
・
・
・
・
・
・
・
・
・
・
・
・
・
74
・
・
・
・
・
・
・
・
・
・
・
・
・
・
・
75
How to Reset the Built-in IC
CARE OF YOUR WATCH
・
・
・
・
・
・
・
・
・
・
・
・
・
・
75
・
・
・
・
・
・
・
・
・
・
・
・
・
・
・
・
・
・
・
・
76
Place to keep your watch
Care of Your Watch
71
Rash and allergy ・・・・・・・・・・・・・・・・・・・・・・・・ 77
68
About Bathing ・・・・・・・・・・・・・・・・・・・・・・・・・・・ 77
・
・
・
・
・
・
・
・
・
・
・
・
・
・
・
68
Water Resistance ・・・・・・・・・・・・・・・・・・・・・・・ 78
・
・
・
・
・
・
・
・
・
・
・
・
・
・
・
・
・
・
・
・
・
・
・
・
・
・
69
Precautions on Wearing Your Watch・・ 79
69
Periodic Check ・・・・・・・・・・・・・・・・・・・・・・・・・・ 79
The Electroluminescent Panel ・・・・・・・・・ 69
Notes on the Replacement Parts ・・・・・・ 79
OTHERS
・
・
・
・
・
・
・
・
・
・
・
・
・
・
・
・
・
・
・
・
・
・
・
・
・
・
・
・
・
・
・
・
・
・
・
・
・
・
・
・
・
・
・
・
・
・
・
・
CONTENTS
・
・
・
・
・
・
・
・
・
・
・
・
・
・
・
・
・
・
・
・
・
・
・
・
・
・
・
・
・
・
・
・
・
・
・
・
・
・
・
・
・
・
・
・
・
・
・
・
・
・
・
・
・
・
・
・
・
・
・
・
BEFORE USE
43
Features
This is a solar radio-controlled watch. The watch receives official standard frequencies of Japan (from either of two transmitting stations) to
display correct time. A solar cell underneath the dial converts any form of light into"electrical energy"to operate the watch.
ABOUT THIS WATCH
■Automatic Time Setting・
・
・
・
・
・
・
・
・
・
・
・
・
・
・
・
・
・ The watch maintains the precise time by
automatically receiving radio signals on the official
→ P.55
standard frequency of Japan. It is also possible to
make the watch manually receive radio signals.
■Display of Radio Signal Reception Level・
・ During reception attempts, the watch displays the
→ P.58
strength of radio wave signals.
■Display of Radio Signal Reception Result・
・ The latest reception result (success/failure) and the
date and time for which the latest reception was
→ P.61
successfully performed can be confirmed.
■Solar Rechargeable Battery・
・
・
・
・
・
・
・
・
・
・
・
・
・ Once fully charged, the watch continues to run for
→ P.48
approximately 3 months.
44
This watch is equipped with the following functions in addition to the time (hour and minute) display.
■Automatic calendar・
・
・
・
・
・
・
・
・
・
・
・
・
・
・
・
・
・
・
・
・ The calendar automatically adjusts for odd and even
months including February of leap years from January
1, 2006 to December 31, 2099.
■World Time・
・
・
・
・
・
・
・
・
・
・
・
・
・
・
・
・
・
・
・
・
・
・
・
・
・
・
・ The watch displays the time for 32 cities and regions
→ P.62
all over the world.
■Single-Time Alarm Function・
・
・
・
・
・
・
・
・
・
・
・
・ An alarm that sounds only one time at the set time
→ P.64
can be set.
■Daily Alarm Function ・
・
・
・
・
・
・
・
・
・
・
・
・
・
・
・
・
・
・ An alarm that sounds everyday at the set time can be
→ P.65
set.
■Display of Remaining Battery Amount・
・
・
・
・ The approximate amount of energy stored in the
→ P.50
watch's battery can be displayed.
■Stopwatch・
・
・
・
・
・
・
・
・
・
・
・
・
・
・
・
・
・
・
・
・
・
・
・
・
・
・
・
・ Time can be measured in 1/100 sec increments.
→ P.66
The maximum measurement time is 9 hours 59 min
59. 99 sec.
■Power Save・
・
・
・
・
・
・
・
・
・
・
・
・
・
・
・
・
・
・
・
・
・
・
・
・
・
・
・ The Power Save mode can be activated in order to
reduce unnecessary energy consumption when the
→ P.52
watch is left without an adequate light source.
■Timer ・
・
・
・
・
・
・
・
・
・
・
・
・
・
・
・
・
・
・
・
・
・
・
・
・
・
・
・
・
・
・
・
・ The countdown timer can be set from 1 min to 9 hours
→ P.67
59 min by the minute.
Name and Function of Each Part
Main body
Liquid Crystal panel
→ P.50
An antenna for radio signal
reception is built in under the panel.
Remaining battery level
Button
Button
Mode change
Radio signal icon
Reception result:
Success/Failure
→ P.61
Receiving: Strength
of radio signal
→ P.58
Setting and adjustment : Plus (advance)
Home time : Display change
STP.W : Start/Stop
Button
Light button
Lighting of built-in
illuminating light
Setting and adjustment: Minus (Return)
Radio signal: Manual reception,
reception result display
STP.W: Split/reset
Mode icon
ABOUT THIS WATCH
Solar panel
Built-in antenna
→ P.46
Indicates the current mode.
45
Mode switching
Each pressing of button
ABOUT THIS WATCH
Home time
→ P.47
Home time,
Calendar,
City code/time difference,
Message
46
changes the mode. The mode icon at the bottom indicates the current mode.
World time
→ P.62
Home time,
Local city code,
Local time
Single-time alarm
→ P.64
Alarm set time
Daily alarm
→ P.65
Alarm set time
Stopwatch
→ P.66
Measurement time
Timer
→ P.67
Timer set time
Home time mode
■ Display change on the home time mode
■ Various Settings
City code/
Time difference display
Time/Calendar display
Press once
Home time mode
Press
once
Time/Calendar display
Long press
Or when no button
operation is performed
Automatically reset
after 10 sec
Message display
Home time ※
city setting
for one minute, the mode
can be reset while in the
process of setting.
Calendar adjustment
Year→Month→Date
Summer time
(DST)
of the Home time
Press once
Time adjustment
Second→Minute→Hour
Press once
Long press
Display change
Press once
Contrast
setting
Press once
Power SAVE
Press once
Press once
※ Only previously set messages are
displayed.
Press once
12H/24H
ABOUT THIS WATCH
Long press
ON/OFF
※ This watch receives the official standard frequency of Japan.
When using your watch by receiving radio signals, set the
home time city code to TYO (Tokyo).
Settable portions flash.
Press or for setting.
→ P.53
47
How to Charge
■ How to charge
CHARGING THE SOLAR BATTERY
48
This watch is a solar watch. This watch operates while generating electric power from light
received on the solar panel and saving the electric power in the secondary battery.
Please remember to sufficiently charge the battery with reference to the display for proper use.
■ Display and remaining battery amount → P.50
Charge the battery
by applying light
to the solar panel.
Solar panel
■ In the following cases, there is a high likelihood that the battery may run out
due to battery shortage.
・A sleeve covers your watch while you are wearing it.
・Continuously use or store in an environment where light is not likely to enter.
Reference for Time Required to Charge
■ Reference for time required to charge
Charge the battery with reference to the times listed in the table.
Extremely low Low
Medium level
Sufficient
Required time
to operate
all day long
Window side on a clear day
Ten thousand lux
Approximately 1 hour
Approximately 23 hours
Approximately 19 hours
Approximately
7 minutes
Approximately
20 minutes
Window side on a cloudy day
Five thousand lux
Approximately 2 hours
Approximately 58 hours
Approximately 39 hours
Approximately
48 minutes
※ Because the battery runs out fast if it is used frequently, limit
your use of the light function (built-in illuminating light).
Indoor under fluorescent lamp
Five hundred lux
Approximately 28 hours
−
−
Approximately
8 hours
※ When operating your watch for the first time or if your watch has
stopped due to battery shortage, charge the battery sufficiently
according to the table on the left.
Outdoors on a clear day
One hundred thousand lux
Approximately 15 minutes Approximately 9 hours
Approximately 5 hours
※Time required to charge varies depending on the model.
CHARGING THE SOLAR BATTERY
Environment
(reference)
This watch which is fully charged once continues operating for
approximately 3 months when used under the following conditions
even if it is not charged thereafter.
・Lighting: 2 sec. (One day)
・Alarm sound: 10 sec. (One day)
・Radio signal reception: 10 min (One day)
・Power save (P.SAVE): 6 hours (One day)
49
Display and Remaining Battery Amount
■ Display and remaining battery amount
Difference in the display
according to the liquid crystal type
The panel display indicates approximately the remaining battery amount.
CHARGING THE SOLAR BATTERY
50
Liquid Crystal panel display
Remaining battery amount
1
Sufficient
2
Medium
level
Remedies
Please use your watch as it is.
Please remember to charge
the battery.
■ How to Charge → P.48
Liquid Crystal panel display
Remaining battery amount
Restriction in operation
and function
※1
Low
Radio signal
reception is no
allowed.
※1
4
CHARGE:
Charge (Charge is required.)
5
※2
Button operation
is not allowed.
Extremely
low
Alarm sound is
stopped.
Nothing is
displayed.
※1 Nothing is displayed in a place without light under conditions ③ and ④.
※2 Stopwatch measured time and timer setting time are reset under condition ③.
Sufficiently charge the battery up to condition ①.
After charging, please use the watch as it is.
■ How to charge → P.48
1. Sufficiently charge the battery up to condition ①
2. Adjust the time by manual reception or by hand.
■ How to charge → P.48
■ Adjust the time by receiving radio signals.
(How to carry out manual reception) → P.58
■ Various Settings (Time adjustment) → P.47
※ If your watch operates abnormally, reset the built-in IC.
■ How to Reset the Built-in IC. → P.74
CHARGING THE SOLAR BATTERY
3
Remedies
51
Power Save (P.SAVE and SLEEP)
■ If the P.SAVE functions
※ P.SAVE means power save.
If button operation is not performed over a predetermined time without light, the P.SAVE (power save function) functions to prevent useless consumption of energy.
CHARGING THE SOLAR BATTERY
Liquid Crystal panel display
[P.SAVE]
flashes
Restriction in
operation and function
Button operation is not
continuously performed
for approximately
4 hours without light.
1
【P.SAVE】In the case of P.SAVE
[SLEEP] flashes
Button operation is not
continuously performed
for approximately
3 days without light.
2
【SLEEP】In the case of SLEEP
52
Condition
Automatic reception
is allowed at
2 AM for receiving
radio signals.
Alarm sound
is stopped.
Remedies
Place your watch under
light for 5 sec or longer,
or press any button to
return to the home time
mode (time display).
※ If condition ② continues, the battery
may become weak. Please keep in mind.
■ P.SAVE ON/OFF
When using the stopwatch or timer function for over 4 hours in a dark place,
it is recommended to turn off (stop) the P.SAVE.
2 Set the P.SAVE.
1
According to "Various Settings"
on P.47, display
the P.SAVE ON/OFF setting screen.
Button
or
Button
Each pressing of the button switches ON/OFF.
Press button , or in one minute,
the mode is reset to the home time mode.
CHARGING THE SOLAR BATTERY
Turn on the P.SAVE before normal use.
53
Overcharge prevention function and Power Source
CHARGING THE SOLAR BATTERY
54
■ Overcharge prevention function
■ Power Source
・ When the secondary battery is fully charged, the overcharge prevention function
is automatically activated to avoid further charging. There is no need to worry
about damage caused by overcharging no matter how much the secondary
battery is charged in excess of the time required for fully charging the watch.
・ The battery used in this watch is a special secondary battery, which is different
from ordinary batteries. Unlike an ordinary silver oxide battery, the secondary
battery does not require periodic replacement.
※To check the time required for fully charging the watch → Reference for Time Required to Charge P.49
NOTICE
■ Notes on charging the watch
・When charging the watch, do not place the watch in close proximity to an intense
light source such as lighting equipment for photography, spotlights or
incandescent lights, as the watch may be excessively heated resulting in damage
to its internal parts.
・When charging the watch by exposure to direct sunlight, avoid places that easily
reach high temperatures, such as a car dashboard.
・Always keep the watch temperature under 60℃.
・ However, for the secondary battery, the battery characteristic changes due to
repeated charge and discharge over a long time, and the duration may be
shortened. (It varies depending on use condition and storage place environment.)
・The secondary battery is an environmentally friendly, clean energy storage device.
Warning
■ The battery used in this watch is a special secondary battery.
When replacing the secondary battery, make sure to install the exclusive SEIKO
secondary battery for this watch. Installation of any other battery can generate
heat that can cause bursting or ignition.
What is a Radio-Controlled Watch?
■ What is a radio-controlled watch?
■ How to receive radio signals
The radio-controlled watch displays the precise time and date by
automatically receiving and synchronizing itself with an accurate time
signal transmitted by an official standard frequency.
The following two methods are employed for radio signal reception.
Radio-controlled watch
Official standard
frequency
Cesium
Atomic
Clock
Receive radio signals
through the antenna
inside the watch
↓
Analyze time information
↓
Display the correct time
Time signal transmitted by a standard frequency is based on a super accurate "Cesium
Atomic Clock" that may have a 1 second loss or gain per one hundred thousand years.
mind that it does not function in other modes than the above.
※ Automatic reception is started one min after system reset.
■ Manual reception: Radio signals can be compulsorily received by hand.
※ Manual reception functions in the home time mode.
It does not function in other modes than the above.
Reception can be satisfactorily performed depending on the reception environment.
According to the environment, radio signals may not be properly received.
Check the [Reception result] to confirm that reception has been satisfactorily performed.
SETTING THE TIME
BY RECEIVING RADIO SIGNAL
Transmitting Station
■ Automatic reception: Daily, radio signals are automatically received.
Automatic reception is performed every hour from 2 AM to 4 AM. Automatic reception ends upon completion of satisfactory reception.
※ Automatic reception functions in the home time mode or world time mode. Please keep in
55
Official standard frequency of Japan (JJY)
■ Official standard frequency of Japan (JJY)
This watch can receive official standard frequencies from transmitting stations in Japan.
The radio signal reception function is activated when the city code of the home time is
set to TYO (Tokyo), SEL (Seoul), or HKG (Hong Kong).
SETTING THE TIME
BY RECEIVING RADIO SIGNAL
56
【Official standard frequency of Japan: JJY】
Reception range of each
standard frequency
Ohtakadoya-yama
transmitting station
(40kHz)
Hagane-yama
transmitting station
(60kHz)
About 1,000 km
About 1,000 km
JJY is operated by the National Institute of Information
and Communications Technology (NICT).
JJY is transmitted from two stations in Japan. Each
station transmits JJY in a different frequency.
・Fukushima
(Ohtakadoya-yama transmitting station: 40 KHz)
・Kyushu
(Hagane-yama transmitting station: 60 KHz)
The reception range from each transmitting
station is approximately 1,000 km (1,000 km
radius of each station).
※ Whether the watch succeeds in receiving radio signals or not depends on the receiving conditions.
※ The watch cannot receive radio signals outside a reception range.
Notice
■ About receiving radio signals
・The watch may display the incorrect time if it fails to receive radio signals properly
because of interference. The watch may fail to receive radio signals depending on the
location or reception conditions. In such a case, change the location of the watch.
・Radio signals can easily be received during nighttime hours due to its characteristics.
・The watch moves depending on the quartz movement (loss/gain: ±30 seconds per
month) when it is unable to receive radio signals.
・The time signal transmission may be stopped during maintenance of the facilities of each
transmitting station or because of a lightning strike. In such a case, see each station's website
for further information or contact SEIKO CUSTOMER SERVICE CENTER.
・Websites of transmitting stations (as of August 2006)
Japan: NICT (Japan Standard Time Group) http://www.nict.go.jp
・SEIKO CUSTOMER SERVICE CENTER: 0120-612-911 (toll free in Japan)
Appropriate Place to Keep a Radio-Controlled Watch
■ To enable the watch to receive radio signals easily
Place the watch where it can easily
receive radio signals, for example,
close to a window.
To enhance the reception of radio
signals, do not move the watch by
changing the orientation of the
watch, tilting the watch, etc., while
it is receiving radio signals.
This watch is equipped with the
built-in antenna for receiving
radio signals. The antenna is at
the 12 o'clock position.
・Inside a building, between tall
buildings, underground
・Close to overhead power lines,
TV stations, and train cables
・In places generating radio
interference, such as construction
sites and in heavy traffic
・Inside a vehicle, train, airplane,
etc.
・Close to home electrical appliances such as TV's,
refrigerators, and air conditioners
・Close to OA devices such as PC's, fax machines, and
mobile phones
・Close to furniture made of steel, such as a steel desk
Avoid these places when
conducting a radio signal reception.
SETTING THE TIME
BY RECEIVING RADIO SIGNAL
The antenna for receiving
radio signals inside the
watch is at the 12 o'clock
position.Turning the antenna
toward the outside of the
window enables the watch
to receive radio signals
more easily.
■ Conditions in which the
watch may be unable to
receive radio signals
57
Adjust the Time by Receiving Radio Signals (How to Carry Out Manual Reception)
1 Place a watch
2 Press button
for two sec or more.
3 Wait for a while with your watch is placed down.
It will take 13 min at maximum for reception.
SETTING THE TIME
BY RECEIVING RADIO SIGNAL
The antenna for receiving
radio signals inside the watch
is at the 12 o'clock position.
Turning the antenna toward
the outside of the window
enables the watch to receive
radio signals more easily.
Radio signal strength is displayed in four stages. (Updated every second)
Radio signal level display
Pressing button
displays [RECEIVE]
as shown above.
Remove the watch from your wrist and place
it in a location that can easily receive radio
signals, for example, close to a window.
Unstable
Stable
Streaming animation indicating reception is displayed.
Press button
for two sec or more with the
home time mode time display.
Please wait until the reception is completed without moving your watch.
Without wearing your watch, wait while placing your watch down and allowing it to remain still.
※ Reception cannot be performed in other modes than the home time mode.
※ Pressing any button during reception cancels the reception.
58 ※ Reception functions when the home time city code is TYO (Tokyo), SEL (Seoul), or HKG (Hong Kong). (This watch receives the official standard frequency of Japan.)
4 Confirm the reception result
Could not
be received
After 10 sec
or
press once
After 10 sec
or
change the location or direction of the watch. Also, the reception
environment varies even in the same location depending on the
time zone. Radio signals can easily be received during nighttime
hours due to its characteristics.
If this message is displayed
Nothing
is
displayed.
press once
The display indicates that reception is completed.The display continues for 10 sec.
After 10 sec or by pressing button
once, it is reset to the home time mode.
※ Reception can be successfully performed depending on the weather and reception environment.
※ Reception cannot be performed outside the radio signal reception range.
The watch has been set to a mode for
which reception cannot be performed.
Refer to the following page for resetting.
SETTING THE TIME
BY RECEIVING RADIO SIGNAL
Could be
received
If reception cannot be properly performed,
Reset to the home time mode
59
When reception is not operated (If CHECK! is displayed)
If this message is displayed
SETTING THE TIME
BY RECEIVING RADIO SIGNAL
60
1
flashes: The stopwatch is operating.
Stop the stopwatch.
→ How to use the stopwatch. P.66
2
flashes: The timer is operating.
Stop the timer.
→ How to use the timer. P.67
Three conditions on the right side
can be considered. Reset according
to the flowchart on the right side.
The display is reset to the home time mode after
10 sec or by pressing button
once.
※ This watch receives The official standard frequency of Japan.
3
The city setting of the home time is incorrect.
Set the home time to TYO (Tokyo), SEL (Seoul),
or HKG (Hong Kong).
→ Various Settings P.47
These three conditions may overlap
Confirm Reception Result
■ Confirm the date and time for which the latest reception was successfully performed.
■ Confirm reception result
The latest reception result (success/failure) can be
confirmed. This is displayed in either mode.
1 Press button
once.
Reception
cannot be
performed.
Nothing
is
displayed.
※ In the home time mode, reception result is reset with no
display when the mode is changed to the various settings mode.
Pressing button
displays [RECEIVE]
as shown above.
Press button
under the condition
of home time mode.
Example: Reception was successful
at 3:10 AM on December 8.
The display is reset to the home time mode when one
min has elapsed or by pressing button
once.
※ Continuously press button
for two sec or more to enter the receiving operation.
Press any button to cancel receiving operation.
SETTING THE TIME
BY RECEIVING RADIO SIGNAL
Reception
can be
performed.
2 Displays the date and time
for which reception
was successfully performed.
61
World Main Area Time Zone List
Names of the cities
WORLD TIME
62
UTC
LON
PAR
BER
ATH
C A I
MOW
BGW
THR
DXB
KBL
K H I
DEL
DAC
RGN
BKK
----------------London★
Paris★
Berlin★
Athens★
Cairo★
Moscow★
Baghdad
Tehran★
Dubai
Kabul
Karachi
Delhi
Dacca
Yangon
Bangkok
Country
Universal Coordinated Time
United Kingdom
France
Germany
Greece
Egypt
Russia
Iraq
Iran
United Arab Emirates
Afghanistan
Pakistan
India
Bangladesh
Myanmar
Thailand
Names of the cities
Time differencewith UTC
-----+ 0 hour
+ 1 hour
+ 1 hour
+ 2 hour
+ 2 hour
+ 3 hour
+ 3 hour
+ 3.5 hour
+ 4 hour
+ 4.5 hour
+ 5 hour
+ 5.5 hour
+ 6 hour
+ 6.5 hour
+ 7 hour
HKG
SEL
TYO
ADL
SYD
NOU
WLG
HNL
ANC
LAX
DEN
C H I
NYC
CCS
R I O
PDL
Hong Kong
Seoul
Tokyo
Adelaide★
Sydney★
Nouméa
Wellington★
Honolulu
Anchorage★
Los Angels★
Denver★
Chicago
New York★
Caracas
Rio de janeiro★
Azores★
Country
China
South Korea
Japan
Australia
Australia
New Caledonia
New Zealand
U.S.A.
U.S.A.
U.S.A.
U.S.A.
U.S.A.
U.S.A.
Venezuela
Brazil
Azores Islands
Time differencewith UTC
+ 8 hour
+ 9 hour
+ 9 hour
+ 9.5 hour
+ 10 hour
+ 11 hour
+ 12 hour
- 10 hour
- 9 hour
- 8 hour
- 7 hour
- 6 hour
- 5 hour
- 4 hour
- 3 hour
- 1 hour
Cities marked with "★" use daylight saving time (as of August 2006).
※ The time differences and use of daylight saving time in each city are subject to change according to the governments of the respective countries or regions.
How to Use World Time
Find out the time all over the world.
2 Select a city or region.
You can find out the time for 32 cities and regions all over the world.
1
Set to the world time mode according
to the "Mode change" on P.46.
Button
Plus (Advance)
■ Universal Coordinated Time(UTC:Coordinated Universal Time)
UTC is the universal standard time coordinated through international
agreement. It is used as the official time around the world.
■ Summer time(DST:Daylight Saving Time )
Summer time is daylight saving time. Advancing the watch one hour to prolong
daytime during longer daylight hours in summer. Daylight saving time has been
adopted in about 80 countries, mainly in Europe and North America. The
adoption and duration of daylight saving time vary depending on the country.
Button
Minus (Return)
3 According to necessity, set to the summer time (DST).
ON
OFF
WORLD TIME
※ The time of the city displayed last time is displayed
when the mode is changed to the world time mode.
Press once:
Forward one place
Long press:
Fast-forward
Button
ON/OFF
Long press
mark is
displayed.
63
How to Use the Single-Time Alarm
Using the single-time alarm
3 When the alarm is set,
An alarm that sounds only one time at the set time can be set.
The single-time mark mode is displayed
in either mode after setting.
1
Set the single-time alarm mode
according to "Mode change" on P.46.
2 Set the alarm time.
ALARM
Plus
(Advance)
Minus
(Return)
64
Mark is
displayed.
Press once: Forward 1 min
Long press: Forward 15 min
When the time reaches the set time, the alarm
sounds for 10 sec and the display is reset
to [−−:−−].
Simultaneously press buttons
and
to cancel the setting.
Press any button to stop the alarm sound.
※ When the time reaches the alarm time while setting,
the setting is reset and「--:--」is displayed.
※ Radio signal reception cannot be made in this mode.
※ The reception is suspended, when the alarm sounds during
radio signal reception.
How to Use the Daily Alarm
Using the daily alarm
3 Alarm ON/OFF
An alarm that sounds everyday at the set time can be set.
Pressing button or switches ON/OFF.
1
Change the mode to the daily alarm mode
according to "Mode change" on P.46.
ON
OFF
※ When the mode is changed to the daily alarm mode, the last alarm set time is displayed.
2 Set the alarm time.
Long
press
Enter
the setting
mode.
or
or
Time setting
Switching
Min setting
(Time flashes)
(Hour to Min)
(Min flashes)
Setting
mode
ended
Operation of buttons and .
When turning on, the daily alarm mark
is displayed in either mode.
One press : Forward one point
Long press : Fast forward
Stopped when released.
※ Pressing button for an extended time,
the alarm sound can be previewed.
(For 10 sec)
※ Radio signal reception cannot be performed in this mode. ※ Reception is suspended when the alarm sounds during radio signal reception.
Press any button to stop alarm sound.
ALARM
The mark
is displayed.
65
How to Use the Stopwatch
2 -1:Normal measurement
Using the stopwatch
STOPWATCH
Time is measured in 1/100 sec unit.
The maximum measurement time is 9 hours 59 min 59. 99 sec.
Start
Reset
P.SAVE ON/OFF → P.53
2 -2:Split time (intermediate time) measurement
1 Change the mode to
the stopwatch mode
according
to
"Mode
Change" on P.46.
Stop
※ When using the stopwatch for one
hour or more in a dark place, it is
recommended to turn off (stop) the
P.SAVE.
Button
Start/Stop
Button
Stop/Reset
Start
Stop
Reset
The split time is
displayed for 5 sec.
Example: Measurement when passing intermediate points
Measurement of respective points of [Start, A point, B point, Goal]
Start
※ Radio signal reception cannot be performed in this mode.
66 ※ Radio signal reception cannot be performed during stopwatch operation.
Split
A Point Passed
B Point Passed
Goal
(Passing time is displayed)
(Passing time is displayed)
(Stop)
Reset
How to Use the Timer
Using the timer
3 Operate the timer.
The timer can be set from 1 min to 9 hours 59 min by the minute.
1
Button
According to the "Mode change" on P.46,
change the mode to the timer mode.
Start/Stop
Button
Reset
2 Set the time.
Long
press
Changed to
the set mode.
The timer is stopped when the
counter reaches 0 and returns to the
set time.
TIMER
※ When the mode is changed to the timer mode, the latest set time
is displayed.
The alarm sounds every sec from
3 seconds before stop.
The alarm continuously sounds for 5
sec after the counter reaches 0.
Press any button to stop the alarm.
or
Operation of buttons and .
or
Timer set
Change
Min setting
(Hour flashes.)
(Hour to Min)
(Min flashes.)
Setting
mode
ended
One press : Forward one point
Long press : Fast forward
Stopped when released.
※ Radio signal reception cannot be made in this mode. ※ Radio signal reception cannot be made during timer operation.
※ Press the reset (button
) to reset to the set time.
※ For using the timer for 1 hour or more in a dark place,
it is recommended to turn off (stop) the P.SAVE.
ON/OFF of the P.SAVE → P.53
67
About Message Display
■ About message display
This watch displays a message unique to each specification.
2 A message is displayed.
Only preset messages are displayed.
Original messages cannot be prepared.
1
In the home time mode,
long press button .
OTHERS
Ex.: In the case of a message of [WIRED]
The message is stopped after scrolling.
Press button to return to the home time mode.
68
Specification
■ Specification
※ The specifications are subject to change
without prior notice due to product improvements.
■ Others
■ BUILT-IN ILLUMINATING LIGHT
The brightness of the electroluminescence (EL) panel used for the built-in illuminating
light will decrease when the battery voltage becomes low. The brightness of the
electroluminescence (EL) panel will also gradually decrease with the passage of time.
*The brightness of the electroluminescence (EL) panel will decrease by one-half after a
total of approximately 120 hours of lighting. When the brightness of the
electroluminescence (EL) panel becomes too dark, first charge the watch sufficiently. If
still too dark after charging the watch, replace the electroluminescence (EL)
panel.Consult the retailer from whom the watch was purchased concerning panel
replacement. A fee will be charged for replacement.
■ The Electroluminescent Panel
After 5 years of use, the contrast of the electroluminescence (EL) panel may decrease
and digits may not be easy to read.
Consult the retailer from whom the watch was purchased concerning panel
replacement. A fee will be charged for replacement.
OTHERS
1. Frequency of crystal oscillator ・・ 32,768 Hz (Hz = Hertz ... Cycles per second)
2. Loss/gain (monthly rate)・・・・・・・・・・ Less than 30 seconds (Except during automatic time setting, worn on
the wrist within normal temperature range between 5℃ and 35℃.)
3. Operational temperature ・・・・・・・・ Between -5℃ and +50℃ (Display function works between 0℃ and
range
+50℃)
4. Display medium ・・・・・・・・・・・・・・・・・・・ Nematic Liquid Crystal, FEM (Field Effect Mode)
5. Power source ・・・・・・・・・・・・・・・・・・・・・・ Secondary battery, 1 piece
6. Duration of operation ・・・・・・・・・・・・・ Approximately 3 months (after being fully charged, exposed to no
light, built-in illuminating light used once a day for 2 seconds, alarm
sounded once a day for 10 seconds, radio signal reception once a
day for 10 minutes, power save activated for 6 hours per day)
7. Time setting by receiving ・・・・・・・・ Automatic reception : 2:00 AM (If the watch fails to receive radio
the JJY-LF radio signal
signals, it will attempt to receive signals again at 4:00 a.m.)
※After having received the JJY-LF radio signal, the watch moves
depending on the quartz movement until the next reception.
Manual reception is also possible.
8. Illuminating light ・・・・・・・・・・・・・・・・・・・ Electroluminascent panel
9.IC(Integrated circuit) ・・・・・・・・・・・・・・・ Oscillator, frequency divider and driving circuit C-MOS-IC, 3 pieces
69
When the Following Messages are Displayed
Refer to each guide when either of the following messages is displayed.
P.SAVE
CHECK!
CHARGE
Nothing is displayed.
All messages are lit.
TROUBLESHOOTING
NO DISPLAY
The P.SAVE
is working.
→ P.52
70
SLEEP
The P.SAVE
is working.
→ P.52
The watch has been
set to a mode for
which reception
cannot be performed.
The remaining
battery amount
is insufficient.
The remaining
battery amount
is insufficient.
→ P.60
→ P.51
→ P.51
Buttons and are
simultaneously pressed
at each mode of the
home time mode.
→ Press any button
to reset to the home
time mode.
TOUBLESHOOTING
Trouble
The watch cannot
receive radio signals.
Solution
Do not move the watch or do not change the orientation of the watch while it is receiving radio signals.
For details, refer to "To enable the watch to receive radio signals easily" on P. 57.
The reception is cancelled while the
watch is receiving radio signals.
Repressing button A during reception cancels the reception while the automatic or manual reception is
being performed.
During automatic reception, the
watch was left where radio signals
were weak or where it could not
receive radio signals.
Place the watch where it can easily receive radio signals.Refer to "To enable the watch to receive radio
signals easily" on P. 57
JJY-LF stations may stop transmitting
time signals for some reasons.
See the website of Communication Research Laboratory (CRL) for further information concerning the
transmission of time signals. Check the URL of the CRL website on P. 56. For details, refer to"Radio
Signal Reception"on P. 55
The stopwatch or timer is operating.
Stop the stopwatch or timer (or both).For details, please refer to the "When Reception is Not Working"
on P.60.
Any city code for which the
reception does not work is selected
to the home time.
When using your watch by receiving radio signals, set the city code of the home time to TYO (Tokyo),
SEL (Seoul), or HKG (Hong Kong).
For details, please refer to the "When Reception is Not Working" on P.60.
TROUBLESHOOTING
Radio
signals
reception
Possible Cause
The watch is moved while it is
receiving radio signals.
71
TOUBLESHOOTING
Trouble
TROUBLESHOOTING
Display of
incorrect time
or
misalignment
of the hands
Solution
The watch receives a wrong radio
signal because of a result of
influence of various external
Place the watch where it can receive radio signals more easily. Conduct the manual reception if
necessary. For details, refer to "Conditions in which the watch may be unable to receive radio
signals" on P. 57 or "Adjust the Time by Receiving Radio Signals (How to Carry Out Manual
Reception)" on P. 58.
The watch has been left in
extremely high or low temperatures
for a long time.
When the watch returns to normal temperature, the condition will be corrected. Conduct the manual
reception if necessary. For details, refer to "Adjust the Time by Receiving Radio Signals (How to Carry
Out Manual Reception)" on P. 58. If the watch hands are not set to current time even after conducting
the manual reception, consult the retailer from whom the watch was purchased.
The city setting of the home time
that has been set to a city or region
that differs from what you intended.
Check the city code setting of the home time to reset.Set the city code to TYO (Tokyo) to display
Japanese time.For details, please refer to the "Various Settings" on P.47.
The summer time (DST) has been
set to the home time.
When DST is displayed at the left lower portion of the home time display, the summer time has been set.
If the summer time setting is not required, turn off the summer time setting.For details, please refer to the
"Various Settings" on P.47.
The watch temporarily
gains or loses time.
The watch has a timelag on an hourly basis.
72
Possible Cause
Trouble
Possible Cause
Solution
The light is too weak or the manner
of lighting the watch has been
altered while the watch is being
charged.
Place the watch where it can be exposed to an adequate light source. Make sure that the manner of
lighting the watch is not altered while the watch is being charged.
The built-in IC has fallen into an
unstable condition.
Reset the built-in IC. For details, refer to "How to Reset the Built-in IC" on P. 74.
The energy stored in the watch runs
low.
Refer to "Display and Remaining Battery Amount" on P. 50 to charge the watch.
Button
operation
Buttons or crown
cannot be operated.
Display
Nothing is displayed.
Others
Blur on the dial glass Small amount of water has got
inside the watch due to deterioration
persists.
of the gasket, etc.
TROUBLESHOOTING
Charging
the watch
The stopped watch was
exposed to adequate light
for a longer time than "the
time required for fully
charging the watch,"
however, it does not resume
its normal one-second
interval movements.
Contact the retailer from whom the watch was purchased.
※For the solutions of troubles other than the above, contact the retailer from whom the watch was purchased or the SEIKO CUSTOMER SERVICE CENTER.
73
Abnormal Display or Improper Function
■ How to Reset the Built-in IC
When the watch shows an abnormal display or does not properly function, reset the built-in IC. Then the watch will resume its normal operation.
TROUBLESHOOTING
1
Press buttons , ,
and simultaneously
for an extended time,
and release them
when the display
is extinguished.
It is reset
NO DISPLAY
When the display is reset from a state where
nothing is displayed, the time of the home time
mode is displayed.
The time and calendar start counting from
12:00:00 AM, Sunday, January 1st, 2006.
Automatic reception is started after one min.
If no radio signals could be received,
2 adjust the time by manual reception or by hand.
■ Manual reception → P.58
■ Various Settings (Time adjustment) → P.47
74
※ After recovery, Japan Standard Time (City code: TYO) is displayed at the home time and local time.
TO PRESERVE THE QUALITY OF YOUR WATCH
■ PLACES TO KEEP YOUR WATCH
・Do not leave the
watch in a place
where it is
subjected to
strong magnetism
or static electricity.
・Do not leave the
watch where
there is strong
vibration.
・Do not leave the
watch in a dusty
place.
・Do not expose the watch to gases or chemicals.
(Ex.: Organic solvents such as benzine and
thinner, gasoline, nail polish, cosmetic spray,
detergent, adhesives, mercury, and iodine
antiseptic solution.)
・Do not leave the watch in a hot spring, or do not
keep it in a drawer having insecticides inside.
CARE OF YOUR WATCH
・If the watch is left in a temperature below -5℃ or
above +50℃ for a long time it may function
improperly or stop operating.
※This watch is so adjusted that it will maintain
stable time accuracy in normal tempertures. (5℃
∼35℃) It will lose or gain slightly, but it will regain
high time accuracy when it returns to normal
temperature.
75
TO PRESERVE THE QUALITY OF YOUR WATCH
CAUTION
■ CARE OF YOUR WATCH
CARE OF YOUR WATCH
76
The case and bracelet touch the skin directly just as underwear. If they are
left dirty, the edge of a sleeve may be stained with rust of those who have a
delicate skin may have a rash.
After removing the watch from your wrist, wipe perspiration or moisture with a
soft cloth. This will prevent the watch from being soiled, adding to the life of
the gasket.
METAL BRACELET
Clean the watch bracelet with a soft toothbrush dipped in water or
soapy water. If your watch is not water-resistant, be careful not to
get the case wet when cleaning.
LEATHER BAND
When removing moisture from a leather band, do not rub the band
with the cloth as this may discolor it or reduce its gloss. Be sure to
blot up the mois-ture using a soft dry cloth.
SOFT PLASTIC BRACELET
If your watch has a soft plastic band such as urethane band, do not leave the watch under a
fluorescent lamp or direct sunlight for a long time, or do not leave the band soiled. Otherwise, the
band may be discolored, hardened or broken. Also, do not keep the watch in a place where it is
exposed to high humidity, or do not leave the band wet with perspiration or water. Otherwise, the
band may be discolored in a very short time.
When the band is soiled, rinse it in soapy water. Do not use solvents for cleaning as some
solvents may deteriorate the band.
If your watch has a semitransparent urethane band which is easily discolored, special care
should be taken to keep it clean. Depending on the condition of use, the semitransparent band
may be disoolored after several months of use.
■ If your watch is not water-resistant, be careful not to get wet with water or sweat. When
it gets wet with water or sweat, wipe it thoroughly dry with a hygroscopic cloth.
■ If your watch is 5, 10 or 20 bar water resistant, rinse it in a bowl of fresh water after
used in seawater. Do not use chemicals to wash it.
■ If your watch has a rotating bezel, clean the bezel regulary. Otherwise, dust will
gather under it, making the rotation harder.
CAUTION
■ RASH AND ALLERGY
WARNING
・If your watch is 3 bar water resistant, do not use it in water.
・If your watch is 5 bar water resistant, do not use it in any type of diving including
skin diving.
・If you are constitutionally predisposed to rash, the band may cause you to
develop a rash or an itch depending on your physical condition.
・If your watch is 10 or 20 bar water resistant, do not use it in saturation diving or
scuba diving.
・The possible causes of the rash are as follows:
1.Allergy to metals or leathers
2.Rust, dust or perspiration on the watch or band
■ About bathing
・If you develop any skin reactions, take off the watch and consult a doctor
immediately.
CAUTION
If your watch is of the fob or pendant type, the strap or chain attached to the watch
may damage your clothes, or injure the hand, neck, or other parts of your body.
・Your watch can be worn while bathing if it is equipped with water resistance over 10
bar. In that case, please note the following carefully.
・Please do not operate your watch (Crown operation, Button operation etc.) when it is
wet with soap or shampoo. It sometimes causes a reduction in the water proofing.
・When the watch gets warm due to warm water, the watch could gain or lose time to
some degree. However, the watch will return to its usual accuracy at normal
temperatures.
CARE OF YOUR WATCH
・Adjust the bracelet or band so that there will be a little clearance between
the bracelet or band and your wrist to avoid accumulation of perspiration.
77
TO PRESERVE THE QUALITY OF YOUR WATCH
CAUTION
■ WATER RESISTANCE
CARE OF YOUR WATCH
78
・Check the dial or case back of your watch for the water
resistant quality, and then see the table below.
・Do not turn or pull out the crown when the watch is
wet, as water may get inside the watch.
“WATER RESISTANT” is not inscribed on the
back of your watch case.
“WATER RESISTANT” is inscribed on the back
of your watch case.
“WATER RESISTANT 5・10・15・20
BAR.”, “WATER RESISTANT” and
marks inscribed on the back
of your watch case.
5 BAR.
10・15・20
BAR.
Designed and manufactured to withstand the water usually experienced in
a daily living such as
splashes and rain.
Designed and
manufactured for
swimming and
kitchen work.
Skindiving without scuba and bathing.
Genuine diving using
scuba or heliumgas.
Crown operation
when the whatch
is wet.
■ NOTES ON THE REPLACEMENT PARTS
Take utmost care in the following cases:
・When clasping and unclasping the band, you may damage your nail, depending on
the type of clasp used with the band.
・In case you tumble and fall or bump into others with the watch worn on your wrist,
you may be injured by the reason of the fact that you wear the watch.
・When you make contact with children, especially with infants, they may get injured or
1.If the watch requires service, take it to the retaller from whom the watch was purchased.
If the trouble occurs within the guarantee period, submit the cirtificate of guarantee
together with the watch. Guarantee coverage is spelled out in the certificate of
guarantee. Please read it carefully and keep the certificate for ready.
■ PERIODIC CHECK
・We suggest that you have your watch checked by every 2 or 3
years or when the battery is replaced for oil condition, battery
electrolyte leakage or damage due to water or sweat. After
checking the watch, adjustment and repair may be required.
・When the replacing the parts or battery, please specify“SEIKO
GENUINE PARTS”. If an old battery is kept in the watch for a long
time, electrolyte leakage from the battery may damage the
module.
・Be sure to have the gasket and push-pin replaced with new ones
by when checking the watch or the battery is replaced.
2.SEIKO makes it a policy to usually keep a stock of spare parts for its watches for 7
years. In principle, your watch can be reconditioned within this period if used normally.
(Replacement parts are those which are essential to maintaining the functional integrity
of the watch.)
3.The number of years that a watch is considered repairable may vary greatly depending
on the condition under which it was used, and normal accuracy may not be achieved in
some cases. We recommend, therefore, that you consult the retailer from whom the
watch was purchased, when having them repair your watch.
Push-pin
4.The case, dial, hands, glass, bracelet, or parts thereof may be replaced with substitutes
if the originals are not available.
CARE OF YOUR WATCH
■ PRECAUTIONS ON WEARING YOUR WATCH
79