1
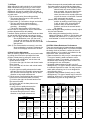
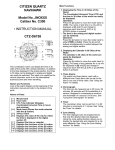
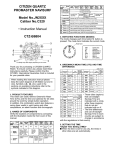
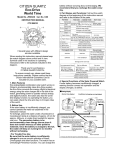
CITIZEN QUARTZ
Perpetual Calendar
2.Setting the Time and Calendar
When the crown is of the screw lock type, turn it after
loosening the screw. After the time, push and turn
the crown clockwise and securely fasten the screw.
Model No. BL0XXXX
Cal. No. E71X
• INSTRUCTION MANUAL
CTZ-B8025
This is a Solar-Powered Watch:
Sufficiently Recharge by Placing
in Light Before Use
A secondary battery is used in this watch to store
electrical energy. This secondary battery is a
clean energy battery that does not contain
mercury or other toxic substances. Once fully
charged, the watch will continue to run for about
10 months (at the time of power save) without
additional charging.
*Power Save: When light is not supplied to the
solar cell and power generation stops, only the
hour and minute hands work, leaving the second
hand stops at 12 o’clock, to set in the power save
state. When light is supplied to the solar cell and
power generation resumes, the second hand moves
quickly to catch up to the current second and then
returns to the normal one-second movement.
<How to Use This Solar-Powered Watch Properly>
To use this watch comfortably, make sure to recharge
the watch before it stops running completely. Since
there is no risk of overcharging (Overcharging
Prevention Feature), it is recommended that the
watch be recharged everyday.
1. Feature
This is an analog-powered watch that is equipped
with a solar cell incorporated in its face to convert
solar energy into electricity.
It provides an auto dating perpetual calendar (year/
month/day, including the leap year with February 29)
and a time difference correction feature to allow
ease of adjustment without stopping the watch.
Setting the Time
1. Pull the crown twice to the time correction
position, and then the second hand advances
rapidly to the zero-second position and stops.
(Note 1) If the crown is pulled twice while the data
is changing, the second hand advances rapidly to
the zero-second position after the date change.
(Note 2) If the second hand does not stop at the
zero-second position, do all reset and then adjust
the base position.
2. Set the time by click-turning the crown
嘷
1 A click to the right, the hour and minute hands
move forward.
嘷
2 A click to the left, the hour and minute hands
move backward.
• When the crown is moved quickly (two or more
clicks at a time), the hour and minute hands
advance rapidly. Click the crown through one turn
in either direction to stop rapid movement.
(Note 1) When the hour and minute hands reach
12.00am, the date changes. (Hour and minute
hands wait at 12.00am while the date is changing,
and resume operation after the date change.)
(Note 2) In the case of reversing, the date does
not change, even when the hour and minute
hands pass 12.00 am.
3. Set the time by a time signal and then return the
crown to the normal position.
Setting the Calendar
• The calendar is of the perpetual type that
automatically changes year/month/day including
the leap year, once it is set.
1. Pull the crown once to the calendar correction
position, and then the second hand moves to a
year/month position it memorises and stops.
(Note) If the crown is pulled once while the date is
changing, the second hand advances rapidly after
the date change.
2. Set the date by turning the crown:
嘷
1 A click to the right, the second hand moves
one step. Turn the crown and set the second
hand to a corresponding year/month position
(years passed from the leap year).
(Example)
December of the leap year:
Set the second hand to the zero position.
April of a year 3 years after the leap year:
Set the second hand to the 23 second position
(between 4:00 and 5:00).
嘷
2 A click to the left, the date moves one day
forward.
• When the crown is moved quickly, the date
advances continuously till it stops automatically
after moving 31 days forward. Click the crown
through one turn in either direction to stop
continuous advancement in the middle.
3. After setting the calendar, securely return the
crown to the normal position. The second hand
catches up with the current second and resumes
position.
<When the Date is Set to a Non-existing Day>
Returning the crown from the calendar correction
position to the normal position automatically moves
the date to the 1st day of the following month.
(Example)
• Normal year: February 29, 30, 31 – March 1
September 31 – October 1
• Leap year: February 30, 31 – March 1
September 31 – October 1
<How to Read the Month and Year>
䡲 Reading the Year
• Leap year:
The starting scale of
each month zone
䡲 • 1st year from the leap year: 1st scale of each
month
䡲 • 2nd year from the leap year: 2nd scale of each
month
䡲 • 3rd year from the leap year: 3rd scale of each
month
䡲 Reading the Month
January:
Between 1:00 and
February: Between 1:00 and
:
:
December: Between 1:00 and
2:00
2:00
:
:
2:00
How to Adjust a Time Difference
• Press button 嘷
A and click the crown quickly; the
time difference can be adjusted in hours.
Correction of time difference can be done during
30 seconds after pressing button 嘷
A or during 30
seconds after the last clicking of crown.
1. Return the crown to the normal position
2. Press button 嘷
A.
3. Adjust the time difference by clicking the right or
left.
• Quickly turning the crown to the right moves the
hour and minute hands one hour forward (clockwise).
• Quickly turning the crown to the left moves the
hour and minute hands one hour backward
(counter clockwise).
• (Note 1) Two or more clicks at a time, if done,
cannot make a rapid advancement. Be
sure to do adjustment hour by hour.
• (Note 2) When the hour and minute hands pass
0:00 a.m. the date is adjusted by the
day after moving the hands. When
adjusting a time difference, beware of
a.m. and p.m.
• (Note 3) To cancel the adjusted time difference,
operate the hour and minute hands
reversely. (When the hour and minute
pass 0:00 a.m., the date is adjusted by
one day after completion of the interval
movement. The date must move forward
(clockwise) through 30 days, so date
adjustment will take 2-3 minutes.)
(Example)
Adjusting from Tokyo home time 10:10 a.m. to
London local time:
The time difference is 9 hours; when it is 10:10 a.m.
in Tokyo, the local time in London is 1:10 a.m. To
adjust the time difference;
1. Press button 嘷
A.
2. Click the crown left and reverse the hands 9 hours
(counter clockwise) and set them to 1:10 a.m.
(Note) If you click the crown to the right and
move the hand clockwise to 1:10, the set
time will become 1:10 p.m., confusing the
changeover time of the calendar. The
calendar will then fail to change the date
at the correct time.
Adjusting a 9-hour Time Difference
<Years Passed from the Leap Year>
Year Passage
2000 Leap year
2001 1st year
2002 2nd year
2003 3rd year
Year Passage
2004 Leap year
2005 1st year
2006 2nd year
2007 3rd year
*When the second hand begins 2-second interval
movement urging recharging, time difference
adjustment is not possible. Supply light to the
solar cell and recharge power, waiting for time
difference adjustment till the normal 1-second
interval movement is returned.
[Reference: Time Difference of Major Cities of
the World Based on the Greenwich International
Standard Time (UTC)]
Time
Summer
Difference
Time
London
Ⳳ0
䡬
Name of City
Time
Summer
Difference
Time
Noumea
+11
ⴒ
Name of City
Paris
+1
䡬
Auckland
+12
䡬
Cairo
+2
䡬
Honolulu
-10
ⴒ
Moscow
+3
䡬
Anchorage
-9
䡬
Dubai
+4
ⴒ
Los Angeles
-8
䡬
Karachi
+5
ⴒ
Denver
-7
䡬
Dacca
+6
ⴒ
Chicago
-6
䡬
Bangkok
+7
ⴒ
New York
-5
䡬
Hong Kong
+8
ⴒ
Caracas
-4
ⴒ
Tokyo
+9
ⴒ
Rio de Janeiro
-3
䡬
Sydney
+10
䡬
* Cities (areas) adopting summer time are given
circles and those not are given crosses.
* The time difference and summer time of each
country may be changed by the country.
3.Special Functions of Solar-Powered Watches
<Note 1>
If Time adjustment is omitted, the 2-second hitch
movement continues. Further, if calendar setting is
omitted subsequent to time adjustment, the second
hand begins 5-second interval movement
(Calendar Setting Warning Feature).
<Note 2>
When the watch is sufficiently recharged in the 2second hitch movement (Time Setting Warning),
and afterwards recharging becomes insufficient
without the time setting, it changes into 2-second
interval movement (recharging warning).
When the 2-second hitch movement begins, time
adjustment should be made earlier and use it after it
is sufficiently recharged.
<Insufficient Recharging Warning Feature>
The second hand changes to 2-second interval
movement to inform the wearer of insufficient
recharging. Although the watch will
keep the correct time when this
happens, the watch will stop when
2-second interval movement
continues for about 2 days.
Place the watch in light to
recharge. The watch will return to
1-second interval movement.
<Time Setting Warning Feature>
Watch hands begin to move when light is supplied
and insufficient charging is solved,
but since the time is incorrect, the
second hand tells by 2-second
hitch movement that the time as
well as the calendar is out of order.
After thoroughly recharging, adjust
the time and calendar.
(Note) • If time adjustment is omitted, the 2-second
hitch movement continues.
• If the crown is returned to the normal position
after adjusting the time only, the calendar
setting warning feature is activated.
<Calendar Setting Warning Feature>
If the crown is returned to the
normal position after adjusting the
time only, omitting calendar
adjustment, the second interval
movement, telling the calendar is
left unadjusted. Pull the crown
once and adjust the calendar.
(Readjust the calendar even if it is correct. It is
recommended to click the crown right to adjust the
month and year.)
<Overcharging Prevention Feature>
This enables the wearer to recharge without risk of
damage to the watch. When the secondary battery
is fully charged, the overcharging prevention feature
is activated to prevent further recharging.
<Power Save Feature>
* When light is not supplied to the solar cell and
power generation stops, the second hand stops at
the zero second position, to set in the power save
state. Although the second hand is stopped, the
hour and minute hands continue to move correctly
and the calendar is adjusted linked with the hour
and minute hands.
* Power save under normal hands movement
The second hand stops at the zero second
position, and when power generation begins, the
second advances rapidly to catch up with the
current second and then resumes the normal 1second interval movement.
* Power save under recharging warning (2-second
interval movement)
The second hand stops at the zero second position,
and when power generation begins, the second
advances rapidly to catch up with the current
second and then resumes the 2-second interval
movement.
* Power save under time setting warning (2-second
hitch movement)
The second hand stops at the zero second
position, and when power generation begins, the
second advances rapidly to catch up with the
current second and then resumes the 2-second
hitch movement.
* Power save under calendar setting warning
(5-second interval movement)
The second hand stops at the zero second
position, and when power generation begins, the
second advances rapidly to catch up with the
current second and then resumes the 5-second
interval movement.
(Note) When the secondary battery is fully charged
and overcharging prevention is activated, the
power save does not even work even when
light is not supplied to the solar cell and power
generation is not done. Likewise, the power
save feature does not work either when the
solar cell is fully charged temporarily by a
sudden supply of intense light.
4. Charging Times
The time required for charging varies according to
the model of watch (colour of the watch face, etc.).
The following table provides a general reference for
determining charging times.
* The charging time is continuous irradiation time.
Charging Time
Illuminance
(lx)
After stopping
Environment
For one day’s
until one-
use
second interval
For full charge
movement
500
In ordinary office
2.5 hours
47 hours
13 days
1,000
60-70cm (24-28 in.)
away from fluorescent
desk lamp (30W)
50 minutes
19 hours
6 days
3,000
20cm (8 in.) away
from florescent desk
lamp (20W)
16 minutes
6.5 hours
39 hours
10,000
Outside, cloudy
conditions
5 minutes
2.5 hours
11 hours
100,000
Outside, sunny
conditions
1.5 minutes
55 minutes
3.5 hours
Time required for full charge: Time from the state
in which the watch has stopped until fully charged.
Time required for one day’s use: Time required for
the watch to run at 1-second intervals for one day.
5. Notes Regarding Handling of Solar-Powered
Watches
<Always Make Sure to Recharge Frequently>
Please note that if you wear long sleeves, the watch
may stop as a result of being covered by your sleeve
and blocked from the light.
* When you take off the watch, try to place it in as
bright a location as possible.This will ensure that it
will continue to run.
• When not using the watch for a long period, we
recommend storage under power save state to
save power for a longer retention time.
Recharging Precautions
• The watch will be damaged during recharging if it
becomes excessively hot (60⬚C/140⬚F). Avoid
recharging when the watch is hot.
Examples: Recharging when the watch is in close
proximity to an incandescent lamp, halogen lamp
or other light source that generates considerable
heat, or recharging the watch while placed on the
dashboard of an automobile or other locations
subject to excessively high temperatures.
• When you charge the watch by an incandescent
lamp, take a distance about 50cm (20 in.) from the
light source to prevent extremely high temperature.
6. Replacement of Secondary Battery
Since the secondary battery used in this watch is
able to be charged and discharged repeatedly, it
does not have to be replaced periodically in the
manner of ordinary batteries.
7. All Reset
When affected by static electricity or hard shocks,
watch indications may go wrong. In such a case,
apply an all reset and the following base position
adjustment. All reset is available from the state or
insufficient recharging warning, time setting warning
or power save.
1. Pull the crown twice (time setting position)
• The second hand moves to a zero position it
memorises and stops.
2. Press button 嘷
A 2 seconds or longer and release.
• The hour and minute hands perform a
demonstrative movement of “forwarding →
reversing → forwarding.”
2. • The second hand makes a full forward turn.
Now all reset is completed. Be sure to make base
position adjustment after all resetting.
If omitted, display positions of watch hands and date
as well as the date changing time may go wrong.
(Note 1) Do not apply all reset during date changing.
Should dislocation occur, pull the crown
once after all resetting, and with button 嘷
A
pressed, turn the crown left and correct the
date position.
(Note 2) The demonstrative movement is not done
when recharging is required. Recharge the
solar cell thoroughly and then do all reset.
8. Base Position Adjustment
After all resetting, adjust the hour and minute hands
by pulling the crown twice and adjust the base
position of date plate by pulling the crown once.
1. With the crown pulled twice, set the hour and
minute hands to 12:00.
嘷
1 A click to the right, the hour and minute hands
move forward.
嘷
2 A click to the left, the hour and minute hands
move backward.
• A quick right turn rapidly advances the hands
right and a quick turn left rapidly advances them
left. Click the crown through one turn in either
direction to stop rapid advancement.
2. Pull the crown once and adjust the second hand
to 00 second and the date plate to one day.
嘷
1 A click to the right, the second hand moves
one second forward.
嘷
2 A click to the left, the date plate moves
one day forward.
• A quick left turn rapidly advances the
date. The date stops automatically
after moving through 31 days. Click
the crown through one turn in either
direction to stop rapid advancement.
Indication
9. Precautions
CAUTION Water-Resistance Performance
There are several types of water-resistance watches,
as shown in the following table. For correct use within
the design limits of the watch, confirm the level of
water-resistance of your watch, as indicated on the
dial and the case, consult the table.
* Water-resistance for daily use (to 3 atmospheres):
This type of watch is water-resistant to minor
exposure to water. For example, you may wear
the watch while washing your face; however it is
not designed for use underwater.
• Upgraded water-resistance for daily use (to 5
atmospheres): This type of watch is water-resistant
to moderate exposure to water. You may wear the
watch while swimming, but it is not designed for
use while skin diving.
• Upgraded water-resistant for daily use (to 10/20
atmospheres): This type of watch may be used for
skindiving; however it is not designed for scuba or
saturated diving such as using helium gas.
Examples of use
moderate
exposure to water
Minor exposure to
(washing, kitchen,
water (washing
work swimming,
face, rain, etc.)
etc.)
Marine sports
(skin diving)
Scuba diving
(with air tank)
Saturation diving
(helium enriched
environment
Operation of the
crown with
moisture visible
NO
NO
NO
NO
NO
OK
OK
NO
NO
NO
NO
OK
OK
OK
NO
NO
NO
Specifications
Dial
Case
(Case back)
WATER RESIST
or no indication
WATER
RESIST(ANT)
Water-resistant to
3 atmospheres
OK
WATER
RESIST(ANT) 5 Water-resistant to
5 atmospheres
bar or WATER
RESIST(ANT)
WATER
RESIST(ANT) Water-resistant to
WR 100/200 or
10/20
WATER RESIST 10 bar / 20 bar or
atmospheres
WATER
100/200
RESIST(ANT)
WR 50 or
WATER RESIST
50
3. Return the crown to the normal position and memorise
the base positions of the hands and date plate.
(Note 1) Memory recording of the standard position
takes around one second. When it has
been recorded, the second hand begins
2-second hitch movement. After you
return the crown to its normal position do
not pull the crown out until after 2-second
hitch movement has started.
3. (Note 2) After all resetting, returning to the normal
position by omitting crown clicking, right
or left, at each of the 1st and 2nd pull
positions does not memorise base
positions, and thus the second hand is
left stopped.
4. After adjusting the base positions, correctly adjust
the time and calendar.
• After setting the standard position, the time
setting will change to 0:00 a.m. Set the time and
calendar with reference to “2. Setting the Time
and Calendar” to avoid confusing a.m. and p.m.
* WATER RESIST(ANT) xx bar may also be indicated as W.R xx bar.
CAUTION
• Be sure to use the watch with the crown pressed
in (normal position). If your watch has a screw-type
crown, be sure to tighten the crown completely.
• Do NOT operate the crown or button with wet
fingers or when the watch is wet. Water may enter
the watch and compromise the water-resistance.
• If the watch is used in seawater, rinse with fresh
water afterward and wipe with a dry cloth.
• If moisture has entered the watch, or if the inside
of the crystal is fogged up and does not become
clear within a day, immediately take the watch to
your dealer or Citizen Service Centre for repair.
Leaving the watch in such a state will allow
corrosion to form inside.
• If seawater enters the watch, place the watch in a
box or plastic bag and immediately take it in for
repair. Otherwise, pressure will increase, and parts
(crystal, buttons, etc.) may come off.
CAUTION: Keep your watch clean.
• Leaving dust and dirt deposited between the case
and crown may result in difficulty in pulling the
crown out.
• Dust and dirt tend to be deposited in gaps in the
back of the case or band. Deposited dust and dirt
may cause corrosion and soil your clothing. Clean
the watch occasionally.
Cleaning the Watch
• Use a soft cloth to wipe off dirt, perspiration and
water from the case and crystal.
• Use a soft, dry cloth to wipe perspiration and dirt
from leather band.
• To clean a metal, plastic, or rubber watch band,
wash away dirt with mild soap and water. Use a
soft brush to remove dust and dirt jammed in the
gaps in the metal band. If your watch is not waterresistant, take it to your dealer.
NOTE: Avoid using solvents (thinner, benzine, etc.),
as they may mar the finish.
CAUTION: Operating Environment
• Use the watch within the operating-temperature
range specified in the instruction manual.
Using the watch where temperatures are outside
the specified range, may result in deterioration of
functions or even stoppage of the watch.
• Do NOT use the watch in a place where it is
exposed to high temperature, such as a sauna.
Doing so may result in a skin burn.
• Do NOT leave the watch in a place where it is
exposed to high temperature, such as the glove
compartment or dashboard of a car.
Doing so may result in deterioration of the watch,
such as deformation of plastic parts.
• Do NOT place the watch close to a magnet.
Timekeeping will become inaccurate if you place
the watch close to a magnetic health equipment
such as a magnetic necklace or a magnetic latch
of a refrigerator door or handbag clasp or the
earphone of a mobile phone. If this has occurred,
move the watch away from the magnet and reset
the time.
• Do NOT place the watch close to household
appliances that generate static electricity.
Timekeeping may become inaccurate if the watch
is exposed to strong static electricity, such as
emitted from a TV screen.
• Do NOT subject the watch to strong shocks such
as dropping it onto a hard floor.
• Avoid using the watch in an environment where it
may be exposed to chemicals or corrosive gases.
If solvents, such as thinner and benzine, or
substances containing such solvents, come in
contact with the watch, discolouration, melting,
cracking, etc., may result. If the watch comes in
contact with mercury used in thermometers, the
case, band or other parts may become discoloured.
10. Specifications
1. Caliber No.: E71
2. Type: Analogue Solar-Powered Watch
3. Accuracy: Within Ⳳ15 seconds per month on
average
(When worn at normal temperatures of +5⬚C to
+35⬚C/41⬚F to 95⬚F)
4. Operating Temperature Range: -10⬚C to
+60⬚C/14⬚F to 140⬚F
5. Display functions:
•Time: Hours, Minutes, Seconds
• Calendar: Date display by date plate (with quick
adjustment feature)
Years passed and month display by
second hand (Years passed and
month are displayed only during
calendar adjustment.)
6. Additional Functions:
• Power Save Feature
• Time Difference Correction Feature
(forward and reverse adjustment in hours)
• Insufficient Recharging Warning Feature
• Time Setting Warning Feature
• Calendar Setting Warning Feature
• Overcharging Prevention Feature
7. Continuous Operating Time:
• Fully charged to stopping:
Approx 10 months (while in operation of
power save feature)
• 2-second interval movement to stopping:
Approx 2 days
8. Battery Used: Secondary battery
*Specifications are subject to change without notice.
Water Resistance
The water-resistant quality of our timepieces is offered in varying degrees depending on the model. This
ranges from non-water resistant models to those suitable for SCUBA diving. Water resistance of our
timepieces is measured in BAR or Barometric Pressure. Each BAR of pressure is equal to 14.5 pounds per
square inch of pressure.
Water resistance is measured when the watch is at a static, or motionless state. As the watch is moved in
water, such as from the motion of swimming, pressure is added from velocity. While you may be swimming in
a pool at surface level, the watch may be experiencing forces equal to that of 100 feet of water pressure
(3 BAR). Diving into a pool can cause forces on the watch to exceed those pressures. As such, you
should always allow a margin of safety when exposing your watch to moisture. Never "push the limit" of
the degree of water resistance of your timepiece.
A primary factor to keep in mind about water resistance is that periodic maintenance is needed to
maintain original factory specifications for water resistance. When a watch is new, it meets
specifications for water resistance as indicated on the case back. However, as the watch ages, the
gaskets that seal the watch become dry and brittle, diminishing its water resistant quality. Exposure to
environments such as chlorinated pools, salt water or soaps from showering can accelerate drying of the
gaskets. We recommend that the gaskets be changed at least every 18 to 24 months to maintain the water
resistant quality of your timepiece. If the watch is frequently exposed to chlorinated pools, soaps salt
water, etc., we recommend that the gaskets be changed on a yearly basis.
From time to time, you may notice condensation that appears then goes away after a short period of time.
This is a normal occurrence and happens primarily from sudden temperature changes. When there are sudden
temperature changes such as entering a cool building from the hot out of doors, or jumping into pool on a
hot day the watch may fog. Conversely, if you go to the cold outdoors from a warm building, fogging may
occur. As long as the fogging clears in a short period of time, there is no need for concern.
Be sure the crown is completely pushed in prior to any contact with moisture. If your model is equipped
with a screw down crown, be sure it is properly seated against the case. Do not operate the crown or any
push button when the watch is wet as this may allow the entrance of moisture. . If at anytime, you notice
moisture in your timepiece that does not clear in a short period of time, you should send your timepiece
as soon as possible to the nearest Authorized Service Center for inspection.
You can determine the level of water resistance of our watches from the markings on your case-back.
Additionally, models that are water resistant to 100 or 200 meters have an indication on the dial as
well. The case-backs and dials are normally marked as follows:
The case back has no indication of water resistance
This indicates the watch is a non water-resistant model and is not designed for contact with moisture at
all. Caution should be exercised to avoid any contact with moisture, such as when washing your hands or
from a rainstorm.
“Water Resist”
This watch is designed to withstand water from accidental splashing, such as from washing your hands or
rain. Any submersion into water may result in the entrance of moisture.
“Water Resist 10BAR” or “W.R. 10BAR”, Dial marked “WR100”
This watch is designed to withstand water pressure up to 333 feet. This includes water exposure from
accidental splashing and rain, but also from showering, swimming in a pool and snorkeling. Be sure to
rinse the watch with fresh water after exposure to a chlorinated pool, salt water, soaps, etc. After
rinsing with fresh water, be sure to dry the exterior with a soft cloth.
“Water Resist 20BAR” or “W.R. 20BAR”, Dial marked “WR200”
This watch is designed to withstand water pressure up to 666 feet. This includes all exposure to water up
to and including recreational SCUBA diving. Be sure to rinse the watch with fresh water after exposure to
a chlorinated pool, salt water, soaps, etc. After rinsing with fresh water, be sure to dry the exterior
with a soft cloth.
Special Note about Jacuzzis and Hot Tubs
The various components used in the manufacture and assembly of your watch expand at various rates. This
results in a loss of the sealing capabilities of gaskets, which may allow moisture to enter. In addition,
heat from these sources can cause deformation of certain materials leading to mechanical failures. For
these reasons, you should remove your watch before entering a hot tub or Jacuzzi.