1
F-07C
INSTRUCTION MANUAL
’11.5
Thank you for purchasing "F-07C" mobile terminal.
Before using F-07C, read this manual to ensure safe use and handling.
Instruction manuals for F-07C
The operations of F-07C are described in this manual, "使いかたガイド (Guide)” (installed in FOMA
terminal) and "Instruction manual (detailed version)" (PDF file). Instruction manual
This manual provides information about screens and operations of basic
(this manual)
functions.
"使いかたガイド
(Guide)"
(installed in FOMA
terminal)
This guide provides overviews and operations of frequently-used functions.
(In Japanese only)
ef LifeKite* GuideeSelect a search
In F-07C Stand-by display,
method
"Instruction manual
(detailed version)"
(PDF file)
This manual provides detailed information and operations of all the functions.
(In Japanese only)
<From a PC> This manual can be downloaded from NTT DOCOMO website.
http://www.nttdocomo.co.jp/support/trouble/manual/download/index.html
* The URL and contents are subject to change without prior notice.
・ In this "F-07C INSTRUCTION MANUAL", "F-07C" mobile terminal is usually referred to as "FOMA terminal".
・ The images or illustration used in this manual are examples. They may differ from the actual displays.
・ In this manual, "authenticate" indicates the operating procedure for entering the terminal security code in 48 digits. ⇒P34
Basic package
F-07C
Battery Pack F20
(including Back Cover F58 and warranty)
Earphone Plug Adapter F01
USB Cable F01
AC Adapter F04
Instruction manual
CD-R of Microsoft® Office
Personal 2010 biennial
licensed version (Japanese)
Compatible options ⇒P99
・ Unauthorized copying of parts of or this entire manual is prohibited.
・ The contents in this manual, URL and contents are subject to change without prior notice.
Contents
FOMA terminal .................................
What you can do with F-07C...........
Part names and functions ...............
Usage Styles.....................................
2
3
4
7
Precautions (Always follow these
directions) .....................................
Handling precautions.......................
8
16
Before Using .....................................
Screen Explanation ..........................
Character Entry ................................
21
24
28
Sound/Screen Setting .....................
Lock/Security ...................................
30
34
Call Telephone..................................
Mail....................................................
Phonebook........................................
38
45
48
Connect
i-mode/Full Browser ........................
i-Channel ...........................................
Map/GPS...........................................
49
51
52
Search
Camera ..............................................
Music .................................................
i-αppli ................................................
54
56
58
i-motion/Movie ................................
Osaifu-Keitai .....................................
i-concier.............................................
Convenient tools ..............................
60
61
62
Data Management ...........................
64
Before Using .....................................
Screen Explanation ..........................
Communication................................
Setting sound/power-saving ..........
68
75
79
83
Maintenance .....................................
Recovery ...........................................
Office .................................................
Support .............................................
85
87
89
90
Support ............................................. 93
Appendix........................................... 100
Index.................................................. 116
Introduction
Basic
Operation
59
Enjoy
More
Convenient
Windows 7
Others
1
FOMA terminal
・ F-07C supports W-CDMA, GSM/GPRS, Wireless LAN system.
・ Because your FOMA terminal uses wireless transmission, it may not function in locations where it is
Introduction
・
・
・
・
・
・
・
difficult for radio waves to penetrate, such as tunnels, underground passages and some buildings, in areas
where radio waves are weak, or out of service area. Even when you are high up in a tall building or
condominium and nothing blocks your view outside, your FOMA terminal may not be able to receive or
transmit signals. Also, communication may be interrupted even when the signal meter on your FOMA
terminal indicates there are strong radio waves and you are not moving (traveling).
Because your FOMA terminal uses radio waves to communicate, it is possible that a third party may
attempt to tap your calls. However, the W-CDMA, GSM/GPRS system automatically applies a confidential
communication function to all calls, so even if a third party could somehow tap a call, they only hear noise.
Your FOMA terminal encodes voice communication as digital data. When you are operating your FOMA
terminal while moving to a location subject to weaker radio wave conditions, the transmitted digital data
may not be correctly decoded and as a result the decoded voice may differ somewhat from the actual voice.
Maintain a separate record of the data (phonebook, schedule, notepad, recorded messages, voice memos,
moving picture memos, etc.) you registered in your FOMA terminal. Note that DOCOMO assumes no
responsibility for any loss of saved contents of data resulting from malfunction, repair, changing of the
model or other handling of FOMA terminal.
You are recommended to save important data to microSD card. Using DOCOMO keitai datalink, you can
transfer and save phonebook, mail, schedule and other data to a PC.
The user hereby agrees that the user shall be solely responsible for the result of the use of SSL/TLS.
Neither DOCOMO nor the certifier as listed herein makes any representation and warranty as for the
security in the use of SSL/TLS. If the data should be erased, DOCOMO assumes no responsibility for the
loss of any data.
Certifier : VeriSign Japan K.K., Cybertrust Japan Co., Ltd., GlobalSign K.K., RSA Security Japan Ltd.,
SECOM Trust Systems Co., Ltd., Comodo CA Ltd., Entrust, Inc.
This FOMA terminal supports FOMA Plus-Area and FOMA HIGH-SPEED Area.
Descriptions in this manual are for the FOMA terminal with a DOCOMO's UIM inserted.
■ SIM unlock
This FOMA terminal supports SIM unlock. If you release SIM lock, you can use UIM by a carrier other than
NTT DOCOMO.
・ The SIM unlock service is provided at a docomo Shop.
・ A SIM unlock charge is separately required.
・ If you use a UIM other than by DOCOMO, available services and functions will be limited. DOCOMO is not
liable to any failures or malfunctions.
・ For details of SIM unlock, refer to NTT DOCOMO website.
2
What you can do with F-07C
Windows 7 mode 68
* The functions of Windows 7 mode are described in the
chapter "Windows 7" other than common portions to FOMA
mode, such as part names. For functions of FOMA mode
used in Windows 7 mode, see "Windows 7".
使いかたガイド (Guide)
27
This function allows you to check the operations
of desired functions with the FOMA terminal.
Without the instruction manual at your hand, you
can check them readily. (In Japanese only)
eco mode 33
The eco mode allows you to save the battery
power by adjusting the display backlight, etc.
International Roaming (WORLD WING) 43
While staying overseas, you can use the same
FOMA terminal, phone number and mail address
as those used in Japan (3G/GSM Areas are
supported).
Introduction
F-07C is equipped with "FOMA mode" for using as
a regular FOMA terminal and "Windows 7 mode".
Press w to switch to Windows 7 mode. You
can use the Internet via Full Browser, e-mail
"Office 2010 Personal" and electronic dictionaries.
In Windows 7 mode, you can also use wireless
LAN compatible with Wi-Fi. (In Japanese only)
AUTO-GPS 53
AUTO-GPS function allows you to use convenient
services that deliver such information as weather,
neighboring shops, sightseeing, etc. around your
location.
High functionality camera 54
Camera offers approximately 5.1 million pixels
(effective pixels) and Auto scene recognition to
switch to the optimal scene mode, Face detection
to detect persons face and smile rate, Tracking
focus to track the subject, Whiteboard mode to
shoot text etc. on the whiteboard sharply, etc.
i-concier 61
i-concier is a service that supports your life like a
butler or concierge. It stores your various
information (area information of residence,
schedule, ToruCa, phonebook, etc.) and offers you
information that matches your schedule, living
area or current location, preferences and interest
at the right time.
3
Part names and functions
Part names of F-07C and major functions assigned to each part are as follows.
Introduction
4
To use the function with *, press the key for 1
second or more.
a Display (touch panel)
b Light for indicating receiving call or mail, or
charging, etc.
c GPS antenna (Built-in)
d Light sensor for sensing the ambient
lightness to adjust the brightness of the
display
e Earpiece
f In-camera
g Windows 7 lights⇒P6
h Microphone
i FOMA antenna (built into FOMA terminal)
Covering around the antenna with your hand
may affect the quality.
j Back cover
To access UIM slot and the microSD card slot,
remove the back cover and the battery pack.
Do not remove the sticker on the rear side of
the back cover . It may cause the FOMA
terminal performance to be degraded.
k Out-camera
l Infrared data port
m Shooting indication light, Camera light
n Speaker
o
mark for placing over IC card reader for
Osaifu-Keitai and iC transmission
p Micro USB connection jack for connecting
the included USB Cable F01 or Earphone
Plug Adapter 01.
q Strap opening
r Cradle connection jack⇒P22
b c Receive a voice call, delete a character,
return to the previous screen, or display i-Channel
list
c QWERTY keypad⇒P6
d Track ball for rotating to move the cursor/pressing
to execute operations. In Windows 7 mode, press
for the same operation as left click of mouse or
press 1 second or more for the same operation as
right click of mouse
In Windows 7 mode, there are functions to be
performed in combination with other keys.⇒P78
e N Multitask key for starting another function
during a call or operation
f z Turn ON/OFF the display or start/cancel
Silent mode*
g w Switch Windows 7 mode/FOMA mode,
press for 4 seconds or more to force-quit Windows
7⇒P75
h C Perform operations while starting Camera or
start the still camera shooting*
Introduction
Covering around the antenna with your hand
may affect the quality.
a f Exit a running function, or turn ON/OFF
the FOMA terminal by pressing for 2 seconds
or more
Connecting of Earphone Plug Adapter 01 and
commercially available earphone
*Connect included Earphone Plug Adapter 01 to
microUSB connection jack
Commercially available earphone
Earphone Plug
Adapter 01
microUSB connection jack
5
QWERTY keypad
Introduction
In slide style, you can operate such as start of
functions using keys. Basic operations in FOMA
mode are explained here.
In Windows 7 mode, you can operate the
QWERTY keypad in the same way as a PC
keyboard.
Functions with * are for pressing key for 1 second
or more to execute.
a q - p, g, h, 0 Enter phone number
or symbols, select menu or item, delete a
character, return to the previous screen
or perform each shortcut operation
b ! Only in Windows 7 mode, select an
item or the same operation as left-click of
mouse pad
c Z Press with the other key to enter
symbols/numbers or to use the functions
marked on the key in blue
d C Press with the other key to enter
symbols or to use the functions marked
on the key in yellow-green
e N Execute another function while calling
or communicating (Multi-access/
Multitask)
6
f M Only in Windows 7 mode, display the
start menu
g 8 Delete a character, return to the
previous screen, or display i-Channel list
h U Display Scheduler, move the cursor, or
display Alarm clock list*
i Guide keys
1 : Display the menu, or perform the
operation at upper-left of the guide area
2 : Display the outgoing call screen, or
perform the operation at upper-right of the
guide area
3 : Display the mail menu, perform the
operation at lower-left of the guide area, or
Check new message*
4 : Display iMenu connecting to i-mode,
perform the operation at lower-right of the
guide area, or display i-αppli folder list*
j [ Execute operations, focus mode or
operations in the center of the guide area
k L Display Received calls, switch screens,
move the cursor
l D Display Phonebook, move the cursor,
or add phonebook entry*
m R Display Redial, switch screens, move
the cursor, or start/cancel IC card lock*
Windows 7 lights
You are notified of the state of Windows 7 by
turning on and blinking the lights.
The lights turn on blue during activation, blink
blue alternately during getting ready for boot,
blink blue during sleep, one light blinks blue
during getting ready for hibernation, and they turn
off during hibernation/Power OFF.
Usage Styles
✜ Slide style
Introduction
You can use the FOMA terminal with two
styles: "basic style (closed state)" supports
touch operation, "slide style (opened state)"
supports touch operation and key operation.
・ The procedures for the Basic style are mainly
described in this manual.
・ For operations available only by QWERTY
keypad, and convenient operations using
QWERTY keypad, key operation is described.
Switch to the Slide style to operate QWERTY
keypad.
✜ Basic style
Vertical and horizontal views can be switched
according to tilt of the FOMA terminal by the auto
rotation in Motion sensor (in some screens, screen
view may not be changed).
The screen is automatically switched to horizontal
view (in some screens, screen view may not be
changed).
Point
・ Do not apply excessive force when opening/closing
the FOMA terminal. It may cause damages on the
keypad or the display.
・ For opening/closing the FOMA terminal, do not
touch the touch panel with your fingers to prevent
inadvertent operations.
・ Before carrying the FOMA terminal, change to basic
style and activate Operation lock to prevent
inadvertent operations or to save battery power
consumption.
7
Precautions (Always follow these directions)
・ Before using your FOMA terminal, or when
Introduction
necessary, read the following precautions to
ensure safe use and handling. After reading this
manual, keep it in a safe place.
・ These precautions are intended to protect you
and others around you. Read and follow them
carefully to avoid injury, damage to the product
or damage to property.
・ The signs below differentiate between the
levels of danger that can occur if the product is
not used within the specified guidelines.
DANGER
WARNING
CAUTION
This sign denotes that
death or serious injury
may directly result from
improper use.
This sign denotes that
death or serious injury
may result from
improper use.
This sign denotes that
minor injury or damage
to property may result
from improper use.
・ The symbols below show specific directions.
This symbol denotes that the action
is prohibited.
Don’t
No disassembly
8
This symbol denotes that
disassembling the phone or its
components is not allowed.
No wet hands
No liquids
Do
This symbol denotes that using the
phone or its components with wet
hands is not allowed.
This symbol denotes that using the
phone or its components in a
bathroom or other highly humid
area is not allowed.
This symbol denotes that an
instruction must be obeyed at all
times.
This symbol denotes that the
equipment should be unplugged.
Unplug
■Precautions contain the descriptions below.
Handling FOMA terminal, battery pack, AC adapter
(including USB cable) and UIM (common) ..............9
Handling FOMA terminal ............................................10
Handling battery pack .................................................12
Handling AC adapter (including USB cable) .............13
Handling UIM...............................................................14
Handling mobile phones near electronic medical
equipment.................................................................14
Material list ..................................................................15
Handling FOMA terminal, battery
pack, AC adapter (including USB
cable) and UIM (common)
DANGER
May cause fire, burns, injuries or electric shock.
Do not cover or wrap the terminal with
a blanket, etc while using or charging.
Don’t May cause fire or burns.
May cause fire, burns or injuries.
Do not put the terminal into heating
cooking device such as microwave oven
Don’t or high-pressure container.
Do
May cause fire, burns, injuries or electric shock.
No disassembly May cause fire, burns, injuries or electric shock.
May cause fire, burns, injuries or electric shock.
Do
Do
Use the battery pack and AC adapter
(including USB cable) specified by NTT
DOCOMO for your FOMA terminal.
If the equipment starts giving off a
strange smell, overheats, becomes
discolored or deformed during use,
charging or in storage, immediately
perform the following operations.
・ Remove the power plug from the wall outlet.
・ Turn FOMA terminal OFF.
・ Remove the battery pack from FOMA
May cause fire, burns, injuries or electric shock.
terminal.
May cause fire, burns, injuries or electric shock.
WARNING
CAUTION
Do not throw the equipment or give
hard shock to it.
Don’t
Turn FOMA terminal OFF and stop
charging if you charge the battery
before entering a place such as a gas
station where flammable gases are
generated.
The gas may catch fire.
When using Osaifu-Keitai in a place as a gas
station, turn OFF the terminal before using it.
(When IC card lock is activated, deactivate it
before turning OFF the terminal.)
Do not disassemble or remodel the
equipment.
Do not let the terminal get wet with
water, drinking water, urine of pet
No liquids animals, etc.
Introduction
Do not use, store, or leave the
equipment in hot areas such as near
Don’t flames or in areas under strong direct
sunlight such as inside a vehicle.
Keep conductive materials (metal
pieces, pencil lead, etc.) from coming in
Don’t contact with the microUSB or cradle
connection jack. Do not put those
materials inside the connection jack.
Do not leave the equipment on unstable
or sloping surfaces.
May cause fire, burns, injuries or electric shock.
Don’t
The euipment may fall and cause injuries.
9
Do not store the equipment in
extremely humid, dusty or hot areas.
Don’t May cause fire, burns or electric shock.
Do
Introduction
Children using the equipment should be
instructed in proper operation by an
adult. Do not allow them to use the
equipment without adult supervision.
May cause injuries.
Store the equipment out of reach of
small children.
Do
Do
Do not turn on the light by getting the
lighting part closer to other person's
Don’t eyes. When shooting infants, keep at
least 1 m away from the object.
May impair eyesight. And may cause accidents
like injury etc., by dazzling or astounding other
people.
Do not put foreign objects such as liquid
like water, metal pieces or burnable
Don’t things into UIM or microSD card slot.
May cause fire, burns, injuries or electric shock.
May be accidentally swallowed or cause
injuries.
Be careful especially when using FOMA
terminal connected to the AC adapter
(including USB cable) continuously for a
long time.
If you use i-αppli or a videophone call while
charging the battery for a long time, FOMA
terminal, battery pack and AC adapter (including
USB cable) may be heated.
Directly touching a hot part for a long time, you
may have redness, itching or rash on your skin,
or it may result in low-temperature burns
depending on your constitution and/or health
condition.
Do not turn on the light aiming directly
at the driver of the car etc.
Don’t May disturb driving and cause an accident.
Do
May cause electronic equipment or electronic
medical equipment to fail or malfunction. If the
function which automatically turns the power
ON is set, cancel the setting before turning the
power OFF.
When using the phone in a medical facility, be
sure to observe the regulations of the facility.
If you do prohibited act such as using the phone
in an airplane, you will be punished according to
law.
If usage of mobile phones in an aircraft is
admitted by setting airplane mode, etc., use the
terminal under the direction of the airline.
Handling FOMA terminal
WARNING
Do not direct the infrared data port
toward your eye and transmit signals.
Don’t
May cause harmful effect on eyes.
Do not direct the infrared data port
toward home electric appliances etc.
Don’t equipped with infrared device when
using infrared communication.
10
May cause an accident because of malfunction
of infrared device.
Turn FOMA terminal OFF in areas where
use is prohibited, such as in airplanes
and hospitals.
Be careful when using the FOMA
terminal in Windows 7 mode.
Do
FOMA terminal may be heated while using
Windows 7 mode. Directly touching a hot part
for a long time, you may have redness, itching or
rash on your skin, or it may result in lowtemperature burns depending on your
constitution and/or health condition.
Do
Do
Surfaces of display and camera lens are made of
plastic panels and they are structured for the
glass not to scatter, however, if you mistakenly
touch broken or exposed parts, you may be
injured.
Too loud volume may cause a hearing loss.
And, if you cannot hear the sound around you
clearly, it may cause an accident.
Do
If you have weak heart, be careful when
setting the Vibrate alert (vibration) or
alert volume setting.
Do
Do
CAUTION
Do not swing FOMA terminal by its
strap.
Don’t
May cause harmful effect on electronic medical
equipment etc.
Do
Turn FOMA terminal OFF near highprecision electronic control equipment
or electronic equipment using lowpower signals.
May cause the equipment to fail or malfunction.
* Examples of electronic equipment to avoid.
Hearing aids, implanted pacemakers or defibrillators,
other electronic medical equipment, fire alarms,
automatic doors and other automatic control
equipment.
Users wearing implanted pacemakers or defibrillators
or other electronic medical equipment should check
with the manufacturer or sales outlet about the effect
of radio frequencies on the equipment.
To sound the high-pitched alarm,
always keep FOMA terminal away from
your ears.
May cause hearing defect.
May cause harmful effect on heart.
When you use electronic medical
equipment, check with the equipment
manufacturer to determine how the
device is affected by radio waves before
using.
When the display or camera lens is
accidentally broken, be careful of
broken glass or exposed internal parts
of FOMA terminal.
Introduction
When you talk by setting handsfree or
ring alert is sounding, keep FOMA
terminal away from your ear.
And, when connecting the earphone/
microphone etc. to FOMA terminal and
play a game or music, adjust the volume
moderately.
May cause accident such as injury to yourself or
others by hitting.
Do not use damaged FOMA terminal.
May cause fire, burns, injuries or electric shock.
Don’t
When using the motion tracking or
motion sensor, check the safety around
Don’t you, hold FOMA terminal firmly, and do
not shake it unnecessarily.
May cause accident such as injuries.
If the display part is accidentally broken
and the liquid crystal leaks out, do not
Don’t make the substance contact with your
skin of face or hands.
May cause loss of sight or skin problems.
If the liquid gets into your eyes or mouth, rinse it
with clean water and see a doctor immediately.
And, if the liquid adheres to skin or clothing, use
alcohol etc. to wipe it off, then wash with soap.
11
Do
To use the terminal in car, check with
automobile manufacturer or dealer to
determine how the device is affected by
radio waves before using.
Introduction
In rare cases, using the phone in some vehicle
models can cause the vehicle's electronic
equipment to malfunction. In that case, stop
using the terminal immediately.
Do
Do
Mobile phones can give some users skin
problems such as itching, allergic
reactions or rashes. If you develop skin
problems, stop using the phone
immediately, and see a doctor.⇒
"Material list (P15)".
When opening or closing FOMA
terminal, take care not to have your
fingers or strap caught by the terminal.
Check the orientation of battery pack to
install it to FOMA terminal, and do not
Don’t try to force the battery pack onto FOMA
terminal if you are having trouble
installing it.
May cause the battery pack to ignite, burst, heat
or leak.
Do not throw the battery pack into the
fire.
Don’t May cause the battery pack to ignite, burst, heat
or leak.
Do not nail the battery pack, hit with a
hammer or step on it.
Don’t May cause the battery pack to ignite, burst, heat
or leak.
May cause accident such as injuries.
Do
Do
When watching the display, take a
certain distance from the display in a
fully bright place.
May cause loss of sight.
WARNING
May reduce visual acuity.
Handling battery pack
■Check that the battery type matches the type
displayed on the battery pack label.
Display
Li-ion 00
May cause the battery pack to ignite, burst, heat
or leak.
Li-ion battery
Do not connect a wire or other metal
objects to the jack. And, do not carry or
Don’t store FOMA terminal with objects like a
metal necklace.
May cause the battery pack to ignite, burst, heat
or leak.
12
If the battery pack seems to have
abnormalities such as deformation or
Don’t scratches due to falling, never use it.
Battery type
DANGER
If the battery pack's fluid contacts eyes,
immediately flush the eyes with clean
water and see a doctor right away. Do
not rub the eyes.
Do
If the battery pack leaks or gives off a
strange smell, immediately remove it
from the vicinity of open flames.
The vapors from leaking battery pack fluid may
ignite or explode.
Be careful not to let your pet bite the
battery pack.
Do
May cause the battery pack to ignite, burst, heat
or leak.
CAUTION
Do not discard old battery packs
together with other garbage.
Don’t
Do not use or charge a wet battery pack.
Don’t
Do
May cause the battery pack to ignite, burst, heat
or leak.
If fluid etc. leaks out from the battery
pack, do not make the fluid contact with
your skin of face or hands.
May cause loss of sight or skin problems.
If the fluid etc. put into your eyes or mouth, or
contacts skin or clothes, immediately flush the
contacted area with clean water.
If the fluid put into the eyes or mouth,
immediately see a doctor after flushing.
Handling AC adapter (including
USB cable)
May cause fire, burns or electric shock.
Do not place heavy objects on the USB
cable cord.
Don’t May cause fire, burns or electric shock.
When you insert and remove AC
adapter from power outlet, do not
Don’t contact a metal strap or other metal
objects with the jack.
May cause fire, burns or electric shock.
Do not touch the AC adapter (including
USB cable) cord or outlet with wet
No wet hands hands.
May cause fire, burns or electric shock.
Do
Do not use the USB cable cord if it gets
damaged.
May cause fire, burns, electric shock.
Do not use the AC adapter or cradle
holder in a bathroom or other highly
Don’t humid area.
Wipe off any dust that accumulates on
the power plug.
Do
May cause fire, burns, electric shock.
When it starts to thunder, do not touch
AC adapter (including USB cable).
Only use with the specified power
source and voltage.
When charging FOMA terminal
overseas, use AC Adapter for global use.
If incorrect voltage is used, this may cause fire,
burns or electric shock.
AC adapter : AC100V
AC adapter for global use : Between 100V and
240V AC (connect to the AC outlet for internal
household use)
WARNING
Don’t
Introduction
May cause igniting or environmental
destruction. Tape the terminals of old battery
packs to insulate them, and then bring them into
a sales outlet such as docomo Shop. If your local
municipality has a battery recycling program,
dispose of them as provided for.
Do not short the charging jack while it is
connected to the outlet. Do not touch
Don’t the microUSB connecting jack with a
part of your body such as your hand or
finger.
May cause fire, burns or electric shock.
When you connect the AC adapter to an
outlet, firmly connect to the outlet.
Do
May cause fire, burns or electric shock.
Don’t May cause electric shock.
13
Do
When you disconnect the power plug
from the outlet, do not pull the USB
cable cord with excessive force. Instead,
hold the AC adapter to disconnect.
May cause fire, burns or electric shock.
Introduction
Always remove the power plug from
the outlet when not using the adapter
Unplug for an extended period.
Handling mobile phones near
electronic medical equipment
■These precautions are based on the guidelines
produced at the Electromagnetic Compatibility
Conference Japan, regarding the protection of
electronic medical equipment from radio waves
emitted by mobile phone units.
WARNING
May cause fire, burns or electric shock.
Immediately remove the power plug
from the outlet if water or other fluids
Unplug get into the AC adapter.
May cause fire, burns or electric shock.
Obey the following rules inside medical
facilities.
Do
rooms (ORs), intensive care units (ICUs) or
coronary care units (CCUs).
・ Turn FOMA terminal OFF in hospital wards.
・ Turn FOMA terminal OFF in hospital lobbies
Always remove the power plug from
the outlet when cleaning the
Unplug equipment.
and corridors if electronic medical equipment
could be nearby.
May cause fire, burns or electric shock.
・ If the medical facility has specified zones
where use or possession of mobile devices is
prohibited, obey those instructions.
・ If the function to automatically turn ON the
power is set, cancel the setting before turning
the power OFF.
Handling UIM
CAUTION
Be careful of the cut surface when
removing UIM.
Do
・ Do not bring FOMA terminal into operating
May cause injuries.
Do
Turn FOMA terminal OFF in crowded
trains or other public places where
pacemaker or defibrillator wearers
could be nearby.
FOMA terminal's signals may affect the
operation of implanted pacemakers or
defibrillators, and other devices.
Do
Wearers of implanted pacemakers or
defibrillators must carry and use FOMA
terminal at least 22 cm away from the
implanted device.
FOMA terminal's signals may affect the
operation of implanted pacemakers or
defibrillators, and other devices.
14
Do
FOMA terminal's signals may affect the
performance of electronic medical equipment.
Material list
Part
Material
Exterior case Movable part PA-GF resin
Display
Surface
treatment
UV hard
coating
Part
Keypad
Material
PC resin
Surface
treatment
UV hard
coating
External
connection
jack cap
Phone
PC+ABS resin UV hard
coating
Flexure
Elastomer
resin (TPE)
None
Static
electricity
contacts
Contacts
Stainless
steel
Ni-Plating
External connection jack
Stainless
steel
Tin plating
Ornamental sheet around
keypad
PET resin
UV hard
coating
Slide module Stainless
steel
Smooth
coating
Back part
Movable part PC+ABS resin UV hard
Display
coating
lower part
Screw cap
Silicon
None
rubber (VMQ)
Movable part PC+ABS resin UV hard
back side
coating
RF cap
Silicon
None
rubber (VMQ)
Fixed part
Keypad
PC+ABS resin UV hard
coating
Slide pad
Fixed part
Battery
PC+ABS resin UV hard
coating
Super high
None
density
polyethylene
film
Back Cover
PC+ABS resin UV hard
coating
Screw (battery install
recess)
Hardened
glass
Battery install recess face
PC board
Gold plating
Battery
contacts
Battery
contacts
connector
PPS resin
None
Battery
contacts
Beryllium
copper
Gold plating
(base : Ni-Pd
plating)
Display panel
Shatterproof
film
Camera lens, camera panel Transparent UV hard
thermoplastic coating
(PMMA)
Light panel
PC resin
None
Front keys
PC resin
UV hard
coating
Side keys (Windows 7
switch key)
PC resin
UV hard
coating
Side keys (multitask key,
Elastomer
lock key, camera/zoom key) resin (TPE)
None
Stainless
steel
Battery Pack Battery pack PC resin
Contacts
UIM tray
Introduction
When electronic medical equipment
other than implanted pacemakers or
defibrillators are in use outside of
medical facilities (such as in home care
settings), check with the device
manufacturer to determine how the
device is affected by electrical signals.
None
None
Beryllium
copper
Gold plating
POM resin
None
15
Handling precautions
General
・ Keep water away from FOMA terminal.
Introduction
16
- FOMA terminal, battery pack, AC adapter (including
USB cable), cradle, UIM are not waterproof. Do not use
them in bathrooms or other high-humidity areas, or in
the rain. When carrying FOMA terminal in a pocket
near your body, sweat may corrode the inner
components, causing malfunction. Malfunctions
deemed to be caused by water are not covered by the
warranty, and may be impossible to repair. Since these
conditions are outside the scope of the warranty, a
repair, if at all possible, is charged.
・ Clean FOMA terminal with a dry soft cloth (such as a
cloth for eyeglasses).
- Rubbing it roughly with a dry cloth can scratch the
display.
- Drops of water or dirt left on the display may cause
stains.
- If FOMA terminal is wiped with alcohol, paint thinner,
benzine or detergent, the printing may disappear or
color may fade.
・ Clean the jack occasionally with a dry cotton swab
etc.
- If the jack is soiled, connection gets worse and it may
cause power to be turned off or insufficient battery
charge, so clean the jack with a dry cotton swab etc.
Also, be careful never to damage the jack when
cleaning it.
・ Do not place FOMA terminal near an air-conditioner
outlet.
- The rapid change in temperature may cause
condensation, causing internal corrosion and
malfunction.
・ When using, be careful not to subject excessive force
to FOMA terminal or the battery.
- If FOMA terminal is crammed into a brimming bag or
placed in a pocket and sat on, display, internal PCBs or
battery pack may be damaged or malfunction. And, if
the included USB Cable F01 etc. are plugged into the
microUSB connection jack, the breakage of the
connector or malfunction may result.
・ Do not rub or scrape the display with a metal piece
etc.
- It may scratch the display, causing malfunction or
damage.
・ Carefully read the separate instructions that come
with battery pack, AC adapter, USB cable and cradle.
FOMA terminal
・ Do not press the surface of the touch panel strongly or
operate it with sharp objects such as a nail, a ballpoint
pen and a pin.
- It may damage the touch panel.
・ Avoid extreme temperature.
- Use FOMA terminal where the temperature ranges
between 5 and 35℃ and humidity ranges between 45
and 85%.
・ FOMA terminal may affect land-line phones, TVs or
radios in use nearby, so use it as far as possible from
these appliances.
・ Maintain a separate record of the data you saved in
your FOMA terminal.
- If the data is deleted, DOCOMO assumes no
responsibility for the loss of any data.
・ Do not drop FOMA terminal or subject it to shocks.
- May cause malfunction or damage.
・ Do not plug USB Cable F01 etc. into the microUSB
connection jack at a slant, or do not pull it forcibly
while it is plugged.
- May cause malfunction or damage.
・ Do not close FOMA terminal with the strap etc. held
inside.
- May cause malfunction or damage.
・ The battery pack may swell out as it comes to near the
during use or charging. Continue to use it.
・ Do not leave FOMA terminal with the camera in areas
under strong direct sunlight.
- May cause discoloring or burn-in of materials.
・ FOMA terminal should normally be used with the
microUSB connection jack cap closed.
- Dust and/or water brought into FOMA terminal cause
troubles.
・ Do not use FOMA terminal with the back cover
removed.
- May cause the battery to come off, or may cause a
malfunction or damage.
・ Do not put extreme thick sticker on the keypad face.
- May cause malfunction, damage or erroneous
operation.
・ Do not put label, sticker, etc. on the back side of
display.
- Label, sticker, etc. may be hooked when opening/
closing FOMA terminal and may cause malfunction or
damage.
・ While microSD card is being used, do not take the
card out and do not turn OFF FOMA terminal.
- May cause data loss or malfunction.
・ Do not bring magnetic cards etc. close to FOMA
terminal nor clip it by FOMA terminal.
- Magnetic data in cash cards, credit cards, telephone
cards, floppy disks, etc. may be erased.
・ Do not bring magnetized objects close to FOMA
terminal.
- Bringing strong magnetism close may cause a
malfunction.
end of its lifetime depending on the usage conditions,
but it is not a problem.
・ Be careful especially about the following points when
preserving the battery pack.
- Keeping under the state of the full charge (right after
charging ends)
- Keeping under the state of the empty charge (too
exhausted to turn on FOMA terminal)
They may cause the battery pack performance to be
degraded or its lifetime to be shortened.
A recommended battery level to keep the battery pack
is the battery icon in 2 cells or in 40 % of remaining
battery level as a guide.
Battery pack
・ The battery pack is a consumable part.
- Replace the battery pack if FOMA terminal has
extremely short operation time on a full charge,
though it may vary by operating conditions. Purchase
a new battery pack of the specified type.
・ Charge the battery in an area within the proper
ambient temperature range (5-35℃).
・ The operation time provided by the battery pack
varies by the operating environment and battery
pack's deterioration.
Introduction
・ It is normal for FOMA terminal to become warm
AC adapter (including USB cable)
・ Charge the battery in an area within the proper
ambient temperature range (5-35℃).
・ Do not charge the battery in the areas below.
- In areas of excessive humidity, dust or vibrations
- Near land-line phones or TVs/radios
・ It is normal for the AC adapter (USB cable) to become
hot while charging. Continue to use it.
・ When using an outlet with a mechanism preventing
unplugging, follow the handling instructions for that
outlet.
・ Do not give strong shock. Do not deform the
microUSB connection jack.
- May cause malfunction.
UIM
・ Do not use excessive force to install/remove UIM.
・ Note that DOCOMO assumes no responsibility for
malfunctions occurring as the result of inserting and
using UIM with another IC card reader/writer.
・ Always keep UIM ICs clean.
・ Clean UIM with a soft, dry cloth (such as a cloth for
eyeglasses).
・ Maintain a separate record of the data you saved in
UIM.
- If the data is deleted, DOCOMO assumes no
responsibility for the loss of any data.
17
・ To preserve the environment, bring the old UIM to a
sales outlet such as docomo Shop.
・ Take care not to scratch, touch accidentally or short
IC.
- May cause data loss or malfunction.
・ Do not drop UIM or subject it to shocks.
- May cause malfunction.
・ Do not bend UIM or place heavy objects on it.
Introduction
- May cause malfunction.
・ Do not install UIM into FOMA terminal with a label or
sticker put on.
- May cause malfunction.
Bluetooth devices
・ This FOMA terminal is equipped with the security
features, that are compliant with Bluetooth standards
for communication via Bluetooth. However,
depending on the settings, there may not be enough
security. Be aware of security risks when using
Bluetooth.
・ DOCOMO assumes no responsibility for any
information which may be leaked during
communication via Bluetooth.
・ You can use headset, handsfree and audio devices
with FOMA terminal. An audio/video remote control
may be available with an audio device (only Bluetooth
compatible devices).
・ Frequency bands
Frequency bands used by FOMA terminal Bluetooth
function are as below.
a bc
2.4FH1
d
a2.4 : Radio equipment that uses the 2400 MHz band.
bFH : The modulation is the FH-SS method.
c1 : The expected interference distance is 10 m or
shorter.
d
: All bandwidths between 2400 MHz
and 2483.5 MHz are used, and the bandwidth used by
mobile object identification devices cannot be
avoided.
18
Cautions on using Bluetooth devices
In the bandwidth used by this terminal, in addition to
home electric appliances such as a microwave oven and
industrial/scientific/medical devices, in-plant radio
stations used to identify mobile objects used in
production lines of a factory that require a license,
specified low power radio stations, or amateur radio
stations that do not require a license (hereafter "other
radio stations") can be in operation.
1. Before using this terminal, check whether other radio
stations are in operation in your neighborhood.
2. If radio wave interference occurs between the
terminal and "other radio stations", use the terminal
in a different location or "Turn the power OFF" to
avoid the radio wave interference.
3. For more detailed information, contact the numbers
for "General Inquiries" on the last page of this
manual.
Wireless LAN (WLAN)
・ Wireless LAN communication (WLAN) uses radio
waves for exchanging information. An advantage is
that connection can be available anywhere the radio
waves can be reached. On the other hand, if you
communicate without appropriate security settings,
communications may be intercepted or hacked by
malicious parties. It is recommended to make
necessary security settings on your judgement and
responsibility.
・ Wireless LAN
Do not use Wireless LAN in a place where magnetized
by electric products, AV, OA equipment, etc. or where
electromagnetic wave is generated.
- If magnetism or electrostatic noise affects FOMA
terminal, noise may be increased or communication
may not be available (especially when using
microwave oven, it may affect the terminal).
- Using near TV or radio may cause poor reception or TV
screen may be blurred.
- When multiple wireless LAN access points exist near
FOMA terminal and they use the same channel, search
may not be performed correctly.
・ Frequency bands
Frequency bands for WLAN devices are written on
battery pack insert section of phone. Label description
are as follows.
a b
cd
2.4DS/OF4
Introduction
e
a2.4 : Radio equipment that uses the 2400 MHz band.
bDS : The modulation is the DS-SS method.
cOF : The modulation is the OFDM method.
d4 : The expected interference distance is 40 m or
shorter.
e
: All bandwidths between 2400 MHz
and 2483.5 MHz are used, and the bandwidth used by
mobile object identification devices can be avoided.
Available channel varies by countries. To use WLAN
overseas, check the conditions such as available
frequency, regulation, etc. for the country.
To use in airplane, confirm with airline company in
advance.
Cautions on using 2.4GHz devices
In the bandwidth used by WLAN devices, in addition to
home electric appliances such as a microwave oven and
industrial/scientific/medical devices, in-plant radio
stations for identification of mobile objects used in
production lines of a factory (a license is required),
specified low power radio stations (a license is not
required), or amateur radio stations (a license is
required) can be in operation.
1. Before using this device, confirm that in-plant radio
stations for identification of mobile objects, specified
low power radio stations or amateur radio stations
are not in operation in your neighborhood.
2. If this device generates harmful radio wave
interference against in-plant radio stations for
identification of mobile objects, change the using
frequency promptly or stop using wireless LAN
function, and contact "General Inquiries" on the last
page of this manual, then consult about treatment for
prevention of the interference (for example,
installation of partitions etc.).
3. If this device generates harmful radio wave
interference against in-plant radio stations for
identification of mobile objects or amateur radio
stations, or if any trouble, contact "General Inquiries"
on the last page of this manual.
FeliCa reader/writer
・ FeliCa reader/writer function of FOMA terminal uses
weak waves requiring no licenses for radio stations.
・ It uses 13.56 MHz frequency band. When using other
reader/writers in your surroundings, keep FOMA
terminal away sufficiently from them. Before using
the FeliCa reader/writer, confirm that there are no
radio stations using the same frequency band nearby.
19
CAUTION
・ Do not use a remodeled FOMA terminal. Using a
Introduction
20
remodeled terminal violates the Radio Law.
FOMA terminal is certified according to technical
standard conformance of specified wireless
equipment based on the Radio Law, and as a proof of
it, the "Technical Compliance Mark " is depicted on
the nameplate sticker of FOMA terminal.
If you remodel FOMA terminal by removing its screws,
your certification of technical standard conformance
becomes invalid.
Do not use FOMA terminal with its certification of
technical standard conformance invalid as it violates
the Radio Law.
・ Be careful when you use FOMA terminal while driving
a car etc.
Using a mobile phone while driving is subject to penal
regulations.
However, absolutely necessary cases such as rescue
of a sick person or maintaining public's safety are
exempted.
・ Use the Bluetooth function only in Japan.
The Bluetooth function of the FOMA terminal is
compliant with wireless standards and is authorized
for use only in Japan.
If you use this function overseas, you may be
punished.
・ Use the Wireless LAN (WLAN) function only in Japan.
The Wireless LAN function of FOMA terminal is
compliant with wireless standards and is authorized
for use only in Japan.
If you use this function overseas, you may be
punished.
・ Use FeliCa reader/writer function only in Japan.
FeliCa reader/writer function of FOMA terminal
conforms to Japanese radio standards.
If you use this function overseas, you may be
punished.
Before Using
Attaching UIM/battery pack
Turn the power OFF, close and hold the FOMA
terminal in your hand to attach UIM/battery pack
properly.
✜ Removing back cover
With pressing the back cover with your thumb, slide
approximately 3 mm in the direction of the arrow to
remove it.
Back cover
✜ Installing UIM
Pull the tab with your nail and pull out the tray until
it clicks (a). Hold UIM with the IC side up, align the
beveled corner with the tray (b) and push into the
tray until it stops (c).
With label side of the battery pack up, align convex
parts of the battery pack with concave parts of the
FOMA terminal, slide the battery pack in the
direction of a and then press it in the direction of
b to set in.
Concave
parts
Battery pack
Basic Operation
Press here with thumb
✜ Attaching battery pack
Convex parts
✜ Attaching back cover
Place the tabs of back cover to the notches of the
FOMA terminal, press the back cover in the
direction of a to avoid forming any clearance
between them, then slide it in the direction of b to
attach.
Back cover
UIM
IC
Tab
Corner cut
Tray
Point
・ UIM (blue) is not available for this FOMA terminal. If
you have the UIM (blue), bring it to a docomo Shop.
21
Before Using
Charging
Charging using AC Adapter F04 and USB Cable F01
a Insert the USB plug of USB cable
horizontally to the USB connection jack,
with the mark side upward
Basic Operation
b Open microUSB connection jack cap (a), hold
the connector horizontally with the mark side
upward and insert it to the jack (b)
c Insert the AC adapter's power plug into a
100V AC outlet
* Check that the light turns on (when the power is off,
it takes time to turn on the light).
* After charging is over, pull out the power plug from
the outlet, and pull out microUSB plug from FOMA
terminal horizontally.
AC Adapter F04
Light
AC100V
outlet
microUSB plug
Power plug
USB connection
jack
USB plug
Jack cap
USB Cable F01
microUSB connection jack
Using cradle for charging
Prepare Cradle Set F01 (optional).
a Insert AC adapter's connection jack to cradle's
power jack (a), and power cable's connection
jack horizontally to AC adapter (b)
b Insert the power cable's power plug into a
100V AC outlet
c Close the FOMA terminal, and insert it to
cradle with cradle connection jack cap
opened
22
* Check that the light turns on (when the power is off,
it takes time to turn on the light).
* After charging is over, remove the FOMA terminal from cradle.
AC100V
outlet
AC Adapter F01
for Cradle
Cradle connection jack
Jcak cap
Light
Power plug
b
Connector
AC Adapter
Power cable
F01 for Cradle
Connector
a
Power jack
Connector of AC Adapter F01 for Cradle
Cradle
Before Using
Turning power ON - Configuring default setting
Initial setting is an operation when the FOMA
terminal is turned ON for the first time.
a f (2 sec. or more)
b "Yes" or "No" on a confirmation screen
of enlarged menu setting
c Set required itemse "Complete"
d On a confirmation screen of software
update function, "OK"
The stand-by display appears.
Point
・ If no operation is performed, the display light is
automatically turned off according to the settings in
Light time-out or eco mode setting. The display light
turns on again if there is any operation or incoming
call.
Turning power off : f (2 sec. or more)
Changing initial settings : mehgef
Changing screen display to English :
mehbfceSelect "English"
a meh Settings & NW serviceseh
NW Servicesec Caller IDea Caller
ID notificationea Activate/Deactivate
ea Notify or b Not notify
Point
・ If you hear an announcement of requesting caller ID
Basic Operation
If you exit without setting Change security
code and Request permit/deny, Initial setting
screen reappears when the power is turned
ON the next time.
Caller ID notification
Set whether to notify your phone number (caller
ID) to the other party's terminal when making a
voice call. Caller ID notification is set to "ON" at the
time of subscription.
when making a call, set Caller ID notification or add
prefix "186" to the phone number to call again.
User information
You can check your own phone number.
For details of checking/changing a mail address,
refer to "Mobile Phone User's Guide [i-mode]
FOMA version".
a me0 User information
User information screen appears.
Point
・ You can display User information also by pressing
1p on stand-by display.
Editing user information : On User information edit
screen, "Edit"eAuthenticateeEdite"Set"
Checking a phone number during a call : Ndf
23
Screen Explanation
Viewing display
Arrival information and the current state can be
checked by the icon appearing on the display.
Major icons are as follows.
Top of the display
Basic Operation
Battery level (Battery icon)
(Ample charge)⇔ (Almost exhausted
(Charge the battery))
Signal strength (Antenna icon)
(Strong)⇔ (Weak)
: Out of service area or where radio waves do
not reach
: Self mode ON
: In data transfer mode
: Connecting to i-mode
: Infrared communication in operation
: Bluetooth ON
: The total calls cost exceeds the limit
: Bluetooth connection being established
: Communication using handsfree-compatible
device in progress
: Handsfree ON
: Femtocell setting available
: eco mode activated
: Positioning with GPS
: Location request setting
: Display off lock ON
: A phonebook entry or schedule has secret
attribute
: High-pitched alarm ON
: Kid-safe mode ON
: Unread Area Mail exists
: Unread i-mode mail exists
24
: Arrival i-concier information exists
: Unreceived i-mode mail exists in i-mode Center
: Displaying SSL/TLS page etc.
: Auto-send mail exists
: During i-αppli operation
: i-αppli call received
: Alarm clock ON
: Schedule reminder ON
: Inside OFFICEED area
Bottom of the display
Arrival information (Starting from the left, missed
call, recorded message, voice mail service, unread
message, unread ToruCa, i-αppli call)
: Silent mode ON
: Call alert volume OFF
: Vibrator for voice call ON
: In Public mode (Drive mode)
: Record message ON
: Keypad dial lock ON
: Personal data lock ON
: IC card lock ON
: microSD card installed during
Communication mode
: Connected to external device using USB cable
F01, or starting Windows 7 mode
: Pedometer/ACT monitor is set
: Software update rewrite notice
: Auto-update of latest pattern definition failure
: Touch button on stand-by
display⇒P25
Screen Explanation
Basic operation of screens and keys
Touch button on stand-by
display
Menu operation
Touch m and then perform the functions from
the menu.
<Example> Selecting "Calculator"
a meTouch "g Accessory"eTouch
"d Calculator"
Point
・ For key operation, press 1ur in slide style.
・ Even when a function is running, you can perform
the same operation if "MENU" is displayed on the
guide area.
・ To return to the previous screen, touch or press
c. To return to the stand-by display, touch
or
press f.
・ On the stand-by display with Info/calendar layout set,
or with arrival information icon or i-concier
information displayed, press [ to change the
display to Focus mode that allows you to quickly
display the related information.
Basic Operation
Starting from the left, there are touch buttons for
displaying the menu, call screen, iMENU with
accessing i-mode, and the mail menu (depending
on the usage style of the FOMA terminal, the order
of the buttons differs).
In this manual, touch buttons in operation steps
are described as m, n, U, a.
Guide area
Operations that can be
Guide area
performed by touching
the screen or pressing
1, 2, [, 3 and
4 are displayed in the
guide area. The
corresponding key appears at upper-right or
upper-left of each operation. To perform an
operation, press 1, 2, 3 or 4. To perform an
operation in the center, press [.
on the guide area corresponds to arrow keys
U, D, L and R.
・ Operations by pressing key for 1 second or more
cannot be executed by touch operation.
Switching menu screens
You can switch among "Kisekae menu", the
design of which can be changed using Kisekae
Tool, "Basic menu", which has the fixed menu
numbers, and "Custom menu", to which menu
items can be saved freely.
To switch the menu screen, touch "Custom"/
"Basic" on Kisekae menu, or touch "Kisekae" on
Basic menu or Custom menu.
25
Screen Explanation
Using touch panel
Notes for using the touch panel
Slide (Drag)
・ Do not apply excessive force when opening/closing
Basic Operation
the FOMA terminal. Doing so may cause
malfunction or damage of the keys or the display.
・ Touching the touch panel may not work in the
following cases. Note that it may cause
malfunction.
- Operation with gloved hands
- Operation with tip of fingernail
- Operation with a foreign object on the display
- Operation with protective sheet or seal on the
display
Basic touch operation
Touch (Click) Touch the display lightly once and
release the finger. The operation
becomes effective when you
release your finger from the
display. This operation is mainly
for selecting menus, items, etc.
To right-click in Windows 7 mode,
touch an icon etc. with one finger
and touch other part with other
finger. Alternatively, touch and
leave it for a while.
Doubletouch
(Doubleclick)
26
Touch the display lightly twice and
release the finger. The operation
becomes effective when you
release your finger from the
display. In FOMA mode, this
operation is mainly for zooming
in/out or switching the display.
Keep touching the display, move
your finger up, down, left or right
and release the finger at any point.
In FOMA mode, this operation is
for rewinding/fast-forwarding on
MUSIC Player, Hand writing input,
switching tabs on the phonebook
list screen or pages.
In Windows 7 mode, this
operation is for specifying range
of text selection etc.
Slide quickly Touch the display lightly and flick
(Flick)
your finger up, down, right or left.
In FOMA mode, this operation is
for switching pages or images, or
moving to a different chapter or
tune, etc.
In Windows 7 mode, this
operation can be used for
switching photo or image file, or
"Back" by flicking right, "Go" by
flicking left in Internet Explorer
window.
Pinch
While touching the screen with
two fingers, widen or narrow
down the distance between the
two fingers. This operation is for
zooming in/out when viewing
website or PDF document.
This operation is unavailable in
FOMA mode.
Screen Explanation
使いかたガイド (Guide)
You can check overviews and operations of
functions, and troubleshooting. (In Japanese only)
a mef LifeKite* GuideeSelect a
search method
Screen Explanation
Stand-by launcher
Touch the stand-by display to display the stand-by
launcher which allows you to easily activate a
function, check an arrival information, etc. by
touching a button.
Touch to return to stand-by
display
Function
New arrival/Status
Basic Operation
Layout on stand-by display
Shortcut icon
<Guide screen>
目次 (Contents) : Search from a list of functions.
索引 (Index) : Search from a list of words
sorted according to Japanese syllabary.
フリーワード検索 (Free word search) : Enter a
keyword to search for.
ブックマーク (Bookmark) : Search from a list
of registered bookmarks.
困ったときには (Troubleshooting) : Search
from lists of troubles or error messages.
Point
・ On a description screen, select "この機能を使う (Use
this function)" to perform a function. Selecting a link
item in "関連機能 (Related functions)", or "→コチラ
(See more)" displays a corresponding description
screen.
・ There are no descriptions on the Windows 7 mode.
<Stand-by launcher screen>
機能 (Function) : Activate a function.
待受カスタマイズ (Stand-by disp layout) : Use
when information set in Info/calendar layout
exists.
新着/ステータス (New arrival/Status) : Check
arrival information.
待受ショートカット (Shortcut icon) : Use when
setting shortcut icon.
Point
・ To display all buttons in the category, touch the title
part.
27
Character Entry
Entering characters
You can enter characters by the touch operation
and the key operation.
On the character entry screen, each time you
touch an input mode switch button (
, etc), the
input modes and the icons switch.
Touch key input
"A/a" : Switch upper/ "Clear" : Delete
lower case
recognized
"Back" : Return to the
characters
first level of each
"Close" : Close the
input mode on the
conversion options
character entry
list
"Corr" : Rewrite a
screen
"PrevPage"/"NextPage"
character
: Display the
previous/next
symbol list
Entering characters with touch operation
Basic Operation
Touch key input
Handwriting input
Operations "Clear" or
: Delete 1 character at the
during
cursor position (after the entry is
entry
fixed)
Handwriting input
Outline Select a character Write characters
with your finger in
with touch
the hand writing
operation
entry area
Entering characters with QWERTY keypad
Roman letters input mode
Example
(in
hiragana
/kanji
mode)
28
ろ : "ら9"e"ろ"
っ : "た4"e"っ "
ぽ : "は6"e"゛゜"
(twice)e"ぽ"
ん : "わ0"e"ん"
ぎ : "か2"e"゛゜"
e"ぎ"
Write "六", "本",
and 木" in order in
the hand writing
entry area.
Outline
Enter characters by pressing alphabet
keys as Romanized spelling
corresponding to the reading. (For
entering Japanese)
Example
(in
hiragana
/kanji
mode)
When entering "六本木" as one word,
input "ropponngi". As an example of
character entry, entering each
character separately is explained here.
"ろ" : ro
"っ " : ltu / xtu /
ltsu
"ぽ" : po
"ん" : nn / xn
"ぎ" : gi
Roman letters input mode
Operations Z+Symbol or number printed key
during
on the upper section : Enter symbol
or number
entry
A+a-z : Enter capital alphabet
C+N : Keep capital letter entering
Entering pictograms/smileys
Entering pictograms
a On the character entry screen, "Pict/
Sym"
The pictogram list appears.
Switching input modes
Switching input modes varies by the input method.
a
Input with touch keys
Roman letters input (for entering
Japanese)
Each time you press 3 on the character entry
screen, the input mode switches as "One-byte
number" ⇒ "Hiragana/Kanji" ⇒ "One-byte katakana"
⇒ "One-byte alphabet" ⇒ "One-byte number"….
・ Use U, D or 7 to switch two-byte or onebyte characters.
b
a Input log field
Recently entered pictograms appear up to
20 (13 for horizontal view).
b Pictogram list
Each time you touch "Pictgm"/"Pictgm D"
(when entering mail message or editing
signature), the pictogram list switches. If
there contains multiple pages, touch
"PrevPage"/"NextPage" to switch them.
Basic Operation
When "TextMode" is touched, the input mode list
is displayed, and touch any of "Kana",
"Alphameric", "Num", "Katakana", "Symbol S",
"Symbol L" to switch the input mode.
・ When input mode is "Kana", "Alphameric",
"Num" or "Katakana", "A/A" switches one-byte
or two-byte characters.
b Select a pictogram
Press c to close the pictogram list.
Point
・ When Roman letter input mode is performed,
Text input
Set a text input method or operation during text
entry.
a meh Settings & NW serviceseg
Clock & Otherec Text inputee Text
input methodeSet required itemse
"Set"
pressing 2 displays pictogram list. The pictogram
list switches by each pressing 2. If there contains
multiple pages, press 3 or 4 to switch them.
Entering smileys
a On the character entry screen, "MENU"
ee Pict/Symbol/Smileyec Smiley
ea 入力履歴 - i すべてeSelect a
smiley
29
Sound/Screen Setting
Sound settings
Setting ring alerts and sound
<Example> Setting Call ring alert (Call ring alert/
V.phone ring alert)
Basic Operation
a meh Settings & NW servicesea
Alerts & Soundsea Ring alerts &
Soundsea Call ring alertea Call ring
alert or b V.phone ring alerteSet
required itemse"Set"
Point
・ When Call ring alert is set, the setting applies to Call
alert and Videophone alert.
・ Some music or moving pictures/i-motion may not be
set to the ring alert.
Adjusting volume
<Example> Setting call alert volume
a meh Settings & NW servicesea
Alerts & Soundseb Adjust volumee
a Alert/Call volumeea Call alert
volumeeSlide up or downe"Select"
Vibration mode
Incoming calls or alarms is notified with vibration,
instead of sound.
<Example> Notifying an incoming voice call with
vibration
a meh Settings & NW servicesea
Alerts & Soundsec Vibrate alert/
30
effectea Call vibrate alertea Call
vibrate alerteSelect a pattern
Silent mode
This function cancels the sound emitted from the
FOMA terminal such as ring alert, Key/touch
sound, Slide sound, Alarm sound, or the sound for
reading a code with Bar code reader, and an
incoming call is notified with vibrator (vibration).
In Silent mode, microphone is sensitized so that
you can call in a small voice.
a z (1 sec. or more)
appears on the stand-by display in Silent
mode.
Canceling Silent mode : z (1 sec. or more)
Point
・ When the FOMA terminal is opened, press R while
pressing C to set/cancel the Silent mode.
・ Shutter sound is emitted even in Silent mode.
Muting key/touch sound
You can turn off a sound to be emitted when
pressing keys or touching the touch panel.
a meh Settings & NW servicesea
Alerts & Soundsea Ring alerts &
Soundsef System soundea Key/
touch soundee OFF
Sound/Screen Setting
Display settings
Image/i-αppli
You can change the default stand-by display.
<Example> Setting an image
When Kisekae Tool is set, select "Yes" on the
confirmation screen for canceling.
b Select a foldereSelect an imagee
"Yes"
Display light time
You can set the duration, for which the display
light is turned on.
<Example> Setting "Normal use"
a meh Settings & NW serviceseb
Displayed Display & Key lightea
Display light time
b a Normal useeSelect a duration
a meh Settings & NW serviceseb
Displayeb Menu preferenceea
Select startup menuea Kisekae menu
- c Shortcut menu
Font size
Basic Operation
a meh Settings & NW serviceseb
Displayea Stand-by displayea
Image/i-αppliea Vertical position or
b Horizontal positionea Set image
Select startup menu
Select a menu to be displayed when m is
touched on the stand-by display from "Kisekae
menu (according to Kisekae Tool)", "Basic menu
(menu structure and menu numbers are fixed)" or
"Shortcut menu (changeable menu items)".
<Example> Changing font size collectively
a meh Settings & NW serviceseb
Displayef Font & Languageea Font
sizeea Allea Smallest - g Largest
Point
・ When you change the font size at once but the items
do not support the font size that is selected in All, the
closest font size is set.
31
Display Machi-chara
You can set a character to be displayed on the
stand-by display, menu screen, etc.
a meh Settings & NW serviceseb
Displayeg Display Machi-charaeSet
required itemse"Set"
Point
・ Machi-chara does not appear when moving picture/iBasic Operation
32
motion or i-αppli is set for the stand-by display.
・ Some Machi-chara change its actions according to
time, arrival information, call duration, etc.
Sound/Screen Setting
Kisekae Tool
You can set the stand-by display, menu, incoming/
outgoing call screens, etc. at once with a
predefined combination.
<Example> Setting preinstalled Kisekae Tool
a mee Data Boxeg Kisekae Toole
b PreinstalledeTouch a Kisekae Tool
e"Set"
Move the cursor to a Kisekae Tool, and touch
"View" to display details of the Kisekae Tool;
touch "Select" to display the stand-by image
and menu screen image enlarged.
b "Yes"
Sound/Screen Setting
Light settings
Indicator light
The light alerts you when missed calls or unread
messages exist.
Light alert
Set the lighting pattern and color for incoming
call/mail or while talking.
<Example> Setting a light alert
a meh Settings & NW serviceseb
Displayee Light alertea Light alert
eSet required itemse"Set"
eco mode
You can set each light to "OFF" or shorten the
lighting time to save battery consumption.
a meh Settings & NW serviceseb
Displayeh eco modeea eco mode
ON/OFF
When ON is selected,
by display.
appears on the stand-
Point
・ If you do not change the default Shortcut menu
setting, press t for 1 second or more to switch eco
mode to on/off.
Sound/Screen Setting
Basic Operation
a meh Settings & NW serviceseb
Displayec Color & Action imageee
Info display & lighteb Indicator light
ea ON or b OFF
Sound/Screen Setting
You can set options for eco mode.
a meh Settings & NW serviceseb
Displayeh eco modeeb eco mode
optionsea Std. saving or b Full
saving
Std. saving : Settings of System sound (except
shutter sound), illumination, Indicator light,
backlight, etc. are changed to save the
battery consumption.
Full saving : In addition to items in Std. saving,
some functions such as motion sensor,
Machi-chara, immobile sensor of Security
lock, AUTO-GPS, Pedometer/ACT monitor,
etc. are restricted to save the battery
consumption.
33
Lock/Security
Security codes
Security codes vary by functions. Security code
protects personal information. Be careful about
handling the security code.
Terminal security code
(Default : 0000)
Basic Operation
The code is the security code to be used when
changing settings or deleting all the items at once.
To change the code, perform the following
operation.
a meh Settings & NW servicesed
Security & Locksef Change security
codeeAuthenticate
b Enter a new terminal security code in
New terminal security code fieldeEnter
the new terminal security code in New
terminal security code-check fielde
"Save"
Point
・ If a wrong terminal security code is entered 5 times
consecutively, the power is turned OFF.
Network security code
(At subscription : Set any code)
34
Network security code is required when DOCOMO
identifies the subscriber at docomo Shop,
docomo Information Center or "お客様サポート
(User support)" or when you subscribe Network
Services. To change the code, perform the
following operation.
a Ue"お客様サポート (User support)"
e"各種設定(確認・変更・利用)
(Settings (Check/Change/Use))"e"ネッ
トワーク暗証番号変更 (Change Network
security code)" (in Japanese only)
i-mode password
(At subscription : 0000)
i-mode password is required to register/delete site
in My Menu, use Message Service, subscribe/
cancel i-mode charged services, etc. To change
the code, perform the following operation.
a Ue"お客様サポート (User support)"
e"各種設定(確認・変更・利用)
(Settings (Check/Change/Use))"e"i
モードパスワード変更 (Change i-mode
Password)" (in Japanese only)
PIN1/PIN2 code
(At subscription : 0000)
You can set 2 security codes to the UIM: PIN1 code
and PIN2 code.
The PIN1 code is a security code to be used when
installing the UIM or turning ON the FOMA
terminal.
The PIN2 code is the security code to be used
when requesting the issuance of a user certificate,
resetting Total calls cost or resetting the total call
costs.
To change either code, perform the following
operation. When changing PIN1 code, set PIN1
code ON/OFF to "ON".
a meh Settings & NW servicesed
Security & Locksee UIMea Change
PIN code or b Change PIN2 codee
Authenticate
Point
・ To display the PIN1 code entry screen when turning
power on, mehdeca, and then set PIN1
code ON/OFF to "ON".
・ Even if PIN2 code is locked by entering incorrect PIN2
code 3 times consecutively, making/receiving calls or
sending/receiving mail is available; if PIN1 code is
locked by entering incorrect PIN1 code 3 times
consecutively, these operations are unavailable.
numbers such as "birth date", "a part of phone
number", "street address or room number",
"1111" or "1234". Maintain a separate record not
to forget the numbers.
・ Be careful never to reveal your security code to
others. If a security code is known to and
misused by others, DOCOMO assumes no
responsibility for damages resulted from it.
・ If you forget your security codes, you need to
bring a document (a drivers license etc.) to
identify your subscription, the FOMA terminal
and the UIM to a docomo Shop. For details,
contact the numbers for "General Inquiries" on
the last page of this manual.
Basic Operation
b Enter a new terminal security codee
Enter the new terminal security code in
New terminal security code-check field
e"Save"
・ For setting a security code, avoid imaginable
PUK code
PUK code is used if the PIN1/PIN2 code is locked.
PUK cannot be changed by users. If the UIM is
locked by entering the PUK code incorrectly 10
times consecutively, contact docomo Shop.
Point
・ PUK code is written on a subscription form (copy for
user) handed at subscription in a docomo Shop. For
users subscribed in other than docomo Shop, bring
a document (a drivers license etc.) to identify your
subscription and the UIM to a docomo Shop, or
contact "General Inquiries" on the last page of this
manual.
35
Lock/Security
Various lock functions
Basic Operation
Use various lock functions for your purpose.
Security lock
All lock
Touch operation or keypad operation is
automatically locked when no operations are
performed for the specified time after screen
display turns off.
Set : mehdabeAuthenticateeSet
required timee"Set"
Temporary deactivate : When screen display turns
off, zeAuthenticate
Any operations other than answering calls,
receiving messages and turning power ON/OFF
are unavailable.
Activate : mehdaceAuthenticate
Deactivate : With QWERTY key, enter the terminal
security codee"OK"
Self mode
All functions requiring communication are
unavailable.
Activate/Deactivate : While pressing C, Le
"Yes"
Personal data lock
Personal information such as phonebook entries,
messages or schedules is not displayed.
Activate/Deactivate :
mehdadeAuthenticateea or b
Keypad dial lock
Calls can be made only by using phonebook.
Activate/Deactivate :
mehdafeAuthenticateea or b
Operation lock
The display turns off and the touch operation is
locked. This function locks side keys (except
z), f and c.
Activate/Deactivate : z (Other than key
operation, activates at set time in Light timeout)
36
Touch lock
Touch lock is automatically activated when
making a call or talking on the phone to prevent
inadvertent touch operations.
Activate/Deactivate : On calling or talking screen,
z (1 sec. or more)
IC card lock
Osaifu-Keitai, obtainment of ToruCa from IC card
reader, iC transmission, etc. are unavailable.
Activate/Deactivate :
me*daeAuthenticateea or b
Omakase Lock
The personal data of phonebook etc. or IC card
function of Osaifu-Keitai is locked only by contacting
DOCOMO in case FOMA terminal is misplaced etc.
■ Setting/Canceling Omakase Lock
0120-524-360 Business hours : 24 hours
(open all year round) (In Japanese only)
* Unavailable from part of IP phones.
* Omakase Lock can be set/canceled from My
docomo site using a PC etc. (In Japanese only)
Lock/Security
Lock/Security
Incoming call restriction
Reset to default
Anonymous caller
Reset
You can restore functions in red characters on the
menu list to the default settings. ⇒P100
a meh Settings & NW servicesee
Call & Answereb Anonymous callere
Authenticateea Anonymous - c
UnavailableeSet required itemse
"Set"
a meh Settings & NW serviceseg
Clock & Otheree Info & Reseted
ReseteAuthenticateeSelect items to
resete"Reset"e"Yes"
Point
・ The reasons for hiding caller ID are as follows:
Anonymous : A call with hiding caller ID set
Payphone : A call from public payphone, etc.
Unavailable : A call unavailable to notify caller ID such
as an overseas call or call from land-line phone using
call forwarding service, etc.
Unregistered caller
You can reject calls from phone numbers not
saved in phonebook.
This function is available for calls showing caller
ID. For calls hiding caller ID, receiving operation is
performed according to the Anonymous caller
setting. It is recommended that you use both
Caller ID request and Anonymous caller setting.
a meh Settings & NW servicesee
Call & Answeree Reject/Accept calle
b Unregistered callereAuthenticate
ea ON or b OFF
Delete all data
You can delete data saved in the FOMA terminal,
and restore the each function's settings to the
default.
Basic Operation
For each reason for hiding caller ID, you can set a
receiving operation.
a meh Settings & NW serviceseg
Clock & Otheree Info & Resetee
Delete all dataeAuthenticatee"Yes"
All data is deleted while restarting. Do not turn
power OFF until the stand-by display is redisplayed.
Point
・ Even after all data is deleted, the data registered by
default is not deleted.
・ Among Osaifu-Keitai compatible i-αppli, data of
which is not saved to the IC card, "iD appli" is
restored to the default by deleting all data, but the
other αppli are deleted.
・ i-αppli other than Osaifu-Keitai compatible i-αppli
are restored to the default by deleting all data,
however, upgraded i-αppli is deleted.
37
Call Telephone
Making a call/videophone call
Entering a phone number
You can make international calls from Japan
using WORLD CALL.
b When ending the call, f
"WORLD CALL" is the international call service
available from DOCOMO mobile phones. You are
subscribed to "WORLD CALL" at the time of
subscription to the FOMA service (unless you
request not to subscribe to it).
・ No subscription or monthly charges apply.
・ DOCOMO charges customers for "WORLD CALL"
fee and monthly FOMA service call fee all
together.
・ For details on "WORLD CALL", contact the
numbers for "General Inquiries" on the last page
of this manual.
・ To use international call services except DOCOMO
service, contact the carrier for details.
・ For countries and overseas telecommunications
carriers available, refer to "Mobile Phone Users
Guide [International Services]" or DOCOMO
International Services website.
・ The image of the other party displayed on FOMA
terminal may be distorted or connection may not
be established depending on the other party's
terminal connected through the international
videophone line.
Using phonebook
a nepeSearch phonebook
Connect
The phonebook list of the Show all names is
displayed by default.
b Touch the partye"
or "VP Call"
Call" (Voice call)
To create an i-mode mail, touch a party, and
then touch " write".
Using redial/received calls
Up to 30 items are recorded in each of Redial and
Received calls. When the maximum is exceeded,
older records are overwritten first.
a neD (Redial) or G (Received
calls)eTouch a partye" Call" (Voice
call) or "VP Call"
Point
・ DOCOMO videophone specifications conform to
38
International calls
a neyeEnter a phone number
including area code (up to 80 digits)e
(Voice call) or "VP Call"
"3G-324M, an international standard prepared by
3GPP". The connection with the videophones of
different specifications cannot be established.
・ You can make calls using logs of mails, etc. if phone
numbers are saved in phonebook.
✜ WORLD CALL
a neyeEnter "010-phone number
without the leading 0 of Country code
(Voice call) or "VP
(City code)"e
Call"
In some countries and areas such as Italy, "0"
is required.
Call Telephone
Receiving a call/videophone call
a An incoming call
You are notified of an incoming call with ring
alert, light alert, the display, etc.
Adjusting the alert volume : Touch the display
e eSlide up or down on the volume
panel
Stopping ring alert sounding or vibration :
C
On-hold : f
b "Call" or "VP Call"
c When ending the call, f
Point
・ When you cannot answer an incoming call,
(the digit indicates the number of missed calls)
appears on the stand-by display. The incoming calls
are recorded as missed calls in Received calls.
・ When you receive a call during operation lock, slide
to the right and touch "Call" or "Videophone".
Operation during a call
You can use useful functions during a call.
On hold
A melody is played while on hold. For a
videophone call, the videophone on-hold image is
displayed on the phone of the other party and
yourself.
a During a call, "OnHold"
Point
Canceling the voice call on hold : "Cancel"
Canceling the videophone call on hold (send the image
before on hold) : "Cancel"
Canceling hold for videophone call (send the camera
image) : "Camera"
Canceling hold for videophone call (send the
substitute image) : "Image"
Connect
Touch lock is automatically activated to avoid
erroneous operation during a call. To unlock,
press z for 1 second or more.
Call Telephone
Listening volume
You can adjust listening volume during a call.
a During a call, touch the displaye e
Slide up or down on the volume panel
Point
・ This setting applies to Listen volume in Adjust
volume.
39
Call Telephone
When you cannot answer a call
Record message
Public mode
When Record message is set to "ON", a greeting
message is played and the caller can record message
when you cannot answer the call.
Public mode is an automatic answering service
putting emphasis on manners in a highly public
place or while driving a car.
a med Phonebook & Logseg
Record msg.&Voice memoea Record
messageea ON
Public mode (Drive mode)
appears on the stand-by display.
Connect
Point
・ You can record up to 4 voice/videophone calls in
total, approximately 30 seconds for each call. When
reaching the savable number,
appears on the
stand-by display and Record message does not
work. Delete unnecessary recorded messages.
・ Even when Record message is not set to "ON", you
can activate it only once by pressing C for 1
second or more while receiving a call.
・ Even when the greeting message is being played or
a message is being recorded, a call can be answered
by pressing c. However, the message before the
call was answered is not recorded.
Playing recorded message : medgbeSelect
memoeSelect whether to delete
When there is an incoming call, an announcement
is played to inform the other party of the reason
you cannot answer the call and request to call
back before the call is disconnected.
a On the stand-by display, g (1 sec. or
more)
appears on the stand-by display.
Point
・ In Public mode (Drive mode), no receiving action is
performed, and calls are recorded as Missed call.
Canceling : On the stand-by display, g (1 sec. or more)
Public mode (Power OFF)
When there is an incoming call while you are
turning power off, an announcement is played to
inform the other party of the reason you cannot
answer the call and request to call back before the
call is disconnected.
a neyeEnter "*25251"e
Even when Public mode (Power OFF) is set, no
indicators such as icons appear on the display.
Point
Canceling : neyeEnter "*25250"e
Checking the settings : neyeEnter "*25259"e
40
Call Telephone
Network Services
Service
Application
Monthly
charge
Voice Mail service
Required Charged
Turned Off or Out of
Range Notification Call
Service
Not
required
Call Waiting Service
Required Charged
Call Forwarding Service
Required
Free
Nuisance Call Blocking
Service
Not
required
Free
Free
Free
Caller ID Request Service
Free
Dual Network Service
English guidance
Not required
Required Charged
Not required
Call
Waiting
Free
Multi Number
Required Charged
2in1
Required Charged
OFFICEED
Required Charged
Public mode (Drive mode) Not required
Free
Public mode (Power OFF) Not required
Free
Melody Call
Service
Required Charged
・ Network services are not available out of service
area or where radio waves are hard to reach.
・ For subscription and details of the services,
contact the numbers for "General Inquiries" on
the last page of this manual.
・ For details, refer to "Mobile Phone User's Guide
[Network Services]".
・ For details on "OFFICEED", refer to DOCOMO's
business website (http://www.docomo.biz/html/
service/officeed/ (In Japanese only)).
Operating procedure
Voice Mail meh Settings & NW servicese
service
h NW Servicesea Voice Mailea
Voice Mail serviceePerform the next
operation
Activate : ae"Yes"e"Yes"eEnter
ring time
Deactivate : ce"Yes"
Play messages : eea or be"Yes"
eFollow the guidance to operate
meh Settings & NW servicese
h NW Serviceseb Call waiting/
forwardea Call waitingePerform
the next operation
Activate : ae"Yes"
Deactivate : be"Yes"
Connect
Caller ID Notification Service Not required
Setting network service
Call
meh Settings & NW servicese
Forwarding h NW Serviceseb Call waiting/
forwardeb Call forwardinge
Service
Perform the next operation
Activate : ae"Yes"e"Yes"eEnter a
phone numbere"OK"e"Yes"e
Enter ring time
Deactivate : be"Yes"
Point
・ When ring time is set to "0 sec." for Voice Mail service
or Call Forwarding service, incoming calls are not
recorded in Received calls.
・ To answer a call from another party during a call
when call waiting is activated, touch
. When a
party is put on hold, touch "Talk to" to switch the
parties to talk to.
41
Call Telephone
Emergency call
You can make the following emergency calls from
the FOMA terminal.
Police
110
Fire and ambulance
119
Marine emergencies
118
・ This FOMA terminal is applicable to "Emergency
Connect
42
Location Report". When making an emergency
call to 110, 119, 118, etc., information of your
location (location information) is automatically
informed to an emergency call receiving
organization such as police. For some locations
and/or wave reception conditions, the
emergency call receiving organization cannot
recognize the correct location.
When the caller ID is hidden for the call, i.e., by
appending "184" to the dialed number, none of
location information or your phone number is
notified; however, the organization may acquire
the location information and phone number
regardless of your settings, if they have
determined that such information is necessary
for the protection of life etc. The area and timing
of implementing "Emergency Location Report"
vary by the preparatory state of respective
emergency call receiving organizations.
・ When calling to 110, 119 or 118 from FOMA
terminal, inform them that you are calling from
a mobile phone and give your phone number
and your current location precisely since the
police or fire department has to call you back for
confirmation. To make sure that you are not cut
off during the call, do not move when making
the call and do not turn OFF the phone after the
call, but keep it on for about 10 minutes.
・ For some areas you are calling from, you are not
connected to the local police or fire department.
・ When Auto redial as voice of Operation is set to
"ON", videophone call to 110, 119 or 118 from
the FOMA terminal changes automatically to
voice call.
Call Telephone
Overseas use
You can use phone call or i-mode overseas.
✜ International roaming (WORLD WING)
Available services overseas
Communication services
3G
GSM/
GSM
GPRS
Voice call*1
○
Videophone call*1
○
×
i-mode*2
○
○
i-mode mail
○
○
SMS*3
○
○
i-Channel*2, 4
○
○
i-concier*5
○
○
i-Widget*6
○
○
Position location of GPS*7
○
○
Packet communication (PC
connection)
○
○
○
○
×
×
×
○
×
×
×
×
×
Connect
International roaming (WORLD WING) is a service
that allows you to make voice calls and access imode using network of telecommunications
carriers affiliated with DOCOMO overseas.
Before using this service, check its subscription
status. For details, contact the numbers for
"General Inquiries" on the last page of this
manual.
・ The service is available in areas that 3G Network
or GSM/GPRS Network covers. Also, it is
available in countries or districts where 3G 850
MHz is applied. Check the service area.
・ Refer to the following documents before using
FOMA terminal overseas.
- "Mobile Phone User's Guide [International
Services]"
- DOCOMO International Services website
- "海外ご利用ガイド" preinstalled in My Document
in Data Box (In Japanese only)
*1 When using 2in1, making a call in B number is
unavailable.
When using Multi number, making a call with appending
number.
*2 International settings of i-mode are required.
*3 When you send SMS to FOMA terminal, enter
the party's phone number as well as in Japan.
*4 International settings of i-Channel are required.
Packet communication fee is also charged for
auto update for Basic channel (included in iChannel usage fee in Japan).
*5 International Settings of i-concier is required.
Packet communication fee is charged each time
you receive information.
43
*6 i-Widget roaming set is required. When multiple
Widget Appli communicate, a packet
communication fee is charged per one
communication.
*7 No fee is charged for GPS positioning. However,
when displaying a map using location
information etc. a packet communication fee is
charged.
Making a call from overseas
Making a call outside the country you
stay
Connect
a neyeoeEnter "Country
code ("81" for Japan) - phone number
without the leading 0 of Area code (City
(Voice call) or "VP Call"
code)"e
In some countries and areas such as Italy, "0"
is required.
Making a call inside the country you stay
a neyeEnter a phone numbere
(Voice call) or "VP Call"e"No,
use original"
The call may be made with no message
displayed.
44
Making a call to WORLD WING user
overseas
a neyeoeEnter "81 - mobile
phone number without the leading 0"e
(Voice call) or "VP Call"
Point
・ The call is forwarded internationally from Japan
even when staying in the same country as the party
to be called, so enter "+" and the country code of
Japan, "81".
Receiving a call inside the
country you stay
a A call is receivede"Call" or "VP Call"
Point
・ Regardless of the country, from which the call is
made, the call is internationally forwarded from
Japan. The caller is charged for call fees to Japan,
and the receiver is charged for receiving the call.
Setting after returning to
Japan
When you turn the FOMA terminal ON, the
connection to the FOMA network is established
automatically. If it is not automatically connected,
set Network search setting to "Auto" and 3G/GSM
setting to "AUTO".
Mail
Sending i-mode mail/Sending SMS
Sending i-mode mail
Only by subscribing to i-mode, i-mode mails can
be exchanged not only with i-mode compatible
terminals but also via Internet.
・ For details of i-mode mail, refer to "Mobile
Phone User's Guide [i-mode] FOMA version".
a aeb Compose messagee"OK"
b Enter an address, title and texte"Send"
When sending is completed correctly, the mail
is automatically saved in a folder of Outbox.
Point
Adding addresses (Add address) : On the mail creation
screen, touch the receiver fielde"Add address"
Attachments
time. After sending such file, a lot of mail in Outbox
may be deleted.
Removing attachment : Move the cursor to the
attachmente"Remove attachment"e"Yes"
Sending SMS
If you do not know the receiver's mail address,
you can send a text message by enter his/her
phone number as the address.
SMS can be also sent to or received from the
parties using overseas telecommunications
carriers except DOCOMO. For countries and
overseas telecommunications carriers available,
refer to "Mobile Phone User's Guide [International
Services]" or DOCOMO International Services
website.
Connect
If you select "OK(Confirm once)" instead of
"OK", the confirmation screen does not appear
from then on.
Point
・ Sending an attachment file of a big size may take
a aeg SMS/Area Mailea SMSe
a Compose SMS
You can attach up to 10 files (images, moving
picture files/i-motion, etc.) of up to 2 Mbytes in
total to a mail.
b Enter an address and texte"Send"
a On the mail creation screen, select the
attachment fieldeSelect a file to attach
eEdit a maile"Send"
・ When there is an incoming SMS, FOMA terminal
Point
operates in the same way as an incoming i-mode
mail.⇒P47
45
Mail
Deco-mail/Decome-Anime
Deco-mail
Decome-Anime
You can change a font size or background color, or
insert still images, Deco-mail picture or Deco-mail
pict. To decorate characters, specify decoration
and then enter characters, or vice versa.
<Example> Specifying decoration before entering
characters
Connect
a On the mail creation screen, select the
text fielde"Deco."eSelect a
decoration iconeDecorate
Insert image
Change a font
color
Change a font
size
Change a
background
color
Blink
Ticker
Swing
Word
alignment
Insert line
b Edit a maile"Send"
Point
・ On the message entry screen, touch "MENU"e0 to
preview the decoration result. The bytes of the
remaining data amount you can enter is displayed in
the lower-right corner of the preview screen. To
return to the previous screen, touch "Back".
46
You can create expressive mails using Flash
graphics with messages or images inserted.
a aec Compose Decome-Anime
b Select Decome-Anime message text
fieldeTouch a template
To preview, touch "Display".
<Decome-Anime-Template
list screen>
c "Load"
d Edit the text or image
Changing a template : "MENU"ea DecomeAnimee"Yes"eTouch a templatee"Load"
e "Complete"eEdit a maile"Send"
Point
・ To preview, load the template, touch the DecomeAnime text field or the Decome-Anime message text
field, and then touch "Preview". To return to the
previous screen, touch "Back".
Mail
Receiving i-mode mail
No specific operations or settings are required for
receiving mails (mail automatic reception).
a Receive an i-mode mail
Blinking
For "Reply""Reply with quote" or "ViewRply",
you can select message from Reply format
screen.
When a confirmation screen appears, select
"OK". If you select "OK(Confirm once)" instead
of "OK", the confirmation screen does not
appear from then on.
b Edit a maile"Send"
Checking new messages
a aef Check new message
<Completion of mail
reception screen>
b a MaileSelect a mail
When you receive two or more mails at the
same time, or mails are sorted in the folders
for Message i-αppli, the folder list appears.
Point
Checking a mail in the mailbox : aea or d or e
eSelect a foldereSelect a mail
Replying to mails
a On the received mail list screen, touch a
maile"MENU"eaReply/Forwarde
aReply-eVreply Decome-Anime
For a mail sent to multiple addresses, you can
select addresses to reply.
Connect
You can make inquiry for any i-mode mail
delivered while you were out of service area or the
power was turned OFF.
Auto-sort method
Sent/Received mails can be sorted by rules you
set.
a aei Mail settingseb Sort
methodea Auto-sort ON/OFFeSet
each option to "ON"e"Set"
b b Inbox sort or c Outbox sorte"Add"
eSet sort methodeSelect a
destination folder to sorteSelect a
priority
47
Mail
Early warning "Area Mail"
This is a service that you can receive emergency
earthquake flash report etc. delivered by the
Meteorological Agency. i-mode subscription is
not required.
Receiving Area Mail
When there is an incoming Area Mail,
turns on,
and you are notified of the reception with blinking
light alert, the dedicated buzzer alarm, vibrate
alert, etc.
Connect
Point
・ Area mail cannot be received during a call or when
Omakase Lock is activated.
Receive setting
You can set if you receive Area Mail.
a aeg SMS/Area Maileb Early
warning "Area Mail" settingea
Receive settingeRead the noticee
Select the option fieldea YES or b
NOe"Set"
48
Phonebook
Phonebook new entry
There are two types of phonebook: FOMA
terminal phonebook and UIM phonebook. Saving
to the FOMA terminal phonebook is explained
here.
a med Phonebook & Logseb
Phonebook new entryeEnter a namee
Set required itemse"Save"
Adding Phonebook entries
from redial/received call
a neD (Redial) or G (Received
calls)eTouch a partye"MENU"ed
Addea Add to phonebook or b
Update phonebookea In phone
memory or b In UIM
To update a phonebook entry, select a entry to
add the phone number to.
b Set required itemse"Save"
Point
Searching a phonebook entry : medaeSpecify
a search method
Editing a phonebook entry : nepeSearch the
phonebookeTouch a phonebook entrye"MENU"
ecaeSet required itemse"Save"e"Overwrite"
or "New entry"
Deleting a phonebook entry : nepeSearch the
phonebookeTouch a phonebook entrye"MENU"
edea or b(efor All contacts, authenticate)e
"Yes"
Saving UIM phonebook entries : meddeEnter
a nameeSet required itemse"Save"
i-mode/Full Browser
Displaying i-mode site/website
With i-mode, you can use services such as site
connection, Internet connection or i-mode mail by
the display of i-mode compatible terminal. You
can use Full Browser to view websites created for
a PC.
・ i-mode is a charged service requiring
subscription.
・ For details, refer to "Mobile Phone User's Guide
[i-mode] FOMA version".
・ The contents of sites and Internet websites are
If you select "OK(Confirm
once)" instead of "OK",
the confirmation screen
does not appear from
then on.
b Select an item to view
During i-mode
communication, blinks
at the top of the display.
To display English
iMENU, scroll down the screen and select
"English".
Displaying web pages
designed for PC
Search
generally protected by copyright laws. All or
any portion of text, image or other data
imported to an i-mode compatible terminal
from a site or website cannot be altered except
for personal use, and cannot be sold or
redistributed in any form without the express
permission of the copyright holder.
・ When you attach a UIM except yours or turn ON
the FOMA terminal without UIM, still images/imotion/melodies downloaded from sites,
attached files sent/received by mail, screen
memos and MessageR/F for some models
cannot be displayed or played.
・ When data with UIM operation restriction is set
for the stand-by display or ring alert, replacing
UIM with another one or turning the power ON
with no UIM installed changes the settings back
to the default.
・ i-mode and Full Browser have different
charging systems. It is recommended that you
subscribe to i-mode packet flat-rate service
because a high packet communication fee is
required to use Full Browser according to data
communication volume.
Displaying i-mode site
a Ue"OK"
a meb i-modee* Full Browser
Home
Switching browsers
Switching i-mode to Full Browser : While a site is
displayed, "MENU"eeb
Switching Full Browser to i-mode : While a
website is displayed, "MENU"egb
49
Viewing and operating screen
In sites and websites, as with Internet websites on
your PC, you can enter characters, jump to the
linked page, select radio buttons or check boxes.
Status, title/URL
Pointer
Bookmark
You can bookmark frequently visited sites or
websites to quickly display them the next time you
want to visit.
Saving : While a site or website is displayed,
"MENU"eabeEnter a title (up to 12 twobyte (24 one-byte) characters)e"Save"eSelect
a folder where the bookmark is added
Displaying : mebbeSelect a foldereSelect
a bookmark
Screen memo
<Browser screen>
Search
50
Scrolling : Slide up, down, left or right
・ For i-mode, sliding left or right displays the view
history.
Moving cursor/pointer (for i-mode) : U, D, L,
R
Changing pages : "Back"/"Next"
Displaying View history : "MENU2"ee
・ Moving page of history : Slide left or right
・ Switching tabs : Slide up or down
Closing a tab/Ending a browser : ce"Yes"
Currently displayed contents of a site or website
can be saved as a screen memo or captured
image.
Saving : While a site or website is displayed,
"MENU"ebbe"Yes"
Displaying : mebceSelect a screen memo
Point
・ If the site or website disapproves of saving screen
memos etc, the screen memo may not be saved.
i-Channel
Using i-Channel
To view the detail information of the ticker,
perform the following operation.
a On the character entry screen, ce
Select a channel
The site is connected and the detail
information appears.
Point
・ When the detail information of i-Channel is
displayed, the same operations as the ones when imode sites or websites are available.⇒P50
Search
i-Channel is a service that news, weather
information, etc. is distributed to the i-Channel
compatible terminal (in Japanese only). The autoreceived information appears in the ticker on the
stand-by display.
● Basic Channel
The channel is provided by DOCOMO, and the
packet communication fee for automatically
updating the distributed information is not
charged.
● Okonomi (Favorite) Channel
The channel is provided by an IP (Information
Provider), and the packet communication fee for
automatically updating the distributed
information is separately charged.
When viewing detail information in Basic
Channel or Okonomi Channel, a packet
communication fee is separately charged. For
overseas use, packet communication fee is
charged for both automatic update and viewing
detail information.
・ i-Channel is a charged service requiring
subscription. i-mode subscription is required
for the service.
・ For details, refer to "Mobile Phone User's Guide
[i-mode] FOMA version".
51
Map/GPS
Using Map/GPS function
・ This function is unavailable as a navigation
・
Search
・
・
・
52
device for aircraft, vehicles or persons or as
high-precision location surveying GPS.
DOCOMO is not liable to any purely economic
damages including troubles, if any, caused by
missing opportunities of viewing positioning
results or making communications due to
failures or malfunctions of the FOMA terminal
or external events such as power interruption
(including battery exhaustion) in using the
FOMA terminal for purposes including but not
limited to the above.
Because GPS is managed by U.S. Department
of Defense, GPS wave conditions may be
controlled (accuracy degraded or wave
stopped) for security reasons of the U.S. And,
wave conditions differ by satellite locations;
therefore, positioning operations in the same
location under the same environmental
conditions may not yield the same result.
Because GPS uses waves transmitted from
satellites, margin of error in location
information may be 300 m or more in a place
where waves cannot be received or are difficult
to be received.
When using Location request and Notify
location functions, check instructions and
precautions given in website of GPS service
providers and NTT DOCOMO. And, you may be
charged for using these functions.
The GPS function except Position location is
unavailable out of service area.
Map
You can start GPS compatible i-αppli to display
maps.
a mef LifeKiteg Map/GPSea
Map
Point
・ i-αppli set in Select map in Map setting starts. "地図
アプリ (Map Application)" is set by default.
Position location
You can check where you are. No packet
communication fee applies for positioning of
Position location, but a packet communication fee
is required separately with map displayed using
location information.
a mef LifeKit
eg Map/GPSe
f Position
location
When positioning is
in progress,
blinks. When
positioning is
completed, the
<Location information
usage menu>
position location
menu appears.
From the menu, you can select options to read
map, use GPS compatible i-αppli, display the
mail creation screen on which location
information is pasted, add to phonebook, etc.
Map/GPS
AUTO-GPS
AUTO-GPS setting
DOCOMO service set
To use AUTO-GPS service linked with i-concier or
services provided by DOCOMO, set whether to
send your location information to DOCOMO on a
regular basis. A separate subscription is required
to use the service.
a mef LifeKiteg Map/GPSe
0 AUTO-GPSea DOCOMO service
sete"ON" or "OFF"e"OK" or "Yes"
Setup service list
This function display a list of the names of i-αppli
(the service name), to which AUTO-GPS service
information is set, and its status.
a mef LifeKiteg Map/GPSe0
AUTO-GPSec Setup service list
Search
Your current location is automatically sent to
service providers on a regular basis
(approximately once in every 5 minutes), which
allows you to services that deliver information
about the weather or shops around where you
are, or sightseeing information. (In Japanese
only)
・ Set an AUTO-GPS compatible service from its
AUTO-GPS compatible i-αppli.
・ When using the AUTO-GPS function, check
instructions and precautions given in website
of GPS service providers and NTT DOCOMO.
And, you may be charged for using these
services.
・ Note that more power is consumed in FOMA
terminal due to a regular communication
depending on your usage.
・ You can set "Low battery setting" to deactivate
the AUTO-GPS function to save the battery
consumption when the battery level gets low.
Canceling the service (including the AUTOGPS function) : Touch a name of i-αppli (the
service name)e"MENU"ea Cancelea
One item - c All itemse"Yes"
You can set whether to use the AUTO-GPS
function.
a mef LifeKiteg Map/GPSe
0 AUTO-GPSeb AUTO-GPS setting
ea ON or b OFF
53
Camera
Shooting still images/moving pictures
Viewing shooting screen
a
b
a Auto optimized
shooting mode
icon
・ To fix the
currently
detected scene,
touch the icon.
c
c
d
<Still image shooting screen>
b
Enjoy
c
d
b Zoom ratio
・ Slide on the
screen to display
the zooming
adjustment panel
to zoom in/out.
: Save to
d
: Recording
Type
: Light
: Macro
shooting
: Auto timer
: Face detection/
Smile finder
: Compatible
mode
Indicator, Counter
<Moving picture shooting screen>
: Scene mode/
effect
: Brightness
: White balance
: Frame
: Shake reduce
: Skew
correction
: Continuous/
Panorama
: Image quality
: Quality
: Size
restrictions
: Image size
Shooting still images
a C (1 sec. or more)
b Point the camera at an object, "Shoot"
or C
c "Save" or C
54
Shooting moving pictures
a mef LifeKited Cameraeb
Movie camera
b Point the camera at an object, "Shoot"
or C
c To stop shooting, "Stop" or C
d "Save" or C
Point
・ If battery power is exhausted on confirmation screen
of shot still image, the image is saved automatically.
・ If FOMA terminal is left in a warm place or exposed
Shooting in various procedures
On the still image shooting screen, you can switch
shooting procedures from the submenu.
Major shooting procedures are as follows.
Shooting
procedure
Scene
The camera detects a subject,
mode/effect switches to the optimized scene
and then focus the subject (Auto
optimized shooting mode).
Setting Scene mode/effect :
[MENU]e"MENU"eaeSelect
required items
Smile finder When a SmileRate of shooting
subjects reaches specified rate, a
still image is shot.
Setting SmileRate : [MENU]e
"MENU"ecbeSelect
SmileRate
Auto timer
Use this function for not only
shooting yourself but also
preventing hand shake.
Setting the remaining time in
seconds before shutter clicks :
[MENU]e"MENU"eeeSelect
seconds
Continuous/
4 frames/
Panorama
shooting
You can specify the number of
frames for continuous and 4
frames shooting, and shoot a
panorama view using the camera's
auto-connecting technology.
Selecting a shooting procedure :
[MENU]e"MENU"efeSelect
a shooting procedure
55
Viewing still images
a mee Data Boxea My Picturee
a CameraeSelect an image
Playing moving pictures
a mee Data Boxed i-motion/
Movieeb CameraeSelect a moving
picture
Point
・ You can set a taken still image/moving picture to the
stand-by display or add to the phonebook.
Effects and procedures
Enjoy
to direct sunlight for a long time, shooting images
may be deteriorated.
・ If no operations are performed for approximately 3
minutes during shooting stand-by, the camera ends.
・ You can also shoot still images/moving pictures by
opening the FOMA terminal and pressing [.
Switching still image/moving picture : On the still
image shooting screen, [MENU]e"MENU"e0e
a or on the movie shooting screen, "MENU"ehe
a
Creating a mail with attachment : On the list screen,
touch an imagee" write"
Music
Music&Video Channel
Music&Video Channel is a service which
automatically distributes a program of up to
approximately 1 hour at night. You can also enjoy
high-quality video program of up to
approximately 30 minutes. (In Japanese only)
・ Music&Video Channel is a charged service
Enjoy
56
requiring subscription. Subscriptions to i-mode
and i-mode packet flat-rate services are
required for the service.
・ Information fee may be required additionally
for some programs besides Music&Video
Channel service fee.
・ If UIM is used on a Music&Video Channel
incompatible FOMA terminal after subscribing
to Music&Video Channel, Music&Video
Channel cannot be used. Note that the service
fee is charged unless Music&Video Channel is
unsubscribed.
・ Program setting and downloading are
unavailable during international roaming*.
Stop distribution of programs before leaving
Japan. When you return to Japan, resume
distribution of programs.
* Note that attempting program setting or downloading
during international roaming requires packet
communication fee for i-mode connection.
・ For details, refer to "Mobile Phone User's Guide
[i-mode] FOMA version".
Setting programs
To set programs, registering Music&Video
Channel program site in My Menu may be
required.
a mei MUSICeb Music&Video
Channele"Set program"eSet a
program according to instructions on
the screen
Playing a program
a mei MUSICeb Music&Video
ChanneleSelect a program
The following operations are available on the
player screen.
Pausing/Playing : "PAUSE/PLAY"
Adjusting the volume : Slide up or down
Rewinding/Fast forwarding : Slide left or right
and hold the finger at the end of the screen
(returns to normal playback if you release
the finger).
Jumping to the beginning of chapter : After a
lapse of 3 seconds in play time, slide left
quickly
Jumping to the previous chapter : Within 3
seconds in play time, slide left quickly
Next chapter : Slide right quickly
Music
MUSIC Player
You can play Chaku-uta full downloaded from a
site and Windows Media Audio (WMA) files
imported from music CDs, the Internet, etc. to a
PC. For details of MUSIC Player, refer to NTT
DOCOMO website. For Windows Media Player,
contact the manufacturer of your PC.
Downloading Chaku-uta full
a Display a siteeSelect Chaku-uta fulle
"Save"e" Save" or " Save"
Saving WMA file on a PC to
microSD
For connection to a PC, the included USB Cable
F01 is required.
b With Windows Media Player activated,
connect the FOMA terminal to a PC
using the included USB cable F01e
Send WMA file from the PC
The following operations are available on the
player screen.
Pausing/Playing : "PAUSE/PLAY" or C
Adjusting the volume : Slide up or down
Rewinding/Fast forwarding : Slide left or right
and hold the finger at the end of the screen
(returns to normal playback if you release
the finger).
Jumping to the beginning of song : After a
lapse of 3 seconds in play time, slide left
quickly
Jumping to the previous song : Within 3
seconds in play time, slide left quickly
Next song : Slide right quickly
Adding to Quick playlist : Double-touch the
display or C (quickly twice)
Stopping : C (1 sec. or more)
Enjoy
a mef LifeKiteb Ir/iC/PC
connectionee USB mode settingse
c MTP modee"Yes"
Playing music data
a mei MUSICea MUSIC Playere
Select a folder or playlisteSelect the
music data
Point
・ When downloading music data from Internet
websites etc., check the use conditions.
・ Music data saved in FOMA terminal or microSD card
is allowed for personal use only. When using the
music data, take extreme care not to infringe
intellectual property rights of a third party such as
copyrights etc.
57
i-αppli
i-αppli/i-Widget
Enjoy
58
i-αppli is a software for i-mode compatible
terminals, which updates the information of stock
price or weather automatically, or provides
games that can be played without connecting to
the network. i-Widget is a convenient function
that allows you to easily access frequently-used
contents and tools (Widget Appli) such as
calculator, clock, memo, stock price information,
etc.
Either i-αppli or i-Widget can be downloaded
from i-mode site or sites provided by IPs
(Information Providers). For details, refer to
"Mobile Phone User's Guide [i-mode] FOMA
version".
・ A packet communication fee may be separately
required for usage.
・ When downloading or displaying i-Widget
screen, etc. a packet communication fee may be
separately charged.
・ When i-Widget screen is displayed, multiple
Widget Appli may communicate.
・ A packet communication fee for overseas use
differs from the one in Japan.
・ If you delete stored i-αppli,
you can download the
software from "@Fケータイ
応援団 (@F mobile phone
supporters)" site.
QR code for site
"@Fケータイ応援団 (@F
access
mobile phone supporters)"
(as of June, 2011)
iMenu ⇒ メニューリスト (Menu list) ⇒ ケータイ
電話メーカー (Mobile phone manufacturer) ⇒
@Fケータイ応援団 (@F mobile phone
supporters) (In Japanese only)
* The access method may be changed without previous
notice.
Downloading
a Display a siteeSelect i-αpplieAfter
completion of downloading, "Yes" or
"No"
Downloaded i-αppli is saved to "My folder" of
Software list. When Message i-αppli is
downloaded, the folders for Message i-αppli
are automatically created in the folder list.
Starting i-αppli
a mec i-αppliea Software liste
Select a foldereSelect i-αppli
Point
Starting Osaifu-Keitai compatible i-αppli :
me*aeSelect i-αppli
Starting GPS compatible i-αppli :
mefgeeSelect i-αppli
Start i-Widget
a Touch the stand-by displayeFrom "機
能 (Function)", "iウィジェット
(i-Widget)"eSelect Widget Appli
i-motion/Movie
Playing i-motion/movie
You can obtain i-motion/movie (images, sound,
etc) from sites or websites.
✜ Playable i-motion
Type
Playing action
Standard While the i-motion data is
type (can downloaded, it is played.
be saved*) ・ The downloaded i-motion can be
operated in the same way as the imotion which is played after entire
data is downloaded.
After the entire i-motion data is
downloaded, it is played.
Streaming While the i-motion data is
downloaded, it is played.
type
(cannot be ・ After the i-motion data is played, it
is deleted.
saved)
*Some i-motion cannot be saved.
Type
Distribution
method
Playing action
The movie is
Streaming Real-time
distribution distributed in real time.
type
(cannot be
・ Pausing/Resuming
play/Moving play
saved)
position are
unavailable.
Playback starts while data is downloaded or
when the download is completed.
Point
・ Note that communication of a large amount of data,
such as downloading a movie, requires high
charges.
Playing moving picture/imotion
a mee Data Boxed i-motion/
MovieeSelect a foldereSelect a
moving picture/i-motion
The following operations are available during
playback.
Adjusting the volume : Touch to display the
volume bar and slide up or down the bar
Rewinding/Fast forwarding : Slide left or right
Pausing : "PAUSE"
Playing/Playing from the beginning (while
stopping) : "PLAY"
Setting a bookmark : "Bookmark"e"Yes"
Stopping : "STOP"
Enjoy
✜ Playable movies
Downloading i-motion/movies
a Select i-motion/movie while site or
website is displayed
On-demand Distribute movies that
distribution are prepared in
advance.
59
Osaifu-Keitai
Using Osaifu-Keitai
More Convenient
60
● Osaifu-Keitai
Osaifu-Keitai is equipped with IC card and allows
you to pay money or to use coupon or stamp rally
only by holding FOMA terminal over the IC card
reader in stores etc.
And you can access site or web site by holding
the FOMA terminal over IC card reader, obtain the
latest coupon by using communication, credit
electronic money, or check the usage. Various
security systems are also equipped. For details,
refer to "Mobile Phone User's Guide [i-mode]
FOMA version".
・ The data (including electronic money, points,
etc.) in the IC card may be lost or modified
because of the malfunction of FOMA terminal
(When we take your Osaifu-Keitai for repair etc.,
as we cannot take it with data remained, you
are required to erase the data by yourself). For
support such as reissuance, restoration,
temporary preservation or transfer of data
except transfer by iC transfer service, confirm
with Osaifu-Keitai compatible service provider.
For important data, be sure to use a service
with backup service.
・ If the data in the IC card is lost, modified or
damaged by any means related to Osaifu-Keitai
compatible service such as malfunction or
model change, DOCOMO assumes no
responsibility for the loss of data.
・ If FOMA terminal is stolen or misplaced,
immediately contact Osaifu-Keitai compatible
service provider for an advice.
● ToruCa
ToruCa is an electronic card that can be obtained
with FOMA terminal. It can conveniently be used
as leaflet, restaurant card, coupon ticket, etc. You
can obtain ToruCa from an IC card reader, site,
etc. It can be exchanged via mail, infrared
communication, iC communication or using a
microSD card. For details, refer to "Mobile Phone
User's Guide [i-mode] FOMA version".
Steps for using Osaifu-Keitai
You can start Osaifu-Keitai compatible i-αppli to
credit money or check the balance or usage. You
can use the Osaifu-Keitai services compatible with
Osaifu-Keitai Web plug-in from a site.
a Download Osaifu-Keitai compatible iαppli as necessary
b Start Osaifu-Keitai compatible i-αppli
and make the initial settings of the
service
c Hold
mark of the FOMA terminal
over IC card reader
In this case, you do not need to activate
Osaifu-Keitai compatible i-αppli.
Point
・ If IC card is not detected successfully when you hold
mark of the FOMA terminal over IC card reader,
try moving the FOMA terminal back, forth and
around.
・ You can disable IC card functions using "IC card
lock".⇒P36
i-concier
Using i-concier
・ For details, refer to "Mobile Phone User's Guide
[i-mode] FOMA version".
Receiving information and
displaying details
Information is sent automatically. When
information is received, the following screen
appears.
" ひつじのしつじくん ®
(Butler Sheep)"
©NTT DOCOMO
<Information reception
screen>
a me# i-conciereSelect a piece of
information
Some pieces of information may have
schedule or ToruCa attached or contain a link
to a site. To display details, select its icon.
More Convenient
i-concier is a service that Machi-chara (a
character on the stand-by display) supports your
life like a butler or concierge. It stores a variety of
your information (area information of your
residence, schedule, ToruCa, phonebook,
bookmarks, etc.) and offers you information that
suits your preferences of your living area and
hobby in the right time. Also, it can automatically
update schedules and ToruCa stored in FOMA
terminal, etc., and automatically add useful
information such as shop hours to the
phonebook. (In Japanese only)
・ i-concier is a charged service requiring
subscription (i-mode subscription is required).
・ If you do not subscribe Data Security Service,
when you subscribe i-concier, you subscribe
Data Security Service, too.
・ A packet communication fee is separately
required to receive information except for some
information.
・ A packet communication fee is separately
required to use detail information.
・ To use i-concier overseas, International
Settings require to be set. For using
international roaming services, a packet
communication fee is charged for both
receiving and viewing detail information (it
differs from the charge in Japan).
・ Information fee may be additionally required
for some contents besides i-concier monthly
service fee.
・ Automatic updating i-schedule/ToruCa/
phonebook, etc. requires a packet
communication fee separately.
61
Convenient tools
Scheduler
You can manage schedules with FOMA terminal.
Saving schedule
a meg Accessoryea Schedulere
"MENU"ea New entry
b Slide left or right to switch Main (New)
screen, Sched. contact screen,
Reminder screen, or Other settings
screen, and then set required itemse
"Save"
Point
Saving quickly from the stand-by display (Quick
schedule) : On the stand-by display, enter date with
keys (for 10:00 on June 8, enter "06081000")eUe
Save the schedule
Checking a schedule
a meg Accessoryea Schedulere
Select the date to save the schedulee
Select the schedule
More Convenient
62
Convenient tools
Alarm clock
Alarm clock sounds at a specified time.
a meg Accessoryec Alarm clock
eSelect a number
b Slide left or right to switch Set alarm
screen, Set sound screen, or Other
settings screen, and then set required
itemse"Save"
Point
・ While sounding alarm clock, press f to
terminate. It stops or starts snooze with no
operations for approximately 1 minute, by pressing a
key other than z!AZCXBM, "Stop"
or by touch operation.
Convenient tools
Bar code reader
You can read and use information of JAN code,
QR code, NW7 code and CODE39 code.
a mef LifeKitea Bar code reader
eMove the out-camera over a bar code
When scanning is completed, a confirmation
sound is heard and the scanned data appears.
Point
・ Press h to switch to Macro OFF before scanning
large size codes. The readability of code may be
raised by pressing R to set zoom to OFF.
Convenient tools
Bluetooth function
You can establish a wireless connection between
FOMA terminal and a Bluetooth device. For
operations of the Bluetooth device, refer to the
operation manual of your Bluetooth device.
* Wireless communication is not guaranteed for all
Bluetooth devices.
✜ Compatible version
Bluetooth standard Version 2.0+EDR
✜ Functions available with Bluetooth
・ You can make a handsfree call by using a
Bluetooth car navigation system (commercially
available) etc. via Bluetooth connection. And, you
can call wirelessly by connecting to a Bluetooth
headset (commercially available).
・ Playing sounds or music wirelessly or performing
remote control via Bluetooth connection with
Wireless Earphone Set 02 (optional) or a
Bluetooth audio device (commercially available).
b Select a Bluetooth device to registere
Enter the Bluetooth passkey
The profile selection screen appears. To connect the
Bluetooth device, go to Step 2 in "Connecting with
registered Bluetooth devices".
Point
・ For details of Bluetooth passkey, refer to the
operation manual for the Bluetooth device. To
connect FOMA terminals with each other, enter the
same Bluetooth passkey on those terminals
(determine any 4-16 digit numbers as Bluetooth
passkey). Bluetooth passkey is not required to
register Wireless Earphone Set 02.
Connecting with registered
Bluetooth devices
Registering Bluetooth devices
a mef LifeKitei Bluetootheb
Device listeSelect Bluetooth device to
connect
Set a Bluetooth device to registration stand-by
mode in advance.
b Select a profile to connecte"Connect"
After Bluetooth device is searched, the
registered device list screen appears.
More Convenient
a mef LifeKitei Bluetoothec
Register new devicese"OK"
The service selection screen appears.
63
Data Management
Using microSD card
You can save still images, moving pictures,
melodies, etc. or back up the phonebook entries or
schedule data to microSD card.
・ F-07C supports microSD card of up to 2 Gbytes,
and microSDHC card of up to 32 Gbytes (as of
June, 2011). For the latest operating
information, refer to the following site.
From i-mode : iMenu ⇒ メニューリスト
(Menulist) ⇒ ケータイ電話メーカー (Mobile
phone manufacturer) ⇒ @Fケータイ応援団 (@F
mobile phone supporters) ⇒ メモリーカード対
応情報 (Memory card support information) (In
Japanese only)
QR code for site
access
More Convenient
64
From PC : FMWORLD(http://www.fmworld.net/)
⇒ 携帯電話 (Mobile phone) ⇒ microSD対応状
況、microSDHC対応状況 (microSD support/
microSDHC support information) (In Japanese
only)
* The access method may be changed without
previous notice.
✜ Notes on using microSD card
・ The data saved from another device such as a PC
may not be displayed or played in FOMA
terminal. And the data saved from FOMA terminal
may not be displayed or played in other device.
Installing
a Turn FOMA terminal OFF and remove
the battery pack
b Insert the microSD card slowly into the
slot with metal connectors side down
(as shown below), and insert it further
until it clicks
* To remove the microSD card, push it lightly to
pop it out, and then pull it out.
Formatting
Format microSD card with FOMA terminal before
using.
a mef LifeKitec microSDe
"Format"e"Regular format"e
Authenticatee"Yes"
Point
・ Formatting microSD card deletes the data in the card.
Data Management
Exchanging data between the FOMA terminal and microSD card
Save important data in FOMA terminal to microSD
card.
Moving/Copying to microSD
card
<Example> Moving/Copying images
a mee Data Boxea My Picturee
Select a folder
b Touch the datae"MENU"ee Move/
Copyed Move to microSD or e Copy
to microSDeSelect a method to move/
copye"Yes"
Point
・ You cannot move or copy the data that is inhibited to
output from FOMA terminal.
Moving/Copying to FOMA
terminal
Backing up at once
You can back up Phonebook, Schedule, mail,
Notepad, Bookmark and setting item data all at
once in microSD card. Data is overwritten for the
second-time backup or later.
a mef LifeKitec microSDeh
Backup/Restoreea Backup to
microSD
b "Yes"eAuthenticate
When phonebook is not saved, omit Step 3.
c "Yes" or "No"
Point
・ Some restrictions apply, such as moving pictures
saved in phonebook or the part of the attachment
files in excess of 100 Kbytes are not backed up.
・ Select "b Restore to phone" at the end of Step 1 to
delete the latest data in FOMA terminal and
overwrite save it.
<Example> Moving/Copying My Document
b Touch the datae"MENU"ec Move/
Copyea Move to phone or b Copy to
phoneeSelect a method to move/copy
e"Yes"
More Convenient
a mef LifeKitec microSDec My
DocumenteSelect a folder
65
Data Management
Infrared communication/iC transmission
You can send or receive data to/from FOMA
terminal equipped with the function of infrared
communication or iC transmission. Check the
infrared data port or
mark of the other party
and perform communication referring to the
following illustration.
15°
Face marks to each other
*Approx. 1 cm or
less in distance
15°
Infrared data
port
Approx. 20 cm or less
Infrared communication
iC transmission
Point
・ When sending/receiving all data items, the sender and
More Convenient
66
receiver need to determine a 4-digit authentication
password in advance. For infrared communications, the
receiver's terminal must be ready for communications
before the sender's terminal.
・ When sending/receiving all data items, the data saved in
the receiver is deleted, and the received data is saved.
However, some data (data in "Preinstalled" folder, etc.)
may not be deleted, or the saving locations, folder
names or the orders of data may be different from those
in the sender.
・ While charging, sending data by iC transmission is
unavailable.
To do
Operation
Sending an item Touch a phonebook entry to
via infrared
sende"MENU"ehea or c
communication/ e"Yes"
iC transmission
<Example> A
phonebook entry
Sending all
items via
infrared
communication/
iC transmission
mefbeb or ceSelect
an itemeAuthenticateeEnter
an authentication passworde
"Yes"
Receiving an
mefbaae"Yes"e
item via infrared Send data from a sendereAfter
communication receiving, "Yes"
Receiving an
item via iC
transmission
Send a data item from the sender
eDisplay the stand-by display on
the receiver and place
marks
close to each othereUpon
completion of reception, "Yes"
Receiving all
items via
infrared
communication
mefbabeAuthenticate
eEnter an authentication password
e"Yes"eSend data from a sender
eAfter receiving, "Yes"
Receiving all
items via iC
transmission
Send data items from the sender
eDisplay the stand-by display on
the receiver and place
marks
close to each othereAuthenticate
eEnter an authentication
passwordePlace the
marks
close to each othereUpon
completion of reception, "Yes"
Data Management
Connecting to a PC
You can connect FOMA terminal to a PC to
transfer WMA files or images in the microSD card.
Also, connecting to the Internet for data
communication is available.
・ The included USB Cable F01 is required.
・ You cannot send or receive data to or from the
connected PC while booting Windows 7 or in
sleep mode.
・ To perform data transfer using data
communication or DOCOMO keitai datalink,
install FOMA communication configuration file
(driver) on a PC. For details, refer to "Manual for
PC Connection".
"FOMA communication configuration file" and
"Manual for PC Connection" can be downloaded
from NTT DOCOMO website.
http://www.nttdocomo.co.jp/support/
(In Japanese only)
USB mode
a mef LifeKiteb Ir/iC/PC
connectionee USB mode settingse
Select a mode
Communication mode : Set for packet
communication, 64K data communication
or data transfer by connecting to a PC.
b "Yes"
DOCOMO Connection Manager
DOCOMO Connection Manager is convenient
software to use DOCOMO's data communication.
You can easily make a PC setting according to
your subscription status and check an estimate of
data communication volume or usage fee by the
charge counter function. For details, refer to NTT
DOCOMO website.
http://www.nttdocomo.co.jp/support/utilization/
application/service/connection_manager/
(In Japanese only)
DOCOMO keitai datalink
DOCOMO keitai datalink is a software for backing
up phonebook, mail and other data in your mobile
phone to a PC and editing them. For details and
downloading, refer to the following website.
http://datalink.nttdocomo.co.jp/ (In Japanese
only)
For details including downloading procedures,
data that can be transferred, operating
environments, installing procedures and
operations, refer to the website above. For
operations after installation, see Help in the
software.
67
More Convenient
From a PC, you can operate data in a microSD card
in FOMA terminal.
・ When USB mode is set to "microSD mode" or
"MTP mode", installation of FOMA
communication configuration file (driver) is not
necessary.
microSD mode : Set for recognizing the
microSD card as a drive and operating the
data by PC operation.
MTP mode : Set for music data transfer to
microSD card using Windows Media Player.
Before Using
Precautions on using Windows 7 mode
Windows 7
68
Check before using Windows 7 mode.
・ FOMA terminal may be heated while using
Windows 7 mode.
If the terminal suddenly becomes hot or keeps
warm for a long period of time, the terminal will
automatically switch to FOMA mode. It is not a
malfunction but a function for avoiding risks
such as burns.
・ If the battery level reaches level 1 in the
Windows 7 mode, Windows 7 mode moves into
hibernate state and switches to FOMA mode.
・ It is recommended to charge with the included
AC Adapter F04 and USB cable F01 or Cradle set
F01. If you charge the FOMA terminal using USB
cable connected to a PC while using Windows 7
mode, battery may run out because charging
rate is not enough.
・ When charging with AC Adapter F04 and USB
cable F01 or Cradle set F01, a message "USB
ケーブルで接続中ですが、バッテリーは充電され
ませんのでご注意ください。(Attention! Battery is
not charged even though it is connected with
USB cable.)" may appear. In this case, unplug
the microUSB plug of USB cable F01 from the
FOMA terminal, or remove the FOMA terminal
from the cradle, and then insert it straight.
・ When CPU becomes overloaded while using
Windows 7 mode or the display brightness is set
to maximal, etc., the battery may discharge even
if the FOMA terminal is connected to the AC
Adapter.
・ Note that Windows will force-quite if the
・
・
・
・
following functions are activated while using
Windows 7 mode.
- All lock
- Omakase Lock
- Kid-safe mode (PC lock ON)
Exit Windows 7 mode when you use microSD
mode or MTP mode in USB mode.
Depending on the using circumstance,
jumpiness may happen when playing movies,
music or sound.
When displaying output images, use 1280x720
in resolution, 60 Hz in frequency. If output image
remains unstable, change frequency to 60 Hz in
the following steps.
a Press w while displaying output image,
make sure that the output image goes out
and Windows 7 lights start blinking (it takes a
few minutes).
b Press w to display Windows 7 mode
screen.
c Right click on the desktop where nothing is
displayed⇒From the menu displayed, "画面
の解像度 (Resolution)"⇒"詳細設定 (Advanced
settings)"⇒"モニター (Monitor)"⇒In "画面の
リフレッシュレート (Refresh rate)", "60ヘルツ
(60 Hz)"⇒"OK"⇒"OK".
While using Windows 7 mode, some functions
of FOMA mode may be restricted.
Incoming calls and i-mode mails
While using Windows 7 mode, operations for
incoming calls and i-mode mails are as follows.
When communication function is not used
Request of location information
×
Omakase Lock
○
i-concier
i-Channel
Incoming call
○
i-mode mail
△
Message R/F
△
Area Mail
○
SMS
△
Request of location information
○
○
AUTO-GPS
Music&Video Channel
×
×
×
○ : When it is received, communication is
disconnected and the FOMA terminal switches
to FOMA mode automatically.
△ : The incoming light turns on. Communication
is sustained in Windows 7 mode.
× : Cannot be received.
AUTO-GPS
×
Omakase Lock
○
i-concier
△
Incoming call
○
i-Channel
△
i-mode mail
△
Music&Video Channel
△
Message R/F
△
Area Mail
○
SMS
△
Request of location information
○
During packet communication by dialup
via mopera U etc.
Incoming voice call
○
Message R/F
×
×
×
Area Mail
○
SMS
△
Videophone call reception
i-mode mail
AUTO-GPS
×
Omakase Lock
○
i-concier
△
i-Channel
△
Music&Video Channel
△
Windows 7
○ : When it is received, the terminal switches to
FOMA mode automatically.
△ : The incoming light turns on (except for i-Channel,
Misic&Video Channel). Communication is
sustained in Windows 7 mode.
× : Cannot be received.
During communication via wireless LAN
○ : When it is received, communication is
disconnected and the FOMA terminal switches
to FOMA mode automatically.
△ : The incoming light turns on (except for i-Channel,
Music&Video Channel). Communication is
sustained in Windows 7 mode.
× : Cannot be received.
69
Osaifu-Keitai/ToruCa
・ If you switch to Windows 7 mode when using
Osaifu-Keitai compatible i-αppli, the OsaifuKeitai function may become unavailable.
・ The following screens do not appear in
Windows 7 mode.
- The confirmation screen for using reading
function
- The screen indicating reading function is
disabled
- A confirmation screen to access site for
downloading details of ToruCa
・ ToruCa alert sound is not emitted in Windows 7
mode.
Camera
In Windows 7 mode, shooting still images and
moving pictures using the out-camera is disabled.
Bluetooth
Windows 7
In Windows 7 mode, Bluetooth function is
unavailable.
GPS
In Windows 7 mode, GPS function is unavailable.
Infrared communication/iC
transmission
In Windows 7 mode, infrared communication and
iC transmission are unavailable.
70
Keyboard/Character entry
・ For character entry in Windows 7 mode, see
Help of "Microsoft Office IME 2010".
- On the desktop screen,
on the task bare
"Microsoft Office IME 2010"e"目次とキー
ワード (Contents and keyword)"
・ To enter the character which cannot be entered
using the QWERTY keys, use the screen
keyboard.
- On the desktop screen, "スタート (Start)"e"す
べてのプログラム (All programs)"e"アクセサ
リ (Accessaries)"e"コンピューターの簡単操作
(Simple operation of computer)"e"スクリーン
キーボード (Screen keyboard)"
Restricted software
In Windows 7 mode, some software is
unavailable.
Examples
・ Software whose resolution of more than
1,024×600 is required
・ Software which does not support rotation
function
・ Usage with maximized Windows Media Center
Point
・ If you accidentally maximized Windows Media
Center, press [ while pressing B to cancel
maximization.
使用許諾契約書 (In Japanese
only)
富士通株式会社(以下弊社といいます)では、本製
品にインストール、もしくは添付されているソフト
ウェア(以下本ソフトウェアといいます)をご使用
いただく権利をお客様に対して許諾するにあたり、
下記「ソフトウェアの使用条件」にご同意いただく
ことを使用の条件とさせていただいております。
なお、お客様が本ソフトウェアのご使用を開始され
た時点で、本契約にご同意いただいたものといたし
ますので、本ソフトウェアをご使用いただく前に必
ず下記「ソフトウェアの使用条件」をお読みいただ
きますようお願い申し上げます。ただし、本ソフト
ウェアのうちの一部ソフトウェアに別途の「使用条
件」もしくは「使用許諾契約書」等が、添付されて
いる場合は、本契約に優先して適用されますので、
ご注意ください。
ソフトウェアの使用条件
Windows 7
1.本ソフトウェアの使用および著作権
お客様は、本ソフトウェアを、日本国内において本
製品でのみ使用できます。なお、お客様は本製品の
ご購入により、本ソフトウェアの使用権のみを得る
ものであり、本ソフトウェアの著作権は引き続き弊
社または開発元である第三者に帰属するものとしま
す。
2.バックアップ
お客様は、本ソフトウェアにつきまして、1 部の予
備用(バックアップ)媒体を作成することができま
す。
3.本ソフトウェアの別ソフトウェアへの組み込み
本ソフトウェアが、別のソフトウェアに組み込んで
使用されることを予定した製品である場合には、お
客様はマニュアル等記載の要領に従って、本ソフト
ウェアの全部または一部を別のソフトウェアに組み
込んで使用することができます。
4.複製
(1)本ソフトウェアの複製は、上記「2.」および
「3.」の場合に限定されるものとします。本ソフト
ウェアが組み込まれた別のソフトウェアについて
は、マニュアル等で弊社が複製を許諾していない限
り、予備用(バックアップ)媒体以外には複製は行
わないでください。ただし、本ソフトウェアに複製
防止処理がほどこしてある場合には、複製できませ
ん。
(2)前号によりお客様が本ソフトウェアを複製する
場合、本ソフトウェアに付されている著作権表示
を、変更、削除、隠蔽等しないでください。
5. 第三者への譲渡
お客様が本ソフトウェア(本製品に添付されている
媒体、マニュアルならびに予備用バックアップ媒体
を含みます)を第三者へ譲渡する場合には、本ソフ
トウェアがインストールされたパソコンとともに本
ソフトウェアのすべてを譲渡することとします。な
お、お客様は、本製品に添付されている媒体を本製
品とは別に第三者へ譲渡することはできません。
6.改造等
お客様は、本ソフトウェアを改造したり、あるい
は、逆コンパイル、逆アセンブルをともなうリバー
スエンジニアリングを行うことはできません。
71
Windows 7
7.壁紙の使用条件
本製品に「FMV」ロゴ入りの壁紙がインストールさ
れている場合、お客様は、その壁紙を改変したり、
第三者へ配布することはできません。
8.保証の範囲
(1)弊社は、本ソフトウェアとマニュアル等との不
一致がある場合、本製品をご購入いただいた日から
90 日以内に限り、お申し出をいただければ当該不一
致の修正に関して弊社が必要と判断した情報を提供
いたします。また、本ソフトウェアの記録媒体等に
物理的な欠陥(破損等)等がある場合、本製品をご
購入いただいた日から1ヶ月以内に限り、不良品と
良品との交換に応じるものとします。
(2)弊社は、前号に基づき負担する責任以外の、本
ソフトウェアの使用または使用不能から生じるいか
なる損害(逸失利益、事業の中断、事業情報の喪失
その他の金銭的損害を含みますが、これに限られな
いものとします)に関しても、一切責任を負いませ
ん。たとえ、弊社がそのような損害の可能性につい
て知らされていた場合も同様とします。
(3)本ソフトウェアに第三者が開発したソフトウェ
アが含まれている場合においても、第三者が開発し
たソフトウェアに関する保証は、弊社が行う上記
(1)の範囲に限られ、開発元である第三者は本ソフ
トウェアに関する一切の保証を行いません。
72
9.ハイセイフティ
本ソフトウェアは、一般事務用、パーソナル用、家
庭用などの一般的用途を想定したものであり、ハイ
セイフティ用途での使用を想定して設計・製造され
たものではありません。お客様は、当該ハイセイフ
ティ用途に要する安全性を確保する措置を施すこと
なく、本ソフトウェアを使用しないものとします。
ハイセイフティ用途とは、下記の例のような、極め
て高度な安全性が要求され、仮に当該安全性が確保
されない場合、直接生命・身体に対する重大な危険
性を伴う用途をいいます。
記
原子力核制御、航空機飛行制御、航空交通管制、大
量輸送運行制御、生命維持、兵器発射制御など
富士通株式会社
Preparation
Setting up Windows 7 mode
When you use Windows 7 mode for the first time,
initial settings such as Windows 7 setup and
communication settings are required.
Notes for setup
・ It takes time to setup. Please allow enough time
・
・
・
・
Windows 7 setup
a Connect the adapter to the FOMA
terminal to be charging state
bw
The screen of "初めてWindows 7モードを使う
ときにはセットアップが必要です。(Setup is
needed when you use Windows 7 mode for
the first time.)" appears.
c While pressing X and B, p
After that, the screen changes some times and
then the screen becomes dark or the terminal
restarts.
Wait for a while until "Windowsのセットアッ
プ (Windows setup)" screen appears.
d Enter user namee"次へ (Next)"
Enter user name within 12 one-byte alphabets
or numbers. Do not use symbol such as @, %,
/, - or space. Numbers should be used in
combination with alphabets. Do not change
the computer name.
Windows 7
・
for the operations. (Estimate required time :
Approx. 60 min.)
During setup, all communication functions such
as receiving a call, mail, etc. cannot be used.
For Windows 7 setup, preparation of the
communication environment is not needed in
advance.
Make sure to connect the adapter for charging
when performing Windows 7 setup.
Do not turn the power OFF until Windows 7
setup is finished. If you turn OFF the power on
the way of operation, Windows may be
disabled.
If Windows setup fails or the power is turned off
during Windows setup, "Windowsのセットアッ
プ (Windows setup)" screen does not appear,
instead the following screen may appear.
setup, the terminal switches to FOMA mode. In
that case, press w to switch to Windows 7
mode.
e Enter passworde"次へ (Next)"
In this case, refer to "Reset to default" and
execute recovery⇒P87
・ Do not press w during setup.
・ When the FOMA terminal is switched to power
saving status (sleep or hibernation) during
You can skip the password entry. If you enter
a password, maintain a separate record not to
forget.
f Read terms of license and mark two
checkboxese"次へ (Next)"
73
g "推奨設定を使用します (Use
recommended settings)"
When "ワイヤレスネットワークへの接続
(Connect to wireless network)" screen
appears, click "スキップ (Skip)".
Windows 7 restarts automatically and the "必
ず実行してください (Make sure to execute)"
screen appears.
h On the "必ず実行してください (Make
sure to execute)" screen, "実行する
(Execute)"
When "ユーザーアカウント制御 (User account
control)" screen appears, click "はい (Yes)".
i On the "設定完了 (Setting completed)"
screen, "OK"
Windows 7 restarts automatically and
Windows 7 setup is completed.
Security software setting follows.
Point
Windows 7
74
・ After Windows 7 setup is finished, no operation may
be performed even when pressing w. In this
case, shut down or restart Windows 7, and then
switch to Windows 7 mode.
Setting security software
Set security software to prevent computer virus
infection and unauthorized access.
・ You can update and use "Norton Internet
Security" preinstalled in the FOMA terminal in
90 days from initial setting is completed.
・ When you use the other security software,
uninstall "Norton Internet Security".
・ After Internet connection is completed, perform
"Live Update".
・ When you set auto update, the terminal checks
the update information automatically, so that it
may connect to the Internet in an unintended
time. Please be careful that a high cost will be
charged for communication when you set
connection by packet communication.
a N or "デスクトップ (Desktop)"
button
b On the desktop screen, "スタート
(Start)"e"すべてのプログラム (All
programs)"e"Norton Internet
Security"e"Norton Internet Security"
After that, follow the onscreen instructions.
Screen Explanation
Screens of Windows 7 mode
Using screen
・ If the view orientation is changed when using in
Windows 7 mode
Home screen*2
(Touch console)
FOMA mode
horizontal display, return the orientation by the
following procedures.
- While pressing X and B, R
- Right-click empty space on the desktop screen
to show the menu, show "画面の解像度
(Screen resolution)" and change "向き
(Orientation)" ("縦(回転)(Vertical (rotate))").
・ For the following screens, operate in vertical
view. They are not changed to the horizontal
view.
- "トラブル解決ナビ (Troubleshooting navi)"
- BIOS start menu
- Safe mode, blue screen
・ In Windows 7, trackball operation is the one in
horizontal view even in the vertical view.
Switching screens
The method of switching screens is as follows.
w
Windows 7
switch key*1
N
Multitask key
Desktop screen *3
Windows 7
*1 The status in Windows 7 mode varies depending
on the Windows status before switching.
Shut down → The Home screen is activated.
Sleep/Hibernation → Restore the state before sleep/
hibernation.
*2 You can also switch from the Home screen to the
desktop screen with the desktop button.
*3 You can also switch from the desktop screen to
the Home screen with "Home screen" icon.
75
d Radio wave condition for wireless LAN
Home screen
You can start software of Windows 7 mode easily
from the Home screen (touch console). When the
software is activated from the Home screen, it
switches to the desktop screen. After exit of
software, the screen is switched to the desktop
screen.
abcde
f
g
h
i
j
Windows 7
Strong
c
76
k
a Battery level
: (Battery level 3) Ample charge.
: (Battery level 2) Low charge.
: (Battery level 1) Very low. Charge the
battery.
(While charging,
appears additionally)
b Received signal level
Weak
Out of service area or where
radio waves do not reach
: Communication using mopera U
None
Strong
Weak No wireless LAN/
Not connected
Wireless LAN
is OFF
e FOMA mode display
: Connecting to i-mode (during packet
communication)
: Out of service area
: Self mode ON
: Unavailable UIM is inserted
: Silent mode ON
: Personalized Silent mode ON
: In Public mode (Drive mode)
f Clock
The same time as FOMA mode appears. Each
time Windows 7 is activated, the clock of
Windows 7 mode is adjusted to the same time
as FOMA mode. When you bring the FOMA
terminal to the different time zone and you set
to adjust time and time difference in FOMA
mode, clock is adjusted to the local time you
stay without changing time zone on Windows
7.
g Setting button
Display the setting screen of touch console.
h Launcher area
Software and shortcut icons appear. Icons
beyond the screen appear by scrolling left or
right.
i Select 3 buttons
You can register often-used software up to 3.
j Running task display
Icons indicating running software appear.
k Desktop button
Switch to the desktop screen.
Software
By default, the following software appear on the
Home screen.
Icon
Software name
Microsoft Word
2010
Microsoft Excel
2010
Description
Internet operation panel
From the Home screen, activate Internet
Explorer 9 to display "インターネット操作パネル
(Internet operation panel)" of touch console.
Create documents
a
b
Create spreadsheet
and graphs
c
Microsoft Outlook Manage e-mail,
2010
schedule, address
list, etc.
Windows Live フォ View photos
ト ギャラリー
(Windows Live
photo gallery)
電子辞書
(e-dictionary)
Activate e-dictionary
マイドキュメント
フォルダ (My
Document folder)
Folder for data
saving
無線LAN ON/OFF
(Wireless LAN ON/
OFF)
Start/Stop emitting
radio wave for
wireless LAN
Windows Internet
Explorer 9
Internet browser
Windows Media
Player
Play sounds and
view movies
e
f
a Perform "戻る (Back)" of Internet Explorer.
b Display the favorite menu.
c Display the URL entry screen.
d Display a saving menu.
e Display "新しいタブ (New tab)" of Internet
Explorer
f Close an Internet Explorer tab. When Internet
Explorer is not activated, Internet operation
panel exits.
Point
・ To display from the desktop screen, "スタート
(Start)" menue"すべてのプログラム (All programs)"
e"タッチコンソール (Touch console)"e"インター
ネット操作パネル(起動)(Internet operation panel
(start))".
Windows 7
ドコモ コネクション Start packet
communication
マネージャ
(DOCOMO
connection
manager)
d
77
Gadget
System status
By default, the following original gadgets are
installed.
twifar (Gadget
for Twitter/
Facebook/RSS)
A gadget which has three
functions: Twitter, Facebook,
RSS reader.*1
カレンダーガ
ジェット
(Calendar
gadget)
A scheduler which reads
Google calendar.*2
メールチェックガ A gadget which supports
POP3 server and displays
ジェット (Mail
number of new mails.*3
check gadget)
Windows 7
*1 Because twifar uses cooperative interfaces of Twitter
and Facebook, it may become disabled depending on
restriction and changing specifications of cooperative
interfaces.
*2 Because some functions of カレンダーガジェット
(Calendar gadget) use cooperative interface of
Google, it may become disabled depending on
restriction and changing specifications of cooperative
interface.
*3 Because メールチェックガジェット (Mail check
gadget) uses cooperative interface of the mail server,
it may become disabled depending on the mail
services.
Point
・ To select and display a gadget, on the desktop
screen, operate "スタート (Start)"e"コントロールパ
ネル (Control panel)"e"デスクトップのカスタマイズ
(Customaize desktop)"e"デスクトップガジェット
(Desktop gadget)".
78
In Windows 7 mode, a software "システム状態表示
(System stasus)" for displaying CPU utilization is
equipped. You can check it with the icon status on
the task bar of the desktop screen.
: Less than 60 % CPU utilization
: 60% or more and less than 80 % CPU
utilization
: 80% or more CPU utilization
If icon remains in red for approximately 3
seconds, the icon starts to blink. Furthermore the
icon kept in red, it blinks at 3-second intervals.
Point
・ When the icon is not displayed on the task bar, click
of the task bar to display the hidden items.
Trackball operation
In Windows 7 mode, some operations are
available by combining 2 or more keys while
using software (Microsoft Word 2010,
Microsoft Excel 2010, Windows Internet
Explorer 9).
Z or C+Trackball up or down : Scroll up and
down in the software screen
X+Z or C+Trackball up or down : Zoom in/
out
Screen Explanation
Adjusting the screen
Zooming
While using Windows Internet Explorer 9,
press Cto zoom in, press and hold it to zoom
out. It may take time for response.
Touch function
Touch function is also available in Windows 7
mode.
・ Depending on software, touch function may
respond poorly or may not be supported.
・ For precautions and operation of the touch
panel, see "Using touch panel".⇒P26
Brightness in Windows 7 mode
a On the desktop screen, "スタート
(Start)"e"コントロールパネル (Control
panel)"
Setting for communication
In Windows 7 mode, you can perform
communications via packet communication or
wireless LAN.
・ This function is disabled when UIM is not
inserted, you unsubscribed to the FOMA service
or suspend using the service.
・ Note that using wireless LAN consumes much
battery power.
Using packet communication
To use packet communication, you need to
subscribe to mopera U. Refer to docomo Shop or
mopera U website.
http://www.mopera.net/ (In Japanese only)
Point
・ Note that communication of a large amount of data,
such as viewing sites including images,
downloading data, etc. using packet communication,
requires high charges.
・ When you set auto update on Windows update etc.,
the terminal checks the update information
automatically, so that it may connect to the Internet
in an unintended time. Please be careful that a high
cost will be charged for communication when you
set connection by packet communication.
Windows 7
Brightness adjustment in Windows 7 mode can be
performed in the following methods.
Auto adjusting using light sensor : Valid by
default
Adjusting in Windows : Invalid by default
To switch the method of brightness adjustment,
operate as follows.
Communication
b "ハードウェアとサウンド (Hardware and
sound)"e"明るさ調整 (Adjust
brightness)"eSelect an adjusting
method
79
Setting DOCOMO Connection Manager
"DOCOMO Connection Manager" is used for
packet communication.
a On the Home screen, click "ドコモ コネ
クションマネージャ (DOCOMO
Connection Manager)" icon eMake a
setting according to the contract
condition.
b Connect to the line via "DOCOMO
Connection Manager"eDisconnect
When you click "接続する (Connect)" on
"DOCOMO Connection Manager"and confirm
to successfully be connected to the line, click "
切断する (Disconnect)" to disconnect the line.
c On the desktop screen, click "回線設定
(Line setting)"icon
"回線設定 (Line setting)" icon disappears and
setting is completed.
Point
Windows 7
80
・ For instructions of "DOCOMO Connection Manager",
refer to the following instruction manual.
- On the desktop screen, "スタート (Start)"→"すべて
のプログラム (All programs)"→"NTT DOCOMO"→"
ドコモ コネクションマネージャ (DOCOMO
Connection Manager)"→"ドコモ コネクションマ
ネージャ 操作マニュアル (Instruction manual of
DOCOMO Connection Manager)"
・ If you cancel out "回線設定 (Line setting)"icon before
performing the operation above, run the following
file.
C:¥Fujitsu¥DialUp¥FJ_replace_rasphone.cmd
・ Although "***(従量)(pay-as-you-go)" (***is
referred to the provider you set) is displayed in host
on the preinstalled "DOCOMO Connection Manager"
connection screen, a limit price of "パソコンなどの外
部機器を接続した通信 (Communication connecting
external device such as a PC)" is applied if you
subscribe to "packet flat-rate service other than flat
rate data plan (Pake-Houdai Double, etc.)".
The latest version of DOCOMO Connection Manager
can be downloaded from the following website.
http://www.nttdocomo.co.jp/support/utilization/
application/service/connection_manager/index.html
・ In the following cases, packet communication will be
disconnected.
- Using power saving function (sleep or hibernation)
- Switching to FOMA mode
- Switching to communication via wireless LAN
- Restarting Windows
To use again, reconnect with "ドコモ コネクションマ
ネージャ (DOCOMO Connection Manager)".
Using wireless LAN
The setting method of wireless LAN varies
depending on the access point. Refer to the
instruction manual attached to the access point.
Setting wireless LAN
a On the Home screen, click "無線LAN
ON/OFF (Wireless LAN ON/OFF)" icon
to turn on the wireless LAN function.
When Windows 7 is started, wireless LAN
function is turned off.
b On the desktop screen, "スタート
(Start)"e"コントロールパネル (Control
panel)"e"ネットワークとインターネッ
ト (Network and Internet)"e"ネット
ワークの状態とタスクの表示 (Network
status and display of tasks)"
c "新しい接続またはネットワークのセット
アップ (Setup of new connection or
network)"
d "ワイヤレスネットワークに手動で接続し
ます (Connect to wireless network
manually)"e"次へ (Next)"
e Enter setting information of wireless
LAN access pointe"次へ (Next)"
For "ネットワーク名(SSID) (Network name
(SSID))", "セキュリティの種類 (Security type)"
and "セキュリティキー (Security key)", follow
the instruction manual or the instruction of the
access point.
f When "正常に∼を追加しました (∼ is
added correctly)" appears, "閉じる
(Close)"
Point
・ Wireless LAN function is turned off in the following
Precautions on using communication via
wireless LAN
Wireless LAN communication uses radio waves
for exchanging information. An advantage is that
connection can be available anywhere the radio
waves can be reached. On the other hand, the
following problems may occur when security
settings are not set.
by intent and peeps the personal information,
content of mails, etc.
・ A malicious third party accesses to the network
of a person or a company without notice and
retrieves personal or confidential information.
・ The computer virus is spread and destroys data
or systems.
Fundamentally, communication via wireless
LAN has security systems to solve these
problems. Proper security settings decrease the
possibility that the problems are generated.
Make sure to set all of security settings of these
products according to the attached instruction
manual.
Note that, because of the specification of
wireless LAN, security settings may be broken
out by special methods. DOCOMO recommends
to make security settings on your own judgment
and responsibility, and use the product on the
basis that you fully understand the problems
when using the product without security
settings. If the security problem occurs without
security settings or due to inevitable
circumstances because of the specification of
wireless LAN, DOCOMO assumes no
responsibility.
・ As the Bluetooth device and wireless LAN
(IEEE802.11b/g/n) use the same frequency band
(2.4GHz), interference of radio waves may occur
and it may result to decrease the
communication speed, to generate noise or to
disable connection. In this case, turn off the
power of Bluetooth device or separate the
Bluetooth device from the FOMA terminal 10 m
or more away.
Windows 7
cases.
- Using power saving function (sleep or hibernation)
- Switching to FOMA mode
- Switching to packet communication
- Restarting Windows
To use wireless LAN again, on the Home screen, click
"無線LAN ON/OFF (Wireless LAN ON/OFF)" icon and
turn on wireless LAN.
・ A malicious third party intercept the radio waves
81
Using mail software
Set the following information from the provider to
the mail software. If you are not sure about the
information, refer to your provider or
communication service company.
・ Receiving (POP) server
・ Sending (SMTP) server
・ Mail address
・ Mail account name
・ Mail password
Setting method varies depending on the mail
software. See Help of the mail software.
Microsoft Outlook 2010
a On the desktop screen, "スタート
(Start)"e"すべてのプログラム (All
programs)"e"Microsoft Office"e
"Microsoft Outlook 2010"
For details on using, check with Help of "Microsoft
Outlook 2010".
Windows 7
Windows Live メール (Windows Live
Mail)
a On the desktop screen, "スタート
(Start)"e"すべてのプログラム (All
programs)"e"Windows Live メール
(Windows Live Mail)"
For details on using, check with Help of "Windows
Live メール (Windows Live mail)".
Windows Live Messenger
a On the desktop screen, "スタート
(Start)"e"すべてのプログラム (All
programs)"e"Windows Live
Messenger"
Windows Live Messenger starts.
After that, follow the onscreen instructions.
Point
・ To use "Windows Live Messenger", obtaining
Windows Live ID is required.
・ When "Windows Live Messenger" is uninstalled, you
need to download the program from the "Windows
Live Messenger" website (http://messenger.live.jp/)
to install it again.
Setting sound/power-saving
Sound settings
a On the desktop screen, click in the
notification area at lower-right of the
screen.
b Drag up or down the volume tab
You can adjust the volume.
To clear the volume screen, click any space on
the desktop screen.
Point
・ When Silent mode is set in FOMA mode, sound is not
emitted in Windows 7 mode.
82
Setting sound/power-saving
Power saving settings
- While performing some process (e.g.
outputting to printer) or right after the process
is completed
- While accessing to the built-in flash memory
disk
- While playing sound from game software, etc.
- While playing moving picture file, etc.
Setting to sleep or hibernation
a On the desktop screen, "スタート
(Start)"
b
or
of
e"スリープ
(Sleep)"
Switch to FOMA mode.
To resume from the power saving status, press
w to switch to Windows 7 mode.
Precautions on using Cradle Set F01
(optional)
・ When the driver of the connected device is not
Precautions on using power
saving functions
・ Depending on the usage, it may take some time
・
・
・
・
・
・
・
Windows 7
・
to set to sleep, hibernate or resume. The
operation is disabled while moving on.
Do not resume as soon as sleep or hibernation
is set. Always take 10 seconds or more to
resume.
It is normal to generate noise for a moment on
the screen when Windows is set to sleep,
hibernate or resume.
It is recommended to avoid setting to sleep or
hibernate while connecting to the network
(Internet, etc.). Depending on the environment,
connection to the network (Internet, etc.) may
not be performed properly. By default, without
any operation for a certain period of time in
Windows 7 mode, Windows changes to sleep.
Do not set to sleep or hibernate in the following
cases.
- While the OS is in process of starting or exiting
- While installing a driver or program
installed correctly, Windows does not change to
sleep or hibernate.
Do not attach/remove the external device while
sleeping.
If hibernation is set with external device
connected, the device may not recover the state
before hibernation because the device
information is initialized when Windows is
resumed.
Do not set to sleep or hibernate while outputting
images on digital television using Cradle Set F01
(optional).
Do not set to sleep or hibernate in the following
cases.
- Displaying images on the digital TV.
- While playing sound from music CD
- While using auto-run CD-ROM, DVD-ROM
(which starts automatically when it is set in the
player)
83
Managing power in Windows 7
mode
Power saving settings set by default are as
follows.
・ Time for sleep of Windows 7 mode after it is
switched to FOMA mode : 1 minute
・ Time for hibernation of Windows 7 mode after it
is switched to FOMA mode : 5 minutes
To change the settings, perform the following
operation.
a On the desktop screen, "スタート
(Start)"e"コントロールパネル (Control
panel)"
b "ハードウェアとサウンド (Hardware and
sound)"e"切替時 電源設定 (Power
setting when switched)"eSelect time
you want to change toe"設定 (Set)"
microSD card control utility
Windows 7
84
In Windows 7 mode, "microSDカード制御ユーティ
リティ (microSD card control utility)" software
which switches microSD card ON/OFF is
equipped. You can check it with the icon status on
the task bar of the desktop screen.
(microSD card is "オフ (OFF)") : Usage of
microSD card in Windows 7 mode is
unavailable
(microSD card is "オン (ON)") : Usage of
microSD card in Windows 7 mode is available.
・ By default, it is set to "オフ (OFF)". To use
microSD card, turn this software to "オン (ON)".
・ If the following status are kept for 3 seconds
after "オン (ON)" is set, it turns to "オフ (OFF)"
automatically.
- Files or folders in the microSD card are not
browsed via the software.
- Files or folders in the microSD card are not
opened.
Switch ON/OFF as follows.
a On the desktop screen, "スタート
(Start)"e"すべてのプログラム (All
programs)"e"microSDカード制御ユー
ティリティ (microSD card control
utility)"e"設定 (Set)"eSelect ON/OFF
Point
・ The following status can switch to "オフ (OFF)".
- Files or folders in the microSD card are not browsed
via the software.
- Files or folders in the microSD card are not opened.
・ When the icon is not displayed on the task bar, click
of the task bar to display the hidden items.
・ ReadyBoost for Windows 7 is not supported.
Maintenance
Update
Perform the following updates on a routine basis.
Point
・ It may take time for update. Make sure to connect the
adapter and perform in the charging state.
・ When you set auto update, the terminal checks the
update information automatically, so that it may
connect to the Internet in an unintended time. Please
be careful that a high cost will be charged for
communication when you set connection by packet
communication.
Windows update
a On the desktop screen, "スタート
(Start)"e"すべてのプログラム (All
programs)"e"Windows Update"
After that, follow the onscreen instructions.
Update navi
a On the desktop screen, "スタート
(Start)"e"すべてのプログラム (All
programs)"e"アップデートナビ
(Update navigation)"e"アップデートナ
ビ (Update navigation)"
After that, follow the onscreen instructions.
Backup
DOCOMO recommends saving copy of necessary
data (backing up).
Daily backup
DOCOMO recommends saving necessary data
outside of the FOMA terminal, such as in microSD
card, other PC, etc.
Using Cradle Set F01 (optional) enables to back up
the data to USB memory, External hard disk drive
(optional), etc.
マイリカバリ (My recovery)
With "マイリカバリ (My recovery)" preinstalled in
the FOMA terminal, you can back up the whole
current information of built-in flash memory disk
and save to the External hard disk drive (optional)
connected via USB with Cradle set F01 (optional).
What you can do with マイリカバリ (My
recovery)
■ Create/Restore disk image of the built-in flash
memory disk
Disk image is a file which collects various
information in the built-in flash memory disk.
Create the disk image with "マイリカバリ (My
recovery)" and restore it when a problem occurs
to restore the state of Windows 7 when creating
the disk image. Note that only data of Windows 7
mode can be backed up with マイリカバリ (My
recovery). Data of FOMA mode cannot be backed
up.
Windows 7
With "アップデートナビ (Update navigation)", you
can check the latest information of driver or
software related to the FOMA terminal provided
by Fujitsu Co., Ltd., and update. (In Japanese only)
Maintenance
85
Precautions on using マイリカバリ (My
recovery)
・ Cradle set F01 (optional) and External hard disk
drive (optional) are required.
・ Do not create the disk image when a problem
occurs. The problem is also restored if it is
saved.
・ マイリカバリ (My recovery) is not guaranteed
for backing up/restoring all data.
・ Copyrighted movies and music may not be
backed up/restored.
・ It takes some time to back up using マイリカバリ
(My recovery). Please allow enough time for the
operations. (Estimate of required time : Approx.
3 hours - 7 hours (Required time varies by
created disc image amount or capability of
saving media))
Free space of saving destination
Windows 7
At least 16Gbytes of free space is required to the
media used as the saving destination of disk
image. Required free space varies depending on
usage after purchasing.
Creating/Restoring disk image
a Insert the connection jack of AC Adapter
Power Cable for Cradle F01 to AC
Adapter for Cradle F01
b Insert the connection jack of AC Adapter
F01 for Cradle to cradles power jack
c Press w on the F-07C to switch to
Windows 7 mode
d Open the cradle connection jack cap of
the F-07C and insert it to the cradle
e Insert the power plug of AC Adapter
Power Cable for Cradle F01 into AC 100V
AC outlet
f On the desktop screen, "スタート
(Start)"e"すべてのプログラム (All
programs)"e"マイリカバリ (My
recovery)" (when "ユーザーアカウント制
御 (User account control)" window
appears, select "はい (Yes)")
g In "マイリカバリとは (About My
recovery)" window, "次へ (Next)"
h On "マイリカバリ (My recovery)" screen,
"つくる (Create)" or "もどす (Restore)"
Windows reboots. After that, follow the onscreen
instructions. And then connect External hard disk
drive.
86
Recovery
Reset to default
Preparation for recovery
The content of Windows 7 mode by default is
saved in "recovery area" in the FOMA terminal.
The FOMA terminal can be restored to default
from the recovery area.
Point
・ Recovery area cannot be deleted. If you delete the
recovery area, recovery cannot be performed. Note
that repair is needed to reset to default.
Backing up
Recovery deletes all data. Back up the necessary
data. Network environment or mail settings
cannot be backed up as data. It is recommended to
maintain a separate record of them.
Precautions on recovery
・ When using Cradle Set F01 (optional), remove
the external memory device such as external
hard disk drive before performing recovery. If
operation is continued with the external
memory device connected, the necessary data
may be broken.
・ Remove the mouse pad, keyboard, printer,
digital camera, scanner, etc., from Cradle Set
F01 (optional).
・ Remove microSD card. If microSD card is
installed, the procedure may be different from
the description in this manual.
・ Do not perform other operations while copying
files.
Wait for a while and do not click more than is
necessary. If you perform other operation,
recovery may not exit correctly.
・ Please allow enough time for the operations.
track ball.
・ Make sure to connect the adapter and perform
Windows 7
(Estimate required time : 85 min. or more)
・ The touch panel operation is disabled. Use the
in the charging state.
・ Do not press w during recovery.
87
Executing recovery
a On the desktop screen, "トラブル解決ナ
ビの起動 (Start Troubleshooting
navigation)"e"再起動 (Restart)"
b Select "Recovery and Utility" of
"Application Menu" and [
When Menu is different, switch using N.
c On "トラブル解決ナビ (Troubleshooting
navigation)" screen, select "Cドライブを
ご購入時の状態に戻す (Restore C drive to
the default)" in the "リカバリ
(Recovery)" tabeExecute
d Scroll 注意事項 (Precaution) to the
bottomeSelect "同意する (Agree)"e
"次へ (Next)"
e On the warning screen, "OK"
Windows 7
A recovery progress status screen appears
and recovery to the default starts. Wait for a
while until "リカバリが正常に完了しました。
(Recovery is completed properly)" appears.
Remaining time until completion may not be
displayed correctly or increased. It is because
of recalculation of the remaining time on the
way.
f On the "リカバリが正常に完了しました。
(Recovery is completed properly)"
screen, "OK"
The terminal switches to FOMA mode and
Windows 7 mode status return to the default.
88
After that, you need to setup Windows 7 in the
same way as when you use the Windows 7 mode
for the first time after the purchase. See "Setting
up Windows 7 mode" (⇒P73) to perform the
setup.
Point
・ If you cannot start Windows 7 mode when
performing recovery, while "<F12>:Boot Menu" is
displaying at the lower right of the screen, press 1
pressing C to display "Application Menu" and
continue operations from Step 2.
Office
Using MicrosoftOffice Personal 2010 biennial licensed version
Windows 7
To use Microsoft Office Personal 2010 biennial
licensed version, entering product key and license
authentication are required when it starts for the
first time.
For details, refer to "お使いになる前に (Before
using)" on the included CD-ROM.
・ Product key is attached to back side of the
included CD-ROM jacket. Keep it in a safe place
and never lose it.
・ To perform license authentication, you need to
connect to the Internet. License authentication
cannot be performed on the telephone.
・ When entering the product key for the first time
of starting, if you cancel the entry halfway and
try to enter again, the FOMA terminal may
restart unexpectedly. Once you start to enter the
product key, do not break up the operation until
the software is set properly.
・ If license authentication is disabled, contact
Microsoft Japan Co,. Ltd.
・ For the method of using the usual Office
functions after validity period of biennial
license, contact Microsoft Japan Co,. Ltd.
・ Entering product key and license authentication
are also required after recovery, which resets
the FOMA terminal to default.
・ When the FOMA terminal is repaired during
validity period of license, license authentication
may be required again.
89
Support
Inquiries for software
For details on software other than "exempted" or
"supported by the software providing company",
contact the numbers for "General Inquiries" on the
last page of this manual.
Software exempted from
support
Due to the free product provided by each software
company, the following software does not have
user support.
Adobe Reader, Adobe Flash Player, Java SE
Runtime Environment 6
Software supported by the
software providing company
Windows 7
Confirm the number to avoid calling wrong
numbers.
■@niftyでブロードバンド (Broadband
communication with @nifty)
Nifty Corporation @nifty subscription desk
TEL : 0120-50-2210
Office hours : 9:00 - 22:00 (open all year round)
*Available on mobile phone and PHS
■i-フィルター 6.0 (i-filter 6.0)
Digital Arts Inc. Support Center
TEL : Monday to Friday/03-3580-5678, Saturday,
Sunday, Holidays/0570-00-1334
Office hours : 10:00: - 18:00 (except specified
holidays)
URL : http://www.daj.jp/faq/ (In Japanese only)
Inquiry form : http://www.daj.jp/ask/ (In Japanese
90 only)
Digital Arts Inc. provides support during 90-day
trial period.
■MicrosoftOffice Personal 2010 biennial
licensed version (Microsoft Excel 2010,
Microsoft Outlook 2010, Microsoft Word
2010, MicrosoftOffice Navigation 2010)
Microsoft Japan Co., Ltd.
TEL : 0120-54-2244
Inquiries for setup or installation :
Office hours : Monday to Friday/9:30 - 12:00, 13:00
- 19:00, Saturday & Sunday/10:00 - 17:00 (except
holidays, New Year and specified holidays)
Inquiries for basic operation : Office hours :
Monday to Friday/9:30 - 12:00, 13:00 - 19:00,
Saturday/10:00 - 17:00 (except Sundays,
holidays, New Year and specified holidays)
・ Inquiries for setup and installation are available
with no validity.
・ Inquiries for basic operation are valid for 90
days from the first day the customer calls the
support. (during support life cycle period)
URL : http://support.microsoft.com/
■学研パーソナル現代国語辞典, 学研パーソナル英
和辞典, 学研パーソナル和英辞典, 学研パーソナル
版漢字辞典
Gakken Education Publishing Co,. Ltd. Digital
Content Development Office
TEL : 03-3493-3286 (Inquiries for dictionary data)
Office hours : 10:00 - 12:00, 13:00 - 17:00 (except
Saturdays, Sundays and holidays)
For the method of seeing a dictionary or operation
of "e-dictionary", contact the numbers for
"General Inquiries" on the last page of this
manual.
■デイリー日中英・中日英辞典, デイリー日韓英・
韓日英辞典, デイリー日独英・独日英辞典, デイ
リー日仏英・仏日英辞典, デイリー日西英・西日
英辞典, デイリー日伊英・伊日英辞典, デイリー日
独英会話辞典, デイリー日仏英会話辞典, デイリー
日中英会話時典, デイリー日韓英会話辞典
SANSEIDO Co., Ltd. CD-ROM Products and User
Support Section
TEL : 03-3230-9416 (Inquiries for dictionary data)
FAX : 03-3230-9580
Office hours : 10:00 - 12:00, 13:00 - 17:00 (except
Saturdays, Sundays, holidays and specified
holidays)
For the method of seeing a dictionary or operation
of "e-dictionary", contact the numbers for
"General Inquiries" on the last page of this
manual.
Windows 7
■Microsoft Silverlight
Microsoft Japan Co., Ltd.
Do the following to inquire.
1. Access to the Silverlight support website.
URL : http://go.microsoft.com/fwlink/
?LinkID=199242
2. Click "マイクロソフトへ問い合わせる (Inquiry to
Microsoft)" down of the "お問い合わせ (Inquiry)" at
right of the website.
3. Follow the on screen instructions.
■Windows Live (Windows Live Messenger,
Windows Live Writer, Windows Live フォト
ギャラリー (Windows Live Photo Gallery),
Windows Live ムービー メーカー (Windows
Live Movie Maker), Windows Live メール
(Windows Live Mail), Windows Live Mesh)
Microsoft Japan Co., Ltd.
Do the following to inquire.
1. Access to the supporting website.
URL : http://www.windowslivehelp.com/
2. From the list of "Windows Live Solution Center
へようこそ (Welcome to Windows Live Solution
Center)", select the product.
3. Search the solution. If there is no solution,
inquire from "質問する (Ask a question)" link on
each page.
91
Windows 7
92
■ノートン インターネット セキュリティ 2011
(Norton Internet Security 2011)
Symantec Corporation Symantec Technical
Support Center
・ The center is the contact information for
technical inquiries.
・ Validity period is equal to update period (90
days). (If you request the extension of update
service, you can have access to the support. For
details, see support pages of each product (URL
: http://www.symss.jp).)
・ You can check solutions of frequently asked
questions from customers using bundle version
on the following website. If the solution cannot
be found, you can also inquire at the contact
information of bundle version.
URL : http://www.symss.jp/jpo-fujitsu-reg/
(In Japanese only)
TEL : 03-5642-2686
Office hours : Monday to Friday/10:00 - 19:00,
Saturday, Sunday, Holidays/10:00 - 16:00
・ For subscription of service extension, contact
information is different from the support center.
Symantec Store URL : http://
www.symantecstore.jp/users.asp
TEL : 0570-005557 (Navi dial)
Office hours : 10:00 - 17:00 (except Saturdays,
Sundays and holidays)
■明鏡国語辞典MX, 新漢語林MX, ジーニアス英和辞
典MX, ジーニアス和英辞典MX
TAISHUKAN Publishing Co., Ltd. Electronics
Publishing Development Office
TEL : 03-3294-2352 (Inquiries for dictionary data)
Office hours : 10:00 - 12:00, 13:00 - 16:00 (except
Saturdays, Sundays, holidays and New Year
holidays)
For the method of seeing a dictionary or operation
of "e-dictionary", contact the numbers for
"General Inquiries" on the last page of this
manual.
Support
Troubleshooting
Check for the necessity of software update first, and update the software if necessary. ⇒P97
If the problem still persists, contact the numbers for "Repairs" on the last page of this manual (in
Japanese only) or DOCOMO-specified repair office.
✜ Terminal operation
● FOMA terminal cannot be turned ON.
・ Is the battery pack installed correctly?
・ Is the battery exhausted?
● FOMA terminal cannot be charged (the charging
light does not turn on).
・ Is the battery pack installed correctly?
・ Are AC Adapter F04, USB Cable F01 and FOMA
terminal set correctly?
・ For using cradle (optional), is AC Adapter F01 for
Cradle connected to cradles power jack, and the
connection jack of AC Adapter Power Cable for
Cradle F01 to AC Adapter for Cradle F01 firmly?
・ Is AC adapter's power plug inserted to the outlet
correctly?
・ When using cradle (optional), is the cradle
connection jack of the FOMA terminal dirty? If it is
dirty, clean with a dry cotton swab etc.
・ If you execute calls, communications or other
function operations while charging the battery
pack, FOMA terminal may become hot. For safety,
charging may not start when FOMA terminal is
hot. Wait until the temperature drops after using
and charge again.
● Turning the power OFF or restarting automatically
happens.
If the jack of battery pack is dirty, the contact may
become poor and the power may shut off. If it is
dirty, clean with a dry cotton swab etc.
● No operations are performed even by keypad and
touch operations.
Have you activated All lock, Omakase Lock,
Operation lock or Security lock?
● The operation time provided by the battery pack is
short.
・ Is your terminal left for a long time under the state
of out of service area? Out of service area, much
power is consumed to search available radio
waves.
・ The operation time provided by the battery pack
varies by the operating environment and battery
pack's deterioration.
・ The battery pack is a consumable part. Each time it
is charged, time available with each charging
reduces. Even the full charge state, when the
operation time is too short, purchase a new
battery pack of the specified type.
● The UIM is not recognized.
・ Is UIM installed in the right direction?
・ Is UIM (blue) inserted?
Others
✜ Power supply and charging
93
● FOMA terminal etc. become hot while operating/
charging.
While operating or charging, or if you use i-αppli,
videophone call, Windows 7 mode, etc. for a long
time while charging the battery, FOMA terminal,
battery pack and adapter may become hot. There is
no problem about safety and continue to use it.
● The clock is not on time
The clock time may become wrong while turning on
the power for a long time. Set Auto time adjust of
Date & time to "ON" and turn the power off and on in
a place with strong radio wave conditions.
✜ Calls
Others
94
● Calls are not connected (Even when moving, "圏外
(out of service area)" does not disappear or
although radio waves are enough, making/
receiving calls is unavailable).
・ Turn the power off and on, or remove and attach
battery pack or UIM.
・ Even when the signal meter on your FOMA
terminal indicates
in radio waves, due to the
type of radio waves, making/receiving calls may
be unavailable. Move to call again.
・ Is Specified caller, Anonymous caller,
Unregistered caller or 3G/GSM setting set?
・ Due to the crossing of radio waves, at the crowded
public places, calls/mails are crossed and the
connection status may not be good. In this case,
"Please wait for a while" appears and the caller
hears a busy tone. Move to other place or call
again at other time.
● Calls cannot be made touching the key/using the
keypads.
Have you activated All lock, Omakase Lock, Self
mode or Keypad dial lock?
✜ Osaifu-Keitai
● Osaifu-Keitai function is unavailable.
・ When removing the battery pack, IC card functions
are unavailable regardless of the IC card lock
settings.
・ Do you place
mark of FOMA terminal over IC
card reader?
・ Have you activated Omakase Lock or IC card lock?
Support
Warranty and After-Sales Service
Warranty
・ FOMA terminal is provided with a written
warranty. Make sure that you receive it. Check
the written contents and items such as "shop
name/date of purchase" and keep it in a safe
place. If it does not contain the necessary
information, immediately contact the shop
where you bought it. The warranty is valid for a
period of one year from the date of purchase.
・ This product and all accessories are subject to
change, in part or whole, for the sake of
improvement without prior notice.
After-Sales Service
✜ When problems occur
Before requesting repair, read the section on
"Troubleshooting" in this manual or "使いかたガイド
(Guide)" in FOMA terminal (in Japanese only). If the
problem still persists, contact the numbers for
"Repairs" on the last page of this manual (in
Japanese only).
✜ If the result of inquiries indicates that a
repair is required
Others
Take your FOMA terminal to DOCOMO-specified
repair office. Be sure to check the opening hours of
the office before you go. Note that, repair may take
longer time depending on the state of damage.
In the warranty period
・ FOMA terminal is repaired at no charge subject to
the conditions of the warranty.
・ The warranty must be presented to receive
warranty service. The subscriber is charged for
the repair of items not covered in the warranty or
repairs of defects resulting from misuse (damage
of the color LCD or connector, etc.), accident,
neglect, etc. even during the warranty period.
・ The subscriber is charged even during the
warranty period for the repair of failures caused
by the use of devices or consumable items that
are not DOCOMO-specified.
Repairs may not be possible in the following cases.
・ When judged as malfunction due to moisture at
the repair office (e.g. when detected in a moisture
seal reaction)
・ When corrosion due to moisture, condensation,
perspiration, etc. is detected, or if any of the
internal boards are damaged or deformed
(microUSB connection jack, cradle connection
jack), liquid crystal panel is damaged, or the
terminal outer case is lifted, repairs may not be
possible.
* Even in case that a repair is possible, since those conditions
are outside the range of the warranty, a repair is charged.
After expiration of the warranty
All repairs that are requested are charged.
Replacement parts
Replacement parts (parts required to maintain the
product functions) are basically kept in stock for at
least 6 years after termination of production.
However, repair may not be possible due to lack of
repair parts etc.
95
✜ Notes
・ Do not modify FOMA terminal or its accessories.
・
・
・
・
Others
96
・
- Repair may be refused depending on the nature
of modification. The following cases may be
regarded as modifications.
- A sticker etc. is put on the LCD or keypad part
- FOMA terminal is embellished with adhesive
material etc.
- Exteriors are replaced with other than
DOCOMO's genuine parts
- Repair of failures or damage caused by
modification is charged even during the
warranty period.
Do not remove any inscription stickers attached to
FOMA terminal.
If confirmation of the inscription sticker content is
impossible, determination of whether specific
technical standards are satisfied cannot be made.
Therefore, repair may be refused
Function settings and information may be cleared
(reset) by malfunctions, repair or other handling
of FOMA terminal. Should that happen, set up the
functions again.
If repair is executed, MAC address for wireless
LAN and Bluetooth address may be changed
regardless of malfunction part.
Magnetic components are used in the earpiece,
speaker, etc. of FOMA terminal. Do not allow cash
cards or other devices that are vulnerable to
magnetism to come into contact with the phone.
If inside of FOMA terminal gets wet or moist, turn
the power off, remove the battery pack
immediately, and bring the terminal to a repair
office as soon as possible. However, repair may
not be possible depending on the condition of
FOMA terminal.
Support
i-mode fault diagnosis site
Using your FOMA terminal, you can check
whether sending/receiving of messages and
downloading of images and melodies are
normally performed. When FOMA terminal is
assumed to have malfunctions as the result of the
diagnosis, contact the numbers for "Repairs" on
the last page of this manual (in Japanese only).
Accessing to “iモード故障診断
サイト (i-mode fault diagnosis
site)”
i-mode site : iMenu⇒お知らせ (Notice)⇒サポート
情報 (Support information)⇒お問い合わせ
(Inquiries)⇒故障・電波状況お問い合わせ先
(Checking malfunction/radio wave condition)⇒
iモード故障診断 (i-mode fault diagnosis site)
(In Japanese only)
QR code for site
access
・ The access method may be changed without
previous notice.
・ Accessing from overseas is charged.
Support
Updating software
This function allows you to connect the network
and check if software in the FOMA terminal needs
to be updated, if software update is necessary,
download a part of software using packet
communication and update the software.
When software update is required, information is
posted in "お客様サポート (user support)" on NTT
DOCOMO website or iMenu (in Japanese only).
Software may be updated in 3 methods: "Autoupdate", "Immediate update" and "Reserved
update".
* Software update can be done even when various
data, such as a phonebook registered in FOMA
terminal, camera images, downloaded data, are
remaining; note that data protection sometimes
cannot be secured according to the conditions of
your FOMA terminal (such as malfunction, damage,
or water leak). DOCOMO recommends backing up
necessary data. However some data such as
downloaded data may not be backed up.
✜ When updating software
・ Do not remove the battery pack while updating
・
・
・
Updating
You can select
(update notification icon) on the
stand-by display or start from the menu.
<Example> Selecting the notification icon to update
a [eSelect
(update notification
icon)e"Yes"eAuthenticate
You can also operate by touching the stand-by
display and then touching "ADL update
notice" from the "New arrival/Status" of the
stand-by launcher.
b The check result appears
When update is necessary, "Update is needed." is
displayed. Select "Now update" or "Reserve".
Others
・
software. The update may fail.
Software update should be done with battery fully
charged.
Software update (downloading or rewriting) may
take time.
Making/Receiving calls, communications
functions and other functions are disabled during
software update (only incoming voice calls can be
answered while downloading).
It is recommended that software update be
executed in good radio wave conditions with
three bars of the antenna icon displayed and the
terminal not moved. If radio wave conditions
become weaker during software download or the
download is stopped, retry software update in a
place with strong radio wave conditions.
・ When updating software, your private
information concerning FOMA terminal (model,
serial number, etc.) is automatically sent to the
server (the server for software update managed
by DOCOMO). DOCOMO does not use the sent
information for purposes except software update.
・ When software update has failed, "Rewrite failed"
appears and all operation becomes unavailable.
In that case, please bring FOMA terminal to
DOCOMO-specified repair office.
<Example> Starting from the menu
a meh Settings & NW serviceseg
Clock & Othered Software updatee
Authenticatee"Update"
97
Support
Scanning function (Security Scan)
For the data or programs that are imported to
FOMA terminal, this function detects data and
deletes data or inhibits activation of applications
that may cause troubles.
・ The Scanning function provides a certain
countermeasure against invasion of data which
causes some trouble in the mobile phone, when
viewing website, receiving messages, etc. Note
that, if pattern definition corresponding to
specific troubles has not been downloaded to
the mobile phone or such pattern definition
does not exist, this function cannot prevent
those troubles from occurring.
●Updating pattern definitions
Update pattern definition first, then keep the
pattern definition up-to-date.
Set auto-update
You can set FOMA terminal so that pattern
definitions can be automatically updated.
Others
a meh Settings & NW servicesed
Security & Lockseg Scanning
functioneb Set auto-updatee
"Enable"e"Yes"e"Yes"e"OK"
When the Auto-updating pattern definitions is
completed,
appears on the stand-by
display.
98
Scan results
Warning level
Actions
[0] Operation "OK" : Continue processing of the
started application
may not run
properly.
[1] Operation "Yes" : Stop processing of the
application that may cause
may not run
troubles
properly.
"No" : Continue processing of the
Cancel
started application
operation?
[2] Operation "OK" : Stop processing of the
application that may cause
may not run
troubles
properly.
Canceling
operation.
[3] Operation "Yes" : Delete data that may cause
troubles
may not run
"No" : Stop processing of the
properly.
application that may cause
Delete data?
troubles
[4] Operation "Yes" : Delete data that may cause
troubles
may not run
properly.
Deleting data.
*Selecting "Detail" on each screen displays a list of names
of the detected problem elements. When 6 or more
problem elements have been detected, the names of the
6th and subsequent problem names are omitted.
Support
Options and related devices
Combining FOMA terminal with optional
accessories supports a wide variety of uses from
personal use to business use. Some products are
unavailable depending on the area.
For details, contact a sales outlet such as docomo
Shop. For details about the optional devices, refer
to the instruction manual for each device.
・ AC Adapter F04
・ In-Car Hands-Free Kit 01
・ Battery Pack F20
・ In-Car Holder 01
・ Cradle Set F01
・ USB Cable F01
・ Earphone Plug Adapter F01
・ Back Cover F58
・ Carry Case 02
・ Wireless Earphone Set 02
・ Bone conduction microphone/receiver 02
* When using FOMA terminal overseas, use the
adapter plug that is suitable for use in your travel
destination. Also, do not charge the battery with a
transformer for overseas travel.
Others
99
Appendix
Menu list
・ Menu list for the case Select startup menu is set to "Basic menu" is described.
・ Menus indicated in red can be restored to the default by executing Reset (including the menu whose
partial sub content menu will be reset to the default).
■Mail
Last URL
Inbox
Enter URL
i-Channel
Compose Decome-Anime
Reset i-Channel
Outbox
i-mode settings
Check new message
FullBrowser Setting
Early warning "Area Mail"
setting
Common Setting
Check i-mode setting
Reset i-mode setting
Alert settings
Sort method
Signature
Reply setting
Access shortcuts
RSS reader
Full Browser Home
Search engine
Auto-reply
Blog/SNS setting
Software list
Display settings
i-αppli call log
Others
Check msg. option
■i-mode
iMenu Search
Bookmark
Screen memo
100
Mail group
■i-αppli
Auto save setting when editing
Template
i-modeBrowserSetting
SMS
Receive option
Mail settings
i-Channel list
i-Channel setting
Unsent messages
SMS/Area Mail
Enter URL
URL enter history
Compose message
i-αppli settings
Sort software
i-motion/Movie
Auto-start
Melody
Software info disp.
My Document
Display light time
Kisekae Tool
Brightness
Machi-chara
Vibrate effect
Chara-den
Sound effect volume
i-Widget settings
i-αppli call DL set
AUTO-GPS preferred setting
Display history
■Life Kit
Bar code reader
Ir/iC/PC connection
Send all via iC
Abnormal exit hist.
Data exchange settings
Security error hist.
i-αppli shortcuts
USB mode setting
microSD
Camera
■Phonebook & Logs
Sound recorder
Phonebook new entry
Data Security
Add group
Send img in Phonebook
Received calls
Backup phonebooks etc./Update
Redial
Backup settings/Update
Record message
Backup images
Recorded messages
Record voice memo
Sent msg. log
Receive msg. log
Map/GPS
Map
imadoco search
imadoco kantan search
i-area
Map/GPS αppli
Others
Voice memos
User information
Data check/How to update etc.
Exchanging history
Phonebook(UIM) new entry
Mail logs
Still camera
Movie camera
Phonebook
Record msg.&Voice memo
Receive Ir data
Send all Ir data
Start failure hist.
Position location
■Data Box
Loc. history
My Picture
Notify location
MUSIC
Map&GPS setting
Music&Video Channel
AUTO-GPS
101
Pedometer/ACT monitor
Bluetooth
Steps/Activity/Calories info
Display
Menu preference
Bluetooth ON/OFF
Color & Action image
Device list
Display & Key light
Register new devices
Light alert
Accept registered
Font & Language
Bluetooth settings
Display Machi-chara
Connecting devices
eco mode
Row height of list
Guide
Kisekae/Themes
■Accessory
Timed theme
Notepad
Security & Locks
Alarm clock
Kid-safe mode
Jpn Dic (Gakken Mobile Jpn Dic)
Receive display option
JE Dic (Gakken Mobile JE Dic)
UIM
EJ Dic (Gakken Mobile EJ Dic)
Change security code
Today's trivia
Scanning function
Today in history
Password manager
Countdown timer
microSD password setting
High-pitched alarm
Call & Answer
Activate
Alert&Time settings
Handy light
Others
Ring alerts & Sounds
Adjust volume
Vibrate alert/effect
Silent mode
Ring alert delay
BGM play
102
Sound & Image
Anonymous caller
Any key answer
Headset
■ Settings & NW services
Alerts & Sounds
Locks
Privacy mode
Calculator
Fake call
Kisekae Tool
Style theme
Scheduler
Dictionaries
Stand-by display
Set Pedometer/Activity monitor
Reject/Accept call
Make/Receive call
Call session
Self mode
Videophone
V.phone dialing img.
ToruCa content
Videophone alert
IC card settings
Lock preference
Data session arv. act
Timed lock
Image setting
Programed activation
External device
Notify switchable mode
Clock & Other
IC lock(power-off)
ToruCa setting
ToruCa alert
Slide and edit
ToruCa from IC card
Clock
ToruCa auto-read
Text input
ToruCa sort rule
Software update
Check IC owner
Info & Reset
Change IC owner
Multitask key shortcut
Search by i-mode
Motion sensor
Femtocell setting
Phone refresh
NW Services
Lock/Unlock
Operation
Voice Mail
Call waiting/forward
■User information
User information
■i-concier
i-concier
Caller ID
OFFICEED
2in1 setting
Melody Call
Other
Overseas network search
Overseas setting
■MUSIC
Others
Overseas service
MUSIC Player
Music&Video Channel
■Osaifu-Keitai
IC card content
DCMX
103
Appendix
Main specifications
■Phone
Camera
section
Product name
F-07C
Size
Approx. 125 mm (H) 61 mm
(W) 19.8 mm (T)
Weight
Approx. 218g
Continuous FOMA/3G
stand-by
time*1, 2, 3
Stationary (Auto) : Approx. 600
H
Moving (Auto) : Approx. 420 H
Moving (3G static) : Approx.
460 H
×
×
GSM
Continuous FOMA/3G
call time*2,
3, 4
GSM
Recording
section
Stationary (Auto) : Approx. 400
H
AC adapter : 170 min.
Type
TFT 262,144 colors
Size
Approx. 4.0 inches
×
Type
Out-camera : CMOS
In-camera : CMOS
Size
Out-camera : 1/4.0 inches
In-camera : 1/10.0 inch
Savable
Up to approx. 1,300 images
still images (default)
*6
Up to approx. 13 min. (save to
phone/default)
Up to approx. 180 min. (save to
2GB microSD card)
Moving
MP4
picture file
format
Playing
music
Others
Number of Out-camera : Approx.
5,100,000 pixels
effective
In-camera : Approx. 320,000
pixels
pixels
Continuous i-motion : Approx. 1,234 min.*8
Chaku-uta full : Approx. 1,306
play time
min.*8, 9
WMA file : Approx. 1,279 min.
*9
Music&Video Channel (sound)
: Approx. 1,306 min.*9
Music&Video Channel (moving
picture) : Approx. 332 min.
Recording
size
104
Out-camera : Up to approx.
16.0x
In-camera : Up to approx. 2.0x
Recordable
time for
moving
picture*7
Number of 614,400 pixels (600 1,024
pixels
dots)
Image
pickup
device
Zoom
(digital)
File format JPEG
for still
image
Approx. 440 min.
Display
Out-camera : Approx.
5,000,000 pixels (Available
only in FOMA mode)
In-camera : Approx. 310,000
pixels (Approx. 170,000
pixels in Windows 7 mode)
Continuous 2-9 images
shooting of
still images
Voice call : Approx. 370 min.
Videophone call : Approx. 170
min.
Charging time*5
Number of
recording
pixels
(max.)
Chaku-uta/ Approx. 74MB
Chaku-uta
full
Windows 7 OS*10
mode
Windows 7 Home Premium
32-bit legitimate version (SP1
applied)
CPU
Intel Atom processor Z600
(HT technology compatible)
(1.20GHz)*11
Main
memory
Standard 1GB/Up to 1 GB
(LPDDR400)
SSD*12
Approx. 32 GB (eMMC)
Wireless
LAN*13
IEEE 802.11b/g/n compatible
(communication speed :
Up to 65Mbps)*14
Battery
driving
time
Approx. 2 hours*15
×
×
■Battery Pack
Quality
Battery Pack F20
Battery used
Li-ion battery
Nominal voltage
3.7V
Nominal capacity
1400mAh
Others
*1 Continuous call time indicates the approximate time that the
phone can receive radio waves normally. Stationary
continuous stand-by time indicates the average utilization
time that the phone can receive radio waves normally remains
stationary. Moving continuous stand-by time indicates the
average utilization time that the phone can receive radio
waves normally with a combination of "stationary",
"moving", and "out of service area" status.
*2 Call, communication or stand-by time may be reduced to
about half due to battery pack charging condition, function
settings, operating environment such as ambient temperature,
radio wave conditions in the area of use (the radio waves are
weak or absent), etc.
*3 The call, communication or stand-by times are reduced by
making i-mode communications, creating i-mode mail,
activating downloaded i-αppli, making i-αppli stand-by
display settings, downloading or playing Music&Video
Channel program, playing tune with MUSIC Player, using
AUTO-GPS, Bluetooth connection or Windows 7 mode etc.
*4 Continuous call time indicates the approximate time that the
phone can send or receive radio waves normally.
*5 Charging time indicates the estimated time for charging an
empty battery with FOMA terminal turned OFF. Charging
with FOMA terminal turned ON requires longer time.
*6 The number of savable still images is based on a image size
"QVGA (320 240)", Quality "Standard" and file size 10
Kbytes.
*7 The moving picture shooting time means allowable time for
one movie. The number is based on Image size "VGA
(640 480)" and Quality "STD (Standard)". Varies
depending on the moving picture to be recorded.
*8 AAC format files.
*9 Background playing is available.
*10 It is Japanese version.
*11 Although CPU for 1.20GHz operating frequency is mounted,
it operates in 50 % frequency in actuality.
*12 "NTFS" is adopted. Windows RE area and recovery area use
approx. 8.2 GB memory space, and C drive uses the rest.
*13 Unavailable in FOMA mode.
*14 Data communication with the FOMA cannot be used at the
same time. The value is theoretical in standards; the actual
speed varies by communication environment. In IEEE
802.11n, 20 MHz bandwidth system (HT20) 2.4 GHz mode
is supported.
*15 Measured figures by JEITA measurement method Ver.1.0.
Battery driving time varies by operation environment, LCD
brightness, systme settings, etc.
105
Savable/Recordable/
Protectable number
Savable/
Recordable
number
Protectable
number
Phonebook*1
Up to 1,000
ー
Kisekae Tool*1
Up to 50
Type
ー
Mail*1, 2 Received messages Up to 2,500 Up to 1,250
Others
106
Sent messages
Up to 500
Unsent messages
Up to 200
Up to 250
Up to 100
Area Mail
Up to 30
Up to 15
Bookmark*3
Up to 200
Screen memo*1, 3
Up to 100
ー
Up to 100
Music*1
Chaku-uta full
Up to 100
ー
Uta-moji Lyrics
Up to 100
ー
i-αppli*1, 4
Up to 100
ー
Images*1
Up to 3000
ー
Moving picture/i-motion/
Sound recorded with Sound
recorder*1
Up to 200
Melodies*1
Up to 500
ー
Scheduler*5
Up to 2,600
ー
Notepad
Up to 50
ー
ー
*1 Depending on the size of data or usage status of common
memory space, the actual number of items that can be saved
and recorded may be fewer.
*2 The total number of i-mode mail and SMS.
*3 The total number of i-mode and Full Browser.
*4 Total number of i-αppli and Message i-αppli. Up to 5 items
of Message i-αppli can be saved.
*5 Total number of schedules and schedules in i-schedule.
Appendix
Specific absorption rate (SAR) of mobile phone
The World Health Organization has stated that present
scientific information does not indicate that there are
harmful effects attributed to the use of mobile devices.
They recommend that if you are worried about your
exposure then you can limit your usage or simply use
a hands-free kit to keep the mobile device away from
the head and body.
Please refer to the WHO website if you would like more
detailed information.
http://www.who.int/docstore/peh-emf/publications/
facts_press/fact_english.htm
Please refer to the websites listed below if you would
like more detailed information regarding SAR.
Ministry of Internal Affairs and Communications
Website: http://www.tele.soumu.go.jp/e/sys/ele/
index.htm
Association of Radio Industries and Businesses
Website: http://www.arib-emf.org/index02.html (in
Japanese only)
NTT DOCOMO, INC. Website: http://
www.nttdocomo.co.jp/english/product/sar/
FUJITSU LIMITED Website:
http://www.fmworld.net/product/phone/sar/ (In
Japanese only)
*1 Technical regulations are defined by the Ministerial Ordinance
Related to Radio Law (Article 14-2 of Radio Equipment
Regulations).
*2 Regarding the method of measuring SAR when using mobile
phones in positions other than against the ear, international
standards (IEC62209-2) were set in March of 2010. On the
other hand, technical regulation is currently being deliberated
on by national council. (As of June, 2011)
Others
This model F-07C mobile phone complies with
Japanese technical regulations and international
guidelines regarding exposure to radio waves.
This mobile phone was designed in observance of
Japanese technical regulations regarding exposure to
radio waves (*1) and limits to exposure to radio waves
recommended by a set of equivalent international
guidelines. This set of international guidelines was set
out by the International Commission on Non-Ionizing
Radiation Protection (ICNIRP), which is in collaboration
with the World Health Organization (WHO), and the
permissible limits include a substantial safety margin
designed to assure the safety of all persons, regardless
of age and health condition.
The technical regulations and international guidelines
set out limits for radio waves as the Specific
Absorption Rate, or SAR, which is the value of
absorbed energy in any 10 grams of tissue over a 6minute period. The SAR limit for mobile phones is 2.0
W/kg. The highest SAR value for this mobile phone
when tested for use at the ear is 0.796 W/kg. There may
be slight differences between the SAR levels for each
product, but they all satisfy the limit.
The actual SAR of this mobile phone while operating
can be well below that indicated above. This is due to
automatic changes to the power level of the device to
ensure it only uses the minimum required to reach the
network. Therefore in general, the closer you are to a
base station, the lower the power output of the device.
This mobile phone can be used in positions other than
against your ear. This mobile phone satisfies the
international guidelines when used with a carrying
case or a wearable accessory approved by NTT
DOCOMO, INC.(*2)
In case you are not using the approved accessory ,
please use a product that does not contain any metals,
and one that positions the mobile phone at least 1.5 cm
away from your body.
107
closer you are to a base station antenna, the
lower the power output.
Declaration of Conformity
The product "F-07C" is declared to conform with the
essential requirements of European Union Directive
1999/5/EC Radio and Telecommunications Terminal
Equipment Directive 3.1(a), 3.1(b) and 3.2. The
Declaration of Conformity can be found on http://
www.fmworld.net/product/phone/doc/ (In Japanese
only).
This mobile phone complies with the EU requirements
for exposure to radio waves.
Your mobile phone is a radio transceiver, designed and
manufactured not to exceed the SAR* limits** for
exposure to radio-frequency(RF) energy, which SAR*
value, when tested for compliance against the
standard was 0.944W/kg. While there may be
differences between the SAR* levels of various phones
and at various positions, they all meet*** the EU
requirements for RF exposure.
*
Others
108
The exposure standard for mobile phones
employs a unit of measurement known as the
Specific Absorption Rate, or SAR.
** The SAR limit for mobile phones used by the
public is 2.0 watts/kilogram (W/Kg) averaged over
ten grams of tissue, recommended by The
Council of the European Union. The limit
incorporates a substantial margin of safety to
give additional protection for the public and to
account for any variations in measurements.
*** Tests for SAR have been conducted using
standard operation positions with the phone
transmitting at its highest certified power level in
all tested frequency bands. Although the SAR is
determined at the highest certified power level,
the actual SAR level of the phone while operating
can be well below the maximum value. This is
because the phone is designed to operate at
multiple power levels so as to use only the power
required to reach the network. In general, the
Federal Communications
Commission (FCC) Notice
・ This device complies with part 15 of the FCC rules.
・
Operation is subject to the following two conditions :
a this device may not cause harmful interference,
and
b this device must accept any interference received,
including interference that may cause undesired
operation.
Changes or modifications made in or to the radio
phone, not expressly approved by the manufacturer,
will void the user's authority to operate the
equipment.
FCC RF Exposure Information
This model phone meets the U.S. Government's
requirements for exposure to radio waves.
This model phone contains a radio transmitter and
receiver. This model phone is designed and
manufactured not to exceed the emission limits for
exposure to radio frequency (RF) energy as set by the
FCC of the U.S. Government. These limits are part of
comprehensive guidelines and establish permitted
levels of RF energy for the general population. The
guidelines are based on standards that were
developed by independent scientific organizations
through periodic and thorough evaluation of scientific
studies.
The exposure standard for wireless mobile phones
employs a unit of measurement known as the Specific
Absorption Rate (SAR). The SAR limit set by the FCC is
1.6 W/kg. Tests for SAR are conducted using standard
operating positions as accepted by the FCC with the
phone transmitting at its highest certified power level
in all tested frequency bands. Although the SAR is
determined at the highest certified power level, the
actual SAR level of the phone while operating can be
well below the maximum value. This is because the
* In the United States, the SAR limit for wireless mobile phones
used by the general public is 1.6 Watts/kg (W/kg), averaged
over one gram of tissue. SAR values may vary depending upon
national reporting requirements and the network band.
This equipment has been tested and found to comply
with the limits for a Class B digital device, pursuant to
part 15 of the FCC Rules.
These limits are designed to provide reasonable
protection against harmful interference in a residential
installation. This equipment generates, uses and can
radiate radio frequency energy and, if not installed and
used in accordance with the instructions, may cause
harmful interference to radio communications.
However, there is no guarantee that interference will
not occur in a particular installation.
If this equipment does cause harmful interference to
radio or television reception, which can be determined
by turning the equipment off and on, the user is
encouraged to try to correct the interference by one or
more of the following measures:
- Reorient or relocate the receiving antenna.
- Increase the separation between the equipment
and receiver.
- Connect the equipment into an outlet on a circuit
different from that to which the receiver is connected.
- Consult the dealer or an experienced radio/TV
technician for help.
Others
phone is designed to operate at multiple power levels
so as to use only the power required to reach the
network. In general, the closer you are to a wireless
base station antenna, the lower the power output level
of the phone.
Before a phone model is available for sale to the public,
it must be tested and certified to prove to the FCC that
it does not exceed the limit established by the U.S.
government-adopted requirement for safe exposure.
The tests are performed on position and locations (for
example, at the ear and worn on the body) as required
by FCC for each model. The highest SAR value for this
model phone as reported to the FCC, when tested for
use at the ear, is 0.730W/kg, and when worn on the
body, is 0.521W/kg. (Body-worn measurements differ
among phone models, depending upon available
accessories and FCC requirements).
While there may be differences between the SAR levels
of various phones and at various positions, they all
meet the U.S. government requirements.
The FCC has granted an Equipment Authorization for
this model phone with all reported SAR levels
evaluated as in compliance with the FCC RF exposure
guidelines. SAR information on this model phone is on
file with the FCC and can be found under the
Equipment Authorization Search section at http://
www.fcc.gov/oet/ea/fccid/ (please search on FCC ID
VQK-F07C).
For body worn operation, this phone has been tested
and meets the FCC RF exposure guidelines when used
with an accessory designated for this product or when
used with an accessory that contains no metal and
which positions the handset at a minimum distance of
1.5 cm from the body.
109
Important Safety Information
Others
110
AIRCRAFT
Switch off your wireless device when boarding an
aircraft or whenever you are instructed to do so by
airline staff. If your device offers flight mode or similar
feature consult airline staff as to whether it can be used
on board.
DRIVING
Full attention should be given to driving at all times
and local laws and regulations restricting the use of
wireless devices while driving must be observed.
HOSPITALS
Mobile phones should be switched off wherever you
are requested to do so in hospitals, clinics or health
care facilities. These requests are designed to prevent
possible interference with sensitive medical
equipment.
PETROL STATIONS
Obey all posted signs with respect to the use of
wireless devices or other radio equipment in locations
with flammable material and chemicals. Switch off
your wireless device whenever you are instructed to do
so by authorized staff.
INTERFERENCE
Care must be taken when using the phone in close
proximity to personal medical devices, such as
pacemakers and hearing aids.
Pacemakers
Pacemaker manufacturers recommend that a
minimum separation of 15 cm be maintained between
a mobile phone and a pace maker to avoid potential
interference with the pacemaker. To achieve this use
the phone on the opposite ear to your pacemaker and
does not carry it in a breast pocket.
Hearing Aids
Some digital wireless phones may interfere with some
hearing aids. In the event of such interference, you
may want to consult your hearing aid manufacturer to
discuss alternatives.
For other Medical Devices :
Please consult your physician and the device
manufacturer to determine if operation of your phone
may interfere with the operation of your medical
device.
Appendix
Wi-Fi
Wi-Fi Alliance conducts an authentication test
based on Wireless LAN specification IEEE802.11 to
guarantee the mutual connectivity of wireless LAN
device. Products which passed the test are authorized
as "Wi-Fi Certified" and their mutual connectivity
with products bearing Wi-Fi logos is guaranteed.
✜ Contents of certification
Others
■IEEE Standard *1
・ IEEE 802.11b
・ IEEE 802.11g
・ IEEE 802.11n
■Security *2
・ WEP (WEP key : 64/128 bit)
・ WPA - Personal (WPA-PSK) (TKIP/AES)
・ WPA2 - Personal (WPA2-PSK)(TKIP/AES)
・ WPA - Enterprise (WPA)(TLS/PEAP)(TKIP/AES)
・ WPA2 - Enterprise (WPA2)(TLS/PEAP)(TKIP/AES)
・ IEEE 802.1X (TLS/PEAP)
*1 Standard which becomes the base of Wi-Fi certification
based on wireless LAN specification IEEE802.11.
*2 WEP key
Key information which is used for data encryption for data
transmission. Because same security key (WEP key) is used
for encryption/decryption, setting the identical security key
(WEP key) with the party you try to communicate is needed.
WPA (Wi-Fi Protected Access)
It is security standard designed by Wi-Fi Alliance. In
addition to existing network name (SSID) and security key
(WEP key), user authentication function and encryption
protocol are used to strengthen the security.
WPA2 (Wi-Fi Protected Access2)
It is a new version of WPA designed by Wi-Fi Alliance. It
is compatible with AES encryption stronger than WPA.
WPA- Personal/WPA2- Personal
It is a simplified authentication method for mutual
authentication when preset text strings match between the
wireless LAN access point and client.
WPA- Enterprise/WPA2- Enterprise
It is an authentication method by RADIUS of device or user
linking with IEEE 802.1X sever.
TKIP
It is an encryption method used for WPA. Although
encryption algorithm is RC4 as well as WEP, encryption key
is varied by 1 packet to heighten the security level.
AES (Advanced Encryption Standard)
For encryption algorithm, "Rijndael" developed by
encryption developer in Belgium is used. Data is encrypted
separating by fixed block length. For the data length 128, 192
and 256 bit are supported and for the key length 128, 192 and
256 bit are supported. So that security strength is extremely
high.
TLS
It is an authentication protocol of IEEE 802.1X. TLS
authenticates using electronic certification.
PEAP (Protected Extensible Authentication
Protocol)
It is an authentication protocol of IEEE 802.1X. PEAP
authenticates using electronic certification and ID/password.
IEEE 802.1X
It is an IEEE standard protocol for specifying user
authentication method on network. Client cannot access the
network unless mutual authentication to RADIUS server is
succeeded. When mutual authentication between client and
RADIUS server is succeeded, security key is issued per
session automatically and delivered to the client. Therefore,
it is unnecessary to set security key individually on the
wireless LAN client. Also the security key is changed
automatically during communication to heighten security.
For authentication types, there are TLS using electronic
certification and PEAP using electronic certification and user
name/password.
111
Appendix
Appendix
Export Administration Regulations
Intellectual Property Right
This product and its accessories may be under
coverage of the Export Administration Regulations of
Japan ("Foreign Exchange and Foreign Trade Control
Laws" and the related laws and regulations). And,
they are also under coverage of Export
Administration Regulations of the U.S. When
exporting and reexporting this product and its
accessories, take necessary procedures on your
responsibility and expense. For details, contact
Ministry of Economy, Trade and Industry of Japan or
US Department of Commerce.
Copyrights and portrait
rights
Except for the case protected by copyright laws such as
personal use, use of FOMA terminal to reproduce,
alter, or publicly transmit recorded pictures or sounds,
or copyrighted text, images, music or software
downloaded from websites without the copyright
holder's authorization is prohibited.
Note that taking photos or recordings at some
demonstrations, performances or exhibitions may be
prohibited even when only for personal use.
Avoid taking pictures of others with FOMA terminal
without their consent or disclosing recorded pictures
of others without their consent to general public
through Internet websites etc., because they may
infringe on portrait rights.
Trademarks
Others
112
Company and product names mentioned in this
manual are trademarks or registered trademarks of
their respective holders.
・ "FOMA", "i-motion", "i-mode", "i-αppli", "mopera",
"WORLD CALL", "WORLD WING", "Deco-mail",
"Chara-den", "ToruCa", "2in1", "DCMX", "i-area",
"OFFICEED" and logos of "i-mode", "i-αppli", "iC" are
trademarks or registered trademarks of NTT
DOCOMO.
・ Microsoft, Windows, Windows Live, Internet
Explorer, Silverlight, Excel and Outlook are
trademarks of Microsoft Corporation and/or its
subsidiaries in the US and /or other countries.
・ "Multitask" is a registered trademark of NEC
Corporation.
・ "Catch Phone (Call Waiting Service)" is a registered
・
・
・
・
・
・
・
is a registered trademark of FeliCa Networks, Inc.
・ McAfee is registered trademarks or trademarks of
・
・
・
・
・
・
・
・
・
・
・
・
McAfee, Inc. and/or its affiliates in the US and/or
other countries.
QuickTime is a registered trademark of Apple Inc. in
the US and other countries.
ATOK + APOT of Justsystem Corporation is installed
in this product as Japanese character conversion
function.
"ATOK" "APOT (Advanced Prediction Optimization
Technology)" are registered trademarks of
Justsystem Corporation.
This product contains software licensed by Symbian
Foundation Limited. Symbian is a registered
trademark of Symbian Foundation Limited.
"Privacy mode" is a registered trademark of FUJITSU
LIMITED.
Bluetooth and its logo are registered trademarks of
Bluetooth SIG, Inc., and NTT DOCOMO uses them
under license. Other trademarks and names inhere
to their respective owners.
"丸ゴシック (Maru Gothic)", "レイミン (Reimin)" and
"丸フォーク (Maru Fork)" are provided by Morisawa
& Company, Ltd. and the copyrights of these font
data belong to them. Names of "レイミン (Reimin)"
and "丸フォーク (Maru Fork)" are their trademarks.
Google, Google calendar and Google Map for Mobile
are trademarks of Google Inc.
Wi-Fi, Wi-Fi Alliance, and logos of Wi-Fi and Wi-Fi
CERTIFIED are registered trademarks of Wi-Fi
Alliance.
Blu-ray Disc and its logo are trademarks.
HDMI, HDMI logo and
High-Definition
Multimedia Interface are
trademarks and registered trademarks of HDMI
Licensing, LLC.
@nifty is a trademark of NIFTY Corporation.
Facebook is a registered trademark of Facebook, Inc.
in the United States and other countries.
Others
・
trademark of Nippon Telegraph and Telephone
Corporation.
Java and all Java-related trademarks and logos are
trademarks or registered trademarks of Sun
Microsystems, Inc. in the US and other countries.
This product contains
NetFront Browser,
NetFront Sync Client
of ACCESS CO., LTD.
ACCESS, the ACCESS logo and NetFront are
registered trademarks or trademarks of ACCESS
CO., LTD. in the United States, Japan and/or other
countries.
Copyright 2011 ACCESS CO., LTD. All rights
reserved.
Powered by JBlend Copyright 2002-2011
Aplix Corporation. All rights reserved.
JBlend and JBlend-related trademarks are
trademarks or registered trademarks of Aplix
Corporation in Japan and other countries.
This product contains Adobe Flash Player,
Adobe Flash Lite and Adobe Reader LE
technology of Adobe Systems Incorporated.
Adobe Flash Player Copyright 1996-2011 Adobe
Systems Incorporated. All rights reserved.
Adobe Flash Lite Copyright 2003-2011 Adobe
Systems Incorporated. All rights reserved.
Adobe Reader Mobile Copyright 1993-2011 Adobe
Systems Incorporated. All rights reserved.
Adobe, Adobe Reader, Flash
and Flash Lite are either
registered trademarks or
trademarks of Adobe Systems Incorporated in the
United States and/or other countries.
QR code is a registered trademark of Denso Wave
Inc.
microSDHC Logo is a trademark of SD-3C,
LLC.
FeliCa is a registered trademark of Sony Corporation.
113
・ Twitter is a registered trademark of Twitter, Inc in the
Others
United States or other countries.
・ Symantec and Symantec logo are registered
・
・
・
Others
114
trademarks of Symantec Corporation and its product
name is a registered trademark or trademark of
Symantec Corporation.
デジタルアーツ/DIGITAL ARTS, ZBRAIN, アイフィル
ター /i-フィルター are registered trademarks of
Digital Arts Inc.
Other company and product names mentioned in
this manual are trademarks or registered trademarks
of their respective holders.
The abbreviations of operating systems (Japanese
versions) below are used in this manual.
- Windows 7 indicates Microsoft Windows 7
(Starter, Home Basic, Home Premium,
Professional, Enterprise or Ultimate).
- Windows Vista indicates Windows Vista (Home
Basic, Home Premium, Business, Enterprise or
Ultimate).
- Windows XP indicates Microsoft Windows XP
Professional operating system or Microsoft
Windows XP Home Edition operating system.
・ FeliCa is a contactless IC card technology developed
by Sony Corporation.
・ This product contains a module developed by the
Independent JPEG Group.
・ This product is equipped with the technologies of
・
・
GestureTek, Inc.
Copyright 2006-2010, GestureTek, Inc. All Rights
Reserved.
"学研モバイル国語辞典 (Gakken Mobile JpnDic)", "学
研モバイル和英辞典 (Gakken Mobile JE Dic)", "学研モ
バイル英和辞典 (Gakken Mobile EJ Dic)", "今日は何の
日 (Today's trivia)" and "今日の歴史 (Today in
history)" are copyrighted by GAKKEN CO., LTD.
This product is licensed based on MPEG-4 Visual
Patent Portfolio License. The use of MPEG-4 Video
Codec function is allowed for personal and nonprofit
use only in the cases below.
- Recording moving pictures and i-motion that
conform to MPEG-4 Visual Standard (hereinafter
referred to as MPEG-4 Video)
- Playing MPEG-4 Videos recorded personally by
consumers not engaged in profit activities
- Playing MPEG-4 Video supplied from the provider
licensed from MPEG-LA
For further utilizing such as promotion, in-house
use or profit-making business, please contact
MPEG LA, LLC in U.S.
・ Content owners use Windows Media digital rights
management technology (WMDRM) to protect their
intellectual property, including copyrights. This
device uses WMDRM software to access WMDRMprotected content. If the WMDRM software fails to
protect the content, content owners may ask
Microsoft to revoke the software's ability to use
WMDRM to play or copy protected content.
Revocation does not affect unprotected content.
When downloading licenses for protected content,
you agree that Microsoft may include a "Revocation
List" with the licenses. Content owners may require
you to upgrade WMDRM to access their content. If
you decline an upgrade, you cannot access a content
that requires the upgrade.
Others
115
Index
A
AC adapter ......................................................... 22
Adjust volume ................................................... 30
Adjust volume 〈Windows 7〉........................... 82
After-Sales Service............................................ 95
Alarm clock ........................................................ 62
All lock................................................................ 36
Anonymous caller ............................................. 37
Area Mail ............................................................ 48
Attachments ...................................................... 45
Auto optimized shooting mode....................... 55
Auto timer.......................................................... 55
AUTO-GPS ......................................................... 53
Auto-sort method.............................................. 47
Available services overseas.............................. 43
B
Others
Back cover.......................................................... 21
Backup at once .................................................. 65
Backup 〈Windows 7〉........................................ 85
Bar code reader ................................................. 62
Basic menu......................................................... 25
Basic operation of screens and keys ............... 25
Basic style ............................................................7
Battery pack....................................................... 21
Bluetooth function ............................................ 63
Bookmark........................................................... 50
Brightness 〈Windows 7〉.................................. 79
C
Call Forwarding Service.................................... 41
Call Waiting ....................................................... 41
Caller ID notification ......................................... 23
Camera ............................................................... 54
Chaku-uta full .................................................... 57
116 Character entry.................................................. 28
Charging ............................................................ 22
Check new message......................................... 47
Communication configuration 〈Windows 7〉...
..................................................................................... 79
Continuous shooting........................................ 55
Cradle................................................................. 22
D
Deco-mail........................................................... 46
Decome-Anime ................................................. 46
Default setting .................................................. 23
Delete all data ................................................... 37
Display light time.............................................. 31
Display Machi-chara ......................................... 32
Displaying i-mode site...................................... 49
Displaying phone number................................ 23
Displaying web pages ...................................... 49
DOCOMO Connection Manager ...................... 67
DOCOMO keitai datalink.................................. 67
E
Early warning "Area Mail" ............................... 48
eco mode ........................................................... 33
Emergency call.................................................. 42
Export Administration Regulations .............. 112
F
FeliCa (Osaifu-Keitai) ........................................ 60
Focus mode ....................................................... 25
FOMA mode during communication .............. 69
Font size ............................................................ 31
Full Browser ...................................................... 49
G
Gadget 〈Windows 7〉......................................... 78
GPS function ..................................................... 52
Guide .................................................................. 27
H
Handwriting input ............................................. 28
I
i-αppli ................................................................. 58
IC card lock ........................................................ 36
iC transmission.................................................. 66
i-Channel ............................................................ 51
Icon ..................................................................... 24
i-concier.............................................................. 61
Image/i-appli...................................................... 31
i-mode fault diagnosis site............................... 96
i-mode password............................................... 34
i-motion/Movie.................................................. 59
Incoming call restriction ................................... 37
Indicator light .................................................... 33
Information ........................................................ 61
Infrared communication ................................... 66
Input mode......................................................... 29
Inquiries for software 〈Windows 7〉.............. 90
Intellectual Property Right ............................. 112
International calls.............................................. 38
International roaming....................................... 43
i-Widget.............................................................. 58
K
N
Network security code ..................................... 34
Network services .............................................. 41
O
Omakase Lock................................................... 36
On hold .............................................................. 39
Operation lock................................................... 36
Options and related devices ............................ 99
Osaifu-Keitai...................................................... 60
Overseas use ..................................................... 43
P
Packet communication 〈Windows 7〉............ 79
PC connection ................................................... 67
Personal data lock ............................................ 36
Phonebook .................................................. 38, 48
Pictogram .......................................................... 29
PIN1/PIN2 code ................................................. 34
Position location ............................................... 52
Power saving mode.......................................... 33
Power-saving function 〈Windows 7〉............. 83
Public mode....................................................... 40
PUK code ........................................................... 35
Others
Key/touch sound............................................... 30
Keypad dial lock ................................................ 36
Kisekae menu .................................................... 25
Kisekae Tool ...................................................... 32
Making a videophone call ................................ 38
Map .................................................................... 52
Menu list.......................................................... 100
microSD card..................................................... 64
microSD card control utility 〈Windows 7〉... 84
MUSIC Player .................................................... 57
Music&Video Channel...................................... 56
L Q
Light alert........................................................... 33
Listening volume............................................... 39
QR code ............................................................. 62
Quick schedule.................................................. 62
M R
Mail software 〈Windows 7〉............................. 82
Making a call...................................................... 38
Receive setting.................................................. 48
Received calls.................................................... 38 117
Receiving a call .................................................. 39
Receiving i-mode mail ...................................... 47
Record message ................................................ 40
Recovery 〈Windows 7〉..................................... 87
Redial.................................................................. 38
Replying to mail ................................................ 47
Reset................................................................... 37
Ring alerts & Sounds ........................................ 30
Roman letters input .......................................... 28
S
Others
118
SAR................................................................... 107
Savable/Recordable/Protectable number .... 106
Scan results ....................................................... 98
Scanning function ............................................. 98
Scene mode/effect ............................................ 55
Scheduler ........................................................... 62
Screen memo..................................................... 50
Security code..................................................... 34
Security lock ...................................................... 36
Security Scan (Scanning function) .................. 98
Security software 〈Windows 7〉..................... 74
Select startup menu.......................................... 31
Self mode........................................................... 36
Sending i-mode mail......................................... 45
Sending SMS ..................................................... 45
Set auto-update................................................. 98
Setting programs .............................................. 56
Shooting moving pictures................................ 55
Shooting still images........................................ 54
Shortcut menu................................................... 25
Silent mode........................................................ 30
Slide style ............................................................7
Smile finder........................................................ 55
Smiley ................................................................ 29
Software update 〈Windows 7〉....................... 85
Specification .................................................... 104
Stand-by launcher ............................................. 27
System status 〈Windows 7〉........................... 78
T
Terminal security code..................................... 34
Text input .......................................................... 29
Touch button on stand-by display .................. 25
Touch console 〈Windows 7〉...................... 76, 77
Touch function 〈Windows 7〉.......................... 79
Touch key input ................................................ 28
Touch lock ......................................................... 36
Touch panel....................................................... 26
Trackball 〈Windows 7〉..................................... 78
Troubleshooting ............................................... 93
U
UIM..................................................................... 21
Unregistered caller ........................................... 37
Update navi 〈Windows 7〉................................ 85
Updating software............................................ 97
USB mode ......................................................... 67
User information............................................... 23
V
Vibration mode ................................................. 30
Viewing and operating screen ........................ 50
Voice Mail service............................................. 41
W
Warranty............................................................ 95
Windows 7 setup 〈Windows 7〉...................... 73
Windows update 〈Windows 7〉....................... 85
Wireless LAN 〈Windows 7〉............................. 80
WMA file ............................................................ 57
WORLD CALL .................................................... 38
WORLD WING ................................................... 43
Z
Zoom 〈Windows 7〉........................................... 79
Please ask checking/changing subscription detail, application of various services and request of
various information materials online.
From i-mode iMenu ⇒ お客様サポート (Support) ⇒ お申込・お手続き (Application/Procedures)
⇒ 各種お申込・お手続き (Various application/Procedures)
No packet communication charges
From PCs
* In Japanese only
My docomo (http://www.mydocomo.com/) ⇒ 各種お申込・お手続き
(Various application/Procedures) * In Japanese only
* You need your "Network security code" to use the site
from i-mode.
* No packet communication charge applies to access the
site from i-mode. Packet communication charge applies to
access from overseas.
* You need "docomo ID/Password" to access the site from
your PC.
* If you do not have or forget "Network security code" or
"docomo ID/Password", contact to the numbers for
"General Inquiries" on the last page of this manual.
* You may not use the services depending on your
subscription.
* There are cases where the site may not be available to
system maintenance, etc.
Using mobile phone with your manners!
When using your mobile phone in a public
place, don’t forget to show common courtesy
and consideration for others around you.
Always turn OFF your FOMA terminal in cases
below
■ In a place where use of mobile phones is
prohibited
・Always turn OFF your FOMA terminal in an aircraft
or hospital.
Always set Public mode in cases below
■ When driving
・Using a mobile phone by holding it with the hand
while driving is subject to penalty.
■ In public places such as a theater, movie
theater or art museum
Consider privacy
Please be considerate of the privacy of
individuals around you when taking and
sending photos using camera-equipped
mobile phones.
DOCOMO’s environmental effort
Fewer pages in the instruction manual
In Japanese version, instruction manual covers
instructions only for basic functions to reduce pages
and paper usage.
For frequently-used functions and their details, see
使いかたガイド (Guide) (installed in this FOMA
terminal, in Japanese only) or visit NTT DOCOMO
website.
Recycle of mobile phones
To protect environment and recycle
the precious resources, mobile phone
and PHS enterprises collect phones,
batteries and chargers, regardless of
brands and manufacturers, at shops
labeled with the mark shown to the
left. Bring these devices to your
nearest docomo Shop.
General Inquiries
<docomo Information Center>
0120-005-250 (toll free)
* Service available in: English, Portuguese, Chinese, Spanish, Korean.
* Unavailable from part of IP phones.
(Business hours : 9:00 a.m. to 8:00 p.m.)
■ From DOCOMO mobile phones (In Japanese only)
(No prefix) 151 (toll free)
* Unavailable from land-line phones, etc.
■ From land-line phones (In Japanese only)
Repairs
■ From DOCOMO mobile phones (In Japanese only)
(No prefix) 113 (toll free)
* Unavailable from land-line phones, etc.
■ From land-line phones (In Japanese only)
0120-800-000 (toll free)
* Unavailable from part of IP phones.
(Business hours : 24 hours (open all year round))
0120-800-000 (toll free)
* Unavailable from part of IP phones.
(Business hours : 9:00 a.m. to 8:00 p.m. (open all year round))
● Please confirm the phone number before you dial.
● For Applications or Repairs and After-Sales Service, please contact the above-mentioned information center or the docomo
shop etc. near you on the NTT DOCOMO website or the i-mode site.
NTT DOCOMO website http://www.nttdocomo.co.jp/english/
i-mode site iMenu⇒お客様サポート (user support)⇒ドコモショップ (docomo Shop) * In Japanese only
Loss or theft of FOMA terminal or payment of cumulative cost overseas
<docomo Information Center>
(available 24 hours a day)
■ From DOCOMO mobile phones
International call access code
for the country you stay
Failures encountered overseas
<Network Support and Operation Center>
(available 24 hours a day)
■ From DOCOMO mobile phones
International call access code
for the country you stay
-81-3-6832-6600* (toll free)
-81-3-6718-1414* (toll free)
* You are charged a call fee to Japan when calling from a land-line phone, etc.
※ If you use F-07C, you should dial the number 㧗81-3-6832-6600
(to enter '㧗', press and hold the '0' key for at least one second).
* You are charged a call fee to Japan when calling from a land-line phone, etc.
※ If you use F-07C, you should dial the number 㧗81-3-6718-1414
(to enter '㧗', press and hold the '0' key for at least one second).
■ From land-line phones <Universal number>
■ From land-line phones <Universal number>
Universal number
international prefix
-8000120-0151*
Universal number
international prefix
-8005931-8600*
* You might be charged a domestic call fee according to the call rate for the country
* You might be charged a domestic call fee according to the call rate for the country
you stay.
you stay.
※ For international call access codes for major countries and universal number
※ For international call access codes for major countries and universal number
international prefix, refer to DOCOMO International Services website.
international prefix, refer to DOCOMO International Services website.
● If you lose your FOMA terminal or have it stolen, immediately take the steps necessary for suspending the use of the FOMA terminal.
● If the FOMA terminal you purchased is damaged, bring your FOMA terminal to a repair counter specified by DOCOMO after returning to Japan.
Don't forget your mobile phone ・・・ or your manners!
When using your mobile phone in a public place, don't forget to
show common courtesy and consideration for others around you.
To prevent damage to the environment, bring
used battery packs to a docomo service counter,
a docomo agent or a recycle center.
2011.5 (1st Edition)
CA92002-6362
Manual for PC Connection
Data Communication . . . . . . . . . . . . . . . . . . . . . . . . . . . . . . . . . . . . . . . . . . 1
Before use . . . . . . . . . . . . . . . . . . . . . . . . . . . . . . . . . . . . . . . . . . . . . . . . . . . 2
Flow of setup for data transfer (OBEX communication) . . . . . . . . . . . . 4
Flow of setup for data communication . . . . . . . . . . . . . . . . . . . . . . . . . . . 4
Connecting up PC to the FOMA terminal . . . . . . . . . . . . . . . . . . . . . . . . . 6
Installing FOMA communication configuration file (driver) . . . . . . . . . . 7
Preparing for Bluetooth connection . . . . . . . . . . . . . . . . . . . . . . . . . . . . 9
Using DOCOMO Connection Manager . . . . . . . . . . . . . . . . . . . . . . . . . . . . 10
Setting communications without using DOCOMO Connection Manager 15
Connecting to a Wi-Fi compatible PC . . . . . . . . . . . . . . . . . . . . . . . . . . . . 25
AT command . . . . . . . . . . . . . . . . . . . . . . . . . . . . . . . . . . . . . . . . . . . . . . . . 27
About Manual for PC Connection
This manual describes about data communications using the FOMA
terminal and how to install "FOMA communication configuration file" and
"DOCOMO Connection Manager".
Depending on the environment of your PC, some of operation procedures
and/or screens may be different.
・ This manual takes FOMA F-09C as an example, for illustrations and screen shots.
・ Driver name and modem name are described as "F09C", which vary by model.
・ In this manual, the description takes the case of FOMA USB Cable with Charge
Function 02 (optional) for example. Actually USB Cable F01 is required for some
models.
・ Illustrations used in this manual are examples. The actual shape, etc. may vary by
model.
・ Description of Bluetooth and Wi-Fi connection is only for compatible models.
'11.5 (Issue 1)
CA92002-6514
Data Communication
There are 3 communication modes available by connecting FOMA terminal and a PC : data
transfer (OBEX communication), packet communication and 64K data communication.
・ To make packet communications or 64K data communications or edit data such as the phonebook using
a PC connected, downloading the software from NTT DOCOMO website, installation and various settings
are required.
・ When performing packet communication overseas, use IP connection (packet communication is
unavailable with PPP connection). 64K data communication cannot be used overseas.
・ FOMA terminal does not support FAX communication or Remote Wakeup.
・ Data communication can be performed connecting with DOCOMO's PDA like sigmarion III. However,
FOMA terminal does not support high-speed communication compatible with HIGH-SPEED area.
❖ Data transfer (OBEX communication)
You can send and receive data such as image, music, phonebook or mail etc. to/from other FOMA terminals
or PCs etc.
・ Transferable data varies depending on transfer method. For data that can be transferred by each transfer
method, see "Instruction manual (detailed version) (in Japanese only)" (in pdf format) of the FOMA
terminal.
Infrared communication
iC transmission
FOMA terminal
Bluetooth communication
FOMA terminal
FOMA USB Cable with Charge Function 02
microSD card
DOCOMO keitai datalink
❖ Packet communication
You can connect to the Internet and perform data communication (packet communication).
Packet communication charges are based on the amount of data sent and received, which makes it suitable
for high-speed exchange of comparatively small amounts of data as in sending and receiving mail. No
communication charges are required when no data are exchanged even if you are connected to the
network. Therefore, sending/receiving data as needed while remaining connected to the network is
possible.
High-speed packet communication can be performed at a maximum reception speed of 7.2Mbps and a
maximum transmission speed of 5.7Mbps or 384kbps by using access points that support FOMA packet
communication such as mopera U of DOCOMO's Internet connection service. Best effort method which the
actual communication speed varies with the environment and the rate of congestion offers.
Note that communications of large-size data such as viewing websites containing images and downloading
will require high charges.
* The communication speed may be slower when connecting out of FOMA HIGH-SPEED area, connecting to access points
incompatible with HIGH-SPEED, or using devices incompatible with HIGH-SPEED such as DOCOMO's PDA; sigmarion
III.
* For Bluetooth connection, though the communication speed of FOMA terminal is equal to HIGH-SPEED, communication
may not be performed by maximum speed because the communication speed between Bluetooth devices has limits.
1
* Maximum speed of reception 7.2Mbps and transmission 5.7Mbps or 384kbps are the values in technical standards, thus they
are not indicated actual communication speed. Actual communication speed varies by the network congestion or
environment of communication.
❖ 64K data communication
You can connect to the Internet and perform 64K data communication.
Communication charges are based on the duration of the connection to the network regardless of the
volume of data, which makes it suitable for sending and receiving relatively large amounts of data as in
downloading multi-media contents.
Access points that support FOMA 64K data communication services such as mopera U of DOCOMO's
Internet connection service or ISDN synchronized 64K access points can be used.
Please be careful that a high cost will be charged for long-time communications.
Before use
◆ Operating environment
The operation environment for using data communication is as shown below. They may vary depending
on the PC system configurations.
Item
Computer
OS (Japanese version)
Requirements
PC/AT compatible computer
For USB cable connection : USB port (conform to USB specification 1.1/2.0)
For Bluetooth connection : Compatible with up to Bluetooth Standard Ver. 2.1 +
EDR (dialup networking profiles) supporting dialup networking profile
For Wi-Fi connection : Compatible with Wireless LAN Standard IEEE 802.11b or
IEEE 802.11g
Recommended 800×600 dots or more in display resolution and High Color 16
bits or more
(1,024×600 dots or more (Recommended 1,024 ×768 dots or more))*
Windows XP, Windows Vista, Windows 7
Memory requirements
Windows XP : 128MB or more Windows Vista : 512MB or more
Windows 7 : 1GB or more for 32-bit, 2GB or more for 64-bit
Hard disk capacity
5MB (10MB*) or more free disk space
Web browser*
Internet Explorer 6.0 or more
Mailer software*
Windows Mail and Outlook Express 6.0
* For operating environment of using DOCOMO Connection Manager.
・ For the latest information about operating environment, refer to NTT DOCOMO website.
・ DOCOMO will not guarantee operations on upgraded OS or added/changed operating environment.
・ Note that utilization may not be possible in certain operating environments. DOCOMO assumes no
responsibility for pertaining to operation under conditions other than that described above.
◆ Devices required
For USB cable connection, the following devices and software are required in addition to FOMA terminal
and a PC.
・ FOMA USB Cable with Charge Function 02 (optional) or FOMA USB Cable (optional)
・ For some models, USB cable F01 is required.
・ FOMA communication configuration file (driver)*
* Download from NTT DOCOMO website.
✔INFORMATION
・ USB cable for PC is not available because the connector type is different.
・ When using USB HUB, it may not operate properly.
2
◆ Usage precautions
❖ Internet service provider usage charges
When using the Internet on a PC, usage charge to your Internet service provider (hereinafter referred to as
Provider) is required. This charge is paid directly to the Provider, and is separated from the FOMA service
charge. For details, contact your Provider.
・ DOCOMO's Internet connection service mopera U is available. mopera U is a charged service requiring
subscription.
❖ Dialup connection (Provider etc.)
Different dialup connections are required for packet communication and 64K data communication. When
performing packet communication, use the dialup connection for packet communication. When performing
64K data communication, use the dialup connection for FOMA 64K data communication or ISDN
synchronized 64K data communication.
・ Connections to DoPa access points are unavailable.
・ For service and connection/settings of mopera, refer to mopera website.
http://www.mopera.net/mopera/index.html
❖ User authentication
Some dialup connections require user authentication before a connection can be established. If user
authentication is required, you must use your communication software or dialup network to enter your ID
and password and connect. Your ID and password will be assigned by the network administrator of the
connection destination such as your provider or corporate LAN. For details, contact your provider or
network administrator.
❖ Access authentication during using PC browser
If FirstPass (user certificate) is required for the access authentication while using PC browser, use FirstPass
PC software. Download FirstPass PC software from NTT DOCOMO website, install, and make required
settings. For details, refer to DOCOMO website.
❖ Conditions of packet communication and 64K data communication
To perform data communication in Japan, the following conditions must be satisfied.
- You must be within the FOMA service area.
- Packet communication requires an access point that supports FOMA packet communications.
- 64K data communication requires a dialup connection that supports FOMA 64K data communications or ISDN
synchronized 64K.
- For Bluetooth connection, a PC requires compatible with up to Bluetooth Standard Ver. 2.1 + EDR (dialup networking
profiles) supporting dialup networking profile.
- Wi-Fi connection requires a PC compatible with Wireless LAN Standard IEEE 802.11b or IEEE 802.11g.
* Note that even when the above requirements are satisfied, you may not be able to perform data communication if base
station traffic is heavy or the radio wave conditions are poor.
◆ Introduction of DOCOMO keitai datalink
DOCOMO keitai datalink is software to back up and edit your phone information such as phonebook and
mail. It is provided on NTT DOCOMO website. For details and download of this software, refer to the
following website.
http://datalink.nttdocomo.co.jp/
・ To use DOCOMO keitai datalink, installing FOMA communication configuration file (driver) in advance is
required.
・ For details of downloading procedure, data that can be transferred, operating environments, installing
procedure, operation procedure, etc., refer to the website above. For operations after installation, see
Help in the software.
・ To use DOCOMO keitai datalink, USB cable is required.
3
Flow of setup for data transfer (OBEX
communication)
When using USB Cable, install FOMA communication configuration file (driver) in advance.
Downloading FOMA communication configuration file (driver) from NTT DOCOMO website
and installing
Data transfer
Flow of setup for data communication
This section describes the setup work for performing packet communication or 64K data
communication.
For USB cable connection
For Bluetooth connection
a Downloading FOMA communication
configuration file (driver) from NTT
DOCOMO website and installing→P7
a Preparing for Bluetooth
connection→P8
b Connecting FOMA terminal to a PC→P6
c Confirming FOMA communication
ޓconfiguration file (driver)→P7
b Checking modem→P9
Downloading DOCOMO Connection Manager from NTT DOCOMO website and
installing→P12
Setting data communication by DOCOMO Connection Manager
Setting communications without using
DOCOMO Connection Manager→P15
Performing communication
4
Wi-Fi connection (packet communication only)
Setting the FOMA terminal to the AP mode
For AP mode, see “Instruction manual (detail version)
(In Japanese only)” (PDF file) of the FOMA terminal.
Setting the connection→P25
Performing communication
◆ Precautions for installation/uninstallation
・ Before starting operation, make sure that no other program is running and exit the program if any.
* Exit any resident programs on Windows including antivirus software.
Example : Right-click the icon displayed in the task bar, click "閉じる (Close)" or "終了 (End)".
・ For installing/uninstalling FOMA communication configuration file (driver) or DOCOMO Connection
Manager, make sure that a user with administrator's privilege performs the operation. Installing/
uninstalling the software by other users may produce an error. For details on PC administrator privileges,
contact your PC manufacturer or Microsoft Corporation.
・ When "ユーザーアカウント制御 (User account control)" screen is appeared, perform the following
operations (it does not appear on Windows XP).
- Windows 7 : Click "はい (Yes)", or enter password and click "OK".
- Windows Vista : Click "許可 (Permit)" or "続行 (Continue)", or enter password and click "OK".
・ For operations of a PC, settings of administrator privileges, etc., refer to the Instructions Manual of the
PC.
5
Connecting up PC to the FOMA terminal
Connecting/disconnecting to PC is explained here. Installing FOMA communication
configuration file (driver) is described separately.→P7
・ If you connect FOMA terminal to a PC before installing FOMA communication configuration file (driver),
Windows may automatically detect that USB cable has been inserted, and may request the driver. In such
a case, click "キャンセル (Cancel)" on the displayed screen to end.
・ The connection should be made with a PC and FOMA terminal both turned ON.
・ Location of external connection jack or connecting/disconnecting to a USB cable may vary depending on
the model. Refer to "Instruction manual (detailed version) (in Japanese only)" (in pdf format) of your
FOMA terminal.
◆ Inserting USB cable
1
Insert the connector of the USB cable into FOMA terminal's external
connection jack.
2
Insert the other end of the USB cable connector into the PC USB port.
・ When a PC and FOMA terminal are connected,
appears on the stand-by display of FOMA
terminal.
❖ Removing USB cable
1
Press the USB cable's release buttons on both sides of the connector and
remove the connector from FOMA terminal.
2
Remove the USB cable out from the PC.
✔INFORMATION
・ Be careful not to give excessive force to the connecter of the USB cable when connecting/disconnecting the cable
to/from FOMA terminal.
When disconnecting the connector, be sure to pull it straight while pressing the release button. Applying an
excessive force to disconnect the connector may give damage to it.
・ Do not remove the USB cable during data communication. The data communication is disconnected and it may
cause data loss or malfunction.
6
Installing FOMA communication configuration file
(driver)
To make data communication by connecting FOMA terminal and a PC with USB cable, FOMA
communication configuration file (driver) is required. Install the file before connecting FOMA
terminal for the first time to the PC.
・ Before operating, refer to "Precautions for installation/uninstallation".→P5
・ For without using USB cable, installing FOMA communication configuration file (driver) is not required.
・ Do not connect FOMA terminal until a message that instructs you to connect FOMA terminal to a PC
appears in Step 5.
1
Download FOMA communication configuration file (driver) from NTT
DOCOMO website.
http://www.nttdocomo.co.jp/support/utilization/application/foma/com_set/driver/index.html
・ Before downloading, check model name of FOMA terminal.
2
3
4
5
Double-click the downloaded file→Double-click the unpacked folder→Select
the file which your PC is applied to.
In the window displayed, double-click the "F09Cst.exe" icon.
Click "インストール開始 (Start installation)".
When a message indicating to connect FOMA terminal to the PC appears,
connect FOMA terminal to the PC.
・ Connect FOMA terminal while the power is ON.
6
On the Installation completion screen, click "OK".
◆ Confirming FOMA communication configuration file (driver)
・ When a PC does not detect FOMA terminal correctly, settings and communication cannot be performed.
<Example> Checking on Windows 7
1
(Start)→"コントロールパネル (Control panel)"→"システムとセキュリティ
(System and security)"→"デバイスマネージャー (Device manager)" in the "シ
ステム (System)" category.
Under Windows Vista
Click
(Start)→"コントロールパネル (Control panel)"→"システムとメンテナンス (System and
maintenance)"→"デバイスマネージャ (Device manager)".
Under Windows XP
a Click "スタート (Start)"→"コントロールパネル (Control panel)"→"パフォーマンスとメンテナンス
(Performance and maintenance)"→"システム (System)".
b On the "システムのプロパティ (Property of system)" screen, click "ハードウェア (Hardware)" tab
→"デバイスマネージャ (Device manager)".
7
2
Double-click the type of each device→Confirm that the name of the following
devices are registered.
・ Device types and names are shown as below.
The order to be displayed differs depending on
OSs.
-ポート(COMとLPT) (Port (COM and LPT)) :
FOMA F09C Command Port (COMx)*
FOMA F09C OBEX Port (COMx)*
-モデム (Modem) : FOMA F09C
-ユニバーサルシリアルバスコントローラー
(Universal Serial Bus Controller) or USB
(Universal Serial Bus) コントローラ
(Controller) : FOMA F09C
* Depending on the PC environment, x
represents different numbers.
◆ Uninstalling FOMA communication configuration file (driver)
・ Before operating, refer to "Precautions for installation/uninstallation".→P5
・ Before operating, remove FOMA terminal from the PC.
<Example> Uninstalling the driver under Windows 7, Windows Vista
1
Click
(Start)→"コントロールパネル (Control panel)"→"プログラムのアンイ
ンストール (Uninstall programs)" in the "プログラム (Programs)" category.
Under Windows XP
Click "スタート (Start)"→"コントロールパネル (Control panel)"→"プログラムの追加と削除 (Add/
delete Programs)".
2
Select "FOMA F09C USB Driver" or "FOMA F09C USB" and click "アンインス
トールと変更 (Uninstall and change)" (for Windows XP, "変更と削除 (Change
and delete)").
3
4
Confirm that "FOMA F09C Uninstaller" is displayed and click "はい (Yes)".
The uninstall process starts.
If the "ドライバを削除しました (Driver deleted)" screen appears, click "OK".
✔INFORMATION
・ When "FOMA F09C USB Driver" or "FOMA F09C USB" is not displayed on the deletion screen, execute the
operations in "Installing FOMA communication configuration file (driver)" again and uninstall.→P7
8
Preparing for Bluetooth connection
You can make data communication by connecting a PC compatible with Bluetooth and
FOMA terminal using Bluetooth.
・ For operations of a PC, refer to the instructions manual of the PC you use.
・ If the FOMA terminal is put on Bluetooth connection standby, (blue) appears on the stand-by display.
If the FOMA terminal and a PC are successfully connected in Bluetooth,
(blue) blinks.
◆ Registering a PC to the FOMA terminal
Register a PC for connecting to FOMA terminal with Bluetooth connection for the first time.
・ Depending on the PC environment, Bluetooth passkey may be required.
1
On FOMA terminal, m681.
2
On a PC, search for the FOMA terminal and register a device.
The FOMA terminal starts the registration waiting and returns to the stand-by display.
・ Perform while the FOMA terminal is in the registration waiting.
・ By some PC instruction manual, "探索 (Quest)" or "サーチ (Search)" may be used instead of "検索
(Retrieve)", or "ペアリング (Pairing)" may be used instead of "機器登録 (Registering device)".
3
When a pass key authentication screen appears, select "はい (Yes)".
・ Select "はい (Yes)" when the connection confirmation screen is displayed.
・ After the PC is registered as a device and the registration is completed, the FOMA terminal returns
to the stand-by display in the registration waiting state. Perform settings/operations on the PC as
required.
For entering Bluetooth passkey
Enter Bluetooth pass key (one-byte number 4 - 16 digit) g[OK]
・ Enter the same Bluetooth passkey on FOMA terminal and a PC.
・ When a confirmation screen of the default connection device (audio) setting appears, select "No".
✔INFORMATION
・ When registering FOMA terminal in a PC, distinguish FOMA terminal by the name of device if the PC recognizes
plural devices. When the PC recognizes many devices of the same name, distinguish by the address of device.
◆ Connecting to a registered PC
When connecting a registered PC to FOMA terminal using Bluetooth, set the FOMA terminal in connecting
stand-by.
1
2
On FOMA terminal, m68.
Move the cursor to [Accept registered]→a [Type]→Mark "Dial-up(DUN)"
to →C [Confrm].
The FOMA terminal starts the registration waiting and returns to the stand-by display.
・ When other Bluetooth device is connected, a confirmation screen for asking whether to
disconnect the device in connection and start the registration waiting.
3
Operate for connecting on the PC.
9
◆ Checking modem
Confirm the name of modem used on a PC or COM port number set for dialup connection.
・ When a PC does not detect FOMA terminal correctly, settings and communication cannot be performed.
<Example> Checking on Windows 7
1
Click
(Start)→"コントロールパネル (Control panel)"→"システムとセキュリ
ティ (System and security)"→"デバイスマネージャー (Device manager)" in
the "システム (System)" category.
Under Windows Vista
Click
(Start)→"コントロールパネル (Control panel)"→"システムとメンテナンス (System and
maintenance)"→"デバイスマネージャ (Device manager)".
Under Windows XP
a Click "スタート (Start)"→"コントロールパネル (Control panel)"→"パフォーマンスとメンテナンス
(Performance and maintenance)"→"システム (System)".
b On the "システムのプロパティ (Property of system)" screen, click "ハードウェア (Hardware)" tab
→"デバイスマネージャ (Device manager)".
2
Double-click the type of each device→Confirm the modem name or COM port
number.
・ Modem name or COM port number is shown under "モデム (Modem)", "ポート (COMとLPT) (Port
(COM and LPT))".
Using DOCOMO Connection Manager
DOCOMO Connection Manager is convenient software to use flat-rate data communication
or pay-as-you-go data communication. You can easily subscribe to mopera U and make a PC
setting according to your subscription status.
Also, you can check an estimate of data communication volume or usage fees by the charge
counter function.
In this manual, the method of installing DOCOMO Connection Manager is explained.
Not displayed in default setting.
For details, refer to ヘルプ (Help)
of ドコモ コネクションマネージャ
"DOCOMO Connection Manager".
Fee counter
Connect/Disconnect button
・ For Internet connection with FOMA terminal, you need to subscribe to Internet service provider (mopera
U etc.) applicable to services and data communication.
For details, refer to DOCOMO website.
10
✔INFORMATION
Using pay-as-you-go data communication (including i-mode flat-rate packet communication services)
・ Note that communications of large-size data such as viewing websites containing images using packet
communication and downloading (example: updating of application, music, movie, OS or anti-virus software) will
require high charges.
Note that FOMA flat-rate packet services such as Pake-hodai and Pake-hodai full are not applied to the data
communication by connecting the FOMA terminal to a PC or another device with a USB cable.
Using flat-rate data plan
・ For using of flat-rate data plan, you need to subscribe to Internet service provider applicable to flat-rate data
communication charging plan. For details, refer to DOCOMO website.
Using mopera
・ For connection/settings of mopera, refer to mopera website.
http://www.mopera.net/mopera/support/index.html
◆ Before installing DOCOMO Connection Manager
Before installing DOCOMO Connection Manager, check the items below and perform to change setting of
software/uninstall as required.
・ Prepare FOMA terminal and USB Cable (For Bluetooth connection, USB cable is not required).
・ Check the contents of subscription for services and Internet service provider.
・ If installing connection software except for DOCOMO Connection Manager, change the setting not to be
activated automatically as required.→P12 "Using connection software except for DOCOMO Connection
Manager"
❖ Changing setting of Internet Explorer
・ Before installing DOCOMO Connection Manager, set to "ダイヤルしない (No dialing)" for connection
setting at "インターネットオプション (Internet option)" field of Internet Explorer in advance.
<Example> Changing under Windows 7, Windows Vista
1
Click
2
3
Click "ツール (Tool)"→"インターネットオプション (Internet option)".
4
Click "OK".
(Start)→"すべてのプログラム (All programs)"→"Internet Explorer".
Under Windows XP
Click "スタート (Start)"→Select "すべてのプログラム (All programs)" → Click "Internet Explorer".
Click "接続 (Connection)" tab→Select "ダイヤルしない (No dialing)".
11
❖ Using connection software except for DOCOMO Connection Manager
DOCOMO Connection Manager includes same function as that of software below and using together is not
required. Perform to change setting not to be activated or uninstall as required.
・ mopera U start up tool
・ mopera U connection & setting tool
・ FOMA PC configuration software
・ FOMA Byte counter
To use Mzone (docomo Public wireless LAN service) by DOCOMO Connection Manager, uninstall the
following public wireless LAN connection software. And, when installing all at once, Mzone connection
cannot be used by DOCOMO Connection Manager.
・ U公衆無線LANユーティリティソフト (U public wireless LAN utility software)
・ ドコモ公衆無線LANユーティリティソフト (DOCOMO public wireless LAN utility software)
・ ドコモ公衆無線LANユーティリティプログラム (DOCOMO public wireless LAN utility program)
◆ Installing DOCOMO Connection Manager
<Example> Installing under Windows 7
1
Download DOCOMO Connection Manager from NTT DOCOMO website.
2
Double-click the "dcm_connect_mng_setup.exe" icon.
3
Click "次へ (Next)".
4
Confirm "注意事項 (Precautions)" and click "次へ (Next)".
http://www.nttdocomo.co.jp/support/utilization/application/service/connection_manager/
index.html
・ Check OS of your PC and select the applicable file.
・ When the warning screen of security is displayed, click "実行 (Execute)".
12
5
Confirm the contents of ソフトウェア使用許諾契約 (Software license
agreement) and if you agree to the agreement, select "使用許諾契約の条項に
同意します (Agree to the clauses of the agreement)" and click "次へ (Next)".
6
Confirm the installing folder and click "次へ (Next)".
・ To change the installation destination, click "変更 (Change)" and specify any installation
destination.
7
Click "インストール (Install)".
Installation starts.
13
8
When the "InstallShieldウィザードを完了しました (InstallShield wizard is
completed)" screen appears, click "完了 (Done)".
Installing DOCOMO Connection Manager is completed.
✔INFORMATION
・ Installation may take a few minutes.
・ When a message notifying you to reboot Windows is displayed, follow the instruction of screen and reboot.
・ Do not install during data communication.
◆ Starting DOCOMO Connection Manager
・ Before operating, make sure that a PC and FOMA terminal are properly connected.
<Example> Setting under Windows 7, Windows Vista
1
Click
(Start)→"すべてのプログラム (All Programs)"→
"NTT DOCOMO"→"ドコモ コネクションマネージャ (DOCOMO Connection
Manager)"→"ドコモ コネクションマネージャ (DOCOMO Connection
Manager)".
Under Windows XP
Click "スタート (Start)"→Select "すべてのプログラム (All programs)"→"NTT DOCOMO"→"ドコモ
コネクションマネージャ (DOCOMO Connection Manager)" and click "ドコモ コネクションマネージャ
(DOCOMO Connection Manager)".
DOCOMO Connection Manager starts.
When booting a PC at first time, the setting wizard screen appears automatically.
・ According to the setting wizard, perform to set for making data communication connecting to
Internet.
After setting, you can perform communication using DOCOMO Connection Manager.
For details, refer to "ドコモ コネクションマネージャ操作マニュアル (DOCOMO Connection
Manager operation manual)".
14
✔INFORMATION
・ Just exiting the Internet browser or mail software may not disconnect communication. When you do not use
communication, be sure to disconnect the communication from "切断する (Disconnect)" button of DOCOMO
Connection Manager.
・ Please note that if auto update is set for OS update etc., the software is updated automatically and high cost may
be charged for the packet communication fee.
Connect/Disconnect button
Setting communications without using DOCOMO
Connection Manager
The method of dialup connection setup without DOCOMO Connection Manager is explained.
◆ Flow of dialup network setting
・ Flow of setup for data communication→P4
・ Before operating, make sure that a PC and FOMA terminal are properly connected.
Setting the dialup connection (APN)*→P16
・When the access point is mopera U or mopera, you do not need to set.
Setting Show/Hide caller ID*→P17
・Set as required.
Setting Dialup Network
・Setting for Windows 7, Windows Vista→P19
・Setting for Windows XP→P21
* Set for packet communication.
Communication software to input AT commands is required for settings.
The method of setting using "ハイパーターミナル (Hyper terminal)" that comes with Windows XP is
explained here. Windows 7 and Windows Vista do not support "ハイパーターミナル (Hyper terminal)". For
Windows 7 and Windows Vista, set using the software supported by Each OS (Follow the method for the
software to be used.).
15
◆ Setting the dialup connection (APN)
❖ The dialup connection (APN) and registration number (cid)
The dialup connections (APN) for packet communication can be set for registration numbers (cid) between
1 and 10 in FOMA terminal. By default, "mopera.ne.jp" (APN) to connect to mopera is registered in cid1,
"mopera.net" (APN) to connect to mopera U is registered in cid2 and 3, and "mpr.ex-pkt.net" (APN) to
connect in 128K communication is registered in cid4. For connecting to other providers or corporate LANs,
register APN for cid5-10.
・ For the dialup connections (APN), inquire your provider or network administrator.
・ For USB cable connection and Bluetooth connection, setting each dialup connections (APN) is required.
・ For packet communication, if switching between USB cable connection and Bluetooth connection,
setting the dialup connections (APN) is required again.
・ The dialup connection settings can be considered as phonebook entries registered for packet
communication. The comparison between dialup connection settings and FOMA terminal phonebook is
as shown below.
Connection (APN)
Phonebook item
Registration number (cid)
Registration number (Phonebook No.)
Connection name (APN)
Party's name
*99***<cid># (packet communication)
Party's phone number
・ The registered cid become the connection number in the dialup connection numbers setting.
❖ Setting the dialup connection (APN)
<Example> Setting under Windows XP
1
Click "スタート (Start)"→Select "すべてのプログラム (All programs)"→"アク
セサリ (Accessories)"→"通信 (Communication)" and click "ハイパーターミナ
ル (Hyper terminal)".
2
Enter the desired dialup connection name in "名前 (Name)"→Click "OK".
・ The following characters (one-byte) cannot be
used in "名前 (Name)".
¥/:*?<>|”
16
3
Enter a fictional phone number (such as "0") for "電話番号 (Phone number)"
→Select "接続方法 (Connection method)"→Click "OK".
・ "市外局番 (Area code)" differs depending on the
PC environment. The code does not relate to
Dialup connection (APN) setup. So no need to
change.
・ Set as follows at "接続方法 (Connection method)"
field.
For USB cable connection : Select "FOMA F09C".
For Bluetooth connection : Select "ご使用の
Bluetoothリンク経由標準モデム (Standard
modem via Bluetooth link you use)" or
"Bluetooth機器メーカが提供しているBluetooth
モデム (Bluetooth modem provided by
Bluetooth device manufacturer)".
4
5
Click "キャンセル (Cancel)" on the "接続 (Connect)" screen.
Enter the dialup connection (APN) in the format "AT+CGDCONT =<cid>,
"<PDP_TYPE>", "<APN>""→
<cid> : Enter any number between 5-10.
<PDP_TYPE> : IP or PPP
<APN> : Dialup connection (APN)
・ +CGDCONT command→P34 "Supplement to AT
command"
・ If nothing is displayed even when AT command is
entered, enter ATE1 and press .
6
Confirm that "OK" is displayed and click "ファイル (File)"→Click "ハイパー
ターミナルの終了 (End HyperTerminal)".
7
When confirming disconnection, click "はい (Yes)"→When confirming saving,
click "いいえ (No)".
◆ Setting Show/Hide caller ID
You can set to show/hide call ID for packet communication at once.
Caller ID is your important information. Take care when deciding to disclose your caller ID.
・ If "Not notify" is set when using mopera U or mopera, connection is unavailable.
<Example> Setting under Windows XP
1
Perform Step 1 - 4 in "Setting the dialup connection (APN)".
17
2
Enter notify/not notify of caller ID in the format "AT*DGPIR=<n>"→
3
Confirm that "OK" is displayed and click "ファイル (File)"→Click "ハイパー
ターミナルの終了 (End HyperTerminal)".
4
When confirming disconnection, click "はい (Yes)"→When confirming saving,
click "いいえ (No)".
.
<n> : 0-2
0 : Connect directly (Default)
1 : Connect prefixing 184 (Not notify)
2 : Connect prefixing 186 (Notify)
・ If nothing is displayed even when AT command is
entered, enter ATE1 and press .
❖ Show/Hide caller ID function by dialup network settings
The dialup network settings can also be used to append 186 (Notify)/184 (Not notify) to the dialup
connection number.
・ The Show/Hide of caller ID when both of the *DGPIR command and dialup network settings are set is
as shown below.
Setting made by *DGPIR
command
Dialup network
setting (<cid>=3)
*99***3#
No setting
Caller ID is not sent
Caller ID is sent
Caller ID is sent
Caller ID is not sent
Caller ID is sent
184*99***3#
Caller ID is not sent
186*99***3#
Caller ID is sent
◆ Setting dialup network
In this manual, the description takes the case of IP connection to mopera U via packet communication for
example.
・ When connecting to mopera U or mopera via packet communication, enter the following number in the
phone number field.
mopera U (PPP connection) : *99***2#
mopera U (IP connection) : *99***3#
128K communication (PPP connection) : *99***4#
mopera (PPP connection) : *99***1#
・ When connecting to mopera U or mopera via 64K data communication, enter the following number in
the phone number field to connect to.
mopera U : *8701
mopera : *9601
18
❖ Setting for Windows 7, Windows Vista
1
Click
(Start)→"コントロールパネル (Control panel)"→"ネットワークの状態
とタスクの表示 (Network status and tasks)" in the "ネットワークとインター
ネット (Network and Internet)" category.
Under Windows Vista
Click
(Start)→"接続先 (Dialup connection)".
2
Click "新しい接続またはネットワークのセットアップ (Setup new connection
or network)".
Under Windows Vista
Click "接続またはネットワークをセットアップします (Set up connection or network)".
3
Select "ダイヤルアップ接続をセットアップします (Set up dialup connection)"
and click "次へ (Next)".
When the "どのモデムを使いますか? (Which modem will you use?)" screen is displayed
For USB cable connection : Click "FOMA F09C".
For Bluetooth connection : Click "ご使用のBluetoothリンク経由標準モデム (Standard modem via
Bluetooth link you use)" or "Bluetooth機器メーカが提供しているBluetoothモデム (Bluetooth
modem provided by Bluetooth device manufacturer)".
4
Enter the phone number of the dialup connection in "ダイヤルアップの電話番
号 (Dialup phone number)" ("*99***<cid>#" for packet communication)
with one-byte→Enter "ユーザー名 (User name)"→Enter "パスワード
(Password)"→Enter "接続名 (Connection name)" and click "接続 (Connect)".
<cid> : The number registered in P16 "Setting the dialup connection (APN)"
・ In "ユーザー名 (User name)" and "パスワード
(Password)", enter the user name and password
specified by your provider or network
administrator.
・ When the access point is mopera U or mopera,
you do not need to enter "ユーザー名 (User
name)" or "パスワード (Password)".
・ You cannot use "." (one-byte period) at the
beginning of "接続名 (Connection name)". Also,
the following characters (one-byte) cannot be
used.
¥/:*?<>|
19
5
6
On the connecting screen, click "スキップ (Skip)".
・ Only make settings without connecting to the Internet right away.
On the "接続の使用準備ができました (Preparation for using is completed)"
screen, click "閉じる (Close)".
Under Windows Vista
a On the " インターネット接続テストに失敗しました (Failed in Internet connection test)" screen,
click "接続をセットアップします (Set up connection)".
b Click "閉じる (Close)".
7
On the "ネットワークと共有センター (Network and shared center)" screen,
click "アダプターの設定の変更 (Change adapter configuration)" appeared on
the left of the top.
Under Windows Vista
Click
(Start)→"接続先 (Dialup connection)".
8
9
Right-click the dialup connection created and click "プロパティ (Property)".
Confirm the setting of each item in "全般 (General)" tab.
・ When multiple modems are connected to a PC,
set as follows.
For USB cable connection : Select only "モデムFOMA F09C (Modem-FOMA F09C)" at "接続の
方法 (Connection method)" field.
For Bluetooth connection : Select "モデム- (ご使用
のBluetoothリンク経由標準モデム) (Modem(Standard modem via Bluetooth link you use))"
or "モデム- (Bluetooth機器メーカーが提供して
いるBluetoothモデム) (Modem- (Bluetooth
modem provided by Bluetooth device
manufacturer))" at "接続の方法 (Connection
method)" field.
・ Uncheck ( ) other than selected modem.
・ COM port number assigned to the modem
displayed at "接続の方法 (Connection method)"
field differs by the environment of a PC you use.
・ Uncheck ( ) "ダイヤル情報を使う (Use dial
information)".
20
10
Click "ネットワーク (Network)" tab→Set each item as shown below.
11
12
Click "オプション (Option)" tab→Click "PPP設定 (PPP settings)".
13
Click "OK".
・ Uncheck (
) "インターネットプロトコルバージョ
ン6 (TCP/IPv6) (Internet Protocol Version 6 (TCP/
IPv6))".
・ When settings of IP and DNS information have
been requested from the provider, etc. select "イ
ンターネットプロトコルバージョン4 (TCP/IPv4)
(Internet Protocol Version 4 (TCP/IPv4))", click "プ
ロパティ (Property)" and set various information.
・ If settings of other items have been requested
from the provider, etc., check/uncheck as
required.
Uncheck all items (
) and click "OK".
Performing communication→P24
❖ Setting for Windows XP
1
Click "スタート (Start)"→Select "すべてのプログラム (All programs)"→"アク
セサリ (Accessories)"→"通信 (Communication)" and click "新しい接続ウィ
ザード (New connection wizard)".
2
On the "新しい接続ウィザードの開始 (Start new connection wizard start)"
screen, click "次へ (Next)".
3
Select "インターネットに接続する (Connect to Internet)" and click "次へ
(Next)".
4
Select "接続を手動でセットアップする (Set up connection manually)" and
click "次へ (Next)".
5
Select "ダイヤルアップモデムを使用して接続する (Use dialup modem to
connect)" and click "次へ (Next)".
When "デバイスの選択 (Device selection)" screen is displayed
For USB cable connection : Select "モデム-FOMA F09C (Modem-FOMA F09C)" and click "次へ
(Next)".
For Bluetooth connection : Select "モデム- (ご使用のBluetoothリンク経由標準モデム) (Modem(Standard modem via Bluetooth link you use))" or "モデム- (Bluetooth機器メーカが提供している
Bluetoothモデム) (Modem- (Bluetooth modem provided by Bluetooth device manufacturer))" and
click "次へ (Next)".
21
6
Enter the desired dialup connection name in "ISP名 (ISP name)"→Click "次へ
(Next)".
・ You cannot use "." (one-byte period) at the
beginning of "ISP名 (ISP name)". Also, the
following characters (one-byte) cannot be used.
¥/:*?<>|”
7
Enter the phone number of the dialup connection in "電話番号 (Phone
number)" ("*99***<cid>#" for packet communication) with one-byte→
Click "次へ (Next)".
<cid> : The number registered in P16 "Setting the dialup connection (APN)"
8
Enter "ユーザー名 (User name)"→Enter "パスワード (Password)"→Enter "パス
ワードの確認入力 (Password confirmation entry)"→Select all items as shown
below and click "次へ (Next)".
・ In "ユーザー名 (User name)" and "パスワード
(Password)", enter the user name and password
specified by your provider or network
administrator.
・ When the access point is mopera U or mopera,
you do not need to enter "ユーザー名 (User
name)", "パスワード (Password)" or "パスワード
の確認入力 (Password confirmation entry)".
9
On the "新しい接続ウィザードの完了 (New connection wizard is completed)"
screen, click "完了 (Done)".
10
Click "スタート (Start)"→Select "すべてのプログラム (All programs)"→"アク
セサリ (Accessories)"→"通信 (Communication)" and click "ネットワーク接続
(Network connection)".
22
11
Select the created dialup connection icon and click "ファイル (File)"→Click "
プロパティ (Property)".
12
Confirm the setting of each item in "全般 (General)" tab.
・ When plural modems are connected to a PC, set
as follows.
For USB cable connection : Select only "モデムFOMA F09C (Modem-FOMA F09C)" at "接続方
法 (Connection method)" field.
For Bluetooth connection : Select "モデム- (ご使用
のBluetoothリンク経由標準モデム) (Modem(Standard modem via Bluetooth link you use))"
or "モデム- (Bluetooth機器メーカが提供してい
るBluetoothモデム) (Modem-(Bluetooth
modem provided by Bluetooth device
manufacturer))" at "接続方法 (Connection
method)" field.
・ Uncheck ( ) other than selected modem.
・ COM port number assigned to the modem
displayed at "接続方法 (Connection method)"
field differs by the environment of a PC you use.
・ Uncheck ( ) "ダイヤル情報を使う (Use dial information)".
13
Click "ネットワーク (Network)" tab→Set each item as shown below→Click "
設定 (Settings)".
・ When settings of IP and DNS information have
been requested from the provider, etc. select "イ
ンターネットプロトコル (TCP/IP) (Internet
protocol (TCP/IP))", click "プロパティ (Property)"
and set necessary information.
・ Since "QoSパケットスケジューラ (QoS packet
scheduler)" settings in "この接続は次の項目を使用
します (Use these items for this connection)" can
not be changed, leave it as it is.
14
Uncheck all items (
) and click "OK".
23
15
Click "OK".
Performing communication→P24
◆ Performing communication via dialup connection
Starting communication and disconnection are explained here.
<Example> Under Windows 7
1
Connect FOMA terminal to a PC.
2
Click
(Start)→"コントロールパネル (Control panel)"→"インターネットへの
接続 (Connect to the Internet)" in the "ネットワークとインターネット
(Network and Internet)" category.
For USB cable connection→P6
For Bluetooth connection→P9
Under Windows Vista
Click
(Start)→"接続先 (Dialup connection)"→Select the dialup connection and click "接続
(Connect)".→Go to Step 4
Under Windows XP
Click "スタート (Start)"→Select "すべてのプログラム (All programs)"→"アクセサリ (Accessories)"→
"通信 (Communication)" and click "ネットワーク接続 (Network connection)"→Double-click the
connection icon.→Go to Step 4
3
4
Select the dialup connection and click "次へ (Next)".
Enter "ユーザー名 (User name)"→Enter "パスワード (Password)"→Click "ダイ
ヤル (Dial)".
・ In "ユーザー名 (User name)" and "パスワード
(Password)", enter the user name and password
specified by your provider or network
administrator.
・ When using mopera U or mopera, you do not
need to enter "ユーザー名 (User name)" or "パス
ワード (Password)".
・ When "ユーザー名 (User name)" was entered or "
パスワード (Password)" was saved while settings,
these entries are no longer necessary.
・ Click "OK" when the connection established
screen is displayed.
24
✔INFORMATION
・ FOMA terminal displays a connecting screen when you execute packet communication or 64K data
communication. The following screens are displayed when a connection has been established.
For packet
For 64K data
communication
communication
・ The communication speed displayed on your PC may differ from actual speed.
・ The communication is available only with FOMA terminal that was connected when the dialup network was set.
❖ Disconnecting communication
Just exiting the PC browser may not disconnect communication. To ensure disconnection, perform the
following operation.
<Example> Under Windows 7
1
Click
on the task tray→Connection name to disconnect→"切断
(Disconnect)".
Under Windows Vista
Right-click
in the task tray→Select "切断 (Disconnect)" and click the dialup connection to
disconnect.
Under Windows XP
Click dial-up icon in the task tray→Click "切断 (Disconnect)".
Connecting to a Wi-Fi compatible PC
Even out of public wireless LAN area, you can perform packet communication with
connecting a Wi-Fi compatible PC to use FOMA terminal as an access point.
・ Switch FOMA terminal to AP mode ON in advance. For AP mode settings, refer to "Instruction manual
(detailed version) (in Japanese only)" (PDF file) of the FOMA terminal.
<Example> Under Windows 7
1
Click
(Start)→"コントロールパネル (Control panel)"→"ネットワークの状態
とタスクの表示 (Network status and tasks)" in the "ネットワークとインター
ネット (Network and Internet)" category.
Under Windows Vista
Click
(Start)→"接続先 (Dialup connection)".
2
Click "新しい接続またはネットワークのセットアップ (Setup new connection
or network)".
Under Windows Vista
Click "接続またはネットワークをセットアップします (Set up connection or network)".
25
3
Select "ワイヤレスネットワークに手動で接続します (Connect to Wireless
network manually)" and click "次へ (Next)".
・ To make wireless connection for the first time, on the "ワイヤレスネットワークに手動で接続します
(Connect to wireless network manually)" screen, change ワイヤレスアダプタ (Wireless adapter) to
"ワイヤレスネットワーク接続 (Wireless network connection)" and click "次へ (Next)".
4
Enter network information and click "次へ (Next)".
・ Set it to the same as "無線設定 (Wireless settings)" of the FOMA terminal.
- ネットワーク名 (Network name) : Enter the SSID set for the FOMA terminal.
- セキュリティの種類 (Security type), 暗号化の種類 (Encryption type) : Set "認証方式
(Authentication method)" information in the FOMA terminal. In "認証方式 (Authentication
method)", it is described in the format combining "セキュリティの種類 (Security type)" and "暗
号化の種類 (Encryption type)" settings. Select a corresponding setting. "パーソナル (Personal)"
in "セキュリティの種類 (Security type)" is the same meaning as "PSK".
- セキュリティキー (Security key) (For Windows Vista, "セキュリティキーまたはパスフレーズ
(Security key or pass phrase)" : Enter encryption key (WEP or PSK).
5
Click "閉じる (Close)".
■ To re-execute communication via Wi-Fi connection after disconnection
Under Windows 7
(Start)→"コントロールパネル (Control panel)"→"ネットワークの状態とタスクの表示 (Network status
and tasks)" in the "ネットワークとインターネット (Network and Internet)" category→On the "ネットワー
クと共有センター (Network and sharing center)" screen, "ネットワークに接続 (Connect to network)"→
Click a connection name on the screen→Click "接続 (Connect)".
Under Windows Vista
(Start)→"接続先 (Connection point)"→Select a connection point and click "接続 (Connect)".
26
AT command
AT commands are commands for setting FOMA terminal functions using a PC. FOMA
terminals comply with AT commands and support some extended commands and
proprietary AT commands.
❖ AT command input format
"AT" must be entered before each AT command. Commands must be entered in one-byte alphanumeric
characters.
<Example> Connecting to mopera U with ATD command
ATD*99***3#
Return character : Press Enter key. (Command separator)
Parameter : Command's argument
Command : Command name
AT commands and their parameters must be entered on a single line. All the characters from the first
character until the character directly preceding
must be entered on a single line. Each line can be up to
256 characters including "AT".
❖ AT command input mode
To operate FOMA terminal using AT commands, a PC must be in terminal mode. Terminal mode is a mode
that lets the PC operate as a single communication terminal. When terminal mode is set, the characters
entered from the keyboard are sent directly to the communication port to operate FOMA terminal.
・ Offline mode
FOMA terminal is in stand-by. FOMA terminal must be in stand-by status to use AT commands to control
it.
・ Online data mode
FOMA terminal is communicating. If you enter AT commands when FOMA terminal is performing
communication, the sent characters are sent directly to the communication receiver and may cause the
receiver's modem to malfunction. Do not enter AT commands while FOMA terminal is performing
communication.
・ Online command mode
AT commands can be used even when FOMA terminal is in communication mode. These operations
make it possible to execute AT commands without interfering with the connection to the communication
receiver, and normal communication can continue after the commands have finished executing.
Switching between online data mode and online command mode
To switch FOMA terminal from online data mode to online command mode, you can use either of the
following procedures.
・ Enter +++ command or code set in the S2 register.
・ Turn the RS-232C*ER signal OFF when set in "AT&D1".
* The USB or Bluetooth interface emulates an RS-232C signal line so RS-232C signal control using communication
applications is possible.
To switch from online command mode to online data mode, enter "ATO ".
✔INFORMATION
・ When making a call or sending an AT command from external device, it is sent from Number A with 2in1 in Dual
mode or A mode, and from Number B in B mode.
27
◆ List of AT command
・ The followings are AT command that can be used via the FOMA F09C (Modem).
・ Entering "¥" may cause "\" to appear depending on the font setting for a PC or communication software.
・ If the battery pack is removed from FOMA terminal before the terminal power is turned off, the setting
values may not be recorded.
Upper slot : Command
Lower slot : Example
A/
A/
OK
AT
AT
OK
ATA
RING
ATA
CONNECT
ATD
ATD*99***1#
CONNECT 460800
ATE<n>*1
ATE1
OK
ATH
ATH
NO CARRIER
ATI<n>
Description
Execute the previously executed command again.
When previous response is "ERROR", "ERROR" is returned.
Use commands on this list by prefixing to commands other than A/ or +++. When using only
this command, "OK" is returned with FOMA terminal enabled for using AT commands.
Perform the receiving process when entered while receiving a packet communication or
64K data communication.
The following commands can be entered when receiving a packet communication.
ATA184 : Handling of incoming calls : Send caller ID function OFF
ATA186 : Handling of incoming calls : Send caller ID function ON
ATD*99***<cid># : Performs calling process for packet communication.
If <cid> or ***<cid> is omitted, <cid>=1 is set.
ATD [parameter] [phone number] : Perform calling process for 64K data communication.
Calling process is not permitted if phone number contains characters other than the
following.
0-9, *, #, A, a, B, b, C, c
The following characters and a space can be entered but are not recognized in dialing.
,(comma), !, -, @, D, d, P, p, T, t, W, w
Setting Show/Hide caller ID is enabled by inserting 186 or 184 after ATD.
ATDN or ATDL can be used for redial calling.
Set whether FOMA terminal will return echo for command sent from a PC.
n=0 : Echo OFF n=1 : Echo ON (default)
Normal usage is n=1. If the PC has an echo function, setting this command to n=0 prevents
double display of characters.
Disconnect line when entered during a communication.
Execute in online command mode.→P27
ATI0
NTT DoCoMo
OK
Display the confirmation code.
n=0 : "NTT DoCoMo" n=1 : Display model name of FOMA terminal
n=2 : Display version of FOMA terminal n=3 : Display elements of ACMP signals
n=4 : Display details of functions that can be communicated by FOMA terminal in numeric
ATO
Return from online command mode to online data mode during communication.
ATO
CONNECT 460800
ATQ<n>*1
ATQ0
OK
ATS0=<n>*1
ATS0=0
OK
ATS2=<n>
ATS2=43
OK
ATS3=<n>
ATS3=13
OK
Set whether to display result code.
n=0 : Display (default) n=1 : Not display
When ATQ1 is executed, "OK" is not returned.
Set number of rings until FOMA terminal receives communication automatically.
n=0 : Not receive automatically (default)
n=1-255 : Receive automatically with specified number of rings
ATS0? : Display current settings
Set escape character.
n=0-127 (default : n=43) When n=127 is set, escape is unavailable.
ATS2? : Display current settings
Set the carriage return (CR) character that identifies the end of AT command character
string. Appended to end of echoed command character string and result code.
n=13 (fixed value)
ATS3? : Display current settings
28
Upper slot : Command
Lower slot : Example
ATS4=<n>
ATS4=10
OK
ATS5=<n>
ATS5=8
OK
ATS6=<n>
ATS6=5
OK
ATS8=<n>
ATS8=3
OK
ATS10=<n>*1
ATS10=1
OK
ATS30=<n>
ATS30=0
OK
ATS103=<n>
ATS103=1
OK
ATS104=<n>
ATS104=1
OK
ATV<n>*1
ATV1
OK
ATX<n>*1
ATX4
OK
ATZ*3
Description
Set the line feed (LF) character. When result code is displayed as alphabetic characters,
appends the character after the carriage return (CR) character.
n=10 (fixed value)
ATS4? : Display current settings
Set the back space (BS) character. When this character is detected during command input,
the last character in the input buffer is deleted.
n=8 (fixed value)
ATS5? : Display current settings
Set pause time (seconds) until dialing commences but do not operate.
n=2-10 (default : n=5)
ATS6? : Display current settings
Set pause time (seconds) until commas are dialed but do not operate.
n=0-255 (default : n=3)
ATS8? : Display current settings
Set the delay time (1/10 seconds) for automatic disconnection but do not operate.
n=1-255 (default : n=1)
ATS10? : Display current settings
Set a period of time (minutes) with no data transmission/reception to terminate the
connection for 64K data communications.
n=0-255 : (default : n=0, n=0 indicates that inactive timer is set to OFF.)
ATS30? : Display current settings
Set the separator of received sub addresses for 64K data communication.
n=0 : * n=1 : / (default) n=2 : ¥ or \
ATS103? : Display current settings
Set the separator of sent sub addresses for 64K data communication.
n=0 : # n=1 : % (default) n=2 : &
ATS104? : Display current settings
Set result code display method.
n=0 : Number display n=1 : Alphabetical display (default)
When ATV0 is executed, "0" is not returned to the same line.
Set whether to detect busy or dial tones and whether to display the speed in the
"CONNECT" display for the connection.
Busy tone detection : Send "BUSY" response when dialup connection is busy.
Dial tone detection : Detect whether FOMA terminal is connected.
n=0 : No busy tone, no dial tone detected, and no speed is displayed
n=1 : No busy tone, no dial tone detected, and speed is displayed
n=2 : No busy tone, dial tone detected, and speed is displayed
n=3 : Busy tone detected, no dial tone detected, and speed is displayed
n=4 : Busy tone detected, dial tone detected, and speed is displayed (default)
When n=0 is set, AT&E and AT¥V command will be unavailable.
ATZ
OK (When in offline mode)
Reset the current setting to the registered state.
When this command is executed during communication, the terminal is reset after the line
is disconnected (displaying "NO CARRIER").
AT%V
Display FOMA terminal version.
AT%V
Ver1.00
OK
AT&C<n>*1
AT&C1
OK
AT&D<n>*1
AT&D2
OK
Set the operating conditions of the circuit CD (DCD) for DTE.
n=0 : Always ON n=1 : Vary according to line connection status (default)
When set to n=0, the CD signal is set to ON directly before sending "CONNECT" when
ending connection. The CD signal is set to OFF directly before the line is disconnected and
"NO CARRIER" is sent.
Set the operation performed when circuit ER (DTR) signal received from DTE is switched
from ON to OFF while online data mode takes effect.
n=0 : Ignore status (status is always considered to be ON)
n=1 : Move to online command mode when status changes from ON to OFF
n=2 : Disconnect line and move to offline mode when status changes from ON to OFF
(default)
29
Upper slot : Command
Lower slot : Example
AT&E<n>*1
AT&E1
OK
AT&F
AT&F
OK (When in offline mode)
AT&S<n>*1
AT&S0
OK
AT&W
Description
Set the speed display used when connection is made.
n=0 : Display communication speed of wireless zone
n=1 : Display communication speed between a PC and FOMA terminal (default)
Reset the current setting to the default.
When this command is executed during communication, the terminal is reset after the line
is disconnected (displaying "NO CARRIER").
Set control of the data set ready (DR) signal to be output to DTE.
n=0 : Always ON (default) n=1 : ON at time of connection
Register the current settings in FOMA terminal.
AT&W
OK
AT*DANTE
AT*DANTE
*DANTE : 3
OK
AT*DGANSM=<n>*2
AT*DGANSM=0
OK
AT*DGAPL=<n> [,<cid>]*2
AT*DGAPL=0,1
OK
AT*DGARL=<n> [,<cid>]*2
AT*DGARL=0,1
OK
AT*DGPIR=<n>*2
AT*DGPIR=0
OK
AT*DRPW
AT*DRPW
*DRPW : 0
OK
AT+CAOC
Indicate FOMA terminal reception level in the "*DANTE : <n>" format.
n=0 : Out of service area n=1 : Received signal level of FOMA terminal is 0 or 1 antenna.
n=2 : Received signal level of FOMA terminal is 2 antennas.
n=3 : Received signal level of FOMA terminal is 3 antennas.
AT*DANTE=? : Display a list of displayable values
Set to reject or permit incoming packet communications.
n=0 : Reject setting = OFF, Accept setting = OFF (default)
n=1 : Reject setting=ON n=2 : Accept setting=ON
AT*DGANSM? : Display current settings
AT*DGANSM=? : Display a list of assignable values
Set the dialup connections (APN) to permit incoming packet communications. APN uses
<cid> defined by +CGDCONT command.
n=0 : Add to list of APN permitted for incoming communications
n=1 : Delete from list of APN permitted for incoming communications
If the <cid> is not defined by the +CGDCONT command, it can still be added to/deleted from
the list.
If the <cid> is omitted, all the <cid> are added to/deleted from the list.
AT*DGAPL? : Display current settings
AT*DGAPL=? : Display a list of assignable values
Set the dialup connections (APN) to refuse incoming packet communications. APN uses
<cid> defined by +CGDCONT command.
n=0 : Add to list of APN rejected for incoming communications
n=1 : Delete from list of APN rejected for incoming communications
If the <cid> is not defined by the +CGDCONT command, it can still be added to/deleted from
the list.
If the <cid> is omitted, all the <cid> are added to/deleted from the list.
AT*DGARL? : Display current settings
AT*DGARL=? : Display a list of assignable values
Set Caller ID notification when packet communication connection is being performed. This
command is available when a communication is sent or received.
n=0 : Connect to APN directly (default) n=1 : Connect to APN prefixing 184
n=2 : Connect to APN prefixing 186
When Show/Hide caller ID is specified by dialup network→P18
AT*DGPIR? : Display current settings
AT*DGPIR=? : Display a list of assignable values
Indicate an index for the reception power of the radio waves that FOMA terminal receive.
AT*DRPW=? : Display a list of displayable values
Display last call cost.
AT+CAOC
+CAOC : "000024"
OK
AT+CBC
AT+CBC
+CBC : 0,100
OK
Display FOMA terminal's battery level in the "+CBC : <bcs>,<bcl>" format.
bcs=0 : Powered by the battery pack bcs=1 : Not powered by the battery pack
bcs=2 : Battery pack removed bcs=3 : Power-supply error
bcl=0 : No battery remained or battery pack removed bcl=1-100 : Battery remained
AT+CBC=? : Display a list of displayable values
30
Upper slot : Command
Lower slot : Example
AT+CBST=<n>,1,0*1
AT+CBST=116,1,0
OK
AT+CDIP=<n>*1
AT+CDIP=0
OK
AT+CEER
AT+CEER
+CEER : 36
OK
AT+CGDCONT*2
Description
Set the line to use (Setting of bearer service)
n=116 : 64K data communication (default) n=134 : 64K videophone
AT+CBST? : Display current settings AT+CBST=? : Display a list of assignable values
Set to notify/not to notify the sub address when receiving in packet communication or 64
data communication. And, subscription status of Multi Number can be confirmed.
n=0 : The information of sub address is not displayed. (default)
n=1 : The information of sub address is displayed.
m=0 : Multi Number not subscribed. m=1 : Multi Number subscribed.
AT+CDIP? : Display the current settings and status in the "+CDIP:<n>,<m>" format
AT+CDIP=? : List of the settable values is displayed.
Display the reason of immediate disconnection.
Disconnection reason list→P33
Set dialup connection (APN) for packet communication.→P34
→P34
AT+CGEQMIN*2
→P35
AT+CGEQREQ*2
→P35
AT+CGMR
Set the criteria for judging whether to permit QoS (Quality of Service) provisioned by the
network when packet communication is established.→P35
Set QoS (Quality of Service) requested to the network at the transmission of packet
communication.→P35
Display FOMA terminal version.
AT+CGMR
1234567890123456
OK
AT+CGREG=<n>*1
AT+CGREG=0
OK
AT+CGSN
Set whether to report network service registration status (Within/Out).
n=0 : Not notified (default)
n=1 : When the terminal is moved from Within service area to Out of service area or vice
versa, the status is reported in the "+CGREG : <stat>" format.
stat=0 : Out of packet service area stat=1 : Within packet service area
stat=4 : Unknown
stat=5 : Within packet service area (during international roaming)
AT+CGREG? : Display the current settings and status in the "+CGREG : <n>,<stat>" format
AT+CGREG=? : Display a list of assignable values
Display FOMA terminal serial No.
AT+CGSN
123456789012345
OK
AT+CLIP=<n>*1
AT+CLIP=0
OK
AT+CLIR=<n>*2
AT+CLIR=2
OK
AT+CMEE=<n>*1
AT+CMEE=0
OK
Set whether to display sender's caller ID on a PC when receiving 64K data communication.
n=0 : Not display result (default) n=1 : Display result
m=0 : Network setting not to send caller ID
m=1 : Network setting to send caller ID m=2 : Unknown
AT+CLIP? : Display the current settings and status in the "+CLIP : <n>,<m>" format
AT+CLIP=? : Display a list of assignable values
Set Caller ID notification when sending 64K data communication.
n=0 : Use the setting in Caller ID notification of FOMA terminal n=1 : Not send
n=2 : Send (default)
m=0 : CLIR not operating (always sends) m=1 : CLIR operating (never sends)
m=2 : Unknown m=3 : CLIR temporary mode (default=does not send)
m=4 : CLIR temporary mode (default=sends)
AT+CLIR? : Display the current settings and status in the "+CLIR : <n>,<m>" format
AT+CLIR=? : Display a list of assignable values
Set whether to display an error report at FOMA terminal.
n=0 : Display "ERROR" and no result code (default)
n=1 : Use result code, displaying reason as number
n=2 : Use result code, displaying reason as alphabetic characters
Display reasons in the "+CME ERROR : xxxx" format when n=1 or n=2 is set (xxxx = number
or alphabetic characters).→P34 "Error messages list"
AT+CMEE? : Display current settings AT+CMEE=? : Display a list of assignable values
31
Upper slot : Command
Lower slot : Example
AT+CNUM
AT+CNUM
+CNUM : ,"090XXXXXXXX",
129
OK
AT+COPS=<n>,2,
<oper>*2
AT+COPS=0
OK
AT+CPAS
AT+CPAS
+CPAS : 0
OK
AT+CPIN="<pin>",
"<newpin>"
AT+CPIN="0000"
OK
AT+CR=<n>*1
AT+CR=0
OK
AT+CRC=<n>*1
AT+CRC=0
OK
AT+CREG=<n>*1
AT+CREG=0
OK
AT+CUSD=<n>,"<str>"*1
AT+CUSD=0,"012345678"
OK
AT+FCLASS=<n>*1
AT+FCLASS=0
OK
AT+GCAP
AT+GCAP
+GCAP : +CGSM,+FCLASS,
+W
OK
Description
Display FOMA terminal's own phone number in the "+CNUM : ,"<number>",<type>" format.
number : Own phone number (With 2in1, display Number B in B mode or Number A in
other mode)
type=129 : International access code + not included
type=145 : International access code + included
Set search method for network operator to connect.
n=0 : Auto (default) n=1 : Manual n=3 : No mapping
When n=1 is set, set PLMN Number in hexadecimal value for <oper>.
AT+COPS? : Display current settings AT+COPS=? : Display a list of assignable values
Display whether FOMA terminal can send and receive AT commands to external devices in
"+CPAS : <n>" format.
n=0 : Possible n=1 : Impossible n=2 : Status unknown
n=3 : Possible and receiving
n=4 : Possible and communicating
AT+CPAS=? : Display a list of displayable values
Enter these commands for entering PIN1/PIN2 codes or PUK with PIN1 code ON. To enter
PUK, enter new PIN1/PIN2 code in <newpin>. Even if entering in <newpin> when entry of
PIN1/PIN2 code is request, PIN1/PIN2 code cannot be changed.
n=READY : Entry of code not requested n=SIM PIN : Entry of PIN1 code waited
n=SIM PIN2 : Entry of PIN2 code waited
n=SIM PUK : Entry of PUK waited due to failure in unblocking PIN1 code
n=SIM PUK2 : Entry of PUK waited due to failure in unblocking PIN2 code
AT+CPIN? : Display the code currently requested in "+CPIN : <n>" format
Set whether to display the communication type before "CONNECT" is displayed during
connection.
n=0 : Not display (default)
n=1 : Display the communication type in the "+CR : <serv>" format
serv=GPRS : Packet communication serv=SYNC : 64K data communication
serv=AV64K : 64K videophone
AT+CR? : Display current settings AT+CR=? : Display a list of assignable values
Set whether to use +CRING result codes when communication is received.
n=0 : Not use (default)
n=1 : Use "+CRING : <type>" result codes
type=GPRS "PPP",,,"<APN>" : Packet communication
type=SYNC : 64K data communication
type=AV64K : 64K videophone
AT+CRC? : Display current settings AT+CRC=? : Display a list of assignable values
Set whether to report network service registration status (Within/Out).
n=0 : Not notified (default)
n=1 : When the terminal is moved from Within service area to Out of service area or vice
versa, the status is reported in the "+CREG : <stat>" format.
stat=0 : Out of sound service area stat=1 : Within sound service area
stat=4 : Unknown
stat=5 : Within sound service area (during international roaming)
AT+CREG? : Display the current settings and status in the "+CREG : <n>,<stat>" format
AT+CREG=? : Display a list of assignable values
Set Additional service (Register USSD) of Network Services. Enter Service code provided
by DOCOMO in <str>.
n=0 : Not answer mid result (default)
n=1 : Answer mid result in "+CUSD : <m>, "<str>",0" format
m=0 : Information not requested m=1 : Information requested
AT+CUSD? : Display current settings AT+CUSD=? : Display a list of assignable values
Set communication type supported by FOMA terminal.
n=0 : Only data supported (fixed value)
AT+FCLASS? : Display current settings
AT+FCLASS=? : Display a list of assignable values
Display the range of AT commands supported by FOMA terminal in the "+GCAP : <n>"
format.
n=+CGSM : Support GSM commands (including the case for supporting a part)
n=+FCLASS : Support +FCLASS commands n=+W : Support +W commands
32
Upper slot : Command
Lower slot : Example
AT+GMI
Description
Display FOMA terminal manufacturer name.
AT+GMI
FUJITSU
OK
AT+GMM
Display model name of FOMA terminal.
AT+GMM
FOMA F09C
OK
AT+GMR
Display FOMA terminal version.
AT+GMR
Ver1.00
OK
AT+IFC=<n,m>*1
AT+IFC=2,2
OK
Set how to control local flow between a PC and FOMA terminal.
n, m=0 : No flow control n, m=1 : Perform XON/XOFF flow control
n, m=2 : RS/CS (RTS/CTS) Perform flow control (default)
AT+IFC? : Display the current settings and status in the "+IFC : <n>,<m>" format (n is the
value of DCE by DTE, and m is the value of DTE by DCE)
AT+IFC=? : List of the settable values is displayed
AT+WS46=<n>*1
Display wireless network used when sending communication in n number.
When entering AT+WS46=<n>, ERROR is returned because it cannot be changed.
n=12 : GSM network n=22 : 3G network (FOMA)
n=25 : GSM or 3G network (FOMA) (fixed value)
AT+WS46? : Display current settings AT+WS46=? : Display a list of assignable values
AT¥S
Display the currently set commands and S register settings.
AT¥S
E1 Q0 V1 X4 &C1 &D2
&S0 ・・・ (snip) ・・・
S104=001
OK
AT¥V<n>*1
AT¥V0
OK
+++
+++ (not displayed)
OK
Set whether to use expanded result codes when connection is made.
n=0 : Not use expanded result codes (default)
n=1 : Use expanded result codes
Move from online data mode to online command mode when entered during a
communication.
The escape guard interval is 1 second (fixed value).
*1 Registered in FOMA terminal by &W command.
*2 Not reset by &F and Z commands.
*3 When Z command is executed before the &W command, the terminal is reset to the last status registered in memory, and
prior changes are erased.
◆ Disconnection reason list
■ Packet communication
Value
26
Description
APN is not present or is incorrect.
27
30
Disconnected by network.
33
Terminal does not subscribe to packet communication.
36
Normal disconnection.
33
■ 64K data communication
Value
Description
1
Specified number does not exist.
16
Normal disconnection.
17
Communication is impossible because remote device is busy.
18
You made a call but did not receive a response within the specified time.
19
The remote device is called but no response.
21
The remote device rejected incoming calls.
63
The service and option of the network are not valid.
65
Unavailable processing speed was specified.
88
You made a call to a terminal or received a call from a terminal with different terminal
properties.
◆ Error messages list
No.
10
Text display
SIM not inserted
Description
UIM is not set.
15
SIM wrong
Other than DOCOMO SIM (IC card equivalent to UIM) is inserted.
16
incorrect password
Incorrect password
100
unknown
Unknown error
◆ Supplement to AT command
・ <cid> is the number used to control dialup connection (APN) for packet communication to be registered
in FOMA terminal. "1-10" can be registered in FOMA terminal.
・ By default, the following APNs are registered in cid1-4.
cid1 : mopera.ne.jp (APN mopera, PPP connection)
cid2 : mopera.net (APN mopera U, PPP connection)
cid3 : mopera.net (APN mopera U, IP connection)
cid4 : mpr.ex-pkt.net (APN mopera U, PPP connection, 128K communication)
・ <APN> is an optional string for each connection to indicate dialup connection.
■ Command name : +CGDCONT=[parameter]
・ Outline
Set dialup connection (APN) for packet communication.
・ Format
+CGDCONT= [<cid> [,"<PDP_TYPE>" [,"<APN>"] ] ]
・ Parameter description
<cid> : 1-10
<PDP_TYPE> : IP or PPP
<APN> : Optional
・ Example of execution
The command used to register an APN named "abc" for PPP connection (when <cid>=5).
AT+CGDCONT=5,"PPP","abc"
OK
・ Operation performed when parameter is omitted
AT+CGDCONT= : Return all <cid> to the setting by default.
AT+CGDCONT=<cid> : Return the specified <cid> to the setting by default.
AT+CGDCONT? : Display current settings.
AT+CGDCONT=? : Display a list of assignable values.
34
■ Command name : +CGEQMIN=[parameter]
・ Outline
・
・
・
・
Set the criteria for judging whether to permit QoS (Quality of Service) provisioned by the network when
packet communication is established.
Format
AT+CGEQMIN= [<cid> [,,<Maximum bitrate UL> [,<Maximum bitrate DL>] ] ]
Parameter description
<cid> : 1-10
<Maximum bitrate UL> : None (default) or 5,760
<Maximum bitrate DL> : None (default) or 7,232
* For <Maximum bitrate UL> and <Maximum bitrate DL>, the maximum communication speed (in kbps) is set for both
upload and download traffic between FOMA terminal and the base station. If the parameter is set to "None (default)", all
speeds are permissible. If "5,760" and "7,232" are set, any connection at a speed less than the above limit is not permitted,
and chances are that packet communication will not be connected.
Example of execution
- Command used to permit all speeds both upload and download (when <cid>=5)
AT+CGEQMIN=5
OK
- Command used to permit only 5,760kbps upload and 7,232kbps download (when <cid>=6)
AT+CGEQMIN=6,,5760,7232
OK
- Command used to permit only 5,760kbps upload and all speeds download (when <cid>=7)
AT+CGEQMIN=7,,5760
OK
- Command used to permit all speeds upload and only 7,232kbps download (when <cid>=8)
AT+CGEQMIN=8,,,7232
OK
Operation performed when parameter is omitted
AT+CGEQMIN= : Returns all <cid> to the setting by default.
AT+CGEQMIN=<cid> : Returns the specified <cid> to the setting by default.
AT+CGEQMIN? : Displays current settings.
AT+CGEQMIN=? : Displays a list of assignable values.
■ Command name : +CGEQREQ=[parameter]
・ Outline
Set QoS (Quality of Service) requested to the network at the transmission of packet communication.
・ Format
AT+CGEQREQ= [<cid>]
・ Parameter description
Only commands that require connection at 64-5,760kbps upload, 64-7,232kbps download can be set. The
contents are set by default for each <cid>.
<cid> : 1-10
・ Example of execution
(when <cid>=3)
AT+CGEQREQ=3
OK
・ Operation performed when parameter is omitted
AT+CGEQREQ= : Returns all <cid> to the setting by default.
AT+CGEQREQ=<cid> : Returns the specified <cid> to the setting by default.
AT+CGEQREQ? : Displays current settings.
AT+CGEQREQ=? : Displays a list of assignable values.
35
◆ Result codes
・ When ATV command is set to n=1 (default), the result code is displayed in alphabetic characters. When
the command is set to n=0, the result code is displayed numerically.→P29
■ Result codes
No.
Text display
Meaning
0
OK
Operation performed normally
1
CONNECT
Terminal connected to other party
2
RING
Incoming call
3
NO CARRIER
Line disconnected
4
ERROR
Unable to accept command
6
NO DIALTONE
Unable to detect dial tone
7
BUSY
Detecting the busy tone
8
NO ANSWER
Completed connection Time-out
100
RESTRICTION
Network restriction in place (The communication network is
busy. Please wait for a while and retry.)
101
DELAYED
Redial call restricted
■ Extended result code
・ When AT&E is set to n=0
No.
Text display
Connection speed between FOMA terminal and base station
122
CONNECT 64000
64000bps
125
CONNECT 384000
384000bps
133
CONNECT 3648000
3648000bps
135
CONNECT 7232000
7232000bps
・ When AT&E is set to n=1
No.
Text display
Connection speed between FOMA terminal and a PC
5
CONNECT 1200
1200bps
10
CONNECT 2400
2400bps
11
CONNECT 4800
4800bps
13
CONNECT 7200
7200bps
12
CONNECT 9600
9600bps
15
CONNECT 14400
14400bps
16
CONNECT 19200
19200bps
17
CONNECT 38400
38400bps
18
CONNECT 57600
57600bps
19
CONNECT 115200
115200bps
20
CONNECT 230400
230400bps
21
CONNECT 460800
460800bps
* To retain compatibility with a modem connected via conventional RS-232C, communication speed is displayed, but it
differs from the actual connection speed because FOMA terminal is connected to a PC with a USB cable or Bluetooth
function.
36
■ Communication protocol result code
No.
1
Text display
Meaning
PPPoverUD
Connect via 64K data communication (BC=UDI, +CBST=116,1,0)
3
AV64K
Connect via 64K videophone
5
PACKET
Connect via packet communication
■ Display example of result code
When ATX0 is set
Regardless of the settings of AT¥V command, only "CONNECT" is displayed upon completion of
connection.
Text display example : ATD*99***1#
CONNECT
Number display example : ATD*99***1#
1
When ATX1 is set
・ When ATX1, AT¥V0 (default) is set
Upon completion of connection, the result code is displayed in the following format : "CONNECT <speed
between FOMA terminal - PC>".
Text display example : ATD*99***1#
CONNECT 460800
Number display example : ATD*99***1#
1 21
・ When ATX1, AT¥V1 is set*1
The code is displayed upon completion of connection in the following format.
"CONNECT<speed between FOMA terminal - PC><Communication protocol><dialup connection (APN)>/
<upstream maximum speed (between FOMA terminal→radio base station)>/<downstream maximum
speed (between FOMA terminal←radio base station)>"*2
Text display example : ATD*99***1#
CONNECT 460800 PACKET mopera.ne.jp/5760/7232
(Indicates the terminal is connected to mopera.ne.jp providing a maximum upload speed of 5,760kbps
and a maximum download speed of 7,232kbps.)
Number display example : ATD*99***1#
1 21 5
*1 When ATX1 and AT¥V1 are set at the same time, it is likely that dialup connection will fail. It is recommended that
only AT¥V0 be used.
*2 When AT¥V1 is set, <dialup connection (APN)> and the following are displayed only when packet is used for
connection.
37
Kuten Code List
For entering characters using code, see "Entering characters using code" in the attached manual.
Note that some characters in the code input list may look different from actual ones.
1st
-3rd
010
011
012
013
014
015
016
017
018
019
020
021
022
023
024
026
027
028
029
4th digit of code
1 2 3 4
5 6 7 8
(スペース) 、 。 , . ・ : ;
! ゛ ゜ ´ `
¨^  ̄ _
ヾ ゝ ゞ 〃 仝 々 〆 〇 ー
‐ / \ ∼ ‖ | … ‥ ‘
“ ”( )〔
〕 [ ]{
〈 〉《 》「
」 『 』【
+ − ± × ÷ = ≠ < >
≧ ∞ ∴ ♂ ♀ ° ′ ″ ℃
$ ¢ £ % # & * @ §
★ ○ ● ◎ ◇
◆ □ ■ △ ▲ ▽ ▼ ※
→ ← ↑ ↓ 〓
∈ ∋ ⊆
⊂ ⊃ ∪ ∩
∧ ∨ ¬ ⇒ ⇔ ∀ ∃
0
∠ ⊥ ͡ ∂ ∇
∽ ∝ ∵ ∫ ∬
Å ‰ ♯
⃝
9
?
ヽ
―
’
}
】
≦
¥
☆
〒
⊇
1st
-3rd
081
082
083
130
131
132
133
134
135
136
137
138
139
0 1
┴ ┼
┫ ┻
┥┸
4th digit of code
2 3 4
5 6 7 8 9
━ ┃ ┏ ┓ ┛ ┗ ┣ ┳
╋ ┠ ┯ ┨ ┷ ┿ ┝ ┰
╂
① ② ③ ④
⑪ ⑫ ⑬ ⑭
Ⅰ Ⅱ Ⅲ Ⅳ
㍉ ㌔ ㌢
㍗ ㌍ ㌦ ㌣
㎎ ㎏ ㏄ ㎡
㍻
㊥ ㊦ ㊧ ㊨ ㈱
≒ ≡ ∫ ∮ Σ
∵ ∩ ∪
⑤
⑮
Ⅴ
㍍
㌫
⑩
⑳
Ⅹ
㍑
㎞
⑥
⑯
Ⅵ
㌘
㍊
⑦
⑰
Ⅶ
㌧
㌻
⑧
⑱
Ⅷ
㌃
㎜
⑨
⑲
Ⅸ
㌶
㎝
№ ㏍ ℡ ㊤
㈲ ㈹ ㍾ ㍽ ㍼
√ ⊥ ∠ ∟ ⊿
あ
≡ ≒ ≪ ≫ √
♭ ♪ † ‡ ¶
160
161
162
163
164
葵
梓
鮎
鞍
亜
茜
圧
或
杏
唖
穐
斡
粟
娃
悪
扱
袷
阿
握
宛
安
以
惟
緯
域
芋
淫
陰
伊
意
胃
育
鰯
胤
隠
位
慰
萎
郁
允
蔭
韻
哀
渥
姐
庵
愛
旭
虻
按
挨
葦
飴
暗
姶
芦
絢
案
逢
鯵
綾
闇
依
易
衣
磯
印
偉
椅
謂
一
咽
囲
為
違
壱
員
夷
畏
遺
溢
因
委
異
医
逸
姻
い
031
032
033
034
035
036
037
038
039
040
041
042
043
044
045
046
047
048
050
051
052
053
054
055
056
057
058
060
061
062
063
064
065
0 1 2 3
4 5 6 7
A
H I J K
R S T U
8
B
L
V
D
N
X
b
l
v
E
O
Y
c
m
w
F
P
Z
d
n
x
e
o
y
G
Q
f g h
p q r
z
ぁ あ
お か が
ご さ ざ
ぞ た だ
と ど な
ひ び ぴ
ぼ ぽ ま
ゆ ょ よ
ゐ ゑ を
ぃ
き
し
ち
に
ふ
み
ら
ん
い
ぎ
じ
ぢ
ぬ
ぶ
む
り
ぅ
く
す
っ
ね
ぷ
め
る
う
ぐ
ず
つ
の
へ
も
れ
ぇ
け
せ
づ
は
べ
ゃ
ろ
え
げ
ぜ
て
ば
ぺ
や
ゎ
ぉ
こ
そ
で
ぱ
ほ
ゅ
わ
ァ
カ
サ
タ
ド
ビ
ポ
ョ
ヱ
ィ
キ
シ
チ
ニ
フ
ミ
ラ
ン
イ
ギ
ジ
ヂ
ヌ
ブ
ム
リ
ヴ
ゥ
ク
ス
ッ
ネ
プ
メ
ル
ヵ
ウ
グ
ズ
ツ
ノ
ヘ
モ
レ
ヶ
ェ
ケ
セ
ヅ
ハ
ベ
ャ
ロ
エ
ゲ
ゼ
テ
バ
ペ
ヤ
ヮ
ォ
コ
ソ
デ
パ
ホ
ュ
ワ
オ
ゴ
ゾ
ト
ヒ
ボ
ユ
ヰ
ア
ガ
ザ
ダ
ナ
ピ
マ
ヨ
ヲ
i j
s t
9
C
M
W
a
k
u
Α Β Γ Δ
Κ Λ Μ Ν Ξ
Υ Φ Χ Ψ Ω
α β
θ ι κ λ μ
σ τ υ φ χ
070
071
072
073
074
075
076
077
078
А Б В Г
И Й К Л М
Т У Ф Х Ц
Ь Э Ю Я
080
─ │ ┌ ┐
б
к
ф
ю
в г д е
л м н о
х ц ч ш
я
Ε Ζ Η Θ Ι
Ο Π Ρ Σ Τ
γ δ ε ζ η
ν ξ ο π ρ
ψ ω
Д Е Ё Ж З
Н О П Р С
Ч Ш Щ Ъ Ы
а
ё ж з и й
п р с т у
щ ъ ы ь э
┘ └ ├ ┬ ┤
164
165
166
167
168
169
170
威
移
井
稲
引
尉
維
亥
茨
飲
院
吋
う
170
171
172
173
迂 雨 卯 鵜 窺
唄 欝 蔚 鰻 姥
云 運 雲
173
174
175
176
177
178
曳
衛
閲
掩
艶
栄
詠
榎
援
苑
永
鋭
厭
沿
薗
荏
泳
液
円
演
遠
餌
洩
疫
園
炎
鉛
178
179
180
181
182
凹 央
押
鴎 黄
牡 乙
奥
旺
岡
俺
往
横
沖
卸
応
欧
荻
恩
仮
家
禍
蝦
我
介
恢
伽
科
稼
嘩
画
解
戒
晦
階
涯
垣
格
郭
笠
活
樺
栢
刈
巻
感
価
暇
箇
貨
臥
回
拐
械
貝
碍
柿
核
閣
樫
渇
鞄
茅
苅
喚
慣
佳
果
花
迦
芽
塊
改
海
凱
蓋
蛎
殻
隔
橿
滑
株
萱
瓦
堪
憾
右 宇 烏 羽
丑 碓 臼 渦 嘘
厩 浦 瓜 閏 噂
え
叡
瑛
益
堰
焔
鴛
営
盈
駅
奄
煙
塩
嬰
穎
悦
宴
燕
影
頴
謁
延
猿
映
英
越
怨
縁
お
於 汚 甥
殴 王 翁 襖 鴬
億 屋 憶 臆 桶
温 穏 音
か
182
183
184
185
186
187
188
189
190
191
192
193
194
195
196
197
198
199
200
201
202
蟹
慨
馨
拡
赫
顎
恰
叶
噛
勘
幹
何
寡
禾
課
牙
会
懐
魁
開
概
蛙
撹
較
掛
括
椛
鴨
粥
勧
患
1
加
架
苛
過
蛾
壊
可
歌
茄
霞
賀
廻
嘉
河
荷
蚊
雅
快
下
夏
火
華
俄
餓
怪
化
嫁
珂
菓
峨
駕
悔
灰
劾
街
鈎
獲
革
梶
葛
兜
界
外
該
劃
確
学
鰍
褐
竃
皆
咳
鎧
嚇
穫
岳
潟
轄
蒲
絵
害
骸
各
覚
楽
割
且
釜
芥
崖
浬
廓
角
額
喝
鰹
鎌
乾 侃 冠 寒 刊
姦 完 官 寛 干
換 敢 柑 桓 棺
4th digit of code
3 4
5 6 7
漢 澗 潅 環 甘
緩 缶 翰 肝 艦
鑑 間 閑 関 陥
岸 巌 玩 癌 眼
顔 願
き
企 伎 危
嬉 寄 岐 希 幾 忌
期 棋 棄
帰 毅 気 汽 畿 祈
規 記 貴 起 軌 輝
偽 儀 妓 宜 戯 技
祇 義 蟻 誼 議 掬
喫 桔 橘 詰 砧 杵
虐 逆 丘 久 仇 休
急 救 朽 求 汲 泣
笈 級 糾 給 旧 牛
拠 挙 渠 虚 許 距
亨 享 京
侠 僑 兇 競 共 凶
喬 境 峡 強 彊 怯
橋 況 狂 狭 矯 胸
鏡 響 饗 驚 仰 凝
曲 極 玉 桐 粁 僅
斤 欣 欽 琴 禁 禽
衿 襟 謹 近 金 吟
く
1st
-3rd
203
204
205
206
207
0
款
竿
諌
舘
贋
207
208
209
210
211
212
213
214
215
216
217
218
219
220
221
222
223
224
225
226
基 奇
旗 既
機
紀 徽
鬼 亀
犠 疑
吉 吃
客 脚
宮 弓
究 窮
巨 拒
禦 魚
供
卿 叫
挟 教
蕎 郷
業 局
巾 錦
芹 菌
226
227
228
229
230
231
232
倶 句 区 狗
駒 具 愚 虞
串 櫛 釧 屑
掘 窟 沓
栗 繰 桑 鍬
郡
1
歓
管
貫
丸
雁
2
汗
簡
還
含
頑
8
監
莞
韓
岩
9
看
観
館
翫
喜 器
揮 机
季
飢
擬
菊
黍
及
灸
去
鋸
稀
騎
欺
鞠
却
吸
球
居
漁
協
恐
脅
尭
勤
筋
銀
匡
恭
興
暁
均
緊
九
矩 苦 躯 駆 駈
空 偶 寓 遇 隅
玖
喰
屈
靴
勲
轡 窪 熊 隈 粂
君 薫 訓 群 軍
け
232
233
234
235
236
237
238
239
240
241
242
243
珪
携
繋
鶏
傑
倹
建
肩
鹸
絃
卦
型
敬
罫
芸
欠
倦
憲
検
見
元
舷
袈
契
景
茎
迎
決
健
懸
権
謙
原
言
祁
形
桂
荊
鯨
潔
兼
拳
牽
賢
厳
諺
係
径
渓
蛍
劇
穴
券
捲
犬
軒
幻
限
孤
袴
鼓
悟
鯉
勾
后
巷
控
洪
紘
荒
鋼
合
国
惚
此
昆
己
股
五
梧
交
厚
喉
幸
攻
浩
絞
行
閤
壕
穀
骨
頃
根
庫
胡
互
檎
佼
口
坑
広
昂
港
綱
衡
降
拷
酷
狛
今
梱
弧
菰
伍
瑚
侯
向
垢
庚
晃
溝
耕
講
項
濠
鵠
込
困
混
傾
恵
畦
計
戟
結
剣
刑
慶
稽
詣
撃
血
喧
兄
慧
系
警
激
訣
圏
啓
憩
経
軽
隙
月
堅
圭
掲
継
頚
桁
件
嫌
献 研 硯 絹 県
遣 鍵 険 顕 験
弦 減 源 玄 現
こ
243
244
245
246
247
248
249
250
251
252
253
254
255
256
257
258
259
260
261
姑
糊
顧
御
乞
効
巧
拘
江
紅
航
砿
号
告
忽
昏
乎
戸
虎
午
碁
候
個
故
誇
呉
語
倖
古
枯
跨
吾
誤
光
呼
湖
鈷
娯
護
公
固
狐
雇
後
醐
功
好
康
更
甲
考
貢
香
豪
黒
孔
弘
杭
皇
肯
購
高
轟
獄
孝
恒
校
硬
肱
郊
鴻
麹
漉
宏
慌
梗
稿
腔
酵
剛
克
腰
工
抗
構
糠
膏
鉱
劫
刻
甑
坤 墾 婚 恨 懇
痕 紺 艮 魂
2008.9 (Issue 1)
CA92002-5477
1st
-3rd
261
262
263
264
265
266
267
268
269
270
271
272
273
0
1
2
叉
鎖
塞
采
際
榊
搾
笹
察
鯖 捌
惨 撒
讃 賛
唆
裟
妻
犀
剤
肴
昨
匙
拶
錆
散
酸
佐
詐
哉
災
載
堺
咋
鮭
4th digit of code
3 4
5 6 7
さ
嵯
坐
宰
砕
在
咲
朔
冊
撮
鮫
桟
餐
左
座
彩
砦
材
崎
柵
刷
擦
皿
燦
斬
沙
催
栽
細
冴
鷺
索
8
9
瑳
再
歳
菜
坂
作
錯
些
砂
最
済
裁
阪
削
桜
差
挫
才
祭
罪
埼
窄
査
債
採
斎
財
碕
策
札
晒
珊
暫
殺 薩 雑 皐
三 傘 参 山
産 算 纂 蚕
残
し
273
274
275
276
277
278
279
280
281
282
283
284
285
286
287
288
289
290
291
292
293
294
295
296
297
298
299
300
301
302
303
304
305
306
307
308
309
310
311
312
313
314
315
使
子
施
紙
諮
字
耳
軸
湿
屡
社
尺
惹
腫
綬
終
輯
従
夙
述
旬
醇
署
恕
妾
彰
松
照
紹
詳
丈
情
醸
蝕
心
疹
身
尋
刺
屍
旨
紫
資
寺
次
自
宍
漆
蕊
紗
杓
主
趣
需
宗
繍
週
戎
宿
俊
楯
順
書
鋤
勝
娼
承
梢
症
肖
象
丞
擾
錠
拭
辱
慎
真
辛
甚
司
市
枝
肢
賜
慈
滋
蒔
雫
疾
縞
者
灼
取
酒
囚
就
習
酋
柔
淑
峻
殉
処
薯
除
匠
宵
抄
樟
省
菖
賞
乗
条
嘱
植
尻
振
神
進
尽
史
師
止
脂
雌
持
治
辞
七
質
舎
謝
爵
守
首
収
州
臭
酬
汁
祝
春
淳
初
藷
傷
升
将
招
樵
硝
蒋
醤
冗
杖
埴
殖
伸
新
秦
針
腎
嗣
志
死
至
飼
時
爾
汐
叱
実
写
車
酌
手
儒
周
修
舟
集
渋
縮
瞬
準
所
諸
償
召
小
掌
沼
礁
蕉
鉦
剰
浄
飾
燭
信
晋
紳
震
訊
四
思
氏
視
歯
士
指
獅
詞
事
仕
始
支
祉
詩
似
仔
姉
孜
私
試
侍
伺
姿
斯
糸
誌
児
璽
鹿
執
蔀
射
遮
釈
朱
受
痔
式
失
篠
捨
蛇
錫
殊
呪
磁
識
嫉
偲
赦
邪
若
狩
寿
示
鴫
室
柴
斜
借
寂
珠
授
而
竺
悉
芝
煮
勺
弱
種
樹
愁
蒐
醜
獣
粛
竣
潤
暑
助
拾
衆
什
縦
塾
舜
盾
曙
叙
洲
襲
住
重
熟
駿
純
渚
女
秀
讐
充
銃
出
准
巡
庶
序
秋
蹴
十
叔
術
循
遵
緒
徐
哨
少
捷
消
祥
衝
鍾
城
状
商
尚
昇
渉
称
裳
鐘
場
畳
唱
庄
昌
湘
章
訟
障
壌
穣
嘗
床
昭
焼
笑
証
鞘
嬢
蒸
奨
廠
晶
焦
粧
詔
上
常
譲
織
侵
森
臣
人
迅
職
唇
榛
芯
仁
陣
色
娠
浸
薪
刃
靭
触
寝
深
親
塵
食
審
申
診
壬
笥
吹 垂 帥 推
遂 酔 錐 錘
枢 趨 雛 据
諏
水
随
杉
瀬
政
盛
醒
斥
跡
節
宣
浅
制
棲
製
税
積
拙
舌
戦
煎
す
315
316
317
318
319
320
須
炊
瑞
椙
酢
睡
髄
菅
澄
図
粋
崇
頗
摺
厨
翠
嵩
雀
寸
逗
衰
数
裾
せ
320
321
322
323
324
325
326
327
328
329
330
331
勢
栖
西
脆
籍
接
蝉
扇
煽
姓
正
誠
隻
績
摂
仙
撰
旋
繊
選 遷
征
清
誓
席
脊
折
先
栓
穿
羨
銭
性
牲
請
惜
責
設
千
栴
箭
腺
銑
世
成
生
逝
戚
赤
窃
占
泉
線
舛
閃
畝
整
精
青
昔
蹟
説
専
洗
是
星
聖
静
析
碩
雪
尖
染
凄
晴
声
斉
石
切
絶
川
潜
1st
-3rd
332
332
333
334
335
336
337
338
339
340
341
342
343
344
345
346
347
348
349
350
351
352
353
354
354
355
356
357
358
359
360
361
362
363
363
364
365
366
366
367
368
369
370
371
372
373
373
374
375
376
377
378
379
380
381
382
383
384
385
386
4th digit of code
0 1 2 3 4
5 6 7
全 禅 繕 膳 糎
そ
噌 塑 岨
曽 楚 狙 疏 疎 礎 祖 租
組 蘇 訴 阻 遡 鼠 僧 創
倉 喪 壮 奏 爽 宋 層 匝
捜 掃 挿 掻 操 早 曹 巣
漕 燥 争 痩 相 窓 糟 総
草 荘 葬 蒼 藻 装 走 送
霜 騒 像 増 憎
臓 蔵 贈 造 促 側 則
捉 束 測 足 速 俗 属 賊
卒 袖 其 揃 存 孫 尊 損
た
他 多 太 汰 詑 唾 堕 妥
柁 舵 楕 陀 駄 騨 体 堆
岱 帯 待 怠 態 戴 替 泰
腿 苔 袋 貸 退 逮 隊 黛
台 大 第 醍 題 鷹 滝 瀧
宅 托 択 拓 沢 濯 琢 託
諾 茸 凧 蛸 只
叩 但 達 辰 奪 脱 巽
棚 谷 狸 鱈 樽 誰 丹 単
担 探 旦 歎 淡 湛 炭 短
綻 耽 胆 蛋 誕 鍛 団 壇
暖 檀 段 男 談
ち
値 知 地
智 池 痴 稚 置 致 蜘 遅
畜 竹 筑 蓄 逐 秩 窒 茶
中 仲 宙 忠 抽 昼 柱 注
註 酎 鋳 駐 樗 瀦 猪 苧
丁 兆 凋 喋 寵
帖 帳 庁 弔 張 彫 徴
暢 朝 潮 牒 町 眺 聴 脹
調 諜 超 跳 銚 長 頂 鳥
直 朕 沈 珍 賃 鎮 陳
つ
津
槌 追 鎚 痛 通 塚 栂 掴
漬 柘 辻 蔦 綴 鍔 椿 潰
嬬 紬 爪 吊 釣 鶴
て
亭 低
剃 貞 呈 堤 定 帝 底 庭
悌 抵 挺 提 梯 汀 碇 禎
艇 訂 諦 蹄 逓
邸 鄭 釘 鼎 泥 摘 擢
的 笛 適 鏑 溺 哲 徹 撤
鉄 典 填 天 展 店 添 纏
転 顛 点 伝 殿 澱 田 電
と
堵
賭
怒
宕
盗
答
鐙
憧
鴇
独
寅
頓
塗
途
倒
島
淘
筒
董
陶
撞
匿
読
酉
呑
妬
都
党
嶋
湯
糖
蕩
頭
洞
得
栃
瀞
曇
屠
鍍
冬
悼
涛
統
藤
騰
瞳
徳
橡
噸
鈍
徒
砥
凍
投
灯
到
討
闘
童
涜
凸
屯
9
措
粗
双
惣
槍
綜
遭
曾
素
叢
想
槽
聡
鎗
即 息
族 続
村 遜
惰
対
滞
鯛
卓
鐸
打
耐
胎
代
啄
濁
竪
嘆
端
弾
辿
坦
箪
断
弛
馳
嫡
虫
著
恥
築
着
衷
貯
懲 挑
腸 蝶
勅 捗
墜 椎
槻 佃
坪 壷
停 偵
廷 弟
程 締
奈
謎 灘 捺 鍋 楢
軟 難 汝
388
389
390
二 尼
虹 廿 日 乳 入
如 尿 韮 任
392
393
393
394
395
396
397
398
399
400
401
402
403
404
405
405
406
407
408
409
410
411
412
413
414
415
4th digit of code
0 1 2 3 4
5 6 7
祢 寧 葱 猫 熱 年 念 捻
粘
の
乃 廼 之 埜 嚢 悩 濃
脳 膿 農 覗 蚤
は
巴 把 播
波 派 琶 破 婆 罵 芭 馬
拝 排 敗 杯 盃 牌 背 肺
倍 培 媒 梅 楳 煤 狽 買
陪 這 蝿 秤 矧 萩 伯 剥
柏 泊 白 箔 粕 舶 薄 迫
爆 縛 莫 駁 麦
函 箱 硲 箸 肇 筈 櫨
畑 畠 八 鉢 溌 発 醗 髪
抜 筏 閥 鳩 噺 塙 蛤 隼
半 反 叛 帆 搬 斑 板 氾
犯 班 畔 繁 般 藩 販 範
頒 飯 挽 晩 番 盤 磐 蕃
ひ
卑
比
誹
枇
肘
百
評
蛭
敏
否
泌
費
毘
鼻
弼
謬
豹
鰭
瓶
妃
疲
避
琵
柊
必
俵
廟
品
庇
皮
非
眉
稗
畢
彪
描
彬
彼
碑
飛
美
匹
筆
標
病
斌
不
扶
譜
葡
復
腹
分
紛
付
敷
負
蕪
幅
複
吻
雰
埠
斧
賦
部
服
覆
噴
文
府
膚
武
伏
怖
芙
舞
副
福
物 鮒
粉 糞
覇
俳
輩
売
博
曝
杷
廃
配
賠
拍
漠
幡
伐
伴
汎
釆
蛮
肌
罰
判
版
煩
匪
悲 扉 批 披 斐
秘 緋 罷 肥 被
樋 簸 備 尾 微
疋
逼
氷
秒
浜
髭
桧
漂
苗
瀕
彦
姫
瓢
錨
貧
膝
媛
票
鋲
賓
菱
紐
表
蒜
頻
夫
普
赴
封
婦
浮
阜
楓
富
父
附
風
冨
符
侮
葺
布
腐
撫
蕗
淵 弗 払 沸 仏
墳 憤 扮 焚 奮
聞
へ
422
423
424
425
426
幣 平 弊 柄 並
僻 壁 癖 碧 別
片 篇 編 辺 返
鞭
426
427
428
429
430
431
432
433
434
435
436
保 舗 鋪
穂 募 墓 慕
俸 包 呆 報
抱 捧 放 方
法 泡 烹
蜂 褒 訪 豊
亡 傍 剖 坊
望 某 棒 冒
鉾 防 吠 頬
牧 睦 穆 釦
本 翻 凡 盆
436
437
438
439
440
摩
昧 枚 毎 哩 槙
鱒 桝 亦 俣 又
繭 麿 万 慢 満
漫 蔓
440
441
味 未
蜜 湊 蓑 稔 脈
441
442
夢 無 牟 矛 霧
442
443
444
名 命 明 盟 迷
免 棉 綿 緬 面
444
445
446
孟 毛 猛 盲 網
目 杢 勿 餅 尤
丙 併 兵
蔽 閉 陛 米
瞥 蔑 箆 偏
遍 便 勉 娩
斗
砺
刀
搭
燈
杜
努
唐
東
当
渡
度
塔
桃
痘
兎
登
土
塘
梼
祷
謄
働
胴
特
突
惇
豆
動
萄
督
椴
敦
踏
同
道
禿
届
沌
逃
堂
銅
篤
鳶
豚
吐
菟
奴
套
棟
等
透
導
峠
毒
苫
遁
圃
戊
奉
朋
砲
邦
妨
紡
北
勃
塀
頁
変
弁
捕 歩 甫 補 輔
暮 母 簿 菩 倣
宝 峰 峯 崩 庖
縫
鋒
帽
肪
僕
没
胞
飽
忘
膨
卜
殆
芳
鳳
忙
謀
墨
堀
萌
鵬
房
貌
撲
幌
蓬
乏
暴
貿
朴
奔
那 内 乍 凪 薙
馴 縄 畷 南 楠
磨 魔 麻 埋 妹
幕 膜 枕 鮪 柾
抹 末 沫 迄 侭
み
魅 巳 箕 岬 密
妙 粍 民 眠
む
務
鵡 椋 婿 娘
め
弐 迩 匂 賑 肉
妊 忍 認
ぬ
冥
銘 鳴 姪 牝 滅
麺
も
濡
ね
禰
2
納 能
ふ
415
416
417
418
419
420
421
422
に
390
8 9
撚 燃
ほ
敵 滴
轍 迭
甜 貼
な
386
387
388
1st
-3rd
391
392
ま
390
船 薦 詮 賎 践
鮮 前 善 漸 然
8
摸 模 茂 妄
耗 蒙 儲 木 黙
戻 籾 貰 問 悶
1st
-3rd
447
447
448
449
449
450
451
452
452
453
454
455
456
4th digit of code
0 1 2 3 4
5 6 7
紋 門 匁
や
也 冶 夜 爺 耶
矢 厄 役 約 薬 訳 躍 靖
鑓
ゆ
愉 愈 油 癒
諭 輸 唯 佑 優 勇 友
悠 憂 揖 有 柚 湧 涌 猶
祐 裕 誘 遊 邑 郵 雄 融
よ
余
揚
窯
養
与
揺
羊
慾
誉
擁
耀
抑
輿
曜
葉
欲
預
楊
蓉
沃
傭
様
要
浴
8
9
野 弥
柳 薮
宥 幽
猷 由
夕
予
幼 妖 容 庸
洋 溶 熔 用
謡 踊 遥 陽
翌 翼 淀
ら
456
457
458
羅
雷 洛 絡 落 酪
藍 蘭 覧
螺 裸 来 莱 頼
乱 卵 嵐 欄 濫
り
458
459
460
461
462
463
464
465
履 李
痢
葎 掠
隆 竜
両 凌
糧 良
厘 林
466
瑠 塁 涙 累 類
利 吏
梨
裏
略
龍
寮
諒
淋
理
裡
劉
侶
料
遼
燐
璃
里
流
慮
梁
量
琳
離
溜
旅
涼
陵
臨
陸
琉
虜
猟
領
輪
律
留
了
療
力
隣
率
硫
亮
瞭
緑
鱗
立
粒
僚
稜
倫
麟
る
れ
466
467
468
469
470
嶺 怜 玲 礼 苓
齢 暦 歴 列 劣
漣 煉 簾 練 聯
蓮 連 錬
470
471
472
473
呂
露 労 婁 廊 弄
牢 狼 篭 老 聾
肋 録 論
令 伶 例 冷 励
鈴 隷 零 霊 麗
烈 裂 廉 恋 憐
ろ
魯 櫓 炉 賂 路
朗 楼 榔 浪 漏
蝋 郎 六 麓 禄
わ
473
474
475
480
481
482
483
484
485
486
487
488
489
490
491
492
493
494
495
496
497
498
499
500
501
502
503
504
505
506
507
508
509
倭 和
枠 鷲 亙 亘 鰐
碗 腕
乖
亟
仂
佝
侑
俑
倅
偃
傀
僮
儡
兢
冏
冫
几
刎
剞
劒
勣
甸
匸
卮
厰
叭
吩
咒
咥
弌 丐 丕 个
乘 亂 亅 豫
亠 亢 亰 亳
仗 仞 仭 仟
佗 佇 佶 侈
佯 來 侖 儘
俚 俐 俤 俥
伜 俶 倡 倩
假 會 偕 偐
傚 傅 傴 傲
僉 僊 傳 僂
價 僵 儉 儁
儺 儷 儼 儻
竸 兩 兪 兮
冑 冓 冕 冖
决 冱 冲 冰
處 凩 凭 凰
刧 刪 刮 刳
剔 剪 剴 剩
剱 劈 劑 辨
辧 劬 劭 劼
勦 飭 勠 勳
匍 匐 匏 匕
區 卆 卅 丗
夘 卻 卷 厂
厶 參 簒 雙
叺 吁 吽 呀
吝 呎 咏 呵
呻 咀 呶 咄
咬 哄 哈 咨
話 歪 賄 脇 惑
詫 藁 蕨 椀 湾
丱
亊
亶
价
侏
俔
倚
倬
偈
丶
舒
从
伉
侘
俟
倨
俾
做
丼
弍
仍
佚
佻
俎
倔
俯
偖
丿
于
仄
估
佩
俘
倪
們
偬
乂
亞
仆
佛
佰
俛
倥
倆
偸
僖
儂
儿
冀
冤
况
凵
刹
剳
僞
儖
兀
冂
冦
冽
凾
剏
剿
僥
儕
兒
囘
冢
凅
刄
剄
剽
僭
儔
兌
册
冩
凉
刋
剋
劍
僣
儚
兔
冉
冪
凛
刔
剌
劔
劵
勵
匚
卉
厖
叟
听
咎
咐
勁
勸
匣
卍
厠
曼
吭
呟
咆
勍
勹
匯
凖
厦
燮
吼
呱
哇
勗
匆
匱
卞
厥
叮
吮
呷
咢
勞
匈
匳
卩
厮
叨
吶
呰
咸
1st
-3rd
510
511
512
513
514
515
516
517
518
519
520
521
522
523
524
525
526
527
528
529
530
531
532
533
534
535
536
537
538
539
540
541
542
543
544
545
546
547
548
549
550
551
552
553
554
555
556
557
558
559
560
561
562
563
564
565
566
567
568
569
570
571
572
573
574
575
576
577
578
579
580
581
582
583
584
585
586
587
0
唔
售
咯
喩
嘔
嘴
嚀
嚼
囹
圷
坿
埔
堡
墟
壗
壻
夭
奢
姜
婀
嫋
嬌
孀
學
寔
寳
尹
岑
峇
崗
嵌
嶢
巓
帑
幟
廁
廬
彜
彎
徃
徠
悳
怕
恊
悁
惠
愆
愍
愴
慴
憇
應
懣
戉
扞
抓
拆
挌
捍
掉
揉
攝
撓
舉
擺
攵
敞
斷
旡
昜
1
咫
哽
啜
喊
喇
嗷
嘶
嚊
囁
圀
圈
圸
垉
埒
塢
墫
壙
壼
夲
奠
奸
妍
婬
嫂
嬋
孑
斈
寐
尅
屁
屐
岔
峙
嵜
嵒
嶝
巒
帛
幢
廂
廖
廱
弋
弯
徂
徨
忿
怫
恆
悍
悄
惓
惶
愎
愽
慯
憬
懷
懶
戍
戞
扣
抖
擔
拮
搜
掟
插
搗
撥
據
擠
攀
攷
敝
旃
旱
晏
2
哂
哮
啅
喟
喨
嘖
嘲
嚠
囃
囿
國
坎
垓
埓
塋
墺
壘
壽
夸
奧
妁
姙
婉
媽
嬖
孕
孺
寤
將
屆
屏
妛
峩
崟
嵎
嶬
巖
帶
幤
廈
廣
廳
弑
彑
彿
徭
怡
怦
恍
惧
悛
悴
惷
慇
慂
慥
憔
懈
懺
戌
戡
扛
拔
拈
拱
捏
掵
揶
搨
撩
擒
擡
擽
收
敲
旆
杲
晄
4th digit of code
3 4
5 6 7
咤 咾 咼 哘 哥
哭 哺 哢 唹 啀
啖 啗 唸 唳 啝
啻 啾 喘 喞 單
嗚 嗅 嗟 嗄 嗜
嗾 嗽 嘛 嗹 噎
嘸 噫 噤 嘯 噬
嚔 嚏 嚥 嚮 嚶
囀 囈 囎 囑 囓
圄 圉
圍 圓 團 圖 嗇
圻 址 坏 坩 埀
垠 垳 垤 垪 垰
堊 埖 埣 堋 堙
塰 毀 塒 堽 塹
壞 墻 墸 墮 壅
壥 壜 壤 壟 壯
夂 夊 夐 夛 梦
夾 竒 奕 奐 奎
奬 奩
妝 佞 侫 妣 妲
姚 娥 娟 娑 娜
娵 娶 婢 婪 媚
嫣 嫗 嫦 嫩 嫖
嬲 嫐 嬪 嬶 嬾
孚 孛 孥 孩 孰
宀 它 宦 宸 寃
實 寢 寞 寥 寫
專 對 尓 尠 尢
屎 屓
孱 屬 屮 乢 屶
岫 岻 岶 岼 岷
峽 峺 峭 嶌 峪
崛 崑 崔 崢 崚
嵋 嵬 嵳 嵶 嶇
嶮 嶽 嶐 嶷 嶼
巛 巫 已 巵 帋
帷 幄 幃 幀 幎
幇 幵 并 幺 麼
廐 廏
廝 廚 廛 廢 廡
廰 廴 廸 廾 弃
弖 弩 弭 弸 彁
彖 彗 彙 彡 彭
徊 很 徑 徇 從
徼 忖 忻 忤 忸
恠 怙 怐 怩 怎
怏 怺 恚 恁 恪
恣 恃 恤 恂 恬
悃 悚
悖 悗 悒 悧 悋
忰 悽 惆 悵 惘
愀 惴 惺 愃 愡
愾 愨 愧 慊 愿
慄 慳 慷 慘 慙
慱 慟 慝 慓 慵
憚 憊 憑 憫 憮
懃 懆 憺 懋 罹
懴 懿 懽 懼 懾
戔 戛
截 戮 戰 戲 戳
扠 扨 扼 抂 抉
抃 抔 拗 拑 抻
拜 拌 拊 拂 拇
挧 挂 挈 拯 拵
掖 掎 掀 掫 捶
捫 捩 掾 揩 揀
揄 搖 搴 搆 搓
搏 摧 摯 摶 摎
撈 撼
擅 擇 撻 擘 擂
抬 擣 擯 攬 擶
攘 攜 攅 攤 攣
攸 畋 效 敖 敕
數 斂 斃 變 斛
旁 旄 旌 旒 旛
昊 昃 旻 杳 昵
晉 晁 晞 晝 晤
3
8
哦
啣
喙
啼
嗤
噐
噪
嚴
囗
9
唏
啌
喀
喃
嗔
營
嚆
囂
囮
圜
垈
埃
堝
墅
壓
壺
夥
奚
圦
坡
埆
塲
墹
壑
壹
夬
奘
姆
娉
媼
嫺
孃
孳
寇
寰
尨
姨
娚
媾
嫻
孅
孵
寉
寶
尸
屹
峅
崋
崙
嶄
巉
帚
幗
广
岌
岾
崕
崘
嶂
巍
帙
幔
庠
廨
弉
彈
彳
徙
忱
怱
恷
恫
廩
彝
彌
彷
徘
忝
怛
恟
恙
惡
慍
惻
愼
慚
憙
懌
懍
戀
悸
愕
惱
愬
慫
憖
懊
懦
戈
扁
找
拏
抛
捐
掣
揆
搦
攪
扎
抒
拿
拉
挾
掏
揣
搶
撕
擱
擴
攫
敍
斟
旙
昶
晧
擧
擲
攴
敘
斫
无
昴
晨
1st
-3rd
588
589
590
591
592
593
594
595
596
597
598
599
600
601
602
603
604
605
606
607
608
609
610
611
612
613
614
615
616
617
618
619
620
621
622
623
624
625
626
627
628
629
630
631
632
633
634
635
636
637
638
639
640
641
642
643
644
645
646
647
648
649
650
651
652
653
654
655
656
657
658
659
660
661
662
663
664
665
4th digit of code
0 1 2 3 4
5 6 7
晟 晢 晰 暃 暈 暎 暉 暄
曁 暹 曉 暾 暼
曄 暸 曖 曚 曠 昿 曦
曵 曷 朏 朖 朞 朦 朧 霸
朶 杁 朸 朷 杆 杞 杠 杙
枉 杰 枩 杼 杪 枌 枋 枦
枷 柯 枴 柬 枳 柩 枸 柤
柢 柮 枹 柎 柆 柧 檜 栞
桀 桍 栲 桎 梳 栫 桙 档
梟 梏 梭 梔 條 梛 梃 檮
梵 梠 梺 椏 梍 桾 椁 棊
椢 椦 棡 椌 棍
棔 棧 棕 椶 椒 椄 棗
棹 棠 棯 椨 椪 椚 椣 椡
楷 楜 楸 楫 楔 楾 楮 椹
楙 椰 楡 楞 楝 榁 楪 榲
榿 槁 槓 榾 槎 寨 槊 槝
榧 樮 榑 榠 榜 榕 榴 槞
樛 槿 權 槹 槲 槧 樅 榱
樔 槫 樊 樒 櫁 樣 樓 橄
樶 橸 橇 橢 橙 橦 橈 樸
檍 檠 檄 檢 檣
檗 蘗 檻 櫃 櫂 檸 檳
櫑 櫟 檪 櫚 櫪 櫻 欅 蘖
欖 鬱 欟 欸 欷 盜 欹 飮
歉 歐 歙 歔 歛 歟 歡 歸
殀 殄 殃 殍 殘 殕 殞 殤
殯 殲 殱 殳 殷 殼 毆 毋
毬 毫 毳 毯 麾 氈 氓 气
氣 汞 汕 汢 汪 沂 沍 沚
汾 汨 汳 沒 沐 泄 泱 泓
泅 泝 沮 沱 沾
沺 泛 泯 泙 泪 洟 衍
洽 洸 洙 洵 洳 洒 洌 浣
浚 浹 浙 涎 涕 濤 涅 淹
涵 淇 淦 涸 淆 淬 淞 淌
淅 淺 淙 淤 淕 淪 淮 渭
渙 湲 湟 渾 渣 湫 渫 湶
湃 渺 湎 渤 滿 渝 游 溂
滉 溷 滓 溽 溯 滄 溲 滔
溥 滂 溟 潁 漑 灌 滬 滸
滲 漱 滯 漲 滌
漾 漓 滷 澆 潺 潸 澁
潛 濳 潭 澂 潼 潘 澎 澑
澳 澣 澡 澤 澹 濆 澪 濟
濔 濘 濱 濮 濛 瀉 瀋 濺
瀏 濾 瀛 瀚 潴 瀝 瀘 瀟
瀲 灑 灣 炙 炒 炯 烱 炬
炮 烟 烋 烝 烙 焉 烽 焜
煕 熈 煦 煢 煌 煖 煬 熏
熕 熨 熬 燗 熹 熾 燒 燉
燠 燬 燧 燵 燼
燹 燿 爍 爐 爛 爨 爭
爲 爻 爼 爿 牀 牆 牋 牘
犂 犁 犇 犒 犖 犢 犧 犹
狆 狄 狎 狒 狢 狠 狡 狹
猗 猊 猜 猖 猝 猴 猯 猩
獎 獏 默 獗 獪 獨 獰 獸
獺 珈 玳 珎 玻 珀 珥 珮
琅 瑯 琥 珸 琲 琺 瑕 琿
瑁 瑜 瑩 瑰 瑣 瑪 瑶 瑾
璧 瓊 瓏 瓔 珱
瓠 瓣 瓧 瓩 瓮 瓲 瓰
瓷 甄 甃 甅 甌 甎 甍 甕
甦 甬 甼 畄 畍 畊 畉 畛
畩 畤 畧 畫 畭 畸 當 疆
疊 疉 疂 疔 疚 疝 疥 疣
痃 疵 疽 疸 疼 疱 痍 痊
痣 痞 痾 痿 痼 瘁 痰 痺
瘋 瘍 瘉 瘟 瘧 瘠 瘡 瘢
瘰 瘻 癇 癈 癆 癜 癘 癡
癩 癪 癧 癬 癰
癲 癶 癸 發 皀 皃 皈
皖 皓 皙 皚 皰 皴 皸 皹
盍 盖 盒 盞 盡 盥 盧 盪
眈 眇 眄 眩 眤 眞 眥 眦
眸 睇 睚 睨 睫 睛 睥 睿
瞎 瞋 瞑 瞠 瞞 瞰 瞶 瞹
8 9
暘 暝
曩
朮
杣
枡
柞
框
桷
梹
椈
曰
朿
杤
枅
柝
栩
桿
桴
棘
棣
棆
楴
榮
榻
槨
樞
樌
樢
椥
楹
椽
槐
槃
樂
槭
橲
檐
檬
櫺
歇
歹
殪
毓
氛
沁
沽
櫞
欒
歃
歿
殫
毟
氤
沛
泗
洶
涓
渕
淨
湮
湍
溪
滕
滾
洫
浤
渊
淒
渮
渟
溘
溏
漿
澀
濂
濕
瀑
瀰
炸
焙
燻
燔
潯
潦
濬
瀁
瀾
炳
煥
熄
燎
爬
牴
犲
狷
猥
獵
珞
瑟
璋
爰
牾
狃
倏
猾
獻
璢
瑙
璞
瓱
甓
畆
疇
痂
痒
痲
瘤
癢
瓸
甞
畚
畴
疳
痙
痳
瘴
癨
皋
皺
蘯
眛
睾
瞿
皎
盂
盻
眷
睹
瞼
1st
-3rd
666
667
668
669
670
671
672
673
674
675
676
677
678
679
680
681
682
683
684
685
686
687
688
689
690
691
692
693
694
695
696
697
698
699
700
701
702
703
704
705
706
707
708
709
710
711
712
713
714
715
716
717
718
719
720
721
722
723
724
725
726
727
728
729
730
731
732
733
734
735
736
737
738
739
740
741
742
0
瞽
砌
碚
碾
礫
禊
秕
稟
穢
窖
竊
竦
笞
筧
箚
箴
簇
簟
籘
粭
粽
糲
紵
經
緇
緘
縡
縵
繙
辮
纎
罟
羇
羮
翦
耙
聚
聿
胛
脛
腦
膣
臂
臠
舍
艝
艷
苣
苞
茯
茣
莨
菷
菻
蒂
蒿
蒡
蓼
薨
藉
蘊
虍
蚋
蛔
蜀
蜷
蝴
螽
蟯
1
瞻
砒
碌
碼
磧
祀
禝
秧
禀
穩
窩
竍
竭
笵
筺
筰
箋
篆
簓
簷
籟
粢
糀
糴
紂
絆
綉
綽
緝
縒
縹
繚
繿
纛
罅
罠
羌
羶
翩
耜
聟
肄
胥
脩
隋
腴
腟
膺
臧
舐
艚
艸
苟
茆
茵
茫
莎
菴
萇
葭
葩
蒟
蔡
蕀
蕁
蕭
薺
蘓
乕
蚌
蛞
蜃
蜻
蝗
蝓
蟀
蟲
4th digit of code
2 3 4
5 6 7
矇 矍 矗 矚 矜 矣
礦 砠 礪 硅 碎 硴
碣 碵 碪 碯 磑 磆
磅 磊 磬
磚 磽 磴 礇 礒 礑
祠 祗 祟 祚 祕 祓
禧 齋 禪 禮 禳 禹
秬 秡 秣 稈 稍 稘
稱 稻 稾 稷 穃 穗
龝 穰 穹 穽 窈 窗
竈 窰 窶 竅 竄 窿
竏 竕 竓 站 竚 竝
竰 笂 笏 笊 笆 笳
笨 笶 筐
笄 筍 笋 筌 筅 筵
筱 筬 筮 箝 箘 箟
箒 箏 筝 箙 篋 篁
篝 篩 簑 簔 篦 篥
篳 篷 簗 簍 篶 簣
簫 簽 籌 籃 籔 籏
籤 籖 籥 籬 籵 粃
粫 粡 粨 粳 粲 粱
糅 糂 糘 糒 糜 糢
糶 糺 紆
紜 紕 紊 絅 絋 紮
絳 絖 絎 絲 絨 絮
絛 綏 絽 綛 綺 綮
綫 總 綢 綯 緜 綸
緤 緞 緻 緲 緡 縅
縱 縟 縉 縋 縢 繆
繃 縷 縲 縺 繧 繝
繹 繪 繩 繼 繻 纃
纈 纉 續 纒 纐 纓
纜 缸 缺
罌 罍 罎 罐 网 罕
罨 罩 罧 罸 羂 羆
羔 羞 羝 羚 羣 羯
羸 譱 翅 翆 翊 翕
翳 翹 飜 耆 耄 耋
耡 耨 耿 耻 聊 聆
聢 聨 聳 聲 聰 聶
肆 肅 肛 肓 肚 肭
胙 胝 胄 胚 胖 脉
脣 脯 腋
腆 脾 腓 腑 胼 腱
膃 膈 膊 膀 膂 膠
膓 膩 膰 膵 膾 膸
臉 臍 臑 臙 臘 臈
臺 臻 臾 舁 舂 舅
舖 舩 舫 舸 舳 艀
艟 艤 艢 艨 艪 艫
艾 芍 芒 芫 芟 芻
苒 苴 苳 苺 莓 范
苜 茉 苙
茴 茖 茲 茱 荀 茹
茗 茘 莅 莚 莪 莟
莇 莊 荼 莵 荳 荵
萓 菫 菎 菽 萃 菘
菠 菲 萍 萢 萠 莽
萪 萼 蕚 蒄 葷 葫
葆 萬 葯 葹 萵 蓊
蓙 蓍 蒻 蓚 蓐 蓁
蓿 蓴 蔗 蔘 蔬 蔟
蕣 蕘 蕈
蘂 蕋 蕕 薀 薤 薈
薔 薛 藪 薇 薜 蕷
藏 薹 藐 藕 藝 藥
蘋 藾 藺 蘆 蘢 蘚
虔 號 虧 虱 蚓 蚣
蚶 蚯 蛄 蛆 蚰 蛉
蛩 蛬 蛟 蛛 蛯 蜒
蛻 蜑 蜉 蜍 蛹 蜊
蜥 蜩 蜚 蝠 蝟 蝸
蝨 蝮 蝙
蝣 蝪 蠅 螢 螟 螂
蟐 雖 螫 蟄 螳 蟇
蟠 蠏 蠍 蟾 蟶 蟷
8
矮
碆
磋
9
矼
硼
磔
礙
祺
禺
稙
穉
窕
邃
竡
笘
礬
祿
秉
稠
穡
窘
竇
竢
笙
筥
箍
篌
籠
簧
籀
粐
粮
鬻
筴
箜
篏
簀
簪
籐
粤
粹
糯
紲
絏
綣
綟
縊
繦
繖
緕
纔
紿
絣
綵
綰
縣
縻
繞
繽
纖
罔
羃
羲
翔
耒
聒
聹
冐
胯
罘
羈
羹
翡
耘
聘
聽
肬
胱
腮
膕
膽
臚
與
艙
舮
芬
苻
腥
膤
臀
臟
舊
艘
艱
苡
苹
荐
莢
莠
萋
萸
蒭
葢
蓆
蔕
荅
莖
莉
菁
蔆
葮
蒹
蓖
蔔
薑
蕾
藜
蘰
蚩
蠣
蜆
蜴
蝌
薊
薐
藹
蘿
蚪
蚫
蜈
蜿
蝎
螯 蟋
蟆 螻
蠎 蟒
1st
-3rd
743
744
745
746
747
748
749
750
751
752
753
754
755
756
757
758
759
760
761
762
763
764
765
766
767
768
769
770
771
772
773
774
775
776
777
778
779
780
781
782
783
784
785
786
787
788
789
790
791
792
793
794
795
796
797
798
799
800
801
802
803
804
805
806
807
808
809
810
811
812
813
814
815
816
817
818
819
0
蠑
衄
衵
袍
裝
褓
褸
覈
覺
訃
詒
誨
諚
諞
謳
證
讓
豐
貍
貳
賻
賍
趾
跟
蹂
蹣
躊
躱
軾
輌
轆
辭
逅
逧
遞
邊
郛
酥
醪
釟
鈕
鉋
鋩
鍼
鏨
鐓
鑒
鑷
閔
閹
關
陏
險
雋
霈
霹
靤
靺
鞴
韶
顏
飆
餞
饐
馮
駲
驅
驢
髏
髫
1
蠖
衂
衽
袤
裹
襃
襌
襦
覊
覽
訖
詆
誡
諫
諛
鞫
譖
譟
讖
豕
貎
貮
贄
贔
趺
跣
踵
蹇
蹕
躓
躾
輊
輦
轎
辯
迹
逶
遏
遨
邉
鄂
酩
醵
釡
鈑
鉐
錏
錙
鍮
鏥
鐃
鑄
鑽
閖
閾
闡
陋
陝
隧
雉
霓
霽
靦
鞆
韃
韵
顋
顱
飩
餤
饋
馼
駻
驂
驥
髑
髮
4th digit of code
2 3 4
5 6 7
蠕 蠢 蠡 蠱 蠶 蠹
衒 衙 衞 衢 衫 袁
袵 衲 袂 袗 袒 袮
袰 袿 袱 裃 裄 裔
褂 裼 裴 裨 裲 褄
褞 褥 褪 褫 襁 襄
褝 襠 襞
襤 襭 襪 襯 襴 襷
覓 覘 覡 覩 覦 覬
覿 觀 觚 觜 觝 觧
訐 訌 訛 訝 訥 訶
詈 詼 詭 詬 詢 誅
誑 誥 誦 誚 誣 諄
諳 諧 諤 諱 謔 諠
謌 謇 謚 諡 謖 謐
謦 謫 謾 謨 譁 譌
譛 譚 譫
譬 譯 譴 譽 讀 讌
讙 讚 谺 豁 谿 豈
豢 豬 豸 豺 貂 貉
貔 豼 貘 戝 貭 貪
貶 賈 賁 賤 賣 賚
贅 贊 贇 贏 贍 贐
贖 赧 赭 赱 赳 趁
跏 跚 跖 跌 跛 跋
跼 踈 踉 跿 踝 踞
踰 踴 蹊
蹉 蹌 蹐 蹈 蹙 蹤
蹶 蹲 蹼 躁 躇 躅
躑 躔 躙 躪 躡 躬
軅 軈 軋 軛 軣 軼
輅 輕 輒 輙 輓 輜
輳 輻 輹 轅 轂 輾
轗 轜 轢 轣 轤 辜
辷 迚 迥 迢 迪 迯
迺 逑 逕 逡 逍 逞
逵 逹 迸
遐 遑 遒 逎 遉 逾
遯 遶 隨 遲 邂 遽
邏 邨 邯 邱 邵 郢
鄒 鄙 鄲 鄰 酊 酖
酳 酲 醋 醉 醂 醢
醴 醺 釀 釁 釉 釋
釛 釼 釵 釶 鈞 釿
鉞 鉗 鉅 鉉 鉤 鉈
銜 銖 銓 銛 鉚 鋏
鋺 鍄 錮
錢 錚 錣 錺 錵 錻
鍖 鎰 鎬 鎭 鎔 鎹
鏘 鏃 鏝 鏐 鏈 鏤
鐇 鐐 鐶 鐫 鐵 鐡
鑛 鑠 鑢 鑞 鑪 鈩
鑚 鑼 鑾 钁 鑿 閂
閘 閙 閠 閨 閧 閭
闊 濶 闃 闍 闌 闕
闥 闢 阡 阨 阮 阯
陷 陜 陞
陟 陦 陲 陬 隍 隘
隱 隲 隰 隴 隶 隸
雍 襍 雜 霍 雕 雹
霎 霑 霏 霖 霙 霤
霾 靄 靆 靈 靂 靉
靨 勒 靫 靱 靹 鞅
鞋 鞏 鞐 鞜 鞨 鞦
韆 韈 韋 韜 韭 齏
頏 頌 頸 頤 頡 頷
顫 顯 顰
顴 顳 颪 颯 颱 颶
飫 餃 餉 餒 餔 餘
餠 餬 餮 餽 餾 饂
饑 饒 饌 饕 馗 馘
駟 駛 駝 駘 駑 駭
駸 騁 騏 騅 駢 騙
驀 驃 騾 驕 驍 驛
驤 驩 驫 驪 骭 骰
髓 體 髞 髟 髢 髣
髴 髱 髷
4
8
蠧
衾
袙
裘
褌
褻
9
蠻
袞
袢
裙
褊
褶
襾
覯
觴
詁
誂
諍
諢
謗
譏
覃
覲
觸
詛
誄
諂
諷
謠
譎
讎
豌
貅
貽
賽
齎
趙
跪
踐
讒
豎
貊
貲
賺
贓
跂
跫
踟
蹠
躄
躰
軻
輟
轌
辟
邇
逖
踪
躋
軆
軫
輛
轉
辣
迴
逋
遖
邁
郤
酘
醫
釐
鈔
銕
銹
遘
邀
扈
酣
醯
釖
鈬
鈿
銷
鍜
鏖
鐚
鐺
鑰
閇
閼
闔
陂
鍠
鏗
鐔
鑁
鑵
閊
閻
闖
陌
隕
隹
霄
霪
靜
靼
鞣
韲
頽
隗
雎
霆
霰
靠
鞁
鞳
竟
顆
飄
餡
饉
馥
駮
騫
驗
骼
髦
飃
餝
饅
馭
駱
騷
驟
髀
髯
1st
-3rd
820
821
822
823
824
825
826
827
828
829
830
831
832
833
834
835
836
837
838
839
840
0
鬨
魎
鮠
鯣
鰔
鰛
鱠
鴃
鵁
鶫
鶸
鷯
麋
麭
黠
黽
齔
齲
1
髻
鬩
魑
鮨
鯢
鰉
鰥
鱧
鴆
鴿
鵝
鵯
鶺
鷽
麌
靡
黥
鼇
齣
齶
堯
2
鬆
鬪
魘
鮴
鯤
鰓
鰤
鱶
鴪
鴾
鵞
鵺
鷆
鸚
麒
黌
黨
鼈
齟
龕
槇
4th digit of code
3 4
5 6 7
鬘 鬚 鬟 鬢 鬣
鬮 鬯 鬲 魄 魃
魴 鮓 鮃 鮑 鮖
鯀 鯊 鮹 鯆 鯏
鯔 鯡 鰺 鯲 鯱
鰌 鰆 鰈 鰒 鰊
鰡 鰰 鱇 鰲 鱆
鱸 鳧 鳬 鳰 鴉
鴦 鶯 鴣 鴟 鵄
鵆 鵈
鵤 鵑 鵐 鵙 鵲
鶚 鶤 鶩 鶲 鷄
鷏 鷂 鷙 鷓 鷸
鸛 鸞 鹵 鹹 鹽
麕 麑 麝 麥 麩
黎 黏 黐 黔 黜
黯 黴 黶 黷 黹
皷 鼕 鼡 鼬 鼾
齠 齡 齦 齧 齬
龜 龠
遙 瑤 凜 熙
8
鬥
魏
鮗
鯑
鯰
鰄
鰾
鴈
鴕
9
鬧
魍
鮟
鯒
鰕
鰮
鱚
鳫
鴒
鶉
鷁
鷦
麁
麸
點
黻
齊
齪
鶇
鶻
鷭
麈
麪
黝
黼
齒
齷


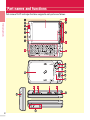


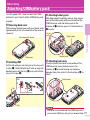
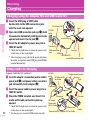
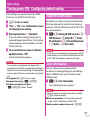
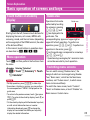
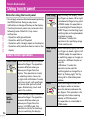
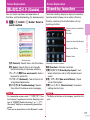

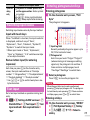


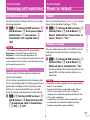
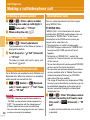


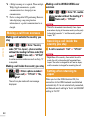


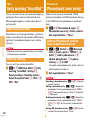
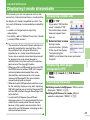


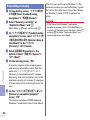


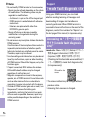

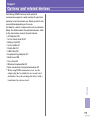
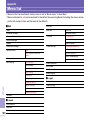

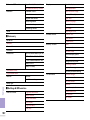


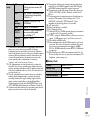


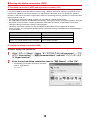
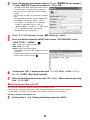

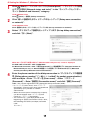
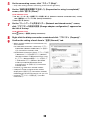
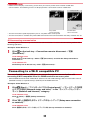


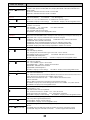
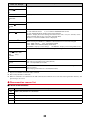


![取扱説明書 [F-02B] - Altehandys.de](http://vs1.manualzilla.com/store/data/006624109_2-964909a0eaf853a4068a164035e61306-150x150.png)
![取扱説明書 [F-04C] - Altehandys.de](http://vs1.manualzilla.com/store/data/006590960_2-e07b811fe805e3d55f110a4d8035f924-150x150.png)
![取扱説明書 [F-07C]](http://vs1.manualzilla.com/store/data/006649618_2-2a441b4a14437b042cf19a1bc565b0b6-150x150.png)
![取扱説明書 [F-03B] - Altehandys.de](http://vs1.manualzilla.com/store/data/006538124_2-9b53d14369fe3af8b4369d863b7cba7c-150x150.png)
![取扱説明書 [F-01C] - Altehandys.de](http://vs1.manualzilla.com/store/data/006698700_2-1423e4aa8845601d17d5495c0fe871e1-150x150.png)