1
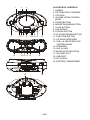
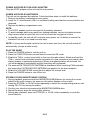
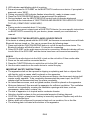
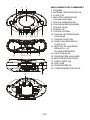
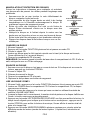
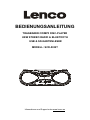
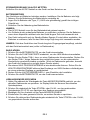
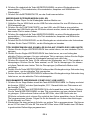
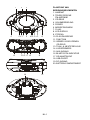
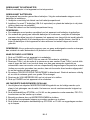
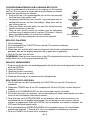
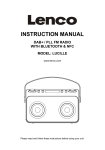
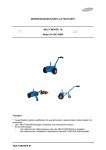
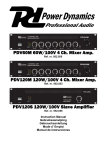
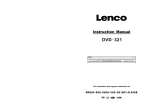
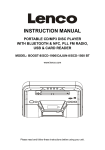
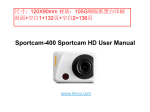
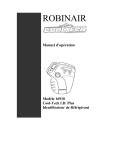
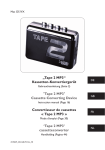
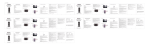
INSTRUCTION MANUAL PORTABLE CD/MP3 DISC PLAYER FM STEREO RADIO & BLUETOOTH RECEPTION USB & SD CARD READER MODEL: SCD-50 BT For information and support www.lenco.eu 1 2 5 6 7 4 14 3 8 9 10 11 12 15 16 17 18 20 13 14 19 EN-1 LOCATION OF CONTROLS 1. HANDLE 2. FM TELESCOPIC ANTENNA 3. CD DOOR 4. VOLUME UP/DN CONTROL KNOB 5. POWER BUTTON 6. MODE/PROG/MEM BUTTON 7. 10+/M- BUTTON 8. LCD DISPLAY 9. STOP/M+ BUTTON 10. PLAY/PAUSE/PAIR BUTTON 11. FUNCTION BUTTON 12. CD DOOR OPEN AREA 13. TUN+/- & NEXT/PREVIOUS CONTROL KNOB 14. SPEAKERS 15. AUX IN JACK 16. BLUETOOTH INDICATOR 17. SD CARD SLOT 18. USB PORT 19. DC IN JACK 20. BATTERY COMPARTMENT POWER SUPPLIED BY THE AC/DC ADAPTER Plug the AC/DC adapter to the unit and the main power. POWER SUPPLIED BY BATTERIES The unit can be operated by batteries. Follow the below steps to install the batteries: 1. Remove the battery compartment cover gently. 2. Install 8 x 'C' size batteries (UM-2 or equivalent) taking care that the correct polarities are observed. 3. Replace the battery compartment cover. NOTE: The AC/DC adapter must be removed for the battery operation. To avoid damage which may result from leaking batteries, remove the batteries when they become weak or when the unit is not to be used for long period of time. In standby mode, the unit will still consume some power, so it is better to remove the batteries if the unit is not used for some days. NOTE: If not any audio signal inputs to the unit in about one hour, the unit will switch off automatically (except at radio mode). PLAY THE RADIO 1. Press the POWER button to turn the unit on. 2. Press the FUNCTION button several times to enter the FM mode. 3. Rotate the TUN+/- control knob briefly to fine tune the radio station. Rotate and hold the TUN+/- control knob clockwise/counter-clockwise for a few seconds to auto search radio station forward or backward respectively (When an available station will be found, the unit will broadcast it immediately and the searching will be stopped). 4. The external FM TELESCOPIC ANTENNA is directional. When receiving FM broadcasts, fully extend the FM TELESCOPIC ANTENNA and position for the best reception. 5. Rotate the VOLUME UP/DN control knob to adjust the volume level. 6. Press the POWER button to turn off the unit. STORING YOUR FAVORITE RADIO STATION 1. During playback, press and hold the MODE/PROG/MEM button for storing the current station to the unit’s memory, the memory cell number flashes on the screen. 2. Press the STOP/M+ or 10+/M- button repeatedly to select the corresponding memory cell among P01-P10 for storing the station. 3. Confirm your selection by pressing the MODE/PROG/MEM button. 4. Repeat the above steps for storing other stations. 5. During radio playback, press the STOP/M+ or 10+/M- button repeatedly to recall the stored stations. EN-2 HANDLE AND MAINTAIN A COMPACT DISC. Follow the instructions below to handle and maintain your disc in order that long time and trouble free performance can possibly be obtained: Ensure not to caress the rain bow side of the disc; handle the disc by the edge. Long time exposure to sunshine, high temperatures and humidity will damage the disc. Keep the storage area clean. Avoid sticking labels on both sides of a disc. Writing with pointed articles on the disc should be strictly avoided. Clean the disc wiping the centre and then working out to the edge with a dry & soft cloth or a disc brush. Avoid any cleansing lotion or chemical eradicator. Store them in their cases when they are not to be used. HANDLE DISC ONLY AS SHOWN CLEAN FROM CENTER TO EDGE DO NOT STORE NEAR HEAT LOAD A DISC 1. Power on the unit. 2. Press the FUNCTION button repeatedly to switch to the CD mode. 3. Open the CD door. 4. Insert a disc with the label side facing upward (if the disc is upside down, the display will indicate no disc on the screen). 5. Close the CD door by hand. NOTE: Never touch the laser lens inside the CD compartment. If it ever gets dirty, clean it with a CD cleaner disc. REMOVE A DISC 1. Make sure the disc is not playing. If it is, press the STOP/M+ button. 2. Open the CD door. 3. Gently remove the disc. 4. Close the CD door by hand. 5. Replace the disc in its protective storage box. PLAY A CD/MP3 DISC 1. Power on the unit, press the FUNCTION button repeatedly to switch to the CD mode. 2. Load a CD/MP3 disc into the CD compartment. Close the CD door, the disc will begin to spin. 3. Adjust the volume level to the desired volume level by using the VOLUME UP/DN control knob. 4. When the disc is successfully read, the total number of the disc shows on the display, the playback starts automatically. 5. Press the PLAY/PAUSE/PAIR button once to halt music playback, the elapsed time of the current track flashes to indicate the player in Pause mode; press the STOP/M+ button to cease music playback, the LCD shows the total number of the tracks. 6. Press the MODE/PROG/MEM button repeatedly to switch among the play modes (repeat 1, repeat All, introduction and random play modes). 7. Press the POWER button to turn off the unit. EN-3 EXTERNAL MEMORY MEDIA OPERATION (USB, SD) Prepare the player for external memory media operation. 1. Insert a USB data traveller into the USB port or insert a SD card into the SD card slot; 2. Press the FUNCTION button to switch the unit to USB or card modes. After the inserted USB or card is detected, the playback will start from the first track of the first folder. 3. Press the MODE/PROG/MEM button repeatedly to switch among the play modes (repeat 1, repeat All, introduction and random play modes). 4. Press the PLAY/PAUSE/PAIR button to pause or resume the playback. Press the STOP/M+ button to cease the playback. SKIP TRACKS AND SEARCH FOR A SPECIFIC POINT TO PLAY (CD/MP3 DISC/ USB/CARD) 1. Clockwise rotate the NEXT/PREVIOUS control knob shortly in music play to skip to the next track. 2. Counter-clockwise rotate the NEXT/PREVIOUS control knob shortly in music play to go back to the beginning of the current track. To skip to the previous track, counter-clockwise rotate NEXT/PREVIOUS control knob twice shortly in music play to skip to the previous track. 3. Press the 10+/M- button once in play to skip to 10 tracks ahead, twice to skip to 20 tracks ahead. You can reach the last track of the disc using this button (unavailable at Bluetooth mode). 4. Clockwise rotate and hold NEXT/PREVIOUS control knob in music play to search forward at quick rate for a specific point to play. 5. Counter-clockwise rotate and hold NEXT/PREVIOUS control knob in music play to search backward at quick rate for a specific point to play. PROGRAMMED PLAY (CD/MP3 DISC/USB/CARD) 1. At stop mode, press the MODE/PROG/MEM button once, icon "PROG" shows with a program sequence indication "P01" first, then a track number flickers on the LCD with the icon “PROG”; 2. Select the first track to be programmed using the NEXT/PREVIUS control knob, and press the MODE/PROG/MEM button again to store and advance to the next programming step (If there are several folders on the MP3 disc or USB and SD card, it is necessary to program folders first, then program tracks; the method of the folder programming is the same as the above instructions of the tracks programming.). 3. Repeat the above steps to program more tracks. A maximum of 20 tracks for CD and 99 tracks for MP3/USB/card can be programmed in memory in a preferred order. 4. Press the PLAY/PAUSE/PAIR button to begin programmed play in the preferred order after you are done with programming. The player stops automatically after all programmed tracks are played. 5. You may press the STOP/M+ button to terminate programmed playback. In program stop mode, press the PLAY/PAUSE/PAIR button to begin the programmed playback with the programming order identical with the previous one done; press the STOP/M+ button again to clear the programming. BLUETOOTH OPERATING This unit can receive stereo audio signal from a BLUETOOTH stereo audio source device. 1. Power on the unit, switch to BLUETOOTH mode by pressing the FUNCTION button. EN-4 2. LED indicator rapid blinking while it is pairing. 3. Pair and connect to SCD-50BT on the BLUETOOTH audio source device. If prompted for passcode, enter “0000”. 4. Pairing successful (LED indicator flashes intermittently), ready to stream music. 5. Press the PLAY/PAUSE/PAIR button to pause/resume the playback. 6. During playback, use the NEXT/PREVIOUS control knob to operate skip/search functions as the instructions of “SKIP TRACKS AND SEARCH FOR A SPECIFIC POINT TO PLAY (CD/MP3 DISC /USB/CARD)”. Note: Pairing mode is canceled about 1.5 minutes. The above are generic steps to pair a BLUETOOTH device, for more specific instructions on BLUETOOTH connectivity for your device, please consult your manufacturer’s manual. RE-CONNECT TO THE BLUETOOTH AUDIO SOURCE DEVICE If the device is already paired with the SCD-50BT, but became unconnected even with both Bluetooth devices turned on. You can re-connect them by following steps: 1. Press and hold the PLAY/PAUSE/PAIR button to re-link the audio source device. The Bluetooth indicator will blink for about 1.5 minutes for connecting. 2. Select SCD-50BT on the audio source device for connecting. Bluetooth indicator will turn to solid blue if the SCD-50BT and the device have been re-connected successfully. AUX IN 1. Connect the audio device into the AUX in jack on the unit with a 3.5mm audio cable. 2. Power on the unit and the connected device. 3. Press the FUNCTION button to switch the unit to the AUX mode. 4. Use the native controls on the audio device to control the play. IMPORTANT SAFETY INSTRUCTIONS The apparatus shall not be exposed to dripping or splashing and that no objects filled with liquids, such as vases, shall be placed on the apparatus. When the AC/DC adapter is used as the disconnect device, the disconnect device shall remain readily operable. To be completely disconnected the power input, the AC/DC adapter shall be disconnected from the mains completely. No naked flame sources, such as lighted candles, should be placed on the apparatus. Minimum distances 2.0cm around the apparatus for sufficient ventilation. The ventilation should not be impeded by covering the ventilation openings with items, such as newspapers, table-cloths, curtains, etc. The use of apparatus is in tropical and/or moderate climates. Attention should be drawn to the environmental aspects of battery disposal. CAUTION: Danger of explosion if battery is incorrectly replaced. Replace only with the same or equivalent type. Battery shall not be exposed to excessive heat such as sunshine, fire or the like. The marking plate is located at the bottom of the apparatus. EN-5 SPECIFICATION Power requirement ............. AC power adapter: Input: AC 100-240V, 50/60Hz Output: DC 9V, 1.5A DC 12V UM-2/"C" x 8pcs (batteries) – not included Power consumption ............ 13W Dimensions ........................ Approx. 440(L) X 254(W) X 144(H) mm Operation temperature........ +5°C ~ + 35°C Receiving band .................. FM Tuning range ...................... FM 87.5 - 108 MHz Playback system ................ Compact Disc Digital Audio System Output power ..................... 2.4W x 2 @10% THD Speaker impedance............ 4Ω / 5W Bluetooth compatible .......... Support A2DP Compatible with.................. USB, SD card Power supply adapter Use only the power supply listed in the user instructions. Manufacturer: NG-L Model number: APX915A Specifications are subject to change without notice. Service and support For information: www.lenco.com For support: http://lencosupport.zendesk.com Lenco helpdesk: Germany The Netherlands Belgium France 0900-1520530 0900-23553626 02-6200115 03-81484280 (Local charges) (Local charges + 1ct p/min) (Local charges) (Local charges) The helpdesk is accessible from Monday till Friday from 9 AM till 6 PM. When contacting Lenco, you will always be asked for the model and serial number of your product. The serial number can be found on the back of the device. Please write down the serial number below: Model: SCD-50 BT Serial number:_________________________________ Lenco offers service and warranty in accordance to European law, which means that in case of repairs (both during and after the warranty period) you should contact your local dealer. Important note: It is not possible to send products that need repairs to Lenco directly. EN-6 Important note: If this unit is opened or accessed by a non-official service center in any way, the warranty expires. This device is not suitable for professional use. In case of professional use, all warranty obligations of the manufacturer will be voided. This product operates at 2400 - 2483.5 MHz and is designated only to be used inside a normal household environment. This product is suited for this purpose within all EU counties. Hereby, STL Group BV, Ankerkade 20 NL 5928 PL Venlo, declares that this product is in compliance with the essential requirements and other relevant provisions of Directive 1999/5/EC. The declaration of conformity may be consulted at https://lencosupport.zendesk.com/forums/22413161-CE-Documents Products with the CE marking comply with the EMC Directive (2004/108/EC) and the Low Voltage Directive (2006/95/EC) issued by the Commission of the European Community. This symbol indicates that the relevant electrical product or battery should not be disposed of as general household waste in Europe. To ensure the correct waste treatment of the product and battery, please dispose them in accordance to any applicable local laws of requirement for disposal of electrical equipment or batteries. In so doing, you will help to conserve natural resources and improve standards of environmental protection in treatment and disposal of electrical waste (Waste Electrical and Electronic Equipment Directive). ®All rights reserved EN-7 MANUAL DE INSTRUCCIONES REPRODUCTOR DE DISCOS CD/MP3 PORTÁTIL CON RADIO FM ESTÉREO, RECEPCIÓN DE BLUETOOTH Y LECTOR DE USB / TARJETAS SD MODELO: SCD-50 BT Para información y asistencia: www.lenco.eu 1 2 5 6 7 4 14 3 8 9 10 11 12 15 16 17 18 20 13 14 19 ES-1 LOCALIZACIÓN DE LOS CONTROLES 1. ASA DE TRANSPORTE 2. ANTENA TELESCÓPICA FM 3. TAPA DE ALOJAMIENTO DE CD 4. CONTROL DE VOLUMEN +/5. BOTÓN DE ENCENDIDO 6. BOTÓN MODE/PROG/MEM 7. BOTÓN 10+/M8. DISPLAY LCD 9. BOTÓN STOP/M+ 10. BOTÓN REPROD/PAUSA/PAIR 11. BOTÓN FUNCTION 12. ÁREA DE APERTURA DE LA TAPA DEL ALOJAMIENTO PARA CD 13. CONTROLES TUN+/- Y SIGUIENTE/ANTERIOR 14. ALTAVOCES 15. TOMA AUX IN 16. INDICADOR DE BLUETOOTH 17. RANURA PARA TARJETAS SD 18. PUERTO USB 19. TOMA DC IN 20. COMPARTIMENTO PARA PILAS ALIMENTACIÓN SUMINISTRADA POR EL ADAPTADOR AC/DC Conecte el adaptador AC/DC a la unidad principal y a una toma de corriente. ALIMENTACIÓN SUMINISTRADA POR LAS PILAS La unidad podrá funcionar alimentada por pilas. Siga los pasos de debajo para instalarlas: 1. Retire la tapa del compartimento para pilas con cuidado. 2. Instale 8 x pilas del tamaño 'C' (UM-2 o equivalente) procurando que la polaridad indicada sea la correcta. 3. Vuelva a colocar la tapa del compartimento para pilas. NOTA: Para la alimentación por pila, el adaptador de corriente deberá estar desenchufado. Para evitar daños resultantes de baterías con pérdidas, retírelas cuando estén a punto de agotarse o cuando no vaya a usar la unidad por largos periodos. En el modo en espera, la unidad seguirá consumiendo energía, así que recomendamos retirar las baterías cuando no use la unidad durante unos días. NOTA: Si no hubiera ninguna señal de audio en la unidad por espacio de una hora, la unidad se apagará automáticamente (excepto en el modo radio). REPRODUCCIÓN DE LA RADIO 1. Pulse el botón ENCENDIDO para encender la unidad. 2. Pulse el botón FUNCTION varias veces para entrar en el modo FM. 3. Gire brevemente el control TUN+/- para la sintonización afinada de la emisora de radio. Mantenga girado el control TUN+/- hacia la izquierda / derecha durante unos segundos para realizar la búsqueda automática de una emisora de radio hacia delante o hacia atrás, respectivamente (cuando se encuentre una emisora, la unidad la reproducirá inmediatamente y la búsqueda se detendrá). 4. La ANTENA TELESCÓPICA FM externa es direccional. Cuando reciba emisiones de FM, extiéndala por completo y oriéntela de modo que pueda obtener la mejor recepción. 5. Gire el control VOLUME +/- para ajustar el volumen. 6. Pulse el botón ENCENDIDO para apagar la unidad. PARA GUARDAR SUS EMISORAS DE RADIO FAVORITAS 1. Durante la reproducción, mantenga pulsado el botón MODE/PROG/MEM para guardar la emisora en reproducción en la memoria de la unidad, entonces, el número de memoria parpadeará en la pantalla. 2. Pulse el botón STOP/M+ o 10+/M- repetidamente entre P01-P10 para e almacenamiento de la memoria. 3. Confirme su selección pulsando el botón MODE/PROG/MEM. 4. Repita los pasos anterior para guardar otras emisoras. 5. Durante la reproducción de radio, pulse el botón STOP/M+ o 10+/M- repetidamente para reproducir las emisoras guardadas. ES-2 MANEJO Y MANTENIMIENTO DE UN DISCO Siga las instrucciones de debajo sobre el manejo y mantenimiento de su disco para poder conseguir un uso duradero y libre de problemas: Asegúrese de no tocar la cara brillante del disco; sostenga el disco por los bordes. Una exposición prolongada al sol, altas temperaturas y humedad podrían dañar el disco. Mantenga el lugar de almacenamiento del disco bien limpio. Evite pegar etiquetas en ninguna de las caras del disco. Evite escribir sobre el disco con objetos puntiagudos. Limpie el disco desde el centro hacia los bordes con un paño seco y suave o un cepillo de discos. Evite usar líquidos limpiadores y limpiadores químicos. Cuando no use los discos, guárdelos en sus respectivos estuches. HANDLE DISC ONLY AS SHOWN CLEAN FROM CENTER TO EDGE DO NOT STORE NEAR HEAT CARGA DE UN DISCO 1. Encienda la unidad. 2. Pulse el botón FUNCTION repetidamente para seleccionar el modo CD. 3. Abra la tapa del alojamiento del CD. 4. Introduzca un disco con la cara impresa mirando hacia arriba (si el disco se encuentra boca abajo, el display indicará que no se ha introducido ningún disco -No disc-). 5. Cierre la tapa del alojamiento del CD con la mano. NOTA: No toque la lente láser que hay en el interior del alojamiento para CDs. Si se ensuciara, límpielo con un disco limpiador de CDs. RETIRAR UN DISCO 1. Asegúrese de que el disco no se encuentra en reproducción. Si lo estuviera, pulse el botón STOP/M+. 2. Abra la tapa del alojamiento para CD. 3. Saque el disco con cuidado. 4. Cierre la tapa del alojamiento del CD con la mano. 5. Coloque el disco en su estuche. REPRODUCCIÓN DE UN DISCO CD/MP3 1. Encienda la unidad, después pulse el botón FUNCTION repetidamente para seleccionar el modo CD. 2. Cargue un disco CD/MP3 en el alojamiento para discos. Cierre la tapa del alojamiento para CD, y el disco comenzará a girar. 3. Ajuste el volumen a su gusto con el control VOLUME +/-. 4. Cuando se haya podido leer el disco, el número total de pistas del disco se mostrará en el display, a continuación, la reproducción comenzará automáticamente. 5. Pulse el botón REPROD/PAUSA/PAIR para interrumpir la reproducción de música, entonces el tiempo transcurrido de la pista interrumpida parpadeará para indicar que el reproductor se encuentra en el modo pausa; pulse el botón STOP/M+ para detener la reproducción de música, entonces la pantalla LCD mostrará el número total de pistas. ES-3 6. Pulse el botón MODE/PROG/MEM repetidamente para pasar por los modos de reproducción (repetir 1, repetir todo, introducción y reproducción aleatoria). 7. Pulse el botón ENCENDIDO para apagar la unidad. USO DE UNIDADES DE MEMORIA MULTIMEDIA EXTERNAS (USB, SD) Prepare el reproductor para el uso de unidades de memoria multimedia externas. 1. Introduzca una unidad USB de transferencia de datos en el puerto USB o una tarjeta SD en la ranura para tarjetas SD; 2. Pulse el botón FUNCTION para seleccionar el modo USB o tarjeta en la unidad. Una vez se haya detectado la unidad USB o la tarjeta introducidos, la reproducción de la primera pista de la primera carpeta comenzará automáticamente. 3. Pulse el botón MODE/PROG/MEM repetidamente para pasar por los modos de reproducción (repetir 1, repetir todo, introducción y reproducción aleatoria). 4. Pulse el botón REPROD/PAUSA/PAIR para reanudar o dejar la reproducción en pausa. Pulse el botón STOP/M+ para detener la reproducción. SALTO DE PISTAS Y BÚSQUEDA DE UN PUNTO ESPECÍFICO PARA SU REPRODUCCIÓN (DISCOS CD/MP3 / USB/TARJETA) 1. Gire el control SIGUIENTE/ANTERIOR brevemente hacia la derecha durante la reproducción de música para pasar a la pista siguiente. 2. Gire el control SIGUIENTE/ANTERIOR brevemente hacia la izquierda durante la reproducción de música para regresar al comienzo de la pista en curso. Para pasar a la pista anterior, gire brevemente dos veces el control SIGUIENTE/ANTERIOR y hacia la izquierda durante la reproducción de música para pasar a la pista anterior. 3. Pulse el botón 10+/M- una vez durante la reproducción para saltar 10 pistas hacia delante, dos para saltar 20 pistas hacia delante. Podrá llegar hasta la última pista del disco usando este botón (no disponible en el modo Bluetooth). 4. Mantenga girado hacia la derecha el control SIGUIENTE/ANTERIOR durante la reproducción de música para buscar hacia delante a velocidad rápida un punto específico para reproducirlo. 5. Mantenga girado hacia la izquierda el control SIGUIENTE/ANTERIOR durante la reproducción de música para buscar hacia atrás a velocidad rápida un punto específico para reproducirlo. REPRODUCCIÓN PROGRAMADA (DISCO CD/MP3 USB/TARJETA) 1. En el modo de detención, pulse el botón MODE/PROG/MEM una vez, entonces se mostrará el icono "PROG" con una indicación se secuencia de programa "P01" primero, después un número de pista parpadeará en la pantalla LCD con el icono “PROG”; 2. Seleccione la primera pista que desee programar usando el control SIGUIENTE/ANTERIOR, después vuelva a pulsar el botón MODE/PROG/MEM para guardarla y avanzar al siguiente paso de programación (si hubiera varias carpetas en el disco MP3, unidad USB o tarjeta SD, primero será necesario programar las tarjetas y después las pistas; el método de programación de tarjetas es el mismo que el apenas explicado para la programación de pistas.). 3. Repita los pasos anteriores para programar más pistas. Podrán programarse un total de 20 pistas para un CD y 99 pistas para MP3/USB/tarjeta en la memoria según un orden preestablecido. ES-4 4. Pulse el botón REPROD/PAUSA/PAIR para comenzar la reproducción programada en el orden que se ha determinado una vez haya terminado con la programación. El reproductor se detendrá automáticamente una vez se hayan reproducido todas las pistas programadas. 5. Podrá pulsar el botón STOP/M+ para finalizar la reproducción programada antes. En el modo de detención del programa, pulse el botón REPROD/PAUSA/PAIR para comenzar la reproducción programada con el orden de programación idéntico al elaborado anteriormente; pulse de nuevo el botón STOP/M+ para eliminar la programación. USO DEL BLUETOOTH Esta unidad podrá recibir señales de audio estéreo de un dispositivo de fuente de audio estéreo BLUETOOTH. 1. Encienda la unidad, luego seleccione el modo BLUETOOTH pulsando el botón FUNCTION. 2. El indicador LED parpadeará rápidamente durante el emparejamiento. 3. Emparéjese y conéctese con el SCD-50BT en el dispositivo de fuente de audio BLUETOOTH. Si se le pidiera una contraseña, introduzca “0000”. 4. Cuando se haya conseguido el emparejamiento (El indicador LED parpadeará de forma intermitente), ya estará listo para la transmisión de música. 5. Pulse el botón REPROD/PAUSA/PAIR para dejar en pausa / reanudar la reproducción. 6. Durante la reproducción, use el control SIGUIENTE/ANTERIOR para utilizar las funciones de salto / búsqueda como se explica en el apartado “SALTO DE PISTAS Y BÚSQUEDA DE UN PUNTO ESPECÍFICO PARA SU REPRODUCCIÓN (DISCOS CD/MP3 / USB/TARJETA)”. Nota: El modo de emparejamiento se cancelará en un minuto y medio aproximadamente. Los anteriores no son más que pasos genéricos para el emparejamiento de un dispositivo BLUETOOTH. Para obtener instrucciones específicas sobre la conectividad BLUETOOTH de su dispositivo, por favor, consulte el manual del fabricante. RECONEXIÓN AL DISPOSITIVO FUENTE DE AUDIO BLUETOOTH Si el dispositivo ya estuviera emparejado con el SCD-50BT, pero se hubiera desconectado, incluso con ambos dispositivos Bluetooth encendidos, podrá reconectarlos siguiendo los pasos a continuación: 1. Mantenga pulsado el botón REPROD/PAUSA/PAIR para volver a enlazar con el dispositivo de fuente de audio. El indicador de Bluetooth parpadeará durante aproximadamente 1,5 minutos para la conexión. 2. Seleccione SCD-50BT en el dispositivo de fuente de audio para su conexión. El indicador de Bluetooth pasará a esta iluminado en azul de forma continua cuando el SCD-50BT y el dispositivo hayan sido reconectados. AUX IN 1. Conecte el dispositivo de audio a la toma AUX in de la unidad con un cable de audio de 3,5mm. 2. Encienda la unidad y el dispositivo que haya conectado a ella. 3. Pulse el botón FUNCTION para seleccionar el modo AUX. 4. Use los controles nativos del dispositivo de audio para controlar la reproducción. ES-5 IMPORTANTES INSTRUCCIONES DE SEGURIDAD No exponga el aparato a goteos ni salpicaduras y no coloque objetos que contengan líquidos, como jarrones, sobre este. Cuando use el adaptador de corriente AC/DC como dispositivo de desconexión, deberá permanecer operativo en todo momento. Para desconectar el aparato completamente, desenchufe el adaptador AC/DC de la toma de corriente. No coloque llamas descubiertas, como una vela, sobre el aparato. Deje una distancia mínima de 2,0cm alrededor del aparato para su adecuada ventilación. No impida la ventilación cubriendo las aberturas del aparato con elementos como periódicos, manteles, cortinas, etc. Use este aparato en climas tropicales y/o moderados. Preste atención a los aspectos medioambientales del desechado de las pilas. PRECAUCIÓN: Existe peligro de explosión si las pilas son sustituidas de forma incorrecta. Sustitúyalas por otras del mismo tipo o de tipo equivalente. No someta las pilas a un calor excesivo, como el de la luz solar, un fuego, etc. La placa de clasificación se encuentra en la parte inferior del posterior del aparato. ESPECIFICACIONES Requisitos de alimentación ......... Adaptador de corriente: Entrada: AC 100-240V, 50/60Hz Salida: DC 9V, 1.5A DC 12V UM-2/"C" x 8uds (pilas) – no incluidas Consumo ................................... 13W Dimensiones .............................. Aprox. 440(Lo) X 254(An) X 144(Al) mm Temperatura operativa ............... +5°C ~ + 35°C Banda de recepción ................... FM Cobertura de sintonización ......... FM 87.5 - 108 MHz Sistema de reproducción ............ Sistema de audio digital de disco compacto Potencia de salida ...................... 2,4W x 2 @10% THD Impedancia del altavoz ............... 4Ω / 5W Compatibilidad de Bluetooth ....... Compatible con A2DP Compatible con .......................... USB, tarjetas SD Adaptador de corriente Utilice solo el adaptador de corriente que figura en las instrucciones del usuario. Fabricante: NG-L Número de modelo: APX915A Las especificaciones quedan sujetas a cambios sin notificación previa. Servicio y asistencia Para información: www.lenco.com Para asistencia: http://lencosupport.zendesk.com Teléfono de asistencia Lenco: Alemania 0900-1520530 Países Bajos 0900-23553626 Bélgica 02-6200115 Francia 03-81484280 (Tarifa local) (Tarifa local + 1ct P/min) (Tarifa local) (Tarifa local) ES-6 El teléfono de asistencia está disponible de lunes a jueves, de 9 de la mañana a 6 de la tarde. Cuando se ponga en contacto con Lenco, se le pedirá el modelo y el número de serie de su producto. El número de serie se encuentra en la parte posterior del aparato. Por favor, escriba debajo el número de serie: Modelo: SCD-50 BT Número de serie:_________________________________ Lenco ofrece servicio y garantía en cumplimiento de la ley de la Unión Europea, lo cual implica que, en caso de que su producto precise ser reparado (tanto durante como después del periodo de garantía), deberá contactar directamente con su distribuidor. Nota importante: No es posible enviar sus reparaciones directamente a Lenco Nota importante: Si la unidad es abierta por un centro de servicio no oficial, la garantía quedará anulada. Este aparato no es adecuado para el uso profesional. En caso de darle un uso profesional, todas las obligaciones de garantía del fabricante quedarán anuladas. Este product funciona a 2400 a 2483,5 MHz está diseñada únicamente para ser utilizado dentro de un entomo doméstico normal. Este product es adecuado para este propósito dentro de todo. Por la presente, STL Group BV, Ankerkade 20 NL 5928 PL Venlo, declara que el producto cumple con los requisitos esenciales y otras disposiciones relevantes de la directiva 1999/5/EC. La declaración de conformidad puede ser consultada en: https://lencosupport.zendesk.com/forums/22413161-CE-Documents Los productos con la marca CE cumplen con la Directiva EMC (2004/108/EC) y con la Directiva de Bajas Tensiones (2006/95/EC) emitida por la Comisión de la Unión Europea. Este símbolo indica que no deberá deshacerse del producto eléctrico o batería en cuestión tratándolo como desecho del hogar en el ámbito de la UE. Para garantizar un tratamiento residual correcto del producto y su batería, por favor, elimínelos cumpliendo con las leyes locales aplicables sobre requisitos para el desechado de equipos eléctricos y baterías. De hacerlo, ayudará a conservar recursos naturales y mejorar los estándares de protección medioambiental en el tratamiento y eliminación de residuos eléctricos (Directiva sobre la Eliminación de Equipos Eléctricos y Electrónicos). ®Reservados todos los derechos ES-7 MANUEL D’INSTRUCTION LECTEUR PORTABLE DISQUE CD/MP3 RÉCEPTION FM STÉRÉO ET BLUETOOTH LECTEUR DE CARTE SD et USB MODÈLE : SCD-50 BT Pour des informations et de l’assistance www.lenco.eu 1 4 2 5 6 7 14 3 8 9 10 11 12 15 16 17 18 20 13 14 19 FR-1 EMPLACEMENT DES COMMANDES 1. POIGNÉE 2. ANTENNE TÉLÉSCOPIQUE FM 3. CLAPET CD 4. MOLETTE CONTRÔLE DE VOLUME HAUT/BAS 5. TOUCHE ALIMENTATION 6. TOUCHE MODE/PROG/MEM 7. TOUCHE 10+/M8. ÉCRAN LCD 9. TOUCHE STOP/M+ 10. TOUCHE LECTURE/PAUSE/ COUPLAGE 11. TOUCHE FONCTION 12. ZONE D’OUVERTURE DU CLAPET CD 13. MOLETTE DE CONTRÔLE RÉGLAGE +/- ET SUIVANT/PRÉCÉDENT 14. HAUT-PARLEURS 15. PRISE ENTRÉE AUXILIAIRE 16. INDICATEUR BLUETOOTH 17. FENTE CARTE SD 18. PORT USB 19. PRISE ENTRÉE DC 20. COMPARTIMENT DES PILES ALIMENTATION AVEC L'ADAPTATEUR CA/CC Branchez l’adaptateur CA/CC sur l’alimentation principale et sur l’unité. ALIMENTATION SUR PILES L'unité peut être alimentée avec des piles. Suivez les étapes ci-dessous pour installer lez piles : 1. Enlevez soigneusement le couvercle du compartiment de batteries 2. Installez huit piles de taille C (UM-2 ou équivalent) et prenez soin de respecter les polarités. 3. Replacez le couvercle du compartiment de piles. REMARQUE: L'adaptateur CA/CC doit être enlevé lors du fonctionnement sur pile. Pour éviter des dégâts qui pourraient survenir du fait de fuite des batteries, enlevez les batteries lorsqu’elles se vident ou lorsque l’unité n’est pas utilisée pendant une longue période. En mode veille, l'unité continuera d'utiliser de l'électricité, donc il est préférable d'enlever les piles si l'unité n'est pas utilisée pendant quelques jours. REMARQUE: S’il n’y a pas d’entrée de signal audio sur l’unité pendant une heure, l’unité passera en mode veille automatiquement (sauf en mode radio). JOUER LA RADIO 1. Appuyez sur la touche POWER pour mettre l’unité en marche. 2. Appuyez sur la touche FUNCTION pour passer en mode FM. 3. Tournez brièvement la touche RÉGLAGE +/- pour régler précisément la station de radio. Tournez et tenez la molette de contrôle Réglage +/- pour rechercher des stations de radio vers l’avant ou vers l’arrière respectivement (lorsqu’une station disponible est détectée, l’unité la diffusera immédiatement et la recherche s’arrêtera). 4. L'ANTENNE TÉLESCOPIQUE FM externe est directionnelle. Lorsque vous recevez des émissions FM, étendez complètement l’ANTENNE TÉLESCOPIQUE FM et positionnez-la pour une meilleure réception. 5. Tournez la molette de contrôle de VOLUME HAUT/BAS pour régler le niveau du son. 6. Appuyez sur la touche POWER pour mettre l’unité en marche. ENREGISTRER VOTRE STATION DE RADIO FAVORITE 1. Pendant la lecture, tenez la touche MODE/PROG/MEM appuyée pour enregistrer la station de radio en cours dans la mémoire de l'unité, le numéro de cellule clignote sur l'écran. 2. Appuyez sur la touche STOP/M+ ou 10+/M- à plusieurs reprises pour choisir l'emplacement de mémoire correspondant parmi P01-P10 pour enregistrer la station. 3. Confirmez votre sélection en appuyant sur la touche MODE/PROG/MEM. 4. Répétez les étapes ci-dessus pour enregistrer d'autres stations. 5. Pendant la diffusion de la radio, appuyez sur la touche STOP/M+ or 10+/M- à plusieurs reprises pour rappeler les stations enregistrées. FR-2 MANIPULATION ET ENTRETIEN DES DISQUES Suivez les instructions ci-dessous pour manipuler et entretenir vos disques afin de pouvoir les utiliser pendant longtemps sans problèmes. Assurez-vous de ne pas toucher le cote réfléchissant du disque, manipulez-le par les bords. Une exposition de trop longue durée au soleil à de hautes températures ou à l’humidité endommageront le disque. Et maintenez l’espace de rangement propre. Évitez de coller des étiquettes d’un coté ou de l’autre du disque. Évitez strictement d’écrire sur le disque avec des articles pointus. Nettoyez le disque en le frottant depuis le centre vers les bords avec un linge doux et sec ou avec une brosse à disque. Évitez toute lotion de nettoyage ou tout éradicateur chimique. Rangez les disques dans leurs boitiers lorsque vous ne les utilisez pas. NE MANIPULEZ LE DISQUE QUE DE LA MANIÈRE INDIQUÉE NETTOYEZ DEPUIS LE CENTRE VERS LES BORDS NE RANGEZ PAS À PROXIMITÉ DE LA CHALEUR CHARGER UN DISQUE 1. Allumez l’appareil. 2. Appuyez sur la touche FUNCTION plusieurs fois et passez en mode CD. 3. Ouvrez le clapet CD. 4. Insérez un disque avec le côté imprimé orienté vers le haut (si le disque est inversé, l'écran affichera qu'il n'y a pas de disque.) 5. Fermez le compartiment CD à la main. REMARQUE: Ne touchez jamais la lentille de laser dans le compartiment du CD. Si elle se salit, nettoyez-la avec un CD de nettoyage. ENLEVER UN DISQUE 1. Assurez-vous que le disque n’est pas en cours de lecture. Si le disque est en cours de lecture, appuyez sur la touche STOP/M+. 2. Ouvrez le clapet CD. 3. Enlevez doucement le disque. 4. Fermez le compartiment CD à la main. 5. Replacez le disque dans son boitier de rangement. LIRE UN DISQUE CD/MP3 1. Allumez l'unité, appuyez sur la touche FUNCTION plusieurs fois et passez en mode CD. 2. Insérez un CD/MP3 dans le compartiment CD. Fermez le compartiment CD, le disque commencera à tourner. 3. Réglez le niveau du volume sur le niveau qui vous convient en utilisant la molette de contrôle VOLUME HAUT/BAS. 4. Lorsque le disque est lu correctement, le nombre total de pistes sur le disque s'affiche sur l'écran, la lecture commence automatiquement. 5. Appuyez sur la touche LECTURE/PAUSE/COUPLAGE une fois pour arrêter la lecture, le temps écoulé clignote pour indiquer que le lecteur est en mode pause ; appuyez sur la touche STOP/M+ pour arrêter la lecture de musique, l’écran affiche le nombre total de piste et le temps total. 6. Appuyez sur la touche MODE/PROG/MEM à plusieurs reprises pour circuler entre les différents modes de lecture (modes de lecture répéter 1, répéter tout, introduction et aléatoire). FR-3 7. Appuyez sur la touche POWER pour mettre l’unité en marche. UTILISATION DE MÉMOIRE MÉDIA EXTERNE (USB/SD) Préparez le lecteur pour l’utilisation d’un support externe. 1. Insérez une clé USB dans le port USB ou insérez une carte SD dans la fente pour carte SD. 2. Appuyez plusieurs fois sur la touche FUNCTION pour circuler entre les modes USB ou carte. Après avoir inséré une clé USB ou une carte et qu'elle est détectée, la lecture commencera depuis la première piste du premier dossier. 3. Appuyez sur la touche MODE/PROG/MEM à plusieurs reprises pour circuler entre les différents modes de lecture (modes de lecture répéter 1, répéter tout, introduction et aléatoire). 4. Appuyez sur la touche LECTURE/PAUSE/COUPLAGE pour mettre en pause ou reprendre la lecture. Appuyez sur la touche STOP/M+ pour arrêter la lecture. SAUTER DES PISTES ET RECHERCHER UN POINT SPÉCIFIQUE POUR LA LECTURE (CD/DISQUE MP3/USB/CARTE) 1. Tournez la molette SUIVANT / PRÉCÉDENT dans le sens des aiguilles d'une montre brièvement pendant la lecture de musique pour passer à la piste suivante. 2. Tournez la molette SUIVANT / PRÉCÉDENT dans le sens inverse des aiguilles d'une montre brièvement pendant la lecture de musique pour passer à la piste suivante. Pour passer à la piste précédente, tournez la molette de contrôle dans le sens des aiguilles d'une montre deux fois brièvement en lecture de musique pour passer à la piste précédente; 3. Appuyez une fois sur la touche 10+/M- durant la lecture pour avancer de 10 pistes, deux fois pour avancer de 20 pistes. Vous pouvez atteindre la dernière piste du disque avec ce bouton (non disponible en mode Bluetooth). 4. Tournez et tenez la molette SUIVANT/PRÉCÉDENT dans le sens des aiguilles d'une montre pour faire une recherche rapide vers l'avant et atteindre un point de lecture spécifique. 5. Tournez et tenez la molette SUIVANT/PRÉCÉDENT dans le sens inverse des aiguilles d'une montre pour faire une recherche rapide vers l'arrière et atteindre un point de lecture spécifique. LECTURE PROGRAMMÉE (CD/DISQUE MP3/USB/CARTE) 1. La lecture à l'arrêt, appuyez une fois sur la touche MODE/PROG/MEM, l'icône « PROG » affiche une indication d'ordre de programmation « P01 » en premier, puis un numéro de piste clignote sur l'écran avec l'icône « PROG »; 2. Sélectionnez la première piste à programmer à l'aide de la molette de contrôle SUIVANT / PRÉCÉDENT et appuyez de nouveau sur la touche MODE/PROG/MEM de nouveau pour enregistrer et avancer à la prochaine étape de programmation (s'il y a plusieurs dossiers sur le disque MP3 ou sur la clé USB ou la carte SD, il est nécessaire de programmer d'abord le dossier, puis la piste; la méthode pour programmer les dossier est la même que celle des instructions ci-dessus pour la programmation des pistes). 3. Répétez les étapes ci-dessus pour programmer d’autres pistes. Un maximum de 20 pistes pour un CD et 99 pistes pour un CD MP3 / Clé USB peuvent être programmées dans la mémoire dans l’ordre que vous souhaitez. 4. Appuyez sur la touche LECTURE/PAUSE/COUPLAGE pour commencer la lecture programmée dans l’ordre de votre choix lorsque vous avez terminé votre programmation. Le lecteur s'arrête automatiquement après que toutes les pistes programmées aient été jouées. FR-4 5. Vous pouvez appuyer sur la touche STOP/M+ pour terminer la lecture programmée. En mode de lecture programmée arrêtée, appuyez sur la touche LECTURE/PAUSE/COUPLAGE pour reprendre la lecture programmée dans le même ordre de programmation que la précédente, appuyez sur la touche STOP/M+ de nouveau pour effacer la programmation. FONCTIONNEMENT DU BLUETOOTH Cette unité peut recevoir des signaux audio stéréo depuis un appareil source audio stéréo BLUETOOTH®. 1. Allumez l’unité, passez en mode BLUETOOTH en appuyant sur la touche FUNCTION. 2. L’indicateur DEL clignote rapidement pendant le couplage. 3. Couplez et connectez le SCD-50BT sur l’appareil source audio BLUETOOTH. Si on vous demande un mot de passe, saisissez « 0000 ». 4. Le couplage est réussi (l'indicateur DEL clignote par intermittence), prêt à diffuser de la musique. 5. Appuyez sur la touche LECTURE/PAUSE/COUPLAGE pour mettre en pause ou reprendre la lecture. 6. Pendant la lecture, utilisez la molette de contrôle SUIVANT/PRÉCÉDENT pour utiliser les fonctions sauter/rechercher comme dans les instructions pour « sauter des pistes et rechercher un point spécifique de lecture (CD/DISQUE MP3/USB/CARTE) ». Remarque: Le mode de couplage s’annule au bout d’1,5 minutes. Les étapes ci-dessus sont des étapes génériques pour coupler un appareil BLUETOOTH®, pour des instructions plus spécifiques sur la connectivité BLUETOOTH®, veuillez consulter le manuel du fabricant de l’appareil à coupler. RECONNECTER A L’APPAREIL SOURCE AUDIO BLUETOOTH Si l’appareil est déjà couplé avec le SCD-50BT, mais s’est déconnecté même avec les deux appareils Bluetooth allumés. Vous pouvez les reconnecter en suivant les étapes ci-dessous : 1. Tenez la touche LECTURE/PAUSE/COUPLER pour coupler à nouveau l'appareil de source audio. L’indicateur Bluetooth® clignotera pendant environ 1,5 minutes pour la connexion. 2. Sélectionnez le SCD-50BT sur l’appareil source audio pour connecter. L’indicateur Bluetooth® passera en bleu continu si le SCD-50BT et l’appareil se sont reconnectés correctement. ENTRÉE AUXILIAIRE 1. Connectez l'appareil audio sur la prise AUXILIAIRE sur l'unité avec le câble audio 3,5mm. 2. Allumer l’appareil et la source audio connectée. 3. Appuyez sur la touche FUNCTION pour faire passer l'unité sur le mode AUX. 4. Utilisez les contrôles d'origine de l’appareil audio connecté pour contrôler la lecture. INSTRUCTIONS IMPORTANTES CONCERNANT LA SÉCURITÉ L’appareil ne doit pas être exposé aux gouttes ou aux éclaboussements et les objets remplis de liquides, tels que des vases, ne doivent pas être placés près de l'appareil. Si le cordon d’alimentation sert de sectionneur, le sectionneur doit toujours rester en état de marche. Pour être complètement déconnecté de l’alimentation électrique, l’adaptateur CA/CC doit être complètement débranché du secteur. FR-5 Aucune source de flamme telle que des bougies allumées ne devraient être placée près de l'appareil. Une distance minimum de 2,0 cm autour de l’appareil doit être préservée pour une ventilation suffisante. La ventilation ne doit pas être empêchée du fait que les ouvertures de ventilation soient couvertes avec des accessoires tels que journaux, serviettes de table, rideaux, etc. L’utilisation de cet appareil est réservée aux climats tropicaux ou modérés. Votre attention devrait se porter sur l’aspect écologique de l’élimination des piles. ATTENTION : Danger d’explosion si les piles ne sont pas correctement remplacées. Remplacez seulement avec les mêmes ou un type équivalent. Les batteries ne doivent pas être exposées à des chaleurs excessives telles que la lumière du soleil, le feu ou autres. La plaque marque est située sous l’appareil ou derrière l'appareil. CARACTÉRISTIQUES Besoins d’alimentation................... Adaptateur CA: Entrée : AC 100-240V, 50/60Hz Sortie : CC 9V, 1,5A 12V CC UM-2/"C" x 8 (piles) – non fournies Consommation énergétique ........... 13W Dimensions ................................... Environ. 440(L) X 254(L) X 144(H) mm Température d’utilisation ............... +5°C ~ +35°C Fréquences de reception ............... FM Plage de fréquence ....................... FM 87,5 - 108 MHz Système de lecture........................ Système audio digital de disque compact Puissance de sortie ....................... 2,4W x 2 @10% THD Impédance des haut-parleurs ........ 4Ω / 5W Compatibilité Bluetooth.................. Compatible A2DP Compatible avec ........................... USB/carte SD Adaptateur d'alimentation N'utilisez que l'alimentation listée dans les instructions d'utilisation Fabricant : NG-L Numéro de modèle : APX915A Ces spécifications peuvent faire l’objet de changement sans notification. Service et support Pour plus d'informations : www.lenco.com Pour de l'aide : http://lencosupport.zendesk.com Service d’assistance Lenco : Allemagne 0900-1520530 Pays-Bas 0900-23553626 Belgique 02-6200115 France 03-81484280 (Prix d’un appel local) (Prix d’un appel local + 1ct P/min) (Prix d’un appel local) (Prix d’un appel local) FR-6 Le centre d’assistance est joignable du lundi au vendredi entre 9 heures et 18 heures. Lorsque vous contactez Lenco, on vous demandera systématiquement le modèle et le numéro de série de votre produit. Le numéro de série se trouve à l'arrière de l'appareil. Écrivez le numéro de série ci-dessous: Modèle: SCD-50 BT Numéro de série : _______________________________ Lenco propose un service et une garantie conformément aux lois européenne, ce qui signifie qu’en besoin de réparation (aussi bien pendant et après la période de garantie), vous pouvez contacter votre revendeur le plus proche. Remarque importante : Il n’est pas possible de renvoyer l’appareil pour réparation directement à Lenco. Remarque importante : Si l’unité est ouverte ou modifiée de quelque manière par un centre de service non agréé, cela mettra fin à la garantie. Cet appareil ne convient pas pour une utilisation professionnelle. En cas d’utilisation professionnelle, les obligations de garantie du fabricant seront annulées. Ce produit fonctionne à 2400 à 2483,5 MHz et est destine uniquement pour être utilize dans un environnement domestique normal. Ce produit convient à cet usage pour tous les pays de I’UE. Par la présente, STL Group BV sis à Ankerkade 20 NL 5928 PL Venlo, déclare que ce produit est conforme aux exigences essentielles et autres dispositions pertinentes de la directive 1999/5/CE. La déclaration de conformité peut être consultée via le lien suivant : https://lencosupport.zendesk.com/forums/22413161-CE-Documents Les produits avec la marque CE sont conformes à la directive CEM (2004/108/CE) et à la directive basse tension (2006/95/EC) émises par la commission de la communauté européenne. Ce symbole indique que le produit électrique concerné ou la batterie ne doit pas être jeté parmi les autres déchets ménagers en Europe. Pour garantir un traitement correct du déchet de la batterie ou de l'appareil, veuillez vous en débarrasser en vous conformant aux règlements en vigueur dans votre secteur en ce qui concerne le des appareils électriques et autres batteries. En agissant de la sorte, vous contribuerez à la préservation des ressources naturelles et à l'amélioration des niveaux de protection environnementale concernant le traitement et la destruction des déchets électriques. (Directive sur les Déchets des Equipements Electriques et Electroniques). ®Tous droits réservés FR-7 BEDIENUNGSANLEITUNG TRAGBARER CD/MP3 DISC-PLAYER UKW STEREO RADIO & BLUETOOTH USB & SD-KARTENLESER MODELL: SCD-50 BT Informationen und Support unter www.lenco.eu 1 2 5 6 7 4 14 3 8 9 10 11 12 15 16 17 18 20 13 14 19 DE-1 TASTEN UND ANSCHLÜSSE 1. GRIFF 2. UKW-TELESKOPANTENNE 3. CD-FACH 4. LAUTSTÄRKEREGLER +/5. BETRIEBSTASTE 6. MODUS/ PROGRAMMIEREN/ SPEICHERN 7. 10+/M8. LCD-DISPLAY 9. STOPP/M+ 10. WIEDERGABE/ PAUSE/ KOPPLUNG 11. FUNKTIONSTASTE 12. CD-FACH ÖFFNEN 13. TUNEN+/- & WEITER/ZURÜCK 14. LAUTSPRECHER 15. AUX-EINGANG 16. BLUETOOTH-ANZEIGE 17. SD-KARTENSCHLITZ 18. USB-PORT 19. DC-EINGANG 20. BATTERIEFACH STROMVERSORGUNG VIA AC/DC NETZTEIL Schließen Sie das AC/DC Netzteil an das Gerät und den Netzstrom an. BATTERIEBETRIEB Das Gerät kann mit Batterien betrieben werden. Installieren Sie die Batterien wie folgt: 1. Nehmen Sie die Abdeckung des Batteriefachs vorsichtig ab. 2. Legen Sie 8x Batterien des Typs „C“ (UM-2 oder gleichwertig) gemäß der richtigen Polarität ein. 3. Schließen Sie die Abdeckung des Batteriefachs. HINWEIS: Das AC/DC Netzteil muss für den Batteriebetrieb getrennt werden. Um Schäden durch auslaufende Batterien zu verhindern, entfernen Sie die Batterien, wenn deren Kapazität nachlässt oder das Gerät längere Zeit nicht verwendet wird. Das Gerät verbraucht auch im Standby-Modus Energie. Es wird daher empfohlen, die Batterien zu entfernen, falls Sie das Gerät einige Tage lang nicht verwenden werden. HINWEIS: Falls das Gerät über eine Stunde lang kein Eingangssignal empfängt, schaltet sich das Gerät automatisch aus (außer im Radiomodus). RADIO HÖREN 1. Drücken Sie die BETRIEBSTASTE, um das Gerät einzuschalten. 2. Drücken Sie die FUNKTIONSTASTE wiederholt, um den UKW-Modus einzuschalten. 3. Drehen Sie den Regler TUN+/- kurz, um einen Radiosender feineinzustellen. Drehen Sie den Regler TUN+/- einige Sekunden lang rechts/links herum, um die automatische Sendersuche vorwärts/rückwärts zu starten. (Wird ein Radiosender gefunden, beendet das Gerät die Sendersuche und gibt diesen Sender wieder). 4. Die externe UKW-TELESKOPANTENNE ist eine direktionale Antenne. Ziehen Sie die UKW-TELESKOPANTENNE während des Empfangs von UKW-Sendern vollständig aus, um einen optimalen Empfang zu gewährleisten. 5. Drehen Sie den LAUTSTÄRKEREGLER +/- zum Einstellen der Lautstärke. 6. Drücken Sie die BETRIEBSTASTE, um das Gerät auszuschalten. LIEBLINGSSENDER SPEICHERN 1. Halten Sie während der Wiedergabe die Taste MODE/PROG/MEM gedrückt, um den aktuellen Radiosender zu speichern. Im Display blinkt die Nummer des aktuellen Speicherplatzes. 2. Drücken Sie wiederholt die Taste STOP/M+ oder 10+/M-, um den gewünschten Speicherplatz (P01-P10) zum Speichern des Senders auszuwählen. 3. Bestätigen Sie Ihre Auswahl mit der Taste MODE/PROG/MEM. 4. Wiederholen Sie oben genannte Schritte, um weitere Sender zu speichern. 5. Drücken Sie während der Radiowiedergabe wiederholt die Taste STOP/M+ oder 10+/M-, um gespeicherte Sender aufzurufen. DE-2 HANDHABUNG UND WARTUNG VON DISCS Folgen Sie den nachstehenden Anleitungen zur Handhabung und Wartung von Discs, um eine langanhaltende und störfreie Leistung zu gewährleisten: Berühren Sie nicht die unbedruckte Seite der Disc. Halten Sie Discs nur an den Kanten fest. Bei langanhaltender Einwirkung von Sonnenschein, hohen Temperaturen und Feuchtigkeit kann die Disc beschädigt werden. Halten Sie den Aufbewahrungsbereich sauber. Bringen Sie keine Aufkleber an der Disc an. Schreiben Sie nicht mit spitzen Gegenständen auf die Disc. Reinigen Sie die Disc, indem Sie von der Mitte nach außen wischen. Verwenden Sie einen trockenen & weichen Lappen oder eine Disc-Bürste. Verwenden Sie keine Lösungen oder Chemikalien. Bewahren Sie Discs während des Nichtgebrauchs in deren Hülle auf. DISC NUR GEMÄSS ABBILDUNG HANDHABEN VON INNEN NACH AUSSEN ABWISCHEN NICHT IN DER NÄHE VON WÄRME AUFBEWAHREN DISC LADEN 1. Schalten Sie das Gerät ein. 2. Drücken Sie die FUNKTIONSTASTE wiederholt, um den CD-Modus einzuschalten. 3. Öffnen Sie das CD-Fach. 4. Legen Sie eine Disc mit der bedruckten Seite nach oben ein. (Bei falsch herum eingelegter Disc erscheint im Display eine Fehlermeldung.) 5. Schließen Sie das CD-Fach per Hand. HINWEIS: Berühren Sie nicht die Laserlinse im Inneren des CD-Fachs. Falls diese schmutzig ist, verwenden Sie eine Reinigungsdisc für die Reinigung. DISC ENTNEHMEN 1. Falls die Disc noch wiedergegeben wird, drücken Sie die Taste STOP/M+, um die Wiedergabe zu beenden. 2. Öffnen Sie das CD-Fach. 3. Entnehmen Sie die Disc vorsichtig. 4. Schließen Sie das CD-Fach per Hand. 5. Bewahren Sie die Disc in deren Schutzhülle auf. CD/MP3-DISC ABSPIELEN 1. Schalten Sie das Gerät ein und drücken Sie wiederholt die FUNKTIONSTASTE, um den CD-Modus einzuschalten. 2. Legen Sie eine CD/MP3-Disc in das CD-Fach ein. Schließen Sie das CD-Fach; die Disc beginnt sich zu drehen. 3. Stellen Sie die Lautstärke mit dem LAUTSTÄRKEREGLER +/- ein. 4. Nach dem erfolgreichen Scannen der Disc erscheint im Display die Gesamtzahl der Titel auf der Disc. Die Wiedergabe startet automatisch. 5. Drücken Sie einmal die Taste PLAY/PAUSE/PAIR, um die Musikwiedergabe zu unterbrechen. Im Display blinkt die verstrichene Zeit des aktuellen Titels und weist somit auf den Pause-Modus hin. Drücken Sie STOP/M+, um die Wiedergabe zu beenden. Im LCD erscheint die Gesamtzahl der Titel. DE-3 6. Drücken Sie wiederholt die Taste MODE/PROG/MEM, um einen Wiedergabemodus auszuwählen (1 Titel wiederholen, Alle wiederholen, Anspielen und Willkürliche Wiedergabe). 7. Drücken Sie die BETRIEBSTASTE, um das Gerät auszuschalten. WIEDERGABE EXTERNER MEDIEN (USB, SD) Bereiten Sie den Player für die Wiedergabe externer Medien vor. 1. Schließen Sie ein USB-Gerät an den USB-Port oder stecken Sie eine SD-Karte an den SD-Kartenschlitz an. 2. Drücken Sie die FUNKTIONSTASTE, um den USB- oder SD-Modus einzuschalten. Nachdem das USB-Gerät oder die SD-Karte erkannt wurden, startet die Wiedergabe ab dem ersten Titel im ersten Ordner. 3. Drücken Sie wiederholt die Taste MODE/PROG/MEM, um einen Wiedergabemodus auszuwählen (1 Titel wiederholen, Alle Titel wiederholen, Anspielen und Willkürliche Wiedergabe). 4. Drücken Sie PLAY/PAUSE/PAIR, um die Wiedergabe zu unterbrechen oder fortzusetzen. Drücken Sie die Taste STOP/M+, um die Wiedergabe zu beenden. TITEL ÜBERSPRINGEN UND SCHNELLER SUCHLAUF (CD/MP3-DISC/ USB/ KARTE) 1. Drehen Sie den Regler WEITER/ZURÜCK kurz rechts herum, um zum nächsten Titel zu springen. 2. Drehen Sie den Regler WEITER/ZURÜCK kurz links herum, um zum Anfang des aktuellen Titels zu springen. Um zum vorherigen Titel zu springen, drehen Sie den Regler WEITER/ZURÜCK während der Wiedergabe zweimal kurz nach links. 3. Drücken Sie einmal die Taste 10+/M- während der Wiedergabe, um 10 Titel vorwärts zu überspringen. Drücken Sie die Taste zweimal, um 20 Titel zu überspringen. Sie können mit dieser Taste bis zum letzten Titel der Disc springen (im Bluetooth-Modus nicht verfügbar). 4. Drehen Sie die Taste WEITER/ZURÜCK während der Wiedergabe einige Sekunden lang rechts herum, um den aktuellen Titel vorzuspulen. 5. Drehen Sie die Taste WEITER/ZURÜCK während der Wiedergabe einige Sekunden lang links herum, um den aktuellen Titel zurückzuspulen. PROGRAMMIERTE WIEDERGABE (CD/MP3-DISC/ USB/ KARTE) 1. Drücken Sie im Stopp-Modus einmal die Taste MODE/PROG/MEM. Im Display erscheint die Anzeige „PROG“ mit dem Speicherplatz „P01“. Danach blinkt eine Titelnummer mit der Anzeige „PROG“. 2. Verwenden Sie die Taste WEITER/ZURÜCK für die Auswahl des ersten Titels. Drücken Sie die Taste MODE/PROG/MEM, um den Titel zu speichern und zum nächsten Schritt zu gelangen. (Falls mehrere Ordner auf der MP3-Disc, dem USB-Gerät oder der SD-Karte vorhanden sind, müssen Sie zunächst den Ordner auswählen, bevor Sie einen Titel programmieren können. Folgen Sie für die Auswahl von Ordnern den Anleitungen für die Auswahl von Titeln.) 3. Wiederholen Sie oben genannte Schritte, um weitere Titel zu programmieren. Sie können bis zu 20 Titel einer CD oder 99 Titel einer MP3-Disc/ eines USB-Geräts/ einer SD-Karte in gewünschter Reihenfolge programmieren. DE-4 4. Drücken Sie die Taste PLAY/PAUSE/PAIR, um die programmierte Wiedergabe in der eingestellten Reihenfolge zu starten. Nach Wiedergabe aller programmierten Titel wird die Wiedergabe automatisch beendet. 5. Drücken Sie die Taste STOP/M+, um die programmierte Wiedergabe manuell zu beenden. Drücken Sie im Stopp-Modus der programmierten Wiedergabe die Taste PLAY/PAUSE/PAIR, um die programmierte Wiedergabe erneut von Anfang an zu starten. Drücken Sie STOP/M+ erneut, um die programmierte Wiedergabe zu beenden. BLUETOOTH-BETRIEB Das Gerät kann Stereosignale von einem BLUETOOTH-Stereogerät empfangen. 1. Schalten Sie das Gerät ein und aktivieren Sie mit der FUNKTIONSTASTE den BLUETOOTH-Modus. 2. Während der Kopplung blinkt die LED-Anzeige schnell. 3. Koppeln und verbinden Sie den Gerätenamen SCD-50BT an Ihrem BLUETOOTH-Gerät. Falls erforderlich, geben Sie das Passwort „0000“ ein. 4. Nach erfolgreicher Kopplung (LED-Anzeige blinkt mit Unterbrechungen) ist das Gerät bereit für die Musikübertragung. 5. Drücken Sie PLAY/PAUSE/PAIR, um die Wiedergabe zu unterbrechen/fortzusetzen. 6. Drücken Sie während der Wiedergabe die Taste WEITER/ZURÜCK, um Titel zu überspringen bzw. vor- oder zurückzuspulen; siehe Anleitungen „TITEL ÜBERSPRINGEN UND SCHNELLER SUCHLAUF (CD/MP3-DISC/ USB/ KARTE)“. Hinweis: Der Kopplungsmodus wird nach 1,5 Minuten abgebrochen. Oben genannte Anleitungen sind allgemeine Schritte für die Kopplung eines BLUETOOTH-Geräts. Detailliertere Anleitungen zur BLUETOOTH-Verbindungsfähigkeit Ihres Geräts finden Sie in der Bedienungsanleitung des Herstellers. EXTERNES BLUETOOTH-GERÄT ERNEUT VERBINDEN Das Gerät war bereits mit dem SCD-50BT gekoppelt, wurde jedoch getrennt, obwohl beide Geräte eingeschaltet sind. Verbinden Sie die Geräte wie folgt: 1. Halten Sie die Taste PLAY/PAUSE/PAIR gedrückt, um das Audiogerät erneut zu verbinden. Die Bluetooth-Anzeige blinkt ungefähr 1,5 Minuten während des Verbindungsaufbaus. 2. Wählen Sie an Ihrem externen Gerät den Player SCD-50BT aus. Die Bluetooth-Anzeige leuchtet blau, sobald der SCD-50BT und das externe Gerät erfolgreich miteinander verbunden wurden. AUX-EINGANG 1. Schließen Sie ein externes Audiogerät mit einem 3,5 mm Audiokabel an den AUX-Eingang des Players an. 2. Schalten Sie den Player und das angeschlossene Gerät ein. 3. Drücken Sie die FUNKTIONSTASTE, um den AUX-Modus einzuschalten. 4. Steuern Sie die Wiedergabe mit den Tasten am externen Audiogerät. WICHTIGE SICHERHEITSHINWEISE Das Gerät ist nicht spritz- oder tropfwasserdicht. Stellen Sie keine mit Flüssigkeit gefüllten Gegenstände wie Vasen auf das Gerät. Wenn das Netzteil als Trennvorrichtung verwendet wird, muss diese Trennvorrichtung DE-5 immer betriebsbereit sein. Trennen Sie das Netzteil vollständig vom Netz, um die Stromversorgung zum Gerät vollständig zu unterbrechen. Stellen Sie kein offenes Feuer wie angezündete Kerzen auf das Gerät. Halten Sie einen Mindestabstand von 2,00 cm um das Gerät herum ein. Die Belüftungsöffnungen dürfen nicht mit Gegenständen wie Zeitungen, Tischdecken, Gardinen oder ähnlichem bedeckt werden, da anderenfalls die Ventilation beeinträchtigt wird. Das Gerät kann in tropischen und/oder moderaten Klimazonen verwendet werden. Entsorgen Sie Batterien umweltgerecht. VORSICHT: Es besteht Explosionsgefahr, wenn Batterien falsch eingelegt werden. Ersetzen Sie Batterien nur durch solche des gleichen oder gleichwertigen Typs. Batterien müssen vor übermäßiger Hitze wie Sonneneinstrahlung, Feuer oder ähnlichem geschützt werden. Das Typenschild befindet sich an der Unterseite oder Rückseite des Geräts. TECHNISCHE DATEN Stromversorgung................... AC-Netzteil: Eingang: AC 100-240V, 50/60Hz Ausgang: DC 9V, 1,5A DC 12V UM-2/ „C“ x 8 (Batterien) – nicht enthalten Stromverbrauch..................... 13W Abmessungen ....................... Ca. 440(L) x 254(B) x 144(H) mm Betriebstemperatur ................ +5°C ~ + 35°C Frequenzband ....................... FM Frequenzbereich ................... FM 87.5 - 108 MHz Wiedergabesystem ................ Compact Disc Digital Audio System Ausgangsleistung .................. 2,4W x 2 @10% THD Lautsprecherimpedanz .......... 4Ω / 5W Bluetooth-Fähigkeit ............... Unterstützt A2DP Kompatibel mit ...................... USB, SD-Karte Netzteilgerät Verwenden Sie nur das in der Bedienungsanleitung angegebene Netzteilgerät. Hersteller: NG-L Modellnummer: APX915A Technische Daten unterliegen unangekündigten Änderungen. Service und Hilfe Für Informationen: www.lenco.com Für Hilfe: http://lencosupport.zendesk.com Lenco Hotlines: Deutschland Die Niederlande Belgien Frankreich 0900-1520530 0900-23553626 02-6200115 03-81484280 (Ortsgebundener Tarif) (Ortsgebundener Tarif + 1ct p/min) (Ortsgebundener Tarif) (Ortsgebundener Tarif) DE-6 Die Hotline erreichen Sie montags bis freitags von 9 bis 18 Uhr. Wenn Sie Lenco kontaktieren, werden Sie immer nach der Modell- und Seriennummer des Geräts gefragt. Die Seriennummer finden Sie auf der Rückseite des Geräts. Bitte notieren Sie hier die Seriennummer: Modell: SCD-50 BT Seriennummer:_________________________________ Lenco bietet Leistungen und Garantien im Einklang mit Europäischem Recht. Im Falle von Reparaturen (sowohl während als auch nach Ablauf der Garantiezeit) sollten Sie deshalb Ihren Einzelhändler kontaktieren. Beachten Sie: Es ist nicht möglich, Geräte für Reparaturen direkt an Lenco zu schicken. Wichtiger Hinweis: Falls dieses Gerät von einem nicht autorisierten Kundendienst geöffnet oder darauf zugegriffen wird, erlischt die Garantie. Dieses Gerät ist nicht für professionelle Zwecke geeignet. Falls das Gerät für professionelle Zwecke eingesetzt wird, erlöschen alle Garantieverpflichtungen seitens des Herstellers. Dieses Produkt arbeitet im Frequenzbereich von 2400 bis 2483,5 MHz und sollte nur in einer normalen häuslichen Umgebung verwendet warden. Es eignet sich zur Verwendung in allen EU Länderm. Hiermit erklären wir als STL Group BV, Ankerkade 20, 5928 PL Venlo, dass dieser Artikel den grundlegenden Anforderungen und anderen relevanten Vorschriften der Direktive 1999/5/EC entspricht. Die Konformitätserklärung kann unter folgendem Link abgerufen werden: https://lencosupport.zendesk.com/forums/22413161-CE-Documents Produkte mit der CE Kennzeichnung entsprechen der EMC-Richtlinie (2004/108/EC) und der Niederspannungsrichtlinie (2006/95/EC), herausgegeben von der Kommission der Europäischen Gemeinschaft. Dieses Symbol zeigt an, dass das entsprechende Produkt oder dessen Batterie in Europa nicht mit dem normalen Hausmüll entsorgt werden darf. Um die ordnungsgemäße Abfallbehandlung des Produkts und dessen Batterie zu gewährleisten, müssen diese im Einklang mit allen anwendbaren örtlichen Vorschriften zur Entsorgung von Elektrogeräten und Batterien entsorgt werden. Dabei helfen Sie natürliche Ressourcen zu schonen und Umweltschutzstandards zur Verwertung und Entsorgung von Altgeräten aufrecht zu halten (Waste Electrical and Electronic Equipment Directive). ®Alle Rechte vorbehalten DE-7 HANDLEIDING DRAAGBARE CD/MP3-SPELER FM-STEREORADIO MET BLUETOOTH-ONTVANGST USB & SD-KAARTLEZER MODEL: SCD-50 BT Voor informatie en ondersteuning www.lenco.eu 1 2 5 6 7 4 14 3 8 9 10 11 12 15 16 17 18 20 13 14 19 NL-1 PLAATSING VAN BEDIENINGSELEMENTEN 1. HANDVAT 2. TELESCOPISCHE FM-ANTENNE 3. CD-DEUR 4. VOLUMEREGELING 5. POWER 6. MODE/PROG/MEM 7. 10+/M8. LCD-DISPLAY 9. STOP/M+ 10. PLAY/PAUSE/PAIR 11. FUNCTION 12. GEBIED VOOR OPENEN CD-DEUR 13. TUN+/- & NEXT/PREVIOUS 14. LUIDSPREKERS 15. AUX-INGANG 16. BLUETOOTH-INDICATOR 17. SD-KAARTSLEUF 18. USB-POORT 19. DC-INGANG 20. BATTERIJCOMPARTIMENT GEBRUIK MET DE NETADAPTER Steek de netadapter in het apparaat en het stopcontact. GEBRUIK MET BATTERIJEN Het apparaat kan worden gevoed door batterijen. Volg de onderstaande stappen om de batterijen te installeren: 1. Verwijder voorzichtig het deksel van het batterijcompartiment. 2. Installeer 8 x maat 'C' batterijen (UM-2 of equivalent) en plaats de batterijen in de juiste richting (denk aan de polariteit). 3. Plaats het deksel van het batterijcompartiment terug. OPMERKING: De netadapter moet worden verwijderd om het apparaat met batterijen te gebruiken. Om schade als gevolg van lekkende batterijen te voorkomen, verwijder de batterijen wanneer deze bijna leeg zijn of wanneer het apparaat voor lange tijd niet wordt gebruikt. Het apparaat gebruikt in de standbymodus nog steeds een beetje stroom, dus het is beter de batterijen uit het apparaat te halen wanneer het enkele dagen niet wordt gebruikt. OPMERKING: Als er gedurende ongeveer een uur geen audiosignalen worden ontvangen, dan schakelt de radio automatisch uit (behalve in de radiomodus). NAAR DE RADIO LUISTEREN 1. Druk op POWER om het apparaat in te schakelen. 2. Druk enkele keren op FUNCTION om naar de FM-modus te schakelen. 3. Draai aan TUN+/- om de radio af te stemmen op een zender. Draai TUN+/- met de klok mee of tegen de klok in en houd de knop voor een paar seconden ingedrukt om automatisch naar een zender met een respectievelijk hogere/lagere frequentie te zoeken (indien een zender gevonden kan worden, dan zal de zender direct worden afgespeeld en zal het zoeken worden gestopt). 4. De externe TELESCOPISCHE FM-ANTENNE is directioneel. Steek de antenne volledig uit en richt de antenne goed voor goede FM-ontvangst. 5. Draai aan de VOLUMEREGELING om het volume in te stellen. 6. Druk op POWER om het apparaat uit te schakelen. UW FAVORIETE RADIOZENDERS OPSLAAN 1. Houd tijdens het afspelen MODE/PROG/MEM ingedrukt om de huidige zender op te slaan in het geheugen van de radio. Het nummer van de voorkeurszender knippert op het display. 2. Druk herhaaldelijk op STOP/M+ or 10+/M- om de gewenste voorkeurszender, P01-P10, te selecteren om de zender op te slaan. 3. Bevestig uw keuze door op MODE/PROG/MEM te drukken. 4. Herhaal de bovenstaande stappen om andere zenders op te slaan. 5. Druk tijdens het afspelen herhaaldelijk op STOP/M+ or 10+/M- om opgeslagen zenders op te roepen. NL-2 VOORZORGSMAATREGELEN BIJ OMGANG MET DISCS Volg de onderstaande instructies bij de omgang en het gebruik van uw CD’s om ervoor te zorgen dat ze lang meegaan en zonder problemen gebruikt kunnen worden: Zorg ervoor dat u de regenboogzijde van de disc niet aanraakt, houd de disc bij de randen vast. Langdurige blootstelling aan zonlicht, hoge temperaturen en vochtigheid kunnen de disc beschadigen. Berg discs ook op een schone plek op. Plak geen labels op beide zijden van een disc. Schrijf niet met spitse voorwerpen op de disc. Veeg de disc schoon vanuit het midden naar de buitenkant met een droge & zachte doek of met een CD-borstel. Gebruik geen reinigingsmiddelen of chemische middelen. Berg CD’s op in hun doosje als ze niet worden gebruikt. BEHANDEL DISCS ALLEEN ZOALS GETOOND REINIG CD’S VAN HET MIDDEN NAAR DE BUITENKANT NIET OPBERGEN IN DE BUURT VAN WARMTE EEN DISC PLAATSEN 1. Zet de radio aan. 2. Druk herhaaldelijk op FUNCTION om naar de CD-modus te schakelen. 3. Open de CD-deur. 4. Plaats een disc met het label naar boven gericht (als de disc ondersteboven wordt geplaatst, dan zal het display aangeven dat er geen disc is geplaatst). 5. Sluit de CD-deur met de hand. OPMERKING: Raak de lens van de laser in het CD-compartiment nooit aan. Maak de lens, indien deze vuil is, schoon met schoonmaak-CD. EEN DISC VERWIJDEREN 1. Zorg ervoor dat de disc niet wordt afgespeeld. Als de disc wel wordt afgespeeld, druk dan eerst op STOP/M+. 2. Open de CD-deur. 3. Verwijder de disc voorzichtig. 4. Sluit de CD-deur met de hand. 5. Plaats de disc terug in het beschermende opbergdoosje. EEN CD/MP3-DISC AFSPELEN 1. Zet de radio aan en druk herhaaldelijk op FUNCTION om naar de CD-modus te schakelen. 2. Plaats een CD/MP3-disc in het CD-compartiment. Sluit de CD-deur, de disc begint te draaien. 3. Gebruik de VOLUMEREGELING om het volume naar wens in te stellen. 4. Als de disc succesvol is ingelezen, dan zal het display het totaal aantal tracks op de disc tonen en zal het afspelen automatisch starten. 5. Druk één keer op PLAY/PAUSE/PAIR om het afspelen van muziek te pauzeren, de verstreken tijd van de huidige track knippert op het display om aan te geven dat het afspelen is gepauzeerd. Druk op STOP/M+ om het afspelen van muziek te stoppen, het LCD toont het totaal aantal tracks. 6. Druk herhaaldelijk op MODE/PROG/MEM om te schakelen tussen de verschillende afspeelmodi (herhaal 1, herhaal alle, intro´s en afspelen in willekeurige volgorde). 7. Druk op POWER om de radio uit te schakelen. NL-3 HET GEBRUIK VAN EXTERNE GEHEUGENMEDIA (USB, SD) Bereid de speler voor op het gebruik van externe geheugenmedia. 1. Plaats een USB-stick in de USB-poort of plaats een SD-kaart in de CD-kaartsleuf; 2. Druk op FUNCTION om naar de USB- of kaartmodus te schakelen. Als de USB-stick of kaart is gedetecteerd, dan zal het afspelen vanaf de eerste track in de eerste map worden gestart. 3. Druk herhaaldelijk op MODE/PROG/MEM om te schakelen tussen de verschillende afspeelmodi (herhaal 1, herhaal alle, intro’s en afspelen in willekeurige volgorde). 4. Druk op PLAY/PAUSE/PAIR om het afspelen te pauzeren of hervatten. Druk op STOP/M+ om het afspelen te stoppen. TRACKS OVERSLAAN EN ZOEKEN NAAR EEN SPECIFIEK AFSPEELPUNT (CD/MP3-DISC/ USB/KAART) 1. Draai de knop NEXT/PREVIOUS kort met de klok mee om naar de volgende track te gaan. 2. Draai de knop NEXT/PREVIOUS kort tegen de klok in om naar het begin van de huidige track te gaan. Draai de NEXT/PREVIOUS knop twee keer kort tegen de klok in om naar de vorige track te gaan. 3. Druk één keer op 10+/M- om 10 tracks over te slaan, of druk twee keer om 20 tracks over te slaan. U kunt de laatste track op de disc bereiken met deze toets (niet beschikbaar in de Bluetooth-modus). 4. Draai NEXT/PREVIOUS met de klok mee en houd de knop ingedrukt om vooruit te spoelen naar een specifiek afspeelpunt. 5. Draai NEXT/PREVIOUS tegen de klok in en houd de knop ingedrukt om terug te spoelen naar een specifiek afspeelpunt. PROGRAMMA AFSPELEN (CD/MP3-DISC/USB/KAART) 1. Druk in de stopmodus één keer op MODE/PROG/MEM, het "PROG" icoontje en "P01", een indicator die de afspeelvolgorde van het programma aangeeft, worden getoond. Daarna zal het tracknummer op het display knipperen; 2. Selecteer de eerste track van het programma met behulp van NEXT/PREVIOUS en druk daarna nogmaals op MODE/PROG/MEM om het nummer op te slaan en door te gaan met de volgende stap van het programma (indien er meerdere mappen op de mp3-disc of usb-stick staan, dan moeten eerst de mappen worden geprogrammeerd en daarna en daarna de tracks, de methode voor het programmeren van mappen is hetzelfde als de methode voor het programmeren van tracks.). 3. herhaal de bovenstaande stappen om meer tracks te programmeren. Er kunnen maximaal 20 tracks voor CD’s en 99 tracks voor MP3/USB/kaart in de gewenste volgorde in het geheugen worden geprogrammeerd. 4. Druk nadat u het invoeren van het programma heeft voltooid op PLAY/PAUSE/PAIR om het afspelen van het programma te starten. De speler stopt automatisch nadat alle tracks van het programma zijn afgespeeld. 5.U kunt op STOP/M+ drukken om het afspelen van het programma te stoppen. Druk als het afspelen van het programma is gestopt op PLAY/PAUSE/PAIR om het afspelen van het eerder geprogrammeerde programma opnieuw te starten of druk nogmaals op STOP/M+ om het programma te wissen. NL-4 BEDIENING BLUETOOTH Dit apparaat kan een stereo-audiosignaal van een Bluetooth-apparaat ontvangen. 1. Zet de radio aan en schakel naar de Bluetooth-functie door op FUNCTION te drukken. 2. De LED-indicator knippert snel tijdens het koppelen. 3. Koppel en maak verbinding met de SCD-50BT op de BLUETOOTH-audiobron. Voer indien gevraagd het wachtwoord “0000” in. 4. Het koppelen is gelukt (de LED- indicator knippert), het apparaat is klaar om muziek te streamen. 5. Druk op PLAY/PAUSE/PAIR om het afspelen te pauzeren/hervatten. 6. Maak tijdens het afspelen gebruik van de knop NEXT/PREVIOUS om gebruik te maken van een van de functies die zijn beschreven in het hoofdstuk “TRACKS OVERSLAAN EN ZOEKEN NAAR EEN SPECIFIEK AFSPEELPUNT (CD/MP3-DISC /USB/KAART)”. Opmerking: De koppelmodus wordt na ongeveer 1,5 minuut geannuleerd. De bovenstaande stappen zijn algemene stappen om te koppelen met een BLUETOOTH-apparaat, voor meer specifieke stappen over het verbinden met een BLUETOOTH-apparaat moet u de handleiding van het Bluetooth-apparaat raadplegen. OPNIEUW VERBINDING MAKEN MET BLUETOOTH-BRONAPPARAAT Als het apparaat al is gekoppeld met de SCD-50BT, maar de verbinding is verbroken, zelfs terwijl Bluetooth op beide apparaten is ingeschakeld, dan kunt u opnieuw verbinding maken door de volgende stappen te volgen: 1. Houd PLAY/PAUSE/PAIR ingedrukt om opnieuw verbinding te maken met het bronapparaat. De Bluetooth-indicator knippert ongeveer 1,5 minuut tijdens het verbinden. 2. Selecteer SCD-50BT op het bronapparaat. De Bluetooth-indicator brandt blauw wanneer de SCD-50BT en het apparaat opnieuw succesvol verbinding hebben gemaakt. AUX-INGANG 1. Sluit het audioapparaat met een 3,5mm audio audiokabel aan op de AUX-INGANG van de radio. 2. Schakel de radio en het apparaat dat wordt aangesloten op de radio in. 3. Druk op FUNCTION om de radio in de AUX-modus te zetten. 4. Gebruik de bedieningselementen van het externe apparaat om het afspelen te bedienen. BELANGRIJKE VEILIGHEIDSINSTRUCTIES Het apparaat mag niet worden blootgesteld aan druppend of spattend water en voorwerpen gevuld met vloeistof, zoals vazen, mogen niet op het apparaat worden geplaatst. Als de netadapter wordt gebruikt om het apparaat los te koppelen van het lichtnet, dan moet de netadapter bereikbaar blijven. U kunt het apparaat van het lichtnet loskoppelen door de netadapter volledig uit het stopcontact te halen. Er mogen geen voorwerpen met open vlam, zoals kaarsen, op het apparaat worden gezet. Er moet een minimumafstand van 2,0cm rond het apparaat worden vrijgehouden voor voldoende ventilatie. De ventilatie moet niet worden verhinderd door de ventilatieopeningen te bedekken met voorwerpen, zoals kranten, tafelkleden, gordijnen, etc. Gebruik dit apparaat in tropische en/of gematigde klimaten. Denk bij het weggooien van batterijen aan het milieu. NL-5 LET OP: Explosiegevaar als de batterij onjuist wordt vervangen. Alleen vervangen door dezelfde of soortgelijke batterijen. De batterij mag niet worden blootgesteld aan extreme warmte, zoals zonlicht, vuur of dergelijke. Het markeringslabel zit op de onderkant of de achterkant van het apparaat. SPECIFICATIES Voeding ................................ Netadapter: Invoer: 100-240V wisselspanning, 50/60Hz Uitvoer: 9V gelijkspanning, 1.5A DC 12V UM-2/"C" x 8 stuks (batterijen) – niet meegeleverd Stroomverbruik...................... 13W Afmetingen............................ Ca. 440(L) X 254(B) X 144(H) mm Bedrijfstemperatuur ............... +5°C ~ + 35°C Ontvangstband...................... FM Afstembereik ......................... FM 87.5 - 108 MHz Afspeelsysteem ..................... Compact Disc digitaal audiosysteem Vermogen ............................. 2.4W x 2 @10% THD Luidsprekerimpedantie .......... 4Ω / 5W Bluetooth-ondersteuning........ Ondersteuning voor A2DP Compatibel met ..................... USB, SD-kaart Netadapter Gebruik uitsluitend de voeding die in de handleiding is vermeld. Fabrikant: NG-L Modelnummer: APX915A Specificaties kunnen zonder voorafgaande kennisgeving worden gewijzigd. Service en ondersteuning Voor informatie: www.lenco.com Voor ondersteuning: http://lencosupport.zendesk.com Lenco helpdesk: Duitsland 0900-1520530 Nederland 0900-23553626 België 02-6200115 Frankrijk 03-81484280 (Lokale kosten) (Lokale kosten + 1ct p/min) (Lokale kosten) (Lokale kosten) De helpdesk is bereikbaar van maandag tot en met vrijdag van 09:00 tot 18:00 uur. Wanneer u Lenco contacteert, zal u altijd gevraagd worden naar het modelnummer en het serienummer van uw product. Het serienummer bevindt zich aan de achterkant van het apparaat. Gelieve dit nummer hier op te schrijven: Model: SCD-50 BT Serienummer: _________________________________ NL-6 Lenco biedt service en garantie aan overeenkomstig met de Europese wetgeving. Dit houdt in dat in het geval van reparaties (zowel tijdens en na de garantieperiode), u uw lokale handelaar moet contacteren. Belangrijke opmerking: Het is niet mogelijk om producten die gerepareerd moeten worden direct naar Lenco te sturen. Belangrijke opmerking: De garantie verloopt als een onofficieel servicecenter het apparaat op wat voor manier dan ook heeft geopend, of er toegang toe heeft gekregen. Het apparaat is niet geschikt voor professioneel gebruik. In het geval van professioneel gebruik worden alle garantieverplichtingen van de fabrikant nietig verklaard. Dit product werkt op 2400 – 2483,5 MHz en is aangewezen om alleen te worden gebruikt in een normal huishoudelijke omgeving. Dit product is geschikt voor dit doel binnen alle EU-landen. Hierbij verklaart STL Group BV, Ankerkade 20 NL 5928 PL Venlo, dat dit product in overeenstemming met de essentiële eisen en andere relevante bepalingen van Richtlijn 1999/5/EG is. De verklaring van overeenstemming kan worden geraadpleegd op https://lencosupport.zendesk.com/forums/22413161-CE-Documents Producten met een CE keurmerk houden zich aan de EMC richtlijn (2004/108/EC) en de Richtlijn voor Lage Voltage (2006/95/EC) uitgegeven door de Europese Commissie. De verklaring van overeenstemming kan worden geraadpleegd op Dit symbool geeft aan dat het betreffende elektrische product of de batterij niet moet worden verwijderd als algemeen huishoudelijk afval in Europa. Zorg voor een juiste afvalverwerking door het product en de batterij in overeenstemming met alle van toepassing zijnde lokale wetten voor het verwijderen van elektrische apparatuur of batterijen te verwijderen. Als u dit doet, helpt u de natuurlijke hulpbronnen te behouden en de standaard van milieubescherming te verbeteren bij de behandeling en verwijdering van elektrisch afval (Afgedankte Elektrische en Elektronische Apparatuur). ®Alle rechten voorbehouden NL-7