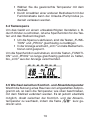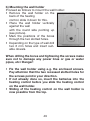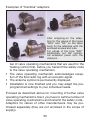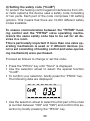
1
FHT8-Set D Funk-Heizkörperthermostat Komplettset Seite 1-37 GB Heating control set Page 38-84 Bedienungsanleitung User manual eQ-3 AG • Maiburger Str. 29 • D-26789 Leer 1 3. Ausgabe Deutsch Januar 2009 Dokumentation © 2006 eQ-3 Alle Rechte vorbehalten. Ohne schriftliche Zustimmung des Herausgebers darf dieses Handbuch auch nicht auszugsweise in irgendeiner Form reproduziert werden oder unter Verwendung elektronischer, mechanischer oder chemischer Verfahren vervielfältigt oder verarbeitet werden. Es ist möglich, daß das vorliegende Handbuch noch druck technische Mängel oder Druckfehler aufweist. Die Angaben in diesem Handbuch werden jedoch regelmäßig überprüft und Korrekturen in der nächsten Ausgabe vorgenommen. Für Fehler technischer oder drucktechnischer Art und ihre Folgen übernehmen wir keine Haftung. Alle Warenzeichen und Schutzrechte werden anerkannt. Printed in Hong Kong Änderungen im Sinne des technischen Fortschritts können ohne Vorankündigung vorgenommen werden. 73020 Y2009 V2.02 2 Inhalt 1. Beschreibung des Systems............................................. 4 1.1 Allgemeine Informationen/Verwendungszweck......... 4 1.2 Funktionsweise........................................................... 5 1.3 Sicherheitscode.......................................................... 5 1.4 Technische Hinweise.................................................. 6 1.5 Lieferumfang.............................................................. 7 2. Installation des Systems................................................. 7 2.1 Anbringen der Regeleinheit FHT 8R........................... 7 2.2 Anbringen des Ventilantriebes FHT 8V..................... 11 3. Programmieren des Systems........................................ 13 3.1 Einstellen der Komforttemperatur und der Absenktemperatur............................................. 14 3.2 Das Wochenprofil gestalten ................................... 15 3.3 Betriebsarten........................................................... 17 3.4 Tastensperre............................................................ 19 3.5 Wechsel zwischen Komfort- und Absenktemperatur.. 19 3.6 Heizpause . ............................................................. 20 3.7 Schließen des Ventils ............................................. 20 3.8 Notbetrieb des Ventilantriebes ............................... 21 3.9 Sonderfunktionen.................................................... 22 4. Batteriewechsel............................................................. 31 4.1 Regeleinheit.............................................................. 31 4.2 Ventilantrieb.............................................................. 32 5. Problembehebung......................................................... 34 5.1 Störungen der Funkübertragung.............................. 35 6. Entsorgungshinweis.................................................... 36 3 1. Beschreibung des Systems 1.1 Allgemeine Informationen/Verwendungszweck Das Funk-Heizkörperthermostat-System dient zur Temperaturregelung in Einzelräumen, in denen die Regulierung der über Heizkörper abgegebenen Wärme durch die Drosselung des Heizwasserflusses erfolgt. Das System ist nur bestimmungsgemäß einzusetzen. Eine anderweitige Verwendung, z. B an Kühlanlagen, Fußbodenheizungen etc. ist nicht zulässig und kann zu schweren Schäden führen. Das Funk-Heizkörperthermostat-System bietet zahlreiche Vorteile gegenüber einfachen, mechanischen Thermostaten. • Durch die Aufteilung in den/oder die am Heizkörper montierte Ventilantriebe FHT 8V und die an der Wand angebrachte Bedien- und Regeleinheit FHT 8R sind Einstellungen sehr komfortabel durchführbar. • Das an die Lebensgewohnheiten anpassbare Zeitprogramm ermöglicht es, dass der Raum stets angenehm warm ist, wenn er genutzt wird, während zu anderen Zeiten durch Absenken der Temperatur Energie gespart wird. Das lästige Herauf- und Herunterdrehen des Thermostats von Hand entfällt. • Verkalkungsschutz: einmal wöchentlich fährt der Ventilantrieb das Ventil auf und zu und verhindert so das Festsetzen durch Ablagerungen. 4 1.2 Funktionsweise In der Regeleinheit FHT 8R wird die Raumtemperatur gemessen und mit der durch das Zeitprogramm bzw. der von Hand vorgegebenen Soll-Temperatur verglichen. Aus der Differenz errechnet der Regelalgorithmus, wie das Ventil verfahren werden muss, um die gewünschte Temperatur zu erreichen. In einem Zeitraster von ca. 2 Minuten werden per Funk Befehle zu dem am Heizkörper montierten Ventilantrieb übertragen, der die zugeführte Heizwärme entsprechend reguliert. 1.3 Sicherheitscode Zur Absicherung gegen Störungen von anderen Funksystemen und um mehrere Funk-Heizkörperthermostat- Systeme unabhängig voneinander in einem Haushalt betreiben zu können, ist das Funksignal mit einem zweiteiligen Sicherheitscode versehen. Jeder Teil umfasst 100 verschiedene Einstellmöglichkeiten, sodass insgesamt 10000 verschiedene Sicherheitscodes zur Verfügung stehen. Damit die Regeleinheit und der/die Ventilantriebe miteinander kommunizieren können, muss bei allen Geräten eines Raumes der selbe Sicherheitscode eingestellt sein. Werksseitig wurde diesem Set bereits ein (zufälliger) Sicherheitscode zugeteilt, so dass hier keine Einstellung erforderlich ist. Lediglich beim Einsatz zusätzlicher Antriebe muss diesen der Sicherheitscode übermittelt werden. Dies ist über die entsprechende Sonderfunktion möglich (s. Kapitel 3.9.5). 5 1.4 Technische Hinweise Die wichtigsten technischen Daten sind in der unten stehenden Tabelle zusammengefasst. Reichweite (Freifeld):............................................ bis 100 m Maximale Anzahl Stellantriebe pro Regler:........................8 Funkfrequenz:................................................... 868,35 MHz Stromversorgung:.... 2 Alkaline-Mignon-Batterien je Einheit Batterielebensdauer:.......................................... ca. 2 Jahre Temperaturbereich:....................................... 6 °C bis 30 °C Anzahl der Schaltzeiten:........ 4 pro Tag bzw. 28 pro Woche.. • Verwenden Sie ausschließlich Alkaline-Batterien. Akkus und andere Batterien eignen sich aufgrund der geringeren Spannung bzw. starken Selbstentladung nicht und können Funktionsstörungen verursachen. • Die Freifeld-Reichweite des verwendeten Funksystems liegt bei 100 m. Dies ist für die innerhalb eines Raumes zu überbrückende, wesentlich geringere Distanz auch unter den systembedingt ungünstigen Umgebungsbedingungen (Abschirmwirkung des Heizkörpers etc.) völlig ausreichend. Sollte es dennoch zu Problemen mit der Funkübertragung kommen, finden Sie Hinweise zur Behebung im Kapitel 5.1. • Die Sendeleistung beträgt weniger als 10 mW und liegt somit weit unter der eines Handys, dessen Sendeleistung mehr als 200-mal größer sein kann. Beeinträchtigungen für empfindliche Menschen und Tiere sind somit nicht zu erwarten. • Reinigen Sie das Gerät nur mit einem trockenen Leinentuch, das bei starken Verschmutzungen leicht angefeuchtet sein darf. Verwenden Sie zur Reinigung keine löse mittelhaltigen Reinigungsmittel. Achten Sie darauf, dass keine Feuchtigkeit in das Geräteinnere gelangt. 6 • Das Aufheizen eines Raumes benötigt abhängig von der Dimensionierung der Heizkörper einige Zeit. Wird der Sollwert geändert, so ändert sich die Raumtemperatur mit einer entsprechenden Verzögerung. Abweichungen zwischen Sollwert und Raumtemperatur können zudem von verschiedenen Störgrößen, wie z. B. Zugluft, Fremdwärmequellen im Raum oder einer unzureichenden Wärmezufuhr vom Heizkessel verursacht werden. • Die Temperaturmessung erfolgt mit hoher Genauigkeit (Abweichung < 1K) innerhalb des Reglers. Um ein unnötig häufiges Verstellen des Ventils z. B. bei kurzzeitigen Änderungen der Raumtemperatur durch das Öffnen einer Tür, zu verhindern wird der Messwert über mehrere Messungen gemittelt. 1.5 Lieferumfang 1 x Regeleinheit FHT 8R 1 x Wandhalter für die Regeleinheit mit Befestigungsmaterial 1 x Ventilantrieb FHT 8V 1 x Satz Adapterringe für Danfoss-Ventile (3 Stück) 1 x Bedienungsanleitung 4 x Mignon-Batterie 1 x Kurzanleitung Zusätzliche Ventilantriebe können unter der Best.Nr. 70-730-21 erworben werden. 2. Installation des Systems 2.1 Anbringen der Regeleinheit FHT 8R 2.1.1 Geeigneter Montageort Wählen Sie einen geeigneten Ort für das Anbringen der Regeleinheit. Dieser sollte 7 • zentral in dem Raum liegen, in dem die Temperatur geregelt werden soll • gut zugänglich sein • in Augenhöhe liegen • nicht an einer schlecht isolierten Außenwand sein • keiner direkten Sonnenbestrahlung unterliegen • nicht auf großen Metallgegenständen sein • keinen Störeinflüssen von Wärmequellen wie Fernseher, Lampen, Kühlschränke etc. ausgesetzt sein. 2.1.2 Montage des Wandhalters Zur Montage gehen Sie wie folgt vor: • Nehmen Sie den Wandhalter von der Rückseite der Regeleinheit ab, indem Sie diesen nach unten schieben. • Halten Sie den Wandhalter mit der runden Seite nach oben weisend lotrecht an die Wand. • Markieren Sie durch die beiden Langlöcher die Position der Bohrungen. • Entfernen Sie den Wandhalter und bohren Sie an den Markierungen ausreichend tief mit einem 6-mm-Bohrer. Achten Sie hierbei darauf, dass keine Leitungen etc. angebohrt werden. • Versehen Sie die Bohrlöcher mit den beiliegenden Dübeln und montieren Sie den Wandhalter mit Hilfe der ebenfalls beiliegenden Schrauben. 2.1.3 Einlegen der Batterien in die Regeleinheit • Öffnen Sie den an der Rückseite befindlichen Batteriefachdeckel der Regeleinheit und legen Sie die Batterien pol8 ungsrichtig ein. Achtung: Bitte unbedingt die dargestellte Polarität beachten, da die Elektronik sonst evtl. zerstört wird. • Schließen Sie das Batteriefach. Nach einem kurzen Displaytest sind folgende Einstellungen an der Regeleinheit vorzunehmen: • Einstellung Jahr: Es erscheint folgende Anzeige: M�O� DI� M�I� DO� F�R� S�A� S�O� P�r� o� g� 1�2� 6� 0� 2�4� 1�8� • Stellen Sie mit dem Stellrad das Jahr ein und bestätigen Sie mit der Taste „PROG”. • Einstellung Monat: Es erscheint folgende Anzeige: MO DI MI DO FR SA SO 12 6 0 24 18 • Stellen Sie mit dem Stellrad den Monat ein und • bestätigen Sie mit der Taste „PROG”. • Einstellung Tag: Es erscheint folgende Anzeige: MO 0 DI MI 6 DO FR SA 12 18 SO 24 • Stellen Sie mit dem Stellrad den Tag ein und • bestätigen Sie mit der Taste „PROG”. 9 • Einstellung Uhrzeit: Es erscheint folgende Anzeige: MO DI MI 6 0 DO FR SA 12 SO 18 24 • Stellen Sie mit dem Stellrad die Stunden ein und • bestätigen Sie mit der Taste „PROG”. • Es erscheint folgende Anzeige: MO 0 DI MI 6 DO FR SA 12 18 SO 24 • Stellen Sie mit dem Stellrad die Minuten ein. • Bestätigen Sie mit der Taste „PROG”. • Anschließend zeigt das Display „Sync” und „120” an. Jetzt zählt die Regeleinheit im 1Sekunden-Takt herunter und befindet sich nach Ablauf von 120 Sekunden im normalen Betriebsmodus. • Schieben Sie die Regeleinheit von oben bis zum Einrasten auf die Wandhalterung. 10 2.2 Anbringen des Ventilantriebes FHT 8V 2.2.1 Entfernen des alten Thermostaten • Entfernen Sie den alten, mechanischen Thermostaten. Bei fest sitzenden Verschraubungen hierfür ggf. eine Wasserpumpenzange verwenden. 2.2.2 Einlegen der Batterien in den Ventilantrieb • Entfernen Sie den Batteriefachdeckel des Ventilantriebes durch Schieben nach unten. • Setzen Sie die Batterien in das Batteriefach ein. Achtung: Bitte unbedingt die dargestellte Polarität beachten, da die Elektronik sonst evtl. zerstört wird. • Das Display zeigt „C1” und anschließend eine 2stellige Zahl, daraufhin „C2” und erneut eine 11 2stellige Zahl (die beiden Zahlen sind der aktuell gespeicherte 2teilige Sicherheitscode des Ventilantriebes). • Im Anschluss erfolgt ein Signalton sowie die Anzeige „A1”. • Der Ventilantrieb fährt jetzt den Steuerstift ganz zurück, um die Montage zu erleichtern. • Anschließend erscheint in der Anzeige „A2”. 2.2.3 Montage des Ventilantriebs am Heizkörper • Schrauben Sie den Ventilantrieb durch Drehen der Überwurfmutter von Hand fest auf das Ventil (1). Bei Ventilen der Firma Danfoss montieren Sie zuvor einen der beiliegenden Adapter auf das Ventil. Die Abbildungen auf S. 13 zeigen, welcher Adapter zu welchem Ventil gehört. • Betätigen Sie die Taste am Ventilantrieb einmal kurz (2). • Das Display zeigt „A3” und der Ventilantrieb schließt das Ventil. • Anschließend blinkt das Antennensymbol im Display und das Display zeigt „0%” an. • Setzen Sie den Batteriefachdeckel auf. • Der Ventilantrieb bestätigt das erste empfangene Funkprotokoll mit einem Signalton. • Das Antennensymbol ist jetzt dauerhaft aktiv. 12 • Damit ist die Installation abgeschlossen und die vorprogrammierten Einstellungen können den individuellen Bedürfnissen angepasst werden. Hinweis: Sollen weitere Ventilantriebe montiert werden, gehen sie zur Montage wie zuvor beschrieben vor. Anschließend muss an der Regeleinheit, wie unter Punkt 3.9.5 „no H” beschrieben, die Anzahl der Heizkörper/Ventilantriebe eingestellt und der Sicherheitscode übertragen werden. RA RAVL RAV Die Adapter für die Ventile Typ RAV und RA sind nach dem Aufrasten auf den Ventilkörper mit der beiliegenden Schraube und Mutter zu befestigen. Auf Ventile vom Typ RAV ist außerdem noch die zylindrische Verlängerung auf den Ventilstift zu setzen. 3. Programmieren des Systems Werkseitig sind bereits alle erforderlichen Einstellungen des Systems mit einem Standardprogramm vorbelegt: • Heizphase: Komforttemperatur 21 °C von 6:00 Uhr bis 23:00 Uhr 13 • Absenkphase: Absenktemperatur 17°C von 23:00 bis 6:00 • Entkalkungsfahrt: Samstag, 11:00 Uhr. Alle genannten Einstellungen lassen sich verändern und so an die individuellen Bedürfnisse anpassen. 3.1 Einstellen der Komforttemperatur und der Absenktemperatur Ist der Automatik-Modus aktiv, d. h. es erfolgt ein selbsttätiger Wechsel zwischen Absenk- und Komforttemperatur, so wird auf der unteren Skala des Displays durch einen Balken dargestellt, wann im Laufe des Tages auf Komforttemperatur geregelt wird. Ein Sonnensymbol im Display symbolisiert, dass die Komforttemperatur aktiv ist, ein Mondsymbol zeigt an, dass auf Absenktemperatur geregelt wird. Komfort- und die Absenktemperatur verändern: ” länger als 3 Sekun• Betätigen Sie die Taste „ den • Es erscheint die Anzeige: MO DI MI DO FR SA SO C 0 6 12 18 24 • Stellen Sie die gewünschte Komforttemperatur mit dem Stellrad ein. ” kurz. • Betätigen Sie die Taste „ • Es erscheint die Anzeige: 14 MO DI MI DO FR SA SO C 12 6 0 24 18 • Stellen Sie die gewünschte Absenktemperatur mit dem Stellrad ein. ” kurz, wonach der • Betätigen Sie die Taste „ Regler in den normalen Betriebsmodus zurückkehrt. 3.2 Das Wochenprofil gestalten Die Zeitsteuerung für den automatischen Wechsel zwischen Komfort- und Absenktemperatur kann für jeden Wochentag einzeln verändert und damit den persönlichen Lebensgewohnheiten angepasst werden. • Betätigen Sie die „PROG”-Taste 1 mal kurz • Es erscheint die Anzeige: MO DI MI DO FR SA SO Prog 0 6 12 18 24 • Wählen Sie mit dem Stellrad den Tag aus, für den das Zeitprogramm verändert werden soll. Es können sowohl die Wochentage einzeln ausgewählt werden als auch eine blockweise Programmierung für 15 • a) die Werktage (Mo-Fr) b) das Wochenende (Sa-So) c) und alle Tage (Mo-So) erfolgen. Nach Auswahl der/des Wochentage/s bestätigen Sie diesen durch Drücken der „PROG”-Taste. • Es erscheint die Anzeige für die erste Komforttemperatur-Zeit: MO DI MI DO FR SA SO Prog 12 6 0 24 18 • Wählen Sie mit dem Stellrad den Zeitpunkt, ab dem auf die Komforttemperatur geregelt werden soll. • Bestätigen Sie diesen durch Betätigen der „PROG”Taste • Es erscheint in der Anzeige der erste Absenk-Zeitpunkt: MO DI MI DO FR SA SO Prog 0 12 6 18 24 • Wählen Sie mit dem Stellrad den Zeitpunkt, ab dem auf die Absenktemperatur geregelt werden soll. • Bestätigen Sie diesen durch Betätigen der „PROG”Taste • Dieser Vorgang wiederholt sich für die 2. Komforttemperatur-Zeit und die 2. Absenktemperatur-Zeit. Wird eine Schaltzeit nicht benötigt, so ist das Stell16 rad so lange nach rechts zu drehen, bis Balken erscheinen: MO DI MI DO FR SA SO Prog 0 12 6 18 24 • Alle Einstellungen sind jeweils durch Betätigen der „PROG”-Taste zu bestätigen. Auf das Programmieren der 2. Absenktemperatur-Zeit folgt wieder der normale Betriebsmodus. Die Skala am unteren Displayrand folgt den aktuellen Änderungen, sodass die Auswirkungen auf das Tagesprofil direkt zu erkennen sind. Zu beachten ist hierbei, dass die Temperatur, mit der der Vortag beendet wird, nicht mit eingeht, d. h. wenn der Vortag mit Komforttemperatur beendet wird, so setzt sich diese Heizphase ggf. am nächsten Tag fort. Während der Programmierung werden die Balken jedoch nicht angezeigt. 3.3 Betriebsarten Das Wechseln der Betriebsart erfolgt mit der Taste „FUNKTION”. Durch wiederholtes Drücken sind dabei die verschiedenen Modi nacheinander abrufbar: 3.3.1 Automatikbetrieb Im Automatikbetrieb (Anzeige „Auto”) folgt die Raumtemperatur dem eingestellten Wochentagsprogramm. Der TemAutomatikbetrieb Manueller Betrieb 17 Urlaub/PartyFunktion peraturverlauf für den aktuellen Wochentag ist auf der Balkenskala am unteren Displayrand dargestellt. Die Symbole ”zeigen an, ob die Absenktemperatur oder die Kom„ forttemperatur aktiv ist. Soll die Temperatur vorübergehend verändert werden, so kann dies einfach über das Stellrad erfolgen. Beim nächsten regulären Temperaturwechsel im Zeitprogramm kehrt der Thermostat dann selbsttätig zum zeitgesteuerten Programm zurück. 3.3.2 Manueller Betrieb Im manuellen Betrieb (Anzeige „Manu”) verbleibt der Regler dauerhaft auf der eingestellten Temperatur. Ein automatischer, zeitgesteuerter Wechsel erfolgt nicht. Diese Funktion entspricht der eines konventionellen Thermostaten. 3.3.3 Urlaubs-/Partyfunktion In dieser Betriebsart (Koffer-Symbol im Display) verbleibt die Temperatur für einen definierten Zeitraum (z. B. die Dauer einer Party oder eines Urlaubs) auf einem festen Temperaturwert. Danach wechselt der Regler selbsttätig in den Auto-matikmodus. • Nach Anwahl dieser Betriebsart (Koffer-Symbol im Display) mit der Taste „FUNKTION” stellen Sie zunächst den Zeitraum ein. Für die folgenden 24 Stunden ist eine Abstufung in 1/2-Stunden-Schritten vorgesehen (Partyfunktion). Darüber hinaus erfolgt die Abstufung in Tagesschritten (Urlaubsfunktion). Es ist der Tag einzustellen, an dem man aus dem Urlaub zurückkehrt. An diesem Tag wird dann ab 0:00 Uhr mit dem gewohnten Zeitprogramm weiter geheizt. • Nach Einstellung des gewünschten Zeitraumes bestätigen Sie diesen durch Betätigen der „PROG”Taste. 18 • Wählen Sie die gewünschte Temperatur mit dem Stellrad. • Durch Anwählen einer anderen Betriebsart mit der Funktionstaste kann der Urlaubs-/Partymodus jederzeit verlassen werden. 3.4 Tastensperre Um das Gerät vor einem unbeabsichtigten Verstellen z. B. durch Kinder zu schützen, ist eine Sperrfunktion für die Tasten und das Stellrad integriert. • Um die Sperre zu aktivieren, sind die Tasten „FUNKTION” und „PROG” gleichzeitig zu betätigen. • In der Anzeige erscheint „LOC” und alle Bedienfunktionen sind gesperrt. Um die Sperrfunktion aufzuheben, sind die Tasten „FUNKTION” und „PROG” so lange gleichzeitig gedrückt zu halten, bis „LOC” aus der Anzeige verschwindet. MO DI MI DO FR SA SO Auto 0 6 12 18 24 3.5 Wechsel zwischen Komfort- und Absenktemperatur Weicht die Nutzung eines Raumes vom eingestellten Zeitprogramm ab, so kann die Temperatur, wie oben beschrieben, mit dem Stellrad verändert werden. Es ist jedoch ebenfalls möglich, direkt zwischen der Komfort- und der Absenk” kurz getemperatur zu wechseln, indem die Taste „ drückt wird. 19 3.6 Heizpause Ist die Heizung im Sommer abgeschaltet, können die Batterien des Stellantriebes geschont werden: • Das Ventil wird geöffnet und verbleibt in dieser Stellung. • Der wöchentliche Verkalkungsschutz wird weiterhin durchgeführt. Um die Heizpause zu aktivieren, • Wechseln Sie durch Betätigen der Taste „FUNKTION” in die Betriebsart „Manu”. Drehen Sie das Stellrad so lange rechts herum, bis „On” in der Anzeige erscheint. MO DI MI DO FR SA SO Manu 0 6 12 18 24 3.7 Schließen des Ventils Diese Betriebsart ist zu wählen, wenn der Raum gar nicht geheizt werden soll. • Das Ventil wird geschlossen und verbleibt in dieser Stellung. • Nur bei Frostgefahr (Temperatur unter 5 °C) wird das Ventil geöffnet. • Der wöchentliche Verkalkungsschutz wird weiterhin durchgeführt. Um das Ventil zu schließen, • wechseln Sie durch Betätigen der Taste „FUNKTION” in die Betriebsart „Manu”. Drehen Sie das Stellrad so lange links herum, bis „OFF” in der Anzeige erscheint. 20 MO DI MI DO FR SA SO Manu 0 6 12 18 24 3.8 Notbetrieb des Ventilantriebes Sollte es aufgrund eines nicht behebbaren Fehlers (z.B. weil die Batterien leer sind und kurzfristig kein Ersatz zur Verfügung steht) nötig sein, das Ventil von Hand zu verstellen, ist dies wie folgt möglich: • Entfernen Sie beide Batterien. • Entnehmen Sie den Verstellstift durch Drücken auf die mit (1) gekennzeichnete Stelle. • Setzten Sie den Verstellstift auf den mit (2) gekennzeichneten Zapfen • Drehen Sie den Verstellstift: im Uhrzeigersinn = wärmer, gegen den Uhrzeigersinn = kälter 21 3.9 Sonderfunktionen Das Menü „Sonderfunktionen” enthält die unten aufgezählten Funktionen. (1) CALC Festlegen des Zeitpunktes der Entkalkungsfahrt. (2) °C°F Auswählen der Einheit der Temperatur (Celsius bzw. Fahrenheit). (3) dAt Einstellen von Datum und Uhrzeit. (4) CodE Verändern des Sicherheitscodes für die Funk übertragung bzw. Codieren neuer Ventilantriebe (5) An A Festlegen der Anzahl der Ventile, die der Regler steuert bzw. System erweitern (6) SYnC Aufsynchronisieren der Ventilantriebe. (7) tESt Testfunktion für die Funkübertragung. (8) StEL Anzeigen der Ventilposition. (9) t-An Umschalten zwischen Soll- bzw. Ist-Tempera turanzeige (10) OFFS Offseteinstellung (nur bei mehreren Ventil antrieben). 3.9.1 Sonderfunktion „CALC”/ Festlegen des Entkalkungszeitpunktes Einmal wöchentlich wird das Ventil vollständig geöffnet und geschlossen. Dies verhindert, dass sich das Ventil durch Ablagerungen festsetzt. Der Zeitpunkt, an dem diese Entkalkungsfahrt durchgeführt wird, kann durch die Sonderfunktion „CALC” verändert werden. MO 0 DI MI DO FR SA 6 12 22 18 SO 24 • Betätigen Sie die Taste „PROG” so lange, bis „Sond” in der Anzeige erscheint. • Wählen Sie mit dem Stellrad die Sonderfunktion „CALC” aus. • Bestätigen Sie diese mit der „PROG”-Taste. • Wählen Sie mit dem Stellrad den Wochentag aus. • Bestätigen Sie diesen mit der „PROG”-Taste. MO 0 DI MI DO FR SA 12 6 18 SO 24 • Stellen Sie mit dem Stellrad die Uhrzeit ein. • Bestätigen Sie diese mit der „PROG”-Taste. 3.9.2 Auswählen der Einheit für die Temperaturanzeige Hier kann mit dem Stellrad ausgewählt werden, ob die Anzeige der Solltemperatur in Grad Celsius oder Grad Fahrenheit erfolgen soll. • Betätigen Sie die Taste „PROG” so lange, bis „Sond” in der Anzeige erscheint. • Wählen Sie mit dem Stellrad die Sonderfunktion „°C°F” aus. • Bestätigen Sie diese mit der „PROG”-Taste. • Wählen Sie mit dem Stellrad „°C” oder „°F” aus. • Bestätigen Sie mit der „PROG”-Taste. 23 3.9.3 Einstellen von Datum und Uhrzeit • Betätigen Sie die Taste „PROG” so lange, bis „Sond” in der Anzeige erscheint. • Wählen Sie mit dem Stellrad die Sonderfunktion „dAt” aus. • Bestätigen Sie diese mit der „PROG”-Taste. Die weiteren Einstellungen sind, wie in „2.1.3 Einlegen der Batterien in die Regeleinheit” beschrieben, vorzunehmen. 3.9.4 CodE Wie bereits unter „1.3 Sicherheitscode” beschrieben, verfügt der Funk-Heizkörperthermostat zur Absicherung gegen Störungen von anderen Funksystemen über einen zweiteiligen Sicherheitscode. Jeder Teil umfasst 100 verschiedene Einstellmöglichkeiten, sodass insgesamt 10000 verschiedene Sicherheitscodes zur Verfügung stehen. Damit die Regeleinheit FHT 8R und der/die Ventilantriebe FHT 8V miteinander kommunizieren können, muss bei allen Geräten eines Raumes der selbe Sicherheitscode eingestellt sein. Werksseitig wurde diesem Set bereits ein (zufälliger) Sicherheitscode zugeteilt, so dass hier normalerweise keine Einstellung erforderlich ist. Soll der Code verändert bzw. neu übertragen werden, gehen Sie wie folgt vor: • Betätigen Sie die Taste „PROG” so lange, bis „Sond” in der Anzeige erscheint. • Wählen Sie mit dem Stellrad die Sonderfunktion „CodE” aus. • Bestätigen Sie diese mit der „PROG”-Taste. • Es erscheint folgende Anzeige: 24 MO DI MI DO FR SA SO 6 0 12 18 24 • Stellen Sie mit dem Stellrad den ersten Teil des Codes ein (000 bis 099). • Bestätigen Sie mit der „PROG”-Taste. • Es erscheint folgende Anzeige: MO DI MI DO FR SA SO 6 0 12 18 24 • Stellen Sie mit dem Stellrad den zweiten Teil des Codes ein (000 bis 099). • Bestätigen Sie mit der „PROG”-Taste. • Es erscheint folgende Anzeige: MO 0 DI MI DO FR SA SO 6 12 18 24 Es folgt das Synchronisieren des (ersten) Ventilantriebes („001” im Display) auf den neuen Gerätecode. • Entfernen Sie den Batteriefachdeckel des (ersten) Ventilantriebes durch Schieben nach unten. • Betätigen Sie die Taste des Ventilantriebs für ca. 3 Sekunden bis 3 Signaltöne erklingen. Der Ventilan25 • • • • trieb ist jetzt empfangsbereit und das Display zeigt „AC”. Durch Drücken der „PROG”-Taste an der Regeleinheit starten Sie die Übertragung des Codes. Der Ventilantrieb quittiert den korrekten Empfang des Codes mit einer Tonfolge. Setzen Sie den Batteriefachdeckel wieder auf. Der erste Empfang des regulären Funksignals wird mit einem Signalton betstätigt. Diese Schritte wiederholen sich ggf. jetzt für die weiteren im Raum befindlichen Ventilantriebe („002” im Display,...). Sind alle Ventilantriebe codiert, geht die Regeleinheit automatisch in den normalen Betriebsmodus. Hinweis: Wenn die Regeleinheit mehrere Ventilantriebe steuert, sich also mehrere Heizkörper in dem Raum befinden, so sollten Sie notieren, welcher Ventilantrieb zu welchem Heizkörper gehört, d. h. welche Nummer er hat. Schlägt das Codieren bei einem Ventilantrieb fehl, so kann diesem Ventilantrieb der Code nachträglich neu übermittelt werden: • Gehen Sie wie zuvor beschrieben vor und überspringen Sie die bereits codierten Ventilantriebe mit der PROG-Taste. • Zeigt das Display die Nummer des Ventilantriebes, der noch keinen Code erhalten hat, so ist bei diesem Ventilantrieb die Taste so lange zu Drücken, bis das Display des Ventilantriebes „AC” anzeigt und er 3 Signaltöne ausgibt. • Jetzt lösen Sie die Codeübertragung durch Betätigen der „PROG”-Taste an der Regeleinheit aus. 26 3.9.5 An A Mit diesem Menüpunkt lässt sich die Anzahl der zu steuernden Heizkörper (Ventilantriebe) verändern. Bei der Installation eines zusätzlichen Ventilantriebes ist es wichtig, dass dieser den selben Sicherheitscode erhält. Dies erfolgt im Laufe der Einstellungen: • Betätigen Sie die Taste „PROG” so lange, bis „Sond” in der Anzeige erscheint. • Wählen Sie mit dem Stellrad die Sonderfunktion „An A” aus. • Bestätigen Sie diese mit der „PROG”-Taste. • Wählen Sie mit dem Stellrad die Anzahl der Heizkörper (1 bis 8) aus. • Bestätigen Sie mit der „PROG”-Taste. • Es erscheint folgende Anzeige: M�O� 0� DI� M�I� 6� DO� F�R� S�A� 1�2� 1�8� S�O� 2�4� Es folgt das Synchronisieren des (ersten) Ventilantriebes („001” im Display) auf den neuen Sicherheitscode. Folgende Schritte wiederholen sich beim Einsatz meherer Ventilantriebe. • Entfernen Sie den Batteriefachdeckel des (ersten) Ventilantriebes durch Schieben nach unten. • Betätigen Sie die Taste für ca. 3 Sekunden bis 3 Signaltöne erklingen. Der Ventilantrieb ist jetzt empfangsbereit und das Display zeigt „AC”. • Durch Drücken der „PROG”-Taste an der Regeleinheit starten Sie die Übertragung des Codes. 27 • Der Ventilantrieb quittiert den korrekten Empfang des Codes mit einer Tonfolge. • Setzen Sie den Batteriefachdeckel wieder auf. • Der erste Empfang des regulären Funksignals wird mit einem Signalton betstätigt. Wiederholen Sie diese Schritte jetzt für jeden weiteren im Raum befindlichen Ventilantrieb („002” im Display,...). Sind alle Ventilantriebe codiert, geht die Regeleinheit automatisch in den normalen Betriebsmodus. Hinweis: Ventilantriebe, die bereits auf einen Sicherheitscode synchronisiert sind, können Sie überspringen. Betätigen sie dazu die „PROG”-Taste an der Regeleinheit ggf. mehrmals. 3.9.6 SynC Wird dieser Menüpunkt ausgewählt, so beginnt der Regler für ca. 2 Minuten allen Ventilantrieben zu signalisieren, dass sie sich neu aufsynchronisieren sollen. Danach wird das normale Sendeprogramm fortgesetzt und die Ventilantriebe geben einen Signalton ab, sobald sie das erste synchrone Signal empfangen haben. • Betätigen Sie die Taste „PROG” so lange, bis „Sond” in der Anzeige erscheint. • Wählen Sie mit dem Stellrad die Sonderfunktion „SynC” aus. • Bestätigen Sie diese mit der „PROG”-Taste. Anschließend zeigt das Display „Sync” und „120” an. Jetzt zählt die Regeleinheit im 1Sekunden-Takt herunter und befindet sich nach Ablauf von 120 Sekunden im normalen Betriebsmodus. 28 3.9.7 tESt Mit der Funktion „tESt” kann überprüft werden, ob alle Ventilantriebe das Funksignal korrekt empfangen. Die angesprochenen Ventilantriebe signalisieren den korrekten Empfang durch ein Tonsignal. Mit dem Stellrad ist auswählbar, welche Ventilantriebe angesprochen werden sollen. Bei einer 0 in der großen Anzeige werden alle Empfänger angesprochen, die weiteren Ziffern sprechen nur den Ventilantrieb an, der dieser Ziffer zugeordnet ist (Nummer des Heizkörpers). Der Timer in der linken oberen Anzeige zählt bis zum nächsten Sendezeitpunkt herunter. • Betätigen Sie die Taste „PROG” so lange, bis „Sond” in der Anzeige erscheint. • Wählen Sie mit dem Stellrad die Sonderfunktion „tESt” aus. • Bestätigen Sie diese mit der „PROG”-Taste. • Wählen Sie mit dem Stellrad den/ die zu testenden Ventilantriebe aus. • Eine Betätigung der „PROG”-Taste beendet die TestFunktion. 3.9.8 StEL Nach Anwahl dieses Menüpunktes kann im Display abgelesen werden, um wie viel Prozent das Ventil etwa geöffnet ist. • Betätigen Sie die Taste „PROG” so lange, bis „Sond” in der Anzeige erscheint. • Wählen Sie mit dem Stellrad die Sonderfunktion „StEL” aus. • Bestätigen Sie diese mit der „PROG”-Taste. • Die Anzeige zeigt die Ventilöffnung in % an. • Eine Betätigung der „PROG”-Taste beendet diese Funktion. 29 3.9.9. t-An Im Anlieferzustand zeigt der FHT 8R rechts auf der großen Anzeige im Display die Solltemperatur, d.h. die Temperatur auf die der Regler den Raum erwärmt, an. Mit der Sonderfunktion „t-An“ kann zu einem anderen Modus gewechselt werden, in dem die Isttemperatur, d. h. die aktuell gemessene Raumtemperatur angezeigt wird. In diesem Modus wird die Solltemperatur nur dann angezeigt, wenn der Benutzer sie z. B. durch Drehen am Stellrad verändert. Dabei blinkt dann die Einheit der Temperatur (°C oder °F), um kenntlich zu machen, dass es sich bei der angezeigten Temperatur um die Solltemperatur handelt. Wird der eingestellte Wert einige Sekunden lang nicht mehr geändert, so kehrt der Regler automatisch zur Anzeige der Isttemperatur zurück. Um die Anzeige der Isttemperatur zu aktivieren bzw. zu deaktivieren gehen Sie wie folgt vor: • Betätigen Sie die Taste „PROG“ so lange, bis „Sond“ in der Anzeige erscheint. • Wählen Sie mit dem Stellrad die Sonderfunktion „t-An“ aus. • Bestätigen Sie mit der „PROG“-Taste. • Wählen Sie mit dem Stellrad zwischen „OFF“ (Anzeige der Isttemperatur deaktiviert) und „On“ (Anzeige der Isttemperatur aktiviert) aus. • Bestätigen Sie mit der „PROG“-Taste. 3.9.10. OFFS Werden mehrere Heizkörper von einem Regler gesteuert, so ist es möglich, dass diese ungleichmäßig stark heizen. Die Ursache liegt hier in einem stark voneinander abweichenden Durchflussverhalten der Ventile bzw. schlecht dimensionierten Heizkörpern. Das Problem lässt sich evtl. beheben, indem man einzelne Heizkörper mehr (positiver Offset) bzw. 30 weniger (negativer Offset) heizen lässt. • Betätigen Sie die Taste „PROG” so lange, bis „Sond” in der Anzeige erscheint. • Wählen Sie mit dem Stellrad die Sonderfunktion „OFFS” aus. • Bestätigen Sie diese mit der „PROG”-Taste. • Wählen Sie mit dem Stellrad den entsprechenden Ventilantrieb/Heizkörper aus. • Bestätigen Sie mit der „PROG”-Taste. • Stellen Sie mit dem Stellrad den Offset ein. • Bestätigen Sie mit der „PROG”-Taste. Dieser Vorgang muss evtl. mehrmals durchgeführt werden, bis die Verteilung der Heizleistung optimal erscheint. Hinweis: Der im Display angezeigt Prozentwert wird durch die Offseteinstellung nicht verändert. Der Offsetwert hat lediglich einen Einfluss auf die Steilheit der Ventilkennlinie. Bei einem vom Regler vorgegebenen Stellwert von 10 % z. B. ist ein Ventil mit positivem Offset weiter geöffnet als ein Ventil mit negativem Offset, beide zeigen aber 10% an. 4. Batteriewechsel 4.1 Regeleinheit ”, so sind die Batterien Erscheint im Display das Symbol „ erschöpft. Außerdem gibt der Regler alle ca. 2 Minuten ein akustisches Warnsignal ab. Dies erfolgt jedoch nicht nachts, sondern nur in der Zeit von 10:00 Uhr bis 11:00 Uhr, von 17:00 bis 18:00 Uhr und von 21:00 Uhr bis 22:00 Uhr. • Nehmen Sie die Regeleinheit vom Wandhalter und öffnen Sie den Batteriefachdeckel durch Schieben nach unten. 31 • Entfernen Sie die Batterien aus dem Batteriefach und entsorgen Sie diese umweltgerecht. Achtung: Verbrauchte Batterien gehören nicht in den Hausmüll, sondern können kostenlos in den örtlichen Batteriesammelstellen abgegeben werden. • Gemäß der in das Batteriefach eingeprägten Polarität sind nun 2 neue Alkaline-Batterien der Größe Mignon (AA) einzulegen, und das Batteriefach ist wieder zu verschließen. • Wie bei der ersten Inbetriebnahme fragt das Gerät nun die aktuelle Uhrzeit und das Datum ab. • Die Einstellungen des Zeitprogrammes, der Komfort/Absenktemperatur etc. sind erhalten geblieben. • Da die Synchronität zwischen Regeleinheit und Ventilantrieb nicht mehr gegeben ist, führt die Regeleinheit ein ca. 2 Minuten dauerndes automatisches Aufsynchronisieren durch (SYnc Auto). Danach kehrt das Gerät in den normalen Betriebsmodus zurück. 4.2 Ventilantrieb Sind die Batterien des Ventilantriebes erschöpft, gibt dieser eine Stunde lang etwa alle 2 Minuten eine Tonfolge ab und das Low-Bat-Symbol erscheint im Display. Dies wird 3-mal am Tag wiederholt. • Entfernen Sie den Batteriefachdeckel des Ventilantriebes durch Schieben nach unten. • Entfernen Sie die erschöpften Batterien. Achtung: Verbrauchte Batterien gehören nicht in den Hausmüll, sondern können kostenlos in den örtlichen Batteriesammelstellen abgegeben werden. • Warten Sie, bis alle Segmente des Displays erloschen sind. Dies lässt sich durch Betätigen und Halten der Taste am Ventilantrieb beschleunigen. 32 • Setzen Sie die Batterien in das Batteriefach im Ventilantrieb ein. Achtung: Bitte unbedingt die dargestellte Polarität beachten, da die Elektronik sonst evtl. zerstört wird. • Das Display zeigt „C1” und anschließend eine 2stellige Zahl, daraufhin „C2” und erneut eine 2stellige Zahl (die beiden Zahlen sind der aktuell gespeicherte Code des Ventilantriebes). • Im Anschluss folgt ein Signalton sowie die Anzeige „A1”. • Der Ventilantrieb fährt jetzt den Steuerstift ganz zurück. • Anschließend erscheint in der Anzeige „A2”. • Betätigen Sie die Taste am Ventilantrieb 1 mal kurz. • Das Display zeigt „A3” und der Ventilantrieb fährt das Ventil vollständig zu. • Anschließend blinkt das Antennensymbol im Display und das Display zeigt „0%” an. • Das erste empfangene Funksignal wir mit einem Signalton bestätigt und das Antennensymbol ist dauerhaft aktiv. • Setzen Sie den Batteriefachdeckel auf. 33 5. Problembehebung Fehlermeldung mögliche Ursache Dauerhafter Das Ventil ist zu Signalton und schwer gängig bzw. „F1” im Display der Ventilantrieb ist blockiert Behebung • Ventilantrieb demontieren • Gängigkeit des Ventils von Hand überprüfen • Ventilantrieb erneut montieren • ggf. einen Heizungsfachmann zu Rate ziehen Dauerhafter • Ventilantrieb nicht • Ventilantrieb neu Signalton und montiert montieren „F2” im Display • Stellbereich zu groß • Ventil ist nicht geeignet Dauerhafter Stellbereich zu klein Signalton und „F3” im Display • Ventilantrieb neu montieren • Ventil ist nicht geeignet Kein Funksymbol • Ausfall der Funk- • Regeleinheit an einer im Display, der verbindung durch anderen Stelle Ventilantrieb gibt Störungen anordnen jede Stunde eine • Batterien der • Batterien erneuern Tonfolge aus. Das Regeleinheit leer Ventil ist zu 30% • Code der Regel- • Den aktuellen Code geöffnet einheit wurde verstellt zum Ventilantrieb ohne den Ventilantrieb übertragen (s. damit zu synchro- Anleitung „Funk nisieren Heizkörper thermostat) 34 Low-Bat-Symbol im Display, der Ventilantrieb gibt eine Stunde lang alle 2 Minuten eine Tonfolge aus • Die Batterien des Ventilantriebes sind fast leer • Batterien erneuern 5.1 Störungen der Funkübertragung Eine Verminderung der Reichweite der Funkübertragung kann folgende Ursachen haben: - Hochfrequenzstörungen aller Art - Der Abstand der Regeleinheit oder des Ventilantriebes zu leitenden Flächen oder Gegenständen (auch zum menschlichen Körper oder dem Erdboden) beeinflusst die Strahlungscharakteristik und somit die Reichweite. - Breitbandstörungen in nichtländlichen Gebieten können den Signal-Rauschabstand verkleinern, wodurch sich die Reichweite verringert. - Geräte mit benachbarten Arbeitsfrequenzen können den Empfänger beeinflussen. - Schlecht abgeschirmte PCs können in den Empfänger einstrahlen und die Reichweite vermindern. 35 6. Entsorgungshinweis Gerät nicht im Hausmüll entsorgen! Elektronische Geräte sind entsprechend der Richtlinie über Elektro- und ElektronikAltgeräte über die örtlichen Sammelstellen für Elektronik-Altgeräte zu entsorgen! Verbrauchte Batterien gehören nicht in den Hausmüll! Entsorgen Sie diese in Ihrer örtlichen Batteriesammelstelle! 36 37 FHT8-Set Heating control set User manual 38 These operating instructions belong with this product. They contain important information for putting it into service and operating it. This should be noted also when this product is passed on to a third party. Therefore look after these operating instructions for future reference! 3nd English edition January 2009 Documentation © 2006 eQ-3 All rights reserved. This handbook must not be reproduced in any form, even in excerpts, or duplicated or processed using electronic, mechanical or chemical procedures without written permission of the publisher. This handbook may contain mistakes and printing errors. The information in this handbook is regularly checked and corrections made in the next issue. We accept no liability for technical mistakes or printing errors, or their consequences. All trademarks and patents are acknowledged. Printed in Hong Kong Modifications due to technical improvements may be made without prior notification. 73020 Y2009 V2.01 39 Table of Contents Page 1. Intended use............................................................... 42 2. Scope of supply.......................................................... 43 3. General information.................................................... 44 4. Safety instructions...................................................... 46 5. Inserting the batteries into the “FHT8R” heating control............................................................ 47 6. Wall mounting of the “FHT8R“ heating control........... 48 7. Setting of date and time............................................. 50 8. Mounting the “FHT8V” valve operating mechanism . 53 9. Programming the system............................................ 56 a) Setting of comfort temperature and lowering temperature.................................................. 56 b) Setting/changing the week profile.......................... 57 c) Modes of operation................................................. 60 d) Key lock (for keys and selection wheel).................. 62 e) Switching between comfort temperature and lowering temperature.................................................. 62 f) Heating pause.......................................................... 62 g) Closing the valve.................................................... 63 h) Emergency operation of the valve operating mechanism........................................ 64 10. Special functions......................................................... 65 11. Replacing of batteries................................................. 77 a) “FHT8R” heating control......................................... 77 b) “FHT8V” valve operating mechanism..................... 78 12. Troubleshooting........................................................... 79 13. Handling...................................................................... 80 14. Maintenance and cleaning.......................................... 80 40 15. System range information........................................... 81 16. Technical data ............................................................ 83 17. Disposal....................................................................... 84 41 1. Intended use The entire radio-controlled radiator thermostat system comprises two components: • the “FHT8R” heating control, and • the “FHT8V” valve operating mechanism The system is used for temperature control in single rooms where the heat that dissipates from the radiators is controlled by reducing the flow of hot water in the heating system. The “FHT8R” heating control measures the room temperature by means of an integrated sensor and transmits the corresponding control data to the “FHT8V” valve operating mechanisms. Any other use (e.g. in cooling systems, floor heating systems, etc.) is not permitted and may lead to severe damage. 42 2. Scope of supply • “FHT8R” heating control • Wall-mounting set for heating control (screws & dowels) • “FHT8V” valve operating mechanism • Valve adaptors for “Danfoss” valves (additional valve adaptors for valves of other manufacturers may be purchased separately) • Operating instructions 43 3. General information Compared with simple mechanical thermostats the radiocontrolled radiator thermostat system has a number of advantages: • the separation into radiator-mounted valve operating mechanisms and freely positionable operation and control units (e.g. the “FHT8R” heating control which is part of the scope of supply) makes it possible to perform settings easily. • the programming option makes it possible to adapt the system to the lifestyle of its users, so that the room is always comfortably warm when it is used. When the room is not used, the temperature may be reduced automatically to save energy, i.e. the often cumbersome manual opening and closing of heating valves is no longer required. • The system is equipped with an integrated calcification protection. Once every week (time can be set) the valve operating mechanism opens and closes the valve to prevent blocking of the valve by lime deposits. a) Operating principle In the “FHT8R” heating control the room temperature is measured and compared to the desired temperature (set either by means of the time program or manually). The difference is used to calculate how far the valve has to be opened or closed to obtain the desired temperature. In a time interval of approx. two minutes commands are radio-transmitted to the “FHT8V” valve operating mechanism mounted on the radiator. This valve operating mechanism then reduces or increases the heat. 44 Heating up of a room takes some time, depending on the size of the radiators. If the desired temperature is changed, the room temperature changes with a certain delay. Deviations between the desired value and the room temperature may also be caused by various disturbance variables, e.g. draughts, other sources of heat in the room, or an insufficient supply of heat by the heating boiler. Temperature measurement within the control is very exact (deviation <1K). To avoid any unnecessary operation of the valve, e.g. when the room temperature changes temporarily because a door is opened, the measured values of several measurements are averaged. b) Safety code The radio signal is protected by a safety code consisting of two parts. This safety code protects the system against interference from other radiosystems and ensures that several radio-controlled radiator thermostat systems can be operated separately in a household. Each part of the code comprises 100 setting options. This means that there are 10,000 different safety codes available. To ensure communication between the heating control and the valve operating mechanism/s the same safety code has to be set for all devices in a room. Ex works the set consisting of heating control and valve operating mechanism is protected by a randomly assigned safety code, the valve operating mechanism is preset to the safety code of the heating control. If you want to use additional valve operating mechanisms on one heating control (maximum number is 8) the number of valve operating mechanisms has to be set on the heating control, and the safety code has to be transmitted to the valve operating mechanism. 45 4. Safety instructions The warranty will lapse for damage due to non-compliance with these operating instructions. We shall not be held liable for any consequential damage or loss! We shall not accept liability for damage to property or personal injury caused by incorrect handling or non-compliance with the safety instructions. Any claim to warranty will lapse in such cases. a) General Do not use this product in hospitals or medical institutions. The product does only emit relatively weak radio signals. These radio signals could, however, lead to malfunctions in life-supporting systems. The same may possibly apply to other areas. The product must only be used in dry indoor areas, it must be protected from moist and water. The product is not a toy and must be kept out of the reach of children. For safety and licensing (CE) reasons, unauthorised conversion of and/or modifications to the product are not permitted. Do not leave the packaging material lying around carelessly. Plastic film and/or bags, polystyrene parts, etc. can be dangerous in the hands of children. Handle the product with care. It can be damaged through impact, blows, or by being dropped even from a low height. b) Batteries and accumulators • Keep batteries/accumulators out of the reach of children. • Make sure to insert the batteries/accumulators with the 46 correct polarity. • Do not leave the batteries lying around in the open; there is a risk of them being swallowed by children or pets. If swallowed, immediately contact a doctor. • Leaking or damaged batteries/accumulators may cause burning if they come into contact with the skin. For this reason you should use suitable protective gloves when handling batteries. • Do not short-circuit batteries/accumulators, and do not throw batteries/accumulators into a fire. There is a risk of explosion! • Do not disassemble batteries/accumulators! • Do not recharge normal batteries. There is a risk of explosion! • In case of longer periods of non-use (e.g. during storage) remove the inserted batteries/accumulators to avoid damage by a leaking battery/accumulator. 5. Inserting the batteries into the „FHT8R“ heating control • Slide down and remove the wall holder on the back of the heating control. • Slide down and remove the cover of the battery compartment (in direction of the imprinted arrow on the cover). • Insert two AA batteries; pay attention to the correct polarity. Look into the battery compartment for an illustration of the correct polarity. We recommend to use high-quality alkaline batteries only. Operation of the heating control using accumulators or conventional zinc-carbon batteries is possible, operating time and radio range of the heating control will, however, be reduced. 47 Furthermore, there will be a risk of malfunctions. Make sure to insert the batteries correctly to avoid damage to the electronic components of the heating control. • Close the battery compartment. • The heating control performs a short display test. After the display test, you have to set date and time). “) is displayed on the LC dis• If the battery symbol (“ play, the battery voltage is low and the batteries should be replaced as soon as possible. The same applies, if the radio range decreases or if data are no longer displayed on the LC display. 6. Wall mounting of “FHT8R“ a) Choosing an appropriate mounting location Make sure to choose an appropriate location for mounting the “FHT8R” heating control. This has to meet the following requirements: • central position in the room where the temperature is to be controlled • easy access for convenient operation • mounting at eye level for easy reading of the display • no mounting on a badly insulated outer wall • no direct sunlight • no interference from heat sources such as radiators, TV sets, lamps, refrigerators,etc. • no mounting next to a window • greatest possible distance to metal objects to avoid any unnecessary reduction of the operating range 48 b) Mounting the wall holder Proceed as follows to mount the wall holder: • Remove the wall holder on the back of the heating control, slide it down for this. • Place the wall holder vertically against the wall with the round side pointing up (see picture). • Mark the positions of the bores through the two slotted holes. • Depending on the type of wall drill two 6 mm holes and insert suitable dowels. When drilling the bores and tightening the screws make sure not to damage any power lines or gas or water pipes, etc.! Danger! • Fix the wall holder using e.g. the enclosed screws. Pay attention that the two recessed slotted holes for the screws point in your direction. • If not already done so, insert the batteries into the heating control before you slide the heating control on the wall holder. • Sliding of the heating control on the wall holder is now possible from the top. 49 7. Setting of date and time • If the display is protected by a foil, remove it. • If batteries have not been inserted yet, proceed as described in chapter 6 to insert them. After inserting the batteries an automatic display test is performed (all segments and displays of the LC display are displayed for several seconds). After the display test you may set the year, the month, the day, the hours and the minutes on the heating control. Use the selection wheel to change the displayed values. To confirm your selection, briefly press the “PROG” key. • After inserting the batteries the year is displayed: M�O� DI� M�I� DO� F�R� S�A� S�O� P�r� o� g� 6� 0� 1�2� 1�8� 2�4� Use the selection wheel to set the desired year. To confirm your setting, briefly press the “PROG” key. • The month is displayed: MO 0 DI MI DO FR SA SO 6 12 18 24 Use the selection wheel to set the desired month, and confirm your setting again by pressing the “PROG” key. 50 • The day is displayed: MO DI MI DO FR SA 12 6 0 SO 24 18 Use the selection wheel to set the desired day, and confirm your setting by pressing the „PROG” key. • The hours are displayed: MO DI MI 12 6 0 DO FR SA SO 24 18 Use the selection wheel to set the desired hour, and confirm your setting by pressing the “PROG” key. • The minutes are displayed: MO 0 DI MI 6 DO FR SA 12 18 SO 24 Use the selection wheel to set the desired minutes, and confirm your setting by pressing the “PROG” key. • „Sync“ and „120“ are now displayed. The heating control counts down in intervals of one second. After 120 seconds the heating control is in its normal operating mode. 51 During this period of time the heating control cannot be operated. The heating control synchronises its operation with the valve operating mechanisms. • Slide the heating control on the wall holder until it audibly snaps into place 52 8. Mounting the „FHT8V“ valve operating mechanism a) Removing the old thermostat • Remove the old mechanical thermostat. • If necessary, use multigrip pliers to loosen seized screws by turning them counterclockwise. b) Inserting the the batteries into the valve operating mechanism • Remove the battery compartment cover of the valve operating mechanism by sliding it down. • Insert two AA batteries into the battery compartment. Make sure to insert the batteries with the correct polarity, see illustration in the battery compartment and figure on the right side. • “C1” is displayed first, followed by a twodigit number, “C2”, and another two-digit number. These two numbers are the currently stored safety code of the valve operating mechanism (e.g. 11 and 22 = safety code 1122). 53 • An acoustic signal is generated, and “A1” is displayed. • The valve operating mechanism fully retracts the control pin to facilitate mounting. • Now “A2” is displayed. c) Mounting the valve operating mechanism on the radiator • Manually turn the coupling nut to fasten the valve operating mechanism on the valve (“1” in the figure on the right side). When using valves by “Danfoss” mount one of the adaptors enclosed on the valve first. The figures on the next page show the adaptors that have to be used for each valve. Additional adaptors for other valves may be purchased separately. • Briefly press the (2) key on the valve operating mechanism once (see figure on the right side). • “A3” is displayed on the LC display of the valve operating mechanism, and the valve is closed. • On the display, the antenna symbol flashes and “0%” is displayed. • Close the battery compartment. Please note: If you have purchased the valve operating mechanism separately (e.g. to use a second valve operating mechanism for one heating control), you have to set the num54 Examples of “Danfoss” adaptors: RA RAVL RAV After snapping-on the adaptors for the valves of the types “RAV” and “RA” on the valve body fix the adaptors with the enclosed screws and nuts. For valves of the type “RAV” additionally put the cylindrical extension piece onto the valve pin. ber of valve operating mechanisms that are used for the heating control first, before you transmit the safety code to the valve operating mechanism. • The valve operating mechanism acknowledges reception of the first radio log with an acoustic signal. • The antenna symbol is permanently displayed. • Installation is now finished and you may adapt the preprogrammed settings to your individual needs. Proceed as described above for mounting of further valve operating mechanisms. Next, you have to set the number of valve operating mechanisms and transmit the safety code . Adaptors for valves of other manufacturers may be purchased separately (they are not enclosed in the scope of supply). 55 9. Programming the system All required system settings are preprogrammed in the works: • Heating phase: Comfort temperature 21°C from 6.00 hrs to 23.00 hrs • Lowering phase: Lowering temperature 17°C from 23.00 hrs to 6.00 hrs • Decalcification cycle: Saturday, 11.00 hrs All settings mentioned above may of course be changed to adapt them to your individual needs. a) Setting of comfort and lowering temperatures When the automatic mode is active (i.e. switching between lowering temperature and comfort temperature is performed automatically), a bar in the display’s bottom part indicates the time of day when the desired temperature will be the comfort temperature. A sun symbol on the display indicates that the comfort temperature is active; a moon symbol indicates that the lowering temperature is active. Proceed as follows to change the settings: “ key for more than 3 seconds. • Press the “ • The comfort temperature is displayed on the LC display. MO DI MI DO FR SA SO C 0 6 12 56 18 24 Use the selection wheel to set the desired comfort tempera„ key. ture. To confirm your setting, briefly press the „ • The lowering temperature is displayed on the LC display. MO DI MI DO FR SA SO C 0 6 12 18 24 Use the selection wheel to set the desired lowering temper„ key. ature. To confirm your setting, briefly press the „ • The heating control returns to the normal operating mode. b) Setting/changing the week profile The time for automatic switching between the comfort temperature and the lowering temperature can be set separately for each day of the week. That way you may adapt the desired room temperature to your individual lifestyle. For each day of the week 4 switching times (comfort temperature on, lowering temperature on, comfort temperature on, lowering temperature on) can be set. These 4 switching times can be different for each day of the week. This makes it e.g. possible to start heating later on weekends or on certain days of the week. 57 • Briefly press the “PROG” key. • “Prog” is displayed MO DI MI DO FR SA SO Prog 12 6 0 24 18 • Use the selection wheel to select the day for which you want to change the time program. You may either select each day of the week individually (MO, DI, MI, DO, FR, SA, SO) or program a combination of days (block), i.e.: - weekend (SA, SO) - weekdays (MO, DI, MI, DO, FR) - all days (MO, DI, MI, DO, FR, SA, SO) This option facilitates and speeds up the programming process. Briefly press the “PROG” key to confirm your selection of a weekday or a block of days (weekend, weekdays, all days). • The time when the comfort temperature will be switched on is displayed: MO DI MI DO FR SA SO Prog 0 6 12 18 24 Use the selection wheel to select the time when control of the comfort temperature is to be started. On the bottom of the LC display a scale is displayed to facilitate orientation (long marks = comfort temperature is active). Briefly press the “PROG” key to confirm the starting time. 58 • On the LC display the time when the lowering temperature is to be activated is displayed: MO DI MI DO FR SA SO Prog 12 6 0 24 18 Use the selection wheel to select the time when control of the lowering temperature is to be started. Briefly press the “PROG” key to confirm the starting time. • Repeat the steps described above to program the second comfort temperature time and the second lowering temperature time. If one of the switching times is not to be used, turn the selection wheel to the right side until four bars are displayed (“--:--”, bars are displayed next to the displayed time 23:50 hrs). MO DI MI DO FR SA SO Prog 0 6 12 18 24 If you set the second comfort temperature time to „--:--“ the setting of the second lowering temperature time is irrelevant, since no data are changed. In all, you may set two periods of time for comfort temperature, e.g. from 6.00 to 9.00 hrs and from 16.00 to 23.00 hrs. 59 After setting of the second lowering temperature time and confirming the setting by pressing the „PROG” key the normal operating mode is active again. The scale displayed on the bottom of the LC display follows the changes as they are being made, i.e. the effect on the day profile is immediately visible. Please note that the temperature at the end of the previous day is not displayed. This means that it may be that the heating phase at the end of the previous day is continued the next day. However, this is not displayed during programming! c) Operating modes Press the “FUNKTION” key to change the operating mode. Press this key several times to scroll through the different operating modes: Automatic operation Automatikbetrieb Manual operation Manueller Betrieb Urlaub/PartyHoliday/party Funktion function • Automatic operation In the automatic operating mode (display “Auto” on the LC display) the room temperature is controlled according to the set program for the weekday. The temperature history for the current weekday is displayed on the bar scale on the bottom of the display. A temporarily temperature change can be set easily with the selection wheel. The next time a regular temperature change is scheduled the thermostat will then automatically return to the time-controlled program. 60 • Manual operation In the manual operating mode (display “Manu”) the heating control maintains the set temperature. An automatic timecontrolled change will not be performed. This function is identical to the function of a conventional thermostat. • Holiday/party function In this operating mode (display of suitcase symbol) the temperature is kept at a certain fixed value for a defined period of time (e.g. the duration of a party or a holiday). After this, the heating control automatically switches to the automatic mode. Setting the holiday/party function: • Select this operating mode with the “FUNKTION” key and set the period of time this function is to be active. During the following 24 hours the temperature will be reduced every 30 minutes (party function). After 24 hours the temperature will be reduced every day (holiday function). Set the day you will return from your holidays. As of this day and starting at 0.00 hrs heating will be performed with the normal time program. • Confirm your setting of the desired period of time by briefly pressing the “PROG” key. • Use the selection wheel to set the desired temperature. If you select a different operating mode with the “FUNKTION” key, you will automatically quit the holiday/party mode. 61 d) Key lock (for keys and selection wheel) The heating control is equipped with an integrated key lock for the keys and the selection wheel, to protect the device from unintentional operation (i.e. by children). Activating the key lock • To activate the key lock, simultaneously press the keys “FUNKTION” and “PROG”. • “LOC” is displayed briefly on the display, all operating functions are blocked. Deactivating the key lock • To deactivate the key lock, simultaneously press the two keys “FUNKTION” and “PROG” until “LOC” is no longer displayed (after about 2 seconds). • All operating functions are available again. e) Switching between comfort temperature and lowering temperature If a room is used at different times than set in the time program you may change the temperature any time using the selection wheel. You may also switch directly from comfort temperature to “ key. lowering temperature by pressing the “ f) Heating pause Switching off the heating during the summer saves battery energy and prolongs the service life of the batteries. During the heating pause the valve is opened completely and remains in this position. The weekly decalcification cycle will, however, still be performed. 62 Proceed as follows to activate the heating pause: • Press the “FUNKTION” key to switch to the operating mode “Manu”. • Turn the selection wheel clockwise until “On” is displayed on the LC display. MO DI MI DO FR SA SO Manu 12 6 0 24 18 g) Closing the valve Select this operating mode if the room is not to be heated at all. The valve is closed and remains closed. The valve is only opened if the temperature drops below 5°C (danger of freezing). The weekly decalcification cycle will still be performed. Proceed as follows. • Press the “FUNKTION” key to switch to the operating mode “Manu”. • Turn the selection wheel counterclockwise until “OFF is displayed on the LC display. MO DI MI DO FR SA SO Manu 0 6 12 63 18 24 h) Emergency operation of the valve operating mechanism If an error occurs that cannot be rectified immediately (e.g. because the battery voltage of the heating control or valve operating mechanism is low and new batteries are not at hand) it may be necessary to operate the valve manually. To do so, proceed as follows: • Remove both batteries from the valve operating mechanism. • Press down the adjusting pin at the point marked with (1) and remove it. • Put the control pin onto the peg marked with (2). • Turn the adjusting pin: - Clockwise = increase heat - Counterclockwise = reduce heat 64 10. Special functions The heating control has several special functions. To open the special functions menu press the “PROG” key until “Sond” is displayed on the LC display. Then release the “PROG” key again. The special functions menu can only be opened if the heating control is in the normal operating mode (time and date displayed on the left side of the display, temperature displayed on the right side). The following special functions are available: CALC Setting the time for the decalcification cycle °C°F Selecting the temperature unit (°C or °F) dAt Setting of date and time CodE Changing the safety code for radio transmission and setting of codes for new valve operating mechanisms, respectively An A Setting the number of valves controlled by the heating control and extending the system, respectively SYnC Synchronising the valve operating mechanisms tESt Testing of radio transmission StEL Displaying the valve position t-An Switching between display of desired temperature and actual temperature OFFS Setting the offset (this option is only displayed, if there is more than one valve operating mechanism) 65 a) Setting the decalcification time („CALC“) Once every week the valve is completely opened and closed. This prevents blocking of the valve by deposits. The time at which the decalcification cycle is performed can be changed using the special function “CALC”. • Press the “PROG” key until “Sond” is displayed. Then release the “PROG” key again. • Use the selection wheel to select the special function “CALC”. • To confirm your selection, briefly press the “PROG” key. MO DI MI DO FR SA 6 0 12 SO 24 18 • Use the selection wheel to select the weekday. • Confirm the selected weekday by pressing the “PROG” key. In the first line of the LC display the time when the decalcification cycle will be performed is displayed. MO 0 DI MI DO FR SA 6 12 18 SO 24 • Use the selection wheel to change the displayed time. • Confirm the set decalcification time by pressing the “PROG” key. The heating control returns to the normal operating mode. 66 b) Selecting the temperature unit (“°C°F”) You may set whether the temperature is to be displayed in degrees Celsius (°C) or degrees Fahrenheit (°F). • Press the “PROG” key until “Sond” is displayed (for special function). • Use the selection wheel to select the special function “°C°F”. • To confirm your selection, briefly press the “PROG” key. • Use the selection wheel to switch between “°C” and “°F”. • To confirm your selection, briefly press the “PROG” key. The heating control returns to the normal operating mode. c) Setting of date and time (“dAt”) • Press the “PROG” key until “Sond” is displayed. • Use the selection wheel to select the special function “dAt”. • To confirm your selection, briefly press the “PROG” key. 67 d) Setting the safety code (“CodE”) To protect the heating control against interference from other radio systems the device uses a safety code consisting of two parts. Each part of the code comprises 100 setting options. This means that there are 10,000 different safety codes available. To ensure communication between the “FHT8R” heating control and the “FHT8V” valve operating mechanism/s the same safety code has to be set for all devices in a room. This is particularly important if more than one valve operating mechanism is used or if different devices (i.e. not a set consisting of heating control and valve operating mechanism) were purchased. Proceed as follows to change or set the code: • Press the “PROG” key until “Sond” is displayed. • Use the selection wheel to select the special function “CodE”. • To confirm your selection, briefly press the “PROG” key. The following data are displayed: MO 0 DI MI DO FR SA SO 6 12 18 24 • Use the selection wheel to select the first part of the code (a number between “000” and “099”) and confirm this selection by briefly pressing the “PROG” key. 68 • The following data are displayed: MO DI MI DO FR SA SO 12 6 0 24 18 • Use the selection wheel to select the second part of the code (a number between “000” and “099”) and confirm this selection by briefly pressing the “PROG” key. • The following data are displayed: MO 0 DI MI DO FR SA SO 6 12 18 24 Now you have to synchronise the (first) valve operating mechanism (“001” on the display) to the new safety code. Proceed as follows to synchronise the data: • Remove the battery compartment cover of the (first) valve operating mechanism by sliding it down. • Press the key of the valve operating mechanism for about 3 seconds until you hear an acoustic signal (3 separate tones). The valve operating mechanism is now ready to receive, “AC” is displayed. • Press the “PROG” key on the “FHT8R” heating control to start transmission of the safety code to the valve operating mechanism. • The valve operating mechanism acknowledges correct 69 reception of the code with an acoustic signal (sequence of tones). • Replace the cover of the battery compartment. • The valve operating mechanism acknowledges the first reception of a normal radio signal with an acoustic signal. Repeat these steps for all other valve operating mechanisms in the room (“002”, “003”, etc. on the display). After encoding of the last valve operating mechanism is finished the heating control automatically returns to the normal operating mode. If the heating control is used to control several valve operating mechanisms, i.e. if there are several radiators in one room, you should make a note of the assignment between valve operating mechanisms and radiators (radiator numbers). If the encoding of a valve operating mechanism fails (e.g. due to bad signal reception, low battery voltage, or the like) transmission of the safety code to this valve operating mechanism can be repeated at a later time. • Proceed as described above and skip the valve operating mechanisms that have already been encoded by briefly pressing the “PROG” key. • If the LC display shows the number of a valve operating mechanism that has not received a safety code yet, press the push-button on this valve operating mechanism until “AC” is displayed on the valve operating mechanism and you hear an acoustic signal (3 signal tones). • Press the “PROG” key on the heating control to initiate transmission of the safety code by the heating control. The valve operating mechanism acknowledges correct recep70 tion of the code with an acoustic signal (sequence of tones). Replace the cover of the battery compartment. The valve operating mechanism acknowledges correct reception of the normal radio signal with an acoustic signal. e) Setting the number of valve operating mechanisms (“An A”) Use this menu item to set the number of radiators (valve operating mechanisms) to be controlled, e.g. if the heating control is to control several valve operating mechanisms in a large room. If an additional valve operating mechanism is installed it is very important that this valve operating mechanisms is assigned the same safety code than the already installed valve operating mechanisms. Proceed as follows: • Press the “PROG” key until “Sond” is displayed. • Use the selection wheel to select the special function “An A”. • To confirm your selection, briefly press the “PROG” key. • The following data are displayed: M�O� 0� DI� M�I� 6� DO� F�R� S�A� 1�2� 1�8� S�O� 2�4� • Use the selection wheel to set the number of radiators (1 to 8) and confirm your setting by briefly pressing the “PROG” key. 71 Now you have to synchronise the (first) valve operating mechanism to the new safety code. Repeat the following 6 steps for each installed valve operating mechanism: 1. Remove the battery compartment cover of the (first) valve operating mechanism by sliding it down. 2. Press the key of the valve operating mechanism for about 3 seconds until you hear 3 signal tones. The valve operating mechanism is now ready to receive, “AC” is displayed. 3. Press the “PROG” key on the heating control to start transmission of the heating control’s safety code to the valve operating mechanism. 4. The valve operating mechanism acknowledges correct reception of the code with a sequence of tones. 5. Replace the cover of the battery compartment. 6. The valve operating mechanism acknowledges the first reception of a normal radio signal with an acoustic signal. Repeat these 6 steps for all other valve operating mechanisms in the room (“002”, “003”, etc. on the display) according to the number of valve operating mechanisms set before. After encoding of all valve operating mechanisms is finished the heating control automatically returns to the normal operating mode. You may skip valve operating mechanisms which are already synchronised/ programmed to the safety code of the heating control. 72 For this purpose, just briefly press the “PROG” key on the heating control (do not open the corresponding valve operating mechanism/do not press the key on the valve operating mechanism!) f) Synchronising the valve operating mechanisms (“SYnC”) After selection of this menu item the heating control starts to transmit signals to all valve operating mechanisms for about 2 minutes instructing them to newly sychronise themselves. After synchronisation the normal transmission program is continued and the valve operating mechanisms generate an acoustic signal the moment they receive the first correct signal. • Press the “PROG” key until “Sond” is displayed. • Use the selection wheel to select the special function “SynC”. • To confirm your selection, briefly press the “PROG” key. • The safety code is displayed and the heating control starts to count down from “120” in steps of 1 second. After these 120 seconds the heating control returns to the normal operating mode. g) Test mode (“tESt”) Use this function to check whether all valve operating mechanisms receive the radio signal correctly. The tested valve operating mechanisms acknowledge correct reception with an acoustic signal. Use the selection wheel to select the valve operating mechanisms to be tested. If the large display shows a “0” (zero), all valve operating mechanisms are tested, otherwise, only the valve operating mechanism assigned to the displayed number is tested. 73 The timer in the left corner of the display counts down to the point in time the next test cycle is to be started. • Press the “PROG” key until “Sond” is displayed. • Use the selection wheel to select the special function “tEST”. • To confirm your selection, briefly press the “PROG” key. • Use the selection wheel to select the valve operating mechanism/s to be tested. • Press the “PROG” key to quit the test function. h) Displaying the valve position (“StEL”) After selection of this menu item the approximate percentage of the valve opening is displayed on the heating control (for valve operating mechanism 1 only). • Press the “PROG” key until “Sond” is displayed. • Use the selection wheel to select the special function “StEL”. • To confirm your selection, briefly press the “PROG” key. • The display shows the valve opening in percent (“%”). • Press the “PROG” key to quit the function. i) Switching between display of the desired temperature and the actual temperature (“t-An”) In the works, the desired temperature (i.e. the maximum temperature the heating control permits the room temperature to reach) is displayed on the right side of the large display of the “FHT8R” heating control. You can use the special function “t-An” to activate a mode displaying the actual temperature (i.e. the currently measured room temperature). In this mode the desired temperature is only displayed if you turn the selection wheel. To indicate that the displayed 74 temperature is the desired temperature the temperature unit (°C or °F) flashes. If the set value is not changed for several seconds, the heating control automatically returns to the display of the actual temperature. Proceed as follows: • Press the “PROG” key until “Sond” is displayed. • Use the selection wheel to select the special function “tAn”. • To confirm your selection, briefly press the “PROG” key. • Use the selection wheel to select either “OFF” (deactivate display of actual temperature) or “ON” (activate display of actual temperature). • To confirm your selection, briefly press the “PROG” key. j) Radiator offset (“OFFS”) This setting option is only displayed if you use more than one valve operating mechanism. If several radiators are controlled by one heating control, it may occur that these radiators are not heated up uniformly. The reason for this is that the flowrates of different valves differ greatly, depending on different or bad radiator dimensions. This problem may be solved by adjusting the settings of single radiators in such a way that they give off more (positive offset) or less (negative offset) heat. • Press the “PROG” key until “Sond” is displayed. • Use the selection wheel to select the special function “OFFS”. 75 • To confirm your selection, briefly press the “PROG” key. • Use the selection wheel to select the desired valve operating mechanism/radiator, and confirm your selection by pressing the “PROG” key. • Use the selection wheel to set the desired offset, and confirm your setting by pressing the “PROG” key. The heating control returns to the normal operating mode. Maybe, this process has to be repeated several times until distribution of the heating power seems to be optimal. Please note: Setting the offset does not change the displayed percentage of the valve opening (valve position). The offset value only influences the slope of the valve characteristic. At a control value of 10% given by the heating control a valve with a positive offset is opened wider than a valve with a negative offset, although the displayed value is 10% for both valves. 76 11. Replacing the battery a) “FHT8R” heating control “) is displayed on the LC display, If the battery symbol (“ the battery voltage is low and they have to be replaced. In addition, the heating control generates an acoustic alarm every 2 minutes. At night the acoustic alarm is not generated, but only during the following three periods of time: - from 10.00 hrs to 11.00 hrs - from 17.00 hrs to 18.00 hrs - from 21.00 hrs to 22.00 hrs Proceed as follows to replace the batteries: • Take the heating control off the wall holder and open the cover of the battery compartment (slide down). • Remove the empty batteries from the battery compartment and dispose of them according to applicable environmental regulations • Insert two new AA batteries; pay attention to the correct polarity. If possible use alkaline batteries. • Close the battery compartment. • Like during first commissioning the heating control asks you to enter date and time. • However, the settings of the time program, the comfort/ lowering temperature, etc., have been maintained. • Since the heating control and the valve operating mechanisms are no longer synchonised after a battery replacement the heating control performs an automatic synchronisation that takes about 2 minutes (“SYnc Auto”). After the synchronisation the heating control returns to the normal operating mode. 77 b) “FHT8V” valve operating mechanism If the batteries of the valve operating mechanism are empty, the battery symbol is displayed. In addition, an acoustic signal in generated in intervals of 2 minutes for three hours every day. Proceed as follows to replace the batteries: • Remove the cover of the valve operating mechanism’s battery compartment (slide down). • Remove the empty batteries and dispose of them according to applicable environmental regulations • Wait until all segments of the valve operating mechanism’s LC display are off. You may speed up this process by pressing the key on the valve operating mechanism. • Insert two new AA batteries into the battery compartment. Pay attention to the correct polarity. If possible use alkaline batteries. • The display shows “C1” followed by a 2-digit number, followed by “C2” and another 2-digit number (both numbers together are the currently stored safety code of the valve operating mechanism). • An acoustic signal is generated, and “A1” is displayed. • The valve operating mechanism fully retracts the control pin. • Afterwards “A2” is displayed. • Briefly press the key on the valve operating mechanism. • “A3” is displayed and the operating mechanism fully closes the valve. • The antenna symbol flashes and “0%” is displayed. • The first received radio signal is acknowledged by an acoustic signal, the antenna symbol is permanently displayed. • Replace the cover of the battery compartment. 78 12. Troubleshooting Problem Possible cause Permanent acoustic signal • Heavy operation of the and display of “F1” on the valve or blocked valve. valve operating mechanism’s display. Remedy • Remove valve operating mechanism. • Manually check valve operation. •Re-install valve ope- rating mechanism. •If necessary ask a heating expert for advice. Permanent acoustic signal • Control range too wide. and display of “F2” on the • Valve operating mecha- valve operating mechanism’s nism not mounted on display. heating valve. • Re-install valve operating mechanism. • Unsuitable valve. • Put a 1mm spacer (e.g. a shim) between heating valve and actuator. Permanent acoustic signal • Control range too narrow. • Re-install valve and display of “F3” on the operating mechavalve operating mechanism’s nism. display. • Unsuitable valve. No antenna symbol displayed • Radio connection failure on the valve operating due to interference. mechanism’s display. At an • Heating control battery interval of one hour the valve empty. operating mechanism gene- • Wrong heating control rates a sequence of tones. code. The valve opening is 30%. • Install heating control in a different location. • Replace heating control batteries. • Transmit the current safety code to the valve operating mechanism. “Low Bat” symbol displayed • Valve operating mecha- • Replace the batteries. on the display, for one hour nism batteries almost and at an interval of 2 min. empty. the valve operating mechanism generates a sequence of tones. Display of “LOC” when key is • Key lock is active. pressed. 79 • Deactivate the key lock. 13. Handling • Protect the product against humidity, cold, heat, dust, and direct sunlight. • Do not disassemble the product. Have any repairs performed by experts, otherwise the license (CE) of the product will lapse! • Do not drop the product, it will be damaged even if it falls from a low height. 14. Maintenance and cleaning The product does not require any maintenance apart from replacing of batteries. Clean the product with a soft, clean, dry and fuzz free cloth. To achieve a better cleaning action the cloth can be dampened with lukewarm water. Take care not to let any moisture get into the product! Do not use cleaning agents containing solvents, since these may damage the plastic housing and labelling. 80 15. System range information Transmission of data between heating control and valve operating mechanism is performed wirelessly per radio transmission. The transmitting power is less than 10mW, i.e. much below the transmitting power of a mobile phone which may have a transmitting power that is 200 times as great. Therefore, negative effects on sensitive people or animals are not to be expected. The radio heating thermostat system works in the 868MHz range which is also used by other radio services. Therefore restrictions in the operation and the range can occur through the devices which work on the same or neighbouring frequency. The range stated of up to 100m is the free-field range, i.e. the range at sight contact between the transmitter and the receiver. In practical operation, however, there are walls, the ceilings of rooms etc. between the transmitter and the receiver which reduce the range correspondingly. Further causes of a reduced range: • high frequency disturbances of all types • buildings of all types and vegetation • conductive metals which are located in the proximity of the devices or within or close to the radio route, e.g. radiators, metal insulation glass windows, reinforced concrete floors etc. 81 • influence of the radiation characteristics of the aerials through the distance of the transmitter or receiver to the conductive areas or objects (also to the human body or floor). • broadband interferences in urban areas which reduce the signal noise distance; the signal is no longer recognised in these “noises”. • irradiation of deficiently shielded electronic devices, e.g. computers operated openly, or similar. 82 16. Technical data a) “FHT8R” heating control Operating range..................... Up to 100m (with free vision) Max. number of valve operating mechanisms per heating control: ........................................................... 8 Radio frequency:................................................868.35MHz Power supply:............................................................. 2 * AA Battery service life:........................................ approx. 1 year Temperature range when in operation:..............6°C to 30°C Number of switching times:.................................. 4 per day Safety code consisting of two parts, up to 10,000 different codes possible After a battery replacement only date and time have to be reset, all other data are maintained b) “FHT8V” valve operating mechanism Power supply:..............................................................2 * AA (if possible use alkaline batteries) Battery service life:.......................................approx. 2 years (depending on the number of valve movements) 83 17. Disposal a) General Dispose of the unusable product according to valid legal regulations b) Disposing of used batteries and accumulators You, as ultimate consumer, are required by law (battery regulations) to return all used batteries. Disposing of used batteries with domestic waste is prohibited! Batteries / accumulators containing toxins are marked by appropriate symbols which refer to the prohibition of disposal with domestic waste. The designations for the decisive heavy metals are: Cd = cadmium, Hg = mercury, Pb = lead (The designation can be found on the battery under the dustbin symbol illustrated on the left). You may return used batteries/accumulators free of charge to collecting stations, our outlets or anywhere else where batteries/accumulators are sold. By doing so, you fulfil the legal requirements and contribute to the conservation of our environment. 84