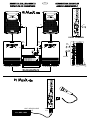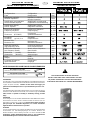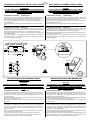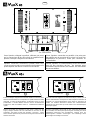
1
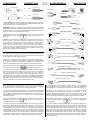
500W + 150W PROCESSED ACTIVE MONITOR
500 W - SOUND REINFORCEMENT MONITOR
I
UK
F
D
Manuale d’uso
Operating manual
Mode d’emploi
Benutzer-Handbuch
FBT ELETTRONICA S.p.A. - ZONA IND.LE SQUARTABUE - 62019 RECANATI (MC) - ITALY
tel. 071750591 r.a. - fax 0717505920 - P.O. BOX 104 - e-mail : [email protected] - www.fbt.it
ATTENZIONE
RISCHIO DI SHOCK ELETTRICO
NON APRIRE
!
WARNING
1
RISK OF ELECTRIC SHOCK
DO NOT OPEN
!
PER EVITARE IL RISCHIO DI SHOCK ELETTRICO
NON APRIRE IL COPERCHIO
NON USARE UTENSILI MECCANICI ALL'INTERNO
CONTATTARE UN CENTRO DI ASSISTENZA QUALIFICATO
TO REDUCE THE RISK OF ELECTRIC SHOCK
DO NOT REMOVE COVER (OR BACK)
NO USER SERVICEABLE PARTS INSIDE
REFER SERVICING TO QUALIFIED SERVICE PERSONNEL
PER EVITARE IL RISCHIO DI INCENDIO O DI SHOCK ELETTRICO
NON ESPORRE L'APPARECCHIATURA ALLA PIOGGIA
O ALL'UMIDITA'
TO REDUCE THE RISK OF FIRE OR ELECTRIC SHOCK
DO NOT EXPOSE THIS EQUIPMENT TO RAIN OR MOISTURE
WHERE MARKED, THIS SYMBOL INDICATES A DANGEROUS NONISOLATED VOLTAGEINSIDETHELOUDSPEAKER:
SUCH VOLTAGE COULD BE SUFFICIENT TO RESULT IN THE RISK OF
ELECTRICSHOCK.
QUESTO SIMBOLO AVVERTE, LADDOVE APPARE, LA PRESENZA DI UNA
TENSIONE PERICOLOSA NON ISOLATA ALL’INTERNO DELLA CASSA:
IL VOLTAGGIO PUÒ ESSERE SUFFICIENTE PER COSTITUIRE
IL RISCHIO DI SCOSSA ELETTRICA.
!
QUESTO SIMBOLO AVVERTE, LADDOVE APPARE, DELLA
PRESENZA DI IMPORTANTI ISTRUZIONI PER L’USO E PER
LA M A N U T E N Z I O N E N E L L A D O C U M E N T A Z I O N E
ALLEGATA. SI PREGA DI CONSULTARE IL MANUALE.
!
WHERE MARKED, THIS SYMBOL INDICATES IMPORTANT
USAGE AND MAINTENANCE INSTRUCTIONS IN THE
ENCLOSED DOCUMENTS. PLEASE REFER TO THE
MANUAL.
IMPORTANTI ISTRUZIONI DI SICUREZZA
IMPORTANT SAFETY INSTRUCTIONS
1) Leggere queste istruzioni
2)Conservare queste istruzioni
3) Fare attenzione a tutti gli avvertimenti
4) Seguire tutte le istruzioni
5)Nonusarequestodispositivo vicino all’acqua
6) Pulire solo con uno strofinaccio asciutto
7) Non ostruire le aperture di ventilazione. L’installazione deve essere
eseguita in base alle istruzioni fornite dal produttore.
8) Non installare nelle vicinanze di fonti di calore come termosifoni,
valvole di regolazione, stufe o altri apparecchi ( amplificatori compresi )
che producono calore
9) Non annullare l’obiettivo di sicurezza delle spine polarizzate o con
messa a terra. Le spine polarizzate hanno due lame, una più larga
dell’altra. Una spina con messa a terra ha due lame e un terzo polo di
terra. La lama larga o il terzo polo servono per la sicurezza
dell’utilizzatore. Se la spina fornita non è adatta alla propria presa,
consultare un elettricista per la sostituzione della spina.
10) Proteggere il cavo di alimentazione dal calpestio e dalla
compressione, in particolare in corrispondenza di spine, prolunghe e
nel punto dal quale escono dall’unità.
11) Usare solo dispositivi opzionali/accessori specificati dal produttore.
12)Utilizzare esclusivamente con carrelli, supporti,
treppiedi, mensole o tavole specificati dal produttore o
venduti unitamente all’apparecchio. Se si utilizza un
carrello prestare attenzione durante lo spostamento
combinato del carrello e dell’apparecchio, per evitare il
verificarsi di danni dovuti ad eventuale ribaltamento.
1)Readtheseinstructions
2) Keep these instructions
3)Heedallwarnings
4) Follow all instructions
5)Donotusethisapparatusnear water
6)Cleanonlywith dry cloth
7) Do not block any ventilation openings. Install in accordance with the
manufacturer’s instructions.
8) Do not install near any heat sources, such as radiators, heat
registers, stoves or other apparatus (including amplifiers) that produce
heat
9) Do not defeat the safety purpose of the polarized or grounding-type
plug. A polarized plug has two blades with one wider than the other. A
grounding type plug has two blades and a third grounding prong. The
wide blade or the third prong are provided for your safety. If the
provided plug does not fit into your outlet, consult an electrician for
replacement of the obsolete outlet.
10) Protect the power cord from beingwalked on or pinched particularly
at plugs, convenience receptacles, and the point where they exit from
the apparatus.
11) Only use attachments/accessories specified by the manufacturer.
12) Use only with the cart, stand, tripod, bracket, or
table specified by the manufacturer or sold with the
apparatus. When a cart is used, use caution when
moving the cart/apparatus combination to avoid injury
from tip-over.
13)Unplug this apparatus during lightning storms or
when unused for long periods of time.
14) Refer all servicing to qualified service personnel.
Servicing is required when the apparatus has been damaged in any
way, such as power-supply cord or plug is damaged, liquid has been
spilled or objects have fallen into the apparatus, the apparatus has
been exposed to rain or moisture, does not operate normally, or has
been dropped.
13) Staccare la spina in caso di temporale o quando non si usa
l’apparecchio per un lungo periodo.
14) Per l’assistenza tecnica rivolgersi a personale qualificato.
L’assistenza tecnica è necessaria nel caso in cui l’unità sia
danneggiata, per es. per problemi del cavo di alimentazione o della
spina, rovesciamento di liquidi od oggetti caduti all’interno
dell’apparecchio, esposizione alla pioggia o all’umidità, anomalie di
funzionamento o cadute dell’apparecchio.
L’APPARECCHIO DEVE ESSERE COLLEGATO ALLA RETE
ELETTRICA MEDIANTE UNA PRESA CON UN COLLEGAMENTO
ALLA TERRA DI PROTEZIONE.
THE DEVICE MUST BE CONNECTED TO THE MAINS THROUGH A
POWER OUTLETWITHAPROTECTIVE EARTH CONNECTION.
Questo apparecchio è dotato di presa di alimentazione; installare
l’apparato in maniera che la presa del cavo di alimentazione risulti
facilmente accessibile.
This device features a power outlet ; install the device so that the outlet
for the power cord is easily accessible .
PRECAUZIONI
PRECAUTIONS
° Per consentire una ventilazione sufficiente è necessario predisporre
una distanzaminima di circa 30 cm. per tutti i lati dell’apparecchiio.
° La ventilazione non dovrebbe essere impedita coprendo le aperture
di ventilazione con oggetti quali giornali, tovaglie, tende, ecc.
° Nessuna sorgente di fiamma nuda, quali candele accese, dovrebbe
essere posta sull’apparecchio.
° L’apparecchio non deve essere esposto a stillicidio o a spruzzi
d’acqua e quindi sopra al dispositivo non devono essere posti oggetti
contenenti liquidi, come ad es. vasi.
° For proper air ventilation please make sure to leave sufficient
clearance (min 11 inc.) on all sides of the device.
° Please do not cover the ventilation slots with papers, table cloths,
curtains, etc. in order not to prevent ventilation of the device.
° Please do not place any naked flame source, such as lighted
candles, on the device.
° Please keep the device away from water springs and splashes and
please do not place any objects containing liquids, such as vases, on
the device.
° ATTENZIONE: Per evitarsi di ferirsi questo apparecchio deve essere
assicurato alla parete secondo le istruzioni di installazione allegate.
° CAUTION: To avoid the risk of injuries please secure the device to
thewallfollowing the enclosed instructions.
2
RISQUE DE CHOC ÉLECTRIQUE
NE PAS OUVRIR
STROMSCHLAGGEFAHR
NICHT ÖFFNEN
POUR ÉVITER LE RISQUE DE CHOC ÉLECTRIQUE
NE PAS OUVRIR LE COUVERCLE
NE PAS UTILISER D’OUTILS MÉCANIQUES À L’INTÉRIEUR
CONTACTER UN CENTRE D’ASSISTANCE QUALIFIÉ
STROMSCHLAGGEFAHR NICHT DEN DECKEL ÖFFNEN
WENDEN SIE SICH AN EINEN QUALIFIZIERTEN KUNDENDIENST
POUR ÉVITER LE RISQUE D’INCENDIE OU DE CHOC ÉLECTRIQUE
NE PAS EXPOSER L’APPAREILLAGE À LA PLUIE OU À L’HUMIDIT
UM RISIKEN VON STROMSCHLAG UND BRAND AUSZUSCHLIESSEN
SETZEN SIE DAS GERÄT KEINEM REGEN ODER FEUCHTIGKEIT AUS
CESYMBOLE PRÉVIENT, LÀOÙILAPPARAÎT,DELAPRÉSENCED'UNE
TENSION DANGEREUSENON ISOLÉE À L'INTÉRIEURDELACAISSE:
LEVOLTAGE PEUT ÊTRESUFFISANTPOURREPRÉSENTER
UNRISQUEDEDÉCHARGES ÉLECTRIQUES.
!
CE SYMBOLE PRÉVIENT, LÀ OÙ IL APPARAÎT, DE LA PRÉSENCE
D'IMPORTANTES NOTICES DE MODE D'EMPLOI ET CONCERNANT
L'ENTRETIEN DANS LA DOCUMENTATION JOINTE. VEUILLEZ
CONSULTERLEMODED'EMPLOI.
DIESES SYMBOL VERWEIST AUF DIE PRÄSENZ EINER GEFÄHRLICHEN
NICHT ISOLIERTEN SPANNUNG IN DER LAUTSPRECHERBOX: DIE
SPANNUNG KANN GENÜGEND STARK SEIN, UM EINE
STROMSCHLAGGEFAHR DARZUSTELLEN.
!
DIESES SYMBOL VERWEIST AUF WICHTIGE HINWEISE IN
DEN MITGELIEFERTEN BEDIENUNGS- UND
WARTUNGSANLEITUNGEN. ZIEHEN SIE DAS HANDBUCH
ZURATE.
INFORMATIONS DE SÉCURITÉ IMPORTANTES
WICHTIGE SICHERHEITSHINWEISE
1) Lisez ces instructions
2)Conservez ces instructions
3) Faites attention à tous les avertissements
4) Suivez toutes les instructions
5)N'employez pas ce dispositif près de l'eau
6)Nenettoyezqu'avec un torchon sec
7) N’obstruez pas les ouvertures de la ventilation. L’installation doit
être effectuée selon les instructions fournies par le producteur.
8) Ne l'installez pas près de sources de chaleur comme radiateurs,
appareils de chauffage, poêles ou d'autres appareils (y compris les
amplificateurs) qui produisent de la chaleur
9)Nesupprimez pas les dispositifs de sécurité des fiches polarisées ou
avec mise à la terre. Les fiches polarisées sont équipées de deux
bornes de largeur différente. Une fiche avec mise à la terre a deux
bornes et un troisième pôle de terre. La borne plus large ou le troisième
pôle sont nécessaires pour la sécurité de l'utilisateur. Si la fiche fournie
n'est pas appropriée pour votre prise, consultez un électricien pour le
remplacement de la fiche.
10)Protégez le câble d'alimentation du piétinement et de la
compression, en particulier où l'on trouve des fiches, des rallonges et
dans le point où ils sortent de l'appareil.
11) Employez uniquement des dispositifs en option/accessoires
indiqués par le producteur.
12) A employer uniquement avec des chariots, des
supports, des trépieds, des consoles ou des tables
indiqués par le producteur ou vendus avec l'appareil.
Si vous utilisez un chariot, faites attention pendant le
déplacement contemporain du chariot et de l'appareil,
afin d'éviter des dommages dus au possible
renversement.
13) Débranchez la fiche en cas d'orage ou lorsqu'on n'utilise pas
l'appareil pendant une longue période.
14) Pour l'assistance technique, adressez-vous au personnel qualifié.
L'assistance technique est nécessaire au cas où l'appareil est
endommagé, par ex. à cause de problèmes du câble d'alimentation ou
de la fiche, du renversement de liquides ou d'objets tombés à l'intérieur
de l'appareil, de l'exposition à la pluie ou à l'humidité, d'anomalies de
fonctionnement ou de chutes de l'appareil.
1) Lesen Sie diese Anleitungen aufmerksam durch.
2) Bewahren Sie sie sorgfältig auf.
3) Beachten Sie alle Hinweise.
4)Halten Sie sich an sämtliche Anleitungen.
5) Verwenden Sie diesesGerätnicht in der Nähe von Wasser.
6)Reinigen Sie es nurmiteinemtrockenen Lappen.
7) Die Lüftungsöffnungen nicht verstellen. Die Installation muss
entsprechend der vom Hersteller gelieferten Anleitung erfolgen.
8) Vermeiden Sie es, das Gerät in der Nähe von Wärmequellen, wie
Heizkörper, Heizrohre, Öfen oder anderen wärmeerzeugenden Geräte
(auch Verstärker) aufzustellen.
9) Achten Sie darauf, die Sicherheitsfunktion der polarisierten oder
geerdeten Steckern nicht aufzuheben. Polarisierte Stecker haben zwei
flache Stifte, einer davon ist breiter als der andere. Ein geerdeter Stecker
hat zwei Stifte und einen Erdungsstift. Ein geerdeter Stecker hat zwei
Klinken und einen Erdungsstift. Der breitere Stift bzw. der dritte Stift
dienen Ihrer Sicherheit. Sollte der mitgelieferte Stecker nicht in Ihre
Steckdose passen, lassen Sie ihn durch einen Elektriker auswechseln.
10) Schützen Sie das Stromkabel vor Tritt- und Druckeinwirkungen,
insbesondere im Bereich der Stecker, von Verlängerungen und bei ihrem
Austritt aus dem Gerät.
11) Verwenden Sie ausschließlich vom Hersteller empfohlene
Zusatzgeräte/Zubehörteile.
12) Benutzen Sie ausschließlich vom Hersteller
empfohlene oder mit dem Gerät verkaufte Wagen,
Ständer, Stative, Halterungen oder Tische. Achten Sie
bei Verwendung eines Wagens darauf, dass das darauf
stehende Gerät während der Fahrt nicht umkippt und
Schaden erleidet.
13) Stecken Sie das Gerät bei Gewittern oder längerer
Außerbetriebsetzung bitte ab.
14) Für den technischen Kundendienst wenden Sie sich bitte
ausschließlich an qualifiziertes Personal. Ein technischer
Kundendiensteinriff wird erforderlich, wenn das Gerät auf irgendeine
Weise beschädigt wird, z.B. durch Schäden am Netzkabel oder -stecker,
durch Eintreten von verschütteten Flüssigkeiten oder Gegenständen,
durch Regen oder Feuchtigkeit, durch Hinunterfallen, oder bei
Funktionsstörungen.
L’APPAREILDOIT ÊTRE CONNECTÉ AU RÉSEAU ÉLECTRIQUE PAR
UNE PRISE AYANTUNECONNEXION DE PROTECTION DE TERRE .
Cet appareil est équipé d’une prise d’alimentation; installez l’appareil
de façon à ce que la prise du câble d’alimentation soit facilement
accessible.
PRÉCAUTIONS
° Afin de permettre une ventilation suffisante il faut disposer une
distancemin.de30cm.environ de tous les côtés de l’appareil.
° La ventilation ne doit pas être empêchée en couvrant les ouvertures
d’aération avec des objets comme journaux, nappes, rideaux, etc.
° Aucune source à flamme nue, comme par exemple des bougies
allumées, ne doit être posée sur cet appareil.
° L’appareil ne doit pas être exposé à la stillation ou aux jets d’eau et
donc il ne faut pas poser sur le dispositif des objets contenant des
liquides, comme par exemple des vases.
° ATTENTION: Afin d’éviter de vous blesser, il faut que cet appareil
soit attaché aumurd’aprèsles instructions d’installation ci-jointes.
DAS GERÄT ÜBER EINE GEERDETE STECKDOSE AN DAS
STROMNETZ ANSCHLIESSEN.
Dieses Gerät ist mit einer Steckdose ausgestattet. Installieren Sie das
Gerät so, dass die Steckdose des Stromkabels leicht zugänglich
resultiert.
VORSICHTSMAßNAHMEN
° Hierzu muss um alle Geräteseiten herum eine Mindestdistanz von 30
cmberücksichtigtwerden.
° Behindern Sie die Ventilation keinesfalls durch Abdecken der
LüftungsöffnungenmitZeitungen, Tischtüchern, Vorhängen usw.
° Keine offenen Flammen, beispielshalber brennende Kerzen, auf das
Gerät stellen.
° Das Gerät ist unbedingt vor Tropfen oder Wasserspritzern zu
schützen. Stellen Sie also keinesfalls Flüssigkeitsbehälter, wie
beispielsweise Blumenvasen darauf.
° ACHTUNG: Um Verletzungsgefahren auszusschließen, muss dieser
Apparat entsprechend der beigefügten Installationsanleirung an der
Wand gesichert werden.
INTRODUZIONE
INTRODUCTION
FBT con la gamma HiMaxX stabilisce un nuovo riferimento nel
panorama dei diffusori da 12” e 15” in polipropilene per “sound
reinforcement”, portando prestazioni e contenuto tecnologico ad
un livello fino ad oggi impensabile.
FBT HiMaxX si affianca alla nota serie MaxX esaltando tutte le
caratteristiche tecnologiche che hanno reso questa serie un best
seller internazionale, ponendosi su un livello di prestazioni ancora
superiore.
Lo studio di nuovi cabinet in polipropilene, l’utilizzo di alimentatori
switching e finali ad alta efficienza, la riprogettazione degli
altoparlanti sono state le attività del team R&D di FBT mirate alla
massimizzazione del rapporto potenza/peso.
Compatta e leggera, HiMaxX risolve brillantemente le più esigenti
richieste di appassionati, musicisti e professionisti, che cercano
diffusori potenti, versatili e di altissima qualità. Ideali per
applicazioni “live” e “sound reinforcement” che richiedono facilità e
comodità di trasporto, sono indicate anche per installazione fissa
grazie alle predisposizioni presenti nel cabinet ed agli accessori
opzionali.
HiMaxX è dotata di un nuovo altoparlante da 12” ideato e disegnato
per l’occasione dalla FBT e costruito dalla B&C; un nuovo driver a
compressione B&C da 1” dotato di anello in rame di
demodulazione per estendere la risposta alle alte frequenze, un
nuovo design, un nuovo pannello di controllo con due canali di
ingresso indipendenti.
La serie HiMaxX comprende il modello HiMaxX 40A (sistema attivo
biamplificato, 500W RMS PWM per LF, 150W RMS in classe “G” per
HF) e il modello HiMaxX 40 (500W “sound reinforcement monitor”).
With the new HiMaxX series, FBT estabilishes a reference point on
the scenario of 12” and 15” enclosures in polypropylene for sound
reinforcement, introducing performance and technical content of a
standard unthinkable up until now.
FBT HiMaxX takes its place alongside the FBTMaxX series,
exalting all the technical features.
The study of a new cabinet in polypropylene, the use of a switch
mode power supply and high efficiency power amplifiers and the
redesign of the loudspeakers were the activities of the FBT R&D
team aimed at maximizing the power weight ratio.
Compact and light weight, HiMaxX brilliantly solve all the most
demanding requests from buffs, musicians and professionals
looking for powerful, versatile and very high quality loudspeaker
enclosures. Ideal for live and sound reinforcement applications
requiring ease of transport, they are also suited to fixed
installations, thanks to the cabinets’ format and optional
accessories.
HiMaxX is equipped with a new 12” loudspeaker specially conceived
and designed by FBT and built by B&C; a new 1” B&C compression
driver equipped with a demodulation copper ring to extend the high
frequency response, a new design, a new control panel with two
independent input channels.
The HiMaxX series includes the HiMaxX 40A model (active biamped system, 500W RMS PWM for LF, 150W RMS in “G” class for
HF) and the HiMaxX 40 model (500W “sound reinforcement
monitor”).
3
INTRODUCTION
EINLEITUNG
La nouvelle enceinte HIMaxX de FBT définit un nouveau standard
dans le panorama des haut-parleurs de 12'' et 15" en
polypropylène pour renfort sonore et pousse performances et
contenu technologique vers un niveau actuellement impensable.
La FBT HIMaxX vient compléter la FBTMaxX : elle exalte toutes les
caractéristiques technologiques qui ont fait de cette enceinte un
best-seller international et se propose à un niveau de
performances encore plus élevé.
L'étude d'une nouvelle caisse en polypropylène, l'utilisation d'une
alimentation switching et de finaux haute efficacité, la conception
"ex novo" des haut-parleurs : voilà les activitès de l'équipe R&D de
FBT qui a visé à maximaliser le rapport puissance/poids.
Compacte et légère, l'HiMaxX résout brillamment les exigences
des amateurs, musiciens et professionnels qui cherchent des
enceintes puissantes, souples et de très haute qualité. Idéale pour
les applications "live" et de renfort sonore, qui exigent facilité et
praticité de transport, elles sont également indiquées pour
l'installation permanente grâce aux pré-équipements présents
dans la caisse et aux accessoires en option.
La série HiMaxX, de conception innovatrice est équipée de : un
nouveau haut-parleur de 12”, projeté sur mesure par l'entreprise
FBT et créé par l'entreprise B&C, un nouveau driver B&C de 1”,
doté d'une bague en cuivre de démodulation servant à étendre le
temps de réponse aux hautes fréquences et un nouveau panneau
contrôlé par deux canaux d'entrée indépendants.
La série HiMaxX comprend le modèle HiMaxX 40 A ( système actif
biamplifié, 500 W RMS PWM pour les longues fréquences, 150 W
RMS de classe « G » pour les hautes fréquences) et le modèle
HiMaxX 40 (500 W, pour un suivi du renforcement du son).
Mit der neuen HiMaxX-Serie definiert FBT eine neue Referenz im
Bereich der 12“ und 15“ Kunststoffgehäuse für Live-Events mit
Leistungen und technischen Merkmalen, die bis dato nicht für
möglich gehalten wurden. FBT HiMaxX erweitert die
Produktpalette der FBTMaxX Serie um weitreichende technische
Merkmale.
Das Studium neuer Gehäuse aus Polypropylen, der Einsatz von
Schaltnetzteilen und hocheffizienten Verstärkern, sowie das ReDesign der Lautsprecher waren die Hauptaktivitäten des
Entwicklungsteams von FBT. Das Ziel – Maximierung des
Leistungs-/ Gewichtsverhältnisses.
Aufgrund ihrer kompakten Größe und des geringen Gewichtes
bewältigt die HiMaxX-Serie alle Anforderungen von Fans,
Musikern und allen Profis, welche auf hochwertige, leistungsstarke
und flexible Lautsprechersysteme Wert legen. Ideal für
Veranstaltungen, die einen einfachen Transport voraussetzen,
aber auch für Installationen geeignet sind – Dank der kompakten
Größe und des optional erhältlichen Zubehörs.
HiMaxX ist mit einem neuen 12”-Lautsprecher ausgestattet, der
extra von FBT konzipiert und entworfen und von B&C konstruiert
wurde; ein neuer 1-Zoll Kompressionstreiber B&C mit einer
Demodulations-Kupferspule für eine erweiterte Antwort auf die
hohen Frequenzen, ein neues Design, eine neue Bedientafel mit
zwei unabhängigen Eingangskanälen.
Die Serie HiMaxX umfasst das Modell HiMaxX 40A (aktives
zweifach verstärktes System, 500W RMS PWM für LF, 150W RMS in
Klasse “G” für HF) und das Modell HiMaxX 40 (500W “sound
reinforcementmonitor”).
CONNESSIONI
CONNECTIONS
XLR female plug
BRANCHEMENTS
ANSCHLÜSSE
TS jack plug
Tip
2
3
1
4
Sleeve
RCA phono jack
XLR male plug
1
3
2
Tip
plug in and rotate
before locking
SPEAKON
TRS jack plug
Sleeve
Ring
RCAPHONOJACKS
PHONO CABLE
I connettori XLR hanno tre poli e vengono utilizzati quasi sempre per condurre
segnali mono bilanciati; i tre poli corrispondono rispettivamente alla massa (1),
al segnale positivo (2) e al segnale negativo (3).
UNBALANCED JACK CABLE
SPEAKON è un connettore adatto appositamente per il collegamento tra finali
di potenza e altoparlanti; inserendolo nell’apposita presa si blocca in modo da
impedire un distacco accidentale; inoltre è dotato di protezione contro scosse
elettriche e garantisce una corretta polarizzazione.
Gli RCA non possono essere bilanciati perchè hanno solo due poli: segnale
(punta centrale) e massa (margine circolare), quindi sono connettori mono
sbilanciati.
I JACK sono connettori tipici per trasportare due segnali separati di due canali,
destra e sinistra, con un unico connettore e quindi possono essere di tipo
mono o stereo. I jack mono (TS) detti anche sbilanciati si differenziano da
quelli stereo (TRS) o bilanciati per la loro composizione. I primi hanno lo
spinotto diviso in due parti, punta e massa (Tip e Slave) alle quali sono
collegati i due poli; i jack stereo o bilanciati sono invece divisi in tre parti, in
quanto hanno un anello centrale (Ring) da cui (TRS) collegato ad un secondo
filo che costituisceilterzopolo(polonegativo).
BALANCED JACK CABLE
SLEEVE-GROUND
RING-COLD(-)
TIP-HOT(+)
SLEEVE-GROUND
RING-COLD(-)
TIP-HOT(+)
BALANCED XLR CABLE
2-HOT (+) / 1-GROUND
XLR MALE
3-COLD(-)
XLRFEMALE
3-COLD(-)
BALANCED JACK TO FEMALE XLR CABLE
2-HOT (+) / 1-GROUND
3-COLD(-)
SPEAKON is a connector which is specially adapted for connecting power
terminals to loudspeakers; when inserted in an appropriate socket, it locks so
as to prevent accidental disconnection; moreover, it is equipped with
protection against electrical shocks and guarantees the correct polarisation.
1-GROUND/2-HOT(+)
XLRFEMALE
SLEEVE-GROUND
RING-COLD(-)
TIP-HOT(+)
The 3-pole XLR connectors are almost always used for conducting monobalanced signals; the three poles correspond respectively to ground (1), the
positive signal (2) and the negative signal (3).
1-GROUND/2-HOT(+)
3-COLD(-)
BALANCED JACK TO MALE XLR CABLE
XLR MALE
SLEEVE-GROUND
RING-COLD(-)
TIP-HOT(+)
UNBALANCED JACK TO FEMALE XLR CABLE
XLRFEMALE
The RCAcannot be balanced as they have just two poles: signal (central point)
and ground (perimeter);theyarethereforeunbalancedmonoconnectors.
UNBALANCED JACK TO MALE XLR CABLE
The JACKS are typical connectors for the transporting of two separate signals
through two channels, left and right, using a single connector and therefore
they can be either mono or stereo. Mono jacks (TS), also known as
unbalanced jacks, are recognisable from stereo or balanced jacks (TRS) by
their composition. The point of the mono jacks is divided into two parts, tip and
ground (Tip and Slave) to which the two poles are connected; the stereo or
balanced jacks are divided in three parts, as they have a central ring (Ring)
which is connected to a second wire, thethird (negative) pole.
XLR MALE
UNBALANCED PHONO TO FEMALE XLR CABLE
XLRFEMALE
LINK P I N S 1 & 3
UNBALANCED PHONO TO MALE XLR CABLE
XLR MALE
RCA PHONO
LINK P I N S 1 & 3
Les connecteurs XLR possèdent trois pôles et servent, en général, à
transmettre les signaux mono balancés ; les trois pôles correspondent, dans
l'ordre, à la masse (1), au signal positif (2) et au signal négatif (3).
Die XLR-Eingänge haben drei Pole und werden fast immer zur Übertragung
von ausgeglichenen Mono-Signalen benutzt; die drei Pole entsprechen
jeweils derMasse (1), dem positiven Signal (2) und dem negativen Signal (3).
Le connecteur SPEAKON a été spécialement conçu pour le branchement des
terminaux de puissance et des hauts-parleurs. Placé dans la prise adéquate, il
sert à prévenir un débranchement accidentel. De plus, il est pourvu d'un
système de protection contre les secousses électriques et garantit un niveau
de polarisation correct.
SPEAKON ist ein Eingang, der extra für die Verbindung zwischen
Leistungsenden und Lautsprechers angepasst wurde. Wenn er in die
entsprechende Buchse eingesteckt wird, dann blockiert er so, dass er nicht
ungewollt herausgezogen werden kann. Er ist außerdem mit einem
Stromschlagschutz ausgerüstet und gewährleistet die richtige Polarisation.
Les RCA ne peuvent être balancés car ils ne possèdent que deux pôles : le
signal (pointe centrale) et la masse (marge circulaire). Ce sont donc des
connecteurs de type mono non balancés.
Die RCA können nicht ausgeglichen sein, da sie nur zwei Pole haben: Signal
(Leiter) und Masse (Mantel), es handelt sich also um nicht ausgeglichene
Mono-Eingänge.
Les prises JACK sont des connecteurs typiques et servent à transporter les
deux signaux séparés des deux canaux, droite et gauche, à travers un seul et
unique connecteur. Ils peuvent être de type mono ou stéréo. Les prises mono
(TS), appelés aussi non balancées, de par leur composition, se distinguent de
celles stéréo (TRS) ou balancées. En effet, les premières ont la prise divisée
en deux parties, pointe et masse (Tip et Slave), auxquelles les deux pôles
sont branchés. Par contre, les prises jack stéréo ou balancées sont divisées
en trois parties : elles possèdent une bague centrale (Ring), à laquelle (TRS)
est branché à un deuxième fil qui constitue le troisièmepôle (pôle négatif).
Die JACK sind typische Eingänge (Klinke), um zwei getrennte Signalen von
zwei Kanälen, rechts und links,miteinemeinzigen Eingang zu übertragen und
können von daher Mono oder Stereo sein. Die Mono-Jacks (TS), auch als
nicht ausgeglichen bezeichnet, unterscheiden sich in ihrem Aufbau von den
Stereo-Jacks (TSR) bzw. den ausgeglichenen Klinkensteckern. Die ersten
haben einen zweigeteilten Stift, Leiter und Masse (Tip und Slave), an denen
die beiden Pole angeschlossen sind. Die Stereo- bzw. die ausgeglichenen
Jacks bestehen aus drei Teilen, da sie eine zentrale Spule (Ring) haben, an
denen (TRS) an einen zweiten Draht angeschlossen ist, der den dritten Pol
bildet (negativer Pol).
5
PRT
PRT
LIMIT
LIMIT
LOW
LOW
-15
+6
MID
-15
+6
-15
+15
MID
-15
+15
HIGH
HIGH
-15
+6
-15
0
VOL
+8 line
+36mic
dB
+6
0
MAIN OUT
VOL
+8 line
+36mic
dB
LINE
MIC
LINE
MIC
PEAK
PEAK
OUT
OUT
IN
LINK
IN
IN
LINK
IN
0
VOL
0
-20
VOL
+8
-20
+8
+12 dB
+12 dB
AUX
AUX
1
1
2
MIXER
GND
LIFT
PWR
NEXT
SPEAKER
PRT
LIMIT
LOW
-15
2
GND
LIFT
PWR
NEXT
SPEAKER
PRT
LIMIT
LOW
+6
MID
-15
+6
-15
+15
MID
-15
+15
HIGH
HIGH
-15
+6
-15
0
+6
0
VOL
VOL
+8 line
+36mic
dB
+8 line
+36mic
dB
LINE
MIC
LINE
MIC
OUT
PEAK
OUT
PEAK
OUT
OUT
LINK
LINK
IN
IN
IN
0
VOL
-20
IN
+8
0
VOL
-20
+8
+12 dB
AUX
+12 dB
AUX
2
1
GND
LIFT
2
1
GND
LIFT
PWR
PWR
PRT
PRT
LIMIT
LIMIT
LOW
LOW
-15
+6
MID
-15
+6
-15
+15
MID
-15
+15
HIGH
HIGH
-15
MAIN OUT
+6
0
VOL
-15
+8 line
+36mic
dB
+6
0
VOL
+8 line
+36mic
dB
LINE
MIC
LINE
MIC
OUT
PEAK
OUT
PEAK
OUT
OUT
LINK
LINK
IN
IN
IN
0
VOL
-20
IN
0
VOL
+8
-20
+8
+12 dB
AUX
1
2
GND
LIFT
PWR
+12 dB
AUX
MIXER
1
2
GND
LIFT
PWR
6
PRT
LIMIT
LOW
-15
+6
-15
+15
MID
HIGH
-15
+6
0
VOL
+8 line
+36mic
dB
LINE
MIC
PEAK
OUT
IN
IN
IN
LINK
IN
0
VOL
-20
+8
+12 dB
AUX
1
2
GND
LIFT
PWR
RIGHT CHANNEL
FILT.
OUT
FILT.
OUT
IN
FILT.
OUT
ADAP R
PHASE
0°
180°
VOL
0
10
HP
FILTERED
OUT
IN
R
OUT
LINK
IN
IN
MAIN OUT
HP
FILTERED
OUT
L
OUT
MIXER
LINK
IN
PWR
FBTMaxX 10SA
MIXER
FBTMaxX 10SA
PRT
LIMIT
LOW
-15
+6
-15
+15
MID
HIGH
-15
+6
0
VOL
+8 line
+36mic
dB
LINE
MIC
PEAK
OUT
LINK
IN
0
VOL
-20
+8
+12dB
AUX
1
2
GND
LIFT
PWR
LINE / HEADPHONE
OUT
CD / MP3 / MIDI
AUX
1/2
IN
900W-PROCESSEDACTIVESUBWOOFER
SPECIFICHE TECNICHE
TECHNICAL SPECIFICATIONS
7
CARACTÉRISTIQUES TECHNIQUES
TECHNISCHE DATEN
Configurazione
Type
Configuration
Konfiguration
Vie
Way
Impedenza nominale
Nominal impedance
Impédance nominale
Nominal impedanz
Ohm
Amplificatore raccomandato
Recommended amplifier
Amplificateur recommandé
Empfohlene verstarkerleitung
W rms
Amplificatore interno
Built-in amplifier
Amplificateur interne
Integrierten Verstärker
W rms
Risposta in frequenza
Frequency response
Réponse en fréquence
Frequenzgang
@ -5dB
Short term
Court terme
Spitzenbelastbarkeit
W rms
(IEC268-5)
Sensibilità
Sensitivity
Sensibilité
Empfindlichkeit
dB
Massimo SPL
Maximum SPL
Maximum SPL
Maximaler shalldruck
dB
Unità alte frequenze
High frequency driver
Unité haute frequence
Hohe frequenzeinheit
mm
inch
Unità basse frequenze
Low frequency woofer
Woofer basses fréquence
Bass-Woofer
mm
inch
Dimensioni
Dimensions
Dimensions
Abmessungen
mm
inch
Peso
Weight
Poids
Gewicht
Kg.
Lb.
Connettori di ingresso
Input connectors
Connecteurs
Eingange
@ 1W / 1 m
( LxAxP)
( WxHxD )
ACCESSORI/ACCESSORIES/ACCESSOIRES/ZUBEHÖR
Mod. BOX100 (code 10187)
(ORIZZONTALE/HORIZONTAL/HORIZONTALE/ HORIZONTAL)
!
Mod. BOX101 (code 10188)
(VERTICALE/VERTICAL/VERTICALE/VERTIKAL)
NON SOVRAPPORRE PIÙ DI DUE DIFFUSORI
DO NOT STACK MORE THAN TWO SPEAKER SYSTEMS
ATTENZIONE
Per il fissaggio a muro dei modelli FBTHiMaxX40 e FBTHiMaxX40A utilizzare
esclusivamente le staffe della FBT modelli BOX100 e BOX101 (vedi istruzioni
a pag.8 di questo manuale). L’utilizzo di altre staffe di fissaggio può
generare una instabilità pericolosa con possibili danni a persone e cose.
CAUTION
The FBTHiMaxX40 and FBTHiMaxX40Aspeakers use only withmount for wall
installation model BOX100 and BOX101 (see instructions pag.8). Use with
other mounts is capable of resulting in instability causing possible
injury.
ATTENTION
Pour le fixage au mur des modèles FBTHiMaxX40 et FBTHiMaxX40A, utiliser
exclusivement les étriers de FBT modèles BOX100 et BOX101 (voir les
instructions à la page 8 de ce manuel). L’usage d’autres étriers de fixation
peut provoquer une instabilité dangereuse, en causant d’éventuels
dégâts matériaux e t des blessures corporelles.
ACHTUNG
Für die Wandinstallation der Modelle FBTHiMaxX40 und FBTHiMaxX40A
aussschließlich die FBT-Befestigungsbügel der Modelle BOX100 und
BOX101 benützen (siehe Anleitung auf Seite 8 in diesem Handbuck). Die
Verwendung anderer Befestigungsbügel kann zu einer gefährlichen
Instabilitätmitmöglichen Personen und Sachschäden führen.
NE JAMAIS SUPERPOSER PLUS DE DEUX ENCEINTES
STELLEN SIE NICHT MEHR ALS 2 BOXEN ÜBEREINANDER
8
ISTRUZIONI DI MONTAGGIO DELLE STAFFE A MURO
WALL BRACKET ASSEMBLY INSTRUCTIONS
ATTENZIONE:
PER PREVENIRE DANNI A PERSONE E COSE È INDISPENSABILE
DOTARE IL SISTEMA DI CATENA DI SICUREZZA QUANDO IL BOX
VIENE FISSATO A MURO
CAUTION:
TO AVOID DAMAGE OR PHYSICAL INJURY ALWAYS ENSURE
THAT THE SYSTEM IS EQUIPPED WITH A SAFETY CHAIN
WHEN THE BOX IS SECURED TO THE WALL
Mod. BOX100 (code 10187)
(ORIZZONTALE)
1. Selezionare con cura l’area dove installare i diffusori; assicurarsi che la
struttura sia adeguata a sopportare il peso del box; fissare la base della staffa
almuroutilizzando appropriate viti su tutti i fori di fissaggio della staffa.
2. Posizionare il diffusore tra i due bracci della staffa e fissarlo tramite i due
inserti filettati M10
3. Ruotare il diffusore nella posizione desiderata utilizzando l’inserto filettato
M 6.
Mod. BOX100 (code 10187)
(HORIZONTAL)
1. Take care when selecting the place of speaker installation; ensure the
structure is adequate to withstand the weight of the box; fix the base of the
bracket to thewallusingsuitable screws in all bracket fixing holes.
2. Position the speaker between the two bracket arms and secure by means of
the twoM10threaded inserts
3. Rotate the speaker to the required position using theM6threadedinsert
Mod. BOX101 (code 10188)
(VERTICALE)
1. Selezionare con cura l’area dove installare i diffusori; assicurarsi che la
struttura sia adeguata a sopportare il peso del box; fissare la base della staffa
almuroutilizzando appropriate viti su tutti i fori di fissaggio della staffa.
2. Posizionare il diffusore tra i due bracci della staffa e fissarlo tramite i due
inserti filettati daM10
3. Ruotare il diffusore nella posizione desiderata. Utilizzare la catena di
sicurezza provvista di 2 moschettoni di aggancio e 1 golfare (A) da inserire
nell’apposito punto di ancoraggio.
Mod.BOX101 (code 10188)
(VERTICAL)
1. Take care when selecting the place of speaker installation; ensure the
structure is adequate to withstand the weight of the box; fix the base of the
bracket to thewallusingsuitable screws in all bracket fixing holes.
2. Position the speaker between the two bracket arms and secure by means of
the twoM10threaded inserts
3. Rotate the speaker to the required position. Using the chain as a safety
device equipped with 2 snap hooks and 1 eyebolt (A) to be inserted in the
relative anchor point.
M10
M10
A
SIDE VIEW
!
A
TOP VIEW
INSTRUCTIONS POUR LE MONTAGE MURAL
DES BRIDES
MONTAGEANLEITUNG DER WANDBÜGEL
ATTENTION:
POUR ÉVITER DE CAUSER DES DOMMAGES A’DES PERSONNES ET
DES OBJETS, IL EST INDISPENSABLE D’ÉQUIPER LE SYSTÈME
D’UNE CHAÎNE DE SÉCURITÉ LORSQUE LE CAISSON EST FIXÉ AU
MUR
ACHTUNG:
ZUR VERMEIDUNG VON PERSONEN-UND SACHSCHÄDEN MUSS
DASS SYSTEM BEI EINER WANDBEFESTIGUNG DER
LAUTSPRECHERBOX UNBEDINGT MIT EINER SICHERHEITSKETTE
AUSGESTATTET WERDEN
Mod. BOX100 (code 10187)
(HORIZONTAL)
1. Sélectionner attentivement l'endroit où les enceintes seront installées ;
s'assurer que la structure soit en mesure de supporter le poids du caisson ;
fixer au mur la base de la bride à l'aide de vis adéquates sur les trous de
fixation de la bride.
2. Placer l'enceinte entre les deux bras de la bride et la fixer entre les deux
pièces intercalaires filetées M10
3. Tourner l'enceinte dans la position voulue en utilisant la pièce intercalaire
filetée M 6
Mod. BOX100 (code 10187)
(HORIZONTAL)
1. Den Installationsort der Lautsprecher sorgfältig wählen; sicherstellen, dass
die Struktur für das Gewicht der Lautsprecherboxen geeignet ist; passende
Schrauben in alle Bohrungen des Bügels einsetzen und die Basis des
Haltebügels an der Wand befestigen.
2. Den Lautsprecher zwischen den beiden Armen des Haltebügels anbringen
undmitdenbeiden M10-Gewindebuchsen befestigen.
3. Den Lautsprecher mit Hilfe der M6-Gewindebuchse in die gewünschte
Position drehen.
Mod. BOX101 (code 10188)
(VERTICAL)
1. Sélectionner attentivement l'endroit où les enceintes seront installées ;
s'assurer que la structure soit en mesure de supporter le poids du caisson ;
fixer au mur la base de la bride à l'aide de vis adéquates sur les trous de
fixation de la bride.
2. Placer l'enceinte entre les deux bras de la bride et la fixer entre les deux
pièces intercalaires filetées de M10
3. Tourner l'enceinte dans la position voulue en utilisant la chaîne de
sécurité munie de deux mousquetons d'accrochage et d'une cheville à
oeillet (A) à introduire dans le point de fixation spécial.
Mod. BOX101 (code 10188)
(VERTIKAL)
1. Den Installationsort der Lautsprecher sorgfältig wählen; sicherstellen, dass
die Struktur für das Gewicht der Lautsprecherboxen geeignet ist; passende
Schrauben in alle Bohrungen des Bügels einsetzen und die Basis des
Haltebügels an der Wand befestigen.
2. Den Lautsprecher zwischen den beiden Armen des Haltebügels anbringen
undmitdenbeiden M10-Gewindebuchsen befestigen.
3. Den Lautsprecher mit Hilfe der Kette (die auch Sicherheitsfunktion hat), die
über 2 Karabinerhaken und 1 Ringschraube (A) zum Einsetzen in den
Befestigungspunkt verfügt, in die gewünschte Position drehen.
9
0
0
1 2
1) PWR: indica l’accensione del sistema
2) GND LIFT: interruttore per la
separazione elettrica tra il circuito di massa
e il circuito di terra. Con il pulsante premuto
la massa dei segnali in ingresso viene
elettricamente scollegata dal circuito di
terra (identificato nello chassis); nel caso si
manifesti un ronzio sul diffusore, questa
posizione provvede ad aprire gli “anelli di
massa”, spesso causa di tali disturbi.
UTILIZZARE IL GROUND LIFT SOLO
PER SEGNALI BILANCIATI.
3) AUX 1/2 : presa RCAper il collegamento
di sorgenti di segnale esterne (CD, tape
recorder, dat, iPod, ecc..); i canali 1 e 2
vengono sommati e inviati al relativo
controllodivolume(4).
5) IN link OUT: prese di ingresso ed uscita
bilanciate elettronicamente; la presa “IN”
XLR-jack combo consente il collegamento
d i u n microfono o un segnale
preamplificato come quello in uscita da un
mixer; la presa “OUT” XLR è connessa in
parallelo (link) con l’ingresso “IN” e
permette il collegamento di più diffusori con
lostesso segnale.
6) PEAK: l’accensione di questo led indica
che il livello del segnale è prossimo alla
saturazione; se ciò avviene quando è
collegata una sorgente microfonica agire
sul controllo di volume della “HiMaxX”; se è
collegata una sorgente di segnale con
controlli di volume propri (mixer, ecc.)
agire su questi ultimi per abbassare il
volume del segnale.
7) LINE/MIC: posizionare l’interruttore in
“MIC” se si collega un microfono ; in “LINE”
per il collegamento di sorgenti di segnale
adalto livello.
8) VOL: regola il livello generale del
segnale. Questo controllo è prioritario
rispetto al controllo di Volume AUX. Agisce
contemporaneamente anche come Gain
per ottimizzare il rapporto segnale/rumore
e la gamma dinamica del preamplificatore.
9) HIGH/MID/LOW: controlli di tono che
permettono di modificare la timbrica del
suono.
10) LIMIT/PRT: il led Limiter si accende
quando il sistema viene utilizzato al limite
della potenza media sopportabile dagli
altoparlanti; in questo caso il segnale viene
ridotto in modo graduale fino a riportare
l’altoparlante entro i limiti di sicurezza: si
consiglia di operare in condizioni in cui il led
si illumini saltuariamente; il led Prt si
accende quando la temperatura interna
dell’amplificatore raggiunge il limite
massimo: in questo caso il segnale viene
ridotto automaticamente in modo graduale,
fino a riportare la temperatura entro i limiti
di sicurezza. L’accensione del led può
anche indicare il malfunzionamento
dell’amplificatore dovuto a corto-circuito in
uscita.
3
0
0
4
5
1) PWR: the LED illuminates to indicate
that the system is switchedon
2) GND LIFT: switch to isolate the chassis
ground and the signal ground. With the
switch held down, the input signal ground is
electrically disconnected from the chassis
ground (identified in the chassis); in the
case where speaker hum should occur, this
allows for the opening of “ground loops”
which are often the cause of these
problems. ONLY USE THE GROUND LIFT
FOR BALANCED SIGNALS.
3) AUX 1/2: RCAsocket for connectingwith
external signal sources (CD, tape recorder,
dat, iPod, etc); channels 1 and 2 are added
together and are sent to the relative volume
control (4).
5) IN link OUT: electronically-balanced
input and output connectors; the “IN” XLRjack combo enables the connection of a
microphone or a preamplified signal such
as a mixer output; the “OUT” XLR is
connected in parallel (link) with the “IN”
input and enables the same signal to be
relayedtoseveral speakers.
6) PEAK: the LED illuminates to indicate
the signal level is close to saturation;
should this occur when a microphone
source is connected, turn down the
“HiMaxX” volume control; if a signal source
with its own volume controls is connected
(mixer, etc), turn down the volume of the
signal using these controls.
7) LINE/MIC: position the switch to “MIC” if
a microphone is connected; position to
“LINE” when connecting a high level signal
source.
8) VOL: regulates the general signal level.
This control has priority over the AUX
volume control. Also acts as a gain control
so as to optimise the signal/noise
relationship and the dynamic range of the
pre-amp.
9) HIGH/MID/LOW: controls which allow
the modificationofthetoneofthesound.
10) LIMIT/PRT: the LED illuminates when
the system is being used at the limits of the
a v e r a g e p o w e r t o l e r a n c e of t h e
loudspeakers; the signal is then gradually
reduced until it is within the safety limits of
the loudspeaker: it is advised to operate the
system so that this LED illuminates only
occasionally; the PRT LED illuminates
when the internal temperature of the
amplifier reaches the maximum limit: the
signal is then automatically gradually
reduced, until the temperature is once
again within safety limits. The illumination
of this LED may indicate a malfunction of
the amplifier causedbyashortcircuit.
6 7
8
9
1) PWR : indique que le système est
allumé.
2) GND LIFT : interrupteur qui a pour
fonction la séparation électrique entre le
circuit de la masse et le circuit de terre.
Lorsque le bouton a été enclenché, il y a
débranchement électrique de la masse des
signaux en entrée du circuit de terre
(identifié dans la base) ; en cas de
bourdonnement provenant du diffuseur,
cette position permet d'ouvrir les bagues
de la masse et donc d'éliminer la nuisance
acoustique. UTILISER LE GROUND LIFT
UNIQUEMENT POUR LES SIGNAUX
BALANCES
3) AUX 1/2 : prise RCA qui permet de
brancher des sources de signal extérieures
(CD, magnétophone, enregistreu r
numérique audio, iPod, etc...) ; les canaux
1 et 2 sont additionnés et envoyés à la
commande duvolume adéquate (4).
5) IN link OUT : prise d'entrée et sortie
balancées électroniquement; la prise « IN »
XLR jack combo permet de brancher un
microphone à un signal préamplifié comme
celui d'une table de mixage ; la prise « OUT
» XLR est connectée en mode parallèle
(link) avec l'entrée « IN » et permet de
brancher un ou plusieurs diffuseurs ayant
lemêmesignal.
6) PEAK : cette LED s'allume pour indiquer
que le niveau du signal est proche de la
saturation ; et si cela se produit lorsque
l'appareil est branché à une source
microphonique, il faut agir sur la
commande du volume du HiMaxX ; mais, si
celui-ci est branché à une source de signal
possédant ses propres commandes de
volume (table de mixage, etc...), il faut alors
agir sur ces dernières pour baisser le
volume du signal.
7) LINE/MIC : placer l'interrupteur sur «
MIC » en cas de branchement de
microphone ; sur « LINE » en cas de
branchement des sources de signal de
haut niveau.
8) VOL : règle le niveau général du signal.
Cette commande a la priorité sur la
commande du volume AUX. Elle agit aussi
comme Gain afin d'optimiser le rapport
signal/bruit et la gamme dynamique du
préamplificateur.
9) HIGH/MID/LOW : commandes de la
tonalité servant à modifier letimbredu son.
10) LIMIT/PRT : La LED de limitation
s'allume lorsque le système est utilisé à la
limite de la puissance moyenne supportée
par les hauts-parleurs ; dans ce cas, le
signal sera réduit de manière graduelle
jusqu'à ramener le haut-parleur à l'intérieur
des limites de sécurité. Il est conseillé de
faire fonctionner l'appareil de manière à ce
que la LED ne s'allume que de manière
passagère. La LED Prt s'allume lorsque la
température interne de l'amplificateur
atteint la limite maximale : dans ce cas, le
signal subit une réduction automatique
graduelle, et ce, jusqu'à ramener la
température à l'intérieur des limites de
sécurité. La LED peut s'allumer aussi pour
indiquer un mauvais fonctionnement de
l'amplificateur dû à un court-circuit qui a eu
lieu en sortie.
10
1) PWR: Zeigt die Einschaltung des
Systems an
2) GND LIFT: Schalter zur elektrischen
Trennung von Masse- und Erdkreis. Bei
gedrückter Taste wird die Masse der
eingehenden Signale elektrisch von dem
Erdkreis getrennt (im Gehäuse markiert).
Sollte es zu einem Brummen im
Lautsprecher kommen, dann werden in
dieser Position die “Massespulen”
geöffnet, die oft Ursache dieser Störungen
sind. GROUND LIFT NUR BEI
AUSGEGLICHENEN SIGNALEN
BENUTZEN.
3) AUX 1/2 : RCA-Buchse für den
Anschluss externer Signalquellen (CD,
Tape Recorder, dat, iPod, usw..). Die
Kanäle 1 und 2 werden addiert und an die
jeweilige Lautstärkensteuerung gesendet
(4).
5 ) IN l i n k OUT: E l e k t r o n i s c h
ausgeglichene Buchsen für Ein- und
Ausgang. Die Buchse “IN” XLR-jack combo
ermöglicht den Anschluss eines Mikrofons
oder eines vorverstärkten Signals, wie das
Signal im Mixerausgang. Die Buchse
“OUT” XLR ist parallel (link) mit dem
Eingang “IN” verbunden, damit mehrere
Lautsprecher mit dem gleichen Signal
angeschlossen werden können.
6) PEAK: Das Leuchten dieser LED zeigt
an, dass der Signalpegel fast gesättigt ist.
Wenn dies der Fall sein sollte, wenn ein
Mikrofon angeschlossen ist, muss die
Lautstärkenregelung von “HiMaxX”
betätigt werden. Ist hingegen eine
Signalquelle mit eigener
Lautstärkenregelung angeschlossen
(Mixer usw.), dann sind diese Regelungen
zu betätigen, um die Signallautstärke zu
mindern.
7) LINE/MIC: Den Schalter auf “MIC”
stellen, wenn ein Mikrofon angeschlossen
wird. Auf “LINE” stellen, um hochstufige
Signalquellen anzuschließen.
8 ) V O L : regelt den allgemeinen
Signalpegel. Diese Steuerung ist vorrangig
bezogen auf die Lautstärkenregelung
AUX. Sie wirkt auch als Gain zur
Verbesserung des Signal/RauschVerhältnisses und der Dynamik des
Vorverstärkers.
9) HIGH/MID/LOW: Tonsteuerungen, um
das Klangtimbre zu bearbeiten.
10) LIMIT/PRT: Die LED Limiter leuchtet,
wenn das System an den Grenzen der von
den Lautsprechern erträglichen mittleren
Leistung benutzt wird. In diesem Fall wird
das Signal allmählich verringert, bis der
Lautsprecher wieder innerhalb der
Sicherheitsgrenzen arbeitet: Es wird
empfohlen, unter Bedingungen zu
arbeiten, in denen die LED nur hin und
wieder leuchtet. Die LED Prt leuchtet auf,
wenn die Temperatur im Verstärker den
maximalen Grenzwert erreicht: In diesem
Fall wird das Signal automatisch und
allmählich verringert, bis die Temperatur
sich wieder innerhalb der
Sicherheitsgrenzwerte befindet. Das
Leuchten der LED kann auch auf eine
Funktionsstörung des Verstärkers
aufgrund eines Kurzschlusses im Ausgang
hinweisen.
10
2 x SPEAKON
Prese Speakon collegate in parallelo; utilizzare una presa
per la connessione del box all’uscita di un amplificatore di
potenza; l’altra per collegare un secondo box.
Prises Speakon connectées en parallèle. Une prise peut
être utilisèe pour la connexion de la caisse à la sortie d’un
amplificateur de puissance; l’autre pour connecter un
second boîtier.
Speakon connectors connected in parallel mode. One
connector can be used to connect the box to the output of a
power amplifier; the other to connect to a second box
Stecker Speakon in Parallelschaltung. Einer der Stecker
kann für den Anschluss der box am Ausgang eines
Verstärkers benutzt werden; der andere, um eine zweite
Box anzuschließen.
220-230V 50/60Hz
T 5A L 250V
120V 60Hz
T 10A H 250V
Prima di collegare l’apparecchio alla rete elettrica accertarsi che la
tensione di alimentazione corrisponda con quella indicata nel retro
dell’unità. La presa di alimentazione comprende anche un vano
portafusibile. I fusibili difettosi devono essere assolutamente
sostituiti con altri che abbiano valore e caratteristiche elettriche
uguali.
Avant de brancher l'appareil au réseau électrique, vérifiez que la
tension d'alimentation correspond à celle indiquée au derrière de
l'appareil. La prise d'alimentation inclut même le logement du
fusible. Les fusibles défectueux doivent être nécessairement
remplacés avec des autres qui ont la valeur et les caractéristiques
électriques égales.
Before connecting the apparatus to the mains, make sure the
supply voltage matches the one indicated on the back of the
apparatus. The power socket also includes a fuse box . Faulty
fuses shall be replaced only with fuses having the same electrical
features and value.
Vor dem Anschließen des Geräts an das Stromnetz überzeugen
Sie sich bitte, dass die Speisespannung der rückseitig am Gerät
angeführten entspricht. Die Strombuchse umfasst auch ein
Sicherungsfach. Defekte Sicherungen sind unbedingt durch
gleichartige und -wertige zu ersetzen.
DIAGRAMMI
11
195
180
3
165
VERTICAL POLAR DIAGRAM
210
150
-3
225
135
-9
240
120
-15
-21
255
105
-33
270
195
250
500
1000
2000
DIAGRAMS
225
135
-9
240
-21
-33
75
60
300
45
315
0
345
VERTICAL POLAR DIAGRAM
180
30
330
15
165
210
-3
225
135
-9
120
-15
-21
225
135
-9
240
120
-15
-21
105
-33
90
60
300
45
315
75
285
60
300
45
315
30
330
30
330
15
345
Q(f)
D(f)
Q FACTOR & DIRECTIVITY INDEX ( DI )
0
15
-18/-6
-6/-6
HORIZONTAL COVERAGE
90
80
100
70
60
50
40
30
20
10
0
-10
-20
-30
-40
-50
-60
-70
-80
-90
deg.
10
1
100
4000
8000
12500
16000
150
-27
75
0
165
-3
-27
285
345
HORIZONTAL POLAR DIAGRAM
180
3
210
270
90
15
0
255
105
-33
195
4000
8000
12500
16000
150
270
45
315
30
330
255
90
285
60
240
105
-27
300
3
120
-15
270
75
195
250
500
1000
2000
150
-3
-27
285
345
165
210
255
90
HORIZONTAL POLAR DIAGRAM
180
3
1000
10000
115
100000
Freq.
FULL SPACE FREQUENCY RESPONSE
dB SPL
110
105
100
95
90
85
80
75
70
65
60
55
20 Hz
50
100
200
500
1K
2K
5K
10K
20K
DIAGRAMMI
12
195
180
3
165
VERTICAL POLAR DIAGRAM
210
150
-3
225
135
-9
240
120
-15
-21
255
180
3
225
135
-9
240
105
-33
270
285
60
300
60
300
0
345
VERTICAL POLAR DIAGRAM
180
165
225
135
-9
120
-15
-21
270
105
210
HORIZONTAL POLAR DIAGRAM
165
135
-9
240
120
-15
105
90
-33
-27
285
60
300
60
300
45
315
30
330
75
-21
45
315
30
330
15
345
Q(f)
D(f)
Q FACTOR & DIRECTIVITY INDEX ( DI )
0
15
-18/-6
-6/-6
HORIZONTAL COVERAGE
100
90
80
70
60
50
40
30
20
10
0
-10
-20
-30
-40
-50
-60
-70
-80
-90
deg.
10
1
100
4000
8000
12500
16000
150
225
270
75
0
180
3
-3
-27
285
345
0
15
255
90
-33
195
4000
8000
12500
16000
150
255
30
330
15
-3
240
45
315
30
330
75
-21
45
315
210
90
-27
75
3
120
-15
-27
195
250
500
1000
2000
150
-3
255
90
285
345
HORIZONTAL POLAR DIAGRAM
165
210
105
-33
270
195
250
500
1000
2000
DIAGRAMS
1000
10000
115
100000
Freq.
FULL SPACE FREQUENCY RESPONSE
dB SPL
110
105
100
95
90
85
80
75
70
65
60
55
20 Hz
50
100
200
500
1K
2K
5K
10K
20K
SCHEMA A BLOCCHI
BLOCK DIAGRAM
13
SCHEMA DES BLOCS
BLOCKSCHEMA
LAYOUT
14
ADATTATORE PER SUPPORTO A MURO ORIZZONTALE
ADAPTER FOR HORIZONTAL WALL SUPPORT
ADAPTATEUR POUR SUPPORT À MUR HORIZONTAL
ADAPTER FÜR WAAGERECHTE WANDBEFESTIGUNG
ADATTATORE INTEGRATO PER STATIVO
BUILT-IN ADAPTER FOR STAND MOUNTING
ADAPTATEUR INTÉGRÉ POUR STATIF
INTEGRIERTER ADAPTER FÜR STATIV
MANIGLIA INTEGRATA
BUILT-IN HANDLE
POIGNÉE INTÉGRÉE
INTEGRIERTER TRAGEGRIFF
ADATTATORE PER SUPPORTO A MURO VERTICALE
ADAPTER FOR VERTICAL WALL SUPPORT
ADAPTATEUR POUR SUPPORT À MUR VERTICAL
ADAPTER FÜR VERTIKAL WANDBEFESTIGUNG
ADATTATORE PER SUPPORTO A MURO ORIZZONTALE
ADAPTER FOR HORIZONTAL WALL SUPPORT
ADAPTATEUR POUR SUPPORT À MUR HORIZONTAL
ADAPTER FÜR WAAGERECHTE WANDBEFESTIGUNG
ADATTATORE INTEGRATO PER STATIVO
BUILT-IN ADAPTER FOR STAND MOUNTING
ADAPTATEUR INTÉGRÉ POUR STATIF
INTEGRIERTER ADAPTER FÜR STATIV
MANIGLIA INTEGRATA
BUILT-IN HANDLE
POIGNÉE INTÉGRÉE
INTEGRIERTER TRAGEGRIFF
CODE 26946
Le informazioni contenute in questo manuale sono state scrupolosamente controllate; la FBT non si assume nessuna responsabilità
per eventuali inesattezze. La FBT Elettronica S.p.A. si riserva il diritto di modificare le caratteristiche tecniche ed estetiche dei prodotti in
qualsiasimomento e senza preavviso.
All information included in this operating manual have been scrupulously controlled; however FBT is not responsible for eventual
mistakes. FBT Elettronica S.p.A. has the right to amend products and specifications without notice.
Les informations contenues dans ce manuel ont été soigneusement; toutefois le constructeur n’est pas responsable d’éventuelles
inexactitudes. La FBT Elettronica S.p.A. s’octroie le droit de modifier les données techniques et l’aspect esthétique de ses produits sans
avis préalable.
Alle informationen in dieser Bedienungsanleitung wurden nach bestem Wissen; Daher können sie als zuverlässig angesehen werden.
Für eventuelle Fehler ûbernimmt FBT aber keine Haftung. FBT Elettronica S.p.A. Behält sich das Recht auf Änderung der Produkte und
Spezifikationen vor.