1
Krüger&Matz
HI-FI AUDIO SYSTEM WITH
DVD, USB AND HDMI
OWNER’S MANUAL
INSTRUKCJA OBSŁUGI
MANUAL DE UTILIZARE
Română
BEDIENUNGSANLEITUNG
Polski
English
Deutsch
KM1584
Bedienungsanleitung
Bevor Sie beginnen
Für Ihre Sicherheit.........................................4
Gehörschutz...............................................5
Produktübersicht..............................................6
Das Gerät......................................................6
Fernbedienung.............................................8
Einlegen der Batterien....................................9
Reichweite der Fernbedienung......................9
Anschließen...............................................10
Anschließen der FM Außenantenne.............10
Anschließen der Kontrollkabel.....................10
Anschließen von Zusatzgeräten.................10
Anschließen der Lautsprecher......................10
Anschließen am die Komposit
Videobuchse.....................................11
Anschließen am die HDMI Buchse............11
Anschließen des Netzkabels.......................11
Anschließen der Kopfhörer..........................11
Erste Schritte................................................. 12
ECO-Power/Standby Merkmale...................12
Einstellen der Uhr........................................12
Einstellen der Bildschirmhelligkeit...............12
Wiedergabe………........................................13
Disk einlegen...............................................13
Disk abspielen..............................................13
Kontrolle der Videowiedergabe....................13
Ändern der Videowiedergabe......................13
Bildzoom............................................13
Zeitlupe.................................................13
Umschalten der Untertitelanzeige.................14
Anzeige der Wiedergabeinformation...........14
Melodiekontrolle.........................................14
Wiedergabe von MP3/WMA Musik............14
Wiedergabe von Bildern als Diashow........14
Bildwiedergabekontrolle..............................14
Wiedergabe von USB Geräten.....................15
Wiedergabe von Bluetooth Geräten............15
Einstellen der Lautstärke und
Klangeffekte..................................................17
Einstellen der Lautstärke.............................17
Einstellen des Basspegels...........................17
Einstellen des Höhenpegels........................17
Ton ausschalten...........................................17
Andere Merkmale...........................................17
Einstellen des Alarmtimers............................17
Alarmtimer aktivieren/deaktivieren................17
Einstellen des Schlaftimers...........................17
Einstellungen.................................................18
Allgemeine Einstellungen............................18
Video-Einstellungen................................18
Audio-Einstellungen....................................19
Benutzer-Einstellungen...............................19
Disk schützen................................................19
Fehlerbehebung.............................................22
Technische Daten...........................................22
Deutsch
Inhaltsverzeichnis
FM Radio........................................................16
Suchen der FM Radiosender........................16
Automatische Senderspeicherung...............16
Manuelle Senderspeicherung......................16
Aufrufen eines gespeicherten
Radiosenders...........................................16
FM Anzeigemodus.......................................16
3
Bedienungsanleitung
Bevor Sie beginnen
Vielen Dank für den Kauf dieses Systems. Bitte lesen Sie die Bedienungsanleitung
bevor Sie das Gerät benutzen. Bewahren Sie die Bedienungsanleitung auf für späteres
nachschlagen.
Für Ihre Sicherheit
Vor dem Betrieb dieses Systems überprüfen
Sie die Spannung dieses System um zu
sehen, ob es mit der Spannung Ihrer lokalen
Stromversorgung übereinstimmt
Die Lüftungsöffnungen des Geräts dürfen
nicht mit Gegenständen wie Zeitungen,
Tischtücher, Vorhänge usw. verdeckt werden.
Überhitzung kann zu Beschädigungen führen
und verkürzt die Lebensdauer der Geräte.
Wenn Sie den Netzstecker ziehen, ziehen
Sie immer am Stecker und nie am Kabel.
Lassen Sie NIEMALS jemanden, insbesondere Kinder irgendetwas in die Löcher,
Schlitze oder andere Öffnung des Gerätes
stecken - das könnte zu einen tödlichen
elektrischen Schlag führen;
Schützen Sie das Netzkabel so, dass nicht
getreten oder geknickt wird, insbesondere an
Steckern, Steckdosen und dem Punkt, wo es
aus dem Gerät heraustritt.
Nie das Produkt mit scharfen Gegenständen
schlagen.
Deutsch
Vermeiden Sie das Aufstellen des Gerät sowie Zubehör in der nähe von offenem Feuer
oder anderen Wärmequellen, sowie direktem
Sonnenlicht.
Um einen Stromschlag zu vermeiden, das
Gehäuse nicht öffnen. Übelassen Sie alle
Wartungsarbeiten qualifiziertem Servicepersonal.
Das Gerät sowie Zubehör nie Regen oder
Wasser aussetzen. Stellen Sie niemals
Behälter mit Flüssigkeiten wie Vasen in der
Nähe des Gerätes auf.
WARNUNG
UM DIE GEFAHR VON FEUER ODER
ELEKTRISCHEN SCHLAG ZU VERMEIDEN,
DARF DAS GERÄT NICHT TROPF- ODER
SPRITZWASSER AUSGESETZT WERDEN.
ACHTUNG:
UM DAS RISIKO VON BRANDVERLETZUNGEN
UND STROMSCHLÄGEN ZU VERRINGERN
ENTFERNEN SIE NICHT DIE ABDECKUNG
(ODER RÜCKSEITE) DES GERÄTS.
ÜBERLASSEN SIE ALLE WARTUNGSARBEITEN
QUALIFIZIERTEM SERVICEPERSONAL.
4
Laser Produkt
Dieses Produkt ist mit einem Laser niedriger Leistung
ausgestattet. Zu Ihrer eigenen Sicherheit keine Abdeckungen entfernen oder das Produkt auseinander
nehmen. Reparaturen dürfen nur von qualifiziertem
Fachpersonal durchgeführt werden
CLASS 1
LASER PRODUCT
Achtung:
Dieses Produkt ist mit einem Laser
niedriger Leistung ausgestattet.
Zu Ihrer eigenen Sicherheit keine
Sicherheits-Abdeckungen entfernen. Nicht direkt in den Laserstrahl
blicken wenn sich das Gerät in
Betrieb befindet.
CAUTION
RISK OF ELECTRIC SHOCK
DO NOT OPEN
Das dreieckige Blitzsymbol mit Pfeilkopf
weist den Benutzer auf das Vorhandensein
von nicht isolierter „gefährlicher Spannung“
im Inneren des Gerätes hin, die ausreichen
kann, um die Gefahr eines elektrischen
Schlags darzustellen.
Das dreieckige Symbol mit dem
Ausrufezeichen weist den Benutzer auf
wichtige Bedienungs- und Wartungs(Reparatur-) hinweise hin, die in dieser
Bedienungsanleitung enthalten sind.
Bedienungsanleitung
Gehörschutz
Hören Sie mit einer gemäßigten Lautstärke.
* Benutzen von Kopfhörern bei hoher Lautstärke kann Ihrem Gehör schaden. Dieses
Produkt kann Töne in Dezibelbereichen produzieren, dass Gehörverlust einer normalen
Person verursachen kann, bereits nach weniger als einer Minute. Die höheren DezibelBereiche sind für diejenigen, die bereits einige Gehörverluste haben.
* Die Lautstärke kann täuschen. Im Laufe der Zeit passt sich Ihr "Gehör Komfort" an
höhere Lautstärken an. Also nach längerem Hören bei "normaler" Lautstärke kann in
Wirklichkeit sehr laut und für Ihr Gehör schädlich sein. Um dem vorzubeugen, sollten
Sie Ihre Lautstärke in einem sicheren Bereich einstellen, bevor sich Ihr Gehör anpasst
und lassen Sie es dort
Um einen sicheren Lautstärkepegel einzurichten:
* Stellen Sie die Lautstärke auf eine geringe Lautstärke.
* Erhöhen Sie langsam die Lautstärke, bis Sie klar und deutlich zu hören ist.
Beachten Sie bei der Verwendung von Kopfhörern folgende Richtlinien:
* Hören Sie nur bei angemessener Lautstärke und nur einen angemessenen Zeitraum.
* Achten Sie darauf, die Lautstärke nicht Ihrem Hörempfinden entsprechend
anzupassen.
* Vermeiden Sie es, die Lautstärke so hoch einzustellen, dass Sie nicht hören können,
was um Sie herum geschieht.
* Sie sollten Vorsicht walten lassen oder vorübergehend das Benutzen einzustellen in
potenziell gefährlichen Situationen. Verwenden Sie keine Kopfhörer während Sie ein
motorisiertes Fahrzeug betätigen, Fahrrad oder Skateboard fahren usw. Dies könnte
für den Straßenverkehr gefährlich sein und ist in vielen Ländern verboten
Deutsch
Hören Sie nur für einen angemessenen Zeitraum:
* Längeres Aussetzen, auch bei eigentlich "sicherem " Lautstärkepegel kann
Hörverluste verursachen.
* Achten Sie darauf, Ihr Gerät angemessen zu verwenden und nehmen entsprechende
Pausen.
5
Bedienungsanleitung
Das Gerät
Vorderansicht (Hauptgerät)
Rückseitige Ansicht (Hauptgerät)
AUX IN1
AUX IN2
ANTENNA
FM
VIDEO
L
L
R
R
Deutsch
CABLE
6
1. STANDBY
- System ein- oder ausschalten
2. UHR
- Einstellen der Uhr
3. MODUS
- Für FM Radio, Auswahl von Mono oder
Stereoklang Ausgang
- Für Disk, Auswahl Wiederholung oder
Gemischt
4. USB
- USB Steckplatz
5. Anzeige
- Wenn das Gerät in Bereitschaft ist,
leuchtet die Anzeige rot
6. IR Sensor
- Empfängt das Signal von der
Fernbedienung
7. Anzeige-Paneel
- Zeigt den aktuellen Status an
8. CD-Fach
9.
/
- Suchen in einer Melodie
- Schneller Vorlauf/Rücklauf
- Suchen eines Radiosenders
/
- Springen zur vorherigen/nächsten
Melodie, Titel oder Datei
- Auswählen eines gespeicherten
Radiosenders
- Beginn oder Pause der Wiedergabe
10.
- Öffnen oder schließen des CD-Faches
11.
- Beenden der Wiedergabe
12 UKW-Antenne (FM-Antenne)
- Zur Verbesserung des UKW-Empfangs
13 Steuerkabel-Steckplatz
14 AUX IN 1 (L & R)
- Schließen Sie ein externes Audiogerät
15 AUX IN 2 (L & R)
- Schließen Sie ein externes Audiogerät
16 Videoausgangs
- Video-Ausgangsbuchse
17 Bluetooth-Antenne
18 HDMI-Ausgang
- Anschluss eines HDMI-Gerät
Bedienungsanleitung
Vordere Ansicht (Verstärker)
SOURC E
Rear View (Amplifier)
AC
CABLE
1. Kopfhörerbuchse
- Kopfhöreranschluss
2. Bass
- Einstellen der Basstöne
3. Höhen
- Einstellen der hohen Töne
4. LAUTSTÄRKE + / - Einstellen der Lautstärke
5. QUELLE
- Auswählen einer Quelle: RADIO, AUX 1,
AUX 2, DISK, USB oder BT
6. AC Hauptanschluss ~
- Anschluss des AC Netzkabels
7. Anschluss für die Kontrollkabel
8. Lautsprecherausgang (6 Ω)
- Anschluss der Lautsprecher
)
Deutsch
S PEAKER OUTPUT(6
7
Bedienungsanleitung
Deutsch
Fernbedienung
8
8.
- Springen zur vorherigen Melodie, Titel oder Datei
- Auswählen eines gespeicherten Radiosenders
SOURCE
9. ZOOM
- Zoom in einem Video oder Bild
MENU
AUDIO
10.
- Einstellen der Lautstärke
11.
OK
- Auswahl einer voreingestellten Klangeinstellung:
Warm, Stark, Klar, Ausgewogen oder Hell.
12. UHR/PROG
SUBTITLE
- Einstellen der Uhr
MODE
- Programmieren der Radiosender
SLOW
DISPLAY/DIM
ZOO M
13. MENÜ
- Für DVD: Diskmenü aufrufen oder verlassen
- Für VCD: PBC ein-/ausschalten
14. OK
CLOCK/PRO GT
IMER/SLEEP
- Bestätigen einer Auswahl
15.
- Suchen in einer Melodie oder Disk
- Schneller Vorlauf
- In Menüs – bewegen nach rechts
- Bild drehen
- Radiosender aussuchen
16. UNTERTITEL
1. STANDBY
- Für Menüs: Bewegung nach unten
- System ein- oder ausschalten
- Bild umdrehen
2. QUELLE
- UNTERTITEL: Auswahl einer Untertitelsprache
- Auswahl einer Quelle
für ein Video.
3.
- : Auswahl einer Nummer (0~9)
- Aufruf des Hauptmenüs
17.
4.
AUDIO
- Wiedergabe beenden
- In Menüs – Bewegung nach oben
18.
- Bild umdrehen
- Springen zur nächsten Melodie, Titel oder Datei
AUDIO: Auswahl der Audiosprache beim - Auswählen eines gespeicherten Radiosenders
abspielen von Videos
19. ANZEIGE/DIM
: Auswahl einer Zahl (0~9)
- Anzeige der Informationen auf einem
5.
angeschlossenem TV Gerät
- Suchen in einer Melodie oder Disk
- Auswahl eines Helligkeitsstufe für dem
- Schneller Rücklauf
Bildschirm
- In Menüs – bewegen nach links
20. LANGSAM
- Bild drehen
- Auswahl des Wiedergabemodus Zeitlupe
- Radiosender aussuchen
21.
6.
- Ton aus
- Beginn, Pause oder fortsetzen der
22. TIMER/SCHLAFEN
Wiedergabe
- Einstellen des Schlaftimers
7. MODUS
- Einstellen des Alarmtimers
- Für FM Radio, Auswahl von Mono oder
23.
Stereoklang Ausgang
- Einstellen der Lautstärke
- Für Disk, Auswahl Wiederholung oder
Gemischt
Bedienungsanleitung
Einlegen der Batterien
1. Öffnen Sie das Batteriefach
2. Legen Sie 2 AAA Batterien mit der korrekten Polarität (+/-)
ein wie angezeigt
Hinweis:
* Entnehmen Sie die Batterien, wenn die Fernbedienung für einen längeren Zeitraum
nicht verwendet wird.
* Um möglichen Ausfall zu vermeiden, lesen Sie die folgenden Anweisungen und
behandeln Sie die Fernbedienung richtig.
* Die Fernbedienung nicht stoßen oder fallen lassen.
* Kein Wasser oder andere Flüssigkeiten über die Fernbedienung verschütten.
* Legen Sie die Fernbedienung nicht auf ein nasses Objekt.
* Legen Sie die Fernbedienung nicht unter direkter Sonneneinstrahlung oder in der
Nähe von Wärmequellen.
* Verwenden Sie keine scharfen Reinigungsmittel (Porzellan, Edelstahl, WC, oder
Backofenreiniger usw.) auf der Fernbedienung, da diese dadurch beschädigt wird.
Deutsch
3. Schließen Sie das Batteriefach
Reichweite der Fernbedienung
1. Richten Sie die Fernbedienung am IR
Sensor an der Vorderseite des Gerätes aus.
2. Stellen Sie sicher dass sich keine
Hindernisse zwischen der Fernbedienung
und dem IR Sensor am Hauptgerät befinden.
9
Bedienungsanleitung
Anschließen
Anschließen der FM Außenantenne
Anschließen von Zusatzgeräten
Main Unit
AUX IN1
AUX IN2
ANTENNA
FM
VIDEO
L
L
R
R
CABLE
Auxiliary equipment
Main Unit
Deutsch
1. Mit einem Koaxial-Stecker A 75 Ohm Antenne mit Koaxial-Stecker über FM 75
Ohm-Koaxialkabel anschließen.
2. Wenn die Verbindung schlecht ist, schließen Sie die Außenantenne an.
Hinweis: Bevor Sie ein 75-Ohm-Koaxialkabel
(die Art, mit einem runden Draht, an eine
Außenantenne angeschlossen), entfernen
Sie die mitgelieferte FM-Antenne.
Achtung: Um Lärm zu vermeiden, halten Sie
die Antennenfern vom System, Verbindungskabel und Netzkabel.
Anschließen der Kontrollkabel
Main Unit
AUX IN1
AUX IN2
ANTENNA
FM
VIDEO
L
L
R
R
CABLE
Auxiliary equipment
Sie können das Audiosignal von einem
externen Gerät auf dieses Produkt
übertragen. Schließen Sie ein Audiokabel
wie folgt an:
• Die AUX IN L / R-Buchsen auf dieses
Produkt.
• Die Audio-Ausgangsbuchsen am externen
Gerät.
Verbinden Sie mit dem Steuerkabel den CD
Player und den Verstärker
Anschluss der Lautsprecher
AU X IN1
AU X IN2
ANTENNA
FM
VIDEO
L
L
R
R
CABLE
AC
CABLE
SPEAKER OUTPUT(6
)
Verbinden Sie das Kontrollkabel zwischen
DVD Player und Verstärker
10
1. Halten Sie die Klappe nach unten
2. Führen Sie das abisolierte Teil des
Drahtes vollständig ein.
• Stecken Sie das rechte Lautsprecherkabel
in „R”, linkes Lautsprecherkabel in „L” ein.
• Stecken Sie das roten Kabel an „+”, das
weißes Kabel an „-” ein.
3. Lassen Sie die Klappe los.
Bedienungsanleitung
Anschließen am die Komposit
Videobuchse
Anschließen des Netzkabels
AC
AUX IN1
AUX IN2
ANTENNA
FM
CABLE
VIDEO
L
L
R
R
S PEAKER OUTPUT(6
)
CABL E
VIDEO
Achtung:
* Beschädigung des Produkts
möglich! Stellen Sie sicher, dass die
Versorgungsspannung mit der Spannung
auf der Rück- oder Unterseite des Geräts
angegeben übereinstimmt.
* Vor dem Anschließen des Netzkabels,
Stellen Sie sicher dass Sie alle anderen
Verbindungen abgeschlossen haben.
Schließen Sie das Netzkabel in die
Steckdose.
Verbinden Sie das Gerät und TV mit einem
Komposit Videokabel (Videoeingang am TV).
Hinweis:
* Diese Art von Verbindung bietet Standard
Bildqualität
Anschließen der Kopfhörer
Deutsch
VIDEO
Anschließen am die HDMI
Buchse
AUX IN1
AUX IN2
ANTENNA
FM
VIDEO
L
L
R
R
CABLE
Stecken Sie die Kopfhörer (nicht im
Lieferumfang) in die Buchse am Gerät um
Musik durch die Kopfhörer zu genießen.
Verbinden Sie das Gerät und TV mit einem
HDMI Kabel (Videoeingang am TV).
Hinweis:
* Diese Art von Verbindung bietet beste
Bildqualität
11
Bedienungsanleitung
ECO-Power /
Bereitschaftsmerkmale
Gerät EIN- / AUSSCHALTEN
Wenn Sie das Netzkabel in eine Steckdose
stecken, wird das Gerät im Bereitschafts-Modus sein.
* Drücken Sie die Taste STANDBY, um
das Gerät einzuschalten. Das Wort „HALLO”
erscheint in der Anzeige.
* Drücken Sie die Taste
STANDBY, um
das Gerät wieder in den Bereitschafts-Modus zu schalten. Die Wörter „BYE BYE”
werden über das Display laufend angezeigt
Deutsch
Schalten Sie in der Anlage auf Eco Power
/ Bereitschaftsmodus
Drücken und halten Sie Taste
STANDBY
mehr als 2 Sekunden gedrückt, um auf Eco
Power Bereitschaft oder normalen Bereitschaftszustand zu schalten.
* ECO-Power Bereitschafts-Modus
Die Uhr wird nicht angezeigt. Drücken Sie
die Taste UHR, zum Anzeigen der Uhr auf
dem LCD-Bildschirm.
* Normaler Bereitschafts-Modus
Die Uhr wird auf dem LCD-Bildschirm
angezeigt.
12
Einstellen der Uhr
1. Im Bereitschaftsmodus drücken
und halten Sie Taste UHR für mehr
als 2 Sekunden gedrückt, um die
Uhrzeiteinstellung zu aktivieren. Anzeige
[UHR EINSTELLUNG] läuft über das
Display und die [24] 24-Stunden-Zeitformat
erscheint.
2. Drücken Sie die Tasten
/
/
/
auf der Fernbedienung, um 12/24-Modus
(Zeitformat) auszuwählen, und drücken Sie
dann die Taste UHR zur Bestätigung. Die
Stundenanzeige beginnt zu blinken.
3. Drücken Sie die Tasten
/
/
/
auf der Fernbedienung oder die Tasten
/
auf der Frontplatte, um die Stunde
einzustellen.
4. Drücken Sie Taste UHR zur Bestätigung.
Die Minutenanzeige beginnt zu blinken.
5. Drücken Sie die Tasten
/
/
/
auf der Fernbedienung oder die Tasten
/
auf der Frontplatte, um die Minuten
einzustellen.
6. Drücken Sie Taste UHR zur Bestätigung.
Einstellen der
Bildschirmhelligkeit
1. Im Bereitschaftsmodus drücken Sie die
Taste DIM um durch drei Helligkeitsstufen zu
blättern.
Bedienungsanleitung
Wiedergabe
Kontrolle der Videowiedergabe
1. Drücken Sie die Taste
um das CD-Fach
zu öffnen.
2. Legen Sie eine Disk ein, mit der
beschrifteten Seite nach oben.
Disk an den Führungen
ausrichten
3. Disk an den Führungen ausrichten
das CD-Fach zu schließen
um
Disk abspielen
1. Drücken Sie die Taste QUELLE, um die
Disk-Quelle auszuwählen.
2. Wiedergabe startet möglicherweise
automatisch. Wenn nicht, drücken Sie die
Taste
• Um die Disk-Wiedergabe zu
sehen, schalten Sie den Fernseher auf den
richtigen Anzeigekanal für dieses Produkt.
• Um die Disk-Wiedergabe zu beenden,
drücken Sie die Taste .
Hinweis:
• Wenn das Passwort-Eingabe-Menü
angezeigt wird, geben Sie das 6-stellige
Passwort (000000) ein, bevor Sie die
gesperrte oder eingeschränkte Disk
abspielen.
• Wenn Sie eine Pause einlegen oder
die Wiedergabe beenden, erscheint
der Bildschirmschoner nach 5 Minuten
Inaktivität. Um den Bildschirmschoner zu
deaktivieren, drücken Sie eine beliebige
Taste.
• Nach dem Unterbrechen oder Beenden
der Wiedergabe und keine Taste innerhalb
von 15 Minuten gedrückt wird, wechselt das
Gerät automatisch in den BereitschaftsModus.
1. Abspielen eines Titels.
2. Benutzen Sie die Fernbedienung um die
Wiedergabe zu kontrollieren.
• Um die Wiedergabe anzuhalten drücken
Sie die Taste
.
• Um die Wiedergabe zu beginnen oder
fortzusetzen drücken Sie erneut die Taste
• Um die Wiedergabe zu beenden drucken
Sie die Taste .
• Um zu vorherigem/nächsten Titel oder
Kapitel zu springen, drücken Sie die Taste
oder Taste
.
• Für schnelle Suche rückwärts oder
vorwärts, drücken Sie die Taste
oder Taste
Wiederholt drücken um
die Suchgeschwindigkeit zu ändern. Im
Pausemodus, Zeitlupe rückwärts oder
vorwärts.
Ändern der Videowiedergabe
1. Abspielen eines Titels.
2. Benutzen Sie die Fernbedienung um die
Wiedergabe zu kontrollieren.
• Drücken Sie die Taste AUDIO zur Auswahl
einer Audio-Sprache oder -Kanal auf der
Disk.
• Drücken Sie die Taste UNTERTITEL zur
Auswahl einer Untertitel-Sprache auf der
Disk.
• Drücken Sie die Taste DISPLAY zur
Anzeige des aktuellen Status oder
Diskinformationen.
Deutsch
Disk einlegen
Bildzoom
1. Drücken Sie die Taste ZOOM, danach
Taste erneut drücken zur Auswahl des
Bildes. Um den Zoommodus zu verlassen,
wählen Sie normalen Modus.
Zeitlupe
1. Während der Videowiedergabe, drücken
Sie die Taste LANGSAM zur Auswahl der
Wiedergabegeschwindigkeit, und der Ton
wird ausgeschaltet. Drücken Sie die Taste
für normale Wiedergabegeschwindigkeit.
13
Bedienungsanleitung
Umschalten der Untertitelanzeige
Diese Funktion ist nur verfügbar wenn Sie
das TV Display auf Kino eingestellt haben.
1. Drücken Sie die Taste UNTERTITEL zum
Umschalten der Untertitelanzeige.
Hinweis:
* Sie können die Taste UNTERTITEL an der
Fernbedienung drücken zum Aufruf dieser
Funktion.
* Untertiteleinstellung wird nicht gespeichert
nach Entnahme der Disk.
Anzeige der
Wiedergabeinformation
Während der Wiedergabe, drücken Sie
die Taste DISPLAY zur Anzeige der
Wiedergabeinformation am TV.
Deutsch
Melodiekontrolle
1. Abspielen eines Titels.
2. Benutzen Sie die Fernbedienung um die
Wiedergabe zu kontrollieren.
• Um die Wiedergabe anzuhalten drücken
Sie die Taste
• Um die Wiedergabe zu beginnen oder
fortzusetzen drücken Sie erneut die Taste
• Um die Wiedergabe zu beenden drucken
Sie die Taste
• Um zu vorherigem/nächsten Titel oder
Kapitel zu springen, drücken Sie die Taste
oder Taste
• Für schnelle Suche rückwärts oder
vorwärts, drücken Sie die Taste
oder
Taste
Wiederholt drücken um die
Suchgeschwindigkeit zu ändern.
Wiedergabe von MP3/WMA Musik
MP3/WMA ist eine Art von stark
komprimierter Audio-Datei.
1. Legen Sie eine CD ein oder USB, die
MP3-/ WMA-Musik enthält. Wählen Sie
einen Musik-Ordner aus und drücken die
Taste OK. Wählen Sie eine Datei, zum
abspielen aus, dann drücken Sie die Taste
OK; um zum Hauptmenü zurückzukehren
drücken Sie die Taste
.
Hinweis:
• Für Disk mit mehreren Sitzungen wird nur
die erste Session abgespielt.
• Eine WMA-Datei, die durch Digital Rights
Management geschützt ist, kann nicht auf
diesem Gerät abgespielt werden.
14
• Sonderzeichen, die in MP3-Titelnamen
(ID3) oder Albumname vorhanden sind,
werden vielleicht nicht richtig am Bildschirm
angezeigt werden, weil diese Zeichen nicht
unterstützt werden.
• Ordner / Dateien, die die unterstützt
Grenze dieses Produkt überschreiten
können nicht angezeigt oder abgespielt
werden.
Wiedergabe von Bildern als
Diashow
Sie können JPEG Bilder betrachten.
1. Legen Sie eine Disk oder USB mit JPEG
Bildern ein. Wählen einen Bildordner aus
und drücken die Taste
• Um ein Bild auszuwählen, drücken Sie die
Navigationstasten , , ,
.
• Um ein ausgewähltes Bild zu vergrößern
und die Diashow zu starten drücken Sie die
Taste OK.
2. Drücken Sie die Taste OK zum beginn der
Diashow.
Hinweis:
• Es kann einen längeren Zeitraum
benötigen, um den gesamten Inhalt der Disk
auf dem TV anzuzeigen aufgrund der großen
Anzahl von Melodien / Bilder enthalten auf
der Disk.
• Dieses Produkt kann nur Digitalkamera
Bilder nach JPEG-Format anzeigen, das
in der Regel von fast allen Digitalkameras
verwendet wird. Bewegte JPEG, Bilder in
anderen Formaten als JPEG oder mit Ton
verknüpfte Bilder können nicht angezeigt
werden.
• Ordner / Dateien, die die unterstützt
Grenze dieses Produkt überschreiten
können nicht angezeigt oder abgespielt
werden.
Bildwiedergabekontrolle
1. Abspielen einer Bilder-Diashow.
2. Benutzen Sie die Fernbedienung um die
Wiedergabe zu kontrollieren.
• Drücken Sie die Navigationstasten
/
um ein Bild gegen den Uhrzeigersinn oder
im Uhrzeigersinn zu drehen.
• Drücken Sie die Navigationstasten / um
ein Bild horizontal/vertikal zu kippen.
• Um die Wiedergabe zu beenden drucken
Sie die Taste .
Hinweis:
- Einige Funktionen können nicht mit einigen
Disks oder Dateien funktionieren.
Bedienungsanleitung
Abspielen oder betrachten von MP3, WMA
oder JPEG Dateien auf den folgenden USB
Geräten.
- Flash Drive
- Speicherkartenleser
1. Stecken Sie ein USB Gerät in den USB
Steckplatz.
2. Drücken Sie die Taste QUELLE. Ein
Inhaltsmenü wird angezeigt.
3. Wählen Sie eine Datei zum abspielen aus
und drücken die Taste OK.
Um die Wiedergabe zu beenden drucken Sie
oder entfernen das USB Gerät.
USB Speichergerät Datenschutz
- USB-Gerät immer in die richtige Richtung
einsetzen. Andernfalls kann es zu Schäden
am USB-Gerät und diesem Produkt führen.
- Entfernen Sie das USB-Gerät nicht,
während auf das Gerät zugegriffen wird.
- Elektrische Störungen und elektrostatische
Entladungen kann zu Fehlfunktionen und
Beschädigung des USB-Geräts führen, was
Datenverlust als Folge hat.
Es wird dringend empfohlen, dass alle
wichtigen Daten auf einem PC gesichert
werden, um gegen Korruption, Datenverlust
oder Fehlfunktion des Gerätes zu schützen.
Bitte beachten Sie, dass unser Unternehmen
keine Haftung für Schäden oder Verlust der
gespeicherten Daten übernimmt.
Hinweis: USB-Anschluss ist nicht mit allen
Festplattenmodellen kompatibel.
Note: USB connection is not compatible with
all hard drive models.
Wiedergabe von Bluetooth
Geräten
Mit diesem Gerät können Sie Audio-Dateien
von einem Abspielgerät hören, wenn die
Bluetooth - Verbindung verfügbar ist.
Koppeln Bluetooth - fähiger Geräte.
Um Ihr Bluetooth-Gerät an das System
anzuschließen, müssen Sie das Gerät mit
dem System koppeln. Kopplung muss nur
einmal durchgeführt werden.
Hinweis:
* Der Reichweite zwischen diesem System
und einem Bluetooth-Gerät sind etwa 10
Meter.
* Bevor Sie ein Bluetooth-Gerät an dieses
System anschließen, machen Sie sich mit
den Bluetooth-Funktionen des Gerätes
vertraut.
* Kompatibilität mit allen Bluetooth-Geräten
wird nicht garantiert.
* Jedes Hindernis zwischen diesem System
und einem Bluetooth-Gerät kann die
Reichweite verringern.
* Halten Sie dieses System entfernt von
anderen elektronischen Geräten, die
Störungen verursachen können.
1 . Schalten Sie die Bluetooth -Funktion auf
Ihrem Gerät ein.
2 . Suche nach anderen Bluetooth-Geräten
mit Ihrem Gerät.
3 . Wählen Sie „ KM1584 „ in der
Paarungsliste.
4 . Geben Sie das Standard-Passwort „0000”
ein, wenn nötig.
Hinweis:
* Das Gerät wird getrennt, wenn das Gerät
über die Reichweite hinaus bewegt wird.
* Wenn Sie das Gerät mit dem System
verbinden möchten, beachten Sie die
Reichweite.
* Das System wird sich mit dem BluetoothGerät verbinden, wenn die Kopplung bereits
angeschlossen ist, im Kopplungs-Modus
können andere Bluetooth-Geräte gesucht
werden zum Verbinden oder Koppeln.
* Wenn das System vom Bluetooth-Gerät
getrennt wird, wird es automatisch in den
Kopplungs-Modus gehen, dadurch können
andere Bluetooth-Geräte gesucht werden
zum Verbinden oder Koppeln
Deutsch
Wiedergabe von USB Geräten
Hören Sie Musik von Bluetooth-Gerät
Wenn das angeschlossene Gerät Bluetooth
Advanced Audio Distribution Profile (A2DP)
unterstützt, können Sie die auf dem Gerät
gespeichert Musik durch das System
anhören.
1 . Koppeln Sie das System mit dem Gerät.
2 . Starten Sie die Musikwiedergabe über
das Gerät.
15
Bedienungsanleitung
FM radio
Suchen der FM Radiosender
Hinweis:
* Stellen Sie sicher, dass Sie die
mitgelieferte FM-Antenne angeschlossen
haben und voll ausgezogen ist.
1. Drücken Sie QUELLE, um die RadioQuelle auszuwählen.
2. Drücken und halten Sie die Taste gedrückt
/
um einen Radiosender zu suchen.
3. Wenn sich die Frequenz zu ändern
beginnt, lassen Sie die Taste los. Der FMTuner stimmt sich auf einen Sender mit
starkem Empfang ein.
4. Wiederholen Sie die Schritte 2-3, um
weitere Sender einzustellen
Zum Einstellen auf einen schwachen
Sender:
Drücken Sie wiederholt die Taste
/
Sie optimalen Empfang erreichen.
bis
Deutsch
Automatische
Senderspeicherung
Hinweis:
* Sie können eine maximale Anzahl von 20
Radiosendern speichern.
1. Im Radiomodus, drücken Sie die Taste
UHR/PROG für 3 Sekunden um die
automatische Speicher-Programmierung zu
aktivieren.
- [AUTO] ist angezeigt.
- Das Gerät speichert alle FM-Sender
automatisch und beginnt danach mit der
Wiedergabe des ersten Radisenders.
Manuelle Senderspeicherung
Hinweis:
* Sie können eine maximale Anzahl von 20
Radiosendern speichern.
1. Suchen Sie einen Radiosender.
2. Drücken Sie die Taste UHR/PROG um die
Speicherprogrammierung zu aktivieren.
3. Drücken Sie die Tasten
/
um eine
Nummer von 1-20 für diesen Radiosender
auszuwählen und drücken die Taste UHR/
PROG um den aktuellem Sender zu
speichern.
16
- Die Nummer des Stationsspeichers sowie
die Frequenz des Radiosenders werden
angezeigt.
4. Wiederholen Sie die Schritte 1-3 um
andere Radiosender zu speichern.
Hinweis:
Um einen gespeicherten Sender zu
löschen, einfach mit einem anderen Sender
überschreiben.
Aufruf eines gespeicherten
Radiosenders
1. Suchen Sie einen Radiosender.
2. Drücken Sie die Tasten
/
button to select a preset
number.
Bedienungsanleitung
Einstellen der Lautstärke und Klangeffekte
Einstellen der Lautstärke
1. Während der Wiedergabe drücken Sie die Taste
verringern.
/
um die Lautstärke zu erhöhen/
Einstellen des Basspegels
1. Während der Wiedergabe, drehen Sie den BASS Regler um den Pegel einzustellen.
Einstellen des Höhenpegels
1. Während der Wiedergabe, drehen Sie den HÖHEN Regler um den Pegel einzustellen.
Ton ausschalten
1. Während der Wiedergabe, drücken Sie die Taste
wiederzustellen.
um den Ton auszuschalten/
Andere Merkmale
Dieses Gerät kann als Weckuhr benutzt
werden. Sie können DISK, USB oder
RADIO als Weckuhr benutzen.
Hinweis:
Überprüfen Sie die korrekte Einstellung der
Uhrzeit.
1. Im Bereitschaftsmodus drücken und
halten Sie die Taste TIMER / SCHLAFEN
gedrückt, bis [TIMER SET] Timereinstellung
über den Bildschirm rollt.
2. Drücken Sie die Taste
/
/
/
auf der Fernbedienung, oder drücken Sie
auf
/
auf der Frontplatte, um eine
Quelle auszuwählen.
3. Drücken Sie die Taste TIMER /
SCHLAFEN, zum bestätigen. Die
Stundenanzeige wird angezeigt und blinkt.
4. Drücken Sie
/
Taste auf der
Frontplatte oder drücken Sie die Taste
/
/
/
auf der Fernbedienung, um die
Stunde einzustellen, und drücken Sie die
Taste TIMER / SCHLAFEN zum bestätigen.
Die Minutenanzeige wird angezeigt und
blinkt.
5. Drücken Sie die Taste
/
auf der
Frontplatte oder drücken Sie die Taste
/
/
/
auf der Fernbedienung),
um die Minuten einzustellen, und drücken
Sie die Taste TIMER / SCHLAFEN zum
bestätigen.
.
6. Drücken Sie die Taste VOL + / -, um die
Lautstärke einzustellen, und drücken Sie die
Taste TIMER / SCHLAFEN zum bestätigen.
Ein Uhr-Symbol erscheint auf dem Display
Alarmtimer aktivieren/deaktivieren
1. Im Bereitschaftsmodus drucken Sie
wiederholt die Taste TIMER/SCHLAFEN.
* Wenn der Timer aktiviert ist, wird das
Uhrsymbol angezeigt.
* Wenn der Timer deaktiviert ist, verschwindet
das Uhrsymbol aus der Anzeige.
Deutsch
Einstellen des Alarmtimers
Hinweis:
■ Der Alarmtimer steht nicht zur Verfügung
wenn als Quelle “AUX” ausgewählt ist.
■ Wenn DISK/USB Quelle ausgewählt wurde,
aber kein Gerät angeschlossen ist, schaltet
das Gerät automatisch auf RADIO.
Einstellen des Schlaftimers
Dieses Gerät kann nach einem
eingestellten Zeitraum automatisch in den
Bereitschaftsmodus schalten.
1. Wenn das Gerät eingeschaltet ist, drücken
Sie wiederholt die Taste TIMER/ SCHLAFEN,
zur Auswahl einer voreingestellten Zeit (in
Minuten). Wenn der Schlaftimer aktiviert
ist, erscheint das Schlaf-Symbol zz in der
Anzeige.
* Um den Schlaftimer zu deaktivieren, drücken
Sie wiederholt die Taste TIMER/ SCHLAFEN
bis [AUS] (schlafen aus) angezeigt wird.
17
Bedienungsanleitung
Einstellungen
1. Beim drücken der Taste
Hauptmenü.
Disc
USB
erscheint das
Setup
2. Wählen Sie
zum Aufruf des
Einstellungsmenü
Deutsch
Auto(eng)
Hinweis:
* Sie können ein grau angezeigtes Menü
nicht ändern.
* Für die Rückkehr zum vorherigen Menü,
drücken sie die Taste
das Menü zu
verlassen, drücken Sie erneut die Taste
.
Allgemeine Einstellungen
1. Drücken Sie die Taste
.
2. Drücken Sie die Taste OK zum Aufruf des
Einstellungsmenüs.
3 Drücken Sie die Taste
zur Auswahl
des Menüs [Allgemeine Einstellungen].
● [Disk sperren]: Disksperre aktivieren/
deaktivieren.
● [OSD Sprache]: Auswahl einer BildschirmAnzeigesprache.
● [Auto Bereitschaft]: Automatische
Bereitschaftsmodus aktivieren/deaktivieren.
Es ist eine Energie-Sparmassnahme.
Hinweis:
Wenn Sie eine Sprache auswählen die sich
nicht auf der Disk befindet, benutz das gerät
die voreingestellte Sprache der Disk.
18
Videoeinstellungen
1. Drücken Sie die Taste
.
2. Press OK button to access the setup menu.
3. Press
zur Auswahl des Menüs
[Videoeinstellungen].
● [TV System]: Auswählen eines TV System das
kompatibel mit Ihrem TV ist.
● [TV Display]: Einstellen des Bildschirmformats
(4:3 Pan Scan, Standard).
● [Bildeinstellungen]: Auswahl von
voreingestellten Farbeinstellungen oder
manuelle Farbeinstellung.
● [HD JPEG]: Aktiviert oder deaktiviert die
Anzeige von hochauflösungs- JPEG Bilder.
● [HDMI Einstellung]:
- [Auflösung]: Wählt die HDMI Videoauflösung,
die mit Ihrem TV-Display-Fähigkeit kompatibel
ist.
- [Auflösung]: Wählt die HDMI Videoauflösung,
die mit Ihrem TV-Display-Fähigkeit kompatibel
ist.
- [HDMI Deep Color]: Diese Funktion ist nur
verfügbar, wenn das Anzeigegerät über ein
HDMI-Kabel angeschlossen ist, und wenn es
die Funktion Deep Color unterstützt.
- [Breitbild]: Einstellen des Bildschirmformat
(Super Breitbild, 4:3 Pillar Box oder aus)
- [Customer Link Einstellung]: Dieses
Produkt unterstützt Customer Link das das
HDMI CEC (Consumer Electronics Control)Protokoll verwendet. Sie können eine einzelne
Fernbedienung verwenden, um alle kompatible
Geräte, die über HDMI angeschlossen sind,
zu steuern.
- [1 Touch Play]: Wenn Sie die WiedergabeTaste drücken, um dieses Gerät
einzuschalten, schaltet sich der Fernseher
automatisch ein (wenn der Fernseher
One-Touch Wiedergabe unterstützt) und
wechselt in den Modus Videoeingang. Die
Disc-Wiedergabe beginnt, wenn sich eine
Disk in diesem Produkt befindet.
- [1-Touch Bereitschaft]: Wenn Sie die
Taste Standby drücken, werden alle
angeschlossenen HDMI-CEC-Geräte (wenn
das Gerät 1-Touch-Standby unterstützt)
gleichzeitig in den Bereitschaftsmodus
geschaltet.
Bedienungsanleitung
Hinweis:
* Sie müssen zuerst die Funktion HDMI
CEC Bedienung am TV/Geräten aktivieren,
bevor Sie die Customer Link Kontrolle
genießen können. Für Einzelheiten, siehe
Bedienungsanleitung des TV/Gerätes.
* Wir garantieren nicht 100%
Interpretierbarkeit mit allen HDMI-CEC
kompatiblen Geräten.
Audioeinstellungen
1. Drücken Sie die Taste
.
2. Drücken Sie die Taste OK zum Aufruf des
Einstellungsmenüs.
3. 3. Drücken Sie die Taste
Auswahl des
Menüs [Audioeinstellungen].
● [HDMI Audio]: HDMI Audioausgang am
Gerät aktivieren/deaktivieren.
● [Audio Sync]: Stellt eine Verzögerung ein
für den Audioausgang beim abspielen einer
Videodisk.
Disk schützen
● [Klangmodus]: Auswahl eines
Voreingestellten Klangeffekts um den
Audioausgang zu verbessern.
● [Nachtmodus]: Wählt einen ruhigen oder
voll dynamischen Klang. Nachtmodus
verringert den Pegel von lautem Ton und
erhöht den Pegel von weichem Ton (wie z.B.
Sprache).
Benutzereinstellungen
1. Drücken Sie die Taste
.
2. Drücken Sie die Taste OK zum Aufruf des
Einstellungsmenüs.
3. Drücken Sie die Taste
zur Auswahl des
Menüs [Benutzereinstellungen].
● [Audio]: Auswahl einer Audiosprache für
Videos.
● [Untertitel]: Auswahl einer Untertitelsprache
für Videos.
● [Disk Menü]: Auswahl der Menüsprache für
eine Videodisk.
● [Kindersicherung]: Einstellen der
Altersfreigabestufe für eine Disk. Beschränkt
den Zugriff auf Disks, die mit Bewertungen
codiert sind. Diese Disks müssen mit
Bewertungsstufen aufgezeichnet werden.
● [PBC]: Anzeigen oder verbergen des
Inhaltsmenü für VCD und SVCD.
● [Passwort]: Einstellen oder ändern des
Passwortes zum abspielen von eingeschränkten
Disks.
● DivX-Untertitel:Wählen Sie einen
Zeichensatzes, der DivX-Untertitel unterstützt.
● [Version Info.]: Anzeige der Softwareversion
dieses Gerätes.
● [Werkseinstellung]: Zurücksetzen der
Einstellungen auf die Werkseinstellungen.
Deutsch
- [Sys Audio Control]: Wenn die SystemAudiosteuerung aktiviert ist, wird der Ton
des angeschlossenen Gerätes automatisch
über die Lautsprecher des Systems
übertragen, wenn Sie die Wiedergabe auf
dem Gerät starten.
- [Audio Mapping]: Wenn die
Systemaudiosteuerung nicht funktioniert,
stellen Sie das angeschlossene Gerät
auf die richtige Audioeingangsbuchse am
System.
- Um die Disk sauber zu halten, beim halten, bitte nicht die Oberfläche der CD berühren. Nur am
Rand halten.
- Wenn die Disc verschmutzt ist, wird die Klangqualität beeinträchtigt. Bitte benutzen Sie ein
sauberes und weiches Tuch, um die Disc von innen nach außen abzuwischen. Wischen Sie die
Disc nicht in kreisenden Bewegungen.
- Kleben Sie kein Papier, auf der Disk.
- Nachdem Sie mit der Disk fertig sind, legen Sie diese bitte zurück in seine ursprüngliche
Schutzhülle. Um ein Verziehen oder Schäden zu vermeiden, sollten Sie die Disks nicht stapeln.
- Disk, die Fehler oder Verformung haben nicht abspielen, dieses kann zur Beschädigung des
Gerätes führen.
- Reinigen Sie CDs nur mit einem weichen, trockenen Tuch. Verwenden Sie keine Chemikalien,
wie z.B. Benzol, Verdünner, Antistatiksprays oder ähnliches, da diese die Oberfläche der CD
beschädigen.
19
Bedienungsanleitung
Fehlerbehebung
Wenn Sie ein Problem mit Ihrem System haben, suchen Sie in dieser Liste nach einer möglichen
Lösung, bevor Sie den Kundendienst anrufen.
Wenn Sie das Problem mit den hier angegebenen Hinweisen nicht lösen können, oder das
System ist beschädigt worden, rufen Sie eine qualifizierte Person, wie z. B. Ihren Fachhändler, für
Behebung.
Kein Strom
Kein oder schwacher Ton
● Überprüfen Sie ob das Netzkabel des
Gerätes richtig angeschlossen ist.
● Überprüfen Sie ob Spannung an der AC
Steckdose ist.
● Lautstärke einstellen.
● Kopfhörer entfernen.
● Überprüfen Sie ob die Lautsprecher
korrekt angeschlossen sind.
● Überprüfen Sie ob die blanken Drähte
eingeklemmt sind.
Keine Disk erkannt
● Disk einlegen.
● Überprüfen Sie ob die Disk mit der
beschrifteten Seite nach unten eingelegt ist.
● Warten Sie bis sich die kondensierte
Feuchtigkeit von den Linsen verflüchtet.
● Disk reinigen oder austauschen.
● Benutzen Sie eine abgeschlossene DVD
oder korrektes Diskformat.
Kein Bild
Deutsch
● Überprüfen Sie den Videoanschluss.
● TV auf den korrekten Videoeingangskanal
schalten.
Schwarz-weißes oder verzerrtes
Bild
● Die Disk stimmt nicht mit dem TV SystemStandard überein (PAL/NTSC).
● Manchmal kann eine leichte
Bildverzerrung auftreten. Dies ist keine
Fehlfunktion.
● Disk reinigen.
Das Seitenverhältnis des
Bildschirms kann nicht
geändert werden, obwohl Sie
das Seitenverhältnis Format
festgelegt haben.
● Das Seitenverhältnis ist festgelegt auf der
eingelegten Disk.
● Das Seitenverhältnis kann bei einigen TV
Geräten nicht verändert werden.
20
Fernbedienung funktioniert
nicht
● Bevor sie eine Funktionstaste drücken,
wählen Sie die korrekte Quelle mit der
Fernbedienung als am Hauptgerät.
● Verringern Sie den Abstand zwischen
Fernbedienung und Gerät.
● Legen Sie Batterien mit der korrekten
Polarität ein (+/- Symbole) wie angezeigt.
● Batterien austauschen.
● Fernbedienung direkt am Sensor des
Hauptgerätes ausrichten.
Keine Diskwiedergabe
● Legen Sie ein lesbare Disk ein mit der
beschrifteten Seite nach oben.
● Überprüfen Sie Disktyp, Farbsystem
und Flächenkode. Überprüfen Sie ob sich
Kratzer oder Schmutz auf der Oberfläche
der Disk befindet.
● Drücken Sie die Taste
um das
Einstellungsmenü zu verlassen.
● Deaktivieren Sie das Passwort für
den Kinderschutz oder ändern Sie die
Altersfreigabestufe.
● Feuchtigkeit hat im System kondensiert.
Disk entfernen und Gerät für etwa eine
Stunde eingeschaltet lassen. Netzkabel
von der Steckdose trennen und wieder
einstecken, das Gerät wieder einschalten
plug, and then turn on the system again.
Schwacher Radioempfang
● Erhöhen Sie den Abstand zwischen dem
Gerät und Ihrem TV oder VCR.
● FM Antenne voll ausziehen und
ausrichten.
Bedienungsanleitung
● Die Disk besitzt keine Tonspur oder
Untertitel in verschieden Sprachen.
● Die Einstellung der Audio- oder UntertitelSprache ist auf dieser Disk verboten.
Kann einige Dateien auf dem
USB-Gerät nicht anzeigen
● Die Anzahl der Ordner oder Dateien
auf dem USB-Gerät überschreitet
die unterstützte Anzahl Dies ist keine
Fehlfunktion.
● Das Format dieser Dateien wird nicht
unterstützt.
USB-Gerät wird nicht unterstützt
● Das USB-Gerät ist inkompatibel mit dem
System. Versuchen Sie ein anderes USBGerät.
Timer funktioniert nicht
● Korrektes Einstellen der Uhrzeit.
● Timer aktivieren.
Uhrtimereinstellung gelöscht
● Die Stromversorgung wurde unterbrochen
oder das Netzkabel wurde getrennt. .
● Einstellungen des Uhrtimers wiederholen.
Über Bluetooth-Geräte
Musikwiedergabe steht nicht zur
Verfügung auch nach erfolgreicher Bluetooth Verbindung.
● Das gerät kann nicht mit dem System
verwendet werfen zur Musikwiedergabe.
Die Audioqualität ist schwach
nach einer Verbindung mit einem
Bluetooth-fähigem Gerät.
● Der Bluetooth Empfang ist schwach.
Bringen Sie das Gerät näher an das
System heran oder entfernen Sie etwaige
Hindernisse dazwischen
Kann keine Verbindung zum
System herstellen
● Das Gerät unterstützt nicht das benötigte
Profil des Systems.
● Die Bluetooth Funktion am Gerät ist nicht
aktiviert. Siehe Bedienungsanleitung des
Gerätes zur Aktivierung der Funktion.
● Das System ist nicht im Kopplungsmodus.
● Das System ist schon mit einem anderen
Bluetooth-Fähigem Gerät verbunden.
Trennen Sie das gerät sowie alle anderen
damit verbundenen Geräte und versuchen
es erneut.
Deutsch
Audio oder Untertitelsprache
kann nicht eingestellt werden
21
Bedienungsanleitung
Technische Daten
GAllgemeine Informationen
Spannungsversorgung....................................................................................... 220-240V~ 50/60Hz
Kanaltrennung........................................................................................................................ ≥ 40 dB
THD.............................................................................................................................................≤ 1%
Verbrauch.................................................................................................................................... 50W
DVD
Videoausgang.......................................................................................................................... 1 Vp-p
Horizontale Auflösung............................................................................................................≥ 500TV
Abmessungen (Hauptgerät).....................................................................160(W)×78(H)×260(D)mm
(Verstärker).............................................................................................160(W)×78(H)×280(D)mm
FM
FM Frequenzbereich......................................................................................................87.5 - 108 MHz
FM Rauschgrenze Empfindlichkeit............................................................................................ ≤ 20uV
FM Rauschabstand.................................................................................................................. ≥ 46 dB
Lautsprecher
Impedanz.................................................................................................................................6Ω
Eingangsleistung....................................................................................................................... 45W
Abmessungen.........................................................................................130(W)×205(H)×176(D)mm
Deutsch
USB
Kompatibilität......................................................................................................USB 2.0 or USB1.1
USB Steckplatz...................................................................................................USB:DC 5 V1 500mA
Bluetooth
Kommunikationssystem..............................Bluetooth Standard version 2.1 und EDR Standard
Ausgang...............................................................................Bluetooth Standard Leistungsklasse 2
Maximale
Reichweite.......................................................................................................etwa10m
Frequenzband................................................................... 2,4 GHz Band (2,4000 GHz – 2,4835 GHz)
Kompatible Bluetooth - Profile....................................Advanced Audio Distribution Profile (A2DP)
Unterstütztes Multigerät-Kopplung.............................................................................. bis zu 8 Geräte
Unterstützte Codes (Empfang)........................................................................SBC (Sub Band Codec)
(Senden).........................................................................................................SBC(Sub Band Codec)
Fernbedienung
Reichweite.....................................................................................................................................5m
Winkel..........................................................................................................................................±30°
Zubehör
Audiokabel.......................................................................................................................1
Videokabel.....................................................................................................................1
FM Antenne.......................................................................................................................................1
Bedienungsanleitung....................................................................................................................1
Fernbedienung.................................................................................................................................1
Hinweis: Design und Technische Daten können ohne Vorankündigung geändert werden.
22
Bedienungsanleitung
Deutsch
Vertrieben durch LECHPOL Electronics BV, Nijverheidsweg 15 4311RT Bruinisse, Niederlande
23
Owner’s manual
Table of Contents
Before Use......................................................25
For your safety...............................................25
Hearing safety..............................................26
Product Overview............................................27
The Unit........................................................27
Remote control.............................................29
Installation of Batteries.................................30
Remote Control Operation Range................30
Connect..........................................................31
Connecting the FM aerial.............................31
Connecting Control Cable............................31
Connecting Auxiliary Equipment...................31
Connecting Speakers...................................31
Connect to the composite video jack............32
Connect to the HDMI jack.............................32
Connect power.............................................32
Connect to the Headphone...........................32
English
Get started.....................................................33
ECO-Power/Standby Features..................33
Setting the clock........................................33
Adjusting the Display Brightness...............33
Playback......................................................34
Place a disc..................................................34
Play disc.......................................................34
Control video play........................................34
Change video play........................................34
Zoom in/out..................................................34
Slow-motion play..........................................34
Shift subtitle display......................................35
Display play information .............................35
Control a track.............................................35
Play MP3/WMA music.................................35
Play photo as slide show.............................35
Control photo play.......................................35
Play from USB device..................................36
Play from Bluetooth device..........................36
Listen to FM radio...........................................37
Tune to FM radio stations............................37
Program radio stations automatically............37
Program radio stations manually..................37
Tune to a preset radio station......................37
24
Adjust volume level and sound effect.............38
Adjust volume level......................................38
Adjust bass level..........................................38
Adjust treble level........................................38
Mute sound..................................................38
Other features.................................................38
Set alarm timer.............................................38
Activate/deactivate alarm timer...................38
Set sleep timer.............................................38
Adjust settings................................................39
General setup..............................................39
Video Setup.................................................39
Audio Setup.................................................40
Preference setup.........................................40
Protect the Disc............................................. 40
Troubleshooting............................................41
Specifications.................................................43
Owner’s manual
Before Use
Thank you for purchasing this system. Please read these operating instructions before
operating the unit. The operating instructions should be retained for future reference.
For your safety
Don’t obstruct the ventilation openings of
the equipment with items such as newspaper,
table-cloths,curtains, etc.. Overheating
will cause damage and shorten the life of
the equipment.
When you disconnect the power cord,
always pull the plug, never the cable.
NEVER let anyone especially children
push anything into holes, slots or any
other opening in the case - this could
result in a fatal electrical shock;
Protect the power cord from being walked
on or pinched, particularly at plugs,
convenience receptacles, and the point
where they exit from the device.
Never hitting the product use the sharp
objects.
Never place the product and accessories
near naked flames or other heat sources,
including direct sunlight.
To avoid electric shock, do not open the
cabinet. Refer all servicing to qualified
service personnel.
Never expose the product and accessories
to rain or water. Never place liquid
containers, such as vases, near the product.
WARNING:
TO PREVENT FIRE OR SHOCK HAZARD,
DO NOT EXPOSE THIS APPLIANCE TO
DRIPPING OR SPLASHING.
CAUTION:
TO REDUCE THIS RISK OF ELECTRIC
SHOCK DO NOT REMOVE COVER
(OR BACK), NO USER SERVICEABLE
PARTS INSIDE, REFER SERVICING TO
QUALIFIED SERVICE PERSONNEL.
Laser Product
This product is equipped with low power
laser equipment. For your own safety do not
remove any covers or take the product apart.
Repair work must be carried out by qualified
personnel.
CLASS 1
LASER PRODUCT
Caution:
This product is equipped with low
power laser equipment inside, for
your safety, don’t open the laser radiation protective equipment. Don’t
look at the laser radiation district
when the equipment is operating.
English
Before operating this system, check the
voltage of this system to see if it is identical
with the voltage of your local power supply.
CAUTION
RISK OF ELECTRIC SHOCK
DO NOT OPEN
This symbol indicates that dangerous voltage
constituting a risk of electric shock is present
within this unit.
This symbol indicates that there are important
operating and maintenance instructions in the
literature accompanying this unit.
25
Owner’s manual
Hearing safety
Listen at a moderate volume.
* Using headphones at high volume can impair your hearing. This product can produce
sounds in decibel ranges that may cause hearing loss for a normal person, even for
exposure less than a minute. The higher decibel ranges are offered for those that may
have already experienced some hearing lose.
* Sound can be deceiving. Over time your hearing “comfort level”adapts to higher
volumes of sound. So after prolonged listening, what sounds “normal”can actually be
loud and harmful to your hearing. To guard against this, set your volume to a safe level
before your hearing adapts and leave it there.
To establish a safe volume level:
* Set your volume control at a low setting.
* Slowly increase the sound until you can hear it comfortably and clearly, without
distortion.
Listen for reasonable periods of time:
* Prolonged exposure to sound, even at normally “safe”levels, can also cause hearing
lose.
* Be sure to use your equipment reasonably and take appropriate breaks.
English
Be sure to observe the following guidelines when using your headphones.
* Listen at reasonable volumes for reasonable periods of time.
* Be careful not to adjust the volume as your hearing adapts.
* Do not turn up the volume so high that you can’t hear what’s around you.
* You should use caution or temporarily discontinue use in potentially hazardous
situations. Do not use headphones while operating a motorized vehicle, cycling,
skateboarding, etc.; it may create a traffic hazard and is illegal in many areas.
26
Owner’s manual
The Unit
Front View (Main unit)
Rear View (Main unit)
AUX IN1
AUX IN2
ANTENNA
FM
VIDEO
L
L
R
R
CABLE
/
- Skip to the previous/next track, title,
or file
- Select a preset radio station
- Start or pause play
10.
- Open or close the disc compartment.
11.
- Stop play
12. FM Antenna
- Improve FM reception
13. Control connect cable
14. AUX IN 1(L&R)
- Conenct an external audio device
15. AUX IN 2(L&R)
- Conenct an external audio device
16. VIDEO Output
- Video output jack
17. Bluetooth antenna
18. HDMI Output
- Connect the HDMI device
English
1. STANDBY
- Switch the system on/off
2. CLOCK
- Set clock
3. MODE
- For FM radio, select stereo or mono
sound output
- For Disc, select repeat or shuffle modes
4. USB
- USB socket
5. Indicator
- When the unit is in standby, the indicator
turns red
6. IR sensor
- Detect signals from the remote control
7. Display panel
- Show current status.
8. Disc compartment
9.
/
- Search within a track
- Fast backward or forward
- Tune to a radio station
27
Owner’s manual
Front View (Amplifier)
SOURC E
Rear View (Amplifier)
AC
CABLE
English
S PEAKER OUTPUT(6
28
1. Headphone Jack
- Headphone socket
2. Bass
- Adjust bass
3. Treble
- Adjust treble
4. VOLUME +
- Adjust volume
5. SOURCE
- Select a source: TUNER, AUX 1,
AUX 2, DISC,USB or BT
6. AC Mains ~
- Connected with AC power cord
7. Control Cable Connector
8. Speaker out (6 Ω)
- Connect the speakers
)
Owner’s manual
SOURCE
MENU
AUDIO
OK
SUBTITLE
MODE
ZOO M
CLOCK/PRO GT
SLOW
DISPLAY/DIM
IMER/SLEEP
1. STANDBY
- Switch the system on/off
2. SOURCE
- Select a source
3.
- Access the home menu
4.
AUDIO
- For menus: navigate up
- Invert a picture
- AUDIO : Select an audio language when
you play a video
: Select number (0~9)
5.
- Search in a track or disc
- Fast backward
- For menus, navigate left
- Rotate a picture
- Tune to a radio station
6.
- Start, pause or resume play
7. MODE
- For FM radio, select stereo or mono sound
output
- For Disc, select repeat or shuffle modes
8.
- Skip to the previous track, title or file
- Select a preset radio station
9. ZOOM
- Zoom into a video scene or picture
10.
- Adjust the volume
11.
- Select a preset sound setting: Warm,
Powerful, Clear, Balanced or Bright.
12. CLOCK/PROG
- Set clock
- Program radio stations
13. MENU
- For DVD: access or exit the dis menu
- For VCD: turn on/off PBC
14. OK
- Confirm a selection
15.
- Search in a track or disc
- Fast forward
- For menus, navigate right
- Rotate a picture
- Tune to a radio station
16. SUBTITLE
- For menus: navigate down
- Invert a picture
- SUBTITLE : Select a subtitle language for
a video.
- : Select number (0~9)
17.
- Stop play
18.
- Skip to the next track, title or file
- Select a preset radio station
19. DISPLAY/DIM
- Display play information on a connected TV
- Select a brightness level for the display
screen
20. SLOW
- Select a slow play mode
21.
- Mute
22. TIMER/SLEEP
- Set sleep timer
- Set alarm timer
23.
- Adjust the volume
English
Remote control
29
Owner’s manual
Installation of Batteries
1. Open the battery compartment.
2. Insert 2 AAA batteries with correct polarity
(+/-) as indicated.
English
3. Close the battery compartment.
Note:
* Remove the batteries if the remote control is not going to be used for an extended
period of time.
* To avoid possible failure, read the following instructions and handle the remote control
properly.
* Do not drop or cause impact to the remote control.
* Do not spill water or any liquid on the remote control.
* Do not place the remote control on a wet object.
* Do not place the remote control under the direct sunlight or near sources of excessive
heat.
* Do not use caustic cleaners ( porcelain, stainless steel, toilet, or oven cleaner etc. )
on the remote, as it may suffer damage.
Remote Control Operation Range
1. Point the remote control towards the remote
sensor IR of the front of the unit.
2. Make sure that there is no obstacle between
the infrared remote sensor of the unit and
remote control.
30
Owner’s manual
Connect
Connecting the FM aerial
Connecting Auxiliary Equipment
Main Unit
AUX IN1
AUX IN2
ANTENNA
FM
VIDEO
L
L
R
R
CABLE
Auxiliary equipment
Main Unit
Note: Before attaching a 75 ohm coaxial lead
(the kind with a round wire going to an utside
antenna), disconnect the supplied FM wire
antenna.
Caution: To avoid noise, keep antennas
away from the system, the connecting cord
and the AC power cord.
Connecting Control Cable
AUX IN1
AUX IN2
ANTENNA
FM
VIDEO
L
L
R
R
CABLE
Auxiliary equipment
You can route audio from an external device
to this product. Connect an audio cable to:
· the AUX IN L/R sockets on this product.
· the audio output sockets on the external
device.
Connecting Speakers
Main Unit
AU X IN1
English
1. Using the coaxial type connector A 75
Ohm antenna with coaxial type connector
should be connected to the FM 75 ohm
coaxial terminal.
2. If connection is poor, connect the outside
antenna.
AU X IN2
ANTENNA
FM
VIDEO
L
L
R
R
CABLE
AC
CABLE
SPEAKER OUTPUT(6
)
Connect the control cable between the DVD
player and the amplifier.
1. Hold down the socket flap.
2. Insert the stripped part of the wire
completely.
· Insert the right speaker wires to “R”, left
speaker wires to “L”.
· Insert the red wires to “+”, white wires to “-”.
3. Release the socket flap.
31
Owner’s manual
Connect to the composite
video jack
AUX IN1
Connect power
AUX IN2
ANTENNA
FM
AC
VIDEO
L
L
R
R
CABLE
CABL E
VIDEO
S PEAKER OUTPUT(6
)
Caution:
* Risk of product damage! Ensure that the
power supply voltage corresponds to the
voltage printed on the back or the underside
of the unit.
* Before connecting the AC power cord,
ensure you have completed all other
connections.
VIDEO
Connect the AC power cord to the wall
socket.
Connect a composite video cable to the
VIDEO jack on this product, the VIDEO input
jack on the TV.
Note:
* This type of connection provides standard
picture quality.
Connect to the Headphone
Connect to the HDMI jack
AUX IN1
AUX IN2
ANTENNA
FM
English
VIDEO
L
L
R
R
CABLE
Plug headphones (not supplied) into the
connector on the unit to listen through the
headphones.
Connect the HDMI cable to the HDMI jack on
this product, the HDMI input jack on the TV.
Note:
* This type of connection provides best
picture quality.
32
Owner’s manual
ECO-Power/Standby Features
Setting the clock
Power in ON/OFF
When you insert the AC power cable into a
wall outlet, the unit will be in standby mode.
* Press the STANDBY button to switch the
unit on. The word “HELLO” will show in the
display.
* Press the STANDBY button to switch the
unit back to standby mode. The words “BYE
BYE” will scroll across the display.
1. In standby mode, press and hold CLOCK
button for over 2 seconds to active the
clock setting mode. [CLOCK SET] scrolls on
the display, and the [24] 24-hours time
format
appears.
2. Press
/
/
/
button on the
remote control to select 12/24 mode (time
format), and then press CLOCK button to
confirm. The hour digits begin to blink.
3. Press
/
/
/
button on the
remote control or press
/
button on
the front panel to set the hour.
4. Press CLOCK button to confirm. The
minute
digits begin to blink.
5. Press
/
/
/
button on the
remote control or press
/
button on
the front panel to set the minutes.
6. Press CLOCK button to confirm.
Adjusting the Display Brightness
1. In standby mode, press the DIM button to
scroll through the 3 brightness levels.
English
Switch in the system to ECO Power/
Standby mode
Press and hold STANDBY button over 2
seconds or more to switch to ECO power
standby or normal standby.
* ECO Power standby mode
The clock will not be displayed. Press the
CLOCK button to display the clock on the
LCD.
* Normal standby mode
The clock display on the LCD.
33
Owner’s manual
Playback
Control video play
Place a disc
1. Press the button to open the disc
compartment.
2. Place the disc on the disc tray with its
label side facing up.
Align the disc to
the disc tray guide
3. Press the button to close the disc
compartment.
Play disc
English
1. Press the SOURCE button to select the
DISC source.
2. Playback may start automatically. If no,
press the
button
· To view disc play, turn on the TV to the
correct viewing channel for this product.
· To stop disc play, press button.
Note:
· If the password entry menu is displayed,
enter the 6-digit password (000000)before
you can play the locked or restricted disc.
· If you pause or stop a disc, the screen
saver appears after 5 minutes of inactivity.
To deactivate the screen saver, press any
button.
· After you pause or stop a disc and no
button is pressed within 15 minutes, this
product automatically switches to standby.
1. Play a title.
2. Use the remote control to control the
playback.
· To pause playback, press the
button.
· To start or resume playback, press it again.
· To stop playback, press button.
· To skip to a previous / next title or chapter,
press
button or
button.
· To search fast-backward or fast-forward,
press
button or
button. Press
repeatedly to change the search speed.
In pause mode, slow a play backward or
forward.
Change video play
1. Play a title.
2. Use the remote control to control the
playback.
· Press the AUDIO button, select an audio
language or channel on a disc.
· Press the SUBTITLE button, select the
subtitle language on a disc.
· Press the DISPLAY button, display the
current status of disc information.
Zoom picture
1. Press ZOOM button, then press it again to
select zoomed picture. To cancel zoom
mode, select the normal mode.
Slow-motion play
1. During video playback,press the SLOW
button to select a play speed, and the
sounds mute. Press the
button to normal
speed play.
34
Owner’s manual
Shift subtitle display
Display play information
During play, press the DISPLAY button to
display play information on the TV.
Control a track
1. Play a track.
2. Use the remote control to control the play.
· To Pause playback, press
button.
· To Start or resume playback, press this
button again.
· To Stop playback, press button.
· To Skip to a previous/next track, press
button or
button.
· To Search fast-backward or fast-forward,
press
button or
button. Press
repeatedly to change the search speed.
Play MP3/WMA music
MP3/WMA is a type of highly compressed
audio file.
1. Insert a disc or USB that contains the
MP3/ WMA music. Select a music folder,
then press OK button. Select a file to play,
then press OK button, to return the main
menu, press
button.
Note:
· For disc recorded in multiple sessions,
only the first session is played.
· For a WMA file that is protected by Digital
Rights Management, it cannot be played
on this product.
· For any special character that is present
in the MP3 track name (ID3) or album
name, it might not be displayed correctly
on the screen because these characters
are not supported.
· Folders/files that exceed the supported
limit of this product cannot be displayed
or played.
Play photo as slide show
You can play JPEG photos.
1. Insert a disc or USB that contains the
JPEG photos. Select a photo folder, then
press button to enter.
· To select a photo, press the Navigation
buttons , , ,
.
· To enlarge the selected photo and start
slide show, press OK button.
2. Press OK button to start slide show play.
Note:
· It may require longer time to display the
disc content on the TV due to the large
number of songs/photos compiled onto
the disc.
· This product can only display digital
camera pictures according to the JPEG
format, typically used by almost all digital
cameras. It cannot display Motion JPEG,
or pictures in formats other than JPEG, or
sound clips associated with pictures.
· Folder/files that exceed the supported limit
of this product cannot be displayed or
played.
Control photo play
1. Play a photo slide show.
2. Use the remote control to control the play.
· Press the Navigation buttons
/
to rotate a photo anti-clockwise/clockwise.
· Press the Navigation buttons / to flip
a photo horizontally/vertically.
· Press button stop play.
Note:
- Some operations may not work with some
discs or files.
English
This feature is only available if you have set
the TV display to Cinema.
1. Press the SUBTITLE button to shift the
subtitle display.
Note:
* You can press the SUBTITLE on the
remote control to access Shift subtitle
feature.
* Subtitle Shift setting will be not retained
after disc is removed.
35
Owner’s manual
Play from USB device
Play or view MP3, WMA or JPEG files on the
following USB devices.
- flash drive
- memory card reader
1. Connect a USB device to the USB jack.
2. Press SOURCE button. A contents menu
is displayed.
3. Select a file to play, then press OK button.
To stop play, press or remove the USB
device.
USB Storage Device Data Protection
- Always insert the USB device in the correct
direction. Failure to do so may result in
damage to the USB device and this product.
- Do not remove the USB device while it is
being accessed.
- Electrical interference and electrostatic
discharges may cause the USB device to
malfunction and suffer damage, resulting in
data loss.
It is strongly recommended that any
important
data is backed up on a PC to protect against
corruption, data loss or device malfunction.
Please note that our company shall not
accept
any liability for damage or loss of stored
data.
English
Note: USB connection is not compatible with
all hard drive models.
Play from Bluetooth device
With this unit, you can listen to audio files
fromm a player if bluetooth connection is
available. Pairing bluetooth-enabled devices
To connect your Bluetooth device to the unit,
you need to pair the device to the unit.
Pairing needs only to be done once.
Note:
* The operational range between this unit
and a Bluetooth device is approximately 10
meters.
* Before you connect a Bluetooth device to
this unit, familiarize yourself with the
Bluetooth capablities of the device.
36
* Compatibility with all Bluetooth devices is
not guaranteed.
* Any obstracle between this unit and a
Bluetooth device can reduce the operational
range.
* Keep this unit away from any other
electronic device that may cause
interference.
1. Turn on the Bluetooth function on your
device.
2. Search for other Bluetooth device with
your device.
3. Select “KM1584” in the pairing list.
4. Enter default password “0000” if
necessary.
Note:
* The device will also be disconnected when
the device is moved beyond the operation
range.
* If you want to reconnect the device to the
unit, place it within the operational range.
* The device will be connected the Bluetooth
device pairing already, and also enter pairing
mode, other Bluetooth device can be
searching for connecting or pairing.
* When the unit disconnected from the
Bluetooth device, it will enter pairing mode
automatically, other Bluetooth devices can
be searching for connection or pairing.
Listen to music from Bluetooth device
If the connected Bluetooth device supports
Advanced Audio Distribution Profile (A2DP),
you can listen to the music stored on the
device through the unit.
1. Pair the device with the unit.
2. Start playing music via device.
Owner’s manual
Listen to FM radio
Tune to FM radio stations
Note:
* Ensure that you have connected and fully
extended the supplied FM antenna.
1. Press SOURCE to select TUNER source.
2. Press and hold
/
button to tune to
a radio station.
3. When the frequency starts to change,
release the button. The FM tuner tunes to
a station with strong reception automatically.
4. Repeat steps 2-3 to tune to more stations.
To tune to a weak station:
Press
/
button reeatedly until you find
optimal reception.
- The preset number and the frequency of
the preset station are displayed.
4. Repeat steps 2-3 to program other
stations.
Note:
To overwrite a programmed station, store
another station in its place.
Tune to a preset radio station
1. Tune to a radio station.
2. Press
/
button to select a preset
number.
Program radio stations
automatically
Note:
* You can program a maximum of 20 preset
radio stations.
Program radio stations
manually
English
1. In tuner mode, press CLOCK/PROG
button for 3 seconds to activate automatic
programming.
- [AUTO] is displayed.
- The unit stores all the FM radio stations
automatically and then broadcasts the first
preset radio station.
Note:
* You can program a maximum of 20 preset
radio stations.
1. Tune to a radio station.
2. Press CLOCK/PROG button to activate
programming mode.
3. Press
/
button to select a number
from 1-20 for this radio station, then press
CLOCK/PROG button to program the current
radio station.
37
Owner’s manual
Adjust volume level and sound effect
Adjust volume level
1. During play, press the
/
button to increase/decrease the volume level.
Adjust bass level
1. During play, rotate the BASS button to adjust bass level.
Adjust treble level
1. During play, rotate the TREBLE button to adjust treble level.
Mute sound
1. During play, press
button to mute/resume sound.
Other features
Set alarm timer
English
This unit can be used as an alarm clock.
You can select DISC, USB or TUNER as
alarm clock.
38
Note:
Make sure that you have set the time
correctly.
1. In standby mode, press and hold TIMER/
SLEEP button, until [TIMER SET] timer set
scrolls on the display.
2. Press
/
/
/
on the remote
control or press
/
on the front panel
to select a source.
3. Press TIMER/SLEEP button to confirm.
The hour digits are displayed and begin to
blink.
4. Press
/
button on the front panel
or press
/
/
/
button on the
remote control to set hour, then press
TIMER/SLEEP button again to confirm. The
minutes digits
are displayed and begin to blink.
5. Press
/
button on the front panel
or press
/
/
/
button on the
remote control) to set minute, then press
TIMER/ SLEEP button to confirm.
6. Press VOL +/– button to adjust volume,
then press TIMER/SLEEP button to confirm.
A clock icon appears on the display.
Activate/deactivate alarm timer
1. In the standby mode, press TIMER/SLEEP
button repeatedly.
* If timer is activated, the icon is displayed.
* If timer is deactivated, the icon disappears
on the display.
Note:
■ The alarm timer is not available when the
source is set as “AUX”.
■ If the DISC/USB source is selected but no
device connected, the unit switches to
TUNER automatically.
Set sleep timer
This unit can switch to standby mode
automatically
after a set period.
1. When the unit is turned on, press TIMER/
SLEEP button repeatedly to select a preset
period (in minutes). When the sleep timer is
activated, SLEEP icon zz displayed.
* To deactivate the sleep timer, press TIMER/
SLEEP button repeatedly until [OFF] (sleep
off) appears.
Owner’s manual
Adjust settings
USB
Disc
2. Select
the button . The home
Setup
to access the system menu
Auto(eng)
Note:
* You cannot change a menu option that is
grayed out.
* To return the previous menu, press
button. To exit the menu, press
again.
General setup
1. Press
button.
2. Press OK button to access the setup
menu.
3. Press
button access the [ General
Setup] options.
● [Disc Lock]: Turn on or off Disc lock.
● [OSD Language]: Select an on-screen
display menu language.
● [Auto Standby]: Turn on or off auto
standby mode. It is an energy saving
feature.
Note:
If you select a language which is not
available on a disc, this unit uses the default
language of the disc.
Video Setup
1. Press
button.
2. Press OK button to access the setup menu.
3. Press
button to access the [ Video Setup ]
options.
● [TV System]: Selects a TV system that is
compatible with the TV.
● [TV Display]: Set screen display format (4:3
Pan Scan, Standard).
● [Picture Setting]: Select a predefined colour
settings or set the colour manually.
● [HD JPEG]: Enables or disables display of
high definition JPEG images.
● [HDMI Setup]:
- [Resolution]: Selects the HDMI video output resolution that is compatible with your TV
display capability.
- [HDMI Deep Color]: This feature is available
only when the display device is connected by
an HDMI cable, and when it supports deep
colour feature.
- [Wide Screen]: Set screen display format
(Super Wide, 4:3 Pillar Box or off)
- [Customer Link Setup]: This product
supports Customer Link which uses the
HDMI CEC (Consumer Electronics Control)
protocol. You can use one single remote
control to control all Customercompliant
devices that are connected
through HDMI connectors.
- [1 Touch Play]: When you press the Play
button to turn on this product, the TV (if the
TV supports one-touch play) automatically
turns on and switches to the video-in
channel. Disc play starts if there is a disc in
this product.
- [1 Touch Standby]: When you press the
Standby button, all the connected HDMI
CEC devices (if the device supports ontouch standby) switch to standby mode
simultaneously.
- [Sys Audio Control]: If system audio
control is enabled, the audio of the
connected device is output through your
apparatus speakers automatically when
you play the device.
- [Audio Mapping]: If system audio control
does not work, map the connected device
to the correct audio input connector on your
apparatus.
English
1. After you press
menu appears.
39
Owner’s manual
Note:
* You must turn on the HDMI CEC perations
on the TV/devices before you can enjoy the
Customer Link control. See the TV/devices
manual for details.
* We does not guarantee 100%
interpretability with all HDMI CEC compliant
devices.
Audio Setup
1. Press
button.
2. Press OK button to access the setup
menu.
3. Press
button to access the [Audio
Setup] options.
● [HDMI Audio]: Enables or disables HDMI
audio output for the TV.
● [Audio Sync]: Sets a delay for audio
output when you play a video disc.
● [Sound Mode]: Selects a preset sound
effect to enhance the audio output.
● [Night Mode]: Select quiet or full dynamic
sound. Night mode decrease the volume of
loud sound and increase the volume of soft
sound (such as speech).
Preference setup
1. Press
button.
2. Press OK button to access the setup menu.
3. Press
button to access [ Preference ]
options.
● [Audio]: Select an audio language for video.
● [Subtitle]: Select a subtitle language for video.
● [Disc Menu]: Select a menu language for a
video disc.
● [Parental Control]: Set the rating level to a
disc. Restrict access to discs that are
encoded with ratings. These discs must be
recorded with rating levels.
● [PBC]: Display or skip the content menu for
VCD and SVCD.
● [Password]: Set or change a password to
play a restricted disc.
● [DivX Subtitle]:
Select the language of the DivX
● [Version Info.]: Display the software version
of this apparatus.
● [Default]: Reset the home theater to the
default settings programmed at the factory.
English
Protect the Disc
- To keep the disc clean, please don’t touch the disc’s surface when you are holding it. You should
hold the edge.
- If the disc is dirty, it will affect the sound quality. Please use the clean and soft cloth to wipe the
disc from inside to outside. Don’t wipe the disc in circular motion.
- Don’t stick paper on the disc.
- After you have finished with the disc, please place it back in its original case. To avoid warping
or damage, do not stack discs.
- Don’t play the disc which has flaw or deformation, in case of damaging this player.
- Clean your discs using only a soft dry cloth. Do not use any chemicals such as benzine, thinner,
antistatic or record sprays as these can damage the disc surface.
40
Owner’s manual
Troubleshooting
If you are having a problem with your system, check this list for a possible solution before calling
for service.
If you can not solve the problem from the hints give here, or the system has been physically
damaged, call a qualified person, such as your dealer, for service.
No power
No sound or poor sound
● Ensure that the AC power plug of the unit
is connected properly.
● Ensure that there is power at the AC
outlet.
● Adjust the volume.
● Disconnect the headphones.
● Check that the speakers are connected
correctly.
● Check if the stripped speaker wires are
clamped.
● Insert a disc.
● Check if the disc is inserted with the print
side facing inward.
● Wait until the moisture condensation at
the lens has cleared.
● Replace or clean the disc.
● Use a finalized DVD or correct format
disc.
No picture
● Check the video connection.
● Turn on the TV to the correct Video-In
channel.
Black and white or distorted
picture
● The disc does not match the TV color
system standard (PAL/NTSC).
● Sometimes a slight picture distortion may
appear. This is not a malfunction.
● Clean the disc.
The aspect ratio of the TV
screen cannot be changed even
though you have set the
Aspect Ratio format.
● The aspect ratio is fixed on the loaded
DVD disc.
● The aspect ratio may not be changed for
some TV systems.
Remote control does not work
● Before pressing any function button, first
select the correct source with the remote
control instead of the main unit.
● Reduce the distance between the remote
control and the unit.
● Insert the battery with its polarities (+/signs)
aligned as indicated.
● Replace the battery.
● Aim the remote control directly at the
sensor
on the front of the unit.
Disc does not play
● Insert a readable disc with the label side
facing you.
● Check the disc type, color system and
regional code. Check for any scratches or
smudges on the disc.
● Press
to exit the system setup menu.
● Disable the password for parental control
or change the rating level.
● Moisture has condensed inside the
system. Remove the disc and leave the
system turned on for about an hour.
Disconnect and reconnect the AC power
plug, and then turn on the system again.
English
No disc detected
Poor radio reception
● Increase the distance between the unit
and your TV or VCR.
● Fully extend and adjust the FM antenna.
41
Owner’s manual
Audio or subtitle languages
cannot be set
● The disc is not recorded with sound or
subtitles in multiple languages.
● The audio or subtitle language setting is
prohibited on the disc.
Cannot display some file in USB
device
● The number of folders or files in the USB
device has exceeded a certain limit. This
phenomenon is not a malfunction.
● The formats of these files are not
supported.
USB device not supported
● The USB device is incompatible with the
unit. Try another one.
Timer does not work
● Set the clock correctly.
● Switch on the timer.
Clock timer setting erased
English
● Power has been interrupted or the power
cord has been disconnected.
● Reset the clock/timer.
42
About Bluetooth device
Music playback is unavailable on
the system even after successful
Bluetooth connection.
● The device cannot be used with the
system to play music.
The audio quality is poor after
connection with a Bluetoothenabled device.
● The Bluetooth reception is poor. Move the
device closer to the system or remove any
obstacle between the device and the
system.
Cannot connect with the system.
● The device does not support the profiles
required for the system.
● The Bluetooth function of the device is not
enabled. Refer to the user manual of the
device for how to enable the function.
● The system is not in the pairing mode.
● The system is already connected with
another Bluetooth-enabled device.
Disconnect that device or all other
connected devices and then try again.
Owner’s manual
Specyfication
General information
Power Requirements........................................................................................... 220-240V~ 50/60Hz
Channel Separation............................................................................................................ ≥ 40 dB
THD.............................................................................................................................................≤ 1%
Power Consumption.................................................................................................................... 50W
DVD Specification
Video Output.......................................................................................................................... 1 Vp-p
Horizontal definition............................................................................................................≥ 500TV
Dimensions (Unit)...................................................................................160(W)×78(H)×260(D)mm
(Amplifier)...........................................................................160(W)×78(H)×280(D)mm
FM Specification
FM Tuning Range........................................................................................................87.5 - 108 MHz
FM Noise Limit Sensitivity.................................................................................................... ≤ 20uV
FM Signal to Noise Ratio......................................................................................................... ≥ 46 dB
Speaker Specification
Impedance.................................................................................................................................6Ω
Input Power............................................................................................................................. 45W
Dimensions..........................................................................................130(W)×205(H)×176(D)mm
Bluetooth Specification
Communication system..............................Bluetooth Standard version 2.1 and EDR specification
Output.......................................................................................Bluetooth Standard Power Class 2
Maximum communication Range.....................................................................................approx.10m
Frequency band................................................................... 2.4 GHz Band (2.4000 GHz - 2.4835 GHz)
Compatible Bluetooth profiles.....................................Advanced Audio Distribution Profile (A2DP)
Supported Multi devices pairing.............................................................................. up to 8 devices
Supported codes (Receive)........................................................................SBC(Sub Band Codec)
(Transmit).......................................................................................................SBC(Sub Band Codec)
Remote Control
Distance.....................................................................................................................................5m
Angle..........................................................................................................................................±30°
English
USB Specification
Compatibility......................................................................................................USB 2.0 or USB1.1
USB port...........................................................................................................USB:DC 5 V1 500mA
Accessories
Audio Line.........................................................................................................................................1
Video Line.........................................................................................................................................1
FM Antenna.......................................................................................................................................1
Instruction Manual.............................................................................................................................1
Remote Control.................................................................................................................................1
Note: Design and specifications are subject to change without prior notice.
43
Owner’s manual
English
Made in China for LECHPOL Zbigniew Leszek, Miętne, 1 Garwolińska Street, 08-400 Garwolin.
44
Instrukcja obsługi
Spis treści
Opis produktu..................................................48
Jednostka główna.........................................48
Pilot........................................................50
Instalacja baterii...........................................51
Zasięg działania pilota..................................51
Podłączanie...................................................52
Podłączanie anteny FM................................52
Podłączanie kabla kontrolnego.....................52
Podłączanie dodatkowych urządzeń............52
Podłączanie głośników................................52
Podłączanie kompozytowego przewodu
wideo.......................................................53
Podłączanie przewodu HDMI........................53
Podłączanie zasilania...................................53
Podłączanie słuchawek................................53
Pierwsze uruchomienie..................................54
Funkcje oszczędzania energii
(ECO-Power/Standby)................................54
Ustawianie zegara.......................................54
Ustawianie jasności wyświetlacza...............54
Odtwarzanie..................................................55
Wkładanie dysku..........................................55
Odtwarzanie dysku......................................55
Kontrola odtwarzania wideo.........................55
Zmiana odtwarzania wideo..........................55
Powiększenie / pomniejszenie obrazu.........55
Odtwarzanie w zwolnionym tempie.............55
Przesunięcie wyświetlania napisów.............56
Wyświetlanie informacji o odtwarzaniu........56
Kontrola odtwarzanego utworu....................56
Odtwarzanie muzyki w MP3 / WMA............56
Oglądanie zdjęć jako pokaz slajdów...........56
Kontrola oglądania zdjęć.............................56
Odtwarzanie z urządzenia USB..................57
Odtwarzanie z urządzenia Bluetooth...........57
Ręczne zapisywanie stacji radiowych.........58
Wybieranie zapisanej stacji radiowej...........58
Regulacja poziomu głośności i ustawień
dźwięku...........................................................59
Regulacja poziomu głośności......................59
Regulacja poziomu basu.............................59
Regulacja poziomu wysokich tonów............59
Wyciszenie dźwięku.....................................59
Inne funkcje....................................................59
Ustawianie godziny alarmu..........................59
Włączanie / wyłączanie alarmu.....................59
Ustawianie czasu do uśpienia urządzenia..59
Regulacja ustawień.......................................60
Ustawienia ogólne.......................................60
Ustawienia wideo.........................................60
Ustawienia audio.........................................61
Ochrona dysków............................................61
Rozwiązywanie problemów............................62
Specyfikacja...................................................64
Polski
Przed użyciem................................................46
Dla Twojego bezpieczeństwa........................46
Ochrona słuchu............................................47
Słuchanie radia FM........................................58
Strojenie stacji radiowych FM......................58
Automatyczne zapisywanie stacji
radiowych..................................................58
45
Instrukcja obsługi
Przed użyciem
Dziękujemy za zakup tego systemu. Prosimy przeczytać instrukcję obsługi przed
rozpoczęciem używania urządzenia. Instrukcja obsługi powinna zostać zachowana na
przyszłość.
Dla Twojego bezpieczeństwa
Przed włączeniem systemu sprawdź czy
napięcie dla tego systemu jest identyczne z
napięciem Twojej sieci elektrycznej.
Gdy odłączasz kabel zasilania, zawsze
chwytaj za wtyczkę, nigdy za kabel.
Nigdy nie pozwalaj nikomu, zwłaszcza
dzieciom, wciskać przedmioty do szczelin,
gniazd i innych otworów w obudowie – może
to doprowadzić do śmiertelnego porażenia
prądem.
Chroń kabel zasilania przed deptaniem i
zginaniem, zwłaszcza przy wtyczce i wyjściu
z urządzenia.
Nigdy nie uderzaj produktu ostrymi
przedmiotami.
Nigdy nie umieszczaj produktu i akcesoriów
w pobliżu odsłoniętego ognia i innych źródeł
ciepła, w tym w bezpośrednim świetle słońca.
By uniknąć porażenia prądem nie otwieraj
obudowy. Wszelkie czynności serwisowe
pozostaw wykwalifikowanemu personelowi
serwisu.
Polski
Nigdy nie wystawiaj produktu i akcesoriów
na działanie deszczu lub wody. Nigdy nie
umieszczaj w pobliżu urządzenia naczyń z
płynami, jak np. wazony.
Ostrzeżenie:
By nie stwarzać zagrożenia pożaru lub
porażenia, nie wystawiać urządzenia na
kapanie i chlapanie płynów.
Uwaga:
Aby zredukować ryzyko porażenia
prądem nie zdejmować obudowy (ani
tylnej płyty), urządzenie nie zawiera
części do naprawy przez użytkownika,
wszelkie czynności serwisowe należy
pozostawić wykwalifikowanemu
personelowi.
46
Nie zasłaniaj otworów wentylacyjnych
urządzenia przedmiotami takimi jak gazeta,
obrus, firanka itd. Przegrzewanie spowoduje
uszkodzenie i skróci żywotność urządzenia.
Produkt laserowy
Ten produkt jest wyposażony w niskiej
mocy urządzenie laserowe. Dla własnego
bezpieczeństwa nie należy zdejmować
żadnych osłon i nie próbować rozkładać
urządzenia wewnątrz. Naprawy musi
wykonywać wykwalifikowany personel.
CLASS 1
LASER PRODUCT
Uwaga:
Ten produkt jest wyposażony w
niskiej mocy urządzenie laserowe.
Dla własnego bezpieczeństwa nie
zdejmować osłon chroniących przed
promieniem lasera. Nie patrzeć na
laser w trakcie pracy urządzenia.
CAUTION
RISK OF ELECTRIC SHOCK
DO NOT OPEN
Ten symbol oznacza niebezpieczne napięcie
stanowiące ryzyko porażenia prądem
wewnątrz tego urządzenia.
Ten symbol wskazuje ważne instrukcje
dotyczące obsługi i utrzymywania tego
urządzenia w dołączonej literaturze.
Instrukcja obsługi
Ochrona słuchu
Słuchaj przy umiarkowanej głośności.
* Używanie słuchawek przy dużej głośności może uszkodzić słuch. Ten produkt może
wytworzyć dźwięki o sile mogącej doprowadzić do uszkodzenia słuchu u zdrowej
osoby, nawet po upływie mniej niż jednej minuty. Wyższe poziomy głośności są
przeznaczone dla osób, które już doświadczyły pewnego osłabienia słuchu.
* Dźwięk potrafi zmylić. Z czasem „poziom komfortu” twojego słuchu adaptuje się do
głośniejszych dźwięków. Po dłuższym słuchaniu to co brzmi „normalnie” może tak
naprawdę być głośne i szkodliwe dla słuchu. By się przed tym uchronić, ustaw poziom
głośności zanim Twój słuch się zaadaptuje i nie zmieniaj go.
Aby ustawić bezpieczny poziom głośności:
* Ustaw niski poziom głośności.
* Powoli zwiększaj głośność aż będziesz słyszeć dźwięk wyraźnie i komfortowo, bez
zniekształceń.
Słuchaj przez rozsądną ilość czasu:
* Przedłużony kontakt z dźwiękiem, nawet przy zazwyczaj „bezpiecznym” poziomie
głośności, również może spowodować uszkodzenie słuchu.
* Używaj swojego urządzenia odpowiedzialnie i rób odpowiednie przerwy.
Polski
Koniecznie przestrzegaj poniższych zasad przy korzystaniu ze słuchawek:
* Słuchaj przy rozsądnym poziomie głośności przez rozsądną ilość czasu.
* Staraj się nie regulować głośności gdy Twój słuch się zaadaptuje.
* Nie ustawiaj głośności tak wysoko, że nie słyszysz niczego innego.
* Zachowaj ostrożność lub tymczasowo przerwij używanie słuchawek w potencjalnie
niebezpiecznych sytuacjach. Nie używaj słuchawek gdy prowadzisz pojazd silnikowy,
jeździsz na rowerze, deskorolce itd.; możesz w ten sposób spowodować niebezpieczną
sytuację w ruchu, jak również w wielu rejonach jest to prawnie zabronione.
47
Instrukcja obsługi
Jednostka główna
Widok z przodu (jednostka główna)
Widok z tyłu (jednostka główna)
AUX IN1
AUX IN2
ANTENNA
FM
VIDEO
L
L
R
R
Polski
CABLE
48
1. Standby
- włączanie / wyłączanie system
2. Clock
- nastawianie zegara
3. Mode
- dla radia FM - przełączanie wyjścia
dźwięku mono / stereo
- dla dysków - wybieranie trybu
odtwarzania losowego lub powtarzania
4. USB
- port USB
5. Kontrolka
- gdy urządzenie jest w stanie
oczekiwania, kontrolka zmienia kolor na
czerwony
6. Czujnik IR
- wykrywa sygnały z pilota
7. Panel wyświetlacza
- wyświetla status
8. Odtwarzacz dysków
9.
/
- wyszukiwanie w utworze
- przewijaj do przodu lub do tyłu
- strojenie stacji radiowych
/
- przeskocz do poprzedniego /
następnego utworu, tytułu lub pliku
- wybieranie zapisanych stacji radiowych
- rozpocznij lub spauzuj odtwarzanie
10.
- otwórz lub zamknij tackę odtwarzacza
dysków
11. - zatrzymaj odtwarzanie
12. FM Antenna (antena FM)
- poprawa odbioru FM
13. Gniazdo kabla kontrolnego
14. AUX IN 1 (L&R)
- podłączanie zewnętrznego urządzenia
audio
15. AUX IN 2 (L&R)
- podłączanie zewnętrznego urządzenia
audio
16. Wyjście Video
- gniazdo wyjścia wideo
17. Antena Bluetooth
18. Wyjście HDMI
- podłączanie urządzenia HDMI
Instrukcja obsługi
Widok z przodu (wzmacniacz)
SOURC E
Widok z tyłu (wzmacniacz)
AC
CABLE
1. Gniazdo słuchawek
- podłączanie słuchawek
2. Bass
- regulacja basu
3. Treble
- regulacja wysokich tonów
4. - Volume +
- regulacja głośności
5. Source
- wybór źródła: Tuner, AUX 1, AUX 2,
Disc, USB, BT
6. Gniazdo AC ~
- podłączanie kabla zasilania AC
7. Gniazdo kabla kontrolnego
8. Speaker output (6 Ω)
- podłączanie głośników
)
Polski
S PEAKER OUTPUT(6
49
Instrukcja obsługi
Pilot
SOURCE
MENU
AUDIO
OK
SUBTITLE
MODE
ZOO M
Polski
CLOCK/PRO GT
50
SLOW
DISPLAY/DIM
IMER/SLEEP
1. Standby
- włączanie / wyłączanie systemu
2. Source
- wybierz źródło
3.
- otwórz menu główne.
4.
Audio
- w menu: nawigacja do góry.
- odwróć obraz
- Audio: wybierz język dźwięku przy
odtwarzaniu wideo
- :wybierz numer (0~9)
5.
- szukaj w utworze lub na dysku.
- szybkie przewijanie do tyłu
- w menu: nawigacja w lewo
- obróć obraz
- strojenie stacji radiowej
6.
- rozpocznij, pauzuj lub wznów odtwarzanie
7. Mode
- dla radia FM - przełączanie między
dźwiękiem mono i stereo
- dla dysków - wybierz tryb powtarzania lub
odtwarzania w losowej kolejności
8.
- przeskocz do poprzedniego utworu,
tytułu lub pliku
- wybieranie zapisanych stacji radiowych
9. Zoom
- dla zdjęć i wideo: powiększenie / pomniejszenie
10.
- regulacja głośności
11.
- wybierz zapisane ustawienia dźwięku: ciepły,
potężny, wyraźny, zbalansowany, jasny
12. Clock/Prog
- ustawianie zegara
- zapisywanie stacji radiowych
13. Menu
- dla dysków DVD: otwórz lub zamknij
menu dysku
- dla dysków VCD: włącz / wyłącz PBC
14. OK
- zatwierdź wybór
15.
- szukaj w utworze lub na dysku.
- szybkie przewijanie do przodu
- w menu: nawigacja w prawo
- obróć obraz
- strojenie stacji radiowej
16. Subtitle
- w menu: nawigacja w dół
- odwróć obraz
- Subtitle: wybierz język napisów przy
odtwarzaniu wideo
- : wybierz numer (0~9)
17.
- zatrzymaj odtwarzanie
18.
- przeskocz do następnego utworu, tytułu lub pliku
- wybieranie zapisanych stacji radiowych
19. Display/dim
- wyświetl informacje o odtwarzaniu na
podłączonym telewizorze
- wybierz poziom jasności ekranu wyświetlacza
20. Slow
- wybierz tryb powolnego odtwarzania
21.
- wyciszenie
22. Timer/sleep
- ustaw czas do uśpienia
- ustaw godzinę alarmu
23.
- regulacja głośności
Instrukcja obsługi
Instalacja baterii
1. Otwórz gniazdo baterii.
2. Włóż 2 baterie AAA z odpowiednią polaryzacją (+/-)
zgodnie z oznaczeniem.
3. Zamknij gniazdo baterii.
Zasięg działania pilota
1. Kieruj pilot w stronę czujnika IR z przodu
urządzenia.
2. Upewnij się, że nie ma przeszkód między
czujnikiem podczerwieni na urządzeniu
i pilotem.
Polski
Uwaga:
* Wyjmij baterie jeśli pilot ma być nieużywany przez dłuższy czas.
* By uniknąć możliwości awarii, przeczytaj instrukcję prawidłowego użytkowania pilota.
* Nie upuszczaj i nie uderzaj pilota.
* Nie polewaj pilota wodą ani innymi płynami.
* Nie kładź pilota na mokrej powierzchni.
* Nie kładź pilota w bezpośrednim świetle słońca ani w pobliżu źródeł nadmiernego
ciepła.
* Nie używaj żrących środków czyszczących (np. do porcelany, stali nierdzewnej,
toalety lub piekarnika) do czyszczenia pilota, mogą go uszkodzić.
51
Instrukcja obsługi
Podłączanie
Podłączanie anteny FM
Podłączanie dodatkowych
urządzeń
Jednostka główna
AUX IN1
AUX IN2
ANTENNA
FM
VIDEO
L
L
R
R
CABLE
Urządzenie dodatkowe
1. Używanie połączenia koncentrycznego
Antena 75 Ohm z kablem koncentrycznym
powinna być podłączona do terminala
koncentrycznego FM 75 Ohm.
2. Jeśli odbiór jest słaby, podłącz antenę
zewnętrzną.
Uwaga: przed podłączeniem przewodu
koncentrycznego 75 Ohm (okrągły przewód
prowadzący do zewnętrznej anteny), odłącz
antenę przewodową FM.
Uwaga: by uniknąć szumów, należy
umieścić anteny daleko od urządzenia, kabla
łączącego i kabla zasilania AC.
Jednostka główna
AUX IN1
AUX IN2
ANTENNA
FM
VIDEO
L
L
R
R
CABLE
Urządzenie dodatkowe
Możesz odtwarzać na tym urządzeniu
dźwięk z urządzeń zewnętrznych.
Podłącz kabel audio do:
- gniazd AUX IN L/R na tym urządzeniu
- gniazd wyjścia audio na urządzeniu
zewnętrznym.
Podłączanie kabla kontrolnego
Jednostka główna
AU X IN1
Podłączanie głośników
AU X IN2
ANTENNA
FM
VIDEO
L
L
R
R
Polski
CABLE
AC
CABLE
SPEAKER OUTPUT(6
)
Wzmacniacz
Połącz kablem kontrolnym odtwarzacz DVD
i wzmacniacz.
52
1. Przytrzymaj klapkę gniazda.
2. Wsuń do końca nieizolowaną część
przewodu.
- Przewody prawego głośnika podłącz do
gniazda „R”, przewody lewego głośnika do
gniazda „L”.
- Podłącz czerwone przewody do „+”, białe
przewody do „-”.
3. Puść klapkę gniazda.
Instrukcja obsługi
Podłączanie kompozytowego
przewodu wideo
AUX IN1
Podłączanie zasilania
AUX IN2
ANTENNA
FM
AC
VIDEO
L
L
R
R
CABLE
CABL E
VIDEO
S PEAKER OUTPUT(6
)
Uwaga:
* Ryzyko uszkodzenia produktu! Upewnij
się, że napięcie zasilania jest zgodne
z napięciem na nadruku na spodzie
urządzenia.
* Przed podłączeniem kabla zasilania
AC upewnij się, że wszystkie pozostałe
przewody są podłączone.
VIDEO
Podłącz kabel zasilania AC do gniazdka.
Podłącz kompozytowy przewód wideo
do gniazda Video w urządzeniu i gniazda
wejścia wideo w telewizorze.
Podłączanie słuchawek
Uwaga:
* Tego typu połączenie daje standardową
jakość obrazu.
Podłączanie przewodu HDMI
AUX IN1
AUX IN2
ANTENNA
FM
VIDEO
L
L
R
R
Podłącz słuchawki (nie dołączone) do
gniazda w urządzeniu by słuchać przez
słuchawki.
Polski
CABLE
Podłącz kabel HDMI do gniazda HDMI
w urządzeniu i gniazda wejścia HDMI w
telewizorze.
Uwaga:
* Tego typu połączenie daje najlepszą
jakość obrazu.
53
Instrukcja obsługi
Pierwsze uruchomienie
Funkcje oszczędzania energii
(ECO-Power/Standby)
Zasilanie wł / wył
Gdy podłączysz kabel zasilania AC do
gniazdka, urządzenie będzie w stanie
oczekiwania.
* Naciśnij przycisk Standby by włączyć
urządzenie. Na wyświetlaczu pojawi się
słowo „Hello”.
* Naciśnij ponownie przycisk Standby by
przełączyć urządzenie z powrotem w stan
oczekiwania. Przez wyświetlacz przesuną
się słowa „Bye bye”.
Polski
Przełączanie systemu w stan oczekiwania
ECO Power
Naciśnij i przytrzymaj przycisk
Standby
przez 2 sekundy lub dłużej, by przełączać
stan oczekiwania ECO Power i normalny
stan oczekiwania.
* Stan oczekiwania ECO Power
Zegar nie będzie wyświetlany. Naciśnij
przycisk Clock by wyświetlić zegar na
wyświetlaczu LCD.
* Normalny stan oczekiwania
Zegar będzie wyświetlany na wyświetlaczu
LCD.
54
Ustawianie zegara
1. W stanie oczekiwania, naciśnij i
przytrzymaj przycisk Clock przez ponad
2 sekundy by włączyć ustawianie
zegara. Napis [Clock set] przesunie się
przez wyświetlacz i pojawi się [24] od
24-godzinnego formatu godziny.
2. Naciskając przyciski
/
/
/
na
pilocie wybierz 12/24 godzinny tryb zegara
(format czasu), następnie naciśnij przycisk
Clock by potwierdzić. Zaczną mrugać cyfry
godzin.
3. Naciskając przyciski
/
/
/
na
pilocie lub
/
na urządzeniu ustaw
godzinę.
4. Naciśnij przycisk Clock by potwierdzić.
Zaczną mrugać cyfry minut.
5. Naciskając przyciski
/
/
/
na pilocie lub
/
na urządzeniu ustaw
minuty.
6. Naciśnij przycisk Clock by potwierdzić.
Ustawianie jasności
wyświetlacza
1. W stanie oczekiwania naciskaj przycisk
Dim by zmieniać kolejno 3 poziomy jasności.
Instrukcja obsługi
Odtwarzanie
1. Naciśnij przycisk by otworzyć tackę na
dysk.
2. Umieść dysk na tacce naklejką do góry.
Ułóż dysk równo w
oznaczonym miejscu
3. Naciśnij przycisk by zamknąć tackę
odtwarzacza dysków.
Odtwarzanie dysku
1. Naciskaj przycisk Source by wybrać
źródło Disc.
2. Odtwarzanie może rozpocząć się
automatycznie. Jeśli nie, naciśnij przycisk
- Aby oglądać zawartość odtwarzanego
dysku, włącz podłączony telewizor na
odpowiedni kanał wejścia.
- Aby zatrzymać odtwarzanie dysku, naciśnij
przycisk
Uwaga:
- Jeśli wyświetli się menu wprowadzania
hasła, wprowadź 6-cyfrowe hasło (000000)
by odtwarzać zastrzeżony dysk.
- Jeśli spauzujesz lub zatrzymasz
odtwarzanie dysku, po 5 minutach włączy się
wygaszacz ekranu. By wyłączyć wygaszacz
ekranu, naciśnij dowolny przycisk.
- Po spauzowaniu lub zatrzymaniu dysku
gdy żaden przycisk nie zostaje wciśnięty
przez 15 minut, urządzenie automatycznie
przełączy się w stan oczekiwania.
Kontrola odtwarzania wideo
1. Odtwarzaj tytuł.
2. Używaj pilota do kontrolowania
odtwarzania.
- Aby spauzować odtwarzanie, naciśnij
przycisk
- Aby rozpocząć lub wznowić odtwarzanie,
naciśnij ponownie ten sam przycisk.
- Aby zatrzymać odtwarzanie, naciśnij
przycisk .
- Aby przeskoczyć do poprzedniego /
następnego tytułu lub rozdziału, naciśnij
przycisk
lub
button.
·- Aby szukać szybko z podglądem, naciśnij
przycisk
lub
.
Naciskaj dany przycisk ponownie by zmienić
prędkość. W trybie pauzy, te przyciski
obsługują powolne odtwarzanie do tyłu lub
do przodu.
Zmiana odtwarzania wideo
1. Odtwarzaj tytuł.
2. Używaj pilota do kontrolowania
odtwarzania.
- Naciśnij przycisk Audio by wybrać język
dźwięku lub kanał na dysku.
- Naciśnij przycisk Subtitle by wybrać język
napisów na dysku.
- Naciśnij przycisk Display by wyświetlić
bieżący stan odtwarzania dysku.
Powiększenie / pomniejszenie
obrazu
1. Naciśnij przycisk Zoom, następnie naciśnij
go ponownie by wybrać powiększony obraz.
Aby anulować tryb powiększenia, wybierz
tryb normalny.
Odtwarzanie w zwolnionym
tempie
1. W trakcie odtwarzania wideo, naciśnij
przycisk Slow by wybrać prędkość
odtwarzania, dźwięk się wyciszy. Naciśnij
przycisk
by wznowić odtwarzanie z
normalną prędkością.
Polski
Wkładanie dysku
55
Instrukcja obsługi
Przesunięcie wyświetlania
napisów
Ta funkcja jest dostępna tylko jeśli ustawisz
ekran TV w trybie Cinema (kinowy).
1. Naciśnij przycisk Subtitle by przesunąć
wyświetlanie napisów.
Uwaga:
* Możesz nacisnąć przycisk Subtitle na
pilocie by skorzystać z funkcji przesunięcia
napisów.
* Ustawienia przesunięcia napisów nie
zostaną zachowane po wyjęciu dysku.
Wyświetlanie informacji
o odtwarzaniu
1. W trakcie odtwarzania naciśnij przycisk
Display by wyświetlić informacje o
odtwarzaniu na telewizorze
Kontrola odtwarzanego utworu
1. Odtwarzaj utwór.
2. Używaj pilota do kontrolowania
odtwarzania.
- Aby spauzować odtwarzanie, naciśnij
przycisk .
- Aby rozpocząć lub wznowić odtwarzanie,
naciśnij ponownie ten sam przycisk.
- Aby zatrzymać odtwarzanie, naciśnij
przycisk button.
- Aby przeskoczyć do poprzedniego /
następnego utworu, naciśnij przycisk
lub
button.
- Aby szybko przeszukiwać do przodu
lub do tyłu, naciśnij przycisk
lub
Naciskaj dany przycisk ponownie by zmienić
prędkość.
Polski
Odtwarzanie muzyki w MP3/WMA
MP3/WMA to wysoko skompresowane
formaty plików muzycznych.
1. Włóż dysk lub podłącz urządzenie USB z
muzyką MP3/WMA. Wybierz folder z muzyką
i naciśnij OK. Wybierz plik do odtwarzania,
po czym naciśnij OK; by wrócić do menu
głównego, naciśnij przycisk
.
Uwaga:
- Przy dyskach wielosesyjnych, odtwarzana
jest tylko pierwsza sesja.
- Pliki WMA chronione przez Digital Rights
Management nie mogą być odtwarzane na
tym urządzeniu.
56
- Znaki specjalne w oznaczeniach MP3
(ID3) w tytułach utworów lub albumów nie
są obsługiwane, przez co mogą nie być
wyświetlane prawidłowo.
- Foldery / pliki powyżej określonego limitu
tego produktu nie mogą być wyświetlone ani
odtworzone.
Oglądanie zdjęć jako pokaz
slajdów
Możesz oglądać zdjęcia JPEG.
1. Włóż dysk lub podłącz urządzenie USB
ze zdjęciami JPEG. Wybierz folder ze
zdjęciami, po czym naciśnij przycisk by go
otworzyć.
- Aby wybrać zdjęcie, używaj przycisków
nawigacyjnych , , ,
.
- Aby powiększyć wybrane zdjęcie i
rozpocząć pokaz slajdów, naciśnij OK.
2. Naciśnij OK by rozpocząć pokaz slajdów.
Uwaga:
- Może być potrzebne więcej czasu na
wyświetlenie zawartości dysku na ekranie
telewizora jeśli zawiera dużą ilość utworów/
zdjęć.
- Ten produkt może wyświetlać jedynie
zdjęcia z aparatów cyfrowych w formacie
JPEG, typowym dla niemal wszystkich
aparatów cyfrowych. Nie obsługuje formatu
Motion JPEG, zdjęć w formatach innych niż
JPEG, ani klipów dźwiękowych powiązanych
ze zdjęciami.
- Foldery / pliki powyżej określonego limitu
tego produktu nie mogą być wyświetlone ani
odtworzone.
played.
Kontrola oglądania zdjęć
1. Odtwarzaj zdjęcia jako pokaz slajdów.
2. Używaj pilota do kontrolowania
odtwarzania.
- Naciskaj przyciski nawigacji
/
by obracać zdjęcie w lewo / w prawo.
- Naciskaj przyciski nawigacji / by
odwracać zdjęcie poziomo / pionowo.
- Naciśnij przycisk by zatrzymać
odtwarzanie.
Uwaga:
Niektóre funkcje mogą nie działać z
niektórymi dyskami lub plikami.
Instrukcja obsługi
Odtwarzanie z urządzenia USB
Ochrona danych na urządzeniach pamięci
USB
- Zawsze wkładaj urządzenie USB
prawidłową stroną. Włożenie urządzenia
nieprawidłową stroną może spowodować
uszkodzenie urządzenia USB i tego
produktu.
- Nie odłączaj urządzenia USB w czasie
odczytywania danych z niego.
- Zakłócenia elektryczne i wyładowania
elektrostatyczne mogą spowodować
awarię i uszkodzenie urządzenia USB i w
konsekwencji utratę danych.
Silnie zaleca się tworzenie kopii zapasowych
wszelkich ważnych danych na komputerze
by uchronić się przez uszkodzeniem danych,
utratą danych lub awarią urządzenia.
Prosimy pamiętać, że nasza firma nie bierze
na siebie odpowiedzialności za uszkodzenia
i utratę danych.
Uwaga: połączenie USB nie jest zgodne ze
wszystkimi modelami dysków.
Odtwarzanie z urządzenia
Bluetooth
Na tym urządzeniu można słuchać plików
audio z odtwarzacza, jeśli jest dostępne
połączenie Bluetooth.
Parowanie urządzeń obsługujących
Bluetooth
Uwaga:
* Zasięg współdziałania między tym
urządzeniem i urządzeniem Bluetooth
wynosi ok. 10 m.
* Zanim podłączysz urządzenie Bluetooth
do tego urządzenia, zapoznaj się z
możliwościami Bluetooth urządzenia.
* Nie gwarantujemy zgodności ze wszystkimi
urządzeniami Bluetooth.
* Wszelkie przeszkody między tym
urządzeniem i urządzeniem Bluetooth mogą
zmniejszyć zasięg współdziałania.
* Należy trzymać to urządzenie w
pewnej odległości od innych urządzeń
elektronicznych, gdyż mogą powodować
zakłócenia.
1. Włącz funkcję Bluetooth w swoim
urządzeniu.
2. Szukaj innych urządzeń Bluetooth w
swoim urządzeniu.
3. Wybierz „KM1584” z listy urządzeń do
sparowania.
4. Jeśli będzie to konieczne, podaj domyślne
hasło „0000”.
Uwaga:
* Nastąpi rozłączenie jeśli urządzenie
znajdzie się poza zasięgiem.
* Jeśli chcesz ponownie połączyć to
urządzenie, umieść je w zasięgu.
* Po odłączeniu urządzenia Bluetooth, to
urządzenie automatycznie przełączy się w
tryb parowania i może zostać wyszukane
przez inne urządzenia i sparowane z nimi.
Słuchanie muzyki z urządzenia Bluetooth
Jeśli połączone urządzenie Bluetooth
obsługuje Advanced Audio Distribution
Profile (A2DP), możesz słuchać muzyki
zapisanej na nim przez tę jednostkę.
1. Sparuj urządzenie z tą jednostką.
2. Rozpocznij odtwarzanie muzyki na
urządzeniu.
Polski
Odtwarzaj lub oglądaj pliki MP3, WMA lub
JPEG z następujących urządzeń USB:
- pamięci flash
- czytniki kart pamięci
1. Podłącz urządzenie USB do portu USB
2. Naciśnij przycisk Source. Wyświetli się
menu zawartości.
3. Wybierz plik do odtwarzania, po czym
naciśnij OK. By zatrzymać odtwarzanie,
naciśnij przycisk lub odłącz urządzenie
USB.
Aby połączyć urządzenie Bluetooth z
tym urządzeniem, musisz je sparować.
Parowanie musi być przeprowadzone tylko
raz.
57
Instrukcja obsługi
Słuchanie radia FM
Strojenie stacji radiowych FM
Uwaga: upewnij się że antena FM jest
podłączona i rozłożona na pełną długość.
1. Naciskaj przycisk Source by wybrać
Tuner.
2. Naciśnij i przytrzymaj przycisk
/
by
rozpocząć strojenie stacji radiowych.
3. Gdy częstotliwość zacznie się
zmieniać, puść przycisk. Tuner FM nastroi
automatycznie stację z dobrym odbiorem.
4. Powtarzaj kroki 2-3 by nastroić więcej
stacji.
By nastroić słabszą stację:
Naciskaj przyciski
/
aż znajdziesz
optymalny odbiór.
Automatyczne zapisywanie
stacji radiowych
Uwaga:
* Możesz zapisać maksymalnie 20 stacji
radiowych.
1. W trybie radia naciskaj przycisk Clock/
Prog przez 3 sekundy by aktywować
automatyczne zapisywanie.
- Wyświetli się napis [Auto].
- Urządzenie zapisze wszystkie stacje
radiowe FM automatycznie, po czym
wybierze pierwszą zapisaną stację.
Polski
Ręczne zapisywanie stacji
radiowych
58
Uwaga:
* Możesz zapisać maksymalnie 20 stacji
radiowych.
1. Nastrój stację radiową.
2. Naciśnij przycisk Clock/Prog by
aktywować tryb zapisywania.
3. Naciskaj przyciski
/
by wybrać
numer od 1 do 20 dla tej stacji, po czym
naciśnij przycisk Clock/Prog by zapisać
bieżącą stację radiową.
- Numer i częstotliwość zapisanej stacji
zostaną wyświetlone.
4. Powtórz kroki 2-3 by zapisać inne stacje.
Uwaga:
By zastąpić zapisaną stację, zapisz inną na
jej pozycji.
Wybieranie zapisanej stacji
radiowej
1. Wybierz stację radiową.
2. Naciskaj przyciski
/
numer zapisanej stacji.
by wybrać
Instrukcja obsługi
Regulacja poziomu głośności i ustawień dźwięku
Regulacja poziomu głośności
1. W trakcie odtwarzania, naciskaj przyciski
/
by zwiększyć / zmniejszyć poziom głośności.
Regulacja poziomu basu
1. W trakcie odtwarzania, obracaj gałkę Bass by regulować poziom basu.
Regulacja poziomu wysokich tonów
1. W trakcie odtwarzania, obracaj gałkę Treble by regulować poziom wysokich tonów.
Wyciszenie dźwięku
1. W trakcie odtwarzania, naciskaj przycisk
by wyciszyć / włączyć ponownie dźwięk.
Pozostałe funkcje
Ustawianie godziny alarmu
Tego urządzenia można używać jako zegara
z alarmem. Możesz wybrać Disc, USB albo
Tuner jako sygnał alarmu.
Uwaga:
Upewnij się że prawidłowo ustawiłeś
godzinę.
1. W stanie oczekiwania, naciśnij i
przytrzymaj przycisk Timer/Sleep, aż napis
[Timer set] przesunie się przez wyświetlacz.
2. Naciskaj przyciski
/
/
/
na
pilocie lub
/
na panelu urządzenia
by wybrać źródło.
3. Naciśnij przycisk Timer/Sleep by
potwierdzić. Cyfry godzin wyświetlą się i
zaczną mrugać.
4. Naciskaj przyciski
/
/
/ na
pilocie lub
/
/ na panelu urządzenia
by wybrać godzinę, po czym naciśnij Timer/
Sleep by potwierdzić. Wyświetlą się cyfry
minut i zaczną mrugać.
5. Naciskaj przyciski
/
na panelu
uzadzenia lub
/
/
/
na pilocie
by wybrać minutę, po czym naciśnij Timer/
Sleep by potwierdzić.
6. Używając przycisku VOL +/- ustaw
głośność, po czym naciśnij Timer/Sleep by
potwierdzić. Na wyświetlaczu pojawi się
ikonka zegara.
Włączanie / Wyłączanie alarmu
1. W trybie oczekiwania, naciskaj przycisk
Timer/Sleep.
- Jeśli alarm jest włączony, będzie wyświetlony
symbol [symbol: zegar]
- Jeśli alarm jest wyłączony, symbol [symbol:
zegar] zniknie.
Uwaga:
* Alarm nie jest dostępny gdy wybrane jest
źródło AUX.
* Jeśli wybrane jest źródło Disc/USB ale
urządzenie nie jest podłączone, ta jednostka
automatycznie przełączy źródło na Tuner.
Ustawianie czasu do uśpienia
urządzenia
To urządzenie może automatycznie przełączyć
się w stan oczekiwania po określonej ilości
czasu.
1. Gdy urządzenie jest włączone, naciskaj
przycisk Timer/Sleep by wybrać określoną
ilość czasu (w minutach). Gdy odliczanie do
uśpienia jest aktywne, ikonka Sleep [symbol:
ZZ] będzie wyświetlona.
* Aby wyłączyć odliczanie do uśpienia,
naciskaj przycisk Timer/Sleep aż wyświetli się
napis [Off].
Polski
Ustawianie godziny alarmu
59
Instrukcja obsługi
Regulacja ustawień
Ustawienia wideo
1. Gdy naciśniesz przycisk
menu główne.
Disc
pojawi się
USB
Setup
2. Wybierz
by wejść do menu
systemowego.
Auto(eng)
Uwaga:
* Nie możesz zmieniać opcji wyświetlonych
na szaro.
* by wrócić do poprzedniego menu, naciśnij
przycisk
By wyjść z menu, naciśnij
ponownie przycisk .
Polski
Ustawienia ogólne
1. Naciśnij przycisk
.
2. Naciśnij przycisk OK by wejść do menu
ustawień.
3. Naciśnij przycisk
by przejść do opcji
[General setup / Ustawienia ogólne].
● [Disc Lock / Blokada dysku]: Włącz lub
wyłącz blokadę dysku.
● [OSD Language / Język OSD]: Wybierz
język wyświetlania ekranowego menu.
● [Auto Standby / Automatyczne
uśpienie urządzenia]: Włącz lub wyłącz
automatyczne przełączanie w stan
oczekiwania. Jest to funkcja mająca na celu
oszczędzanie energii.
Uwaga:
Jeśli wybierzesz język, który jest
niedostępny na dysku, urządzenie wybierze
domyślny język dysku.
60
1. Naciśnij przycisk
.
2. Naciśnij przycisk OK by wejść do menu
ustawień.
3. Naciśnij przycisk
by przejść do opcji [Video
setup / ustawienia wideo].
* [TV System / System telewizji]: Wybór systemu
telewizji zgodnego z telewizorem.
* [TV Display / Ekran telewizora]: Wybór formatu
wyświetlania (4:3, Pan Scan, Standard).
* [Picture Setting / Ustawienia obrazu]: Wybór
zapisanych ustawień kolorów lub ręczna zmiana
ustawień kolorów.
* [HD JPEG]: Włącz / wyłącz wyświetlanie obrazów
JPEG w wysokiej rozdzielczości.
* [HDMI Setup / Ustawienia HDMI]:
- [Resolution / rozdzielczość]: Wybór
rozdzielczości dla wyjścia wideo HDMI zgodnej z
możliwościami podłączonego telewizora.
- [HDMI Deep Color / Głęboki kolor HDMI]: Ta
funkcja jest dostępna tylko gdy urządzenie jest
podłączone kablem HDMI i obsługuje funkcję
deep color / głęboki kolor.
- [Wide Screen / Szeroki ekran]: Wybór
formatu wyświetlania obrazu na ekranie (Super
Wide, 4:3, Pillar Box, off / Super szeroki, 4:3,
Wyrównanie do wysokości, wyłączony)
- [Customer Link Setup / ustawienia Customer
Link]: Ten produkt obsługuje Customer Link,
które używa protokołu HDMI CEC (Consumer
Electronics Control). Możesz używać jednego
pilota do obsługi wszystkich urządzeń zgodnych
z Customer Link podłączonych przez HDMI.
- [1 Touch Play / Odtwarzanie jednym
przyciskiem]: Gdy naciśniesz przycisk Play /
Odtwarzaj na tym urządzeniu, telewizor (jeśli
telewizor obsługuje tę funkcję) automatycznie
się włączy i przełączy na kanał wejścia wideo.
Jeśli w tym produkcie jest dysk, rozpocznie się
odtwarzanie go.
- [1 Touch Standby / Uśpienie jednym
przyciskiem]: Gdy naciśniesz przycisk
Standby, wszystkie podłączone urządzenia
HDMI CEC (jeśli obsługują tę funkcję)
przełączą się w tryb oczekiwania
jednocześnie.
- [Sys Audio Control / System kontroli audio]:
Jeśli system kontroli audio jest włączony,
dźwięk z podłączonego urządzenia jest
automatycznie kierowany na głośniki tego
urządzenia gdy włączysz odtwarzanie.
- [Audio Mapping / Mapowanie audio]: Jeśli
system kontroli audio nie działa, przypisz
podłączone urządzenia do właściwych wejść
audio tego urządzenia.
Instrukcja obsługi
Uwaga:
* Musisz włączyć funkcje HDMI CEC w
telewizorze i/lub w innych urządzeniach by
móc korzystać z kontroli Customer Link.
Więcej informacji znajdziesz w instrukcji
telewizora/urządzenia.
* Nie gwarantujemy 100% współpracy ze
wszystkimi urządzeniami zgodnymi z HDMI
CEC.
Ustawienia audio
1. Naciśnij przycisk
.
2. Naciśnij przycisk OK by wejść do menu
ustawień.
3. Naciśnij przycisk
by przejść do opcji
[Audio Setup / Ustawienia audio].
* [HDMI Audio / Dźwięk HDMI]: Włącz /
wyłącz wyjście dźwięku HDMI do telewizora.
* [Audio Sync / Synchronizacja audio]:
Ustawianie opóźnienia dla wyjścia dźwięku
przy odtwarzaniu dysku wideo.
* [Sound Mode / Tryb dźwięku]: Wybór
zapisanego efektu dźwięku dla poprawy
brzmienia.
* [Night Mode / Tryb nocny]: Wybierz dźwięk
cichy lub z pełną dynamiką. Tryb nocny
zmniejsza głośność głośniejszych dźwięków
i zwiększa głośność cichszych (jak np.
mowa).
Preferencje
1. Naciśnij przycisk
.
2. Naciśnij przycisk OK by wejść do menu
ustawień.
3. Naciśnij przycisk
by przejść do opcji
[Preferences / preferencje].
* [Audio / Dźwięk]: Wybierz język dźwięku dla
wideo.
* [Subtitle / Napisy]: Wybierz język napisów dla
wideo.
* [Disc Menu / Menu dysku]: Wybierz język
menu dla dysków wideo.
* [Parental Control / Kontrola rodzicielska]:
Ustaw dostęp do dysków z kategoriami
wiekowymi. Zastrzeż dostęp do dysków
określonych kategorii. Aby ta funkcja działała,
dyski muszą mieć zapisane kategorie wiekowe.
* [PBC]: Wyświetlaj lub przeskakuj menu
zawartości dla VCD i SVCD.
* [Password / Hasło]: Ustaw lub zmień hasło do
odtwarzania zastrzeżonych dysków.
* [Napisy DivX]: Wybierz język dla napisów
* [Version Info / Informacje o wersji]: Wyświetl
wersję oprogramowania tego urządzenia.
* [Default / Domyślne]: Przywróć wszystkie
ustawienia do wartości fabrycznych.
Ochrona dysków
- Nie naklejaj naklejek na dyski.
- Gdy skończysz korzystać z dysku, odłóż go do jego pudełka. Aby uniknąć deformacji lub
uszkodzenia dysków nie układaj ich jeden na drugim.
- Nie odtwarzaj muzyki ze zdeformowanych dysków – możesz w ten sposób uszkodzić
odtwarzacz.
- Czyść dyski używając wyłącznie czystej, suchej szmatki. Nie używaj żadnych chemikaliów jak
benzyna, rozcieńczalnik lub środki antystatyczne, gdyż mogą uszkodzić powierzchnię dysku.
Polski
- By nie ubrudzić dysku, nie dotykaj jego powierzchni. Należy trzymać dysk za krawędź.
- Jeśli dysk jest zabrudzony, wpłynie to na jakość dźwięku. Użyj czystej i suchej szmatki by
wytrzeć dysk od środka do zewnątrz. Nie wycieraj dysków ruchem okrężnym.
61
Instrukcja obsługi
Rozwiązywanie problemów
Jeśli masz jakiś problem z urządzeniem, sprawdź poniższą listę możliwych rozwiązań zanim
zadzwonisz do serwisu.
Jeśli nie rozwiążesz problemu z tymi wskazówkami lub urządzenie zostało fizycznie uszkodzone,
zadzwoń do wykwalifikowanej osoby, na przykład dealera, w celu kontaktu z serwisem.
Brak zasilania
- Upewnij się, że przewód AC urządzenia
jest prawidłowo podłączony.
- Upewnij się, że w gniazdku AC jest
zasilanie.
Nie wykryto dysku
- Włóż dysk.
- Upewnij się, że dysk jest włożony właściwą
stroną do dołu.
- Zaczekaj aż skroplona wilgoć odparuje z
soczewki.
- Wymień lub wyczyść dysk.
- Użyj sfinalizowanego dysku lub
prawidłowego formatu dysku.
Brak obrazu
- Sprawdź połączenie wideo.
- Włącz właściwy kanał wejścia wideo w
telewizorze.
Obraz czarno-biały lub z
zakłóceniami
Polski
- Dysk nie jest zgodny ze standardem
kolorów telewizora (PAL / NTSC).
- Czasami mogą się pojawić niewielkie
zakłócenia obrazu. To nie awaria.
- Wyczyść dysk.
Proporcji obrazu na telewizorze
nie da się zmienić, pomimo
ustawienia prawidłowego
formatu ekranu.
- Proporcje są zablokowane na
załadowanym dysku DVD.
- W niektórych telewizorach nie jest możliwa
zmiana proporcji wyświetlanego obrazu.
Brak dźwięku lub dźwięk niskiej
jakości
- Wyreguluj głośność.
- Odłącz słuchawki
- Upewnij się, że głośniki są prawidłowo
podłączone.
- Sprawdź czy nieizolowane części
przewodów głośnikowych są zaciśnięte w
zaciskach.
Pilot nie działa
- Zanim naciśniesz jakikolwiek przycisk
funkcyjny, wybierz właściwe źródło używając
pilota zamiast jednostki głównej.
- Zmniejsz odległość między pilotem i
urządzeniem.
- Włóż baterie zgodnie z oznaczeniem
polaryzacji (znaki +/-).
- Wymień baterie.
- Kieruj pilota bezpośrednio na czujnik z
przodu urządzenia.
Dysk się nie odtwarza
- Włóż odczytywalny dysk i upewnij się że
jest włożony właściwą stroną do góry.
- Sprawdź rodzaj dysku, system kolorów i
kod regionu.
- Sprawdź czy dysk nie jest porysowany i/
lub zabrudzony.
- Naciśnij przycisk by wyjść z menu
ustawień systemowych.
- Wyłącz hasło dla kontroli rodzicielskiej lub
zmień poziom dostępu.
- Wewnątrz systemu doszło do kondensacji
wilgoci. Wyjmij dysk i pozostaw system
włączony przez około godzinę. Odłącz i
podłącz ponownie wtyczkę zasilania AC, po
czym ponownie włącz system.plug, and then
turn on the system again.
Słaby odbiór radia
- Umieść urządzenie dalej od telewizora lub
odtwarzacza wideo.
- Rozłóż na pełną długość antenę FM.
62
Instrukcja obsługi
- Dysk nie został nagrany z różnymi
wersjami językowymi do wyboru.
- Ustawianie języka dźwięku lub napisów
jest na dysku zablokowane.
Nie można wyświetlić niektórych
plików na urządzeniu USBdevice
- Liczba folderów lub plików na urządzeniu
USB przekroczyła pewien limit. Takie
zachowanie nie jest awarią.
- Format tych plików nie jest obsługiwany.
Urządzenie USB nie jest
obsługiwane
- Urządzenie USB nie jest zgodne z tym
systemem. Spróbuj użyć innego.
Alarm nie działa
- Nastaw zegar prawidłowo.
- Włącz alarm.
Ustawienie zegara/alarmu
zostało utracone
- Nastąpiła przerwa w dopływie prądu lub
kabel zasilania został odłączony.
- Nastaw ponownie zegar/alarm.
Do urządzeń Bluetooth
System nie odtwarza muzyki
nawet po udanym podłączeniu
urządzenia Bluetooth.
- Urządzenia nie można użyć do
odtwarzania muzyki bezprzewodowo przez
ten system.
Jakość dźwięku jest słaba
po podłączeniu urządzenia
obsługującego Bluetooth.
- Słaby odbiór Bluetooth. Przenieś
urządzenie Bluetooth bliżej systemu lub
usuń przeszkody między nimi.
Nie można połączyć się z
systemem.
- Urządzenie nie obsługuje profili
wymaganych przez system.
- Funkcja Bluetooth urządzenia nie jest
włączona. Sprawdź w instrukcji obsługi
danego urządzenia jak włączyć tę funkcję.
- System nie jest w trybie parowania.
- System już jest połączony z innym
urządzeniem Bluetooth. Odłącz inne
urządzenie i spróbuj ponownie.
Polski
Nie można ustawić języka
dźwięku lub napisów
63
Instrukcja obsługi
Specyfikacja
Informacje ogólne
Wymagane zasilanie........................................................................................... 220-240V~ 50/60Hz
Separacja kanałów............................................................................................................ ≥ 40 dB
THD.............................................................................................................................................≤ 1%
Zużycie energii............................................................................................................................ 50W
Specyfikacja DVD
Wyjście wideo .......................................................................................................................... 1 Vp-p
Rozdzielczość pozioma........................................................................................................≥ 500TV
Wymiary (Jednoska główna)..................................................................160(W)×78(H)×260(D)mm
(Wzmacniacz)...........................................................................160(W)×78(H)×280(D)mm
Specyfikacja FM
Zakres strojenia...........................................................................................................87.5 - 108 MHz
Czułość: limit szumu............................................................................................................. ≤ 20uV
Proporcje S/N FM..................................................................................................................... ≥ 46 dB
Specyfikacja głośnika
Impedancja.....................................................................................................................................6Ω
Moc wejściowa............................................................................................................................. 45W
Wymiary..........................................................................................130(W)×205(H)×176(D)mm
Specyfikacja USB
Kompatybilność USB............................................................................................USB 2.0 / USB1.1
Port USB ...........................................................................................................USB:DC 5 V1 500mA
Specyfikacja Bluetooth
Standard komunikacji...........................Bluetooth Standard version 2.1 and EDR specification
Wyjście.......................................................................................Bluetooth Standard Power Class 2
Maksymalny zasięg łączności...........................................................................................ok..10m
Pasmo częstotliwości...................................................Pasmo 2.4 GHz (2.4000 GHz - 2.4835 GHz)
Zgodne profile Bluetooth...........................................Advanced Audio Distribution Profile (A2DP)
Obsługa parowania z wieloma urządzeniami ............................................................ o 8 urządzeń\
Obsługiwane kodeki.(Odbiór)..........................................................................SBC(Sub Band Codec)
(Nadawanie)..................................................................................................SBC(Sub Band Codec)
Polski
Pilot
Dystans.....................................................................................................................................5m
Kąt.........................................................................................................................................±30°
Akesoria
Przewód audio................................................................................................................................1
Przewód wideo................................................................................................................................1
Antena FM.........................................................................................................................................1
Instrukcja obsługi .............................................................................................................................1
Pilot..............................................................................................................................................1
Uwaga: Projekt i specyfikacje mogą się zmienić bez ostrzeżenia.
64
Instrukcja obsługi
Polski
Wyprodukowano w CHRL dla LECHPOL Zbigniew Leszek, Miętne ul. Garwolińska 1, 08-400 Garwolin.
65
Manual de utilizare
Cuprins
Cuvant inainte ................................................67
Masuri de siguranta.....................................67
Protejarea auzului........................................68
Prezentare aparat...........................................69
Unitatea....................................................69
Telecomanda...............................................71
Instalare baterii............................................72
Conectare ......................................................73
Conectarea antenei FM...............................73
Conectarea cablului de control....................73
Conectarea echipamentelor auxiliare............73
Conectarea difuzoarelor...............................73
Conectarea la mufa semnal video compozit..74
Conectarea la mufa HDMI...........................74
Conectarea la alimentare.............................74
Conectarea la casti....................................74
Pornire.....................................................75
Caracteristici ECO/Standby.........................75
Setare ora....................................................75
Reglarea luminozitatii afisajului...................75
Română
Redare................................................76
Introducere disc...........................................76
Redare discuri..............................................76
Controlul redarii video.................................76
Schimbare redare video..............................76
Marire/micsorare imagine............................76
Redare slow-motion....................................76
Comutare afisare subtitrare.......................77
Afisare informatii redare...........................77
Controlul unei piese....................................77
Redare muzica MP3/WMA ........................77
Redarea imaginilor.......................................77
Control redare imagine................................77
Redare de pe dispozitivul USB...................78
Redare de pe dispozitiv Bluetooth................78
66
Radio FM .......................................................79
Cautare posturi radio FM...........................79
Memorare automata posturi radio..............79
Memorare manuala posturi radio..............79
Selectarea unui post radio presetat...........79
Moduri de afisare FM...............................79
Reglare nivel volum si efecte sonore..........80
Alte funciti......................................................80
Setare cronometru alarma.........................80
Activare/dezactivare alarma........................80
Setare sleep timer.......................................80
Setari
81
Setari generale.............................................81
Setari Video.................................................81
Setari Audio.................................................82
Setari preferentiale......................................82
Protejarea discului..........................................82
Depanare.......................................................83
Specificatii.....................................................85
Manual de utilizare
Cuvant inainte
Va multumim pentru achizitionarea acestui sistem. Va rugam sa cititi aceste instructiuni
de utilizare inainte de a utiliza aparatul. Instructiunile de utilizare trebuie sa fie pastrate
pentru consultari ulterioare.
Masuri de siguranta
Inainte de a utiliza acest sistem, verificati
tensiunea de alimentare de la retea, pentru a
va asigura ca este identica cu cea necesara
aparatului.
NU permiteti ca nimeni in special copiii
sa introduca nimic in orificiile din carcasa
aparatului - acest lucru ar putea cauza un
soc electric fatal.
Cand deconectati cablul de alimentare,
trageti intotdeauna de stecher si nu cablu.
Nu blocati caile de ventilatie ale
ehipamentului cu obiecte cum ar fi ziare,
fete de masa, perdele, etc..Supraincalzirea
va deteriora aparatul si va scurta durata de
functionare a echipamentului.
Incercati sa nu calcati pe cablul de alimentare
si sa nu-l prindeti la usa, si in punctul unde
acesta iese din aparat.
Nu loviti produsul.
Pentru a evita un posibil soc electric nu
deschideti carcasa aparatului. Consultati
personalul calificat pentru efectuarea
intretinerii aparatului.
Feriti produsul si accesoriile sale de ploaie
sau apa. Nu asezati recipiente cu lichide,
cum ar fi vaze cu flori, in apropierea
produsului.
AVERTISMENT:
Pentru prevenirea incendiilor sau a
pericolului de electrocutare, feriti acest
aparat de stropire sau picurare.
ATENTIE:
Pentru a reduce acest risc de
electrocutare, nu scoateti capacul
(sau partea din spate) - nu veti gasi
componente de schimb in interiorul
aparatului. Pentru reparatii apelati
la personal calificat.
Produs cu dioda laser
Acest produs este dotat cu echipament
laser cu consum redus de energie. Pentru
siguranta proprie nu indepartati capacele
si nu demontati aparatul.Reparatiile trebuie
efectuate de personal calificat.
CLASS 1
LASER PRODUCT
Atentie:
Acest produs este echipat cu
echipament laser cu consum redus
de energie. Pentru siguranta proprie
nu deschideti echipamentul. Nu
priviti direct catre raza laser in
timpul functionarii echipamentului.
CAUTION
RISK OF ELECTRIC SHOCK
DO NOT OPEN
Acest simbol indica prezenta de tensiuni
periculoase in interiorul aparatului.
Acest simbol indica prezenta instructiunilor
importante privind functionarea si intretinerea
in manualul de utilizare care insoteste
aparatul.
Română
Nu plasati produsul sau accesoriile in
apropierea surselor de flacari deschise sau
a surselor de caldura, nici chiar la lumina
directa a soarelui.
67
Manual de utilizare
Protejarea auzului
Ascultati la un volum moderat .
* Folosirea castilor la volum ridicat poate deteriora auzul . Acest produs poate produce
sunete puternice care pot provoca pierderea auzului, chiar la o durata de expunere mai
mica de un minut .
* Sunetul poate fi inselator . De-a lungul timpului " nivelul de confort "al auzului , se
adapteaza la volume mai mari de sunet . Deci, dupa ascultarea prelungita , ceea
ce pare " normal" poate fi de fapt tare si daunator pentru auz . Pentru a va proteja
impotriva acestui lucru, setati volumul la un nivel sigur inainte ca auzul dumneavoastra
sa se adapteze si lasati-l setat la acest nivel.
Pentru a stabili un nivel de volum in conditii de siguranta :
* Setati volumul la un nivel mic.
* Mariti usor sunetul pana cand puteti auzi clar si confortabil , fara distorsiuni .
Ascultati pentru perioade rezonabile de timp :
* Expunerea prelungita la sunet , chiar si la nivel normal "sigur" , poate provoca , de
asemenea, pierderea auzului.
* Asigurati-va ca utilizati echipamentul rezonabil si faceti pauze adecvate .
Română
Aveti grijă sa respectati urmatoarele indicatii atunci cand utilizati castile .
* Ascultati la niveluri de volum rezonabile pentru perioade rezonabile de timp .
* Aveti grija sa nu reglati volumul in timp ce auzul dumneavoastra se adapteaza la
nivelul de sunet.
* Nu mariti volumul atat de mult incat sa nu puteti auzi ceea ce este in jurul
dumneavoastra.
* Ar trebui sa intrerupeti temporar utilizarea in situatii potential periculoase . Nu utilizati
castile in timp ce conduceti un vehicul motorizat , in timp ce mergeti cu bicicleta , faceti
skateboarding , etc , se poate crea un pericol in trafic si este ilegal in multe situatii .
68
Manual de utilizare
PREZENTARE APARAT
Vedere frontala (unitatea principala)
Vedere din spate (unitatea principala)
AUX IN1
AUX IN2
ANTENNA
FM
VIDEO
L
L
R
R
CABLE
9.
/
- Cautati in cadrul unei piese
- Derulare inapoi sau inainte
- Fixare pe un post radio
/
- Sariti la piesa anterioara/urmatoare, titlu
sau fisier
- Selectati un post radio presetat
- Porniti sau intrerupeti redarea
10.
- Deschideti sau inchideti compartimentul
discurilor
11.
- Opriti redarea
12 Antenă FM (Antenă FM)
- Pentru a îmbunătăți recepția FM
13 Slot pentru cablu de control
14 AUX IN 1 (L & R)
- Conectați un dispozitiv audio extern
15 AUX IN 2 (L & R)
- Conectați un dispozitiv audio extern
16 Ieșire video
- Jack de ieșire video
17 antenă Bluetooth
18 Ieșire HDMI
- Conectarea unui dispozitiv HDMI
Română
1. STANDBY
2. CEAS
- Setare ora
3. MOD
- Pentru radio FM, selectati stereo sau
mono
- Pentru Disc, selectati modul repetare
sau redare aleatoare
4. USB
5. Indicator
- Cand aparatul este in standby (in
asteptare), indicatorul are culoarea rosie
6. Senzor IR
- Detecteaza semnalele de la
telecomanda
7. Afisaj
- Indica starea curenta
8. Compartimentul discului
69
Manual de utilizare
Vedere frontala (amplificator)
SOURC E
Vedere din spate (amplificator)
AC
CABLE
S PEAKER OUTPUT(6
)
Română
1. Mufa casti
- Jack casti
2. Bass
- Reglare frecvente joase
3. Treble
- Reglare frecvente inalte
4. VOLUM +: reglare volum
5. SURSA: selectati o sursa: TUNER, AUX 1, AUX 2, DISC, USB sau BT
6. Alimentare AC: conectati cablul de alimentare AC
7. Conector cablu de control
8. Iesire difuzor (6Ω): conecteaza difuzoarele
70
Manual de utilizare
SOURCE
MENU
AUDIO
OK
SUBTITLE
MODE
ZOO M
CLOCK/PRO GT
SLOW
DISPLAY/DIM
IMER/SLEEP
1. STANDBY
- Pornire/oprire sistem
2. SURSA
- Selectare sursa
3.
- Accesarea meniului de pornire
4.
Audio
- Pentru meniuri – Navigare in sus
- Inversare imagine
- AUDIO: Selectarea unui limbaj audio
pentru redarea unui fisier video
- :Selectare numar (0~9)
5.
- Cautare in cadrul unei piese sau a unui disc
- Derulare inapoi
- Pentru meniuri – navigati stanga
- Rotiti o imagine
- Reglati pe un post radio
6.
- Pornire redare, intrerupere sau reluare
redarea
7. Mode
- Pentru radio FM, selectati sunetul stereo
sau mono
- Pentru Disc, selectati modurile repetare sau
redare aleatoare
8.
- Sariti la piesa anterioara, titlu sau fisier
- Selectati un post radio presetat
9. ZOOM
- Marirea unei scene video sau a unei imagini
10.
- Reglare volum
11.
- Selectarea unei corectii de sunet presetate:
Cald, Puternic, Clar, Echilibrat sau Placut.
12. CEAS/PROG
- Setare ora
- Programare posturi radio
13. MENIU
- Pentru DVD: accesati sau parasiti meniul
discului
- Pentru VCD: pornire/oprire PBC
14. OK
- Confirmarea unei selectii
15.
- Cautare intr-o melodie sau disc
- Derulare inainte
- Pentru meniuri – navigati spre dreapta
- Rotiti o imagine
- Reglati pe un post radio
16. SUBTITRARE
- Pentru meniuri: navigati in jos
- Inversare imagine
- SUBTITRARE: Selectati limba subtitrarii pentru
un fisier video
- : Selectare numar (0~9)
17.
- Oprire redare
18.
- Sariti la piesa urmatoare, urmatorul titlu sau fisier
- Selectati un post radio presetat
19. AFISAJ/DIM
- Afisare informatii redare la un televizor conectat
- Selectare nivel luminozitate pentru afisaj
20. SLOW
- Selectarea modului de redare slow-motion
21.
- Silentios
22. TIMER/SLEEP
- Setare cronometru sleep
- Setare cronometru alarma
23.
- Reglare volum
Română
Telecomanda
71
Manual de utilizare
Instalare baterii
1. Deschideti compartimentul pentru baterii.
2. Introduceti 2 baterii AAA respectand polaritatea corecta
(+/-) asa cum este indicat in figura.
3. Inchideti compartimentul bateriilor.
Nota:
* Scoateti bateriile daca telecomanda nu va fi folosita pentru o perioada indelungata.
* Pentru a evita o posibila eroare, cititi urmatoarele instructiuni si actionati telecomanda
in mod corespunzator.
* Nu loviti si nu scapati telecomanda.
* Nu scapati apa sau alte lichide pe telecomanda.
* Nu puneti telecomanda pe suprafete umede.
* Nu puneti telecomanda in bataia directa a soarelui sau in apropierea surselor de
caldura.
* Nu utilizati agenti de curatare corozivi (portelan, otel inoxidabil, toaleta sau solutii de
curatare pentru cuptor) pentru telecomanda, deoarece acest lucru o va deteriora.
Română
Raza de actiune a telecomenzii
72
1. Indreptati telecomanda spre senzorul
IR de pe partea frontala a dispozitivului.
2. Asigurati-va ca nu sunt obstacole intre
telecomanda si senzorul IR al unitatii
principale.
Manual de utilizare
Conectare
Conectarea antenei FM
Conectarea echipamentelor
auxiliare
Unitate principala
AUX IN1
AUX IN2
ANTENNA
FM
VIDEO
L
L
R
R
CABLE
Echipament auxiliar
1. Utilizarea antenei cu conectorul de tip
coaxial pentru conectare la terminalul cablu
coaxial FM 75 ohmi.
2. In cazul in care conexiunea este slaba,
conectati antena de exterior.
Nota: Inainte de a atasa un cablu coaxial de
75 ohmi (de tipul cu fir rotund, conectat la o
antena de exterior), deconectati antena FM
furnizata.
Atentie: Pentru a evita zgomotul, tineti
antena departe de cablul de alimentare AC.
Unitate principala
AUX IN1
AUX IN2
ANTENNA
FM
VIDEO
L
L
R
R
CABLE
Echipament auxiliar
Puteți transmite semnalul audio de la un
dispozitiv extern la acest produs. Conectati
un cablu audio, dupa cum urmeaza:
• La mufele AUX IN L/R ale acestui produs.
• La mufele de iesire audio ale dispozitivului
extern.
Conectarea cablului de control
Unitate principala
AU X IN1
Conectarea difuzoarelor
AU X IN2
ANTENNA
FM
VIDEO
L
L
R
R
AC
CABLE
SPEAKER OUTPUT(6
)
Amplificator
Conectati cablul de control intre DVD player
si amplificator.
1. Apasati pe parghie.
2. Introduceti complet partea neizolata a
cablului difuzorului.
• Conectati cablul difuzorului : dreapta la „R”,
stanga la „L”
• Conectati firul rosu la „+”, firul alb la „-”.
3. Eliberati parghia.
Română
CABLE
73
Manual de utilizare
Conectarea la mufa semnal video
compozit
AUX IN1
Conectarea cablului de
alimentare
AUX IN2
ANTENNA
FM
AC
VIDEO
L
L
R
R
CABLE
CABL E
VIDEO
S PEAKER OUTPUT(6
)
Atentie:
* Risc de deteriorare a produsului! Asigurativa ca tensiunea de alimentare corespunde
tensiunii specificate pe partea din spate sau
in partea inferioara a unitatii.
* Inainte de a conecta cablul de alimentare,
asigurati-va ca ati finalizat toate celelalte
conexiuni.
Conectati cablul de alimentare la priza.
VIDEO
Conectati un cablu video compozit la mufa
VIDEO a aparatului. (intrare video de pe
televizor).
Conectarea la casti
Nota:
* Acest tip de conexiune ofera o calitate
standard a imaginii.
Conectare la mufa HDMI
AUX IN1
AUX IN2
ANTENNA
FM
VIDEO
L
L
R
R
CABLE
Română
Conectati castile (nu sunt incluse), in mufa
de pe dispozitiv pentru a reda muzică prin
casti.
74
Conectați aparatul la televizor folosind un
cablu HDMI (intrare video de pe televizor).
Nota:
* Acest tip de conexiune ofera cea mai buna
calitate a imaginii
Manual de utilizare
Caracteristici ECO/Standby
Setare ora
Pornire/Oprire
Daca conectati cablul de alimentare la
priza de perete, aparatul va intra in modul
standby.
* Apasati tasta
STANDBY,pentru a
porni aparatul. Pe ecran va aparea mesajul
„HELLO”.
* Apasati tasta STANDBY, pentru a
comuta aparatul inapoi pe modul standby.
Cuvintele „BYE BYE” vor fi afisate pe ecran.
1. In modul de asteptare, apasati si tineti
apasata tasta CEAS pentru mai mult de 2
secunde, pentru a activa modul de setare
al orei. Pe afisaj apare optiunea [SETARE
CEAS] si formatul [24] 24 -ore.
2. Apasati tasta
/
/
/
telecomenzii, pentru a selecta modul 12/24
(format ora) si apasati apoi tasta CEAS
pentru confirmare. Cifrele orei incep sa
palpaie.
3. Apasati tasta
/
/
/
telecomenzii sau tasta
/
de pe
panoul frontal pentru a seta ora.
4. Apasati tasta CEAS pentru confirmare.
Cifrele pentru minute incep sa palpaie.
5. Apasati tasta
/
/
/
telecomenzii sau tasta
/
panoului
frontal, pentru a seta minutele.
6. Apasati tasta CEAS pentru confirmare.
Apasati si tineti apasata tasta STANDBY
timp de 2 secunde sau mai mult pentru a
comuta pe modul Standby Eco sau Standby
normal.
* Modul de asteptare ECO-Power
Ora nu va fi afisata. Apasati tasta CEAS,
pentru a afisa ora pe ecranul LCD.
* Mod de asteptare normal
Ora va fi afisata pe ecranul LCD.
Reglarea luminozitatii afisajului
1. In modul asteptare, apasati butonul
DIM pentru a parcurge cele trei niveluri de
luminozitate.
Română
Comutati sistemul pe ECO/ Standby
75
Manual de utilizare
Redare
Controlul redarii video
Introducere disc
1. Apasati tasta
pentru a deschide
compartimentul pentru discuri.
2. Introduceti un disc cu eticheta in sus.
Aliniati discul conform
instructiunilor
3. Apasati tasta
pentru a inchide
compartimentul pentru discuri.
Redare discuri
Română
1. Apasati tasta SURSA pentru a selecta
sursa DISC.
2. Redarea poate porni automat. Daca nu
apasati tasta
• Pentru a vizualiza redarea discului, porniti
televizorul pe canalul de vizionare corect
pentru acest produs.
• Pentru a opri redarea discului, apasati
tasta
76
Nota:
• Daca se afiseaza meniul de introducere a
parolei, introduceti parola formata din 6 cifre
(parola implicita este 000000) inainte de a
reda discul blocat sau restrictionat.
• Daca intrerupeti sau opriti redarea, screen
saver-ul apare dupa 5 minute de inactivitate.
Pentru a dezactiva screen saver-ul, apasati
orice tasta.
• Dupa intrerupeti sau opriti redarea si nici un
buton nu este apasat timp de 15 de minute,
aparatul trece automat in modul standby (in
asteptare).
1. Redarea unui titlu.
2. Folositi telecomanda pentru a controla
redarea.
• Pentru a intrerupe redarea, apasati tasta
• Pentru a porni sau a relua redarea, apasati
inca o data tasta
• Pentru a opri redarea, apasati tasta .
• pentru a sari la titlul sau capitolul anterior/
urmator apasati tasta
sau tasta
.
• Pentru cautare rapida inainte sau inapoi
apasati taste
sau tasta
. Apasati
in mod repetat pentru a schimba viteza de
cautare. Pe modul pauza, incetiniti redarea
inapoi sau inainte.
Schimbare redare video
1. Redarea unui titlu.
2. Folositi telecomanda pentru a controla
redarea.
• Apasati tasta AUDIO selectati limbajul
audio sau canalul unui disc.
• Apasati tasta SUBTITRARE selectati limba
subtitrarii.
• Apasati tasta AFISAJ pentru afisarea starii
curente a informatiilor de pe disc.
Marire/micsorare imagine
1. Apasati tasta ZOOM, apoi apasati din
nou tasta pentru a selecta imaginea. Pentru
a iesi din modul de zoom, selectati modul
normal
Redare slow-motion
1. In timpul redarii video, apasati tasta
SLOW pentru a selecta viteza de redare si
setarea pe sunet silentios. Apasati tasta
pentru redare la viteza normala.
Manual de utilizare
Aceasta functie este disponibila numai daca
ati setat televizorul pe optiunea Cinema.
1. Apasati tasta SUBTITRARE pentru a
comuta
Nota:
* Puteti apasa butonul SUBTITRARE al
telecomenzii pentru a accesa caracteristica
de comutare a subtitrarii.
* Setarea comutare subtitrare nu va fi
salvata dupa indepartarea discului.
Afisare informatii redare
In timpul redarii, apasati tasta AFISAJ pentru
a afisa informatiile de redare pe televizor.
Controlul unei piese
1. Redare piesa.
2. Folositi telecomanda pentru a controla
redarea.
• Pentru a intrerupe redarea, apasati
tasta
.
• Pentru a porni sau a relua redarea, apasati
aceasta tast
din nou.
• Pentru a opri redarea,apasati tasta
• pentru a sari la piesa anterioara/urmatoare,
apasati tasta
sau
.
• Pentru derulare inapoi sau inainte, apasati
tasta
sau
Apasati in mod repetat
pentru a schimba viteza de cautare.
Redare muzica MP3/WMA
MP3/WMA este un tip de fisier audio
comprimat.
1. Introduceti un disc sau un dispozitiv USB
care contine fisiere cu muzica MP3/WMA.
Selectati un folder de muzica si apasati
butonul OK. Selectati un fisier pentru redare,
apoi apasati butonul OK, pentru a reveni la
meniul principal, apasati butonul
.
Nota:
• Pentru discurile inregistrate cu mai multe
sesiuni, numai prima sesiune va fi redata.
• Un fisier WMA, care este protejat de Digital
Rights Management nu poate fi redat pe
aceasta unitate.
• Caractere speciale in denumirea piesei
MP3 (ID3) sau in numele albumului, s-ar
putea sa nu fie afiaate corect pe ecran,
deoarece aceste caractere nu sunt
acceptate.
• Directoarele / fisierele care depasesc limita
suportata de acest produs nu vor fi afisate
sau redate.
Redarea imaginilor
Puteti vizualiza imagini JPEG.
1. Introduceti un disc sau un dispozitiv USB
cu imagini JPEG. Selectati un director cu
imagini si apasati butonul .
• Pentru a selecta o imagine, apasati tastele
de navigare , , ,
.
• Pentru a mari o imagine selectata si a
incepe redarea Slide Show-ului, apasati
butonul OK.
2. Apasati butonul OK pentru a incepe
prezentarea.
Nota:
• Va fi nevoie de o perioada mai lunga
de timp pentru a afisa intregul continut al
discului pe televizor, datorita numarului mare
de piese / imagini incluse pe disc.
• Dispozitivul poate afisa doar fotografiile
digitale in functie de formatul JPEG, care
este de obicei folosit de aproape toate
camerele digitale. Nu pot afisate imagini in
format JPEG sau fotografii in alte formate
decat JPEG, sau imagini asociate cu sunet
nu pot fi afisate.
• Directoare / fisiere care depasesc limita
suportata de acest produs nu vor fi afisate
sau redate.
Control redare imagine
1. Redati imaginile in slide show.
2. Utilizati telecomanda pentru a controla
redarea.
• Apasati butoanele de navigare
/
pentru a roti o imagine in sensul acelor de
ceasornic/in sens invers.
• Apasati butoanele de navigare / pentru a
rasuci imaginile orizontal/vertical.
• Apasati butonul pentru a opri redarea.
Nota:
- Unele operatiuni nu functioneaza cu unele
discuri sau fisiere.
Română
Comutare afisare subtitrare
77
Manual de utilizare
Redare de pe dispozitivul USB
Redarea sau vizualizarea de fisiere MP3 ,
WMA sau fisiere JPEG de pe urmatoarele
dispozitive USB .
- Stick de memorie
- Cititor de carduri de memorie
1. Introduceti un dispozitiv USB in slotul
USB .
2. Apasati butonul SURSA . Se afiseaza un
meniu ce contine cuprinsul dispozitivului.
3. Selectati un fisier pentru redare si apasati
apoi butonul OK .
Pentru a opri redarea , apasati tasta sau
scoateti dispozitivul de stocare USB.
Politica de confidentialitate a dispozitivelor
de stocare USB
- Intotdeauna introduceti dispozitivul USB
in directia corespunzatoare. In caz contrar,
acest lucru poate provoca deteriorarea
dispozitivului USB si a acestui produs .
- Nu scoateti dispozitivul USB in timp ce este
accesat.
- Interferentele electrice si descarcarile
electrostatice pot cauza defectiuni si
deteriorari ale dispozitivului USB , care duc
la pierderea de date.
Este recomandat ca toate datele importante
sa fie salvate pe un PC , in scopul de a
proteja impotriva coruptiei , pierderea de
date sau defectiunea aparatului . Va rugam
sa retineti ca firma noastra nu isi asuma
raspunderea pentru deteriorarea sau
pierderea datelor stocate.
Nota : Portul USB nu este compatibil cu
toate modelele de hard disk.
Română
Redare de pe dispozitiv
Bluetooth
78
Cu acest aparat puteti asculta fisiere audio
de lpe un dispozitiv atunci cand conexiunea
Bluetooth este disponibila.Asociere
Bluetooth - dispozitive activate.
Pentru a conecta dispozitivul Bluetooth
la sistem, trebuie sa asociati aparatul cu
sistemul. Asocierea trebuie sa fie efectuata
doar o singura data.
Nota :
*Intervalul de functionare intre acest sistem
si un dispozitiv Bluetooth este de aproximativ
10 metri.
* Inainte de a conecta un dispozitiv
Bluetooth la acest sistem , familiarizati-va cu
functionalitatea Bluetooth a dispozitivului .
* Compatibilitatea cu toate dispozitivele
Bluetooth nu este garantata.
* Orice obstacol intre acest sistem si un
dispozitiv Bluetooth poate reduce raza de
actiune.
* Tineti acest sistem departe de la alte
dispozitive electronice care pot provoca
interferente.
1. Activati functia Bluetooth a dispozitivului.
2. Cautati alte dispozitive Bluetooth cu
dispozitivul.
3. Selectati optiunea „ KM1584 „ din lista de
cuplare.
4. Introduceti parola implicita „ 0000 „, daca
este necesar .
Nota :
*Aparatul este deconectat atunci cand nu se
mai afla in raza de functionare.
* Daca doriti sa conectati din nou dispozitivul
la sistem respectati distanta de functionare.
* Sistemul se va conecta la dispozitivul
Bluetooth cand asocierea este deja facuta.
Pe modul asociere, alte dispozitive
Bluetooth pot fi cautate pentru conectare.
* In cazul in care sistemul este deconectat
de la dispozitivul Bluetooth , se va trece
automat in modul de asociere, alte
dispozitive Bluetooth pot fi cautate pentru
conectare.
Ascultati muzica de pe un dispozitiv
Bluetooth
Daca dispozitivul conectat Bluetooth suporta
Advanced Audio Distribution Profile (A2DP),
puteti asculta muzica stocata pe dispozitiv
prin intermediul sistemului.
1. Asociati sistemul cu dispozitivul.
2. Incepeti redarea muzicii cu ajutorul
dispozitivului
Manual de utilizare
Cautare posturi radio FM
Nota:
* Asigurati-va ca ati conectat si intins
complet antena FM furnizata.
1. Apasati SURSA pentru a selecta sursa
RADIO.
2. Apasati si tineti apasat butonul
/
pentru a cauta un post de radio.
3. Atunci cand frecventa incepe sa se
schimbe, eliberati butonul. Radioul FM se va
fixa pe un post radio cu receptie puternica.
4. Repetati pasii 2-3 pentru a regla mai multe
posturi.
Pentru a receptiona un post slab:
Apasati in mod repetat butonul
/
cand veti obtine receptia optima.
Nota:
Pentru a suprascrie un post de radio
memorat, memorati un alt post radio in locul
acestuia.
Selectarea unui post radio
presetat
1. Cautarea unui post radio.
2. Apasati tasta
/
a selecta un
numar de post presetat.
,pana
Memorare automata posturi
radio
Nota:
* Puteti programa maxim 20 de posturi radio.
1. Pe modul radio, apasati butonul CEAS /
PROG timp de 3 secunde pentru a activa
programarea automata.
- Simbolul [AUTO] este afisat.
- Aparatul stocheaza toate posturile radio FM
automat si apoi transmite primul post radio
presetat.
Nota:
* Puteti programa maxim 20 de posturi radio.
1. Cautarea unui post radio.
2. Apasati butonul CEAS/PROG. pentru a
activa programarea.
3. Apasati butonul
/
pentru a selecta
un numar cuprins intre 1-20 pentru acest
post radio, si apasati apoi butonul CEAS/
PROG. pentru a programa postul curent.
- Se afiseaza numarul presetat si frecventa
postului radio.
4. Repetati pasii 2-3 pentru a programa alte
posturi radio.
Română
Memorare manuala posturi
radio
79
Manual de utilizare
Reglarea volumului si efecte sonore
Reglarea volumului
1. In timpul redarii, apasati butonul
/
pentru a mari/reduce volumul.
Setarea nivelului de Bass
1. In timpul redarii, rotiti butonul BASS pentru a regla nivelul sunetelor joase.
Setarea nivelului de sunete inalte
1. In timpul redarii, rotiti butonul TREBLE pentru a regla nivelul sunetelor inalte.
Dezactivare sunet
1.In timpul redarii, apasati butonul
pentru a opri/relua sonorul.
Setare cronometru alarma
Română
Acest aparat poate fi folosit ca un ceas cu
alarma.Puteti selecta optiunile DISC, USB
sau RADIO ca alarma.
80
Nota:
Verificati setarea corecta a timpului.
1. In modul de asteptare , apasati si tineti
apasat butonul TIMER / SLEEP pana cand
setarea [TIMER SET] este in rulare pe
ecran .
2. Apasati tastele
/
/
/
telecomenzii, sau apasati tastele
/
panoului frontal pentru a selecta o sursa.
3. Apasati tasta TIMER / SLEEP, pentru
confirmare. Ora este afisata si palpaie.
4. Apasati tastele
/
/
/ de pe
panoul frontal sau apasati tastele
/
/
telecomenzii pentru a seta ora, apoi apasati
butonul TIMER/SLEEP inca o data pentru
confirmare. Minutele vor fi afisate si incep
sa palpaie.
5. Apasati tastele
/
panoului frontal
sau apasati tastele
/
/
/
telecomenzii, pentru a seta minutele, apoi
apasati butonul TIMER/SLEEP pentru
confirmare.
6. Apasati butonul VOL + / -, pentru a regla
volumul si apasati butonul TIMER / SLEEP
pentru a confirma . Apare o pictograma cu
ceas pe ecran.
Activare / dezactivare temporizator
alarma
1. In modul de asteptare, apasati in mod
repetat butonul TIMER / SLEEP.
* Cand cronometrul este activat, pictograma
ceas va fi afisata.
* Cand cronometrul este dezactivat,
pictograma ceas dispare de pe ecran.
Nota:
■ Temporizatorul de alarma nu este disponibil
daca este selectat ca sursa „AUX”.
■ Daca este selectata sursa DISC / USB, dar
nici un dispozitiv nu este conectat, aparatul va
trece automat pe RADIO.
Setare sleep timer
Acest aparat poate fi comutat automat in
modul standby dupa o anumita perioada de
timp.
1. Daca aparatul este pornit, apasati in mod
repetat butonul TIMER / SLEEP pentru a
selecta o perioada de timp prestabilita (in
minute). Atunci cand cronometrul este activat,
pe afisaj apare simbolul zz.
* Pentru a anula setarea, apasati in mod
repetat butonul TIMER / SLEEP pana cand pe
afisaj apare simbolul [OFF].
Manual de utilizare
Setari
1. Dupa apasarea tastei
pornire apare.
Disc
USB
2. Selectati simbolul
meniul sistemului.
meniul de
Setup
pentru a accesa
Auto(eng)
Nota:
* Nu puteti modifica optiunea unui meniu
afisat in gri.
* Pentru a reveni la meniul anterior, apasati
butonul
Pentru a iesi din meniu, apasati
din nou tasta .
Setari generale
1. Apasati tasta
.
2. Apasati tasta OK pentru a intra in meniul
de configurare.
3. Apasati tasta
pentru a accesa
optiunile [Setari Generale].
● [Blocare Disc]: Porniti sau opriti blocarea
discului.
● [Limbaj OSD]: Selectati o limba de afisare
pe ecran.
● [Auto Standby]: Activeaza / Dezactiveaza
modul automat de asteptare. Este o masura
de economisire a energiei.
Nota:
Daca selectati o limba care nu este
disponibila pe disc, utilizatorul primeste
limba implicita a discului.
1. Apasati tasta
.
2. Apasati tasta OK pentru a intra in meniul de
configurare.
3. Apasati tasta
pentru a accesa optiunile
[Setare Video].
● [ Sistem TV ] : Selecteaza un sistem de
televiziune , care este compatibil cu televizorul.
● [ Afisaj TV] : Reglati formatul ecranului ( 4:3 Pan
Scan , implicit ).
● [ Setari imagini ] : Selectati setarile de culoare
presetate sau reglati manual culorile.
● [ HD JPEG ] : Activeaza sau dezactiveaza
afisarea de inalta definitie a imaginilor JPEG.
● [ Setari HDMI ] :
- [ Rezolutie ] : Selecteaza rezolutia video HDMI
, care este compatibil cu capacitatea de afisare
TV .
- [ HDMI Deep Color ] : Aceasta functie este
disponibila numai atunci cand dispozitivul de
afisare este conectat prin intermediul unui cablu
HDMI si in cazul in care se accepta caracteristica
Deep Color .
- [ Ecran lat ] : Reglati dimensiunea ecranului (
Super- lat , 4:3 Pillar Box sau Oprit )
- [ Setare Customer Link ] : Acest produs
suporta Client Link care utilizeaza protocolul
HDMI CEC (Consumer Electronics Control) .
Puteti utiliza o singura telecomanda pentru a
controla toate dispozitivele compatibile conectate
prin HDMI.
- [ 1 Touch Play ] : Daca apasati butonul
Play pentru a porni acest aparat , televizorul
porneste automat ( daca televizorul suporta
redarea one-touch) si va schimba pe canalul
de intrare video. Discul va incepe redarea
atunci cand un disc este in acest produs .
- [ 1 Touch Standby ] : Daca apasati butonul
de asteptare , toate dispozitivele conectate
HDMI CEC (daca dispozitivul suporta 1
touch standby ) se comuta pe modul standby
simultan .
- [Control Audio al Sistemului ] : Cand
Comanda sistemului audio este activata
, sunetul de la dispozitivul conectat este
transferat automat prin difuzoarele sistemului ,
atunci cand incepe redarea pe dispozitiv .
- [ Audio Mapping ] : Cand Comanda
sistemului audio nu functioneaza , asociati
dispozitivul conectat la mufa corecta de intrare
audio a sistemului.
Română
Setare Video
81
Manual de utilizare
Nota:
* Trebuie sa activati functia HDMI CEC de
pe TV / dispozitive inainte de a va putea
bucura de verificarea Customer Link. Pentru
detalii , consultati instructiunile de utilizare
ale televizorului / dispozitivului .
* Nu garantam 100% interpretabilitate cu
toate dispozitivele compatibile HDMI CEC.
Setare Audio
1. Apasati tasta
.
2. Apasati tasta OK pentru a accesa meniul
setarii.
3. Apasati tasta
pentru a accesa
optiunile [Setarii Audio].
● [HDMI Audio]: Permite activarea/
dezactivarea iesirii audio HDMI.
● [Audio Sync]: Stabileste o intarziere
pentru iesirea audio atunci cand redati un
disc video.
● [Mod sunet]: Selecteaza un efect de sunet
presetat pentru a spori iesirea audio.
● [Mod de noapte]: Selecteaza un sunet
dinamic linistit sau plin. Modul de noapte
reduce nivelul de sunet puternic si mareste
nivelul de sunet linistit (cum ar fi vorbirea).
Setari preferentiale
1. Apasati tasta
.
2. Apasati tasta OK pentru a accesa meniul
setarii.
3. Apasati tasta
pentru a accesa optiunile
[Preferentiale].
● [Audio]: Selectati un limbaj audio pentru video.
● [Subtitrare]: Selectati o limba de subtitrare
pentru video.
● [Meniu disc]: Selectati limba meniului pentru
un disc video.
● [Control parental]: Setarea nivelul controlului
parental pentru un disc. Restrictioneaza accesul
la discurile care sunt codificate cu ratinguri.
Aceste discuri trebuie inregistrate cu niveluri de
clasificare.
● [PBC]: Afiseaza sau ascunde meniul
continutului pentru VCD si SVCD.
● [Parola]: Setati sau modificati parola pentru a
reda un disc restrictionat.
● [Subtitrare DivX]: Selectați limba DivX
● [Info versiune.]: Afiseaza versiunea de
software a acestei unitati.
● [Setari fabrica]: Reseteaza dispozitivul la
setarile din fabrica.
Protejarea discului
Română
- Pentru a mentine curata suprafata discului, va rugam sa nu atingeti suprafata CD-ului. Prindeti-l
doar de margini.
- Daca discul este murdar, calitatea sunetului este compromisa. Va rugam sa folositi un material
curat, moale pentru a curata discul dinspre centru spre exterior. Nu stergeti discul cu miscari
circulare.
82
- Nu lipiti hartie pe disc.
- Dupa ce ati terminat cu discul, introduceti-l inapoi in carcasa de protectie. In scopul de a evita
deformarea sau deteriorarea, nu ar trebui sa ingramaditi discurile.
- Nu folositi discuri cu crapaturi sau deformate, acest lucru poate duce la defectarea aparatului.
- Curatati CD-urile cu o carpa moale, uscata. Nu utilizati substanțe chimice, cum ar fi benzen,
diluant, spray anti-static, sau altele asemanatoare, deoarece acestea vor deteriora suprafata CDului.
Manual de utilizare
Depanare
Daca aveti o problema cu sistemul, verificati aceasta lista pentru o posibila solutie inainte de a
apela la service .
Daca nu puteti rezolva problema cu ajutorul indiciilor oferite aici , sau sistemul a fost deteriorat ,
consultati o persoana calificata , cum ar fi furnizorul dumneavoastra, pentru remedii.
Fara alimentare
Fara sunet sau sunet slab
● Verificati daca cablul de alimentare al
aparatului este conectat corect .
● Verificati daca exista tensiune la priza
● Setati volumul.
● Scoateti castile.
● Verificati ca difuzoarele sa fie conectate
corect.
● Verificati daca firele fara izolatie sunt
prinse .
● Introduceti discul.
● Verificati daca discul este introdus cu
eticheta in jos .
● Asteptati pana cand condensul de pe
lentile s-a evaporat.
● Curatati sau inlocuiti discul .
● Folositi un DVD finalizat sau un format
corect de disc .
Fara poza
● Verificati conexiunea video.
● Comutati TV la canalul corect de intrare
video .
Imagine alb-negru sau
distorsionata
● Discul nu se potriveste cu standardul
sistemului TV color ( PAL / NTSC ) .
● Uneori, poate aparea o distorsiune usoara
a imaginii. Aceasta nu este o defectiune .
● Curatati discul .
Raportul de aspect al ecranului
nu poate fi schimbat , chiar
daca setati formatul de raport
de aspect
● Raportul de aspect este fixat pe discul
introdus
● Raportul de aspect nu poate fi schimbat
pentru unele televizoare.
Telecomanda nu functioneaza
● Inainte de a apasa orice buton, selectati
sursa corecta cu telecomanda in loc de
unitatea principala.
● Reduceti distanta dintre telecomanda si
aparat
● Introduceti bateriile cu polaritatea
corecta(+/-), dupa cum este indicat .
● Inlocuiti bateriile .
● Aliniati telecomanda direct spre senzorul
de pe unitatea principala.
Continutul discului nu poate fi
redat
● Introduceti un disc care poate fi citit cu
eticheta in sus .
● Verificati tipul discului , sistemul de
culoare si codul regional. Verificati daca
exista zgarieturi sau murdarie pe suprafata
discului.
● Apasati butonul
pentru a parasi meniul
de setari al sistemului.
● Dezactivati parola pentru control parental
sau schimbati nivelul de clasificare .
● In interiorul sistemului s-a format condens
. Scoateti discul si lasati aparatul pornit timp
de aproximativ o ora. Deconectati cablul de
alimentare de la priza si introduceti-l inapoi ,
porniti alimentarea.
Receptie slaba a posturilor
radio
● Mariti distanta dintre dispozitiv si televizor
sau VCR .
● Intindeti la maxim si reglati antena FM.
Română
Nu a fost detectat niciun disc
83
Manual de utilizare
Limbajul audio sau subtitrarea
nu pot fi setate
● Discul nu are sunet sau subtitrare in
diferite limbi .
● Setarea limbii audio sau subtitrare este
interzisa pe acest disc .
Unele fisiere nu pot fi afisate pe
dispozitivul USB
● Numarul de foldere sau fisiere pe
dispozitivul USB a depasit limita. Aceasta nu
este o defectiune.
● Formatul acestor fisiere nu este acceptat .
Dispozitivul USB nu este
suportat
● Dispozitivul USB este incompatibil cu
sistemul. Incercati un alt dispozitiv USB.
Cronometrul nu functioneaza
● Setati corect ora.
● Activati cronometrul
Stergere setare
Română
● Alimentarea cu energie a fost intrerupta
sau cablul de alimentare a fost deconectat.
● Resetati ceasul/cronometrul.
84
Despre dispozitivul
Bluetooth
Redarea muzicii nu este
disponibila, chiar si dupa
conectarea Bluetooth cu succes.
● Aparatul nu poate fi utilizat cu sistemul
pentru a reda muzica.
Calitatea audio este slaba, dupa
conectarea la un dispozitiv
Bluetooth.
● Receptia Bluetooth este slaba. Aduceti
aparatul mai aproape de sistem sau
inlaturati orice obstacol ce se afla intre
dispozitiv si sistem.
Nu se poate conecta la sistem
● Aparatul nu accepta profilele necesare
sistemului.
● Caracteristica Bluetooth a dispozitivului
nu este activata. A se vedea instructiunile
de utilizare ale dispozitivului pentru a activa
functia.
● Sistemul nu este in modul de asociere
● Sistemul este deja conectat la un alt
dispozitiv cu Bluetooth activat. Deconectati
dispozitivul, precum si orice alte dispozitive
asociate si incercati din nou.
Manual de utilizare
Specificatii
Informatii generale
Tensiune de alimentare......................................................................................... 220-240V~ 50/60Hz
Separare canal....................................................................................................................... ≥ 40 dB
THD.............................................................................................................................................≤ 1%
Consum............................................................................................................................
50W
DVD
Iesire Video .............................................................................................................................. 1 Vp-p
Rezolutie orizontala..............................................................................................................≥ 500TV
Dimensiuni (Unitate principala)..................................................................160(W)×78(H)×260(D)mm
(Amplificator)...........................................................................160(W)×78(H)×280(D)mm
FM
Gama de frecvente FM................................................................................................87.5 - 108 MHz
Sensibilitate la zgomot FM........................................................................................................ ≤ 20uV
Raport Semnal/Zgomot......................................................................................................... ≥ 46 dB
Specificatii difuzor
Impedanta.....................................................................................................................................6Ω
Putere intrare............................................................................................................................. 45W
Dimensiuni..........................................................................................130(W)×205(H)×176(D)mm
USB
Compatibilitate.......................................................................................................USB 2.0 / USB1.1
Port USB ...........................................................................................................USB:DC 5 V1 500mA
Specificatii Bluetooth
Sistem de comunicare...........................Bluetooth Standard version 2.1 and EDR specification
Iesire.......................................................................................Bluetooth Standard Power Class 2
Raza maxima de comunicare...........................................................................................ok..10m
Banda de frecventa...................................................Pasmo 2.4 GHz (2.4000 GHz - 2.4835 GHz)
Profil Bluetooth compatibil...........................................Advanced Audio Distribution Profile (A2DP)
Suport asociere dispozitive multiple ............................................................ o 8 urządzeń\Coduri
suportate (Receptionare)..........................................................................SBC(Sub Band Codec)
(Transmisie)..................................................................................................SBC(Sub Band Codec)
Accesorii
Cablu audio.......................................................................................................................................1
Cablu
video................................................................................................................................1
Antena FM.........................................................................................................................................1
Manual de utilizare .............................................................................................................................1
Telecomanda.............................................................................................................................1
Nota: Designul si caracteristicile pot fi modificate fara instiintare prealabila.
Română
Telecomanda
Distanta maxima de actionare ........................................................................................................5m
Unghi.........................................................................................................................................±30°
85
Manual de utilizare
Română
Distribuit de Lechpol Electronic SRL, Republicii nr. 5, Resita, CS , ROMANIA.
86
To see more product visit:
http://www.krugermatz.com
Krüger&Matz is a registered trademark


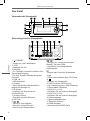

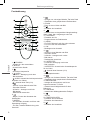
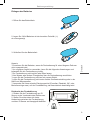
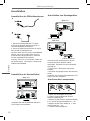
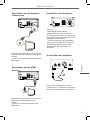
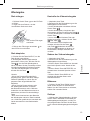
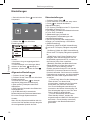
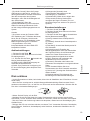


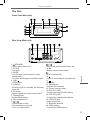
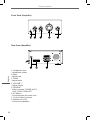
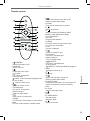
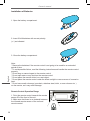
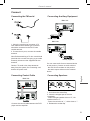
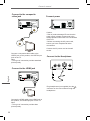
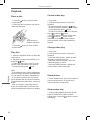

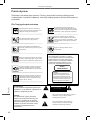
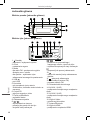
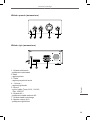
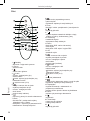
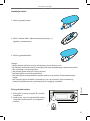
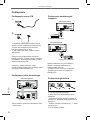
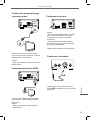

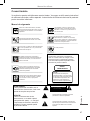
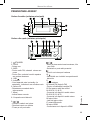
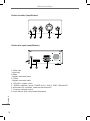
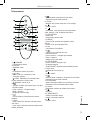
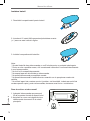
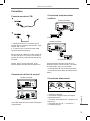
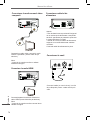


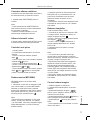
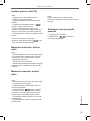

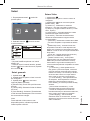
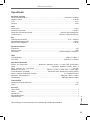


![Manual de utilizare[DOWNLOAD]](http://vs1.manualzilla.com/store/data/005723533_1-258331d4abba7698d1081b2119c4c2bf-150x150.png)