1
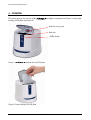
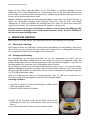
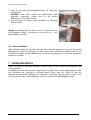
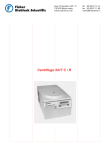
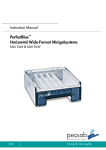
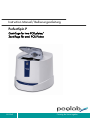
Instruction Manual/ Bedienungsanleitung
PerfectSpin P
Centrifuge for two PCR plates/
Zentrifuge für zwei PCR Platten
0312D+E
Creating the future together.
Instruction Manual PerfectSpin P
CONTENTS
1
SAFETY PRECAUTIONS
1
2
GENERAL DESCRIPTION
1
2.1
2.2
2.3
3
Description
Technical specifications
Warranty
1
1
2
INSTALLATION
3.1
3.2
2
Unpacking the centrifuge
Installation
2
2
4
OVERVIEW
3
5
OPERATION
4
6
SERVICE AND MAINTENANCE
4
6.1
6.2
6.3
7
Centrifuge service
Cleaning the centrifuge
Rotor disinfection
4
4
5
TECHNICAL SERVICE
PEQLAB_v0312E
6
1
Bedienungsanleitung PerfectSpin P
1 SAFETY PRECAUTIONS
Before using the PerfectSpin P centrifuge for PCR plates for the first time, please read this entire
operating manual carefully. To guarantee problem free, safe operation, it is essential to observe the
following points:
NEVER
use the centrifuge in any manner not specified in theses instructions.
NEVER
put hands in the rotor area unless the rotor is completely stopped.
NEVER
move the centrifuge while the rotor is spinning.
NEVER
use solvents or flammables near this or other electrical equipment.
NEVER
centrifuge flammable, explosive or corrosive materials.
NEVER
centrifuge hazardous materials outside of a hood or proper containment facility.
NEVER
continue to operate a centrifuge that is vibrating excessively.
ALWAYS load the rotor symmetrically. Each plate should be counterbalanced by another plate of the same
brand, type and volume.
ALWAYS use plates that have been sealed in some manner to avoid spillage.
ALWAYS be sure the plates are pushed all the way to the bottom of the rotor slot before operating the
centrifuge.
ALWAYS locate the centrifuge within easy access to an electrical outlet.
2 GENERAL DESCRIPTION
2.1 Description
The PerfectSpin P centrifuge for PCR plates is designed for quick spins of samples in PCR plates.
Primarily designed for use with 96 or 384 well plates and small volumes, it will accommodate skirted,
non skirted and semi skirted styles.
This manual provides important safety information for the PerfectSpin P centrifuge for PCR plates
(Cat. No. 91-PSPIN-P / 91-PSPINP-US). It should be kept near the centrifuge for quick and easy
reference.
PEQLAB_v0312E
1
Instruction Manual PerfectSpin P
2.2 Technical specifications
Model
Max. Speed
Max. RCF
Max. Rotor Capacity
Power Supply
91-PSPIN-P / 91-PSPINP-US
2,500 rpm
500 x g
2 PCR plates
120 V / 50~60 Hz, 0.6 A (Fuse 1.0 AT)
230 V / 50~60 Hz, 0.3 A (Fuse 0.5 AT)
190 x 183 x 210 mm
3 kg
Dimensions (W x H x D)
Weight (with Rotor)
Note: Specifications are subject to change without prior notice.
2.3 Warranty
PEQLAB guarantees that the PerfectSpin P centrifuge for PCR plates you have received has been
thoroughly tested and meets its published specification.
However, immediately upon arrival, please check carefully that the shipment is complete and has not
been damaged in transit. For missing parts or to report any kind of damage, please contact PEQLAB
(see 'TECHNICAL SERVICE’). Please retain all packaging materials until the delivery has been
completely checked since this will speed up the return of goods if required and reduce environmental
impact. Any form of returns, replacements or credit notes must be agreed in advance by PEQLAB.
This centrifuge has been subjected to thorough testing and quality control. In the unlikely event of a
manufacturing fault, our two year warranty (from the date of delivery) covers the centrifuge and the
rotor. This warranty becomes invalid in the case of incorrect operation, use of non-standard spare parts
or accessories and unauthorized modification of the rotor or centrifuge.
PEQLAB reserves the right to make technical modifications.
3 INSTALLATION
3.1 Unpacking the centrifuge
Remove the centrifuge from the carton in which it is delivered. All packaging should be retained until it
has been established that the centrifuge was proved for transport damage and is working properly.
Confirm that all items are included in the PerfectSpin P package:
-
PerfectSpin P unit with a rotor for two PCR plates
-
Instruction manual
-
Power cord
For missing parts or to report any kind of damage, please contact PEQLAB (see 'TECHNICAL SERVICE').
3.2 Installation
The PerfectSpin P centrifuge for PCR plates should be placed on a clean, flat surface with sufficient
space around it for ventilation. Be sure that both the bench and the unit’s rubber feet are clean. Plug the
power cord into the back of the unit and the wall socket. Turn the power switch (on the back of the unit)
to the “ON” position.
Mains power and frequency “must” be compatible with the information given on the product label on
the rear of the centrifuge.
PEQLAB_v0312E
2
Instruction Manual PerfectSpin P
4 OVERVIEW
This section presents an overview of the PerfectSpin P centrifuge’s components (see Figure 1) and proper
loading of PCR plates (see Figure 2).
Knob for turning rotor
Rotor slot
„OPEN“ button
Figure 1: PerfectSpin P centrifuge for two PCR plates
Figure 2: Proper loading of a PCR plate
PEQLAB_v0312E
3
Instruction Manual PerfectSpin P
5 OPERATION
To avoid spillage of samples, only plates that have been heat or tape sealed should be placed in the
centrifuge. Plates are loaded in the rotor in a vertical position. Lift the clear centrifuge cover to gain
access to the rotor (press the “OPEN” button to release the lid if it is locked down). Using the knob in the
top of the unit, turn the rotor until the rotor slot lines up with the opening. Carefully slide the first plate
into position so that the sealed side faces the center of the rotor and the bottom of the plate faces out. Be
sure that the plate is pushed all the way down into the slot. Line up the second slot like the first, using the
knob on the top of the unit.
Note: If the rotor is hard to turn, close the lid to start a run to release the friction brake. Load the second
plate in the same manner as the first; making sure that it is all the way down in the rotor slot.
If spinning only one plate, it is extremely important to load a dummy plate of the same brand, style
and sample volumes (water can be used) as a balance.
To begin a run, close the lid of the centrifuge, and the run is started automatically. The centrifuge will
automatically accelerate to maximum speed of 2500 rpm, the centrifugal force cannot be adjusted. A
run of approximately 15 seconds is sufficient to spin samples to the bottoms of the wells. Pressing the
“OPEN” button will engage the friction break and brings the rotor to a stop. Once the rotor has
stopped, you can lift the lid completely. To access the plates, turn the knob on the top of the unit until the
rotor slot lines up with the opening. If the rotor is hard to turn, close the lid of the centrifuge to start a
short run to disengage the friction brake.
Note: A slight vibration may be felt when the centrifuge reaches full speed. Excessive vibration indicates
that the rotor is not balanced. DO NOT run the centrifuge unbalanced. Always use a balance plate of
the same brand, type and sample volume.
Attention: Never attempt to operate the centrifuge with a rotor that shows signs of corrosion or
mechanical damage. Never centrifuge strongly corrosive materials that may damage the rotors,
accessories or bowl of the unit.
6 SERVICE AND MAINTENANCE
Always unplug the power plug before service and maintenance.
6.1 Centrifuge service
The brushless motor in the PerfectSpin P requires no routine maintenance. Any required service should
be performed by authorized, qualified personnel only. Repairs performed by unauthorized personnel
voids the warranty.
6.2 Cleaning the centrifuge
Maintenance of the centrifuge is confined to keeping the rotor and plate channels clean. The outside
housing of the centrifuge may be wiped down with a clean, soft cloth. The rotor slots/plate channels
may be cleaned with a sponge. Do not pour liquids in or over the centrifuge. Do not immerse the
centrifuge in liquid.
PEQLAB_v0312E
4
Instruction Manual PerfectSpin P
Only pH-neutral Detergents with a pH-value of 6-8 may be used for cleaning. Alkaline cleaning agents
(pH-value > 8) must not be used! After cleaning, please ensure all parts are dried thoroughly, either by
hand or in a hot-air cabinet (maximum temperature +50 °C).
It may also be desired to remove the rotor for cleaning or in the event of spillage. If so continue with the
below instruction for disassembly.
Disassembly:
1. Lay down a soft cloth and turn the unit upside down.
2. Remove the four outer screws.
3. Turn the unit right side up and loosen the rotor knob set screw with a
1/16” allen key and pull of knob.
4. Remove housing by lifting upward.
5. Loosen the rotor connection set screw with a .050” allen key.
PLEASE NOTE: This rotor contains two set screws directly across from
one another. Only the smaller (.050”) set screw is to be loosened.
6. The rotor can now be removed for cleaning by lifting upward.
IMPORTANT: During reattachment of the rotor, the rotor must be
tightened while lifted ½ inch from the baseplate.
(Typically accomplished by using a ½ inch spacer.)
6.3 Rotor disinfection
In case of infectious material spilling into the centrifuge, the rotor and rotor chamber have to be
disinfected right after the run. The rotor should be cleaned with a universal, neutral disinfection agent,
e.g. in formalin base. A disinfection spray is most suitable in order to easily reach all difficult to access
spots.
PEQLAB_v0312E
5
Instruction Manual PerfectSpin P
7 TECHNICAL SERVICE
Should you have any questions about the PerfectSpin P, please visit www.peqlab.com to find the
respective contact person.
Please have the unit’s serial number (located on the bottom of the instrument) available when calling.
Should an item require return to PEQLAB for service, a decontamination form must be completed first by
the user. Items sent without decontamination form will not be accepted.
All returns must be pre-approved by PEQLAB!
PEQLAB_v0312E
6
Bedienungsanleitung PerfectSpin P
INHALT
1
SICHERHEITSHINWEISE
8
2
ALLGEMEINE INFORMATION
8
2.1
2.2
2.3
3
Produktbeschreibung
Technische Spezifikationen
Garantie
8
9
9
INSTALLATION
3.1
3.2
9
Auspacken der Zentrifuge
Installation
9
10
4
ÜBERSICHT
10
5
BEDIENUNG
11
6
SERVICE UND WARTUNG
12
6.1
6.2
6.3
7
Wartung der Zentrifuge
Reinigung der Zentrifuge
Rotor Desinfektion
12
12
13
TECHNISCHER SERVICE
PEQLAB_v0312D
13
7
Instruction Manual PerfectSpin P
1 SICHERHEITSHINWEISE
Bevor Sie die Zentrifuge PerfectSpin P das erste Mal nutzen, um PCR-Platten zu zentrifugieren, lesen
Sie bitte die komplette Bedienungsanleitung sorgfältig durch. Um eine problemlose, sichere Handhabung gewährleisten zu können, müssen folgende Punkte beachtet werden:
Niemals mit den Hände den Rotorraum berühren, ehe die Zentrifuge nicht vollständig gestoppt ist.
Niemals die Zentrifuge bewegen, während der Rotor läuft.
Niemals entzündliche Substanzen in der Nähe der Zentrifuge oder anderen elektrischen Geräten benutzen.
Niemals entzündliches, explosives oder ätzendes Material zentrifugieren.
Niemals gesundheitsgefährdendes Material außerhalb entsprechender Sicherheitsvorkehrungen wie z.B.
einer Hood zentrifugieren.
Niemals eine Zentrifuge weiter bedienen, wenn sie eine starke Vibration zeigt.
Immer
die Zentrifuge entsprechend der Bedienungsanleitung verwenden.
Immer
den Rotor symmetrisch beladen. Die Platten sollten immer mit einer entsprechenden Tara-Platte des
gleichen Typs, Herstellers und Volumens ausbalanciert werden.
Immer
versiegelte Platten nutzen, um Verschmutzungen der Zentrifuge zu vermeiden.
Immer
sicherstellen, dass die Platten auf dem Boden der Zentrifuge aufsitzen, ehe Sie die Bedienung
starten.
Immer
die Zentrifuge in der Nähe eines einfach erreichbaren Stromanschlusses aufstellen.
2 ALLGEMEINE INFORMATION
2.1 Produktbeschreibung
Die Zentrifuge PerfectSpin P wurde entwickelt, um schnell und einfach Proben in PCR-Platten
zentrifugieren zu können. Die Zentrifuge ist primär zur Benutzung von Platten im 96 oder 384 well
Format, sowie für kleine Volumina konstruiert, und passend für skirted, non skirted und semi skirted
Platten.
Diese Bedienungsanleitung der Zentrifuge PerfectSpin P für PCR Platten (Artikelnr. 91-PSPIN-P /
91-PSPINP-US) enthält wichtige Sicherheitshinweise. Die Anleitung sollte zur schnellen und einfachen
Verfügbarkeit in der Nähe der Zentrifuge aufbewahrt werden
PEQLAB_v0312D
8
Instruction Manual PerfectSpin P
2.2 Technische Spezifikationen
Model
Max. Geschwindigkeit
Max. RCF
Max. Fassungsvermägen
Power Supply
91-PSPIN-P / 91-PSPINP-US
2500 rpm
500 x g
2 PCR Platten
120 V / 50~60 Hz, 0.6 A (Sicherung 1.0 AT)
230 V / 50~60 Hz, 0.3 A (Sicherung 0.5 AT)
190 x 183 x 210 mm
3 kg
Abmessungen (W x H x D)
Gewicht (mit Rotor)
Hinweis: Spezifikationen können ohne weitere Ankündigung geändert werden.
2.3 Garantie
PEQLAB garantiert, dass die von Ihnen erworbene Zentrifuge PerfectSpin P für PCR Platten sorgfältig
getestet wurde und den angegebenen Spezifikationen entspricht.
Bitte überprüfen Sie umgehend nach Erhalt der Zentrifuge die Lieferung auf Vollständigkeit und
eventuelle Transportschäden. Sollte die Lieferung fehlerhaft oder beschädigt sein, wenden Sie sich bitte
umgehend an den Technischen Service von PEQLAB oder Ihren PEQLAB-Außendienstmitarbeiter (siehe
'TECHNISCHER SERVICE & BESTELLINFORMATIONEN').
Durch die Aufbewahrung des Verpackungsmaterials bis zur vollständigen Prüfung der Lieferung wird
die Umwelt geschont und eine evtl. Rückholung beschleunigt. Alle Rücksendungen, Austauschlieferungen
und Gutschriften müssen zuvor von PEQLAB freigegeben werden.
Diese Zentrifuge wurde sorgfältig gestestet und strengen Qualitätskontrollen unterzogen. Sollten Sie
dennoch einmal Grund zur Beanstandung haben gewähren wir Ihnen 2 Jahre Garantie ab Lieferdatum
auf die Zentrifuge und den Rotor.
Die Garantieansprüche erlöschen, sollte die Zentrifuge anderweitig als der Bedienungsanleitung
entsprechend benutzt worden sein, bei der Verwendung von unzulässigen Ersatz-/Zubehörteilen oder
unerlaubter Modifikation des Rotors oder der Zentrifuge.
PEQLAB behält sich das Recht vor ohne weitere Ankündigung technische Modifikationen am Gerät
vorzunehmen.
3 INSTALLATION
3.1 Auspacken der Zentrifuge
Nehmen Sie die Zentrifuge aus dem Versandkarton und heben Sie diesen auf, bis sichergestellt ist, dass
die Zentrifuge auf mögliche Transportschäden geprüft wurde und problemlos funktioniert.
Überprüfen Sie die Lieferung der PerfectSpin P auf Vollständigkeit:
-
Zentrifuge PerfectSpin P inklusive Rotor für zwei PCR Platten
-
Bedienungsanleitung
-
Stromkabel
Sollte die Lieferung fehlerhaft oder beschädigt sein, wenden Sie sich bitte umgehend an den
Technischen Service von PEQLAB oder Ihren PEQLAB-Außendienstmitarbeiter (siehe 'TECHNISCHER
SERVICE & BESTELLINFORMATIONEN').
PEQLAB_v0312D
9
Instruction Manual PerfectSpin P
3.2 Installation
Die Zentrifuge PerfectSpin P für zwei PCR Platten sollte auf einer sauberen und ebenen Oberfläche
aufgestellt werden. Um eine gute Ventilation zu gewährleisten, halten Sie bei der Installation bitte
ausreichend Abstand zu benachbarten Geräten ein.
Zur sicheren Installation müssen sowohl die Aufstellfläche als auch die Gummifüße der Zentrifuge
sauber sein. Auf der Geräterückseite finden Sie den Anschluss für das Stromkabel und den
Hauptschalter für die Zentrifuge. Schließen Sie das Stromkabel am Gerät und der Steckdose an und
stellen Sie den Hauptschalter auf “ON“.
Stromnetz und Frequenz müssen mit den Anforderungen für die Zentrifuge, welche Sie auf der
Geräterückseite finden, übereinstimmen.
4 ÜBERSICHT
Dieser Abschnitt gibt Ihnen einen Überblick zu den Komponenten der Zentrifuge PerfectSpin P (Abb. 1)
und der richtigen Beladung von PCR Platten (Abb. 2).
Drehknopf zur manuellen
Rotorbewegung
Plattenschacht
„OPEN“ Knopf
Abb. 1: Zentrifuge PerfectSpin P für zwei PCR Platten
PEQLAB_v0312D
10
Instruction Manual PerfectSpin P
Abb. 2: korrekte Beladung einer PCR Platte
5 BEDIENUNG
Um Verschmutzung des Rotorinnenraums zu vermeiden, sollten in die Zentrifuge nur Platten eingesetzt
werden, welche hitzeverschweißt oder mit Folie versiegelt wurden. Die Platten werden in vertikaler
Position in den Rotor eingesetzt. Zum Beladen der Platten öffnen Sie den durchsichtigen Rotordeckel.
Sollte dieser verschlossen sein, drücken Sie den “OPEN“ Knopf, um den Deckel zu öffnen. Nutzen Sie
den Drehknopf, um den Rotor so zu positionieren, dass ein kompletter Plattenschacht in der Rotoröffnung erscheint. Setzen Sie nun vorsichtig die erste PCR Platte in den Schacht ein. Bitte beachten Sie
dabei, dass die versiegelte Oberfläche der Platte zum Geräteinneren zeigt, der Boden der Platte zeigt
zu Ihnen.
Stellen Sie sicher, dass die Platte bis auf den Rotorboden eingesetzt wird. Nutzen Sie erneut den
Drehknopf, um den zweiten Plattenschacht entsprechend zu positionieren.
Hinweis: Sollte sich der Rotor schwer drehen lassen, schließen Sie den Deckel und starten Sie einen
Lauf, um die Reibungsbremse zu lösen. Setzen Sie die zweite Platte wie die Erste in den Rotor ein,
achten Sie ebenfalls darauf, dass die Platte bis auf den Rotorboden eingesetzt wird.
Wenn nur eine PCR Platte zentrifugiert werden soll, ist es unerlässlich eine Tara-Platte des gleichen
Herstellers, Typs und Probenvolumens (Wasser kann genutzt werden) einzusetzen.
Schließen Sie dann den Deckel der Zentrifuge und der Lauf startet automatisch. Der Rotor wird
standardmäßig auf 2500 rpm beschleunigt, die Geschwindigkeit kann nicht eingestellt oder verändert
werden. In der Regel ist ein Lauf für 15 Sekunden ausreichend, um die Proben auf den Boden der Wells
zu zentrifugieren. Indem Sie den “OPEN“ Knopf betätigen, öffnet sich der Deckel und die
Reibungsbremse wird aktiviert, um den Rotor zu stoppen. Sobald der Rotor komplett gestoppt ist,
PEQLAB_v0312D
11
Instruction Manual PerfectSpin P
können Sie den Deckel vollständig öffnen, um die PCR Platten zu entnehmen. Betätigen Sie den
Drehknopf, um den ersten Plattenschacht so zu positionieren, dass Sie die erste Platte herausnehmen
können. Sollte sich der Rotor schlecht bewegen lassen, schließen Sie den Deckel und starten Sie einen
kurzen Lauf um die Reibungsbremse zu lösen.
Hinweis: Sobald die Zentrifuge die Maximalgeschwindigkeit erreicht, kann eine leichte Vibration zu
spüren sein. Übermäßige Vibration deutet allerdings darauf hin, dass der Rotor nicht korrekt
ausbalanciert ist. Nutzen Sie NIEMALS die Zentrifuge ohne Tara. Setzen Sie immer eine zweite Platte
des gleichen Herstellers, Typs und Probenvolumens als Ausgleich in den Rotor ein.
Achtung: Versuchen Sie niemals die Zentrifuge zu bedienen, wenn der Rotor Beschädigungen oder
Korrosion aufweist. Zentrifugieren Sie niemals ätzendes Material, welches den Rotor, Zubehörteile
oder den Innenraum beschädigen kann.
6 SERVICE UND WARTUNG
Bitte trennen Sie vor jeder Service- oder Wartungseinheit das Gerät vollständig vom Stromnetz.
6.1 Wartung der Zentrifuge
Der bürstenlose Motor der PerfectSpin P benötigt keine regelmäßigen Wartungsarbeiten. Jeder nötige
Service sollte nur von geschultem Personal vorgenommen werden. Durch unsachgemäße Reparaturen
von nicht geschultem Personal erlischt jeglicher Garantieanspruch.
6.2 Reinigung der Zentrifuge
Die Instandhaltung der Zentrifuge beschränkt sich auf das Sauberhalten des Rotors und der
Plattenschächte. Das äußere Gehäuse kann mit einem sauberen, weichen Tuch abgewischt werden. Die
Plattenschächte sollten mit einem Schwamm gereinigt werden. Bitte keine Flüssigkeiten in oder über die
Zentrifuge gießen. Das Gerät darf nicht in Flüssigkeiten getaucht werden.
Für die Reinigung dürfen nur pH-neutrale Reinigungsmittel (pH-Wert von 6 - 8) verwendet werden.
Alkalische Detergenzien (pH-Wert > 8) dürfen nicht verwendet werden. Stellen Sie sicher, dass nach der
Reinigung alle Teile entweder per Hand oder in einem warmen Trockenschrank (maximale Temperatur
50 °C) gründlich getrocknet werden.
Sollte eine Entfernung des Rotors zu Reinigungszwecken oder im Falle eines Verschüttens von
Flüssigkeiten nötig sein, bitte folgende Anweisung zur Demontage befolgen.
Demontage des Rotors:
1. Legen Sie ein weiches Tuch neben die Zentrifuge und stellen Sie die
Zentrifuge umgekehrt darauf.
2. Entfernen Sie die 4 äußeren Schrauben.
3. Stellen Sie die Zentrifuge wieder auf die Füße und lösen den
Rotorknopf mit einem 1/16” Inbusschlüssel. Ziehen Sie den Knopf
heraus.
4. Das Gehäuse kann durch Ziehen nach oben entfernt werden.
PEQLAB_v0312D
12
Instruction Manual PerfectSpin P
5. Lösen Sie die Rotor-Verbindungsstellschraube mit einem.050”
Inbusschlüssel.
ACHTUNG: Dieser Rotor enthält zwei Stellschrauben direkt
gegenüber voneinander. Hierbei darf nur die kleinere
Stellschraube (.050”) gelöst werden!
6. Der Rotor kann nun einfach durch Hochheben zur Reinigung
entfernt werden.
Wichtig: Der Wiedereinbau des Rotors muss mit ½ inch Abstand von
der Bodenplatte erfolgen. Typischerweise wird hierfür ein ½ inchAbstandshalter verwendet
6.3 Rotor Desinfektion
Sollte infektiöses Material in den Rotor oder den Rotorinnenraum gelangt sein, muss das Gerät direkt
dekontaminiert werden. Die Reinigung des Rotors kann mittels neutralem Desinfektionsmittel z.B. auf
Formalinbasis erfolgen. Ein Desinfektionsspray ist besonders gut geeignet, um auch schwer zugängliche
Bereiche zu erreichen.
7 TECHNISCHER SERVICE
Sollten Sie Fragen zur Zentrifuge PerfectSpin P haben, finden Sie den richtigen Ansprechpartner unter
www.peqlab.com.
Bitte halten Sie die Seriennummer des Gerätes bereit, Sie finden diese auf der Geräteunterseite. Sollte
eine Rückholung der Zentrifuge zu PEQLAB zwecks Service nötig sein, füllen Sie bitte das
Dekontaminationszertifikat vollständig aus. Lieferungen ohne dieses Formular müssen wieder an Sie
zurück geschickt werden. Alle Rückholungen müssen im Vorfeld mit PEQLAB abgeklärt werden.
PEQLAB_v0312D
13
D
AT
UK
USA
PEQLAB Biotechnologie GmbH, 91052 Erlangen, Freecall (D): 0800 100 20 16, [email protected], www.peqlab.de
PEQLAB Biotechnologie GmbH, 6404 Polling, Tel: +43 (0) 5238 84 169, [email protected], www.peqlab.at
PEQLAB Ltd., Southampton SO31 7ZN, Freecall (UK): 0808 20 21 302, [email protected], www.peqlab.co.uk
PEQLAB LLC, Wilmington, DE 19810, Toll-Free (US): 877 737 5220, [email protected], www.peqlab.us
Creating the future together.