1
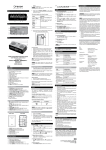
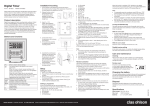
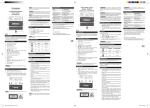
Weather Hub
Model: BA169
•
USER MANUAL
•
•
EN
INTRODUCTION
FIG. 1
•
Thank you for selecting the Oregon ScientificTM Weather Hub.
Please keep this manual for instructions and information you
should know about.
PRODUCT OVERVIEW
1
2
•
•
•
FRONT VIEW – FIG. 1
•
1. Weather forecast
2. Time and temperature display
•
BACK VIEW – FIG. 2
FIG. 2
1
2
3
6
7
8
4
9
1.
2.
3.
4.
5.
6.
7.
8.
9.
Wall mount hole
: Enter alarm mode
+ / - : Change settings
: Enter clock setting mode; toggle display
Stand
Magnet
Battery compartment
RESET: Reset unit to default settings
°C / °F: Select temperature unit
•
•
•
FIG. 3
Insert the batteries as shown, taking care to match the
polarities (+ / -).
indicates the batteries are low.
Unclip the stand to place on a horizontal surface.
MANUALE PER L’UTENTE
IT
DESCRIPTION
LxWxH
167 x 79 x 21 mm (6.6 x 3.1 x 0.8 in)
Premere RESET per ripristinare le impostazioni predefinite
dell’unità.
PRECAUZIONI
•
INTRODUZIONE
Grazie per aver scelto la stazione meteo base di Oregon
ScientificTM. Conservare il presente manuale, poiché contiene
istruzioni e informazioni che è necessario conoscere.
PANORAMICA DEL PRODOTTO
•
•
•
•
VISTA PANORAMICA – FIG. 1
1. Previsioni meteorologiche
2. Visualizzazione di ora e temperatura
•
VISTA POSTERIORE – FIG. 2
•
•
1. Foro per fissaggio a parete
2.
: consente di accedere alla modalità sveglia
3. + / - : consente di modificare le impostazioni
4.
: consente di accedere alla modalità di impostazione
dell’ora e di alternare le visualizzazioni
5. Supporto
6. Calamita
7. Vano batterie
8. RESET: consente di ripristinare i valori predefiniti dell’unità
9. °C / °F: consente di selezionare l’unità di misura della
temperatura
•
•
•
•
OPERAZIONI PRELIMINARI
Inserire le batterie come indicato, facendo attenzione a
rispettare le polarità (+ / -).
indica che le batterie sono in esaurimento.
Non sottoporre il prodotto a forza eccessiva, urti, polvere,
temperatura o a umidità.
Non otturare i fori di aerazione con oggetti come giornali,
tende, etc.
Non immergere l’unità in acqua. Se si versa del liquido
sul prodotto, asciugarlo immediatamente con un panno
morbido e liscio.
Non pulire l’unità con materiali abrasivi o corrosivi.
Non manomettere i componenti interni. In questo modo
si invalida la garanzia.
Utilizzare solo batterie nuove. Non mescolare batterie
nuove con batterie vecchie.
Le immagini del manuale possono differire dalla realtà.
Al momento dello smaltimento del prodotto, utilizzare la
raccolta differenziata.
Oregon Scientific declina ogni responsabilità per
eventuali danni alle finiture causati dal posizionamento
del prodotto su determinati tipi di legno. Consultare le
istruzioni fornite dal fabbricante del mobile per ulteriori
informazioni.
Il contenuto di questo manuale non può essere ristampato
senza l’autorizzazione del fabbricante.
Non smaltire le batterie vecchie come rifiuto non
differenziato. È necessario che questo rifiuto venga
smaltito mediante raccolta differenziata per essere
trattato in modo particolare.
Alcune unità sono dotate di una striscia di sicurezza per
le batterie. Rimuovere la striscia dal vano batterie prima
del primo utilizzo.
Le specifiche tecniche del prodotto e il contenuto del
manuale per l’utente possono essere modificati senza preavviso.
SPECIFICHE
FR
Appuyez sur °C / °F pour sélectionner l’unité de mesure de
la température.
BEDIENUNGSANLEITUNG
RESET
Appuyez sur RESET pour que l’appareil revienne aux réglages
par défaut.
INTRODUCTION
Merci d’avoir choisi cette station météorologique Hub de
Oregon ScientificTM. Veuillez conserver ce manuel et prendre
connaissance des instructions et informations nécessaires
à l’utilisation.
PRECAUTIONS
•
VUE D ENSEMBLE DU PRODUIT
•
FACE AVANT FIG. 1
•
1. Prévision météorologique
2. Affichage de l’heure et de la température
•
FACE ARRIERE FIG. 2
1. Trou de fixation murale
2.
: Permet d’entrer dans le mode alarme
3. + / - : Permet de modifier les réglages
4.
: Permet d'entrer dans le mode réglage, d'alterner les
différents affichages
5. Support de table
6. Aimant
7. Compartiment des piles
8. RESET (REINITIALISER): Réinitialise l’appareil aux
réglages par défaut
9. °C / °F : Permet de sélectionner l’unité de mesure de la
température
AU COMMENCEMENT
Wetterstation
Modell: BA169
TEMPERATURE
•
•
•
•
•
•
•
PILES FIG. 3
Ne pas soumettre le produit à une force excessive, au
choc, à la poussière, aux changements de température
ou à l’humidité.
Ne pas couvrir les trous de ventilation avec des journaux,
rideaux etc.
Ne pas immerger le produit dans l’eau. Si vous renversez
du liquide sur l’appareil, séchez-le immédiatement avec
un tissu doux.
Ne pas nettoyer l’appareil avec des matériaux corrosifs
ou abrasifs.
Ne pas trafiquer les composants internes. Cela invalidera
votre garantie.
N’utilisez que des piles neuves. Ne pas mélanger des
piles neuves et usagées.
Les images de ce manuel peuvent différer de l’aspect
réel du produit.
Lorsque vous désirez vous débarrasser de ce produit,
assurez-vous qu’il soit collecté séparément pour un
traitement adapté.
Le poser sur certaines surfaces en bois peut endommager
la finition du meuble, et Oregon Scientific ne peut en
être tenu responsable. Consultez les mises en garde du
fabricant du meuble pour de plus amples informations.
Le contenu du présent manuel ne peut être reproduit
sans la permission du fabriquant.
Ne pas jeter les piles usagées dans les containers
municipaux non adaptés Veuillez effectuer le tri de ces
ordures pour un traitement adapté si nécessaire.
Veuillez remarquer que certains appareils sont
équipés d’une bande de sécurité. Retirez la bande du
compartiment des piles avant la première utilisation.
Insérez les piles comme indiqué en prenant soin de respecter
les polarités (+ / -).
indique que les piles sont faibles.
•
SUPPORT – FIG. 4
Décochez le support pour placer l’appareil sur une surface
horizontale.
Les caractéristiques techniques de ce
produit et le contenu de ce manuel peuvent être soumis à
modifications sans préavis.
DE
PRODUKTÜBERSICHT
Drücken Sie auf RESET, um das Gerät auf die
Standardeinstellungen zurückzusetzen.
VORDERANSICHT – ABB. 1
1. Wettervorhersage
2. Anzeige von Uhrzeit und Temperatur
RÜCKANSICHT – ABB. 2
1. Öffnung für Wandmontage
2.
: Alarmmodus aufrufen
3. + / - : Einstellungen ändern
4.
5.
6.
7.
8.
9.
: Uhreinstellungsmodus aufrufen; Anzeige umschalten
Tischaufsteller
Magnet
Batteriefach
RESET: Gerät auf Standardeinstellungen zurücksetzen
°C / °F: Temperatureinheit auswählen
ERSTE SCHRITTE
BATTERIEN – ABB. 3
Legen Sie die Batterien entsprechend der Abbildung ein;
achten Sie dabei auf die Übereinstimmung der Polaritäten
(+ / -).
gibt an, dass die Batterien schwach sind.
SUPPORTO – FIG. 4
°C / °F
Estrarre il supporto per collocare su un piano orizzontale.
Use the magnets to fix to a metallic object or wall mount on
a screw or nail.
Temperature range. -5°C to 50°C (23°F to 122°F)
FISSAGGIO A PARETE – FIG. 5
Temperature resolution 0.1°C (0.2°F)
Base x altezza x profondità
167 x 79 x 21 mm
Utilizzare le calamite per fissare ad un oggetto metallico o su
una parete ad una vite o ad un chiodo.
Peso
90 g senza batterie
Unità di misura
temperatura
°C / °F
FIXATION MURALE – FIG. 5
CARACTERISTIQUES
WANDHALTERUNG – ABB. 5
Campo di misurazione
temperatura
Da -5°C a 50°C
Utilisez les aimants pour fixer l’appareil à un objet métallique
ou la fixation murale sur un vis ou un clou.
TYPE
Verwenden Sie die Magnete, um das Gerät auf einem
metallischen Objekt zu fixieren, oder befestigen Sie es mit
Hilfe einer Schraube oder eines Nagels an der Wand.
Risoluzione temperatura
0,1°C
AFFICHAGE
LxExH
167 x 79 x 21 mm (6,6 x 3,1 x 0,8 pouces)
Alimentazione
2 batterie CR2032
L’affichage de l’heure et de la température alternera
automatiquement entre l’horloge et la température.
Appuyez sur
pour passer immédiatement à un autre affichage.
Poids
90 g (3,2 onces) sans les piles
Unité de température
°C / °F
Plage de mesure
de la température
-5°C à 50°C
(23°F à 122°F)
Résolution de la
température
0,1°C (0,2 °F)
Alimentation
2 piles CR2032
Power
The time and temperature display will automatically toggle
between the clock and the temperature.
Press
to change the display immediately.
CLOCK
SET CLOCK
1.
2.
3.
4.
Press and hold
for 2 seconds.
Press + / - to change the settings.
to confirm.
Press
The settings order is: 12 / 24 hr format, hour, minute.
Time zone offset sets the clock + / - 23 hours from
the set clock time.
ALARM
To set the alarm:
1. Press
to enter alarm mode. AL will appear.
to enter alarm setting mode.
2. Press and hold
3. Press + / - to set hour / minute.
4. Press
to confirm.
appears when the alarm is ON.
To toggle alarms ON / OFF:
to display alarm time.
1. Press
2. Press
again to turn alarm ON / OFF.
To silence the alarm:
Press any other key to turn the alarm off and activate it again
after 24 hours.
WEATHER FORECAST
This product uses an internal barometric sensor to forecast a
projection of the next 12 to 24 hours of weather within a 30-50
km (19-31 mile) radius.
2 x CR2032 batteries
ABOUT OREGON SCIENTIFIC
Visit our website (www.oregonscientific.com) to learn more
about Oregon Scientific products.
If you’re in the US and would like to contact our Customer
Care department directly, please visit:
www2.oregonscientific.com/service/support.asp
OR
Call 1-800-853-8883.
For international inquiries, please visit:
www2.oregonscientific.com/about/international.asp.
EU-DECLARATION OF CONFORMITY
Hereby, Oregon Scientific, declares that this Weather
Hub (Model: BA169) is in compliance with EMC directive
89/336/CE. A copy of the signed and dated Declaration of
Conformity is available on request via our Oregon Scientific
Customer Service.
VISUALIZZAZIONE
La visualizzazione dell’ora e quella della temperatura si
alternano automaticamente tra loro.
per modificare subito il tipo di visualizzazione.
Premere
OROLOGIO
INFORMAZIONI SU OREGON SCIENTIFIC
IMPOSTAZIONE DELL’ORA
1.
2.
3.
4.
Tenere premuto
per 2 secondi.
Premere + / - per modificare le impostazioni.
per confermare.
Premere
L’ordine delle impostazioni è: formato ora 12/24 ore, ora,
minuti.
La differenza di fuso orario imposta l’orologio su + /
- 23 ore dall’ora impostata.GLIA
SVEGLIA
Per impostare la sveglia:
1. Premere
per accedere alla modalità sveglia. Apparirà
la scritta AL.
per accedere alla modalità
2. Tenere premuto
impostazioni della sveglia.
3. Premere + / - per impostare ora e minuti.
per confermare. Quando la sveglia è attiva,
4. Premere
appare l’icona
.
Per attivare / disattivare la sveglia:
per visualizzare l’ora della sveglia.
1. Premere
2. Premere nuovamente
per attivare / disattivare la sveglia.
Per arrestare la sveglia:
Premere un tasto qualsiasi per spegnere la sveglia e per
attivarla nuovamente dopo 24 ore.
PREVISIONI METEOROLOGICHE
Questo prodotto utilizza un sensore barometrico interno per
le previsioni meteorologiche delle successive 12-24 ore entro
un raggio di 30-50 km.
Sunny
Partially Cloudy
Cloudy
Rainy
Per avere maggiori informazioni sui nuovi prodotti Oregon
Scientific visita il nostro sito internet www.oregonscientific.it,
dove potrai trovare tutte le informazioni di cui hai bisogno.
Per ricerche di tipo internazionale puoi visitare invece il sito
www2.oregonscientific.com/about/international.asp.
DICHIARAZIONE DI CONFORMITÀ UE
Oregon Scientific dichiara che questo Stazione meteo base
(Modello: BA169) è conforme alla direttiva EMC 89/336/CE.
Una copia firmata e datata della Dichiarazione di Conformità
è disponibile, su richiesta, tramite il servizio clienti della
Oregon Scientific.
HORLOGE
REGLER L’HORLOGE
1.
2.
3.
4.
Appuyez et maintenez enfoncée la touche
pendant 2 secondes.
Appuyez sur + / - pour modifier les réglages.
pour confirmer.
Appuyez sur
L’ordre de réglage est le suivant : format 12 ou 24
heures, heure et minute.
La fonction de décalage horaire règle l’horloge
à +/- 23 heures de l’heure de l’horloge réglée.RME
ALARME
Pour régler l’alarme :
1. Appuyez sur
pour entrer dans le mode de l’alarme.
AL s’affiche.
2. Appuyez et maintenez enfoncée la touche
pour
entrer dans le mode de réglage de l’alarme.
3. Appuyez sur + / - pour régler l’heure / les minutes.
4. Appuyez sur
pour confirmer.
apparaît si l’alarme est activée.
Pour activer/désactiver l’alarme :
1. Appuyez sur
pour afficher l’heure de l’alarme.
2. Appuyez une nouvelle fois sur
pour activer ou désactiver l’alarme.
Pour couper le son de l’alarme :
Appuyez sur n’importe quelle touche pour éteindre l’alarme et
pour qu’elle se déclenche 24 heures plus tard.
PREVISION METEOROLOGIQUE
Ce produit utilise un capteur barométrique interne pour prévoir
les conditions météo de 12 à 24 heures dans un rayon de 30
à 50 Km (19 à 21 miles).
Sereno
Parzialmente
nuvoloso
Nuvoloso
A PROPOS D’OREGON SCIENTIFIC
Pour plus d‘informations sur les produits Oregon Scientific
France, rendez-vous sur notre site www.oregonscientific.fr.
Si vous êtes aux Etats-Unis, vous pouvez contacter notre
support consommateur directement : sur le site w w w 2.
oregonscientific.com/service/support.asp
OU
par téléphone au: 1-800-853-8883
Pour des renseignements internationaux, rendez vous sur le site:
www2.oregonscientific.com/about/international.asp.
EU - DÉCLARATION DE CONFORMITÉ
Par la présente, Oregon Scientific déclare que Station Météo
Hub (Modèle BA169) est conforme à la directive européenne
89/336/CE. Une copie signée et datée de la déclaration de
conformité est disponible sur demande auprès de notre
Service Client.
Lösen Sie den Tischaufsteller und stellen Sie das Gerät auf
eine waagerechte Fläche.
ANZEIGE
Die Zeit- und Temperaturanzeige wechselt automatisch
zwischen Uhrzeit und Temperatur.
Drücken Sie auf
, um die Anzeige sofort zu wechseln.
FUNKUHR
mit
UHR EINSTELLEN
PC1. Halten Sie
2 Sekunden lang gedrückt.
2. Drücken Sie auf + / -, um die Einstellungen zu ändern.
Anbi
.
3. Drücken Sie zur Bestätigung auf
ndu
4. Die Reihenfolge der Einstellungen lautet: 12- / 24ng Stundenformat, Stunde, Minute.
Der Zeitzonenausgleich stellt die Uhr auf + / - 23
Stunden von der festgelegten Uhrzeit ein.
ALARM
So stellen Sie den Alarm ein:
1. Drücken Sie auf
, um den Alarmmodus aufzurufen.
AL erscheint auf der Anzeige.
gedrückt, um den Alarmeinstellungsmodus
2. Halten Sie
aufzurufen.
3. Drücken Sie auf + / -, um die Stunde / Minute
einzustellen.
4. Drücken Sie zur Bestätigung auf
.
erscheint bei
aktiviertem Alarm (ON).
So schalten Sie den Alarm ein / aus (ON / OFF):
1. Drücken Sie auf
um die Alarmzeit anzuzeigen.
, um den Alarm ein- oder
2. Drücken Sie erneut auf
auszuschalten (ON / OFF).
So schalten Sie den Alarm stumm:
Drücken Sie eine beliebige andere Taste, um den Alarm
auszuschalten und ihn nach 24 Stunden erneut zu
aktivieren.
Dieses Produkt verwendet einen internen Luftdrucksensor,
um eine Wetterprognose der nächsten 12 bis 24 Stunden
innerhalb eines Radius von 30-50 km zu erstellen.
Pioggia
RESET
Press RESET to return the unit to default settings.
APPAREIL PRINCIPAL
Ensoleillé
TEMPERATURA
Premere °C / °F per selezionare l’unità di misura della
temperatura.
Partiellement
nuageux
Nuageux
Pluvieux
RESET
VORSICHTSMASSNAHMEN
•
•
•
•
•
•
•
•
•
TISCHAUFSTELLER – ABB. 4
WETTERVORHERSAGE
TEMPERATURE
Press °C / °F to select the temperature unit.
DESCRIPTION
Regnerisch
Drücken Sie auf °C / °F, um die Temperatureinheit
auszuwählen.
90 g (3.2 oz) without batteries
DESCRIZIONE
Bewölkt
TEMPERATUR
Temperature unit
UNITÀ PRINCIPALE
Teils bewölkt
Wir danken Ihnen, dass Sie sich für die Wetterstation von
Oregon ScientificTM entschieden haben. Halten Sie bitte diese
Anleitung bereit, da sie Anweisungen und wichtige Hinweise
für den Umgang mit diesem Gerät enthält.
Weight
TIPO
Sonnig
EINLEITUNG
WALL MOUNT – FIG. 5
DISPLAY
FIG. 5
TYPE
Station Météo Hub
Modèle : BA169
MANUEL DE L’UTILISATEUR
RESET
BATTERIE – FIG. 3
SPECIFICATIONS
MAIN UNIT
STAND – FIG. 4
FIG. 4
Do not subject the unit to excessive force, shock, dust,
temperature or humidity
Do not cover the ventilation holes with any items such as
newspapers, curtains etc.
Do not immerse the unit in water. If you spill liquid over it,
dry it immediately with a soft, lint-free cloth.
Do not clean the unit with abrasive or corrosive
materials
Do not tamper with the unit ’s internal components. This
invalidates the warranty
Only use fresh batteries. Do not mix new and old
batteries.
Images shown in this manual may differ from the actual
display
When disposing of this product, ensure it is collected
separately for special treatment
Placement of this product on certain types of wood
may result in damage to its finish for which Oregon
Scientific will not be responsible. Consult the furniture
manufacturer’s care instructions for information
The contents of this manual may not be reproduced
without the permission of the manufacturer
Do not dispose old batteries as unsorted municipal
waste. Collection of such waste separately for special
treatment is necessary.
Please note that some units are equipped with a
battery safety strip. Remove the strip from the battery
compartment before first use.
The technical specifications for this product and the
contents of the user manual are subject to change without
notice.
GETTING STARTED
BATTERIES – FIG. 3
5
Stazione meteo base
Modello: BA169
PRECAUTIONS
•
•
•
Setzen Sie das Gerät keiner extremen Gewalteinwirkung
und keinen Stößen aus, und halten Sie es von
übermäßigem Staub, Hitze oder Feuchtigkeit fern.
Sie dürfen die Belüftungsöffnungen nicht mit
Gegenständen abdecken, wie z.B. Zeitungen, Vorhänge,
usw.
Tauchen Sie das Gerät niemals in Wasser. Falls Sie eine
Flüssigkeit über das Gerät verschütten, trocknen Sie es
sofort mit einem weichen, faserfreien Tuch.
Reinigen Sie das Gerät keinesfalls mit scheuernden oder
ätzenden Mitteln.
Machen Sie sich nicht an den internen Komponenten
des Geräts zu schaffen, da dies zu einem Verlust der
Garantie führen kann.
Verwenden Sie nur neue Batterien. Verwenden Sie
keinesfalls neue und alte Batterien gemeinsam.
Die in dieser Anleitung dargestellten Abbildungen können
sich vom Original unterscheiden.
Entsorgen Sie das Gerät ausschließlich in den dafür
vorgesehenen, kommunalen Sammelstellen, die Sie bei
Ihrer Gemeinde erfragen können.
Wenn dieses Produkt auf bestimmte Holzflächen gestellt
wird, kann die Oberfläche beschädigt werden. Oregon
Scientific ist nicht haftbar für solche Beschädigungen.
Entsprechende Hinweise entnehmen Sie bitte der
Pflegeanleitung Ihres Möbelherstellers.
Der Inhalt dieser Anleitung darf ohne Genehmigung des
Herstellers nicht vervielfältigt werden
Verbrauchte Batterien gehören nicht in den Hausmüll.
Bitte geben Sie sie bei einer Sammelstelle für Altbatterien
bzw. Sondermüll ab.
Bitte beachten Sie, dass manche Geräte mit einem Batte
rieunterbrechungsstreifen bestückt sind. Vor dem ersten
Gebrauch müssen Sie den Streifen aus dem Batteriefach
ziehen.
Die technischen Daten für dieses Produkt und der
Inhalt der Bedienungsanleitung können ohne Benachrichtigung
geändert werden.
TECHNISCHE DATEN
TYP
BESCHREIBUNG
BASISEINHEIT
LxBxH
167 x 79 x 21 mm
Gewicht
90 g (ohne Batterien)
Temperatureinheit
°C / °F
Temperaturbereich
-5°C bis 50°C (23°F bis 122°F)
Temperaturauflösung 0,1°C (0,2°F)
Stromversorgung
2 Batterien CR2032
ÜBER OREGON SCIENTIFIC
Besuchen Sie unsere Website www.oregonscientific.de und
erfahren Sie mehr über unsere Oregon Scientific-Produkte.
Auf der Website finden Sie auch Informationen, wie Sie
im Bedarfsfall unseren Kundendienst erreichen und Daten
herunterladen können.
Für internationale Anfragen besuchen Sie bitte unsere Website:
www2.oregonscientific.com/about/international.asp.
EU-KONFORMITÄTSERKLÄRUNG
Hiermit erklärt Oregon Scientific, dass die Wetterstation (Modell:
BA169) mit der EMC Richtlinie 89/336/CE übereinstimmt. Eine
Kopie der unterschriebenen und mit Datum versehenen
Konformitätserklärung erhalten Sie auf Anfrage über unseren
Oregon Scientific Kundendienst.
Estación meteorológica
Modelo: BA169
Pulse RESET para volver a la configuración predeterminada.
MANUAL DE USUARIO
1
•
INTRODUCCIÓN
2
•
Gracias por elegir esta estación meteorológica de Oregon
ScientificTM Guarde este manual a mano para disponer de
las instrucciones e informaciones necesarias.
•
PANORÁMICA GENERAL DEL PRODUCTO
•
VISTA FRONTAL FIG. 1
•
1. Previsión meteorológica
2. Hora y temperatura
•
•
VISTA TRASERA FIG. 2
•
1. Orificio para montaje en pared
2.
: Accede al modo de ajuste de la alarma
3. + / - : Cambiar configuración
FIG. 2
1
2
3
4
5
FIG. 3
6
7
8
9
4.
5.
6.
7.
8.
9.
: Acceder al modo de ajuste de reloj; alternar pantalla
Soporte
Imán
Compartimento para pilas
REINICIO: La unidad vuelve a los ajustes predeterminados
°C / °F: Selección de unidad de temperatura
•
•
PILAS – FIG. 3
Introduzca las pilas como muestra la imagen. Las polaridades
deben coincidir (+ / -).
aparece cuando las pilas están casi gastadas.
Abra el soporte para colocar la unidad en una superficie
horizontal.
Use los imanes para fijarla a un objeto metálico o móntelo
en la pared con un tornillo o clavo.
PANTALLA
RELOJ
CONFIGURAR EL RELOJ
FICHA TÉCNICA
DESCRIPCIÓN
UNIDAD PRINCIPAL
LXAXA
167 x 79 x 21 mm (6,6 x 3,1 x 0,8 pulgadas)
Peso
90 g (3,2 oz) sin pilas
Alcance de temperatura -5°C a 50°C (23°C a 122°F)
El huso horario configura el reloj a + / - 23 horas de
la hora ajustada en el reloj.
ALARMA
Para configurar la alarma:
1. Pulse
para acceder al modo de alarma. Aparecerá AL.
2. Pulse
y manténgalo pulsado para acceder al modo
de configuración de alarma.
3. Pulse + / - para configurar hora / minuto.
4. Pulse
para confirmar.
aparece cuando la alarma
está ACTIVADA.
Para activar / desactivar la alarma:
1. Pulse
para mostrar la hora de la alarma.
2. Pulse
de nuevo encender/apagar la alarma.
Para apagar la alarma:
Pulse cualquier otra tecla para apagar la alarma y que se
active de nuevo pasadas 24 horas.
PREVISIÓN METEOROLÓGICA
Este producto utiliza un sensor barométrico interno para
predecir el tiempo de las próximas 12 a 24 horas en un radio
de 30 a 50 km (19 a 31 millas).
PRECAUÇÕES
POR
•
INTRODUÇÃO
Obrigado por selecionar o Oregon Scientific™ Weather Hub
Por favor mantenha este manual para instruções e informação
importantes.
VISÃO GERAL DO PRODUTO
•
•
•
VISÃO DIANTEIRA – FIG. 1
•
1. Previsão do tempo
2. Exibição de hora e temperatura
•
VISÃO TRASEIRA – FIG. 2
•
1.
2.
3.
4.
5.
6.
7.
8.
Orifício para montagem em parede
: Entrar em modo de alarme
+ / - : Alterar configurações
: Acessar o modo de ajuste do relógio; alternar exibição
Base
Ímã
Compartimento de bateria
RESET: Reajusta a unidade com os valores de
configuração padrão
9. °C / °F: Selecionar a unidade de temperatura
•
•
•
•
INTRODUÇÃO
•
BATERIAS – FIG. 3
Insira as baterias conforme exibido, observando as
polaridades indicadas (+ / -).
indica que as baterias estão fracas.
BASE – FIG. 4
MONTAGEM EM PAREDE – FIG. 5
Use os ímãs para fixar a um objeto metálico ou monte na
parede usando um parafuso ou prego.
VISOR
A exibição de hora e temperatura alterna automaticamente.
Pressione
para alterar a exibição imediatamente.
Não submeta a unidade a forças excessivas, impactos,
poeiras, oscilações de temperatura ou umidade.
Não obstrua as aberturas de ventilação com itens como
jornais, cortinas, etc.
Não mergulhe a unidade na água. Se respingar líquido
nela, seque-a imediatamente com um pano macio e que
não solte fiapos.
Não limpe a unidade com material abrasivo ou
corrosivo.
Não altere os componentes internos da unidade. Isso
invalidará sua garantia.
Utilize apenas pilhas novas. Não misture pilhas novas e
usadas.
As imagens mostradas neste manual podem diferir da
imagem real.
Ao descartar este produto, certifique-se de que ele seja
coletado separadamente para tratamento especial.
A colocação deste produto sobre certos tipos de madeira
pode resultar em danos ao seu acabamento, pelos quais
a Oregon Scientific não se responsabilizará. Consulte
as instruções de cuidados do fabricante do móvel para
obter informações.
O conteúdo deste manual não pode ser reproduzido sem
a permissão do fabricante.
Não descarte baterias usadas em locais não apropriados.
É necessária a coleta do lixo em questão de maneira
separada para tratamento especial.
Observe que algumas unidades estão equipadas com
uma tira de segurança da bateria. Remova a tira do
compartimento de bateria antes do primeiro uso.
Dank u dat u gekozen hebt voor de Oregon Scientific Weer
Hub. Bewaar deze handleiding voor instructies en informatie
over het gebruik van dit product.
PRODUCT OVERZICHT
•
Plaats de batterijen als aangegeven, en let op de polariteit
(+ / -).
geeft aan dat batterijen leeg raken.
Stel het apparaat niet bloot aan extreme klappen,
schokken, stof, temperatuur of vochtigheid.
Dek de ventilatiegaten niet af met kranten, gordijnen
etc.
Dompel het product nooit onder in water. Als u water
over het apparaat morst, droog het dan onmiddellijk af
met een zachte stofvrije doek.
Reinig het apparaat niet met krassende of bijtende
materialen.
Laat de interne componenten met rust. Anders kan dit de
garantie beïnvloeden.
Gebruik alleen nieuwe batterijen. Gebruik nooit oude en
nieuwe batterijen door elkaar.
De in deze handleiding weergegeven plaatjes kunnen
afwijken van de werkelijkheid.
Wanneer u dit product weg gooit, zorg dan dat
het opgehaald wordt door de daarvoor bestemde
afvaldienst.
Dit product kan eventueel schade veroorzaken aan de
laklaag van bepaalde houtsoorten. Oregon Scientific is
hiervoor niet aansprakelijk. Lees de instructies van de
fabrikant van het meubel voor meer informatie.
De inhoud van deze handleiding mag niet worden
vermenigvuldigd zonder toestemming van de fabrikant.
Gooi lege batterijen niet bij het huisvuil. Dergelijk afval
moet gescheiden verwerkt worden.
Let op, sommige apparaten zijn voorzien van een
batterijstrip. Verwijder deze strip uit het batterijvak
alvorens het apparaat te gebruiken.
STANDAARD – FIG. 4
Klap de standaard open om het apparaat op een horizontaal
oppervlak te plaatsen.
SPECIFICATIES
MUURBEVESTIGING – FIG. 5
TYPE
Gebruik de magneten om het apparaat aan een metalen
voorwerp te hangen of de muurbevestiging om aan een
schroef of spijker te hangen.
APPARAAT
SCHERM
Temperatuureenheid °C / °F
Temperatuurbereik.
-5°C tot 50°C (23°F tot 122°F)
Faixa de temperatura. -5°C a 50°C (23°F a 122°F)
Het tijd- en temperatuurscherm zal automatisch schakelen
tussen klok en temperatuur.
Temperatuurresolutie
0,1°C (0,2°F)
Stroom
2 x CR2032 batterijen
ESPECIFICAÇÕES
TIPO
DESCRIÇÃO
UNIDADE PRINCIPAL
AXLXP
167 x 79 x 21 mm (6.6 x 3.1 x 0.8 pol)
Peso
90 g (3.2 oz) sem baterias
Unidade de temperatura °C / °F
KLOK
SOBRE A OREGON SCIENTIFIC
Visite nosso site (www.oregonscientific.com.br) para saber
mais sobre os produtos Oregon Scientific.
Caso você necessite de mais informações ou tenha dúvidas,
entre em contato com o nosso Serviço de Atendimento ao
Consumidor através do telefone 11 2182-8608 ou e-mail
[email protected].
CE – DECLARAÇÃO DE CONFORMIDADE
A Oregon Scientific declara que este Hub Meteorológico
(Modelo: BA169) está de acordo com a EMC diretiva
89/336/CE. Uma cópia assinada e datada da Declaração
de Conformidade está disponível para requisições através
do nosso SAC.
om de weergave onmiddellijk te wisselen.
1.
2.
3.
4.
Houd
ingedrukt gedurende 2 seconden.
Druk + / - om instelling te wijzigen.
om te bevestigen.
Druk
De volgorde van de instellingen is: 12 / 24 uur formaat,
uur, minuut.
Tijdzone stelt de klok in op + / - 23 uur van de
ingevoerde tijd.
ALARM
Om het alarm in te stellen:
1. Druk
om de alarmmodus te openen. AL verschijnt.
2. Houd
ingedrukt om de alarminstellingsmodus te
openen.
3. Druk + / - om uren / minuten in te stellen.
om te bevestigen.
verschijnt wanneer het
4. Druk
alarm AAN is.
De alarmen AAN / UIT zetten:
1. Druk
om de alarmtijd weer te geven.
2. Druk nogmaals
om het alarm AAN / UIT te zetten.
Om het alarm uit te zetten:
Druk enige andere knop om het alarm uit te zetten en het na
24 uur weer te laten afgaan.
WEERSVERWACHTING
ANVÄNDARMANUAL
Soleado
Parcialmente
nublado
Nublado
Lluvia
TEMPERATURA
Pulse °C / °F para seleccionar unidad de temperatura.
Parcialmente
Nublado
Nublado
•
INTRODUKTION
•
Tack för att du valt Oregon Scientific TM väderstation. Ha
denna manual lättillgänglig för instruktioner och information
du bör känna till.
•
PRODUKTÖVERSIKT
•
•
FRAMSIDA – FIG. 1
•
1. Väderprognos
2. Tid- och temperaturvisning
•
BAKSIDA – FIG. 2
1.
2.
3.
4.
5.
6.
7.
8.
9.
Väggmonteringshål
: Ange alarmläge
+ / - : Ändra inställningar
: Ange klockinställningsläge; växelvis visning
Stativ
Magnet
Batterifack
RESET: Återställ standardinställningar
°C / °F: Välj temperaturenhet
•
•
•
KOMMA IGÄNG
•
BATTERIER – FIG. 3
Sätt i batterierna enligt bilden och var noga med rätt polaritet
(+ / -).
indikerar lågt batteri.
STATIV – FIG. 4
Utsätt inte apparaten för kraftigt våld, stötar, damm,
extrema temepraturer eller fukt.
Täck inte för ventilationshålen. Försäkra dig om att
närliggande föremål såsom tidningar, dukar, gardiner
m.m. inte täcker för ventilationshålen.
Utsätt inte produkten för vatten. Om du spiller vätska
över den, torka omedelbart med en mjuk, luddfri trasa.
Rengör inte apparaten med frätande eller slipande
material.
Mixtra inte med enhetens interna komponenter då detta
kan påverka garantin.
Använd enbart nya batterier. Blanda inte nya och gamla
batterier.
Av trycktekniska skäl, kan displaybilderna i denna
manual skilja sig från dem i verkligheten.
Förbrukad produkt måste sorteras som specialavfall
på avsedd miljöstation och får inte slängas som vanligt
restavfall.
Om denna produkt placeras på ytor med speciell finish
såsom lackat trä etc. kan dessa ytor skadas. Ta kontakt
med din möbeltillverkare för att få mer information om
huruvida det går bra att placera föremål på ytan. Oregon
Scientific kan inte hållas ansvariga för skador på träyto
r som uppkommit på grund av kontakt med denna
produkt.
Innehållet I denna manual får ej kopieras utan
tillverkarens medgivande.
Kassera inte gamla batterier som osorterade sopor.
Insamling av kasserade batterier måste ske separat.
Notera att vissa enheter är utrustade med en
batterisäkerhetsstrip. Ta bort denna strip från
batteriutrymmet innan produkten används första
gången.
De tekniska specifikationerna för denna
product och innehållet I användarmanualen kan komma
att ändras utan vidare upplysning.
SPECIFIKATIONER
BESCHRIJVING
LxBxH
167 x 79 x 21 mm (6,6 x 3,1 x 0,8 in)
Gewicht
90 g (3,2 oz) zonder batterijen
Bezoek onze website (www.oregonscientific.com) om meer te
weten over uw nieuwe product en andere Oregon Scientific
producten zoals digitale fototoestellen, gezondheids- en
fitnessuitrusting en weerstations. Op deze website vindt u
tevens de informatie over onze klantendienst, voor het geval
u ons wenst te contacteren.
EU CONFORMITEITS VERKLARING
Hierbij verklaart Oregon Scientific dat deze Weer Hub (Model:
BA169) in overeenstemming is met EMC richtlijn 89/336/CE.
Een kopie van de getekende en gedateerde Conformiteits
verklaring is op verzoek beschikbaar via onze Oregon
Scientific klanten service.
VÄGGMONTERING – FIG. 5
Använd magneterna för att fästa mot ett metallobjekt eller
väggmontering på skruv eller spik.
DISPLAY
Tid- och temperaturdisplayen växlar automatiskt mellan
klockan och temperaturen.
för att byta visning omedelbart.
Tryck
KLOCKA
TYP
BESKRIVNING
HUVUDENHET
LxBxH
167 x 79 x 21 mm (6.6 x 3.1 x 0.8 in)
Vikt
90 g (3.2 oz) utan batterier
Temperaturenhet
°C / °F
Temperaturområde.
-5°C till 50°C (23°F till 122°F)
Temperaturkänsliget
0.1°C (0.2°F)
Drift
2 x CR2032 batterier
KLOCKINSTÄLLNING
OM OREGON SCIENTIFIC
1. Tryck och håll ner
i 2 sekunder.
2. Tryck + / - för att ändra inställningarna.
3. Tryck
för att bekräfta.
4. Inställningsordningen är: 12 / 24 timformat, timme,
minut.
NOTERA Tidzonutjämningen ställer klockan + / - 23 timmar
från den inställda tiden
ALARM
Ställ in alarm:
1. Tryck
för att aktivera alarmläge. AL visas.
2. Tryck och håll ner
för att aktivera alarminställningsläge.
3. Tryck + / - för att ställa in timme / minut.
4. Tryck
för att bekräfta.
visas när alarmet är PÅ.
Skifta alarmet mellan ON / OFF:
1. Tryck för att visa alarmtiden.
2. Tryck igen för att sätta alarmet på ON / OFF.
Besök vår hemsida (www.oregonscientific.se) för att se
mer av våra produkter såsom digitalkameror; MP3 spelare;
projektionsklockor; hälsoprodukter; väderstationer; DECTtelefoner och konferenstelefoner. Hemsidan innehåller också
information för våra kunder i de fall ni behöver ta kontakt med
oss eller behöver ladda ner information.
Vi hoppas du hittar all information du behöver på vår
hemsida och om du vill komma i kontakt med Oregon
Scientific kundkontakt besöker du vår lokala hemsida www.
oregonscientific.se eller www.oregonscientific.com för att finna
telefonnummer till respektive supportavdelning.
EU-FÖRSÄKRAN OM ÖVERENSSTÄMMELSE
Oregon Scientific intygar härmed att denna Väderstation
(Modell:BA169) överensstämmer med EMC direktivet
89/336/CE. En signerad kopia av “DECLARATION OF
CONFORMITY” kan erhållas vid hänvändelse till OREGON
SCIENTIFIC servicecenter.
Stäng av alarmet:
Tryck på någon knapp för att stänga av alarmet så att det
återaktiveras igen efter 24 timmar.
VÄDERPROGNOS
Den här produkten använder en inbyggd barometersensor för
väderprognos inom de kommande 12 till 24 timmarna inom
en radie av 30-50 km (19-31 miles).
Dit product gebruikt een interne barometrische sensor om een
verwachting te geven van het weer van de komende 12 tot 24
uur binnen een straal van 30-50 km (19-31 mijl).
Soligt
Ensolarado
•
Lossa stativet för att placera det på en horisontell yta.
OVER OREGON SCIENTIFIC
KLOK INSTELLEN
FÖRSIKTIGHETSÅTGÄRDER
SWE
De technische specificaties van dit product en de inhoud
van de handleiding zijn zonder voorafgaande waarschuwing
aan veranderingen onderhevig.
As especificações técnicas deste produto e o
conteúdo do manual do usuário estão sujeitos a alterações
sem aviso prévio.
2 baterias CR2032
Este produto usa um sensor barométrico interno para realizar
a previsão meteorológica das próximas 12 a 24 horas dentro
de um raio de 30-50 km (19-31 milhas).
•
BATTERIJEN – FIG. 3
Energia
PREVISÃO DO TEMPO
•
•
AJUSTE DO RELÓGIO
Por medio de la presente, Oregon Scientific declara que
el estación meteorológica (Modelo: BA169) cumple con la
Directiva 89/336/CE del EMC. Tiene a su disposición una
copia firmada y sellada de la Declaración de Conformidad,
solicítela al Departamento de Atención al Cliente de Oregon
Scientific.
•
STARTEN
Funciona con 2 x pilas CR2032
EU - DECLARACIÓN DE CONFORMIDAD
•
Muurbevestigingsgat
: Alarmmodus openen
+ / - : Instellingen wijzigen
: Klokinstellingsmodus openen; Scherm wisselen
Standaard
Magneet
Batterijvak
RESET: Apparaat terugzetten in standaardinstellingen
°C / °F: Temperatuureenheid selecteren
Alimentación
Para definir o alarme:
1. Pressione
para acessar o modo alarme. AL
aparecerá.
2. Pressione
para acessar o modo de ajuste de
alarme.
3. Pressione + / - para ajustar a hora / minutos
para confirmar.
aparece quando o
4. Pressione
alarme está LIGADO.
Para ligar/desligar o alarme:
1. Pressione
para exibir a hora do alarme.
2. Pressione
novamente para LIGAR/DESLIGAR o alarme.
Para silenciar o alarme:
Pressione qualquer outra tecla para desligar o alarme, e
ativá-lo novamente em 24 horas.
•
ACHTERKANT – FIG. 2
Druk
ALARME
•
•
1. Weersverwachting
2. Weergave tijd en temperatuur
0.1°C (0.2°F)
O deslocamento do fuso horário faz um ajuste em +
/ - 23 horas com base no horário definido.ALARME
•
•
VOORKANT – FIG. 1
Resolução de
temperatura
Visite nuestra página web (www.oregonscientific.com) para
conocer más sobre los productos de Oregon Scientific.
Si está en EE.UU y quiere contactar directamente con
nuestro Departamento de Atención al Cliente, por favor visite
www2.oregonscientific.com/service/support.asp o llame al
1-800-853-8883.
Si está en España y quiere contactar directamente con
nuestro Departamento de Atención al Cliente, por favor visite
www.oregonscientific.es o llame al 902 338 368
Para consultas internacionales, por favor visite w w w 2.
oregonscientific.com/about/international.asp.
•
TM
RELÓGIO
Pressione e segure
por 2 segundos.
Pressione + / - para alterar as configurações.
para confirmar.
Pressione
A ordem de ajuste é : formato de 12/24 h, hora,
minutos.
KENMERKEN
INTRODUCTIE
0,1°C (0,2°F)
1.
2.
3.
4.
Druk RESET om het apparaat terug te zetten in de
standaardinstellingen.
HANDLEIDING
1.
2.
3.
4.
5.
6.
7.
8.
9.
Väderstation
Modell: BA169
RESET
NL
Resolución de
temperatura
SOBRE OREGON SCIENTIFIC
Pulse
y manténgalo pulsado durante 2 segundos.
Pulse + / - para modificar la configuración.
para confirmar.
Pulse
La secuencia de configuración es: formato 12/24 horas,
hora, minuto.
Pressione RESET para restaurar as configurações de
fábrica.
Solte a base para colocá-la sob uma superfície horizontal.
Unidad de temperatura °C/°F
La pantalla de hora y temperatura alterna de modo automático
entre reloj y temperatura.
Pulse
para cambiar de pantalla al instante.
1.
2.
3.
4.
La ficha técnica de este producto y los contenidos de
este manual de usuario pueden cambiarse sin aviso.
TIPO
MONTAJE EN PARED – FIG. 5
FIG. 5
•
PARA EMPEZAR
SOPORTE – FIG. 4
FIG. 4
•
No exponga el producto a fuerza extrema, descargas,
polvo, fluctuaciones de temperatura o humedad.
No cubra los orificios de ventilación con objetos como
periódicos, cortinas, etc.
No sumerja el dispositivo en agua. Si se vertiera
líquido en la unidad, límpiela con un paño suave y sin
electricidad estática.
No limpie la unidad con materiales abrasivos o
corrosivos.
No manipule los componentes internos. De hacerlo se
invalidaría la garantía.
Use siempre pilas nuevas. No mezcle pilas viejas con
pilas nuevas.
Las imágenes de esta guía para el usuario puede ser
distintas al producto en sí.
Cuando elimine este producto, asegúrese de que no
vaya a parar a la basura general, sino separadamente
para recibir un tratamiento especial.
La colocación de este producto encima de ciertos tipos
de madera puede provocar daños a sus acabados.
Oregon Scientific no se responsabilizará de dichos
daños. Consulte las instrucciones de cuidado del
fabricante para obtener más información.
Los contenidos de este manual no pueden reproducirse
sin permiso del fabricante.
No elimine las pilas gastadas con la basura normal.
Es necesario desecharlo separadamente para poder
tratarlo.
Tenga en cuenta que algunas unidades disponen de
una cinta de seguridad para las pilas. Retire la cinta de
compartimiento para pilas antes de usarlo por primera
vez.
Weer Hub
Model: BA169
RESET
MANUAL DO USUÁRIO
PRECAUCIÓN
ES
FIG. 1
Hub Meteorológico
Modelo: BA169
REINICIO
Halvklart
Molnigt
Regn
Chuvoso
Zonnig
Halfbewolkt
Bewolkt
Regenachtig
TEMPERATUR
Tryck °C / °F för att välja temperaturenhet.
TEMPERATURA
TEMPERATUUR
Pressione °C / °F para selecionar a unidade de
temperatura.
Druk °C / °F om de temperatuureenheid te selecteren.
RESET
Press RESET to return the unit to default settings.
© 2006 Oregon Scientific. All rights reserved.
P/N.: 086L004703-017