1
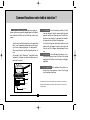
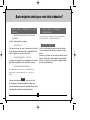
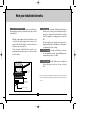
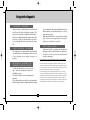
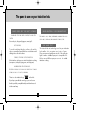
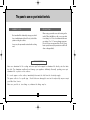
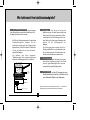
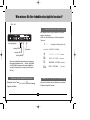
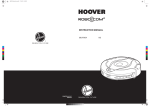
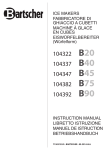
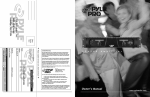
UTILISATION de votre table à induction
USING your induction hob
BENUTZUNG Ihrer Induktionskochplatte
Fr a n ç a i s
PR O TE CTIO N DE L’ E N V IR O N N E ME N T
Les matériaux d'emballage de cet appareil sont recyclables. Participez à leur recyclage et
contribuez ainsi à la protection de l'environnement en les déposant dans les conteneurs
municipaux prévus à cet effet.
Comment fonctionne votre table à induction?
Comment utiliser votre table à induction?
Votre appareil contient également de nombreux matériaux recyclables. Il est
donc marqué de ce logo afin de vous indiquer que les appareils usagés ne
doivent pas être mélangés avec d'autres déchets. Le recyclage des appareils
qu'organise votre fabricant sera ainsi réalisé dans les meilleures conditions,
conformément à la directive européenne 2002/96/CE sur les déchets d'équipements électriques et électroniques. Adressez vous à votre mairie ou à
votre revendeur pour connaître les points de collecte des appareils usagés
les plus proches de votre domicile.
Nous vous remercions pour votre collaboration à la protection de
l'environnement.
2
p.3
p.4-5
Nettoyage.
p.6
Sécurité de fonctionnement.
p.7
Quels récipients choisir pour votre table
à induction ?
p.8-9
Comment installer votre table de cuisson?
p.10
Que faire si ...?
p.11
Comment fonctionne votre table à induction ?
Votre ta ble à induc tion fonctionne principalement grâce aux propriétés magnétiques de la plupart
des récipients utilisés sur les tables de cuisson ordinaires.
A partir des touches de fonction sur le devant de la
table, vous commandez l’alimentation électrique
qui crée un champ magnétique. Ce champ induit
des courants dans le fond du récipient posé sur la
table.
Ces courants, dits “d’induction”, chauffent instantanément le récipient qui cède sa chaleur aux aliments qu’il contient.
L a c ha le ur est directement produite à l’intérieur du récipient. Ainsi la cuisson s’effectue pratiquement sans perte d'énergie entre la table à induction et les aliments. La puissance de chauffe
de l’appareil est restituée à son maximum.
Le retrait du récipient de la table à induction, ou le
simple arrêt de l’appareil à partir des touches de
fonction, suffit à stopper instantanément la cuisson.
L a c uis s on est entièrement gérée par un circuit électronique qui vous offre une très grande
souplesse d’utilisation et une finesse de réglage
inégalable.
L a puis s a nc e et le rendement d'un foyer à induction sont très supérieurs à ceux d'un feu gaz
ou d'une plaque électrique.
R écipient
C ourants induits
B obine
Cet appareil répond à la norme EN 60335-2-36 correspondant à la sécurité des
C ircuit électronique
appareils électrodomestiques et analogues ( table de cuisson et foyer de cuisson
à usage collectif).
Alimentation électrique
3
Comment utiliser votre table à induction ?
AR R E T / MAR C HE
2 . R E G L E Z L A P UIS S ANC E DE C HAUF F E
Votre foyer dispose d’une puissance de chauffe de 50
Watts à 3000 Watts .
6
10
Ajuster la puissance de chauffe à l’aide des touches :
12
+/-
:
réglage de la puissance (1 à Bo)
réglage de puissance
ou P R E S E L E C T IONS
puissance 500W
6
10
12
Bo
minuterie
puissance 1400W
puissance 2800W
L a zone de cuisson de 230 mm s’adapte et reconnait
automatiquement le diamètre du récipient utilisé (de
100 à 260 mm) de manière à restituer la meilleure
répartition de chaleur au récipient, et obtenir une
cuisson homogène.
indique
AR R E T / MAR C HE »,
F OR T E -
1400 Watts .
M AXIM AL E B OOS T -
500 Watts .
2800 Watts .
3000 Watts
3 . C HOIS IS S E Z L A DUR É E DE C UIS S ON
1 . M E T T E Z E N M AR C HE .
Appuyez sur la touche «
M OY E NNE -
La minuterie permet une durée maximale de 99
minutes.
Le foyer peut fonctionner sans la minuterie.
Mettez en marche le foyer et ajustez la puissance de
chauffe.
l’afficheur
0 clignotant.
4
Comment utiliser votre table à induction ?
Dès que vous appuyez sur les touches de la minuterie
(+ ou -), celle-ci se met en service pour la durée de
votre choix.
4 . AR R E T E Z VOT R E T AB L E
Appuyez sur la touche «
s'éteint.
Pour un réglage plus rapide, maintenez le doigt sur la
touche choisie. Un affichage lumineux permet de
connaître le temps qui reste (toujours indiqué en
minutes).
Pendant la cuisson, vous pouvez modifier à tout instant
la durée de la minuterie en appuyant sur les touches +
ou Pendant la cuisson, vous pouvez stopper à tout instant
la minuterie en appuyant simultanément sur les touches
+ et -.
Lorsque le temps est écoulé, le foyer s’arrête. Vous entendez
alors des «bip» discontinus. Ce signal sonore dure environ
30 secondes. Vous pouvez le stopper à tout moment en
appuyant sur une touche quelconque du clavier.
5
AR R E T
/ MAR C HE », l’afficheur
Nettoyage
Les salissures légères s’enlèvent simplement avec
un chiffon de papier humide (type essuie-tout) .
IMPORTANT :
Essuyez dès que possible les débordements et les
projections. Vérifiez qu’il n’en reste pas avant de
réutiliser la plaque.
L'utilisation de produits abrasifs ou de poudres récurantes (laine d'acier, éponges abrasives) est déconseillée : risques de rayures sur les pièces apparentes de votre produit.
Pour les salissures plus résistantes et traces métalliques, utilisez une goutte de produit de nettoyage
doux, type crème.
Les frottements de récipients peuvent à la longue
générer une dégradation des dessins sur le dessus
vitrocéramique.
Pour enlever les traces d’eau et de calcaire, utilisez
quelques gouttes de vinaigre d’alcool blanc.
C es dé fa uts d' a s pec t qui n' entra î nent pa s un
non fonc tionnement ou une inaptitude à l'us age
n'entrent pas dans le c adre de la garantie.
Pour terminer, rincez toujours à l’eau claire, puis
essuyez à l’aide d’un papier absorbant.
Veillez à ne pas introduire de liquide dans les ouïes
d’aération sous la table
Ne pas nettoyer le carter inox avec de l’eau de javel.
REC OMMANDATIONS :
N’ immergez pas votre appareil.
Ne le nettoyez pas s ous le robinet.
Ne le nettoyez pas au lave- vais s elle.
6
Sécurité de fonctionnement
S E C UR IT E “ E L E C T R ONIQUE ”
Il est recommandé de ne pas déposer des ustensiles de cuisine en métal, des couverts, couteaux
ou objets métalliques tout près du récipient pendant la cuisson.
:
En dessous de votre table, un ventilateur aspire de
l’air à l’arrière et le refoule vers l’avant par les ouvertures pratiquées, afin de protéger les circuits
électroniques contre une chaleur excessive.
Une sonde surveille en permanence la température
des circuits électroniques. Si la température devient excessive, le fonctionnement de la table est
arrêté automatiquement.
•
E n cours d’utilisation de la table à induction, ne posez pas d'objets magnétisables sur le dessus verre
(ex : cartes de crédit, cassettes, ...).
DE B OR DE M E NT E T P R OJ E C T IONS :
En cas de débordement ou de projections sur la
table à induction (dessus verre et clavier), les circuits électroniques de l’appareil sont protégés et
ne risquent donc pas d’être endommagés.
S E C UR IT E C AS S E R OL E VIDE :
La zone de chauffe est équipée d’une sonde qui
détecte en permanence sa température, ainsi plus
de risque de surchauffe dûe à des casseroles
vides.
A l'attention des porteurs de stimulateurs cardiaques et implants actifs :
Le fonctionnement de la table est conforme aux normes de perturbations
électromagnétiques en vigueur. Votre table de cuisson à induction répond ainsi
parfaitement aux exigences légales (directives 89/336/CEE). Elle est conçue pour
ne pas gêner le fonctionnement des autres appareils électriques dans la mesure
où ceux-ci respectent cette même réglementation.
Votre table à induction génère des champs magnétiques dans son très proche
environnement.Pour qu’il n’y ait pas d’interférences entre votre table de cuisson
et un stimulateur cardiaque, il faut que ce dernier soit conçu en conformité avec
la réglementation qui le concerne. A cet égard, nous ne pouvons vous garantir
que la seule conformité de notre propre produit. En ce qui concerne la conformité
du stimulateur cardiaque ou d’éventuelles incompatibilités, vous pouvez vous
renseigner auprès de son fabricant ou votre médecin traitant.
DE T E C T ION D' UN OB J E T OU
D' UN R E C IP IE NT S UR L A T AB L E :
Un objet de petites dimensions comme une fourchette, une cuillère ou encore une bague…,posé
seul sur la table en fonctionnement, n'est pas détecté comme un récipient.
L’affichage clignote et aucune puissance de
chauffe n'est délivrée.
Le système de sécurité agit de la même façon lorsqu’il détecte un récipient qui n’est pas adapté à la
cuisson par induction.
7
Quels récipients choisir pour votre table à induction ?
QUE L S S ONT L E S R E C IP IE NT S L E S P L US
ADAP T É S ?
QUE L S S ONT L E S M AT É R IAUX
INC OM P AT IB L E S ?
R ÉC IP IE NTS E N AC IE R ÉMAILLÉ AVE C OU S ANS R E VE TE ME NT
ANTI - ADHÉR E NT .
L E S R ÉC IP IE NTS E N VE R R E , E N C ÉR AMIQUE OU E N TE R R E , E N ALUMINIUM S ANS
, C E R TAINS INOX NON MAGNÉTIQUE S .
FOND S P ÉC IAL OU E N C UIVR E
Cocotte, friteuse, poêle, gril viande...
R ÉC IP IE NTS E N FONTE
.
L E T E S T “ T AB L E ”
Pour ne pas risquer de rayer le dessus verre de votre
table, choisissez un récipient avec un fond émaillé ou évitez de le glisser sur la surface de la table.
R ÉC IP IE NTS E N INOX ADAP TÉS A L
’ INDUC TION .
La plupart des récipients inox conviennent à la cuisson
par induction (casseroles, fait tout, poêle, friteuse).
R ÉC IP IE NTS E N ALUMINIUM A FOND S P ÉC IAL
.
N OTA : ME ME LE S R ÉC IP IE NTS DONT LE FOND N ' E S T P AS P AR FAITE ME NT P LAN
- C I NE S OIT P AS TR OP
DÉFOR MÉ .
P E UVE NT C ONVE NIR , À C ONDITION C E P E NDANT QUE C E LUI
Un sigle class induction INDUCTION figure sur la table .
En choisissant un récipient possédant ce même logo,
vous serez assuré de sa parfaite compatibilité avec votre
table dans des conditions normales d’utilisation.
8
:
Grâce à sa technologie de pointe votre table à induction est capable de reconnaître la plupart des récipients.
Posez votre récipient sur une zone de chauffe en puissance 4, si l’afficheur reste fixevotre récipient est
compatible, s’il clignote votre récipient n’estpas utilisable
pour la cuisson à induction.
Quels récipients choisir pour votre table à induction ?
P R E C AUT IONS D' UT IL IS AT ION :
P OUR UNE B ONNE UT IL IS AT ION :
Vous obtiendrez le meilleur résultat en utilisant un
récipient (minimum 12 cm) dont le diamètre est
proche de la taille du foyer dessiné sur le dessus
verre.
Dans tous les cas, le récipient doit être centré sur la
zone de cuisson.
Quand vous utilisez un ré cipient avec un revêtement intérieur anti-adhérent (type téflon) sans apport ou avec très peu de matière grasse, préchauffez-le sur la position 9 ou sur la position 10, un
court instant mais n'utilisez jamais la position 11 ou
12. Vous risquez d'endommager vos récipients.
Ne chauffez pas une boîte de conserve fermée,
elle risque d’éclater (cette précaution est d'ailleurs
valable pour tous les autres modes de cuisson).
REC OMMANDATIONS
Pour la cuisson, n’utilisez jamais de feuille de papier d’aluminium, ou ne placez jamais directement sur la
table à induction des produits emballés avec de l’aluminium. L’aluminium fondrait et endommagerait définitivement votre appareil. D’une manière générale, ne placez jamais des feuilles d’aluminium ou des matières
plastiques sur des surfaces chaudes.
Si une fêlure apparaissait dans la surface, déconnectez immédiatement la table de l’alimentation.
Votre câble d’alimentation est un câble spécifique. S’il est endommagé, il doit être remplacé exclusivement
par votre Service Après-Vente .
Ne vous servez pas de votre table pour y entreposer quoi que ce soit.
9
Comment installer votre table de cuisson ?
T R E S IM P ORTANT
Sortez l’appareil de son emballage.
V otr e a ppa r e il doit r e pos e r s u r u n e s u r f a c e
propre, horizontale, plane, s table et résis tant à
la c haleur, ou revê
t ue d’ une telle matiè
r e.
Dégagez et déroulez complètement le cordon d’alimentation situé sous l’appareil.
Respectez une distance de 5 cm par rapport à toute paroi verticale.
Ne posez pas votre table au-dessous d’une étagère ou proche de matériaux inflammables, tels que
rideaux, tentures, etc.
Branchez votre table sur une prise de courant de 16
ampères(Pour les appareils équipés d’une prise
mâle de type U.K. une prise de 13 ampères est à
utiliser) reliée à la terre. Dans le cas où vous utilisez
une rallonge électrique, assurez-vous de son bon
état et de sa conformité (prise de terre, section de
conducteurs = 1,5 mm2 ).
L ’ e ntrée d’ a ir s ous l’ a ppa reil ne doit pa s être
obs trué
e (ex. : papier, c hiffon, etc .).
E NT R E T IE N
Tous les mois environ nettoyez à l’eau savonneuse
le filtre placé sous votre appareil ( ou au Lave vaisselle).
Le remettre, bien s ec ,
avant toute nouvelle utilisa-
tion .
C e filtre es t indis pens able il protège votre appareil des poussières et des graisses.
La fiche de la prise de courant doit être accessible.
Ne déplacez pas votre appareil alors qu’il est en
fonctionnement.
P our ouvrir devis s er la vis
AVE R T IS S E M E NT
A la mise sous tension de votre appareil, un affichage lumineux peut apparaître.
Ce code, réservé aux services techniques, n’est
pas à prendre en compte par l’utilisateur.
Il s’éteint de lui même au bout d’environ 30 secondes ou suite à l’appui sur une touche quelconque de votre appareil.
FILTR E A NE TTOY E R
10
Que faire si... ?
Vous avez un doute sur le bon fonctionnement de votre table à induction, ceci ne signifie pas forcément qu'il y a une panne. Dans tous les cas, vérifiez les point suivants.
VOU S
C ONS T AT E Z
QUE …
LE S
C AUS E S
P O S S IB L E S
QUE
F A U T - IL
F A IR E
?
La table à induction ne fonctionne pas. Les voyants lumineux sur le
clavier restent éteints.
L’appareil n'est pas alimenté. L’alimentation ou le branchement est
défectueux.
Vérifiez l'état de l'installation électrique.Inspectez les fusibles et le
disjoncteur électrique.
Aprè s avoir mis en fonctionnement la table à induction, les voyants
lumineux du clavier continuent de clignoter.
Le récipient que vous utilisez n’est pas adapté à la cuisson par induction.
Utilisez un ustensile compatible (voir liste fournie).
La table à induction s’est arrêtée de fonctionner en cours d’utilisation.
La minuterie peut afficher le message
Les circuits électroniques se sont échauffés.
Vérifiez la conformité de votre installation et plus particulièrement
les entrées et sorties d'air, comme indiqué dans la notice.
La table ne fonctionne pas.
Le circuit électronique est en panne.
Faites appel au Service Après-Vente.
Votre table émet un léger clic clac.
Il est produit par la répartition de puissance entre deux foyers.
C'est normal.
La ventilation continue quelques minutes après l'arrê t de votre table.
Refroidissement de l'électronique.
C'est normal.
Après branchement, la ventilation fonctionne quelques secondes.
Auto-test du produit.
C'est normal.
En cas d'anomalies notez le message donné par la minuterie et reportez-vous au tableau des anomalies .
Ne soyez pas surpris du très léger échauffement permanent du dessus verre de votre table, il est normal.
Dans tous les c as , s i votre intervention n’es t pas s uffis ante, c ontac tez s ans attendre
le S ervic e Après - Vente.
11
Les descriptions et les caractéristiques apportées dans
ce “Livret” sont données seulement à titre d’information
et non d’engagement. En effet, soucieux de la qualité
de nos produits, nous nous réservons le droit d’effectuer, sans préavis, toutes modifications ou améliorations nécessaires.
Pièces d’origine : demandez à votre vendeur que, lors
d’une intervention d’entretien, seules des pièces détachées certifiées d’origine sont utilisées
GAR ANTIE
Pour bénéficier de la garantie sur votre table, n’oubliez
pas de garder une preuve de la date d’achat.
Toute intervention ayant pour origine une installation ou une utilisation non conforme aux prescriptions de cette notice ne sera pas acceptée au titre
de la garantie constructeur et celle-ci sera définitivement suspendue
Les défauts d’aspect provoqués par l’utilisation de
produits abrasifs ou le frottement des casseroles sur le
dessus vitrocéramique qui n'entraîne pas un non
fonctionnement ou une inaptitude à l’usage n’entrent pas dans le cadre de la garantie
RELATIONS CONSOMMATEURS
Tout dépannage doit être effectué par un technicien
qualifié. Seuls les distributeurs de notre marque :
C ONNAIS S E NT P AR FAITE ME NT VOTR E AP P AR E IL E T S ON FONC TIONNE ME NT ,
A P P LIQUE NT INTÉGR ALE ME NT NOS MÉTHODE S DE R ÉGLAGE , D’ E NTR E TIE N E T DE
U TILIS E NT E XC LUS IVE ME NT LE S P IE C E S D’ OR IGINE .
R ÉP AR ATION ,
En cas de réclamation ou pour commander des pièces
de rechange à votre distributeur, précisez-lui la référence complète de votre appareil (type de l’appareil et
numéro de série). Ces renseignements figurent sur la
plaque signalétique fixée sous le caisson métallique de
l’appareil.
12
1 an de garantie, pièces et main d’oeuvre.
E n glis h
ENVIRONMENTAL PROTECTION
This appliance's packaging material is recyclable. Help recycle it and protect
the environment by dropping it off in the municipal receptacles provided for
this purpose.
Your appliance also contains a great amount of recyclable material. It is marked with this label to indicate the used appliances that should not be mixed
with other waste. This way, the appliance recycling organised by your
manufacturer will be done under the best possible conditions, in compliance
with European Directive 2002/96/EC on Waste Electrical and Electronic
Equipment. Contact your town hall or your retailer for the used appliance
collection points closest to your home.
We thank you doing your part to protect the environment.
13
How your induction hob works .
p. 14
How to useyour induction hob .
p. 15-16
C leaning.
p. 17
Integrated safeguards .
p. 18
The pans to use on your induction hob . p. 19-20
How to install your induction hob.
p. 21
Troubleshooting.
p. 22
How your induction hob works.
Y our induc tion hob
works mainly thanks to
the magnetic properties contained in mos t pans us ed on
ordinary hobs .
T he he a t
is produced directly ins ide the pan.
Therefore the cooking is done with practically no
energy los s between the induc tion hob and the
food. The appliance's heating power is us ed to its
full.
With the control buttons at the front of the hob, you
control the electricity s upply, which creates a magnetic field. This field induces currents in the bas e
of the pan placed on the hob.
T hes e c urrents , c alled " induc tion c urrents " , ins tantly heat the pan which pas s es on its heat to the
food it contains .
B y removing the pan from the induc tion hob, or
s imply turning the hob off with the control buttons ,
you ins tantly s top the cooking.
T he c ook ing is totally controlled by an electronic circuit, which provides great flexibility and incomparable precis ion of control.
T he powe r and the effic ienc y of an induc tion
hob are far s uperior to thos e of a gas or elec tric
hob.
epan
RS auc
écipient
ed induits
CInduc
ourants
c urrents
This appliance complies with the E N 60335-2-36 s tandard corres ponding to the
BCobine
oil
s afety of electrodomes tic and analogous appliances (hobs and hobs for collective us e).
CE ircuit
électronique
lec tronic
c irc uit
E lec tric al main
s upply
Alimentation
électrique
14
How to use your induction hob.
ON/OFF
2 . S E T T ING T HE HE AT
The heat s ettings of your hob rang from 50 watts to
3000 watts .
6
10
12
Adjus t the heat s etting required by us ing thes e buttons :
+/-
power s ettings
500W
6
10
12
Bo
1400W
2800W
The 230 mm cooking zone adapts its elf and
automatic ally rec ognis es the diameter of the pan
us ed (100-260 mm), and s o produces an even
dis tribution of heat in the pan and ens ures all the food
is cooked at the s ame heat.
P res s the
ON/OFF
button. A flas hing
0 is dis played.
power s ettings (1 to B o)
or P R E S E T T ING S
timer
1 . S WIT C HING ON.
:
M E DIUM HIG H -
500 Watts .
1400 Watts .
M AXIM UM B OOS T
-
2800 Watts .
3000 Watts
3 . S E L E C T ING C OOK ING T IM E
The timer can be s et for a maximum length of 99
minutes .
The hob can be us ed without operating the timer.
S witch on the hob and s elect the heat s etting.
15
How to use your induction hob.
When you pres s the timer buttons (+ or - ), the timer
s tarts working for the length of time you s et.
4 . S WIT C HING T HE HOB OF F .
P res s the
To s et the timer quickly, keep your finger pres s ed on
the button s elected. An indicator light indicates the
number of minutes remaining.
It is pos s ible, at any time during cooking, to change the
length of time s et on the timer by jus t pres s ing the + or
- buttons .
It is pos s ible, at any time during cooking, to s top the
timer by jus t pre s s ing a t the s ame time the buttons
- and +.
When the time is up, the hob turns its elf off. An
intermittent beep s ound will be heard which las ts about
30 s econds . To s top the beep, you can pres s any button
on the keyboard.
16
ON / OFF
button. The indicator light will go out.
Cleaning
S light s tains can be removed with jus t a damp piece of kitchen paper.
IMPORTANT NOTE
S pills and s plas hes s hould be wiped as s oon as
pos s ible. C heck that they have been removed before us ing the hob again.
Y ou are advis ed not to us e abras ive produc ts or
s c ouring powder (s teel wool, abras ive s ponges ).
Thes e may leave s cratch marks on the vis ible parts
of your hob.
T o remove tough s tains and metal marks , us e a
drop of a gentle c leaning produc t, preferably a
cream one.
The rubbing of pans may, in the long term, lead to
a deterioration of the patterns on the glas s ceramic
s urface.
To remove water and s cale marks , us e a few drops
of white alcohol vinegar.
T hes e defec ts in a ppea ra nc e do not lea d to a
non- func tioning of the hob or the impos s ibility
of us ing it and are not covered by the guarantee.
To finis h off, always rins e with clean water and then
wipe with abs orbent paper.
B e careful not to allow liquid to run into ventilation
inlets under the hob.
REC OMMENDATIONS :
Do not immers e your applianc e.
Do not c lean it under the tap.
Do not was h it in the dis hwas her.
17
Integrated safeguards
" E L E C T R ONIC " S AF E G UAR D
Under your hob, a ventilator takes in air at the back
and blows it to the front through openings . T his
protects the electronic circuits from extreme heat.
A probe cons tantly monitors the temperature of the
elec tronic c irc uits . If the temperature bec omes
exc es s ively high the hob is automatic ally turned
off.
Y ou are advis ed not to put metallic kitchen utens ils ,
knives and forks or other metal objects too clos e to
pans during cooking.
When the induction hob is in operation do not put
o bje c ts tha t c a n be ma gne tis e d o n the gla s s
surface (e.g. credit cards, cassettes,).
" E M P T Y S AUC E P AN" S AF E G UAR D :
The heating zone is equipped with a probe, which
cons tantly detects its temperature, and s o the ris k
o f o v e r- he a ting d ue to e m p ty s a uc e p a ns is
avoided.
In the event of s pills or s plas hes onto the induction
hob (glas s s urface and keyboard), the appliance's
elec tronic c irc uits a re protec ted a nd therefore
cannot be damaged.
S P IL L S AND S P L AS HE S :
For the attention of people equipped with pacemakers or active implants :
DE T E C T ION OF AN OB J E C T OR
UNS UIT AB L E P AN ON T HE HOB :
A s mall object like a fork, a s poon or even a
ring…, placed on the turned-on hob is not
identified as a pan.
The indicator flas hes but no heating power is
s upplied.
This s afeguard device works in the s ame way when
it detects a pan, which is not suited to induction cooking.
The hob complies with electromagnetic perturbation s tandards in force. Y our
induction hob therefore fully meets legal requirements (directives 89/336/C E E ). It
has been des igned s o that it does not interfere with the working of other electric
appliances provided that they res pect the s ame regulations .
Y our induction hob generates electromagnetic fields in its very clos e vicinity.
In order to avoid interference between your hob and a pacemaker it is es s ential
that the pacemaker be des igned in compliance with the regulations relating to it.
In this res pect, we can only guarantee the compliance of our own product. To
check that the pacemaker complies with s tandards or to enquire about pos s ible
incompatibilities you s hould contact the manufacturer or your own doctor.
18
The pans to use on your induction hob.
WHIC H P ANS AR E T HE M OS T S UIT AB L E ?
WHIC H M AT E R IAL S AR E INC OM P AT IB L E ?
E NAM E L L E D S T E E L P ANS WIT H OR WIT HOUT A NON-S T IC K
C OATING
P ANS
MADE OF GLAS S , C E R AMIC , E AR THE NWAR E , ALLUMINIUM THAT HAS NO
S P E C IAL B AS E , C OP P E R AND S OME NON-MAGNE TIC S TAINLE S S S TE E L.
C as s erole pot, chip-pan, frying-pan, meat grill…
T HE " HOB " T E S T :
C AS T IR ON P ANS .
T he s tate-of- the-art tec hnology us ed in your induc tion
hob enables it to rec ognis e mos t s orts of pans .
P lace your pan on a heating zone s et at 4, if the indic ator
light rema ins s ta blethen your pan is c ompa tible. If it
fla s hes on and off then your pan c a n not be us ed
for
induction cooking.
T o a void s c ra tc hing the gla s s s urfa c e of your hob,
choos e a pan with an enamelled bas e or otherwis e avoid
s liding it acros s the hob s urface.
S TAINLE S S S TE E L P ANS S UITE D TO INDUC TION.
Mos t s tainles s s teel pans are s uited to induction cooking
(s aucepans , s tockpots , frying pans , and chip-pans ).
ALLUMINIUM P ANS WITH S P E C IAL B AS E S .
N OTE :E VE N
IF THE B AS E OF THE P AN IS NOT P E R FE C TLY FLAT IT MAY B E
S UITAB LE , AS LONG AS IT IS NOT TOO DE FOR ME D.
There is a clas s induction logo INDUCTION on the hob.
If you buy a pan with this s ame logo, you can be s ure
that it is perfectly compatible with your hob when us ed
in the normal way.
19
The pans to use on your induction hob.
C OR R E C T US E :
P R E C AUT IONS :
When us ing a pan with a non-s tick coating on the
ins ide (Teflon) with little or no fat, you can pre-heat
it on s etting 9 or 10 for a s hort moment but never
us e s ettings 11 or 12. Y ou may damage your pans .
Do not heat up an unopened tin of food. It may
burs t open (moreover, this precaution is valid for all
other cooking methods ).
B es t res ults will be obtained by us ing a pan, which
has a s imilar diameter (at leas t12 cm), to that of the
pattern on the glas s s urface.
In any case, the pan must be centred on the cooking
zone.
REC OMMENDATIONS
Never us e aluminium foil for c ook ing and never put food wrapped in aluminium foil direc tly onto the induc tion hob. T he aluminium would melt and damage your applianc e definitively. G enerally s peak ing, never put
aluminium foil or plas tic on hot s urfac es .
If a c rac k appears on the s urfac e, immediately dis c onnec t the hob from the elec tric ity s upply.
T he power c able is of a s pec ific type.
your After-S ales S ervic e.
S hould it bec ome damaged, it mus t not be replac ed by anyone exc ept
Never us e your hob to s tore things on, whatever the things may be.
20
How to install your induction hob.
VE R Y IM P OR TANT
R emove the packaging material.
F ree the elec tric ity s upply flex from under the
appliance and unroll it fully.
Y our applianc e s hould be plac ed on a c lean, horizontal, flat, s table s urfac e whic h is heat proof
or els e c oated with a heat proof material.
A s pac e of 5 c m s hould be left between the wall
and the appliance.
T he air inlet under the applianc e s hould not be
bloc ked (e.g. paper, c loths , etc .).
Do not fit your hob below a s helf or near inflammable material, s uch as curtains , draperies , etc…
P lug your hob into a 16 ampere earthed (For hobs
with a United K ingdon S ocket plug type : a 13 ampere earthed s ocket has to be us e) s ocket. If you
us e an extens ion lead check that it complies with
s ta nda rds (ea rth c onnec tion, c ros s s ec tion of
conductor = 1.5 mm²).
M AINT E NANC E
About
once a month, clean the filter, located under your
appliance, with s oapy water.
When it is c ompletely dry put it back in place before us ing the appliance.
T his filter is es s ential. It protects your appliance
from dus t and fat.
The plug mus t remain acces s ible.
Do not move your appliance while it is working.
To open uns crew the s crew
WAR NING
When your appliance is turned on, an indicator light
may appear.
This code is res erved for the technical department,
and does not concern the us er.
It goes off its elf after about 30 s econds or when any
button on your appliance is pres s ed.
C LE AN THE FILTE R
21
Troubleshooting.
You have doubts about whether your induction hob is working correctly. This does not necessarily mean there is a breakdown. Nevertheless, check the following points.
YOU
N O T IC E
T HAT …
P O S S IB L E
C AUS E S
W HAT
S HOULD
YOU
DO?
The induc tion hob is not working. The indic ator lights on the
keyboard do not light up.
The appliance is not being supplied. The electricity supply or the
connection is faulty.
C heck the electrical installation. Inspect the fuses and the circuit
breaker.
When you turn the induction hob on the indicator lights on the
keyboard keep flashing.
The pan you are using is not suited to induction cooking.
Use a compatible pan (see list provided).
The induction hob stopped working during cooking.
The timer may indicate the message
The electronic circuits are over heated.
C heck the conformity of your installation and especially the air
inlets and outlets, as indicated in the instructions.
The hob does not work.
The electronic circuits have broken down.
C ontact the After-S ales S ervice.
Your hob makes a slight "clic clac" sound.
It is caused by the power being distributed between 2 cooking rings.
This is normal.
The ventilation continues for a few minutes after the hob has been turned off.
C ooling the electronics.
This is normal.
Just after being connected, the ventilation comes on for a few seconds.
Automatic testing of product.
This is normal.
In the e ve nt of a fa ult, note down the m e s s a ge give n by the tim e r a nd re fe r to the fa ult c ha rt.
Do not be s urpris e d if the gla s s s urfa c e of your hob is a lwa ys s lightly wa rm . T his is norm a l.
In all events , if your intervention proves ins uffic ient, c ontac t the After- S ales S ervic e immediately.
22
GUAR ANTE E
In order to benefit from the guarantee on your hob,
remember to keep s ome proof of the date of purchas e.
Any intervention that is c arried out further to an ins tallation or an ins tallation, whic h is not in ac c ordanc e with the ins truc tions given here, is not ac c epted
by the manufac turer's guarantee and this guarantee
will be s us pended definitively.
N o t c o ve r e d by the gua r a nte e a r e de fe c ts in
a p p e a r a n c e c a us e d by a bra s ive produc ts or the
rubbing of pans on the glas s ceramic s urface, whic h do
not lead to the non- func tioning of the hob or the impos s ibility of us ing it.
A qualified tec hnic ian mus t c arry out all repairs . Only
dis tributors of our brand :
K NOW P E R FE C TLY HOW YOUR AP P LIANC E WOR K S .
F ULLY AP P LY OUR ME THODS FOR S E TTING , MAINTE NANC E AND R E P AIR .
O NLY US E OR IGINAL P AR TS .
When making a complaint or ordering s pare parts from
your dis tributor, s pec ify the full referenc e of your
applianc e (type of applianc e and s erial number). This
information is indic ated on the nameplate fixed under
the metal cas e of the appliance.
T he des c riptions a nd c ha ra c teris tic s given in this
" booklet" are only for your information and are not
binding. Indeed, as we c are about the quality of our
produc ts , we res erve the right to c arry out, without
notic e, a ny modific a tion or improvement we deem
neces s ary.
Original parts : as k your s ales man to ens ure that when
maintenance is carried out, only certified original s pare
parts are us ed.
C US T OM E R R E L AT IONS
1-year guarantee inc ludes parts and labour
c os ts .
23
De u ts c h
U M W E L T SC H U T Z
In diesem affet vorhergesehen, städtish nehmen an ihrem Recycling teil und tragen
so zum Umweltschutz bzi, sie in Container abstellend.
W ie funktioniert Ihre Induktionskochplatte ?
s.25
Wie müssen Sie Ihre Induktionskochplatte benutzen s . 26-27
Ihr Gerät enthält ebenfalls zahlreiche recyclabare Baustoffe. E ist also mit diesem
Firmenzeichen gekennzeichnet, um Ihnen anzuzeigen, Daß die Gebrauchtgeräte
it anderen. Abfällen nicht vermischt sein sollen. Das Recycling der Geräte, das
Ihr Fabrikant organisiert, wird so in den besten Bedingungen, der eoropäischen,
Direktive 2002/96/CE über die Abfälle elektrischer und elektronischer Ausrüstun-gen entsprechend realisiert sein. Schicken Sie Sie an Ihr Bürgermeisteramt
oder an Ihrem Einzelhäindler, em die Punkte von Gerauchtsammlung der Geräte
der nächte Ihrem Wolhnistz zu kennen.
Wir bedanken uns bei Ihnen Für Ihre Zusammenarbeit im Umwaltschutz.
24
R einigung .
s. 28
Funktionssicherheit .
s. 29
W elche B ehä lter eignen sich am besten für Ihre
s.30-31
Induktionskochplatte ?
W ie muß Ihre Induktionskochplatte installiert werden ? s.32
W as tun, wenn ...?
s.33
Wie funktioniert Ihre Induktionskochplatte?
Ihre Induk tions k oc hpla tte nutzt die magnetischen Eigenschaften von metallischen Behältern, die in
der Regel zum Kochen benutzt werden.
Die Hitz e
wird direkt im Inneren des
Behälters erzeugt. Auf diese Weise entsteht beim
Kochen kein Energieverlust zwischen der Induktionskochplatte und den Nahrungsmitteln. Auf
diese Weise ist die übertragene Heizenergie des
Gerätes
auf
die
Nahrungsmittel
ein
Maximum.
Der Kochvorgang kann entweder durch die
Entnahme des Behälters von der Kochplatte oder
durch die Betätigung der Funktionsstasten des
Gerätes unterbrochen oder beendet werden.
Mit Hilfe der Funktionstasten an der Vorderseite der
Induktionskochplatte bedienen Sie die
elektrische Versorgung für die Erzeugung eines
Magnetfeldes. Dieses Feld induziert elektrische
Ströme im Boden des auf der Kochplatte
abgestellten Behälters.
Der Behälter wird durch sogenannte
"Induktionsströme" sofort erwärmt und gibt seine
Wärme an die Nahrungsmittel, die er enthält, ab.
Der K ochvorgang wird vollständig durch einen
elektrischen Schaltkreis gesteuert, der Ihnen
eine sehr große Bedienungsfreiheit und eine
unvergleichlich genaue Einstellung erlaubt.
Die L e is tung
und der Wirkungsgrad eines
Induktionskochherds sind sehr viel höher als die
von traditionellen Elektro- oder Gasherden.
RB écehä
ipient
lter
CInduzierter
ourants induits
S trom
BSobine
pule
lek tronik
CE ircuit
électronique
Dieses Gerät ist konform der Sicherheitsnorm EN 60335 - 2- 36 für elektrische
Haushaltsgeräte (im Haushalt benutzte Kochherde und Kochplatten).
Alimentation
E lek tris c he électrique
Vers orgung
25
W ie müssen Sie Ihre Induktionskochplatte benutzen?
EIN / AUS
2 . E INS T E L L UNG DE R HE IZ L E IS T UNG
6
10
Ihre Kochplatte hat eine von 50 Watt bis 3000 Watt
regelbare Heizleistung.
Stellen Sie die Heizleistung mit Hilfe der folgenden
Tasten ein :
12
Leistungsregelung
+/-
Leistung 500 W
Zeitschalter
6
10
12
Bo
Leistung 2800W
Damit eine optimale Wärmeverteilung und ein homogener
Kochvorgang gewährleistet sind, erkennt das Kochfeld
von 230 mm den Durchmesser des benutzten Behälters
und paßt sich automatisch an diesen an (von 100 mm bis
260 mm).
1. EINSCHALTEN DER INDUKTIONSKOCHPLATTE
beginnt zu blinken.
EIN / AUS .
Die
Einstellung der Heizleistung (1 bis B0)
oder durch VOR E INS T E L L UNG E N
Leistung 1400 W
Betätigen Sie die Taste
:
MITTLE R E LE ISTUNG HOHE L E IS T UNG -
500 Watts .
1400 Watts .
MAXIMALE LE ISTUNG -
2800 Watts .
B OOST LE ISTUNG
3000 Watts.
-
3. WÄ
HLEN SIE DIE DAUER DES KOCHVORGANGS
0 in der Anzeige
Mit dem Zeitschalter kann eine Kochdauer von maximal
99 Minuten eingestellt werden.
26
Wie müssen Sie Ihre Induktionskochplatte benutzen?
Die Kochplatte arbeitet natürlich auch ohne Benutzung
des Zeitschalters.Schalten Sie die Kochplatte ein und
regeln Sie die Heizleistung.Sobald Sie die Tasten des
Zeitschalters betätigen ( + oder - ), steht die gewählte
4. AUSSCHALTE N DE R INDUK TIONSK OCHPLATTE
Betätigen Sie die Taste E IN / AUS
Einstellung wünschen, lassen Sie die gewählte Taste
Kochdauer zu Ihrer Verfügung.Wenn Sie eine schnellere
gedrückt. Eine Leuchtanzeige ermöglicht ein Ablesen
der restlichen Zeit (Anzeige immer in Minuten).
Die am Zeitschalter eingestellte Zeit kann während des
Kochvorgangs jederzeit verändert werden, indem die
Tasten + oder - betätigt werden.
Sie Können in jedem Augenblick dasUhrwerk stoppen,
gleichzeitig auf die Stiche drückend + und -.
Die Kochplatte wird abgeschaltet, sobald die
eingestellte Zeit abgelaufen ist.In diesem Moment hören
Sie während 2 Minuten ein fortlaufendes akustisches
Signal.Dieses akustische Signal können sie aber in
einem beliebigen Moment abstellen, indem Sie eine
beliebige Taste auf der Tastatur betätigen.
27
. Die Anzeige erlischt.
Reinigung
Leichte Verschmutzungen können einfach mit
einem feuchten Papiertuch (vom Typ Allesreiniger)
gesäubert werden.
WIC HTIG:
Benutzen Sie niemals scheuernde Produkte (Sandpapier,
scheuernde
Schwämme)
oder
Scheuerpulver, um an den sichtbaren Teilen des
Geräts keine Schrammen oder Kratzer zu
erzeugen.
Entfernen Sie möglichst schnell übergelaufene und
verspritzte Speisereste. Prüfen Sie, daß vor einer
Wiederbenutzung keine Speisereste vorhanden
sind.
Eine dauernde Reibung der Behälter auf der
Oberfläche der Ceranscheiben kann zu einer
Beschädigung
der
dort
angebrachten
Zeichnungen führen.
Zum Entfernen von hartnäckigen Verschmutzungen
und metallischen Spuren benutzen Sie am besten
ein weiches dickflüssiges Reinigungsmittel.
Da diese äußeren Fehler aber in keiner Weise
die Funktionstüchtigkeit des Geräts
beeinträchtigen, bleiben sie im Garantiefall
unberücksichtigt.
Zum Entfernen von Wasser- und Kalkresten benutzen Sie am besten etwas farblosen Weinessig.
Zum Abschluß spülen Sie mit klarem Wasser und
reiben mit einem saugfähigen Papier ab.
RATS C HLÄGE :
Achten Sie darauf, daß keine Flüssigkeit in die Lufteinlaßöffnungen unter der Platte eindringen kann.
Tauchen Sie das Gerät nie unter Wasser.
Reinigen Sie das Gehäuse aus rostfreiem Stahl
niemals mit Natriumlösung.
Reinigen Sie das Gerät nicht in der
Geschirrspülmaschine.
Reinigen Sie das Gerät nicht unter
fließendem Wasser.
.
28
Funktionssicherheit
Es wird davon abgeraten, Küchenutensilien aus
Metall, Bestecke, Messer oder andere
metallische Objekte ganz in der Nähe des
Behälters während des Kochvorgangs abzulegen.
" E L E K T R ONIS C HE " S IC HE R HE IT :
Unter der Kochplatte saugt ein Ventilator Luft von
hinten an und gibt diese mittels spezieller Öffnungen nach vorne ab, damit die Elektronik gegen zu
große Hitze geschützt wird.
Während der Benutzung der Induktionskochplatte
dürfen keine magnetisierbaren Gegenstände auf
die Oberfläche der Ceranscheiben gelegt werden
(z.B. Kreditkarten, Kassetten, etc.).
Eine Sonde überwacht permanent die Temperatur
der Elektronik. Sobald die Temperatur einen voreingestellten Schwellwert übersteigt, wird die
Kochplatte automatisch abgestellt.
ÜB E R LAUFE N UND VE R S PR ITZE N VON S PE IS E N :
Die Elektronik des Geräts ist gegen das
Überlaufen oder Verspritzen von Speisen auf die Induktionskochplatte geschützt (Oberfläche der Ceranscheiben oder Tastatur) und können auf diese
Art nicht beschädigt werden.
S ICHE R HE IT GE GE N LE E R E K OCHTÖ PFE :
Die Temperatur des Kochfelds wird permanent von
einer Sonde überprüft, um das Risiko des Aufheizens
von
leeren
Kochtöpfen
auszuschalten.
Hinweise fü
r Träger von Herzschrittmachern:
Die Platte funktioniert in Konformität mit den geltenden Normen für
elektromagnetische Störungen. Ihre Induktionskochplatte ist so in
Übereinstimmung mit den Rechtsvorschriften (Anweisungen 89/336/EWG). Sie ist
so ausgestattet, um das Funktionieren mit anderen elektrischen Geräten nicht zu
beeinträchtigen, vorausgesetzt diese respektieren ebenfalls diese Vorschriften.
Ihre Induktionskochplatte erzeugt Magnetfelder in ihrer sehr nahen Umgebung.
Damit es zu keinen Interferenzen zwischen Ihrer Kochplatte und einem
Herzschrittmacher kommt, muß dieser in Übereinstimmung mit den ihn
betreffenden Vorschriften sein. Wir können Ihnen diesbezüglich lediglich die
Konformität unseres Gerätes garantieren. Was die Konformität des
Herzschrittmachers oder eventuelle Unverträglichkeiten desselben anbelangt, so
können Sie sich hierzu beim Hersteller des Herzschrittmachers oder bei Ihrem
Arzt informieren.
E R K E NNUNG E INE S OB J E K TS ODE R E INE S
B E HÄ
L TE R S AUF DE R K OCHPLATTE :
Kleine Objekte wie Gabeln, Kaffeelöffel oder Ringe,
die sich auf der eingeschalteten Kochplatte befinden,
werden nicht als Behälter erkannt.
In diesem Fall blinkt die Anzeige und das Gerät liefert
keine Heizleistung.
Das Sicherheitssystem arbeitet in der gleichen Weise
wenn es einen Behälter erkennt, der für das Kochen
auf Induktionskochplatten nicht geeignet ist.
29
Welche Behälter eignen sich am besten für Ihre
Induktionskochplatte?
WE L C HE B E HÄ
L T E R E IG NE N S IC H AM
B E S T E N?
WE L C HE M AT E R IAL IE N S IND NIC HT
G E E IG NE T ?
B E H ÄL T E R A U S E M A IL L IE R T E M S T A H L M IT O D E R O H N E
TEFLON - BESCHICHTUNG .
B E HÄLTE R
ODE R AUS K UP FE R
Töpfe, Friteusen, Pfannen, Grillgeräte, etc.
BEHÄL TER AUS GUSSEISEN
.
, K E R AMIK ODE R TON , AUS ALUMINIUM OHNE S P E ZIALB ODE N
, S OWIE E INIGE NIC HTMAGNE TIS C HE N E DE LS TAHLB E HÄLTE R .
AUS GLAS
DE R " B E HÄ
LTE R TE S T"
Um das Risiko des Verkratzens der Oberfläche der Ceranscheiben Ihrer Platte auszuschließen, wählen Sie, wenn möglich, einen Behälter mit emailliertem Boden oder vermeiden
es, ihn auf der Oberfläche der Platte unnötig zu verschieben.
Dank
ihrer
Technologie
kann
Ihre
Induktionskochplatte die meisten der Behälter erkennen.
Stellen Sie Ihren Behälter auf ein Kochfeld mit der
Einstellung 4. Wenn die Leuchtanzeige ohne
Unterbrechung leuchtet
, ist Ihr Behälter geeignet,
wenn sie blinkt , ist Ihr Behälter für die Induktionskochplatte nicht geeignet.
BEHÄL TER AUS EDELSTAHL FÜR INDUK TIONSK OCHPLATTEN .
Die meisten Behälter aus Edelstahl sind für Induktionskochplatten geeignet (Töpfe, Alleskocher, Pfannen, Friteusen).
BEHÄL TER AUS ALUMINIUM MIT SPEZIALBODEN
H INWE IS : AUCH B E HÄLTE R DIE K E INE N GANZ E B E NE N B ODE N B E SITZE N K Ö NNE N
VE R WE NDE T WE R DE N . E S MUSS NUR DAR AUF GE ACHTE T WE R DE N , DASS DE R B ODE N
NICHT ZU STAR K VE R FOR MT IST .
Das Zeichen class induction INDUCTION fist auf der Platte
angebracht.
Wenn Sie einen Behälter wählen der das gleiche Zeichen
besitzt, können Sie sicher sein, daß er für die
Induktionskochplatte unter normalen
Anwendungsbedingungen bestens geeignet ist.
30
Welche Behälter eignen sich am besten für Ihre
Induktionskochplatte?
VORSICHTSMASSNAHMEN BEI DER ANWENDUNG :
F ÜR E INE R IC HT IG E ANWE NDUNG :
Wenn
Sie
einen
Behälter
mit
einer
Innenbeschichtung aus Teflon mit sehr wenig oder
gar ohne Fettzugabe benutzen, heizen Sie ihn kurz
in der Position 9 oder 10 vor. Benutzen Sie nie die
Position 11 oder 12, da Sie sonst
riskieren Ihren Behälter zu beschädigen.
Erhitzen Sie keine geschlossene Konservendose,
da sie zerplatzen könnte (diese Vorsichtsmaßnahme
gilt im übrigen für alle Kocharten).
Das beste Ergebnis erhalten Sie wenn Sie einen
Behälter benutzen, dessen Durchmesser
ungefähr gleich dem des auf der Oberfläche der
Ceranscheiben abgebildeten Durchmessers ist
(12 cm Minimum).
Der Behälter muß immer in die Mitte des
Kochfeldes gestellt werden.
RATS C HLÄGE
Verwenden Sie zum Kochen niemals Aluminiumfolie und legen Sie nie in Aluminiumfolie gewickelte
Produkte direkt auf die Induktionsplatte. Das Aluminium würde schmelzen und Ihr Gerät beschädigen.
Legen Sie niemals Aluminiumfolie oder Kunststoffteile auf die heißen Oberflächen.
Wenn ein Riß oder ein Sprung in der Oberfläche des Kochfeldes erscheint, müssen Sie die Kochplatte sofort
abschalten.
Bei Ihrem Stromkabel handelt es sich um ein Spezialkabel. Bei einer Beschädigung darf das Kabel lediglich
von Ihrem Kundendienst ausgetauscht werden.
Stellen Sie auf der Kochplatte niemals irgendwelche Gegenstände ab.
31
Wie muß Ihre Induktionskochplatte installiert werden?
S E HR WIC HT IG
Nehmen Sie das Gerät aus der Verpackung.
Entnehmen Sie das unter dem Gerät befindliche
Anschlußkabel und rollen Sie es vollständig auf.
Respektieren Sie einen Abstand von 5 cm in
bezug auf jede senkrechte Wandung in der Nähe.
Stellen Sie die Kochplatte nicht unter einem
Regal oder in der Nähe von leicht entflammbaren
Gegenständen wie Gardinen, oder Vorhängen auf
Schließen Sie die Kochplatte an eine mit 16 A
abgesicherte und geerdete Steckdose an. Wenn
Sie eine elektrische Verlängerungsschnur
benutzen, kontrollieren Sie den guten Zustand und
die Konformität mit den elektrischen Normen
(Erdung, Querschnitt der Leiter = 1,5 mm2).
Ihr Gerät muß auf eine saubere, horizontale, ebene
und stabile Unterlage gestellt werden, die
hitzebeständig ist oder dafür vorbereitet wurde.
Der Steckdosenstecker muß zugänglich sein.
Die Kochplatte darf niemals ohne den Filter
benutzt werden, da er sie gegen das Eindringen
von Staub und Fett schützt.
Der Lufteintritt unter dem Gerät darf nicht
verstopft werden (z.B. durch Papier, Lappen, etc.).
WAR T UNG
Reinigen Sie den unter dem Gerät befindlichen
Filter ungefähr ein Mal im Monat mit
Seifenwasser.
Achten Sie darauf, daß der Filter vor einer erneuten
Benutzung des Gerätes völlig trocken ist.
Verschieben Sie das Gerät niemals, wenn es
gerade benutzt wird.
Zum Öffnen die
S chrauben lö
s en
VOR S IC HT
Wenn das Gerät eingeschaltet wird, kann eine
Leuchtanzeige erscheinen.
Diese Leuchtanzeige ist ein Code, der nur vom
technischen Kundendienst benutzt wird und vom
Anwender ignoriert werden kann.
Der Code erlischt automatisch nach ungefähr 30
Sekunden oder nach Betätigung einer beliebigen
Taste des Gerätes.
ZU R EINIGENDER FILTER
32
Was tun, wenn ... ?
Wenn Sie eine Frage zur richtigen Funktionsweise Ihres Gerätes haben, heißt das nicht unbedingt, daß eine Panne
vorliegt. Überprüfen Sie in allen Fällen die folgenden Punkte.
S IE
S TE LLE N
FE S T,
DAS S
. . .DIE
MÖ G LIC HE N UR S AC HE N
W AS
IS T
ZU
T UN?
Die Induktionskochplatte funktioniert nicht. Die Kontrolleuchten der
Tastatur leuchten nicht auf.
Das G erät is t nic ht elektris c h anges c hlos s en. Der elektris c he
Anschluß oder die elektrische Versorgung sind beschädigt.
Überprüfen S ie den Zustand der elektrischen Installation, die
S icherungen und den elektrischen S chaltautomat.
Nachdem die Induktionskochplatte eingeschaltet wurde blinken die
Kontrolleuchten weiter.
Der von Ihnen benutzte B ehälter ist nicht für das K ochen durch
Induktion geeignet.
B enutzen S ie einen geeigneten B ehälter (siehe das Kapitel über die
B ehälter).
Die Induktions koc hplatte fällt wäh rend des B etriebs aus . Der
Zeitschalter kann dann die Meldung
anzeigen.
Die Elektronik hat sich zu stark erhitzt.
Überprüfen S ie die Konformität Ihrer Installation und
insbesondere die Luft-Ein- und Ausgänge wie in der Anleitung
beschrieben.
Die Kochplatte funktioniert nicht.
Die Elektronik ist ausgefallen.
Wenden S ie sich an den Kundendienst.
Die Kochplatte gibt ein leises Klickgeräusch ab.
Dieses Geräuschentstehtdurchdie Verteilung der Leistung auf die beidenKochplatten.
Das ist normal.
Die Ventilation läuft einige Minuten nach dem Abschalten der Kochplatte noch weiter.
Die Elektronik wird abgekühlt.
Das ist normal.
Nach dem Anschluß läuft die Ventilation einige S ekunden.
Automatischer Test des Produktes.
Das ist normal.
In einem Fehlerfall sollten Sie immer die Anzeige des Zeitschalters notieren und diese mit den Angaben der Fehlertabelle vergleichen.
Seien Sie über eine leichte permanente Erwärmung der Oberfläche der Ceranscheiben Ihrer Kochplatte nicht beunruhigt. Das ist normal.
Wenden S ie s ich in allen Fä
llen, in denen Ihre Intervention nicht genü
gt, s ofort an uns eren K undendiens t.
33
GAR ANTIE
Damit Sie den Garantieanspruch für die
Induktionskochplatte voll nutzen können, müssen Sie
die Rechnung mit dem Datum des Kaufs unbedingt aufbewahren und auf Verlangen vorlegen können.
J ede Intervention a uf der B a s is einer mit den Vors c hriften und Anw endungs hinw eis en dies er N otiz
nic ht k o nfo r m e n I ns ta lla tio n o de r B e nutz ung
s c hlie ßt d e n G a r a ntie a ns pr uc h g e g e nü be r d e m
Hers teller dies es P roduk ts definitiv aus .
Ä
u ße r lic h e F e h le r d ie durch die Benutzung von
scheuernden Produkten oder das Reiben von Töpfen
auf der Oberfläche der Ceranscheiben entstehen und
die F unk tions tü c htigk eit und B enutzung nic ht beeinträ chtigen, fallen nicht unter die Garantiebedingungen.
Reparaturarbeiten dürfen nur von autorisierten
Fachkräften durchgeführt werden. Nur die Fachgeschäfte die unsere Marke vertreiben :
K E NNE N DE N TE C HNIS C HE N AUFB AU UND DIE FUNK TIONS WE IS E IHR E S GE R ÄTS
S TE LLE N IHR GE R ÄT NAC H UNS E R E N ME THODE N E IN , UND WAR TE N UND
Alle Beschreibungen und Eigenschaften die in dieser
"Bedienungsanleitung" enthalten sind, haben nur einen
informativen Charakter und sind unverbindlich. Im Rahmen unserer Bemühungen die Qualität unserer Produkte laufend zu verbessern, behalten wir uns das Recht
vor, Änderungen und qualitative Verbesserungen ohne
Vorankündigung zu realisieren.
Original- E rs atzteile : Verlangen Sie im Fall von Reparatur- oder Wartungsarbeiten von Ihrem Vertragshändler, daß er ausschließlich gekennzeichnete Original-Ersatzteile benutzt.
K UNDE NDIE NS T
,
R E P AR IE R E N E S NAC H UNS E R E N VOR S C HR IFTE N UND
B E NUTZE N NUR OR IGINAL - E R S ATZTE ILE
Geben Sie im Fall von Reklamationen oder bei der Bestellung von Ersatzteilen bei Ihrem Vertragshändler immer die vollständige Referenz Ihres Gerätes an (Gerätetyp und Seriennummer). Diese Angaben finden Sie auf
dem Geräteschild unter dem metallischen Gehäuse des
Geräts.
34
1 J ahr G arantie auf alle
eileT und
Arbeits k os ten.
35
FX00141B - 11/06
36