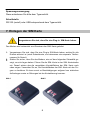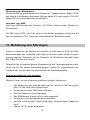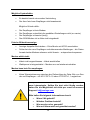
1
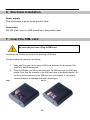
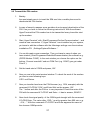
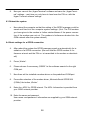
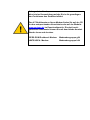
Sehr geehrter Kunde,
dies ist eine Kurzanleitung welche Sie in die grundlegenden Funktionen des Gerätes einführt.
Den AT Befehlssatz zu Ihrem Modem finden Sie auf der CD
in dem entsprechenden Verzeichnis oder auf der Website
www.coniugo.de im Downloadbereich. Die dort bereitgestellten Dokumente können Sie mit dem Adobe Acrobat
Reader lesen und drucken.
GPRS GSM Dualband- Modem:
UMTS/HSPA- Modem:
Modembaugruppe g24
Modembaugruppe h24
Einführung / Herstellererklärung
=
Sehr geehrter Kunde,
wir bedanken uns für den Kauf des Modems. Das vorliegende Gerät wurde nach
dem neuesten Stand der Technik gebaut. Es ist ein GSM Modem zur drahtlosen
Datenübertragung in den Funktelefonnetzen.
Hersteller ist:
ConiuGo® GmbH
Berliner Strasse 4a
16540 Hohen Neuendorf
Für die CE- Kennzeichnung sind von Bedeutung und wurden beachtet:
EU-Richtlinie 89/336/EWG vom 3. Mai 1989 (EMV- Richtlinie) zuletzt geändert durch
EU-Richtlinien 91/263/EWG, 92/31/EWG, 93/68/EWG, EN 61000-6-4/01 Fachgrundnorm zur Störaussendung im Industriebereich, EN 61000-6–2/05 Fachgrundnorm zur
Störfestigkeit im Industriebereich, Fertigung nach den Richtlinien der Qualitätsnorm
DIN EN ISO 9001, EU-Richtlinie 1999/5/EC nach R&TTE.
Das Gerät wird in Verbindung mit einer Telekommunikationsendeinrichtung für die
Netze GSM 900 MHz & 1800 MHz und / oder 850 MHz & 1900 MHz verwendet (je
nach Bestellung). Es hat eine eigene CE- Kennzeichnung mit Prüfziffer.
=
Um einen gefahrlosen Betrieb unseres Modems sicher zu stellen, müssen Sie als Anwender diese Bedienungsanleitung be= achten.==
=
=
=
=
=
=
Hohen Neuendorf, 11. Februar 2011
=
=
2
Inhaltsverzeichnis
=
1. Garantie- und Haftungsbedingungen ................................................................. 4
2. Bestimmungsgemäßer Gebrauch ....................................................................... 5
3. Sicherheitshinweise ............................................................................................. 5
4. Funktions- und Leistungsbeschreibung ............................................................ 7
5. Installationshinweise ........................................................................................... 7
6. Elektrische Installation ........................................................................................ 7
7. Einlegen der SIM Karte ........................................................................................ 8
8. Installation der USB- Treiber ............................................................................. 10
9. Nutzung der GPRS- Funktion ............................................................................ 10
10. Parametrieren des Modems............................................................................. 13
11. Behebung von Störungen................................................................................ 14
=
=
3
1. Garantie- und Haftungsbedingungen
Die ConiuGo GmbH gewährleistet, dass das Produkt bei normalen Gebrauch und
Wartung frei von Material- und Herstellungsfehlern ist. Diese Garantie gilt für 2 Jahre
ab Lieferungsdatum, sofern nicht anders vereinbart. Die Garantie erstreckt sich auf
eine Reparatur oder Ersatz, wobei sich die ConiuGo GmbH das Wahlrecht vorbehält.
Die Garantie erstreckt sich auf Material- und Personalkosten im Falle einer Reparatur, nicht jedoch auf Montage- und Versandkosten.
Die Garantie besteht nur bei normalen Gebrauch und Wartung. Sie ist ausgeschlossen, bei unsachgemäßem Gebrauch, Veränderung, Demontage, bzw. Umbau. Der
Kaufbeleg muss bei einer Rücksendung beigefügt sein.
Jeglicher Gebrauch des Modems geschieht auf eigene Gefahr. In keinen Fall ist
ConiuGo GmbH haftbar für Begleit- oder Folgeschäden, einschließlich Sachschäden,
der Gebrauchsverlust des Gerätes, oder anderer Geräte, oder sonstigem Vermögensverlust.
Bei Schäden, die durch Nichtbeachten dieser Bedienungsanleitung verursacht werden, erlischt der Garantieanspruch. Für Folgeschäden übernehmen wir keine Haftung!
Bei Sach- oder Personenschäden, die durch unsachgemäße
Handhabung oder Nichtbeachten der Sicherheitshinweise verursacht werden, übernehmen wir keine Haftung. In solchen Fällen
erlischt jeder Garantieanspruch.
4
2. Bestimmungsgemäßer Gebrauch
=
Das Gerät ist für den Einsatz in Deutschland gefertigt. Es darf außerhalb von
Deutschland, Österreich und der Schweiz nur mit einer Bedienungsanleitung in Landessprache in Verkehr gebracht werden. Diese Anleitung muss vom Hersteller autorisiert sein. Jeder Distributor muss sicherstellen, dass der Endabnehmer dieses
Gerätes in der Lage ist, das Handbuch sowohl sprachlich, wie auch inhaltlich zu
verstehen.
Installation und Inbetriebnahme des Gerätes bedürfen spezieller
Fachkenntnisse (Fernmeldetechnik, Elektrotechnik, Elektronik,
etc.). Die sachgerechte Installation und Inbetriebnahme ist vom
Erwerber, bzw. Betreiber sicherzustellen.
Die Beachtung aller Hinweise dieses Handbuchs und der Technischen Dokumentation sowie der Hinweise am Gerät (Typenschild, etc.) ist vorgeschrieben. In Zweifelsfällen ist das Gerät außer Betrieb zu setzen und der Hersteller zu konsultieren.
Es ist eine SIM- Karte mit Freischaltung für die gewünschte Betriebsart (Datenverbindung, Sprachverbindung, SMS oder GPRS) erforderlich.
Eine andere Verwendung als zuvor beschrieben, führt zur Beschädigung dieses Produktes. Außerdem ist dies mit Gefahren, wie z. B. Kurzschluss, Brand, elektrischer
Schlag etc. verbunden. Das gesamte Modul darf nicht geändert bzw. umgebaut und
das Gehäuse nicht geöffnet werden!
Die Sicherheitshinweise sind unbedingt zu beachten.
3. Sicherheitshinweise
Das GSM Modem entspricht den allgemein gültigen GSM- Standards. Bei Verwendung einer GSM- Sende- und Empfangseinheit müssen die für den Mobilfunk notwendigen Sicherheitsvorkehrungen getroffen werden:
5
GSM- Geräte können explosionsfähige bzw. brennbare Gasgemische elektromagnetisch zünden.
Das System darf in Flugzeugen und Krankenhäusern nur eingeschaltet werden, wenn dies erlaubt und unbedenklich ist.
Das System darf nicht in Fahrzeugen betrieben werden, es sei
denn es liegt eine gesonderte Zulassung für das Gerät vor.
Der Einsatz des GSM- Modems unter den zuvor genannten Bedingungen muss fachkundig geprüft bzw. ausgeschlossen werden.
Erkundigen Sie sich vor dem Einschalten des Gerätes unbedingt nach eventuellen Einflüssen des Moduls auf Ihre vorhandenen technischen Anlagen.
Der Hersteller liefert ein Produkt für die Integration in eine Anlage. Dieses Produkt ist
entsprechend der CE- Richtlinie sorgfältig auf die Einhaltung der in der Herstellererklärung genannten Normen und Richtlinien kontrolliert. Dennoch hängt das elektromagnetische Verhalten des GSM Modems von den Einbau- und Umgebungsbedingungen ab.
Das elektromagnetische Verhalten des GSM- Modems hängt von
Einbau- und Umgebungsbedingungen ab, die nicht der Kontrolle des Herstellers unterliegen. Daher übernimmt der Hersteller
für dieses Verhalten auch keine Haftung.
Ein GSM-Gerät darf wegen der auftretenden HF-Strahlung
grundsätzlich nur mit einer geeigneten externen GSM- Antenne
für das entsprechende Frequenzband betrieben werden. Die
Antennenleitung darf keine Beschädigungen aufweisen.
6
4. Funktions- und Leistungsbeschreibung
Das Modem ist ein GSM Sende- und Empfangsmodul zur Übertragung von Daten,
Fax und SMS in GSM-Netzen. Das Modem ist auch in der Lage, den IP-Transfer in
den GSM- Netzen über GPRS (g24) bzw. UMTS (h24) zu unterstützen.
Sobald das Modem in ein Netz eingebucht ist, arbeitet es wie ein Standard-Modem
oder Fax-Modem. Zur Programmierung wird der Standardsatz der AT-Kommandos
gemäß ETSI 07.07 oder ETSI 07.05 benutzt. Das Modem unterstützt die auf dem Typenschild angegebenen GSM Netze (Dualband 900/1800 MHz, Quadband 900/1800
und 850/1900 MHz, UMTS- Modem auch das UMTS- Frequenzband 2,1 GHz).
=
=
5. Installationshinweise
=
Das Modem darf nur in trockenen Räumen installiert werden; der zulässige Temperaturbereich beträgt -30 bis +60°C. Die allgemeinen Vorschriften zur Sicherheit elektrischer Installationen sind zu beachten. Der Kontakt mit Feuchtigkeit (> 70 % RF) ist
unbedingt zu vermeiden.
Das Modem kann mit entsprechendem Zubehör an Wände montiert oder für die
Hutschienenmontage vorgesehen werden. Einfaches aufstellen ist ebenso möglich.
Dabei sollte darauf geachtet werden, das es gegen verrutschen gesichert ist um ein
abreissen der angeschlossenen Kontakte zu vermeiden.
•
•
Umgebungstemperatur von –30 bis +60 °C.
Nur in trockenen Räumen bis max. 70% RH
•
SIM- Karte mit anwendungsbezogener Freischaltung erforderlich
(bei CSD- Datenübertragung: Datenfreischaltung).
•
Empfohlene Einstellungen (GSM/GPRS g24):
8N1 bei 57.600 Baud
•
Empfohlene Einstellungen (UMTS h24):
8N1 bei 115.200 Baud
6. Elektrische Installation
7
Spannungsversorgung
Diese entnehmen Sie bitte dem Typenschild.
Schnittstelle
RS 232 (seriell) oder USB entsprechend dem Typenschild.
7. Einlegen der SIM Karte
Vergewissern Sie sich, dass Sie eine Plug-in SIM-Karte haben.
=
Das Modem wird vorbereitet zum Einsetzen der SIM- Karte geliefert
1.
OK
Vergewissern Sie sich, dass Sie eine Plug-in SIM-Karte haben, welche für alle
Dienste aktiviert ist (auch Datendienste, sie bekommen eine separate Telefonnummer für Daten!).
Stellen Sie sicher, dass Sie das Modem, wie auf dem folgenden Schaubild gezeigt, vor sich liegen haben. Führen Sie die SIM- Karte in den SIM- Kartenhalter
ein. Darauf achten das die vergoldeten Kontaktflächen der SIM- Karte nach
oben zeigen. Vermeiden Sie es, die Kontaktflächen der SIM- Karte mit den Fingern zu berühren. Es kann sonst zu Beschädigungen aufgrund von statischen
Aufladungen sowie zu Störungen bei der Kontaktierung kommen.=
=
Abb.1
Abb.2==
=
==
8
3.
Sollten Sie das GSM GPRS (Dualband / Ouadband) Modem Professional benutzen, öffnen Sie zum Einlegen der SIM-Karte das Gehäuse wie in Abbildung
3 dargestellt.
4.
Schließen Sie die GSM-Antenne – ggf. über den mitgelieferten Antennenadapter
am GSM-Modem an.
9
8. Installation der USB- Treiber
Um das Modem zu nutzen, müssen zuerst die USB-Treiber installiert werden. Die
Treiber finden sich auf der beigefügten CD.
Zu beachten ist, dass das GSM- Modem mit der Modembaugruppe g24 (GSM/GPRS) oder h24 (UMTS) ausgeliefert wird. Bei der
Installation der Treiber ist sicherzustellen, dass der Treiber passend zu der Modembaugruppe ausgewählt wird.
Sollte das Modem noch nicht erkannt werden, starten Sie den Rechner bitte neu.
9. Nutzung der GPRS- Funktion
Die GPRS-Funktionalität des GSM/GPRS-Modems ist grundsätzlich unter allen Betriebssystemen (Windowas, Linux, MacOS) möglich. Für die Nutzung unter Windows
ist ein einfach zu benutzender GPRS-Manager von Motorola verfügbar, der lizenzfrei
genutzt werden kann.
9.1
Installieren des Motorola GPRS Managers
1.
Starten Sie das Programm „install.exe“ von der Installations- CD.
2.
Der Motorola GPRS Manager wird nun installiert.
3.
Klicken Sie auf den Doppelpfeil, bis Sie zur Sprachauswahl gelangen. Anschließend wieder den Doppelpfeil klicken, bis Sie zur eigentlichen Installation des Managers gelangen. Ggf. den Installationspfad wechseln oder den
vorgeschlagenen akzeptieren.
4.
Die Frage nach Neustart des Computers mit NEIN beantworten.
10
9.2
Übergabe der PIN Nummer
1.
Grundsätzlich:
Der einfachste Weg ist hierbei, die SIM-Karte zuvor in ein Handy einzulegen, die Sicherheitseinstellungen auszuwählen und die Abfrage der PIN
Nummer zu deaktivieren.
2.
Aus Sicherheitsgründen lässt z.B. D2 dies nicht zu. Deshalb wird mit Hilfe
des Programms „HyperTerminal“ die PIN Nummer nach jedem EINSCHALTEN des GPRS Modems wie folgt übergeben:
3.
Starten Sie „HyperTerminal“ unter
„Start/Programme/Zubehör/Kommunikation/... und richten eine neue Verbindung ein. Sollte „HyperTerminal“ auf Ihrem System nicht installiert sein,
halten Sie bitte Ihre Windows Installations-CD bereit und fügen diese Software mittels „Einstellungen/Systemsteuerung/Software..“ hinzu.
4.
Eine neue Verbindung mittels „HyperTerminal“ wird hinzugefügt, indem Sie
beim Start dieses Programms unter
„Start/Programme/Zubehör/Kommunikation/...zunächst einen Namen vergeben (z.B. GPRS Modem COM7“). Im nächsten Fenster wählen Sie die
Option ganz unten „Verbinden über“ und stellen den unter Punkt 3.) bestimmten COM Port ein (z.B. COM7).
5.
Nun stellen Sie die Baudrate auf 57600 ein und drücken auf „OK“.
6.
Nun sind Sie im eigentlichen Terminaleingabefenster. Um die Funktionsweise des Modems zu testen, geben Sie zunächst ein: ATE1 und Return.
7.
Nun übergeben Sie die PIN Nummer (hier sei Sie 1234) mit dem Befehl
AT+CPIN=“1234“ und Return. Warten Sie auf die Antwort „OK“.
Die Anführungszeichen bei der PIN Nummer sind unbedingt notwendig!
Überprüfen Sie die Eingabe mit dem Befehl AT+CPIN? und Return – es
muss „READY“ melden.
8.
Checken Sie nun noch kurz die Signalqualität des Empfangs mit dem Befehl AT+CSQ Return. Der Wert hinter „CSQ: “ muss größer als 000 sein,
z.B. 014,...“. Mit AT+COPS? und Return kommt u.a. der Name Ihres Netz-
11
dienstes.
9.
9.3
Jetzt können Sie „HyperTerminal“ schließen und die HyperTerminaleinstellung abspeichern – In Zukunft genügt der Aufruf der HyperTerminalsettings,
um die PIN erneut zu übergeben.
Neustart des Rechners
•
9.4
Starten Sie nun den Computer neu, damit die Einstellungen des GPRS Managers im System verankert werden können. (Tip: Die soeben übergebene
PIN Nummer im GPRS-Modem bleibt ja erhalten, solange Sie die Stromzufuhr nicht unterbrechen. Nach diesem Neustart wird das GPRS-Modem immer noch im Netz eingebucht sein!)
Einrichten einer GPRS oder UMTS Daten- Verbindung
1.
Nach dem Neustart des Computers meldet sich automatisch der GPRS Manager zur Einrichtung einer GPRS Verbindung. (Das GPRS-Modem ist
doch noch immer in Bereitschaft und die PIN erfolgreich mittels HyperTerminal übergeben bzw. deren Abfrage deaktiviert?)
2.
Drücken Sie auf „Weiter“.
3.
Wählen Sie ggf. „RS232“ aus und lassen nach dem möglichen COM Port
suchen.
4.
Es wird automatisch auf dem von Ihnen vorher bestimmten COM Port ein
Modemtreiber installiert werden.
5.
Drücken Sie nach der Bestimmung des Modemtreibers „Motorola Serial
GPRS 56K (COMx)“ auf „Weiter“
6.
Geben Sie den Zugangspunkt („APN“) für GPRS Internet ein. Entsprechende Informationen sind von Ihrem Netzbetreiber erhältlich.
7.
Geben Sie Zugangsname und Passwort ein. Auch diese Angaben erhalten
Sie bei Ihrem Netzbetreiber. Drücken Sie anschließend auf „Weiter“.
12
8.
Geben Sie die DNS Adressen Ihres Netzdienstes ein, die Sie von Ihrem
Netzbetreiber mitgeteilt bekommen. Klicken Sie auf „Weiter“.
9.
Geben Sie nun den Namen für die Verbindung ein, z.B. „GPRS-Vodafone“.
Drücken Sie auf „Weiter“.
9.5
Aufbau einer GPRS Verbindung
•
9.6
In Zukunft steht Ihnen diese Verbindung als „Icon“ zur Verfügung. Doppelklick startet die Verbindung.
Auflegen einer GPRS Verbindung
•
Das Auflegen einer Verbindung wird ebenfalls innerhalb dieses Steuerungsfensters ausgeführt.
10. Parametrieren des Modems
Die Einstellung des Modems erfolgt mit Hilfe eines Terminalprogramms, wir empfehlen die Verwendung von ConiuGo Terminal, CommLite, Telix oder Hyperterminal.
Nach Eingabe von „AT“ sollte sich das Modem zunächst mit „OK“ melden.
=
PIN- Nummer=
Fragen Sie mit AT+CPIN?, ob eine PIN- Nummer bereits eingegeben wurde oder geben Sie die PIN- Nummer mit AT+CPIN="xxxx" ein. Wichtig! Die PIN- Nummer muss
in Anführungszeichen stehen.
=
Sendequalität=
Überprüfen Sie die Sendequalität mit AT+CSQ. Hier wird die physikalische Sendequalität abgefragt. Sie sollte mindestens Werte von > 10 aufweisen, da ansonsten
die Datenübertragung trotz erfolgreicher Einbuchung beim Netzbetreiber gestört sein
kann.
Statusabfrage=
Durch Abfrage von AT+CREGH? und AT+COPS? werden der Einbuch- Zustand und
der Provider angezeigt.
13
Überprüfung der Wählfunktion=
Überprüfen Sie die Wählfunktion durch Einwahl im Tonwahlverfahren. Befehl: ATDT
und folgend eine beliebige Rufnummer. Mit dem Befehl ATH oder besser: AT+CHUP
können Sie die Verbindung wieder unterbrechen.=
=
Absenden einer SMS:=
Anruf des SMS-Dienstes des Providers: AT+CSCA="+49xxxxxxxxxx" (Beispiel für
Deutschland).
Die SMS wird im PDU- oder Text- Mode an das Modem übergeben. Hierzu bitte mit
den im ausführlichen PDF- Dokument beschriebenen AT-Befehlen arbeiten.
11. Behebung von Störungen
Sofern ein Ansteuern des Modems noch möglich ist, kann man mit AT&F die Standardeinstellungen des Herstellers laden. Man muss dann erneut mit der Programmierung beginnen. Überprüfen Sie die Parameter der Schnittstelle, Baudrate, DataBits, Parity- Bit, Stop Bits, Duplex.
Überprüfen Sie, ob eventuell andere Programme mit dem Terminalprogramm interferieren und z.B. die serielle Schnittstelle belegen. Starten Sie gegebenenfalls den
Computer neu und aktivieren Sie ausschließlich das Terminalprogramm.
Verbindung lässt sich nicht herstellen
=
Mögliche Fehler, die eine Verbindung unmöglich machen, können sein:
•
Das Modem hat eine feste Baudrate und wirt nicht mit 57.600 baud (g24)
bzw. 115.200 baud (h24) angesprochen.
•
Es befindet sich keine SIM- Karte im Modem
•
Die PIN- Nummer ist nicht eingegeben
•
Das GSM Modem ist noch nicht im Netz eingebucht
•
Es wurde ein nicht verfügbares Netz ausgewählt
•
Die SIM- Karte hat keine Datenfreischaltung und keine eigene Datennummer!!!
Falsche Tel.-Nr. wurde eingegeben
•
14
=
Mögliche Systemfehler:
=
•
Es besteht bereits eine andere Verbindung
•
Der Anruf wird vom Empfänger nicht beantwortet.
Mögliche Gründe dafür:
•
Der Empfänger ist kein Modem
•
•
Der Empfänger unterstützt die gewählten Einstellungen nicht (no carrier)
Der Empfänger ist besetzt (busy)
•
Das GSM Modem ist im Netz nicht eingebucht
=
Falsche Bildschirmanzeige:
=
•
•
Anzeige doppelter Buchstaben – Echo-Modus mit ATE0 ausschalten.
Fehler bei den vom Empfänger zurückkommenden Meldungen – die Datenformate beider Modems stimmen nicht überein – entsprechend anpassen.
Modem wählt nicht:
=
•
•
Kabel nicht angeschlossen – Kabel anschließen
Wahlsperre ist eingeschaltet – Modem aus und wieder einschalten
=
Modem kann kein Fax empfangen:
•
Keine Übereinstimmung zwischen der Reihenfolge der Data- Bits von Sender und Empfänger – mit AT+FOPT=1,0 oder AT+FOPT=1,1 angleichen.
Zu speziellen Problemen finden Sie Hilfestellungen auf unserer Internetseite. Sollten Sie dort nicht fündig werden,
haben Sie die Möglichkeit sich bitte per e-mail an unseren
Support: [email protected]
Bitte halten Sie folgende Informationen bereit:
•
Wann / Wo gekauft?
•
•
Welches Problem besteht?
Was wurde vorher gemacht?
•
Was soll überwacht und gemeldet werden?
15
16
Dear customer,
this is a short description to give you some basic informations about the GSM modem you purchased.
Informations to the AT commands you will find on the CD
as a PDF file. As well informations can be downloaded from
our website www.coniugo.com. Those documents can be
read and printed with the Adobe Acrobat Reader.
GPRS GSM dualband- modem:
UMTS/HSPA- modem:
17
modem module g24
modem module h24
Introduction / Declaration of Conformity
=
Thank you for buying the ConiuGo GSM/GPRS-modem. This product was produced
according to the latest technology. It is a device suited for data transmission in GSM
networks
The manufacturer is:
ConiuGo® GmbH
Berliner Strasse 4A
16540 Hohen Neuendorf
This product is labelled with the CE-mark according to following standards:
EU-guidelines 73/23/EWG of February 19th 1973, EU-guidelines 89/336/EWG of
May 3rd 1989 (EMV-guideline) changed by EU-guidelines 91/263/EWG, 92/31/EWG,
93/68/EWG, EU-guidelines 89/392/EWG of June 14th 1989 changed by EUguidelines 91/368/EWG, 93/44/EWG, 93/68/EWG
EN 61000-6-4/01 German basic standard for RF-emission for industrial application,
EN 61000-6–2/05 German basic standard for RF-immission for industrial application
This product is manufactured according to the quality standard DIN EN ISO 9001.
This product includes a GSM transceiver unit from a third-party manufacturer. It is
CE-certified by it’s own manufacturer.
=
=
To ensure a safe operation of the modem, please read this manual carefully before taking it into operation
Hohen Neuendorf, Nov. 11th of February 2011
=
=
=
=
18
Table of contents=
=
1. Limited Warranty / Limitation of Liability ......................................................... 20
2. Use as agreed ..................................................................................................... 21
3. Safety notes ........................................................................................................ 22
4. Description of the modem ................................................................................. 23
5. Installation of the modem .................................................................................. 23
6. Electrical installation ......................................................................................... 24
7. Insert the SIM- card ............................................................................................ 24
8. Installation of the USB driver ............................................................................ 26
9. Use of the GPRS function .................................................................................. 26
10. First modem settings ....................................................................................... 29
11. Troubleshooting ............................................................................................... 30
=
19
1. Limited Warranty / Limitation of Liability
ConiuGo GmbH warrants its product to be free from defects in materials and workmanship under normal use and service for a period of two years from the date of delivery, if no other agreement was made. The warranty is limited to the repair or replacement, at ConiuGo`s sole option. The costs of parts and labour are covered in
case of a repair. Costs for mounting and de-mounting, as well as for return transport
to ConiuGo GmbH are not covered.
This limited warranty will apply only to ConiuGo GmbH products that exhibit normal
use and service and will not cover any damages resulting from any misuse, modification, disassembly or alteration. Proof of purchase must accompany the product returned for consideration under this warranty.
Any use of the modem is carried out at your own risk. In no event shall ConiuGo be
liable for incidental or consequential damages, including, without limitation, loss to
property other than the ConiuGo GmbH product, loss of the use of the ConiuGo
GmbH product or other property, or other economic loss.
Damages resulting from neglect of this manual are not covered
by the warranty. ConiuGo GmbH is not liable for any consequential damage.
ConiuGo is not liable for damages to property or personal injuries resulting from improper use or neglect of the safety warnings. Such events are not covered by the warranty.
20
2. Use as agreed
=
The modem is designed for use in Germany and the European Community. According to the rules of CE-conformity, it is not allowed to distribute this device without a
manual in the national language. The manual has to be authorised by the manufacturer. Any distributor has to make sure that the user of the device is capable to understand the manual as regards the content and the language.
The modem has to be installed and put into operation by competent technicians.
The modem is designed according to the valid GSM standards. At the use of this modem all safety precautions necessary for GSM devices have to be taken into account. It is not allowed to switch on the modem in airplanes or hospitals. Please
check carefully any possible influences the modem may have on other technical and
electronic devices.
The modem has to be installed and put into function by technical experts. All notes
and information of this manual have to be read carefully and followed strictly. In case
of doubt don’t put the device into function but consult the manufacturer or your authorised distribution agent.
GSM devices are able to ignite explodable or inflammable gases by electromagnetic
radiation. The use of the modem in an environment with a potential for these conditions must be definitely excluded.
Because of the RF-radiation of a GSM device the modem has to be used with a
suitable GSM antenna for the RF band of 900 MHz (or 1800 MHz depending of the
type of the chosen GSM network). The antenna cable has to be free from any damages.
The manufacturer provides a product for integration in a technical assembly. The
product is tested carefully according to the CE-certification to meet the standards
mentioned in the Declaration of Conformity. Nevertheless, the electromagnetic behaviour of the modem is depending on the conditions of mounting and environment.
21
Safety notes must be regarded!
3. Safety notes
The modem corresponds to broadly valid GSM standards. At the use of a GSM
transceiver for the mobile communication, certain safety precautions have to be
made.
GSM products can ignite explosive or inflammable gases.
The use of the modem in an environment with a potential for these conditions must
be definitely excluded.
The system must be switched off in airplanes or hospitals.
The use of the modem in these areas must be avoided.
Before connecting the product, possible interference of the
modem on your existing technical equipment has to be inquired.
The manufacturer provides a product for integration in a technical assembly. The
product is tested carefully according to the CE- certification to meet the standards
mentioned in the Declaration of Conformity. Nevertheless, the electromagnetic behaviour of the GSM modem is depending on the conditions of mounting and environment.
The electromagnetic behaviour of the modem depends on the
environmental not controlled by the manufacturer. Any liability
for eventual electronic misbehaviour is excluded.
22
Because of the RF-radiation of the GSM unit the modem has to
be used with a suitable GSM antenna for the RF band, depending on the type of the chosen GSM network). The antenna cable has to be free from any damages.
4. Description of the modem
The modem is a GSM modem for data-, fax- and SMS- transfer in GSM networks.
From the moment the modem is booked into the provider’s network the device behaves like a standard modem or a fax modem. The configuration of the system is
carried out via the V.24 serial port resp. the USB-connection. For programming the
standard AT-commands according to ETSI-standards (ETSI 07.07 or ETSI 07.05)
are used.
The modem is dedicated to applications several GSM networks and depends on the
versions name which is given on the product label (Dualband: 900/1800 MHz, Quadband: 850/900/1800/1900 MHz). UMTS- modem does supply UMTS frequencies as
well.
=
5. Installation of the modem
The modem must be installed only in dry places. The allowed range of temperature
is –30 to +60 °C. The common regulations for electr ical installations have to be regarded.
The modem is allowed to be run according to the following conditions:
=
•
Ambient temperature: –30 to +60 °C
•
Indoor use only, max. 70% RH
•
SIM-card with appropriate service subscription (e.g. for data transmission:
subscription for data transmission).
•
Recommend interface settings: 8N1 on 19.200 baud.
23
6. Electrical installation
Power supply
This information is given by the product label.
Connection
RS 232 (Com- port) or USB according to the product label.
7. Insert the SIM- card
=
Be sure that you have a Plug-In-SIM-card.
=
At delivery the modem is prepared for inserting a SIM-card.
Put the modem into operation as follows:
1.
2.
img.1
Make sure that you have a plug-in SIM-card activated for all required services (e.g. data transmission)
Place the Modem-unit as shown and insert the SIM-card into the SIM-card
reader. Note that the contacts of the SIM card have to be placed upside. Do
not touch the connectors of the SIM card with your fingers. It can lead to
contact problems or damage from static discharges.
img.2
=
24
If you use the GSM (GPRS dualband / quadband) professional modem, open the
device to insert the SIM card as in figure 3.
img.3
3.
Connect the antenna-adaptor or an antenna to the modem.
25
8. Installation of the USB driver
For use the modem you have to install the USB driver. You will find the installtion file
on the CD.
Please note that the GSM modem is delivered with the two different modem modules g24 (GSM/GPRS) and h24 (UMTS). For a
correct installation it is necessary that the driver files are choosen according to the modem module that is used (g24 resp. h24)
If the PC does not register the modem you have to restart the PC.
9. Use of the GPRS / UMTS function
To use the GPRS or UMTS data services of the modem you have to do some important steps. Please note that you can use the GPRS function only in combination
with a Windows based system!
9.1 Installation of the Motorola GPRS Manager
1.
2.
3.
4.
Start the file „install.exe“ from the installation CD.
The Motorola GPRS Manager will now be installed.
Double click the double arrow until you could see the choice of the language. After choice you have to click the double arrow again until you have
reached the main installation. If necessary change the installation path or
accept the predefined installation path.
The question to restart the computer you have to answer with NO.
26
9.2 Transmit the PIN number
1.
Basicly:
the most simple way is to insert the SIM card into a mobile phone and to
deactivate the PIN number.
2.
In case of security reasons some provider do not support deactivation of the
PIN. If so you have to follow the following instructions: With the software
HyperTerminal the PIN number has to be transmitted every time after start
up the modem:
3.
Start „HyperTerminal“ with „Start/Programms/Further/Communication/... and
create a new connection. If „HyperTerminal“ is not installed on your system,
you have to add the software with the followings settings over the windows
installation CD: „Settings/System/Software..“.
4.
You could create a new connection. Then you have to name it when you
have started („Start/Programme/Zubehör/Kommunikation) the software e.g.
(GPRS Modem COM7). In the next window you choose the option on the
bottom „Connect over/with” and set COM Port (e.g. COM7) you get under
Point 3.).
5.
Set the baud rate to 57600 and press „OK“.
6.
Now you are in the main terminal window. To check the work of the modem
you hav to enter following keys:
ATE1 und Return.
7.
Now you transfer hand over the PIN Nummer (e.g. 1234, example) with the
command AT+CPIN=“1234“ and Enter.Wait on the answer „OK“.
The “ before and after the PIN no. is very important! Check the enter of the
PIN with the command AT+CPIN? and Enter – it has to answer „READY“.
8.
Now check the signal quality of the GSM signal strenght with the command
AT+CSQ Enter. The value after „CSQ: “ must be greater then 000 sein, e.g.
...014,...“. With the command AT+COPS? and Enter appears the name of
the choosen GSM provider.
27
9.
Now you can exit the „HyperTerminal“ software and save the „HyperTerminal“ settings – next time you only have to hand over the PIN no. with the
Hyper Terminal sofware settings.
9.3 Reboot the system
=
•
Now reboot the computer so that the setting of the GPRS manager could be
saved and fixed into the computer system settings. (Hint: The PIN number
you have given to the modem is further existent/known if the power connection of the modem was not cut. The modem is furthermore booked into the
GSM network after the system reboot!)=
9.4 Basic settings for a GPRS connection
=
4. After reboot the system the GPRS manager poped up automatically for installation of a GPRS connection. (Be sure that the GPRS modem is furthermore at work and the PIN no. is transmitted to the modem or deactivated!)
5.
Press „Weiter“.
6.
Please choose if neccessary „RS232“ let the software search for the right
COM port.
7.
Now there will be installed a modem driver on the predefined COM port.
8.
Press after selection of the modem driver „Motorola Serial GPRS 56K
(COMx)“ the button „Weiter“
9.
Enter the „APN“ for GPRS internet. The APN- Information is provided from
your GSM- network provider.
10. Enter the name and passwort.
User name- and password- information are supplied by your GSM network
provider.
28
11. Enter now the DNS adress of your GSM provider. Those informations are
supplied by your GSM network provider.
12. Now enter a name for the connection, e.g.: „GPRS Online“.
9.5 Build up a GPRS connection
•
In the future you have this connection as a icon on your desktop. To start
the connection make a double click on it.=
9.6 Hang up a GPRS connection
•
The hang up of a existing connection could be realized from the same
GPRS Manager window.
10. First modem settings
The configuration of the modem is done with a terminal software. ConiuGo GmbH recommends the use of CommLite®. After sending “AT” the modem should send back
“OK“.
PIN-number
Ask by AT+CPIN? if a PIN-number is already entered, or enter the PIN-number with
AT+CPIN="xxxx“. Don not leave out the quotation marks!
Signal quality
Check the signal quality by AT+CSQ. With this command the physical signal quality
is tested. It should be higher than 10, otherwise a data transmission can be unstable
despite of a successfully booked in modem.
Status question
By AT+CREG and AT+COPS? the registration status and the provider name are
shown by the device.
29
Check of dialling function
Check the dialling function by dialling with DTMF tone. Command: ATDT followed by
any given number. With the command ATH, or better AT+CHUP, you can interrupt
any connection.
Transmission of a SMS
Call the SMS-service center of the provider with AT+CSCA= "+49xxxxxxxxxx" (example for Germany).
The SMS has to be transferred to the modem in PDU-Mode. Please refer to the
description of the AT commands in Appendix 1.
11. Troubleshooting
In case the modem still reacts you can load the standard settings of the manufacturer with the command AT&F. Then you have to re-start the program and adjust all
settings. Please ensure that the COM-port parameters (baudrate, data bits, parity,
stop bits) are correct.
Check whether other programs use the COM- port of the computer (PC). E.g., Hotsync managers can retain control of the port and should be disabled when not in use.
Restart the computer and activate only the terminal program.
Connection cannot be established:
=
Common mistakes that may happen are:
=
•
The SIM-card is not inserted to the modem.
•
The PIN-number is not entered.
•
A not available GSM network is selected.
•
The GSM Modem is not booked into the GSM network.
•
The antenna is not connected, not suitable or is damaged.
•
The wrong telephone number was entered.=
=
Possible system faults=
=
•
Another connection is active.
•
The call is not answered by the receiver.=
30
=
Possible reasons:=
•
=
The receiver is not a modem.
•
The receiver does not support the selected parameters (“no carrier”).
•
•
The receiver is busy.
The GSM Modem is not booked in the GSM network.=
=
Wrong screen indication==
=
•
Unintended double characters are shown: switch off echo-mode by ATE0.
•
Incorrect messages that are received from the modem: The format of the
data settings has to be checked. They have to be equal for both the transmitting and receiving modem.=
=
GSM Modem does not dial==
=
•
Cable is disconnected - connect the cable
•
Dialling inhibition is activated - switch off and on the modem=
=
GSM Modem cannot receive a fax==
=
•
The data-bits of transmitter and receiver are not equal: Adjust them by
AT+FOPT=1,0 or AT+FOPT=1,1.
In case of problems please consult our homepage or send
an e-mail to: [email protected]
Please give informations regarding the following issues:
•
Where and when buyed?
•
Which problem do you have?
•
What was done before?
•
Which application do you use the modem for?
31
32