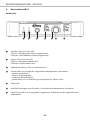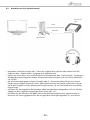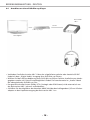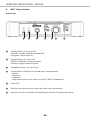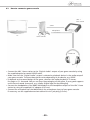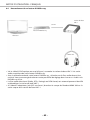
1
Headzone Game
5.1 Surround Sound Headset System
BEDIENUNGSANLEITUNG
OPERATING INSTRUCTIONS
NOTICE D’UTILISATION
BEDIENUNGSANLEITUNG - DEUTSCH
Inhalt
1.
Sicherheitsinformationen . . . . . . . . . . . . . . . . . . . . . . . . . . . . . . . . . . . . . . . . . . . . . . . . Seite
1.1 Basisstation HBC 1 . . . . . . . . . . . . . . . . . . . . . . . . . . . . . . . . . . . . . . . . . . . . . . . . . Seite
1.2 Headset MMX 300. . . . . . . . . . . . . . . . . . . . . . . . . . . . . . . . . . . . . . . . . . . . . . . . . Seite
4
4
5
2.
Entsorgung . . . . . . . . . . . . . . . . . . . . . . . . . . . . . . . . . . . . . . . . . . . . . . . . . . . . . . . . . . . Seite
5
3.
Anwendung . . . . . . . . . . . . . . . . . . . . . . . . . . . . . . . . . . . . . . . . . . . . . . . . . . . . . . . . . . . Seite
6
4.
Komponenten . . . . . . . . . . . . . . . . . . . . . . . . . . . . . . . . . . . . . . . . . . . . . . . . . . . . . . . . . Seite
4.1 Ersatzteile . . . . . . . . . . . . . . . . . . . . . . . . . . . . . . . . . . . . . . . . . . . . . . . . . . . . . . . Seite
7
7
5.
Basisstation HBC 1 . . . . . . . . . . . . . . . . . . . . . . . . . . . . . . . . . . . . . . . . . . . . . . . . . . . . . . Seite 8
5.1 Anschluss Basisstation HBC 1 . . . . . . . . . . . . . . . . . . . . . . . . . . . . . . . . . . . . . . . . Seite 10
6.
Bedienung . . . . . . . . . . . . . . . . . . . . . . . . . . . . . . . . . . . . . . . . . . . . . . . . . . . . . . . . . . . . Seite 11
7.
Headset MMX 300 . . . . . . . . . . . . . . . . . . . . . . . . . . . . . . . . . . . . . . . . . . . . . . . . . . . . . . Seite 13
8.
Audioformate . . . . . . . . . . . . . . . . . . . . . . . . . . . . . . . . . . . . . . . . . . . . . . . . . . . . . . . . . Seite 14
9.
Typische Setups mit Headzone® Game . . . . . . . . . . . . . . . . . . . . . . . . . . . . . . . . . . . . . . Seite
9.1 Anschluss an einen Gaming PC mit Dolby Digital Live Soundkarte . . . . . . . . . . Seite
9.2 Anschluss an einen Gaming PC mit externem 5.1 Encoding . . . . . . . . . . . . . . . Seite
9.3 Anschluss an eine Spielekonsole . . . . . . . . . . . . . . . . . . . . . . . . . . . . . . . . . . . . . Seite
9.4 Anschluss an einen DVD-/Blu-ray-Player . . . . . . . . . . . . . . . . . . . . . . . . . . . . . . . Seite
15
15
16
17
18
10. Service . . . . . . . . . . . . . . . . . . . . . . . . . . . . . . . . . . . . . . . . . . . . . . . . . . . . . . . . . . . . . . . Seite 19
11. Pflege . . . . . . . . . . . . . . . . . . . . . . . . . . . . . . . . . . . . . . . . . . . . . . . . . . . . . . . . . . . . . . . . Seite 19
12. Problemlösung. . . . . . . . . . . . . . . . . . . . . . . . . . . . . . . . . . . . . . . . . . . . . . . . . . . . . . . . . Seite 19
13. Technische Daten. . . . . . . . . . . . . . . . . . . . . . . . . . . . . . . . . . . . . . . . . . . . . . . . . . . . . . . Seite 21
14. Glossar . . . . . . . . . . . . . . . . . . . . . . . . . . . . . . . . . . . . . . . . . . . . . . . . . . . . . . . . . . . . . . . Seite 23
Konformitätserklärung . . . . . . . . . . . . . . . . . . . . . . . . . . . . . . . . . . . . . . . . . . . . . . . . . . . . . . Seite 68
-3-
BEDIENUNGSANLEITUNG - DEUTSCH
Sie haben sich für das Headset-System Headzone® Game für hochwertige Audio- und
Musikwiedergabe in Surround (5.1) von beyerdynamic entschieden. Vielen Dank für Ihr
Vertrauen. Nehmen Sie sich bitte einige Minuten Zeit und lesen Sie diese Bedienungsanleitung
vor Inbetriebnahme aufmerksam durch.
1.
Sicherheitsinformationen
Wichtig!
• LESEN Sie die Bedienungsanleitung.
• BEWAHREN Sie diese Bedienungsanleitung auf.
• BEFOLGEN Sie die aufgeführten Bedienungs- und Sicherheitshinweise.
Haftungsausschluss
• Die Firma beyerdynamic GmbH & Co. KG übernimmt keine Haftung für Schäden am Produkt
oder Verletzungen von Personen aufgrund unachtsamer, unsachgemäßer, falscher oder nicht
dem vom Hersteller angegebenen Zweck entsprechender Verwendung des Produkts.
1.1
Basisstation HBC 1
Standort
• Das Gerät muss so aufgestellt werden, dass der Netzanschluss, Netzschalter und alle
Audioanschlüsse auf der Rückseite des Gerätes leicht zugänglich sind.
Anschluss
• Das Gerät muss an eine Netz-Steckdose mit Schutzkontakt angeschlossen werden.
• Verlegen Sie alle Kabel stets so, dass sie nicht durch scharfe Gegenstände geknickt oder gar
durchgetrennt werden können.
• Verlegen Sie alle Anschlusskabel so, dass niemand darüber stolpern und sich verletzen kann.
• Schalten Sie bei allen Arbeiten an den Ein- und Ausgängen die Stromzufuhr aus.
• Überprüfen Sie, ob die Anschlusswerte mit der vorhandenen Netzstromversorgung übereinstimmen. Bei Anschluss des Systems an die falsche Stromversorgung können ernsthafte
Schäden entstehen. Eine falsche Netzspannung kann das Gerät beschädigen oder einen
elektrischen Schlag verursachen.
• Nehmen Sie das Gerät bei einem Gewitter oder wenn Sie es längere Zeit nicht benutzen, vom
Netz.
• Wenn durch das Gerät eine Sicherung defekt oder ein Kurzschluss verursacht wurde, nehmen
Sie es vom Netz und lassen Sie es überprüfen und reparieren.
• Fassen Sie das Netzkabel nicht mit nassen Händen an. An den Kontaktstiften sollte sich kein
Wasser oder Staub befinden. In beiden Fällen könnten Sie einen elektrischen Schlag erleiden.
• Das Netzkabel muss fest angeschlossen sein. Ist es lose, besteht Brandgefahr.
• Ziehen Sie das Netzkabel immer am Stecker vom Netz und/oder vom Gerät - niemals am Kabel.
Das Kabel könnte beschädigt werden und einen elektrischen Schlag oder Brand verursachen.
• Wenn das Netzkabel angeschlossen ist, bringen Sie das Gerät nicht mit anderen metallischen
Gegenständen in Berührung.
• Setzen Sie das Gerät nicht ein, wenn der Netzstecker beschädigt ist.
-4-
Feuchtigkeit / Wärmequellen
• Setzen Sie das Gerät niemals Regen oder hoher Feuchtigkeit aus. Installieren Sie es daher nicht
in unmittelbarer Nähe von Swimming Pools, Duschanlagen, feuchten Kellerräumen oder
sonstigen Bereichen mit außergewöhnlich hoher Luftfeuchtigkeit.
• Stellen Sie niemals mit Flüssigkeiten gefüllte Gegenstände (z.B. Vasen oder Trinkgläser) auf das
Gerät. Flüssigkeiten in den Geräten können einen Kurzschluss verursachen.
• Installieren und betreiben Sie das Gerät auch niemals in unmittelbarer Nähe von
Heizkörpern, Beleuchtungsanlagen oder anderen wärmeerzeugenden Geräten.
Brandgefahr
• Stellen Sie niemals offene Brandquellen (z.B. Kerzen) auf das Gerät.
Fehlerbeseitigung / Reparatur
• Öffnen Sie nicht eigenmächtig das Gerät. Sie könnten einen elektrischen Schlag erleiden.
• Überlassen Sie alle Servicearbeiten nur autorisiertem Fachpersonal.
1.2
Headset MMX 300
Lautstärke / Gehörschäden
• Wenn Sie das Headset anschließen, achten Sie darauf, dass die Lautstärke (Volume) am Gerät
auf Minimum gedreht ist. Regeln Sie die Lautstärke erst nach Aufsetzen des Headsets.
Stellen Sie die Lautstärke nicht zu hoch ein. Sie können Ihr Gehör dauerhaft schädigen.
Anwendung / Gebrauch
• Bei kabelgebundenen Headsets sollten Sie heftige Bewegungen vermeiden, bei denen der
Hörer vom Kopf fallen kann. Sie könnten sich ernsthaft verletzen, insbesondere, wenn Sie
Piercings, Ohrringe, Brille usw. tragen. Das Kabel könnte sich um den Hals wickeln und zur
Strangulation führen.
2.
Entsorgung
Dieses Produkt darf am Ende seiner Lebensdauer nicht über den normalen Haushaltsabfall entsorgt werden, sondern muss an einem Sammelpunkt für das Recycling
von elektrischen und elektronischen Geräten abgegeben werden. Das Symbol auf
dem Produkt, der Gebrauchsanweisung oder der Verpackung weist darauf hin.
beyerdynamic und Headzone sind eingetragene Warenzeichen der Firma beyerdynamic GmbH & Co. KG
-5-
BEDIENUNGSANLEITUNG - DEUTSCH
3.
Anwendung
Headzone® Game ist das ideale Headset-System zur Wiedergabe von Surroundsound (5.1) im
Spielebereich. Mit Headzone® Game werden virtuelle Spiel-Welten absolut real wiedergegeben.
Genießen Sie ein Sounderlebnis und eine einzigartige akustische Rundumsicht, die Sie mitten ins
Geschehen versetzt. Hören Sie frühzeitig herannahende Angreifer und lokalisieren Sie ihre
Position winkelgenau.
Diese hochwertige Audiowiedergabe in Surround (5.1) erfolgt über das Headset MMX 300.
Surround-Audioformate wie z.B. Dolby*Digital 5.1 oder DTS®** werden mit einer ähnlichen räumlichen Tiefenstaffelung und Ortbarkeit wie über ein gutes Surroundlautsprechersystem wiedergegeben. Die Lautstärke kann mit einem Regler an der Basisstation optimal eingestellt werden.
Mit dem geräuschkompensierenden Kondensatormikrofon des Headsets MMX 300 werden
Kommandos und Gespräche klar und präzise übertragen.
Bei deaktiviertem Mikrofon ist Headzone® Game auch für den Heimkinobereich hervorragend
geeignet.
Wenn Sie mehr zu Headzone® erfahren möchten, besuchen Sie unsere Website
www.beyerdynamic.de.
*Hergestellt unter Lizenz von Dolby Laboratories.
„Dolby“, „Pro Logic“ und das Doppel-D-Symbol sind Warenzeichen von Dolby Laboratories.
**Hergestellt unter Lizenz von DTS, Inc.
Die US-Patentnummern 5,451,942; 5,956,674; 5,974,380; 5,978,762; 6,487,535 und andere US- und weltweite
Patente sind ausgestellt und angemeldet. DTS und DTS Digital Surround sind eingetragene Warenzeichen und
das DTS-Logo und Symbol sind Warenzeichen von DTS, Inc. © 1996-2007 DTS, Inc. Alle Rechte vorbehalten.
-6-
4.
Komponenten
Headzone® Game . . . . . . . . . . . . . . . . . . . . . . . . . . . . . . . . . . . . . . . . . . . . . . . . . . Best.-Nr. 498.629
Einzelkomponenten des o.g. Sets:
HBC 1
Basisstation (9,5"), inkl. externem Netzteil und
Desktop Frame . . . . . . . . . . . . . . . . . . . . . . . . . . . . . . . . . . . . . . . . . Best.-Nr. 592.455
MMX 300
Gaming Headset, 250 Ω, geschlossen,
Elektretkondensatormikrofon,
einseitige Kabelführung,
glattes Kabel mit 2 x Ministereoklinke (3,5 mm)
und Adapter (6,35 mm) . . . . . . . . . . . . . . . . . . . . . . . . . . . . . . . . . . Best.-Nr. 592.382
Verlängerungskabel für Headset-Mikrofon
(3,5 mm Klinkenstecker / 3,5 mm Klinkenbuchse) . . . . . . . . . . . . . Best.-Nr. 593.273
S/P-DIF-Kabel Koaxial, 75 Ω, 2 m lang . . . . . . . . . . . . . . . . . . . . . . . . . . . . . . . . . . Best.-Nr. 593.036
S/P-DIF-Kabel Optisch, 2 m lang, . . . . . . . . . . . . . . . . . . . . . . . . . . . . . . . . . . . . . . . Best.-Nr. 593.028
Headzone® Basistation . . . . . . . . . . . . . . . . . . . . . . . . . . . . . . . . . . . . . . . . . . . . . Best.-Nr. 485.527
Einzelkomponenten des o.g. Sets:
HBC 1
Basisstation (9,5"), inkl. externem Netzteil und
Desktop Frame . . . . . . . . . . . . . . . . . . . . . . . . . . . . . . . . . . . . . . . . . Best.-Nr. 592.455
S/P-DIF-Kabel Koaxial, 75 Ω, 2 m lang . . . . . . . . . . . . . . . . . . . . . . . . . . . . . . . . . . Best.-Nr. 593.036
S/P-DIF-Kabel Optisch, 2 m lang, . . . . . . . . . . . . . . . . . . . . . . . . . . . . . . . . . . . . . . . Best.-Nr. 593.028
4.1 Ersatzteile
EDT 770 V
Ersatzohrpolster für MMX 300, Velours, hellgrau,
ohrumschließend . . . . . . . . . . . . . . . . . . . . . . . . . . . . . . . . . . . . . . . Best.-Nr. 926.660
-7-
BEDIENUNGSANLEITUNG - DEUTSCH
5.
Basisstation HBC 1
Vorderseite
Standby-Taste mit Status LED
LED rot = Standbymodus (Gerät ausgeschaltet)
LED grün = Betriebsbereit (Gerät eingeschaltet)
Bypass-Taste mit Status LED
LED aus = Headzone®-Modus aktiv
LED blau = Bypass-Modus aktiv
Kopfhöreranschluss, 6,35 mm Klinkenbuchse
Control LEDs zur Anzeige des ausgewählten Menüpunktes / Parameters
– Volume (Lautstärke)
– Room Size (Raumgröße)
– Ambience (Raumeindruck)
– Headtracker (nur in Verbindung mit Kopfhörer DT 880 HT aktiv)
Value LEDs
Multifunktionsregler zum Einstellen / Auswählen der Menüpunkte / Parameter
Input Format LEDs zur Anzeige des eingespeisten Audioformats der angeschlossenen
Audioquelle
-8-
Rückseite
Optischer S/P-DIF-Ausgang
Optischer S/P-DIF-Eingang (zum Anschluss von digitalen Surroundsignalen)
Eingangswahlschalter „Input Select“ (Auswahl von optischem / koaxialem S/P-DIF-Eingang)
Koaxialer S/P-DIF-Eingang (zum Anschluss von digitalen Surroundsignalen)
Anschluss für Netzteil, 5 V DC
Headtracker Ein-/Ausschalter
Wichtig: Um eine einwandfreie Funktion zu gewährleisten, MUSS der Headtracker Ein/Ausschalter dauerhaft auf „Off“ bleiben bei Verwendung mit dem Headset MMX 300)
Anschluss für Headtracking-Empfänger HR 1 (nur in Verbindung mit Kopfhörer DT 880 HT)
-9-
BEDIENUNGSANLEITUNG - DEUTSCH
5.1 Anschluss Basisstation HBC 1
1. Schließen Sie das Kopfhörerkabel des Headsets MMX 300 mit dem 6,35 mm Klinkenadapter
an den Kopfhöreranschluss der Basisstation HBC 1 an. Verbinden Sie das Mikrofonkabel
des Headsets MMX 300 mit dem Mikrofoneingang Ihres PCs oder Spielekonsole. Verwenden
Sie gegebenenfalls das mitgelieferte Verlängerungskabel (3,5 mm Klinke).
Kopfhörer
Mikrofon
Wichtig: Zur Vermeidung von Gehörschäden sollte die Lautstärke bei Anschluss und
Aufsetzen des Headsets zunächst auf Minimum eingestellt sein (d.h. Multifunktionsregler ganz links).
2. Schließen Sie an den S/P-DIF Eingang oder eine Spielekonsole, PC-Soundkarte, einen
DVD-/Blu-ray-Player oder CD-Player an. Über die digitale S/P-DIF-Verbindung können sowohl
Stereo-signale als auch encodierte Surroundsignale wie Dolby Digital oder DTS® übertragen
werden. Das jeweils verwendete Format wird von der Basisstation HBC 1 automatisch erkannt
und durch Leuchten der betreffenden „Input Format“ LED auf der Vorderseite angezeigt.
Verwenden Sie zum Anschluss an den optischen S/P-DIF-Eingang das mitgelieferte optische
Kabel bzw. das mitgelieferte koaxiale Kabel mit einer Impedanz von 75 Ohm, wenn Sie den
koaxialen S/P-DIF-Eingang nutzen. Möchten Sie ein längeres koaxiales Kabel verwenden,
beträgt die maximale Länge 10 Meter.
3. Schalten Sie den Eingangswahlschalter auf die Position „Optical“ oder „Coaxial“, je nachdem an welchem S/P-DIF-Eingang die Audioquelle angeschlossen wurde.
Das Signal des ausgewählten Eingangs steht am optischen S/P-DIF-Ausgang in unveränderter
Form zur Weiterleitung an andere Geräte zur Verfügung.
4. Schließen Sie das mitgelieferte Netzteil an der DC-Buchse an.
Wichtig:
• Verwenden Sie kein anderes Netzteil als das von beyerdynamic mitgelieferte;
andernfalls könnte die Basisstation HBC 1 beschädigt werden.
• Wenn Sie das Netzteil von der Basisstation HBC 1 trennen möchten, schalten Sie die
Basisstation vorher mit der Standby-Taste aus. Die zugehörige LED leuchtet rot.
5. Der optische S/P-DIF-Ausgang im TOSLINK-Format dient zur Weiterleitung des digitalen
Audiosignals an andere Geräte (z.B. eine weitere Basisstation HBC 1). An diesem Anschluss
liegt immer das identische Signal wie am ausgewählten S/P-DIF-Eingang an, d.h. je nach
Stellung des Eingangswahlschalter „Input Select“ liegt am optischen S/P-DIF-Ausgang das
Signal des optischen oder des koaxialen S/P-DIF-Eingangs an.
- 10 -
6.
Bedienung
Einschalten
• Sobald alle Anschlüsse hergestellt sind, schalten Sie die Basisstation HBC 1 mit der StandbyTaste ein. Die zugehörige LED leuchtet grün.
Wichtig: Wenn Sie die Basisstation HBC 1 wieder vom Netz trennen möchten, schalten Sie die
Basisstation vorher mit der Standby-Taste aus. Die zugehörige LED leuchtet rot.
Lautstärke regeln
• Drücken Sie auf den Multifunktionsregler , um den Menüpunkt/Parameter „Volume“ auszuwählen. Die entsprechende „Control“ LED leuchtet. Drehen Sie den Multifunktionsregler ,
um die Lautstärke einzustellen.
Im Menüpunkt „Volume“ regeln Sie die Lautstärke Ihres Headzone®-Systems.
Wichtig: Zur Vermeidung von Gehörschäden sollte die Lautstärke bei Anschluss und Aufsetzen
des Headsets zunächst auf Minimum eingestellt sein (d.h. Multifunktionsregler ganz links).
Hinweis: Falls Sie die Aussteuerungsgrenze Ihres Headzone®-Systems überschreiten und hörbare Verzerrungen wahrnehmen (z.B. bei hoch ausgesteuerten Eingangssignalen und gleichzeitig sehr hohen Volume-Einstellungen), verringern Sie die Lautstärke im Menüpunkt
„Volume“ solange bis die Verzerrungen verschwinden.
Anzeige Audioformat
• Das eingespeiste Surroundformat der angeschlossenen Audioquelle wird durch Leuchten der
jeweiligen „Input Format“ LED angezeigt.
Die Audioformate, die von Headzone® Game erkannt und wiedergegeben werden, sind die
codierten Surroundformate DTS®, Dolby Digital und Dolby Pro Logic sowie das Standard
2-Kanal-Format PCM Stereo (z.B. CDs).
Konfiguration Menüpunkt/Parameter
Wichtig: Der Menüpunkt „Headtracker“ ist nur bei Verwendung des Kopfhörers DT 880 HT
und des Headtracking-Empfängers HR 1 aktiv.
• Drücken Sie auf den Multifunktionsregler , um den einzustellenden Menüpunkt / Parameter
auszuwählen. Die entsprechende „Control“ LED leuchtet.
• Drehen Sie den Multifunktionsregler nach rechts bzw. links, um die Einstellung für den ausgewählten Parameter zu verändern. Die veränderte Einstellung wird durch die „Value“ LEDs angezeigt.
• Die Parameter können in 33 Stufen eingestellt werden; d.h. bei jedem dritten Wert springt die
Anzeige der Value LEDs um eine LED weiter. Die ganz linke LED kennzeichnet die niedrigste
mögliche Einstellung, die ganz rechte LED den höchst möglichen Wert.
Hinweis: Nach der Konfiguration von „Room Size“ oder „Ambience“, springt die Basisstation
HBC 1 nach einigen Sekunden automatisch auf den Menüpunkt „Volume“ (Lautstärke) zurück.
Dadurch hat der Multifunktionsregler im normalen Betrieb immer die Funktion eines Lautstärkereglers, mit welchem Sie direkt die Kopfhörerlautstärke einstellen können.
Wichtig: Alle Einstellungen von „Volume“, „Room Size“ und „Ambience“ werden in der
Basisstation HBC 1 gespeichert.
- 11 -
BEDIENUNGSANLEITUNG - DEUTSCH
– Room Size (Raumgröße und Entfernung)
Mit dem Parameter „Room Size“ können Sie die Größe Ihres virtuellen Raumes / Wohnzimmers sowie Ihren Abstand zu den virtuellen Lautsprechern festlegen, d.h. Sie entscheiden,
wie stark ein kleiner oder großer Raum Einfluss auf die Wiedergabe von Audiomaterial
über die Lautsprecher nimmt. Dies beeinflusst vor allem den Schalldruck an der Position des
Hörers und auch die Balance zwischen Direktschall und Reflexionen.
Bitte beachten Sie, dass dieser Parameter die Lautstärke des wiedergegebenen Audiomaterials direkt beeinflusst. Je größer der eingestellte Raum und die Entfernung der Lautsprecher ist, desto geringer wird die Lautstärke. Bei großen Abständen müssen Sie den
geringeren Schalldruck eventuell durch Erhöhen der Abhörlautstärke im Menüpunkt
„Volume“ kompensieren.
– Ambience (Raumeindruck)
Der Parameter „Ambience“ legt fest, inwieweit Ihr Raum das Audiomaterial klanglich „färben“
soll. Mit anderen Worten: Sie entscheiden, ob Sie eher eine trockene Akustik in Ihrem virtuellen
Wohnzimmer wünschen oder einen Raum mit viel „Eigenklang“ haben möchten.
Der Klang eines realen Raumes hat großen Einfluss auf den Raumeindruck und auch auf
den Lautsprecherklang. Daher klingen sehr niedrige Ambience-Einstellungen eher
unrealistisch, denn der virtuelle Raum ist praktisch schalltot.
Hinweis: Bitte beachten Sie, dass die Bedienelemente für die Raumeinstellung funktional
gekoppelt sind! Wenn Sie zum Beispiel den Parameter „Raumgröße“ auf „0“ setzen,
„sitzen“ die virtuellen Lautsprecher praktisch direkt auf Ihren Ohren, so dass keine
Unterschiede hörbar sind, wenn Sie versuchen den Parameter „Raumeindruck“ an Ihren
virtuellen Raum anzupassen. Wenn Sie wiederum „Raumeindruck" auf „0“ setzen (wodurch
ein schalltoter Raum simuliert wird), werden hohe Raumgrößen zwar die Lautstärke
verändern, aber nicht die Reflexionen in Ihrem virtuellen Wohnzimmer, da in einem
schalltoten Raum keine Reflexionen vorhanden sind.
Bypass-Modus wählen
• Wenn Sie die Basisstation HBC 1 als Stereo-Kopfhörerverstärker verwenden möchten (BypassModus), drücken Sie die Bypass-Taste . Die zugehörige LED leuchtet blau.
Hinweis: Auch wenn die Surround-Verarbeitung im Bypass-Modus komplett deaktiviert ist,
wird die Wiedergabelautstärke weiterhin von den Parametern „Room Size“ (Raumgröße/Abstand) und „Ambience“ (Raumeindruck) beeinflusst, denn durch das Umschalten zwischen
„Processing“ und „Bypass“ könnte die Lautstärke plötzlich extrem ansteigen und Ihr Gehör
schädigen. Durch die feste Verknüpfung der Wiedergabelautstärke mit den Parametern
„Roomsize“ und „Ambience“ werden die Lautstärken der „Bypass“- und „Processing“-Modi
angeglichen.
• Soll die Basisstation HBC 1 im Headzone®-Modus arbeiten, brauchen Sie die Bypass-Taste nicht zu drücken. Die zugehörige LED leuchtet nicht.
- 12 -
7.
Headset MMX 300
Anschluss
• Das Headset MMX 300 ist mit zwei Miniklinkenstecker
(3,5 mm) ausgestattet. Schließen Sie das Kopfhörerkabel an die Basisstation HBC 1 und das Mikrofonkabel an den Mikrofoneingang Ihres PCs oder
Spielekonsole an. Siehe auch Kapitel 5.1 „Anschluss
Basisstation HBC 1“.
Wichtig: Zur Vermeidung von Gehörschäden sollte die
Lautstärke bei Anschluss und Aufsetzen des Headsets
zunächst auf Minimum eingestellt sein (d.h. Multifunktionsregler ganz links).
Inbetriebnahme
• Setzen Sie das Headset auf den Kopf. Das Mikrofon ist
dabei auf der linken Seite. Positionieren Sie das Mikrofon seitlich vor dem Mund. Zur Vermeidung von Poppgeräuschen sollten Sie das Mikrofon nur mit
Poppschutz verwenden.
• Um den Tragekomfort zu optimieren, müssen Sie den
Kopfbügel des Headsets an Ihren Kopf anpassen.
Wenn der Kopfbügel über die Kopfmitte verläuft,
sollte der Bügel so eingestellt sein, dass
– beide Ohren komplett umschlossen sind
– ein leichter Druck um die Ohren zu spüren ist
– beide Seiten des Bügels gleich verlängert sind
• Drehen Sie am festen Mikrofonarmhalter (niemals am
Schwanenhals!) das Mikrofon auf die von Ihnen
gewünschte Seite.
• Ziehen Sie den Windschutz auf das Mikrofon, so dass
dieser das Mikrofon komplett umschließt.
• Biegen Sie den flexiblen Schwanenhals so, dass das
Mikrofon etwa zwei Zentimeter mittig vor Ihrem Mund
platziert ist.
Wichtig: Zur Vermeidung von Überdehnungen und
frühzeitigem Verschleiß darf der Schwanenhals nur
max. 90 Grad gebogen werden.
- 13 -
BEDIENUNGSANLEITUNG - DEUTSCH
8.
Audioformate
Unterstützte Audioformate und Anzeige über die „Input Format“ LEDs
Format
Input Format LED
DTS
Dolby Digital
Pro Logic
PCM Stereo
DTS 1/01)
O
-
-
-
DTS 2/01)
O
-
-
-
DTS 2/11)
O
-
-
-
DTS 2/21)
O
-
-
-
DTS 3/01)
O
-
-
-
DTS 3/11)
O
-
-
-
DTS 3/21)
O
-
-
-
Dolby Digital 1/01)
-
O
-
-
Dolby Digital 2/01)
-
O
- / O 2)
-
Dolby Digital 2/11)
-
O
-
-
Dolby Digital 2/21)
-
O
-
-
Dolby Digital 3/01)
-
O
-
-
Dolby Digital 3/11)
-
O
-
-
Dolby Digital 3/21)
-
O
-
-
PCM Stereo
-
-
-
O 3)
1) Ein optional vorhandener LFE-Kanal wird ebenfalls von Headzone® Game wiedergegeben.
2) Headzone® Game erkennt automatisch, ob das Audiosignal Dolby Surround-codiert ist. Wenn
dies der Fall ist, wird automatisch der interne Pro Logic II-Dekoder aktiviert und die Pro Logic
LED leuchtet auf.
3) Headzone® Game wendet automatisch eine eventuell erforderliche De-emphasis an.
Unterstützte Abtastraten: 32, 44,1 und 48 kHz
Hinweis: Bei Blu-ray-Discs mit den neuen Audioformaten Dolby Digital Plus / Dolby True HD /
DTS-HD Master Audio gibt der Blu-ray-Player den separat vorhandenen Surround-„Core“ über den
S/PDIF-Ausgang aus. Dadurch erhält man mit Headzone® Game etwa die doppelte Auflösung wie
mit herkömmlichen Tonformaten.
- 14 -
9.
Typische Setups mit Headzone® Game
9.1
Anschluss an einen Gaming PC mit Dolby Digital Live Soundkarte
Basisstation
HBC 1
S/P-DIF
Mikrofon
Monitor
PC mit Dolby Live
Soundkarte
MMX 300
• Sie können prinzipiell jedes beliebige PC-Game, welches Mehrkanal-Ton (Surround) ausgibt
und die Dolby Digital Live Technologie unterstützt mit Ihrem Headzone®-System verwenden.
• Installieren Sie hierzu in Ihrem PC eine Soundkarte, welche Dolby Digital Live unterstützt
(z.B. Terratec Aureon 7.1 PCI) und wählen Sie diese in Ihrem PC als Audio-Device aus.
• Verbinden Sie die Basisstation HBC 1 über das mitgelieferte optische oder koaxiale S/P-DIF
Kabel mit dem „Digital Audio“-Ausgang Ihrer Dolby Digital Live Soundkarte.
• Das mehrkanalige Audiosignal Ihres Spiels wird nun von Ihrer Soundkarte in einen Dolby
Digital Stream encodiert und per S/P-DIF Kabel an die Basisstation HBC 1 weitergeleitet.
• Ob die Audiowiedergabe in Stereo oder 5.1 Surround erfolgt, hängt vom Sound-Design des
jeweiligen Spieles ab. Ob Ihr Spiel Mehrkanal-Ton (Surround) unterstützt, können Sie an den
Angaben auf der Spieleverpackung erkennen, z.B. am Vorhandensein eines Dolby Digital
Logos.
• Wenn Sie eine Soundkarte ohne Dolby Digital Live verwenden, wird über die S/P-DIF-Schnittstelle lediglich ein Stereosignal ausgegeben.
• Schließen Sie den Kopfhörer des Headsets MMX 300 über den beiliegenden 6,35 mm Klinkenadapter an den Kopfhörerausgang der Basisstation HBC 1 an.
• Schließen Sie das Mikrofon des MMX 300 an den Mikrofoneingang Ihres PCs an.
Benutzen Sie hierzu gegebenenfalls das mitgelieferte Verlängerungskabel (3,5 mm Klinke).
- 15 -
BEDIENUNGSANLEITUNG - DEUTSCH
9.2
Anschluss an einen Gaming PC mit externem 5.1 Encoding
6 x Analog
Out
Basisstation
HBC 1
S/P-DIF
Dolby/DTS®-Encoder
Mikrofon
Monitor
PC mit Dolby Live
Soundkarte
MMX 300
• Wenn Ihr PC über eine 5.1 Soundkarte mit analogen Ausgängen verfügt, können Sie, unter
Zuhilfenahme eines externen Encoders, jedes beliebige PC-Game mit Ihrem Headzone®-System
verwenden.
• Verbinden Sie hierzu die 6 analogen Ausgänge Ihrer Soundkarte mit den 6 analogen Eingängen
Ihres Dolby oder DTS®-Encoders (z.B. Creative DTS-610).
• Verbinden Sie die Basisstation HBC 1 über das mitgelieferte optische oder koaxiale S/P-DIF
Kabel mit dem „Digital Audio“-Ausgang Ihres externen Dolby oder DTS®-Encoders.
• Das mehrkanalige Audiosignal Ihres Spiels wird nun von Ihrem Encoder in einen DTS® oder
Dolby Digital Stream encodiert und per S/P-DIF Kabel an die Basisstation HBC 1 weitergeleitet.
• Ob die Audiowiedergabe in Stereo oder 5.1 Surround erfolgt, hängt vom Sound-Design des
jeweiligen Spieles ab. Ob Ihr Spiel Mehrkanal-Ton (Surround) unterstützt, können Sie an den
Angaben auf der Spieleverpackung erkennen.
• Schließen Sie den Kopfhörer des Headsets MMX 300 über den beiliegenden 6,35 mm Klinkenadapter an den Kopfhörerausgang der Basisstation HBC 1 an.
• Schließen Sie das Mikrofon des MMX 300 an den Mikrofoneingang Ihres PCs an.
Benutzen Sie hierzu gegebenenfalls das mitgelieferte Verlängerungskabel (3,5 mm Klinke).
- 16 -
9.3
Anschluss an eine Spielekonsole
Basisstation
HBC 1
S/P-DIF
Mikrofon
Fernsehgerät
Spielekonsole
MMX 300
• Verbinden Sie die Basisstation HBC 1 über das mitgelieferte optische oder koaxiale S/P-DIF
Kabel mit dem „Digital Audio“-Ausgang Ihrer Spielekonsole.
• Stellen Sie sicher, dass Sie im Audio-Setup Ihrer Spielekonsole den „Digital Audio“-Ausgang als
Wiedergabe-Gerät eingestellt haben. Die genaue Bezeichnung kann je nach Gerät abweichen,
z.B. S/P-DIF.
• Ob die Audiowiedergabe in Stereo, ProLogic oder 5.1 Surround erfolgt, hängt vom SoundDesign des jeweiligen Spieles ab. Ob Ihr Spiel Mehrkanal-Ton (Surround) unterstützt, können
Sie an den Angaben auf der Spieleverpackung erkennen, z.B. am Vorhandensein eines Dolby
Digital Logos.
• Schließen Sie den Kopfhörer des Headsets MMX 300 über den beiliegenden 6,35 mm Klinkenadapter an den Kopfhörerausgang der Basisstation HBC 1 an.
• Schließen Sie das Mikrofon des MMX 300 an den Mikrofoneingang Ihrer Spielekonsole an.
Benutzen Sie hierzu gegebenenfalls das mitgelieferte Verlängerungskabel (3,5 mm Klinke).
- 17 -
BEDIENUNGSANLEITUNG - DEUTSCH
9.4
Anschluss an einen DVD-/Blu-ray-Player
Basisstation
HBC 1
S/P-DIF
s-/Blu-ray-Player
Fernsehgerät
MMX 300
• Verbinden Sie die Basisstation HBC 1 über das mitgelieferte optische oder koaxiale S/P-DIF
Kabel mit dem „Digital Audio“-Ausgang Ihres DVD-/Blu-ray-Players.
• Wählen Sie über die Fernbedienung Ihres DVD-/Blu-ray-Players welcher Audio-Stream wiedergegeben werden soll. Diese Einstellmöglichkeit finden Sie normalerweise im „Audio“-Menü
der abzuspielenden DVD/Blu-ray Disc.
• Der gewählte Audio-Stream (Dolby, DTS®, ProLogic oder PCM Stereo) wird automatisch von
der Basisstation HBC 1 erkannt und dekodiert.
• Schließen Sie den Kopfhörer des Headsets MMX 300 über den beiliegenden 6,35 mm Klinkenadapter an den Kopfhörerausgang der Basisstation HBC 1 an.
- 18 -
10. Service
Im Servicefall wenden Sie sich bitte an autorisiertes Fachpersonal. Öffnen Sie die Geräte auf
keinen Fall selbst, Sie könnten sonst alle Garantieansprüche verlieren.
11. Pflege
• Reinigen Sie die Geräte nur mit einem leicht feuchten oder trockenem Tuch. Verwenden Sie
niemals Lösungsmittel, da diese die Oberfläche beschädigen.
• Reinigen Sie die Ohrpolster des Kopfhörers von Zeit zu Zeit mit einem weichen, feuchten Tuch.
Verwenden Sie dazu reines Wasser, keine Reinigungsmittel. Da die Ohrpolster einem gewissen
Verschleiß unterliegen, sollten diese bei Bedarf ausgetauscht werden. Dies können Sie leicht
selbst machen.
• Den Windschutz des Mikrofons können Sie abnehmen und unter fließendem Wasser reinigen.
Bei Bedarf können Sie ein mildes Reinigungsmittel (z.B. Geschirrspülmittel) verwenden. Der
Windschutz muss ganz trocken sein, bevor Sie ihn wieder auf das Mikrofon setzen.
12. Problemlösung
Die Werkseinstellungen des Headzone®-Systems können Sie wie folgt wiederherstellen:
• Schalten Sie die Basisstation HBC 1 mit der Standby-Taste in den Standby-Modus. Die zugehörige LED leuchtet rot.
• Drücken Sie auf den Multifunktionsregler und halten Sie diesen gedrückt, während Sie die
Basisstation HBC 1 mit der Standby Taste einschalten.
• Die Value LEDs beginnen in Form eines Lauflichtes zu leuchten.
• Lassen Sie den Multifunktionsregler los.
• Das werkseitige Preset ist nun wiederhergestellt.
Problem
Mögliche Ursache
Obwohl eine Mehrkanalspur
abgespielt wird, kommt nur
ein Zweikanalton bei
Headzone® Game an („PCM
Stereo“-LED leuchtet anstatt
„Dolby Digital“- oder „DTS“LED.
• Viele DVD-/Blu-ray-Player
• Wählen Sie im Konfigubieten die Möglichkeit, das
rationsmenü Ihres DVD-/
Ausgabeformat auf dem
Blu-ray-Players „Bitstream“
S/P-DIF-Ausgang zwischen
als Ausgabeformat für den
„PCM“ und den OriginaldaS/P-DIF-Ausgang.
ten der DVD/Blu-ray-Tonspur umzuschalten
(„Bitstream“). Im Falle von
„PCM“ wird aus Mehrkanalformaten ein StereoDownmix erstellt und
ausgegeben.
Virtuelles Klangbild hängt
„schief“.
• Headtracker Ein-/Ausschalter auf der Rückseite der
Basisstation HBC 1 befindet
sich nicht auf Position
„Off“.
- 19 -
Lösung
• Bringen Sie den Schalter
auf Position „Off“.
BEDIENUNGSANLEITUNG - DEUTSCH
Problem
Mögliche Ursache
Kein Signal auf dem
Kopfhörer.
• Falscher S/P-DIF-Eingang an- • Wählen Sie den korrekten
gewählt.
Eingang (optisch oder
koaxial) mit Hilfe des
„Input Select“-Schalter auf der Rückseite der
Basisstation HBC 1.
Lösung
• Der angeschlossene DVD-/
Blu-ray-Player gibt kein
Signal auf dem S/P-DIF-Ausgang aus (kann z.B. bei
DTS®-Spuren auftreten,
wenn der Player keine
DTS®-Ausgabe unterstützt).
• Wählen Sie eine andere
Tonspur auf der DVD/
Blu-ray Disc.
• Das angeschlossene Abspielgerät gibt ein PCMSignal mit zu hoher
Abtastrate aus (z.B. 96 kHz
Tonspur einer DVD-Audio).
• Wählen Sie eine andere
Tonspur auf dem abzuspielenden Medium.
• Viele DVD-/Blu-ray-Player
bieten die Möglichkeit, Tonspuren mit zu hoher Abtastrate herunterzusampeln.
Wählen Sie diese Option im
Konfigurationsmenü Ihres
DVD-/Blu-ray-Players.
Beim Einschalten von
• Wie in diesem Handbuch
Headzone® Game entsprechen
beschreiben, speichert
die Einstellungen nicht den
Headzone® Game automabeim letzten Ausschalten getisch alle Einstellungen in
speicherten Einstellungen.
der Hardware. In sehr seltenen Fällen kann es vorkommen, dass das Gerät
während des Speichervorgangs ausgeschaltet wird
bzw. dass es ausgeschaltet
wird, bevor die neuen Einstellungen gespeichert wurden.
• Warten Sie nach einer Änderung der Headzone®Einstellungen mindestens 3
Sekunden, bevor Sie das
Gerät ausschalten.
Wenn nach dem Einschalten
von Headzone® Game alle
Einstellungen auf „0“ gesetzt sind, können Sie einen
Reset auf die Werkseinstellungen durchführen, wie
am Anfang dieses Kapitels
beschrieben.
• Erhöhen Sie die Lautstärke
• Volume-Einstellungen die
wieder auf den von Ihnen
2/3 des Regelbereiches
gewünschten Wert.
überschreiten, werden nicht
gespeichert um beim
nächsten Einschalten von
Headzone® Game zu verhindern, dass Sie unvermittelt
Audiomaterial in extremer
Lautstärke ausgesetzt sind.
- 20 -
Problem
Mögliche Ursache
Lösung
Audiomaterial klingt verzerrt.
• Die Audio-Ausgangspegel
sind zu hoch.
• Verringern Sie die Abhörlautstärke. Benutzen Sie
hierzu bitte den Lautstärkeregler auf der Vorderseite der Basisstation HBC 1.
13. Technische Daten
Allgemeines
Zulässige Umgebungstemperatur. . . . +10 °C bis +40 °C bei < 90% Luftfeuchtigkeit
Stromversorgung
Externes Netzteil, 5 VDC
Betriebsspannung . . . . . . . . . . . . . . . . 100 bis 240 VAC, 47 bis 63 Hz
Leistungsaufnahme . . . . . . . . . . . . . . . max. 20 W
Kopfhörerausgang
Anschlussbuchse. . . . . . . . . . . . . . . . . . Stereoklinke 6,35 mm
Max. Ausgangsleistung . . . . . . . . . . . . 100 mW an 250 Ω @ 1 kHz
Rauschabstand . . . . . . . . . . . . . . . . . . . 98 dB @ 1 kHz, A-gewichtet
Frequenzgang . . . . . . . . . . . . . . . . . . . 10 Hz bis 20 kHz, ±0,3 dB
Klirrfaktor + Rauschen. . . . . . . . . . . . . 0,006% 1 kHz an 250 Ω Last bei max. Ausgangspegel
Ausgangsimpedanz . . . . . . . . . . . . . . . 100 Ω
Kopfhörerimpedanz . . . . . . . . . . . . . . 32 bis 600 Ω
S/P-DIF-Eingang optisch
Anschlussbuchse. . . . . . . . . . . . . . . . . . TOSLINK
S/P-DIF-Eingang koaxial
Anschlussbuchse. . . . . . . . . . . . . . . . . . Cinch
Eingangsimpedanz. . . . . . . . . . . . . . . . 75 Ω
S/P-DIF-Ausgang optisch
Anschlussbuchse. . . . . . . . . . . . . . . . . . TOSLINK
- 21 -
BEDIENUNGSANLEITUNG - DEUTSCH
Headset MMX 300
Hörer
Wandlerprinzip . . . . . . . . . . . . . . . . . . Dynamisch
Arbeitsprinzip. . . . . . . . . . . . . . . . . . . . Geschlossen
Übertragungsbereich. . . . . . . . . . . . . . 5 - 30.000 Hz
Nennimpedanz. . . . . . . . . . . . . . . . . . . 32 Ω pro System
Kennschalldruckpegel . . . . . . . . . . . . . 96 dB
Klirrfaktor. . . . . . . . . . . . . . . . . . . . . . . < 0,2%
Nennbelastbarkeit . . . . . . . . . . . . . . . . 100 mW
Art der Ankopplung an das Ohr . . . . . ohrumschließend
Isolierung von Außengeräuschen . . . . ca. 18 dBA
Nennandrückkraft . . . . . . . . . . . . . . . . 3,5 N
Gewicht inkl. Mikrofon u. Kabel. . . . . 380 g
Länge und Art des Kabels . . . . . . . . . . 2,5 m, gestreckt
Anschluss . . . . . . . . . . . . . . . . . . . . . . . 3,5 mm Stereoklinkenstecker
Mikrofon
Wandlerprinzip . . . . . . . . . . . . . . . . . . Kondensator (Back-Elektret)
Arbeitsprinzip. . . . . . . . . . . . . . . . . . . . Druckgradientenempfänger
Richtcharakteristik . . . . . . . . . . . . . . . . Niere
Art der Stromversorgung . . . . . . . . . . Tonaderspeisung
Versorgungsspannung . . . . . . . . . . . . . 1,5 - 9 V
Stromaufnahme . . . . . . . . . . . . . . . . . . < 0,5 mA
Nennimpedanz. . . . . . . . . . . . . . . . . . . ca. 1,5 kΩ
Feldübertragungsfaktor
bei f = 1 kHz . . . . . . . . . . . . . . . . . . . . . 20 mV / Pa
Übertragungsbereich. . . . . . . . . . . . . . 30 - 18.000 Hz
Klirrfaktor. . . . . . . . . . . . . . . . . . . . . . . 0,2% bei f = 1 kHz
Max. Grenzschalldruckpegel . . . . . . . . 120 dB
Mikrofonausgang . . . . . . . . . . . . . . . . unsymmetrisch
Abmessungen
Länge Mikrofonarm. . . . . . . . . . . . . . . ca. 150 mm
Kopfdurchmesser . . . . . . . . . . . . . . . . . 13 mm
Anschluss . . . . . . . . . . . . . . . . . . . . . . . 3,5 mm Stereoklinkenstecker
Ring und Spitze: NF, Schaft: Masse
- 22 -
14. Glossar*
• DTS®
DTS® bezeichnet ein Mehrkanal-Tonsystem der gleichnamigen kalifornischen Firma DTS Inc.,
das sowohl im Kino als auch bei Laserdiscs, DVD/Blu-ray, speziellen Audio-CDs und auf D-VHS
zum Einsatz kommt, wobei sich die Versionen für Kino und Endverbraucher
allerdings technisch fundamental unterscheiden. DTS® verwendet komprimierte Audiodaten,
die mittels eines verlustbehafteten Verfahrens erzeugt werden.
• Dolby Digital
Dolby Digital (auch ATSC A/52 und AC-3) ist ein Mehrkanal-Tonsystem der Firma Dolby, das in
der Filmtechnik (Kino), auf Laserdiscs, DVD/Blu-ray und in der Fernsehtechnik zum Einsatz
kommt. Dolby Digital unterstützt bis zu sechs diskrete Kanäle und verwendet ein psychoakustisches, verlustbehaftetes Verfahren zur Datenkompression.
• Dolby Digital Live
Dolby Digital Live ist eine Echtzeit-Codiertechnologie, die jedes beliebige Mehrkanal-Tonsignal
in einen Dolby Digital-Datenstrom verwandelt. Mit ihrer Hilfe lassen sich Audiosignale vom
PC über eine einzige digitale Verbindung auf Dolby Digital-Receiver oder Heimkino-Komplettsysteme übertragen. Umständliche Mehrfachverbindungen und Kabelsalat gehören damit der
Vergangenheit an.
• Dolby Pro Logic
Dolby Pro Logic ist ein analoges Mehrkanal-Tonsystem, das von der Firma Dolby 1986 für den
Heimkino-Bereich entwickelt wurde. Es basiert auf dem 1976 entwickelten Dolby Stereo.
Dolby Pro Logic dekodiert Raumklang-Informationen aus einer Stereoquelle.
• PCM Stereo
PCM ist die Abkürzung für „Pulse Code Modulation“. Es handelt sich um einen digitalen
2-Kanalton, wie er auch für Musik-CDs verwendet wird. PCM liefert im Gegensatz zu datenreduzierten Tonformaten wie Dolby Digital Stereo und DTS® einen umkomprimierten Klang.
• S/P-DIF
Diese Abkürzung steht für Sony/Philips-Digital Interface und ist eine Bus- und Interfacespezifikation für die Übertragung digitaler Audiosignale zwischen verschiedenen Geräten. S/P-DIF
wird z.B. beim CD-Spieler, DAT-Recorder, bei MiniDisc, zwischen DVD-/Blu-ray-Player und Heimkinoreceiver sowie bei digitalen Audiokarten im PC verwendet. S/P-DIF wird auch für Audioanlagen in Fahrzeugen verwendet, wo ein ganzer Kabelbaum durch ein einziges Glasfaserkabel
ersetzt werden kann, das zudem noch unempfindlich gegen Störeinstrahlungen ist.
• TOSLINK
TOSLINK ist ein standardisiertes Lichtwellenleiter-Verbindungssystem für optische Signal-Übertragungen im Bereich bis etwa 20 Mb/s. TOSLINK wurde ursprünglich von der Firma Toshiba
entwickelt (daher der Name TOShiba-LINK), um deren CD-Player mit deren Radio-Receivern zu
verbinden, was sich schnell auch bei CD-Spielern anderer Marken durchgesetzt hat. Heutzutage wird TOSLINK meistens dazu verwendet, um Daten an MiniDisc- oder DAT-Recorder zu
senden.
*Mehr Informationen zu den einzelnen Punkten finden Sie in entsprechender Fachliteratur oder im Internet.
- 23 -
OPERATING INSTRUCTIONS - ENGLISH
Contents
1.
Important safety information. . . . . . . . . . . . . . . . . . . . . . . . . . . . . . . . . . . . . . . . . . . . . Page 26
1.1 HBC 1 base station . . . . . . . . . . . . . . . . . . . . . . . . . . . . . . . . . . . . . . . . . . . . . . . . Page 26
1.2 MMX 300 headset . . . . . . . . . . . . . . . . . . . . . . . . . . . . . . . . . . . . . . . . . . . . . . . . . Page 27
2.
Disposal . . . . . . . . . . . . . . . . . . . . . . . . . . . . . . . . . . . . . . . . . . . . . . . . . . . . . . . . . . . . . . Page 27
3.
Application. . . . . . . . . . . . . . . . . . . . . . . . . . . . . . . . . . . . . . . . . . . . . . . . . . . . . . . . . . . . Page 28
4.
Components. . . . . . . . . . . . . . . . . . . . . . . . . . . . . . . . . . . . . . . . . . . . . . . . . . . . . . . . . . . Page 29
4.1 Spare parts. . . . . . . . . . . . . . . . . . . . . . . . . . . . . . . . . . . . . . . . . . . . . . . . . . . . . . . Page 29
5.
HBC 1 base station. . . . . . . . . . . . . . . . . . . . . . . . . . . . . . . . . . . . . . . . . . . . . . . . . . . . . . Page 30
5.1 How to connect the HBC 1 base station . . . . . . . . . . . . . . . . . . . . . . . . . . . . . . . Page 32
6.
Operation. . . . . . . . . . . . . . . . . . . . . . . . . . . . . . . . . . . . . . . . . . . . . . . . . . . . . . . . . . . . . Page 33
7.
MMX 300 headset . . . . . . . . . . . . . . . . . . . . . . . . . . . . . . . . . . . . . . . . . . . . . . . . . . . . . . Page 35
8.
Audio formats . . . . . . . . . . . . . . . . . . . . . . . . . . . . . . . . . . . . . . . . . . . . . . . . . . . . . . . . . Page 36
9.
Typical setups with Headzone® Game . . . . . . . . . . . . . . . . . . . . . . . . . . . . . . . . . . . . . . Page
9.1 How to connect a gaming PC with Dolby Digital Live sound card . . . . . . . . . . Page
9.2 How to connect a gaming PC with external 5.1 encoding . . . . . . . . . . . . . . . . . Page
9.3 How to connect a game console . . . . . . . . . . . . . . . . . . . . . . . . . . . . . . . . . . . . . Page
9.4 How to connect a DVD/Blu-ray player . . . . . . . . . . . . . . . . . . . . . . . . . . . . . . . . . Page
37
37
38
39
40
10. Service . . . . . . . . . . . . . . . . . . . . . . . . . . . . . . . . . . . . . . . . . . . . . . . . . . . . . . . . . . . . . . . Page 41
11. Maintenance . . . . . . . . . . . . . . . . . . . . . . . . . . . . . . . . . . . . . . . . . . . . . . . . . . . . . . . . . . Page 41
12. Trouble shooting . . . . . . . . . . . . . . . . . . . . . . . . . . . . . . . . . . . . . . . . . . . . . . . . . . . . . . . Page 41
13. Technical specifications . . . . . . . . . . . . . . . . . . . . . . . . . . . . . . . . . . . . . . . . . . . . . . . . . . Page 43
14. Glossary . . . . . . . . . . . . . . . . . . . . . . . . . . . . . . . . . . . . . . . . . . . . . . . . . . . . . . . . . . . . . . Page 45
EC-Declaration of conformity. . . . . . . . . . . . . . . . . . . . . . . . . . . . . . . . . . . . . . . . . . . . . . . . . Page 68
- 25 -
OPERATING INSTRUCTIONS - ENGLISH
Thank you for selecting Headzone® Game headset system for high-quality audio and music
reproduction in surround (5.1) from beyerdynamic. Please take some time to read through this
manual carefully before using this product.
1.
Important safety information
Important!
• READ these instructions.
• KEEP these instructions.
• HEED all warnings and follow all instructions.
Exemption from Liability
• beyerdynamic GmbH & Co. KG will not be liable if any damage, injury or accident occurs due
to negligent, incorrect or inappropriate operation of the product.
1.1
HBC 1 base station
Location
• The equipment must be set up so that the mains switch, mains plug and all connection on the
rear of the device are easily accessible.
Connection
• The equipment must be connected to a mains socket that has an earth contact.
• Protect the power cord from being walked on or pinched particularly at plugs, convenience
receptacles, and the point where they exit from the apparatus.
• Lay all connection cables so that they do not present a trip hazard.
• Check whether the connection figures comply with the existing mains supply. Serious damage
could occur due to connecting the system to the wrong power supply. An incorrect mains
voltage could damage the equipment or cause an electric shock.
• Do not defeat the safety purpose of the polarised or grounding-type plug. A polarised plug
has two blades with one wider than the other. A grounding type plug has two blades and a
third grounding prong. The wide blade or the third prong is provided for your safety. If the
provided plug does not fit into your outlet, consult an electrician for replacement of the
obsolete outlet.
• Unplug the device during lightning storms or when unused for long periods of time.
• If the equipment causes a blown fuse or a short circuit, disconnect it from the mains and have
it checked and repaired.
• Do not hold the mains cable with wet hands. There must be no water or dust on the contact
pins. In both cases you could receive an electric shock.
• The mains cable must be firmly connected. If it is loose there is a fire hazard.
• Always pull out the mains cable from the mains and/or from the equipment by the plug –
never by the cable. The cable could be damaged and cause an electric shock or fire.
• If the power cable is connected, avoid contact of the unit with other metallic objects.
• Do not use the equipment if the mains plug is damaged.
- 26 -
Humidity / Heat sources
• Never expose the equipment to rain or a high level of humidity. For this reason do not install it
in the immediate vicinity of swimming pools, showers, damp basement rooms or other areas
with unusually high atmospheric humidity.
• Never place objects containing liquid (e.g. vases or drinking glasses) on the equipment. Liquids
in the equipment could cause a short circuit.
• Do not install near any heat sources such as radiators, heat registers, stoves or other apparatus
(including amplifiers) that produce heat.
Fire Hazard
• Never place naked flames near the equipment.
Trouble shooting and Servicing
• Do not open the equipment without authorisation. You could receive an electric shock. Leave
all service work to authorised expert personnel.
• Refer all servicing to qualified service personnel. Servicing is required when the apparatus has
been damaged in any way, such as power-supply cord or plug is damaged, liquid has been
spilled or objects have fallen into the apparatus, the apparatus has been exposed to rain or
moisture, does not operate normally, or has been dropped.
1.2
MMX 300 headset
Volume / Hearing damage
• When connecting the headset please ensure that the volume is turned down to minimum.
Adjust the volume after putting on the headset. Do not set the volume too high, as you could
permanently damage your hearing.
Application / Usage
• With wired headsets you should avoid sharp movements, which could cause the headset to fall
off your head. You could be seriously injured especially if you are wearing pierced
earrings, spectacles etc. The cable could wind around your neck and cause strangulation.
2.
Disposal
This symbol on the product, in the instructions or on the packaging means that
your electrical and electronic equipment should be disposed at the end of its life
separately from your household waste. There are separate collection systems for
recycling in the EU. For more information, please contact the local authority or
your retailer where you purchased the product.
beyerdynamic and Headzone are registered trademarks of beyerdynamic GmbH & Co. KG
- 27 -
OPERATING INSTRUCTIONS - ENGLISH
3.
Application
Headzone® Game is the ideal headset system for the reproduction of surround sound (5.1) in
games. Using Headzone® Game you will experience games with realistic sound. Enjoy a world of
sound and a unique all-round acoustics that puts you right at the centre of the action. Hear how
an aggressor approaches and localise his position exactly.
This high-quality audio reproduction in surround (5.1) is achieved via the MMX 300 headset.
Surround audio formats such as Dolby*Digital 5.1 or DTS® are reproduced in a similar spatial
depth, which achieves a good surround loudspeaker system.
The headphone volume can optimally be set via a control of the base station.
Commands and talks are clearly and precisely transmitted via the noise-cancelling condenser
microphone of the MMX 300 headset.
If you would like to know more about Headzone®, please go to www.beyerdynamic.com.
*Manufactured under license from Dolby Laboratories.
“Dolby”, “Pro Logic” and the double-D symbol are trademarks of Dolby Laboratories.
**Manufactured under license under U.S. Patent #‘s: 5,451,942; 5,956,674; 5,974,380; 5,978,762; 6,487,535 &
other U.S. and worldwide patents issued & pending. DTS and DTS Digital Surround are registered trademarks
and the DTS logos and Symbol are trademarks of DTS, Inc. © 1996-2007 DTS, Inc. All Rights Reserved.
- 28 -
4.
Components
Headzone® Game . . . . . . . . . . . . . . . . . . . . . . . . . . . . . . . . . . . . . . . . . . . . . . . . . . . Order # 498.629
Individual components of the a.m. set:
HBC 1
Base station (9.5"), incl. external power supply and
Desktop frame . . . . . . . . . . . . . . . . . . . . . . . . . . . . . . . . . . . . . . . . . Order # 592.455
MMX 300
Gaming headset, 250 Ω, closed,
electret condenser microphone,
single-sided cable,
straight cable with 2 mini stereo jack plugs (3.5 mm)
and 1/4" adapter (6.35 mm). . . . . . . . . . . . . . . . . . . . . . . . . . . . . . . Order # 592.382
Extension cable for headset microphone
(3.5 mm jack plug / 3.5 mm jack socket) . . . . . . . . . . . . . . . . . . . . . Order # 593.273
S/PDIF cable
Coaxial, 75 Ω, 2 m long . . . . . . . . . . . . . . . . . . . . . . . . . . . . . . . . . . Order # 593.036
S/PDIF cable
Optical, 2 m long . . . . . . . . . . . . . . . . . . . . . . . . . . . . . . . . . . . . . . . Order # 593.028
Headzone® Base station. . . . . . . . . . . . . . . . . . . . . . . . . . . . . . . . . . . . . . . . . . . . . Order # 485.527
Individual components of the a.m. set:
HBC 1
Base station (9.5"), incl. external power supply and
Desktop frame . . . . . . . . . . . . . . . . . . . . . . . . . . . . . . . . . . . . . . . . . Order # 592.455
S/PDIF cable
Coaxial, 75 Ω, 2 m long . . . . . . . . . . . . . . . . . . . . . . . . . . . . . . . . . . Order # 593.036
S/PDIF cable
Optical, 2 m long . . . . . . . . . . . . . . . . . . . . . . . . . . . . . . . . . . . . . . . Order # 593.028
4.1 Spare parts
EDT 770 V
Ear pads for MMX 300, velour,
light grey, circumaural . . . . . . . . . . . . . . . . . . . . . . . . . . . . . . . . . . . Order # 926.660
- 29 -
OPERATING INSTRUCTIONS - ENGLISH
5.
HBC 1 base station
Front view
Standby button with status LED
LED red = standby mode (base station off)
LED green = base station on
Bypass button with status LED
LED off = Headzone® mode activated
LED blue = bypass mode activated
Headphone socket, 1/4" (6.35 mm)
Control LEDs to indicate the selected menu item/parameter
– Volume
– Room Size
– Ambience
– Head tracker (only active when using the DT 880 HT headphone)
Value LEDs
Multifunction control to set / select the menu items / parameters
Input Format LEDs to indicate the audio format of the connected audio source
- 30 -
Rear view
Optical S/PDIF output
Optical S/PDIF input (to connect digital surround signals)
“Input select” switch to select the optical or coaxial S/PDIF input
Coaxial S/PDIF input (to connect digital surround signals)
Connection for power supply, 5 V DC
Head tracker On / Off switch
Important: In order to ensure a proper function, the Headtracker On/Off switch MUST
remain in the “Off” position permanently when using the MMX 300 headset.
Connection to connect HR 1 head tracking receiver (only when using the DT 880 HT
headphone)
- 31 -
OPERATING INSTRUCTIONS - ENGLISH
5.1 How to connect the HBC 1 base station
1. Connect the headphone cable of the MMX 300 to the headphone socket of the HBC 1
base station by using the 1/4" adapter (6.35 mm). Connect the microphone cable of the
MMX 300 headset to the microphone input of your PC or game console. If necessary, use the
supplied extension cable with mini stereo jack plug (3.5 mm).
Headphone
Microphone
Important: When connecting the headset please ensure that the volume is turned down to
minimum (i.e. turn the multifunction control to the very left). Adjust the volume after
putting on the headset.
2. Connect a game console, PC sound card, DVD/Blu-ray player or CD player to the S/PDIF input
or . Stereo signals as well as encoded surround signals such as Dolby Digital or DTS® can
be
transmitted via the digital S/PDIF connection. The format is automatically recognised by the
HBC 1 base station and indicated by the illuminating, appropriate “Input Format” LED on
the front.
Use the supplied optical cable to connect the optical S/PDIF input or the supplied coaxial
cable with an impedance of 75 ohms, if you use the coaxial S/PDIF input . The maximum
length is 10 metres, if you would like to use a longer coaxial cable.
3. Switch the “Input select” switch to the “Optical” or “Coaxial” position, depending on the
S/PDIF input to which the audio source has been connected.
The signal of the selected input is also available at the optical S/PDIF output and can be
routed to other devices.
4. Connect the supplied power supply to the DC socket .
Important:
• Connecting any power supply other than the beyerdynamic device included can
damage the HBC 1 base station.
• If you want to unplug the power supply from the HBC 1 base station, turn off the base
station with the standby button first. The appropriate LED will illuminate red.
5. The optical S/PDIF output in the TOSLINK format is used to route the digital audio signal
to other devices (e.g. another HBC 1 base station). The connection always provides the
identical signal of the selected S/PDIF input. Depending on the position of the “Input select”
switch the optical S/PDIF output provides the signal of the optical or the coaxial S/PDIF
input .
- 32 -
6.
Operation
Turning on
• When the HBC 1 base station is connected, turn it on via the standby button . The
appropriate LED will illuminate green.
Important: If you would like to disconnect the HBC 1 base station, turn it off via the standby
button first. The appropriate LED will illuminate red.
Volume control
• Press the multifunction control to select the “Volume” parameter. The appropriate
“Control” LED will illuminate. Turn the multifunction control to adjust the volume.
In the “Volume” menu you can set the volume of the Headzone® system.
Important: When connecting the headphone please ensure that the volume is turned down to
minimum (i.e. turn the multifunction control 6 to the very left). Adjust the volume after
putting on the headphone.
Note: If overload occurs and distortions are audible (e.g. when the input signals are set to a
high gain and the volume is also set very high), reduce the volume via the “Volume” menu
until the distortions are eliminated.
How to display the audio format
• The fed in surround format of the connected audio source is displayed via the illuminated
appropriate “Input Format” LED .
The audio formats which are recognised and reproduced by Headzone® Game include DTS®,
Dolby Digital und Dolby Pro Logic as well as the standard 2-channel format PCM stereo (e.g.
CDs).
Configuration menu item / parameter
Important: The “Headtracker” menu item is only active when using the DT 880 HT headphone
and the HR 1 head tracking receiver HR 1.
• Press the multifunction control to select the menu item / parameter you would like to
adjust. The appropriate “Control” LED will illuminate.
• Turn the multifunction control to the right or left to adjust the selected parameter. The
changed adjustment of the selected parameter is indicated by the “Value” LEDs .
• The parameters can be set in 33 steps; i.e. with every third value the display of the “Value”
LEDs moves one LED further. The very left LED identifies the lowest possible setting, the very
right LED the highest possible setting.
Note: After the configuration of the parameters “Room Size” or “Ambience” the HBC 1 base
station will automatically return to the menu item “Volume” after a few seconds. Therefore,
the multifunction control always has the function of a volume control to set the headphone
volume in normal operation.
Important: All “Volume”, “Room Size” and “Ambience” settings are stored in the HBC 1 base
station.
- 33 -
OPERATING INSTRUCTIONS - ENGLISH
– Room Size
With the “Room Size” parameter you can adjust the size of the virtual room / living room
and the distance to the virtual speakers, i.e. you decide how strong a small or large room
will change the sonic impression of audio material reproduced by loudspeakers. This will
mainly affect the sound pressure at the position of the listener and also the balance
between direct sound and reflections.
Please note that this parameter will directly affect the volume of the reproduced audio
material. The larger the room and the greater the distance of the loudspeakers will lower
the volume. With large distances you will probably have to compensate the low sound
pressure by increasing the volume in the “Volume” menu.
– Ambience
The “Ambience” parameter basically controls how much colouration your room should add
to your audio material - in other words: if you want the acoustics of your room to be “dry”
or really “wet”. You should be aware of the fact that in reality the room sound has quite a
big influence on your spatial impression and also on the sound of your loudspeakers. For
this reason very low “Ambience” settings tend to be slightly unrealistic, because your
virtual room is turned into an anechoic chamber.
Note: Please note that the parameters for the room settings are interactive! For instance,
when setting the “Room Size” parameter to “0”, the virtual speakers will be “nailed” to
your ears and you will obviously not hear any difference when adapting the “Ambience”
parameter of your room. Likewise, if you turn “Ambience” to “0” (which simulates an
anechoic chamber), high “Room Size” settings will influence the volume, but not the
reflections in your virtual living room, as there are no reflections in an anechoic chamber.
How to select the bypass mode
• If you would like to use the HBC 1 base station as a stereo headphone amplifier (bypass mode),
press the bypass button . The appropriate LED will illuminate blue.
Note: Although the surround processing is completely deactivated in the bypass mode, the
reproduced volume is still influenced by the “Room Size” and “Ambience” parameters,
because the volume could suddenly increase too much and damage your hearing when
switching between the “Processing” and “Bypass” mode. As the reproduced volume is linked
to the “Room Size” and “Ambience” parameters, the volume of the “Bypass” or “Processing”
mode is adapted accordingly.
• If the HBC 1 base station is to operate in the Headzone® mode, you need not press the bypass
button . The appropriate LED will not illuminate.
- 34 -
7.
MMX 300 Headset
Connection
• The MMX 300 headset provides two mini jack plugs
(3.5 mm). Connect the headphone cable to the HBC 1
base station and the microphone cable to the
microphone input of your PC or game console. Refer
also to chapter 5.1 “How to connect the HBC 1 base
station”.
Important: When connecting the headset please
ensure that the volume is turned down to minimum
(i.e. turn the multifunction control to the very left).
Setting up and use of the headset
• Put the headset on your head. The microphone is on
the left side. Position the microphone to the side of
the mouth. In order to avoid pop noise you should use
the microphone with a pop shield.
• For best comfort and noise attenuation, the headband
has to be adjusted to fit your head properly.
Wear the headset so that the headband runs over the
top of your head and adjust the headband so that
– your ears are completely enclosed by the ear cushions,
– you feel a gentle pressure around your ears,
– both ends of the headband have the same length t
• Turn the microphone holder (not the gooseneck!) to
position the microphone on the left or right hand side
of the mouth.
• Place the wind shield onto the microphone and make
sure that the microphone is completely enclosed.
• Bend the flexible gooseneck so that the microphone is
placed about 2 cm in front of the middle of your
mouth.
Important: In order to avoid overstretching and
premature wear and tear never bend the gooseneck
more than 90°.
- 35 -
OPERATING INSTRUCTIONS - ENGLISH
8.
Audio formats
Supported audio format which are indicated via the “Input Format” LEDs
Format
Input Format LED
DTS
Dolby Digital
Pro Logic
PCM Stereo
DTS 1/01)
O
-
-
-
DTS 2/01)
O
-
-
-
DTS 2/11)
O
-
-
-
DTS 2/21)
O
-
-
-
DTS 3/01)
O
-
-
-
DTS 3/11)
O
-
-
-
DTS 3/21)
O
-
-
-
Dolby Digital 1/01)
-
O
-
-
Dolby Digital 2/01)
-
O
- / O 2)
-
Dolby Digital 2/11)
-
O
-
-
Dolby Digital 2/21)
-
O
-
-
Dolby Digital 3/01)
-
O
-
-
Dolby Digital 3/11)
-
O
-
-
Dolby Digital 3/21)
-
O
-
-
PCM Stereo
-
-
-
O 3)
1) Headzone® Game also reproduces an LFE channel which is optional available.
2) Headzone® Game automatically recognises if the audio signal is Dolby Surround coded. In
this case the internal Pro Logic II decoder is automatically activated and the Pro Logic LED
will illuminate.
3) Headzone® Game automatically applies a de-emphasis when needed.
Supported sampling rate: 32, 44.1 and 48 kHz
Note: When playing Blu-ray discs with the new audio formats Dolby Digital Plus / Dolby True HD /
DTS-HD Master Audio, the Blu-ray player transmits the separately contained surround “core” via
the S/PDIF output. Thus, Headzone® Game provides about twice the resolution as known from
conventional audio formats.
- 36 -
9.
Typical setups with Headzone® Game
9.1
How to connect a gaming PC with Dolby Digital Live sound card
HBC 1
base station
S/PDIF
Microphone
Monitor
PC with Dolby Live
sound card
MMX 300
• With Headzone® Game you can use any PC game that supports multi-channel sound (surround)
and the Dolby Digital Live technology.
• Install into your PC a sound card that supports Dolby Digital Live (e.g. Terratec Aureon 7.1 PCI)
and select it as audio device.
• Connect the HBC 1 base station to the “Digital Audio” output of your Dolby Digital Live sound
card by using the supplied optical or coaxial S/PDIF cable.
• The multi-channel audio signal of your game is now encoded by your sound card into a Dolby
Digital stream and transmitted to the HBC 1 base station via the S/PDIF cable.
• It depends on the sound design of the game, whether the audio playback is in stereo,
Pro Logic or 5.1 Surround. You can see from the packaging of the game, if your game supports
multi-channel sound (surround), e.g. a Dolby Digital logo on the packaging.
• When using a sound card without Dolby Digital Live, the S/PDIF connection will emit a normal
stereo signal.
• Connect the headphone of the MMX 300 headset to the headphone output of the HBC 1 base
station by using the supplied 1/4" adapter (6.35 mm).
• Connect the microphone of the MMX 300 to the microphone input of your PC. If necessary, use
the supplied extension cable with mini jack plug (3.5 mm).
- 37 -
OPERATING INSTRUCTIONS - ENGLISH
9.2
How to connect a gaming PC with external 5.1 encoding
6 x Analog
Out
HBC 1
base station
S/PDIF
Dolby/DTS® Encoder
Microphone
Monitor
PC with Dolby Live sound card
MMX 300
• When your PC is equipped with a 5.1 sound card with analogue outputs you can use any PC
game with your Headzone® system when connecting an external encoder to the HBC 1 base
station and your PC.
• Connect the 6 analogue outputs of your sound card to the 6 analogue inputs of your Dolby or
DTS® encoder (e.g. Creative DTS-610).
• Connect the HBC 1 base station to the “Digital Audio” output of the external Dolby or DTS®
encoder Dolby Digital Live sound card by using the supplied optical or coaxial S/PDIF cable.
• The multi-channel audio signal of your game is now encoded by your encoder into a DTS® or
Dolby Digital stream and transmitted to the HBC 1 base station via the S/PDIF cable.
• It depends on the sound design of the game, whether the audio playback is in stereo, Pro
Logic or 5.1 Surround. You can see from the packaging of the game, if your game supports
multi-channel sound (surround), e.g. a Dolby Digital logo on the packaging.
• Connect the headphone of the MMX 300 headset to the headphone output of the HBC 1 base
station by using the supplied 1/4" adapter (6.35 mm).
• Connect the microphone of the MMX 300 to the microphone input of your PC. If necessary, use
the supplied extension cable with mini jack plug (3.5 mm).
- 38 -
9.3
How to connect a game console
HBC 1
base station
S/PDIF
Microphone
TV
Game console
MMX 300
• Connect the HBC 1 base station to the “Digital Audio” output of your game console by using
the supplied optical or coaxial S/PDIF cable.
• Make sure that the “Digital Audio” output is selected as playback device in the audio setup of
your game console. The exact description varies depending on the device, e.g. S/PDIF.
• It depends on the sound design of the game, whether the audio playback is in stereo,
Pro Logic or 5.1 Surround. You can see from the packaging of the game, if your game supports
multi-channel sound (surround), e.g. a Dolby Digital logo on the packaging.
• Connect the headphone of the MMX 300 headset to the headphone output of the HBC 1 base
station by using the supplied 1/4" adapter (6.35 mm).
• Connect the microphone of the MMX 300 to the microphone input of your game console.
If necessary, use the supplied extension cable with mini jack plug (3.5 mm).
- 39 -
OPERATING INSTRUCTIONS - ENGLISH
9.4
How to connect a DVD/Blu-ray player
HBC 1
base station
S/PDIF
DVD/Blu-ray player
TV
MMX 300
• Connect the HBC 1 base station to the “Digital Audio” output of your DVD/Blu-ray player by
using the supplied optical or coaxial S/PDIF cable.
• Use the remote control of your DVD/Blu-ray player to select the audio stream in the “Audio”
menu of the DVD/Blu-ray disc to be played.
• The selected audio stream (Dolby, DTS®, Pro Logic or PCM Stereo) is automatically recognised
and decoded by the HBC 1 base station.
• Connect the headphone of the MMX 300 headset to the headphone output of the HBC 1 base
station by using the supplied 1/4" adapter (6.35 mm).
- 40 -
10. Service
In the unlikely event of equipment failure, the product should be returned to your beyerdynamic
dealer. Unauthorised attempts at repair may invalidate the warranty.
11. Maintenance
• Use a slightly moistened or dry cloth for cleaning the device. Do not use any solvent cleaners,
as these could damage the surface.
• From time to time you should clean the ear pads of the headphone with a soft, damp cloth.
Use clear water only, no detergents. Make sure not to allow any water to enter the transducer
elements. As ear pads wear out eventually you should replace them if it becomes necessary.
• For cleaning the pop shield remove it from the microphone and wash it under clear running
water. If necessary you can use a mild cleansing agent (e.g. washing-up liquid). Make sure that
the pop shield is completely dry before you replace it onto the microphone.
12. Trouble shooting
To restore the factory settings of your Headzone® system, please proceed as described in the
following:
• Switch the HBC 1 base station with the standby button into the standby mode. The
appropriate LED will illuminate red.
• Press and hold the multifunction control while turning the HBC 1 base station on with the
standby button .
• The “Value” LEDs will start illuminating in sequence (running lights).
• Release the multifunction control .
• The factory preset is restored.
Problem
Possible cause
Although a multi-channel
track is used, Headzone®
Game only receives a twochannel sound (“PCM Stereo”
LED will illuminate instead of
“Dolby Digital” or “DTS®”
LED.
• Many DVD/Blu-ray players
• Select “Bit stream” as
provide the option to
output format for the
change over the output forS/PDIF output in the
mat at the S/PDIF output
configuration menu of your
between “PCM” and the
DVD/Blu-ray player.
original data of the
DVD/Blu-ray audio track (bit
stream). Regarding “PCM”
a stereo down mix is
created out of multichannel formats.
Virtual “audio picture” is
“crooked”.
• Headtracker On/Off switch
on the rear of the HBC 1
base station is not switched
to the “Off” position.
- 41 -
Solution
• Put the switch to the “Off”
position.
OPERATING INSTRUCTIONS - ENGLISH
Problem
Possible cause
Solution
No signal via the headphone.
• Wrong S/PDIF input
selected.
• Select the correct input
(optical or coaxial) with the
“Input select” switch on
the rear of the HBC 1 base
station.
• The connected DVD/Blu-ray • Select another audio track
player produces no signal at
on your DVD/Blu-ray disc.
the S/PDIF output (this can
happen if DTS® traces occur
when the player does not
support DTS® format).
• The connected player
produces a PCM signal with
a too high sampling rate
(e.g. 96 kHz audio track of
a DVD audio).
When turning on the
Headzone® system, the
settings do not correspond to
the settings stored when the
system was turned off last.
The audio material sounds
distorted.
• Select another audio track
on your DVD/Blu-ray disc.
• Many DVD/Blu-ray players
provide the option to sample down audio tracks with
a high sampling rate. Select
this option in the configuration menu of your
DVD/Blu-ray player.
• As described in this manual, • After having changed some
Headzone® will store all setHeadzone® settings wait at
tings automatically.
least 3 seconds before you
Seldom, it can occur that
turn off the device. When
the device is turned off
all settings are set to “0”
during storing or that it is
after turning Headzone®
Game on, restore the
turned off before all
factory settings as described
settings are stored.
at the beginning of this
chapter.
• Volume settings that
exceed 2/3 of the control
range are not stored to
avoid extreme volume
level when turning on
Headzone® Game again.
• Set the volume to the
desired level.
• The audio output levels are
set too high.
• Reduce the volume by using
the multifunction control on the front panel of the
HBC 1 base station.
- 42 -
13. Technical specifications
General
Permissible ambient temperature. . . . +10 °C to +40 °C at < 90% humidity
Power supply
External mains adapter, 5 VDC
Operating voltage . . . . . . . . . . . . . . . . 100 to 240 V AC, 47 to 63 Hz
Power consumption . . . . . . . . . . . . . . . max. 20 W
Headphone output socket
Connection . . . . . . . . . . . . . . . . . . . . . . 1/4" stereo jack (6.35 mm)
Max. output level. . . . . . . . . . . . . . . . . 100 mW into 250 Ohms @ 1 kHz
SNR . . . . . . . . . . . . . . . . . . . . . . . . . . . . 98 dB @ 1 kHz, A-weighted
Frequency response . . . . . . . . . . . . . . . 10 Hz to 20 kHz ± 0.3 dB
THD + N . . . . . . . . . . . . . . . . . . . . . . . . 0.006% 1 kHz into 250 Ω load at max. output level
Output impedance. . . . . . . . . . . . . . . . 100 Ω
Headphone impedance . . . . . . . . . . . . 32 to 600 Ω
Optical S/PDIF input
Connection . . . . . . . . . . . . . . . . . . . . . . TOSLINK
Coaxial S/PDIF input
Connection . . . . . . . . . . . . . . . . . . . . . . RCA
Input impedance . . . . . . . . . . . . . . . . . 75 Ω
Optical S/PDIF output
Connection . . . . . . . . . . . . . . . . . . . . . . TOSLINK
MMX 300 headset
Headphone
Transducer type . . . . . . . . . . . . . . . . . . Dynamic
Operating principle . . . . . . . . . . . . . . . Closed
Frequency response . . . . . . . . . . . . . . . 5 - 30,000 Hz
Nominal impedance. . . . . . . . . . . . . . . 32 Ω per system
Nominal SPL . . . . . . . . . . . . . . . . . . . . . 96 dB
T.H.D.. . . . . . . . . . . . . . . . . . . . . . . . . . . < 0.2%
Power handling capacity . . . . . . . . . . . 100 mW
Sound coupling to the ear. . . . . . . . . . Circumaural
Ambient noise attenuation . . . . . . . . . approx. 18 dBA
Headband pressure . . . . . . . . . . . . . . . 3.5 N
Weight with microphone / cable . . . . 380 g
Cable length and type . . . . . . . . . . . . . 2.5 m, straight cable
Connection . . . . . . . . . . . . . . . . . . . . . . Mini stereo jack plug (3.5 mm)
- 43 -
OPERATING INSTRUCTIONS - ENGLISH
Microphone
Transducer type . . . . . . . . . . . . . . . . . . Condenser (back electret)
Operating principle . . . . . . . . . . . . . . . Pressure gradient
Polar Pattern . . . . . . . . . . . . . . . . . . . . Cardioid
Power supply . . . . . . . . . . . . . . . . . . . . AB powering
Supply voltage . . . . . . . . . . . . . . . . . . . 1.5 - 9 V
Current consumption. . . . . . . . . . . . . . < 0.5 mA
Nominal impedance. . . . . . . . . . . . . . . approx. 1.5 kΩ
Open circuit voltage at f = 1 kHz . . . . 20 mV / Pa
Frequency response . . . . . . . . . . . . . . . 30 - 18,000 Hz
T.H.D.. . . . . . . . . . . . . . . . . . . . . . . . . . . 0.2% at f = 1 kHz
Max. SPL . . . . . . . . . . . . . . . . . . . . . . . . 120 dB
Microphone output . . . . . . . . . . . . . . . unbalanced
Dimensions
Length mic boom . . . . . . . . . . . . . . . . . approx. 150 mm
Capsule diameter . . . . . . . . . . . . . . . . . 13 mm
Connection . . . . . . . . . . . . . . . . . . . . . . Mini stereo jack plug (3.5 mm)
Ring and tip: AF, shaft: ground
- 44 -
14. Glossary*
• DTS®
DTS®, owned by DTS® Inc., is a multi-channel digital surround sound format used for both
commercial/theatrical and consumer applications on LDs, DVD/Blu-ray, special audio CDs and
D-VHS. There are significant technical differences between commercial/theatrical and home
variants. DTS® uses compressed audio data, which are produced by a lossy audio compression
procedure.
• Dolby Digital
Dolby Digital (also ATSC A/52 and AC-3) is a multi-channel digital surround sound format
developed by Dolby Laboratories. Dolby Digital is used for commercial/theatrical and consumer
applications on LDs, DVD/Blu-ray as well as for broadcasting applications. Dolby Digital
contains up to six discrete channels of sound and uses a lossy audio compression procedure.
• Dolby Digital Live
Dolby Digital Live (DDL) is a real-time encoding technology to convert any multi-channel audio
signals into a Dolby Digital bit stream for transport and playback through a home theatre
system. With it, a PC or game console can be hooked up to your Dolby Digital-equipped
audio/video receiver or home theatre system via a single digital connection, eliminating the
confusion of multiple cables and ensuring the integrity of the audio signal.
• Dolby Pro Logic
Dolby Pro Logic is an analogue multi-channel format, which has been developed by Dolby
Laboratories for home cinema use in 1986. It is based on Dolby Surround Stereo, which was
originally developed in 1976 for analogue cinema sound systems. Dolby Pro Logic decodes the
sound information from a stereo source.
• PCM Stereo
PCM is the abbreviation for “Pulse Code Modulation”. It is a digital 2-channel sound, which is
also used for music CDs. In contrast to compressed sound formats such as Dolby Digital Stereo
and DTS®, PCM provides an uncompressed sound.
• S/PDIF
Short for Sony/Philips Digital Interface, a standard audio file transfer format. S/PDIF allows the
transfer of digital audio signals from one device to another without having to be converted
first to an analogue format. S/PDIF is used with CD players, DAT recorders, MD players,
DVD/Blu-ray players and home cinema receivers as well as digital PC sound cards. S/PDIF is also
used for car audio systems, where a single fibre optic cable replaces a wiring harness, which is
also insensitive to interferences.
• TOSLINK
TOSLINK is a standardised optical fibre connection system for optical signal transmission of
20 Mb/s. TOSLINK was originally created by Toshiba to connect their CD players to their
receivers; but it was soon adopted for most CD players, regardless of manufacturer. Today
TOSLINK is used in consumer audio equipment to carry a digital audio stream between
components such as MD and CD players and DAT recorders.
*For more information about the individual items, please refer to appropriate literature or the internet.
- 45 -
NOTICE D’UTILISATION - FRANÇAIS
Sommaire
1.
Instructions de sécurité importantes . . . . . . . . . . . . . . . . . . . . . . . . . . . . . . . . . . . . . . . Page 48
1.1 Station de base HBC 1 et récepteur headtracking HR 1 . . . . . . . . . . . . . . . . . . . Page 48
1.2 Micro-casque MMX 300 . . . . . . . . . . . . . . . . . . . . . . . . . . . . . . . . . . . . . . . . . . . . Page 49
2.
Evacuation . . . . . . . . . . . . . . . . . . . . . . . . . . . . . . . . . . . . . . . . . . . . . . . . . . . . . . . . . . . . Page 49
3.
Application. . . . . . . . . . . . . . . . . . . . . . . . . . . . . . . . . . . . . . . . . . . . . . . . . . . . . . . . . . . . Page 50
4.
Versions / Composants. . . . . . . . . . . . . . . . . . . . . . . . . . . . . . . . . . . . . . . . . . . . . . . . . . . Page 51
4.1 Pièces de rechange . . . . . . . . . . . . . . . . . . . . . . . . . . . . . . . . . . . . . . . . . . . . . . . . Page 51
5.
Station de base HBC 1 . . . . . . . . . . . . . . . . . . . . . . . . . . . . . . . . . . . . . . . . . . . . . . . . . . . Page 52
5.1 Raccordement de station de base HBC 1 . . . . . . . . . . . . . . . . . . . . . . . . . . . . . . . Page 54
6.
Utilisation. . . . . . . . . . . . . . . . . . . . . . . . . . . . . . . . . . . . . . . . . . . . . . . . . . . . . . . . . . . . . Page 55
7.
Micro-casque MMX 300 . . . . . . . . . . . . . . . . . . . . . . . . . . . . . . . . . . . . . . . . . . . . . . . . . Page 57
8.
Formats audio . . . . . . . . . . . . . . . . . . . . . . . . . . . . . . . . . . . . . . . . . . . . . . . . . . . . . . . . . Page 58
9.
Configuration Headzone® Game typiques . . . . . . . . . . . . . . . . . . . . . . . . . . . . . . . . . . Page
9.1 Raccordement à une machine de jeux avec carte son Dolby Digital Live . . . . . Page
9.2 Raccordement à une machine de jeux avec encodage 5.1 externe . . . . . . . . . . Page
9.3 Raccordement à une console de jeux . . . . . . . . . . . . . . . . . . . . . . . . . . . . . . . . . Page
9.4 Raccordement à un lecteur DVD/Blu-ray . . . . . . . . . . . . . . . . . . . . . . . . . . . . . . Page
59
59
60
61
62
10. Service après-vente . . . . . . . . . . . . . . . . . . . . . . . . . . . . . . . . . . . . . . . . . . . . . . . . . . . . . Page 63
11. Entretien . . . . . . . . . . . . . . . . . . . . . . . . . . . . . . . . . . . . . . . . . . . . . . . . . . . . . . . . . . . . . Page 63
12. Dépannage . . . . . . . . . . . . . . . . . . . . . . . . . . . . . . . . . . . . . . . . . . . . . . . . . . . . . . . . . . . Page 63
13. Spécifications techniques . . . . . . . . . . . . . . . . . . . . . . . . . . . . . . . . . . . . . . . . . . . . . . . . Page 65
14. Glossaire . . . . . . . . . . . . . . . . . . . . . . . . . . . . . . . . . . . . . . . . . . . . . . . . . . . . . . . . . . . . . . Page 67
Déclaration de conformité . . . . . . . . . . . . . . . . . . . . . . . . . . . . . . . . . . . . . . . . . . . . . . . . . . . Page 68
- 47 -
NOTICE D’UTILISATION - FRANÇAIS
Vous avez opté pour le système de micro-casque Headzone® Game de beyerdynamic offrant une
restitution audio Surround (5.1) de haute qualité. Nous vous remercions de votre confiance.
Veuillez prendre le temps de lire attentivement cette notice d’utilisation avant la mise en service
du produit.
1.
Instructions de sécurité importantes
Important!
• LIRE la notice d’utilisation.
• CONSERVER la notice d’utilisation.
• OBSERVER toutes les avertissements et SUIVRE toutes les consignes.
Non-responsabilité
• La société beyerdynamic GmbH & Co. KG décline toute responsabilité en cas de dommages
ou blessures dus à une utilisation du produit négligente, incorrecte ou non-conforme à
l’application indiquée par le fabricant.
1.1
Station de base HBC 1
Emplacement
• L’appareil doit être placé de sorte à permettre un accès aisé à l’interrupteur secteur, à la fiche
secteur et à toutes les entrées sur la face arrière de l’appareil.
Connexion
• L’appareil doit être raccordé à une prise correctement mise à la terre.
• Posez les câbles de façon à ce qu’ils ne soient pas courbés, voire coupés pas des objets
coupants.
• Posez les câbles de telle sorte qu’on ne puisse trébucher dessus et se blesser.
• Déconnectez toujours l’alimentation de courant avant de procéder à des travaux sur les
entrées et les sorties.
• Vérifiez si les puissances connectées correspondent à l’alimentation secteur existante. Un
raccordement du système à la mauvaise alimentation en courant risque de provoquer de
graves dommages. Une mauvaise alimentation peut endommager l’appareil ou provoquer un
choc électrique.
• Débranchez l’appareil lors d’orages ou d’une non-utilisation prolongée.
• En cas de court-circuit ou d’endommagement de fusible lors de l’utilisation de l’appareil
veuillez couper l’alimentation secteur et faire examiner et réparer l’appareil.
• Ne manipulez pas le câble d’alimentation avec des mains humides, eau et poussière ne doivent
d’autre part pas recouvrir les contacts dorés. Dans les deux cas, vous pourriez subir un choc
électrique.
• Le câble d’alimentation doit être fermement raccordé, s’il est lâche, il y a risque d’incendie.
• Ne retirez le câble du secteur et/ou de l’appareil que par sa prise, jamais en tirant sur le
cordon. Vous pourriez endommager le câble et provoquer un choc électrique ou un incendie.
• Lorsque l’appareil est sous tension, ne le faites pas entrer en contact avec d’autres objets
métalliques.
• N’allumez pas l’appareil si le câble d’alimentation est endommagé.
- 48 -
Humidité / Radiateurs
• N’exposez jamais l’appareil à la pluie ou à forte humidité. Ne l’installez jamais à proximité
directe de piscines, douches, caves humides ou autres zones présentant une humidité d’air
exceptionnellement élevée.
• Ne jamais poser de récipient contenant un liquide (p.ex. vase, verre) sur l’appareil. Tout liquide
pénétrant dans l’appareil peut en effet provoquer un court-circuit.
• N’installez jamais et ne faites jamais fonctionner l’appareil à proximité directe de radiateurs,
d’installations d’éclairage ou autres appareils dégageant de la chaleur.
Danger d’incendie
• Ne jamais disposer une flamme nue (p.ex. bougie) sur l’appareil.
Elimination des erreurs / Réparation
• N’ouvrez jamais de vous-même l’appareil. Vous pourriez subir un choc électrique.
• Ne confiez la réparation de l’appareil qu’à un technicien spécialiste .
1.2
Micro-casque MMX 300
Volume / Dommages auditifs
• Au moment de raccorder un micro-casque, veillez à ce que le volume soit réglé sur la position
minimum. Ne réglez le volume qu’après avoir posé le casque sur vos oreilles. Ne réglez pas le
volume trop haut. Vous vous exposeriez à des dommages auditifs durables.
Application / Emploi
• Dans le cas de casques micro à câble, évitez les mouvements brusques pouvant entraîner une
chute de l’écouteur. Vous pourriez vous blesser sérieusement, en particulier si vous portez des
piercings, boucles d’oreilles, lunettes etc. Le câble pourrait s’enrouler autour de votre cou et
vous étrangler.
2.
Evacuation
Ce symbole sur le produit, l’emballage ou dans le manuel signifie que votre
équipement électrique et électronique doit être, en fin de vie, jeté séparement de
vos déchets ménages. Il existe en France des systèmes de collecte différents pour les
déchets recyclables. Pour plus d’information, veuillez contacter les autorités locales
ou le revendeur chez qui vous avez acheté le produit.
beyerdynamic et Headzone sont des marques déposées de la société beyerdynamic GmbH & Co KG.
- 49 -
NOTICE D’UTILISATION - FRANÇAIS
3.
Application
Headzone® Game est un système de micro-casque idéal pour la restitution surround (5.1) dans
le domaine des jeux vidéo. Headzone® Game permet une restitution absolument réaliste des
mondes de jeux virtuels. Savourez une expérience sonore inédite et un panorama acoustique
vous transportant au centre de l’action. Entendez arriver les attaquants et localisez exactement
leur angle de position.
Le micro-casque MMX 300 est à même d’offrir cette restitution surround (5.1) de haute qualité.
Les formats audio surround tels que par exemple Dolby*Digital 5.1 ou DTS®** sont restitués avec
une progression et une localisation spatiales analogues à celles d’un bon système de hautparleurs surround. Le volume sonore peut être ajusté de manière optimale au moyen du régleur
situé sur la station de base.
Par le biais du microphone à condensateur réducteur de bruit de MMX 300, ordres et dialogues
sont transmis de manière claire et précise.
Lorsque le microphone est désactivé, Headzone® Game est également tout à fait approprié pour
l’utilisation dans le domaine du Home Cinema.
Pour en savoir plus sur Headzone®, connectez-vous sur notre site Web www.beyerdynamic.com.
*Fabriqué sous licence de Dolby Laboratories.
Les termes « Dolby » et « Pro Logic », ainsi que le sigle double D sont des marques commerciales de Dolby
Laboratories.
**Fabriqué sous licence de DTS, Inc.
Brevets américains n° 5,451,942; 5,956,674; 5,974,380; 5,978,762; 6,487,535 et autres brevets américains et
mondiaux délivrés ou en instance. DTS et DTS Digital Surround sont des marques déposées et le logo et
le symbole DTS sont des marques de DTS, Inc. © 1996-2007 DTS, Inc. Tous droits réservés.
- 50 -
4.
Composants
Headzone® Game Head Tracker . . . . . . . . . . . . . . . . . . . . . . . . . . . . . . . . . . . . . . Art. n° 498.629
Composants du kit ci-dessus:
HBC 1
Station de base (9,5"), y compris bloc d’alimentation externe
et écran de bureau . . . . . . . . . . . . . . . . . . . . . . . . . . . . . . . . . . . . . . Art. n° 592.455
MMX 300
Micro-casque Gaming, 250 Ω, fermé,
microphone à condensateur électret,
amenée du câble unilatérale
câble lisse avec 2 x mini-jack stéréo (3,5 mm)
et adaptateur (6,35 mm) . . . . . . . . . . . . . . . . . . . . . . . . . . . . . . . . . Art. n° 592.382
Rallonge pour microphone headset
(fiche jack 3,5 mm / douille de jack 3,5 mm). . . . . . . . . . . . . . . . . . Art. n° 593.273
S/P-DIF-Kabel coaxial, 75 Ω, longueur 2 m . . . . . . . . . . . . . . . . . . . . . . . . . . . . . . . Art. n° 593.036
S/P-DIF-Kabel optique, longueur 2 m, . . . . . . . . . . . . . . . . . . . . . . . . . . . . . . . . . . Art. n° 593.028
Headzone® Station de base. . . . . . . . . . . . . . . . . . . . . . . . . . . . . . . . . . . . . . . . . . Art. n° 485.527
Composants du kit ci-dessus:
HBC 1
Station de base (9,5"), y compris bloc d’alimentation externe
et écran de bureau . . . . . . . . . . . . . . . . . . . . . . . . . . . . . . . . . . . . . . Art. n° 592.455
S/P-DIF-Kabel coaxial, 75 Ω, longueur 2 m . . . . . . . . . . . . . . . . . . . . . . . . . . . . . . . Art. n° 593.036
S/P-DIF-Kabel optique, longueur 2 m, . . . . . . . . . . . . . . . . . . . . . . . . . . . . . . . . . . Art. n° 593.028
4.1 Pièces de rechange
EDT 770 V
Coussinet d’oreillette pour MMX 300, velours,
gris clair, circumaural . . . . . . . . . . . . . . . . . . . . . . . . . . . . . . . . . . . . Art. n° 926.660
- 51 -
NOTICE D’UTILISATION - FRANÇAIS
5.
Station de base HBC 1
Face avant
Touche Standby (veille) avec LED de statut
LED rouge = mode veille (appareil éteint)
LED verte = mode fonctionnement (appareil allumé)
Touche Bypass avec LED de statut
LED éteinte = mode Headzone® actif
LED bleue = mode Bypass actif
Connecteur casque, jack 6,35 mm
Témoins LED de contrôle pour indication du point de menu / paramètre sélectionné
– Volume (volume sonore)
– Room Size (dimensions de la pièce)
– Ambience (ambiance/impression spatiale)
– Head Tracker (uniquement en association avec casque DT 880 HT activé)
Indicateurs LED de niveau
Régleur multifonctions pour le réglage / la sélection des points de menu / paramètres
Témoins LED d’entrée format pour affichage du format audio appliqué de la source sonore
raccordée
- 52 -
Face arrière
Sortie optique S/P-DIF
Entrée optique S/P-DIF (pour le raccordement de signaux surround numériques)
Sélecteur d’entrée « Input Select » (sélection d’entrée optique / coaxiale S/P-DIF)
Entrée coaxiale S/P-DIF (pour le raccordement de signaux surround numériques)
Connecteur pour bloc d’alimentation, 5 V DC
Interrupteur marche/arrêt Head Tracker
Important: pour garantir un fonctionnement correct, l’interrupteur marche/arrêt de l’Head
Tracker DOIT rester positionné sur « Off » si utilisation avec micro-casque MMX 300.
Connecteur pour récepteur headtracking HR 1 (uniquement en association avec casque
DT 880 HT)
- 53 -
NOTICE D’UTILISATION - FRANÇAIS
5.1 Raccordement station de base HBC 1
1. A l’aide de l’adaptateur jack 6,35 mm, branchez le câble d’écouteurs du micro-casque MMX 300
sur la prise casque de la station de base HBC 1. Branchez le câble de microphone de
l’headset MMX 300 sur l’entrée microphone de votre PC ou console de jeux. Utilisez le cas
échéant la rallonge fournie (jack 3,5 mm).
Casque
Micro
Important: Lors du branchement et avant de poser le micro-casque sur les oreilles, il est
recommandé de régler le volume sonore au niveau minimum (via le régleur multifonctions
tout à gauche) afin d’éviter tout dommage auditif.
2. Branchez sur l'entrée S/P-DIF ou une console de jeux, une carte son PC, un lecteur
DVD/Blu-ray ou lecteur CD. Via la liaison numérique S/P-DIF, des signaux stéréo mais également des signaux surround encodés tels que Dolby Digital ou DTS® peuvent être transmis. Le
format respectivement employé est automatiquement identifié par la station de base et
affiché au moyen des témoins « Input Format » situés sur la station de base.
Pour le raccordement à l’entrée S/P-DIF optique , veuillez utiliser le câble optique fourni.
Utilisez le câble coaxial fourni avec impédance de 75 ohms si vous utilisez l’entrée S/P-DIF
coaxiale . Si vous souhaitez utiliser un câble coaxial plus long, la longueur maximale est
alors de 10 m.
3. Réglez le sélecteur d’entrée sur la position « Optical » ou « Coaxial » selon l’entrée S/P-DIF
sur laquelle vous avez branché la source sonore. Le signal de l’entrée sélectionnée se tient,
inchangé, à disposition sur la sortie S/P-DIF pour le transfert à d’autres appareils.
4. Branchez le bloc d’alimentation fourni sur la prise DC .
Important:
• N’utilisez pas d’autre bloc d’alimentation que celui fourni par beyerdynamic,
la station de base HBC 1 pourrait sinon être endommagée.
• Si vous souhaitez déconnecter le bloc d'alimentation de la station de base HBC 1,
éteignez tout d’abord la station de base à l’aide de la touche Standby . La diode LED
correspondante s’allume alors en rouge.
5. La sortie optique S/P-DIF au format TOSLINK sert à la transmission du signal audio numérique
à d’autres appareils (par exemple une station de base HBC 1 supplémentaire). Sur cette
prise se trouve toujours un signal identique à celui de l’entrée S/P-DIF sélectionnée: selon la
position du sélecteur d’entrée le signal de l’entrée S/P-DIF optique ou coaxiale se
situe alors sur la sortie S/P-DIF optique.
- 54 -
6.
Utilisation
Mise en marche
• Une fois effectués tous les raccordements, allumez la station de base HBC 1 via la touche
Standby . La diode LED correspondante s’allume alors en vert.
Important: si vous souhaitez de nouveau déconnecter la station de base HBC 1 du secteur,
éteignez-la tout d’abord via la touche Standby . La diode LED correspondante s’allume alors
en rouge.
Réglage du volume sonore
• Pressez le régleur multifonctions pour sélectionner le point de menu / paramètre « Volume ».
Le témoin de contrôle correspondant s’allume. Tournez le régleur multifonctions pour
ajuster le volume sonore.
Le point de menu « Volume » vous permet de régler le volume sonore de votre système
Headzone®.
Important: lors du branchement et avant de poser le casque sur les oreilles, il est recommandé
de régler le volume sonore au niveau minimum (via le régleur multifonctions tout à gauche).
Note: si vous dépassez la puissance limite admissible de votre système Headzone® et percevez
des distorsions (par exemple en présence de signaux d’entrée réglés au maximum et parallèlement de réglages de volume très élevés), réduisez alors le volume dans le point de menu
jusqu’à disparition des distorsions.
Affichage du format audio
• Le format surround de la source sonore raccordée est indiqué par le témoin lumineux « Input
Format » correspondant.
Les formats audio identifiés et restitués par Headzone® Game sont les formats surround codés
DTS®, Dolby Digital et Dolby Pro Logic ainsi que le format standard 2 canaux PCM Stereo (p. ex.
CD).
Configuration du point de menu / paramètre
Important : le point de menu « Headtracker » est uniquement actif si utilisation du casque
DT 880 HT et du récepteur headtracking HR 1.
• Pressez le régleur multifonctions pour sélectionner le point de menu / paramètre à ajuster.
Le témoin de contrôle correspondant s’allume.
• Tournez le régleur multifonctions vers la droite ou la gauche pour modifier le réglage du
paramètre sélectionné. La modification de réglage est affichée par les indicateurs de niveau
« Value » .
• Les paramètres peuvent être réglés sur 33 positions; toutes les trois valeurs, l’affichage des
indicateurs passe ainsi au niveau suivant. La diode située tout à gauche correspond au
niveau de réglage le plus bas, la diode située tout à droite à la valeur la plus élevée.
Note: quelques secondes après la configuration des paramètres « Room Size », « Ambience »
ou « Headtracker », la station de base HBC 1 revient automatiquement au point de menu
« Volume ». Le régleur multifonctions a donc en mode de fonctionnement normal toujours
la fonction d’un régleur de volume grâce auquel vous pouvez directement ajuster le volume
sonore du casque.
- 55 -
NOTICE D’UTILISATION - FRANÇAIS
Important: tous les réglages de paramètres « Volume », « Room Size » et « Ambience » sont
mémorisés dans la station de base HBC 1.
– Room Size (dimensions de la pièce et distance)
Le paramètre « Room Size » vous permet de déterminer les dimensions de votre pièce
d’écoute virtuelle / de votre séjour ainsi que la distance vous séparant des haut-parleurs
virtuels: vous pouvez ainsi décider dans quelle mesure une pièce, de petites ou de grandes
dimensions, influence via les haut-parleurs la restitution du matériel audio.
La pression acoustique à l’endroit où se situe l’auditeur et la balance entre son direct et
réflexions sont notamment influencés.
Nous attirons votre attention sur le fait que ce paramètre a une influence directe sur le
volume sonore du matériel audio restitué.
Plus le réglage des données spatiales et de la distance par rapport aux haut-parleurs est
élevé, plus le volume sonore est faible. En présence de grandes distances, il peut être
nécessaire de compenser la faible pression acoustique en augmentant le volume d’écoute
au point de menu « Volume ».
– Ambience (impression spatiale)
Le paramètre « Ambience » détermine dans quelle mesure votre pièce d’écoute doit
« colorer » le matériel audio, en d’autres mots : si vous désirez conférer à votre pièce
d’écoute virtuelle une acoustique plutôt « sèche » ou très « humide ».
Le son d’une vraie pièce a une influence fondamentale sur votre impression spatiale et sur
le son de vos haut-parleurs. C’est la raison pour laquelle les réglages d’ambiance très bas
semblent peu réalistes, la pièce virtuelle étant alors comparable à une chambre sourde.
Note: nous attirons votre attention sur le fait que les éléments de commande pour le
réglage spatial sont interactifs ! Avec par exemple un paramètre « Room Size » mis sur 0,
les haut-parleurs virtuels seront comme directement posés sur vos oreilles, de sorte
qu’aucune différence ne sera audible si vous essayez d’ajuster le paramètre « Ambience »
à votre pièce virtuelle. De même, avec un paramètre « Ambience » mis sur 0 (et simulant
ainsi une chambre sourde), des dimensions de pièce élevées modifieront certes le volume
sonore mais non pas les réflexions dans votre pièce d’écoute virtuelle, une chambre sourde
n’offrant pas de réflexion des ondes sonores.
Sélection du mode Bypass
• Si vous souhaitez utiliser la station de base HBC 1 en tant qu’amplificateur de casque stéréo
(mode Bypass), veuillez presser la touche Bypass . La diode LED correspondante s’allume
alors en bleu.
Note: même si le traitement surround est complètement désactivé en mode Bypass, le volume
de lecture continue à être influencé par les paramètres « Room Size » (dimensions de la
pièce/distance) et « Ambience » (impression spatiale) : en effet, la commutation entre le mode
« Processing » et le mode « Bypass » pourrait s’accompagner d’une hausse subite du volume
sonore et entraîner des dommages auditifs. Cette interdépendance du volume de lecture et
des paramètres « Room Size » et « Ambience » assure un équilibre de volume optimal entre les
modes « Bypass » et « Processing ».
• Si la station de base HBC 1 doit travailler en mode Headzone®, vous n’avez alors pas besoin de
presser la touche Bypass . La diode LED correspondante reste éteinte.
- 56 -
7.
Micro-casque MMX 300
Raccordement
• Le micro-casque MMX 300 est doté de deux mini-jack
(3,5 mm). Reliez le câble d’écouteurs à la station de
base HBC 1 et le câble de microphone à l’entrée microphone de votre PC ou console de jeux. Cf. également
chapitre 5.1 « Raccordement station de base HBC 1 ».
Important : lors du branchement et avant de poser le
casque sur les oreilles, il est recommandé de régler au
préalable le volume sonore au niveau minimum (via le
régleur multifonctions tout à gauche).
Mise en service
• Posez le micro-casque sur vos oreilles. Le microphone
doit se trouver à votre gauche. Positionnez le microphone latéralement devant votre bouche. Pour éviter
les bruits pop, nous vous recommandons de toujours
utiliser le microphone avec une protection anti-pop.
• Pour optimiser le confort de port, veuillez ajuster
l’arceau du micro-casque sur votre tête. Une fois le
casque posé au sommet de la tête, l'arceau doit être
ajusté de telle sorte
– que les écouteurs entourent complètement les deux
oreilles
– qu’une légère pression soit perceptible autour des
oreilles
– que les deux côtés de l’arceau aient une longueur
identique
• Tournez le support de perche (jamais le col de cygne!)
pour orienter le microphone dans la direction souhaitée.
• Tendez la protection anti-vent sur le microphone, le
microphone doit être entièrement enveloppé.
• Courbez le col de cygne flexible de telle sorte que le
microphone soit placé à environ 2 centimètres devant
votre bouche.
Important : flexion de 90 degrés maximum afin d’éviter
un allongement excessif et une usure prématurée du
col de cygne.
- 57 -
NOTICE D’UTILISATION - FRANÇAIS
8.
Formats audio
Formats audio soutenus et affichage via témoins LED « Input format »
Format
Diode LED Input Format
DTS
Dolby Digital
Pro Logic
PCM Stereo
DTS 1/01)
O
-
-
-
DTS 2/01)
O
-
-
-
DTS 2/11)
O
-
-
-
DTS 2/21)
O
-
-
-
DTS 3/01)
O
-
-
-
DTS 3/11)
O
-
-
-
DTS 3/21)
O
-
-
-
Dolby Digital 1/01)
-
O
-
-
Dolby Digital 2/01)
-
O
- / O 2)
-
Dolby Digital 2/11)
-
O
-
-
Dolby Digital 2/21)
-
O
-
-
Dolby Digital 3/01)
-
O
-
-
Dolby Digital 3/11)
-
O
-
-
Dolby Digital 3/21)
-
O
-
-
PCM Stereo
-
-
-
O 3)
1) Un canal LFE optionnel est également exploité par Headzone® Game.
2) Headzone® Game reconnaît automatiquement si le signal audio est codé Dolby Surround. Si
c’est le cas, le décodeur Pro Logic II intégré est automatiquement activé et le témoin Pro
Logic s’allume.
3) Headzone® Game effectue automatiquement une post-correction éventuellement nécessaire.
Taux d’échantillonnage soutenus: 32, 44,1 et 48 kHz
Note : avec les disques Blu-ray aux nouveaux formats audio Dolby Digital Plus / Dolby True HD /
DTS-HD Master Audio, le lecteur Blu-ray restitue le Surround « core » séparé via la sortie S/PDIF.
Headzone® Game permet de la sorte d’obtenir une résolution environ deux fois plus élevée qu’avec
les formats sonores classiques.
- 58 -
9.
Configurations Headzone® Game typiques
9.1
Raccordement à une machine de jeux avec carte son Dolby Digital Live
Station de base
HBC 1
S/P-DIF
Microphone
Moniteur
PC avec carte son Dolby Live
MMX 300
• En principe, vous pouvez avec votre système Headzone® Game utiliser tout jeu vidéo offrant
un son multicanal (surround) et soutenant la technologie Dolby Digital Live.
• A cet effet, installez dans votre PC une carte son soutenant Dolby Digital Live (par exemple
Terratec Aureon 7.1 PCI) et sélectionnez-la en tant qu’appareil audio.
• Via le câble S/P-DIF optique ou coaxial fourni, raccordez la station de base HBC 1 à la sortie
audio numérique de votre carte son Dolby Digital Live.
• Le signal audio multicanal de votre jeu est à présent encodé en un flux Dolby Digital par votre
carte son et via câble S/P-DIF transmis à la station de base HBC 1.
• Selon le design sonore du jeu, la lecture audio s’effectue en stéréo ou 5.1 Surround.
Reportez-vous aux indications de l’emballage du jeu, en l’occurrence à la présence d’un logo
Dolby Digital, pour savoir si le jeu est compatible son multicanal (surround).
• Si vous utilisez une carte son sans Dolby Digital Live, seul un signal stéréo est fourni via
l’interface S/P-DIF.
• A l’aide de l’adaptateur jack 6,35 mm fourni, branchez le casque de l’headset MMX 300 sur la
sortie casque de la station de base HBC 1.
• Branchez le microphone de MMX 300 sur l’entrée microphone de votre PC. Utilisez le cas
échéant la rallonge fournie (jack 3,5 mm).
- 59 -
NOTICE D’UTILISATION - FRANÇAIS
9.2
Raccordement à une machine de jeux avec encodage 5.1 externe
6 sorties
analogiques
Station de base
HBC 1
S/P-DIF
Encodeur Dolby/DTS®
Microphone
Moniteur
PC avec carte son
Dolby Live
MMX 300
• Si votre PC est doté d’une carte son 5.1 avec sorties analogiques, vous pouvez, à l’aide d’un
encodeur externe, utiliser tout type de jeu PC avec votre système Headzone® Game.
• A cet effet, raccordez les 6 sorties analogiques de votre carte son au 6 entrées analogiques de
votre encodeur Dolby ou DTS® (par exemple Creative DTS-610).
• Via le câble S/P-DIF optique ou coaxial fourni, raccordez la station de base HBC 1 à la sortie
audio numérique de votre encodeur Dolby ou DTS® externe.
• Le signal audio multicanal de votre jeu est à présent encodé en un flux DTS® ou Dolby Digital
et via câble S/P-DIF transmis à la station de base HBC 1.
• Selon le design sonore du jeu, la lecture audio s’effectue en stéréo ou 5.1 Surround.
Reportez-vous aux indications de l’emballage du jeu pour savoir si le jeu est compatible son
multicanal (surround).
• A l’aide de l’adaptateur jack 6,35 mm fourni, branchez le casque de l’headset MMX 300 sur la
sortie casque de la station de base HBC 1.
• Branchez le microphone de MMX 300 sur l’entrée microphone de votre PC. Utilisez le cas
échéant la rallonge fournie (jack 3,5 mm).
- 60 -
9.3
Raccordement à une console de jeux
Station de base
HBC 1
S/P-DIF
Microphone
Téléviseur
Console de jeux
MMX 300
• Via le câble S/P-DIF optique ou coaxial fourni, raccordez la station de base HBC 1 à la sortie
audio numérique de votre console de jeux.
• Assurez-vous de bien avoir réglé la sortie audio numérique en tant qu’appareil de lecture dans
la configuration audio de votre console de jeux. L’appellation exacte peut varier selon le type
d’appareil, par exemple S/P-DIF.
• Selon le design sonore du jeu, la lecture audio s’effectue en stéréo, ProLogic ou 5.1 Surround.
Reportez-vous aux indications de l’emballage du jeu, par exemple à la présence d’un logo
Dolby Digital, pour savoir si le jeu est compatible son multicanal (surround).
• A l’aide de l’adaptateur jack 6,35 mm fourni, branchez le casque de l’headset MMX 300 sur la
sortie casque de la station de base HBC 1.
• Branchez le microphone de MMX 300 sur l’entrée microphone de votre console de jeux.
Utilisez le cas échéant la rallonge fournie (jack 3,5 mm).
- 61 -
NOTICE D’UTILISATION - FRANÇAIS
9.4
Raccordement à un lecteur DVD/Blu-ray
Station de base
HBC 1
S/P-DIF
Lecteur DVD/Blue-ray
Téléviseur
MMX 300
• Via le câble S/P-DIF optique ou coaxial fourni, raccordez la station de base HBC 1 à la sortie
audio numérique de votre lecteur DVD/Blu-ray.
• Avec la télécommande de votre lecteur DVD/Blu-ray , sélectionnez le flux audio devant être
restitué. Vous trouverez généralement cette possibilité de réglage dans le menu « Audio » du
DVD/Blu-ray à lire.
• Le flux audio sélectionné (Dolby, DTS®, ProLogic ou PCM Stereo) est automatiquement identifié
et décodé par la station de base HBC 1.
• A l’aide de l’adaptateur jack 6,35 mm fourni, branchez le casque de l’headset MMX 300 sur la
sortie casque de la station de base HBC 1.
- 62 -
10. Service après-vente
En cas de nécessité, veuillez vous adresser à un technicien beyerdynamic autorisé. N’ouvrez en
aucun cas l’appareil, vous pourriez perdre vos droits de garantie.
11. Entretien
• Utilisez un tissu doux sec ou humidifié pour nettoyer l’appareil. N’utilisez jamais de produits
solvants, ces derniers endommagent les surfaces.
• Pour des raisons hygiéniques il est important de nettoyer le casque régulièrement avec un
chiffon humide. N’utilisez que d’eau, mais en aucun cas des produits détergeants. Veillez à ce
que l’eau ne s’infiltre pas dans les systèmes d’écoute. Les coussinets d’un casque sont soumis à
une certaine usure. Nous vous recommandons de remplacer de temps à autre les coussinets
afin de toujours disposer d’un casque d’une hygiène et d’une qualité sonore parfaites.
• La protection anti-vent du microphone peut être retirée et lavée à l’eau claire. Au besoin, vous
pouvez utiliser un produit nettoyant doux (p. ex. liquide vaisselle). La protection anti-vent doit
être complètement sèche avant d’être de nouveau placée sur le microphone.
12. Dépannage
Pour rétablir les réglages usine initiaux du système Headzone® Game, veuillez procéder comme
suit:
• Via la touche Standby , mettez la station de base HBC 1 en mode veille. La diode LED
correspondante s’allume alors en rouge.
• Pressez le régleur multifonctions et maintenez-le enfoncé pendant que vous allumez la
station de base HBC 1 via la touche Standby .
• Les indicateurs de niveau s’allument tout d’abord en défilant.
• Relâchez le régleur multifonctions .
• Les réglages usine sont à présent rétablis.
Problème
Cause éventuelle
Bien qu’une piste multicanal
soit lue, seul un son bicanal
parvient à Headzone® Game
(diode « PCM Stereo » est allumée, au lieu de « Dolby Digital » ou « DTS »).
• De nombreux DVD/Blu-ray
• Sélectionnez dans le menu
offrent la possibilité converde configuration de votre
tir le format de lecture sur
lecteur DVD/Blu-ray « train
l’entrée S/P-DIF entre
de bits » en tant que format
« PCM » et les données
de restitution pour la sortie
d’origine de la piste
S/P-DIF.
DVD/Blu-ray (« train de bits
»). Dans le cas de « PCM »,
un sous-mixage stéréo est
effectué et restitué à partir
de formats multicanal.
L’image virtuelle est « bancale ». • Interrupteur de marche/
arrêt Head Tracker au
verso de la station de base
HBC 1 ne se trouve pas en
position « Off ».
- 63 -
Solution
• Positionnez l’interrupteur
sur « Off ».
NOTICE D’UTILISATION - FRANÇAIS
Problème
Cause éventuelle
Solution
Aucun signal sur le casque.
• Entrée S/P-DIF sélectionnée
incorrecte.
• Sélectionnez la sortie
appropriée (optique ou
coaxiale) à l’aide du
sélecteur d’entrée situé à
l’arrière de la station de
base HBC 1.
• Le lecteur DVD/Blu-ray
raccordé ne fournit aucun
signal sur la sortie S/P-DIF
(peut se produire en présence de pistes DTS®, lorsque le lecteur ne soutient
pas la lecture DTS®).
• Sélectionnez une autre
piste sonore sur le DVD/
Blu-ray.
• L’appareil de lecture rac• Sélectionnez une autre
cordé fournit un signal PCM
piste sonore sur le support
avec taux d’échantillonnage
à lire.
trop élevé (p. ex. piste
• De nombreux DVD/Blu-ray
sonore 96 kHz d’un DVD
offrent la possibilité de réaudio).
duire les taux d’échantillonnage trop élevés.
Sélectionnez cette option
dans le menu de configuration de votre lecteur
DVD/Blu-ray.
Lors de la mise en marche de
• Comme il est décrit dans ce
Headzone® Game, les réglages
manuel, Headzone® sauvene correspondent pas au dergarde automatiquement
niers réglages mémorisés.
tous les réglages. Dans de
très rares cas, il peut arriver
que l’appareil soit éteint
durant le processus de
mémorisation ou qu’il soit
éteint avant que tous les
nouveaux réglages aient
été mémorisés.
• Les réglages de volume
dépassant 2/3 tiers de la
plage de réglage normale
ne sont pas sauvegardés
afin d’éviter que lors de la
prochaine mise en marche
de Headzone® vous ne
soyez directement exposé à
un volume sonore extrêmement élevé.
- 64 -
• Après une modification
des réglages Headzone®
Game, patientez au moins
3 secondes avant d’éteindre
l’appareil.
Si après avoir allumé
Headzone® tous les
réglages se trouvent sur
« 0 », vous pouvez effectuer
un retour aux réglages
usine initiaux, conformément aux instructions du
début de ce chapitre.
• Augmentez de nouveau le
volume sonore jusqu’à la
valeur souhaitée.
Problème
Cause éventuelle
Solution
Le matériel audio est affecté
de distorsion.
• Les niveaux de sortie audio
sont trop élevés.
• Réduisez le volume de
lecture. Utilisez à cet effet
le régleur de volume sonore
situé sur la face avant de
la station de base HBC 1.
13. Spécifications techniques
Généralités
Température ambiante autorisée . . . . de +10 °C à +40 °C avec humidité < 90%
Alimentation
Bloc d’alimentation externe, 5 VDC
Tension de fonctionnement . . . . . . . . de 100 à 240 VAC, 47 à 63 Hz
Consommation . . . . . . . . . . . . . . . . . . 20 W maximum
Sortie casque
Connecteur . . . . . . . . . . . . . . . . . . . . . . fiche jack stéréo 6,35 mm
Puissance de sortie maxi . . . . . . . . . . . 100 mW à 250 Ω @ 1 kHz
Rapport signal/bruit. . . . . . . . . . . . . . . 98 dB @ 1 kHz, pondéré A
Courbe de fréquence . . . . . . . . . . . . . . 10 Hz à 20 kHz, ±0,3 dB
Taux de distorsion + bruit . . . . . . . . . . 0,006% 1 kHz à 250 Ω, charge pour niveau de sortie maxi
Impédance de sortie . . . . . . . . . . . . . . 100 Ω
Impédance casque . . . . . . . . . . . . . . . . 32 à 600 Ω
Entrée S/P-DIF optique
Connecteur . . . . . . . . . . . . . . . . . . . . . . TOSLINK
Entrée S/P-DIF coaxiale
Connecteur . . . . . . . . . . . . . . . . . . . . . . RCA
Impédance d’entrée. . . . . . . . . . . . . . . 75 Ω
Sortie S/P-DIF optique
Connecteur . . . . . . . . . . . . . . . . . . . . . . TOSLINK
- 65 -
NOTICE D’UTILISATION - FRANÇAIS
Micro-casque MMX 300
Ecouteurs
Type de transducteur . . . . . . . . . . . . . . dynamique
Principe de fonctionnement . . . . . . . . fermé
Bande de transmission. . . . . . . . . . . . . 5 - 30 000 Hz
Impédance nominale . . . . . . . . . . . . . . 32 Ω par système
Niveau de pression sonore . . . . . . . . . 96 dB
Taux de distorsion audio . . . . . . . . . . . < 0,2%
Charge nominale maximale . . . . . . . . 100 mW
Couplage à l’oreille . . . . . . . . . . . . . . . circumaural
Isolation contre les bruits extérieurs. . env. 18 dBA
Force de pression nominale. . . . . . . . . 3,5 N
Poids, microphone et câble incl. . . . . . 380 g
Longueur et type de câble . . . . . . . . . 2,5 m, étiré
Raccordement . . . . . . . . . . . . . . . . . . . fiche jack stéréo 3,5 mm
Microphone
Type de transducteur . . . . . . . . . . . . . . condensateur (back-électret)
Principe de fonctionnement . . . . . . . . microphone à gradient de pression
Directivité . . . . . . . . . . . . . . . . . . . . . . . cardioïde
Type d’alimentation . . . . . . . . . . . . . . . alimentation AB
Tension d’alimentation . . . . . . . . . . . . 1,5 - 9 V
Consommation . . . . . . . . . . . . . . . . . . . < 0,5 mA
Impédance nominale . . . . . . . . . . . . . . env. 1,5 kΩ
Efficacité en champ libre
pour f = 1 kHz . . . . . . . . . . . . . . . . . . . 20 mV / Pa
Bande de transmission. . . . . . . . . . . . . 30 - 18 000 Hz
Taux de distorsion audio . . . . . . . . . . . 0,2% pour f = 1 kHz
Pression sonore max. . . . . . . . . . . . . . . 120 dB
Sortie de microphone . . . . . . . . . . . . . asymétrique
Dimensions
Longueur perche de microphone . . . . env. 150 mm
Diamètre tête . . . . . . . . . . . . . . . . . . . . 13 mm
Raccordement . . . . . . . . . . . . . . . . . . . fiche jack stéréo 3,5 mm
Anneau et pointe : BF, corps : masse
- 66 -
14. Glossaire*
• DTS®
DTS® caractérise un système son multicanal de la société californienne du même nom Digital
Theater Systems Inc., utilisé aussi bien au cinéma que sur disques laser, DVD/Blu-ray, CD audio
spéciaux et D-VHS. Les versions pour le cinéma et les consommateurs finaux sont toutefois
fondamentalement différentes sur le plan technique. DTS® utilise des données compressées
générées au moyen d’un procédé de compression avec pertes.
• Dolby Digital
Dolby Digital (également appelé ATSC A/52 et AC-3) est un système son multicanal utilisé au
cinéma, sur disques laser, DVD/Blu-ray et dans le domaine de la technique de la télévision.
Dolby Digital soutient jusqu’à six canaux discrets et utilise un procédé de compression psychoacoustique avec pertes.
• Dolby Digital Live
Dolby Digital Live est une technologie de codage en temps réel convertissant n’importe quel
signal son multicanal en un flux de données Dolby Digital. Par le biais d’une unique liaison
numérique, les signaux audio peuvent ainsi être transférés du PC sur des récepteurs Dolby
Digital ou des systèmes complets de Home Cinema. Liaisons multiples fastidieuses et salade de
câbles sont désormais révolues.
• Dolby Pro Logic
Dolby Pro Logic est un système son multicanal analogique mis au point en 1986 par la société
Dolby pour le domaine du cinéma à domicile. Il est basé sur le système Dolby Stereo développé
en 1976. Dolby Pro Logic décode les informations sonores spatiales à partir d’une source stéréo.
• PCM Stereo
PCM est l’abréviation de « Pulse Code Modulation ». Il s’agit d’un son bicanal numérique
semblable à celui utilisé pour les CD de musique. A l’inverse des formats sonores réducteurs de
données tels que Dolby Digital Stereo et DTS®, PCM offre un son non compressé.
• S/P-DIF
Cette abréviation signifie Sony/Philips-Digital Interface et constitue une spécification
d’interface et de bus pour la transmission de signaux audio numériques entre différents
appareils. S/P-DIF est par exemple utilisé pour les lecteurs de CD, enregistreurs DAT,
minidisques, entre lecteur DVD/Blu-ray et récepteur de Home Cinema ainsi que pour les cartes
PC audio numériques. S/P-DIF est également employé pour les chaînes audio dans les véhicules
et permet de remplacer tout un groupe de fils par un seul câble à fibres optiques insensible
aux rayonnements parasites.
• TOSLINK
TOSLINK est un système à fibres optiques standardisé pour la transmission optique de signaux
dans la plage allant jusqu’à 20 Mbit/s. A l’origine, TOSLINK a été développé par la société
Toshiba (d’où le nom TOShiba-LINK) pour relier ses lecteurs CD à ses récepteurs radio. Le
procédé a très vite été étendu aux lecteurs CD d’autres marques. Aujourd’hui, TOSLINK est
généralement utilisé pour transmettre des données à des enregistreurs minidisque ou DAT.
*Vous trouverez dans la littérature spécialisée ou sur Internet davantage d’informations sur ces différents points.
- 67 -
EC-DECLARATION
OF
CONFORMITY
Application of
Council directive:
2004/108/EC
Electromagnetic Compatibility
2006/95/EC
Low Voltage Directive
Standards to which
Conformity is declared:
EN 55013:2001+ A1:2003
EN 55020:2002+ A1:2003 +A2:2005
Emission
Immunity
EN 60065
Safety
Manufacturer’s Name:
beyerdynamic GmbH & Co. KG
Manufacturer’s Address:
Theresienstrasse 8, 74072 Heilbronn, Germany
Type of Equipment:
Surround Sound Headset System
Model Numbers:
Headzone Game
I, the undersigned, as an employee of beyerdynamic, hereby declare that the
equipment specified conforms to the above Directive and Standards.
Manufacturer’s Signature:
Full Name:
Ulrich Roth
Date:
1st September 2007
Position:
Director of R&D
- 68 -
- 69 -
NOTIZEN • NOTES
- 70 -
- 71 -
Weitere Vertriebspartner weltweit finden Sie unter www.beyerdynamic.com
For further distributors worldwide, please go to www.beyerdynamic.com
DEF 3/BA Headzone Game (06.11)/593.222 • Abbildungen nicht vertragsbindend. Änderungen und Irrtümer vorbehalten • Non-contractual illustrations. Subject to change without notice. • Illustrations non contractuelles. Sous réserve de modifications.
beyerdynamic GmbH & Co. KG
Theresienstr. 8 | 74072 Heilbronn – Germany
Tel. +49 (0) 7131 / 617 - 0 | Fax +49 (0) 7131 / 617 - 204
[email protected] | www.beyerdynamic.com