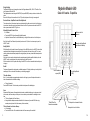
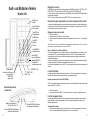
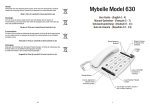
1
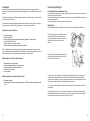
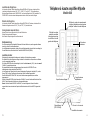
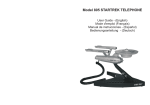
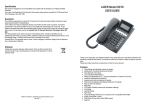
Ajuste del timbre
El Mybelle 640 le permite cambiar el volumen del timbre a ALTO, BAJO y APAGADO y el tono del timbre (pitch)
a ALTO y BAJO.
Estos ajustes se efectúan usando el interruptor de RINGTONE (tono) y RINGER (volumen) en el lado del
teléfono.
Nota con el interruptor de volumen ajustado en la posición OFF(apagado), el teléfono no sonará cuando reciba
llamadas.
Volumen del auricular Ajuste del amplificador y del tono
El tono y volumen del auricular se pueden ajustar por medio de un interruptor deslizante situado en la parte
frontal del teléfono. Con el uso normal, estos controles están inactivos y no tienen efecto en la llamada. Se
activan apretando el interruptor AMPLIFY (amplificador) y cuando la luz de AMPLIFY (amplificador) está
encendida.
Para ajustar el volumen del auricular y el tono
! Descuelgue el teléfono.
! Apriete el interruptor AMPLIFY (amplificador) (la luz del amplificador se iluminará).
! Ajuste el volumen del auricular y el tono a un nivel cómodo por medio de los interruptores deslizantes en la
parte frontal del teléfono.
Nota si el interruptor para anular el amplificador (ver más adelante) se ha ajustado en la posición ON, no es
necesario ajustar el interruptor de AMPLIFY (amplificador).
Interruptor de amplificador
Con el interruptor de amplificador (en la base del teléfono) ajustado en la posición MANUAL, el modo de
amplificador será cancelado cada vez que se cuelgue el auricular (al terminar cada llamada). Esto es más
apropiado para situaciones donde hay varias personas usando el teléfono (no todo el mundo puede necesitar
el volumen amplificado).
Si el teléfono se va a usar en situaciones donde el volumen se debe amplificar continuamente, entonces el
interruptor de AMPLIFY (amplificador) (en la base del teléfono) debe ajustarse en la posición ON (encendido).
Con éste ajuste, el modo de AMPLIFY (amplificador) no se cancela cada vez que se cuelga el teléfono.
Este producto cumple con las siguientes normas:
TBR37 (Requirements for pan-European connection to telephone networks)
TBR38 (Requirements for pan-European connection to telephone networks)
EN60950 1:2001
EN55022:1998 (EMC Emissions)
EN55024:1998 (EMC Immunity)
Para una copia de la declaración de la conformidad, escribe por favor a
Lazerbuilt Ltd, 20 Gunnels Wood Park, Stevenage, Herts, SG1 2BH
Fabricado en China por Lazerbuilt Ltd (www.lazerbuilt.co.uk)
Mybelle Amplified Telephone
Model 640
1-5
Téléphone à écoute amplifiée Mybelle
Modèle 640
6 - 10
Groß- und Bildtasten-Telefon
Mybelle 640
11 - 15
Mybelle Model 640
Guía de Usuaria - Española
16 - 19
19
Mybelle Amplified Telephone
Model 640
Re-llamada
El teléfono recordará el último número marcado (31 dígitos máximo) y le permitirá fácilmente hacer una rellamada. Esto es útil si el número marcado está comunicando.
Nota Si ha llamado a un número ocupado y desea llamar de nuevo, debe colgar el teléfono primero para
terminar la primera llamada antes de re-llamar.
Para re-llamar a un número ya marcado
9 x Picture Memory
buttons
Amplify Switch
(under base)
! Nota Si ha llamado a un número ocupado y desea llamar de nuevo, debe colgar el teléfono primero para
terminar la primera llamada antes de re-llamar.
! Descolgar el auricular.
! Oprimir el botón de REDIAL (re-llamada) El último número marcado se volverá a marcar.
Guardar/Grabar
Mientras que el botón de REDIAL (re-llamada) le permitirá recordar el último número marcado y le permitirá
hacer una nueva llamada al mismo número, el botón de SAVE (grabar/guardar) le permitirá grabar un número
marcado para poder llamar en otra ocasión.
Para grabar un número en la memoria SAVE
! Habiendo marcado el número de teléfono y mientras se está en la misma llamada, oprima el botón de
SAVE (grabar) (cualquier otro número grabado en la memoria SAVE será sobrescrito)
Para marcar un número de la memoria SAVE
! Descuelgue el auricular.
! Oprima el botón de SAVE. El último número grabado en la memoria SAVE será marcado
automáticamente.
Hold LED (light)
Amplify LED (light
Espera
Para poner una llamada en espera
! Oprima el botón HOLD (espera) y cuelgue el auricular.
Nota La luz de HOLD (espera) en el teléfono se iluminará mientras que tenga la llamada en espera.
Para volver a su llamada originalDescuelgue el auricular.
Re-llamada y pausa cronometrada para Re-marcar
100ms/300ms
Timed Recall
Ringer Volume Switch
Ringer Tone Switch
Algunas redes requieren el uso de una señal de re-llamada. Este teléfono genera un Timed Break Recall (TBR)
(pausa cronometrada para la re-llamada).
La pausa para la señal re-llamada se puede ajustar entre 100mS y 300mS por medio del interruptor en la parte
de atrás del teléfono.
Para uso en el Reino Unido y en la mayoría de otros países Europeos, el interruptor se debe ajustar a 100mS.
Para uso en Francia, el interruptor se debe ajustar a 300mS.
! Oprima el botón R cuando necesite re-llamar.
1
18
Fotollamada
El Mybelle 640 le permite grabar hasta 9 números de teléfono por medio de botones que aceptan fotos o
gráficos. Estos números se pueden marcar fácilmente descolgando el auricular y oprimiendo la foto o el gráfico
adecuado.
Connecting and Setting Up
Connecting the telephone and Handset cords.
Cada número puede tener hasta 15 dígitos y permanecerá grabado en el teléfono siempre y cuando el teléfono
se mantenga conectado a la línea.
Plug one end of the curly handset cord into the socket provided on the end of the handset, and the other end to
the socket on the left side of the phone.
Connect the straight telephone line cord to the socket at the rear of the phone (marked LINE) and the other end
to the telephone wall outlet.
Lift the handset and listen for dial tone to confirm correct connection.
Los números se pueden cambiar simplemente grabando el número nuevo en el botón requerido y se pueden
borrar siguiendo el procedimiento de 'Store' (grabado) pero omitiendo el número de teléfono.
Wall Mounting
The phone may be mounted on a suitable wall or other vertical surface, by following the procedure below.
Para grabar un número de teléfono
!
!
!
!
!
!
Descolgar el auricular.
Oprimir el botón PROG.
Entrar el número de teléfono que quiera grabar por medio del teclado (15 dígitos máximo).
Oprimir el botón PROG de nuevo.
Oprimir el botón de la foto o gráfico deseado.
Colgar el auricular para completar el procedimiento de grabación.
Nota 1 Cualquier número grabado previamente en el botón elegido, será reemplazado con el número nuevo.
Nota 2 Se puede añadir una pausa apretando el botón de REDIAL (re-llamada). Esta operación es muy útil si el
teléfono está conectado como una extensión en un sistema telefónico de oficina (PABX).
Añadir el gráfico o foto al botón de foto memoria
!
!
!
!
!
a) Slide out the clip (next to the hookswitch) and then
turn through 180° before sliding it back into place.
Note - the clip will locate into a recess in the handset,
which will hold the handset in place when wall
mounted.
b) Fit the wall mount bracket (supplied with the phone)
under the base of the phone, locating the tabs on the
bracket into the slots in the phone.
Seleccione la foto o el gráfico deseado.
Usando la plantilla suministrada, corte la foto a medida.
Levante la cubierta del marco (encima del botón).
Introduzca la foto o el gráfico.
Cierre la cubierta.
Marcando un número por medio de la foto memoria
! Descuelgue el auricular.
! Oprima el botón de la foto que tenga el número deseado. El teléfono marcará el número grabado en ese
botón.
c) Select an area of the wall where you would like to hang your phone and check that there are no pipes or
electrical cables buried in the wall in this area. Note cables to electrical switches and sockets usually run
vertically in the wall, therefore do not mount your phone directly above or below an electrical switch or socket
unless you are sure that the cables will not be damaged by the fixing screws.
d) Fix 2 screws into the wall leaving the heads of the screws protruding. The screws should be fixed 100 mm
vertically apart.
e) Align the keyhole slots in the rear of the phone with the heads of the screws and slide the phone slightly
downwards so that the heads of the screws locate in the slots. Note adjust the amount that the screw heads
protrude from the wall so that when the phone is finally hung, it lies flat.
17
2
Ringer Settings
Mybelle Model 640
The Mybelle 640 allows you to change the volume of the Ringer between HIGH, LOW & OFF and the Tone
(pitch), between HIGH and LOW.
These adjustments are made using the RINGTONE (tone) and RINGER (volume), switches on the side of the
phone.
Note with the Ringer Volume switch set in the OFF position, the phone will not ring for incoming calls.
Guía de Usuaria - Española
Receive Volume - Amplification and Tone Adjustment
The volume and tone of the received speech may be adjusted by the slider controls on the front of the phone.
In normal use, these slider controls are inactive and have no effect. They become active when the AMPLIFY
button is pressed and the AMPLIFY light is on.
Adjusting Receive Volume & Tone
9 botones de foto
memoria
! Lift handset
! Press the AMPLIFY button (the amplify light will illuminate)
! Adjust the Volume and Tone to a comfortable level, by using the Slider controls on front of the phone.
Note if the Amplify Over-Ride switch (see below) has been set to ON, then it is not necessary to press the
AMPLIFY button.
Interruptor de Amplificador
(en la base del teléfono)
Amplify Switch
With the Amplify switch (under the base of the phone) set to the MANUAL position, the AMPLIFY mode will be
cancelled each time the handset is returned to the On-Hook position (at the end of every call). This is most
suited to situations where different people will be using the phone (some may not need the received speech to
be amplified).
If the phone is to be used in a situation where the received speech should be amplified all the time, then the
AMPLIFY switch (under the base of the phone) should be set to the ON position.
With this switch set to the ON position the setting of the AMPLIFY mode is not cancelled each time the phone
is hung up.
Redial
The phone will remember the last number you dialled (maximum of 31 digits) and allow you to easily dial that
number again. This can be useful if the number you are dialling is engaged.
Luz de llamada en
espera (LED)
Luz de Amplificador
(LED)
To Redial a Number
Note - If you have called an engaged number and wish to call it again, you must first place the handset on
hook to terminate the first call before re-dialling.
! Pick up the handset.
Press the REDIAL button. The last number you dialled on the phone will be dialled again.
Save
Whereas the Redial memory will remember the last number you dialled and allow you to make your next call
to this number, the Save memory will allow you to store a number you have dialled for re-dialling at a later
time.
! To Store a Number in the Save Memory
! Having dialled the telephone number and whilst still on the same call, press the SAVE button (any
number previously stored in the Save memory will be overwritten).
To Dial a Number from the Save Memory
! Lift the handset.
! Press the SAVE button. The number last stored in the Save memory will be re-dialled.
3
100ms/300ms Rellamada cronometrada
Interruptor de volumen del timbre
Interruptor de tono del timbre
16
Ein Gespräch halten
Um ein Gespräch zu halten (kurzzeitiges Unterbrechen, ohne die Verbindung zu trennen), drücken Sie die Taste
HOLD und legen Sie ggf. den Hörer auf. Die “HOLD-LED" links in der halbtransparenten Leiste auf der
Vorderseite leuchtet. Sie können dann z. B. eine Rückfrage im Raum führen, die Ihr Gesprächspartner nicht
mithören kann.
Um das Gespräch fortzusetzen, nehmen Sie den entweder den Hörer wieder ab oder drücken Sie die Taste
HOLD erneut. Die “HOLD-LED" erlischt.
Hinweis: Während des Haltens von Telefongesprächen entstehen Kosten, auch wenn während des Haltens der
Hörer aufgelegt ist.
Die R-Taste (Flash)
Aktiviert wird ein Flash-Befehl durch Drücken der R-Taste R. Der Flash 100 ms wird in TK-Anlagen und sog. a/bAdaptern benötigt. Zur Nutzung der T-Net Dienste, bei direktem Anschluss an das Telefonnetz, z. B. der
Deutschen Telekom, stellen Sie auf 300 ms (Hook Flash).
Der Schalter R zur Auswahl von “100MS" oder “300MS" befindet sich auf der rechten Seite des Telefons.
Hinweis: Die Änderung der Einstellung dieses Schalters wird nach dem Auflegen des Hörers wirksam.
Hold
To place a call on HOLD
! Press the HOLD button and hang up the handset.
! Note - The 'HOLD' light on the front of the phone will illuminate when the call is on HOLD.
To Return to a HELD call
! Lift the handset.
Recall and Recall Time Setting
Some network services require the use of a Recall signal. This phone generates a Timed Break Recall (TBR).
The period of the Recall signal can be adjusted between 100mS and 300mS, by the switch on the side of the
phone.
For use in the UK and most other European countries, the switch should be set to 100mS.
For use in France, the switch should be set to 300mS.
! Press the R button when a recall is required.
Photo Dialling
Anschließen eines zweiten Geräts an das Mybelle 640
An der Buchse PHONE auf der Rückseite des Geräts können Sie ein zweites Gerät (z.B. Telefon, Fax,
Anrufbeantworter, Zusatzklingel) anschließen.
Sie benötigen dazu ein Kabel mit Modular-Steckern (RJ-11). Dieses Kabel ist nicht im Lieferumfang.
Wo dieses Kabel am zweiten Gerät angeschlossen wird, entnehmen Sie bitte der Bedienungsanleitung des
zweiten Geräts.
Fehlerbehebung
Das Telefon klingelt nicht bei ankommenden Rufen
Prüfen Sie, ob alle Stecker richtig verbunden sind.
Prüfen Sie, ob der Schalter für die Lautstärke des Klingeltons (auf der rechten Seite des Geräts) auf AUS (”OFF")
steht.
The Mybelle 640 allows you to store up to 9 telephone numbers under buttons that will accept a photograph or
picture. These numbers can be easily dialled by picking up the handset and pressing the appropriate picture.
Each number can be up to 15 digits long and will remain stored in the telephone provided the phone remains
connected to the telephone line.
Numbers can be changed by simply storing the new number in the required button and can be erased by
following the 'Store' procedure but omitting the telephone number.
Storing a Telephone Number
!
!
!
!
!
!
Lift the handset
Press the PROG button.
Enter the telephone number you wish to store on the telephone keypad (maximum of 15 digits)
Press the PROG button again.
Press the Picture button that you would like to hold the number.
Hang up the handset to complete the store procedure
Sie hören keinen Wählton oder keine Sprache im Hörer
Stellen Sie sicher, dass das Telefonanschlusskabel und das Spiralkabel vom Hörer zum Telefon korrekt
eingesteckt sind. Falls möglich tauschen Sie das komplette Telefon gegen ein sicher funktionierendes aus, um
die Leitung und die Anschlussdose zu testen.
Note 1 any number previously stored under the button you have chosen, will be replaced by the new number you
have stored.
Note 2 a pause may be inserted in the stored number by pressing the REDIAL button. This may be useful if the
phone is connected as an extension of an office telephone system (PABX)
Garantiebedingungen
Adding the Picture or Photo to the Picture Memory Button
Die Gewährleistung erfolgt im Rahmen der gesetzlichen Bestimmungen. Das Gerät (inkl. Kabel) darf nicht
geöffnet, modifiziert oder beschädigt worden sein. Weitere Fremdeinwirkungen unterliegen ebenfalls nicht der
Gewährleistung. Nachweis des Anspruches ist durch ordnungsgemäßen Kaufbeleg (im Original) zu erbringen.
Gemacht in China für Lazerbuilt Ltd (www.lazerbuilt.co.uk)
Dieses Produkt entspricht den Bedingungen der RTTE-Vorgaben 1999/5/EEC. Um eine Durchschrift der
Konformitätserklärung zu erhalten, schreiben Sie bitte an Lazerbuilt Ltd, 20 Gunnelswood Park, Stevenage,
Herts, Sg1 2BH, England
15
!
!
!
!
!
Select the photo or picture you wish to use.
Using the template provided, cut the picture to size
Lift the cover of the photo frame (on top of the button)
Insert the photo
Re-fit the cover
Dialling a Number from the Picture Memory
! Lift the handset
! Press the picture button that contains the required number. The telephone will dial the number stored under
that button.
4
Schalter “AMPLIFIER" (Verstärker) an der Unterseite
Trouble shooting
Ringer does not ring for incoming calls make sure the ringer volume switch, on the side of the phone, is set
to HI or LO.
Unable to get dial tone when the handset is lifted make sure the telephone line cord and handset surly cords
are properly located into the sockets on the phone. Make sure the line core is plugged into the telephone wall
socket. If possible, try another phone in the wall socket to check that the line is OK.
Schalter AMPLIFIER. Hier wird die Betriebsart des
Verstärkers eingestellt.
Entweder immer ein (”ON") oder manuell (”MANUAL").
Siehe Kapitel “Lautstärke im Hörer”
Guarantee/Service
Your telephone is guaranteed for a period of 12 months from the date of purchase. Before returning for repair,
please read the section 'Troubleshooting' (in this guide).
Guarantee Procedure
In the unlikely event that your Mybelle telephone develops a fault within the first month of purchase, it should be
returned with a copy of the purchase invoice, to your retailer who will exchange it for a new one. If your
telephone becomes faulty within the guarantee period but after the first month, it should be returned, with a copy
of the purchase invoice, for repair to the address shown below.
Lazerbuilt Ltd, 20, Gunnels Wood Park, Stevenage, Herts, SG1 2BH
After the guarantee period, return your phone to the address shown. Indicate the problems you are experiencing
and include your name, address, telephone number and a postal order/cheque for £4.00 to cover the handling
charge. Lazerbuilt will then send you an estimate for the repair.
Important Note -This guarantee does not cover faults due to the following reasons:- Misuse; negligence; faults on
the telephone line; damage due to lightening.
This guarantee does not affect your statutory rights.
Speicherplätze
Häufig gewählte Rufnummern können gespeichert und durch Drücken von einer Taste gewählt werden.
Das Mybelle 640 hat 10 solcher Zielwahlspeicher (Wahl mit einer Taste): die Taste SAVE und 9 große BildTasten.
Eine Rufnummer auf der Taste SAVE speichern
Nehmen Sie den Hörer ab und wählen Sie die gewünschte Rufnummer.
Drücken Sie die Taste SAVE. Der Teilnehmer wird dabei gleichzeitig gerufen und die Rufnummer gespeichert.
Legen Sie den Hörer auf um den Vorgang abzuschließen.
Eine Rufnummer mit der Taste SAVE anrufen
Heben Sie den Hörer ab und warten Sie bis Sie den Wählton hören.
Drücken Sie die Taste SAVE.
Die Rufnummer wird dadurch gewählt.
Eine Rufnummer auf einer Bild-Taste speichern
Disposal
Please take care when disposing of this product. At the end of the products life it should be
entered into a recycling scheme. It should not be disposed of in normal domestic waste
This product complies with the following standards
TBR37 (Requirements for pan-European connection to telephone networks)
TBR38 (Requirements for pan-European connection to telephone networks)
EN60950 1:2001
EN55022:1998 (EMC Emissions)
EN55024:1998 (EMC Immunity)
For a copy of the declaration of conformity, please write to
Lazerbuilt Ltd, 20 Gunnels Wood Park, Stevenage, Herts, SG1 2BH
Made in China for Lazerbuilt Ltd (www.lazerbuilt.co.uk)
5
Nehmen Sie den Hörer ab und drücken Sie die Taste PROG.
Geben Sie die gewünschte Rufnummer ein.
Drücken Sie erneut die Taste PROG.
Drücken Sie die Bild-Taste, unter der Sie die Rufnummer speichern wollen.
Legen Sie den Hörer auf um den Vorgang abzuschließen.
Eine Rufnummer mit einer Bild-Taste anrufen
Heben Sie den Hörer ab und warten Sie, bis Sie den Wählton hören.
Drücken Sie die gewünschte Bild-Taste.
Die Rufnummer wird dadurch gewählt.
Anbringen eines Bildes an einer Bild-Taste
Schneiden Sie das gewünschte Bild mit Hilfe der mitgelieferten Schablone auf die passende Größe
zu.
Heben Sie die Abdeckung der Bild-Taste vorsichtig mit dem Fingernagel an der Vorderseite der
Klappe an.
Setzen Sie das Bild ein.
Schließen Sie die Abdeckung der Bild-Taste wieder.
14
Lautstärke des Klingeltones
Auf der rechten Seite des Telefons finden Sie den Schalter RINGER mit 3 Positionen, mit welchem Sie die
Lautstärke des Klingeltons zwischen “AUS" (”OFF"), “LEISE" (”LO") und “LAUT" (”HI") einstellen können.
Bei jedem Klingeln leuchten auch die “RINGER-LEDs", auch wenn der Klingelton auf “AUS" geschaltet ist. Die
“RINGER-LEDs" sind in der vorderen halbtransparenten Leiste des Geräts, sowie seitlich, integriert.
Téléphone à écoute amplifiée Mybelle
Modèle 640
Melodie des Klingeltons
Enficher le cordon de raccordement
à la ligne téléphonique dans la prise
indiquée l’arrière de votre téléphone
Auf der rechten Seite des Telefons finden Sie den Schalter RINGTONE mit 2 Positionen, mit welchem Sie die
Melodie des Klingeltons zwischen “HOCH" (”HI") und “TIEF" (”LO") einstellen können.
Ein abgehendes Gespräch führen
Nehmen Sie den Hörer ab und warten Sie, bis Sie den Wählton hören.
Wählen Sie die gewünschte Rufnummer.
Nach Ende des Gesprächs legen Sie den Hörer wieder auf.
Wahlwiederholung
Enficher le cordon
spiralé du combiné
dans la prise prévue
à cet effet sur le côté
gauche du téléphone
Das Telefon speichert die zuletzt gewählte Rufnummer. Dies kann hilfreich sein, wenn die angerufene Nummer
besetzt ist, oder der Ruf nicht beantwortet wird.
Um die Wahlwiederholung einzuleiten, drücken Sie kurz den Gabelumschalter (oder den Hörer kurz auflegen) bis
Sie den Wählton hören, dann drücken Sie die Taste WAHLWIEDERHOLUNG (REDIAL).
9 x touches
mémoires
Lautstärke im Hörer
Bitte beachten Sie die jeweiligen Einstellungen der Lautstärke, um Gehörschäden zu vermeiden.
Das Mybelle 640 hat einen integrierten Leistungs-Verstärker für die Lautstärke im Hörer, welcher vom Benutzer
ein- oder ausgeschaltet werden kann.
Der Schalter AMPLIFIER auf der Unterseite legt fest, ob der Verstärker immer ein („ON") ist, oder ob er manuell
(”MANUAL") zugeschaltet werden kann.
Bei eingeschaltetem Verstärker und abgenommenem Hörer leuchtet die “AMPLIFIER-LED" in der
halbtransparenten Leiste unterhalb der Taste AMPLIFY.
Auf der Oberseite des Telefons finden Sie je einen Schieberegler zur Regelung der Lautstärke (VOL.) und des
Klangs (TONE) im Hörer. Diese Regler sind nur wirksam, falls der Verstärker eingeschaltet ist.
Wenn der Schalter AMPLIFIER auf “ON" steht, ist der Verstärker immer eingeschaltet, wenn der Hörer
abgenommen ist.
Steht der Schalter AMPLIFIER (auf der Unterseite) auf “MANUAL", kann der Verstärker bei Bedarf mit der Taste
AMPLIFY auf der Oberseite des Gerätes ein- oder ausgeschaltet werden.
Hinweis: Steht der Schalter AMPLIFIER auf “MANUAL", wird nach Auflegen des Hörers der Verstärker
ausgeschaltet und muss beim nächsten Gespräch bei Bedarf wieder durch die Taste AMPLIFY eingeschaltet
werden.
Voyant lumineuxd’appel
Signal d’appel
(100 / 300 mS)
Voyant lumineux
amplificateur
Volume de la sonnerie
Tonalité de la sonnerie
13
6
Branchement et mise en service
Branchement des cordons du téléphone et du combiné.
Clipez l'un des embout du cordon spiralé dans la prise prévu à cet effet à la base du combiné, et l'autre embout
dans la prise prévue sur le côté gauche du téléphone.
Branchez le cordon de raccordement à l'arrière de l'appareil (fiche « LINE ») et la fiche dans votre prise de
téléphone murale.
Décrochez le combiné pour vous assurer que vous avez bien branché votre appareil. Si l'appareil est
correctement branché vous devez entendre la tonalité de connexion au réseau.
Accrochage mural
Votre téléphone peut être accroché sur un mur ou tout autre surface verticale adaptée. Il vous suffit pour cela de
suivre les instructions suivantes :
Sicherheitshinweise
!
!
!
!
!
!
!
!
!
!
Nicht in feuchten Räumen verwenden (z.B. Badezimmer, in der Nähe von Feuchtigkeit usw.).
Das Gerät ist nicht spritzwasserfest. Nur für trockene Räume.
Anschlusskabel unfallsicher verlegen.
Reparieren oder öffnen Sie selbst niemals das Gerät, sondern wenden Sie sich an den technischen Service.
Wenn eines der Kabel beschädigt oder defekt ist, darf das Gerät nicht mehr betrieben werden.
Wenn Flüssigkeiten in das Gerät eingedrungen sind, ziehen Sie sofort das Telefonkabel aus der
Telefondose. Vor einer erneuten Inbetriebnahme lassen Sie bitte das Gerät von einem Fachmann
überprüfen.
Bitte bewahren Sie diese Bedienungsanleitung auf, sie gehört zum Gerät.
Das Mybelle 640 darf nicht umgebaut oder geändert werden.
Bei Fragen zur Sicherheit, Funktion oder Anschluss wenden Sie sich an einen Fachmann.
Bitte beachten Sie die Einstellung der Hörerlautstärke, um Gehörschäden zu vermeiden.
Installation
a) Sur le devant de l'appareil, (là ù s'emboîte la
partie haute du combiné) localisez et faites
sortir le clip. Faites pivoter celui-ci de 180°
avant de le remettre en place. NOTA La partie
désormais protubérante du clip permet
d'accrocher le combiné en position verticale.
Packen Sie Ihr Telefon aus.
Verbinden Sie das Hörer-Spiralkabel mit dem Hörer und das andere Ende des Kabels mit der kleinen Buchse auf
der linken Seite des Telefons. Bitte beachten Sie, dass der kleine Modularstecker hörbar einrastet. Andernfalls ist
keine korrekte Verbindung hergestellt.
Stecken Sie nun das mitgelieferte Telefonkabel (TAE-F-Kabel) in die Modular-Buchse LINE auf der Rückseite des
Telefons (der Stecker muss hörbar einrasten) und stecken Sie es dann in den mit F markierten Steckplatz Ihrer
TAE-Dose (Telefondose).
Falls Sie die Kabel wieder ausstecken wollen, drücken Sie an den Modular-Steckern die Rastnase, damit die
Stecker entriegelt werden können.
Das Gerät ist nach dem Ende der Lebensdauer entsprechend den gesetzlichen Bestimmungen zu entsorgen.
Wandmontage
b) Fixez le support mural (fourni avec votre
appareil) sous la base de votre téléphone,
en introduisant les taquets du support dans
les encoches de la base du téléphone
prévues à cet effet.
c) Choisissez l'endroit du mur sur lequel vous voulez fixer votre téléphone et vérifiez qu'il n'y a pas de tuyaux ou
de câbles électriques à cet emplacement. NOTA les câbles électriques sont normalement en position verticale
au dessus ou en dessous des appliques et des prises. Ne placez donc pas votre téléphone directement au
dessus ou en dessous d'une applique ou d'une prise électrique à moins que vous soyez certain de ne pas
pouvoir abîmer les câbles avec les vis de fixation.
Ihr Telefon ist als Tischgerät und auch für die Wandmontage geeignet.
Bringen Sie die mitgelieferte Wandhalterung auf der Unterseite des Telefons an, indem Sie die
Laschen an der Halterung in die passenden Schlitze am Telefon drücken. Bohren Sie zwei Löcher im
Abstand von 83 mm senkrecht übereinander in die Wand. Bitte stellen Sie vorher sicher, dass keine
Kabel oder Rohre an der betroffenen Stelle in der Wand verlegt sind. Gehen Sie kein Risiko ein, bei
Unklarheit hilft ein Fachmann. Schrauben und Dübel erhalten Sie im Fachhandel. Stecken Sie Dübel
in die Löcher und drehen Sie in beide Dübel je eine Schraube so weit hinein, bis noch etwa 3 mm
Abstand zwischen Wand und Schraubenkopf sind. Der Hörer-Halteclip (siehe Bild) muss nun von
Einstellung „Tischgerät" auf Einstellung „Wandmontage" umgestellt werden. Schieben Sie ihn aus
seiner Halterung nach hinten bzw. oben weg und stecken ihn umgedreht wieder hinein.
Hängen Sie nun das Telefon an den vorgesehenen Öffnungen (auf der Unterseite des Telefons) auf
die Schraubenköpfe. Korrigieren Sie evtl. den Abstand der Schrauben zur Wand, um sicherzustellen,
dass das Telefon fest an der Wand hängt.
d) Fixez 2 vis dans votre mur en laissant les têtes dépasser. Les vis doivent être espacées de 100 mm sur la
même ligne horizontale.
e) Alignez les trous à l'arrière du téléphone avec les têtes des vis et faiteslisser votre appareil vers le bas afin que
celles-ci s'emboîtent dans les trous. NOTA Vous devez ajuster la longueur de dépassement des têtes des vis de
façon à ce que le téléphone soit bien à plat contre le mur.
7
12
Groß- und Bildtasten-Telefon
Mybelle 640
Bild-Tasten für
Zielwahl
Taste HOLD für die
Funktion halten
Taste PROG zur
Programmierung
der Bild-Tasten
Taste SAVE
(Zielwahl)
Le Mybelle 640 vous permet de régler le volume de la sonnerie (RINGER) des appels sur FORT (HIGH), BAS
(LOW) et ARRET (OFF), ainsi que la tonalité (RINGTONE) sur HAUTE (HIGH) ou BASE (LOW).
Pour cela, vous devez utiliser les boutons de la sonnerie (RINGER) et de la tonalité (RINGTONE) positionnés sur
le côté droit de votre appareil.
NOTA Si le bouton du volume est sur la position ARRET (OFF), vous n'avez pas de sonnerie.
Réception des appels Augmentation du volume et ajustement de la tonalité
Le volume et la tonalité des appels reçus peuvent être ajustés grâce aux boutons de contrôle positionnés sur le
devant de l'appareil. Attention les fonctions de ces boutons ne sont activées que lorsque la touche « AMPLIFY »
est enclenchée et que le voyant lumineux est allumé.
Réglage du volume et de la tonalité
! Décrochez le combiné
! Appuyez sur la touche « AMPLIFY» (celle-ci s'illumine)
! Ajustez le volume et la tonalité selon vos besoins en déplaçant les touches « Tone » et « Vol » de gauche à
droite.
R-Taste
NOTA Si le bouton sous la base, contrôlant la fonction d'amplificateur est positionnée sur « ON » (voir ci-après),
alors il n'est pas nécessaire d'appuyer sur la touche « AMPLIFY » .
Taste REDIAL für
Wahlwiederholung
Activer / désactiver le bouton d'amplification
Taste AMPLIFY.
Nur in der Betriebsart
manuell („MANUAL")
wird hiermit der
Verstärker eingeschaltet
Schieberegler für
Lautstärke und Klang, nur
wenn Verstärker
(AMPLIFIER)
eingeschaltet
Réglage de la sonnerie
“AMPLIFIER” - LED
“RING” - LED
“HOLD" - LED
Sous la base du téléphone se trouve le bouton de contrôle de la fonction d'amplification. Lorsque celui-ci est en
position manuelle (OFF), la fonction d'amplification de la touche « AMPLIFY » s'annule chaque fois que le
combiné est raccroché. Cette position est utile lorsque plusieurs personnes n'ayant pas les mêmes besoins
auditifs utilisent le téléphone.
Lorsque le ou les utilisateurs ont toujours besoin d'augmenter le volume et la tonalité de réception des appels, le
bouton de contrôle peut être activé de façon constante en étant placé sur "ON".
Ainsi, la fonction d'augmentation ( touche « AMPLIFY ») n'est pas annulée chaque fois qu'une communication est
terminée.
Fonction Bis (Redial)
Le téléphone mémorise le dernier numéro appelé (maximum 31 chiffres), vous permettant ainsi de le rappeler
facilement. Cette fonction est utile lorsque le numéro que vous appelez est occupé.
Rappeler un numéro par la fonction BIS (REDIAL)
NOTA Si vous souhaitez rappeler un numéro qui était occupé, vous devez d'abords raccrocher le combiné avant
d'utiliser la touche BIS (« REDIAL »).
Bedienelemente an der
rechten Seite
! Décrochez le combiné.
! Appuyez sur la touche Bis (« REDIAL »). Le dernier numéro que vous avez fait est appelé de nouveau.
Fonction Sauvegarde (Save)
Schalter R zur Auswahl von
100 oder 300 ms Flash
Schalter RINGTONE zum Einstellen
der Melodie des Klingeltons
11
Schalter RINGER zum Einstellen
der Lautstärke des Klingeltons
Alors que la mémoire de la fonction bis (« Redial ») enregistre le dernier numéro appelé et vous permet de le
rappeler facilement, la fonction de sauvegarde (« Save ») vous permet d'enregistrer un numéro que vous
souhaitez rappeler plus tard.
Sauvegarde d'un numéro
! Lorsque vous avez appelé un numéro et que vous êtes en train de communiquer, appuyez sur la touche «
Save » (tout numéro précédemment sauvegardé sous « Save » est alors effacé).
8
Appeler un numéro à partir de la touche de sauvegarde « Save »)
! Décrochez le combiné.
! Appuyez sur la touche « SAVE ». Le dernier numéro sauvegardé est appelé.
Mise en attente des appels (« Hold »)
Pour mettre un appel en attente
! Appuyez sur la touche « HOLD » et raccrochez le combiné.
Aide en cas de défaillance
Pas de sonnerie des appels entrant assurez vous que le bouton du volume de la sonnerie (RINGER), sur le
côté du téléphone est sur FORT ( HI) ou BAS (LO), et non pas sur ARRET ( OFF)..
Pas de tonalité réseau en décrochant le combiné assurez vous que le cordon de raccordement est bien
enfiché dans la base du téléphone et bien branché à la prise murale, et que le cordon du combiné est bien
enfiché dans le combiné et à la base du téléphone. Si possible, essayez un autre téléphone pour vous assurer
que ce n'est pas un problème de réseau.
Garantie/Service
NOTA La touche « HOLD » sur le devant de votre téléphone s'illumine lorsqu'un appel est mis en attente.
Période de garantie
Pour reprendre l'appel
Votre téléphone est garanti pour une période de 12 mois à partir de la date d'achat.
Avant de renvoyer votre téléphone, relisez le paragraphe ci-dessus « Aide en cas de défaillance ».
! Décrochez le combiné.
Signal d'appel et installation
Pour pouvoir utiliser le Signal d'appel en France, vous devez vous assurez que cette fonction de votre
téléphone est réglée sur 300mS.
Ceci est fait en réglant le bouton Signal d'appel situé sur le côté de votre téléphone sur 300mS.
Appuyez sur la touche "R" lorsque vous souhaitez utiliser la fonction Signal d'appel.
Appel à partir des touches photo
Le Mybelle 640 vous permet d'enregistrer 9 numéros de téléphone sous les touches photo. Pour appeler ces
numéros, il vous suffit de décrocher votre combiné et d'appuyer sur la touche photo souhaitée.
Les numéros peuvent faire 15 chiffres au maximum. Ils restent en mémoire tant que le téléphone n'est pas
débranché.
Les numéros peuvent être changés en enregistrant un nouveau numéro par-dessus et peuvent être éliminés en
suivant la procédure d'enregistrement (« Store») mais sans enregistrer de numéro.
Conditions de la garantie:
Si votre téléphone Mybelle, pour autant que vous l'avez utilisé conformément à sa destination et aux instructions
du mode d'emploi, devait présenter une panne dans le mois suivant votre achat, retournez celui-ci à votre
revendeur, avec la copie de votre facture, pour remplacement.
Au delà du premier mois, et dans la limite de la garantie, retournez votre appareil, avec la copie de votre facture,
chez votre revendeur pour réparation.
Au delà de la période de garantie, nos services pourront vérifier votre appareil. Les frais de réparation ou de
remplacement vous seront alors facturés directement. Veuillez retourner votre appareil à votre revendeur ou à
notre réparateur.
Attention: Cette garantie ne couvre pas les dommages résultant d'une utilisation non conforme, négligence, des
dommages provoqués par une cause extérieure à l'appareil et notamment par foudre, incendie, dégâts des eaux.
Enegistrement d'un numéro de téléphone (« PROG »)
!
!
!
!
!
!
Décrochez le combiné
Appuyez sur la touche d'enregistrement « PROG »
Enregistrez le numéro de téléphone que vous voulez sauvegarder (15 chiffres au maximum)
Appuyez de nouveau sur la touche d'enregistrement « PROG »
Appuyez sur la touche photo sous laquelle vous voulez enregistrer le numéro.
Raccrochez le combiné pour terminer l'enregistrement.
NOTA 1 Tout numéro préalablement enregistré sous la touche photo choisie sera annulé.
NOTA 2 Une pause peut être insérée dans le numéro enregistré en appuyant sur la touche REDIAL. Ceci peut
être utile si votre téléphone est relié à une installation secondaire (par exemple dans un bureau).
Insérer l'image ou la Photo sous la touche choisie
!
!
!
!
!
Choisissez la photo ou l'image que vous voulez utiliser
Utilisez le modèle inclus pour couper à la taille requise
Soulevez le couvercle sur la touche choisie
Insérez la photo ou l'image
Refermez le couvercle
Recyclage:
En fin de vie de ce produit, veuillez prendre soin d'en disposer dans le respect de
l'environnement, en le portant dans votre centre de recyclage le plus proche. Ne le jetez
pas dans votre poubelle domestique.
Auquel cette déclaration se rapporte est en conformité avec les standards et normes suivantes
TBR37 (Spécifications pour raccordement au réseau télephonique au niveau pan-européen)
TBR38 (Spécifications pour raccordement au réseau télephonique au niveau pan-européen)
EN60950 Modifications 1 â 5 incluses (Sécurité)
EN55022:1998 (EMC Emissions)
EN55024-1:1998 (EMC Immunité)
En accord avec les dispositions de la directive RTTE
Appeler à partir des touches photo
! Décrochez le combiné
! Appuyez sur la touche contenant le numéro désiré. Le téléphone appele le numéro enregistré sous cette
touche.
9
Fabriqué en Chine pour Lazerbuilt Ltd (www.lazerbuilt.co.uk)
10