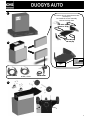
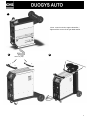
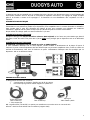
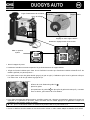
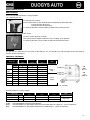
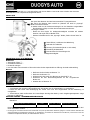
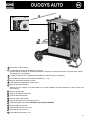
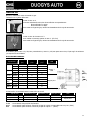
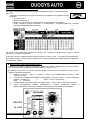
1
P : 4-12 / 58-64 P : 13-21 / 58-64 P : 22-30 / 58-64 P : 31-39 / 58-64 P : 40-48 / 58-64 P : 49-64 S121-V10-240211 - 73524 MONTAGE / ASSEMBLY 1 Pré monter les vis manuellement sans les bloquer / Pre-install the screws manually without blocking them Vis 5x12 (X8) Screws 5 x 12 (8) Ecrous M5 (X8) M5 nuts (x8) 2 ACIER / STEEL ACIER / STEEL SPOOL GUN 3 2 4 Visser toutes les vis du support bouteilles / Tighten all the screws of the gas bottle stand 5 6 M5 x 12 (X4) 3 DESCRIPTION Merci de votre choix ! Afin de tirer le maximum de satisfaction de votre poste, veuillez lire avec attention ce qui suit : Le DuoGys Auto est recommandé pour le soudage des aciers, des inox, des aluminums et pour le soudo brasage des aciers haute résistance avec les fils CuSi et CuAl (idéal en réparation carrosserie). Son réglage est simple et rapide grâce à sa fonction « vitesse de fil synergique ». Il fonctionne sur une alimentation 400 V triphasée ou 230 V triphasée. ALIMENTATION ELECTRIQUE Le courant effectif absorbé (I1eff) est indiqué sur l'appareil, pour les conditions d'utilisation maximales. Vérifier que l'alimentation et ses protections (fusible et/ou disjoncteur) sont compatibles avec le courant nécessaire en utilisation. Dans certains pays, il peut être nécessaire de changer la prise pour permettre une utilisation aux conditions maximales. L'appareil doit être placé de façon telle que la fiche de prise de courant soit accessible. Ne pas utiliser de rallonge ayant une section inférieure à 2,5 mm². ALIMENTATION 400V TRIPHASEE D’origine le Duogys Auto est pré-monté en usine en 400V triphasé et livré avec une prise 16A de type RS-015 CEE 400V. Il doit être relié à une prise 400 V (50 Hz) AVEC terre protégée par un disjoncteur 10A et un différentiel 30mA. ALIMENTATION 230V TRIPHASEE ATTENTION : Cet appareil est pré-monté en usine en 400V triphasé. Si votre installation électrique est en 230V triphasé, veuillez modifier le branchement de la plaque à bornes à l’intérieur du poste. Cette manipulation doit être effectuée par une personne compétente. Pour ce faire se référer au schéma de branchement 230V situé à l’intérieur du poste. L’alimentation électrique doit être protégée par un disjoncteur 16A et un différentiel 30mA. PRESENTATION DU POSTE Le Duogys Auto est livré avec 3 torches: 2 torches acier de 3 mètres, équipée pour du fil de 0,8 mm. Une torche spool gun de 4 mètres équipée en 0,8mm ALU Spool gun Torche acier150A Torche acier 150A Tube contact 0,8 Alu Tube contact 0,8 Tube contact 0,8 + Tube contact 0,6 NB : La gaîne téflon (ref.041578 ) en option pour transformer une torche acier en une torche Alu Sécurité : Seule la torche utilisée est sous tension (exigence PSA) 4 13 9 8 16 3 17 14 7 6 5 1 2 10 15 4 5 12 68 kg 11 1 Interrupteur marche – arrêt 2 Réglage de puissance par un commutateur 7 positions : permet d’ajuster la tension de soudage en sortie de générateur. Le réglage de tension de sortie est proportionnel à l’épaisseur du matériau à souder. 3 Clavier de réglages des paramètres de soudage (mode manuel ou automatique). 4 Commutateur 2 positons pour le choix de la torche utilisée (T1 ou T2). 5 Raccords torche au standard européen. 6 Connecteur de commande du spool gun. 7 Voyant de protection thermique sur le clavier de commande : signale une coupure thermique lorsque l’appareil est utilisé de façon intensive (coupure de plusieurs minutes). 8 Support torches 9 Support câbles torches 10 Câble d’alimentation (6m) 11 Câble de masse avec pince 250A. 12 Support bouteilles (maxi 2 bouteilles de 4m3). 13 Chaine de fixation pour bouteilles. Attention : bien fixer les bouteilles 14 Support bobine Ø 200 mm. 15 Support bobine Ø 200 ou 300 mm. 16 Electrovanne torche 1 (T1) 17 Electrovanne torche 2 (T2) 5 INSTALATION DU POSTE RACCORDEMENT GAZ Visser le mano-détendeur sur la bouteille de gaz. Pour une utilisation avec 2 gaz différents. Couper en 2 le tuyau. Connecter chaque bouteille sur les électrovannes en respectant l’ordre : - électrovanne T1 en haut - électrovanne T2 en bas. Pour éviter toute fuite de gaz, utiliser les colliers fournis dans la boîte d’accessoires. Pour une utilisation avec un seul et même gaz. Couper le tuyau de 2 mètres en 3. Puis réaliser le montage grâce au raccord Y. (Cf photo ci-contre) Pour éviter toute fuite de gaz, utiliser les colliers fournis dans la boîte d’accessoires. DEBIT GAZ Le débit de gaz se situe de 15 à 25 L/min pour l’alu et de 8 à 12 L pour l’acier Ø 0,6 à 0,8 selon l’environnement et l’expérience du soudeur. CHOIX DES BOBINES: Configurations possibles : Type fil Acier Torche 1 (T1) Torche 2 (T2) X X X X X Ø 300 Ø 200 X Ø 100 INOX Ø 200 Spool gun (T1) GAZ Argon + CO2 T1 X Ø 100 CuSi3 Ø 200 X X CuAl8 Alu AG5 Ø 200 X X T2 X* Ø 300 X* Ø 200 Argon pur X* AlSi5 Ø 100 X AlSi12 Ø 100 X * Prévoir gaine téflon (ref 041548) et tube contact spécial alu (Ø 0,8 : 041059) Configuration recommandée pour la réparation carrosserie : Type fil Acier CuSi3 / CuAl8 AlSi5 / CuSi3 CuAl8 AlSi12 AlSi5 Torche 1 (T1) Ø 200 Ø 200 Torche 2 (T2) X Spool gun (T1) GAZ Argon + CO2 X Argon pur X AlSi12 Ø 100 : Préconisation OPEL & MERCEDES : Préconisation Peugeot/Citroën/Renault : Préconisation pour l’aluminium automobile à partir de tôle d’épaisseur comprise entre 0,6 et 1,5mm. : Préconisation pour l’aluminium automobile pour des tôles d’épaisseur > 1,5mm 6 PROCEDURE DE MONTAGE DES BOBINES ET DES TORCHES : Ergot d’entrainement de la bobine Support bobine Ecrou de sérrage Réglage du frein support bobine Molette de réglage tension fil du moteur Galet en position 0,8mm • Ouvrir la trappe du poste. • Positionner la bobine en tenant compte de l’ergot d’entrainement du support bobine. • Régler le frein de la bobine pour éviter lors de l’arrêt de la soudure que l’inertie de la bobine n’emmêle le fil. De manière générale, ne pas trop serrer ! • Les galets moteur sont des galets double gorge (0,6/ 0,8 et 0,8/1). L’indication qu’on lit sur le galet est celle que l’on utilise. Pour un fil de 0,8, utiliser la gorge de 0,8. • Pour la première mise en service : - déserrer la vis de fixation du guide fil 1 - placer les galets 2 - puis positionner le guide fil 1 2 au plus près du galet mais sans qu’il y a contact avec ce dernier, puis resserer la vis de fixation • Pour régler la molette des galets presseurs, procéder comme suit : desserrer au maximum, actionner le moteur en appuyant sur la gâchette de la torche, serrer la molette tout en restant appuyé sur la gâchette. Lorsque le fil commence à être entrainé, arrêter le serrage. Nb : pour le fil aluminium mettre un minimum de pression afin de ne pas écraser le fil. • Choisir le diamètre du tube contact au bout de la torche. Utiliser un tube contact adapté au diamètre du fil utilisé. 7 FONCTIONNEMENT DU POSTE CLAVIER DE COMMANDE : 4 2 1 5 3 Choix du mode de soudage NORMAL (2T) : soudage standard 2 temps DELAY : fonction « point de chainette », pointage avec réglage de l’intermittence de point SPOT : fonction « bouchonnage », pointage avec diamètre du point réglable Réglage de la vitesse fil Potentiomètre d’ajustage de la vitesse du fil. La vitesse varie de 1 à 15 m/minute. Potentiomètre de réglage SPOT/DELAY Mode Manual En mode manuel, la vitesse de dévidage du fil est déterminée par l’utilisateur en ajustant le potentiomètre. Mode Synergic Positionner le potentiomètre au milieu de la zone « OPTIMAL SYNERGIC » Dans ce mode le poste détermine la vitesse de fil optimale à partir de 3 paramètres : Tension Diamètre du fil Nature du fil Il est possible d’ajuster la vitesse du fil + / -. En position NORMAL (2T), 2 modes sont proposés pour faciliter le réglage du poste : MANUAL ou SYNERGIC. MODE «MANUAL » Pour régler votre poste procéder comme suit : - Choisissez la tension de soudage à l’aide du commutateur 7 positions exemple : position 1 pour de la tôle de 0,6mm et position 7 pour de la tôle de 4 mm - Ajustez la vitesse du fil à l’aide du potentiomètre. Conseils L’ajustement de la vitesse du fil se fait souvent « au bruit » : l’arc doit être stable et avoir très peu de crépitement. Si la vitesse est trop faible, l’arc n’est pas continu. Si la vitesse est trop élevée, l’arc crépite et le fil a tendance à repousser la torche. 8 MODE « SYNERGIC » Grâce à cette fonction, plus besoin de régler la vitesse fil. Pour cela : - Positionner le potentiomètre vitesse fil au milieu de la zone « Optimal synergic » Sélectionner : La nature du fil Le diamètre du fil La puissance (commutateur 7 positions en face avant) Pour sélectionner la position adéquate en fonction de l’épaisseur à souder se référer au tableau cidessous: A partir de cette combinaison de paramètres, le DuoGys Auto détermine la vitesse de fil optimale et le poste est pret à souder. Il est ensuite possible d’ajuster la vitesse fil si nécessaire en + ou en – grâce au potentiomètre. Pour chaque torche, une mémorisation des dernières configurations de soudage est effectuée (diamètre fil, nature fil, mode). Choix du GAZ (uniquement pour le soudage acier) : En mode synergic, le DUOGYS détermine les paramètres de soudage en fonction du gaz utilisé. Par défaut, en soudage acier le poste est configuré « Argon + CO2 ». Pour changer de gaz et configurer le poste en mode CO2 ou revenir en mode Argon + CO2, procéder comme suit : 1- Appuyer sur le bouton « Type » pendant 5 secondes jusqu'à ce que le clavier s’éteigne puis relacher le bouton. 2- Dans un délai de 5 secondes choisir la configuration souhaitée avec le bouton : « choix mode ». Normal (2T) => Argon + CO2 (réglage par défaut) Delay => CO2 100% 3- La validation se fait soit par la touche « Type » soit en attendant un délai de 5 secondes. 4- Une fois validé le poste revient en mode de fonctionnement normal et la modification reste enregistrée même une fois le poste éteint. 100% CO2 Ar + CO2 9 MODE SPOT Cette fonction permet de réaliser des travaux de pointage. Pour ajuster la durée du point, utiliser le potentiomètre. MODE DELAY Pour effectuer vos travaux en « points de chaînette », ajuster le potentiomètre. Cette fonction permet de souder des tôles très fines en acier ou en aluminium, en limitant le risque de perçage et de déformation de la tôle (surtout pour le soudage aluminium). SPOOL GUN PRESENTATION ET FONCTIONNEMENT TORCHE SPOOL GUN • La torche spool gun se monte sur le connecteur de la torche T1. • Le spool gun fonctionne soit en mode « Manuel », soit en mode « Synergic ». • En mode manuel ou en mode « Synergic », seul le bouton de réglage de vitesse fil déporté sur la torche est actif (le potentiomètre vitesse fil du poste est inactif). • Mode « Synergic » : - Placer le bouton de vitesse fil de la torche au centre de sa plage puis ajuster si nécessaire. - Pour plus d’informations sur le mode « Synergic » se référer à la page 9. T1 4 5 1 2 1 Bouton d’ouverture/fermeture capot 2 Ecrou de serrage bobine 3 Écrou frein bobine (ne pas trop serrer) 4 Vis de réglage de tension des galets 5 Bouton de réglage de vitesse fil 3 PROCEDURE DE MONTAGE Bobine Ouvrir le capot Enlever l’écrou de maintien (nb. : pas de vis inversé) Serrer l’écrou frein afin de bomber l’axe bobine (ne pas trop serrer) Insérer votre bobine Pour insérer le fil dans les galets appliquer une pression sur la « vis de réglage tension galets » Torche • Retirer le fil de la torche T1 en enroulant la bobine. • Retirer la torche T1 • Brancher le connecteur de puissance du spool gun sur le connecteur T1. • Brancher le connecteur de commande du spool gun • Basculer le commutateur sur T1. CONSEILS ET PROTECTION THERMIQUE • Respecter les règles classiques du soudage. • Laisser les ouïes de l'appareil libres pour l’entrée et la sortie d’air. • Laisser l’appareil branché après soudage pour permettre le refroidissement. • Protection thermique : le voyant s’allume et la durée de refroidissement est de quelques minutes en fonction de la température ambiante. 10 FACTEURS DE MARCHE & ENVIRONNEMENT D’UTILISATION • Le poste décrit a une caractéristique de sortie de type "tension constante". Son facteur de marche selon la norme EN60974-1 est indiqué dans le tableau suivant : X / 60974-1 @ 40°C (T cycle = 10 min) I max 60% (T cycle = 10 min) 100% (T cycle = 10 min) DuoGys Auto 22% @ 150 A 105 A 90 A Note : les essais d’échauffement ont été effectués à température ambiante et le facteur de marche à 40 °C a été déterminé par simulation. • Cet appareil est de Classe A. Il est conçu pour un emploi dans un environnement industriel ou professionnel. Dans un environnement différent, il peut être difficile d’assurer la compatibilité électromagnétique, à cause de perturbations conduites aussi bien que rayonnées. Ne pas utiliser dans un environnement comportant des poussières métalliques conductrices. • Ce matériel est conforme à la CEI 61000-3-12, à condition que la puissance de court-circuit Ssc soit supérieure ou égale à 1,8MVA au point d’interface entre l’alimentation de l’utilisateur et le réseau public de distribution. Il est de la responsabilité de l’installateur ou de l’utilisateur du matériel de s’assurer, si nécessaire en consultant l’exploitant du réseau de distribution, que le matériel est raccordé uniquement à une alimentaiton telle que la puissance du court-circuit Ssc soit supérieure ou égale à 1,8MVA.. ENTRETIEN • L'entretien ne doit être effectué que par une personne qualifiée. • Couper l'alimentation en débranchant la prise, et attendre l’arrêt du ventilateur avant de travailler sur l'appareil. A l’intérieur, les tensions et intensités sont élevées et dangereuses. • Régulièrement, enlever le capot et dépoussiérer à la soufflette. En profiter pour faire vérifier la tenue des connexions électriques avec un outil isolé par un personnel qualifié. • Contrôler régulièrement l'état du cordon d'alimentation. Si le câble d'alimentation est endommagé, il doit être remplacé par le fabricant, son service après vente ou une personne de qualification similaire, afin d'éviter un danger SÉCURITÉ Le soudage MIG/MAG peut être dangereux et causer des blessures graves voire mortelles. Protégez-vous et protégez les autres. Respecter les instructions de sécurité suivantes: Rayonnements de l’arc : Protéger vous à l’aide d’un masque muni de filtres conformes EN 169 ou EN 379. Pluie, vapeur d’eau, humidité: Utiliser votre poste dans une atmosphère propre (degré de pollution ≤ 3), à plat et à plus d’un mètre de la pièce à souder. Ne pas utiliser sous la pluie ou la neige. Choc électrique : Cet appareil ne doit être utilisé que sur une alimentation triphasée à 4 fils avec terre. Ne pas toucher les pièces sous tension. Vérifier que le réseau d'alimentation est adapté au poste. Ne jamais utiliser une torche en mauvais état (défaut d’isolation électrique) sous risques d’endommager l’appareil et l’installation électrique. Chutes : Ne pas faire transiter le poste au-dessus de personnes ou d’objets. Brûlures : Porter des vêtements de travail en tissu ignifugé (coton, bleu ou jeans). Travailler avec des gants de protection et un tablier ignifugé. Protéger les autres en installant des paravents ininflammables, ou les prévenir de ne pas regarder l'arc et garder des distances suffisantes. Risques de feu : Supprimer tous les produits inflammables de l'espace de travail. Ne pas travailler en présence de gaz inflammable. Fumées : Ne pas inhaler les gaz et fumées de soudage. Utiliser dans un environnement correctement ventilé, avec extraction artificielle si soudage en intérieur. Précautions supplémentaires : Toute opération de soudage : - dans des lieux comportant des risques accrus de choc électrique, - dans des lieux fermés, - en présence de matériau inflammable ou comportant des risques d'explosion, doit toujours être soumise à l'approbation préalable d'un "responsable expert", et effectuée en présence de personnes formées pour intervenir en cas d'urgence. Les moyens techniques de protections décrits dans la Spécification Technique CEI/IEC 62081 doivent être appliqués. Le soudage en position surélevée est interdit, sauf en cas d'utilisation de plates-formes de sécurité. Les porteurs de stimulateurs cardiaques doivent consulter un médecin avant d'utiliser ces appareils. Ne pas utiliser le poste pour dégeler des canalisations. Manipuler la bouteille de gaz avec précaution, des risques existent si la bouteille ou la soupape de la bouteille sont endommagées. 11 ANOMALIES, CAUSES, REMEDES SYMPTOMES Le débit du fil de soudage n’est pas constant. Le moteur de dévidage ne fonctionne pas. Mauvais dévidage du fil. Pas de courant de soudage. Le fil bouchonne après les galets. Le cordon de soudage est poreux. CAUSES POSSIBLES Nettoyer le tube contact ou le changer et remettre du produit anti-adhésion. Le fil patine dans les galets. - Contrôler la pression des galets ou les remplacer. - Diamètre du fil non conforme au galet. -Gaine guide fil dans la torche non conforme. Desserrer le frein et les galets Frein de la bobine ou galet trop serré. Problème d’alimentation Gaine guide fil sale ou endommagée. Frein de la bobine trop serré. Vérifier que le bouton de mise en service est sur la position marche. Nettoyer ou remplacer. Desserrer le frein. Mauvais branchement de la prise secteur. Voir le branchement de la prise et regarder si la prise est bien alimentée avec 3 phases. Mauvaise connexion de masse. Contacteur de puissance inopérant. Contrôler le câble de masse (connexion et état de la pince). Contrôler la gâchette de la torche. Gaine guide fil écrasée. Vérifier la gaine et corps de torche. Blocage du fil dans la torche. Remplacer ou nettoyer. Pas de tube capillaire. Vitesse du fil trop importante. Le débit de gaz est insuffisant. Vérifier la présence du tube capillaire. Réduire la vitesse de fil Plage de réglage de 15 à 20 L / min. Nettoyer le métal de base. La remplacer. Bouteille de gaz vide. Qualité du gaz non satisfaisante. Le remplacer. Circulation d’air ou influence du vent. Buse gaz trop encrassée. Empêcher les courants d’air, protéger la zone de soudage. Nettoyer la buse gaz ou la remplacer. Mauvaise qualité du fil. Utiliser un fil adapté au soudage MIGMAG. Nettoyer la pièce avant de souder État de la surface à souder de mauvaise qualité (rouille, etc…) Particules d’étincelage très importantes. REMEDES Des grattons obstruent l’orifice. Tension d’arc trop basse ou trop haute. Voir paramètres de soudage. Mauvaise prise de masse. Contrôler et positionner la pince de masse au plus proche de la zone à souder Ajuster le débit de gaz. Gaz de protection insuffisant. Pas de gaz en sortie de torche Mauvaise connexion du gaz Le Spool Gun ne fonctionne pas Problème de connexion En mode Spool Gun, le bouton de réglage vitesse situé sur le poste ne fonctionne pas. Comportement normal du poste Voir si le raccordement du gaz à côté du moteur est bien connecté. Vérifier les branchements de la torche (connecteur puissance et connecteur commande) Lors de l’utilisation du spool gun, seul le bouton de vitesse fil déportée sur la torche fonctionne. 12 DESCRIPTION Thank you for choosing our product! In order to take the most of your Mig welder please read the following instructions carefully: The DUOGYS is recommended to weld steel, stainless steel, aluminium and for the “MIG Brazing” of high-tensile strength steels with CuSi and CuAl wires (ideal for car body repairs). Its adjustment is easy and fast thanks to its « synergic wire speed » function. It works on a 400v Three-phase or 230 three-phase supply. ELECTRIC SUPPLY The absorbed current (I1eff) is indicated on the device, for the maximum use conditions. Check that the power supply and its protections (fuse and/or circuit breaker) are compatible with the current needed at use. In some countries, it might be necessary to change the plug to allow the use at maximum conditions. The device must be placed in such way that the power socket is always accessible. Do not use an extension cord which has a wire section inferior to à 2,5 mm². 400V THREE-PHASE SUPPLY The Duogys Auto is initially pre-built in 400V three-phase and supplied with a 16A plug of RS-015 CEE 400V type. It has to be plugged on a 400 V (50Hz) power socket WITH earth and protected by a circuit breaker 10A and 1 differential 30mA. 230V THREE-PHASE SUPPLY BECAREFUL: This device is pre-built in 400V three-phase. If your electrical installation is in 230V three-phase, you have to modify the connection on the terminal board. This modification has to be realized by a competent person. The modification has to be done in accordance with the 230V connection schema situated inside the device. The electric supply has to be protected by a 16A circuit breaker and a 30mA differential. DEVICE PRESENTATION The Duogys Auto is supplied with 3 torches: 2 steel torchs of 3 meter, designed for 0,8 mm wires One spool on gun torch of 4 meters, designed for 0,8 mm Alu wire Steel Torch 150A Steel Torch 150A Contact tip 0,8 Contact tip 0,8 + Contact tip 0,6 Nb: the Teflon sheath (ref.041578) is in option Security: Only the torch used is live (PSA requirement) Spool on gun Contact tip 0,8 Alu 13 13 9 8 16 3 17 14 7 6 5 1 2 10 15 4 5 12 68 kg 11 1 Switch On – Off 2 7 positions power adjustment switch: allows to adjust the welding voltage at the generator output. The adjustment of the output voltage is proportional to the thickness of the material to weld. 3 Welding settings adjustment keyboard (manual or automatic mode). 4 2 positions switch to choose the torch to be used (T1 or T2). 5 European standard torch coupling. 6 Spool on gun coupling command. 7 Thermal protection light on the settings keyboard: 8 Torches support 9 Cables torches support Inform a thermal break when the device is used in an intensive way (couple of minutes break). 10 Supply Cable (6m) 11 Earth cable with a 250A clamp. 12 Gas bottles support (maxi 2 bottles of 4m3). 13 Fastening chain for bottles. Be careful: fasten the bottles correctly. 14 Reel support Ø 200 mm. 15 Reel support Ø 200 or 300 mm. 16 Solenoid valve torche 1 (T1) 17 Solenoid valve torche 2 (T2) 14 DEVICE INSTALLATION GAS COUPLING Screw the regulator/flowmeter on the gas bottle. For 2 different gas use. Cut the pipe into 2 pieces. Connect each bottle on the solenoid valves respecting the following order: - T1 solenoid valve at the top - T2 solenoid valve at the bottom To avoid all gas leaks, use the collars provided in the accessories box. For the use with only one type of gas. Cut the 2 meters pipe into 3 pieces. Then put the pieces together thanks to the Y coupling. (See opposite) To avoid all gas leak, use the collars provided in the accessories box. GAS FLOW The gas flow is in between 15 to 25 L/min for alu and 8 to 12 L for steel Ø 0,6 to 0,8 in function of the environment and the welder’s experience. CHOICE OF THE REELS: Possible settings: Wire typ STEEL STAINLESS CuSi3 CuAl8 Alu AG5 AlSi5 AlSi12 Ø Ø Ø Ø Ø Ø Ø Ø Ø Ø Ø 300 200 100 200 100 200 200 300 200 100 100 Torch 1 (T1) X Torch 2 (T2) X X X X X X X X X* X* Spool on gun (T1) X X X* GAS T1 Argon + CO2 T2 Pure Argon X X * Think about Teflon sheath (ref 041548) and special aluminium contact tip (Ø 0, 8: 041059) Advised setting for car body repairs: Torch 1 Torch 2 Spool on gun Wire typ GAS (T1) (T2) (T1) X Argon + CO2 Acier Ø 200 X CuSi3 / CuAl8 Ø 200 Argon pur X AlSi5 / AlSi12 Ø 100 CuSi3 : Recommandation OPEL & MERCEDES CuAl8 : Recommandation Peugeot/Citroën/Renault AlSi12 : Recommendation for automotive aluminium from metal sheet of 0,6mm to 1,5 mm of thickness. AlSi5 : Recommendation for automotive aluminium for metal sheets > 1,5mm of thickness. 15 PROCESS OF REELS AND TORCHES ASSEMBLY : Reels drive pin Reel support Clamping nut Adjusting of the reel support brake Adjusting knob of the electrical roller wire tension Roller in 0,8mm position • Open the device trapdoor. • Place the reel in function of the driving pin of the reel support. • Adjust the reel brake to avoid the reel inertia tangling the wire when the welding stops. In a general way, do not tighten too much! • The electrical rollers are double groove rollers (0,6/ 0,8 and 0,8/1). The indication on the visible side of the roller is the diameter in use.. For a 0,8 wire, use the 0,8 groove. • For the first use: - Release the fixing screw of the wire guide 1 - Place the rollers 2 - Then place the wire guide 1 2 as close as possible to the roller but without touching it, then tighten the fixing screw. • To set the adjusting knob of the pressing rollers, proceed as follow: untight to the maximum, start the electrical engine by pressing the torch trigger, tighten the adjusting knob while pressing the trigger. When the wire starts to be hauled, stop the tightening. Nb: for the aluminium wire put a minimum pressure in order not to crush the wire. • Choose the contact tip diameter at the end of the torch. Use a contact tip adapted to the wire diameter used. 16 DEVICE FUNCTIONNING SETTINGS KEYBOARD: 4 2 1 5 3 Welding mode choice NORMAL (2T) : standard two-stage welding DELAY: intermittent welding modes for an optimised operating procedure. SPOT : Spot welding with adjustable spot diameter Wire speed settings Wire speed fitting potentiometer. The speed varies from 1 to 15 m/minute. SPOT/DELAY potentiometer fitting Manual Mode In manual mode, the wire speed is determinated by the user by adjusting the potentiometer. Synergic Mode Position the potentiometer in the middle of the« OPTIMAL SYNERGIC » zone In this mode, the device determines the optimal wire speed according to 3 parameters: Voltage Wire diameter The power mode It is possbile to adjust the speed wire + / -. In position NORMAL (2T), 2 modes are proposed to ease the settings of the device: MANUAL or SYNERGIC. «MANUAL» MODE To set your device, proceed as follow: - Choose the welding voltage using the 7 positions switch Example: position 1 for 0,6mm metal sheets and position 7 for 4 mm metal sheets. - Adjust the wire speed with the potentiometer. Advice The wire speed adjustment is often determinated « with the noise »: the arc must be stable and have a low crackling. If the speed is too low, the arc is not continuous. If the speed is too high, the arc crackles and the wire pushes back the torch. 17 « SYNERGIC » MODE Thanks to this function, no more need to set the wire speed. For this : Position the wire speed potentiometer in the middle of the« Optimal synergic » zone. - Select: The wire type The wire diameter The power mode (7 positions switch). To select the right position in accordance with the thickness of the part to weld, please refer to the following table: From the combination, the duogys auto determines the optimal wire speed and the device is ready to weld. It is then possible to adjust the wire speed if necessary thanks to the potentiometer in + or in – . For each torch, a memory of the last welding configuration is done (wire diameter, wire type, mode). GAS choice (only for steel welding) : In synergic mode, the DUOGYS determines the welding settings in accordance with the gas used. By default, in steel welding the machine is set in « Argon + CO2 ». To change the gas and set the machine in C02 mode or come back in Argon + CO2 mode, process as explained: 1- Press « Type » for 5 seconds until the keyboard switches off the release. 2- Within 5 seconds, choose the required setting with the key « choose mode ». Normal (2T) => Argon + CO2 (default setting) Delay => CO2 100% 3- The confirmation is done either by the « Type » key, or by waiting for 5 seconds. 4- Once confirmed, the machine reverts to the normal functioning mode but the modification is registered even when the machines is switched off. 100% CO2 Ar + CO2 18 SPOT MODE This function allows to do spot welding. To adjust the length of each spot, use the potentiometer. DELAY MODE To weld in intermittent welding, adjust the potentiometer. This function allows welding very thin steel or aluminium metal sheet, limiting the risk of piercing and distortion (especially for aluminium welding). SPOOL ON GUN DESCRIPTION AND FUNCTIONNING T1 • The spool on gun torch must be installed on the torch T1 connector. • The spool on gun works either in « Manual » mode or either in « Synergic » mode. • In « manual » or « Synergic » mode, only the wire speed adjustment knob on the torch is active (the wire speed potentiometer of the device is not active). • « Synergic » mode: - Place the wire speed knob on the torch at the middle of its area then adjust if necessary. - For more information on the « Synergic » mode, refer to page 9. 4 5 1 2 1 Hood Opening/closing knob 2 Reel holding nut 3 Reel locknut (do not tighten too much) 4 Rollers tension adjusting screw 5 Wire speed adjusting knob 3 ASSEMBLY PROCESS Reel Open the hood Remove the reel holding nut (NB. : no reversed screw) Tighten the locknut to bulge the reel axis (do not tighten too much) Insert the reel To insert the wire in the rollers, apply pressure on the «roller tension setting screw » Torch • Pull out the wire of the T1 torch in winding up the reel. • Pull out the T1 torch • Plug the power connector of the spool on gun on the T1 connector. • Plug the control connector of the spool gun • Place the switch on T1 position. ADVICE & THERMAL PROTECTION • • • • Respect the basic rules of welding. Leave the air holes of the device open to allow air circulation. Leave the device plugged after welding to allow its cooling. Thermal protection: The light turns on and the cooling duration is a couple of minute according to the area temperature. 19 DUTY CYCLE & WELDING ENVIRONMENT • The welding unit describes an output characteristic of "constant current" type. The duty cycles following the norm EN60974-1 (at 40°C on a 10mn cycle) are indicated in the table here below: X / 60974-1 @ 40°C (T cycle = 10 min) I max 60% (T cycle = 10 min) 100% (T cycle = 10 min) DuoGys Auto 22% @ 150 A 105 A 90 A Note: The warming test was done at room temperature and the duty cycle at 40°C were determinated by simulation. • These are A-class devices. They are designed to be used in an industrial or professional environment. In a different environment, it can be difficult to ensure electromagnetic compatibility, due to conducted disturbances as well as radiation. • This device complies with IEC 6100-3-12, provided that the power of the short-circuit Ssc is equal to or greater than 1.8MVA at the interface between the machine and the mains power network. It is the responsibility of the installer or user of the equipment to ensure - if necessary by consulting the operator of the mains electricity, that the equipment is only connected to a power supply where the power of short-circuit ssc is equal to or greater than 1.8MVA. MAINTENANCE • The maintenance has to be done by a qualified person. • Cut the power supply unplugging the device, wait for the ventilator to stop before working on the welding unit. Inside, tensions and currents are high and dangerous. • Regularly remove the metal cover and dust with compressed air. Take the opportunity to have the electrical connections checked by a qualified person with an insulated tool. • Regularly check the good condition of the power supply cord. If damaged, it has to be changed by the manufacturer, its after sales service or a qualified person, to avoid any danger. SECURITY The MIG/MAG welding can be dangerous and cause serious or even lethal wounds. Protect yourself and protect the others. Respect the following safety instructions: Arc radiations Protect yourself with a helmet fitted with filters in compliance with EN169 or EN 379. Rain, steam, dampness Use your welding unit in a clean environment (pollution factor ≤ 3), laid down flat and more than one meter far from the part to be welded. Do not use in rain or snow. Electric shock This device must only be used with a three-phase power supply with 3 wires and a neutral connected to earth. Do not touch the parts under tension. Check that the supply net is well adapted to the unit. Never use a defective torch (i.e that has a problem with electrical insulation) at the risk of damaging the machine and the electrical system. Falls Burns Do not move the unit over people or objects. Wear fire-proof working clothes (cotton, overalls or jeans). Work with protection gloves and a fire-proof apron. Protect the others installing fire-proof protection walls or telling them not to look at the arc and to keep sufficient distances. Fire risks Remove all flammable products from the working area. Do not work in presence of flammable gases. Fumes Do not inhale welding gases and fumes. Use the device in a correctly ventilated environment, with artificial extraction if welding indoor. Additional Precautions Any welding operation: - in rooms where there are increased electric shock risks, - in closed rooms, - in presence of flammable or explosive material, must always be approved by a "responsible expert", and made in presence of people trained to intervene in case of urgency. Technical protection means described in the Technical Specification CEI/IEC 62081 must be implemented. Welding in raised positions is forbidden, except in case of safety platforms use. People wearing Pacemakers must see their doctor before using these devices. Do not use the welding unit to unfreeze pipes. Handle the gas bottle with care, there might be risks if the bottle or its valve get damaged. 20 SYMPTOMS, REASONS, SOLUTIONS SYMPTOMS The welding wire debit is not constant. The unwinding motor doesn’t operate. POSSIBLE REASONS Clean out the contact batch or change it and replace the anti-adherence product. The wire skids in the rollers. - Control the roller pressure or replace it. - Wire diameter non-consonant with roller - Covering wire guide in the torch nonconsonant. Release the brake and rollers. Reel or roller brake too tight. Electrical supply problem. Bad wire unwinding. No welding current Covering wire guide dirty or damaged. Reel brake too tight The welding cord is porous. Release the brake See the branch connection and look if the lap is fed by 3 phases. Bad earth connection. Control the earth cable (connection and clamp condition). Control the torch trigger. Covering WIRE guide crushed. Check the covering and torch body. Locking of the wire in the torch Clean or replace. No capillary tube. Wire speed too fast The gas flow is not sufficient. Gas bottle empty. Check the presence of capillary tube. Reduce the wire speed Adjusting range 15 to 20 L / min. Clean the working metal. Replace it. Gas quality non-satisfying. Replace it. Air flow or wind influence. Avert air blast, protect welding area. Gas nozzle too full. Clean or replace the gas nozzle. Bad wire quality. Use adapted WIRE for MIG-MAG welding. Clean the working parts before welding. Surface to weld in bad condtion. (rust, etc…) Very important flashing particules. Check that the running button is on the position on. Clean or replace Bad connection to the main supply. Power contactor inoperative. The WIRE rubs down after the rollers. SOLUTIONS Cracklings block up the opening. Arc voltage too low or too high. See welding settings. Bad earth connection. Check and place the earth cable to have a better connection. Adjust the gas flow. Protecting gas insufficient. No gas at the torch output. Bad gas connection. The Spool on Gun does not work. In Spool on Gun mode, the speed adjustement knob on the machine does not work. Connection problem Normal condition of the machine. See if the gas coupling beside the engine is well connected. Check the torch connections (power and control connectors). When Spool on Gun is used, only the wire speed knob on the torch is working. 21 Wir freuen uns, dass Sie sich für ein Markengerät der Firma GYS entschieden haben und danken Ihnen für das entgegengebrachte Vertrauen. Um das Gerät optimal nutzen zu können, lesen Sie bitte die Betriebsanleitung sorgfältig durch. NETZANSCHLUSS - INBETRIEBNAHME Die maximale Stromaufnahme (I1eff) finden Sie auf dem Typenschild des Gerätes. Überprüfen Sie, ob Ihre Stromversorgung und die Schutzeinrichtungen (Netzabsicherung) zum Betrieb der Maschine ausreichend sind. Hinweis: Benutzen Sie kein Verlängerungskabel, dessen Querschnitt kleiner als 2.5mm² ist 400V DREIPHASIG NETZANSCHLUSS Die DUOGYS AUTO wird mit einem dreiphasigen 400V Netzanschluss und 16A Netzstecker (type RS 015 CEE 400V) geliefert. Das Gerät soll mit einer entsprechenden Steckdose mit Schutzleiter und 10 AT Absicherung verbunden werden. 230V DREIPHASIG NETZANSCHLUSS VORSICHT : Dieses Gerät ist ursprünglich in 400V dreiphasig montiert. Wenn Ihren Stromversorgung in 230V dreiphasig ausgeführt ist, ändern Sie die Beschaltung der Anschlussplatte im Gerät wie unten dargestellt. Diese Änderungen dürfen nur von sachkundigen Personen durchgeführt werden. BESCHREIBUNG Die DUOGYS wird mit drei Brennern geliefert : 2 Standardbrenner mit 3m Kabel, ausgerüstet für 0,8mm Draht. 1 «Spool gun»- Brenner mit 4m Kabel, ausgerüstet für 0,8mm Aluminium-Draht. Standardbrenner 150A Kontaktrohre 0,8 + Kontaktrohre 0,6 Spoolgunbrenner Kontaktrohre 0,8 Standardbrenner 150A Kontaktrohre 0,8 NB : Zur Umrüstung eines Standardbrenners Teflonführungsseele (Ref. 041578) verfügbar. für den Betrieb mit Aluminiumdraht ist optional eine Sicherheit : Nur der angewählte Brenner ist spannungsführend (PSA Anforderung). 22 13 9 8 16 3 17 7 14 1 6 5 2 10 4 15 5 12 68 kg 11 1 Ein / AUS Schalter. 2 7-stufiger Schweißspannungsregler zur Anpassung der Schweißleistung adäquat zur verschweißenden Blechstärke. 3 Bedienfeld zur Einstellung der Schweißparameter. 4 Wahlschalter Brenner 1/ Brenner 2. 5 Eurozentralanschluß zum Anschluss der Schweißbrenner. 6 Steueranschlussbuchse für Spoolgun. 7 Kontrollampe für Thermoüberwachung: Meldet Überlastung bei Überschreitung der maximalen Einschaltdauer. 8 Brenner Support. 9 Brenner-Kabel Support. 10 Stromkabel (6m). 11 Massekabel mit 250A Zange 12 Auflageplatte für 2 Gasflaschen. 13 Befestigungskette für Gasflaschen. Achtung : Gasflaschen gegen Umkippen sichern! 14 15 Aufnahmedorn für Drahtrolle Ø 200mm. Aufnahmedorn für Drahtrolle Ø 200mm oder 300mm. 16 Magnetventil Brenner 1 (T1). 17 Magnetventil Brenner 2 (T2). 23 MONTAGE DES GERÄTES GAS-ANSCHLUSS Montieren Sie den Druckminderer an der Gasflasche. Für Anwendung mit 2 verschiedenen Gasen: Schneiden Sie die Schlauch in 2 gleiche Teile. Befestigen Sie je einen Schlauch an den Magnetventilanschlüssen: - Magnetventil T1 oben, - Magnetventil T2 unten. Um Gasverlusst zu vermeiden, benutzten Sie die in der Zubehörbox enthaltenen Schlauchklemmen. Für Anwendung mit einem Gas: Schneiden Sie den Schlauch in 3 Teile. Koppeln Sie die von den Magnetventilen kommenden Schläuche mit dem Y-Anschluss (siehe Foto links). Um Gasverlusst zu vermeiden, benutzten Sie die in der Zubehörbox enthaltenen Schlauchklemmen. GASDURCHFLUSSMENGE Die richtige Gasdurchflussmenge beträgt 15 bis 25 L/min für Alu und von 8 bis 12 L/min für Stahl (Ø 0,6 bis 0,8) je nach Umgebung und Schweisserfahrung. DRAHTROLLENAUSWAHL : Mögliche Konfigurationen : Brenner 1 (T1) Brenner 2 (T2) Spoolgun (T1) Ø 300 - X - Ø 200 X X - Ø 100 - - X Ø 200 X X - Ø 100 - - X CuSi3 Ø 200 X X - CuAl8 AlMg5 Ø 200 X X - Ø 300 - X - Ø 200 X X - AlSi5 Ø 100 - - X AlSi12 Ø 100 - - X Drahttype Stahl Edelstahl GAS Argon + CO2 Rein-Argon *Teflonseelen empfohlen (Art-Nr. 041578) und Kontaktrohre speziell für Alu (Ø 0,8, ref 041059). Empfohlene Konfiguration für die Karosseriereparatur : Drahttyp Stahl CuSi3/CuAl8 Ø200 Ø200 Brenner 1 (T1) X Brenner 2 (T2) X - AlSi5/AlSi12 Ø100 CuSi3 : Empfehlung Opel & Mercedes CuAl8 : Empfehlung Peugeot/Citroёn/Renault AlSi12 : Empfehlung für Karosserie-Alubleche von 0,6 bis 1,5 mm AlSi5 : Empfehlung für Karosserie-Alubleche über 1,5mm Spool Gun (T1) X GAS Argon + CO2 Rein-Argon 24 MONTAGE DER DRAHTROLLEN UND SCHWEISSBRENNER Führungsdorn für Drahtrolle Aufnahmedorn Drahtrolle Spannmutter Einstellung Drahtrollenbremse Andruckeinstellung Drahttransport Antriebsrollenspur 0,8mm Entfernen Sie den linken Seitendeckel des Gerätes. Positionieren Sie die Drahtrolle auf der Aufnahme und dem Führungsdorn. Justieren Sie die Drahtrollenbremse um die Drahtrolle bei Schweißstop gegen Nachdrehen zu sichern. Die Antriebsrollen sind mit je 2 Spuren (0,6/0,8 und 0,8/1,0) versehen. Der sichtbare Wert, ist der zur Zeit benutzte. Verwenden Sie immer die für den jeweiligen Drahtdurchmesser richtige Spur. Drahtransport- Montage: - Lockern Sie die Fixierungsschrauben der Drahtführung. 1 - Legen Sie die Drahttransportrollen mit der richtigen Nut ein. 2 - Stellen Sie sicher, dass Drahtführung, Schweißdraht und Transportrollen in einer Flucht liegen. - Die Drahtführung darf keinen Kontakt mit der Transportrolle haben. Ziehen Sie 1 nun die Fixierungsschrauben wieder an. 2 Um den Transportandruck korrekt einzustellen betätigen Sie bei eingelegtem Draht den Brennertaster und justieren die Andruckmutter so, dass der Draht konstant transportiert wird. Zu starker Andruck wirkt sich negativ aus. Tipp : Alu-Draht muss mit möglichst geringem Druck transportiert werden, da er sonst deformiert wird. Die Kontaktrohre/Stromdüsen müssen dem entsprechenden Drahtdurchmesser angepasst werden. 25 GERÄTEFUNKTION BEDIENEINHEIT 4 2 1 5 3 Auswahl Brennertastermodus NORMAL (2T) : Standard Schweissen 2 Takt DELAY: Funktion “Schweißpause” SPOT : Funktion “Schweißzeit” Einstellung der Drahtgeschwindigkeit Potentiometer regelt von 1 – 15m/min Zeiteinstellung für Spot/Delay Potentiometer regelt von 0,1 – 5 sec Manuell Modus Im Manuell Modus wird die Drahtgeschwindigkeit mit dem Potentiometer vom Benutzter eingestellt . Synergic Modus Stellen Sie das Potentiometer in der Mitte der “OPTIMAL SYNERGIC” Zone ein. In diesem Modus regelt das Gerät die richtige Geschwindigkeit anhand von 3 Kriterien: Spannungstufe Drahtdurchmesser Drahttyp Hier wird über das Drahtvorschubpotentiometer ein Feinregulierung ermöglicht. Im NORMAL Position (2T) sind 2 Modi verfügbar : MANUELL oder SYNERGIC. « MANUELL » MODUS Geräteeinstellung : Schweißpannung über 7-Stufenschalter entsprechend der Blechdicke wählen. Beispiel : Position 1 für 0,6mm Bleche und Position 7 für 4mm Bleche. Drahtgeschwindigkeit mittels Potentiometer anpassen. Tipp: Die korrekte Drahtgeschwindigkeit ist am Abbrandgeräusch zu erkennen : Der Lichtbogen sollte stabil und ohne große Spritzerbildung brennen. Wenn die Geschwindigkeit zu gering ist, brennt der Lichtboge nicht kontinuierlich. Wenn die Geschwindigkeit zu hoch ist, erzeugt der Lichtbogen Spritzer und drückt den Brenner weg. 26 « SYNERGIC » MODUS In dieser Funktion muss die Drahtgeschwindigkeit nicht separat eingestellt werden. Geräteeinstellung: - Stellen Sie das Potentiometer auf die Zone „Optimal Synergic“. Wählen Sie aus : Drahttyp Drahtdurchmesser Leistung (7-Stufenschalter). Wählen Sie die richtige Position je nach Blechstarke. Referenztabelle: Anhand dieser Parameter wird bei DUOGYS AUTO automatisch die optimale Drahtgeschwindigkeit schweißbereit eingestellt. Eine Feinregulierung erfolgt hier im „Optimal Synergic“- Bereich des Drahtvorschubreglers.. Für die jeweiligen Brenner wird die letzte Einstellung für Drahtdurchmesser, Drahttyp und Modus gespeichert. SCHUTZGASAUSWAHL (nur bei Stahlschweißen) : Im Modus SYNERGIC bestimmt die DUOGYS AUTO entsprechend dem ausgewählten Schutzgas selbsttätig die geeigneten Schweißeinstellungen. Das Gerät ist für Stahlschweißarbeiten automatisch auf „Argon + CO2“ voreingestellt. Um den Schutzgastyp zu ändern und das Gerät im CO2 Modus einzustellen oder zum Argon+CO2 Modus zurückzuwechseln, gehen Sie bitte wie folgt vor: 1. Drücken Sie 5 Sek. lang die Taste „Type“ bis sich das Bedienfeld ausschaltet 2. Stellen Sie nun innerhalb von 5 Sek. mit der entsprechenden Taste den gewünschten Brennertastermodus ein: - Normal (2T) => Argon + CO2 (Voreinstellung= - Delay => 100% CO2 3. Warten Sie weitere 5 Sek., um die Einstellungen zu bestätigen oder drücken Sie die „Type“ Taste Danach kehrt das Gerät in seinen normalen Funktionsmodus zurück. Die Einstellungen werden gespeichert und können auch dann noch abgerufen werden, wenn das Gerät zeitweilig ausgeschaltet war. 100% CO2 Ar + CO2 SPOT MODUS In dieser Funktion erzeugt die Maschine über die Einstellung der Punktzeit immer gleich große Schweißpunkte. 27 DELAY MODUS Diese Funktion eignet sich u.a. zum Schweißen sehr dünner Bleche. Das Gerät setzt zwischen die einzelnen Schweißpunkte eine entsprechend eingestellte Pause. SPOOL GUN BESCHREIBUNG UND FUNKTION Der Spool Gun Brenner wird am Brenneranschluß T1 angeschlossen. Der Spool Gun Brenner kann sowohl im „Manuell“ als auch im „Synergic“ Modus verwendet werden. In beiden Modi ist der Drahtvorschubregler an der Maschine ausgeschaltet. Eine Regelung erfolgt nur über das Potentiometer am Brenner. « Synergic » Modus : - Stellen Sie den Regler für Drahtgeschwindigkeit zunächst auf mittlere Position und regeln Sie bei Bedarf nach. - Weitere Informationen für den „Synergic“ Modus, finden Sie auf Seite 30. T1 4 5 1 2 1 Taste Öffnen / Schliessen der Abdeckung 2 Schraube für Drahtrolle 3 Fixierung für Drahtrolle (Nicht zu viel ziehen) 4 Einstellung Drahtandruck 5 Potentiometer für Einstellungen der Drahtgeschwindigkeit 3 ANSCHLUSS SPOOL GUN-BRENNER Drahtrolle Abdeckung öffnen Schrauben entfernen Drahtrolle einlegen Um den Draht in den Antrieb zu führen drüucken Sie den Spannhebel zur Öffnung der Andruckeinstellung Brenner Entfernen Sie den Draht aus Brenner T1. Entfernen Sie Brenner T1. Schliessen Sie den Spool Gun-Brenner am Anschluß T1 an. Schliessen Sie den Steuerleitungsstecker an der vorgesehenen Buchse an. Schalten Sie auf Brenner T1. HINWEISE • Beachten Sie bitte die Grundregeln des Schweißen. • Verschliessen Sie nicht die Lüftungsöffnungen des Gerätes um die Luftzirkulation zu ermöglichen. • Lassen Sie das Gerät nach Beendigung der Arbeit noch eine Zeit eingeschaltet um die Abkühlung zu ermöglichen. • Thermoschutz: Nach Aufleuchten der Kontrollampe benötigt das Gerät je nach Umgebungstemparatur einige Minuten zur Abkühlung. EINSCHALTDAUER - UMGEBUNGSBEDINGUNGEN • Das Gerät arbeitet mit einer „Konstantstrom-Kennlinie“. Die Angaben für die Einschaltdauer folgen der Norm EN60974-1 X / 60974-1 @ 40°C (T cycle = 10 min) I max 60% (T cycle = 10 min) 100% (T cycle = 10 min) DuoGys Auto 22% @ 150 A 105 A 90 A Bemerkung: Der Überhitzungstest wurde bei Raumtemperatur durchgeführt und die Einschaltdauer bei 40°C durch Simulation ermittelt. • Die Duogys ist ein A-Klasse Gerät für den industriellen und/ oder professionellen Gebrauch geeignet. In einem anderen Umfeld ist die elektromagnetische Verträglichkeit schwieriger zu gewährleisten. Verwenden Sie das Gerät nicht in Räumen, in denen sich in der Luft metallische Staubpartikel befinden, die Elektrizität leiten können. 28 • Vorausgesetzt, dass die Kurzschlussleistung Ssc an der Schnittstelle zwischen privatem Nutzer und öffentlichem Versorgungsnetz größer oder gleich 1.8MVA ist, stimmt dieses Gerät mit der Norm EN 61000-3-12 überein. Es liegt in der Verantwortung des Elektroinstallateurs bzw. des Geräteanwenders dafür Sorge zu tragen, dass das Gerät ausschließlich an eine Stromversorgung mit einer Kurzschlussleistung Ssc größer oder gleich 1.8MVA angeschlossen wird. Wenden Sie sich bei eventuellen Fragen bitte an den lokalen Stromnetzbetreiber. INSTANDHALTUNG • Die Instandhaltung sollte nur von qualifiziertem Fachpersonal durchgeführt werden. • Trennen Sie die Stromversorgung des Gerätes und warten Sie bis der Ventilator sich nicht mehr dreht. Im Gerät sind die Spannungen sehr hoch und deshalb gefährlich. • Nehmen Sie regelmäßig das Gehäuse ab und reinigen Sie das Innere des Gerätes mit Pressluft. Lassen Sie regelmäßig Prüfungen des GYS Gerätes auf seine elektrische Betriebssicherheit von qualifiziertem Fachpersonal durchführen. • Prüfen Sie regelmäßig den Zustand der Netzzuleitung. Wenn diese beschädigt ist, muss sie durch den Hersteller, seinen Reparaturservice oder eine qualifizierte Person ausgetauscht werden, um Gefahren zu vermeiden. UNFALLPRÄVENTION Lichtbogenschweissen kann gefährlich sein und zu schweren – unter Umständen auch tödlichen – Verletzungen führen. Schützen Sie daher sich selbst und andere. Beachten Sie unbedingt die folgenden Sicherheitshinweise: Lichtbogenstrahlung Umgebung : Feuchtigkeit : Stromversorgung : Transport : Gesichtshaut und Augen sind durch ausreichend dimensionierte EN 175 konforme Schutzschirme mit Spezialschutzgläsern nach EN 169 / 379 vor der intensiven Ultraviolettstrahlung zu schützen. Auch in der Nähe des Lichtbogens befindliche Personen oder Helfer müssen auf Gefahren hingewiesen und mit den nötigen Schutzmitteln ausgerüstet werde. Benutzen Sie das Gerät nur in sauberer und gegen Nässeeinwirkung geschützter Umgebung. Nicht bei erhöhter Feuchtigkeit (Regen/Schnee) benutzen. Das Gerät darf nur an einer dafür geeigneten Stromversorgung betrieben werden. Keine spannungsführenden Teile berühren. Verwenden Sie niemals einen beschädigten Brenner, da dies zu Schäden an der Maschine sowie an der Elektrik verursachen kann. Unterschätzen Sie nicht das Gewicht der Anlage. Bewegen Sie das Gerät nicht über Personen oder Sachen hinweg und lassen Sie es nicht herunterfallen oder hart aufsetzen. Verbrennungsgefahr : Schützen Sie sich durch geeignete trockene Schweißerkleidung (Schürze, Handschuhe, Kopfbedeckung sowie feste Schuhe). Tragen Sie auch eine Schutzbrille, wenn Sie Schlacke abklopfen. Schützen Sie andere durch nicht entzündbare Trennwände. Nicht in den Lichtbogen schauen und ausreichend Distanz halten. Brandgefahr : Entfernen Sie alle entflammbaren Produkte vom Schweissplatz und arbeiten Sie nicht in der Nähe von brennbaren Stoffen und Gasen. Schweissrauch : Die beim Schweißen entstehenden Gase und der Rauch sind gesundheitsschädlich. Der Arbeitsplatz sollte daher gut belüftet sein und der entstehende Rauch und die Gase müssen abgesaugt werden. Weitere Hinweise : Führen Sie Schweißarbeiten : -in Bereichen mit erhöhten elektrische Risiken, -in abgeschlossenen Räumen, -in der Umgebund von entflammbaren oder explosiven Produkten, -nur in Anwesenheit von qualifiziertem Rettungs- und/oder Fachpersonal durch. Treffen Sie Vorsichtsmaßnahmen in Übereinstimmung mit „IEC 62081“. Schweißarbeiten an Gegenständen in größeren Höhen dürfen nur auf professionell aufgebauten Gerüsten durchgeführt werden. Halten Sie beim Arbeiten ausreichend Abstand zu Personen mit Herzschrittmacher! Personen mit Herzschrittmacher dürfen mit dem Gerät nicht ohne ärtzliche Zustimmung arbeiten! Das Gerät ist nicht geeignet für das Auftauen von Leitungen! Achten Sie beim Umgang mit Gasflaschen auf sicheren Stand und Schutz des Flaschenventils! Beschädigte Flaschen stellen ein Sicherheitsrisiko dar! 29 FEHLERSUCHE, URSACHE, LÖSUNG Fehlersuche Drahtgeschwindigkeit nicht konstant Motor läuft nicht. Ursache Lösung Das Kontaktrohr ist verstopft. Reinigen Sie das Kontaktrohr oder tauschen Sie es aus und benutzen Sie Spray. Der Draht rutscht im Antrieb durch. Prüfen Sie den Druck des Rollenantriebes oder ändern die Antriebsnut auf die korrekte Drahtstärke. -Drahtführungsschlauch des Brenners nicht korrekt. Lockern Sie die Bremse und den Rollenantrieb. Prüfen Sie, ob der Schalter auf « EIN »Position ist. Reinigen Sie den Drahtführungsschlauch oder tauschen Sie diesen aus. Lockern Sie die Bremse. Bremse der Drahtrolle oder Rollenantrieb zu fest. Versorgungsproblem Schlechte Drahtförderung. Drahtführungsschlauch verschmutzt oder beschädigt. Drahtrollen-Bremse zu fest. Kein Schweißstrom. Fehlerhafte Netzversorgung Prüfen der Netzversorgung (Stecker, Kabel, Steckdose, Sicherung) Fehlerhafte Masseverbindung. Prüfen Sie die Masseklemme (Verbindung und Klemmenzustand). Prüfen Sie den Brenner bzw. Tauschen Sie diesen aus. Prüfen bzw. austauschen. Brenner defekt Drahtstau im Antrieb Die Schweissnaht ist porös. Drahtführungsschlauch fehlerhaft Draht blockiert im Brenner Prüfen, reinigen oder austauschen Fehlendes Kapillarrohr Drahtgeschwindigkeit zu hoch. Gasfluß zu niedrig. Gasflasche leer. Prüfen und einsetzen Drahtgeschwindigkeit reduzieren Korrigieren Sie die Gaseinstellung Reinigen Sie das Material. Austauschen Schlechte Gasqualität. Austauschen Zugluft Starke Spritzerbildung Schweisszone abschirmen. Schmutzige Gasdüse. Reinigen oder austauschen. Schlechte Drahtqualität. Austauschen gegen geeigneten Schweißdraht Schweißgut reinigen Schweissmaterial von schlechter Qualität (Rost, …) Lichtbogenspannung zu niedrig oder zu hoch. Masse schlecht positioniert. Schutzgas zu niedrig. Gasmangel am Brenner Spool Gun ohne Funktion Fehlerhafte Gasverbindung. Verbindungsproblem. Im Spool Gun Modus, keine Drahtregelung am Gerät möglich Normale Funktion des Gerätes Schweißparameter kontrollieren Positionieren Sie die Masse näher an der Schweißstelle Prüfen und Einstellen Gasschläuche u. Verbindungen prüfen Brennerverbindung prüfen (Anschluß T1 u. Steuerleitungsstecker) Bei Verwendung der Spool Gun ist der Regler am Gerät abgeschaltet 30 DESCRIPCION Gracias por elegir uno de nuestros equipos. Para obtener el máximo rendimiento del mismo, lea con atención el siguiente documento: El Duogys es recomendado para la soldadura del acero, del inox, del aluminio y para las soldaduras fuertes de aceros alta resistencia con hilos CuSi y Cual (ideal al reparar la carrocería). Su reglaje es sencillo y rápido gracias por su función « Velocidad de hilo sinérgico ». Funciona con una alimentación de 400V trifásica o de 230V trifásica. ALIMENTACION ELECTRICA La corriente efectiva absorbida (I1eff) esta señalada sobre el aparato, para las condiciones de uso máximas. Comprobar que la red eléctrica y sus protecciones (fusible y disyuntor) sean compatibles con la corriente necesaria para su utilización. En algunos países, es necesario cambiar el enchufe para más de rendimiento. El aparato tiene que ser colocado de tal manera que sea accesible el enchufe. No utilizar alargadores con una sección inferior a 2.5mm2. ALIMENTACION 400V TRIFASICOS El Duogys Auto de origen está ensamblado a la fabrica para une utilización en 400V trifásico y entregado con un enchufe de 16A tipo RS-015 CEE 400V. Tiene que ser conectado a una toma de 400V (50 Hz) CON tierra protegida por un disyuntor 10A y un diferencial de 30mA. ALIMENTATION 230V TRIFASICOS ATTENCION: este aparato esta ensamblado a la fábrica para una utilización en 400V bifásicos. Si la red eléctrica es de 230V 3 fases, modificar la conexión de la placa al interior de la maquina. Esta manipulación tiene que efectuarse por operarios cualificados. Para esta manipulación, referirse al esquema de conexión incluido en el aparato. La alimentación eléctrica debe ser protegida por un disyuntor 16A y un diferencial 30mA. PRESENTACION DEL APARATO El Duogys es entregado con 3 antorchas: 2 antorchas acero de 3 metros, equipada para hilo de 0,8 mm. Una antorcha spool gun de 4 metros equipada para hilo de 0,8mm ALU Antorcha acero 150A Tubo de contacto 0,8 + Tubo de contacto 0,6 Antorcha acero 150A Tubo de contacto 0,8 Spool gun Tubo de contacto 0,8 Alu NB: La funda teflón (ref.041578) en opcional para transformar una antorcha acero en una antorcha Alu. Seguridad: sola la antorcha utilizada esta bajo tensión (exigencia PSA). 31 13 9 8 16 3 17 7 14 6 5 1 2 10 4 15 5 12 68 kg 11 1 Interruptor 0-I de arranque- paro 2 Conmutador de ajuste de tensión de 7 posiciones: permite ajustar la tensión de salida del generador. El ajuste de la tensión de salida es proporcional al espesor del material que va a soldarse. 3 4 5 6 7 Teclado de arreglos de los parámetros de soldadura. (Modo manual o automático). Conmutador de selección de la antorcha utilizada (T1 o T2). Racores antorcha al estándar europeo. Conmutador de manipulación del spool gun. Piloto de protección térmica: Advierte de que el equipo va a desconectarse si se esta utilizando de manera intensiva (el paro durara unos diez minutos). 8 Soporte de antorchas 9 Soporte de cables de antorchas 10 Cable de alimentación (6m) 11 Cable de maza y pinza 250A. 12 Soporte de botellas (maxi 2 botellas de 4m3). 13 Cadena de fijación de botellas. Atención: bien fijar las botellas 14 Soporte bobina Ø 200 mm. 15 Soporte bobina Ø 200 o 300 mm. 16 Electroválvulas antorcha 1 (T 17 Electroválvulas antorcha 2 (T2) 32 INSTALACION DEL APARATO CONEXION GAS Apretar el manómetro sobre la botella de gas. Utilización con 2 gases diferentes: Cortar el tubo en 2. Conectar cada botella sobre las electroválvulas correspondientes: - Electroválvulas T1 arriba. - Electroválvulas T2 abajo. Para evitar las fugas de gas, utilizar las abrazaderas de la caja de accesorios. Utilización con un solo gas: Cortar el tubo de 2 metros en 3. Pues realizar el montaje gracias al racor Y. (Cf. foto) Para evitar las fugas de gas, utilizar las abrazaderas de la caja de accesorios. CAUDAL DE GAS El caudal de gas es entre 15 y 25L/min. para aluminio y entre 8 y 12L/mm para acero Ø 0,6 à 0,8 según el ambiente y la experiencia del soldador. ELECCION DE BOBINAS: posibilidades : Tipo de hilo Acero antorcha 1 (T1) antorcha 2 (T2) X X X X X Ø 300 Ø 200 GAS X Ø 100 INOX Spool gun (T1) Ø 200 Argon + CO2 T1 X Ø 100 CuSi3 Ø 200 X X CuAl8 Alu AG5 Ø 200 X X T2 X* Ø 300 X* Ø 200 Argon puro X* AlSi5 Ø 100 X AlSi12 Ø 100 X * Prever una funda teflón (ref. 041548) y un tubo de contacto especial alu (Ø 0,8: 041059) Configuración recomendada para la reparación carrocería Tipo de hilo Acero CuSi3 / CuAl8 AlSi5 / CuSi3 CuAl8 AlSi12 AlSi5 Ø 200 Ø 200 antorcha 1 (T1) antorcha 2 (T2) X Spool gun (T1) GAS Argon + CO2 X Argon puro X AlSi12 Ø 100 : Preconización OPEL & MERCEDES : Preconización Peugeot/Citroën/Renault : Preconización para aluminio automóvil (chapa de espesor comprendido entre 0,6 et 1,5mm). : Preconización para aluminio automóvil (chapa de espesor > 1,5mm). 33 PROCESO DE AJUSTE DEL EQUIPO: Espolón de entrenamiento de la bobina Tuerca de presión Soporte de bobina Freno del soporte de bobina Pomo de tensión hilo del motor rodillas en posición 0,8mm • Abrir la trampilla del aparato. • Posicionar la bobina respetando el espolón de entrada de la bobina. • De manera general, no apretar excesivamente. Regular el freno de la bobina para evitar que la inercia de la misma enmarañe el hilo al detenerse la soldadura. • Escoger el rodillo adecuado según el hilo que se vaya a utilizar (por ejemplo si se utiliza un hilo de 0.6, deben colocarse dos rodillos adecuados a este diámetro). Sin apretar excesivamente, ajustar la leva de apriete del rodillo para evitar que este patine. • Para la primera utilización : - aflojar el tornillo de fijación del guía de hilo (1) - colocar los rodillos 2 1 colocar la guía de hilo (2) lo más cercano del rodillo sin impactarlo, luego apretar el tornillo de fijación. • Para ajustar el pomo de los rodillos prensadores: aflojar al máximo, accionar el motor apretando el gatillo de la antorcha, apretar el pomo y seguir pulsando el gatillo. Cuando el hilo corre, parar la presión. Nb: para el hilo aluminio, utilizar un mínimo de presión para no aplastar el hilo. • elegir el tubo de contacto y la sirga adecuados al hilo utilizado. 34 FUNCIONAMIENTO TECLADO : 4 2 1 5 3 Elección del modo de soldadura NORMAL (2T) : soldadura estándar 2 tiempos DELAY : función « taponado », soldadura discontinua con ajuste del diámetro y de la intermitencia del punto. SPOT : función « punto de cadeneta », soldadura discontinua con ajuste del diámetro del punto. Arreglo de la velocidad del hilo Potenciómetro de ajuste de la velocidad del hilo. La velocidad varía de 1 à 15 m/minuto. Potenciómetro de ajuste SPOT/DELAY Modo Manual En modo manual, la velocidad de devanado del hilo es determinada por el soldador ajustando el potenciómetro. Modo Sinérgico Situar el potenciómetro en medio de la zona « OPTIMO SYNERGIC » Con este modo, el aparato determina la velocidad de hilo óptima a partir de 3 parámetros: Tensión Diámetro de Hilo Naturaleza del hilo Es posible ajustar la velocidad del hilo + / -. En posición NORMAL (2T), 2 modos son propuestos para facilitar el arreglo del aparato: MANUAL o SYNERGIC. MODO «MANUAL » Para ajustar su aparato proceder come sigue: - Elegir la tensión de soldadura gracias al conmutador 7 posiciones. ejemplo: posición 1 para soldar chapa de 0.6mm y posición 7 para chapa de 4mm. - Apuntar la velocidad del hilo gracias por el potenciómetro. Consejos : El ajuste de la velocidad del hilo se hace a menudo por el « ruido »: el arco debe ser estable y no crepitar demasiado. Cuando la velocidad es demasiado débil, el arco no es continuo. Cuando la velocidad es demasiado rápida, el arco crepita y el hilo rechaza la antorcha. 35 MODO « SYNERGIC » Gracias a esta función, no es necesario mas ajustar la velocidad del hilo. Sigue las instrucciones siguientes : - situar el potenciómetro velocidad de hilo a medio de la zona « Optimal synergic » seleccionar: el tipo de hilo El diámetro de hilo La tensión (conmutador 7 posiciones sobre la cara antes) Para elegir la posición adecuada según el espesor que soldar, referirse a la tabla abajo : A partir de esta combinación de parámetros, el DuoGys Auto determina la velocidad de hilo óptima y el mismo esta dispuesto a soldar. Es posible ajustar la velocidad del hilo en + / – gracias al potenciómetro. Para cada antorcha, una memorización de las últimas configuraciones de soldadura es efectuada. (Diámetro de hilo, calidad, modo). Selección del GAS (solamente para la soldadura de acero) : En modo sinérgico, el DUOGYS determina los parametros de soldadura según el gas utilizado. Por defecto, en soldadura de acero, la máquina está configurada « Argon + CO2 ». Para cambiar de gas y configurar el equipo en modo CO2 o volver al modo Argón + CO2, proceder como abajo mencionado : 12- 34- Apretar la tecla « Type » durante 5 segundos hasta que el teclado se apague, luego relajar la tecla. En un plazo de 5 segundos, elegir la configuración deseada con la tecla : « choix mode ». Normal (2T) => Argón + CO2 (reglaje de origen) Delay => CO2 100% La validación se efectua o sea por la tecla « Type » o sea al esperar unos 5 segundos. Una vez validado, el equipo vuelve al modo de funcionamiento normal y la modificación queda registrada aún el aparato apagado. 100% CO2 Ar + CO2 36 MODO SPOT Esta función permite realizar soldadura por puntos. Para ajustar el tiempo del punto, utilizar el potenciómetro.. MODO DELAY Para realizar soldaduras en « punto de cadeneta », ajustar el potenciómetro.. Esta función permite soldar chapas muy finas en acero o aluminio, evitando que la chapa sea perforada y deformada. (Sobre todo la soldadura del aluminio). SPOOL GUN PRÉSENTACION Y FUNCIONAMIENTO T1 • La antorcha spool gun se instala sobre el conectador de la antorcha T1. • El spool gun funciona sea en modo « manual » o sea en modo « sinérgico » • En modo manual o en modo « Sinérgico », solo el botón de ajuste de la velocidad de hilo deportado sobre la antorcha es activo (el potenciómetro velocidad de hilo del aparato es inactivo). • Modo « Sinérgico » : - Colocar el botón de velocidad de hilo de la antorcha al centro de su ralla y ajustar si necesario. - Para tener mas información sobre el modo « sinérgico » referirse a la pagina 9. 4 5 1 2 1 Botón de apertura/cierre del capo 2 Tuerca de sujeción bobina 3 Tuerca de freno bobina (no apretar demasiado) 4 Tornillo de ajuste de tensión de los rodillos 5 Botón de ajuste de velocidad de hilo 3 PROCEDIMIENTO DE MONTAJE Bobina Abrir el capo Quitar la tuerca de sujeción (nb. : paso de rosca inverso) Apretar la tuerca freno para curvar el eje bobina (no apretar demasiado) Insertar la bobina Para insertar el hilo en los rodillos, aplicar una presión en el « tornillo de ajuste de tensión de los rodillos » Antorcha • Sacar el hilo de la antorcha T1 enrollado en la bobina. • Sacar la antorcha T1 • enchufar el conector de potencia del spool gun sobre el conector T1 • enchufar el conector de control del spool gun • transferir el conmutador sobre T1. CONSEJOS Y PROTECCION TERMICA • Respetar las normas clásicas de soldadura. • Dejar las aletas del aparato libres para la toma y salida del aire. • Dejar el aparato conectado para permitir el enfriamiento. • Protección térmica: el piloto luminoso se enciende y el enfriamiento dura algunas minutas según la temperatura ambiente. 37 FACTORES DE MARCHA & ENTORNO DE UTILIZACION • El aparato tiene una característica de salida de tipo « tensión constante”. Su factor de marcha según la norma EN60974-1 esta indicado en la siguiente matriz : X / 60974-1 @ 40°C (T ciclo = 10 min.) I max 60% (T ciclo = 10 min.) 100% (T ciclo = 10 min.) DuoGys Auto 22% @ 150 A 105 A 90 A Nota: los ensayos de calentamiento han sido efectuados en temperatura ambiente y el factor de marcha a 40ºC ha sido determinado por simulación. • Estos aparatos son de Clase A. Son concebidos para un uso en un ambiente industrial o profesional. En un entorno distinto, puede ser difícil asegurar la compatibilidad electromagnética, a causa de perturbaciones conducidas tan bien como radiadas. No utilizar en un entorno con polvos metálicos conductores. • Este equipo es conforme a la norma CEI 61000-3-12, bajo condición que la potencia de cortocircuito Ssc sea superior o igual a 1,8MVA al punto de interfaz entre la alimentación del usuario y la red publica de distribución. Es de la responsabilidad del instalador del equipo de asegurarse, si necesario consultando al organismo responsable de la red de distribución, que el equipo esté conectado únicamente con una alimentación cuya potencia de cortocircuito Ssc sea superior o igual a 1,8MVA. MANTENIMIENTO • El mantenimiento debe ser efectuado por una persona cualificada. • Parar la alimentación desconectando la toma, y esperar el paro del ventilador antes de trabajar sobre el aparato. Al interior, las tensiones e intensidades son elevadas y peligrosas. • Regularmente, retirar las carcasas y soplar el polvo. Verificar el buen estado de las conexiones eléctricas con una herramienta por una persona cualificada. • Controlar regularmente el estado del cordón de alimentación. Si el cable de alimentación esta deteriorado, debe ser reemplazado por el fabricante, su servicio postventa o una persona de misma calificación por evitar el peligro. SEGURIDAD La soldadura MIG/MAG puede ser peligrosa y causar lesiones graves y así mismo mortales. Protéjase y proteja los otros. Respetar las instrucciones siguientes de seguridad: Radiaciones del arco: protéjase con un mascara provisto de filtros conformes EN 169 o EN 379. Lluvia, vapor de agua, Utilizar su aparato en una atmosfera limpia (grado de polución inferior a 3), a plano Humedad: y situado más de 1 metro de la pieza a soldar. No utilizar bajo lluvia ni nieve. Choque eléctrico: esta maquina solo debe ser utilizada sobre una alimentación trifásica de 4 hilos y tierra. No tomar las piezas sobre tensión. Verificar que la alimentación sea adaptada al aparato. Nunca utilizar una antorcha en mal estado (defecto de isolación electrica) : existen riesgos de dañar el aparato y la instalación electrica. Caídas: No suspender el aparato encima de personas u objetos. Quemaduras: al soldar se deberá ir adecuadamente equipado, protecciones para los ojos, guantes para las manos, y vestimenta ignifuga para el soldador y las personas de su entorno inmediato. Proteja los otros instalando protecciones no inflamables, o previniéndolos no mirar al arco y mantener distancias suficientes. Riesgos de fuego: Suprimir todos productos inflamables del espacio de trabajo. No trabajar si hay GAS inflamable. Humos: no inhalar los gases y humos de soldadura. Se deberá trabajar en un local bien ventilado, con extracción artificial si es soldadura en interior. Precauciones Suplementarias: todas operaciones de soldadura: - en lugares con importante riesgos de choques eléctricos. - en lugares cerrados, - en presencia de materiales inflamables o con riesgos de explosión. Siempre debe ser sujeta a la aprobación de un « experto », y efectuada en presencia de personas cualificadas capaces de intervenir en caso de urgencia. Los medios técnicos de protección especificados en la Especificación Técnica CEI/IEC 62081 deben ser aplicados. La soldadura en posición sobreelevada esta prohibida, excepto en caso de utilización de plataformas de seguridad. Las personas que tienen un estimulador cardiaco deben acudar al medico antes de utilizar estos aparatos. No utilizar el aparato para descongelar las canalizaciones. Manipulese la botella de gas con precauciones, riesgos existen cuando la botella o la valvula estan deterioradas. 38 SINTOMAS, CAUSAS POSIBLES, REMEDIOS SINTOMAS La salida del hilo de soldadura no es constante. El motor de devanado no funciona. CAUSAS POSIBLES REMEDIOS Residuos obstruyen el orificio. Limpiar el tubo de contacto o cambiarlo. El hilo desliza en los rodillos. - supervisar la presión de los rodillos o reemplazarlos. - diámetro del hilo no conforme al rodillo. - funda guía de hilo en la antorcha no es correcta. Aflojar el freno y los rodillos. Freno de la bobina o del rodillo demasiado apretado. Problema de alimentación Verificar que el botón de arranque esta activado. Limpiar o reemplazar. El hilo no se devana bien funda guía de hilo sucia o deteriorada. Freno de la bobina demasiado fijado. No corriente de soldadura. La toma no esta bien conectada. Verificar la conexión de toma y si la misma esta bien alimentada. La masa no esta bien conectada. Supervisar el cable de masa (conexión y estado de la pinza) Verificar el gatillo de la antorcha. Contactor de potencia inactivo. Se engancha el hilo después de los rodillos. El cordón de soldadura es poroso. Vaina guía de hilo aplastada. Obstrucción del hilo en al interior de la antorcha. Falta de la cánula guia-hilo. Velocidad del hilo demasiado rápida. El consumo de gas es insuficiente. Botella de gas vacío. Verificar la funda y el interior de la antorcha. Reemplazar o limpiar Verificar la presencia se la cánula guia-hilo. Reducir la velocidad del hilo. Ralla de ajuste de 15 a 20L /min Limpiar el metal de base. Reemplazarla Calidad del gas non satisfactorio reemplazarlo Circulación de aire o influencia del viento. Boquilla gas demasiada sucia. Impedir las corrientes de aire, proteger la zona de soldadura. Limpiar la boquilla gas o reemplazarla. Mala calidad del hilo. Utilizar un hilo adaptado a la soldadura MIG-MAG. Limpiar la pieza antes de soldar. Estado de la superficie a soldar en mal estado. Partículas de chispas importantes. Aflojar el freno. Tensión del arco demasiada baja o alta. Ver los parámetros de soldadura. Mala toma de masa. Controlar y posicionar la toma de masa lo mas próximo posible de la zona a soldar. Ajustar el caudal de gas Gas de protección insuficiente. No llega gas a la salida de la antorcha el Spool Gun no funciona Mala conexión del gas. En modo Spool Gun, El botón de ajuste velocidad situado sobre el aparato no funciona. Comportamiento normal del aparato Problema de conexión. Verificar que la unión del gas cerca del motor sea bien conectada. Verificar las conexiones de la antorcha (conector potencia y conector potencia orden). Durante la utilización del spool gun, solo el botón de ajuste de velocidad del hilo sobre la antorcha funciona. 39 ОПИСАНИЕ Спасибо за ваш выбор! Чтобы полностью использовать возможности аппарата, пожалуйста, ознакомьтесь с данной инструкцией. DuoGys Auto рекомендуется для сварки стали, нержавейки, алюминия, а также для сварки-пайки сталей выскокой прочности с помощью проволки из сплавов CuSi и CuAl (идеален для ремонта кузова). Благодаря функции «синергическая скорость подачи проволки» аппарат настраивается просто и быстро. DuoGys работает от трехфазной розетки 400В или от трехфазной розетки 230В. ЭЛЕКТРИЧЕСКОЕ ПИТАНИЕ Эффективное значение потребляемого тока (I1eff) для использования при максимальных условиях указано на аппарате. Проверьте, что питание и его предохранители соответствуют необходимому для использования току. В некоторых странах будет необходима замена розетки чтобы аппарат смог быть использован при максимальных нагрузках. Аппарат должен быть расположен так, чтобы штепсельная розетка была доступна. Не использовать удлинитель с диаметром сечения менее чем 2,5 мм². ТРЕХФАЗНОЕ ПИТАНИЕ 400В Изначально Duogys Auto смонтирован на заводе для трехфазного питания на 400В и поставляется в комплекте с вилкой на 16A типа RS-015 CEE 400В. Он должен быть включен в розетку на 400В (50 Гц) С ЗАЗЕМЛЕНИЕМ и защищен предохранителем на 10A и дифференциалом на 30мA. ТРЕХФАЗНОЕ ПИТАНИЕ 230В ВНИМАНИЕ : Изначально этот аппарат смонтирован на для трехфазного питания на 400В. Если у вас трехфазная электропроводка на 230В, необходимо изменить подключение платы с клеммами внутри аппарата. Эта операция должна быть сделана компетентным специалистом. Для этого воспользуйтесь схемой подключения на 230В, расположенной внутри аппарата. Электрическое питание должно быть защищено 16-Aмперным предохранителем и дифференциалом 30мA. ОЗНАКОМЛЕНИЕ С АППАРАТОМ Duogys Auto поставляется с 3 горелками : 2 трёх-метровые горелки для стали, оснащенные для проволоки диаметром 0,8 мм. Приводная четырёх-метровая горелка, оснащенная для алюминиевой проволоки диам 0,8мм Горелка для стали 150A Приводная горелка (Spool gun) Горелка для стали 150A Контактная трубка 0,8 Контактная трубка 0,8 для Контактная трубка 0,8 Алюминия + Контактная трубка 0,6 NB : ОПЦИЯ - Тефлоновый рукав (арт. 041578 ), чтобы переделать горелку для стали в горелку для Алюминия Безопасность : Под напряжением находится лишь используемая горелка (требование PSA) 40 13 9 8 16 3 17 14 7 1 6 5 2 10 15 4 5 12 68 kg 11 1 Выключатель вкл – выкл 2 Регулировка мощности 7-позиционного коммутатора : позволяет подкорректировать сварочное напряжение на выходе генератора. Настройка напряжения на выходе пропорциональна толщине свариваемого материала. 3 Панель регулировки сварочных параметров (ручной или автоматический режим). 4 2-позиционный переключатель для выбора используемой горелки (T1 или T2). 5 Разъёмы для горелок европейского стандарта. 6 Разъём управления приводной горелки. 7 Лампочка термозащиты на панели управления : предупреждает о выключении из-за перегрева, когда аппарат использован интенсивно (отключается на несколько минут). 8 Подставка для горелки 9 Подставка для кабелей горелки 10 Шнур питания (8м) 11 Кабель массы с зажимом 250A. 12 Подставка для баллонов (максимум 2 баллона объёмом 4м3). 13 Цепь для закрепления баллонов. Внимание : правильно закрепите баллоны 14 Держатель бобины Ø 200 мм. 15 Держатель бобины Ø 200 или 300 мм. 16 Электроклапан горелки 1 (T1) 17 Электроклапан горелки 2 (T2) 41 УСТАНОВКА АППАРАТА ПОДКЛЮЧЕНИЕ ГАЗА Привинтите редуктор к газовому баллону. Для использования с двумя разными газами. Разрежьте шланг пополам. Подсоедините каждый баллон к электроклапанам, соблюдая следующий порядок : - электроклапан T1 сверху - электроклапан T2 снизу. Во избежание утечки газа, используйте стяжки, находящиеся в коробке с аксессуарами. Для использования с одним и тем же газом. Разрежьте 2-х метровый шланг на 3 части. Затем выполните следующее подключение благодаря соединителю Y. (См фото слева) Во избежание утечки газа, используйте стяжки, находящиеся в коробке с аксессуарами. РАСХОД ГАЗА Расход газа составляет примерно от 15 до 25 л/мин для Алюминия и от 8 до 12 л для стали Ø от 0,6 до 0,8 в зависимости от среды и опыта сварщика. ВЫБОР БОБИНЫ: Возможные конфигурации : Тип проволоки Сталь Горелка 1 (T1) Горелка 2 (T2) X X X X X Ø 300 Ø 200 X Ø 100 Нержавейка Приводная горелка (T1) Ø 200 ГАЗ Аргон + CO2 T1 X Ø 100 CuSi3 Ø 200 X X CuAl8 Alu AG5 Ø 200 X X Ø 300 AlSi5 Ø 100 X AlSi12 Ø 100 X T2 X* X* Ø 200 Чистый аргон X* * Предусмотрите тефлоновый рукав (арт 041548) и контактную трубку спец. для Алюминия (Ø 0,8 : 041059) Конфигурация, рекомендованная для кузовного ремонта : Тип проволоки Сталь Ø 200 CuSi3 / CuAl8 AlSi5 / CuSi3 CuAl8 AlSi12 AlSi5 Горелка 1 (T1) Ø 200 AlSi12 Ø 100 : Технологическое : Технологическое : Технологическое : Технологическое Горелка 2 (T2) X Приводная горелка (T1) X X требование требование требование требование ГАЗ Аргон + CO2 Чистый аргон OPEL & MERCEDES Peugeot/Citroën/Renault для автомоб. алюминия, для листов толщиной от 0,6 и до 1,5 мм. для автомобильного алюминия для листов толщиной > 1,5мм 42 ИНСТРУКЦИЯ ПО УСТАНОВКЕ БОБИН И ГОРЕЛОК : Ведущий палец бобины Держатель бобины Зажимная гайка Регулировка тормоза держателя бобины Колесико для наладки натяжения проволоки двигателя Ролик в положении 0,8мм • Откройте люк аппарата. • Установите бобину с помощью ведущего пальца держателя. • Отрегулируйте тормоз бобины так, чтобы при остановке сварки бобина по инерции не запутала проволоку. Не зажимайте слижком сильно ! • Ведущие ролики - двухжелобчатые (0,6/ 0,8 и 0,8/1). Видимый на ролике диаметр - тот, который используется. Для проволоки 0,8, нужно использовать жёлоб 0,8. • При первом запуске аппарата : - ослабить крепежные винты проводника проволоки 1 - установите ролики 2 - затем установите нитеводитель 1 2 как можно ближе к ролику, но не впритык, затем завинтите зажимный винт • Для регулировки колесика нажимных роликов, действуйте следующим образом : максимально развиньтите колесико, включите мотор нажатием на гашетку горелки, завиньтите колесико, продолжая нажимать на гашетку. Как только проволока начинает протягиваться, перестаньте завинчивать. Nb : для алюминиевой проволоки давление должно быть минимальным, чтобы не сплющивать проволоку. • Выберите диаметр контактной трубки наконечника горелки. Используйте контактную трубку, подходящую для диаметра используемой проволоки. 43 КАК РАБОТАЕТ АППАРАТ КНОПКИ ПАНЕЛИ УПРАВЛЕНИЯ : 4 2 1 5 3 Выбор сварочного режима NORMAL (2T): стандарт.2х-тактный режим DELAY : функция « цепного шва », прихватка с регулированием прерывистости точек SPOT : функция « заваривания », прихватка с регулируемым диам. точки Регулировка скорости подачи проволоки Потенциометр точной настройки скорости подачи. Скорость колеблится от 1 до 15 метров в минуту. Потенциометр регулировки SPOT/DELAY Ручной режим В ручном режиме скорость подачи проволоки определена пользователем с помощью потенциометра . Синергичный режим Поставьте потенциометр по середине зоны « OPTIMAL SYNERGIC » В этом режиме аппарат определяет оптимальную скорость подачи, исходя из 3 параметров : Натяжение Диаметр проволоки Материал проволоки Можно более точно настроить эту скорость + / - В положении NORMAL (2T), предлагаются 2 режима для облегчения настройки аппарата : MANUAL (ручной) или SYNERGIC (синергичный). РЕЖИМ «MANUAL» (РУЧНОЙ) Для настройки аппарата действуйте следующим образом : - Выберите сварочное напряжение с помощью 7-позиционного коммутатора Например : позиция 1 для листа толщиной в 0,6мм и позиция 7 для листа толщиной 4мм - подберите скорость подачи проволоки с помощью потенциометра . Coветы Как правило, регулировка скорости производится «на слух»: дуга должна быть стабильной и издавать лишь слабое потрескивание. При слишком низкой скорости дуга не будет неприрывной. При слишком высокой скорости дуга «потрескивает», и поволока отталкивает горелку. 44 РЕЖИМ «SYNERGIC» (СИНЕРГИЧЕСКИЙ) Благодаря этой функции Вам больше не нужно настраивать скорость подачи проволоки. Для этого : - Установите потенциометр скорости проволоки посередине зоны «Optimal synergic» - Виберите : Тип проволоки Диаметр проволоки Мощность (7-позиционный переключатель на лицевой панели аппарата) Чтобы подобрать нужное положение в соответствии с толщиной проволоки, следуйте указаниям нижеприведенной таблицы: На основе этой комбинации параметров DuoGys Auto определяет оптимальную скорость подачи проволоки, и аппарат готов варить. Если нужно, можно откорректировать скорость подачи в сторону + или – с помощью потенциометра. Для каждой горелки, предусмотрено запоминание последних параметров сварки (диаметр проволоки, тип проволоки, режим). Выбор Газа (только для сварки стали) : В синергичном режиме DUOGYS определяет параметры сварки в зависимиости от используемого газа. По определению аппарат запрограммирован на « Argon + CO2 ». Для замения газа и для того чтобы настроить аппарат на CO2 или снова перейти на Аrgon + CO2, следуйте следующим указаниям : 1Нажать на кнопку « Type » в течении 5 секунд пока клавиатура не погаснет, затем отпустите кнопку. 2В течении 5 сек выберите желаемую конфигурацию с помощью кнопки : « choix mode/выбор режима ». Normal (2T) => Argon + CO2 (по умолчанию) Delay => CO2 100% 3Подтверждение происходит либо с помощью кнопки « Type » либо по истечению 5 секунд. 4После подтверждения аппарат возвращается в режим нормальной работы и зарегистрированное изменение остается в памяти даже после выключения аппарата. 100% CO2 Ar + CO2 ТОЧЕЧНЫЙ РЕЖИМ (SPOT) 45 Эта функция позволяет выполнять операцию прихвата. Для настройки продолжительности точки (прихвата), используйте потенциометр. РЕЖИМ ЗАДЕРЖКИ ( DELAY) Для сварки «цепным швом» отрегулируйте потенциометр. Эта функция позволяет варить очень тонкие листы стали или алюминия, ограничивая при этом риск провара или деформации листа (особенно при сварке алюминия). ПРИВОДНАЯ ГОРЕЛКА (SPOOL GUN) ПРЕЗЕНТАЦИЯ И ФУНКЦИОНИРОВАНИЕ • Горелка Spool Gun подключается к гнезду горелки T1. • Spool Gun может использоваться либо в ручном режиме «Manual», либо в синергическом «Synergic». • В режиме «Manual» или в режиме «Synergic» будет активна только кнопка управления скоростью проволоки, находящаяся на горелке (потенциометр скорости подачи бездействует). • В режиме «Synergic»: - Установите кнопку скорости подачи на горелке посередине диапазона переключения и, если необходимо, подкорректируйте. - Более подробную информацию – см на стр.40 Режим «Synergic». T1 4 5 1 СБОРКА Катушка 2 1 Кнопка Открыть/Закрыть крышку 2 Зажимная гайка катушки 3 Гайка тормоза катушки (не закручивать сильно) 4 Винт регулировки напряжения роликов 5 Кнопка регулировки скорости подачи 3 Открыть корпус Отвинтите гайку (Примечание : обратный шаг резьбы) Закрутить гайку тормоза чтобы выгнуть ось катушки (сильно не затягивать) Вставить вашу катушку Чтобы вставить проволку в ролики нажмите на « винт регулировки напряжения роликов » Горелка • Вытяните проволоку из горелки T1 накручивая ее на бобину. • Отсоедините горелку T1 • Подключите коннектор мощности Spool Gun к гнезду T1. • Подключите коннектор управления Spool Gun • Переключить коммутатор на T1 СОВЕТЫ И ТЕРМОЗАЩИТА • Следуйте общепринятым правилам сварки. • После сварки оставляйте аппарат подключенным для охлаждения. • Термозащита: индикатор загорается и охлаждение происходит за несколько минут в зависимости от температуры окружающей среды. • Оставляйте отверстия в аппарате свободными для свободного прохождения воздуха. 46 РАБОЧИЙ ЦИКЛ & СРЕДА ИСПОЛЬЗОВАНИЯ • Данный аппарат имеет выходную характеристику типа «постоянное напряжение». Его ПВ% согласно норме EN60974-1 указан в приведенной ниже таблице : X / 60974-1 @ 40°C (T cycle = 10 min) I max 60% (T cycle = 10 min) 100% (T cycle = 10 min) DuoGys Auto 22% @ 150 A 105 A 90 A Примечание : испытания на нагрев производились при комнатной температуре, а продолжительность включения (ПВ%) при 40 °C был определен с помощью симуляции. • • Эти аппараты относятся к Классу A. Они созданы для использования в промышленной и профессиональной среде. В любой другой среде ему будет сложно обеспечить электромагнитную совместимость из-за кондуктивных и индуктивных помех. Не использовать в среде содержащей металлическую пыль-проводник. Этот аппарат соответствует директиве CEI 61000-3-12 при условии, что мощность короткого замыкания Ssс превышает или равна 1.8MVA в месте стыковки между питанием пользователя и сетью электроснабжения. Специалист, установивший аппарат, или пользователь должны убедиться в том, что аппарат подсоединен именно к такой системе питания, что мощность короткого замыкания Ssс превышает или равна 1.8MVA, обратившись при надобности к организации, отвечающей за эксплуатацию системы питания. ОБСЛУЖИВАНИЕ • Техническое обслуживание должно производиться только квалифицированным персоналом. • Отключите питание, вынув вилку из розетки, и дождитесь остановки вентилятора перед тем, как приступить к тех. обслуживанию. Внутри аппарата высокие и опасные напряжение и ток. • Регулярно открывайте аппарат и продувайте его, чтобы очистить от пыли. Необходимо также проверять все электрические соединения с помощью изолированного инструмента. Проверка должна осуществляться квалифицированным персоналом. • Проверяйте состояние провода питания. Если он поврежден, он должен быть заменен производителем, его сервисной службой или квалифицированным специалистом во избежание опасности. БЕЗОПАСНОСТЬ Сварка MIG/MAG может быть опасной и вызвать тяжелые и даже смертельные ранения. Защититесь сами и защитите окружающих. Соблюдайте следующие правила безопасности : Лучеиспускание дуги: Защититесь с помощью маски сварщика с фильтрами, соответствующими норме EN 169 или EN 379. Дождь, пар, влага: Используйте аппарат в чистой среде (степень загрязнённости ≤ 3), на ровной поверхности и на расстоянии более метра от свариваемой детали. Не использовать под дождём или снегом. Удар электрическим Этот аппарат можно подключать только к однофазному питанию c 4 проводами шоком: и с заземлением. Не дотрагивайтесь до частей, находящихся под напряжением. Проверьте, что электрическая сеть подходит для этого аппарата. Не использовать горелку в плохом состоянии (дефект изоляции электричества), существует риск повреждения аппарата и электропроводки. Падение : Не переносить аппарат над людьми или предметами. Ожоги : Носите рабочую одежду из огнеупорной ткани (хлопок, спецовка или джинсовка). Работайте в защитных перчатках и фартуке из огнеупорной ткани. Защитите окружающих с помощью защитных огнестойких экранов или предупредите их не смотреть на дугу и оставаться на безопасном расстоянии. Риск пожара : Уберите все возгараемые предметы из рабочего пространства. Не работайте в присутствии возгараемого газа. Дым : Не вдыхайте сварочные газ и дым. Используйте аппарат в хорошо проветриваемом месте. Если вы варите в помещении, то должна быть вытяжка. Дополнительные предостережения: Любые сварочные работы : - в помещениях с высоким риском удара электрическим шоком, - в закрытых помещениях, - в присутствии возгараемых или взрывоопасных материалов, всегда должна быть предварительно одобрены «ответственным экспертом» и выполнены в присутствии людей, специально обученных, чтобы прийти на помощь в случае необходимости. Необходимо использовать технические средства защиты, описанные в Технической Спецификации CEI/IEC 62081. Сварка на высоте запрещена, кроме случаев использования платформ безопасности. Лица, использующие электрокардиостимуляторы, должны проконсультироваться у врача перед работой с данными аппаратами. Не используйте этот аппарат для размораживания канализаций. Обращайтесь с газовым баллоном осторожно. Это может быть опасно, если газовый баллон или вентиль баллона повреждены. 47 НЕИСПРАВНОСТИ, ПРИЧИНЫ, УСТРАНЕНИЕ НЕИСПРАВНОСТЬ Подача сварочной проволоки неравномерна. ВОЗМОЖНЫЕ ПРИЧИНЫ Наплавы металла забивают отверстие. Проволока прокручивается в роликах. Двигатель разматывания не работает. Плохая подача проволоки. Отсутствует сварочный ток. Тормозное устройство бобины или ролика слишком тугое. Проблема с подачей Нитенаправляющая трубка загрязнена или повреждена. Тормозное устройство бобины слишком тугое. Аппарат неправильно подключен к сети. Неправильное подключение массы. Проволока застревает после прохода через ролики. Переключатель мощности не работает. Нитенаправляющая трубка расплющена. Проволока застревает в горелке. Отсутствует капиллярная трубка. Пористый сварочный шов. Значительное количество частичек искрения Слишком высокая скорость подачи. Недостаточная подача газа УСТРАНЕНИЕ НЕИСПРАВНОСТИ Очистите контактную трубку или поменяйте ее и смажте составом против прилипания. - Проверьте давление роликов или замените их. - Диаметр проволоки не соответствует ролику. - Используется несоответствующая нитенаправляющая трубка в горелке. Разожмите тормоз и ролики. Проверьте, что кнопка пуска в положении ВКЛ. Очистите или замените ее. Разожмите тормоз. Проверьте подключение к сети, а также, что питание действительно трёхфазное. Проверьте кабель массы (подсоединение и клещи). Проверьте гашетку горелки. Проверьте нитепроводящую трубку и корпус горелки. Прочистите или замените ее. Проверьте наличие капиллярной трубки. Снизьте скорость подачи. Диапазон регулировки от 15 до 20 л/мин. Защистите основной металл В баллоне закончился газ. Замените баллон. Неудовлетворительное качество газа. Циркуляция воздуха или воздействие ветра. Выпускное сопло газа загрязнено. Смените газ. Проволока плохого качества. Используйте проволоку, подходящую для сварки МИГ-МАГ. Зачистите деталь перед сваркой Плохое качество свариваемой поверхности (ржавчина и тд …) Натяжение дуги либо слишком низкое, либо слишком высокое. Неправильное закреплание массы. Защитного газа недолстаточно. Отсутствие газа на выходе горелки Spool Gun не работает Газ неправильно подсоединен. В режиме Spool Gun, кнопка регулировки скорости, расположенная на сварочном аппарате, не работает. Нормальное поведение аппарата Проблема с подключением Предотвратите сквозняки, защитите сварочную зону. Очистите сопло или замените его. См. параметры сварки. Проверьте и поместите зажим массы как можно ближе к зоне сварки. Отрегулируйте расход газа. Проверьте правильно ли подключено соединение газа рядом с двигателем. Проверьте поключения горелки (коннектор мощности и коннектор управления) Во время использования spool gun (приводной горелки) работает только вынесенная на горелку кнопка скорости подачи. 48 DESCRIZIONE Grazie per aver scelto questo prodotto. Per ottenere le migliori prestazioni dalla saldatrice, si consiglia di leggere attentamente le seguenti istruzioni: La DuoGys Auto è consigliata per la saldatura di acciaio, acciaio inossidabile, dei pezzi in alluminio e per la saldobrasatura degli acciai ad alta resistenza, con fili CuSi e CuAl (ideale per le riparazioni in carrozzeria). La regolazione è semplice e rapida grazie alla funzione “ velocità sinergica filo”. Funziona con un’alimentazione 400 V o 230 V trifase. ALIMENTAZIONE ELETTRICA Per le massime condizioni d’uso, la corrente effettiva massimale (I1eff) è indicata sulla macchina. Verificare che l’alimentazione e le protezioni (fusibile e/o differenziale) siano compatibili con la corrente necessaria al funzionamento. In certi paesi, per permettere l’uso nelle massime condizioni, potrebbe essere necessario cambiare la presa. La saldatrice deve essere posizionata in modo che la presa sia sempre accessibile. Non usare prolunghe con una sezione inferiore a 2,5 mm². ALIMENTAZIONE 400V TRIFASE La Duogys Auto è fabbricata per un’alimentazione 400V trifase e consegnata con una spina 16A del tipo RS-015 CEE 400V. Deve essere inserita in una spina da 400 V (50Hz) CON la terra e protetta da un fusibile da 10A e 1 differenziale 30mA. ALIMENTAZIONE 230V TRIFASE ATTENZIONE: La Duogys Auto è fabbricata per un’alimentazione 400V trifase Se la linea elettrica è da 230V trifase, bisogna modificare la connessione sulla scheda. La modifica deve essere fatta da un tecnico competente e in base allo schema di connessione 230V che è all’interno della saldatrice. La linea di alimentazione deve essere protetta da un fusibile da 16A e da un differenziale da 30mA. PRESENTAZIONE SALDATRICE La Duogys Auto viene fornita con 3 torce: o 2 torce acciaio da 3 metri, progettate per il filo da 0,8 mm o 1 torcia a bobina integrata da 4 metri, progettata per il filo da 0,8 mm in alluminio Pistola a bobina integrata Torcia acciaio 150A Torcia acciaio 150A Ugello di contatto in alluminio Ugello di contatto 0,8 Ugello di contatto 0,8 0,8 + Ugello di contatto 0,6 Nb: la guaina in teflon (cod.041578) è un’optional Per la sicurezza: Solo nella torcia che viene usata passa la corrente (requisito PSA) 49 13 9 8 16 3 17 14 7 6 5 1 2 10 15 4 5 12 68 kg 11 1 Interruttore On – Off 2 Manopola 7 posizioni per la regolazione della corrente: permette di regolare il voltaggio della saldatura in uscita dal generatore. La regolazione del voltaggio in uscita è proporzionale allo spessore del materiale da saldare. Tastiera per la regolazione dei parametri di saldatura (modo manuale o automatico) 4 Manopola 2 posizioni per scegliere la torcia da usare (T1 o T2). 5 Raccordo standard (Europeo) torcia 6 Presa di comando della pistola a bobina integrata. 7 Spia protezione termica: si trova sul panello dei comandi. Se la saldatrice è usata in maniera intensiva, la spia segnala un’interruzione termica (blocco di due minuti). 8 Supporto torce 9 Supporto cavi torce 10 Cavo corrente (6m) 11 Cavo di massa con pinza da 250A. 12 Supporto bombole a gas (max 2 bombole da 4m3). 13 Catena: per fissare le bombole. Attenzione: fissare le bombole correttamente. 14 Supporto bobina da Ø 200 mm. 15 Supporto bobina da Ø 200 o da 300 mm. 16 Valvola solenoide Torcia 1 (T1) 17 Valvola solenoide Torcia 2 (T2) 50 INSTALLAZIONE SALDATRICE COLLEGAMENTO GAS Montare il regolatore pressione sulla bombola del gas. Uso di 2 diversi tipi di gas Tagliare il tubo in 2 pezzi Connettere ciascuna bombola alle elettrovalvole seguendo l’ordine sotto: - elettrovalvola T1 sopra - elettrovalvola T2 sotto Per evitare perdite di gas, usare le guarnizioni fornite nella scatola degli accessori. Uso di un solo tipo di gas Tagliare il tubo da 2 metri in 3 pezzi. Quindi unire i pezzi con il raccordo ad Y (vd. foto accanto) Per evitare perdite di gas, usare le guarnizioni fornite nella scatola degli accessori. FLUSSO DEL GAS Per l’alluminio, il flusso del gas va da 15 a 25 L/min e per l’acciaio con Ø da 0,6 a 0,8, il flusso del gas va da 8 a 12L in funzione alla situazione e all’esperienza di chi salda. SCELTA DELLE BOBINE: Possibili impostazioni: Tipo di filo ACCIAIO INOSSIDABILE CuSi3 CuAl8 Alu AG5 AlSi5 AlSi12 Ø Ø Ø Ø Ø Ø Ø Ø Ø Ø Ø Torcia 1 (T1) Torcia 2 (T2) X X X 300 200 100 200 100 200 200 300 200 100 100 Pistola a bobina integrata (T1) GAS T1 X X X X X X X X* X* Argon + CO2 X X* T2 Argon puro X X * Considerare guaina in Teflon (cod.041548) e ugello di contatto speciale per l’alluminio (Ø 0, 8: 041059) Impostazioni consigliate per le riparazioni delle carrozzerie: Tipo di filo Acciaio CuSi3 / CuAl8 AlSi5 / AlSi12 Torcia 1 (T1) Ø 200 Ø 200 Ø 100 Torcia 2 (T2) Pistola a bobina integrata (T1) X GAS Argon + CO2 X X Argon puro Label1 CuSi3 CuAl8 AlSi12 AlSi5 : Raccomandato : Raccomandato : Raccomandato mm. : Raccomandato da OPEL & MERCEDES Peugeot/Citroën/Renault per l’alluminio delle auto a partire da lamiere di metallo con uno spessore da 0,6 mm a 1,5 per l’alluminio delle auto a partire da lamiere di metallo con uno spessore > di 1,5 mm. 51 PROCEDURA DI MONTAGGIO DELLE BOBINE E DELLE TORCE: Sperone dove si incastra la bobina Dado messo a bloccare Supporto bobina Regolazione freno del supporto bobina Manopola regolazione del rullo elettrico che regola la tensione del filo Rullo da 0,8 mm • Aprire la copertura laterale. • Posizionare la bobina in base alla forma del suo supporto. • Regolare il freno bobina per evitare che la forza di inerzia della bobina intrecci il filo quando si inizia a fermare. Non stringere troppo! • I rulli elettrici hanno doppia scanalatura (0,6/0,8 e 0,8/1). L’indicazione sul lato visibile della bobina indica il diametro in uso. Per il filo da 0,8 usare la scanalatura da 0,8. • La prima volta in cui si usa: - Allentare la vite della guida filo che è stretta apposta per bloccare 2 1 - Posizionare i rulli 1 - Posizionare la guaina 2 il più vicino possibile al rullo, ma senza toccarlo, quindi stringere la vite. • Per impostare la posizione dei rulli che regolano la tensione del filo: allentarli al massimo, accendere il motore premendo il grilletto della torcia, stringere il rullo continuando a premere il grilletto. Smettere di stringere non appena il filo inizia ad essere tirato. Nb: per il filo di alluminio, usare una pressione scarsa per evitare di strapparlo. • Scegliere il diametro dell’ugello alla fine della torcia. Utilizzare un ugello adatto al diametro del filo usato. 52 FUNZIONAMENTO SALDATRICE PANNELLO IMPOSTAZIONI: 4 2 1 5 3 Scelta modo saldatura NORMALE(2T) : saldatura standard a due fasi SALDATURA DELAY: saldatura intermittente che permette di regolare il diametro del punto SPOT : Saldatura Spot con possibilità di saldare in maniera intermittente tra un punto e l’atro. Regolazione della velocità del filo: Manopola per la regolazione della velocità del filo. La velocità varia da 1 a 15/m al minuto Manopola per scelta SPOT/DELAY Modo manuale Nel modo manuale la velocità del filo è determinata dall’utilizzatore tramite la manopola di regolazione . Modo sinergico Posizionare la manopola al centro dell’area che indica « OPTIMAL SYNERGIC » Così, la saldatrice determina la velocità ottimale del filo in base a 3 parametri: Voltaggio Diametro filo Materiale con cui è fatto il filo E’ possibile regolare la velocità del filo +/- Se la manopola è nella posizione NORMALE (2T), è possibile scegliere tra il modo MANUALE o SINERGICO, per impostare facilmente la saldatrice. MODO «MANUALE» -Scegliere il voltaggio di saldatura usando la manopola a 7 posizioni Esempio: posizione 1 per lamiere di metallo dello spessore di 0,6mm e posizione 7 per lamiere di metallo da 4 mm. -Regolare la velocità del filo con la manopola. Avvertenza La regolazione della velocità del filo, generalmente, si fa ascoltando il rumore: l’arco deve essere stabile e deve fare poco rumore. Se la velocità è troppo bassa, l’arco non è continuo. Se la velocità è troppo elevata, l’arco fa rumore e il filo spinge indietro la torcia. 53 MODO « SINERGICO » Grazie a questa funzione, non c’è più bisogno di regolare la velocità del filo. Per attivare questo modo: - Posizionare la manopola che regola la velocità del filo al centro dell’area che indica « Optimal synergic ». - Selezionare: Il tipo di filo Il diametro del filo Potenza (manopola a 7 posizioni). Fare riferimento agli spessori della lamiera indicati nella tabella sotto per posizionare la manopola sul valore adatto a saldare il pezzo in questione. Da questa combinazione, la duogys auto determina la velocità ottimale del filo. La saldatrice è pronta a saldare. Se necessario, poi è possibile regolare la velocità del filo grazie alla manopola + o -. Per ciascuna torcia, rimane memorizzata l’ultima configurazione (diametro filo, tipo e modo). Scelta del gas (solo per la saldatura dell’acciaio) Nel modo sinergico, la trimig 205-4S determina i parametri di saldatura in base al gas usato. Come impostazione di default, nella saldatura dell’acciaio, i gas selezionati sono « Argo + CO2 ». Se si vuole cambiare il gas e selezionare la C02 o se si vuole tornare al modo Argo + CO2, seguire la procedura sotto: 12- 34- Premere per 5 secondi il tasto « Type » fino a che la tastiera si spegne, quindi rilasciare. Scegliere l’impostazione desiderata entro 5 secondi, premendo « scelta modo ». Normale (2T) => Argo + CO2 (impostazione di default) Delay => CO2 100% La conferma viene data sia premendo il pulsante « Tipo », che aspettando 5 secondi. Dopo la conferma, la saldatrice torna a funzionare normalmente e la modifica rimane registrata anche quando viene spenta. 100% CO2 Ar + CO2 54 MODO SPOT Questa funzione permette di fare una saldatura spot. Per regolare la durata di ciascun punto, usare la manopola. MODO DELAY Per fare una saldatura intermittente, selezionare il modo con la manopola. Questa funzione permette di saldare lamiere in acciaio o alluminio molto sottili, abbassando il rischio di perforare o saldare in modo storto. (specialmente per la saldatura dell’alluminio). PISTOLA A BOBINA INTEGRATA DESCRIZIONE E FUNZIONAMENTO T1 • La pistola a bobina integrata deve essere collegata al posto della torcia T1 • La pistola funziona sia in modo “Manuale” che “Sinergico” • In entrambi i modi, è attivo solamente il pulsante di regolazione velocità del filo che è sulla torcia (la manopola sul pannello di controllo non è attiva). • Modo “Sinergico”: - Posizionare il pulsante per la regolazione della velocità del filo presente sulla torcia al centro, poi, se necessario, regolare. - Vedere pag. 17 per altre informazioni sul modo “Sinergico”. 3 1 Pulsante di apertuara/chiusura del coperchio 2 Dado che tiene la bobina 3 Dado che blocca la bobina (non stringere troppo) Vite per regolare la tensione dei rulli 4 4 1 Manopola per la regolazione della velocità del filo 2 MONTAGGIO Bobina Aprire il coperchio Rimuovere il dado che tiene la bobina (NB. : non invertire la vite) Stringere (non troppo) il dado numero per far uscire l’asse che reggerà la bobina e lasciare posto per inserire quest’ultima Inserire la bobina Per inserire il filo sui rulli, premere sulla vite che serve a regolare la tensione di questi Torcia • Ritirare il filo della torcia T1 srotolando la bobina. • Staccare la torcia T1 • Collegare l’attacco della pistola a bobina integrata nell’attacco della torcia T1 • Collegare la presa di commando della pistola a bobina integrata • Girare l’interruttore nella posizione T1. CONSIGLIO E PROTEZIONE TERMICA • Rispettare le regole basilari della saldatura. • Lasciare le fessure aperte, affinché circoli l’aria. • Al termine della saldatura, lasciare la saldatrice collegata alla presa in modo che si raffreddi. • Protezione termica: si accende la spia e il processo di raffreddamento dura un paio di minuti e dipende anche dalla temperatura dell’ambiente. 55 CICLO & AMBIENTE DI LAVORO • La saldatrice funziona con “tensione costante”. Il suo ciclo di lavoro, secondo la norma EN60974-1 (a 40°C – durata 10mn x ciclo) è descritto nella tabella seguente: X / 60974-1 @ 40°C (T cycle = 10 min) I max 60% (T cycle = 10 min) 100% (T cycle = 10 min) DuoGys Auto 22% @ 150 A 105 A 90 A N.B.: La prova del riscaldamento è stata fatta a temperatura ambiente e la temperature di 40°C durante il ciclo è stata simulata. • La Duogys Auto è una machina de classe A progettata per essere usata in un ambiente industriale o professionale. Se usata in altro ambiente, sarebbe difficile assicurare la compatibilità elettromagnetica. Non usare in ambiente dove è presente polvere metallica conduttiva. • L'attrezzatura è conformata alla norma CEI 61000-3-12 considerando una potenza di corto circuito Ssc superiore o pari a 1.8MVA tra la rete dell'utente e quella pubblica. E' responsabilità dell'utente o di chi installa l'attrezzatura di assicurarsi, se necessario contattando l'ente che si occupa della rete elettrica pubblica, che l'attrezzatura sia collegata ad un'alimentazione con potenza di corto circuito Ssc superiore o pari a 1.8MVA. MANUTENZIONE • La manutenzione deve essere fatta da un tecnico qualificato. • Togliere la corrente staccando dalla presa la saldatrice, aspettare che il ventilatore si fermi prima di lavorare sulla saldatrice. La tensione e la corrente che sono all’interno sono alte e pericolose. • Togliere regolarmente la copertura metallica e spolverare con l’aria compresa. Far controllare da un tecnico qualificato e con un accessorio non conduttore le connessioni elettriche. • Controllare regolarmente che il cavo della corrente sia in buone condizioni. Se danneggiato, deve essere cambiato dal produttore, dal rivenditore o da una persona qualificata, in modo da evitare di danneggiare la strumentazione. SICUREZZA La saldatura MIG/MAG può essere pericolosa e causare ferite serie o anche letali. Proteggere se stessi e gli altri. Rispettare le seguenti istruzioni di sicurezza: Irradiazione dell’arco Pioggia, vapore, Umidità Shock Elettrico Cadute Bruciature Proteggersi con un elmetto conforme ad EN169 o EN 379, completo di filtri. Usare la saldatrice in un ambiente pulito (fattore inquinamento ≤ 3), in piano e ad una distanza superiore a 1 metro dal pezzo che deve essere saldato. Non usare sotto la neve o la pioggia. La saldatrice deve essere usata solo con una spina a tre fasi e un neutro connesso a terra. Non toccare il pezzo sotto tensione. Controllare che la rete elettrica sia adatta alla saldatrice. Non usare mai una torcia difettosa (per esempio, nel caso in cui abbia un problema riguardante l'isolamento elettrico). Si corre il rischio di danneggiare la macchina e il sistema elettrico. Durante gli spostamenti non passare sopra persone o oggetti. Indossare abbigliamento da lavoro ignifugo (cotone, tuta da lavoro o jeans). Proteggere le altre persone montando barriere ignifughe o mantenere comunque chi è intorno ad una distanza di sicurezza, facendo in modo che non guardi l’arco. Rischio d’incendio Fumi Ulteriori Precauzioni Togliere tutti i prodotti infiammabili dalla zona di lavoro. Non usare la saldatrice in presenza di gas infiammabili. Non inalare i fumi e i gas che derivano dalla saldatura. Usare in ambiente ben ventilato. Se si salda in ambiente chiuso, usare un estrattore artificiale. Qualsiasi operazione di saldatura: - in stanze dove c’è un rischio più elevato di shock elettrici, - in stanze chiuse - in presenza di materiale infiammabile o esplosivo. deve sempre essere approvata da un “esperto responsabile” e eseguita in presenza di persone addestrate per intervenire in caso di urgenza. Si devono usare i mezzi tecnici di protezione descritti nella Scheda Tecnica CEI/IEC 62081. E’ vietato saldare da una posizione elevata, eccetto nel caso in cui si tratti dell’uso di piattaforme di sicurezza. Le persone che portano pacemakers devono consultare il medico prima di usare queste saldatrci. Non usare per scongelare i tubi. Maneggiare le bombole del gas con attenzione. Controllare se la bombola o la sua valvola sono danneggiate, per evitare spiacevoli conseguenze. 56 PROBLEMA, POSSIBLI CAUSE, SOLUZIONE PROBLEMA La fuoriuscita del filo non è costante. Non funziona il motore che deve srotolare. Cattivo funzionamento del meccanismo che srotola il filo. Non c’è corrente Il filo si intreccia dopo che i rulli hanno cominciato a girare. Il cordone di saldatura è poroso POSSIBILI CAUSE Pulire il tubo di contatto o sostituirlo. Cambiare anche il prodotto antiaderenza. Il filo pattina sui rulli. - Controllare la pressione del rulli o sostituirli. - Diametro filo non idoneo al rullo. - Guaina per il filo non idonea. Bobina o freno rulli regolati troppo stretti. Problema di alimentazione. Allentare il freno e i rulli. Guida di copertura del filo sporca o danneggiata. Freno bobina troppo stretto. Controllare che l’interruttore che aziona il movimento sia in posizione “on”. Pulire o cambiare. Allentare il freno. Cattiva connessione alla fonte principale di corrente. Controllare la connessione della presa e guardare se questa è ben alimentata con tutte e 3 le fasi. Cattiva connessione a terra. Controllare il cavo della terra (connessione e stato della pinza). Controllare il grilletto della torcia Contatore corrente non funzionante. Guaina filo danneggiata Blocco del filo nella torcia Non c’è il tubo capillare Velocità filo troppo elevata Il flusso del gas non è sufficiente Bombola gas vuota Controllare la guaina e il corpo della torcia Pulire o sostituire Controllarne la presenza Ridurne la velocità Regolare il valore tra 15 a 20 l/min. Pulire il metallo su cui si sta lavorando. Sostituire Qualità gas non buona Sostituire Correnti d’aria Evitare l’interferenza delle correnti, proteggendo l’area dove si salda. Pulire o sostituire gli ugelli del gas Bombola gas troppo piena Cattiva qualità del filo Superficie da saldare in cattiva condizione (ruggine, ecc.) Scintille molto evidenti SOLUZIONE Sporcizia blocca l’apertura Usare filo adatto alla saldatura MIGMAG. Pulire le parti prima di saldare Voltaggio arco troppo basso o alto Vedere le impostazioni di saldatura Cattiva connessione a terra Controllare il cavo e posizionarlo in modo da avere un buono scarico a terra. Regolare il flusso del gas Gas di protezione insufficiente Non c’è gas in uscita dalla torcia La pistola non funziona Cattivo collegamento del gas Nel modo pistola, la manopola di regolazione della velocità che si trova sulla saldatrice non funziona. E’ normale Problema di connessione Controllare se il collegamento del gas dietro la saldatrice è in buone condizioni. Controllare le connessioni della torcia (presa di alimentazione e presa di comando). Quando viene usata la pistola, funziona solo la manopola posta sulla torcia. 57 Déclaration de conformité : Gys atteste que les postes de soudure DUOGYS AUTO sont fabriqués conformément aux exigences des directives Basse tension 2006/95/CE du 12/12/2006, et aux directives CEM 2004/108/CE du 15/12/2004. Cette conformité est établie par le respect des normes harmonisées EN 60974-1 de 2005, EN 60974-10 de 2003. Le marquage CE a été apposé en 2008. Declaration of conformity : The equipment described on this manual is conform to the instructions of low voltage 2006/95/CE of 12/12/2006, and the instructions of CEM 2004/108/CE of the 15/12/2004. This conformity respects the standards EN60974-1 of 2005, EN 60974-10 of 2003. CE marking was added in 2008. Konformitätserklärung GYS erklärt, dass die Schweißgeräte DUOGYS AUTO in Übereinstimmung mit den Anforderungen der folgenden europäischen Bestimmungen: Niederspannungsrichtlinie 2006/95/CE –12.12.2006 und EMV- Richtlinien 2004/108/CE – 15.12.2004 elektromagnetische Verträglichkeit- hergestellt wurden. Diese Geräte stimmen mit den harmonisierten Normen EN60974-1 von 2005 und EN 60974-10 überein. CE Kennzeichnung: 2007 Declaracion de conformidad GYS atesta que los aparatos de soldadura DUOGYS AUTO están fabricados en conformidad con las directivas baja tensión 2006/95/CE del 12/12/2006, y las directivas compatibilidad electromecánica 2004/108/CE del 15/12/2004. Esta conformidad está establecida por el respeto a las normas EN 60974-1 de 2005, EN 60974-10 de 2003. El marcado CE fue fijado en 2008. Декларация о соответствии: GYS заявляет, что сварочные аппараты DUOGYS AUTO произведены в соответствии с директивами Евросоюза 2006/95/CE о низком напряжении от 12/12/2006, а также с директивами CEМ 2004/108/CE от 15/12/2004. Данное соответствие установлено в соответствии с согласованными нормами EN 60974-1 2005 г, EN 60974-10 2003 г.. Маркировка ЕС нанесенна в 2008 г. Dichiarazione di conformità: La DuoGys Auto descritta nel presente manuale è conforme alla direttiva sulla bassa tensione n. 2006/95/CE del 12/12/2006 e alla Direttiva n. CEM2004/108/CE del 15/12/2004.. Queste conformità rispettano gli standard EN60974-1 del 20055, EN 60974-10 de 2003. La marcatura CE è stata aggiunta nel 2008. 01/10/08 Société GYS 134 BD des Loges 53941 Saint Berthevin Nicolas BOUYGUES Président Directeur Général 58 CONDITIONS DE GARANTIE FRANCE • La garantie n’est valable que si le bon a été correctement rempli par le vendeur. • La garantie couvre tout défaut ou vice de fabrication pendant 1 an, à compter de la date d’achat (pièces et main d’œuvre). • La garantie ne couvre pas les erreurs de tension, incidents dus à un mauvais usage, chute, démontage ou toute autre avarie due au transport. • La garantie ne couvre pas l’usure normale des pièces (Ex. : câbles, pinces, etc.). En cas de panne, retournez l’appareil à la société GYS (port dû refusé), en y joignant : • Le présent certificat de garantie validé par le vendeur • Une note explicative de la panne. Après la garantie, notre SAV assure les réparations après acceptation d’un devis. Contact SAV : Société Gys-134 Bd des Loges BP 4159-53941 Saint-Berthevin Cedex Fax: +33 (0)2 43 01 23 75 Tél: +33 (0)2 43 01 23 68 HERSTELLERGARANTIE Die Garantieleistung des Herstellers erfolgt ausschließlich bei Fabrikations- oder Materialfehlern, die binnen 12 Monate nach Kauf angezeigt werden (Nachweis Kaufbeleg). Nach Anerkenntnis des Garantieanspruchs durch den Hersteller bzw. seines Beauftragten erfolgen eine für den Käufer kostenlose Reparatur und ein kostenloser Ersatz von Ersatzteilen. Der Garantiezeitraum bleibt aufgrund erfolgter Garantieleistungen unverändert. Ausschluss: Die Garantieleistung erfolgt nicht bei Defekten, die durch unsachgemäßen Gebrauch, Sturz oder harte Stöße sowie durch nicht autorisierte Reparaturen oder durch Transportschäden, die infolge des Einsendens zur Reparatur, hervorgerufen worden sind. Keine Garantie wird für Verschleißteile (z.B. Kabel, Klemmen, Vorsatzscheiben etc.) sowie bei Gebrauchsspuren übernommen. Das betreffende Gerät bitte immer mit Kaufbeleg und kurzer Fehlerbeschreibung ausschließlich über den Fachhandel einschicken. Die Reparatur erfolgt erst nach Erhalt einer schriftlichen Akzeptanz (Unterschrift) des zuvor vorgelegten Kostenvoranschlags durch den Besteller. Im Fall einer Garantieleistung trägt GYS ausschließlich die Kosten für den Rückversand an den Fachhändler. 59 SCHÉMA ÉLECTRIQUE / CIRCUIT DIAGRAM /SCHALTPLAN/DIAGRAMA ELECTRICO/ ЭЛЕКТРИЧЕСКАЯ СХЕМА / DIAGRAMMA ELETTRICO 60 PIÈCES DE RECHANGE / SPARE PARTS / ERSATZTEILE/ PIEZAS DE RECAMBIO/ ЗАПЧАСТИ/ PEZZI DI RICAMBIO 34 2 33 3 1 4 5 31 7 17 29 6 12 9 30 8 15 28 10 18 32 11 12 27 22 21 26 20 24 25 19 13 23 14 N° 1 2 3 4 5 6 7 8 9 10 11 12 13 14 15 17 18 Chaîne de 80cm / 80cm chain / 80cm Kette / cadena de 80cm / Цепь 80 см/ Catena da 80cm Support torches arrière / Rear torches support / Hinterer Brennerhalter / Soporte antorchas de atrás / Подставка для горелок задняя / Supporto posteriore torce Support torches avant / Front torches support / Vorderer Brennerhalter / Soporte antorchas delanteras / Подставка для горелок передняя / Supporto anteriore torce Poignée / Handle / Griff / Puño/ Ручка / Impugnatura Bouton réglage de vitesse fil / Wire speed adjusting knob / Drahtvorschubseinsteller / Botón reglaje de velocidad de hilo / Кнопка регулировки скорости проволоки / Manopola regolazione velocità filo Bouton SPOT-DELAY / SPOT-DELAY button / SPOT-DELAY Knopf / botón SPOT/DELAY / Кнопка SPOTDELAY / Manopola SPOT-DELAY Clavier de commande / Control Keyboard / Bedientastatur/ Teclado de mando / Панель управления / Pannello dei comandi Interrupteur I/O / I/O Switch / I/O Schalter / Conmutador ON/OFF / Выключатель ON/OFF / Interruttore I/O Connecteur spool gun + faisceau carte / Spool on Gun connector + control connector / Spool Gun Stecker + Anschlussr / Conectador spool gun + haz de carta / Коннектор spool gun + коннектор платы / Connessione pistola + presa di comando Commutateur 7 positions / 7 positions switch /7 Positionen Betriebsartenschalter / Conmutador 7 posiciones / Переключатель 7 положений / Manopola 7 posizioni Commutateur 2 positions / 2 positions switch / 2 Positionen Betriebsartenschalter / Conmutador 2 posiciones / Переключатель 2 положения / Manopola 2 posizioni Motodévidoir (sans galet) / Wire feeder (without roller) / Drahtvorschub (ohne Drahtförderrollen) / Devanadera sin rodillos (sin rodillo) / Подающее устройство (без роликов) / Dispositivo per arrotolare il filo (senza rullo) Cable de masse + cosse / Earth cable + cable lugs / Massekabel + Kabelschuh / Cable de masa / Кабель массы + наконечник / Cavo di terra + aletta cavo Pince de masse 250A / Earth clamp 250A / Massezange 250A / Pinza de masa 250A / Зажим массы 250A / Pinza di massa da 250A Câble d'alimentation (6m) / Supply cable (6m) / Stromkabel (6m) / Cable de alimentación (6m) / Питающий кабель (6м) / Cavo corrente (6m) Support bobine 5Kg / Reel support 5 Kg / Rollenhalter 5Kg / Soporte de bobina 5Kg / Подставка для катушки 5кг / Support bobina 5 Kg Support bobine 15Kg / Reel support 15 Kg / Rollenhalter 15Kg / Soporte de bobina 15Kg / Подставка для катушки 15кг / Supporto bobina 15 Kg Ref. 35067 98435BG 98436BG 72068 73008 73099 51916 52461 71483 95564 95563 51135 95354 + 55046 71122 21485 71600 71503 61 19 Roue avant / Front wheels / Vorderrad / Rueda de atrás / Переднее колесо / Ruote anteriori 71361 20 Pont de diodes / Diode bridge / Diodenbrücke / Puente de LED / Диодный мост / Ponte diodo 52189 21 Self / Induction oil / Self / Self / Дроссель / Olio lubrificante 92975 22 Thermostat / Thermostat / Thermostat / termostato / Термостат / Termostato 51350 23 Transformateur + Thermostat / Transformer + thermostat / Trafo + Thermostat / Transformador y termostato / Трансформатор + Термостат / Trasformatore + termostato Ventilateur / Fan /Ventilator /ventilador/ Вентилятор / Ventola 24 25 26 27 28 29 30 31 32 33 34 Roue diamètre 200mm / 200mm diameter wheels / 200mm Durchmesser Rad / Rueda diámetro 200mm / Колесо диаметром 200мм / Ruote diametro 200 mm Embout d'axe / End axis / Endachse / Boquilla de pasador / Наконечник оси / Asse Contacteur 24V AC 10A / Contactor 24V AC 10A / 24V AC 10A Schalter / Contactor 24V AC 10A / Соединитель 24V AC 10A / Contatore 24V AC 10A Transformateur de commande / Control transformer / Kontroll Transformator / Transformador de mando / Трансформатор управления / Trasformatore di controllo Electrovanne / Solenoid valve / Elektroventil / Electro-válvula /Электроклапан/ Elettrovalvola Carte de commande / Control card / Steuerkarte / Carta de mando / Плата управления / Scheda di controllo Carte d'affichage / Display card / Anzeigekarte/ Carta de fijación / Плата отображения / Scheda display Plaque à bornes (9 poles) / Terminal board / Anschlussstutzen Platte (9 polig) / Placa terminal (9 polos) / Пластина с клеммами (9 полюсов) / Scheda terminale Tuyau gaz (2m) / Gas pipe (2m) / Gas Schlauch (2m) /Tubo del gas (2m) / Газовый шланг (2м) / Tubo gas (2m) Collier 10,5 / Collar 10,5 / Kabelschelle 10,5 / Collar 10,5 / Хомут 10,5 / Guarnizione 10,5 92984 51001 71375 71382 51113 92981 71512 97066C 97074C 51397 95992 71225 62 ICONES/SYMBOLS/ ERSATZTEILE / SIMBOLOS GRAFICOS/ СИМВОЛЫ / SIMBOLI A V Hz Ampères Volt Hertz Amps Volt Hertz Ampere Volt Voltios Hertz Hertz Amperios Вольт Герц Ампер Ampere Volt Hertz Soudage MIG/MAG (MIG : Metal Inert Gas / MAG : Metal Active Gas) MIG/MAG Welding (MIG : Metal Inert Gas / MAG : Metal Active Gas) MIG/MAG Schweißen (MIG : Metal Inert Gas / MAG : Metal Active Gas) Soldadura MIG/MAG (MIG : Metal Inert Gas / MAG : Metal Active Gas Сварка MIG-MAG (MIG : Metal Inert Gas / MAG : Metal Active Gas) Saldatura MIG/MAG (MIG : Metal Inert Gas / MAG : Metal Active Gas) Convient au soudage dans un environnement avec risque accru de choc électrique. La source de courant elle-même ne doit toutefois pas être placée dans de tels locaux. Adapted for welding in environment with increased risks of electrical shock. However, the welding source must not be placed in such places. Geeignet für Schweißarbeiten im Bereich mit erhöhten elektrischen Risiken. Trotzdem sollte die Schweißquelle nicht unbedingt in solchen Bereichen betrieben werden. Adaptado a la soldadura en un entorno que comprende riesgos de choque eléctrico. La fuente de corriente ella misma no debe estar situada dentro de tal locales. Адаптирован для сварки в среде с повышенным риском электрошока. Однако сам источник питания не должен быть расположен в таких местах. Adatta per saldare in ambienti ad elevato rischio di shock elettrico. Comunque la saldatrice non deve essere posizionata in tali ambienti. Protégé contre l’accès aux parties dangereuses avec un doigt, et contre les chutes verticales de gouttes IP21 d'eau Protected against rain and against fingers access to dangerous parts Geschützt gegen Berührung mit gefährlichen Teilen und gegen senkrechten Wassertropfenfall protegido contra el acceso a las partes peligrosas con los dedos, y contra las caídas verticales de gotas de agua. Аппарат защищен от доступа рук в опасные зоны и от вертикального падения капель воды Proteggere dalla pioggia e proteggere le dita evitando l’accesso di queste alle zone pericolose. Courant de soudage continu Welding direct current Gleichschweissstrom La corriente de soldadura es continua Сварка на постоянном токе Corrente di saldatura continua Alimentation électrique triphasée 50Hz Three-phase power supply 50 Hz Dreiphasige Netzversorgung mit 50 oder 60Hz Alimentación eléctrica monofásica 50 o 60 Hz Трехфазное питание 50Гц. Alimentazione elettrica tri-fase, 50 Hz Tension assignée à vide Rated no-load voltage Leerlaufspannung Tensión asignada de vacío Uo Напряжение холостого хода Tensione assegnata senza carica Tension assignée d’alimentation rated supply voltage Netzspannung Tensión de la red U1 Напряжение сети Tensione assegnata di alimentazione Courant d’alimentation assigné maximal (valeur efficace) Rated maximum supply current (effective value) I1max Maximaler Versorgungsstrom (Effektivwert) Corriente máxima de alimentación de la red Максимальный сетевой ток (эффективная мощность) Corrente d’alimentazione massimale (valore effettivo) Courant d’alimentation effectif maximal Maximum effective supply current Maximaler tatsächlicher I1eff Versorgungsstrom Corriente de alimentación efectiva máxima Максимальный эффективный сетевой ток Corrente d’alimentazione effettiva massimale L’appareil respecte la norme EN60974-1 The device complies with EN60974-1 standard relative to welding EN60 974-1 units Das Gerät entspricht der Norm EN60974-1 für Schweißgeräte El aparato está conforme a la norma EN60974-1 referente a los aparatos de soldadura Аппарат соответствует европейской норме EN60974-1 La saldatrice è conforme agli standard EN60974-1, relativi all’attrezzatura per saldare Transformateur-redresseur triphasée Three-phase converter-rectifier Dreiphasiger Trafo/Frequenzumwandler Transformador-rectificador trifásico Трехфазный трансформаторвыпрямитель. Trasformatore-raddrizzatore tri-fase X (40°C) Facteur de marche selon la norme EN 60974-1 (10 minutes – 40°C) Duty cycle according to the standar EN 60974-1 (10 minutes – 40°C) Einschaltdauer gemäß EN 60974-1 (10 Minuten – 40°C) Factor de marcha según la norma EN 60974-1 (10 minutos – 40°C). Продолжительность включения в % по норме EN 60974-1 (10 минут – 40°C) Ciclo di lavoro in conformità con lo standard EN 60974-1 (10 minuti– 40°C) … I2 I2 : courant de soudage conventionnnel correspondant I2 : corresponding conventional welding current % I2 : entsprechender Schweißstrom I2 : Corrientes correspondientes I2 : Соответствующий условный сварочный ток I2 : corrente di saldatura convenzionale corrispondente … U2 U2 : Tensions conventionnelles en charges correspondantes U2 : conventional voltages in corresponding % load U2 : entsprechende Arbeitsspannung U2 : Tensiones convencionales en carga U2 : соответствующее условное напряжения под нагрузкой U2 : tensione convenzionale in carica corrispondente Appareil conforme aux directives européennes The device complies with European Directive Gerät entspricht europäischen Richtlinien El aparato está conforme a las normas europeas Устройство соответствует европейским нормам La saldatrice è conforme alla direttiva europea Conforme aux normes GOST (Russie) Conform to standards GOST / PCT (Russia) in Ubereinstimmung mit der Norm GOST/PCT Conforme a la normas GOST (PCT) (Rusia) Продукт соответствует стандарту России (ГОСТ) Conforme agli standard GOST / PCT (Russia) 63 L’arc électrique produit des rayons dangereux pour les yeux et la peau (protégez-vous !) The electric arc produces dangerous rays for eyes and skin (protect yourself !) Der elektrische Lichtbogen verursacht Strahlungen auf Augen und Haut (schützen Sie sich !) El arco produce rayos peligrosos para los ojos y la piel (¡ Protéjase !) Электрическая дуга производит опасные лучи для глаз и кожи (защитите себя!) L’arco elettrico produce raggi pericolosi per gli occhi e la pelle (proteggersi !) Attention, souder peut déclencher un feu ou une explosion. Caution, welding can produce fire or explosion. Achtung : Schweißen kann Feuer oder Explosion verursachen Cuidado, soldar puede iniciar un fuego o una explosión. Внимание ! Сварка может вызвать пожар или взрыв Attenzione la saldatura può originare incendi o esplosioni Attention ! Lire le manuel d’instruction avant utilisation Caution ! Read the user manual Achtung : Lesen Sie die Betriebsanleitung Cuidado, leer las instrucciones de utilización. Внимание ! Читайте инструкцию по использованию Attenzione ! Leggere il manuale d’istruzioni Produit faisant l'objet d'une collecte sélective- Ne pas jeter dans une poubelle domestique Separate collection required – Do not throw in a domestic dustbin Produkt für selektives Einsammeln. Werfen Sie diese Geräte nicht in die häusliche Mülltonne. Este aparato es objeto de una recolección selectiva. No debe ser tirado en un cubo doméstico. Продукт требует специальной утилизации. Не выбрасывать с бытовыми отходами. Smaltimento separato – Non gettare insieme alla spazzatura domestica ACCESSOIRES/ACCESSORIES / ZUBEHÖR / ACCESORIOS / АКСЕССУАРЫ / ACCESSORI 64