Transcript
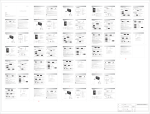
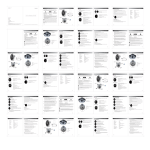
Manual Edition 1.0, Nov. 2013 IB-200-S0760D-00 Déballage du carton Guía de funcionamiento Illustrations Contenu du produit S760D Multimedia Speaker Speaker Out 2 3 Télécommande Filaire 4 5 R Wired Controller 13 Power On 7 Off 5.1 IN 8 Optical 1 Optical 2 Power On COX câble à fibres optiques Contrôle du volume filaire 2. Gire el dial de volumen general o apriete ADJ+/ADJ- para ajustar: graves/agudos, FL/FR/CE/SL/SR/SUB. 9. Affichage LCD 2. Prises d'entrée audio 5.1 Câble audio de 3,5 mm - double fiche RCA cordon d'alimentation 5. Reinicio: Presione y mantenga el dial de función y (en el mando cableado) simultáneamente durante aproximadamente 2 segundos; el mando cableado mostrará la versión de software, y a continuación se borrará 12. Sélecteur de la source audio toda la configuración y se establecerá el sistema en la configuración por defecto de fábrica. 13. Prise casque 7. Interrupteur principal Manuel d’utilisateur câble à fiche RCA con rapidez a derechas para activar la amplificación del volumen (no en modo de auriculares). 11. Veille/marche 6. Prises optiques User manual | Manuel d’utilisateur | Manual de usuario | Bedienungsanleitung | Manuale dell’utente 4. Amplificación del volumen general: Cuando el volumen general sea de 60, gire el dial de volumen general volume principal 4. Prise de commande filaire S760D Multimedia Speaker general del sistema. 10. Sélecteur de fonction/réglage du 5. Prise d'entrée coaxiale J Conecte el altavoz satélite en el orificio de "Salida de altavoz" situado en el panel posterior del subwoofer (cable dorado en abrazadera de alambre rojo, y cable plata en la abrazadera negra). J Conecte el cable de audio en los orificios de conector de 5.1 /PC/AUX en el panel posterior de la fuente de audio (tarjeta de sonido de PC, reproductor DVD/MP3/MP4, etc.) J Conecte el cable de alimentación a una toma de corriente y encienda el interruptor de encendido, el sistema se enciende. Nota: 1. Cuando conecte los altavoces, asegúrese de que el sistema esté apagado. 2. Antes de apagar el altavoz, apriete Important safety instructions 13 Français 14 Français Guide d'utilisation de la télécommande Unpack the box 1 2 Wired controller 3 5 7 9 Satellite speaker 1. Indicateur 2. Veille/marche 3. Bouton sourdine 4. Entrée 5.1 5. Entrée optique 6. Entrée coaxiale 7. Entrée CD 8. Entrée AUX 9. 4 CD On/Off: Dolby Pro Logic II activé/désactivé 6 (Seulement pour le signal d'entrée stéréo, non disponible en mode 5.1.) Movie---- mode film Dolby Pro Logic II 11 Remote control Subwoofer 12 Virtual---- mode virtuel Dolby Pro Logic II 13 Game: mode jeu Dolby Pro Logic II 14 PC-Soundkartenanschlüsse 5.1 Eingangsanschlussbuchsen DVD-Ausgangsanschlüsse 3.5 mm to dual RCA audio connecting cable en mode écouteurs). 5. Réinitialisation: Maintenez enfoncé le sélecteur de fonction et 14. Réglage des aigus and et les paramètres par défaut du système seront rétablis. 16. Réglage des basses 1 English 2 English (sur la commande filaire) en même temps pendant 2 secondes, la commande filaire affichera la version du logiciel, puis tous les réglages seront effacés 15. Monter/baisser le volume principal User manual Technische Daten FR/FL/C/SR/SL: RMS 60W × 5 (DRC ein) SW: RMS 240W (DRC ein) ≥85dBA Satelliten: 130Hz ~ 20KHz (+/-5dB) Subwoofer: 42Hz ~ 140Hz (+/-6dB) 5.1IN/CD/AUX: Satelliten: 750mV ± 50mV Subwoofer: 900mV ± 50mV Optisch/Koaxial: Satelliten: 350 ± 50mFFS Subwoofer: 400 ± 50mFFS Φ25mm Seidenkalotten 92mm (3½ Zoll) 260mm (10 Zoll) SW: 367(B) × 397(H) × 489(T) mm FR/FL/SR/SL: 116(B) × 203(H) × 160(T) mm C: 316(B) × 117(H) × 157(T) mm Satellitenlautsprecher: Ca. 11,5kg Subwoofer: Ca. 19kg Signal-Rausch-Abstand: Frequenzbereich: 16 Français 15 Français Eingangsempfindlichkeit: Höhentreiber: Mitteltöner: Tieftöner: Abmessungen: Gewicht (netto): ● Schalten Sie den EDIFIER S760D aus und anschließend wieder ein. Schließen Sie die Audioquelle erneut an. ● Vergewissern Sie sich, dass alle angeschlossenen Geräte funktionieren und ordnungsgemäß angeschlossen wurden. ● Prüfen Sie, ob das Netzkabel korrekt eingesteckt ist, und ob die Steckdose Strom führt ● Prüfen Sie, ob die Haupt-Lautstärke auf Minimum eingestellt ist. ● Prüfen Sie, ob das System im Standby-Modus ist. ● Prüfen Sie, ob die Audiokabel korrekt angeschlossen sind. ● Prüfen Sie, ob von der Audiquelle Signale kommen. ● Überprüfen Sie, ob die Batterien eingelegt wurden. Wenn Sie weitere Fragen zu EDIFIER und EDIFIER-Produkten haben… Asien, Europa, Ozeanien: Bitte besuchen Sie unsere Webseite auf www.edifier.com, oder senden Sie eine E-Mail an den EDIFIER Support unter: main@edifier.com. → Wir belückwünschen Sie zu dem Kauf dieses EDIFIER-Produktes. Wenn Sie Fragen zu der Garantie für dieses Produkt haben, besuchen Sie bitte unsere Webseite auf www.edifier-international.com/warranty-terms. Kanada/USA/Mexico: www.edifier.ca, E-Mail: service@edifier.ca Wenn Sie es bevorzugen, können Sie uns anrufen, Gebührenfrei: 1-877-EDIFIER (334-3437) in Kanada, 1-800-688-7406 in den USA. Südamerika: Bitte besuchen Sie unsere Webseite www.edifier.com (Englisch) oder www.edifierla.com (Spanisch/ Portugiesisch) für detaillierte lokale Kontaktinformationen. Entrada de CD 1. Conecte el cable de corriente a una toma de corriente y encienda el interruptor de encendido, el sistema se enciende; 2. Gire el dial de función (o utilice el mando a distancia) para ajustar el volumen general y otros ajustes; 3. En modo de reproducción, apriete y mantenga durante aproximadamente 2 segundos para poner el sistema en modo de espera, la pantalla LCD del controlador cableado se apagará. 4. Pulse para poner el sistema en el modo de reproducción. 29 Español o CD INPUT/ESC 1. Apriete el botón “INPUT” botón del controlador cableado hasta que la pantalla LCD muestre “CD”, o apriete “CD” en el mando a distancia para seleccionar la entrada de CD. 2. Conecte los orificios de conector de “CD” al reproductor de CD con el cable de conexión de audio. 3. Reproduzca la música en el dispositivo conectado y ajuste la configuración según el nivel que desee. 30 Español 43 Deutsch 44 Deutsch 德 Operational guide for remote control Connectivité Guide d'utilisation Branchement des haut-parleurs et d'une source audio Guía de funcionamiento Emplacement des haut-parleurs satellites Especificaciones 1 Line In 5.1CH S760D Multimedia Speaker Speaker Out 1 2 3 4 5 R 4 L Wired Controller Coaxial Digital In Optical 2 Optical 3 3. Mute key 4. 5.1CH input 5. Optical input 6. Coaxial input 7. CD input 8. AUX input 9. 6 On INPUT/ESC Line In 5.1CH R S760D L Wired Controller Coaxial Off 1. Pulse el botón “INPUT” (entrada) del controlador con cable o la tecla “5.1CH” del mando a distancia hasta que la pantalla LCD muestre “5.1CH”. 2. Conecte los puertos de conector “5.1CH” a su dispositivo con el cable de audio (3.5mm a doble RCA) 3. Reproduzca la música en el dispositivo conectado y ajuste la configuración al nivel deseado. 10. Music---- Dolby Pro Logic II Music mode Power Off Movie---- Dolby Pro Logic II Moive mode Matrix---- Dolby Pro Logic II Matrix mode 11 Virtual---- Dolby Pro Logic II Virtual mode 13 Game---- Dolby Pro Logic II Game mode 14 1. Speaker output ports 9. LCD display window 2. 5.1CH input connector ports 10. Function dial/master volume dial 3. Stereo input connector ports (AUX/CD) 11. Standby/ON 4. Wired controller connector port 5. Coaxial input connector 6. Optical connector ports Mise en marche/mise en veille J Branchez le haut-parleur satellite sur la prise de « sortie du haut-parleur » à l'arrière du caisson de basses (câble doré sur l'attache-fil rouge et câble argenté sur l'attache-fil noir). J Branchez le câble audio sur les prises 5.1/PC/AUX à l'arrière de votre source audio (carte son de PC, lecteur de DVD/MP3/MP4, etc.). J Branchez le câble d'alimentation sur une prise électrique, allumez l'appareil, et le système se met en marche. Step 1: press “Func” repeatedly; 15 Step 2: press ADJ+/ADJ-. 13. Function navigator 12. Audio source selector 14. Treble adjustment 13. Headphone port 15. Master volume up/down 2. Avant d'éteindre le haut-parleur, appuyez sur 3 English 4 English COA o INPUT/ESC 1. Branchez le cordon d'alimentation sur une prise électrique, allumez l'appareil, et le système se met en marche ; 2. Tournez le sélecteur de fonction (ou utilisez la télécommande) pour régler le volume principal et les autres réglages ; 3. En mode lecture, maintenez enfoncé pendant environ 2 secondes pour mettre le système en mode veille, l'écran LCD et la commande filaire s'éteindront ; 4. Appuyez sur pour repasser en mode lecture. pour le mettre en veille, puis mettez 18 Français Guide d'utilisation Connect to the speakers and audio source ● Please refer to the figure to open the battery compartment, load the batteries and shut the compartment. ● Point the remote controller to the IR window on wired controller when operating the remote controller. ● The optimum operational distance is within 7 meters. ● The optimum operational scope is within a 60 degree angle. ENTRADA AUXILIAR 17 Français Connectivity ENTRÉE 5.1 Entrée optique 32 Español ou INPUT/ESC Line In 5.1CH S760D R L Wired Controller Coaxial Optical 1 Digital In Optical 2 Power Off COX ● Apague y encienda el EDIFIER S760D y vuelva a conectar a la fuente de audio. WARNUNG: Um das Risiko von Feuer oder Stromschlag zu vermeiden, dieses Gerät keinem Regen oder Feuchtigkeit aussetzen. ● Asegúrese de que los dispositivos funcionan y están conectados correctamente. Vielen Dank, dass Sie sich für ein Produkt von EDIFIER entschieden haben. Seit Generationen liefern wir bei EDIFIER aktive Lautsprecher zur Zufriedenheit unserer Kunden, selbst mit den höchsten Anforderungen. Dieses Produkt kann an Unterhaltungselektronik, Computer oder Heimkino angeschlossen werden und liefert einen hervorragenden Sound. Bitte lesen Sie die Bedienungsanleitung vor Inbetriebnahme, um das Beste aus dem Produkt herauszuholen. Connexion à une carte de PC ● Compruebe si las baterías están disponibles. Si tiene alguna otra duda o pregunta sobre los productos de EDIFIER… Asia, Europa, Oceanía: Connexion à un DVD Prise de connexion d'entrée 5.1 Prises de carte PC Visite nuestro sitio Web en: www.edifier.com, o escriba un correo electrónico al Servicio Técnico de EDIFIER a la Prises de connexion d'entrée 5.1 Prises de sortie de connexion DVD Entrée coaxiale Adjustment ou 1. Press “FUNC” key to access VOL - BASS - TREB - FL - FR - CE - SL - SR - SUB - LIGHT - DELAY (unavailable) - dirección: main@edifier.com, → Estimado cliente, gracias por adquirir este producto de EDIFIER. Para la garantía de EDIFIER correspondiente a este producto, visite el sitio Web de EDIFIER www.edifier-international.com/warranty-terms. Canadá/EE. UU./México: www.edifier.ca; Correo electrónico: service@edifier.ca COX INPUT/ESC C DELAYSL/SR adjustments (DELAY setting is only available for Dolby Pro Logic II ON). 2. Rotate the master volume dial or press ADJ+/ADJ- to adjust: bass/treble, FL/FR/CE/SL/SR/SUB. 3. In play mode, rotate the master volume dial or press VOL+/VOL- to adjust the master volume of system. 4. Master Volume Boost: When the master volume is 60, rotate the master volume dial clockwise quickly to activate the volume boost (not available in headphone mode). 5. Reset: Press & hold the function dial and (on the wired controller) at the same time approximately 2 seconds, the wired controller will display the software version, and then all settings will be erased and will set the system to the original factory default settings. J Connect the satellite speaker to the "Speaker Out" port on the rear panel of the subwoofer (golden cable to red wire clamp, and silver cable to the black wire clamp). J Connect the audio cable to the 5.1/PC/AUX connector ports on the rear panel to your audio source (PC sound card, DVD/MP3/MP4 player etc.) J Connect the power cable to the wall socket and turn on the power switch, system is in on. 2. Before powering off the speaker, please press to set speaker to standby mode, and then turn off the the system at the master power switch. 6 English 5 English 1-877-EDIFIER (334-3437) en Canadá, 1-800-688-7406 en EE. UU. y Les câbles Double RCA vers Double RCA sont nécessaires si vous souhaitez brancher certains appareils. Sudamérica: Visite www.edifier.com (inglés) o www.edifierla.com (español/portugués) para consultar la información de contacto. ENTRÉE AUX ENTREE CD Entrée CD ou ou Cavo di alimentazione Cavo connettore RCA S760D Multimedia Speaker Speaker Out Das Ausrufungszeichen im gleichseitigen Dreieck weist auf wichtige Bedienungs- und Wartungsanleitungen hin. 1 2 4 5 R 6 Manuale dell'utente 5 7 9 Optical 3 2. Standby/On 3. Tasto Silenzioso 4. Ingresso 5.1CH 5. Ingresso ottico 6. Ingresso coassiale 7. Ingresso CD 8. Ingresso AUX 9. 6 Off On 10. Music---- Modalità Musica Dolby Pro Logic II Movie---- Modalità Film Dolby Pro Logic II 10 Off On/Off: Dolby Pro Logic II attivo/disattivo (Solo per il segnale di ingresso stereo, non disponibile in modalità 5.1.) 8 CD 13 Power On 1. Indicatore Emul---- Modalità Emulazione Dolby Pro Logic II Matrix---- Modalità Matrice Dolby Pro Logic II Comp on 12 8 11 13 Game---- Modalità Giochi Dolby Pro Logic II 11. Compressione attiva/disattiva (Efficace solo per decoder Dolby Digital) Comp off Controllore cablato Pannello posteriore del subwoofer Virtual---- Modalità Virtuale Dolby Pro Logic II 14 1. Porte di uscita altoparlante 9. Finestra display LCD 2. Porte connettore ingresso 5.1CH 10. Compositore funzione/compositore master 12. Tasti di regolazione Passaggio 1: premere ripetutamente “Func”; 15 Passaggio 2: premere ADJ+/ADJ-. volume 3. Porte connettore ingresso stereo (AUX/CD) 13. Funzione navigatore 16 4. Porta connettore controllore cablato 11. Standby/ON 5. Connettore ingresso coassiale 12. Selettore fonte audio 6. Porte connettore ottico 13. Porta cuffie 14. Regolazione acuti 15. Aumento/diminuzione del volume master 16. Regolazione dei bassi 7. Interruttore master di alimentazione 8. Porta connettore cavo di alimentazione 20 Français 19 Français Wired Controller Optical 2 7 3 4 L Coaxial Optical 1 Richtige Entsorgung dieses Produkts. Dieses Zeichen zeigt an, dass dieses Produkt in der gesamten EU nicht mit dem übrigen Hausmüll entsorgt werden darf. Um mögliche Umwelt- oder Gesundheitsschäden durch unkontrollierte Müllentsorgung zu vermeiden, das Produkt verantwortlich recyceln, um eine nachhaltige Wiederverwendung der Materialressourcen zu fördern. Bitte das gebrauchte Gerät an den Rücknahme- und Sammelsystemen abgeben oder den Händler, bei dem das Produkt gekauft wurde, kontaktieren. Sie können das Produkt umweltgerecht recyceln. 1. Appuyez sur le bouton « INPUT » sur la commande filaire jusqu'à ce que « AUX » s'affiche, ou appuyez sur le bouton « AUX » de la télécommande pour sélectionner l'entrée auxiliaire. 2. Branchez le câble audio sur les prises « AUX » ainsi que sur votre source audio (lecteur MP3/MP4, etc.). 3. Lisez la musique sur l'appareil branché et modifiez les réglages à votre convenance. 1. Appuyez sur le bouton « INPUT » sur la commande filaire jusqu'à ce que « CD » s'affiche, ou appuyez sur le bouton « CD » de la télécommande pour sélectionner l'entrée CD. 2. Branchez le câble audio sur les prises « CD » ainsi que sur votre lecteur de CD. 3. Lisez la musique sur l'appareil branché et modifiez les réglages à votre convenance. Line In 5.1CH Nur mit dem vom Hersteller genehmigten oder mit dem Gerät erworbenen Wagen, Ständer, Stativ, Halter oder Tisch benutzen. Beim Verwenden eines Wagens beim Bewegen der Wagen/Gerätekombination vorsichtig sein, um Verletzungen durch Umkippen zu vermeiden. AUX INPUT/ESC Zur Vermeidung von Stromschlag Gerätegehäuse nicht öffnen. Es befinden sich keine vom Verbraucher wartbaren Teile im Innern des Geräts. Reparatur und Wartung nur durch Fachpersonal. 1. Bitte die gesamte, nachstehende Anleitung lesen. 2. Bitte diese Anleitung für zukünftiges Nachschlagen sorgfältig aufbewahren. 3. Bitte alle Sicherheitswarnungen beachten. 4. Bitte laut Anweisungen des Herstellers installieren. 5. Das System nicht in der Nähe von Wasser betreiben und nicht in Flüssigkeiten tauchen oder Flüssigkeiten in das System gießen. 6. Nur mit einem trockenen Tuch reinigen. 7. Die Öffnungen des Systems nicht blockieren und niemals Gegenstände in die Lüftungsschlitze oder Öffnungen drücken. Zum Vermeiden von Brandgefahr oder Gefährdungen durch Strom muss rund um das System genügend Raum für sachgemäße Lüftung freigelassen werden. 8. Das System nicht in der Nähe von Wärmequellen aufstellen, wie z.B. Heizungen, Herd und direkte Sonneneinstrahlung. 9. Den gepolten Stecker nicht missbräuchlich verwenden. 10. Das Netzkabel schützen. 11. Nur Zubehör/Zubehörteile vom Hersteller verwenden. 12. Für zusätzlichen Schutz bei Gewittern Netzstecker ziehen. 13. Wartung ist erforderlich, wenn Stromkabel oder Stecker beschädigt sind, wenn Flüssigkeit oder sonstige Gegenstände in das Gerät gelangt sind, wenn es Regen oder Feuchtigkeit ausgesetzt wurde oder wenn das System aus einer bestimmten Entfernung fallen gelassen wurde. Bitte sämtliche Reparaturen nur von qualifiziertem Servicepersonal durchführen lassen. 14. Bei längerer Nichtbenutzung Netzstecker ziehen. Entrée AUX CD INPUT/ESC Note: 1. Make sure the system is powered off when connecting speakers. Si lo prefiere, puede ponerse en contacto con nosotros por teléfono (gratuito en sus respectivos países): 1. Appuyez sur le bouton « INPUT » sur la commande filaire jusqu'à ce que « COX » s'affiche, ou appuyez sur le bouton « COX » de la télécommande pour sélectionner l'entrée optique. 2. Branchez le câble en fibre optique sur la prise « COX » ainsi que sur votre source audio. 3. Lisez la musique sur l'appareil branché et modifiez les réglages à votre convenance. User manual | Manuel d’utilisateur | Manual de usuario | Bedienungsanleitung | Manuale dell’utente 1 3 Der Blitz im gleichseitigen Dreieck weist auf gefährliche Hochspannung im Gerät hin, die zu Stromschlag führen kann. S760D Multimedia Speaker Guida operativa per il telecomando 2 ● Compruebe si hay señal de la fuente de audio. 1. Appuyez sur le bouton «INPUT» de la commande filaire ou sur la touche «5.1CH» de la télécommande jusqu'à ce que l'écran LCD affiche «5.1CH» . 2. Connectez la prise «5.1CH» à votre appareil à l'aide du câble audio de 3,5 mm - double fiche RCA. 3. Jouez la musique sur l'appareil connecté et ajustez les paramètres au niveau souhaité. Entrée coaxiale Cavo di connessione audio RCA doppio da 3.5 mm Cavo a fibra ottica ● Compruebe si el cable de entrada de audio está conectado correctamente. Optical 3 On Cavo di connessione altoparlanti 46 Italiano Digital In Notice: 1. Do not place the remote in an extremely hot or humid place. 2. Do not use a new battery with an old one. 3. Remove the batteries when the remote is left unused for a long period of time to avoid battery leakage or corrosion. 1. Appuyez sur le bouton « INPUT » sur la commande filaire jusqu'à ce que « OPT » s'affiche, ou appuyez sur le bouton « OPT » de la télécommande pour sélectionner l'entrée optique. 2. Branchez le câble en fibre optique sur la prise « OPT » ainsi que sur la source audio (DVD, etc.). 3. Lisez la musique sur l'appareil branché et modifiez les réglages à votre convenance. Remarque: Seuls les signaux audio PCM standards (44,1/48/96 kHz) de l'horloge d'échantillonnage sont adaptables en mode optique. Subwoofer Immagini ● Compruebe si el volumen maestro está establecido en el mínimo. 5.1 INPUT/ESC Multimedia Speaker Speaker Out Telecomando 45 Italiano Wichtige sicherheitshinweise ● Compruebe que el amplificador está todavía en modo STBY. ou Altoparlante satellite Il corretto smaltimento di questo prodotto. Questo simbolo indica che questo prodotto non deve essere smaltito insieme agli altri rifiuti domestici in tutta la UE. Per prevenire possibili danni all’ambiente o alla salute umana a causa dello smaltimento incontrollato dei rifiuti, riciclarla responsabilmente per promuovere il riuso delle risorse materiali. Per restituire il vostro dispositivo usato, servirsi dei sistemi di smaltimento e di raccolta o contattare il rivenditore dove il prodotto è stato acquistato. Loro possono ritirare questo prodotto per un riciclaggio ecologicamente sicuro. 31 Español ● Compruebe si está conectada la alimentación y si la toma de pared está conectada. Entrée 5.1 Controllore cablato Il punto esclamativo contenuto in un triangolo costituisce un avvertimento della presenza di importanti istruzioni di funzionamento e manutenzione (assistenza) all’interno della documentazione allegata al prodotto. Utilizzare solo con carrello, supporto, treppiedi, staffa o tavola come specificata dal produttore o venduta con l’apparecchio. Quando si utilizza un carrello, fare attenzione quando si sposta il carrello/l’apparecchio insieme per evitare il pericolo di ribaltamento. AUX Resolución de problemas 5.1 input Non rimuovere la copertura (o la parte posteriore)in modo da evitare il rischio di shock elettrico. All'interno non vi sono parti sostituibili dall'utente. Richiedete semprel'intervento di personale qualificato. 1. Leggere queste istruzioni. 2. Conservare queste istruzioni. 3. Rispettare tutti gli avvisi. 4. Seguire tutte le istruzioni. 5. Non utilizzare l’apparecchio vicino all’acqua. 6. Pulire con un panno asciutto. 7. Non bloccare le aperture di ventilazione. Montare secondo le istruzioni fornite dal produttore. 8. Non installare vicino a sorgenti di calore, quali radiatori, registri di calore, stufe o altri apparecchi (amplificatori compresi) che producono calore. 9. Non manomettere gli scopi di sicurezza della spina polarizzata o con messa a terra. Una spina polarizzata ha due contatti uno più ampio dell’altro.Una spina con messa a terra ha due contatti e un perno per la messa a terra. I contatti ampi o il terzo perno sono forniti per la vostra sicurezza. Se la spina in dotazione non può essere inserita nella presa, contattare un elettricista per la sostituzione della presa di tipo obsoleto. 10. Proteggere il cavo di alimentazione in modo che non venga calpestato o schiacciato in prossimità delle spine, delle prese a muro e nei punti di uscita dall’apparecchio. 11. Utilizzare solo gli attacchi/accessori specificati dal produttore. 12. Sfilare la spina dalla presa dell’apparecchio durante i temporali o se non utilizzato per periodi di tempo prolungati. 13. Tutti i lavori di assistenza devono essere svolti da personale qualificato. L’assistenza è necessaria quando l’apparecchio è stato danneggiato, se il cavo di alimentazione è danneggiato, se del liquido è stato rovesciato sopra l’apparecchio o degli oggetti sono caduti su di esso, se l’apparecchio è stato esposto a pioggia o umidità, non funziona normalmente, o è caduto. 14. La spina principale o il connettore apparecchio è utilizzato per scollegare l’apparecchio, l’apparecchio scollegato deve rimanere pronto per funzionare. 1. Apriete el botón “INPUT” botón del controlador cableado hasta que la pantalla LCD muestre “AUX”, o apriete “AUX” en el mando a distancia para seleccionar la entrada AUX. 2. Conecte los orificios de conector “AUX” a la fuente de audio (reproductor MP3/MP4, etc.) con el cable de conexión de audio. 3. Reproduzca la música en el dispositivo conectado y ajuste la configuración según el nivel que desee. Guide d'utilisation Entrée optique 5.1 IN Peso (neto): La freccia a forma di fulmine all’interno di un triangolo segnala la presenza nel prodotto di tensione pericolosa non isolata di intensità tale da poter provocare scariche elettriche alle persone. Entrada AUXILIAR l'interrupteur principal sur OFF. 8. Power cord connector port Operational guide Unidad de agudos: Unidad de gama media: Unidad de graves: Dimensiones: orificios de conector de salida de DVD ATTENZIONE RISCHIO DI SCOSSE ELETTRICHE NON APRIRE Volume principal Remarques: 1. Vérifiez que le système est éteint avant de brancher les haut-parleurs. 16. Bass adjustment 7. Master power switch Dolby Pro Logic II activé PROLOGIC II 12. Adjustment keys 16 orificios de conector de entrada 5.1 Se necesitan cables de audio RCA doble-RCA doble si desea reproducir música por medio de ciertos dispositivos. 11. Compression On/Off (Effective only for Dolby Digital decoder) Comp off Wired controller Rear panel of subwoofer 12 Conecte a un DVD Pour obtenir les meilleures performances de votre système audio surround, il faut placer les enceintes à même distance du point d’écoute. Si votre pièce est en carré, nous vous suggérons de placer les enceintes comme présenté sur le schéma A. Si votre pièce est rectangulaire, nous vous suggérons de placer vos enceintes comme présenté sur le schéma B. Emul---- Dolby Pro Logic II Emulation mode Comp on Conecte a un PC orificios de conector de entrada 5.1 orificios de tarjeta de sonido del PC Optical 3 On 8 Sensibilidad de entrada: Optical 1 Optical 2 On Relación de señal y ruido: Frecuencia del sistema: 5.1 Multimedia Speaker Speaker Out On/Off: Dolby Pro Logic II On/Off 10 Off o 5.1 IN Contenuto della scatola Grazie per aver acquistato questo prodotto EDIFIER. Da generazioni EDIFIER cerca di offrire prodotti con altoparlanti alimentati per soddisfare le esigenze del cliente finale anche i clienti più esigenti. Questo prodotto può essere un'aggiunta alla prestazione audio del vostro intrattenimento domestico, computer personale e mini home theater. Leggere attentamente questo manuale per avere il meglio dal sistema. FR/FL/C/SR/SL: RMS 60W × 5 (DRC ENCENDIDO) SW: RMS 240W (DRC ENCENDIDO) ≥85dBA Satélites: 130Hz ~ 20KHz (+/-5dB) Subwoofer: 42Hz ~ 140Hz (+/-6dB) 5.1IN/CD/AUX: Satélites: 750mV ± 50mV Subwoofer: 900mV ± 50mV Óptica/Coaxial: Satélites: 350 ± 50mFFS Subwoofer: 400 ± 50mFFS Φ25mm con cúpula de seda 3.5 pulgadas (92mm) 10 pulgadas (260mm) Subwoofer: 367(ancho) × 397(altura) × 489(profundidad) mm FR/FL/SR/SL: 116(ancho) × 203(altura) × 160(profundidad) mm C: 316(ancho) × 117(altura) × 157(profundidad) mm Altavoz satélite: Aproximadamente 11,5kg Subwoofer: Aproximadamente 19kg Potencia de salida: Entrada 5.1 (Only for stereo signal input mode, not available in 5.1 mode.) 8 CD 13 Power 7 2. Standby/On Digital In 5 7 9 Optical 1 6 3 1. Indicator Disimballaggio ATTENZIONE: per ridurre il rischio di incendio o di folgorazione, non esporre l’apparecchio a pioggia o umidità. ENTRADA 5.1 5.1 input 2 Importanti istruzioni di sicurezza 34 Deutsch 33 Español 47 Italiano 48 Italiano 西 Operational guide Spécifications Operational guide Place the satellite speakers Dépannage Puissance: Optical input Optical input Signal sonore: Fréquence: or INPUT/ESC Sensibilité d’entrée: Coaxial input To achieve the best surround effect, all speakers should be of the similar distance from the listening spot. If your room is shaped like a horizontal-rectangle, we suggest you arrange the speakers in the way shown in figure A. If your room is a vertical-rectangle, we suggest you arrange the speakers in the way shown in figure B. Coaxial input or INPUT/ESC COX Power on/Standby Poids (net): PROLOGIC II Dolby Pro Logic II ON Master volume 1. Press the “INPUT” button on wired controller until the LCD displays “COX”, or press “COX” key on the remote control. 2. Connect the “COX” connector port to your audio source with the coaxial cable. 3. Play the music on the connected device and adjust the settings to a desired level. 1 Line In 5.1CH ● Vérifier si le cordon d’alimentation est bien branché ou si l’alimentation de la pièce ne présente aucun souci. ● Vérifier si le système est en Veille. ● Vérifier si les Câbles audio sont bien branché. 3 Kabelgebundener Controller ● Vérifier si la source fonctionne correctement. 4 5 ● Vérifiez si les piles sont en bonne état. Si vous avez d'autres questions ou problèmes concernant les produits d'EDIFIER… 6 Asie, Europe, Océanie: Satellitenlautsprecher main@edifier.com, 7 English On R L Wired Controller Coaxial Optical 1 Optical 2 Optical 3 Power On Off 1. Premere il tasto “FUNC” per accedere alle regolazioni VOL - BASS - TREB - FL - FR - CE - SL - SR - SUB - LIGHT DELAYC (non disponibile) - DELAYSL/SR (l'impostazione DELAY è disponibile solo per Dolby Pro Logic II ON). Subwoofer aux États-Unis. Amérique du Sud: Visitez www.edifier.com (anglais) ou www.edifierla.com (espagnol/portugais) pour les Rückseite des Subwoofers 2. Ruotare il regolatore di volume master o premere ADJ+/ADJ- per regolare: bassi/acuti, FL/FR/CE/SL/SR/SUB. Kabelgebundener Controller 3. In modalità di riproduzione, ruotare il regolatore di volume master o premere VOL+/VOL- per regolare il volume Audioanschlusskabel (3,5mm zu Doppel-RCA) S760D Multimedia Speaker User manual | Manuel d’utilisateur | Manual de usuario | Bedienungsanleitung | Manuale dell’utente master del sistema. 1. Lautsprecher-Ausgangsbuchsen 9. LC-Display 2. 5.1-Kanal Eingangsbuchsen 10. Funktionsauswahl/Haupt-Lautstärkeregler 3. Stereo-Eingangsbuchsen (AUX/CD) 11. Standby/On (Ein) 4. Anschluss für kabelgebundenen Controller velocemente per impostare il sistema su boost (non in modalità cuffie). 5. Reset: Premere e tenere premuto contemporaneamenteil selettore di funzionee 12. Audioquellenauswahl (sul controller cablato) per 22 Français Cinch-Anschlusskabel Bedienungsanleitung J Collegare l'altoparlante satellitare alla porta "Uscita altoparlante" sul pannello posteriore del subwoofer (cavo dorato al morsetto cavo rosso e cavo argentato al morsetto cavo nero). J Collegare il cavo audio alle porte di connessione 5.1/PC/AUX sul pannello posteriore alla fonte audio (scheda audio PC, lettore DVD/MP3/MP4, ecc.) J Collegare il cavo di alimentazione alla presa a parete e accendere l'interruttore di alimentazione, il sistema è attivo. circa 2 secondi, la versione del software viene visualizzata sul controller, tutte le impostazioni vengono 13. Kopfhöreranschluss 5. Koaxial-Eingang 4. Master Volume Boost: Quando il volume master è 60, ruotare il regolatore del volume master in senso orario Nota: 1. Verificare che il sistema sia disattivato quando si collegano gli altoparlanti. 2. Prima di disattivare gli altoparlanti, premere per impostare l'altoparlante in modalità standby, quindi spegnere il sistema dall’interruttore di alimentazione master. annullate e il sistema viene riportato alle impostazioni inziali predefinite di fabbrica. 6. Optische Eingänge 7. Haupt-Netzschalter Netzkabel 21 Français S760D Multimedia Speaker Off 8 LWL-Kabel 8 English 13 Fernbedienung Vous pouvez également nous appeler sans frais au : 1-877-EDIFIER (334-3437) au Canada,1-800-688-7406 CD 1. Press the “INPUT” button on wired controller until the LCD displays “CD”, or press “CD” key on the remote control to select CD input. 2. Connect the “CD” connector ports to your CD player with the audio connecting cable. 3. Play the music on the connected device and adjust the settings to a desired level. Line In 5.1CH Regolazione Lautsprecher-Anschlusskabel or Optical 2 Power 7 5.1 IN Notice: 1. Do not place the remote in an extremely hot or humid place. 2. Do not use a new battery with an old one. 3. Remove the batteries when the remote is left unused for a long period of time to avoid battery leakage or corrosion. Wired Controller Coaxial → Cher client, merci d'avoir acheté ce produit d'EDIFIER.Pour la garantie d'EDIFIER applicable à ce produit, nous vous invitons à visiter le site web d'EDIFIER www.edifier-international.com/warranty-terms. Canada/USA/Mexique: www.edifier.ca, Email: service@edifier.ca CD input INPUT/ESC L Optical 3 Visitez notre site web: www.edifier.com, ou écrivez au service d'assistance d'EDIFIER à l'adresse: Collegamento ad altoparlanti e fonte audio Speaker Out R Optical 1 CD INPUT 1. Connect the power cord to the wall socket, and turn on the power switch, the system is on; 2. Rotate the function dial (or use the remote control) to adjust the master volume and other settings; 3. In playing mode, press & hold for approximately 2 seconds to set system into standby mode, LCD display of the wired controller will turn off; 4. Press to set system back to playing mode. S760D Multimedia Speaker Speaker Out 2 ● Vérifier si le volume principal est au minimum. coordonnées locales. COA ● Please refer to the figure to open the battery compartment, load the batteries and shut the compartment. ● Point the remote controller to the IR window on wired controller when operating the remote controller. ● The optimum operational distance is within 7 meters. ● The optimum operational scope is within a 60 degree angle. Verpackungsinhalt ● Vérifiez que les appareils sont utilisables et bien branchés. Connettività e posizionamento Digital In COX Membrane des Aigus: Membranes des Middle: Membrane des Basses: Dimension: Guida operativa Digital In 1. Press the “INPUT” button on wired controller until the LCD displays “OPT”, or press “OPT” key on the remote control. 2. Connect the “OPT” connector port to your audio source (DVD, etc) using the fiber optical cable. 3. Play the music on the connected device and adjust the settings to a desired level. Note: Only the standard PCM audio signals (44.1/48/96KHz) of sampling clock are adaptable in optical mode. ● Éteignez l'EDIFIER S760D et rallumez-le avant de le rebrancher à la source audio. FR/FL/C/SR/SL: RMS 60W × 5 (DRC Marche) SW: RMS 240W (DRC Marche) ≥85dBA Satellite: 130Hz ~ 20KHz (+/-5dB) Caisson de basse: 42Hz ~ 140Hz (+/-6dB) 5.1IN/CD/AUX: Satellites: 750mV ± 50mV Cassion de basse: 900mV ± 50mV Optique/Coaxiale: Satellite: 350 ± 50mFFS Cassion de basses: 400 ± 50mFFS Dôme en soie de Φ2,5cm 9,2cm (3½ pouces) 26cm (10 pouces) Caisson de basses: 367(ℓ) × 397(H) × 489(P) mm FR/FL/SR/SL: 116(ℓ) × 203(H) × 160(P) mm C: 316(ℓ) × 117(H) × 157(P) mm Haut-parleur satellites: Env. 11,5kg Caisson de basses: Env. 19kg Abbildungen Auspacken 8. Anschluss für Netzkabel 35 Deutsch 36 Deutsch 49 Italiano 50 Italiano 法 Operational guide Specifications ADVERTENCIA: Para reducir el riesgo de fuego o descarga eléctrica, no exponga este aparato a la lluvia o la humedad. 5.1 INPUT Power output: 5.1 input 5.1 input or INPUT/ESC Signal to noise ratio: System response: 5.1 Input sensitivity: 1. Press the “INPUT” button on wired controller or “5.1CH” key on remote control until the LCD displays “5.1CH”. 2. Connect the “5.1CH” connector ports to your device with the 3.5mm-dual RCA audio cable. 3. Play the music on the connected device and adjust the settings to a desired level. Connect to PC Connect to DVD 5.1 input connector ports PC sound card ports 5.1 input connector ports DVD output connector ports y Dual RCA-Dual RCA audio cables are needed if you want to play music through certain devices. Treble unit: Mid-range unit: Bass unit: Dimension: Weight (net): FL/FR/C/SL/SR: RMS 60W × 5 (DRC ON) SW: RMS 240W (DRC ON) ≥85dBA Satellite: 130Hz ~ 20KHz(±5dB) Subwoofer: 42Hz ~ 140Hz(±6dB ) 5.1IN/CD/AUX: Satellite: 750mV ± 50mV Subwoofer: 900mV ± 50mV Optical/Coaxial: Satellite: 350 ± 50mFFS Subwoofer: 400 ± 50mFFS Φ25mm silk dome tweeter 3½ inch (92mm) 10 inch (260mm) SW: 367(W) × 397(H) × 489(D) mm FR/FL/SR/SL: 116(W) × 203(H) × 160(D) mm C: 316(W) × 117(H) × 157(D) mm Satellite: Approx. 11.5kg Subwoofer: Approx. 19kg 1 La exclamación dentro del triangulo pretende alertar al usuario de la presencia de instrucciones de funcionamiento y mantenimiento (revisión) importantes en la documentación que acompaña al producto. 1. Lea estas instrucciones. 2. Guarde estas instrucciones. 3. Haga caso de todas las advertencias. 4. Siga todas las instrucciones. 5. No utilice este aparato cerca del agua. 6. Limpie sólo con un trapo seco. 7. No bloquee las aberturas de ventilación. Instale de acuerdo con las instrucciones del fabricante. 8. No instale cerca de cualquier fuente de calor como radiadores, como rejillas de calor, cocinas u otros aparatos (inclusive amplificadores) que produzcan calor. 9. No rechace la finalidad de la seguridad del enchufe polarizado o de tipo tierra. Un enchufe polarizado tiene dos patillas, con una más ancha que la otra.Un enchufe de tipo tierra tiene dos patillas y una tercera punta de tierra. La patilla ancha o la tercera punta se proporcionan para su seguridad. Si el enchufe proporcionado no encaja en su enchufe de pared, consulte a un electricista para la sustitución del enchufe de pared obsoleto. 10. Proteja el cable de alimentación para que no sea pisado o pellizcado especialmente en los enchufes, receptáculos de comodidad y el punto por el que salen del aparato. 11. Sólo utilice implementos/accesorios especificados por el fabricante. 12. Desenchufe este aparato durante tormentas de relámpagos o cuando no se utilice durante largos periodos de tiempo. 13. Solicite asistencia al personal de servicio cualificado. La asistencia se necesita cuando el aparato se dañe de alguna manera, tal como si se daña el cable de alimentación o el enchufe, se ha derramado líquido o han caído objetos en el aparato, el aparato se ha expuesto a la lluvia o la humedad, no funciona normalmente o se ha caído. 14. El enchufe de la RED o el adaptador del aparato se utiliza como dispositivo de desconexión, el dispositivo de desconexión quedará fácilmente operativo. AUX input or Para evitar el riesgo de descarga eléctrica no retire la cubierta (ni la tapa posterior). En el interior no hay componentes cuyo mantenimiento pueda realizar el usuario. Hágalos revisar sólo por personal cualificado. 2 Controlador con cable 3 4 5 7 9 Altavoz satélite Switch the EDIFIER S760D off then on and reconnect to the audio source. AVERTISSEMENT: Afin de diminuer les risques d’incendies ou de chocs électriques, ne pas exposer cet appareil à la pluie ou à l’humidité. ● Ensure the devices are workable and connected correctly. ● Check if power is connected, and if the wall outlet is switched on. Merci d’avoir acheté le produit EDIFIER . Depuis des générations, EDIFIER essaie de fournir des haut-parleurs puissants afin de satisfaire le besoin de nos clients finaux même les plus exigeants. Ce produit peut ajouter à votre divertissement de maison, à votre ordinateur et à un mini home cinéma une grande performance de son. Veuillez lire soigneusement ce manuel afin d’obtenir le meilleur de votre appareil. ● Check if the master volume is turned to minimum. ● Check if the system is in standby. Off On 10. Music---- Dolby Pro Logic II Musikmodus Movie---- Dolby Pro Logic II Filmmodus Virtual---- Dolby Pro Logic II Virtueller Modus 13 Game---- Dolby Pro Logic II Spielmodus 11. Kompression Ein/Aus (nur für Dolby Digital-Decoder) 14 12. Einstelltasten ● Check if the audio input cable is connected correctly. ● Check if there is signal from audio source. ● Check if the batteries are available. 15 Schritt 2: Drücken Sie die Taste ADJ+ /ADJ-. South America: Please visit www.edifier.com (English) or www.edifierla.com (Spanish/Portuguese) for detailed local contact information. Le symbole d’éclair avec une flèche à l’intérieur d’un triangle équilatéral informe l’utilisateur de la présence d’une tension non isolée et dangereuse dans l’enceinte de l’appareil. Cette dernière peut être de magnitude suffisante pour constituer un risque d’électrocution. Afin de prévenir les risque de chocs électriques, ne pas retirer le couvercle (ou l’arrière). Aucun élément n’est réparable par l’utilisateur. Veuillez contacter un personnel qualifié pour les réparations. Le point d’exclamation à l’intérieur d’un triangle équilatéral informe l’utilisateur de la présence, dans ce manuel qui accompagne l’appareil, d’instructions de maintenance (réparation) et d’instructions de fonctionnement importantes. 1. Lire ces notices. 2. Conserver ces notices. 3. Attention à tous les avertissements. 4. Suivre toutes les instructions. 5. Ne pas utiliser cet appareil à proximité d’eau. 6. Ne nettoyer qu’avec un chiffon doux. 7. Ne pas obstruer les orifices de ventilation. Installer conformément aux instructions du fabricant. 8. Ne pas installer près de sources de chaleur tels des radiateurs, de bouches d’air chaud, des fours, ou autres appareils (y compris des amplificateurs) générant de la chaleur. 9. Ne pas contrevenir aux mesures de sécurité de la prise polarisée ou de type de mise à la terre. Une prise polarisée a deux barrettes avec une plus large que l’autre Une prise de type de mise à la terre a deux barrettes et une troisième fiche de terre. La barrette large ou la troisième fiche sont fournies pour votre sécurité. Si la fiche fournie ne correspond pas à votre prise, contacter un électricien pour remplacer la prise obsolète. 10. Protégez le cordon d’alimentation pour ne pas être piétiné ou pincé en particulier aux prises de courant de proximité et au point de sortie de l'appareil. 11. N’utiliser que les fixations/accessoires stipulés par le fabricant. 12. Débrancher cet appareil lors d’orages ou lorsqu’inutilisé pendant de longues périodes. 13. Confier la réparation à un personnel technique agréé. La réparation est nécessaire lors de tout endommagement de l’appareil, tel les dégâts au cordon d’alimentation ou à la prise, un liquide a été versé ou des objets sont tombés sur l’appareil, ce dernier a été exposé à la pluie ou l’humidité, ne fonctionne pas normalement ou est tombé. 14. Lors de l’utilisation d’une prise au RESEAU ELECTRIQUE ou d’un coupleur comme dispositif de déconnexion ; ce dernier sera maintenu opérationnel. N’utiliser qu’avec le panier, le support, le trépied, le crochet ou la table stipulés par le fabricant ou vendus avec l’appareil. Faire attention lors du déplacement d’un panier / appareil combiné afin d’éviter des blessures en cas de renversement si un panier est utilisé. Élimination correcte de ce produit. Ce symbole avise qu’en Europe, ce produit ne doit pas être éliminé avec les autres déchets ménagers. Recyclez-le de manière responsable pour promouvoir la réutilisation durable des ressources matérielles et éviter tout risque pour l’environnement ou la santé résultant d’une élimination non contrôlée des déchets. Pour retourner le produit usagé, utilisez les points de retour et de collecte ou contactez le vendeur du produit qui peut prendre en charge ce produit pour un recyclage respectueux de l’environnement. ADVERTENCIA: La construcción de la unidad es de clase l. La unidad debe conectarse a una salida de red eléctrica con una toma a tierra de protección. Cuando el enchufe de red se utilice como dispositivo de desconexión, este dispositivo deberá permanecer listo para usar. 12 Français 11 English 英 1. Premere il tasto “INPUT” sul controllore cablato finché l'LCD non visualizza “OPT”, o premere il tasto “OPT” del telecomando per selezionare l'ingresso ottico. 2. Collegare la porta connettore “OPT” alla sorgente audio (DVD, ecc.) usando il cavo a fibra ottica. 3. Riprodurre la musica del dispositivo connesso e regolare le impostazioni al livello desiderato. Nota: Solo i segnali audio PCM standard (44.1/48/96KHz) dell'orologio sampling sono adattabili in modalità ottica. Hinweis: 1. Legen Sie die Fernbedienung nicht an heißen oder feuchten Stellen ab. 2. Verwenden Sie niemals eine neue und eine alte Batterie gleichzeitig. 3. Entfernen Sie bitte die Batterien wenn Sie die Fernbedienung über einen längeren Zeitraum nicht nutzen. Anderenfalls können Schäden durch ausgelaufene Batterieflüssigkeit entstehen. Per ottenere il miglior effetto surround, tutti gli altoparlanti devono trovarsi ad una distanza simile dal punto di ascolto. Se la stanza ha la forma di un rettangolo orizzontale, consigliamo di sistemare gli altoparlanti come indicato nella figura A. Se la stanza ha la forma di un rettangolo verticale, consigliamo di sistemare gli altoparlanti come indicato nella figura B. Einstellung Cable de audio (3.5mm a doble RCA) 13. Funktionsauswahltaste 16 S760D Multimedia Speaker 14. Höheneinstellung 15. Haupt -Lautstärke erhöhen/Verringern User manual | Manuel d’utilisateur | Manual de usuario | Bedienungsanleitung | Manuale dell’utente Cable conector RCA 16. Basseinstellung Manual de usuario 1. Indicador S760D Speaker Out 3 2 R 6 3 – LIGHT (Displaybeleuchtung) – DELAYC (nicht verfügbar) – DELAYSL/SR (Verzögerung Surround links/rechts) auf (die PROLOGIC II DELAY-Einstellung ist nur für Dolby Pro Logic II ON (Ein) verfügbar). 4 Wired Controller Optical 2 5 7 9 Optical 3 13 Power FL/FR/CE/SL/SR/SUB. 7 4. Entradas de canales 5.1 5. Entrada óptica 6. Entrada coaxial 7. Entrada de CD 8. Entrada AUX CD 6 8 modo 5.1.) Off On 4. Lautstärke-Boost: Wenn die Lautstärke auf 60 eingestellt ist, drehen Sie den Haupt-Lautstärkeregler schnell im Uhrzeigersinn um den Lautstärke-Boost zu aktivieren (nicht im Kopfhörermodus). 5. Rücksetzen: Drücken und halten Sie die Funktionsskala und (am verdrahteten Kontroller) gleichzeitig etwa 2 38 Deutsch Anschließen und Aufstellen 11 R S760D Virtual ---- Modo virtual Dolby Pro Logic II Juego ---- Modo juego Dolby Pro Logic II Controlador cableado 2. Orificios de conectores de entrada de canales 5.1 10. Dial de función/dial de volumen general 3. Orificios de conectores de entradas estéreo (AUX/CD) 11. Espera/ENCENDIDO 6. Orificio de conector óptico 7. Interruptor general de encendido 8. Orificio de conector de cable de corriente 25 Español 12. Selector de fuente de audio Wired Controller Optical 3 Power Off Um den bestmöglichen Surround-Effekt zu erzielen, sollten alle Lautsprecher in gleicher Entfernung zum Hörer stehen. Ist der Aufstellungsort ein Raum mit eher quadratischem oder horizontal-rechteckigem Grundriss, empfehlen wir eine Aufstellung der Lautsprecher wie in Abbildung A dargestellt. Ist der Aufstellungsort eher vertikal-rechteckig im Grundriss, empfehlen wir eine Anordnung der Lautsprecher wie in Abbildung B gezeigt. 13. Orificio para auriculares Connessione a DVD Connessione a PC Connettore ingresso 5.1 Porte scheda audio PC Porte connettore ingresso 5.1 Porte connettore uscita Sensibilità ingresso: Gruppo vibrati: Unità a medio raggio: Unità bassi: Misure: Ein-/Ausschalten/Standby Peso (netto): PROLOGIC II J Schließen Sie die Satellitenlautsprecher an die „Lautsprecherausgang“-Buchsen auf der Rückseite des Subwoofers an (das goldene Kabel an die rote Kabelklemme und das silberne Kabel an die schwarze Kabelklemme). J Verbinden Sie das Audiokabel mit den 5.1/PC/AUX-Anschlussbuchsen auf der Rückseite und der Audioquelle (PC-Soundkarte, DVD/MP3/MP4-Player usw.). J Schließen Sie das Netzkabel an eine Steckdose an und schalten Sie den Netzschalter ein. Das System ist jetzt betriebsbereit. Hinweis: 1. Achten Sie beim Anschluss der Lautsprecher darauf, dass das System ausgeschaltet ist. 2. Drücken Sie vor dem Ausschalten des Lautsprechers , um den Lautsprecher in den Standby-Modus zu versetzen und schalten Sie dann das System mit dem Haupt-Netzschalter aus. descodificador Dolby Digital). 12. Teclas de ajuste 15 Paso 1: apriete varias veces “Func”; 16 1. Premere il pulsante “INPUT” sul controller cablato oppure sul tasto “5.1CH” sul controllo remoto finché non compare “5.1CH” sull’LCD. 2. Collegare le porte del connettore “5.1CH” al dispositivo tramite il cavo di connessione audio RCA doppio da 3.5 mm. 3. Eseguire la musica sul dispositivo collegato e regolare le impostazioni al livello desiderato. 11. Compresión activada/desactivada (efectivo únicamente para 14 5.1 INPUT/ESC Optical 1 Matriz ---- Modo matriz Dolby Pro Logic II 13 Segnale a rapporto rumore: Frequenza di sistema: Multimedia Speaker L Optical 2 1. Premere il tasto “INPUT” sul controllore cablato finché l'LCD non visualizza “CD”, o premere il tasto “CD” del telecomando per selezionare l'ingresso CD. 2. Collegare le porte connettore “CD” al lettore CD con il cavo di connessione audio. 3. Riprodurre la musica del dispositivo connesso e regolare le impostazioni al livello desiderato. 52 Italiano Uscita potenza: o Speaker Out Paso 2: apriete ADJ+/ADJ-. 13. Función navegador 14. Ajuste de agudos 15. Subir/bajar el volumen general 16. Ajuste de graves 26 Español 39 Deutsch CD Specifiche tecniche INGRESSO 5.1 5.1 IN Line In 5.1CH o INPUT/ESC Guida operativa Ingresso 5.1 Coaxial 12 Comp off 5. Conector de entrada coaxial 51 Italiano Aufstellen der Satellitenlautsprecher Película ---- Modo película Dolby Pro Logic II Comp on 8 4. Orificio de conector de controlador cableado 1. Collegare il cavo di alimentazione alla presa a parete e accendere l'interruttore di alimentazione, il sistema è attivo; 2. Ruotare il compositore di funzione (o usare il telecomando) per regolare il volume master o le altre impostazioni; 3. In modalità di riproduzione, premere e tenere premuto per circa 2 secondi per impostare il sistema in modalità standby, il display LCD del controllore cablato sarà disattivato; 4. Premere per impostare il sistema nuovamente in modalità di riproduzione. Betriebsanleitung Emulación ---- Modo emulación Dolby Pro Logic II 9. Display LCD Ingresso CD 5.1 input 10. Música ---- Modo música Dolby Pro Logic II 10 1. Orificios de salidas para altavoces 1. Premere il tasto “INPUT” sul controllore cablato finché l'LCD non visualizza “COX”, o premere il tasto “COX” del telecomando per selezionare l'ingresso ottico. 2. Collegare la porta connettore “COX” alla sorgente audio con il cavo coassiale. 3. Riprodurre la musica del dispositivo connesso e regolare le impostazioni al livello desiderato. Haupt-Lautstärke des Systems anzupassen. On/Off: Dolby Pro Logic II activado/desactivado (Sólo para la señal de entrada estéreo, no disponible en el Off Panel trasero del subwoofer COX INGRESSO CD 3. Drehen Sie während der Wiedergabe den Haupt-Lautstärkeregler oder drücken Sie die Taste VOL+/VOL- um die 37 Deutsch On On Dolby Pro Logic II attivo Volume master 2. Espera/Encendido 3. Tecla de silencio 9. L Coaxial Optical 1 Ingresso coassiale o Multimedia Speaker 1 4 5 Ingresso coassiale INPUT/ESC Accensione/Standby – FL (Front links) – FR (Front rechts) – CE (Center) – SL (Surround links) – SR (Surrond rechts) – SUB (Subwoofer) Sekunden lang, der verdrahtete Kontroller zeigt dann die Software-Version an, und dann werden alle Einstellungen Anschluss der Lautsprecher und der Audioquelle Line In 5.1CH COX 1. Rufen Sie mit der FUNC-Taste die Einstellungen für VOL (Gesamtlautstärke) – BASS (Tieftöne) – TREB (Hochtöne) Digital In in US. o INPUT/ESC COA 1 Digital In If you prefer, you may contact us by phone, Toll Free: 1-877-EDIFIER (334-3437) in Canada, 1-800-688-7406 Ingresso ottico 2. Drehen Sie den Haupt-Lautstärkeregler oder drücken Sie die Taste ADJ+/ADJ- zur Anpassung von Bass/Höhen, Schritt 1: Drücken Sie wiederholt die Taste „Func“. Cable de conexión de altavoces Ingresso ottico Matrix---- Dolby Pro Logic II Matrixmodus Comp off Guía de funcionamiento del mando a distancia 2 Canada/USA/Mexico: www.edifier.ca, Email: service@edifier.ca On/Off: Dolby Pro Logic II Ein/Aus (Nur für Stereo-Signaleingang, im 5.1-Modus nicht verfügbar.) Subwoofer 24 Español Risque d’électrocution ne pas ouvrir we refer you to the EDIFIER website www.edifier-international.com/warranty-terms. 8. AUX-Eingang 10 Control remoto Ilustraciones ● → Dear Customer, thank you for purchasing this EDIFIER product. For the EDIFIER warranty applicable for this product, 7. CD-Eingang 12 23 Español Consignes de securite importantes enquiry@edifier.com, 6. Koaxial-Eingang ● Bitte öffnen Sie das Batteriefach wie in der Abbildung gezeigt, legen Sie die Batterien ein, und verschließen Sie das Fach wieder. ● Richten Sie die Fernbedienung auf den Infrarot-Empfänger am Display des kabelgebundenen Controllers, um eine bestmögliche Signalübertragung zu erzielen. ● Die optimale Entfernung für die Nutzung der Fernbedienung beträgt bis 7 Meter. ● Der optimale seitliche Winkel für die Nutzung der Fernbedienung beträgt bis 60 Grad. gelöscht und das System wird zu den Originalwerkseinstellungen zurückgesetzt. Troubleshooting Please visit our website at: www.edifier-international.com or email EDIFIER Support for further assistance at: 4. 5.1-Kanal-Eingang 5. Optischer Eingang 8 11 Cable de corriente 10 English Asia, Europe, Oceania: 3. Stummschaltung Emul---- Dolby Pro Logic II Emulationsmodus Correcta eliminación de este producto. Esta marca indica que este producto no se debe desechar con la basura doméstica en toda la Unión Europea. Para evitar posibles daños al medio ambiente o a la salud derivados de vertido de residuos sin control, recicle de manera responsable para impulsar la reutilización sostenible de los recursos materiales. Para reciclar el dispositivo usado, utilice los sistemas de recogida y reciclado o consulte al proveedor donde compró el producto. Allí pueden llevar este producto para su reciclado protegiendoel medio ambiente. 9 English If you have any further questions or concerns regarding EDIFIER Products… 2. Standby/On (Ein) Comp on Cable de fibra óptica 1. Press the “INPUT” button on wired controller until the LCD displays “AUX”, or press “AUX” key on the remote control to select AUX input. 2. Connect the “AUX” connector ports to your audio source (MP3/MP4 player, etc.) with the audio connecting cable. 3. Play the music on the connected device and adjust the settings to a desired level. 1. LED 9. 6 CD Utilice sólo con el carrito, el estante, el trípode, el soporte o con la mesa especificados por el fabricante, o vendidos con el aparato. Cuando se utiliza un carrito, tenga precaución al mover la combinación carrito/aparato para evitar daños por vuelco. AUX Guida operativa Posizionamento degli altoparlanti satellitari Riesgo de choque eléctrico no abrir El destello con cabeza de flecha dentro del triangulo advierte al usuario de la presencia de un voltaje peligroso no aislado dentro de la carcasa del producto que puede ser de suficiente magnitud como para constituir un riesgo de descarga eléctrica para las personas. Guida operativa Betriebsanleitung Contenido de la caja Gracias por comprar éste producto EDIFIER. Desde hace varias generaciones, es la meta de EDIFIER proporcionar altavoces potentes para satisfacer las necesidades de nuestros consumidores finales, incluso de los más exigentes. Este producto le da unas grandes prestaciones de sonido a suentretenimiento doméstico, ordenador personal y mini cine doméstico. Lea con cuidado este manual para obtener lo mejor de este sistema. AUX INPUT INPUT/ESC Fernbedienung Desembalaje de la caja Instrucciones de seguridad importantes Dolby Pro Logic II ON (Ein) y Sono necessari cavo connettore RCA doppi se si desidera eseguire musica tramite determinati dispositivi. FR/FL/C/SR/SL: RMS 60W × 5 (DRC ON) SW: RMS 240W (DRC ON) ≥85dBA Satelliti: 130Hz ~ 20KHz (+/-5dB) Subwoofer: 42Hz ~ 140Hz (+/-6dB) 5.1IN/CD/AUX: Satelliti: 750mV ± 50mV Subwoofer: 900mV ± 50mV Ottico/Coassiale: Satelliti: 350 ± 50mFFS Subwoofer: 400 ± 50mFFS Φ25mm riv. seta 3.5 pollici (92mm) 10 pollici (260mm) Subwoofer: 367(Lungh.) × 397(Alt.) × 489(Prof.) mm FR/FL/SR/SL: 116(Lungh.) × 203(Alt.) × 160(Prof.) mm C: 316(Lungh.) × 117(Alt.) × 157(Prof.) mm Altoparlati satellitari: Appros. 11,5kg Subwoofer: Appros. 19kg Haupt-Lautstärke INGRESSO AUX Ingresso AUX COA o 1. Verbinden Sie das Netzkabel mit einer Steckdose und schalten Sie den Netzschalter ein. Das System ist eingeschaltet. 2. Drehen Sie die Funktionsauswahltaste (oder verwenden Sie die Fernbedienung), um die Haupt-Lautstärke und weitere Einstellungen anzupassen. 3. Halten Sie während der Wiedergabe die Taste ca. 2 Sekunden lang gedrückt um das System in den Standby-Modus zu versetzen. Die LCD-Anzeige des kabelgebundenen Controllers schaltet sich aus. 4. Drücken Sie die Taste um das System wieder in den Wiedergabemodus zu versetzen. 40 Deutsch INPUT/ESC AUX 1. Premere il tasto “INPUT” sul controllore cablato finché l'LCD non visualizza “AUX”, o premere il tasto “AUX” del telecomando per selezionare l'ingresso AUX. 2. Collegare le porte connettore “AUX” alla sorgente audio (lettore MP3/MP4, ecc.) con il cavo di connessione audio. 3. Riprodurre la musica del dispositivo connesso e regolare le impostazioni al livello desiderato. 53 Italiano 55 Italiano 意 Fehlerbehebung COX COA de réglage du volume dans le sens des aiguilles d’une montre pour régler le système en suramplificateur (pas 13. Fonction de navigateur 1. Drücken Sie die Taste „INPUT“ am kabelgebundenen Controller, bis auf dem LCD „AUX“ angezeigt wird oder drücken Sie zur Auswahl des AUX-Eingangs die Taste „AUX“ auf der Fernbedienung. 2. Verbinden Sie mit dem Audiokabel die „AUX“-Anschlussbuchsen mit Ihrer Audioquelle (MP3/MP4-Player usw.). 3. Geben Sie auf dem angeschlossenen Gerät Musik wieder und stellen Sie die Lautstärke auf den gewünschten Pegel ein. 42 ENTRADA DE CD 4. Suramplificateur de volume principal: Quand le volume principal est à 60, tournez rapidement le bouton User manual | Manuel d’utilisateur | Manual de usuario | Bedienungsanleitung | Manuale dell’utente RCA connector cable Volumen general AUX INPUT/ESC Deutsch 1. Apriete el botón “INPUT” botón del controlador cableado hasta que la pantalla LCD muestre “COX”, o apriete “COX” en el mando a distancia. 2. Conecte el orificio de conector “COX” a la fuente de audio con el cable coaxial. 3. Reproduzca la música en el dispositivo conectado y ajuste la configuración según el nivel que desee. principal du système. Étape 1: appuyez plusieurs fois sur « Func » ; S760D Multimedia Speaker Dolby Pro Logic II ACTIVO PROLOGIC II 3. En mode lecture, tournez le bouton du volume principal ou appuyez sur VOL+/VOL- pour régler le volume Étape 2: appuyez sur ADJ+/ADJ-. 16 oder CD 41 Deutsch Entrada coaxial INPUT/ESC di contatto locali dettagliate. AUX-Eingang Ausgangsleistung: o Sud America: Visita www.edifier.com (Inglese) o www.edifierla.com (Spagnolo/Portoghese) per informazioni y Einige Audioquellen können den Einsatz von Dual-Cinch auf Dual-Cinch Audiokabeln erfordern. 1. Drücken Sie die Taste „INPUT“ am kabelgebundenen Controller, bis auf dem LCD „CD“ angezeigt wird oder drücken Sie zur Auswahl des CD-Eingangs die Taste „CD“ auf der Fernbedienung. 2. Verbinden Sie mit dem Audiokabel die „CD“-Anschlussbuchsen mit Ihrem CD-Player. 3. Geben Sie auf dem angeschlossenen Gerät Musik wieder und stellen Sie die Lautstärke auf den gewünschten Wert ein. Entrada coaxial Encendido/Espera FL/FR/CE/SL/SR/SUB. 15 oder 1. Apriete el botón “INPUT” botón del controlador cableado hasta que la pantalla LCD muestre “OPT”, o apriete “OPT” en el mando a distancia para seleccionar la entrada óptica. 2. Conecte el orificio de conector “OPT” a la fuente de audio (DVD, etc.) utilizando el cable de fibra óptica. 3. Reproduzca la música en el dispositivo conectado y ajuste la configuración según el nivel que desee. Nota: En modo óptico solo son adaptables las señales de audio del estándar PCM (44,1/48/96 kHz) del reloj de muestreo. Para lograr el mejor efecto envolvente, todos los altavoces deben estar a una distancia similar del lugar de escucha. Si su sala tiene la forma de un rectángulo horizontal, le sugerimos que coloque los altavoces como se muestra en la figura A. Si su sala es un rectángulo vertical, le sugerimos que coloque los altavoces como se muestra en la figura B. 1-800-688-7406 in USA. AUX-EINGANG INPUT/ESC o DELAYC (indisponible) - DELAYSL/SR (le réglage DELAY est disponible uniquement pour Dolby Pro Logic II ON). décodeur Dolby Digital) Speaker connecting cable Illustrations Visita il nostro sito web: www.edifier.com, o invia un e-mail al servizio assistenza a: main@edifier.com, →Gentile cliente, grazie per aver acquistato questo prodotto EDIFIER. Per la garanzia EDIFIER applicabile su Canada/USA/Messico: www.edifier.ca, E-mail: service@edifier.ca CD-Eingang Entrada óptica 2. Tournez le bouton du volume principal ou appuyez sur ADJ+/ADJ- pour régler le volume: bass/treble, 12. Boutons de réglage Power cord Asia, Europa, Oceania: COX INPUT/ESC 1. Appuyez sur « FUNC » pour accéder aux réglages VOL - BASS - TREB - FL - FR - CE - SL - SR - SUB - LIGHT - 11. Compression activée/désactivée (effective uniquement pour le Comp off WARNING! The unit is of Class l construction and must be connected to a mains socket outlet with a protective earthing connection. Where the mains plug is used as the disconnect device, the disconnect device shall remain readily operable. 5.1 Eingangsanschlussbuchsen CD-EINGANG Entrada óptica Réglages Matrix---- mode matrice Dolby Pro Logic II Comp on Coloque los altavoces satélite COX Emul---- mode émulation Dolby Pro Logic II Fiber optical cable Se hai ulteriori domande o preoccupazioni riguardanti i prodotti EDIFIER Products… Anschluss an DVD Anschluss an PC 1. Drücken Sie die Taste „INPUT“ am kabelgebundenen Controller, bis auf dem LCD „COX“ angezeigt wird oder drücken Sie zur Auswahl des Koaxial-Eingangs die Taste „COX“ auf der Fernbedienung. 2. Verbinden Sie mit dem Koaxialkabel die „COX“-Anschlussbuchse mit Ihrer Audioquelle. 3. Geben Sie auf dem angeschlossenen Gerät Musik wieder und stellen Sie die Lautstärke auf den gewünschten Wert ein. Guía de funcionamiento Notice: 1. Ne pas laisser la télécommande dans un endroits humide ou chaux. 2. Ne pas utiliser d’ancienne piles mélanges avec de nouvelles. 3. Toujours enlever les piles de la télécommande si vous comptez ne pas vous en servir pendant un moment afin d’éviter qu’elles ne déchargent rapidement ou pour éviter toute corrosion. 10. Music---- mode musique Dolby Pro Logic II 10 Guía de funcionamiento ● Merci de se référer au schéma pour changer les piles & refermer le compartiment correctement.. ● Toujours pointer la télécommande vers le récepteur infrarouge du système pour une efficacité optimum. ● La distance optimum de la télécommande est de 7 mètres. ● L’angle d’utilisation optimum est de 60°. 8 Off On 28 Español 27 Español Guide d'utilisation Box contents Thank you for purchasing this EDIFIER product. For generations, EDIFIER tries to provide powered speaker products to satisfy the need of our end customers, even the most demanding ones. This product can add to your home entertainment, personal computer, and mini home theater great sound performance. Please read this manual carefully to obtain the best of this system. para poner los altavoces en modo de espera y luego apague el sistema con el interruptor general de encendido. 8. Prise du cordon d'alimentation User manual | Manuel d’utilisateur | Manual de usuario | Bedienungsanleitung | Manuale dell’utente Correct Disposal of this product. This marking indicates that this product should not be disposed with other household wastes throughout the EU. To prevent possible harm to the environment or human health from uncontrolled waste disposal, recycle it responsibly to promote the sustainable reuse of material resources. To return your used device, please use the return and collection systems or contact the retailerwhere the product was purchased. They can take this product for environmental safe recycling. Koaxial-Eingang ● Controllare se le batteria sono disponibili. Se preferisci, puoi contattarci telefonicamente, Numero Verde: 1-877-EDIFIER (334-3437) in Canada, - DELAYC (indisponible) - DELAYSL/SR (La configuración DELAY solo está disponible para Dolby Pro Logic II ON). 3. Prises d'entrée stéréo (AUX/CD) Use only with the cart, stand, tripod, bracket, or table specified by the manufacturer, or sold with the apparatus. When a cart is used, use caution when moving the cart/apparatus combination to avoid injury from tip-over. Off ● Verificare la presenza di segnale dalla sorgente audio. 1. Drücken Sie auf der drahtgebundenen Steuerung die Taste „INPUT“ oder die Taste „5.1CH“ auf der Fernbedienung, bis im LCD-Display die Anzeige „5.1CH“ erscheint. 2. Schließen Sie Ihr Gerät mit dem audioanschlusskabel (3,5mm zu Doppel-RCA) an den „5.1CH“ Eingang an. 3. Starten Sie an Ihrem angeschlossenen Audiogerät die Wiedergabe und konfigurieren Sie alle Einstellungen wunschgemäß. Optical 3 INPUT/ESC câble de raccordement des haut-parleurs 1. Read these instructions. 2. Keep these instructions. 3. Heed all warnings. 4. Follow all instructions. 5. Do not use this apparatus near water. 6. Clean only with dry cloth. 7. Do not block any ventilation openings. Install in accordance with the manufacturer’s instructions. 8. Do not install near any heat sources such as radiators, heat registers, stoves, or other apparatus (including amplifiers) that produce heat. 9. Do not defeat the safety purpose of the polarized or grounding-type plug. A polarized plug has two blades with one wider than the other. A grounding type plug has two blades and a third grounding prong. The wide blade or the third prong are provided for your safety. If the provided plug does not fit into your outlet, consult an electrician for replacement of the obsolete outlet. 10. Protect the power cord from being walked on or pinched particularly at plugs, convenience receptacles, and the point where they exit from the apparatus. 11. Only use attachments/accessories specified by the manufacturer. 12. Unplug this apparatus during lightning storms or when unused for long periods of time. 13. Refer all servicing to qualified service personnel. Servicing is required when the apparatus has been damaged in any way, such as power-supply cord or plug is damaged, liquid has been spilled or objects have fallen into the apparatus, the apparatus has been exposed to rain or moisture, does not operate normally, or has been dropped. 14. The MAINS plug or an appliance coupler is used as the disconnect device, the disconnect device shall remain readily operable. Wired Controller 1. Apriete la tecla “FUNC” para acceder a los ajustes de VOL - BASS - TREB - FL - FR - CE - SL - SR - SUB - LIGHT Télécommande Tel: +852 2522 6989 Fax: +852 2522 1989 www.edifier-international.com 2013 Edifier International Limited. All rights reserved. Printed in China The exclamation point inside the triangle is intended to alert the user to the presence of important operating and maintenance (servicing) instructions in the literature accompanying the product. L Coaxial ● Verificare se il cavo di ingresso audio è collegato correttamente. questo prodotto ti rimandiamo al sito web EDIFIER www.edifier-international.com/warranty-terms. 1. Prises de sortie du haut-parleur To prevent the risk of electric shock, do not remove cover (or back). No user-serviceable Parts inside. Refer servicing to qualified Service personnel only. 1. Drücken Sie die Taste „INPUT“ am kabelgebundenen Controller, bis auf dem LCD „OPT“ angezeigt wird oder drücken Sie zur Auswahl des optischen Eingangs die Taste „OPT“ auf der Fernbedienung. 2. Verbinden Sie mit dem LWL-Kabel die „OPT“-Anschlussbuchse mit Ihrer Audioquelle (DVD usw.). 3. Geben Sie auf dem angeschlossenen Gerät Musik wieder und stellen Sie die Lautstärke auf den gewünschten Wert ein. Hinweis: Es werden im optischen Modus nur Standard PCM-Audiosignale (44,1/48/96 KHz Abtastrate) akzeptiert. Manufactured under license from Dolby Laboratories. Dolby, Pro Logic, and the double-D symbol are trademarks of Dolby Laboratories. ● Verificare se il volume principale è al minimo. 5.1 INPUT/ESC oder 3. En el modo de reproducción, gire el dial de volumen general o apriete VOL+/VOL- para ajustar el volumen The lightning flash with arrowhead inside thetriangle, is intended to alert the user to the presence of un-insulated dangerous voltage within the product's enclosure that may be of a sufficient magnitude to constitute a risk of electric shock to persons. Multimedia Speaker Speaker Out R oder S760D Ajuste Vue arrière du caisson de basses WARNING: To reduce the risk of fire or electric shock, do not expose this apparatus to rain or moisture. ● Verificare se l’alimentazione è collegata, e se la presa a muro è accesa. ● Si prega di verificare se l'amplificatore è ancora in modalità stand-by. INPUT/ESC Line In 5.1CH Manufactured under license from Dolby Laboratories. Dolby and the double-D symbol are trademarks of Dolby Laboratories. ● Verificare che i dispositivi siano funzionanti e connessi correttamente. 5.1-Eingang Koaxial-Eingang Caisson de basses NOTICE: For the need of technical improvement and system upgrade, information contained herein may be subject to change from time to time without prior notice. Products of EDIFIER will be customized for different applications. Pictures and illustrations shown on this manual may be slightly different from actual product. If any difference is found, the actual product prevails. ● Spegnere l'EDIFIER S760D, quindi riaccenderlo e ricollegare la fonte audio. 5.1 EINGANG oder Digital In Optical 3 Haut-parleur satellite Multimedia Speaker Edifier International Ltd., Suite 1610 16th Floor, Tower II, Lippo Centre, 89 Queensway Hong Kong Digital In S760D Optical 2 Risoluzione di problemi 5.1 input Optischer Eingang Advertencia : 1. No deje el mando en un lugar extremadamente caliente o húmedo. 2. No use una batería nueva con una vieja. 3. Saque las baterías cuando el mando se deje sin usar durante un periodo prolongado de tiempo para evitar fugas o corrosión de las baterías. Optical 1 Betriebsanleitung Optischer Eingang L Coaxial 6 Betriebsanleitung Conecte los altavoces y la fuente de audio ● Consulte la figura del lado izquierdo para abrir el compartimiento de batería, cargue las baterías y cierre el compartimiento. ● Apunte el mando a distancia a la ventana IR del panel frontal del subwoofer cuando use el mando a distancia. ● La distancia operativa óptima es de 7 metros o menos. ● El ángulo operativo óptimo es de 60 grados o menos como se indica en la figura del lado izquierdo. 1 Line In 5.1CH Conectividad 54 Italiano Manufactured under license under U.S. Patent Nos: 5,956,674; 5,974,380; 6,487,535 & other U.S. and worldwide patents issued & pending. DTS, the Symbol, & DTS and the Symbol together are registered trademarks & DTS Digital Surround and the DTS logos are trademarks of DTS, Inc. Product includes software. © DTS, Inc. All Rights Reserved.