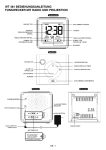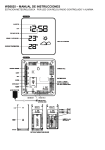
1
WS6825 - BEDIENUNGSANLEITUNG LED-WETTERSTATION MIT FUNKUHR UND ALARM DE.1 UMWELTEINFLÜSSE AUF FUNKEMPFANG Die Wetterstation empfängt kabellos die genaue Uhrzeit. Wie bei allen kabellosen Geräten kann der Funkempfang durch folgende Einflüsse beeinträchtigt sein: Lange Übertragungswege Naheliegende Berge und Täler Inmitten hoher Gebäude Nahe Autobahnen, Gleisen, Flughäfen, Hochspannungsleitungen, etc Nahe Baustellen In Betonbauten Nahe elektrischer Geräte (Computer, Fernseher, etc) In bewegten Fahrzeugen Nahe metallischer Gegenstände Platzieren Sie die Station an einem Ort mit optimalem Empfang, z.B. in der Nähe von Fenstern und entfernt zu metallischen oder elektrischen Gegenständen. SCHNELLSTART Schritt 1 Legen Sie die Station und den Außensender nebeneinander. Öffnen Sie das Batteriefach des Außensenders. Stellen Sie sicher, dass der Kanal-Wählschalter auf CH1 (Position 1, oben) steht, legen Sie 2 x AAA Batterien (nicht inklusive) unter Beachtung der richtigen „+/-“ Polarität in das Batteriefach ein. Schließen Sie das Batteriefach. Schritt 2 Stecken Sie das AC/DC Netzteil in eine Haushalts-Steckdose. Schließen Sie anschließend das Netzteil an die DC-Eingangsbuchse auf der Rückseite der Station an. Stecken Sie den Standfuß an der Unterseite der Station an. Schritt 3 Öffnen Sie das Batteriefach auf der Rückseite der Station. Legen Sie 1 x CR2032 Lithium Batterie (nicht inklusive) mit dem „+“ Pol nach oben in das Batteriefach ein. Schließen Sie das Batteriefach. Schritt 4 Entfernen Sie die Schutzfolie vom Display. Die Wetterstation ist nun betriebsbereit. Die Station empfängt nach wenigen Sekunden die Temperaturdaten des Außensenders. Platzieren Sie diesen nun draußen an einem trockenen und schattigen Ort. BACK-UP BATTERIEN Ist das Netzteil nicht in Gebrauch, erfolgt die Stromversorgung der Station über die Reservebatterien. Die LED-Anzeige wird ausgeschaltet, Uhrzeit und Alarmzeit aber bleiben gespeichert (auch im Falle eines Stromausfalls). DCF FUNKSIGNALEMPFANG UND FUNKEMPFANG-INDIKATOR Nachdem die Station betriebsbereit ist, startet der Funkempfang. Das Empfang des Funksignals Erfolgreicher Funkempfang Fehlgeschlagener Funkempfang ( ( ( Ikon blinkt) Ikon bleibt statisch) Ikon verschwindet) DE.2 Ikon blinkt. Drücken Sie während des Funkempfangs die / WAVE Taste um den Signalstärke-Indikator anzuzeigen: Wird ein starkes Funksignal empfangen, werden 3 Balken angezeigt Wird ein schwaches oder gar kein Funksignal empfangen, wird . oder angezeigt. Während des Funkempfangs wechselt der Signalstärke-Indikator möglicherweise von 1 Balken zu 2 Balken zu 3 Balken. Dies ist zu erwarten da die Station neben dem DCF-Signal auch andere Signale in der Luft erfasst. Ikon zurück zu wechseln. Drücken Sie die SET Taste um zur normalen Zeitanzeige mit dem blinkenden Erfolgreicher oder fehlgeschlagener Funkempfang Ikon hört auf zu blinken wenn der Funkempfang erfolgreich ist. Ikon verschwindet vom Display wenn der Funkempfang fehlgeschlagen ist. Automatischer und manueller Funkempfang Die Station startet automatisch täglich um 1:00, 2:00 und 3:00 Uhr den Funkempfang. Schlägt der Funkempfang um 3:00 Uhr fehl, startet um 4:00 Uhr ein erneuter Empfangsversuch. Schlägt auch dieser Funkempfang fehl, startet um 5:00 Uhr ein erneuter Empfangsversuch. Schlägt auch dieser fehl, startet am nächsten Tag um 1:00 Uhr der Prozess erneut. / WAVE Taste gedrückt, es ertönt ein Piep-Ton Für den manuellen Funkempfang halten Sie die und der Funkempfang startet. Halten Sie erneut die / WAVE Taste gedrückt um den manuellen Funkempfang abzubrechen. Während des Funkempfangs wird die Displayanzeige gedimmt. Nach Funkempfangs erscheint die Anzeige wieder in ihrer ursprünglichen Helligkeit. Beendigung des Während des Funkempfangs sind alle Tasten der Station ohne Funktion, es erfolgt keine Temperaturmessung. Die Temperaturwerte stabilisieren sich und werden genauer, wenn die Station etwa 30 Minuten in Betrieb ist. Dauerhafter Abbruch des Funkempfangs / WAVE und die Taste für 2 Sekunden gedrückt. Es ertönen 2 PiepHalten Sie gleichzeitig die Töne und der Funkempfang ist dauerhaft abgebrochen. Um den Funkempfang wieder fortzusetzen, halten Sie gleichzeitig die / WAVE und die für 2 Sekunden gedrückt. Es ertönen 2 Piep-Töne und der Funkempfang wird fortgesetzt. Taste DIE WETTERVORHERSAGE Die Wetterstation hat ein eingebautes Barometer, welches den Luftdruck misst. Nach der Inbetriebnahme wird zunächst das SONNIG & BEWÖLKT Symbol angezeigt. Die Wetterstation benötigt ca. 24 Stunden um die Änderungen des Luftdrucks zu erfassen und die Wettersituationen für die nächsten 6-12 Stunden vorherzusagen. Die Wettervorhersage wird mit 4 verschiedenen Wettersymbolen dargestellt: Sonnig Sonnig & Bewölkt Bewölkt Regnerisch DE.3 Hinweis: Ein Umplatzieren der Wetterstation innerhalb des Hauses oder im näheren Umkreis verursacht eine plötzliche Änderung der Einstellung der Station und beeinträchtigt die Genauigkeit und Richtigkeit der Wettervorhersage. Nach Inbetriebnahme der Station dauert es etwa 24 Stunden, bis sich die Wettervorhersage stabilisiert hat. Die angezeigtenWettersymbole stellen die voraussichtlichen Wettersituationen der nächsten 6-12 Stunden dar. Sie stimmen daher nicht unbedingt mit der aktuellen Wetterlage überein. ZEITEINSTELLUNG 1. 2. 3. 4. Halten Sie die SET Taste für 2 Sekunden gedrückt, die Stundenziffern blinken. Drücken Sie die oder die Taste um die Stunden einzustellen. Drücken Sie erneut die SET Taste, die Minutenziffern blinken. Drücken Sie die oder die Taste um die Minuten einzustellen. Drücken Sie erneut die SET Taste, die Anzeige :05 blinkt. Drücken Sie die oder die Taste um die gewünschte Dauer der Schlummerzeit von 5 bis 60 Minuten einzustellen. Taste Drücken Sie erneut die SET Taste, die Anzeige 00 blinkt. Drücken Sie die oder die um die Zeitzone einzustellen: “-01” GMT +0 (Vereintes Königreich) “00” GMT +1 (Zentraleuropäische Zeit) “01” GMT +2 (Osteuropäische Zeit) Hinweis: Die Zeitzone kann nur eingestellt werden, wenn die Uhr erfolgreich ein Funksignal empfängt. 5. Drücken Sie erneut die SET Taste um die Einstellungen zu speichern und zur normalen Zeitanzeige zurück zu wechseln. Nach 10 Sekunden ohne weitere Einstellung wechselt die Anzeige automatisch zur normalen Zeitanzeige zurück. Hiweis: Die Uhrzeitanzeige erfolgt im 24-Stunden-Format. ALARMEINSTELLUNG (voreingestellte Alarmzeit ist 6:00) 1. 2. 3. Halten Sie die ALM Taste für 2 Sekunden gedrückt bis auf dem Display das AL Ikon erscheint, Taste um die gewünschten Stunden die Stundenziffern blinken. Drücken Sie die oder die für den Alarm einzustellen. Drücken Sie erneut die ALM Taste, die Minutenziffern blinken. Drücken Sie die oder die Taste um die gewünschten Minuten für den Alarm einzustellen. Drücken Sie erneut die ALM Taste um die Einstellungen zu speichern und zur normalen Zeitanzeige zurück zu wechseln. Nach 10 Sekunden ohne weitere Einstellung wechselt die Anzeige automatisch zur normalen Zeitanzeige zurück. Ein- und Ausschalten des Alarms Drücken Sie während der normalen Zeitanzeige die ALM Taste um den Alarm ein- oder auszuschalten. Ist der Alarm eingeschaltet, erscheint auf dem Display ein AL Ikon über der Uhrzeitanzeige. Hinweis: Die Dauer des Alarms beträgt 2 Minuten. Nutzen der Schlummerfunktion Ist die eingestellte Alarmzeit erreicht, ertönt der Weckalarm. Das AL Ikon blinkt. 1. Drücken Sie die SNOOZE Taste um den Alarm vorübergehend auszuschalten. Das AL Ikon blinkt weiter. Der Alarm ertönt erneut nach der eingestellten Dauer der Schlummerzeit. 2. Um den Alarm endgültig auszuschalten, drücken Sie während des Alarms eine beliebige Taste außer der SNOOZE Taste. Das AL Ikon hört auf zu blinken. Der Alarm ertönt erneut am nächsten Tag zur gleichen Zeit. DE.4 DIMM-FUNKTION Drücken Sie die SNOOZE / DIMMER Taste um die Helligkeit der LED-Anzeige heller oder dunkler einzustellen. FEHLERBEHEBUNG Sollte die Station falsche Werte anzeigen, könnte das an elektrostatischer Ladung oder einer Störung durch andere Geräte liegen. Drücken Sie die RESET Taste auf der Rückseite der Station. Die Uhrzeit- und Kalenderanzeige wird auf die voreingestellten Werte zurückgesetzt, der Funkempfang wird neugestartet. Verlust der Außentemperaturanzeige Wenn die Außentemperaturanzeige “--“ zeigt, ist die Verbindung zum Außensender unterbrochen oder ging verloren. Halten Sie die Taste der Station gedrückt und drücken Sie dann die RESET Taste am Außensender. Kann trotzdem keine Verbindung zum Außensender hergestellt werden, platzieren Sie diesen an anderen Orten bis die Außentemperaturdaten empfangen werden. Hinweis: Beachten Sie, dass die Reichweite des Außensenders nur im absoluten Freifeld (ohne Störquellen) 30 Meter beträgt. Jede Störquelle, die sich zwischen Außensender und Station befindet (Dächer, Mauern, Böden, Decken, dicke Bäume, etc.), verringert die Reichweite des Senders um die Hälfte. SCHUTZ DES GERÄTS Setzen Sie das Gerät nicht hohen Temperaturen, Wasser oder direktem Sonnenlicht aus. Vermeiden Sie den Kontakt mit ätzenden Materialien. Setzen Sie das Gerät nicht übermäßigen Kräften, Trockenheit oder Feuchtigkeit aus. Öffnen Sie nicht das Gehäuse und manipullieren Sie nicht bauliche Bestandteile des Geräts. TECHNISCHE DATEN Betriebstemperatur: Temperaturmessbereiche: Innen: 0°C bis +45°C Temperaturauflösung: 0°C bis +50°C (außerhalb dieses Bereichs wird HH.H / LL.L angezeigt) -50°C bis +70°C (außerhalb dieses Bereichs wird HH.H / LL.L angezeigt) 1°C Dauer des Alarms: Dauer der Schlummerzeit: 2 Minuten 5 bis 60 Minuten Außen: HAFTUNGSAUSSCHLUSS: Elektrischer und elektronischer Abfall enthält gefährliche Substanzen. Entsorgung von solchem Abfall in der freien Natur oder auf nicht autorisierten Deponien zerstört die Umwelt in hohem Maße. Bitte kontaktieren Sie Ihre lokalen oder regionalen Verwaltungsstellen zum Erhalt der Adressen autorisierter Deponien oder Wertstoffhöfe mit selektiver Abfalltrennung. Alle elektronischen Geräte und Instrumente müssen ab sofort dem Recycling zugeführt werden. Der Anwender wird gebeten, sich aktiv an Sammlung, Recycling und Wiederverwendung von elektrischem und elektronischem Abfall zu beteiligen. Die unkontrollierte Entsorgung von solchem Abfall schädigt die öffentliche Gesundheit und die Qualität der Umwelt. Eine Entsorgung mit dem generellen Restmüll ist strikt untersagt. Wie auf der Verpackung und auf dem Produkt vermerkt, ist es dem Benutzer zum eigenen Nutzen im höchsten Maße empfohlen, die Betriebsanleitung aufmerksam zu lesen. DE.5 Der Hersteller oder Lieferant übernimmt keine Verantwortung für ungenaue Anzeigen oder Konsequenzen, die auf ungenauen Anzeigen beruhen sollten. Dieses Produkt wurde nur für den Hausgebrauch und nur als Indikator von Temperatur und Luftfeuchtigkeit entwickelt. Dieses Produkt darf nicht für medizinische Zwecke oder für die Information der Öffentlichkeit verwendet werden. Die technischen Daten dieses Produkt können ohne vorherige Benachrichtigung geändert werden. Dieses Produkt ist kein Spielzeug. Bitte außerhalb des Zugriffs von Kindern verwenden und aufbewahren. Kein Teil dieser Betriebsanleitung darf ohne ausdrückliche schriftliche Genehmigung des Herstellers reproduziert werden. Hinweispflicht nach dem Batteriegesetz Altbatterien gehören nicht in den Hausmüll. Wenn Batterien in die Umwelt gelangen, können diese Umwelt- und Gesundheitsschäden zur Folge haben. Sie können gebrauchte Batterien unentgeltlich bei ihrem Händler und Sammelstellen zurückgeben. Sie sind als Verbraucher zur Rückgabe von Altbatterien gesetzlich verpflichtet! DE.6 WS6825 - INSTRUCTION MANUAL LED WEATHER STATION WITH RADIO CONTROLLED CLOCK AND ALARM EN.1 ENVIRONMENTAL RECEPTION EFFECTS The weather station obtains the accurate time with wireless technology. Same as all wireless devices, the reception is maybe affected by the following circumstances: Long transmitting distance Nearby mountains and valleys Among tall buildings Near freeway, railway, airports, high voltage cable etc. Near construction site Inside concrete buildings Near electrical appliances (computers, TV’s, etc) Inside moving vehicles Near metallic structures Place the station at a location with optimal signal, i.e. close to a window and away from metal surfaces or electrical appliances. QUICK SETUP Step 1 Keep the station and outdoor sensor next to each other. Slide open the battery cover at the back of the outdoor sensor. Make sure the channel selector is set at position 1 (top position), then insert 2 x AAA batteries (not included) into the outdoor sensor by observing the correct “+/-“ polarity signs inside the battery compartment. Replace the battery door. Step 2 Insert the AC/DC adaptor to any 230V AC household outlet. Then insert the DC jack to the back case of the station. Insert the stand to the bottom of the weather station. Step 3 Slide open the battery cover at the back of the station, then insert 1 x CR2032 Lithium battery (not included) to the battery compartment. Make sure “+” polarity of the battery is facing up. Then replace the battery cover. Step 4 Peel off the protective label on the front. The weather station is ready to work for you. The station will receive data signal from the outdoor sensor in few seconds. Then place the outdoor sensor in a dry and shaded area outdoor. BACK-UP BATTERIES When the power supply is not in use, the station will be powered by the back-up batteries. The LED display is turned off, but time and alarm time remain stored (also in the event of a power failure). DCF SIGNAL RECEPTION AND SIGNAL INDICATOR After the station is powered up, it starts to receive DCF signal. The Receiving DCF signal Successful reception Failed reception ( ( ( icon flashes. icon flashing) icon becomes static) icon disappear) During reception, press the / WAVE button will display reception mode and signal strength indication: When strong DCF signal is detected, display shows with 3 bars . When weak or no DCF signal is detected, display shows or . EN.2 During reception, the signal strength may move from 1 bar to 2 bars to 3 bars. This is normal since the clock is detecting DCF signal and other signals in the air at the same time. Press the SET button will return to the time display with icon flashing. Successful reception or failed reception Icon becomes static on (stop blinking) when reception is successful. Icon disappears when reception is failed. Automatic reception and manual reception The station starts automatic reception everyday at 1:00, 2:00, and 3:00. If it fails to receive the DCF signal at 3:00, it will start reception at 4:00. If it fails again, it will start reception at 5:00. If it fails again, it will start automatic reception at 1:00 again in the next day. For manual reception simply press and hold the and starts manual reception. Press and hold the / WAVE button, the station will gives a short beep / WAVE button to stop DCF reception. When the weather station is receiving the radio controlled time signal, the display will turn dimmer. It will resume to the brightness level which you originally selected after the radio controlled time reception is completed. During DCF reception all buttons do not function and it does not take temperature measurement. The temperature readings will get stable and become more accurate after the station clock is powered up for around 30 minutes. To cancel DCF reception permanently Press and hold the / WAVE and the button at the same time for 2 seconds, the station will give 2 short beeps and the radio controlled function is permanently disabled. / WAVE and the button at the To resume the radio controlled function, press and hold the same time for 2 seconds, the station will give 2 short beeps and will start DCF reception immediately. THE WEATHER FORECAST The weather station has a built-in barometer which measures the barometric pressure. After power up, the display shows SUNNY & CLOUDY icon. The weather station takes around 24 hours to gather data of barometric pressure changes and predicts next 6-12 hours weather conditions. There are four types of weather display in the weather station: Sunny Sunny & Cloudy Cloudy Rainy Note: Moving the weather station within the house or in the vicinity will causing a sudden change in the attitude of the station and it affects the accuracy and correctness of the weather forecast. After the weather station is powered up, it will take around 24 hours to get stable. The weather icons on the display give a reference to the next 6-12 hours weather conditions. It may not match with the current weather condition outside. EN.3 TIME SETTING 1. 2. 3. 4. button to Press and hold the SET button for 2 seconds, hour digits flash. Press the or the set the hours. Then press the SET button again, the minute digits flash. Press the or the button to set the minutes. Then press the SET button again, display shows :05 and flash. Press the or the button to set snooze duration from 5 minutes to 60 minutes. Then press the SET button again, display shows 00 and flash. Press the or the button to set the time zone: “-01” GMT +0 (United Kingdom) “00” GMT +1 (Central Europaen time) “01” GMT +2 (Eastern Europaen time) Note: Time zone can only set when the clock successfully receives a radio signal. 5. Press the SET button again to store the settings and return to normal time display. The clock will return to normal mode in around 10 seconds if no further press of any other buttons. Note: The time is displayed in 24-hour display format. ALARM SETTING (default alarm setting is 6:00 AM) 1. 2. 3. Press and hold the ALM button until the AL icon appears on the display, the hour digits flash. Press the or the button to set the desired alarm hours. Press the ALM button again, the minute digits flash. Press the or the button to set the desired alarm minutes. Press the ALM button again to store the alarm settings and return to normal time display. The clock will return to normal mode in around 10 seconds if no further press of any other buttons. To turn on or off the alarm Single press the ALM button during normal time display to turn on or off the alarm. When the alarm function is turned on the AL icon appears on top of the time digits. Note: Alarm duration is 2 minutes. To use the snooze function When time reaches the set alarm time, the station will give a beep sound to wake you up. The AL icon will flash. 1. Press SNOOZE once to stop the alarm temporarily, AL icon keeps flashing. The alarm will beep again after the set snooze duration. 2. To stop the daily alarm, press any button except the SNOOZE button when alarm is beeping. The alarm will stop and AL icon becomes static. The Alarm will beep again same time next day. DIMMER FUNCTION Press the SNOOZE / DIMMER button to adjust high or low brightness of the LED display. TROUBLE SHOOTING In case the station shows false digits, it maybe affected by electrostatic discharge or interferences from other devices. Press the RESET button on the back of the station. The station will be reset to default setting of time and calendar and it will start to receive radio controlled time signal again. EN.4 If you lose the outdoor temperature When the outdoor temperature digits show “--“, the wireless transmission is either interrupted or lost. button of the station, then press the RESET button located on the back of the Press and hold the outdoor transmitter. If you continue to lose the outdoor temperature display, try placing the transmitter in a different location until you have smooth transmission of temperature data. Note: Keep in mind that the outdoor transmitter only has a 30 meter transmission range in open area with no obstructions. Each obstruction between the transmitter and the station (roof, walls, floors, ceilings, thick trees, etc.) will effectively cut the transmission range in half. CARE OF THIS ITEM Do not expose the unit to extreme temperature, water or direct sunlight. Avoid contact with any corrosive materials. Do not subject the unit to excessive force, dust or humidity. Do not open the inner back case or tamper with any components of this unit. SPECIFICATIONS Operation temperature: 0°C to +45°C Temperature measuring range: Indoor: 0°C to +50°C (display shows HH.H / LL.L if out of this range) Outdoor: -50°C to +70°C (display shows HH.H / LL.L if out of this range) Temperature resolution: 1°C Alarm duration: Snooze duration: 2 minutes 5 to 60 minutes LIABILITY DISCLAIMER The electrical and electronic wastes contain hazardous substances. Disposal of electronic waste in wild country and/or in unauthorized grounds strongly damages the environment. Please contact your local or/and regional authorities to retrieve the addresses of legal dumping grounds with selective collection. All electronic instruments must from now on be recycled. User shall take an active part in the reuse, recycling and recovery of the electrical and electronic waste. The unrestricted disposal of electronic waste may do harm on public health and the quality of environment. As stated on the gift box and labeled on the product, reading the “User manual” is highly recommended for the benefit of the user. This product must however not be thrown in general rubbish collection points. The manufacturer and supplier cannot accept any responsibility for any incorrect readings and any consequences that occur should an inaccurate reading take place. This product is designed for use in the home only as indication of the temperature. This product is not to be used for medical purposes or for public information. The specifications of this product may change without prior notice. This product is not a toy. Keep out of the reach of children. No part of this manual may be reproduced without written authorization of the manufacturer. EN.5 Consideration of duty according to the battery law Old batteries do not belong to domestic waste because they could cause damages of health and environment. End-users are committed by law to bring back needed batteries to distributors and other collecting points! EN.6 WS6825 – MANUEL D'INSTRUCTIONS STATION MÉTÉOROLOGIQUE RADIO-PILOTÉE À LED AVEC RÉVEIL FR. 1 QUALITÉ DE LA RÉCEPTION La station météorologique utilise la technologie de transmission sans fil pour récupérer le signal DCF et ajuster l'heure en conséquence. Comme pour tout appareil de communication sans fil, la qualité de cette réception se dégrade dans les circonstances suivantes : Longue distance de transmission, Montagnes et vallées proches, Au milieu de hauts bâtiments, Près d'une autoroute, d'un chemin de fer, d'un aéroport, d'une ligne à haute tension, etc. Près d'un chantier de construction, À l'intérieur d'un bâtiment en béton, À proximité d'un appareil électrique (ordinateur, téléviseur, etc.), À l'intérieur d'un véhicule en déplacement, À proximité d'une structure métallique. Placez la station à un endroit adapté pour une bonne réception du signal DCF, en l'occurrence près d'une fenêtre et loin de toute surface métallique et de tout appareil électrique. RÉGLAGE RAPIDE Étape 1 Placez la station juste à côté de son émetteur de température extérieure. Retournez l’émetteur et ouvrez le compartiment des piles. Vérifiez que le sélecteur de canal est réglé sur la position 1 (tout en haut), et insérez 2 piles AAA LR03 (non fournies), en respectant le sens des polarités "+/-" indiquées à l'intérieur du compartiment. Refermez le compartiment des piles. Étape 2 Branchez l'adaptateur AC/DC sur une prise secteur 230 V. Branchez l'extrémité DC de l'adaptateur sur le connecteur d'alimentation situé à l'arrière de la station. Fixez le pied au bas de la station météorologique. Étape 3 Retournez la station, ouvrez le compartiment de la pile et placez-y 1 pile au lithium CR2032 (non fournie). Respectez le sens des polarités "+/-" indiquées à l'intérieur du compartiment. Refermez le compartiment de la pile. Étape 4 Retirez le film protecteur sur le devant. La station météorologique est prête à fonctionner. Attendez quelques secondes que la station reçoive le signal de données de son émetteur extérieur. Placez ensuite l’émetteur à l'extérieur, dans un endroit sec et ombragé. RÉCEPTION DU SIGNAL DCF ET INDICATEUR DE SIGNAL Dès que vous allumez votre station météorologique, celle-ci se place en mode de réception du signal DCF. L'icône clignote. Réception du signal radio en cours ( l'icône clignote) Signal reçu ( l'icône reste allumée) Le signal n'a pas été reçu ( l'icône s'éteint) Pendant la réception, appuyez sur la touche / WAVE pour afficher le mode de réception et la force du signal. 3 barres indiquent que le signal radio est fort. ou Lorsque le signal est faible ou est absent, l'écran affiche FR. 2 Pendant la réception, la force du signal peut passer de 1 barre à 2 ou 3 barres. Ceci est normal car l'horloge détecte d'autres signaux en même temps que son signal radio. Appuyez sur la touche SET pour revenir à l'affichage de l'heure actuelle. L'icône clignote sur l'écran. Détection et non détection du signal radio L'icône reste allumée sur l'écran (elle s'arrête de clignoter) lorsque le signal DCF a été détecté. L'icône s'éteint complètement lorsque le signal DCF n'a pas été détecté. Réception automatique ou manuelle La station est programmée pour se synchroniser automatiquement sur l'émetteur à 1:00, 2:00 et 3:00. Si elle ne détecte aucun signal à 3:00, elle effectue une nouvelle tentative de synchronisation à 4:00 puis à 5:00 si cette tentative échoue également. En cas de nouvel échec, le cycle de synchronisation reprendra normalement le lendemain à 1:00. Pour procéder à une synchronisation radio à un autre moment, appuyez sur la touche / WAVE et maintenez-la enfoncée jusqu'à ce que la station émette un bip. La détection du signal radio est maintenant activée. Pour désactiver la réception du signal radio, appuyez sur la touche / WAVE et maintenez-la enfoncée. L'intensité lumineuse de l'écran s'atténue sensiblement pendant que la station météo reçoit le signal DCF. Elle revient au niveau que vous lui aviez sélectionné dès que la synchronisation horaire est terminée. Lorsque la station recherche le signal, toutes les touches de la station sont désactivées et la température n'est pas mesurée. Comptez environ 30 minutes après la mise sous tension de la station pour stabiliser les lectures de la température et obtenir des relevés plus exacts. Désactivation de la réception du signal DCF Appuyez en même temps sur les touches / WAVE et et maintenez-les enfoncées pendant 2 secondes. La station émet 2 bips, indiquant que la recherche du signal DCF est désactivée. / WAVE et et maintenez-les Pour la réactiver, appuyez en même temps sur les touches enfoncées pendant 2 secondes. La station émet 2 bips, indiquant que la recherche du signal DCF a été réactivée. PREVISIONS METEOROLOGIQUES La prévision météo est affichée avec 4 icônes météo différentes : ENSOLEILLÉ ENSOLEILLÉ, PARTIELLEMENT NUAGEUX FR. 3 NUAGEUX PLUVIEUX Remarque: Déplacer la station météorologique à l'intérieur de la maison ou au voisinage de la maison provoque un changement soudain dans le comportement de la station et affecte l'exactitude des prévisions météorologiques. Après la mise en route de votre appareil, comptez 24 heures avant de pouvoir obtenir des informations fiables. Les prévisions météorologiques affichées valent pour les 6-12 heures à venir. Elles peuvent donc ne pas correspondre aux conditions atmosphériques actuelles. RÉGLAGE DE L'HEURE 1. 2. 3. 4. Appuyez sur la touche SET et maintenez-la enfoncée pendant 2 secondes, jusqu'à ce que les quatre chiffres de l'horloge clignotent. Ajustez les chiffres des heures à l'aide des touches et . Réappuyez sur la touche SET pour passer au réglage suivant. Les chiffres des minutes clignotent. Ajustez les chiffres des minutes à l'aide des touches et . Réappuyez sur la touche SET. L'écran affiche :05 et clignote. Ajustez le délai de rappel du réveil (SNOOZE) à l'aide des touches et (une valeur entre 5 et 60 minutes). Réappuyez sur la touche SET. L'écran affiche 00 et clignote. Ajustez le fuseau horaire à l'aide et : des touche “-01” GMT +0 (Royaume-Uni) “00” GMT +1 (Heure de l’Europe centrale) “01” GMT +2 (Heure de l’Europe de l’est) Remarque: Ce réglage n'est possible que lorsque l'horloge est synchronisée avec le signal DCF. 5. Réappuyez sur la touche SET pour valider vos modifications et revenir à l'affichage principal. Si vous n'appuyez sur aucune touche durant 10 secondes, l’appareil reviendra à l’affichage principal. Remarque: L'heure est affichée au format 24 heures. RÉGLAGE DU RÉVEIL (par défaut, l'heure de réveil est réglée sur 6:00) 1. 2. 3. Appuyez sur la touche ALM et maintenez-la enfoncée jusqu'à ce que l'icône AL s'allume sur l'écran. Les chiffres des heures clignotent. Ajustez les chiffres des heures à l'aide des touches et . Réappuyez sur la touche ALM pour passer au réglage suivant. Les chiffres des minutes clignotent. Ajustez les chiffres des minutes à l'aide des touches et . Réappuyez sur la touche ALM pour valider vos modifications et revenir à l'affichage normal de l'heure actuelle. Si vous n'appuyez sur aucune touche durant 10 secondes, l’appareil reviendra à l’affichage principal. FR. 4 Activation/désactivation du réveil A partir de l’affichage principal, appuyez une fois sur la touche ALM pour activer ou désactiver le réveil. Lorsque le réveil est activé, l'icône AL reste allumée juste au-dessus des chiffres de l'horloge. Fonction rappel du réveil Lorsque l'heure de réveil que vous avez choisie est arrivée, la station diffuse une sonnerie pour vous réveiller. L'icône AL se met à clignoter. 1. Appuyez une fois sur SNOOZE pour arrêter momentanément la sonnerie. L'icône AL continue de clignoter. La sonnerie retentira à nouveau une fois que le délai de rappel aura expiré. 2. Pour arrêter définitivement la sonnerie pour la journée, appuyez sur n'importe quelle touche autre que SNOOZE lorsque vous entendez la sonnerie. La sonnerie s'arrête et l'icône AL reste allumée. Elle retentira à nouveau le lendemain, à la même heure. Remarque: La sonnerie de réveil retentit pendant 2 minutes. RÉGLAGE DE LA LUMINOSITÉ DE L'ÉCRAN Vous pouvez ajuster la luminosité de l'écran LED à l'aide de la touche SNOOZE / DIMMER. GUIDE DE DÉPANNAGE Si la station affiche des chiffres qui vous semblent erronés, probablement qu'elle a été affectée par des décharges électrostatiques ou par des interférences causées par d'autres appareils. Réinitialisez-la en appuyant sur la touche RESET située à l'arrière de la station. Cette opération rétablit tous les réglages effectués en usine concernant l'horloge et le calendrier, et démarre la synchronisation avec le signal DCF. La température extérieure n'est plus affichée sur l'écran Si vous apercevez le symbole "--" à la place de la température extérieure, probablement que la communication sans fil a été interrompue ou coupée. Appuyez sur la touche de la station, maintenez-la enfoncée et appuyez sur la touche RESET située à l'arrière de l’émetteur extérieur. Si le problème persiste, déplacez l’émetteur jusqu'à récupérer l'affichage de la température extérieure sur l'écran. Remarque: N'oubliez pas que la portée de transmission de l’émetteur extérieur est limitée à 30 mètres en terrain découvert, sans obstacle. Tout obstacle situé entre l'émetteur et la station (toit, mur, plancher, plafond, gros arbre, etc.) divise la portée de transmission par deux. PRÉCAUTIONS 1. 2. 3. 4. N'exposez pas votre station à des températures très élevées, à tout contact avec de l'eau et aux rayons directs du soleil. Évitez tout contact avec des matériaux corrosifs. N'exposez pas votre station à une force, des poussières ou une humidité excessive. N'ouvrez pas le coffret de la station et n'altérez aucun de ses composants. SPÉCIFICATIONS Température de fonctionnement: 0°C à 45°C Plage de mesure de la température: Intérieure : -10°C à +50°C (+14°F à +122°F) (en-deçà et au-delà de ces limites, l'écran affiche HH.H / LL.L) Extérieure : -50°C à +70°C (-58°F à +158°F) (en-deçà et au-delà de ces limites, l'écran affiche HH.H / LL.L) Résolution : 1°C FR. 5 Durée de la sonnerie de réveil: Plage du délai de rappel de l’alarme : 2 minutes 5 à 60 minutes INFORMATIONS DU CONSOMMATEUR • Les déchets électriques et électroniques contiennent des substances dangereuses. La décharge sauvage ou en milieu non autorisé des déchets électroniques provoque de sérieux dommages à notre environnement. • Veuillez contacter les autorités locales pour connaître les adresses des centres de collecte ou de tri agréés. • Désormais, tous les appareil électroniques doivent être recyclés. L'utilisateur doit participer activement à la réutilisation, le recyclage et la récupération des déchets électriques et électroniques. • La mise au rebut non réglementée des déchets électroniques peuvent nuire à la santé publique et à la qualité de notre environnement. • Comme indiqué sur l'emballage et sur le produit, nous vous conseillons vivement de lire le manuel d'instructions, ceci dans votre intérêt. Il est rappelé que ce produit ne doit pas être jeté avec les ordures ménagères. • Ni le fabricant ni le fournisseur ne peut être tenu responsable d'éventuels relevés incorrects et des conséquences qui pourraient en découler. • Ce produit est conçu pour une utilisation domestique uniquement et comme indicateur de la température. • Ce produit ne doit pas être utilisé à des fins médicales ou à titre d'information du public. • Les caractéristiques de ce produit peuvent être modifiées sans préavis. • Ce produit n'est pas un jouet. Tenez-le hors de la portée des enfants. • Aucune partie de ce manuel ne peut être reproduite sans l'autorisation préalable et écrite du fabricant. REGLEMENTATION LIEE AU RECYCLAGE DES PILES Les piles usagées ne doivent pas être déposées avec vos ordures ménagères au risque de provoquer des dommages importants à l’environnement ou/et à la santé d'autrui. Rapportez les piles usagées auprès du point de vente ou d’un centre de collecte agréé. FR. 6 WS6825 - MANUALE DI ISTRUZIONI STAZIONE METEOROLÓGICA A LED CON OROLOGIO E SVEGLIA RADIO CONTROLLATO IT.1 EFFETTI RICEZIONE AMBIENTALE La stazione meteorológica ottiene l'orario preciso con tecnologia wireless. Come per tutti i dispositivo wireless, la ricezione può essere influenzata dalle seguenti circostanze: Lunga distanza di trasmissione Prossimità di montagne e valli Tra edifici alti In prossimità di autostrada, stazione, aeroporti, cavi di alta tensione ecc. In prossimità di cantieri All'interno di edifici in cemento In prossimità di apparecchiature elettriche (computer, TV, ecc.) All'interno di veicoli in movimento In prossimità di strutture metalliche Porre la stazione in una posizione con segnale ottimale, ad es. vicino a una finestra e lontano da superfici in metallo o apparecchiature elettriche. CONFIGURAZIONE RAPIDA Fase 1 Tenere la stazione e il sensore esterno l'uno accanto all'altro. Aprire il coperchio del vano batteria sul retro del sensore esterno. Assicurarsi che il selettore del canale sia impostato nella posizione 1 (posizione superiore), quindi inserire 2 x batterie AAA (non incluse) nel sensore esterno osservando i segno della corretta polarità “+/-” all'interno del vano batteria. Riposizionare il coperchio del vano batteria. Fase 2 Inserire l'adattatore CA/CC in qualsiasi presa domestica a 230V CA. Quindi inserire il jack CC sul retro della stazione. Inserire il supporto nella parte bassa della stazione meteo. Fase 3 Aprire il coperchio del vano batteria sul retro della stazione, quindi inserire 1 x batteria al litio CR2032 (non inclusa) nel vano batteria. Assicurarsi che la polarità “+” della batteria sia rivolta verso l'alto. Quindi riposizionare il coperchio del vano batteria. Fase 4 Rimuovere la pellicola protettiva dal display. La stazione meteo è ora operativo. La stazione riceverà il segnale dati dal sensore esterno in pochi secondi. Quindi posizionare il sensore esterno in un area asciutta e all'ombra. BATTERIE DI RISERVA Quando l’alimentatore non è in uso, la stazione sarà alimentata da batterie di riserva. Il display a LED è spento, ma l'orario e l'ora della sveglia restano memorizzati (anche in caso di mancanza di corrente). RICEZIONE SEGNALE DCF E INDICATORE SEGNALE Dopo aver acceso la stazione, essa inizia a ricevere il segnale DCF. L'icona Ricezione segnale DCF Ricezione avvenuta con successo Ricezione fallita (L'icona (L'icona (L'icona lampeggia) diventa fissa) scompare) IT.2 lampeggia. Durante la ricezione, premere il pulsante / WAVE per visualizzare l'indicazione della modalità di ricezione e la potenza di segnale: Se è rilevato un segnale DCF forte, il display mostra 3 barrette . Se è rilevato un segnale DCF debole o assente, il display mostra o . Durante la ricezione, la potenza di segnale può passare da 1 barretta a 2 barrette a 3 barrette. Ciò è normale in quanto l'orologio sta rilevando un segnale DCF e altri segnali nell'aria allo stesso tempo. Premendo il pulsante SET si ritornerà alla visualizzazione dell'orario con l'icona che lampeggia. Ricezione avvenuta con successo o ricezione fallita L'icona diventa fissa accesa (smette di lampeggiare) quando la ricezione avviene con successo L'icona scompare quando la ricezione è fallita Ricezione automatica e ricezione manuale La stazione avvia la ricezione automatica ogni giorno all'1:00, 2:00 e 3:00. Se la ricezione del segnale DCF alle 3:00 fallisce, essa sarà riprovata alle 4:00. Se la ricezione fallisce nuovamente, essa sarà riavviata alle 5:00. Se essa fallisce nuovamente, essa sarà riavviata automaticamente all'1:00 del giorno successivo. Per la ricezione manuale basta semplicemente premere e tenere premuto il pulsante / WAVE ,la stazione emetterà un breve beet e avvierà la ricezione manuale. Premere e tenere premuto il pulsante / WAVE per sospendere la ricezione DCF. Se la stazione meteo sta ricevendo il segnale orario radiocontrollato, il display si oscurerà gradualmente. Riprenderà il livello di luminosità originariamente selezionato dopo il completamento della ricezione radiocontrollata dell’orario. Durante la ricezione DCF tutti i pulsanti non funzionano e non viene effettuata la misurazione della temperatura. Le letture della temperatura saranno ottenute in modo stabile e diventano più precise dopo che l'orologio della stazione è acceso per circa 30 minuti. Per cancellare la ricezione DCF in modo permanente Premere e tenere premuto il pulsante / WAVE e il pulsante contemporaneamente per 2 secondi, la stazione emetterà 2 beep brevi e la funzione radiocontrollata sarà disabilitata in modo permanente. / WAVE e il Per riprendere la funzione radiocontrollata, premere e tenere premuto il pulsante pulsante contemporaneamente per 2 secondi, la stazione emetterà 2 beep brevi e riprenderà immediatamente la ricezione DCF. PREVISIONI METEO La stazione meteo integra un barometro che misura la pressione atmosferica. Dopo l’accensione, il display mostra le icone SOLEGGIATO & NUVOLOSO. La stazione meteo a LED impiega circa 24 ore per raccogliere i dati delle variazioni nella pressione atmosferica ed è in grado di fare previsioni sulle condizioni meteo delle successive 6-12 ore. Le previsioni del tempo viene rappresentato con 4 icone meteorologiche diverse: Soleggiato Soleggiato & Nuvoloso Nuvoloso Piovoso IT.3 Nota: Spostando la stazione meteo nella casa o nelle vicinanze causerà l'improvviso cambiamento del comportamento della stazione e ciò influenzerà la precisione e la correttezza della previsione meteo. Dopo aver acceso la stazione meteo, essa impiegherà circa 24 ore per diventare stabile. Le icone meteo sul display fanno riferimento alle condizioni meteo delle 6-12 ore successive. Ciò può non corrispondere alle condizioni meteo esterne attuali. IMPOSTAZIONE ORARIO 1. 2. 3. 4. Premere e tenere premuto il pulsante SET per 2 secondi, le cifre dell'ora lampeggiano. Premere per impostare le ore. il pulsante o Quindi premere nuovamente il pulsante SET, le cifre dei minuti lampeggiano. Premere il pulsante o per impostare i minuti. Quindi premere nuovamente il pulsante SET, il display mostra :05 e lampeggia. Premere il pulsante o per impostare la durata della funzione snooze da 5 a 60 minuti. Quindi premere nuovamente il pulsante SET, il display mostra 00 e lampeggia. Premere il per impostare il fuso orario: pulsante o “-01” GMT +0 (Regno Unito) “00” GMT +1 (Ora dell’Europa Centrale) “01” GMT +2 (Ora dell’Europa Orientale) Nota: Il fuso orario può essere impostato quando l'orologio riceve con successo un segnale radio. 5. Premere il pulsante SET nuovamenteper salvare le impostazioni e ritornare alla visualizzazione normale dell'orario. L'orologio ritorna alla modalità normale in circa 10 secondi se non si preme nessun altro pulsante. Nota: L'orario è visualizzato in formato 24 ore. IMPOSTAZIONE SVEGLIA (impostazione sveglia predefinita è 6:00) 1. 2. 3. Premere e tenere premuto il pulsante ALM finché l'icona AL appare sul display, le cifre dell'ora lampeggiano. Premere il pulsante o per impostare le ore desiderate per la sveglia. Premere nuovamente il pulsante ALM, le cifre dei minuti lampeggiano. Premere il pulsante o per impostare i minuti desiderati per la sveglia. Premere nuovamente il pulsante ALM per salvare le impostazioni e ritornare alla visualizzazione normale dell'orario. L'orologio ritornerà alla modalità normale in circa 10 secondi se non è premuto nessun altro pulsante. Spegnere o accendere la sveglia La singola pressione del pulsante ALM durante la visualizzazione dell'orario normale accende o spegne la sveglia. Quando la funzione sveglia è attiva, l'icona AL appare sulla parte delle cifre dell'orario. Nota: La durata della sveglia è di 2 minuti. Per utilizzare la funzione snooze Quando l'orario raggiunge l'orario impostato per la sveglia, la stazione emette un beep per svegliarti. L'icona AL lampeggia. 1. Premere SNOOZE una volta per interrompere temporaneamente la sveglia, l'icona AL lampeggia. La sveglia emetterà un altro beep dopo l'impostazione della durata della funzione snooze. 2. Per interrompere la sveglia quotidiana, premere qualsiasi pulsante eccetto il pulsante SNOOZE mentre la sveglia sta emettendo un segnale. L'allarme si interrompe e l'icona AL diventa fissa. La sveglia suonerà nuovamente alla stessa ora del giorno successivo. IT.4 FUNZIONE OSCURATORE GRADUALE Premere il pulsante SNOOZE / DIMMER per regolare la luminosità alta o bassa del display LED. RISOLUZIONE DEI PROBLEMI Nel caso in cui la stazione mostri dei numeri errati, ciò potrebbe essere influenzato da interferenze o scariche elettrostatiche provenienti da altri dispositivi. Premere il pulsante RESETsul retro della stazione. La stazione sarà ripristinata alle impostazioni predefinite di orario e calendario e sarà nuovamente avviata per ricevere segnale orario radiocontrollato. Se si perde la temperatura esterna Quando i numeri della temperatura esterna mostrano “--“, la trasmissione wireless è interrotta o persa. Premere e tenere premuto il pulsante della stazione, quindi premere il pulsante RESET posto sul retro del trasmettitore esterno. Se si continua a perdere la visualizzazione della temperatura esterna, cercare di porre il trasmettitore in una posizione diversa finché non si ottiene una trasmissione corretta dei dati della temperatura. Nota: Ricordarsi che il trasmettitore esterno ha un raggio di trasmissione di soli 30 metri in area aperta senza ostruzioni. Ogni ostruzione tra il trasmettitore e la stazione (tetto, pareti, pavimenti, soffitti, alberi spessi ecc.) ridurrà il raggio di trasmissione della metà. FAR ATTENZIONE A QUANTO SEGUE Non esporre l'unità a temperature estreme, acqua o raggi solari diretti. Evitare il contatto con qualsiasi materiale corrosivo. Non sottoporre l'unità a forza eccessiva, polvere o umidità. Non aprire l'alloggiamento posteriore interno o alterare componenti di questa unità. SPECIFICHE TECNICHE Temperatura di funzionamento: 0°C à +45°C Intervallo di misurazione della temperatura: Interna: 0°C à +50°C (il display mostra HH.H / LL.L se fuori dall'intervallo) Esterna: -50°C à +70°C (il display mostra HH.H / LL.L se fuori dall'intervallo) Risoluzione temperatura: 1°C Durata sveglia: Durata de alarme ritardo: 2 minuti 5 a 60 minuti IT.5 LIMITAZIONE DI RESPONSABILITÀ I rifiuti derivanti da apparecchi elettrici o elettronici contengono sostanze nocive. L'eliminazione dei rifiuti di apparecchi elettronici in aperta campagna e/o su terreni non adibiti all'eliminazione, danneggia l'ambiente in maniera considerevole. Contattare le autorità locali e/o regionali per ottenere l'esatta ubicazione dei terreni adibiti all'eliminazione delle scorie con raccolta selezionata. Tutti gli strumenti elettronici sono oggigiorno riciclabili. Gli utenti devono essere parte attiva nell'uso continuo, nel riciclaggio e nel recupero delle scorie elettriche ed elettroniche. L'eliminazione sconsiderata delle scorie elettroniche può essere nociva alla salute pubblica e alla qualità dell'ambiente. Come indicato sull'imballaggio del prodotto, si raccomanda di leggere il "Manuale delle istruzioni ", per sfruttare meglio le caratteristiche dell'apparecchio da parte dell'utente. Questo prodotto non deve, ad ogni modo, essere eliminato in un comune punto di raccolta di scorie generali. Il fabbricante o il fornitore non accetta alcuna responsabilità per qualsiasi conseguenza dovuta ad una lettura scorretta dell'apparecchio. Questo prodotto è stato concepito solamente per uso domestico come indicatore della temperatura. Questo prodotto non deve essere usato per scopi medici o per divulgare informazioni pubbliche. Le specifiche tecniche di questo prodotto possono variare senza preavviso. Questo prodotto non è un giocattolo. Tenere fuori della portata dei bambini. Non si può riprodurre questo manuale, interamente o parzialmente, senza il previo consenso scritto del fabbricante. Obbligo di avviso secondo la legge sulle batterie Le batterie esaurite non devono essere considerate rifiuti domestici. Le batterie smaltite nell’ambiente possono causare danni all’ambiente e alla salute. È possibile restituire gratuitamente le batterie usate al proprio rivenditore e consegnarle ai centri di raccolta. Il consumatore è tenuto per legge alla restituzione delle batterie scariche! IT.6 WS6825 – MANUAL DE INSTRUCCIONES ESTACION METEOROLÓGICA POR LED CON RELOJ RADIO-CONTROLADO Y ALARMA ES.1 EFECTOS AMBIENTALES EN LA RECEPCIÓN La estacion meteorológica obtiene la hora exacta con tecnología inalámbrica. Al igual que todos los dispositivos inalámbricos, las recepción puede verse afectada por las siguientes circunstancias: Largas distancias de transmisión Proximidad de montañas y valles Encontrarse entre edificios altos Proximidad de autopistas, vías de tren, aeropuertos, cables de alta tensión, etc. Proximidad de edificios en construcción En el interior de edificios de hormigón Proximidad de aparatos eléctricos (PCs, TVs, etc.) En el interior de vehículos en movimiento Proximidad de estructuras metálicas Coloque la estación en una posición donde obtenga una señal óptima, p.ej. cerca de una ventana y lejos de superficies metálicas o aparatos eléctricos. CONFIGURACIÓN RÁPIDA Paso 1 Mantenga la estación y el sensor de exteriores uno cerca del otro. Deslice la tapa de las pilas situada en la parte trasera del sensor de exteriores para abrirla. Cerciórese que el selector de canal está en la posición 1 (posición de arriba), y entonces coloque 2 pilas AAA (no incluidas) en el sensor de exteriores haciendo corresponder los signos de la polaridad “+/-“ correctos en el interior del compartimiento. Vuelva a colocar la tapa de las pilas. Paso 2 Enchufe le adaptador eléctrico en cualquier toma de corriente doméstica 230V AC. Luego introduzca la clavija CC del adaptador en el conector de la parte trasera de la estación. Inserte el soporte en la parte inferior de la estación meteorológica. Paso 3 Deslice la tapa de la pila en la parte trasera de la estación para abrirla, luego introduzca 1 pila-botón CR2032 de litio (no incluida) en el compartimiento. Cerciórese de que la polaridad “+” de la pila está hacia arriba. Después cierre la tapa. Paso 4 Retire la etiqueta protectora de la parte delantera. La estación está lista para trabajar para usted. La estación recibirá señal de datos procedente del sensor de exteriores en unos cuantos segundos. Entonces coloque el sensor de exteriores en un área en el exterior, seca y a la sombra. PILAS SECUNDARIAS Cuando no se utiliza la alimentación, la estación queda alimentada por las pilas secundarias. La pantalla LED se apaga, pero la hora y la hora de la alarma permanecen guardadas (también en el caso de un fallo de alimentación). RECEPCIÓN DE LA SEÑAL DCF E INDICADOR DE SEÑAL Después de encender la estación, esta empieza a recibir la señal DCF. El icono Recibiendo la señal DCF (Icono Recepción correcta (Icono Fallo en la recepción (Icono parpadeando) permanece estático) desaparece) ES.2 parpadea. Durante la recepción, pulsando el botón / WAVE se mostrará el modo de recepción y la fuerza de la señal indicación: Cuando se detecta una señal DCF fuerte, en la pantalla aparecen 3 barras . Cuando es débil o no se detecta la señal DCF, la pantalla muestra o . Durante la recepción, la fuerza de la señal puede variar entre 1 barra, 2 barras y 3 barras. Esto es normal ya que el reloj está detectando la señal DCF junto con otras señales al mismo tiempo. Pulsando el botón SET regresará a la presentación de la hora con el icono parpadeando. Recepción correcta o fallo en la recepción El icono permanece estático (no parpadea) cuando la recepción es correcta. El icono desaparece cuando falló la recepción. Recepción automática y recepción manual La Estación inicia la recepción automática cada día a la 1:00, las 2:00 y las 3:00. Si no consigue recibir la señal DFC a las 3:00, iniciará la recepción a las 4:00. Si vuelve a fallar, la iniciará a las 5:00. Si vuelve a fallar otra vez, iniciará la recepción automática de nuevo a la 1:00 del día siguiente. Para una recepción manual simplemente mantenga pulsado el botón / WAVE,la estación dará un 'bip' / WAVE para detener la recepción DCF. corto e iniciará la recepción manual. Mantenga pulsado el botón Cuando la estación meteorológica recibe la señal horaria controlada por radio, la pantalla se convertirá en potenciómetro. Volverá al nivel de brillo que haya seleccionado originalmente una vez que se complete la recepción de la hora controlada por radio. Durante la recepción DCF no funcionará ningún botón y no habrá lecturas de temperatura. Las lecturas de temperatura serán estables y más precisas después de que la estación-reloj lleve encendida unos 30 minutos. Para anular la recepción DCF permanentemente / WAVE y simultáneamente durante 2 segundos, la Estación Mantenga pulsados los botones dará 2 ‘bips’ cortos y la función de control por radio quedará permanentemente inhabilitada. / WAVE y Para recuperar la función de control por radio, mantenga pulsados los botones simultáneamente durante 2 segundos, la Estación dará 2 ‘bips’ cortos e iniciará la recepción DCF inmediatamente. PREVISIÓN DEL TIEMPO El estación meteorológica está equipada con un barómetro integrado que mide la presión barométrica. Después de encenderlo, la pantalla muestra icono SOLEADO & NUBLADO. El estación meteorológica necesita alrededor de 24 horas para reunir los datos de los cambios en la presión barométrica y predice las condiciones meteorológicas de las próximas 6-12 horas. El pronóstico del tiempo se muestra con 4 iconos del tiempo diferentes: Soleado Soleado & Nublado Nublado Lluvioso ES.3 Nota: Mover la estación meteorológica dentro de la casa o en las cercanías provocará un cambio súbito en la actitud de la estación y afecta a la precisión y corrección de la previsión meteorológica. Una vez que se haya conectado la estación meteorológica, tardará aproximadamente 24 horas en estabilizarse. Los iconos del tiempo en la pantalla ofrecen una referencia de las condiciones meteorológicas de las próximas 6-12 horas. Puede que no concuerden con las condiciones meteorológicas actuales del exterior. AJUSTAR LA HORA 1. Mantenga pulsado el botón SET durante 2 segundos y los dígitos de la hora parpadearán. Use para ajustar las horas. los botones o 2. Luego pulse el botón SET otra vez y parpadearán los dígitos de los minutos. Use el botón o para ajustar los minutos. Luego pulse el botón SET otra vez y la pantalla mostrará :05 parpadeando. Pulse el botón o 3. para establecer la duración del retardo de alarma desde 5 minutos hasta 60 minutos. 4. Luego pulse el botón SET otra vez y la pantalla mostrará 00 parpadeando. Use el botón o para ajustar la zona horaria: “-01” GMT +0 (Reino Unido) “00” GMT +1 (Hora de Europa Central) “01” GMT +2 (Hora de Europa Oriental) Nota: La zona horaria solo se puede ajustar cuando el reloj reciba correctamente una señal radio. 5. Pulse el botón SET otra vezpara guardar los ajustes y regresar a la pantalla normal de presentación de la hora. El reloj regresará al modo normal en unos 10 segundos si no se pulsa ningún otro botón. Nota: La hora aparecerá en formato 24-horas. AJUSTAR LA ALARMA (la hora de la alarma por defecto es 6:00 AM) 1. 2. 3. Mantenga pulsado el botón ALM hasta que el icono AL aparezca en pantalla, los dígitos de para ajustar las horas que desea para la alarma. las horas parpadearán. Use el botón o Pulse el botón ALM otra vez y parpadearán los dígitos de los minutos. Use el botón o para ajustar los minutos que desea para la alarma. Pulse el botón ALM otra vez para guardar los ajustes de la alarma y regresar a la pantalla normal de presentación de la hora. El reloj regresará al modo normal en unos 10 segundos si no se pulsa ningún otro botón. Habilitar o inhabilitar la alarma Pulse una vez el botón ALM con la presentación normal de la hora para habilitar o inhabilitar la alarma. Cuando la función de alarma está habilitada el icono AL aparece sobre los dígitos de la hora. Nota: El sonido de la alarma dura 2 minutos. Usar la función de retardo de alarma Cuando se alcance la hora establecida para la alarma, la estación emitirá una serie de ‘bips’ para despertarle. El icono AL parpadeará. 1. Pulse SNOOZE una vez para detener la alarma temporalmente, el icono AL continua parpadeando. La alarma sonará otra vez después de que transcurra el periodo de retardo de alarma establecido. 2. Para detener definitivamente la alarma diaria, pulse cualquier botón excepto el botón SNOOZE cuando esté sonando la alarma. La alarma dejará de sonar y el icono AL dejará de parpadear (quedará estático). La alarma volverá a sonar otra vez a la misma hora al día siguiente. ES.4 FUNCIÓN DE ATENUACIÓN Pulse el botón SNOOZE / DIMMER para ajustar la intensidad del brillo de la pantalla LED. RESOLUCIÓN DE PROBLEMAS En el caso de que la estación muestre dígitos sin sentido, puede ser que esté afectada por descargas electroestáticas o por interferencias de otros dispositivos. Pulse el botón RESET en la parte trasera de la Estación. La Estación recuperará la configuración por defecto de la hora y el calendario, y empezará a recibir la señal horaria radio-controlada de nuevo. Si pierde la temperatura exterior Cuando los dígitos de la temperatura exterior sean “--”, es porque la transmisión inalámbrica se ha interrumpido o se ha perdido. Mantenga pulsado el botón de la Estación, y luego pulse el botón RESET situado en la parte trasera del transmisor exterior. Si continúa perdiendo la presentación de la temperatura exterior, intente colocar el transmisor en un lugar diferente hasta que tenga una transmisión sin interrupciones de los datos de temperatura. Nota: Recuerde que el transmisor de exteriores sólo tiene un alcance de transmisión de 30 metros en un área abierta sin obstáculos. Cada obstáculo entre el transmisor y la Estación (tejado, paredes, suelos, techos, árboles grandes, etc.) reducirá el alcance de la señal a la mitad. CUIDADOS DE ESTE APARATO No exponga la unidad a temperaturas extremas, agua o rayos directos del sol. Evite el contacto con cualquier material corrosivo. No someta la unidad a fuerzas excesivas, polvo o humedad. No abra la carcasa trasera interior ni manipule ninguno de los componentes de esta unidad. ESPECIFICACIONES Temperatura de funcionamiento: Margen de medida de temperatura: Interiores: 0°C hasta +45°C Resolución de temperatura: 0°C hasta +50°C (la pantalla muestra HH.H / LL.L si está fuera de límites) -50°C hasta +70°C (la pantalla muestra HH.H / LL.L si está fuera de límites) 1°C Duración del sonido de alarma: Duración del retardo de alarma: 2 minutos 5 a 60 minutos Exteriores: ES.5 EXCLUSIÓN DE RESPONSABILIDADES Los desechos eléctricos y electrónicos contienen sustancias peligrosas. Arrojando los desechos electrónicos en bosques, áreas silvestres y/o en zonas no autorizadas daña enormemente el medio ambiente. Por favor contacte a las autoridades locales o/y regionales de su localidad para obtener las direcciones de las áreas designadas y autorizadas legalmente para arrojar este tipo de desechos y realizar así una recolección selectiva de los mismos. A partir de la fecha todos los instrumentos electrónicos deberán ser reciclados. El usuario deberá tomar parte activa en la reutilización, reciclaje y recuperación de los desechos eléctricos y electrónicos. El arrojo indiscriminado de los desechos electrónicos puede causar daños en la salud pública y en la calidad del medio ambiente. Tal como se indica en el empaque del producto y tal como esta marcado también en el producto mismo, se recomienda y es importante leer el “Manual del Usuario” en beneficio del usuario mismo. Este producto sin embargo, no deberá ser arrojado en los puntos generales de recolección de basuras. El fabricante y el distribuidor no pueden aceptar ninguna responsabilidad por ninguna lectura incorrecta y ninguna consecuencia que pueda ocurrir debido a la toma de una lectura inexacta. Este producto está diseñado únicamente para ser usado en casa como indicador de la temperatura. Este producto no deberá ser utilizado para propósitos médicos o para información al público. Las especificaciones de este producto pueden cambiar sin previo aviso. Este producto no es un juguete. Manténgalo alejado del alcance de los niños. Ninguna parte de este manual puede ser reproducido sin previo permiso escrito por parte del fabricante. Obligación en virtud de la ley de baterías Las baterías usadas no deben ser eliminadas en la basura doméstica. Si las baterías llegan al medio ambiente, éstas pueden ocasionar graves efectos para la salud o para el proprio medio ambiente. Puede devolver las baterías usadas de forma gratuita a su distribuidor o suministrador. Según la ley, como consumidor uste destá obligado a devolver las baterías usadas! ES.6 WS6825 - GEBRUIKSHANDLEIDING LED WEERSTATION MET RADIOGESTUURDE KLOK EN ALARM NL.1 OMGEVINGSONTVANGST EFFECTEN Het weerstation behoudt de exacte tijd via draadloze technologie. Zoals met alle draadloze apparatuur kan de ontvangstkwaliteit in de volgende omstandigheden worden aangetast: Lange zendafstand In de buurt van bergen en valleien In de buurt van hoge gebouwen In de buurt van snelwegen, spoorwegen, vliegvelden, hoogspanningskabels, enz. In de buurt van bouwterreinen Binnenin betonnen gebouwen In de buurt van elektrische apparatuur (computers, TV’s, enz.) Binnenin bewegende voertuigen In de buurt van metalen structuren Plaats het station op een locatie met een optimaal signaal, bijv. dicht bij een raam en uit de buurt van metalen oppervlaktes of elektrisache apparatuur. KORTE INSTELLING Stap 1 Houd het station en de buitensensor naast elkaar. Schuif het batterijklepje op de achterzijde van de buitensensor open. Zorg ervoor dat de kanaalschakelaar op positie 1 (bovenste positie) staat, installeer vervolgens 2 x AAA batterijen (niet inbegrepen) in de buitensensor en let daarbij op de correcte “+/-“ polariteitmarkeringen binnenin de batterijhouder. Schuif het klepje weer vast. Stap 2 Steek de AC/DC adapter in een willekeurig 230V AC stopcontact. Steek vervolgens de DC stekker in de achterbehuizing van het station. Steek de voetsteun aan de onderkant van het weerstation in. Stap 3 Schuif het batterijklepje op de achterzijde van het station open en installeer vervolgens 1 x CR2032 Lithium batterij (niet inbegrepen) in de batterijhouder. Zorg ervoor dat de “+” polariteit van de batterij omhoog is gericht. Schuif vervolgens het batterijklepje weer vast. Stap 4 Verwijder de beschermfolie van de display. Het weerstation is nu gebruiksklaar. Het station zal binnen enkele seconden het gegevenssignaal vanaf de buitensensor ontvangen. Plaats de buitensensor vervolgens buitenshuis op een droge plek in de schaduw. BACK-UP-BATTERIJEN Wanneer de voeding niet in gebruik is, zal het station door de back-up-batterijen worden gevoed. De LED-display wordt uitgeschakeld, maar de tijd en alarmtijd blijven opgeslagen (ook in het geval van een stroomstoring). DCF SIGNAALONTVANGST EN SIGNAALINDICATOR Nadat het station is ingeschakeld, zal het beginnen met de DCF signaalontvangst. Het knippert. DCF signaal wordt ontvangen Geslaagde ontvangst Mislukte ontvangst ( ( ( Icoontje knippert) Icoontje blijft constant) Icoontje verdwijnt) NL.2 icoontje Druk tijdens de ontvangst op de / WAVE toets om de indicaties voor ontvangstmodus en signaalsterkte weer te geven: De display toont 3 streepjes wanneer een krachtig DCF signaal wordt ontvangen . Wanneer een zwak of geen DCF signaal wordt ontvangen, toont de display of . De signaalsterkte kan tijdens ontvangst wisselen van 1 streepje naar 2 streepjes naar 3 streepjes. Dit is normaal omdat de klok gelijkertijd bezig is met detectie van het DFC signaal en van andere signalen in icoontje. de lucht. Druk op de SET toets om terug te keren naar de tijdweergave met knipperend Geslaagde ontvangst of mislukte ontvangst Icoontje blijft constant ingeschakeld (stopt met knipperen) wanneer de ontvangst geslaagd is Icoontje verdwijnt wanneer de ontvangts mislukt is Automatische ontvangst en handmatige ontvangst Het station start dagelijks met automatische ontvangst om 1:00, 2:00, en 3:00. Als de DFC signaalontvangst om 3:00 mislukt, wordt de ontvangst gestart om 4:00. Als het weer mislukt, wordt de ontvangst gestart om 5:00. Als het nog een keer mislukt, zal de automatische ontvangst weer om 1:00 de volgende dag gestart. / WAVE toets ingedrukt te houden,het station zal U hoeft voor handmatige ontvangst slechts de een korte pieptoon laten klinken en de handmatige ontvangst starten. Houd de / WAVE toets ingedrukt om de DCF ontvangst te stoppen. Tijdens de signaalontvangst wordt de displayaanduiding gedimt. Na beeindiging van de signaalontvangst verschijnt de aanduiding weer in haar oorspronkelijke lichtsterkte. Geen van de toetsen functioneren tijdens DCF ontvangst en er wordt geen temperatuurmeting uitgevoerd. De temperatuurlezingen zullen stabiel en nauwkeuriger worden nadat de stationklok ongeveer 30 minuten ingeschakeld is geweest. De DCF ontvangst permanent annuleren / WAVE en toetsengelijkertijd 2 seconden ingedrukt, het station zal 2 korte pieptonen Houd de laten horen en de radiogestuurde functie permanent uitschakelen. U kunt de radiogestuurde functie weer hervatten door de / WAVE en toetsen gelijkertijd voor 2 seconden ingedrukt te houden, het station zal 2 korte pieptonen laten horen en de DCF ontvangst onmiddellijk starten. DE WEERSVOORSPELLING Het weerstation heeft een ingebouwde barometer die de barometrische druk meet. Na het opstarten worden op de display de iconen voor ZONNIG & BEWOLKT weergegeven. Uw weerstation heeft ongeveer 24 uur nodig om de gegevens te verzamelen over de veranderingen in de barometrische druk en voorspelt het weer voor de komende 6-12 uur. De weersvoorspelling wordt door 4 verschillende weersymbolen aangegeven: Zonnig Zonnig & Bewolkt Bewolkt Regenachtig NL.3 Opmerking: Verplaatsen van het weerstation in huis of naaste omgeving veroorzaakt een plotselinge verandering van de instelling van het station en beinvloed de precisie en juistheid van de weersvoorspelling.Na ingebruikneming van het station duurt het ongeveer 24 uur, tot zich de weersvoorspelling heft gestabiliseert. De getoonde weerssymbolen stellen de verwachte weerssituatie van de komende 6-12 uur voor. Ze komen derhalve niet onbeslist overseen met de aktuele weerssituatie. TIJDINSTELLING 1. 2. 3. 4. of toets om Houd de SET toets 2 seconden ingedrukt, de uurcijfers knipperen. Druk op de de uren in te stellen. Druk vervolgens nog een keer op de SET toets, de minuutcijfers knipperen. Druk op de of toets om de minuten in te stellen. Druk vervolgens nog een keer op de SET toets, de display toont :05 en knippert. Druk op de of toets om de snoozetijd in te stellen tussen 5 minuten en 60 minuten. Druk vervolgens nog een keer op de SET toets, de display toont 00 en knippert. Druk op de of toets om de tijdzone in te stellen: “-01” GMT +0 (Verenigd Koninkrijk) “00” GMT +1 (Centraal Europese Tijd) “01” GMT +2 (Oostelijke Europese Tijd) Opmerking: Tijdzone kan alleen worden ingesteldwanneer de kloksuccesvol een radiosignaal ontvangt. 5. Druk nogmaals op de SET toetsomde instellingen op te slaan en terug te keren naar de normale tijdweergave. De klok zal na ongeveer 10 seconden terugkeren naar de normale modus als u geen andere toetsen meer indrukt. Opmerking: De tijd wordt weergegeven in het 24-uur formaat. ALARMINSTELLING (standaard alarminstelling is 6:00 AM) 1. 2. 3. Houd de ALM toets ingedrukt totdat het AL icoontje op de display verschijnt, de uurcijfers of toets om de gewenste uren voor het alarm in te stellen. knipperen. Druk op de Druk nog een keer op de ALM toets, de minuutcijfers knipperen. Druk op de of toets om de gewenste minuten voor het alarm in te stellen. Druk nogmaals op de ALM toets om de alarminstellingen op te slaan en terug te keren naar de normale tijdweergave. De klok zal na ongeveer 10 seconden terugkeren naar de normale modus als u geen andere toetsen meer indrukt. Het alarm in- of uitschakelen Druk één keer op de ALM toets tijdens normale tijdweergave om het alarm in of uit te schakelen. Wanneer de alarmfunctie is ingeschakeld, verschijnt het AL icoontje boven de tijdcijfers. Opmerking: De tijdsduur van het alarm is 2 minuten. De snoozefunctie gebruiken Wanneer de tijd de ingestelde alarmtijd bereikt, zal het station u met een pieptoon wekken. Het AL icoontje zal knipperen. 1. Druk eenmaal op SNOOZE om het alarm tijdelijk te stoppen, het AL icoontje blijft knipperen. Het alarm zal na de ingestelde snoozetijd weer piepen. 2. U kunt het dagelijkse alarm stoppen door op een willekeurige toets met uitzondering van de SNOOZE toets te drukken wanneer het alarm klinkt. Het alarm zal stoppen en het AL icoontje stopt met knipperen. Het alarm zal de volgende dag op dezelfde tijd weer klinken. NL.4 DIMMERFUNCTIE Druk op de SNOOZE / DIMMER toets om de hoge of lage helderheid van de LED display aan te passen. PROBLEEMOPLOSSING In het geval dat het station valse cijfers toont, kan het worden aangetast door elektrostatische ontlading of interferenties vanaf andere apparatuur. Druk op de RESET toets op de achterzijde van het station. Het station zal worden teruggesteld op de standaard tijd- en kalenderinstellingen en opnieuw beginnen met ontvangst van het radiogestuurde tijdsignaal. Indien de buitentemperatuur verloren is geraakt Wanneer de cijfers van de buitentemperatuur “--“ laten zien, dan is de draadloze signaaloverdracht onderbroken of verloren. Houd de toets van het station ingedrukt en druk vervolgens op de RESET toets op de achterzijde van de buitenzender. Als de weergave van de buitentemperatuur verloren blijft gaan, kunt u proberen de zender op een andere locatie te plaatsen totdat u een goede overdracht krijgt van de temperatuurgegevens. Opmerking: Vergeet a.u.b. niet dat de buitenzender een zendbereik heeft van slechts 30 meter in een open gebied zonder obstructies. Elke obstructie tussen de zender en het station (dak, muren, plafonds, dikke bomen, enz.) zal het zendbereik effectief halveren. ONDERHOUD VAN DIT PRODUCT Niet blootstellen aan extreme temperaturen, water of direct zonlicht. Niet in contact laten komen met bijtende materialen. Het apparaat niet blootstellen aan teveel kracht, stof of vochtigheid. De binnenbehuizing niet openen of de onderdelen van dit apparaat modificeren. SPECIFICATIES Bedrijfstemperatuur: 0°C tot +45°C Bereik van temperatuurmeting: Binnenshuis: 0°C tot +50°C (display toont HH.H / LL.L wanneer buiten dit bereik) Buitenshuis: -50°C tot +70°C (display toont HH.H / LL.L wanneer buiten dit bereik) Temperatuurresolutie: 1°C Alarmduur: Snoozeduur: 2 minuten 5 tot 60 minuten NL.5 BEPERKTE AANSPRAKELIJKHEID Elektrisch en elektronisch afval bevat gevaarlijke stoffen. Storten van elektrisch of elektronisch afval in de natuur en/of op verboden terrein brengt ernstige vervuiling toe aan het milieu. Neem contact op met politie of rijkswaterstaat voor adressenlijst met vuilstortplaatsen en toegestane afvalstoffen. Alle elektronische apparatuur moet zoveel mogelijk te worden hergebruikt. Neem actief deel in het kringloopgebruik van elektrisch en elektronisch afval. Het onbeperkte dumpen van elektronisch afval kan gevaar opleveren voor de bevolkingsgezondheid en de kwaliteit van ons leefmilieu. Zoals vermeld op de verpakking en de productstikker is het ten zeerste aangeraden de handleiding aandachtig te lezen. Dit product moet gescheiden worden verwijderd en niet met huisvuil worden meegegeven. De fabrikant en leverancier accepteren geen enkele verantwoordelijkheid voor foutieve registraties van de apparatuur en de mogelijke gevolgen daarvan. Dit product is enkel ontworpen voor gebruik thuis als indicatie van toekomstig weer. Dit product is niet geschikt voor medische doeleinden of voor publieksinformatie. Specificaties van dit product kunnen wijzigen zonder voorgaande kennisgeving. Dit product is geen speelgoed. Uit de buurt van kinderen houden. Geen enkel deel van deze handleiding mag gereproduceerd worden zonder schriftelijke toestemming van de fabrikant. Verordening verwijdering batterijen Oude batterijen horen niet in het huisvuil. Als batterijen in het milieu terechtkomen kunnen deze milieu en gezondheidsproblemen tot gevolg hebben. U kunt gebruikte batterijen kosteloos bij uw handelaar of inzamelplaatsen teruggeven. U bent als verbruiker wettelijk verplicht oude batterijen, als omschreven, in te leveren. NL.6 WS6825 - INSTRUKCJA OBSŁUGI STACJA POGODOWA LED Z ZEGAREM STEROWANYM RADIOWO I ALARMEM PL.1 ŚRODOWISKOWE EFEKTY ODBIORU Stacja pogodowa pobiera dokładny czas za pomocą technologii bezprzewodowej. Tak jak we wszystkich urządzeniach bezprzewodowych, odbiór może być zakłócany przez następujące okoliczności: Duża odległość przekazu Góry i doliny pobliżu Wzdłuż wysokich budynków Bliskość autostrad, linii kolejowych, lotnisk, linii wysokiego napięcia, itd. Bliskość budów Wewnątrz betonowych budynków W pobliżu urządzeń elektrycznych (komputerów, telewizorów, itd.) W poruszających się pojazdach Obok konstrukcji metalowych Stację należy ustawić w miejscu z optymalnym sygnałem, tzn. blisko okna i z dala od powierzchni metalowych lub urządzeń elektrycznych. SZYBKA KONFIGURACJA Krok 1 Ustawić stację i czujnik zewnętrzny blisko siebie. Zsunąć pokrywę baterii z tyłu czujnika zewnętrznego. Upewnić się, że przycisk wybierający kanału jest ustawiony w pozycji 1 (pozycja górna), następnie włożyć 2 baterie AAA (nie znajdują się w dostawie) do czujnika zewnętrznego, przestrzegając prawidłowych znaków biegunowości „+/-” w komorze baterii. Wymienić osłonę baterii. Krok 2 Włożyć adapter AC/DC do dowolnego gniazdka domowego 230V AC. Następnie włożyć wtyczkę DC z tyłu obudowy stacji. Wsuń podstawkę do dolnej części stacji pogodowej. Krok 3 Zsunąć pokrywę baterii z tyłu stacji, następnie włożyć 1 baterię litową CR2032 (nie znajduje się w dostawie) do komory baterii. Upewnić się, że biegun „+” baterii jest skierowany do góry. Następnie wymienić pokrywę baterii. Krok 4 Usuń folię ochronną z wyświetlacza. Stacja meteorologiczna już działa. Stacja odbierze sygnał danych z czujnika zewnętrznego za kilka sekund. Następnie należy ustawić czujnik zewnętrzny w suchym i ocienionym miejscu na zewnątrz. BATERIE PODTRZYMANIA Przy braku zasilania, stacja będzie zasilana z baterii podtrzymujących,Wyświetlacz LED jest wyłączony, ale czas i czas alarmu zostają zachowane (także w przypadku zaniku zasilania). ODBIÓR SYGNAŁU DCF I WSKAŹNIK SYGNAŁU Po podłączeniu zasilania do stacji zacznie ona odbierać sygnał DCF. Ikona Odbieranie sygnału DCF Pomyślny odbiór Nieudany odbiór (Ikona (Ikona (Ikona miga) przestaje migać) znika) PL.2 miga. W czasie odbierania naciśnięcie przycisku / WAVE spowoduje wyświetlenie trybu odbioru i siły sygnału wskazanie: Po wykryciu silnego sygnału DCF, na wyświetlaczu pojawią się 3 kreski . Jeśli nie zostanie wykryty sygnał DCF lub zostanie wykryty słaby sygnał, na wyświetlaczu pojawi się lub . Podczas odbioru siła sygnału może zmieniać się z 1 kreski do 2 i 3 kresek. Jest to normalne, ponieważ zegar odbiera sygnał DCF i inne sygnały w powietrzu w tym samym czasie. Naciśnięcie przycisku SET spowoduje powrót do wyświetlania czasu, będzie migać ikona . Odbiór pomyślny lub nieudany Ikona staje się statyczna (przestaje migać), kiedy odbiór jest pomyślny. Ikona znika, jeśli odbiór jest nieudany. Odbiór automatyczny i ręczny Stacja rozpoczyna automatyczny odbiór codziennie o godz. 1:00, 2:00 i 3:00. Jeśli nie uda się odbiór sygnału DCF o godz. 3:00, kolejny odbiór rozpocznie się o godz. 4:00. Jeśli nie uda się ponownie, kolejny odbiór rozpocznie się o godz. 5:00. Jeśli znowu się nie uda, kolejny odbiór rozpocznie się automatycznie ponownie o godz. 1:00 następnego dnia. Aby rozpocząć odbiór ręczny, należy nacisnąć i przytrzymać przycisk / WAVE, ze stacji rozlegnie się krótki sygnał dźwiękowy i rozpocznie ona odbiór ręczny. Naciśnięcie i przytrzymanie przycisku / WAVE zatrzyma odbiór DCF. Gdy stacja pogodowa otrzymuje radiowy sygnał czasowy, to wyświetlacz ściemnia się. Powraca do poprzedniego poziomu jaskrawości po zakończeniu odbioru radiowego sygnału czasu. Podczas odbioru DCF żaden przycisk nie działa i nie jest wykonywany pomiar temperatury. Odczyty temperatury ustabilizują się i staną się bardziej dokładne, gdy zegar stacji będzie zasilany przez około 30 minut. Anulowanie odbioru DCF na stałe Nacisnąć i przytrzymać przycisk / WAVE i w tym samym czasie przez 2 sekundy, ze stacji rozlegną się 2 krótkie sygnały dźwiękowe i funkcja sterowania radiowego zostanie wyłączona na stałe. Aby przywrócić działanie funkcji sterowania radiowego, należy nacisnąć i przytrzymać przycisk / WAVE oraz w tym samym czasie przez 2 sekundy, ze stacji rozlegną się 2 krótkie sygnały dźwiękowe i natychmiast rozpocznie ona odbiór DCF. PROGNOZA POGODY Stacja meteorologiczna posiada wbudowany barometr, który mierzy ciśnienie powietrza. Po pierwszym uruchomieniu SŁONECZNY & ZACHMURZENIE ikona jest wyświetlana. Stacja pogodowa wymaga około 24 godzin, zmiany w ciśnieniu powietrza w celu wykrycia i przewidzenia warunki pogodowe w ciągu najbliższych 6-12 godzin. Prognoza pogody jest wyświetlany z 4 różnych ikon pogodowych: Słoneczny Słonecznie&Zachmurzenie Zachmurzenie PL.3 Deszczowy Uwaga: Przeniesienie stacji pogodowej wewnątrz domu albo w jego okolice spowoduje nagłą zmianę w położeniu stacji i ma wpływ na dokładność i prawidłowość prognozy pogody. Po włączeniu stacji pogodowej, potrzebuje ona około 24 godzin na ustabilizowanie. Ikony pogody na wyświetlaczu podają prognozy na następne 6-12 godzin. Mogą nie odpowiadać warunkom pogodowym na zewnątrz. USTAWIANIE CZASU 1. 2. 3. 4. Nacisnąć i przytrzymać przycisk SET przez 2 sekundy, cyfry godziny będą migać. Nacisnąć lub , aby ustawić godzinę. przycisk Następnie ponownie nacisnąć przycisk SET, cyfry minut zaczną migać. Nacisnąć przycisk lub , aby ustawić minuty. Następnie ponownie nacisnąć przycisk SET, na wyświetlaczu pojawi się :05 i zacznie migać. Nacisnąć przycisk lub , aby ustawić czas trwania drzemki w zakresie od 5 do 60 minut. Następnie ponownie nacisnąć przycisk SET, na wyświetlaczu pojawi się 00 i zacznie migać. , aby ustawić strefę czasową: Nacisnąć przycisk lub “-01” GMT +0 (Zjednoczone Królestwo) “00” GMT +1 (Czasu Europa Środkowa) “01” GMT +2 (Czasu Europa Wschodnia) Uwaga: Srefę czasową można ustawiać tylko wtedy, gdy zegar pomyślnie odbierze sygnał radiowy. 5. Nacisnąć ponownie przycisk SET, aby zapisać ustawienia i wrócić do zwykłego wyświetlania czasu. Zegar wróci do trybu zwykłego za około 10 sekund, jeśli nie zostanie naciśnięty żaden inny przycisk. Uwaga: Czas jest wyświetlany w formacie 24-godzinnym. USTAWIANIE ALARMU (standardowe ustawienie alarmu to godz. 6:00 AM) 1. 2. 3. Nacisnąć i przytrzymać przycisk ALM, aż na wyświetlaczu pojawi się ikona AL, cyfry godziny zaczną migać. Nacisnąć przycisk lub , aby ustawić wybraną godzinę alarmu. Ponownie nacisnąć przycisk ALM, cyfry minut zaczną migać. Nacisnąć przycisk lub , aby ustawić wybraną minutę alarmu. Nacisnąć ponownie przycisk ALM, aby zapisać ustawienia alarmu i wrócić do zwykłego wyświetlania czasu. Zegar wróci do trybu zwykłego za około 10 sekund, jeśli nie zostanie naciśnięty żaden inny przycisk. Włączanie i wyłączanie alarmu Pojedyncze naciśnięcie przycisku ALM przy zwykłym wyświetlaniu czasu włącza lub wyłącza alarm. Gdy funkcja alarmu jest włączona, nad cyframi czasu pojawia się ikona AL. Uwaga: Czas trwania alarmu wynosi 2 minuty. Korzystanie z funkcji drzemki Kiedy nadejdzie godzina ustawionego czasu alarmu, ze stacji rozlegnie się sygnał dźwiękowy pobudki. Ikona AL będzie migać. 1. Naciśnięcie raz przycisku SNOOZE zatrzyma czasowo alarm, ikona AL nadal będzie migać. Alarm rozlegnie się ponownie po upływie ustawionego czasu drzemki. 2. Aby zatrzymać codzienny alarm, należy nacisnąć dowolny przycisk za wyjątkiem SNOOZE podczas trwania alarmu. Alarm zatrzyma się, a ikona AL przestanie migać. Alarm rozlegnie się ponownie o tej samej godzinie następnego dnia. PL.4 FUNKCJA REGULATORA OŚWIETLENIA Nacisnąć przycisk SNOOZE / DIMMER, aby wyregulować dużą lub małą jasność wyświetlacza LED. ROZWIĄZYWANIE PROBLEMÓW Jeśli stacja pokaże nieprawidłowe cyfry, może to oznaczać wpływ rozładowania elektrostatycznego lub zakłóceń ze strony innych urządzeń. Nacisnąć przycisk RESET z tyłu stacji. Stacja zostanie zresetowana do ustawienia standardowego czasu oraz kalendarza i zacznie ponownie odbierać sygnał sterowania radiowego czasu. Jeśli temperatura na zewnątrz zostanie utracona Jeśli cyfry temperatury na zewnątrz wskazują „--”, oznacza to przerwanie lub utratę przekazu bezprzewodowego. Nacisnąć i przytrzymać przycisk na stacji, a następnie nacisnąć przycisk RESET znajdujący się z tyłu przekaźnika zewnętrznego. Jeśli temperatura na zewnątrz nadal się nie wyświetla, należy spróbować ustawić przekaźnik w innymi miejscu, aż transmisja danych temperatury będzie przebiegała bez zakłóceń. Uwaga: Należy pamiętać, że zasięg przekaźnika zewnętrznego wynosi tylko 30 metrów na otwartej przestrzeni bez przeszkód. Każda przeszkoda między przekaźnikiem a stacją (dach, ściany, podłogi, sufity, grube drzewa, itd.) będzie zmniejszać zasięg przekazu o połowę. DBANIE O URZĄDZENIE Nie narażać urządzenia na działanie ekstremalnych temperatur, wody lub bezpośredniego nasłonecznienia. Unikać kontaktu z materiałami korodującymi. Nie narażać urządzenia na działanie dużych sił, pyłu lub wilgotności. Nie otwierać tylnej obudowy wewnętrznej ani nie ingerować w żadne komponenty urządzenia. SPECYFIKACJA Temperatura robocza: Zakres pomiaru temperatury: Wewnątrz: 0°C do +45°C Stopniowanie temperatury: 0°C do +50°C (w przypadku przekroczenia zakresu na wyświetlaczu pojawia się HH.H / LL.L) -50°C do +70°C (w przypadku przekroczenia zakresu na wyświetlaczu pojawia się HH.H / LL.L) 1°C Czas trwania alarmu: Czas trwania drzemki: 2 minuty 5 do 60 minuty Na zewnątrz: Zawiadomienie wymagań na mocy dyrektywy baterii Stare baterie nie należą do odpadów domowych, ponieważ mogą one powodować uszkodzeń zdrowia i środowiska. Użytkownika końcowego są zobowiązane przez prawo przywrócić potrzebne baterie do dystrybutorów i innych punktów zbiorczych! PL.5 WS6825 – NÁVOD K POUŽITÍ METEOROLOGICKÁ STANICE LED S RÁDIOVĚ ŘÍZENÝMI HODINAMI A BUDÍKEM CZ.1 ENVIRONMENTÁLNÍ DOPADY PŘIJMU Meteorologická stanice přijímá přesný čas pomocí bezdrátové technologie. Stejně jako u všech bezdrátových přístrojů mohou být tyto ovlivněny následujícími okolnostmi: Dlouhá přenosová vzdálenost Blízké hory a údolí Mezi vysokými stavbami Blízká dálnice, železnice, letiště, vysokonapěťové kabely atd. Blízké staveniště Uvnitř betonových staveb Elektrické přístroje (počítače, TV atd.) v blízkosti Uvnitř jedoucích vozidel V blízkosti kovových konstrukcí Umístěte stanici do místa s optimálním signálem např. blízko okna a daleko od kovových povrchů či elektrických přístrojů. RYCHLÉ NASTAVENÍ Krok 1 Udržujte stanici a venkovní čidlo vedle sebe. Posunutím otevřete bateriový kryt vzadu na venkovním čidle Ujistěte se, že je volič kanálů nastaven na pozici 1 (top pozice), potom vložte 2 x AAA baterie (nejsou součástí balení) do venkovního čidla s přihlédnutím k správné “+/-“ polaritě uvnitř bateriového oddělení. Bateriový kryt dejte na původní místo. Krok 2 Vložte AC/DC adaptér do jakékoliv 230V AC zásuvky v domácnosti. Potom vložte DC zdířku do zadní skříňky stanice. Vložte podstavec do spodní části meteorologické stanice. Krok 3 V zadní části stanice vysuňte bateriový kryt, potom vložte 1 x CR2032 Lithiovou baterii (není součástí balení) do bateriového prostoru. Ujistěte se, že “+” – polarita baterie směřuje nahoru. Potom vložte bateriový kryt na původní místo. Krok 4 Odstraňte ochrannou fólii z displeje. Meteorologická stanice je nyní funkční. Stanice začne za pár sekund přijímat datový signál z venkovního čidla. Potom umístěte venkovní čidlo na suché a stinné venkovní místo. ZÁLOŽNÍ BATERIE Jestliže není používán napájecí zdroj, stanice bude napájena záložními bateriemi. LED displej bude vypnut, ale čas a alarm zůstane uložen (i v případě výpadku el. energie). PŘÍJEM SIGNÁLU A UKAZATEL SIGNÁLU DCF Po zapnutí stanice se začne přijímat DCF signál. Ikona Příjem DCF signálu Úspěšný příjem Neúspěšný příjem ( ( ( Ikona bliká) Ikona se stane statickou) Ikona zmizí) CZ.2 bliká. Během příjmu prosím stiskněte tlačítko / WAVE zobrazí se režim přijmu a síla signálu označení: Když je zjištěn silný signál DCF, displej ukazuje 3 čárky . Když je slabý signál DCF, nebo není žádný, displej ukazuje nebo . Během příjmu se síla signálu může pohybovat od 1 do 2 čárek až do 3 čárek. To je normální protože hodiny zjišťují DCF signál a další signály ve vzduchu současně. Stiskněte tlačítko SET a vrátíte se do zobrazení času s blikající ikonou. Úspěšný příjem nebo neúspěšný příjem Ikona se stane statickou (přestane blikat) když dojde k úspěšnému příjmu. Když selže příjem, tak ikona zmizí. Automatický příjem a manuální příjem Stanice začne automaticky přijímat signál každý den v 1:00, 2:00, a 3:00. Pokud se nepodaří příjem signálu DCF ve 3:00 hodiny, začne příjem ve 4:00 hodiny. Pokud se opět nepodaří příjem signálu, začne signál přijímat opět v 5:00 hodin. Pokud příjem opět selže, začne opět automatický příjem v 1:00 příštího dne. Pro ruční nastavení jednoduše stiskněte a držte / WAVE tlačítko,stanice krátce zapípá a začne / WAVE tlačítko. ruční příjem. Pro zastavení příjmu DCF signálu stiskněte a držte Jestliže Meteorologická stanice přijímá rádiem řízený časový signál její displej potemní. Po ukončení příjmu časového signálu dojde k obnovení úrovně jasu, kterou jste předtím nastavili. Během příjmu DCF signálu nefunguje žádné tlačítko a stanice neprovádí měření teploty. Údaje o teplotě se stabilizují a zpřesní až poté, co jsou hodiny napájeny alespoň po 30 minut. Trvalé zrušení příjmu DCF signálu Stlačte a držte / WAVE a tlačítkosoučasně na 2 sekundy, stanice dvakrát krátce zapípá a rádiově řízená funkce bude trvale vypnutá. Pro obnovení funkce rádiově řízeného signálu, stlačte a držte / WAVE a sekundy, stanice 2 krát krátce zapípá a okamžitě začne příjem DCF signálu. tlačítko současně na 2 PŘEDPOVĚĎ POČASÍ Meteorologická stanice má zabudovaný barometr, který měří tlak vzduchu. Po uvedení do provozu symbol SLUNEČNÝ & POLOJASNO je zobrazena. Meteorologická stanice vyžaduje přibližně 24 hodin pro změny v tlaku vzduchu odhalit a předpovídat počasí v průběhu příštích 6-12 hodin. Předpověď počasí je zobrazena se 4 různými počasí ikonami: Slunečný Slunečný & Polojasno Polojasno Deštivý Poznámka:Jestliže meteorologickou stanicí v domě nebo v jeho blízkosti pohybujete dojde k náhlé změně výšky stanice, a to se může projevit v přesnosti a správnosti předpovědi počasí. Po zapnutí meteorologické stanice trvá asi 24 hodin než se stabilizuje. Ikony počasí na displeji poskytují referenční meteorologické podmínky na příštích 6 - 12 hodin. Nemusí se shodovat s aktuálními meteorologickými podmínkami venku. CZ.3 NASTAVENÍ ČASU 1. 2. 3. 4. Stiskněte a držte SET tlačítko na 2 sekundy, rozblikají se číslice hodin. Stiskněte tlačítko pro nastavení hodin. Potom stiskněte znovutlačítko SET, the rozblikají se číslice minut. Stiskněte nebo k nastavení minut. Potom opět stiskněte tlačítko SET, displej ukáže :05 a zabliká. Stiskněte nebo k nastavení doby dřímání z 5 minut na 60 minut. Potom opět stiskněte tlačítko SET, displej ukáže 00 a zabliká. Stiskněte nebo k nastavení časového pásma: nebo tlačítko tlačítko tlačítko “-01” GMT +0 (Spojené království) “00” GMT +1 (Čas Střední Evropa) “01” GMT +2 (Čas východní Evropa) Poznámka: Časové pásmo může být nastaveno pouze v případěkdyž hodinyúspěšně přijímají rádiová signál. 5. Stiskněte opět tlačítkoSETpro uložení nastavení a návrat do normálního zobrazení času. Hodiny se vrátí do normálního režimu za ca. 10 sekund pokud nedojde k dalšímu stisknutí jakéhokoliv tlačítka. Poznámka: Zobrazený čas je ve 24 hodinovém formátu. NASTAVENÍ ALARMU (výchozí nastavení budíku je 6:00 AM) 1. 2. 3. Stiskněte a držte ALM tlačítko až se na displeji zobrazí ikona AL, začne blikat číslice hodin. Stiskněte nebo tlačítko pro nastavení požadované hodiny buzení. tlačítko k nastavení Stiskněte opět ALM tlačítkorozbliká se číslice minut. Stiskněte nebo požadovaných minut buzení. Stiskněte opět tlačítko ALM pro uložení nastavení budíku a návrat do normálního zobrazení času. Hodiny se vrátí do normálního režimu za ca. 10 sekund pokud nedojde ke stlačení jakéhokoliv jiného tlačítka. Zapnutí a vypnutí alarmu Jednou zmáčkněte tlačítko ALM během normálního zobrazení času pro zapnutí nebo vypnutí budíku. Když je funkce budíku zapnutá, objeví se ikona AL nad časovými číslicemi. Poznámka: Délka buzení je 2 minuty. Používání funkce dřímání Když čas dosáhne požadovaného času buzení, tak stanice začne vydávat pípací zvuk, aby vás probudila. Bude blikat ikona AL. 1. Stiskněte jednou SNOOZE abyste dočasně zastavili budík, ikona AL bude blikat. Alarm bude znovu pípat po uplynutí nastavené doby dřímání. 2. Pro zastavení denního budíku, stiskněte jakékoliv tlačítko kromě tlačítka SNOOZE když budík pípá. Budík se zastaví a ikona AL se zastaví a bude statická. Budík začne znovu pípat následující den. FUNKCE TLUMIČE SVĚTLA Stiskněte tlačítko SNOOZE / DIMMER pro nastavení vysokého nebo nízkého jasu displeje LED. CZ.4 ŘEŠENÍ PROBLÉMŮ V případě, že stanice ukazuje špatné číslice, je možné, že je ovlivněna elektrostatickým výbojem nebo rušením z druhých přístrojů. Stiskněte tlačíko RESET vzadu na stanici. Stanice bude resetována na výchozí nastavení času a kalendáře a začne zase přijímat rádiově řízený signál. Pokud ztratíte venkovní teplotu Když číslice venkovní teploty ukazují “--“, tak je bezdrátový přenos buď přerušen, nebo ztracen. Stiskněte a držte tlačíko stanice a potom stiskněte tlačítko RESET umístěné vzdau na venkovním vysílači. Pokud bude opakovaně docházet ke ztrátě venkovního teplotního displeje, zkuste vysílač umístit do jiného prostředí, abyste zajistili hladké vysílání teplotních údajů. Poznámka: Mějte na paměti, že venkovní vysílač má v otevřeném prostranství bez překážek rozsah pouze 30 metrů. Každá překážka mezi vysílačem a stanicí (střecha, zdi, podlahy, stropy, hrubé stromy atd.) účinně sníží vysílací dosah na polovinu. PÉČE O PRODUKT Přístroj nevystavujte extrémní teplotě, vodě nebo přímému slunci. Vyhněte se kontaktu s jakýmikoliv korozivními materiály. Nevystavujte přístroj nadměrné síle, prachu nebo vlhkosti. Neotevírejte vnitřek zadní skříně a nemanipulujte s jakýmikoliv částmi této jednotky. SPECIFIKACE Provozní teplota: Rozsah měření teploty: Vnitřní: 0°C do +45°C Teplotní rozlišení: 0°C do +50°C (+14°F do +122°F) (displej ukazuje HH.H / LL.L pokud mimo rozsah) -50°C do +70°C (-58°F do +158°F) (displej ukazuje HH.H / LL.L pokud mimo rozsah) 1°C Délka buzení: Délka dřímání: 2 minuty 5 na 60 minuty Venkovní: Všimněte si požadavky podle baterie-směrnice Staré baterie nepatří do domovního odpadu, protože by mohly způsobit škody na zdraví a životní prostředí. Koncový uživatel se zavazuje zákon přivézt potřebné baterie distributorům a dalších sběrných míst! 12-12-02 CZ.5