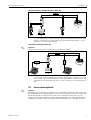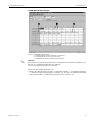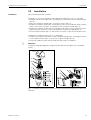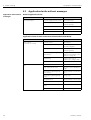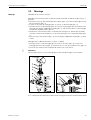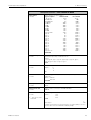
1
BA 105R/09/a3/04.02 510 02838 iTEMP® HART® TMT 182 Betriebsanleitung Operating Instructions Mise en service Temperaturkopftransmitter 2 Endress+Hauser Temperaturkopftransmitter Temperaturkopftransmitter iTEMP® HART® TMT 182 Betriebsanleitung (Bitte lesen, bevor Sie das Gerät in Betrieb nehmen) Gerätenummer:..................................... Deutsch English 319...34 ... 30 Temperature head transmitter iTEMP® HART® TMT 182 Operating manual (Please read before installing the unit) Unit number:..................................... English English 31 ... 58 19...34 Transmetteur de Température iTEMP® HART® TMT 182 Manuel de mise en service (veuillez entièrement lire le manuel avant la mise en service de l’appareil) No appareil:.................................... Français English 59 ... 86 19...34 3 Inhaltsverzeichnis Temperaturkopftransmitter Inhaltsverzeichnis 1 Sicherheitshinweise . . . . . . . . . . . . . . . . . 6 1.1 1.2 1.3 1.4 1.5 2 Bestimmungsgemäße Verwendung . . . . . . Montage, Inbetriebnahme und Bedienung . Betriebssicherheit . . . . . . . . . . . . . . . . . . . . Rücksendung . . . . . . . . . . . . . . . . . . . . . . . Sicherheitszeichen und -symbole . . . . . . . . 6 6 6 6 7 5.1 Kommunikation . . . . . . . . . . . . . . . . . . . . 12 6 Inbetriebnahme. . . . . . . . . . . . . . . . . 13 6.1 Installations- und Funktionskontrolle . . . . 13 6.2 Inbetriebnahme . . . . . . . . . . . . . . . . . . . . 13 7 Wartung . . . . . . . . . . . . . . . . . . . . . . . 20 8 Zubehör . . . . . . . . . . . . . . . . . . . . . . . 20 9 Störungsbehebung . . . . . . . . . . . . . . . . . 21 Montage . . . . . . . . . . . . . . . . . . . . . . . . 8 3.1 Einbaubedingungen . . . . . . . . . . . . . . . . . . 8 3.2 Einbau . . . . . . . . . . . . . . . . . . . . . . . . . . . . . 9 4 Bedienung . . . . . . . . . . . . . . . . . . . . . 12 Identifizierung . . . . . . . . . . . . . . . . . . . 7 2.1 Gerätebezeichnung . . . . . . . . . . . . . . . . . . 7 2.2 Lieferumfang . . . . . . . . . . . . . . . . . . . . . . . . 8 3 5 Verdrahtung . . . . . . . . . . . . . . . . . . . . . . . . 10 4.1 Verdrahtung auf einen Blick . . . . . . . . . . . 10 4.2 Anschluss Messeinheit . . . . . . . . . . . . . . . 10 4.3 Potenzialausgleich . . . . . . . . . . . . . . . . . . 11 9.1 9.2 9.3 9.4 9.5 9.6 Fehlersuchanleitung . . . . . . . . . . . . . . . . . Applikationsfehlermeldungen . . . . . . . . . Applikationsfehler ohne Meldungen . . . . Ersatzteile . . . . . . . . . . . . . . . . . . . . . . . . . Rücksendung . . . . . . . . . . . . . . . . . . . . . . Entsorgung . . . . . . . . . . . . . . . . . . . . . . . . 21 21 22 23 23 23 10 Technische Daten . . . . . . . . . . . . . . . . . . 24 11 Anhang . . . . . . . . . . . . . . . . . . . . . . . . . . . . . 28 11.1 Arbeitsweise und Systemaufbau . . . . . . . 28 4 Endress+Hauser Temperaturkopftransmitter Kurzanleitung Kurzanleitung Mit der folgenden Kurzanleitung können Sie Ihr Messgerät schnell und einfach in Betrieb nehmen: Sicherheitshinweise Seite 6 Montage Seite 8 Verdrahtung Seite 10 Inbetriebnahme (mit Beschreibung der Gerätefunktionen) Eine ausführliche Beschreibung aller Funktionen sowie eine Detailübersicht der Funktionsmatrix finden Sie in diesem Kapitel. Quick-SETUP - Schnelleinstieg in die Gerätekonfiguration für den standardmäßigen Messbetrieb Seite 13 Störungsbehebung / Fehlersuche Beginnen Sie die Fehlersuche in jedem Fall mit der Checkliste, falls nach der Inbetriebnahme oder während des Messbetriebs Störungen auftreten. Über verschiedene Abfragen werden Sie gezielt zur Fehlerursache und den entsprechenden Behebungsmaßnahmen geführt. Endress+Hauser Seite 21 5 1 Sicherheitshinweise Temperaturkopftransmitter 1 Sicherheitshinweise Ein sicherer und gefahrloser Betrieb des Temperaturkopftransmitters ist nur sichergestellt, wenn die Betriebsanleitung gelesen und die Sicherheitshinweise darin beachtet wurden. 1.1 Bestimmungsgemäße Verwendung • Das Gerät ist ein universeller, konfigurierbarer Temperaturtransmitter für Widerstandsthermometer (RTD),Thermoelemente (TC) sowie Widerstands- und Spannungsgeber. Das Gerät ist zur Montage im Anschlusskopf Form B und im Feldgehäuse vorgesehen. • Für Schäden aus unsachgemässem oder nicht bestimmungsgemässem Gebrauch haftet der Hersteller nicht. • Messsystemen, die im explosionsgefährdetem Bereich eingesetzt werden, liegt eine separate Ex-Dokumentation bei, die ein fester Bestandteil dieser Betriebsanleitung ist. Die darin aufgeführten Installationsvorschriften und Anschlusswerte müssen konsequent beachtet werden! 1.2 Montage, Inbetriebnahme, Bedienung Montage, Inbetriebnahme und Bedienung Das Gerät ist nach dem Stand der Technik betriebssicher gebaut und berücksichtigt die einschlägigen Vorschriften und EU-Richtlinien. Wenn es jedoch unsachgemäß oder nicht bestimmungsgemäß eingesetzt wird, können von ihm applikationsbedingte Gefahren ausgehen. Montage, Verdrahtung, Inbetriebnahme und Wartung des Gerätes dürfen nur durch ausgebildetes Fachpersonal erfolgen, das vom Anlagenbetreiber dazu autorisiert und eingewiesen wurde. Das Fachpersonal muss diese Betriebsanleitung gelesen, verstanden haben und deren Anweisungen unbedingt befolgen. Der Betreiber hat dafür Sorge zu tragen, dass das Messsystem gemäss den elektrischen Anschlussplänen korrekt angeschlossen ist. 1.3 Betriebssicherheit Bestimmungsgemäße Verwendung Betriebssicherheit Explosionsgefährdeter Bereich Bei Einsatz des Messsystems in explosionsgefährdeten Bereichen sind die entsprechenden nationalen Normen einzuhalten. Stellen Sie sicher, dass das Fachpersonal ausreichend ausgebildet ist. Die messtechnischen und sicherheitstechnischen Auflagen an die Messstellen sind einzuhalten. Technischer Fortschritt Der Hersteller behält sich vor, technische Daten ohne spezielle Ankündigung dem entwicklungstechnischen Fortschritt anzupassen. Über die Aktualität und eventuelle Erweiterungen der Betriebsanleitung erhalten Sie bei Ihrer Vertriebsstelle Auskunft. 1.4 Rücksendung 6 Rücksendung Bei Transportschäden informieren Sie bitte die Spedition und den Lieferanten. Endress+Hauser Temperaturkopftransmitter 2 Identifizierung 1.5 Sicherheitszeichen und Symbole " ! F = Ein einwandfreier und zuverlässiger Betrieb dieses Gerätes ist nur gewährleistet, wenn Sie die Sicherheitshinweise in dieser Betriebsanleitung beachten. Die in dieser Betriebsanleitung enthaltenen Sicherheitshinweise sind mit folgenden Symbolen belegt. Achtung! “Achtung” deutet auf Aktivitäten oder Vorgänge, die – wenn sie nicht ordnungsgemäß durchgeführt werden – zu fehlerhaftem Betrieb oder zur Zerstörung des Gerätes führen können. Hinweis! “Hinweis” deutet auf Aktivitäten oder Vorgänge, die – wenn sie nicht ordnungsgemäß durchgeführt werden – einen indirekten Einfluss auf den Betrieb haben, oder eine unvorhergesehene Gerätereaktion auslösen können. Explosionsgeschützte, baumustergeprüfte Betriebsmittel! Befindet sich dieses Zeichen auf dem Typenschild des Gerätes, kann das Gerät im explosionsgefährdeten Bereich eingesetzt werden. Sicherer Bereich (nicht explosionsgefährdeter Bereich)! Dieses Symbol kennzeichnet in den Zeichnungen dieser Bedienungsanleitung den nicht explosionsgefährdeten Bereich. Geräte im nicht explosionsgefährdeten Bereich müssen auch zertifiziert sein, wenn Anschlussleitungen in den explosionsgefährdeten Bereich führen. 2 2.1 Gerätebezeichnung Sicherheitszeichen und -symbole Identifizierung Gerätebezeichnung Vergleichen Sie die Typenschilder am Gerät mit den folgenden Abbildungen: Abb. 2-1: Typenschild des Kopftransmitters (beispielhaft) Abb. 2-2: Bestellcode mit Einstellung (beispielhaft) Abb. 2-3: Kennzeichnung für Ex-Bereich (beispielhaft, gültig nur bei Ex-Zulassung) Endress+Hauser 7 3 Montage Temperaturkopftransmitter CE-Zeichen, Konformitätserklärung Das Gerät ist nach dem Stand der Technik betriebsicher gebaut und geprüft und hat das Werk in sicherheitstechnisch einwandfreiem Zustand verlassen. Das Gerät berücksichtigt die einschlägigen Normen und Vorschriften nach EN 61 010 “Sicherheitsbestimmungen für elektrische Mess-, Steuer-, Regel- und Laborgeräte”. Das in dieser Betriebsanleitung beschriebene Gerät erfüllt somit die gesetzlichen Anforderungen der EU-Richtlinien. Der Hersteller bestätigt die erfolgreiche Prüfung des Gerätes mit der Anbringung des CE-Zeichens. 2.2 Lieferumfang Der Lieferumfang des Temperaturkopftransmitters besteht aus: • Kopftransmitter • Montageschrauben, -federn und Sicherungsringe • Betriebsanleitung pro Auftrag • ATEX-Betriebsanleitung für den Einsatz von ATEX-Geräten Lieferumfang ! Hinweis! Beachten Sie im Kap. 8 "Zubehör" die Zubehörteile des Kopftransmitters. 3 3.1 Einbaubedingungen Montage Einbaubedingungen • Die zulässige Umgebungstemperatur (siehe »Technische Daten« auf Seite 24) ist beim Einbau und im Betrieb einzuhalten. • Für den Einsatz im Ex-Bereich sind die Grenzwerte der Zertifikate und Zulassungen (siehe Zusatz-BA ATEX) einzuhalten. Einbaumaße Die Abmessungen des Kopftransmitters finden Sie in Kap. 10 "Technische Daten" Einbauort • Sensoranschlusskopf nach DIN 43 729 Form B • Feldgehäuse Einbaulage Es bestehen keine Einschränkungen bezüglich der Einbaulage. 8 Endress+Hauser Temperaturkopftransmitter 3 Montage 3.2 Einbau Gehen Sie beim Einbau des Gerätes wie folgt vor: Einbau Einbau in den Sensoranschlusskopf nach DIN 43 729 Form B (s. Abb. 3-1, links) • Führen Sie die Anschlussdrähte des Sensoreinsatzes (Pos. 5) durch die zentrale Bohrung im Kopftransmitter (Pos. 4). • Stecken Sie die Montagefedern (Pos. 3) auf die Montageschrauben (Pos. 2). • Führen Sie die Montageschrauben (Pos. 2) durch die Bohrungen des Kopftransmitters und die Bohrungen des Sensoreinsatzes (Pos. 5). Fixieren Sie beide Montageschrauben mit den Sicherungsringen (Pos. 6). • Positionieren Sie den Kopftransmitter im Anschlusskopf so, dass die Anschlussklemmen des Stromausgangs (Klemmen 1 und 2) zur Kabeldurchführung (Pos. 7) weisen. • Fixieren Sie anschliessend den Kopftransmitter (Pos. 4) mit dem Sensoreinsatz (Pos. 5) im Anschlusskopf. Einbau in das Feldgehäuse (s. Abb. 3-1, rechts) • Führen Sie die Montageschrauben (Pos. 2) mit den Montagefedern (Pos. 3) durch die Bohrungen des Kopftransmitters (Pos. 4). Fixieren Sie die Montageschrauben mit den Sicherungsringen (Pos. 5). • Schrauben Sie den Kopftransmitter mit einem Schraubendreher am Feldgehäuse fest. R-TMT187ZX-17-06-06-yy-002.eps Achtung! Ziehen Sie die Montageschrauben nicht zu fest an, um eine Beschädigung des Kopftransmitters zu vermeiden. R-TMT187ZX-17-06-06-yy-001.eps " Abb. 3-1: Einbau des Kopftransmitters in den Sensoranschlusskopf Form B (links) und in das Feldgehäuse (rechts) Endress+Hauser 9 4 Verdrahtung Temperaturkopftransmitter Verdrahtung 4.1 Verdrahtung auf einen Blick Klemmenbelegung R09-TMT182ZZ-04-06-xx-de-001.eps Verdrahtung auf einen Blick 4 Abb. 4-1: Verdrahtung des Kopftransmitters 4.2 Anschluss Messeinheit Anschluss Messeinheit 3 Achtung! Hilfsenergie ausschalten, bevor Sie die Abdeckung des Gehäuses öffnen. Gerät nicht unter Netzspannung installieren bzw. verdrahten. Ein Nichtbeachten kann zur Zerstörung von Teilen der Elektronik führen. 4.2.1 Sensoren Verdrahtung zwischen Sensorleitungen und Kopftransmitterklemmen (Klemmen 3 bis 6) gemäß der elektrischen Klemmenbelegung (s. Abb. 4-1) vornehmen. 4.2.2 Ausgangssignal und Spannungsversorgung Öffnen Sie die PG-Verschraubung der Kabeldurchführung am Anschlusskopf oder Feldgehäuse. Führen Sie die Leitungen durch die Öffnung der PG-Verschraubung und schliessen Sie die Leitungen an den Klemmen 1 und 2 gemäß Abb. 4-1 an. 2 Hinweis! Die Schrauben der Anschlussklemmen müssen festgedreht sein. 4.2.3 Anschluss HART® Der Anschluss erfolgt direkt über die 4...20 mA-Signalleitung (Abb. 4-1, Klemmen 1 und 2) oder über Kommunikationsbuchsen eines Speisegerätes oder -trenners (s. Abb. 4-2 und Abb. 4-3). Zum Anschluss des Transmitters in Ex-Ausführung beachten Sie bitte die separate ExDokumentation. 2 10 Hinweis! Der Messkreis muss eine Bürde von mindestens 250 Ω aufweisen. Bei den E+H Speisegeräten RNS 221 und RN 221N ist dieser Widerstand bereits im Gerät integriert und deshalb nicht erforderlich (s. Abb. 4-2, Pos. b und Abb. 4-3, Pos. b)! Endress+Hauser Temperaturkopftransmitter 4 Verdrahtung R09-TMT182ZZ-04-06-xx-xx-001.eps Anschluss HART®-Handbediengerät DXR 275 Abb. 4-2: Elektrischer Anschluss des HART®-Bediengerätes a = HART®-Bediengerät, a* = HART®-Bediengerät an den Kommunikationsbuchsen eines Speisegerätes, b = Hilfsenergie (z. B. Speisegerät RNS 221 oder Speisetrenner RN 221N), c = HART®Transmitter, d = SPS mit passivem Eingang Anschluss Commubox FXA 191 Hinweis! Stellen Sie hierzu den DIP-Schalter der Commubox auf ’HART®’! R09-TMT182ZZ-04-06-xx-xx-002.eps ! Abb. 4-3: Elektrischer Anschluss der Commubox FXA 191 a = Commubox FXA 191 (in Verbindung mit PC und E+H Bediensoftware ’Commuwin II’), a* = Commubox FXA 191 an den Kommunikationsbuchsen eines Speisegerätes, b = Hilfsenergie (z. B. Speisegerät RNS 221 oder Speisetrenner RN 221N), c = HART®-Transmitter, d = SPS mit passivem Eingang 4.3 ! Endress+Hauser Potenzialausgleich Hinweis! Bei abgesetzter Installation im Feldgehäuse ist Folgendes zu beachten: Die Schirmung der Ausgangsseite (Ausgangssignal 4...20 mA) muss das gleiche Potenzial haben wie die Schirmung der Sensoranschlussseite! Für eine effektive Schirmung muss der Kabelschirm mit dem Feldgehäuse grossflächig verbunden sein. Dies wird durch das Auflegen des Kabelschirms auf die speziellen EMV Kabelverschraubungen erreicht. 11 5 Bedienung Temperaturkopftransmitter Öffnen Sie die PG-Kabelverschraubungen des Feldgehäuses und schliessen Sie die Schirmung der Ausgangs- und der Sensoranschlussseite gemäß der Abbildung (s. Abb. 4-4) an. R-TAF10xxx-04-08-00-de-001.eps aaaaaaaa bbbbbbbb bbbbbbbb aaaaaaaa bbbbbbbb aaaaaaaa 5 5.1 Bei Einsatz von geerdeten Thermoelementen wird eine Schirmung der Ausgangsleitung (4-20 mA-Leitung) empfohlen. In stark EMV-gefährdeten Anlagen wird eine Schirmung aller Leitungen mit niederohmiger Anbindung am Einbaugehäuse des Transmitters empfohlen. Abb. 4-4: Schirmung bei abgesetzter Installation Bedienung Kommunikation Die Konfiguration des Temperaturkopftransmitters erfolgt mittels HART®-Protokoll. Die ermittelten Messwerte können ebenfalls über das HART®-Protokoll abgefragt werden. Dem Benutzer stehen zur Bedienung über die HART®-Kommunikation zwei Möglichkeiten zur Verfügung: • Bedienung über das universelle Handbediengerät “HART® Communicator DXR 275”. • Bedienung über den PC unter Verwendung einer Bediensoftware (z. B. Commuwin II) sowie eines HART®-Modems (“Commubox FXA 191”). 5.1.1 HART® Communicator DXR 275 Das Anwählen der Gerätefunktionen erfolgt beim “HART®-Communicator” über verschiedene Menüebenen sowie mit Hilfe einer speziellen HART®-Funktionsmatrix (s. Seite 14). ! Hinweis! • Mit dem HART®-Handbediengerät sind grundsätzlich alle Parameter lesbar, die Programmierung ist gesperrt. Sie können die HART®-Funktionsmatrix jedoch freigeben, indem Sie in der Funktion VERRIEGELUNG den Wert 281 eingeben. Der Freigabezustand bleibt auch nach einem Ausfall der Hilfsenergie erhalten. Durch Löschen der persönlichen Codezahl kann die HART®-Funktionsmatrix wieder gesperrt werden. • Ausführliche Informationen zum HART®-Handbediengerät finden Sie in der betreffenden Betriebsanleitung, die sich in der Transporttasche zum Handbediengerät befindet. 5.1.2 Commuwin II-Bedienprogramm Commuwin II ist ein universelles Programm für die Fernbedienung von Feld- und Schaltwartengeräten. Der Einsatz des Commuwin II-Bedienprogramms ist unabhängig vom Gerätetyp und der Kommunikationsart (HART® oder PROFIBUS®) möglich. Commuwin II bietet folgende Funktionen: • Parametrieren von Gerätefunktionen • Visualisieren von Messwerten • Datensicherung von Geräteparametern • Gerätediagnose • Messstellendokumentation 12 Endress+Hauser Temperaturkopftransmitter ! 6 Inbetriebnahme Hinweis! Ausführliche Informationen zu Commuwin II finden Sie in den E+H-Dokumentationen: • System Information: SI 018F/00/de “Commuwin II” • Betriebsanleitung: BA 124F/00/de “Commuwin II”-Bedienprogramm 6 Inbetriebnahme 6.1 Installations- und Funktionskontrolle Installationskontrolle Überprüfen Sie alle angeschlossenen Drähte auf festen Sitz. Um eine einwandfreie Funktion zu gewährleisten, müssen die Schrauben der Anschlussklemmen festgedreht sein. Funktionskontrolle Messung des analogen 4-20 mA Ausgangssignals oder folgende Ausfallsignale: Messbereichsunterschreitung linearer Abfall bis 3,8 mA Messbereichsüberschreitung linearer Anstieg bis 20,5 mA Fühlerbruch; Fühlerkurzschluss 1 ≤ 3,6 mA oder ≥ 21,0 mA 1. 6.2 nicht für Thermoelemente Inbetriebnahme Nach Anlegen der Versorgungsspannung ist der Kopftransmitter im Messbetrieb. Inbetriebnahme 6.2.1 Quick-Setup Mit Hilfe des Quick-Setups werden Sie systematisch durch alle wichtigen Gerätefunktionen geführt, die für den standardmäßigen Messbetrieb einzustellen und zu konfigurieren sind. Mit dem HART®-Handbediengerät ist ein Quick-Setup über die in der HART®-Funktionsmatrix (s. Abb. 6-2) schwarz markierten Felder möglich. In der Bedienmatrix COMMUWIN II (s. Abb. 6-3) wird über nachfolgende Felder ein Quick-Setup durchgeführt: V2H0, V2H2, V2H4, V2H5, V2H6. 6.2.2 Konfiguration mit HART® -Protokoll Handbediengerät DXR 275 ! Hinweis! Das Anwählen aller Kopftransmitterfunktionen erfolgt beim HART®-Handbediengerät über verschiedene Menüebenen mit Hilfe der E+H-Funktionsmatrix (s. Abb. 6-2). Alle Kopftransmitterfunktionen sind in 6.2.3 "Beschreibung Gerätefunktionen" beschrieben. Vorgehensweise: 1. Handbediengerät einschalten: – Messgerät ist noch nicht angeschlossen. Das HART®-Hauptmenü erscheint. Diese Menüebene erscheint bei jeder HART®-Programmierung, d.h. unabhängig vom Messgerätetyp. Informationen zur Offline-Parametrierung finden Sie in der Handbediengerät “Communicator DXR 275” Betriebsanleitung. Endress+Hauser 13 6 Inbetriebnahme Temperaturkopftransmitter 2. 3. 4. R09-TMT182-02-06-xx-de-002.eps 5. – Messgerät ist bereits angeschlossen. Es erscheint direkt die Menüebene “Online”. In der Menüebene “Online” werden die aktuellen Messdaten wie Messwert (PV) und Ausgangsstrom (AO) laufend angezeigt. Über die Zeile “Matrix Parameter” gelangen Sie in die Kopftransmitter-Funktionsmatrix (s. Seite 14). In dieser Matrix sind alle unter HART® zugänglichen Funktionen systematisch angeordnet. Über “Matrix Parameter” wählen Sie die Funktionsgruppe aus (z.B. Grundabgleich) und danach die gewünschte Funktion, z.B. “Sensor Eingang”. Zahlenwert eingeben bzw. Einstellung ändern. Danach mit Funktionstaste F4 “Eing” bestätigen. Über der Funktionstaste “F2” erscheint “SENDE”. Durch Drücken der F2-Taste werden alle mit dem Handbediengerät eingegebenen Werte auf das KopftransmitterMesssystem übertragen. Mit der HEIM-Funktionstaste “F3” gelangen Sie zurück zur Menüebene “Online”. Hier können Sie die aktuellen Werte ablesen, die der Transmitter mit den neuen Einstellungen misst. Abb. 6-1: Konfiguration am Handbediengerät am Beispiel "Sensoreingang" R09-TMT182-02-06-xx-de-001.eps HART®-Funktionsmatrix Abb. 6-2: HART®-Funktionsmatrix 14 Endress+Hauser Temperaturkopftransmitter 6 Inbetriebnahme COMMUWIN II Bedienmatrix Abb. 6-3: COMMUWIN II Bedienmatrix: A = Gerätefunktionen nur bei kundenspez. Linearisierung B = Gerätefunktionen nur bei TC-Anschluss aktiv C = Gerätefunktion nur bei RTD-2-Draht-Anschluss aktiv. ! Hinweis! Bei Auftreten von Kommunikationsfehlern im Betriebssystem Microsoft® Windows NT® Version 4.0 ist folgende Maßnahme zu ergreifen: Ausschalten der Einstellung "FIFO aktiviert". Gehen Sie dazu folgendermaßen vor: • Wählen Sie über das Menü ’START’ → ’EINSTELLUNGEN’ → ’SYSTEMSTEUERUNG’ → ’ANSCHLÜSSE’ den Menüpunkt ’COM-Port’ aus. Schalten Sie über den Menüpfad ’EINSTELLUNGEN → ’ERWEITERT’ den Befehl "FIFO aktiviert" aus. Endress+Hauser 15 6 Inbetriebnahme Temperaturkopftransmitter 6.2.3 Beschreibung Gerätefunktionen In der folgenden Tabelle sind alle Funktionen der HART®-Funktionsmatrix, die für die Konfiguration des Temperaturtransmitters abgelesen und parametriert werden können, aufgelistet und beschrieben. ! Hinweis! wird die von der Werkseinstellungen sind in fetter Schrift dargestellt. Mit dem Symbol COMMUWIN II-Matrix abweichende Display-Anzeige des HART®-Bediengerätes (DXR 275) dargestellt. 3 Funktionsgruppe: ARBEITSPARAMETER 1. Prozesswert • V0H0 • 3 PV (Messwert) interne Temperatur • V0H1 Anzeige der aktuell gemessenen Temperatur. Anzeige: 7-stellige Gleitpunktzahl, zzgl. Einheit (z.B. 199.98 Ohm; -62.36 Grd. C) Anzeige der aktuell gemessenen Temperatur der internen Vergleichsmessstelle. ! Hinweis! Anzeige: 7-stellige Gleitpunktzahl, zzgl. Einheit (z.B. 23,70 Grd. C)1 Filter Zeitkonstante • V0H2 Auswahl des digitalen Filters 1. Ordnung. Eingabe: 0...100 Sekunden 0 sec. Vergleichsstelle • V0H3 Auswahl der internen (Pt100) oder externen Vergleichsmessstelle. Eingabe: intern; extern intern Hinweis! Eingabe nur möglich bei Auswahl eines Thermoelementes (TC) in der Gerätefunktion SENSORTYP.1 Ext. Vergleichswert • V0H4 ! Eingabe des ext. Vergleichsstellenmesswertes. Eingabe: -40,00...85,00 °C (°C, °F, K) 0 °C ! Hinweis! Eingabe nur möglich bei Auswahl einer externen Vergleichsmessstelle in der Gerätefunktion VERGLEICHSSTELLE. OFFSET • V0H5 Eingabe der Nullpunktkorrektur (Offset). Eingabe: -10,00...10,00 °C (°C, °F, K) 0,00 °C ! Hinweis! Eingegebener Wert wird bei Änderung des Sensortyps auf die Werkseinstellung zurückgesetzt! 16 Endress+Hauser Temperaturkopftransmitter 6 Inbetriebnahme Funktionsgruppe: GRUNDABGLEICH Sensortyp • V2H0 Eingabe des verwendeten Sensortyps: Sensortyp Messber.-anfang -10..75 mV -10 mV 10..400 Ohm 10 Ω 10..2000 Ohm 10 Ω Pt100 DIN -200 °C Pt100 JIS -200 °C Pt500 -200 °C Pt1000 -200 °C Ni100 -60 °C Ni500 -60 °C Ni1000 -60 °C Polynom RTD -270 °C Typ B 0 °C Typ C 0 °C Typ D 0 °C Typ E -270 °C Typ J -210 °C Typ K -270 °C Typ L -200 °C Typ N -270 °C Typ R -50 °C Typ S -50 °C Typ T -270 °C Typ U -200 °C Polynom TC -270 °C Pt100 DIN Temp.-Kompensat. • V2H1 Auswahl Temperaturkompensation der Vergleichsstelle bei kundenspezifischer Linearisierung Polynom TC Eingabe: ohne, Typ B, Typ C, Typ D, Typ E, Typ J, Typ K, Typ L, Typ N, Typ R, Typ S, Typ T, Typ U ohne Einheit Messwert • V2H2 Eingabe der Messwerteinheit. Eingabe: (°C, °F oder K) °C Stromausgang • V2H3 Eingabe des standard (4-20 mA) oder inversen (20-4 mA) Stromausgangssignals. Eingabe: 4-20 mA 20-4 mA 4-20 mA Wert für 4 mA • V2H4 Eingabe: Grenzwerte siehe Gerätefunktion SENSORTYP. 0 °C Wert für 20 mA • V2H5 Eingabe: Grenzwerte siehe Gerätefunktion SENSORTYP. 100 °C Anschlussart • V2H6 Eingabe der RTD Anschlussart Eingabe: 2-Leiter 3-Leiter 4-Leiter 3-Leiter • 3 RTD Anschlussart Messber.-endwert 75 mV 400 Ω 2000 Ω 850 °C 649 °C 250 °C 250 °C 180 °C 150 °C 150 °C 2500 °C 1820 °C 2320 °C 2495 °C 1000 °C 1200 °C 1372 °C 900 °C 1300 °C 1768 °C 1768 °C 400 °C 600 °C 2500 °C ! Hinweis! Funktionsfeld ist nur bei Auswahl eines Widerstandsthermometers (RTD) in der Gerätefunktion SENSORTYP (V2H0) aktiv1. Endress+Hauser 17 6 Inbetriebnahme Temperaturkopftransmitter 2-Leiter Kompensation • V2H7 Eingabe der Leitungswiderstandskompensation bei RTD 2-Leiterschaltung. Eingabe: 0,00...30,00 Ohm 0,00 Ohm ! Hinweis! Funktionsfeld ist nur bei Auswahl einer 2-Leiterschaltung in der Gerätefunktion ANSCHLUSSART (V2H6) aktiv1. Fehlerverhalten • V2H8 Eingabe des Ausfallsignals bei Fühlerbruch2 oder -kurzschluss. Eingabe: max (≥ 21,0 mA) min (≤ 3,6 mA) max Funktionsgruppe: LINEARISIERUNG (3 USER LINEAR.) Die Funktionsfelder sind nur bei Auswahl einer kundenspezifischen Linearisierung (Polynom RTD oder Polynom TC) in der Gerätefunktion SENSORTYP (V2H0) aktiv1. Koeffizient X0 • V3H0 Eingabe des ersten Koeffizienten der kundenspezifischen Linearisierung (Polynom 4. Grades mit fünf Koeffizienten), s. Kap. 6.2.4. Koeffizient X1 • V3H1 Eingabe KOEFFIZIENT X1, s. Kap. 6.2.4. Koeffizient X2 • V3H2 Eingabe KOEFFIZIENT X2, s. Kap. 6.2.4. Koeffizient X3 • V3H3 Eingabe KOEFFIZIENT X3, s. Kap. 6.2.4. Koeffizient X4 • V3H4 Eingabe KOEFFIZIENT X4, s. Kap. 6.2.4. Funktionsgruppe: SERVICE Fehlercode • V9H0 Anzeige des aktuellen Fehlercodes, siehe »Applikationsfehlermeldungen« auf Seite 21 0 Letzter Diagnose Code • V9H1 Anzeige des vorhergehenden Fehlercodes. Anzeige: siehe »Applikationsfehlermeldungen« auf Seite 21 0 • 3 Letzter Fehlercode Einst. geaendert • V9H2 Parameteränderung erfolgt. Anzeige: ja/nein nein Min. Prozesswert • V9H3 Anzeige des min. Prozesswertes. Der Prozesswert wird nach Beginn der Messung übernommen. ! Hinweis! Min. Prozesswert wird bei Schreibzugriff auf den aktuellen Prozesswert geändert. Bei Rücksetzung auf Werkseinstellung wird der Defaultwert eingetragen. +10000 18 Endress+Hauser Temperaturkopftransmitter 6 Inbetriebnahme Anzeige des max. Prozesswertes. Der Prozesswert wird nach Beginn der Messung übernommen. Max. Prozesswert • V9H4 ! Hinweis! Max. Prozesswert wird bei Schreibzugriff auf aktuellen Prozesswert geändert. Bei Rücksetzung auf Werkseinstellung wird der Defaultwert eingetragen. -10000 Eingabe: 182 (Reset auf Werkseinstellung) 0 Werkswerte • V9H5 • 3 Werkseinstellung Ausgangsstrom • V9H6 Anzeige des aktuellen Ausgangsstromsignals. Simulation • V9H7 Eingabe des Simulationsmodus. Eingabe: Aus Ein Aus Ausg.strom (Sim.) • V9H8 Eingabe des Simulationswertes (Strom). Eingabe: 3.58...21.7 mA Verriegelung • V9H9 Freigabecode für Parametrierung. Eingabe: Verriegelung = 0 Freigabe = 281 281 Funktionsgruppe: BENUTZER INFORMATION Messstelle • VAH0 Eingabe und Anzeige der Messstellenbezeichnung (TAG). Eingabe: 8 Zeichen - Anlagenkennzeichnung • VAH1 Eingabe und Anzeige der Anlagenbezeichnung. Eingabe: 16 Zeichen - • 3 Beschreibung Hardware Version • VAH2 Anzeige der Geräteversion z. B.: 1.0000 entspricht einer Version 1.00.00 Software Version • VAH3 Anzeige der Softwareversion z. B.: 8010 entspricht einer Version 1.0 • 3 Software Rev. Seriennummer • VAH4 1. 2. Endress+Hauser 8-stellige Anzeige der E+H Geräte Seriennummer (vgl. Typenschild auf dem Gerät). Hinweis gilt nur für COMMUWIN II-Bedienmatrix nicht für Thermoelemente (TC) 19 7 Wartung Temperaturkopftransmitter 6.2.4 Konfiguration mit HART®-Protokoll und ReadWin® 2000 PC-Konfigurationssoftware ReadWin® 2000 Die Konfiguration des Kopftransmitters erfolgt, neben dem HART® - Protokoll, mit der PC-Konfigurationssoftware ReadWin® 2000. Folgende Tabelle zeigt die Struktur der menügeführten Bedienung von ReadWin® 2000. Konfigurierbare Parameter (Beschreibung Gerätefunktionen s. Kap. 6.2.3) Standardeinstellungen – – – – – – – Sensortyp Anschlussart (2-,3-, oder 4-Leiteranschluss bei RTD) Messeinheit (°C, °F oder K) Messbereichsanfang Messbereichsendwert Koeffizient X0 bis X4 (bei Sensortyp Polynom RTD/TC) Temp.-Kompensation (bei Sensortyp Polynom TC) Erweiterte Einstellungen – – – – – – – – – Vergleichsstelle intern/extern (bei TC) Temperatur extern (bei TC mit Vergleichsstelle extern) Kompensation Leitungswiderstand (bei RTD 2-Leiteranschluss) Fehlerverhalten Ausgang (4 bis 20 mA/20 bis 4 mA) Dämpfung (Filter) Offset TAG (Messstellenbezeichnung) Beschreibung (Descriptor) Servicefunktionen – – – – Simulation (ein/aus) Reset/Werkswerte Seriennummer (nur Anzeige) Bediencode (=Freigabecode 281) Ausführliche Informationen zur Bedienung über ReadWin® 2000 finden Sie in der Online-Dokumentation der Software. ReadWin® 2000 kann kostenlos direkt vom Internet unter folgender Adresse geladen werden: • www.endress.com/Readwin Menügeführte Einstellung des Temperaturtransmitters Die kundenspezifische Linearisierung und die Kennlinienanpassung (Sensor matching) wird mit Hilfe der Konfigurationssoftware SMC32.exe (Sensor Matching Calibration) durchgeführt. Die PC-Konfigurationssoftware ReadWin® 2000 und das Programm SMC32.exe stehen kostenlos unter www.endress.com/Readwin zum Download zur Verfügung. Das Programm SMC32.exe berechnet die Linearisierungskoeffizienten X0 bis X4, die anschließend dem HART® Transmitter in der COMMUWIN II Bedienmatrix, im HART®- Handbediengerät DXR 275 oder in ReadWin® 2000 eingegeben werden. ! Hinweis! Für die PC-Konfigurationssoftware ReadWin® 2000 ist die Integration des Programms SMC32.exe und ein Quick-Setup, in dem alle Parameter auf einen Blick dargestellt werden, geplant. 7 Wartung 20 Wartung Der Kopftransmitter ist wartungsfrei. Endress+Hauser Temperaturkopftransmitter 8 Zubehör 8 Zubehör Zubehör Commubox FXA 191, PC-Bediensoftware COMMUWIN II, ReadWin® 2000. Für Bestellungen (z. B. Ersatzteile) kontaktieren Sie bitte Ihren Lieferanten. 9 9.1 Störungsbehebung Fehlersuchanleitung Beginnen Sie die Fehlersuche in jedem Fall mit den nachfolgenden Checklisten, falls nach der Inbetriebnahme oder während des Messbetriebs Störungen auftreten. Über verschiedene Abfragen werden Sie gezielt zur Fehlerursache und den entsprechenden Behebungsmaßnahmen geführt. 9.2 Applikationsfehlermeldungen Endress+Hauser Applikationsfehlermeldungen Applikationsfehlermeldungen werden auf dem Display des HART®-Handbediengerät "DXR 275" nach Anwählen des Menüpunktes "FEHLERCODE" oder in der PC-Bedienoberfläche von COMMUWIN II (V9H0 - FEHLERCODE) angezeigt. Fehlercode Ursache Aktion/Behebung 0 kein Fehler, Warnung keine 10 Hardware Fehler (Gerät defekt) Kopftransmitter ersetzen 11 Sensor Kurzschluss Sensor überprüfen 12 Sensor Leitungsbruch Sensor überprüfen 13 Referenzmessstelle defekt keine 14 Gerät nicht kalibriert Kopftransmitter zurück an den Lieferanten 106 Up-/Download aktiv Keine (wird automatisch quittiert) 201 Warnung: Messwert zu klein Andere Werte für Messber.anfang eingeben 202 Warnung: Messwert zu groß Andere Werte für Messber.-endwert eingeben 203 Gerät wird rückgesetzt (auf Werkseinstellungen) Keine 21 9 Störungsbehebung Temperaturkopftransmitter 9.3 Applikationsfehler Applikationsfehler ohne Meldungen Applikationsfehler allgemein Fehlerbild Ursache Aktion/Behebung Keine Kommunikation Keine Stromversorgung über die 2-Draht-Leitung Anschlussleitungen nach Klemmenplan richtig anschließen (Polarität) Versorgungsspannung zu niedrig (<10 V) Spannungsversorgung überprüfen Schnittstellenkabel defekt Schnittstellenkabel überprüfen Schnittstelle defekt Schnittstelle Ihres PC’s überprüfen Kopftransmitter defekt Kopftransmitter erneuern Applikationsfehler für RTD-Anschluss (Pt100/Pt500/Pt1000/Ni100) 22 Fehlerbild Ursache Aktion/Behebung Fehlerstrom (≤ 3,6 mA oder ≥ 21 mA) Sensor defekt Sensor überprüfen Anschluss des RTD’s falsch Anschlussleitungen richtig anschließen (Klemmenplan) Anschluss der 2-Draht-Leitung falsch Anschlussleitungen nach Klemmenplan richtig anschließen (Polarität) Transmitterprogrammierung ist fehlerhaft (Leiter-Anzahl) Gerätefunktion ANSCHLUSSART (s. Kap. 6.2.3) ändern Programmierung Falscher Sensortyp in der Gerätefunktion SENSORTYP (s. Kap. 6.2.3) eingestellt; auf richtigen Sensortyp ändern Kopftransmitter defekt Kopftransmitter erneuern Fehlerbild Ursache Aktion/Behebung Messwert ist falsch/ungenau Einbaulage des Sensors ist fehlerhaft Sensor richtig einbauen Ableitwärme über den Sensor Einbaulänge des Sensors beachten Transmitterprogrammierung ist fehlerhaft (Leiter-Anzahl) Parameter ‘Anschlussart’ ändern Transmitterprogrammierung ist fehlerhaft (Skalierung) Skalierung ändern Falscher RTD eingestellt Parameter ‘Sensortyp’ ändern Anschluss des Sensors (2-Leiter) Anschluss des Sensors überprüfen Leitungswiderstand des Sensors (2-Leiter) wurde nicht kompensiert Leitungswiderstand kompensieren Offset falsch eingestellt Offset überprüfen Endress+Hauser Temperaturkopftransmitter 9 Störungsbehebung Applikationsfehler für TC-Anschluss Fehler Ursache Aktion/Behebung Fehlerstrom (≤ 3,6 mA oder ≥ 21 mA) Sensor falsch angeschlossen Sensor nach Klemmenplan anschließen (Polarität) Sensor defekt Sensor erneuern Programmierung Falscher Sensortyp in der Gerätefunktion SENSORTYP (s. Kap. 6.2.3) eingestellt; richtiges Thermoelement einstellen Kopftransmitter defekt Kopftransmitter erneuern Einbaulage des Sensors ist fehlerhaft Sensor richtig einbauen Ableitwärme über den Sensor Einbaulänge des Sensors beachten Transmitterprogrammierung fehlerhaft (Skalierung) Skalierung ändern Falscher Thermoelementtyp ist eingestellt Parameter ‘Sensortyp’ ändern Falsche Vergleichsmessstelle eingestellt siehe Kap. ‘Bedienung’ und ‘Techn. Daten’ Offset falsch eingestellt Offset überprüfen Störungen über den im Schutzrohr angeschweißten Thermodraht (Einkopplung von Störspannungen) Sensor verwenden, bei dem der Thermodraht nicht angeschweißt ist Messwert ist falsch/ungenau 9.4 Ersatzteile Montagesatz für Kopftransmitter (4 Schrauben, 6 Federn, 10 Sicherungsringe) Bestell-Nr.: 510 01112 9.5 Rücksendung Endress+Hauser Rücksendung Bei Rücksendung des Gerätes zur Überprüfung legen Sie bitte eine Notiz mit der Beschreibung des Fehlers und der Anwendung bei. 9.6 Entsorgung Ersatzteile Entsorgung Der Temperaturkopftransmitter ist aufgrund seines Aufbaus nicht reparierbar. Für eine spätere Entsorgung beachten Sie bitte die örtlichen Vorschriften. 23 10 Technische Daten Temperaturkopftransmitter 10 Technische Daten Arbeitsweise und Systemaufbau Messprinzip Elektronische Erfassung und Umformung von Eingangssignalen in der industriellen Temperaturmessung. Messeinrichtung Der Temperaturkopftransmitter iTEMP® HART® TMT 182 ist ein Zweidrahtmessumformer mit Analogausgang, Messeingang für Widerstandsthermometer und Widerstandsgeber in 2-, 3-, oder 4-Leiteranschluss, Thermoelemente und Spannungsgeber. Die Einstellung des TMT 182 erfolgt über HART® -Protokoll mit Handbediengerät (DXR 275) oder PC (COMMUWIN II). Eingangskenngrößen Messgröße Temperatur (temperaturlineares Übertragungsverhalten), Widerstand und Spannung Messbereich Je nach Sensoranschluss und Eingangssignalen erfasst der Transmitter unterschiedliche Messbereiche. Eingangssignale Bezeichnung Widerstandsthermometer (RTD) min. Messspanne Messbereichsgrenzen Pt100 Pt500 Pt1000 nach IEC 751 -200 bis 850 °C(-328 bis 1562 °F) -200 bis 250 °C(-328 bis 482 °F) -200 bis 250 °C(-328 bis 482 °F) 10 K 10 K 10 K Ni100 Ni500 Ni1000 nach DIN 43760 -60 bis 250 °C (-76 bis 482 °F) -60 bis 150 °C (-76 bis 302 °F) -60 bis 150 °C (-76 bis 302 °F) 10 K 10 K 10 K • Anschlussart: 2-, 3- oder 4-Leiteranschluss • Bei 2-Leiteranschluss Software-Kompensation des Leitungswiderstandes möglich (0...30 Ω). • Bei 3-, 4-Leiteranschluss Sensorleitungswiderstand bis max. 11 Ω je Leitung • Sensorstrom ≤ 0,2 mA Widerstandsgeber 24 Widerstand (Ω) 10... 400 Ω 10...2000 Ω 10 Ω 100 Ω Endress+Hauser Temperaturkopftransmitter 10 Technische Daten Bezeichnung Thermoelemente (TC) B (PtRh30-PtRh6) C (W5Re-W26Re)1 D (W3Re-W25Re)1 E (NiCr-CuNi) J (Fe-CuNi) K (NiCr-Ni) L (Fe-CuNi)2 N (NiCrSi-NiSi) R (PtRh13-Pt) S (PtRh10-Pt) T (Cu-CuNi) U (Cu-CuNi)2 nach IEC 584 Teil 1 Messbereichsgrenzen 0 bis +1820 °C (32 bis 3308 °F) 0 bis +2320 °C (32 bis 4208 °F) 0 bis +2495 °C (32 bis 4523 °F) -270 bis +1000 °C (-454 bis 1832 °F) -210 bis +1200 °C (-346 bis 2192 °F) -270 bis +1372 °C (-454 bis 2501 °F) -200 bis +900 °C (-328 bis 1652 °F) -270 bis +1300 °C (-454 bis 2372 °F) -50 bis +1768 °C (-58 bis 3214 °F) -50 bis +1768 °C (-58 bis 3214 °F) -270 bis +400 °C (-454 bis 752 °F) -200 bis +600 °C (-328 bis1112 °F) min. Messspanne 500 K 500 K 500 K 50 K 50 K 50 K 50 K 50 K 500 K 500 K 50 K 50 K • Vergleichsstelle: intern (Pt100) • Vergleichsstellengenauigkeit: ±1K Spannungsgeber (mV) Millivoltgeber (mV) -10...75 mV 5 mV Ausgangskenngrößen Ausgangssignal analog 4...20 mA, 20...4 mA Übertragungsverhalten temperaturlinear, widerstandslinear, spannungslinear Ausfallsignal (Fehlerüberwachung) • Messbereichsunterschreitung: linearer Abfall bis 3,8 mA • Messbereichsüberschreitung: linearer Anstieg bis 20,5 mA • Fühlerbruch; -kurzschluss3: ≤ 3,6 mA oder ≥ 21,0 mA Bürde (VVersorgung - 10 V) / 0,022 A (Stromausgang) Filter Digitales Filter 1. Ordnung: 0...60 s Eigenstrombedarf ≤ 3,5 mA Strombegrenzung ≤ 23 mA Einschaltverzögerung 4 s (während Einschaltvorgang Ia = 3,8 mA) Galvanische Trennung (Eingang/Ausgang) U = 2 kV AC Hilfsenergie Endress+Hauser Elektrische Anschlüsse siehe Kapitel 4 "Verdrahtung" Versorgungsspannung Ub = 10...35 V, Verpolungsschutz Restwelligkeit Zul. Restwelligkeit Uss ≤ 3 V bei Ub ≥ 13 V, f max. = 1 kHz 25 10 Technische Daten Temperaturkopftransmitter Messgenauigkeit Antwortzeit 1s Referenzbedingungen Kalibriertemperatur 23 °C ± 5 K Widerstandsthermometer RTD: Bezeichnung: Pt100, Ni100 Pt500, Ni500 Pt1000, Ni1000 Messgenauigkeit:4 0,2 K oder 0,08% 0,5 K oder 0,20% 0,3 K oder 0,12% Thermoelemente TC: Bezeichnung: K, J, T, E, L, U N, C, D S, B, R Messabweichung Messgenauigkeit: typ. 0,5 K oder 0,08%4 typ. 1,0 K oder 0,08%4 typ. 2,0 K oder 0,08%4 Widerstandsgeber (Ω): Messgenauigkeit:4 ± 0,1 Ω oder 0,08% ± 1,5 Ω oder 0,12% Messbereich: 10... 400 Ω 10...2000 Ω Spannungsgeber (mV) Messgenauigkeit:4 ± 20 µV oder 0,08% Messbereich: -10...75 mV Einfluss der Versorgungsspannung ≤ ±0,01%/V Abweichung von 24 V5 Einfluss der Umgebungstemperatur (Temperaturdrift) • Widerstandsthermometer (RTD): Td = ± (15 ppm/K * max. Messbereich + 50 ppm/K * eingestellter Messbereich) * ∆ ϑ • Widerstandsthermometer Pt100: Td = ± (15 ppm/K * (Messbereichsendwert + 200) + 50 ppm/K * eingestellter Messbereich) * ∆ ϑ • Thermoelement (TC): Td = ± (50 ppm/K * max. Messbereich + 50 ppm/K * eingestellter Messbereich) * ∆ ϑ ∆ ϑ = Abweichung der Umgebungstemperatur von der Referenzbedingung. Langzeitstabilität ≤ 0,1 K/Jahr6 oder ≤ 0,05%/Jahr4 Einfluss der Bürde ≤ ±0,02%/100 Ω5 Einfluss der Vergleichsstelle Pt100 DIN IEC 751 Kl. B (interne Vergleichsstelle bei Thermoelementen TC) 6 Einsatzbedingungen (Einbaubedingungen) Einbauhinweise • Einbaulage: keine Einschränkungen • Einbauposition: Anschlusskopf nach DIN 43 729 Form B; Feldgehäuse TAF 10 Einsatzbedingungen (Umgebungsbedingungen) 26 Umgebungstemperatur −40...+85 °C (für Ex-Bereich siehe Ex-Zertifikat) Lagerungstemperatur -40...+100 °C Klimaklasse nach EN 60 654-1, Klasse C Betauung zulässig Endress+Hauser Temperaturkopftransmitter 10 Technische Daten Schutzart IP 00, IP 66 eingebaut Stoß- und Schwingungsfestigkeit 4g / 2...150 Hz nach IEC 60 068-2-6 Elektromagnetische Verträglichkeit (EMV) Störfestigkeit und Störaussendung nach EN 61 326-1 (IEC 1326) und NAMUR NE 21. Konstruktiver Aufbau Abmessungen in mm Gewicht ca. 40 g Werkstoffe • Gehäuse Messumformer: PC • Vergussmaterial: PUR Anschlussklemmen Leitungen bis max. 1,75 mm 2 (Schrauben unverlierbar) R09-TMT182ZZ-06-06-xx-xx-001.eps Bauform, Maße Anzeige- und Bedienoberfläche Fernbedienung • Konfiguration: Handbediengerät DXR 275 oder PC mit Commubox FXA 191 und Bediensoftware, z. B. COMMUWIN II • Schnittstelle PC-Schnittstelle RS232 und Commubox FXA 191 • Konfigurierbare Parameter Sensortyp und Anschlussart, Messdimension (°C/°F), Messbereiche, interne/externe Vergleichsstelle, Kompensation des Leitungswiderstands bei 2-Leiteranschluss, Fehlerverhalten, Ausgangssignal (4...20/ 20...4 mA), digitales Filter (Dämpfung), Offset, Messstellenbezeichnung + Descriptor (8 + 16 Zeichen), Ausgangssimulation, kundenspezifische Linearisierung, Erfassung min./max. Prozesswert Zertifikate und Zulassungen Ex-Zulassung Über die aktuell lieferbaren Ex-Ausführungen (ATEX, FM, CSA) erhalten Sie bei Ihrer E+H-Vertriebsstelle Auskunft. Alle für den Explosionsschutz relevanten Daten finden Sie in separaten Dokumentationen, die Sie bei Bedarf ebenfalls anfordern können. CE-Zeichen Das Gerät erfüllt die gesetzlichen Anforderungen aus den EU-Richtlinien. Endress+Hauser bestätigt die erfolgreiche Prüfung des Gerätes mit der Anbringung des CE-Zeichens. Ergänzende Dokumentationen Ergänzende Dokumentationen 1. 2. 3. 4. 5. 6. Endress+Hauser • System Information: Temperaturkopftransmitter (SI 008R/09/de) • Technische Information: iTEMP® HART® TMT 182 (TI 078R/09/de) • Ex-Zusatzdokumentation: ATEX, CSA, FM, usw. nach ASTM E988 nach DIN 43710 nicht für Thermoelemente (TC) % beziehen sich auf die eingestellte Messspanne. Der grössere Wert ist gültig. Alle Angaben beziehen sich auf den Messbereichsendwert unter Referenzbedingungen 27 11 Anhang Temperaturkopftransmitter 11 Anhang 11.1 Arbeitsweise und Systemaufbau 11.1.1 Funktionsweise Funktionsweise Elektronische Erfassung und Umformung von verschiedenen Eingangssignalen in ein analoges Ausgangssignal in der industriellen Temperaturmessung. Der Kopftransmitter wird im Anschlusskopf Form B oder abgesetzt vom Sensor in ein Feldgehäuse eingebaut. Die Einstellung des Gerätes erfolgt über das HART®-Protokoll mit Handbediengerät (DXR 275) oder PC (COMMUWIN II). 11.1.2 Messsystem Messsystem Umformung folgender Eingangssignale: • Widerstandsthermometer (RTD) und Widerstandsgeber in 2-,3- oder 4-Leiteranschluss • Thermoelemente (TC) und Spannungsgeber in ein skalierbares, analoges Ausgangssignal (4...20 mA oder 20...4 mA). Fehlerüberwachung bei: • Messbereichsüber- bzw. unterschreitung • Fühlerbruch und -kurzschluss1 Der Einsatz im Ex-Bereich ist nach Zulassung ATEX II 1 G EEx ia IIC T4/T5/T6 zulässig. 1. Nicht für Thermoelemente (TC) 28 Endress+Hauser Temperaturkopftransmitter Index Index H 4...20 mA-Signalleitung . . . . . . . . . . . . . . . . . . . . . . 10 HART®-Funktionsmatrix . . . . . . . . . . . . . . . 12, 14, 16 HART®-Handbediengerät DXR 275 . . . . . . . . . . 11, 13 HART®-Protokoll . . . . . . . . . . . . . . . . . . . . . . . . . . . . 12 Hilfsenergie . . . . . . . . . . . . . . . . . . . . . . . . . . . . . . . . 25 A K Numerics Anzeige- und Bedienoberfläche . . . . . . . . . . . . . . . Applikationsfehler allgemein . . . . . . . . . . . . . . . . . . Applikationsfehler für RTD-Anschlus . . . . . . . . . . . . Applikationsfehler für TC-Anschluss . . . . . . . . . . . . Arbeitsweise und Systemaufbau . . . . . . . . . . . . . . . Ausgangskenngrößen . . . . . . . . . . . . . . . . . . . . . . . 27 22 22 23 24 25 B Kennlinienanpassung . . . . . . . . . . . . . . . . . . . . . . . . 20 Klemmenbelegung . . . . . . . . . . . . . . . . . . . . . . . . . . 10 Kommunikationsbuchsen . . . . . . . . . . . . . . . . . 10, 11 Konformitätserklärung . . . . . . . . . . . . . . . . . . . . . . . . . 8 Konstruktiver Aufbau . . . . . . . . . . . . . . . . . . . . . . . . . 27 Kopftransmitter . . . . . . . . . . . . . . . . . . . . . . . . . . . . . . 8 kundenspezifische Linearisierung . . . . . . . . . . . . . . 20 Kurzanleitung . . . . . . . . . . . . . . . . . . . . . . . . . . . . . . . 5 Behebungsmaßnahmen . . . . . . . . . . . . . . . . . . . . . . 21 Bürde . . . . . . . . . . . . . . . . . . . . . . . . . . . . . . . . . . . . 11 M C CE-Zeichen . . . . . . . . . . . . . . . . . . . . . . . . . . . . . . . . 8 Commubox FXA 191 . . . . . . . . . . . . . . . . . . . . . . . . 11 COMMUWIN II Bedienmatrix . . . . . . . . . . . . . . . . . . 15 Commuwin II-Bedienprogramm . . . . . . . . . . . . . . . . 12 P E PG-Verschraubung . . . . . . . . . . . . . . . . . . . . . . . . . . 10 E+H-Funktionsmatrix . . . . . . . . . . . . . . . . . . . . . . . . 13 Einbaulage . . . . . . . . . . . . . . . . . . . . . . . . . . . . . . . . . 8 Einbaumaße . . . . . . . . . . . . . . . . . . . . . . . . . . . . . . . . 8 Einbauort . . . . . . . . . . . . . . . . . . . . . . . . . . . . . . . . . . 8 Eingangskenngrößen . . . . . . . . . . . . . . . . . . . . . . . . 24 Einsatzbedingungen (Einbaubedingungen) . . . . . . 26 Einsatzbedingungen (Umgebungsbedingungen) . . 26 Entsorgung . . . . . . . . . . . . . . . . . . . . . . . . . . . . . . . . 23 Ergänzende Dokumentationen . . . . . . . . . . . . . . . . 27 Explosionsgefährdeter Bereich . . . . . . . . . . . . . . . . . 6 F Fehlerbild . . . . . . . . . . . . . . . . . . . . . . . . . . . . . . . . . Fehlercode . . . . . . . . . . . . . . . . . . . . . . . . . . . . . . . . Fehlerursache . . . . . . . . . . . . . . . . . . . . . . . . . . . . . Fühlerbruch . . . . . . . . . . . . . . . . . . . . . . . . . . . . . . . Fühlerkurzschluss . . . . . . . . . . . . . . . . . . . . . . . . . . Funktionsgruppe ARBEITSPARAMETER . . . . . . . . . . . . . . . . . . . . BENUTZER INFORMATION . . . . . . . . . . . . . . . . GRUNDABGLEICH . . . . . . . . . . . . . . . . . . . . . . . LINEARISIERUNG . . . . . . . . . . . . . . . . . . . . . . . . SERVICE . . . . . . . . . . . . . . . . . . . . . . . . . . . . . . . Endress+Hauser Messbereichsüberschreitung . . . . . . . . . . . . . . . . . . 13 Messbereichsunterschreitung . . . . . . . . . . . . . . . . . 13 Messgenauigkeit . . . . . . . . . . . . . . . . . . . . . . . . . . . . 26 Montagefedern . . . . . . . . . . . . . . . . . . . . . . . . . . . . . . 9 Montageschrauben . . . . . . . . . . . . . . . . . . . . . . . . 8, 9 22 21 21 13 13 16 19 17 18 18 R Rücksendung . . . . . . . . . . . . . . . . . . . . . . . . . . . . . . 23 S Schirmung . . . . . . . . . . . . . . . . . . . . . . . . . . . . . . . . . 11 Sicherheitshinweise . . . . . . . . . . . . . . . . . . . . . . . . . . 6 Sicherungsringe . . . . . . . . . . . . . . . . . . . . . . . . . . 8, 9 T Thermoelemente (TC) . . . . . . . . . . . . . . . . . . . . . . . . . 6 Transportschäden . . . . . . . . . . . . . . . . . . . . . . . . . . . . 6 Typenschilder . . . . . . . . . . . . . . . . . . . . . . . . . . . . . . . 7 W Werkseinstellungen . . . . . . . . . . . . . . . . . . . . . . . . . . 16 Widerstands- und Spannungsgeber . . . . . . . . . . . . . . 6 Widerstandsthermometer (RTD) . . . . . . . . . . . . . . . . . 6 Z Zertifikate und Zulassungen . . . . . . . . . . . . . . . . . . . 27 zulässige Umgebungstemperatur . . . . . . . . . . . . . . . 8 29 Index 30 Temperaturkopftransmitter Endress+Hauser Temperature head transmitter Temperaturkopftransmitter iTEMP® HART® TMT 182 Betriebsanleitung (Bitte lesen, bevor Sie das Gerät in Betrieb nehmen) Gerätenummer:..................................... Deutsch English 319...34 ... 30 Temperature head transmitter iTEMP® HART® TMT 182 Operating manual (Please read before installing the unit) Unit number:..................................... English English 31 ... 58 19...34 Transmetteur de Température iTEMP® HART® TMT 182 Manuel de mise en service (veuillez entièrement lire le manuel avant la mise en service de l’appareil) No appareil:.................................... Français English 59 ... 86 19...34 31 Table of contents Temperature head transmitter Table of contents 1 Safety notes . . . . . . . . . . . . . . . . . . . . . . . 34 6 Commissioning . . . . . . . . . . . . . . . . 41 1.1 1.2 1.3 1.4 1.5 Correct use . . . . . . . . . . . . . . . . . . . . . . . . . . Installation, commissioning and operation . . Operational safety . . . . . . . . . . . . . . . . . . . . . Returns . . . . . . . . . . . . . . . . . . . . . . . . . . . . . . Safety pictograms and symbols . . . . . . . . . . 6.1 6.2 2 Identification . . . . . . . . . . . . . . . . . 35 Installation and function check . . . . . . . . . . . 41 Commissioning . . . . . . . . . . . . . . . . . . . . . . . 41 6.2.1 Quick Setup . . . . . . . . . . . . . . . . . . . . 41 6.2.2 Configuration with HART® protocol . . 41 6.2.3 Description of unit functions . . . . . . . 44 6.2.4 Configuration using HART® -protocol and ReadWin® 2000 . . . . . . . . . . . . . . . 48 2.1 2.2 Unit identification . . . . . . . . . . . . . . . . . . . . . . 35 Delivery contents . . . . . . . . . . . . . . . . . . . . . . 36 7 Maintenance . . . . . . . . . . . . . . . . . . 48 3 Installation . . . . . . . . . . . . . . . . . . . 36 8 Accessories . . . . . . . . . . . . . . . . . . . 49 3.1 3.2 Installation conditions . . . . . . . . . . . . . . . . . . 36 Installation . . . . . . . . . . . . . . . . . . . . . . . . . . . 37 9 Trouble-shooting . . . . . . . . . . . . . . 49 4 Wiring . . . . . . . . . . . . . . . . . . . . . . . . . . . . . 38 4.1 4.2 Trouble-shooting instructions . . . . . . . . . . . . Application fault messages . . . . . . . . . . . . . . Application faults without messages . . . . . . Spare parts . . . . . . . . . . . . . . . . . . . . . . . . . . Returns . . . . . . . . . . . . . . . . . . . . . . . . . . . . . Disposal . . . . . . . . . . . . . . . . . . . . . . . . . . . . 4.3 Overview . . . . . . . . . . . . . . . . . . . . . . . . . . . . Measurement unit connection . . . . . . . . . . . . 4.2.1 Sensors . . . . . . . . . . . . . . . . . . . . . . . . 4.2.2 Output signal and power supply . . . . 4.2.3 HART® connection . . . . . . . . . . . . . . . Potential leveling . . . . . . . . . . . . . . . . . . . . . . 9.1 9.2 9.3 9.4 9.5 9.6 10 Technical Data . . . . . . . . . . . . . . . . . . . . 52 5 Operation . . . . . . . . . . . . . . . . . . . . . 40 11 Appendix . . . . . . . . . . . . . . . . . . . . . 56 5.1 Communication . . . . . . . . . . . . . . . . . . . . . . . 40 5.1.1 HART® Communicator DXR 275 . . . . . 40 5.1.2 Commuwin II-operating programme . . 40 11.1 Function and system construction . . . . . . . . 56 11.1.1 Function . . . . . . . . . . . . . . . . . . . . . . . 56 11.1.2 Measurement system . . . . . . . . . . . . . 56 32 34 34 34 34 35 38 38 38 38 38 39 49 49 50 51 51 51 Endress+Hauser Temperature head transmitter Short form instructions Short form instructions Using the following short form instructions you can commission your system easily and swiftly: Safety hints page 34 Installation page 36 Wiring page 38 Commissioning (including a description of the unit functions) A complete description of all the functions as well as a detailed overview of the function matrix can be found in this chapter. Quick Setup - Fast entry into the unit configuration for standard measuring. page 41 Trouble shooting / fault-finding If problems occur after commissioning or during operation always start fault finding using the check list. Special questions will act as a guide to the cause of the fault and the necessary cure. Endress+Hauser page 49 33 1 Safety notes Temperature head transmitter 1 Safety notes Safe and secure operation of the head transmitter can only be guaranteed if the operating instructions and all safety notes are read, understood and followed. 1.1 Correct use • The unit is a universal, presettable temperature transmitter for resistance thermometer (RTD), thermocouple (TC) as well as resistance and voltage sensors. The unit is constructed for mounting in a connection head (form B) and a field housing. • The manufacturer cannot be held responsible for damage caused by misuse of the unit. • Separate Ex documentation is contained in this operating manual, for measurement systems in hazardous areas. The installation conditions and connection values indicated in these instructions must be followed! 1.2 Installation, commissioning and operation Installation, commissioning and operation The unit is constructed using the most up-to-date production equipment and complies to the safety requirements of the EU guidelines. However, if it is installed incorrectly or is misused, then certain application dangers can occur. Installation, wiring and maintenance of the unit must only be done by trained skilled personnel who are authorised to do so by the plant operator. These skilled staff must have read and understood these instructions and must follow them to the letter. The plant operator must make sure that the measurement system has been correctly wired to the connection schematics. 1.3 Operational safety Correct use Operational safety Hazardous areas When installing the unit in a hazardous area the national safety requirements must be met. Make sure that all personnel are trained in these areas. The measurement and safety values must be followed in all these installations. Technical advancement The manufacturer reserves the right to change the technical data without notification if this advances the technical development. Details regarding the validity and further expansions to these instructions can be obtained from your nearest sales office. 1.4 Returns 34 Returns On transport damage please contact both the supplier and shipping agent. Endress+Hauser Temperature head transmitter 2 Identification 1.5 Safety pictograms and symbols " 2 F = Safe and reliable operation of this unit can only be guaranteed if the safety hints and warnings in these operating instructions are followed. The safety hints in these instructions are highlighted using the following symbols. Attention! This symbol indicates activities and actions that, if not followed correctly, could lead to faulty unit operation or even damage to the unit. Hint! This symbol indicates activities and actions that, if not followed correctly, could have an indirect influence on the unit operation or could lead to an unforeseen unit reaction. Hazardous area, certified equipment! If this character can be seen on the unit then it may be operated in hazardous areas. Non-hazardous areas! This symbol identifies the non-hazardous areas in these instructions. Units that operate in the non-hazardous areas but that are connected to the hazardous areas must also be certified. 2 2.1 Unit identification Safety pictograms and symbols Identification Unit identification Compare the legend plates on the head transmitter with the following figures: Fig. 2-1: Head transmitter legend plate (example) Fig. 2-2: Order code with configuration (example) Fig. 2-3: Identification for hazardous area use (example, only on Ex certified units) Endress+Hauser 35 3 Installation Temperature head transmitter CE-marks, conformity description The unit has been manufactured using up-to-date production equipment and has left our works in perfect and safe condition. It complies with the safety requirements to EN 61 010. The unit described in these instructions therefore fulfils the legal requirements set by the EU guidelines. The manufacturer confirms a positive completion of all tests by fitting the unit with a CE mark. 2.2 Delivery contents 2 The delivery contents of a temperature head transmitter are as follows: • Head transmitter • Installation screws, installation springs and circlips • Operating instructions per order • ATEX-operating instructions for use in hazardous areas Hint! Please take note of the head transmitter accessories in chapter 8 "Accessories" 3 3.1 Installation conditions Delivery contents Installation Installation conditions • When installing and operating the unit please take note of the allowable ambient temperature (see chapter 10 "Technical Data"). • When using the unit in a hazardous area, the limits indicated in the certification must be adhered to (see additional ATEX manual). Dimensions The head transmitter dimensions can be found in chapter 10 "Technical Data". Installation point • Sensor connection head to DIN 43 729 Form B • Field housing Installation angle There are no limits as to the angle on installation. 36 Endress+Hauser Temperature head transmitter 3 Installation 3.2 Installation For installation proceed as follows: Installation Installing in a sensor connection head to DIN 43 729 Form B (s. fig. 3-1, left side) • Feed the sensor inset cables (Pos. 5) through the central hole in the head transmitter (Pos. 4). • Place the installation springs (Pos. 3) onto the screws (Pos. 2). • Feed the installation screws (Pos. 2) through the holes in the head transmitter and the holes in the sensor inset (Pos. 5). Fix both screws using the circlips (Pos. 6). • Position the head transmitter in the connection head in such a way so that the current output terminals (terminal 1 and 2) are towards the cable entry gland (Pos. 7). • Fix the head transmitter (Pos. 4) and sensor inset (Pos. 5) into the connection head. Installation in a field housing (s. fig. 3-1, right side) • Feed the installation screws (Pos. 2) with installation springs (Pos. 3) through the holes in the head transmitter (Pos. 4). Fix these using the circlips (Pos. 5). • Screw the head transmitter into the field housing using a screwdriver. R-TMT187ZX-17-06-06-en-002.eps Attention! In order to avoid damaging the head transmitter, do not over-tighten the installation screws. R-TMT187ZX-17-06-06-en-001.eps " Fig. 3-1: Installation of head transmitter into a Form B sensor connection head (left side) and a field housing (right side). Endress+Hauser 37 4 Wiring Temperature head transmitter 4 Wiring 4.1 Overview Terminal layout R09-TMT182ZZ-04-06-xx-en-001.eps Wiring overview Fig. 4-1: Head transmitter wiring 4.2 Measurement unit connection Measurement unit connection 3 Attention! Switch off power supply before opening the housing cover. Do not install or connect the unit to mains power. If this is not followed parts of the electronic circuit will be damaged. 4.2.1 Sensors Connect the sensor cables to the respective head transmitter terminals (Terminals 3 to 6) by following the wiring diagram (s. fig. 4-1). 4.2.2 Output signal and power supply Open the PG cable gland on the head transmitter or field housing. Feed the cable through the opening in the PG cable gland and then connect the cable cores to terminals 1 and 2 according to the wiring diagram (s. fig. 4-1). 2 Hint! The screws on the terminals must be screwed in tightly. 4.2.3 HART® connection Connection is made directly using the 4...20 mA signal cables or the communication sockets fitted to a power supply or barrier (s. fig. 4-2 and s. fig. 4-3). In order to connect the transmitter in an Ex application, please read the separate Ex documentation. 2 38 Hint! The measurement circuit must have a load of at least 250 Ω. If using the E+H power supplies RNS 221 and RN 221N this resistance is already installed in the unit and is therefore not required externally (s. fig. 4-2, and s. fig. 4-3)! Endress+Hauser Temperature head transmitter 4 Wiring R09-TMT182ZZ-04-06-xx-xx-001.eps Connection of a HART® hand operating module DXR 275 Fig. 4-2.: Electrical connection of the HART® operating module a = HART® module, a* = HART® module connected to the communication sockets of a power supply, b = Loop power supply (e.g. RNS 221 power supply or RN 221N active barrier), c = HART® transmitter, d = PLC with passive input Connection of Commubox FXA 191 Hint! Set the Commubox DIP switch to ’HART®’! R09-TMT182ZZ-04-06-xx-xx002.eps 2 Fig. 4-3: Electrical connection of the Commubox FXA 191 a = Commubox FXA 191 (in combination with a PC - E+H operating software ’Commuwin II’), a* = Commubox FXA 191 connected to the communication sockets of a power supply unit, b = Loop power supply (e.g. RNS 221 power supply or RN 221N active barrier), c = HART® transmitter, d = PLC with a passive input 4.3 2 Endress+Hauser Potential leveling Hint! Please take note of the following when remotely installing the head transmitter in a field housing. The screen on the output (output signal 4...20 mA) must be at the same potential as the screen at the sensor connection. For an effective screening the cable screen must be solidly connected to the field housing. This can be achieved by connecting the cable screen to the special EMC cable gland. 39 5 Operation Temperature head transmitter R-TAF10xxx-04-00-08-en-001.eps bbbbbbbb aaaaaaaa aaaaaaaa bbbbbbbb aaaaaaaa bbbbbbbb 5 5.1 Open the field housing PG cable gland and connect the screen of the output and sensor connection according to the figure opposite (s. fig. 4-4) When using earthed thermocouples, screening of the output cable (4 ... 20 mA cable) is recommended. In plants with strong EMC problems screening of all cables with a low ohm connection to the transmitter housing is recommended. Fig. 4-4: Screening on remote installation Operation Communication The temperature head transmitter is set up using the HART® protocol. The values measured can also be read using the HART® protocol. In order to do this the user has two possibilities: • Operation using a universal hand operating module “HART® Communicator DXR 275”. • Operation using a PC and operating software (e.g. Commuwin II) as well as a HART® modem (e.g. “Commubox FXA 191”). 5.1.1 HART® Communicator DXR 275 Selection of the unit functions using the “HART® -Communicator” is done using various menu levels as well as with the help of a special HART® function matrix (see page 42). 2 Hint! • When using the HART® hand unit all parameters can be read out, however, programming is blocked. It is possible to release the HART® function matrix by entering 281 in the LOCK function. This condition remains even after a power failure. The HART® function matrix can be locked again by releasing the personal code number. • More detailed information to the HART® hand operation module can be found in the respective operating manual in the carrying case. 5.1.2 Commuwin II-operating programme Commuwin II is a universal programme for remote operation of field and panel-mounted instrumentation. Application of the Commuwin II operating programme is possible independent of the type of unit and communication mode (HART® or PROFIBUS®). Commuwin II offers the following functions: • Setting up unit functions • Visualisation of measured values • Data security of unit parameters • Unit diagnostics • Measurement point documentation 2 40 Hint! More detailed information to Commuwin II can be found in the E+H documentation: • System Information: SI 018F/00/en “Commuwin II” • Operating manual: BA 124F/00/en “Commuwin II” operating programme Endress+Hauser Temperature head transmitter 6 Commissioning 6 Commissioning 6.1 Installation and function check Installation check Monitor all connections making sure they are tight. In order to guarantee fault-free operation, the terminal screws must be screwed tightly onto the connection cables. Function check Measuring the analogue 4-20 mA output signal or following failure signals: Measurement range undercut linear fall to 3.8 mA Measurement range excess linear rise to 20.5 mA Sensor break; sensor short circuit1 ≤ 3.6 mA or ≥ 21.0 mA 1. 6.2 not for thermocouples Commissioning Once the power supply has been connected the head transmitter is operational. Commissioning 6.2.1 Quick Setup Using the Quick Setup the operator is led through all the most important unit functions that must be set up for standard measurement operation of the unit. Using the HART® hand module a quick set-up of the black highlighted fields of the HART® function matrix (s. fig. 6-2) is possible. Using the Commuwin II operating matrix (s. fig. 6-3) a quick set-up is possible with the following fields: • • • • • Type of sensor (V2H0) Unit meas. value (V2H2) Value for 4 mA (V2H4) Value for 20 mA (V2H5) Connection (V2H6). 6.2.2 Configuration with HART® protocol DXR 275 hand operating module 2 Hint! Selection of all head transmitter functions using the HART® hand module is done with various menu levels with the help of the E+H function matrix (s. fig. 6-2). All head transmitter functions are described in 6.2.3 "Description of unit functions". What needs to be done: 1. Switch on hand module: – Measurement unit is not yet connected. The HART® main menu appears. This menu level appears for all HART® programming independent of the type of instrumentation. Information to offline programming can be found in the “Communicator DXR 275” operating manual. – Measuring unit is connected. The menu level “Online” appears. In this “Online” menu level the actual measured data such as measured value (PV) and output current (AO) are continuously displayed. Entry into the TMT 182 operating matrix is done using the line “Matrix Parameter”. This matrix systematically contains all HART® accessible functions. Endress+Hauser 41 6 Commissioning Temperature head transmitter 2. 3. 4. R09-TMT182ZZ-02-06-xx-en-002.eps 5. Using “Matrix Parameter” the function group can be selected (e.g. basic calibration) and then followed by the required function, e.g. “Sensor input”. Enter numeric values or change settings. Then acknowledge using the F4 "Entry" function key. "SEND" appears when operating the F2 function key. Once the F2 key has been operated all values entered in the hand module are transmitted to the TMT 182 measurement system. A return to the "Online" menu level is made using the F3 "HOME" function key. Here, the actual transmitter values measured with the new settings can be read. Fig. 6-1: Configuration at the hand module example "Sensor input" R09-TMT182ZZ-02-06-xx-en-001.eps HART® function matrix Fig. 6-2: HART® function matrix 42 Endress+Hauser Temperature head transmitter 6 Commissioning Commuwin II operating matrix Fig. 6-3: Commuwin II operating matrix: A = Unit functions only active on customer specific linearisation B = Unit functions only active on TC connection C = Unit functions only active on RTD 2 wire connection. 2 Hint! If there are any communication faults in the Microsoft® Windows NT® Version 4.0 operating system please follows these instructions: Switch of the ’FIFO active’ setting. In order to do this proceed as follows: • Using the menu 'START' → 'SETTINGS' → 'SYSTEM CONTROL' → 'CONNECTIONS' select the menu point 'COM-Port'. Switch off the ’FIFO active’ command off using the menu path 'SETTINGS’ → ’EXPANDED'. Endress+Hauser 43 6 Commissioning Temperature head transmitter 6.2.3 Description of unit functions The following table contains a listing and description of all unit functions of the HART® protocol that can be used for setting up the temperature head transmitter. 2 Hint! Factory default values are shown in bold text. The HART® operating module (DXR275) display is indicated by the following symbol 3. Function group: WORKING PARAMETERS Primary value • V0H0 • 3 (PV) Int: temperature • V0H1 Display of actual measured temperature. Display: 7-digit number with floating decimal point and engineering unit. (e.g. 199.98 Ohm; -62.36 deg. C) Display of the actual measured temperature of the internal comparison measurement point. H Hint! Display: 7-digit number with floating decimal point and engineering unit. (e.g. 23.70 deg. C)1 Time filter • V0H2 Digital filter selection 1st grade. Input: 0...100 seconds 0 sec. RJ Mode • V0H3 Selection of internal (Pt100) or external (0...80 °C) cold junction compensation. Entry: internal; external internal Hint! Entry only possible on selection of thermocouple (TC) in unit function SENSOR TYPE.1 Ext. RJ Value • V0H4 H Entry of external cold junction value. Entry: -40.00...85.00 °C (°C, °F, K) 0 °C H Hint! Entry only possible on selection of an external cold junction compensation in unit function RJ MODE. OFFSET • V0H5 Entry of zero point correction (Offset). Entry: -10.00...10.00 °C (°C, °F, K) 0.00 °C Hint! Entry returns to factory default values when changing sensor type! 44 H Endress+Hauser Temperature head transmitter 6 Commissioning Function group: BASIC CALIBRATION Type of sensor • V2H0 Entry of sensor used: Sensor type Range start -10..75 mV -10 mV 10..400 Ohm 10 Ω 10..2000 Ohm 10 Ω Pt100 DIN -200 °C (-328 °F) Pt100 JIS -200 °C (-328 °F) Pt500 -200 °C (-328 °F) Pt1000 -200 °C (-328 °F) Ni100 -60 °C (-76 °F) Ni500 -60 °C (-76 °F Ni1000 -60 °C (-76 °F Polynom RTD -270 °C (-454 °F) Type B 0 °C (32 °F) Type C 0 °C (32 °F) Type D 0 °C (32 °F) Type E -270 °C (-454 °F) Type J -210 °C (-346 °F) Type K -270 °C (-454 °F) Type L -200 °C (-328 °F) Type N -270 °C (-454 °F) Type R -50 °C (-58 °F) Type S -50 °C (-58 °F) Type T -270 °C (-454 °F) Type U -200 °C (-328 °F) Polynom TC -270 °C (-454 °F) Pt100 DIN Temp.Compensation • V2H1 Selection of temperature compensation of the cold junction when using customer specific linearisation of the TC polynom Input: None, Type B, Type C, Type D, Type E, Type J, Type K, Type L, Type N, Type R, Type S, Type T, Type U None Unit meas. value • V2H2 Enter engineering units. Entry: °C °F K °C Current output • V2H3 Enter standard (4-20 mA) or inverse (20-4 mA) current output signal. Entry: 4-20 mA 20 - 4 mA 4-20 mA Value for 4 mA • V2H4 Entry: For limits see unit function SENSOR TYPE. 0 °C Value for 20 mA • V2H5 Entry: For limits see unit function SENSOR TYPE. 100 °C Connection • V2H6 Entry of RTD connection mode Entry: 2 wire 3 wire 4 wire 3 wire • 3 RTD connection Range end value 75 mV 400 Ω 2000 Ω 850 °C (1562 °F) 649 °C (482 °F) 250 °C (482 °F) 250 °C (482 °F) 180 °C (356 °F) 150 °C (302 °F) 150 °C (302 °F) 2500 °C (4532 °F) 1820 °C (3308 °F) 2320 °C (4208 °F) 2495 °C (4523 °F) 1000 °C (1832 °F) 1200 °C (2192 °F) 1372 °C (2501 °F) 900 °C (1652 °F) 1300 °C (2372 °F) 1768 °C (3214 °F) 1768 °C (3214 °F) 400 °C (752 °F) 600 °C (1112 °F) 2500 °C (4532 °F) H Hint! Function field is only active on selection of resistance thermometer (RTD) in the unit function SENSOR TYPE (V2H0)1. Endress+Hauser 45 6 Commissioning Temperature head transmitter 2 wire comp. • V2H7 Entry of cable compensation on RTD 2 wire connection. Entry: 0.00...30.00 Ohm 0.00 Ohm H Hint! Function field is only active on selection of 2 wire cable connection in unit function CONNECTION TYPE (V2H6)1. Failsafe mode • V2H8 Entry of failure signal on sensor fracture2 or short circuit. Entry: max (≥ 21,0 mA) min (≤ 3,6 mA) max Function group: LINEARIZATION 3 USER LINEARISATION The following function fields are only active in the unit function SENSORTYPE (V2H0) on selection of customer-specific linearisation (polynome RTD or polynome TC).1 Coefficient X0 • V3H0 Input of first coefficient for customer-specific linearisation (polynome 4th grade with five coefficients), s. chapter 6.2.4 Coefficient X1 • V3H1 Input COEFFICIENT X1, s. chapter 6.2.4. Coefficient X2 • V3H2 Input COEFFICIENT X2, s. chapter 6.2.4. Coefficient X3 • V3H3 Input COEFFICIENT X3, s. chapter 6.2.4. Coefficient X4 • V3H4 Input COEFFICIENT X4, s. chapter 6.2.4. Function group: SERVICE Error code • V9H0 Display of actual error code. Display: See “Application fault messages” on page 49. 0 Last diagnostic • V9H1 Display of previous error code. Display: See “Application fault messages” on page 49. 0 Config. changed • V9H2 Parameter changes are done. Display: Yes/no No Min primary value • V9H3 Display the minimum process value. The process value is accepted at the beginning of the measurement. H Hint! Min. process value will be changed to the actual process value on write. On reset to factory default, the default value is entered. +10000 46 Endress+Hauser Temperature head transmitter 6 Commissioning Max primary value • V9H4 Display the maximum process value. The process value is accepted at the beginning of the measurement. H Hint! Max. process value will be changed to the actual process value on write. On reset to factory default, the default value is entered. -10000 Default values • V9H5 Entry: 182 (Reset to factory default settings) 0 Output current • V9H6 Display of the actual output current signal. Simulation • V9H7 Entry of simulation mode. Entry: Off On Off Current out (sim) • V9H8 Entry of simulation value (current). Entry: 3.58...21.7 mA Security locking • V9H9 Release code for setting up. Entry: Lock = 0 Release = 281 281 Function group: USER INFORMATION Tag number • VAH0 Entry and display of measurement point description (TAG). Entry: 8 characters - Descriptor • VAH1 Entry and display of plant description. Entry: 16 characters - Hardware Version • VAH2 Display of unit version, e.g.: 1.0000 indicates version 1.00.00. Software Version • VAH3 Display of software version, e.g.: 8010 indicates version 1.0. • 3 Software Rev. Serial number • VAH4 1. 2. Endress+Hauser 8-digit display of E+H device serial numbers (see legend plates on the device). Hint only for Commuwin II operating matrix not for thermocouples (TC) 47 7 Maintenance Temperature head transmitter 6.2.4 Configuration using HART®-protocol and ReadWin® 2000 PC configuration software ReadWin® 2000 The configuration of the head transmitter can be done using both the HART® -protocol and the ReadWin® 2000 configuration software. The following table shows the structure of the interactive menu led operation of ReadWin® 2000. Configurable parameters (Unit function description see s. chapter 6.2.3) Standard settings – – – – – – – Type of sensor Connection mode (2-,3-, or 4-wire connection on RTD) Units (°C, °F or K) Measurement range start value Measurement range end value Coefficient X0 to X4 (on sensor type polynom RTD/TC) Temp.-compensation (on sensor type polynom TC) Expanded settings – Cold junction compensation internal/external (on TC) – Temperature external (on TC with cold junction compensation external) – Cable resistance compensation (on RTD 2-wire connection) – Fault condition reaction – Output (4 to 20 mA/20 to 4 mA) – Damping (filter) – Offset – TAG (Measurement point description) – Identifier (Descriptor) Service functions – – – – Simulation (on/off) Reset/factory default Series number (only display) Operation code (=release code 281) For detailed ReadWin® 2000 operating instructions please read the on-line documentation contained in the ReadWin® 2000 software. ReadWin® 2000 can be downloaded free of charge from the Internet on the following address: • www.endress.com/Readwin Interactive setting up of the temperature transmitter Customer specific linearisation and sensor matching is done using the SMC32.exe (Sensor Matching Calibration) configuration software. The PC configuration software ReadWin® 2000 and the SMC32.exe programme are available for a free of charge download under the address www.endress.com/Readwin. The SMC32.exe programme calculates the linearisation coefficients X0 to X4, that need to be entered into the HART® transmitter in the COMMUWIN II operating matrix, the DXR 275 HART® hand held operating unit or in ReadWin® 2000. 2 Hint! Integration into the ReadWin® 2000 PC configuration programme of both the SMC32.exe programme and a Quick set up under which all parameters can be seen at a glance is planned. 7 Maintenance 48 Maintenance The head transmitter is maintenance-free. Endress+Hauser Temperature head transmitter 8 Accessories 8 Accessories Accessories Commubox FXA 191, PC-Software Commuwin II, ReadWin® 2000. Please contact your supplier when ordering (e.g. spare parts)! 9 9.1 Trouble-shooting Trouble-shooting instructions If faults occur after commissioning or during measurement, always start any troubleshooting sequence using the following check. The user is led towards the possible fault cause and its rectification via question and answer. 9.2 Application fault messages Endress+Hauser Application fault messages Application fault messages are shown in the display of the HART® hand operating module "DXR 275" once the menu point "ERROR CODE" has been selected or in the PC operating surface of Commuwin II (V9H0 - ERROR CODE). Fault code Cause Action/cure 0 No fault, Warning None 10 Hardware fault (unit defective) Replace head transmitter 11 Sensor short circuit Check sensor 12 Sensor cable open circuit Check sensor 13 Reference measurement point defective None 14 Unit not calibrated Return head transmitter to manufacturer 106 Up-/Download active None (will be automatically acknowledged) 201 Warning: Measured value too small Enter other values for measured value range start 202 Warning: Measured value too large Enter other values for measured value range end 203 Unit is reset (to factory default settings) None 49 9 Trouble-shooting Temperature head transmitter 9.3 Application fault without messages Application faults without messages General application faults Fault Cause Action/cure No communication No power supply on 2 wire circuit Check current loop Power supply too low (<10 V) Connect cables correctly to terminal plan (polarity) Defective interface cable Check interface cable Defective interface Check PC interface Defective head transmitter Replace head transmitter Application faults for RTD connection (Pt100/Pt500/Pt1000/Ni100) Fault Cause Action/cure Fault current (≤ 3.6 mA or ≥ 21 mA) Defective sensor Check sensor Incorrect RTD connection Reconnect cables correctly (connection diagram) Incorrect 2 wire connection Connect cables correctly to terminal plan (polarity) Transmitter programming faulty (wire number) Change parameter ’CONNECTION’ (See “Description of unit functions” on page 44.) Programming Thermocouple set up (s. chapter 6.2.3); change to RTD Defective head transmitter Replace head transmitter Faulty sensor installation Install sensor correctly Heat conducted via sensor Take note of sensor installation length Transmitter programming faulty (wire number) Change parameter ‘Connection type’ Transmitter programming faulty (scale) Change scale Wrong RTD used Change parameter ‘Sensor type’ Sensor connection (2 wire) Check sensor connections Sensor cable (2 wire) not compensated Compensate cable resistance Offset incorrectly set Check offset Measured value incorrect/inaccurate 50 Endress+Hauser Temperature head transmitter 9 Trouble-shooting Application faults for TC connection Fault Cause Action/cure Fault current (≤ 3.6 mA or ≥ 21 mA) Sensor incorrectly connected Connect sensor correctly to terminal plan (polarity) Defective sensor Replace sensor Programming Sensor type ’RTD’ set-up; set up correct thermocouple Incorrect 2 wire connection (current loop) Connect the cables correctly (see connection diagram) Defective head transmitter Replace head transmitter Faulty sensor installation Install sensor correctly Heat conducted via sensor Take note of sensor installation length Transmitter programming faulty (scale) Change scale Incorrect thermocouple set up Change parameter ‘Sensor type’ Incorrect cold junction set up See chapter ‘Operation’ and ‘Techn. data’ Offset incorrectly set up Check offset Fault on the thermowell welded thermo wire (coupling of interference voltages) Use sensor where the thermo wire is not welded Measured value incorrect/inaccurate 9.4 Spare parts Head transmitter installation set (4 screws, 6 springs, 10 circlips) Order No.: 510 01112 9.5 Returns Endress+Hauser Returns When returning the unit for repair, please add a description of both the fault and the application. 9.6 Disposal Spare parts Disposal Due to its construction, the head transmitter cannot be repaired. When disposing of the head transmitter please take note of the local disposal regulations. 51 10 Technical Data Temperature head transmitter 10 Technical Data Operation and system construction Measurement principle Electronic measurement and conversion of input signals in industrial temperature measurement. Measurement system The iTEMP® HART® TMT 182 temperature head transmitter is a 2 wire transmitter with an analogue output. It has a measurement input for resistance thermometers (RTD) in 2-, 3- or 4-wire connection, thermocouples and voltage transmitters. Setting up of the TMT 182 is done using the HART®Protocol with hand operating module (DXR 275) or PC (COMMUWIN II). Input values Measurement value Temperature (temperature linear), resistance and voltage. Measurement range Dependent on the sensor connection and input signal, the transmitter evaluates a number of different measurement ranges. Type of input Type Pt100 Pt500 Pt1000 acc. to IEC 751 Resistance thermometer (RTD) Ni100 Ni500 Ni1000 acc. to DIN 43760 min. meas. range Measurement ranges -200 to 850 °C (-328 to 1562 °F) -200 to 250 °C (-328 to 482 °F) -200 to 250 °C (-328 to 482 °F) 10 K 10 K 10 K -60 to 250 °C (-76 to 482 °F) -60 to 150 °C (-76 to 302 °F) -60 to 150 °C (-76 to 302 °F) 10 K 10 K 10 K • Connection type: 2-, 3- or 4-wire connection • Software compensation of cable resistance possible in the 2 wire system (0...30 Ω) • Sensor cable resistance max. 11 Ω per cable in the 3 and 4 wire system • Sensor current: ≤ 0.2 mA Resistance transmitter 52 Resistance (Ω) 10... 400 Ω 10...2000 Ω 10 Ω 100 Ω Endress+Hauser Temperature head transmitter 10 Technical Data Type Thermocouples (TC) Measurement ranges B (PtRh30-PtRh6) C (W5Re-W26Re)1 D (W3Re-W25Re)1 E (NiCr-CuNi) J (Fe-CuNi) K (NiCr-Ni) L (Fe-CuNi)2 N (NiCrSi-NiSi) R (PtRh13-Pt) S (PtRh10-Pt) T (Cu-CuNi) U (Cu-CuNi)2 according to IEC 584 Part 1 0 to +1820 °C 0 to +2320 °C 0 to +2495 °C -270 to +1000 °C -210 to +1200 °C -270 to +1372 °C -200 to +900 °C -270 to +1300 °C -50 to +1768 °C -50 to +1768 °C -270 to +400 °C -200 to +600 °C (32 to 3308 °F) (32 to 4208 °F) (32 to 4523 °F) (-454 to 1832 °F) (-346 to 2192 °F) (-454 to 2501 °F) (-328 to 1652 °F) (-454 to 2372 °F) (-58 to 3214 °F) (-58 to 3214 °F) (-454 to 752 °F) (-328 to 1112 °F) min. meas. range 500 K 500 K 500 K 50 K 50 K 50 K 50 K 50 K 500 K 500 K 50 K 50 K • Cold junction: internal (Pt100) • Cold junction accuracy: ± 1 K Voltage transmitters (mV) Millivolt transmitter (mV) -10...75 mV 5 mV Output values Output signal analogue 4...20 mA, 20...4 mA Transmission behaviour temperature linear, resistance linear, voltage linear Fault condition signal • Measurement range undercut: Linear drop to 3.8 mA • Exceeding measurement range: Linear rise to 20.5 mA • Sensor breakage; Sensor short circuit3: ≤ 3.6 mA or ≥ 21.0 mA Load max. (Vpower supply - 10 V) / 0.022 A (Current output) Filter Digital filter 1st degree: 0...60 s Input current required ≤ 3.5 mA Current limit ≤ 23 mA Switch on delay 4 s (during power up Ia = 3.8 mA) Galvanic isolation U = 2 kV AC (In/Out) Power supply Electrical connection See “Wiring” on page 38. Supply voltage Ub = 10...35 V, polarity protected Residual ripple Allowable ripple Uss ≤ 3 V at Ub ≥ 13 V, f max. = 1 kHz Performance characteristics Endress+Hauser Response time 1s Reference conditions Calibration temperature +23 °C ± 5 K 53 10 Technical Data Temperature head transmitter Resistance thermometer (RTD) Type: Pt100, Ni100 Pt500, Ni500 Pt1000, Ni1000 Measurement accuracy:4 0.2 K or 0.08% 0.5 K or 0.20% 0.3 K or 0.12% Thermocouple (TC): Maximum measured error Type: K, J, T, E, L, U N, C, D S, B, R Measurement accuracy: typ. 0.5 K or 0.08%4 typ. 1.0 K or 0.08%4 typ. 2.0 K or 0.08%4 Resistance transmitter (Ω): Measurement accuracy:4 ± 0.1 Ω or 0.08% ± 1.5 Ω or 0.12% Measurement range: 10... 400 Ω 10...2000 Ω Voltage transmitter (mV) Measurement accuracy:4 ± 20 mV oder 0,08% Measurement range: -10...75 mV Influence of power supply ≤ ±0.01%/V deviation from 24 V 5 Influence of ambient temperature (temperature drift) • Resistance thermometer (RTD): Td = ± (15 ppm/K * max. meas. range + 50 ppm/K * preset meas. range) * ∆ϑ • Resistance thermometer Pt100: Td = ± (15 ppm/K * (range end value + 200) + 50 ppm/K * preset meas. range) * ∆ϑ • Thermocouple (TC): Td = ± (50 ppm/K * max. meas. range + 50 ppm/K * preset meas. range) * ∆ϑ ∆ϑ = Deviation of the ambient temperature according to reference junction. Long term stability ≤ 0.1 K/Year6 or ≤ 0.05%/Year4 Influence of load ≤ ±0.02%/100 Ω 5 Influence of reference junction Pt100 DIN IEC 751 Cl. B (internal reference junction for Thermocouples TC) 6 Operating conditions (Installation) Installation conditions • Installation angle: No limit • Installation area: Connection head accord. to DIN 43 729 Form B; TAF 10 field housing Operating conditions (Environment) 54 Ambient temperature range −40...+85 °C (for hazardous-areas see Ex-certification) Storage temperature range -40...+100 °C Climate class according to EN 60 654-1, Class C Condensation allowable Ingress protection IP 00, IP 66 installed Endress+Hauser Temperature head transmitter 10 Technical Data Shock and vibration resistance 4g / 2...150 Hz accord. to IEC 60 068-2-6 Electromagnetic compatibility (EMC) Interference immunity and interference emission according to EN 61 326-1 (IEC 1326) and NAMUR NE 21. Mechanical construction Dimensions in mm Weight approx. 40 g Material • Housing: PC • Potting: PUR Terminals Cable up to max. 1.75 mm2 (secure screws) R09-TMT182ZZ-06-xx-xx-001.eps Design, dimensions Human interface Remote operation • Configuration: Hand operating module DXR 275 or PC with Commubox FXA 191 and operating software, e. g. Commuwin II • Interface PC interface RS232 and Commubox FXA 191 • Configurable parameters Sensor type and connection type, engineering units (°C/°F), measurement range, internal/external cold junction compensation, cable resistance compensation on 2 wire connection, fault conditioning, output signal (4...20/20...4 mA), digital filter (damping), offset, measurement point identification + Descriptor (8 + 16 characters), output simulation, customer specific linearisation, min./max. process value indicator function Certificates and approvals Ex certification For further details on the available Ex versions (ATEX, FM, CSA, usw.) please contact your respective E+H sales organisation. All relevant data for hazardous areas can be found in separate Ex documentation. If required, please request copies from us or your E+H sales organisation. CE mark The measurement system fulfills the requirements demanded by the EU regulations. Endress+Hauser acknowledges successful unit testing by adding the CE mark. Further Documentation Further Documentation 1. 2. 3. 4. 5. 6. Endress+Hauser • System information iTEMP® Temperature head transmitter (SI 008R/09/en) • Technical information: iTEMP® HART® TMT 182 (TI 078R/09/en) • Additional documentation for use in explosion-hazardous areas: ATEX, FM, CSA according to ASTM E988 according to DIN 43710 not for thermocouple (TC) % is related to the adjusted measurement range (the value to be applied is the greater). All data is related to a measurement end value. according to reference conditions 55 11 Appendix Temperature head transmitter 11 Appendix 11.1 Function and system construction 11.1.1 Function Function Electronic monitoring and transformation of various input signals into an analogue output signal in industrial temperature measurement. The head transmitter is mounted in a connection head form B or separated from the sensor in field housing. Setting up of the head transmitter is done using the HART® Protocol using the hand operating module (DXR 275) or PC (Commuwin II). 11.1.2 Measurement system Measurement system Transforming the following input signals: • Resistance thermometers (RTD) and resistance sensors (in 2-,3- or 4-wire connection systems) • Thermocouples (TC) and • Voltage sensors into a scalable analogue output signal (4...20 mA or 20...4 mA). Fault monitoring of: • Measurement range override or undercut • Sensor breakage and short circuit1 Application in hazardous areas is certified to ATEX II 1 GEEx ia IIC T4/T5/T6. 1.Not for thermocouples (TC) 56 Endress+Hauser Temperature head transmitter Index Index C I CE-marks . . . . . . . . . . . . . . . . . . . . . . . . . . . . . . . . . 36 Certificates and approvals . . . . . . . . . . . . . . . . . . . . .55 Circlips . . . . . . . . . . . . . . . . . . . . . . . . . . . . . . . . .36, 37 Commubox FXA 191 . . . . . . . . . . . . . . . . . . . . . . . . . 39 Commuwin II operating matrix . . . . . . . . . . . . . . . . . .43 Commuwin II operating programme . . . . . . . . . . . . .40 Conformity description . . . . . . . . . . . . . . . . . . . . . . . .36 Input values . . . . . . . . . . . . . . . . . . . . . . . . . . . . . . . . 52 Installation angle . . . . . . . . . . . . . . . . . . . . . . . . . . . . 36 Installation point . . . . . . . . . . . . . . . . . . . . . . . . . . . . 36 Installation screws . . . . . . . . . . . . . . . . . . . . . . . . . . . 37 Installation springs . . . . . . . . . . . . . . . . . . . . . . . 36, 37 L Legend plates . . . . . . . . . . . . . . . . . . . . . . . . . . . . . . 35 D Dimensions . . . . . . . . . . . . . . . . . . . . . . . . . . . . . . . .36 M F Measurement range excess . . . . . . . . . . . . . . . . . . . 41 Measurement range undercut . . . . . . . . . . . . . . . . . 41 Mechanical construction . . . . . . . . . . . . . . . . . . . . . . 55 Fault code . . . . . . . . . . . . . . . . . . . . . . . . . . . . . . . . .49 Fault monitoring . . . . . . . . . . . . . . . . . . . . . . . . . . . . .56 Field housing . . . . . . . . . . . . . . . . . . . . . . . . . . . . . . .37 Form B sensor connection head . . . . . . . . . . . . . . . .37 Function group BASIC CALIBRATION . . . . . . . . . . . . . . . . . . . . . .45 LINEARIZATION . . . . . . . . . . . . . . . . . . . . . . . . . .46 SERVICE . . . . . . . . . . . . . . . . . . . . . . . . . . . . . . . .46 USER INFORMATION . . . . . . . . . . . . . . . . . . . . . .47 WORKING PARAMETERS . . . . . . . . . . . . . . . . . .44 Further Documentation . . . . . . . . . . . . . . . . . . . . . . .55 H ® HART function matrix . . . . . . . . . . . . . . . . . . . . . . . .42 HART® hand operating module DXR 275 . . . . . . . . .39 HART® protocol . . . . . . . . . . . . . . . . . . . . . . . . . . . . .40 Hazardous areas . . . . . . . . . . . . . . . . . . . . . . . . . . . .34 Head transmitter . . . . . . . . . . . . . . . . . . . . . . . . . . . .36 Human interface . . . . . . . . . . . . . . . . . . . . . . . . . . . . .55 O Operating conditions (Environment) . . . . . . . . . . . . . 54 Operating conditions (Installation) . . . . . . . . . . . . . . 54 Output values . . . . . . . . . . . . . . . . . . . . . . . . . . . . . . 53 P Performance characteristics . . . . . . . . . . . . . . . . . . . 53 Power supply . . . . . . . . . . . . . . . . . . . . . . . . . . . . . . 53 R Resistance thermometer (RTD) . . . . . . . . . . . . . . . . . 54 Resistance transmitter (Ω) . . . . . . . . . . . . . . . . . . . . 54 Returns. . . . . . . . . . . . . . . . . . . . . . . . . . . . . . . . . . . . 51 S Sensor break . . . . . . . . . . . . . . . . . . . . . . . . . . . . . . . 41 Sensor short circuit . . . . . . . . . . . . . . . . . . . . . . . . . . 41 T Terminal layout. . . . . . . . . . . . . . . . . . . . . . . . . . . . . . 38 Thermocouple (TC) . . . . . . . . . . . . . . . . . . . . . . . . . . 54 V Voltage transmitter (mV) . . . . . . . . . . . . . . . . . . . . . . 54 Endress+Hauser 57 Temperature head transmitter 58 Endress+Hauser Transmetteur de température Temperaturkopftransmitter iTEMP® HART® TMT 182 Betriebsanleitung (Bitte lesen, bevor Sie das Gerät in Betrieb nehmen) Gerätenummer:..................................... Deutsch English 319...34 ... 30 Temperature head transmitter iTEMP® HART® TMT 182 Operating manual (Please read before installing the unit) Unit number:..................................... English English 31 ... 58 19...34 Transmetteur de Température iTEMP® HART® TMT 182 Manuel de mise en service (veuillez entièrement lire le manuel avant la mise en service de l’appareil) No appareil:.................................... Français English 59 ... 86 19...34 59 Sommaire Transmetteur de température Sommaire 1 Conseils de sécurité . . . . . . . . . . . . . . . . 62 1.1 1.2 1.3 1.4 1.5 2 Utilisation conforme à l’objet . . . . . . . . . . . Montage, mise en service, exploitation . . Sécurité de fonctionnement . . . . . . . . . . . Retour de matériel . . . . . . . . . . . . . . . . . . Symboles utilisés . . . . . . . . . . . . . . . . . . . 6 62 62 62 62 63 6.1 Contrôle de l’installation et des fonctions 6.2 Mise en service . . . . . . . . . . . . . . . . . . . . 6.2.1 Quick setup . . . . . . . . . . . . . . . . 6.2.2 Configuration avec le protocole HART® . . . . . . . . . . . . . . . . . . . . 6.2.3 Description des fonctions de l’appareil . . . . . . . . . . . . . . . . . . . . . . 6.2.4 Configuration avec protocole HART® et ReadWin® 2000 . . . . Identification . . . . . . . . . . . . . . . . . . . 63 2.1 Désignation de l’appareil . . . . . . . . . . . . . 63 2.2 Contenu de la livraison . . . . . . . . . . . . . . . 64 3 Raccordement . . . . . . . . . . . . . . . . . . . . . . 66 4.1 Aperçu . . . . . . . . . . . . . . . . . . . . . . . . . . . 4.2 Raccordement de l’unité de mesure . . . . 4.2.1 Capteurs . . . . . . . . . . . . . . . . . . . 4.2.2 Signal de sortie et tension d’alimentation . . . . . . . . . . . . . . . 4.2.3 Raccordement HART® . . . . . . . . 4.3 Compensation de potentiel . . . . . . . . . . . . 5 66 66 66 66 66 67 69 72 76 7 Maintenance . . . . . . . . . . . . . . . . . . . . 76 8 Accessoires . . . . . . . . . . . . . . . . . . . . . 77 9 Suppression des défauts . . . . . . . . . 77 9.1 9.2 9.3 9.4 9.5 9.6 Recherche des défauts . . . . . . . . . . . . . . Messages d’erreur d’application . . . . . . . Erreurs d’application sans message . . . . Pièces de rechange . . . . . . . . . . . . . . . . . Retour . . . . . . . . . . . . . . . . . . . . . . . . . . . . Mise au rebut . . . . . . . . . . . . . . . . . . . . . . 77 77 78 79 79 79 10 Caractéristiques techniques . . . . . . 80 Exploitation . . . . . . . . . . . . . . . . . . . . 68 5.1 Communication . . . . . . . . . . . . . . . . . . . . . 68 5.1.1 HART® Communicator DXR 275 68 5.1.2 Programme d’exploitation Commuwin II . . . . . . . . . . . . . . . . 68 60 69 69 69 Montage . . . . . . . . . . . . . . . . . . . . . . . 64 3.1 Conditions de montage . . . . . . . . . . . . . . 64 3.2 Montage . . . . . . . . . . . . . . . . . . . . . . . . . . 65 4 Mise en service . . . . . . . . . . . . . . . . . 69 11 Annexe . . . . . . . . . . . . . . . . . . . . . . . . . . . . . 84 11.1 Principe de fonctionnement et construction du système . . . . . . . . . . . . . . . . . . . . . . . . 84 11.1.1 Principe de fonctionnement . . . . 84 11.1.2 Système de mesure . . . . . . . . . . 84 Endress+Hauser Transmetteur de température Manuel de mise en service rapide Manuel de mise en service rapide Grâce à ce manuel de mise en service, vous pouvez mettre en service rapidement et facilement votre appareil de mesure : Conseils de sécurité Page , 62 Montage Page , 64 Raccordement Page , 66 Mise en service (avec description des fonctions de l’appareil) Vous trouverez dans ce chapître une description détaillée de toutes les fonctions ainsi qu’un aperçu de la matrice des fonctions. Quick-SETUP - Accès rapide à la configuration de l’appareil pour un fonctionnement standard Page , 69 Suppression / recherche des défauts Toujours commencer la recherche de défauts par la checklist, si des défauts sont apparus après la mise en service ou lors de la mesure. Grâce à différentes questions, vous serez orientés vers les causes du défaut et les mesures correctives correspondantes. Endress+Hauser Page , 77 61 1 Conseils de sécurité Transmetteur de température 1 Conseils de sécurité Un fonctionnement sûr et fiable du transmetteur de température n’est garanti que si les instructions et les conseils de sécurité contenus dans ce manuel ont été suivis. 1.1 Utilisation conforme à l’objet • L’appareil est un transmetteur de température universel configurable qui peut recevoir les signaux des thermorésistances (RTD), thermocouples (TC), résistances et tensions. L’appareil a été conçu pour un montage en tête de sonde de forme B ou dans un boîtier de terrain. • La garantie du fabricant ne couvre pas une utilisation non conforme. • Les systèmes de mesure pour zones explosibles sont fournis avec une documentation Ex spéciale qui fait partie intégrante du présent manuel. Les consignes d’installation et de raccordement doivent être impérativement respectées. 1.2 Montage, mise en service, exploitation Montage, mise en service, exploitation L’appareil a été fabriqué selon les dernières acquisitions techniques et les directives CE. Cependant, une utilisation non conforme peut générer des risques et dangers. Le montage, le raccordement, la mise en service et la maintenance de l’appareil ne doivent être réalisés que par un personnel spécialisé et qualifié, dûment autorisé par l’exploitant. Le personnel spécialisé doit impérativement avoir lu, compris et suivi les instructions. L’exploitant veillera au raccordement correct du système de mesure, conformément aux schémas électriques. 1.3 Sécurité de fonctionnement Utilisation conforme à l’objet Sécurité de fonctionnement Zone explosible Si le système est utilisé en zone explosible, tenir compte des normes nationales en vigueur. S’assurer que le personnel spécialisé ait la formation adéquate dans ce domaine. Respecter les directives de sécurité au point de mesure. Evolution technique Le fabricant se réserve le droit de modifier les caractéristiques techniques de l’appareil sans préavis. Pour connaître les mises à jour du manuel, contacter l’agence commerciale. 1.4 Retour de matériel 62 Retour de matériel En cas de dommages dus au transport, informer le transporteur et le fournisseur. Endress+Hauser Transmetteur de température 2 Identification 1.5 Symboles utilisés Un fonctionnement sûr et fiable du transmetteur de température n’est garanti que si les instructions et les conseils de sécurité contenus dans ce manuel sont suivis. Les conseils de sécurité dispensés dans le présent manuel sont accompagnés des symboles suivants : Symboles utilisés " ! F = Attention ! “Attention” signale les actions ou procédures risquant d’entraîner des dysfonctionnements ou la destruction de l’appareil si elles ne sont pas menées correctement. Remarque ! “Remarque” signale les actions ou procédures susceptibles de perturber indirectement le fonctionnement des appareils ou de générer des réactions imprévues si elles n’ont pas été menées correctement. Appareils en protection antidéflagrante avec certificat d’essai de type Si la plaque signalétique de l’appareil porte le symbole ci-contre, l’appareil peut être utilisé en zone explosible. Zone sûre (zone non explosible) Ce symbole représente la zone sûre. Les appareils en zone sûre doivent également être certifiés, si les câble de liaison mènent en zone explosible. 2 2.1 Désignation de l’appareil Identification Désignation de l’appareil Comparez les plaques signalétiques sur l’appareil avec les figures suivantes : Fig. 2-1 : Plaque signalétique du transmetteur (exemple) Fig. 2-2: Référence de commande avec réglages (exemple) Fig. 2-3: Désignation pour l’appareil en zone explosible (uniquement pour agrément Ex) Endress+Hauser 63 3 Montage Transmetteur de température Sigle CE, déclaration de conformité L’appareil a été construit et contrôlé dans les règles de l’art, il a quitté nos locaux dans un état technique parfait. Il a été construit selon les normes et directives EN 61 010 “Directives de sécurité pour appareils électriques de mesure, de commande, de régulation et de laboratoire". L’appareil décrit dans la présente notice répond ainsi aux exigences légales des directives CE. Par l’apposition du sigle CE, le constructeur certifie que l’appareil a subi avec succès les contrôles. 2.2 Contenu de la livraison ! La livraison comprend : • le transmetteur pour tête de sonde • les vis, ressorts et rondelles de montage • le manuel de mise en service • le manuel ATEX pour l’exploitation en zone explosible Remarque ! Tenir compte des accessoires du transmetteur indiqués au chapitre 8 "Accessoires". 3 3.1 Conditions de montage Contenu de la livraison Montage Conditions de montage • La température ambiante admissible (voir »Caractéristiques techniques« en page 80) doit être prise en compte lors du montage et de l’exploitation. • Pour l’utilisation en zone explosible, tenir compte des valeurs limites figurant sur les certificats et agréments (voir annexe BA ATEX). Dimensions Les dimensions du transmetteur figurent au chapitre 10 "Caractéristiques techniques". Lieu de montage • Tête de sonde selon DIN 43 729 forme B • Boîtier de terrain Implantation Pas de restriction. 64 Endress+Hauser Transmetteur de température 3 Montage 3.2 Montage Procéder de la manière suivante : Montage Montage du transmetteur dans la tête de sonde selon DIN 43 729 forme B (v. Fig. 3-1, gauche) • Faire passer les fils de l’électronique du capteur (pos. 5) à travers le perçage central du transmetteur (pos. 4). • Insérer les ressorts de montage (pos. 3) sur les vis de montage (pos. 2). • Faire passer les vis de montage (pos. 2) à travers les perçages du transmetteur et les perçages du disque support de la sonde (pos. 5). Sécuriser les deux vis de montage à l’aide des rondelles freins (pos. 6). • Positionner le transmetteur dans la tête de telle sorte que les bornes de raccordement de la sortie courant (bornes 1 et 2) soient orientées vers l’entrée de câble (pos. 7). • Fixer ensuite le transmetteur (pos. 4) avec le disque support de sonde (pos. 5) dans la tête. Montage dans le boîtier de terrain (v. Fig. 3-1, droite) • Faire passer les vis de montage (pos. 2) avec les ressorts (pos. 3) à travers les perçages du transmetteur (pos. 4). Sécuriser les vis avec les rondelles freins (pos. 5). • Visser le transmetteur dans le boîtier de terrain avec un tournevis. R-TMT187ZX-17-06-06-fr-002.eps Attention ! Ne pas trop serrer les vis de montage pour éviter d’endommager le transmetteur. R-TMT187ZX-17-06-06-fr-001.eps " Fig. 3-1: Montage du transmetteur dans la tête de sonde forme B (gauche) et dans le boîtier de terrain (droite) Endress+Hauser 65 4 Raccordement Transmetteur de température 4 Raccordement 4.1 Aperçu Occupation des bornes R09-TMT182ZZ-04-06-xx-fr-001.eps Aperçu Fig. 4-1: Raccordement du transmetteur 4.2 Raccordement de l’unité de mesure Raccordement de l’unité de mesure 3 Attention ! Mettre l’appareil hors tension avant de retirer le capot. Ne pas installer ou raccorder l’appareil sous tension. Le non-respect de cette consigne peut entraîner un endommagement irrémédiable. 4.2.1 Capteurs Réaliser le raccordement entre les câbles du capteur et les bornes du transmetteur (bornes 3 à 6) conformément au schéma électrique (v. Fig. 4-1). 4.2.2 Signal de sortie et tension d’alimentation Ouvrir le presse-étoupe du passage de câble sur la tête de sonde ou le boîtier de terrain. Faire passer les fils à travers l’ouverture, puis les raccorder aux bornes 1 et 2 selon Fig. 4-1. 2 Remarque ! Les vis des bornes de raccordement doivent être serrées. 4.2.3 Raccordement HART® Le raccordement se fait directement par le biais de la liaison 4...20 mA (Fig. 4-1, bornes 1 et 2) ou par des prises de communication d’une alimentation ou d’un séparateur d’alimentation (v. Fig. 4-2 et Fig. 4-3). Pour le raccordement du transmetteur en configuration Ex, se référer à la documentation Ex séparée. 66 Endress+Hauser Transmetteur de température ! 4 Raccordement Remarque ! Le circuit de mesure doit avoir une résistance ohmique supérieure ou égale à 250 Ω. Cette résistance est déjà intégrée dans les alimentations E+H RNS 221 et RN 221N et donc pas nécessaire (v. Fig. 4-2, pos. b et Fig. 4-3, pos. b)! R09-TMT182ZZ-04-06-xx-xx-001.eps Raccordement du terminal portable HART® DXR 275 Fig. 4-2: Raccordement du terminal portable HART® a = Terminal HART®, a* = Terminal HART® connecté aux prises de communication d’une alimentation, b = Energie auxiliaire (par ex. Alimentation RNS 221 ou séparateur d’alimentation RN 221N), c = Transmetteur HART® , d = API avec entrée passive Raccordement Commubox FXA 191 Remarque ! Mettre le commutateur DIP de Commubox sur ’HART®’! R09-TMT182ZZ-04-06-xx-xx-002.eps ! Fig. 4-3: Raccordement électrique de Commubox FXA 191 a = Commubox FXA 191 (relié à un PC et le logiciel d’exploitation E+H ’Commuwin II’), a* = Commubox FXA 191 connecté aux prises de communication d’une alimentation, b = Energie auxiliaire (p. ex. Alimentation RNS 221 ou séparateur d’alimentation RN 221N), c = Transmetteur HART®, d = API avec entrée passive 4.3 ! Endress+Hauser Compensation de potentiel Remarque ! Pour la version séparée en boîtier de terrain, tenir compte des consignes suivantes : le blindage côté sortie (signal de sortie 4...20 mA) doit avoir le même potentiel que le blindage côté capteur ! Pour ceci, il suffit de relier le blindage du câble au PE spécial CEM. 67 5 Exploitation Transmetteur de température Ouvrir les PE du boîtier de terrain et raccorder le blindage de la sortie et du capteur conformément au schéma (v. Fig. 4-4). R-TAF10xxx-04-08-00-de-001.eps aaaaaaaa bbbbbbbb aaaaaaaa bbbbbbbb aaaaaaaa bbbbbbbb 5 5.1 Si le système utilise des thermocouples blindés, il est conseillé d’utiliser un blindage pour le câble de sortie. Dans le cas d’une installation fortement parasitée (CEM), il est conseillé de blinder tous les câbles par une liaison basse impédance au boîtier du transmetteur. Fig. 4-4: Blindage de la version séparée Exploitation Communication La configuration du transmetteur de température est réalisée par l’intermédiaire du protocole HART® . Les valeurs mesurées peuvent également être interrogées via le protocole HART® . L’utilisateur dispose de deux possibilités pour l’exploitation à l’aide de la communication HART® : • Exploitation via le terminal portable “HART® Communicator DXR 275”. • Exploitation via un PC utilisant un logiciel d’exploitation (p. ex. Commuwin II) ainsi qu’un modem HART® (“Commubox FXA 191”). 5.1.1 HART® Communicator DXR 275 La sélection des fonctions de l’appareil se fait à l’aide du “Communicator HART® ” par l’intermédiaire de différents menus et d’une matrice de programmation spéciale HART® (v. page 70). ! Remarque ! • Avec le terminal portable HART® , tous les paramètres peuvent être lus, la programmation étant bloquée. Vous pouvez cependant débloquer la matrice de programmation HART® en entrant la valeur 281 dans la fonction VERROUILLAGE. Le déblocage est maintenu même après une défaillance de l’énergie auxiliaire. La matrice de programmation HART® peut à nouveau être bloquée en effaçant le code personnel. • Vous trouverez des informations détaillées sur le terminal portable HART® dans le manuel de mise en service correspondant qui se trouve dans la pochette de transport de l’appareil. 5.1.2 Programme d’exploitation Commuwin II Commuwin II est un programme universel de commande à distance d’appareils de terrain et de commande. L’utilisation du programme d’exploitation Commuwin II est indépendante du type d’appareil ou du mode de communication (HART® ou PROFIBUS® ). Commuwin II offre les fonctions suivantes : • Paramétrage des fonctions de l’appareil • Visualisation des valeurs mesurées • Sauvegarde des paramètres de l’appareil • Diagnostic de l’appareil • Données concernant les points de mesure 68 Endress+Hauser Transmetteur de température ! 6 Mise en service Remarque ! Vous trouverez plus d’informations sur Commuwin II dans les documents E+H suivants : • Information série : SI 018F “Commuwin II” • Mise en service : BA 124F Programme d’exploitation “Commuwin II” 6 Mise en service 6.1 Contrôle de l’installation et des fonctions Contrôle de l’installation Vérifier tous les raccordements. Pour avoir un fonctionnement parfait, serrer les vis des bornes de raccordement. Contrôle des fonctions Mesure du signal de sortie analogique 4-20 mA ou signaux de défaut suivants : Dépas. par défaut de la gamme de mesure diminution linéaire jusqu’à 3,8 mA Dépas. par excès de la gamme de mesure augmentation linéaire jusqu’à 20,5 mA Rupture de sonde ; Court-circuit sonde 1 ≤ 3,6 mA ou ≥ 21,0 mA 1. pas valable pour les thermocouples 6.2 Mise en service Après la mise sous tension, le tranmetteur est prêt à fonctionner pour une utilisation standard. Mise en service 6.2.1 Quick setup Le Quick setup vous permettra de régler et de configurer systématiquement toutes les fonctions de l’appareil. Avec le terminal portable HART® , il est possible d’effectuer un Quick setup par l’intermédiaire des cases de la matrice de programmation HART® marquées en noir (v. Fig. 6-2). Dans la matrice COMMUWIN II (v. Fig. 6-3), un quick setup est effectué via les cases suivantes : V2H0, V2H2, V2H4, V2H5, V2H6. 6.2.2 Configuration avec le protocole HART® Terminal portable DXR 275 ! Remarque ! La sélection des fonctions du transmetteur se fait à l’aide du terminal portable HART® par l’intermédiaire de différents menus et d’une matrice de programmation E+H (v. Fig. 6-2). Toutes les fonctions du transmetteur sont décrites dans le chapitre 6.2.3. Procédure : 1. Mettre le terminal portable sous tension : – L’appareil de mesure n’est pas encore raccordé. Le menu principal HART® s’affiche. Ce menu apparaît pour toutes les programmations HART® et ne dépend donc pas du type d’appareil de mesure. Vous trouverez les informations relatives au paramétrage offline dans le manuel de mise en service du terminal portable “Communicator DXR 275”. Endress+Hauser 69 6 Mise en service Transmetteur de température 2. 3. 4. R09-TMT182-02-06-xx-en-002.eps 5. – L’appareil de mesure est déjà raccordé. Le menu “Online” s’affiche directement. Dans le menu “Online”, les données actuelles (valeur mesurée (PV) et sortie courant (AO)) sont affichées en permanence. Vous accédez à la matrice de programmation du transmetteur par la ligne “Paramètres de la matrice” (v. page 70). Toutes les fonctions accessibles sous HART® se trouvent systématiquement dans cette matrice. Sélectionner le groupe de fonctions dans “Paramètres de la matrice” (p.ex. étalonnage de base) et ensuite la fonction souhaitée, p.ex. “Entrée capteur”. Entrer une valeur numérique ou modifier le réglage. Valider ensuite avec la touche de fonction F4. "ENVOI" est affiché au-dessus de la touche de fonction “F2”. En appuyant sur la touche F2, toutes les valeurs entrées avec le terminal portable sont transmises au système de mesure du transmetteur. La touche de fonction “F3” "RETOUR" permet de retourner au menu “Online”. Vous pouvez alors lire les valeurs actuelles mesurées par le transmetteur avec les nouveaux réglages. Fig. 6-1: Configuration de "l’entrée capteur" du terminal portable R09-TMT182-02-06-xx-en-001.eps Matrice de programmation HART® Fig. 6-2: Matrice de programmation HART® 70 Endress+Hauser Transmetteur de température 6 Mise en service Matrice de programmation COMMUWIN II Fig. 6-3: Matrice de programmation COMMUWIN II : A = Fonctions de l’appareil uniquement pour linéarisation spécifique à l’utilisateur B = Fonctions de l’appareil actives uniquement avec raccordement TC C = Fonctions de l’appareil actives uniquement avec raccordement RTD 2 fils. ! Remarque ! Lors de l'apparition d'erreurs de communication dans le système d'exploitation Microsoft® Windows NT® Version 4.0 il convient de prendre la mesure suivante : désactivation du réglage ’FIFO activé’. Pour ce faire procéder comme suit : • Par le biais du menu 'DEMARRER' → 'PARAMETRES' → ’PANNEAU DE CONFIGURATION' → 'PORTS' le point 'COM1'. Par le biais du chemin 'PARAMETRES’ → 'AVANCE' désactiver la commande ’FIFO activé’. Endress+Hauser 71 6 Mise en service Transmetteur de température 6.2.3 Description des fonctions de l’appareil Le tableau ci-dessous contient la liste et la description de toutes les fonctions de la matrice de programmation HART® qui peuvent être lues et paramétrées pour la configuration du transmetteur de température. ! Remarque ! représente l’affichage appaLes réglages usine sont indiqués en gras. Le symbole raissant sur l’écran du terminal portable HART® (DXR 275). 3 Groupe de fonctions : PARAMETRES DE BASE Mesure principale • V0H0 • 3 (PV) Température int. • V0H1 Affichage de la température mesurée actuellement. Affichage : nombre à virgule flottante à 7 chiffres + unité (p.ex. 199.98 Ohm; -62.36 °C) Affichage de la température mesurée actuellement au point de référence interne. ! Remarque ! Affichage : nombre à virgule flottante à 7 chiffres + unité (p.ex. 23,70 °C)1 Filtre de temps • V0H2 Sélection du filtre numérique 1er degré Entrée : 0...100 secondes 0 sec. Mode RJ • V0H3 Sélection du point de mesure de référence interne (Pt100) ou externe (0...80 °C). Entrée : interne, externe interne Remarque ! Entrée possible uniquement si le capteur sélectionné dans la fonction TYPE DE CAPTEUR1 est du type thermocouple (TC). Valeur comp t Ext • V0H3 ! Entrée de la valeur mesurée au point de référence externe. Entrée : -40,00...85,00 °C (°C, °F, K) 0 °C ! Remarque ! Entrée possible uniquement si un point de référence externe a été sélectionné dans la fonction MODE RJ. OFFSET • V0H4 Entrée de la correction du zéro (Offset). Entrée : -10,00...10,00 °C (°C, °F, K) 0,00 °C ! Remarque ! Lors du changement du type de capteur, la valeur entrée est ramenée au réglage usine ! 72 Endress+Hauser Transmetteur de température 6 Mise en service Groupe de fonctions : ETALONNAGE DE BASE Type capteur • V2H0 Entrée du type de capteur utilisé : Type de capteur Début d’échelle -10..75 mV - 10 mV 10..400 Ohm 10 Ω 10..2000 Ohm 10 Ω Pt100 DIN -200 °C Pt100 JIS -200 °C Pt500 -200 °C Pt1000 -200 °C Ni100 -60 °C Ni500 -60 °C Ni1000 -60 °C Polynom RTD -270 °C Type B 0 °C Type C 0 °C Type D 0 °C Type E -270 °C Type J -210 °C Type K -270 °C Type L -200 °C Type N -270 °C Type R -50 °C Type S -50 °C Type T -270 °C Type U -200 °C Polynôme TC -270 °C Pt100 DIN Comp. de Temperature • V2H1 Sélection compensation de température du point de référence en cas de linéarisation spécifique à l'utilisateur de TC Entrée: sans, Type B, Type C, Type D, Type E, Type J, Type K, Type L, Type N, Type R, Type S, Type T, Type U sans Unité mesure • V2H2 Unité de mesure. Entrée : °C °F K °C Sortie courant • V2H3 Entrée du signal de sortie courant standard (4-20 mA) ou inversé (20-4 mA). Entrée : 4-20 mA 20-4 mA 4-20 mA Valeur pour 4 mA • V2H4 Entrée : Limites voir fonction TYPE DE CAPTEUR. 0 °C Valeur pour 20 mA • V2H5 Entrée : Limites voir fonction TYPE DE CAPTEUR. 100 °C Connection • V2H6 Entrée du type de raccordement RTD Entrée : 2 fils 3 fils 4 fils 3 fils • 3 Type de raccordement RTD Fin d’échelle 75 mV 400 Ω 2000 Ω 850 °C 649 °C 250 °C 250 °C 180 °C 150 °C 150 °C 2500 °C 1820 °C 2320 °C 2495 °C 1000 °C 1200 °C 1372 °C 900 °C 1300 °C 1768 °C 1768 °C 400 °C 600 °C 2500 °C ! Remarque ! Champ actif uniquement si Thermorésistance électrique (RTD) a été sélectionnée dans la fonction TYPE DE CAPTEUR (V2H0)1. Endress+Hauser 73 6 Mise en service Transmetteur de température 2-fils compens. • V2H7 Entrée de la compensation de résistivité pour circuit 2 fils RTD. Entrée : 0,00...30,00 Ohm 0,00 Ohm ! Remarque ! Champ actif uniquement si Circuit 2 fils a été sélectionné dans la fonction TYPE DE RACCORDEMENT (V2H6)1. Entrée du signal de défaut lors d’une rupture de sonde2 ou d’un court-circuit. Entrée : max (≥ 21,0 mA) min (≤ 3,6 mA) max Mode défaut • V2H8 Groupe de fonctions : LINEARISATION (3 USER LINEAR.) Champs actifs uniquement si une linéarisation spécifique à l’utilisateur (polynôme RTD ou polynôme TC) a été sélectionnée dans la fonction TYPE CAPTEUR (V2H0) 1. Coefficient X0 • V3H0 Entrée du premier coefficient de linéarisation spécifique au client (Polynôme 4ème degré avec cinq coefficients), v. Chap. 6.2.4. ! Remarque ! Champ actif uniquement si une linéarisation spécifique au client (Polynôme RTD ou polynôme TC) a été sélectionnée dans la fonction TYPE DE CAPTEUR (V2H0). Coefficient X1 • V3H1 Entrée du COEFFICIENT X1, v. Chap. 6.2.4. Coefficient X2 • V3H2 Entrée du COEFFICIENT X2, v. Chap. 6.2.4. Coefficient X3 • V3H3 Entrée du COEFFICIENT X3, v. Chap. 6.2.4. Coefficient X4 • V3H4 Entrée du COEFFICIENT X4, v. Chap. 6.2.4. Groupe de fonction : SERVICE Code erreur • V9H0 Affichage du code erreur actuel. Affichage : voir »Messages d’erreur d’application« en page 77 0 Dernier défaut • V9H1 Affichage du code erreur précédent. Affichage : voir »Messages d’erreur d’application« en page 77 0 • 3 Dernier code erreur Config. changé • V9H2 Modification des paramètres suit. Affichage : oui/non non Mesure min • V9H3 Affichage de la valeur process min. La valeur process est reprise après le début de la mesure. ! Remarque ! La valeur process min. est modifiée par accès à la valeur process actuelle. La valeur par défaut est enregistrée lors du retour au réglage usine. +10000 74 Endress+Hauser Transmetteur de température 6 Mise en service Affichage de la valeur process max. La valeur process est reprise après le début de la mesure. Mesure max • V9H4 ! Remarque ! La valeur process max. est modifiée par accès à la valeur process actuelle. La valeur par défaut est enregistrée lors du retour au réglage usine. -10000 Entrée : 182 (Retour au réglage usine) 0 Val. par défaut • V9H5 • 3 Réglage usine Courrant d. Sortie • V9H6 Affichage du signal de sortie courant actuel. Simulation • V9H7 Entrée du mode de simulation. Entrée : Inactif actif Off Current sort (sim) • V9H8 Entrée de la valeur de simulation (courant). Entrée : 3.58...21.7 mA Verrouillage • V9H9 Déverrouillage pour paramétrage. Entrée : Verrouillage = 0 Déverrouillage = 281 281 Groupe de fonctions : INFORMATION UTILISATEUR Designation • VAH0 Entrée et affichage de la désignation du point de mesure (TAG). Entrée : 8 caractères - Designation proc. • VAH1 Entrée et affichage de la désignation de l’installation. Entrée : 16 caractères - • 3 Désignation Version hardware • VAH2 Affichage de la version de l’appareil p. ex. : 1.0000 correspond à une version 1.00.00 Version software • VAH3 Affichage de la version logiciel p. ex. : 8010 correspond à une version 1.0 • 3 Ver. logiciel Numéro série • VAH4 1. 2. Endress+Hauser Affichage à 8 chiffres du numéro de série de l’appareil E+H (voir plaque signalétique sur l’appareil). La remarque n’est valable que pour la matrice de commande COMMUWIN II Pas pour les thermocouples (TC) 75 7 Maintenance Transmetteur de température 6.2.4 Configuration avec protocole HART® et ReadWin® 2000 Logiciel de configuration PC ReadWin® 2000 La configuration du transmetteur de tête se fait, outre avec le protocole HART®, avec le logiciel de configuration PC ReadWin® 2000. Le tableau suivant montre la structure de la commande par menu avec ReadWin® 2000. Paramètres configurables (Description fonctions d’appareil v. Chap. 6.2.3) Configuration standard – – – – – – – Type de sonde Type raccordement (2, 3 ou 4 fils avec RTD) Unité de mesure (°C, °F ou K) Début d'échelle Fin d'échelle Coefficient X0 à X4 (pour type de capteur RTD/TC) Compensation de température (pour type de capteur TC) Configuration optionnelle – – – – – – – – – Point de référence interne/externe (pour TC) Température externe (pour TC avec point de référence externe) Compensation résistance de ligne (pour liaison 2 fils RTD) Mode défaut Sortie (4 à 20 mA/20 à 4 mA) Amortissement (Filtre) Offset TAG (Désignation point de mesure) Description (Descriptor) Options de service – – – – Simulation (on/off) Reset/Valeurs par défaut Numéro de série (seulement affichage) Code de commande (= code de libération 281) Des informations détaillées sur la commande via ReadWin® 2000 figurent dans la documentation en ligne du logiciel. ReadWin® 2000 peut être chargé gratuitement directement d'Internet à l’adresse suivante : • www.endress.com/Readwin Réglage par menu du transmetteur de température : La linéarisation spécifique au client et l'adaptation automatique aux caractéristiques du capteur (Sensor matching) sont réalisées à l'aide du logiciel de configuration SMC32.exe (Sensor Matching Calibration). Le logiciel de configuration PC ReadWin® 2000 et le programme SMC32.exe sont disponibles gratuitement sous www.endress.com/Readwin pour téléchargement. Le programme SMC32.exe calcule les coefficients de linéarisation X0 à X4 qui, après raccordement du transmetteur HART® sont entrés dans la matrice de commande COMMUWIN II, dans le terminal portable HART® -DXR 275 ou dans ReadWin® 2000. ! Remarque ! Pour le logiciel de configuration ReadWin® 2000 il est prévu l'intégration du programme SMC32.exe et un Quick-Setup, qui donne une vue d'ensemble de tous les paramètres. 7 Maintenance 76 Maintenance Le transmetteur ne nécessite aucune maintenance. Endress+Hauser Transmetteur de température 8 Accessoires 8 Accessoires Accessoires Commubox FXA 191, Logiciel d’exploitation PC COMMUWIN II, ReadWin® 2000. Pour toute commande (p. ex. de pièces de rechange), veuillez contacter votre fournisseur. 9 9.1 Suppression des défauts Recherche des défauts Les checklists ci-dessous permettent d’entamer une recherche de défauts, s’ils sont apparus après la mise en service ou lors du processus de mesure. Grâce à différentes questions, vous serez orientés vers les causes du défaut et les mesures correctives correspondantes. 9.2 Messages d’erreur d’application Endress+Hauser Messages d’erreur d’application Les messages d’erreur d’application s’affichent soit sur l’écran du terminal portable HART® , si "CODE ERREUR" a été sélectionné dans le menu, soit dans la surface de commande PC de COMMUWIN II (V9H0 - CODE ERREUR). Code erreur Cause Procédure / Suppression 0 Aucune erreur, avertissement Aucune 10 Erreur matériel (défaut appareil) Remplacer le transmetteur 11 Court-circuit capteur Vérifier le capteur 12 Rupture de liaison capteur Vérifier le capteur 13 Défaut de point de mesure de référence Aucune 14 Appareil pas étalonné Retourner le transmetteur au fournisseur 106 Up-/Download actifs Aucune (est automatiquement validé) 201 Avertissement : valeur mesurée trop faible Entrer d’autres valeurs de début d’échelle 202 Avertissement : valeur mesurée trop grande Entrer d’autres valeurs de fin d’échelle 203 Appareil remis à zéro (retour aux réglages usine) Aucune 77 9 Suppression des défauts Transmetteur de température 9.3 Erreurs d’application Erreurs d’application sans message Erreurs d’application - Généralités Erreur Cause Action / Suppression Pas de communication Aucun courant ne passe dans le câble 2 fils Raccorder correctement les câbles (voir fig. occupation des bornes) Tension d’alimentation trop faible (<10 V) Vérifier l’alimentation Défaut du câble d’interface Vérifier le câble d’interface Défaut de l’interface Vérifier l’interface de votre PC Défaut du transmetteur Remplacer le transmetteur Erreur d’application pour raccordement RTD (Pt100/Pt500/Pt1000/Ni100) Erreur Cause Action / Suppression Courant de défaut (≤ 3,6 mA ou ≥ 21 mA) Défaut capteur Vérifier le capteur Mauvais raccordement du RTD Raccorder correctement les câbles (schéma d’occupation des bornes) Mauvais raccordement du câble 2 fils Raccorder correctement les câbles selon le schéma d’occupation des bornes (polarité) Programmation du transmetteur défectueuse (Nombre de fils) Modifier la fonction TYPE DE RACCORDEMENT (v. Chap. 6.2.3) Programmation Fonction TYPE DE CAPTEUR réglée sur thermocouple TC (v. Chap. 6.2.3) ; la régler sur RTD Défaut transmetteur Remplacer le transmetteur Mauvaise implantation du capteur Monter correctement le capteur Chaleur conduite par le capteur Tenir compte de la longueur d’implantation du capteur Programmation du transmetteur défectueuse (Nombre de fils) Modifier le paramètre ‘Type de raccordement’ Programmation du transmetteur défectueuse (mise à l’échelle) Modifier la mise à l’échelle Réglage sur le mauvais RTD Modifier le paramètre ‘Type de capteur’ Raccordement du capteur (câble 2 fils) Vérifier le raccordement du capteur La résistivité du capteur (2 fils) n’a pas été compensée Compenser la résistivité Mauvais réglage offset Vérifier l’offset Valeur mesurée fausse / imprécise 78 Endress+Hauser Transmetteur de température 9 Suppression des défauts Erreurs d’application pour raccordement TC Erreur Cause Action / Suppression Courant de défaut (≤ 3,6 mA ou ≥ 21 mA) Mauvais raccordement du capteur Raccorder le capteur selon le schéma d’occupation des bornes (polarité) Défaut capteur Remplacer le capteur Programmation Type de capteur réglé sur ’RTD’ Régler le thermocouple correct Défaut transmetteur Remplacer le transmetteur Mauvaise implantation du capteur Monter correctement le capteur Chaleur conduite par le capteur Tenir compte de la longueur d’implantation du capteur Programmation du transmetteur défectueuse (mise à l’échelle) Modifier la mise à l’échelle Réglage sur le mauvais type de thermocouples Modifier le paramètre ‘Type de capteur’ Réglage sur le mauvais point de mesure de référence voir chap. ‘Commande’ et ‘Caractéristiques techniques’ Mauvais réglage offset Vérifier l’offset Défauts sur le fil pour couples thermoélectriques soudé dans le tube protecteur (Couplage de tensions parasites) Utiliser un capteur dont le fil pour couples thermoélectriques n’est pas soudé La valeur mesurée est fausse / imprécise 9.4 Pièces de rechange Kit de montage pour transmetteur (4 vis, 6 ressorts, 10 rondelles freins) Référence de commande : 510 01112 9.5 Retour Endress+Hauser Retour Lorsque vous retournez l’appareil pour vérification, veuillez joindre une note décrivant le défaut et l’application. 9.6 Mise au rebut Pièces de rechange Mise au rebut De par sa conception, le transmetteur n’est pas réparable. Pour la mise au rebut, tenir compte des normes en vigueur. 79 10 Caractéristiques techniques Transmetteur de température 10 Caractéristiques techniques Principe de fonctionnement et construction du système Principe de mesure Acquisition et conversion électroniques des signaux d’entrée en mesure de température industrielle. Système de mesure Le transmetteur de température iTEMP HART® TMT 182 est un transmetteur 2 fils à sortie analogique, entrée de mesure pour thermorésistances et résistances en technique 2, 3, ou 4 fils, thermocouples et tensions. Le réglage du transmetteur TMT 182 est effectué via le protocole HART® sur un terminal portable (DXR 275) ou un PC (COMMUWIN II). Grandeurs d’entrée Grandeur mesurée Température (transmission linéaire), résistance et tension Gamme de mesure La gamme de mesure du transmetteur dépend du raccordement du capteur et des signaux d’entrée. Signaux d’entrée Désignation Thermorésistance (RTD) Limites de gamme de mesure Etendue min. Pt100 Pt500 Pt1000 selon IEC 751 -200 à 850 °C(-328 à 1562 °F) -200 à 250 °C(-328 à 482 °F) -200 à 250 °C(-328 à 482 °F) 10 K 10 K 10 K Ni100 Ni500 Ni1000 selon DIN 43760 -60 à 250 °C (-76 à 482 °F) -60 à 150 °C (-76 à 302 °F) -60 à 150 °C (-76 à 302 °F) 10 K 10 K 10 K • Type de raccordement : Raccordement 2, 3 ou 4 fils • Pour raccordement 2 fils, compensation software de la résistance de ligne possible (0 à 30 Ω) • Pour raccordement 3 ou 4 fils, résistance de ligne max. 11 Ω par ligne • Courant de capteur : ≤ 0,2 mA Résistance 80 Résistance (Ω) 10... 400 Ω 10...2000 Ω 10 Ω 100 Ω Endress+Hauser Transmetteur de température 10 Caractéristiques techniques Désignation Thermocouples (TC) B (PtRh30-PtRh6) C (W5Re-W26Re)1 D (W3Re-W25Re)1 E (NiCr-CuNi) J (Fe-CuNi) K (NiCr-Ni) L (Fe-CuNi)2 N (NiCrSi-NiSi) R (PtRh13-Pt) S (PtRh10-Pt) T (Cu-CuNi) U (Cu-CuNi)2 selon IEC 584 partie 1 Limites de gamme de mesure 0 à +1820 °C (32 à 3308 °F) 0 à +2320 °C (32 à 4208 °F) 0 à +2495 °C (32 à 4523 °F) -270 à +1000 °C (-454 à 1832 °F) -210 à +1200 °C (-346 à 2192 °F) -270 à +1372 °C (-454 à 2501 °F) -200 à +900 °C (-328 à 1652 °F) -270 à +1300 °C (-454 à 2372 °F) -50 à +1768 °C (-58 à 3214 °F) -50 à +1768 °C (-58 à 3214 °F) -270 à +400 °C (-454 à 752 °F) -200 à +600 °C (-328 à 1112 °F) Etendue min. 500 K 500 K 500 K 50 K 50 K 50 K 50 K 50 K 500 K 500 K 50 K 50 K • Point de mesure de référence : interne (Pt100) • Précision du point de mesure de référence : ±1K Tension (mV) millivoltmètre (mV) -10...75 mV 5 mV Grandeurs de sortie Signal de sortie analogique 4...20 mA, 20...4 mA Comportement à la transmission linéaire en température, résistance et tension Signal de panne (surveillance des défauts) • Dépassement par défaut de la gamme de mesure : diminution linéaire jusqu’à 3,8 mA • Dépassement par excès de la gamme de mesure : augmentation linéaire jusqu’à 20,5 mA • Rupture de sonde ; court-circuit3 : ≤ 3,6 mA ou ≥ 21,0 mA Charge (VAlimentation - 10 V) / 0,022 A (sortie courant) Filtre Filtre digital 1er ordre : 0...60 s Consommation intrinsèque ≤ 3,5 mA Limitation de courant ≤ 23 mA Temporisation au démarrage 4 s (au démarrage Ia = 3,8 mA) Isolation galvanique (entrée / sortie) U = 2 kV AC Alimentation auxiliaire Endress+Hauser Raccordements électriques voir chapitre 4 "Raccordement" Tension d’alimentation Ub = 10...35 V, protection contre les inversions de polarité Ondulation résiduelle Ondulation résiduelle admissible Uss ≤ 3 V pour Ub ≥ 13 V, f max. = 1 kHz 81 10 Caractéristiques techniques Transmetteur de température Précision de mesure Temps de réponse 1s Conditions de référence Température d’étalonnage 23 °C ± 5 K Thermorésistance RTD : Désignation : Pt100, Ni100 Pt500, Ni500 Pt1000, Ni1000 Précision de mesure :4 0,2 K ou 0,08% 0,5 K ou 0,20% 0,3 K ou 0,12% Thermocouple TC : Désignation : K, J, T, E, L, U N, C, D S, B, R Ecart de mesure Précision de mesure : typ. 0,5 K ou 0,08%4 typ. 1,0 K ou 0,08%4 typ. 2,0 K ou 0,08%4 Résistance (Ω): Précision de mesure :4 ± 0,1 Ω ou 0,08% ± 1,5 Ω ou 0,12% Gamme de mesure : 10... 400 Ω 10...2000 Ω Tension (mV) Précision de mesure :4 ± 20 µV ou 0,08% Gamme de mesure : -10...75 mV Influence de la tension d’alimentation ≤ ±0,01%/V écart de 24 V5 Influence de la température ambiante (dérive de la température) Thermorésistance (RTD) : Td = ± (15 ppm/K * gamme de mesure max. + 50 ppm/K * gamme de mesure réglée) * ∆ ϑ Thermorésistance Pt100 : Td = ± (15 ppm/K * (fin d’échelle game de mesure +200) + 50 ppm/K * gamme de mesure réglée) * ∆ ϑ Thermocouple (TC) : Td = ± (50 ppm/K * gamme de mesure max + 50 ppm/K * gamme de mesure réglée) * ∆ ϑ ∆ ϑ = écart entre la température ambiante et la condition de référence. Stabilité à long terme ≤ 0,1 K/an6 ou ≤ 0,05%/an4 Influence de la charge ≤ ±0,02%/100 Ω5 Influence du point de mesure de référence Pt100 DIN IEC 751 classe B (point de mesure de référence pour les thermocouples TC) 6 Conditions d’utilisation (Conditions de montage) Conseils de montage • Implantation : pas de restriction • Position de montage : Tête de raccordement selon DIN 43 729 forme B; boîtier de terrain TAF 10 Conditions d’utilisation (Conditions ambiantes) 82 Température ambiante −40...+85 °C (pour zone Ex, voir certificat Ex) Température de stockage -40...+100 °C Classe climatique selon EN 60 654-1, classe C Endress+Hauser Transmetteur de température 10 Caractéristiques techniques Condensation admissible Protection IP 00, IP 66 si monté Résistance aux chocs et aux vibrations 4g / 2...150 Hz selon IEC 60 068-2-6 Compatibilité électromagnétique (CEM) Immunité et émissivité selon EN 61 326-1 (IEC 1326) et NAMUR NE 21. Construction Dimensions en mm Poids env. 40 g Matériau • Boîtier : PC • Surmoulage : PUR Bornes de raccordement Section de fil max. 1,75 mm2 (vis imperdables) R09-TMT182ZZ-06-06-xx-xx-001.eps Dimensions Eléments d’affichage et de commande Commande à distance • Configuration : Terminal portable DXR 275 ou PC avec Commubox FXA 191 et logiciel d’exploitation, p. ex. COMMUWIN II • Interface Interface PC RS232 et Commubox FXA 191 • Paramètres configurables Type de capteur, type de raccordement, unité de mesure (°C/°F), gammes de mesure, point de mesure de référence interne/externe, compensation de la résistance de ligne pour raccordement 2 fils, mode défaut, signal de sortie (4...20/20...4 mA), filtre digital (amortissement), offset, désignation du point de mesure + description (8 + 16 caractères), simulation de sortie, linéarisation spécifique au client, acquisition des valeurs de process min./max. Certificats et Agréments Agrément Ex Vous obtiendrez tous les renseignements concernant les produits disponibles certifiés Ex (ATEX, FM, CSA) auprès de votre agence E+H. Vous trouverez toutes les informations relatives à la protection anti-déflagration dans des documents séparés, également disponibles sur demande. Marque CE L’appareil est conforme aux exigences des directives CE. Par l’apposition de la marque CE, Endress+Hauser certifie que l’appareil a passé le contrôle avec succès. Documentation complémentaire Documentations complémentaires 1. 2. 3. 4. 5. 6. Endress+Hauser • Information Série : Transmetteur de température (SI 008R) • Information Technique : iTEMP HART® TMT 182 (TI 078R) • Documentation complémentaire Ex : ATEX, CSA, FM, etc. selon ASTM E988 selon DIN 43710 pas pour les thermocouples (TC) % se réfèrent à l’étendue de mesure réglée. La valeur la plus élevée est valable. toutes les données se réfèrent à la limite supérieure de la gamme de mesure sous les conditions de référence 83 11 Annexe Transmetteur de température 11 Annexe 11.1 Principe de fonctionnement et construction du système 11.1.1 Principe de fonctionnement Principe de fonctionnement Acquisition et conversion électroniques des signaux d’entrée en un signal de sortie analogique pour la mesure de température industrielle. Le transmetteur est monté dans une tête de sonde de forme B ou, séparé du capteur, dans un boîtier de terrain. Le réglage du transmetteur s’effectue via le protocole HART® avec un terminal portable (DXR 275) ou un PC (COMMUWIN II). 11.1.2 Système de mesure Système de mesure Conversion des signaux d’entrée suivants : • Thermorésistances (RTD) et résistances (raccordement 2, 3 ou 4 fils) • Thermocouples (TC) et tensions en un signal de sortie analogique réglable (4...20 mA ou 20...4 mA). Surveillance des défauts : • Dépassement par excès ou par défaut de la gamme de mesure • Rupture de sonde et court-circuit1 L’utilisation en zone explosible est autorisée conformément à ATEX II 1 G EEx ia IIC T4/ T5/T6. 1. Pas pour thermocouple (TC) 84 Endress+Hauser Transmetteur de température Index Index A M Agréments. . . . . . . . . . . . . . . . . . . . . . . . . . . . . . . . . 83 Alimentation auxiliaire . . . . . . . . . . . . . . . . . . . . . . . . 81 Marque CE . . . . . . . . . . . . . . . . . . . . . . . . . . . . . . . . . 83 B Occupation des bornes . . . . . . . . . . . . . . . . . . . . . . . 66 Blindage . . . . . . . . . . . . . . . . . . . . . . . . . . . . . . . . . . 67 Bornes de raccordement . . . . . . . . . . . . . . . . . . . . . 65 P C Précision de mesure . . . . . . . . . . . . . . . . . . . . . . . . . 82 Presse-étoupe . . . . . . . . . . . . . . . . . . . . . . . . . . . . . . 66 Programme d’exploitation Commuwin II . . . . . . . . . . 68 Certificats . . . . . . . . . . . . . . . . . . . . . . . . . . . . . . . . . Compensation de potentiel. . . . . . . . . . . . . . . . . . . . Conditions d’utilisation . . . . . . . . . . . . . . . . . . . . . . . Configuration programme Commuwin II . . . . . . . . . . . . . . . . . . Conseils de sécurité . . . . . . . . . . . . . . . . . . . . . . . . . Construction . . . . . . . . . . . . . . . . . . . . . . . . . . . . . . . 83 67 82 68 62 83 D Déclaration de conformité. . . . . . . . . . . . . . . . . . . . . Dépassement par excès ou par défaut de la gamme de mesure. . . . . . . . . . . . . . . . . . . . . . . . . . Dimensions . . . . . . . . . . . . . . . . . . . . . . . . . . . . . . . . Documentation complémentaire. . . . . . . . . . . . . . . . 64 84 64 83 E Entrée de câble. . . . . . . . . . . . . . . . . . . . . . . . . . . . . 65 F Fils de l’électronique du capteur . . . . . . . . . . . . . . . 65 O R Raccordement . . . . . . . . . . . . . . . . . . . . . . . . . . . . . . 66 Rondelles freins . . . . . . . . . . . . . . . . . . . . . . . . . . . . . 65 Rupture de sonde et court-circuit . . . . . . . . . . . . . . . 84 S Sigle CE . . . . . . . . . . . . . . . . . . . . . . . . . . . . . . . . . . . 64 Signal de panne. . . . . . . . . . . . . . . . . . . . . . . . . . . . . 81 Signaux d’entrée . . . . . . . . . . . . . . . . . . . . . . . . . . . . 80 Sortie courant. . . . . . . . . . . . . . . . . . . . . . . . . . . . . . . 65 Surveillance des défauts . . . . . . . . . . . . . . . . . . . . . . 84 T Température ambiante admissible . . . . . . . . . . . . . . 64 Tête de sonde de forme B . . . . . . . . . . . . . . . . . . . . . 62 Thermocouple (TC) . . . . . . . . . . . . . . . . . . . . . . . . . . 62 Thermorésistance (RTD) . . . . . . . . . . . . . . . . . . . . . . 62 U H Utilisation conforme à l’objet . . . . . . . . . . . . . . . . . . . 62 HART logiciel Commuwin II . . . . . . . . . . . . . . . . . . . . . . 68 V Vis de montage . . . . . . . . . . . . . . . . . . . . . . . . . . . . . 64 L Limites de la gamme de mesure . . . . . . . . . . . . . . . 80 Z Zone explosible . . . . . . . . . . . . . . . . . . . . . . . . . . . . . 62 Endress+Hauser 85 Europe Austria ❑ Endress+Hauser Ges.m.b.H. Wien Tel. ++43 (1) 88056-0, Fax (1) 88056-35 Belarus Belorgsintez Minsk Tel. ++375 (172) 263166, Fax (172) 263111 Belgium / Luxembourg ❑ Endress+Hauser S.A./N.V. Brussels Tel. ++32 (2) 2480600, Fax (2) 2480553 Bulgaria INTERTECH-AUTOMATION Sofia Tel. ++359 (2) 664869, Fax (2) 9631389 Croatia ❑ Endress+Hauser GmbH+Co. Zagreb Tel. ++385 (1) 6637785, Fax (1) 6637823 Cyprus I+G Electrical Services Co. Ltd. Nicosia Tel. ++357 (2) 484788, Fax (2) 484690 Czech Republic ❑ Endress+Hauser GmbH+Co. Praha Tel. ++420 (26) 6784200, Fax (26) 6784179 Denmark ❑ Endress+Hauser A/S Søborg Tel. ++45 (70) 131132, Fax (70) 132133 Estonia Elvi-Aqua Tartu Tel. ++372 (7) 422726, Fax (7) 422727 Finland ❑ Endress+Hauser Oy Espoo Tel. ++358 (9) 8596155, Fax (9) 8596055 France ❑ Endress+Hauser Huningue Tel. ++33 (3) 89696768, Fax (3) 89694802 Germany ❑ Endress+Hauser Meßtechnik GmbH+Co. Weil am Rhein Tel. ++49 (7621) 97501, Fax (7621) 975555 Great Britain ❑ Endress+Hauser Ltd. Manchester Tel. ++44 (161) 2865000, Fax (161) 9981841 Greece I & G Building Services Automation S.A. Athens Tel. ++30 (1) 9241500, Fax (1) 9221714 Hungary Mile Ipari-Elektro Budapest Tel. ++36 (1) 2615535, Fax (1) 2615535 Iceland Vatnshreinsun HF Reykjavik Tel. ++345 (5) 619616, Fax (5) 619617 Ireland Flomeaco Company Ltd. Kildare Tel. ++335 (45) 868615, Fax (45) 868182 Italy ❑ Endress+Hauser Italia S.p.A. Cernusco s/N Milano Tel. ++39 (02) 92106421, Fax (02) 92107153 Norway ❑ Endress+Hauser A/S Tranby Tel. ++47 (32) 859850, Fax (32) 859851 Brazil ❑ Samson Endress+Hauser Ltda. Sao Paulo Tel. ++55 (11) 50313455, Fax (11) 50313067 Papua New Guinea SBS Electrical Pty Limited Port Moresby Tel. ++675 (3) 251188, Fax (3) 259556 Poland ❑ Endress+Hauser Polska Sp. z o.o. Warszawy Tel. ++48 (22) 7201090, Fax (22) 7201085 Canada ❑ Endress+Hauser Ltd. Burlington, Ontario Tel. ++1 (905) 6819292, Fax (905) 6819444 Philippines Brenton Industries Inc. Makati Metro Manila Tel. ++63 (2) 6388041, Fax (2) 6388042 Portugal Tecnisis - Tecnica de Sistemas Industriais Linda-a-Velha Tel. ++351 (1) 4172637, Fax (1) 4185278 Chile Endress+Hauser Chile Ltd. Las Condes - Santiago Tel. ++56 (2) 321 3009, Fax (2) 321 3025 Singapore ❑ Endress+Hauser (S.E.A.) Pte., Ltd. Singapore Tel. ++65 (5) 668222, Fax (2) 666848 Romania Romconseng SRL Bucharest Tel. ++40 (1) 4101634, Fax (1) 4101634 Colombia Colsein Ltd. Bogota D.C. Tel. ++57 (1) 2367659, Fax (1) 6107868 South Korea ❑ Endress+Hauser (Korea) Co., Ltd. Seoul Tel. ++82 (2) 6587200, Fax (2) 6592838 Russia ❑ Endress+Hauser Moscow Office Moscow Tel. ++709 (5) 1587571, Fax (5) 1589864 Slovak Republic Transcom Technik s.r.o. Bratislava Tel. ++421 (74) 4888684, Fax (74) 4887112 Slovenia ❑ Endress+Hauser D.O.O. Ljubljana Tel. ++386 (61) 1592217, Fax (61) 1592298 Spain ❑ Endress+Hauser S.A. Barcelona Tel. ++34 (93) 4803366, Fax (93) 4733839 Sweden ❑ Endress+Hauser AB Sollentuna Tel. ++46 (8) 55511600, Fax (8) 55511600 Switzerland ❑ Endress+Hauser Metso AG Reinach/BL 1 Tel. ++41 (61) 7157575, Fax (61) 7111650 Turkey Intek Endüstriyel Ölcü ve Kontrol Sistemleri Istanbul Tel. ++90 (212) 2751355, Fax (212) 2662775 Ukraine Industria Ukraïna Kiev Tel. ++380 (44) 26881, Fax (44) 26908 Yugoslavia Meris d.o.o. Beograd Tel. ++381 (11) 4446164, Fax (11) 4441966 Africa Egypt Anasia Heliopolis/Cairo Tel. ++20 (2) 417900, Fax (2) 417900 Morocco Oussama S.A. Casablanca Tel. ++212 (2) 241338, Fax (2) 402657 Nigeria J F Technical Invest. Nig. Ltd. Lagos Tel. ++234 (1) 62234546, Fax (1) 62234548 South Africa ❑ Endress+Hauser Pty. Ltd. Sandton Tel. ++27 (11) 4441386, Fax (11) 4441977 Tunisia Controle, Maintenance et Regulation Tunis Tel. ++216 (1) 793077, Fax (1) 788595 Costa Rica EURO-TEC S.A. San Jose Tel. ++506 (2) 961542, Fax (2) 961542 Ecuador Insetec Cia. Ltda. Quito Tel. ++593 (2) 269148, Fax (2) 461833 Guatemala ACISA Automatizacion Y Control Industrial S.A. Ciudad de Guatemala, C.A. Tel. ++502 (3) 345985, Fax (2) 327431 Paraguay Incoel S.R.L. Asuncion Tel. ++595 (21) 213989, Fax (21) 226583 Israel Instrumetrics Industrial Control Ltd. Tel-Aviv Tel. ++972 (3) 6480205, Fax (3) 6471992 Uruguay Circular S.A. Montevideo Tel. ++598 (2) 925785, Fax (2) 929151 Jordan A.P. Parpas Engineering S.A. Amman Tel. ++962 (6) 4643246, Fax (6) 4645707 USA ❑ Endress+Hauser Inc. Greenwood, Indiana Tel. ++1 (317) 5357138, Fax (317) 5358489 Kingdom of Saudi Arabia Anasia Jeddah Tel. ++966 (2) 6710014, Fax (2) 6725929 Venezuela H. Z. Instrumentos C.A. Caracas Tel. ++58 (2) 9440966, Fax (2) 9444554 Kuwait Kuwait Maritime & Mercantile Co. K.S.C. Safat Tel. ++965 (2) 441481, Fax (2) 441486 Asia Lebanon Nabil Ibrahim Jbeil Tel. ++961 (3) 254052, Fax (9) 548038 China ❑ Endress+Hauser Shanghai Instrumentation Co. Ltd. Shanghai Tel. ++86 (21) 54902300, Fax (21) 54902303 ❑ Endress+Hauser Beijing Office Beijing Tel. ++86 (10) 68344058, Fax (10) 68344068 ❑ Endress+Hauser (H.K.) Ltd. Hong Kong Tel. ++852 (2) 5283120, Fax (2) 8654171 India ❑ Endress+Hauser (India) Pvt Ltd. Mumbai Tel. ++91 (22) 8521458, Fax (22) 8521927 United Arab Emirates Descon Trading EST. Dubai Tel. ++971 (4) 653651, Fax (4) 653264 Yemen Yemen Company for Ghee and Soap Industry Taiz Tel. ++976 (4) 230664, Fax (4) 212338 Australia + New Zealand Australia ALSTOM Australia Ltd. Sydney Tel. ++61 (2) 97224777, Fax (2) 97224888 New Zealand EMC Industrial Group Ltd Auckland Tel. ++64 (9) 4155110, Fax (9) 4155115 All other countries Argentina ❑ Endress+Hauser Argentina S.A. Buenos Aires Tel. ++54 (1) 145227970, Fax (1) 145227909 Malaysia ❑ Endress+Hauser (M) Sdn. Bhd. Petaling Jaya, Selangor Darul Ehsan Tel. ++60 (3) 7334848, Fax (3) 7338800 Netherlands ❑ Endress+Hauser B.V. Naarden Tel. ++31 (35) 6958611, Fax (35) 6958825 Bolivia Tritec S.R.L. BOL - Cochabamba Tel. ++591 (42) 56993, Fax (42) 50981 Pakistan Speedy Automation Karachi Tel. ++92 (21) 7722953, Fax (21) 7736884 BA 105R/09/a3/04.02 510 02838 FM+SGML6.0 Sultanate of Oman Mustafa & Jawad Science & Industry Co. L.L.C. Ruwi Tel. ++968 (60) 2009, Fax (60) 7066 Indonesia PT Grama Bazita Jakarta Tel. ++62 (21) 7975083, Fax (21) 7975089 America http://www.endress.com Vietnam Tan Viet Bao Co. Ltd. Ho Chi Minh City Tel. ++84 (8) 8335225, Fax (8) 8335227 Iran Telephone Technical Services Co. Ltd. Tehran Tel. ++98 (21) 8746750, Fax (21) 8737295 Lithuania Agava Ltd. Kaunas Tel. ++370 (7) 202410, Fax (7) 207414 ❑ Unternehmen der Endress+Hauser-Gruppe ❑ Members of the Endress+Hauser Group Thailand ❑ Endress+Hauser Ltd. Bangkok Tel. ++66 (2) 996781120, Fax (2) 9967810 Mexico ❑ Endress+Hauser I.I. Mexico City Tel. ++52 (5) 568965, Fax (5) 568418 Japan ❑ Sakura Endress Co., Ltd. Tokyo Tel. ++81 (422) 540611, Fax (422) 550275 Latvia Raita Ltd. Riga Tel. ++371 (7) 312897, Fax (7) 312894 Taiwan Kingjarl Corporation Taipei R.O.C. Tel. ++886 (2) 27183938, Fax (2) 27134190 ❑ Endress+Hauser GmbH+Co. Instruments International D-Weil am Rhein Germany Tel. ++49 (7621) 97502, Fax (7621) 975345