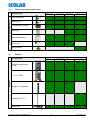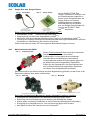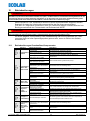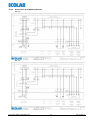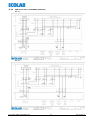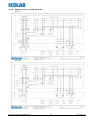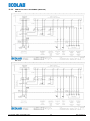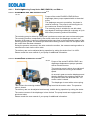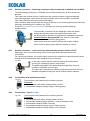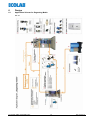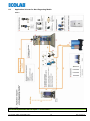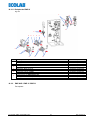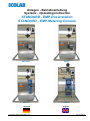
1
Anlagen - Betriebsanleitung
Systems - Operating Instruction
STANDARD - EMP-Dosierstation
STANDARD - EMP-Metering Console
EMP KKS
EMP II
EMP III
EMP IV
Deutsch
417101488_EMP_Dosierstation.doc
English
Rev. 04-03.12
Inhaltsverzeichnis
1
Allgemeines ............................................................................................................... 5
1.1
1.2
1.3
1.4
1.5
1.6
EBS Nummernreihe ................................................................................................................ 5
Transportschäden ................................................................................................................... 5
Hervorhebungen ..................................................................................................................... 5
Gewährleistungsumfang .......................................................................................................... 6
Betriebsanleitungen ................................................................................................................ 6
Kontaktadresse / Hersteller ..................................................................................................... 6
2
Sicherheit .................................................................................................................. 7
2.1
Allgemeine Sicherheitshinweise ............................................................................................... 7
2.1.1
2.1.2
Einhaltung der Umgebungsbedingungen .............................................................................................................................7
Umgang mit chemischen Dosiermedien...............................................................................................................................7
2.2
Installation / Inbetriebnahme ................................................................................................... 7
2.2.1
2.2.2
2.2.3
2.2.3.1
2.2.3.2
2.2.4
2.2.5
2.2.5.1
2.2.5.2
2.2.5.3
Allgemeines .........................................................................................................................................................................7
Seitens des Betreibers bereitgestellte Anlagenkomponenten...............................................................................................8
Installation ...........................................................................................................................................................................8
Elektrische Installation .........................................................................................................................................................8
Hydraulische Installation ......................................................................................................................................................8
Inbetriebnahme ...................................................................................................................................................................8
Betrieb .................................................................................................................................................................................9
Gebindewechsel ..................................................................................................................................................................9
Connexx Systeme ...............................................................................................................................................................9
Tagesvorratsbehälter (TVB).................................................................................................................................................9
2.3
Wartung / Reparatur ............................................................................................................. 10
2.3.1
2.3.2
2.3.3
Allgemeines .......................................................................................................................................................................10
Wartung.............................................................................................................................................................................10
Reparaturen ......................................................................................................................................................................10
2.4
Demontage / Entsorgung der Anlage ...................................................................................... 10
3
Lieferumfang ............................................................................................................ 11
3.1
3.2
3.3
Grundaufbau ........................................................................................................................ 11
Optionale Anlagenkomponenten ............................................................................................ 12
Zubehör ............................................................................................................................... 12
4
Funktionsbeschreibung ........................................................................................... 13
4.1
4.2
4.3
4.4
Grundaufbau ........................................................................................................................ 13
Optionale Erweiterungen ....................................................................................................... 13
Zubehör ............................................................................................................................... 13
Funktionsbeschreibung der einsetzbaren Anlagenkomponenten .............................................. 14
4.4.1
4.4.1.1
4.4.2
4.4.3
4.4.4
Dosierpumpen ...................................................................................................................................................................14
ELADOSâ Dosierpumpenreihe EMP, EMP E60 und E60PLUS..............................................................................................14
Dongle Box, bzw. Dongle Platine .......................................................................................................................................16
Mehrfunktionsventile (MFV) ...............................................................................................................................................16
Pulsationsdämpfer (zur Verwendung bei Dosierkonsolen mit EMP IV Pumpen).................................................................17
4.5
Optionales Zubehör .............................................................................................................. 17
4.5.1
4.5.1.1
4.5.1.2
4.5.2
4.5.3
4.5.4
4.5.5
4.5.6
4.5.7
Durchflussmessung ...........................................................................................................................................................17
Ovalradzähler (OGMPLUS) in Verbindung mit Dongle-Box ...................................................................................................17
Dosimag ............................................................................................................................................................................17
Sauganschluss - Gebindeumschaltung mit pneumatisch gesteuerten Ventilen 610/630 ....................................................18
Sauganschluss - Spülanschluss mit handbetriebenen Ventilen 617/677 ............................................................................18
Klemmkasten mit Wartungsschalter ...................................................................................................................................18
Klemmkasten “Ausführung ECOLAB“ ................................................................................................................................18
Klemmkasten “Ausführung OEM“ ......................................................................................................................................19
Spritzschutzhaube .............................................................................................................................................................19
4.6
Zubehör ............................................................................................................................... 19
4.6.1
4.6.2
4.6.3
4.6.4
4.6.5
Sauglanzen beim Einsatz von Dosierpumpen: EMP IV, III, II .............................................................................................19
Connexx OEM / Connexx switch OEM...............................................................................................................................19
Tagesvorratsbehälter (TVB)...............................................................................................................................................20
Leckagesonde Maximat (Auswertung durch SPS) .............................................................................................................20
Saugheber (auf Anfrage) ...................................................................................................................................................20
5
Übersicht - VARIANTEN ........................................................................................... 21
5.1
5.2
Dosierstationenschlüssel (Bestellschlüssel) EMP KKS / EMP II / EMP III Pumpen.................... 21
Dosierstationenschlüssel (Bestellschlüssel) EMP IV ............................................................... 22
6
Aufbau ...................................................................................................................... 23
6.1
6.2
Anwendungsschema bei ausgasenden Medien ....................................................................... 23
Anwendungsschema bei nicht ausgasenden Medien ............................................................... 24
417101488_EMP_Dosierstation.doc
2
Rev. 04-02.12
7
Geräteinstallation ..................................................................................................... 25
7.1
7.2
7.3
Allgemeines .......................................................................................................................... 25
Installationsbeispiele ............................................................................................................ 25
Umgebungsbedingungen ....................................................................................................... 25
7.3.1
7.3.2
Installation der Dosierkonsole ............................................................................................................................................25
Verrohrungen, Dosierleitungen, Rohrverschraubungen (Einschraub-, -Übergangs-, Armaturverschraubungen) ................26
7.4
Elektrische Installation .......................................................................................................... 26
7.4.1
7.4.2
7.4.3
7.4.4
7.4.5
7.4.6
7.4.7
7.4.8
7.4.9
Klemmkasten mit Wartungsschalter / Ausführung ECOLAB / Ausführung OEM .................................................................26
Ovalradzähler (optional) ....................................................................................................................................................26
Dosimag (optional) ............................................................................................................................................................26
Gebindeumschaltung (optional) .........................................................................................................................................26
Sauglanze mit Niveauschalter (Zubehör) ...........................................................................................................................26
Leckagesonde Maximat (Zubehör) ....................................................................................................................................26
Connexx / Connexx switch (Zubehör) ................................................................................................................................26
Tagesvorratsbehälter TVB (Zubehör).................................................................................................................................26
Dongle box / Dongle Platine (Zubehör) ..............................................................................................................................26
7.5
Mechanische (hydraulische) Installation ................................................................................. 27
7.5.1
7.5.1.1
7.5.1.2
7.5.1.3
7.5.2
7.5.3
7.5.4
7.5.5
7.5.6
Leitungen ..........................................................................................................................................................................27
Saugleitung (bauseitige Leistung) ......................................................................................................................................27
Dosierleitung (bauseitige Leistung) ....................................................................................................................................27
Überströmleitung Mehrfunktionsventil ................................................................................................................................27
Connexx / Connexx switch (Zubehör) ................................................................................................................................27
Tagesvorratsbehälter (TVB) (Zubehör) ..............................................................................................................................27
Leckagesonde Maximat (Zubehör) ....................................................................................................................................27
Dosierventil (Zubehör) .......................................................................................................................................................27
Sauglanze mit Niveauschalter (Zubehör) ...........................................................................................................................27
8
9
Inbetriebnahme ........................................................................................................ 28
Betrieb ...................................................................................................................... 29
9.1
Betriebszustand herstellen .................................................................................................... 29
9.1.1
9.1.1.1
9.1.1.2
9.1.1.3
9.1.2
9.1.2.1
9.1.2.2
9.1.2.3
Betriebsarten .....................................................................................................................................................................29
Handbetrieb bei Ausführung der Dosierkonsole mit EMP E60 Pumpen .............................................................................29
Handbetrieb mit OEM Klemmkasten ..................................................................................................................................29
Automatikbetrieb................................................................................................................................................................29
Sicherheitseinrichtungen ...................................................................................................................................................29
Grundausführung...............................................................................................................................................................29
Optionen............................................................................................................................................................................30
Zubehör .............................................................................................................................................................................31
10
Betriebsstörungen ................................................................................................... 32
10.1
10.2
10.3
Betriebsstörungen Grundaufbau-Komponenten....................................................................... 32
Betriebsstörungen Options-Komponenten .............................................................................. 33
Betriebsstörungen Zubehör-Komponenten .............................................................................. 33
11
Wartungen ................................................................................................................ 34
11.1
Wartungsvorschriften für Anlagenkomponenten ...................................................................... 34
12
Reparatur / Entsorgung ............................................................................................ 35
12.1
Reparatur durch die ECOLAB Engineering GmbH ................................................................... 35
12.1.1
12.1.2
12.1.3
Rücksendungsbedingungen ..............................................................................................................................................35
Rücksendungsformular ......................................................................................................................................................35
Rücksendungsadresse ......................................................................................................................................................35
12.2
Entsorgung ........................................................................................................................... 35
13
Technische Daten ..................................................................................................... 36
13.1
Geltende Normen / Richtlinien ............................................................................................... 36
13.1.1
13.1.2
13.1.3
Auffangwanne / Dosierbehälter..........................................................................................................................................36
Dosierpumpe .....................................................................................................................................................................36
Ovalradzähler (OGM / OGMPLUS) - Optional / Dosimag - Optional ......................................................................................36
13.2
13.3
13.4
13.5
13.6
13.7
13.8
Leistungsdaten ..................................................................................................................... 36
Werkstoffe ............................................................................................................................ 36
Anschlüsse mechanisch ........................................................................................................ 37
Anschlüsse elektrisch ........................................................................................................... 37
Abmessungen ....................................................................................................................... 37
Bestellschlüssel .................................................................................................................... 37
Anschlusspläne .................................................................................................................... 38
13.8.1
13.8.2
13.8.3
13.8.4
13.8.5
13.8.6
Dosierstation STANDARD (38603002) ..............................................................................................................................38
Dosierstation & OGM (38603003) ......................................................................................................................................39
Dosierstation & DOSIMAG (38603004)..............................................................................................................................40
OEM Dosierstation STANDARD (38604102) .....................................................................................................................41
OEM Dosierstation & OGM (38604103) .............................................................................................................................42
OEM Dosierstation & DOSIMAG (38604104).....................................................................................................................43
417101488_EMP_Dosierstation.doc
3
Rev. 04-03.12
14
Ersatz- / Verschleißteile ........................................................................................... 44
14.1
14.2
Ersatzteile ............................................................................................................................ 44
Verschleißteile ...................................................................................................................... 44
14.2.1
14.2.1.1
14.2.1.2
14.2.2
EMP IV ..............................................................................................................................................................................44
Grundsets EMP IV .............................................................................................................................................................44
Peripherie EMP IV .............................................................................................................................................................45
EMP KKS / EMP II / EMP III ..............................................................................................................................................45
15
Zubehör .................................................................................................................... 46
15.1
Sauglanzen .......................................................................................................................... 46
15.1.1
15.1.2
15.1.3
Sauglanzen Dosierstation EMP IV .....................................................................................................................................46
Sauglanzen Dosierstation EMP III / II.................................................................................................................................47
Sauglanzen Dosierstation EMP KKS .................................................................................................................................47
15.2
15.3
Sauglanzenadapter Dosierstation EMP IV + III + II + KKS ...................................................... 48
Schläuche ............................................................................................................................ 49
15.3.1
15.3.2
Schläuche Dosierstation EMP IV .......................................................................................................................................49
Schläuche Dosierstation EMP III / II / KKS .........................................................................................................................49
15.4
Dosierventile ........................................................................................................................ 49
15.4.1
15.4.2
Dosierventile Dosierstation EMP IV ...................................................................................................................................49
Dosierventile Dosierstation EMP III / II / KKS .....................................................................................................................50
15.5
15.6
15.7
15.8
15.9
Connexx OEM / Connexx switch OEM .................................................................................... 51
Tagesvorratsbehälter 25L ...................................................................................................... 51
Leckagesonde Maximat ......................................................................................................... 52
Auffangwannen ..................................................................................................................... 52
Saugheber ............................................................................................................................ 52
16
EG-Konformitätserklärung ....................................................................................... 53
417101488_EMP_Dosierstation.doc
4
Rev. 04-03.12
1
Allgemeines
Diese Anlagen-Betriebsanleitung enthält alle Anweisungen zur Installation, Inbetriebnahme,
Wartung und Reparatur der Dosierkonsole.
HINWEIS
Bei den deutschsprachigen Kapiteln dieser Anleitung handelt es sich um die ORIGINALBETRIEBSANLEITUNG, die
rechtlich relevant ist. Alle anderen Sprachen sind Übersetzungen der ORIGINALBETRIEBSANLEITUNG.
WICHTIG
Bitte diese Anleitung sorgfältig lesen und als Referenz aufbewahren.
Bei Fragen kontaktieren Sie uns bitte wie unter Kapitel 1.6 „Kontaktadresse„ angegeben.
VORSICHT
Da sich der Einsatzbereich der Dosierkonsole auf Chemikalien (Säuren/Laugen) bezieht, sind die Hinweise auf dem
Sicherheitsdatenblatt des Dosiermediums sowie alle Hervorhebungen in dieser sowie aller Anleitungen der
Anlagenkomponenten strikt einzuhalten, das Bedienpersonal muss entsprechend geschult werden (dokumentieren!).
1.1
EBS Nummernreihe
Innerhalb dieser Betriebsanleitung werden sowohl Artikelnummern, als auch EBS Nummern
dargestellt. EBS Nummern sind ECOLAB interne Artikelnummern und werden „konzernintern“
verwendet.
1.2
Transportschäden
VORSICHT
ACHTUNG
Wird beim Auspacken einer Anlagenkomponente ein Transportschaden festgestellt, darf die gesamte Anlage nicht
installiert und in Betrieb genommen werden!
1.3
Hervorhebungen
Die hier dargestellten Hervorhebungen haben folgendeBedeutung:
VORSICHT
wird benutzt, wenn ungenaues Befolgen oder Nichtbefolgen von Bedienungsanweisungen, Arbeitsanweisungen,
vorgeschriebenen Arbeitsabläufen und dergleichen zu Verletzungen oder Unfällen führen kann.
ACHTUNG
wird benutzt, wenn ungenaues Befolgen oder Nichtbefolgen von Bedienungsanweisungen, Arbeitsanweisungen,
vorgeschriebenen Arbeitsabläufen und dergleichen zur Beschädigung einer Anlagenkomponente führen kann.
VORSICHT
ACHTUNG
wird benutzt, wenn ungenaues Befolgen oder Nichtbefolgen von Bedienungsanweisungen, Arbeitsanweisungen,
vorgeschriebenen Arbeitsabläufen und dergleichen zu Verletzungen und/oder Unfällen und zur Beschädigung von
Anlagenkomponenten führen kann.
WICHTIG
wird benutzt, wenn auf eine besondere Aufmerksamkeit im Umgang mit dem Gerät geachtet werden muss.
HINWEIS
wird benutzt, wenn auf eine Besonderheit aufmerksam gemacht werden soll.
417101488_EMP_Dosierstation.doc
5
Rev. 04-03.12
1.4
Gewährleistungsumfang
Gewährleistung in Bezug auf Betriebssicherheit, Zuverlässigkeit und Leistung dieser
Ausführung wird vom Hersteller nur unter folgenden Bedingungen übernommen:
· Montage, Anschluss, Einstellung, Wartung und Reparatur werden von autorisiertem und
geschultem Fachpersonal durchgeführt.
Wir empfehlen den Service der Fa. ECOLAB-Engineering GmbH in Anspruch zu nehmen.
· Anlagenkomponenten der Dosierkonsole werden entsprechend den Ausführungen der im
Lieferumfang enthaltenen Betriebsanleitungen verwendet.
· Bei Reparaturen werden ausschließlich Original-Ersatzteile verwendet.
· Durch Öffnen einer Anlagenkomponente geht der Gewährleistungsanspruch verloren.
Im Übrigen gelten die allgemeinen Garantie- und Leistungsbedingungen der
ECOLAB-Engineering GmbH.
1.5
Betriebsanleitungen
HINWEIS
Halten Sie Ihre Betriebsanleitungen auf dem aktuellen Stand! Alle Anleitungen enthalten einen Revisionsindex (rechts
unten) anhand dessen die Version des Dokumentes erkennbar ist.
Beispiel: Rev. 01-09.09 = 01 = Version (hier version 1), 09 = Monat (hier September), 09 = Jahr 2009.
Alle ECOLAB Anleitungen sind im Internet unter dem Menüpunkt „DOWNLOAD“ verfügbar. Sollte eine Anleitung dort
nicht abgelegt sein, wenden Sie sich an: [email protected]
1.6
Kontaktadresse / Hersteller
ECOLAB-Engineering GMBH
Raiffeisenstraße 7
D-83313 Siegsdorf
Telefon (+49) 86 62 / 61 0
Telefax (+49) 86 62 / 61 2 35
eMail: [email protected]
417101488_EMP_Dosierstation.doc
6
Rev. 04-03.12
2
Sicherheit
2.1
Allgemeine Sicherheitshinweise
VORSICHT
ACHTUNG
Die dem Lieferumfang beiliegenden, Betriebsanleitungen der montierten Anlagenteile sind unbedingt erforderlich und
Grundlage für alle Arbeiten an der Anlage! Die Sicherheitshinweise und Hervorhebungen ALLER beiliegenden
Betriebsanleitungen sind in jedem Fall zu beachten!
2.1.1
Einhaltung der Umgebungsbedingungen
VORSICHT
ACHTUNG
Bitte beachten Sie die durch unsere Projektierung festgelegte und mit der Auftragsbestätigung mitgeteilten
Umgebungsbedingungen. Sollten Sie diese nicht vorliegen haben oder sich unsicher sein, kontaktieren Sie uns (siehe auch
Kapitel 7.3). Achten Sie darauf, dass bereits bei der Installation der Anlagenkomponenten alle relevanten und
vorgeschriebenen Sicherheitseinrichtungen vorhanden, bzw. erreichbar und intakt sein müssen.
Die Dosierkonsole darf keines Falls bei direkter Sonneneinstrahlung, bzw. im freien verwendet werden!
2.1.2
Umgang mit chemischen Dosiermedien
VORSICHT
Beim Umgang mit Dosiermedien ist immer geeignete Schutzkleidung zu tragen. Nähere Angaben hierzu entnehmen Sie dem
Produkt-/Sicherheitsdatenblatt Ihres Dosiermediums.
Alle Sicherheitsbestimmungen im Umgang mit Chemikalien sind stets einzuhalten und die vorgeschriebenen
Notfalleinrichtungen (z.B. Augenwäsche / Dusche, etc.) bereit zu stellen! Beachten Sie bei Verwendung von gefährlichen
bzw. aggressiven Chemikalien unbedingt die gesetzlichen Vorschriften und das entsprechende Produktdatenblatt /
Sicherheitsdatenblatt. Ferner beachten Sie ebenfalls die geltenden Normen und Vorschriften (z.B. WHG).
Die Dosierkonsole darf ausschließlich mit geeigneten Dosiermedien (siehe Auslegung der Anlage bei Bestellung) befüllt und
betrieben werden. Das Dosiermedium darf keinesfalls von dem für das System spezifizierte Medium abweichen um eine
Gefährdung für die Anlage und das Bedienpersonal auszuschließen.
Wir empfehlen immer den Einsatz einer Sicherheitshaube z.B. aus unserem Lieferprogramm.
Um eine Kontamination des Wassernetzes zu verhindern, installieren Sie gemäß Trinkwasserverordnung einen
Systemtrenner.
Die Befüllung, bzw. die Nachfüllung des Dosiersystems darf nur durch autorisiertes, geschultes Fachpersonal nach örtlichen
Vorschriften ausgeführt werden. Zur Sicherheit vor Überfüllung, etc. empfehlen wir den Einsatz von Leckagesystemen.
Sollte trotz aller Vorsichtsmaßnahmen/Sicherheitseinrichtungen Dosiermedium ausgetreten sein, entsorgen Sie dieses
fachgerecht und ordnungsgemäß entsprechend der im Sicherheitsdatenblatt ihres Dosiermediums angebenen Vorgaben.
2.2
Installation / Inbetriebnahme
2.2.1
Allgemeines
VORSICHT
ACHTUNG
Installations- und Inbetriebnahmearbeiten dürfen ausschließlich von autorisiertem, geschultem Fachpersonal ausgeführt
werden. Wir empfehlen hier dringend den Service der Fa. ECOLAB-Engineering GmbH in Anspruch zu nehmen.
Vor allen Arbeiten an elektrischen Teilen ist die Anlage vom Netz zu trennen und gegen wiedereinschalten zu sichern.
Zur Sicherheit vor Überfüllung, etc. empfehlen wir den Einsatz von Leckagesystemen.
Um eine Kontamination des Wassernetzes zu verhindern, ist nach gültigen Richtlinien eine Systemtrennung zu installieren.
Achten Sie auf den korrekten Einbau von nicht vormontierten Anlagenkomponenten, um deren Funktion nicht zu
beeinträchtigen und eine Gefahr für die Anlage, bzw. Personen auszuschließen.
Kontrollieren Sie vor Inbetriebnahme den festen Sitz/Einbau aller Anlagenkomponenten.
Zur sicheren, einfacheren und zeitsparenden Reinigung der Anlage bei Inbetriebnahme, Wieder-Inbetriebnahme nach
Stillstand durch Wartungs-, Reparaturarbeiten, empfehlen wir dringend Spülanschlüsse zu installieren.
Zum Schutz der Dosieranlage wird die Verwendung einer Sauglanze mit Leermeldeeinrichtung und Schmutzfänger aus
unserem Zubehörprogramm dringend empfohlen!
Die Leermeldeeinrichtung muss bei Unterschreitung eines bestimmten Niveaus (im Behälter) die Pumpe abschalten.
417101488_EMP_Dosierstation.doc
7
Rev. 04-03.12
2.2.2
Seitens des Betreibers bereitgestellte Anlagenkomponenten
ACHTUNG
Um eine Beschädigung der Anlage zu vermeiden, achten Sie darauf, dass die von Ihnen bereitgestellten
Anschlusskomponenten (Rohranschlüsse / Rohrflansche) richtig montiert wurden. Beim Übergang von Kunststoff auf
Edelstahlverrohrung empfehlen wir den Einsatz von Kompensatoren zur Minimierung von Spannungen bei Montage und im
Betrieb.
Sollte die Installation nicht durch den Service der Fa. ECOLAB-Engineering GmbH durchgeführt werden, achten Sie bei der
Ausführung der Rohr-, und Dosierleitungen auf die richtigen Materialien, Durchmesser und Längen, um einen einwandfreien
Betrieb der Anlage zu gewährleisten.
2.2.3
Installation
2.2.3.1 Elektrische Installation
VORSICHT
Alle elektrischen Installationsarbeiten dürfen ausschließlich von autorisierten Elektrofachkräften nach örtlichen Vorschriften
ausgeführt werden. Beachten Sie dabei die Unfallverhütungsvorschriften der Berufsgenossenschaften (z.B. BGV A1
„Allgemeine Vorschriften“, BGV A3 „Elektrische Anlagen und Betriebsmittel“ der Berufsgenossenschaft der Feinmechanik
und Elektrotechnik BGFE)!
Vor allen Arbeiten an elektrischen Teilen ist die Anlage vom Netz zu trennen und gegen Wiedereinschalten zu sichern.
Sicherheits-Trennschalter sind bauseits vorzusehen! Beim Öffnen von Abdeckungen oder Entfernen von Teilen können
spannungsführende Teile freigelegt werden. Auch können Anschlussstellen spannungsführend sein.
Achten Sie darauf, dass keine erhöhte EMV Strahlung vorhandene Messtechnik stören kann.
Überprüfen Sie alle von Ihnen bereitgestellten elektrischen Verbindungen (Isolationswiderstand, Polarität, richtiger
Anschluss, fester Sitz bei Klemmen) um eine Fehlfunktion, Beschädigung der Anlage oder Gefährdung des
Installationspersonals auszuschließen.
2.2.3.2 Hydraulische Installation
VORSICHT
Alle hydraulischen Installationsarbeiten dürfen ausschließlich von autorisiertem, geschulten Fachpersonal nach örtlichen
Vorschriften ausgeführt werden.
Achten Sie bei der Verlegung der Dosierleitung darauf, dass es hier nicht zu Spannungen durch Ausdehnung kommen kann.
Dosierleitungen sollten immer nur so lang sein wie nötig und sind in regelmäßigen Zeitabständen auf Undichtigkeiten zu
überprüfen.
Alle Verschraubungen müssen kontrolliert ggf. nachgezogen werden (diese könnten sich mitunter durch große
Schwankungen der Umgebungstemperatur oder durch Vibrationen gelockert haben). Achten Sie hierbei darauf, dass
Kunststoff-Verschraubungen nur handfest angezogen werden dürfen, um keine Bauteile zu zerstören!
Um Undichtigkeiten besser erkennen und schneller beseitigen zu können, empfehlen wir dringend den Einsatz einer
Leckageerkennung z.B. durch den Einsatz einer Durchflussüberwachung.
2.2.4
Inbetriebnahme
VORSICHT
ACHTUNG
Bei der Inbetriebnahme der Anlage ist ein vollständiges Abnahmeprotokoll zu führen.
Zur Funktions-, Dichtheitsprüfung wird eine Wasserdruckprobe durchgeführt. Erst danach darf die Anlage mit dem
eigentlichen Dosiermedium eingestellt und in Betrieb genommen werden. Sorgen Sie deshalb vor Ort für einen geeigneten
Wasseranschluss.
Um die Anlage auf das spezifizierte Dosiermedium einstellen zu können, stellen Sie sicher, dass dieses vor Ort verfügbar und
sicher gekennzeichnet ist. Es dürfen ausschließlich Dosiermedien verwendet werden, die den Spezifikationen der Anlage und
deren Komponenten entsprechen!
Versichern Sie sich, das Ihr eingesetztes Dosiermedium, bei Unverträglichkeit mit Wasser, nicht mit dem durch die
vorangegangene Wasserdruckprüfung evtl. im System verbliebenen Wasserrückstände in Kontakt kommt. Wir empfehlen in
diesem Fall das Systems vorsichtig mit Druckluft zu spülen.
Kontrollieren Sie, unter Berücksichtigung der Unfallverhütungsvorschriften, ob Dosiermedium in der Auffang-, Tropfwanne
steht. Dieses muss fachgerecht entsorgt werden. Zur Sicherheit vor Überfüllung, etc. empfehlen wir den Einsatz von
Leckagesystemen.
Alle eingestellten / einstellbaren Anlagenkomponenten müssen nach Inbetriebnahme markiert (Stellung) oder ggf. versiegelt
werden, um ein unbeabsichtigtes verstellen zu vermeiden.
Nach 24 Stunden müssen alle Verschraubungen und die Schrauben der hydraulischen Komponenten (z. B. Pumpen) auf
festen Sitz kontrolliert und gegebenenfalls nachgezogen werden. Siehe hierzu die jeweiligen Betriebsanleitungen der
entsprechenden Anlagenkomponente.
417101488_EMP_Dosierstation.doc
8
Rev. 04-03.12
2.2.5
Betrieb
VORSICHT
ACHTUNG
Alle Arbeiten während des Betriebes dürfen ausschließlich von autorisiertem, geschulten Fachpersonal nach örtlichen
Vorschriften ausgeführt werden.
Alle Rohr-, Dosierleitungen sowie die Verbindungen und Verschraubungen sollten in regelmäßigen Abständen einer
Sichtprüfung unterzogen werden, um Undichtigkeiten frühzeitig erkennen und beseitigen zu können.
Kontrollieren Sie in regelmäßigen Zeitabständen, unter Berücksichtigung der Unfallverhütungsvorschriften, ob Dosiermedium
in der Auffang-, Tropfwanne steht. Dieses muss fachgerecht entsorgt werden, entsprechend geeignetes Zubehör, siehe
Kapitel 4.6.5.
Zur Sicherheit vor Überfüllung, etc. empfehlen wir den Einsatz von Leckagesystemen.
Sollten sich die Standzeiten einzelner Anlagenkomponenten durch geänderte Umgebungsbedingungen verkürzen, so sind
entsprechende Maßnahmen (zusätzliche Absicherung, Verkürzung von Wartungsintervallen) zu treffen.
Die Dosierkonsole darf ausschließlich mit geeigneten Dosiermedien (siehe Auslegung der Anlage bei Bestellung) befüllt und
betrieben werden. Das Dosiermedium darf keinesfalls von dem für das System spezifizierte Medium abweichen um eine
Gefährdung für die Anlage und das Bedienpersonal auszuschließen.
Halten Sie alle Wartungsfristen, -Intervalle sorgfältig ein und führen Sie in regelmäßigen Abständen eine Sichtprüfung Ihres
Systems durch, um einen störungsfreien Betrieb zu gewährleisten. Wir empfehlen ein Wartungsbuch zu führen.
Sollte Ihre Anlage mit Spülanschlüssen ausgeführt sein, achten Sie darauf, dass diese während des Betriebes zusätzlich mit
einem Blinddeckel verschlossen sind.
Zum Schutz der Dosierkomponenten wird die Verwendung einer Sauglanze mit Leermelde-einrichtung und Schmutzfänger
aus unserem Zubehörprogramm (siehe Kapitel 4.6.1) dringend empfohlen!
Die Leermeldeeinrichtung muss bei Unterschreitung eines bestimmten Niveaus im Behälter die Dosierpumpe abschalten, um
Fehlfunktionen und Anlagenbeschädigungen zu vermeiden.
Nach 24 Stunden Erstbetrieb müssen alle Verschraubungen (Rohrleitungen, Schläuche) und die Schrauben der
hydraulischen Komponenten (z. B. Pumpen) auf festen Sitz kontrolliert und gegebenenfalls nachgezogen werden.
Siehe hierzu die jeweiligen Betriebsanleitungen der entsprechenden Anlagenkomponente.
2.2.5.1 Gebindewechsel
VORSICHT
Achten Sie bei dem Gebindewechsel darauf, das keine Verwechslung des Dosiermediums vorliegt, da ausschließlich die
spezifizierten Dosiermedien zugelassen sind und nur so eine Beschädigung oder Zerstörung der Anlage verhindert werden
kann. Kontrollieren Sie, unter Berücksichtigung der Unfallverhütungsvorschriften, ob Dosiermedium in der Auffang-,
Tropfwanne steht. Dieses muss fachgerecht, entsprechend der Sicherheitsdatenblätter des ausgetretenen Mediums, entsorgt
werden. Zur Sicherheit vor Leckage und/oder Überfüllung, etc. empfehlen wir den Einsatz von Leckage-, Detektionssystemen.
2.2.5.2 Connexx Systeme
VORSICHT
Achten Sie bei Verwendung eines Connexx-Systems auf die korrekte Auslegung der Dosierleitung (maximales Volumen), da
es ansonsten zu Schäden kommen kann. Beachten Sie unbedingt die separate Betriebsanleitung für das Connexx-System!
2.2.5.3 Tagesvorratsbehälter (TVB)
VORSICHT
Achten Sie auf die korrekte, maximal zulässige Auslegung zur Befüllung des Tagesvorratsbehälters (TVB), da dieser sonst
zerstört und Unfälle nicht ausgeschlossen werden können. Der Aktivkohlefilter des TVB ist in regelmäßigen Abständen zu
kontrollieren, bzw. auszutauschen. Bei hoher Luffeuchtigkeit ist der Kohlefilter entsprechend früher zu tauschen, da früher
eine Sättigung erreicht wird.
417101488_EMP_Dosierstation.doc
9
Rev. 04-03.12
2.3
Wartung / Reparatur
2.3.1
Allgemeines
VORSICHT
Alle Anlagenkomponenten dürfen nur von sachkundigen und autorisierten Personen gewartet/repariert werden. Wir
empfehlen aus Sicherheitsgründen den Service der Fa. ECOLAB-Engineering GmbH in Anspruch zu nehmen.
Vor allen Arbeiten an elektrischen Teilen ist die Anlage vom Netz zu trennen und gegen Wiedereinschalen zu sichern. Diese
Arbeiten dürfen ausschließlich durch Elektrofachkräfte nach den geltenden Regeln und Richtlinien ausgeführt werden!
Beim Öffnen von Abdeckungen oder Entfernen von Teilen können spannungsführende Teile freigelegt werden. Auch können
Anschlussstellen spannungsführend sein.
Vor allen Arbeiten an mechanischen Teilen ist die Anlage zu Spülen die Druckleitung zu entlasten und Schutzkleidung
(Schutzbrille, Schutzhandschuhe und Schürze) zu tragen um das System von Rückständen des Dosiermediums zu befreien
und Verätzungen aller Art zu vermeiden.
Es dürfen ausschließlich Original-Ersatzteile verwendet werden!
Zu Wartungs-, Reparaturzwecken der Anlagenkomponenten sind die, dem Lieferumfang beiliegenden, Betriebsanleitungen
der montierten Anlagenteile unbedingt erforderlich und Grundlage für alle Arbeiten!
Wir empfehlen ein Wartungsbuch zu führen.
Kontrollieren Sie unter Berücksichtigung der Unfallverhütungsvorschriften, ob Dosiermedium in der Auffang-, Tropfwanne
steht. Dieses muss fachgerecht entsorgt werden. Zur Sicherheit vor Überfüllung, etc. empfehlen wir den Einsatz von
Leckagesystemen.
Kontrollieren Sie bei jeder Wartung der Anlage auch den Zustand und die Dichtigkeit der Dosier-, Schlauchleitungen.
Nach „Wieder-Inbetriebnahme“ der Anlage nach Wartungs-, Reparaturarbeiten, sind die spezifizierten
Umgebungsbedingungen zu kontrollieren und die Anlage entsprechend neu einzustellen. Achten Sie hierbei auch darauf, das
nur das spezifizierte Dosiermedium zum Einsatz kommt.
Beachten Sie bitte, dass jegliche eigenmächtige Änderung an Anlagenkomponenten zum Erlöschen der Garantieansprüche
und der Konformität führen kann. Wir empfehlen deshalb den Service der Fa. ECOLAB-Engineering GmbH in Anspruch zu
nehmen.
2.3.2
Wartung
VORSICHT
Alle Wartungsintervalle der vorhandenen Anlagenkomponenten sind strikt einzuhalten! (siehe hier auch unbedingt die
beiliegenden Anleitungen der jeweiligen Komponente!)
Es dürfen ausschließlich Original-Ersatzteile verwendet werden!
Im Zuge der Wartungsarbeiten müssen alle Verschraubungen kontrolliert und gegebenenfalls nachgezogen werden!
2.3.3
Reparaturen
VORSICHT
ACHTUNG
Zu Reparaturzwecken der Anlagenkomponenten sind die, dem Lieferumfang, beiliegenden Betriebsanleitungen der
montierten Anlagenteile unbedingt erforderlich und Grundlage für alle Wartungs- und Servicearbeiten!
Alle Sicherheitshinweise der Betriebsanleitungen sind strikt einzuhalten!
Wir empfehlen aus Gründen der Geräte- und Personensicherheit den Reparaturservice der Fa. ECOLAB-Engineering GmbH
zu nutzen! Achten Sie hierbei unbedingt auf die Rücksendungsbedingungen, um Ihren Auftrag schnell abwickeln zu können.
2.4
Demontage / Entsorgung der Anlage
VORSICHT
ACHTUNG
Alle Anlagenkomponenten dürfen nur von sachkundigen und autorisierten Personen demontiert werden. Wir empfehlen aus
Sicherheitsgründen den Service der Fa. ECOLAB-Engineering GmbH in Anspruch zu nehmen.
Vor allen Arbeiten an elektrischen Teilen ist die Anlage vom Netz zu trennen und gegen Wiedereinschalten zu sichern. Diese
Arbeiten dürfen ausschließlich durch Elektrofachkräfte nach den geltenden Regeln und Richtlinien ausgeführt werden!
Beim Öffnen von Abdeckungen oder Entfernen von Teilen können spannungsführende Teile freigelegt werden. Auch können
Anschlussstellen spannungsführend sein.
Vor der Demontage ist die Anlage zu Spülen und die Druckleitung zu entlasten.
Es sind stets geeignete Schutzkleidung zu tragen. Nähere Angaben hierzu entnehmen Sie dem Produkt/Sicherheitsdatenblatt Ihres Dosiermediums.
Bei der Entsorgung ist immer auf die Einhaltung der gültigen Vorschriften zu achten. Insbesondere bei chemischen
Dosiermedien, bzw. bei Rückständen in den Anlagenkomponenten ist besondere Beachtung geboten (siehe Produkt/Sicherheitsdatenblatt Ihres Dosiermediums).
Entsorgen Sie ausschließlich gereinigte Anlagenkomponenten und beachten Sie hierbei die örtlichen Vorschriften.
417101488_EMP_Dosierstation.doc
10
Rev. 04-03.12
3
Lieferumfang
HINWEIS
Der hier dargestellte Lieferumfang bezeichnet den Aufbau einer Dosierkonsole mit allen, auch für die Konsole
optional, erhältlichen Komponenten. Welche Anlagenkomponenten in Ihrer Dosierkonsole verbaut sind entnehmen
Sie bitte Ihren Bestellunterlagen.
3.1
Grundaufbau
Komponente
EMP KKS
Dosierstation mit:
EMP II
EMP III
EMP IV
EMP KKS
EMP II
EMP III
Grundaufbau
EMP IV
MFV I-II
MFV III-IV
Klemmkasten
Klemmkasten
Klemmkasten
Pulsationsdämpfer
Membranabsperrventil,
handbetätigt
Betriebsanleitung
für die Dosierkonsole
417101488_EMP_Dosierstation.doc
11
Rev. 04-03.12
3.2
Optionale Anlagenkomponenten
Komponente
EMP KKS
Dosierstation mit:
EMP II
EMP III
EMP IV
EMP KKS
Dosierstation mit:
EMP II
EMP III
EMP IV
Optionale Anlagenkomponenten
Umschaltventile
Spülventil(e)
P
Plluuss
Ovalradzähler OGMPlus
Dosimag
Spritzschutzhaube
Dongle Box
Dongle Platine
3.3
Zubehör
Komponente
Tagesvorratsbehälter
(TVB)
Zubehör
Connexx OEM
Saugrohr / Sauglanze
Sauglanze EMP IV
Dosierventil
417101488_EMP_Dosierstation.doc
12
Rev. 04-03.12
4
Funktionsbeschreibung
Die Dosierkonsole setzt sich aus Anlagenkomponenten zusammen, die für eine sichere
Dosierung von Chemikalien erforderlich sind.
Über ein entsprechendes Baukastensystem werden die einzelnen Bauteile, bestehend aus
einem Grundaufbau, Optionen und Zubehör werksseitig individuell nach den jeweiligen
Prozess-Anforderungen zusammengestellt.
4.1
Grundaufbau
Der Grundaufbau der Dosierkonsolen besteht aus einer werksseitig vormontierten EMP
Dosierpumpe, einem Mehrfunktionsventil (MFV), einem Handabsperrventil, einem
Wartungsschalter und bei Dosierkonsolen unter Verwendung einer EMP IV Pumpe zusätzlich
aus einem Pulsationsdämpfer.
4.2
Optionale Erweiterungen
Neben dem Grundaufbau der Dosierkonsolen stehen zur Integration optionale Komponenten
zur Verfügung.
Optionale Erweiterungen sind:
·
·
·
·
4.3
pneumatisch gesteuerte Membranventile zur Gebindeumschaltung oder handbetätigte
Membranventile zum Spülen,
Ovalradzähler “OGMPLUS“ oder “Dosimag“ für die volumetrische oder induktive
Durchflussüberwachung
Klemmkasten mit integriertem Wartungsschalter, Anschluss für Sauglanzenstecker und
zusätzlichen Klemmplätzen für Durchflussüberwachung “OGMPLUS“ oder “Dosimag“
Abdeckhaube aus PVC zum Schutz vor evtl. austretendem Dosiermedium
Zubehör
Zur Dosierung erforderliche Bauteile, die nicht dem Grundaufbau, bzw. den optionalen
Erweiterungen entsprechen, können nicht über den Dosierkonsolen-Konfigurator abgerufen
werden.
Bitte bestellen Sie diese Zubehörbauteile (siehe auch Kapitel 15) separat, gemäß unserem
Produktkatalog.
417101488_EMP_Dosierstation.doc
13
Rev. 04-03.12
4.4
Funktionsbeschreibung der einsetzbaren Anlagenkomponenten
4.4.1
Dosierpumpen
Dosierpumpen kommen überall dort zum Einsatz, wo Flüssigkeiten dosiert, d. h. möglichst
genau mit einem definierten Volumen und in einer definierten Zeit einem Medium zugegeben
werden sollen.
4.4.1.1 ELADOSâ Dosierpumpenreihe EMP, EMP E60 und E60PLUS
4.4.1.1.1 ELADOSâ EMP KKS, EMP KKS E60 und E60
PLUS
Abb. 4.1
Die Pumpen der Reihe ELADOSâ EMP KKS sind
elektromotorisch betriebene Membrankolben-Pumpen.
Die Membrane dient zur Vorförderung.
Mit dem Kolben wird dosiert. Aufgrund der ständigen
Überschussrückführung arbeitet diese Dosierpumpe
selbstentlüftend.
Sie ist für den Einsatz von sauberen, nicht abrasiven
Dosiermedien bis zu einer Viskosität von 200 mPas
(Messmethode: Brookfield) geeignet.
Der Antrieb der Dosierpumpe erfolgt durch einen blockierfesten Synchronmotor und ein PleuelExzentergetriebe.
Bei der Bewegung der Membrane in Richtung Getriebe, wird das Dosiermedium über das
Saugventil angesaugt. Gleichzeitig entsteht im Kompressionsraum der DosierkolbenZylindereinheit ein Vakuum und das vorgeförderte Dosiermedium strömt nach Freigabe der
Steuerbohrung in diesen Raum.
Bei der Druckbewegung erfolgt die Dosierung über das Ventil, das überschüssige
Dosiermedium wird über das Rücklaufventil in den Behälter zurückgefördert.
Die Fördermenge lässt sich während des Betriebes über die Hubverstellung von 0 - 100 %
regulieren.
Weitere Informationen finden Sie in der separaten Betriebsanleitung Ihrer Pumpe.
4.4.1.1.2 ELADOSâ EMP II, EMP II E60 und E60
Abb. 4.2
PLUS
Die Pumpen der Reihe ELADOSâ EMP II sind
elektromotorisch betriebene Membran-VerdrängerPumpen.
Die Dosierpumpe wird von einem blockierfesten, mit
konstanter Drehzahl laufenden Synchronmotor
angetrieben.
Ein Exzentergetriebe bewegt die Membrane und
verdrängt dabei über das Druckventil mit
Doppelkugelabdichtung das Dosiermedium. Das
Saugventil ist geschlossen.
Die Membrane wird durch eine Rückholfeder zurückgestellt. Dadurch wird das Dosiermedium
über das Saugventil in den Pumpenkopf angesaugt. Das Druckventil ist geschlossen.
Die Fördermenge lässt sich während des Betriebes über die Hubverstellung stufenlos
regulieren.
Es wird hierbei die Rückstellbewegung der Membrane begrenzt. Die Pumpenköpfe sind mit
einem Schnellentlüftungsventil ausgestattet.
Weitere Informationen finden Sie in der separaten Betriebsanleitung Ihrer Pumpe.
417101488_EMP_Dosierstation.doc
14
Rev. 04-03.12
4.4.1.1.3 ELADOSâ EMP III E60 und E60
PLUS
Die Pumpen der Reihe ELADOSâ EMP III
sind elektromotorisch betriebene MembranVerdränger-Pumpen.
Abb. 4.3
Die Dosierpumpe ist für den Einsatz von
sauberen, nicht abrasiven Dosiermedien bis
zu einer Viskosität von 200 mPas
(Messmethode: Brookfield) geeignet.
Ein Exzenter-Schneckengetriebe bewegt die
Membrane und fördert dabei über das
Druckventil das Dosiermedium.
Das Saugventil ist geschlossen.
Die Membrane wird durch eine Rückholfeder
zurückgestellt.
Dadurch wird das Dosiermedium über das Saugventil in den Pumpenkopf angesaugt. Das
Druckventil ist geschlossen.
Die Fördermenge lässt sich nur während des Betriebes über die Hubverstellung regulieren. Es
wird hierbei die Rückstellbewegung der Membrane begrenzt.
Weitere Informationen finden Sie in der separaten Betriebsanleitung Ihrer Pumpe.
4.4.1.1.4 ELADOSâ EMP IV E60 und E60
PLUS
Abb. 4.4
Die Dosierpumpe ELADOSâ EMP IV E60 und E60PLUS ist eine
elektromotorisch betriebene Membran-Verdränger-Pumpe.
Sie ist für den Einsatz von sauberen, nicht abrasiven Dosiermedien bis zu
einer Viskosität von 100 mPas (Messmethode: Brookfield) geeignet.
Ein Exzenter-Schneckengetriebe bewegt die Membrane und fördert dabei
über das Druckventil das Dosiermedium. Das Saugventil ist geschlossen.
Die Membrane wird durch eine Rückholfeder zurückgestellt. Dadurch wird
das Dosiermedium über das Saugventil in den Pumpenkopf angesaugt.
Das Druckventil ist geschlossen.
Die Fördermenge lässt sich nur während des Betriebes über die Hubverstellung regulieren.
Es wird hierbei die Rückstellbewegung der Membrane begrenzt.
Weitere Informationen finden Sie in der separaten Betriebsanleitung Ihrer Pumpe.
417101488_EMP_Dosierstation.doc
15
Rev. 04-03.12
4.4.2
Dongle Box, bzw. Dongle Platine
Abb. 4.5
Dongle Box
Abb. 4.6
Art. Nr. 249629
bei Dosierkonsolen mit
EMP KKS/EMP II /EMP III
Dongle Platine
Art. Nr. 248606
bei Dosierkonsolen mit
EMP IV Pumpen.
Um die ELADOSâ EMP E60
Pumpen funktionell zu erweitern und
auf Zusatzfunktionen zugreifen zu
können ist die Dongle-Box bzw. die
Dongle Platine aus unserem
Zubehörprogramm erforderlich.
Nach Montage der Dongle Box,
bzw. der Dongle Platine werden die
Pumpen als ELADOSâ “EMP
E60PLUS“ bezeichnet.
Elektronische Zusatzfunktionen bei ELADOSâ EMP E60PLUS:
· Ovalradzähler (OGMPLUS) Anschluss und Auswertung
· Dosierregelung mit Hilfe eines Ovalradzählers (OGMPLUS)
· Möglichkeit einer automatischen Kalibrierung der Pumpe mit Ovalradzähler (OGMPLUS)
· Trennung der Eingänge Dosiersperre/Impuls/Dosierüberwachung/Ovalradzähler auf mehrere
Anschlüsse zur Vereinfachung der externen Anschlüsse.
Weitere Informationen finden Sie in der separaten Betriebsanleitung Ihrer Pumpe.
4.4.3
Mehrfunktionsventile (MFV)
Abb. 4.7
Funktionsprinzip
Dieses Sicherheitsbauteil dient sowohl dem Schutz der
Rohrleitungskomponenten, als auch der
Dosierpumpen und ermöglicht eine zuverlässige
Inbetriebnahme und Wartung der Dosierstation.
Im Normalbetrieb arbeitet die Dosierpumpe gegen den
am Mehrfunktionsventil eingestellten Gegendruck.
Erhöht sich der Gegendruck in der Dosierleitung über
den am Mehrfunktionsventil eingestellten Überdruck,
wird dieser über die Bypassleitung entlastet.
Das Dosiermedium wird hierbei solange durch die Bypassleitung gefördert, bis der Druck in der
Dosierleitung diesen Wert wieder unterschreitet.
Abb. 4.8
MFV II-III
Abb. 4.9
MFV III-IV
Zur Verwendung bei Dosierkonsolen mit EMP IV Pumpen
Zur Verwendung bei Dosierkonsolen mit EMP II/III Pumpen
Durch zwei federbelastete Membranen werden folgende Funktionen realisiert:
·
·
·
·
·
Ansaughilfe bei Inbetriebnahme der Membrandosierpumpe gegen Druck.
Entleerung und somit Entlastung der Druckleitung bei Stillstand der Anlage.
Schutz gegen unzulässigen Überdruck in der Druckleitung (Öffnungsdruck einstellbar).
Erzeugung eines Gegendrucks von 1 bar bei Dosierung gegen freien Auslauf.
Anti-Siphon-Funktion bei Unterdruck an der Dosierstelle.
417101488_EMP_Dosierstation.doc
16
Rev. 04-03.12
4.4.4
Pulsationsdämpfer (zur Verwendung bei Dosierkonsolen mit EMP IV Pumpen)
Abb. 4.10
Pulsationsdämpfer kommen bei pulsierender Förderung und größeren
Dosierleistungen zum Einsatz. Sie dienen der Vermeidung / Verringerung von
Druckschlägen und Vibrationen.
Bei Dosierkonsolen mit EMP IV Dosierpumpen ab 140 l/h wird ein
Pulsationsdämpfer eingesetzt, der membranfrei mit einem Luftpolster
ausgeführt ist. Der Pulsationsdämpfer ist auch bei langen Dosierleitungen
problemlos einsetzbar.
4.5
Optionales Zubehör
4.5.1
Durchflussmessung
4.5.1.1 Ovalradzähler (OGMPLUS) in Verbindung mit Dongle-Box
Der OGMPLUS dient zur volumetrischen Erfassung der Durchflussmenge
von reinen, sauberen Flüssigkeiten (max. 1000 mPas, Messmethode:
Brookfield).
Da es sich um einen volumetrischen Zähler handelt, können auch
pulsierende bzw. diskontinuierliche Durchflüsse erfasst werden.
Dieser Zähler ist deshalb sehr gut geeignet um den Volumenstrom von
elektromotorisch betriebenen Membranpumpen (z.B. EMP KKS, EMP II,
EMP III, EMP IV) zu messen.
PLUS
Der OGM
verfügt über eine automatische Flussrichtungserkennung. Volumenströme in
Rückwärtsrichtung werden gespeichert ohne Impulse auszugeben. Vorhergehende
Volumenströme in Rückwärtsrichtung werden von dem nächsten Volumenstrom in
Vorwärtsrichtung subtrahiert.
Ein weiterer Vorteil des OGMPLUS liegt in seiner Kalibrierfähigkeit. Damit erzielt man die
größtmögliche Genauigkeit unter Berücksichtigung der Einsatzbedingungen.
Der OGMPLUS ist in seinen Eigenschaften optimal auf den Anschluss an eine
Membrandosierpumpe aus der EMP E60-Pumpenreihe abgestimmt.
Abb. 4.11
4.5.1.2 Dosimag
Abb. 4.12
Der “Dosimag“ dient zur magnetisch induktiven Durchflussmessung von
leitfähigen Flüssigkeiten in geschlossenen Rohrleitungen.
Die meisten Flüssigkeiten können ab einer Mindestleitfähigkeit von
5 μS/cm gemessen werden.
Dies sind z.B.:
· Säuren, Laugen, Pasten, Breie, Pulpe
· Trinkwasser, Abwasser, Klärschlamm, Milch, Bier, Wein,
Mineralwasser, Joghurt, Melasse, usw.
Zur Messung von demineralisiertem Wasser ist eine Mindestleitfähigkeit
von 20 μS/cm erforderlich.
Der Dosimag kann nicht direkt an die Dosierpumpe angeschlossen werden.
Die Impulsauswertung erfolgt in der Regel durch eine externe Steuerung.
Der Dosimag kann nur für Dosierpumpen mit einer Leistung ab 25 l/h eingesetzt werden.
417101488_EMP_Dosierstation.doc
17
Rev. 04-03.12
4.5.2
Sauganschluss - Gebindeumschaltung mit pneumatisch gesteuerten Ventilen 610/630
Zur Vermeidung von Dosier-Stillständen kommt eine Gebindeumschaltung in der
Produktansaugung zum Einsatz.
Hierbei wird die Produktansaugung bei Leermeldung eines Gebindes mittels pneumatisch
gesteuerten Membranventilen automatisch auf das zweite Gebinde umgeschaltet.
Damit ist eine unterbrechungsfreie Dosierung möglich.
Die Ansteuerung der Ventile ist nicht im Lieferumfang der Dosierstation enthalten und erfolgt
bauseits durch eine externe Steuerung (z.B. SPS).
Im Bedarfsfall unterstützt Sie ECOLAB Engineering GmbH bei der Detailplanung / Ausführung.
Abb. 4.13
Das fremdgesteuerte 2/2-Wege-Membranventil mit KunststoffDurchgangskörper besitzt einen wartungsarmen Kolbenantrieb.
Serienmäßig ist eine optische Stellungsanzeige integriert.
Steuerfunktion: Federkraft schließend Ruhezustand des Ventils:
durch Federkraft geschlossen
Beaufschlagung des Antriebs mit Steuermedium öffnet das Ventil.
Entlüften des Antriebs bewirkt das Schließen des Ventils durch
Federkraft.
4.5.3
Sauganschluss - Spülanschluss mit handbetriebenen Ventilen 617/677
Membranventil zur Handabsperrung der Saug- und/oder Dosierleitung und Spülanschlüsse.
Im Wartungs- oder Reparaturfall wird mittels Handabsperrventil die Saug- oder Druckleitung
abgesperrt und über die Spülanschlüsse mit Wasser gespült.
Abb. 4.14
Hierdurch wird Kontakt mit dem Dosiermedium bei der Wartung oder
beim Wechsel von Anlagenkomponenten vermieden.
Das Kunststoff-Membranventil mit Durchgangskörper dient zur
Eindrosselung oder vollständigen Absperrung von Rohrleitungen.
Das Ventil verfügt über ein temperaturbeständiges Kunststoffhandrad
sowie serienmäßig über eine integrierte Schließbegrenzung und eine
optische Stellungsanzeige.
4.5.4
Klemmkasten mit Wartungsschalter
Abb. 4.15
4.5.5
Klemmkasten zur Installation auf der Dosierkonsole.
Funktionen:
· Wartungsschalter mit Sicherheitstrennschalterfunktion
· Zwischenklemmung Spannungsversorgung Dosierpumpe
Klemmkasten “Ausführung ECOLAB“
Abb. 4.16
Klemmkasten zur Installation auf der Dosierkonsole.
Funktionen:
·
·
·
·
·
Wartungsschalter mit Sicherheitstrennschalterfunktion
Zwischenklemmung Leermeldung / Reservemeldung / Leckage
Zwischenklemmung OGM/Dosimag
Zwischenklemmung Spannungsversorgung Dosierpumpe
Zwischenklemmung Spannungsversorgung Steuerspannung
417101488_EMP_Dosierstation.doc
18
Rev. 04-03.12
4.5.6
Klemmkasten “Ausführung OEM“
Abb. 4.17
4.5.7
Klemmkasten zur Installation auf der Dosierkonsole.
Funktionen:
· Wartungsschalter mit Sicherheitstrennschalterfunktion
· Optische Leermeldeanzeige
· Handfunktion Dosierpumpe
· Zwischenklemmung Leermeldung / Reservemeldung / Leckage
· Zwischenklemmung OGM / Dosimag
· Zwischenklemmung Spannungsversorgung Dosierpumpe
· Zwischenklemmung Spannungsversorgung Steuerspannung
Spritzschutzhaube
Abb. 4.18
Sicherheitseinrichtung zur Eindämmung einer Chemikalienfreisetzung im Falle
von Fehlfunktion(en) oder Zerstörung(en) von Bauteilen auf der Dosierkonsole.
4.6
Zubehör
4.6.1
Sauglanzen beim Einsatz von Dosierpumpen: EMP IV, III, II
Abb. 4.19
Beispielfoto
4.6.2
Die Sauglanze dient als optionales Zubehör bei Dosierstationen. Sie wird
direkt in das Liefergebinde eingebracht und mittels Schlauch mit der
Dosierstation verbunden.
Mittels an der Sauglanze installierten Schwimmerschaltern besteht die
Möglichkeit, das Leer-Niveau und optional ein Vorwarn-Niveau elektrisch
auszuwerten.
Grobe Verschmutzungen im Gebinde werden sicher zurückgehalten, ein
Rückschlagventil im Boden der Sauglanze verhindert ein Leerlaufen der
Saugleitung bei Stillstand der EMP-Dosierstation oder Gebindewechsel.
Connexx OEM / Connexx switch OEM
Abb. 4.20
Gerät mit Leermeldung zur automatischen Entnahme und Entlüftung
ausgasender Produkte aus Ecolab-Gebinden mit integrierter Sauglanze.
Beim CONNEXX System handelt es sich um ein Fördergerät zur
automatischen Produktentnahme und -bereitstellung aus Gebinden
(optional mit integrierter Sauglanze). Es wurde speziell für alle im CIPBereich eingesetzten Peressigsäure- und Wasserstoffperoxydhaltige
Produkte ausgelegt.
Im Einzelnen kann es für folgende Produkte eingesetzt werden:
· P3-oxonia, P3-oxonia active, P3-oxonia active S, P3-oxonia active 150,
P3-oxysan ZS.
Das Gerät beinhaltet Leermelde- und Überwachungsfunktionen und kann optional mit einer
Umschaltung zwischen zwei Gebinden ausgeführt bzw. nachgerüstet werden. Zusätzliche
Anschlussbaugruppen ermöglichen die Adaption von Dosierpumpen sowie die optionale
Rückführung von Produkt ins Hebergefäß aus Überdruck- oder Entgasungs(ring)leitungen.
417101488_EMP_Dosierstation.doc
19
Rev. 04-03.12
4.6.3
Tagesvorratsbehälter (TVB)
Abb. 4.21
Gerät zur saugseitigen Produktbevorratung für nicht ausgasende und
ausgasende Medien.
Befüllung durch aktive Vorförderung. Niveauüberwachung MAX und
REORDER durch konduktive Stabsonde zzgl. Elektronischer
Überfüllsicherung.
Die Be- und Entlüftung des Tagesvorratsbehälters (TVB) erfolgt über
einen Aktivkohlefilter.
Zusätzliche Anschlussbaugruppen ermöglichen die optionale Rückführung
von Produkt in den TVB aus Überdruck- oder Entgasungs(ring)leitungen.
4.6.4
Leckagesonde Maximat (Auswertung durch SPS)
Abb. 4.22
4.6.5
Die Leckagesonde MAXIMAT LWC-B (Bodenelektrode) wird zur
Leckageüberwachung in Auffangwannen und -räumen eingesetzt.
Sie ist mit drei unterschiedlichen Ausgangskreisen ausgerüstet:
· binärer Ausgang zur Ansteuerung eines Koppelrelais
· Stromausgang 0 ... 20 mA geeignet zur Ansteuerung eines AnalogEingabe-Kanals z.B. einer Speicher-Programmierbaren Steuerung
(SPS).
· Selbstüberwachender Messkreis in Verbindung mit Messumformer
MAXIMAT SHR C.. in Zweileiterschaltung
Saugheber (auf Anfrage)
Abb. 4.23
Zum einfachen und sicheren Abfüllen von Flüssigkeiten aus der Tropfwanne der
Wandkonsole.
417101488_EMP_Dosierstation.doc
20
Rev. 04-03.12
5
Übersicht - VARIANTEN
5.1
Dosierstationenschlüssel (Bestellschlüssel) EMP KKS / EMP II / EMP III Pumpen
1.
Bezeichnung
DOS
2.
=
Dosierkonsole
Pumpenleistung 50 Hz [60 Hz]
00014
00043
00112
00160
00540
3.
=
=
=
=
=
1,4 l/h
4,3 l/h
11,2 l/h
16 l/h
54 l/h
[1,7 l/h]
[5,1 l/h]
[13 l/h]
[19 l/h]
[64 l/h]
EMP KKS
EMP II
EMP II
EMP III
EMP III
Werkstoff Pumpe / Anschlüsse
PP
PV
4.
=
=
PP (nicht für EMP KKS)
PVDF
Werkstoff Dichtung
EP
FP
5.1
=
=
EPDM (EMP II & III nur bei PP Pumpenkopf)
Viton B
Elektrische Version Pumpe
0
6
9
5.2.
=
=
=
E10
E60
E00 (nur bei EMP III)
Spannung Pumpe
BEI EMP KKS / EMP II:
1
= 115 V/50 Hz
2
= 230 V/50 Hz
3
= 115 V/60 Hz
4
= 230 V/60 Hz
BEI EMP III:
1
2
6.
=
=
Saugseitige Ausführung
01
02
03
12
7.
=
=
=
=
=
=
=
=
=
=
=
PLUS
OGM
PLUS
PLUS
OGM
(mit Dongle Box für E60
)
Dosimag (nur bei EMP III)
ohne
Zubehör
SS
99
10.
Klemmkasten OEM
Klemmkasten Ecolab
Hauptschalter
Durchflussmessung
OG
OP
DM
99
9.
Schlauchanschluss 6/12
Umschaltventile (mit 90° Schlauchanschluss)
Spülventil saugseitig
Umschaltventile mit Pilotventilen und
DLC (Dual Level Control)
Elektrische Version Konsole
01
02
10
8.
115 V/50 / 60 Hz
230 V/50 / 60 Hz
=
=
Spritzschutz
ohne
Konsolenausführung
EC =
99 =
Ecolab
neutral
D O S 00043 P V F P 6 2 0 1 0 2 O G S S E C
Beispiel für eine konfigurierte Dosierstation
417101488_EMP_Dosierstation.doc
Andere Spezifikationen auf Anfrage!
21
Rev. 04-03.12
5.2
Dosierstationenschlüssel (Bestellschlüssel) EMP IV
1. Bezeichnung
DOS
=
Dosierkonsole
2. Pumpenleistung 50 Hz
01400 =
140 l/h
02100 =
210 l/h
04500 =
450 l/h
06300 =
630 l/h
07500 =
750 l/h
[60 Hz]
[168 l/h]
[252 l/h]
[540 l/h]
[756 l/h]
[900 l/h]
3. Werkstoff Pumpe / Anschlüsse
PP
PV
=
=
PP
PVDF
4. Werkstoff Dichtung
EP
FP
=
=
EPDM (nur bei PP Pumpenkopf)
Viton B
5. Elektrische Version Pumpe
01
02
03
11
12
61
62
= E00; 115 V 50/60 Hz
= E00; 230 V 50/60 Hz
= E00; 3PE 400 / 230 V 50/60 Hz
= E10; 115 V 50/60 Hz
= E10; 230 V 50/60 Hz
= E60; 115 V 50/60 Hz
= E60; 230 V 50/60 Hz
6. Saugseitige Ausführung
01
02
03
04
05
06
99
=
=
=
=
=
=
=
Schlauchtülle 90°
Umschaltventile
Spülventil saug- und druckseitig
Einlegeteil (in Rohrleitungswerkstoff PP/PVDF)
Einlegeteil VA 29 x 1,5 für Verrohrung
Schlauchtülle 90° + Spülanschluss druckseitig
ohne
7. Elektrische Version Konsole
01
02
10
=
=
=
Klemmkasten OEM
Klemmkasten Ecolab
Hauptschalter
8. Durchflussmessung
OG
OP
DM
99
=
=
=
=
OGM
£ 450 l/h
PLUS
PLUS
(mit Dongle Platine f. E60
) £ 450 l/h
OGM
Dosimag
ohne
PLUS
9. Zubehör
SS
SL
SM
SR
99
=
=
=
=
=
Spritzschutz
Spritzschutz links
Spritzschutz mitte
Spritzschutz rechts
ohne
10. Konsolenausführung
D O S 02100 P V
FP 62
01
02
OG SS EC
EC =
99 =
Ecolab
neutral
Beispiel für eine konfigurierte Dosierstation
Andere Spezifikationen auf Anfrage!
417101488_EMP_Dosierstation.doc
22
Rev. 04-03.12
6
Aufbau
6.1
Anwendungsschema bei ausgasenden Medien
Abb. 6.1
417101488_EMP_Dosierstation.doc
23
Rev. 04-03.12
6.2
Anwendungsschema bei nicht ausgasenden Medien
Abb.6.2
HINWEIS
Leistungsdaten finden Sie im Kapitel 13 „Technische Daten“
417101488_EMP_Dosierstation.doc
24
Rev. 04-03.12
7
Geräteinstallation
HINWEIS
Beachten Sie unbedingt die Sicherheitshinweise im Kapitel 2.2.3 “Installation“
7.1
Allgemeines
Komponenten des Grundaufbaus (siehe Kapitel 3.1) sowie ausgewählte optionale
Anlagenkomponenten (siehe Kapitel 3.2) werden werksseitig in die Dosierstation integriert und
geprüft. Zubehör (siehe Kapitel 3.3) wird werksseitig nicht montiert und geprüft und muss bei
der Installation der Dosierkonsole in die Gesamtanlage integriert und geprüft werden.
Installation des Zubehörs gemäß Anwendungsschema (siehe Kapitel 6) und ZubehörBetriebsanleitung in die Gesamtanlage.
7.2
Installationsbeispiele
Installationsbeispiele für ausgasende Dosiermedien:
Installationsbeispiele für nicht ausgasende Dosiermedien:
7.3
siehe Kapitel: 6.1.
siehe Kapitel: 6.2.
Umgebungsbedingungen
Bitte beachten Sie die durch unsere Projektierung festgelegten und mit der Auftragsbestätigung
mitgeteilten Umgebungsbedingungen. Sollten Sie diese nicht vorliegen haben oder sich
unsicher sein, kontaktieren Sie bitte die Fa. ECOLAB-Engineering GmbH (siehe Kapitel 1.4).
Zu den wichtigsten (relevanten) Umgebungsbedingungen zählen:
· Umgebungstemperatur
· Luftfeuchtigkeit
· Belüftung
· Spannungsversorgung
· Uneingeschränkte elektromagnetische Verträglichkeit (EMV), um Störungen der Messtechik
auszuschließen
· Wasseranschlüsse (z.B. zum Spülen der Anlage im Wartungsfall)
Sollten die Umgebungsbedingungen von unseren Spezifikationen abweichen, kann unter
Umständen eine Installation/Inbetriebnahme nicht vollständig durchgeführt werden.
7.3.1
Installation der Dosierkonsole
VORSICHT
ACHTUNG
Die Konsole darf nicht durch zusätzliche (Gewichts-)Kräfte belastet werden! Der Aufbau oder die Ablage zusätzlicher
Komponenten sowie das Betreten oder das Anhängen an bereits montierte Konsolen ist unzulässig.
Achten Sie unbedingt darauf, dass die Konsole Plan an der Wand anliegt und ordnungsgemäß angeschraubt ist.
417101488_EMP_Dosierstation.doc
25
Rev. 04-03.12
7.3.2
Verrohrungen, Dosierleitungen, Rohrverschraubungen
(Einschraub-, -Übergangs-, Armaturverschraubungen)
Um einen unkontrollierten Austritt des Dosiermediums zu verhindern und eine
Gefährdung des Bedienpersonals auszuschließen, beachten Sie folgende Punkte:
· richtige Abmessungen (Ø, NW) der Rohrleitungen (Saug-, Druck-, Rückführ-, Befüllleitungen)
· Knickfreie Installation von Schläuchen
· Leitungslängen (Schläuche, Rohrleitungen) den Erfordernissen angepasst
· einwandfreie Abdichtung aller Rohrleitungen
· einwandfreie Abdichtung aller Verschraubungen
(Kunststoff-Verschraubungen dürfen nur handfest angezogen werden!)
· spannungsfreie Installation aller Komponenten (Ausdehnung)
7.4
Elektrische Installation
7.4.1
Klemmkasten mit Wartungsschalter / Ausführung ECOLAB / Ausführung OEM
@ Klemmkasten gemäß beiliegender Betriebsanleitung anschließen.
@ Spannungsversorgung prüfen und mit Angaben auf dem Typenschild vergleichen.
7.4.2
Ovalradzähler (optional)
@ Gemäß beiliegender Betriebsanleitung installieren und anschließen.
7.4.3
Dosimag (optional)
@ Gemäß beiliegender Betriebsanleitung installieren und anschließen.
7.4.4
Gebindeumschaltung (optional)
@ Gemäß beiliegender Betriebsanleitung anschließen.
7.4.5
Sauglanze mit Niveauschalter (Zubehör)
@ Gemäß beiliegender Betriebsanleitung installieren und anschließen.
7.4.6
Leckagesonde Maximat (Zubehör)
@ Gemäß beiliegender Betriebsanleitung installieren und anschließen.
7.4.7
Connexx / Connexx switch (Zubehör)
@ Gemäß beiliegender Betriebsanleitung installieren und anschließen.
7.4.8
Tagesvorratsbehälter TVB (Zubehör)
@ Gemäß beiliegender Betriebsanleitung installieren und anschließen.
7.4.9
Dongle box / Dongle Platine (Zubehör)
@ Gemäß beiliegender Betriebsanleitung installieren und anschließen.
417101488_EMP_Dosierstation.doc
26
Rev. 04-03.12
7.5
Mechanische (hydraulische) Installation
7.5.1
Leitungen
7.5.1.1 Saugleitung (bauseitige Leistung)
@ Saugseitige Anschlussverschraubung überprüfen.
@ Befestigungsschrauben auf festen Sitz überprüfen.
@ Saugleitung wie in beiliegender Betriebsanleitung „Dosierpumpe“ beschrieben installieren
und anschließen.
7.5.1.2 Dosierleitung (bauseitige Leistung)
@ Druckseitige Anschlussverschraubung überprüfen.
@ Befestigungsschrauben auf festen Sitz überprüfen.
@ Druckleitung wie in beiliegender Betriebsanleitung „Dosierpumpe“ beschrieben installieren
und anschließen.
7.5.1.3 Überströmleitung Mehrfunktionsventil
@ Wie in beiliegender Betriebsanleitung beschrieben installieren und anschließen.
HINWEIS
Ordnungsgemäße Rückführung der Überströmleitung in das Liefergebinde / Connexx / Connexx switch /
Tagesvorratsbehälter kontrollieren.
7.5.2
Connexx / Connexx switch (Zubehör)
@ Wie in beiliegender Betriebsanleitung beschrieben installieren und anschließen.
HINWEIS
Ordnungsgemäße Rückführung der Überströmleitung/Entgasungsleitung zum Connexx / Connexx switch
kontrollieren.
7.5.3
Tagesvorratsbehälter (TVB) (Zubehör)
@ Wie in beiliegender Betriebsanleitung beschrieben installieren und anschließen.
HINWEIS
Ordnungsgemäße Rückführung der Entgasungsleitung in den Tagesvorratsbehälter kontrollieren.
7.5.4
Leckagesonde Maximat (Zubehör)
@ Wie in beiliegender Betriebsanleitung beschrieben installieren.
7.5.5
Dosierventil (Zubehör)
@ Dosierventil an Dosier- / Impfstelle einschrauben.
HINWEIS
Die Abdichtung am Einschraubgewinde sollte mittels O-Ring realisiert werden. Ist dies durch die örtlichen
Verhältnisse nicht möglich, empfehlen wir mit Teflonband oder Flüssigteflon einzudichten.
@ Dosierleitung an Dosierventil anschließen.
7.5.6
Sauglanze mit Niveauschalter (Zubehör)
@ Verschraubung und Sitz kontrollieren.
417101488_EMP_Dosierstation.doc
27
Rev. 04-03.12
8
Inbetriebnahme
HINWEIS
Beachten Sie unbedingt die Sicherheitshinweise im Kapitel 2.2.4 “Inbetriebnahme“
Unter Inbetriebnahme werden Arbeitsschritte behandelt, die sowohl nach der Erst-Installation als
auch nach Wartung, Reparatur oder Austausch von Anlagenkomponenten stattfinden.
WICHTIG
Die Inbetriebnahme der Anlage ist wie folgt durchzuführen:
· Anlagenkomponenten auf kompletten Umfang und fehlerfreie Montage überprüfen (siehe Anlagenschema Kapitel 6)
·
·
·
·
und schriftlich mittels Abnahmeprotokoll dokumentieren.
Konformität der geprüften Anlage dokumentieren.
CE-Kennzeichnung für Anlage, sichtbar aufbringen. (Europäischer Geltungsbereich)
Die Inbetriebnahme darf nur von sachkundigem und unterwiesenem Personal durchgeführt werden
Die Inbetriebnahme ist mit einem geeigneten Inbetriebnahme-Prüfmedium durchzuführen. Zur Definition eines
geeigneten Inbetriebnahme-Prüfmediums kontaktieren Sie bitte den Lieferanten des Dosiermediums, um negative
Wechselwirkungen zwischen Dosiermedium und Inbetriebnahme-Prüfmedium auszuschließen.
@ Umgebungsbedingungen gemäß Vorgaben (siehe Kapitel 7.3) prüfen und bei
Abweichungen einstellen.
@ Dosiermedium muss mit Kennzeichnung auf dem Dosierkonsolen-Typenschild
übereinstimmen.
@ Einstellungen der Anlagenkomponenten gemäß Anlagenkomponenten-Betriebsanleitungen
kontrollieren.
@ Anlagensteuerung (falls vorhanden) aktivieren.
@ Inbetriebnahme der Dosierpumpe gemäß beiliegender Betriebsanleitung „EMPDosierpumpe“ mit Inbetriebnahme-Prüfmedium.
@ Leermeldung Sauglanze (falls vorhanden) auf Funktion prüfen.
@ Dosierpumpe über Entlüftungsfunktion des Mehrfunktionsventils entlüften und Einstellung
des Mehrfunktionsventils gemäß Prozessbedingungen herstellen, siehe Betriebsanleitung
„Mehrfunktionsventil“.
@ Dosierleitung und Dosierstelle durch Betrieb der Dosierkonsole mit InbetriebnahmePrüfmedium beaufschlagen.
@ Sicherheitseinrichtungen wie Mehrfunktionsventil (Überströmfunktion),
Durchflussüberwachung, Niveaumeldungen gem. Anlagenkennlinie einstellen und auf
Funktion hin überprüfen.
@ Kompletten Installationsumfang durch Sichtprüfung auf Dichtheit prüfen und etwaige
Undichtigkeiten sofort abstellen.
@ Vollständige Entleerung aller Anlagenkomponenten vom Inbetriebnahme-Prüfmedium
@ Anschluss Dosiermedium und Befüllung des kompletten Systems mit Dosiermedium
417101488_EMP_Dosierstation.doc
28
Rev. 04-03.12
9
Betrieb
HINWEIS
Beachten Sie unbedingt die Sicherheitshinweise im Kapitel 2.2.5 “Betrieb“.
Bitte kontaktieren Sie die Ecolab Engineering GmbH im Falle von Fragen oder technischen Erläuterungen.
9.1
Betriebszustand herstellen
Stellen Sie die, wie in dieser Betriebsanleitung unter Kapitel 6 “Aufbau“, Kapitel 7
“Geräteinstallation“ und Kapitel 8 “Inbetriebnahme, beschriebenen, Betriebszustände der
Anlagenkomponenten her.
WICHTIG
Beachten Sie zu jeder Zeit des Betriebes die angegebenen Einsatz- und Bedienungshinweise.
Sollten einzelne oder mehrere Einsatz- und Bedienungsparameter von den Vorgaben abweichen
ist ein Betrieb der Dosierstation nicht zulässig!
9.1.1
Betriebsarten
9.1.1.1 Handbetrieb bei Ausführung der Dosierkonsole mit EMP E60 Pumpen
Bei den Dosierpumpen EMP E60 die Möglichkeit der Aktivierung des Handbetriebs durch
Drücken der Taste „Test“ im Pumpen-Bedienfeld, siehe hierzu die Betriebsanleitung der
Dosierpumpe.
9.1.1.2 Handbetrieb mit OEM Klemmkasten
Der Handbetrieb der Dosierpumpe mit OEM Klemmkasten ist nur in Verbindung mit einer
externen Steuerung möglich.
Der „Handbetrieb Dosierstation“ wird bei Installation der Option Klemmkasten OEM
(siehe Kapitel 4.5.6) direkt am Klemmkasten aktiviert.
Hierbei erfolgt die Dosierung solange, wie der Taster gedrückt wird. Durch Deaktivierung des
Tasters wird der Handbetrieb beendet und die Dosierpumpe stoppt.
Abb. 9.1
Klemmkasten OEM:
· Handtaster (schwarz)
9.1.1.3 Automatikbetrieb
9.1.1.3.1 Ansteuerung Analogsignal / Impulsansteuerung / Schütz-Spannung (Ein/Aus) bei E00
Siehe Betriebsanleitung EMP-Dosierpumpe
9.1.2
Sicherheitseinrichtungen
9.1.2.1 Grundausführung
Die Dosierstation ist in der Grundausführung mit unterschiedlichen Sicherheitseinrichtungen
ausgerüstet, um einen störungsfreien Betrieb zu gewährleisten und Personalgefährdungen zu
minimieren bzw. auszuschließen.
417101488_EMP_Dosierstation.doc
29
Rev. 04-03.12
9.1.2.1.1 Eigenüberwachung EMP-Dosierpumpe in der Elektronikversion E60
Um Fehlfunktionen der EMP-Dosierpumpe in der Elektronikversion E60 aufgrund von
Hardwaredefekten (Platine, Stecker) und Installationsfehlern (Gegendruck, Dosierstelle)
auszuschließen, verfügt diese über 3 interne Überwachungsroutinen:
Überdosierung / Keine Dosierung / Dauerdosierung
Details hierzu entnehmen Sie bitte der Betriebsanleitung der Dosierpumpe EMP E60.
9.1.2.1.2 Überströmung Mehrfunktionsventil
Die Funktion „Überströmung des Mehrfunktionsventils“ (siehe Betriebsanleitung MFV)
verhindert durch Ableitung des Dosiermediums einen unzulässigen Druckanstieg in der
Dosierleitung. Der anlagentechnisch zu ermittelnde zulässige Maximaldruck in der Dosierleitung
(Bauteile, Dosierstelle, Komponenten) wird am Mehrfunktionsventil vor Inbetriebnahme
eingestellt.
Die Ausführung der Ableitung des Dosiermediums vom Überströmanschluss des
Mehrfunktionsventils erfolgt nach Vorgabe in der Betriebsanleitung MFV.
VORSICHT
ACHTUNG
Vor Inbetriebnahme der Dosierstation muss sichergestellt sein, dass der Überströmdruck des Mehrfunktionsventils
entsprechend der Auslegung und Eigenschaften der Dosierstation und nachgeschalteter Anlagenteile eingestellt ist.
Beachten Sie unbedingt die Betriebsanleitung „Mehrfunktionsventil“
9.1.2.2 Optionen
9.1.2.2.1 Dosierüberwachung mittels Dosimag oder OGM
PLUS
(Option) durch externe Steuerung
Mit den Durchflußmeßgeräten Dosimag (siehe 4.5.1.2) oder OGMPLUS (siehe 4.5.1.1) besteht
die Möglichkeit der Überwachung der tatsächlichen Dosiermenge.
Hierbei vergleicht die übergeordnete bauseitige Steuerung durch vom Messgerät gesendete
Impulse rechnerisch die Soll- und Ist-Dosierleistung. Werden vorbestimmte Grenzen der
Abweichung überschritten (die auf einen Defekt der Dosierstation/des Dosiersystems
hindeuten) kommt es zur Störmeldung und Anlagenstillstand durch die übergeordnete
bauseitige Steuerung.
Zusätzlich können auch Verbrauchssummen über frei auswählbare Zeiträume ermittelt werden.
Die elektrische Verbindung der Messgeräte kann unter Einsatz der Option Klemmkasten OEM
(siehe 4.5.6) direkt auf der Dosierstation mit M12-Stecker zwischengeklemmt, und von dort aus
mit der übergeordneten Steuerung verbunden werden.
9.1.2.2.2 Sauganschluß - Gebindeumschaltung mit pneumatisch gesteuerten Ventilen (Option)
Der Sauganschluss mit Gebindeumschaltung (siehe Kapitel 4.5.2) dient zur Realisierung eines
unterbrechungsfreien Betriebs der Dosierstation. Hierbei sind beide Sauganschlüsse jeweils mit
einem eigenen Dosiermedium-Liefergebinde verbunden.
Die übergeordnete Steuerung erfasst die Leermeldesignale der Sauglanzen in den
Liefergebinden (siehe Kapitel 9.1.2.3.2) und wertet diese entsprechend aus. Hierbei Ist das Ziel
die Dosierstation permanent mit zumindest einem gefüllten Dosiermedium-Liefergebinde zu
versorgen.
Bei Leermeldung eines Liefergebindes erfolgt die automatische Umschaltung per
Sauganschluss auf das zweite Liefergebinde.
Der Anlagenbediener wird mittels Hinweis in der übergeordneten Steuerung darauf aufmerksam
gemacht, das leere Liefergebinde gegen ein volles Liefergebinde auszutauschen. Sobald er die
Sauglanze in das volle Liefergebinde eintaucht registriert die übergeordnete Steuerung die
Bereitschaft.
417101488_EMP_Dosierstation.doc
30
Rev. 04-03.12
9.1.2.2.3 Sauganschluß Spülanschluss mit handbetriebenen Membranventilen
Mit dem Sauganschluss mit handbetriebenen Membranventilen steht ein Spülanschluss zur
Verfügung, um die Dosierstation ab diesem Spülanschluss mit Spülmedium zu spülen. Vor
allem bei mechanischen Handeingriffen in Dosierstationen mit Demontage von
Anlagenkomponenten zu Wartungs- oder Reparaturzwecken ist es erforderlich, das
Dosiermedium aus diesen Anlagenteilen zu entfernen.
VORSICHT
ACHTUNG
Achten Sie vor Aktivierung des Spülanschlusses auf ordnungsgemäßes Tragen der persönlichen Schutzausrüstung,
siehe Kapitel 2.1.2 „Umgang mit Dosiermedium“.
9.1.2.3 Zubehör
9.1.2.3.1 Leckagesonde Tropfwanne (Zubehör)
Die als Zubehör erhältliche Leckagesonde (siehe Kapitel 4.6.4) in der Tropfwanne der
Dosierstation detektiert Flüssigkeiten, die in der Tropfwanne gesammelt werden. Sie dient zur
Anzeige von unkontrolliertem Austritt von Dosiermedium im Bereich der Dosierstation.
Die Auswertung des Signals der Leckagesonde Tropfwanne erfolgt durch die übergeordnete
bauseitige Steuerung.
9.1.2.3.2 Sauglanze Leermeldung Liefergebinde (Zubehör)
Die Sauglanze zur Installation in das Dosiermedium-Liefergebinde ist werksseitig mit 2
Niveauschaltern ausgerüstet:
· Das Vorwarnsignal dient zur Information des Anlagenbedieners, dass in Kürze ein
Gebindewechsel erforderlich sein wird, die Anlage aber noch funktionsfähig ist.
· Das Leermeldesignal setzt die Dosierstation still, da aufgrund des niedrigen Niveaus im
Dosiermedium-Liefergebinde eine Prozesssicherheit nicht mehr gegeben ist, und ein
Trockenlaufen der Dosierstation verhindert wird.
Steckeranschluß:
· Der Stecker der Sauglanze wird direkt an die EMP E60 Dosierpumpe angeschlossen, wobei
die Anzeige der beiden oben genannten Signale dann über das Pumpendisplay erfolgt und
per Sammelstörmeldung an die übergeordnete Steuerung weitergegeben werden kann.
· Im Falle des Einsatzes der Option Klemmkasten OEM (siehe Kapitel 4.5.6 und Abb. 9.2)
wird der Sauglanzenstecker direkt mit dem Klemmkasten verschraubt und von hier aus mit
der übergeordneten Steuerung verbunden. Die übergeordnete Steuerung wertet diese
beiden Signale aus und aktiviert entsprechend die gelbe Signallampe.
Abb. 9.2
Klemmkasten OEM
· Liefergebinde Hinweislampe (gelb)
-> Blinkt bei Erreichen des Vorwarnniveaus
-> Leuchtet permanent bei Erreichen des Leermeldeniveaus
9.1.2.3.3 Spritzschutzhaube
Die Spritzschutzhaube dient zur Vermeidung unkontrollierter Freisetzung von Dosiermedium im
Falle von Komponenten-Defekten auf der Dosierstation.
Im Betrieb der Dosierstation ist eine Sicherheit gegen unkontrollierte Freisetzung im Fall von
Komponenten-Defekten nur gegeben, wenn die Spritzschutzhaube ordnungsgemäß installiert
ist. Stellen Sie sicher, dass die Dosierstation nur mit installierter Spritzschutzhaube in Betrieb ist.
VORSICHT
ACHTUNG
Achten Sie vor Demontage der Spritzschutzhaube auf ordnungsgemäßes Tragen der persönlichen
Schutzausrüstung, siehe 2.1.2 Umgang mit Dosiermedium!
417101488_EMP_Dosierstation.doc
31
Rev. 04-03.12
10
Betriebsstörungen
VORSICHT
Vor Reparatur- und Wartungsarbeiten im Betrieb mit Dosiermedium immer den Dosierkopf mit einem geeigneten
Spülmedium (Lieferant Dosiermedium kontaktieren) spülen, die Mehr-funktionsventi-Druckentlastungsfunktion für die
Dosierleitung aktivieren und bei sämtlichen Tätigkeiten an der Dosierkonsole persönliche Schutzausrüstung (siehe
Sicherheitsdatenblatt Dosiermedium z.B.Schutzbrille, Schutzhandschuhe und Schürze) tragen.
Elektroreparaturen und -installationen dürfen nur durch Elektrofachkräfte ausgeführt werden.
Beachten Sie dabei die Unfallverhütungsvorschriften der Berufsgenossenschaften!
(z.B. BGV A1 „Allgemeine Vorschriften“, BGV A3 „Elektrische Anlagen und Betriebsmittel“ der
Berufsgenossenschaft der Feinmechanik und Elektrotechnik BGFE!
VORSICHT
Beim Öffnen von Abdeckungen oder Entfernen von Teilen, außer wenn dies ohne Werkzeug möglich ist, können
spannungsführende Teile freigelegt werden. Anschlussstellen können spannungsführend sein.
Vor einem Abgleich, einer Wartung, einer Instandsetzung oder einem Austausch von Teilen
muss das Gerät von allen Spannungsquellen getrennt sein, wenn ein Öffnen des Gerätes
erforderlich ist.
10.1
Betriebsstörungen Grundaufbau-Komponenten
Dosierstation
undicht
Mögliche Ursache
Undichtigkeit EMP-Dosierpumpe
Undichtigkeit
Rohrverschraubungen
Undichtigkeit Mehrfunktionsventil
Undichtigkeit Handmembranventil
Dosierstation
saugt kein
Dosiermedium an
Siehe Betriebsanleitung EMP-Dosierpumpe
Verschraubungen nachziehen oder ggf.
Verschraubungsdichtungen austauschen
Siehe Betriebsanleitung Mehrfunktionsventil
Antriebsschrauben nachziehen oder ggf. Membrane
austauschen
Siehe Betriebsanleitung EMP-Dosierpumpe
Handmembranventil vollständig öffnen
Dosierstellenfunktion prüfen und ggf. in Stand setzen
Spezifikation Dosierstelle abweichend von Spezifikation
Dosierstation.
siehe Betriebsanleitung Mehrfunktionsventil
Saugleitung überprüfen und Leckstelle abdichten/erneuern
Membranventil Saugleitung vollständig öffnen
Spannungsversorgungskabel wechseln
Netzspannung überprüfen
Anschluss gemäß Klemmenplan überprüfen
Über die Saugleitung den EMP-Dosierpumpenkopf durchspülen,
evtl. Ventile ausbauen und reinigen bzw. austauschen
Hubeinstellung EMPDosierpumpe < 40%
Saugleitung überprüfen und Leckstelle abdichten/erneuern
Pumpenkopf mittels Mehrfunktionsventil entlüften (siehe
Betriebsanleitung Mehrfunktionsventil)
Hubeinstellung EMP-Dosierpumpe > 40% einstellen (siehe
Betriebsanleitung EMP-Dosierpumpe)
Störung
1.5
Dosierstation
„läuft“ aber
dosiert nicht
Gasansammlung im EMPDosierpumpenkopf
Ablagerung, Verklebung der
EMP-Dosierpumpenventile
Hublängen kleiner 40% gestellt
Handmembranventil auf EMPDosierstation ganz oder teilweise
geschlossen
Dosierstelle nicht betriebsbereit
Dosierstellen-Gegendruck zu
hoch
Überströmfunktion
Mehrfunktionsventil aktiv
Undichtigkeit Saugleitung
Membranventil Saugleitung
geschlossen
Spannungsversorgungskabel
beschädigt
falsche Spannung
Fehlerhafter Anschluss
Ablagerungen, Verkleben,
Austrocknen der EMPDosierpumpenventile
Undichtigkeit Saugleitung
Behebung
Schlagen in
Dosierleitung
Pulsationsdämpfer nicht aktiv
Druckleitung spülen und entleeren damit sich Gaspolster im
Pulsationsdämpfer wieder aufbauen kann.
Störung
1.6
Störung
1.3
Dosierstation
„läuft“ aber
dosiert nicht
Störung
1.4
Störung
1.2
Störung
1.1
Störung
Dosierstation
dosiert
jedoch mit
verminderter
Dosierleistung
Handmembranventil auf EMPDosierstation ganz oder teilweise
geschlossen
Dosierstelle nicht betriebsbereit
Dosierstellen-Gegendruck zu
hoch
Überströmfunktion
Mehrfunktionsventil aktiv
Gasansammlung im Pumpenkopf
417101488_EMP_Dosierstation.doc
Handmembranventil vollständig öffnen
Dosierstellenfunktion prüfen und in Stand setzen
Spezifikation Dosierstelle abweichend von Spezifikation EMPDosierstation.
siehe Betriebsanleitung Mehrfunktionsventil
32
Rev. 04-03.12
10.2
Betriebsstörungen Options-Komponenten
Störung
2.1
Störung
Dosierüberwachung
aktiv
Mögliche Ursache
Verkabelungsfehler
Membranventil geschlossen
Dosierstelle nicht betriebsbereit
Überströmung MFV aktiv
Undichtigkeit Saugleitung
Membranventil Saugleitung
geschlossen
Undichtigkeit EMP-Dosierpumpe
Undichtigkeit
Rohrverschraubungen
Undichtigkeit Mehrfunktionsventil
Stör-ung
2.3
Störung
2.2
Undichtigkeit Handmembranventil
10.3
Ovalradzähler
PLUS
OGM
steht still
trotz
Funktion der
Dosierpumpe
Gebindeumschaltung
funktioniert
nicht
Ovalradzähler durch
Verschmutzungen blockiert
Gasansammlung im EMPDosierpumpenkopf
Behebung
Siehe Betriebsanleitung OGMPLUS / Dosimag
Handmembranventil vollständig öffnen
Dosierstellenfunktion prüfen und ggf. in Stand setzen
siehe Betriebsanleitung Mehrfunktionsventil
Saugleitung überprüfen und Leckstelle abdichten/erneuern
Membranventil Saugleitung vollständig öffnen
Siehe Betriebsanleitung EMP-Dosierpumpe
Verschraubungen nachziehen oder ggf. VerschraubungsDichtungen austauschen
Siehe Betriebsanleitung Mehrfunktionsventil
Antriebsschrauben nachziehen oder ggf. Membrane
austauschen
Ovalradzähler mit Spülmedium spülen und Verunreinigungen
entfernen
Pumpe mittels Entlüftungsfunktion Mehrfunktionsventil (siehe
Betriebsanleitung Mehrfunktionsventil) entlüften
Pumpe mit Spülmedium spülen, Ventile reinigen oder tauschen
Hubeinstellung EMP-Dosierpumpe > 40% einstellen (siehe
Betriebsanleitung EMP-Dosierpumpe)
Übergeordnete Steuerung (Programm) prüfen
Funktion der Membranventile
fehlerhaft
Luftversorgung der Membranventile prüfen
Funktion der Membranventile prüfen
Betriebsstörungen Zubehör-Komponenten
Störung
3.4
Störung
3.3
Störung
3.2
Störung
3.1
Störung
Niveau-
Mögliche Ursache
Sauglanze nicht korrekt im
Liefergebinde positioniert
Schwimmer der Sauglanze ist
blockiert
Sauglanzenstecker oder
Brückenstecker ist locker bzw.
nicht angesteckt.
Sauglanzenkabel defekt
Spannungsversorgungskabel
beschädigt
falsche Spannung
anzeige
erscheint im
PumpenDisplay trotz
vollem
Behälter
Leckageüberwachung
Tropfwanne
funktioniert
Fehlerhafter Anschluss
nicht
Connexx
OEM /
Connexx
switch OEM
funktioniert
nicht
Tagesvorrats
-behälter
funktioniert
nicht
417101488_EMP_Dosierstation.doc
Behebung
Sauglanze ordnungsgemäß im Liefergebinde positionieren
Schwimmer gangbar machen
Stecker festziehen, Kontakte reinigen, überprüfen ob
Brückenstecker gesteckt ist
Leermeldeeinrichtung austauschen
Spannungsversorgungskabel wechseln
Steuerspannung überprüfen
Anschluss gemäß Klemmenplan überprüfen
Siehe Betriebsanleitung
Connexx OEM / Connexx switch OEM
Siehe Betriebsanleitung Tagesvorratsbehälter
33
Rev. 04-03.12
11
Wartungen
HINWEIS
Beachten Sie unbedingt die Sicherheitshinweise im Kapitel 2.3 “Wartung / Reparatur“.
11.1
Wartungsvorschriften für Anlagenkomponenten
Anlagenkomponente
Dosierpumpe
Mehrfunktionsventil (MFV)
Pulsationsdämpfer
PLUS
Ovalradzähler (OGM
) (Option)
Dosimag (Option)
Sauganschluß
Gebindeumschaltung (Option)
Sauganschluß Spülanschluß
(Option)
Klemmkasten mit
Wartungsschalter / Ecolab / OEM
Spritzschutzhaube (Option)
Sauglanze/Saugrohr (Zubehör)
incl. Niveaugeber
Connexx basic OEM / Connexx
switch OEM (Zubehör)
Tagesvorratsbehälter (Zubehör)
Leckagesonde Maximat
(Zubehör)
Saugheber (Zubehör)
417101488_EMP_Dosierstation.doc
Kontrolle
Durchführbar von
Intervall
Siehe Betriebsanleitung Dosierpumpe
leckfreier Anschluss
Siehe Betriebsanleitung Mehrfunktionsventil
Fachpersonal geschult
Siehe Betriebsanleitung Ovalradzähler
Siehe Betriebsanleitung Dosimag
Funktion
leckfreier Anschluss
Funktion
leckfreier Anschluss
Elektrische Funktion
Zustand Verkabelung (Versprödung,
Beschädigung)
Zustand / Beschädigung
Sieb (ggf. reinigen)
elektrische Funktion Niveaugeber
Schwimmer auf Leichtgängigkeit
leckfreier Anschluss
elektrische Funktion Niveaugeber
Schwimmer auf Leichtgängigkeit
Elektrische Funktion Magnetventil
Funktion Handabsperrventil
Aktivkohleabluftfilter
leckfreier Anschluss
elektrische Funktion Niveaugeber
elektrische Funktion Überfüllsicherung
Funktion Zulaufventile
Funktion Handabsperrventil
Aktivkohleabluftfilter
Elektrische Funktion
Zustand Verkabelung (Versprödung,
Beschädigung)
Funktion
34
¼-jährlich
Fachpersonal geschult
¼-jährlich
Fachpersonal geschult
¼-jährlich
Fachpersonal geschult
¼-jährlich
Fachpersonal geschult
¼-jährlich
Fachpersonal geschult
Monatlich
Fachpersonal geschult
Monatlich
Fachpersonal geschult
Monatlich
Fachpersonal geschult
Monatlich
Fachpersonal geschult
Rev. 04-03.12
12
Reparatur / Entsorgung
HINWEIS
Beachten Sie unbedingt die Sicherheitshinweise im Kapitel 2.3 “Wartung / Reparatur“.
12.1
Reparatur durch die ECOLAB Engineering GmbH
12.1.1
Rücksendungsbedingungen
HINWEIS
Bitte haben Sie Verständnis dafür, dass wir nur Reparaturaufträge von Anlagenkomponenten entgegen nehmen, die
sich in gefährdungsfreiem Zustand befinden.
Folgende Auflagen müssen erfüllt sein, damit wir einen Reparaturauftrag entgegennehmen können:
· Rücksendungsformular:
@ Anfordern unter Tel. Nr. (+49) 8662 61-0 / Fax-Nr. (+49) 8662 61-258
@ Korrekt und vollständig ausfüllen
@ Vorab per Fax an: (+49) 8662 61-258 senden
· Anlagenkomponenten:
@ Frei von Verschmutzungen (gespült) aller Art, insbesondere von Chemierückständen des Dosiermediums.
@ In Plastikverpackung im Karton, um ein Auslaufen von Spülwasser zu vermeiden.
· Karton:
@ Adressiert an ECOLAB Engineering GmbH-Reparatur Service (Adresse, siehe Kapitel 12.1.3)
@ Aufkleber oder deutlicher Schriftzug „REPARATUR“
@ Rücksendungsformular einlegen.
12.1.2
Rücksendungsformular
Bitte fordern Sie das Rücksendungsformular an bei:
Ecolab Engineering GmbH
Abteilung QUM
Raiffeisenstrasse 7
D-83313 Siegsdorf
Tel: (+49) 8662 61-0
Fax: (+49) 8662 61-258
12.1.3
Rücksendungsadresse
ECOLAB-Engineering GMBH
REPARATUR-SERVICE
Raiffeisenstraße 7
D-83313 Siegsdorf
Telefon (+49) 86 62 / 61-0
Telefax (+49) 86 62 / 61-258
12.2
Entsorgung
Entsorgen Sie unbrauchbar gewordene Anlagenkomponenten gemäß den geltenden
gesetzlichen Vorschriften.
Sofern es sich bei diesen Anlagenkomponenten um ECOLAB-Produkte handelt, richten Sie
bitte unter Beachtung der in Kapitel 12.1.1 beschriebenen Punkte, einen Entsorgungsauftrag an
uns.
HINWEIS
Dies gilt jedoch nicht für Chemikalien aller Art!
417101488_EMP_Dosierstation.doc
35
Rev. 04-03.12
13
Technische Daten
13.1
Geltende Normen / Richtlinien
13.1.1
Auffangwanne / Dosierbehälter
Ø
13.1.2
Pumpen-/Pumpengeräte-Richtlinie:
Niederspannungsrichtline:
Elektromagnetische Verträglichkeit:
Maschinenrichtlinie:
DIN/EN 809
2006/95/EG
2004/108/EG
2006/42/EG
Ovalradzähler (OGM / OGMPLUS) - Optional / Dosimag - Optional
Ø
13.2
DIN/EN 10204 2.1
Dosierpumpe
Ø
Ø
Ø
Ø
13.1.3
Werksprüfung:
Elektromagnetische Verträglichkeit:
2004/108/EG
Leistungsdaten
Typ EMP-Dosierstation
Förderleistung Dosierpumpe [l/h] bei 50 Hz
Gegendruck [bar] bei 50 Hz
Max. förderbare Viskosität [mPas]
Max. Saughöhe [mWs] bei 100% Hub
Max. Sauglänge [m] bei 100% Hub
Min. erforderliche Nennweite Saugleitung [DN]
Min. erforderliche Nennweite Druckleitung [DN]
Zulässige Umgebungstemperatur [°C]
Spannungsversorgung / Stromaufnahme
Schutzklasse
Abmessungen [l x b x h]
Gewicht
EMP IV
750 630
3
4
450
6
30
25
25
20
30
25
210 140
8
10
EMP III
54
10
EMP II
EMP KKS
16
11,2
4,3
10
5
10
200
2
3
20
6
6
6
6
4
12
12
6
6
6
4
0…40
Siehe Typenschild EMP-Dosierstation
IP 55
IP 65
500 x 545 x 1000
auf Anfrage
1,4
10
6
4
Die detaillierten Leistungsdaten der einzelnen Komponenten der EMP-Dosierstation entnehmen
Sie bitte den beigefügten Komponenten-Betriebsanleitungen.
13.3
Werkstoffe
Die einzelnen Komponenten der EMP-Dosierstation sind aus den nachfolgend aufgeführten
Werkstoffen aufgebaut.
VORSICHT
ACHTUNG
Prüfen Sie vor Einsatz der EMP-Dosierstation in jedem Fall die im Produktdatenblatt des Dosiermediums
angegebenen Material-Empfehlungen und verwenden Sie nur EMP-Dosierstationen die aus freigegebenen Materialien
aufgebaut sind.
EMP KKS
Konsole:
Pumpe
Pumpenkopf / Saug-Druckventile:
Membrane:
Dichtungen:
Rohr/Schlauch:
Mehrfunktionsventil:
Ventile:
Ventilmembrane:
PLUS
OGM
:
417101488_EMP_Dosierstation.doc
VA 1.4301
PVDF / PVDF
PTFE-beschichtet
FPM oder EPDM
PTFE
PVDF
PVC/PVDF
PTFE
PVC/PVDF
36
Rev. 04-03.12
EMP II / III
bei Lauge*
bei Säure*
Konsole:
Pumpe
Pumpenkopf / Saug-Druckventile:
Membrane:
Dichtungen:
Rohr/Schlauch:
Mehrfunktionsventil:
Ventile:
Ventilmembrane:
PLUS
OGM
:
Dosimag (nur bei EMP III):
VA 1.4301
VA 1.4301
PP / PP
PTFE-beschichtet
EPDM
PTFE
PP
PVC/PP
PTFE
PVC/PP
VA 1.4435
PVDF / PVDF
PTFE-beschichtet
FPM (Viton B)
PTFE
PVDF
PVC/PVDF
PTFE
PVC/PVDF
Alloy C22
EMP IV
bei Lauge*
bei Säure*
Konsole:
Pumpe
Pumpenkopf / Saug-Druckventile:
Membrane:
Dichtungen:
Verrohrung:
Mehrfunktionsventil:
Ventile:
Ventilmembrane:
PLUS
OGM
:
Dosimag:
VA 1.4301
VA 1.4301
PP / PP
PTFE-beschichtet
EPDM
PP
PP
PP
PTFE
PVC/PP
VA 1.4435
PVDF / PVDF
PTFE-beschichtet
FPM (Viton B)
PVDF
PVDF
PVDF
PTFE
PVC/PVDF
Alloy C22
* Lauge / Säure sind allgemeine Bezeichnungen. Die Beständigkeiten auf dem Produktdatenblatt sind zu beachten.
13.4
Anschlüsse mechanisch
Pumpe:
Spülventil:
Umschaltventil:
Ausgang Handventil:
Überstromseite:
EMP KKS
EMP II
EMP III
6/8, 6/10, 6/12 mm
4/6, 6/8, 6/10, 6/12 mm
(2x) 4/6, 6/8, 6/10, 6/12 mm
6/8 mm
6/8 mm
4/6, 6/8, 6/12 mm
6/8, 6/10, 6/12 mm
(2x) 6/8, 6/10, 6/12 mm
6/8 mm
6/8 mm
6/12, 10/16 mm
6/12, 10/16 mm
(2x) 6/12, 10/16 mm
6/8 mm
6/8 mm
EMP IV 140 / 210 l/h
Saugseite:
Überstromseite:
Druckseite:
Spülventil druckseitig:
Spülventil saugseitig:
13.5
EMP IV 450- 750 l/h
Schlauch 19/27 mm (ID/AD)
Schlauch 30/38 mm (ID/AD)
bei Umschaltventilen 2x
bei Umschaltventilen 2x
Schlauch 19/27 mm (ID/AD)
Schlauch 25/34 mm (ID/AD) bzw. Flansch d32
Schlauch 19/27 mm (ID/AD)
1 x Einlegeteil für Festverrohrung D25
1 x Einlegeteil für Festverrohrung D40
Schlauch 19/27 mm (ID/AD)
Schlauch 19/27 mm (ID/AD)
Anschlüsse elektrisch
Siehe Typenschild EMP-Dosierstation
13.6
Abmessungen
Die Abmessungen der EMP-Dosierstation entnehmen Sie bitte Kapitel 13.2.
13.7
Bestellschlüssel
Siehe Kapitel 5 “Übersicht – VARIANTEN”
417101488_EMP_Dosierstation.doc
37
Rev. 04-03.12
13.8
Anschlusspläne
13.8.1
Dosierstation STANDARD (38603002)
Abb. 13.1
Abb. 13.2
417101488_EMP_Dosierstation.doc
38
Rev. 04-03.12
13.8.2
Dosierstation & OGM (38603003)
Abb. 13.3
Abb. 13.4
417101488_EMP_Dosierstation.doc
39
Rev. 04-03.12
13.8.3
Dosierstation & DOSIMAG (38603004)
Abb. 13.5
Abb. 13.6
417101488_EMP_Dosierstation.doc
40
Rev. 04-03.12
13.8.4
OEM Dosierstation STANDARD (38604102)
Abb. 13.7
Abb. 13.8
417101488_EMP_Dosierstation.doc
41
Rev. 04-03.12
13.8.5
OEM Dosierstation & OGM (38604103)
Abb. 13.9
Abb. 13.10
417101488_EMP_Dosierstation.doc
42
Rev. 04-03.12
13.8.6
OEM Dosierstation & DOSIMAG (38604104)
Abb. 13.11
Abb. 13.12
417101488_EMP_Dosierstation.doc
43
Rev. 04-03.12
14
Ersatz- / Verschleißteile
VORSICHT
Es dürfen ausschließlich Original-Ersatzteile verwendet werden!
HINWEIS
Die zugehörigen Artikelnummern der Verschleiß- und Ersatzteile entnehmen Sie bitte aus Ihrer Auftragsstückliste.
14.1
Ersatzteile
Ersatzteile auf Anfrage
14.2
Verschleißteile
Die Verschleißteile beziehen sich auf die nachfolgend aufgeführten Einbaupositionen. Um die
Übersichtlichkeit zu bewahren sind die Verschleißteile in Gruppen zusammengefasst.
14.2.1
EMP IV
14.2.1.1 Grundsets EMP IV
Abb. 14.1
Feder
Membrane
O-Ring
Membrane
O-Ringe
O-Ring
Saug-/Druckventil
Schutzmembrane
Fördermembrane
Bezeichnung
EMP IV 140 / 210 l/h
Artikel Nr. (EBS-Nr.)
PP-Ventile, EPDM-Dichtungen
PP-Ventile, Viton-Dichtungen
PVDF-Ventile, EPDM-Dichtungen
PVDF -Ventile, Viton-Dichtungen
286082 (auf Anfrage)
286385 (auf Anfrage)
286382 (auf Anfrage)
286085 (auf Anfrage)
EMP IV 450 l/h
PP-Ventile, EPDM-Dichtungen
PP-Ventile, Viton-Dichtungen
PVDF-Ventile, EPDM-Dichtungen
PVDF -Ventile, Viton-Dichtungen
286083 (auf Anfrage)
286386 (auf Anfrage)
286383 (auf Anfrage)
286086 (auf Anfrage)
EMP IV 630 / 750 l/h
PP-Ventile, EPDM-Dichtungen
PP-Ventile, Viton-Dichtungen
PVDF-Ventile, EPDM-Dichtungen
PVDF -Ventile, Viton-Dichtungen
417101488_EMP_Dosierstation.doc
286084 (auf Anfrage)
286387 (auf Anfrage)
286384 (auf Anfrage)
286087 (auf Anfrage)
44
Rev. 04-03.12
14.2.1.2 Peripherie EMP IV
Abb. 14.2
1
6
5
2
3
4
1
4
2
1
3
1
2
Pos.
1
2
3
4
5
6
14.2.2
1
2
Bezeichnung
Artikel Nr. (EBS-Nr.)
O-Ring 28.17x3.53 70 EPDM
O-Ring 28.17x3.53 70 FPM
Membrane DN 15-25 PTFE/EPDM
O-Ring 40.6x5.3 70 EPDM
O-Ring 40.6x5.3 70 FPM
Membrane DN32-40 PTFE
O-Ring 64,77x2,62 70 EPDM
O-Ring 64,77x2,62 70 FPM
O-Ring 12x2.5 70 EPDM (140-210 l/h)
O-Ring 12x2.5 70 FPM (140-210 l/h)
O-Ring 18x2.5 70 EPDM (450-750 l/h)
O-Ring 18x2.5 70 FPM (450-750 l/h)
417001277 (10002740)
417003593 (10000488)
415502535 (10006002)
417001938 (auf Anfrage)
417003359 (10003839)
415502323 (10006068)
417001519 (10004139)
417003415 (10006155)
417001102 (10002916)
417003334 (10002584)
417001172 (10003079)
417003350 (10020129)
EMP KKS / EMP II / EMP III
Auf Anfrage
417101488_EMP_Dosierstation.doc
45
Rev. 04-03.12
15
Zubehör
15.1
Sauglanzen
15.1.1
Sauglanzen Dosierstation EMP IV
Abb. 15.1
Sauglanzen
Bezeichnung
Artikel Nr. (EBS-Nr.)
250052 (10000807)
250054 (10001170)
250055 (10001697)
250056 (10001892)
Lieferumfang: Anschlussdichtung EPDM (schwarz) oder Viton (braun),
Anschlusskabel 5 m, Fassverschraubung mit Gewinde S70, ohne Schlauchanschluss
130
33
1200
SGL VC VC FP FP GL 000 G2 25 2SS 1200 99 99
SGL VC VC EP EP GL 000 G2 25 2SS 1200 99 99
SGL VC VC FP FP GL 000 G2 25 2SS 1200 G2 99
SGL VC VC EP EP GL 000 G2 25 2SS 1200 G2 99
54
SGL VC VC FP FP GL 000 G2 25 2SS 1200
417101488_EMP_Dosierstation.doc
99
1. Bezeichnung
SGL = Sauglanze
2. Werkstoff Sauglanzenrohr /Schwimmer
VC = PVC
3. Werkstoff Kugelventil
VC = PVC
4. Werkstoff Dichtung 1
FP = Viton B
EP = EPDM
5. Werkstoff Dichtung 2
FP = Viton B
EP = EPDM
6. Werkstoff Ventilkugel
GL = Glas
7. Druck Ventilfeder
000 = keine Federbelastung
8. Anschlussgewinde
G2 = G 2"
9. Nennweite Saugrohr
25 = 25 mm (di)
10. Niveaukontakt
2SS = 2 Schließer, Kabel mit Stecker
11. Länge Sauglanze
1200 = 1200 mm
12. Rücklaufanschluss
G2 = Anschlussgewinde für Rücklaufanschluss 2“
99 = ohne Rücklaufanschluss
13. Anschluss
99 = ohne Anschluss
99
46
Rev. 04-03.12
15.1.2
Sauglanzen Dosierstation EMP III / II
Abb. 15.2
Sauglanzen D32 mit Reserve- und Leermeldung
inkl. Kugelrückschlagventil, Ansaugsieb und potentialfreiem Leermeldekontakt
(leer = Kontakt unterbrochen), Schlauchanschlussmaterial (4/6 mm, 6/8 mm und 6/12 mm)
Rohrdurchmesser:
Anschlusskabel:
Schaltspannung:
Schaltstrom:
Schaltleistung:
32 mm
3-poliger Rundstecker inkl. 5 m Kabel
max. 50 V AC/DC
0,5 A
10 W / 10 VA
Bezeichnung
Artikel Nr. (EBS-Nr.)
(für Behälter 20 l)
186140 (10001084)
SGL VCPVFPEPGL000 G5/8-06-2SS-0725-9921
(für Behälter 30/60 l)
186141 (10001238)
SGL VCPVFPEPGL000 G5/8-06-2SS-0975-9921
(für Behälter 100/200 l)
186142 (10000775)
SGL VCPVFPEPGL000 G5/8-06-2SS-1125-9921
(für Behälter 200 l)
186143 (10001004)
25
125
SGL VCPVFPEPGL000 G5/8-06-2SS-0475-9921
15.1.3
Sauglanzen Dosierstation EMP KKS
Abb. 15.3
Sauglanzen D 32 mit Reserve- und Leermeldung und Rücklaufanschluss
inkl. Kugelrückschlagventil, Ansaugsieb, Schlauchanschlussmaterial (für Duo-Schlauch 6/10 mm und
PVC-Gewebe 6/12 mm) Niveauvorwarnkontakt, (Niveau unterschritten = Kontakt unterbrochen) und
Rücklaufanschluss aus PVC
Rohrdurchmesser:
Rücklaufanschluss:
Anschlusskabel:
Schaltspannung:
Schaltstrom:
Schaltleistung:
32 mm
DN 6
3-poliger Stecker inkl. 5 m Kabel
max. 48 V AC/DC
0,5 A
8 W / 8 VA
Artikel Nr. (EBS-Nr.)
SGL VCPVFPEPGL000 G5/8-06-2SS-0475-0633 (für Behälter 20 l)
247614 (10001343)
SGL VCPVFPEPGL000 G5/8-06-2SS-0725-0633 (für Behälter 30/60 l)
247615 (10017261)
SGL VCPVFPEPGL000 G5/8-06-2SS-0975-0633 (für Behälter 100/200 l)
247616 (10001885)
SGL VCPVFPEPGL000 G5/8-06-2SS-1125-0633 (für Behälter 200 l)
247617 (10016004)
25
125
Bezeichnung
417101488_EMP_Dosierstation.doc
47
Rev. 04-03.12
15.2
Sauglanzenadapter Dosierstation EMP IV + III + II + KKS
Bezeichnung
Artikel Nr. (EBS-Nr.)
Abb. 15.4
Sauglanzenadapter mit Rücklaufbohrung
für Sauglanze Ø 16 mm
Gewindesteigung:
5 mm
Gewindeinnenmaß:
56 mm
Gewindeaußenmaß:
61 mm
aufschraubbar auf:
Kanister 30 l oder Behälter 60 – 200 l
Abb. 15.5
Adapter – Steckkappe
247627 (auf Anfrage)
286198 (10000912)
für Sauglanze Ø 32 mm PVC weich
zum Aufstecken auf:
Kanister 10 l und 20 l
Abb. 15.6
Adapter – Steckkappe
288534 (10001133)
für Sauglanze Ø 32 mm PVC – hart / Viton B
geeignet für ausgasende Produkte
Rückführanschluss:
Entlüftungsanschluss:
zum Aufstecken auf:
4/6, 6/8 oder 6/12 mm (ID/AD)
6/12 mm (ID/AD)
Kanister 30 l oder Behälter 60 – 200 l
Abb. 15.7
Adapter – Verschraubung
286197 (10016073)
Abb. 15.8
für Sauglanze Ø 32 mm PVC hart
Gewindesteigung:
5 mm
Gewindeinnenmaß:
56 mm
Gewindeaußenmaß:
61 mm
aufschraubbar auf:
Kanister 30 l oder Behälter 60 – 200 l
Adapter – Verschraubung
288535 (10001370)
für Sauglanze Ø 32 mm PVC – hart / Viton B / Silikon
geeignet für ausgasende Produkte
Rückführanschluss:
4/6, 6/8 oder 6/12 mm (ID/AD)
Entlüftungsanschluss:
6/12 mm (ID/AD)
Gewindesteigung:
5 mm
Gewindeinnenmaß:
63 mm
Gewindeaußenmaß:
69 mm
für Fass mit Innengewinde (L – Ring plus Fass 220 l)
Abb. 15.9
Adapter – Verschraubung
288570 (auf Anfrage)
für Sauglanze Ø 32 mm PVC – hart / Viton B / Silikon
geeignet für ausgasende Produkte
Rückführanschluss:
4/6, 6/8 oder 6/12 mm (ID/AD)
Entlüftungsanschluss:
6/12 mm (ID/AD)
Gewindesteigung:
2,31 mm
Gewindeinnenmaß:
56,66 mm
Gewindeaußenmaß:
59,61 mm
für Containerschraubdeckel mit 2“ Innengewinde
Abb. 15.10
Adapter
419800026 (auf Anfrage)
2“ Innengewinde für Adapter–Verschraubung 288570
Tri-Sure Außengewinde für Containerschraubdeckel
Abb. 15.11
Schutzhülsen für Sauglanzen Ø 32 mm
zur Verhinderung einer mechanischen Beschädigung
des Saugventils bzw. des Sauglanzen-Schwimmers
Schutzhülse, PVDF, inkl. Befestigungsschraube
286191 (10001077)
Schutzhülse, VA (1.4035), inkl. Befestigungsschraube
286153 (10036468)
417101488_EMP_Dosierstation.doc
48
Rev. 04-03.12
15.3
Schläuche
15.3.1
Schläuche Dosierstation EMP IV
Abb. 15.12
15.3.2
Bezeichnung
Artikel Nr. (EBS-Nr.)
PVC-Gewebeschlauch, 19/27 mm
PVC-Gewebeschlauch, 25/34 mm
PVC-Gewebeschlauch, 30/38 mm
417400131 (10000427)
417400139 (10001298)
417400136 (10004077)
Schläuche Dosierstation EMP III / II / KKS
Abb. 15.13
Abb. 15.14
Abb. 15.15
Bezeichnung
Artikel Nr. (EBS-Nr.)
PVC-Gewebeschlauch 6/12 mm
417400123 (10000159)
Schlauch PTFE 6/8 mm
417400224 (10000312)
Schlauch PTFE 4/6 mm
417400215 (10090427)
15.4
Dosierventile
15.4.1
Dosierventile Dosierstation EMP IV
1. Ventilbezeichnung
DVO = Dosierventil ohne Dosierrohr
2. Werkstoff Einschraubteil
PP = PP
PV = PVDF
3. Werkstoff Ventilkörper
PP = PP
PV = PVDF
4. Werkstoff Dichtungen
EP = EPDM
FP = Viton B
5. Werkstoff Ventilkugel
GL = Glas
KE = Keramik
6. Druck Ventilfeder/Ventilgummi
008 = 0,8 bar
7. Gewinde Einschraubseite
G 1¼
8. Gewinde Anschlussseite
G 1¼
9. Anschluss
99 = ohne Anschluss
DVO
PP
PP
EP
GL
008 G 1¼
G 1¼
99
Bezeichnung
Artikel Nr. (EBS-Nr.)
Abb. 15.16
DVO PP PP FP GL 008 G 1¼ – G 1¼ – 99
DVO PP PP EP GL 008 G 1¼ – G 1¼ – 99
DVO PV PV FP GL 008 G 1¼ – G 1¼ – 99
250017 (10039337)
250018 (10002321)
249086 (10002170)
Abb. 15.17
Dosierrohr PP G ¾ für DVO G 1¼
Dosierrohr PV G ¾ für DVO G 1¼
249235 (10002457)
249236 (10002536)
417101488_EMP_Dosierstation.doc
49
Rev. 04-03.12
15.4.2
Dosierventile Dosierstation EMP III / II / KKS
1. Ventilbezeichnung
DVM = Dosierventil mit Dosierrohr
2. Werkstoff Einschraubteil
VC = PVC
PP = PP
3. Werkstoff Ventilkörper
PV = PVDF
PP = PP
4. Werkstoff Dichtungen
EP = EPDM
FP = Viton B
5. Werkstoff Ventilkugel
GL = Glas
KE = Keramik
6. Druck Ventilfeder/Ventilgummi
003 = 0,3 bar
007 = 0,7 bar
009 = 0,9 bar
7. Gewinde Einschraubseite
G½
8. Gewinde Anschlussseite
G 3/8
G 5/8
9. Anschluss
21 = Set für Schlauch 4/6, 6/8, 6/12
37 = Set für Schlauch 6/8, 6/12
DVM
Abb. 15.18
VC
PV
EP
GL
003 G1/2
G3/8
21
Bezeichnung
Artikel Nr. (EBS-Nr.)
für EMP KKS / II:
DVM VC PV FP GL 003 G 1/2 – G 3/8 – 21
DVM VC PV EP GL 003 G 1/2 – G 3/8 – 21
für EMP III:
DVM VC PV FP GL 009 G 1/2 – G 5/8 – 37
DVM PP PP FP KE 007 G 1/2 – G 5/8 – 21
DVM PP PP EP KE 007 G 1/2 – G 5/8 – 21
417101488_EMP_Dosierstation.doc
248059 (10016098)
248060 (10006226)
245037 (10003491)
245040 (auf Anfrage)
245041 (10106939)
50
Rev. 04-03.12
15.5
Connexx OEM / Connexx switch OEM
Bezeichnung
Artikel Nr. (EBS-Nr.)
Connexx OEM:
286036 (auf Anfrage)
Gerät mit Leermeldung zur automatischen Entnahme und Entlüftung ausgasender
Produkte aus Ecolab-Gebinden mit integrierter Sauglanze.
Beim CONNEXX System handelt es sich um ein Fördergerät zur automatischen
Produktentnahme und -bereitstellung aus Gebinden (optional mit integrierter
Sauglanze). Es wurde speziell für alle im CIP-Bereich eingesetzten Peressigsäureund Wasserstoffperoxydhaltige Produkte ausgelegt.
Im Einzelnen kann es für folgende Produkte eingesetzt werden:
P3-oxonia, P3-oxonia active, P3-oxonia active S, P3-oxonia active 150, P3-oxysan
ZS.
Connexx switch OEM:
Gerät mit Leermeldung zur automatischen Entnahme und Entlüftung ausgasender
Produkte aus Ecolab-Gebinden mit integrierter Sauglanze.
Beim CONNEXX System handelt es sich um ein Fördergerät zur automatischen
Produktentnahme und -bereitstellung aus Gebinden (optional mit integrierter
Sauglanze). Es wurde speziell für alle im CIP-Bereich eingesetzten Peressigsäureund Wasserstoffperoxydhaltige Produkte ausgelegt.
Das Gerät ist mit einer Gebindeumschaltung ausgerüstet.
Im Einzelnen kann es für folgende Produkte eingesetzt werden:
P3-oxonia, P3-oxonia active, P3-oxonia active S, P3-oxonia active 150, P3-oxysan
ZS.
3-Stab-Sonde zur Niveauüberwachung mit integrierter Auswerteelektronik - passend
zu Connexx OEM und Connexx switch OEM
Vibrationsgrenzschalter zur Überfüllsicherung - passend zu Connexx OEM und
Connexx switch OEM
auf Anfrage
415711137 (auf Anfrage)
415711138 (auf Anfrage)
Zusätzliche Anschlussbaugruppen ermöglichen die Adaption von Dosierpumpen sowie die optionale
Rückführung von Produkt ins Hebergefäß aus Überdruck- oder Entgasungs(ring)leitungen.
15.6
Tagesvorratsbehälter 25L
Bezeichnung
Abb. 15.19
Artikel Nr. (EBS-Nr.)
Gerät zur saugseitigen Produktbevorratung für nicht ausgasende und
ausgasende Medien.
Befüllung durch aktive Vorförderung. Niveauüberwachung MAX und
REORDER durch konduktive Stabsonde zzgl. elektronischer
Überfüllsicherung.
Die Be- und Entlüftung des Tagesvorratsbehälters (TVB) erfolgt über
einen Aktivkohlefilter.
Zusätzliche Anschlussbaugruppen ermöglichen die optionale
Rückführung von Produkt in den TVB aus Überdruck- oder
Entgasungs(ring)leitungen.
TVB 25l auf Konsole PVC/PP/EPDM
Behälter: PVC
Verrohrung Medienberührt: PP
Dichtungswerkstoff: EPDM
TVB 25l auf Konsole PVC/PVDF/FPM
Behälter: PVC
Verrohrung Medienberührt: PVDF
Dichtungswerkstoff: FPM (Viton B)
3-Stab-Sonde zur Niveauüberwachung mit integrierter
Auswerteelektronik – passend zum Tagesvorratsbehälter 25L
Vibrationsgrenzschalter zur Überfüllsicherung – passend zum
Tagesvorratsbehälter 25L
417101488_EMP_Dosierstation.doc
51
286330 (auf Anfrage)
286037 (auf Anfrage)
415711137 (auf Anfrage)
415711138 (auf Anfrage)
Rev. 04-03.12
15.7
Leckagesonde Maximat
Abb. 15.20
Bezeichnung
Artikel Nr. (EBS-Nr.)
Die Leckagesonde MAXIMAT LWC-B (Bodenelektrode) wird zur
Leckageüberwachung in Auffangwannen und –räumen eingesetzt.
Sie ist mit drei unterschiedlichen Ausgangskreisen ausgerüstet:
418264044 (10105200)
· binärer Ausgang zur Ansteuerung eines Koppelrelais
· Stromausgang 0 ... 20 mA geeignet zur Ansteuerung eines AnalogEingabe-Kanals z.B. einer Speicher-Programmierbaren Steuerung
(SPS).
· Selbstüberwachender Messkreis in Verbindung mit Messumformer
MAXIMAT SHR C.. in Zweileiterschaltung
15.8
Auffangwannen
Bezeichnung
Abb. 15.21
Artikel Nr. (EBS-Nr.)
Auffangwanne 2 Kanister, PE
419800477 (auf Anfrage)
2 x 60 l Kanister
Abb. 15.22
Auffangwanne 2 Fass, PE
419800421 (10093209)
2 x 200 l Fass
Abb. 15.23
Auffangwanne 4 Fass, PE
419800422 (10093193)
4 x 200 l Fass
Abb. 15.24
Auffangwanne 1 Container, PE
419800423 (auf Anfrage)
1 x IBC Container 1000 l
Abb. 15.25
Auffangwanne 2 Container, PE
419800425 (auf Anfrage)
2 x IBC Container 1000 l
15.9
Saugheber
Bezeichnung
Artikel Nr. (EBS-Nr.)
Abb. 15.26
Auf Anfrage
Zum einfachen und sicheren Abfüllen von Flüssigkeiten aus
der Tropfwanne der Wandkonsole.
417101488_EMP_Dosierstation.doc
52
Rev. 04-03.12
16
EG-Konformitätserklärung
417101488_EMP_Dosierstation.doc
53
Rev. 04-03.12
Tables of Contents
1
General Information ................................................................................................. 57
1.1
1.2
1.3
1.4
1.5
1.6
EBS Article numbers ............................................................................................................. 57
Transport damages ............................................................................................................... 57
Emphasized Text .................................................................................................................. 57
Warranty Scope .................................................................................................................... 58
Operating instructions ........................................................................................................... 58
Contact Address / Manufacturer ............................................................................................ 58
2
safety ........................................................................................................................ 59
2.1
General Safety Information .................................................................................................... 59
2.1.1
2.1.2
Compliance with Ambient Conditions .................................................................................................................................59
Handling with Chemical Metered Media .............................................................................................................................59
2.2
Installation / Commissioning .................................................................................................. 59
2.2.1
2.2.2
2.2.3
2.2.3.1
2.2.3.2
2.2.4
2.2.5
2.2.5.1
2.2.5.2
2.2.5.3
General Information ...........................................................................................................................................................59
System Components Provided by the Operating Company................................................................................................60
Installation .........................................................................................................................................................................60
Electrical Installation ..........................................................................................................................................................60
Hydraulic Installation .........................................................................................................................................................60
Commissioning ..................................................................................................................................................................60
Operation ..........................................................................................................................................................................61
Container Replacement .....................................................................................................................................................61
Connexx Systems..............................................................................................................................................................61
Day Tank ...........................................................................................................................................................................61
2.3
Maintenance / Repair ............................................................................................................ 62
2.3.1
2.3.2
2.3.3
General Information ...........................................................................................................................................................62
Maintenance ......................................................................................................................................................................62
Repairs ..............................................................................................................................................................................62
2.4
Disassembly / Disposal of the System .................................................................................... 62
3
Scope of Delivery ..................................................................................................... 63
3.1
3.2
3.3
Basic Set-Up ........................................................................................................................ 63
Optional Systems copmponents ............................................................................................. 64
Accessories .......................................................................................................................... 64
4
Function Description ................................................................................................ 65
4.1
4.2
4.3
4.4
Basic Set-Up ........................................................................................................................ 65
Optional Equipment .............................................................................................................. 65
Accessories .......................................................................................................................... 65
Function Description of Individual System Components .......................................................... 65
4.4.1
4.4.1.1
4.4.2
4.4.3
4.4.4
Metering Pumps ................................................................................................................................................................65
ELADOSâ Metering Pump Series EMP, EMP-E60, and E60PLUS ........................................................................................66
Dongle Box, or rather Dongle Plate ...................................................................................................................................68
Multifunction Valve (MFV)..................................................................................................................................................68
Pulsation Dampener ..........................................................................................................................................................69
4.5
Optional Accessories ............................................................................................................ 69
4.5.1
4.5.1.1
4.5.1.2
4.5.2
4.5.3
4.5.4
4.5.5
4.5.6
4.5.7
Measuring of the flow rate .................................................................................................................................................69
Oval Gear Meter (OGMPLUS) in conjunction with Dongle-Box..............................................................................................69
Dosimag ............................................................................................................................................................................69
Suction connection – Switching Containers with pneumatically controlled valve 610/630...................................................70
Suction connection – rinse connection with manually-operated valves 617/677 .................................................................70
Terminal Box with maintenance switch ..............................................................................................................................70
Terminal Box “Type ECOLAB “ ..........................................................................................................................................70
Terminal Box “Type OEM“ .................................................................................................................................................71
Splash Guard ....................................................................................................................................................................71
4.6
Accessories .......................................................................................................................... 71
4.6.1
4.6.2
4.6.3
4.6.4
4.6.5
Suction Lances for use with Metering Pumps: EMP IV, III, II ..............................................................................................71
Connexx OEM / Connexx switch OEM...............................................................................................................................71
Day Tank (TVB).................................................................................................................................................................72
Leak Sensor Maximat (Analyzed with SPC) .......................................................................................................................72
Siphon (on request) ...........................................................................................................................................................72
5
Overview - VARIANTS .............................................................................................. 73
5.1
5.2
Metering station Code (ordering key) for EMP KKS / EMP II / EMP III Pumps .......................... 73
Metering station Code (ordering key) for EMP IV Pump .......................................................... 74
6
Design ...................................................................................................................... 75
6.1
6.2
Application Scheme for Degassing Media ............................................................................... 75
Application Scheme for Non-Degassing Media ....................................................................... 76
417101488_EMP_Dosierstation.doc
54
Rev. 04-02.12
7
Installing equipment ................................................................................................ 77
7.1
7.2
7.3
General information .............................................................................................................. 77
Sample installations .............................................................................................................. 77
Ambient Conditions ............................................................................................................... 77
7.3.1
7.3.2
Installation of metering console .........................................................................................................................................77
Pipes, metering lines and pipe fittings (male connectors, adaptor unions, valve fittings) ....................................................78
7.4
Electrical Installation ............................................................................................................. 78
7.4.1
7.4.2
7.4.3
7.4.4
7.4.5
7.4.6
7.4.7
7.4.8
7.4.9
Terminal Box with maintenance switch / type ECOLAB / type OEM ...................................................................................78
Oval Gear Meter (optional) ................................................................................................................................................78
Dosimag (optional) ............................................................................................................................................................78
Container Switch (optional) ................................................................................................................................................78
Suction lance with level switch (Accessories) ....................................................................................................................78
Leak Sensor Maximat (Accessories)..................................................................................................................................78
Connexx / Connexx switch (Accessories) ..........................................................................................................................78
Day Tank TVB (Accessories) .............................................................................................................................................78
Dongle box / Dongle Plate (Accessories) ...........................................................................................................................78
7.5
Mechanical (hydraulic) installation ......................................................................................... 79
7.5.1
7.5.1.1
7.5.1.2
7.5.1.3
7.5.2
7.5.3
7.5.4
7.5.5
7.5.6
Pipes .................................................................................................................................................................................79
Suction line (to be performed by the customer)..................................................................................................................79
Metering line (to be performed by the customer) ................................................................................................................79
Multi-function valve overflow pipe ......................................................................................................................................79
Connexx / Connexx switch (Accessories) ..........................................................................................................................79
Day Tank (TVB) (Accessories) ..........................................................................................................................................79
Leak Sensor Maximat (Accessories)..................................................................................................................................79
Metering valve (Accessories) .............................................................................................................................................79
Suction lance with level switch (Accessories) ....................................................................................................................79
8
9
Commissioning ........................................................................................................ 80
Operation .................................................................................................................. 81
9.1
Setting the operating state .................................................................................................... 81
9.1.1
9.1.1.1
9.1.1.2
9.1.1.3
9.1.2
9.1.2.1
9.1.2.2
9.1.2.3
Operating modes ...............................................................................................................................................................81
Manual mode for the metering console model with EMP E60 pumps .................................................................................81
Manual mode with OEM terminal box ................................................................................................................................81
Automatic operation...........................................................................................................................................................81
Safety Equipment ..............................................................................................................................................................81
Basic model .......................................................................................................................................................................81
Options ..............................................................................................................................................................................82
Accessories .......................................................................................................................................................................83
10
Operating faults ....................................................................................................... 84
10.1
10.2
10.3
Operating faults of basic setup components ........................................................................... 84
Operating faults of optional components ................................................................................ 85
Operating faults of accessory components ............................................................................. 85
11
Maintenance ............................................................................................................. 86
11.1
Maintenance instructions for system components ................................................................... 86
12
Repairs / Disposal .................................................................................................... 87
12.1
Repairs by ECOLAB Engineering GmbH ................................................................................ 87
12.1.1
12.1.2
12.1.3
Conditions of return ...........................................................................................................................................................87
Returns form......................................................................................................................................................................87
Address for returns ............................................................................................................................................................87
12.2
Disposal ............................................................................................................................... 87
13
Technical data .......................................................................................................... 88
13.1
Applicable standards / guidelines .......................................................................................... 88
13.1.1
13.1.2
13.1.3
Drip pan / metering container.............................................................................................................................................88
Metering pump ..................................................................................................................................................................88
Oval gear meter (OGMPLUS) – optional / Dosimag - optional ...............................................................................................88
13.2
13.3
13.4
13.5
13.6
13.7
13.8
Performance data ................................................................................................................. 88
Materials .............................................................................................................................. 88
Mechanical connections ........................................................................................................ 89
Electrical connections ........................................................................................................... 89
Dimensions .......................................................................................................................... 89
Ordering code ....................................................................................................................... 89
Connecting Diagram ............................................................................................................. 90
13.8.1
13.8.2
13.8.3
13.8.4
13.8.5
13.8.6
Metering station STANDARD (38603002) ..........................................................................................................................90
Metering station & OGM (38603003) .................................................................................................................................91
Metering station & DOSIMAG (38603004) .........................................................................................................................92
OEM Metering station STANDARD (38604102) .................................................................................................................93
OEM Metering station & OGM (38604103) ........................................................................................................................94
OEM Metering station & DOSIMAG (38604104) ................................................................................................................95
417101488_EMP_Dosierstation.doc
55
Rev. 04-03.12
14
Spare/wearing parts ................................................................................................. 96
14.1
14.2
Spare parts .......................................................................................................................... 96
Wearing parts ....................................................................................................................... 96
14.2.1
14.2.1.1
14.2.1.2
14.2.2
EMP IV ..............................................................................................................................................................................96
EMP IV basic sets .............................................................................................................................................................96
Peripherals EMP IV ...........................................................................................................................................................97
EMP KKS / EMP II / EMP III ..............................................................................................................................................97
15
Accessories .............................................................................................................. 98
15.1
Suction lances ...................................................................................................................... 98
15.1.1
15.1.2
15.1.3
Suction lance for Metering Console EMP IV ......................................................................................................................98
Suction lance for Metering Console EMP III / II ..................................................................................................................99
Suction lance for Metering Console EMP KKS...................................................................................................................99
15.2
15.3
Suction pipe adapter for Metering Console with EMP IV + III + II + KKS ................................ 100
Tubes ................................................................................................................................. 101
15.3.1
15.3.2
Tubes for Metering Console with EMP IV ........................................................................................................................101
Tubes for Metering Console with EMP III / II / KKS ..........................................................................................................101
15.4
Metering valves .................................................................................................................. 101
15.4.1
15.4.2
Metering valves for Metering Console with EMP IV..........................................................................................................101
Metering valves for Metering Console with EMP III / II / KKS ...........................................................................................102
15.5
15.6
15.7
15.8
15.9
Connexx OEM / Connexx switch OEM ..................................................................................
Day Tank 25L .....................................................................................................................
Leak Sensor Maximat ..........................................................................................................
Sumps ................................................................................................................................
Siphon ...............................................................................................................................
16
Declaration of Conformity .......................................................................................................... 105
417101488_EMP_Dosierstation.doc
56
103
103
104
104
104
Rev. 04-03.12
1
General Information
This system manual includes all instructions for the installation, commissioning, maintenance,
and repair of the metering console.
NOTE
The German sections of this manual constitute the ORIGINAL OPERATING INSTRUCTIONS and take legal
precedence. All other languages are translations of the ORIGINAL OPERATING INSTRUCTIONS.
IMPORTANT
Please read this manual carefully and keep it as reference. If you have questions, please contact us as outlined in
chapter 1.6 Contact Address / Manufacturer.
CAUTION
Since the application scope of the metering console refers to chemicals (acids/alkaline solutions), strict compliance
with the notes and information on the safety datasheet of the metering agent is strictly necessary and the operating
personnel must be trained and instructed accordingly (document!).
1.1
EBS Article numbers
Within this manual article numbers, and EBS numbers are represented. EBS numbers are
ECOLAB internal article numbers and used only “concern internal”.
1.2
Transport damages
CAUTION
WARNING
Do not install/operate any portion of the metering unit if transport damage on a component of the metering station is
detected after unpacking.
1.3
Emphasized Text
The emphasized text depicted below has the following meaning in this manual:
CAUTION
Is used if inaccurately following or non compliance with operating instructions, work instructions, specified work
processes and procedures, etc. may result in injuries or accidents.
WARNING
Is used if inaccurately following or non compliance with operating instructions, work instructions, specified work
processes and procedures, etc. may result in damage to the equipment or a system component.
CAUTION
WARNING
Is used if inaccurately following or non compliance with operating instructions, work instructions, specified work
processes and procedures, etc. may result in injuries and/or accidents and in damage to the equipment or a system
component.
IMPORTANT
Is used when special care must be taken when handling or working with the equipment.
NOTE
Is used to point out a special feature or peculiarity of the equipment.
417101488_EMP_Dosierstation.doc
57
Rev. 04-03.12
1.4
Warranty Scope
The manufacturer provides a warranty concerning operational safety, reliability, and
capacity of this unit only if the following conditions apply:
· Assembly, installation, connection, configuration, maintenance, and repair are carried out by
authorized and trained service technicians.
We recommend the service of the company ECOLAB-Engineering GmbH.
· The metering console and its components are used as outlined and specified in the user
manual included in the delivery scope.
· Only original spare parts are to be used for repairs.
· Opening a system component voids the warranty.
The general warranty and service terms and conditions of the company
ECOLAB-Engineering GmbH apply as well.
1.5
Operating instructions
NOTE
Keep your user manual updated at all times! All manuals include a revision index (lower right) used to identify the version of
a document.
Example: Rev. 01-09.09 = 01 = Version, 09 = Month, 09 = Year 2009.
All ECOLAB manuals are available on the Internet under the "DOWNLOAD" menu item. Please contact the following email if
you need a manual that is not listed online: [email protected]
1.6
Contact Address / Manufacturer
ECOLAB-Engineering GMBH
Raiffeisenstraße 7
D-83313 Siegsdorf
Phone (+49) 86 62 / 61 0
Fax (+49) 86 62 / 61 2 35
eMail: [email protected]
417101488_EMP_Dosierstation.doc
58
Rev. 04-03.12
2
safety
2.1
General Safety Information
CAUTION
WARNING
Always comply with the instructions supplied in the enclosed manuals of the installed system or machine components.
These instructions are the basis for all work on or with the system or machine! Strict compliance with the safety notes and
information of ALL enclosed manuals is mandatory!
2.1.1
Compliance with Ambient Conditions
CAUTION
WARNING
Please note and comply with the ambient conditions specified in the project plan and submitted with the order confirmation.
Please contact us if you do not have these ambient conditions or are unsure about how to apply them. (see also chapter 7.3).
Make sure all relevant and prescribed safety equipment and safety measures are installed and implemented or reachable and
intact as soon as the system components are being installed.
The metering console may not be used with or exposed to direct sunlight or outside!
2.1.2
Handling with Chemical Metered Media
CAUTION
Always wear suitable protective clothing when handling metered media or additives. Please consult the safety datasheet /
product datasheet of the metered media for additional information.
Always comply with all safety notes and instructions pertaining to the handling of chemicals and make available the specified
emergency measures or equipment (e.g. eye bath/showers, etc)!
Compliance with the information supplied by the corresponding safety datasheet / product datasheet and all applicable
statutory rules and regulations when handling or using hazardous or aggressive chemicals. Compliance with the information
supplied by additionally applicable standards and rules (e.g. water contamination or resources laws) is mandatory as well!
Never fill and/or operate the metering console with unsuitable additives or media (see system configuration when ordering).
The media to be metered must not be different than the one specified for the system to exclude risk to the system and the
operating personnel.
We recommend using a safety cover such as offered by our product program.
A system separator based on applicable potable water ordinances must be installed to prevent contamination of the water
supply network.
Filling, topping off, and refilling of the metering system must be carried out by authorized and trained service technicians in
compliance with local rules and regulations.
We recommend the use of leak systems to prevent overfilling, etc.
If metering media should leak from the system in spite of all precautionary measures/safety equipment, please consult the
safety datasheet of your metering media for the proper cleanup and disposal procedures.
2.2
Installation / Commissioning
2.2.1
General Information
CAUTION
WARNING
Installation and commissioning work must only be carried out by authorized, trained service technicians. We urgently
recommend the service of the company ECOLAB-Engineering GmbH.
Always pull the mains power plug and secure against accidental startup before working on electrical components.
To prevent overfilling etc we recommend using leakage systems.
To avoid contamination of the water supply, a system separation should be installed in accordance with the applicable
guidelines.
Make sure components not preinstalled are mounted correctly to prevent malfunctions or diminished functionality and
eliminate any risks for the system or persons. Before starting the system for the first time, check all system components for
proper and tight fit.
We urgently recommend installing flush line connections to ensure the system can be easily, safely, and quickly cleaned
when commissioning, re-commissioning after downtime due to maintenance or repairs.
We urgently recommend using a suction lance with an empty signal system and dirt trap from our accessory range!
The empty signal must deactivate the pump below a certain level (in the container).
417101488_EMP_Dosierstation.doc
59
Rev. 04-03.12
2.2.2
System Components Provided by the Operating Company
WARNING
To prevent damage to the system, make sure the system components made available by you (pipe connections/flanges) are
mounted properly. When transitioning from plastic to stainless steel pipes, we recommend using compensators to minimize
stresses during installation and operation.
If installation is not carried out by the service department of the company ECOLAB-Engineering GmbH, please make sure the
pipes and metering lines are the correct materials and have the required diameter and length to ensure trouble-free operation
of the system.
2.2.3
Installation
2.2.3.1 Electrical Installation
CAUTION
All of the electrical work must be carried out by authorized electricians and in accordance with local rules and regulations.
Please observe the accident prevention regulations of the Employers’ Liability Insurance Association! (e.g. BGV A1 ‘General
Regulations’, BGV A3 ‘Electrical Systems and Equipment’ of the Employers’ Liability Insurance Association for Precision
Engineering and Electrical Engineering (BGFE).
Always pull the mains power plug and secure against accidental startup before working on electrical components.
Safety cutouts must be provided on-site by customer!
Live parts or energized components may be exposed by opening covers or removing parts. Connecting points may also carry
an electrical current.
Make sure the existing measuring equipment is properly shielded from any increased electromagnetic interference.
Check all electrical connections provided by you (insulation resistance, polarity, connection, properly connected terminals)
to prevent malfunctions, damage to the system, or endangering the installation personnel.
2.2.3.2 Hydraulic Installation
CAUTION
All of the hydraulic work must be carried out by authorized and trained service technicians and in accordance with local rules
and regulations.
When installing the metering line, make sure stresses due to stretches are avoided. Metering lines should only be as long as
necessary and must be checked regularly for leaks or damage.
All screw connections must be checked and tightened if necessary (these may become loose due to large fluctuations of the
ambient temperature or vibrations). Only hand-tighten plastic screw connections to avoid damage to the components!
To detect and eliminate leaks quicker, we recommend employing a leak detection system, e.g. by using a flow monitor.
2.2.4
Commissioning
CAUTION
WARNING
A complete acceptance record must be kept during commissioning of the system.
A water pressure test is carried out to check function and check for leaks. Do not configure or operate the system with the
actual metering medium or additive until these checks have been successfully completed. Always make sure a suitable water
connection is ready on-site.
Make sure to have the specified metering media ready for use on-site in order to configure the system correctly. Any
chemicals to be used must be properly labeled.
The use of metering media and additives not complying with the specifications of the system and its component is not
permitted.
Make sure your utilized metering medium, if not compatible with water, does not come in contact with any water residue
possibly remaining in the system after the previous water pressure test.
In this case, we recommend flushing the system carefully with compressed air.
Check whether metering medium is contained in the collection or drip pan. Comply with accident prevention rules and
regulations while carrying out this check. Any found metering medium must be disposed of properly. We recommend the use
of leak systems to prevent overfilling, etc.
All of the set/configurable system components must be marked (position) or possibly sealed after the commissioning
process to avoid accidentally modifying them.
All screw connections and screws of the hydraulic components (e.g. pumps) must be checked for proper and tight fit and
retightened as needed after 24 hours. Consult the respective manuals of the corresponding system or machine components
for details.
417101488_EMP_Dosierstation.doc
60
Rev. 04-03.12
2.2.5
Operation
CAUTION
WARNING
Any work performed during operation of the system must be carried out by authorized and trained service technicians and in
accordance with local rules and regulations.
All of the pipes, metering lines, as well as the connections and screw-type connectors must be subjected to a visual
inspection at regular intervals to detect and eliminate leaks early on.
Check whether metering medium is contained in the collection or drip pan. Comply with accident prevention rules and
regulations while carrying out this check. Any found metering medium must be disposed of properly. For suitable
accessories, see chapter 4.6.5.
We recommend the use of leak systems to prevent overfilling, etc.
Should downtimes of individual system components be shortened due to changed ambient conditions, the corresponding
measures (additional safeguards, shortening of waiting intervals) must be implemented.
Never fill and/or operate the metering console with unsuitable additives or media (see system configuration when ordering).
The media to be metered must not be different than the one specified for the system to exclude risk to the system and the
operating personnel.
Comply with all waiting times and intervals and regularly conduct a visual inspection of your system to ensure trouble-free
operation of all components. We recommend keeping a maintenance book.
If your system is equipped with flushing line connections, make sure that these are closed off with a blind plug or cover
during operation.
A suction lance with empty indicator and pollutant trap from our accessory program (see chapter 4.6.1) is urgently
recommended to protect the metering components!
The empty level indicator must switch off the pump if a specific level (in the tank) is less than specified.
All screw connections and screws of the hydraulic components (e.g. pumps) must be checked for proper and tight fit and
retightened as needed after 24 hours.
Consult the respective manuals of the corresponding system or machine components for details.
2.2.5.1 Container Replacement
CAUTION
When changing the container, make sure not to mix up the metering medium or additive since only the specified metering
media are permitted and the use of any other media may damage or destroy the system.
Check whether metering medium is contained in the collection or drip pan. Comply with accident prevention rules and
regulations while carrying out this check. Any found metering medium must be disposed of properly and in accordance with
the safety datasheets.
We recommend the use of leak systems to prevent overfilling, etc.
2.2.5.2 Connexx Systems
CAUTION
When using a Connexx system, make sure the metering line is dimensioned correctly (max. volume) or damages may occur.
Always comply with the separate user manual of the Connexx system.
2.2.5.3 Day Tank
CAUTION
Make sure the day tank is filled correctly and only according to its max. capacity or the tank may be destroyed and accidents
may occur. The activated charcoal filter of the day tank must be checked or replaced at regular intervals. The charcoal filter
must be replaced sooner if humidity levels are high because the filter will be saturated more quickly.
417101488_EMP_Dosierstation.doc
61
Rev. 04-03.12
2.3
Maintenance / Repair
2.3.1
General Information
CAUTION
Only technically well versed and authorized service technicians are permitted to service or repair any of the system or
machine components. We urgently recommend the service of the company ECOLAB-Engineering GmbH due to safety
reasons.
Always pull the mains power plug and secure against accidental startup before working on electrical components. These
tasks must be carried out only by trained electricians and according to applicable rules and guidelines!
Live parts may be exposed when opening covers or removing parts. Connection points may also be live.
Always flush the system, depressurize the pressure line, and wear protective gear (goggles, gloves, and apron) before
carrying out work on mechanical components to free the system of all residues of the metering medium and to avoid any type
of chemical burn.
Only original spare and replacement parts may be used for repairs!
Always comply with the instructions supplied in the enclosed manuals of the installed system or machine components. These
instructions are the basis for all work on or with the system or machine!
We recommend keeping a maintenance book.
Check whether metering medium is contained in the collection or drip pan. Comply with accident prevention rules and
regulations while carrying out this check. Any found metering medium must be disposed of properly. We recommend the use
of leak systems to prevent overfilling, etc.
During each maintenance of the system, also check the condition of the metering tubes and hoses and inspect them for
leaks.
After "re-commissioning" the system after maintenance or repair work, the specified ambient conditions must be checked
and the system must be reconfigured accordingly. Make sure that only the specified metering medium or additive is used.
Please note: Any unauthorized or independent change of system components will void the warranty and the conformity. We
therefore recommend the service of the company ECOLAB-Engineering GmbH.
2.3.2
Maintenance
CAUTION
Always strictly comply with the maintenance intervals of the installed system/machine components! Consult the respective
manuals of the corresponding system or machine components for details.
Only original spare and replacement parts may be used for repairs!
All screw-type connections must be checked and retightened as part of the maintenance work if necessary!
2.3.3
Repairs
CAUTION
WARNING
Always comply with the instructions supplied in the enclosed manuals of the installed system or machine components.
These instructions are the basis for all work on or with the system or machine!
Strict compliance with the safety notes and information of the manuals is mandatory!
Due to safety reasons concerning the equipment and personnel, we recommend using the repair service of the company
ECOLAB-Engineering GmbH.
It is essential that you comply with the conditions of return in order for us to process your order quickly.
2.4
Disassembly / Disposal of the System
CAUTION
WARNING
Only technically well versed and authorized service technicians are permitted to service or repair any of the system or
machine components. We urgently recommend the service of the company ECOLAB-Engineering GmbH due to safety
reasons.
Always pull the mains power plug and secure against accidental startup before working on electrical components. These
tasks must be carried out only by trained electricians and according to applicable rules and guidelines!
Live parts may be exposed when opening covers or removing parts. Connection points may also be live.
Flush the system and de-pressurize the pressure line before disassembling the system.
Always wear suitable protective clothing. Please consult the safety datasheet / product datasheet of the metered media for
additional information.
Comply with local applicable rules and regulations during disposal. Please consult the safety datasheet / product datasheet
of the metered media for additional information. This is especially important when using chemical metering media or in case
of residues in the system components.
Only dispose of cleaned system components and comply with local rules and regulations when doing so.
417101488_EMP_Dosierstation.doc
62
Rev. 04-03.12
3
Scope of Delivery
NOTE
The delivery scope depicted here is for the layout of a metering console and includes all associated and optionally
available system or machine components. Please consult your order parts list to find out which system or machine
components are included in your metering console.
3.1
Basic Set-Up
Component
EMP KKS
Metering Console with:
EMP II
EMP III
EMP IV
EMP KKS
Basic Set-Up
EMP II
EMP III
EMP IV
MFV I-II
MFV III-IV
Control box
Control box
Control box
Basic Set-Up
Pulsation dampener
Diaphragm shutoff valve,
manually actuated
Systems Operating
Instruction for Metering
Console
417101488_EMP_Dosierstation.doc
63
Rev. 04-03.12
3.2
Optional Systems copmponents
Component
EMP KKS
Metering Console with:
EMP II
EMP III
EMP IV
EMP KKS
Metering Console with:
EMP II
EMP III
EMP IV
Optional Systems Components
Changeover valves
Flushing valve(s)
Oval gear meter OGMPlus
Dosimag
Splash guard
Dongle Box
Dongle Plate
3.3
Accessories
Component
Day tank
Accessories
Connexx OEM
Suction tube /
Suction lance
Suction lance EMP IV
Metering valve
417101488_EMP_Dosierstation.doc
64
Rev. 04-03.12
4
Function Description
The metering console is a combination of different system components required for metering or
dosing chemicals accurately and safely.
A corresponding modular system is used to combine the individual modules (options) at the
factory as specified by the individual process requirements.
4.1
Basic Set-Up
The basic set-up consists of the pre-mounted metering console and a metering pump premounted at the factory, a multifunction valve, manual shutoff valve, maintenance switch/control
box, as well as a pulsation dampener (as with EMP IV) are also installed.
4.2
Optional Equipment
Optional components are available as well.
These are as follows:
·
·
·
·
4.3
Pneumatically-controlled diaphragm valve to switch containers or manually switched
diaphragm valve for flushing.
OGMPLUS or Dosimag for volumetric or inductive flow monitoring.
Terminal box with integrated service switch, connection for suction lance connector and
additional clamping points for ‘OGMPLUS’ or ‘Dosimag’ flow monitor.
A matching cover made from PVC to protect from leaking metering media.
Accessories
Components required for metering, which are not part of the basic set-up or the optional
expansion modules, cannot be accessed via the metering console configurator.
Please order these accessories (see also chapter 15) separately from our product catalogue.
4.4
Function Description of Individual System Components
4.4.1
Metering Pumps
Metering pumps are used wherever liquids are to be metered, i.e. added to a medium as
precisely as possible with a defined volume and a defined time.
417101488_EMP_Dosierstation.doc
65
Rev. 04-03.12
4.4.1.1 ELADOSâ Metering Pump Series EMP, EMP-E60, and E60PLUS
4.4.1.1.1 ELADOSâ EMP KKS, EMP KKS E60 and E60
PLUS
Fig. 4.1
Pumps of the series ELADOSâ EMP KKS are
diaphragm piston pumps operated with an electrical
motor.
The diaphragm serves to pre-deliver, the piston is
used for metering. The pump is self-venting due to
the continuous excess recirculation.
The metering pump is suitable for use with clean,
non-abrasive metering media with a viscosity of up to
200 mPas (measuring method: Brookfield).
The metering pump is driven by a stall-proof synchronous motor and a con-rod eccentric gear.
The metering medium is aspirated by the suction valve when the diaphragm moves in the
direction of the gear. A vacuum is generated at the same time in the compression space of the
metering piston cylinder unit and the pre-delivered metering medium flows into this space after
the control bore has been released.
During the pressure movement, the valve meters the medium, the excess metering medium is
returned to the tank via the reflux valve.
The delivery rate can be adjusted during operation by setting the stroke from 0 to 100%.
Please consult the user manual of your pump for additional information.
4.4.1.1.2 ELADOSâ EMP II, EMP II E60 and E60
PLUS
Fig. 4.2
Pumps of the series ELADOSâ EMP II are
diaphragm displacement pumps operated
with an electrical motor.
The metering pump is driven by a stall-proof
synchronous motor running at a constant
speed.
An eccentric gear moves the diaphragm and
thereby displaces the metering medium via
the pressure valve with dual ball seal. The
suction valve is closed.
The diaphragm is reset with a return spring.
This suctions the metering medium into the pump head via the suction valve. The pressure
valve is closed.
The delivery rate can be adjusted continuously variable during operation by setting the stroke.
The reset movement of the diaphragm is here limited. The pump heads are equipped with a
quick-vent valve.
Please consult the user manual of your pump for additional information.
417101488_EMP_Dosierstation.doc
66
Rev. 04-03.12
4.4.1.1.3 ELADOSâ EMP III E60 and E60
PLUS
Pumps of the series ELADOSâ EMP III are
diaphragm displacement pumps operated
with an electrical motor.
Fig. 4.3
The metering pump is designed for use with
clean, non-abrasive metering media with a
viscosity of up to 200 mPas (measuring
method: Brookfield).
An eccentric worm gear moves the
diaphragm and thereby pumps the metering
medium via the pressure valve.
The suction valve is closed.
The diaphragm is reset with a return spring.
This suctions the metering medium into the pump head via the suction valve. The pressure
valve is closed.
The delivery rate can be adjusted only during operation by setting the stroke. The reset
movement of the diaphragm is here limited.
Please consult the user manual of your pump for additional information.
4.4.1.1.4 ELADOSâ EMP IV E60 and E60
PLUS
Fig. 4.4
The ELADOSâ EMP IV-E60 and E60PLUS pump is a diaphragm
displacement pumps operated with an electrical motor.
It is designed for use with clean, non-abrasive metering media with a
viscosity of up to 100 mPas (measuring method: Brookfield).
An eccentric worm gear moves the diaphragm and thereby pumps the
metering medium via the pressure valve. The suction valve is closed.
The diaphragm is reset with a return spring. This suctions the metering
medium into the pump head via the suction valve. The pressure valve is
closed.
The delivery rate can be adjusted only during operation by setting the stroke.
The reset movement of the diaphragm is here limited.
Please consult the user manual of your pump for additional information.
417101488_EMP_Dosierstation.doc
67
Rev. 04-03.12
4.4.2
Dongle Box, or rather Dongle Plate
Fig. 4.5
Dongle Box
Art. no. 249629
at Metering Console with
EMP KKS/EMP II /EMP III
Fig. 4.6
Dongle Plate
To upgrade ELADOSâ EMP E60
pumps and access additional
functions, you will need the Dongle
Box or the Dongle Plate from our
accessory range.
Art. no. 248606
at Metering Console with
EMP IV Pumpen.
After the Dongle Box or the Dongle
Plate is fitted, the pumps are
referred to as ELADOSâ ‘EMP
E60PLUS'
Additional electronic functions with the ELADOSâ EMP E60PLUS:
· Oval gear meter (OGMPLUS) connection and analysis
· Dose adjustment using an oval gear meter (OGMPLUS)
· Pump can be calibrated automatically with oval gear meter (OGMPLUS)
· Metering lock/pulse/meter monitoring/oval gear meter inputs connected separately to several
connections, thus simplifying external connections.
For further information, please consult the operating instructions for your pump.
4.4.3
Multifunction Valve (MFV)
Fig. 4.7
Functional principle
This safety component serves to protect the piping and
the metering pump and allows the system to be
commissioned and maintained reliably and safely.
During normal operation, the metering pump works
against the counter pressure set at the multifunction
valve.
If the counter pressure in the metering line rises above
the overpressure set at the multifunction valve, it is
relieved via the bypass line.
The metering medium is here pumped through the bypass line until the pressure in the metering
line falls below this value again.
Fig. 4.8
MFV II-III
Fig. 4.9
MFV III-IV
For use with Metering Console with EMP IV Pumpen
For use with Metering Console with EMP II/III pumps
Two spring-loaded diaphragms realize the following functions:
· suction aid when starting up diaphragm pump against pressure.
· Emptying and thereby relieving the pressure line is done while the system has been stopped.
· Protection against impermissible overpressure in the pressure line (adjustable opening
pressure).
· Generating a counter pressure of 1 bar when metering against free outlet flow.
· Anti-siphon function with negative pressure at the metering point.
417101488_EMP_Dosierstation.doc
68
Rev. 04-03.12
4.4.4
Pulsation Dampener
Fig. 4.10
The use of pulsation dampeners generates a low-pulsation flow. This prevents
troublesome vibrations and reduces pressure blows.
Metering consoles with EMP IV dosing pumps of 140 l/h and above are fitted
with a pulsation dampener which has an air cushion and no diaphragm. The
pulsation dampener can also be used without any problems even with long
dosing lines.
4.5
Optional Accessories
4.5.1
Measuring of the flow rate
4.5.1.1 Oval Gear Meter (OGMPLUS) in conjunction with Dongle-Box
Fig. 4.11
The OGMPLUS serves the volumetric logging of the flow rate of pure, clean
liquids (max. 1000 mPas, measuring method: Brookfield).
Since this is a volumetric counter, pulsating or discontinuous flows can be
logged as well.
This counter is therefore very well suited to measure the volume flow of
electromotive diaphragm pumps
(e.g. EMP KKS, EMP II, EMP III, EMP IV).
The OGMPLUS has an automatic flow direction detection. Volume flows in reverse are stored
without outputting any pulses. Prior volume flows in reverse direction are subtracted from the
next volume flow in forward direction.
The OGMPLUS can also be calibrated, which is another advantage. This achieves the highest
level of precision while considering the operational conditions.
The OGMPLUS properties are coordinated optimally for connecting to a diaphragm pump from the
EMP E60 series of pumps.
4.5.1.2 Dosimag
Fig. 4.12
The Dosimag measuring device is to be used only for the flow
measurement of conductive liquids in closed pipes.
Most liquids can be measured starting at a min. conductivity of 5 μS/cm.
These are, e.g.:
· Acids, alkaline substances, pastes, slurries, pulps
· Potable water, waste water, sludge, Milk, beer, wine, mineral water,
yogurt, molasses, etc.
A min. conductivity of 20 μS/cm is needed to measure de-mineralized
water.
The Dosimag cannot be connected directly to the metering pump.
In general, pulse analysis is controlled externally.
The Dosimag can only be used with metering pumps of an output of 25 l/h.
417101488_EMP_Dosierstation.doc
69
Rev. 04-03.12
4.5.2
Suction connection – Switching Containers with pneumatically controlled valve 610/630
To avoid metering downtimes, containers can be switched during the product suctioning
process.
This means the product suction is switched to the second container using pneumatically
controlled diaphragm valves when the empty indicator on the first container is activated.
This means metering continues without interruption.
Valve activation does not fall within the scope of delivery for the metering station and should be
externally controlled by the customer (e.g. SPS).
If required, ECOLAB Engineering GmbH can assist you with any detailed planning /
implementation.
Fig. 4.13
4.5.3
The externally controlled 2/2-way diaphragm valve with plastic
straight through body has a low-maintenance piston drive.
An optical position indicator is integrated as a standard component.
Control function: Spring-loaded valve closure in idle mode:
closed by spring power
Valve opens when the system is primed with control medium.
Valve closes by spring power when the system is vented.
Suction connection – rinse connection with manually-operated valves 617/677
Diaphragm valve for manual locking of the suction pipe and/or dosing line and rinse
connections.
For servicing and repairs, the suction pipe or pressure line should be locked using the manual
locking valve and rinsed with water using the rinse connections.
Fig. 4.14
4.5.4
Terminal Box with maintenance switch
Fig. 4.15
4.5.5
In this way, contact with the metering medium is avoided when
servicing or exchanging system components.
The plastic diaphragm valve with straight through body serves to
throttle or completely shut off pipes.
The valve has a temperature resistant plastic hand wheel as well as a
standard integrated closing limit and an optical position indicator.
Terminal box to be installed on the metering console.
Functions:
· Service switch with safety isolating switch function
· Intermediate clamping voltage supply, metering pump
Terminal Box “Type ECOLAB “
Fig. 4.16
Terminal box to be installed on the metering console.
Functions:
· Service switch with safety isolating switch function
· Intermediate clamping empty indicator / reserve message / leak
· Intermediate clamping OGM / Dosimag
· Intermediate clamping voltage supply, metering pump
· Intermediate clamping voltage supply, control voltage
417101488_EMP_Dosierstation.doc
70
Rev. 04-03.12
4.5.6
Terminal Box “Type OEM“
Fig. 4.17
4.5.7
Terminal box to be installed on the metering console.
Functions:
· Service switch with safety isolating switch function
· Optical empty signal indication
· Manual function, metering pump
· Intermediate clamping empty indicator / reserve message / leak
· Intermediate clamping OGM / Dosimag
· Intermediate clamping voltage supply, metering pump
· Intermediate clamping voltage supply, control voltage
Splash Guard
Fig. 4.18
Optional safety element to avoid / reduce the release of chemicals due to
malfunction or destruction of components on the metering console.
4.6
Accessories
4.6.1
Suction Lances for use with Metering Pumps: EMP IV, III, II
Fig. 4.19
The suction lance serves as an optional accessory for the diaphragm metering
pumps. The lance is directly immersed into the delivered container and
connected with the diaphragm metering pump using a tube.
Floating switches installed on the suction lance make it possible to electrically
interpret the empty level and optionally also a pre-alert level.
example photo
4.6.2
Larger pollutant particles in the container are safely retained, a non-return
valve in the bottom of the suction lance prevents that the suction line runs dry
when the pump is stopped or when changing the container.
Connexx OEM / Connexx switch OEM
Fig. 4.20
Unit with empty indicator for the automatic removal and de-aeration of
Degassing products from containers with integrated suction lance.
The CONNEXX system is a delivery unit for the automatic product removal
and making available of product from containers (optionally with integrated
suction lance. This unit was specifically developed for all peracetic acids
and products containing hydrogen peroxide.
The following products can be used with this unit:
· P3-oxonia, P3-oxonia active, P3-oxonia active S, P3-oxonia active 150,
P3-oxysan ZS.
The unit features empty indicators and monitoring functions and can be delivered or retrofitted
with a switchover between two containers. Additional add-on modules make it possible to adapt
metering pumps and to optionally return the product into the siphon basin from overpressure or
Degassing (ring) lines.
417101488_EMP_Dosierstation.doc
71
Rev. 04-03.12
4.6.3
Day Tank (TVB)
Fig. 4.21
Unit for the suction-side product storage for non-Degassing / Degassing
media.
Filling with active pre-delivery. Level monitoring MAX and REORDER with
conductive bar probe plus electronic overfill guard.
The ventilation and de-aeration of the day tank (DT) is achieved with an
activated charcoal filter.
Additional add-on modules make it possible to optionally return product
into the day tank from overpressure or Degassing (ring) lines.
4.6.4
Leak Sensor Maximat (Analyzed with SPC)
Fig. 4.22
The leak sensor MAXIMAT LWC-B (hearth electrode) is used to
monitor leaks with drip pans and similar equipment.
The sensor features three different output circuits.
· Binary output to control a coupling relay.
· Power output 0 ... 20 mA suitable to control an analogue input
channel, e.g. a SPC.
· Self-monitoring measuring circuit in conjunction with the measuring
transducer MAXIMAT SHR C in two-wire circuit.
4.6.5
Siphon (on request)
Fig. 4.23
For the easy and safe filling of liquids from drip pan to wall console.
417101488_EMP_Dosierstation.doc
72
Rev. 04-03.12
5
Overview - VARIANTS
5.1
Metering station Code (ordering key) for EMP KKS / EMP II / EMP III Pumps
1.
Designation
DOS
2.
=
Metering station
Pump capacity 50 Hz
00014
00043
00112
00160
00540
3.
=
=
=
=
=
1,4 l/h
4,3 l/h
11,2 l/h
16 l/h
54 l/h
[60 Hz]
[1,7 l/h]
[5,1 l/h]
[13 l/h]
[19 l/h]
[64 l/h]
EMP KKS
EMP II
EMP II
EMP III
EMP III
Pipe material / Connections
PP
PV
4.
=
=
PP (not for EMP KKS)
PVDF
Sealing material
EP
FP
5.1
=
=
EPDM (EMP II & III only for PP pump head)
Viton B
Electrical version of the pump
0
6
9
5.2
=
=
=
E10
E60
E00 (nur bei EMP III)
Voltage of pump
AT EMP KKS / EMP II:
1
= 115 V/50 Hz
2
= 230 V/50 Hz
3
= 115 V/60 Hz
4
= 230 V/60 Hz
AT EMP III:
1
2
6.
=
=
Suction side specification
01
02
03
12
7.
=
=
=
=
=
=
=
=
=
=
=
PLUS
OGM
PLUS
PLUS
OGM
(with Dongle Box for E60
)
Dosimag (only at EMP III pump)
without
Accessories
SS
99
10.
Terminal box OEM
Terminal box Ecolab
Mains switch
Flow measuring
OG
OP
DM
99
9.
Hose connection 6/12
Switching valve (with 90° hose connection)
Rinse valves suction side
Switching valve with pilot valves and
DLC (Dual Level Control)
Electrical version of the console
01
02
10
8.
115 V/50 / 60 Hz
230 V/50 / 60 Hz
=
=
Splash guard
without
Console version
EC =
99 =
Ecolab
neutral
D O S 00043 P V F P 6 2 0 1 0 2 O G S S E C
Other versions on request!
Example for a metering station code
417101488_EMP_Dosierstation.doc
73
Rev. 04-03.12
5.2
Metering station Code (ordering key) for EMP IV Pump
1. Designation
DOS
=
Metering station
2. Pump capacity 50 Hz
01400 =
140 l/h
02100 =
210 l/h
04500 =
450 l/h
06300 =
630 l/h
07500 =
750 l/h
[60 Hz]
[168 l/h]
[252 l/h]
[540 l/h]
[756 l/h]
[900 l/h]
3. Pipe material / Connections
PP
PV
=
=
PP
PVDF
4. Sealing material
EP
FP
=
=
EPDM (only for PP pump head)
Viton B
5. Electrical version of the pump
01
02
03
11
12
61
62
= E00; 115 V 50/60 Hz
= E00; 230 V 50/60 Hz
= E00; 3PE 400 / 230 V 50/60 Hz
= E10; 115 V 50/60 Hz
= E10; 230 V 50/60 Hz
= E60; 115 V 50/60 Hz
= E60; 230 V 50/60 Hz
6. Suction side specification
01
02
03
04
05
06
99
=
=
=
=
=
=
=
Hose clip 90°
Switching valve
Rinse valves suction and pressure side
Insertion piece (in PP/PVDF pipes)
Insertion piece SS 29 x 1.5 for piping
Hose clip 90° + rinse connection pressure side
without
7. Electrical version of the console
01
02
10
=
=
=
Terminal box OEM
Terminal box Ecolab
Mains switch
8. Flow measuring
OG
OP
DM
99
=
=
=
=
OGM
£ 450 l/h
PLUS
PLUS
(with Dongle Plate for E60
) £ 450 l/h
OGM
Dosimag
without
PLUS
9. Accessories
SS
SL
SM
SR
99
=
=
=
=
=
Splash guard
Splash guard left
Splash guard central
Splash guard right
without
10. Console version
D O S 02100 P V
FP 62
01
02
OG SS EC
EC =
99 =
Ecolab
neutral
Example for a metering station code
Other versions on request!
417101488_EMP_Dosierstation.doc
74
Rev. 04-03.12
6
Design
6.1
Application Scheme for Degassing Media
Fig. 6.1
417101488_EMP_Dosierstation.doc
75
Rev. 04-03.12
6.2
Application Scheme for Non-Degassing Media
Fig.6.2
NOTE
You can find the performance data’s in chapter 13 “Technical Data”!
417101488_EMP_Dosierstation.doc
76
Rev. 04-03.12
7
Installing equipment
NOTE
It is essential that you follow the safety instructions in chapter 2.2.3 ‘Installation’
7.1
General information
Basic setup components (see chapter 3.1) and selected optional system components (see
chapter 3.2) are factory-fitted in the metering station and tested in-factory.
Accessories (see chapter 3.3) are not factory-fitted and tested and must be installed and tested
when integrating the metering console within the overall system.
Accessories should be installed in the overall system in accordance with the implementation
diagram (see chapter 6) and operating instructions for accessories.
7.2
Sample installations
Sample installations for degassing metering media:
Sample installations for non-degassing metering media:
7.3
see chapter: 6.1.
see chapter: 6.2.
Ambient Conditions
Please ensure that the ambient conditions specified in our proposal and notified in the order
confirmation are observed. If these conditions are not met or you have any uncertainties, please
contact ECOLAB-Engineering GmbH (see chapter 1.4).
Among the most important (relevant) ambient conditions are:
· Ambient temperature
· Humidity
· Ventilation
· Power Supply
· Unlimited electromagnetic compatibility (EMC) to prevent measuring equipment faults
· Water connections (e.g. for rinsing the system during servicing)
If the ambient conditions do not meet our specifications, it may not be possible to complete
installation/commissioning.
7.3.1
Installation of metering console
CAUTION
WARNING
The console may not be loaded by additional (weight) forces! The structure or the loading of additional components
as well as entering or attaching to installed consoles are not allowed.
Absolutely make sure that the console plan rests against the wall and is screwed on correctly.
417101488_EMP_Dosierstation.doc
77
Rev. 04-03.12
7.3.2
Pipes, metering lines and pipe fittings (male connectors, adaptor unions, valve fittings)
Please observe the following instructions to prevent uncontrolled leaks of metering
medium and thus protect operating staff:
· Correct dimensions (Ø, NW) of pipes (suction, pressure, feedback and filling lines)
· Ensure that tubes are installed without any kinks
· Ensure that pipes (tubes and pipes) are long enough to meet requirements
· Ensure that all pipes are properly sealed
· Ensure that all fittings are sealed (plastic fittings only need to be tightened by hand!)
· All components should be installed without tension (expansion)
7.4
Electrical Installation
7.4.1
Terminal Box with maintenance switch / type ECOLAB / type OEM
@ Install the terminal box in accordance to enclosed operating instruction.
@ Check the power supply and compare this with data from the rating plate.
7.4.2
Oval Gear Meter (optional)
@ Install and connect in accordance to enclosed operating instruction.
7.4.3
Dosimag (optional)
@ Install and connect in accordance to enclosed operating instruction.
7.4.4
Container Switch (optional)
@ Install in accordance to enclosed operating instruction.
7.4.5
Suction lance with level switch (Accessories)
@ Install and connect in accordance to enclosed operating instruction.
7.4.6
Leak Sensor Maximat (Accessories)
@ Install and connect in accordance to enclosed operating instruction.
7.4.7
Connexx / Connexx switch (Accessories)
@ Install and connect in accordance to enclosed operating instruction.
7.4.8
Day Tank TVB (Accessories)
@ Install and connect in accordance to enclosed operating instruction.
7.4.9
Dongle box / Dongle Plate (Accessories)
@ Install and connect in accordance to enclosed operating instruction.
417101488_EMP_Dosierstation.doc
78
Rev. 04-03.12
7.5
Mechanical (hydraulic) installation
7.5.1
Pipes
7.5.1.1 Suction line (to be performed by the customer)
@ Check the connection fitting on the suction side.
@ Check that the fixing screws are tightly fastened
@ Install and connect the suction line as described in the annexed metering pump operating
instructions
7.5.1.2 Metering line (to be performed by the customer)
@ Check the connection fitting on the pressure side.
@ Check that the fixing screws are tightly fastened
@ Install and connect the pressure line as described in the dosing pump operating instructions
included
7.5.1.3 Multi-function valve overflow pipe
@ Install & connect the as described in the operating instructions included
NOTE
Check that overflow pipe is properly fed back into the supply container / Connexx / Connexx switch / day tank.
7.5.2
Connexx / Connexx switch (Accessories)
@ Install & connect as described in the operating instructions included.
NOTE
Check that the overflow/vent line is properly fed back to the Connexx / Connex switch.
7.5.3
Day Tank (TVB) (Accessories)
@ Install & connect as described in the annexed operating instructions.
NOTE
Check that the vent line is properly fed back to the day tank.
7.5.4
Leak Sensor Maximat (Accessories)
@ Install as described in operating instructions included.
7.5.5
Metering valve (Accessories)
@ Screw the metering valve onto the metering/injection point.
NOTE
The thread should be sealed with an O-Ring. If this is not possible due to local circumstances, we recommend sealing
it with Teflon tape or liquid Teflon.
@ Connect the dosing line to the metering valve.
7.5.6
Suction lance with level switch (Accessories)
@ Check the fitting and seat.
417101488_EMP_Dosierstation.doc
79
Rev. 04-03.12
8
Commissioning
NOTE
It is essential that you follow the safety instructions in chapter 2.2.4 ‘Commissioning’
In the Commissioning section, procedures are covered which should be performed after the first fit,
servicing, repairs or system component exchange.
IMPORTANT
When using the system for the first time, proceed as follows:
· Check that all system components are present and have been installed correctly (see system diagram in chapter 5).
Document this in writing on an acceptance inspection record.
·
·
·
·
Document the conformity of the system after testing
Apply CE marking for the system in a visible place (European territory)
Commissioning should only be performed by trained, specialist staff
Commissioning should be performed using an appropriate test medium for commissioning. To identify an
appropriate test medium for commissioning, please contact the suppliers of the metering medium, thus preventing
negative interaction between the metering medium and the commissioning test medium.
@ Check the ambient conditions against specifications (see chapter 7.3) and adjust if there
are any discrepancies.
@ The metering medium used must match that indicated on the metering console rating plate.
@ Check the settings of system components against the instruction manuals for the system
components
@ Activate the system control unit (if present).
@ Start up the metering pump in accordance with the annexed instruction manual for the
"EMP metering pump" with the commissioning test medium
@ Check that the suction lance empty signal is functioning (if present).
@ Vent the metering pump using the multi-function valve vent function and set the multifunction valve’s settings in accordance with the process conditions, see ‘Multi-function
Valve’ operating instructions.
@ Prime the metering line and metering point with test medium by operating the metering
console.
@ Ensure that safety equipment such as the multifunction valve (overflow function), flow
monitor and level signal is set in accordance with the system’s characteristic curve and
check that it is functioning.
@ Check the entire installation visually for leaks and eliminate any leaks immediately.
@ Completely drain the commissioning test medium from all system components.
@ Connect the metering medium and fill the entire system with metering medium.
417101488_EMP_Dosierstation.doc
80
Rev. 04-03.12
9
Operation
NOTE
It is essential that you follow the safety instructions in chapter 2.2.5 ‘Operation’
Please contact Ecolab Engineering GmbH should you have any questions or require technical explanations.
9.1
Setting the operating state
Set the system component operating states as described in this operating manual under chapter 6
‘Design’, chapter 7 ‘Installing the Equipment’ and chapter 8 ‘Commissioning’.
IMPORTANT
Follow the operating instructions provided at all times during operation.
If one or more operating parameters differ from the specifications, the metering station should not
be operated!
9.1.1
Operating modes
9.1.1.1 Manual mode for the metering console model with EMP E60 pumps
Manual mode may be activated for EMP E60 metering pumps by pressing the ‘test’ key on the
pump control panel – see metering pump operating instructions.
9.1.1.2 Manual mode with OEM terminal box
Manual operation of the metering pump with an OEM terminal box is only possible when
connected to an external control unit.
‘Measuring station manual mode’ is activated directly on the terminal box when the OEM
terminal box option is installed (see chapter 4.5.6).
Here, metering occurs for as long as the button is pressed. When the button is released,
manual operation ends and the metering pump is stopped.
Fig. 9.1
OEM terminal box:
· Push button (black)
9.1.1.3 Automatic operation
9.1.1.3.1 Activating the analog signal / Pulse control / using protective voltage (On/Off) with E00
See operating Instruction EMP-Metering Pump
9.1.2
Safety Equipment
9.1.2.1 Basic model
The basic model of the metering station is fitted with various safety devices ensuring that it
operates without interruption and that risks for staff are minimised or eliminated.
417101488_EMP_Dosierstation.doc
81
Rev. 04-03.12
9.1.2.1.1 Self-monitoring of the EMP metering pump (E60 electronic version)
To prevent the E60 electronic version of the EMP metering pump from malfunctioning due to
hardware defects (plate, connector) and installation faults (back pressure, metering point), it has
3 internal monitoring routines:
Excessive metering / no metering / continual metering
For details, please consult the operating instructions for the EMP E60 metering pump.
9.1.2.1.2 Multi-function valve overflow
The function ‘multi-function valve overflow’ (see operating instructions for the multi-function
valve) prevents an impermissible pressure increase in the metering line by draining the metering
medium. The permissible maximum pressure in the metering line (parts, metering point,
components) calculated by plant technicians should be set on the multifunction valve before
commissioning.
The metering medium should be drained from the overflow connection of the multifunction valve
in line with the specifications in the operating instructions for the multifunction valve.
CAUTION
WARNING
Before you commission the metering station, you should ensure that the overflow pressure of the multi-function valve
is set appropriately for the layout and properties of the metering station and any downstream system components.
It is essential that you follow the operating instructions for the multi-function valve
9.1.2.2 Options
9.1.2.2.1 Meter monitoring using Dosimag or OGM
PLUS
(optional) controlled externally
The actual dosage amount can be monitored using the flow rate measuring devices Dosimag
(see 4.5.1.2) or OGMPLUS (see 4.5.1.1).
For this purpose, the master on-site control unit compares target and actual metering rates
mathematically based on pulses sent by the measuring device. If pre-determined variation limits
are exceeded (indicating a metering station/metering system fault) the on-site master control
unit sends an alert and shuts the system down.
In addition, total use can be calculated for any selected period.
The electrical connection for the measuring equipment can be clamped directly onto the
metering station with an M12 connector when using the OEM terminal box option and then
connected from here to the master control unit.
9.1.2.2.2 Suction connection – Container switchover with pneumatically controlled valves (optional)
The suction connection with container switchover (see chapter 4.5.2) enables the metering
station to operate without any interruption. For this purpose, both suction connections are
connected to their own metering medium container.
The master control unit registers empty signals from the suction lances in the supply containers
(see chapter 9.1.2.3.2) and analyses these accordingly. The aim here is to ensure that the
metering station is permanently supplied with at least one full metering medium supply
container.
If there is an empty signal from one of the supply containers, automatic switchover to the
second supply container occurs using the suction connection.
The system operator is instructed by an alert in the master control unit to exchange the empty
supply container for a full supply container. As soon as he/she places the suction lance in the
full supply container, the master control unit registers that it is ready for use.
417101488_EMP_Dosierstation.doc
82
Rev. 04-03.12
9.1.2.2.3 Rinse connection for the suction connection with manually operated diaphragm valves
A rinse connection is supplied with the suction connection for manually-operated diaphragm
valves to rinse the metering station with rinse medium from this rinse connection. In particular,
for manual mechanical work on metering stations where system components are dismantled for
the purposes of servicing or repairs, the metering medium must be drained from these system
components.
CAUTION
WARNING
Before you activate the rinse connection, ensure that you are wearing the correct personal protective equipment – see
chapter 2.1.2 ‘Handling the metering medium’.
9.1.2.3 Accessories
9.1.2.3.1 Leak sensor - Sump (Accessories)
The leak sensor in the metering station drip pan is available as an accessory
(see chapter 4.6.4) and detects fluids accumulating in the drip pan. It indicates any uncontrolled
leakage of metering medium around the metering station.
The signal from the drip pan leak sensor is analysed by the master on-site control unit.
9.1.2.3.2 Supply container empty signal suction lance (accessories)
The suction lance to be installed in the metering medium supply container is factory fitted with 2
level control switches:
· The pre-warning signal tells the system operator that it will soon be necessary to change the
container although the system is still functional.
· The empty signal shuts down the metering station since the process is no longer safe owing
to low levels in the metering medium supply container and the metering station avoids dry
running.
Plug connection:
· The suction lance connector should be connected directly to the EMP E60 metering pump.
The two abovementioned signals are then displayed on the pump display and the collective
alarm signal can be forwarded to the master control unit.
· If the OEM terminal box is used (see chapter 4.5.6 und Paragraph 9.2) the suction lance
connector is screwed directly onto the terminal box and connected from here to the master
control unit. The master control unit analyses these two signals and accordingly activates
the yellow warning light.
Fig. 9.2
OEM terminal box:
· Supply container warning light (yellow)
-> Flashes when pre-warning level is reached
-> Permanently illuminated when the empty signal level is reached
9.1.2.3.3 Splash Guard
The splash guard prevents metering medium from being splashed over the metering station in
the event of component faults.
When the metering station is running, the splash guard can only protect against uncontrolled
splashes caused by component faults, if it is correctly installed.
Please ensure that the metering station is only operated once the splash guard is installed.
CAUTION
WARNING
Before you disassemble the splash guard, ensure that you are wearing the correct personal protective
equipment – see chapter 2.1.2 ‘Handling the metering medium’.
417101488_EMP_Dosierstation.doc
83
Rev. 04-03.12
10
Operating faults
CAUTION
Before carrying out any repairs or maintenance in the plant involving metering medium, always rinse the metering
head with an appropriate rinse medium (contact the metering medium supplier), activate the multifunction valve
pressure release function for the metering line and ensure that you a wearing personal protective equipment when
conducting any work on the metering console (see safety data sheet on metering medium e.g. protective goggles,
gloves and apron).
Electrical repairs and installations may only be carried out by electricians. Please observe the
accident prevention regulations of the Employers’ Liability Insurance Association!
(e.g. BGV A1 ‘General Regulations’, BGV A3 ‘Electrical Systems and Equipment’ of the
Employers’ Liability Insurance Association for Precision Engineering and Electrical Engineering
(BGFE).
CAUTION
Live parts may be uncovered when opening covers or removing parts (with the exception of covers that can be
opened or parts that can be removed without using tools). Connection points may also be live.
Before any adjustment, maintenance work, repair work or exchange of parts, the device must be
disconnected from all sources of power if it is necessary to open the device.
Operating faults of basic setup components
Fault 1.2
Fault 1.1
10.1
Fault
Possible cause
Remedy
Metering
station not
leak-tight
EMP metering pump not leak-tight
Pipe fittings not leak-tight
Multifunction valve not leak-tight
Manual diaphragm valve not leak-tight
Gas build-up in EMP metering pump
head
EMP metering pump valve blocked or
stuck together
Stroke lengths set below 40%
Manual diaphragm valve on EMP
metering station fully or partially
closed
Metering point not operational
See operating instructions for the EMP metering pump
Retighten the fittings or exchange fitting seals if necessary
See operating instructions for the multifunction valve
Retighten drive screws or exchange the diaphragm if necessary
Metering
station is
‘running’ but
not metering
Fault 1.3
Fully open the manual diaphragm valve
Check that metering point is functional and repair if necessary
Metering point specification different from metering station
specification.
See operating instructions for the multifunction valve
Check suction line and seal/replace leaking part
Fully open the suction line diaphragm valve
Exchange power supply cable
Check mains voltage
Faulty connection
Check connection against the terminal diagram
EMP metering pump valve blocked,
stuck together or dried up
Flush out the EMP dosing pump head using the suction line
and also remove valves and clean or replace if required
Suction line not leak-tight
Check suction line and seal/replace leaking part
Vent the pump head using the multifunction valve (see multifunction valve operating instructions)
Adjust the EMP metering pump stroke settings to > 40% (see
operating instructions for EMP metering pump)
Gas build-up in pump head
EMP metering pump stroke settings <
40%
Fault 1.5
Metering
station not
drawing off
metering
medium
Multi-function valve overflow function
active
Suction line not leak-tight
Suction line diaphragm valve closed
Power supply cable damaged
Wrong voltage
Knocking in
metering line Pulsation dampener not active
Fault 1.6
Metering
station is
‘running’ but
not metering
Fault 1.4
Metering point back pressure too high
See operating instructions for the EMP metering pump
Metering
station
functioning
with reduced
metering
performance
Manual diaphragm valve on EMP
metering station fully or partially
closed
Metering point not operational
Metering point back pressure too high
Multifunction valve overflow function
active
417101488_EMP_Dosierstation.doc
Rinse and empty the pressure line so that a gas cushion can
build up again in the pulsation dampener.
Fully open the manual diaphragm valve
Check metering point function if and repair
Metering point specification different from EMP metering station
specification.
See operating instructions for the multifunction valve
84
Rev. 04-03.12
10.2
Operating faults of optional components
Fault 2.1
Meter
monitoring
active
Fault 2.2
OGM
oval
gear meter
shut down
although
metering
pump is
functional
Fault 2.3
Fault
Container
switchover
not working
Possible cause
Cabling error
Diaphragm valve closed
Metering point not operational
MFV overflow active
Suction line not leak-tight
Suction line diaphragm valve
closed
EMP metering pump not leak-tight
Pipe fittings not leak-tight
Multifunction valve not leak-tight
Manual diaphragm valve not leaktight
PLUS
10.3
Oval gear meter blocked by dirt
Gas build-up in EMP metering
pump head
Remedy
See operating instructions for OGMPLUS / Dosimag
Fully open the manual diaphragm valve
Check that metering point is functional and repair if necessary
See operating instructions for the multi-function valve
Check suction line and seal/replace leaking part
Fully open the suction line diaphragm valve
See operating instructions for the EMP metering pump
Retighten the fittings or exchange fitting seals if necessary
See operating instructions for the multifunction valve
Retighten the drive screws or exchange the diaphragm if
necessary
Rinse the oval gear meter with rinse medium and remove any
dirt
Vent the pump using the multi-function valve vent function (see
multifunction valve operating instructions)
Rinse the pump with rinse medium, clean or change valves
Adjust the EMP metering pump stroke settings to > 40% (see
operating instructions for EMP metering pump)
Check the master control unit (program)
Diaphragm valves not working
properly
Check air supply to the diaphragm valves
Check that diaphragm valves are working
Operating faults of accessory components
Suction lance not correctly
positioned in the supply container
Suction lance float blocked
Suction lance connector or
strapping plug is loosely or not
plugged in.
Remedy
Position the suction lance correctly in the supply container
Repair float
Secure connector, clean contacts, check whether the strapping
plug is plugged in
Change the empty signal settings
Power supply cable damaged
Wrong voltage
Exchange power supply cable
Check control voltage
Faulty connection
Check connection against the terminal diagram
Fault 3.2
Suction lance cable fault
Drip tray leak
monitor not
functioning
Fault 3.3
indicator
appears on
pump display
despite
container
being full
Possible cause
Connexx
OEM /
Connexx
switch OEM
not
functioning
See operating instructions for the
Connexx OEM / Connexx switch OEM
Fault 3.4
Fault 3.1
Fault
Level
Day tank not
functioning
See operating instructions for the day tank
417101488_EMP_Dosierstation.doc
85
Rev. 04-03.12
11
Maintenance
NOTE
It is essential that you follow the safety instructions in chapter 2.3 ‘Servicing/Repairs’
11.1
Maintenance instructions for system components
System components
Metering pump
Multi-function valve (MFV)
Pulsation dampener
Check
Carried out by
Interval
See operating instructions for the metering pump
See operating instructions for the multi-function valve
Persons trained by a
Leak-tight connection
specialist
Quarterly
PLUS
Oval gear meter (OGM
)
(Optional)
Dosimag (optional)
Container switchover suction
connection (optional)
Rinse connection for the suction
connection (optional)
Terminal box with Ecolab/OEM
service switch
Splash guard (optional)
Suction lance/suction pipe
(accessory) incl. level sensor
OEM Connexx basic / OEM
Connexx switch (accessory)
Day tank (accessory)
Maximat leak sensor (accessory)
Siphon (accessory)
417101488_EMP_Dosierstation.doc
See operating instructions for the oval gear meter
See operating instructions for the Dosimag
Function
Persons trained by a
specialist
Leak-tight connection
Function
Persons trained by a
specialist
Leak-tight connection
Electrical function
Persons trained by a
specialist
Cable condition (brittleness, damage)
Persons trained by a
Condition / damage
specialist
Mesh filter (clean if necessary)
Persons trained by a
Electrical function of the level sensor
specialist
Check that float can move freely
Leak-tight connection
Electrical function of the level sensor
Check that float can move freely
Persons trained by a
specialist
Solenoid valve electrical function
Manual shut-off valve function
Active carbon air filter
Leak-tight connection
Electrical function of the level sensor
Electrical function of the overfill
Persons trained by a
protection
specialist
Feed valve function
Manual shut-off valve functioning
Active carbon air filter
Electrical function
Persons trained by a
specialist
Cable condition (brittleness, damage)
Function
Trained specialist
86
Quarterly
Quarterly
Quarterly
Quarterly
Monthly
Monthly
Monthly
Monthly
Rev. 04-03.12
12
Repairs / Disposal
NOTE
It is essential that you follow the safety instructions in chapter 2.3 ‘Servicing/Repairs’
12.1
Repairs by ECOLAB Engineering GmbH
12.1.1
Conditions of return
NOTE
Please be aware that we can only accept repair requests for system components that are in a safe condition.
The following documents must be completed in order for us to accept a repair request:
· Returns form:
@ Request one on tel. no. (+49) 8662 61-0 / fax no. (+49) 8662 61-258
@ Complete it correctly and in full
@ Send it initially by fax to: (+49) 8662 61-258
· System components:
@ Free of all contaminants (rinsed) especially metering medium chemical residues.
@ In plastic packaging within cardboard boxes to prevent leakage of rinse water.
· Cardboard box:
@ Addressed to ECOLAB Engineering GmbH repairs service (see chapter 12.1.3 for the address)
@ ‘REPAIR’ to be indicated on a sticker or in clear handwriting
@ Enclose a return form
12.1.2
Returns form
Please request a returns form from:
Ecolab Engineering GmbH
Department QUM
Raiffeisenstrasse 7
D-83313 Siegsdorf
Tel: (+49) 8662 61-0
Fax: (+49) 8662 61-258
12.1.3
Address for returns
ECOLAB-Engineering GMBH
REPARATUR-SERVICE
Raiffeisenstraße 7
D-83313 Siegsdorf
Tel: (+49) 86 62 / 61 -0
Fax: (+49) 86 62 / 61-258
12.2
Disposal
System components which can no longer be used must be disposed of in accordance with the
applicable statutory requirements.
If these system components are ECOLAB products, please send us a disposal request in
accordance with the points described in chapter 12.1.1.
NOTE
This does not apply to chemicals of any kind.
417101488_EMP_Dosierstation.doc
87
Rev. 04-03.12
13
Technical data
13.1
Applicable standards / guidelines
13.1.1
Drip pan / metering container
Ø
13.1.2
Pump/pump equipment guideline:
Low voltage guideline:
Electromagnetic compatibility:
Machine guideline
DIN/EN 809
2006/95/EC
2004/108/EC
2006/42/EC
Oval gear meter (OGMPLUS) – optional / Dosimag - optional
Ø
13.2
DIN/EN 10204 2.1
Metering pump
Ø
Ø
Ø
Ø
13.1.3
Workshop test:
Electromagnetic compatibility:
2004/108/EC
Performance data
EMP type metering station
Metering pump delivery rate [l/h] at 50 Hz
Back pressure [bar] at 50 Hz
Max. supported viscosity [mPAS]
Max. suction height [mWs] at 100% stroke
Max. suction length [m] at 100% stroke
Min. required nominal width for suction line
[DN]
Min. required nominal width for pressure line
[DN]
Permitted ambient temperature [°C]
Power supply/current consumption
Safety class
Dimensions [l x b x h]
Weight
EMP IV
EMP III
750
3
630
4
450
6
210
8
140
10
30
30
25
20
25
25
20
12
EMP II
EMP KKS
54
10
200
2
3
16
10
11.2
5
4.3
10
1.4
10
6
6
6
6
4
6
12
6
6
6
4
4
0…40
See EMP metering station rating plate
IP 55
500 x 545 x 1000
On request
IP 65
Detailed performance data for individual EMP metering station components can be found in the
component operating instructions included with this document.
13.3
Materials
The individual EMP metering station components are manufactured using the following
materials.
CAUTION
WARNING
Before using the EMP metering station, always check the material recommendations provided in the metering medium
product data sheet and only use EMP metering stations manufactured using approved materials.
EMP KKS
Console:
Pump
Pump head/suction-pressure valves:
Diaphragm:
Seals:
Pipe/tube:
Multi-function valve:
Valves:
Valve diaphragms:
PLUS
OGM
:
417101488_EMP_Dosierstation.doc
VA 1.4301
PVDF / PVDF
PTFE-coated
FPM or EPDM
PTFE
PVDF
PVC/PVDF
PTFE
PVC/PVDF
88
Rev. 04-03.12
EMP II / III
For caustic soda*
For acid*
Console:
Pump
Pump head/suction-pressure valves:
Diaphragm:
Seals:
Pipe/tube:
Multi-function valve:
Valves:
Valve diaphragms:
PLUS
OGM
:
Dosimag (only with EMP III):
VA 1.4301
VA 1.4301
PP / PP
PTFE-coated
EPDM
PTFE
PP
PVC/PP
PTFE
PVC/PP
VA 1.4435
PVDF / PVDF
PTFE-coated
FPM (Viton B)
PTFE
PVDF
PVC/PVDF
PTFE
PVC/PVDF
Alloy C22
EMP IV
For caustic soda*
For acid*
Console:
VA 1.4301
VA 1.4301
Pump
Pump head / suction-pressure valves:
PP / PP
PVDF / PVDF
Diaphragms:
PTFE-coated
PTFE-coated
Seals:
EPDM
FPM (Viton B)
Piping:
PP
PVDF
Multi-function valve:
PP
PVDF
Valves:
PP
PVDF
Valve diaphragms:
PTFE
PTFE
PLUS
OGM
:
PVC/PP
PVC/PVDF
Dosimag:
VA 1.4435
Alloy C22
* Caustic soda/acid are used as general terms. Please take note of the resistances on the product data sheet.
13.4
Mechanical connections
Pump:
Rinse valve:
Switch-over valve:
Manual valve output:
Overflow side:
Suction side:
Overflow side:
Pressure side:
Pressure side rinse valve:
Suction side rinse valve:
13.5
EMP KKS
EMP II
EMP III
6/8, 6/10, 6/12 mm
4/6, 6/8, 6/10, 6/12 mm
(2x) 4/6, 6/8, 6/10, 6/12 mm
6/8 mm
6/8 mm
4/6, 6/8, 6/12 mm
6/8, 6/10, 6/12 mm
(2x) 6/8, 6/10, 6/12 mm
6/8 mm
6/8 mm
6/12, 10/16 mm
6/12, 10/16 mm
(2x) 6/12, 10/16 mm
6/8 mm
6/8 mm
EMP IV 140 / 210 l/h
EMP IV 450- 750 l/h
19/27 mm tube (ID/AD) for switchover
valves 2x
19/27 mm tube (ID/AD)
25/34 mm tube (ID/AD) or d32 flange
19/27 mm tube (ID/AD)
1 x insert for D25 fixed piping
19/27 mm tube (ID/AD)
30/38 mm tube (ID/AD) for switchover
valves 2x
1 x insert for D40 fixed piping
19/27 mm tube (ID/AD)
Electrical connections
See EMP metering station rating plate
13.6
Dimensions
The dimensions for the EMP metering station can be found in chapter 13.2.
13.7
Ordering code
See chapter 5 “Overview – VARIANTS”
417101488_EMP_Dosierstation.doc
89
Rev. 04-03.12
13.8
Connecting Diagram
13.8.1
Metering station STANDARD (38603002)
Fig. 13.1
Fig. 13.2
417101488_EMP_Dosierstation.doc
90
Rev. 04-03.12
13.8.2
Metering station & OGM (38603003)
Fig. 13.3
Fig. 13.4
417101488_EMP_Dosierstation.doc
91
Rev. 04-03.12
13.8.3
Metering station & DOSIMAG (38603004)
Fig. 13.5
Fig. 13.6
417101488_EMP_Dosierstation.doc
92
Rev. 04-03.12
13.8.4
OEM Metering station STANDARD (38604102)
Fig. 13.7
Fig. 13.8
417101488_EMP_Dosierstation.doc
93
Rev. 04-03.12
13.8.5
OEM Metering station & OGM (38604103)
Fig. 13.9
Fig. 13.10
417101488_EMP_Dosierstation.doc
94
Rev. 04-03.12
13.8.6
OEM Metering station & DOSIMAG (38604104)
Fig. 13.11
Fig. 13.12
417101488_EMP_Dosierstation.doc
95
Rev. 04-03.12
14
Spare/wearing parts
CAUTION
Only OE spare parts should be used for repairs.
NOTE
Item numbers for wearing parts and spare parts can be found on your order BOM
14.1
Spare parts
Spare parts on request
14.2
Wearing parts
Wearing parts correspond to the following mounting positions. For the sake of clarity, wearing
parts are listed in groups.
14.2.1
EMP IV
14.2.1.1 EMP IV basic sets
Fig. 14.1
Spring
Diaphragm
O-Ring
Diaphragm
O-Rings
O-Ring
Suction-/Pressure
valve
ProtectionDiaphragm
Metering Diaphragm
Description
Article no. (EBS-No.)
EMP IV 140 / 210 l/h
PP-Valves, EPDM-Sealings
PP- Valves, Viton- Sealings
PVDF- Valves, EPDM- Sealings
PVDF - Valves, Viton- Sealings
286082 (on request)
286385 (on request)
286382 (on request)
286085 (on request)
EMP IV 450 l/h
PP- Valves, EPDM- Sealings
PP- Valves, Viton- Sealings
PVDF- Valves, EPDM- Sealings
PVDF - Valves, Viton- Sealings
286083 (on request)
286386 (on request)
286383 (on request)
286086 (on request)
EMP IV 630 / 750 l/h
PP- Valves, EPDM- Sealings
PP- Valves, Viton- Sealings
PVDF- Valves, EPDM- Sealings
PVDF - Valves, Viton- Sealings
417101488_EMP_Dosierstation.doc
286084 (on request)
286387 (on request)
286384 (on request)
286087 (on request)
96
Rev. 04-03.12
14.2.1.2 Peripherals EMP IV
Fig. 14.2
1
6
5
2
3
4
1
4
2
1
3
1
2
Pos.
1
2
3
4
5
6
14.2.2
1
2
Description
Article no. (EBS-No.)
O-Ring 28.17x3.53 70 EPDM
O-Ring 28.17x3.53 70 FPM
Diaphragm DN 15-25 PTFE/EPDM
O-Ring 40.6x5.3 70 EPDM
O-Ring 40.6x5.3 70 FPM
Diaphragm DN32-40 PTFE
O-Ring 64,77x2,62 70 EPDM
O-Ring 64,77x2,62 70 FPM
O-Ring 12x2.5 70 EPDM (140-210 l/h)
O-Ring 12x2.5 70 FPM (140-210 l/h)
O-Ring 18x2.5 70 EPDM (450-750 l/h)
O-Ring 18x2.5 70 FPM (450-750 l/h)
417001277 (10002740)
417003593 (10000488)
415502535 (10006002)
417001938 (on request)
417003359 (10003839)
415502323 (10006068)
417001519 (10004139)
417003415 (10006155)
417001102 (10002916)
417003334 (10002584)
417001172 (10003079)
417003350 (10020129)
EMP KKS / EMP II / EMP III
On request
417101488_EMP_Dosierstation.doc
97
Rev. 04-03.12
15
Accessories
15.1
Suction lances
15.1.1
Suction lance for Metering Console EMP IV
Fig. 15.1
Suction lance
Description
Article no. (EBS-No.)
250052 (10000807)
250054 (10001170)
250055 (10001697)
250056 (10001892)
Extent of supply: Connecting seal EPDM (black) or Viton (brown),
connection cable 5 m, container screw connection with thread S70, without hose
connection
130
33
1200
SGL VC VC FP FP GL 000 G2 25 2SS 1200 99 99
SGL VC VC EP EP GL 000 G2 25 2SS 1200 99 99
SGL VC VC FP FP GL 000 G2 25 2SS 1200 G2 99
SGL VC VC EP EP GL 000 G2 25 2SS 1200 G2 99
54
SGL VC VC FP FP GL 000
417101488_EMP_Dosierstation.doc
1. Designation
SGL = suction lance
2. Suction lance material / float
VC = PVC
3. Ball valve material
VC = PVC
4. Sealing (1) material
FP = Viton B
EP = EPDM
5. Sealing (2) material
FP = Viton B
EP = EPDM
6. Valve ball material
GL = glass
7. Valve spring pressure
000 = no spring loading
8. Connection thread
G2 = G 2"
9. Nominal width suction pipe
25 = 25 mm (di)
10. Level contact
2SS = 2 make contacts, cable with plug
11. Length of suction lance
1200 = 1200 mm
12. Return connection
G2 = connection thread f. return connection 2”
99 = without return connection
13. Connection
99 = without connection
G2 25 2SS 1200 99
99
98
Rev. 04-03.12
15.1.2
Suction lance for Metering Console EMP III / II
Fig. 15.2
Description
Article no. (EBS-No.)
Suction lances D32 with reserve and empty signal report
incl. of ball non-return valve, suction strainer and zero-potential empty signal
contact (empty = contact interrupted), hose connection material (4/6 mm, 6/8 mm,
6/12 mm)
Pipe diameter:
Connection cable:
Turn-on voltage:
Switching current:
Rupturing capacity:
32 mm
3-pin circular connector incl. 5 m cable
max. 50 V AC/DC
0,5 A
10 W / 10 VA
(for container 20 l)
186140 (10001084)
SGL VCPVFPEPGL000 G5/8-06-2SS-0725-9921
(for container 30/60 l)
186141 (10001238)
SGL VCPVFPEPGL000 G5/8-06-2SS-0975-9921
(for container 100/200 l)
186142 (10000775)
SGL VCPVFPEPGL000 G5/8-06-2SS-1125-9921
(for container 200 l)
186143 (10001004)
25
125
SGL VCPVFPEPGL000 G5/8-06-2SS-0475-9921
15.1.3
Suction lance for Metering Console EMP KKS
Fig. 15.3
Description
Article no. (EBS-No.)
Suction lances D 32 with reserve and empty signal report and return connection
incl. ball non-return valve, suction strainer, level pre-warning contact, empty signal contact (when
dropping below the level = contact interrupted) and return connection from PVC
32 mm
DN 6
3-pin plug incl. 5 m cable
max.48 V AC/DC
0,5 A
8 W / 8 VA
SGL VCPVFPEPGL000 G5/8-06-2SS-0475-0633 (for container 20 l)
247614 (10001343)
SGL VCPVFPEPGL000 G5/8-06-2SS-0725-0633 (for container 30/60 l)
247615 (10017261)
SGL VCPVFPEPGL000 G5/8-06-2SS-0975-0633 (for container 100/200 l)
247616 (10001885)
SGL VCPVFPEPGL000 G5/8-06-2SS-1125-0633 (for container 200 l)
247617 (10016004)
25
125
Tube diameter:
Return connection:
Connection cable:
Turn-on voltage:
Switching current:
Rupturing capacity:
417101488_EMP_Dosierstation.doc
99
Rev. 04-03.12
15.2
Suction pipe adapter for Metering Console with EMP IV + III + II + KKS
Description
Article no. (EBS-No.)
Fig. 15.4
Suction pipe adapter with return hole
for suction pipe Ø 16 mm
thread pitch:
5 mm
thread dimension inside:
56 mm
thread dimension outside:
61 mm
to screw on:
canister 30 l or vessel 60 – 200 l
247627 (on request)
Fig. 15.5
Adapter insert cap
286198 (10000912)
for suction pipe Ø 32 mm PVC soft
to attach on:
canister 10 l and 20 l
Fig. 15.6
Adapter – insert cap
288534 (10001133)
for suction pipe Ø 32 mm PVC – hard / Viton B
suitable for degassing products
Return connection:
Vent connection:
to attach on:
4/6, 6/8 or 6/12 mm (ID/AD)
6/12 mm (ID/AD)
canister 30 l or vessel 60 – 200 l
Fig. 15.7
Adapter screw connection
286197 (10016073)
Fig. 15.8
for suction pipe Ø 32 mm PVC hard
thread pitch:
5 mm
thread dimension inside:
56 mm
thread dimension outside:
61 mm
to screw on:
canister 30 l or vessel 60 – 200 l
Adapter screw connection
288535 (10001370)
for suction pipe Ø 32 mm PVC – hard / Viton B / Silikon
suitable for degassing products
Return connection:
4/6, 6/8 or 6/12 mm (ID/AD)
Vent connection:
6/12 mm (ID/AD)
thread pitch:
5 mm
thread dimension inside:
63 mm
thread dimension outside:
69 mm
for barrel with internal thread (L – Ring plus barrel 220 l)
Fig. 15.9
Adapter screw connection
288570 (on request)
for suction pipe Ø 32 mm PVC – hard / Viton B / Silikon
suitable for degassing products
Return connection:
4/6, 6/8 oder 6/12 mm (ID/AD)
Vent connection:
6/12 mm (ID/AD)
thread pitch:
2,31 mm
thread dimension inside:
56,66 mm
thread dimension outside:
59,61 mm
for container screw cap with 2“ internal thread
Fig. 15.10
Adapter
419800026 (on request)
2“ internal thread for adapter screw connection 288570
Tri-Sure external thread for container screw cap
Fig. 15.11
Protection tubes for suction lances Ø 32 mm
286191 (10001077)
for prevention of mechanical damage of the suction valve and the float
respectively, incl. fastening screw
Protection tube, PVDF
286153 (10036468)
Protection tube, stainless steel (1.4035)
247627 (on request)
417101488_EMP_Dosierstation.doc
100
Rev. 04-03.12
15.3
Tubes
15.3.1
Tubes for Metering Console with EMP IV
Description
Fig. 15.12
15.3.2
Article no. (EBS-No.)
PVC-fabric, 19/27 mm
PVC-fabric, 25/34 mm
PVC-fabric, 30/38 mm
417400131 (10000427)
417400139 (10001298)
417400136 (10004077)
Tubes for Metering Console with EMP III / II / KKS
Description
Fig. 15.13
Fig. 15.14
Fig. 15.15
Article no. (EBS-No.)
PVC-fabric 6/12 mm
417400123 (10000159)
Tube PTFE 6/8 mm
417400224 (10000312)
Tube PTFE 4/6 mm
417400215 (10090427)
15.4
Metering valves
15.4.1
Metering valves for Metering Console with EMP IV
1. Valve designation
DVO =
metering valve without metering pipe
2. Screw-in part material
PP
PV
VA
=
=
=
PP
PVDF
stainless steel
3. Valve body material
PP
PV
VA
=
=
=
PP
PVDF
stainless steel
4. Sealing material
EP
FP
=
=
EPDM
Viton B
5. Valve ball / conical nipple material *
GL
VA
=
=
glass
stainless steel
6. Valve spring pressure
008 =
0,8 bar
7. Thread screw-in side
G 1¼
8. Thread connecting side
G 1¼
9. Connection
99
DVO PP PP FP
=
without connection
GL 008 G1¼ G1¼ 99
Description
Article no. (EBS-No.)
Fig. 15.16
DVO PP PP FP GL 008 G 1¼ – G 1¼ – 99
DVO PP PP EP GL 008 G 1¼ – G 1¼ – 99
DVO PV PV FP GL 008 G 1¼ – G 1¼ – 99
250017 (10039337)
250018 (10002321)
249086 (10002170)
Fig. 15.17
Metering pipe PP G ¾ for DVO G 1¼
Metering pipe PV G ¾ for DVO G 1¼
249235 (10002457)
249236 (10002536)
417101488_EMP_Dosierstation.doc
101
Rev. 04-03.12
15.4.2
Metering valves for Metering Console with EMP III / II / KKS
1. Valve designation
DVM =
DVO =
metering valve with metering pipe
metering valve without metering pipe
2. Screw-in part material
VC =
PV =
VA =
PVC
PVDF
stainless steel
3. Valve body material
PV
VA
=
=
PVDF
stainless steel
4. Sealing material
EP
FP
=
=
EPDM
Viton B
5. Valve ball / conical nipple material *
GL
=
glass
6. Valve spring pressure
002 =
005 =
009 =
0,2 bar
0,5 bar
0,9 bar
7. Thread screw-in side
G½
8. Thread connecting side
G 5/8
9. Connection
21
37
99
DVM VC PV FP
Fig. 15.18
=
=
=
set with insertion part G1/4i
set for hose 6/8, 6/12
without connection
GL 009 G1/2 G5/8 37
Description
Article no. (EBS-No.)
for EMP KKS / II:
DVM VC PV FP GL 003 G 1/2 – G 3/8 – 21
DVM VC PV EP GL 003 G 1/2 – G 3/8 – 21
for EMP III:
DVM VC PV FP GL 009 G 1/2 – G 5/8 – 37
DVM PP PP FP KE 007 G 1/2 – G 5/8 – 21
DVM PP PP EP KE 007 G 1/2 – G 5/8 – 21
417101488_EMP_Dosierstation.doc
248059 (10016098)
248060 (10006226)
245037 (10003491)
245040 (on request)
245041 (10106939)
102
Rev. 04-03.12
15.5
Connexx OEM / Connexx switch OEM
Description
Article no. (EBS-No.)
Connexx OEM:
286036 (on request)
Device with empty signal for automatic tapping and venting of degassing products from
Ecolab containers with integrated suction lance.
The version used with the CONNEXX system is a conveyor for automatic product
tapping and supply from containers (integrated suction lance optional). It has been
specially designed for all products containing peracetic acid and hydrogen peroxide
used in CIP.
It can be specifically used for the following products:
P3 Oxonia, P3 Oxonia Active, P3 Oxonia Active S, P3 Oxonia Active 150 and P3
Oxysan ZS.
Connexx switch OEM:
Device with empty signal for automatic tapping and venting of degassing products from
Ecolab containers with integrated suction lance.
The version used with the CONNEXX system is a conveyor for automatic product
tapping and supply from containers (integrated suction lance optional). It has been
specially designed for all products containing peracetic acid and hydrogen peroxide
used in CIP.
This device is equipped for container switch-over.
It can be specifically used for the following products:
P3 Oxonia, P3 Oxonia Active, P3 Oxonia Active S, P3 Oxonia Active 150 and P3
Oxysan ZS.
3-rod sensor for monitoring levels with integrated analytical electronics – suitable for
Connexx OEM and Connexx switch OEM.
Vibration limit switch for overfill protection - suitable for Connexx OEM and Connexx
switch OEM
on request
415711137 (on request)
415711138 (on request)
Additional connecting modules can be used to adapt the dosing pumps and feed product back to the
lifting vessel from overpressure or degassing lines (circular line) if required.
15.6
Day Tank 25L
Description
Fig. 15.19
Article no. (EBS-No.)
Suction-side product supply device for non-degassing and degassing
media.
Filled by active pre-conveyance. MAX and REORDER level monitoring by
conductive rod probes plus electronic overfill protection.
Inward and outward ventilation of the day tank is performed by an active
carbon filter.
If required, additional connecting modules can be used to feed the
product back to the day tank via overpressure or degassing lines (circular
line).
25l day tank on PVC/PP/EPDM console
Container: PVC
Piping in contact with media: PP
Sealant: EPDM
25l day tank on PVC/PVDF/FPM console
Container: PVC
Piping in contact with media: PVDF
Sealant: FPM (Viton B)
3-rod sensor for monitoring levels with integrated analytical electronics –
suitable for 25L day tank
Vibration limit switch for overfill protection - suitable for 25L day tank
417101488_EMP_Dosierstation.doc
103
286330 (on request)
286037 (on request)
415711137 (on request)
415711138 (on request)
Rev. 04-03.12
15.7
Leak Sensor Maximat
Fig. 15.20
Description
Article no. (EBS-No.)
The MAXIMAT LWC-B leak sensor (floor electrode) is used in drip pans
and drip areas to monitor leaks
It is equipped with three different output circuits:
418264044 (10105200)
· Binary output activating a coupling relay
· Current output 0 … 20 mA suitable for activating an analogue input
channel e.g. a programmable logic controller (PLC).
· Self-measuring measuring circuit with MAXIMAT SHR C. measuring
transducer in a two-wire circuit
15.8
Sumps
Description
Fig. 15.21
Article no. (EBS-No.)
Sump 2 canister, PE
419800477 (on request)
2 x 60 l canister
Fig. 15.22
Sump 2 barrel, PE
419800421 (10093209)
2 x 200 l barrel
Fig. 15.23
Sump 4 barrel, PE
419800422 (10093193)
4 x 200 l barrel
Fig. 15.24
Sump 1 Container, PE
419800423 (on request)
1 x IBC Container 1000 l
Fig. 15.25
Sump 2 Container, PE
419800425 (on request)
2 x IBC Container 1000 l
15.9
Siphon
Description
Article no. (EBS-No.)
Fig. 15.26
on request
For the easy and safe filling of liquids from drip pan to wall
console.
417101488_EMP_Dosierstation.doc
104
Rev. 04-03.12
16
Declaration of Conformity
417101488_EMP_Dosierstation.doc
105
Rev. 04-03.12
Dokumenten Nr.:
document no.:
417101488
Version / Revision:
4
version / review:
Erstelldatum:
28.09.2009
date of issue:
Letzte Änderung:
29.03.2012
last changing:
© Copyright ECOLAB Engineering GmbH, 2011
Alle Rechte vorbehalten. All rights reserved
Nachdruck, auch auszugsweise, nur mit Genehmigung
der Firma ECOLAB Engineering GmbH gestattet.
Reproduction, also in part, only with permission of
ECOLAB Engineering GmbH.