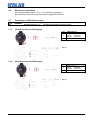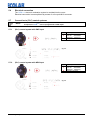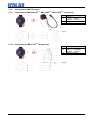
1
Betriebsanleitung Operating Instructions Notice Technique PLUS OGM Ovalradzähler Oval gear meter Compteur à roues ovales OGMPLUS (Oval Gear Meter PLUS) Deutsch 417102208_OGM_Plus English Francaise Rev. 4-01.13 Inhaltsverzeichnis 1 Allgemeines ........................................................................................................... 3 1.1 1.2 1.3 1.4 EBS Nummernreihe .......................................................................................................... 3 Transportschäden ............................................................................................................. 3 Gewährleistungsumfang .................................................................................................... 3 Kontaktadresse / Hersteller ............................................................................................... 3 2.1 2.2 2.3 2.3.1 2.3.2 2.4 2.5 2.6 2.7 2.8 Bestimmungsgemäße Verwendung ................................................................................... 4 Hinweise zur Sicherheit ..................................................................................................... 4 Sicherheitsmaßnahmen (vom Betreiber durchzuführen) .................................................... 4 Definition: Unterwiesene Person ....................................................................................... 5 Definition: Fachkraft .......................................................................................................... 5 Pflichten des Betreibers .................................................................................................... 5 Hinweise ........................................................................................................................... 6 Aufzählungen .................................................................................................................... 6 Spezielle Sicherheitsinformationen für Wartungs- und Reparaturarbeiten ......................... 6 Gerätekennzeichnung ....................................................................................................... 6 4.1 4.2 Aufbau............................................................................................................................... 8 Funktionsbeschreibung ..................................................................................................... 8 5.1 5.2 5.3 5.4 5.5 5.5.1 5.5.2 5.5.3 5.6 5.7 5.7.1 5.7.2 5.7.3 Hinweise zur Installation .................................................................................................... 9 Anschlussadapter montieren ............................................................................................. 9 Konsole montieren ............................................................................................................ 9 Wandmontage ................................................................................................................... 9 Montage der Schlauch- oder Rohrleitung .......................................................................... 9 Übersicht ......................................................................................................................... 10 Montage der Schlauchleitung .......................................................................................... 10 Montage der Rohrleitung ................................................................................................. 10 Elektrischer Anschluss .................................................................................................... 11 Anschluss an (SPS-)Steuerungen ................................................................................... 11 (SPS-)Steuerung mit PNP-Eingang ................................................................................. 11 (SPS-)Steuerung mit NPN-Eingang ................................................................................. 11 Anschluss an EMP E60 Pumpen ..................................................................................... 12 6.1 Ermittlung der Impulswertigkeit des Zählers .................................................................... 13 7.1 7.2 Zerlegen des Ovalradzählers .......................................................................................... 14 Zusammenbau des Ovalradzählers ................................................................................. 14 8.1 8.2 Materialien ...................................................................................................................... 15 Abmessungen ................................................................................................................. 15 9.1 9.2 9.3 9.4 9.4.1 Übersicht ......................................................................................................................... 16 Bestellschlüssel............................................................................................................... 16 Ersatzteile ....................................................................................................................... 17 Zubehör........................................................................................................................... 18 Anschlussadapter (je 2 Stück erforderlich) ...................................................................... 18 2 3 4 5 6 7 8 9 10 11 Sicherheit ............................................................................................................... 4 Lieferumfang ......................................................................................................... 7 Aufbau / Funktionsbeschreibung ........................................................................ 8 Installation ............................................................................................................. 9 Inbetriebnahme ................................................................................................... 13 Wartung ............................................................................................................... 14 Technische Daten ............................................................................................... 15 Bestellschlüssel, Ersatzteile und Zubehör ....................................................... 16 Demontage / Entsorgung.................................................................................... 19 Konformitätserklärung ....................................................................................... 20 417102208_OGM_Plus -2- Rev. 4-01.13 1 Allgemeines Dieses Technische Handbuch enthält alle Anweisungen zur Installation, Inbetriebnahme, Wartung und Reparatur des Ovalradzählers, OGMPLUS. 1.1 HINWEIS Bei den deutschsprachigen Kapiteln dieser Anleitung handelt es sich um die ORIGINALBETRIEBSANLEITUNG und ist rechtlich relevant. Alle anderen Sprachen sind Übersetzungen der ORIGINALBETRIEBSANLEITUNG. WICHTIG Bitte diese Anleitung sorgfältig lesen und als Referenz für Bedienung und Service aufbewahren. Bei Fragen kontaktieren Sie uns bitte wie in Kapitel 1.4 „Kontaktadresse“ angegeben. EBS Nummernreihe Innerhalb dieser Betriebsanleitung werden sowohl Artikelnummern, als auch EBS Nummern dargestellt. EBS Nummern sind Ecolab interne Artikelnummern und werden „konzernintern“ verwendet. 1.2 Transportschäden PLUS beim Auspacken ein Transportschaden festgestellt, darf der Ovalradzähler OGM VORSICHT Wird nicht installiert werden! Das jeweilige Transportunternehmen ist unverzüglich zu ACHTUNG 1.3 verständigen und eine Schadensbestätigung zu beantragen. Eine Kopie der Schadensbestätigung ist umgehend an Firma Ecolab Engineering GmbH zu senden. Gewährleistungsumfang Gewährleistung in Bezug auf Betriebssicherheit, Zuverlässigkeit und Genauigkeit des Ovalradzählers (im folgenden OGMPLUS genannt) wird vom Hersteller nur unter folgenden Bedingungen übernommen: • Montage, Anschluss, Einstellung, Wartung und Reparatur werden von autorisiertem und geschultem Fachpersonal durchgeführt. • Der OGMPLUS wird entsprechend den Ausführungen der im Lieferumfang enthaltenen Bedienungsanleitung verwendet. • Bei Reparaturen dürfen nur Original-Ersatzteile verwendet werden. Im Übrigen gelten die allgemeinen Garantie- und Leistungsbedingungen der Firma Ecolab Engineering GmbH. 1.4 Kontaktadresse / Hersteller Ecolab Engineering GmbH Raiffeisenstraße 7 D-83309 Siegsdorf Telefon (+49) 86 62 / 61 0 Telefax (+49) 86 62 / 61 235 eMail: [email protected] 417102208_OGM_Plus -3- Rev. 4-01.13 2 Sicherheit VORSICHT Die Sicherheitshinweise und Hervorhebungen sind in jedem Fall zu beachten! HINWEIS 2.1 Vor der Installation, der Inbetriebnahme und vor allen Wartungs- bzw. Reparaturarbeiten müssen die einschlägigen Kapitel des Handbuches gelesen und beachtet werden. Diese Betriebsanleitung ist Bestandteil des Ovalradzählers und muss für das Bedien- und Wartungspersonal jederzeit zur Verfügung stehen. Bei einem Weiterverkauf ist diese Betriebsanleitung immer mitzuliefern. Bestimmungsgemäße Verwendung ACHTUNG PLUS Der OGM darf nur mit von Ecolab validierten Produkten verwendet werden! Bei Verwendung unvalidierter Produkte kann keine Gewährleistung übernommen werden! Das OGMPLUS wurde ausschließlich für die industrielle und gewerbliche Nutzung entwickelt, konstruiert und gebaut. Eine private Nutzung des Gerätes wird ausgeschlossen. Zur bestimmungsgemäßen Verwendung gehört auch die Einhaltung der vom Hersteller vorgeschriebenen Bedienungs- und Betriebsanweisungen sowie die Wartungs- und Instandhaltungsbedingungen. Die Lebensdauer des OGMPLUS beträgt in Abhängigkeit zu den ordnungsgemäß durchgeführten Wartungen ca. 5 Jahre. Anschließend ist eine Revision (ggf. anschließende Generalüberholung) durch die Herstellerfirma oder eine Fachfirma notwendig. 2.2 Hinweise zur Sicherheit • Die Anschluss- und Reparaturarbeiten am OGMPLUS dürfen nur von autorisiertem und geschultem Fachpersonal ausgeführt werden. • Bei Wartungs- und Reparaturarbeiten ist geeignete Schutzkleidung zu tragen. • Die Sicherheitsbestimmungen im Umgang mit Chemikalien sind stets zu beachten. • Die Zufuhr des Dosiermediums ist abzusperren, und die ggf. vorhandene Druckerhöhungspumpen/ Dosiergeräte vom Netz zu trennen, bevor jegliche Reparaturarbeiten begonnen werden. 2.3 Sicherheitsmaßnahmen (vom Betreiber durchzuführen) Es wird darauf hingewiesen, dass der Betreiber sein Bedien- und Wartungspersonal: • über die Schutzeinrichtungen der Anlage unterweist; • bezüglich der Einhaltung der Sicherheitsmaßnahmen überwacht; • sicherstellt, dass das Betreten des Gefahrenbereiches der Anlage durch unbefugte Personen (kein Bedien- und Wartungspersonal) verhindert wird. Diese Betriebsanleitung ist für die zukünftige Verwendung aufzubewahren. Die Häufigkeit von Inspektionen und Kontrollmaßnahmen muss eingehalten werden. Die hier beschriebenen Arbeiten sind so aufgeführt, dass sie: • in den Kapiteln Bedienung von einer unterwiesenen Person • in den Kapiteln Transport, Aufstellung und Montage, Wartung, Störung / Ursache / Behebung von einer Fachkraft verstanden werden. Die Kapitel Transport, Aufstellung und Montage, Wartung, Störung / Ursache / Behebung sind nur für Fachkräfte vorgesehen. Arbeiten, die in diesen Kapiteln beschrieben sind, sind nur von Fachkräften auszuführen. 417102208_OGM_Plus -4- Rev. 4-01.13 2.3.1 Definition: Unterwiesene Person Eine Person, die durch eine Fachkraft über die ihr übertragenen Aufgaben und die möglichen Gefahren bei unsachgemäßem Verhalten unterrichtet und erforderlichenfalls angelernt sowie über die notwendigen Schutzeinrichtungen und Schutzmaßnahmen belehrt wurde. 2.3.2 Definition: Fachkraft Eine Person mit geeignetem Training, geeigneter Ausbildung und Erfahrungen die sie in die Lage versetzt Risiken zu erkennen und Gefährdungen zu vermeiden. In der Definition angelehnt an die EN 60204-1:2006. 2.4 Pflichten des Betreibers HINWEIS In dem EWR (Europäischen Wirtschaftsraum) ist die nationale Umsetzung der Rahmenrichtlinie (89/391/EWG) sowie die dazugehörigen Einzelrichtlinien und davon besonders die Richtlinie (2009/104/EG) über die Mindestvorschriften für Sicherheit und Gesundheitsschutz bei Benutzung von Arbeitsmitteln durch Arbeitnehmer bei der Arbeit, jeweils in der gültigen Fassung, zu beachten und einzuhalten. In Deutschland ist die Betriebssicherheitsverordnung vom Oktober 2002 (BGV D1, BGV D1 DA) zu beachten (Umsetzung der o. g. Richtlinie in nationales Recht). Der Betreiber muss sich die örtliche Betriebserlaubnis einholen und die damit verbundenen Auflagen beachten. Zusätzlich muss er die örtlichen gesetzlichen Bestimmungen für: • Sicherheit des Personals (BG- und Unfallverhütungsvorschriften, Arbeitsstätten-Richtlinien), z.B. Betriebsanweisungen, auch nach §20 GefStoffV, persönliche Schutzausrüstung (PSA)), Vorsorgeuntersuchungen; • Sicherheit der Arbeitsmittel (Schutzausrüstung, Arbeitsanweisungen, Verfahrensrisiken und Wartung); • Produktbeschaffung (Sicherheitsdatenblätter, Gefahrstoffverzeichnis); • Produktentsorgung (Abfallgesetz); • Materialentsorgung (Außerbetriebnahme, Abfallgesetz); • Reinigung (Reinigungsmittel und Entsorgung) einhalten, • sowie die aktuellen Umweltschutzauflagen beachten. Außerdem ist betreiberseitig: • persönliche Schutzausrüstung (PSA) zur Verfügung zu stellen: Sicherheitsschuhe, Schutzhandschuhe, Schutzbrille, Schutzmaske, Schutzanzug. • eine ständige Gefährdungsbeurteilung der Arbeitsplätze durchzuführen einschließlich der Betrachtung der Gefahrstoffe und des Brandschutzes. Dazu gehört auch der Umgang mit heißen Bauteilen (langsame Abkühlung beachten). • Maßnahmen in Betriebsanweisungen zu fixieren und dementsprechend das Personal zu unterweisen; • bei Bedienplätzen (ab 1 Meter über Boden): sicherer Zugang zu schaffen, ggf. Arbeitsgerüst stellen; • Ausbildung des Bedienpersonals zu gewährleisten; • es sind Arbeitsanweisungen zu erstellen; • darauf zu achten, dass sich keine zweite Person während der Bedienung in Gefahrenbereichen (Quetschstellen) aufhält. • Schutzeinrichtungen wie z.B. geeignete Handfeuerlöscher in vorgeschriebener Anzahl und Größe an gut erreichbaren Stellen anzubringen. • Beleuchtung der Arbeitsplätze ist betreiberseitig laut ASR 7/3 herzustellen. • regelmäßig zu prüfen, ob Stolperstellen gekennzeichnet sind. 417102208_OGM_Plus -5- Rev. 4-01.13 Anschlüsse: Beleuchtungsstärke: Der Betreiber muss für eine ausreichende und gleichmäßige Beleuchtungsstärke in allen Bereichen der Anlage sorgen. Es werden 300 Lux (Kontrollplätze 500 Lux), je nach Anlagenbereich, empfohlen (Wartungswert; in Deutschland: ASR 7/3). Mindestens eine jährliche Sicherheitsunterweisung (und jeweils zu Beginn einer Beschäftigung) über Gefahren und Schutzmaßnahmen ist anhand der Betriebsanleitung erforderlich und mit Unterschrift zu bestätigen (TRGS 555). HINWEIS 2.5 Vor dem Betreiben der Anlage ist vom Betreiber sicherzustellen, dass bei der Montage und Inbetriebnahme, wenn diese vom Betreiber selbst durchgeführt werden, örtliche Vorschriften (z.B. für Elektro-Anschluss) beachtet werden. Hinweise Die hier dargestellten Hervorhebungen folgende Bedeutung: Wird verwendet, wenn unzureichende oder Nicht-Beachtung von Bedienungsanweisungen, VORSICHT Arbeitsanweisungen, vorgegebener Reihenfolge von Schritten oder ähnlichem zu Verletzungen oder Unfällen führen kann. Wird verwendet, wenn unzureichende oder Nicht-Beachtung von Bedienungsanweisungen, WARNUNG Arbeitsanweisungen, vorgegebener Reihenfolge von Schritten oder ähnlichem zu Schäden an der Ausrüstung führen kann. 2.6 WICHTIG Wird verwendet, wenn besondere Aufmerksamkeit beim Umgang mit der Ausrüstung erforderlich ist. HINWEIS Soll die Aufmerksamkeit auf ein besonderes Merkmal lenken. HINWEIS Hinweise in Bedienungsanleitungen / Dokumentationen sind mit einem „Buch-Symbol“ gekennzeichnet. Aufzählungen 2.7 Aufzählungen mit dem Symbol () beziehen sich auf eine Aktivität, die nur vom Installations- bzw. Bedienpersonal ausgeführt werden darf. Spezielle Sicherheitsinformationen für Wartungs- und Reparaturarbeiten Bei Wartungs- und Reparaturarbeiten an Teilen, die mit gefährlichen Produkten in Berührung VORSICHT kommen, sowie bei Gebindewechsel ist wegen der Verätzungsgefahr die vorgeschriebene Schutzkleidung (Schutzbrille, Schutzhandschuhe, Schürze) zu tragen. 2.8 WICHTIG Für Reparaturen dürfen nur Original-Ersatzteile verwendet werden. Gerätekennzeichnung Die Angaben in dieser Betriebsanleitung gelten nur für das Gerät, deren Typen-Nr. auf dem Titelblatt angegeben ist. Das Typenschild mit der Typen-Nr. befindet sich seitlich auf dem Ovalradzähler. Abb. 2.1 Beispiel: Typenschild für Ovalradzähler: HINWEIS Wichtig für alle Rückfragen ist die richtige Angabe: • der Benennung (Pos. 1) • des Typs (Pos. 2) Nur so ist eine einwandfreie und schnelle Bearbeitung möglich. 417102208_OGM_Plus -6- Rev. 4-01.13 3 Lieferumfang Der Lieferumfang besteht aus: Abb. 3.1 • Abb. 3.2 • 417102208_OGM_Plus Ovalradzähler OGM PLUS (Oval Gear Meter PLUS) Artikel Nr. (EBS-Nr.) 280141 (10200631) 280043 (10092943) 280044 (10013357) 280045 (10106904) 280046 (10100572) 280151 (10200632) 280073 (10200627) 280074 (10200628) 280077 (10200629) 280078 (10200630) Betriebsanleitung Artikel Nr. (EBS-Nr.) 417102208 (auf Anfrage) -7- Rev. 4-01.13 4 Aufbau / Funktionsbeschreibung 4.1 Aufbau Pos. 1 2 3 4 5 6 7 8 Beschreibung O-Ringe für Anschlussadapter Anschlussadapter Gehäuseschrauben Elektronischer Ausgang Gehäusedeckel Dichtring zwischen Deckel und Gehäuse Ovalzahnräder Ovalradgehäuse Abb. 4.1 4.2 Funktionsbeschreibung Der OGMPLUS dient zur volumetrischen Erfassung der Durchflussmenge von reinen, sauberen Flüssigkeiten (max. 1000 mPas, Messmethode: Brookfield). Da es sich um einen volumetrischen Zähler handelt, können auch pulsierende bzw. diskontinuierliche Durchflüsse erfasst werden. Dieser Zähler ist deshalb sehr gut geeignet um den Volumenstrom von elektromotorisch betriebenen Membranpumpen (z.B. EMP-KKS, EMP II, EMP III, EMP IV) zu messen. Der OGMPLUS verfügt über eine automatische Flussrichtungserkennung. Volumenströme in Rückwärtsrichtung werden gespeichert ohne Impulse auszugeben. Vorhergehende Volumenströme in Rückwärtsrichtung werden von dem nächsten Volumenstrom in Vorwärtsrichtung subtrahiert. Ein weiterer Vorteil des OGMPLUS liegt in seiner Kalibrierfähigkeit. Damit erzielt man die größtmögliche Genauigkeit unter Berücksichtigung der Einsatzbedingungen. Der OGMPLUS ist in seinen Eigenschaften optimal auf den Anschluss an eine Membrandosierpumpe aus der EMP E60-Pumpenreihe abgestimmt. Die Vorteile sind: • Direkter Anschluss an eine EMP E60 (über Dongle-Box oder Dongle-Platine). • Arbeitet mit hoch auflösender Impulsanzahl von 120 Impulse pro Zahnradumdrehung • Die Rotationsgeschwindigkeit der Ovalzahnräder ist proportional zur Durchflussmenge. Bei Anschluss an ein übergeordnetes Erfassungssystem (SPS oder ähnlichem): • Einstellbare Impulsanzahl, wahlweise in Impulsen pro Umdrehung oder Impulsen pro Liter bzw. Impulsen pro ml. Werkseitige Einstellung siehe Kapitel 8 „Technische Daten“. (Impulszahl bei Anschluss an übergeordnete Steuerung)*) • Impulsausgang kann wahlweise zwischen PNP oder NPN umgeschaltet werden (werkseitig wird der Ausgang PNP eingestellt)*) *) nur mit Zusatzhardware OGM Commander Art.-Nr. 280094 (EBS-Nr. 10200916) und Windows-Software 417102208_OGM_Plus -8- Rev. 4-01.13 5 Installation 5.1 Hinweise zur Installation HINWEIS 5.2 Um Lufteinschlüsse zu vermeiden, sollte der Zähler in einer steigenden Dosierleitung eingebaut und entlüftet werden. Die Verwendung eines Filters/Siebes ist bei der Dosierung von auskristallisierenden Produkten erforderlich. Anschlussadapter montieren Abb. 5.1 Die für den OGMPLUS im Zubehör erhältlichen Anschlussadapter (Pos. 1) an der Eingangs- und Ausgangsseite des Ovalradzählers montieren. Hierbei ist besonders darauf zu achten, dass die zugehörigen O-Ringe (Pos. 2) lagerichtig eingebaut werden. Die notwendigen Anschlussadapter (Pos. 1) und die dazugehörigen O-Ringe (Pos. 2) können Sie dem Kapitel 9 „Bestellschlüssel, Ersatzteile und Zubehör“ entnehmen. Anstelle der Schlauchanschlussverschraubungen kann mit einem entsprechenden Einlegeteil auch direkt eine Rohrleitung angeschlossen werden. 5.3 Konsole montieren Abb. 5.2 Den OGMPLUS an der im Zubehör erhältlichen Konsole (siehe Kapitel 8.2, „Abmessungen“ und Kapitel 9, „Bestellschlüssel, Ersatzteile und Zubehör“) mit geeigneten Schrauben (Pos. 2) und Unterlegscheiben (Pos. 1) befestigen. 5.4 Wandmontage PLUS ACHTUNG 5.5 Der OGM muss entsprechend der auf dem Deckel markierten Durchflussrichtung eingebaut werden, da er nur dann Impulse ausgibt wenn der Volumenstrom in dieser Richtung erfolgt. PLUS Alternativ kann der OGM auch ohne Konsole direkt an einer “Montagewand“ befestigt werden. Befestigungsabstand der Gewindebohrungen (siehe Kapitel 8.2 „Abmessungen“). Montage der Schlauch- oder Rohrleitung PLUS HINWEIS 417102208_OGM_Plus Dem OGM liegen die notwendigen Schlauchanschlussteile nicht bei und müssen entsprechend der Größe (Typenbezeichnung) aus dem Zubehör bestellt werden (siehe Kapitel 9 „Bestellschlüssel, Ersatzteile und Zubehör“). -9- Rev. 4-01.13 5.5.1 Übersicht Schlauchleitung Abb. 5.3 5.5.2 Rohrleitung Abb. 5.4 Pos. 1 1a 2 3 3a 4 5 6 Bezeichnung Schlauchleitung Rohrleitung Überwurfmutter Spannteil Einlegeteil Kegelteil O-Ring Anschlussadapter Montage der Schlauchleitung HINWEIS Angaben auf dem Beipackzettel der Schlauchanschlussteile beachten! • Schlauch (Abb. 5.3, Pos. 1) gerade abschneiden. • Überwurfmutter (Abb. 5.3, Pos. 2) und Spannteil (Abb. 5.3, Pos. 3) über den Schlauch schieben. • Schlauch auf Kegelteil (Abb. 5.3, Pos. 4) bis zum Anschlagbund aufschieben. • O-Ring (Abb. 5.3, Pos. 5) in die vorgesehene Nut am Anschlussadapter (Abb. 5.3, Pos. 6) einlegen. • Schlauch mit Kegelteil (Abb. 5.3, Pos. 4) aufstecken und Überwurfmutter (Abb. 5.3, Pos. 2) festziehen. 5.5.3 Montage der Rohrleitung Rohrleitung (Abb. 5.4, Pos. 1a) gerade abschneiden. Überwurfmutter (Abb. 5.4, Pos. 2) über das Rohr schieben. Einlegeteil (Abb. 5.4, Pos. 3a) mit Rohr verschweißen/ verkleben. O-Ring (Abb. 5.4, Pos. 5) in die vorgesehene Nut am Anschlussadapter (Abb. 5.4, Pos. 6) einlegen. • Überwurfmutter (Abb. 5.4, Pos. 2) festziehen. • • • • 417102208_OGM_Plus - 10 - Rev. 4-01.13 5.6 Elektrischer Anschluss Die Auswerteelektronik des OGMPLUS ist im Deckel eingegossen. Der elektrische Anschluß erfolgt über einen 4-poligen M12 Stecker. 5.7 Anschluss an (SPS-)Steuerungen HINWEIS 5.7.1 PLUS Der OGM wird mit PNP-Ausgang geliefert. PLUS Bei Bedarf kann der OGM auf NPN-Ausgang umprogrammiert werden. (SPS-)Steuerung mit PNP-Eingang Pos. A B Bezeichnung Kabel, (5 m) Art. Nr. 418439006 (EBS-Nr. 10093156) Winkelstecker Abb. 5.5 5.7.2 (SPS-)Steuerung mit NPN-Eingang Pos. A B Bezeichnung Kabel, (5 m) Art. Nr. 418439006 (EBS-Nr. 10093156) Winkelstecker Abb. 5.6 417102208_OGM_Plus - 11 - Rev. 4-01.13 5.7.3 Anschluss an EMP E60 Pumpen 5.7.3.1 Anschluß an EMP KKS E60Plus, EMP II E60Plus, EMP III E60Plus (Dongle-Box) Pos. A B C Bezeichnung Kabel Art. Nr. 248607 (EBS-Nr. 10007292) Winkelstecker Gerader Stecker Abb. 5.7 5.7.3.2 Anschluß an EMP IV E60Plus (Dongle-Platine) Pos. A B Bezeichnung Kabel, (5 m) Art. Nr. 418439005 (EBS-Nr. 10007453) Winkelstecker Abb. 5.8 417102208_OGM_Plus - 12 - Rev. 4-01.13 6 Inbetriebnahme Um eine korrekte Erfassung der Durchflussmengen zu gewährleisten, ist vor Inbetriebnahme die Impulswertigkeit des Zählers (Zählerkonstante) zu ermitteln. Hierzu muss die Förderleistung der Pumpe im Betrieb gemessen werden. 6.1 Ermittlung der Impulswertigkeit des Zählers geeigneten Messzylinder mit dem Dosiermedium füllen. Saugleitung in den Messzylinder einführen. Dosierpumpe in Betrieb nehmen. Entlüftung des Dosiersystems durchführen (solange dosieren, bis Dosierleitung und OGMPLUS entlüftet sind). Dosierpumpe stoppen. Messgefäß bis zur Maximalmenge auffüllen. HINWEIS Die Menge im Messzylinder sollte min. 1/6 der an der Dosierpumpe eingestellten Dosierleistung (l/h) entsprechen. Der Zähler ist nur für reine, saubere Flüssigkeiten geeignet! PLUS Bei Anschluss eines OGM an unsere Dosierpumpenreihe E60 (mit Elektronikausführung) ist die Ermittlung der Impulswertigkeit in der Bedienungsanleitung der entsprechenden Dosierpumpe unter Kapitel 'Kalibrierung' beschrieben. Dosierpumpe starten und Zählimpulse des OGMPLUS aufnehmen. Die aus dem Messgefäß entnommene Menge ermitteln. Gezählte Impulse ins Verhältnis zu der Dosierten Menge setzen. Das Ergebnis entspricht der genauen Impulszahl pro Liter. 417102208_OGM_Plus - 13 - Rev. 4-01.13 7 Wartung VORSICHT Die Anschluss- und Wartungsarbeiten am Ovalradzähler dürfen nur von autorisiertem Fachpersonal ausgeführt werden. Vor Reparatur- und Wartungsarbeiten und Dosierung von gefährlichen Medien immer den Ovalradzähler spülen, die Druckleitung entlasten und Schutzkleidung (Schutzbrille, Schutzhandschuhe und Schürze) tragen. Beachten Sie vor der Reinigung unbedingt das Produktdatenblatt des Dosiermediums, um chemische Reaktionen, z. B. bei der Reinigung mit Wasser und nicht verträglicher Chemie zu verhindern. Beim Öffnen des Ovalradzählers ist darauf zu achten, dass das System drucklos ist und die vorgeschaltete Dosierpumpe nicht in Betrieb genommen wird. Pos. 1 2 3 4 5 Bezeichnung Schrauben Deckel O-Ring Ovalrad – 1 Ovalrad – 2 mit Magneteinsatz Abb. 7.1 7.1 Zerlegen des Ovalradzählers Am Ovalradzähler die 4 Schrauben (siehe Abb. 7.1, Pos. 1) herausdrehen. Deckel (Pos. 2) abnehmen. Die beiden Ovalräder (Pos. 4 + Pos. 5) entfernen und reinigen oder ersetzen. HINWEIS 7.2 Es wird empfohlen grundsätzlich die O-Ring-Dichtung (Pos. 3) zwischen Deckel und Gehäuse zu erneuern. Zusammenbau des Ovalradzählers Pos. 1 2 Bezeichnung Ovalrad – 1 Ovalrad – 2 mit Magneteinsatz Abb. 7.2 Ovalräder einsetzen HINWEIS Unbedingt auf den richtigen Sitz der Ovalräder achten! Die Ovalräder müssen so eingesetzt werden, dass sie genau 90° zueinander versetzt sind (siehe Abb. 7.1, Pos. 4 + pos. 5). Das Ovalrad mit den eingeschweißten Magneten (Pos. 2) muss unter dem Sensor im Deckel positioniert sein. Die Plättchen auf diesem Ovalrad müssen nach unten zeigen! Zur Kontrolle ein Ovalrad vorsichtig per Finger drehen; das andere Ovalrad muss über eine komplette Umdrehung mitgenommen werden ohne zu Sperren oder den Kontakt zum zweiten Ovalrad zu verlieren. Schrauben vorsichtig ansetzen (Gegengewinde im Gehäuse aus Kunststoff) und mit einem Anzugsmoment von 1 Nm +0,4 diagonal festziehen HINWEIS 417102208_OGM_Plus Nach Reinigung der Ovalräder mit dem damit verbundenen Öffnen und Schließen des Ovalradzählers wird eine Neukalibrierung empfohlen! - 14 - Rev. 4-01.13 8 Technische Daten Ovalradzähler Typ: Artikel Nr. (EBS-Nr.) Empfohlen für Dosierpumpe 8.1 4,8 65 12 160 (16...54l/h) (80...120l/h) (140...210l/h) (450l/h) 18 144 45 360 40 250 100 625 60 540 150 1200 1 5 10 20 50 0,01 0,029 0,055 0,133 0,222 10 40 1000 G1/8” ±5% ± 1% G3/4” * G1/4” G1 1/4” Materialien Ovalräder Ovalradachsen Abb. 8.1 0,5* 13,5 1,25 34 01200 02100 04500 280044 280045 280046 (10013357) (10106904) (10100572) 280074 280077 280078 (10200628) (10200629) (10200630) EMP III EMP IV EMP IV * für den Reglerbetrieb mit Elektronik E60+ ist ein Mindestdurchfluss von 1l/h erforderlich. ** Das Gerät kann auch auf andere Impulsfolgen, die im Rahmen der Verarbeitungsgrenzen liegen, programmiert werden. Gehäuse Gehäusedeckel O-Ringe 8.2 00540 280043 (10092943) 280073 (10200627) EMP III (0,9...11,2l/h) min. Durchflussmenge bei Verwendung einer EMP Dosierpumpe [l/h] max. min. Durchflussmenge bei kontinuierlichem Durchfluss [l/h] max. Impulszahl bei Anschluss an ml/Imp übergeordnete Steuerung (z.B. SPS)** Impulszahl bei Anschluss an Elektronik E60 ml/Imp (hochauflösend) zulässiger Systemdruck [bar] max. Umgebungs- /Mediumstemperatur [°C] max. Viskosität [mPas] max. Genauigkeit nicht kalibriert (Lieferzustand) Kalibriert unter Betriebsbedingungen Anschlussgewinde HINWEIS 00112 280141 (10200631) 280151 (10200632) EMP II/KKS PVC grau oder PP (280048) PVC (transparent) oder PP (280048) FPM (Viton B) wahlweise EPDM PVDF (für Typ 00112), PVC (für Typ 00112) PEEK (für Typen 00540, 01200, 02100, 04500) Keramik Abmessungen OGM Typ 00112 00540 01200 02100 04500 Abb. 8.2 *Maße nicht gültig für PP- Ausführung: 417102208_OGM_Plus A 41 45 53 76 76 52 56 64 88,7 88,7 B* 66 74 82 106,7 106,7 00112/00540/01200 02100/04500 - 15 - D 13 17,8 19 30,5 30,5 E F 35 40 40 60 60 64 73 80 108 108 G M4 M5 M5 M8 M8 *ohne / mit Winkelstecker des Anschlusskabels Konsole Typ C G 1/8“ G 1/4" G 3/4" G 1 ¼" G 1 ¼" A [mm] 120 150 B [mm] C [mm] D [mm] 60 100 10* 80 10 135 E 35 55 Rev. 4-01.13 9 Bestellschlüssel, Ersatzteile und Zubehör 9.1 Übersicht Artikel Nr. (EBS-Nr.) 280141 (10200631) 280043 (10092943) 280044 (10013357) 280045 (10106904) 280046 (10100572) 280151 (10200632) 280073 (10200627) 280074 (10200628) 280077 (10200629) 280078 (10200630) 9.2 Bezeichnung OGM PLUS 00112VCFPPVKE-G1/8i-99-0001m-P OGM PLUS 00540VCFPPKKE-G1/4i-99-0005m-P OGM PLUS 01200VCFPPKKE-G3/4i-99-0010m-P OGM PLUS 02100VCFPPKKE-G5/4i-99-0020m-P OGM PLUS 02100VCEPPKKE-G5/4i-99-0020m-P OGM PLUS 00112VCEPVCKE-G1/8i-99-0001m-P OGM PLUS 00540VCEPPKKE-G1/4i-99-0005m-P OGM PLUS 01200VCEPPKKE-G3/4i-99-0010m-P OGM PLUS 02100VCEPPKKE-G5/4i-99-0020m-P OGM PLUS 04500VCEPPKKE-G5/4i-99-0050m-P Bestellschlüssel 1. Gerätebezeichnung PLUS OGM 2. Typ 00112 00540 01200 02100 04500 = = = = = für EMP bis 11,2 l/h für EMP bis 54 l/h für EMP bis 120 l/h für EMP bis 210 l/h für EMP bis 450 l/h 3. Werkstoff Gehäuse VC = PP = PVC PP 4. Werkstoff Dichtungen FP EP = = Viton B EPDM 5. Werkstoff Ovalräder PK = PV = VC = PEEK (Typ 00540 - 04500) PVDF (nur für Typ 00112) PVC (nur für Typ 00112) 6. Werkstoff Ovalradachsen KE = Keramik 7. Anschlussgewinde G1/8, G1/4, G3/4, G5/4, G1/2i-G1a 8. Anschlussmaterial 99 = ohne Anschlussmaterial 9. Impulsrate 0001m = 1 ml / Impuls 0005m = 5 ml / Impuls 0010m = 10 ml / Impuls 0020m = 20 ml / Impuls 0050m = 50 ml / Impuls andere mögliche Impulsraten: 2600p = 2600 Pulse / Liter 0820p = 820 Pulse / Liter 0450p = 450 Pulse / Liter 0300p = 300 Pulse / Liter 0075p = 75 Pulse / Liter 10. Halbleiterübergang P N OGM PLUS 01200 417102208_OGM_Plus VC FP PK KE G3/4 99 = = PNP NPN 0010m P - 16 - Rev. 4-01.13 9.3 Ersatzteile Abb. 9.1 Abb. 9. 2 Abb. 9.3 Plus Pos. 1 2 2a 3 4 5 7 8 10 Bezeichnung: Innensechskantschraube, M4 x 20 V2A Innensechskantschraube, M5 x 25 V2A Sechskantschraube, M8 x 40 V2A OGM PLUS 01200 Deckel komplett, PVC OGM PLUS 01200 Deckel komplett, PP Verstärkung für Gehäusedeckel O-Ring 35 x 2,5 FPM O-Ring 35 x 2,5 EPDM O-Ring 40 x 2 FPM O-Ring 40 x 2 EPDM O-Ring 65 x 2,5 FPM O-Ring 64,77 x 2,62 EPDM Ovalrad PVC Ovalrad PVDF Ovalrad PEEK Ovalrad PVC mit Magnet Ovalrad PVDF mit Magnet Ovalrad PEEK mit Magnet Scheibe B15 x 5,3 x 1,6 DIN9021 ISO7093 V2A Scheibe Form A 5,5 x 10 x 1 DIN 126 V2A Scheibe Form A 8,4 x 17 x 1,6 V2A 417102208_OGM_Plus 00112 413031007 (auf Anfrage) 280189 (auf Anfrage) Typ: OGM 00540 01200 Artikel Nr. (EBS-Nr.) 413031023 (10030685) 280091 (auf Anfrage) 417003356 (auf Anfrage) 417001330 (10122528) 38006046 (auf Anfrage) 38006043 (auf Anfrage) 38006044 (auf Anfrage) 38006041 (auf Anfrage) 280092 (auf Anfrage) 280088 (auf Anfrage) 417003411 (auf Anfrage) 417001365 (10200033) 02100 04500 413000320 (auf Anfrage) 280093 (auf Anfrage) 38006036 (auf Anfrage) 417003415 (auf Anfrage) 417001519 (10004139) 38006018 (auf Anfrage) 38006023 (auf Anfrage) 38006029 (auf Anfrage) 38006033 (auf Anfrage) 38006049 (auf Anfrage) 38006066 (auf Anfrage) 413501720 (10015901) 413500360 (10005460) 38006051 (auf Anfrage) 38006052 (auf Anfrage) - 17 - 413500363 (auf Anfrage) Rev. 4-01.13 9.4 Zubehör Artikel Nr. (EBS-Nr.) 418439006 (10093156) 248607 (10007292) 418439005 (10007453) 280095 (auf Anfrage) 280084 (10007319) 280085 (10016056) 280094 (10200916) 9.4.1 Bezeichnung PLUS Anschlusskabel 5 m OGM zum Anschluss an SPS PLUS Anschlusskabel 5 m OGM – Dongle Box E60+ zum Anschluss an EMP KKS, EMP II, EMP III PLUS Anschlusskabel 5 m OGM zum Anschluss an EMP IV E60 mit Dongleplatine Winkelstecker mit Schraubklemmen zum Anschluss an SPS Wandkonsole OGM Typ 00112/00540/01200 inklusive Befestigungsschrauben Wandkonsole OGM Typ 02100/04500 inklusive Befestigungsschrauben OGM Commander Einstellungs-Tool zur Programmierung von Impulsrate bzw. Halbleitertyp (PNP oder NPN). Anschlussadapter (je 2 Stück erforderlich) OGM Plus Typ Art. Nr. 280080 (EBS-Nr.) (10016051) für Typ 00112 Art. Nr. 280081 (EBS-Nr.) (10007190) für Typ 00540 Art. Nr. 280082 (EBS-Nr.) (10016058) für Typ 01200 Art. Nr. 280083 (EBS-Nr.) (10016066) für Typ 02100 & 04500 417102208_OGM_Plus Stück Bezeichnung Anschluss-Adapter OGM 00112 1/8-3/8-PVFP/EP-21 bestehend aus: 1 Anschluss-Adapter G1/8a-G3/8a PVDF 1 O-Ring 10 x 1,5 FPM (Viton B) 1 O-Ring 10 x 2,5 FPM (Viton B) 1 O-Ring 10 x 1,5 EPDM 1 O-Ring 10 x 2,5 EPDM 1 Anschlussset PVDF G3/8-Schl. 4/6,6/8,6/12 Anschluss-Adapter OGM 00540 1/4-5/8-PVFP/EP-50 bestehend aus: 1 Anschluss-Adapter G1/4a-G5/8a PVDF 1 O-Ring 12 x 2,5 FPM (Viton B) 1 O-Ring 13 x 2,5 FPM (Viton B) 1 O-Ring 12 x 2,5 EPDM 1 O-Ring 13 x 2,5 EPDM 1 Anschlussset PVDF G5/8-Schl. 4/6,6/8,6/12 Anschluss-Adapter OGM 01200 ¾-5/4-PVFP/EP-07 bestehend aus: 1 Anschluss-Adapter G3/4”a-G5/4”a PVDF 1 O-Ring 14 x 2,5 FPM (Viton B) 1 O-Ring 28 x 3,5 FPM (Viton B) 1 O-Ring 14 x 2,5 EPDM 1 O-Ring 28 x 3,5 EPDM 1 Anschlussset PVDF G1 ¼-Schl. 12/21 Anschluss-Adapter OGM 02100 5/4-5/4-PVFP/EP-99 bestehend aus: 1 Ventilgehäuse 1 1/4" PVDF 2 O-Ring 28 x 3,5 FPM (Viton B) 2 O-Ring 28 x 3,5 EPDM 1 Ventilsitz 1 1/4 PVDF - 18 - Rev. 4-01.13 10 Demontage / Entsorgung Demontage Die Demontage darf nur vom Fachpersonal durchgeführt werden. Achten Sie darauf, dass vor Beginn der Demontagearbeiten das System komplett von der Stromversorgung getrennt wurde. Der Ovalradzähler muss sorgfältig durchgespült werden um Chemiereste zu beseitigen. Entsorgung Die Materialien des Ovalradzählers OGMPLUS sind in Kapitel 8.1 „Materialien“ aufgeführt und müssen entsprechend den dann gültigen örtlichen Umweltvorschriften entsorgt werden. Entsorgen Sie je nach Beschaffenheit, existierenden Vorschriften und unter Beachtung aktueller Bestimmungen z.B. als: Elektroschrott (Leiterplatten), Kunststoffe (Gehäuse), Blech, Stahl, Kupfer, Aluminium (nach Sorten trennen). Vor dem Entsorgen sind alle medienberührten Teile zu dekontaminieren. Öle, Lösungs- und Reinigungsmittel und kontaminierte Reinigungswerkzeuge (Pinsel, Lappen usw.) müssen den örtlichen Bestimmungen entsprechend, gemäß dem geltenden Abfall- Schlüssel und unter Beachtung der Hinweise in den Sicherheitsdatenblättern der Hersteller entsorgt werden. 417102208_OGM_Plus - 19 - Rev. 4-01.13 11 Konformitätserklärung 417102208_OGM_Plus - 20 - Rev. 4-01.13 Contents 1 General ................................................................................................................. 22 1.1 1.2 1.3 1.4 EBS Article numbers ....................................................................................................... 22 Transport damage ........................................................................................................... 22 Scope of warranty ........................................................................................................... 22 Contact address / manufacturer ...................................................................................... 22 2.1 2.2 2.3 2.3.1 2.3.2 2.4 2.5 2.6 2.7 2.8 Use as intended .............................................................................................................. 23 Safety information ........................................................................................................... 23 Safety measures (to be carried out by the owner) ........................................................... 23 Definition: Trained person ............................................................................................... 24 Definition: Specialist ........................................................................................................ 24 Duties of the owner ......................................................................................................... 24 Emphases ....................................................................................................................... 25 Numberings ..................................................................................................................... 25 Special notes on safety for servicing, maintenance and repair work ................................ 25 Device marking ............................................................................................................... 25 4.1 4.2 Assembling ..................................................................................................................... 27 Functional descripion ...................................................................................................... 27 5.1 5.2 5.3 5.4 5.5 5.5.1 5.5.2 5.5.3 5.6 5.7 5.7.1 5.7.2 5.7.3 Notes for installation ........................................................................................................ 28 Installation of connecting adapter .................................................................................... 28 Install brackets ................................................................................................................ 28 Installation on walls ......................................................................................................... 28 Installation of hose or pipe............................................................................................... 28 Overview ......................................................................................................................... 29 Connection of hose ......................................................................................................... 29 Connection of pipe .......................................................................................................... 29 Electrical connection ....................................................................................................... 30 Connection to (PLC) control systems .............................................................................. 30 (PLC) control system with PNP input ............................................................................... 30 (PLC) control system with NPN input............................................................................... 30 Connection to EMP E60 pumps....................................................................................... 31 6.1 Determination of the meter’s pulse value......................................................................... 32 7.1 7.2 Dismantling of the oval gear meter .................................................................................. 33 Re-assembly of the oval gear meter ................................................................................ 33 8.1 8.2 Materials ......................................................................................................................... 34 Dimensions ..................................................................................................................... 34 9.1 9.2 9.3 9.4 9.4.1 Overview ......................................................................................................................... 35 Ordering Code................................................................................................................. 35 Spare parts ..................................................................................................................... 36 Accessories ..................................................................................................................... 37 Connecting adapters (two items necessary in each case) ............................................... 37 2 3 4 5 6 7 8 9 10 11 Safety ................................................................................................................... 23 Scope of supply .................................................................................................. 26 Assembling / Functional descripion.................................................................. 27 Installation ........................................................................................................... 28 Start up ................................................................................................................ 32 Maintenance ........................................................................................................ 33 Technical data ..................................................................................................... 34 Ordering code, Spare parts and accessories ................................................... 35 Dismantling / Disposal ........................................................................................ 38 Declaration of Conformity .................................................................................. 39 417102208_OGM_Plus - 21 - Rev. 4-01.13 1 General This Technical Manual includes all the instructions necessary for the installation, commissioning, servicing, maintenance and repair of the Oval Gear Meter OGMPLUS. NOTE The German sections of this manual constitute the ORIGINAL OPERATING MANUAL and take legal precedence. All other languages are translations of the ORIGINAL OPERATING MANUAL. If you have questions, please contact us as outlined in chapter 1.4 “Contact Address / IMPORTANT Manufacturer”. 1.1 EBS Article numbers Within this operating instruction article numbers, and EBS numbers are represented. EBS numbers are Ecolab internal article numbers and used only “concern internal”. 1.2 Transport damage CAUTION WARNING 1.3 PLUS If transport damage is discovered at the time of unpacking, the OGM unit may not be installed! The carrier in question must be notified immediately and a damage confirmation slip must be requested. A copy of the damage confirmation slip must be sent to Ecolab Engineering GmbH immediately. Scope of warranty Guarantee liability with respect to operational safety and reliability, dependability and accuracy of the Oval Gear Meter (referred to below as the "OGMPLUS") is accepted by the manufacturer only under the following conditions: • Installation, connection, setting, adjustment, servicing, maintenance and repair must be performed by authorized and trained specialist staff. • The OGMPLUS must be used in accordance with the notes and remarks contained in the Operating Manual included in the Scope of Supply. • Only original manufacturer’s spare parts may be used for repairs. The general warranty and service terms and conditions of the company Ecolab Engineering GmbH apply as well. 1.4 Contact address / manufacturer Ecolab Engineering GmbH Raiffeisenstraße 7 D-83313 Siegsdorf Phone (+49) 86 62 / 61 0 Fax (+49) 86 62 / 61 235 eMail: [email protected] 417102208_OGM_Plus - 22 - Rev. 4-01.13 2 2.1 Safety CAUTION Attention must be paid to the safety information and to the highlighted sections at all times! NOTE The relevant sections of this manual must be read and noted before installing the device, using it for the first time, and before carrying out any maintenance or repair work. These operating instructions are an integral part of the oval gear meter and must be placed at the disposal of the operating and maintenance personnel at all times. If the system is resold, the operating instructions must always be supplied with it. Use as intended WARNING PLUS The OGM may only be used with products which have been validated by Ecolab. Liability is not accepted if unvalidated products are used! The OGMPLUS has been developed, designed and built exclusively for industrial and commercial use. The system is not intended for private use. Use as intended also includes compliance with the control and operating instructions prescribed by the manufacturer, as well as with the maintenance and servicing conditions. The service life of the metering system is approximately 5 years, provided the system is properly maintained. It then needs to be inspected (followed by a general overhaul, if necessary) by the manufacturer or by a specialist firm. 2.2 Safety information • The connection and repair work on the OGMPLUS may only be conducted by authorised and trained specialist personnel. • Suitable protective clothing must be worn during maintenance and repair work. • Safety regulations covering the handling of chemicals must always be observed. • The supply of metering medium must be shut off, and the pressure booster pump must be isolated from the mains before any repair work is commenced. 2.3 Safety measures (to be carried out by the owner) It is expressly up to the owner: • to instruct its operating and maintenance personnel about safety features of the system; • to monitor compliance with safety measures; • to ensure that the danger area of the plant is kept inaccessible to unauthorised personnel (not operating and maintenance personnel). These operating instructions must be kept safe for future reference. The frequency of inspections and controls must be complied with. The procedures described here must be set out to make sense: • to a trained person in the section on Operation; • to a specialist in the sections on Transport, Setup and Installation, Maintenance, and Troubleshooting. The chapters on Transport, Setup and Installation, Maintenance, and Troubleshooting are only intended for specialist personnel. Procedures described in these sections may only be performed by specialist personnel. 417102208_OGM_Plus - 23 - Rev. 4-01.13 2.3.1 Definition: Trained person A person who receives instructions and, where necessary, training from a specialist about the duties which are assigned to him or her and about the possible hazards of incorrect use and who has been advised about the necessary safety features and measures. 2.3.2 Definition: Specialist A person with appropriate training, schooling and experience enabling him or her to identify risks and avert danger. Definition based on EN 60204-1:2006. 2.4 Duties of the owner NOTE Within the EEA (European Economic Area), national transposition of the framework directive (89/391/EEC) and corresponding individual directives, in particular the directive (89/655/EEC) concerning the minimum safety and health requirements for the use of work equipment by workers at work, as amended, are to be observed and adhered to. The Industrial Safety Ordinance of October 2002 (BGV D1, BGV D1 DA) must be observed in Germany (transposition of the above directive into national legislation). The owner must obtain any local operating permits required and observe the provisions contained therein. In addition to this, it must observe local laws and regulations on: • personnel safety (employers' insurance association and accident prevention regulations, workplace directives), e.g. operating instructions, including those in accordance with s. 20 Hazardous Substances Ordinance (GefStoffV), personal protective equipment (PPE)), health screening; • safety of work materials and tools (safety equipment, standard operating procedures, procedural risks and maintenance); • product procurement (safety data sheets, list of hazardous substances); • disposal of products (Waste Act); • disposal of materials (decommissioning, Waste Act); • cleaning (detergents and disposal); • as well as to comply with current environment protection regulations. The owner is also required: • to provide personal protective equipment (PPE): safety footwear, gloves, goggles, mask, suit. • to conduct a constant hazard assessment of the workplaces, including consideration for hazardous substances and fire protection. This also includes handling hot components (please note that they cool slowly). • to incorporate the measures into operating instructions and to instruct personnel accordingly; • to provide safe access to operator stations (which are a metre or more off the ground), and to erect scaffolding, if necessary; • to guarantee training for operating personnel; • to ensure that standard operating procedures are compiled; • to ensure that there is no other person located within the danger areas (crushing points) during operation; • to provide the proscribed number and size of safety equipment, such as suitable handheld fire extinguishers, in easily accessible places. • to provide suitable workplace lighting in accordance with ASR 7/;. • to make regular checks to ensure that tripping hazards are marked. 417102208_OGM_Plus - 24 - Rev. 4-01.13 Connections: Before operating the system, the owner must ensure that local regulations (e.g. for electrical connections) are complied with during installation and commissioning if these procedures are conducted by the owner itself. Lighting: The owner must provide an adequate and consistent level of lighting throughout all the areas of the system. Lighting levels of 300 lux (500 lux at inspection stations) are recommended, depending on the area of the plant (maintenance value; in Germany: ASR 7/3). Personnel must receive safety training at least once a year (and at the start of their appointment) on hazards and the safety measures, with reference to the operating instructions. Signed confirmation is required that training has been given (TRGS 555 (Technical Rules on Hazardous Substances)). NOTE 2.5 Emphases The emphases indicated in this manual have the following meanings: is used in cases in which imprecise adherence or non-adherence to operating instructions, working procedures, specified working sequences, etc., could result in injury or accidents. CAUTION is used in cases in which imprecise adherence or non-adherence to operating instructions, ATTENTION working procedures, specified working sequences, etc., could result in damage to the equipment. 2.6 is used in cases in which particular attention must be devoted to the handling and use of the IMPORTANT equipment. NOTE is used in cases in which attention is to be drawn to a particular feature. NOTE Notes in operating instructions / documentation are to be indicated by a "Book" symbol. Numberings 2.7 Numberings marked with this sign () describe an activity which must only be performed by the installer / user. Special notes on safety for servicing, maintenance and repair work The specified safety clothing (safety goggles, safety gloves, safety apron, etc.) must be worn, due to the danger of corrosive injury, for all servicing, maintenance and repair work on components which come into contact with hazardous products, and for pack changes. CAUTION 2.8 IMPORTANT Only manufacturer’s original spare parts may be used for repairs. Device marking The information contained in these operating instructions only applies to the device whose model no. appears on the cover page. The rating plate and model no. can be found on side of the Oval gear meter. Example: Rating Plate for oval gear meter: Fig. 2.1 NOTE To enable all queries to be processed, it is important that the: • designation and (pos. 1) • model are quoted correctly (pos. 2) This is the only way of ensuring that we can answer your query correctly and quickly. 417102208_OGM_Plus - 25 - Rev. 4-01.13 3 Scope of supply The delivery scope consists of the following: • Fig. 3.1 Fig. 3.2 Oval Gear Meter OGM PLUS (Oval Gear Meter PLUS) Article No. (EBS-No.) 280141 (10200631) 280043 (10092943) 280044 (10013357) 280045 (10106904) 280046 (10100572) 280151 (10200632) 280073 (10200627) 280074 (10200628) 280077 (10200629) 280078 (10200630) • Operating manual Article No. (EBS-No.) 417102208 (on request) 417102208_OGM_Plus - 26 - Rev. 4-01.13 4 Assembling / Functional descripion 4.1 Assembling Pos. 1 2 3 4 5 6 7 8 Description O-Rings for Connecting adapter Connecting adapter Housing bolts Electronic output Housing cover Sealing ring between Cover and Housing Oval Gear Wheels Oval Gear Housing Fig. 4.1 4.2 Functional descripion The OGMPLUS is used for volumetric measurement of the rate of flow of pure and cleaned liquids (max. 1000 mPas, measuring method: Brookfield). The fact that this is a volumetric meter means that surging and discontinuous ("intermittent") flows can also be measured. This meter is therefore also extremely suitable for measurement of the volumetric flow of diaphragm pumps (e.g. EMP-KKS, EMP II, EMP III, EMP IV) driven by means of electric motors. The OGMPLUS features an automatic direction of flow detection system. Reverse volumetric flows are stored without transmission of pulses. Preceding reverse volumetric flows are subtracted from the next forward volumetric flow. A further benefit of the OGMPLUS can be found in its calibration capability. This permits achievement of maximum possible accuracy, taking account of conditions of use. The properties and characteristics of the OGMPLUS are optimally tailored to connection to an EMP E60 series diaphragm-type metering pump. The advantages of this are: • Direct connection to an EMP E60 (via dongle box or dongle-card). • Operation with high-resolution pulse rate of 120 pulses per gear-wheel revolution. • The rate of rotation of the oval gear wheels is proportional to flow. In cases of connection to a higher-level quantification or measuring system (PLC or similar): • Adjustable pulse rate, either in pulses per revolution or pulses per liter / pulses per ml. For factory setting see chapter 8 “Technical Data” (number of pulses when connecting to master controller)*) • The pulse output can be optionally switched between PNP or NPN. (factory settings of this output: PNP) *) *) only with auxiliary software OGM Commander Article No. 280094 (EBS-Nr. 10200916) and Windows-Software 417102208_OGM_Plus - 27 - Rev. 4-01.13 5 Installation 5.1 Notes for installation NOTES 5.2 In order to avoid inclusions of air, the meter should be installed in a vertical metering line and vented ("bled"). The use of a filter / strainer is necessary if crystallizing products are to be metered. Installation of connecting adapter Fig. 5.1 Install the connecting adapter (pos. 1) available as an accessory for the OGMPLUS on the input and output side of the Oval Gear Meter. It must be ensured during this operation that the appurtenant O-ring seals (pos. 2) are installed in the correct position. The necessary connecting adapter (pos. 1) and the appurtenant O-ring seals (pos. 2) can be found in chapter 9. "Ordering Code, Spare Parts and Accessories". A pipeline can also be connected directly using an appropriate insert instead of the hose connection fittings. 5.3 Install brackets Fig. 5.2 Fix the OGMPLUS to the brackets available as accessories (see chapter 8.2, "Dimensions" and chapter 9, "Ordering Code, Spare Parts and Accessories") using suitable bolts (pos. 2) and shims (pos. 1) 5.4 Installation on walls PLUS ATTENTION 5.5 The OGM must be installed in accordance with the direction of flow marked on the cover, since it will only then emit pulses when the volumetric flow occurs in this direction. PLUS Alternatively, the OGM can also be fixed without brackets directly to an "installation wall", thanks to the spacing of the threaded holes (see chapter 8.2, "Dimensions"). Installation of hose or pipe PLUS NOTE 417102208_OGM_Plus The necessary hose connecting components are not included with the OGM and must be ordered in the correct size (see model designation) from the available accessories (see chapter 9, "Ordering code, Spare Parts and Accessories"). - 28 - Rev. 4-01.13 5.5.1 Overview Hose connection Fig. 5.3 5.5.2 Pipe connection Fig. 5.4 Pos. 1 1a 2 3 3a 4 5 6 Description Hose Pipe Union nut Clamping element Insert element Cone O-Ring Connecting adapter Connection of hose NOTE Note data on the in-pack notelet with the hose connecting elements! Cut the hose (Fig. 5.3, pos. 1) at right angles. Slip the union nut (Fig. 5.3, pos. 2) and clamping element (Fig. 5.3, pos. 3) over the hose. Slip the hose onto the cone (Fig. 5.3, pos. 4) up to the stop collar. Position the O-ring seal (Fig. 5.3, pos. 5) into the groove provided on the connecting adapter (Fig. 5.3, pos. 6). • Connect the hose and cone (Fig. 5.3, pos. 4) and tighten the union nut (Fig. 5.3, pos. 2). • • • • 5.5.3 Connection of pipe Cut the pipe (Fig. 5.4, pos. 1a) at right angles. Slip the union nut (Fig. 5.4, pos. 2) over the pipe. Weld / adhesive bond the insert (Fig. 5.4, pos. 3a) to the pipe. Position the O-ring seal (Fig. 5.4, pos. 5) in the groove provided on the connecting adapter (Fig. 5.4, pos. 6). • Tighten the union nut (Fig. 5.4, pos. 2). • • • • 417102208_OGM_Plus - 29 - Rev. 4-01.13 5.6 Electrical connection The OGMPLUS electronic evaluation system is moulded into the cover. Electrical connection is accomplished by means of a four-pole M12 connector. 5.7 Connection to (PLC) control systems NOTE 5.7.1 PLUS The OGM is supplied with PNP output. PLUS If required, the OGM can be reprogrammed to NPN output. (PLC) control system with PNP input Pos. A B Description Cable, (5 m) Art. No. 418439006 (EBS-No. 10093156) Angular connector Fig. 5.5 5.7.2 (PLC) control system with NPN input Pos. A B Description Cable, (5 m) Art. No. 418439006 (EBS-No. 10093156) Angular connector Fig. 5.6 417102208_OGM_Plus - 30 - Rev. 4-01.13 5.7.3 Connection to EMP E60 pumps 5.7.3.1 Connection to EMP KKS E60Plus, EMP II E60Plus, EMP III E60Plus (dongle box) Pos. A B C Description Cable Art. No. 248607 (EBS-No. 10007292) Angular connector Straight connector Fig. 5.7 5.7.3.2 Connection to EMP IV E60Plus (dongle-card) Pos. A B Description Cable, (5 m) Art. No. 418439005 (EBS-No. 10007453) Angular connector Fig. 5.8 417102208_OGM_Plus - 31 - Rev. 4-01.13 6 Start up The meter’s pulse value (meter constant) must be determined prior to commissioning, in order to ensure correct measurement of flow rates. The pump’s delivery rate during operation must be measured for this purpose. 6.1 Determination of the meter’s pulse value Fill suitable measuring glass with the fluid to be metered. Insert the suction line into the measuring glass. Start the metering pump. Perform venting of the metering system (continue metering until the metering line and OGMPLUS have been vented). Stop the metering pump. Fill the measuring vessel up to the maximum quantity. NOTE The quantity in the measuring glass should be not less than 1/6 of the metering rate (l/h) set on the metering pump. The meter is suitable only for pure and clean liquids! PLUS If the OGM is connected to an E60 metering pump (with electronic version), determination of pulse value is described in the Operating Manual for the corresponding metering pump in the "Calibration" section. Start the metering pump and record the metering pulses of the OGMPLUS. Determine the quantity removed from the measuring vessel. Refer the number of pulses counted to the quantity metered. The result is the precise number of pulses per liter. 417102208_OGM_Plus - 32 - Rev. 4-01.13 7 Maintenance CAUTION Any and all connection, servicing and maintenance work on the oval gear meter may be performed only by authorized specialist staff. In case of repair and servicing / maintenance work, and in case of metering of hazardous fluids, always rinse the oval gear meter out, depressurize the pressure line and put on protective clothing (safety goggles, safety gloves and aprons) before starting work. Before cleaning the oval gear meter and / or the system, always note the product data sheet for the conveyed fluid, in order to prevent the possibility of chemical reactions, in case, for example, of cleaning using water and non-compatible chemicals. It must be ensured when opening the oval gear meter that the system has been depressurized and that any upstream metering pump cannot be started. Pos. 1 2 3 4 5 Description Housing bolts Cover O-Ring Oval Gear Wheel – 1 Oval Gear Wheel – 2 with solenoid Fig. 7.1 7.1 Dismantling of the oval gear meter Remove the four bolts (see Fig. 7.1, pos. 1) on the oval gear meter. Remove the cover (pos. 2). Remove the two oval gear wheels (pos. 4 + pos. 5) and clean or replace them. NOTE 7.2 It is recommended in all cases that the O-ring seal (pos. 3) between the cover and the housing should always be renewed. Re-assembly of the oval gear meter Pos. 1 2 Description Oval Gear Wheel – 1 Oval Gear Wheel – 2 with solenoid Fig. 7.2 Replace the oval gear wheels. NOTE Under all circumstances ensure correct seating of the oval gear wheels! The oval gear wheels must be inserted in such a way that they are offset to one another at precisely 90° (see fig. 7.1, pos. 4 + pos. 5). The oval gear wheel with the welded-in magnets (pos. 2) must be positioned below the sensor at the Housing cover. The small plates of this oval gear must point downwards. Carefully turn an oval gear wheel using your finger to check; the other oval gear wheel must co-rotate through a complete revolution without jamming and without loosing contact with the first oval gear wheel. Carefully position the bolts (plastic thread in the housing) and tighten the screw with a tightening torque of 1 Nm + 0,4 in a diagonal over-cross pattern. NOTE 417102208_OGM_Plus Recalibration is recommended after cleaning of the oval gear wheel and the associated opening and closure of the oval gear wheel meter! - 33 - Rev. 4-01.13 8 Technical data Oval gear meter type: Article No. (EBS-No.) 00112 280141 (10200631) 280151 (10200632) Recommended for metering pump Flow rate with use of an EMP metering pump [l/h] Flow rate (continuous flow) [l/h] Pulse rate for connection to higher-level control system (e.g. PLC)** Pulse rate for connection to E60 (electronic) (high-resolution) Allowable system pressure [bar] Ambient / fluid temperature [°C] Viscosity [mPas] Accuracy not calibrated (as delivered condition) calibrated under service conditions Connecting thread EMPII/KKS EMP III (0.9 to 11.2l/h) 0,5* 13,5 1,25 34 min. max. min. max. 01200 02100 04500 280044 280045 280046 (10013357) (10106904) (10100572) 280074 280077 280078 (10200628) (10200629) (10200630) EMP IV EMP III EMP IV (140 to (16 to 54l/h) (80 to 120l/h) 210l/h) (450l/h) 4.8 65 12 160 18 144 45 360 40 250 100 625 60 540 150 1200 ml/Imp 1 5 10 20 50 ml/Imp 0,01 0,029 0,055 0,133 0,222 max. max. max. 10 40 1000 G1/8" G1/4" ± 5% ±1% G3/4" * G1 1/4" * A minimum flow of 1 l/h is necessary for controller operation with E60+ electronic. ** The unit can also be programmed to other pulse sequences within the processing limits. NOTE 8.1 00540 280043 (10092943) 280073 (10200627) Materials Housing Housing cover O-ring seals Oval gear wheels Oval gear spindles 8.2 PVC, gray or PP (280048) PVC (transparent) or PP (280048) FPM (Viton B) optional EPDM PVDF (for type 00112), PVC (for type 00112) PEEK (for typs 00540, 01200, 02100, 04500) Ceramic Dimensions Fig. 8.1 OGM Type 00112 00540 01200 02100 04500 A 41 45 53 76 76 52 56 64 88,7 88,7 B* 66 74 82 106,7 106,7 C G 1/8“ G 1/4" G 3/4" G 1 ¼" G 1 ¼" D 13 17,8 19 30,5 30,5 * with / without angular-type connector for connecting cable Fig. 8.2 E F 35 40 40 60 60 64 73 80 108 108 G M4 M5 M5 M8 M8 Bracket * * * Dimensions are not valid for PP version: 417102208_OGM_Plus Type 00112/00540/01200 02100/04500 - 34 - A [mm] 120 150 B [mm] C [mm] D [mm] 60 100 10* 80 10 135 E 35 55 Rev. 4-01.13 9 Ordering code, Spare parts and accessories 9.1 Overview Article No. (EBS-No.) 280141 (10200631) 280043 (10092943) 280044 (10013357) 280045 (10106904) 280046 (10100572) 280151 (10200632) 280073 (10200627) 280074 (10200628) 280077 (10200629) 280078 (10200630) 9.2 Designation OGM PLUS 00112VCFPPVKE-G1/8i-99-0001m-P OGM PLUS 00540VCFPPKKE-G1/4i-99-0005m-P OGM PLUS 01200VCFPPKKE-G3/4i-99-0010m-P OGM PLUS 02100VCFPPKKE-G5/4i-99-0020m-P OGM PLUS 02100VCEPPKKE-G5/4i-99-0020m-P OGM PLUS 00112VCEPVCKE-G1/8i-99-0001m-P OGM PLUS 00540VCEPPKKE-G1/4i-99-0005m-P OGM PLUS 01200VCEPPKKE-G3/4i-99-0010m-P OGM PLUS 02100VCEPPKKE-G5/4i-99-0020m-P OGM PLUS 04500VCEPPKKE-G5/4i-99-0050m-P Ordering Code 1. Designation PLUS OGM 2. Type 00112 00540 01200 02100 04500 = = = = = for EMP up to 11,2 l/h for EMP up to 54 l/h for EMP up to 120 l/h for EMP up to 210 l/h for EMP up to 450 l/h 3. Housing Material VC = PP = PVC PP 4. Sealing Material FP EP = = Viton B EPDM 5. Oval Wheel Material PK = PV = VC = PEEK(types 00540 - 04500) PVDF (only for type 00112) PVC (only for type 00112) 6. Axes Material KE = Ceramics 7. Connecting thread G1/8, G1/4, G3/4, G5/4, G1/2i-G1a 8. Connection 99 = without connection 9. Pulsrate 0001m = 1 ml / puls 0005m = 5 ml / puls 0010m = 10 ml / puls 0020m = 20 ml / puls 0050m = 50 ml / puls other possible pulsrates: 2600p = 2600 pulse / litre 0820p = 820 pulse / litre 0450p = 450 pulse / litre 0300p = 300 pulse / litre 0075p = 75 pulse / litre 10. Semiconductor junction P N OGM PLUS 01200 417102208_OGM_Plus VC FP PK KE G3/4 99 = = PNP NPN 0010m P - 35 - Rev. 4-01.13 9.3 Spare parts Fig. 9.1 Fig. 9. 2 Fig. 9.3 Plus Pos. 1 2 2a 3 4 5 7 8 10 Designation: Allan bolt, M4 x 20 V2A Allan bolt, M5 x 25 V2A Hexagon head screw, M8 x 40 V2A Housing cover + electronic unit, PVC, transparent OGM PLUS 01200 housing cover, complete, PP 00112 00540 413031007 (on request) 280189 (on request) Type: OGM 01200 02100 Artikel No. (EBS-No.) 413031023 (10030685) 280091 (on request) 280092 (on request) 280088 (on request) Reinforcement for housing cover O-ring seal 35 x 2.5 FPM O-ring seal 35 x 2.5 EPDM O-ring seal 40 x 2 FPM O-ring seal 40 x 2 EPDM O-ring seal 65 x 2.5 FPM O-ring seal 64.77 x 2.62 EPDM Oval gear wheel PVC Oval gear wheel PVDF Oval gear wheel PEEK Oval gear wheel PVC, with magnet Oval gear wheel PVDF, with magnet Oval gear wheel PEEK, with magnet Washer B15 x 5,3 x 1,6 DIN9021 ISO7093 V2A Washer form A 5,5 x 10 x 1 DIN 126 V2A Disk form A 8,4 x 17 x 1,6 V2A 417102208_OGM_Plus 417003356 (on request) 417001330 (10122528) 38006046 (on request) 38006043 (on request) 38006044 (on request) 38006041 (on request) 417003411 (on request) 417001365 (10200033) 04500 413000320 (on request) 280093 (on request) 38006036 (on request) 417003415 (on request) 417001519 (10004139) 38006018 (on request) 38006023 (on request) 38006029 (on request) 38006033 (on request) 38006049 (on request) 38006066 (on request) 413501720 (10015901) 413500360 (10005460) 38006051 (on request) 38006052 (on request) - 36 - 413500363 (on request) Rev. 4-01.13 9.4 Accessories Article No. (EBS-No.) 418439006 (10093156) 248607 (10007292) 418439005 (10007453) 280095 (on request) 280084 (10007319) 280085 (10016056) 280094 (10200916) 9.4.1 Designation PLUS Connecting cable, 5 m, OGM for connection to PLC PLUS Connecting cable, 5 m, OGM – Dongle Box E60+ for connection to EMP KKS, EMP II, EMP III PLUS Connecting cable, 5 m, OGM for connection to EMP IV E60 with dongle card Elbow plug with screw clamp (for connection to PLC Wall-mounting bracket, OGM, Type 00112/00540/01200 including fixing bolts Wall-mounting bracket, OGM, Type 02100/04500 including fixing bolts OGM Commander Attitude tools to programming of pulse rate and/or type of semiconductor (PNP or NPN). Connecting adapters (two items necessary in each case) OGM Plus type Art. No. 280080 (EBS-No.) (10016051) for type 00112 Art. No. 280081 (EBS-No.) (10007190) for type 00540 Art. No. 280082 (EBS-No.) (10016058) for type 01200 Art. No. 280083 (EBS-No.) (10016066) for type 02100 & 04500 417102208_OGM_Plus Designation Qty. Designation Connecting adapter, OGM 00112 1/8-3/8-PVFP/EP-21isting of: 1 Connecting adapter, G1/8a-G3/8a PVDF 1 O-ring seal, 10 x 1.5 FPM (Viton B) 1 O-ring seal, 10 x 2.5 FPM (Viton B) 1 O-ring seal, 10 x 1.5 EPDM 1 O-ring seal, 10 x 2.5 EPDM 1 Connecting set, PVDF G3/8 hose 4/6,6/8,6/12 Connecting adapter, OGM 00540 1/4-5/8-PVFP/EP -50 consisting of: 1 Connecting adapter, G1/4a-G5/8a PVDF 1 O-ring seal, 12 x 2.5 FPM (Viton B) 1 O-ring seal, 13 x 2.5 FPM (Viton B) 1 O-ring seal, 12 x 2.5 EPDM 1 O-ring seal, 13 x 2.5 EPDM 1 Connecting set, PVDF G5/8 hose 4/6,6/8,6/12 Connecting adapter, OGM 01200 3/4-5/4-PVFP/EP -07 consisting of: 1 Connecting adapter, G3/4"a-G5/4"a PVDF 1 O-ring seal, 14 x 2.5 FPM (Viton B) 1 O-ring seal, 28 x 3.5 FPM (Viton B) 1 O-ring seal, 14 x 2.5 EPDM 1 O-ring seal, 28 x 3.5 EPDM 1 Connecting set, PVDF G1 1/4 hose 12/21 Connecting adapter, OGM 02100 5/4-5/4-PVFP/EP -99 consisting of: 1 Valve housing, 1 ¼", PVDF 2 O-ring seal, 28 x 3.5 FPM (Viton B) 2 O-ring seal, 28 x 3.5 EPDM 1 Valve seat, 1 ¼", PVDF - 37 - Rev. 4-01.13 10 Dismantling / Disposal Dismantling The system may only be dismantled by specialist personnel. Before commencing dismantling, ensure that the device has been fully isolated from the power supply. The Oval Gear Meter must be flushed through with care in order to get rid of any residual chemicals. Disposal The materials of the OGMPLUS oval gear meter are listed in chapter 8.1 "Materials" and must be disposed of in accordance with local environmental regulations prevailing at that time. Depending on the condition, existing regulations and with due regard for current requirements, dispose of it, for example, as: electrical waste (printed circuit boards), plastics (housing), metal plates, steel, copper, aluminium (separate after sorting). Prior to disposal, all parts which are in contact with media must be decontaminated. Oils, solvents, detergents and contaminated cleaning tools (brushes, cloths, etc.) must be disposed of in compliance with local requirements, in accordance with the prevailing waste code and with due attention to the notes contained in the manufacturers' safety data sheets. 417102208_OGM_Plus - 38 - Rev. 4-01.13 11 Declaration of Conformity 417102208_OGM_Plus - 39 - Rev. 4-01.13 Tables des matières 1 Généralités........................................................................................................... 41 1.1 1.2 1.3 1.4 Numéros EBS ................................................................................................................. 41 Dégâts causés pendant le transport ................................................................................ 41 Etendue de la garantie .................................................................................................... 41 Adresse de contact / Fabricant ........................................................................................ 41 2.1 2.2 2.3 2.3.1 2.3.2 2.4 2.5 2.6 2.7 2.8 Utilisation conforme ......................................................................................................... 42 Consignes de sécurité ..................................................................................................... 42 Mesures de sécurité (à prendre par l'exploitant) .............................................................. 42 Définition : Personne instruite .......................................................................................... 43 Définition : Personne qualifiée ......................................................................................... 43 Obligations de l'exploitant ................................................................................................ 43 Passages mis en évidence .............................................................................................. 44 Enumérations .................................................................................................................. 44 Instructions sécurité spéciales pendant les travaux maintenance et réparation ............... 44 Identification de l'appareil ................................................................................................ 44 4.1 4.2 Construction .................................................................................................................... 46 Description du fonctionnement ........................................................................................ 46 5.1 5.2 5.3 5.4 5.5 5.5.1 5.5.2 5.5.3 5.6 5.7 5.7.1 5.7.2 5.7.3 Remarques concernant l’installation ................................................................................ 47 Montage de l’adaptateur de raccord ................................................................................ 47 Montage de la console .................................................................................................... 47 Montage mural ................................................................................................................ 47 Montage du tuyau flexible ou de la tuyauterie.................................................................. 47 Aperçue........................................................................................................................... 48 Raccordement du tuyau flexible ...................................................................................... 48 Raccordement du tuyauterie ........................................................................................... 48 Raccordement électrique................................................................................................. 49 Raccordement à des commandes (PLC) ......................................................................... 49 Commande (PLC) avc entrée PNP .................................................................................. 49 Commande (PLC) avc entrée NPN ................................................................................. 49 Raccordement à des pompes EMP E60 .......................................................................... 50 6.1 Détermination de la priorité d’impulsion du compteur ...................................................... 51 7.1 7.2 Désassemblage du compteur à roues ovales .................................................................. 52 Assemblage du compteur à roues ovales ........................................................................ 52 8.1 8.2 Matériaux ........................................................................................................................ 53 Dimensions ..................................................................................................................... 53 9.1 9.2 9.3 9.4 9.4.1 Aperçu............................................................................................................................. 54 Code de référence pour OGM ......................................................................................... 54 Pièces détachées ............................................................................................................ 55 Accessoires ..................................................................................................................... 56 Adaptateur de raccord (2 exemplaires chacun sont nécessaires) .................................... 56 2 3 4 5 6 7 8 9 10 11 Sécurité ................................................................................................................ 42 Contenu de la livraison ....................................................................................... 45 Construction / Description du fonctionnement ................................................ 46 Installation ........................................................................................................... 47 Mise en service.................................................................................................... 51 Maintenance ........................................................................................................ 52 Données techniques ........................................................................................... 53 Code de référence / Pièces détachées et accessories .................................... 54 Démontage / mise au rebut ................................................................................ 57 Déclaration de Conformité ................................................................................. 58 417102208_OGM_Plus - 40 - Rev. 4-01.13 1 Généralités Ce manuel technique contient toutes les instructions concernant l’installation et la mise en service ainsi que les travaux de maintenance et de réparation sur le compteur à roues ovales, dénommé ci-après OGMPLUS. REMARQUE Les chapitres en allemand de ce guide constituent la VERSION ORIGINALE DE LA NOTICE D’UTILISATION, juridiquement pertinente. Toutes les autres langues sont des traductions de la VERSION ORIGINALE DE LA NOTICE D’UTILISATION. Pour toute question, prendre contact avec nous comme indiqué au IMPORTANT chapitre 1.4 « Adresse de contact / Fabricant » 1.1 Numéros EBS La présente notice technique indique non seulement les numéros d’article mais aussi les numéros EBS. Les numéros EBS sont les numéros de référence internes d’ Ecolab utilisés « à l’intérieur de l’entreprise ». 1.2 Dégâts causés pendant le transport PRUDENCE ATTENTION 1.3 Si des dégâts dus au transport sont constatés lors du déballage, ne pas installer le PLUS compteur à roues ovales OGM . La société de transport doit être immédiatement informée et doit fournir une déclaration de dommages. Une copie de la déclaration de dommages doit être immédiatement envoyée à la société Ecolab Engineering GmbH. Etendue de la garantie Le fabricant reconnaîtra un cas de garantie comme tel, en ce qui concerne la sécurité de service, la fiabilité et l’exactitude du compteur à roues ovales (dénommé ci-après OGMPLUS) uniquement dans les conditions suivantes : • le montage, le raccordement, le réglage, la maintenance et les réparations sont exécutés par un personnel spécialisé et agréé, • le compteur à roues ovales OGMPLUS est utilisé conformément aux instructions figurant dans la notice technique, et • seules des pièces détachées originales sont utilisées lors des réparations. Les conditions générales de garantie et de prestation de la société Ecolab Engineering GmbH sont valables. 1.4 Adresse de contact / Fabricant Ecolab Engineering GmbH Raiffeisenstraße 7 D-83313 Siegsdorf Téléphone : (+49) 86 62 / 61 0 Télécopie : (+49) 86 62 / 61 235 eMail: [email protected] 417102208_OGM_Plus - 41 - Rev. 4-01.13 2 Sécurité PRUDENCE Les consignes de sécurité et les mises en garde doivent absolument être respectées ! REMARQUE 2.1 Avant de procéder à l'installation, à la mise en service et à tous travaux de maintenance ou de réparation, il est impératif de lire et d'observer le chapitre correspondant du manuel. La présente notice d'utilisation fait partie du compteur à roues ovales et doit être tenue à disposition du personnel de service et de maintenance. En cas de revente de l'installation, la notice d'utilisation doit toujours l'accompagner. Utilisation conforme Le OGM PLUS ne peut être utilisé qu'avec des produits validés par Ecolab. ATTENTION Aucune garantie ne saurait être honorée en cas d'utilisation de produits non validés ! Le OGMPLUS a été élaboré, conçu et construit exclusivement pour un usage industriel et commercial. Toute utilisation privée de l'installation est exclue. L'utilisation conforme signifie également le respect des instructions de manipulation et d'exploitation ainsi que ainsi que des conditions de maintenance et de réparation prescrites par le fabricant. La durée de vie de OGMPLUS, sous réserve d'un entretien correct, est d'environ 5 ans. Par la suite, une révision (éventuellement suivie d'une remise en état générale) par le fabricant ou par une entreprise spécialisée est nécessaire. 2.2 Consignes de sécurité • Les travaux de raccordement et de réparation sur le OGMPLUS ne peuvent être effectués que par un personnel qualifié, autorisé et formé. • Pour les travaux de maintenance et de réparation, il convient de porter des vêtements de protection appropriés. • Respecter en permanence les dispositions de sécurité relatives à la manipulation de produits chimiques. • Couper l'arrivée du produit dosé et débrancher du secteur les pompes de charge/appareils de dosage éventuellement présents avant d'entreprendre un quelconque travail de réparation. 2.3 Mesures de sécurité (à prendre par l'exploitant) Il convient de noter qu'il incombe à l'exploitant : • d'instruire son personnel de service et de maintenance sur les dispositifs de sécurité de l'installation ; • de surveiller le respect par son personnel de service et de maintenance des mesures de sécurité ; • de veiller à ce que les personnes non autorisées (aucun personnel de service et de maintenance) ne puissent pas entrer dans la zone dangereuse de l'installation. La présente notice d'utilisation doit être conservée pour utilisation ultérieure. La fréquence des inspections et mesures de contrôle doit être respectée. Les travaux décrits ici sont énumérés de telle sorte qu'ils soient compris : • par une personne instruite lorsqu'ils figurent au chapitre Fonctionnement ; • par une personne qualifiée lorsqu'ils figurent aux chapitres Transport, Installation et montage, Maintenance, Pannes/causes/solutions. Les chapitres Transport, Installation et montage, Maintenance, Pannes/causes/solutions s'adressent uniquement à des personnes qualifiées. Les travaux décrits dans ces chapitres ne doivent être effectués que par des personnes qualifiées. 417102208_OGM_Plus - 42 - Rev. 4-01.13 2.3.1 Définition : Personne instruite Une personne qui a été informée par une personne qualifiée sur les tâches qui lui sont confiées et les dangers potentiels en cas de mauvais comportement et qui a été renseignée au besoin sur les dispositifs de sécurité et mesures de protection nécessaires. 2.3.2 Définition : Personne qualifiée Une personne possédant la formation, l'entraînement et l'expérience appropriés lui permettant de reconnaître les risques et d'éviter les dangers. Définition tirée de la norme EN 60204-1:2006. 2.4 Obligations de l'exploitant REMARQUE Dans l'EEE (Espace économique européen), la transposition en droit national de la directive cadre (89/391/CEE) ainsi que les directives individuelles connexes, dont en particulier la directive (2009/104/CE) concernant les prescriptions minimales de sécurité et de protection de la santé pour l'utilisation par les travailleurs au travail d'équipements de travail, doivent être respectées et appliquées dans leur version en vigueur. En Allemagne, l'ordonnance sur la sécurité d'exploitation d'octobre 2002 (BGV D1, BGV D1 DA) doit être respectée (transposition dans le droit national de la directive mentionnée plus haut). L'exploitant doit obtenir l'homologation locale et se conformer aux exigences qui s'y rapportent. Il doit en outre se conformer aux obligations légales locales concernant : • la sécurité des personnes (prescriptions des organisations professionnelles et dispositions de prévention des accidents, directives relatives au lieu de travail), par exemple les notices d'utilisation, ou encore conformément au paragraphe 20 de l'ordonnance sur les substances dangereuses, les équipements de protection individuelle (EPI), les examens médicaux préventifs ; • la sécurité des équipements de travail (équipements de protection, modes opératoires, risques procéduraux et maintenance) ; • l'approvisionnement en produits (fiches de données de sécurité, répertoire des substances dangereuses) ; • l'élimination des produits (loi sur les déchets) ; • la mise au rebut des matériaux (mise hors service, loi sur les déchets) ; • le nettoyage (produits nettoyants et élimination) ; • ainsi que les règlements actuels sur la protection de l'environnement. Il appartient également à l'exploitant : • de mettre à disposition les équipements de protection individuelle (EPI) : casque de sécurité, gants, lunettes de protection, masque, combinaison de protection ; • d'effectuer une évaluation continue des risques du lieu de travail, y compris un examen des substances dangereuses et de la protection incendie. Cela inclut notamment la manipulation de pièces chaudes (tenir compte d'un refroidissement lent) ; • de fixer les mesures à prendre dans des notices d'utilisation et d'instruire le personnel en conséquence ; • de sécuriser l'accès aux postes de travail (à partir de 1 mètre au-dessus du sol) et de fournir si nécessaire des échafaudages de service ; • d'assurer la formation du personnel de service ; • d'établir certains modes opératoires ; • de veiller à l'absence de toute tierce personne dans les zones dangereuses (points d'écrasement) pendant le fonctionnement de l'installation ; • de mettre en place à des endroits facilement accessibles des dispositifs de sécurité tels que des extincteurs portatifs appropriés, en nombre suffisant et correctement dimensionnés ; • de prévoir l'éclairage des postes de travail suivant la réglementation ASR 7/3 ; • de contrôler régulièrement que les points de trébuchement sont identifiés. 417102208_OGM_Plus - 43 - Rev. 4-01.13 Raccordements : avant la mise en fonctionnement de l'installation, il incombe à l'exploitant de s'assurer que les dispositions locales (par exemple pour le raccordement électrique) ont été observées lors du montage et de la mise en service, lorsque ces opérations ont été effectuées par l'exploitant lui-même. REMARQUE 2.5 Éclairement : L'exploitant doit pourvoir à un éclairement suffisant et uniforme dans toutes les zones de l'installation. Il est recommandé de prévoir 300 lux (500 lux aux postes de contrôle), en fonction de la zone d'installation (valeur de service ; en Allemagne : ASR 7/3). Il convient d'organiser au moins une session annuelle d'instruction à la sécurité (et systématiquement à l'embauche) sur les dangers et les mesures de protection sur la base de la notice d'utilisation et d'en garder la trace par une signature (TRGS 555). Passages mis en évidence Signification des mises en garde : PRECAUTION 2.6 ATTENTION Ce pictogramme « ATTENTION » est utilisé si le fait de ne pas respecter à la lettre les instructions d’utilisation, les instructions de travail et les déroulements de travail prescrits, ou autres, (ou de ne pas les respecter du tout) peut provoquer un endommagement de l’appareil. IMPORTANT Ce pictogramme « IMPORTANT » est utilisé s’il faut prêter une attention particulière lors de la manipulation de l’appareil. REMARQUE Ce pictogramme « REMARQUE » est utilisé s’il faut prêter une attention à une particularité. REMARQUE Dans les notices d'utilisation et autres documentations, les remarques sont signalées par un « livre ». Enumérations 2.7 Les énumérations mise en évidence par ce symbole () décrivent une activité qui doit être réalisée par le monteur ou par l’utilisateur. Instructions sécurité spéciales pendant les travaux maintenance et réparation PRECAUTION 2.8 Ce pictogramme « PRECAUTION » est utilisé si le fait de ne pas respecter à la lettre les instructions d’utilisation, les instructions de travail et les déroulements de travail prescrits, ou autres, (ou de ne pas les respecter du tout) peut provoquer des blessures ou des accidents. IMPORTANT Pendant les travaux de maintenance et de réparation sur des pièces qui entrent en contact avec des produits dangereux, ainsi que pour le changement de contenant, il est impératif de toujours porter les vêtements de protection prescrits (lunettes de protection, gants de protection, tablier) à cause du risque de brûlure par acide. Utiliser uniquement des pièces détachées originales pour des réparations. Identification de l'appareil REMARQUE 417102208_OGM_Plus Les données figurant dans la présente notice d'utilisation ne sont valables que pour l'appareil dont le numéro de type apparaît sur la page de couverture. La plaque signalétique avec le numéro de type se trouve sur le côté du compteur à roues ovales. Fig. 2.1 Exemple: Identification pour compteur à roues ovales: Il est important pour toute requête de préciser : • la désignation (pos. 1) • le type (pos. 2) C'est la condition sine qua non pour un traitement rapide et efficace des demandes. - 44 - Rev. 4-01.13 3 Contenu de la livraison La livraison comprend : Fig. 3.1 Fig. 3.2 • Compteur à roues ovales OGM PLUS (Oval Gear Meter PLUS) o o Article N (EBS-N ) 280141 (10200631) 280043 (10092943) 280044 (10013357) 280045 (10106904) 280046 (10100572) 280151 (10200632) 280073 (10200627) 280074 (10200628) 280077 (10200629) 280078 (10200630) • Notice technique o o Article N (EBS-N ) 417102208 (sur demande) 417102208_OGM_Plus - 45 - Rev. 4-01.13 4 Construction / Description du fonctionnement 4.1 Construction Pos. Désignation 1 2 3 4 5 6 7 8 Joint torique pour adaptateurs de raccord Adaptateurs de raccord Vis de boîte Sortie électronique Couvercle Joint Torique entre couvercle et boîtier Roues Ovales Boîtier de roues ovales Fig. 4.1 4.2 Description du fonctionnement Le compteur à roues ovales OGMPLUS sert à la saisie volumétrique du débit des liquides purs et propres (max. 1000 mPas, méthode de mesure : Brookfield). Comme il s’agit d’un compteur volumétrique, il est également possible de saisir des écoulements par pulsations ou par discontinuité. C’est pourquoi ce compteur convient très bien pour mesurer le flux volumique généré par des pompes à membrane qui fonctionnent par électromoteur (par exemple, EMP-KKS, EMP II, EMP III, EMP IV). Le compteur à roues ovales OGMPLUS est équipé d’un dispositif automatique de reconnaissance du sens d’écoulement. Des flux volumiques en direction arrière sont mémorisés sans émettre d’impulsions. Des flux volumiques précédents en direction arrière sont soustraits du prochain flux volumique en direction avant. Un autre avantage du compteur à roues ovales OGMPLUS est sa capacité de calibrage. De cette manière, on obtient la plus haute exactitude possible en tenant compte des conditions d’utilisation. Dans ses propriétés, le compteur à roues ovales OGMPLUS est adapté de manière optimale au raccordement à une pompe doseuse à membrane de la série de pompes EMP E60. Les avantages sont les suivants : • raccordement direct á une EMP E60 (par Dongle-Box (coffret du module de protection) ou Dongle-Card (carte mère du module de protection) ; • le fonctionnement a lieu avec un nombre d’impulsions à haute résolution de 120 impulsions par tour de roue dentée ; et • la vitesse de rotation des roues dentées ovales est proportionnelle au débit ; Dans le cas d’une connexion à un système de saisie d’ordre supérieur (PLC ou similaire) : • il existe la possibilité d’ajuster le nombre d’impulsions, au choix en impulsions par tour ou en impulsions par litres ou en impulsions par ml. Réglage usine, voir chapitre 8 « Caractéristiques techniques ». (nombre d’impulsions en cas de raccordement à la commande supérieure) *) • la sortie d’impulsions peut être commutée au choix entre PNP ou NPN (la sortie est ajustée en usine sur PNP) *) *) o seulement avec le logiciel d'additif compteur á roues ovales, Article-n . 280094 (EBS-Nr. 10200916) et Windows logiciel 417102208_OGM_Plus - 46 - Rev. 4-01.13 5 Installation 5.1 Remarques concernant l’installation REMARQUE 5.2 Pour éviter des inclusions d’air, le compteur doit être monté dans une conduite de dosage ascendante et être purgé. L’utilisation d’un filtre ou d’un tamis est nécessaire pour le dosage de produits qui se cristallisent. Montage de l’adaptateur de raccord Fig. 5.1 Monter les adaptateurs de raccord (pos. 1) pour l’OGMPLUS vendus comme accessoires et placés sur le côté entrée et sur le côté sortie du compteur à roues ovales. Veiller alors particulièrement à ce que les joints toriques correspondants (pos. 2) soient mis en place dans la position correcte. Les adaptateurs de raccord (pos. 1) nécessaires et les joints toriques associés (pos. 2) figurent au chapitre 9 « Code de référence / Pièces détachées et accessoires ». À la place des raccords de tuyaux à vis, on pourra également raccorder directement une canalisation avec une pièce d'insertion appropriée. 5.3 Montage de la console Fig. 5.2 Fixer le compteur à roues ovales OGMPLUS sur la console vendue comme accessoires (voir au chapitre 8.2, « Dimensions » et au chapitre 9, « Code de référence / Pièces détachées et accessoires ») avec les vis appropriées (pos. 2) et rondelles (pos. 1). 5.4 Montage mural PLUS ATTENTION 5.5 L’OGM doit être monté en fonction du sens d’écoulement qui figure sur le couvercle car il n’émet des impulsions que si le flux volumique a lieu dans cette direction. PLUS Comme alternative, l’OGM peut aussi être fixé directement sans console à un « mur de montage ». Respecter la distance de fixation des perçages taraudés (voir au chapitre 8.2 « Dimensions »). Montage du tuyau flexible ou de la tuyauterie PLUS REMARQUE 417102208_OGM_Plus Dans le modèle OGM , les pièces nécessaires pour le raccordement de tuyaux flexibles ne sont pas jointes à la livraison et doivent être commandées parmi la palette d’accessoires en fonction de la dimension (voir la désignation du type) parmi la palette d’accessoires (voir au chapitre 9 « Code de référence / Pièces détachées et accessoires »). - 47 - Rev. 4-01.13 5.5.1 Aperçue Liaison de tuyaux flexibles Fig. 5.3 5.5.2 Pipe Liaison de tuyauteries Fig. 5.4 Pos. 1 1a 2 3 3a 4 5 6 Désignation Liaison de tuyaux flexibles Pipe Liaison de tuyauteries Écrou-raccord Pièce de serrage Pièce insérée Pièce conique Joint Torique Écrou-raccord Raccordement du tuyau flexible REMARQUE Observer les indications figurant sur la notice d’emballage des pièces de raccord pour tuyaux flexibles ! • Sectionner le tuyau flexible (Fig. 5.3, pos. 1) en coupe droite. • Pousser l’écrou-raccord (Fig. 5.3, pos. 2) et la pièce de serrage (Fig. 5.3, pos. 3) sur le tuyau flexible. • Emmancher le tuyau flexible sur la pièce conique (Fig. 5.3, pos. 4) jusqu’à la collerette de butée. • Poser le joint torique (Fig. 5.3, pos. 5) dans la gorge prévue pour sur l’adaptateur de raccord (Fig. 5.3, pos. 6). • Emboîter le tuyau flexible avec la pièce conique (Fig. 5.3, pos. 4) et visser l’écrou-raccord (Fig. 5.3, pos. 2) à bloc. 5.5.3 Raccordement du tuyauterie Sectionner la tuyauterie (Fig. 5.4, pos. 1a) en coupe droite. Pousser l’écrou-raccord (Fig. 5.4, pos. 2) sur la tuyauterie. Souder la pièce insérée (Fig. 5.4, pos. 3a) à la tuyauterie ou la coller à celle-ci. Poser le joint torique (Fig. 5.4, pos. 5) dans la gorge prévue pour sur l’adaptateur de raccord (Fig. 5.4, pos. 6). • Visser l’écrou-raccord (Fig. 5.4, pos. 2) à bloc. • • • • 417102208_OGM_Plus - 48 - Rev. 4-01.13 5.6 Raccordement électrique L’unité électronique d’évaluation de l’OGMPLUS est moulée dans le couvercle. Le raccordement électrique est réalisé au moyen d’un connecteur M12 à 4 pôles. 5.7 Raccordement à des commandes (PLC) L’OGM PLUS est livré avec une sortie PNP. REMARQUE Au besoin ,l’OGMPLUS peut être reprogrammé sur une sortie NPN. 5.7.1 Commande (PLC) avec entrée PNP Pos. A B Désignation câble, (5 m) o Art. N 418439006 o (EBS-N 10093156) coin connecteur Fig. 5.5 5.7.2 Commande (PLC) avec entrée NPN Pos. A B Désignation câble, (5 m) o Art. N 418439006 o (EBS-N 10093156) coin connecteur Fig. 5.6 417102208_OGM_Plus - 49 - Rev. 4-01.13 5.7.3 Raccordement à des pompes EMP E60 5.7.3.1 Raccordement à une EMP KKS E60Plus, EMP II E60Plus, EMP III E60Plus (Dongle-Box) Pos. A B C Désignation câble o Art. N 248607 o (EBS- N 10007292) coin connecteur droit connecteur Fig. 5.7 5.7.3.2 Raccordement à une EMP IV E60Plus (Dongle-Card) Pos. A B Désignation câble, (5 m) o Art. N 418439005 o (EBS- N 10007453) coin connecteur Fig. 5.8 417102208_OGM_Plus - 50 - Rev. 4-01.13 6 Mise en service Il faut déterminer la priorité d’impulsion du compteur (constante de compteur) avant la mise en service pour garantir la saisie correcte des débits. A ces fins, il convient de vérifier le débit de la pompe pendant le fonctionnement. 6.1 Détermination de la priorité d’impulsion du compteur Remplir de la matière à doser dans un cylindre de mesure approprié. Introduire la conduite d’aspiration dans le cylindre de mesure. Mettre la pompe doseuse en service. Purger le système de dosage (doser jusqu’à ce que la conduite de dosage et l’ OGMPLUS soient purgés). Stopper la pompe doseuse. Remplir le récipient gradué jusqu’à la quantité maximale. REMARQUE La quantité dans le cylindre de mesure devrait correspondre au moins à 1/6 du débit de dosage (l/h) ajusté sur la pompe doseuse. Le compteur convient uniquement aux liquides purs et propres ! PLUS Si l’OGM est connecté à une pompe doseuse de notre série E60 (avec version électronique), la détermination de la priorité d’impulsion est décrite dans la notice technique de la pompe doseuse correspondante dans le chapitre « Calibrage ». Démarrer la pompe doseuse et enregistrer les impulsions de comptage de l’ OGMPLUS. Déterminer la quantité prélevée du récipient gradué. Calculer le rapport des impulsions comptées et de la quantité dosée. Le résultat correspond au chiffre d’impulsions exact par litre. 417102208_OGM_Plus - 51 - Rev. 4-01.13 7 Maintenance PRECAUTION Les travaux de maintenance et de connexion sur le compteur à roues ovales doivent être exécutés uniquement par un personnel spécialisé et agréé. Avant d’exécuter des travaux de maintenance et de réparation et de doser des matières dangereuses, il faut toujours rincer le compteur à roues ovales, décharger la conduite de pression et porter des vêtements de protection (lunettes de protection, gants de protection et tablier). Avant le nettoyage, observer absolument la fiche de données de produit de la matière à doser afin d’empêcher des réactions chimiques, par exemple, lors du nettoyage avec de l’eau et un produit chimique non compatible. Lors de l’ouverture du compteur à roues ovales, veiller à ce que le système ne soit pas sous pression et à ce que la pompe doseuse montée en amont ne soit pas mise en service. Pos. 1 2 3 4 5 Désignation Vis Couvercle Joint Torique Roues ovales – 1 Roues ovales – 2 avec aimant Fig. 7.1 7.1 Désassemblage du compteur à roues ovales Dévisser les 4 vis (voir au Fig., pos. 1) sur le compteur à roues ovales. Retirer le couvercle (pos. 2). Enlever ou changer les deux roues ovales (pos. 4 + pos. 5) et les nettoyer. Par principe, il est recommandé de remplacer le joint torique (pos. 3) entre le couvercle et REMARQUE le boîtier. 7.2 Assemblage du compteur à roues ovales Pos. Désignation 1 2 Roues ovales – 1 Roues ovales – 2 avec aimant Fig. 7.2 Mettre les roues ovales en place. REMARQUE Veiller absolument à la mise en place correcte des roues ovales ! Les roues ovales doivent être placées de manière à être décalées exactement de 90° l’une par rapport à l’autre (voir la figure 7.1, pos. 4 + pos. 5). La roue ovale avec les aimants soudés doit être positionnée sous le capteur. Les panneaux doivent montrer vers le bas. Pour contrôler, tourner une roue ovale avec précaution avec le doigt ; l’autre roue ovale doit être entraînée sur un tour complet sans bloquer, ni perdre le contact avec la seconde roue ovale. Placer les vis avec précaution (trous taraudés dans le boîtier en matière plastique) et visser fermement en diagonale avec un couple de serrage de 1 Nm +0,4. Il est recommandé de procéder à un nouveau calibrage après le nettoyage des roues REMARQUE ovales, suivi de l’ouverture et de la fermeture du compteur à roues ovales qui y sont associées ! 417102208_OGM_Plus - 52 - Rev. 4-01.13 8 Données techniques Type de compteur à roues ovales : Article n° o (EBS-N ) Recommandé pour la pompe doseuse min. max. min. max. Débit avec l’utilisation d’une pompe doseuse EMP [l/h] Débit dans le cas d’un écoulement continu [l/h] Nombre d’impulsions avec une connexion à la commande d’ordre supérieur (par ex. PLC)** Nombre d’impulsions avec une connexion à une unité électronique E60 (à haute résolution) Pression de système admissible [bar] Température ambiante / du liquide [°C] Viscosité [mPas] Exactitude non calibre (état du livraison) calibre de condition de l’enterprise Pas de vis du raccordement REMARQUE 8.1 00112 280141 (10200631) 280151 (10200632) EMP II/KKS 00540 280043 (10092943) 280073 (10200627) EMP III 0,5* 13,5 1,25 34 4,8 65 12 160 (0,9...11,2l/h) (16...54l/h) 01200 02100 04500 280044 280045 280046 (10013357) (10106904) (10100572) 280074 280077 280078 (10200628) (10200629) (10200630) EMP III EMP IV EMP IV (80...120l/h) (140...210l/h) (450l/h) 18 144 45 360 40 250 100 625 60 540 150 1200 ml/Imp 1 5 10 20 50 ml/Imp 0,01 0,029 0,055 0,133 0,222 max. max. max. 10 40 1000 G1/8” G1/4” ± 5% ±1% G3/4” * G1 1/4” * un écoulement minimal de 1l/h est nécessaire pour le mode de réglage avec unité électronique E60+. ** Il est également possible de programmer l’appareil sur d’autres séquences d’impulsions se trouvant dans le cadre des limites de mise en œuvre. Matériaux Boîtier Couvercle de boîtier Joints toriques Roues ovales Axes de roues ovales 8.2 PVC gris ou PP (280048) PVC (transparent) ou PP (280048) FPM (Viton B) optional EPDM PVDF (pour le type 00112), PVC (pour le type 00112) PEEK (pour les types 00540, 01200, 02100, 04500) céramique Dimensions Fig. 8.1 OGM Type 00112 00540 01200 02100 04500 Fig. 8.2 A 41 45 53 76 76 52 56 64 88,7 88,7 B* 66 74 82 106,7 106,7 C G 1/8“ G 1/4" G 3/4" G 1 ¼" G 1 ¼" D 13 17,8 19 30,5 30,5 E 35 40 40 60 60 F 64 73 80 108 108 G M4 M5 M5 M8 M8 * sans / avec fiche coudée du câble de raccordement console * * * Les dimensions ne sont pas valides pour la version PP: 417102208_OGM_Plus Type 00112/00540/01200 02100/04500 - 53 - A [mm] 120 150 B [mm] C [mm] D [mm] 60 100 10* 80 10 135 E 35 55 Rev. 4-01.13 9 Code de référence / Pièces détachées et accessories 9.1 Aperçu o o Article N (EBS-N ) 280141 (10200631) 280043 (10092943) 280044 (10013357) 280045 (10106904) 280046 (10100572) 280151 (10200632) 280073 (10200627) 280074 (10200628) 280077 (10200629) 280078 (10200630) 9.2 Désignation OGM PLUS 00112VCFPPVKE-G1/8i-99-0001m-P OGM PLUS 00540VCFPPKKE-G1/4i-99-0005m-P OGM PLUS 01200VCFPPKKE-G3/4i-99-0010m-P OGM PLUS 02100VCFPPKKE-G5/4i-99-0020m-P OGM PLUS 02100VCEPPKKE-G5/4i-99-0020m-P OGM PLUS 00112VCEPVCKE-G1/8i-99-0001m-P OGM PLUS 00540VCEPPKKE-G1/4i-99-0005m-P OGM PLUS 01200VCEPPKKE-G3/4i-99-0010m-P OGM PLUS 02100VCEPPKKE-G5/4i-99-0020m-P OGM PLUS 04500VCEPPKKE-G5/4i-99-0050m-P Code de référence pour OGM 1. Désignation PLUS OGM 2. Type 00112 00540 01200 02100 04500 = = = = = pour EMP jusque 11,2 l/h pour EMP jusque 54 l/h pour EMP jusque 120 l/h pour EMP jusque 210 l/h pour EMP jusque 450 l/h 3. Matériau de boîtier VC = PP = PVC PP 4. Matériau de joint FP EP = = Viton B EPDM 5. Matériau de roue ovale PK = PV = VC = PEEK (type 00540 - 04500) PVDF (seulement pour le type 00112) PVC (seulement pour le type 00112) 6. Matériau des axes de roue ovale KE = céramique 7. Filetage de vissage de l’adaptater G1/8, G1/4, G3/4, G5/4, G1/2i – G1a 8. Raccord 99 = sans raccord (standard) 9. Taux d'impulsion 0001m = 1 ml / impulsion 0005m = 5 ml / impulsion 0010m = 10 ml / impulsion 0020m = 20 ml / impulsion 0050m = 50 ml / impulsion autre le possible taux d'impulsion: 2600p = 2600 impulsion / Liter 0820p = 820 impulsion / Liter 0450p = 450 impulsion / Liter 0300p = 300 impulsion / Liter 0075p = 75 impulsion / Liter 10. Semi-conducteurs P = PNP N = NPN OGM PLUS 01200 417102208_OGM_Plus VC FP PK KE G3/4 99 0010m P - 54 - Rev. 4-01.13 9.3 Pièces détachées fig. 9.1 fig. 9. 2 fig. 9.3 Plus Pos. 1 2 2a 3 4 5 7 8 10 Désignation : Vis à tête à six pans creux, M4 x 20 V2A Vis à tête à six pans creux, M5 x 25 V2A Vis hexagonal, M8 x 40 V2A OGM PLUS 01200 couvercle entièrement PVC OGM PLUS 01200 couvercle entièrement PP Renforcement pour couvercle de boîtier seulement Joint torique 35x2,5 FPM Joint torique 35x2,5 EPDM Joint torique 40x2 FPM Joint torique 40x2 EPDM Joint torique 65x2,5 FPM Joint torique 64,77x2,62 EPDM Roue ovale PVC Roue ovale PVDF Roue ovale PEEK Roue ovale PVC avec aimant Roue ovale PVDF avec aimant Roue ovale PEEK avec aimant Rondelle B15 x 5,3 x 1,6 DIN9021 ISO7093 V2A Rondelle A 5,5 x 10 x 1 DIN 126 V2A Plaquette Form A 8,4 x 17 x 1,6 V2A 417102208_OGM_Plus 00112 413031007 (sur demande) 280189 (sur demande) Type: OGM 00540 01200 o Article n° (EBS N ) 413031023 (10030685) 280091 280092 (sur demande) (sur demande) 280088 (sur demande) 417003356 (sur demande) 417001330 (10122528) 38006046 (sur demande) 38006043 (sur demande) 38006044 (sur demande) 38006041 (sur demande) 417003411 (sur demande) 417001365 (10200033) 02100 04500 413000320 (sur demande) 280093 (sur demande) 38006036 (sur demande) 417003415 (sur demande) 417001519 (10004139) 38006018 38006023 38006029 38006033 (sur demande) (sur demande) (sur demande) (sur demande) 38006049 38006066 38006051 38006052 (sur demande) (sur demande) (sur demande) (sur demande) 413501720 (10015901) 413500360 (10005460) 413500363 (sur demande) - 55 - Rev. 4-01.13 9.4 Accessoires Article N° (EBS- N°) 418439006 (10093156) 248607 (10007292) 418439005 (10007453) 280095 (sur demande) 280084 (10007319) 280085 (10016056) 280094 (10200916) 9.4.1 Désignation PLUS Câble de connexion 5 m OGM pour la connexion à la PLC PLUS Câble de connexion 5 m OGM Dongle Box E60+ pour la connexion à EMP KKS, EMP II, EMP III PLUS Câble de connexion 5 m OGM pour la connexion à la EMP IV E60 avec dongle-card Fiche coudée avec bornes à vis pour la connexion à la PLC Console murale OGM, type 00112/00540/01200 avec vis de fixation Console murale OGM, type 02100/04500 avec vis de fixation compteur á roues ovales Outil de réglage visant la programmation du taux d'impulsion et/ou du type de semiconducteurs (PNP ou NPN). Adaptateur de raccord (2 exemplaires chacun sont nécessaires) OGM Plus Type Art. n°280080 o (EBS-N ) (10016051) pour type 00112 Art. n°280081 o (EBS-N ) (10007190) pour type 00540 Art. n°280082 o (EBS-N ) (10016058) pour type 01200 Art. n°280083 o (EBS-N ) (10016066) pour type 02100 & 04500 417102208_OGM_Plus Nombre Désignation Adaptateur de raccord OGM 00112 1/8-3/8-PVFP/EP -21 constitué des éléments suivants : 1 Adaptateur de raccord G1/8a-G3/8a PVDF 1 Joint torique 10 x 1.5 FPM (Viton B) 1 Joint torique 10 x 2.5 FPM (Viton B) 1 Joint torique 10 x 1.5 EPDM 1 Joint torique 10 x 2.5 EPDM 1 Set de connexion tuyau PVDF G3/8. 4/6,6/8,6/12 Adaptateur de raccord OGM 00540 1/4-5/8-PVFP/EP -50 constitué des éléments suivants : 1 Adaptateur de raccord G1/4a-G5/8a PVDF 1 Joint torique 12 x 2.5 FPM (Viton B) 1 Joint torique 13 x 2.5 FPM (Viton B) 1 Joint torique 13 x 2.5 EPDM 1 Joint torique 12 x 2.5 EPDM 1 Set de connexion tuyau PVDF G5/8. 4/6,6/8,6/12 Adaptateur de raccord OGM 01200 3/4-5/4-PVFP/EP -07 constitué des éléments suivants : 1 Adaptateur de raccord G3/4"a-G5/4"a PVDF 1 Joint torique 14 x 2.5 FPM (Viton B) 1 Joint torique 28 x 3.5 FPM (Viton B) 1 Joint torique 14 x 2.5 EPDM 1 Joint torique 28 x 3.5 EPDM 1 Set de connexion tuyau PVDF G1 1/4. 12/21 Adaptateur de raccord OGM 02100 5/4-5/4-PVFP/EP -99 constitué des éléments suivants : 1 Boîtier de soupape 1 1/4" PVDF 2 Joint torique 28 x 3.5 FPM (Viton B) 2 Joint torique 28 x 3.5 EPDM 1 Siège de soupape 1 1/4 PVDF - 56 - Rev. 4-01.13 10 Démontage / mise au rebut Démontage Le démontage ne peut être effectué que par un personnel qualifié. S'assurer avant le début des travaux de démontage que l'appareil a été entièrement débranché de l'alimentation électrique. Le compteur à roues ovales doit être soigneusement rincé afin d'éliminer les résidus chimiques. Mise au rebut Les matériaux constituant le compteur à roues ovales OGMPLUS sont décrits au chapitre 8.1 « Matériaux » et doivent être mis au rebut conformément aux prescriptions environnementales alors en vigueur sur place. Mettre au rebut suivant l'état, les prescriptions existantes et dans le respect de la réglementation en vigueur, notamment : les déchets électriques (circuits imprimés), les plastiques (boîtier), les tôles, l'acier, le cuivre, l'aluminium (trier par sorte). Avant la mise au rebut, toutes les pièces en contact avec le produit doivent être décontaminées. Les huiles, solvants et produits de nettoyage ainsi que les outils contaminés (pinceaux, chiffons, etc.) doivent être éliminés conformément à la réglementation locale, suivant les critères de classement des déchets en vigueur et dans le respect des indications figurant dans les fiches de données de sécurité des fabricants. 417102208_OGM_Plus - 57 - Rev. 4-01.13 11 Déclaration de Conformité 417102208_OGM_Plus - 58 - Rev. 4-01.13 Dokumenten Nr.: document no.: 417102208 Version / Revision: version / review: 4 Erstelldatum: date of issue: Letzte Änderung: last changing: 29.01.2013 © Copyright Ecolab Engineering GmbH, 2013 Alle Rechte vorbehalten. All rights reserved Nachdruck, auch auszugsweise, nur mit Genehmigung der Firma Ecolab Engineering GmbH gestattet. Reproduction, also in part, only with permission of Ecolab Engineering GmbH.