1
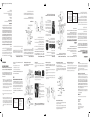
Customer Service
STREAMLIGHT, INC.
30 Eagleville Road, Suite 100
Eagleville, PA U.S.A. 19403-39996
Phone: (800) 523-7488 Toll-Free
Fax: (800) 220-7007
www.streamlight.com
©2012 997606 Rev B 5/12
Operating Instructions
The TLR-VIR contains few or no user-serviceable parts.
SERVICE
TLR-VIR™
ESPANOL
ADVERTENCIAS IMPORTANTES
ADVERTENCIA: El uso de la linterna en modo “estroboscópico” puede provocar
ataques epilépticos a personas con epilepsia fotosensible.
NO LEER ESTAS INSTRUCCIONES DE FUNCIONAMIENTO Y ADVERTENCIAS, ASÍ COMO EL
INCUMPLIMIENTO DE ÉSTAS AL MANIPULAR UN ARMA DE FUEGO O LA LINTERNA TLR
PUEDE SER PELIGROSO Y PUEDE PROVOCAR LESIONES GRAVES, DAÑOS A LA
PROPIEDAD O LA MUERTE
ANTES DE ACOPLAR, INSPECCIONAR O PRESTAR SERVICIO A UNA TLR INSTALADA EN UN ARMA DE FUEGO
1. Acople el seguro del arma de fuego, si corresponde.
2. Retire el cargador del arma de fuego, si corresponde.
3. Abra la acción e inspeccione la cámara para asegurarse de que está vacía.
NOTE: Always avoid aggressive cleaning solutions as they may damage the TLR-VIR.
• El uso de un arma de fuego bajo cualquier circunstancia puede ser peligroso. Pueden
producirse LESIONES GRAVES E INCLUSO LA MUERTE si no se ha recibido la
formación necesaria en el manejo seguro de armas de fuego. Debe recibirse formación
adecuada a través de un programa de seguridad sobre armas de fuego acreditado
impartido por instructores competentes cualificados en el ejército, en academias de
policía o en programas de formación afiliados a la Asociación Nacional del Rifle
(National Rifle Association).
The TLR-VIR features a Strobe Mode that can be activated by the paddle switch or
remote switch.
Within 0.4 seconds, press either the paddle switch or remote switch into the momentary
position, release and immediately re-press and hold for strobe.
Streamlight warrants this product to be free of defects for a lifetime of use except for batteries
and bulbs, abuse and normal wear. We will repair, replace or refund the purchase price of
this product should we determine it to be defective. This limited lifetime warranty also excludes rechargeable batteries, chargers, switches and electronics which have a 2 year warranty with proof of purchase. THIS IS THE ONLY WARRANTY, EXPRESSED OR IMPLIED,
INCLUDING ANY WARRANTY OF MERCHANTABILITY OR FITNESS FOR A PARTICULAR
PURPOSE. INCIDENTAL, CONSEQUENTIAL OR SPECIAL DAMAGES ARE EXPRESSLY
DISCLAIMED EXCEPT WHERE SUCH LIMITATION IS PROHIBITED BY LAW. You may have
other specific legal rights which vary by jurisdiction.
• Lea el manual de su arma de fuego antes de acoplar su linterna en la pistola.
Hex Nut Cavity
STROBE OPERATION
4. Tighten clamp thumbscrew. Verify TLR-VIR™ is secure by further tightening clamp thumbscrew.
LIMITED LIFETIME WARRANTY
The TLR-VIR clamp thumbscrew requires an application of high quality gun oil to keep it
rust free. Use a soft cloth and mild detergent to clean the glass LED lens and keep it free of
dirt and grime. The IR illuminator aperture can be cleaned with a cotton swab (or similar
item) and mild detergent.
• No apunte nunca un arma de fuego a algo que no esté dispuesto a destruir.
Each rail key is stamped for easy identification and the keys
share a common key screw and hex nut. Each key has a hex nut
cavity in the base.
3. Rotate the TLR-VIR™ onto the rail and release clamp thumbscrew to attach TLR-VIR™ to rail.
MAKE SURE THAT THE FIREARM IS UNLOADED AND THE BREECH IS OPEN. IT IS
IMPERATIVE THAT SAFETY MEASURES BE EMPLOYED AT ALLTIMES WHILE HANDLING
THE FIREARM.
Go to www.streamlight.com/support for a complete copy of the warranty, and information
on product registration and the location of authorized service centers. Retain your receipt
for proof of purchase.
MOUNTING/RREMOVAL PROCEDURE
MAINTENANCE
Paddle switch located on rear of TLR-VIR provides momentary or constant on activation
of selected illumination source.
Toggle switch located on the rear of the IR Illuminator housing selects IR or Visible
illumination, or a Safe/OFF center position. Tactile IR position indicator easily identifies
toggle switch IR position in dark environment.
• Streamlight recomienda que la TLR-VIR sólo se active con la mano que no se utiliza
para disparar mientras utiliza un agarre de dos manos en el arma de fuego con el dedo
índice fuera del protector del gatillo cuando sea posible. De lo contrario, podría
producirse la descarga accidental y graves lesiones, daño a la propiedad o la muerte.
The TLR-VIR ships from the factory with strobe mode enabled.
The light can be reprogrammed to disable strobe by rapidly tapping the momentary paddle
switch nine times and holding it down on the tenth time. After one second the light will
turn off to indicate reprogramming was successful.
Repeat the procedure above to re-enable strobe mode.
Please Return To:
Four polymer rail keys (included) allow the TLR to be attached to a variety of firearms:
GL - Glock or "universal" rails; 1913 – Mil Std-1913 (Picatinny); SW - TSW & 99, and
Beretta - 90two.
RAIL KEYS
Visible and IR LED
Weapon-Mounted Tactical
Illuminator
2. Place the fixed portion of clamp against the rail and align the key with the selected rail groove.
1. Loosen clamp thumbscrew and push it toward the housing to allow mounting clamp to
open to fit rail.
Instalación y extracción de la pila
Llaves del riel
ANTES DE PROCEDER A LA APERTURA O EL CIERRE DEL COMPARTIMENTO DE
LA PILA DEBERÁ RETIRARSE LA TLR-VIR DEL ARMA.
Cuatro llaves de riel de polímero (incluidas) permiten acoplar la TLR a diferentes armas de fuego:
Rieles GL -Glock o "universales"; 1913 – Mil Std-1913 (Picatinny); SW - TSW y 99, y
Beretta - 90two.
El interruptor de paleta situado en la parte posterior de la TLR-VIR ofece la activación
momentánea o constante de la fuente de iluminación seleccionada.
El interruptor basculante situado en la parte trasera del alojamiento del iluminador
de infrarrojos selecciona iluminación de infrarrojos o visible o una posición central
de apagado/segura. El indicador de posición de infrarrojos táctil identifica fácilmente
la posición de infrarrojos del interruptor basculante en un entorno oscuro
ASEGÚRESE DE QUE EL ARMA DE FUEGO ESTÉ DESCARGADA Y LA CULATA ABIERTA.
DURANTE LA MANIPULACIÓN DEL ARMA DE FUEGO ES OBLIGATORIO EL USO DE MEDIDAS DE SEGURIDAD EN TODO MOMENTO.
Funcionamiento del interruptor
Procedimiento de montaje/extracción
1. Afloje el tornillo de la abrazadera y empújelo hacia la carcasa para que la abrazadera
de montaje se abra para encajar el riel.
DURANTE LA MANIPULACIÓN DEL ARMA DE FUEGO ES OBLIGATORIO EL USO DE
MEDIDAS DE SEGURIDAD EN TODO MOMENTO.
Cada llave de riel está sellada para facilitar su identificación y
las llaves comparten un tornillo de llave y una tuerca hexagonal
comunes. Cada llave tiene una cavidad de tuerca hexagonal en
la base.
PILAS
ADVERTENCIA: RIESGO DE INCENDIO, EXPLOSIÓN, QUEMADURAS
Cavidad de tuerca
hexagonal
1. Seleccione la llave apropiada e inserte una tuerca
hexagonal en la cavidad en la base de la llave.
Nota: Ajuste la tuerca hexagonal de manera que no
sobresalga ninguna parte de la llave.
2. Agarre la llave del riel (lado de la tuerca hexagonal
hacia arriba) y la TLR (bolsillo de la llave hacia
abajo) y alinee los dos.
3. Inserte la llave en el bolsillo de la llave de la TLRVIR y utilice una llave hexagonal de 7/64 pulg para
asegurarla con el tornillo de la llave.
UTILICE ÚNICAMENTE: Pilas Streamlight, Panasonic o Sanyo tamaño CR123A;
Duracell 123A o Energizer 123. El uso de otras pilas o la combinación de pilas
usadas y nuevas, o de diferentes marcas podría producir fugas, un incendio o
explosión y lesiones personales graves. NO recargue, utilice incorrectamente,
cortocircuite, almacene o deseche incorrectamente, desmonte ni caliente a una
temperatura superior a 100 °C. Manténgase alejado de los niños.
UTILICE ÚNICAMENTE LAS PILAS RECOMENDADAS PARA SU USO EN ESTE
PRODUCTO.
LED de infrarrojos
Precaución – Radiación LED invisible
LED de Clase 1
780 – 875 nm
De conformidad con IEC 60825-1 Ed 1.2
2001-08
VISIBLE LED
Caution LED Radiation
Do Not Stare INto Beam or
View Directly eith Opticalk Instruments
Class 2M LED Product White
Max. Output < 67 mW
Per IEC 60825-1 Ed. 1.2 2001-08
USE ONLY: Streamlight, Panasonic, or Sanyo size CR123A; Duracell 123A, or
Energizer 123. Use of other batteries or mixing of used and new or different brand
batteries may result in leakage, fire or explosion and serious personal injury. DO
NOT recharge, misuse, short circuit, improperly store or discard, disassemble, or heat
above 212°F (100°C). Keep away from children.
SWITCH OPERATION
• Practique exhaustivamente (bajo condiciones de formación seguras) con la TLR y el
arma de fuego antes de usar el arma en una situación táctica
STROBE ENABLE/DISABLE
1. Engage the safety on the firearm if applicable.
2. Remove the magazine from the firearm if applicable.
3. Open the action and inspect the chamber to be sure it is empty.
THE TLR-VIR™ MUST BE REMOVED FROM THE FIREARM BEFORE THE BATTERY
COMPARTMENT CAN BE OPENED OR CLOSED.
BATTERY INSTALLATION/REMOVAL
IR LED
Caution Invicible LED Radiation
Class 1 LED
780 – 875 nm
Per IEC 60825-1 Ed. 1.2 2001-08
NOTE: A key MUST be used or the TLR-VIR will slide off the front
of the rail under recoil.
USE ONLY THOSE BATTERIES SPECIFICALLY RECOMMENDED FOR USE IN THIS PRODUCT.
1. Select the appropriate key and insert a hex nut into the
cavity in the base of the key.
Note: Adjust the hex nut so no portion protrudes from
the key.
2. Hold the rail key (hex nut side up) and the TLR (key
pocket side down) and align the two.
3. Insert the key into the TLR-VIR key pocket and use a
7/64" hex wrench to secure it with the key screw.
WARNING: FIRE, EXPLOSION, BURN HAZARD
BATTERIES
LED VISIBLE
Precaución – Radiación LED
No mire directamente al haz nilo mire
directamente con instrumentos ópticos
Producto LED de clase 2M: Blanco
Potencia máxima < 67 mW
De conformidad con IEC 60825-1 Ed 1.2
2001-08
IT IS IMPERATIVE THAT SAFETY MEASURES BE EMPLOYED AT ALL TIMES WHILE
HANDLING THE FIREARM.
BEFORE ATTACHING, INSPECTING, OR SERVCING A FIREARM-MOUNTED TLR-VIR™
Activación/desactivación del estroboscopio
La TLR-VIR se envía de fábrica con el modo. estroboscopio activado.
Es posible volver a programa la luz para inhabilitar el estroboscopio tocando muy rápido
nueve veces el interruptor de paleta momentáneo y manteniéndolo apretado la décima vez.
Transcurrido un segundo, la luz se apagará para indicar que la reprogramación se ha
realizado con éxito.
Repita el procedimiento de arriba para volver a activar el modo estroboscópico.
2. Coloque la parte fija de la abrazadera contra el riel y alinee la llave con la ranura del
riel seleccionada.
• Use of a firearm under any circumstance may be dangerous. SERIOUS INJURY
OR EVEN DEATH may result without proper training in the safe handling of
firearms. Proper training should be obtained from an accredited firearms safety
program conducted by competent, qualified instructors in the military, police
academies or National Rifle Association affiliated instruction programs.
• Read your firearm’s manual before attaching your gun mounted light.
• Never point a firearm at something you are not willing to destroy.
• Streamlight recommends that the TLR-VIR™ should only be activated with the
non-trigger hand while employing a two-hand grip on the firearm and with the
trigger finger outside the trigger guard when possible. Failure to do so could
result in an accidental discharge and serious injury, damage to property, or death.
• Thoroughly practice (employing safe training conditions) with the TLR
and firearm before using the weapon in a tactical situation.
FAILURE TO READ AND FOLLOW THESE OPERATING INSTRUCTIONS AND
WARNINGS WHEN HANDLING A FIREARM OR THE TLR-VIR™ CAN BE DANGEROUS
AND CAN RESULT IN SERIOUS INJURY, DAMAGE TO PROPERTY, OR DEATH.
WARNING - Use of light in “strobe” mode may cause seizures in persons
with photosensitive epilepsy.
IMPORTANT WARNINGS
Congratulations on your purchase of the Streamlight TLR-VIR™, a weapon-mounted visible
and IR LED tactical illuminator. This high quality system offers adjustable mounting flexibility
that accommodates the MIL-STD-1913 accessory rails featured on a wide variety of firearms.
ENGLISH
Mantenimiento
Es necesario aplicar aceite para pistolas de alta calidad en el tornillo de la abrazadera de la
TLR para evitar su oxidación. Utilice un paño suave y un detergente suave para limpiar la
óptica del LED de vidrio y mantenerla libre de suciedad y mugre. La apertura del iluminador
de infrarrojos puede limpiarse con un bastoncillo (o artículo similar) y detergente suave.
NOTA: Evite siempre el uso de soluciones de limpieza agresivas pues podrían dañar la
TLR-VIR.
Garantía limitada de por vida de Streamlight
y desgaste normal. Repararemos, sustituiremos o reembolsaremos el precio de compra de
este producto si determináramos que está defectuoso. Esta garantía limitada de por vida
también excluye las pilas recargables, los cargadores, botones y sistemas electrónicos que
tengan una garantía de 2 años con prueba de compra. ESTA ES LA ÚNICA GARANTÍA,
EXPRESA O IMPLÍCITA, INCLUIDA CUALQUIER GARANTÍA DE COMERCIABILIDAD E
IDONEIDAD PARA UN FIN EN PARTICULAR. SE RECHAZAN EXPRESAMENTE LOS
DAÑOS FORTUITOS, CONSECUENTES O ESPECIALES SALVO EN AQUELLOS LUGARES
DONDE DICHA LIMITACIÓN ESTÉ PROHIBIDA POR LA LEY. Podría tener otros derechos
legales específicos que varían según la jurisdicción.
Diríjase a www.streamlight.com/support para obtener una copia completa de la garantía e
información sobre el registro de un producto, así como la ubicación de los centros de
mantenimiento autorizados. Conserve su recibo como prueba de compra.
3. Gire la TLR-VIR hacia el riel y suelte el tornillo de la abrazadera para acoplar la
TLR-VIR al riel.
4. Apriete el tornillo de la abrazadera. Compruebe que se ha fijado la TLR-VIR apretando
aún más el tornillo de fijación.
SERVICIO
La TLR-VIR incluye pocas o ninguna pieza que pueda ser reparada por el usuario.
Envíe a:
Customer Service
STREAMLIGHT, INC.
30 Eagleville Road
Suite 100
Eagleville, PA U.S.A. 19403-39996
Teléfono: (800) 523-7488 gratuito (en Estados Unidos) / +1-610-631-0600
Fax: (800) 220-7007 / +1-610-631-0712
www.streamlight.com
Funcionamiento del estroboscopio
NOTA: DEBE usarse una llave o de lo contrario la TLR se saldrá de
la parte delantera del riel bajo el recuperador.
La TLR-VIR cuenta con un modo estroboscópico que puede activarse mediante el
interruptor de paleta o el interruptor remoto.
En un intervalo de 0,4 segundos, presione el interruptorde paleta situándolo en la
posición momentánea, momentánea, suéltelo y vuelva a presionarlo inmediatamente
manteniéndolo presionado para activar el estroboscopio.
997606_TLR-0612_Layout 1 6/13/12 11:27 AM Page 1
REMARQUE : Une clavette doit IMPÉRATIVEMENT être utilisée
pour éviter que la TLR glisse hors de l’avant du rail sous l’effet du
recul
En l’espace de 0,4 seconde, pousser soit commutateur à palette, soit le commutateur
à distance la position de rappel, le relâche puis rappuyer immédiatement et le tenir
dans cette position pour faire marcher le stroboscope.
La TLR-VIR comporte un mode stroboscope qui peut être activé par le commutateur
à palette ou par une commande à distance.
Function De Lumière Le Strobescope
1.Sélectionner la clavette qui convient et insérer un
écrou dans la cavité dans la base de la clavette.
Remarque : Placer l’écrou de telle manière qu’il ne
dépasse pas de
la clavette.
2.Tenir la clavette (côté écrou vers le haut) et la TLR
(côté logement de clavette vers le bas) et les aligner
l’une avec l’autre.
3.Insérer la clavette dans le logement de clavette de la
TLR et la fixer avec la vis pour clavette à l’aide d’une
clé Allen de 7/64".
Veuillez le renvoyer à :
Customer Service
STREAMLIGHT, INC.
30 Eagleville Road, Suite 100
Eagleville, PA U.S.A. 19403-39996
Téléphone : (800) 523-7488 Gratuit / +1-610-631-0600
Télécopie : (800) 220-7007 / +1-610-631-0712
www.streamlight.com
La TLR-VIR ne contient que peu ou pas de pièces réparables par l’utilisateur.
RÉPARATION
Ablauf von Montage/Demontage
Schienenadapter
Clavette de rail
Procédure de pose/dépose
Fonctionnement du commutateur
Activer/désactiver le stroboscope
Entretien
LA TLR-VIR DOIT ÊTRE DÉMONTÉE DE L’ARME À FEU POUR POUVOIR OUVRIR OU
FERMER LE COMPARTIMENT DES PILES.
Les quatre clavettes de rail en polymère (fournies) permettent de monter la TLR sur diverses
armes à feu : GL - Glock ou « universel » ; 1913 – Mil Std-1913 (Picatinny) ; SW - TSW et 99
et Beretta - 90two.
S’ASSURER QUE L’ARME À FEU EST DÉCHARGÉE ET QUE LA CULASSE EST OUVERTE.
IL EST IMPÉRATIF DE RESPECTER EN PERMANENCE LES MESURES DE SÉCURITÉ LORS
DE LA MANIPULATION D’ARMES À FEU..
La TLR-VIR est livrée avec le mode stroboscope activé.
Pour reprogrammer la lampe et désactiver le stroboscope, pousser rapidement la palette
neuf fois successives vers sa position de rappel puis la tenir enfoncée la dixième fois. Au
bout d’une seconde, la lampe s’éteint pour indiquer que la reprogrammation a réussi.
La vis de griffe de la TLR-VIR nécessite une application d’huile pour arme de haute qualité
pour la protéger contre la rouille. Utiliser un chiffon doux et un détergent léger pour nettoyer
la lentille de DEL en verre et éliminer la saleté. L’ouverture d'éclairage IR peut être nettoyée
avec un coton-tige (ou objet similaire) et un détergent léger.
Remarque : Toujours éviter les solutions de nettoyage corrosives susceptibles d’endommager
la TLR-VIR.
Chaque clavette de rail est estampée pour faciliter son identification et elles partagent toutes une vis et un écrou communs.
Chaque clavette comporte une cavité pour écrou dans la base.
1. Desserrer la vis de griffe et la pousser vers le boîtier pour permettre d'engager la griffe
de fixation sur le rail.
2. Placer la partie fixe de la griffe contre le rail et aligner la clavette avec la rainure de rail
sélectionnée.
3. Tourner la TLR-VIR sur le rail et relâcher la vis de griffe pour attacher la TLR-VIR au rail.
4. Serrer la vis de griffe. Vérifier que la TLR-VIR est solidement fixée en serrant encore
plus la vis le cas échéant.
Le commutateur à palette sur l'arrière de la TLR-VIR permet une activation stable ou
à rappel de la source lumineuse sélectionnée.
Le commutateur à bascule sur l'arrière du boîtier IR permet de sélectionner entre
l'éclairage IR ou visible, ainsi qu'une position arrêt/sécurité centrale. L'indicateur
tactile IR permet d'identifier aisément la position du commutateur à bascule IR dans
la pénombre.
DEUTSCH
BEVOR SIE EIN AUF EINER FEUERWAFFE MONTIERTES TLR BEFESTIGEN,
INSPIZIEREN ODER WARTEN
WICHTIGE WARNHINWEISE
WARNHINWEIS: Die Verwendung des Lichts im „Stroboskopmodus" kann bei
Personen mit fotosensitiver Epilepsie Anfälle auslösen.
DIE NICHTBEACHTUNG DIESER BETRIEBSANLEITUNG UND WARNHINWEISE
FÜR DEN UMGANG MIT EINER FEUERWAFFE BZW. DAS TLR NICHT ZU LESEN
UND ZU BEFOLGEN KANN GEFÄHRLICH SEIN UND SACHSCHÄDEN SOWIE
SCHWERE KÖRPERVERLETZUNGEN MIT TODESFOLGE ZUR FOLGE HABEN.
• Der Gebrauch einer Feuerwaffe kann unter allen Umständen gefährlich sein. Ohne
ordnungsgemäße Schulung im sicheren Umgang mit Feuerwaffen kann dies SCHWERE
KÖRPERVERLETZUNGEN ODER SOGAR DEN TOD zur Folge haben. Eine
ordnungsgemäße Schulung sollte durch ein anerkanntes Feuerwaffen-Sicherheitsprogramm
erbracht werden, das von kompetenten, qualifizierten Ausbildern in der Armee, in
Polizeischulen oder in Schulungsprogrammen durchgeführt wird, die mit der National
Rifle Association verbunden sind.
• Lesen Sie die Bedienungsanleitung Ihrer Feuerwaffe, bevor Sie Ihr an einer Waffe
montierbares Lichtsystem montieren.
1. Sichern Sie die Feuerwaffe ggf.
2. Nehmen Sie ggf. das Magazin aus der Feuerwaffe.
3. Öffnen Sie den Verschluss und vergewissern Sie sich, dass die Kammer leer ist.
Einlegen / Herausnehmen der Batterien
DER TLR-VIR MUSS VON DER FEUERWAFFE ABGENOMMEN WERDEN, UM DAS
BATTERIEFACH ÖFFNEN ODER SCHLIESSEN ZU KÖNNEN.
Mithilfe von vier Kunststoff-Schienenadaptern (im Lieferumfang enthalten) kann der TLR an
vielen Feuerwaffen befestigt werden:
GL – Glock-Schienen oder „Universalschienen“; 1913 – Mil Std-1913 (Picatinny);
SW - TSW & 99 und Beretta - 90two.
Bedienung des Schalters
VERGEWISSERN SIE SICH, DASS DIE FEUERWAFFE NICHT GELADEN UND DER
VERSCHLUSS OFFEN IST. DER UNUNTERBROCHENE EINSATZ VON
SICHERHEITSVORKEHRUNGEN IST BEIM UMGANG MIT DER FEUERWAFFE UNABDINGBAR.
1. Lösen Sie die Halterungsschraube und schieben Sie sie zum Gehäuse hin, sodass Sie
die Halterung öffnen und die Schiene einsetzen können.
DER UNUNTERBROCHENE EINSATZ VON SICHERHEITSVORKEHRUNGEN IST
BEIM UMGANG MIT DER FEUERWAFFE UNABDINGBAR.
Mithilfe des Wippschalters auf der Rückseite des TLR-VIR wird die ausgewählte
Lichtquelle im Tasterbetrieb oder Dauer-Ein-Betrieb aktiviert. Am Umschalters auf der
Rückseite des Gehäuses der IR-Beleuchtung können Sie IR oder sichtbares Licht oder
in der Mittelstellung die Gesichert/AUS-Position einstellen. Am taktilen Indikator für
die IR-Position können Sie die IR-Position des Umschalters auch bei Dunkelheit einfach
feststellen.
WARNHINWEIS: BRAND-, EXPLOSIONS- UND VERBRENNUNGSGEFAHR
VERWENDEN SIE NUR SOLCHE BATTERIEN, DIE AUSDRÜCKLICH FÜR DIESES
PRODUKT EMPFOHLEN SIND.
Aussparung für
die Sechskantmutter
Stroboskop aktivieren/deaktivieren
Pflege
Der TLR-VIR wird mit aktiviertem Stroboskopmodus ausgeliefert.
Das Licht kann so umprogrammiert werden, dass das Stroboskop deaktiviert ist, indem
man den Wippschalter neun Mal antippt und ihn beim zehnten Mal gedrückt hält. Nach
einer Sekunde schaltet sich das Licht aus, um anzuzeigen, dass die Umprogrammierung
erfolgreich war.
Wiederholen Sie die obigen Schritte, um den Stroboskopmodus wieder zu aktivieren
2. Drücken Sie den festen Teil der Halterung gegen die Schiene und bringen Sie den Keil
in Deckung mit der ausgewählte Nut in der Schiene.
BATTERIEN
Zur leichten Identifikation ist jeder Schienenadapter gestempelt.
Die Adapter haben eine gemeinsame Sechskantschraube und
Sechskantmutter. Jeder Adapter verfügt an seiner Grundseite
über eine Aussparung für die Sechskantmutter.
VERWENDEN SIE NUR: Streamlight, Panasonic oder Sanyo Größe CR123A; Duracell
123A oder Energizer 123. Die Verwendung anderer Batterien oder die gemeinsame
Verwendung gebrauchter und neuer Batterien oder Batterien anderer Marken können
zu Leckagen, Bränden oder Explosionen sowie schweren Verletzungen führen. NICHT
wiederaufladen, missbrauchen, kurzschließen, unsachgemäß lagern oder entsorgen,
öffnen oder über 100°C erhitzen. Von Kindern fernhalten.
1.Wählen Sie den geeigneten Adapter und stecken Sie
die Sechskantmutter in die Aussparung an der
Grundseite des Adapters.
Hinweis: Drehen Sie die Sechskantmutter so, dass
kein Teil von ihr.
2.Halten Sie den Adapter (mit der Sechskantmutterseite
nach oben) und den TLR (mit der Adapteraufnahmeseite
nach unten) und richten Sie beide aufeinander aus.
3. Schieben Sie den Adapter in die Adapteraufnahme
am TLR-VIR und ziehen Sie ihn mithilfe der
Adapterschraube und mit einem 7/64
Zoll-Innensechskantschlüssel fest.
• Zielen Sie mit einer Feuerwaffe niemals auf etwas, das Sie nicht zerstören möchten.
• Streamlight empfiehlt, dass das TLR-VIR mit der Hand eingeschaltet wird, die sich
nicht am Abzug befindet. Dabei sollte ein Zweihandgriff an der Waffe verwendet werden
und der Abzugsfinger sollte sich wenn möglich außerhalb der Abzugsabdeckung
befinden. Nichtbeachtung kann zur versehentlichem Abfeuern und Sachschäden sowie
schweren Körperverletzungen, auch mit Todesfolge, führen.
Cavité pour écrou
Garantie limitée à vie de Streamlight
Répéter la procédure ci-dessus pour réactiver le mode stroboscope.
SICHTBARE LED
Achtung – LED-Strahlung
Nicht direkt in den Lichtstrahl schauen oder
direkt mit optischen Instrumenten betrachten
LED-Produkt der Klasse 2M: Weiß
Max. Output < 67 mW
Per IEC 60825-1 Ed. 1.2 2001-08
DEL VISIBLE
Attention – Rayonnement LED
Ne pas regarder le faisceau en face ni
l'observer directement avec un appareil
d’optique
Produit DEL de Classe 2M : Blanc
Puissance max. < 67 mW
Per IEC 60825-1 Ed. 1.2 2001-08
AVERTISSEMENT : DANGER DE FEU, D'EXPLOSION ET DE BRÛLURE
Streamlight garantit ce produit, hormis les piles et les ampoules, à vie contre les défauts, à l'exception
des emplois abusifs et de l'usure normale. Nous nous engageons à réparer, à remplacer ou à
rembourser le prix d’achat de ce produit si nous déterminons qu'il est défectueux. Cette garantie
limitée à vie exclut également les batteries rechargeables, les chargeurs, les commutateurs et
l'électronique, qui sont couverts par une garantie de 2 ans sur présentation d'un justificatif d'achat.
IL N'EST OFFERT AUCUNE AUTRE GARANTIE, NI EXPRESSE NI IMPLICITE, NOTAMMENT DE
QUALITÉ MARCHANDE OU D'ADAPTATION À UN EMPLOI PARTICULIER. NOUS DÉCLINONS
EXPRESSÉMENT TOUS DOMMAGES INDIRECTS, CONSÉCUTIFS OU SPÉCIAUX, SAUF AUX
ENDROITS OÙ LA LOI INTERDIT DE TELLES RESTRICTIONS. Il est possible que la réglementation
locale vous accorde d'autres droits juridiques particuliers.
Allez à www.streamlight.com/support pour obtenir un exemplaire complet de la garantie et pour
tout renseignement sur l'enregistrement du produit et sur les centres de réparation agréés. Conservez
votre reçu en tant que justificatif d’achat
Mise en place/enlèvement des piles
IR LED
Achtung – Unsichtbare LED-Strahlung
LED der Klasse 1
780 – 875 nm
Gemäß IEC 60825-1 Ausgabe 1.2
2001-08
DER IR
Attention – Rayonnement DEL invisible
DEL de Classe 1
780 à 875 nm
Suivant CEI 60825-1 Ed. 1.2 2001-08
UTILISER UNIQUEMENT LES PILES SPÉCIFIQUEMENT RECOMMANDÉES POUR
CE PRODUIT.
• L’utilisation d’une arme à feu peut s’avérer dangereuse dans toutes
circonstances. DES BLESSURES GRAVES, VOIRE LA MORT, peuvent résulter
d’un manque de formation adéquate à la bonne manipulation des armes à feu.
Une formation adaptée doit être obtenue dans le cadre d’un programme sur la
sécurité des armes à feu agréé et dispensé par des instructeurs compétents et
qualifiés auprès des forces armées, des écoles de police ou de programmes
de formation affiliés à la National Rifle Association.
PILES
1. Engager la sécurité de l'arme à feu le cas échéant.
2. Sortir le chargeur de l’arme à feu le cas échéant.
3. Ouvrir le mécanisme et vérifier que la chambre est vide.
AVANT DE FIXER, DE CONTRÔLER OU D’ENTRETENIR UNE TRL-VIR MONTÉE
SUR ARME À FEU
• Üben Sie umfassend mit dem TLR und der Waffe (in einem sicheren Schulungsumfeld),
bevor Sie die Waffe in einer taktischen Situation verwenden.
• Streamlight conseille d’activer la TLR-VIR uniquement avec la main qui
n’actionne pas la détente tout en tenant l’arme à deux mains et avec le doigt
de détente hors du pontet autant que possible. Toute autre pratique peut
résulter en une décharge accidentelle et des blessures graves, des dégâts
matériels ou la mort.S’entraîner assidûment (dans des conditions de formation
sûres) avec la TLR et l’arme à feu avant d’utiliser l’arme dans une situation
tactique.
• Ne jamais pointer une arme à feu vers quelque chose qu’on ne souhaite pas
détruire.
• Veiller à lire le manuel de l’arme à feu avant de monter la lampe sur l’arme.
UTILISER SEULEMENT : piles Streamlight, Panasonic ou Sanyo CR123A, Duracell
123A ou Energizer 123. L'utilisation d'autres piles ou l’association de piles usagées
et neuves ou de piles de marques différentes présentent des risques de fuites,
d’incendie, d’explosion et de blessures graves. NE PAS recharger, utiliser de façon
abusive, court-circuiter, stocker ou éliminer de façon inappropriée, démonter ou
chauffer au-dessus de 100 °C. Garder hors de portée des enfants.
VEILLER À LIRE ET COMPRENDRE CES INSTRUCTIONS D’UTILISATION ET
MISES EN GARDE AVANT DE MANIPULER UNE ARME À FEU OU LA TLR AFIN
D’ÉCARTER LES DANGERS POTENTIELS DE BLESSURES GRAVES, DE DÉGÂTS
MATÉRIELS ET DE MORT.
IL EST IMPÉRATIF DE RESPECTER EN PERMANENCE LES MESURES DE SÉCURITÉ
LORS DE LA MANIPULATION D’ARMES À FEU.
AVERTISSEMENT : L’utilisation de la lampe en mode « stroboscope » peut
provoquer une crise chez les personnes souffrant d'épilepsie photosensible.
AVERTISSEMENTS IMPORTANTS
FRANÇAIS
Die Halterungsschraube des TLR-VIR ist mit qualitativ hochwertigem Waffenöl zu schmieren,
um sie vor Korrosion zu schützen. Reinigen Sie die aus Glas bestehende LED-Linse mit
einem weichen Lappen und einem sanften Reinigungsmittel und halten Sie sie schmutz- und
schmauchfrei. Die Optik der IR-Lichtquelle kann mit einem Wattestäbchen (oder dergl.) und
einem sanften Reinigungsmittel gereinigt werden.
Hinweis: Vermeiden Sie aggressive Reinigungslösungen stets, denn diese können den TLRVIR beschädigen.
Streamlights eingeschränkte lebenslange Garantie
Streamlight garantiert, dass dieses Produkt während eines gesamten Verwendungslebens frei von
Mängeln ist. Ausgenommen sind Batterien und Glühbirnen, Missbrauch und normaler Verschleiß.
Wir werden dieses Produkt reparieren, ersetzen oder den Kaufpreis zurückerstatten, wenn wir feststellen sollten, dass es mangelhaft ist. Ebenfalls von dieser eingeschränkten lebenslangen Garantie
ausgenommen sind wiederaufladbare Batterien, Ladegeräte, Schalter und die Elektronik, für die eine
zweijährige Garantie mit Kaufnachweis gilt. DIES IST DIE EINZIGE AUSDRÜCKLICH ODER IMPLIZITE
GARANTIE, EINSCHLIESSLICH EINER ETWAIGEN GARANTIE DER MARKTÜBLICHKEIT ODER EIGNUNG FÜR EINEN BESTIMMTEN ZWECK. ERSATZ FÜR BEILÄUFIGE SCHÄDEN ODER
FOLGESCHÄDEN UND BESONDERER SCHADENSERSATZ WERDEN AUSDRÜCKLICH AUSGESCHLOSSEN, AUSSER IN LÄNDERN, IN DENEN EINE DERARTIGE EINSCHRÄNKUNG GESETZLICH VERBOTEN IST. Je nach Land könnten Sie andere bestimmte gesetzliche Rechte haben.
Alle Garantieunterlagen sowie Informationen zur Produktregistrierung und Vertragswerkstätten finden
Sie auf www.streamlight.com/support. Bewahren Sie Ihren Einkaufsbeleg als Kaufnachweis auf.
3. Kippen Sie den TLR-VIR auf die Schiene und lassen Sie die Halterungsschraube los,
um den TLR-VIR an der Schiene zu befestigen.
4. Ziehen Sie die Halterungsschraube fest. Vergewissern Sie sich, dass der TLR-VIR fest
sitzt, indem Sie die Halterungsschraube weiter festziehen.
.
KUNDENDIENST
Der TLR enthält nur wenige oder keine vom Benutzer wartbaren Teile.
Rücksendungen bitte an:
Customer Service
STREAMLIGHT, INC.
30 Eagleville Road, Suite 100
Eagleville, PA U.S.A. 19403-39996
Telefon: +1 800 523-7488 gebührenfrei (nur in den USA) / +1-610-631-0600
Fax: (800) 220-7007 / +1-610-631-0712
www.streamlight.com
Stroboskopbetrieb
Der TLR-VIR hat einen Stroboskopmodus, der mithilfe. des Wippschalters oder an
der Schalterverlängerung aktiviert werden kann.
HINWEIS: Ein Adapter MUSS verwendet werden. Andernfalls wird
der TLR-VIR vom Rückstoß von der Schiene geschoben.
Drücken Sie den Wippschalter oder die Schalterverlängerung in die Taster-Position,
lassen Sie ihn/sie los und drücken und halten Sie ihn/sie erneut innerhalb von 0,4
Sekunden, um in den Stroboskopmodus zu schalten.
997606_TLR-0612_Layout 1 6/13/12 11:27 AM Page 2