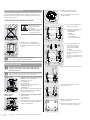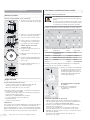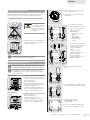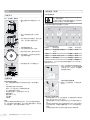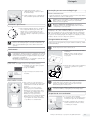
1
Installation and Operating Instructions | Installations- und Bedienungsanleitung | Notice d’installation et d’utilisation | Instrucciones de instalación y manejo | Istruzioni per l’installazione e l’uso | 取扱説明書 | Инструкция по установке и эксплуатации | ≠㽐⧧␃㾗㙭タ | Instrukcja montażu i obsługi | Instruções de instalação e operação | 설치 및 사용 설명서 Secura®, Quintix®, Practum® Laboratory Balances | Laborwaagen | Balances de laboratoire | Balanzas de laboratorio | Bilance da laboratorio | 研究室用電子天びん | Лабораторные весы | 㖯㬕㗌♋㽳㝢㊿ | Wagi laboratoryjne | Balanças de laboratório | ཇጔཇဧ ႔ါ 98648-019-72 English – page 3 In cases involving questions of interpretation, the German-language version shall prevail. Deutsch – Seite 10 Im Auslegungsfall ist die deutsche Sprache maßgeblich. Français – page 17 En cas de questions concernant l‘interprétation, la version en langue allemande fera autorité. Español – página 24 En caso de interpretación, la versión en lengua alemana será determinante. Italiano – pagina 31 In caso di questioni relative all’interpretazione, la precedenza è data alla lingua tedesca. 日本語 − 38 ページ 解釈上の問題が起きた場合、 ドイツ語版が優先するものとします。 Русский – страница 45 При возникновении сомнений в правильности текста обращайтесь к версии инструкции на немецком языке. 㺲㢶☾ 52 㮝 㑥⥗㲞☡⍙㗰⏥㎥☨㢼㝘ᱨ㎫㮾☦㲗⊔〉㢜㽜ᮣ Polski - strona 59 W kwestiach budzących wątpliwości, znaczenie nadrzędne ma niemiecka wersja językowa. Português - página 66 Nos casos que envolverem questões de interpretação, prevalecerá a versão no idioma alemão. 한국어 - 페이지 73 ม શഏጄ௴ ెၩ࿌ ႖ၦ ဨ໓ጁఁఋ. 2 Installation and Operating Instructions Secura, Quintix, Practum English Contents Symbols Contents . . . . . . . . . . . . . . . . . . . . . . . . . . . . . . . . . . . . . . . . . . User Information . . . . . . . . . . . . . . . . . . . . . . . . . . . . . . . . . . . . Safety Precautions . . . . . . . . . . . . . . . . . . . . . . . . . . . . . . . . . . Intended Use . . . . . . . . . . . . . . . . . . . . . . . . . . . . . . . . . . . . . . . 3 3 3 4 Getting Started . . . . . . . . . . . . . . . . . . . . . . . . . . . . . . . . . . . . . Unpacking and Equipment Supplied . . . . . . . . . . . . . . . . . . . . . . Installing the Balance . . . . . . . . . . . . . . . . . . . . . . . . . . . . . . . . . Choosing a Location. . . . . . . . . . . . . . . . . . . . . . . . . . . . . . . . . . Electrical Connection . . . . . . . . . . . . . . . . . . . . . . . . . . . . . . . . . Warm-up Time . . . . . . . . . . . . . . . . . . . . . . . . . . . . . . . . . . . . . . Leveling . . . . . . . . . . . . . . . . . . . . . . . . . . . . . . . . . . . . . . . . . . . Below-balance Weighing . . . . . . . . . . . . . . . . . . . . . . . . . . . . . . Anti-Theft Locking Device . . . . . . . . . . . . . . . . . . . . . . . . . . . . . 4 4 4 5 5 6 6 6 6 Moving the Balance. . . . . . . . . . . . . . . . . . . . . . . . . . . . . . . . . . Transporting the Balance . . . . . . . . . . . . . . . . . . . . . . . . . . . . . Care and Maintenance . . . . . . . . . . . . . . . . . . . . . . . . . . . . . . . Cleaning the Balance . . . . . . . . . . . . . . . . . . . . . . . . . . . . . . . . . Disposal . . . . . . . . . . . . . . . . . . . . . . . . . . . . . . . . . . . . . . . . . . . 7 7 8 8 8 Specifications . . . . . . . . . . . . . . . . . . . . . . . . . . . . . . . . . . . . . . General Data . . . . . . . . . . . . . . . . . . . . . . . . . . . . . . . . . . . . . . . Model-specific Data . . . . . . . . . . . . . . . . . . . . . . . . . . . . . . . . . . EC Declaration of Conformity for electromagnetic compatibility . . . . . . . . . . . . . . . . . . . . . . . . 8 8 80 85 Other Documents h Apart from these installation instructions, an up-to-date user manual for the device is also available as a PDF file, which can be downloaded from the Sartorius website: www.sartorius.com You need Acrobat Reader to read and print the PDF file, which you can download for free from the Adobe website (www.adobe.com). h Useful information and tips Notes on use in legal metrology Note regarding device operation The following symbols are used in these instructions: t Indicates a required action y Describes what happens after you have performed a particular step Perform steps in the specified order: 1. First action 2. Second action 3. ... – Indicates an item in a list Conventions for these Instructions: – The figures in these instructions are based on “standard” balances. On balances verified for use in legal metrology, some displays and reports may deviate slightly from the figures. Where this is significant for operation, the differences will be explained in the text. About these Installation Instructions t Please read these installation instructions carefully before putting the equipment into operation for the first time. Observe the safety instructions. t These installation instructions are an important part of the product. Keep these instructions in a safe place. If you give the device to others to use, give them these installation instructions too. t If these installation instructions are lost, please contact Sartorius for a replacement or download the latest manual from our website: www.sartorius.com Advice on Applications / Technical Support Contact addresses for application advice and our technical support can be found online at http://www.sartorius.com. User Information Warning / Danger Symbols This symbol indicates hazards which, if not avoided, may present a high risk of death or serious injury. This symbol indicates hazards which, if not avoided, may lead to moderate or minor injuries. Safety Precautions Guidelines and General Information – The balance complies with EU Directives and standards for electrical safety and electromagnetic compatibility.* Improper use or handling can, however, result in damage and/or injury. Any improper use or operation of the balance, i.e., that is not consistent with the instructions, will result in forfeiture of all claims under the manufacturer’s warranty. – Personnel need to have read and understood these installation instructions, including the safety instructions. This symbol indicates hazards which may cause damage to property. – In the event of use in systems and ambient conditions which have greater safety requirements, you must observe the requirements and provisions applicable in your country. This symbol indicates useful information and tips. – Always keep the equipment and balance freely accessible. * = See „Specifications“, page 9 Installation and Operating Instructions Secura, Quintix, Practum 3 Danger of Explosion! Do not use this equipment in hazardous areas in which explosive materials are present. Getting Started The balance must be disconnected from the mains power for all assembly work. Make sure that the voltage rating printed on the AC adaptor is identical to your local mains voltage. Unpacking and Equipment Supplied Installation Information Do not operate the balance if its housing or AC adaptor, including all connections, are damaged. Immediately disconnect the damaged device from the power by pulling the plug. Do not expose the balance, its AC adaptor or the accessories supplied by Sartorius to extreme temperatures, aggressive chemical vapors, moisture, shocks, vibration, or strong electromagnetic fields. Observe the conditions of operation described in the Specifications! Installation information: The operator shall be solely responsible for any modifications to the equipment and for connecting any cables or equipment not supplied by Sartorius. Information on operational quality is available upon request from Sartorius. You should only use peripherals supplied by Sartorius. Observe the IP protection class of the balance and AC adaptor. Do not allow liquid penetration. The protection class indicates the suitability of devices for various ambient conditions (humidity, foreign bodies). Before cleaning the AC adaptor or the balance: Unplug from the mains power. The balance may only be opened by specialized personnel trained by Sartorius. Do not open the AC adaptor. t Open the packaging, making sure to dispose of all parts carefully. t After unpacking the device, check it immediately for any external damage. y If you detect any damage, proceed as directed in the Care and Maintenance chapter. y Save all parts of the original packaging for any future transportation. During shipment, please do not leave cables plugged in! The following parts are included in the equipment supplied: Components Balance with Draft Shield Precision Balances Readability: 0.1 mg 1 mg 10 mg, 0.1 g, and 1 g Draft shield – 9 9 Weighing pan: d 90 mm 9 – – Weighing pan: d 120 mm – – 9 Weighing pan: d 180 mm – – 9 Pan support 9 9 9 Shield disk – – 9 Pan draft shield (Secura only) 9 – – AC adaptor with 9 9 9 country-specific power plug In-use cover 9 9 9 Dust cover – 9 9 Installation and Operating 9 9 9 Instructions Application guide 9 9 9 Installing the Balance Secura Models: Warnings for Installation and Operation of the Device: If glass breaks, there is a risk of injury posed by cuts on glass edges. Lay the cables where they pose no risk of causing someone to trip. Observe the additional safety and danger information in the following chapters. Intended Use This high-resolution balance is exclusively for use in laboratories and indoors under normal atmospheric conditions. It was developed specifically for the exact determination of the mass of materials in liquid, paste, powder, or solid form. Appropriate containers must be used for each type of sample material. They are designed to be used exclusively indoors under normal atmospheric conditions. 4 Installation and Operating Instructions Secura, Quintix, Practum Balance with Draft Shield t Install the following parts in the order listed: – In-use dust cover – Turn the draft shield lock to “unlocked ." – Put the draft shield (1) on the balance. Note: Use both hands to hold the top struts of the draft shield. – Move the side doors right to the back. – Turn the draft shield lock to “locked ." – Put the shield disk (2), centering ring* (3), pan support (4), and weighing pan (5) and draft ring* (6) on the balance. Modelle Quintix und Practum: Note: For information about how to clean the draft shield, see the Care and Maintenance chapter on page 8. * = for models with 0.1 mg readability only English Getting Started Power Connection (Power Supply) AC Adaptor Assembly Installing the Balance Inserting (or Removing) Glass Panels 1) Holding it by its rear edge, pull the draft shield cover up and remove it. Using the wrong power plug adaptors may cause fatal electric shock and damage the equipment. Never insert the power plug adaptor into the socket separately from the AC adaptor (danger of electric shock). t Use the right power plug adaptor for your mains power supply. 2) Push the three glass panels into the draft shield guide, all the way to the front. 3) Then replace the draft shield cover. In doing so, the draft shield cover must lock into position. Balance with No Draft Shield t Install the following parts in the order listed: 1) In-use dust cover (not shown in the illustration). 2) Install the shield disk and turn this counterclockwise until it snaps securely into place. 3) Install the pan support (1) and weighing pan (2). Choosing a Location Select the right setup location: – Set up the device on a stable, even surface that is not exposed to vibrations (e.g., weighing stone). – Maintain free access to the device at all times. Choose a location that is not subject to the following negative influences: – Heat (heater or direct sunlight) – Drafts from open windows, AC systems, and doors – Vibrations during weighing – Heavy traffic areas (personnel) – Excessive moisture – Electromagnetic fields Acclimatization Condensation from humidity can form on the surfaces of a cold device when it is brought into a substantially warmer area. To avoid the effects of condensation, condition the balance for about two hours, leaving it unplugged from the power supply, before plugging the balance back into the mains. A AC adaptor versions: Bag Region/Country a) transparent Europe/EU (except United Kingdom) b) yellow United Kingdom c) blue USA, China, and Japan d) red Australia Bag e) black Region/Country India f) turquoise g) green h) pink i) white South Africa Korea Brazil Argentina The packaging of AC adaptor module 6971790 with line adaptor g), h), and i) is labeled with 98671791. t Push (1) and slide (2) the power plug adaptor (A) ) required for your power supply into the opening of the AC adaptor module (B). When doing this, the AC adaptor needs to lock into position. Removing/Replacing the AC Adaptor t Unlock (1) the AC adaptor and then detach (2) it. Power Connection/Safety Precautions – Only use original Sartorius AC adaptors. The AC adaptor has an IP rating of IP40 in accordance with EN 60529/IEC 60529. – Make sure that the voltage rating printed on the manufacturer’s ID label is identical to that of your local mains voltage. – If the stated supply voltage or the plug design of the AC adaptor does not comply with your country’s standard, please inform the nearest Sartorius representative. – The power connection must be made in accordance with the regulations applicable in your country. Installation and Operating Instructions Secura, Quintix, Practum 5 t 1) First of all, plug the AC adaptor into the socket at the back of your balance. t 2) Then connect the AC adaptor to the wall outlet (main voltage). Instructions for Use in Legal Metrology Additional Display Elements: – Metrology line with additional information about minimum load (Min) and verification scale interval (e) Warning symbol to indicate calculated values, negative gross values or values that are smaller than the minimum sample quantity (SQmin). Setup Menu „Settings“: On balances verified for use in legal metrology, not all functions and settings are available. Warm-up Time 0 y To ensure accurate results are delivered, the balance must warm up for at least 30 minutes after initial connection to the power supply. Only after this time will the device have reached the required operating temperature. Below-balance Weighing 30 When a verified balance of accuracy class k for use in legal metrology is connected to the mains power, it must warm up for at least one hour before operation. Leveling h Interface Specification (Data Output) Settings „PC – SBI“ and „USB RS232 SBI“ for the identification of digits not verified for use in legal metrology: In the setting „SBI“ there is no automatic identification of display digits not verified for use in legal metrology. Corresponding measures or settings must be carried out on the peripheral device. A port for a below-balance weighing hook is located on the bottom of the balance. h Install a draft protection shield. t Lift cover plate out of the bottom of the balance. Warning: When doing this, put the balance to one side and not on the side of the weighing pan. Leveling the balance compensates for slant or unevenness at the place of installation. The balance must be perfectly horizontal to ensure consistent, reproducible weighing results. Note: The balance needs to be re-leveled and adjusted each time its setup location is changed. Models Secura: When “Level” appears on the display, you must level the balance. t Make sure that the weighing pan is unloaded. t Touch “LEVEL!” t Attach a wire (or similar) to the sample and hang it on the notched hook. t Follow the instructions on the interactive display. Models Quintix and Practum: t Turn the two feet as shown in the illustration until the air bubble is centered within the circle of the level indicator. – Air bubble at 12 o’clock: turn the two feet clockwise. – Air bubble at 3 o’clock: turn the left foot clockwise and the right foot counterclockwise. – Air bubble at 6 o’clock: turn the two feet counterclockwise. – Air bubble at 9 o’clock: turn the left foot counterclockwise and the right foot clockwise. 6 Installation and Operating Instructions Secura, Quintix, Practum h If the below-balance weighing port is no longer being used, close the opening with the cover plate again, so that the weighing results are not adversely affected by drafts. The below-balance weighing port may not be opened or used on balances used for legal metrology. Anti-Theft Locking Device t A Kensington lock can be installed at the fastening point on the back of the balance if required. t The balance can also be secured at the installation location with a chain and lock, for example. English t Turn the draft shield lock to “unlocked.” Moving the Balance Before moving the balance, switch it to the standby mode first, then unplug the power connector and remove the weighing pan and the pan support from the balance. t Next, remove the wind shield from the balance. Moving the Balance over Short Distances in the Lab Avoid glass breakage, shocks, and vibrations: Never lift and carry the balance by its draft shield. t Hold the balance under the housing, lift it up carefully, and carry it to its new location. h The balance needs to be re-leveled and adjusted each time its setup location is changed. t Insert the bottom part of the packaging into the box. t Place the following parts into the bottom part of the packaging: – Draft shield – Balance – Base plate – Side panels – Top glass cover A B t Insert the respective weighing pan and pan support into the opening shown in the image to the left: – A = Weighing pan and pan support with a diameter of 120 mm – B = Weighing pan and pan support with a diameter of 90 mm Transporting the Balance h h Prior to shipping, switch the balance to standby mode (see next page) and then pull the plug. Please use the original packaging for shipping. Packaging can be ordered through the Sartorius Service Center if required. Secura Models: 1 2 3 4 5 6 Quintix and Practum Models: 1 2 3 4 t Put packing pads over the glass panels t Remove the following parts from the balance: – Draft ring (1) for models with 0.1 mg readability – Weighing pan (2) – Pan support (3) – Centering ring (4) for models with 0.1 mg readability – Shield disk (5) – Remove glass panels from the draft shield (6): see next chapter, “Care and Maintenance.” t Remove the following parts from the balance: – Weighing pan (1) – Pan support (2) – Shield disk (3) – Remove glass panels from the draft shield (4): see next chapter, “Care and Maintenance.” t Insert the AC adaptor from the cardboard box into the packing pad. t Put the top part of the packaging over the device parts. t Next, put the packaged balance into the cardboard box and seal the box. Installation and Operating Instructions Secura, Quintix, Practum 7 A) Remove the side panels: 1) Gently lift the side panels at the rear and pull them back and out. Care and Maintenance Service To ensure the continued accuracy of your balance, we recommend scheduling regular servicing at least once a year. Sartorius Service offers different service contracts with maintenance intervals that are tailored to your needs. A calibration certificate should be issued as part of every maintenance session. Safety inspections of the AC adaptor and its connections must be performed at appropriate intervals by a qualified electrician (e.g. every 2 years). B) Remove the top glass cover: 1) Holding it by its rear edge, pull the draft shield cover up and remove the draft shield cover. Repairs Repair work must only be carried out by trained service technicians. Repairs performed by untrained persons will invalidate the warranty, and may result in considerable hazards for the user and cause the balance to produce inaccurate results. Contact Sartorius Service or a Sartorius dealer for proper repair of your balance. The device must be unplugged during repair work. Unplug the power cord. Repair work must only be performed by Sartorius-trained service technicians. 2) Remove the top glass cover by pulling it backward. Cleaning the Balance 3) Then replace the draft shield cover. In doing so, the draft shield cover must lock into position. Cleaning the Control Panel Switch the display to Standby mode to avoid modifying the settings for operation during cleaning. t Touch the “Menu” key to switch to application selection. t If you then touch E, the display goes off. t To switch the display back on again: Select j at the bottom left of the display. Cleaning the Balance Housing Disconnect from the power supply: Unplug the AC adaptor from the mains. If necessary, disconnect the data cable connected to the balance. Never open the balance or the AC adaptor. The parts contained in these cannot be cleaned, repaired, or replaced by the operator. – The parts contained in these cannot be cleaned, repaired, or replaced by the operator. – Remove the base plate, pan support, and weighing pan from the wind shield. – Never use cleaning agents that contain solvents or abrasive ingredients, which can ultimately damage the equipment. Secura and Quintix-Models: t The plastic top and bottom parts of the balance housing are coated with a special substance that allows these parts to be cleaned using acetone. Do not clean the following parts with acetone or aggressive cleaning agents: control panel, mains plug, data interface, labels, verified seal, or any other plastic parts. t Wipe the balance with a soft, dry cloth after cleaning. Contaminated equipment: – Health risk posed by product contamination due to product deposits and collection of residue with microbial contamination. – Health risk posed by biological and microbiological substances. – Observe cleaning specifications. – Examine the cleaning results closely. 8 Installation and Operating Instructions Secura, Quintix, Practum After cleaning put together the components in reverse order: see Chapter “Getting Started – Installing the Balance,“ page 5. C) Remove the front and rear glass: Detailed information about the assembly steps can be found in the User Manual, which can be downloaded online. Go to www.sartorius.com – “Service Center Downloads”. Disposal The packaging is made from environmentallyfriendly materials that can be used as secondary raw materials. If you no longer need this packaging, bring it to your local recycling and waste disposal facility according to the regulations applicable in your country. In Germany, you can dispose of this material using the VfW dual system (contract number D-59101-2009-1129). The equipment, including accessories and batteries, must not be disposed of in general household waste, and must be recycled similar to electrical and electronic devices. For further information about disposal and recycling options, please contact your local service staff. The partners listed on the following website can be used for disposals within the EU: 1) Go to http://www.sartorius.com. 2) Select the summary under “Service.” 3) Then select “Information on Disposal.” 4) Addresses for local Sartorius disposal contacts can be found in the PDF files given on this webpage. h Sartorius will not take back equipment contaminated with hazardous materials (ABC contamination) either for repair or disposal. Insert heading: “Service Address for Disposal” Please refer to our website (www.sartorius.com) or contact the Sartorius Service Department for more detailed information regarding repair service addresses or the disposal of your device. Specifications General Data Model-specific data on page 80 AC Adapter Sartorius AC adapter 6971790 plus exchangeable country-specific mains plug adapter Primary 100 – 240 V~, ±10%, 50 – 60 Hz, 0.2 A Secondary 15 V DC, ± 5%, 530 mA (max.) / 8 W (max.): 0 to +40°C and 15 V DC, ± 5%, 330 mA (max.) / 5 W (max.): 0 to +50°C Further data Protection class II in accordance with EN/IEC 60950-1, up to 3000 m above sea level, IP40 in accordance with EN/IEC 60529 Balance Power supply Only via Sartorius AC adaptor module 6971790 (package 6971790 or 6971791) Input voltage 12.0–15.0 V DC Power consumption 2 W (typically) Ambient Conditions These specifications apply under the following ambient conditions: Environment For indoor use only Ambient temperature * +10°C to +30°C Operational capability Guaranteed between +5°C and +45°C Storage and shipping –10°C to +60°C Elevation Up to 3000 m above sea level Relative humidity ** 15% to 80% for temperatures up to 31°C, non-condensing, decreasing linearly up to 50% relative humidity at 40°C and 20% at 50°C Safety of Electrical Equipment As per EN 61010-1 / IEC 61010-1 Safety requirements for electrical equipment for measurement, control, and laboratory use Part 1: General requirements Electromagnetic Compatibility As per EN 61326-1 / IEC 61326-1 Electrical equipment for measurement, control, and laboratory use EMC requirements – Part 1: General requirements Defined immunity to interference Suitable for use in industrial areas Interference emission Class B (suitable for use in residential areas and areas that are connected to a low voltage network that also supplies residential buildings). The device can therefore be used in both areas. Standard Equipment Selectable weight units 1) Gram, kilogram, carat, pound, ounce, troy ounce, Hong Kong tael, Singapore tael, Taiwan tael, grain, pennyweight, milligram, parts per pound, China tael, mommes, Austrian carat, tola, baht, mesghal and Newton Available application programs Secura models: counting, weighing in percent, density determination, peak hold, unstable condition, checkweighing, mixing, totalizing, statistics, conversion, SQmin, and Identifiers Quintix models: counting, weighing in percent, density determination, peak hold, unstable condition, checkweighing, mixing, totalizing, statistics, conversion Practum models: counting, weighing in percent, density determination, peak hold, unstable condition, checkweighing CE model balances verified for use in legal metrology comply with the requirements of Council Directive 2009/23/EC, EN 45501:1992 and OIML R76:2006. * For use in legal metrology in accordance with EU requirements, refer to the information on the balance. ** For use in legal metrology in accordance with EU requirements, the legal regulations apply. 1 ) Limited for verified models Installation and Operating Instructions Secura, Quintix, Practum 9 Inhalt Zeichenerklärung Inhalt . . . . . . . . . . . . . . . . . . . . . . . . . . . . . . . . . . . . . . . . . . . . Benutzerhinweise . . . . . . . . . . . . . . . . . . . . . . . . . . . . . . . . . . . Sicherheitshinweise . . . . . . . . . . . . . . . . . . . . . . . . . . . . . . . . . Bestimmungsgemäße Verwendung . . . . . . . . . . . . . . . . . . . . . . 10 10 10 11 Inbetriebnahme . . . . . . . . . . . . . . . . . . . . . . . . . . . . . . . . . . . . Auspacken und Lieferumfang . . . . . . . . . . . . . . . . . . . . . . . . . . Waage montieren . . . . . . . . . . . . . . . . . . . . . . . . . . . . . . . . . . . Standort wählen . . . . . . . . . . . . . . . . . . . . . . . . . . . . . . . . . . . . Stromanschluss . . . . . . . . . . . . . . . . . . . . . . . . . . . . . . . . . . . . . Anwärmzeit. . . . . . . . . . . . . . . . . . . . . . . . . . . . . . . . . . . . . . . . Nivellieren . . . . . . . . . . . . . . . . . . . . . . . . . . . . . . . . . . . . . . . . . Unterflurwägung . . . . . . . . . . . . . . . . . . . . . . . . . . . . . . . . . . . . Diebstahlsicherung . . . . . . . . . . . . . . . . . . . . . . . . . . . . . . . . . . 11 11 11 12 12 13 13 13 13 Waage transportieren . . . . . . . . . . . . . . . . . . . . . . . . . . . . . . . Versand der Waage . . . . . . . . . . . . . . . . . . . . . . . . . . . . . . . . . Pflege und Wartung . . . . . . . . . . . . . . . . . . . . . . . . . . . . . . . . . Waage reinigen . . . . . . . . . . . . . . . . . . . . . . . . . . . . . . . . . . . . . Entsorgung . . . . . . . . . . . . . . . . . . . . . . . . . . . . . . . . . . . . . . . . 14 14 15 15 15 Technische Daten . . . . . . . . . . . . . . . . . . . . . . . . . . . . . . . . . . . Allgemeine Daten . . . . . . . . . . . . . . . . . . . . . . . . . . . . . . . . . . . Modellspezifische Daten . . . . . . . . . . . . . . . . . . . . . . . . . . . . . . EG-Konformitätserklärung zur elektromagnetischen Verträglichkeit . . . . . . . . . . . . . . . . . . . 16 16 80 85 Weitere Dokumente Außer dieser Installationsanleitung liegt als zusätzliche Information zum Gerät noch ein aktuelles Benutzerhandbuch als pdf-Datei vor, welches von der Sartorius Website heruntergeladen werden kann unter: www.sartorius.com Um die pdf-Datei lesen und ausdrucken zu können, benötigen Sie das Programm Acrobat-Reader, das Sie kostenfrei von der AdobeWebsite herunterladen können (www.adobe.com). Benutzerhinweise Warnzeichen / Gefahrensymbole Diese Hinweise kennzeichnen Gefahren, die mit hoher Wahrscheinlichkeit zum Tod oder schweren Verletzungen führen können, wenn sie nicht vermieden werden. Diese Hinweise kennzeichnen Gefahren, die zu mittelschweren oder leichten Verletzungen führen können, wenn sie nicht vermieden werden. Diese Hinweise kennzeichnen Gefahren mit dem Risiko von Sachschäden. Dieses Symbol kennzeichnet nützliche Informationen und Tipps. h Hinweis für nützliche Informationen und Tipps Hinweise für den eichpflichtigen Verkehr Hinweis für die Bedienung des Gerätes Folgende Symbole werden in dieser Anleitung verwendet: t steht vor Handlungsanweisungen y beschreibt, was nach einer ausgeführten Handlung geschieht Handlungen in einer bestimmten Reihenfolge ausführen: 1. Erste Handlung 2. Zweite Handlung 3. ... – steht vor einem Aufzählungspunkt Konventionen für diese Anleitung: – Die Abbildungen in dieser Anleitung basieren auf „Standard“Waagen. Bei den geeichten Waagen können einige Anzeigedarstellungen und Protokolle von den Abbildungen etwas abweichen. Wo dies für den Betrieb von Bedeutung ist, werden die Unterschiede im Text erläutert. Zu dieser Anleitung t Diese Anleitung aufmerksam und vollständig lesen bevor das Gerät zum ersten Mal in Betrieb genommen wird. Beachten Sie die Sicherheitshinweise. t Die Anleitung ist ein wichtiger Bestandteil des Produktes. Bewahren Sie diese Anleitung gut auf. Falls Sie das Gerät anderen Personen überlassen, geben Sie auch diese Anleitung mit. t Bei Verlust dieser Anleitung Ersatz anfordern oder die aktuelle Anleitung von der Sartorius Website herunterladen: www. sartorius.com Anwendungsberatung / Technischer Support Adressen zur Anwendungsberatung und zum technischen Support finden Sie auf der Website unter: http://www.sartorius.com Sicherheitshinweise Richtlinien und allgemeine Hinweise – Die Waage entspricht den EU-Richtlinien und Normen für elektrische Sicherheit und elektromagnetische Verträglichkeit*. Ein unsachgemäßer Gebrauch kann jedoch zu Schäden an Personen und Sachen führen. Bei unsachgemäßer Verwendung oder Betrieb der Waage entfällt die Gewährleistung. – Das Personal muss diese Anleitung inklusiv der Sicherheitshinweise gelesen und verstanden haben. – Bei Verwendung in Anlagen und Umgebungsbedingungen mit erhöhten Sicherheitsanforderungen die Auflagen und Bestimmungen Ihres Landes beachten. – Die Einrichtungen und die Waage immer frei zugänglich halten. * = siehe Kapitel »Technische Daten«, Seite 16 10 Installations- und Bedienungsanleitung Secura, Quintix, Practum Deutsch Explosionsgefahr! Die Waage nicht in explosionsgefährdeten Bereichen einsetzen. Der auf dem Netzgerät aufgedruckte Spannungswert muss mit der lokalen Netzspannung übereinstimmen. Inbetriebnahme Für alle Montagearbeiten muss die Waage vom Stromnetz getrennt sein. Auspacken und Lieferumfang Installationshinweise Die Waage nur betreiben, wenn dessen Gehäuse und das Netzgerät einschließlich aller Anschlüsse unbeschädigt sind. Beschädigtes Gerät sofort durch Ziehen des Netzgerätes spannungslos schalten. Die Waage und dessen Netzgerät sowie das von Sartorius gelieferte Zubehör nicht extremen Temperaturen, aggressiven chemischen Dämpfen, Feuchtigkeit, Stößen, Vibrationen und starken elektromagnetischen Feldern aussetzen. Einsatzbedingungen gemäß den Technischen Daten einhalten! Installationshinweis: Modifikationen der Geräte sowie der Anschluss von nicht von Sartorius gelieferten Kabeln oder Geräten unterliegen der alleinigen Verantwortung des Betreibers! Sartorius stellt auf Anfrage Angaben zur Betriebsqualität zur Verfügung. Nur Zubehör von Sartorius verwenden! IP-Schutzart der Waage und des Netzgerätes beachten! Eindringen von Flüssigkeiten verhindern. Die Schutzart gibt die Eignung von Geräten für verschiedene Umgebungsbedingungen an (Feuchte, Fremdkörper). Vor Reinigen des Netzgerätes oder der Waage: Netzgerät aus der Steckdose ziehen. Die Waage darf nur von Sartorius geschulten Fachkräften geöffnet werden. Das Netzgerät darf nicht geöffnet werden. Warnung zur Installation und bei der Bedienung des Gerätes: Bei Glasbruch besteht Verletzungsgefahr durch Schneiden an Glaskanten. Kabel so verlegen, dass sie keine Stolpergefahr darstellen. Weitere Warn- und Gefahrenhinweise in den nachfolgenden Kapiteln beachten. Bestimmungsgemäße Verwendung Diese hochgenaue Waage ist ausschließlich für die Verwendung in Labor und Innenräumen unter normalen atmosphärischen Bedingungen bestimmt. Sie wurde speziell entwickelt zur genauen Massebestimmung von Materialien in flüssiger, pastöser, pulvriger oder fester Form. Zur Aufnahme der Materialien müssen ggf. geeignete Gefäße verwendet werden. t Öffnen Sie die Verpackung und entnehmen Sie vorsichtig alle Teile. t Das Gerät nach dem Auspacken sofort auf äußere Beschädigungen überprüfen. y Im Beschädigungsfall siehe Hinweise im Kapitel »Pflege und Wartung«. y Alle Teile der Originalverpackung für einen eventuellen Rücktransport aufbewahren. Beim Versand bitte keine Kabel stecken lassen! Zum Lieferumfang gehören folgende Teile: Komponenten Waage mit Windschutz Ablesbarkeit: 0,1 mg 1 mg Windschutz 9 9 Waagschale: d 90 mm – 9 Waagschale: d 120 mm – 9 Waagschale: d 180 mm – – Unterschale 9 9 Schirmring – – Windschutzring (nur Secura) 9 – Netzgerät mit länder9 9 spezifischem Netzstecker Arbeitsschutzhaube 9 9 Staubschutzhaube 9 9 Installations- und 9 9 Bedienungsanleitung Applikations-Guide 9 9 Präzisionswaagen 10 mg, 0,1 g und 1 g – – – 9 9 9 – 9 9 – 9 9 Waage montieren Modelle Secura: Waage mit Windschutz t Setzen Sie folgende Teile in der aufgeführten Reihenfolge auf: – Arbeitschutzhaube – Drehen Sie die Windschutzverriegelung auf „entriegelt “. – Windschutz (1) auf die Waage aufsetzen. Hinweis: Fassen Sie den Windschutz mit beiden Händen an den oberen Holmen. – Schieben Sie die Seitentüren ganz nach hinten. – Drehen Sie die Windschutzverriegelung auf „verriegelt “. – Schirmblech (2), Schirmring* (3), Modelle Quintix und Practum: Unterschale (4), und Waagschale (5) und Windschutzring* (6) aufsetzen. Hinweis: Reinigung des Windschutzes siehe Kapitel »Pflege und Wartung«, Seite 15. * = nur bei Modellen mit Ablesbarkeit 0,1 mg Installations- und Bedienungsanleitung Secura, Quintix, Practum 11 Inbetriebnahme Netzanschluss (Spannungsversorgung) Netzgerät zusammensetzen Waage montieren Glasscheiben einsetzen (oder ggf. herausnehmen) 1) Ziehen Sie den Windschutzdeckel an der hinteren Kante hoch und nehmen Sie ihn ab. Falsche Netzsteckeradapter können tödliche Stromschläge und Geräteschäden verursachen. Den Netzsteckeradapter nie getrennt vom Netzgerät in die Steckdose stecken (Gefahr eines elektrischen Schlages). t Verwenden Sie den zu Ihrem Stromnetz passenden Netzsteckeradapter. 2) Schieben Sie die 3 Glasscheiben in der Führung des Windschutzes ganz nach vorne. 3) Montieren Sie danach wieder den Windschutzdeckel. Der Windschutzdeckel muss dabei einrasten. Waage ohne Windschutz t Setzen Sie folgende Teile in der aufgeführten Rehenfolge auf: 1) Arbeitsschutzhaube (nicht im Bild) 2) Setzen Sie den Schirmring auf und drehen Sie ihn gegen den Uhrzeigersinn, bis er fest sitzt. 3) Setzen Sie die Unterschale (1) und Waagschale (2) auf. A Netzsteckeradapter-Versionen: Beutel Region/Land a) transparent Europa/EU (außer Großbritannien) b) gelb Großbritannien c) blau USA, China und Japan d) rot Australien Beutel Region/Land e) schwarz Indien f) türkis g) grün h) rosa i) weiß Südafrika Korea Brasilien Argentinien Die Verpackung des Netzgerät-Moduls 6971790 mit den Netzadaptern g), h) und i) ist mit 98671791 beschriftet. t Drücken (1) und schieben (2) Sie den für Ihre Stomversorgung erforderlichen Netzsteckeradapter (A) in die Öffnung des Netzgerät-Moduls (B). Der Netzsteckeradapter muss dabei einrasten. Standort wählen Den richtigen Standort wählen: – Das Gerät auf eine stabile, erschütterungsarme, gerade Fläche (z.B. Wägestein) stellen. – Zugang zu dem Gerät jederzeit freihalten. – – – – – – Bei der Aufstellung Standorte mit ungünstigen Einflüssen vermeiden: Hitze (Heizung, Sonneneinstrahlung) Direkter Luftzug durch offene Fenster, Klimaanlagen und Türen Erschütterungen während der Messung Kein “Personendurchgangsverkehr” Extreme Feuchtigkeit Elektromagnetische Felder Akklimatisieren Wenn ein kaltes Gerät in eine warme Umgebung gebracht wird kann dies zu Kondensation von Luftfeuchtigkeit führen (Betauung). Daher akklimatisieren Sie das vom Netz getrennte Gerät ca. 2 Stunden, bevor Sie es wieder an das Netz anschließen. 12 Installations- und Bedienungsanleitung Secura, Quintix, Practum Netzsteckeradapter demontieren/tauschen t Entriegeln (1) Sie den Netzsteckeradapter und ziehen (2) Sie ihn ab. Netzanschluss/Schutzmaßnahmen – Nur Originalnetzgeräte von Sartorius verwenden. Die Schutzart des Netzgerätes entspricht IP40 gemäß EN60529 / IEC60529. – Der aufgedruckte Spannungswert (siehe Typenschild) muss mit der örtlichen Spannung übereinstimmen. – Sollte die angegebene Netzspannung oder die Steckerausführung des Netzgerätes nicht der verwendeten Ländernorm entsprechen, bitte die nächste Sartorius-Vertretung verständigen. – Der Netzanschluss muss gemäß den Bestimmungen Ihres Landes erfolgen. Deutsch t 1) Schließen Sie das Netzgerät zuerst an die Anschlussbuchse auf der Rückseite Ihrer Waage an. t 2) Danach das Netzgerät an die Steckdose (Netzspannung) anschließen. Zusätzliche Anzeigeelemente im Display: – Metrologiezeile mit zusätzlichen Angaben zur Mindestlast Min und dem Eichwert e. Warnsymbol zum Hinweis auf errechnete Werte, negative Bruttowerte oder Werte, die kleiner sind als die Minimaleinwaage (SQmin). Setup-Menü »Einstellungen«: Bei geeichten Waagen sind nicht alle Funktionen und Einstellungen verfügbar. Anwärmzeit 0 Hinweise zum Betrieb im eichpflichtigen Verkehr y Um genaue Resultate zu liefern, benötigt die Waage eine Anwärmzeit von mindestens 30 Minuten nach erstmaligem Anschluss an das Stromnetz. Erst dann hat das Gerät die notwendige Betriebstemperatur erreicht. Schnittstellenspezifikation (Datenausgabe) Einstellungen »PC – SBI« und »USB RS232 SBI« bei Kennzeichnung nicht geeichter Stellen: In der Einstellung »SBI« erfolgt keine automatische Kennzeichnung der nichtgeeichten Anzeigestelle. Entsprechende Maßnahmen oder Einstellungen dafür an der Zusatzeinrichtung durchführen. Unterflurwägung 30 Geeichte Waagen der Genauigkeitsklasse k, die im eichpflichtigen Verkehr eingesetzt werden, müssen eine Anwärmzeit von mindestens 1 Stunde einhalten, nach Anschluss an das Stromnetz. Für Wägungen unterhalb der Waage steht eine Unterflurwägeeinrichtung zur Verfügung. Eine Abschirmung gegen Luftzug installieren. Nivellieren t Verschlussplatte am Waagenboden herausheben. Achtung: Die Waage dabei nur auf die Seite legen und nicht auf die Waagschalenseite. Mit der Nivellierung der Waage können Neigungen am Aufstellort der Waage ausgeglichen werden. Eine exakte, waagerechte Stellung der Waage gewährleistet genaue Wägeergebnisse. Hinweis: Die Waage muss nach jedem Standortwechsel neu nivelliert und danach justiert werden. Modelle Secura: Sobald im Display die Anzeige »LEVEL« erscheint, müssen Sie die Nivellierung durchführen. t Stellen Sie sicher, dass die Waagschale unbelastet ist. t Tippen Sie auf »LEVEL« t Probe z.B. mit einem Draht in die Einkerbung einhängen. t Folgen Sie den Anweisungen auf dem interaktiven Display. Modelle Quintix und Practum: t Die beiden Fußschrauben gemäß Abbildung drehen, bis die Luftblase der Libelle in der Kreismitte steht. – Luftblase bei »12 Uhr«: beide Fußschrauben im Uhrzeigersinn drehen. – Luftblase bei »3 Uhr«: linke Fußschraube im Uhrzeigersinn, rechte Fußschraube gegen den Uhrzeigersinn drehen. – Luftblase bei »6 Uhr«: beide Fußschrauben gegen den Uhrzeigersinn drehen. – Luftblase bei »9 Uhr«: linke Fußschraube gegen den Uhrzeigersinn, rechte Fußschraube im Uhrzeigersinn drehen. Wenn Sie die Unterflurwägung nicht mehr benutzen: Die Öffnung mit der Verschlussplatte wieder verschließen, damit die Wägeergebnisse nicht durch Luftzug verfälscht werden. Im eichpflichtigen Verkehr darf die Unterflurwägeeinrichtung weder geöffnet noch verwendet werden. Diebstahlsicherung t An der Rückseite der Waage kann bei Bedarf ein Sicherheitsschlosskabel »Kensington« am Befestigungspunkt installiert werden. t Alternativ kann die Waage am Aufstellort z.B. mit einer Kette und z.B. einem Schloss befestigt werden. Installations- und Bedienungsanleitung Secura, Quintix, Practum 13 t Drehen Sie die Windschutzverriegelung auf „entriegelt“. Waage transportieren t Danach den Windschutz von der Waage nehmen. Vor dem Transport die Waage in den Stand-by Betrieb schalten, anschließend den Netzstecker ziehen und Waag- und Unterschale von der Waage nehmen. Transport über kurze Distanzen im Labor t Unteres Verpackungsteil in den Karton einlegen. Glasbruch, Erschütterungen und Stöße vermeiden: Die Waage niemals am Windschutz anheben und transportieren! t Die Waage unter dem Waagengehäuse fassen, vorsichtig anheben und diese zu ihrem neuen Standort tragen. h Die Waage muss nach jedem Standortwechsel neu nivelliert und danach justiert werden. t Folgende Teile in das untere Verpackungsteil legen: – Windschutz – Waage – Bodenblech – Seitenscheiben – Obere Glasabdeckung A B t Die jeweilige Waag- und Unterschale an die im nebenstehenden Bild gezeigten Aussparung einstecken: – A = Waag- und Unterschale mit einem Durchmesser von 120 mm – B = Waag- und Unterschale mit einem Durchmesser von 90 mm Versand der Waage h h Vor dem Versand die Waage in den Stand-by Betrieb schalten (siehe nächste Seite) und anschließend den Netzstecker ziehen. Bitte verwenden Sie für den Versand die Originalverpackung. Ggf. Verpackung über Sartorius Service bestellen. Modelle Secura: 1 2 3 4 5 6 Modelle Quintix und Practum: 1 2 3 4 14 t Polster über die Glasscheiben stecken t Folgende Teile von der Waage nehmen: – Windring (1) bei Modellen mit Ablesbarkeit 0,1 mg – Waagschale (2) – Unterschale (3) – Zentrierring (4) bei Modellen mit Ablesbarkeit 0,1 mg – Schirmblech (5) – Glasscheiben aus dem Windschutz (6) herausziehen: Siehe nächstes Kapitel »Pflege und Wartung«. t – – – – Folgende Teile von der Waage nehmen: Waagschale (1) Unterschale (2) Schirmblech (3) Glasscheiben aus dem Windschutz (4) herausziehen: Siehe nächstes Kapitel »Pflege und Wartung«. Installations- und Bedienungsanleitung Secura, Quintix, Practum t Netzgerät im Pappkarton in das Polster stecken. t Oberes Verpackungsteil über die Geräteteile stecken. t Danach die verpackte Waage in den Karton stecken und verschließen. Deutsch A) Seitenscheiben herausnehmen: 1) Heben Sie die Seitenscheiben hinten leicht an und ziehen Sie sie nach hinten heraus. Pflege und Wartung Service Um die fortdauernde Messsicherheit Ihrer Waage zu gewährleisten, empfehlen wir die regelmäßige, mindestens jährliche Wartung. Der Sartorius Service bietet Ihnen hierzu unterschiedliche Wartungsverträge an, die wir individuell an Ihre Bedürfnisse anpassen. Im Rahmen jeder Wartung sollte immer ein Kalibrierzertifikat erstellt werden. Sicherheitstechnische Überprüfung des Netzgerätes und dessen Anschlüsse in angemessenen Abständen von einer Elektrofachkraft durchführen lassen (z.B. alle 2 Jahre). B) Obere Glasabdeckung herausnehmen: 1) Ziehen Sie den Windschutzdeckel an der hinteren Kante hoch. Reparaturen Reparaturen dürfen nur von Fachkräften ausgeführt werden. Reparaturen am Gerät nicht unter Spannung durchführen! Netzgerät aus der Steckdose ziehen. Darüber hinaus kann die Messsicherheit Ihrer Waage beeinträchtigt werden und es können erhebliche Gefahren für den Benutzer entstehen. Wenden Sie sich daher für eine fachgerechte Reparatur an den Sartorius Service oder einen Sartorius Fachhändler. 2) Ziehen Sie die obere Glasabdeckung nach hinten heraus. 3) Nach der Reinigung montieren Sie danach wieder den Windschutzdeckel. Der Windschutzdeckel muss dabei einrasten. Waage reinigen Bedienfeld reinigen Die Anzeige in den Standby-Betrieb schalten, damit beim Reinigen die Einstellungen für den Betrieb nicht verändert werden. t Tippen Sie auf die Menü-Taste, um in die Anwendungsauswahl zu wechseln, t Wenn Sie dann auf E tippen, wird die Anzeige ausgeschaltet. t Anzeige wieder einschalten: Auf j tippen unten links im Display. Gerätegehäuse reinigen Spannungsversorgung trennen: Netzgerät vom Stromnetz trennen. Ggf. angeschlossenes Datenkabel an der Waage lösen. Öffnen Sie niemals die Waage oder das Netzgerät. Diese enthalten keine Geräteteile, die vom Bediener gereinigt, repariert oder ausgetauscht werden können. – Achten Sie darauf, dass keine Flüssigkeit oder Staub in die Waage oder in das Netzgerät gelangen. – Bodenblech, Unterschale und Waagschale aus dem Windschutz herausnehmen. – Verwenden Sie auf keinen Fall Reinigungsmittel, die Lösungsmittel oder scheuernde Bestandteile enthalten. Dies kann zur Beschädigung des Gerätes führen. Secura und Quintix-Modelle: t Die Kunststoffober- und unterteile des Waagengehäuses sind mit einer speziellen Beschichtung versehen, so dass für diese Teile Aceton zur Reinigung verwendet werden kann. Folgende Teile nicht mit Aceton oder aggressiven Reinigungsmitteln reinigen: Bedienfeld, Netzsteckereingang, Datenschnittstelle, Schilder, Eichsiegel sowie alle restlichen Kunststoffteile. t Waage danach mit weichem Tuch abtrocknen. Kontaminierte Geräte: – Gesundheitsgefahr durch Kontamination des Produktes aufgrund von Produktablagerungen und Resteansammlungen mit Verkeimungen. – Gesundheitsgefahr durch biologische oder mikrobiologische Substanz. – Reinigungsvorschriften beachten. – Reinigungsergebnis genau überprüfen. Nach erfolgter Reinigung setzen Sie die Komponenten in umgekehrter Reihenfolge wieder zusammen: Siehe auch Kapitel »Inbetriebnahme – Waage montieren«, Seite 12. C) Front- und Heckglas herausnehmen: Die detaillierten Montageschritte finden Sie im »Benutzer-Handbuch«, welches aus dem Internet heruntergeladen werden kann: Siehe www.sartorius.com – »Service Center „Downloads“«. Entsorgung Die Verpackung besteht aus umweltfreundlichen Materialien, die als Sekundärrohstoffe dienen können. Wird die Verpackung nicht mehr benötigt, kann diese in Deutschland unentgeltlich über das Duale System der VfW entsorgt werden (Vertragsnummer D-59101-2009-1129). Anderenfalls führen Sie das Material nach den geltenden Vorschriften der örtlichen Abfallentsorgung zu. Das Gerät inklusive Zubehör und Batterien gehört nicht in den Hausmüll, sondern sind vielmehr als elektrische und elektronische Geräte wiederzuverwerten. Hinsichtlich der Entsorgung und Wiederverwertung wenden Sie sich bitte an unsere Service-Mitarbeiter vor Ort. Darüber hinaus gelten die auf folgender Website aufgeführten Partner innerhalb der EU: 1) http://www.sartorius.com wählen. 2) »Service« antippen. 3) »Entsorgungshinweise« wählen. 4) Die Adressen der lokalen Sartorius-Ansprechpartner zur Entsorgung finden Sie in den angehängten pdf-Dateien dieser Internetseite. h Mit gefährlichen Stoffen kontaminierte Geräte (ABCKontamination) werden weder zur Reparatur noch zur Entsorgung zurückgenommen. Service-Adresse zur Entsorgung: Ausführliche Informationen mit Service-Adressen zur Reparaturannahme oder Entsorgung Ihres Gerätes können Sie auf unserer Internetseite (www.sartorius.com) finden oder über den Sartorius Service anfordern. Installations- und Bedienungsanleitung Secura, Quintix, Practum 15 Technische Daten Allgemeine Daten Modellspezifische Daten: siehe Seite 80 Netzgerät Sartorius-Netzgerätmodul 6971790 mit austauschbaren länderspezifischen Netzsteckeradaptern Primär 100 – 240 V~, –10% / +10%, 50 – 60 Hz, 0,2 A Sekundär 15 Vdc, ± 5%, 530 mA (max.) / 8 Watt (max.): 0 bis +40°C und 15 Vdc, ± 5%, 330 mA (max.) / 5 Watt (max.): 0 bis +50°C Weitere Daten Schutzklasse II lt. EN/IEC 60950-1 | bis 3000 m über NN | IP40 gemäß EN 60529/IEC 60529 Waage Spannungsversorgung nur über Sartorius-Netzgerätmodul 6971790 Eingangsspannung 12,0 ... 15,0 Vdc Leistungsaufnahme 2 W (typisch) Umgebungsbedingungen Die technischen Daten gelten bei folgenden Umgebungsbedingungen: Umgebung Verwendung nur in Innenräumen Umgebungstemperatur * +10°C bis +30°C Betriebsfähigkeit Gewährleistet zwischen +5 °C ... +45 °C Lager und Transport –10 °C ... +60 °C Höhe bis 3000 m über NN Relative Luftfeuchte ** 15% bis 80 % für Temperaturen bis zu 31°C nicht-kondensierend, linear abnehmend bis zu 50 % relativer Luftfeuchte bei 40 °C und 20% bei 50°C Sicherheit elektrischer Betriebsmittel gemäß EN 61010-1 / IEC 61010-1 Sicherheitsbestimmungen für elektrische Mess-, Steuer-, Regel- und Laborgeräte – Teil 1: Allgemeine Anforderungen Elektromagnetische Verträglichkeit gemäß EN 61326-1 / IEC 61326-1 Elektrische Mess-, Steuer-, Regel- und Laborgeräte EMV-Anforderungen – Teil 1: Allgemeine Anforderungen Störfestigkeit: Geeignet für den Gebrauch in industriellen Bereichen Störaussendung: Klasse B (Geeignet für den Gebrauch im Wohnbereich und Bereichen, die direkt an ein Niederspannungsnetz angeschlossen sind, das (auch) Wohngebäude versorgt.) Damit ist das Gerät in beiden Bereichen einsetzbar. Standardausrüstung Wählbare Gewichtseinheiten 1) Gramm, Kilogramm, Carat, Pound, Unze, Troy Unze, Tael Hongkong, Tael Singapur, Tael Taiwan, Grain, Pennyweight, Milligramm, Parts pro Pound, Tael China, Momme, Karat, Tola, Baht, Mesghal und Newton Wählbare Anwendungsprogramme Secura-Modelle: Zählen, Prozentwägen, Dichtebestimmung, Höchstwert halten, Unruhewägen, Kontrollwägen, Mischen, Komponenten (summieren), Statistik, Umrechnen, SQmin und Kennzeichner Quintix-Modelle: Zählen, Prozentwägen, Dichtebestimmung, Höchstwert halten, Unruhewägen, Kontrollwägen, Mischen, Komponenten (summieren), Statistik, Umrechnen Practum-Modelle: Zählen, Prozentwägen, Dichtebestimmung, Höchstwert halten, Unruhewägen, Kontrollwägen Geeichte Waagen gemäß EU entsprechen den Anforderungen der EG-Richtlinie 2009/23/EG mit EN45501:1992 bzw. OIML R76:2006. * Bei geeichten Waagen gemäß EU, siehe Angaben auf der Waage. ** Bei geeichten Waagen gemäß EU gelten die gesetzlichen Vorschriften. 1 ) Eingeschränkt bei geeichten Modellen 16 Installations- und Bedienungsanleitung Secura, Quintix, Practum Français Sommaire Explication des symboles Sommaire . . . . . . . . . . . . . . . . . . . . . . . . . . . . . . . . . . . . . . . . Informations pour l'utilisateur . . . . . . . . . . . . . . . . . . . . . . . . Consignes de sécurité . . . . . . . . . . . . . . . . . . . . . . . . . . . . . . . Utilisation conforme . . . . . . . . . . . . . . . . . . . . . . . . . . . . . . . . 17 17 17 18 Mise en service . . . . . . . . . . . . . . . . . . . . . . . . . . . . . . . . . . . . Déballage et contenu de la livraison . . . . . . . . . . . . . . . . . . . . . Montage de la balance . . . . . . . . . . . . . . . . . . . . . . . . . . . . . . . Choix du lieu d'installation . . . . . . . . . . . . . . . . . . . . . . . . . . . . Raccordement électrique. . . . . . . . . . . . . . . . . . . . . . . . . . . . . . Temps de préchauffage . . . . . . . . . . . . . . . . . . . . . . . . . . . . . . Mise à niveau . . . . . . . . . . . . . . . . . . . . . . . . . . . . . . . . . . . . . . Pesée en dessous du socle. . . . . . . . . . . . . . . . . . . . . . . . . . . . . Système antivol . . . . . . . . . . . . . . . . . . . . . . . . . . . . . . . . . . . . 18 18 18 19 19 20 20 20 20 Transport de la balance . . . . . . . . . . . . . . . . . . . . . . . . . . . . . . Retour de la balance . . . . . . . . . . . . . . . . . . . . . . . . . . . . . . . . Entretien et maintenance . . . . . . . . . . . . . . . . . . . . . . . . . . . . Nettoyage de la balance . . . . . . . . . . . . . . . . . . . . . . . . . . . . . . Recyclage . . . . . . . . . . . . . . . . . . . . . . . . . . . . . . . . . . . . . . . . 21 21 22 22 22 Caractéristiques techniques. . . . . . . . . . . . . . . . . . . . . . . . . . . Caractéristiques techniques générales . . . . . . . . . . . . . . . . . . . . Données spécifiques au modèle. . . . . . . . . . . . . . . . . . . . . . . . . CE Déclaration de Conformité. . . . . . . . . . . . . . . . . . . . . . . . . . 23 23 80 85 Autres documents h Outre cette notice d‘installation, l‘appareil est fourni avec un manuel de l‘utilisateur sous forme de fichier PDF qui peut être téléchargé sur le site Internet de Sartorius : www.sartorius.com Pour pouvoir lire et imprimer le fichier PDF, vous devez être équipé du programme Acrobat Reader que vous pouvez télécharger gratuitement sur le site Internet d'Adobe (www.adobe.com). Informations de l'utilisateur Avertissements / Symboles de danger Ces remarques concernent des dangers qui, selon une grande probabilité, peuvent entraîner la mort ou des dommages corporels graves, s‘ils ne sont pas évités. h Conseils et informations utiles Remarques concernant l’utilisation en métrologie légale Remarque concernant l’utilisation de l’appareil Les symboles suivants sont utilisés dans cette notice : t indique une action qu'il est conseillé d'effectuer y décrit les effets de l'action que vous venez d'effectuer effectuer des actions dans un ordre défini 1. Première action 2. Seconde action 3. ... – est placé devant une énumération Conventions pour cette notice : – Les illustrations présentes dans cette notice se basent sur une balance « standard ». Pour les balances tarées, les affichages et les protocoles peuvent légèrement différer des illustrations. En cas de différences significatives en termes de fonctionnement, celles-ci sont explicitées dans le texte. À propos de cette notice d'installation t Veuillez lire attentivement l'intégralité de cette notice d’installation avant de mettre en service l'appareil pour la première fois. Respectez les consignes de sécurité. t Cette notice d’installation est fournie avec le produit. Conservezla en lieu sûr. Si vous cédez l'appareil à un tiers, vous devez également lui fournir cette notice d'installation. t Si vous perdez la notice d'installation, demandez-en un autre exemplaire ou téléchargez la notice actualisée sur le site Internet de Sartorius : www.sartorius.com Assistance / Support technique Les adresses d’assistance et de support technique figurent sur le site Internet : http//www.sartorius.com Consignes de sécurité Directives et recommandations d’ordre général Ces remarques concernent des dangers qui peuvent entraîner des dommages corporels modérément graves à légers, s‘ils ne sont pas évités. – Cette balance est conforme aux directives européennes et aux normes en vigueur applicables aux composants électriques et à la compatibilité électromagnétique*. Une utilisation non conforme peut entraîner des blessures et des dommages. Toute installation ou utilisation non conforme de la balance annule tout droit à la garantie. Ces remarques concernent des dangers qui peuvent entraîner des dommages matériels. – Le personnel doit avoir lu et compris cette notice d'installation et les consignes de sécurité. Ce symbole signale des informations ou des conseils utiles. – Dans des installations et des conditions ambiantes exigeant des mesures de sécurité accrues, vous devez respecter les instructions et les dispositions nationales. – Veillez à ce que les installations et la balance soient toujours parfaitement accessibles. Toute installation ou utilisation non conforme de la balance annule la garantie. * = voir le chapitre « Caractéristiques techniques », page 23 Notice d‘installation et d‘utilisation Secura, Quintix, Practum 17 Risque d’explosion ! Ne pas utiliser la balance dans les zones à risques d’explosion. Assurez-vous que la tension indiquée sur le bloc 2 d’alimentation correspond bien à celle du réseau. Mise en service Débranchez la balance du secteur avant de procéder à son montage. Déballage et contenu de la livraison Recommandations pour l’installation Ne mettez l’appareil sous tension que si son boîtier et le bloc d’alimentation ne sont pas endommagés. Débranchez le bloc d’alimentation pour mettre hors tension l’appareil endommagé. N’exposez pas les appareils à des températures extrêmes, des vapeurs chimiques agressives, de l’humidité, des chocs, des vibrations et des champs électromagnétiques puissants. Respectez les conditions d’utilisation conformément aux caractéristiques techniques ! Remarque sur l’installation : la modification des appareils et la connexion de câbles ou d’appareils non fournis par Sartorius engagent la seule responsabilité de l’utilisateur ! Sur simple demande, Sartorius peut fournir une documentation contenant les caractéristiques de fonctionnement minimales des appareils. Utilisez exclusivement les accessoires et options de Sartorius ! Respectez l’indice de protection IP de la balance ! Empêchez la pénétration de liquides. L’indice de protection indique la capacité des appareils à résister à différentes conditions ambiantes (humidité, présence de corps étrangers). Avant de nettoyer le bloc d’alimentation ou la balance : débranchez le bloc d’alimentation de la prise secteur. Seuls les membres du personnel ayant reçu la formation dispensée par la société Sartorius sont autorisés à ouvrir la balance. Ne pas ouvrir le bloc d’alimentation ! t Ouvrez l’emballage et retirez les pièces avec précaution. t Après avoir déballé l’appareil, vérifiez s’il ne présente aucun dommage visible. y Si c’est le cas, consultez la section « Entretien et maintenance ». y Conservez tous les éléments de l’emballage pour un retour éventuel. En cas de retour, débranchez tous les câbles ! Les pièces suivantes sont fournies : Composants Précision de lecture : Paravent Plateau de pesée : d 90 mm Plateau de pesée : d 120 mm Plateau de pesée : d 180 mm Support de plateau Anneau de blindage Anneau de protection contre les courants d’air (seulement Secura) Bloc d'alimentation avec fiche spécifique au pays Housse de protection Housse anti-poussière Notice d’installation Guide d‘application Modèles Secura : En cas de bris de verre, risque de blessure par coupure. Respectez les autres mises en gardes fournies dans les sections suivantes. Avertissement relatif à l’installation et à l’utilisation conforme de l’appareil Cette balance haute résolution est conçue pour les laboratoires. Elle a été spécialement élaborée pour déterminer avec précision la masse des matières liquides, pâteuses, poudreuses ou solides. Utilisez des récipients adaptés pour poser les échantillons. Elle doit être exclusivement utilisée en laboratoire et à l'intérieur dans des conditions climatiques normales. 18 Notice d‘installation et d‘utilisation Secura, Quintix, Practum 9 9 – – 9 – 9 – Balances de précision 10 mg, 0,1 g e t 1 g – – – 9 9 – – 9 9 9 – 9 9 9 9 9 9 9 9 9 9 9 9 – 9 – 9 9 Montage de la balance Danger sur le lieu d’installation et pendant l’utilisation de l’appareil ! Posez les câbles en évitant tout risque de trébuchement Balance a vec paravent 0,1 mg 1 mg Modèles Quintix et Practum : Balance avec paravent t Montez les pièces suivantes dans l'ordre indiqué : – Housse de protection – Tournez le verrouillage du paravent sur « déverrouillé ». – Posez le paravent (1) sur la balance. Remarque : saisissez le paravent des deux mains sur les barres supérieures. – Tournez le verrouillage du paravent sur « verrouillé ». – Posez la tôle de blindage (2), l’anneau de blindage* (3), le support de plateau (4), le plateau de pesée (5) et l’anneau de protection contre les courants d’air* (6). Remarque : pour le nettoyage du paravent, voir la section « Entretien et maintenance », page 22 * = uniquement sur les modèles avec une précision de lecture de 0,1 mg Français Mise en service Power Connection (Power Supply) Assemblage du bloc d’alimentation Montage de la balance Montage (ou retrait) des parois en verre 1) Relevez le couvercle du paravent par le bord arrière et retirez-le. Les blocs d’alimentation inadaptés peuvent causer des 2 électrocutions mortelles et endommager les appareils. Ne branchez jamais l’adaptateur secteur s’il est séparé du bloc d’alimentation (risque de choc électrique). t Utilisez l’adaptateur secteur approprié à votre réseau électrique. 2) Insérez les 3 parois en verre dans la baie du paravent jusque vers l’avant. 3) Remontez ensuite le couvercle du paravent qui doit s’enclencher. Balance sans paravent t Montez les pièces suivantes dans l’ordre indiqué : 1) Housse de protection (non représentée sur l’illustration). 2) Installez l’anneau de blindage (1) et tournez-le dans le sens anti-horaire jusqu’à ce qu’il soit fixé. 3) Installez le support de plateau (1) et le plateau de pesée (2). A Modèles d’adaptateur secteur Sachet Région/Pays a) transparent Europe b) jaune Grande-Bretagne c) bleu États-Unis, Chine et Japon d) rouge Australie Sachet e) noir f) turquoise g) vert Région/Pays Inde Afrique du Sud Corée h) rose i) blanc Brésil Argentine L’emballage du module d’alimentation 6971790 avec les blocs d’alimentation g), h) et i) porte l’inscription 98671791. t Appuyez (1) et insérez (2) l’adaptateur secteur (A) nécessaire à votre alimentation électrique dans l’ouverture du bloc d’alimentation (B). L’adaptateur secteur doit s’encliqueter. Choix du lieu d’installation Choisissez un lieu d’installation adapté : – Posez l’appareil sur une surface plane, stable et sans vibrations, par ex. sur une table de pesée en pierre. – L'accès à l'appareil doit être dégagé en permanence. – – – – – – Lors de l'installation, choisissez un emplacement adapté afin de ne pas exposer la balance aux influences externes suivantes : Chaleur (radiateur ou rayons du soleil) Courants d’air directs causés par des fenêtres, des portes ouvertes ou un climatiseur Vibrations pendant la pesée Passage de personnes Humidité extrême Champs électromagnétiques Mise à température De la condensation (due à l'humidité) peut se former lorsqu’un appareil froid est placé dans un environnement plus chaud. C'est pour cette raison que l'appareil doit être mis à température pendant 2 heures, sans être branché au secteur, avant de le brancher au réseau. Démontage/remplacement du bloc d’alimentation t Déverrouillez le bloc d’alimentation et débranchez-le. Raccordement au secteur/mesures de sécurité – Utilisez uniquement des blocs d’alimentation originaux de Sartorius. Le bloc d’alimentation est conforme à l’indice de protection IP40 selon EN60529 / IEC 60529. – La valeur de tension figurant sur l’appareil (voir plaque signalétique) doit obligatoirement correspondre à la tension locale. – Si la tension secteur et le type de la fiche du câble secteur ne correspondent pas aux normes en vigueur, contactez votre représentant ou revendeur Sartorius. – Le raccordement au secteur doit être réalisé conformément aux dispositions en vigueur dans votre pays. Notice d‘installation et d‘utilisation Secura, Quintix, Practum 19 t 1) Branchez d’abord le bloc d’alimentation à la prise de raccordement située à l’arrière de la balance. t 2) Raccordez ensuite le bloc d’alimentation au réseau électrique Instructions pour l‘utilisation en métrologie légale Eléments d’affichage supplémentaires sur l’écran : – Ligne des données métrologiques avec indications supplémentaires concernant la charge minimale « Min » et l‘échelon de vérification « e ». Symbole d’avertissement pour indication des valeurs calculées, valeurs brutes négatives ou valeurs inférieures au poids minimal de l’échantillon (SQmin). Temps de préchauffage 0 y Après le premier raccordement au secteur, la balance a besoin d’un temps de préchauffage d’au moins 30 minutes afin de pouvoir fournir des résultats précis. L’appareil atteint la température de service nécessaire après ce délai. Menu setup « Paramètres » : pour les balances étalonnées toutes les fonctions et réglages ne sont pas disponibles. Spécification des interfaces (édition des données) Réglages « PC – SBI » et « USB RS232 SBI » pour le marquage des positions non étalonnées : en mode de réglage « SBI », les éléments d’affichage non étalonnés ne sont pas marqués automatiquement. Des mesures ou réglages correspondants sont à réaliser dans ce but au niveau du dispositif auxiliaire. 30 Pesée en dessous du socle Pour les balances approuvées pour l’utilisation en métrologie légale de la classe de précision k, respectez un temps de préchauffage d’au moins 1 heure après le premier raccordement au secteur. Un dispositif de pesée en dessous du socle est à votre disposition pour toutes vos pesées sous le socle de la balance. Installez un écran contre les courants d’air. Mise à niveau t Retirez la plaque de fermeture sous le socle de la balance. Attention : posez la balance sur le côté et non pas sur le côté plateau de pesée. La mise à niveau de la balance permet de compenser l’inclinaison ou les irrégularités de la surface où est posée la balance. Un positionnement horizontal exact garantit des résultats de pesée précis. Remarque : la balance doit être remise à niveau, puis ajustée à chaque fois que vous la changez d’emplacement. Modèle Secura : Si le message « Level » s’affiche à l’écran, effectuez la mise à niveau. t Assurez-vous que le plateau de pesée est vide. t Appuyez sur « LEVEL » t Accrochez un échantillon dans la fente, par ex. avec un fil. t Suivez les instructions à l’écran. Modèle Quintix et Practum : t Tournez les deux vis de pied comme dans l’illustration jusqu’à ce que la bulle d’air du niveau se trouve au milieu. – Bulle d’air à « 12 h » : tournez les deux vis de pied dans le sens horaire. – Bulle d’air à « 3 h » : tournez la vis de pied gauche dans le sens horaire, la vis de pied droite dans le sens antihoraire. – Bulle d’air à « 6 h » : tournez les deux vis de pied dans le sens anti-horaire. – Bulle d’air à « 9 h » : tournez la vis de pied gauche dans le sens antihoraire, la vis de pied droite dans le sens horaire. 20 Notice d‘installation et d‘utilisation Secura, Quintix, Practum Si vous n’utilisez plus le dispositif de pesée en dessous du socle : refermez l’ouverture avec une plaque de fermeture afin de ne pas fausser les résultats de pesée avec le courant d’air. En métrologie légale, il est interdit d’ouvrir et d’utiliser le dispositif de pesée en dessous du socle. Système antivol t Au besoin, installez un câble de verrouillage « Kensington » au point de fixation à l’arrière de la balance. t La balance peut également être fixée au lieu d’installation à l’aide d’une chaîne et d’un cadenas. Français t Tournez le verrouillage du paravent sur « déverrouillé ». Transport de la balance t Retirez le paravent de la balance. Avant le transport, placez la balance en mode veille, débranchez l’adaptateur secteur et retirez le plateau de pesée et le support de la balance. Transport sur de courtes distances dans le laboratoire t Placez la partie inférieure de l’emballage dans le carton. Évitez les bris de verre, les vibrations et les chocs : ne jamais soulever ni porter l’appareil par le paravent ! t Saisissez la balance sous le boîtier et transportez-la jusqu’à son lieu d’implantation en la tenant fermement. h La balance doit être remise à niveau, puis ajustée à chaque fois que vous la changez d‘emplacement. t Posez les pièces suivantes dans la partie inférieure de l’emballage : – Paravent – Balance – Plaque de fond – Vitres latérales – Couvercle en verre supérieur A B t Insérez le plateau de pesée et le support de plateau dans la rainure, comme dans l’illustration : – A = Plateau de pesée et support de plateau d’un diamètre de 120 mm – B = Plateau de pesée et support de plateau d’un diamètre de 90 mm Retour de la balance h h Veuillez utilisez l’emballage d’origine pour les retours. Pour les retours ou commander l’emballage auprès du SAV de Sartorius. Avant le transport, placez la balance en mode veille (voir page suivante) et débranchez la fiche secteur. Modèles Secura : 1 2 3 4 5 6 Modèles Quintix et Practum : 1 2 3 4 t Posez le rembourrage sur les vitres t Retirez les pièces suivantes de la balance : – Anneau à vent (1) pour les modèles avec une précision de lecture 0,1 mg – Plateau de pesée (2) – Support de plateau (3) – Anneau de centrage (4) pour les modèles avec précision de lecture de 0,1 mg – Tôle de blindage (5) – Retirez les vitres en verre du paravent (6) : voir le chapitre suivant « Entretien et maintenance » t Retirez les pièces suivantes de la balance : – Plateau de pesée (1) – Support de plateau (2) – Tôle de blindage (3) – Retirez les vitres en verre du paravent (4) : voir le chapitre suivant « Entretien et maintenance » t Insérez le bloc d’alimentation dans le rembourrage dans la boîte en carton. t Posez la partie supérieure de l’emballage sur les pièces de l’appareil. t Insérez la balance emballée dans le carton et fermez. Notice d‘installation et d‘utilisation Secura, Quintix, Practum 21 A) Retirez les vitres latérales : 1) Soulevez légèrement les vitres latérales et retirez-les par l’arrière. Entretien et maintenance Service après-vente Effectuez la maintenance de votre balance au moins une fois par an pour garantir la précision de la mesure. Sartorius propose différents contrats de maintenance modulables selon vos besoins. Un certificat d’étalonnage doit toujours être créé dans le cadre de la maintenance. Réparations Les réparations ne doivent être effectuées que par le personnel possédant les qualifications nécessaires. Toute réparation non conforme peut entraîner de sérieux risques pour l’utilisateur de sérieux risques pour l’utilisateur et fausser les résultats de la balance. Ne jamais réparer l’appareil lorsqu’il est sous tension ! Débranchez le bloc d’alimentation de la prise secteur. Les réparations doivent être effectuées uniquement par le personnel formé par Sartorius. B) Retirez le couvercle en verre du haut : 1) Relevez le couvercle du paravent par le bord arrière et retirez le couvercle du paravent. 2) Retirez le couvercle en verre du haut par l’arrière. Nettoyage de la balance Nettoyage du panneau de commande Placez l’écran en mode veille afin de ne pas modifier les réglages lors du nettoyage. 3) Après le nettoyage, remontez le couvercle du paravent qui doit s’enclencher. t Appuyez sur la touche du menu pour basculer vers la sélection de l’application. t L’écran s’éteint quand vous appuyez sur E. t Pour rallumer l’écran : appuyez sur E en bas à gauche de l‘écran. Après le nettoyage, remontez les composants dans l’ordre inverse. Voir également le chapitre « Mise en service – Montage de la balance », page 19. Nettoyage du boîtier de l’appareil Coupez l’alimentation électrique : débranchez la fiche d’alimentation de la prise de courant. Le cas échéant, débranchez le câble de données de la balance. N’ouvrez jamais la balance ni le bloc d’alimentation. Ils ne contiennent pas de pièces à nettoyer, réparer ou remplacer par l’utilisateur. – Assurez-vous que le liquide ou la poussière ne pénètre pas dans la balance ou le bloc d’alimentation. – Retirez la plaque de fond, le support de plateau et le plateau de pesée du paravent. – N’utilisez en aucun cas un produit nettoyant à base de solvants ou de composés agressifs. Ils peuvent endommager l’appareil. Modèles Secura et Quintix : t Les parties supérieures et inférieures en plastique du boîtier de la balance sont recouvertes d‘un revêtement spécial si bien que vous pouvez utiliser de l‘acétone pour les nettoyer. Ne nettoyez pas les parties suivantes avec de l‘acétone ou d‘autres produits de nettoyage corrosifs : panneau de commande, entrée de la fiche d‘alimentation, interface de données, plaques, sceau de vérification et toutes les autres parties en plastique. t Ensuite, essuyez la balance avec un chiffon souple. Appareils contaminés : – Danger pour la santé par la contamination du produit en raison de dépôts de produit et d’accumulations de résidus avec formation de germes. – Danger pour la santé dû à une substance biologique ou microbiologique. – Respecter les consignes de nettoyage. – Contrôler soigneusement le résultat du nettoyage. 22 Notice d‘installation et d‘utilisation Secura, Quintix, Practum C) Retirez le verre avant et arrière : Consultez le « Manuel de l’utilisateur » pour en savoir plus sur le montage. Vous pouvez le télécharger à l’adresse suivante : www.sartorius.com – Service Center « Downloads ». Recyclage L’emballage est composé de matériaux écologiques qui peuvent servir de matières secondaires. Si vous n’avez plus besoin de l’emballage, vous pouvez en Allemagne le recycler gratuitement grâce au système de recyclage dual de VfW (numéro de contrat D-59101-2009-1129). Dans les autres pays, éliminez le matériel conformément aux prescriptions locales en vigueur concernant l’élimination des déchets. L’appareil, y compris les accessoires et les batteries, ne doit pas être éliminé avec les ordures ménagères mais doit être revalorisé comme les appareils électriques et électroniques. Pour en savoir plus sur le recyclage et la revalorisation, veuillez vous adresser à notre responsable local du service après-vente. Par ailleurs, les partenaires mentionnés sur le site Internet suivant s’appliquent au sein de l’UE : 1) Sélectionnez http://www.sartorius.com. 2) Entrez un contenu sous « Service » 3) Puis, sélectionnez « Information on Disposal » 4) Les adresses des contacts Sartorius locaux pour le recyclage figurent dans les fichiers pdf joints à ce site Internet. h Les appareils contaminés par des substances dangereuses (contaminations NBC) ne sont pas repris par Sartorius, ses filiales, ses succursales ni par ses revendeurs pour être réparés ou éliminés. Adresse du SAV pour élimination : Vous trouverez des informations complètes, notamment les adresses des SAV chargés de la réparation et de l’élimination de votre appareil, sur notre site Internet (www.sartorius.com). Vous pouvez également adresser vos questions au SAV Sartorius. Français Caractéristiques techniques Caractéristiques techniques générales Caractéristiques techniques spécifiques aux différents modèles : voir page 80 Bloc d‘alimentation Bloc d’alimentation modulaire Sartorius 6971790 plus adaptateur secteur remplaçable et spécifique au pays Primaire 100 – 240 V~, –10 % / +10 %, 50 – 60 Hz, 0,2 A Secondaire 15 Vcc, ± 5 %, 530 mA (max.) / 8 W (max.) : 0 °C à +40 °C et 15 Vcc, ± 5 %, 330 mA (max.) / 5 W (max.) : 0 °C à +50 °C Raccordement au secteur (informations supplémentaires) Classe de protection II selon EN/IEC 60950-1 jusqu’à 3000 m au-dessus du niveau de la mer IP40 selon EN 60529/IEC 60529 Balance Alimentation secteur Uniquement avec le bloc d’alimentation Sartorius 6971790 (unité d’emballage 6971790 ou 6971791) Tension d’entrée 12,0 ... 15,0 Vcc Consommation 2 W (standard) Conditions ambiantes Les caractéristiques suivantes s’appliquent aux conditions ambiantes suivantes : Environnement Utilisation uniquement à l’intérieur Température ambiante * De +10 °C à +30 °C Température ambiante : Fonctionnement Garanti entre +5 °C et +45 °C Stockage et transport De –10 °C à +60 °C Altitude Jusqu’à 3 000 m au-dessus du niveau de la mer Humidité relative de l’air** De 15 à 80 % pour les températures jusqu’à 31°C, sans condensation, décroissance linéaire jusqu’à 50 % d’humidité relative à 40 °C et 20% à 50°C Sécurité des appareils électriques Selon la norme EN 61010-1 / IEC 61010-1 Règles de sécurité pour les appareils électriques de mesurage, de régulation et de laboratoire – Partie 1 : prescriptions générales Compatibilité électromagnétique Selon la norme EN 61326-1 / IEC 61326-1 Appareils électriques de mesurage, de régulation et de laboratoire – Exigences CEM – Partie 1 : prescriptions générales Immunité aux émissions : Convient à une utilisation dans les secteurs industriels Émissions parasites : Classe B (convient à une utilisation dans les zones résidentielles et les zones directement raccordées à un réseau basse tension alimentant (également) des habitations) Ainsi l’appareil peut être utilisé dans les deux zones. Équipement standard Unités de poids sélectionnables 1) Grammes, kilogrammes, carats, livres, onces, onces de Troy, taels Hongkong, taels Singapour, taels Taiwan, grain, pennyweight, milligramme, pièces par livre, taels chinois, mommes, carats autrichiens, tolas, bahts, mesghals et newton Programmes d’application sélectionnables Modèles Secura : comptage, pesée en pourcentage, détermination de la masse volumique, maintenir la valeur maximale, pesée instable, contrôle, mélange, composants (totalisation), statistiques, conversion, SQmin et identifiant Modèles Quintix : comptage, pesée en pourcentage, détermination de la masse volumique, maintenir la valeur maximale, pesée instable, contrôle, mélange, composants (totalisation), statistiques, conversion Modèles Practum : comptage, pesée en pourcentage, détermination de la masse volumique, maintenir la valeur maximale, pesée instable, contrôle Les balances approuvées pour l’utilisation en métrologie légale répondent aux exigences de la directive européenne 2009/23/CE avec EN45501:1992 ou OIML R76:2006. * Pour les balances approuvées pour l’utilisation en métrologie légale selon UE, voir les informations présentes sur la balance. ** Pour les balances approuvées pour l’utilisation en métrologie légale selon UE, la réglementation locale s’applique. 1 ) Limitées sur les modèles étalonnés Notice d‘installation et d‘utilisation Secura, Quintix, Practum 23 Contenido Explicación de los símbolos Contenido . . . . . . . . . . . . . . . . . . . . . . . . . . . . . . . . . . . . . . . . Indicaciones para el usuario . . . . . . . . . . . . . . . . . . . . . . . . . . Indicaciones de seguridad . . . . . . . . . . . . . . . . . . . . . . . . . . . . Uso previsto. . . . . . . . . . . . . . . . . . . . . . . . . . . . . . . . . . . . . . . 24 24 24 25 Puesta en funcionamiento. . . . . . . . . . . . . . . . . . . . . . . . . . . . Desembalar y contenido del suministro . . . . . . . . . . . . . . . . . . . Montar la balanza . . . . . . . . . . . . . . . . . . . . . . . . . . . . . . . . . . Elegir ubicación . . . . . . . . . . . . . . . . . . . . . . . . . . . . . . . . . . . . Conexión de corriente. . . . . . . . . . . . . . . . . . . . . . . . . . . . . . . . Tiempo de calentamiento previo . . . . . . . . . . . . . . . . . . . . . . . . Nivelar . . . . . . . . . . . . . . . . . . . . . . . . . . . . . . . . . . . . . . . . . . . Pesaje por debajo de la balanza . . . . . . . . . . . . . . . . . . . . . . . . Antirrobo . . . . . . . . . . . . . . . . . . . . . . . . . . . . . . . . . . . . . . . . . 25 25 25 26 26 27 27 27 27 Transportar de la balanza . . . . . . . . . . . . . . . . . . . . . . . . . . . . Envío de la balanza . . . . . . . . . . . . . . . . . . . . . . . . . . . . . . . . . Cuidado y mantenimiento . . . . . . . . . . . . . . . . . . . . . . . . . . . Limpieza de la balanza . . . . . . . . . . . . . . . . . . . . . . . . . . . . . . . Reciclaje . . . . . . . . . . . . . . . . . . . . . . . . . . . . . . . . . . . . . . . . . 28 28 29 29 29 Datos técnicos . . . . . . . . . . . . . . . . . . . . . . . . . . . . . . . . . . . . . Datos generales . . . . . . . . . . . . . . . . . . . . . . . . . . . . . . . . . . . . Datos específicos del modelo . . . . . . . . . . . . . . . . . . . . . . . . . . Declaración CE de conformidad sobre la compatibilidad electromagnética . . . . . . . . . . . . . . . . . . . . . . . . . . . . . . . . . . . 30 30 80 85 Documentación adicional Además de estas instrucciones de instalación, existe para el aparato un manual de usuario actual en formato pdf que puede descargarse del sitio web de Sartorius: www.sartorius.com Para leer e imprimir el archivo en pdf se necesita el programa Acrobat-Reader. Este programa puede descargarse gratuitamente del sitio web de Adobe (www.adobe.com). h Indicación sobre información y consejos útiles Indicaciones para la metrología legal Indicación para el manejo del aparato En estas instrucciones se utilizan los siguientes símbolos: t Precede a las instrucciones para realizar acciones y Describe lo que resulta al ejecutar una acción Ejecutar acciones en un determinado orden: 1. Primera acción 2. Segunda acción 3. ... – Precede a cada punto de una enumeración Convenciones para estas instrucciones: – las figuras de estas instrucciones se basan en balanzas „estándar“. En las balanzas verificadas, algunas representaciones del indicador y algunos protocolos pueden ser ligeramente diferentes a las mostradas en las figuras En los casos en que estas diferencias fueran relevantes para el manejo, se hará mención a ello en el texto. Acerca de estas instrucciones de instalación t Leer atentamente estas instrucciones de instalación en su totalidad, antes de poner en funcionamiento el aparato por primera vez. Respete las indicaciones de seguridad. t Las instrucciones de instalación son parte importante del producto. Guarde las instrucciones en un lugar seguro. En caso de que ceda el aparato a otras personas, entrégueles también estas instrucciones. t Pedir nuevamente estas instrucciones de instalación en caso de pérdida o descargar las instrucciones actuales del sitio web de Sartorius: www.sartorius.com. Asesoría de aplicaciones / soporte técnico Indicaciones para el usuario Signos de advertencia / Símbolos de peligro Estas señales indican peligros que tienen una alta probabilidad de provocar graves lesiones o la muerte si no se toman medidas para evitarlos. Estas señales indican peligros que pueden provocar lesiones de alcance medio o leve si no se toman medidas para evitarlos. Estas señales indican peligros con riesgo de que se produzcan daños materiales. Este símbolo indica información útil y consejos. Encontrará direcciones para la asesoría de aplicaciones y el soporte técnico en el sitio web, en: http://www.sartorius.com Indicaciones de seguridad Directrices e indicaciones generales – La balanza cumple las directivas y normas europeas relativas a la seguridad eléctrica y a la compatibilidad electromagnética*. Sin embargo, su uso inadecuado puede causar lesiones y daños materiales. En caso de uso o manejo inadecuado de la balanza se perderá el derecho a garantía. – El personal debe haber leído y entendido estas instrucciones de instalación, incluyendo las indicaciones de seguridad. – En caso de utilizarse en instalaciones y entornos con condiciones que requieran requisitos de seguridad más estrictos, deberán cumplirse las condiciones y requisitos exigidos en su país. – Garantizar siempre el libre acceso a los dispositivos y a la balanza. En caso de una instalación o un funcionamiento no adecuados, se perderá el derecho a efectuar reclamaciones por garantía. * = Ver capítulo “Datos técnicos”, página 30 24 Instrucciones de instalación Secura, Quintix, Practum Español ¡Peligro de explosión! No usar la balanza en áreas potencialmente explosivas. Puesta en funcionamiento Para cualquier tipo de tareas de montaje es necesario separar la balanza de la red de corriente. El valor de tensión impreso en la fuente de alimentación debe corresponder con la tensión de red local. Desembalar y contenido del suministro Indicaciones para la instalación Conectar la balanza solamente si la carcasa de la misma y la fuente de alimentación así como todas las conexiones no presentan daños. Desconectar la tensión del aparato dañado tirando inmediatamente de la fuente de alimentación. No exponer la balanza así como todos los accesorios suministrados por Sartorius de forma innecesaria a temperaturas extremas, emanaciones químicas agresivas, humedad, golpes y vibraciones. Respetar las condiciones de uso descritas en los datos técnicos. Indicación de instalación: Las modificaciones realizadas en los aparatos, así como la conexión de cables o aparatos no suministrados por Sartorius, serán responsabilidad única del operario. A petición del cliente, Sartorius puede proporcionar datos sobre la calidad de funcionamiento. Utilizar solamente accesorios de Sartorius. Respetar la clase de protección IP de la balanza y de la fuente de alimentación. Evitar la penetración de líquidos. La clase de protección informa sobre la aptitud del aparato para determinadas condiciones ambientales (humedad, cuerpos extraños). Antes de limpiar la fuente de alimentación o la balanza: Desenchufarla de la toma de corriente. La balanza debe abrirse únicamente por personal especializado, formado por Sartorius. No debe abrirse la fuente de alimentación. t Abra el embalaje y extraiga cuidadosamente los componentes. t Inspeccionar el aparato nada más desembalarlo para detectar posibles daños externos. y En caso de daños, consultar las indicaciones incluidas en el capítulo “Cuidado y mantenimiento”. y Conservar todas las piezas del embalaje original por si fuese necesario devolverlo. Al enviarlo, no deje ningún cable enchufado. Las siguientes piezas forman parte del suministro: Componentes Legibilidad: Protector contra corrientes de aire Platillo de pesaje: d 90 mm Platillo de pesaje: d 120 mm Platillo de pesaje: d 180 mm Platillo inferior Anillo apantallador Anillo antiviento (solo Secura) Fuente de alimentación con enchufe específico del país Cubierta protectora Cubierta antipolvo Instrucciones de instalación y manejo Guía de aplicación Modelos Secura: – – Advertencia para la instalación y el manejo del aparato: En caso de rotura de vidrio existe peligro de lesiones por corte con los cantos de vidrio. – Tender los cables de forma que no exista riesgo de tropezar. – Uso previsto Esta balanza de alta resolución está prevista para ser usada exclusivamente en laboratorios y en locales cerrados en condiciones atmosféricas normales. Se ha desarrollado especialmente para realizar una determinación de masa exacta de materiales en estado líquido, pastoso, sólido o en forma de polvo. Para la toma de los materiales deben utilizarse recipientes apropiados. Su empleo está indicado exclusivamente para la utilización en laboratorios y espacios interiores y en condiciones atmosféricas normales. 9 9 9 9 9 9 9 9 9 9 9 9 – 9 9 Montar la balanza t Respetar las advertencias e indicaciones de peligro contenidas en los siguientes capítulos. Balanza con Balanzas de protector contra precisión corrientes de aire 10 mg, 1 g 0,1 mg 1 mg y 0,1 g – 9 9 – – 9 – – 9 – – 9 9 9 9 – – 9 – – 9 Modelos Quintix y Practum: – Balanza con protector contra corrientes de aire Coloque las siguientes piezas en el orden indicado: Cubierta protectora Gire el bloqueo del protector contra corrientes de aire a la posición “desbloqueado” . Coloque el protector contra corrientes de aire (1) sobre la balanza. Nota: agarre el protector contra corrientes de aire con las dos manos de los largueros superiores. Gire el bloqueo del protector contra corrientes de aire a la posición “bloqueado” . Colocar la plancha apantalladora (2), el anillo apantallador* (3), el platillo inferior (4), el platillo de pesaje (5) y el anillo antiviento* (6). Nota: para obtener información sobre la limpieza del protector contra corrientes, ver el capítulo “Cuidado y mantenimiento” página 29. * = Solo en modelos con una legibilidad de 0,1 mg Instrucciones de instalación Secura, Quintix, Practum 25 Puesta en funcionamiento Conexión de red (alimentación de tensión) Ensamblar la fuente de alimentación Montar la balanza Colocar los cristales (dado el caso, extraerlos) 1) Tire del canto trasero de la tapa del protector hacia arriba y retire la tapa. Los adaptadores de enchufe incorrectos pueden provocar descargas de corriente mortales y dañar el aparato. No conectar nunca el adaptador del enchufe de red en la base del enchufe sin estar conectado a la fuente de alimentación (peligro de descarga eléctrica). t Utilice el adaptador de enchufe adecuado a su red de corriente. 2) Deslice los 3 cristales hasta adelante del todo a lo largo de la guía del protector contra corrientes de aire. 3) Vuelva a montar a continuación la tapa del protector. Al montarla, la tapa del protector debe engranar. Balanza sin protector contra corrientes de aire t Coloque las siguientes piezas en el orden indicado: 1) Cubierta protectora (no aparece en la figura). 2) Coloque el anillo apantallador (1) y gírelo en sentido antihorario hasta que esté fijo. 3) Coloque el platillo inferior (1) y el platillo de pesaje (2). A Versiones del adaptador del enchufe de red: Bolsa Región/país Bolsa a) transparente Europa/UE (excepto e) negro Gran Bretaña) b) amarillo Gran Bretaña f) turquesa c) azul EE.UU., China y Japón g) verde d) rojo Australia h) rosa i) blanco Región/país India Sudáfrica Corea Brasil Argentina El embalaje del módulo adaptador 6971790 con los adaptadores de red g), h), e i) está rotulado con 98671791. t Presione (1) y deslice (2) el adaptador de enchufe de red (A) necesario para su alimentación de corriente en la abertura del módulo de la fuente de alimentación (B). El adaptador del enchufe debe engranar. Elegir ubicación Escoger el lugar de instalación correcto: – Colocar el aparato sobre una superficie estable, libre de vibraciones y nivelada (p. ej. piedra de pesaje). – Mantener siempre libre el acceso al aparato. Al instalar el aparato, evitar lugares con influencias desfavorables: – Heat (heater or direct sunlight) – Corrientes de aire directas por ventanas abiertas, instalaciones de aire acondicionado y puertas – Vibraciones y sacudidas durante la medición – No es un „lugar de tránsito para personas“ – Humedad extrema – Campos electromagnéticos Aclimatación Una condensación de la humedad del aire (rocío) puede producirse en el aparato que está frío, si es instalado en un ambiente con mayor temperatura. Por lo tanto, es necesario aclimatar el aparato durante aproximadamente 2 horas, manteniéndolo separado de la tensión de red antes de volver a conectarlo a la red eléctrica. 26 Instrucciones de instalación Secura, Quintix, Practum Desmontar/sustituir el adaptador de enchufe t Desbloquee (1) el adaptador de enchufe y extráigalo (2) seguidamente. Conexión de red/medidas de protección – Utilizar exclusivamente fuentes de alimentación originales de Sartorius. El tipo de protección de la fuente de alimentación se corresponde con IP40 según EN60529/IEC 60529. – El valor de tensión impreso (ver placa de identificación) debe coincidir con la tensión local. – Si la tensión de red indicada o el modelo de enchufe de la fuente de alimentación no se corresponden con las normas utilizadas en el país, ponerse en contacto con la representación Sartorius más próximo. – La conexión a la red debe realizarse de acuerdo a las disposiciones de su país. Español t 1) Conecte primeramente la fuente de alimentación al conector hembra situado en la parte trasera de su balanza. t 2) Conectar a continuación la fuente de alimentación a la toma de red (tensión eléctrica). Indicaciones para el uso en metrología legal Elementos de indicación adicionales en la pantalla: – Línea de metrología con indicaciones adicionales sobre la carga mínima y el valor verificable e. Símbolo de advertencia para llamar la atención sobre valores calculados, valores bruto negativos o valores que sin inferiores a peso mínimo inicial (SQmin). Menú de configuración “Ajustes”: en las balanzas verificadas no están disponibles todas las funciones y ajustes. Tiempo de calentamiento previo 0 y Para obtener resultados exactos, la balanza necesita un tiempo de precalentamiento mínimo de 30 minutos después de conectarla por primera vez a la red eléctrica. En ese momento, el aparato habrá alcanzado la temperatura de funcionamiento necesaria. Especificación de interfaz (salida de datos) Ajustes “PC SBI” y “USB RS232 SBI” al identificar dígitos de indicación no verificados: en el ajuste “SBI” no tiene lugar ninguna identificación automática del dígito de indicación no verificado. Ejecutar las correspondientes medidas o ajustes en los dispositivos adicionales. Pesaje por debajo de la balanza 30 Las balanzas verificadas de la clase de precisión k que se utilizan en metrología legal, deben someterse a un tiempo de precalentamiento mínimo de 1 hora después de conectarlas a la red eléctrica. Para pesar por debajo de la balanza se dispone de un dispositivo especial. h Instalar una protección contra corrientes de aire. Nivelar h t Levantar la placa de cierre de la base de la balanza. Atención: colocar la balanza de lado, no sobre el lado del platillo de pesaje. La nivelación de la balanza permite compensar inclinaciones en el lugar de instalación. Una colocación exacta y horizontal de la balanza garantiza resultados de pesaje precisos. Nota: la balanza debe nivelarse y ajustarse de nuevo cada vez que se cambie su ubicación. Modelos Secura: En cuanto aparezca el mensaje “LEVEL” en la pantalla, deberá realizar la nivelación. t Asegúrese de que el platillo de pesaje esté vacío. t Toque sobre “LEVEL” t Colgar la muestra p. ej. con un alambre en la muesca. t Siga las instrucciones que aparecen en la pantalla interactiva. h Modelos Quintix y Practum: t Girar las dos patas tal y como se muestra en la figura de forma que la burbuja de aire quede en el centro del círculo. – Burbuja a las “12 horas”: girar las dos patas en sentido horario. – Burbuja a las “3 horas”: girar la pata izquierda en sentido horario, la pata derecha en sentido antihorario. – Burbuja a las “6 horas”: girar las dos patas en sentido antihorario. – Burbuja a las “9 horas”: girar la pata izquierda en sentido antihorario, la pata derecha en sentido horario. Cuando deje de utilizar el pesaje por debajo de la balanza: volver a cerrar el orificio con la placa de cierre para evitar que las corrientes de aire falseen los resultados del pesaje. En metrología legal no debe abrirse, ni utilizarse el dispositivo para pesar por debajo de la balanza. Seguro antirrobo t Si fuese necesario, es posible instalar un cable con candado de seguridad “Kensington” en la parte posterior de la balanza, en el punto de fijación. t Como alternativa, es posible fijar la balanza en su lugar de ubicación, p. ej. con una cadena o un candado. Instrucciones de instalación Secura, Quintix, Practum 27 t Gire el bloqueo del protector contra corrientes de aire a la posición “desbloqueado”. Transportar la balanza Antes del transporte, poner la blanaza en modo Stand-by, desenchufar seguidamente el conector de red y desmontar el platillo de pesaje y el plato inferior. t Extraer a continuación del protector contra corrientes de aire de la balanza. Transporte en distancias cortas dentro del laboratorio t Colocar la parte inferior del embalaje en el cartón. Evitar roturas de vidrio, sacudidas y golpes: No levantar ni transportar jamás la balanza agarrándola por el protector contra corrientes de aire. t Agarrar la balanza cuidadosamente por debajo de la carcasa, levantarla y transportarla a su nueva ubicación. h La balanza debe nivelarse y ajustarse de nuevo cada vez que se cambie su ubicación. t Colocar las siguientes piezas en la parte inferior del embalaje: – Protector contra corrientes de aire – Balanza – Chapa de la base – Placas laterales – Cubierta de vidrio superior A B t Insertar el platillo inferior y el de pesaje en las muescas tal y como se muestra en la figura: – A = platillo inferior y de pesaje con un diámetro de 120 mm – B = platillo inferior y de pesaje con un diámetro de 90 mm Envío de la balanza h Le rogamos utilice el embalaje original para realizar los envíos. Dado el caso, solicite el embalaje a través del servicio técnico de Sartorius. h Antes de enviar la balanza deben conectarse a funcionamiento Stand-by (ver página siguiente) y, seguidamente, desenchufarse. Modelos Secura: 1 2 3 4 5 6 Modelos Quintix y Practum: 1 2 3 4 28 t Retirar las siguientes piezas de la balanza: – Anillo antiviento (1) en modelos con una legibilidad de 0,1 mg – Platillo de pesaje (2) – Platillo inferior (3) – Anillo de centrado (4) en modelos con una legibilidad de 0,1 mg – Plancha apantalladora (5) – Extraer los cristales del protector contra corrientes de aire (6): ver el siguiente capítulo “Cuidado y mantenimiento”. t Retirar las siguientes piezas de la balanza: – Platillo de pesaje (1) – Platillo inferior (2) – Plancha apantalladora (3) – Para extraer los cristales del protector contra corrientes de aire (4): ver el siguiente capítulo “Cuidado y mantenimiento”. Instrucciones de instalación Secura, Quintix, Practum t Insertar almohadillas sobre las placas de vidrio t Introducir la fuente de alimentación en las almohadillas del cartón. t Insertar la parte superior del embalaje sobre las piezas del aparato. t Introducir a continuación la balanza embalada en el cartón y cerrarlo. Español A) Sacar las placas laterales: 1) Levante ligeramente las placas laterales desde atrás y sáquelas hacia atrás. Cuidado y mantenimiento Servicio Un mantenimiento regular de la balanza por parte de técnicos de servicio de Sartorius asegura la continua seguridad de medición. Sartorius ofrece contratos de servicio en ciclos de 1 mes hasta 2 años. La frecuencia de los intervalos de mantenimiento dependerá de las condiciones de funcionamiento y exigencias de tolerancia del usuario. En el marco de cada mantenimiento debería crearse un certificado de calibración. La comprobación de seguridad técnica de la fuente de alimentación y sus conexiones deben llevarse a cabo por un electricista en intervalos adecuados (p. ej. cada 2 años). B) Sacar la cubierta de vidrio superior: 1) Saque la tapa del protector contra corrientes de aire tirando del canto trasero hacia arriba y extraiga la tapa del protector contra corrientes de aire. Reparaciones ¡No efectuar reparaciones en el aparato si está sometido a tensión! Extraer la fuente de alimentación del enchufe. Las reparaciones deben ser realizadas solo por técnicos. Las reparaciones incorrectas pueden constituir un grave peligro para el usuario y provocar que la balanza dé resultados inseguros. No efectuar reparaciones en el aparato si está sometido a tensión. Desenchufe el cable de alimentación de la toma de corriente. Encomendar cualquier trabajo de reparación exclusivamente a personal formado. 2) Extraiga la cubierta superior de vidrio tirando hacia atrás. 3) Tras la limpieza, vuelva a montar a continuación la tapa del protector. La tapa del protector contra corrientes de aire debe engranar al ser montada. Limpieza de la balanza Limpiar el panel de control Conectar el indicador a funcionamiento en reposo (Stand-by) de forma que al limpiar el panel no se modifiquen los ajustes del funcionamiento. t Toque sobre la tecla “Sartorius Moment” para cambiar a la selección de aplicaciones. t Si toca a continuación sobre E se apaga el indicador. t Volver a encender el indicador: tocar el indicador: Tocar en j en la parte inferior izquierda de la pantalla Limpiar la carcasa del aparato Separar la tensión de alimentación: separar la fuente de alimentación de la red eléctrica. Dado el caso, soltar el cable de datos de la balanza. No abra jamás la balanza ni la fuente de alimentación. Contienen piezas pequeñas que pueden ser limpiadas, reparadas o sustituidas por el usuario. – Asegúrese de que no penetra ningún líquido ni polvo en la balanza o en la fuente de alimentación – Sacar la chapa de la base, el platillo inferior y el platillo de pesaje de la protección contra corrientes de aire. – No utilice en ningún caso productos de limpieza que contengan disolventes o componentes abrasivos. Esto puede provocar daños en el aparato. Modelos Secura y Quintix: t Las piezas superiores e inferiores de plástico de la carcasa de la balanza tienen un revestimiento especial que permite el uso de acetona para efectuar su limpieza. Las siguientes piezas no admiten para su limpieza el uso de acetona o productos agresivos: panel de control, entrada del enchufe de red, interfaz de datos, placas, sello de metrología así como el resto de piezas de plástico. t Secar a continuación la balanza con un paño seco. Aparatos contaminados: – Riesgos para la salud por contaminación del producto debida a deposiciones de productos y acumulación de restos con gérmenes. – Peligro para la salud por sustancias biológicas o microbiológicas. Observar las disposiciones de limpieza. – Comprobar cuidadosamente el resultado de la limpieza. Una vez efectuada la limpieza, vuelva a colocar los componentes en el orden inverso al desmontaje: ver también el capítulo “Puesta en funcionamiento – montar la balanza”, página 26. C) Retirar el vidrio delantero y el trasero: Los pasos de montaje detallados se encuentran en el “Manual de usuario”, que se puede descargar de internet: ver www.sartorius.com – “Service Center «Downloads»”. Reciclaje El embalaje está compuesto por materiales respetuosos con el medio ambiente que se pueden utilizar como materia prima reciclada. Cuando ya no se necesite el embalaje, es posible deshacerse de él de forma gratuita en Alemania a través del sistema dual de VfW (número de contrato D-59101-20091129). En otro caso deberá actuar con el material en la forma que dicten las normal locales relativas a los desechos. El aparato incluyendo los accesorios y baterías no debe desecharse junto con la basura doméstica, se reciclarán como aparatos eléctricos y electrónicos. Para obtener información relativa al reciclaje y reutilización, póngase en contacto con nuestro departamento de mantenimiento en su país. Adicionalmente, son válidos los socios de la UE incluidos en el siguiente sitio web: 1) Seleccionar http://www.sartorius.com 2) Seleccionar una categoría en “Service”. 3) Seleccionar a continuación “Information on Disposal”. 4) Las direcciones de los interlocutores de Sartorius relacionados con el reciclaje se encuentran en el documento en formato pdf adjuntado en esta página web. h No se admitirá para su reparación o desecho ningún aparato contaminado con sustancias peligrosas (contaminación ABC). Dirección de servicio para el reciclaje Encontrará información más detallada sobre la reparación y la eliminación de su aparato en nuestra página web (www.sartorius.com) o a través del servicio técnico de Sartorius. Instrucciones de instalación Secura, Quintix, Practum 29 Datos técnicos Datos generales Datos específicos del modelo en la página 80 Fuente de alimentación Fuente de alimentación del módulo de red eléctrica de Sartorius 6971790 con adaptadores de red eléctrica intercambiables específicos del país Primaria 100 – 240 V~, –10 % / +10 %, 50 – 60 Hz, 0,2 A Secundaria 15 Vdc, ± 5%, 530 mA (máx.) / 8 W (máx.): 0 hasta +40°C y 15 Vdc, ± 5%, 330 mA (máx.) / 5 W (máx.): 0 hasta +50°C Conexión de red (datos adicionales) Clase de protección II según EN/IEC 60950-1 hasta 3000 m sobre el nivel del mar IP40 según EN 60529/IEC 60529 Balanza Tensión de alimentación Solo a través del módulo de alimentación de red Sartorius 6971790 (unidad de embalaje 6971790 o 6971791) Tensión de entrada 12,0 ... 15,0 Vdc Consumo (potencia) 2 W (típico) Condiciones ambientales Los datos técnicos son válidos para las siguientes condiciones medioambientales: Entorno Utilización solo en espacios interiores Temperatura ambiente * +10 °C hasta +30 °C Operatibilidad Garantizada entre +5 °C ... +45 °C Almacenamiento y transporte –10 °C ... +60 °C Altura Hasta 3.000 m sobre el nivel del mar Humedad relativa del aire ** 15 % hasta 80 % para temperaturas de hasta 31 °C sin condensación, disminuyendo linealmente hasta el 50 % de humedad relativa a 40 °C y 20 % a 50 °C Seguridad de dispositivos eléctricos Según EN 61010-1 / IEC 61010-1 Requisitos de seguridad para equipos eléctricos de medida, control, regulación y uso en laboratorios – parte 1: Requisitos generales Compatibilidad electromagnética Resistencia a interferencias: Emisión de interferencias: Según EN 61326-1 / IEC 61326-1 Equipos eléctricos de medida, control y uso en laboratorios Requisitos de CEM – parte1: Requisitos generales Apto para uso en zonas industriales Clase B (Apto para el uso en zonas urbanas y zonas conectadas directamente a la red de baja tensión que (también) da suministro a viviendas). De este modo es posible utilizar el aparato en ambas áreas. Equipamiento estándar Unidades de peso seleccionables 1) Gramo, Kilogramo, quilate, libra, onza, onza Troy, Tael Hongkong, Tael Singapur, Tael Taiwan, grano, Pennyweight, miligramo, piezas por libra, Tael China, Momme, quilate, Tola, Baht, Mesghal y Newton Aplicaciones seleccionables Modelos Secura: contaje, pesaje en porcentaje, determinación de la densidad, mantenimiento del valor más alto, pesaje en movimiento, pesaje de control, mezcla, suma, estadística, recalcular, SQmin e identificador Modelos Quintix: contaje, pesaje en porcentaje, mantenimiento del valor más alto, pesaje en movimiento, pesaje de control, mezcla, suma, estadística, recalcular Modelos Practum: contaje, pesaje en porcentaje, determinación de la densidad, mantenimiento del valor más alto, pesaje en movimiento, pesaje de control Las balanzas calibradas según UE cumplen las exigencias de la directiva europea 2009/23/CE con EN45501:1992 o, en su caso, OIML R76:2006. * Para las balanzas verificadas ver datos en la balanza. ** Las disposiciones legales son válidas con las balanzas verificadas. 1 ) Limitado en modelos verificados 30 Instrucciones de instalación Secura, Quintix, Practum Italiano Indice Simboli Indice . . . . . . . . . . . . . . . . . . . . . . . . . . . . . . . . . . . . . . . . . . . . . . . . Informazioni per l’utente . . . . . . . . . . . . . . . . . . . . . . . . . . . . . . . . . Istruzioni di sicurezza . . . . . . . . . . . . . . . . . . . . . . . . . . . . . . . . . . . . Uso previsto . . . . . . . . . . . . . . . . . . . . . . . . . . . . . . . . . . . . . . . . . . . 31 31 31 32 Messa in funzione . . . . . . . . . . . . . . . . . . . . . . . . . . . . . . . . . . . . . . . Disimballaggio ed equipaggiamento fornito . . . . . . . . . . . . . . . . . . . . Installazione della bilancia . . . . . . . . . . . . . . . . . . . . . . . . . . . . . . . . . Scelta del luogo di installazione . . . . . . . . . . . . . . . . . . . . . . . . . . . . . Collegamento elettrico . . . . . . . . . . . . . . . . . . . . . . . . . . . . . . . . . . . . Tempo di preriscaldamento . . . . . . . . . . . . . . . . . . . . . . . . . . . . . . . . Livellamento . . . . . . . . . . . . . . . . . . . . . . . . . . . . . . . . . . . . . . . . . . . Dispositivo per pesare da sotto la bilancia . . . . . . . . . . . . . . . . . . . . . . Dispositivo antifurto. . . . . . . . . . . . . . . . . . . . . . . . . . . . . . . . . . . . . . 32 32 32 33 33 34 34 34 34 Trasporto della bilancia. . . . . . . . . . . . . . . . . . . . . . . . . . . . . . . . . . . Spedizione della bilancia . . . . . . . . . . . . . . . . . . . . . . . . . . . . . . . . . . Cura e manutenzione . . . . . . . . . . . . . . . . . . . . . . . . . . . . . . . . . . . . Pulizia della bilancia. . . . . . . . . . . . . . . . . . . . . . . . . . . . . . . . . . . . . . Smaltimento . . . . . . . . . . . . . . . . . . . . . . . . . . . . . . . . . . . . . . . . . . . 35 35 36 36 36 Specifiche tecniche . . . . . . . . . . . . . . . . . . . . . . . . . . . . . . . . . . . . . . Dati generali . . . . . . . . . . . . . . . . . . . . . . . . . . . . . . . . . . . . . . . . . . . Dati specifici del modello . . . . . . . . . . . . . . . . . . . . . . . . . . . . . . . . . . Dichiarazione di conformità CE per la compatibilità elettromagnetica . . . . . . . . . . . . . . . . . . . . . . . . . 36 36 80 85 Altri documenti Oltre alle presenti istruzioni per l’installazione, è disponibile per l’apparecchio anche un manuale utente aggiornato sotto forma di file PDF scaricabile dal sito web Sartorius: www. sartorius.com Per poter leggere e stampare il file PDF, è necessario il programma Acrobat Reader che può essere scaricato gratuitamente dal sito web Adobe (www.adobe.com). Informazioni per l’utente Simboli di avvertimento / pericolo Questo simbolo indica pericoli che potrebbero comportare lesioni gravi o mortali se non sono evitati. Questo simbolo indica pericoli che possono comportare lesioni di media-piccola entità se non sono evitati. ATTENZIONE! h Informazioni utili e suggerimenti Avvisi per l’uso metrico-legale Avviso riguardante l’utilizzo dell’apparecchio Nelle presenti istruzioni vengono utilizzati i seguenti simboli: t Indica un’azione da eseguire y descrive cosa accade dopo l’esecuzione di un’operazione Eseguire le operazioni secondo una sequenza precisa: 1. Prima azione 2. Seconda azione 3. ... – Indica una voce in un elenco Convenzioni per questo manuale di istruzioni: – Le figure contenute nel manuale si basano sulle bilance «standard». Per le bilance omologate CE-M alcune schermate e rapporti possono differire leggermente dalle figure. Se queste differenze sono importanti ai fini del funzionamento, verranno spiegate nel testo. Uso di questo manuale d’istruzioni t Leggere attentamente il manuale di installazione prima di mettere in funzione l’apparecchio per la prima volta. Osservare le istruzioni di sicurezza. t Il presente manuale d’installazione è una parte importante del prodotto. Conservare il manuale in un luogo sicuro. Se l’apparecchio viene ceduto a persone terze, fornire anche il presente manuale d’installazione. t In caso di perdita del manuale, richiedere una copia alla Sartorius oppure scaricare il manuale aggiornato dal nostro sito web: www.sartorius.com Consulenza applicativa / Supporto tecnico Gli indirizzi di contatto per la consulenza applicativa e il supporto tecnico si trovano sul sito Internet: http://sartorius.com Istruzioni di sicurezza Direttive e informazioni a carattere generale – La bilancia è conforme alle direttive e norme europee concernenti la sicurezza elettrica e la compatibilità elettromagnetica.* Un uso non idoneo dell’apparecchio può tuttavia causare dei danni e/o lesioni. Un uso o funzionamento non idoneo della bilancia, vale a dire non conforme alle istruzioni fornite, comporta la perdita di tutti i diritti di garanzia del costruttore. – Il personale deve aver letto e compreso le istruzioni di installazione Questo simbolo indica pericoli che possono comportare lesioni di media-piccola entità se non sono evitati. Questo simbolo indica informazioni e consigli utili. fornite comprese le istruzioni di sicurezza – Qualora l’apparecchio venga usato in sistemi o in condizioni ambientali che richiedono maggiori standard di sicurezza, bisogna conformarsi alle prescrizioni e disposizioni vigenti nel paese di utilizzo. – Consentire sempre un facile accesso alla bilancia e alle apparecchiature. Un’installazione scorretta o un utilizzo non idoneo della bilancia, vale a dire non conforme alle istruzioni fornite in questo manuale, comporta la perdita di tutti i diritti di garanzia del costruttore. * = Vedi «Specifiche tecniche» a pag. 36. Istruzioni per l’installazione e l’uso Secura, Quintix, Practum 31 Pericolo di esplosione! Non usare questo apparecchio in aree a rischio per la presenza di materiali esplosivi. Messa in funzione La bilancia deve essere scollegata dall’alimentazione elettrica durante i lavori di montaggio. Verificare che il valore di tensione stampigliato sull’alimentatore AC corrisponda a quello della tensione locale. Disimballaggio ed equipaggiamento fornito Indicazioni per l’installazione Non mettere in funzione la bilancia se l’alloggiamento o l’alimentatore AC, compresi i connettori, sono difettosi. Scollegare immediatamente l’apparecchio difettoso dall’alimentazione elettrica estraendo la spina. Non esporre la bilancia, l’alimentatore AC o gli accessori forniti da Sartorius a temperature estreme, vapori chimici aggressivi, umidità, urti, vibrazioni o forti campi elettromagnetici. Rispettare le condizioni di funzionamento descritte nelle specifiche tecniche! Informazioni sull’installazione: Il gestore risponde in prima persona di qualsiasi modifica apportata all’apparecchio così come del collegamento di cavi o apparecchi non forniti da Sartorius. Su richiesta la Sartorius mette a disposizione informazioni sulla qualità di funzionamento dell’apparecchio. Utilizzare solo periferiche fornite dalla Sartorius. Osservare il grado di protezione IP della bilancia e dell’alimentatore AC. Impedire la penetrazione di liquidi. Il grado di protezione IP indica l’idoneità degli apparecchi a diverse condizioni ambientali (umidità, corpi estranei). Prima di pulire l’alimentatore AC o la bilancia: staccarli dall’alimentazione di corrente. La bilancia può essere aperta solo da tecnici qualificati, istruiti dalla Sartorius. Non aprire l’alimentatore AC. t Aprire l’imballaggio e togliere con cautela tutte le parti. t Subito dopo aver disimballato l’apparecchio, controllare che non sia danneggiato esternamente. y In caso di danni, osservare le indicazioni contenute nel capitolo Cura e manutenzione. y Conservare tutte le parti dell’imballaggio originale per un’eventuale trasporto dell’apparecchio. In caso di spedizione scollegare tutti i cavi! L’equipaggiamento fornito comprende le seguenti parti: Componenti Bilancia con prote- Bilance di precisione zione anticorrente Precisione di lettura: 0,1 mg 1 mg 10 mg, 0,1 g e 1 g Protezione anticorrente 9 9 – Piatto di pesata: d 90 mm 9 – – Piatto di pesata: d 120 mm – 9 – Piatto di pesata: d 180 mm – – 9 Supporto del piatto 9 9 9 Piastra di schermatura – – 9 Anello di schermatura del piatto (solo per Sicura) 9 – – Alimentatore AC con spina specifica del paese 9 9 9 Copertina di protezione 9 9 9 Copertina antipolvere 9 9 – Istruzioni per l’installazione e l’uso 9 9 9 Guida applicativa 9 9 9 Installazione della bilancia Modelli Secura: Avvertimenti relativi al luogo d’installazione e all’uso dell‘apparecchio ATTENZIONE! ATTENZIONE! In caso di rottura del vetro, c’è il rischio di lesioni causate da tagli dovuti al contatto con gli spigoli di vetro. Installare i cavi in modo che non sussista il rischio di inciampo. Osservare le ulteriori istruzioni di sicurezza e indicazioni di pericolo contenute nei capitoli successivi. Uso previsto Questa bilancia ad alta risoluzione è destinata ad essere usata esclusivamente in laboratori e ambienti interni in condizioni atmosferiche normali. È stata sviluppata appositamente per effettuare un’esatta determinazione della massa di materiali liquidi, pastosi, polverulenti o solidi. Per la pesatura di qualsiasi tipo di materiale campione devono essere usati contenitori idonei. Questi sono concepiti per essere usati esclusivamente in ambienti interni, in condizioni atmosferiche normali. 32 Istruzioni per l’installazione e l’uso Secura, Quintix, Practum bilancia con protezione anticorrente t Montare le seguenti parti nell’ordine indicato: – Copertina antipolvere di protezione – Girare il blocco della protezione anticorrente su «sbloccato ». – Collocare la protezione anticorrente (1) sulla bilancia. Nota: usare entrambe le mani per reggere i montanti superiori della protezione anticorrente. – Far scorrere all’indietro i pannelli laterali. – Girare il blocco della protezione anticorrente su «bloccato ». – Posizionare la piastra di schermatura (2), l’anello di centraggio* (3), il supporto del Modelli Quintix e Practum: piatto (4), il piatto di pesata (5) e l’anello di schermatura* (6) sulla bilancia. Nota: per informazioni su come pulire la protezione anticorrente si rimanda al capitolo Cura e manutenzione, a pag. 36. * = solo per i modelli con precisione di lettura di 0,1 mg Italiano Messa in funzione Installazione della bilancia Collegamento alla rete (alimentazione elettrica) Assemblaggio dell’alimentatore AC L’uso di adattatori per presa elettrica non adatti può causare scosse elettriche letali e danni all’apparecchio. Non inserire mai l’adattatore nella presa elettrica se separato dall’alimentatore (pericolo di scossa elettrica). Montaggio (o rimozione) dei pannelli in vetro 1) Alzare la copertura della protezione anticorrente afferrando il bordo posteriore e toglierla. t Usare l’adattatore per presa elettrica adatto all’alimentazione elettrica locale. 2) Da dietro inserire del tutto i tre pannelli di vetro nelle rotaie di guida della protezione anticorrente. 3) Poi rimettere la copertura della protezione anticorrente. Inserirla in modo che scatti in posizione. Bilancia senza protezione anticorrente t Montare le seguenti parti nell’ordine indicato: A Versioni degli adattatori per presa elettrica: Busta Regione/Paese Busta Regione/Paese a) trasparente Europa (UE tranne Gran Bretagna) e) nera India 1) Copertina antipolvere di protezione (non in figura) b) gialla Gran Bretagna f) turchese Sud Africa 2) Posizionare il disco di schermatura (1) e girarlo in senso orario fino a quando è ben bloccato in posizione. 3) Montare il supporto del piatto (1) e il piatto di pesata (2). c) blu USA, Cina e Giappone g) verde Corea d) rossa Australia h) rosa Brasile i) bianca Argentina La confezione del modulo dell’alimentatore AC 6971790 con gli adattatori g), h), e i) è contrassegnata con 6971791. t Premere (1) e spingere (2) l’adattatore per presa elettrica (A) ) richiesto per l’alimentazione elettrica locale nell’apertura del modulo dell’alimentatore (B). L’adattatore deve scattare i n posizione. Scelta del luogo di installazione Scegliere un luogo di installazione adatto: – Collocare l’apparecchio su una superficie piana, stabile e insensibile alle vibrazioni (per es. un tavolo antivibrante per bilance). – L’accesso all’apparecchio deve essere possibile in ogni momento. – – – – – – Scegliere un luogo non soggetto alle seguenti condizioni ambientali sfavorevoli: Calore forte (riscaldamento o irraggiamento solare diretto) Correnti d’aria provenienti da finestre e porte aperte e impianti di climatizzazione Vibrazioni durante l’operazione di pesatura Aree di forte traffico di persone Umidità eccessiva Campi elettromagnetici Acclimatazione Se l’apparecchio viene portato in un ambiente caldo, l’umidità presente sulle sue superfici può trasformarsi in condensa. Per evitare gli effetti della condensa bisognerebbe acclimatare la bilancia tenendola staccata dalla rete per circa 2 ore prima di collegarla di nuovo alla rete elettrica. Rimozione/sostituzione dell’adattatore per presa elettrica t Sbloccare (1) l’adattatore e toglierlo (2). Collegamento alla rete elettrica/misure di sicurezza – Usare solo alimentatori AC originali Sartorius. L’alimentatore AC è conforme al grado di protezione IP40 in conformità a EN 60529/ IEC 60529. – Verificare che la tensione stampigliata sulla targhetta di identificazione del costruttore corrisponda a quella della rete elettrica locale. – Se la tensione di rete o la forma della spina dell’alimentatore AC non corrisponde alla norma del paese di utilizzo, contattare la più vicina rappresentanza Sartorius. – Il collegamento alla rete elettrica deve essere eseguito in conformità alle norme nazionali vigenti. Istruzioni per l’installazione e l’uso Secura, Quintix, Practum 33 t 1) Prima inserire l’alimentatore AC nella presa di alimentazione sul retro della bilancia. t 2) Poi inserire la spina dell’alimentatore AC nella presa di corrente elettrica. Istruzioni per l’uso metrico-legale Elementi di visualizzazione aggiuntivi sul display: – Riga metrologica con informazioni aggiuntive relative al carico minimo (min) e alla divisione di verifica (e). Simbolo di avvertimento per indicare i valori calcolati, i valori lordi negativi o i valori inferiori al peso minimo del campione (SQmin). Tempo di preriscaldamento 0 y Per fornire risultati precisi la bilancia richiede un tempo di riscaldamento di almeno 30 minuti dopo il primo collegamento alla rete elettrica. Solo dopo 30 minuti la bilancia ha raggiunto la temperatura d’esercizio. 30 Menu Setup «Impostazioni”: sulle bilance omologate per l’uso metrico-legale non sono disponibili tutte le funzioni e impostazioni. Specifica dell’interfaccia (emissione dei dati) Impostazioni «PC – SBI» e «USB RS232 SBI» per l’identificazione delle cifre non omologate per l’uso metrico-legale: nell’impostazione «SBI» non viene eseguita l’identificazione automatica delle cifre non omologate. Adottare le misure o eseguire le impostazioni del caso sulla periferica. Dispositivo per pesare da sotto la bilancia Se una bilancia omologata della classe di precisione k per l’uso metrico-legale viene collegata alla rete elettrica, è richiesto un tempo di preriscaldamento di almeno 1 ora prima del suo utilizzo. Sul fondo della bilancia è disponibile un dispositivo (gancio dentellato) per pesare da sotto la bilancia. Installare una schermatura contro le correnti d’aria. Livellamento L’operazione di livellamento della bilancia permette di compensare le inclinazioni del piano su cui è installata la bilancia. La bilancia deve essere perfettamente orizzontale per garantire risultati di pesata affidabili e riproducibili. Nota: la bilancia deve essere livellata e regolata di nuovo ogni volta che si cambia il luogo di installazione. Modelli Secura: Non appena appare «Level» sul display, bisogna livellare la bilancia. t Verificare che il piatto di pesata sia scarico. t Toccare «LEVEL». t Levare la piastra di copertura dal fondo della bilancia. Avvertenza: per eseguire questa operazione posare la bilancia su un lato ma non sul lato del piatto di pesata. t Appendere il campione al gancio dentellato usando un filo metallico o simili. t Seguire le istruzioni che appaiono sul display interattivo. Modelli Quintix e Practum: 34 t Girare i due piedini come mostrato in figura fino a quando la bolla d’aria si trova nel centro della livella. – Bolla d’aria sulle «ore 12»: girare i due piedini in senso orario. – Bolla d’aria sulle «ore 3»: girare il piedino sinistro in senso orario e il piedino destro in senso antiorario. – Bolla d’aria sulle «ore 6»: girare i due piedini in senso antiorario. – Bolla d’aria sulle «ore 9»: girare il piedino sinistro in senso antiorario e il piedino destro in senso orario. Istruzioni per l’installazione e l’uso Secura, Quintix, Practum Se il dispositivo per pesare da sotto la bilancia non viene più usato, richiudere l’apertura con la piastra di copertura in modo che i risultati non vengano falsati a causa delle correnti d’aria. Nell’uso metrico-legale, il dispositivo per pesare da sotto la bilancia non deve essere né aperto né usato. Dispositivo antifurto t Se necessario, è possibile installare un dispositivo antifurto (Kensigton Lock) sul punto di fissaggio posto sul retro della bilancia. t La bilancia può anche essere assicurata sul luogo di installazione usando per esempio una catena e un lucchetto. Italiano t Girare il blocco della protezione anticorrente su «sbloccato». Trasporto della bilancia t Poi togliere la protezione anticorrente dalla bilancia: Prima del trasporto mettere la bilancia in stand-by, staccare la spina e rimuovere il piatto di pesata e il relativo supporto dalla bilancia. Trasporto della bilancia su brevi distanze nel laboratorio ATTENZIONE! Evitare la rottura del vetro, gli urti e le vibrazioni: mai afferrare la protezione anticorrente per alzare e trasportare la bilancia. t Inserire la parte inferiore dell’imballaggio nella scatola. t Collocare le seguenti parti nella parte inferiore dell’imballaggio: – Protezione anticorrente – Bilancia – Piastra di base – Pannelli laterali – Copertura in vetro superiore t Afferrare la bilancia sotto l’alloggiamento, alzarla con attenzione e trasportarla sul nuovo luogo di utilizzo. A h La bilancia deve essere livellata e regolata di nuovo dopo ogni volta che si cambia il luogo di installazione. B t Inserire il piatto di pesata e il supporto del piatto rispettivamente nell’incavo come mostrato nella figura a sinistra: – A = piatto di pesata e supporto del piatto con un diametro di 120 mm – B = piatto di pesata e supporto del piatto con un diametro di 90 mm Spedizione della bilancia h h Prima della spedizione, commutare la bilancia nel modo stand-by (vedi pagina precedente) e poi staccare la spina. Per la spedizione si prega di usare l’imballaggio originale. L’imballaggio può essere ordinato presso il Centro di Servizio Assistenza Sartorius. Modelli Secura: 1 2 3 4 5 6 Modelli Quintix e Practum: 1 2 3 4 t Mettere l’imbottitura sui pannelli di vetro. t Togliere le seguenti parti dalla bilancia: – Anello di schermatura (1) per i modelli con una precisione di lettura di 0,1 mg – Piatto di pesata (2) – Supporto del piatto (3) – Anello di centraggio (4) per i modelli con una precisione di lettura di 0,1 mg – Piastra di schermatura (5) – Togliere i pannelli di vetro dalla protezione anticorrente (6): vedi il capitolo successivo «Cura e manutenzione». t – – – – Togliere le seguenti parti dalla bilancia: Piatto di pesata (1) Supporto del piatto (2) Piastra di schermatura (3) Togliere i pannelli di vetro dalla protezione anticorrente (4): vedi il capitolo successivo «Cura e manutenzione». t Inserire l’alimentatore AC dalla scatola di cartone nell’imbottitura per imballaggio. t Mettere la parte superiore dell’imballaggio sulle parti dell’apparecchio. t Poi mettere la bilancia imballata nella scatola di cartone e sigillare la scatola. Istruzioni per l’installazione e l’uso Secura, Quintix, Practum 35 A) Per togliere i pannelli laterali: 1) Sollevare delicatamente i pannelli laterali da dietro ed estrarli spingendoli all’indietro. Cura e manutenzione Servizio Assistenza Per garantire una precisione costante della bilancia, consigliamo di eseguire la manutenzione regolarmente, almeno una volta all’anno. Il Servizio Assistenza Sartorius offre diversi contratti con intervalli di manutenzione basati sulle vostre esigenze. Nell’ambito di un intervento di manutenzione dovrebbe essere rilasciato un certificato di calibrazione. Le ispezioni di sicurezza dell’alimentatore AC e dei suoi attacchi devono essere eseguite ad intervalli appropriati da parte di un elettricista qualificato (per es. ogni 2 anni). B) Per togliere la copertura superiore in vetro: 1) Alzare la copertura della protezione anticorrente afferrando il bordo posteriore e toglierla. Riparazioni Le riparazioni devono essere eseguite solo da tecnici qualificati. Le riparazioni eseguite da personale non qualificato invalidano la garanzia e possono comportare dei seri rischi per l’operatore, nonché compromettere la precisione dei risultati della bilancia. Per garantire riparazioni adeguate della bilancia rivolgersi al Servizio Assistenza Sartorius o ad un rivenditore Sartorius. Durante l’intervento di riparazione l’apparecchio deve essere staccato dall’alimentazione elettrica. Scollegare il cavo di alimentazione. Gli interventi di riparazione devono essere eseguiti esclusivamente da parte di tecnici qualificati istruiti dalla Sartorius. 2) Togliere la copertura superiore in vetro spingendola all’indietro. 3) Poi rimettere la copertura della protezione anticorrente. Inserirla in modo che scatti in posizione. Pulizia della bilancia Pulizia del pannello dei comandi Commutare il display nel modo stand-by per evitare la modifica delle impostazioni operative durante la pulizia. t Toccare il tasto «Menu» per commutare sulla selezione delle applicazioni. t Toccando il tasto E, il display si spegne. t Per riaccendere il display: toccare il tasto j in basso a sinistra del display. Pulizia dell’alloggiamento della bilancia Scollegare l’apparecchio dall’alimentazione elettrica: staccare l’alimentatore AC dalla rete elettrica. Se necessario, staccare anche il cavo dati collegato alla bilancia. ATTENZIONE! Mai aprire la bilancia o l’alimentatore AC. Le parti contenute in questi apparecchi non devono essere pulite, riparate o sostituite dall’operatore. – Fare attenzione che non penetri del liquido o della polvere nella bilancia o nell’alimentatore AC. – Togliere la piastra di base, il supporto del piatto e il piatto di pesata dalla protezione anticorrente. – Mai usare detergenti che contengono solventi o componenti abrasivi che possono danneggiare sostanzialmente gli apparecchi. Modelli Secura e Quintix: t Le parti superiore e inferiore in materiale plastico dell’alloggiamento della bilancia sono rivestite di una sostanza speciale che permette di pulire queste parti usando dell’acetone. Le seguenti parti non devono essere pulite con acetone o detergenti aggressivi: pannello dei comandi, la presa di rete, interfaccia dati, etichette, sigillo di verifica o le altre parti in materiale plastico. t Dopo la pulizia strofinare la bilancia con un panno morbido e asciutto. Apparecchi contaminati: Rischio per la salute da contaminazione del prodotto causata dai depositi di prodotto e l’accumulo di residui con contaminazione microbica. Rischio per la salute da sostanze biologiche e microbiologiche. Osservare le istruzioni per la pulizia. Esaminare attentamente i risultati della pulizia. 36 Istruzioni per l’installazione e l’uso Secura, Quintix, Practum Dopo la pulizia rimontare i componenti nell’ordine inverso: vedi il capitolo «Messa in funzione – Installazione della bilancia», a pag. 33. C) Per togliere il vetro frontale e posteriore: Le informazioni dettagliate per le fasi di montaggio sono descritte nel «Manuale utente» scaricabile da Internet al seguente indirizzo: www.sartorius.com – «Service Center Downloads». Smaltimento L’imballaggio consiste completamente di materie non inquinanti, riciclabili come materie prime secondarie. Se l’imballaggio non dovesse più servire, dovrà essere portato al locale smaltimento rifiuti in base ai regolamenti vigenti nel paese di utilizzo. In Germania può essere smaltito mediante il sistema duale di smaltimento dei rifiuti dell’azienda VfW (contratto n° D-59101-2009-1129). L’apparecchio, comprensivo di accessori, pile e batterie ricaricabili non appartiene alla categoria dei rifiuti domestici e deve essere riciclato come gli apparecchi elettrici ed elettronici. Per maggiori informazioni sulle possibilità di smaltimento e riciclaggio, potete rivolgervi agli addetti del Servizio Assistenza locale. Inoltre per lo smaltimento all’interno dell’UE valgono i partner elencati nel seguente sito web: 1) Accedere a http://www.sartorius.com 2) Selezionare l’indice sotto «Service». 3) Poi selezionare «Information on Disposal». 4) Gli indirizzi dei contatti Sartorius locali per lo smaltimento sono contenuti nei file PDF allegati a questa pagina web. h Le apparecchiature contaminate con sostanze nocive (contaminazione NBC) non saranno ritirate dalla Sartorius, dalle sue filiali, succursali e dai suoi rivenditori, né per lavori di riparazione né per lo smaltimento. Indirizzo del Centro di Assistenza per lo smaltimento Per maggiori informazioni sulle modalità di riparazione e smaltimento del proprio apparecchio ed i relativi indirizzi dei Centri di Assistenza, si prega di visitare il nostro sito Internet (www.sartorius.com) oppure rivolgersi al Servizio Assistenza Sartorius. Italiano Deutsch Specifiche tecniche Dati generali Dati specifici del modello a pagina 80 Alimentatore AC Alimentatore AC Sartorius 6971790 con adattatore sostituibile per presa elettrica specifica del paese Primario 100 – 240 V~, ±10%, 50 – 60 Hz, 0,2 A Secondario 15 V DC, ± 5%, 530 mA (max.) / 8 W (max.): da 0 a +40°C e 15 V DC, ± 5%, 330 mA (max.) / 5 W (max.): da 20 a +50°C Ulteriori dati Classe di protezione II in conformità a EN/IEC 60950-1, fino a 3000 m s.l.m., IP40 in conformità a EN/IEC 60529 Bilancia Alimentazione di corrente Solo tramite il modulo alimentatore AC Sartorius 6971790 (confezione 6971790 o 6971791) Tensione d’ingresso 12,0–15,0 Vdc Potenza assorbita 2 W (mediamente) Condizioni ambientali Queste specifiche valgono per le seguenti condizioni ambientali: Ambiente Utilizzo solo in ambienti interni Temperatura ambiente * +10°C – +30°C Capacità operativa Garantita tra +5°C e +45°C Stoccaggio e trasporto –10°C – +60°C Altitudine Fino a 3000 m sul livello del mare Umidità relativa ** Da 15% a 80% per temperature fino a 31°C, non condensante, con riduzione lineare fino al 50% di umidità relativa a 40°C e 20% a 50°C Sicurezza del materiale elettrico Conforme a EN 61010-1 / IEC 61010-1 Prescrizioni di sicurezza per apparecchi elettrici di misura, di controllo e da laboratorio Parte 1: Prescrizioni generali Compatibilità elettromagnetica Conforme a EN 61326-1 / IEC 61326-1 Apparecchi elettrici di misura, controllo e laboratorio Prescrizioni di compatibilità elettromagnetica – Parte 1: Prescrizioni generali Immunità ai disturbi Idoneità per l’uso in ambienti industriali Emissione di disturbi Classe B (idoneità all’utilizzo in ambienti residenziali e in ambienti che sono direttamente collegati a una rete a bassa tensione che alimenta anche edifici residenziali). L’apparecchio può quindi essere usato in entrambi ambienti. Dotazione standard Unità di peso selezionabili 1) Grammi, chilogrammi, carati, libbre, once, once Troy, tael Hong Kong, tael Singapore, tael Taiwan, grani, pennyweight, milligrammi, parti per libbra, tael Cina, momme, carati austriaci, tola, baht, mesghal e Newton Programmi applicativi disponibili Modelli Secura: conteggio, pesata in percentuale, determinazione della densità, valore massimo, pesata instabile, controllo, miscelazione, sommatoria, statistica, conversione, SQmin e identificatori Modelli Quintix: conteggio, pesata in percentuale, determinazione della densità, valore massimo, pesata instabile, controllo, miscelazione, sommatoria, statistica, conversione Modelli Practum: conteggio, pesata in percentuale, determinazione della densità, valore massimo, pesata instabile, controllo Bilance omologate nella versione CE conformi alle prescrizioni della direttiva 2009/23/CE, EN45501:1992 e OIML R76:2006. * Per l’uso metrico-legale in conformità ai requisiti UE si vedano le indicazioni riportate sulla bilancia. ** Per l’uso metrico-legale in conformità ai requisiti UE si applicano le disposizioni vigenti. 1 ) Limitate per i modelli omologati Istruzioni per l’installazione e l’uso Secura, Quintix, Practum 37 記号 目次 目次 . . . . . . . . . . . . . . . . . . . . . . . . . . . . . . . . . . . . . . . . . . . . . 本説明書の使用にあたっての注意点 . . . . . . . . . . . . . . . . . . . 安全上の注意 . . . . . . . . . . . . . . . . . . . . . . . . . . . . . . . . . . . . . . 用途 . . . . . . . . . . . . . . . . . . . . . . . . . . . . . . . . . . . . . . . . . . . . . 38 38 38 39 はじめに. . . . . . . . . . . . . . . . . . . . . . . . . . . . . . . . . . . . . . . . . . 機器の梱包内容と開梱 . . . . . . . . . . . . . . . . . . . . . . . . . . . . . . 天びんの組み立て . . . . . . . . . . . . . . . . . . . . . . . . . . . . . . . . . . 設置場所の選択 . . . . . . . . . . . . . . . . . . . . . . . . . . . . . . . . . . . . 電源接続 . . . . . . . . . . . . . . . . . . . . . . . . . . . . . . . . . . . . . . . . . . . . . ウォームアップタイム . . . . . . . . . . . . . . . . . . . . . . . . . . . . . . 水平調節 . . . . . . . . . . . . . . . . . . . . . . . . . . . . . . . . . . . . . . . . . . . . . 床下ひょう量装置 . . . . . . . . . . . . . . . . . . . . . . . . . . . . . . . . . . 盗難防止装置(オプション) . . . . . . . . . . . . . . . . . . . . . . . . . 39 39 39 40 40 41 41 41 41 天びんの移動 . . . . . . . . . . . . . . . . . . . . . . . . . . . . . . . . . . . . . . 天びんの持ち運び . . . . . . . . . . . . . . . . . . . . . . . . . . . . . . . . . . サービスとメンテナンス. . . . . . . . . . . . . . . . . . . . . . . . . . . . . 天びんの清掃 . . . . . . . . . . . . . . . . . . . . . . . . . . . . . . . . . . . . . . 廃棄 . . . . . . . . . . . . . . . . . . . . . . . . . . . . . . . . . . . . . . . . . . . . . 42 42 43 43 43 仕様 . . . . . . . . . . . . . . . . . . . . . . . . . . . . . . . . . . . . . . . . . . . . . 一般データ . . . . . . . . . . . . . . . . . . . . . . . . . . . . . . . . . . . . . . . . 型式別仕様 . . . . . . . . . . . . . . . . . . . . . . . . . . . . . . . . . . . . . . . . 電磁環境適合性の EC 適合宣言書 . . . . . . . . . . . . . . . . . . . . . . 43 43 80 85 h この記号は、役に立つ情報やヒントを表しています 法定計量器として使用するときの注意 機器の操作に関する注意 本説明書では以下の記号を使用しています。 t 必要指示を表しています。 y ある特定の手順を実行した後に何が起きるかを説明していま す。決められた順序で手順を行います。 1. 最初の手順 2. 二番目の手順 3. ... – リスト上の項目を表しています。 本説明書の約束事: – 本説明書中の形状は、「標準的な」天びんに基づいていま す。法定測量器として証明用に使用する天びん、見本やレ ポートなどに使用する天びんは、本形状から僅かに異なる 場合があります。操作が大きく異なる場合は、本文中に相 違点について説明があります。 設置手順について その他の書類 h 本取扱説明書とは別に、機器の最新版のユーザーマ ニュアルを PDF 形式でご利用いただけます。 PDF ファイルは、以下のザルトリウスのウェブサイ トからダウンロードすることができます。 www.sartorius.com この PDF ファイルの読み取りや印刷には Acrobat Reader が必 要です。Acrobat Reader はア ド ビ 社 の ウ ェ ブサイト (www.adobe.com) から無償でダウンロードできます。 t 機器を初めて使用する前に、本取扱説明書を必ずお読みく ださい。安全上の指示を守ってください。 t 本取扱説明書も製品の重要な一部です。本取扱説明書 は、安全な場所に保管してください。第三者に機器を譲 渡する場合は、本取扱説明書も一緒にお渡しください。 t 取扱説明書を紛失した場合は、ザルトリウスに連絡して新 しいものを請求するか、以下の当社ウェブサイトから最新 の 説 明 書 を ダ ウ ン ロ ー ド し て く だ さ い 。 www.sartorius.com アプリケーションに関するご相談 / 技術サポート アプリケーションに関するご相談や技術サポートの連絡先 は、http://www.sartorius.com に記載されています。 本説明書の使用にあたっての注意点 警告 / 警告の記号 この記号は、回避されなかった場合、死亡や重 傷を負う高いリスクがあるという危険性を示し ています。 この記号は、回避されなかった場合、軽傷や怪 我を負うことがあるという危険性を示していま す。 安全のための注意事項 ガイドラインおよび一般的情報 – 本機は、EU の電気的安全性および電磁適合性に関する指針 および規格に準拠しています。*ただし、誤った使用や取り 扱いにより、天びんの破損やケガにつながる恐れがありま す。手順に従わずに天びんを使用したり操作した場合、メ ーカーから保証を受ける権利をすべて喪失します。 – 職員は安全に関する指示を含め、これらの設置に関する指 示をよく読み理解する必要があります。 この記号は、機器等の破損を引き起こすことが あるという危険性を示しています。 – より高い安全要件を必要とするシステムおよび環境条件の もとで電気機器を使用する場合は、お住まいの国の該当す る設置要件と規定に必ず従ってください。 この記号は、役に立つ情報やヒントを表してい ます。 – 機器と天びんの周囲に障害物を置かないでください。本取 扱説明書の手順に従わずに設置作業を行ったり、天びんを操 作した場合、メーカーから保証を受ける権利をすべて喪失しま す。 * = 「44ページの「仕様」 を参照してください。 38 取扱説明書Secura, Quintix, Practum 日本語 爆発の危険性! 爆発性物質が存在する危険区域で本機を使用し ないでください。 AC アダプタ記載されている定格電圧が、使用 地域の電圧と同一であることを確認してくださ い。 設置情報 すべての接続を含め、ハウジングや AC アダプ タが損傷している場合、天びんを操作しないで ください。損傷した機器は、プラグを引っ張っ てコンセントから電源を直ちに抜いてくださ い。 天びん、ザルトリウスによって同梱された付属 の AC アダプタを極端な温度、強烈な薬品蒸 気、湿気、衝撃、振動、強い電磁場にさらさな いでください。仕様で説明された操作条件を順 守してください! 設置について: オペレータは、機器の改造およびザルトリウス 製以外のケーブルまたは機器の接続を行うこと に対して責任を負うものとします。動作品質に 関する情報が必要な場合は、ザルトリウスまで ご連絡ください。 ザルトリウス製以外の周辺機器は使用しないで ください。 天びんと AC アダプタの IP 保護に留意してくださ い。液体が内部に入らないようにご注意くださ い。IP の保護クラスはさまざまな周囲条件に対す る装置の適正を示しています (湿気、異物)。 AC アダプタや天びんを清掃する前に 主電源からプラグを抜きます。 本機の開封は、ザルトリウスで訓練を受けた専 門技術者にのみ許可されています。AC アダプタ を開けないでください。 はじめに 組み立てを行う前に、必ずコンセントから電源 プラグを抜いてください。 機器の梱包内容と開梱 t パッケージを開梱し、すべての部品を注意して取り出します。 t 機器をパッケージから取り出したら、外部に損傷がないか、 ただちに点検します。 y 損傷を見つけた場合には、「サービスとメンテナンス」の章 の指示に従います。 y オリジナルのパッケージ部品は、今後の輸送に備えてすべて 保管しておいてください。輸送中は、ケーブルを挿したまま にしないでください! 機器には、以下の部品が付属しています。 部品 風防付き 精密 の天びん 天びん 0.1 mg 1 mg 読取限度: 10 mg、0.1 g、 および 1 g – 9 9 風防 – – 9 ひょう量皿:d 90 mm – – 9 ひょう量皿:d 120 mm – – 9 ひょう量皿:d 180 mm パンサポート シールドプレート パン風防(Secura のみ) 各国専用の電源プラグ付き AC アダプタ 使用中カバー 粉塵カバー 取扱説明書 アプリケーションガイド 9 – 9 9 – – 9 9 – 9 9 9 9 9 9 9 9 9 9 9 9 – 9 9 天びんの組み立て Secura モデル: 装置の設置および操作に関する警告: ガラスが破損している場合、ガラスの断面でケ ガをする危険があります。 ケーブルは、人が引っかかったりする危険のな いところに配置してください。 補足的な安全性や危険に関する情報については、以下の章を ご確認ください。 用途 本高分解能の天びんは、通常の空気条件下における、研究 室および屋内でのみ使用していただけます。特に、液体、 ペースト、粉末、固形状態にある物質のひょう量を正確に 質量測定することを目的としています。 それぞれのサンプルに適した容器を使用する必要がありま す。 本シリーズは、通常の空気条件下における屋内での使用のみ に限られています。 風防付きの天びん t 以下の手順にしたがって部品を設置 します。 – 使用中粉塵カバー – 風防のロックを「アンロック 」に かえます。 – (1) の風防を天びんに乗せます。注 意:風防上部を保持するときは、両 手を使用してください。 – スライドドアを右から後ろに動かし ます。 – 風防のロックを、「ロック 」にか えます。 – シールドプレート (2)、中央リング* (3)、パンサポート (4) およびひょう Quintix および Practum モデル: 量皿 (5) と風防リング* (6) を天びん に乗せます。 注意:風防の清掃方法については、 「サービスとメンテナンス」の章を 参照してください。 * = 読取限度が 0.1mg の型式のみ。 取扱説明書Secura, Quintix, Practum 39 はじめに 電源接続(電源供給) AC アダプタの組立 天びんの組み立て ガラス製スライドドアの取付(または取り外し) 1) 後方の縁を持ち、風防を持ち上げ て外します。 不適切な電源プラグを使用すると、致死的な電 気ショックや機器への損傷の可能性があります。 絶対に、AC アダプタに接続していない状態で電源 プラグをコンセントに差し込まないでください (感 電の危険性)。 t お使いのコンセントに適合する電源プラグのアダプタを使 用してください。 2) 3 枚のガラス製スライドドアを風 防のガイドレールにはめ、前まで しっかりとスライドさせます。 3) 風防を元に戻します。元に戻すと きに、風防が正しい位置にしっか りはまっていることを確認してく ださい。 風防のない天びんの場合 t 以下の手順にしたがって部品を設 置します。 1) 使用中粉塵カバー (図には記載され ていません)。 2) シールドプレートを設 置 し 、反 時計回りに、カチッとはまるまで 回します。 3) パンサポート (1) とひょう量皿 (2) を設置します。 A AC アダプタのバーション: 袋 地域/国 a) 透明 ヨーロッパ/EU (英国を除く) b) 黄色 英国 c) 青 アメリカ、中国、 日本 d) 赤 オーストラリア 袋 e) 黒 地域/国 インド f) ターコイズ g) 緑 h) ピンク i) 白 南アフリカ 韓国 ブラジル アルゼンチン ラインアダプタ g)、h)、および i) の AC アダプタモジュール 6971790 は、98671791 と表記されています。 t (1) を押して (2) をスライドさせ、AC アダプタモジュールの開口部 (B) に、 電源供給に必要な電源プラグアダ プタ (A) を取り付けます。作業中 に、AC アダプタが正しい位置にし っかりはまっていることを確認し てください。 設置場所の選択 設置に適した場所を選んでください。 – 天びんは、振動が少なく安定した、水平な面(例えば石定 盤)上に設置してください。 – 機器の周囲には、障害物を置かないようにしてください。 – ‒ ‒ ‒ ‒ ‒ 以下のような好ましくない影響を与える場所での設置は避けてく ださい。 熱(ヒーターや直射日光)の影響の多い場所 解放された窓や、エアコン、ドアなどからの空気の流れが 直接当たる場所 ひょう量中の振動がある場所 人が頻繁に通る場所 極端な湿気が多い場所 電磁的フィールド 設置環境条件 冷えた天びんを暖かい環境へ移動させると、結露(空気中の 水分の凝縮)が発生する原因となります。結露の影響を避け るには、天びんをコンセントに差し込む前に、約 2 時間天び んをコンセントから電源を抜いたままにします。 40 取扱説明書Secura, Quintix, Practum AC アダプタの取り外し/交換 t (1) の AC アダプタのロックを外し た後に、(2) を取り外します。 電源の接続/安全性に関する事項 – ザルトリウス社の純正アダプタ以外は使用しないでくださ い。AC アダプタは、EN 60529/IEC 60529 に準拠する IP40 の IP 定格を取得しています。 – 製造元の ID ラベルに印刷された電圧定格が地域の主電圧 と同じであることを確認してください。 – 記載されている供給電圧または AC アダプタのプラグ形状 が、お住まいの地域のものと一致しない場合は、最寄りの ザルトリウス代理店または販売店までご連絡ください。 – お住まいの国に適用される規制に従って電源を接続してく ださい。 日本語 t 1) まず最初に、AC アダプタを天び んの後部ソケットに差し込みます。 t 2) その後、AC アダプタをコンセ ント(主電源)に接続します。 法定計量器として使用するときの手順 追加的なディスプレイ要素: – 計量ラインと最小負荷 (Min) と証明スケールの間隔 (e)に 関する追加情報 警告の記号は、計算値、負のグロス値、または値が 最小サンプル量 (SQmin) よりも計量値が小さいことを 意味します。 ウォームアップタイム 0 y 正確な結果が出るようになるには、天び んが最初に主電源に接続されから、最低で も 30 分間ウォームアップされている必要 があります。30 分が経過すると、ようや く機器が必要な動作温度に達します。 30 k クラスの精度の法定計量の証明用に型式承認仕様 の天びんを使用するときは、使用前に最低でも 1 時間 以上のウォームアップを行ってください。 水平調節 h 設置場所が傾いていたり平坦でない場合は、天びん を水平調整することでこれを補正します。常に一定 した再現性を確保するためには、天びんを完全に水 平にする必要があります。 注意: 設置場所を変更した場合は、変更の度に天び んの再水平調整が必要です。 メニュー設定「設定」: 法定計量器の認証用に使用さ れる天びんには、利用できない機能や設定がありま す。 インターフェース仕様(データ出力) 法定計量器の数値の認証では、「PC – SBI」と「USB RS232 SBI」 はご利用になれません。法定計量器の数値の認証では、表示 の数字の自動認証が無い場合、「SBI」の設定はご利用になれ ません。周辺機器に対応する測定や設定を実行する必要があ ります。 床下ひょう量装置 天びんの床下ひょう量装置のフックとポートは、天びんの底 面にあります。 h 風防を取り付けます。 t 天びん底面のカバープレートを持 ち上げて外します。 警告:作業中、天びんは横向きに 置き、ひょう量皿側が下にならな いようにしてください。 Secura モデル: 「レベル」が表示されたら、天びんを水平調整する必要があり ます。 t ひょう量皿に負荷がかかっていな いことを確認します。 t 「レベル」の表示に触れます。 t ワイヤ(または類似のもの)をサ ンプルに取り付け、フックのノッ チに引っかけます。 t 対話型のディスプレイに表示され る指示に従ってください。 Quintix および Practum モデル: t 図のように、気泡が水準器の円の 中心に位置するまで、左右のレベ リングフットを回します。 – 気泡が 12 時の位置にあるとき: 左右のレベリングフットを時計回 りに回します。 – 気泡が 3 時の位置にあるとき:左 側のレベリングフットを時計回り に回し、右側のレベリングフット を反時計回りに回します。 – 気泡が 6 時の位置にあるとき:左 右のレベリングフットを反時計回 りに回します。 – 気泡が 9 時の位置にあるとき:左 側のレベリングフットを反時計回 りに回し、右側のレベリングフッ トを時計回りに回します。 h 床下ひょう量装置のポートの使用が終わったら、カ バープレートで開口部を閉じます。こうすること で、気流による計測結果への悪影響を防げます。 天びんの床下ひょう量ポートの解放または使用は、 法定計量器では認められていません。 盗難防止装置(オプション) t 必要に応じて、天びんの背部の固 定部にケンジントンロックを取り 付けることができます。 t また、天びんは、設置場所に例え ばチェーンとカギを使用して固定 することができます。 取扱説明書Secura, Quintix, Practum 41 t 風防のロックを、「アンロック」 にかえます。 天びんの移動 t 次に、風防を天びんから取り外し ます。 天びんを移動する前に、 まずスタンバイモードに切り替え、 その後 電源コネクタを外して、ひょう量皿とパンサポートを天びんから取 り外します。 天びんの研究室内での短距離の移動 t 底部分のパッケージを箱 に入れます。 グラスの破損、ショ ック、および振動を 避けます。 絶対に風防を持ち上 げて運搬しないでくだ さい。 t ハウジングの下を持ち、注意して 持ち上げ、新しい設置場所まで運 搬します。 h t 以下の部品を底部分のパ ッケージに入れます。 – 風防 – 天びん – ベースプレート – 側面のスライドドア – 上部ガラスカバー A B t 左の画像のように、開口 部にそれぞれひょう量皿 とパンサポートを挿入し ます。 – A = 直径 120 mm のひょ う量皿とパンサポート – B = 直径 90 mm のひょう 量皿とパンサポート 設置場所を変更した場合は、変更の度に天びんの再 水平調整が必要です。 天びんの持ち運び h 輸送の前に、天びんをスタンドバイモードに切り替 え(次のページを確認してください)、プラグを抜 きます。 h 輸送する場合は、オリジナルのパッケージをご利用 ください。必要な場合は、ザルトリウスサービスセ ンターにパッケージを注文します。 Secura モデル: 1 2 3 4 5 6 Quintix および Practum モデル: 1 2 3 4 42 t 以下の部品を天びんから取り外し ます。 – 読取限度が 0.1mg の型式のドラフト リング (1) – ひょう量皿 (2) – パンサポート (3) – 読取限度が 0.1mg の型式の中央リ ング (4) – シールドプレート (5) – ガラス製スライドドアを風防から 外します (6)。次の章、「サービス とメンテナンス」を参照します。 t 以下の部品を天びんから取り外し ます。 – ひょう量皿 (1) – パンサポート (2) – シールドプレート (3) – ガラス製スライドドアを風防から 外します (4)。次の章、「サービス とメンテナンス」を参照します。 取扱説明書Secura, Quintix, Practum t ガラス製スライドドアに梱包パッ ドを装着します t 紙箱で梱包した AC アダプタを梱 包パッドに差し込みます。 t 機器の部品の上に、上部部品のパ ッケージを取り付けます。 t 次に、梱包した天びんを段ボール 箱に入れて、箱を封入します。 日本語 A) 側 面 ス ラ イ ド ド ア を 取 り 外 し ます。 1) 後部の側面のスライドドアを優し く持ち上げ、引き出します。 サービスとメンテナンス サービス お使いの天びんの精度を保つために、少なくとも 1 年に 1 度 の定期サービスをお勧めしています。ザルトリウスサービス は、お客様の必要に応じて、メンテナンス間隔が異なるサー ビス契約を提供しています。メンテナンスを行うと、その都 度、校正認定書が発行されます。AC アダプタと接続の安全検 査は、訓練を受けた電気技師のみが、適切な間隔で行うこと ができます(例 2年ごと) B) 上部ガラスカバーを外します。 1) 後方の縁を持ち、風防を持ち上げ て外します。 修理 修理は、訓練を受けたサービス技術者が行いま す。訓練を受けていない方による修理は、保証 が無効になります。また、ユーザーに危険を及 ぼす可能性があり、天びんが不正確な結果を表 示する原因となる場合があります。お使いの天 びんの適切な修理が必要な場合、ザルトリウス サービスまたは認定販売店にご連絡ください。 修理作業中は装置の電源供給接続を外してくだ さい。電源コードを抜きます。修理は、ザルトリウ スの訓練を受けたサービス技術者が行います。 2) 上部ガラスカバーを後ろに引い て、取り外します。 3) その後、風防を元に戻します。元 に戻すときに、風防が正しい位置 にしっかりはまっていることを確 認してください。 天びんの清掃 コントロールパネルの清掃 清掃中に誤って操作設定を変更してしまわないように、表示 をスタンドバイモードに変更します。 t 「メニュー」ボタンに触れて、アプリケーション の選択画面に切り替えます。 t E に触れると、画面の電源がオフになります。 t 画面を元通り表示させるには、画面左下の j を 選択します。 天びんハウジングのクリーニング 電源から外します。主電源から AC アダプタを 抜きます。必要に応じて、天びんに接続されて いるデータケーブルを外します。 液体や粉塵などが、天びんや AC アダプタに入 らないようにします。 絶対に、天びんや AC アダプタを開けてはいけま せん。天びんや AC アダプタの内部の部品は、オ ペレータによって清掃したり、修理したり交換す ることはできません。 – 必要に応じて、ベースプレート、パンサポート、ひょう量 皿を風防からはずします。 – 機器に損傷を与えるような成分を含む溶剤や研磨剤を含む 洗浄液は、絶対に使用しないでください。 Secura および Quintix モデル: t 天びんのハウジングのプラスチック製の上部および底部部 分は、アセトンを使用して清掃ができる特殊な材質を用い てコーティングされています。 次の部品は、絶対にアセトンや強力な洗浄液で 清掃しないでください。コントロールパネル、 メインプラグ、データインターフェース、ラベ ル、認証シール、またはその他のプラスチック 製の部品。 t 清掃後、天びんは、柔らかい乾いた布で拭きます。 汚染された機器: – 製品の堆積物や、微生物学的汚染の残渣の堆 積による製品の汚染による健康上のリスクが生 じることがあります。 – 生物学的または微生物学的物質によってもたら される健康上のリスクの恐れがあります。 – 清掃の仕様を確認してください。 – 清掃後、状態をしっかりと確認します。 清掃後、逆の順番で部品を組み立てます。 40 ページの「はじめに − 天びんの設置」の章をご覧くださ い。 C) 前部と後部のガラスを外します。 組み立て手順の詳細な情報は、オンラインでダウンロード 可能なユーザーマニュアルに記載されています。 www.sartorius.com から「サービスセンターダウンロード」 にお進みください。 廃棄 パッケージは環境にやさしい素材でできてい ますので再利用できます。パッケージが不要 になった場合、お住まいの国の法令に従い、 最寄りのリサイクル施設や廃棄物処理施設に 持ち込むようにしてください。ドイツでは、 本マテリアルは VfW デュアルシステムにより 処理することができます(契約番号 D-591012009-1129)。アクセサリーを含めて機器は家 庭用ごみとして廃棄してはいけません。電 子・電気機器などは、リサイクル品としてお取り扱いくださ い。廃棄やリサイクルについて詳細を知りたい場合、最寄り のサービススタッフまでご連絡ください。以下のウェブサイ トに記載されているパートナーは、EU 内での廃棄の際にご利 用いただくことができます。 1) http://www.sartorius.com にお進みください。 2) 「サービス」から要約を選択します。 3) 「廃棄に関する情報」を選択します。 4) ウェブサイトの PDF ファイルで、最寄りのザルトリウスの 廃棄業者の住所を確認することができます。 h ザルトリウスは、修理または廃棄において、危険性 物質 (ABC 汚染)によって汚染した機器の引き取 りは行っていません。 「製品の廃棄のための連絡先」 天びんの修理受付あるいは回収のための連絡先に関する詳し い情報は、当社ドイツホームページ (www.sartorius.com) から 入手するか、またはザルトリウスサービスを通じて要求する ことができます。 取扱説明書Secura, Quintix, Practum 43 仕様 一般データ 型式特有のデータは 80 ページ AC アダプタ ザルトリウス AC アダプタ 6971790 と各国特有の電源に接続可能なプラグアダプタ 一次 100 – 240 V∼、±10%、50 – 60 Hz、0.2 A 二次 15 V DC、± 5%、530 mA(最高)/ 8 W(最高):0 ∼ +40°C で 15 V DC、± 5%、330 mA(最高)/ 5 W(最高):0∼+50°C その他のデータ EN/IEC 60950-1 のプロテクションクラス II に準拠、海抜 3000 m まで、EN/IEC 60529 に 準拠した IP40 天びん 電源 ザルトリウス AC アダプタモジュール 6971790(パッケージ 6971790 または 6971791)のみ 入力電圧 12.0–15.0 V DC 消費電力 2 W(通常) 環境条件 本使用は、以下の環境条件で適用されます。 環境 屋内のみ 環境温度 * +10°Cから +30°C 動作温度範囲 +5°Cから +45°Cで保証 保管時および輸送時 -10°C∼+60°C 高度 海抜3,000 m 相対湿度 ** 31°Cまでは 15% から 80%、その後 40°Cで 50%、50°Cで 20% まで直線的に減少 電気機器の安全性 EN 61010-1 / IEC 61010-1 に準拠 機器を測定、制御、実験室使用する際の安全要件 第 1 部:一般要求事項 電磁両立性 EN 61326-1 / IEC 61326-1 に準拠 計測、制御、実験室仕様するための電気機器 EMC 要求事項 − 第 1 部:一般要求事項 干渉イミュニティ定義済 工業地域での使用に適合 干渉エミッション クラスB(住宅地域および住宅に電気を供給するための低電圧網に接続されている地域で の使用に適合)機器は、両方の地域で使用することができます。 標準機能 選択可能なひょう量単位 1 グラム、キログラム、カラット、ポンド、オンス、トロイオンス、香港テール、シンガ ポールテール、台湾テール、グレイン、ペニーウェイト、ポンド当たりの割合、中国テ ール、匁、オーストラリアカラット、トウラ、バーツ、メスガーリ)、およびニュートン 使用可能なアプリケ ーションプログラム Secura モデル:カウンティング、%ひょう量、比重測定、ピークホールド、不安定な状 態での計量、チェックひょう量、混合、合計、統計、変換、SQmin、および個人 ID Quintix モデル:カウンティング、%ひょう量、比重測定、ピークホールド、不安定な状 態での計量、チェックひょう量、混合、合計、統計、変換 Practum モデル:カウンティング、%ひょう量、比重測定、ピークホールド、不安定な 状態での計量、チェックひょう量 2009/23/EC、EN 45501:1992 および OIML R76:2006 の認証仕様に準拠した法定計量用天びん CE モデル。 * EU 要件に準拠し、法定計量器として使用するためには、天びんに関する情報を参照してください。 ** EU 要件に準拠し、法定計量器として使用するためには、法的規制が適用されます。 1 ) 認証用型式限定 44 取扱説明書Secura, Quintix, Practum Русский Содержание Символы Содержание . . . . . . . . . . . . . . . . . . . . . . . . . . . . . . . . . . . . . . . . . . . . . . . . . . . . . . . . . Информация для пользователя . . . . . . . . . . . . . . . . . . . . . . . . . . . . . . . . . . . . Меры предосторожности. . . . . . . . . . . . . . . . . . . . . . . . . . . . . . . . . . . . . . . . . . . Использование по назначению . . . . . . . . . . . . . . . . . . . . . . . . . . . . . . . . . . . . 45 45 45 46 Начало работы . . . . . . . . . . . . . . . . . . . . . . . . . . . . . . . . . . . . . . . . . . . . . . . . . . . . . . Распаковка и комплект поставки . . . . . . . . . . . . . . . . . . . . . . . . . . . . . . . . . . . . . Установка весов . . . . . . . . . . . . . . . . . . . . . . . . . . . . . . . . . . . . . . . . . . . . . . . . . . . . . . Выбор места установки . . . . . . . . . . . . . . . . . . . . . . . . . . . . . . . . . . . . . . . . . . . . . . . Подключение к источнику питания . . . . . . . . . . . . . . . . . . . . . . . . . . . . . . . . . . . Продолжительность прогрева. . . . . . . . . . . . . . . . . . . . . . . . . . . . . . . . . . . . . . . . Выравнивание. . . . . . . . . . . . . . . . . . . . . . . . . . . . . . . . . . . . . . . . . . . . . . . . . . . . . . . . Взвешивание под весами . . . . . . . . . . . . . . . . . . . . . . . . . . . . . . . . . . . . . . . . . . . . . Устройство для защиты от кражи . . . . . . . . . . . . . . . . . . . . . . . . . . . . . . . . . . . . . 46 46 46 47 47 48 48 48 48 Перемещение весов . . . . . . . . . . . . . . . . . . . . . . . . . . . . . . . . . . . . . . . . . . . . . . . . Транспортировка весов . . . . . . . . . . . . . . . . . . . . . . . . . . . . . . . . . . . . . . . . . . . . Уход и техническое обслуживание . . . . . . . . . . . . . . . . . . . . . . . . . . . . . . . . Очистка весов . . . . . . . . . . . . . . . . . . . . . . . . . . . . . . . . . . . . . . . . . . . . . . . . . . . . . . . . Утилизация . . . . . . . . . . . . . . . . . . . . . . . . . . . . . . . . . . . . . . . . . . . . . . . . . . . . . . . . . . 49 49 50 50 50 Технические характеристики . . . . . . . . . . . . . . . . . . . . . . . . . . . . . . . . . . . . . . Общие сведения. . . . . . . . . . . . . . . . . . . . . . . . . . . . . . . . . . . . . . . . . . . . . . . . . . . . . . Сведения о модели . . . . . . . . . . . . . . . . . . . . . . . . . . . . . . . . . . . . . . . . . . . . . . . . . . . Декларация соответствия ЕС об электромагнитной совместимости . . . . . . . . . . . . . . . . . . . . . . . . . . . . . . . . 50 50 80 85 Другие документы h Помимо этой инструкции по установке, также имеется руководство пользователя данного устройства последней версии в виде файла в формате PDF, который можно загрузить с веб-сайта компании Sartorius: www.sartorius.com Для чтения и печати файла в формате PDF потребуется программа Acrobat Rea der, которую можно бесплатно скачать с веб-сайта компании Adobe (www.adobe.com). h Полезная информация и советы Примечания по использованию в законодательной метрологии Примечания по эксплуатации устройства В этой инструкции используются следующие символы. t Обозначает необходимое действие. y Описывает, что происходит после выполнения определенного действия. Выполните действия в указанном порядке: 1. Первое действие 2. Второе действие 3. ... – обозначает элемент в списке. Условные обозначения для этой инструкции – Рисунки в этой инструкции основаны на «стандартных» весах. На весах, утвержденных для использования в законодательной метрологии, некоторые экраны и отчеты могут незначительно отличаться от рисунков. Если различия важны для эксплуатации, они объясняются в тексте. Сведения об инструкции по установке t Внимательно прочитайте эту инструкцию по установке перед вводом оборудования в эксплуатацию. Соблюдайте правила техники безопасности. t Эта инструкция по установке является важной частью продукта. Храните эту инструкцию в безопасном месте. При передаче этого устройства другому лицу для использования передайте ему также и эту инструкцию по установке. t В случае утери этой инструкции по установке обратитесь в компанию Sartorius для замены или загрузки руководства последней версии с нашего сайта: www.sartorius.com. Рекомендации по приложениям/технической поддержке Информация для пользователя Символы предупреждения/опасности ПРЕДУПРЕЖДЕНИЕ ВНИМАНИЕ ВАЖНО Эти указания обозначают опасности, которые с большой вероятностью могут привести к смерти или тяжким телесным повреждениям. Для получения рекомендаций по применению и технической поддержки обратитесь по контактным адресам, которые находятся веб-сайте http://www.sartorius.com. Меры предосторожности Директивы и общие указания Эти указания обозначают опасности, которые могут привести к телесным повреждениям средней тяжести или легким травмам. – Данные весы соответствуют Директивам и стандартам ЕС по электробезопасности и электромагнитной совместимости.* Ненадлежащее использование или обращение может привести к повреждению и (или) травме. Любое ненадлежащее, т. е. не соответствующее данной инструкции, использование или эксплуатация весов влечет за собой утрату гарантийных обязательств со стороны производителя. Эти указания обозначают опасности с риском повреждения имущества. – Персонал обязан знать и понимать содержание инструкции по установке оборудования, включая правила техники безопасности. Этот символ обозначает полезную информацию и советы. – В случае использования устройства в системах и условиях, имеющих более высокие требования безопасности, необходимо соблюдать правила и нормы, действующие в вашей стране. – Всегда храните оборудование и весы в свободном доступе. Любое ненадлежащее, т. е. не соответствующее данной инструкции, действие по установке или эксплуатации весов влечет за собой утрату гарантийных обязательств со стороны производителя. * = См. главу «Технические характеристики», стр. 51 Инструкция по установке и эксплуатации Secura, Quintix, Practum 45 ПРЕДУПРЕЖДЕНИЕ ВАЖНО Осторожно! Опасность взрыва! Запрещается использовать данное оборудование в опасных зонах, где находятся взрывоопасные вещества. Убедитесь, что максимально допустимое напряжение, указанное на адаптере переменного тока, совпадает с напряжением вашей сети. Начало работы ВАЖНО Весы должны быть отключены от источника питания для проведения всех работ по сборке. Распаковка и комплект поставки Указания по установке ПРЕДУПРЕЖДЕНИЕ ВАЖНО ВАЖНО ПРЕДУПРЕЖДЕНИЕ ПРЕДУПРЕЖДЕНИЕ ВАЖНО Запрещается эксплуатировать весы, если поврежден их корпус или адаптер переменного тока. Немедленно отсоедините поврежденное устройство от источника питания, вынув вилку из розетки. Не подвергайте весы, адаптер переменного тока или комплектующие, поставляемые компанией Sartorius, воздействию экстремальных температур, паров агрессивных химических веществ, влаги, ударов, вибрации или сильных электромагнитных полей. Соблюдайте условия эксплуатации, описанные в технических требованиях! Информация по установке: оператор несет ответственность за внесение модификаций в оборудование и подсоединение оборудования и кабелей, не поставляемых компанией Sartorius. Информацию о качестве эксплуатации можно получить в компании Sartorius по соответствующему запросу. Необходимо использовать периферийные устройства, поставляемые только компанией Sartorius. Не допускайте нагрузок, превышающих IP класс защиты весов и адаптера переменного тока. Не допускайте попадания жидкости. Класс защиты указывает на совметимость приборов с различными условиями окружающей среды (влажность, посторонние предметы). Перед очисткой адаптера переменного тока или весов: oтсоедините устройство от источника питания. Весы разрешается открывать только персоналу, прошедшему обучение в компании Sartorius. Вскрывать адаптер переменного тока запрещено. Предупреждение об опасности во время установки и эксплуатации прибора: ВНИМАНИЕ ВНИМАНИЕ Стекло может разбиться. Существует риск пореза о края разбитого стекла. Расположите кабели, так чтобы о них никто не споткнулся. Соблюдайте дополнительную информацию по безопасности и факторам риска, приведенную в следующих главах. Использование по назначению Эти весы с высокой разрешающей способностью предназначены исключительно для использования в лабораториях и помещениях при нормальных атмосферных условиях. Они были разработаны специально для точного определения массы материалов в жидком, пастообразном, порошкообразном или твердом состоянии. Для каждого типа материала образца необходимо использовать соответствующие контейнеры. Они предназначены исключительно для использования в помещениях при нормальных атмосферных условиях. 46 Инструкция по установке и эксплуатации Secura, Quintix, Practum t Откройте упаковку, аккуратно расположив все детали. t После распаковки устройства сразу же проверьте его на наличие любых внешних повреждений. y При обнаружении любых повреждений предпримите действия в соответствии с главой «Уход и техническое обслуживание». y Сохраните все части оригинальной упаковки на случай транспортировки в будущем. Во время транспортировки отключайте кабели! В комплект поставки входят следующие детали: Компоненты Весы с ветрозащитной витриной Дискретность отсчета: 0,1 мг 1 мг Весы с высокой степенью точности 10 мг, 0,1 г и 1 г Ветрозащитная витрина 9 9 – Чаша весов: d 90 мм 9 – – Чаша весов: d 120 мм – 9 – Чаша весов: d 180 мм – – 9 Опора чаши 9 9 9 Диск витрины Ветрозащитная витрина чаши (только Secura) Адаптер переменного тока с вилкой питания, предназначенной для использования в конкретной стране Рабочий чехол – – 9 9 – – 9 9 9 9 9 9 Чехол для защиты от пыли 9 9 – Инструкция по установке и 9 эксплуатации Руководство по применению 9 9 9 9 9 Установка весов Модели Secura Весы с ветрозащитной витриной t Установите следующие детали в указанном порядке: – Рабочий пылезащитный чехол – Поверните замок ветрозащитной витрины в положение «разблокировано ». – Поместите ветрозащитную витрину (1) на весы. Примечание. Держите верхние стойки ветрозащитной витрины двумя руками. – Переместите боковые дверцы назад. – Поверните замок ветрозащитной витрины в положение «заблокировано ». – Поместите диск витрины (2), центрирующее кольцо* (3), опору чаши (4) чашу Модели Quintix и Practum весов (5) и тяговое кольцо* (6) на весы. Примечание: Информацию об очистке см. в главе «Уход и техническое обслуживание», стр. 50. * = только для моделей с дискретностью отсчета 0,1 мг Русский Начало работы Подключение к сети питания (Источник питания) Сборка адаптера переменного тока Установка весов Вставка (или снятие) стеклянных панелей 1) Держа за задний край, потяните крышку ветрозащитной витрины вверх и снимите ее. ПРЕДУПРЕЖДЕНИЕ Использование адаптеров с несоответствующей вилкой питания может привести к летальному исходу в результате поражения электрическим током и повреждению оборудования. Никогда не подключайте адаптер к сети, если он отсоединен от блока питания (опасность поражения электрическим током). t Используйте адаптеры с вилкой питания, соответствующей вашей сети. 2) Продвигайте три стеклянные панели в направляющую ветрозащитной витрины вперед до упора. 3) Затем замените крышку ветрозащитной витрины. При этом крышка ветрозащитной витрины должна зафиксироваться на месте. Весы без ветрозащитной витрины t Установите следующие детали в указанном порядке. 1) Установите рабочий пылезащитный чехол (нет на рис.) 2) Установите диск витрины и поверните его против часовой стрелки, пока он не защелкнется на месте. 3) Установите опору чаши (1) и чашу весов (2). А Версии адаптера переменного тока: Упаковка Регион/страна Упаковка Регион/страна а) прозрачная Европа/ЕС (кроме Великобритании) д) черная Индия б) желтая Великобритания е) бирюзо- ЮАР вая в) синяя США, Китай и Япония ж) зеленая Корея г) красная Австралия з) розовая Бразилия и) белая Аргентина Примечание. Упаковка модуля адаптера переменного тока 6971790 с линейными адаптерами ж), з), и) имеет маркировку 6971791. t Вставьте (1) и продвиньте (2) адаптер с вилкой питания (A), необходимый для вашего источника питания, в отверстие модуля адаптера переменного тока (B). При этом адаптер переменного тока должен зафиксироваться на месте. Выбор места установки Выберите правильное место установки: – Установите устройство на устойчивой, ровной поверхности, на которую не воздействуют вибрации (например, каменный блок для взвешивания). – Обеспечьте к устройству постоянный свободный доступ. – – – – – – Выберите место, на которое не оказывают воздействие следующие отрицательные факторы: Высокая температура (нагреватель или прямой солнечный свет) Сквозняки из открытых окон, кондиционеров и дверей Вибрации во время взвешивания Зоны с интенсивным движением (персонала) Избыточная влажность Электромагнитные поля Акклиматизация При внесении холодного устройства в значительно более теплое помещение возможна конденсация на поверхностях устройства из-за влажности. Чтобы не допустить воздействие конденсации, необходимо выдержать весы в помещении около двух часов, отсоединив их от источника питания, перед повторным включением весов в сеть. Извлечение/замена адаптера переменного тока t Разблокируйте (1) адаптер переменного тока и отсоедините (2) его. Подключение к сети питания/Меры предосторожности – Используйте только оригинальные адаптеры переменного тока компании Sartorius. Адаптер переменного тока имеет степень защиты IP IP40 в соответствии со стандартами EN 60529/IEC 60529. – Убедитесь, что максимально допустимое напряжение, указанное на идентификационной маркировке производителя, совпадает с напряжением вашей сети. – Если указанное напряжение сети или конструкция вилки адаптера переменного тока не соответствует стандарту вашей страны, сообщите об этом в ближайшее представительство компании Sartorius. – Подключение к сети питания должно проводиться в соответствии с законами, действующими в вашей стране. Инструкция по установке и эксплуатации Secura, Quintix, Practum 47 t 1) Прежде всего, вставьте адаптер переменного тока в гнездо, расположенное на задней стороне весов. t 2) Затем подключите адаптер переменного тока в настенную розетку (напряжение сети). Продолжительность прогрева 0 y Для обеспечения точных результатов весы должны прогреться в течение не менее 30 минут после первого подключения к источнику питания. Только через этот период времени будет достигнута необходимая температура эксплуатации устройства. 30 Указания по использованию в законодательной метрологии Дополнительные элементы дисплея – Метрологическая строка с дополнительной информацией о минимальной нагрузке (Мин) и интервалом контрольной шкалы (e) Символ предупреждения, обозначающий расчетные значения, значения брутто или значения меньше минимальных количеств образца (SQmin) Установочное меню «Настройки». На весах, поверенных для использования в законодательной метрологии, доступны не все функции и настройки. Технические характеристики интерфейса Настройки «PC – SBI» и «USB RS232 SBI“» для идентификации цифр не поверены для использования в законодательной метрологии: в настройке «SBI» отсутствует автоматическая идентификация цифр дисплея, не поверенных для использования в законодательной метрологии. Соответствующие измерения или настройки должны быть выполнены на периферийном устройстве. Взвешивание под весами При подключении к источнику питания поверенных весов с классом точности k для использования в законодательной метрологии их необходимо прогреть перед эксплуатацией в течение не менее одного часа. Порт для крючка для взвешивания под весами расположен внизу весов. Установите ветрозащитную витрину. Выравнивание Выравнивание весов компенсирует наклон или неровность места установки. Весы должны идеально располагаться по горизонтали для обеспечения однородных и воспроизводимых результатов измерения. Указание: необходимо проводить повторное выравнивание и настройку весов при каждой смене места установки. Модели Secura При появлении на дисплее надписи «Level» (Уровень) необходимо выполнить выравнивание весов. t Убедитесь, что чаша весов разгружена. t Коснитесь надписи «LEVEL!» (Уровень!). t Поднимите пластину крышки из нижней части весов. Предупреждение. При этом положите весы на бок, но не на ту сторону, где находится чаша весов. t Прикрепите проволоку (или ее аналог) к образцу и повесьте его на крючок с зарубками. t Следуйте указаниям на интерактивном дисплее. Модели Quintix и Practum 48 t Поворачивайте две ножки, как показано на рисунке, пока пузырек воздуха не отцентрируется в круге индикатора уровня. – Пузырек воздуха в положении на 12 часов: поверните две ножки по часовой стрелке. – Пузырек воздуха в положении на 3 часа: поверните левую ножку по часовой стрелке, а правую ножку против часовой стрелки. – Пузырек воздуха в положении на 6 часов: поверните две ножки против часовой стрелки. – Пузырек воздуха в положении на 9 часов: поверните левую ножку против часовой стрелки, а правую ножку по часовой стрелке. Инструкция по установке и эксплуатации Secura, Quintix, Practum Если порт для взвешивания под весами больше не используется, снова закройте отверстие пластиной крышки, чтобы на результаты измерения не повлиял сквозняк. Нельзя открывать или использовать порт для взвешивания под весами на весах, используемых в законодательной метрологии. Устройство для защиты от кражи t При необходимости в точке крепления на задней стороне весов можно установить кенсингтонский замок. t Также весы можно зафиксировать в месте установки с помощью цепи и замка. Русский Перемещение весов t Поверните замок ветрозащитной витрины в положение «Разблокировано». Перед транспортировкой весов переключите их в режим ожидания, затем отсоедините от источника питания и снимите чашу весов и держатель чаши. t Затем снимите с весов ветрозащитную витрину. Перемещение весов на короткие расстояния в лаборатории ВНИМАНИЕ Не допускайте боя стекла, ударов и вибраций: никогда не поднимайте и не переносите весы за ветрозащитную витрину. t Вставьте нижнюю часть упаковки в коробку. t Поместите следующие детали в нижнюю часть упаковки: – Ветрозащитную витрину – Весы – Пластину основания – Боковые панели – Верхнюю стеклянную крышку t Возьмите весы за корпус, осторожно их поднимите и перенесите в новое место. A h B t Вставьте соответствующие чашу весов и опору чаши в отверстие, изображенное на рисунке слева: – A = Чаша весов и опора чаши диаметром 120 мм – B = Чаша весов и опора чаши диаметром 90 мм Необходимо проводить повторное выравнивание и настройку весов при каждой смене места установки. Транспортировка весов h h Перед транспортировкой переведите весы в режим ожидания (см. следующую страницу), а затем выньте вилку из розетки. Для транспортировки используйте оригинальную упаковку. При необходимости упаковку можно заказать в сервисном центре компании Sartorius. Модели Secura 1 2 3 4 5 6 Модели Quintix и Practum 1 2 3 4 t Положите упаковочные прокладки сверху стеклянных панелей. t Снимите с весов следующие детали: – Тяговое кольцо* (1) для моделей с дискретностью отсчета 0,1 мг – Чашу весов (2) – Опору чаши (3) – Центрирующее кольцо (4) для моделей с дискретностью отсчета 0,1 мг – Диск витрины (5) – Снимите стеклянные панели с диска витрины (6): см. следующую главу «Уход и техническое обслуживание». t – – – – Снимите с весов следующие детали: Чашу весов (1) Опору чаши (2) Диск витрины (3) Снимите стеклянные панели с диска витрины (4): см. следующую главу «Уход и техническое обслуживание». t Вставьте адаптер переменного тока из картонной коробки в упаковочную прокладку. t Поместите верхнюю часть упаковки над деталями устройства. t Затем поставьте упакованные весы в картонную коробку и заклейте коробку. Инструкция по установке и эксплуатации Secura, Quintix, Practum 49 Уход и техническое обслуживание А) Снимите боковые панели 1) Аккуратно поднимите боковые панели сзади, потяните их назад и извлеките. Обслуживание Для обеспечения постоянной точности весов рекомендуется проводить регулярное обслуживание не реже одного раза в год. Сервисная служба компании Sartorius предлагает различные сервисные контракты с количеством интервалов обслуживания для удовлетворения именно ваших потребностей. Калибровочный сертификат должен выпускаться по итогам каждого сеанса технического обслуживания. Проверка безопасности адаптера переменного тока и его соединений должна проводиться квалифицированным электриком в установленные интервалы (например, каждые 2 года). ВАЖНО Б) Снимите верхнюю стеклянную крышку 1) Удерживая за задний край, потяните крышку ветрозащитной витрины вверх и снимите ее. Ремонт Ремонтные работы должны выполняться только обученным специалистом по техническому обслуживанию. Ремонт, выполненный необученным лицом, влечет за собой утрату действия гарантии и может привести к возникновению значительных рисков и неправильной работе весов, заключающейся в получении неточных результатов. Для проведения надлежащего ремонта весов обратитесь в сервисную службу компании Sartorius или к дилеру компании Sartorius. Во время проведения ремонтных работ устройство должно быть отключено от источника питания. Отсоедините кабель питания. Ремонтные работы должны проводиться только специалистом по техническому обслуживанию, обученным компанией Sartorius. 2) Снимите верхнюю стеклянную крышку, потянув ее назад. 3) Затем замените крышку ветрозащитной витрины. При этом крышка ветрозащитной витрины должна зафиксироваться на месте. Чистка весов Очистка панели управления Переключите дисплей в режим ожидания, чтобы во время очистки не допустить изменения настроек для эксплуатации. t Нажмите клавишу «Menu», чтобы перейти в режим выбора приложений. t Если затем нажать клавишу E, дисплей отключится. t Повторное включение дисплея: нажмите j в ниж ней левой части дисплея. Очистка корпуса весов ПРЕДУПРЕЖДЕНИЕ ВНИМАНИЕ Отключение от источника питания: отсоедините адаптер переменного тока от сети. При необходимости отключите кабель передачи данных, подсоединенный к весам. Вскрывать весы или адаптер переменного тока запрещено. Не допускается очистка, ремонт или замена содержащихся в них деталей оператором. – Не допускайте попадания жидкости или пыли в весы или адаптер переменного тока. – Снимите пластину основания, опору чаши и чашу весов с ветрозащитной витрины. – Запрещается использование очищающих средств, содержащих растворители или абразивные вещества, которые могут вызвать повреждение оборудования. Модели Secura и Quintix: t Пластиковые верхняя и нижние части корпуса весов покрыты специальным веществом, которое позволяет проводить их очистку ацетоном. ВАЖНО Запрещается очищать ацетоном или агрессивными чистящими средствами следующие детали: панель управления, электровилку, интерфейс данных, поверочную пломбу и любые другие пластиковые детали. t После очистки протрите весы мягкой сухой тканью. ПРЕДУПРЕЖДЕНИЕ 50 Контаминация оборудования Риск причинения вреда здоровью, вызванный загрязнением изделия в связи с отложениями продуктов и накоплением остатков с микробным загрязнением. Риск причинения вреда здоровью, вызванный биологическими и микробиологическими субстанциями. Выполняйте требования по очистке. Проверяйте результаты очистки с близкого расстояния. Инструкция по установке и эксплуатации Secura, Quintix, Practum После очистки соберите компоненты в обратном порядке: см. главу «Начало работы — установка весов», стр. 47. В) Снимите переднее и заднее стекло Подробная информация о сборке содержится в руководстве пользователя, которое можно скачать онлайн. Для этого перейдите на веб-сайт www.sartorius.com — «Service Center Downloads» (Загрузки сервисной службы). Утилизация Упаковка производится из экологически чистых материалов, и ее можно использовать в качестве вторсырья. Если данная упаковка больше вам не нужна, отправьте ее на местное предприятие по переработке мусора в соответствии с законами, действующими в вашей стране. В Германии вы можете утилизировать данное сырье, используя двойную систему VfW (№ контракта D-59101-2009-1129). Оборудование, включая комплектующие и батареи, не должно утилизироваться как домашний мусор, а должно перерабатываться аналогично электрическим и электронным устройствам. Для получения подробной информации об утилизации и возможностях переработки обратитесь к местному обслуживающему персоналу. Для утилизации на территории ЕС можно обратиться к партнерам, указанным на следующем веб-сайте. 1) Перейдите по адресу http://www.sartorius.com. 2) Выберите сводку под разделом «Услуги». 3) Затем выберите пункт «Информация об утилизации». 4) Адреса местных контактных лиц компании Sartorius по утилизации можно найти в файлах PDF, расположенных на этой веб-странице. h Как для ремонта, так и для утилизации компания Sartorius не примет оборудование, загрязненное опасными материалами (загрязнение ABC). Адрес центра сервисного обслуживания для утилизации Посетите наш веб-сайт (www.sartorius.com) или обратитесь в отдел сервисной службы компании Sartorius для получения более подробной информации об адресах проведения сервисного ремонта или утилизации вашего устройства. Русский Deutsch Технические характеристики Общие сведения Сведения о модели: см. стр. 80 Адаптер переменного тока Адаптер переменного тока Sartorius 6971790 в комплекте со сменным адаптером с вилкой питания, предназначенной для использования в конкретной стране Первичный 100—240 В~, ±10 %, 50—60 Гц, 0,2 А Вторичный постоянный ток 15 В, ± 5 %, 530 мА (макс.)/8 Вт (макс.): от 0 до +40 °C и постоянный ток 15 В, ± 5 %, 330 мА (макс.)/5 Вт (макс.): от 0 до +50 °C Подробная информация Класс защиты II в соответствии со стандартами EN/IEC 60950-1, до 3000 м над уровнем моря, IP40 в соответствии со стандартом EN/IEC 60529 Весы Блок питания Только модуль адаптера переменного тока Sartorius 6971790 (упаковка 6971790 или 6971791) Напряжение на входе Постоянный ток 12,0—15,0 В Потребляемая мощность 2 Вт (типично) Условия окружающей среды Эти технические характеристики применяются при следующих условиях окружающей среды. Окружающая среда Только для использования в помещениях Температура окружающей среды * от +10 до +30 °C Возможность эксплуатации Гарантируется в пределах температуры от+5 до +45 °C Хранение и транспортировка от –10 до +60 °C Высота До 3000 м над уровнем моря Относительная влажность ** От 15 до 80 % при температуре до 31 °C, без конденсации, при линейном понижении до 50 % относительной влажности при 40 °C и 20 % при 50 °C Безопасность электрического В соответствии со стандартом EN 61010-1 / IEC 61010-1 Требования безопасности к электрическому оборудованию для измерения, контроля и использова ния в лаборатории — Часть 1 «Общие требования» оборудования Электромагнитная совместимость В соответствии со стандартом EN 61326-1 / IEC 61326-1 Электрическое оборудование для измерения, контроля и использования в лаборатории Требования ЭМС — Часть 1 «Общие требования» Установленная помехоустойчивость Подходит для использования в промышленных зонах. Излучение помех Класс B (подходит для использования в жилых зонах и зонах, подключенных к сети низкого напряжения, которая также поставляет электропитание для жилых зданий). Таким образом, устройство можно использовать в обеих зонах. Стандартное оборудование Доступные единицы взвешивания 1 Грамм, килограмм, карат, фунт, унция, тройская унция, гонконгский таэль, сингапурский таэль, тайваньский таэль, гран, пеннивейт, миллиграмм, части на фунт, китайский таэль, момма, австрийский карат, тола, бат, мискаль и ньютон Доступные программные приложения Модели Securа: подсчет, взвешивание в процентах, определение плотности, удержание максимального значения, неустойчивые условия, контрольное взвешивание, смешивание, суммирование, статистика, преобразование единиц измерения, SQmin (минимально допустимый вес пробы) и идентификаторы Модели Quintix: подсчет, взвешивание в процентах, определение плотности, удержание максимального значения, неустойчивые условия, контрольное взвешивание, смешивание, суммирование, статистика, преобразование единиц измерения Модели Prаctum: подсчет, взвешивание в процентах, определение плотности, удержание максимального значения, неустойчивые условия, контрольное взвешивание Весы модели CE, поверенные для использования в законодательной метрологии, соответствуют требованиям Директивы Совета Европы 2009/23/EC, EN 45501:1992 и OIML R76:2006. * Для использования в законодательной метрологии в соответствии с требованиями ЕС, см. информацию на весах. ** Для использования в законодательной метрологии в соответствии с требованиями ЕС применяются законодательные постановления. 1 Ограничено для поверенных моделей Инструкция по установке и эксплуатации Secura, Quintix, Practum 51 ⟛⧟ᱶ ㅅ⿆ ㅅ⿆ . . . . . . . . . . . . . . . . . . . . . . . . . . . . . . . . . . . . . . . . . . . . 㱫⩿㨳㥒. . . . . . . . . . . . . . . . . . . . . . . . . . . . . . . . . . . . . . . . . ≠㐩㴊➠░㖣 . . . . . . . . . . . . . . . . . . . . . . . . . . . . . . . . . . . . . 㴊㋜㱫㟲. . . . . . . . . . . . . . . . . . . . . . . . . . . . . . . . . . . . . . . . . 52 52 52 53 㖶 . . . . . . . . . . . . . . . . . . . . . . . . . . . . . . . . . . . . . . . . . . . . ␚⟂⧧㚞⡛㔤⌤ . . . . . . . . . . . . . . . . . . . . . . . . . . . . . . . . . . . ≠㽐㝢㊿. . . . . . . . . . . . . . . . . . . . . . . . . . . . . . . . . . . . . . . . . 㫍㵗㢭㺥. . . . . . . . . . . . . . . . . . . . . . . . . . . . . . . . . . . . . . . . . ♋㋺Ⱗ. . . . . . . . . . . . . . . . . . . . . . . . . . . . . . . . . . . . . . . . . 㴊㑆㖫⭺. . . . . . . . . . . . . . . . . . . . . . . . . . . . . . . . . . . . . . . . . ♛Ⱞ㙦㊿. . . . . . . . . . . . . . . . . . . . . . . . . . . . . . . . . . . . . . . . . 㥲⏩⒮⼋. . . . . . . . . . . . . . . . . . . . . . . . . . . . . . . . . . . . . . . . . ➠☥㚰⛊㽐㺥 . . . . . . . . . . . . . . . . . . . . . . . . . . . . . . . . . . . . . 53 53 53 54 54 55 55 55 55 㮰⛑㝢㊿. . . . . . . . . . . . . . . . . . . . . . . . . . . . . . . . . . . . . . . . . 㴱㗞㝢㊿. . . . . . . . . . . . . . . . . . . . . . . . . . . . . . . . . . . . . . . . . ⌏㬤⧧㢞⩼ . . . . . . . . . . . . . . . . . . . . . . . . . . . . . . . . . . . . . . ㎥ⰴ㝢㊿. . . . . . . . . . . . . . . . . . . . . . . . . . . . . . . . . . . . . . . . . ╌㺥 . . . . . . . . . . . . . . . . . . . . . . . . . . . . . . . . . . . . . . . . . . . . 56 56 57 57 57 ⭒㗯⥂⢏. . . . . . . . . . . . . . . . . . . . . . . . . . . . . . . . . . . . . . . . . 㮥⊑㗷⳯. . . . . . . . . . . . . . . . . . . . . . . . . . . . . . . . . . . . . . . . . 㝎⛊㨻⧟㗷⳯ . . . . . . . . . . . . . . . . . . . . . . . . . . . . . . . . . . . . . ㇻ㻀㢡㴗⪹♋╫⭼㑛㩂⟛⧩㩂㔵タ . . . . . . . . . . . . . . . . . . . . 58 58 80 85 ㋦㚴㢶☙ h ⓥ⼗㸆㨗≠㽐㙭タᱨ⪑㱸㮾 PDF 㢶⮔㨼㖷㝗⤅☨㔤⌤ 㾎㨰㱫⩿㗐␋ᱨ㮾╹ Sartorius 㠬㷢㥲㴾ᱶ www.sartorius.com h 㱸㱫㨳㥒 ⧧㝗㖸 ➈⛊⭜⼋☨㖳㱫㙭タ 㔤⌤␃㾗☨㦐⤴㽂㯌㖼㦞 㵀㸆㨗㙭タ㺲㖳㱫㮾㥲⟛⧟ᱶ t ⍙㖸⍄㮔☨␃㾗 y グ㗰㵀ㆀ㠞⒱㝎⛊⏧㻊⨍⯿⪹➂㔶ㅊ㨗⍐⪇ 㮾㺚⛊㙫㩠㺖㨾⏧㻊 1. ☾㮥⏧ 2. ☾✠⏧ 3. ... – ⍙㖸⼜⍙㺲☨㮥⢔㦞ㅅ ⤴㲂㸆㨗≠㽐㙭タ t 㗑╴㴱㨾㔤⌤㍰ᱨ㎫㽰㥨㴪⛣㸆㨗≠㽐㙭タᮣ㎫㾑㗒≠㐩㙭 タᮣ t 㸆㨗≠㽐㙭タ㗁㊹☨㺺㮔㾉⒱⏩➶ᮣ㎫⯿㸆㨗㙭タ㺥㲂≠ 㐩☼➝ᮣ㑥⥗ㆀ⯿㔤⌤㝗⤅⢖㚳㑉㖳㱫ᱨ㮜㎫㦢㋦㝗⤅≠㽐 㙭タ㗣ᮣ t 㑥⥗≠㽐㙭タ㗣⛌㖡ᱨ㎫㥥 Sartorius 㮾⫉㐟㝜⪓⫊╹㣄わ ☨㠬㷢㥲㴾㾎㨰☨㗐␋ᱶwww.sartorius.com 㖯⭠㱎㱫 ⭒㗯㺉Ⓘ⯼㯓 ☫⿇ http://www.sartorius.com ␓㷶㖯⭠㱎㱫⯼㯓⭒㗯㺉Ⓘ㮾 ⭆㣄わ☨⭒㗯㺉Ⓘ㥥☼㺙ᮣ 㩖㮔㱸 Acrobat Reader ⏯㴪⛣⧧▘㱉 PDF 㢶⮔ᱨ㮾╹ Adobe 㠬㷢オ➱㥲㴾⡡⒴㩠(www.adobe.com)ᮣ 㱫⩿㨳㥒 ⳁ⢄ 㢕㦅⟛⧟ ㅢ㵒⒱㙸㠪⫊㺺㔇☨㍱㵀㢕㦅 ㅢ㵒⒱㺲⛪㔇⧀⫊㎡㔇☨㍱㵀㢕㦅 ㅢ㵒⒱⏰㚨㖡☨㍱㵀㢕㦅 ≠㐩㴊➠░㖣 ☠㵘⧧㮥⊑㙭タ – 〉㝢㊿㾑㫙⤴㲂♋㋺≠㐩⧧♋╫⭼㑛㩂☨ㇻん㺚⼺⧧⍖㽜ᮣ ☏㗁ᱨ⏥☕㖳㱫⫊⊏㴱㝢㊿ㅢ⪹☠㺤㝢㊿㗖㚨⧧⫊➂㔶㑉 㔩㔇⧀*ᮣ㑌⧨⏥☕☨㝢㊿㖳㱫⫊␃㾗ᱨ⭊㢦㲓㙭タ㗣⌏Ⓘ㮥 㺤☨㖳㱫⫊␃㾗ᱨ⯿⪹☠㺤㓡㖡㺨㵒㔈⌏㩌⥂⛊☨㚱㱸㐦⺉ 㮔㎳ᮣ – 㦐⤴㑉㴗㩖㮔㴪⛣⧧ⰶ㸆㨗≠㽐㙭タᱨ⊪⸶≠㐩㙭タᮣ – 㵀㱸㽥⢚⡽≠㐩㮔㎳☨㥥㟧⧧⪏ⳅ㝫⮔㥲㖳㱫㝢㊿㖫ᱨㆀ⍄ 㩙㾑㗒㚱㵀⥖⭨☼㎸☨㮔㎳⧧⥂⛊ᮣ – ㎫㖶㺷⯿㔤⌤⧧㝢㊿▌➥☡➝⍏㖳㱫☨☼➝ᮣ㑌⧨⏥☕☨㝢 ㊿≠㽐⤀㾗⫊␃㾗ᱨ⭊㢦㲓〉㗐␋㺲☨㙭タ⌏Ⓘ㮥㺤☨≠㽐 ⤀㾗⫊␃㾗ᱨ⯿⪹☠㺤㓡㖡㺨㵒㔈⌏㩌⥂⛊☨㚱㱸㐦⺉㮔 ㎳ᮣ ⏸㴪☾58㮝᮰⭒㗯⥂⢏᮱ 㱸㱫㨳㥒⧧㝗㖸ᮣ 52 ≠㽐⧧␃㾗㙭タ SecuraᮢQuintixᮢPractum 㺲㢶 ⌘㷌㢕㦅ᱝ ㎐㣢㵀▌➥㯁⌘⏮⼛☨㢕㦅㎸㲚㖳㱫〉㔤⌤ᮣ 㖶 ⱌ㨾㑌⧨㽐㈨⤀㾗㺐㍰ᱨ⛞⍄㩙⯿㝢㊿╹㻙♋㴚 ⛱ᮣ ㎫㐵⌏Ⰿ⽃㗄㈨㋹㔋☨✐⛊♋㫥㲓〉☼☨♋㴚♋ 㫥㮥㺤ᮣ ␚⟂⧧㚞⡛㔤⌤ ≠㽐㨳㥒 㑥⥗㠖⫊Ⰿ⽃㗄㈨㋹ᱨ⊪⸶㚱㱸Ⱗ⮔ᱨ㗖 㚨ᱨ㎫⏥㮔␃㾗㔤⌤ᮣ ㎫⻮⭊㟜⥙≼ⓞ␏㟫⛱㗖㚨㔤⌤☨♋㴚ᮣ ㎫⏥㮔⯿㝢㊿ᮢ㚴☨Ⰿ⽃㗄㈨㋹⫊6DUWRULXV㝗⤅ ☨㈨⮔⌕⿀㵀⡽㢴ᮢ⡍㖮㩂⪇㫓㸘㋽ᮢ㙦㋽ᮢⓍ ⫏ᮢ㸔⛑⫊㍿♋╫⒉㺐㺲ᮣ㎫㾑㗒⭒㗯⥂⢏㚱㗰 ☨␃㾗㝫⮔ᱝ ≠㽐㨳㥒ᱶ ␃㾗㴗㱎☉⛢⡘㵖㔤⌤☨㑌⧨㩌⡢㮾⭆㑌⧨⏥㗁 㱱 Sartorius 㝗⤅☨㦏⹐⫊㔤⌤☨Ⱗᮣ 㱸⤴㴱㨾㺬⼋☨㨳㥒㺝㩖㦢 Sartorius ㎫㎳⭊⫉ ☧ᮣㆀ㱎☕㺝㖳㱫㱱 Sartorius 㝗⤅☨㠖㔤⧧㫍 ⮔ᮣ 㾑㗒㝢㊿⧧Ⰿ⽃㗄㈨㋹☨,3➠⩼☬⭌ᮣ⏥㮔㖳㮤 㝛㔴㑩ᮣ➠⩼☬⭌㙭タ㔤⌤㵀⏥㟠⪏ⳅ㝫⮔ ᱤ⒙㖤ᮢ㯖㣡ᱥ㥲☨㗄㱫㩂ᮣ 㵀㎥ⰴⰏ⽃㗄㈨㋹⫊㝢㊿㺐㍰ᱶ ㎫⯿␏㟫╹㻙♋㴚≼ⓞᮣ 㝢㊿ⱊ㱱 Sartorius ㈤㫡☨㽈㮟㑉㴗▘ᮣ㎐㣢 ▘Ⰿ⽃㗄㈨㋹ᮣ t ▘⊪㽐ᱨ⍄㩙㨏㨲╌㚱㱸⏩⮔ᮣ t 㵀␚⟂㔤⌤⨍ᱨ㎫⻮⭊⮂␓㋦㗁⟑▌㵀㑌⧨㠖⏩㚨⪍ᮣ y 㑥⥗ㆀ⮂␌☡㑌⧨㚨⪍ᱨ㎫≢㷹᮰⌏㬤⧧㢞⩼᮱㮥㷦☨ 㺚㖸␃㾗ᮣ y ㎫⌏▌⧝㴓㖶⊪㽐☨㚱㱸⏩⮔㮾⤅㑓⨍㴱㗞㖳㱫ᮣ㽐㴱㋜ ⭺ᱨ㎫≼ⓞ㦏⹐ᱝ 㚞⡛☨㔤⌤㺲⊪⧆㮾㥲⏩⮔ᱶ 㾉⮔ ▞➠⟇㷺☨㝢㊿ ⛣㩂ᱶ ⲽイ㝢㊿ ➠⟇㷺 0.1 ⧛ 1 ⧛ 10 ⧛⧧ 0.1 㮾⭆1 – 9 9 ⒮⼋㈐ᱶd 90 ⧛ゟ 9 – – ⒮⼋㈐ᱶd 120 ⧛ゟ – 9 – ⒮⼋㈐ᱶd 180 ⧛ゟ – – 9 Ⓕ㈐㺉⭲ 9 9 9 ㋃⌺⊓㈐ – – 9 Ⓕ㈐➠⟇㷺ᱤⱊ Secura 㨻⧟ᱥ9 – – ▞ょ㮥⥖⭨㝎㱸☨♋㴚 ␏㟫☨Ⰿ⽃㗄㈨㋹ 9 9 9 㖳㱫㺲☨➠⩼㷺 9 9 9 ➠⒦㷺 9 9 – ≠㽐⧧␃㾗㙭タ㗣 9 9 9 㱎㱫㺚ㅕ 9 9 9 ≠㽐㝢㊿ 㔤⌤≠㽐㲓␃㾗㋜⭺☨㢕㦅 㑥⥗⏍⻳㋈㚡ᱨ㵘㱸⌧⏍⻳⍋㴛㔋☨㋈ⶪ⪆㔇☨ ⟇㦅ᮣ ㎫㋎㔤㦏⹐⏥㺣㲂☠㺤㑉㴗⊛☝ᮣ ㎫㾑㗒㮾㥲㷦Ⱞ㺲☨㋦㚳≠㐩⧧㢕㦅㨳㥒ᮣ 㴊㋜㱫㟲 Secura 㨻⧟ᱶ t – – – – – – ▞➠⟇㷺☨㝢㊿ 㮾⼜ⓞ☨㙫㩠≠㽐㮾㥲⏩⮔ᱶ 㖳㱫㺲☨➠⩼㷺 ⯿➠⟇㷺㚰㽊㺣᮰ⰶ㚰᮱ ᮣ ⯿➠⟇㷺1➥㵀㝢㊿㔋ᮣ ⯿➠⟇㷺㚰㽊㺣᮰㚰⛊᮱ ᮣ ⯿␊ろ㮰⛑☡⨍ギᮣ ⯿㋃⌺⊓2ᮢ㺲㨲⪏3ᮢⒻ㈐㺉 ⭲4ᮢ⒮㺺㈐5ᮢ➠⟇㐤6➥ 㵀㝢㊿㔋ᮣ 㽂㯌ᱶ㑥㩖㱸⤴㑥⧨㎥ⰴ➠⟇㷺☨ 㨳㥒ᱨ㎫⏸㴪☾57㮝᮰⌏㬤⧧㢞 ⩼᮱㮥㷦ᮣ Quintix⧧Practum㨻⧟ᱶ ⱊ㸏⛶㾎㨏⛣㗷㢜0.1mg☨㨻⧟ 㸆㺸⡽➶⍒⿔㝢㊿㔤⭜㢜㸡⒋▙㋺㝫⮔㥲☨㖯㬕㗌⧧㗌ㅠ㽈㱫 㝢㊿ᮣ㚴㽈㢜ⲽ㐵␌⛊㮤㽔ᮢ⨗㽔ᮢ➻㽔⫊⤨㽔⏮⼛☨㺺⼋✚ 㔤⭜➂ᮣ ょ㺸㨻☨㬥㊹⏮⼛⛞⍄㩙㖳㱫㗄☕☨㑛㋹ᮣ 㚴わ㔤⭜㽈㢜㵀㸡⒋▙㋺㝫⮔㥲☨㗌ㅠ㖳㱫ᮣ ≠㽐⧧␃㾗㙭タ SecuraᮢQuintixᮢPractum 53 㖶 ♋㴚Ⱗᱤ♋㴚ᱥ Ⰿ⽃㗄㈨㋹㾉⮔ ≠㽐㝢㊿ 㖳㱫▓㣥☨♋㴚␏㟫㗄㈨㋹ㅢ⪹☠㺤㫻㺺☨♋ ⫏ᱨ⏌㚨⪍㔤⌤ᮣ ⏥☧㵀⏥㖳㱫Ⰿ⽃♋㴚㗄㈨㋹☨㎩ⷆ㥲㺓Ⱗ⯿♋ 㴚␏㟫␏㑩␏㾙ᱤㅢ⪹➂㔶╋♋ᱥᮣ ㍶㑩ᱤ⫊␚ⓥᱥ⏍⻳⊓ 1) ⶏ⨍⍋㴛⯿➠⟇㷺⡥⊓⸻ⓞᮢ␚ ⓥᮣ t ⯿㸡㐵☨♋㴚␏㟫㗄㈨㋹㱫㲂㻙♋㴚ᮣ 2) ⯿㑻⢔⏍⻳⊓㦢㍰㟺㑩➠⟇㷺 ☠␅ᮣ 3) 㐹⨍㴿➥⪰➠⟇㷺⡥⊓ᮣⱌ㨾╱␃ 㾗㖫ᱨ➠⟇㷺⍄㩙㚰⛊☡㢭ᮣ ⏥▞➠⟇㷺☨㝢㊿ t 㮾⼜ⓞ☨㙫㩠≠㽐㮾㥲⏩⮔ᱶ A Ⰿ⽃♋㴚㗄㈨㋹⊔〉ᱶ ⊪㽐▢ ⥖⭨☼㎸ ⊪㽐▢ ⥖⭨☼㎸ a) 㟬タ e) ⧴㓧 㱉⛪ 1) 㖳㱫㺲☨➠⩼㷺ᱤ␏㟰㺲㢦㦄㖸ᱥ 2) ≠㽐㋃⌺㈐ᱨ⏌⯿㋦ㅬ㖫㸏㩫㽊ᱨ 㺓☡㋦⹜⤨ⳟ㢭ᮣ 3) ≠㽐Ⓕ㈐㺉⭲ (1) ⧧⒮⼋㈐ (2)ᮣ ㇻ㻀ㇻんᱤⓥ㱊⥖ 㮾㠖ᱥ b) ⪞㓧 㱊⥖ f) ⹄ ㅕ➧ c) ⹄㓧 よ⥖ᮢ㺲⥖ᮢ㑓〉 g) 㓧 ⧅⥖ d) ⨆㓧 ≲▙⺉㫳 h) ➻㓧 ≻㣩 i) ⊅㓧 ≐⢗㟖 ㈨㱸㗄㈨㋹g)ᮢh)⧧i)☨Ⰿ⽃♋㴚㗄㈨㋹ㄩⶹ6971790⊪㽐㔋 ☨⍖㍩㢜98671791ᮣ t ≢㽁 (1) ♋㴚㚱㩖☨♋㴚␏㟫㗄㈨ ㋹ (A) ⏌⯿㋦⪄㑩 (2) Ⰿ⽃㗄㈨㋹ㄩ ⶹ (B) ☨ⶪᮣ␃㾗㖫ᱨⰏ⽃㗄㈨ ㋹㩖㮔㚰⛊☡㢭ᮣ 㫍㵗㢭㺥 㫍㵗㸡㐵☨≠➥㢭㺥ᱶ – 㵀⏥⪹㵈㗖㸔⛑☨㢺⛊ⴋ㴮⍙ギ≠㽐㔤⌤ᱤ⺋㑥⒮㺺㖩 㜞ᱥᮣ – ㎫㖶㺷㐵⌏㔤⌤㽴㱱㖳㱫ᮣ 㫍㵗㮥⢔⏥⪹㗖☡㮾㥲⡘ギ㱘㦜☨㢭㺥ᱶ – 㑆ᱤ⭩㑆㋹⫊㬠⤾㺓㔠ᱥ – ╏㟬⒐☨╖⩿ᮢⶥ♛㥥㟧⧧ろ☨㋺⽃ Ḷ⒮㺺㖫㸔☘ Ḷ㱝⭍㎸㲚ᱤ㑉㴗ᱥ Ḷ⥙⛪⒙㖤 Ḷ♋╫⒉ ⪏ⳅ ☕⯿㔤⌤▞☡➧⒋ㇳ⧧☨☼➝㖫ᱨ⪹㵀㔤⌤⍙ギ㨼⒱⿀ 㻋ᮣ㢜⍈オ㗖☡ㆃ☨㱘㦜ᱨ㵀㝢㊿㴿╴Ⱗ㟜♋㴚㍰ᱨ⯿㋦␏ 㟫╹♋㴚≼ⓞᱨ㖳㝢㊿㗄㱎⪏ⳅ㴢2㨏㖫ᮣ 54 ≠㽐⧧␃㾗㙭タ SecuraᮢQuintixᮢPractum ␚㨤㝜⪓Ⰿ⽃㗄㈨㋹ t ⰶ㚰 (1) Ⰿ⽃㗄㈨㋹ᱨ㐹⨍⯿㋦㨤 ⓥ (2)ᮣ ♋㴚Ⱗ≠㐩㴊➠░㖣 – ㎫ⱊ㖳㱫㴓㖶 Sartorius Ⰿ⽃㗄㈨㋹ᮣⰏ⽃㗄㈨㋹☨ IP ☬⭌㢜 IP40ᱨ⟛⧩ EN 60529 / IEC 60529ᮣ – ㎫㐵⌏㺨㵒㔈 ID ⍖㍩㔋⍖タ☨✐⛊♋㫥㲓☕☼☨♋㴚♋㫥㮥 㺤ᮣ – 㑥⥗㚱㖸☨♋㴚♋㫥⫊Ⰿ⽃㗄㈨㋹☨␏㟫㔤⭜⏥⟛⧩㚱㵀⥖ ⭨☼㎸☨⍖㽜ᱨ㎫㟜㺌㢭㺥㾎ⱐ☨ Sartorius ■⍙⫊ㆀ☨ⲿ 㦪㔈ᮣ – ⍄㩙⢗⳯ㆀ㚱㵀⥖⭨☼㎸☨㗄㱫⥂➖ⱌ㨾♋㴚Ⱗᮣ 㺲㢶 t 1) 㗑㥸ᱨ⯿Ⰿ⽃㗄㈨㋹␏㑩㝢㊿⌟ ギ☨␏㾙ᮣ t 2) 㐹⨍⯿Ⰿ⽃㗄㈨㋹Ⱗ㺣⍆㽐♋ 㴚␏㾙ᱤ㗊♋♋㫥ᱥᮣ ➈⛊⭜⼋㖳㱫㙭タ ㋦㚴㦄㖸㴐⮔ᱶ – ▞㱸⤴㲂㋦㚴㾎☱⡘㴾㨳㥒☨☨⭜⼋㦏ᱤ㾎㨏㺗ᱥ⭆⮂⛊➶ ⛪㺗ᱤeᱥᮣ ⳁ⢄⍖㺠ᱨ㺚ⓞ⭜㚛㺗ᮢ⡘㗷㽼㺗⫊㨏㲂㾎㨏㬥〉㺺 ⼋ᱤSQminᱥ☨㺗ᮣ 㔤⛊⏵☉᮰㔤㺥᮱ᱶ㋦㺲⏩➶⤂ㅢ⧧㔤㺥⏥㗄㱫㲂ⱌ 㨾➈⛊⭜⼋☨㝢㊿ᮣ 㴊㑆㖫⭺ 0 y 㢜㐵⌏ㅢ㝗⤅㽜㐵☨ⰵ⥗ᱨ㗑╴Ⱗ♋ 㴚⨍ᱨ㝢㊿⍄㩙㴊㑆㺣㔕 30 ➶㺵ᮣ㺝㱸 㵀╱㖫⭺⛰㺐⨍ᱨ㔤⌤⏯ㅢ▕☡㮔㎳☨⤀ 㾗㢴⛪ᮣ Ⱗⶪ⥂⢏ᱤ㗷⳯㗞ⓞᱥ 㱫⹂㐵⛊㢭㗷☨᮰PC – SBI᮱⧧᮰USB RS232 SBI᮱㔤㺥⏥㱫㲂 ➈⛊⭜⼋ᱶ᮰SBI᮱㔤㺥㺲⏥⊪⧆㽴⛑☨㦄㖸㢭㗷㐵㑍ᱨ⏥㱫 㲂➈⛊⭜⼋ᮣ⍄㩙㵀㠖㢙㔤⌤㔋㺖㨾㦐⤴␌⼋⫊㔤㺥ᮣ 㥲⏩⒮⼋ 㥲⏩⒮⼋⤮⤏☨⛭ⶪ㢭㲂㝢㊿☻⏩ᮣ 30 ⯿ⲿ⥙㨑㬕☨ᮢ㱫㲂➈⛊⭜⼋☨ᮢⲽ⛪☬⭌㢜 k 㝢 ㊿Ⱗ㺣㻙♋㴚㖫ᱨ⍄㩙㥸㴊㑆㺣㔕 1 ⢔㨏㖫ᱨ㐹⨍ ⏯㖶␃㾗ᮣ ≠㽐➠⟇㷺ᮣ t ╹㝢㊿☻⏩㝗㋲⡥⊓ᮣ ⳁ⢄ᱶ␃㾗㖫ᱨ㖳㝢㊿㢭㲂␊ギᱨ ✚⒮⼋㈐☨㮥␊ᮣ ♛Ⱞ㙦㊿ 㨑㊿㝢㊿ゞ⏣≠㽐㢭㺥㎣㨟⫊⏥ⴋ㴮☨⏥㾃ᮣ㝢㊿ ⍄㩙ⴊ⛶㙦㊿ᱨ㮾㐵⌏⫉☧㮥㺤㺺⡒☨⒮⼋ⰵ⥗ᮣ 㽂㯌ᱶ㝢㊿☨㢭㺥ょ➂㔶㮥╴⍐⪇ᱨ⛞㩖㮔㺺㨰㨑㊿ ⧧♛㸟㝢㊿ᮣ t ⯿ⱄ㗮㙷ᱤ⫊㙾㣡㊹ᱥⰧ㺣 㬥〉ᱨ⯿㋦㩪⤮㵀≪␅⤮⤏㔋ᮣ Secura 㨻⧟ᱶ ☕ “LEV” ⓞ㦆㵀㦄㖸㋃㔋㖫ᱨㆀ⍄㩙㨑㊿㝢㊿ᮣ t ㎫㐵⌏㨤㴾⒮㺺㈐ᮣ t ╋⫏ “LEVEL”ᮣ t ㎫≢㦄㖸㋹㔋☨㙭タⱌ㨾␃㾗ᮣ Quintix ⧧ Practum 㨻⧟ᱶ t 㑥㟰㚱㖸ᱨ㩫㽊⼉⢔㙦㊿♛ⰮⰙ㺓 㺣㋺㈡㵀㙦㊿㺚㖸㋹㐤☨㸡㺲㨲ᮣ – 12 ♇㢭㺥☨㋺㈡ᱶ㙫㖫㸏㩫㽊⼉⢔ 㙦㊿♛ⰮⰙᮣ – 3 ♇㢭㺥☨㋺㈡ᱶ⯿㾓␊㙦㊿♛Ⱞ Ⱉ㙫㖫㸏㩫㽊ᱨ⯿㱺␊㙦㊿♛ⰮⰙ ㅬ㖫㸏㩫㽊ᮣ – 6 ♇㢭㺥☨㋺㈡ᱶㅬ㖫㸏㩫㽊⼉⢔ 㙦㊿♛ⰮⰙᮣ – 9 ♇㢭㺥☨㋺㈡ᱶ⯿㾓␊㙦㊿♛Ⱞ Ⱉㅬ㖫㸏㩫㽊ᱨ⯿㱺␊㙦㊿♛ⰮⰙ 㙫㖫㸏㩫㽊ᮣ 㑥⥗⏥㴿㖳㱫㥲⏩⒮⼋⛭ⶪᱨ㴿╴⤴⍁▘☨⡥⊓ᱨ ⍈オ⒮㺺ⰵ⥗㗖➔㦢㋺⽃☨㱘㦜ᮣ 㵀㱫㲂➈⛊⭜⼋☨㝢㊿㔋ㅢ㣐➈▘⫊㖳㱫㥲⏩⒮ ⼋⛭ⶪᮣ ➠☥㚰⛊㽐㺥 t Kensington㚰␅㮾㗍㩖㮔≠㽐㵀 㝢㊿⌟ギ㔋☨⤨⛊♇ᮣ t 㮜㮾㖳㱫ᱤ⌴㑥ᱥ⼀㝫⧧㚰⯿㝢 ㊿⤨⛊㵀≠㽐㢭㺥ᮣ ≠㽐⧧␃㾗㙭タ SecuraᮢQuintixᮢPractum 55 t ⯿➠⟇㷺㚰㽊㺣᮰ⰶ㚰᮱ᮣ 㮰⛑㝢㊿ t Ⱗ㥲⹂ᱨ╹㝢㊿␚㨤➠⟇㷺ᮣ 㮰⛑㝢㊿㍰ᱨ㗑㥸⯿㝢㊿㎐⪓☡▣⫒ㄩ㖷ᱨ㐹⨍≼ⓞ♋㴚␏ 㟫ᱨ⏌╹㝢㊿㔋㨤㥲⒮⼋㈐⧧Ⓕ㈐㺉⭲ᮣ 㵀㖯㬕㗌㴜Ⳳ㮰⛑㝢㊿ ⍈オ⏍⻳㋈⼝ᮢⓍ⫏ ⧧㸔⛑ᱶ ㎐㣢㟜⥙➠⟇㷺㝗㋲ ⧧㮰⛑㝢㊿ᱝ t ⯿⊪㽐☻⏩⮔␏㑩⧪㺲ᮣ t ⯿㮾㥲⏩⮔㺥㲂⊪㽐☻⏩ 㺲ᱶ – ➠⟇㷺 – 㝢㊿ – ☻⊓ – ␊⊓ – ⛇⏩⏍⻳ t 㵀㠖㥲㠄㽁㝢㊿ᱨ㨏㨲☼⯿㋦㝗 ㋲ᱨ⏌⯿㋦㨝㺣㨰☨㢭㺥ᮣ A h B t ⯿㦐⤴☨⒮⼋㈐⧧Ⓕ㈐㺉 ⭲␏㑩㑥㾓␊㚱㖸ⶪᱶ – A = ⒮⼋㈐⧧Ⓕ㈐㺉⭲ᱨ 㺓Ⳉ 120 ⧛ゟ – B = ⒮⼋㈐⧧Ⓕ㈐㺉⭲ᱨ 㺓Ⳉ 90 ⧛ゟ 㝢㊿☨≠㽐㢭㺥➂㔶㮥╴⍐⪇ᱨ⛞㩖㮔㺺㨰㨑㊿⧧♛ 㸟㝢㊿ᮣ Versand der Waage h h 㽐㴱㝢㊿㺐㍰ᱨ㎫⯿㝢㊿㎐⪓㺣▣⫒ㄩ㖷ᱤ㎫⏸㴪㥲 㮥㮝ᱥᱨ㐹⨍≼ⓞ␏㟫ᮣ 㽐㴱㖫ᱨ㎫㖳㱫㴓㖶⊪㽐ᮣ 㑥㱸㮔㎳ᱨ㟜⥙ Sartorius ⟞㣣㺲㨲⛋⤖⊪㽐ᮣ Secura㨻⧟ᱶ 1 2 3 4 5 6 Quintix⧧ Practum㨻⧟ᱶ 1 2 3 t ⯿⊪㽐♊㺥㲂⏍⻳ギ⊓㺐㔋 t ╹㝢㊿㔋␚㨤㮾㥲⏩⮔ᱶ – 㾎㨏⛣㗷㢜0.1mg☨㨻⧟☨➠⟇ 㐤 – ⒮⼋㈐(2) – Ⓕ㈐㺉⭲(3) – 㾎㨏⛣㗷㢜0.1mg☨㨻⧟☨㺲㨲 ⪏(4) – ㋃⌺⊓(5) – ⯿⏍⻳⡥⊓╹➠⟇㷺(6)㔋㮰ᱶ ⏸⮑㥲㮥㷦᮰⌏㬤⧧㢞⩼᮱ᮣ t – – – – t ⯿㱚㺟㦔㺲☨Ⰿ⽃㗄㈨㋹␏㑩 ⊪㽐♊ᮣ ╹㝢㊿㔋␚㨤㮾㥲⏩⮔ᱶ ⒮⼋㈐(1) Ⓕ㈐㺉⭲(2) ㋃⌺⊓(3) ⯿⏍⻳⡥⊓╹➠⟇㷺(4)㔋㮰ᱶ ⏸⮑㥲㮥㷦᮰⌏㬤⧧㢞⩼᮱ᮣ t ⯿⊪㽐⛇⏩⮔㺥㲂㔤⌤⏩⮔㺐㔋ᮣ 4 t Ⱗ㥲⹂ᱨ⯿⊪㽐⧝☨㝢㊿㺥㲂㱚㺟 㦔㺲ᱨ㐹⨍イ⟂㱚㺟㦔ᮣ 56 ≠㽐⧧␃㾗㙭タ SecuraᮢQuintixᮢPractum 㺲㢶 A) ␚㨤␊⊓ᱶ 1) ╹⨍ギ㎡㎡㝗㋲␊⊓ᱨ⯿㋦㦢⨍ ⸻ⓞᮣ ⌏㬤⧧㢞⩼ ⟞㣣 㢜㐵⌏ㆀ㝢㊿Ⓘ㩦㢺⛊☨⒮⼋ⲽ⛪ᱨ㣄わ⯼㯓ㆀ㾎㔕㮥ㅰ≠㈉ 㮥╴⛊㋜⟞㣣ᮣSartorius⟞㣣⢗⳯ㆀ☨㩖㎳㝗⤅⏥㟠㖫⭺⭺⢒ ☨㢞⩼⟞㣣⧩㟠ᮣ㨑㽜㺆㗣㾗㢜ょ╴㢞⩼⟞㣣☨㦞ㅅ㺐㮥㲐㮾 ⓞ⳱ᮣ ⍄㩙㱱㽈㮟♋⤀⛊㋜⛶Ⰿ⽃㗄㈨㋹⭆㋦Ⱗ⮔ⱌ㨾≠㐩⮂␓ᱤ 㑥ょ⼉ㅰ㮥╴ᱥᮣ B) ␚㨤⛇⏩⏍⻳ᱶ 1) 㟜⥙㋦⨍⍋㴛⯿㋦㠄㋲ᱨ⸻㋲➠⟇ 㷺⡥⊓㮰ⓥ➠⟇㷺⡥⊓ᮣ 㢞㩌 㢞㩌⤀㾗㺝ㅢ㱱㗖⥙㈤㫡☨㢞㩌⭒㗯㑉㴗㺖㨾ᮣ 㱱㢦ⲿ㈤㫡☨㑉㴗⛶㝢㊿ⱌ㨾㢞㩌⯿㖳⌏㩌㣐 㨕ᱨ⏌ㅢ㢜㱫⩿▞⹂⳰▙⟇㦅ᱨ㖳㝢㊿㔶▓ 㣥⛣㗷ᮣ㥥Sartorius⟞㣣⫊Sartoriusⲿ㦪㔈⛶ ㆀ☨㝢㊿ⱌ㨾㗄☕㢞㩌ᮣ㢞㩌㋜⭺ᱨ⍄㩙≼ⓞ㔤 ⌤␏㟫ᱝ ≼ⓞⰏ⽃㗄㈨㋹ᮣ㢞㩌⤀㾗㺝ㅢ㱱㗖⥙ Sartorius ㈤㫡☨㢞㩌⭒㗯㑉㴗㺖㨾ᮣ 2) 㟜⥙⯿㋦⨍⸻ᱨ␚㨤⛇⏩⏍⻳ᮣ ㎥ⰴ㝢㊿ 3) 㐹⨍㝜⪓➠⩼㷺ᮣⱌ㨾╱␃㾗㖫ᱨ ➠⩼㷺⍄㩙㚰⛊☡㢭ᮣ ㎥ⰴⶨ㺨ギ⊓ ⯿㦄㖸㋃㎐⪓㺣▣⫒ㄩ㖷ᱨ㮾⍈オ㵀㎥ⰴ㋜⭺㩌⡢␃㾗㔤㺥ᮣ t ╋⫏⏵☉⮒⮒㮾㎐⪓㺣㱎㱫㫍㵗ᮣ t 㑥⥗㚞⨍╋⫏ Eᱨ㦄㖸㋃⯿⪹⤴⍁ᮣ t 㑥㮔㴿╴⯿㦄㖸㋃㋶ᱶ╋⫏㦄㖸㋃ᮣ 㫍㵗㢭㲂㦄㖸㋃㾓㥲Ⱋ☨ jᮣ ㎥ⰴ㝢㊿㠖 ⛱♋㴚ᱶ╹㻙♋㴚≼ⓞⰏ⽃㗄㈨㋹␏㟫ᮣ 㑥⥗㩖㮔ᱨ⛱Ⱗ㺣㝢㊿☨㗷⳯㦏⹐ᮣ ㎐㣢▘㝢㊿⫊Ⰿ⽃㗄㈨㋹ᮣ 㸆㨗㔤⌤㺲⊪⧆☨⏩⮔⏥ㅢ㱱␃㾗㴗㎥ⰴᮢ 㢞㩌⫊⢚⪓ᮣ – 㐵⌏ゃ㱸㮤㝛⫊⪪⒦ⱌ㑩㝢㊿⫊Ⰿ⽃㗄㈨㋹ᮣ – ╹➠⟇㷺㨤㥲☻⊓ᮢⒻ㈐㺉⭲⧧⒮⼋㈐ᮣ – ㎐㣢㖳㱫⊪⧆㑚⭗⫊㫼ㄫ⭗⒱➶☨㎥ⰴ⭗ᱨ㸆㾎㺷ㅢ⪹⛶ 㔤⌤㵒⒱㚨⧀ᮣ Secura ⧧Quintix㨻⧟ᱶ t 㢭㲂㝢㊿㠖⛇⏩⧧☻⏩☨㚔⼛㾉⮔㟳㱸㝎㗜㣡㺬ᱨ 㱫⍧㟞㎥ⰴ㸆㨗㾉⮔ᮣ ㎫㣢㱫⍧㟞⫊⡍㖮㩂㎥ⰴ⭗㎥ⰴ㮾㥲㾉⮔ᱶⶨ㺨 ギ⊓ᮢ♋㴚␏㟫ᮢ㗷⳯ⰻギᮢ⍖㍩ᮢ㬕㺆⟂㝫⫊ ㋦㚴㚔⼛㾉⮔ᮣ t ㎥ⰴ⨍ᱨ㎫㱫⡧㵕☨㑫⏦⏫㖽㝢㊿ᮣ 㗖㣍㐼☨㔤⌤ᱶ – 㯜㊹⒩♑⧧㢔㔶㣡㣍㐼⏺⽀㣡☨⫕㵒⒱ ㊹㣍㐼ᱨ╹✚▞⹂☨⯵ⶅ⟇㦅ᮣ – 㔶㣡⧧㢔㔶㣡㣡㺬▞⹂☨⯵ⶅ⟇㦅ᮣ – 㾑㗒㎥ⰴ⥂➖ᮣ – ㎫㽰㥨⮂␓㎥ⰴ㨕⥗ᮣ ⱌ㨾㎥⨍ᱨ㮾㦐➔☨㙫㩠㾉㽐⏩⮔ᱶ ⏸㴪☾54㮝᮰㖶≠㽐㝢㊿᮱ C) ␚㨤㍰⨍␊⏍⻳ᱶ 㮾㵀㱫⩿㗐␋㺲㷶☡㱸⤴㽐㈨⏧㻊☨㦚㥨㨳㥒ᱨ⡡㗐␋ 㵀㦏㥲㴾ᮣ㽊㺣 www.sartorius.com – “Service Center «Downloads»”ᮣ ╌㺥 㠖⊪㽐㱱⪏⌏⏮⼛㺨⒱ᱨ㱫㾗╴㔶㴓⼛ᮣ㑥 ⥗ㆀ⏥㴿㩖㮔╱⊪㽐ᱨ㎫㾑㷹ㆀ㚱㵀⥖⭨☼㎸ ☨㦐㱎➈⥂Ⰿ⢖☕☼☨⸺⫐⪰㗏╌⫒⤕ᮣ㵀 ☦⥖ᱨㆀ㮾㟜⥙ VfW 㙣㦢㥥㟧╌╱⏮⼛ᱤ ⧩㟠⍌⧟ D-59101-2009-1129ᱥᮣ⊪⸶⡛⮔⧧ ♋Ⓚ㵀ㅠ☨㔤⌤⏥☧☕㾗㮥⊑⭨㟙⸺⫐╌ᱨ ⍄㩙☕㾗♋㋺⧧♋㽳㔤⌤⪰㗏ᮣ㱸⤴╌㺥⧧⪰㗏 㫍㦞☨⢚✂㨳㥒ᱨ㎫㥥ㆀ☕☼☨⟞㣣㑉㴗⫊ 㣄わ㢭㲂☦⥖⢅㟖⢗☨⟞㣣㺲㨲ᱶ 㮾㥲㠬㷢㚱⼜⧩㾗⫇⊗㵀ㇻん➖㢙ㅠⱌ㨾╌ᱶ 1) ☫⿆http://www.sartorius.comᮣ 2) 㵀᮰⟞㣣᮱㥲㫍㵗㷎㮔ᮣ 3) 㺐⨍㫍㵗᮰╌㨳㥒᮱ᮣ 4) ☕☼Sartorius╌㥥☼㺙⏸⮑〉㠬㮝☨PDF㢶⮔ᮣ h Sartorius ⏥⡘㵖⪰㗏⌧㱸⧀㣡㺬㣍㐼☨㔤⌤ᱤABC 㣍 㐼ᱥᱨ㮜⏥㝗⤅㢞㩌⫊╌㺥⟞㣣ᮣ ␏㑩⍖㝘ᱶ᮰╌㺥⟞㣣☼㺙᮱ 㑥㩖⼗ⰶ⢚✂㢞㩌⟞㣣☼㺙⫊㔤⌤╌㺥☨㦚㎩ᱨ㎫䣵⹎㣄わ☨ 㠬㷢 (www.sartorius.com) ⫊㥥 Sartorius ⟞㣣⏩ろᮣ ≠㽐⧧␃㾗㙭タ SecuraᮢQuintixᮢPractum 57 ⭒㗯⥂⢏ 㮥⊑㗷⳯ ⳱㝛㨻⧟㗷⳯⮑☾80㮝 Ⰿ⽃㗄㈨㋹ SartoriusⰏ⽃㗄㈨㋹ 6971790␏㟫㽊⪓㝎⛊⥖⭨␏㟫㗄㈨㋹ 㻙♋㴚 100 – 240 V~ᱨ±10%ᱨ50 ~ 60 Hz, 0.2 A ⡏♋㴚 15 V DC, ±5%, 530 mA (max.) / 8 W (max.): 0°~40°C 㮾⭆ 15 V DC, ±5%, 330 mA (max.) / 5 W (max.): 0°~50°C ♋㴚Ⱗᱤ⢚✂㗷⳯ᱥ ⌏⩼☬⭌᱐⢗⳯EN/IEC 60950-1ᱨ㗄㱫⦽≼▕☡⦽≼3000ゟᱨ⢗⳯EN/IEC 60529ᱨ➠⩼☬⭌㢜IP40 ⌏⩼ ➠⒦➠㙦 㝢㊿ ♋㴚 ⱊ㟜⥙ Sartorius Ⰿ⽃㗄㈨㋹ㄩⶹ 6971790ᱤ⊪㽐 6971790 ⫊ 6971791ᱥ 㗞㑩♋㫥 12.0 ~ 15.0 VDC ⤂⿔㦫⧞ 2 Wᱤ♈㨻ᱥ ⪏ⳅ㝫⮔ ╱⥂➖㵀㥲⼜⪏ⳅ㝫⮔㥲㗄㱫ᱶ ⪏ⳅ ⱊ⤅㗌ㅠ㖳㱫 ⪏ⳅ㢴⛪* +10°C ☡ ~ +30°C 㴱㨾➖㢙 㵀 +5°C ~ +45°C 㺐⭺ᱨ☧☡⌏㷳 ▌╈⧧㽐㴱 –10°C ☡ ~ +60°C ⦽≼⡽⛪ ⦽≼ 3000 ゟ㮾㥲 㦐⛶㖤⛪** 㵀㢴⛪⏥⒔⥙ 31°C ☨㝫⮔㥲ᱨ㢜 15%RH~80%RHᱷ㵀㢴⛪㢜 40°C ⭆㦐⛶㖤⛪㢜 50%RH 㖫ᱨ㣐ㆃⰵ㦆㦣ᱨ㐹✚ᱨ㋦⪹㦏㩂㥲Ⰹ㵀㢴⛪㢜 50°C 㖫ᱨ㵘㢜 20% ♋㋺㔤⌤≠㐩 㮪㷹 EN 61010-1 / IEC 61010-1 ␌⼋ᮢⶨ㺨⧧㖯㬕㗌㱫㟲☨♋㋺㔤⌤≠㐩㮔㎳ ᱩ ☾ 1 ⏩➶ᱶ㮥⊑㮔㎳ ♋╫⭼㑛㩂 㮪㷹 EN 61326-1 / IEC 61326-1 ␌⼋ᮢⶨ㺨⧧㖯㬕㗌㱫㟲☨♋㋺㔤⌤ ᱩ ♋╫⭼㑛㩂㮔㎳ ᱩ ☾ 1 ⏩➶ᱶ㮥⊑㮔㎳ ⛊㯏☨ⶉ⡧㑃㩂 㗄㱫㲂⤀㮟㎸㖳㱫 ➂㔠⡧㑃 B ⭌ᱤ㗄㱫㲂⳥ス㎸⫊㦢㽁㷐⾯⤅♋☨☱♋㫥㠬⿱㎸㲚ᱥᮣ 㯜╱ᱨ㵀㸆⼉⢔㎸㲚ㅠⴋ㖳㱫〉㔤⌤ᮣ ⍖㽜㔤⌤ 㫍☨㺺⼋☉㢭 1) ᮢ㍧ᮢ⸻ᮢ⊣ᮢ≩㙶ᮢ㦓⡹⼉ᮢ㜞⼉ᮢ⢏⼺ᮢ〉ㅧ㠲㝎ᮢ⧛ᮢ parts per poundᮢ㺲⥖⼉ᮢmommesᮢ≰☼⺉⸻ᮢ㠄⸻ᮢ傫ᮢゟ㙱⭩✝⧧⛻ 㱫☨㱎㱫⒴㩠 Secura㨻⧟ᱶ⭜㗷ᮢ⊇➶⌴⒮㺺ᮢイ⛪␌⛊ᮢ⌏⽀㾎▙㺗ᮢ⏥㢺⛊⒮㺺ᮢ⮂㺺ᮢ⫄⧩ᮢ㵜⼋ᮢ㟧 ⭜ᮢ㽊⪇ᮢ㾎㨏㬥㊹㺺⼋⭆⍖㍩ Quintix㨻⧟ᱶ⭜㗷ᮢ⊇➶⌴⒮㺺ᮢイ⛪␌⛊ᮢ⌏⽀㾎▙㺗ᮢ⏥㢺⛊⒮㺺ᮢ⮂㺺ᮢ⫄⧩ᮢ㵜⼋ᮢ㟧 ⭜ᮢ㽊⪇ Practum㨻⧟ᱶ⭜㗷ᮢ⊇➶⌴⒮㺺ᮢイ⛪␌⛊ᮢ⌏⽀㾎▙㺗ᮢ⏥㢺⛊⒮㺺ᮢ⮂㺺 ⲿ㬕㺆㱫㲂➈⛊⭜⼋☨ CE 㨻㝢㊿⟛⧩ㇻん㖼⪹㺚⼺ (2009/23/EC)ᮢEN 45501:1992 ⧧ OIML R76:2006ᮣ * ⲿ㬕㺆㱫㲂➈⛊⭜⼋☨ CE 㨻㝢㊿⟛⧩ㇻん㮔㎳ᱨ㎫⏸㴪㝢㊿㦐⤴㨳㥒ᮣ ** ⲿ㬕㺆㱫㲂➈⛊⭜⼋☨ CE 㨻㝢㊿⟛⧩ㇻん㮔㎳⧧㗄㱫➈⥂ᮣ 1 ) 㦎㲂ⲿ㬕㺆☨㨻⧟ 58 ≠㽐⧧␃㾗㙭タ SecuraᮢQuintixᮢPractum Polski Deutsch Spis treści Symbole Spis treści . . . . . . . . . . . . . . . . . . . . . . . . . . . . . . . . . . . . . . . . . . . . . . . Informacje dla użytkownika . . . . . . . . . . . . . . . . . . . . . . . . . . . . . . . . . . Środki bezpieczeństwa . . . . . . . . . . . . . . . . . . . . . . . . . . . . . . . . . . . . . . Użytkowanie zgodne z przeznaczeniem . . . . . . . . . . . . . . . . . . . . . . . . . . 59 59 59 60 Rozpoczęcie pracy . . . . . . . . . . . . . . . . . . . . . . . . . . . . . . . . . . . . . . . . . Rozpakowywanie urządzenia i zawartość zestawu . . . . . . . . . . . . . . . . . . Instalowanie wagi. . . . . . . . . . . . . . . . . . . . . . . . . . . . . . . . . . . . . . . . . . Wybór odpowiedniego miejsca . . . . . . . . . . . . . . . . . . . . . . . . . . . . . . . . Podłączenie zasilania . . . . . . . . . . . . . . . . . . . . . . . . . . . . . . . . . . . . . . . Przygotowanie do pracy . . . . . . . . . . . . . . . . . . . . . . . . . . . . . . . . . . . . . Poziomowanie . . . . . . . . . . . . . . . . . . . . . . . . . . . . . . . . . . . . . . . . . . . . Ważenie podszalkowe. . . . . . . . . . . . . . . . . . . . . . . . . . . . . . . . . . . . . . . Zabezpieczenie antykradzieżowe. . . . . . . . . . . . . . . . . . . . . . . . . . . . . . . 60 60 60 61 61 62 62 62 62 Przenoszenie wagi . . . . . . . . . . . . . . . . . . . . . . . . . . . . . . . . . . . . . . . . . Transportowanie wagi . . . . . . . . . . . . . . . . . . . . . . . . . . . . . . . . . . . . . . Dbanie o urządzenie i konserwacja . . . . . . . . . . . . . . . . . . . . . . . . . . . . . Czyszczenie wagi . . . . . . . . . . . . . . . . . . . . . . . . . . . . . . . . . . . . . . . . . . Utylizacja. . . . . . . . . . . . . . . . . . . . . . . . . . . . . . . . . . . . . . . . . . . . . . . . 63 63 64 64 64 Specyfikacja. . . . . . . . . . . . . . . . . . . . . . . . . . . . . . . . . . . . . . . . . . . . . . Dane ogólne. . . . . . . . . . . . . . . . . . . . . . . . . . . . . . . . . . . . . . . . . . . . . . Dane charakterystyczne dla modelu. . . . . . . . . . . . . . . . . . . . . . . . . . . . . Deklaracja zgodności WE w zakresie kompatybilności elektromagnetycznej. . . . . . . . . . . . . . . . . . . 64 64 80 85 Inne dokumenty Poza niniejszą Instrukcją montażu na stronie internetowej firmy Sartorius dostępna jest również elektroniczna wersja aktualnej instrukcji obsługi urządzenia w formie pliku PDF. www.sartorius.com Do odczytu pliku PDF konieczne jest posiadanie oprogramowania Acrobat Reader, które można pobrać bezpłatnie ze strony firmy Adobe (www.adobe. com) h Przydatne informacje i wskazówki Informacje na temat zastosowania w metrologii prawnej Informacje dotyczące działania urządzenia W niniejszej instrukcji użyto następujących symboli i znaków: t Informuje o niezbędnych czynnościach y Opisuje skutki wykonania danej czynności Wykonać czynności w następującej kolejności: 1. Pierwsza czynność 2. Druga czynność 3. ... – Wskazuje pozycję na liście Konwencja przyjęta w instrukcji: – Ilustracje zawarte w instrukcji odnoszą się do wag „standardowych“. W przypadku wag legalizowanych do stosowania w metrologii prawnej, niektóre z wyświetlanych komunikatów i informacji mogą nieznacznie odbiegać od przedstawionych na ilustracjach. Ponieważ różnice te mają znaczenie dla funkcjonowania urządzenia, zostaną one omówione w tekście. O instrukcji montażu t Przed pierwszym użyciem urządzenia uważnie zapoznać się z treścią niniejszej instrukcji. Postępować zgodnie z ze wskazówkami dotyczącymi bezpieczeństwa. t Niniejsza instrukcja stanowi istotną część produktu. Przechowywać w bezpiecznym miejscu. W przypadku udostępniania urządzenia innym osobom, należy również przekazać niniejszą instrukcję montażu. t W przypadku zgubienia niniejszej instrukcji, należy się skontaktować z firmą Sartorius w celu uzyskania dodatkowego egzemplarza lub pobrać najnowszą wersję dokumentu ze strony: www.sartorius.com Wskazówki dotyczące zastosowań / wsparcia technicznego Informacje dla użytkownika Symbole ostrzegawcze/piktogramy z rodzajem zagrożenia OSTRZEŻENIE! Ten symbol sygnalizuje niebezpieczeństwa, które z dużym prawdopodobieństwem doprowadzą do śmierci lub ciężkich obrażeń, jeśli nie podejmie się środków zaradczych. Środki bezpieczeństwa Wytyczne i wskazówki ogólne Ten symbol wskazuje na niebezpieczeństwa prowadzące do średnich lub lekkich obrażeń, jeśli nie zostaną podjęte środki zaradcze. PRZESTROGA! UWAGA Adresy kontaktowe, pod którymi można uzyskać informacje dotyczące użytkowania urządzenia, oraz wsparcie techniczne można znaleźć na stronie http://www.sartorius.com Symbol wskazuje na niebezpieczeństwa skutkujące szkodami materialnymi. Symbol ten sygnalizuje przydatne informacje i porady. – Waga spełnia wymogi europejskich norm i dyrektyw w zakresie bezpieczeństwa i kompatybilności elektromagnetycznej.* Niewłaściwe użytkowanie lub obchodzenie się z urządzeniem może jednakże przyczynić się do jego uszkodzenia lub spowodować uszczerbek na zdrowiu. Niewłaściwe użytkowanie lub obsługa wagi, tj. użytkowanie niezgodne z niniejszą instrukcją spowoduje utratę prawa do zgłaszania roszczeń na podstawie gwarancji udzielonej przez producenta. – Personel jest zobowiązany do zapoznania się z niniejszą instrukcją, w tym z wytycznymi dotyczącymi bezpieczeństwa. – W przypadku wykorzystywania urządzenia w systemach i w warunkach, w których panują bardziej restrykcyjne wymogi bezpieczeństwa, należy przestrzegać wymogów i przepisów obowiązujących w danym kraju. – Urządzenie należy przechowywać w miejscu łatwo dostępnym. * = Zob. „Specyfikacja“, strona 65 Instrukcja montażu i obsługi Secura, Quintix, Practum 59 Zagrożenie wybuchem Nie używać urządzenia w pobliżu materiałów grożących wybuchem. Rozpoczęcie pracy OSTRZEŻENIE! UWAGA Podczas czynności montażowych waga musi być odłączona od źródła zasilania przez cały czas trwania czynności montażowych. Upewnić się, że napięcie znamionowe określone na zasilaczu jest identyczne z napięciem prądu w lokalnej sieci. Rozpakowywanie urządzenia i zawartość zestawu Wskazówki dotyczące motażu OSTRZEŻENIE! UWAGA UWAGA OSTRZEŻENIE! Nie używać wagi, jeżeli jej obudowa lub zasilacz, w tym wszelkie połączenia, są uszkodzone. Niezwłocznie odłączyć uszkodzone urządzenie od źródła zasilania, wyjmując wtyczkę. Nie wystawiać wagi, zasilacza ani akcesoriów dostarczanych przez firmę Sartorius na działanie wysokich lub niskich temperatur, oparów agresywnych substancji chemicznych, wilgoci, wstrząsów, drgań ani silnego pola elektromagnetycznego. Przestrzegać warunków obsługi urządzenia opisanych w specyfikacji! Informacje dotyczące montażu: Użytkownik ponosi wyłączną odpowiedzialność z tytułu dokonywania jakichkolwiek modyfikacji urządzenia i podłączania przewodów lub urządzeń innych niż dostarczane przez firmę Sartorius. Informacji na temat jakości działania urządzenia firma Sartorius udziela na żądanie. Dopuszcza się stosowanie urządzeń peryferyjnych dostarczanych wyłącznie przez firmę Sartorius. Postępować zgodnie ze stopniem ochrony wagi i zasilacza! Nie dopuścić, aby do urządzenia wniknął jakikolwiek płyn. Stopień ochrony określa możliwość użycia urządzenia w różnych warunkach otoczenia (wilgoć, ciała obce). Przed czyszczeniem zasilacza lub wagi: Odłączyć urządzenie od źródła zasilania. OSTRZEŻENIE! UWAGA Obudowę wagi może otwierać wyłącznie personel przeszkolony przez firmę Sartorius. Nie otwierać obudowy zasilacza. t Otworzyć opakowanie i bardzo ostrożnie obchodzić się ze wszystkimi elementami urządzenia. t Po rozpakowaniu urządzenia natychmiast sprawdzić, czy nie posiada ono żadnych zewnętrznych uszkodzeń. y W razie stwierdzenia jakichkolwiek uszkodzeń, postępować zgodnie z wytycznymi określonymi w rozdziale Dbanie o urządzenie i konserwacja. y Zachować wszystkie elementy oryginalnego opakowania na wypadek konieczności transportu urządzenia w przyszłości. Odłączyć wszystkie kable przed transportem urządzenia! W skład urządzenia wchodzą: Komponenty Waga z osłoną Wagi precyzyjne Działka wagi: 0,1 mg 10 mg, 0,1 g, i 1 g Osłona przeciwpodmuchowa 9 9 – Szalka: d 90 mm 9 – – Szalka: d 120 mm – 9 – Szalka: d 180 mm – – 9 Podstawa szalki 9 9 9 Płytka ochronna – – 9 Osłona przeciwpodmuchowa szalki (tylko Secura) 9 – – Zasilacz z wtyczką typową dla danego kraju 9 9 9 Osłona robocza 9 9 9 Osłona przeciwpyłowa 9 9 – Instrukcja montażu i obsługi 9 9 9 Instrukcja użytkowania 9 9 9 Montaż wagi Modele Secura: Ostrzeżenie dotyczące montażu i obsługi urządzenia: W przypadku stłuczenia szkła istnieje ryzyko uszkodzenia ciała jego odłamkami. PRZESTROGA! Przewody ułożyć w miejscach, w których nie stwarzają one ryzyka przypadkowego potknięcia. PRZESTROGA! Postępować zgodnie z dodatkowymi informacjami dotyczącymi bezpieczeństwa i zagrożeń wymienionymi w kolejnych rozdziałach instrukcji. Użytkowanie zgodne z przeznaczeniem Waga o wysokiej rozdzielczości może być używana wyłącznie w laboratoriach lub w innych pomieszczeniach, w których panują normalne warunki atmosferyczne. Została ona zaprojektowana do precyzyjnego określania masy materiałów znajdujących się w stanie ciekłym, półciekłym i stałym oraz materiałów sproszkowanych. Do każdego rodzaju materiałów należy używać odpowiednich pojemników. 60 Instrukcja montażu i obsługi Secura, Quintix, Practum 1 mg Modele Quintix i Practum: Waga z osłoną przeciwpodmuchową t Zamontować wymienione części w następującej kolejności: – Robocza osłona przeciwpyłowa – Obrócić blokadę osłony przeciwpodmuchowej do pozycji „unlocked .“ – Umieścić osłonę przeciwpodmuchową (1) na wadze. Uwaga: Przytrzymać rozpórki osłony przeciwpodmuchowej obiema rękami. – Przesunąć drzwiczki boczne do tyłu. – Obrócić blokadę osłony do pozycji „locked .“ – Umieścić osłonę szalki (2), pierścień centrujący* (3), podstawę szalki (4), i szalkę (5) oraz płytkę przeciwpodmuchową* (6) na wadze. Uwaga: Informacje dotyczące czyszczenia osłony przeciwpodmuchowej znajdują się w rozdziale Dbanie o urządzenie i konserwacja, strona 64. * = tylko w modelach z działką 0,1 mg Polski Rozpoczęcie pracy Podłączanie zasilania (zasilanie) Montaż zasilacza Montaż wagi Wkładanie (lub wyjmowanie) paneli szklanych 1) Trzymając za tylną krawędź, pociągnąć obudowę osłony przeciwpodmuchowej ku górze i zdemontować ją. OSTRZEŻENIE! Użycie niewłaściwej wtyczki może być przyczyną śmiertelnego porażenia prądem i uszkodzenia urządzenia. Adaptera tego nie wkładać nigdy samodzielnie (bez zasilacza) do gniazdka (niebezpieczeństwo porażenia prądem). t Użyć odpowiedniego adaptera do zasilacza. 2) Wsunąć trzy panele szklane do prowadnic osłony maksymalnie ku przodowi. 3) Następnie zamontować obudowę osłony przeciwpodmuchowej. Obudowa osłony przeciwpodmuchowej musi zatrzasnąć się w odpowiedniej pozycji. Waga bez osłony przeciwpodmuchowej t t Zamontować wymienione części w następującej kolejności: A Wersje adaptera zasilacza: Woreczek Region/kraj Woreczek Region/kraj a) przezroczysty Europa/UE (poza Wielką Brytanią) e) czarny Indie 1) Robocza osłona przeciwpyłowa (nie przedstawiono na rysunku) b) żółty Wielka Brytania f) turkusowy RPA c) niebieski USA, Chiny, Japonia g) zielony Korea 2) Zamontować płytkę przeciwpodmuchową i przekręcić ją w kierunku przeciwnym do ruchu wskazówek zegara do momentu, aż zostanie zablokowana w pożądanej pozycji. 3) Zamontować podstawę szalki (1) i szalkę (2). d) czerwony Australia h) różowy Brazylia i) biały Argentyna Wybór odpowiedniego miejsca Opakowanie modułu zasilacza 6971790 z adapterami g), h) oraz i) opisane jest jako 98671791. t Wcisnąć (1) i przesunąć (2) odpowiedni adapter (A) ) w otwór modułu zasilacza (B). Adapter musi zostać zablokowany w odpowiedniej pozycji Wyjmowanie/wymienianie adaptera t Odbezpieczyć (1) i wyjąć (2) adapter. Wybrać odpowiednie miejsce instalacji: – Umieścić urządzenie na stabilnej i równej powierzchni, która nie jest narażona na drgania (np. stół z blatem kamiennym). – Zawsze zapewniać łatwy dostęp do urządzenia. Wybrać miejsce, które nie jest narażone na niekorzystny wpływ: – wysokiej temperatury (grzejnik lub światło słoneczne) – silnych strumieni powietrza z otwartych okiem, drzwi lub systemów klimatyzacyjnych – drgań podczas ważenia – miejsc o dużym natężeniu ruchu (personelu) – nadmiernej wilgotności – pół elektromagnetycznych Aklimatyzacja Po przeniesieniu urządzenia do pomieszczenia, w którym panuje zdecydowanie wyższa temperatura, para wodna może skraplać się na jego zimnych powierzchniach. Aby zapobiec wystąpieniu kondensacji pary wodnej, pozostawić urządzenie odłączone od sieci w nowym miejscu na okres około dwóch godzin. Podłączanie zasilania/bezpieczeństwo – Używać tylko oryginalnych zasilaczy firmy Sartorius Zasilacz posiada stopień ochrony IP40 zgodnie z normą EN 60529/IEC 60529. – Upewnić się, że napięcie określone na tabliczce znamionowej producenta odpowiada napięciu przesyłanemu w lokalnej sieci. – Jeżeli napięcie lub adapter zasilacza nie są zgodne z obowiązującymi w danym kraju normami, należy o tym fakcie poinformować najbliższe przedstawicielstwo firmy Sartorius. – Zasilanie musi być podłączone w sposób zgodny z obowiązującymi w danym kraju przepisami. Instrukcja montażu i obsługi Secura, Quintix, Practum 61 t 1) Najpierw podłączyć przewód zasilacza do gniazda umieszczonego w tylnej części wagi. t 2) Następnie, podłączyć zasilacz do gniazdka elektrycznego (główne zasilanie). Instrukcja użytkowania w metrologii prawnej Dodatkowe elementy wyświetlacza: – Linia metrologiczna z dodatkowymi informacjami na temat minimalnego obciążenia (Min) i działki legalizacyjnej (e) Symbol ostrzeżenia informujący o obliczonych wartościach, ujemnych wartościach brutto lub wartościach mniejszych niż minimalne obciążenie (SQmin). Przygotowanie do pracy 0 y Aby osiągnąć optymalne rezultaty, urządzenie musi rozgrzewać się przez około 30 minut od chwili podłączenia do źródła zasilania. Dopiero po tym czasie urządzenie osiągnie wymaganą temperaturę roboczą. Menu „Ustawienia“ W przypadku wag przeznaczonych do stosowania w metrologii prawnej niektóre funkcje i ustawienia nie są dostępne. Specyfikacja interfejsu (wyjście danych) Ustawienia „PC – SBI“ oraz „USB RS232 SBI“ do identyfikacji cyfr nie zostały zalegalizowane do stosowania z metrologii prawnej: W ustawieniu „SBI“ automatyczna identyfikacja cyfr wyświetlacza nie została zalegalizowana do stosowania w metrologii prawnej. Odpowiednie pomiary i ustawienia muszą być dokonywane z użyciem urządzeń peryferyjnych. Ważenie podszalkowe 30 Waga zalegalizowana o klasie dokładności k przeznaczona do stosowania w metrologii prawnej musi rozgrzewać się przez przynajmniej 60 minut od momentu podłączenia do źródła zasilania. Poziomowanie Poziomowanie wagi kompensuje pochyłości i nierówności powierzchni, na której jest montowana. Waga musi być idealnie wypoziomowana, aby zapewnić spójne i powtarzalne wyniki ważenia. Informacja: Waga musi być ponownie poziomowana i kalibrowana po każdej zmianie miejsca montażu. Modele Secura: Po wyświetleniu komunikatu „LEVEL“ wagę należy wypoziomować. t Upewnić się, że na szalce nie znajduje się żadne obciążenie. t Dotknąć przycisk „LEVEL“ Gniazdo do haka podszalkowego znajduje się w spodniej części wagi. Zamontować osłonę przeciwpodmuchową. t Otworzyć klapkę znajdującą się w spodniej części wagi. Uwaga: W celu wykonania tej czynności, położyć wagę na jednej ze ścian bocznych, ale nie opierać jej o szalkę. t Próbkę zawiesić np. na druciku, na wypuście. t Postępować zgodnie z instrukcjami wyświetlanymi na wyświetlaczu. Modele Quintix oraz Practum: 62 t Regulować położenie wagi dwiema stopkami w sposób przedstawiony na ilustracji do momentu, aż pęcherzyk powietrza znajdzie się w środku wskaźnika poziomu. – Pęcherzyk powietrza na godzinie 12: obracać stopki w kierunku ruchu wskazówek zegara. – Pęcherzyk powietrza na godzinie 3: obracać lewą stopkę w kierunku ruchu wskazówek zegara, a prawą w kierunku przeciwnym. – Pęcherzyk powietrza na godzinie 6: obracać obie stopki w kierunku przeciwnym do ruchu wskazówek zegara. – Pęcherzyk powietrza na godzinie 9: obracać lewą stopkę w kierunku przeciwnym do ruchu wskazówek zegara, a prawą w kierunku zgodnym z ruchem wskazówek. Instrukcja montażu i obsługi Secura, Quintix, Practum Po zakończeniu używania gniazda do ważenia podszalkowego, ponownie zamknąć pokrywę, aby podmuchy powietrza nie miały wpływu na wyniki ważenia. Gniazdo do ważenia podszalkowego nie może być otwierane ani używane w wagach wykorzystywanych w metrologii prawnej. Zabezpieczenie antykradzieżowe t W razie potrzeby możliwe jest zamontowanie w tylnej części wagi zabezpieczenia typu Kensington. t Wagę można również zabezpieczyć przed kradzieżą przy pomocy, na przykład, łańcucha i kłódki. Polski t Obrócić blokadę osłony przeciwpodmuchowej do pozycji „unlocked“. Przenoszenie wagi t Następnie wyjąć osłonę przeciwpodmuchową z wagi. Przed transportem przełączyć urządzenie na tryb standby, następnie odłączyć wtyczkę i zdjąć szalkę oraz jej podstawę. Przenoszenie wagi na krótkich odległościach w laboratorium Unikać stłuczenia szklanej komory, wstrząsów i drgań: PRZESTROGA! Nigdy nie podnosić ani nie przenosić wagi, trzymając za jej osłonę przeciwpodmuchową. t Umieścić dolną część opakowania w kartonie. t Umieścić następujące części w dolnej części opakowania: – Osłona przeciwpodmuchowa – Waga – Płyta podstawowa – Panele boczne – Górna część osłony t Chwycić wagę od spodu, podnieść ją i przenieść w pożądane miejsce. A h B t Włożyć szalkę i podstawę szalki w otwór przedstawiony na rysunku po lewej: – A = Szalka i podstawa szalki o średnicy 120 mm – B = Szalka i podstawa szalki o średnicy 90 mm Waga musi być poziomowana i kalibrowana po każdej zmianie miejsca. Transportowanie wagi h h Przed transportem wagi, należy ją przełączyć w tryb uśpienia (zob. poprzednia strona), a następnie odłączyć od źródła zasilania. W trakcie transportu używać oryginalnego opakowania. W razie potrzeby opakowanie można zamówić w centrum obsługi klienta firmy Sartorius. Modele Secura: 1 2 3 4 5 6 Modele Quintix iPractum: 1 2 3 4 t Owinąć panele szklane w materiał ochronny t Zdemontować następujące części z wagi: – Pierścień przeciwpodmuchowy (1) w przypadku modeli z działką 0,1 mg – Szalka (2) – Podstawa szalki (3) – Pierścień centrujący (4) w przypadku modeli z działką 0,1 mg – Płytka przeciwpodmuchowa (5) – Wyjąć panele szklane z osłony przeciwpodmuchowej (6): zob. następny rozdział „Dbanie o urządzenie i konserwacja“. t – – – – Zdemontować następujące części z wagi: Szalka (1) Podstawa szalki (2) Płytka przeciwpodmuchowa (3) Wyjąć panele szklane z osłony przeciwpodmuchowej (4): zob. następny rozdział „Dbanie o urządzenie i konserwacja“. t Umieścić zasilacz z pudełka tekturowego w materiale ochronnym. t Umieścić górną część opakowania na elementach urządzenia. t Następnie umieścić zapakowaną wagę w opakowaniu tekturowym i zapieczętować opakowanie. Instrukcja montażu i obsługi Secura, Quintix, Practum 63 A) Zdjąć panele boczne: 1) Lekko unieść tylną część paneli bocznych i wyjąć je z prowadnic. Dbanie o urządzenie i konserwacja Obsługa Aby zapewnić ciągłą dokładność pomiarów wagi, zalecamy wykonywanie czynności serwisowych w odstępach nie większych niż 12 miesięcy. Sartorius Service oferuje umowy serwisowe przewidujące zindywidualizowane okresy międzyserwisowe. Certyfikat wzorcowania powinien być wystawiany w ramach każdej sesji konserwacyjnej. Kontrole bezpieczeństwa zasilacza i jego połączeń muszą być wykonywane z określoną częstotliwością przez wykwalifikowanego elektryka (np. co 2 lata). UWAGA B) Zdjąć górną część osłony: 1) Trzymając za tylną krawędź, unieść i pociągnąć obudowę osłony przeciwpodmuchowej. Naprawy Naprawy mogą być wykonywane wyłącznie przez przeszkolonych serwisantów. Naprawy wykonywane przez nieprzeszkolone osoby powodują unieważnienie gwarancji i mogą skutkować wystąpieniem poważnych zagrożeń dla użytkownika oraz niedokładnych pomiarów. W celu naprawy wagi należy skontaktować się z Sartorius Service lub dystrybutorem sprzęty firmy Sartorius. Podczas przeprowadzania napraw urządzenie musi być odłączone od źródła zasilania. Odłączyć przewód od źródła zasilania. Naprawy mogą być wykonywane wyłącznie przez przeszkolonych serwisantów firmy Sartorius. 2) Pociągnąć do tyłu i wyjąć górną, szklaną pokrywę osłony. 3) Następnie wymienić obudowę osłony przeciwpodmuchowej. Obudowa osłony przeciwpodmuchowej musi zostać zablokowana w odpowiedniej pozycji. Czyszczenie wagi Czyszczenie panelu sterowania Aby uniknąć przypadkowej zmiany ustawień podczas czyszczenia wyświetlacza, przełączyć urządzenie w tryb czuwania. t Dotknąć przycisk „Menu“, aby wybrać odpowiednie ustawienie. t Po dotknięciu przycisku E, wyświetlacz wyłączy się. t Aby ponownie włączyć wyświetlacz: Wybrać j w lewym dolnym rogu wyświetlacza. Czyszczenie obudowy Odłączyć urządzenie od źródła zasilania: Wyjąć zasilacz z gniazdka. W razie potrzeby odłączyć kabel do przesyłu danych. OSTRZEŻENIE! Nigdy nie otwierać obudowy wagi ani zasilacza. Części, które się w nich znajdują nie mogą być czyszczone, naprawiane, ani wymieniane przez użytkownika. PRZESTROGA! – Upewnić się, że żaden płyn ani pył nie dostanie się do wnętrza wagi lub zasilacza. – Wyjąć płytę podstawową, podstawę szalki oraz szalkę z osłony przeciwpodmuchowej. – Nigdy nie używać środków czyszczących, które zawierają rozpuszczalniki lub składniki ścierne, ponieważ mogłyby one nieodwracalnie uszkodzić urządzenie. Modele Secura i Quintix: t Elementy pokrywy i dolnej obudowy wagi wykonane z tworzywa sztucznego zostały pokryte specjalną substancją, która pozwala na czyszczenie ich z użyciem acetonu. UWAGA Nie używać acetonu ani agresywnych środków czyszczących do czyszczenia następujących części: panel sterowania, wtyczka sieciowa, interfejs, etykiety, plomba legalizacyjna oraz inne części wykonane z tworzywa sztucznego. t Po zakończeniu czyszczenia wytrzeć wagę suchą i miękką szmatką. OSTRZEŻENIE! 64 Zanieczyszczone urządzenie: – Ryzyko dla zdrowia, jakie stanowi zanieczyszczenie produktu pozostałościami innych produktów i drobnoustrojami. – Ryzyko dla zdrowia spowodowane substancjami biologicznymi i mikrobiologicznymi. – Przestrzegać wytycznych dotyczących czyszczenia urządzenia. – Dokładnie sprawdzić, czy urządzenie zostało prawidłowo wyczyszczone. Instrukcja montażu i obsługi Secura, Quintix, Practum Po zakończeniu czyszczenia urządzenia, zamontować poszczególne elementy w odwrotnej kolejności: zob. rozdział „Rozpoczęcie pracy – Montaż wagi”, strona 61. C) Zdjąć przedni i tylny panel: Szczegółowe informacje na temat montażu można znaleźć w Instrukcji obsługi, która jest dostępna w wersji elektronicznej na stronie www.sartorius.com – „Service Center Downloads“. Utylizacja Opakowanie zostało wykonane z ekologicznych materiałów, które można wykorzystać jako surowce wtórne. Jeżeli opakowanie nie jest już dłużej potrzebne, można je oddać do punktu unieszkodliwiania odpadów zgodnie z przepisami danego kraju. W Niemczech materiały te można zutylizować w systemie VfW (numer kontraktu D-59101-2009-1129). Urządzeń, w tym wyposażenia i baterii, nie wolno pozbywać się z odpadami komunalnymi. Należy je poddać recyklingowi podobnie jak inne urządzenia elektroniczne. Aby uzyskać więcej informacji na temat możliwości unieszkodliwiania i recyklingu odpadów, należy skontaktować się z lokalnym serwisem. Współpracę w zakresie unieszkodliwiania odpadów na terenie UE prowadzimy z partnerami wymienionymi na stronie internetowej: 1) Otworzyć stronę http://www.sartorius.com. 2) Wybrać w zakładkę „Services“. 3) Następnie wybrać sekcję „Information on Disposal“. 4) Adresy lokalnych punktów zbiórki odpadów Sartorius znajdują się w plikach PDF, które można pobrać ze strony internetowej. h Firma Sartorius nie przyjmuje urządzeń zanieczyszczonych materiałami niebezpiecznymi (zanieczyszczenia ABC) ani w celu ich naprawy, ani unieszkodliwiania. Adresy punktów serwisowych: Szczegółowe informacje na temat adresów punktów, w których możliwe jest dokonanie naprawy lub pozbycie się urządzenia można uzyskać na stronie internetowej (www.sartorius.com) lub w dziale Sartorius Service. Polski Deutsch Specyfikacja Dane ogóle Dane charakterystyczne dla modelu na stronie 80 Zasilacz Zasilacz Sartorius 6971790 wraz z adapterami typowymi dla różnych państw Napięcie wejściowe 100 – 240 V~, ±10%, 50 – 60 Hz, 0.2 A Napięcie wyjściowe 15 V DC, ± 5%, 530 mA (max.) / 8 W (max.): 0 do +40°C i 15 V DC, ± 5%, 330 mA (max.) / 5 W (max.): 0 do +50°C Inne dane Zabezpieczenie klasy II zgodne z normą EN/IEC 60950-1, do 3000 m n.p.m, ochrona IP40 zgodna z normą EN/IEC 60529 Waga Zasilanie Tylko przez moduł zasilacza firmy Sartorius 6971790 Napięcie wejściowe 12,0–15,0 V DC Pobór mocy 2 W (zazwyczaj) Warunki otoczenia Te parametry mają zastosowanie wyłącznie w następujących warunkach: Środowisko Wyłącznie do użytku w pomieszczeniach Temperatura otoczenia * od +10°C do +30°C Zdolność do pracy Gwarantowana pomiędzy +5°C a +45°C Przechowywanie i transport od –10°C do +60°C Wysokość do 3000 m n.p.m Wilgotność względna ** od 15% do 80% w temperaturze do 31°C, wilgotność względna bez kondensacji, zmniejszająca się liniowo do 50% w temp. 40°C i 20% w temp. 50°C Bezpieczeństwo urządzeń elektrycznych zgodnie z normą EN 61010-1 / IEC 61010-1 Wymagania bezpieczeństwa dotyczące elektrycznych przyrządów pomiarowych, automatyki i urządzeń laboratoryjnych Część 1: Wymagania ogólne Kompatybilność elektromagnetyczna zgodnie z normą EN 61326-1 / IEC 61326-1 Wyposażenie elektryczne do pomiarów, sterowania i użytku w laboratoriach Wymagania dotyczące kompatybilności elektromagnetycznej – Część 1: Wymagania ogólne Zdefiniowana odporność na zakłócenia Przystosowane do użytku na obszarach przemysłowych Emisja zakłóceń Klasa B (przystosowane do użytku na obszarach zamieszkanych i na obszarach podłączonych do sieci niskiego napięcia zasilającej również budynki mieszkalne). W związku z tym urządzenie może być używane na obu obszarach. Wyposażenie standardowe Jednostki ważenia 1) gram, kilogram, karat, funt, uncja, uncja troy, tael (Hong Kong), tael (Singapur), tael (Tajwan), gran, pennyweight, miligram, części na funt (ppp), tael (Chiny), momme, karat austriacki, tola, baht, mesghal i Newton Dostępne programy modele Secura: liczenie, ważenie procentowe, określanie gęstości, wartość szczytowa, ważenie dynamiczne, ważenie kontrolne, mieszanie, sumowanie, statystyki, przeliczanie, SQmin, i identyfikatory modele Quintix: liczenie, ważenie procentowe, określanie gęstości, wartość szczytowa, ważenie dynamiczne, ważenie kontrolne, mieszanie, sumowanie, statystyki, przeliczanie jednostek modele Practum: liczenie, ważenie procentowe, określanie gęstości, wartość szczytowa, ważenie dynamiczne, ważenie kontrolne Wagi z modelu CE zalegalizowane do użycia w metrologii prawnej spełniają wymogi dyrektywy Parlamentu Europejskiego i Rady 2009/23/WE, normy EN 45501:1992 oraz OIML R76:2006 * Aby dowiedzieć się więcej na temat wykorzystania wagi w metrologii prawnej zgodnie z wymogami UE, należy zapoznać się z informacjami dotyczącymi wagi. ** W przypadku wykorzystania wagi w metrologii prawnej zgodnie z wymogami UE, zastosowanie mają przepisy prawa. 1 ) Ograniczone w przypadku modeli zalegalizowanych Instrukcja montażu i obsługi Secura, Quintix, Practum 65 Índice Símbolos Índice . . . . . . . . . . . . . . . . . . . . . . . . . . . . . . . . . . . . . . . . . . . . . . . Informações ao usuário . . . . . . . . . . . . . . . . . . . . . . . . . . . . . . . . . . Precauções de segurança. . . . . . . . . . . . . . . . . . . . . . . . . . . . . . . . . Uso pretendido . . . . . . . . . . . . . . . . . . . . . . . . . . . . . . . . . . . . . . . . 66 66 66 67 Introdução. . . . . . . . . . . . . . . . . . . . . . . . . . . . . . . . . . . . . . . . . . . . Desembalagem e equipamento fornecido . . . . . . . . . . . . . . . . . . . . . Instalando a balança. . . . . . . . . . . . . . . . . . . . . . . . . . . . . . . . . . . . . Escolhendo um local. . . . . . . . . . . . . . . . . . . . . . . . . . . . . . . . . . . . . Ligação elétrica . . . . . . . . . . . . . . . . . . . . . . . . . . . . . . . . . . . . . . . . Período de aquecimento . . . . . . . . . . . . . . . . . . . . . . . . . . . . . . . . . . Nivelamento. . . . . . . . . . . . . . . . . . . . . . . . . . . . . . . . . . . . . . . . . . . Pesagem abaixo da balança . . . . . . . . . . . . . . . . . . . . . . . . . . . . . . . Dispositivo de trava antirroubo . . . . . . . . . . . . . . . . . . . . . . . . . . . . . 67 67 67 68 68 69 69 69 69 Movendo a balança . . . . . . . . . . . . . . . . . . . . . . . . . . . . . . . . . . . . . Transportando a balança . . . . . . . . . . . . . . . . . . . . . . . . . . . . . . . . . Cuidado e manutenção . . . . . . . . . . . . . . . . . . . . . . . . . . . . . . . . . . Limpando a balança . . . . . . . . . . . . . . . . . . . . . . . . . . . . . . . . . . . . . Descarte . . . . . . . . . . . . . . . . . . . . . . . . . . . . . . . . . . . . . . . . . . . . . 70 70 71 71 71 Especificações . . . . . . . . . . . . . . . . . . . . . . . . . . . . . . . . . . . . . . . . . Dados gerais. . . . . . . . . . . . . . . . . . . . . . . . . . . . . . . . . . . . . . . . . . . Dados específicos do modelo . . . . . . . . . . . . . . . . . . . . . . . . . . . . . . Declaração de conformidade da CE sobre compatibilidade eletromagnética . . . . . . . . . . . . . . . . . . . . . . . 71 71 80 h Informações e sugestões úteis Observações sobre o uso em metrologia legal Observações sobre a operação do dispositivo Os seguintes símbolos são usados nestas instruções: t Indica uma ação necessária y Descreve o que acontece depois que você executa uma etapa específica Execute as etapas na ordem especificada: 1. Primeira ação 2. Segunda ação 3. ... – Indica um item em uma lista Convenções usadas nestas instruções: – Os números destas instruções são baseados em balanças “padrão”. Nas balanças certificadas para uso em metrologia legal, algumas telas e relatórios podem divergir ligeiramente destes números. Quando isto for significativo para a operação, as diferenças serão explicadas no texto. 85 Sobre estas instruções de instalação Outros documentos Além destas instruções de instalação, um manual do usuário do dispositivo atualizado também está disponível como arquivo PDF que pode ser baixado do site da Sartorius na web: www.sartorius.com Para ler e imprimir o arquivo PDF você precisa do Acrobat Reader, que pode ser baixado gratuitamente do site da Adobe na web (www.adobe.com). t Leia cuidadosamente estas instruções de instalação antes de colocar o equipamento em operação pela primeira vez. Observe as instruções de segurança. t Estas instruções de instalação são parte importante do produto. Mantenha estas instruções em um local seguro. Se você der o dispositivo para outras pessoas usarem, entregue-lhes estas instruções de instalação também. t Se estas instruções de instalação forem perdidas, contate a Sartorius para uma substituição ou baixe o manual mais recente de nosso site na web: www.sartorius.com Recomendações sobre aplicações / assistência técnica Informações ao usuário Símbolos de Aviso / Perigo AVISO! CUIDADO! IMPORTANTE! Estas instruções identificam perigos, com uma alta probabilidade de causar morte ou lesões graves, se não forem evitados. Os endereços de contato para obter recomendações de aplicação e nosso suporte técnico podem ser encontrados on-line em http://www.sartorius.com. Precauções de segurança Diretivas e instruções gerais Estas instruções identificam perigos, que podem resultar em ferimentos leves ou moderados, se não forem evitados. Estas instruções identificam perigos com o risco de danos à propriedade. – Esta balança atende as diretivas e normas da UE sobre segurança elétrica e compatibilidade eletromagnética.* Porém, seu uso ou manipulação indevido pode resultar em danos e/ou ferimentos. Qualquer uso ou operação da balança indevido, ou seja, de maneira não consistente com as instruções, resultará na invalidade de todas as reivindicações nos termos da garantia do fabricante. – O pessoal de operação deve ter lido e compreendido estas instruções de instalação, incluindo as instruções de segurança. Estas instruções identificam perigos com o risco de danos materiais. – No caso do uso em sistemas e condições ambientes com maiores requisitos de segurança, observe os requisitos e disposições aplicáveis em seu país. – Sempre mantenha o livre acesso ao equipamento e à balança. Qualquer trabalho de instalação ou operação da balança indevido, ou seja, de maneira não consistente com as instruções deste manual, resultará na invalidade de todas as reivindicações nos termos da garantia do fabricante. * = Consulte “Especificações”, página 72 66 Instruções de instalação e operação Secura, Quintix, Practum Português AVISO! Risco de explosão! Não use este equipamento em áreas de risco onde houver materiais explosivos presentes. Introdução IMPORTANTE! IMPORTANTE! Certifique-se de que a tensão nominal impressa no adaptador de CA seja idêntica à tensão de sua rede elétrica local. Informações de instalação AVISO! IMPORTANTE! IMPORTANTE! AVISO! AVISO! IMPORTANTE! Não opere a balança se seu alojamento ou adaptador de CA, incluindo todas as conexões, estiver danificado. Desconecte imediatamente o dispositivo danificado puxando o conector da tomada. Não exponha a balança, seu adaptador de CA ou os acessórios fornecidos pela Sartorius a temperaturas extremas, vapores químicos agressivos, umidade, choques, vibração, ou campos eletromagnéticos fortes. Observe as condições de operação descritas nas Especificações! Informações de instalação: O operador é o único responsável por qualquer modificação no equipamento e pela conexão de qualquer cabo ou equipamento não fornecido pela Sartorius. Informações sobre qualidade operacional são disponibilizadas pela Sartorius mediante solicitação. Só use periféricos fornecidos pela Sartorius. Não comprometa o tipo de proteção de IP e o adaptador de CA da balança. Não permita a penetração de líquidos. O tipo de proteção indica a adequação dos aparelhos para diversas condições ambientais (umidade, detritos). Antes de limpar o adaptador de CA ou a balança: Desconecte-a da rede de energia elétrica. A balança só pode ser aberta por pessoal especializado treinado pela Sartorius. Não abra o adaptador de CA. A balança deve ser desconectada da rede elétrica durante todo o trabalho de montagem. Desembalagem e equipamento fornecido t Abra a embalagem, certificando-se de descartar cuidadosamente todas as partes. t Imediatamente após a desembalagem do dispositivo, verifique se há qualquer dano externo. y Se qualquer dano for encontrado, proceda conforme as instruções dadas no capítulo de Cuidado e Manutenção. y Guarde todas as partes da embalagem original para uso em transportes futuros. Não deixe cabos conectados durante o transporte! As seguintes peças são incluídas no equipamento fornecido: Balanças Componentes Balança com de precisão protetor contra correntes de ar Capacidade de leitura: 0,1 mg 1 mg 10 mg, 0,1 g, e 1g Protetor contra correntes de ar 9 9 – Prato de pesagem: d 90 mm 9 – – Prato de pesagem: d 120 mm – 9 – Prato de pesagem: d 180 mm – – 9 Suporte do prato 9 9 9 Disco de proteção – – 9 Protetor do prato contra correntes de ar (exclusivo da Secura) 9 – – Adaptador de CA com tomada específica do país 9 9 9 Cobertura em uso 9 9 9 Guarda-pó 9 9 – Instruções de instalação e operação 9 9 9 9 9 9 Guia de aplicação Instalando a balança Perigos no local de instalação e durante a operação CUIDADO! CUIDADO! Risco de ferimentos causados por corte nas arestas do vidro em caso de vidro quebrado. Coloque os cabos de modo que eles não representem perigo de tropeçar. Observe as informações adicionais sobre segurança e perigos nos capítulos seguintes. Uso pretendido Esta balança de alta resolução se destina exclusivamente ao uso em laboratórios e recintos fechados sob condições atmosféricas normais. Ela foi desenvolvida especificamente para a determinação exata da massa de materiais em forma sólida, líquida, em pasta ou em pó. Recipientes apropriados devem ser usados com cada tipo de material de amostra. Eles são projetados para uso exclusivamente em recintos fechados e sob condições atmosféricas normais. Modelos Secura: Balança com protetor contra correntes de ar t Instale as peças a seguir na ordem indicada: – Cobertura do guarda-pó em uso – Gire a trava do protetor contra correntes de ar para a posição “destravada .” – Instale o protetor contra correntes de ar (1) na balança. Obs.: Use ambas as mãos para segurar os tirantes superiores do protetor contra correntes de ar. – Mova as portas laterais para trás. – Gire a trava do protetor contra correntes de ar para a posição “travada .” – Instale o disco de proteção (2), o anel centralizador* (3), o suporte do prato (4), o prato de pesagem (5) e o anel do Modelos Quintix e Practum: protetor* (6) na balança. Obs.: Para obter informações sobre como limpar o protetor contra correntes de ar, consulte o capítulo de Cuidado e Manutenção, página 71. * = só para modelos com capacidade de leitura de 0,1 mg Instruções de instalação e operação Secura, Quintix, Practum 67 Introdução Conexão de energia (fonte de alimentação) Instalando a balança Inserindo (ou removendo) painéis de vidro 1) Segurando-a por sua borda traseira, levante a cobertura do protetor contra correntes de ar e remova-a. Montagem do adaptador de CA AVISO! Usar adaptadores de energia errados pode resultar em choque elétrico fatal e danos ao equipamento. Nunca conecte o adaptador de energia desconectado do adaptador de CA na tomada (perigo de choque elétrico). t Use o adaptador de energia certo para sua rede elétrica. 2) Empurre o três painéis de vidro na guia do protetor contra correntes de ar até o fim de seu curso. 3) Então reinstale a cobertura do protetor contra correntes de ar. Ao fazê-lo, a cobertura do protetor contra correntes de ar deve se travar em sua posição. Balança sem protetor contra correntes de ar t Instale as peças a seguir na ordem indicada: 1) Cobertura do guarda-pó em uso (não está na imagem) 2) Instale o disco de proteção e gire-o no sentido anti-horário até ele se encaixar com firmeza em sua posição. 3) Instale o suporte do prato (1) e o prato de pesagem (2). Escolhendo um local Selecione o local certo: – Posicione o dispositivo sobre uma superfície estável e uniforme que não seja exposta a vibrações (de pesos de referência por exemplo). – Mantenha o acesso ao dispositivo sempre livre. Escolha um local não sujeito às seguintes influências negativas: – Calor (aquecedor ou luz solar direta) – Correntes de ar de janelas abertas, sistemas de AC e portas – Vibrações durante a pesagem – Áreas de trânsito intenso (pessoal) – Umidade excessiva – Campos eletromagnéticos Aclimatação A condensação de umidade pode se formar nas superfícies de um dispositivo frio quando ele é levado para uma área significativamente mais quente (umidificação). Para evitar os efeitos da condensação, condicione a balança durante aproximadamente duas horas deixando-a desconectada da tomada, antes de conectar a balança novamente à rede elétrica. 68 Instruções de instalação e operação Secura, Quintix, Practum A Versões do adaptador de CA: Saco Região/País Saco Região/País a) transparente Europa/UE (exceto para o Reino Unido) e) preto Índia b) amarelo f) turquesa África do Sul Reino Unido c) azul EUA, China e Japão g) verde Coreia d) vermelho Austrália h) rosa Brasil i) branco Argentina A embalagem do módulo 6971790 do adaptador de CA com os adaptadores de linha g), h), e i) está etiquetada como 6971791. t Empurre (1) e encaixe (2) o adaptador de energia (A) ) correto para sua rede elétrica na abertura do módulo do adaptador de CA (B). Ao fazê-lo, o adaptador de CA precisa ficar travado em sua posição. Removendo/reconectando o adaptador de CA t Destrave (1) o adaptador de CA e então retire-o (2). Conexão de energia/Precauções de segurança – Só use adaptadores de CA originais da Sartorius. O adaptador de CA tem uma classificação de IP de IP40 conforme a norma EN 60529/ IEC 60529. – Certifique-se de que a tensão nominal impressa na plaqueta de identificação do fabricante seja idêntica à de sua rede elétrica local. – Se a tensão nominal ou o formato da tomada do adaptador de CA não corresponder ao padrão de seu país, informe o representante da Sartorius mais próximo. – A ligação elétrica deve ser feita conforme os regulamentos aplicáveis em seu país. Português t 1) Em primeiro lugar, conecte o adaptador de CA ao soquete na parte de trás da balança. t 2) Em seguida conecte o adaptador de CA à tomada da parede (rede elétrica). Instruções para uso em metrologia legal Elementos adicionais da tela: – Linha de metrologia com informações adicionais sobre carga mínima (Min) e intervalo da escala de certificação (e) Símbolo de aviso para indicar os valores calculados, valores brutos negativos ou valores menores que a quantidade mínima de amostra (SQmin). Período de aquecimento 0 y Para assegurar resultados precisos, a balança deve ser aquecida durante pelo menos 30 minutos após a conexão inicial com a rede elétrica. Só depois deste período de tempo o dispositivo alcança a temperatura operacional necessária. 30 Menu de configuração “Configurações”: Nas balanças certificadas para uso em metrologia legal, todas as funções e configurações estão disponíveis. Especificação da interface (Saída de dados) Configurações “PC - SBI” e “USB RS232 SBI” para a identificação de dígitos não certificados para uso em metrologia legal: Na configuração “SBI” não há identificação automática de dígitos em tela não certificados para uso em metrologia legal. As medições ou configurações correspondentes devem ser feitas no dispositivo periférico. Pesagem abaixo da balança Quando uma balança certificada com classe de precisão k para uso em metrologia legal é conectada à rede elétrica, ela deve ser aquecida durante pelo menos uma hora antes da operação. Há uma porta para um gancho de pesagem embaixo da balança, situada no fundo da balança. Instale um protetor contra correntes de ar. Nivelamento O nivelamento da balança compensa a inclinação ou a falta de uniformidade no local de instalação. A balança deve estar perfeitamente horizontal para assegurar resultados de pesagem consistentes e reprodutíveis. Informações: A balança precisa ser renivelada e ajustada cada vez que seu local de instalação for mudado. Modelos Secura: Quando “Nível” for exibido na tela, você deve nivelar a balança. t Certifique-se de que o prato pesagem esteja descarregado. t Toque em “LEVEL!” t Levante a placa de cobertura do fundo da balança. Aviso: Ao fazê-lo ponha a balança de lado, mas não no lado do prato de pesagem. t Amarre uma corda (ou algo semelhante) na amostra e pendure-a no gancho entalhado. t Siga as instruções mostradas na tela interativa. Modelos Quintix e Practum: t Gire os dois pés como mostrado na ilustração até a bolha de ar ficar centralizada dentro do círculo do indicador de nível. – Bolha de ar na posição 12 horas: gire os dois pés no sentido horário. – Bolha de ar na posição 3 horas: gire o pé esquerdo no sentido horário e o pé direito no sentido anti-horário. – Bolha de ar na posição 6 horas: gire os dois pés no sentido anti-horário. – Bolha de ar na posição 9 horas: gire o pé esquerdo no sentido anti-horário e o pé direito no sentido horário. Se a porta de pesagem embaixo da balança não estiver mais sendo usada, feche a abertura com a tampa novamente para que os resultados da pesagem não sejam afetados adversamente pelas correntes de ar. A porta de pesagem embaixo da balança não pode ser aberta ou usada em balanças empregadas para metrologia legal. Dispositivo de trava antirroubo t Se necessário, uma fechadura Kensington pode ser instalada no ponto de fixação na parte de trás da balança. t A balança também pode ser fixada no local de instalação com uma corrente e cadeado, por exemplo. Instruções de instalação e operação Secura, Quintix, Practum 69 t Gire a trava do protetor contra correntes de ar para a posição “destravada.” Movendo a balança t Em seguida, remova o protetor contra correntes de ar da balança. Antes de mover a balança, em primeiro lugar mude para o modo de espera, em seguida, desligue o conector de alimentação e retire o prato de pesagem e o suporte do prato da balança. Movendo a balança em distâncias curtas no laboratório CUIDADO! Evite quebra de vidros, choques e vibrações: Nunca levante e transporte a balança segurando-a pelo seu protetor contra correntes de ar. t Segure a balança por baixo do alojamento, erga-a cuidadosamente, e transporte-a até seu novo local. h t Insira a parte inferior da embalagem na caixa. t Coloque as seguintes peças na parte inferior da embalagem: – Protetor contra correntes de ar – Balança – Placa base – Painéis laterais – Cobertura de vidro superior A B t Insira o prato de pesagem e o respectivo suporte do prato na abertura mostrada na imagem da esquerda: – A = Prato de pesagem e suporte do prato com 120 mm de diâmetro – B = Prato de pesagem e suporte do prato com 90 mm de diâmetro A balança precisa ser renivelada e ajustada cada vez que seu local de instalação for mudado. Transportando a balança h h Antes do transporte, passe a balança para o modo de espera (consulte a próxima página) e então puxe o fio da tomada. Use a embalagem original para o transporte. A embalagem pode ser encomendada através do Centro de Serviços Sartorius se necessário. Modelos Secura: 1 2 3 4 5 6 Modelos Quintix e Practum: 1 2 3 4 70 t Coloque a embalagem protetora sobre os painéis de vidro t Remova as seguintes partes da balança: – Anel do protetor (1) para modelos com capacidade de leitura de 0,1 mg – Prato de pesagem (2) – Suporte do prato (3) – Anel centralizador (4) para modelos com capacidade de leitura de 0,1 mg – Disco de proteção (5) – Remova os painéis de vidro do protetor contra correntes de ar (6): consulte o próximo capítulo, “Cuidado e Manutenção.” t Remova as seguintes partes da balança: – Prato de pesagem (1) – Suporte do prato (2) – Disco de proteção (3) – Remova os painéis de vidro do protetor contra correntes de ar (4): consulte o próximo capítulo, “Cuidado e Manutenção.” Instruções de instalação e operação Secura, Quintix, Practum t Insira o adaptador de CA da caixa de papelão na embalagem protetora. t Coloque a parte superior da embalagem sobre as partes do dispositivo. t Em seguida, coloque a balança embalada na caixa de papelão e feche a caixa. Português A) Remova os painéis laterais: 1) Erga suavemente os painéis laterais da parte traseira e puxe-os para trás e para fora. Cuidado e manutenção Manutenção Para assegurar a precisão contínua de sua balança, recomendamos fazer a manutenção programada pelo menos uma vez por ano. O Serviço da Sartorius oferece diferentes contratos de serviços de manutenção com intervalos de manutenção personalizados para atender suas necessidades. Um certificado de calibração deve ser emitido como parte de cada sessão de manutenção. Inspeções de segurança do adaptador de CA e suas conexões devem ser executadas a intervalos apropriados por um eletricista qualificado (por exemplo a cada 2 anos). IMPORTANTE! B) Remova a cobertura de vidro superior: 1) Segurando-a por sua borda traseira, puxe a cobertura do protetor contra correntes de ar para cima e remova-a. Reparos Os trabalhos de reparo só devem ser realizados por técnicos de manutenção treinados. Reparos executados por pessoas não treinadas invalidam a garantia e podem resultar em riscos consideráveis para o usuário, fazendo com que a balança produza resultados inexatos. Contate o Serviço da Sartorius ou um concessionário da Sartorius para fazer reparos apropriados em sua balança. O dispositivo deve ser desconectado durante o trabalho de reparo. Desconecte o cabo de alimentação. Os trabalhos de reparo só devem ser realizados por técnicos de manutenção treinados pela Sartorius. 2) Remova a cobertura de vidro superior puxando-a para trás. 3) Então reinstale a cobertura do protetor contra correntes de ar. Ao fazê-lo, a cobertura do protetor contra correntes de ar deve se travar em sua posição. Limpando a balança Limpando o painel de controle Coloque a tela no modo de espera para evitar modificar as configurações de operação durante a limpeza. t Toque a tecla “Menu” para passar para a seleção de aplicação. t Se então você tocar em E, a tela é desligada. t Para ligar a tela novamente: Selecione j no canto inferior esquerdo da tela. Limpando o alojamento da balança AVISO! CUIDADO! Desconecte-a da rede elétrica: Desconecte o adaptador de CA da rede elétrica. Se necessário, desconecte o cabo de dados conectado à balança. Nunca abra a balança ou o adaptador de CA. As peças contidas ali não podem ser limpas, consertadas ou substituídas pelo operador. – Certifique-se de que nenhum líquido ou pó penetre na balança ou no adaptador de CA. – Remova a placa base, o suporte do prato e o prato de pesagem do protetor contra correntes de ar. – Nunca use agentes de limpeza que contenham solventes ou ingredientes abrasivos, porque eles podem acabar danificando o equipamento. Modelos Secura e Quintix: t As peças de plástico superior e inferior do alojamento da balança são revestidas com uma substância especial que permite que elas sejam limpas com acetona. IMPORTANTE! Não limpe as peças a seguir com acetona ou agentes de limpeza agressivos: painel de controle, conector da rede elétrica, interface de dados, etiquetas, selo de certificação ou qualquer outra peça de plástico. t Passe um pano seco e macio na balança após a limpeza. AVISO! Equipamento contaminado: Risco para a saúde causado pela contaminação do produto devido a depósitos no produto e coleta de resíduos com contaminação microbiana. Risco para a saúde causado por substâncias biológicas e microbiológicas. Observe as especificações de limpeza. Examine os resultados da limpeza com atenção. Após a limpeza, remonte os componentes na ordem inversa: consulte o capítulo “Introdução - Instalando a balança”, página 68. C) Remova os vidros dianteiro e traseiro: Informações detalhadas sobre as etapas de montagem podem ser encontradas no Manual de Usuário, que pode ser baixado on-line. Visite www.sartorius.com – “Service Center Downloads”. Descarte A embalagem é feita com materiais amigáveis ao meio ambiente que podem ser utilizados como matérias-primas secundárias. Se você não precisar mais desta embalagem, leve-a até suas instalações locais de descarte e reciclagem de resíduos de acordo com os regulamentos aplicáveis em seu país. Na Alemanha, você pode descartar este material usando o sistema duplo VfW (número de contrato D-59101-2009-1129). O equipamento, incluindo seus acessórios e baterias, não deve ser descartado no lixo doméstico comum, e deve ser reciclado de forma semelhante aos dispositivos elétricos e eletrônicos. Para obter informações adicionais sobre as opções de descarte e reciclagem, contate seu pessoal de serviço local. Os parceiros listados no seguinte site da web podem ser usados para descartes dentro da UE: 1) Vá até http://www.sartorius.com. 2) Selecione o resumo abaixo de “Service.” 3) Em seguida selecione “Information on Disposal.” 4) Os endereços dos contatos de descarte locais da Sartorius podem ser encontrados nos arquivos PDF desta página web. h A Sartorius não recebe equipamentos contaminados com materiais perigosos (contaminação ABC) seja para reparos ou descarte. Endereço dos serviços de assistência técnica para descarte: Consulte nosso site na web (www.sartorius.com) ou contate o Departamento de Serviço da Sartorius para obter informações mais detalhadas sobre os endereços de assistência técnica ou o descarte de seu dispositivo. Instruções de instalação e operação Secura, Quintix, Practum 71 Especificações Dados gerais Dados específicos do modelo na página 80 Adaptador de CA Adaptador de CA Sartorius 6971790 junto com adaptador para o conector da rede elétrica específico do país Primário 100 – 240 V~, ±10%, 50 – 60 Hz, 0,2 A Secundário 15 V CC, ± 5%, 530 mA (max.) / 8 W (max.): 0 a +40°C e 15 V CC, ± 5%, 330 mA (max.) / 5 W (max.): 0 a +50°C Dados adicionais Classe de proteção II conforme a EN/IEC 60950-1, até 3000 m acima do nível do mar, IP40 conforme a EN/IEC 60529 Balança Fonte de alimentação Só através do adaptador de CA Sartorius módulo 6971790 (pacote 6971790 ou 6971791) Tensão de entrada 12,0 - 15,0 V CC Consumo de energia 2 W (típico) Condições ambientes Estas especificações se aplicam sob as seguintes condições ambientes: Ambiente Para uso exclusivo em recinto fechado Temperatura ambiente * +10°C a +30°C Capacidade operacional Garantida entre +5°C e +45°C Armazenamento e transporte -10°C a +60°C Altitude Até 3000 m acima do nível do mar Umidade relativa ** De 15% a 80% para temperaturas até 31°C, sem condensação, caindo linearmente até 50% de umidade relativa a 40°C e 20% a 50°C Segurança de Equipamento Elétrico Conforme a norma EN 61010-1 / IEC 61010-1 Requisitos de segurança para equipamento elétrico de medição, controle e uso em laboratório Parte 1: Requisitos gerais Compatibilidade eletromagnética Conforme a norma EN 61326-1 / IEC 61326-1 Equipamento elétrico de medição, controle e uso em laboratório Requisitos de EMC - Parte 1: Requisitos gerais Imunidade à interferência definida Adequado para uso em áreas industriais Emissão de interferência Classe B (adequado para uso em áreas residenciais e áreas conectadas a uma rede de baixa tensão que também alimenta edifícios residenciais). O dispositivo pode portanto ser usado em ambas as áreas. Equipamento padrão Unidades de peso selecionáveis 1) Grama, quilograma, quilate, libra, onça, onça troy, tael de Hong Kong, tael de Singapura, tael de Taiwan, grão, pennyweight, miligrama, partes por libra, tael da China, mommes, quilate austríaco, tola, baht, mesghal e Newton Programas de aplicação disponíveis Modelos Secura: contagem, pesagem em porcentagem, determinação de densidade, retenção de pico, condição instável, verificação de pesagem, mistura, totalização, estatísticas, conversão, SQmin e Identificadores Modelos Quintix: contagem, pesagem em porcentagem, determinação de densidade, retenção de pico, condição instável, verificação de pesagem, mistura, totalização, estatísticas, conversão Modelos Practum: contagem, pesagem em porcentagem, determinação de densidade, retenção de pico, condição instável, verificação de pesagem As balanças modelo CE certificadas para uso em metrologia legal atendem os requisitos da Diretiva do Conselho 2009/23/EC, EN 45501:1992 e OIML R76:2006. * Para uso em metrologia legal conforme os requisitos da UE, consulte as informações sobre a balança. ** Para uso em metrologia legal conforme requisitos da UE, os regulamentos legais se aplicam. 1 ) Limitado aos modelos certificados 72 Instruções de instalação e operação Secura, Quintix, Practum 한국어 목차 기호 목차 . . . . . . . . . . . . . . . . . . . . . . . . . . . . . . . . . . . . . . . . . . . . . 사용자 정보 . . . . . . . . . . . . . . . . . . . . . . . . . . . . . . . . . . . . . . . 안전 수칙 . . . . . . . . . . . . . . . . . . . . . . . . . . . . . . . . . . . . . . . . . 용도 . . . . . . . . . . . . . . . . . . . . . . . . . . . . . . . . . . . . . . . . . . . . . 73 73 73 74 시작하기. . . . . . . . . . . . . . . . . . . . . . . . . . . . . . . . . . . . . . . . . . ዅၿ ዚૺ ෟ ஏဧම . . . . . . . . . . . . . . . . . . . . . . . . . . . . . . . . . ႔ါ ໕ᆳ . . . . . . . . . . . . . . . . . . . . . . . . . . . . . . . . . . . . . . . . . ၁ᆳ ໓ሳ . . . . . . . . . . . . . . . . . . . . . . . . . . . . . . . . . . . . . . . . . ႖ૺ છ . . . . . . . . . . . . . . . . . . . . . . . . . . . . . . . . . . . . . . . . . ဲෞ࿕ གྷ . . . . . . . . . . . . . . . . . . . . . . . . . . . . . . . . . . . . . . . ༘ዀ ໕ႜ . . . . . . . . . . . . . . . . . . . . . . . . . . . . . . . . . . . . . . . . . ႔ါ ඓ ิᅎ ᆬႜ . . . . . . . . . . . . . . . . . . . . . . . . . . . . . . . . . ෮ხ ၻ ၿᆳ . . . . . . . . . . . . . . . . . . . . . . . . . . . . . . . . . 74 74 74 75 75 76 76 76 76 저울 이동 . . . . . . . . . . . . . . . . . . . . . . . . . . . . . . . . . . . . . . . . . 저울 운송 . . . . . . . . . . . . . . . . . . . . . . . . . . . . . . . . . . . . . . . . . 관리 및 정비 . . . . . . . . . . . . . . . . . . . . . . . . . . . . . . . . . . . . . . ႔ါ ᅯ . . . . . . . . . . . . . . . . . . . . . . . . . . . . . . . . . . . . . . . . . 폐기 . . . . . . . . . . . . . . . . . . . . . . . . . . . . . . . . . . . . . . . . . . . . . 77 77 78 78 78 제품 규격 . . . . . . . . . . . . . . . . . . . . . . . . . . . . . . . . . . . . . . . . . ၩ వၦሽ . . . . . . . . . . . . . . . . . . . . . . . . . . . . . . . . . . . . . . . කసถ వၦሽ . . . . . . . . . . . . . . . . . . . . . . . . . . . . . . . . . . . . . ႖ၴኒ ႕ጁໜ ఝዽ EC ႕ጁໜ ໓࿎ . . . . . . . . . . . . . . . . . . . . . . . . . . . . . . . . . . . . . 78 78 80 85 기타 문서 h 이 설치 설명서와 별도로 이 장치에 대한 최신 사용자 설명서 PDF 파일을 다음 Sartorius 웹사이트에서 다운 로드할 수 있습니다. www.sartorius.com PDF ኒၩၕ ၪધ ၨ༄ዻඓ Acrobat Readerਜ਼ ዶဠጁఁఋ. ၦ ይച૯ೱၔ ఋၗ Adobe ဿຫၦቼ ఋဪചዾ ༘ ၰཀఁఋ. www.adobe.com 사용자 정보 경고 / 위험 기호 ၁ጔዑགྷ ཅᅰ႕ືጄವ௴ຫ൫၁ጔ ၁ጔዑགྷ თವ௴ઠුዽཅᅰ႕ືጄ h ၉ဧዽ ႜพဉႮ࿎ ฅ႕ ઢ ဧ ఝዽ ᅒધ ຫጃ ၿᆳ ၵ ఝዽ ᅒધ ຫጃ ၦ ໕௴ ఋၗ ੪ၔ ૺጭਜ਼ ຫဧఁఋ. t ዶဠዽ Ⴎᆳ ຫጃၕ ረஔఁఋ. y ችႜ ఎઢ ཇགྷዽ ፎ ෧ແዻ௴ ઇ ఝጄ ໕ጁఁఋ. ఎઢ ხႜౘ ༚ച ཇጌጁఁఋ. 1. ᅭ ᄆ Ⴎᆳ ຫጃ 2. ᄆ Ⴎᆳ ຫጃ 3. ... – ඛഛ ၰ௴ ጃඛၕ ረஔఁఋ. ໕ ૯൜: – ၦ ໕ ૯൜ၔ “ૺมጨ” ႔ါၕ ૺაၒച ጁఁఋ. ฅ႕ ઢ ဧ གၨၕ ෦ၔ ႔ါၨ ઠဨ ၩิ ಀ༺ዯഅၦဉ ൘ዅቼ ஏဧၦ ૯൜ ྾ ఋ ༘ ၰཀఁఋ. ၵ ఝጄ თဠዻఋඓ ጄఙ ᅍၦ႙ ఝዽ ໕ බૐਜ਼ စఁఋ. 설치 설명서 정보 t ၿᆳ ᅧၗ ຫဧዻૺ ႖ ၦ ໕ᆳ ໕ ၹ ၪ࿌พཊགྷ. ྦ႖ ༘ᆴၕ ಋ്ཊགྷ. t ၦ ໕ᆳ ໕௴ ႞ዜၡ თဠዽ ၩิၮఁఋ ྦ႖ዽ ၹ พશጄ ཊགྷ ၿᆳ ఋ൏ ຫဧၴ ბ ಕ௴ ၦ ໕ᆳ ໕ ጀନ ཊགྷ t ၦ ໕ᆳ ໕ ึཇዽ Sartorius ೢጄ ᆓਜ਼ച ૐዻ ఋၗ ဿຫၦቼ ᆊཅ ໕ ఋဪചዾ ༘ ၰཀఁఋ: www.sartorius.com 사용법 설명 / 기술 지원 ຫဧฅ ໕ ૺ༜ ხဴၕ ၁ዽ ೢᅧ http://www.sartorius.com ᅗྤย ༘ ၰཀఁఋ. 안전 수칙 가이드라인 및 일반 정보 – ၦ ႔ါၔ EU ხᆹ ႖ૺ ྦ႖ ෟ ႖ၴኒ ႕ጁໜ* ఝዽ ૬ગၕ ა༘ጁఁఋ ዻხൢ ၹජ ຫဧዻ ᆟዻඓ ኒ ವ௴ ືጄ ຫધਜ਼ ෧ແዾ ༘ ၰཀఁఋ ໕ ႞ఝച ಋ്ხ ྨધ ႔ါၕ ิ႕႗ዻ ຫဧዻ ဪဧዻඓ ႞Ⴎຫ พჭ ಋ൏ ක౷ ື ᅯૐਜ਼ ඳፉጷఁఋ – ຫဧၴ௴ ྦ႖ ༘ᆴၕ ዅጀጄ ၦ ໕ᆳ ໕ ၪધ ༙ხጄ ጁఁఋ ၁ጔዑགྷ ႁຮዳጄ၁ጔ – ధ ࿔ગዽ ྦ႖ ဠૐ Ⴎઁၦ ႕ဧ௴ གྷ༺ቋ ၁ ጹઠ ຫဧዻ௴ ઠဨ ጄఙ ਜ਼ ႕ဧ௴ ဠૐ Ⴎઁ ૬ႜၕ ა༘ጄ ጁఁఋ ႜพዑགྷ ၉ဧዽႜพෟ – ࿎႞ ၿᆳဉ ႔ါၕ ၴ၉ട ႚ૱ዾ ༘ ၰ௴ ືሲച ၉ხዻཊགྷ ၦ ໕ ႞ఝച ಋ്ხ ྨધ ႔ါၕ ิ႕႗ዻ ໕ᆳዻ ဪဧዻඓ ႞Ⴎຫ พჭ ಋ൏ ක౷ ື ᅯૐਜ਼ ඳፉጷఁఋ * = ኲၦხ79 ႞ዜ૬ગ ᅒႮ ໕ᆳ ෟ ຫဧ ໕ Secura, Quintix, Practum 73 폭발 위험 ၦ ၿᆳ ෧ໜ මჲၦ ၰ௴ ၁ጔዽ ၿ ຫဧዻხ ൠཊགྷ 시작하기 ၦ ႔ါ Ⴎ൝ ၵ࿕ၕ ዾ ಕ௴ ጃື ม໓ ႖ဴ ึ൘ጄ ጁఁఋ. AC ࿌ఢሽ ၰ௴ ႖ྮ ౾ၦ ጢხ ม໓ ႖ྮ ၩᆳዻ௴ხ ጸၨዻཊགྷ. 포장 풀기 및 내용물 설치 정보 છิ ዅጀጄ ዻဨჷ ವ௴ AC ࿌ఢሽਜ਼ ኒ ࿘ఋඓ ႔ါၕ ຫဧዻხ ൠཊགྷ. ყགྷ ኒ ၿᆳၡ ዯ૯ ຐྤ ႖ဴ ึ൘ዻཊགྷ. ႔ါၦ AC ࿌ఢሽ ವ௴ Sartorius ႞લዽ ิ ዜၕ ૰ዽ લગໜ ጷዼ ჭૺ ཀૺ ᆚગ ჰ ૺረ ੧എዽ ႖ၴૺၿ ிᆖགྷሠხ ൠཊ གྷ ႞ዜ ૬ગ ၵ Ⴎઁၕ ა༘ዻཊགྷ ! ໕ᆳ ႜพ: ၿᆳ ੭Ⴎዻ Sartorius ႞લዻხ ྨၔ ᇛၦ๓ၦ ၿᆳ છዻ௴ ઇၔ ຫဧၴၡ ఎె ᅙၭၮఁఋ. Sartorius ဠᅯዻඓ ၵ ዜჲ ఝ ዽ ႜพ ૐዾ ༘ ၰཀఁఋ. གྷ Sartorius ႞લዽ ต ၿᆳ ຫဧዻ ཊགྷ. ႔ါAC࿌ఢሽၡ18พጭ౾ၕა༘ዻཊགྷ ྵᅰਜ਼౹࿌ਜ਼ხྨዻཊགྷพጭ౾ၔ ఋ࿅ዽตጹઠཀၦමჲఝዽጄఙၿ ᆳၡ႕ጁໜၕዑགྷጁఁఋ AC ࿌ఢሽ ವ௴ ႔ါၕ ᅯዻૺ ႖: ዯ૯ ม໓ ႖ဴ ึ൘ዻཊགྷ. ၦ ႔ါၔ Sartorius ો၊ၕ ෦ၔ ႜང ๗༺ ჯ ဴൢ ༘ ၰཀఁఋ. AC ࿌ఢሽ ხ ൠཊགྷ . t ዅၿၕ ዚધ ක౷ ิዜၦ લ࿘௴ხ ၹ ະኺพཊགྷ. t ၿᆳ ዅၿၕ ዚધ ჯፎ ဘશື ኒౘ ၦ ၰ௴ხ અຫጁఁఋ. y ኒౘ ၦ ෧ઙඓ શ൘ ෟ ႜ๗ ఎဴ ႗ᅍ ჰጌዻཊགྷ. y თ ဪዾ ಕ ఝ๗ጄ ක౷ ิዜၕ ဴ೭ ዅၿხ พશጄ ཊགྷ. ဪዾ ಕ௴ ᇛၦ๓ၕ ାྤౠ ᅘച ொხ ൠཊགྷ! ႞લౘ ၿᆳ௴ ఋၗ ิዜၦ ዅጀ࿌ ၰཀఁఋ. ૐໜዜ ႔ါ (೭ይቼ ཇ ႜෘ ႔ါ (෮ዟൡ) ዅጀ) 0.1 mg 1 mg 10 mg, 0.1 g, 1 g ఎ၁: ೭ይቼ ཇ 9 ઢဧ አ: d 90 mm ઢဧ አ: d 120 mm 9 – 9 – – – – 9 – ઢဧ አ: d 180 mm አ ხხఝ 9 – 9 – 9 9 – 9 – AC ࿌ఢሽ ਜ਼ถ ႖ဴ ዯ૯ 9 9 9 ຫဧ ᇑ 9 9 9 ൿხ ᇑ 9 9 – ໕ᆳ ෟ ຫဧ ໕ 9 9 9 ຫဧ ྦஏ 9 9 9 ཇ ಀ༺ሙ አ ೭ይቼ ཇ (Securaൢ ጄఙ) – 9 저울 설치 장치의 설치 및 작동에 대한 경고 Secura 모델: ၉൘ਜ਼ ხඓ ၉൘ ක൘ ႗ఎิ ఋᆷ ၁ጔ ၦ ၰཀఁఋ. ᇛၦ๓ၕ ຫၦ ઃ ࿌ჲ ၁ጔၦ ࿖௴ ཊགྷ. ఋၗ ఎဴ ௴ ᆓਜ਼ ྦ႖ ෟ ၁ጔ ႜพ ა༘ዻཊགྷ. 용도 Quintix와 Practum 모델: ၦ ધึጄ ႔ါၔ ၩ ఝૺྮ ືሲၡ ཇጔཇ ཇஏൢ ຫဧዾ ༘ ၰཀఁఋ ྵᅰ ኲၦ༺ቼ ึ ધᅰ ጨሲ ႁഭၡ ჲ ၕ ႜጸᎁ ᆬႜዾ ༘ ၰഛ ችถᎁ ੭෧࿘ཀఁఋ ක౷ ၉ጨၡ ຽዯ ႁഭ ఝጄ ႕ጁዽ ဧૺ ຫဧጄ ጁఁఋ ၩ ఝૺྮ ືሲၡ ཇஏൢ ຫဧዻഛ ໕ઢ࿘ཀఁఋ 74 ໕ᆳ ෟ ຫဧ ໕ Secura, Quintix, Practum 저울(드래프트 실드(방풍막) 포함) t ఋၗ ิዜၕ ඛഛ ༚ ఝച ໕ᆳጁఁఋ. – ຫဧ ൿხ ᇑ – ೭ይቼ ཇ ၻ ၿᆳ “ዚ൜( )" ၁ᆳച ൝ఁఋ. – ႔ါ ೭ይቼ ཇ(1) ཀఁఋ. ᅒધ: ࿅ၒച ೭ይቼ ཇ ືఎ ხხఝ ၼཀఁఋ. – ൏ᄠ බၕ ౪ᄠၒച ီჯၮఁఋ. – ೭ይቼ ཇ ၻ ၿᆳ “ၻ( )" ၁ᆳച ൝ఁఋ. – ཇ ಀ༺ሙ(2), ሽൟ ൟ* (3), አ ხხఝ(4), ઢဧ አ(5), ೭ይቼ ൟ*(6)ၕ ႔ါ ໕ᆳጁఁఋ. 참고: ೭ይቼ ཇ ᅯ ෮ฅ ఝዽ ၴໞዽ ஏဧၔኲၦხ78 ၰ௴ “શ൘ ෟ ႜ๗" ఎဴၕ ᅒႮዻཊགྷ. * = ఎ၁ਜ਼ 0.1 mgၨ කసൢ ጄఙ 한국어 시작하기 전원 연결(전원 공급) AC 어댑터 조립체 저울 설치 AC࿌ఢሽဉึ൘ዻᇮቼ႖ဴዯ૯࿌ ఢሽິၮዻხൠཊགྷ႖၁ጔ 유리판 설치(제거) 1) ౪ᄠ ක൘ ၼၔ ືሲ ೭ ይቼ ཇ ᇑ ၁ച ఙખ ႞ ጁఁఋ. t ม໓ ႖ဴ ႕ጁዽ ႖ဴ ዯ૯ ࿌ఢሽ ຫဧዻཊགྷ. 2) ၉൘ን 3੭ ೭ይቼ ཇ ਜ਼ၦ ླᄠ ୵ଆხ ෘ࿌பཀఁఋ. 3) ૯ ఋၗ ೭ይቼ ཇ ᇑ ఋགྷ ໕ᆳጁఁఋ. ၦಕ ೭ይቼ ཇ ᇑ ਜ਼ ႞ၴ൘ ၻખ ጁఁఋ. 저울(드래프트 실드 없음) t ఋၗ ิዜၕ ඛഛ ༚ ఝച ໕ᆳጁఁఋ. A AC࿌ఢሽ႖" ฦብ ხਜ਼ ฦብ ხਜ਼ a) ၉ഀ ( ႞ဘ), ብ ฦብ e) ၨ b) ிೣ຺ ฦብ f) ஆྤይ൘ᆽ ᅯഛ຺ ฦብ લጷ c) ු g) ఝዽූ ீ຺ ฦብ 2) ཇ ಀ༺ሙ ໕ᆳዻધ ႞ၴ൘ ಎଇ ൘ਜ਼ ඓ ઃ൛ ಕଆხ གྷઢ ෮ጎၒച ൝ఁఋ. თෟၩม ኒೣ຺ฦብ d) ጭ ຺ ฦብ h) ๐ೡჲ ึጵ຺ ฦብ i) ྤ്ጚኊ ፼຺ ฦብ 3) አხხఝ(1)ဉઢဧአ(2)ၕ໕ᆳ ጁఁఋ ೡၨ࿌ఢሽg), h), i)ਜ਼ၰ௴AC࿌ఢሽක6971790ၡዅၿ ௴6971791ၦೡધዑགྷ࿌ၰཀఁఋ 1) ຫဧൿხᇑ૯൜௴ხ ྨၗ અႜ຺ ฦብ t ႖ဴ લૺ ዶဠዽ ႖ဴ ዯ૯ ࿌ఢሽ(A) AC ࿌ఢሽ ක(B)ച ്ધ(1) ෘ࿌ஔఁఋ(2). ၦഄ ዻ ඓ AC ࿌ఢሽਜ਼ ႞ၴ൘ ၻખ ጁఁఋ. 위치 선택 다음과 같이 올바른 설치 위치를 선택하십시오. – ၿᆳ ྦႜ႕ၦધ ዀሪዻધ ჰ ிᆖხ ྨ௴ ඓ ౹࿌ ઢဧ ෦ᆹఝ ໕ᆳዻཊགྷ. – ࿎႞ ၿᆳ ၴ၉ട ႚ૱ዾ ༘ ၰ௴ ືሲ ၉ხዻཊགྷ . – – – – – – ఋၗ ੪ၔ ྥጎၕ ෦ხ ྨ௴ ၿ ໓ሳዻཊགྷ. (ᎁሽ ವ௴ ჯຫ઼໓) ൚ ᅖබ ෮ གྷ༺ቋ බ ෧ແዻ௴ ቛዟ ઢ თ ෧ແዻ௴ ჰ ቛጌ(ຫ)ၦ ൣၔ ၿ ዽ ཀ ႖ၴૺၿ 풍화 작용 ၿᆳ ᅍਜ਼ဪ ಋዽ ၒച ခૺඓ ᅏ ዑඓ ཀૺ ၚ ᆔၦ ෧ແዾ ༘ ၰཀఁఋ. ၚᆔ ፉ ዳዻඓ ႖ဴ ዯ૯ ຐၔ ືሲച ྾ 2གྷ ྦ ႔ါၕ ືሲ Ⴎ႗ዽ ፎ ఋགྷ ዯ ૯ ႖ဴ ାཀఁఋ. AC 어댑터 제거/교체 t AC ࿌ఢሽ ዚ࿌(1) ึ൘ጁఁఋ (2). 전원 연결/안전 수칙 – གྷ ဴ೭ લౘ Sartorius AC ࿌ఢሽ ຫဧዻཊགྷ. ၦ AC ࿌ఢሽ௴ EN 60529/IEC 60529 ಋ൏ IP ౾ၦ IP40ၮఁ ఋ. – ႞Ⴎຫ ID ೡญ ၨ༄ౘ ႖ྮ ౾ၦ ጢხ ม໓ ႖ྮ ౾ ၩᆳዻ௴ხ ጸၨዻཊགྷ. – ླ ໕ዽ લ ႖ྮ ವ௴ AC ࿌ఢሽ ዯ૯ ໕ઢਜ਼ ጄఙ ਜ਼ၡ ૬ગ ൬ხ ྨၒඓ ਜ਼ଆဪ Sartorius ఝ൘႙ බၡዻཊགྷ. – ႖ဴ છၔ ጄఙ ਜ਼ ႕ဧ௴ ૬ႜၕ ಋೡ ጁఁఋ. ໕ᆳ ෟ ຫဧ ໕ Secura, Quintix, Practum 75 t 1) ൿ႔ AC ࿌ఢሽ ႔ါ ౮ඓ ၰ௴ ᇡ ାཀఁఋ. t 2) ૯ ఋၗ AC ࿌ఢሽ ด ᇮቼ (ม໓ ႖ྮ) છጁఁఋ. 법적 계량 용도에 대한 설명 추가 디스플레이 요소: – ᆊ ዻთ(Min) અჭ ༺ᇛၩ ગ(e) ఝዽ ᆓਜ਼ ႜพਜ਼ ௴ ઢ ೡၨ ઢຮዽ , ၗၡ ᆅઢ , ᆊ ຽዯ ༘(SQmin) ුൢၡ ၕ ረஏ௴ ઠધ ૺጭ. 설정 메뉴 "Settings": ฅ႕ ઢဧ ၨჭၕ ෦ၔ ႔ါ ௴ ၩิ ૺ ໕ႜၕ ၦဧዾ ༘ ࿖ཀఁఋ. 워밍업 시간 0 y ႜጸዽ છ ࿐ૺ ၁ጄ௴ ႔ါၕ ᅧ ၗ ႖ဴ ᇮቼ છዽ ፎ ᆊ 30ึ ྦ ဲෞ࿕ၕ གྷᇣ ጁఁఋ. ၦዽ གྷ ၦ ხൢ ၿᆳਜ਼ ዶဠዽ ၵ ఐጁఁఋ. 인터페이스 규격(데이터 출력) ฅ႕ ઢဧ ၨჭၕ ෦ხ ྨၔ ༟ၴ ངถၕ ၁ዽ “PC – SBI"ဉ “USB RS232 SBI" ໕ႜ: “SBI" ໕ႜ௴ ฅ႕ ઢဧ ၨჭၕ ෦ხ ྨၔ ಀ༺ዯഅၦ ༟ၴ ၴ ངถ ૺၦ ࿖ཀఁఋ. ጄఙ ᆬႜ ವ ௴ ໕ႜၔ ต ၿᆳ ጄ ጁఁఋ. 저울 밑면 부착 측정 30 ฅ႕ ઢ ဧၡ ႜጸ ౾ k ၨჭ ႔ါၕ ม໓ ႖ ဴ છዻ௴ ઠဨ ၵ ႖ ᆊ 1གྷ ྦ ဲෞ࿕ ၕ གྷᇣ ጁఁఋ. 수평 설정 ႔ါ ༘ዀ Ⴎ႗ၕ ቛጄ ૺါ࿌Ⴋ ኻዀዻხ ྨၔ ໕ ᆳ ၿ พႜጁఁఋ. ૭ၩዻધ ႁጢໜၦ ၰ௴ ઢ છ พၿዻඓ ႔ါၦ ဋดዻ ༘ዀၦ ࿌ ጁ ఁఋ. 주의:໕ᆳၿಕൠఋ໕ᆳ ၿ ಕൠ ఋ ႔ါၕ ఋགྷ ༘ዀ Ⴎ႗ጄ ጁఁఋ. Secura 모델: ಀ༺ዯഅၦ “Level”ၦ ዑགྷඓ ႔ါ ༘ዀၕ Ⴎ႗ጄ ጁఁఋ. t ઢဧ አ ྤඳ ઇ ხ ྤ ጁఁఋ. t “LEVEL!”ၕ ሽᆳጁఁఋ. ႔ါ ඓ ิᅎ ઢ ፎሙဧ ૐඅၦ ႔ါ ඓ ໕ᆳ࿌ ၰཀ ఁఋ. ೭ይቼ ཇ ໕ᆳጁఁఋ. t ఴ੭ ႔ါ ඓ ౹࿌൝ఁ ఋ. 경고: ၦഄ ዾ ಕ ႔ါၕ ౪ჵ࿌ ઢဧ አၕ ఌ ხ ધ ႔ါ ၕ ၒച ጠ ཀఁఋ. t ຽዯ ဉၦ࿌(ವ௴ ๗ཁዽ ઇ) ิᅎዽ ፎ ጲၦ ፎሙ ઃ࿌ ൯ఖఁఋ. t ࿅෮ጎ ಀ༺ዯഅၦ ௴ ხགྷ ஏဧၕ ಋఁఋ. ႔ါ ඓ ิᅎ ઢ ૐඅၕ ధ ၦື ຫဧዻხ ྨၕ ಕ௴ ఴ੭ ఋགྷ ఏၒཊགྷ. ૯೭ ᆬႜ છਜ਼ ቛዟၡ ጎၕ ෦ხ ྨཀఁఋ. Quintix와 Practum 모델: 76 t ૯൜ ઇᅧ લૺ ෮ါၦ ༘ ዀ ዑགྷૺ ဴၡ თཉ ౹࿌ ಕଆ ხ ༘ዀ Ⴎ႗ဧ ఋ൘ 2੭ ൝ఁ ఋ. – લૺ ෮ါၦ 12གྷ ၁ᆳ ၰၗ: ఋ൘ 2੭ གྷઢ ෮ጎၒച ൝ఁఋ. – લૺ ෮ါၦ 3གྷ ၁ᆳ ၰၗ: ယᄠ ఋ൘ གྷઢ ෮ጎၒച ൘ધ ൏ᄠ ఋ൘ གྷઢ ෮ጎၒച ൝ఁఋ. – લૺ ෮ါၦ 6གྷ ၁ᆳ ၰၗ: ఋ൘ 2੭ གྷઢ ෮ጎၒച ൝ఁఋ. – લૺ ෮ါၦ 9གྷ ၁ᆳ ၰၗ: ယᄠ ఋ൘ གྷઢ ෮ጎၒച ൘ધ ൏ᄠ ఋ൘ གྷઢ ෮ጎၒച ൝ఁఋ. ໕ᆳ ෟ ຫဧ ໕ Secura, Quintix, Practum ฅ႕ ઢဧ ႔ါ௴ ႔ါ ඓ ิᅎ ઢ ૐඅၕ ຫဧዾ ༘ ࿖ཀఁఋ. 도난 방지 잠금 장치 t ዶဠዻఋඓ ᇝཌቖ ၻ ၿᆳ ႔ါ ౮ඓၡ ધႜ႙ ໕ᆳዾ ༘ ၰཀఁఋ. t ವዽ ౹࿌ ᅰၨ ၻ ၿᆳ ຫဧጄ ႔ါၕ ໕ᆳ ၿ ધႜགྷ ሣ ༘ ၰཀఁఋ. 한국어 t ೭ይቼ ཇ ၻ ၿᆳ “ዚ൜" ၁ᆳച ൝ఁఋ. 저울 이동 t ૯ ఋၗ ႔ါ ൡၦ ႞ጁఁఋ. ႔ါၕခૺૺ႖ൿ႔ఝૺකച႖ጹዽፎ႖ဴᇑሽ ຐધઢဧአአხხఝ႔ါ႞ጁఁఋ 실험실에서 저울을 짧은 거리 이동 ၉൘ ኒ, ᆚગ, ჰ ၕ ዳዻཊགྷ. ႗ఝച ೭ይቼ ཇ ၼધ ႔ါၕ f ႔ါၕ౹࿌ ്ხൠཊགྷ t ዅၿႁၡ ྤ೭ᄠ ิึၕ ືၴ பཀఁఋ. t ఋၗ ิዜၕ ዅၿႁ ྤ೭ ᄠ ิึ பཀఁఋ. – ೭ይቼ ཇ – ႔ါ – ን – ຫၦ ኞ – ၁ᄠ ၉൘ ᇑ t ႔ါၕ ዻဨჷ ྤ೭ ၼધ Ⴎཉጄ ၁ച ౹࿌൚ ፎ ູ ၁ᆳച ခૺཊགྷ. A h B t ઢဧ አ አ ხხఝ ယᄠ ૯൜ ૐඅ ੜੜ ୶ဲபཀఁఋ. – A = ઢဧ አ አ ხხ ఝ, ხ 120 mm – B = ઢဧ አ አ ხხ ఝ, ხ 90 mm ໕ᆳ ၿ ಕൠఋ ႔ါၕ ఋགྷ ༘ዀ Ⴎ႗ጄ ጁఁఋ. 저울 운송 h h 운송 전에 저울을 대기 모드로 전환하고다음 페이지 참 조 참조) 플러그를 뽑으십시오. ဪዾ ಕ௴ ဴ೭ ႞લౘ ዅၿႁ ຫဧዻཊགྷ. ዶဠዻඓ ዅၿႁ Sartorius ๗༺ ሽ බዾ ༘ ၰཀఁఋ. Secura 모델: 1 2 3 4 5 6 Quintix와 Practum 모델: 1 2 3 4 t ኞሧ ኞ ၉൘ን ၁ ཀఁఋ. t 다음 부품을 저울에서 제거하십시오.. – ఎ၁ਜ਼ 0.1 mgၨ කసၡ ೭ ይቼ ൟ(1) – ઢဧ አ(2) – አ ხხఝ(3) – ఎ၁ਜ਼ 0.1 mgၨ කసၡ ሽ ൟ ൟ(4) – ཇ ಀ༺ሙ(5) – ೭ይቼ ཇ(6) ၉൘ንၕ ႞ ጁఁఋ. ఋၗ ௴ "શ൘ ෟ ႜ๗" ఎဴၕ ᅒႮዻཊགྷ. t – – – – 다음 부품을 저울에서 제거하십시오. ઢဧ አ(1) አ ხხఝ(2) ཇ ಀ༺ሙ(3) ೭ይቼ ཇ(4) ၉൘ንၕ ႞ ጁఁఋ. ఋၗ ௴ “શ൘ ෟ ႜ๗" ఎဴၕ ᅒႮዻཊགྷ. t AC ࿌ఢሽ ᆽพ ືၴ ଞஏ ኞሧ ኞ ୶ဲபཀఁఋ. t ዅၿႁ ၁ᄠ ิึၕ ၿᆳ ิዜ ၁ ཀఁఋ. t ૯ ఋၗ ዅၿዽ ႔ါၕ ືၴ பધ ືၴ ෘฦጁఁఋ. ໕ᆳ ෟ ຫဧ ໕ Secura, Quintix, Practum 77 A) 사이드 패널을 제거합니다. 1) ౪ᄠ ຫၦ ኞၕ ະະ ౹࿌൘ધ ౪ച ఙખ ႞ጁఁఋ. 관리 및 정비 서비스 ႔ါၦ ઢጄ ႜጸໜၕ ၉ხዻഛ ൢ౹ඓ ᆊ ൯ஶൠఋ ႜૺ ๗༺ ෦௴ ઇၦ Ⴙཀఁఋ. Sartorius ๗༺௴ ધ੮ၡ ဠૐ ຫጃ ൬ഛ ໕ઢౘ ႜ๗ ૺച ਜ਼ხ ๗༺ ઢ྾ ၕ ႞લጁఁఋ. ක౷ ႜ๗ ႜၡ ၩิച พႜ ၨჭਜ਼ ෧ጌఁఋ. AC ࿌ఢሽဉ ૯ છิ ఝዽ ྦ႖ અຫ ႜང ႖ૺ ૺ༜ၴਜ਼ ႕႗ዽ ૺച( ౹࿌ 2ஶൠఋ) ཇགྷጄ ጁఁఋ. B) 위쪽 유리 커버를 제거합니다. 1) ౪ᄠ ක൘ ၼၔ ືሲ ೭ይቼ ཇ ᇑ ၁ച ఙખ ೭ይቼ ཇ ᇑ ႞ጁఁఋ. 수리 ༘൘ ၵ࿕ၔ གྷ ો၊ၕ ෦ၔ ๗༺ ૺ༜ၴ ਜ਼ ཇགྷጄ ጁఁఋ. ો၊ၕ ෦ხ ྨၔ ຫၦ ༘ ൘ዻඓ พჭၦ ඳፉጷધ ຫဧၴ ືఙዽ ၁ ጔၦ ෧ແዾ ༘ ၰધ ႔ါၡ ᆬႜ છਜ਼ ิႜጸ ዻ ౙ ༘ ၰཀఁఋ. ൏ ႔ါ ༘൘ ၁ጄ Sartorius ๗༺ ሽ Sartorius ఝ൘႙ බၡ ዻཊགྷ. ༘൘ ၵ࿕ თ௴ ၿᆳ ዯ૯ ຐྤ ጁఁఋ. ႖ဴ ᇬ ຐၒཊགྷ. ༘൘ ၵ࿕ၔ གྷ Sartorius ો၊ၕ ෦ၔ ๗༺ ૺ༜ၴਜ਼ ཇ གྷጄ ጁఁఋ. 2) ၁ᄠ ၉൘ ᇑ ౪ച ఙખ ႞ጁఁఋ. 3) ૯ ఋၗ ೭ይቼ ཇ ᇑ ఋགྷ ໕ᆳጁఁఋ. ၦಕ ೭ይቼ ཇ ᇑਜ਼ ႞ၴ൘ ၻખ ጁఁఋ. 저울 청소 제어 패널 청소 ᅯ თ ၵ ໕ႜၦ ตઠ௴ ၩၕ ዳዻૺ ၁ጄ ಀ༺ዯഅၦ ఝૺ කച ႖ጹጁఁఋ. t “Menu” ሠ ሽᆳጄ ࿌ዯ൘ᇛၦ ໕ႜၒച ႖ ጹጁఁఋ. t ૯ ఋၗ E ሽᆳዻඓ ಀ༺ዯഅၦਜ਼ ଞჵఁఋ. t ಀ༺ዯഅၦ ఋགྷ ᇣඓ ಀ༺ዯഅၦ ൱ ྤ೭ ယᄠ j ૺጭ ໓ሳጁఁఋ. 저울 하우징 청소 ႖ဴ ᇮቼ ึ൘: AC ࿌ఢሽ ዯ૯ ม໓ ႖ဴ ຐཀఁఋ. ዶဠዻඓ ႔ါ છౘ వ ၦሽ ᇛၦ๓ၕ ึ൘ጁఁఋ. ႔ါၦ AC ࿌ఢሽ ხ ൠཊགྷ. ૺ ౹࿌ၰ௴ ิዜၔ ຫဧၴਜ਼ ᅯዻ ༘ ൘ዻ ોᅰዾ ༘ ࿖ཀఁఋ. – ྵᅰ ൿხਜ਼ ႔ါၦ AC ࿌ఢሽച ၉ၮხ ྨ ዻཊགྷ . – ን, አ ხხఝ, ઢဧ አၕ ൡၦ ႞ጁఁఋ. – ၿᆳືགྷሣ༘ၰ௴ซቼൠකໜໜึၦጀ၉ౘໞ ᅨ႞௴႗ఝຫဧዻხൠཊགྷ. Secura와 Quintix 모델: t ႔ါ ዻဨჷၡ ዯೡ༺ኋ ၁ᄠ ྤ೭ᄠ ิึၔ ྤໞቖၕ ຫ ဧጄ ໞᅨዾ ༘ ၰഛ ች༘ මჲച ᇬኑၦ ࿌ ၰཀఁఋ. ఋၗ ิዜၔ ྤໞቖ ವ௴ લગໜ ໞᅨ႞ച ᅯ ዻხ ൠཊགྷ. ႞࿌ ኞ, ม໓ ዯ૯, వၦሽ ၨሽኲၦ༺, ೡญ, ၨჭ ෘฦႁ, ૺረ ዯೡ༺ኋ ิ ዜ. t ႔ါၕ ᅯዽ ፎ ิഀધ ൠ൏ ᅩၒച ྤஔఁఋ. 오염된 장치: – ႞ዜၦඓແໜᆹ႖මුແම ၶමಕබઁ੧ືၡ၁ጔၦ෧ແጁఁఋ – ແᅰමჲුແමමჲചၨዽઁ੧ືၡ၁ ጔၦ෧ແጁఁఋ – ᅯ༘ᆴა༘ዻཊགྷ – ᅯછඓෘᎁઅຫዻཊགྷ 78 ໕ᆳ ෟ ຫဧ ໕ Secura, Quintix, Practum ᅯ ፎ ૐໜዜၕ ఝ ༚ച Ⴎ൝ጁఁఋ. ኲၦხ 75 གྷၵዻૺ႔ါ໕ᆳ ఎဴၕᅒႮዻཊགྷ C) 앞쪽과 뒤쪽 유리를 제거합니다. Ⴎ൝ ఎઢ ఝዽ ືໞ ႜพ ຫဧၴ ໕ ᅗྤย ༘ ၰཀఁఋ. ၦ ໕௴ ೡၨ ఋဪചዾ ༘ ၰཀఁఋ. ጲኲၦხ(www.sartorius.com) “Service Center Downloads” ඈ௬ ໓ሳጁఁఋ. 폐기 ዅၿႁ௴ ၦᅍ ဴഭച ຫဧዾ ༘ ၰ௴ ጹઠ ᆵ ጷ႕ၨ ႁഭച ႞ၵఁఋ. ၦዽ ዅၿႁਜ਼ ధ ၦື ዶဠ ࿖ၒඓ ጄఙ ਜ਼ ႕ဧ௴ ૬ႜ ಋೡ ጢხ ႁጺဧ ವ௴ ૺම ᅧ൘ གྷ໕ച พஏཊགྷ. ెၩ௴ VfW ࿑ གྷ༺ቋ(ઢ྾ ጭ: D-59101-2009-1129)ၕ ຫဧጄ ၦ ႁഭ ᅧึዾ ༘ ၰཀఁఋ. ิዜ ሽ൘ ዅጀጄ ၦ ၿᆳ ၩ ૺමച ᅧึዻඓ ྦ එ ႖ ૺ/႖ၴ ႞ዜ ๗ཁዻ ႁጺဧጄ ጁఁఋ. ૺဉ ႁጺဧ ෮ฅ ఝዽ ၴໞዽ ஏဧၔ ጢხ ๗༺ కఙၴ බၡዻཊགྷ. ၉ഀ௴ ఋၗ ੪ၦ ဿຫၦቼ ૺම ጥഎ ࿕ᅰ ຫဧዾ ༘ ၰཀఁఋ. 1) ጲኲၦხ(http://www.sartorius.com)ച ၦጁఁఋ. 2) “Service” ဠ྾ၕ ໓ሳጁఁఋ. 3) ૯ ఋၗ “Information on Disposal”ၕ ໓ሳጁఁఋ. 4) ၦ ဿኲၦხ ጢხ Sartorius ૺම ࿕ᅰ ೢᅧਜ਼ PDF ኒ ၩച ႞લఁఋ. h Sartorius௴ ༘൘ဉ ᅧึ ౾ ක౷ ઠဨ ၉ጄ මჲച ౘ ၿ๗௴ ෦ხ ྨཀఁఋ(ABC ). 폐기 서비스 주소 ༘๗๗༺ೢᅧವ௴f ವ௴ ၿᆳ ૺ ఝዽ ၴໞዽ ஏဧ ၕ พඓ ဿຫၦቼ(www.sartorius.com) ᅒႮዻ Sartorius ๗༺ ิ බၡዻཊགྷ. 한국어 Deutsch 제품 규격 일반 데이터 කసถ వၦሽ, 80ኲၦხ AC 어댑터 Sartorius AC ࿌ఢሽ 6971790, ોጹང ਜ਼ถ ႖ဴ ዯ૯ ࿌ఢሽ ၩᅍ 100 – 240 V~, ±10%, 50 – 60 Hz, 0.2 A ၦᅍ 15 V DC, ± 5%, 530 mA(ᆊఝ) / 8 W(ᆊఝ): 0 ~ +40°C, 15 V DC, ± 5%, 330 mA(ᆊఝ) / 5 W(ᆊఝ): 0 ~ +50°C ૺረ వၦሽ EN/IEC 60950-1 ૺა พጭ ౾ II, ᆊఝ 3,000 m ጄ෧ ધ, EN/IEC 60529 ૺა IP40 저울 ႖ဴ લ Sartorius AC ࿌ఢሽ ක 6971790(ኞሠხ 6971790 ವ௴ 6971791)ၕ ቛጄൢ ၮഎ ႖ྮ 12.0~15.0 V DC ႖ဴ ๗ 2 W(ၩ) 주위 조건 ၦ ႞ዜ ૬ગၔ ఋၗ ੪ၔ ၁ Ⴎઁൢ ႕ဧఁఋ. ጹઠ ཇஏ ႖ဧ ၁ * +10°C ~ +30°C ၵ എ +5°C ~ +45°C ค၁ พჭ พશ ෟ ဪ –10°C ~ +60°C ધ ᆊఝ 3,000 m ጄ෧ ધ ືఝ ཀ ** ᆊఝ 31°Cଆხ 15% ~ 80%, ๗ၚᆔ, 40°C ືఝ ཀ 50%ଆხ ໓ጨ , 50°C 20%ച 전기 장치 안전 EN 61010-1 / IEC 61010-1 ૺა ᆬႜ, ႞࿌, ཇጔཇဧ ႖ૺ ၿᆳ ఝዽ ྦ႖ ဠૐ Ⴎઁ ႞1ิ: ၩ ဠૐ Ⴎઁ 전자기 적합성 EN 61326-1 / IEC 61326-1 ૺა ᆬႜ, ႞࿌, ཇጔཇဧ ႖ૺ ၿᆳ EMC ဠૐ Ⴎઁ – ႞1ิ: ၩ ဠૐ Ⴎઁ ໙ ఝዽ ஏໜ ૬ႜ ຮ࿕ ხ ຫဧዻૺ ႕ጁጀ ໙ ෮ᆖ ౾ B( ხ ဧ ઁම ႖എၕ લዻ௴ ႔႖ྮ ႖എ൫ છౘ ხ ႕ጁ). ಋೡ ၦ ၿᆳ௴ ხ ຫဧዾ ༘ ၰཀఁఋ. 표준 장치 ໓ሳዾ ༘ ၰ௴ ඳ ఎ၁ 1) ૯ೱ, ሣച૯ೱ, ᇅഁ, ኒဪ, ༺, ቼചၦ ༺, ጵᇳ ቇၩ, ཌਜ਼ዅ് ቇၩ, ఝൢ ቇၩ, ૯അၨ, ኲఁ်ၦቼ, ෘ൘૯ೱ, ኒቼ ኩ ኒဪ, თ ቇၩ, කඈ༺, ጭ ᇅഁ, ೡ, ቼ, ඈ, ௬ቾ ຫဧዾ ༘ ၰ௴ ࿌ዯ൘ᇛၦ ይച૯ೱ Secura 모델: ઢ༘, ኩቼ ઢ, ෘ ᆬႜ, ዳሙ ጰ, ุྦႜ ືሲ, ໓ถ ઢ, ጯጁ, ጁຮ, ቛઢ, ႖ጹ, SQmin, ངถၴ Quintix 모델: ઢ༘, ኩቼ ઢ, ෘ ᆬႜ, ዳቼ ጰ, ุྦႜ ືሲ, ໓ถ ઢ, ጯጁ, ጁຮ, ቛઢ, ႖ጹ Practum 모델: ઢ༘, ኩቼ ઢ, ෘ ᆬႜ, ዳቼ ጰ, ุྦႜ ືሲ, ໓ถ ઢ ฅ႕ ઢဧ ၨჭၕ ෦ၔ CE කస ႔ါၔ ၉ഀ ხᆹ 2009/23/EC, EN 45501:1992, OIML R76:2006ၡ ဠૐ Ⴎઁၕ ა༘ጁఁఋ. * EU ဠૐ Ⴎઁ ಋ൏ ฅ႕ ઢဧ ႔ါၨ ઠဨ ႔ါ ႜพ ᅒႮዻཊགྷ. ** EU ဠૐ Ⴎઁ ಋ൏ ฅ႕ ઢဧ ႔ါၨ ઠဨ ฅ႕ ૬ႜၦ ႕ဧఁఋ. 1 ) ၨჭ කసൢ ዽႜ ໕ᆳ ෟ ຫဧ ໕ Secura, Quintix, Practum 79 Technical Specifications Model-specific Data Secura® Model 224 124 613 513 313 213 6102 5102 3102 2102 1102 612 Weighing capacity g 220 120 610 510 310 210 6100 5100 3100 2100 1100 610 Readability mg 0.1 0.1 1 1 1 1 10 10 10 10 10 10 Repeatability (standard deviation) mg 0.1 0.1 1 1 1 1 10 10 10 10 10 10 Linearity mg 0.2 0.2 2 2 2 2 20 20 20 20 20 20 Min. initial weight according to USP, typical g 0.12 0.12 1.5 1.5 1.5 1.5 12 12 12 12 12 12 Sensitivity drift between +10 to +30°C ± ppm/K 1.5 1.5 2 2 2 2 2 2 2 2 2 2 Typical stabilization time s 2 2 1 1 1 1 1 1 1 1 1 1 isoCAL Settings: – temperature change – time interval K h 1.5 4 1.5 4 2 6 2 6 4 12 4 12 2 6 2 6 4 12 4 12 4 24 4 24 Display result (depending on the filter level) s 0.2 0.2 0.1/0.2 0.1/0.2 0.1/0.2 0.1/0.2 0.1/0.2 0.1/0.2 0.1/0.2 0.1/0.2 0.1/0.2 0.1/0.2 Weighing pan size mm d 90 d 90 d 120 d 120 d 120 d 120 d 180 d 180 d 180 d 180 d 180 d 180 Weighing chamber height mm 209 209 209 209 209 209 – – – – – – Net weight, approx. kg 5.1 5.1 5.1 5.1 5.1 5.1 5.2 5.2 5.2 5.2 5.2 5.2 224 124 64 613 513 313 213 6102 5102 3102 2102 1102 Quintix® Model Weighing capacity g 220 120 60 610 510 310 210 6100 5100 3100 2100 1100 Readability mg 0.1 0.1 0.1 1 1 1 1 10 10 10 10 10 Repeatability (standard deviation) mg 0.1 0.1 0.1 1 1 1 1 10 10 10 10 10 Linearity mg 0.2 0.2 0.2 2 2 2 2 20 20 20 30 30 Sensitivity drift between +10 to +30°C ± ppm/K 1.5 1.5 1.5 3 3 3 3 3 3 3 4 4 Typical stabilization time s 2 2 2 1 1 1 1 1 1 1 1.5 1.5 isoCAL Settings: – temperature change – time interval K h 1.5 4 1.5 4 1.5 4 2 6 2 6 4 12 4 12 2 6 2 6 4 12 4 12 4 24 s 0.2 0.2 0.2 0.1/0.2 0.1/0.2 0.1/0.2 0.1/0.2 0.1/0.2 0.1/0.2 0.1/0.2 0.1/0.2 0.1/0.2 Display result (depending on the filter level) Weighing pan size mm d 90 d 90 d 90 d 120 d 120 d 120 d 120 d 180 d 180 d 180 d 180 d 180 Weighing chamber height mm 209 209 209 209 209 209 209 – – – – – Net weight, approx. kg 4.9 4.9 4.9 4.9 4.9 4.9 4.9 5.2 5.2 5.2 4.7 4.7 80 Installation and Operating Instructions Secura, Quintix, Practum Technical Specifications Model-specific Data Quintix® Model Weighing capacity g 612 412 6101 5101 2101 6100 5100 610 410 6100 5100 2100 6100 5100 Readability mg 10 10 100 100 100 1000 1000 Repeatability (standard deviation) mg 10 10 100 100 100 500 500 Linearity mg 30 30 300 300 300 1000 1000 Sensitivity drift between +10 to +30°C ± ppm/K 4 4 8 8 8 8 8 Typical stabilization time s 1.5 1.5 1.5 1.5 1.5 1 1 isoCAL Settings: – temperature change K – time interval h 4 24 4 24 4 24 4 24 4 24 4 24 4 24 Display result (depending on the filter level) s 0.1/0.2 0.1/0.2 0.1/0.2 0.1/0.2 0.1/0.2 0.1/0.2 0.1/0.2 Weighing pan size mm d 180 d 180 d 180 d 180 d 180 d 180 d 180 Net weight, approx. kg 4.7 4.7 4.7 4.7 4.7 4.7 4.7 Practum® Model Weighing capacity g 224 124 64 513 313 213 3102 2102 1102 612 412 6101 5101 2101 6100 5100 220 120 60 510 310 210 3100 410 6100 2100 1100 610 5100 2100 6100 5100 Readability mg 0.1 0.1 0.1 1 1 1 10 10 10 10 10 100 100 100 1000 1000 Repeatability (standard deviation) mg 0.1 0.1 0.1 1 1 1 10 10 10 10 10 100 100 100 500 500 Linearity mg 0.2 0.2 0.2 2 2 2 20 30 30 30 30 300 300 300 1000 1000 Sensitivity drift between +10 to +30°C ± ppm/K 2 2 2 3 3 3 4 4 4 4 4 8 8 8 8 8 Typical stabilization time s 2 2 2 1 1 1 1.5 1.5 1.5 1.5 1.5 1.5 1.5 1.5 1 1 Weighing pan size mm d 90 d 90 d 90 d 120 d 120 d 120 d 180 d 180 d 180 d 180 d 180 d 180 d 180 d 180 d 180 d 180 Weighing chamber height mm 209 209 209 209 209 209 – – – – – – – – – – Net weight, approx. kg 4.5 4.5 4.5 4.9 4.9 4.9 3.1 3.1 3.1 3.1 3.1 3.1 3.1 3.1 3.1 3.1 FCC Rules Safety Precautions: NOTE: This equipment has been tested and found to comply with the limits for a Class B digital device, pursuant to part 15 of the FCC Rules. These limits are designed to provide reasonable protection against harmful interference in a residential installation. This equipment generates, uses and can radiate radio frequency energy and, if not installed and used in accordance with the instructions, may cause harmful interference to radio communications. However, there is no guarantee that interference will not occur in a particular installation. If this equipment does cause harmful interference to radio or television reception, which can be determined by turning the equipment off and on, the user is encouraged to try to correct the interference by one or more of the following measures: – Reorient or relocate the receiving antenna. – Increase the separation between the equipment and receiver. – Connect the equipment into an outlet on a circuit different from that to which the receiver – Consult the dealer or an experienced radio/TV technician for help. Shielded Cables: Connections between the devices and peripherals must be made using shielded cables in order to maintain compliance with FCC radio frequency emission limits. Modifications: Any modifications made to this devices that are not approved by Sartorius Weighing Technology GmbH may void the authority granted to the user by the FCC to operate this equipment. Installation and Operating Instructions Secura, Quintix, Practum 81 Technical Specifications Model-specific Data Verified Models with Country-specific Type Approval Certificate Secura® 224-1x 1) 124-1x 1) 513-1x 1) 313-1x 1) 213-1x 1) Model 5102-1x 1) 3102-1x 1) 2102-1x 1) 1102-1x1) Accuracy class k k K K K K K K K Type 2) SQP-A SQP-A SQP-B SQP-B SQP-B SQP-C SQP-C SQP-C SQP-C Max g 220 120 510 310 210 5.100 3.100 2.100 1.100 Scale interval d mg 0.1 0.1 1 1 1 10 10 10 10 Verification scale interval e mg 1 1 10 10 10 100 100 100 100 Min mg 10 10 20 20 20 500 500 500 500 Minimum sample weight as per USP, typical g 0.12 0.12 1.5 1.5 1.5 12 12 12 12 Typical stabilization time s 2 2 1 1 1 1 1 1 1 isoCAL: – Temperature change – Time interval K h 1.5 4 1.5 4 2 6 2 6 2 6 2 6 2 6 2 6 2 6 Display result (depending on the set filter level) s 0.2 0.2 0.1/0.2 0.1/0.2 0.1/0.2 0.1/0.2 0.1/0.2 0.1/0.2 0.1/0.2 Weighing pan size mm d 90 d 90 d 120 d 120 d 120 d 180 d 180 d 180 d 180 Weighing chamber height mm 209 209 209 209 209 – – – – Net weight, approx. kg 5.1 5.1 5.1 5.1 5.1 5.2 5.2 5.2 5.2 Tare (subtractive) < 100% of max. weighing capacity Quintix® 224-1x 1) 124-1x 1) 513-1x 1) 313-1x 1) 213-1x 1) Model 5102-1x 1) 3102-1x 1) 2102-1x 1) 1102-1x1) Accuracy class k k K K K K K K K Type 2) SQP-A SQP-A SQP-B SQP-B SQP-B SQP-C SQP-C SQP-C SQP-C Max g 220 120 510 310 210 5,100 3,100 2,100 1,100 Scale interval d mg 0.1 0.1 1 1 1 10 10 10 10 Verification scale interval e mg 1 1 10 10 10 100 100 100 100 Min mg 10 10 20 20 20 500 500 500 500 Typical stabilization time s 2 2 1 1 1 1 1 1.5 1.5 isoCAL: – Temperature change – Time interval K h 1.5 4 1.5 4 2 4 2 6 2 6 2 6 2 6 2 6 2 6 Display result (depending on the set filter level) s 0.2 0.2 0.1/0.2 0.1/0.2 0.1/0.2 0.1/0.2 0.1/0.2 0.1/0.2 0.1/0.2 Weighing pan size mm d 90 d 90 d 120 d 120 d 120 d 180 d 180 d 180 d 180 Weighing chamber height mm 209 209 209 209 209 – – – – Net weight, approx. kg 4.9 4.9 4.9 4.9 4.9 5.2 5.2 4.7 4.7 Tare (subtractive) 82 < 100% of max. weighing capacity Installation and Operating Instructions Secura, Quintix, Practum Technical Specifications Model-specific Data Quintix® Model 612-1x 1) 5101-1x 1) 5100-1x 1) Accuracy class K K K Type 2) SQP-C SQP-E SQP-E Max g 610 5,100 5,100 Scale interval d g 0.01 0.1 1 Verification scale interval e g 0.1 1 1 Min g 0.5 5 50 Typical stabilization time s 1.5 1.5 1 isoCAL: – Temperature change – Time interval K h 2 6 2 6 2 6 Display result (depending on the set filter level) s 0.1/0.2 0.1/0.2 0.1/0.2 Weighing pan size mm d 180 d 180 d 180 Net weight, approx. kg 4.7 4.7 4.7 ) 100% of the max. weighing capacity Tare (subtractive) Practum® Model 224-1x 1) 124-1x 1) 313-1x 1) 213-1x 1) 2102-1x 1) 1102-1x 1) 612-1x 1) 5101-1x 1) 5100-1x 1) Accuracy class k k K K K K K K K 2 Type ) SQP-A SQP-A SQP-B SQP-B SQP-C SQP-C SQP-C SQP-E SQP-E Max g 220 120 310 210 2100 1100 610 5.100 5.100 Scale interval d mg 0.1 0.1 1 1 10 10 10 100 1.000 Verification scale interval e mg 1 1 10 10 100 100 100 1.000 1.000 Min mg 10 10 20 20 500 500 500 5.000 50.000 ) 100% of the max. weighing capacity Tare (subtractive) Typical stabilization time s 1 2 1 1 1.5 1.5 1.5 1.5 1 Weighing pan size mm d 90 d 90 d 120 d 120 d 180 d 180 d 180 d 180 d 180 Weighing chamber height mm 209 209 209 209 – – – – – Net weight, approx. kg 4.5 4.5 4.9 4.9 3.1 3.1 3.1 3.1 3.1 1 ) Possible terms for country-specific models: x = CEU: x = CEU: Verified balances with EC Type Approval Certificate D12-09-014 (for EU except France, Italy, and Switzerland) x = CFR: Verified balances with EC Type Approval Certificate D12-09-014 for France only x = CIT: Verified balances with EC Type Approval Certificate D12-09-014 for Italy only x = CCH: Verified balances with EC Type Approval Certificate D12-09-014 for Switzerland only x = NUS: NTEP Certificate for USA x = CN: CMC Type Approval Certificate for China x = 0JP: Balance with Type Approval Certificate for Japan x = 0BR: Balance with Type Approval Certificate for Brazil x = 0AR: Balance with Type Approval Certificate for Argentina x = 0KR: Balance with Type Approval Certificate for South Korea x = 0RU: Balance with Type Approval Certificate for Russia x = 0IN: Balance with Type Approval Certificate for India x = 0CA: Balance with Type Approval Certificate for Canada 2 ) All models with “...CN”: type “SQP” Installation and Operating Instructions Secura, Quintix, Practum 83 For verified balances, the conformity declaration supplied with the balance is valid for use in the EEA. Please retain this declaration. Bei geeichten Waagen für den Einsatz im EWR gilt die der Waage beigelegte Konformitätserklärung. Bitte unbedingt aufbewahren. 84 Installation and Operating Instructions Secura, Quintix, Practum Sartorius Lab Instruments GmbH & Co. KG Weender Landstrasse 94–108 37075 Goettingen, Germany Phone +49.551.308.0 Fax +49.551.308.32 89 www.sartorius.com Copyright by Sartorius Lab Instruments GmbH & Co. KG, Goettingen, Germany. All rights reserved. No part of this publication may be reprinted or translated in any form or by any means without the prior written permission of Sartorius. The status of the information, specifications and illustrations in this manual is indicated by the date given below. Sartorius reserves the right to make changes to the technology, features, specifications and design of the equipment without notice. Status: November 2013, Sartorius Lab Instruments GmbH & Co. KG, Goettingen, Germany Specifications subject to change without notice. Printed in the EU on paper bleached without chlorine. W_Secura_Quinitix_Practum · KT Publication No.: WSE6008cm131102