1
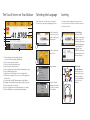
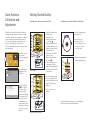
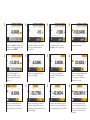
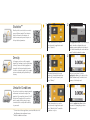
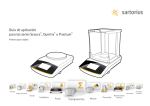
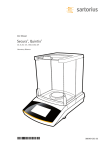
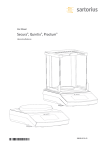
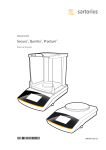
Application Guide for the Secura, Quintix and Practum Series Getting Started Quickly Density Unstable Conditions Checkweighing Conversion Counting Statistics Weighing Components Mixing Percentage Peak Hold The Touch Screen on Your Balance 1 Selecting the Language Leveling Each balance has been factory preset to English. You can select your preferred language as follows: To ensure accurate measurement results, you need to level the balance each time after you have moved it to a different location. 2 13 3 12 4 11 5 10 9 8 Touch the menu key to enter the selection mode for applications and functions. 6 7 1Toolbar showing currently available buttons: Zero, Tare, Print (data output), GLP Printout 2 Line for metrological specifications 3 Alert icon indicating calculated values 4 Current weight or value measured 5 Key for toggling between the weight unit and display accuracy 6 Key for running an application 7 Application toolbar: Settings for the selected application 8Menu key: For toggling to the selection mode for applications and functions 9 Secura models only: USP minimum sample weight, SQmin 10 Bar graph: Scaled display showing capacity usage (in percent) 11 Plus (or minus) sign of the weight 12 Key for toggling between various display modes of a weight 13 Field for displaying the operating status and warnings Touch the open-end wrench icon. Select Language. Touch the desired language and confirm selection by touching the checkmark. Secura Balances As soon as LEVEL appears on the display, you will need to level the balance. Make sure that the weighing pan is unloaded before you begin. Touch LEVEL. Then follow the prompts shown on the interactive display. Quintix and Practum Balances Turn the two feet as shown in the picture until the air bubble is centered within the circle of the level indicator. Quick Access to Calibration and Adjustment Getting Started Quickly Initial Operation of Balances with a Draft Shield You will need to perform the combined calibration and adjustment procedure the first time you operate the balance, each time after changing it to a different location and at regular intervals during operation. If you are using a Practum series balance, you will have to do this manually as described below. The Secura and Quintix series perform this procedure fully automatically. Touch CAL to select the combined calibration and adjustment mode. To perform external adjustment, touch CAL-Extern. First touch A, then w to calibrate the balance. Place a calibration weight equal to that displayed on the balance on the pan. The balance will now perform automatic calibration and adjustment, then it will change to the operating mode. Secura Balances Install the following parts in the order listed: – In-use dust cover – Turn the draft shield lock to “unlocked” . – Place the draft shield (1) on the balance. Note: Use both hands to hold the top struts of the draft shield. – Slide the side doors all the way to the back. – Turn the draft shield lock to “locked” . – Position the base plate (2), centering ring* (3), pan support (4), weighing pan (5) and high-rim shield ring* (6) on the balance. Initial Operation of Balances Without a Draft Shield Install the following parts in the order listed: 1) In-use dust cover 2) Position the shield disk (1) and turn it clock wise until it is locked securely in place. 3) Position the pan support (2) and the weighing pan (3). Note: For information about how to clean the draft shield, see the Care and Maintenance chapter in the Installation Instructions. * only for Secura with 0.1 mg readability For detailed instructions, please refer to our Installation Instructions and our detailed User Manual. Quintix and Practum Balances Quick Six-Step Guide to Applications Counting Familiarize yourself with the capabilities of your Sartorius balance and start off by counting identical parts. The balance will show you the quantity and the total weight. 1 2 * Touch the menu key to access the selection mode for applications and select “Counting”. Mixing** Say you have a formula and need to weigh in various components quickly with 100% traceability, without losing track of the total weight. Just use the Mixing application. 1 Place an empty container for your sample on the balance and press D to tare (zero the display). 2 * Touch the menu key to access the selection mode for applications and select “Mixing”. Components** Do you need to compound components according to a formula, but don’t want to mix them immediately? The application Components enables you to weigh your individual ingredients into different containers and retrieve the total amount weighed-in – anytime at the touch of a key. * To view videos of these applications, scan in our QR code or visit http://www.sartorius.com/manual-secura **Available in Quintix and Secura 1 Place an empty container on the balance and press D to tare (zero) the container weight. 2 * Touch the menu key to access the selection mode for applications and select “Components”. Place the first empty container on the balance and press D to tare (zero). Then weigh-in component 1 and touch v to save the weight in the memory. 3 4 Enter the reference sample quantity by touching the application toolbar (factory setting: 10 pcs); place this q uantity in the container and press w. 3 5 The reference sample quantity you entered will now appear on the display. Place your total sample quantity in the container. 4 Add the first component to the container and touch v to save the component weight. The display will change to 0. 3 On the balance display, the piece count of your sample will now be shown. Touch Qnt to view the total weight. 5 Add the next component and save its weight by touching v. 4 Remove the container with your first sample from the balance, the weight reading will change to a negative value. 6 6 If necessary, you can add further components. Touch Net1 to view the total weight. 5 Now place another empty container on the balance and press D to tare (zero). Afterwards, you can add component 2 and confirm using v. The total weight of your sample will now appear on the display. Now the total weight is displayed with a triangle (= calculated value). You can continue to add further components, if necessary. 6 To weigh-in further samples, repeat this procedure. To display the total weight of the components added so far, touch Net. The total of all saved components will now be displayed (“Sum”) with a triangle (= calculated value). Now you can remove the container with the last sample. Statistics** Would you like to save statistics on an entire group of different samples? Your Sartorius balance will transfer the readings to its statistics memory and generate a report on the key statistical parameters. 1 2 * Touch the menu key to access the selection mode for applications and select “Statistics”. Density Let’s suppose you have a solid, irregularlyshaped object and want to precisely determine its density. Just use the Density application along with the Sartorius density determination kit to calculate the quality of, for example, precious metals and plastic parts with high accuracy. Unstable Conditions Do you have to weigh in an extremely unstable environment or measure the weight of an inquisitive little mouse that just won’t sit still? No problem. This application lets you determine the weight reliably, giving you peace of mind about the accuracy and traceability of your results. * To view videos of these applications, scan in our QR code or visit http://www.sartorius.com/manual-secura **Available in Quintix and Secura 1 2 Touch application toolbar to select whether you want to have the result printed after each weighing operation and whether the balance is to be tared automatically after a value has been saved. Touch the checkmark to confirm. * First install the density kit on your balance by following the instructions for the kit. Touch the menu key and select “Density”. 1 Tare (zero) your balance. Touch the application toolbar to set the density of the liquid (“Medium density”) and the desired accuracy of the density result. 2 * Touch the menu key to access the selection mode for applications and select “Unstable Cond.” for unstable conditions or objects. Touch the application toolbar to define the number of subweighing operations (“Measurements”). 3 4 Remove the first sample from the balance. Now the display will change to 0. Touch A to zero the balance. Place your first sample on the balance and press v to save the reading in the memory. 3 5 4 Select the desired settings and confirm these by touching the checkmark. Then touch w on the next screen display. 3 To weigh-in further samples, proceed in the same manner. Touch n to display the results. 5 6 5 For example, press 1 and 5 to enter 15 measurements and touch the checkmark to confirm this number. You will now see your results as a report. Immerse your sample in the sample holder in the beaker filled with your reference liquid; then touch v. Place your sample on the upper pan of the density kit to view its weight in air and press v. 4 This number has been factory-set to five measurements. You can enter a different number by touching the three dots. 6 The balance will now show you the calculated density of your solid sample. The result will be displayed with a triangle (= calculated value). 6 Place your sample or an animal on the pan and press w to begin weighing under unstable conditions. The averaged result will be displayed with a triangle (= calculated value). Phone +49(0)551.308.0 Fax +49(0)551.308.3289 www.sartorius.com Specifications subject to change without notice. Printed in Germany on paper that has been bleached without any use of chlorine. | W Publication No.: WSE6003-e13093 · Order No.: 98649-013-53 Sartorius Lab Instruments GmbH & Co. KG Weender Landstrasse 94–108 37075 Goettingen, Germany