1
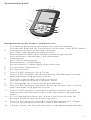
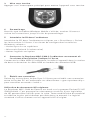
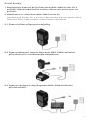
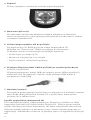
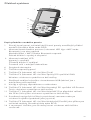
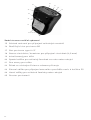
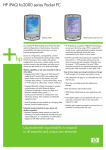
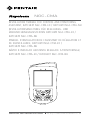
NGC-CMA
Installation manual for control and monitoring
assistant, RAYCHEM NGC-CMA-EX / RAYCHEM NGC-CMA-NH
Installationsanleitung für Regelungs- und
Überwachungsassistenten RAYCHEM NGC-CMA-EX /
RAYCHEM NGC-CMA-NH
Manuel d’installation de l’assistant de régulation et
de surveillance, RAYCHEM NGC-CMA-EX /
RAYCHEM NGC-CMA-NH
Návod k instalaci asistenta regulace a monitoringu,
RAYCHEM NGC-CMA-EX / RAYCHEM NGC-CMA-NH
Industrial Heat Tracing Solutions
ML-RaychemNGCCMA-IM-INSTALL131 R4
For English text, go to page 3
Für Deutsch, siehe Seite 9
Pour la version française, voir page 15
Češtinu najdete na straně 21
2
Getting started
1Do not connect the Raychem NGC-CMA pocket PC to your
computer until you have finished installing Microsoft Active Sync on
your computer.
2Charge the battery pack of the Raychem NGC-CMA Pocket PC
Do not connect the Pocket PC to you computer untill the battery
pack is fully charged.
You have following options to charge the Raychem NGC-CMA:
2.1 Using direct connected charger
2.2 Using the Raychem NGC-CMA docking station (optional) with
assembled adaptor
2.3 Using the Raychem NGC-CMA-USB connection set (optional)
3
3
Power On
Press the power button to turn the unit on.
4Set up the device
When the Windows Mobile screen displays on the screen tap anywhere
on the screen and follow the on-screen instructions until setup is
complete.
5
Insert the Companion CD into the computer
Insert the Companion CD into the computer‘s CD Rom drive.
Click “Start Here“. Follow the on-screen instructions.
The setup wizard installs following:
– Active Sync 4.x or higher
– Microsoft Outlook (if necessary)
– Other optional software applications
6Connect the Raychem NGC-CMA to your computer when
instructed by setup wizard on the computer
Connect the USB connection cable to a free USB port on your computer,
insert the device into the docking station or connect the USB cable to
USB connection set.
7Establish a partnership
Follow the on-screen Active Sync instructions to establish a connection
between your Pocket PC and your computer or select guest partnership.
Use of HP original documents
The Pentair Raychem NGC-CMA is based on the HP iPAQ hx2000 Pocket
PC family. Therefore all related HP documents or Software updates
can be used further on. All modifications regarding the hardware are
descripted within these booklet as good as possible. The use of standard
software is equal to the original HP devices.
4
Resetting the unit
All resets should be performed without being connected to the charger.
Performing a Soft-Reset
A Soft-Reset stops all running applications, but does not erase any
programs or saved data. Be sure to save any unsaved data with a
running application before performing a Soft-Reset.
– To perform a Soft-Reset press both reset buttons on the keypad
– The Pocket PC restarts and displays the today screen
Performing a Hard-Reset
A Hard Reset stops all running applications, but does not erase any
programs or saved data. Additional to a soft reset all hardware registers
will be erased.
– To perform a Hard-Reset press and hold down the F1 and F4 buttons
– While holding down these buttons, press the reset buttons for about
two seconds
– When the Pocket PC screen begins to fade, release the F1 and F4
buttons first
and then release the reset buttons.
– The Pocket PC resets and powers on
Note: If you simultaneously push and hold the Reset, F1 and F4 buttons
for more than two seconds, the battery disconnects. To restart the
device, either plug the device into the AC Adapter or press the reset
buttons again.
Performing a Clean-Reset
A Clean Reset clears all user-installed settings, applications and data
from the device.
– To perform a Clean-Reset, press and hold F1, F3 and the power
buttons
– While holding down these buttons, press the reset buttons for about
two seconds
– When the Pocket PC restarts release first the F1, F3 and power
buttons first and then release the reset buttons
– The Pocket PC resets and powers on
5
Learning more about the Raychem NGC-CMA
control and monitoring assistant
for information on ...
see this source ...
Using your Pocket PC
– HP iPAQ hx2000 Pocket PC Family user guide on the related PC Companion CD
– HP iPAQ hx2000 product side on http://www.hp.com/country/de
Bluetooth- and WiFi
connections
HP iPAQ hx2000 Pocket PC Family
user guide on the related HP
Companion CD
Additional programs that can
be installed on your Pocket PC
– HP Companion CD
– NGC-CMA software operating
manual (INSTALL-146)
– User guide for ”AutoInstall”
Safety precautions and Safety
instructions
Document ”Safety instructions“
Information about warranty
Document ”Safety instructions“
on i.roc x20 product side on
http://www.ecom-ex.com
CE Conformity
Document ”CE Conformity“
on i.roc x20 product side on
http://www.ecom-ex.com
Support
Contact your nearest Pentair
representative
Technical data
Refer to Raychem NGC-CMA
datasheet (DOC-682)
(Russia, Kazakhstan, Belarus)
For other countries contact your local Pentair representative.
6
System Overview
2
3
1
4
14
13
5
12
11
6
10
7
9
8
Front and bottom panel components
1Flat top panel, optional long top panels for adding barcode or
RFID modules available
2Wireless / Notification LED indicator
Off = WiFi or Bluetooth are both off
Blue flash = WiFi and / or Bluetooth are on
Green flash = notification events have occured
3Charge LED indicator
Off = no charging
Red flash = charging
Red solid = charging complete
4Touchscreen
5
Power button
6
F4 button (HP indication: iTask button)
7F3 button (HP indication: Messaging button) Starting iPAQ Wireless,
press and hold for two seconds
85 pin charging plug with USB connector (only active with powered
charger)
9
Speaker and microphon in / outputs
10F2 button (HP indication: Contacts button) Starting HP Protect
Tools, press and hold for two seconds
11 F1 button (HP indication: Calendar button) Switching Landscape /
Portrait mode, press and hold for two seconds
12 5-Way Navigation button, scrolling through a list or pushing to
select (similar to using a joystick)
13 F5 button (HP indication: Record button) Using as trigger button for
optional barcode or RFID modules
14 2 Reset buttons, for Soft Reset press both buttons at the same time
7
16
15
17
18
25
19
24
23
22
21
20
Back and inhousing components
15 serial interface for connecting optional modules
16 SD card expansion slot
17 Typ II CF card slot
18 Stereo-headphone / headset jack (3,5mm)
19 IrDA Infrared port
20 Lower socket for optional handstraps or handgrips
21 Two stylus slots
22 Backcover label, including serial number and device name
23 External socket for connecting external trigger additional to
F5 button
24 Upper sockets for optional handstraps or handgrips
25 Battery slot
8
Erste Schritte
1Raychem NGC-CMA Pocket PC erst an Ihren Computer
anschließen, nachdem Sie Microsoft Active Sync auf Ihrem
Computer installiert haben.
2Akku des Raychem NGC-CMA Pocket PCs laden
Schließen Sie den Pocket PC erst an Ihren Computer an, wenn der
Akku vollständig aufgeladen ist. Sie haben folgende Möglichkeiten
zum Aufladen des Raychem NGC-CMA:
2.1 Über ein direkt angeschlossenes Ladegerät
2.2 Ü
ber die Raychem NGC-CMA Docking Station (optional) mit
montiertem Adapter
2.3 Über den Raychem NGC-CMA-USB-Anschlusssatz (optional)
9
3Einschalten
Schalten Sie das Gerät über den Ein-/Ausschalter ein.
4Gerät einrichten
Wenn der Windows Mobile-Bildschirm angezeigt wird, tippen Sie
auf dem Bildschirm auf eine beliebige Stelle, und führen Sie die
Bildschirmanweisungen aus, bis das Gerät vollständig eingerichtet ist.
5Companion CD in den Computer einlegen
Legen Sie die Companion CD in das CD-ROM-Laufwerk des Computers
ein.Klicken Sie auf „Start Here“ (Hier starten). Verfahren Sie
entsprechend den auf dem Bildschirm ausgegebenen Anweisungen. Der
Setup-Assistent installiert Folgendes:
– Active Sync 4.x oder höher
– Microsoft Outlook (falls notwendig)
– Weitere optionale Softwareanwendungen
6Raychem NGC-CMA an Ihren Computer anschließen, wenn der
Setup-Assistent auf dem Computer dazu auffordert
Schließen Sie das USB-Anschlusskabel an einen freien USB-Anschluss
an Ihrem Computer an, stecken Sie das Gerät in die Docking Station,
oder schließen Sie das USB-Kabel an den USB-Anschluss an.
7
Partnerschaft herstellen
Stellen Sie entsprechend den auf dem Bildschirm von Active Sync
ausgegebenen Anweisungen eine Verbindung zwischen dem Pocket PC
und Ihrem Computer her, oder wählen Sie eine Gast-Partnerschaft.
Verwendung von HP-Originaldokumenten
Der Pentair Raychem NGC-CMA basiert auf der Produktreihe HP iPAQ
hx2000 Pocket PC. Deshalb können alle entsprechenden HP-Dokumente
oder Software-Updates weiterhin verwendet werden. Alle Änderungen
im Zusammenhang mit der Hardware sind möglichst gut in diesem
Handbuch beschrieben. Die Verwendung der Standardsoftware
entspricht der bei den HP-Originalgeräten.
10
Zurücksetzen der Einheit
Bei allen Resets ist darauf zu achten, dass das Gerät nicht an das
Ladegerät angeschlossen ist.
Ausführen eines Soft-Resets
Ein Soft-Reset stoppt alle laufenden Anwendungen, löscht aber keine
Programme oder gespeicherten Daten. Speichern Sie unbedingt alle
ungespeicherten Daten bei laufender Anwendung, bevor Sie einen SoftReset vornehmen.
– F
ür einen Soft-Reset drücken Sie beide Reset-Tasten auf der
Tastatur.
– D
er Pocket PC wird neu gestartet und zeigt den aktuellen Bildschirm
an.
Ausführen eines Hard-Resets
Ein Hard-Reset stoppt alle laufenden Anwendungen, löscht aber keine
Programme oder gespeicherten Daten. Zusätzlich zu einem Soft-Reset
werden alle Hardware-Register gelöscht.
– Zum Ausführen eines Hard-Resets halten Sie die Tasten F1 und F4
gedrückt.
– Halten Sie diese beiden Tasten gedrückt, und drücken Sie gleichzeitig
ca. zwei Sekunden lang die Reset-Tasten.
– Wenn der Pocket PC-Bildschirm allmählich ausgeblendet wird, lassen
Sie erst die Tasten F1 und F4 und dann die Reset-Tasten los.
– Der Pocket PC wird zurückgesetzt und eingeschaltet.
Hinweis: Wenn Sie gleichzeitig die Reset-Taste und die Tasten F1 und
F4 länger als zwei Sekunden gedrückt halten, wird der Akku getrennt.
Zum Neustarten des Geräts müssen Sie entweder das Gerät in den
Netzadapter einstecken oder die Reset-Tasten erneut drücken.
Ausführen eines Clean-Resets
Bei einem Clean-Reset werden alle vom Benutzer installierten
Einstellungen, Anwendungen und Daten vom Gerät gelöscht.
– Zum Ausführen eines Clean-Resets halten Sie die Tasten F1 und F3
und den Ein-/Ausschalter gedrückt.
– Halten Sie diese beiden Tasten gedrückt, und drücken Sie gleichzeitig
ca. zwei Sekunden lang die Reset-Tasten.
– Wenn der Pocket PC-Bildschirm neu gestartet wird, lassen Sie zuerst
die Tasten F1 und F3 und den Ein-/Ausschalter und dann die ResetTasten los.
– Der Pocket PC wird zurückgesetzt und eingeschaltet.
11
Weitere Informationen über den Regelungs- und
Überwachungsassistenten Raychem NGC-CMA
Informationen über
... finden Sie hier ...
Verwendung des Pocket PCs
– Benutzerhandbuch der
Produktreihe HP iPAQ hx2000 Pocket PC auf der mitgelieferten PC Companion CD
– Produktseite zu HP iPAQ hx2000 unter http://www.hp.com/country/
de
Bluetooth- und
WiFi-Verbindungen
Benutzerhandbuch der Produktreihe
HP iPAQ hx2000 Pocket PC auf der
mitgelieferten HP Companion CD
Weitere Produkte, die auf
Ihrem Pocket PC installiert
werden
können
– HP Companion CD
– Bedienungsanleitung der
NGC-CMA-Software
(INSTALL-146)
– Benutzerhandbuch für
„AutoInstall“
Sicherheitsvorkehrungen
und Sicherheitshinweise
Dokument „Safety instructions“
(Sicherheitshinweise)
Informationen zur Garantie
Dokument „Safety instructions“
(Sicherheitshinweise) auf der
i.roc x20-Produktseite unter
http://www.ecom-ex.com
CE-Konformität
Dokument „CE Conformity“
(CE-Konformität) auf der
i.roc x20-Produktseite unter
http://www.ecom-ex.com
Support
Wenden Sie sich an einen Vertreter
von Pentair vor Ort
Technische Daten
Siehe Datenblatt zu Raychem
NGC-CMA (DOC-682)
12
Systemüberblick
2
3
1
4
14
13
5
12
11
6
10
7
9
8
Komponenten an der Vorder- und Unterseite
1Frontplatte/ Rahmen an der Oberseite, optional größere
Frontplatte/ Rahmen für zusätzliches Strichcode- oder RFID-Modul
2 Anzeige für drahtlosen Betrieb / Anzeige
Aus = WiFi oder Bluetooth abgeschaltet.
Blau blinkend = WiFi und / oder Bluetooth eingeschaltet.
Grün blinkend = Meldungen sind vorhanden.
3Ladeanzeige
Aus = Kein Ladevorgang
Rot blinkend = Ladevorgang
Rot leuchtend = Ladevorgang abgeschlossen
4
Touchscreen / Bildschirm
5
Ein-/Ausschalter
6
Taste F4 (HP-Anzeige: iTask-Taste)
7 Taste F3 (HP-Anzeige: Nachrichtentaste) iPAQ Wireless starten,
zwei Sekunden lang gedrückt halten
8 5-poliger Ladestecker mit USB-Anschluss
(nur mit eingeschaltetem Ladegerät aktiv)
9
Ein-/Ausgänge für Lautsprecher und Mikrofon
10 Taste F2 (HP-Anzeige: Kontakte-Taste) HP Protect Tools starten,
zwei Sekunden lang gedrückt halten
11 Taste F1 (HP-Anzeige: Kalendertaste) Umschalten zwischen
Querformat-/Hochformatmodus, zwei Sekunden lang gedrückt
halten
12 5-Fach-Navigationstaste, durch eine Liste blättern oder zur
Auswahl drücken (wie bei einem Joystick)
13 Taste F5 (HP-Anzeige: Aufnahmetaste) Verwendung als TriggerTaste für optionales Strichcode- oder RFID-Modul
14 2 Reset-Tasten, für Soft-Reset beide Tasten gleichzeitig drücken
13
16
15
17
18
25
19
24
23
22
21
20
Komponenten auf der Rückseite und im Gehäuse
15 Serielle Schnittstelle für den Anschluss optionaler Module
16 SD-Kartensteckplatz
17 CF-Kartensteckplatz Typ II
18 Buchse für Stereokopfhörer / -Headset (3,5 mm)
19 IrDA Infrarotanschluss 20 Untere Buchse für optionale
Handschlaufen oder Handgriffe
21 Zwei Stiftaufnahmen
22 Etikett auf der Rückseite mit Seriennummer und Gerätename
23 Externe Buchse für den Anschluss eines externen Triggers
zusätzlich zur Taste F5
24 Obere Buchsen für optionale Handschlaufen oder Handgriffe
25 Akkufach
14
Mise en service
1Ne pas connecter le Raychem NGC-CMA pocket PC à votre
ordinateur avant d’avoir terminé l’installation de Microsoft Active
Sync sur votre ordinateur.
2Charger la batterie du Raychem NGC-CMA Pocket PC
Charger complètement la batterie avant de connecter le Pocket PC
à votre ordinateur. Voici plusieurs manières de charger le Raychem
NGC-CMA:
2.1 Avec un chargeur connecté en direct
2.2 À
l’aide d’une station de base Raychem NGC-CMA (en option)
avec adaptateur
2.3 Avec le kit de connexion Raychem NGC-CMA-USB (en option)
15
3
Mise sous tension
Appuyer sur l’interrupteur principal pour mettre l’appareil sous tension.
4Paramétrage
Une fois que la fenêtre Windows Mobile s’affiche, toucher l’écran et
suivre les instructions jusqu’à la fin du paramétrage.
5
Introduire le CD dans l’ordinateur
Introduire le CD dans l’ordinateur et cliquer sur « Start Here ». Suivre
les instructions à l’écran. L’assistant de configuration installe les
éléments suivants:
– Active Sync 4.x ou supérieur
– Microsoft Outlook (si nécessaire)
– Autres logiciels en option
6Connecter le Raychem NGC-CMA à l’ordinateur au moment où
l’assistant d’installation l’indique à l’écran
Connecter le câble USB à l’ordinateur, installer l’appareil dans la station
de base ou brancher le câble USB au module de connexion USB.
7
Établir une connexion
Suivre les instructions Active Sync à l’écran pour établir une connexion
entre le Pocket PC et l’ordinateur ou sélectionner « guest partnership »
pour travailler en mode « invité ».
Utilisation de documents HP originaux
Le Raychem NGC-CMA de Pentair est basé sur la gamme Pocket PC HP
iPAQ hx2000. C’est pourquoi les documents et mises à jour logicielles
de HP peuvent être utilisés pour la suite. Toute modification du matériel
est décrite le plus précisément possible dans ce manuel. Le logiciel
standard s’utilise comme sur les appareils HP d’origine.
16
Réinitialisation de l’unité
Déconnecter le chargeur avant de réinitialiser l’appareil.
Réinitialisation logicielle
Une réinitialisation logicielle interrompt toutes les applications en cours
mais n’efface ni les programmes ni les données enregistrées. Veiller à
enregistrer les données des applications en cours avant de procéder à
une réinitialisation logicielle.
– Pour procéder à une réinitialisation logicielle, appuyer sur les deux
boutons de réinitialisation du clavier
– Le Pocket PC redémarre et affiche l’écran du jour
Réinitialisation matérielle
Une réinitialisation matérielle interrompt toutes les applications en
cours mais n’efface ni les programmes ni les données enregistrées.
Lorsqu’elle suit une réinitialisation logicielle, la réinitialisation
matérielle efface tous les registres matériels.
– Pour procéder à une réinitialisation matérielle, appuyer
simultanément sur les touches F1 et F4
– Tout en maintenant ces touches enfoncées, appuyer sur les boutons
de réinitialisation pendant environ deux secondes
– Lorsque l’écran du Pocket PC diminue d’intensité, relâcher les
touches F1 et F4 puis les boutons de réinitialisation
– Le Pocket PC se réinitialise et se met sous tension
Remarque: En appuyant simultanément sur Reset, F1 et F4 pendant
plus de deux secondes, la batterie se déconnecte. Pour redémarrer
l’appareil, le brancher sur l’adaptateur secteur ou ré-appuyer sur les
boutons de réinitialisation.
Réinitialisation complète
La réinitialisation de nettoyage efface tous les paramètres, applications
et données installés par l’utilisateur.
– Pour procéder à un nettoyage complet, appuyer simultanément sur
les touches F1 et F3
– Tout en maintenant ces touches enfoncées, appuyer sur les boutons
de réinitialisation pendant environ deux secondes
– Lorsque le Pocket PC redémarre, relâcher d’abord les touches F1, F3
et le bouton de mises sous tension, puis les boutons de réinitialisation
– Le Pocket PC se réinitialise et se met sous tension
17
Pour plus d’informations sur l’assistant de régulation et
de surveillance Raychem NGC-CMA
pour des informations sur ...
... consulter:
Utilisation du Pocket PC
– Le guide de l’utilisateur HP iPAQ
hx2000 Pocket PC Family sur le
CD « Companion » fourni
– La rubrique produit HP iPAQ
hx2000 sur http://www.hp.com
country/de
Connexions Bluetooth et WiFi
Le guide de l’utilisateur HP iPAQ
hx2000 Pocket PC Family sur le CD
« Companion » fourni
Autres programmes
compatibles avec le Pocket PC
– CD HP Companion
– Mode d’emploi logiciel NGC-CMA
(INSTALL-146)
– Guide de l’utilisateur pour
l’installation automatique
Précautions et consignes de
sécurité
Document « Consignes de sécurité »
Garantie
Le document « Consignes de
sécurité » de la rubrique produit
i.roc x20 sur http://www.ecom-ex.
com
Conformité CE
Le document « Conformité CE » de
la rubrique produit i.roc x20 sur
http://www.ecom-ex.com
Support
Contacter le représentant Pentair le
plus proche
Caractéristiques techniques
Voir la fiche technique Raychem
NGC-CMA (DOC-682)
18
Description du système
2
3
1
4
14
13
5
12
11
6
10
7
9
Face avant
8
1Bord supérieur plat; en option: bord supérieur allongé permettant
d’ajouter des modules pour codes à barres ou RFID
2Indicateur LED de fonctionnement sans fil/notification
Éteint = WiFi ou Bluetooth désactivés
Bleu clignotant = WiFi et / ou Bluetooth activés
Vert clignotant = des événements ont été notifiés
3Témoin de charge
Éteint = pas en charge
Rouge clignotant = charge en cours
Rouge en permanence = charge terminée
4
Écran tactile
5
Bouton de mise sous tension
6
Touche F4 (nomenclature HP: touche iTask)
7Touche F3 (nomenclature HP: touche Messagerie) Au démarrage
du iPAQ Wireless, maintenir enfoncé pendant 2 secondes
8Fiche de chargement 5 broches avec connecteur USB (active
uniquement lorsque le chargeur est sous tension)
9
Entrées/sorties haut-parleur et micro
10Touche F2 (nomenclature HP: touches Contacts) Au démarrage de
HP Protect Tools, maintenir enfoncé pendant 2 secondes
11Touche F1 (nomenclature HP: touche Calendrier) Changement
mode Paysage / Portrait mode, maintenir enfoncé pendant 2
secondes
12Touche de navigation 5 voies permettant faire défiler une liste;
appuyer pour sélectionner (fonctionnement identique à un joystick)
13Touche F5 (nomenclature HP: touche Enregistrement) S’utilise
comme commande pour les modules en option code à barres ou
RFID
142 boutons de réinitialisation. Pour une réinitialisation logicielle,
appuyer simultanément sur les deux boutons.
19
16
15
17
18
25
19
24
23
22
21
20
Face arrière et équipement interne
15 Interface série pour connexion de modules en option
16 Port d’extension pour carte SD
17 Port pout carte type II CF
18 Fiche casque stéréo / casque audio (3,5 mm)
19 Port infrarouge IrDA
20 Point de fixation pour dragonne ou poignée en option
21 Double logement pour stylet
22 Étiquette avec numéro de série et nom de l’appareil
23 Prise pour déclencheur externe en complément de la touche F5
24 Point de fixation pour dragonne ou poignée en option
25 Compartiment batterie
20
První kroky
1Nepřipojujte kapesní počítač Raychem NGC-CMA Pocket PC k
počítači, dokud nedokončíte instalaci Microsoft Active Sync na
počítači.
2Nabití baterie v Raychem NGC-CMA Pocket PC
Nepřipojujte Pocket PC k počítači, dokud není baterie úplně nabitá.
Raychem NGC-CMA můžete nabít různým způsobem:
2.1 Pomocí přímo připojené nabíječky
2.2 Pomocí dokovací stanice Raychem NGC-CMA (volitelné
příslušenství) s instalovaným adaptérem.
2.3 Pomocí spojovací sady Raychem NGC-CMA (volitelné příslušenství).
21
3Zapnutí
Přístroj zapnete stisknutím tlačítka zapnutí/vypnutí.
4Nastavení přístroje
Po zobrazení obrazovky Windows Mobile klikněte na libovolné
místo na obrazovce a postupujte podle pokynů na obrazovce, dokud
nastavení nedokončíte.
5 Vložení doprovodného CD do počítače
Do mechaniky CD-ROM počítače vložte doprovodné CD.
Klikněte na "Start Here". Řiďte se pokyny na obrazovce.
Průvodce instalací nainstaluje následující aplikace:
– Active Sync 4.x nebo vyšší
– Microsoft Outlook (je-li to nutné)
– Další volitelné softwarové aplikace
6 Připojení Raychem NGC-CMA k počítači po vyzvání průvodcem
instalací na počítači
Připojte propojovací kabel USB do volného portu USB na počítači,
vložte přístroj do dokovací stanice, nebo připojte USB kabel k
propojovací sadě USB.
7Navázání spojení
Postupujte podle pokynů Active Sync na obrazovce k navázání spojení
mezi kapesním počítačem Pocket PC a počítačem, nebo zvolte
partnerství v režimu host.
Použití originálních dokumentů HP
Přístroj Raychem NGC-CMA společnosti Pentair je založen na řadě
kapesních počítačů HP iPAQ hx2000 Pocket PC. Dále je proto možné
použít všechny příslušné dokumenty HP nebo softwarové aktualizace.
Všechny změny týkající se hardwaru jsou v tomto návodu popsány co
nepřesněji. Standardní software se používá jako u originálních přístrojů
HP.
22
Reset jednotky
Všechny resety se musí provádět s odpojenou nabíječkou.
Provedení částečného resetu
Částečný reset zastaví všechny spuštěné aplikace, ale nevymaže žádné
programy ani uložená data.
Před částečným resetem nezapomeňte uložit všechna neuložená data
spuštěných aplikací.
– Chcete-li provést částečný reset, stiskněte obě resetovací tlačítka na
klávesnici.
– Pocket PC se restartuje a zobrazí obrazovku Dnes.
Provedení úplného resetu
Úplný reset zastaví všechny spuštěné aplikace, ale nevymaže žádné
programy ani uložená data.
V porovnání s částečným resetem se navíc vymažou všechny hardwarové
registry.
– Chcete-li provést úplný reset, stiskněte a podržte tlačítka F1 a F4.
– Podržte tato tlačítka stisknutá a asi na dvě vteřiny stiskněte
resetovací tlačítka.
– Jakmile obrazovka Pocket PC začne tmavnout, uvolněte nejprve
tlačítka F1 a F4, a pak uvolněte resetovací tlačítka.
– Pocket PC se resetuje a zapne.
Poznámka: Pokud současně stiskněte a podržíte tlačítka Reset, F1 a
F4 na dobu delší než dvě vteřiny, baterie se odpojí. Chcete-li přístroj
restartovat, buď ho zapojte do síťového adaptéru AC, nebo stiskněte opět
resetovací tlačítka.
Provedení čistého resetu
Čistý reset vymaže v přístroji všechna nastavení instalovaná uživatelem,
aplikace a data.
– Chcete-li provést čistý reset, stiskněte a podržte F1, F3 a tlačítko
zapnutí/vypnutí.
– Držte tato tlačítka a asi na dvě vteřiny stiskněte ještě resetovací
tlačítka.
– Když se Pocket PC restartuje, uvolněte nejprve F1, F3 a tlačítko
zapnutí/vypnutí, a pak uvolněte resetovací tlačítka.
– Pocket PC se resetuje a zapne.
23
Další informace o asistentovi regulace a monitoringu
Raychem NGC-CMA
informace o ...
najdete zde ...
Použití Pocket PC
– Uživatelská příručka k produktové
řadě HP iPAQ hx2000 Pocket PC na
příslušném doprovodném CD
– Webová stránka k HP iPAQ hx2000
na http://www.hp.com/country/de
Připojení Bluetooth a WiFi
Uživatelská příručka k produktové
řadě HP iPAQ hx2000 Pocket PC na
přiloženém doprovodném CD
Další programy, které můžete
nainstalovat na kapesním
počítači Pocket PC
– Doprovodné CD HP
– Návod k použití pro software
NGC-CMA (INSTALL-146)
- Uživatelská příručka pro
"AutoInstall"
Bezpečnostní opatření a
bezpečnostní pokyny
Dokument "Safety instructions"
(Bezpečnostní pokyny)
Informace o záruce
Dokument "Safety instructions" na
webové stránce produktu i.roc x20
na http://www.ecom-ex.com
Shoda ES
Dokument "CE Conformity" na
webové stránce produktu i.roc x20
na http://www.ecom-ex.com
Podpora
Obraťte se prosím na nejbližšího
zástupce společnosti Pentair.
Technické údaje
Viz technický list pro Raychem
NGC-CMA (DOC-682)
24
Přehled systému
2
3
1
4
14
13
5
12
11
6
10
7
9
8
Popis předního a zadního panelu
1 Plochý horní panel, volitelně delší horní panely umožňující přidání
modulů čárového kódu nebo RFID
2 Ukazatel bezdrátového provozu / ukazatel LED Vyp = WiFi nebo
Bluetooth jsou oba vypnuté
Modré blikání = WiFi a/nebo Bluetooth zapnuté
Zelené blikání = zprávy k dispozici
3 Ukazatel nabíjení LED
Vypnutý = nenabíjí
Červené blikání = nabíjení
Červeně svítí = nabíjení dokončeno
4 Dotyková obrazovka
5 Tlačítko zapnutí/vypnutí
6 Tlačítko F4 (ukazatel HP: tlačítko iTask)
7 Tlačítko F3 (ukazatel HP: tlačítko Zprávy) Při spuštění iPAQ
Wireless stisknout a podržet na dvě vteřiny
8 5kolíková nabíjecí zástrčka s konektorem USB (aktivní jen s
nabíječkou pod napětím)
9 Vstupy a výstupy reproduktoru a mikrofonu
10 Tlačítko F2 (ukazatel HP: tlačítko Kontakty) Při spuštění HP Protect
Tools stisknout a podržet na dvě vteřiny
11 Tlačítko F1 (ukazatel HP: tlačítko Kalendář) Pro přepínání režimů
Na šířku / Na výšku stisknout a podržet na dvě vteřiny
12 5směrové navigační tlačítko k procházení seznamu nebo po
stisknutí k výběru (podobně jako joystick)
13 Tlačítko F5 (ukazatel HP: tlačítko Nahrávání) Použití jako příkaz pro
volitelné moduly čárového kódu nebo RFID
14 2 resetovací tlačítka, pro částečný reset stisknout obě tlačítka
současně
25
16
15
17
18
25
19
24
23
22
21
20
Zadní strana a vnitřní vybavení
15 Sériové rozhraní pro připojení volitelných modulů
16 Rozšiřující slot pro kartu SD
17 Slot pro kartu typu II CF
18 Stereo sluchátka / konektor pro připojení sluchátek (3,5 mm)
19 Infračervený port IrDA
20 Spodní zdířka pro volitelný řemínek na ruku nebo rukojeť
21 Dva otvory pro tužku
22 Štítek se sériovým číslem a názvem přístroje
23 Externí zdířka pro připojení externího spouštěče navíc k tlačítku F5
24 Horní zdířky pro volitelné řemínky nebo rukojeti
25 Prostor pro baterii
26
27
België / Belgique
Norge
Bulgaria
Österreich
Česká Republika
Polska
Danmark
Republic of Kazakhstan
Deutschland
РОССИЯ
España
Serbia and Montenegro
France
Schweiz / Suisse
Hrvatska
Suomi
Italia
Sverige
Lietuva/Latvija/Eesti
Türkiye
Magyarország
United Kingdom
Tel. +32 16 21 35 02
Fax +32 16 21 36 04
[email protected]
Tel./fax +359 56 86 68 86
fax +359 56 86 68 86
[email protected]
Tel. +420 241 009 215
Fax +420 241 009 219
[email protected]
Tel. +45 70 11 04 00
Fax +45 70 11 04 01
[email protected]
Tel. 0800 1818205
Fax 0800 1818204
[email protected]
Tel. +34 902 125 307
Fax +34 91 640 29 90
[email protected]
Tél. 0800 906045
Fax 0800 906003
[email protected]
Tel. +385 1 605 01 88
Fax +385 1 605 01 88
[email protected]
Tel. +39 02 577 61 51
Fax +39 02 577 61 55 28
[email protected]
Tel. +370 5 2136633
Fax +370 5 2330084
[email protected]
Tel. +36 1 253 7617
Fax +36 1 253 7618
[email protected]
Tel. +47 66 81 79 90
Fax +47 66 80 83 92
[email protected]
Tel. 0800 297410
Fax 0800 297409
[email protected]
Tel. +48 22 331 29 50
Fax +48 22 331 29 51
[email protected]
Tel. +7 495 926 18 85
Fax +7 495 926 18 86
[email protected]
Тел. +7 495 926 18 85
Факс +7 495 926 18 86
[email protected]
Tel. +381 230 401 770
Fax +381 230 401 770
[email protected]
Tel. 0800 551308
Fax 0800 551309
[email protected]
Puh. 0800 11 67 99
Telekopio 0800 11 86 74
[email protected]
Tel. +46 31 335 58 00
Fax +46 31 335 58 99
[email protected]
Tel. +90 530 977 64 67
Fax +32 16 21 36 04
[email protected]
Tel. 0800 969013
Fax 0800 968624
[email protected]
Nederland
Tel. 0800 0224978
Fax 0800 0224993
[email protected]
www.pentairthermal.com
All Pentair trademarks and logos are owned by Pentair or its global affiliates. Pentair reserves the
right to change specifications without prior notice.
© 2008-2014 Pentair.
Industrial Heat Tracing Solutions
ML-RaychemNGCCMA-IM-INSTALL131 R4