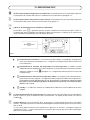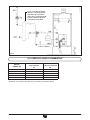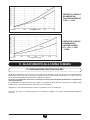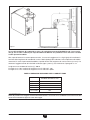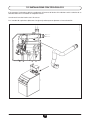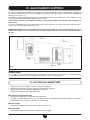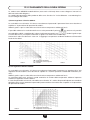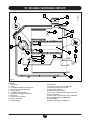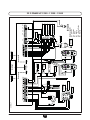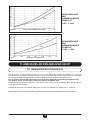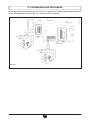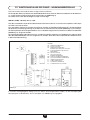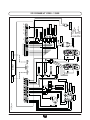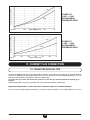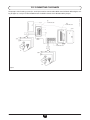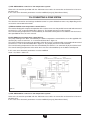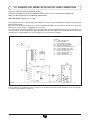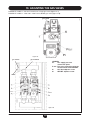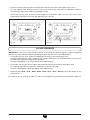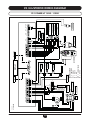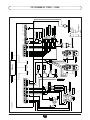
1
Caldaie a terra a gas a condensazione it de manuale per l’uso destinato all’utente ed all’installatore Brennwert-Gaskessel at Gebrauchsanleitung für den Verbraucher und den Installateur Floor standing condensing gas boilers en Installation, operation and maintenance Manual 0085 Gentile Cliente, la nostra Azienda ritiene che il Suo nuovo prodotto soddisferà tutte le Sue esigenze. L’acquisto di un nostro prodotto garantisce quanto Lei si aspetta: un buon funzionamento ed un uso semplice e razionale. Quello che Le chiediamo è di non mettere da parte queste istruzioni senza averle prima lette: esse contengono informazioni utili per una corretta ed efficiente gestione della Suo prodotto. La nostra azienda dichiara che questi prodotti sono dotati di marcatura essenziali delle seguenti : conformemente ai requisiti - Direttiva Gas 2009/142/CE - Direttiva Rendimenti 92/42/CEE - Direttiva Compatibilità Elettromagnetica 2004/108/CE - Direttiva Bassa tensione 2006/95/CE La nostra azienda, nella costante azione di miglioramento dei prodotti, si riserva la possibilità di modificare i dati espressi in questa documentazione in qualsiasi momento e senza preavviso. La presente documentazione è un supporto informativo e non considerabile come contratto nei confronti di terzi. ATTENZIONE Questo apparecchio può essere installato e funzionare solo in locali permanentemente ventilati secondo le Norme UNI 7129 e 7131 BAXI S.p.A., tra i leader in Europa nella produzione di caldaie e sistemi per il riscaldamento ad alta tecnologia, è certificata da CSQ per i sistemi di gestione per la qualità (ISO 9001) per l’ambiente (ISO 14001) e per la salute e sicurezza (OHSAS 18001). Questo attesta che BAXI S.p.A. riconosce come propri obiettivi strategici la salvaguardia dell’ambiente, l’affidabilità e la qualità dei propri prodotti, la salute e sicurezza dei propri dipendenti. L’azienda attraverso la propria organizzazione è costantemente impegnata a implementare e migliorare tali aspetti a favore della soddisfazione dei propri clienti. ISTRUZIONI DESTINATE ALL’UTENTE 2 7115313.01 - it INDICE ISTRUZIONI DESTINATE ALL’UTENTE 1. Avvertenze prima dell’installazione 2. Avvertenze prima della messa in funzione 3. Messa in funzione della caldaia 4. Riempimento impianto 5. Spegnimento della caldaia 6. Arresto prolungato dell’impianto. Protezione al gelo 7. Istruzioni per l’ordinaria manutenzione e cambio gas 4 4 5 11 11 11 11 ISTRUZIONI DESTINATE ALL’INSTALLATORE 8. Avvertenze generali 9. Avvertenze prima dell’installazione 10. Installazione e dimensioni caldaia 11. Allacciamento alla canna fumaria 12. Allacciamento elettrico 13. Regolazione delle valvole gas e cambio gas 14. Impostazione dei parametri di caldaia 15. Dispositivi di regolazione e sicurezza 16. Posizionamento elettrodo di accensione e rivelazione di fiamma 17. Verifica dei parametri di combustione 18. Attivazione funzione spazzacamino 19. Manutenzione annuale 20. Sostituzione del termofusibile dello scambiatore 21. Schema funzionale circuiti 22. Schema collegamento connettori 23. Caratteristiche tecniche 12 12 13 16 19 26 30 31 32 32 33 33 34 35 36-37 38 ISTRUZIONI DESTINATE ALL’UTENTE 7115313.01 - it 3 1. AVVERTENZE PRIMA DELL’INSTALLAZIONE Questa caldaia serve a riscaldare l’acqua ad una temperatura inferiore a quella di ebollizione a pressione atmosferica. Essa deve essere allacciata ad un impianto di riscaldamento compatibilmente alle sue prestazioni ed alla sua potenza. Prima di far allacciare la caldaia da personale professionalmente qualificato, secondo il DM 22 gennaio 2008, n.37, far effettuare: a)Una verifica che la caldaia sia predisposta per il funzionamento con il tipo di gas disponibile. Questo è rilevabile dalla scritta sull’imballo e dalla targa presente sull’apparecchio. b) Un controllo che il camino abbia un tiraggio adeguato, non presenti strozzature e non siano inseriti nella canna fumaria scarichi di altri apparecchi, salvo che questa non sia realizzata per servire più utenze secondo le specifiche Norme e prescrizioni vigenti. c) Un controllo che, nel caso di raccordi su canne fumarie preesistenti, queste siano state perfettamente pulite poiché le scorie, staccandosi dalle pareti durante il funzionamento, potrebbero occludere il passaggio dei fumi. d) Risulta inoltre indispensabile, al fine di preservare il corretto funzionamento e la garanzia dell’apparecchio, seguire le seguenti precauzioni: 1. Circuito di riscaldamento 1.1.impianto nuovo Prima di procedere all’installazione della caldaia l’impianto deve essere opportunamente pulito allo scopo di eliminare residui di filettature, saldature ed eventuali solventi utilizzando prodotti idonei disponibili nel mercato non acidi e non alcalini, che non attacchino i metalli, le parti in plastica e gomma. I prodotti raccomandati per la pulizia sono: SENTINEL X300 o X400 e FERNOX Rigeneratore per impianti di riscaldamento. Per l’utilizzo di questi prodotti seguire attentamente le istruzioni fornite con i prodotti stessi. 1.2.impianto esistente: Prima di procedere all’installazione della caldaia l’impianto deve essere completamente svuotato ed opportunamente pulito da fanghi e contaminanti utilizzando prodotti idonei disponibili nel mercato citati al punto 1.1. Per la protezione dell’impianto dall’incrostazioni è necessario l’utilizzo di prodotti inibitori quali SENTINEL X100 e FERNOX Protettivo per impianti di riscaldamento. Per l’utilizzo di questi prodotti seguire attentamente le istruzioni fornite con i prodotti stessi. Ricordiamo che la presenza di depositi nell’impianto di riscaldamento comporta dei problemi funzionali alla caldaia (es. surriscaldamento e rumorosità dello scambiatore). La mancata osservazione di queste avvertenze comporta il decadimento della garanzia dell’apparecchio. 2. AVVERTENZE PRIMA DELLA MESSA IN FUNZIONE La prima accensione deve essere effettuata dal Servizio di Assistenza Tecnica autorizzato che dovrà verificare: a) Che i dati di targa siano rispondenti a quelli delle reti di alimentazione (elettrica, idrica, gas). b) Che l’installazione sia conforme alle normative vigenti. c) Che sia stato effettuato regolarmente il collegamento elettrico alla rete più terra. I nominativi dei Centri di Assistenza Tecnica autorizzati sono rilevabili dal foglio allegato. Il mancato rispetto di quanto sopra comporta il decadimento della garanzia. L’apparecchio non è destinato a essere usato da persone (bambini compresi) le cui capacità fisiche, sensoriali o mentali siano ridotte, oppure con mancanza di esperienza o di conoscenza, a meno che esse abbiano potuto beneficiare, attraverso l’intermediazione di una persona responsabile della loro sicurezza, di una sorveglianza o di istruzioni riguardanti l’uso dell’apparecchio. ISTRUZIONI DESTINATE ALL’UTENTE 4 7115313.01 - it 3. MESSA IN FUNZIONE DELLA CALDAIA 020503_1100 Procedere come di seguito descritto per le corrette operazioni di accensione: 1) alimentare la caldaia elettricamente; 2) aprire il rubinetto del gas; 3) seguire le indicazioni di seguito riportate riguardanti le regolazioni da effettuare sul pannello comandi della caldaia. Figura 1 IMPORTANTE: Le istruzioni riportate in questo manuale, riguardanti il funzionamento in sanitario, sono da prendere in considerazione solamente se l’apparecchio è stato collegato ad un sistema per la produzione di acqua calda sanitaria. LEGENDA TASTI LEGENDA SIMBOLI SUL DISPLAY Tasto funzionamento sanitario on/off Funzionamento in sanitario Tasto regolazione temperatura acqua di riscaldamento Funzionamento in riscaldamento Tasto regolazione temperatura acqua sanitario Funzionamento automatico Tasto di reset (riarmo) Funzionamento in manuale alla temperatura massima impostata Tasto accesso e scorrimento programmi Funzionamento in manuale alla temperatura ridotta Tasto accesso e scorrimento programmi Standby (spento) Tasto regolazione parametri (decremento valore) Temperatura esterna Tasto regolazione parametri (incremento valore) Presenza fiamma (bruciatore acceso) Tasto visualizzazione informazioni Presenza anomalia resettabile Tasto impostazione modalità riscaldamento Display PRINCIPALE Display SECONDARIO ISTRUZIONI DESTINATE ALL’UTENTE 5 7115313.01 - it 3.1 DESCRIZIONE TASTI (2) Tasto impostazione temperatura riscaldamento. Premendo questo tasto è possibile impostare la temperatura di mandata dell’acqua in riscaldamento come descritto al paragrafo 3-3. (3) Tasto impostazione temperatura acqua sanitaria. Premendo questo tasto è possibile impostare la temperatura dell’acqua sanitaria come descritto al paragrafo 3-4. (10) Tasto di funzionamento in modalità riscaldamento. Premendo il tasto è possibile attivare quattro modalità di funzionamento della caldaia in riscaldamento; queste modalità sono identificate dalla visualizzazione, sul display, di un trattino nero sotto al simbolo corrispondente come di seguito descritto: 020503_0800 Trattino “Modalità automatica” attiva Figura 2 • • Funzionamento automatico. Il funzionamento della caldaia è subordinato al programma orario come descritto nel paragrafo 3-5.1: “Programma orario giornaliero del funzionamento in riscaldamento”; funzionamento in manuale alla temperatura massima impostata. La caldaia accende indipendentemente dal programma orario impostato.La temperatura di funzionamento è quella impostata mediante il tasto riscaldamento”); (paragrafo 3-3 : “Regolazione della temperatura massima di • funzionamento in manuale alla temperatura ridotta. La temperatura di funzionamento è quella impostata nel paragrafo 3-6:“regolazione della temperatura ridotta di riscaldamento”. Il passaggio manuale dalle posizioni a) e b) alla posizione c) comporta lo spegnimento del bruciatore e l’arresto della pompa dopo il tempo di postcircolazione (il valore impostato dalla fabbrica è di 3 minuti). • standby. La caldaia non funziona in modalità di riscaldamento, rimane abilitata la funzione antigelo. (1) Tasto funzionamento in sanitario on/off. Premendo questo tasto è possibile attivare o disabilitare questa funzione la quale è identificata dalla visualizzazione, sul display, di due trattini neri sotto al simbolo . (4) Tasto di Reset. In caso d’anomalia, di cui al paragrafo 3-8 “Segnalazioni d’anomalia e riarmo della caldaia”, è possibile ripristinare il funzionamento dell’apparecchio premendo questo tasto per almeno due secondi. In caso venga premuto questo tasto quando non è presente un’anomalia, sul display compare la segnalazione “E153”, è necessario premere nuovamente questo tasto (per almeno due secondi) per ripristinare il funzionamento. ISTRUZIONI DESTINATE ALL’UTENTE 6 7115313.01 - it (9) Tasto informazioni. Premendo in sequenza questo tasto è possibile visualizzare le seguenti informazioni : - temperatura (°C) dell’acqua in sanitario ( ); - temperatura (°C) esterna ( ); funziona solo con sonda esterna collegata. Premere uno dei due tasti per uscire e ritornare al menù principale. 3.2 IMPOSTAZIONE ORA • 020503_0700 Premere uno dei due tasti per entrare nella funzione di programmazione; sul display appare la lettera P seguita da un numero (linea di programma); Figura 3 • • • agire sui tasti fino alla comparsa della scritta P1 relativa all’ora da impostare; premere i tasti per regolare l’ora, sul display la lettera P inizierà a lampeggiare; premere il tasto per memorizzare e terminare la programmazione; 3.3 REGOLAZIONE DELLA TEMPERATURA MASSIMA DI RISCALDAMENTO - Premere il tasto - premere i tasti (2- figura 1) per impostare la temperatura dell’acqua di riscaldamento; per impostare la temperatura desiderata; - premere uno dei due tasti (1 o 10 - figura 1) per memorizzare e ritornare al menù principale. N.b – Con sonda esterna collegata, mediante il tasto (2 – figura 1) è possibile effettuare la traslazione della curva di riscaldamento. Premere i tasti del locale da riscaldare. per diminuire o aumentare la temperatura ambiente 3.4 REGOLAZIONE DELLA TEMPERATURA DELL’ACQUA IN SANITARIO - Premere il tasto - premere i tasti (3- figura 1) per impostare la temperatura massima dell’acqua sanitaria; per impostare la temperatura desiderata; - premere uno dei due tasti ISTRUZIONI DESTINATE ALL’UTENTE (1 o 10 - figura 1) per memorizzare e ritornare al menù principale. 7 7115313.01 - it 3.5 IMPOSTAZIONE DEL PROGRAMMA GIORNALIERO DEL FUNZIONAMENTO IN RISCALDAMENTO E SANITARIO 3.5.1 Programma orario giornaliero del funzionamento in riscaldamento - Premere uno dei due tasti per entrare nella funzione di programmazione; a) agire su questi tasti fino alla comparsa della scritta P11 relativa all’ora d’inizio programma; b) premere i tasti per regolare l’ora; - premere il tasto , sul display appare la scritta P12 relativa all’ora di fine programma; - ripetere le operazioni descritte nei punti a e b fino al terzo e ultimo ciclo (linea di programma P16); - premere il tasto per memorizzare e terminare la programmazione. 3.5.2 Programma orario giornaliero del funzionamento in sanitario con bollitore - Allo stato di fornitura dell’apparecchio il funzionamento in sanitario è sempre abilitato, mentre risulta disabilitata la funzione di programmazione sanitario. L’abilitazione di tale programma è descritta nel capitolo 14 destinato all’installatore (parametro H91). In caso di abilitazione effettuare l’impostazione delle righe di programma da 31 a 36 come descritto al paragrafo 3-5.1. 3.6 REGOLAZIONE DELLA TEMPERATURA RIDOTTA DI RISCALDAMENTO - premere uno dei due tasti per entrare nella funzione di programmazione; - agire sugli stessi fino alla comparsa della scritta P5 relativa alla temperatura da impostare; - premere i tasti per regolare la temperatura desiderata. Tale funzionamento risulta attivo quando è attivata la modalità di funzionamento in riscaldamento ridotto quando il programma giornaliero non richiede calore. o N.B – Con sonda esterna collegata è possibile impostare, mediante il parametro P5, la minima temperatura ambiente del locale da riscaldare. ISTRUZIONI DESTINATE ALL’UTENTE 8 7115313.01 - it 3.7 TABELLA PARAMETRI IMPOSTABILI DALL’UTENTE N° parametro Descrizione parametro P1 Impostazione ora del giorno Valore di fabbrica Range ———- 0…23:59 P5 Impostazione temperatura ridotta in riscaldamento (°C) 25 25..80 P11 Inizio prima fase programma giornaliero riscaldamento automatico 6:00 00:00…24:00 P12 Fine prima fase programma giornaliero riscaldamento automatico 22:00 00:00…24:00 P13 Inizio seconda fase programma giornaliero riscaldamento automatico 0:00 00:00…24:00 P14 Fine seconda fase programma giornaliero riscaldamento automatico 0:00 00:00…24:00 P15 Inizio terza fase programma giornaliero riscaldamento automatico 0:00 00:00…24:00 P16 Fine terza fase programma giornaliero riscaldamento automatico 0:00 00:00…24:00 Inizio prima fase programma giornaliero sanitario (*) 0:00 00:00…24:00 Fine prima fase programma giornaliero sanitario (*) 24:00 00:00…24:00 Inizio seconda fase programma giornaliero sanitario (*) 0:00 00:00…24:00 Fine seconda fase programma giornaliero sanitario (*) 0:00 00:00…24:00 Inizio terza fase programma giornaliero sanitario (*) 0:00 00:00…24:00 Fine terza fase programma giornaliero sanitario (*) 0:00 00:00…24:00 0 0...1 * P31 * P32 * P33 * P34 * P35 * P36 P45 Reset programmi giornalieri del riscaldamento e del sanitario (valori di fabbrica). Premere contemporaneamente per circa 3 secondi i tasti - + , sul display compare il numero 1. Confermare premendo uno dei due tasti parametri da P31 a P36 sono visualizzabili solo se è stata abilitata la programmazione sanitario descritta * Inel capitolo 14 destinato all’installatore (parametro H91). 3.8 SEGNALAZIONI D’ANOMALIA E RIARMO DELLA CALDAIA al simbolo (figura 4). Il riarmo è possibile mediante il pulsante di reset il quale deve essere premuto per almeno due secondi. 020503_0500 In caso d’anomalia sul display viene visualizzato un codice di segnalazione lampeggiante. Sul display principale (figura 1 a) compaiono le segnalazioni di anomalia assieme Figura 4 020503_0600 Sul display secondario (figura 1 b) compaiono le segnalazioni di anomalia e l’ora che si alternano lampeggiando (figura 4.1). Non è possibile resettare le segnalazioni di anomalia che compaiono sul display secondario in quanto deve essere prima rimossa la causa che ne ha provocato la segnalazione. Figura 4.1 ISTRUZIONI DESTINATE ALL’UTENTE 9 7115313.01 - it 3.9 TABELLA RIASSUNTIVA SEGNALAZIONI E ANOMALIE Codice anomalia descrizione anomalia intervento E10 Sensore sonda esterna guasto Chiamare il centro di assistenza tecnica autorizzato. E20 sensore ntc di mandata guasto Chiamare il centro di assistenza tecnica autorizzato. E40 sonda NTC ritorno riscaldamento Chiamare il centro di assistenza tecnica autorizzato. guasta E50 sensore ntc sanitario guasto Chiamare il centro di assistenza tecnica autorizzato. E110 Intervento termostato di sicurezza / fumi / termofusibile / termostato flangia scambiatore / sonda temperatura ritorno riscaldamento Vedere paragrafo “DISPOSITIVI DI REGOLAZIONE E SICUREZZA”. Premere il tasto di reset (circa 2 secondi). In caso d’intervento ripetuto di questo dispositivo, chiamare il centro di assistenza tecnica autorizzato. E111 Temperatura mandata superiore a 95°C In caso di intervento ripetuto chiamare il centro di assistenza tecnica autorizzato. E128 perdita fiamma durante il funzionamento (valore della corrente di ionizzazione fuori tolleranza) Chiamare il centro di assistenza tecnica autorizzato. E129 velocità minima ventilatore fuori tolleranza Chiamare il centro di assistenza tecnica autorizzato. E132 intervento termostato a pavimento Chiamare il centro di assistenza tecnica autorizzato. E133 mancanza gas Premere il tasto di reset (circa 2 secondi). Se l’anomalia persiste chiamare il centro di assistenza tecnica autorizzato. E151 errore interno scheda di caldaia Premere il pulsante di reset se presente su display il simbolo , altrimenti spegnere elettricamente la caldaia per un tempo di 10 secondi. Se l’anomalia persiste, chiamare il centro di assistenza tecnica autorizzato. Verificare il posizionamento degli elettrodi di accensione (capitolo 16). E153 è stato premuto il tasto di reset Ripremere il tasto una seconda volta (circa 2 secondi) senza motivo E154 Mancanza circolazione o flusso invertito Chiamare il centro di assistenza tecnica autorizzato E160 soglia velocità ventilatore non raggiunta Chiamare il centro di assistenza tecnica autorizzato. E164 mancato consenso pressostato idraulico Verificare che la pressione dell’impianto sia quella prescritta. Vedere capitolo riempimento impianto. Se l’anomalia persiste, chiamare il centro di assistenza tecnica autorizzato. Tutte le anomalie sono visualizzate in ordine d’importanza; se dovessero presentarsi contemporaneamente più anomalie, la prima ad essere visualizzata è quella con maggiore priorità. Dopo aver rimosso la causa della prima anomalia sarà visualizzata la seconda e così via. In caso una determinata anomalia si presenti con frequenza rivolgersi al Servizio di Assistenza Tecnica autorizzato. ISTRUZIONI DESTINATE ALL’UTENTE 10 7115313.01 - it 4. RIEMPIMENTO IMPIANTO IMPORTANTE: Verificare periodicamente che la pressione, letta sul manometro (1 - figura 17), ad impianto freddo, sia di 1 - 1,5 bar. Nel caso sia inferiore agire sul rubinetto di caricamento impianto previsto dall’installatore. E’ consigliabile che l’apertura di tale rubinetto sia effettuata molto lentamente in modo da facilitare lo sfiato dell’aria. Se si dovessero verificare frequenti diminuzioni di pressione chiedere l’intervento del Servizio di Assistenza Tecnica autorizzato. NOTA. Si raccomanda di porre particolare cura nella fase di riempimento dell’impianto di riscaldamento. In particolare aprire le valvole termostatiche eventualmente presenti nell’impianto, far affluire lentamente l’acqua al fine di evitare formazione di aria all’interno del circuito primario finché non si raggiunge la pressione necessaria al funzionamento. Infine eseguire lo sfiato degli eventuali elementi radianti all’interno dell’impianto. BAXI non si assume alcuna responsabilità per danni derivati dalla presenza di bolle d’aria all’interno dello scambiatore primario dovuta ad errata o approssimativa osservanza di quanto sopra indicato. 5. SPEGNIMENTO DELLA CALDAIA Per lo spegnimento della caldaia occorre togliere l’alimentazione elettrica dell’apparecchio. 6. ARRESTO PROLUNGATO DELL’IMPIANTO. PROTEZIONE AL GELO E’ buona norma evitare lo svuotamento dell’intero impianto di riscaldamento poiché ricambi d’acqua portano anche ad inutili e dannosi depositi di calcare all’interno della caldaia e dei corpi scaldanti. Se durante l’inverno l’impianto termico non dovesse essere utilizzato, e nel caso di pericolo di gelo, è consigliabile miscelare l’acqua dell’impianto con idonee soluzioni anticongelanti destinate a tale uso specifico (es. glicole propilenico associato ad inibitori di incrostazioni e corrosioni). La gestione elettronica della caldaia è provvista di una funzione “antigelo” che con temperatura di mandata impianto inferiore ai 5 °C fa funzionare il bruciatore fino al raggiungimento in mandata di un valore pari a 30 °C. Tale funzione è operativa se: * la caldaia è alimentata elettricamente; * c’è gas; * la pressione dell’impianto è quella prescritta; * la caldaia non è in blocco. 7. ISTRUZIONI PER L’ORDINARIA MANUTENZIONE E CAMBIO GAS Per garantire alla caldaia una perfetta efficienza funzionale e di sicurezza è necessario, alla fine di ogni stagione, far ispezionare la caldaia dal Servizio di Assistenza Tecnica autorizzato (vedere DPR 26 Agosto 1993 n° 412). Una manutenzione accurata è sempre motivo di risparmio nella gestione dell’impianto. La pulizia esterna dell’apparecchio non deve essere effettuata con sostanze abrasive, aggressive e/o facilmente infiammabili (es. benzina alcoli, ecc.) e comunque dev’essere effettuata con l’apparecchio non in funzione (vedi capitolo 5 spegnimento della caldaia). Le caldaie possono funzionare sia a gas metano che a gas GPL. Nel caso in cui si renda necessaria la trasformazione ci si dovrà rivolgere al Servizio di Assistenza Tecnica autorizzato. ISTRUZIONI DESTINATE ALL’UTENTE 11 7115313.01 - it 8. AVVERTENZE GENERALI Le note ed istruzioni tecniche che seguono sono rivolte agli installatori per dar loro la possibilità di effettuare una perfetta installazione. Le istruzioni riguardanti l’accensione e l’utilizzo della caldaia sono contenute nella parte destinata all’utente. Si fa presente che le Norme Italiane che regolano l’installazione, la manutenzione e la conduzione degli impianti d’uso domestico a gas sono contenute nei seguenti documenti: • Norme UNI-CIG 7129, CEI 64-8 e DM 12 Aprile 1996. • Legge 9 gennaio 1991 n° 10 e relativo Regolamento d’Attuazione DPR 26 Agosto 1993 n° 412 + DPR 21 Dicembre 1999 n° 551. • Disposizioni dei Vigili del Fuoco, dell’Azienda del gas ed in specie i Regolamenti Comunali. Inoltre, il tecnico installatore dev’essere abilitato all’installazione degli apparecchi per riscaldamento secondo il DM 22 gennaio 2008, n.37. Oltre a ciò va tenuto presente che: • La caldaia deve essere installata in un locale aerato adibito a sala termica. • La caldaia può essere utilizzata con qualunque tipo di piastra convettrice, radiatore, termoconvettore. Le sezioni del circuito saranno, in ogni caso, calcolate secondo i normali metodi, tenendo conto della caratteristica portata-prevalenza della pompa d’impianto utilizzata. • Le parti dell’imballo (sacchetti in plastica, polistirolo ecc.) non devono essere lasciate alla portata dei bambini in quanto potenziali fonti di pericolo. • La prima accensione deve essere effettuata dal Servizio di Assistenza Tecnica autorizzato, rilevabile dal foglio allegato. • E’ necessario che nel locale in cui è installata la caldaia affluisca l’aria richiesta dalla regolare combustione del gas consumato dall’apparecchio. Pertanto bisogna praticare delle aperture libere non ostruibili di almeno 6 cm2 per ogni kW (860 kcal/h) di portata termica installata con un minimo di 100 cm2. • La caldaia deve avere un collegamento diretto a canna fumaria efficiente per scaricare all’esterno i prodotti della combustione. La sezione del collegamento fra caldaia e canna fumaria non deve essere minore di quella dell’attacco dell’apparecchio. Il camino deve sempre essere in ottime condizioni e non deve presentare aperture o crepe che possano determinare dispersioni di tiraggio. Il mancato rispetto di quanto sopra comporta il decadimento della garanzia. 9. AVVERTENZE PRIMA DELL’INSTALLAZIONE Questa caldaia serve a riscaldare l’acqua ad una temperatura inferiore a quella di ebollizione a pressione atmosferica. Essa deve essere allacciata ad un impianto di riscaldamento compatibilmente alle sue prestazioni ed alla sua potenza. IMPORTANTE: allo stato di fornitura la caldaia è priva dei seguenti componenti che devono essere montati a cura dell’installatore: • Vaso espansione; • Valvola di sicurezza; • Pompa di circolazione; • Rubinetto di riempimento impianto. Prima di collegare la caldaia è indispensabile effettuare: a) Una verifica che la caldaia sia predisposta per il funzionamento con il tipo di gas disponibile. Questo è rilevabile dalla scritta sull’imballo e dalla targa presente sull’apparecchio. b) Un controllo che il camino abbia un tiraggio adeguato, non presenti strozzature e non siano inseriti nella canna fumaria scarichi di altri apparecchi, salvo che questa non sia realizzata per servire più utenze secondo le specifiche Norme e prescrizioni vigenti. c) Un controllo che, nel caso di raccordi su canne fumarie preesistenti, queste siano state perfettamente pulite poiché le scorie, staccandosi dalle pareti durante il funzionamento, potrebbero occludere il passaggio dei fumi. ISTRUZIONI DESTINATE ALL’INSTALLATORE 12 7115313.01 - it Risulta inoltre indispensabile, al fine di preservare il corretto funzionamento e la garanzia dell’apparecchio, seguire le seguenti precauzioni: 1. Circuito di riscaldamento 1.1.impianto nuovo Prima di procedere all’installazione della caldaia l’impianto deve essere opportunamente pulito allo scopo di eliminare residui di filettature, saldature ed eventuali solventi utilizzando prodotti idonei disponibili nel mercato non acidi e non alcalini, che non attacchino i metalli, le parti in plastica e gomma. I prodotti raccomandati per la pulizia sono: SENTINEL X300 o X400 e FERNOX Rigeneratore per impianti di riscaldamento. Per l’utilizzo di questi prodotti seguire attentamente le istruzioni fornite con i prodotti stessi. 1.2.impianto esistente: Prima di procedere all’installazione della caldaia l’impianto deve essere completamente svuotato ed opportunamente pulito da fanghi e contaminanti utilizzando prodotti idonei disponibili nel mercato citati al punto 1.1. Per la protezione dell’impianto dall’incrostazioni è necessario l’utilizzo di prodotti inibitori quali SENTINEL X100 e FERNOX Protettivo per impianti di riscaldamento. Per l’utilizzo di questi prodotti seguire attentamente le istruzioni fornite con i prodotti stessi. Ricordiamo che la presenza di depositi nell’impianto di riscaldamento comporta dei problemi funzionali alla caldaia (es. surriscaldamento e rumorosità dello scambiatore). La mancata osservazione di queste avvertenze comporta il decadimento della garanzia dell’apparecchio. 10. INSTALLAZIONE E DIMENSIONI CALDAIA L’installazione va fatta tenendo presente l’agevole manutenzione (la porta anteriore deve aprirsi e si deve poter accedere al posteriore caldaia). Si consiglia la creazione di un basamento di fondo rialzato di 200 mm per agevolare lo scarico della condensa fumi. Per valutare il peso che la caldaia esercita sul pavimento si deve tener conto anche del peso dell’acqua contenuta nello scambiatore (si veda tabella). Agire sui piedini regolabili per compensare eventuali dislivelli del pavimento. Eseguire la posa in opera dell’impianto partendo dalla posizione degli attacchi idrici e gas presenti nella parte posteriore caldaia (dimensioni e attacchi sono riportati in tabella). Consigliamo quanto segue: • Installare sulla mandata (MR) e sul ritorno (RR) del circuito di riscaldamento due rubinetti d’intercettazione che permettono, in caso di interventi importanti, di operare senza dover svuotare tutto l’impianto di riscaldamento. • Collegare il tubo di alimentazione gas della caldaia alla rete di distribuzione del gas per mezzo di una tubazione metallica inserendo un rubinetto di arresto a monte della caldaia stessa (obbligatorio). • Inserire dei giunti a tre pezzi, sia nel collegamento idraulico che in quello del gas per agevolare la separazione della caldaia dall’impianto. • Inserire un separatore idraulico. • Installare un gruppo di caricamento automatico per il riempimento dell’impianto. Tali apparecchi sono privi di circolatore, vaso d’espansione e valvola di sicurezza; questi dispositivi devono essere presenti nell’impianto e opportunamente dimensionati in funzione della portata termica e della capacità dell’impianto stesso. NOTA. Si raccomanda di porre particolare cura nella fase di riempimento dell’impianto di riscaldamento. In particolare aprire le valvole termostatiche eventualmente presenti nell’impianto, far affluire lentamente l’acqua al fine di evitare formazione di aria all’interno del circuito primario finché non si raggiunge la pressione necessaria al funzionamento. Infine eseguire lo sfiato degli eventuali elementi radianti all’interno dell’impianto. BAXI non si assume alcuna responsabilità per danni derivati dalla presenza di bolle d’aria all’interno dello scambiatore primario dovuta ad errata o approssimativa osservanza di quanto sopra indicato. ISTRUZIONI DESTINATE ALL’INSTALLATORE 13 7115313.01 - it Per il Mercato Italiano l’impianto deve essere provvisto delle sicurezze previste dalla Raccolta R (termostato sicurezza, pressostato sicurezza, valvola intercettazione combustibile, ecc..) Collegare il tubo di scarico condensa fumi ad un pozzetto di scarico assicurando una pendenza minima. Lo svuotamento della caldaia viene effettuato utilizzando il rubinetto di scarico posto nella parte posteriore della caldaia. Modello POWER HT.. Profondità (mm) A Altezza (mm) Larghezza (mm) Attacco Gas Attacco MR Attacco RR Contenuto d’acqua (l) 13,7 1.850 801 850 450 G 3/4” G 1’’ G 1’’ 1.1000 871 850 450 G 1” G 1 1/4” G 1 1/4” 21 1.1150 1024 850 450 G 1” G 1 1/4” G 1 1/4” 23,3 1.1200 1024 850 450 G 1” G 1 1/4” G 1 1/4” 23,3 1.1500 1132 850 450 G 1” G 1 1/4” G 1 1/4” 25,3 CT_0806 / 0902_2501 Tabella 1 inserire il raccordo fumi e allacciare il connettore al termostato fumi GAS RR RR: ritorno impianto di riscaldamento MR: mandata riscaldamento GAS: entrata gas alla caldaia SC: scarico condensa MR SC Figura 5 ISTRUZIONI DESTINATE ALL’INSTALLATORE 14 7115313.01 - it CT_0807 7 0902_2502 Per la scelta del separatore idraulico consultare quanto dichiarato dal costruttore dello stesso in funzione delle portate idrauliche riportate nella tabella sottostante SCARICO CONDENSA Figura 6 10.1 PERDITE DI CARICO SCAMBIATORI Modello POWER HT Portata acqua minima l/h Portata acqua con ∆t=20°K l/h 1.850 1900 3700 1.1000 2100 4300 1.1150 2300 4800 1.1200 2600 5200 1.1500 3300 6500 Verificare che la portata d’acqua non sia inferiore a quanto indicato ISTRUZIONI DESTINATE ALL’INSTALLATORE 15 7115313.01 - it 0502_2105 Perdite di carico scambiatori (mH2O) 0601_2008 PORTATA ACQUA (l/h) Perdite di carico scambiatori (mH2O) Grafico 1 PERDITE DI CARICO SCAMBIATORI CALDAIE POWER HT 1.850 - 1.1000 Grafico 1.1 112-120 kW PERDITE DI CARICO SCAMBIATORI CALDAIE POWER HT 1.1150 - 1.1200 - 1.1500 PORTATA ACQUA (l/h) 11. ALLACCIAMENTO ALLA CANNA FUMARIA 11.1 INSTALLAZIONE CON TIPOLOGIA B23 Effettuare il collegamento alla canna fumaria mediante un condotto fumi in acciaio inox o in materiale plastico di diametro interno 100 mm, resistente nel tempo alle normali sollecitazioni meccaniche, al calore (<120°C) ed all’azione dei prodotti di combustione e delle loro condense. Inserire il raccordo fumi e allacciare il connettore al termostato fumi prima di effettuare il collegamento alla canna fumaria. E’ consigliabile che l’allacciamento alla caldaia sia eseguito in modo da poter sconnettere il condotto dalla caldaia stessa, cosi da agevolare le operazioni di manutenzione. Importante: I tratti orizzontali devono avere una pendenza verso la caldaia di 3°. Accessori di scarico in materiale plastico per installazione singola o in cascata sono disponibili (diametro 110mm). ISTRUZIONI DESTINATE ALL’INSTALLATORE 16 7115313.01 - it CT0667 / 0903_1601 CT_0809 / 0902_2705 Figura 7 In caso d’installazione di condotti di scarico e di aspirazione non forniti da BAXI S.p.A. è necessario che gli stessi siano certificati per il tipo di utilizzo ed abbiano una perdita di carico massima secondo i valori riportati in tabella. Allo scopo di ottenere la corretta portata termica, è necessario aggiornare il n° di giri (rpm) del ventilatore in funzione della lunghezza dei condotti di scarico e della tipologia d’installazione come riportato nelle tabelle sottostanti. Il valore impostato dalla fabbrica è quello relativo alla lunghezza di scarico minima (0÷10 m). Per effettuare l’aggiornamento dei valori del ventilatore (rpm e pwm%), fare riferimento ai paragrafi 13÷14. Lunghezza max condotto di scarico ( L) : 20 m Per ogni curva a 90° installata la lunghezza max si riduce di : 1 m Per ogni curva a 45° installata la lunghezza max si riduce di : 0,5 m TABELLA PRESSIONI DISPONIBILI PER I CONDOTTI FUMI ΔP disponibile Condotto fumi B23 Ø 100 HT 1.850 110 HT 1.1000 150 HT 1.1150 160 HT 1.1200 170 HT 1.1500 280 AVVERTENZA Al fine di garantire una maggior sicurezza di funzionamento è necessario che i condotti di scarico fumi siano ben fissati al muro mediante apposite staffe di fissaggio. ISTRUZIONI DESTINATE ALL’INSTALLATORE 17 7115313.01 - it 11.2 INSTALLAZIONE CON TIPOLOGIA C53 Il kit permette l’aspirazione dell’aria comburente all’esterno del locale di installazione ed è costituito da un tubo flessibile che va installato nel corpo del venturi. Consultare le istruzioni fornite con il kit stesso. CT_0813 / 0903_0601 Per i condotti di aspirazione (diametro e lunghezza) vedere quanto riportato nel manuale del kit. ISTRUZIONI DESTINATE ALL’INSTALLATORE 18 7115313.01 - it 12. ALLACCIAMENTO ELETTRICO La sicurezza elettrica dell’apparecchio è raggiunta soltanto quando lo stesso è correttamente collegato ad un efficace impianto di messa a terra, eseguito come previsto dalle vigenti Norme di sicurezza sugli impianti (DM 22 gennaio 2008, n.37). La caldaia va collegata elettricamente ad una rete di alimentazione 230 V monofase + terra mediante il cavo a tre fili in dotazione rispettando la polarità Linea-Neutro. L’allacciamento dev’essere effettuato tramite un interruttore bipolare con apertura dei contatti di almeno 3 mm. In casi di sostituzione del cavo di alimentazione dev’essere utilizzato un cavo armonizzato “HAR H05 VV-F” 3x0,75 mm2 con diametro massimo di 8 mm. Coperchio 0902_1201 / CT_0674 IMPORTANTE: Verificare che l’assorbimento nominale totale degli accessori collegati all’apparecchi sia inferiore ai 2 A. Nel caso sia superiore è necessario interporre tra gli accessori e la scheda elettronica un relè. Morsettiera Morsettiera Coperchio Morsettiera Figura 8 AVVERTENZA In caso l’apparecchio sia collegato direttamente ad un impianto a pavimento deve essere previsto, a cura dell’installatore, un termostato di protezione per la salvaguardia di quest’ultimo contro le sovratemperature. 12.1 ACCESSO ALLE MORSETTIERE • • • • Togliere tensione alla caldaia mediante l’interruttore bipolare. Rimuovere il pannello cruscotto superiore (fissaggio con magneti) Svitare le due viti che tengono in posizione il cruscotto. Ruotare il cruscotto verso la parte anteriore. Morsettiera di alimentazione M1 • Rimuovere il coperchio a scatto della morsettiera M1. • Il fusibile, del tipo rapido da 3,15 A, è incorporato nella morsettiera di alimentazione (figura 8). Estrarre il portafusibile colore nero per il controllo e/o sostituzione. Morsettiera M2 • Rimuovere il coperchio della morsettiera M2 svitando la vite. Morsettiera M3 • Rimuovere il coperchio principale svitando le viti di fissaggio. ISTRUZIONI DESTINATE ALL’INSTALLATORE 19 7115313.01 - it 12.2 COLLEGAMENTO ELETTRICO DELLE POMPE Coperchio 0902_1202 / CT_0676 Le pompe dell’impianto di riscaldamento (P1 e P2) devono essere alimentate seguendo lo schema di figura 9 interponendo tra la scheda elettronica di caldaia e le pompe stesse dei relè. Morsettiera Morsettiera Coperchio Morsettiera Figura 9 ISTRUZIONI DESTINATE ALL’INSTALLATORE 20 7115313.01 - it 12.3 DESCRIZIONE DEI COLLEGAMENTI ELETTRICI ALLE MORSETTIERE M1 E M2 DI CALDAIA Ruotare verso il basso la scatola comandi ed accedere alle morsettiere M1 e M2 destinate ai collegamenti elettrici togliendo i due coperchi di protezione (vedere figura 8). Morsetti 1-2: collegamento del regolatore climatico SIEMENS modello QAA73 fornito come accessorio. Non è necessario rispettare la polarità dei collegamenti. Il ponticello presente sui morsetti 3-4 “TA” deve essere tolto. Leggere le istruzioni che accompagnano questo accessorio per la corretta installazione e programmazione. Morsetti 3-4: “TA” collegamento termostato ambiente. Non devono essere utilizzati termostati con resistenza anticipatrice. Verificare che non ci sia tensione ai capi dei due fili di collegamento del termostato. Morsetti 5-6: “TP” collegamento termostato per impianti a pavimento (reperibile in commercio). Verificare che non ci sia tensione ai capi dei due fili di collegamento del termostato. Morsetti 7-8: collegamento sonda esterna SIEMENS modello QAC34 fornita come accessorio. Leggere le istruzioni che accompagnano questo accessorio per la corretta installazione. Morsetti 9-10: collegamento sonda di precedenza sanitario fornita come accessorio per il collegamento delle caldaie ad un bollitore esterno. Morsetti a-b (230V AC; 50 Hz; 0,5 A max; cos ϕ > 0,8): alimentazione elettrica pompa circolazione caldaia (alimentazione bobina relais). 12.4 COLLEGAMENTO DEL REGOLATORE CLIMATICO QAA73 Il regolatore climatico SIEMENS modello QAA73 (accessorio a richiesta) deve essere collegato ai morsetti 1-2 della morsettiera M2 di figura 8. Il ponte presente sui morsetti 3-4, previsto per il collegamento di un termostato ambiente, deve essere tolto. Le regolazioni concernenti la temperatura dell’acqua sanitaria ed il programma orario sanitario devono essere effettuate mediante questo dispositivo. Il programma orario del circuito di riscaldamento deve essere impostato sul QAA73 in caso di unica zona o relativamente alla zona controllata dal QAA73 stesso. Il programma orario del circuito di riscaldamento delle altre zone può essere impostato direttamente sul pannello comandi della caldaia. Vedere le istruzioni fornite con il regolatore climatico QAA73 per la modalità di programmazione dei parametri destinati all’utente. - QAA73:parametri settabili dall’installatore (service) Premendo contemporaneamente i due tasti PROG per un tempo di almeno 3 secondi è possibile accedere alla lista dei parametri visualizzabili e/o settabili dall’installatore. Premere uno di questi due tasti per cambiare il parametro da visualizzare o modificare. Premere il tasto [+] o [-] per modificare il valore visualizzato. Premere nuovamente uno dei tasti PROG per memorizzare la modifica. Premere il tasto informazioni (i) per uscire dalla programmazione. Di seguito vengono riportati solamente i parametri di comune utilizzo: ISTRUZIONI DESTINATE ALL’INSTALLATORE 21 7115313.01 - it Parametro Range Valore di fabbrica 70 Pendenza HC1 Selezione curva climatica “kt” del circuito di riscaldamento 2.5…40 15 72 Mandata Max HC1 Massima temperatura di mandata impianto di riscaldamento 25…85 85 74 Tipo di edificio Leggero, Pesante Leggero on HC1 on HC2 on HC1+HC2 nulla On HC1 N° linea 75 Compensazione ambiente Attivazione / disattivazione dell’influenza della temperatura ambiente. Se disattivata deve essere presente la sonda esterna. 77 Adattamento automatico della curva climatica “kt” in funzione della temperatura ambiente. Inattivo - attivo Attivo 78 Ottimizzazione partenza Max Massimo anticipo, rispetto al programma orario, di accensione della caldaia per l’ottimizzazione della temperatura del locale. 0…360 min 0 Ottimizzazione stop Max Massimo anticipo, rispetto al programma orario, di spegnimento della caldaia per l’ottimizzazione della temperatura del locale. 0…360 min 0 2.5…40 —.- = non attivo —.- 10…58 10 24 h/giorno PROG HC-1h PROG HC PROG ACS 24 h/giorno 79 80 Pendenza HC2 90 ACS set ridotto Minima temperatura dell’acqua sanitaria 91 Programma ACS Scelta del tipo di programma orario in sanitario. 24 h/giorno PROG HC-1h PROG HC PROG ACS = sempre attivo = come programma riscaldamento HC1 meno 1 ora = come programma di riscaldamento = programma specifico per il Sanitario (vedere anche le linee di programma 30-36) - segnalazioni di anomalie In caso di anomalie, sul display del QAA73 compare il simbolo lampeggiante. Premendo il tasto informazioni ( ) è possibile visualizzare il codice di errore e la descrizione dell’anomalia riscontrata (vedere tabella paragrafo 3.9). ISTRUZIONI DESTINATE ALL’INSTALLATORE 22 7115313.01 - it 12.5 COLLEGAMENTO DELLA SONDA ESTERNA La sonda esterna SIEMENS modello QAC34 (accessorio a richiesta) deve essere collegata ai morsetti 7-8 della morsettiera M2 di figura 8. Le modalità d’impostazione della pendenza della curva climatica “kt” risulta differente a seconda degli accessori collegati alla caldaia. a) Senza regolatore climatico QAA73: La scelta della curva climatica “kt” deve essere effettuata impostando il parametro H532 come descritto al capitolo 14 “impostazione dei parametri di caldaia”. Vedere il grafico 1 per la scelta della curva riferita ad una temperatura ambiente di 20°C. E’ possibile effettuare la traslazione della curva scelta premendo il pulsante (2), presente sul pannello 020523_0600 comandi della caldaia, e modificando il valore visualizzato premendo i tasti e . Vedere il grafico 2 per la scelta della curva. (L’esempio visualizzato sul grafico 3 è riferito alla curva Kt=15). Aumentare il valore visualizzato in caso non si raggiunga la temperatura ambiente desiderata all’interno del locale da riscaldare. Grafico 2 TM = Temperatura di mandata Te = Temperatura esterna composta Sth = Curva Kt Grafico 3 b) con regolatore climatico QAA73: 020523_1000 La scelta della curva climatica “kt” deve essere effettuata impostando il parametro 70 “pendenza HC1” del regolatore climatico QAA73 come descritto al capitolo 12.4 “QAA73: parametri settabili dall’installatore (service)”. Vedere il grafico 4 per la scelta della curva riferita ad una temperatura ambiente di 20°C. La traslazione della curva avviene in modo automatico in funzione della temperatura ambiente impostata mediante il regolatore climatico QAA73. In caso d’impianto diviso in zone la scelta della curva climatica “kt”, relativa alla parte d’impianto non controllato dal QAA73, deve essere effettuata impostando il parametro H532 come descritto al capitolo 14 “impostazione dei parametri di caldaia”. Grafico 4 ISTRUZIONI DESTINATE ALL’INSTALLATORE TM = Temperatura di mandata Te = Temperatura esterna composta 23 7115313.01 - it c) con AGU2.500 per la gestione di un impianto a bassa temperatura: Vedere le istruzioni che accompagnano l’accessorio AGU2.500 per il collegamento e la gestione di una zona a bassa temperatura. In questo caso alcuni parametri di configurazione della scheda elettronica devono essere modificati (vedi §14) (H552-H553-H632). 12.6 COLLEGAMENTO DI UN IMPIANTO A ZONE Il collegamento elettrico e le regolazioni necessarie per la gestione di un impianto diviso in zone risulta differente a seconda degli accessori collegati alla caldaia. a) Senza regolatore climatico QAA73: Il contatto relativo alla richiesta di funzionamento delle differenti zone deve essere collegato in parallelo e connesso al morsetto 3-4 “TA” della morsettiera M2 di figura 10. Il ponticello presente deve essere rimosso. La scelta della temperatura del riscaldamento è effettuata direttamente sul pannello comandi della caldaia come da istruzioni riportate in questo manuale destinate all’utente. b) con regolatore climatico QAA73: La pompa di zona, relativa all’ambiente controllato dal regolatore climatico QAA73, deve essere alimentata elettricamente mediante i morsetti 11-12 della morsettiera M3 di figura 10. Il contatto relativo alla richiesta di funzionamento delle altre zone deve essere collegato in parallelo e connesso ai morsetti 3-4 “TA” della morsettiera M2 di figura 10. Il ponticello presente deve essere rimosso. La scelta della temperatura del riscaldamento della zona controllata dal QAA73 è effettuata automaticamente dal QAA73 stesso. La scelta della temperatura del riscaldamento delle altre zone deve essere effettuata direttamente sul pannello comandi della caldaia. In questo caso alcuni parametri della scheda elettronica devono essere modificati: H552 = 50, H632 = 00001111. ZONA 2 ZONA 3 ZONA n (TERMOSTATO AMBIENTE) (TERMOSTATO AMBIENTE) (TERMOSTATO AMBIENTE) POMPA ZONA 2 ZONA 1 (QAA73) POMPA ZONA 3 POMPA ZONA n POMPA BOLLITORE POMPA ZONA 1 RELÉ ESCLUSIONE RISCALDAMENTO Figura 10 0702_0501 / CT_0675 POMPA CIRCOLAZIONE CALDAIA c) con AGU2.500 per la gestione di un impianto a bassa temperatura: Vedere le istruzioni che accompagnano l’accessorio AGU2.500 per il collegamento e la gestione di una zona a bassa temperatura. In questo caso alcuni parametri di configurazione della scheda elettronica devono essere modificati (vedi §14) (H552-H553-H632). ISTRUZIONI DESTINATE ALL’INSTALLATORE 24 7115313.01 - it 12.7 COLLEGAMENTO ELETTRICO DELLA POMPA - CIRCUITO SANITARIO Installare il bollitore a valle del separatore idraulico. La pompa del circuito sanitario deve essere collegata sulla Morsettiera M3 di caldaia ai morsetti 13-14 (figura 9). Le caratteristiche elettriche della pompa devono essere le seguenti: 230 V AC; 50 Hz; 1 A max; cos ϕ > 0.8. Nel caso in cui la pompa utilizzata abbia delle caratteristiche differenti è necessario interporre tra la scheda elettronica di caldaia e la pompa stessa un relè. Collegare la sonda NTC di precedenza sanitario, fornita come accessorio, ai morsetti 9-10 della morsettiera M2 di figura 11 dopo aver rimosso la resistenza elettrica presente. L’elemento sensibile della sonda NTC deve essere inserito sull’apposito pozzetto previsto sul bollitore stesso (figura 11). La regolazione della temperatura dell’acqua sanitaria e la scelta del programma orario sanitario possono essere effettuati direttamente sul pannello comandi della caldaia come descritto in questo manuale nelle istruzioni destinate all’utente. SCHEMA COLLEGAMENTO BOLLITORE LEGENDA: UB - UNITA’ BOLLITORE M2 - MORSETTIERA DI COLLEGAMENTO SB - SONDA BOLLITORE RE - RESISTENZA ELETTRICA DA RIMUOVERE MR - MANDATA RISCALDAMENTO CALDAIA RR - RITORNO RISCALDAMENTO CALDAIA MB - MANDATA SERPENTINA BOLLITORE RB - RITORNO SERPENTINA BOLLITORE P1 - POMPA CIRCOLAZIONE CALDAIA P2 - POMPA BOLLITORE TS - TERMOSTATO DI SICUREZZA PS - PRESSOSTATO DI SICUREZZA Figura 11 In caso di impianto a zone è necessario interporre un relè per disattivare l’alimentazione delle pompe di zona, come indicato nello schema della figura 10. ISTRUZIONI DESTINATE ALL’INSTALLATORE 25 7115313.01 - it 13. REGOLAZIONE DELLE VALVOLE GAS E CAMBIO GAS 0502_2108 Per i modelli POWER HT 1. 850 e 1.1000 la valvola del gas è singola (Figura 12 a). Per i modelli POWER HT 1. 1150, 1. 1200 e 1.1500 la valvola del gas è doppia (Figura 12 b). diaframma gas Figura 12a diaframma gas collettore valvole Pi: presa di pressione alimentazione gas P out: presa di pressione per la misura dell’OFFSET V: vite di regolazione della portata gas K: vite di regolazione dell’OFFSET 0502_2109 venturi Figura 12b ISTRUZIONI DESTINATE ALL’INSTALLATORE 26 7115313.01 - it 13.1 MODELLI CON SINGOLA VALVOLA (POWER HT 1.850 E 1.1000) FIGURA 12a Per regolare la valvola del gas procedere come di seguito descritto: • Inserire la sonda dell’analizzatore fumi nella presa di prelievo fumi come riportato nel paragrafo (17 – figura 15). • Accendere la caldaia attivando “la funzione taratura” dal pannello comandi premendo contemporaneamente per 7 secondi i tasti 13a e 13b. e fino alla comparsa sul display dei simboli nella posizione illustrata in figura • Attivare il funzionamento alla massima portata termica premendo il tasto (100% a display figura 13a). Attenzione: in caso di non accensione della caldaia, o sostituzione della valvola gas, consigliamo di avvitare completamente a fine corsa la vite di regolazione (V) e successivamente svitarla di 3 giri ripetendo le operazioni sopradescritte. • Agire sulla vite di regolazione V della valvola gas in modo da raggiungere i valori di CO2 riportati in tabella 2.1 per gas metano (G20) e 2.2 per gas propano (GPL): - - Aumento CO2: ruotare la vite in senso antiorario. Diminuzione CO2: ruotare la vite in senso orario. • Attivare il funzionamento alla minima portata termica premendo il tasto (0% a display Figura 13b). • Agire sulla vite di regolazione K della valvola gas in modo da raggiungere i valori di CO2 riportati in tabella 2.1 per gas metano (G20) e 2.2 per gas propano (GPL): - - Aumento CO2: ruotare la vite in senso orario. Diminuzione CO2: ruotare la vite in senso antiorario. 13.2 MODELLI CON DOPPIA VALVOLA (POWER HT 1.1150, 1.1200 E 1.1500) FIGURA 12b Per regolare le valvole del gas procedere come di seguito descritto: • Collegare un manometro alla presa di pressione P1OUT della valvola 1. • Inserire la sonda dell’analizzatore fumi nella presa di prelievo fumi come riportato nel paragrafo 17 – figura 15. • Accendere la caldaia attivando “la funzione taratura” dal pannello comandi premendo contemporaneamente per 7 secondi i tasti figura 13a e 13b. e fino alla comparsa sul display dei simboli nella posizione illustrata in • Attivare il funzionamento alla massima portata termica premendo il tasto 13a). (100 % a display figura Attenzione: in caso di non accensione della caldaia, o di sostituzione delle valvole gas, consigliamo di avvitare completamente a fine corsa le viti di regolazione (V1) e (V2) e successivamente svitarle, a seconda del modello, di 2 giri e 1/4 (POWER HT 1.1150 e 1.1200) o di 2 giri e 1/2 (POWER HT 1.1500) e ripetere le operazioni sopradescritte. • Agire su entrambi le viti di regolazione (V1) e (V2) in modo da raggiungere il valore di CO2 riportato in tabella 2.1 per gas metano (G20) e 2.2 per gas propano (GPL): - - Diminuzione CO2: ruotare la vite in senso orario. Aumento CO2: ruotare la vite in senso antiorario. • Attivare il funzionamento alla minima portata termica premendo il tasto (0% a display figura 13b). • Agire sulla vite di regolazione K1 della valvola gas 1 in modo da raggiungere il valore di pressione (Pout) riportato in tabella 2.1 per gas metano (G20) e 2.2 per gas propano (GPL): ISTRUZIONI DESTINATE ALL’INSTALLATORE 27 7115313.01 - it - - Aumento Pressione: ruotare la vite in senso orario (aumento CO2). Diminuzione Pressione: ruotare la vite in senso antiorario (diminuzione CO2). • Spostare il manometro dalla presa di pressione P1OUT alla presa P2 OUT della valvola gas 2. • Agire sulla vite di regolazione K2 della valvola gas 2 in modo da raggiungere il valore di pressione (Pout) riportato in tabella 2.1 per gas metano (G20) e 2.2 per gas propano (GPL): 0307_2201 0502_2110 • Verificare che il valore di CO2 alla minima portata termica sia quello riportato in tabella 2.1 o 2.2 e correggere leggermente K2 in modo da ottimizzare il valore di CO2. Figura 13a ⇑ Figura 13b ⇑ 13.3 MODALITÀ CAMBIO GAS IMPORTANTE: in caso di trasformazione per il funzionamento da gas metano (G20) a gas propano (GPL), prima di effettuare la taratura della valvola gas, come appena descritto, deve essere effettuata la seguente operazione: • Per i modelli con singola valvola sostituire il diaframma gas situato sull’uscita della valvola gas (figura 12a). Per eseguire tale operazione è necessario smontare la valvola del gas agendo sugli attacchi di entrata e uscita e svitare l’ugello utilizzando una pinza a punte cilindriche dritte. Verificare la tenuta dei giunti gas precedentemente smontati. • Per i modelli con doppia valvola sostituire il diaframma gas situato all’ingresso del venturi (figura 12b). Per eseguire tale operazione è necessario smontare il collettore delle valvole gas. Verificare la tenuta dei giunti gas precedentemente smontati. • Impostare, mediante il display presente sul pannello comandi, i parametri H536 - H541 - H608 - H609 - H610 - H611 - H612 - H613. Nelle tabelle 2.1 e 2.2 sono riportati i valori da impostare. Le modalità di programmazione sono descritte al capitolo 14. ISTRUZIONI DESTINATE ALL’INSTALLATORE 28 7115313.01 - it Consumo gas a 15 °C 1013 mbar Gas G20 - 2H - 20 mbar POWER HT 1.850 POWER HT 1.1000 POWER HT 1.1150 POWER HT 1.1200 POWER HT 1.1500 MJ/m3 34,02 34,02 34,02 34,02 34,02 Consumo a portata termica max m3/h 9,26 10,9 12,16 13,08 16,35 Consumo a portata termica min 3 m /h 3,50 3,89 4,23 4,23 4,39 Diaframma gas mm 11,5 12 11 11 11,5 CO2 portata termica max % 8,7 8,7 8,7 8,7 8,7 CO2 portata termica min % 8,6 8,6 8,4 8,4 8,4 Pressione Pout portata termica min Pa PCI - - -4 -4 -5 Parametri H536-H613 (rpm) a portata termica max 5100 5650 4350 4650 6000 Parametri H541-H610 PWM (%) a portata termica max 90 100 50 55 100 1900 2100 1600 1600 1550 15 15 10 10 9,5 3600 3600 2600 2600 2900 15 15 15 Parametro H612 (rpm) a portata termica min Parametro H609 PWM (%) a portata termica min Parametro H611 (rpm) potenza accensione Lunghezza scarico fumi : 0 ÷ 10 m Parametro H608 PWM (%) potenza accensione 30 30 Lunghezza scarico fumi : 10 ÷ 20 m Parametro H608 PWM (%) potenza accensione 40 40 20 20 20 POWER HT 1.850 POWER HT 1.1000 POWER HT 1.1150 POWER HT 1.1200 POWER HT 1.1500 Tabella 2.1 Consumo gas a 15 °C 1013 mbar Gas G31 - 3P - 37 mbar PCI MJ/Kg 46,34 46,34 46,34 46,34 46,34 Consumo a portata termica max Kg/h 6,77 7,97 8,93 9,56 11,95 Consumo a portata termica min Kg/h 2,57 2,86 3,10 3,10 3,22 Diaframma gas mm 7,8 7,8 7,8 7,8 7,8 CO2 portata termica max % 10,2 10,2 10,2 10,2 10,2 CO2 portata termica min % 9,3 9,8 10,2 10,2 10,2 Pressione Pout portata termica min Pa - - -5 -7 -8 Parametri H536-H613 (rpm) a portata termica max 4600 5150 4050 4300 5350 Parametri H541-H610 PWM (%) a portata termica max 90 100 50 55 100 Parametro H612 (rpm) a portata termica min 1900 1950 1450 1450 1450 Parametro H609 PWM (%) a portata termica min 14,5 14,5 10 10 9,5 4200 4200 2600 2600 2900 15 15 15 20 20 20 Parametro H611 (rpm) potenza accensione Lunghezza scarico fumi : 0 ÷ 10 m Parametro H608 PWM (%) potenza accensione 40 40 Lunghezza scarico fumi : 10 ÷ 20 m Parametro H608 PWM (%) potenza accensione 50 50 Tabella 2.2 ISTRUZIONI DESTINATE ALL’INSTALLATORE 29 7115313.01 - it 14. IMPOSTAZIONE DEI PARAMETRI DI CALDAIA La modifica dei parametri di caldaia può essere effettuata solamente da personale qualificato operando come di seguito descritto: a) premere contemporaneamente i tasti , presenti sul pannello frontale della caldaia, per un tempo di circa 3 s fino alla comparsa sul display del parametro H90; b) premere i tasti per selezionare il parametro da modificare; c) premere i tasti e per modificare il parametro; d) premere il tasto per uscire dalla programmazione e memorizzare. Di seguito sono elencati i parametri di comune utilizzo: N° parametro Valore di fabbrica Descrizione H90 Impostazione temperatura ridotta in sanitario (°C) 10 H91 Abilitazione programma sanitario (0=abilitato; 1=non abilitato) 1 H505 Temperatura massima (°C) del circuito di riscaldamento HC1 corrispondente al: -circuito principale in caso di impianto con unica zona; -circuito della zona dove è installato il regolatore climatico QAA73 in caso di impianto con più zone ad alta temperatura; -circuito della zona ad alta temperatura in caso di impianto misto ed utilizzo dell’accessorio SIEMENS AGU2.500. 80 H507 Temperatura massima (°C) del circuito di riscaldamento HC2 di un impianto a più zone corrispondente al circuito della zona a bassa temperatura in caso di utilizzo dell’accessorio SIEMENS AGU2.500. 80 H516 Temperatura di commutazione automatica Estate / Inverno (°C). 20 H532 Selezione curva climatica circuito di riscaldamento HC1 (vedere grafico 1) 15 H533 Selezione curva climatica circuito di riscaldamento HC2 (vedere grafico 1) 15 H608 Settaggio PWM (%) : potenza accensione H611 Settaggio n° di giri (rpm) : potenza accensione H609 Settaggio PWM (%) : potenza minima H541-H610 H612 H536-H613 Settaggio PWM (%) : potenza massima riscaldamento/sanitario Vedere tabella 2 Settaggio n° di giri (rpm) : potenza minima Settaggio n° di giri (rpm) : potenza massima riscaldamento/sanitario H544 Tempo di postcircolazione della pompa in riscaldamento (min) H545 Tempo di attesa funzionamento bruciatore tra due accensioni (s) 3 H552 Settaggio sistema idraulico (vedere istruzioni che accompagnano l’accessorio SIEMENS AGU2.500). H552 = 50 con AGU2.500 e con QAA73 + termostati ambiente di zona H552 = 80 con RVA 47 2 H553 Configurazione circuiti di riscaldamento H553 = 12 con AGU2.500 21 H615 Funzione uscita programmabile: 9 180 Configurazione del sistema con pompa supplementare H632 = 00001111 con AGU2.500 e con QAA73 + termostati ambiente di zona H632 = 00001111 con RVA 47 H632 H641 Il valore di ogni Bit può essere 1 o 0 Per la modifica di tale parametro premere i pulsanti 5 e 6 per scegliere il bit da modificare (b0 è il bit a destra, b7 è l’ultimo bit a sinistra). Per modificare il valore del Bit premere sui pulsanti 7 e 8. Tempo di postventilazione del ventilatore (s) 00001100 10 Setpoint della funzione ANTILEGIONELLA H657 60…80 °C = intervallo di temperatura impostabile 0 = funzione disabilitata 0 In caso di sostituzione della scheda elettronica accertarsi che i parametri impostati siano quelli specifici per il modello di caldaia come da documentazione disponibile presso il Servizio di Assistenza Tecnica autorizzato. ISTRUZIONI DESTINATE ALL’INSTALLATORE 30 7115313.01 - it 15. DISPOSITIVI DI REGOLAZIONE E SICUREZZA La caldaia è costruita per soddisfare a tutte le prescrizioni delle Normative europee di riferimento, in particolare è dotata di: • Termostato di sicurezza Questo dispositivo, il cui sensore è posizionato sulla mandata del riscaldamento, interrompe l’afflusso del gas al bruciatore in caso di surriscaldamento dell’acqua contenuta nel circuito. In queste condizioni la caldaia va in blocco e solo dopo aver rimosso la causa dell’intervento è possibile ripetere l’accensione premendo il pulsante di reset presente sul pannello comandi della caldaia. E’ vietato mettere fuori servizio questo dispositivo di sicurezza • Controllo circolazione circuito caldaia La gestione elettronica della caldaia è provvista di una funzione “controllo circolazione caldaia” effettuata tramite la verifica continua della temperatura di mandata e ritorno circuito primario. In caso di incremento anomalo della temperatura di mandata e ritorno o inversione delle temperature la caldaia si arresta segnalando l’errore sul display (vedi tabella errori). • Termostato fumi Questo dispositivo, posizionato sul condotto di evacuazione dei fumi della caldaia, interrompe l’afflusso di gas al bruciatore in caso di temperatura superiore ai 90 °C. Premere il pulsante di ripristino, posizionato sul termostato stesso, dopo aver appurato le cause d’intervento, quindi premere il pulsante di reset presente sul pannello comandi della caldaia. E’ vietato mettere fuori servizio questo dispositivo di sicurezza • Termostato flangia scambiatore (260°C) Questo dispositivo è posizionato sulla flangia dello scambiatore e interrompe l’afflusso del gas al bruciatore in caso di surriscaldamento dello scambiatore dovuto al cedimento dell’isolamento anteriore o alla non corretta tenuta delle guarnizioni della flangia. Premere il pulsante di ripristino, posizionato sul termostato stesso, dopo aver appurato le cause d’intervento, quindi premere il pulsante di reset presente sul pannello comandi della caldaia. E’ vietato mettere fuori servizio questo dispositivo di sicurezza • Termofusibile Questo dispositivo è posizionato sulla parte posteriore dello scambiatore e interrompe l’afflusso del gas al bruciatore in caso di surriscaldamento dello scambiatore dovuto al cedimento dell’isolamento posteriore. In caso d’intervento di questo dispositivo è necessario smontare lo scambiatore e sostituire il termofusibile (vedere paragrafo “SOSTITUZIONE DEL TERMOFUSIBILE DELLO SCAMBIATORE”). E’ vietato mettere fuori servizio questo dispositivo di sicurezza • Rivelatore a ionizzazione di fiamma L’elettrodo di rivelazione garantisce la sicurezza in caso di mancanza gas o interaccensione incompleta del bruciatore. In queste condizioni la caldaia va in blocco. É necessario premere il pulsante di reset presente sul pannello comandi della caldaia per ristabilire le normali condizioni di funzionamento. • Postcircolazione pompa La postcircolazione della pompa, ottenuta elettronicamente, ha una durata di 3 minuti e viene attivata, nella funzione riscaldamento, dopo lo spegnimento del bruciatore per l’intervento del termostato ambiente. • Dispositivo antigelo La gestione elettronica della caldaia è provvista di una funzione “antigelo” in riscaldamento ed in sanitario che con temperatura di mandata impianto inferiore ai 5 °C fa funzionare il bruciatore fino al raggiungimento in mandata di un valore pari a 30 °C. Tale funzione è operativa se la caldaia è alimentata elettricamente, se c’è gas e se la pressione dell’impianto è quella prescritta. • Antibloccaggio pompa In caso di mancanza di richiesta di calore, in riscaldamento e/o in sanitario, per un tempo di 24 ore consecutive la pompa si mette in funzione automaticamente per 10 secondi. • Pressostato idraulico Questo dispositivo permette l’accensione del bruciatore principale solamente se la pressione dell’impianto è superiore a 0,5 bar. ISTRUZIONI DESTINATE ALL’INSTALLATORE 31 7115313.01 - it CT_0826 / 1002_1801 16. POSIZIONAMENTO ELETTRODO DI ACCENSIONE E RIVELAZIONE DI FIAMMA Figura 14 17. VERIFICA DEI PARAMETRI DI COMBUSTIONE 0811_1703 / CT_0782 Per la misura in opera del rendimento di combustione e dell’igienicità dei prodotti della combustione, come disposto dal DPR 26 Agosto 1993 n° 412, è necessario realizzare un foro sul condotto di scarico dei fumi ad una distanza dalla caldaia di 2 volte il diametro interno del condotto stesso. Mediante tale foro possono essere rilevati i seguenti parametri: • Temperatura dei prodotti della combustione. • Concentrazione di ossigeno (O2) od in alternativa di anidride carbonica (CO2). • Concentrazione di ossido di carbonio (CO). La misura della temperatura dell’aria comburente deve essere effettuata nei pressi dell’ingresso dell’aria nella caldaia. Il foro, che deve essere realizzato dal responsabile dell’impianto in occasione della prima messa in servizio, deve essere chiuso in modo da garantire la tenuta del condotto di evacuazione dei prodotti della combustione durante il normale funzionamento. Nel condotto fumi caldaia è comunque disponibile una presa per prelievo fumi Importante: al termine delle verifiche chiudere la presa con l’apposito tappo. PRESA FUMI CALDAIA Figura 15 ISTRUZIONI DESTINATE ALL’INSTALLATORE 32 7115313.01 - it 18. ATTIVAZIONE FUNZIONE SPAZZACAMINO 020429_0200 Al fine di facilitare le operazioni di misura del rendimento di combustione e dell’igienicità dei prodotti di combustione è possibile attivare la funzione spazzacamino procedendo come di seguito descritto: 1)premere contemporaneamente i tasti (2-3) fino a quando sul display compare l’indice “ ” in corrispondenza del simbolo (circa 3 secondi ma non più di 6 secondi). In queste condizioni la caldaia funziona alla massima portata termica prevista per il riscaldamento. 2) premere uno dei due tasti per terminare la funzione Figura 16a 19. MANUTENZIONE ANNUALE Allo scopo di assicurare un’efficienza ottimale della caldaia è necessario effettuare annualmente i seguenti controlli: • verifica dell’aspetto e della tenuta delle guarnizioni del circuito gas e del circuito di combustione; • verifica dello stato e della corretta posizione degli elettrodi di accensione e rivelazione di fiamma; • verifica dello stato del bruciatore ed il suo corretto fissaggio; • verifica delle eventuali impurità presenti all’interno della camera di combustione. Utilizzare allo scopo un aspirapolvere per la pulizia; • verifica della corretta taratura della valvola gas; • verifica della pressione dell’impianto di riscaldamento; • verifica della pressione del vaso espansione; • verifica che il ventilatore funzioni correttamente; • verifica che i condotti di scarico e aspirazione non siano ostruiti; • verifica delle eventuali impurità presenti all’interno del sifone, su caldaie predisposte; • verifica dell’ integrità dell’anodo di magnesio, dove presente, per le caldaie dotate di bollitore. AVVERTENZE Prima di effettuare qualsiasi intervento, assicurarsi che la caldaia non sia alimentata elettricamente. Terminate le operazioni di manutenzione, riportare le manopole e/o i parametri di funzionamento della caldaia nelle posizioni originali. ISTRUZIONI DESTINATE ALL’INSTALLATORE 33 7115313.01 - it 20. SOSTITUZIONE DEL TERMOFUSIBILE DELLO SCAMBIATORE 1311_1401.ai Il termofusibile è posizionato sulla parte posteriore dello scambiatore come illustrato nella figura, elettricamente è collegato in serie al termostato di sicurezza. La sua funzione è quella di salvaguardare lo scambiatore da sovratemperatura in caso di cedimento dell’isolamento. Quando interviene questo dispositivo sul display appare l’anomalia E110. Se la causa è dovuta alla rottura dall’isolamento è necessario smontare lo scambiatore e sostituire l’isolamento posteriore e il termofusibile. Figura 16b ISTRUZIONI DESTINATE ALL’INSTALLATORE 34 7115313.01 - it 18 17 CT_0824 22 1311_2103 21. SCHEMA FUNZIONALE CIRCUITI 13 19 14 6 10 9 12 V.G. 11 7 8 4 20 3 5 21 2 GAS 1 RR 15 MR 16 Figura 17 Legenda: 1manometro 2sifone 3 sonda NTC mandata riscaldamento 4 termostato di sicurezza 105°C 5 valvola del gas 6 scambiatore acqua-fumi 7 elettrodo di rilevazione di fiamma 8bruciatore 9 elettrodo di accensione 10 mixer con venturi 11 diaframma gas ISTRUZIONI DESTINATE ALL’INSTALLATORE 12 ventilatore 13 raccordo scarico fumi scambiatore 14 valvola automatica sfogo aria 15 pressostato idraulico 16 rubinetto scarico caldaia 17 raccordo scarico fumi con termostato fumi 18 termostato fumi 19 sede condotto aspirazione aria comburente 20 sonda NTC ritorno riscaldamento 21termofusibile 22 termostato flangia scambiatore 35 7115313.01 - it CT_0822_IT G/V C M G/V 1 2 1 2 1 2 1 2 1 2 3 1 1 2 1 FUSIBILE VENTILATORE C C M C C M RETE DI ALIMENTAZIONE USCITA 230V PROGRAMMABILE X40 TERMOFUSIBILE SCAMBIATORE TERMOSTATO DI SICUREZZA TERMOSTATO DI SICUREZZA FLANGIA TERMOSTATO FUMI X30 DISPLAY Colore cavetti C = Celeste M = Marrone N = Nero R = Rosso G/V = Giallo/Verde B = Bianco ELETTRODO DI RIVELAZIONE 11 12 13 14 15 16 17 M C C M C M MORSETTIERA DI ALIMENTAZIONE C M L G/V N M C M C M C 2 1 2 1 I X2-01 I X2-02 I X2-03 IX2-04 IX2-05I I X3-01I X3-02 I X3-03IX3-04I M N C G/V 1 2 4 5 M C G/V 2 3 PRED. POMPA RISCALDAMENTO 1 PRED. POMPA SANITARIO VALVOLA GAS X50 2 1 2 1 2 1 C C N N R R 1 2 1 2 LN 1 2 3 4 5 6 7 8 9 10 G/V PRED TERMOSTATO IMP. A PAVIMENTO TP PRED. SONDA NTC PRECEDENZA SANITARIO PRED. SONDA ESTERNA TERMOSTATO AMBIENTE PRED. COMANDO A DISTANZA NM TA SONDA NTC MANDTA RISC. SONDA NTC RITORNO RISC. ACCENDITORE NN C X11 12 11 10 9 8 7 6 5 4 3 2 1 V V X12 6 5 4 3 2 1 RR X15 X14 X13 5 4 3 2 1 ELETTRODO DI ACCENSIONE M C G/V V V M M 2 1 I X10-01 IX10-02 I X10-03 IX10-04 I X10-05 I X10-06 I 4 3 2 1 AGU 2.500 3 2 1 OCI 420 L OT PI I X1-01 I X1-02 I b a N b a L AIR IN OUT IN 36 PRESSOSTATO ACQUA COM ISTRUZIONI DESTINATE ALL’INSTALLATORE NO 1311_2001 V V 22. SCHEMA COLLEGAMENTO CONNETTORI 22.1 POWER HT 1.850 - 1.1000 7115313.01 - it CT_0823_IT G/V C M G/V 2 1 2 1 2 1 2 3 1 1 2 1 FUSIBILE RETE DI ALIMENTAZIONE MORSETTIERA DI ALIMENTAZIONE C M L G/V N C C M C C M 2 1 2 1 11 12 13 14 15 16 17 M C C M C M USCITA 230V PROGRAMMABILE M C M C M C VENTILATORE 1 2 4 5 1 I X2-01 I X2-02 I X2-03 IX2-04 IX2-05I I X3-01I X3-02 I X3-03IX3-04I M N C G/V M C G/V 1 2 PRED. POMPA RISCALDAMENTO 2 3 b a L N b a PRED. POMPA SANITARIO 1 TERMOSTATO DI SICUREZZA TERMOSTATO DI SICUREZZA FLANGIA TERMOSTATO FUMI X30 VALVOLA GAS 1 TERMOFUSIBILE SCAMBIATORE X40 L T PI O I X1-01 I X1-02 I ELETTRODO DI RIVELAZIONE DISPLAY AIR IN VALVOLA GAS 2 18 19 20 C M G/V X50 2 1 2 1 2 1 C C N N R R 1 2 1 2 LN 1 2 3 4 5 6 7 8 9 10 G/V TERMOSTATO AMBIENTE PRED. COMANDO A DISTANZA NM PRED. SONDA NTC PRECEDENZA SANITARIO PRED. SONDA ESTERNA PRED TERMOSTATO IMP. A TP PAVIMENTO TA SONDA NTC MANDTA RISC. SONDA NTC RITORNO RISC. PRESSOSTATO ACQUA Colore cavetti C = Celeste M = Marrone N = Nero R = Rosso G/V = Giallo/Verde B = Bianco ACCENDITORE NN C X11 12 11 10 9 8 7 6 5 4 3 2 1 V V X12 6 5 4 3 2 1 RR X15 X14 X13 5 4 3 2 1 ELETTRODO DI ACCENSIONE M C G/V V V M M 2 1 I X10-01 IX10-02 I X10-03 IX10-04 IX10-05 I X10-06 I 4 3 2 1 AGU 2.500 OUT 3 2 1 OCI 420 T PI L O IN AIR IN OUT IN 37 COM ISTRUZIONI DESTINATE ALL’INSTALLATORE NO 1311_2002 V V 22.2 POWER HT 1.1150 - 1.1200 - 1.1500 7115313.01 - it 23. CARATTERISTICHE TECNICHE Caldaia Modello POWER HT 1.850 1.1000 1.1150 1.1200 1.1500 Categoria II2H3P II2H3P II2H3P II2H3P II2H3P Portata termica nominale kW 87,2 102,7 115 123,2 154 Portata termica ridotta kW 33,1 36,8 40 40 41,5 Potenza termica nominale 75/60°C kW 85 100 112 120 150 kcal/h 73100 86000 96320 103200 129000 kW 91,6 107,8 121,1 129,7 162 kcal/h 78776 92708 104146 111542 139320 kW 32,2 35,8 39 39 40,4 kcal/h 27692 30788 33540 33540 34744 kW 34,9 38,8 42,1 42,1 43,7 kcal/h 30014 33368 36206 36206 37582 Rendimento secondo la direttiva 92/42/CEE — ★★★★ ★★★★ ★★★★ ★★★★ ★★★★ Pressione massima acqua circuito termico bar 4 4 4 4 4 Range temperatura circuito di riscaldamento °C 25÷80 25÷80 25÷80 25÷80 25÷80 Tipo — Potenza termica nominale 50/30°C Potenza termica ridotta 75/60°C Potenza termica ridotta 50/30°C B23 - B23P - C53* Diametro condotto di scarico mm 100 100 100 100 100 Portata massica fumi max kg/s 0,041 0,049 0,054 0,059 0,073 Portata massica fumi min. kg/s 0,016 0,018 0,019 0,019 0,020 Temperatura fumi max °C 78 80 72 77 75 Classe NOx — 5 5 5 5 5 Tipo di gas — G20 G20 G20 G20 G20 G31 G31 G31 G31 G31 20 20 20 20 20 Pressione di alimentazione gas naturale 2H mbar Pressione di alimentazione gas propano 3P mbar 37 37 37 37 37 Tensione di alimentazione elettrica V 230 230 230 230 230 Frequenza di alimentazione elettrica Hz 50 50 50 50 50 Potenza elettrica nominale W 100 160 128 135 235 Peso netto Dimensioni kg 75 83 95 95 103 altezza mm 850 850 850 850 850 larghezza mm 450 450 450 450 450 profondità mm 801 871 1024 1024 1132 *C53 (solamente con kit aspirazione aria) ISTRUZIONI DESTINATE ALL’INSTALLATORE 38 7115313.01 - it Sehr geehrter Kunde! Unser Unternehmen ist überzeugt, dass Ihr neues Produkt voll und ganz Ihren Anforderungen entsprechen wird. Der Kauf eines unserer Produkte ist Garantie für einen einwandfreien Betrieb und eine einfache und rationelle Verwendung. Bitte legen Sie diese Anleitungen nicht beiseite, ohne sie vorher gelesen zu haben: Sie enthalten nützliche Informationen für den korrekten und effizienten Einsatz Ihres Produkts. Unser Unternehmen erklärt, dass diese Produkte eine Anforderungen der folgenden Richtlinien entsprechen : Kennzeichnung besitzen und den grundlegenden - Gas-Richtlinie 2009/142/EG - Leistungs-Richtlinie 92/42/EWG - Richtlinie der elektromagnetischen Kompatibilität 2004/108/EG - Niederspannungsr-Richtlinie 2006/95/EG Unser Unternehmen ist bemüht, seine Produkte kontinuierlich zu verbessern und behält sich das Recht vor, die in diesem Dokument enthaltenen Informationen jederzeit ohne Vorankündigung zu ändern. Diese Anleitung soll unsere Kunden mit nützlichen Informationen versorgen und kann in keinem Fall als Vertrag mit einem Dritten ausgelegt werden. ACHTUNG Dieses Gerät darf und kann nur in den gesetzlichen Vorschriften entsprechenden, dauerbelüfteten Räumen installiert und betrieben werden BAXI S.p.A., eines der führenden europäischen Unternehmen für die Produktion von hochtechnologischen Heizkesseln und Heizsystemen, hat von CSQ die Zertifizierungen des Qualitätssicherungssystems (ISO 9001), des Umweltmanagementsystems (ISO 14001) und des Verwaltungssystems der Arbeitssicherheit und Gesundheit (OHSAS 18001) erzielt. Dies bezeugt, dass die Firma BAXI S.p.A. den Umweltschutz, die Zuverlässigkeit und Qualität ihrer Produkte, sowie die Arbeitssicherheit und Gesundheit ihrer Beschäftigten als ihre strategischen Zielstellungen anerkennt. Die Firma befasst sich mit ihrer Organisation ständig damit, diese Aspekte für die beste Zufriedenheit ihrer Kundschaft weiter zu implementieren und zu verbessern ANLEITUNGEN FÜR DEN VERBRAUCHER 39 7115313.01 - de (at) INHALTSANGABE ANLEITUNGEN FÜR DEN VERBRAUCHER 1. Anweisungen vor der Installation 2. Hinweise vor der Inbetriebnahme 3. Inbetriebnahme des Heizkessels 4. Füllen der Anlage 5. Ausschaltung des Heizkessels 6. Langer Anlagenstillstand Frostschutz 7. Wartungsanleitung und Änderung der Gasart 41 41 42 48 48 48 48 ANLEITUNGEN FÜR DEN INSTALLATEUR 8. Allgemeinen Anweisungen 49 9. Anweisungen vor der Installation 49 10. Installation und Abmessungen des Gerätes 50 11. Anschluss an den Abzugsschacht 53 12. Elektroanschluß 56 13. Einstellen der Gasventile und Änderung der Gasart 63 14. Eingabe der Kesselparameter 67 15. Regelungs- und Sicherheits-vorrichtungen 68 16. Positionierung der Zünd- und Überwachungselektrode 69 17. Überprüfung der Verbrennungsparameter 69 18. Aktivierung der Schornsteinkehrerfunktion 70 19. Jährliche Wartung 70 20. Austausch der Schmelzsicherung des Wärmetauschers71 21. Funktionsplan der Kreisläufe 72 22. Anschlußplan der Verbinder 73-74 23. Technische Eigenschaften 75 ANLEITUNGEN FÜR DEN VERBRAUCHER 40 7115313.01 - de (at) 1. ANWEISUNGEN VOR DER INSTALLATION Dieser Heizkessel heizt das Wasser bis zu einer unterhalb des Siedepunktes bei Luftdruck befindlichen Temperatur auf. Der Heizkessel ist an eine Heizanlage anzuschließen, die seinen Leistungsmerkmalen entspricht. Bevor Sie den Heizkessel von Fachleuten anschließen lassen, müssen folgende Vorgänge durchgeführt werden: a) Es muß überprüft werden, ob der Heizkessel für den Betrieb mit der zur Verfügung stehenden Gasart vorgesehen ist. Diese Angäben finden Sie auf der Verpackung und auf dem Geräteschild. b) Um den einwandfreien Betrieb des Geräts und den Garantieanspruch zu bewahren, müssen außerdem folgende Vorsichtsmaßregeln befolgt werden: 1.Heizwasserkreis 1.1.Neue Anlage Vor der Installation des Kessels muss die Anlage gründlich gereinigt werden, um Rückstände von Gewinden, Schweißnähten und eventuellen Lösungsmitteln zu entfernen. Für die Reinigung geeignete, nicht saure und nicht alkalische, handelsübliche Mittel verwenden, die die Metalle, Kunststoff- und Gummiteile nicht angreifen. Empfohlene Reinigungsmittel: SENTINEL X300 oder X400 und FERNOX Regenerierer für Heizanlagen. Beim Gebrauch dieser Produkte die herstellerseitigen Gebrauchsanweisungen genau befolgen. 1.2.Bereits existierende Anlage: Vor der Installation des Kessels muss die Anlage vollkommen geleert und mit geeigneten, unter Punkt 1.1. aufgeführten handelsüblichen Produkten von Schlamm und Verunreinigungen befreit werden. Für den Schutz der Anlage vor Inkrustationen sind entsprechende Spezialprodukte wie SENTINEL X100 und FERNOX Schutzmittel für Heizanlagen zu verwenden. Beim Gebrauch dieser Produkte die herstellerseitigen Gebrauchsanweisungen genau befolgen. Es wird ausdrücklich darauf hingewiesen, dass durch Ablagerungen in der Heizanlage der Betrieb des Kessels beeinträchtigt werden kann (z.B. Überhitzung und lauter Betrieb des Wärmetauschers). Die Missachtung dieser Hinweise bewirkt den Verfall der Gerätegarantie. 2. HINWEISE VOR DER INBETRIEBNAHME Die erste Inbetriebnahme muß vom Fachmann durchgeführt werden. Dieser muß folgendes kontrollieren: a) ob die Daten auf dem Schild jenen des Versorgungsnetzes entsprechen (Strom, Wasser, Gas). b) die Installation muss die geltenden gesetzlichen Vorschriften erfüllen. c) ob der Elektroanschluß vorschriftsmäßig an Stromnetz mit Erdung ausgeführt worden ist. Die Nichtbeachtung dieser Punkte hat den Verfall der Garantie zur Folge. Das Gerät darf nicht von Personen (einschließlich Kindern) mit körperlich und geistig eingeschränkten Fähigkeiten und Empfindungsvermögen oder mangelnder Erfahrung oder Kenntnissen verwendet werden, außer diese haben mittels einer für ihre Sicherheit verantwortliche Person Anleitungen bezüglich des Gebrauchs des Geräts erhalten oder werden von diesen überwacht. ANLEITUNGEN FÜR DEN VERBRAUCHER 41 7115313.01 - de (at) 3. INBETRIEBNAHME DES HEIZKESSELS 020503_1100 Für eine korrekte Inbetriebnahme wie folgt vorgehen: 1)den Heizkessel mit Strom versorgen; 2)den Gashahn öffnen; 3) Befolgen Sie die nachstehenden Anleitungen bezüglich der Einstellungen, die am Bedienfeld des Heizkessels durchzuführen sind. Abbildung 1 WICHTIG: Die Anweisungen in dieser Betriebsanleitung betreffen den Warmwasserbetrieb und sind daher nur zu berücksichtigen, wenn das Gerät an eine Warmwasserversorgung angeschlossen ist. ERKLÄRUNG DER TASTENFUNKTION ERKLÄRUNG DER SYMBOLE AM DISPLAY Taste Brauchwassererwärmung on/off Brauchwassererwärmung Taste für die Einstellung der Heizungsvorlauftemperatur Heizbetrieb Taste für die Einstellung der Brauchwassertemperatur Automatikbetrieb Resettaste (Rücksetzung) Manualbetrieb bei der vorgegebenen Höchsttemperatur Taste für den Zugriff und das Durchsehen der Programme Manualbetrieb bei reduzierter Temperatur Taste für den Zugriff und das Durchsehen der Programme Standby (aus) Taste für die Parametereinstellung (Wert verringern) Außentemperatur Taste für die Parametereinstellung (Wert erhöhen) Flamme vorhanden (ein) Rücksetzbare Betriebsstörung vorhanden Taste für die Anzeige der Informationen Taste für die Einstellung der Heizbetriebsart HAUPTDISPLAY ZWEITDISPLAY ANLEITUNGEN FÜR DEN VERBRAUCHER 42 7115313.01 - de (at) 3.1 BESCHREIBUNG DER TASTEN (2) Taste für die Einstellung der Heizungsvorlauftemperatur. Mit dieser Taste kann die Vorlauftemperatur des Heizwassers wie in Abschnitt 3-3 beschrieben eingestellt werden. (3) Taste für die Einstellung der Brauchwassertemperatur. Mit dieser Taste kann die Brauchwassertemperatur wie in Abschnitt 3-4 beschrieben eingestellt werden. (10) Betriebsartentaste Heizbetrieb. Mit dieser Taste können vier Betriebsarten des Heizkessels im Heizbetrieb aktiviert werden; diese Betriebsarten werden am Display wie nachstehend beschrieben durch einen schwarzen Balken unter dem entsprechenden Symbol angezeigt: 020503_0800 Strich “Betriebsart Automatik” aktiv Abbildung 2 • Automatikbetrieb. Der Betrieb des Heizkessels ist wie im Abschnitt 3-5.1 “Tages-/ Stundenprogramm des Heizbetriebs” beschrieben an das Zeitprogramm gebunden • Manualbetrieb bei der vorgegebenen Höchsttemperatur. Der Heizkessel wird unabhängig vom eingegebenen Zeitprogramm eingeschaltet. Die Betriebstemperatur ist die mit der Taste eingestellte (Abschnitt 3-3 : “Einstellung der max. Heiztemperatur”); • Manualbetrieb bei reduzierter Temperatur. Die Betriebstemperatur ist die im Abschnitt 3-6:“Einstellung der reduzierten Heiztemperatur” eingestellte. Der manuelle Übergang von den Positionen a) und b) auf die Position c) bewirkt das Ausgehen des Brenners und den Pumpenstopp nach Ablauf der Pumpennachlaufzeit (werkseitig voreingestellter Wert 3 Minuten). • Standby. Der Heizkessel läuft nicht im Heizbetrieb, es ist lediglich die Frostschutzfunktion des Heizkessels aktiviert. (1) Taste Brauchwassererwärmung on/off. Durch Drücken dieser Taste kann diese Funktion aktiviert oder deaktiviert werden, die durch die Anzeige von zwei schwarzen Linien unter dem Symbol auf dem Display erkennbar ist. (4) Resettaste. Bei Auftreten einer der im Abschnitt 3-8 “Störungsanzeige und Rücksetzung des Heizkessels” genannten Betriebsstörungen kann der Betrieb des Geräts wieder hergestellt werden, indem diese Taste mindestens zwei Sekunden lang gedrückt wird. Falls diese Taste gedrückt wird, wenn keine Betriebsstörung vorliegt, erscheint am Display die Anzeige “E153”. In diesem Fall muss die Taste (mindestens zwei Sekunden lang) erneut gedrückt werden, um den Betrieb wieder herzustellen (9) Informationstaste. Durch wiederholtes Drücken dieser Taste können folgende Informationen ANLEITUNGEN FÜR DEN VERBRAUCHER 43 7115313.01 - de (at) abgerufen werden: - Brauchwassertemperatur (°C) ( ); - Aussentemperatur (°C) ( ); diese Funktion ist nur mit angeschlossenem Aussentemperaturfühler verfügbar. Eine der zwei Tasten zurückzukehren. drücken, um die Info-Funktion zu verlassen und zum Hauptmenü 3.2 EINSTELLUNG DER UHRZEIT Eine der zwei Tasten drücken, um die Programmierungsfunktion abzurufen; am Display erscheint der Buchstabe P, gefolgt von einer Zahl (Programmlinie). 020503_0700 • Abbildung 3 • • • Die Tasten betätigen, bis die Anzeige P1 für die einzustellende Uhrzeit erscheint; Die Tasten blinken; betätigen, um die Uhrzeit einzustellen. Am Display beginnt der Buchstabe P zu Die Taste betätigen, um die Eingabe zu speichern und die Programmierung zu beenden; 3.3 EINSTELLUNG DER MAX. HEIZTEMPERATUR - Für die Einstellung der Heizwassertemperatur die Taste - Die Tasten (2- Abbildung 1) drücken; drücken, um die gewünschte Temperatur einzugeben; - Eine der zwei Tasten Hauptmenü zurückzukehren. (1 oder 10 - Abbildung 1) drücken, um die Eingabe zu speichern und zum Anmerkung – Mit angeschlossenem Außentemperaturfühler kann mit der Taste Heizkurve verschoben werden. Die Tasten zu erhöhen (2 – Abbildung 1) die drücken, um die Raumtemperatur zu verringern bzw. 3.4 EINSTELLUNG DER BRAUCHWASSERTEMPERATUR - Für die Einstellung der max. Brauchwassertemperatur die Taste - Die Tasten (3- Abbildung 1) drücken; drücken, um die gewünschte Temperatur einzugeben; - Eine der zwei Tasten Hauptmenü zurückzukehren. ANLEITUNGEN FÜR DEN VERBRAUCHER (1 oder 10 - Abbildung 1) drücken, um die Eingabe zu speichern und zum 44 7115313.01 - de (at) 3.5 EINGABE DES TAGESPROGRAMMS FÜR DEN HEIZBETRIEB UND FÜR DIE BRAUCHWASSERERWÄRMUNG 3.5.1 Tages-/Stundenprogramm des Heizbetriebs - Eine der zwei Tasten drücken, um die Programmierungsfunktion abzurufen; a) Diese Tasten betätigen, bis die Anzeige P11 erscheint, die sich auf die Uhrzeit des Programmstarts bezieht; b) Die Tasten drücken, um die Uhrzeit einzustellen; - Die Taste drücken; am Display erscheint die Anzeige P12, die sich auf die Uhrzeit des Programmendes bezieht.; - Die unter den Punkten a und b beschriebenen Vorgänge bis zum dritten und letzten Zyklus wiederholen (Programmlinie P16). - Die Taste drücken, um die Eingaben zu speichern und die Programmierung zu beenden. 3.5.2 Tages-/Stundenprogramm der Brauchwassererwärmung mit warmwasserbereiter - Bei Anlieferung des Gerätes ist der Warmwasserbetrieb stets aktiviert, während die Programmierfunktion des Warmwasserbetriebs deaktiviert ist. Die Freigabe dieses Programms ist im Kapitel 14 der Anweisungen für den Installateur beschrieben (Parameter H91). Bei Freigabe ist die Einstellung der Programmzeilen 31 bis 36 durchzuführen, siehe Abschnitt 3-5.1. 3.6 EINSTELLUNG DER REDUZIERTEN HEIZTEMPERATUR - Eine der zwei Tasten drücken, um die Programmierungsfunktion abzurufen. - Dieselben Tasten betätigen, bis die Anzeige P5 erscheint, die sich auf die einzustellende Temperatur bezieht. - Die Tasten drücken, um die gewünschte Temperatur einzustellen. Diese Funktion ist aktiv, wenn der reduzierte Heizbetrieb “ keinen Wärmebedarf anfordert. “ aktiviert wurde, bzw. wenn das Tagesprogramm Anmerkung – Mit angeschlossenem Außentemperaturfühler kann mit dem Parameter P5 die Mindestraumtemperatur eingestellt werden. ANLEITUNGEN FÜR DEN VERBRAUCHER 45 7115313.01 - de (at) 3.7 TABELLE DER BENUTZERDEFINIERTEN PARAMETER N° parametro Parameterbeschreibung Valore di fabbrica Range P1 Einstellung der Tageszeit ———- 0…23:59 P5 Einstellung der reduzierten Vorlauftemperatur (°C) 25 25..80 P11 Beginn der ersten Phase des Tagesprogramms im automatischen Heizbetrieb 6:00 00:00…24:00 P12 Ende der ersten Phase des Tagesprogramms im automatischen Heizbetrieb 22:00 00:00…24:00 P13 Beginn der zweiten Phase des Tagesprogramms im automatischen Heizbetrieb 0:00 00:00…24:00 P14 Ende der zweiten Phase des Tagesprogramms im automatischen Heizbetrieb 0:00 00:00…24:00 P15 Beginn der dritten Phase des Tagesprogramms im automatischen Heizbetrieb 0:00 00:00…24:00 P16 Ende der dritten Phase des Tagesprogramms im automatischen Heizbetrieb 0:00 00:00…24:00 Beginn der ersten Phase des Tagesprogramms in Brauchwassererwärmung (*) 0:00 00:00…24:00 Ende der ersten Phase des Tagesprogramms in Brauchwassererwärmung (*) 24:00 00:00…24:00 Beginn der zweiten Phase des Tagesprogramms in Brauchwassererwärmung (*) 0:00 00:00…24:00 Ende der zweiten Phase des Tagesprogramms in Brauchwassererwärmung (*) 0:00 00:00…24:00 Beginn der dritten Phase des Tagesprogramms in Brauchwassererwärmung (*) 0:00 00:00…24:00 Ende der dritten Phase des Tagesprogramms in Brauchwassererwärmung (*) 0:00 00:00…24:00 0 0...1 * P31 * P32 * P33 * P34 * P35 * P36 P45 Rücksetzung der Tagesprogramme des Heizbetriebs und der Brauchwassererwärmung (werkseitige Einstellung). Die Tasten - + ca. 3 Sekunden lang gleichzeitig drücken; am Display erscheint die Nummer 1. Durch Drücken einer der zwei Tasten bestätigen. Parameter P31 bis P36 werden nur angezeigt, wenn die Programmierung des Warmwasserbetriebs frei* Die gegeben wurde, die im Kapitel 15 der Anweisungen für den Installateur beschrieben wurde (Parameter H91). 3.8 STÖRUNGSANZEIGE UND RÜCKSETZUNG DES HEIZKESSELS 020503_0500 Bei Auftreten einer Betriebsstörung erscheint am Display ein blinkender Fehlercode. Am Hauptdisplay (Abbildung 1 a) erscheinen die Störungsanzeigen zusammen mit dem Symbol (Abbildung 4 ). Die Rücksetzung erfolgt mit der Resettaste die mindestens zwei Sekunden lang gedrückt werden muss. Abbildung 4 020503_0600 Am Zweitdisplay (Abbildung 1 b) blinken die Störungsanzeigen abwechselnd mit der Uhrzeit (Abbildung 4.1). Die Störungsmeldungen, die am Zweitdisplay erscheinen, können nicht rückgesetzt werden, da zuerst die Ursache für die Auslösung der Störung beseitigt werden muss. Abbildung 4.1 ANLEITUNGEN FÜR DEN VERBRAUCHER 46 7115313.01 - de (at) 3.9 ÜBERSICHTSTABELLE DER STÖRUNGSANZEIGEN Fehler– code Beschreibung der Störung Abhilfe E10 Sensor des Aussentemperaturfühlers defekt Wenden sie sich an den Vertragskundendienst. E20 Kesselvorlauf NTC defekt Wenden sie sich an den Vertragskundendienst. E40 NTC-Fühler Heizungsrücklauf defekt Wenden sie sich an den Vertragskundendienst E50 Brauchwasser NTC defekt Wenden sie sich an den Vertragskundendienst. E110 Sicherheits / Abgasthermostat / Thermosicherung / Thermostat des Wärmetauscherflansches / Temperaturfühler Heizungsrücklauf haben eingegriffen Siehe Abschnitt “REGELUNGS- UND SICHERHEITSVORRICHTUNGEN”. Die Resettaste drücken (ca. 2 Sekunden). Bei wiederholtem Ansprechen dieser Vorrichtung wenden Sie sich an den Vertragskundendienst E111 Vorlauftemperatur über 95°C Bei wiederholtem Eingriff wenden Sie sich bitte an den autorisierten Kundendienst. E128 Flammenausfall in Betrieb (Flammenionisationsstrom außerhalb der Toleranz) Wenden sie sich an den Vertragskundendienst. E129 Mindeste Geschwindigkeit (Ventilator) außerhalb der Toleranz Wenden sie sich an den Vertragskundendienst. E132 Begrenzungsthermostat hat ausgelöst Wenden sie sich an den Vertragskundendienst. E133 Kein Gas Die Resettaste drücken (ca. 2 Sekunden). wenn die Störung fortdauert, wenden Sie sich an den Vertragskundendienst. Netzanschluß phasenrichtig anschließen. E151 Interner Fehler der Kesselplatine Die Reset-Taste drücken, wenn auf dem Display das Symbol erscheint, andernfalls den Kessel während 10 Sekunden von der Stromversorgung abschalten. Bei Fortbestehen der Störung den autorisierten technischen Kundendienst anfordern. Die Positionierung der Zündelektroden überprüfen (Kapitel 16). E153 Die Resettaste wurde ohne Grund gedrückt Die Taste ein zweites mal drücken (ca. 2 Sekunden). E154 Keine Zirkulation oder umgekehrte Flussrichtung Wenden sie sich an den Vertragskundendienst. E160 Schwellenwert der Ventilatordrehzahl wurde nicht erreicht Wenden sie sich an den Vertragskundendienst. E164 Keine Freigabe durch den Wasserdruckwächter Überprüfen, ob der Anlagendruck dem vorgeschriebenen Wert entspricht, siehe Kapitel “Befüllen der Anlage”. Wenn die Störung fortdauert, wenden Sie sich an den Vertragskundendienst. Alle Betriebsstörungen werden in der Reihenfolge ihrer Wichtigkeit aufgeführt; falls gleichzeitig mehrere Störungen auftreten sollten, wird als erstes die mit der höchsten Priorität angezeigt. Erst nachdem die Ursache der ersten Störung beseitigt wurde, wird die zweite angezeigt usw. Bei häufigem Auftreten derselben Störung wenden Sie sich bitte an den Vertragskundendienst. ANLEITUNGEN FÜR DEN VERBRAUCHER 47 7115313.01 - de (at) 4. FÜLLEN DER ANLAGE WICHTIG: Regelmäßig überprüfen, ob auf dem Manometer bei kalter Anlage ein Druckwert von 1-1,5 bar vorhanden ist (1 - Abbildung 17). Falls der Wert geringer ist, entsprechend mit dem vom Installateur montierten Kesselfüllventil nachregulieren. Es ist empfehlenswert, diesen Hahn sehr langsam zu öffnen, um die Entlüftung zu erleichtern. Bei häufigem Druckabfall den technischen Kundendienst anfordern. HINWEIS! Beim Anfüllen der Heizanlage ist mit größter Vorsicht vorzugehen. Insbesondere müssen die ggf. auf der Anlage vorhandenen thermostatischen Ventile geöffnet und das Wasser langsam eingefüllt werden, um die Bildung von Luftblasen im Inneren des Primärkreises zu vermeiden. Abwarten, bis der erforderliche Betriebsdruck aufgebaut wurde. Sodann die Luft aus allen allfälligen Heizelementen im Inneren der Anlage ablassen. BAXI weist jegliche Verantwortung für Schäden zurück, die auf das Vorhandensein von Luftblasen im Inneren des Primär-Wärmeaustauschers aufgrund einer falschen oder unzulänglichen Befolgung der vorstehenden Hinweise zurückgehen. 5. AUSSCHALTUNG DES HEIZKESSELS Zum Abschalten des Heizkessels muss die Stromversorgung des Geräts unterbrochen werden. 6. LANGER ANLAGENSTILLSTAND FROSTSCHUTZ Generell ist das vollständige Entleeren der gesamten Heizanlage zu vermeiden, da der Wasseraustauch unnötige und schädliche Kalkablagerungen im Heizkessel und in den Heizkörpern zur Folge hat. Falls die Heizanlage im Winter nicht verwendet wird und Frostgefahr besteht, wird empfohlen, dem Wasser in der Anlage geeignete, eigens zu diesem Zweck bestimmte Frostschutzmittel beizugeben (z.B. Propylenglykol mit Substanzen, die vor Ablagerungen und Rost schützen). Die elektronische Steuerung des Heizkessels verfügt über eine “Frostschutzfunktion” des Heizkreislaufes, durch die bei einer Vorlauftemperatur des Kessels von unter 5°C der Brenner in Betrieb gesetzt wird, bis 30°C beim Vorlauf im Kessel erreicht werden. Diese Vorrichtung funktioniert, wenn: * der Heizkessel mit Strom versorgt wird; * Gas vorhanden ist; * der Anlagendruck dem vorgeschriebenen Druck entspricht; * der Heizkessel nicht außer Betrieb gesetzt ist. 7. WARTUNGSANLEITUNG UND ÄNDERUNG DER GASART Um die einwandfreie Funktionstüchtigkeit und Sicherheit des Heizkessels zu gewährleisten, lassen Sie diesen am Ende jeder Heizperiode vom technischen Kundendienst überprüfen. Eine sorgfältige Wartung hat immer Einsparungen beim Betrieb der Anlage zur Folge. Die äußerliche Reinigung des Gerätes darf nicht mit Scheuermitteln oder aggressiven und/oder leicht entflammbaren Substanzen (z.B. Benzin, Alkohol, usw.) und nur bei ausgeschaltenem Gerät durchgeführt werden (siehe Kapitel 5 Ausschaltung des Heizkessels). Die Heizkessel können mit Methan oder mit Flüssiggas betrieben werden. Falls eine Umstellung nötig ist, muß man sich an den technischen Kundendienst wenden. ANLEITUNGEN FÜR DEN VERBRAUCHER 48 7115313.01 - de (at) 8. ALLGEMEINE ANWEISUNGEN Die folgenden Erklärungen und technischen Anleitungen wenden sich an die Installateure und sollen ihnen die Möglichkeit geben, die Installation perfekt auszuführen. Die Anleitungen für die Inbetriebnahme und den Gebrauch des Heizkessels befinden sich im Handbuch für den Verbraucher. • Installation, Einstellung und erste Inbetriebnahme dürfen nur von einem zugelassenen Fachmann durchgeführt werden. Die Vorschriften der Gasversorgungsunternehmen sowie die Vorschriften der örtlichen Bauordnung sind einzuhalten. Es gelten die ÖVGW Richtlinie G1 - TR GAS 1996. Außerdem sind die einschlägigen Vorschriften der Versorgungsunternehmen sowie baurechtliche Vorschriften zu beachten. • Zur Vorbeugung von Korrosion und Ablagerungen sind die Regeln der ÖNORM H 5195 einzuhalten. • Bei gleichzeitigem Betrieb von Abluftventilatoren oder ähnlichen Einrichtungen sind die jeweils geltenden örtlichen Vorschriften zu beachten. • Der Heizkessel kann mit jeder Art von Heizsystemen und Heizflächen verwendet werden. Die Abschnitte des Kreislaufs werden in jedem Fall nach den üblichen Methoden berechnet, dabei ist die H/Q-Kennlinie der verwendeten Pumpe zu berücksichtigen. Es wird empfohlen, einen vor Unwetter geschützten Raum zu schaffen. • Das Gerät muß mindestens 50 cm von leicht entflammbaren Materialien entfernt installiert werden. • Um einen einwandfreien und sicheren Betrieb des Heizkessels zu gewährleisten, ist dieser einmal jährlich vom autorisierten technischen Kundendienst kontrollieren zu lassen. • Das Verpackungsmaterial (Plastikbeutel, Polystyrol usw.) darf für Kinder nicht erreichbar sein, da es eine potentielle Gefahrenquelle darstellt. • Der Kessel muss in einem als Heizraum genutzten, ausreichend belüfteten Raum installiert werden. • Der Raum, in dem das Gerät aufgestellt wird, muss ausreichend belüftet sein, damit das Gas gut verbrannt werden kann. Deshalb müssen nicht verstopfbare Öffnungen von mindestens 6 cm2 pro kW (860 kcal/h) installiertem Wärmedurchsatz mit mindestens 100 cm2 vorgesehen werden. • Das Gerät muss direkt an einen gut ziehenden Abzugsschacht zum Ableiten der Verbrennungsprodukte nach außen angeschlossen sein. Der Querschnitt der Verbindung zwischen Gerät und Abzugsschacht darf auf keinen Fall kleiner sein als der Querschnitt des Geräteanschlusses. Der Schacht muss sich stets in einwandfreiem Zustand befinden und darf keine Öffnungen oder Risse aufweisen, durch die der Zug beeinträchtigt werden kann. 9. ANWEISUNGEN VOR DER INSTALLATION Dieser Heizkessel heizt das Wasser bis zu einer unterhalb des Siedepunktes bei Luftdruck befindlichen Temperatur auf. Das Gerät ist an eine Heizanlage anzuschließen, die seinen Leistungsmerkmalen entspricht. WICHTIG: Im Lieferumfang des Heizkessels sind folgende Komponenten nicht enthalten und müssen daher vom Installateur beigestellt und montiert werden: • Ausdehnungsgefäß; • Sicherheitsventil; • Umwälzpumpe; • Heizkesselfüllventil. Vor Anschluß des Heizkessels müssen folgende Vorgänge durchgeführt werden: a) Es muß überprüft werden, ob der Heizkessel für den Betrieb mit der zur Verfügung stehenden Gasart vorgesehen ist. Dies kann der auf der Verpackung befindlichen Aufschrift und dem auf dem Gerät befindlichen Typenschild entnommen werden. b) Der Kessel darf nur in einem Raum installiert werden, der die maßgeblichen Belüftungsanforderungen erfüllt. (Dies gilt nicht für raumluftunabhängige Geräte). c) Beim Anschluß an bereits vorhandene Heizzüge muß überprüft werden, ob diese vollkommen sauber sind, da Schlacken, die sich während des Betriebes von den Wänden lösen,den Rauchabzug verstopfen und Gefahrensituationen hervorrufen könnten. ANLEITUNGEN FÜR DEN INSTALLATEUR 49 7115313.01 - de (at) Um den einwandfreien Betrieb des Geräts und den Garantieanspruch zu bewahren, müssen außerdem folgende Vorsichtsmaßregeln befolgt werden: 1.Heizwasserkreis 1.1.Neue Anlage Vor der Installation des Kessels muss die Anlage gründlich gereinigt werden, um Rückstände von Gewinden, Schweißnähten und eventuellen Lösungsmitteln zu entfernen. Für die Reinigung geeignete, nicht saure und nicht alkalische, handelsübliche Mittel verwenden, die die Metalle, Kunststoff- und Gummiteile nicht angreifen. Empfohlene Reinigungsmittel: SENTINEL X300 oder X400 und FERNOX Regenerierer für Heizanlagen. Beim Gebrauch dieser Produkte die herstellerseitigen Gebrauchsanweisungen genau befolgen. 1.2.Bereits existierende Anlage: Vor der Installation des Kessels muss die Anlage vollkommen geleert und mit geeigneten, unter Punkt 1.1. aufgeführten handelsüblichen Produkten von Schlamm und Verunreinigungen befreit werden. Für den Schutz der Anlage vor Inkrustationen sind entsprechende Spezialprodukte wie SENTINEL X100 und FERNOX Schutzmittel für Heizanlagen zu verwenden. Beim Gebrauch dieser Produkte die herstellerseitigen Gebrauchsanweisungen genau befolgen. Es wird ausdrücklich darauf hingewiesen, dass durch Ablagerungen in der Heizanlage der Betrieb des Kessels beeinträchtigt werden kann (z.B. Überhitzung und lauter Betrieb des Wärmetauschers). Die Missachtung dieser Hinweise bewirkt den Verfall der Gerätegarantie. 10. INSTALLATION UND ABMESSUNGEN DES GERÄTES Das Gerät ist so zu installieren, dass es problemlos gewartet werden kann (die vordere Inspektionstür muss geöffnet werden können und man muss zur Rückseite des Gerätes gelangen können). Es empfiehlt sich die Ausführung eines 200 mm hohen Sockels für eine einfachere Ableitung des Abgaskondenswassers. Zusätzlich zu dem Eigengewicht des Gerätes ist auch das Gewicht des im Tauscher enthaltenen Wassers zu berücksichtigen (siehe Tabelle). Die einstellbaren Füße betätigen, um eventuelle Unebenheiten des Bodens auszugleichen. Bei der Installation der Anlage bei den Wasser- und den Gasanschlüssen an der Geräterückseite beginnen (Abmessungen und Anschlüsse finden Sie in der Tabelle). Empfohlene Ausstattung: • Auf dem Vorlauf (MR) und dem Rücklauf (RR) des Heizkreises zwei Sperrhähne installieren, damit die Heizungsanlage zum Durchführen von Wartungs- oder Reparaturarbeiten nicht entleert werden muss. • Die Gaszuleitung zum Gerät mit Hilfe eines Metallrohres anschließen und vor dem Gerät unbedingt einen Sperrhahn installieren. • Sowohl beim Wasser- als auch beim Gasanschluss dreiteilige Verbindungen verwenden, damit die Trennung des Kessels von der Anlage einfacher ist. • Einen Kondenswasserabscheider installieren. • Ein Vorrichtung für die automatische Befüllung der Anlage installieren. Solche Vorrichtungen haben keine Pumpe, kein Überlaufgefäß und kein Sicherheitsventil; diese Teile müssen in der Anlage vorhanden und so dimensioniert sein, dass sie dem Durchsatz und der Kapazität der Anlage genügen. HINWEIS! Beim Anfüllen der Heizanlage ist mit größter Vorsicht vorzugehen. Insbesondere müssen die ggf. auf der Anlage vorhandenen thermostatischen Ventile geöffnet und das Wasser langsam eingefüllt werden, um die Bildung von Luftblasen im Inneren des Primärkreises zu vermeiden. Abwarten, bis der erforderliche Betriebsdruck aufgebaut wurde. Sodann die Luft aus allen allfälligen Heizelementen im Inneren der Anlage ablassen. BAXI weist jegliche Verantwortung für Schäden zurück, die auf das Vorhandensein von Luftblasen im Inneren des Primär-Wärmeaustauschers aufgrund einer falschen oder unzulänglichen Befolgung der vorstehenden Hinweise zurückgehen. ANLEITUNGEN FÜR DEN INSTALLATEUR 50 7115313.01 - de (at) Die Abgaskondenswasserableitung mit einem Mindestgefälle an einen Ablaufschacht anschließen. Zum Leeren des Kessels den Ablasshahn an der Kesselrückseite öffnen. Kesselmodell POWER HT.. Tiefe (mm) A Höhe (mm) Breite (mm) Anschluss Gas Anschluss MR Anschluss RR Wasserinhalt (l) 13,7 1.850 801 850 450 G 3/4” G 1’’ G 1’’ 1.1000 871 850 450 G 1” G 1 1/4” G 1 1/4” 21 1.1200 1024 850 450 G 1” G 1 1/4” G 1 1/4” 23,3 1.1500 1132 850 450 G 1” G 1 1/4” G 1 1/4” 25,3 CT_0806 / 0902_2501 Tabelle 1 Das Anschlussstück für die Abgasung einsetzen und den Verbinder an den Abgasungsthermostat anschließen GAS RR RR: Rücklauf Heizanlage MR: Vorlauf Heizung GAS: Gasanschluß SC: Kondensatabführung MR SC Abbildung 5 ANLEITUNGEN FÜR DEN INSTALLATEUR 51 7115313.01 - de (at) CT_0807 7 0902_2502 Zur Auswahl des Wasserabscheiders die Hinweise des betreffenden Herstellers auf Grundlage der in der nachstehenden Tabelle aufgeführten Wasservolumenströme konsultieren KONDENSATABFÜHRUNG Abbildung 6 10.1 DRUCKVERLUSTE DER WÄRMETAUSCHER Modell POWER HT Mindestdurchsatz l/h Durchsatz bei ∆t=20°K l/h 1.850 1900 3700 1.1000 2100 4300 1.1200 2600 5200 1.1500 3300 6500 Vergewissern Sie sich, dass der Durchsatz nicht geringer als angegeben ist ANLEITUNGEN FÜR DEN INSTALLATEUR 52 7115313.01 - de (at) 0502_2105 Druckverluste der Wärmetauscher (mH2O) 0601_2008 WASSERDURCHFLUSSMENGE (l/h) Druckverluste der Wärmetauscher (mH2O) Graphik 1 DRUCKVERLUSTE DER WÄRMETAUSCHER POWER HT 1.850 - 1.1000 Graphik 1.1 120 kW DRUCKVERLUSTE DER WÄRMETAUSCHER POWER HT 1.1200 - 1.1500 WASSERDURCHFLUSSMENGE (l/h) 11. ANSCHLUSS AN DEN ABZUGSSCHACHT 11.1 INSTALLATION MIT TYPOLOGIE B23 Der Anschluss an den Abzugschacht muss mit einem Edelstahl- oder Kunststoffrohr mit 100 mm Innendurchmesser erfolgen, das den normalen mechanischen Beanspruchungen, der Hitze (<120°C) und der Einwirkung der Verbrennungsprodukte und des Kondenswassers langfristig standhalten kann. Das Anschlussstück für die Abgasung einsetzen und den Verbinder an den Abgasungsthermostat anschließen, bevor der Anschluss an den Rauchkanal ausgeführt wird. Um die Wartung einfacher zu gestalten, sollte der Anschluss an das Gerät so erfolgen, dass die Leitung vom Gerät getrennt werden kann. Wichtig: die horizontal verlaufenden Abschnitte müssen zum Gerät hin ein Gefälle von 3° aufweisen. Ablauf-Zubehör aus Kunststoff für Einzel- oder Kaskadeninstallation lieferbar (Durchmesser 110 mm) ANLEITUNGEN FÜR DEN INSTALLATEUR 53 7115313.01 - de (at) CT0667 / 0903_1601 CT_0809 / 0902_2705 Abbildung 7 Falls nicht von BAXI S.p.A. gelieferte Ablauf- und Saugleitungen installiert werden, müssen dieselben für diesen Anwendungszweck zertifiziert sein und einen maximalen Druckverlust aufweisen, der den in der Tabelle aufgeführten Werten entspricht. Für den Erhalt der korrekten Heizleistung muss die Ventilatordrehzahl (rpm) abhängig von der Länge der Abgasleitungen und dem Installationstyp wie in den untenstehenden Tabellen angegeben verändert werden. Der werkseitig eingestellte Wert bezieht sich auf die Mindestlänge der Abgasleitung (0÷10 m). Für die Durchführung dieser Änderung (rpm und pwm%), siehe Abschnitt 13÷14. Max. Länge des Abgaszuges ( L) : 20 m Für jeden installierten 90° - Krümmer reduziert sich die maximale Länge um : 1 m Für jeden installierten 45° - Krümmer reduziert sich die maximale Länge um : 0,5 m TABELLE VERFÜGBARE DRUCKE BEI ABGASROHRE Verfügbares ΔP bei Abgasrohr B23 Ø 100 HT 1.850 110 HT 1.1000 150 HT 1.1200 170 HT 1.1500 280 HINWEIS Um eine höhere Betriebssicherheit zu gewährleisten, müssen die Abgasleitungen mittels geeigneten Feststellbügeln an der Wand befestigt werden. ANLEITUNGEN FÜR DEN INSTALLATEUR 54 7115313.01 - de (at) 11.2 INSTALLATION MIT TYPOLOGIE C53 Der Satz ermöglicht das Ansaugen der Verbrennungsluft von außerhalb des Aufstellungslokals und besteht aus einem biegsamen Schlauch, der in den Venturikörper eingebaut wird. Bitte beachten Sie die mit dem Satz selbst gelieferten Anleitungen. CT_0813 / 0903_0601 Für die Ansaugleitungen (Durchmesser und Länge) beziehen Sie sich auf das Handbuch des Satzes. ANLEITUNGEN FÜR DEN INSTALLATEUR 55 7115313.01 - de (at) 12. ELEKTROANSCHLUSS Die elektrische Sicherheit des Gerätes ist nur dann gegeben, wenn es richtig an eine leistungsfähige Erdung angeschlossen ist, die den für die Sicherheit der Anlagen gültigen Vorschriften entspricht. Der Heizkessel muß mit dem mitgelieferten dreiadrigen Kabel an ein einphasiges 230V-Speisenetz + Erdung angeschlossen werden, wobei die Polarität Hauptleiter - Mittelleiter beachtet werden muß Der Anschluß muß mit einem zweipoligen Schalter mit einer Öffnung der Kontakte von mindestens 3 mm ausgeführt werden. Muß das Speisekabel ausgewechselt werden, so ist ein passendes Kabel “HAR H05 VV-F’ 3x0,75mm2 mit einem maximalen Durchmesser von 8mm zu verwenden. Deckel 0902_1201 / CT_0674 WICHTIG: Kontrollieren, ob die Gesamtnennstromaufnahme des an das Gerät angeschlossenen Zubehörs auch weniger als 2 A beträgt. Falls der Wert höher ist, muss zwischen das Zubehör und die Platine ein Relais zwischengeschaltet werden. Klemmenbrett Klemmenbrett Deckel Klemmenbrett Abbildung 8 12.1 FREILEGEN DER KLEMMENBRETTER • • • • Das Gerät mit dem zweipoligen Schalter spannungsfrei schalten. Die obere Verkleidung abnehmen (ist mit Magneten befestigt) Die zwei Schrauben, mit denen das Schaltbrett befestigt ist, ausschrauben. Das Schaltbrett nach vorne drehen. Netzanschluss-Klemmenleiste M1 • Den Deckel mit Schnappmechanismus von der Klemmenleiste M1 nehmen. • Die flinke 3,15 A-Schmelzsicherung befindet sich in der Klemmenleiste M1 (Abbildung 8). Den schwarzen Sicherungssockel herausziehen und die Sicherung kontrollieren und gegebenenfalls auswechseln. Klemmenbrett M2 • Den Deckel des Klemmenbrettes M2 abschrauben. Klemmenbrett M3 • Den Hauptdeckel abschrauben. ANLEITUNGEN FÜR DEN INSTALLATEUR 56 7115313.01 - de (at) 12.2 STROMANSCHLUSS DER PUMPEN Deckel Klemmenbrett Klemmenbrett 0902_1202 / CT_0676 Die Versorgung der Heizanlagenpumpen (P1 und P2) muss gemäß Plan in Abb. 9 erfolgen; hierbei sind Relais zwischen der Elektronikkarte des Heizkessels und den Pumpen vorgesehen. Deckel Klemmenbrett Abbildung 9 ANLEITUNGEN FÜR DEN INSTALLATEUR 57 7115313.01 - de (at) 12.3 BESCHREIBUNG DER ELEKTRISCHEN ANSCHLÜSSE AM HEIZKESSEL Das Steuergehäuse nach unten drehen und die zwei Schutzabdeckungen abnehmen, um Zugriff zu den Klemmenleisten M1 und M2 zu haben, die für die elektrischen Anschlüsse vorgesehen sind (siehe Abbildung 8). Klemmen 1-2: Anschluss des als Zubehör erhältlichen Raumregelgerätes BAXI QAA73. Die Polung der Anschlüsse muss nicht unbedingt eingehalten werden. Die an den Klemmen 3-4 “TA” vorhandene Überbrückung muss entfernt werden. Um eine korrekte Installation und Programmierung zu gewährleisten, müssen die dem Gerät beiliegenden Anleitungen aufmerksam durchgelesen werden. Klemmen 3-4: “TA” Anschluss des Raumthermostats. Es dürfen keine Thermostate mit Vorwiderstand verwendet werden. Sicherstellen, dass an den Enden der zwei Anschlussdrähte des Thermostats keine Spannung vorhanden ist. Klemmen 5-6: “TP” Anschluss des Begrenzungsthermostats für Niedertemperaturanlagen (im Handel erhältlich). Sicherstellen, dass an den Enden der zwei Anschlussdrähte des Thermostats keine Spannung vorhanden ist. Klemmen 7-8: Anschluss des als Zubehör erhältlichen Aussentemperaturfühlers BAXI QAC34. Um eine korrekte Installation zu gewährleisten, müssen die dem Gerät beiliegenden Anleitungen aufmerksam durchgelesen werden. Klemmen 9-10: Anschluss der als Zubehör erhältlichen Sonde der Warmwasser-Vorrangschaltung bei Anschluss des Heizkessels an einen externen Warmwasserbereiter. Klemmen A-B (230 Vac; 50 Hz; 0,5 A max.; Cos ϕ > 0,8): Stromversorgung der Heizkessel-Umlaufpumpe (Versorgung der Relaisspulen). 12.4 ANSCHLUSS DES RAUMREGELGERÄTES QAA73 Das Raumregelgerät BAXI QAA73 (auf Anfrage erhältliches Zubehör) muss an den Klemmen 1-2 der auf Abbildung 8 dargestellten Klemmenleiste M2 angeschlossen werden. Die an den Klemmen 3-4 vorhandene Überbrückung, die für den Anschluss eines Raumthermostats vorgesehen ist, muss entfernt werden. Die Einstellungen, die Brauchwassertemperatur und das Brauchwasser-Zeitprogramm betreffen, müssen mit dieser Vorrichtung vorgenommen werden. Das Zeitprogramm des Heizkreises muss im Falle einer einzigen Zone am QAA73, bzw. in Bezug auf die vom QAA73 geregelten Zone eingestellt werden. Das Zeitprogramm des Heizkreises der anderen Zonen kann direkt am Bedienfeld des Heizkessels eingestellt werden. Bezüglich der Programmierung der Benutzerparameter wird auf die dem Raumregelgerät QAA73 beiliegenden Anleitungen verwiesen. - QAA73: Vom Installateur einstellbare Parameter (Service) Indem die zwei Tasten PROG mindestens 3 Sekunden lang gleichzeitig gedrückt werden, kann die Liste der visualisierbaren und/oder vom Installateur verstellbaren Parameter abgerufen werden. Eine dieser zwei Tasten drücken, um den Parameter, der angezeigt oder geändert werden soll, zu wechseln. Die Taste [+] o [-] drücken, um den angezeigten Wert zu ändern. Eine der Tasten PROG erneut drücken, um die Änderung abzuspeichern. Die Informationstaste (i) drücken, um die Programmierung zu verlassen. Nachstehend werden nur die meistbenutzten Parameter aufgeführt: ANLEITUNGEN FÜR DEN INSTALLATEUR 58 7115313.01 - de (at) Linie Nr. Parameter Stellbereich Werkseitige Einstellung 70 Steilheit HK 1 Wahl der Heizkurve “kt” des Heizkreises 2.5…40 15 72 Vorlauf max. HK 1 Max. Vorlauftemperatur Heizanlage 25…85 85 74 Gebäudeart leicht / schwer leicht 75 Raumtemperatureinfluß Aktivierung / Deaktivierung des Einflusses der Raumtemperatur. Wenn deaktiviert, muss der Außentemperaturfühler vorhanden sein. auf HK 1 auf HK 2 auf HK1 + HK 2 kein 77 Automatische Anpassung der Heizkurve “kt” in Abhängigkeit von der Raumtemperatur. 78 Max. Startoptimierung Maximal vorgezogene Einschaltung des Kessels im Vergleich zum Zeitprogramm zur Optimierung der Raumtemperatur. 0…360 min 0 79 Max. Abschaltoptimierung Maximal vorgezogene Abschaltung des Kessels im Vergleich zum Zeitprogramm zur Optimierung der Raumtemperatur 0…360 min 0 80 Steilheit HK 2 2.5…40 —.- = nicht aktiv —.- 90 BW reduzierter Sollwert Mindestbrauchwassertemperatur 10…58 10 24 h/Tag PROG HK-1h PROG HK PROG BW 24 h/Tag BW Programm Wahl der Zeitprogrammart für das Brauchwasser. 91 24 h/Tag PROG HK-1h PROG HK PROG BW = immer aktiv = wie Heizprogramm HK 1 minus 1 Stunde = wie Heizprogramm = Spezifisches Programm für das Brauchwasser (siehe auch Programmlinien 30-36) Inaktiv - aktiv auf HK 1 Aktiv - Anzeige von Betriebsstörungen Im Falle von Betriebstörungen erscheint am Display der QAA73 das blinkende Symbol . Durch Drücken der Informationstaste ( ) kann der Fehlercode und die Beschreibung der aufgetretenen Störung angezeigt werden (siehe kapitel 3.9). ANLEITUNGEN FÜR DEN INSTALLATEUR 59 7115313.01 - de (at) 12.5 ANSCHLUSS DES AUSSENTEMPERATURFÜHLERS Der Aussentemperaturfühler BAXI QAC34 (auf Anfrage erhältliches Zubehör) muss an den Klemmen 7-8 der auf Abbildung 8 dargestellten Klemmenleiste M2 angeschlossen werden. Die Steilheit der Klimakurve “kt” wird je nach den mit dem Heizkessel verbundenen Zubehörgeräten auf unterschiedliche Weise eingestellt. a) Ohne Raumregler QAA73: Für die Wahl der Heizkurve “kt” muss der Parameter H532 wie im Kapitel 14 “Eingabe der Kesselparameter” beschrieben eingestellt werden. Für die Wahl der auf eine Raumtemperatur von 20°C bezogenen Kurve siehe Graphik 1. Die gewählte Kurve kann verschoben werden, indem die Taste (2), am Bedienfeld des Heizkessels gedrückt, 020523_0600 und der angezeigte Wert durch Drücken der Tasten und geändert wird. Für die Wahl der Kurve siehe Graphik 2. (Das in der Grafik 3 dargestellte Beispiel bezieht sich auf die Kurve Kt=15). Der angezeigte Wert muss erhöht werden, wenn die gewünschte Raumtemperatur im beheizten Raum nicht erreicht wird. Graphik 2 TV = Vorlauftemperatur Ta = Zusammengesetzte gemischte Aussentemperatur Sth = Kurve Kt Graphik 3 b) Mit Raumregler QAA73: 020523_1000 Für die Wahl der Heizkurve “kt” muss der Parameter 70 “Steilheit HK 1” des Raumreglers QAA73 wie im Kapitel 12.4 “QAA73: Vom Installateur einstellbare Parameter (Service)” beschrieben eingestellt werden. Für die Wahl der auf eine Raumtemperatur von 20° C bezogenen Kurve siehe Graphik 4. Die Verschiebung der Heizkurve erfolgt automatisch in Abhängigkeit von der mit dem Raumregelgerät QAA73 eingegebenen Raumtemperatur. Wenn die Anlage in Zonen unterteilt ist, muss die Wahl der Heizkurve “kt” für den nicht vom QAA73 gesteuerten Anlagenteil erfolgen, indem der Parameter H532 wie im Kapitel 14 “Eingabe der Kesselparameter” beschrieben eingestellt wird. Graphik 4 ANLEITUNGEN FÜR DEN INSTALLATEUR TM = Vorlauftemperatur Te = Außentemperatur gemäßigt 60 7115313.01 - de (at) c) Mit AGU2.500 für die Verwaltung einer Niedertemperaturanlage: Für den Anschluss und die Verwaltung einer Niedertemperaturzone wird auf die Anleitungen verwiesen, die dem Zubehörgerät AGU2.500 beiliegen. In diesem Fall müssen einige Konfigurationsparameter der Elektronikkarte geändert werden (siehe §14) (H552-H553-H632). 12.6 ANSCHLUSS EINER ZONENGEREGELTEN ANLAGE Der elektrische Anschluss und die für die Verwaltung einer in Zonen unterteilten Anlage erforderlichen Einstelllungen sind unterschiedlich und hängen von den mit dem Heizkessel verbundenen Zubehörgeräten ab. a) Ohne Raumregler QAA73: Der Kontakt für die Betriebsanforderung der verschiedenen Zonen muss parallelgeschaltet und an der Klemme 3-4 “TA” der auf Abbildung 10 dargestellten Klemmenleiste M2 angeschlossen werden. Die vorhandene Überbrückung muss beseitigt werden. Die Heiztemperatur wird gemäß den in diesem Benutzerhandbuch enthaltenen Anleitungen direkt am Bedienfeld des Heizkessels gewählt. b) Mit Raumregelgerät QAA73: Die der Zonenpumpe für den vom Raumregler QAA73 geregelten Raum muss über die Klemmen 11-12 der auf Abbildung 10 dargestellten Klemmenleiste M3 erfolgen. Der Kontakt für die Betriebsanforderung der anderen Zonen muss parallelgeschaltet und an der Klemme 3-4 “TA” der auf Abbildung 10 dargestellten Klemmenleiste M2 angeschlossen werden. Die vorhandene Überbrückung muss beseitigt werden. Die Wahl der Heiztemperatur der vom QAA73 geregelten Zone erfolgt automatisch vom QAA73. Die Wahl der Heiztemperatur der anderen Zonen muss direkt am Bedienfeld des Heizkessels vorgenommen werden. WICHTIG: Der am Raumregler QAA73 einstellbare Parameter 80 “Steilheit HK 2” muss auf —.- nicht aktiv eingestellt werden (siehe Kapitel 12.4). In diesem Fall müssen einige Parameter der Elektronikkarte geändert werden: H552 = 50, H632 = 00001111. ZONE 2 (RAUMTHERMOSTAT) ZONE 3 (RAUMTHERMOSTAT) ZONE 2 PUMPE ZONE 1 (QAA73) ZONE 1 PUMPE RELAIS HEIZUNGSABSCHALTUNG Abbildung 10 ZONE 3 PUMPE ZONE n (RAUMTHERMOSTAT) ZONE n PUMPE BOILERPUMPE 0702_0501 / CT_0675 HEIZKESSELUMLAUFPUMPE c) Mit AGU2.500 für die Verwaltung einer Niedertemperaturanlage: Für den Anschluss und die Verwaltung einer Niedertemperaturzone wird auf die Anleitungen verwiesen, die dem Zubehörgerät AGU2.500 beiliegen. In diesem Fall müssen einige Konfigurationsparameter der Elektronikkarte geändert werden (siehe §14) (H552-H553-H632). ANLEITUNGEN FÜR DEN INSTALLATEUR 61 7115313.01 - de (at) 12.7 ELEKTROANSCHLUSS DER PUMPE - WARMWASSERKREISLAUF Den Erhitzer dem Wasserabscheider nachgeschaltet installieren. Die Pumpe des Warmwasserkreislaufs wird bei Betrieb mit einem externen Warmwasserbereiter an die Klemmen 13-14 der Heizkessel-Klemmenleiste M3 angeschlossen (Abbildung 9). Die elektrischen Daten der benötigten Pumpe sind wie folgt: 230 Vac; 50 Hz; 1 A max.; Cos ϕ > 0,8. Falls die verwendete Pumpe davon abweichende Kennwerte aufweist, ist zwischen Kesselplatine und Pumpe ein Relais zwischenzusetzen. Das vorhandene elektrische Heizelement entfernen und den als Zubehörteil gelieferten NTC Temperaturfühler der Warmwasser-Vorrangschaltung an die Klemmen 9-10 der Klemmenleiste M2 (Abbildung 11) anschlie§en. Die Fühlerspitze des NTC Temperaturfühlers muss in die dafür vorgesehene Tauchhülse am Warmwasserbereiter (Abbildung 11) eingesetzt werden. Die Temperaturregelung des Warmwassers und die Auswahl des Warmwasser-Zeitprogramms können direkt über die Bedienblende des Kessels vorgenommen werden. Siehe dazu die entsprechenden Bedienhinweise in dieser Betriebsanleitung. LEGENDE: UB - WARMWASSERBEREITER M2 - ANSCHLUSSLEISTE SB - WARMWASSERSONDE DER WARMWASSER-VORRANGSCHALTUNG RE - ZU ENTFERNENDES ELEKTRISCHES HEIZELEMENT MR - VORLAUF HEIZUNG RR - RÜCKLAUF HEIZUNG/ WARMWASSERBEREITER MB - VORLAUF WARMWASSERBEREITER RB - RÜCKLAUF WARMWASSERBEREITER P1 - UMWÄLZPUMPE HEIZUNG P2 - PUMPE WARMWASSER TS - SICHERHEITSTHERMOSTAT PS - SICHERHEITSDRUCKSCHALTER CT_0808 / 0902_2503 ANSCHLUSSSCHEMA DES WARMWASSERBEREITERS Abbildung 11 In Fall einer zonengeregelten Anlage muss ein Relais zwischengeschaltet werden, um die Versorgung der Zonenpumpen zu deaktivieren, wie im Schaltplan von Abbildung 10 angegeben. ANLEITUNGEN FÜR DEN INSTALLATEUR 62 7115313.01 - de (at) 13. EINSTELLEN DER GASVENTILE 0502_2108 Die Modelle POWER HT 1.850 und 1.1000 haben ein einfaches Gasventil (Abbildung 12a). Die Modelle POWER HT 1.1200 und 1.500 haben eine doppeltes Gasventil (Abbildung 12b). Gasmembran Abbildung 12a Gasmembran Gasventil Sammler Pi: Anschluß Gasversorgung P out: Anschluß für die OFFSETMessung Stellschraube Gasdurchsatz K: OFFSET-Stellschraube 0502_2109 Venturi Mischeinrichtung V: Abbildung 12b ANLEITUNGEN FÜR DEN INSTALLATEUR 63 7115313.01 - de (at) 13.1 MODELLE MIT EINFACHEM VENTIL (POWER HT 1.850 UND 1.1000) ABBILDUNG 12a Zum Einstellen des Gasventils wie folgt vorgehen: • Die Sonde des Rauchgasprüfers wie im Abschnitt (17 – Abbildung 15) abgebildet in den Abgasentnahmeanschluss einführen. • Den Kessel einschalten und an der Bedienblende die “Einstellungsfunktion” aktivieren. Hierzu die Tasten und gleichzeitig 7 Sekunden lang drücken, bis auf dem Display die Symbole Abbildungen 13a und 13b dargestellten Position erscheinen. • Durch Drücken der Taste einschalten. in der auf den (100% auf dem Display Abbildung 13a) den Betrieb mit maximaler Heizleistung Achtung: Wenn der Kessel nicht einschaltet oder wenn das Gasventil gewechselt wird, wird empfohlen, die Stellschraube (V) ganz zu- und anschließend um 3 Umdrehungen wieder aufzudrehen und dann die oben beschriebenen Vorgänge zu wiederholen. • Die Stellschraube V des Gasventils regulieren, bis die in der Tabelle 2.1 für Methan (G20) und 2.2 für Propan (LPG) angegebenen CO2-Werte erreicht sind: - - Erhöhen des CO2: die Schraube gegen den Uhrzeigersinn drehen. Herabsetzen des CO2: die Schraube im Uhrzeigersinn drehen. • Durch Drücken der Taste (0% auf dem Display Abbildung 13b) den Betrieb mit minimaler Heizleistung einschalten. • Die Stellschraube K des Gasventils regulieren, bis die in der Tabelle 2.1 für Methan (G20) und 2.2 für Propan (LPG) angegebenen CO2-Werte erreicht sind: -Erhöhen des CO2: die Schraube im Uhrzeigersinn drehen. -Herabsetzen des CO2: die Schraube gegen den Uhrzeigersinn drehen. 13.2 MODELLE MIT DOPPELVENTIL (POWER HT 1.1200 UND 1.1500) ABBILDUNG 12b Zum Einstellen der Gasventile wie folgt vorgehen: • Einen Manometer an den Druckanschluss P1OUT auf dem Ventil 1 anschließen. • Die Sonde des Abgasanalysators wie im Abschnitt 17 - Abbildung 15 dargestellt in die Abgas-Entnahmestelle stecken. • Den Kessel einschalten und an der Bedienblende die “Einstellungsfunktion” aktivieren. Hierzu die Tasten und gleichzeitig 7 Sekunden lang drücken, bis auf dem Display die Symbole Abbildungen 13a und 13b dargestellten Position erscheinen. • Durch Drücken der Taste einschalten. in der auf den (100% auf dem Display Abbildung 13a) den Betrieb mit maximaler Heizleistung Achtung: Wenn der Kessel nicht einschaltet oder wenn die Gasventile gewechselt werden, wird empfohlen, die Stellschrauben (V1) und (V2) ganz zu- und anschließend je nach Modell um 2 ~ 1/4 Umdrehungen (POWER HT 1.1200) oder um 2 ~ 1/2 Umdrehungen (POWER HT 1.1500) wieder aufzudrehen und dann die oben beschriebenen Vorgänge zu wiederholen. • Beide Stellschrauben (V1) und (V2) regulieren, bis der in der Tabelle 2.1 für Methan (G20) und 2.2 für Propan (LPG) angegebene CO2-Wert erreicht ist: - - Herabsetzen des CO2: die Schraube im Uhrzeigersinn drehen. Erhöhen des CO2: die Schraube gegen den Uhrzeigersinn drehen. ANLEITUNGEN FÜR DEN INSTALLATEUR 64 7115313.01 - de (at) • Durch Drücken der Taste (0% auf dem Display Abbildung 13b) den Betrieb mit minimaler Heizleistung einschalten. • Die Stellschraube K1 des Gasventils 1 regulieren, bis der in der Tabelle 2.1 für Methan (G20) und 2.2 für Propan (LPG) angegebene Druckwert (Pout) erreicht ist: - Erhöhen des Drucks: die Schraube im Uhrzeigersinn drehen (Zunahme CO2). - Herabsetzen des Drucks: die Schraube gegen den Uhrzeigersinn drehen (Abnahme CO2). • Das Manometer von der Druckentnahmestelle P1OUT zur Entnahmestelle P2 OUT des Gasventils 2 bringen. • Die Stellschraube K2 des Gasventils 2 regulieren, bis der in der Tabelle 2.1 für Methan (G20) und 2.2 für Propan (LPG) angegebene Druckwert (Pout) erreicht ist: Abbildung 13a 0502_2110 0307_2201 • Kontrollieren, ob der CO2-Wert bei Mindestwärmebelastung dem in der Tabelle 2.1 bzw. 2.2 angegebenen Wert entspricht und K2 leicht verstellen, um den CO2-Wert zu optimieren. ⇑ Abbildung 13b ⇑ 13.3 GASARTWECHSEL WICHTIG: Bei Umstellung von Betrieb mit Methan (G20) auf Betrieb mit Propan (LPG) muss der folgende Eingriff vorgenommen werden, bevor das Gasventil wie oben beschrieben eingestellt wird: • Bei den Modellen mit Einfachventil die Drossel am Ausgang des Gasventils auswechseln (Abbildung 12a). Hierzu muss das Gasventil ausgebaut werden: die Anschlüsse am Ein- und Ausgang lockern und die Düse mithilfe einer Zange mit geraden zylindrischen Spitzen herausschrauben. Die Dichtheit der zuvor ausgebauten Gasanschlüsse kontrollieren. • Bei den Modellen mit Doppelventil die Gasdrossel am Eingang des Venturirohrs auswechseln (Abbildung 12b). Hierzu muss die Sammelleitung der Gasventile ausgebaut werden. Die Dichtheit der zuvor ausgebauten Gasanschlüsse kontrollieren. • Über das Display an der Bedienblende die Parameter H536 - H541 - H608 - H609 - H610 - H611 - H612 - H613 einstellen. In den Tabellen 2.1 und 2.2 sind die einzustellenden Werte angegeben. Die Programmierung ist in Kapitel 14 beschrieben. ANLEITUNGEN FÜR DEN INSTALLATEUR 65 7115313.01 - de (at) Gasverbrauch bei 15 °C 1013 mbar Gas G20 - 2H - 20 mbar POWER HT 1.850 POWER HT 1.1000 POWER HT 1.1200 POWER HT 1.1500 MJ/m3 34,02 34,02 34,02 34,02 Max Heizleistung m3/h 9,26 10,9 13,08 16,35 Min Heizleistung 3 m /h 3,50 3,89 4,23 4,39 Gasdüse mm 11,5 12 11 11,5 CO2 bei max Heizleistung % 8,7 8,7 8,7 8,7 CO2 bei min Heizleistung % 8,6 8,6 8,4 8,4 Druck Pout bei min. Heizleistung Pa HU Parameteren H536-H613 (rpm) max. Heizleistung Parameteren H541-H610 PWM (%) max. Heizleistung Parameter H612 (rpm) min. Heizleistung Parameter H609 PWM (%) min. Heizleistung Parameter H611 (rpm) modulation luft in zündlast - - -4 -5 5100 5650 4650 6000 90 100 55 100 1900 2100 1600 1550 15 15 10 9,5 3600 3600 2600 2900 30 15 15 40 40 20 20 POWER HT 1.850 POWER HT 1.1000 POWER HT 1.1200 POWER HT 1.1500 Länge Rauchabzug : 0 ÷ 10 m Parameter H608 PWM (%) modulation luft in zündlast 30 Länge Rauchabzug : 10 ÷ 20 m Parameter H608 PWM (%) modulation luft in zündlast Tabelle 2.1 Gasverbrauch bei 15 °C 1013 mbar Gas G31 - 3P - 37 mbar HU MJ/Kg 46,34 46,34 46,34 46,34 Max Heizleistung Kg/h 6,77 7,97 9,56 11,95 Min Heizleistung Kg/h 2,57 2,86 3,10 3,22 Gasdüse mm 7,8 7,8 7,8 7,8 CO2 bei max Heizleistung % 10,2 10,2 10,2 10,2 CO2 bei min Heizleistung % 9,3 9,8 10,2 10,2 Druck Pout bei min. Heizleistung Pa - - -7 -8 4600 5150 4300 5350 90 100 55 100 Parameter H612 (rpm) min. Heizleistung 1900 1950 1450 1450 Parameter H609 PWM (%) min. Heizleistung 14,5 14,5 10 9,5 Parameter H611 (rpm) modulation luft in zündlast 4200 4200 2600 2900 40 15 15 50 20 20 Parameteren H536-H613 (rpm) max. Heizleistung Parameteren H541-H610 PWM (%) max. Heizleistung Länge Rauchabzug : 0 ÷ 10 m Parameter H608 PWM (%) modulation luft in zündlast 40 Länge Rauchabzug : 10 ÷ 20 m Parameter H608 PWM (%) modulation luft in zündlast 50 Tabelle 2.2 ANLEITUNGEN FÜR DEN INSTALLATEUR 66 7115313.01 - de (at) 14. EINGABE DER KESSELPARAMETER Die Änderung der Kesselparameter darf nur von qualifiziertem Fachpersonal vorgenommen werden, das wie nachstehend beschrieben vorgehen muss: a) Die vom vorderen Bedienfeld des Heizkessels befindlichen Tasten , ca. 3 Sekunden lang gleichzeitig drücken, bis am Display der Parameter H90 angezeigt wird; b) Die Tasten drücken, um den Parameter, der geändert werden soll, anzuwählen; c) Die Tasten und drücken, um den Parameter zu ändern; d) Die Taste drücken um die Programmierung zu verlassen. Nachstehend werden die meistbenutzten Parameter aufgeführt: Parameter Nr. Werkseitige Einstellung Beschreibung H90 Einstellung reduzierte Temperatur im Warmwasserbetrieb (°C) 10 H91 Programmfreigabe Warmwasserbetrieb (0=freigegeben; 1=nicht freigegeben) 1 H505 Höchsttemperatur (°C) des Heizkreises HK 1. Dieser entspricht: - dem Hauptkreis, wenn es sich um eine Anlage mit nur einer Zone handelt; - dem Kreis der Zone, in der der Raumregler QAA73 installiert ist, wenn die Anlage mehrere Hochtemperaturzonen aufweist; - dem Kreis der Hochtemperaturzone, wenn es sich um eine gemischte Anlage handelt und das Zubehörgerät BAXI AGU2.500 verwendet wird. 80 H507 Höchsttemperatur (°C) des Heizkreises HK 2 einer Anlage mit mehreren Zonen. Dieser entspricht dem Kreis der Niedertemperaturzone bei Benutzung des Zubehörgeräts BAXI AGU2.500. 80 H516 Temperatur für die automatische Umschaltung Sommer / Winter (°C). 20 H532 Wahl der Heizkurve des Heizkreises HK 1 (siehe Graphik 1) 15 H533 Wahl der Heizkurve des Heizkreises HK 2 (siehe Graphik 1) 15 H608 Einstellwert PWM (%) : modulation luft in zündlast H611 Einstellwert (rpm) : modulation luft in zündlast H609 Einstellwert PWM (%) : min. Heizleistung H541-H610 H612 H536-H613 Einstellwert PWM (%) : max. Heizleistung im Heizbetrieb/Warmwasserbetrieb Siehe Tabelle 2 Einstellwert (rpm) : min. Heizleistung Einstellwert (rpm) : max. Heizleistung im Heizbetrieb/Warmwasserbetrieb H544 Pumpennachlauf im Heizbetrieb (Min.) H545 Brennerstillstand zwischen zwei Einschaltungen (Sek.) 3 H552 Einstellung des Wassersystems (siehe Anleitungen für das Gerät BAXI AGU2.500). H552 = 50 mit AGU2.500 und mit QAA73 + Zonen mit Raumthermostat H552 = 80 mit RVA 47 2 H553 Konfiguration der Heizreise (Position YX, X für Heizkreis 1, Y für Heizkreis 2 der LMU) H553 = 12 mit AGU2.500 21 H615 Programmierbare Funktion 9 H632 Wärmeanforderungen, die von der Zubringerpumpe “Q8“ zu unterstützen sind. H632 = 00001111 mit AGU2.500 und mit QAA73 + Zonen mit Raumthermostat H632 = 00001111 mit RVA 47 Der Wert jedes Bit kann 1 oder 0 sein. Zur Änderung dieses Parameters die Tasten 5 und 6 drücken, um das zu ändernde Bit anzuwählen (b0 ist das erste Bit rechts; b7 ist das letzte Bit links). Zur Änderung des Bit-Werts die Tasten 7 und 8 drücken H641 Nachlaufzeit des Lüfters (s) 180 00001100 10 Sollwert der ANTILEGIONELLENFUNKTION H657 0 60...80 °C = einstellbares Temperaturintervall 0 = Legionellefunktion nicht aktiv Bei Ersatz der Platine muss sichergestellt werden, dass die spezifischen Parameter für das Kesselmodell eingegeben wurden; es wird auf die beim Vertragskundendienst erhältliche Dokumentation verwiesen. ANLEITUNGEN FÜR DEN INSTALLATEUR 67 7115313.01 - de (at) 15. REGELUNGS-UND SICHERHEITSVORRICHTUNGEN Der Heizkessel entspricht allen Vorschriften und verfügt über folgende Vorrichtungen: • Sicherheitsthermostat Diese Vorrichtung, deren Sensor sich am Vorlauf des Heizkessels befindet, unterbricht den Gaszufluß zum Hauptbrenner, wenn das Wasser im Heizkessel überhitzt ist. Unter diesen Bedingungen wird der Betrieb des Heizkessels gesperrt und erst nach Beseitigung der Ursache für die Auslösung kann die Einschaltung wiederholt werden, indem die Resettaste am Bedienfeld des Heizkessels gedrückt wird. Diese Sicherheitsvorrichtung darf nicht außer Betrieb gesetzt werden. • Kontrolle der Zirkulation im Heizkesselkreis Die elektronische Steuerung des Heizkessels ist mit einer Funktion zur “Kontrolle der Heizkesselzirkulation” ausgestattet, die durch die dauernde Kontrolle der Vorlauf- und Rücklauftemperatur im Primärkreis wahrgenommen wird. Bei einem abnormalen Anstieg der Vorlaufund Rücklauftemperatur oder Umkehr der Temperaturen, stoppt der Heizkessel und auf der Anzeige erscheint die Fehlermeldung (siehe Fehlertabelle). • Abgasthermostat Diese Vorrichtung befindet sich an der Abgasleitung des Kessels und unterbricht den Gaszufluß zum Brenner, wenn die Temperatur 90 °C übersteigt. Nach Feststellung der Ursache für die Auslösung die Reset-Taste am Thermostat, und dann die Resettaste am Bedienfeld des Heizkessels drücken Diese Sicherheitsvorrichtung darf nicht außer Betrieb gesetzt werden. • Thermostat des Wärmetauscherflansches (260°C) Diese Vorrichtung befindet sich auf dem Flansch des Wärmetauschers und unterbricht den Gaszufluss zum Brenner bei einer Überhitzung des Wärmetauschers aufgrund eines Bruches der vorderen Isolierung oder einer nicht korrekten Abdichtung der Flanschdichtungen. Die auf dem Thermostat befindliche Resettaste drücken, nachdem man die Ursachen des Eingriffs überprüft hat, und sodann die auf der Schalttafel des Heizkessels vorhandene Resettaste drücken. Diese Sicherheitsvorrichtung darf nicht außer Betrieb gesetzt werden • Thermosicherung Diese Vorrichtung befindet sich auf der Rückseite des Wärmetauschers und unterbricht den Gaszufluss zum Brenner bei einer Überhitzung des Wärmetauschers aufgrund eines Bruches der hinteren Isolierung. Bei einem Eingriff dieser Vorrichtung muss der Wärmetauscher ausgebaut und die Thermosicherung ersetzt werden (siehe Abschnitt “AUSTAUSCH DER SCHMELZSICHERUNG DES WÄRMETAUSCHERS”). Diese Sicherheitsvorrichtung darf nicht außer Betrieb gesetzt werden • Flammenionisierungsdetektor Die Detektorelektrode gewährleistet die Sicherheit bei ausbleibender Gasversorgung oder bei fehlerhafter Zwischenzündung des Haupt brenners. Unter diesen Bedingungen wird der Heizkessel außer Betrieb gesetzt. Um die normalen Betriebsbedingungen wieder herzustellen, muss die Resettaste am Bedienfeld des Heizkessels gedrückt werden • Nachzirkulation der Pumpe Die elektronisch gesteuerte Nachzirkulation dauert 3 Minuten und wird in der Heizungsfunktion nach Abschalten des Hauptbrenners für den Eingriff des Raumthermostats in Betrieb gesetzt. • Frostschutzvorrichtung Die elektronische Steuerung des Heizkessels verfügt über eine “Frostschutzfunktion” im Heizbetrieb und im Warmwasserbetrieb, durch die bei einer Vorlauftemperatur der Anlage von unter 5 °C der Brenner in Betrieb gesetzt wird, bis 30 °C im Vorlauf erreicht werden. Diese Funktion ist aktiv, wenn der Heizkessel mit Strom versorgt wird, wenn Gas vorhanden ist, und der vorgeschriebene Anlagendruck erreicht wird. • Blockierschutz der Pumpe Wenn im Heizbetrieb und/oder in der Brauchwassererwärmung 24 Stunden lang kein Wärmebedarf vorliegt, wird die Pumpe automatisch für 10 Sekunden in Betrieb gesetzt. • Hydraulischer Druckwachter Dieses Gerät erlaubt die Einschaltung des Hauptbrenners nur wenn der Druck der Anlage hörer ist als 0,5 Bar. ANLEITUNGEN FÜR DEN INSTALLATEUR 68 7115313.01 - de (at) CT_0826 / 1002_1801 16. POSITIONIERUNG DER ZÜND- UND ÜBERWACHUNGSELEKTRODE Abbildung 14 17. ÜBERPRÜFUNG DER VERBRENNUNGSPARAMETER Zum Messen der effektiven Verbrennungsleistung und der Zusammensetzung der Verbrennungsprodukte muss auf der Abgasableitung in einer Entfernung, die das Doppelte des Innendurchmessers der Leitung misst, eine Öffnung angebracht werden. Durch diese Öffnung können die folgenden Parameter erhoben werden: • Temperatur der Verbrennungsprodukte. • Sauerstoffkonzentration (O2) oder alternativ dazu die Kohlendioxidkonzentration (CO2). • Kohlenmonoxidkonzentration (CO). Die Messung der Verbrennungslufttemperatur muss in der Nähe des Lufteintrittes in den Kessel erfolgen. Die Öffnung muss von der für die Anlage verantwortlichen Person bei der Inbetriebnahme ausgeführt und so verschlossen werden, dass die Leitung zur Abführung der Verbrennungsprodukte bei normalem Betrieb absolut dicht ist. 0811_1703 / CT_0782 Im Rauchkanal des Kessels ist ein Rauch-Entnahmeanschluss vorgesehen. Wichtig: nach den Kontrollen den Anschluss mit einem Verschluss verschließen RAUCH-ENTNAHMEANSCHLUSS KESSEL Abbildung 15 ANLEITUNGEN FÜR DEN INSTALLATEUR 69 7115313.01 - de (at) 18. AKTIVIERUNG DER SCHORNSTEINKEHRERFUNKTION 020429_0200 Um die Messung des feuerungstechnischen Wirkungsgrads und der Sauberkeit der Abgase zu erleichtern kann wie nachstehend beschrieben die Schornsteinkehrerfunktion aktiviert werden: 1)Die Tasten (2-3) gleichzeitig drücken, bis am Display beim Symbol der Pfeil “ ” erscheint (ca. 3 Sekunden, aber nicht mehr als 6 Sekunden). Unter diesen Bedingungen funktioniert der Heizkessel bei der höchsten, für den Heizbetrieb vorgesehenen Brennerbelastung. 2) Eine der zwei Tasten drücken, um die Funktion zu beenden. Abbildung 16a 19. JÄHRLICHE WARTUNG Um eine optimale Funktionstüchtigkeit des Heizkessels zu gewährleisten, müssen alljährlich folgende Kontrollen durchgeführt werden: • den Zustand und die Funktionstüchtigkeit der Dichtungen des Gas- und Heizkreises kontrollieren; • den Zustand und die korrekte Position der Zünd- und Flammenpräsenzelektroden kontrollieren; • den Zustand des Brenners und dessen korrekten Sitz kontrollieren; • allfällige Verunreinigungen im Inneren der Verbrennungskammer entfernen. Zur entsprechenden Reinigung ist ein Staubsauger zu verwenden. • die korrekte Eichung des Gasventils sicherstellen; • den Druck in der Heizanlage kontrollieren; • den Druck im Expansionsgefäß kontrollieren; • sicherstellen, dass der Ventilator korrekt funktioniert; • kontrollieren, dass die Abzugs- und Saugleitungen nicht verstopft sind; • kontrollieren, dass keine Verunreinigungen im Inneren des Siphons vorhanden sein (auf entsprechend ausgerüsteten Heizkesseln); • die Integrität der Magnesiumanode, sofern vorhanden, auf den mit Boiler ausgestatteten Heizkesseln kontrollieren. HINWEISE Vor jeglichem Eingriff ist sicherzustellen, dass die Stromspeisung des Heizkessels unterbrochen wurde. Nach den Wartungseingriffen sind die Drehknöpfe bzw. Funktionsparameter des Heizkessels wieder auf ihre ursprünglichen Stellungen bzw. Werte zurückzustellen. ANLEITUNGEN FÜR DEN INSTALLATEUR 70 7115313.01 - de (at) 20. AUSTAUSCH DER SCHMELZSICHERUNG DES WÄRMETAUSCHERS 1311_1401.ai Die Schmelzsicherung befindet sich auf der Rückseite des Wärmetauschers, wie in der Abbildung dargestellt. Elektrisch ist sie in Serie an den Sicherheitsthermostat angeschlossen. Sie schützt den Wärmetauscher für Übertemperaturen bei einem allfälligen Bruch der Isolierung. Bei Eingriff dieser Vorrichtung erscheint auf dem Display die Störungsmeldung E110. Wenn dies auf den Bruch der Isolierung zurückzuführen ist, muss der Wärmetauscher abmontiert und die hintere Isolierung sowie die Schmelzsicherung ersetzt werden. Abbildung 16b ANLEITUNGEN FÜR DEN INSTALLATEUR 71 7115313.01 - de (at) 18 17 CT_0824 22 1311_2103 21. FUNKTIONSPLAN DER KREISLÄUFE 13 19 14 6 10 9 12 V.G. 11 7 4 20 3 5 21 8 2 GAS 1 RR 15 MR 16 Abbildung 17 LEGENDE: 1Manometer 2Siphon 3 NTC Fühler Heizungsvorlauf 4 Sicherheitsthermostat 105 °C 5Gasventil 6Abgaswärmetauscher 7Flammfühler 8Brenner 9Zündelektrode 10 Venturi-Mischeinrichtung 11 Gasdrosselblende ANLEITUNGEN FÜR DEN INSTALLATEUR 12 Gebläse 13 Anschluss an Abzug 14 Automatisches Entlüftungsventil 15 Hydraulischer Druckwachter 16 Kessel-Entleerungshahn 17 Anschluss Abgasableitung mit Abgasthermostat 18 Abgasthermostat 19 Sitz der Ansaugleitung der Verbrennungsluft 20 NTC Fühler Heizungsrücklauf 21Thermosicherung 22 Thermostat des Wärmetauscherflasches 72 7115313.01 - de (at) CT_0822_DE G/V C M G/V 1 2 2 1 2 1 2 1 2 3 1 1 2 1 VERSORGUNGSNETZ VERSORGUNGS KLEMMBRETTT C M G/V ABGAS THERMOSTAT X30 DISPLAY X50 THERMOSICHERUNG SICHERHEITS THERMOSTAT THERMOSTAT DES WÄRMETAUSCHERFLANSCHES X40 Kabelfarbe C = Hellblau M = Braun N = Schwarz R = Rot G/V = Gelb/Grün B = Weiß DETEKTOELEKTRODE C C M C C M 2 1 2 1 11 12 13 14 15 16 17 M C C M C M 230V PROGRAMMIERBARER AUSGANG L N M C M C M C SICHERUNG LÜFTER 1 2 4 5 1 I X2-01 I X2-02 I X2-03 IX2-04 IX2-05I I X3-01I X3-02 I X3-03IX3-04I M N C G/V M C G/V 2 3 AUF HEIZUNGSPUMPE VORBEREITET 1 AUF SANITÄR-PUMPE VORBEREITET GASVENTIL 2 1 2 1 2 1 C C N N R R 1 2 1 2 LN 1 2 3 4 5 6 7 8 9 10 NM G/V TP VORBEREITUNG NTC SONDE FÜR VORRANG DES WARMWASSER VORBEREITUNG AUSSENFUHLER RAUMTHERMOSTAT VORBEREITUNG THERMOSTAT FUSSBODENANLAGE TA HYDRAULISCHER DRUCKWACHTER V V VORBEREITUNGFERRNSTEUERUNGA NTC FÜHLER HEIZUNGSVORLAUF NTC FÜHLER HEIZUNGSRÜCKLAUF ZUNDER VERDBINDER NN C X11 12 11 10 9 8 7 6 5 4 3 2 1 V V X12 6 5 4 3 2 1 RR X15 X14 X13 5 4 3 2 1 ZÜNDELEKTRODE M C G/V V V M M 2 1 I X10-01 IX10-02 I X10-03 IX10-04 IX10-05 I X10-06 I 4 3 2 1 AGU 2.500 3 2 1 OCI 420 L OT PI I X1-01 I X1-02 I b a N b a L AIR IN OUT IN 73 COM ANLEITUNGEN FÜR DEN INSTALLATEUR NO 1311_2003 22. ANSCHLUSSPLAN DER VERBINDER 22.1 POWER HT 1.850 - 1.1000 7115313.01 - de (at) CT_0823_DE G/V C M 2 3 1 2 1 2 1 2 1 2 1 2 3 1 LÜFTER M N C G/V 1 2 4 5 1 2 1 SICHERUNG C M C C M C C M 2 1 2 1 11 12 13 14 15 16 17 M C C M C M AUF HEIZUNGSPUMPE VORBEREITET VERSORGUNGS KLEMMBRETTT VERSORGUNGSNETZ 230V PROGRAMMIERBARER AUSGANG L G/V N M C M C M C AUF SANITÄR-PUMPE VORBEREITET M C G/V b a N b G/V 1 I X1-01 I X1-02 I I X2-01 I X2-02 I X2-03 IX2-04 IX2-05I I X3-01I X3-02 I X3-03IX3-04I DETEKTOELEKTRODE ABGAS TERMOSTAT X30 GASVENTIL 1 THERMOSICHERUNG SICHERHEITS THERMOSTAT 2 1 2 1 2 1 C C N N R R 1 2 1 2 LN 1 2 3 4 5 6 7 8 9 10 NTC FÜHLER HEIZUNGSRÜCKLAUF HYDRAULISCHER DRUCKWACHTER Kabelfarbe C = Hellblau M = Braun N = Schwarz R = Rot G/V = Gelb/Grün B = Weiß VORBEREITUNG NTC SONDE FÜR VORRANG DES WARMWASSER VORBEREITUNG AUSSENFUHLER VORBEREITUNG THERMOSTAT FUSSBODENANLAGE TP G/V RAUMTHERMOSTAT NM TA VORBEREITUNG FERRNSTEUERUNG NTC FÜHLER HEIZUNGSVORLAUF ZUNDER VERDBINDER NN C X11 12 11 10 9 8 7 6 5 4 3 2 1 V V X12 6 5 4 3 2 1 RR X15 X14 X13 5 4 3 2 1 ZÜNDELEKTRODE M C G/V V V M M 2 1 I X10-01 IX10-02 I X10-03 IX10-04 I X10-05 I X10-06 I 4 3 2 1 AGU 2.500 GASVENTIL 2 18 19 20 C M G/V X50 THERMOSTAT DES WÄRMETAUSCHERFLANSCHES X40 DISPLAY L P I OT 3 2 1 OCI 420 AIR IN OUT a L L OT PI IN AIR IN OUT IN 74 COM ANLEITUNGEN FÜR DEN INSTALLATEUR NO 1311_2004 V V 22.2 POWER HT 1.1200 - 1.1500 7115313.01 - de (at) 23. TECHNISCHE EIGENSCHAFTEN Kesselodell POWER HT 1.850 1.1000 1.1200 1.1500 Kat. II2H3P II2H3P II2H3P II2H3P Nennwärmebelastung kW 87,2 102,7 123,2 154 Reduzierte Wärmebelastung kW 33,1 36,8 40 41,5 Nennwärmeleistung 75/60°C kW 85 100 120 150 kcal/h 73100 86000 103200 129000 kW 91,6 107,8 129,7 162 kcal/h 78776 92708 111542 139320 kW 32,2 35,8 39 40,4 kcal/h 27692 30788 33540 34744 kW 34,9 38,8 42,1 43,7 kcal/h 30014 33368 36206 37582 Wirkungsgrad nach der Richtlinie 92/42/CEE — ★★★★ ★★★★ ★★★★ ★★★★ Maximaler Wasserdruck im Heizkreislauf bar 4 4 4 4 Temperaturbereich Heizkreislauf °C 25÷80 25÷80 25÷80 25÷80 Typ — Nennwärmeleistung 50/30°C Reduzierte Wärmeleistung 75/60°C Reduzierte Wärmeleistung 50/30°C B23 - B23P - C53* Durchmesser Abgasleitung mm 100 100 100 100 Max. Rauchgas-Massenstrom kg/s 0,041 0,049 0,059 0,073 Min. Rauchgas-Massenstrom kg/s 0,016 0,018 0,019 0,020 Max. Rauchgastemperatur °C 78 80 77 75 NOx-Klasse — 5 5 5 5 Gasart — G20 G20 G20 G20 G31 G31 G31 G31 20 20 20 20 Förderdruck Erdgasförderdruck 2H mbar Förderdruck Flussigas 3P mbar 50 50 50 50 Spannung d. Stromversorgung V 230 230 230 230 Frequenz d. Stromversorgung Hz 50 50 50 50 Nennstromaufnahme W 100 160 135 235 Nettogewicht Abmessungen kg 75 83 95 103 Höhe mm 850 850 850 850 Breite mm 450 450 450 450 Tiefe mm 801 871 1024 1132 *C53 (nur mit Luftansaugsatz) ANLEITUNGEN FÜR DEN INSTALLATEUR 75 7115313.01 - de (at) Dear Customer, Our company is confident our new product will meet all your requirements. Buying one of our products guarantees all your expectations: good performance combined with simple and rational use. Please do not put this booklet away without reading it first: it contains useful information for the correct and efficient use of your product. Our company declares that these products are marked of the following Directives : in compliance with the essential requirements - Gas Directive 2009/142/EC - Efficiency Directive 92/42/EEC - Electromagnetic Compatibility Directive 2004/108/EC - Low Voltage Directive 2006/95/EC Our company, constantly striving to improve the products, reserves the right to modify the details given in this documentation at any time and without notice. These Instructions are only meant to provide consumers with use information and under no circumstance should they be construed as a contract with a third party. ATTENTION This device can only be installed and operate in permanent, ventilated rooms in accordance with the Rules in force BAXI S.p.A., a leading European manufacturer of hi-tech boilers and heating systems, has developed CSQ-certified quality management (ISO 9001), environmental (ISO 14001) and health and safety (OHSAS 18001) systems. This means that BAXI S.p.A. includes among its objectives the safeguard of the environment, the reliability and quality of its products, and the health and safety of its employees. Through its organisation, the company is constantly committed to implementing and improving these aspects in favour of customer satisfaction. ISTRUCTIONS PERTAINING TO THE USER 76 7115313.01 - en CONTENTS ISTRUCTIONS PERTAINING TO THE USER 1. Instructions prior to installation 2. Instructions prior to commissioning 3. Commissioning of the boiler 4. Filling the boiler 5. Switching the boiler off 6. Prolonged standstill of the system. Frost protection 7. Servicing instructions and gas change 78 78 79 85 85 85 85 ISTRUCTIONS PERTAINING TO THE INSTALLER 8. General information 9. Instructions prior to installation 10. Boiler installation and dimensions 11. Chimney flue connection 12. Connecting the mains supply 13. Adjusting the gas valves and gas change 14. Setting the boiler parameters 15. Control and operation devices 16. Positioning of the ignition and flame sensing electrode 17. Check of combustion parameters 18. Activating the flue-sweeper function 19. Annual service 20. Thermal fuse replacement of heat exchanger 21. Boiler schematic 22. Illustrated wiring diagram 23. Technical data ISTRUCTIONS PERTAINING TO THE USER 77 86 86 87 90 92 98 104 105 106 106 107 107 108 109 110-111 112 7115313.01 - en 1. INSTRUCTIONS PRIOR TO INSTALLATION This boiler is designed to heat water at a lower than boiling temperature at atmospheric pressure. The boiler must be connected to a central heating system and/or to a domestic hot water supply system in compliance with its performances and output power. The boiler must be installed by a Qualified Service Engineer and ensure the following operations are carried out: a)check that the boiler is fit for operation with the type of gas available. For more details see the notice on the packaging and the label on the appliance itself. b)careful checking that the flue terminal draft is appropriate; that the terminal is not obstructed and that no other appliance exhaust gases are expelled through the same flue duct, unless the flue is especially designed to collect the exhaust gas coming from more than one appliance, in conformity with the standards and regulations in force. c)careful checking that, in case the flue has been connected to pre-existing flue ducts, thorough cleaning has been carried out in that residual combustion products may come off during operation of the boiler and obstruct the flue duct. d) to ensure correct operation of the appliance and avoid invalidating the guarantee, observe the following precautions: 1. Heating circuit 1.1.new system Before proceeding with installation of the boiler, the system must be cleaned and flushed out thoroughly to eliminate residual thread-cutting swarf, solder and solvents if any, using suitable proprietary products. To avoid damaging metal, plastic and rubber parts, use only neutral cleaners, i.e. non-acid and non alkaline. The recommended products for cleaning are: SENTINEL X300 or X400 and FERNOX heating circuit restore. To use this product proceeding strictly in accordance with the maker’s directions. 1.2. existing system Before proceeding with installation of the boiler, the system must be cleaned and flushed out to remove sludge and contaminants, using suitable proprietary products as described in section 1.1. To avoid damaging metal, plastic and rubber parts, use only neutral cleaners, i.e. non-acid and nonalkaline such us SENTINEL X100 and FERNOX heating circuit protective. To use this product proceeding strictly in accordance with the maker’s directions. Remember that the presence of foreign matter in the heating system can adversely affect the operation of the boiler (e.g. overheating and noisy operation of the heat exchanger). Failure to observe the above will render the guarantee null and void. 2. INSTRUCTIONS PRIOR TO COMMISSIONING Initial lighting of the boiler must be carried out by a qualified service engineer. Ensure the following operations are carried out: a) compliance of boiler parameters with (electricity, water, gas) supply systems settings. b) compliance of installation with the standards and regulations in force. c) appropriate connection to the power supply and earthing of the appliance. Failure to observe the above will render the guarantee null and void. The instructions shall state the substance of the following: This appliance is not intended for use by persons (including children) with reduced physical, sensory or mental capabilities, or lack of experience and knowledge, unless they have been given supervision or instruction concerning use of the appliance by a person responsible for their safety. Children should be supervised to ensure that they do not play with the appliance. ISTRUCTIONS PERTAINING TO THE USER 78 7115313.01 - en 3. COMMISSIONING OF THE BOILER 020503_1100 To correctly light the burner proceed as follows: 1) provide power supply to the boiler; 2) open the gas cock; 3) follow the directions given below regarding the adjustments to be made at the boiler control panel. Figure 1 IMPORTANT: Domestic Hot Water (D.H.W.) instructions here discribed, are to take in account only if the boiler is connected to a D.H.W. production system. KEYS DISPLAY SYMBOLS Domestic hot water on/off key Operation in domestic hot water mode Central heating water temperature setting key Operation in central heating mode Domestic hot water temperature setting key Operation in automatic mode Reset key Operation in manual mode at the maximum temperature set Program access and scroll keys Operation in manual mode at minimum temperature Program access and scroll key Standby (off) Parameter setting key (decrease value) Outdoor temperature Flame present (on) Parameter setting key (increase value) Data display reset key Resettable alarm warning Central heating mode setting key MAIN display SECONDARY display ISTRUCTIONS PERTAINING TO THE USER 79 7115313.01 - en 3.1 DESCRIPTION OF KEYS (2) Central heating water temperature setting key. This key can be pressed to set the central heating water output temperature as described in point 3-3. (3) Domestic hot water temperature setting key. This key can be pressed to set the domestic hot water temperature as described in point 3-4. (10) Central heating mode operating key . 020503_0800 The key can be pressed to activate four boiler central heating operating modes; these modes are identified by a black cursor line underneath the relative symbol on the display, and are as follows: Dash “Automatic mode” active Figure 2 • Automatic operation. Operation of the boiler is controlled by the timed program as described in point 3-5.1 “Daily timed program for operation of the central heating system”; • Manual operation at the maximum temperature set. The boiler comes into operation regardless of the timed program set. The operating temperature is that set using the “Setting the maximum central heating temperature”); key (point 3-3: operation at minimum temperature. The operating temperature is that set in point • Manual 3-6: “setting the minimum central heating temperature”. • standby. The boiler does not work in central heating mode, although the antifreeze function is still enabled. (1) Domestic hot water on/off key: This key can be pressed to activate or deactivate this function, which is identified on the display by a black cursor line under the symbol . (4) Reset key. In case of a fault, referred to in point 3-7 “Faults and resetting the boiler”, the boiler can be restarted by pressing this key for at least two seconds. If this key is pressed with no fault present, the display will show the message “E153”, and the same key has to be pressed again (for at least two seconds) to restart the boiler. (9) Data key. This key can be pressed repeatedly to display the following information: - Temperature (°C) of the domestic hot water ( ); - outdoor temperature (°C) ( ); only provided with the outdoor temperature sensor probe connected. Press either of the ISTRUCTIONS PERTAINING TO THE USER keys to return to the main menu. 80 7115313.01 - en 3.2 SETTING THE TIME 020503_0700 Press either of the keys to access the programming function; • the display will show the letter P followed by a number (program line); Figure 3 • • • press the keys until the display shows P1, referring to the time to be set; press the keys to set the time; on the display, the letter P will start to flash; press the key to save and exit the programming function; 3.3 SETTING THE MAXIMUM CENTRAL HEATING TEMPERATURE - Press the key (2-figure 1) to set the central heating water temperature; - Press the keys to set the temperature required; - press either of the keys (1 or 10 - figure 1) to save and return to the main menu. N.b – With the outdoor sensor connected, the curve. Press the key (2 - figure 1) can be used to shift the central heating keys to decrease or increase the room temperature in the premises to be heated. 3.4 SETTING THE MAXIMUM DOMESTIC HOT WATER TEMPERATURE - Press the key (3-figure 1) to set the maximum domestic hot water temperature; - Press the - press either of the keys to set the temperature required; keys (1 or 10 - figure 1) to save and return to the main menu. ISTRUCTIONS PERTAINING TO THE USER 81 7115313.01 - en 3.5 SETTING THE DAILY PROGRAM FOR OPERATION IN CENTRAL HEATING AND DOMESTIC HOT WATER MODES 3.5.1 Setting the daily times for central heating mode operation - Press either of the keys to access the programming function; a) press these keys until the display shows P11, referring to the program start time; b) press the keys to set the time; - press the key; the display will show P12, referring to the program end time; - repeat the operations described in points a and b until the third and last cycle is reached (program line P16); - press the key to save and exit from the programming function. 3.5.2 Setting the daily times for domestic hot water mode operation - Factory setting of D.H.W. function is enable (ON) while is disabled D.H.W. daily times program. To enable D.H.W. daily times program see section 14 (parameter H91). Setting the daily times for domestic hot water mode operation-Carry out the operations described in section 3.5.1 for program lines 31 to 36. 3.6 SETTING THE MINIMUM CENTRAL HEATING TEMPERATURE - press either of the keys to access the programming function; - press these keys until the display shows P5, referring to the temperature to be set; - press the keys to set the temperature required. This operating mode is enabled when minimum temperature central heating mode “ the daily central heating program does not require heat. ” is activated or when N.B – With the outdoor sensor connected, parameter P5 can be used to set the minimum room temperature in the premises to be heated. ISTRUCTIONS PERTAINING TO THE USER 82 7115313.01 - en 3.7 TABLE FO USER-SETTABLE PARAMETERS Parameter N. Parameter description Factory setting Range P1 Time of day setting ———- 0…23:59 P5 Minimum central heating temperature setting (°C) 25 25..80 P11 Start of first daily period of automatic central heating 6:00 00:00…24:00 P12 End of first daily period of automatic central heating 22:00 00:00…24:00 P13 Start of second daily period of automatic central heating 0:00 00:00…24:00 P14 End of second daily period of automatic central heating 0:00 00:00…24:00 P15 Start of third daily period of automatic heating 0:00 00:00…24:00 P16 End of third daily period of automatic central heating 0:00 00:00…24:00 Start of first daily period of domestic hot water production 0:00 00:00…24:00 End of first daily period of domestic hot water production 24:00 00:00…24:00 Start of second daily period of domestic hot water production 0:00 00:00…24:00 End of second daily period of domestic hot water production 0:00 00:00…24:00 Start of third daily period of domestic hot water production 0:00 00:00…24:00 Fine End of third daily period of domestic hot water production 0:00 00:00…24:00 0 0...1 * P31 * P32 * P33 * P34 * P35 * P36 P45 Reset of daily central heating and domestic hot water production programs (factory settings). Press the - + keys together for about 3 seconds; the number 1 appears on the display. Confirm by pressing either of the keys for program lines P31 to P36 are displayed only if Domestic Hot Water (D.H.W.) program * Parameters (parameter H91 see section 14) is activated. 3.8 FAULT WARNINGS AND RESETTING THE BOILER 020503_0500 If a fault occurs, a flashing warning code appears on the display. The fault warnings appear on the main display (figure 1 a) together with the symbol (Figure 4). To reset, press the reset button for at least two seconds. Figure 4 020503_0600 Fault warnings appear on the secondary display (figure 1 b) alternating with the time, both of them flashing (figure 4.1). It is not possible to reset malfunction warnings which appear on the secondary display as the cause of the alarm has first to be removed. Figure 4.1 ISTRUCTIONS PERTAINING TO THE USER 83 7115313.01 - en 3.9 TABLE OF FAULTS AND ERROR MESSAGES Error code Description of fault Corrective action E10 Outdoor temperature sensor fault Call an authorised service centre. E20 ntc output sensor failure Call an authorised service centre. E40 NTC return heating probe faulty call the authorised service centre E50 domestic hot water ntc sensor failure Call an authorised service centre. E110 Safety / fumes thermostat / thermal fuse / exchanger flange thermostat / heating return temperature probe tripped See paragraph “CONTROL AND OPERATION DEVICES”. press the reset key (for about 2 seconds: if this device is triggered repeatedly, call the authorised service centre) E111 Delivery temperature higher than 95°C If this fault persists, call the authorised service centre E128 Loss of flame during operation (the ionization current has fallen below Call an authorised service centre. the limit) E129 Minimum fan speed limit is hurt Call an authorised service centre. E132 floor thermostat tripped Call an authorised service centre. E133 no gas Press the reset key (for about 2 seconds); if the fault persists, call the authorised service centre) E151 boiler circuit board error If symbol is displayed, press the reset button otherwise switch off the electricity supply to the boiler for at least 10 seconds; if the fault persists, call the authorised service centre. Check the positioning of the ignition and flame sensing electrode (see section 16). E153 the reset key has been pressed inappropriately Press the key again (about 2 seconds) E154 No circulation or reverse flow call the authorised service centre E160 fan speed threshold not reached Call an authorised service centre. E164 no hydraulic differential pressure Check that the system is at the rated pressure. (refer to the section on filling the switch enabling signal system). if the fault persists, call the authorised service centre. All the faults are displayed in order of importance; if several faults occur simultaneously, the first to be displayed is the one with highest priority. After the cause of the first fault has been removed, the second one will be displayed, and so on. If any given fault occurs frequently, contact the authorised Service Centre. ISTRUCTIONS PERTAINING TO THE USER 84 7115313.01 - en 4. FILLING THE SYSTEM IMPORTANT: Regularly check that the pressure gauge (1 - figure 17) reads out a pressure of 1 - 1.5 bar when the central heating system is cold. Open the boiler drain cock (16 - figure 17) to reduce pressure if it is too high. Open the filling cock to increase pressure if it too low. Always open the filling cock very slowly to allow any air to bleed off. If the pressure in the system drops frequently, contact an authorised service centre to have the system checked. N.B.: Take special care when filling the heating system. In particular, open any thermostat valves in the system, ensure the water enters slowly in order to prevent the formation of air inside the primary circuit until operating pressure is reached. Lastly, vent any radiators in the system. BAXI declines all liability for damage deriving from the presence of air bubbles in the primary exchanger due to the incorrect or imprecise observance of the above. 5. SWITCHING THE BOILER OFF To shut down the boiler switch off the electrical supply to the appliance. 6. PROLONGED STANDSTILL OF THE SYSTEM. FROST PROTECTION We recommend you avoid draining the whole system as water replacements engender purposeless and harmful limestone deposits inside the boiler and on the heating elements. In case the boiler is not operated during wintertime and is therefore exposed to danger of frost we suggest you add some specific-purpose anti-freeze to the water contained in the system (e.g.: propylene glycole coupled with corrosion and scaling inhibitors). The electronic management of boilers includes a “frost protection” function in the central heating system which operates the burner to reach a heating flow temperature of 30° C when the system heating flow temperature drops below 5°C. The frost protection function is enabled if: * electrical supply to the boiler is on; * the gas service cock is open; * the system pressure is as required; * the boiler is not blocked. 7. SERVICING INSTRUCTIONS AND GAS CHANGE To maintain efficient and safe operation of your boiler have it checked by a Qualified Service Engineer at the end of every operating period. Careful servicing will ensure economical operation of the system. Do not clean the outer casing of the appliance with abrasive, aggressive and/or easily flammable cleaners (i.e.: gasoline, alcohol, and so on). Always isolate the electrical supply to the appliance before cleaning it (see section 5 Turning off the boiler). These boilers produced for natural gas can be converted to work with LPG. Any gas change be effected by a Qualified Service Engineer. ISTRUCTIONS PERTAINING TO THE USER 85 7115313.01 - en 8. GENERAL INFORMATION The following remarks and instructions are addressed to Service Engineers to help them carry out a faultless installation. Instructions regarding lighting and operation of the boiler are contained in the ‘Instructions pertaining to the user’ section. Note that installation, maintenance and operation of the gas appliances must be performed exclusively by qualified personnel in compliance with current standards. Please note the following: • Install the boiler in a permanent ventilated central heating boiler room. • This boiler can be connected to any type of convector plates, radiators, thermoconvectors. Design the system sections as usual though taking into account the available output / pump head performances. • Do not leave any packaging components (plastic bags, polystyrene, etc.) within children’s reach as they are a potential source of danger. • Initial lighting of the boiler must be effected by a Qualified Service Engineer. • Make sure that the room where the boiler is installed has a sufficient supply of air to ensure complete combustion of the gas consumed by the appliance. Install unblockable ventilation grilles as necessary in accordance with the Rules in force. • Connect the boiler directly to an efficient flue to vent all fumes and combustion gases outdoors. Make sure that the pipe connecting the boiler to the flue is not smaller in diameter than the boiler’s flue outlet. Make sure that the flue is in good condition and free from holes or cracks that could reduce draw. Failure to observe the above will render the guarantee null and void. 9. INSTRUCTIONS PRIOR TO INSTALLATION This boiler is designed to heat water at a lower than boiling temperature at atmospheric pressure. The boiler must be connected to a central heating system and to a domestic hot water supply system in compliance with its performances and output power. IMPORTANT! The following components are not installed in the boiler as supplied. It is the installer’s responsibility to provide them: • Expansion vessel; • Pressure safety valve; • Circulation pump; • Filling system cock. Before connecting the boiler have the following operations effected: a)careful checking that the boiler is fit for operation with the type of gas available. For more details see the notice on the packaging and the label on the appliance itself. b)careful checking that the flue terminal draft is appropriate; that the terminal is not obstructed and that no other appliance exhaust gases are expelled through the same flue duct, unless the flue is especially designed to collect the exhaust gas coming from more than one appliance, in conformity with the standards and regulations in force. c)careful checking that, in case the flue has been connected to pre-existing flue ducts, thorough cleaning has been carried out in that residual combustion products may come off during operation of the boiler and obstruct the flue duct. ISTRUCTIONS PERTAINING TO THE INSTALLER 86 7115313.01 - en To ensure correct operation of the appliance and avoid invalidating the guarantee, observe the following precautions: 1. Heating circuit 1.1.new system Before proceeding with installation of the boiler, the system must be cleaned and flushed out thoroughly to eliminate residual thread-cutting swarf, solder and solvents if any, using suitable proprietary products. To avoid damaging metal, plastic and rubber parts, use only neutral cleaners, i.e. non-acid and non alkaline. The recommended products for cleaning are: SENTINEL X300 or X400 and FERNOX heating circuit restore. To use this product proceeding strictly in accordance with the maker’s directions. 1.2. existing system Before proceeding with installation of the boiler, the system must be cleaned and flushed out to remove sludge and contaminants, using suitable proprietary products as described in section 1.1. To avoid damaging metal, plastic and rubber parts, use only neutral cleaners, i.e. non-acid and nonalkaline such us SENTINEL X100 and FERNOX heating circuit protective. To use this product proceeding strictly in accordance with the maker’s directions. Remember that the presence of foreign matter in the heating system can adversely affect the operation of the boiler (e.g. overheating and noisy operation of the heat exchanger). Failure to observe the above will render the guarantee null and void. 10. BOILER INSTALLATION AND DIMENSIONS Install the boiler in a position that ensures easy maintenance. You must be able to fully open the front access door and have adequate access to the rear of the boiler. If possible, install the boiler on a raised base of 200 mm in height to facilitate drainage of flue condensate. When calculating the weight of the boiler on the floor, bear in mind the weight of the water in the heat exchanger (see table 1). Adjust the levelling feet to compensate for any unevenness in the floor. Install the necessary utility connections starting from the water and gas connections on the rear of the boiler (see table 1 for fitting type and size). The following steps are strongly recommended: • Install two shut-off valves, one on the heating circuit delivery pipe (MR) and the other on the return pipe (RR) so that you can service the boiler without having to drain the entire heating system. • Use a metal pipe to connect the boiler’s gas connection to the gas supply point, and fit a (mandatory) shutoff valve upstream from the boiler. • Fit three-part joints in the water and gas connections to and from the boiler to separate it mechanically from utility supplies. • Fit a water separator (header). • Install an automatic water filling system to keep the heating circuit full. These appliances do not have any circulation pump, expansion tank or safety valve. These devices must therefore be provided elsewhere in the system, and must be sized to suit the system’s thermal capacity. N.B.: Take special care when filling the heating system. In particular, open any thermostat valves in the system, ensure the water enters slowly in order to prevent the formation of air inside the primary circuit until operating pressure is reached. Lastly, vent any radiators in the system. BAXI declines all liability for damage deriving from the presence of air bubbles in the primary exchanger due to the incorrect or imprecise observance of the above. Connect the flue condensate drain pipe to a suitable water drain, ensuring an adequate slope. To drain the boiler, use the drain tap at the rear. ISTRUCTIONS PERTAINING TO THE INSTALLER 87 7115313.01 - en Model POWER HT.. Depth (mm) A Height (mm) Wight (mm) Gas fitting Fitting MR (CH) Fitting RR (CH) Contenuto d’acqua (l) 1.850 801 850 450 G 3/4” G 1’’ G 1’’ 13,7 1.1000 871 850 450 G 1” G 1 1/4” G 1 1/4” 21 1.1200 1024 850 450 G 1” G 1 /4” G 1 /4” 23,3 1.1500 1132 850 450 G 1” G 1 1/4” G 1 1/4” 25,3 1 1 CT_0806 / 0902_2501 Table 1 Insert the flue-gas union and fasten the connector to the flue-gas thermostat GAS RR MR: RR: GAS: SC: heating flow heating return gas inlet to the boiler condensate drain MR SC Figure 5 ISTRUCTIONS PERTAINING TO THE INSTALLER 88 7115313.01 - en CT_0807 7 0902_2502 For the choice of water separator refer to the declaration made by the manufacturer, according to the water flow rates given in the table below CONDENSATE DRAIN Figure 6 10.1 BOILER PRESSURE LOSS POWER HT Model Minimum water flow rate l/h Water flow rate with ∆t=20°K l/h 1.850 1900 3700 1.1000 2100 4300 1.1200 2600 5200 1.1500 3300 6500 Check that the water flow rate is no lower than as stated ISTRUCTIONS PERTAINING TO THE INSTALLER 89 7115313.01 - en 0502_2105 Exchangers pressure drop (mH2O) 0601_2008 WATER FLOW RATE (l/h) Exchangers pressure drop (mH2O) Graph 1 POWER HT 1.850 - 1.1000 EXCHANGERS PRESSURE DROP. Graph 1.1 120 kW POWER HT 1.1200 - 1.1500 EXCHANGERS PRESSURE DROP. WATER FLOW RATE (l/h) 11. CHIMNEY FLUE CONNECTION 11.1 CONNECTOR WITH B23 TYPE Connect the boiler to the flue using a pipe made of stainless steel or plastic material with an internal diameter of 100 mm, capable of resisting normal mechanical stresses over time, as well as high temperatures (<120°C) and the chemical effects of fuel gases and their condensates. Insert the flue-gas union and fasten the connector to the flue-gas thermostat before hooking up to the flue. Whenever possible use a flue connection that can be disconnected for maintenance. Important! Horizontal flue sections must have a minimum slope of 3° towards the boiler. Flue accessories made of plastic material for cascade or single installations are available (diameter 110 mm) ISTRUCTIONS PERTAINING TO THE INSTALLER 90 7115313.01 - en CT0667 / 0903_1601 CT_0809 / 0902_2705 Figure 7 In case exhaust and intake flues not supplied by BAXI S.p.A. have been installed, these must be certified for the type of use and must have a maximum pressure drop in according to the values reported in the table. To ensure the correct rated heat input to the maximum and minimum heat input, it is necessary to update the speed (rpm) of the fan, it depends on the lenght of the pipes, in accordance with the installation of flue and air pipes as indicated in the tables below. The factory-set value is referred to the minimum length of flue pipe (0÷10 m). To carry such updating, changing the speed of the fan at the (rpm and pwm%) , refer to par. 13÷14. Max. length of flue duct ( L) : 20 m Each 90° bend reduces the duct max. length by : 1 m Each 45° bend reduces the duct max. length by : 0,5 m TABLE FUMES PRESSURE AVAILABLE ΔP available flue duct B23 Ø 100 HT 1.850 110 HT 1.1000 150 HT 1.1200 170 HT 1.1500 280 WARNING To guarantee more operating insurance it is necessary to assure the flue pipes to the wall using the apposite clamps. ISTRUCTIONS PERTAINING TO THE INSTALLER 91 7115313.01 - en 11.2 CONNECTOR WITH C53 TYPE The kit is used to introduce combustion air from outside the installation area and comprises a hose to be installed in the venturi body. Please consult the instructions supplied with the kit. CT_0813 / 0903_0601 For air ducts (diameter and length), see the kit manual. ISTRUCTIONS PERTAINING TO THE INSTALLER 92 7115313.01 - en 12. MAKING THE ELECTRICAL CONNECTIONS Electrical safety of the appliance is only guaranteed by correct grounding, in accordance with the rules in force. Connect the boiler to a 230V monophase + ground power supply by means of the three-pin cable supplied with it and make sure you connect polarities correctly. Use a double-pole switch with a contact separation of at least 3mm in both poles. In case you replace the power supply cable fit a HAR H05 VV-F’ 3x0.75mm2 cable with an 8mm diameter max. Cover 0902_1201 / CT_0674 IMPORTANT: Check that the overall current drawn by accessories connected to the appliance is less than 2 A. If the value is greater, a relay must be wired between the boiler control circuit board and the accessories drawing the higher current. Terminal board Terminal board Cover Terminal board Figure 8 CAUTION If the appliance is directly connected to a underfloor system, install a safety thermostat to prevent the latter from overheating. 12.1 TERMINAL BLOCKS ACCESS • • • • Cut off power to the boiler with the two-pole switch. Remove the top facia panel cover (which is held by magnets). Unscrew the two screws holding the facia panel in place. Swing the facia panel forwards. Main terminal block M1 • Remove the clip-on cover from terminal strip M1. • The main terminal block incorporates a fast blow 3.15 A fuse (figure 8). Remove the black fuse holder to check and/or replace the fuse. Terminal block M2 • Unscrew the fixing screw and remove the cover from terminal block M2. Terminal block M3 • Unscrew the fixing screws and remove the main cover. ISTRUCTIONS PERTAINING TO THE INSTALLER 93 7115313.01 - en 12.2 CONNECTING THE PUMPS Cover Terminal board Terminal board 0902_1202 / CT_0676 The pumps of the heating system (P1 and P2) have to be connected to boiler terminal block following the wiring of figure 9, a relay must be wired between the boiler control circuit board and the pumps. Cover Terminal board Figure 9 ISTRUCTIONS PERTAINING TO THE INSTALLER 94 7115313.01 - en 12.3 DESCRIPTION OF THE ELECTRICAL CONNECTIONS TO THE BOILER Turn the control box downward to access terminal blocks M1 and M2 used for the electrical connections by removing the two protective covers (see figure 8). Terminals 1-2: connections for the optional SIEMENS QAA73 temperature regulator. These connections do not have any specific polarity. Remove the bridge between terminals 1-2 “TA” on terminal block M1. Read the instructions provided with the temperature regulator to ensure correct installation and programming. Terminals 3-4: room temperature thermostat “TA”. Thermostats with integral accelerator resistor must not be used. Check that there is no voltage across the ends of the two thermostat connection wires. Terminals 5-6: floor temperature thermostat connection “TP” (commercially available device). Check that there is no voltage across the ends of the two thermostat connection wires. Terminals 7-8: connections for the optional SIEMENS QAC34 outdoor temperature sensor. Read the instructions provided with the outdoor temperature sensor to ensure correct installation. Terminals 9-10: connections for the optional domestic hot water priority sensor, for connecting single system boilers to external DHW boilers. Terminals a-b (230V AC; 50 Hz; 0,5 A max; cos ϕ > 0,8): electricity supply for boiler pump. (Feeding relay coil). 12.4 CONNECTING THE QAA73 TEMPERATURE REGULATOR The SIEMENS model QAA73 temperature regulator (optional accessory) must be connected to terminals 1-2 of terminal block M2 in figure 8. The jumper across terminals 3-4, provided for connection of a room temperature thermostat, must be removed. The settings of the domestic hot water temperature and domestic hot water production schedule must be made using this device. The timed program of the central heating circuit must be set on the QAA73 if there is a single zone, or in relation to the zone controlled by the QAA73 device. The timed program for the central heating circuit of the other zones can be set directly on the boiler control panel. See the instructions provided with the QAA73 temperature regulator for the user parameter programming procedure. QAA73: parameters which can be set by the installer (service) By pressing the two PROG buttons together for at least three seconds it is possible to access the list of parameters that the installer can display and/or set. Press either of these buttons to change the parameter to display or change. Press the [+] or [-] key to change the value displayed. Press either of the PROG buttons again to save the change. Press the information button (i) to quit programming. Here follows a list of the most commonly used parameters: ISTRUCTIONS PERTAINING TO THE INSTALLER 95 7115313.01 - en Parameter Range Default value 70 HC1 gradient Selection of central heating circuit temperature curve “kt” 2.5…40 15 72 HC1 max. output Central heating system maximum output temperature 25…85 85 74 Type of building Light, Heavy Leggero 75 Room compensation Activation/deactivation of the influence of the room temperature. If it is deactivated, the outdoor temperature sensor must be installed. on HC1 on HC2 on HC1+HC2 nil On HC1 77 Automatic adaptation of the temperature curve “kt” in relation to the room temperature. On - off Attivo 78 Opt Start Max Maximum time the boiler is switched on ahead of the timed program to optimise the temperature in the premises. 0…360 min 0 79 Opt Stop Max Maximum time the boiler is switched off ahead of the timed program to optimise the temperature in the premises 0…360 min 0 80 HC2 gradient 2.5…40 —.- = not active —.- 90 ACS set ridotto Minima temperatura dell’acqua sanitaria 10…58 10 24 h/day TSP HC-1h TSP HC TSP DHW 24 h/day Line no. DHW program Selection of the type of timed program for domestic hot water. 91 24 h/day PROG HC-1h PROG HC PROG ACS = always on = as HC1 central heating program less one hour = as central heating program = specific domestic hot water program (see also program lines 30-36) - fault messages In the event of fault, the display panel on the QAA73 shows the flashing symbol . Press the information key ( ) to display the error code and a description of the fault (see table on paragraph 3.9). ISTRUCTIONS PERTAINING TO THE INSTALLER 96 7115313.01 - en 12.5 CONNECTING THE OUTDOOR TEMPERATURE SENSOR PROBE The SIEMENS model QAC34 outdoor temperature sensor probe (optional accessory) must be connected to terminals 7-8 of terminal board M2 in figure 8. The procedures for setting the gradient of the temperature curve “kt” vary depending on the accessories connected to the boiler. a) Without QAA73 room temperature regulator: The temperature curve “kt” must be selected by setting parameter H532 as described in section 14 “setting the boiler parameters”. See graph 1 for selecting the curve referred to a room temperature of 20°C. The chosen curve can be shifted by pressing the (2), button (2) on the boiler control panel, and modifying 020523_0600 the value displayed by pressing the and . keys. See graph 2 for curve selection. (The example show in graph 3 refers to the curve Kt=15. Increase the value displayed if the room temperature required is not reached inside the premises for central heating. Graph 2 TM = Flow temperature Te = Composite outside temperature Sth = Kt Curve Graph 3 b) with QAA73 room temperature regulator: 020523_1000 The temperature curve “kt” must be selected by setting parameter 70 “HC1 curve” of the QAA73 room temperature control device as described in section 12.4 “QAA73: parameters which can be set by the installation (service) engineer”. See graph 4 for selecting the curve referred to a room temperature of 20°C. The curve is shifted automatically on the basis of the room temperature set using the QAA73 climate control. If the system is divided into zones, the temperature curve “kt” relating to the part of the system not controlled by the QAA73 must be selected by setting parameter H532 as described in section 17 “setting the boiler parameters”. Graph 4 TM = Flow temperature Te = Composite outside temperature ISTRUCTIONS PERTAINING TO THE INSTALLER 97 7115313.01 - en c) with AGU2.500 for control of a low temperature system: Refer to the instructions provided with the AGU2.500 accessories for connection and control of a low temperature zone. In this case some electronic parameters must be modified (see §14) (H552-H553-H632). 12.6 CONNECTING A ZONE SYSTEM The electrical connection and settings needed to control a system divided into zones vary depending on the accessories connected to the boiler. a) Without QAA73 room temperature control device: The contact relating to the request for operation of the various zones must be parallel-connected and connected to terminal 3-4 “TA” of terminal block M2 in figure 10. The jumper present must be removed. The central heating temperature is selected directly on the boiler control panel in accordance with the instructions provided for the user in this manual. b) with QAA73 room temperature control device: The pump relating to the room controlled by the QAA73 temperature control device must be supplied with electricity by means of terminals 11-12 of terminal block M3 in figure 10. The contact relating to the request for operation of the other zones must be parallel-connected and connected to terminal 3-4 “TA” of terminal block M2 in figure 10. The jumper present must be removed. The central heating temperature of the zone controlled by the QAA73 is set automatically by the QAA73 itself. The central heating temperature of the other zones must be selected directly on the boiler control panel. In this case some electronic parameters must be modified: H552 = 50, H632 = 00001111. 2 ZONE 3 ZONE n ZONE (ROOM THERMOSTAT) (ROOM THERMOSTAT) (ROOM THERMOSTAT) 2 ZONEPUMP 1 ZONE (QAA73) 1 ZONE PUMP HEATING CUT-OUT RELAY 3 ZONEPUMP N ZONEPUMP BOILER PUMP 0702_0501 / CT_0675 BOILER CIRCULATING PUMP Figure 10 c) with AGU2.500 for control of a low temperature system: Refer to the instructions provided with the AGU2.500 accessories for connection and control of a low temperature zone. In this case some electronic parameters must be modified (see §14) (H552-H553-H632). ISTRUCTIONS PERTAINING TO THE INSTALLER 98 7115313.01 - en 12.7 DOMESTIC HOT WATER CIRCUIT ELECTRIC PUMP CONNECTIONS Fit the hot water tank after the hydraulic header. Connect the pump of the external DHW boiler to terminals 13-14 on terminal block M3 (figure 9). Make sure that the pump has the following specifications: 230 V AC; 50 Hz; 1 A max; cos ϕ > 0.8. If the specifications of the installed pump are different, a relay must be wired between the boiler control circuit board and the pump. Remove the resistor from terminals 9-10 of terminal block M2 (figure 11), and connect the domestic hot water priority NTC sensor, which is supplied as an accessory. The sensing element of the NTC device must be located in the pocket provided on the storage tank (figure 11). The temperature and on-off programming of the domestic hot water supply are selected directly from the boiler control panel, as described in this manual under the user instruction headings. LEGEND: UB - D.H.W. STORAGE TANK M2 - TERMINAL BOARD SB - D.H.W. PRIORITY SENSOR RE - RESISTOR TO BE REMOVED MR - CENTRAL HEATING FLOW RR - CENTRAL HEATING/DHW RETURN MB - D.H.W. STORAGE TANK FLOW RB - D.H.W. STORAGE TANK RETURN P1 - CENTRAL HEATING PUMP P2 - D.H.W. STORAGE TANK PUMP TS - SAFETY THERMOSTAT PS - SAFETY PRESSURE SWITCH CT_0808 / 0902_2503 DHW BOILER CONNECTION DIAGRAM Figure 11 If the installation is divided into zones, a relay has to be de-activated to switch off power to the zone pumps, as shown in the diagram in figure 10. ISTRUCTIONS PERTAINING TO THE INSTALLER 99 7115313.01 - en 13. ADJUSTING THE GAS VALVES 0502_2108 POWER HT models 1. 850 and 1.1000 have a single gas valve (figure 12 a). POWER HT models 1. 1200 and 1.1500 have a double gas valve (figure 12 b). gas nozzle Figure 12a gas nozzle gas manifold LEGEND: Pi: Gas supply pressure connection point P out: Pressure connection point for measurement of the OFFSET V: Gas flow adjuster screw K: OFFSET adjuster screw 0502_2109 mixer Figure 12b ISTRUCTIONS PERTAINING TO THE INSTALLER 100 7115313.01 - en 13.1 SINGLE GAS VALVE MODELS (POWER HT 1.850 AND 1.1000) FIGURE 12a Proceed as follows to adjust the single gas valve: • Insert the fume analysis probe into the fume sampling hole as instructed in section 17 (figure 15). • Switch on the boiler, activating the “setting function” from the control panel by pressing and holding the and keys simultaneously until the 13a and 13b. • Press the symbols are displayed, positioned as illustrated in figures key to set the maximum heat output, with the display showing 100% (figure 13a). Caution: in the event of the boiler failing to ignite, or when replacing the gas valve, the recommended procedure is to tighten the adjuster screw (V) fully and then back off 3 turns, repeating the steps described above. • Turn the gas valve adjuster screw V so as to set the CO2 values as indicated in table 2.1 for natural gas (G20) and in table 2.2 for propane (LPG): - - Turn the screw anti-clockwise to increase the CO2 level. Turn the screw clockwise to decrease the CO2 level. • Press the key to set the minimum heat output, with the display showing 0% (figure 13b). • Turn the gas valve adjuster screw K so as to set the CO2 values as indicated in table 2.1 for natural gas (G20) and in table 2.2 for propane (LPG): - - Turn the screw clockwise to increase the CO2 level. Turn the screw anti-clockwise to decrease the CO2 level. 13.2 DOUBLE GAS VALVE MODELS (POWER HT 1.1200 AND 1.1500) FIGURE 12b Proceed as follows to adjust the double gas valve: • Connect a pressure gauge to the P1OUT pressure measurement hole on valve 1. • Insert the probe of the flue gas analyzer in the sampling port as indicated in heading 17 - figure 15. • Switch on the boiler, activating the “setting function” from the control panel by pressing and holding the and keys simultaneously until the 13a and 13b. • Press the symbols are displayed, positioned as illustrated in figures key to set the maximum heat output, with the display showing 100% (figure 13a). Caution: in the event of the boiler failing to ignite, or when replacing the gas valves, the recommended procedure is to tighten the adjuster screws (V1) and (V2) fully and then, depending on the model, back off 2¼ turns (POWER HT 1.1200) or 2½ turns (POWER HT 1.1500), repeating the steps described above. • Turn both gas valve adjuster screws (V1) and (V2) so as to set the CO2 values as indicated in table 2.1 for natural gas (G20) and in table 2.2 for propane (LPG): - - Turn the screw clockwise to decrease the CO2 level. Turn the screw anti-clockwise to increase the CO2 level. • Press the key to set the minimum heat output, with the display showing 0% (figure 13b). • Turn the adjuster screw K1 of gas valve 1 so as to set the pressure value (Pout) as indicated in table 2.1 for natural gas (G20) and in table 2.2 for propane (LPG): c. d. Turn the screw clockwise to increase pressure (CO2 increasing). Turn the screw anti-clockwise to decrease pressure (CO2 decreasing). ISTRUCTIONS PERTAINING TO THE INSTALLER 101 7115313.01 - en • Remove the pressure gauge from the P1OUT port and connect to the P2OUT port of gas valve 2. • Turn the adjuster screw K2 of gas valve 2 so as to set the pressure value (Pout) as indicated in table 2.1 for natural gas (G20) and in table 2.2 for propane (LPG): Figure 13a ⇑ 0502_2110 0307_2201 • Check that the CO2 value at minimum heat output is as indicated in table 2.1 or 2.2. The value can be optimized by making the necessary fine adjustment to screw K2. Figure 13b ⇑ 13.3 GAS CONVERSION IMPORTANT: in the event of converting the boiler from natural gas (G20) to propane (LPG), the following operation must be carried out before proceeding to adjust the gas valve as described above: • For models with one valve, replace the diaphragm on the gas valve outlet (figure 12a). To replace the diaphragm, disassemble the gas valve by undoing the inlet and outlet fittings, then unscrew the nozzle with a pair of straight round nose pliers. Check the fluid-tightness of the gas fittings removed previously. • For models with two gas valves, replace the diaphragm located at the venturi inlet (figure 12b). To enable this operation, the gas valve manifold must first be removed. Check the fluid-tightness of the gas fittings removed previously. • Set parameters H536 - H541 - H608 - H609 - H610 - H611 - H612 - H613 by way of the display on the control panel. The values to be set are given in tables 2.1 and 2.2. The programming methods are described in chapter 14. ISTRUCTIONS PERTAINING TO THE INSTALLER 102 7115313.01 - en Gas consumption at 15 °C 1013 mbar Gas G20 - 2H - 20 mbar POWER HT 1.850 POWER HT 1.1000 POWER HT 1.1200 POWER HT 1.1500 MJ/m3 34,02 34,02 34,02 34,02 Consumption at max. heat output m3/h 9,26 10,9 13,08 16,35 Consumption at min. heat output 3 m /h 3,50 3,89 4,23 4,39 Gas nozzle mm 11,5 12 11 11,5 CO2 max. heat output % 8,7 8,7 8,7 8,7 CO2 min. heat output % 8,6 8,6 8,4 8,4 Pout pressure at minimum power Pa PCI - - -4 -5 5100 5650 4650 6000 90 100 55 100 Parameter H612 (rpm) at minimum power 1900 2100 1600 1550 Parameter H609 (pwm) at minimum power 15 15 10 9,5 3600 3600 2600 2900 30 15 15 40 40 20 20 POWER HT 1.850 POWER HT 1.1000 POWER HT 1.1200 POWER HT 1.1500 Parameters H536-H613 (rpm) at maximum power Parameters H541-H610 (pwm %) at maximum power Parameter H611 (rpm) ignition load Length of exhaust flue : 0 ÷ 10 m Parameter H608 (pwm) ignition load 30 Length of exhaust flue : 10 ÷ 20 m Parameter H608 (pwm) ignition load Table 2.1 Gas consumption at 15 °C 1013 mbar Gas G31 - 3P - 37 mbar PCI MJ/Kg 46,34 46,34 46,34 46,34 Consumption at max. heat output Kg/h 6,77 7,97 9,56 11,95 Consumption at min. heat output Kg/h 2,57 2,86 3,10 3,22 Gas nozzle mm 7,8 7,8 7,8 7,8 % 10,2 10,2 10,2 10,2 CO2 bei min Heizleistung % 9,3 9,8 10,2 10,2 Pout pressure at minimum power Pa - - -7 -8 4600 5150 4300 5350 90 100 55 100 1900 1950 1450 1450 CO2 max. heat output Parameters H536-H613 (rpm) at maximum power Parameters H541-H610 (pwm %) at maximum power Parameter H612 (rpm) at minimum power Parameter H609 (pwm) at minimum power 14,5 14,5 10 9,5 Parameter H611 (rpm) ignition load 4200 4200 2600 2900 40 15 15 50 20 20 Length of exhaust flue : 0 ÷ 10 m Parameter H608 (pwm) ignition load 40 Length of exhaust flue : 10 ÷ 20 m Parameter H608 (pwm) ignition load 50 Table 2.2 ISTRUCTIONS PERTAINING TO THE INSTALLER 103 7115313.01 - en 14. SETTING THE BOILER PARAMETERS The boiler parameters may only be modified by professionally qualified staff proceeding as follows: a) press the , keys on the boiler’s front panel together for about 3 s until the parameter H90 appears on the display; b) press the keys to select the parameter for modification; c) press the and keys to modify the parameter; d) press the key to exit the programming function. The following are the parameters generally used: Parameter N. Description Factory setting H90 Minimum D.H.W. temperature setting (°C). 10 H91 D.H.W. activation program (0=active; 1=not active) 1 H505 Maximum temperature (°C) of the central heating circuit HC1 corresponding to: - the main circuit in systems with just one zone; - the circuit of the zone where the QAA73 room temperature control device is installed in case of systems with more than one high-temperature zone; - the high temperature zone circuit in mixed systems and if the SIEMENS AGU2.500 accessory is used. 80 H507 Maximum temperature (°C) of the central heating circuit HC2 of a system with more than one zone, corresponding to the circuit of the low-temperature zone if the SIEMENS AGU2.500 accessory is used. 80 H516 Automatic Summer / Winter switching temperature (°C). 20 H532 Selection of temperature curve of central heating circuit HC1 (see Graph 1) 15 H533 Selection of temperature curve of central heating circuit HC2 (see Graph 1) 15 H608 PWM (%) Setting: Ignition load H611 Speed setting (rpm) : Ignition load H609 PWM Setting (%) : minimum power H541-H610 H612 H536-H613 PWM Setting (%) : maximum power Central heating / Domestic hot water See table 2 Speed setting (rpm) : minimum power Speed setting (rpm) : maximum power Central heating / Domestic hot water H544 Pump post-circulation time in central heating mode (min) H545 Burner operating pause time between two start-ups (s) 3 H552 Hydraulic system setting (see instructions provided with the SIEMENS AGU2.500 accessory) H552 = 50 with AGU2.500 and with QAA73 + zones with room thermostat H552 = 80 with RVA 47 2 H553 Configuration of heating circuits H553 = 12 with AGU2.500 21 H615 Programmable function: 9 180 Configuration of system with supplementary pump H632 = 00001111 with AGU2.500 and with QAA73 + zones with room thermostat H632 = 00001111 with RVA 47 H632 H641 The value of Bit could be 1 or 0. Press the keys 5 and 6 to select the bit to modify (b0 is the bit on the right, b7 is the last bit on the left). To modify the Bit value press on the keys 7 and 8 Fan overrun time setting (s) 00001100 10 Setpoint of autonomous ANTILEGIONELLA function H657 0 60...80 °C = setting temperature range 0 = function inactive If the electronic circuit board is replaced, make sure that the parameters set are those specific to the boiler model, as indicated in the documentation available from the authorised Service Centre. ISTRUCTIONS PERTAINING TO THE INSTALLER 104 7115313.01 - en 15. CONTROL AND OPERATION DEVICES The boiler has been designed in full compliance with European reference standards and in particular is equipped with the following: • Overheat safety thermostat Thanks to a sensor placed on the heating flow, this thermostat interrupts the gas flow to the main burner in case the water contained in the circuit has overheated. Under these conditions the boiler locks out and you can only repeat the ignition procedure by pressing the reset button on the boiler after you have remedied the cause of the trip. It is strictly forbidden to disable this safety device. • Boiler circuit circulation test The boiler electronic management unit is fitted with a “boiler circulation test” function which involves continuously checking the primary circuit delivery and return temperatures. In case of an irregular increase in the delivery and return temperature or a temperature reversal, the boiler stops and signals the error on the display (see error table). • Flue thermostat This device, positioned on the flue inside the boiler, interrupts the flow of gas to the burner if the temperature exceeds 90 °C. After verifying the cause of the trip, press the reset button positioned on the thermostat itself, then press the release button on the boiler. It is forbidden to disenable this safety device • Exchanger flange thermostat (260°C) This device is located on the exchanger flange and interrupts the flow of gas to the burner if the front insulation yields and overheats the exchanger or the flange gasket develops a fault. Press the reset button on the thermostat, eliminate the fault and then press the reset button on the boiler control panel. It is forbidden to disenable this safety device • Thermal fuse This device is located at the rear of the exchanger and interrupts the flow of gas to the burner if the rear insulation yields and overheats the exchanger. If this device cuts in, dismount the exchanger and replace the thermal fuse (see paragraph “THERMAL FUSE REPLACEMENT OF HEAT EXCHANGER”). It is forbidden to disenable this safety device • Flame ionization detector The flame sensing electrode guarantees safety of operation in case of gas failure or incomplete interlighting of the main burner. Under such conditions the boiler is locked out. You must press the reset button on the boiler to restore the normal operating conditions. • Pump overrun The electronic control system keeps the pump operating for 3 minutes in central heating mode after the room temperature thermostat has switched off the main burner. • Frost protection device Boilers electronic management includes a “frost protection” function in the central heating system which operates the burner to reach a heating flow temperature of 30°C when the system heating flow temperature drops below 5 °C. This function is enabled as long as the boiler is connected to the a.c. power and gas supplies and the pressure in the system is as specified. • Pump-blocking prevention In case there is no call for heat either from the central heating system or from the DHW system for 24 hours on end the pump will automatically switch on for 10 seconds. • Hydraulic pressure sensor This device enables the main burner only to be switched on if the system pressure is over 0.5 bar. ISTRUCTIONS PERTAINING TO THE INSTALLER 105 7115313.01 - en CT_0826 / 1002_1801 16. POSITIONING OF THE IGNITION AND FLAME SENSING ELECTRODE Figure 14 17. CHECK OF COMBUSTION PARAMETERS 0811_1703 / CT_0782 Drill a hole in the flue at a distance from the boiler equivalent to twice the diameter of the flue to measure combustion efficiency and combustion flue composition in accordance with the rules in force. Use this hole to measure the following parameters: • Combustion flue temperature • Oxygen (O2) or carbon dioxide (CO2) concentration. • Carbon monoxide (CO) concentration. Measure the temperature of combustion air near the air inlet to the boiler. The necessary hole must be made by the technician responsible for the heating system when the system is first started up, and must then be closed to ensure that the flue remains properly sealed during normal operation. Important! Close the flue test point hole on completion of measurements. BOILER FLUE TEST POINT HOLE Figure 15 ISTRUCTIONS PERTAINING TO THE INSTALLER 106 7115313.01 - en 18. ACTIVATING THE CHIMNEY SWEEP FUNCTION 020429_0200 To facilitate measurement of the combustion efficiency and improve the cleanliness of the production products, the chimney sweep function can be activated by proceeding as described below: 1)press the (2-3) together until the pointer “ ” appears on the display alongside the symbol (about 3 seconds but no more than 6 seconds). In these conditions, the boiler operates at the maximum heat output in central heating mode. 2) press either of the buttons to exit the function Figure 16a 19. ANNUAL SERVICE To optimise boiler efficiency, carry out the following annual controls: • check the appearance and airtightness of the gaskets of the gas and combustion circuits; • check the state and correct position of the ignition and flame-sensing electrodes; • check the state of the burner and make sure it is firmly fixed; • check for any impurities inside the combustion chamber. Use a vacuum cleaner to do this; • check the gas valve is correctly calibrated; • check the pressure of the heating system; • check the pressure of the expansion vessel; • check the fan works correctly; • make sure the flue and air ducts are unobstructed; • check for any impurities inside the siphon fitted on certain boilers; • check the magnesium anode, where present, for boilers fitted with storage boilers. WARNINGS Before commencing any maintenance operations, make sure the boiler is disconnected from the power supply. Afterwards, move the knobs and/or operating parameters of the boiler to their original positions. ISTRUCTIONS PERTAINING TO THE INSTALLER 107 7115313.01 - en 20. THERMAL FUSE REPLACEMENT OF HEAT EXCHANGER 1311_1401.ai The thermal fuse is positioned on the rear of the heat exchanger as shown in the figure, is electrically connected in series with the safety thermostat. Its function is to protect the exchanger from overheating in case of insulation failure. When this occurs the device appears on the display the anomaly E110. If the cause is due to the rupture of the isolation it is necessary to remove the heat exchanger and replace the rear isolation and the thermal fuse. Figure 16b ISTRUCTIONS PERTAINING TO THE INSTALLER 108 7115313.01 - en 18 17 CT_0824 22 1311_2103 21. BOILER SCHEMATIC 13 19 14 6 10 9 12 V.G. 11 7 8 4 20 3 5 21 2 GAS 1 RR 15 MR 16 Figure 17 Key: 1 pressure gauge 2siphon 3 NTC return heating probe 4 105°C overheat safety thermostat 5 gas valve 6 flue-water exchanger 7 flame detector electrode 8burner 9 ignition electrode 10 mixer with venturi 11 gas diaphragm ISTRUCTIONS PERTAINING TO THE INSTALLER 12 fan 13 flue joint 14 automatic air vent 15 hydraulic pressure sensor 16 boiler drain point 17 joint flue with flue thermostat 18 flue thermostat 19 seat of air intake pipe 20 NTC return heating probe 21 thermal fuse 22 exchanger flange thermostat 109 7115313.01 - en CT_0822_EN G/V C M G/V 1 2 FUSE FAN 1 2 4 5 1 2 1 2 1 2 1 2 3 1 1 2 1 MAINS POWER 230 V - 50 Hz PROGRAMMABLE OUTPUT 230 V X40 THERMAL FUSE SAFETY THERMOSTAT EXCHANGER FLANGE THERMOSTAT FLUE THERMOSTAT X30 DISPLAY Cables colours C = light blue M = brown N = black R = red G/V = yellow/green B = white FLAME SENSING ELECTRODE C C M C C M 11 12 13 14 15 16 17 M C C M C M MAINS POWER TERMINAL BOARD C M L G/V N M C M C M C 2 1 2 1 I X2-01 I X2-02 I X2-03 IX2-04 IX2-05I I X3-01I X3-02 I X3-03IX3-04I M N C G/V M C G/V 2 3 CENTRAL HEATING SYSTEM PUMP CONNECTION POINTS 1 DOMESTIC HOT WATER PUMP CONNECTION POINTS X50 GAS VALVE 2 1 2 1 2 1 C C N N R R 1 2 1 2 LN NN IGNITER 1 2 3 4 5 6 7 8 9 10 TP TA G/V ROOM THERMOSTAT QAA73 CONNECTION NM D.H.W. STORAGE THANK SENSOR OUTSIDE SENSOR FLOOR TEMPERATURE THERMOSTAT CONNECTION NTC DELIVERY HEATING PROBE NTC RETURN HEATING PROBE. C X11 12 11 10 9 8 7 6 5 4 3 2 1 V V X12 6 5 4 3 2 1 RR X15 X14 X13 5 4 3 2 1 IGNITION ELECTRODE M C G/V V V M M 2 1 I X10-01 IX10-02 I X10-03 IX10-04 IX10-05 I X10-06 I 4 3 2 1 AGU 2.500 3 2 1 OCI 420 PI L OT I X1-01 I X1-02 I b a N b a L AIR IN OUT IN 110 HYDRAULIC PRESSURE SENSOR COM ISTRUCTIONS PERTAINING TO THE INSTALLER NO 1311_2005 V V 22. ILLUSTRATED WIRING DIAGRAM 22.1 POWER HT 1.850 - 1.1000 7115313.01 - en G/V C M 2 3 1 2 1 2 1 2 1 2 1 2 3 1 1 FUSE FAN M N C G/V 1 2 4 5 2 1 MAINS POWER 230 V - 50 Hz MAINS POWER TERMINAL BOARD C M C C M C C M 2 1 2 1 11 12 13 14 15 16 17 M C C M C M CENTRAL HEATING SYSTEM PUMP CONNECTION POINTS PROGRAMMABLE OUTPUT 230 V L G/V N M C M C M C DOMESTIC HOT WATER PUMP CONNECTION POINTS M C G/V b a L N b a G/V 1 I X1-01 I X1-02 I I X2-01 I X2-02 I X2-03 IX2-04 IX2-05I I X3-01I X3-02 I X3-03IX3-04I FLAME SENSING ELECTRODE GAS VALVE 1 X30 SAFETY THERMOSTAT EXCHANGER FLANGE THERMOSTAT FLUE THERMOSTAT THERMAL FUSE X40 DISPLAY PI L OT GAS VALVE 2 18 19 20 C M G/V X50 2 1 2 1 2 1 C C N N R R 1 2 1 2 G/V 1 2 3 4 5 6 7 8 9 10 IGNITER NN D.H.W. STORAGE THANK SENSOR OUTSIDE SENSOR FLOOR TEMPERATURE THERMOSTAT CONNECTION TP G/V ROOM THERMOSTAT NM TA QAA73 CONNECTION NTC DELIVERY HEATING PROBE NTC RETURN HEATING PROBE C X11 12 11 10 9 8 7 6 5 4 3 2 1 V V X12 6 5 4 3 2 1 RR X15 X14 X13 5 4 3 2 1 V V HYDRAULIC PRESSURE SENSOR Cables colours IGNITION ELECTRODE C = light blue M = brown N = black R = red G/V = yellow/green B = white LN MC V V M M 2 1 I X10-01 IX10-02 I X10-03 IX10-04 IX10-05 I X10-06 I 4 3 2 1 AGU 2.500 3 2 1 OCI 420 AIR IN OUT IN CT_0823_EN PI L OT AIR IN OUT IN 111 COM ISTRUCTIONS PERTAINING TO THE INSTALLER NO 1311_2006 22.2 POWER HT 1.1200 - 1.1500 7115313.01 - en 23. TECHNICAL DATA Boiler model POWER HT 1.850 1.1000 1.1200 1.1500 Category II2H3P II2H3P II2H3P II2H3P 123,2 154 Maximum heat input kW 87,2 102,7 Minimum heat input kW 33,1 36,8 40 41,5 Maximum heat output 75/60°C kW 85 100 120 150 kcal/h 73100 86000 103200 129000 kW 91,6 107,8 129,7 162 kcal/h 78776 92708 111542 139320 Maximum heat output 50/30°C Minimum heat output 75/60°C Minimum heat output 50/30°C kW 32,2 35,8 39 40,4 kcal/h 27692 30788 33540 34744 kW 34,9 38,8 42,1 43,7 kcal/h 30014 33368 36206 37582 Useful efficiency according to 92/42/CEE directive — ★★★★ ★★★★ ★★★★ ★★★★ Central heating system max. pressure bar 4 4 4 4 Heating circuit temperature range °C 25÷80 25÷80 25÷80 25÷80 Type — B23 - B23P - C53* Flue duct diameter mm 100 100 100 100 Max. flue mass flow rate kg/s 0,041 0,049 0,059 0,073 Min. flue mass flow rate. kg/s 0,016 0,018 0,019 0,020 Max. flue temperature °C 78 80 77 75 NOx class — 5 5 5 5 Type of gas used — G20 G20 G20 G20 G31 G31 G31 G31 Natural gas feeding pressure 2H mbar 20 20 20 20 Propane gas feeding pressure 3P mbar 37 37 37 37 Power supply voltage V 230 230 230 230 Power supply frequency Hz 50 50 50 50 Rated power supply W 100 160 135 235 Net weight kg 75 83 95 103 height mm 850 850 850 850 width mm 450 450 450 450 depth mm 801 871 1024 1132 Dimensions *C53 (only with air intake kit) BAXI S.p.A. Ed. 1 - 11/13 36061 BASSANO DEL GRAPPA (VI) ITALIA Via Trozzetti, 20 Servizio clienti: Tel. 0424 - 517800 - Telefax 0424/38089 www.baxi.it Cod. 7115313.01