1
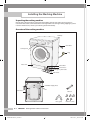
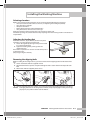
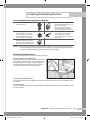
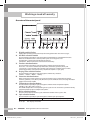
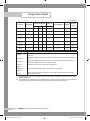
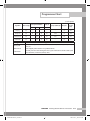
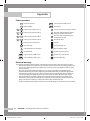
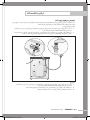
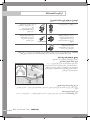
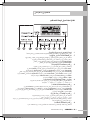
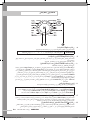
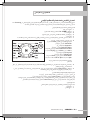
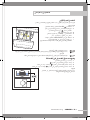
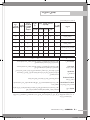
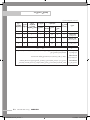
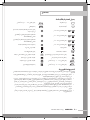
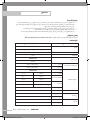
Washing Machine Owner’s Instructions WD8602R8(W/V/C/S/R) Register your product at www.samsung.com/global/register Code No.: DC68-02410Z_EN WD8602R8-02410Z_EN.indd 1 2009-01-09 ¿ÀÈÄ 6:20:27 WD8602R8-02410Z_EN.indd 2 2009-01-09 ¿ÀÈÄ 6:20:27 Features 1. Child Lock 2. Delay End 3. Calm Wash 4. Less Ironing 5. Delicates & Wool Program 6. Air Wash The Child Lock function keeps curious little hands out of the washer. This safety feature ensures, that children do not toy with the operation of the washer. It also alerts you when it is activated. This function enables uses to delay the washing machine’s starting time for up to 24 hours. We have a wash cycle that is so quiet you can do laundry while you sleep. The spin cycle is whisper quiet as it drains away water. Less ironing is needed as Samsung’s Carefreewash safely cleans your soft, delicate cloths and easy-care fabrics. Developed by Samsung’s globally recognized digital process technology, the Less Iron function is a specialized laundry program that will help to reduce wrinkles on your delicate garments, freeing up the time you would have spent on ironing. Special care can be determined by the appropriate temperature, the gentle wash action and the appropriate amount of water. The Air Wash system deodorizes unpleasant smells and sterilizes ‘bacteria’ and mites in the laundry that cannot be eliminated through a conventional washing system, a benefit of its unique airwashing mechanism. • Air-washable : Woolen coats, cotton/down jumpers, sweaters, suits, pillows, cushions, needlework dolls • Not applicable : leather, silk, velvet, electric blankets, other dirty laundry SAMSUNG Washing Machine Owner’s Instructions WD8602R8-02410Z_EN.indd 3 2009-01-09 ¿ÀÈÄ 6:20:27 Safety Precautions Congratulations on your purchase of this Samsung washing machine. These Owner’s Instructions contain valuable information on the installation, use, and care of this appliance. Please take the time to read these instructions so that you can take full advantage of the washing machine’s features and enjoy this appliance for many years to come. Before using the appliance • • • • • Packing materials can be dangerous to children; keep all packing material (plastic bags, polystyrene, etc.) well out of the reach of children. The appliance is designed for home use only. Make sure that water and electrical connections are made by qualified technicians, observing the manufacturer’s instructions (see “Installing the Washing Machine”) and local safety regulations. All packaging and shipping bolts must be removed before the appliance is used. Serious damage may occur if they are not removed. See “Removing the shipping bolts”. Before washing clothes for the first time, you must run a complete cycle without clothes. See “Washing for the first time”. Safety instructions • • • • • • • • • • • • • • • • • Before cleaning or carrying out maintenance, unplug the appliance from the electrical outlet or set the (On/Off) button to Off. Make sure that the pockets of all clothing to be washed are empty. Hard, sharp objects, such as coins, safety pins, nails, screws, or stones can cause extensive damage to the appliance. Always unplug the appliance and turn off the water after use. Before you open the door of the appliance, check that the water has drained. Do not open the door if you can still see water. Pets and small children may climb into the appliance. Check the appliance before each use. The glass door becomes very hot during the washing cycle. Keep children away from the appliance while it is in use. Do not attempt to repair the appliance yourself. Repairs made by inexperienced or unqualified persons may cause injury and/or make more serious repairs to the appliance necessary. If the plug (power supply cord) is damaged, it must be replaced by the manufacturer or its service agent or a similarly qualified person in order to avoid a hazard. This appliance should only be serviced by an authorized service center, and only genuine spare parts should be used. This appliance is not intended for use by young children or infirm persons unless they have been adequately supervised by a responsible person to ensure that they can use the appliance safely. Young children should be supervised to ensure that they do not play with the appliance. If this appliance is supplied from a cord extension set or an electrical portable outlet device, the cord extension set or electrical portable outlet device must be positioned so that it is not subject to splashing or ingress of moisture. Additionally, the cord extension set or electrical portable out let device must be of a current rating suitable for the appliance. This appliance has to be connected to the plug endurable to proper power consumption. This appliance has to be positioned so that the plug is accessible after installation. Do not use processed water containing oil, cream or lotion, which is usually found in skin-care shops or massage clinics. - Otherwise this will cause the packing to be deformed, which causes a malfunction or water leak. A stainless washing tube does not usually rust. However if some metal such as a hair pin is left in the tube for an extended time, the tube could rust. - Do not leave water or bleach containing chlorine in the tube for an extended period of time. - Do not regularly use or leave water containing iron in the tube for an extended period of time. If rust starts appearing on the surface of the tube, apply a cleansing agent (neutral) to the surface and use a sponge or soft cloth to clean it. (Under no circumstances use a metal brush) For washing machines with ventilation openings in the base, that a carpet must not obstruct the openings. Use the new hose-sets and old hose-sets should not be reused. 4SAVE SAMSUNG Washing Machine Owner’s Instructions THESE INSTRUCTIONS WD8602R8-02410Z_EN.indd 4 2009-01-09 ¿ÀÈÄ 6:20:28 Table of Contents Safety Precautions . . . . . . . . . . . . . . . . . . . . . . . . . . . . . . . . . . . . . . . . . . . inside cover Installing the Washing Machine. . . . . . . . . . . Unpacking the washing machine . . . . . . . . . Overview of the washing machine . . . . . . . . Selecting a location. . . . . . . . . . . . . . . . . . . Adjusting the leveling feet . . . . . . . . . . . . . . Removing the shipping bolts . . . . . . . . . . . . Connecting the water supply hose . . . . . . . . Positioning the drain hose . . . . . . . . . . . . . . . . . . . . . . ................ ................. ................. ................. ................. ................. ................. ................. . . . . . . . . ............ ............. ............. ............. ............. ............. ............. ............. A-1 A-1 A-1 A-2 A-2 A-2 A-3 A-4 Washing a Load of Laundry . . . . . . . . . . . . . Overview of the control panel . . . . . . . . . . . Washing clothes using Fuzzy Logic . . . . . . . . Washing clothes manually . . . . . . . . . . . . . . Using Delay End . . . . . . . . . . . . . . . . . . . . . Washing for the first time. . . . . . . . . . . . . . . Putting detergent in the washing machine . . Washing tips and hints . . . . . . . . . . . . . . . . . . . . . . . . ................ ................. ................. ................. ................. ................. ................. ................. . . . . . . . . . . . . . . . . . . . . .B-1 . . . . . . . . . . . . . .B-1 . . . . . . . . . . . . . .B-3 . . . . . . . . . . . . . .B-4 . . . . . . . . . . . . . .B-4 . . . . . . . . . . . . . .B-5 . . . . . . . . . . . . . .B-5 . . . . . . . . . . . . . .B-6 Maintaining the Washing Machine . . . . . . . . . . . . . . . . . . . . . . . . . Draining the washing machine in an emergency . . . . . . . . . . . . . . . . Repairing a frozen washing machine. . . . . . . . . . . . . . . . . . . . . . . . . Cleaning the exterior . . . . . . . . . . . . . . . . . . . . . . . . . . . . . . . . . . . Cleaning the detergent drawer and recess . . . . . . . . . . . . . . . . . . . . . Cleaning the debris filter . . . . . . . . . . . . . . . . . . . . . . . . . . . . . . . . . Cleaning the water hose mesh filter . . . . . . . . . . . . . . . . . . . . . . . . . . . . . . . . . . . . . . . . . . . . .C-1 . . . . . . . . . . . . . .C-1 . . . . . . . . . . . . . .C-1 . . . . . . . . . . . . . .C-1 . . . . . . . . . . . . . .C-2 . . . . . . . . . . . . . .C-2 . . . . . . . . . . . . . .C-3 Troubleshooting . . . . . . . . . . . . . . . . . . . . . . . . . . . . . . . . . . . . . . . . . . . . . . . . . . . D-1 Problems and solutions . . . . . . . . . . . . . . . . . . . . . . . . . . . . . . . . . . . . . . . . . . . . . . . . D-1 Understanding error messages. . . . . . . . . . . . . . . . . . . . . . . . . . . . . . . . . . . . . . . . . . . D-1 Programme Chart . . . . . . . . . . . . . . . . . . . . . . . . . . . . . . . . . . . . . . . . . . . . . . . . . . .E-1 Appendix . . . . . . . . . . . . . . . . . . . . . . . . . . Fabric care chart . . . . . . . . . . . . . . . . . . . . . Electrical warnings . . . . . . . . . . . . . . . . . . . Protecting the environment. . . . . . . . . . . . . Declaration of conformity . . . . . . . . . . . . . . Specification . . . . . . . . . . . . . . . . . . . . . . . . . . . . . ................ ................. ................. ................. ................. ................. . . . . . . . . . . . . . . . . . . .F-1 . . . . . . . . . . . . . .F-1 . . . . . . . . . . . . . .F-1 . . . . . . . . . . . . . .F-2 . . . . . . . . . . . . . .F-2 . . . . . . . . . . . . . .F-2 24 WD8602R8-02410Z_EN.indd 5 2009-01-09 ¿ÀÈÄ 6:20:28 Installing the Washing Machine Unpacking the washing machine Unpack your washing machine and inspect it for shipping damage. Also make sure that you have received all of the items shown below. If the washing machine was damaged during shipping or you do not have all of the items, contact your Samsung dealer immediately. Overview of the washing machine Worktop Drain Hose Control panel Plug Base cover Debris filter Door release Emergency drain tube Filter Cover Cold Water Supply Hose Drain hose Wrench Hose guide Bolt hole covers A-1 SAMSUNG Washing Machine Owner’s Instructions WD8602R8-02410Z_EN.indd 1 2009-01-09 ¿ÀÈÄ 6:20:29 Installing the Washing Machine Selecting a location Before you install the washing machine, select a location with the following characteristics: • A hard, level surface (if the surface is uneven, see “Adjusting the leveling feet,” below) • Away from direct sunlight. • Adequate ventilation • Room temperature that will not fall below 0 ˚C • Away from sources of heat such as coal or gas Make sure that the washing machine does not stand on its power cord. Ventilation openings must not be obstructed by carpeting when the washing machine is installed on a carpeted floor. Adjusting the leveling feet If the floor is uneven, adjust the feet (do not insert pieces of wood or any other objects under the feet): 1. Loosen the leg bolt by turning it with your hand until it is at the desired height. 2. Tighten the locking nut by turning it with the supplied wrench. If the washer is placed on an uneven or weak surface, noise or vibration occurs. (Only l degree angle is allowed.) loose Removing the shipping bolts Before installing the washing machine, you must remove the five shipping bolts from the back of the unit. 1. Loosen all the bolts with the supplied wrench. 2. Hold the bolt with the spanner and pull it through the wide section of the hole. Repeat for each bolt. 3. Fill the holes with the supplied plastic covers. 4. Store the shipping bolts away safely in case you have to move the washing machine in the future. NOTICE Packaging materials can be dangerous to children; keep all packaging material (plastic bags, polystyrene, etc.) well out of the reach of children. SAMSUNG Washing Machine Owner’s Instructions A-2 WD8602R8-02410Z_EN.indd 2 2009-01-09 ¿ÀÈÄ 6:20:30 Installing the Washing Machine Connecting the water supply hose The water supply hose must be connected to the washing machine at one end and to the water faucet at the other. Do not stretch the water supply hose. If the hose is too short replace the hose with a longer, high pressure hose. To connect the water supply hose: 1. Take the L-shaped arm fitting for the cold water supply hose and connect to the cold water supply intake on the back of the machine. Tighten by hand. 2. Connect the other end of the cold water supply hose to your sink’s cold water faucet and tighten it by hand. If necessary, you can reposition the water supply hose at the washing machine end by loosening the fitting,rotating the hose, and retightening the fitting. Option: 1. Take the red L-shaped arm fitting for the hot water supply hose and connect to the red hot water supply intake on the back of the machine. Tighten by hand. 2. Connect the other end of the hot water supply hose to your sink’s hot water faucet and tighten it by hand. 3. Use a Y-piece if you only want to use cold water. A-3 SAMSUNG Washing Machine Owner’s Instructions WD8602R8-02410Z_EN.indd 3 2009-01-09 ¿ÀÈÄ 6:20:31 Installing the Washing Machine Connecting the water supply hose (Option) 1. Remove the adaptor from the water supply hose. c 5. Connect the other end of the water supply hose to the inlet water valve at the rear of the washer. Screw the hose clockwise all the way in. 2. First, using a ‘+’ type screw driver, loosen the four screws on the adaptor. Next, take the adaptor and turn part(b) following the arrow until there is a 5mm gap. 3. Connect adaptor to the water tap by tightening the screws firmly. Then, turn part (b) following the arrow and put(a) and (b) together. NOTICE 4. Connect the water supply hose to the adaptor. Pull down part (c) of the water supply hose. When you release part (c) the hose automatically connects to the adaptor making a ‘click’ sound. a b After completing connection, if water leaks from the hose, then repeat the same steps. Use the most conventional type of faucet for water supply. In case the faucet is square or too big, remove the spacing ring before inserting the faucet into the adaptor. Positioning the drain hose The end of the drain hose may be positioned in three ways: Over the edge of a wash basin. The drain hose must be placed at a height of between 60 and 90 cm. To keep the drain hose spout bent, use the supplied plastic hose guide. Secure the guide to the wall with a hook or to the faucet with a piece of string to prevent the drain hose from moving. ln a sink drain pipe branch The drain pipe branch must be above the sink siphon so that the end of the hose is at least 60 cm above the ground. ln a drain pipe Samsung recommends that you use a 65 cm high vertical pipe; it must be no shorter than 60 cm and no longer than 90 cm. SAMSUNG Washing Machine Owner’s Instructions A-4 WD8602R8-02410Z_EN.indd 4 2009-01-09 ¿ÀÈÄ 6:20:32 Washing a Load of Laundry Overview of the control panel 1. Digital graphic display 2. Air Wash selection button 3. Funtion selection button Displays the remaining wash cycle time,all of washing information and error messages. Press the button repeatedly to cycle through the Deodorization and Sterilization functions. When the Air Wash function is selected, other cycles can no longer be used. Deodorization : Removes bad smells from the laundry Sterilization : Eliminates bacteria and mites from the laundry Press the button repeatedly to cycle through the available partial wash options. Pre-wash+ : Pre-wash is available only with Cotton, Coloureds, Synthetics, Heavy Soil. Less lroning : Less Ironing will reduce wrinkles and ironing time. (available course: Cotton, Coloureds, Synthetics, Jean, Quick, Heavy Soil, Mixed Load, Rinse + Spin, Spin) 4. Drying Time selection button 5. Intensive selection button 6. Temperature selection button Press the button repeatedly to cycle through the available dry selections. (130min. 90min. 60min. 30min.) When selected, the washing power increases. This function can be selected for the Cotton, Coloreds, Synthetics, Jeans, Heavy Soil, Mixed Load, and Calm Wash courses. Pressing this button toggles between On and Off. Press the button repeatedly to cycle through the available water temperature options. (cold(0˚C), 30˚C, 40˚C, 60˚C and 95˚C) The default temperature varies depending on the cycle. You can also choose a particular laundry temperature from the preset temperature options. 7. Rinse selection button 8. Spin selection button Press the rinse button to add rinse cycles. Maximum number of rinse cycles is five. Press the button repeatedly to cycle through the available spin speed options. WD8602R8 0 : no spin Rinse hold,No spin(0), 400, 800, 1000, 1200 rpm Non display : Rinse hold B-1 SAMSUNG Washing Machine Owner’s Instructions WD8602R8-02410Z_EN.indd 1 2009-01-09 ¿ÀÈÄ 6:20:33 Washing a Load of Laundry 9. Delay End selection button Press the button repeatedly to cycle through the available delayed start options (from 3 hour to 19 hours in one hour increments). Displayed hours means the time of finished washing-cycle. 10. Child Lock selection button This is a button for preventing children from manipulating the washing machine. On/Off - To set the program on: Press the Start/Pause button to turn on the washing machine. Press and hold down the [Intensive] + [Temp] button for 2-3 seconds. It can only be activated when the machine is turned on. Once you set the Child Lock on while in washing, no button is activated until you set if off. Even the POWER button will not be activated. The Child Lock lamp lights on. To set the program off: Press and hold down the [Intensive] + [Temp] button again for 2-3 seconds, then the lamp lights off and is set off. NOTE : Check out the Child Lock button first when no button is activated while the washing machine is working. 11. Fuzzy Control dial Turn the dial to select one of the 14 available wash programs Cotton, Coloureds, Synthetics, Delicate Fabrics, Hand Wash For Wool, Jeans, Quick, Drying, Heavy Soil, Mixed Load, Calm Wash, Drain, Spin, Rinse+Spin 12. Start/Pause selection button Press the Start/Pause button to pause or restart a cycle. If you want to change the washing cycle while a cycle is running, press this button to pause the currently running cycle, and press it again to restart the washing machine after choosing a different cycle. 13. (On/Off) selection button Press once to turn the washing machine on, press again to turn the washing machine off. If the washing machine power is left on for longer than 10 minutes without any buttons being touched, the power automatically turns off. SAMSUNG Washing Machine Owner’s Instructions B-2 WD8602R8-02410Z_EN.indd 2 2009-01-09 ¿ÀÈÄ 6:20:34 Washing a Load of Laundry Washing clothes using Fuzzy Logic Your new washing machine makes washing clothes easy, using Samsung’s “Fuzzy Logic” automatic control system. When you select a wash programme, the machine will set the correct temperature, washing time, and washing speed. To wash clothes using the Fuzzy Logic programs: 1. Turn on your sink’s water faucet. 2. Press the (On/Off) button. 3. Open the door. 4. Load the articles one at a time loosely into the drum, without overfilling. 5. Close the door. 6. Add the detergent, softener, and prewash detergent (if necessary) into the appropriate compartment. 7. Turn the Fuzzy Control dial to select the appropriate program for the type of clothes Cotton, Coloureds, Synthetics, Delicate Fabrics, Hand Wash For Wool, Jeans, Quick, Drying, Heavy Soil, Mixed Load, Calm Wash, Drain, Spin, Rinse+Spin. You will see the indicators light up on the control panel. 8. At this time, you can control the wash temperature, rinsing times, spin speed, delay time by pressing the appropriate option button. 9. Press the Start/Pause button on the Fuzzy Control dial and the wash cycle will begin. The process indicator will light up and the remaining time for the cycle will appear in the display. Pause Option (Stop & Adding laundry Function) Within 5 minutes from start, it is possible to put in the laundry or take out. If push Start/Pause button, the door is unlocked immediately. In case of too hot or too much water in washer, the door can not be opened. After closed the door, one more push Start/Pause button to make washing process going on continuously. When the cycle is finished: After the total cycle has finished,the power will turn off automatically. 1. Open the door. 2. Remove laundry. B-3 SAMSUNG Washing Machine Owner’s Instructions WD8602R8-02410Z_EN.indd 3 2009-01-09 ¿ÀÈÄ 6:20:35 Washing a Load of Laundry Washing clothes manually You can wash clothes manually without using the Fuzzy Logic feature. To do so: 1. Turn the water supply on. 2. Press the (On/Off) button on the washing machine. 3. Open the door. 4. Load the articles one at a time loosely into the drum, without overfilling. 5. Close the door. 6. Put the detergent and, if necessary, softener or prewash detergent, in the appropriate compartments. 7. Press the Temperature button to select the temperature. (cold(0˚C), 30˚C, 40˚C, 60˚C and 95˚C) 8. Press to rinse button to select the required number of rinse cycles. Maximum number of rinse cycles is five. The washing duration will be prolonged accordingly. 9. Press the Spin button to select the spin speed. [ 0, 400, 800, 1000, 1200 revolutions per minute(rpm)] Notice: The rinse hold program allows you to take clothes that are dripping wet out of the washing machine. 0 : No spin , Non display : Rinse hold 10. Press the button repeatedly to cycle through the available delayed start options (from 3 hour to 19 hours in one hour increments). Displayed hours means the time of finished washing-cycle. 11. Press the Start/Pause button and the machine will begin the cycle. Using Delay End You can set the washing machine to finish your wash automatically at a later time, choosing from 3 to 19 hour delay (in 1 hour increments). Displayed hours means the time of finished washing-cycle. To do this: 1. Manually or automatically set your washing machine for the type of clothes you are washing. 2. Press the Delay End button repeatedly until the delay time is set. 3. Press the Start/Pause button. The Delay End indicator will light, and the clock will begin counting down until it reaches your finish time. 4. To cancel Delay End, press the (On/Off) button, then turn the washing machine on again. SAMSUNG Washing Machine Owner’s Instructions B-4 WD8602R8-02410Z_EN.indd 4 2009-01-09 ¿ÀÈÄ 6:20:36 Washing a Load of Laundry Washing for the first time Before washing clothes for the first time, you must run a complete cycle without clothes. To do this: 1. Press the (On/Off) button. 2. Pour a little detergent into compartment ( ) in the detergent drawer. 3. Turn on the water supply to the washing machine. 4. Press the Temperature button repeatedly until 40 ˚C is displayed. 5. Press the Start/Pause button. • This will remove any water from the manufacturer’s test run remaining in the machine. Dispenser Dispenser : : Dispenser : Detergent for prewash or starch. Detergent for main wash, water softener,pre-soaking agent, bleach and stain removal product. Additives,e.g.fabric softener or former (fill no higher than lower edge of insert “ A”) Putting detergent in the washing machine 1. 2. 3. 4. Pull out the detergent drawer. Add laundry detergent into compartment ( ). Add softener into compartment ( ) (if you desire). Add prewash detergent into compartment ( ) (if you desire). Caution : Concentrated or thick fabric softener and conditioner must be diluted with a little water before being poured into the dispenser (prevents the overflow from becoming blocked. B-5 SAMSUNG Washing Machine Owner’s Instructions WD8602R8-02410Z_EN.indd 5 2009-01-09 ¿ÀÈÄ 6:20:37 Washing a Load of Laundry Washing tips and hints Sorting your laundry: Sort your laundry according to the following characteristics: • Type of fabric care label symbol: Sort laundry into cottons, mixed fibres, synthetics, silks, wools and rayon. • Colour: Divide whites and colours. Wash new, coloured items separately. • Size: Placing items of different sizes in the same load will improve the washing action. • Sensitivity: Wash delicate items separately, using the Delicate wash programme for pure new wool, curtains and silk articles. Check the labels on the items you are washing or refer to the fabric care chart in the appendix. Emptying pockets: Coins, safety pins and similar items can damage linen, the washing machine drum, and the water tank. Securing fasteners: Close zippers and fasten buttons or hooks; loose belts or ribbons should be tied together. Prewashing cotton: Your new washing machine, combined with modern detergents, will give perfect washing results, thus saving energy, time, water and detergent. However, if your cotton is particularly dirty, use a prewash with a protein-based detergent. Determining load capacity: Do not overload the washing machine or your laundry may not wash properly. Use the chart below to determine the load capacity for the type of laundry you are washing. Fabric Type Load Capacity Cotton/Coloureds 6.5 kg Synthetics 3.0 kg Delicates 2.5 kg Hand Wash For Wool 2.0 kg Detergent tips: The type of detergent you should use is based on the type of fabric (cotton, synthetics, delicates items, Hand Wash For Wool), colour, wash temperature, degree and type of soiling. Always use “low suds” laundry soap, which is designed for automatic washing machines. Follow the detergent manufacturer’s recommendations based upon the weight of the laundry, the degree of soiling, and the hardness of the water in your area. If you do not know how hard your water is, ask your water authority. Notice : Keep detergents and additives in a safe, dry place out of the reach of children. SAMSUNG Washing Machine Owner’s Instructions B-6 WD8602R8-02410Z_EN.indd 6 2009-01-09 ¿ÀÈÄ 6:20:37 Maintaining the Washing Machine Draining the washing machine in an emergency 1. Unplug the washing machine from the power supply. 2. Open the filter-cover by using a coin or a key. 3. Unscrew the emergency drain cap by turning left. Grip the cap on the end of the emergency drain tube and slowly pull it out about 15 cm. 4. Allow all the water to flow into a bowl. 5. Reinsert the drain tube and screw the cap back on. 6. Replace the filter-cover. Repairing a frozen washing machine If the temperature drops below freezing and your washing machine is frozen: 1. Unplug the washing machine. 2. Pour warm water on the source faucet to loosen the water supply hose. 3. Remove the water supply hose and soak it in warm water. 4. Pour warm water into the washing machine drum and let it sit for 10 minutes. 5. Reconnect the water supply hose to the water faucet and check if the water supply and drain operations are normal. Cleaning the exterior 1. Wipe the washing machine surfaces, including the control panel, with a soft cloth and nonabrasive household detergents. 2. Use a soft cloth to dry the surfaces. 3. Do not pour water on the washing machine. C-1 SAMSUNG Washing Machine Owner’s Instructions WD8602R8-02410Z_EN.indd 1 2009-01-09 ¿ÀÈÄ 6:20:38 Maintaining the Washing Machine Cleaning the detergent drawer and recess 1. 2. 3. 4. 5. Press the release lever on the inside of the detergent drawer and pull it out. Remove the cap from compartment ( ). Wash all of the parts under running water. Clean the drawer recess with an old toothbrush. Reinsert the cap (Pushing it firmly into place) and replace the liquid detergent divider into the drawer. 6. Push the drawer back into place. 7. Run a rinse programme without any laundry in the drum. Cleaning the debris filter Clean the debris filter 5 or 6 times a year, or when you see the following error message on the display: 1. Open the filter-cover, See “Draining the washing machine in an emergency” on page C-1. 2. Unscrew emergency drain cap by turning left and drain off all the water. See “Draining the washing machine in an emergency” on page C-1. 3. Unscrew the filter cap and take it out. 4. Wash any dirt or other material from the filter. Make sure the drain pump propeller behind the filter is not blocked. Replace the filter cap. 5. Replace the filter-cover. SAMSUNG Washing Machine Owner’s Instructions C-2 WD8602R8-02410Z_EN.indd 2 2009-01-09 ¿ÀÈÄ 6:20:39 Maintaining the Washing Machine Cleaning the water hose mesh filter You should clean the water hose mesh filter at least one time per year, or when you see the following error message on the display: To do this: 1. Turn off the water source to the washing machine. 2. Unscrew the hose from the back of the washing machine. 3. With a pair of pliers, gently pull out the mesh filter from the end of the hose and rinse it under water until clean. Also clean the inside and outside of the threaded connector. 4. Push the filter back into place. 5. Screw the hose back onto the washing machine. 6. Turn on the faucet and make sure the connections are watertight. C-3 SAMSUNG Washing Machine Owner’s Instructions WD8602R8-02410Z_EN.indd 3 2009-01-09 ¿ÀÈÄ 6:20:39 Troubleshooting Problems and solutions The washing machine will not start • • • • Make sure the door is firmly closed. Make sure the washing machine is plugged in. Make sure the water source faucet is turned on. Make sure to press the Start/Pause button. No water or insufficient water supply • • • • Make sure the water source faucet is turned on. Make sure the water source hose is not frozen. Make sure the water intake hose is not bent. Make sure the filter on the water intake hose is not clogged. Detergent remains in the detergent drawer after the wash programme is complete • • Make sure the washing machine is running with sufficient water pressure. Put the detergents in the inner parts of the detergent drawer(away from the outside edges). Washing machine vibrates or is too noisy • • • • Make sure the washing machine is set on a level surface. If the surface is not level, adjust the washing machine feet to level the appliance. Make sure that the shipping bolts are removed. Make sure the washing machine is not touching any other object. Make sure the laundry load is balanced. The washing machine does not drain and/or spin • • Make sure the drain hose is not squashed or bent. Make sure the water hose mesh filter is not clogged. The Door does not open 1. 2. 3. 4. Disconnect the power plug from the power supply. Remove the water from the washing machine. Open the filter cover using a coin. Locate the orange plastic tab and pull forward to open the door. Understanding error messages Error displayed dE2 4E Solution • Close the door. • • Make sure the source water faucet is turned on. Check the water pressure. 5E • • Clean the debris filter. Make sure the drainage hose is installed correctly. UE • Laundry load is unbalanced; loosen any tangled laundry. If only one item of clothing needs washing, such as a bathrobe or jeans, the final spin result might be unsatisfactory and an “UE” error message will be shown in the display window. cE / 3E HOT • Call after-sales service. • Displayed when the door does not open for high temperature. Before contacting After-Sales service: 1. Try to remedy the problem (See “Troubleshooting” on this page). 2. Restart the programme to see if the fault is repeated. 3. If the malfunction persists, call after-sales service and describe the problem. SAMSUNG Washing Machine Owner’s Instructions D-1 WD8602R8-02410Z_EN.indd 1 2009-01-09 ¿ÀÈÄ 6:20:40 Programme Chart ( user option) Programme Max Load (kg) Detergent and Additives Temp. (˚C) prewash wash softener max Spin Speed (Max) rpm Delay End Cycle Time (min) Cotton 6.5 yes 95 1200 89 Coloureds 6.5 yes 60 1200 97 Synthetics 3.0 yes 60 1000 69 Delicates Fabrics 2.5 - yes 40 800 52 Handwash for Wool 2.0 - yes 40 800 39 Jeans 2.0 - yes 40 800 59 Quick 3.0 - yes 60 1200 27 Programme Cotton Coloureds Synthetics Delicates Fabrics Handwash for Wool Quick Type of WASH Averagely or lightly soiled cottons, bed linen, table linen, underwear, towels, shirts,etc. Averagely or lightly soiled cottons, bed linen, table linen, underwear, towels, shirts, etc. Averagely or lightly soiled blouses, shirts, etc. Made of polyester (Diolen, Trevira), polyamide (perlon, Nylon) or other similar blends. Delicate curtains, dresses, skirts, shirts and blouses. Only machine washable woolens with pure new wool label. Lightly soiled cottons or linen blouses, shirts, dark coloured terry cloth, coloured linen articles, jeans, etc. 1. The programme duration data has been measured under the conditions specified in Standard IEC 60456 / EN 60456. 2. Consumption in individual homes may differ from the values given in the table due to variations in the pressure and temperature of the water supply, the load and the type of laundry. E-1 SAMSUNG Washing Machine Owner’s Instructions WD8602R8-02410Z_EN.indd 1 2009-01-09 ¿ÀÈÄ 6:20:40 Programme Chart ( user option) Programme Max Load (kg) Detergent and Additives Temp. (˚C) prewash wash softener max Spin Speed (Max) rpm Delay End Cycle Time (min) Drying 3.0 - - - - - 130 Heavy Soil 6.5 yes 60 1200 108 Mixed Load 2.5 - yes 60 800 75 Calm Wash 3.0 - yes 40 - 95 Programme Heavy Soil Mixed Load Calm Wash Type of WASH Stained or heavily soiled cottons, bed linen, table linen, underwear, towels, shirts, jeans, etc. A mix of lightly soiled cottons and synthetic fabrics. Extremely low noise level during the entire cycle and finish rinse hold. Cottons, bed linen, table linen, underwear, towels, shirts. SAMSUNG Washing Machine Owner’s Instructions E-2 WD8602R8-02410Z_EN.indd 2 2009-01-09 ¿ÀÈÄ 6:20:40 Appendix Fabric care chart Resistant material Can be ironed at 100 ˚C max Delicate fabric Do not iron Item may be washed at 95 ˚C Can be dry cleaned using any solvent Item may be washed at 60 ˚C Item may be washed at 40 ˚C Dry clean with perchloride, lighter fuel,pure alcohol or R113 only Dry clean with aviation fuel, pure alcohol or R113 only Item may be washed at 30 ˚C Do not dry clean Item may be hand washed Dry flat Dry clean only Can be hung to dry Can be bleached in cold water Dry on clothes hanger Do not bleach Tumble dry, normal heat Can be ironed at 200 ˚C max Tumble dry, reduced heat Can be ironed at 150 ˚C max Do not tumble dry Electrical warnings To reduce the risk of fire, electrical shock, and other injuries, keep these safety precautions in mind: • Operate the appliance only from the type of power source indicated on the marking label. If you are not sure of the type of power supplied to your home, consult your appliance dealer or local power company. • Use only a grounded or polarized outlet. For your safety, this appliance is equipped with a polarized alternating current line plug having one blade wider than the other. This plug will fit into the power outlet only one way. If you are unable to insert the plug fully into the outlet, try reversing the plug. If the plug still doesn’t fit, contact your electrician to replace your outlet. • Protect the power cord. Power supply cords should be routed so that they are unlikely to be walked on or pinched by items placed on or against them. Pay particular attention to cords at plugs, convenience receptacles, and the point where they exit from the unit. • Do not overload the wall outlet or extension cords. Overloading can result in fire or electric shock. F-1 SAMSUNG Washing Machine Owner’s Instructions WD8602R8-02410Z_EN.indd 1 2009-01-09 ¿ÀÈÄ 6:20:45 Appendix Protecting the environment • • • • This appliance is manufactured from recyclable materials. If you decide to dispose of this appliance, please observe local waste disposal regulations. Cut off the power cord so that the appliance cannot be connected to a power source. Remove the door so that animals and small children cannot get trapped inside the appliance. Do not exceed the detergent quantities recommended in the detergent manu-facturers’ instructions. Use stain removal products and bleaches before the wash cycle only when strictly necessary. Save water and electricity by only washing full loads (the exact amount depends upon the programme used). Declaration of conformity This appliance complies with European safety standards, EC directive 93/68 and EN Standard 60335. Specification TYPE FRONT LOADING WASHER WD8602R8 DIMENSION W598mm X D584mm X H844mm WATER PRESSUERE 50 kPa ~ 800 kPa 78 ℓ WATER VOLUME WD8602R8 NET WEIGHT WASH AND DRY CAPACITY 78 kg WASH 6.5 kg (DRY LAUNDRY) DRY 3.0 kg(DRY LAUNDRY) MODEL POWER CONSUMPTION WASHING 230 V 150 W WASHING AND HEATING 220 V 2000 W 240 V 2400 W 220 V 2000 W 240 V 2400 W DRY PUMPING SPIN REVOLUTION PACKAGE Wt LOAD WD8602R8 34 W MODEL WD8602R8 PAPER 2.5 kg PLASTIC 1.0 kg MODEL WD8602R8 rpm 1200 SAMSUNG Washing Machine Owner’s Instructions F-2 WD8602R8-02410Z_EN.indd 2 2009-01-09 ¿ÀÈÄ 6:20:45 QUESTIONS OR COMMENTS? Country CALL OR VISIT US ONLINE AT U.A.E 800-SAMSUNG (726-7864) 8000-4726 www.samsung.com/ae WD8602R8-02410Z_EN.indd 3 2009-01-09 ¿ÀÈÄ 6:20:45 إرشادات ملالك الغسالة )WD8602R8(W/V/C/S/R قم بتسجيل املنتج اخلاص بك على موقع www.samsung.com/global/register رقم الكودDC68-02410Z_AR : 1/12/2009 11:07:16 AM WD8602R8-02410Z_AR.indd 1 WD8602R8-02410Z_AR.indd 2 1/12/2009 11:07:16 AM امليزات ( Child Lock .1التأمني ضد عبث األطفال) بعيدا عن الغسالة .حيث تضمن لك متكنك وظيفة ( Child Lockالتأمني ضد عبث األطفال) من إبقاء األطفال ً هذه الوظيفة عدم عبث األطفال بأزرار تشغيل الغسالة .كما تنبهك عند تشغيلها. ( Delay End .2تأجيل التوقف) متكنك هذه الوظيفة من تأجيل وقت بدء الغسيل لفترة تصل إلى 24ساعة. ( Calm Wash .3غسيل هاديء) جدا بحيث ميكنك القيام بالغسيل أثناء نومك .وتتميز دورة (تنشيف) بأنها متنحك الغسالة دورة غسيل هادئة ً جدا عندما تصرف املاء خارج الغسالة. هادئة ً ( Less Ironing .4كي أقل) سوف تتضاءل احلاجة إلى الكي نظرا ً لقيام برنامج • “Samsung“s Carefreewashبتنظيف املالبس الناعمة عامليا واملطورة بواسطة ،Samsung والرقيقة والتعامل مع األلياف برقة .بفضل تقنية املعاجلة الرقمية املعروفة ً تعد وظيفة ( Less Ironكي أقل) مخصصة للغسيل للمساعدة على تقليل التجاعيد في املالبس الرقيقة مبا يوفر الوقت الذي تستغرقه في الكي. .5دورة ( Delicates &Woolاملالبس الرقيقة والصوف) ميكنك العناية مبثل هذه األنواع من املالبس بشكل خاص وذلك عن طريق حتديد درجة احلرارة املالئمة ودورة الغسيل الرقيق وكمية املاء املناسبة. ( Air Wash .6الغسيل بالهواء) يقوم نظام ( Air Washالغسيل بالهواء) بإزالة الروائح الكريهة والتخلص من البكتيريا واحلشرات التي يصعب التخلص منها مع نظام الغسيل التقليدي ،وهذه إحدى فوائد تقنية التنظيف بالهواء الفريدة. • املالبس التي ميكن تنظيفها بالهواء :املعاطف الصوفية والسترات القطنية/الدخلية والسترات الثقيلة والبدل واملساند والوسائد ومالبس التطريز • املالبس التي ال ميكن تنظيفها بالهواء :املالبس اجللدية واحلريرية والناعمة والبطاطني التي حتتوي على كهربائية واملالبس األخرى املتسخة SAMSUNGإرشادات ملالك الغسالة 1/12/2009 11:07:16 AM WD8602R8-02410Z_AR.indd 3 احتياطات من أجل السالمة تهانينا لشرائك غسالة .Samsungحتتوي تعليمات املالك هذه على معلومات مفيدة تتعلق بتركيب اجلهاز وتشغيله والعناية به .الرجاء قراءة هذه اإلرشادات بعناية لتتمكن من حتقيق أقصى استفادة من مزايا الغسالة واالستمتاع باستخدامها لسنوات عديدة. قبل استخدام اجلهاز • • • • • قد تشكل مواد التعبئة خطورة على األطفال؛ احتفظ بكافة مواد التعبئة (األكياس البالستيكية واملواد املصنوعة من مادة البوليستيرين...الخ) بعيدا ً عن متناول األطفال. مت تصميم اجلهاز لالستخدام املنزلي فقط. تأكد من قيام فنيني مؤهلني بتوصيل توصيالت املاء والكهرباء ،مع مراعاة تعليمات الشركة املصنعة (راجع •تركيب الغسالة“) وقواعد السالمة احمللية. يجب إزالة جميع مسامير التعبئة والشحن قبل تشغيل اجلهاز .حيث قد حتدث أضرارًا خطيرة في حالة عدم إزالتها .راجع اجلزء •إزالة مسامير الشحن“. قبل غسيل املالبس للمرة األولى ،يجب تشغيل الغسالة دورة كاملة دون مالبس. راجع •الغسيل للمرة األولى“. إرشادات من أجل السالمة • • • • • • • • • • • • • • • • • On/Off قبل تنظيف اجلهاز أو نقله للصيانة ،افصل قابس اجلهاز من منفذ التيار الكهربي أو اضبط زر (التشغيل/اإليقاف) على وضع اإليقاف. تأكد من تفريغ جيوب املالبس التي سيتم غسلها .ميكن أن تتسبب األشياء الصلبة واحلادة مثل العمالت املعدنية أو الدبابيس أو املسامير أو البراغي أو األحجار في إحداث أضرار بالغة باجلهاز. دائما. افصل قابس اجلهاز من منفذ التيار الكهربي وأغلق صنبور املاء بعد االستخدام ً قبل فتح باب اجلهاز ،تأكد من جفاف املاء على اجلهاز .ال تفتح الباب في حالة وجود املاء داخل الغسالة. قد يتسلق احليوانات األليفة واألطفال إلى داخل اجلهاز .افحص اجلهاز كل مرة قبل التشغيل. جدا أثناء دورة الغسل .تأكد من إبعاد األطفال عن اجلهاز أثناء تشغيله. يكون الباب الزجاجي ً ساخنا ً ال حتاول إصالح اجلهاز بنفسك .فقد تؤدي عمليات اإلصالح من قبل األفراد غير الفنيني أو غير املؤهلني إلى حدوث إصابات و/أو إحداث املزيد من اخللل باجلهاز. في حالة تلف قابس اجلهاز (سلك التيار الكهربائي) ،يجب تغييره من قبل الشركة املصنعة أو وكيل الصيانة اخلاص بها أو أي فني مؤهل لتجنب التعرض ألي خطر. يجب صيانة هذا اجلهاز من قبل مركز اخلدمات املعتمد ،ويجب تبديل قطع الغيار بقطع غيار أصلية فقط. هذا اجلهاز غير مخصص لالستخدام بواسطة األطفال الصغار أو األشخاص ذوي االحتياجات اخلاصة ما لم يخضعوا إلشراف شخص مسؤول للتأكد من إمكانية استخدامهم للجهاز بشكلٍ آمن. يجب أن يخضع األطفال لإلشراف لضمان عدم عبثهم باجلهاز. إذا مت توصيل هذا اجلهاز بالتيار الكهربي من خالل كبل إضافي أو جهاز توليد للتيار الكهربي محمول ،يجب وضع الكبل اإلضافي أو جهاز توليد التيار الكهربي احملمول بشكلٍ ال يجعله عرضة للبلل أو الرطوبة .باإلضافة إلى أنه يجب أن يكون معدل مرور التيار في الكبل اإلضافي أو في جهاز توليد التيار الكهربي احملمول مناسب للجهاز. يجب أن يتم توصيل هذا اجلهاز من خالل مأخذ قوي االحتمال لضمان االستهالك الصحيح للطاقة. يجب وضع اجلهاز في مكان يتيح الوصول إلى مأخذ التوصيل بعد تركيبه. يُحظر استخدام املاء املعاجلة والتي حتتوي على زيوت أو كرميات أو مستحضرات ،والتي تكون في الغالب موجودة في املستحضرات اجللدية أو عيادات التدليك. وإال سيؤدي هذا إلى إتالف التغليف وهو ما يؤدي بدوره إلى التعطل أو تسرب املاء. وبالنسبة ألنبوب الغسيل الداخلي فهو مصنوع بحيث يكون مضادا ً للصدأ .ولكن في حالة ترسب بعض املعادن الصغيرة مثل دبابيس الشعر في ذلك األنبوب لفترة زمنية طويلة ،فقد يتعرض األنبوب للصدأ نتيجة لذلك. يُحظر أيضا ً ترك املاء التي حتتوي على الكلور أو أي مواد كيميائية في األنبوب لفترة زمنية طويلة. يُحظر استخدام املاء التي حتتوي على املعادن بصورة منتظمة أو تركها في األنبوب لفترة زمنية طويلة. وفي حالة ظهور الصدأ على سطح األنبوب ،يفضل تنظيف سطح األنبوب باستخدام سائل تنظيف (محايد) واستخدام قطعة قماش ناعمة أو قطعة إسفنج في التنظيف. (يُحظر بأي حال من األحوال استخدام فرشة معدنية في التنظيف) الغساالت التي حتتوي على فتحات تهوية بقاعدتها ،يجب جتنب سد السجاد لهذه الفتحات. استخدم أطقم خراطيم جديدة ،حيث ال يجب إعادة استخدام اخلراطيم القدمية. اإلرشادات احتفظ بهذه إرشادات ملالك الغسالة SAMSUNG 1/12/2009 11:07:16 AM WD8602R8-02410Z_AR.indd 4 جدول احملتويات احتياطات من أجل السالمة . . . . . . . . . . . . . . . . . . . . . . . . . . . . . . . . .الغالف الداخلي تركيبالغسالة A-1 . . . . . . . . . . . . . . . . . . . . . . . . . . . . . . . . . . . . . . . . . . . . . . إخراج الغسالة من صندوق التعبئة A-1. . . . . . . . . . . . . . . . . . . . . . . . . . . . . . . . . . . . . . . . . . . . نظرة عامة حول الغسالة A-1. . . . . . . . . . . . . . . . . . . . . . . . . . . . . . . . . . . . . . . . . . . . . . . . . . اختيار مكان الغسالةA-2. . . . . . . . . . . . . . . . . . . . . . . . . . . . . . . . . . . . . . . . . . . . . . . . . . . . . ضبط استواء أرجل الغسالة A-2. . . . . . . . . . . . . . . . . . . . . . . . . . . . . . . . . . . . . . . . . . . . . . . . إزالة مسامير الشحن A-2. . . . . . . . . . . . . . . . . . . . . . . . . . . . . . . . . . . . . . . . . . . . . . . . . . . . توصيل خرطوم تزويد املاءA-3. . . . . . . . . . . . . . . . . . . . . . . . . . . . . . . . . . . . . . . . . . . . . . . . . . . وضع خرطوم تصريف املاء A-4. . . . . . . . . . . . . . . . . . . . . . . . . . . . . . . . . . . . . . . . . . . . . . . . . . غسيل املالبس B-1 . . . . . . . . . . . . . . . . . . . . . . . . . . . . . . . . . . . . . . . . . . . . . . . نظرة عامة حول لوحة التحكم B-1. . . . . . . . . . . . . . . . . . . . . . . . . . . . . . . . . . . . . . . . . . . . . . . غسيل املالبس باستخدام التحكم الرقمي B-3. . . . . . . . . . . . . . . . . . . . . . . . . . . . . . . . . . . . . . . . غسل املالبس يدويا ً B-4. . . . . . . . . . . . . . . . . . . . . . . . . . . . . . . . . . . . . . . . . . . . . . . . . . . . . . استخدام تأجيل التوقفB-4. . . . . . . . . . . . . . . . . . . . . . . . . . . . . . . . . . . . . . . . . . . . . . . . . . . الغسل للمرة األولى B-5. . . . . . . . . . . . . . . . . . . . . . . . . . . . . . . . . . . . . . . . . . . . . . . . . . . . . وضع مسحوق الغسيل في الغسالة B-5. . . . . . . . . . . . . . . . . . . . . . . . . . . . . . . . . . . . . . . . . . . تلميحات وأفكار مفيدة للغسيل B-6. . . . . . . . . . . . . . . . . . . . . . . . . . . . . . . . . . . . . . . . . . . . . . صيانةالغسالة C-1 . . . . . . . . . . . . . . . . . . . . . . . . . . . . . . . . . . . . . . . . . . . . . . تصريف املاء من الغسالة عند الطوارئ C-1 . . . . . . . . . . . . . . . . . . . . . . . . . . . . . . . . . . . . . . . . . . إصالح جهاز غسالة متجمد C-1 . . . . . . . . . . . . . . . . . . . . . . . . . . . . . . . . . . . . . . . . . . . . . . . . تنظيف األسطح اخلارجية C-1 . . . . . . . . . . . . . . . . . . . . . . . . . . . . . . . . . . . . . . . . . . . . . . . . . تنظيف درج مسحوق الغسيل واملوضع الداخليC-2 . . . . . . . . . . . . . . . . . . . . . . . . . . . . . . . . . . . . . تنظيف مصفاة اخمللفات C-2 . . . . . . . . . . . . . . . . . . . . . . . . . . . . . . . . . . . . . . . . . . . . . . . . . . تنظيف املصفاة الشبكية املتصلة بخرطوم املاء C-3 . . . . . . . . . . . . . . . . . . . . . . . . . . . . . . . . . . . . استكشاف املشاكل وحلها D-1 . . . . . . . . . . . . . . . . . . . . . . . . . . . . . . . . . . . . . . . املشاكل واحللول D-1 . . . . . . . . . . . . . . . . . . . . . . . . . . . . . . . . . . . . . . . . . . . . . . . . . . . . . . . فهم رسائل اخلطأ D-1 . . . . . . . . . . . . . . . . . . . . . . . . . . . . . . . . . . . . . . . . . . . . . . . . . . . . . . جدول الدوراتE-1 . . . . . . . . . . . . . . . . . . . . . . . . . . . . . . . . . . . . . . . . . . . . . . . . امللحقF-1 . . . . . . . . . . . . . . . . . . . . . . . . . . . . . . . . . . . . . . . . . . . . . . . . . . . . جدول العناية باألقمشة F-1 . . . . . . . . . . . . . . . . . . . . . . . . . . . . . . . . . . . . . . . . . . . . . . . . . . . التنبيهاتالكهربية F-1 . . . . . . . . . . . . . . . . . . . . . . . . . . . . . . . . . . . . . . . . . . . . . . . . . . . . . حمايةالبيئةF-2 . . . . . . . . . . . . . . . . . . . . . . . . . . . . . . . . . . . . . . . . . . . . . . . . . . . . . . . . . . إعالن التوافق F-2 . . . . . . . . . . . . . . . . . . . . . . . . . . . . . . . . . . . . . . . . . . . . . . . . . . . . . . . . . املواصفات F-2 . . . . . . . . . . . . . . . . . . . . . . . . . . . . . . . . . . . . . . . . . . . . . . . . . . . . . . . . . . . 24 1/12/2009 11:07:16 AM WD8602R8-02410Z_AR.indd 5 تركيبالغسالة إخراج الغسالة من صندوق التعبئة أخرج الغسالة من الصندوق وافحصها للتأكد من عدم تعرضها ألي تلف أثناء الشحن .تأكد أيضا ً من وجود جميع القطع املبينة أدناه .في حالة تعرض الغسالة ألي تلف أثناء الشحن أو عدم وجود جميع القطع املبينة أدناه ،اتصل مبوزع Samsungفورا ً. نظرة عامة حول الغسالة سطح الغسالة خرطوم التصريف لوحةالتحكم القابس غطاء القاعدة مصفاة اخمللفات مفتاح الباب أنبوب التصريف عند الطوارئ غطاء املصفاة خرطوم توريد املاء البارد مفتاحالصواميل أغطية فتحات املسامير خرطومالتصريف ماسك اخلرطوم SAMSUNG A-1إرشادات ملالك الغسالة 1/12/2009 11:07:18 AM WD8602R8-02410Z_AR.indd 1 تركيبالغسالة اختيار مكان الغسالة قبل تركيب الغسالة ،اختر مكانا ً تتوفر به اخلصائص التالية: • أرض ثابتة ومستوية (إذا كانت األرض غير مستوية ،راجع •ضبط استواء أرجل الغسالة“ املبني أدناه). • مكان بعيد عن أشعة الشمس املباشرة. • تهويةمناسبة • ال تقل درجة حرارة الغرفة عن درجة صفر مئوية. • بعيد عن مصادر احلرارة مثل الفحم أو الغاز تأكد من عدم وضع الغسالة فوق سلك الطاقة. يجب جتنب سد فتحات التهوية بواسطة السجاد عند تركيب الغسالة على أرض مغطاة بالسجاد. ضبط استواء أرجل الغسالة إذا كانت األرض غير مستوية ،اضبط األرجل (ال تضع قطع من اخلشب أو أي أشياء أخرى حتت أرجل الغسالة): .1أرخ برغي الرجل بتدويره باليد حتى يصل إلى االرتفاع املطلوب. .2اربط صمولة التأمني بلفها باستخدام مفتاح الصواميل املزود مع اجلهاز. إذا مت تثبيت الغسالة على سطح غير مستو أو ضعيف إلى ارتفاع صوت الغسالة أو اهتزازها أثناء التشغيل. (مسموح فقط بزاوية 1درجة). قم باإلرخاء إزالة مسامير الشحن قبل تركيب جهاز الغسالة ،يجب إزالة مسامير الشحن اخلمسة من اللوحة اخللفية للجهاز. .1قم بخلخلة جميع املسامير بواسطة مفتاح الربط املرفق مع اجلهاز. .2امسك الصواميل بواسطة مفتاح الربط واسحبها من خالل اجلزء العريض للفتحة .كرر ذلك إلزالة كل مسمار. .3قم بتغطية جميع الفتحات باستخدام األغطية البالستيكية املرفقة مع اجلهاز. .4قم بحفظ صواميل الشحن في مكان بعيد آمن حيث قد حتتاج إلى نقل الغسالة إلى مكان آخر في املستقبل. مالحظة قد تشكل مواد التعبئة خطورة على األطفال؛ احتفظ بكافة مواد التعبئة (األكياس البالستيكية واملواد املصنوعة من مادة البوليستيرين ،الخ ).بعيدا ً عن متناول األطفال. SAMSUNGإرشادات ملالك الغسالة A-2 1/12/2009 11:07:18 AM WD8602R8-02410Z_AR.indd 2 تركيبالغسالة توصيل خرطوم تزويد املاء يجب توصيل أحد طرفي خرطوم توريد املاء بالغسالة وتوصيل الطرف اآلخر للخرطوم بصنبور املاء .ال جتذب خرطوم توريد بدله بخرطوم أطول عالي الضغط. املاء .إذا كان اخلرطوم قصيرا ً للغايةّ ، لتوصيل خرطوم توريد املاء: .1خذ مثبت الذراع الذي على شكل حرف Lالذي يالئم خرطوم توريد املاء البارد ووصله إلى مدخل توريد املاء البارد املوجود في اللوحة اخللفية للغسالة .وأحكم ربطه يدويًا. .2صل الطرف اآلخر خلرطوم توريد املاء البارد بصنبور املاء الساخن وأحكم توصيله باليد .ميكنك ،عند احلاجة ،إعادة املثبت. توصيل خرطوم املاء بالغسالة من خالل إرخاء مثبت اخلرطوم ولف اخلرطوم وإعادة تشديد ّ اختياري: .1خذ مثبت الذراع الذي على شكل Lاألحمر خلرطوم توريد املاء الساخن ووصله إلى مدخل توريد املاء الساخن األحمر املوجود على اللوحة اخللفية للغسالة .وأحكم ربطه يدويًا. .2صل الطرف اآلخر خلرطوم توريد املاء الساخن بصنبور املاء الساخن وأحكم توصيله باليد. .3استخدم قطعة على شكل Yإذا أردت استخدام املاء البارد فقط. SAMSUNG A-3إرشادات ملالك الغسالة 1/12/2009 11:07:19 AM WD8602R8-02410Z_AR.indd 3 تركيبالغسالة توصيل خرطوم توريد املاء (اختياري) .1أزل احملول من خرطوم تزويد املاء. ﺝ .2أوالً ،باستخدام مفك برغي من نوع • “+أرخ البراغي األربعة املوجودة باحملول .ثم أخرج احملول ودور اجلزء (ب) باجتاه السهم حتى توجد مسافة مقدارها 5مم بينهما. احملول إلى صنبور املاء .3صل ّ بتشديد البراغي بإحكام. ثم لف اجلزء (ب) باجتاه السهم وضع اجلزأين (أ) و (ب) معا. ﺃ ﺏ .4صل خرطوم تزويد املاء باحملول. اجذب اجلزء (ج) من خرطوم توريد املاء. عند ترك اجلزء (ج) ،يتصل اخلرطوم تلقائيا ً باحملول محدثا ً صوت •إغالق“. .5صل الطرف اآلخر من خرطوم توريد املاء بصمام دخول املاء املوجود خلف الغسالة .لف خرطوم تزويد املاء في اجتاه عقارب الساعة. ﺃ ﺏ ة بعد اكتمال التوصيل ،إذا تسرب املاء من اخلرطوم ،كرر نفس اخلطوات .استخدم صنبور من النوع العادي مالحظ احملول. للتزويد باملاء .إذا كان الصنبور مربعا ً أو كبيرا ً جداً ،أزل احللقة الفاصلة قبل إدخال الصنبور إلى ّ وضع خرطوم تصريف املاء ميكنك وضع نهاية خرطوم التصريف بثالث طرق: فوق حافة حوض الغسيل. يجب وضع خرطوم التصريف على ارتفاع يتراوح بني 60و90 سم .لالحتفاظ بثني خرطوم التصريف ،استخدم دليل اخلرطوم البالستيكي املزود مع اجلهاز .ثبت الدليل على اجلدار بواسطة خطاف أو ثبته في الصنبور بواسطة سلك أو حبل ملنع سقوط خرطوم التصريف على األرض. في فرع أنبوب تصريف احلوض يجب أن يكون فرع أنبوب التصريف فوق سيفون احلوض بحيث يكون طرف اخلرطوم على ارتفاع 60سم على األقل عن األرض. في أنبوب تصريف املاء توصي Samsungباستخدام أنبوب عمودي على ارتفاع 65سم؛ يجب أال يقل طوله عن 60سم وال يزيد عن 90سم. SAMSUNGإرشادات ملالك الغسالة A-4 1/12/2009 11:07:20 AM WD8602R8-02410Z_AR.indd 4 غسيل املالبس نظرة عامة حول لوحة التحكم .1لوحة العرض الرسومية الرقمية تعرض الوقت املتبقي لدورة الغسيل وكافة املعلومات اخلاصة بالغسيل ورسائل اخلطأ. .2الزر ( Air Washغسيل بالهواء) اضغط على الزر بشكل متكرر لتشغيل دورة إزالة الروائح الكريهة من املالبس وتعقيمها. ال ميكن تشغيل أي دورة تنظيف أخرى أثناء تشغيل وظيفة الغسيل بالهواء. ( Deodorizationإزالة الروائح الكريهة) :إزالة الروائح الكريهة من املالبس ( Sterilizationالتعقيم) :إزالة البكتيريا واحلشرات من املالبس .3زر حتديد ( Funtionالوظيفة) اضغط الزر بشكل متكرر لالختيار من بني خيارات الغسيل اجلزئي املتوفرة. +( Pre-wash+غسل أولي) :تتاح خاصية الغسيل األولي فقط مع ( Cottonقطن) و ( Colouredsمالبس ملونة) و ( Syntheticsاصطناعي) و ( Heavy Soilأوساخ كثيرة). ( Less lroningكي أقل) :يؤدي حتديد ( Less Ironingكي أقل) إلى تقليل الثنيات وتوفير وقت الكي. (الدورات املتاحة( Cotton :قطن)( Coloureds ،مالبس ملونة)( Synthetics ،اصطناعي)( Jean ،جينز)، ( Quickسريع)( Heavy Soil ،أوساخ كثيرة)( Mixed Load ،حمولة متنوعة)، ( Rinse + Spinشطف +تنشيف)( Spin ،تنشيف)) .4اختيار زر ( Drying Timeمدة التجفيف) اضغط على الزر بشكل متكرر لالختيار من بني خيارات حتديد التنشيف املتوفرة. ( 130دقيقة 90 ← .دقيقة 60 ← .دقيقة 30 ← .دقيقة). .5زر حتديد ( Intensiveمكثف) تزيد طاقة الغسيل عند حتديد هذا الزر .ميكن حتديد هذه الوظيفة للدورات ( Cottonقطن) و ( Coloredsمالبس ملونة) و ( Syntheticsاصطناعي) و ( Jeansجينز) و ( Heavy Soilأوساخ كثيرة) و ( Mixed Loadحمولة متنوعة) و ( Calm Washغسيل هادئ) .يؤدي الضغط على هذا الزر إلى التبديل بني ( Onتشغيل) و ( Offإيقاف تشغيل). .6زر حتديد ( Temp.درجة احلرارة) اضغط على الزر بشكل متكرر للتنقل بني خيارات درجات حرارة املياه املتوفرة (بارد ( 0درجة م) و 30درجة و 40درجة و 60درجة و 95درجة) تختلف درجة احلرارة االفتراضية باختالف دورة الغسيل .ميكنك أيضا ً اختيار درجة حرارة معينة للغسيل من خيارات درجات احلرارة التي مت ضبطها مسبقا ً. .7زر حتديد ( Rinseشطف) اضغط زر الشطف إلضافة دورات الشطف .احلد األقصى لعدد دورات الشطف هو .5 SAMSUNG B-1إرشادات ملالك الغسالة 1/12/2009 11:07:21 AM WD8602R8-02410Z_AR.indd 1 غسيل املالبس .8زر حتديد ( Spinتنشيف) اضغط على الزر بشكل متكرر لالختيار من بني سرعات التنشيف املتوفرة. WD8602R8 : 0بدون تنشيف انتظار الشطف ،عدم التنشيف ( 1200 ،1000 ،800 ،400 ،)0دورة في الدقيقة بدون عرض :انتظار الشطف .9زر حتديد ( Delay Endتأجيل التوقف) اضغط الزر بشكل متكرر لالختيار من بني خيارات تأجيل التشغيل املتوفرة (من ساعة واحدة إلى 19ساعة بواقع ساعة واحدة). تشير الساعات املعروضة إلى وقت دورة الغسيل املنتهية. .10زر حتديد ( Child Lockالتأمني ضد عبث األطفال) مينع هذا الزر األطفال من العبث بالغسالة. الزر ( On/Offتشغيل/إيقاف التشغيل) -لضبط البرنامج على :اضغط على الزر ( Start/Pauseتشغيل/توقف) لتشغيل الغسالة .اضغط واستمر في الضغط على الزر [( ]Intensiveمكثف) ( ]Temp.[ +درجة احلرارة) ملدة تتراوح بني 2إلى 3ثانية .ميكن تشغيل هذا البرنامج فقط عند تشغيل الغسالة .مبجرد تشغيل دورة •التأمني ضد عبث األطفال“ أثناء الغسيل ،ال يتم تنشيط أي زر حتى يتم إيقاف تشغيل البرنامج .ولن يتم حتى تنشيط الزر ( POWERالطاقة) .يضيء مصباح •التأمني ضد عبث األطفال“ .إليقاف تشغيل الدورة :اضغط مع االستمرار في الضغط على الزر [( ]Intensiveمكثف) ( ]Temp.[ +درجة احلرارة) مرة أخرى من ثانيتني إلى ثالث ثواني ،ومن ثم ينطفئ مصباح الدورة ويتم إيقاف تشغيله. مالحظة :حتقق من الزر ( Child Lockالتأمني ضد عبث األطفال) أوالً في حالة عدم تشغيل أي زر في أثناء عمل الغسالة. .11قرص التحكم الرقمي قم بإدارة القرص الختيار دورة من بني دورات الغسيل األربعة عشر املتاحة ( Cottonقطن) أو ( Colouredsمالبس ملونة) أو ( Syntheticsاصطناعي) أو ( Delicate Fabricsمالبس رقيقة)( Hand Wash For Wool ،الغسيل اليدوي للصوف)( Jeans ،جينز)، ( Quickسريع)( Drying ،جتفيف)( Heavy Soil ،أوساخ كثيرة)( Mixed Load ،حمولة متنوعة)، ( Calm Washغسيل هادىء)( Drain ،تصريف)( Spin ،تنشيف)( Rinse+Spin ،شطف+تنشيف) .12زر حتديد ( Start/Pauseتشغيل/توقف) اضغط على الزر ( Start/Pauseتشغيل/توقف) إليقاف أحد دورات الغسيل أو إعادة تشغيله .إذا كنت تريد تغيير تغيير دورة الغسيل أثناء تشغيل أحد الدورات ،اضغط على هذا الزر إليقاف الدورة التي تعمل حاليا ثم اضغط عليه مرة أخرى إلعادة تشغيل الغسالة بعد اختيار دورة غسيل مختلفة. .13زر حتديد ( On/Offتشغيل/إيقاف التشغيل) اضغط على الزر مرة لتشغيل الغسالة ،واضغط عليه مرة أخرى إليقاف الغسالة عن العمل .في حالة ضغط زر تشغيل الغسالة وتركها ملدة تزيد عن 10دقائق دون ضغط أي زر ،يتوقف اجلهاز عن العمل بشكل تلقائي. SAMSUNGإرشادات ملالك الغسالة B-2 1/12/2009 11:07:22 AM WD8602R8-02410Z_AR.indd 2 غسيل املالبس غسيل املالبس باستخدام التحكم الرقمي تسهل الغسالة اجلديدة من عملية غسل املالبس ،باستخدام نظام التحكم الرقمي األوتوماتيكي من .Samsungعند اختيار دورة غسيل ،تقوم الغسالة بضبط درجة احلرارة ووقت الغسيل وسرعات الغسيل املناسبة. لغسيل املالبس باستخدام دورة التحكم الرقمي: .1افتح صنبور املاء. .2اضغط الزر ( On/Offتشغيل/إيقاف التشغيل). .3افتح الباب. .4ضع املالبس قطعة بقطعة في احلاوية دون جتاوز سعتها. .5أغلق الباب. ومنعم القماش ومسحوق الغسيل األولي (عند احلاجة) في احلجيرة اخلاصة به. .6أضف مسحوق الغسيل ّ .7قم بإدارة قرص التحكم الرقمي لتحديد البرنامج املالئم لنوع املالبس ( Cottonقطن) أو ( Colouredsمالبس ملونة) أو ( Syntheticsاصطناعي) أو ( Delicate Fabricsمالبس رقيقة) أو ( Hand Wash For Woolالغسيل اليدوي للصوف)، ( Jeansجينز)( Quick ،سريع)( Drying ،جتفيف)، ( Heavy Soilأوساخ كثيرة)، ( Mixed Loadحمولة متنوعة)، ( Calm Washغسيل هادىء)( Drain ،تصريف)، ( Spinتنشيف)( Rinse+Spin ،شطف+تنشيف). ميكنك مشاهدة املؤشرات املضاءة في لوحة التحكم. .8ميكنك في هذا الوقت ،التحكم في حرارة الغسيل وأوقات الشطف وسرعة التنشيف وتأجيل التشغيل من خالل الضغط على زر االختيار املالئم. .9اضغط زر ( Start/Pauseتشغيل/توقف) املوجود في قرص التحكم الرقمي وعندها تبدأ دورة الغسيل .يضيء مؤشر العملية ويظهر الوقت املتبقي للدورة على الشاشة. خيارات التوقف (وظيفة اإليقاف وإضافة الغسيل) في غضون 5ثوان من بدء التشغيل ،ميكنك إضافة غسيل أو إخراجه. إذا قمت بالضغط على الزر ( Start/Pauseتشغيل/توقف) ،يتم فتح الباب فورا ً. وفي حالة وجود كمية كبيرة من املاء في الغسالة أو كانت درجة حرارة املاء مرتفعة للغاية ،لن ميكن فتح الباب. بعد إغالق الباب ،اضغط مرة أخرى على الزر ( Start/Pauseتشغيل/توقف) ملتابعة عملية الغسيل. عند انتهاء الدورة: بعد انتهاء دورة الغسيل بالكامل ،يتم فصل التيار بشكل تلقائي. .1افتح الباب. .2أخرج املالبس. SAMSUNG B-3إرشادات ملالك الغسالة 1/12/2009 11:07:22 AM WD8602R8-02410Z_AR.indd 3 غسيل املالبس غسل املالبس يدوياً ميكنك غسيل املالبس يدويا ً دون استخدام ميزة التحكم الرقمي. للقيامبذلك: .1قم بتشغيل مصدر توريد املاء. .2اضغط الزر ( On/Offتشغيل/إيقاف التشغيل) املوجود في جهاز الغسالة. .3افتح الباب. .4ضع املالبس قطعة بقطعة في احلاوية دون جتاوز سعتها. .5أغلق الباب. .6ضع مسحوق الغسيل ،وعند احلاجة ،ملينّ القماش أو مسحوق الغسيل األولي في احلجيرات املناسبة. .7اضغط الزر ( Temp.درجة احلرارة) الختيار درجة حرارة املاء. (ماء بارد˚30 ،م˚40 ،م˚60 ،م˚95 ،م). .8اضغط على زر الشطف لتحديد الرقم املطلوب لدورات الشطف. احلد األقصى لعدد دورات الشطف هو خمس. وفقا لعدد الدورات. ستستمر مدة الغسيل ً .9اضغط على الزر ( Spinتنشيف) لتحديد سرعة الدوران 1200 ،1000 ،800 ،400 ،0 [ .دورة في الدقيقة] مالحظة :يسمح لك برنامج انتظار الشطف بإخراج املالبس املبتلة من الغسالة. : 0بدون تنشيف بدون عرض :انتظار الشطف .10اضغط الزر بشكل متكرر لالختيار من بني خيارات تأجيل التشغيل املتوفرة (من ساعة واحدة إلى 19ساعة بواقع ساعة واحدة) .تشير الساعات املعروضة إلى وقت دورة الغسيل املنتهية. .11اضغط على الزر ( Start/Pauseتشغيل/توقف) وعندها يبدأ اجلهاز بالدوران. استخدام تأجيل التوقف ميكنك ضبط جهاز الغسالة إلنهاء عملية الغسيل تلقائيا ً بعد وقت معني ،باختيار وقت من 3ساعات وحتى 19ساعة للتأجيل (بواقع ساعة واحدة) .تشير الساعات املعروضة إلى وقت دورة الغسيل املنتهية. للقيامبذلك: .1ميكنك ضبط الغسالة تلقائيا ً أو يدويا ً حسب نوع املالبس التي تريد غسلها. .2اضغط على الزر ( Delay Endتأجيل التوقف) بشكل متكرر حتى تصل إلى وقت التأجيل املطلوب. ٍ وعندئذ سيومض مؤشر ( Delay Endتأجيل التوقف) ،وتبدأ .3اضغط على الزر ( Start/Pauseتشغيل/توقف). الساعة بالعد التنازلي حتى تصل إلى وقت اإلنهاء. .4إللغاء وظيفة ( Delay Endتأجيل التوقف) ،اضغط على الزر ( On/Offتشغيل/إيقاف التشغيل) ،ثم قم بتشغيل الغسالة مرة أخرى. SAMSUNGإرشادات ملالك الغسالة B-4 1/12/2009 11:07:22 AM WD8602R8-02410Z_AR.indd 4 غسيل املالبس الغسل للمرة األولى قبل غسيل املالبس للمرة األولى ،يجب تشغيل اجلهاز دورة كاملة دون مالبس. للقيام بذلك: .1اضغط الزر ( On/Offتشغيل/إيقاف التشغيل). .2ضع كمية قليلة من مسحوق الغسيل في اجلزء اخملصص له في درج مسحوق الغسيل. .3قم بتزويد الغسالة باملاء. .4اضغط على زر ( Temp.درجة احلرارة) بشكل متكرر حتى تظهر درجة احلرارة °40م. .5اضغط على الزر ( Start/Pauseتشغيل/توقف). • يزيل ذلك أي ماء متبقي في الغسالة نتيجة للتشغيل االختباري الذي قامت به الشركة املصنعة للجهاز. املوزع املوزع : : املوزع : مسحوق للغسيل األولي أو النشا. ومنعم األقمشة ومواد النقع ومادة التبييض ومواد إزالة مسحوق الغسيل لدورة الغسيل الرئيسية ّ األوساخ. منعم األقمشة (ال تتجاوز حد اإلدخال السفلي •)“A املواد اإلضافية ،مثل مكون أو ّ وضع مسحوق الغسيل في الغسالة . 1 .2 .3 .4 اسحب درج مسحوق الغسيل. أضف مسحوق الغسيل في احلجيرة . منعم األقمشة في احلجيرة (إذا كنت ترغب في ذلك). أضف ّ أضف مسحوق الغسيل األولي في احلجيرة (إذا كنت ترغب في ذلك). تنبيه: يجب إذابة ملني األقمشة املركز أو السميك بقليل من املاء قبل صبه في املوزع (ملنع إعاقة تدفق املاء. SAMSUNG B-5إرشادات ملالك الغسالة 1/12/2009 11:07:23 AM WD8602R8-02410Z_AR.indd 5 غسيل املالبس تلميحات وأفكار مفيدة للغسيل فرز املالبس :افرز املالبس حسب اخلصائص التالية: • عالمة العناية بنوع القماش :افرز املالبس إلى مالبس قطنية وألياف ممزوجة واصطناعية ومالبس حريرية وأصواف ورايون. • اللون :قسم املالبس إلى مالبس بيضاء ومالبس ملونة .اغسل املالبس اجلديدة واملالبس امللونة كل على حدة. • احلجم :ضع املالبس من مختلف األحجام واملقاسات في مرة واحدة لتحسني عملية الغسيل. • رقة امللمس :اغسل املالبس الرقيقة على حدة ،باستخدام برنامج •رقيق“ من أجل غسيل الصوف اخلالص والستائر واملالبس احلريرية .افحص العالمات املوجودة باملالبس التي تريد غسلها أو راجع جدول العناية باألقمشة في امللحق. تفريغ اجليوب :قد حتدث العمالت املعدنية ودبابيس األمان وما شابه أضرارا ً باألقمشة وحاوية الغسيل وخزان املاء. التثبيت بإحكام :أغلق أي سوست أو أزرار أو خطافات باملالبس؛ كما يجب ربط األحزمة أو األشرطة املفكوكة. الغسيل األولي للمالبس القطنية :تقدم لك الغسالة اجلديدة باستخدام مساحيق الغسيل احلديثة ،أفضل نتائج الغسيل ،ومن ثم فهي تساعدك على توفير الطاقة الكهربائية والوقت واملاء واملسحوق .لكن إذا كانت املالبس القطنية شديدة االتساخ ،استخدم الغسيل األولي بواسطة مسحوق الغسيل الذي يحتوي على البروتني. حتديد سعة حمل املالبس :ال تتجاوز حمل الغسيل في الغسالة حيث يؤدي ذلك إلى عدم احلصول على النظافة التي تريدها .استخدم اجلدول التالي لتحديد سعة الوزن لنوع املالبس التي تقوم بغسلها. نوع القماش ( Cotton/Colouredsقطن/مالبس ملونة) ( Syntheticsاصطناعي) ( Delicate Fabricsمالبس رقيقة) ( Hand Wash For Woolالغسيل اليدوي للصوف) سعة الوزن 6.5كجم 3.0كجم 2.5كجم 2.0كجم تلميحات حول مسحوق الغسيل :يعتمد نوع مسحوق الغسيل الذي تستخدمه على نوع القماش (( cottonقطن) أو ( syntheticsاصطناعي) أو ( delicates itemsاملالبس الرقيقة) أو ( Hand Wash For Woolالغسيل اليدوي للصوف)) ،واأللوان ودرجة حرارة املاء ودرجة االتساخ ونوعه. استخدم دوما ً مسحوق الغسيل ذي •الرغوة القليلة“ والذي صمم خصيصا ً للغساالت األوتوماتيكية. ُ اتبع توصيات الشركة املصنعة ملسحوق الغسيل على أساس وزن املالبس ودرجة االتساخ وما إذا كان املاء عسرا ً في منطقتك .إذا لم تكن تعرف ما إذا كان املاء عسرا ً أم ال في منطقتك ،اتصل مبصلحة املاء. مالحظة :أحفظ مسحوق الغسيل واإلضافات في مكان آمن وجاف بعيدا ً عن متناول األطفال. SAMSUNGإرشادات ملالك الغسالة B-6 1/12/2009 11:07:23 AM WD8602R8-02410Z_AR.indd 6 صيانةالغسالة تصريف املاء من الغسالة عند الطوارئ .1افصل الغسالة من مصدر الطاقة. .2افتح غطاء املصفاة باستخدام عملة معدنية أو مفتاح. ُ .3فك غطاء تصريف الطوارئ عن طريق اللف لليسار. أمسك الغطاء من نهاية أنبوب تصريف الطوارئ واجذبه ببطء مسافة حوالي 15سم. .4اسمح بتصريف املاء بأكمله ليتدفق في وعاء. .5أعد إدخال أنبوب التصريف وثبت الغطاء مرة أخرى. .6أعد غطاء املصفاة إلى مكانه. إصالح جهاز غسالة متجمد إذا انخفضت درجة احلرارة إلى أقل من درجة التجمد وجتمدت الغسالة: .1افصل الغسالة من مصدر التيار الكهربائي. .2صب املاء الدافئ على صنبور املاء إلرخاء خرطوم توريد املاء وفصله. .3قم بإزالة خرطوم توريد املاء وانقعه في املاء الدافئ. .4صب املاء الدافئ في حاوية الغسالة واتركه ملدة 10دقائق. .5أعد توصيل خرطوم توريد املاء إلى صنبور املاء وتأكد من أن توريد املاء والتصريف يجري كما ينبغي. تنظيف األسطح اخلارجية .1امسح األسطح اخلارجية جلهاز الغسالة ،مبا في ذلك لوحة التحكم بقطعة من القماش الناعم ومسحوق تنظيف منزلي غير خادش. .2استخدم قطعة من القماش الناعم لتجفيف األسطح اخلارجية. .3ال تصب املاء على الغسالة. SAMSUNG C-1إرشادات ملالك الغسالة 1/12/2009 11:07:24 AM WD8602R8-02410Z_AR.indd 1 صيانةالغسالة تنظيف درج مسحوق الغسيل واملوضع الداخلي .1 . 2 .3 .4 .5 . 6 .7 اضغط ذراع اإلرخاء املوجودة في داخل درج مسحوق الغسيل واسحبه إلى اخلارج. قم بإزالة الغطاء من حجيرة . اغسل كل القطع باملاء اجلاري. نظف اجلزء الداخلي للدرج باستخدام فرشاة أسنان قدمية. أعد الغطاء (بدفعه بإحكام) إلى مكانه ،وأعد القاسم اخلاص بسائل مسحوق الغسيل إلى مكانه في الدرج. أعد الدرج إلى مكانه. شغل برنامج الشطف دون وضع أي غسيل في احلاوية. ّ تنظيف مصفاة اخمللفات نظف املصفاة من اخمللفات 5أو 6مرات في السنة ،أو عند ظهور رسالة اخلطأ التالية على الشاشة: .1 .2 .3 .4 افتح غطاء املصفاة ،راجع اجلزء •تصريف املاء من الغسالة عند الطوارئ“ في صفحة .1-C قم بإرخاء غطاء التصريف عند الطوارئ بتدويره إلى اليسار لصرف املاء من اجلهاز. راجع اجلزء •تصريف املاء من الغسالة عند الطوارئ“ في صفحة .1-C فك غطاء املصفاة واسحبه إلى اخلارج. اغسل أية أوساخ أو مواد أخرى عالقة في املصفاة .تأكد أن مروحة مضخة تصريف املاء املوجودة خلف املصفاة غير مسدودة .أعد مقدمة املصفاة إلى مكانها. .5أعد غطاء املصفاة إلى مكانه. SAMSUNGإرشادات ملالك الغسالة C-2 1/12/2009 11:07:25 AM WD8602R8-02410Z_AR.indd 2 صيانةالغسالة تنظيف املصفاة الشبكية املتصلة بخرطوم املاء يجب تنظيف املصفاة الشبكية املتصلة بخرطوم املاء مرة واحدة في السنة على األقل ،أو عند مشاهدة رسالة اخلطأ التالية على الشاشة: للقيامبذلك: .1أغلق صنبور املاء املتصل بالغسالة. .2افصل اخلرطوم عن اجلانب اخللفي من الغسالة. .3بواسطة زوج من الزردية ،اسحب املصفاة املشبكة إلى اخلارج من طرف اخلرطوم بلطف واشطفها باملاء حتى تصبح نظيفة .نظف كذلك اجلزأين الداخلي واخلارجي للوصلة. .4أعد املصفاة إلى مكانها. .5ثبت اخلرطوم في الغسالة مرة أخرى. .6افتح صنبور املاء وتأكد من عدم ترسب املاء في التوصيالت. SAMSUNG C-3إرشادات ملالك الغسالة 1/12/2009 11:07:26 AM WD8602R8-02410Z_AR.indd 3 استكشاف املشاكل وحلها املشاكل واحللول الغسالة ال تعمل • • • • تأكد من إغالق الباب بإحكام. تأكد من توصيل قابس اجلهاز مبصدر التيار الكهربي. تأكد من فتح صنبور املاء. تأكد من الضغط على الزر ( Start/Pauseتشغيل/توقف). • • • • تأكد من فتح صنبور املاء. تأكد أن خرطوم توريد املاء غير متجمد. تأكد من عدم انثناء خرطوم توريد املاء. تأكد أن املصفاة املوجودة في خرطوم توريد املاء غير مسدودة. • • تأكد من تشغيل الغسالة بضغط ماء كاف. ضع مسحوق الغسيل في األجزاء الداخلية لدرج مسحوق الغسيل (بعيدا ً عن احلواف اخلارجية). • تأكد من تركيب الغسالة على أرض مستوية .إذا كانت األرض غير مستوية ،اضبط قدم الغسالة حتى تستوي على األرضية. تأكد من إزالة مسامير الشحن. تأكد من عدم مالمسة الغسالة ألي شيء آخر. تأكد من توزيع وزن املالبس املوجودة في الغسالة. • • تأكد من عدم تعرض خرطوم التصريف لضغط أو انثناء. تأكد أن املصفاة الشبكية في خرطوم املاء غير مسدودة. .1 .2 .3 .4 افصل القابس من منفذ التيار الكهربائي. قم بإزالة املاء من جهاز الغسالة. افتح غطاء املصفاة باستخدام قطعة معدنية. حدد مكان العالمة البالستيك البرتقالية اللون واسحب لفتح الباب. ال يتم توريد املاء أو يتم توريد كمية غير كافية منه يبقى مسحوق الغسيل في الدرج بعد اكتمال برنامج الغسيل تهتز الغسالة أو حتدث صوتاً مرتفعاً • • • ال يتم تصريف املاء من الغسالة و/أو ال تقم بعملية التنشيف يتعذر فتح الباب فهم رسائل اخلطأ اخلطأ املعروض على الشاشة dE2 4E 5E • أغلق الباب. • • نظف مصفاة اخمللفات. تأكد من تركيب خرطوم تصريف املاء بطريقة صحيحة. • • UE • cE / 3E • HOT احلل • تأكد من أن صنبور املاء مفتوح. تأكد من ضغط املاء. وضع املالبس غير متوازن؛ فك أي تشابك بني املالبس. في حالة غسيل قطعة واحدة من املالبس ،مثل برنس حمام أو جينز، قد ال تكون نتيجة التجفيف النهائي مرضية ،وتظهر رسالة خطأ • “UEفي إطار العرض. اتصل بخدمة ما بعد البيع. يتم عرضها في حالة عدم فتح الباب بسبب درجة احلرارة العالية. قبل االتصال مبركز خدمة ما بعد البيع: .1حاول حل املشكلة (راجع •استكشاف األخطاء وإصالحها“ في هذه الصفحة). .2أعد تشغيل البرنامج ملعرفة ما إذا كان سيتكرر ظهور اخلطأ مرة أخرى. .3إذا استمر اخلطأ ،اتصل مبركز خدمة ما بعد البيع واشرح املشكلة. SAMSUNGإرشادات ملالك الغسالة D-1 1/12/2009 11:07:26 AM WD8602R8-02410Z_AR.indd 1 جدول الدورات ( حسب اختيار املستخدم) الدورات أقصى وزن (بالكجم) مسحوق الغسيل واملواد اإلضافية درجة احلرارة (˚م) منعم الغسيل ّ القصوى غسيل القماش األولي سرعة التنشيف (القصوى) لفة في الدقيقة دورة تأجيل الغسيل التوقف (بالدقيقة) ( Cottonقطن) 6.5 نعم 95 1200 89 Coloureds (مالبس ملونة) 6.5 نعم 60 1200 97 ( Syntheticsاصطناعي) 3.0 نعم 60 1000 69 Delicates Fabrics (مالبس رقيقة) 2.5 - نعم 40 800 52 Hand Wash For Wool (الغسيل اليدوي للصوف) 2.0 - نعم 40 800 39 ( Jeansجينز) 2.0 - نعم 40 800 59 ( Quickسريع) 3.0 - نعم 60 1200 27 نوع الغسيل الدورة ( Cottonقطن) املالبس القطنية وأغطية السرير واملفارش الكتانية واملالبس الداخلية واملناشف والقمصان الخ ،متوسطة أو خفيفة االتساخ. Coloureds (مالبس ملونة) املالبس القطنية وأغطية السرير واملفارش الكتانية ،واملالبس الداخلية واملناشف والقمصان متوسطة أو خفيفة االتساخ...الخ Synthetics (اصطناعي) البلوزات والقمصان متوسطة أو خفيفة االتساخ وغيرها من املالبس املصنوعة من البوليستر (الديولني والتريفيرا) ومادة البوليامايد (البيرلون والنيلون) أو األنسجة الصناعية األخرى. Delicates Fabrics (مالبس رقيقة) الستائر والفساتني والتنورات والقمصان والبلوزات الرقيقة. Hand Wash For Wool (الغسيل اليدوي للصوف) املالبس الصوفية القابلة للغسيل في جهاز الغسالة فقط والتي حتمل عالمة الصوف اخلالص اجلديد. ( Quickسريع) املالبس القطنية خفيفة االتساخ والبلوزات والقمصان الكتانية واملالبس الوبرية امللونة الغامقة واملالبس الكتانية امللونة اخلامات الكتانية واجلينز ،إلخ. .1مت قياس بيانات مدد البرامج وفقا ً للظروف املبينة في .Standard IEC 60456 / EN 60456 .2قد يختلف االستهالك في كل منزل عن القيم املبينة في اجلدول بسبب االختالف في ضغط املاء ودرجة حرارتها، وكمية الغسيل ونوعه. SAMSUNG E-1إرشادات ملالك الغسالة 1/12/2009 11:07:26 AM WD8602R8-02410Z_AR.indd 1 جدول الدورات ( حسب اختيار املستخدم) الدورة أقصى وزن (بالكجم) مسحوق الغسيل واملواد اإلضافية الغسيل األولي درجة احلرارة (˚م) منعم ّ غسيل القماش سرعة التنشيف (القصوى) القصوى لفة في الدقيقة دورة تأجيل الغسيل التوقف (بالدقيقة) ( Dryingجتفيف) 3.0 - - - - - 130 Heavy Soil (أوساخ كثيرة) 6.5 نعم 60 1200 108 Mixed Load (حمولةمتنوعة) 2.5 - نعم 60 800 75 Calm Wash (غسيل هاديء) 3.0 - نعم 40 - 95 الدورة نوع الغسيل Heavy Soil (أوساخ كثيرة) املالبس القطنية وأغطية السرير واملفارش الكتانية ،واملالبس الداخلية واملناشف والقمصان املبقعة أو كثيرة االتساخ...الخ Mixed Load (حمولةمتنوعة) خليط من املالبس القطنية خفيفة االتساخ واأللياف االصطناعية. Calm Wash (غسيل هاديء) مستوى صوت منخفض للغاية خالل دورة الغسيل بأكملها وانتهاء مدة انتظار الشطف. املالبس القطنية وأغطية السرير واملفارش الكتانية واملالبس الداخلية واملناشف والقمصان. SAMSUNGإرشادات ملالك الغسالة E-2 1/12/2009 11:07:26 AM WD8602R8-02410Z_AR.indd 2 امللحق جدول العناية باألقمشة مواد مقاومة ميكن الكي عند ˚ 100م بحد أقصى أقمشة ناعمة يحظر الكي ميكن الغسيل عند ˚95م ميكن استخدام التنظيف اجلاف باستخدام أي مواد مذيبة ميكن الغسيل عند ˚60م التنظيف اجلاف بالبروكلوريد أو الكحول النقي أو R113فقط ميكن الغسيل عند ˚40م التنظيف اجلاف بوقود الطائرات أو الكحول النقي أو R113فقط ميكن الغسيل عند ˚30م يحظر استخدام التنظيف اجلاف تغسل باليد جتفف وهي مفرودة تنظيف جاف فقط ميكن تعليقها لتجف ميكن استخدام مادة تبييض مع املاء البارد جتفيف املالبس وهي معلقة على حمالة يحظر استخدام مادة تبييض جتفيف بالتدوير ،حرارة عادية ميكن الكي عند ˚ 200م بحد أقصى جتفيف بالتدوير ،حرارة خفيفة ميكن الكي عند ˚ 150م بحد أقصى يحظر جتفيفها بالتدوير التنبيهاتالكهربية لتقليل احتمال التعرض ألخطار احلرائق والصدمات الكهربية وغيرها من اإلصابات ،ضع احتياطات السالمة التالية في االعتبار: شغل اجلهاز فقط من نوع مصدر الطاقة املشار إليه على اجلهاز .إذا لم تكن متأكدا ً من نوع الطاقة الكهربائية • ّ في منزلك ،استشر مورد اجلهاز أو شركة الطاقة احمللية. • استخدم مخرج التيار الذي مت توصيله األرضي أو تقطيبه .من أجل سالمتك ،مت تزويد هذا اجلهاز بقابس تيار متردد متقطب ذو طرف أعرض من اآلخر .يناسب هذا القابس منفذ التيار الكهربي باجتاه واحد فقط .إذا لم تستطع إدخال القابس بأكمله في منفذ التيار الكهربي ،جرب إدخال القابس بشكل عكسي .إذا كان القابس غير مالئم ملنفذ التيار ،اتصل بفني كهربائي لتبديل منفذ التيار. • احم سلك الطاقة .ال بد من وضع سلك التيار الكهربي بعيدا ً عن وطء األقدام وجتنب وضع أية أجسام عليه أو فوقه .توخ املزيد من احلذر عند التعامل مع األسالك املتصلة بالقابس ومصدر التيار ونقطة خروج السلك من اجلهاز. • جتنب زيادة الضغط على منفذ التيار الكهربي أو األسالك اإلضافية .ميكن أن ينتج عن التحميل الزائد حريقا ً أو صدمة كهربية. SAMSUNG F-1إرشادات ملالك الغسالة 1/12/2009 11:07:29 AM WD8602R8-02410Z_AR.indd 1 امللحق حمايةالبيئة • • • • هذا اجلهاز مصنوع من مواد قابلة إلعادة التدوير .إذا قررت التخلص من هذا اجلهاز ،يرجى مراعاة القوانني احمللية اخلاصة بالتخلص من النفايات .اقطع سلك التيار بحيث ال ميكن توصيل اجلهاز مبصدر طاقة .قم بإزالة الباب ملنع تعرض احليوانات أو األطفال الصغار لالحتباس داخل اجلهاز. ال تضع مسحوق غسيل أكثر من الكمية املبينة في إرشادات الشركة املصنعة ملسحوق الغسيل. استخدم مواد إزالة البقع ومواد التبييض قبل دورة الغسل عند احلاجة فقط. وفر املاء والكهرباء من خالل غسيل أحمال مالبس كاملة فقط (تختلف الكمية وفقا ً لدورة املستخدم). ّ إعالن التوافق يتوافق هذا اجلهاز مع مقاييس السالمة األوروبية و EC directive 93/68و .EN Standard 60335 املواصفات غسالة مالبس أمامية التحميل النوع WD8602R8 األبعاد العرض 598مم × العمق 584مم × االرتفاع 844مم ضغط املاء 50كيلوباسكال ~ 800كيلوباسكال كمية املاء 78لتر WD8602R8 الوزن الصافي سعة الغسيل والتجفيف 78كجم غسيل 6.5كجم (مالبس جافة) التجفيف 3.0كجم (مالبس جافة) الطراز الغسل استهالك الطاقة الغسيلوالتسخني التجفيف دورة التنشيف وزن العبوة احلمولة WD8602R8 230فولت 150وات 220فولت 2000وات 240فولت 2400وات 220فولت 2000وات 240فولت 2400وات الضخ 34وات الطراز WD8602R8 الغالف الورقي 2.5كجم غالف بالستيكي 1.0كجم الطراز دورة في الدقيقة WD8602R8 1200 SAMSUNGإرشادات ملالك الغسالة F-2 1/12/2009 11:07:30 AM WD8602R8-02410Z_AR.indd 2 هل لديك أسئلة أو تعليقات؟ البلد اتصل بـ أو قم بزيارة موقعنا على اإلنترنت على U.A.E )800-SAMSUNG (726-7864 8000-4726 www.samsung.com/ae 1/12/2009 11:07:30 AM WD8602R8-02410Z_AR.indd 3