1
C139ST_GB.fm Page 1 Thursday, October 17, 2002 4:58 PM
MICROWAVE OVEN
Owner’s Instructions and Cooking Guide
C138ST / C138STB
C138STT / C138STF
C139ST / C139STB
C139STT / C139STF
Code No.: DE68-02258H
“Quick” Look-up Guide ...........................................................................2
Oven .......................................................................................................3
Control Panel .........................................................................................3
Accessories ............................................................................................4
Using this Instruction Booklet.................................................................5
Safety Precautions .................................................................................6
Installing Your Microwave Oven.............................................................7
Selecting the Display Language.............................................................8
Setting the Time .....................................................................................8
How a Microwave Oven Works ..............................................................9
Checking that Your Oven is Operating Correctly ...................................9
What to Do if You are in Doubt or You have a Problem ......................10
Cooking/Reheating...............................................................................11
Power Levels and Time Variations.......................................................11
Stopping the Cooking ...........................................................................12
Adjusting the Cooking Time .................................................................12
Using the Auto Cook Feature...............................................................13
Using the Auto Reheat Feature............................................................14
Using the Auto Defrost Feature............................................................15
Using the Junior/Snack Cook Feature .................................................16
Using the Cafeteria Feature .................................................................18
Cafeteria Settings.................................................................................18
Using a Crusting Plate..........................................................................19
Using the Square metal tray and Rack ................................................20
Multistage Cooking...............................................................................22
Setting a Standing Time .......................................................................23
Choosing the Accessories....................................................................23
Preheating the Oven ............................................................................23
Cooking by Convection ........................................................................24
Grilling ..................................................................................................24
Choosing the Heating Element Position...............................................25
Spit-Roasting........................................................................................25
Using The Vertical Multi-Spit ................................................................26
Combining Microwaves and the Grill....................................................26
Combining Microwaves and Convection ..............................................27
Safety-locking Your Microwave Oven ..................................................28
Scroll Speed .........................................................................................28
Switching the Beeper Off......................................................................28
Manual Stop Turntable Function ..........................................................28
Cookware Guide...................................................................................29
Cooking Guide......................................................................................30
Cleaning Your Microwave Oven...........................................................41
Storing and Repairing Your Microwave Oven......................................42
Technical Specifications.......................................................................42
C139ST_GB.fm Page 2 Thursday, October 17, 2002 4:58 PM
“Quick” Look-up Guide
GB
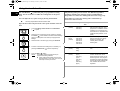
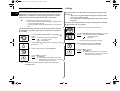
I want to cook some food
I want to add an extra 30 seconds
1. Turn the Cooking Control knob to the Microwave(
symbol.
2. Press the Select(
level is displayed.
Leave the food in the oven.
Press +30s( ) button one or more times for each extra
30 seconds that you wish to add.
)
) button until the appropriate power
✉
3. Select the cooking time by turning the dial knob as
required.
4. Press Start(
) button.
Result:
Cooking starts
◆ When cooking has finished, the oven will
beep and flash “0” four times. The oven will
then beep one time per minute.
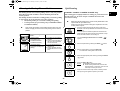
I want to defrost some food
1. Place the frozen food in the oven.
Turn the Cooking Control knob to the Defrost(
symbol.
)
2. Select the food category by pressing the Select( )
button, until the desired food category is selected.
3. Select the weight by turning the dial knob as required.
4. Press Start(
) button.
Result:
Defrosting starts
◆ When cooking has finished, the oven will
beep and flash “0” four times. The oven will
then beep once each minute thereafter.
2
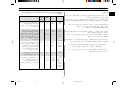
The first time you plug the power cord into an outlet, or after there
has been an interruption in power, the display shows “SELECT
YOUR LANGUAGE”. At this point, you must select a language for
the display. You can choose from English, French, German,
Spanish, Italian, Dutch and Russian. Please refer to page 8.
C139ST_GB.fm Page 3 Thursday, October 17, 2002 4:58 PM
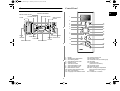
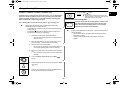
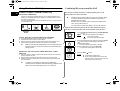
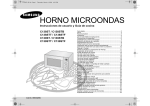
Oven
Control Panel
GB
HEATING ELEMENT
VENTILATION HOLES
HOLDER RACK
DOOR
HOLDER RACK
1
VENTILATION
HOLES
2
3
4
5
12
13
14
6
15
16
7
8
DOOR
HANDLE
TURNTABLE
DOOR LATCHES
COUPLER
ROLLER RING
17
18
CONTROL PANEL
9
SAFETY INTERLOCK
HOLES
19
10
11
20
21
1.
2.
3.
4.
5.
6.
7.
8.
9.
10.
11.
12.
3
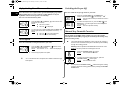
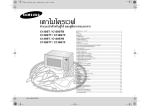
Display
Standing time setting button
Clock setting button
Auto defrost feature mode
Cafeteria mode
Junior/Snack mode
Auto reheat feature mode
Auto cook feature mode
Mode selection button
Preheat mode selection button
Stop / Cancel button
Language mode selection button
13.
14.
15.
16.
17.
18.
19.
20.
21.
Cooking Control knob
Microwave mode
Combined mode (microwave+grill)
Grill mode
Combined mode
(microwave+convection)
Convection mode
More/Less button
Start / cooking time adjustment
button and time setting weight
selection
Turntable on / off button
C139ST_GB.fm Page 4 Thursday, October 17, 2002 4:58 PM
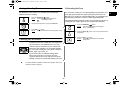
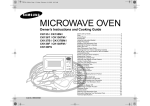
Accessories
GB
9. Glass bowl, to be placed on the turntable (C138STB/
C138STF/C139STB/ C139STF only).
Purpose: Roasting stand is placed on the glass bowl.
Depending on the model that you have purchased, you are supplied
with several accessories that can be used in a variety of ways.
1. Coupler, to be placed correctly over the motor shaft in the
base of the oven.
Purpose: The coupler rotates the turntable.
10. Crusting plate, to be placed on the turntable (C138STT/
C138STF/C139STT/ C139STF only).
Purpose: The crusting plate is used to brown food
better in the microwave or grill combination
cooking modes and to keep pastry and pizza
dough crisp.
2. Roller ring, to be placed in the center of the oven.
Purpose: The roller ring supports the turntable.
3. turntable, to be placed on the roller ring with the center
fitting on to the coupler.
Purpose: The turntable serves as the main cooking
surface; it can be easily removed for cleaning.
4. Metal racks (High rack, Low rack), to be placed on the
turntable.
Purpose: The metal racks can be used to cook two
dishes at the same time. A small dish may be
placed on the turntable and a second dish on
the rack. The metal racks can be used in
grill, convection and combination cooking.
5. Square Metal Rack, to be placed in the supporter rack.
Purpose: The square metal rack is used for the
convection cooking.(Refer to the page 20)
6. Square Metal Tray, to be placed in the supporter rack.
Purpose: The square metal rack is used for the
convection cooking.(Refer to the page 20)
7. Supporter Rack, to be placed in the right and left of the
oven.(Refer to the page 20)
Purpose: The square metal rack is used for the
convection cooking.
8. Roasting spit, Coupler Barbecue and Skewer, to be
placed in the glass bowl (C138STB/C138STF/C139STB/
C139STF only).
Purpose: The roasting spit is a convenient way of
barbecuing a chicken, as the meat does not
have to be turned over. It can be used for grill
combination cooking.
4
C139ST_GB.fm Page 5 Thursday, October 17, 2002 4:58 PM
Using this Instruction Booklet
PRECAUTIONS TO AVOID POSSIBLE EXPOSURE TO
EXCESSIVE MICROWAVE ENERGY
Thank you for purchasing a SAMSUNG microwave oven. Your
Owner’s Instructions contains much valuable information on cooking
with your new microwave oven:
• Safety precautions
• Accessories and cookware
• Useful cooking tips
Failure to observe the following safety precautions may result in harmful
exposure to microwave energy.
(a) Under no circumstances should any attempt be made to operate the oven with
the door open or to tamper with the safety interlocks (door latches) or to insert
anything into the safety interlock holes.
(b) Do not place any object between the oven door and front face, or allow food or
cleaner residues to accumulate on sealing surfaces. Ensure that the door and
door sealing surfaces are kept clean by wiping after use with first a damp cloth
and then a final wipe with a soft dry cloth.
(c) Do not operate the oven if it is damaged until it has been repaired by a
qualified microwave service technician trained by the manufacturer.
It is particularly important that the oven door closes properly and that there is
no damage to the:
(1) Door, door seals and sealing surfaces
(2) Door hinges (broken or loose)
(3) Power cable
(d) The oven should not be adjusted or repaired by anyone other than a properly
qualified microwave service technician trained by the manufacturer.
Inside the cover you will find a quick look-up guide explaining three
basic cooking operations:
• Cooking (microwave mode)
• Defrosting
• Adding an extra 30 seconds, if the dish is inadequately
cooked or requires additional reheating
At the end of the booklet you will find illustrations of the oven, and
more importantly the control panel, so that you can find the buttons
more easily.
The illustrations in the step-by-step procedures use two different
symbols.
☛
✉
Important
Note
5
GB
C139ST_GB.fm Page 6 Thursday, October 17, 2002 4:58 PM
Safety Precautions
GB
8. Take particular care when heating liquids and baby foods.
• ALWAYS allow a standing time of at least 20 seconds after the oven has
been switched off to allow the temperature to equalize.
• Stir during heating if necessary and ALWAYS stir after heating.
• To prevent eruptive boiling and possible scalding, you should stir before,
during, and after heating.
• In the event of scalding, follow these FIRST AID instructions :
* Immerse hand in cold water for at least 10 minutes.
* Cover with clean, dry dressing.
* Do not apply any creams, oils or lotions.
• NEVER fill the container to the top and choose a container that is wider at
the top than at the bottom to prevent the liquid from boiling over. Bottles
with narrow necks may also explode if overheated.
• ALWAYS check the temperature of baby food or milk before giving it to
the baby.
• NEVER heat a baby's bottle with the teat on, as the bottle may explode if
overheated.
• During microwave heating of beverages, there are results in delayed
eruptive boiling, therefore care has to be taken when handling the
container.
Important Safety Instructions.
Read Carefully and keep for future reference.
Before cooking food or liquids in your microwave oven, please check
that the following safety precautions are taken.
1. DO NOT use any metallic cookware in the microwave oven:
• Metallic containers
• Dinnerware with gold or silver trimmings
• Skewers, forks, etc.
Reason: Electric arcing or sparking may occur and may damage the oven.
2. DO NOT heat:
• Airtight or vacuum-sealed bottles, jars, containers. Ex) Baby food jars
• Airtight food. Ex) Eggs, nuts in shells, tomatoes
Reason: The increase in pressure may cause them to explode.
Tip:
Remove lids and pierce skins, bags, etc.
3. DO NOT operate the microwave oven when it is empty.
Reason: The oven walls may be damaged.
Tip:
Leave a glass of water inside the oven at all times. The water will
absorb the microwaves if you accidentally set the oven going when
it is empty.
9. Be careful not to damage the power cable.
• Do not immerse power cable or plug in water and keep power cable away
from heated surfaces.
• Do not operate this appliance if it has a damaged power cable or plug.
4. DO NOT cover the rear ventilation slots with cloths or paper.
Reason: The cloths or paper may catch fire as hot air is evacuated from the
oven.
10. Stand at arm’s length from the oven when opening the door.
Reason: The hot air or steam released may cause scalding.
5. ALWAYS use oven gloves when removing a dish from the oven.
Reason: Some dishes absorb microwaves and heat is always transferred
from the food to the dish. The dishes are therefore hot.
11. Keep the inside of the oven clean.
• Clean the inside of the oven right after each use with a mild detergent
solution, but let the microwave oven cool down before cleaning in order to
avoid injury.
Reason: Food particles or spattered oils stuck to oven walls or floor can
cause the damage of painting and reduce the efficiency of the oven.
6. DO NOT touch heating elements or interior oven walls.
Reason: These walls may be hot enough to burn skin even after cooking is
finished, oven though they do not appear to be so. Keep away from
hot spot. Do not allow inflammable materials to come into contact
with any interior area of the oven. Let the oven cool down first.
12. “Clicking” sound might be noticed while operating, especially in defrosting
mode.
Reason: When the power output is changing electrically, you may hear that
sound. This is normal.
7. To reduce the risk of fire in the oven cavity
• Do not store flammable materials in the oven
• Remove wire twist ties from paper or plastic bags
• Do not use your microwave oven to dry newspapers
• If smoke is observed, keep the oven door closed and switch off or
disconnect the oven from the power supply.
6
C139ST_GB.fm Page 7 Thursday, October 17, 2002 4:58 PM
Safety Precautions (continued)
Installing Your Microwave Oven
This microwave oven can be placed almost anywhere (kitchen work
surface or shelf, movable trolley, table).
13. If the microwave oven is operating without any load, the power will cut off
automatically for safety. After standing for over 30 min, you can operate the
oven normally.
• Do not worry is the oven continues to work after cooking has finished.
Reason: This product is designed to fan for some minutes, not operating
microwave oven(MWO), to cool down the inner electronic parts
when the stop button is pressed or the door is opened after finishing
cooking in case that the oven operates for some minutes in
cooking(MWO, GRILL, CONVECTION, MWO+GRILL, MWO+
CONVECTION). When cooking has finished, the oven will beep
and flash “0” four times. The oven will then beep one time per
minute.
20cm
above
85 cm
of the floor
10cm on
the side
1. When you install your oven, make sure there is adequate
ventilation for your oven by leaving at least 10 cm (4
inches) of space behind, and on the sides of the oven and
20 cm (8 inches) of space above the oven and 85 cm (33
inches) of the floor.
2. Remove all packing materials inside the oven.
Install the roller ring and turntable.
Check that the turntable rotates freely.
IMPORTANT SAFETY INSTRUCTIONS
3. This microwave oven has to be positioned so that plug is
accessible.
During cooking, you should look into the oven from time to time when food is
being heated or cooked in disposable containers of plastic paper or other
combustible material.
☛
WARNING:
Do not use the door or door seals are damaged, the oven must not be operated
until it has been repaired by a competent person.
☛
WARNING:
It is hazardous for anyone other than a comperent person to carry out any service
or repair operation which involves the removal of a cover which gives protection
against exposure to microwave energy.
☛
WARNING:
Liquids and other foods must not be heated in sealed containers since they are
liable to explode.
WARNING:
Only allow children to use the oven without supervicion when adequate
instructions have been given so that the child is able to use the oven in a safe
way and understands the hazards of improper use.
WARNING:
Oven casing and door will get hot during convection and combination cooking.
☛
10cm
behind
DO NOT operate the microwave oven without the coupler, roller
ring and turntable.
7
Never block the air vents as the oven may overheat and
automatically switch itself off. It will remain inoperable until it has
cooled sufficiently.
For your personal safety, plug the cable into a 3-pin, 230 Volt,
50Hz, AC earthed socket. If the power cable of this appliance is
damaged, it must be replaced by the manufacturer or its service
agent or a similarly qualified person in order to avoid a hazard.
Do not install the microwave oven in hot or damp surroundings
like next to a traditional oven or radiator. The power supply
specifications of the oven must be respected and any extension
cable used must be of the same standard as the power cable
supplied with the oven. Wipe the interior and the door seal with a
damp cloth before using your microwave oven for the first time.
GB
C139ST_GB.fm Page 8 Thursday, October 17, 2002 4:58 PM
GB
Selecting the Display Language
Setting the Time
The first time you plug the power cord into an outlet, or after there has
been an interruption in power, the display shows “SELECT YOUR
LANGUAGE”. At this point, you can select a language for the display.
You can choose from English, French, German, Spanish, Italian,
Dutch and Russian.
Your microwave oven has an inbuilt clock. The time can be displayed
in either the 24-hour or 12-hour notation. You must set the clock:
• When you first install your microwave oven
• After a power failure
✉
1. Press the Language button immediately after plugging in
your microwave, or immediately after a power shortage.
Result:
If you continue to press the Language button,
the settings will cycle in the following order:
ENGLISH(LBS), ENGLISH(KG), FRENCH,
GERMAN, SPANISH, ITALIAN, DUTCH,
RUSSIAN.
Do not forget to reset the clock when you switch to and from
summer or winter time.
1. To display the time in
the...
12-hour notation
24-hour notation
Then press the Clock(
button...
Once
Twice
2. Turn the dial knob to set the hour.
2. When you have selected the language and display you
want to use, press the Start(
) button to end this
procedure.
3. Press the Clock(
) button.
4. Turn the dial knob to set the minute.
5. When the right time is displayed, press the Clock( )
button to start the clock.
The time is displayed whenever you are not
Result:
using the microwave oven.
8
)
C139ST_GB.fm Page 9 Thursday, October 17, 2002 4:58 PM
How a Microwave Oven Works
Checking that Your Oven is Operating Correctly
Microwaves are high-frequency electromagnetic waves; the energy
released enables food to be cooked or reheated without changing
either the form or the colour.
The following simple procedure enables you to check that your oven is GB
working correctly at all times. If you are in doubt, refer to the section
entitled “What to Do if You are in Doubt or Have a Problem” on the
page.
You can use your microwave oven to:
• Defrost
• Reheat
• Cook
✉
Cooking Principle
Open the oven door by pulling the handle on the right side of the door.
Place a glass of water on the turntable. Close the door.
1. The microwaves generated by the magnetron are
distributed uniformly as the food rotates on the
turntable. The food is thus cooked evenly.
1. Press the Start ( ) button and set the time to 4 or 5
minutes, by pressing the Start ( ) button the appropriate
number of times.
Result:
The oven heats the water for 4 or 5 minutes.
The water should then be boiling.
2. The microwaves are absorbed by the food up to a
depth of about 1 inch (2.5 cm). Cooking then
continues as the heat is dissipated within the food.
3. Cooking times vary according to the container used
and the properties of the food:
• Quantity and density
• Water content
• Initial temperature (refrigerated or not)
☛
The oven must be plugged into an appropriate wall socket. The
turntable must be in position in the oven. If a power level other
than the maximum (100% - 900 W) is used, the water takes
longer to boil.
As the centre of the food is cooked by heat dissipation, cooking
continues even when you have taken the food out of the oven.
Standing times specified in recipes and in this booklet must
therefore be respected to ensure:
• Even cooking of the food right to the centre
• The same temperature throughout the food
9
C139ST_GB.fm Page 10 Thursday, October 17, 2002 4:58 PM
What to Do if You are in Doubt or You have a Problem
GB
Becoming familiar with a new appliance always takes a little time. If
you have any of the problems listed below, try the solutions given. They
may save you the time and inconvenience of an unnecessary service
call.
If the above guidelines do not enable you to solve the problem, then
contact your local Samsung customer service centre.
Please have the following information read;
• The model and serial numbers, normally printed on the rear
of the oven
• Your warranty details
• A clear description of the problem
◆ The following are normal occurrences.
• Condensation inside the oven
• Air flow around the door and outer casing
• Light reflection around the door and outer casing
• Steam escaping from around the door or vents
Then contact your local dealer or SAMSUNG aftersales service.
◆ The food is not cooked at all
• Have you set the timer correctly and pressed the Start (
) button?
• Is the door closed?
• Have you overloaded the electric circuit and caused a fuse to blow or a
breaker to be triggered.
◆ The food is either overcooked or undercooked
• Was the appropriate cooking length set for the type of food?
• Was an appropriate power level chosen?
◆ Sparking and cracking occur inside the oven (arcing)
• Have you used a dish with metal trimmings?
• Have you left a fork or other metal utensil inside the oven?
• Is aluminium foil too close to the inside walls?
◆ The oven causes interference with radios or televisions
• Slight interference may be observed on televisions or radios when the
oven is operating. This is normal.
* Solution: Install the oven away from televisions, radios and aerials.
• If interference is detected by the oven’s microprocessor, the display may
be reset.
* Solution: Disconnect the power plug and reconnect it. Reset the time.
◆ “E3" message indicates
• The "E3" message is automatically activated prior to the microwave oven
overheating. Should the "E3" message be activated, then depress the
" " key to utilize the initialization mode.
10
C139ST_GB.fm Page 11 Thursday, October 17, 2002 4:58 PM
Cooking/Reheating
Power Levels and Time Variations
The following procedure explains how to cook or reheat food.
The power level function enables you to adapt the amount of energy
dissipated and thus the time required to cook or reheat your food,
according to its type and quantity. You can choose between six power
levels.
☛
ALWAYS check your cooking settings before leaving the oven
unattended.
Open the door. Place the food in the centre of the turntable. Close the
door. Never switch the microwave oven on when it is empty.
1. Turn the Cooking Control knob to the Microwave(
symbol.
Result:
The following indications are displayed:
(one-stage cooking)
(microwave mode)
)
2. Select the appropriate power level by pressing the Select
(
) button again until the corresponding output power is
displayed. Refer to the power level table below for further
details.
4. Press the Start (
) button.
Result:
The oven light comes on and the turntable starts
rotating. Cooking starts and when it has
finished:
◆ When cooking has finished, the oven will
beep and flash “0” four times. The oven will
then beep one time per minute.
✉
Percentage
Output
HIGH
MEDIUM HIGH
MEDIUM
MEDIUM LOW
DEFROST
LOW
100%
67%
50%
33%
20%
11%
900W
600W
450W
300W
180W
100W
The cooking times given in recipes and in this booklet correspond to
the specific power level indicated.
3. Set the cooking time by turning the dial knob.
• Example: For a cooking time of 3 minutes, 30 seconds,
turn the dial knob to the right to set 3:30.
Result:
The cooking time is displayed.
✉
Power Level
If you would like to know the current Power
Level of the oven cavity, press Select ( )
button once. If you would like to change the
power level during cooking, press the Select
( ) button twice or more times to select the
desired power level.
If you wish to heat a dish for a short period of time at maximum
power (900W), you can also simply press the Start ( ) button
once for each 30 seconds of cooking time. The oven starts
immediately.
11
If you select a...
Then the cooking time must be...
Higher power level
Lower power level
Decreased
Increased
GB
C139ST_GB.fm Page 12 Thursday, October 17, 2002 4:58 PM
GB
Stopping the Cooking
Adjusting the Cooking Time
You can stop cooking at any time so that you can:
• Check the food
• Turn the food over or stir it
• Leave it to stand
Like traditional cooking, you may find that, depending on the food’s
characteristics or your tastes, you have to adjust the cooking times
slightly. You can:
• Check how cooking is progressing at any time simply by
opening the door
• Increase or decrease the remaining cooking time
To stop the cooking...
Then...
Temporarily
Open the door.
Result:
Cooking stops.
1. To increase the cooking time of your food, press the
Start( ) button once for each 30 seconds that you wish
to add.
• Example: To add three minutes, press the Start( )
button six times.
To resume cooking, close the door again and
press the Start(
) button.
Completely
2. During the cooking, to increase or decrease the cooking
time of your food, turn the dial knob right or left.
Press the Stop(
) button.
Cooking stops.
Result:
If you wish to cancel the cooking settings, press
the Stop(
) button again.
12
C139ST_GB.fm Page 13 Thursday, October 17, 2002 4:58 PM
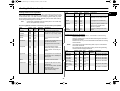
Using the Auto Cook Feature
The Auto Cook(
) feature has four pre-programmed cooking times.
You do not need to set either the cooking times or the power level.
The following table presents various Auto Cook Programmes,
quantities, standing times and appropriate recommendations.
Programmes no 1 and 3 use a combination of microwaves and grill
cooking.
You can adjust the size of the serving by turning the dial knob.
☛
Programmes no 2 cooks using a microwave and convection
combination. And programme no 4 uses a combination of microwaves,
convection and microwaves & grill.
Use only recipients that are microwave-safe.
Open the door. Place the food in the centre of the turntable. Close the
door.
1. Turn the Cooking Control knob to the Auto Cook(
symbol.
Code Food
Serving Size
Standing
Time
Recommendations
1
Jacket
Potatoes
2 x 200 g
4 x 200 g
6 x 200 g
4-5 min
Take potatoes with similar size
and weight of circa 200g per
potato. Wash and prick the skin
with a fork. Put 2 potatoes
opposite to each other and 4 or 6
potatoes in a circle on the high
rack. Turn over, when the oven
beeps.
2
Roast
Chicken
700 g
900 g
1100 g
1300 g
1500 g
1700 g
1900 g
5-10 min
Brush the chicken with oil and
spice it with pepper, salt and
paprika. Put it on the low rack
with the breast-side down. Turn
over, when the oven beeps.
3
Chicken
Pieces
200-300 g
400-500 g
600-700 g
800-900 g
3 min
Brush the chicken pieces with oil
and spice them with pepper, salt
and paprika. Put them on the high
rack with the skin-side down.
Turn over, when the oven beeps.
4
Roast Beef/
900-1000 g 10-15 min Brush the beef/lamb with oil and
spices (pepper only, salt should
Roast Lamb 1200-1300 g
be added after roasting).
1400-1500 g
Put it on the low rack with the fatside down. Turn over, when the
oven beeps. After roasting and
during standing time it should be
wrapped in aluminium foil.
)
2. Select the type of food that you are cooking by pressing
the Select ( ) button. Refer to the table on the following
page for a description of the various pre-programmed
settings.
3. Select the size of the serving by turning the dial knob.
4. Increase or decrease the cooking time, if necessary, by
pressing the More/Less ( ) buttons respectively.
5. Press the Start (
) button.
Result:
The food is cooked according to the preprogrammed setting selected.
◆ When cooking has finished, the oven will
beep and flash “0” four times. The oven will
then beep one time per minute.
13
GB
C139ST_GB.fm Page 14 Thursday, October 17, 2002 4:58 PM
Using the Auto Reheat Feature
GB
The Auto Reheat(
) feature has four pre-programmed cooking
times. You do not need to set either the cooking times or the power
level.
The following table presents various Auto Reheat Programmes,
quantities, standing times and appropriate recommendations.
Programmes no 1 and 2 are running with microwave energy only.
You can adjust the size of the serving by turning the dial knob.
Programmes no 3 and 4 are running with a combination of
microwaves and convection.
☛
Use only recipients that are microwave-safe.
Code Food
Open the door. Place the food in the centre of the turntable. Close the
door.
Serving Size
Standing
Time
Recommendations
3 min
Put on a ceramic plate and cover
with microwave cling film. This
programme is suitable for meals
consisting of 3 components (e.g.
meat with sauce, vegetables and
a side dish like potatoes, rice or
pasta).
1
Ready-Meal 300-350 g
(chilled)
400-450 g
500-550 g
2
Soup/
Sauce
(chilled)
200-250 ml
300-350 ml
400-450 ml
500-550 ml
600-650 ml
700-750 ml
2-3 min
Pour into a deep ceramic soup
plate or bowl and cover during
heating and standing. Stir
carefully before and after
standing time.
4. Increase or decrease the cooking time, if necessary, by
pressing the More/Less ( ) buttons respectively.
3
Pizza
(frozen)
300 g
400 g
500 g
-
Place frozen pizza on the high
rack.
5. Press the Start (
) button.
Result:
The food is cooked according to the preprogrammed setting selected.
◆ When cooking has finished, the oven will
beep and flash “0” four times. The oven will
then beep one time per minute.
4
Bread Rolls
(frozen)
100-150 g
(2pcs)
200-250 g
(4pcs)
300-350 g
(6pcs)
400-450 g
(8pcs)
3-5 min
Put 2 to 6 frozen bread rolls in a
circle on the low rack. Put 8
frozen bread rolls equally on the
low and high rack. This program
is suitable for small frozen bakery
products like ready baked bread
rolls, ciabatta rolls and small
baguettes.
1. Turn the Cooking Control knob to the Auto Reheat
(
) symbol.
2. Select the type of food that you are cooking by pressing
the Select ( ) button. Refer to the table on the following
page for a description of the various pre-programmed
settings.
3. Select the size of the serving by turning the dial knob.
14
C139ST_GB.fm Page 15 Thursday, October 17, 2002 4:58 PM
Using the Auto Defrost Feature
The Auto Defrost( ) feature enables you to defrost steaks/ chops/
minced meat/ chicken pieces, meat joint, chicken, fish, bread and cake.
The defrost time and power level are set automatically. You simply
select the programme and the weight.
☛
The following table presents the various Auto Defrost programmes,
GB
quantities, standing times and appropriate recommendations. Remove
all kind of package material before defrosting. Place meat, poultry and
fish on a flat ceramic plate.
Code Food
Use only containers that are microwave-safe.
Open the door. Place the frozen food in the center of the turntable.
Close the door.
1. Turn the Cooking Control knob to the Auto Defrost (
symbol.
5. Press the Start (
) again to finish defrosting.
Result:
When cooking has finished, the oven will beep
and flash “0” four times. The oven will then beep
one time per minute.
☛
You can also defrost food manually. To do so, select the
microwave cooking/reheating function with a power level of 180
W. Refer to the section entitled “Cooking/Reheating” on page 11
for further details.
15
Recommendations
200-1200g 10 - 60 min.
Steaks/
Chops/
Minced Meat/
Chicken
Pieces
2
Meat Joint
600-2000g 20 - 90 min. Shield the edges with aluminium
foil.
When the oven beeps, turn the
meat joint over.
This programme is suitable for a
joint of meat (pork, beef, lamb) or
a lamb leg.
3
Chicken
600-2000g 20 - 60 min. Shield the leg and wing tips with
aluminium foil and put the
chicken first breast-side down.
When the oven beeps, turn the
chicken over.
This programme is suitable for
whole chicken.
4
Fish
200-2000g 20 - 50 min. Shield the tail of a whole fish with
aluminium foil.
When the oven beeps, turn the
fish over.
This programme is suitable for
whole fishes as well as for fish
fillets.
3. Select the food weight by turning the dial knob.
4. Press Start ( ) button.
Result:
◆ Defrosting begins.
◆ The oven beeps half way through defrosting
to remind you to turn the food over.
Standing
Time
1
)
2. Select the type of food that you are cooking by pressing
the Select ( ) button. Refer to the table on the following
page for a description of the various pre-programmed
settings.
Serving
Size
Shield the edges with aluminium
foil.
When the oven beeps, turn the
plieces over.
This programme is suitable for
flat pieces of meat or poultry, like
steaks, chops, chicken legs,
chicken or duck breast and
minced meat.
C139ST_GB.fm Page 16 Thursday, October 17, 2002 4:58 PM
Using the Auto Defrost Feature (continued)
GB
Code Food
Serving
Size
5
100-1000g 5 - 20 min.
6
Bread
Cake
Standing
Time
100-1500g 5 - 60 min.
Using the Junior/Snack Cook Feature
The Junior/Snack(
) Cook feature has six pre-programmed
cooking time, you do not need to set either the cooking time or power
level.
Recommendations
Put bread slices horizontally on a
piece of kitchen paper and turn
over, as soon as the oven beeps.
This programme is suitable for
all kinds of bread, sliced or
whole, as well as for bread rolls
and baguettes.
Arrange bread rolls in a circle.
You can adjust the number of servings by turning the dial knob.
First, place the food in the centre of the turntable and close the door.
1. Turn the Cooking Control knob to the Junior/Snack
(
) symbol.
2. Select the type of food that you are cooking by pressing
the Select ( ) button. Refer to the table on the following
page for a description of the various pre-programmed
settings.
Place cake on a turntable. This
programme is suitable for all
kinds of yeast cake, sponge
cake, cheese cake, puff pastry,
fruit cake and cream cake rolls. It
is not suitable for gateaux or
cake with cream or chocolate
topping and icing.
3. Select the size of the serving by turning the dial knob.
4. Increase or decrease the cooking time, if necessary, by
pressing the More/Less ( ) buttons respectively.
5. Press Start ( ) button.
Result:
The food is cooked according to the preprogrammed setting selected.
◆ When cooking has finished, the oven will
beep and flash “0” four times. The oven will
then beep one time per minute.
16
C139ST_GB.fm Page 17 Thursday, October 17, 2002 4:58 PM
Using the Junior/Snack Cook Feature (continued)
The following table presents Auto Programmes for types of food and
snacks which are favoured by children and for trendy finger food. It
contains its quantities, standing times and appropriate
recommendations.
5
Popcorn
100 g
-
Use special popcorn product for
preparing in microwave oven.
Follow the instructions of food
manufacturer and put the bag in the
centre of turntable.
During this programme corn will pop
and the bag will increase in volume.
Be careful when taking out and
opening the hot bag.
6
Nachos
125 g
-
Put nachos (tortilla chips) on a flat
ceramic plate.
Put 50g grated cheddar cheese and
spices on top. Place on turntable.
Programmes no 1, 2, 5 and 6 are running with microwave energy only.
Programme no 3 is running with a combi-nation of microwaves and
grill. Programme no 4 is running with a combination of microwaves
and convection.
Code Food
Serving
Size
Standing Recommendations
Time
1
150 g
(1pc)
1-2 min
Hamburger
(chilled)
300 g
(2pcs)
2
Mini Ravioli
(chilled)
200-250 g 3 min
300-350 g
3
Frozen
Chicken
Wings
200-250 g 2 min
300-350 g
400-450 g
4
Frozen
Pizza
Snacks
150 g
(4-6pcs)
250 g
(7-9pcs)
-
Put hamburger (bread roll with slice
of beef) or cheeseburger on kitchen
paper.
Put one hamburger in the centre of
turntable, put two hamburgers
opposite to each other on turntable.
After reheating garnish with lettuce,
tomato slice, dressing and spices.
Put chilled ready mini ravioli in a
microwave proof plastic dish in the
centre of turntable.
Pierce film of ready product or cover
plastic dish with microwave wrap.
Stir carefully before and after
standing time.
This programme is suitable for ravioli,
as well as for noodles in sauce.
Put the frozen ready chicken wings or
small drumsticks (pre-cooked and
spiced) on the metal rack with the
skin-side down.
Put them in a circle and leave the
centre clear.
Turn over when the oven beeps.
Put the frozen pizza snacks or mini
quiches evenly on rack.
17
GB
C139ST_GB.fm Page 18 Thursday, October 17, 2002 4:58 PM
GB
Using the Cafeteria Feature
Cafeteria Settings
With the Cafeteria(
The following table presents Auto Programmes for Reheat of drinks
and defrosting & warming frozen cake.
) feature, the cooking time is set automatically.
You can adjust the number of servings by turning the dial knob.
Programme no 1 use the microwave only mode. Programme no 2 uses
a combination of microwaves and convection mode.
First, place the food in the centre of the turntable and close the door.
1. Turn the Cooking Control knob to the Cafeteria (
symbol.
)
Button Food
2. Select the type of food that you are cooking by pressing
the Select ( ) button. Refer to the table on the following
page for a description of the various pre-programmed
settings.
1
Drinks
Coffee, milk,
tea, water
(roomtemperature)
2
Frozen Cake
3. Select the size of the serving by turning the dial knob.
4. Increase or decrease the cooking time, if necessary, by
pressing the More/Less ( ) buttons respectively.
5. Press Start ( ) button.
The food is cooked according to the preResult:
programmed setting selected.
◆ When cooking has finished, the oven will
beep and flash “0” four times. The oven will
then beep one time per minute.
18
Serving Size Standing
Time
150 ml
(1 cup)
300 ml
(2 cups)
450 ml
(3 cups)
600 ml
(4 cups)
Recommendations
1-2 mins Pour the liquid into ceramic cups
only and reheat uncovered.
Place one cup in the centre, 2
cups opposite to each other and
3 or 4 cups in a circle.
Leave them to stand in the
microwave oven.
Stir drinks before and after
standing time.
Be careful while taking the cups
out (see safety instructions for
liquids).
200-300 g 5-15 mins
400-500 g
600-700 g
800-900 g
1000-1100 g
1200-1300 g
Place frozen cake in the middle
of the rack, alternatively place
frozen cake pieces in a circle on
low rack.
Place the rack in the middle of
the turntable.
This programme is not suitable
for cakes with cream fillings or
chocolate toppings.
C139ST_GB.fm Page 19 Thursday, October 17, 2002 4:58 PM
Using a Crusting Plate
C138STT / C138STF / C139STT / C139STF only
8. Press the Start ( ) button.
GB
Result:
Cooking starts.
◆ When cooking has finished, the oven will
beep and flash “0” four times. The oven will
then beep one time per minute.
Normally when cooking food in just a microwave oven, or through the
microwave mode in grill/convection ovens, foods that are made with
pastries normally become soggy. Using the Samsung Crusting plate
helps maintain the crispiness of your food
How to clean the crusting plate
The best way to clean the crusting plate is to wash it with
hot water and detergent and then rinse if off with clean
water. Do not use a scrubbing brush or a hard sponge
otherwise the top layer will be damaged.
The crusting plate can also be used for bacon, eggs, sausages, etc.
☛
Before using the crusting plate, preheat it by selecting the
combination mode for 3 to 5 minutes:
• Combination of convection (250°C) and microwaves (600 W
power level) or
• Combination of grill and microwaves (600 W power level)
• See page 26 and page 27 respectively.
☛
1. Preheat the crusting plate, as described above.
• Use oven gloves at all times as the crusting plate will
become very hot.
2. Brush the plate with oil if you are cooking food, such as
bacon and eggs, in order to brown the food nicely.
3. Place the food on the crusting plate.
• Do not place any recipients on the crusting plate that
are not heat-resistant (plastic bowls for example).
4. Place the crusting plate on the turntable in the microwave
oven.
• Never place the crusting plate in the oven without the
turntable.
5. Turn the Cooking Control knob to the Combi (
symbol.
)
6. Select the appropriate power level by pressing the Select
(
) button.
7. Then set the cooking time by turning the dial knob until
the appropriate cooking time is displayed.
19
As the crusting plate has a Teflon layer, if you use it incorrectly, it
can be damaged.
• Never cut the food on the plate. Remove the food from the
plate prior to cutting.
• Turn the food over preferably with a plastic or wooden
spatula.
C139ST_GB.fm Page 20 Thursday, October 17, 2002 4:58 PM
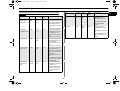
Using the Square metal tray and Rack
GB
Convection Guide for baking Pizza, Croissants, Bread Rolls and Cake
using fresh dough.
The Square metal rack or tray is useful for cake, pizza, cookies, etc..
It can be used for convection cooking.
☛
Set turntable-off-function when using rectangular square metal tray and
rack. Use multistage accessory only with convection mode. Preheat the
convection with the auto preheat function to the desired temperature, unless
we recommend not to preheat the oven- see table.
Use the cooking times and instructions in this table as guide lines for convection
baking.
Fresh Food Portion Auto
Stage Power Time Instructions
(min.)
Preheat (From
below)
Always use oven gloves when touching the recipients in the oven.
1. Open the door.
Hang the supporter rack on the holder rack that is located
on the left and the right inside of the microwave oven.
2. Put food for cooking on the square metal rack or tray,
insert the square rack between the supporter racks.
☛
You can put uncovered foods with any vessel
on the square metal rack or tray.
Pizza
800 g
200°C
3
200°C 20-25 Put fresh pizza dough (300
g) flat on square metal tyar.
Distribute topping e.g.
tomato sauce, vegetables
and cheese evenly on top.
Bread Rolls 400 g 180°C
(8 pcs)
(chilled
fresh yeast
dough)
3
180°C 14-16 Arrange bread rolls evenly
on square metal tyar.
Croissants 250 g 180°C
(6 pcs)
(chilled
dough)
3
180°C 10-13 Arrange fresh croissants
evenly on square metal
tyar.
Loaf Mould 700 g
Cake
(Marble
Cake)
-
2
160°C 55-60 Put fresh dough in
rectangular black metal
dish (length 25 cm). Set
dish widthways in the
middle of rack.
Dutch
Butter
Cake
(batter
cake)
800 g
-
2
160°C 55-65 Put fresh dough in
rectangular glass pyrex
dish (length 28 cm). Set
dish widthways in the
middle of rack.
Sponge
Cake
700 g
-
2
160°C 35-40 Put the fresh dough in a
round glass pyrex dish or
black metal dish.
Put cake in the centre of
oven on rack.
Close the door.
3. Turn the Cooking Control knob to the Convection (
symbol.
)
4. Press the Select(
) button once or more times to set the
temperature.
Refer to the table on the following page for a description of
the various pre programmed settings.
5. Set the cooking time by turning the dial knob.
6. Press the Start (
) button.
Result:
Cooking starts:
◆ When cooking has finished, the oven will
beep and flash “0” four times. The oven will
then beep one time per minute.
✉
Only use them in the Convection mode.
Separate from the Microwave oven except the Convection model
and keep them well.
20
C139ST_GB.fm Page 21 Thursday, October 17, 2002 4:58 PM
Using the Square metal tray and Rack (continued)
Convection Guide for baking Pizza, Croissants, Bread Rolls and Cake
using fresh dough (continued).
Fresh
Food
Portion
Hazel-nut 800 g
Cake
Sponge
Cake
Base
(Swiss
Roll)
300 g
Apple
Sheet
Cake
1500 g
Muffins
Cookies
Auto
Stage Power
Preheat (From
below)
Time Instructions
(min.)
-
60-65 Put the fresh dough
in a round black
metal dish (Ø 24
cm). Set cake in the
middle of oven on
rack.
180°C
180°C
500-600 g 180°C
(12 pcs)
300 g
(30 pcs)
180°C
2
4
3
4
4
160°C
180°C
180°C
180°C
Convection Guide for ready products like Pizza, Potato Snacks and
Pasta
Set turntable-off-function when using rectangular square metal tyar and
rack.
Use multistage accessoiry only with convection mode.
Preheat the convection with the preheating function to the desired
temperature, unless we recommend not to preheat the oven- see table.
Use the cooking times and instructions in this table as guide lines for convection
baking
Fresh Food Portion Auto
Stage Power Time Instructions
(min.)
Preheat (From
below)
10-12 Put dough evenly on
baking paper on
square metal tyar.
22-25 Put fresh dough (600
g) flat on square
metal tyar. Put sliced
apples on top.
Add almonds slices
or crumbles.
18-21 Fill muffins dough
evenly in a metal
muffin mould,
suitable for 12
muffins.
Set dish on rack.
160-180°C 12-15 Put cookies evenly
on baking paper on
square metal tyar.
21
Frozen
Pizza
1000 g 200°C
2
200°C 22-25 Put the frozen Pizza on the
rack.
Frozen
Oven
Chips
500 g
220°C
3-4
220°C 25-28 Distribute oven chips
evenly on square metal
tyar. Turn over several
times.
Frozen
500 g
Croquettes
180°C
3
180°C 13-16 Distribute croquettes
evenly on square metal
tyar. Turn over after half of
time.
Frozen
Potato
Waffles
500 g
200°C
3
200°C 20-25 Put potato waffles evenly
on square metal tyar. Turn
over after half of time.
Frozen
Mini
Vegetable
Rolls
(Chinese
style)
250 g
220°C
4
220°C 10-12 Distribute mini vegetable
rolls evenly on square
metal tyar.
Turn over after half of time.
Fresh
Lasagne
(chilled)
1000 g 220°C
3
200°C 25-30 Put lasagne in a suitable
sized dish (heatproof) in
the centre of rack.
GB
C139ST_GB.fm Page 22 Thursday, October 17, 2002 4:58 PM
Multistage Cooking
GB
7. Set the microwave power level by pressing the Select
( ) button to select the appropriate Power Level (450W
in the example)
Your microwave oven can be programmed to cook food in up to four
stages (the Convection , Microwave+Convection and Preheat mode
can not be used in Multistage cooking). Example: You wish to defrost
food and cook it without having to reset the oven after each stage. You
can thus defrost and cook a 1.8 kg chicken in four stages:
• Defrosting
• Standing for 20 minutes
• Microwave cooking for 30 minutes
• Grill for 15 minutes
☛
8. Set the cooking time by turning the dial knob (30 minutes
in the example).
9. Turn the Cooking Control knob to the Grill (
Defrosting and standing must be the first two stages. Combination
and Grill can only be used once during the remaining two stages,
However microwave can be used twice(at two different power
levels).
) symbol.
10. Set the cooking time by turning the dial knob the
appropriate number of times (15 minutes in the example).
1. Turn the Cooking Control knob to the Auto Defrost
(
) symbol.
11. Press Start ( ) button.
Cooking starts:
Result:
◆ When cooking has finished, the oven will
beep and flash “0” four times. The oven will
then beep one time per minute.
2. Select the type of food that you are cooking by pressing
the Select ( ) button.
3. Set the weight by turning the dial knob the appropriate
number of times (1800 g in the example).
4. Press the Hold/Delay(
) button.
5. Set the standing time by turning the dial knob the
appropriate number of times (20 minutes in the example).
6. Turn the Cooking Control knob to the Microwave (
symbol.
)
22
C139ST_GB.fm Page 23 Thursday, October 17, 2002 4:58 PM
Setting a Standing Time
Preheating the Oven
The Hold Time can be used to set a standing time automatically
(without microwave cooking).
For convection cooking, it is recommended that you preheat the oven
to the appropriate temperature before placing the food in the oven.
When the oven reaches the requested temperature, it is maintained for
approximately 10 minutes; it is then switched off automatically.
1. Press the Hold/Delay ( ) button.
The following indication isdisplayed :
Result:
(Hold/Delay mode)
Check that the heating element is in the correct position for the type of
cooking that you require. Open the door and place the turntable.
2. Select the standing time by turning the dial knob.
1. Press the PREHEAT(
) button.
Result:
The following indications are displayed:
250°C (temperature)
3. Press Start ( ) button.
The oven beeps when the standing time is over.
Result:
2. Press the Select(
temperature.
3. Press the Start ( ) button.
Result:
The oven is preheated to the requested
temperature.
Choosing the Accessories
Traditional convection cooking does not require any
special cookware. You should, however, use only
cookware that you would use in your normal oven.
Microwave-safe cantainers are not usually suitable
for convection cooking; don’t use plastic containers,
dishes, paper cups, towels, etc.
If you wish to select a combined cooking mode
(microwave and grill or convection), use only
recipients that are microwave-safe and oven-proof.
Metallic cookware or utensils may damage your oven.
☛
) button once or more times to set the
For further details on suitable cookware and utensils, refer to the
Cookware Guide on page 29 .
23
GB
C139ST_GB.fm Page 24 Thursday, October 17, 2002 4:58 PM
GB
Cooking by Convection
Grilling
The convection mode enables you to cook food in the same way as in a
traditional oven. The microwave mode is not used. You can set the
temperature, as required, in a range varying from 40°C to 250°C in
eight preset levels. The maximum cooking time is 60 minutes.
The grill enables you to heat and brown food quickly, without using
microwaves.
• Always use oven gloves when touching the recipients in the
oven, as they will be very hot.
• You can get better cooking and grilling results, if you use the
high rack.
☛
If you wish to preheat the oven, see page 23.
• Always use oven gloves when touching the recipients in the
oven, as they will be very hot.
• You can get better cooking and browning, if you use the low
rack.
Check that the heating element is in the horizontal position, and that
the appropriate rack is in position.
1. Open the door and place the food on the rack.
Check that the heating element is in the horizontal position and that
the turntable is in position. Open the door and place the recipient on
the turntable.
1. Turn the Cooking Control knob to the Convection (
symbol.
The following indications are displayed:
Result:
(convection mode)
250°C (temperature)
2. Press the Select(
temperature.
2. Turn the Cooking Control knob to the Grill ( ) symbol.
Result:
The following indications are displayed:
(one-stage cooking)
(grill mode)
)
•
) button once or more times to set the
3. Set the grilling time by turning the dial knob.
• The maximum grilling time is 60 minutes.
3. Set the cooking time by turning the dial knob.
4. Press the Start ( ) button.
Result:
Grilling starts:
◆ When cooking has finished, the oven will
beep and flash “0” four times. The oven will
then beep one time per minute.
4. Press the Start (
) button.
Cooking starts:
Result:
◆ When cooking has finished, the oven will
beep and flash “0” four times. The oven will
then beep one time per minute.
✉
You cannot set the temperature of the grill.
You can check the temperature at any time by pressing the
Language button.
24
C139ST_GB.fm Page 25 Thursday, October 17, 2002 4:58 PM
Choosing the Heating Element Position
Spit-Roasting
The heating element is used when grilling. There is only one position
listed. We need to tell consumers when it should be placed in the
vertlcal position.
C138STB / C138STF / C139STB / C139STF only
The heating element is used when cooking food by convection, grilling
or spit roasting. It can be placed in one of two positions:
• Horizontal position for convection cooking and grilling
• Vertical position for spit roasting only (C138STB/C138STF/
C139STB/C139STF)
☛
☛
Only change the position of the heating element when it is cold
and do not apply excessive force when placing it in the vertical
position.
To set the heating element
to the...
Then...
Vertical position
(spit roasting only :
C138STB/C138STF/
C139STB/C139STF)
◆ Pull down on the heating
element
◆ Push it towards the back of
the oven until it is parallel
with the back wall
Horizontal position
(convection cooking and
grilling)
◆ Pull the heating element
towards you
◆ Push it upwards until it is
parallel with the roof of the
oven
GB
The roasting spit is useful for barbecue cooking, as you do not need to
turn the meat over. It can be used for combined microwave and
Convection cooking.
Make sure that the weight of the meat is evenly distributed on the
spit and that the spit rotates freely.
Always use oven gloves when touching the recipients in the oven,
as they will be very hot.
1. Push the roasting spit through the centre of the meat.
Example: Push the spit between the backbone and breast
of a chicken.
Place the spit on its stand and place the stand onto the
glass bowl and the glass bowl onto the turntable. To help
brown the meat, brush it with cooking oil.
2. Turn the Cooking Control knob to the Combi (
symbol.
3. Set the temperature by pressing the Select (
)
) button.
4. Set the cooking time by turning the dial knob.
• The maximum cooking time is 60 minutes.
5. Select the appropriate power level by pressing the Select
( ) button.
6. Press the Start ( ) button.
Result:
Cooking starts and the spit rotates.
◆ When cooking has finished, the oven will
beep and flash “0” four times. The oven will
then beep one time per minute.
7. When the meat has been fully cooked, carefully remove
the spit, using oven gloves to protect your hands.
25
C139ST_GB.fm Page 26 Thursday, October 17, 2002 4:58 PM
GB
Using The Vertical Multi-Spit
Combining Microwaves and the Grill
C138STB / C138STF / C139STB / C139STF only
You can also combine microwave cooking with the grill, to cook
quickly and brown at the same time.
MULTI-SPIT FOR KEBAB
Using the multi-spit with 6 kebab skewers you can easily barbecue meat,
poultry, fish, vegetables (like onions, peppers or courgettes) and fruit which
have been cut into pieces.
You can prepare the above food with the kebab skewers by using convection
or combination mode.
☛
+
Coupler
Barbecue,
Skewer,
Multi-Spit
Roasting-Spit
Open the door. Place the food on the rack best suited to the type of
food to be cooked. Place the rack on the turntable. Close the door.
Glass Bowl
1. Turn the Cooking Control knob to the Combi (MW+Grill
) symbol.
Result:
The following indications are displayed:
(one - stage cooking)
(microwave & grill combi mode)
USE OF THE MULTI-SPIT WITH KEBAB SKEWERS
1.
2.
3.
4.
For preparing kebabs with the multi-spit use the 6 skewers.
Put the same amount of food on each skewer.
Place the roasting- spit into the glass bowl and insert the multi-spit into it.
Put the glass bowl with the multi-spit in the centre of the turntable.
✉
2. Select the appropriate power level by pressing the Select
( ) button until the corresponding output power is
displayed (300-600W).
• You cannot set the temperature of the grill.
Make sure that the grill heating element is in the right position at
the back wall of the cavity and not at the top before starting the
grilling process.
3. Set the cooking time by turning the dial knob.
• The maximum cooking time is 60 minutes.
REMOVING THE MULTI-SPIT FROM THE OVEN AFTER
GRILLING
4. Press the Start ( ) button.
Result:
◆ Combination cooking starts.
◆ When cooking has finished, the oven will
beep and flash “0” four times. The oven will
then beep one time per minute.
1. Use oven gloves for taking for glass bowl with the multi-spit out of the oven,
because it will be very hot.
2. Remove multi-spit out of the spit stand by using oven gloves as well.
3. Carefully remove the skewers and use a fork for removing the food pieces
from the skewers.
✉
ALWAYS use microwave-safe and oven-proof cookware. Glass
or ceramic dishes are ideal as they allow the microwaves to
penetrate the food evenly.
ALWAYS use oven gloves when touching the recipients in the
oven, as they will be very hot.
You can improve cooking and grilling, if you use the high rack.
The multi--is not suitable for cleaning in the dishwasher.
Therefore clean it with warm water and washing up liquid by hand.
Remove the vertical multi-spit from the oven, after use.
26
C139ST_GB.fm Page 27 Thursday, October 17, 2002 4:58 PM
Combining Microwaves and Convection
Combination cooking uses both microwave energy and convection
heating. No preheating is required as the microwave energy is
immediately available.
Open the door . Place the food on the turntable or on the low rack
which should then be placed on the turntable. Close the door. The
heating element must be in the horizontal position.
Many foods can be cooked in combination mode, particularly:
• Roast meats and poultry
• Pies and cakes
• Egg and cheese dishes
☛
1. Turn the Cooking Control knob to the Combi
(MW+Convection
) symbol.
The following indications are displayed:
Result:
(microwave & convection combi mode)
250°C (temperature)
2. Select the temperature by pressing the Select ( )
button.
ALWAYS use microwave-safe and oven-proof cookware. Glass
or ceramic dishes are ideal as they allow the microwaves to
penetrate the food evenly.
ALWAYS use oven gloves when touching the recipients in the
oven, as they will be very hot.
You can get better cooking and browning, if you use the low rack.
3. Set the cooking time by turning the dial knob.
• The maximum cooking time is 60 minutes.
4. Select the appropriate power level by pressing the Select
( ) button until the corresponding output power is
displayed (100-600W).
5. Press the Start ( ) button.
Result:
◆ Combination cooking starts.
◆ The oven is heated to the required
temperature and then microwave cooking
continues until the cooking time is over.
◆ When cooking has finished, the oven will
beep and flash “0” four times. The oven will
then beep one time per minute.
✉
27
If you would like to know the current temperature of the oven
cavity, press the Language button.
GB
C139ST_GB.fm Page 28 Thursday, October 17, 2002 4:58 PM
GB
Safety-locking Your Microwave Oven
Switching the Beeper Off
Your microwave oven is fitted with a special Child Safety programme,
which enables the oven to be “locked” so that children or anyone
unfamiliar with it cannot operate it accidentally.
You can switch the beeper off whenever you want.
1. Press the Turntable Stop (
) and More/Less ( )
buttons at the same time (about one second).
The oven does not beep to indicate the end of a
Result:
function.
The oven can be locked at any time.
1. Press the Stop (
) and Select ( ) buttons at the same
time(about one second).
Result:
◆ The oven is locked.
◆ The icon( ) is displayed.
2. To unlock the oven, press the Stop (
) and Select (
buttons again at the same time (about one second).
Result:
◆ The icon( ) is no longer displayed.
◆ The oven can be used normally.
2. To switch the beeper back on, press the Stop ( ) and
More/Less (
) buttons again at the same time (about
one second).
Result:
The oven operates normally.
)
Manual Stop Turntable Function
The turntable on/off(
) button enables you to use large dishes
which fill the whole oven by stopping the turntable from rotating (only
manual cooking mode).
Scroll Speed
☛
Your can control the scroll speed whenever you want.
1. Press the Stop ( ) and Preheat (
) buttons at the
same time(about one second).
The numbers “11111” - “55555” are displayed.
Result:
1. Press the Turntable on/off (
) button.
The turntable will not rotate.
Result:
2. Select the appropriate scroll speed.
✉
The results will be less satisfactory in this case as the cooking is
less even. We recommend that you turn the dish by hand halfway
through the cooking process.
Warning ! Never operate the turntable without food in the oven.
Reason: This may cause fire or damage to the unit.
2. To switch the turntable rotating back on, press the
Turntable on/off (
) button again.
The turntable will rotate.
Result:
“11111” means the low scroll speed, and “55555” means the high
scroll speed.
✉
28
Do not press the Turntable on/off(
) button during the cooking
process. Cancel the cooking phase, before pressing the turntable
On/Off button.
C139ST_GB.fm Page 29 Thursday, October 17, 2002 4:58 PM
Cookware Guide
To cook food in the microwave oven, the microwaves must be able to
penetrate the food, without being reflected or absorbed by the dish
used.
Metal
•
•
Care must therefore be taken when choosing the cookware. If the
cookware is marked microwave-safe, you do not need to worry.
Paper
• Plates, cups,
napkins and
Kitchen paper
• Recycled paper
The following table lists various types of cookware and indicates
whether and how they should be used in a microwave oven.
Cookware
Microwave- Comments
Safe
Aluminium foil
✓✗
Dishes
Freezer bag twist
ties
Plastic
• Containers
Can be used in small quantities to
protect areas against overcooking.
Arcing can occur if the foil is too close
to the oven wall or if too much foil is
used.
Disposable polyester
cardboard dishes
✓
Some frozen foods are packaged in
these dishes.
Wax or grease-proof
paper
✓
✓ : Recommended
✓✗ : Use Caution
✗ : Unsafe
✗
Can be used to warm food.
Overheating may cause the
polystyrene to melt.
May catch fire.
✗
May cause arcing.
✓
Can be used, unless decorated with a
metal trim.
Can be used to warm foods or liquids.
Delicate glass may break or crack if
heated suddenly.
Must remove the lid. Suitable for
warming only.
•
Fine glassware
✓
•
Glass jars
✓
29
✓
Particularly if heat-resistant
thermoplastic. Some other plastics
may warp or discolour at high
temperatures. Do not use Melamine
plas-tic.
Can be used to retain moisture. Should
not touch the food. Take care when
removing the film as hot steam will
escape.
Only if boilable or oven-proof. Should
not be airtight. Prick with a fork, if
necessary.
✓✗
Porcelain, pottery, glazed earthenware
and bone china are usually suitable,
unless deco-rated with a metal trim.
Glassware
• Oven-to-table
ware
May cause arcing.
Freezer bags
✓
•
✗
•
China and earthenware
Paper bags or
newspaper
Recycled paper or
metal trims
For short cooking times and warming.
Also to absorb excess moisture.
✓
Do not preheat for more than
8minutes.
•
✓
Cling film
✓
Fast-food packaging
• Polystyrene cups
containers
May cause arcing or fire.
•
Crusting plate
GB
✗
✗
✓
Can be used to retain moisture and
prevent spattering.
C139ST_GB.fm Page 30 Thursday, October 17, 2002 4:58 PM
Cooking Guide
GB
MICROWAVES
Cooking Guide for frozen vegetables
Microwave energy actually penetrates food, attracted and absorbed by its water,
fat and sugar content.
The microwaves cause the molecules in the food to move rapidly. The rapid
movement of these molecules creates friction and the resulting heat cooks the
food.
Use a suitable glass pyrex bowl with lid. Cook covered for the minimum time –
see table. Continue cooking to get the result you prefer.
Stir twice during cooking and once after cooking. Add salt, herbs or butter after
cooking. Cover during standing time.
Food
Portion Power Time
(min.)
COOKING
Spinach
300g
600W
9½-10½ 2-3
Add 15 ml (1 tablespoon)
cold water.
Broccoli
300g
600W
8½-9½
2-3
Add 30 ml (2 tbsp.) cold
water.
Peas
300g
600W
7½-8½
2-3
Add 15 ml (1 tbsp.) cold
water.
Green Beans
300g
600W
9-10
2-3
Add 30 ml (2 tbsp.) cold
water.
300g
Mixed
Vegetables
(carrots/peas/
corn)
600W
7½-8½
2-3
Add 15 ml (1 tbsp.) cold
water.
Mixed
Vegetables
(Chinese
style)
600W
8½-9½
2-3
Add 15 ml (1 tbsp.) cold
water.
Cookware for microwave cooking:
Cookware must allow microwave energy to pass through it for maximum
effectiveness. Microwaves are reflected by metal, such as stainless steel,
aluminum and copper, but they can penetrate through ceramic, glass, porcelain
and plastic as well as paper and wood. So food must never be cooked in metal
containers.
Food suitable for microwave cooking:
Many kinds of food are suitable for microwave cooking, including fresh or frozen
vegetables, fruit, pasta, rice, grains, beans, fish, and meat. Sauces, custard,
soups, steamed puddings, preserves, and chutneys can also be cooked in a
microwave oven. Generally speaking, microwave cooking is ideal for any food
that would normally be prepared on a hob. Melting butter or chocolate, for
example (see the chapter with tips, techniques and hints).
Covering during cooking
To cover the food during cooking is very important, as the evaporated water rises
as steam and contributes to cooking process. Food can be covered in different
ways: e.g. with a ceramic plate, plastic cover or microwave suitable cling film.
Standing times
After cooking is over food the standing time is important to allow the temperature
to even out within the food.
30
300g
Standing Instructions
Time(min.)
C139ST_GB.fm Page 31 Thursday, October 17, 2002 4:58 PM
Cooking Guide (continued)
Cooking Guide for fresh vegetables
Use a suitable pyrex bowl with lid. Add 30-45 ml cold water (2-3 tbsp.) for every
250 g unless another water quantity is recommended – see table. Cook covered
for the minimum time – see table. Continue cooking to get the result you prefer.
Stir once during and once after cooking. Add salt, herbs or butter after cooking.
Cover during a standing time of 3 minutes.
Hint:
Cut the fresh vegetables into even sized pieces. The smaller they
are cut, the quicker they will cook.
Food
Portion
Time
(min.)
Standing
Instructions
Time (min.)
Onions
250g
500g
5-5½
8-8½
3
Cut onions into slices or halves.
Add only 15 ml (1 tbsp.) water.
Pepper
250g
500g
4½-5
7-8½
3
Cut pepper into small slices.
Potatoes
250g
500g
4½-5
3
7½-8½
Weigh the peeled potatoes and
cut them into similar sized
halves or quarters.
Turnip
Cabbage
250g
500g
5½-6
8½-9
Cut turnip cabbage into small
cubes.
All fresh vegetables should be cooked using full microwave power (900W).
Food
Portion
Time
(min.)
Standing
Instructions
Time (min.)
Broccoli
250g
500g
4½-5
7-7½
3
Prepare even sized florets.
Arrange the stems to the centre.
Brussels
Sprouts
250g
500g
6-6½
9-9½
3
Add 60-75 ml (5-6 tbsp.) water.
Carrots
250g
500g
4½-5
8-8½
3
Cut carrots into even sized
slices.
Cauliflower
250g
500g
5-5½
8½-9
3
Prepare even sized florets. Cut
big florets into halves.
Arrange stems to the centre.
Courgettes
250g
500g
3-3½
7-7½
3
Cut courgettes into slices.
Add 30 ml (2 tbsp.) water or a
knob of butter. Cook until just
tender.
Egg Plants
250g
500g
3½-4
6-6½
3
Cooking Guide for rice and pasta
Cut egg plants into small slices
and sprinkle with 1 tablespoon
lemon juice.
Leeks
250g
500g
4-4½
7½-8
3
Cut leeks into thick slices.
Mushrooms
125g
250g
1½-2
2½-3
3
Prepare small whole or sliced
mushrooms.
Do not add any water. Sprinkle
with lemon juice.
Spice with salt and pepper.
Drain before serving.
3
31
Rice:
Use a large pyrex bowl with lid – rice doubles in volume during
cooking. Cook covered.
After the cooking time is over, stir before standing time and salt or
add herbs and butter.
Remark: the rice may not have absorbed all water after the cooking
time is finished.
Pasta:
Use a large pyrex bowl. Add boiling water, a pinch of salt and stir
well. Cook uncovered.
Stir occasionally during and after cooking. Cover during standing
time and drain thoroughly afterwards.
Food
Portion Power Time
(min.)
Standing Instructions
Time(min.)
White Rice
(parboiled)
250g
375g
900W 15½-16½ 5
18-19
Add 500 ml cold water.
Add 750 ml cold water.
Brown Rice
(parboiled)
250g
375g
900W 20½-21½ 5
23-24
Add 500 ml cold water.
Add 750 ml cold water.
Mixed Rice
250g
(rice + wild rice) 375g
900W 16½-17½ 5
19-20
Add 500 ml cold water.
Mixed Corn
(rice + grain)
250g
375g
900W 17½-18½ 5
20-21
Add 400 ml cold water.
Pasta
250g
900W 11-12
Add 1000 ml hot water.
5
GB
C139ST_GB.fm Page 32 Thursday, October 17, 2002 4:58 PM
Cooking Guide (continued)
GB
REHEATING
REHEATING LIQUIDS
Your microwave oven will reheat food in a fraction of the time that conventional
ovens and hobs normally take.
Use the power levels and reheating times in the following chart as a guide. The
times in the chart consider liquids with a room temperature of about +18 to +20°C
or a chilled food with a temperature of about +5 to +7°C.
Always allow a standing time of at least 20 seconds after the oven has been
switched off to allow the temperature to even out. Stir during heating, if
necessary, and ALWAYS stir after heating. To prevent eruptive boiling and
possible scalding, you should put a spoon or glass stick into the beverages and
stir before, during and after heating.
Arranging and covering
Avoid reheating large items such as joint of meat - they tend to overcook and dry
out before the centre is piping hot. Reheating small pieces will be more
successful.
REHEATING BABY FOOD
BABY FOOD:
Empty into a deep ceramic plate. Cover with plastic lid. Stir well after reheating!
Let stand for 2-3 minutes before serving. Stir again and check the temperature.
Recommended serving temperature: between 30-40°C.
Power levels and stirring
Some foods can be reheated using 900 W power while others should be reheated
using 600 W, 450 W or even 300 W.
Check the tables for guidance.
In general, it is better to reheat food using a lower power level, if the food is
delicate, in large quantities, or if it is likely to heat up very quickly (mince pies, for
example).
Stir well or turn food over during reheating for best results. When possible, stir
again before serving.
Take particular care when heating liquids and baby foods. To prevent eruptive
boiling of liquids and possible scalding, stir before, during and after heating. Keep
them in the microwave oven during standing time. We recommend putting a
plastic spoon or glass stick into the liquids. Avoid overheating (and therefore
spoiling) the food. It is preferable to underestimate cooking time and add extra
heating time, if necessary.
BABY MILK:
Pour milk into a sterilised glass bottle. Reheat uncovered. Never heat a baby’s
bottle with teat on, as the bottle may explode if overheated. Shake well before
standing time and again before serving! Always carefully check the temperature
of baby milk or food before giving it to the baby. Recommended serving
temperature: ca. 37°C.
REMARK:
Baby food particularly needs to be checked carefully before serving to prevent
burns. Use the power levels and times in the next table as a guide lines for
reheating.
Heating and standing times
When reheating food for the first time, it is helpful to make a note of the time
taken - for future reference.
Always make sure that the reheated food is piping hot throughout.
Allow food to stand for a short time after reheating - to let the temperature even
out. The recommended standing time after reheating is 2-4 minutes, unless
another time is recommended in the chart.
Take particular care when heating liquids and baby food. See also the chapter
with the safety precautions.
32
C139ST_GB.fm Page 33 Thursday, October 17, 2002 4:58 PM
Cooking Guide (continued)
Reheating Liquids and Food
Reheating Baby Food and Milk
Use the power levels and times in this table as a guide lines for reheating.
Use the power levels and times in this table as guide lines for reheating.
Food
Portion
Standing
Instructions
Time (min.)
Food
Drinks
(coffee,
tea and
water)
150ml 900W 1-1½
(1 cup)
2-2½
300ml
(2 cups)
450ml
3-3½
(3 cups)
600ml
3½-4
(4 cups)
1-2
Pour into cups and reheat
uncovered: 1 cup in the centre,
2 cups opposite of each other,
3 cups in a circle. Keep in
microwave oven during
standing time and stir well.
Baby food 190g
(vegetables
+ meat)
Soup
(chilled)
250 ml
500 ml
900W 2½-3
4-4½
2-3
Pour into a deep ceramic plate
or deep ceramic bowl. Cover
with plastic lid. Stir well after
reheating. Stir again before
serving.
Stew
(chilled)
350g
600W 5-6
2-3
Put stew in a deep ceramic
plate. Cover with plastic lid. Stir
occasionally during reheating
and again before standing and
serving.
Pasta
with
sauce
(chilled)
350g
600W 4½-5½ 3
Put pasta (e.g. spaghetti or
egg noodles) on a flat ceramic
plate. Cover with microwave
cling film. Stir before serving.
Filled
pasta
with
sauce
(chilled)
350g
600W 5-6
3
Put filled pasta (e.g. ravioli,
tortellini) in a deep ceramic
plate. Cover with plastic lid. Stir
occasionally during reheating
and again before standing and
serving.
Plated
Meal
(chilled)
350g
450g
550g
600W 4½-5½ 3
5½-6½
6½-7½
Plate a meal of 2-3 chilled
components on a ceramic dish.
Cover with microwave clingfilm.
Power Time
(min.)
33
Portion Power
Time
Standing Instructions
Time(min.)
600W
30sec.
2-3
Empty into ceramic deep
plate. Cook covered. Stir
after cooking time. Stand
for 2-3 minutes. Before
serving, stir well and
check the temperature
carefully.
Baby
190g
porridge
(grain + milk
+ fruit)
600W
20sec.
2-3
Empty into ceramic deep
plate. Cook covered. Stir
after cooking time. Stand
for 2-3 minutes. Before
serving, stir well and
check the temperature
carefully.
Baby milk
300W
30-40sec. 2-3
1min.
10 sec. to
1min.
20sec.
100ml
200ml
Stir or shake well and pour
into a sterilised glass
bottle. Place into the
centre of turntable. Cook
uncovered. Shake well
and stand for at least 2
minutes. Before serving,
shake well and check the
temperature carefully.
GB
C139ST_GB.fm Page 34 Thursday, October 17, 2002 4:58 PM
Cooking Guide (continued)
GB
DEFROSTING
All frozen food should be defrosted using defrosting power level (180 W).
Microwaves are an excellent way of defrosting frozen food. Microwaves gently
defrost frozen food in a short period of time.
Frozen poultry must be thoroughly thawed before cooking. Remove any metal
ties and take it out of any wrapping to allow thawed liquid to drain away.
Food
Meat
Minced
beef
Put the frozen food on a dish without cover. Turn over half way, drain off any
liquid and remove any giblets as soon as possible. Check the food occasionally to
make sure that it does not feel warm.
Standing
Instructions
Time (min.)
500g
15-30
Place the meat on a flat ceramic
plate. Shield thinner edges with
aluminium foil. Turn over after
half of defrosting time!
15-60
First, put chicken pieces first
skin-side down, whole chicken
first breast-side-down on a flat
ceramic plate. Shield the thinner
parts like wings and ends with
aluminium foil. Turn over after
half of defrosting time!
10-25
Put frozen fish in the middle of a
flat ceramic plate. Arrange the
thinner parts under the thicker
parts. Shield narrow ends with
aluminium foil. Turn over after
half of defrosting time!
Pork steaks 250g
Poultry
Chicken
pieces
If smaller and thinner parts of the frozen food start to warm up, they can be shield
by wrapping very small strips of aluminium foil around them during defrosting.
Should poultry start to warm up on the outer surface, stop thawing and allow it to
stand for 20 minutes before continuing.
You will obtain more even defrosting results if you defrost smaller
pieces of meat, rather than larger joints of meat.
13-15
7-8
500g
(2 pcs)
14-15
1200g
32-34
Fish
Fish fillets
200g
6-7
Whole fish
400g
11-13
250g
6-7
5-10
Spread fruit on a flat, round
glass dish (with a large
diameter).
2pcs
4pcs
1-1½
2½-3
5-10
250g
4½-5
Arrange rolls in a circle or bread
vertically(like a tower) on kitchen
paper in the middle of turntable.
Turn over after half of defrosting
time!
Whole
chicken
Leave the fish, meat and poultry to stand in order to complete defrosting. The
standing time for complete defrosting will vary depending on the quantity
defrosted. Please refer to the table below.
Hint:
Portion Time
(min.)
For defrosting of frozen food with a temperature of about -18 to - 20°C, use the
following table as a guide.
Fruit
Berries
Bread
Bread rolls
(each ca.
50 g)
Toast/
Sandwich
34
C139ST_GB.fm Page 35 Thursday, October 17, 2002 4:58 PM
Cooking Guide (continued)
GRILL
MICROWAVE + GRILL
The grill-heating element is located underneath the ceiling of the cavity. It
operates while the door is closed and the turntable is rotating. The turntable’s
rotation makes the food brown more evenly. Preheating the grill for 4 minutes will
make the food brown more quickly.
This cooking mode combines the radiant heat that is coming from the grill with the
speed of microwave cooking. It operates only while the door is closed and the
turntable is rotating. Due to the rotation of the turntable, the food browns evenly.
Three combination modes are available with this model:
600 W + Grill, 450 W + Grill and 300 W + Grill.
Cookware for grilling:
Should be flameproof and may include metal. Do not use any type of plastic
cookware, as it can melt.
Cookware for cooking with microwaves + grill
Please use cookware that microwaves can pass through. Cookware should be
flameproof. Do not use metal cookware with combination mode. Do not use any
type of plastic cookware, as it can melt.
Food suitable for grilling:
Chops, sausages, steaks, hamburgers, bacon and gammon rashers, thin fish
portions, sandwiches and all kinds of toast with toppings.
Food suitable for microwaves + grill cooking:
Food suitable for combination mode cooking include all kinds of cooked food
which need reheating and browning (e.g. baked pasta), as well as foods which
require a short cooking time to brown the top of the food. Also, this mode can be
used for thick food portions that benefit from a browned and crispy top (e.g.
chicken pieces, turning them over half way through cooking). Please refer to the
grill table for further details.
IMPORTANT REMARK:
Whenever the grill only mode is used, make sure that the grill-heating element is
under the ceiling in the horizontal position and not on the back-wall in the vertical
position. Please remember that food must be placed on the high rack, unless
another instruction is recommended.
IMPORTANT:
Whenever the combination mode (microwave + grill) is used, make sure that the
grill heating element is under the ceiling in the horizontal position and not on the
back-wall in the vertical position. The food should be placed on the high rack,
unless another instruction is recommended. Otherwise it has to be placed directly
on the turntable. Please refer to the instructions in the following chart.
The food must be turned over, if it is to be browned on both sides.
35
GB
C139ST_GB.fm Page 36 Thursday, October 17, 2002 4:58 PM
Cooking Guide (continued)
GB
Grill Guide for fresh food
Fresh Food
Portion
Power
1. Side 2. Side Instructions
Time
Time
(min.) (min.)
Baked Apples 4 apples
(ca.800g)
300W+
Grill
13-15
-
Chicken
Pieces
500 g
(2pcs)
800 g
(4pcs)
300W+
Grill
10-11
9-10
Lamb Chops
(medium)
500 g
(4-5pcs)
Grill
only
12-14
10-12 Brush the lamb chops with
oil and spices. Lay them in
a circle on the high rack.
Place the rack on the
metal enamel tray. After
grilling stand for 2-3
minutes.
Roast Fish
650 g
(2pcs)
300W+
Grill
10-11
9-10
Preheat the grill with the grill-function for 3 minutes.
Use the power levels and times in this table as guide lines for grilling.
Fresh Food
Portion
Toast Slices
4 pcs
Grill
(each 25g) only
5-6
Grilled
Tomatoes
400 g
(4pcs)
7½-8½ -
Tomato4 pcs
Cheese Toast (300 g)
Toast Hawaii 4 pcs
(ham,
(500 g)
pineapple,
cheese slices)
Power
300W+
Grill
300W+
Grill
450W+
Grill
1. Side 2. Side Instructions
Time
Time
(min.) (min.)
3-4
5½-6½ -
6½-7½ -
Put toast slices side by
side on the rack.
Cut tomatoes into halves.
Put some cheese on top.
Arrange in a circle in a flat
glass pyrex dish. Place it
on the high rack. Stand for
2-3 minutes.
Toast the bread slices first.
Put the toast with topping
on the high rack. Place the
rack on the metal enamel
tray. Stand for 2-3
minutes.
Toast the bread slices first.
Put the toast with topping
on the high rack. Place
therack on the metal
enamel tray. Stand for 2-3
minutes.
Jacket
Potatoes
2x 200 g
2x 400 g
600W+
Grill
5-6
3-4
8½-9½ 5-6
Cut potatoes into halves.
Put 2 potatoes opposite, 4
potatoes in a circle on the
high rack. Stand for 3-5
minutes.
Gratin
Potatoes /
vegetables
(chilled)
800 g
600W+
Grill
16-17
-
Put the fresh gratin into a
big rectangular glass pyrex
dish. Put the dish on the
low rack. After cooking
stand for 2-3 minutes.
Lasagne
(chilled)
800 g
600W+
Grill
17-18
-
Put the fresh lasagne into
a big rectangular glass
pyrex dish. Put the dish on
the low rack. After cooking
stand for 2-3 minutes.
36
12-13
Core the apples and fill
them with raisins and jam.
Put some almond slices on
top. Put apples on a flat
glass pyrex dish. Place the
dish directly on the low
rack.
Brush chicken pieces with
oil and spices. Put them in
11-12 a circle on the high rack.
Put one chicken piece not
into the centre of the high
rack. Place the rack on the
metal enamel tray. Stand
for 2-3 minutes.
Brush skin of whole fish
with oil and add herbs and
spices. Put two fishes side
by side (head to tail) on
the high rack. Place the
rack on the metal enamel
tray. Stand for 2-3
minutes.
C139ST_GB.fm Page 37 Thursday, October 17, 2002 4:58 PM
Cooking Guide (continued)
Grill guide for frozen food
CONVECTION
Preheat the grill with the grill function for 3 minutes, unless indicated
differently.
Use the power levels and times in this table as guide lines for grilling.
Power
Time
(min.)
Cooking with convection is the traditional and well known method of cooking food
in a traditional oven with hot air.
The heating element and the fan are situated on the back-wall, so that the hot air
is circulating.
Food
Portion
Burger (raw
frozen)
2pieces 450W+Grill 5-6
(125 g)
4pieces
8-9
(250 g)
Put the raw burger in a circle on
the high rack. Turn over after 3½
(125 g) and after 5 min. (250 g).
Put burger into rolls.
Cookware for convection cooking:
All conventional ovenproof cookware, can be used in the microwave whilst
cooking with only the Convection Mode.
Hamburger,
Cheeseburger
etc.(ready,
cooked with
bread roll)
2 pcs
(300 g)
600W+Grill 5-6
without
preheating!
Put frozen burger side by side
on a flameproof dish. Place
plate directly on the turntable.
Stand for 2-3 minutes.
Food suitable for convection cooking:
Foods that contain pastry are suitable in this mode (Cake, Pies etc).
Gratin
(vegetables or
potatoes)
400 g
450W+Grill 14-16
Put frozen gratin into a round
glass pyrex dish. Put the dish on
the high rack. After cooking
stand for 2-3 minutes.
Fish Gratin
400 g
450W+Grill 20-22
Instructions
MICROWAVES +CONVECTION
This mode combines the microwave energy with the hot air and therefore reduces
the cooking time while giving the food a brown and crispy surface.
Cooking with convection is the traditional and well known method of cooking food
in an oven with hot air circulated by a fan on the back-wall.
Put frozen fish gratin into a small
flat rectangular glass pyrex dish.
Put the dish on the low rack.
After cooking stand for 2-3
minutes.
Cookware for cooking with microwaves + convection:
Cookware should be ovenproof (like glass, pottery or china without metal trims);
similar to the cookware described under MW + Grill.
Food suitable for microwave + convection cooking:
All kinds of meats and poultry as well as casseroles and gratin dishes, sponge
cakes, pies and crumbles, roast vegetables, scones and breads.
37
GB
C139ST_GB.fm Page 38 Thursday, October 17, 2002 4:58 PM
Cooking Guide (continued)
GB
Convection Guide for fresh food like Pie/Quiche, Pizza and Meat
Convection Guide for fresh food like Bread Rolls, Bread and Cake
Preheat the convection with the preheating function to the desired
temperature.
Use the power levels and times in this table as guide lines for convection cooking
Preheat the convection with the preheating function to the desired
temperature, unless we recommend not to preheat the oven- see table.
Use the power levels and times in this table as guide lines for convection cooking.
Food
Fresh Food
Portion
PIE/QUICHE
Pie/Quiche on 200g
baking (ready 400g
baked and
chilled)
PIZZA
Chilled Pizza
(ready baked)
300-400g
MEAT
Roast Beef/
Roast Lamb
(medium)
12001300g
Roast Chicken 900g
1300g
Power
1. Side 2. Side Instructions
Time Time
(min.) (min.)
300 W + 6-7
180°C
10-11
600 W + 6-7
220°C
-
BREAD ROLLS
Bread Rolls
(ready baked)
Put the chilled pie/quiche
paper on the high rack.
Stand 2-3 minutes.
Place the pizza on the high
rack. After baking stand for
2-3 minutes.
1.side: 20-22 13-15 Brush beef/ lamb with oil
and spice itwith pepper,
600W +
salt and paprika. Put it on
160°C
the low rack, first with the
2.side:
fat side down. Place the
600W
rack on the metal enamel
+Grill
tray. After cooking wrap in
aluminium foil and stand
for 10-15minutes.
Portion Power
Put bread rolls in a circle
on the low rack. Use oven
gloves while taking out!
Stand 2-3 minutes.
Bread Rolls
(pre-baked)
4-6 pcs 100 W +
(each
200°C
ca. 50 g)
7-8
Put bread rolls in a circle
on the high rack. Use
oven gloves while taking
out! Stand 2-3 minutes.
Bread Rolls
(chilled fresh
yeast dough)
200 g
(4 pcs)
400 g
(8 pcs)
10-11
Arrange bread rolls on
baking paper in a circle on
the low rack.Use oven
gloves while taking out!
Stand 2-3 minutes.
180 W +
220°C
15-16
180 W +
220°C
7-8
Put the frozen baguette
on baking paper on the
high rack. Use oven
gloves while taking out!
After baking stand for 2-3
minutes.
750g
21-23
180 W +
220°C
without
preheating!
Put the fresh dough in a
small, rectangular black
metal dish (length 25cm).
Make a shallow cut
lengthways. Put the bread
on the low rack. Stand for
5-10 minutes.
Brown Bread Rye 750g
and Wheat (fresh
leaven with yeast)
180 W +
28-30
220°C
without
preheating!
Put the fresh dough in a
small, rectangular black
metal dish (length 25cm).
Make a shallow cut
lengthways. Put the bread
on the low rack. Stand for
5-10 minutes.
White Bread
Wheat (fresh
yeast dough)
38
Instructions
3-4
4-6 pcs Only
convection
(each
ca. 50 g) 180°C
BREAD
Garlic Bread (pre- 200 g
baked and
(1pc)
chilled)
450 W + 14-16 12-14 Brush chicken with oil and
250°C
18-20 14-16 spices. Put chicken first
breast side down, second
side breast side up on the
low rack. Place the rack on
the metal enamel tray.
Stand for 5 minutes.
Time
(min)
C139ST_GB.fm Page 39 Thursday, October 17, 2002 4:58 PM
Cooking Guide (continued)
Convection Guide for fresh food like Bread Rolls, Bread and Cake
(continued)
Food
Portion Power
Time
(min)
Instructions
Food
Portion Power
Time
(min)
Instructions
Muffins
400 g
(6 pcs)
180 W +
200°C
14-16
CAKE
Marble Cake;
(batter cake)
500g
19-21
Put the fresh dough in a
small, round, glass pyrex
dish (diameter 18 cm).
Put the cake on the low
rack.
Stand for 5-10 minutes.
Empty dough into a black
metal muffin dish.
Put muffins on the low
rack.
Use oven gloves while
taking out! Stand 5
minutes.
Brownies
650g
180 W +
200°C
20-22
Empty dough into a
rectangular glass pyrex
dish.
Put brownies on the low
rack.
Use oven gloves while
taking out! Stand 5-10
minutes.
180 W +
220°C
Dutch Butter
800g
Cake(batter cake)
180 W +
220°C
22-23
Put the fresh dough in
rectangular glass pyrex
dish (length 28 cm).
Put the cake on the low
rack.
Stand for 5-10 minutes.
Sponge Cake
250g
220°C +
180 W
11-13
Put the fresh dough in a
small round glass pyrex
dish (Ø 18 cm).
Put the cake on the low
rack.
Stand for 5-10 minutes.
Fruit Flan Base
(batter cake)
400g
220°C +
180 W
17-18
Take a flat, round glass
pyrex dish (Ø 25 cm).
Cover bottom with baking
paper and empty dough
into the dish.
Put the cake on the low
rack.
After standing time of 20 30 minutes, top cake with
fruits and glaze.
Fresh Pastries
(yeast dough,
filled)
250 g
(5 pcs)
100 W +
200°C
11-12
Put yeast pastries on
baking paper in a circle on
the low rack.
Leave the centre clear.
Use oven gloves while
taking out! Stand 2-3
minutes.
39
GB
C139ST_GB.fm Page 40 Thursday, October 17, 2002 4:58 PM
Cooking Guide (continued)
GB
Convection guide for frozen food like Bread Rolls, Bread, Cake and
Pastry
Convection guide for frozen Pizza, Pasta, Chips and Nuggets
Preheat the convection with the preheating function until the desired
temperature is reached, unless we recommend not to preheat the oven- see
table.
Use the power levels and times in this table as guide lines for baking.
Preheat the convection with the preheating function until the desired
temperature is reached, unless we recommend not to preheat the oven- see
table.
Use the power levels and times in this table as guide lines for baking.
Food
Portion
Power
Time
(min)
Instructions
Food
Bread Rolls
(ready baked)
6 pcs
(each ca.
50 g)
180 W +
200°C
6-7
Arrange rolls in a circle on
the low rack. Stand for 2-5
minutes.
Pizza (pre-baked) 300-400 g 600 W + 12-14
250°C
Place one pizza on the low
rack. After baking stand for 23 minutes.
Bread Rolls (pre- 6 pcs
baked)
(each ca.
50 g)
180 W +
200°C
6½-7½ Arrange rolls in a circle on
the low rack. Stand for 2-5
minutes.
2 Baguettes with 2 x 125 g 300 W + 10-12
topping
220°C
(pre-baked)
Croissants (ready 4 pcs
baked)
(each ca.
50 g)
180 W +
200°C
4-5
Place two baguettes on high
rack.
After baking stand for 2-3
minutes
Lasagne
Canneloni
Baguettes / Garlic 200-250 g 180 W +
Bread (pre(1pc)
200°C
baked)
Time
(min)
Instructions
400 g
450 W + 20-22
200°C
Fill it into a suitable sized
glass pyrex dish or leave in
the original packaging (take
care that this is suitable for
microwaves and oven heat).
Put frozen lasagne on the low
rack. After cooking stand for
2-3 minutes.
Put the frozen baguette on
baking paper on the low
rack. After baking stand for
2-3 minutes.
6-7
Put frozen baguettes side by
side on the low rack. After
baking stand for 2-3
minutes.
Gratin (Macaroni, 400 g
Tortellini)
450 W + 18-20
200°C
Put cake on baking paper.
Set a small cake on the low,
cake with a large diameter
on the high rack. After
baking stand for 15-30
minutes. Hint: Stand cake in
the oven and serve warm.
Fill it into a suitable sized
glass pyrex dish or leave in
the original packaging (take
care that this is suitable for
microwaves and oven heat).
Put frozen gratin on the low
rack. After cooking stand for
2-3 minutes.
Croquettes
(Potato Snacks)
180 W + 16-18
250°C
Put croquettes on the low
rack. After cooking stand for
1-2 minutes.
250 g
(2pcs)
Cake (ready
baked with fruit
filling)
400-500 g 180 W +
8-10
180°C
without
preheating!
180 W +
220°C
Power
9-10
Baguettes +
topping (e.g.
tomatoes,
cheese, ham,
etc.)
Puff Pastries (raw 250 g
dough with filling) (5-6 pcs)
450 W +
200°C
Put the croissants on the
low rack. After baking stand
for 2-3 minutes.
Portion
10-11
Put pastry on baking paper
on high rack. After baking
stand for 2-3 minutes.
40
500 g
C139ST_GB.fm Page 41 Thursday, October 17, 2002 4:58 PM
Cooking Guide (continued)
Cleaning Your Microwave Oven
SPECIAL HINTS
The following parts of your microwave oven should be cleaned
regularly to prevent grease and food particles from building up:
• Inside and outside surfaces
• Door and door seals
• Turntable and Roller rings
MELTING BUTTER
Put 50 g butter into a small deep glass dish. Cover with plastic lid.
Heat for 30-40 seconds using 900 W, until butter is melted.
MELTING CHOCOLATE
Put 100 g chocolate into a small deep glass dish.
Heat for 3-5 minutes, using 450 W until chocolate is melted.
Stir once or twice during melting. Use oven gloves while taking out!
☛
ALWAYS ensure that the door seals are clean and the door
closes properly.
1. Clean the outside surfaces with a soft cloth and warm, soapy water. Rinse and
dry.
MELTNG CRYSTALLIZED HONEY
Put 20 g crystallized honey into a small deep glass dish.
Heat for 20-30 seconds using 300 W, until honey is melted.
2. Remove any splashes or stains on the inside surfaces or on the roller ring with
a soapy cloth. Rinse and dry.
MELTING GELATINE
Lay dry gelatine sheets (10 g) for 5 minutes into cold water.
Put drained gelatine into a small glass pyrex bowl.
Heat for 1 minute using 300 W. Stir after melting.
3. To loosen hardened food particles and remove smells, place a cup of diluted
lemon juice on the turntable and heat for ten minutes at maximum power.
4. Wash the dishwasher-safe plate whenever necessary.
COOKING GLAZE/ICING (FOR CAKE AND GATEAUX)
Mix instant glaze (approximately 14 g) with 40 g sugar and 250 ml cold water.
Cook uncovered in a glass pyrex bowl for 3½ to 4½ minutes using 900 W,
until glaze/icing is transparent. Stir twice during cooking.
✉
COOKING JAM
Put 600 g fruits (for example mixed berries) in a suitable sized glass
pyrex bowl with lid. Add 300 g preserving sugar and stir well.
Cook covered for 10-12 minutes using 900 W.
Stir several times during cooking. Empty directly into small jam
glasses with twist-off lids. Stand on lid for 5 minutes.
COOKING PUDDING
Mix pudding powder with sugar and milk (500 ml) by following the
manufacturers instructions and stir well. Use a suitable sized glass pyrex
bowl with lid. Cook covered for 6½ to 7½ minutes using 900 W.
Stir several times well during cooking.
BROWNING ALMOND SLICES
Spread 30 g sliced almonds evenly on a medium sized ceramic plate.
Stir several times during browning for 3½ to 4½ minutes using 600 W.
Let it stand for 2-3 minutes in the oven. Use oven gloves while taking out!
41
DO NOT spill water in the vents. NEVER use any abrasive
products or chemical solvents. Take particular care when
cleaning the door seals to ensure that no particles:
• Accumulate
• Prevent the door from closing correctly
GB
C139ST_GB.fm Page 42 Thursday, October 17, 2002 4:58 PM
GB
Storing and Repairing Your Microwave Oven
Technical Specifications
A few simple precautions should be taken when storing or having your
microwave oven serviced.
SAMSUNG strives to improve its products at all times. Both the design
specifications and these user instructions are thus subject to change
without notice.
The oven must not be used if the door or door seals are damaged:
• Broken hinge
• Deteriorated seals
• Distorted or bent oven casing
Only a qualified microwave service technician should perform repairs.
☛
✉
NEVER remove the outer casing from the oven. If the oven is
faulty and needs servicing or you are in doubt about its condition:
• Unplug it from the wall socket
• Contact the nearest after-sales service centre
If you wish to store your oven away temporarily, choose a dry,
dust-free place.
• Reason: Dust and damp may adversely affect the working
parts in the oven.
42
Power source
230V ~ 50 Hz AC
Power consumption
Maximum power
Microwave
Grill (heating element)
Convection (heating element)
3100 W
1400 W
1300 W
1700 W
Output power
100 W / 900 W - 6 levels (IEC-705)
Operating frequency
2450 MHz
Dimensions (W x D x H)
Outside
Oven cavity
556 x 557 x 324 mm
369 x 391.7 x 252 mm
Volume
1.3 Cubic feet
Weight
Shipping
Net
30 kg approx.
24 kg approx.
A
ﺣﻔﻆ ﻓﺮن اﳌﺎﻳﻜﺮووﻳ وإﺻﻼﺣﻪ
اﳌﻮاﺻﻔﺎت اﻟﻔﻨﻴﺔ
ﻻ ﺑﺪ ﻣﻦ اﻋﺘﺒﺎر ﺑﻌﺾ اﻟﺘﺤﺬﻳﺮات اﻟﺒﺴﻴﻄﺔ ﻋﻨﺪ ﺣﻔﻆ ﻓﺮن اﳌﺎﻳﻜﺮووﻳ وﻃﻠﺐ إﺻﻼﺣﻪ.
ﻻ ﺑﺪ ﻣﻦ اﺳﺘﺨﺪام اﻟﻔﺮن ﻓﻲ ﺣﺎﻟﺔ ﺣﺪوث ﺿﺮر ﻓﻲ اﻟﺒﺎب أو أﺧﺘﺎم اﻟﺒﺎب:
• اﳌﻔﺼﻠﺔ اﳌﻨﻜﺴﺮة
• اﻷﺧﺘﺎم اﳌﻔﺴﺪة
• ﻫﻴﻜﻞ اﻟﻔﺮن اﳌﻠﺘﻮي أو اﳌﺸﻮه
ﺷﺮﻛﺔ ﺳﺎﻣﺴﻮﱋ ﺗﺴﻌﻰ اﻟﻰ ﲢﺴﲔ اﳌﻨﺘﺠﺎت ﻓﻲ ﺟﻤﻴﻊ اﻷوﻗﺎت .اﻟﺘﺼﺎﻣﻴﻢ واﳌﻮاﺻﻔﺎت
وﺗﻌﻠﻴﻤﺎت اﳌﺎﻟﻚ ﻫﺬه ﻋﺮﺿﺔ ﻟﻠﺘﻐﻴﻴﺮ ﺑﺪون إﺷﻌﺎر.
ﻣﺼﺪر اﻟﻄﺎﻗﺔ
∞≥≤ œœd²# —UOð eðdO¼ µ∞ ¨ ≠ X!u
اﺳﺘﻬﻼك اﻟﻄﺎﻗﺔ
√W8UÞ vB8
«*n¹ËËdJ¹U
«!©56²!« dBMŽ® W¹«uA
«Í—«d(« ‰UI²½ô
®©56²!« dBMŽ
∞∞◊«Ë ≥±
∞∞◊«Ë ±¥
∞∞≥◊«Ë ±
∞∞∑◊«Ë ±
• «Í—«b'« —UO²!« Ãd6# s# —UO²!« fÐU8 Ãdš
ﻃﺎﻗﺔ اﳋﺮوج
∞∞©IEC-705® U¹u²# ∂ ≠ ◊«Ë π∞∞ Ø ◊«Ë ±
• «Æ¡«dA!« bFÐ U#b6K! e+d# »d8QÐ qBð
اﻟﺘﺮدد ﻟﻠﺘﺸﻐﻴﻞ
∞eðdO¼UGO# ≤¥µ
اﻷﺑﻌﺎد®©oLŽ™ŸUHð—«™÷dŽ
«)WOł—U
&ÊdH!« n¹u
∂rK# ≥≤¥ ™ µµ∑ ™ µµ
rK# ≤µ≤ ™ ≥π±[∑ ™ ≥∂π
اﳊﺠﻢ
≥[VFJ# Âb8 ±
اﻟﻮزن
«(WOA
«!wUB
∞≥ U³¹dIð r−+
U³¹dIð r−+ ≤¥
ﻻ ﺑﺪ ﻣﻦ إﺻﻼح ﻓﺮن اﳌﺎﻳﻜﺮووﻳ ﻣﻦ ﻗﺒﻞ ﻓﻨﻲ ﻣﺨﺘﺺ ﳋﺪﻣﺎت ﻓﺮن اﳌﺎﻳﻜﺮووﻳ ﻓﻘﻂ .
☛
ﻻ qKš ÀbŠ «–« Æ«bÐ√ ÊdH!« s# wł—U)« n¹ËËdJ¹U*« Êd qJO¼ V×ð
W!UŠ w „uJý „bMŽ ÊU+ Ë√ ÊdHK! U#b)« VKÞ v!« X−²Š«Ë ÊdH!« w
«!∫ÊdH
«–« ≈—Æ—U³G!« s# UO!Uš UUł U½UJ# d²š« ¨U²8R# ÊdH!« kHŠ œ
• اﻟﺴﺒﺐWK#UF!« ¡«eł_« w WKJA# À«bŠ≈ v!« ÍœRð b8 WÐuÞd!«Ë —U³G!« :
ÆÊdH!« w
≤¥
10/17/02, 4:41 PM
42
C138ST
A
ﺗﻨﻈﻴ ﻓﺮن اﳌﺎﻳﻜﺮوﻳ
(دﻟﻴﻞ اﻟﻄﺒﺦ )ﻣﺘﺎﺑﻊ
ﻻ ﺑﺪ ﻣﻦ ﺗﻨﻈﻴ اﻷﺟﺰاء اﻟﺘﺎﻟﻴﺔ ﻣﻦ ﻓﺮن اﳌﺎﻳﻜﺮووﻳ ﳌﻨﻊ اﻟﺸﺤﻢ وﺟﺴﻴﻤﺎت اﻟﻄﻌﺎم ﻣﻦ
:ﺑﻘﺎﺋﻬﺎ
اﻷﺳﻄﺢ اﻟﺪاﺧﻠﻴﺔ واﳋﺎرﺟﻴﺔ ﻟﻔﺮن اﳌﺎﻳﻜﺮووﻳ
اﻟﺒﺎب وأﺧﺘﺎم اﻟﺒﺎب
اﻟﻄﺒﻖ اﻟﺰﺟﺎﺟﻲ وﺣﻠﻘﺔ اﳌﻠ
اﻟﻠﻤﺤﺎت اﳋﺎﺻﺔ
ÆÂUJŠSÐ oKG# »U³!«Ë WHOE½ »U³!« ÂU²š√ Ê√ s#
b+Qð
إذاﺑﺔ اﻟﺰﺑﺪة
ÆwJO²ÝöÐ ¡UDGÐ tODž ÆoLFÐ dOGm włUł“ o³Þ w …bÐe!« s# «dł µ∞ l{
Æ…bÐe!« »«cð v²Š ¨◊«Ë π∞∞ W8UÞ vKŽ WO½UŁ ¥∞ ≠≥∞ …b* tM6Ý
Ò
إذاﺑﺔ اﻟﺸﻮﻛﻮﻻت
ÆwJO²ÝöÐ ¡UDGÐ tODž ÆoLFÐ dOGm włUł“ o³Þ w ôu+uA!« s# «dł ±∞∞ l{
Æ ôu+uA!« »«cð v²Š ¨◊«Ë ¥µ∞ W8UÞ vKŽ ozU8œ µ≠≥ …b* tM6Ý
Ò
ÆUN³×Ý bMŽ ÊdH!« “UH8 Âb6²Ý« ÆUN²Ð«–≈ ¡UMŁ√ 5ðd# Ë√ …d# „dŠ
Ò
☛
إذاﺑﺔ اﻟﻌﺴﻞ اﳌﺘﺒﻠﻮر
¡UDGÐ tODž ÆoLFÐ dOGm włUł“ o³Þ w —uK³²*« qF!« s# «dł ≤∞ l{
ÆwJO²ÝöÐ
ÆqF!« »«c¹ v²Š ¨◊«Ë ≥∞∞ W8UÞ vKŽ WO½UŁ ≥∞≠≤∞ …b* tM6Ý
Ò
ÆT«b!« w½uÐUB!« ¡U*« l# rŽUM!« ‘ULI!« s# WFDIÐ WOł—U)« `DÝ_« nE½
Ò
ÆUNHHł
Ò Ë UNHDý«
l# ‘ULI!« s# WFDIÐ nK*« WIKŠ Ë√ WOKš«b!« `DÝ_« vKŽ aÝË Ë√ WFIÐ Í√ `#«
ÆUNHHł
Ò Ë UNHDý«Ë ÆÊuÐUB!«
إذاﺑﺔ اﻟﻐﺮاﺗﲔ
Æ ozU8œ µ …b* œ—U³!« ¡«uN!« w ©Â«dł ±∞® WHH:« 5ð«dG!« `zUHm l{
Æf+«dO³!« ÃUł“ s# dOGm ¡UŽË w tM# n¹dB²!« - Íc!« 5ð«dG!« l{
Æ◊«Ë ≥∞∞ W8UÞ vKŽ …bŠ«Ë WIO8œ …b* UNM6Ý
Ò
ÆWЫ–ù« bFÐ UN+dŠ
Ò
dOBŽ s# UÐu+ l{ ¨WN¹dJ!« `z«Ëd!« W!«“≈Ë W³KB²*« ÂUFD!« ULOł W!«“ù
Æ W8UÞ vB8√ vKŽ ozU8œ dAŽ …b* tM6Ý
Ë …—«Ëb!«
WOMOB!« vKŽ oO8d!« ÊuLOK!«
Ò
Ò
ÆtO!« WłU(« w XM+ ULK+ n¹ËËdJ¹U*« W8UD! W³ÝUM*« WO½U#_« w½«Ë_« qž«
(اﻻﻳﺴﻜﺮﱘ )ﺑﺎﻟﻨﺴﺒﺔ ﻟﻠﻜﻌﻜﺔ واﳉﻴﺘﻴﺎوﻛﺲ/اﻟﻄﺒﺦ ﺑﺎﻟﻄﻼء
Æœ—U³!« ¡U*« s# d²KOK# ≤µ∞Ë dJÝ ¥∞ l# ©Â«dł ±¥ w!«uŠ® e¼U'« ¡öD!« Ãe#«
π∞∞ W8UÞ vKŽ ozU8œ ≤ر¥ ≠≤ر≥ …b* f+«dO³!« ÃUł“ s# ¡UŽË w ¡UDž ÊËbÐ UN6³Þ«
Æa³D!« ¡UMŁ√ 5ðd# UN+dŠ ÆUUHý .dJ¹ô«Ø¡öD!« `³B¹ v²Š ¨◊«Ë
ôuK×# Ë√ WDýU+ …œU# Í√ Âb6²ð ÆÊdH!« Uײ w ¡U*« VBð
ÂbŽ ÊULC! »U³!« ÂU²š√ nOEMð bMŽ WmUš W¹UMŽ cš Æ
WOzULO+
∫ÂUFD!« s# ULOł œułË
WL+«d²#
wG³M¹ UL+ tÐöž≈ s# »U³!« lM9
ﻃﺒﺦ اﳌﺮﺑﻰ
r−(« VÝUM# ¡UŽË w ©W−¹e*« …ôË«dH!« ‰U¦*« qO³Ý vKŽ® t+«u!« s# «dł ∂∞∞ l{
Æ«bOł UN+dŠ
Ò Ë dJ!« s# «dł ≥∞∞ n{« Æ¡UDGÐ f+«dO³!« ÃUł“ s#
Æ◊«Ë π∞∞ «b6²ÝUÐ WIO8œ ±≤≠±∞ …b* UN6³Þ«
¡UDG*UÐ …dýU³# …dOGB!« vÐd*« UłUł“ v!« UNKI½« Æa³D!« ¡UMŁ√ «d# …bŽ „dŠ
Ò
ÆWODG²!« q³8 ozU8œ µ …b* dE²½« ÆV!uK*«
ﻃﺒﺦ اﻟﺒﻮدﻧﻎ
t+dŠ
Ò Ë Z²M*« ULOKF²! UF³ð ©d²KOK# µ∞∞®VOK(«Ë dJ!UÐ m½œu³K! ‚u×*« Ãe#«
…b* ¡UDGÐ t6³Þ« Æ¡UDž m# f+«dO³!« ÃUł“ s# r−(« VÝUM# ¡UŽË Âb6²Ý« Æ«bOł
Æa³D!« ¡UMŁ√ «bOł «d# …bŽ t+dŠ
Æ◊«Ë π∞∞ W8UÞ vKŽ ozU8œ ≤ر∑≠≤ر∂
Ò
ﲢﻤﻴﺮ اﻟﺸﺮاﺋﺢ ﻣﻦ اﻟﻠﻮزة
UN+dŠ
Ær−(« jÝu²# weš s×m vKŽ U¹ËU²# …“uK!« s# `z«dý s# «dł ≥∞ jЫ
Ò
≥≠≤ …b*dE²½« Æ◊«Ë ∂∞∞ W8UÞ vKŽ dOLײ!« s# ozU8œ ≤ر¥≠≤ر≥ ¡UMŁ√ «d# …bŽ
ÆUN³×Ý bMŽ ÊdH!« “UH8 Âb6²Ý« ÆÊdH!« w ozU8œ
¥±
C138ST
41
10/17/02, 4:41 PM
(دﻟﻴﻞ اﻟﻄﺒﺦ )ﻣﺘﺎﺑﻊ
اﻟﺸﺮاﺋﺢ وﺻﺪر اﻟﺪﺟﺎج اﺠﻤﻟﻤﺪ, واﻟﻔﻄﻴﺮة,دﻟﻴﻞ اﻻﻧﺘﻘﺎل اﳊﺮاري ﻟﻠﺒﻴﺘﺰا
دﻟﻴﻞ اﻻﻧﺘﻘﺎل اﳊﺮاري ﻟﻠﻄﻌﺎم اﻟﻄﺎزج ﻣﺜﻞ أرﻏﻔﺔ اﳋﺒﺰ واﳋﺒﺰ واﻟﻜﻌﻜﺔ
وﻓﻲ ﺣﺎﻟﺔ,ﺳﺨﻦ ﻣﺴﺘﻘﺎ ﻟﻼﻧﺘﻘﺎل اﳊﺮاري ﺑﻮاﺳﻄﺔ اﻟﺘﺴﺨﲔ اﳌﺴﺒﻖ ﺣﺘﻲ ﺗﺼﻞ اﻟﻰ درﺟﺔ اﳊﺮارة اﳌﻄﻠﻮﺑﺔ
ّ
. راﺟﻊ اﳉﺪول- أﻧﻨﺎ ﻧﻮﺻﻴﻚ ﺑﻌﺪم ﺗﺴﺨﲔ اﻟﻔﺮن ﻣﺴﺒﻘﺎ
Æe³6K! qO!b+ ‰Ëb'« Ác¼ w WMO³*« U8Ë_«Ë W8UD!« U¹u²# Âb6²Ý«
وﻓﻲ ﺣﺎﻟﺔ,ﺳﺨﻦ ﻣﺴﺘﻘﺎ ﻟﻼﻧﺘﻘﺎل اﳊﺮاري ﺑﻮاﺳﻄﺔ اﻟﺘﺴﺨﲔ اﳌﺴﺒﻖ ﺣﺘﻲ ﺗﺼﻞ اﻟﻰ درﺟﺔ اﳊﺮارة اﳌﻄﻠﻮﺑﺔ
ّ
. راﺟﻊ اﳉﺪول- أﻧﻨﺎ ﻧﻮﺻﻴﻚ ﺑﻌﺪم ﺗﺴﺨﲔ اﻟﻔﺮن ﻣﺴﺒﻘﺎ
Æe³6K! qO!b+ ‰Ëb'« Ác¼ w WMO³*« U8Ë_«Ë W8UD!« U¹u²# Âb6²Ý«
اﻟﻜﻤﻴﺔ
اﻟﻄﻌﺎم
اﻟﻄﺎزج
اﻟﺘﻌﻠﻴﻤﺎت
وﻗﺖ
()دﻗﻴﻘﺔ
اﻟﻄﺎﻗﺔ
±¥≠±≤
´ ◊«Ë ∂∞∞ ¥∞∞≠≥∞∞
Â Ú ≤µ∞
«dł
«e²O³!«
WI³#®
©e³)«
·d!« vKŽ …dz«œ w WHž—_« VðÒ—
ÆozU8œ µ≠≤ …b* dE²½« ÆiH6M*«
∑≠∂
´ ◊«Ë ±∏∞
Â Ú ≤∞∞
lD8 ∂ e³)« WHž—√
«dł µ∞®
…e¼Uł®
©qJ!
©e³6K!
vKŽ t²OžUÐ s# 5²FD8 l{
ÆlHðd*« ·d!«
…b* dE²½« ¨e³)« WOKLŽ bFÐ
ÆozU8œ ≥≠≤
±≤≠±∞
´ ◊«Ë ≥∞∞
Â Ú ≤≤∞
±≤µ ™≤ s# ÊU²FD8
«dł
t²OžUÐ
WI³Þ l#
W¹uKŽ
“u³6#®
©UI³#
·d!« vKŽ …dz«œ w WHž—_« VðÒ—
ÆozU8œ µ≠≤ …b* dE²½« ÆiH6M*«
∑≠≤ر∂
´ ◊«Ë ±∏∞
ÂÚ ≤∞∞
lD8 ∂ e³)« WHž—√
«dł µ∞®
WI³#®
©qJ!
©e³)«
ÆiH6M*« ·d!« vKŽ WJFJ!« l{
ÆozU8œ ≥ ≠ ≤ …b* dE²½« e³)« bFÐ
µ≠¥
´ ◊«Ë ±∏∞
Â Ú ≤∞∞
lD8 ¥ WO!ö¼ WJF+
«dł µ∞®
…e¼Uł®
©qJ!
©e³6K!
s# r−(« VÝUM# s×m w UNF{
w UN+dð« Ë√ f+dO³!« ÃUł“
sŽ W¹UMŽ cš ®wKm_« nOKG²!«
VÝUM# nOKG²!« «c¼ Ê√
Æ©ÊdH!« …«—UŠË n¹ËËdJ¹ULK!
·d!« vKŽ …bL:« w½Ë“ö!« l{
…b* dE²½« a³D!« bFÐ ÆiH6L*«
ÆozU8œ ≥≠ ≤
≤≤≠≤∞
W8—Ë vKŽ …bL:« tO²OžU³!« l{
ÆiH6M*« ·d!« vKŽ e³)«
ÆozU8œ ≥ ≠ ≤ …b* dE²½« e³)« bFÐ
±∞≠π
´ ◊«Ë ±∏∞ ≤µ∞≠ ≤∞∞ ØtO²OžU³!«
Â Ú ≤∞∞
«dł
e³)«
©WFD8® o³#®Âu¦!UÐ
©e³)«
v!« U³Mł …bL:« UO²žU³!« l{
ÆiH6M*« ·d!« vKŽ VMł
ÆozU8œ ≥ ≠ ≤ …b* dE²½« e³)« bFÐ
∑ ≠∂
´ ◊«Ë ¥µ∞ «dł ≤µ∞
Â Ú ≤∞∞ ©5²FD8®
s# r−(« VÝUM# s×m w l{
w UN+dð« Ë√ f+dO³!« ÃUł“
sŽ W¹UMŽ cš ®wKm_« nOKG²!«
VÝUM# nOKG²!« «c¼ Ê√
Æ©ÊdH!« …«—UŠË n¹ËËdJ¹ULK!
·d!« vKŽ …bL:« w½Ë“ö!« l{
…b* dE²½« a³D!« bFÐ ÆiH6L*«
ÆozU8œ ≥≠ ≤
≤∞≠±∏
Æe³)« W8—Ë vKŽ WJFJ!« l{
·d!« vKŽ …dOGm WJF+ l{
dO³+ dDIÐ WJFJ!« l{Ë iH6M*«
e³)« lÐ ÆlHðd*« ·d!« vKŽ
∫ W; ÆWIO8œ ≥∞≠±µ …b* dE²½«
w¼Ë UN#Òb8Ë ÊdH!« w WJFJ!« „dð«
ÆW¾«œ
±∞≠∏
ÆiH6M*« ·d!« vKŽ w+ËdJ!« l{
ÆWIO8œ ≤≠± …b* dE²½« a³D!« bFÐ
±∏≠±∂
vKŽ e³)« W8—Ë vKŽ …dODH!« l{
dE²½« ¨ e³)« bFÐ ÆlHðd*« ·d!«
ÆozU8œ ≥≠≤ …b*
±±≠±∞
اﻟﺘﻌﻠﻴﻤﺎت
وﻗﺖ
()دﻗﻴﻘﺔ
·d!« vKŽ …bŠ«Ë «e²OÐ l{
…b* dE²½« e³)« bFÐ ÆiH6M*«
ÆozU8œ ≥≠≤
اﻟﻄﺎﻗﺔ
´ ◊«Ë ¥µ∞ «dł ¥∞∞
Â Ú ≤∞∞
´ ◊«Ë ¥µ∞ «dł ¥∞∞
Â Ú ≤∞∞
´ ◊«Ë ±∏∞ «dł µ∞∞
Â Ú ≤µ∞
w½«“ô
‚d²×#
5ð«dž
¨W½ËdJF#®
©wMOKOð—uð
w+ËdJ!«
UOłË®
s# WHOHš
©fÞUDÐ
¥∞
C138ST
40
10/17/02, 4:41 PM
≤ر
اﻟﻜﻤﻴﺔ
اﻟﻄﻌﺎم
اﻟﻄﺎزج
´ WO²žU³!«
WI³Þ
q¦#®W¹uKŽ
¨rÞULD!«
©a!«ÆÆÆ6'«
´ ◊«Ë ±∏∞ µ∞∞≠¥∞∞
WJFJ!«
ÊËbÐ Â Ú ±∂∞
«dł
…e¼Uł®
56ð
ÊËbÐ e³6K!
o³#
¡ö²#«
©t+«uH!«
´ ◊«Ë ±∏∞ «dł ≤µ∞
Â Ú ≤≤∞ ©lD8 ∂≠µ®
…dODH!«
W6HM*«
l# 5−Ž®
©WOAŠ
A
(دﻟﻴﻞ اﻟﻄﺒﺦ )ﻣﺘﺎﺑﻊ
A
اﻟﺘﻌﻠﻴﻤﺎت
وﻗﺖ
()دﻗﻴﻘﺔ
œuÝ√ w½bF# s×m w 5−F!« l{
WOMOu*« l{Ë ÆWOMOuLK! ’Uš
“UH8 Âb6²Ý« ÆiH6M*« ·d!« vKŽ
ÆÊdH!« s# UNł«dš≈ ¡UMŁ√ ÊdH!«
ÆozU8œ µ …b* dE²½«
±∂≠±¥
s# qOD²# s×m w WMO−Ž l{
WJFJ!« Ác¼ l{Ë Æf+dO³!« ÃUł“
“UH8 Âb6²Ý« ÆiH6M*« ·d!« vKŽ
ÆÊdH!« s# UNł«dš≈ ¡UMŁ√ ÊdH!«
ÆozU8œ ±∞≠µ …b* dE²½«
≤≤≠≤∞
اﻟﻄﺎﻗﺔ
اﻟﻜﻤﻴﺔ
™ ◊«Ë ±∏∞ «dł ¥∞∞
Â Ú ≤∞∞ ©lD8 ∂®
(دﻟﻴﻞ اﻻﻧﺘﻘﺎل اﳊﺮاري ﻟﻠﻄﻌﺎم اﻟﻄﺎزج ﻣﺜﻞ أرﻏﻔﺔ اﳋﺒﺰ واﳋﺒﺰ واﻟﻜﻌﻜﺔ )ﻣﺘﺎﺑﻊ
اﻟﻄﻌﺎم
اﻟﻄﺎزج
اﻟﺘﻌﻠﻴﻤﺎت
وﻗﺖ
()دﻗﻴﻘﺔ
39
اﻟﻜﻤﻴﺔ
اﻟﻄﻌﺎم
اﻟﻄﺎزج
s×m w ÓUD!« 5−F!« l{
f+dO³!« ÃUł“ s# Ídz«œ dOGm
w WJFJ!« l{ Æ ©rÝ ±∏ dD8®
±∞≠µ …b* dE²½« ÆiH6M*« ·d!«
ÆozU8œ
≤±≠±π
s×m w ÓUD!« 5−F!« l{
f+dO³!« ÃUł“ s# qOD²#
vKŽ WJFJ!« l{ Æ©rÝ ≤∏ ‰uÞ®
±∞≠µ …b* dE²½« ÆiH6M*« ·d!«
ÆozU8œ
≤≥≠≤≤
s×m w ÓUD!« 5−F!« l{
f+dO³!« ÃUł“ s# Ídz«œ dOGm
·d!« w WJFJ!« l{ Æ©rÝ ±∏ dD8®
ÆozU8œ ±∞≠µ …b* dE²½« ÆiH6M*«
±≥≠±±
´ Â Ú ≤≤∞ «dł ≤µ∞
◊«Ë ±∏∞
WJF+
ZMHÝô«
ÃUł“ s# Ídz«œ `D# s×m cš
wDž Æ©rÝ ≤µ dD8® f+dO³!«
5−F!« l{Ë e³)« W8—uÐ ÷—_«
·d!« vKŽ WJFJ!« l{ Æs×B!« w
s# —UE²½ô« X8Ë bFÐ ÆiH6M*«
s# WI³Þ l{ ¨ WIO8œ ≥∞ ≠ ≤∞
Æt+«uH!«
±∏≠±∑
´ Â Ú ≤≤∞ «dł ¥∞∞
◊«Ë ±∏∞
…bŽUI!«
t+«uH!« s#
WJF+®
©WCL6#
W8—Ë vKŽ …dOL)« …dODH!« l{
ÆiH6M*« ·d!« vKŽ …dz«œ w e³)«
“UH8 Âb6²Ý« ÆUB!Uš jÝu!« „dð«
ÆÊdH!« s# UNł«dš≈ ¡UMŁ√ ÊdH!«
ÆozU8œ ≥≠≤ …b* dE²½«
±≤≠±±
´ ◊«Ë ±∞∞ «dł ≤µ∞
Â Ú ≤∞∞ ©lD8 µ®
…dOD
Wł“UÞ
5−Ž®
¨dO6#
©TK²2
WOMOu*«
´ ◊«Ë ±∏∞ «dł ∂µ∞ ôu+uý WJF+
Â Ú ≤∞∞
‚bM³!UÐ
≥π
C138ST
اﻟﻄﺎﻗﺔ
10/17/02, 4:41 PM
اﻟﻜﻌﻜﺔ
´ ◊«Ë ±∏∞ «dł µ∞∞ ªWLšd# WJF+
Â Ú ≤≤∞
WJF+®
©WCO6#
´ ◊«Ë ±∏∞ «dł ∏∞∞ 6'UÐ WJF+
Â Ú ≤≤∞
WJF+®
©WOM³ł
(دﻟﻴﻞ اﻟﻄﺒﺦ )ﻣﺘﺎﺑﻊ
دﻟﻴﻞ اﻻﻧﺘﻘﺎل اﳊﺮاري ﻟﻠﻄﻌﺎم اﻟﻄﺎزج ﻣﺜﻞ أرﻏﻔﺔ اﳋﺒﺰ واﳋﺒﺰ واﻟﻜﻌﻜﺔ
اﻟﺒﻴﺘﺰا واﻟﻠﺤﻢ,دﻟﻴﻞ اﻻﻧﺘﻘﺎل اﳊﺮاري ﻟﻠﻄﻌﺎم اﻟﻄﺎزج ﻣﺜﻞ اﻟﻔﻄﻴﺮة
.ﺳﺨﻦ ﻣﺴﺘﻘﺎ ﻟﻼﻧﺘﻘﺎل اﳊﺮاري ﺑﻮاﺳﻄﺔ اﻟﺘﺴﺨﲔ اﳌﺴﺒﻖ ﺣﺘﻲ ﺗﺼﻞ اﻟﻰ درﺟﺔ اﳊﺮارة اﳌﻄﻠﻮﺑﺔ
ّ
‰UI²½ôUÐ a³DK! qO!b+ ‰Ëb'« Ác¼ w WMO³*« U8Ë_«Ë W8UD!« U¹u²# Âb6²Ý«
ÆÍ—«d(«
.ﺳﺨﻦ ﻣﺴﺘﻘﺎ ﻟﻼﻧﺘﻘﺎل اﳊﺮاري ﺑﻮاﺳﻄﺔ اﻟﺘﺴﺨﲔ اﳌﺴﺒﻖ ﺣﺘﻲ ﺗﺼﻞ اﻟﻰ درﺟﺔ اﳊﺮارة اﳌﻄﻠﻮﺑﺔ
ّ
‰UI²½ôUÐ a³DK! qO!b+ ‰Ëb'« Ác¼ w WMO³*« U8Ë_«Ë W8UD!« U¹u²# Âb6²Ý«
ÆÍ—«d(«
اﻟﺘﻌﻠﻴﻤﺎت
وﻗﺖ
()دﻗﻴﻘﺔ
vKŽ …dz«œ w e³)« WHž—√ l{
ÆiH6M*« ·d!«
UNł«dš≈ ¡UMŁ√ ÊdH!« “UH8 Âb6²Ý«
ÆozU8œ ≥≠≤ …b* dE²½« ÆÊdH!« s#
¥≠≥
vKŽ …dz«œ w e³)« WHž—√ l{
ÆlHðd*« ·d!«
UNł«dš≈ ¡UMŁ√ ÊdH!« “UH8 Âb6²Ý«
ÆozU8œ ≥≠≤ …b* dE²½« ÆÊdH!« s#
∏≠∑
e³)« W8—Ë vKŽ e³)« WHž—« VðÒ—
ÆiH6M*« ·d!« vKŽ …dz«œ w
UNł«dš≈ ¡UMŁ√ ÊdH!« “UH8 Âb6²Ý«
ÆozU8œ ≥≠≤ …b* dE²½« ÆÊdH!« s#
±±≠±∞
±∂≠±µ
W8—Ë vKŽ …bL:« tO²OžU³!« l{
ÆlHðd*« ·d!« vKŽ e³)«
UNł«dš≈ ¡UMŁ√ ÊdH!« “UH8 Âb6²Ý«
…b* dE²½« ¨e³)« bFÐ ÆÊdH!« s#
ÆozU8œ ≥≠≤
∏≠∑
s×m w ÓUD!« 5−F!« l{
‰uÞ® qOD²# dOGm bFÝ√ w½bF#
ÁU&UÐ wKE!« lDI!« qLŽ« Æ ©rÝ ≤µ
·d!« vKŽ e³)« l{ ƉuD!«
ÆozU8œ ±∞≠µ …b* dE²½« ÆiH6M*«
≤≥≠≤±
s×m w ÓUD!« 5−F!« l{
‰uÞ® qOD²# dOGm bFÝ√ w½bF#
ÁU&UÐ wKE!« lDI!« qLŽ« Æ ©rÝ ≤µ
·d!« vKŽ e³)« l{ ƉuD!«
ÆozU8œ ±∞≠µ …b* dE²½« ÆiH6M*«
≥∞≠≤∏
اﻟﻄﺎﻗﺔ
اﻟﻜﻤﻴﺔ
اﻟﻄﻌﺎم
اﻟﻄﺎزج
أرﻏﻔﺔ اﳋﺒﺰ
‰UI²½ô« lD8 ∂≠¥ e³)« WHž—√
Í—«d(« «dł µ∞®
…e¼Uł®
jI
©qJ!
©e³6K!
Â Ú ±∏∞
اﻟﺘﻌﻠﻴﻤﺎت
وﻗﺖ.٢
إﺿﺎﻓﻲ
()دﻗﻴﻘﺔ
…œd³*« W6OHM!«Ø…dODH!« l{
ÆlHðd*« ·d!« vKŽ
ÆozU8œ ≥≠≤ …b* dE²½«
≠
38
اﻟﻄﺎﻗﺔ
اﻟﻜﻤﻴﺔ
·d!« vKŽ «e²O³!« l{
dE²½« e³)« bFÐ ÆlHðd*«
ÆozU8œ ≥≠≤ …b*
≠
X¹e!UÐ qL(« Ør×K!« `#«
¨ `K*«Ë ¨ qHKH!«Ë qЫu²!«Ë
·d!« vKŽ UNF{ ÆuK(« qHKË
¡e'« t−²¹ UNF{ ¨iH6M*«
l{ ÆqHÝ_« v!« pOL!«
WO½bF*« WOMOB!« w ·d!«
¨a³D!« bFÐ ÆUMO*UÐ …UDG*«
WO#uOM#u!« W8U8dÐ UNH!
ÆWIO8œ ±µ≠±∞ …b* dE²½«Ë
±µ≠±≥
≤≤≠≤∞
X¹e!UÐ ÃUłb!« `#«
t−²¹Ë ÃUłb!« l{ ÆqЫu²!«Ë
tF{ rŁ ÆqHÝ_« v!« —bB!«
vKŽ_« v!« —bB!« t−²¹Ë
l{ ÆiH6M*« ·d!« vKŽ
WO½bF*« WOMOB!« w ·d!«
µ …b* dE²½« ÆUMO*UÐ …UDG*«
ÆozU8œ
±¥≠±≤
±∂≠±¥
±∂≠±¥ ´◊«Ë ¥µ∞ «dł π∞∞
≤∞≠±∏
Â Ú ≤µ∞ «dł ±≥∞∞
∑≠∂ ´ ◊«Ë ≥∞∞ «dł ≤∞∞
±±≠±∞
Â Ú ±∏∞ «dł ¥∞∞
´◊«Ë ±∞∞ lD8 ∂≠¥ e³)« WHž—√
Â Ú ≤∞∞ «dł µ∞®
WI³#®
©qJ!
©e³)«
´◊«Ë ±∏∞ «dł ≤∞∞ e³)« WHž—√
Â Ú ≤≤∞ ©lD8 ¥® dOLš 5−Ž®
«dł ¥∞∞ ©œd³# ÓUÞ
©lD8 ∏®
اﳋﺒﺰ
´◊«Ë ±∏∞ «dł ≤∞∞ Âu¦!UÐ e³)«
Â Ú ≤≤∞
©WFD8® e³)« o³#®
©œd³*«
´ ◊«Ë ±∏∞ «dł ∑µ∞ iOÐ_« e³)«
Â Ú ≤≤∞
oO8b!« s#
ÊËbÐ
dOLš 5−Ž®
56ð
©Ã“UÞ
°o³#
´ ◊«Ë ±∏∞ «dł ∑µ∞ wM³!« e³)«
Â Ú ≤≤∞
iOÐ_«Ë
ÊËbÐ
ÓUÞ 5−Ž®
56ð
©…dOL6Ð
° o³#
≥∏
C138ST
وﻗﺖ.١
إﺿﺎﻓﻲ
()دﻗﻴﻘﺔ
10/17/02, 4:41 PM
اﻟﻄﻌﺎم
اﻟﻄﺎزج
اﻟﻨﻔﻴﺨﺔ/اﻟﻔﻄﻴﺮة
Ø…dODH!«
W6OHM!«
e³6K!
…e¼Uł®
e³6K!
©…œd³#Ë
اﻟﺒﻴﺘﺰا
∑≠∂ ´◊«Ë ∂∞∞ ¥∞∞≠≥∞∞ œd³*« «e²O³!«
Â Ú ≤≤∞
«dł
e¼Uł®
©e³6K!
X8讱
≠±≤∞∞
∫wU{≈ «dł±≥∞∞
´◊«Ë ∂∞∞
Â Ú ±∂∞
X8Ë Æ≤
∫wU{≈
´◊«Ë ∂∞∞
W¹«uA!« ´
اﻟﻠﺤﻢ
…dI³!«
ØW¹uA*«
qL(«
Íu²A*«
ÃUłb!«
Íu²A*«
A
(دﻟﻴﻞ اﻟﻄﺒﺦ )ﻣﺘﺎﺑﻊ
اﻻﻧﺘﻘﺎل اﳊﺮاري
A
اﺠﻤﻟﻤﺪ
دﻟﻴﻞ اﻟﺘﺸﻮﻳﺔ ﻟﻠﻄﻌﺎم
ّ
.a ﺑﺎﺳﺘﺜﻨﺎء ﺷﺮح ﻣﺨﺘﻠ, دﻗﺎﺋﻖ٣ ﺳﺨﻦ اﻟﺸﻮاﻳﺔ ﻣﺴﺒﻘﺎ ﺑﻮﻇﻴﻔﺔ اﻟﺘﺸﻮﻳﺔ ﳌﺪة
ّ
ÆW¹uA²K! qO!b+ ‰Ëb'« «c¼ w WMO³*« U8Ëô«Ë W8UD!« U¹u²# Âb6²Ý«
Êd w ÂUFD!« a³D! «bOł WËdF# W¹bOKIð WI¹dÞ Í—«d(« ‰UI²½ô« WDÝ«uÐ a³D!«
Æ—U(« ¡«uN!UÐ ÍbOKIð
ÆsšU!« ¡«uN!« —Ëb¹ Y×OÐ ¨ wHK)« —«b'« w W³+d# WŠËd*«Ë 56²!« dBMŽ
:أواﻧﻲ اﻟﻄﺒﺦ ﻟﻠﻄﺒﺦ ﺑﺎﻻﻧﺘﻘﺎل اﳊﺮاري
Êd w UN#«b6²Ý« sJ1 ¨ n¹ËËdJ¹U*« W8UD! WO½U#_« W¹bOKI²!« WOŽË_« lOLł
ÆjI Í—«d(« ‰UI²½ô« WOF{Ë vKŽ a³D!« WOKLŽ ¡UMŁ√ n¹ËËdJ¹U*«
: اﻟﻄﻌﺎم اﳌﻨﺎﺳﺐ ﻟﻠﻄﺒﺦ ﺑﺎﻻﻧﺘﻘﺎل اﳊﺮاري
Æ©a!« ÆÆÆ …dOD ¨pF+® WOF{u!« Ác¼ w W³ÝUM# UM−F*« vKŽ Íu²% w²!« WLFÞ_«
اﻻﻧﺘﻘﺎل اﳊﺮاري+ اﳌﺎﻳﻜﺮووﻳ
¡UMŁ√ a³D!« X8Ë iH6² sšU!« ¡«uN!« l# n¹ËËdJ¹U*« W8UÞ lL& WOF{u!« Ác¼
Æ`DÝ_« oO8dðË ÂUFD!« dOL%
ÊdH!« w ÂUFD!« a³D! «bł WËdF#Ë W¹bOKIð WI¹dÞ d³²F¹ Í—«d(« ‰UI²½ôUÐ a³D!«
ÆwHK)« —«b'« w W³+d# WŠËd# WDÝ«uÐ sšU!« ¡«uN!« d¹Ëb²Ð
: اﻻﻧﺘﻘﺎل اﳊﺮاري+ aاﻷواﻧﻲ ﻟﻠﻄﺒﺦ ﺑﺎﳌﺎﻳﻜﺮووﻳ
…œUC*« w½«Ë_« «b6²Ý« s# bÐ ô Æ w½«Ë_UÐ n¹ËËdJ¹U*« d¹d9 s# bÐ ô
WNO³ý ª©WO½bF# ·«dÞ√ ÊËbÐ 5B!« Ë√ we)« ¡U½ù«Ë ¨ÃUłe!« q¦#® n¹ËËdJ¹ULK!
ÆW¹«uA!« ´ n¹ËËdJ¹U*« X% WMO³*« w½«Ëú!
: اﻻﻧﺘﻘﺎل اﳊﺮاري+ aاﻟﻄﻌﺎم اﳌﻨﺎﺳﺒﺔ ﻟﻠﻄﺒﺦ ﺑﺎﳌﺎﻳﻜﺮووﻳ
ZMHÝô« WJF+Ë 5ð«dG!«Ë ‰ËdOÝUJ!« V½Uł v!« UłUłb!«Ë Âu×K!« s# Ÿ«u½_« lOLł
…—Ëb*« W−D*« WJFJ!«Ë «Ë«dC)« W¹uAðË W¹e*«Ë …dODH!«Ë t+«uH!UÐ UJFJ!«Ë
Æe³)«Ë
اﻟﺘﻌﻠﻴﻤﺎت
اﻟﻮﻗﺖ
()دﻗﻴﻘﺔ
·d!« vKŽ …dz«œ w dłd³!« l{
±≤µ® ozU8œ ≥[µ bFÐ t³K8 ÆlHðd*«
l{ Æ ©Â«dł ≤µ∞® ozU8œ µË ©Â«dł
Æ UHK!« w dłd³!«
∂≠µ
VMł v!« U³Mł bL:« dłd³!« l{
ƉUF²ýö! ÂËUI*« s×B!« vKŽ
…—«Ëb!«
WOMOB!« vKŽ s×B!« l{
Ò
ÆozU8œ ≥ ≠ ≤ …b* dE²½« Æ…dýU³#
∂≠µ
Ídz«œ o³Þ w …bL:« 5ðdG!« l{
l{ Æf+«dO³!« ÃUł“ s#dOGm
¨a³D!« bFÐË Æ·d!« vKŽ o³D!«
ÆozU8œ ≥ ≠≤ …b* dE²½«
±∂≠±¥
´ ◊«Ë ¥µ∞
W¹«uA!«
«dł ¥∞∞
5ð«dG!«
Ë√ «Ë«dCš®
©fÞUD³!«
o³Þ w bL:« pL!« 5ð«dž l{
ÃUł“ s# qOD²# `D#
·d!« vKŽ s×B!« l{ ÆfO+dO³!«
…b* dE²½« ¨a³D!« bFÐ ÆiH6M*«
ÆozU8œ ≥ ≠ ≤
≤≤≠≤∞
´ ◊«Ë ¥µ∞
W¹«uA!«
«dł ¥∞∞
s# 5ð«dž
pL!«
≥∑
C138ST
37
10/17/02, 4:41 PM
π≠∏
اﻟﻄﺎﻗﺔ
اﻟﻜﻤﻴﺔ
اﻟﻄﻌﺎم
´ ◊«Ë ¥µ∞
5²FD8
W¹«uA!« ©Â«dł ±≤µ®
lD8 ¥
©Â«dł ≤µ∞®
dłd³!«
©bL:«®
´ ◊«Ë ∂∞∞
5²FD8 WOž—u³LN!«
dłd³!«Ë
W¹«uA!« ©Â«dł ≥∞∞®
ÊËbÐ
6'UÐ
56ð
-® a!« ÆÆÆ
o³#
a³D!«
WI—« l#
©e³)«
(دﻟﻴﻞ اﻟﻄﺒﺦ )ﻣﺘﺎﺑﻊ
اﻟﺘﻌﻠﻴﻤﺎت
وﻗﺖ.٢
إﺿﺎﻓﻲ
()دﻗﻴﻘﺔ
U¼ú#«Ë WŠUH²!« VIŁ«
iFÐ l{ ÆvÐd*«Ë VOÐe!UÐ
vKŽ “uK!« s# `z«dA!«
vKŽ UŠUH²!« l{ ÆWŠUH²!«
ÃUł“ s# `D# s×m
vKŽ s×B!« l{ ÆfO+dO³!«
Æ…dýU³# iH6M*« ·d!«
≠
X¹e!UÐ ÃUłb!« lD8 `#«
…dz«œ w UNF{ ÆqЫu²!«Ë
lCð ôË ÆlHðd*« ·d!« vKŽ
·d!« jÝË w ÃUłb!« lD8
vKŽ ·d!« l{ ÆlHðd*«
…UDG*« WO½bF*« WOMOB!«
≥≠≤ …b* dE²½« Æ UMO*UÐ
ÆozU8œ
±∞≠π
±≤≠±±
X¹e!UÐ ÂËdH*« qL(« `#«
vKŽ …dz«œ w tF{ ÆqЫu²!«Ë
vKŽ ·d!« l{ ÆlHðd*« ·d!«
…UDG*« WO½bF*« WOMOB!«
dE²½« ¨W¹uA²!« bFÐÆ UMO*UÐ
ÆozU8œ ≥ ≠ ≤ …b*
±≤≠±∞
n{«Ë X¹e!UÐ ÃUłb!« `#«
l{ ÆqЫu²!«Ë «Ë«dC)«
VMł v!« U³Mł 5JL!«
©dšü« q¹– v!« t−²¹ ”√d!«®
·d!« l{ ÆlHðd*« ·d!« vKŽ
WO½bF*« WOMOB!« vKŽ
µ …b* dE²½« ÆUMO*UÐ …UDG*«
ÆozU8œ
±∞≠π
وﻗﺖ.١
إﺿﺎﻓﻲ
()دﻗﻴﻘﺔ
اﻟﻄﺎﻗﺔ
اﻟﻜﻤﻴﺔ
±µ≠±≥ ´ ◊«Ë ≥∞∞ UŠUHð ¥
W¹«uA!« ©Â«dł ∏∞∞®
±±≠±∞ ´◊«Ë ≥∞∞ «dł µ∞∞
W¹«uA!« ©5²FD8®
±≥≠±≤
«dł ∏∞∞
©lD8 ¥®
دﻟﻴﻞ اﻟﺘﺸﻮﻳﺔ ﻟﻠﻄﻌﺎم اﻟﻄﺎزج
اﻟﻄﻌﺎم
اﻟﻄﺎزج
. دﻗﺎﺋﻖ ﺑﻮاﺳﻄﺔ اﺳﺘﺨﺪام وﻇﻴﻔﺔ اﻟﺘﺸﻮﻳﺔ٣ ﺳﺨﻦ اﻟﺸﻮاﻳﺔ ﳌﺪة
ّ
ÆW¹uA²!« qł√ s# qO!b+ ‰Ëb'« «c¼ w WMO³*« U8Ë_«Ë W8UD!« U¹u²# Âb6²Ý«
UŠUH²!«
…“u³<«
s# lD8
ÃUłb!«
±¥≠±≤ W¹uA²!« «dł µ∞∞ ÂËdH*« qL(«
jI ©lD8 µ≠¥®
©jÝu²#®
±±≠±∞ ´◊«Ë ≥∞∞ «dł ∂µ∞
W¹«uA!« ©5²FD8®
pL!«
ÍuA*«
اﻟﺘﻌﻠﻴﻤﺎت
وﻗﺖ.٢
إﺿﺎﻓﻲ
()دﻗﻴﻘﺔ
وﻗﺖ.١
إﺿﺎﻓﻲ
()دﻗﻴﻘﺔ
U³Mł e³)« s# `z«dý l{
Æ·d!« vKŽ VMł v!«
¥≠≥
∂≠µ
ÆUNUB½QÐ rÞULD!« lD8«
ÆUN8u 6'« iFÐ l{
o³Þ w …dz«œ w UN³ð—Ë
Æ`D*« f+dO³!« ÃUł“ s#
ÆlHðd*« ·d!« vKŽ o³D!« l{
ÆozU8œ ≥≠ ≤ …b* dE²½«
≠
≤ر
∏≠≤ر∑ ´◊«Ë ≥∞∞ «dł ¥∞∞
W¹«uA!« ©lD8 ¥®
rÞULD!«
W¹uA*«
ÆôË√ e³)« Õdý«
l# e³)« s# `z«dA!« l{
ÆlHðd*« ·d!« vKŽ UOA(«
WOMOB!« w ·d!« l{
UMO*UÐ …UDG*« WO½bF*«
ÆozU8œ ≥ ≠ ≤ …b* dE²½«Ë
≠
≤ر
∂≠≤رµ ´◊«Ë ≥∞∞
lD8 ¥
W¹«uA!« ©Â«dł ≥∞∞®
e³)«
hL;«
rÞULD!«
6'«Ë
ÆôË√ e³)« Õdý«
l# e³)« s# `z«dA!« l{
ÆlHðd*« ·d!« vKŽ UOA(«
ÆWOMOB!« w ·d!« l{
≠
≤ر
∑≠≤ر∂ ´◊«Ë ¥µ∞
lD8 ¥
W¹«uA!« ©Â«dł µ∞∞®
Í«ËU¼ e³š
´”U½U½√®
©6ł `z«dý
ÆUNUB½QÐ fÞUD³!« lD8«
5dÞ vKŽ 5²FD8 l{
…dz«œ w lD8 ¥ ¨5KÐUI#
dE²½« ÆlHðd*« ·d!« vKŽ
ÆozU8œ µ≠≥ …b*
¥≠≥
∂≠µ
∂≠µ ´◊«Ë ∂∞∞ «dł ≤∞∞™≤
π≠≤ر∏ W¹«uA!« «dł ¥∞∞™≤
fÞUD³!«
…dAIÐ
o³Þ w ÓUD!« 5ðdG!« l{
ÃUł“ s# dO³+ qOD²#
vKŽ o³D!« l{ Æf+dO³!«
¨a³D!« bFÐ ÆiH6M*« ·d!«
ÆozU8œ ≥≠≤ …b* dE²½«
≠
±∑≠±∂ ´◊«Ë ∂∞∞ «dł ∏∞∞
5ð«dž
W¹«uA!«
ØfÞUD³!«
«Ë«dC)«
©…œd³#®
w ÓUD!« w½«“ö!« l{
s# qOD²# dO³+ s×m
s×B!« l{ Æf+dO³!« ÃUł“
bFÐ ÆiH6M*« ·d!« vKŽ
ÆozU8œ ≥≠≤ …b* dE²½« a³D!«
≠
±∏≠±∑ ´ ◊«Ë ∂∞∞ «dł ∏∞∞
W¹«uA!«
≥∂
C138ST
36
10/17/02, 4:41 PM
≤ر
اﻟﻄﺎﻗﺔ
اﻟﻜﻤﻴﺔ
اﻟﻄﻌﺎم
اﻟﻄﺎزج
W¹uAð
lD8 ¥
`z«dý
jI «dł ≤µ® hL×# e³š
©W×¹dA!
w½«“ô
©œd³#®
A
(دﻟﻴﻞ اﻟﻄﺒﺦ )ﻣﺘﺎﺑﻊ
اﻟﺸﻮاﻳﺔ+اﳌﺎﻳﻜﺮووﻳ
A
اﻟﺸﻮاﻳﺔ
a³D!«Ë W¹«uA!« s# YF³Mð w²!« WOŽUFýù« …—«d(« 5Ð lL& Ác¼ a³D!« WOF{Ë
WOMOB!« d¹ËbðË »U³!« ‚öž≈ ¡UMŁ√ qLFð WOF{u!« Ác¼ Æn¹ËËdJ¹U*UÐ l¹d!«
Âb6²ðË ÆU¹ËU²# ÂUFD!« dOL% r²¹ ¨…—«Ëb!«
WOMOB!« d¹Ëbð V³Ð ÆjI …—« Ëb!«
Ò
Ò
∫ q¹œu*« «c¼ w wFL'« a³D!« UOF{Ë ÀöŁ
ÆW¹«uA!« ´ ◊«Ë ≥∞∞Ë W¹«uA!« ´ ◊«Ë ¥µ∞ ¨ W¹«uA!« ´ ◊«Ë ∂∞∞
‚öž≈ ¡UMŁ√ qLF¹ «c¼ ÆnOH−²!« nIÝ X% Ÿu{u# W¹«uA!« w 56²!« dBMŽ
dOL% qF−¹ …—«Ëb!«
WOMOB!« d¹ËbðË Æ…—«Ëb!«
WOMOB!« d¹ËbðË d¹ËbðË »U³!«
Ò
Ò
o³*« W¹«uA!« 56ð V³Ð d¦+√ WŽdÐ ÂUFD!« dOL% r²¹ ÆU¹ËU²# d¦+√ ÂUFD!«
Æ ozU8œ ¥ …b*
:إﻧﺎء اﻟﻄﺒﺦ ﻟﻠﺘﺸﻮﻳﺔ
w½«Ë√ s# Ÿu½ Í√ Âb6²ð ô ÆÊbF# vKŽ Íu²×¹ b8Ë ‰UF²ýö! œUC# t½« s# bÐ ô
Æ»«cð b8 UN½ô WOJO²Ýö³!« a³D!«
واﻟﺸﻮاﻳﺔaإﻧﺎء اﻟﻄﺒﺦ ﻣﻦ أﺟﻞ اﻟﻄﺒﺦ اﳉﻤﻌﻲ ﺑﲔ اﳌﺎﻳﻜﺮووﻳ
œUC# ¡U½ù« Ê« s# bÐ ô ÆtÐ ËdJ¹U*« Ułu#–uH½ sJ1 Íc!« ¡U½ù« «b6²Ý« ¡Ułd!«
Ÿu½ Í√ Âb6²ð ô ÆwFL'« a³D!« WOF{Ë w w½bF*« ¡U½ù« Âb6²ð ô ƉUF²ýö!
Æ»«c¹ b8 t½ô wJO²Ýö³!« ¡U½ù« s#
اﻟﻄﻌﺎم اﳌﻨﺎﺳﺐ ﻟﻠﺘﺸﻮﻳﺔ
¨pL!« s# WIO8— lD8¨ WOžËd³LN!« ¨r×K!« s# `z«dA!« ¨ ÂËdH*« r×K!«
Æ UM−F*« l# Ÿ«u½_« lOLł s# WBL;« “U³š_«Ë UA²¹ËbM!«
: واﻟﺸﻮاﻳﺔaاﻟﻄﻌﺎم اﳌﻨﺎﺳﺐ ﻟﻠﻄﺒﺦ اﳉﻤﻌﻲ ﺑﲔ اﳌﺎﻳﻜﺮووﻳ
w²!« Wšu³D*« WLFÞ_« s# Ÿ«u½√ lOLł u¼ wFL'« a³D!« WOF{u! VÝUM*« ÂUFD!«
WLFÞ_« V½Uł v!« ¨©…“u³<« …dODH!« q¦#®dOLײ!«Ë 56²!« …œUŽ≈ v!« ÃU²%
sJ1 UL+ ÆÂUFD!« s# UOKF!« `D!« dOL% qł√ s# …dOB8 …b* a³DK! WÐuKD*«
`D!« dOL%Ë dOLײK! »uKD*«Ë pOL!« ÂUFD!« a³D! WOF{u!« Ác¼ «b6²Ý«
W¹uA²!« ‰Ëbł WFł«d# ¡Ułd!« Æ©a³D!« ¡UMŁ√ UN³ÒK8 ¨ÃUłb!« s# lDI! W³M!UЮ UOKF!«
ÆqOmUH²!« s# b¹e*
:اﳌﻼﺣﻈﺔ اﻟﻬﺎﻣﺔ
W¹«uA!« w 56²!« dBMŽ Ê√ s# b+Qð ¨jI W¹«uA!« WOF{Ë X#b6²Ý« ULK+
vKŽ wHK)« —«b'« w Ÿu{u# dOžË wI« l{u# vKŽ nOH−²!« nIÝ X% Ÿu{u#
iGÐ ¨lHðd*« ·d!« vKŽ tF{Ë s# bÐ ô ÂUFD!« Ê√ fMð ô ¡Ułd!« ÆÍœuLŽ l{u#
ÆUNÐ vmu*« ULOKF²!« sŽ dEM!«
:اﻟﻬﺎﻣﺔ
dBMŽ Ê√ s# b+Qð ¨jI©W¹«uA!«´n¹ËËdJ¹U*«®W¹«uA!« WOF{Ë X#b6²Ý« ULK+
Ÿu{u# dOžË wI« l{u# vKŽ nOH−²!« nIÝ X% Ÿu{u# W¹«uA!« w 56²!«
¨lHðd*« ·d!« vKŽ Ÿu{u# ÂUFD!« Ê√ s# bÐ ô ÆÍœuLŽ l{u# vKŽ wHK)« —«b'« w
…—«Ëb!«
WOMOB!« vKŽ ÂUFD!« l{ ¨ô≈Ë ÆUNÐ vmu*« ULOKF²!« sŽ dEM!« iGÐ
Ò
Æw!U²!« ‰Ëb'« w ULOKF²!« WFł«d# ¡Ułd!« Æ …dýU³#
ÆÂUFD!« s# 5NłË dOL% W!UŠ w t³OKIð s# bÐ ô ÂUFD!«
≥µ
C138ST
35
10/17/02, 4:41 PM
(دﻟﻴﻞ اﻟﻄﺒﺦ )ﻣﺘﺎﺑﻊ
إذاﺑﺔ اﻟﺜﻠﺞ
اﺠﻤﻟﻤﺪة ﻻ ﺑﺪ ﻣﻦ إذاﺑﺔ اﻟﺜﻠﺞ ﻣﻨﻬﺎ ﺑﻮاﺳﻄﺔ اﺳﺘﺨﺪام ﻣﺴﺘﻮى اﻟﻄﺎﻗﺔ ﻹذاﺑﺔ اﻟﺜﻠﺞ
ﺟﻤﻴﻊ اﻷﻃﻌﻤﺔ
ّ
.( واط١٨٠)
اﻟﺘﻌﻠﻴﻤﺎت
وﻗﺖ
اﻻﻧﺘﻈﺎر
()دﻗﻴﻘﺔ
اﻟﻮﻗﺖ
()دﻗﻴﻘﺔ
اﻟﻜﻤﻴﺔ
اﻟﻄﻌﺎم
Æ`D# w«eš s×m vKŽ r×K!« l{
W8U8dÐ r×K!« ·«dÞ√ V−Š«Ë
nB½ —Ëd# bFÐ t³ÒK8 ÆWO#uOM#u!«
°WЫ–ù« X8Ë
≥∞≠±µ
±µ≠±≥
∏≠∑
«dł µ∞∞
«dł ≤µ∞
r(
…dI³!«
W#ËdH*«
t−²ðË ÃUłb!« s# lD8 l{ ¨ôË√
ÃUłb!« l{Ë ¨qHÝ_« v!« t×DÝ√
w qHÝ_« v!« Á—bm t−²¹Ë q#UJ!«
·«dÞ√ V−Š« Æ`D# weš s×m
W8U8dÐ ·«dÞ_«Ë W×Młô« q¦# ‚—√
nB½ —Ëd# bFÐ UN³K8 ÆWO#uOM*«
ÆWЫ–ù« X8Ë
∂∞≠±µ
±µ≠±¥
«dł µ∞∞
©5²FD8®
ÃUłb!«
s# lÞ ‚
ÃUłb!«
≥¥≠≥≤ «dł ±≤∞∞
s×m jÝË w bÒL:« pL!« l{
X% ‚—_« ¡«eł_« VðÒ— Æ`D# weš
·«dÞ_« V−Š« ÆpLÝ_« ¡«eł_«
q¹–Ë pL!« s# `z«dA! WIOC!«
—Ëd# bFÐ UN³K8 ÆWO#uOM*« W8U8dÐ
°WЫ–ù« X8Ë nB½
≤µ≠±∞
włUł“ o³Þ w t+«uH!« jЫ
Æ©dO³+ dDIЮ `D# d¹b²#
±∞≠µ
U¹œuLŽ e³)« Ë√ …dz«b!UÐ WHž—_« VðÒ—
WO8—u!« WÞuH!« vKŽ ©ÃdÐ q¦#®
Æ…—«Ëb!«
WOMOB!« jÝË w
Ò
°WЫ–ù« X8Ë nB½ —Ëd# bFÐ UN³K8
Ò
±∞≠µ
∑≠ ∂
±≥≠±±
∑≠∂
≤ر
±≠±
≥≠≤ر≤
µ≠≤ر¥
Ułu# V¹cð ÆbÒL:« ÂUFD!« s# ZK¦!« WЫ–ù ‚dD!« qC√ s# WI¹dÞ ËdJ¹U*« Ułu#
Æ…dOB8 …b* bÒL:« ÂUFD!« s# ZK¦!« ËdJ¹U*«
◊uÐd# w½bF# ¡wý Í√ ‰“« Æa³D!« q³8 W#Uð WЫ–≈ ZK¦!« WЫ–≈ s# bÐ ô bÒL:« ÃUłb!«
ÆZK¦!« WЫ–≈ sŽ W&UM!« ¡U*« n¹dBð qł√ s# nOKGð Í√ s# ÃUłb!« Ãdš«Ë ÃUłb!UÐ
qzUÝ Í√ ·dmË ZK¦!« WЫ–≈ ¡UMŁ√ t³ÒK8 Æ¡UDž ÊËbÐ o³Þ w bÒL:« ÂUFD!« l{
ÆÊUJ#ù« —b8 vKŽ WŽdÐ VK8Ë b³+ q¦# wKš«œ “UNł Í√ Ãdš«Ë
ÆZCM¹ ô t½« s# b+Q²K! U½UOŠ√ ÂUFD!« h׫
W8U8d!UÐ UN³−Š pMJ1 ¨W¾«œ …bÒL:« rFD!« s# WFD8 ‚—√ Ë√ WFD8 dGm√ X׳m√ «–«
ÆZK¦!« WЫ–≈ ¡UMŁ√ ÂuOM#u!ô« s# WO½bF*«
WIO8œ ≤∞ …b* t+dð«Ë ÃUłb!« s# ZK¦!« WЫ–≈ n8Ë« ¨W¾«œ ÃUłb!« `DÝ√ X׳m√ «–«
ÆZK¦!« WЫ–≈ w —«dL²Ýô« q³8 —UE²½ö!
ÃUłb!«
q#UJ!«
WЫ–ù —UE²½ô« X8Ë ÆU#U9 ZK¦!« WЫ–≈ qł√ s# —UE²½ö! ÃUłb!«Ë r×K!« ¨pL!« „dð«
ÆÁU½œ√ ‰Ëb'« WFł«d# ¡Ułd!« ÆbÒL:« ÂUFD!« WOLJ! UIË nK²6# W#U²!« ZK¦!«
pL!«
«dł ≤∞∞ s# `z«dý
«dł ¥∞∞
«dł ≤µ∞
5²FD8
lD8 ¥
«dł ≤µ∞
V¹cð p½√ W!UŠ w d¦+_« W¹ËU²*« ZK¦!« WЫ–≈ ZzU²½ vKŽ qB×²Ý :ﶈﺔ
Ær×K!« s# d³+_« ömu!« XO!Ë ¨r×K!« s# dGm_« lDI!«
pL!«
q#UJ!«
Â Ú ±∏ ≠w!«uŠ 5Ð ÕË«d²ð …—«dŠ Wł—œ w bL:«
ÂUFD!« s# ZK¦!« WЫ–≈ qł√ s#
Ò
ÆqO!b+ w!U²!« ‰Ëb'« bH²Ý« ¨ ÂÚ ≤∞ ≠Ë
t+«uH!«
«dLŁ
e³)«
WHž—«
e³)« s#
«dł µ∞®
©nOžd!
e³š
ØhL×#
g²¹ËbMÝ
≥¥
C138ST
34
10/17/02, 4:41 PM
A
(دﻟﻴﻞ اﻟﻄﺒﺦ )ﻣﺘﺎﺑﻊ
دﻟﻴﻞ إﻋﺎدة ﺗﺴﺨﲔ ﻃﻌﺎم اﻟﻄﻔﻞ وﺣﻠﻴﺒﻪ
إﻋﺎدة ﺗﺴﺨﲔ اﻟﺴﻮاﺋﻞ واﻟﻄﻌﺎم
…œUŽ≈ qł√ s# qO!b+ ‰Ëb'« «c¼ w WMO³*« U8Ë_«Ë W8UD!« U¹u²# Âb6²Ý«
Æ56²!«
Æ56²!« …œUŽ≈ qł√ s# qO!b+ ‰Ëb'« «c¼ w WMO³*« U8Ë_«Ë W8UD!« U¹u²# Âb6²Ý«
A
اﻟﺘﻌﻠﻴﻤﺎت
وﻗﺖ
اﻻﻧﺘﻈﺎر
()دﻗﻴﻘﺔ
اﻟﻮﻗﺖ
ÆoLFÐ weš s×m w tF{
bFÐ t+dŠ
Æ¡UDGÐ t6³Þ«
Ò
Æa³D!«
q³8 Æ ozU8œ ≥≠≤ …b* dE²½«Ë
h×«Ë «bOł t+dŠ
Ò ¨.bI²!«
ÆW¹UMFÐ tð—«dŠ Wł—œ
≥≠≤
WO½UŁ ≥∞
ÆoLFÐ weš s×m w tF{
bFÐ t+dŠ
Æ¡UDGÐ t6³Þ«
Ò
Æa³D!«
q³8 ÆozU8œ ≥≠≤ …b* dE²½«Ë
h×«Ë «bOł t+dŠ
Ò ¨.bI²!«
lÐ tð—«dŠ Wł—œ
≥≠≤
w t³mË «bOł Áe¼
Ò Ë√ t+dŠ
Ò
ÆU¼dONDð bFÐ WOłUł“ WłUł“
Æ…—«Ëb!«
WOMOm jÝË w tF{
Ò
«bOł Áe¼
Ò Æ¡UDž ÊËbÐ t6³Þ«
Æq8_« vKŽ ozU8œ ≥ …b* dE²½«Ë
h×«Ë «bOł Áe¼
Ò ¨t1bIð q³8
ÆW¹UMFÐ tð—«dŠ Wł—œ
WO½UŁ ≤∞
اﻟﻄﺎﻗﺔ
◊«Ë ∂∞∞
◊«Ë ∂∞∞
اﻟﻜﻤﻴﺔ
اﻟﺘﻌﻠﻴﻤﺎت
اﻟﻄﻌﺎم
«dł ±π∞ qHD!« ÂUFÞ
´ «Ë«dCš®
©r(
«dł ±π∞
…bOBŽ
qHD!«
´ »u³Š
VOKŠ
©WN+U´
≥≠≤ WO½UŁ ¥∞≠≥∞ ◊«Ë ≥∞∞ d²KOK# ±∞∞ qHD!« VOKŠ
WIO8œ
d²KOK# ≤∞∞
WO½UŁ ±∞Ë
WIO8œ
WO½UŁ ≤∞Ë
وﻗﺖ
اﻻﻧﺘﻈﺎر
()دﻗﻴﻘﺔ
33
≤ر
±≠±
≤ر
≤≠≤
≤ر
≥≠≥
اﻟﻄﺎﻗﺔ
اﻟﻜﻤﻴﺔ
اﻟﻄﻌﺎم
◊«Ë π∞∞ d²KOK#±µ∞
©»u+±®
d²KOK#≥∞∞
©s¹u+®
d²KOK#¥µ∞
©»«u+√ ≥®
d²KOK#∂∞∞
©»«u+√ ¥®
UÐËdA*«
ÈUý¨…uN8®
©¡U#Ë
bŽ«Ë »«u+_« w UN³m
Æ¡UDž ÊËbÐ UNMO6ð
5Ð u+Ë jÝu!« w UÐu+ l{
≥Ë 5KÐUI# 5dÞ vKŽ
Æ…dz«b!« w »«u+√
n¹ËËdJ¹U*« Êd w UNF{
UN+dŠ
Ò Ë —UE²½ô« X8Ë ¡UMŁ√
Æ«bOł
≤≠±
ÆoLFÐ weš s×m w t³m
ÆwJO²ÝöÐ ¡UDGÐ tODžË
…œUŽ≈ bFÐ «bOł t+dŠ
Ò
q³8 Èdš« t+dŠ
Ò Æ56²!«
Æ.bI²!«
≥≠≤
≥≠≤ر ≤
≤ر
¥≠¥
◊«Ë π∞∞ «dł ≤µ∞
«dł µ∞∞
¡U(«
©œd³#®
weš s×m w ‚d*« l{
¡UDGÐ tODžË ÆoLFÐ
U½UOŠ« „dŠ
ÆwJO²ÝöÐ
Ò
…d# t+dŠË 56²!« ¡UMŁ√
Æ.bI²!«Ë —UE²½ô« q³8 Èdš«
≥≠≤
∂≠µ
◊«Ë ∂∞∞ «dł ≥µ∞
‚d*«
©œd³#®
Ò
w²OžU³!« q¦#®…dODH!« l{
©iO³!« s# WO³zUBF!« Ë√
Æ`D# weš s×m vKŽ
’Uš ¡UDGÐ UNODž
q³8 UN+dŠ
Ò Æn¹ËËdJ¹ULK!
Æ.bI²!«
≥
µ≠≤ر¥ ◊«Ë ∂∞∞ «dł ≥µ∞
…dODH!«
WBKB!UÐ
©…œd³#®
q¦#®W¹u×A*« …dODH!« l{
w©wMOKOð—uð ¨w!uO«—
ÆoLFÐ weš s×m
ÆwJO²ÝöÐ ¡UDGÐ UNODž
56²!« ¡UMŁ√ U½UOŠ√ UN+dŠ
Ò
—UE²½ô« q³8 WO½UŁ …d#Ë
Æ.bI²!«Ë
≥
w …œd³# U³łË ≥≠≤ l{
UNODžË Æw«eš o³Þ
’U)« qOMOH!UÐ
Æn¹ËËdJ¹ULK!
≥
≥≥
C138ST
اﻟﻮﻗﺖ
()دﻗﻴﻘﺔ
10/17/02, 4:41 PM
¥≠≤ر ≥
≤ر
∂≠µ
◊«Ë ∂∞∞ «dł ≥µ∞
…dODH!«
W¹uA;«
WBKB!«
©…œd³#®
Ò
µ≠≤ر¥ ◊«Ë ∂∞∞ «dł ≥µ∞
∂≠≤رµ
«dł ¥µ∞
≤ر
∑≠≤ر∂
«dł µµ∞
U³łu!«
©…œd³#®
≤ر
≤ر
(دﻟﻴﻞ اﻟﻄﺒﺦ )ﻣﺘﺎﺑﻊ
إﻋﺎدة ﺗﺴﺨﲔ اﻟﺴﻮاﺋﻞ
إﻋﺎدة اﻟﺘﺴﺨﲔ
s# qLF!« sŽ ÊdH!« ·UI¹≈ bFÐ q8_« vKŽ WO½UŁ ≤∞‡Ð —UE²½ô« X8u! ÂUFÞ ULz«œ „dð«
bFÐ ULz«œ t+dŠ
ÆÂUFDK! …—«d(« Wł—œ ÈËUð qł√
Ò Ë ¨WłU(« bMŽ ¨56²!« ¡UMŁ√ t+dŠ
Ò
włUł“ œuŽ Ë√ WIFK# l{Ë s# bÐ ô ¨‚«dŠô« ‰UL²Š«Ë WÞdH*« WOKG²!« lM* Æ56²!«
ÆÁbFÐË Á¡UMŁ√Ë 56²!« q³8 UN+dŠ
Ò Ë UÐËdA*« w
Íc!« X8u!« s# q8√ …b* ÂUFD!« 56ð …œUŽ≈ pMJ1 n¹ËËdJ¹U*« Êd WDÝ«uÐ
Æ W¹bOKI²!« Ê«dú! …œUŽ ‚dG²Ý«
U8Ë_« ÆqO!b+ ‰Ëb−K! UF³ð 56²!« …œUŽ≈ U8Ë√Ë W8UD!« U¹u²# Âb6²Ý«
±∏ w!«u×Ð WdG!« …—«dŠ Wł—œ w qz«u!« —U³²ŽUÐ U¼b¹b% - ‰Ëb'« w WMO³*«
ÆÂ Ú ∑ v²Š Â Ú µ w œd³*«
ÂUFD!« Ë√ Â Ú ≤∞ v²ŠË W¹u¾# Wł—œ
Ò
إﻋﺎدة اﻟﻄﻌﺎم اﳋﺎص ﻟﻠﻄﻔﻞ
اﻟﺘﺮﺗﻴﺐ واﻟﺘﻐﻄﻴﺔ
a³D!« ◊«dù WKNÝ UN½≈ ≠ r×K!« WKmË q¦# r×(« …dO³J!« œ«u*« 56ð …œUŽ≈ VM&
Ò
Æd¦+√ ÕU−MÐ …dOGB!« lDI!« 56ð …œUŽ≈ sJ1 ÆjÝu!« 56ð q³8 ¡U*« nOH&Ë
:ﻃﻌﺎم اﻟﻄﻔﻞ
°tMO6ð bFÐ «bOł t+dŠ
ÆwJO²ÝöÐ ¡UDGÐ tODž ÆoLFÐ w«eš s×m w tF{
Ò
Æ…—«d(« Wł—œ h×«Ë WO½UŁ …d# t+dŠ
Æ.bI²!« q³8 —UE²½ö! ozU8œ ≥≠≤ …b* t+dð«
Ò
ÆÂ Ú ¥∞ ≠ ≥∞ 5Ð ∫ .bI²!« bMŽ UNÐ vmu*« …—«d(« Wł—œ
ﻣﺴﺘﻮﻳﺎت اﻟﻄﺎﻗﺔ واﻟﺘﺤﺮﻳﻚ
s# bÐ ô UNCFÐ ULMOÐ ◊«Ë π∞∞ W8UÞ Â«b6²ÝUÐ UNMO6ð …œUŽ≈ pMJ1 WLFÞ_« iFÐ
Æ◊«Ë ≥∞∞ v²Š Ë√ ◊«Ë ¥µ∞ ¨◊«Ë ∂∞∞ U8UÞ Â«b6²ÝUÐ UNMO6ð …œUŽ≈
W8UÞ Èu²# «b6²ÝUÐ ÂUFD!« 56ð …œUŽ≈ qC_« s# …œUŽ ÆqO!b+ ‰Ëb'« lł«—
WŽdÐ tMO6²! qNÝ ÂUFD!« Ë√ ¨…dO³+ tðUOL+Ë ¨oO8— ÂUFD!« Ê« W!UŠ w iH6M#
Æ©…dODH!« s# lD8 ¨‰U¦*« qO³Ý vKŽ®«bł
¨sJ#√ «–« ÆW−O²½ qC√ qł√ s# 56²!« …œUŽ≈ ¡UMŁ√ t³ÒK8 Ë√ «bOł ÂUFD!« „dŠ
Ò
Æ.bI²!« q³8 Èdš« …d# „dŠ
Ò
WOKGð lM* ƉUHÞú! WmU)« WLFÞ_«Ë qz«u!« 56ð bMŽ WmU)« W¹UMF!« cš
w tEHŠ« ÆÁbFÐË Á¡UMŁ√Ë 56²!« q³8 t+dŠ
Ò ¨UN8«dŠ≈ ‰UL²Š«Ë ◊«dUÐ qz«u!«
Ë√ WOJO²ÝöÐ WIFK# l{Ë tÐ vmu*« s# Æ—UE²½ô« X8Ë ¡UMŁ√ n¹ËËdJ¹U*« Êd
Æ©t½UCOË® ÂUFD!« 56ð ◊«d≈ VÒM& Æqz«u!« w włUł“ VOC8
bMŽ UOU{≈ U²8Ë a³Þ« rŁ »uKD*« a³D!« s# q8√ a³D!« X8Ë b¹b% qC_« s#
ÆWłU(«
:ﺣﻠﻴﺐ اﻟﻄﻔﻞ
l# VOK(« ÃUł“ s6ð ô Æ¡UDž ÊËbÐ tMO6ð bŽ« ÆwłUł“ ¡UŽË w VOK(« Vm
e¼Ë —UE²½ô« X8Ë q³8 Áe¼ Æ…—«d(« ◊«d≈ V³Ð d−HM¹ b8 ÃUłe!« Êô ¨Íb¦!« WLKŠ
q³8 ÂUFD!« Ë√ qHDK! VOK(« …—«dŠ Wł—œ ULz«œ W¹UMFÐ h׫ °.bI²!« q³8 WO½UŁ …d#
Â Ú ≥∑ ∫ .bI²!« bMŽ UNÐ vmu*« …—«d(« Wł—œ ÆqHDK! t1bIð
:ﻣﻼﺣﻈﺔ
ÆÕdł À«bŠ≈ lM* .bI²!« q³8 W¹UMFÐ tB× v!« ÃU²×¹ qHD!« ÂUFÞ iš_« vKŽ
…œUŽ≈ qł√ s# qO!b+ WO!U²!« ‰Ëb'« w WMO³*« U8Ëô«Ë W8UD!« U¹u²# Âb6²Ý«
Æ56²!«
أوﻗﺎت اﻟﺘﺴﺨﲔ واﻻﻧﺘﻈﺎر
w WFł«dLK! ≠ »uKD*« X8uK! …d+c# V²+« ¨…d# ‰Ë_ ÂUFD!« 56ð …œUŽ≈ bMŽ
Æq³I²*«
ÆULz«œ ÂUFD!« qš«œ 56ð …œUŽ≈ s# b+Qð
Wł—œ ÍËUð qł√ s# ≠ 56²!« …œUŽ≈ bFÐ —UE²½ö! …dOB8 …b* ÂUFD!« „dð«
Æ…—«d(«
X8u!« sŽ dEM!« iGÐ ozU8œ ¥≠ ≤ 56²!« …œUŽ≈ bFÐ tÐ vmu*« —UE²½ô« X8Ë
ƉËb'« w 5³*«
l# ‰Ëb'« lł«— ƉUHÞú! WmU)« WLFÞ_«Ë qz«u!« 56ð bMŽ WmU)« W¹UMF!« cš
ÆUC¹√ ÊU#_« «d¹c%
≥≤
C138ST
32
10/17/02, 4:41 PM
A
(دﻟﻴﻞ اﻟﻄﺒﺦ )ﻣﺘﺎﺑﻊ
اﻟﺘﻌﻠﻴﻤﺎت
A
اﻟﻮﻗﺖ وﻗﺖ اﻻﻧﺘﻈﺎر
()دﻗﻴﻘﺔ
()دﻗﻴﻘﺔ
اﻟﻜﻤﻴﺔ
اﻟﻄﻌﺎم
ÆtUB½√ Ë√ `z«dý v!« qB³!« lD8«
ÂUFÞ WIFK#±® d²KOK# ±µ n{«
Æ¡U*« s# ©…dOGm
≥
≤ر
µ≠µ
≤ر
∏≠∏
«dł ≤µ∞
«dł µ∞∞
qB³!«
Æ…dOGm lD8 v!« qHKH!« lD8«
≥
µ≠≤ر ¥
≤ر
∏≠∑
«dł ≤µ∞
«dł µ∞∞
qHK
UNFD8«Ë …dAI*UÐ fÞUD³!« Ê“Ë f8
ÆUNŽUЗ√ Ë√ …dOGm lD8 v!«
≥
µ ≠ ≤ر¥ «dł ≤µ∞
≤ر
∏≠≤ر ∑ «dł µ∞∞
fÞUD³!«
…dOGm lD8 v!« ·uH*« V½dJ!« lD8«
ÆW³FJ#
≥
∂≠≤ر µ
π≠≤ر ∏
«dł ≤µ∞
«dł µ∞∞
دﻟﻴﻞ اﻟﻄﺒﺦ ﻟﻠﺨﻀﺮاوات اﻟﻄﺎزﺟﺔ
¡U*« s# d²KOK# ¥µ≠ ≥∞ n{« Æ¡UDž l# f+dO³!« ÃUł“ s# U³ÝUM# ¡UŽË Âb6²Ý«
sŽ dEM!« iGÐ «Ë«dC)« s# «dł ≤µ∞ qJ! ©…dOGm ÂUFÞ WIFK# ≥ ≠ ≤®œ—U³!«
q8_« vKŽ …bLK! ¡UDž l# UN6³Þ« ƉËb'« lł«— ≠ ¡U*« s# Èdšô« UNÐ vmu*« WOLJ!«
ÂUFD!« „dŠ
Ò ÆUNKCHð w²!« ZzU²M!« vKŽ ‰uB×K! a³D!« w dL²Ý« ƉËb'« lł«— ≠
bFÐ …bÐe!« Ë√ W¹dDF!« »UAŽ_« ¨`K*« n{« Æa³D!« bFÐ …d#Ë a³D!« ¡UMŁ√ …d#
ÆozU8œ ≥ …b* —UE²½ô« X8Ë ¡UMŁ√ ÂUFD!« wDž Æa³D!«
WNÐUA²*« lDI!« Ær−(« fH½ s# lD8 v!« Wł“UD!« «Ë«dC)« lD8«
Æd¦+√ WŽdÐ UN6³Þ r²¹ r−(«
.( واط٩٠٠) aﺟﻤﻴﻊ اﳋﻀﺮاوات اﻟﻄﺎزﺟﺔ ﻻ ﺑﺪ ﻣﻦ ﻃﺒﺨﻬﺎ ﻋﻠﻰ أﻗﺼﻰ ﻃﺎﻗﺔ ﻣﺎﻳﻜﺮووﻳ
V½dJ!«
·uHK*«
اﻟﺘﻌﻠﻴﻤﺎت
دﻟﻴﻞ اﻟﻄﺒﺦ ﻟﻸزر واﻟﻔﻄﻴﺮة
5HFCÐ “—_« WOL+ d¦JðË ¡UDž l# f+dO³!« ÃUł“ s# «dO³+ ¡UŽË Âb6²Ý«
Æ¡UDGÐ —“_« a³Þ«Ë Æa³D!« ¡UMŁ√
Ë√ `K*« n{«Ë —UE²½ô« X8Ë q³8 …d# „dŠ
Ò ¨a³D!« X8Ë ¡UN²½« bFÐ
Æ…bÐe!«Ë W¹dDF!« »UAŽ_«
Æa³D!« X8Ë ¡UN²½« bFÐ ¡U*« lOLł “—_« h²1 ô b8∫WEŠö#
`K*« s# öOK8 ¨w!UG!« ¡U*« n{« Æf+dO³!« ÃUł“ s# «dO³+ ¡UŽË Âb6²Ý«
Æ¡UDGÐ …dODH!« a³Þ« Æ«bOł „dŠ
Ò Ë
ÆU#U9 ¡U*« ‰“«Ë —UE²½ô« X8Ë ¡UMŁ√ UNODž ÆÁbFÐË a³D!« ¡UMŁ√ U½UOŠ« „dŠ
Ò
اﻟﺘﻌﻠﻴﻤﺎت
وﻗﺖ
اﻻﻧﺘﻈﺎر
()دﻗﻴﻘﺔ
Æœ—U³!« ¡U*« s# d²KOK# µ∞∞ n{«
Æœ—U³!« ¡U*« s# d²KOK# ∑µ∞ n{«
µ
Æœ—U³!« ¡U*« s# d²KOK# µ∞∞ n{«
Æœ—U³!« ¡U*« s# d²KOK# ∑µ∞ n{«
µ
Æœ—U³!« ¡U*« s# d²KOK# µ∞∞ n{«
µ
Æœ—U³!« ¡U*« s# d²KOK# ¥∞∞ n{«
µ
Æœ—U³!« ¡U*« s# d²KOK# ±∞∞∞ n{«
µ
اﻟﻮﻗﺖ
()دﻗﻴﻘﺔ
≤ر
≤ر
≤ر
≤ر
اﻟﻄﺎﻗﺔ
اﻟﻜﻤﻴﺔ
:اﻷرز
اﻟﻄﻌﺎم
“—_«
iOÐ_«
©‚uK#®
≤±≠≤ر≤∞ ◊«Ë π∞∞ «dł ≤µ∞
≤¥≠≤≥
«dł ≥∑µ
wM³! “—_«
©‚uK#®
±∑≠≤ر±∂ ◊«Ë π∞∞ «dł ≤µ∞ Z¹e*« “—_«
≤∞≠±π
«dł ≥∑µ “—√´“—_«®
©wAŠË
±∏≠≤ر±∑ ◊«Ë π∞∞ «dł ≤µ∞ W−¹e*« …—c!«
≤±≠≤∞
«dł ≥∑µ ©W³Š´“—√®
◊«Ë π∞∞ «dł ≤µ∞
31
اﻟﻜﻤﻴﺔ
اﻟﻄﻌﺎم
VðÒ— Æ r−(« fH½ s# w!u+d³!« bŽ«
ÆjÝu!« w UNðU8UÝ
≥
µ≠≤ر¥
≤ر
∑≠∑
«dł ≤µ∞
«dł µ∞∞
w!u+d³!«
ÂUFÞ oŽö# ∂≠µ®d²KOK# ∑µ≠∂∞ n{«
Æ¡U*« s# ©…dOGm
≥
≤ر
∂≠∂
π≠π
«dł ≤µ∞
«dł µ∞∞
V½dJ!«
‚u*«
Ær−(« fH½ s# `z«dý v!« Õdý«
≥
µ≠≤ر¥
≤ر
∏≠∏
«dł ≤µ∞
«dł µ∞∞
—e'«
lD8« Ær−(« fH½ s# jO³MI!« bŽ«
π≠∏[µ «dł µ∞∞ v!« dO³J!« jO³MI!«
ÆjÝu!« w UNðU8UÝ VðÒ— ÆtUB½√
≥
≤ر
µ≠µ
π≠≤ر∏
«dł ≤µ∞
«dł µ∞∞
jO³MI!«
≥∞ n{« Æ`z«dý v!« courgettes lD8«
Ë√ ¡U*« s# ©ÂUFD!« U²IFK#® d²KOK#
ÆrFM²¹ v²Š a³Þ« Æ…bÐe!« WK²+
≥
≤ر
≥≠≥
∑≠∑
«dł ≤µ∞
«dł µ∞∞
Courgettes
…dOGm lz«dý v!« ÊU$œU³!« lD8«
dOBŽ s# …dOGm ÂUFÞ WIKF# ‘—Ë
ÆUNOKŽ ÊuLOK!«
≥
¥≠≤ر≥
≤ر
∂≠∂
«dł ≤µ∞
«dł µ∞∞
ÊU$œU³!«
ÆWJ#UÝ `z«dý v!« À«dJ!« lD8«
≥
≤ر
¥≠¥
∏≠≤ر∑
«dł ≤µ∞
«dł µ∞∞
À«dJ!«
s# `z«dý Ë√ dD q#U+ dD bŽ«
‘— ÆtO!« ¡U# Í√ nCð ôÆdDH!«
`K# l# tłe#«ÆtOKŽ ÊuLOK!« dOBŽ
Æt1bIð q³8 ¡U*« ‰“≈ ÆqHKË
≥
≤≠≤ر±
≥≠≤ر≤
«dł ±≤µ
«dł ≤µ∞
dDH!«
…dODH!«
≥±
C138ST
اﻟﻮﻗﺖ وﻗﺖ اﻻﻧﺘﻈﺎر
()دﻗﻴﻘﺔ
()دﻗﻴﻘﺔ
≤ر
:اﻟﻔﻄﻴﺮة
±∂≠≤ر±µ ◊«Ë π∞∞ «dł ≤µ∞
±π≠±∏
«dł ≥∑µ
±≤≠±±
:ﳊﻤﺔ
10/17/02, 4:41 PM
≤ر
دﻟﻴﻞ اﻟﻄﺒﺦ
ﻣﻮﺟﺎت اﳌﺎﻳﻜﺮو
دﻟﺴﻞ اﻟﻄﺒﺦ ﻟﻠﺨﻀﺮاوات اﺠﻤﻟﻤﺪة
vKŽ …bLK! ¡UDž l# ÂUFD!« a³Þ« Æ¡UDG!UÐ f+dO³!« ÃUł“ s# U³ÝUM# ¡UŽË Âb6²Ý«
ÆUNKCHð w²!« ZzU²M!« vKŽ ‰uB×K! a³D!« w dL²Ý« ƉËb'« lł«— ≠ q8_«
Ë√ W¹dDF!« »UAŽ_« ¨`K*« n{« Æa³D!« bFÐ …d#Ë a³D!« ¡UMŁ√ 5ðd# ÂUFD!« „dŠ
Ò
Æ—UE²½ô« X8Ë ¡UMŁ√ ÂUFD!« wDž Æa³D!« bFÐ …bÐe!«
اﻟﺘﻌﻠﻴﻤﺎت
وﻗﺖ
اﻻﻧﺘﻈﺎر
()دﻗﻴﻘﺔ
اﻟﻮﻗﺖ
()دﻗﻴﻘﺔ
WIFK# ±®d²KOK# ±µ n{«
Æœ—U³!« ¡U*« s# ©…dOGm ÂUFÞ
≥≠≤
≤ر
w²IFK# ≤ ®d²KOK# ≥∞ n{«
Æœ—U³!« ¡U*« s# ©…dOGm ÂUFÞ
≥≠≤
≤ر
WIFK# ±®d²KOK# ±µ n{«
Æœ—U³!« ¡U*« s# ©…dOGm ÂUFÞ
≥≠≤
≤ر
w²IFK# ≤ ®d²KOK# ≥∞ n{«
Æœ—U³!« ¡U*« s# ©…dOGm ÂUFÞ
≥≠≤
WIFK# ±®d²KOK# ±µ n{«
Æœ—U³!« ¡U*« s# ©…dOGm ÂUFÞ
≥≠≤
≤ر
WIFK# ±®d²KOK# ±µ n{«
Æœ—U³!« ¡U*« s# ©…dOGm ÂUFÞ
≥≠≤
≤ر
اﻟﻄﺎﻗﺔ
±∞≠≤رπ ◊«Ë ∂∞∞
اﻟﻜﻤﻴﺔ
s¼b!«Ë ¡U*« vKŽ Íu²;« ÂUFD!«Ë ¨UOIOIŠ ÂUFD!« cHMð ËdJ¹U*« Ułu# W8UÞ
ÆUNB²1Ë Ułu*« Ác¼ »c−¹dJ!«Ë
l¹d!« „dײ!« ÆWŽdÐ „dײ²! ÂUFD!« w U¾¹e'« qFł V³ð ËËdJ¹U*« Ułu#
ÆÂUFD!« ÁbMŽ …—«d(« s6ð Íc!« „UJ²Šô« sŽ dH¹ U¾¹e'« ÁcN!
اﻟﻄﺒﺦ
اﻟﻄﻌﺎم
:aاﻷواﻧﻲ ﻟﻠﻄﺒﺦ ﺑﺎﳌﺎﻳﻜﺮووﻳ
ÆWO!UF vB8√ qł√ s# UN! n¹ËËdJ¹U*« W8UÞ –uH½ ÊUJ#≈ s# bÐ ô w½«Ë_«
sJ!Ë ”U×M!« ¨ÊuOM*ô« ¨√bB¹ ô Íc!« –ôuH!« q¦# ¨ ÊœUF*« vKŽ WJFM# n¹ËËd+U*«
v!« WOJO²Ýö³!«Ë WOMOB!« WOe)« ¨WOłUłe!« ¨ WOe)« œ«u*« cHMð ËdJ¹U*« UłU#
ÆWO½bF*« WOŽË_« w ÂUFD!« a³Dð ö ÆWO³A)«Ë WO8—u!« V½Uł
«dł ≥∞∞
ŒU½UHÝô«
«dł ≥∞∞
w!u+d³!«
◊«Ë ∂∞∞
«dł ≥∞∞
U³Š
WK³!«
◊«Ë ∂∞∞
«dł ≥∞∞
ôuH!«
¡«dC)«
∏≠ ≤ر∑ ◊«Ë ∂∞∞
«dł ≥∞∞
«Ë«dC)«
W−¹e*«
U³ŠØ—eł®
©…—–ØWK³!«
اﻟﺘﻐﻄﻴﺔ أﺛﻨﺎء اﻟﻄﺒﺦ
—U6³+ ÂUFD!« s# ld¹ d6³*« ¡U*« Êô ¨«bł rN# d#√ a³D!« ¡UMŁ√ ÂUFD!« WODG²!
¨ ‰U¦*« qO³Ý vKŽ ∫WHK²6# ‚dDÐ ÂUFD!« WODGð pMJ1Ë Æa³D!« WOKLŽ w Âb6¹Ë
Æn¹ËËdJ¹ULK! VÝUM*« wKOMOH!« nK!« Ë√ ¨wJO²Ýö³!« ¡UDG!« ¨we)« s×B!«
«dł ≥∞∞
«Ë«dC)«
W−¹e*«
»uKÝô«®
©wMOB!«
أوﻗﺎت اﻻﻧﺘﻈﺎر
ÆÂUFD!« qš«œ s# …—«d(« ÃËdš wJ! rN# —UE²½ô« X8Ë ¨ÂUFD!« a³Þ ¡UN²½≈ bFÐ
π≠ ≤ر∏ ◊«Ë ∂∞∞
∏≠≤ر∑
±∞ ≠ π
π≠≤ر∏
◊«Ë ∂∞∞
:aاﻷﻃﻌﻤﺔ اﳌﻨﺎﺳﺒﺔ ﻟﻠﻄﺒﺦ ﺑﺎﳌﺎﻳﻜﺮووﻳ
«Ë«dC)« UNO U0 n¹ËËdJ¹U*UÐ a³DK! W³ÝUM# W#UFÞ_« Ÿ«u½√ s# dO³+ œbŽ
¨WBKB!« ¨r×K!« ¨pL!« ¨‰uH!« ¨»u³(ô« ¨“—_« ¨…dODH!« ¨ W+«uH!« ¨…bL:«
Ò
sJ1Ë qЫu²!« l# UBKB!« ¨ W³KF*« UþuH;« ¨Í—U6³!« !œu³!« ¨¡U(« ¨œ—U²ÝUJ!«
w!U¦# n¹ËËdJ¹U*UÐ a³D!« ¨W#UŽ …—U³FÐ Æn¹ËËdJ¹U*« Êd w WLFÞ_« Ác¼ a³Þ
lł«—® ôu+uA!« Ë√ …bÐe!« WЫ–≈ ¨‰U¦*« qO³Ý vKŽ Æb8u*« vKŽ Áœ«bŽ≈ r²¹ ÂUFÞ Í_
Æ©`zUBM!«Ë UOMI²!«Ë UL×K!«
≥∞
C138ST
30
10/17/02, 4:41 PM
A
دﻟﻴﻞ اﻷواﻧﻲ
A
Wdše*« WOŽËô« ¡UM²ŁUÐ UN#«b6²Ý« pMJ1
ÆWO½bF# ·«dÞQÐ
Ë√ WLFÞ_« W¾b²! UN#«b6²Ý« pMJ1
Ë√ nOFC!« ÃUłe!« dJM¹ b8 Æqz«u!«
Æ…QłUH# UNMO6ð W!UŠ w oAM¹
W³ÝUM# Ác¼ Æ¡UDG!« W!«“≈ s# bÐ ô
ÆjI W¾b²K!
Ë√ wzUÐdNJ!« ”uI!« À«bŠ≈ v!« ÍœRð b8
Æ‚«d²Šô«
✓
✓
✓
U?łUłe?!« •
✗
اﻷوﻋﻴﺔ اﳌﻌﺪﻧﻴﺔ
‚U?³?Þ_« •
✗
ÆW¾b²K!Ë …dOB8 …b* a³DK! W³ÝUM#
Æ«dO¦+ WÐuÞd!« ’UB²#ô UC¹√ W³ÝUM#
ÆwzUÐdNJ!« ”uI!« À«bŠ≈ v!« ÍœR¹ b8
…—«d×K! œUC*« wJO²Ýö³!« hš_« vKŽ
b8 WOJO²Ýö³!« œ«u*« iFÐ ÆW³ÝUM#
…—«d(« Wł—œ vKŽ UN½u! dOG²ð Ë√ Íu²Kð
WOJO²Ýö³!« œ«u*« Âb6²ð ô ÆWO!UF!«
ÆWOMO#U²OI!«
ô ÆWÐuÞd!UÐ ÿUH²Šö! UN#«b6²Ý« pMJ1
bMŽ W¹UMŽ cš ÆÂUFD!« W#ö# ÂbŽ s# bÐ
sšU!« —U6³!« Êô ÂUFD!« sŽ rKOH!« W!«“√
ÆÃd6¹
Ë√ WOKG²K! WKÐU8 X½U+ «–« UN#b6²Ý«
Æ¡«uN!« œËbÝ ÂbŽ s# bÐ ô ÆÊdHK! …œUC#
ÆWłU(« bMŽ W+uAÐ VIŁ«
WÐuÞd!UÐ ÿUH²Šö! UN#«b6²Ý« pMJ1
ÆÂUFD!« d¦½ lM#Ë
✓
✗
✓
✓
ﺑﺪون, ﻻ ﺑﺪ ﻣﻦ ﻧﻔﻮذ اﳌﺎﻳﻜﺮووﻳ ﻣﻦ اﻟﻄﻌﺎم,ﻣﻦ أﺟﻞ ﻃﺒﺦ اﻟﻄﻌﺎم ﻓﻲ ﻓﺮن اﳌﺎﻳﻜﺮووﻳ
.اﻧﻌﻜﺎس اﳌﺎﻳﻜﺮووﻳ أو اﻣﺘﺼﺎﺻﻪ ﻓﻲ اﻟﻄﺒﻖ اﳌﺴﺘﺨﺪم
اﻷوﻋﻴﺔ اﻟﺰﺟﺎﺟﻴﺔ
Êd?H?K! WOŽË_« •
W!ËUD!«Ë
W?OłUłe?!« WOŽË_« •
W×{«u!«
اذا ﻛﺎﻧﺖ ﻋﻼﻣﺔ اﻷﻣﺎن ﻟﻄﺎﻗﺔ.ﻻ ﺑﺪ ﻣﻦ اﻻﻋﺘﻨﺎء ﺑﺎﺧﺘﻴﺎر اﻷواﻧﻲ ﻟﻠﻄﺒﺦ ﺑﺎﳌﺎﻳﻜﺮووﻳ
. ﻻ ﺗﻘﻠﻖ,اﳌﺎﻳﻜﺮووﻳ ﻣﻄﺒﻮﻋﺔ ﻓﻲ اﻷواﻧﻲ
اﳉﺪول اﻟﺘﺎﻟﻲ ﻳﺒﻴّﻦ ﻣﺨﺘﻠ أﻧﻮاع ﻣﻦ اﻷواﻧﻲ وﺗﺸﻴﺮ اﻟﻰ أن أي إﻧﺎء ﳝﻜﻦ اﺳﺘﺨﺪاﻣﻪ وﻛﻴ
.ﻳﺴﺘﺨﺪم ﻓﻲ ﻓﺮن اﳌﺎﻳﻜﺮووﻳ
Âu?²?<« fOJ!« •
Íu²K# qJAÐ
s# WKOK8 WOL+ w UN#«b6²Ý« pMJ1
s# ÂUFD!« ¡«eł√ W¹ULŠ ÷dG! ÂUFD!«
”uI!« Àb×¹ b8 Æ◊dH*« UNMO6ð
s# W8U8d!« »«d²8« W!UŠ w wzUÐdNJ!«
…dO¦+ WOL+ «b6²Ý« Ë√ «bł ÊdH!« Ê«—bł
ÆUNM# «bł
اﻷوﻋﻴﺔ اﻟﻮرﻗﻴﺔ
¨»«u+_« ¨ ‚U³Þ_« •
¨ UÞuH!«
a³D*« ný UM#Ë
qLF²*« ‚—u!«
∏ s# d¦+√ …b* UI³# ÊdH!« s6ð
ô
Ò
ÆozU8œ
WOŽË_«
w½«Ë_« ¨ WOMOB!« WOe)« w½«Ë_«
‚U³Þ_«Ë 5D!« s# w½«Ë_« ¨W¹—U6H!«
W8UD! W³ÝUM# WOMB!« WOe)«
w½«Ë_« ¡UM¦²ÝUÐ ¨…œUŽ n¹ËËdJ¹U*«
ÆWO½bF*« UN«dÞQÐ Wdše*«
WOJO²ÝöÐ Âö√
Æ‚U³Þ_« ÁcNÐ W³KF# …bL:« WLFÞ_« iFÐ
✓ ✗
ÆÂUFD!« W¾b²Ð UN#«b6²Ý« pMJ1
…œU*« WЫ–≈ v!« ÍœR¹ b8 ◊dH*« UNMO6ð
ÆWOM¹dO²O!u³!«
Æ‚«d²Š« À«bŠ≈ v!« ÍœRð b8
✓
ÆwzUÐdNJ!« ”uI!« À«bŠ≈ v!« ÍœRð b8
≤π
29
✓
✓
✓
—e¹dHK! ”UO+√
✓
✓ ✗
✗
C138ST
✓ ✗
10/17/02, 4:41 PM
✓
✗
✗
WOŽË√Ë »«u+«
WOM¹dO²O!uÐ
W?O8—Ë ”U?O+√
—U³šô« ‚«—Ë√Ë
W?K?LF²*« W8—u!«
WO½bF*« ·UFÞ_« Ë√
A
اﻹﻏﻼق اﻷﻣﺎﻧﻲ ﻟﻔﺮن اﳌﺎﻳﻜﺮووﻳ%
إﻳﻘﺎف اﻧﻄﻼق اﻟﺼﻔﺎرة
ﻓﺮن اﳌﺎﻳﻜﺮووﻳ %ﻣﺰود ﺑﺒﺮﻧﺎﻣﺞ أﻣﺎن اﻟﻄﻔﻞ اﳋﺎص ,واﻟﺬي ﳝﻜﻨﻚ ﻣﻦ "إﻏﻼق" ﺿﻮاﺑﻂ اﻟﻔﺮن
ﺑﺤﻴﺚ ﺑﺤﻴﺚ ﻻ ﻳﺴﺘﻄﻴﻊ اﻷﻃﻔﺎل أو أي ﺷﺨﺺ ﻻ ﻳﻄﻠﻊ ﻋﻠﻰ اﻟﻔﺮن ﺗﺸﻐﻴﻞ اﻟﻔﺮن ﻣﻔﺎﺟﺌﺎ.
ﳝﻜﻨﻚ إﻳﻘﺎف اﻧﻄﻼق اﻟﺼﻔﺎرة ﻛﻠﻤﺎ ﺗﺮﻳﺪه.
—“ vKŽ jG{« .١اﻹﻳﻘﺎف ® © —“Ëاﻷﻛﺜﺮ/اﻷﻗﻞ ®
Æ©…bŠ«Ë WO½UŁ w«uŠ® Xu« fH½ w
«W¹UN½ bMŽ ÊdH« s2 …—UHI oKDMð ô U¼bMŽ ∫W−O²M
«ÆWHOþu
ﳝﻜﻨﻚ إﻏﻼق ﺿﻮاﺑﻂ اﻟﻔﺮن ﻓﻲ أي وﻗﺖ.
©
© —“Ëاﻻﺧﺘﻴﺎر ®
—“ vKŽ jG{« .١اﻹﻳﻘﺎف ®
®Æ©…bŠ«Ë WO½UŁ w«uŠ
«∫W−O²M
◆ Æ ÊdH« jЫu{ ‚öŽ≈ r²¹ U¼bMŽ
◆ Æ© ® W2uÝd« ÷dFð
© Xu« fH½ w
—“ vKŽ jG{« ¨qOGA²« v« …—UHB« …œuF .٢اﻹﻳﻘﺎف ®
—“Ëاﻷﻛﺜﺮ/اﻷﻗﻞ ® © WO½UŁ w«uŠ® Xu« fH½ w
Æ©…bŠ«Ë
«ÆwG³M¹ UL: ÊdH« qLF¹ U¼bMŽ ∫W−O²M
—“ vKŽ jG{« ¨ÊdH« ‚öž≈ ¡UGù .٢اﻹﻳﻘﺎف ®
® © Æ©…bŠ«Ë WO½UŁ w«uŠ® Xu« fH½ w
«∫W−O²M
◆ Æ© ® W2uÝd« ÷dFð ô
◆ ÆwG³M¹ UL: ÊdH« qOGAð pMJ1
©
© —“Ëاﻻﺧﺘﻴﺎر
اﻟﺪوارة ﻳﺪوﻳﺎ
إﻳﻘﺎف وﻇﻴﻔﺔ اﻟﺼﻴﻨﻴﺔ ّ
ﺑﻮاﺳﻄﺔ زر ﺗﺸﻐﻴﻞ/إﻳﻘﺎف اﻟﺼﻴﻨﻴﺔ اﻟﺪوّارة ) ( ,ﳝﻜﻨﻚ اﺳﺘﺨﺪام أﻃﺒﺎق ﻛﺒﻴﺮة اﳊﺠﻢ
اﻟﺪوارة ﻣﻦ اﻟﺘﺪوﻳﺮ )وﺿﻌﻴﺔ اﻟﻄﺒﺦ اﻟﻴﺪوي ﻓﻘﻂ(.
ﲤﺘﻠﺊ ﺑﺄرض اﻟﻔﺮن اﻟﻜﺎﻣﻠﺔ ﻹﻳﻘﺎف اﻟﺼﻴﻨﻴﺔ ّ
ﺳﺮﻋﺔ اﻟﺪﺣﺮج
☛
ﳝﻜﻨﻚ اﻟﺘﺤﻜﻢ ﻓﻲ ﺳﺮﻋﺔ اﻟﺪﺣﺮج ﻛﻤﺎ ﺗﺮﻳﺪ.
—“ vKŽ jG{« .١اﻹﻳﻘﺎف ® © —“Ëاﻟﺘﺴﺨﲔ اﳌﺴﺒﻖ ®
½Æ©…bŠ«Ë WO½UŁ w«uŠ® Xu« fH
«Æ ¢ 5 5 5 5 5 ¢ ≠ ¢1 1 1 1 1¢ ·Ëd(« ÷dFð U¼bMŽ ∫W−O²M
© w
Æq√ U¹ËUW²2 r²¹ ô a³D« Êô ¡U{— q√ a³D« ZzU²½ ¨ WU(« Ác¼ w
½Æa³D« UOKLŽ ‰öš bOUÐ o³D« —Ëbð p½QÐ „UIu
«ÆÊdH« w ÂUFÞ ÊËbÐ …—«Ëb
WOMOB« qLFð ô
Ò
«Æ“UN'« w —d{ Ë√ ‚«d²Š« À«bŠ≈ v« ÍœR¹ b «c¼ ∫V³W
—“ vKŽ jG{« .١ﺗﺸﻐﻴﻞ/إﻳﻘﺎف اﻟﺼﻴﻨﻴﺔ اﻟﺪوّارة ®
«Æ…—«Ëb
«WOMOB« —Ëbð ô U¼bMŽ ∫W−O²M
Ò
ÆW³ÝUM*« ÃdŠb« WŽdÝ d²š« .٢
©Æ
« —“ vKŽ jG{« ¨ …—«Ëbﺗﺸﻐﻴﻞ/
WOMOB« d¹Ëbð v« …œuFK .٢
Ò
اﻟﺪوارة ® © ÆÈdš√ …d2
إﻳﻘﺎف اﻟﺼﻴﻨﻴﺔ
ّ
«ÆwG³M¹ UL: …—«Ëb
«WOMOB
—Ëbð
U¼bMŽ
«∫W−O²M
Ò
WŽdÝ wMF¹ ¢5 5 5 5 5¢ Ë WCHHM*« ÃdŠb« WŽdÝ vMF¹ ¢1 1 1 1 1¢
«ÆWOUF« ÃdŠb
© √m« Æa³D« WOKLŽ ¡UMŁ
—“ vKŽ jGCð ôﺗﺸﻐﻴﻞ/إﻳﻘﺎف اﻟﺼﻴﻨﻴﺔ اﻟﺪوّارة ®
—“ vKŽ jGC« q³ ¨a³D« WOKLŽﺗﺸﻐﻴﻞ/إﻳﻘﺎف اﻟﺼﻴﻨﻴﺔ اﻟﺪوّارةÆ
∏≤
10/17/02, 5:15 PM
28
C138ST
اﻟﻄﺒﺦ اﳉﻤﻌﻲ ﻣﻦ ﻃﺎﻗﺔ اﳌﺎﻳﻜﺮووﻳ واﻻﻧﺘﻘﺎل اﳊﺮاري
A
اﻟﺪوارة أو ﻋﻠﻰ اﻟﺮف اﳌﻨﺨﻔﺾ اﻟﺬي ﻻ ﺑﺪ ﻣﻦ وﺿﻌﻪ
ّ ﺿﻊ اﻟﻄﻌﺎم ﻓﻲ اﻟﺼﻴﻨﻴﺔ.اﻓﺘﺢ اﻟﺒﺎب
. وﻻ ﺑﺪ ﻣﻦ وﺿﻊ ﻋﻨﺼﺮ اﻟﺘﺴﺨﲔ ﻓﻲ اﳌﻮﺿﻊ اﻷﻓﻘﻲ. اﻏﻠﻖ اﻟﺒﺎب.ﻋﻠﻰ اﻟﺼﻴﻨﻴﺔ اﻟﺪوّارة
اﻟﺘﺴﺨﲔ,اﻟﻄﺒﺦ اﳉﻤﻌﻲ ﻳﺴﺘﺨﺪم ﻟﻠﻄﺒﺦ اﳉﻤﻌﻲ ﺑﲔ ﻃﺎﻗﺔ اﳌﺎﻳﻜﺮووﻳ واﻻﻧﺘﻘﺎل اﳊﺮاري
.اﳌﺴﺒﻖ ﻟﻴﺲ ﻣﻄﻠﻮﺑﺎ ﻻن ﻃﺎﻗﺔ اﳌﺎﻳﻜﺮووﻳ ﺗﺴﺘﺨﺪم ﻓﻮرا
: ﺧﺎﺻﺔ, ﳝﻜﻨﻚ ﻃﺒﺦ اﻷﻃﻌﻤﺔ ﻣﻦ اﻷﻧﻮاع اﻟﻜﺜﻴﺮة ﻓﻲ وﺿﻌﻴﺔ اﻟﻄﺒﺦ اﳉﻤﻌﻲ
• ﺗﺸﻮﻳﺔ اﻟﻠﺤﻢ واﻟﺪﺟﺎج
• اﻟﻔﻄﻴﺮة واﻟﻜﻌﻜﺔ
• اﻟﺒﻴﻀﺎت واﳉﱭ
´ n¹ËËdJ¹U*«® اﻟﻄﺒﺦ اﳉﻤﻌﻲe#— v!« — ﺣﻠﻘﺔ اﻟﺘﺤﻜﻢ ﻓﻲ اﻟﻄﺒﺦËœ
Ò .١
Æ©
Í—«d(« ‰UI²½ô«
∫ WO!U²!« «dýR*« ÷dFð U¼bMŽ ∫W−O²M!«
n¹ËËdJ¹U*« 5Ð wFL'« a³D!« WOF{Ë®
©Í—«d(« ‰UI²½ô«Ë
©…—«d(« Wł—œ® Â Ú ≤µ∞
® “— اﻻﺧﺘﻴﺎرvKŽ jGC!UÐ …—«d(« Wł—œ d²š« .٢
‚U³Þ_« ÆULz«œ n¹ËËdJ¹U*« W8UD! W³ÝUM*« WO½U#_« w½«Ë_« Âb6²Ý«
qJAÐ ÂUFD!« cHM¹ n¹ËËdJ¹U*« qF& UN½ô qC√ WO«e)«Ë WOłUłe!«
ÆÍËU²#
Æ اﳊﻠﻘﺔd¹Ëb²Ð a³D!« X8Ë j³{« .٣
ÆWIO8œ ∂∞ v!« qB¹ vB8_« vKŽ a³D!« X8Ë •
«b6²Ý« W!UŠ w dOLײ!«Ë a³DK! W−O²½ qC√ vKŽ ‰uB(« pMJ1
ÆiH6M*« ·d!«
Æ©
Æ«bł WMšUÝ UN½ô ¨ ÊdH!UÐ w½«Ë_« f* bMŽ ULz«œ ÊdH!« “UH8 Âb6²Ý«
©
® “— اﻻﺧﺘﻴﺎرvKŽ jGC!UÐ VÝUM*« W8UD!« Èu²# d²š« .٤
Æ©◊«Ë ∂∞∞≠±∞∞® b¹dð Íc!« W8UD!« Íu²# ÷dF¹ v²Š
® “— اﻟﺘﺸﻐﻴﻞvKŽ jG{« .٥
∫W−O²M!«
ÆwFL'« a³D!UÐ ÊdH!« √b³¹ Üm ◆
Wł—œ v!« qB¹ v²Š ÊdH!« 56ð r²¹ ◆
a³D!« w dL²¹ rŁ WÐuKD*« …—«d(«
Æa³D!« X8Ë wN²M¹ v²Š n¹ËËdJ¹U*UÐ
s# …—UHm oKDMð ¨a³D!« s# ¡UN²½ô« bMŽ ◆
Æ «d# lЗ√ ¢ 0¢ X8u!« i#u¹Ë ÊdH!«
ÆWIO8œ q+ …d# …—UHm oKDMðË
Æ©
Language —“ vKŽ jG{« ¨ÊdHK! WO!U(« …—«d(« Wł—œ WdF# œ—√ «–≈
Æ©WGK!«®
≤∑
C138ST
27
10/17/02, 4:41 PM
☛
اﻟﻄﺒﺦ اﳉﻤﻌﻲ ﻣﻦ ﻃﺎﻗﺔ اﳌﺎﻳﻜﺮووﻳ واﻟﺸﻮاﻳﺔ
اﺳﺘﺨﺪام اﻟﺘﺸﻮﻳﺔ ﺑﺎﻟﺴﻔﺎﻓﻴﺪ اﳌﺘﻌﺪدة ﺑﺸﻜﻞ ﻋﻤﻮدي
ﻣﻦ أﺟﻞ اﻟﻄﺒﺦ اﻟﺴﺮﻳﻊ واﻟﺘﺤﻤﻴﺮ ﻓﻲ ﻧﻔﺲ,ﳝﻜﻨﻚ اﻟﻄﺒﺦ اﳉﻤﻌﻲ ﺑﲔ اﳌﺎﻳﻜﺮووﻳ واﻟﺘﺸﻮﻳﺔ
.اﻟﻮﻗﺖ
‚U³Þ_« ÆULz«œ n¹ËËdJ¹U*« W8UD! W³ÝUM*« WO½U#_« w½«Ë_« Âb6²Ý«
qJAÐ ÂUFD!« cHM¹ n¹ËËdJ¹U*« qF& UN½ô qC√ WO«e)«Ë WOłUłe!«
ÆÍËU²#
ﻓﻘﻂC138STB / C138STF / C139STB / C139STF A
اﻟﺴﻔﺎﻓﻴﺪ اﳌﺘﻌﺪدة ﻟﻄﺒﺦ اﻟﻜﺒﺎب
☛
¨ÃUłb!«Ë ¨ r×K!« W¹uAð pMJ1 ¨»U³JK! ŒUOÝ√ ∂ l# …œbF²*« bOUH!« WDÝ«uÐ
r²¹ w²!« t+«uH!«Ë © 5DIO!« Ë√ qHKH!« ¨qB³!« q¦#® «Ë«dC)«Ë ¨ pL!«Ë
Æ…dOGm lD8 v!« UNFD8
«b6²Ý« WDÝ«uÐ »U³JK! ŒUOÝ√ WDÝ«uÐ ÁöŽ√ …—u+c*« WLFÞ_« œ«bŽ≈ pMJ1
ÆwFL'« a³D!« WOF{Ë Ë√ W¹«uA!«
Æ«bł WMšUÝ UN½ô ¨ ÊdH!UÐ w½«Ë_« f* bMŽ ULz«œ ÊdH!« “UH8 Âb6²Ý«
·d!« «b6²Ý« W!UŠ w dOLײ!«Ë a³DK! W−O²½ qC√ vKŽ ‰uB(« pMJ1
ÆiH6M*«
+
ﺿﻊ اﻟﺮف. وﺿﻊ اﻟﻄﻌﺎم ﻋﻠﻰ اﻟﺮف اﻷﻓﻀﻞ ﻣﻨﺎﺳﺒﺔ ﻟﻨﻮع اﻟﻄﻌﺎم اﻟﺬي ﺗﻄﺒﺨﻪ.اﻓﺘﺢ اﻟﺒﺎب
. اﻏﻠﻖ اﻟﺒﺎب.اﻟﺪوارة
ّ ﻋﻠﻰ اﻟﺼﻴﻨﻴﺔ
włUł“ ¡UŽË
wFL'« a³D!« e#— v!« a³D!« w rJײ!« WIKŠ —Ëœ
Ò .١
Æ©
W¹«uA!« ´ n¹ËËdJ¹U*«®
∫ WO!U²!« «dýR*« ÷dFð U¼bMŽ ∫W−O²M!«
©…bŠ«Ë WKŠd# s# a³D!«®
©W¹«uA!«Ë n¹ËËdJ¹U*« 5Ð wFL'« a³D!«®
—«Ëœ
Ò œuHÝ
bOUH!«
…œbF²*«
W¹uAð W½«dI#
ŒUOÝ_« ¨ r×K!«
اﺳﺘﺨﺪام اﻟﺴﻔﺎﻓﻴﺪ اﳌﺘﻌﺪدة ﻣﻊ أﺳﻴﺎخ ﻟﻠﻜﺒﺎب
bOUHÝ cš ¨ …œbF²*« bOUH!« WDÝ«uÐ »U³J!« a³D! œ«bŽô« qł√ s#
Æ»U³JK! ŒUOÝ√ ∂ l# W¹uA²!«
“— اﻻﺧﺘﻴﺎرvKŽ jGC!UÐ VÝUM*« W8UD!« Èu²# d²š« .٢
Æ ©◊«Ë ∂∞∞≠≥∞∞® W³ÝUM*« ÃËd)« W8UÞ ÷dFð v²Š © ®
ÆW¹«uA!« …—«dŠ Wł—œ j³{ sJ1 ô •
ÆaOÝ q+ vKŽ ÂUFD!« s# WOL+ fH½ l{
ÆtO!« …œbF²*« bOUH!« qšœ«Ë włUłe!« ¡UŽu!« w W¹uA²!« aOÝ l{
Æ…—«Ëb!«
WOMOB!« jÝË w …œbF²*« bOUH!« l# włUłe!« ¡UŽu!« l{
Ò
.١
.٢
.٣
.٤
—«b'« w `O×B!« l{u*« w ÊuJ¹ W¹«uA!« 56ð dBMŽ Ê« s# b+Qð
ÆW¹uA²!« WOKLFÐ ¡b³!« q³8 vKŽ_« w fO!Ë ÊdH!« n¹u−²! wHK)«
Æ اﳊﻠﻘﺔd¹Ëb²Ð a³D!« X8Ë j³{« .٣
ÆWIO8œ ∂∞ v!« qB¹ vB8_« vKŽ a³D!« X8Ë •
ﺳﺤﺐ اﻟﺴﻔﺎﻓﻴﺪ اﳌﺘﻌﺪدة ﻣﻦ اﻟﻔﺮن ﺑﻌﺪ اﻟﺘﺸﻮﻳﺔ
¨ ÊdH!« s# …œbF²*« bOUH!« l# włUłe!« ¡UŽu!« ëdšù ÊdH!« “UH8 Âb6²Ý« .١
Æ«bł WMšUÝ `³Bð UN½ô
® “— اﻟﺘﺸﻐﻴﻞvKŽ jG{« .٤
∫W−O²M!«
ÆwFL'« a³D!UÐ ÊdH!« √b³¹ ◆
s# …—UHm oKDMð ¨a³D!« s# ¡UN²½ô« bMŽ ◆
Æ «d# lЗ√ ¢ 0 ¢ X8u!« i#u¹Ë ÊdH!«
ÆWIO8œ q+ …d# …—UHm oKDMðË
Æ©
ÆUC¹« ÊdH!« “UH8 «b6²ÝUÐ ÊdH!« s# …œbF²*« bOUH!« Ãdš«
s# ÂUFD!« s# lD8 W!«“ù W+uý Âb6²Ý«Ë W¹UMFÐ ÊdH!« s# ŒUOÝ_« Ãdš«
ÆŒUOÝ_«
Æ‚U³Þ_« W!Už “UNł w UNHOEM²! W³ÝUM# dOž …œbF²*« bOUH!«
V×Ý« ÆbO!UÐ nOEM²!« qzUÐ UNKž«Ë T«b!« ¡U*UÐ UNHÒE½ p!c!Ë
ÆUN#«b6²Ý« bFÐ ÊdH!« s# W¹œuLF!« …œbF²*« bOUH!«
≤∂
C138ST
26
10/17/02, 4:41 PM
.٢
.٣
A
اﻟﺘﺸﻮﻳﺔ ﺑﺎﻟﺴﻔﻮد
اﺧﺘﻴﺎر ﻣﻮﺿﻊ ﻋﻨﺼﺮ اﻟﺘﺴﺨﲔ
ﻓﻘﻂC138STB / C138STF / C139STB / C139STF
ﳝﻜﻨﻚ. واﻟﺘﺸﻮﻳﺔ ﺑﺎﻟﺴﻔﻮد, ﻳﺴﺘﺨﺪم ﻋﻨﺼﺮ اﻟﺘﺴﺨﲔ ﻓﻲ ﻃﺒﺦ اﻟﻄﻌﺎم ﺑﺎﻻﻧﺘﻘﺎل اﳊﺮاري
:وﺿﻌﻪ ﻓﻲ واﺣﺪ ﻣﻦ اﳌﻮﺿﻌﲔ
• اﳌﻮﺿﻊ اﻷﻓﻘﻲ ﻟﻠﻄﺒﺦ ﺑﺎﻻﻧﺘﻘﺎل اﳊﺮاري واﻟﺘﺸﻮﻳﺔ
C138STB/C138STF/C139STB/) • اﳌﻮﺿﻊ اﻟﻌﻤﻮدي ﻟﻠﺘﺸﻮﻳﺔ ﺑﺎﻟﺴﻔﻮد ﻓﻘﻂ
. ﻻﻧﻚ ﻻ ﲢﺘﺎج اﻟﻰ ﺗﻘﻠﻴﺐ اﻟﻠﺤﻢ, ﺗﺴﺘﺨﺪم وﻇﻴﻔﺔ اﻟﺘﺸﻮﻳﺔ ﺑﺎﻟﺴﻔﻮد ﻣﻔﻴﺪة ﻟﺘﺸﻮﻳﺔ اﻟﻠﺤﻢ
.وﳝﻜﻨﻚ اﺳﺘﺨﺪام وﻇﻴﻔﺔ اﻟﺘﺸﻮﻳﺔ ﻟﻠﻄﺒﺦ اﳉﻤﻌﻲ ﺑﲔ اﳌﺎﻳﻜﺮووﻳ واﻻﻧﺘﻘﺎل اﳊﺮاري
œuH!« vKŽ ÍËU²# qJý vKŽ WŽ“u# r×K!« s# WNÐUA²# WFD8 Ê√ s# b+Qð
ÆdŠ qJAÐ —Ëbð œuH!«Ë
UN½ô ¨ÊdH!UÐ w½«Ë_« f* bMŽ ULz«œ ÊdH!« “UH8 «b6²Ý«
Æ«bł WMšUÝ `³B²Ý
☛
(C139STF
…uI!« vKŽ o³DM¹ ôË «œ—UÐ ÊuJ¹ U#bMŽ jI 56²!« dBMŽ l{u# d²š«
ÆÍœuLF!« l{u*« w t½u+ W!UŠ w WÞdH*«
Ær×K!« jÝË ‰öš s# œuH!« lœ« .١
ÆÍdIH!« œuLF!« 5Ð œuH!« lœ« ∫‰U¦*« qO³Ý vKŽ
l{Ë włUłe!« ¡UŽu!« vKŽ q#U(« l{Ë tK#UŠ vKŽ œuH!« l{
`#« ¨r×K!« dOLײ! Æ…—«Ëb!«
WOMOB!« vKŽ włUłe!« ¡UŽu!«
Ò
ÆX¹eÐ r×K!«
® اﻟﻄﺒﺦ اﳉﻤﻌﻲe#— v!« — ﺣﻠﻘﺔ اﻟﺘﺤﻜﻢ ﻓﻲ اﻟﻄﺒﺦËœ
Ò .٢
Æ©
Æ©
® “— اﻻﺧﺘﻴﺎرvKŽ jGC!UÐ …—«d(« Wł—œ j³{« .٣
... ﻓـ
... ﻟﻀﺒﻂ ﻋﻨﺼﺮ اﻟﺘﺴﺨﲔ ﻋﻠﻰ
v!« 56²!« dBMŽ V×Ý« ◆
qHÝ_«
`³B¹ v²Š ÊdH!« nKš v!« tFœ« ◆
ÆÊdHK! wHK)« —«b−K! U¹–U×#
ÍœuLF!« l{u*«
∫ jI W¹uA²!« œuHÝ®
C138STB/C138STF/
C139STB/C139STF)
„u×½ 56²!« dBMŽ V×Ý« ◆
`³B¹ v²Š vKŽ_« v!« tFœ« ◆
ÆÊdH!« nI! U¹–U×#
wI_« l{u*«
‰UI²½ôUÐ a³D!«®
©W¹uA²!«Ë Í—«d(«
Æ اﳊﻠﻘﺔd¹Ëb²Ð a³D!« X8Ë j³{« .٤
ÆWIO8œ ∂∞ mK³¹ vB8_« vKŽ a³D!« X8Ë •
“— اﻻﺧﺘﻴﺎرvKŽ jGC!UÐ VÝUM*« W8UD!« Èu²# d²š« .٥
Æ© ®
Æ © ® “— اﻟﺘﺸﻐﻴﻞvKŽ jG{« .٦
ÆœuH!« —ËbðË a³D!UÐ ÊdH!« √b³¹ U¼bMŽ ∫W−O²M!«
s# …—UHm oKDMð ¨a³D!« s# ¡UN²½ô« bMŽ ◆
Æ «d# lЗ√ ¢ 0¢ X8u!« i#u¹Ë ÊdH!«
ÆWIO8œ q+ …d# …—UHm oKDMðË
“UH8 «b6²ÝUÐË ¨ W¹UMFÐ œuH!« ‰“« ¨ö#U+ r×K!« a³Þ bMŽ .٧
Æ„b¹ W¹UL( ÊdH!«
≤µ
C138ST
25
10/17/02, 4:41 PM
☛
A
اﻟﻄﺒﺦ ﺑﺎﻻﻧﺘﻘﺎل اﳊﺮاري
اﻟﺘﺸﻮﻳﺔ
وﺿﻌﻴﺔ اﻻﻧﺘﻘﺎل اﳊﺮاري ﲤﻜﻨﻚ ﻣﻦ ﻃﺒﺦ اﻟﻄﻌﺎم ﺑﻨﻔﺲ اﻟﻄﺮﻳﻘﺔ ﻣﻌﻤﺎ ﻳﻜﻮن ﻓﻲ اﻟﻔﺮن اﻟﻌﺎدي.
ﻻ ﻳﺴﺘﺨﺪم اﳌﺎﻳﻜﺮووﻳ .ﳝﻜﻨﻚ ﺿﺒﻂ درﺟﺔ اﳊﺮارة ﻋﻨﺪ اﳊﺎﺟﺔ ﻋﻠﻰ ﻣﺪى ﻣﺨﺘﻠ ﻣﻦ ْ ٤٠
م وﺣﺘﻰ ْ ٢٥٠م ﻣﻦ ﺛﻤﺎﻧﻴﺔ ﻣﺴﺘﻮﻳﺎت ﻣﺴﺒﻘﺔ اﻟﻀﺒﻂ .وأﻗﺼﻰ وﻗﺖ ﻟﻠﻄﺒﺦ ﻫﻮ ٦٠دﻗﻴﻘﺔ.
اﻟﺸﻮاﻳﺔ ﲤﻜّﻨﻚ ﻣﻦ ﺗﺴﺨﲔ اﻟﻄﻌﺎم وﲢﻤﻴﺮه ﺑﺴﺮﻋﺔ ,ﺑﺪون اﺳﺘﺨﺪام ﻃﺎﻗﺔ اﳌﺎﻳﻜﺮووﻳ.
• اﺳﺘﺨﺪم ﻗﻔﺎز اﻟﻔﺮن داﺋﻤﺎ ﻋﻨﺪ ﳌﺲ اﻷواﻧﻲ اﳌﻮﺟﻮدة ﻓﻲ اﻟﻔﺮن ,ﻻﻧﻬﺎ ﺳﺎﺧﻨﺔ
ﺟﺪا.
• ﳝﻜﻨﻚ اﳊﺼﻮل ﻋﻠﻰ أﻓﻀﻞ ﻧﺘﻴﺠﺔ ﻟﻠﻄﺒﺦ واﻟﺘﺤﻤﻴﺮ ,ﻓﻲ ﺣﺎﻟﺔ اﺳﺘﺨﺪام اﻟﺮف
اﳌﺮﺗﻔﻊ.
☛
≈–« √—Æ≤≥ W×Hm lł«— ¨UI³# ÊdH!« 56ð œ
• «UN½ô ¨ ÊdH!« w …œułu*« w½«Ë_« f* bMŽ ULz«œ ÊdH!« “UH8 Âb6²Ý
Æ«bł WMšUÝ
• W!UŠ w ¨ dOLײ!«Ë a³DK! W−O²½ qC√ vKŽ ‰uB(« pMJ1
ﺗﺄﻛﺪ ﻣﻦ أن ﻋﻨﺼﺮ اﻟﺘﺴﺨﲔ ﻣﻮﺿﻮع ﻓﻲ اﳌﻮﺿﻊ اﻷﻓﻘﻲ وأن اﻟﺮف اﳌﻨﺎﺳﺐ ﻣﻮﺟﻮد ﻓﻲ
ﻣﻮﺿﻌﻪ.
«ÆiH6M*« ·d!« «b6²Ý
Æ·d!« vKŽ ÂUFD!« l{Ë »U³!« `²« .١
اﻟﺪوارة ﻣﻮﺿﻮﻋﺔ ﻓﻲ
ﺗﺄﻛﺪ ﻣﻦ أن ﻋﻨﺼﺮ اﻟﺘﺴﺨﲔ ﻣﻮﺿﻮع ﻓﻲ اﳌﻮﺿﻊ اﻷﻓﻘﻲ وأن اﻟﺼﻴﻨﻴﺔ ّ
اﻟﺪوارة.
ﻣﻜﺎﻧﻬﺎ .اﻓﺘﺢ اﻟﺒﺎب وﺿﻊ اﻷواﻧﻲ ﻋﻠﻰ اﻟﺼﻴﻨﻴﺔ ّ
—Ëœﺣﻠﻘﺔ اﻟﺘﺤﻜﻢ ﻓﻲ اﻟﻄﺒﺦ «! e#— vاﻟﺸﻮاﻳﺔ ®
Ò .٢
‰UI²½ô« e#— v!« a³D!« w rJײ!« WIKŠ —Ëœ
Ò .١
«(Æ© ® Í—«d
«!∫w!U²!« dýR*« ÷dF¹ U¼bMŽ ∫W−O²M
®© Í—«d(« ‰UI²½ô« WOF{Ë
∞©…—«d(« Wł—œ® Â Ú ≤µ
—“ vKŽ jG{« .٢اﻻﺧﺘﻴﺎر ®
«(Æ…—«d
©Æ
«!ÆWO!U²!« «dýR*« ÷dFð U¼bMŽ ∫W−O²M
®«!©…bŠ«Ë WKŠd# s# a³D
®©W¹«uA!« WOF{Ë
• ÆW¹«uA!« …—«dŠ Wł—œ j³{ sJ1 ô
d¹Ëb²Ð W¹uA²!« X8Ë j³{« .٣اﳊﻠﻘﺔÆ
© Wł—œ j³C! d¦+√ Ë√ …d#
• ÆWIO8œ ∂∞ v!« qB¹ vB8_« vKŽ W¹uA²!« X8Ë
d¹Ëb²Ð a³D!« X8Ë j³{« .٣اﳊﻠﻘﺔÆ
—“ vKŽ jG{« .٤اﻟﺘﺸﻐﻴﻞ ®
«!∫W−O²M
—“ vKŽ jG{« .٤اﻟﺘﺸﻐﻴﻞ ® © Æ
«!∫ a³D!UÐ ÊdH!« √b³¹ U¼bMŽ ∫W−O²M
◆ s# …—UHm oKDMð ¨a³D!« s# ¡UN²½ô« bMŽ
«!Æ «d# lЗ√ ¢ 0¢ X8u!« i#u¹Ë ÊdH
ÆWIO8œ q+ …d# …—UHm oKDMðË
©Æ
∫ a³D!UÐ ÊdH!« √b³¹ U¼bMŽ
◆ s# …—UHm oKDMð ¨a³D!« s# ¡UN²½ô« bMŽ
«!Æ «d# lЗ√ ¢ 0¢ X8u!« i#u¹Ë ÊdH
ÆWIO8œ q+ …d# …—UHm oKDMðË
Language —“ vKŽ jGC!UÐ X8Ë Í√ w …—«d(« Wł—œ h× pMJ1
®«!Æ©WGK
≤¥
10/17/02, 4:41 PM
24
C138ST
ﺿﺒﻂ وﻗﺖ اﻻﻧﺘﻈﺎر
ﺗﺴﺨﲔ اﻟﻔﺮن اﳌﺴﺒﻖ
ﳝﻜﻨﻚ اﺳﺘﺨﺪام زر وﻗﺖ اﻻﻧﺘﻈﺎر ﻟﻀﺒﻂ وﻗﺖ اﻻﻧﺘﻈﺎر أوﺗﻮﻣﺎﺗﻴﻜﻴﺎ )ﺑﺪون اﻟﻄﺒﺦ
ﺑﺎﳌﺎﻳﻜﺮووﻳ&(.
ﻟﻠﻄﺒﺦ ﺑﺎﻻﻧﺘﻘﺎل اﳊﺮاري ,ﻣﻦ اﳌﻮﺻﻰ ﺑﻪ أﻧﻚ ﺗﺴﺨﻦ اﻟﻔﺮن ﻣﺴﺒﻘﺎ ﻟﻜﻲ ﻳﺼﻞ اﻟﻰ درﺟﺔ اﳊﺮارة
اﳌﻨﺎﺳﺒﺔ ﻗﺒﻞ وﺿﻊ اﻟﻄﻌﺎم ﻓﻲ اﻟﻔﺮن.
—“ vKŽ jG{« .١اﻻﻧﺘﻈﺎر/اﻟﺘﺄﺟﻴﻞ ® ©Æ
«ÆwU²« dýR*« ÷dF¹ U¼bMŽ ∫W−O²M
®©qOłQ²«Ø—UE²½ô« WOF{Ë
ﻋﻨﺪ وﺻﻮل اﻟﻔﺮن اﻟﻰ درﺟﺔ اﳊﺮارة اﳌﻄﻠﻮﺑﺔ ,ﻳﺤﺘﻔﻆ ﺑﻬﺎ ﳌﺪة ﺣﻮاﻟﻲ ١٠دﻗﺎﺋﻖ ; ﺛﻢ ﻳﺘﻮﻗ&
اﻟﻔﺮن ﻋﻦ اﻟﻌﻤﻞ أوﺗﻮﻣﺎﺗﻴﻜﻴﺎ.
d¹Ëb²Ð —UE²½ô« X-Ë d²š« .٢اﳊﻠﻘﺔÆ
ﺗﺄﻛﺪ ﻣﻦ أن ﻋﻨﺼﺮ اﻟﺘﺴﺨﲔ ﻣﻮﺿﻮع ﻓﻲ اﳌﻮﺿﻊ اﻟﺼﺤﻴﺢ ﺣﺴﺐ ﻧﻮع
اﻟﺪوارة.
اﻟﻄﺒﺦ اﻟﺬي ﺗﺮﻳﺪه .اﻓﺘﺢ اﻟﺒﺎب وﺿﻊ اﻟﺼﻴﻨﻴﺔ ّ
A
©Æ
—“ vKŽ jG{« .١اﻟﺘﺴﺨﲔ اﳌﺴﺒﻖ ®
«∫wU²« dýR*« ÷dF¹ U¼bMŽ ∫W−O²M
∞©…—«d(« Wł—œ® Ú ≤µ
—“ vKŽ jG{« .٣اﻟﺘﺸﻐﻴﻞ ® © Æ
«X-Ë ¡UN²½« bMŽ ÊdH« s7 …—UH/ oKDMð ∫W−O²M
«Æ—UE²½ô
—“ vKŽ jG{« .٢اﻻﺧﺘﻴﺎر ® © Wł—œ j³C d¦K√ Ë√ …d7
«(Æ…—«d
اﺧﺘﻴﺎر اﳌﻠﺤﻘﺎت
—“ vKŽ jG{« .٣اﻟﺘﺸﻐﻴﻞ ® © Æ
«v« qB¹ v²Š UI³O7 ÊdH« 5QOð - U¼bMŽ ∫W−O²M
ÆWÐuKD*« …—«d(« Wł—œ
ﻃﺒﺦ اﻻﻧﺘﻘﺎل اﳊﺮاري اﻟﺘﻘﻠﻴﺪي ﻻ ﻳﺤﺘﺎج اﻟﻰ أي أواﻧﻲ ﺧﺎﺻﺔ .وﻟﻜﻦ
ﻻ ﺑﺪ ﻣﻦ اﺳﺘﺨﺪام اﻷواﻧﻲ اﻷﻣﺎﻧﻴﺔ اﻟﺘﻲ ﺗﺴﺘﺨﺪم ﻓﻲ اﻟﻔﺮن اﻟﻌﺎدي.
اﻷواﻧﻲ اﻷﻣﺎﻧﻴﺔ اﳌﻨﺎﺳﺒﺔ ﻟﻄﺎﻗﺔ اﳌﺎﻳﻜﺮووﻳ& ﻏﻴﺮ ﻣﻨﺎﺳﺒﺔ ﻟﻠﻄﺒﺦ
ﺑﺎﻻﻧﺘﻘﺎل اﳊﺮاري :ﻻ ﺗﺴﺘﺨﺪم اﻷوﻋﻴﺔ واﻷﻃﺒﺎق اﻟﺒﻼﺳﺘﻴﻜﻴﺔ,
اﻷﻛﻮاب ,اﳌﻨﺎﺷ& اﻟﻮرﻗﻴﺔ ...اﻟﺦ.
اذا أردت اﺧﺘﻴﺎر وﺿﻌﻴﺔ اﻟﻄﺒﺦ اﺠﻤﻟﻤﻮع )اﳌﺎﻳﻜﺮووﻳ& واﻟﺸﻮاﻳﺔ
واﻻﻧﺘﻘﺎل اﳊﺮاري( ,اﺳﺘﺨﺪم اﻷﻃﺒﺎق اﻷﻣﺎﻧﻴﺔ اﳌﻨﺎﺳﺒﺔ ﻟﻄﺎﻗﺔ
اﳌﺎﻳﻜﺮووﻳ& واﳌﻨﺎﺳﺒﺔ ﻟﻠﻔﺮن ﻓﻘﻂ .اﻷوﻋﻴﺔ أو اﻷواﻧﻲ اﳌﻌﺪﻧﻴﺔ ﻗﺪ
ﺗﺆدي اﻟﻰ إﺣﺪاث ﺿﺮر ﻓﻲ اﻟﻔﺮن.
☛
*WOŽË_« qOœ lł«— ¨W³ÝUM*« w½«Ë_«Ë WOŽË_« ‰uŠ qO/UH²« s7 b¹e
«*Æ≤π W×H/ vKŽ œułu
≥≤
10/17/02, 5:14 PM
23
C138ST
اﻟﻄﺒﺦ ﻋﻠﻰ ﻣﺮاﺣﻞ ﻣﺘﻌﺪدة
A
ﳝﻜﻨﻚ ﺑﺮﻣﺠﺔ ﻃﺒﺦ اﻟﻄﻌﺎم ﻣﻦ أرﺑﻊ ﻣﺮاﺣﻞ )وﺿﻌﻴﺎت اﻻﻧﺘﻘﺎل اﳊﺮاري ,اﳌﺎﻳﻜﺮووﻳ +
اﻻﻧﺘﻘﺎل اﳊﺮاري واﻟﺘﺴﺨﲔ اﳌﺴﺒﻖ ﻻ ﳝﻜﻦ اﺳﺘﺨﺪاﻣﻬﺎ ﻓﻲ اﻟﻄﺒﺦ ﻣﻦ اﳌﺮاﺣﻞ اﳌﺘﻌﺪدة(.
ﻋﻠﻰ ﺳﺒﻴﻞ اﳌﺜﺎل :أردت إذاﺑﺔ اﻟﺜﻠﺞ واﻟﻄﺒﺦ ﺑﺪون إﻋﺎدة ﺿﺒﻂ اﻟﻔﺮن ﺑﻌﺪ ﻛﻞ ﻣﺮﺣﻠﺔ .ﳝﻜﻨﻚ
إذاﺑﺔ اﻟﺜﻠﺞ واﻟﻄﺒﺦ ﻟـ ١٫٨ﻛﺠﻢ ﻣﻦ اﻟﺪﺟﺎج ﻋﻠﻰ أرﺑﻊ ﻣﺮاﺣﻞ :
• إذاﺑﺔ اﻟﺜﻠﺞ
• اﻧﺘﻈﺎر ﳌﺪة ٢٠دﻗﻴﻘﺔ
• اﻟﻄﺒﺦ ﺑﺎﳌﺎﻳﻜﺮووﻳ ﳌﺪة ٣٠دﻗﻴﻘﺔ
• اﻟﺘﺸﻮﻳﺔ ﳌﺪة ١٥دﻗﻴﻘﺔ
☛
—“ vKŽ jGC!UÐ n¹ËËdJ¹U*« W8UÞ Èu²# j³{« .٧اﻻﺧﺘﻴﺎر
® © ¥µ∞‰U¦*« qO³Ý vKŽ® VÝUM*« W8UD!« Èu²# —UO²šô
Æ© ◊«Ë
d¹Ëb²Ð a³D!« X8Ë j³{« .٨اﳊﻠﻘﺔ ®Æ©WIO8œ ≥∞ ‰U¦*« qO³Ý vKŽ
—Ëœﺣﻠﻘﺔ اﻟﺘﺤﻜﻢ ﻓﻲ اﻟﻄﺒﺦ «! e#— vاﻟﺸﻮاﻳﺔ ®
Ò .٩
pMJ1Ë Æ5²O!Ë_« 5²KŠd*« w —UE²½ô«Ë ZK¦!« WЫ–≈ «b6²Ý« s# bÐ ô
«sJ! ¨ 5²OI³²*« 5²KŠd*« ¡UMŁ√ …d# W¹«uA!«Ë wFL'« a³D!« «b6²Ý
Æ©W8UDK! 5HK²6# 5¹u²# vKŽ® 5ðd# n¹ËËdJ¹U*« «b6²Ý« pMJ1
©Æ
d¹Ëb²Ð a³D!« X8Ë j³{« .١٠اﳊﻠﻘﺔ qO³Ý vKŽ® W³ÝUM# «d#
«*¦Æ©WIO8œ ±µ ‰U
—Ëœﺣﻠﻘﺔ اﻟﺘﺤﻜﻢ ﻓﻲ اﻟﻄﺒﺦ «! e#— vإذاﺑﺔ اﻟﺜﻠﺞ اﻷوﺗﻮﻣﺎﺗﻴﻜﻴﺔ
Ò .١
® ©Æ
Æ© ® qOGA²!« —“ vKŽ jG{« .١١
«!∫ a³D!« √b³¹ U¼bMŽ ∫W−O²M
◆ ÊdH!« s# …—UHm oKDMð ¨a³D!« ¡UN²½« bMŽ
s# …—UHm oKDMðË Æ «d# lЗ√ ¢0¢ i#u¹Ë
«!ÆWIO8œ q+ …d# ÊdH
—“ vKŽ jGC!UÐ t6³Þ b¹dð Íc!« ÂUFD!« Ÿu½ d²š« .٢اﻻﺧﺘﻴﺎر
® ©Æ
d¹Ëb²Ð Ê“u!« j³{« .٣اﳊﻠﻘﺔ qO³Ý vKŽ® W³ÝUM# «d#
«*¦© «dł ±∏∞∞‰U
n8u²!« —“ jG{« .٤ﻻﻧﺘﻈﺎر/اﻟﺘﺄﺟﻴﻞ ® ©Æ
d¹Ëb²Ð —UE²½ô« X8Ë j³{« .٥اﳊﻠﻘﺔ vKŽ® W³ÝUM# «d#
Æ©WIO8œ ≤∞ ‰U¦*« qO³Ý
—Ëœﺣﻠﻘﺔ اﻟﺘﺤﻜﻢ ﻓﻲ اﻟﻄﺒﺦ «! e#— vاﳌﺎﻳﻜﺮووﻳ® a
Ò .٦
©Æ
≤≤
10/17/02, 4:41 PM
22
C138ST
(اﺳﺘﺨﺪام اﻟﺼﻴﻨﻴﺔ واﻟﺮف اﳌﻌﺪﻧﻲ اﳌﺮﺑﻊ)ﻣﺘﺎﺑﻊ
A
دﻟﻴﻞ اﻻﻧﺘﻘﺎل اﳊﺮاري ﳋﺒﺰ اﻟﺒﻴﺘﺰا واﻟﻜﻌﻜﺔ اﻟﻬﻼﻟﻴﺔ اﻟﺸﻜﻞ وأرﻏﻔﺔ اﳋﺒﺰ واﻟﻜﻌﻚ ﺑﺎﺳﺘﺨﺪام اﻟﻌﺠﻴﻨﺔ
()ﻣﺘﺎﺑﻊ.اﻟﻄﺎزﺟﺔ
دﻟﻴﻞ اﻻﻧﺘﻘﺎل اﳊﺮاري ﻟﻠﻤﻨﺘﺠﺎت اﻟﺴﺮﻳﻌﺔ اﻟﺘﺤﻀﻴﺮ ﻣﺜﻞ اﻟﺒﻴﺘﺰا ووﺟﺒﺎت ﺧﻔﻴﻔﺔ ﻣﻦ اﻟﺒﻄﺎﻃﺲ واﻟﻔﻄﻴﺮة
.اﻟﺪوارة ﻋﻨﺪ اﺳﺘﺨﺪام ﺻﻴﻨﻴﺔ ﻣﻌﺪﻧﻴﺔ ﻣﺴﺘﻄﻴﻠﺔ واﻟﺮف
ّ اﺿﺒﻂ وﻇﻴﻔﺔ إﻳﻘﺎف اﻟﺼﻴﻨﻴﺔ
.اﺳﺘﺨﺪم اﳌﻠﺤﻘﺎت ﻣﻦ اﳌﺮاﺣﻞ اﳌﺘﻌﺪدة ﻓﻘﻂ ﻋﻠﻰ وﺿﻌﻴﺔ اﻟﻄﺒﺦ ﺑﺎﻻﻧﺘﻘﺎل اﳊﺮاري
ﺳﺨﻦ اﻟﻔﺮن ﻣﺴﺒﻘﺎ ﻟﻼﻧﺘﻘﺎل اﳊﺮاري ﺑﻮاﺳﻄﺔ وﻇﻴﻔﺔ اﻟﺘﺴﺨﲔ اﳌﺴﺒﻖ اﻷوﺗﻮﻣﺎﺗﻴﻜﻲ ﺣﺘﻰ ﺗﺼﻞ درﺟﺔ اﳊﺮارى اﻟﻰ
. راﺟﻊ اﳉﺪول- ﺑﺎﺳﺴﺘﺜﻨﺎء أﻧﻨﺎ ﻧﻮﺻﻲ اﻟﺘﺴﺨﲔ اﳌﺴﺒﻖ ﻟﻠﻔﺮن,اﳌﺴﺘﻮى اﳌﺮﻏﻮب ﻓﻴﻪ
اﻟﺘﻌﻠﻴﻤﺎت
‰UI²½ôUÐ a³DK! býdL+ ‰Ëb'« «c¼ w WMO³*« tðULOKFðË a³D!« U8Ë√ Âb6²Ý«
ÆÍ—«d(«
اﻟﺘﻌﻠﻴﻤﺎت
اﻟﻮﻗﺖ
()دﻗﻴﻘﺔ
اﻟﺘﺴﺨﲔ اﳌﺮﺣﻠﺔ اﻟﻄﺎﻗﺔ
(اﳌﺴﺒﻖ )ﻣﻦ اﻟﺘﺤﺖ
اﻷوﺗﻮ
ﻣﺎﺗﻴﻜﻲ
اﻟﻜﻤﻴﺔ
≤ Â Ú ≤∞∞ «dł ±∞∞∞
«e²O³!«
bL:«
W¹ËU²# ÊdH!UÐ WmU)« `z«dA!« l{ ≤∏≠≤µ Â Ú ≤≤∞
UN³K8 ÆWFÐd# WO½bF# WOMOm vKŽ
Æ «d# …bŽ
¥≠≥ Â Ú ≤≤∞ «dł µ∞∞
`z«dý
…bL−#
ÊdH!UÐ WmUš
WOMOm vKŽ U¹ËU²# XO+ËdJ!« l{ ±∂≠±≥ Â Ú ±∏∞
—Ëd# bFÐ UN³K8 ÆWFÐd# WO½bF#
ÆX8u!« s# nB½
≥ Â Ú ±∏∞ «dł µ∞∞
XO+ËdJ!«
bL:«
U¹ËU²# fÞUD³!« s# qu!« l{ ≤µ≠≤∞ Â Ú ≤∞∞
ÆWFÐd# WO½bF# WOMOm vKŽ
ÆX8u!« s# nB½ —Ëd# bFÐ t³K8
«Ë«dC)« s# …dOGB!« UHK!« l{ ±≤≠±∞ Â Ú ≤≤∞
ÆWFÐd# WO½bF# WOMOm w
bFÐ UN³K8 «Ë«dC)« s# …bL:«
ÆX8u!« s# nB½ —Ëd#
r−(« VÝUM# o³Þ w tO½«“ô l{ ≥∞≠≤µ Â Ú ≤∞∞
Æ·d!« jÝË w ©…—«d×K! w½U#√®
21
≠ «dł ∏∞∞ W8bMÐ WJF+
ÕUH²!« ∂∞∞® Wł“UÞ WMO−Ž l{ ≤µ≠≤≤
WOMOm w W×D# ©Â«dł
s# `z«dý l{ ÆWFÐd# WO½bF#
s# `z«dý n{« ÆUN8u ÕUH²!«
Æ“uK!« s# …—uJ# lD8 Ë√ “uK!«
≥ Â Ú ±∏∞ «dł ±µ∞∞ `z«dý WJF+
≥ Â Ú ≤≤∞ «dł ±∞∞∞ ÓUÞ tO½«“ô
©œd³#®
≤±
C138ST
اﻟﻄﻌﺎم
اﻟﻄﺎزج
¥ Â Ú ±∏∞ «dł ≥∞∞
WÞu vKŽ W¹ËU²# U¹uK(« l{ ±µ≠±≤
WOMOm vKŽ e³)UÐ WmUš WO8—Ë
ÆWFÐd# WO½bF#
WHK!«
…dOGB!«
»uKÝ√®
©wMOm
≤
اﻟﻜﻤﻴﺔ
WÞu vKŽ W¹ËU²# WMO−Ž l{ ±≤≠±∞ Â Ú ±∏∞
WOMOm vKŽ e³)UÐ WmUš WO8—Ë
ÆWFÐd# WO½bF#
ÂÚ ±∏∞
vKŽ W¹ËU²# WOMOuLK! WMO−Ž l{ ≤±≠±∏ Â Ú ±∏∞
¨WOMOu*UÐ ’Uš w½bF# V!U8
ÆWOMOu*« s# WFD8 ±≤ ‡! VÝUM#Ë
Æ·d!« vKŽ o³D!« j³{«
≥ Â Ú ≤∞∞ «dł µ∞∞ bL:« qu!«
fÞUD³!« s#
¥ Â Ú ≤≤∞ «dł ≤µ∞
اﻟﺘﺴﺨﲔ اﳌﺮﺣﻠﺔ اﻟﻄﺎﻗﺔ
(اﳌﺴﺒﻖ )ﻣﻦ اﻟﺘﺤﺖ
اﻷوﺗﻮ
ﻣﺎﺗﻴﻜﻲ
o³Þ w Wł“UD!« WMO−F!« l{ ∂µ≠∂∞ Â Ú ±∂∞
≤¥ dD8® d¹b²# œuÝ√ w½bF#
ÊdH!« jÝË w WJF+ j³{« Æ©rÝ
Æ·d!« vKŽ
اﻟﻄﻌﺎم
اﻟﻄﺎزج
Æ·d!« vKŽ bL:« «e²O³!« l{ ≤µ≠≤≤ Â Ú ≤∞∞
اﻟﻮﻗﺖ
()دﻗﻴﻘﺔ
10/17/02, 4:41 PM
≠±∂∞
ÂÚ ±∏∞
¥
ÂÚ ±∏∞
WJF+
WO−MHÝ«
nOž—®
©Íd¹uÝ
≠µ∞∞
«dł ∂∞∞
©WFD8 ±≤®
WOMOu*«
¥ Â Ú ±∏∞ «dł ≥∞∞
©WFD8 ≥∞®
U¹uK(«
اﺳﺘﺨﺪام اﻟﺼﻴﻨﻴﺔ واﻟﺮف اﳌﻌﺪﻧﻲ اﳌﺮﺑﻊ
.اﻟﺪوارة ﻋﻨﺪ اﺳﺘﺨﺪام ﺻﻴﻨﻴﺔ ﻣﻌﺪﻧﻴﺔ ﻣﺴﺘﻄﻴﻠﺔ واﻟﺮف
ّ اﺿﺒﻂ وﻇﻴﻔﺔ إﻳﻘﺎف اﻟﺼﻴﻨﻴﺔ
. اﻟﺦ... واﳊﻠﻮﻳﺎت, واﻟﺒﻴﺘﺰا,اﻟﺮف اﳌﻌﺪﻧﻲ اﳌﺮﺑﻊ أو اﻟﺼﻴﻨﻴﺔ اﳌﻌﺪﻧﻴﺔ اﳌﺮﺑﻌﺔ ﻣﻔﻴﺪة ﻟﻠﻜﻌﻚ
ﺳﺨﻦ اﻟﻔﺮن ﻣﺴﺒﻘﺎ ﻟﻼﻧﺘﻘﺎل.اﺳﺘﺨﺪم اﳌﻠﺤﻘﺎت ﻣﻦ اﳌﺮاﺣﻞ اﳌﺘﻌﺪدة ﻓﻘﻂ ﻋﻠﻰ وﺿﻌﻴﺔ اﻟﻄﺒﺦ ﺑﺎﻻﻧﺘﻘﺎل اﳊﺮاري
,اﳊﺮاري ﺑﻮاﺳﻄﺔ وﻇﻴﻔﺔ اﻟﺘﺴﺨﲔ اﳌﺴﺒﻖ اﻷوﺗﻮﻣﺎﺗﻴﻜﻲ ﺣﺘﻰ ﺗﺼﻞ درﺟﺔ اﳊﺮارى اﻟﻰ اﳌﺴﺘﻮى اﳌﺮﻏﻮب ﻓﻴﻪ
. راﺟﻊ اﳉﺪول- ﺑﺎﺳﺴﺘﺜﻨﺎء أﻧﻨﺎ ﻧﻮﺻﻲ اﻟﺘﺴﺨﲔ اﳌﺴﺒﻖ ﻟﻠﻔﺮن
.وﳝﻜﻦ اﺳﺘﺨﺪاﻣﻬﺎ ﻟﻠﻄﺒﺦ ﺑﺎﻻﻧﺘﻘﺎل اﳊﺮاري
ÆÊdH!« w ÂUFD!« W#ö# bMŽ ULz«œ ÊdH!UÐ ’U)« “UHI!« Âb6²Ý«
‰UI²½ôUÐ a³DK! býdL+ ‰Ëb'« «c¼ w WMO³*« tðULOKFðË a³D!« U8Ë√ Âb6²Ý«
ÆÍ—«d(«
اﻟﺘﻌﻠﻴﻤﺎت
اﻟﻮﻗﺖ
()دﻗﻴﻘﺔ
اﻟﺘﺴﺨﲔ اﳌﺮﺣﻠﺔ اﻟﻄﺎﻗﺔ
(اﳌﺴﺒﻖ )ﻣﻦ اﻟﺘﺤﺖ
اﻷوﺗﻮ
ﻣﺎﺗﻴﻜﻲ
≥∞∞® Wł“UD!« «e²O³!« WMO−Ž l{ ≤µ≠≤∞ Â Ú ≤∞∞
WOMOB!« vKŽ W×D*« ©Â«dł
W¹uKF!« WI³D!« d¦½« ÆWFÐd*« WO½bF*«
«Ë«dC)«Ë rÞULD!« W×¹dý q¦#
ÆvKŽ_« vKŽ U¹ËU²# 6'«Ë
vKŽ W¹ËU²# e³)« WHž—√ VðÒ— ±∂≠±¥ Â Ú ±∏∞
ÆWFÐd# WO½bF# WOMOm
qJA!« WO!öN!« UJFJ!« VðÒ— ±≥≠±∞ Â Ú ±∏∞
WOMOB!« vKŽ W¹ËU²#
WFÐd*« WO½bF*«
اﻟﻜﻤﻴﺔ
Æ»U³!« `²« .١
—UO!« vKŽ błu¹ Íc!« ·d!« q#UŠ vKŽ ·d!« bM# oKŽ
Æn¹ËËdJ¹U*« Êd qš«œ wLO!«Ë
اﻟﻄﻌﺎم
اﻟﻄﺎزج
≥ Â Ú ≤∞∞ «dł ∏∞∞
WO½bF*« WOMOB!« Ë√ ·d!« vKŽ t6³D²Ý Íc!« ÂUFD!« l{ .٢
Æ·ud!« b½U# 5Ð lÐd*« ·d!« qšœ« ¨WFÐd*«
Ë√ ·d!« vKŽ ¡UŽË Í√ w ¡UDž ÊËbÐ ÂUFD!« pMJ1
☛
ÆWFÐd*« WO½bF*« WOMOB!«
«e²O³!«
Æ©
≥ Â Ú ±∏∞ «dł ¥∞∞ e³)« WHž—√
©lD8 ∏® …dOLš WO−Ž®
©…œd³# Wł“UÞ
≥ Â Ú ±∏∞ «dł ≤µ∞
©lD8 ∂ ®
≠ «dł ∑∞∞
Æ…—«d(« Wł—œ j³C! d¦+√ Ë√ …d# © ® “— اﻻﺧﺘﻴﺎرvKŽ jG{« .٤
UOF{Ë nmu! WO!U²!« W×HB!« w œułu*« ‰Ëb'« lł«—
ÆUI³# UN²−#dÐ - w²!« WHK²<« j³C!«
WJFJ!«
WO!öN!«
o³Þ w Wł“UD!« WMO−F!« l{ ∂∞≠µµ ÂÚ ±∂∞
Æ©rÝ ≤µ ‰uÞ® qOD²# œuÝ√ w½bF#
Æ·d!« jÝË w o³D!« ÷dŽ j³{«
≤
o³Þ w Wł“UD!« WMO−F!« l{ ∂µ≠µµ Â Ú ±∂∞
Æ©rÝ ≤µ ‰uÞ® qOD²# œuÝ√ w½bF#
Æ·d!« jÝË w o³D!« ÷dŽ j³{«
≤
≠ «dł ∏∞∞
W¹bГ WJF+
WO½U*√
©W¹bГ WJF+®
o³Þ w Wł“UD!« WMO−F!« l{ ¥∞≠≥µ Â Ú ±∂∞
f+d¹U³!« WłUł“ s# …d¹b²#
Æ·d!« ÆœuÝ√ w½bF# o³Þ w Ë√
vKŽ ÊdH!« jÝË w WJFJ!« l{
Æ·d!«
≤
≠ «dł ∑∞∞
WJF+
WO−MHÝ«
® اﻻﻧﺘﻘﺎل اﳊﺮاريe#— v!« — ﺣﻠﻘﺔ اﻟﺘﺤﻜﻢ ﻓﻲ اﻟﻄﺒﺦËœ
Ò .٣
Æ اﳊﻠﻘﺔd¹Ëb²Ð a³D!« X8Ë j³{« .٥
WLŽU½ WJF+
©WLšd# WJF+®
Æ© ® “— اﻟﺘﺸﻐﻴﻞvKŽ jG{« .٦
∫a³D!UÐ ÊdH!« √b³¹ U¼bMŽ ∫W−O²M!«
ÊdH!« s# …—UHm oKDMð ¨a³D!« ¡UN²½« bMŽ ◆
s# …—UHm oKDMðË Æ «d# lЗ√ ¢ 0¢ i#u¹Ë
ÆWIO8œ q+ …d# ÊdH!«
WHž—√Ë qJA!« WO!öN!« WJFJ!«Ë «e²O³!« e³) Í—«d(« ‰UI²½ô« qO!œ
ÆWł“UD!« WMO−F!« «b6²ÝUÐ pFJ!«Ë e³)«
≤∞
C138ST
20
10/17/02, 4:41 PM
☛
A
اﺳﺘﺨﺪام ﺻﺤﻦ اﻟﺘﺤﻤﻴﺮ
A
ﻓﻘﻂC138STT / C138STF / C139STT / C139STF
,ﻋﺎدة ﻋﻨﺪ ﻃﺒﺦ اﻷﻃﻌﻤﺔ ﻣﺜﻞ اﻟﺒﻴﺘﺰا أو اﻟﻔﻄﻴﺮة ﻋﻠﻰ اﻟﺸﻮاﻳﺔ أو ﻓﻲ ﻓﺮن اﳌﺎﻳﻜﺮووﻳ
وﻓﻲ ﻫﺬه اﳊﺎﻟﺔ ﻣﻦ اﳌﻮﺻﻰ ﺑﻬﺎ اﺳﺘﺨﺪام ﺻﺤﻦ.اﻟﻌﺠﻴﻨﺔ أو اﻟﻔﻄﻴﺮة أﺻﺒﺤﺖ ﻣﺸﺒﻌﺔ ﺑﺎﳌﺎء
ﺧﺎص ﻟﻠﻄﺒﺦ; ﻷن درﺟﺔ اﳊﺮارة اﻟﻌﺎﻟﻴﺔ اﻟﻰ اﻟﻄﻌﺎم ﺑﺴﺮﻋﺔ ﻓﺘﺘﻢ ﺗﺮﻗﻴﻖ ﻗﺸﺮة اﻟﻄﻌﺎم
.وﲢﻤﻴﺮﻫﺎ
Æ © ® “— اﻟﺘﺸﻐﻴﻞvKŽ jG{« .٦
Æa³D!UÐ ÊdH!« √b³¹ ∫W−O²M!«
…—UHm ÊdH!« —bB¹ Æa³D!« X8Ë ¡UN²½« bMŽ ◆
—bB¹Ë Æ «d# lЗ√ ¢ 0¢ r8d!« i#u¹Ë
ÆWIO8œ q+ …—UHm ÊdH!«
ﻛﻴﻔﻴﺔ ﺗﻨﻈﻴ ﺻﺤﻦ اﻟﺘﺤﻤﻴﺮ
. اﻟﺦ... وﳝﻜﻨﻚ اﺳﺘﺨﺪام اﻟﺼﺤﻦ اﳋﺎص ﻟﻠﻄﺒﺦ ﻟﻄﺒﺦ اﻟﻠﺤﻢ واﻟﺒﻴﻀﺎت
أﻓﻀﻞ ﻃﺮﻳﻘﺔ ﻟﺘﻨﻈﻴ ﺻﺤﻦ اﻟﺘﺤﻤﻴﺮ ﻫﻮ ﻏﺴﻴﻠﻪ ﺑﺎﳌﺎء اﻟﺴﺎﺧﻦ وﻣﺎدة
ﻻ ﺗﺴﺘﺨﺪم اﻟﻔﺮﺷﺎة اﻟﻜﺎﺷﻄﺔ أو.اﻟﺘﻨﻈﻴ ﺛﻢ اﺷﻄﻔﻪ ﺑﺎﳌﺎء اﻟﺼﺎﻓﻲ
. أﻋﻠﻰ ﻃﺒﻘﺔ ﺗﺼﺒﺢ ﻣﺘﻀﺮرة,اﻻﺳﻔﻨﺠﻴﺔ اﻟﺼﻠﺒﺔ وإﻻ
b8 ¨wG³M¹ UL+ t#b6²ð r! «–≈ ¨ÊuKHOð WI³Þ t! dOLײ!« s×m Ê_
Æ—dC²¹
s×B!« s# ÂUFD!« Ãdš« Æs×B!« vKŽ ÂUFD!« lDIð ô •
ÆÂUFD!« lD8 q³8
Æw³A)« Ë√ wJO²Ýö³!« ‚uK*« WDÝ«uÐ ÂUFD!« VK8
Ò •
WOF{Ë —UO²šUÐ UI³# s×B!« s6Ý ¨dOLײ!« s×m «b6²Ý« q³8
∫ozU8œ µ Ë√ ≥ …b* lL'«
W8UD!« Èu²#® n¹ËËdJ¹U*«Ë © Â Ú ≤µ∞® Í—«d(« ‰UI²½ô« 5Ð lL'« •
Ë√ ©◊«Ë ∂∞∞
©◊«Ë ∂∞∞ W8UD!« Èu²#® n¹ËËdJ¹U*«Ë W¹«uA!« 5Ð lL'« •
Æw!«u²!« vKŽ ≤∑ Ë ≤∂ w²×Hm lł«— •
☛
ÆÁöŽ√ —u+c# u¼ UL+ ¨ dOLײ!« s×m s6Ý
.١
Ò
s×B!« «c¼ Ê_ U8Ë_« lOLł w ÊdH!« “UH8 Âb6²Ý« •
Æ«bł UMšUÝ `³BOÝ
r×K!« q¦# ¨ÂUFD!« a³Þ bMŽ X¹e!UÐ s×B!« `#« .٢
Æ«bOł ÂUFD!« dOL% qł√ s# ¨ UCO³!«Ë
Æs×B!« w ÂUFD!« l{ .٣
vKŽ® …—«d×K! œUC# dOž s×B!« vKŽ ¡U½≈ Í√ lCð ô •
Æ© WOJO²ÝöÐ WOŽË√ ¨‰U¦*« qO³Ý
Êd w …—«Ëb!«
WOMOB!« vKŽ a³DK! ’U)« s×B!« l{ .٤
Ò
Æn¹ËËdJ¹U*«
WOMOB!« ÊËbÐ ÊdH!« w a³DK! ’U)« s×B!« lCð ô •
Æ…—«Ëb!«
Ò
©
Æ©
® اﻟﻄﺒﺦ اﳉﻤﻌﻲe#— v!« — ﺣﻠﻘﺔ اﻟﺘﺤﻜﻢ ﻓﻲ اﻟﻄﺒﺦËœ
Ò .٥
® “— اﻻﺧﺘﻴﺎرvKŽ jGC!UÐ VÝUM*« W8UD!« Èu²# d²š« .٦
a³D!« X8Ë ÷dF¹ v²Š اﳊﻠﻘﺔd¹Ëb²Ð a³D!« X8Ë j³{« rŁ .٧
ÆVÝUM*«
±π
C138ST
19
10/17/02, 4:41 PM
☛
اﺳﺘﺨﺪام وﻇﻴﻔﺔ اﻟﻜﻔﻄﻴﺮ
ﺿﺒﻂ وﺿﻌﻴﺔ اﻟﻜﻔﻄﻴﺮ
ﻳﻘﺪم اﻟﺒﺮاﻣﺞ اﻷوﺗﻮﻣﺎﺗﻴﻜﻴﺔ ﻹﻋﺎدة ﺗﺴﺨﲔ اﳌﺸﺮوﺑﺎت وإذاﺑﺔ اﻟﺜﻠﺞ وﺗﺪﻓﺌﺔ
ّ اﳉﺪول اﻟﺘﺎﻟﻲ
,اﻟﻜﻌﻚ اﺠﻤﻟﻤﺪ
ﻟﻠﻄﺒﺦ٢ وﻳﺴﺘﺨﺪم ﺑﺮﻧﺎﻣﺞ رﻗﻢ. ﻟﻠﻄﺒﺦ ﺑﻄﺎﻗﺔ اﳌﺎﻳﻜﺮووﻳ ﻓﻘﻂ١ وﻳﺴﺘﺨﺪم ﺑﺮﻧﺎﻣﺞ رﻗﻢ
.اﳉﻤﻌﻲ ﺑﲔ اﳌﺎﻳﻜﺮووﻳ واﻻﻧﺘﻘﺎل اﳊﺮاري
وﳝﻜﻨﻚ ﺿﺒﻂ. ﻳﺘﻢ ﺿﺒﻂ وﻗﺖ اﻟﻄﺒﺦ أوﺗﻮﻣﺎﺗﻴﻜﻴﺎ, (
) ﻓﻲ وﺿﻌﻴﺔ وﻇﻴﻔﺔ اﻟﻜﻔﻄﻴﺮ
.ﻋﺪد اﻟﺘﻘﺪﱘ ﺑﺘﺪوﻳﺮ اﳊﻠﻘﺔ
.اﻟﺪوارة واﻏﻠﻖ اﻟﺒﺎب
اﻟﺼﻴﻨﻴﺔ
ﺿﻊ اﻟﻄﻌﺎم ﻓﻲ وﺳﻂ,أوﻻ
ّ
Æ©
اﻟﻨﺼﺎﺋﺢ
وﻗﺖ اﻻﻧﺘﻈﺎر
bŽ«Ë weš ¡UŽË w qzU!« Vm WIO8œ ≤≠±
UÐu+ l{ Æ¡UDž ÊËbÐ UNMO6ð
l{Ë jÝu!« d²KOK# w «bŠ«Ë
Ë√ ≥Ë 5KÐUI*« 5dD!« w 5Ðu+
UN+dð« Æ…dz«b!« w »«u+√ ¥
Æn¹ËËdJ¹U*« Êd w —UE²½ö!
X8Ë bFÐË q³8 W¹UMFÐ UN+dŠ
Ò Ë
Æ—UE²½ô«
ÊdH!« s# UNł«dš≈ bMŽ W¹UMŽ cšË
W#ö!« qł√ s# ULOKFð lł«—®
Æ©qz«uK!
ﺣﺠﻢ اﻟﺘﻘﺪﱘ
اﻟﻄﻌﺎم
اﻟﺰر
d²KOK# ±µ∞
UÐËdA#
©»u+ ±® ¨VOKŠ ¨…uN8
d²KOK# ≥∞∞
¡U1Uý
©ÊUÐu+®
Wł—œ w®
d²KOK# ¥µ∞
…—«dŠ
©»«u+√ ≥ ®
©WdG!«
d²KOK# ∂∞∞
©»«u+√ ¥®
±
¨·d!« jÝË w bL:« pFJ!« l{ WIO8œ ±µ≠µ «dł ≥∞∞≠≤∞∞
UÐËUM²# bL:« pFJ!« l{Ë
«dł µ∞∞≠¥∞∞
ÆiH6M# ·— vKŽ …dz«b!UÐ
«dł ∑∞∞≠∂∞∞
WOMOB!« jÝË w ·d!« l{
«dł π∞∞≠∏∞∞
dOž Z#U½d³!« «c¼ Æ…—«Ëb!«
«dł ±±∞∞≠±∞∞∞
Ò
Ë√ .dJ!UÐ pFJK! VÝUM#
«dł ±≥∞∞≠±≤∞∞
Æ ôu+uA!«
—“ vKŽ jGC!UÐ t6³Þ b¹dð Íc!« ÂUFD!« s# UŽu½ d²š« .٢
WO!U²!« W×HB!« w œułu*« ‰Ëb'« lł«— Æ© ® اﻻﺧﺘﻴﺎر
ÆUI³# UN²−#dÐ X9 w²!« WHK²<« j³C!« UOF{Ë nmu!
Æ اﳊﻠﻘﺔd¹Ëb²Ð .bI²!« œbŽ d²š« .٣
Æ
bL:« pFJ!«
® اﻟﻜﻔﻄﻴﺮe#— v!« — ﺣﻠﻘﺔ اﻟﺘﺤﻜﻢ ﻓﻲ اﻟﻄﺒﺦËœ
Ò .١
bMŽ w!«u²!« vKŽ © ® اﻷﻗﻞ/ “— اﻷﻛﺜﺮvKŽ jG{« .٤
Æ a³D!« X8Ë iHš Ë√ …œU¹e! ¨WłU(«
≤
Æ © ® “— اﻟﺘﺸﻐﻴﻞvKŽ jG{« .٥
WÞu³C*« UOF{uK! UIË a³D!« r²¹ U¼bMŽ ∫W−O²M!«
∫UI³D# W−#d³*«
s# …—UHm oKDMð ¨a³D!« s# ¡UN²½ô« bMŽ ◆
Æ «d# lЗ√ ¢0¢ X8u!« i#u¹Ë ÊdH!«
ÆWIO8œ q+ …d# …—UHm oKDMðË
±∏
C138ST
18
10/17/02, 4:41 PM
A
(اﻟﻮﺟﺒﺎت اﳋﻔﻴﻔﺔ )ﻣﺘﺎﺑﻊ/اﺳﺘﺨﺪام وﻇﻴﻔﺔ اﻷﺻﻐﺮ
وﻗﺖ اﻻﻧﺘﻈﺎر اﻟﻨﺼﺎﺋﺢ
A
…dODH!« Ë√ bL:« «e²O³!« l{
Æ·d!« vKŽ U¹ËU²# …dOGB!«
≠
œ«bŽù WmU)« —UAH!« U−²M# Âb6²Ý«
Æn¹ËËdJ¹U*« Êd w —UAH!«
Z²M# w WMO³*« ULOKF²!« l³ð«
WOMOB!« jÝË w fOJ!« l{Ë ÂUFD!«
Èd−¹ ¨Z#U½d³!« «c¼ ¡UMŁ√ Æ …—«Ëb!«
Ò
W¹UMŽ cš Æ fOJ!« aH²M¹Ë …—c!« —UA
fOJ!« `²Ë —UAH!« ëdš≈ bMŽ
ÆsšU!«
≠
vKŽ ©WOðd²!« `z«dý® ”uAðUM!« l{
s# «dł µ∞ l{ Æ`D# weš a³Þ
vKŽ tF{ Æt8u qЫu²!«Ë 6'«
Æ…—«Ëb!«
WOMOB!«
Ò
≠
ﺣﺠﻢ اﻟﺘﻘﺪﱘ
ﻳﻘﺪم اﻟﺒﺮاﻣﺞ اﻷوﺗﻮﻣﺎﺗﻴﻜﻴﺔ ﻷﻧﻮاع اﻟﻄﻌﺎم واﻟﻮﺟﺒﺎت اﳋﻔﻴﻔﺔ اﻟﺘﻲ ﻳﻔﻀﻠﻬﺎ
ّ اﳉﺪول اﻟﺘﺎﻟﻲ
واﻟﻨﺼﺎﺋﺢ اﺨﻤﻟﺘﻠﻔﺔ, وﻓﻴﻬﺎ اﻟﻜﻤﻴﺎت وأوﻗﺎت اﻻﻧﺘﻈﺎر, اﻷﻃﻔﺎل وﻟﻸﻃﻌﻤﺔ اﳋﻔﻴﻔﺔ اﳊﺪﻳﺜﺔ
.اﳌﻨﺎﺳﺒﺔ
اﻟﺮﻣﺰ اﻟﻄﻌﺎم
«dł ±µ∞
©lD8 ∂≠¥®
«dł ≤µ∞
©lD8 π≠∑®
«e²O³!«
bL:«
«dł ±∞∞
—UAH!«
¥
. ﻟﻠﻄﺒﺦ ﺑﻄﺎﻗﺔ اﳌﺎﻳﻜﺮووﻳ ﻓﻘﻂ٦ و٥ و٢ و١ وﻳﺴﺘﺨﺪم ﺑﺮاﻣﺞ أرﻗﺎم
٤ وﻳﺴﺘﺨﺪم ﺑﺮﻧﺎﻣﺞ رﻗﻢ. ﻟﻠﻄﺒﺦ اﳉﻤﻌﻲ ﺑﲔ اﳌﺎﻳﻜﺮووﻳ واﻟﺸﻮاﻳﺔ٣ وﻳﺴﺘﺨﺪم ﺑﺮﻧﺎﻣﺞ رﻗﻢ
.ﻟﻠﻄﺒﺦ اﳉﻤﻌﻲ ﺑﲔ اﳌﺎﻳﻜﺮووﻳ واﻻﻧﺘﻘﺎل اﳊﺮاري
µ
وﻗﺖ اﻻﻧﺘﻈﺎر اﻟﻨﺼﺎﺋﺢ
«dł ±≤µ
”uAðU½
l# e³)« s# WHOž—® WOž—u³LN!« l{ WIO8œ ≤≠±
WOž—uÐeOA²!« Ë√ ©r×K!« s# W×¹dý
Æa³DLK! WmUš WO8—Ë WÞu vKŽ
WOMOB!« jÝË w WOž—u³L¼ l{
WOž—u³LN!« s# 5²FD8 l{ ¨…—«Ëb!«
Ò
vKŽ iF³Ð ULNCFÐ 5²KÐUI²#
¨ 56²!« …œUŽ≈ bFÐ Æ…—«Ëb!«
WOMOB!«
Ò
s# W×¹dýË ¨f)« q¦# ·—Uše!« l{
ÆqЫu²!«Ë ‚d*«Ë rÞULD!«
∂
17
اﻟﺮﻣﺰ اﻟﻄﻌﺎم
«dł ±µ∞ WOž—u³LN!«
©WFD8 ±®
©…œd³#®
±
«dł ≥∞∞
©ÊU²FD8®
w œd³# e¼Uł dOGm w!uO«— l{
W8UD! w½U#√ wJO²ÝöÐ o³Þ
WOMOB!« jÝË w n¹ËËdJ¹U*«
Æ…—«Ëb!«
Ò
jž Ë√ …e¼U'« U−²MLK! rKO VIŁ«
WmUš WHKÐ wJO²Ýö³!« o³D!«
bFÐË q³8 W¹UMFÐ t+dŠ
Ò Æn¹ËËdJ¹U*UÐ
VÝUM# Z#U½d³!« «c¼ Æ—UE²½ô« X8Ë
W½ËdJF*« V½Uł v!« ¨ w!uO«dK!
ÆWBKB!UÐ
ozU8œ ≥
«dł ≤µ∞≠≤∞∞
«dł ≥µ∞≠≥∞∞
w!uO«—
dOGm
©œd³#®
Ò
≤
Ë√ …bL:« …e¼U'« ÃUłb!« W×Mł√ l{
UN6³Þ -® …dOGB!« ÃUłb!« WKmË
·d!« vKŽ ©qЫu²!« l{ËË UI³#
ÆqHÝ_« v!« ÃUłb!« bKł t−²¹Ë w½bF*«
ÆUŽ—U jÝu!« „dð«Ë …dz«b!UÐ UNF{
ÆÊdH!« s# …—UHB!« ‚öD½« bMŽ UN³K8
ÊU²IO8œ
«dł ≤µ∞≠≤∞∞
«dł ≥µ∞≠≥∞∞
«dł ¥µ∞≠¥∞∞
W×Mł√
ÃUłb!«
…bL:«
≥
±∑
C138ST
ﺣﺠﻢ اﻟﺘﻘﺪﱘ
10/17/02, 4:41 PM
اﻟﻮﺟﺒﺎت اﳋﻔﻴﻔﺔ/اﺳﺘﺨﺪام وﻇﻴﻔﺔ اﻷﺻﻐﺮ
وﻻ ﲢﺘﺎج.( ﻟﻬﺎ ﺳﺖ أوﻗﺎت اﻟﻄﺒﺦ اﳌﺒﺮﻣﺠﺔ ﻣﺴﺒﻘﺎ
) اﻟﻮﺟﺒﺎت اﳋﻔﻴﻔﺔ/وﻇﻴﻔﺔ اﻷﺻﻐﺮ
.إﻟﻰ ﺿﺒﻂ وﻗﺖ اﻟﻄﺒﺦ وﻣﺴﺘﻮى اﻟﻄﺎﻗﺔ
.ﳝﻜﻨﻚ ﺿﺒﻂ ﻋﺪد اﻟﺘﻘﺪﱘ ﺑﺘﺪوﻳﺮ اﳊﻠﻘﺔ
.اﻟﺪوارة واﻏﻠﻖ اﻟﺒﺎب
ّ ﺿﻊ اﻟﻄﻌﺎم ﻓﻲ وﺳﻂ اﻟﺼﻴﻨﻴﺔ,أوﻻ
® اﻟﻮﺟﺒﺎت اﳋﻔﻴﻔﺔ/ اﻷﺻﻐﺮe#— v!« — ﺣﻠﻘﺔ اﻟﺘﺤﻜﻢ ﻓﻲ اﻟﻄﺒﺦËœ
Ò .١
Æ©
(اﺳﺘﺨﺪام وﻇﻴﻔﺔ إذاﺑﺔ اﻟﺜﻠﺞ اﻷوﺗﻮﻣﺎﺗﻴﻜﻴﺔ )ﻣﺘﺎﺑﻊ
A
وﻗﺖ اﻻﻧﺘﻈﺎر اﻟﻨﺼﺎﺋﺢ
≤∞ ≠ µ «dł ±∞∞∞ ≠ ±∞∞
WIO8œ
e³)«
µ
«c¼ Æ…—«Ëœ
Ò WOMOm vKŽ WJFJ!« l{
s# …dOL)« WJFJ!« a³D! Z#U½d³!«
WJF+ ¨ ZMHÝô« WJF+Ë ¨ Ÿ«u½e!« lOLł
WJF+Ë ¨ W6HM*« …dODH!«Ë ¨ 6'UÐ
Z#U½d³!« «c¼ Æ.dJ!UÐ WJF+Ë t+«uH!UÐ
Ë√ .dJ!UÐ WJFJK! VÝUM# dOž
Æ.dJ¹_« Ë√ ôu+uA!«
∂∞ ≠ µ «dł ±µ∞∞ ≠±∞∞
WIO8œ
WJFJ!«
∂
Æ اﳊﻠﻘﺔd¹Ëb²Ð .bI²!« œbŽ d²š« .٣
bMŽ w!«u²!« vKŽ © ® اﻷﻗﻞ/ “— اﻷﻛﺜﺮvKŽ jG{« .٤
Æ a³D!« X8Ë iHš Ë√ …œU¹e! ¨WłU(«
Æ © ® “— اﻟﺘﺸﻐﻴﻞvKŽ jG{« .٥
WÞu³C*« UOF{uK! UIË a³D!« r²¹ U¼bMŽ ∫W−O²M!«
∫UI³D# W−#d³*«
s# …—UHm oKDMð ¨a³D!« s# ¡UN²½ô« bMŽ ◆
Æ «d# lЗ√ ¢0¢ X8u!« i#u¹Ë ÊdH!«
ÆWIO8œ q+ …d# …—UHm oKDMðË
±∂
16
اﻟﺮﻣﺰ اﻟﻄﻌﺎم
s# WFD8 vKŽ UOI√ e³)« `z«dý l{
‚öD½« bMŽ «—u UN³K8Ë WO8—u!« WÞuH!«
Z#U½d³!« «c¼ ÆÊdH!« s# …—UHm
¨ Ÿ«u½_« lOLł s# e³)« a³D! VÝUM#
v!« ¨ q#UJ!« e³)« Ë√ e³)« `z«dý Ë√
VðÒ— Æ tO²OžU³!«Ë e³)« WHž—√ V½Uł
Æ…dz«b!« w WHž—_«
—“ vKŽ jGC!UÐ t6³Þ b¹dð Íc!« ÂUFD!« s# UŽu½ d²š« .٢
WO!U²!« W×HB!« w œułu*« ‰Ëb'« lł«— Æ© ® اﻻﺧﺘﻴﺎر
ÆUI³# UN²−#dÐ X9 w²!« WHK²<« j³C!« UOF{Ë nmu!
C138ST
ﺣﺠﻢ اﻟﺘﻘﺪﱘ
10/17/02, 4:41 PM
اﺳﺘﺨﺪام وﻇﻴﻔﺔ إذاﺑﺔ اﻟﺜﻠﺞ اﻷوﺗﻮﻣﺎﺗﻴﻜﻴﺔ
A
وأوﻗﺎت, اﻟﻜﻤﻴﺎت, ﻳﻘﺪم ﻟﻚ ﻣﺨﺘﻠ ﺑﺮاﻣﺞ إذاﺑﺔ اﻟﺜﻠﺞ اﻻوﺗﻮﻣﺎﺗﻴﻜﻴﺔ
ّ اﳉﺪول اﻟﺘﺎﻟﻲ
ﺿﻊ اﻟﻠﺤﻢ. ازل ﻣﺎدة اﻟﺘﻐﻠﻴ ﻣﻦ ﺟﻤﻴﻊ اﻷﻧﻮاع ﻗﺒﻞ إذاﺑﺔ اﻟﺜﻠﺞ.اﻻﻧﺘﻈﺎر واﻟﻨﺼﺎﺋﺢ اﳌﻨﺎﺳﺒﺔ
. واﻟﺴﻤﻚ ﻓﻲ ﺻﺤﻦ ﺧﺰاﻓﻲ ﻣﺴﻄﺢ, واﻟﺪﺟﺎج,
وﻗﺖ اﻻﻧﺘﻈﺎر اﻟﻨﺼﺎﺋﺢ
ﺣﺠﻢ اﻟﺘﻘﺪﱘ
ﻗﻄﻊ ﻣﻦ/وﻇﻴﻔﺔ إذاﺑﺔ اﻟﺜﻠﺞ اﻷوﺗﻮ ) ( ﻣﺎﺗﻴﻜﻴﺔ ﲤﻜﻨﻚ ﻣﻦ إذاﺑﺔ اﻟﺜﻠﺞ ﻣﻦ ﺷﺮاﺋﺢ اﻟﻠﺤﻢ
أو, أو اﻟﺴﻤﻚ, أو اﻟﺪﺟﺎج, أو اﻟﻠﺤﻢ اﳌﺰﻳﺞ,ﻗﻄﻊ ﻣﻦ اﻟﺪﺟﺎج/ اﳌﻔﺮوم ﻣﻦ اﻟﻠﺤﻢ/اﻟﻠﺤﻢ
اﺧﺘﺮ اﻟﺒﺮﻧﺎﻣﺞ. وﻳﺘﻢ ﺿﺒﻂ وﻗﺖ إذاﺑﺔ اﻟﺜﻠﺞ وﻣﺴﺘﻮى اﻟﻄﺎﻗﺔ أوﺗﻮﻣﺎﺗﻴﻜﻴﺎ.اﳋﺒﺰ أو اﻟﻜﻌﻜﺔ
.واﻟﻮزن ﻓﻘﻂ
اﻟﺮﻣﺰ اﻟﻄﻌﺎم
ÆjI n¹ËËdJ¹U*« W8UD! W³ÝUM*« WO½U#_« WOŽË_« ršb²Ý«
bMŽ Æ WO#uOM*« W8U8dÐ ·«dÞ_« V−Š«
ÆlDI!« VK8 ¨ÊdH!« s# …—UHm ‚öD½«
W×D*« lDIK! VÝUM# Z#U½d³!« «c¼
¨ `z«dA!« q¦# ÃUłb!« Ë√ r×K!« s#
—bmË ¨ ÃUłb!« qł—√Ë ¨ŸuDI*«Ë
Ær×K!« s# ÂËdH*«Ë j³!«Ë ÃUłb!«
∂∞≠±∞ «dł ±≤∞∞≠≤∞∞
WIO8œ
Ø`z«dý
ØŸuDI#
ØÂËdH# r(
s# lD8
ÃUłb!«
±
bMŽ Æ WO#uOM*« W8U8dÐ ·«dÞ_« V−Š«
r×K!« VK8 ¨ÊdH!« s# …—UHm ‚öD½«
r×K! VÝUM# Z#U½d³!« «c¼ ÆZ¹e*«
qł— Ë√ ©dI³!« r(Ë qL(« r(® Z¹e*«
ÆqLŠ
π∞≠≤∞ «dł ≤∞∞∞≠∂∞∞
WIO8œ
Z¹e# r(
≤
W8U8dÐ ·«dÞ_«Ë qłd!« V−Š«
v!« Á—bm t−²¹Ë ÃUłb!« l{ ÆWO#uOM*«
…—UHm ‚öD½« bMŽ ÃUłb!« VÒK8 ÆqHÝ_«
a³D! VÝUM# Z#U½d³!« «c¼ ÆÊdH!« s#
Æq#UJ!« ÃUłb!«
∂∞≠≤∞ «dł ≤∞∞∞ ≠ ∂∞∞
WIO8œ
ÃUłb!«
W8U8dÐ q#UJ!« pL!« q¹– V−Š«
‚öD½« bMŽ pL!« VÒK8 ÆWO#uOM*«
Z#U½d³!« «c¼ ÆÊdH!« s# …—UHm
Ë√ WK#UJ!« „ULÝ_« a³D! VÝUM#
ÆpL!« `z«dý
µ∞ ≠ ≤∞ «dł ≤∞∞∞ ≠≤∞∞
WIO8œ
. ﺿﻊ اﻷﻃﻌﻤﺔ اﺠﻤﻟﻤﺪة ﻓﻲ وﺳﻂ اﻟﺼﻴﻨﻴﺔ اﻟﺪوّارة.اﻓﺘﺢ اﻟﺒﺎب
Æ©
® رﻣﺰ إذاﺑﺔ اﻟﺜﻠﺞ اﻷوﺗﻮﻣﺎﺗﻴﻜﻴﺔv!« — ﺣﻠﻘﺔ اﻟﺘﺤﻜﻢ ﻓﻲ اﻟﻄﺒﺦËœ
Ò .١
—“ vKŽ jGC!UÐ t6³Þ b¹dð Íc!« ÂUFD!« s# UŽu½ d²š« .٢
WO!U²!« W×HB!« w œułu*« ‰Ëb'« lł«— Æ© ® اﻻﺧﺘﻴﺎر
ÆUI³# UN²−#dÐ X9 w²!« WHK²<« j³C!« UOF{Ë nmu!
Æ اﳊﻠﻘﺔd¹Ëb²Ð ÂUFD!« Ê“Ë d²š« .٣
≥
® “— اﻟﺘﺸﻐﻴﻞvKŽ jG{« .٤
∫W−O²M!«
ÆZK¦!« WЫ–SÐ ÊdH!« √b³¹ ◆
ZK¦!« WЫ–≈ ¡UMŁ√ ÊdH!« s# …—UHm oKDMð ◆
ÆÂUFD!« VOKIð pH¹dF²!
Æ©
pL!«
¥
® “— اﻟﺘﺸﻐﻴﻞvKŽ jG{« .٥
ÆZK¦!«
ÊdH!« s# …—UHm oKDMð ¨a³D!« s# ¡UN²½ô« bMŽ ∫W−O²M!«
…—UHm oKDMðË Æ «d# lЗ√ ¢ 0¢ X8u!« i#u¹Ë
ÆWIO8œ q+ …d#
WЫ–≈ WOKLŽ ¡UN½ô WO½UŁ …d# ©
Ø a³D!« WHOþË d²š« ¨«c¼ qł√ s# ÆU¹Ëb¹ ÂUFD!« w ZK¦!« WЫ–≈ pMJ1
lł«— ÆW8UD!« Èu²# s# ◊«Ë ±∏∞ vKŽ n¹ËËdJ¹U*UÐ 56²!« …œUŽ≈
s# b¹e* ±± W×Hm vKŽ œułu*« ¢56²!« …œUŽ≈Øa³D!«¢ Ê«uMFÐ ¡e'«
ÆqOmUH²!«
±µ
C138ST
15
☛
10/17/02, 4:41 PM
☛
اﺳﺘﺨﺪام وﻇﻴﻔﺔ إﻋﺎدة اﻟﺘﺴﺨﲔ اﻷوﺗﻮﻣﺎﺗﻴﻜﻴﺔ
واﻟﻜﻤﻴﺎت وأوﻗﺎت,ﻳﻘﺪم اﻟﺒﺮاﻣﺞ اﺨﻤﻟﺘﻠﻔﺔ ﻹﻋﺎدة اﻟﺘﺴﺨﲔ اﻷوﺗﻮﻣﺎﺗﻴﻜﻴﺔ
ّ اﳉﺪول اﻟﺘﺎﻟﻲ
ﻟﻠﻄﺒﺦ ﺑﻄﺎﻗﺔ٢ و١ وﻳﺴﺘﺨﺪم ﺑﺮﻧﺎﻣﺠﺎ رﻗﻤﻲ. واﻟﻨﺼﺎﺋﺢ اﺨﻤﻟﺘﻠﻔﺔ اﳌﻨﺎﺳﺒﺔ,اﻻﻧﺘﻈﺎر
.اﳌﺎﻳﻜﺮووﻳ ﻓﻘﻂ
. ﻟﻠﻄﺒﺦ اﳉﻤﻌﻲ ﺑﲔ اﳌﺎﻳﻜﺮووﻳ واﻻﻧﺘﻘﺎل اﳊﺮاري٤ و٣ وﻳﺴﺘﺨﺪم ﺑﺮﻧﺎﻣﺠﺎ رﻗﻤﻲ
وﻗﺖ اﻻﻧﺘﻈﺎر اﻻﻗﺘﺮاﺣﺎت
rKOHÐ w«e)« o³D!« w UNF{
VÝUM# Z#U½d³!« «c¼ ÆwJO²ÝöÐ
q¦#® U½uJ# ≥ vKŽ W¹u²;« U³łuK!
«Ë«dC)« ¨WBKB!« l# r×K!«
“—_« ¨…dODH!« q¦# WO³½U'« ‚U³Þ_«Ë
Æ©fÞUD³!« Ë√
ozU8œ ≥
Æn¹ËËdJ¹U*« W8UD! W³ÝUM*« WO½U#_« w½«Ë_« Âb6²Ý«
«dł ≥µ∞≠≥∞∞ WF¹dÝ U³łË
«dł ¥µ∞ ≠¥∞∞
dOCײ!«
«dł µµ∞ ≠ µ∞∞
©…œd³#®
≠
d²KOK# ≤µ∞≠ ≤∞∞ WBKB!«Ø¡U(«
d²KOK# ≥µ∞ ≠≥∞∞
©œd³#®
d²KOK# ¥µ∞ ≠¥∞∞
d²KOK# µµ∞≠ µ∞∞
d²KOK# ∂µ∞ ≠ ∂∞∞
XKOK# ∑µ∞ ≠ ∑∞∞
«dł ≥∞∞
«dł ¥∞∞
«dł µ∞∞
إﻋﺎدة اﻟﺘﺴﺨﲔ اﻷوﺗﻮﻣﺎﺗﻴﻜﻴﺔe#— v!« — ﺣﻠﻘﺔ اﻟﺘﺤﻜﻢ ﻓﻲ اﻟﻄﺒﺦËœ
Ò .١
Æ©
®
±
≤
Æ اﳊﻠﻘﺔd¹Ëb²Ð .bI²!« œbŽ d²š« .٣
«e²O³!«
© bL−#®
≥
w …bL−# WHž—√ ∂ v²Š ≤ s# l{ ozU8œ µ≠≥ ©5²FD8® «dł ±µ∞≠±∞∞ e³)« WHž—√
ÆiH6M*« ·d!« vKŽ …dz«b!«
©lD8 ¥ ® «dł ≤µ∞≠≤∞∞
©…bL−#®
vKŽ W¹ËU²# …bL−# WHž—√ ∏ l{
©lD8 ∂ ® «dł ≥µ∞≠≥∞∞
«c¼ ÆlHðd*«Ë iH6M*« 5d!«
©lD8 ∏ ® «dł ¥µ∞≠¥∞∞
s# …dOGm lDI! VÝUM# Z#U½d³!«
WO²žUÐ ¨ WHž—√ q¦# bL:« e³)«
ÆWOMOu*« ¨ …dOGm
¥
bMŽ w!«u²!« vKŽ © ® اﻷﻗﻞ/ “— اﻷﻛﺜﺮvKŽ jG{« .٤
Æ a³D!« X8Ë iHš Ë√ …œU¹e! ¨WłU(«
Æ © ® “— اﻟﺘﺸﻐﻴﻞvKŽ jG{« .٥
WÞu³C*« UOF{uK! UIË a³D!« r²¹ U¼bMŽ ∫W−O²M!«
∫UI³D# W−#d³*«
s# …—UHm oKDMð ¨a³D!« s# ¡UN²½ô« bMŽ ◆
Æ «d# lЗ√ ¢0¢ X8u!« i#u¹Ë ÊdH!«
ÆWIO8œ q+ …d# …—UHm oKDMðË
±¥
C138ST
14
☛
. واﻏﻠﻖ اﻟﺒﺎب.اﻟﺪوارة
ّ ﺿﻊ اﻟﻄﻌﺎم ﻓﻲ وﺳﻂ اﻟﺼﻴﻨﻴﺔ.اﻓﺘﺢ اﻟﺒﺎب
اﻟﺮﻣﺰ ﻧﻮع اﻟﻄﻌﺎم
—“ vKŽ jGC!UÐ t6³Þ b¹dð Íc!« ÂUFD!« s# UŽu½ d²š« .٢
WO!U²!« W×HB!« w œułu*« ‰Ëb'« lł«— Æ© ® اﻻﺧﺘﻴﺎر
ÆUI³# UN²−#dÐ X9 w²!« WHK²<« j³C!« UOF{Ë nmu!
Ë√ s×m w WBKB!«Ø¡U(« Vm ozU8œ ≥ ≠≤
oLFÐ ¡U×K! ’Uš w«eš ¡UŽË
X8ËË 56²!« ¡UMŁ√ tODžË
W¹UMFÐ UN+dŠ Æ—UE²½ô«
Æ—UE²½ô« X8Ë bFÐË q³8
ÆlHðd*« ·d!« vKŽ bL:« «e²O³!« l{
ﺣﺠﻢ اﻟﻄﻌﺎم
.وﻇﻴﻔﺔ إﻋﺎدة اﻟﺘﺴﺨﲔ اﻷوﺗﻮﻣﺎﺗﻴﻜﻴﺔ ) ( ﻟﻬﺎ أرﺑﻊ أوﻗﺎت اﻟﻄﺒﺦ اﳌﺒﺮﻣﺠﺔ ﻣﺴﺒﻘﺎ
.وﻻ ﲢﺘﺎج إﻟﻰ ﺿﺒﻂ وﻗﺖ اﻟﻄﺒﺦ وﻣﺴﺘﻮى اﻟﻄﺎﻗﺔ
.ﳝﻜﻨﻚ ﺿﺒﻂ ﻋﺪد اﻟﺘﻘﺪﱘ ﺑﺘﺪوﻳﺮ اﳊﻠﻘﺔ
10/17/02, 4:41 PM
A
اﺳﺘﺨﺪام وﻇﻴﻔﺔ اﻟﻄﺒﺦ اﻷوﺗﻮﻣﺎﺗﻴﻜﻲ
A
, واﻟﻜﻤﻴﺎت وأوﻗﺎت اﻻﻧﺘﻈﺎر,ﻳﻘﺪم اﻟﺒﺮاﻣﺞ اﺨﻤﻟﺘﻠﻔﺔ ﻟﻠﻄﺒﺦ اﻷوﺗﻮﻣﺎﺗﻴﻜﻲ
ّ اﳉﺪول اﻟﺘﺎﻟﻲ
ﻟﻠﻄﺒﺦ اﳉﻤﻌﻲ ﺑﲔ اﳌﺎﻳﻜﺮووﻳ٣ و١ وﻳﺴﺘﺨﺪم ﺑﺮﻧﺎﻣﺠﺎ رﻗﻤﻲ.واﻟﻨﺼﺎﺋﺢ اﺨﻤﻟﺘﻠﻔﺔ اﳌﻨﺎﺳﺒﺔ
.واﻟﺸﻮاﻳﺔ
وﻳﺴﺘﺨﺪم ﺑﺮﻧﺎﻣﺞ. ﻟﻠﻄﺒﺦ اﳉﻤﻌﻲ ﺑﲔ اﳌﺎﻳﻜﺮووﻳ واﻻﻧﺘﻘﺎل اﳊﺮاري٢ وﻳﺴﺘﺨﺪم ﺑﺮﻧﺎﻣﺞ رﻗﻢ
. واﳌﺎﻳﻜﺮووﻳ واﻟﺸﻮاﻳﺔ, ﻟﻠﻄﺒﺦ اﳉﻤﻌﻲ ﺑﲔ اﳌﺎﻳﻜﺮووﻳ واﻻﻧﺘﻘﺎل اﳊﺮاري٤ رﻗﻢ
وﻗﺖ اﻻﻧﺘﻈﺎر اﻻﻗﺘﺮاﺣﺎت
ﺣﺠﻢ اﻟﻄﻌﺎم
WNÐUA²# ÂU−ŠQÐ fÞUD³!« cš ozU8œ µ≠¥
Æ fÞUD³!« s# «dł ≤∞∞ Ê“Ë f8Ë
fÞUD³!« «dA8 VIŁ«Ë UNKž«
Ë√ ¥Ë qÐUI²!UÐ 5²FD8 l{ ÆW+uAÐ
Ídz«œ qJAÐ fÞUD³!« s# lD8 ∂
bMŽ UNÒ³K8 ÆlHðd*« ·d!« vKŽ
ÆÊdH!« s# …—UHm ‚öD½«
«dł ≤∞∞ ™ ≤
«dł ≤∞∞ ™ ¥
«dł ≤∞∞ ™ ∂
.وﻇﻴﻔﺔ اﻟﻄﺒﺦ اﻷوﺗﻮﻣﺎﺗﻴﻜﻲ ) ( ﻟﻬﺎ أرﺑﻊ أوﻗﺎت اﻟﻄﺒﺦ اﳌﺒﺮﻣﺠﺔ ﻣﺴﺒﻘﺎ
.ﻻ ﲢﺘﺎج إﻟﻰ ﺿﺒﻂ وﻗﺖ اﻟﻄﺒﺦ وﻣﺴﺘﻮى اﻟﻄﺎﻗﺔ
.ﳝﻜﻨﻚ ﺿﺒﻂ ﻋﺪد اﻟﺘﻘﺪﱘ ﺑﺘﺪوﻳﺮ اﳊﻠﻘﺔ
Æn¹ËËdJ¹U*« W8UD! W³ÝUM*« WO½U#_« w½«Ë_« Âb6²Ý«
. واﻏﻠﻖ اﻟﺒﺎب.اﻟﺪوارة
ّ ﺿﻊ اﻟﻄﻌﺎم ﻓﻲ وﺳﻂ اﻟﺼﻴﻨﻴﺔ.اﻓﺘﺢ اﻟﺒﺎب
اﻟﺮﻣﺰ ﻧﻮع اﻟﻄﻌﺎم
Æ©
qЫu²!« Ãe#«Ë X¹e!UÐ ÃUłb!« `#« ozU8œ ±∞ ≠µ
ÆuK(« qHK `K*«Ë qHKH!« q¦#
t−²¹Ë iH6M*« ·d!« w UNF{Ë
bMŽ UN³K8Ë ÆqHÝ_« v!« U¼—bm
ÆÊdH!« s# …—UHB!« ‚öD½
qЫu²!« Ãe#«Ë X¹e!UÐ ÃUłb!« `#«
ÆuK(« qHK `K*«Ë qHKH!« q¦#
t−²¹Ë lHðd*« ·d!« w UNF{Ë
bMŽ UN³K8Ë ÆqHÝ_« v!« U¼bKł
ÆÊdH!« s# …—UHB!« ‚öD½«
ozU8œ ≥
fÞUDÐ
…dAIÐ
® اﻟﻄﺒﺦ اﻷوﺗﻮﻣﺎﺗﻴﻜﻲe#— v!« — ﺣﻠﻘﺔ اﻟﺘﺤﻜﻢ ﻓﻲ اﻟﻄﺒﺦËœ
Ò .١
±
—“ vKŽ jGC!UÐ t6³Þ b¹dð Íc!« ÂUFD!« s# UŽu½ d²š« .٢
WO!U²!« W×HB!« w œułu*« ‰Ëb'« lł«— Æ© ® اﻻﺧﺘﻴﺎر
ÆUI³# UN²−#dÐ X9 w²!« WHK²<« j³C!« UOF{Ë nmu!
«dł ∑∞∞
«dł π∞∞
«dł ±±∞∞
«dł ±≥∞∞
«dł ±µ∞∞
«dł ±∑∞∞
«dł ±π∞∞
ÃUłb!«
ÍuA*«
X¹e!UÐ qL(«Ø…dI³!« r( `#« ozU8œ ±µ ≠±∞ «dł ±∞∞∞≠ π∞∞
`K#Ë ¨ jI qHK® qЫu²!UÐ UNłe#«Ë
«dł ±≥∞∞≠±≤∞∞
UNF{ Æ©W¹uA²!« bFÐ t²U{≈ bÐ ô
«dł ±µ∞∞≠±¥∞∞
¡e'« t−²¹Ë iH6M*« ·d!« vKŽ
bMŽ UN³K8Ë ÆqHÝ_« v!« pOL!«
bFÐ ÆÊdH!« s# …—UHB!« ‚öD½«
ô ¨—UE²½ô« X8Ë ¡UMŁ√ Ë√ W¹uA²!«
W8U8d!UÐ UN²ODGð s# bÐ
ÆWO#uOM#u!ô«
Æ اﳊﻠﻘﺔd¹Ëb²Ð .bI²!« œbŽ d²š« .٣
≤
bMŽ w!«u²!« vKŽ © ® اﻷﻗﻞ/ “— اﻷﻛﺜﺮvKŽ jG{« .٤
Æ a³D!« X8Ë iHš Ë√ …œU¹e! ¨WłU(«
«dł ≥∞∞ ≠≤∞∞
WFD8
«dł µ∞∞≠ ¥∞∞ ÃUłb!« s#
«dł ∑∞∞≠∂∞∞
«dł π∞∞≠∏∞∞
dIÐ r(
ØÍuA#
≥
Æ © ® “— اﻟﺘﺸﻐﻴﻞvKŽ jG{« .٥
WÞu³C*« UOF{uK! UIË a³D!« r²¹ U¼bMŽ ∫W−O²M!«
∫UI³D# W−#d³*«
s# …—UHm oKDMð ¨a³D!« s# ¡UN²½ô« bMŽ ◆
Æ «d# lЗ√ ¢0¢ X8u!« i#u¹Ë ÊdH!«
ÆWIO8œ q+ …d# …—UHm oKDMðË
¥
±≥
C138ST
13
☛
10/17/02, 4:41 PM
A
إﻳﻘﺎف اﻟﻄﺒﺦ
ﺿﺒﻂ وﻗﺖ اﻟﻄﺒﺦ
ﳝﻜﻨﻚ إﻳﻘﺎف اﻟﻄﺒﺦ ﻓﻲ أي وﻗﺖ ﺑﺤﻴﺚ ﳝﻜﻨﻚ :
• ﻓﺤﺺ اﻟﻄﻌﺎم
• ﺗﻘﻠﻴﺐ اﻟﻄﻌﺎم أو ﲢﺮﻳﻜﻪ
• ﺗﺮك اﻟﻄﻌﺎم ﳌﺪة اﻷﻧﺘﻈﺎر
ﻣﺜﻞ اﻟﻄﺒﺦ اﻟﺘﻘﻠﻴﺪي ,ﳝﻜﻨﻚ ﺿﺒﻂ وﻗﺖ اﻟﻄﺒﺦ ,وﻓﻘﺎ ﳋﺼﺎﺋﺺ اﻟﻄﻌﺎم أو ذوﻗﻚ .ﻟﻀﺒﻂ
وﻗﺖ اﻟﻄﺒﺦ ,ﳝﻜﻨﻚ :
• ﻣﻌﺮﻓﺔ ﻛﻴ ﻳﺠﺮي اﻟﻄﺒﺦ ﻓﻲ أي وﻗﺖ ﻣﻦ ﺧﻼل ﻓﺘﺢ اﻟﺒﺎب ﻓﻘﻂ.
• ﺿﺒﻂ اﻟﻮﻗﺖ اﳌﺘﺒﻘﻲ ﻣﻦ اﻟﻄﺒﺦ.
—“ vKŽ jG{« ¨ÂUFD!« a³Þ X8Ë …œU¹e! .١اﻟﺘﺸﻐﻴﻞ ®
ÆUN²U{≈ b¹dð WO½UŁ ≥∞ …œU¹e! …d#
• —“ vKŽ jG{« ¨‚–U8œ ÀöŁ WU{ù ∫ ‰U¦*« qO³Ý vKŽ
اﻟﺘﺸﻐﻴﻞ ® © Æ «d# XÝ
©
ﻹﻳﻘﺎف اﻟﻄﺒﺦ ...
ﻓـ ..
U²8R#
«»U³!« `²
«!∫W−O²M
ÆqLF!« sŽ ÊdH!« n8u²¹ U¼bMŽ
—Ëœ ¨ÂUFD!« a³Þ X8Ë iHš Ë√ …œU¹e! ¨a³D!« ¡UMŁ√ .٢اﳊﻠﻘﺔ
«!Æ—UO!« Ë√ 5LO!« v
!—“ vKŽ jG{«Ë »U³!« oKž« ¨a³D!« v!« …œuFK
اﻟﺘﺸﻐﻴﻞ ® ©Æ
ö#U+
«{ —“ vKŽ jGاﻹﻳﻘﺎف ® © Æ
«!ÆqLF!« sŽ ÊdH!« n8u²¹ U¼bMŽ ∫W−O²M
≈–« √—vKŽ jG{« ¨a³DK! j³C!« UOF{Ë ¡UG!≈ œ
“— اﻹﻳﻘﺎف ® © ÆWO½UŁ …d#
≤±
10/17/02, 4:41 PM
12
C138ST
ﻣﺴﺘﻮﻳﺎت اﻟﻄﺎﻗﺔ وأوﻗﺎت اﻟﻄﺒﺦ اﺨﻤﻟﺘﻠﻔﺔ
A
إﻋﺎدة اﻟﺘﺴﺨﲔ/اﻟﻄﺒﺦ
وﻇﻴﻔﺔ ﺿﺒﻂ ﻣﺴﺘﻮى اﻟﻄﺎﻗﺔ ﲤﻜّﻨﻚ ﻣﻦ اﺧﺘﻴﺎر ﻣﺴﺘﻮى اﻟﻄﺎﻗﺔ اﳌﻄﻠﻘﺔ واﻟﻮﻗﺖ اﳌﻄﻠﻮب ﻟﻄﺒﺦ
ﳝﻜﻨﻚ اﺧﺘﻴﺎر اﳌﺴﺘﻮى ﻣﻦ ﺑﲔ ﻋﺸﺮة. وﻓﻘﺎ ﻟﻨﻮع اﻟﻄﻌﺎم وﻛﻤﻴﺘﻪ,اﻟﻄﻌﺎم أو إﻋﺎدة ﺗﺴﺨﻴﻨﻪ
.ﻣﺴﺘﻮﻳﺎت اﻟﻄﺎﻗﺔ
ﻗﻮة اﳋﺮوج
اﻟﻨﺴﺒﺔ
ﻣﺴﺘﻮى اﻟﻄﺎﻗﺔ
◊«Ë π∞∞
◊«Ë ∂∞∞
◊«Ë ¥µ∞
◊«Ë ≥∞∞
◊«Ë ±∏∞
◊«Ë ±∞∞
•±∞∞
•∂∑
•µ∞
• ≥≥
• ≤∞
• ±±
w!UŽ
w!UŽ jÝu²#
jÝu²#
iH6M# jÝu²#
WЫ–≈
iH6M#
.اﻹﺟﺮاءات اﻟﺘﺎﻟﻴﺔ ﺗﺸﺤﺮ ﻛﻴﻔﻴﺔ اﻟﻄﺒﺦ وإﻋﺎدة اﻟﺘﺴﺨﲔ
bMŽ ÊdH!« „dð q³8 ULz«œ UND³{ - Íc!« a³D!« WOF{Ë s# b+Qð
ÆpÐUOž
ﻻ ﺗﺸﻐﻞ ﻓﺮن. اﻏﻠﻖ اﻟﺒﺎب.اﻟﺪوارة
ّ وﺿﻊ اﻟﻄﻌﺎم ﻓﻲ وﺳﻂ اﻟﺼﻴﻨﻴﺔ.اﻓﺘﺢ اﻟﺒﺎب
.اﳌﺎﻳﻜﺮووﻳ ﻋﻨﺪ ﺗﻔﺮﻳﻎ أﺑﺪا
Æ©
... اذا اﺧﺘﺮت
tBI½
tðœU¹“
vKŽ_« W8UD!« Èu²#
qHÝ_« W8UD!« Èu²#
® a اﳌﺎﻳﻜﺮووﻳe#— v!« — ﺣﻠﻘﺔ اﻟﺘﺤﻜﻢ ﻓﻲ اﻟﻄﺒﺦËœ
Ò .١
∫ WO!U²!« «dýR*« ÷dFð U¼bMŽ ∫W−O²M!«
©…bŠ«Ë …uDš vKŽ a³D!«®
©n¹ËËdJ¹U*« WOF{Ë®
“— اﻻﺧﺘﻴﺎرvKŽ jGC!UÐ VÝUM*« W8UD!« Èu²# d²š« .٢
‰Ëbł lł«— ÆW³ÝUM*« W8UD!« ÷dFð v²Š Èdš√ …d# © ®
ÆqOmUH²!« s# b¹e* ÁU½œ√ —u+c*« W8UD!« U¹u²#
أوﻗﺎت اﻟﻄﺒﺦ ﻣﻮﺿﺤﺔ ﻓﻲ وﺻﻔﺎت اﻟﻄﺒﺦ وﻣﺴﻮﻳﺎت اﻟﻄﺎﻗﺔ اﺨﻤﻟﺘﺼﺔ ﻣﻮﺿﺤﺔ ﻓﻲ ﺗﻌﻠﻴﻤﺎت
.اﳌﺎﻟﻚ ﻫﺬه
... وﻗﺖ اﻟﻄﺒﺦ ﻻ ﺑﺪ ﻣﻦ
Æ اﳊﻠﻘﺔd¹Ëb²Ð a³D!« X8Ë j³{« .٣
X8Ë s# WO½UŁ ≥∞Ë ozU8œ ≥ —UO²šô ∫‰U¦*« qO³Ý vKŽ •
Æ ≥∞∫≥ X8u!« j³C! 5LO!« v!« WIK(« —Ëœ
Ò ¨a³D!«
Æa³D!« X8Ë ÷dF¹ U¼bMŽ ∫W−O²M!«
Æ © ® “— اﻟﺘﺸﻐﻴﻞvKŽ jG{« .٤
…—«Ëb!«
WOMOB!« √b³ðË ÊdH!« dýR# ¡UC¹ U¼bMŽ ∫W−O²M!«
Ò
∫ a³D!« wN²M¹Ë a³D!UÐ ÊdH!« √b³¹Ë ÆU¼d¹Ëb²Ð
s# …—UHm oKDMð ¨a³D!« s# ¡UN²½ô« bMŽ ◆
Æ «d# lЗ√ ¢ 0¢ X8u!« i#u¹Ë ÊdH!«
ÆWIO8œ q+ …d# …—UHm oKDMðË
jG{« ¨ÊdHK! w!U(« W8UD!« Èu²# WdF# œ—√ «–≈
W8UD!« Èu²# dOOG𠜗√ «–≈ Æ© ® “— اﻻﺧﺘﻴﺎرvKŽ
Ë√ 5ðd# W8UD!« Èu²# —“ vKŽ jG{« ¨a³D!« ¡UMŁ√
Æ»uKD*« W8UD!« Èu²# —UO²šô d¦+√
pMJ1 ¨©◊«Ë π∞∞® W8UÞ vB8√ vKŽ …dOB8 …b* o³Þ 56𠜗√ «–«
Æa³D!« X8Ë s# WIO8œ q+ jI …d# © ® “— اﻟﺘﺸﻐﻴﻞvKŽ jGC!«
Æ«—u qOGA²!UÐ ÊdH!« √b³¹ U¼bMŽË
Æ5ðuDš vKŽ ÂUFD!« a³D! n¹ËËdJ¹U*« WOF{Ë W−#dÐ pMJ1
±±
C138ST
11
☛
10/17/02, 4:41 PM
ﻣﺎذا ﺗﻔﻌﻞ ﻓﻲ ﺣﺎﻟﺔ وﺟﻮد ﺷﻜﻮك أو ﺣﺪوث ﻣﺸﻜﻠﺔ
: اﻛﺘﺐ,اذا ﻟﻢ ﲢﻞ اﳌﺸﻜﻠﺔ ﻣﺮاﺟﻌﺔ ﻣﻦ اﻟﻘﺎﺋﻤﺎت اﳌﺬﻛﻮرة أﻋﻼه
. اﳌﻄﺒﻮﻋﺎن ﻋﺎدة ﻋﻠﻰ اﻟﻠﻮﺣﺔ اﳋﻠﻔﻴﺔ ﻟﻠﻔﺮن,• رﻗﻢ اﳌﻮدﻳﻞ واﻟﺮﻗﻢ اﳌﺴﻠﺴﻞ
(• ﺗﻔﺎﺻﻴﻞ ﺷﻬﺎدة اﻟﻀﻤﺎن )ﺗﺎرﻳﺦ اﻟﺸﺮاء وﻣﻜﺎﻧﻪ
• اﻻﺷﺮاح اﻟﻮاﺿﺤﺔ ﻟﻠﻤﺸﻜﻠﺔ
اذا ﻛﺎن ﻋﻨﺪك ﻣﺸﺎﻛﻞ ﻣﻮﺿﺤﺔ.اﻷﻃﻼع ﻋﻠﻰ ﻓﺮن ﻣﺎﻳﻜﺮووﻳ ﺟﺪﻳﺪ ﺗﺄﺧﺬ وﻗﺘﺎ ﻗﻠﻴﻼ داﺋﻤﺎ
ﻫﺬا اﻷﻣﺮ ﻳﻮﻓّﺮ اﻟﻮﻗﺖ ﻟﻚ وﺗﺨﻔﺾ ﻋﺪم اﻟﺮاﺣﺔ اﻟﻨﺎﺟﻤﺔ ﻋﻦ. ﺣﺎول ﺣﻠﻬﺎ,ﻓﻲ اﻟﻘﺎﺋﻤﺔ أدﻧﺎه
.اﻻﺗﺼﺎل ﲟﺮﻛﺰ اﳋﺪﻣﺎت ﻏﻴﺮ اﻟﻀﺮوري
ÆwFO³Þ d#√ «c¼ ◆
ÊdH!« qš«œ nŁUJ²!« •
ÊdH!« ×UšË »U³!« ‰uŠ ¡«uN!« obð •
ÊdH!« ×UšË »U³!« ‰uŠ …¡U{ù« ”UJF½« •
UײH!« Ë√ »U³!« ‰uŠ s# —U6³!« ÃËdš •
.ﺛﻢ اﺗﺼﻞ ﺑﺎﳌﻮزع اﶈﻠﻲ أو ﻣﺮﻛﺰ اﳋﺪﻣﺎت ﺑﻌﺪ اﻟﺸﺮاء ﻣﻦ ﺳﺎﻣﺴﻮﱋ
«bÐ√ ÂUFD!« a³Þ r²¹ ô ◆
® “— اﻟﺘﺸﻐﻴﻞvKŽ XDG{Ë `O×m qJAÐ X8u!« XD³{ q¼ •
ø »U³!« XIKž√ q¼ •
V³¹ d#_«u#“ö!« s# d¦+√ Í—«b'« —UO²!« Ãd6# v!« …dO¦+ …eNł√ XKmË q¼ •
ø WFÞU8 —U−H½« Ë√ …dONm lD8 w
ø©
q#U+ dOž Ë√ UÞdH# ÂUFD!« a³Þ r²¹ ◆
ø ÂUFD!« ŸuM! U³ÝUM# a³D!« X8Ë XD³Þ q¼ •
ø VÝUM*« W8UD!« Èu²# d²š« q¼ •
©wzUÐdNJ!« ”uI!«® ÊdH!« qš«œ W¹—UM!« WF8dH!«Ë …—«dA!« Àb% ◆
ø WO½bF*« t«dÞ√ l# UI³Þ Âb6²Ý« q¼ •
ø ÊdH!« qš«œ dš« w½bF# ¡U½≈ Ë√ W+uý X+dð q¼ •
ø «bł ÊdH!« Ê«—bł s# W³¹d8 WO#uOM*ô« W8U8d!« q¼ •
Êu¹eHK²!«Ë u¹œ«d!« …eNł« w qš«b²!« À«bŠ≈ v!« ÍœR¹ ÊdH!« ◆
ÆÊd?H!« qOGAð ¡UMŁ√ u¹œ«d!« Ë√ Êu¹eHK²!« …e?Nł√ w qOK8 qš«bð Àb% b8 •
ÆwFO³Þ d#√ «c¼
Æwz«uN!«Ë u¹œ«d!«Ë Êu¹eHK²!« …eNł« sŽ «bOFÐ n¹ËËdJ¹U*« Êd V+
Ò — ∫q(« *
j³C!« …œUŽ≈ j³{ r²¹ b8 ¨ ÊdHK! dOGB!« dðuO³LJ!« w qš«b²!« błË «–« •
Æ÷dF!« …cU½ vKŽ
ÆX8u!« j³{ bŽ«Ë ÆÃd<« v!« tKOmuð bŽ«Ë —UO²!« fÐU8 qB« ∫q(« *
¢E3¢ W!UÝ— dýR# ◆
qJAÐ n¹ËËdJ¹U*« Êd 56ð s# o³Ý√ UOJOðU#uðË√ qLF¹ ¢E3¢ W!UÝ— •
ÆW¹«b³!« WOF{Ë v!« …œuFK!
—“ vKŽ jG{« ¢E3¢ W!UÝ— qLŽ bMŽË Æbz«“
±∞
C138ST
10
10/17/02, 4:41 PM
A
ﻛﻴ ﻳﻌﻤﻞ ﻓﺮن اﳌﺎﻳﻜﺮووﻳ
ﺗﺄﻛﺪ ﻣﻦ ﺗﺸﻐﻴﻞ اﻟﻔﺮن ﻛﻤﺎ ﻳﻨﺒﻐﻲ
ﻣﻮﺟﺎت اﳌﺎﻳﻜﺮو ﻣﻮﺟﺎت ﻣﻐﻨﺎﻃﻴﺴﻴﺔ ﻛﻬﺮﺑﺎﺋﻴﺔ ذات اﻟﺘﺮدد اﻟﻌﺎﻟﻲ ; اﻟﻄﺎﻗﺔ اﳌﻄﻠﻘﺔ ﲤﻜﻦ
اﻟﻄﻌﺎم ﻣﻦ اﻟﻄﺒﺦ أو إﻋﺎدة ﺗﺴﺨﻴﻨﻪ ﺑﺪون ﺗﻐﻴﻴﺮ ﺷﻜﻞ أو ﻟﻮن ﻟﻪ.
اﻹﺟﺮاءات اﻟﺒﺴﻴﻄﺔ اﻟﺘﺎﻟﻴﺔ ﲤﻜﻨﻚ ﻣﻦ ﻣﻌﺮﻓﺔ ﺗﺸﻐﻴﻞ اﻟﻔﺮن ﻛﻤﺎ ﻳﻨﺒﻐﻲ داﺋﻤﺎ .اذا ﻛﺎن ﻋﻨﺪك
ﺷﻜﻮك ,راﺟﻊ اﳉﺰء ﺑﻌﻨﻮان "ﻣﺎذا ﺗﻔﻌﻞ ﻓﻲ ﺣﺎﻟﺔ وﺟﻮد ﺷﻜﻮك أو ﺣﺪوث ﻣﺸﻜﻠﺔ" ﻋﻠﻰ
اﻟﺼﻔﺤﺔ اﻟﺘﺎﻟﻴﺔ .
ﳝﻜﻨﻚ اﺳﺘﺨﺪام ﻓﺮن اﳌﺎﻳﻜﺮووﻳ ﻣﻦ أﺟﻞ :
• إذاﺑﺔ اﻟﺜﻠﺞ
• إﻋﺎدة اﻟﺘﺴﺨﲔ
• اﻟﻄﺒﺦ
A
l{Ë s# bÐ ô VÝUM# Í—«bł —UOð Ãd6# v!« ÊdH!« qOmuð s# bÐ ô
«!Èu²# vB8√ ×Uš W8UD!« Èu²# ÊU+ «–« ÊdH!« w …—«Ëb
«!WOMOB
Ò
ƉuÞ√ U²8Ë ¡U*« WOKGð ‚dG²ð ¨©◊«Ë π∞∞ ≠ •±∞∞® Âb6²#
اﻓﺘﺢ ﺑﺎب اﻟﻔﺮن ﺑﺴﺤﺐ اﳌﻘﺒﺾ ﻓﻲ اﳉﺎﻧﺐ اﻟﻴﻤﲔ ﻣﻦ اﻟﺒﺎب .ﺿﻊ وﻋﺎء ﻣﻦ اﳌﺎء ﻋﻠﻰ
اﻟﺼﻴﻨﻴﺔ اﻟﺪوّارة .واﻏﻠﻖ اﻟﺒﺎب.
ﻣﺒﺎد اﻟﻄﺒﺦ
qJAÐ ÊuDOMG*« l¹“uð ‰öš s# QAMð ËdJ¹U*« Ułu# .١
«!Æ…—«Ëb
WOMOB!« vKŽ —Ëb¹ ÂUFD!« Êô «dE½ ÍËU²#
Ò
«!ÆÍËU²# qJAÐ Œu³D# ÂUFD
—“ vKŽ jG{« .١اﻟﺘﺸﻐﻴﻞ ® © µ Ë√ ¥ …b* X8u!« j³{«Ë
—“ vKŽ jGC!UÐ ¨ozU8œاﻟﺘﺸﻐﻴﻞ ® © ÆW³ÝUM# «d#
«!ÆozU8œ µ Ë√ ¥ …b* ¡U*« 56²Ð ÊdH!« √b³¹ U¼bMŽ ∫W−O²M
Æ¡U*« WOKGð s# bÐ ô U¼bFÐË
≤[µ® WmuÐ ± w!«u×Ð ÂUFD!« oLŽ v!« …cU½ ËdJ¹U*« Ułu# .٢
ÆÂUFD!« ÊuCž w W¦F³M# …—«d(« Êô a³D!« dL²¹Ë Æ©rÝ
…b6²*« a³D!« UHmu! UIË WHK²6# a³D!« U8Ë√ .٣
∫ÂUFD!« hzUBšË
• «!WU¦J!«Ë WOLJ
• ½Èu²;« ¡U*« W³
• ©ô Ë√ œd³# ÂUFÞ® WO!Ë_« …—«d(« Wł—œ
☛
½u! v²Š a³D!« dL²¹ ¨…—«d(« ‚öÞ≈ o¹dÞ sŽ ÂUFD!« jÝË a³Þ Ê_ «dE
√ UHmË w WŠu{u# WOÝUOI!« a³D!« U8Ë√ ÆÊdH!« s# ÂUFD!« Xłdš
«!∫ ÊUC* U8Ë_« Ác¼ …UŽ«d# s# bÐ ô Ác¼ p!U*« ULOKFð w p!c!Ë a³D
• jÝu!« s# ÍËU²# qJAÐ ÂUFD!« a³Þ
• «tK+ ÂUFD!« ‰öš …—«d(« Wł—œ ¡«u²Ý
π
10/17/02, 4:41 PM
9
C138ST
A
اﺧﺘﻴﺎر اﻟﻠﻐﺔ ﻟﻠﻌﺮض
ﺿﺒﻂ اﻟﻮﻗﺖ
ﻋﻨﺪﻣﺎ ﺗﺼﻞ ﻗﺎﺑﺲ اﻟﺘﻴﺎر اﻟﻰ ﻣﺨﺮج اﻟﺘﻴﺎر ﻷول ﻣﺮة ,أو ﺑﻌﺪ اﻧﻘﻄﺎع اﻟﻜﻬﺮﺑﺎء ,ﺗﻈﻬﺮ ﺟﻤﻠﺔ
"® SELECT YOUR LANGUAGEاﺧﺘﺮ ﻟﻐﺘﻚ(" ﻋﻠﻰ زﺟﺎج اﻟﻌﺮض .ﻓﻲ ﻫﺬه اﳊﺎﻟﺔ,
ﳝﻜﻨﻚ اﺧﺘﻴﺎر ﻟﻐﺔ ﻟﻠﻌﺮض .ﳝﻜﻨﻚ اﺧﺘﻴﺎر ﻟﻐﺔ ﻣﻦ اﻟﻠﻐﺎت اﻻﳒﻠﻴﺰﻳﺔ ,اﻟﻔﺮﻧﺴﻴﺔ ,اﻷﳌﺎﻧﻴﺔ ,
اﻻﺳﺒﺎﻧﻴﺔ ,اﻹﻳﻄﺎﻟﻴﺔ ,اﻟﻬﻮﻟﻨﺪﻳﺔ ,اﻟﺮوﺳﻴﺔ.
ﻓﺮن اﳌﺎﻳﻜﺮووﻳ ﻣﺰود ﺑﺴﺎﻋﺔ داﺧﻠﻴﺔ .وﳝﻜﻨﻚ ﻋﺮض اﻟﻮﻗﺖ ﺑﻨﻈﺎم ٢٤ﺳﺎﻋﺔ أو ١٢
ﺳﺎﻋﺔ .ﻻ ﺑﺪ ﻣﻦ ﺿﺒﻂ اﻟﺴﺎﻋﺔ:
• ﻋﻨﺪ ﺗﺮﻛﻴﺐ ﻓﺮن اﳌﺎﻳﻜﺮووﻳ ﻷول ﻣﺮة
• ﺑﻌﺪ اﻧﻘﻄﺎع اﻟﻄﺎﻗﺔ اﻟﻜﻬﺮﺑﺎﺋﻴﺔ
—“ vKŽ jG{« .١اﻟﻠﻐﺔ —UO²!« fÐU8 qOmuð bFÐ «—u
!Æ¡UÐdNJ!« ŸUDI½« bFÐ «—u Ë√ —UO²!« Ãd6# v!« ÊuËdJ¹ULK
«! —“ vKŽ jGC!« w dL²Ý« «–≈ ∫W−O²Mاﻟﻠﻐﺔ¨ —Ëbð
¨ ©LBS® W¹eOK$ô« ∫ VOðd²!UÐ j³C!« UOF{Ë
«¨ WO½U³Ýù« ¨ WO½U*_« ¨ WO½dH!« ¨ ©KG® W¹eOK$ù
«ÆWOÝËd!«¨ W¹bM!uH!« ¨ WO!UD¹ù
ÆÍu²A!« XO8u²!«Ë wHOB!« XO8u²!« bMŽ WŽU!« …œUŽ≈ fMð ô
.١ﻟﻌﺮض اﻟﻮﻗﺖ ﺑﻨﻈﺎم ...
≤WŽUÝ ±
WŽUÝ ≤¥
ﻓﺎﺿﻐﻂ ﻋﻠﻰ زر اﻟﺴﺎﻋﺔ )
…d#
5ðd#
( ...
—Ëœاﳊﻠﻘﺔ !ÆWŽU!« j³C
Ò .٢
¨ UN#«b6²Ý« b¹dð w²!« WGK!« ÷dFðË ¨WGK!« —UO²š« bMŽ .٢
«{ —“ vKŽ jGاﻟﺘﺸﻐﻴﻞ ® © Æ «¡«dłô« Ác¼ ¡UN½ù
—“ vKŽ jG{« .٣اﻟﺴﺎﻋﺔ ®
©Æ
—Ëœاﳊﻠﻘﺔ !ÆozU8b!« j³C
Ò .٤
—“ vKŽ jG{« ¨◊u³C*« X8u!« ÷dŽ bMŽ .٥اﻟﺴﺎﻋﺔ ®
«ÆWŽU!« qOGA²! Èdš
«!Âb6²ð ô p½« s# ržd!UÐ X8u!« ÷dF¹ U¼bMŽ ∫W−O²M
Æn¹ËËdJ¹U*« Êd
© …d#
∏
10/17/02, 4:41 PM
8
C138ST
ﺗﺮﻛﻴﺐ ﻓﺮن اﳌﺎﻳﻜﺮووﻳ
A
(ﲢﺬﻳﺮات ﻣﻦ أﺟﻞ اﻟﺴﻼﻣﺔ )ﻣﺘﺎﺑﻊ
, أو اﻟﺮف,ﻓﺮن اﳌﺎﻳﻜﺮوﻳ ﻫﺬا ﳝﻜﻨﻚ ﺗﺮﻛﻴﺒﻪ ﻓﻲ ﻛﻞ اﻷﻣﺎﻛﻦ ﺗﻘﺮﻳﺒﺎ )ﺳﻄﺢ اﻟﻌﻤﻞ ﻓﻲ اﳌﻄﺒﺦ
.( اﻟﻄﺎوﻟﺔ, اﻟﺘﺮوﻟﻲ اﻟﻘﺎﺑﻞ ﻟﻠﺘﺤﺮﻳﻚ
„d²Ð ÊdHK! W³ÝUM*« W¹uN²!« s# b+Qð ¨ÊdH!« VO+dð bMŽ .١
Êd nKš w q8_« vKŽ © UmuÐ ¥® rÝ ±∞ WU#
rÝ ≤∞ WU# „dðË ÊdH!« w³½Uł wË n¹ËËdJ¹U*«
s# ©WmuÐ ≥≥® rÝ ∏µ ŸUHð—«Ë ÊdH!« ‚u © UmuÐ ∏®
Æ÷—_«
w rÝ ≤∞
‚uH!«
UOJOðU#uðË« WOzUÐdNJ!« W8UD!« lDIM𠨡wý Í√ ÊËbÐ n¹ËËdJ¹U*« Êd qLŽ «–≈ .١٣
UL+ ÊdH!« qOGAð pMJ1 ¨—UE²½ô« s# WIO8œ ≥∞ s# d¦+√ bFÐ ÆW#ö!« qł√ s#
ÆwG³M¹
Æa³D!« ¡UN²½« bFÐ qOGA²!« w ÊdH!« —«dL²Ý« s# oKIð ô •
Êd qOGA²! fO!Ë ¨ ozU8œ iF³! WŠËd*« qOGA²! rLB# “UN'« «c¼ ∫V³!«
WOKš«b!« WO½Ëd²J!ù« …eNł_« b¹d³²! «c¼ ¨©n¹ËËdJ¹U*«® n¹ËËdJ¹U*«
Ê W!UŠ w a³D!« ¡UN²½« bFÐ »U³!« `² Ë√ ·UI¹ù« —“ vKŽ jGC!« bMŽ
‰UI²½ô« ¨ W¹«uA!« ¨n¹ËËdJ¹U*«® ozU8œ iFÐ …b* a³DK! qLF¹ ÊdH!«
Æ©Í—«d(« ‰UI²½ô« ´ n¹ËËdJ¹U*« ¨ W¹«uA!« ´ n¹ËËdJ¹U*« ¨Í—«d(«
Æ «d# lЗ√ ¢ 0 ¢ i#u¹Ë ÊdH!« s# …—UHm oKDMð ¨a³D!« ¡UN²½« bMŽ
ÆWIO8œ q+ …d# ÊdH!« s# …—UHm oKDMðË
w rÝ ±∞
nK)«
rÝ ∏µ
÷—_« s#
w rÝ ±∞
V½U'«
ÆÊdH!« qš«œ WOA(« œ«u# lOLł ‰“« .٢
ÆwłUłe!« s×B!«Ë n*« WIKŠ V+
Ò—
ÆdŠ qJAÐ —Ëb¹ włUłe!« s×B!« Ê« s# b+Qð
ﺗﻌﻠﻴﻤﺎت ﻣﻬﻤﺔ ﻣﻦ أﺟﻞ اﻟﺴﻼﻣﺔ
fÐU8 qB¹ YO×Ð tF{Ë s# bÐ ô «c¼ n¹ËËdJ¹U*« Êd .٣
Æ—UO²!« Ãd6# v!« ÊdH!«
ÊdH!« n8u²¹Ë WþdH*« …—«d×K! ÷dF¹ b8 ÊdH!« Êô ¡«uN!« Uײ bð ô
Æ·U+ qJAÐ œd³¹ v²Š qLF¹ ô t½« W!UŠ w vI³¹ ÊdH!«Ë ÆUOð«– qLF!« sŽ
Í– œœd²*« —UO²!« Ãd6# v!« —UO²!« fÐU8 qšœ« ¨WOB6A!« W#ö!« qł√ s#
Æœœd²*« —UO²!« vKŽ w{—_« pK!UÐ qmu*«Ë ¨eðd¼ µ∞ ¨X!u ≤≥∞ ¨fOÐUÐœ ≥
q³8 s# tK¹b³ð s# bÐ ô ¨“UN'« «cN! —UO²!« pKÝ w —d{ ÀbŠ ÊU+ «–«
ÆdD)« VM& qł√ s# tO³ý q¼R# wM Ë√ t! U#bš qO+Ë Ë√ l½Um
Êd s# V¹d8 ÊUJ# q¦# jЗ Ë√ —UŠ ÊUJ# w n¹ËËdJ¹U*« Êd V+dð ô
s# bÐ ôË WOzUÐdNJ!« UHm«u*« …UŽ«d# s# bÐ ôË ÆW¾b²!« “UNł Ë√ ÍbOKIð
œËe*« —UO²!« pKÝ l# wÝUOI!« ŸuM!« fH½ s# wzUÐdNJ!« —UO²!« pKÝ b¹b9
s# WFDIÐ »U³!« r²šË WOKš«b!« `DÝ_« `#« Æ«c¼ n¹ËËdJ¹U*« Êd l#
Æ…d# ‰Ë_ n¹ËËdJ¹U*« Êd «b6²Ý« q³8 qK³*« ‘ULI!«
Ë√ ÂUFD!« 56ð bMŽ dš« v!« 5Š s# ÊdH!« qš«œ …b¼UA# s# bÐ ô ¨a³D!« ¡UMŁ√
WJKN²*« œ«u*« Ë√ ¨‚—u!« Ë√ ¨ pO²Ýö³!« s# …bŠ«Ë …d# …b6²*« WOŽË_« w a³D!«
ÆÈdšô«
:ﺗﻨﺒﻴﻪ
☛
bFÐ ÊdH!« qOGAð s# bÐ ôË ¨…—dC²*« »U³!« ÂU²š√ Ë√ —dC²*« »U³!« Âb6²ð ô
Æq¼R*« wMH!« q³8 s# UNŠöm≈
:ﺗﻨﺒﻴﻪ
☛
UNO U0 Õöm≈ WOKLŽ Ë√ W#bš ÍSÐ q¼R*« wMH!« dOž s# h6ý ÂUO8 dOD)« s#
Æn¹ËËdJ¹U*« W8UD! ÷dF²!« s# wL% ¡UDž W!«“≈
:ﺗﻨﺒﻴﻪ
☛
ÂbŽ sLCð v²Š W#u²<« WOŽË_« w UNMO6ð s# bÐ ô Èdš_« WLFÞ_«Ë qz«u!«
ÆUNłËdš
:ﺗﻨﺒﻴﻪ
ULOKF²!« ¡UDŽ≈ bMŽ jI rNOKŽ ·«dýùUÐ n¹ËËdJ¹U*« Êd qOGA²! ‰UHÞû! `LÝ«
sŽ W&UM!« —UDš_« WdF#Ë W#öÐ ÊdH!« «b6²Ý« ‰UHÞú! sJ1 YO×Ð W³ÝUM*«
ÆVÝUM*« dOž «b6²Ýô«
:ﺗﻨﺒﻴﻪ
ÆwFL'« a³D!«Ë Í—«d(« ‰UI²½ôUÐ a³D!« ¡UMŁ√ UMšUÝ »U³!«Ë ÊdH!« qJO¼ `³B¹
Æ…—«Ëœ
Ò WOMOmË ö−FÐ WIKŠ ¨ W½«dI# ÊËbÐ n¹ËËdJ¹U*« Êd qGAð ô
∑
C138ST
7
10/17/02, 4:41 PM
☛
ﲢﺬﻳﺮات ﻣﻦ أﺟﻞ اﻟﺴﻼﻣﺔ
ﺗﻌﻠﻴﻤﺎت ﻣﻬﻤﺔ ﻣﻦ أﺟﻞ اﻟﺴﻼﻣﺔ
.اﻗﺮؤﻫﺎ ﺑﻌﻨﺎﻳﺔ واﺣﺘﻔﻆ ﺑﻬﺎ ﻟﻠﻤﺮاﺟﻌﺔ ﻓﻲ اﳌﺴﺘﻘﺒﻞ
Æ—U³š_« ‚«—Ë√ nOH−²! n¹ËËdJ¹U*« Êd Âb6²ð ô •
·UI¹û! wzUÐdNJ!« —UO²!« —“ vKŽ jG{«Ë ÊdH!« »UÐ `² oЫ ¨ÊUšœ ÀbŠ «–« •
ÆÍ—«b'« —UO²!« Ãd6# s# —UO²!« fÐU8 Ãdš« Ë√
اﻟﺮﺟﺎء اﻟﺘﺄﻛﺪ ﻣﻦ ﺗﺒﻊ اﻟﺘﺤﺬﻳﺮات ﻣﻦ أﺟﻞ,ﻗﺒﻞ ﻃﺒﺦ اﻟﻄﻌﺎم أو اﻟﺴﻮاﺋﻞ ﻓﻲ ﻓﺮن اﳌﺎﻳﻜﺮوﻳ
.اﻟﺴﻼﻣﺔ
ƉUHÞú! WLFÞ_«Ë qz«u!« 56ð bMŽ …dO³+ W¹UMŽ cš .٨
sŽ ÊdH!« ·UI¹≈ bFÐ q8_« vKŽ WO½UŁ ≤∞ …b* ULz«œ —UE²½_« X8u! ÂUFD!« „dð« •
Æ…—«d( « Wł—œ ÍËU²! qLF!«
ÆULz«œ tMO6ð bFÐ ÂUFD!« „d+
•
Ò Ë WłU(« bMŽ tMO6ð ¡UMŁ√ ÂUFD!« „dŠ
Ò
q³8 ÂUFD!« p¹d% s# bÐ ô ¨ÂUFD!« ‚«dŠ≈ WO½UJ#≈Ë w!UG!« ÂUFD!« ÊUCO lM* •
ÆÁbFÐË Á¡UMŁ√Ë tMO6ð
∫ v!Ë_« …bŽU*« ULOKFð l³ð« ¨ÂUFD!« ‚«dŠ≈ W!UŠ w •
Æq8_« vKŽ ozU8œ ±∞ …b* œ—U³!« ¡U*« w ÂUFD!« s# W8d;« WIDM*« dLž« *
Æ·U'«Ë nOEM!« ‚d*UÐ wDž
Ò
*
ÆqzUÝ dCײ# Ë√ X¹“ ¨ .d+ Í√ nCð ô *
·dD!« Íc!« ¡UŽu!« d²š«Ë ¡UŽu!« vKŽ√ v!« qB¹ v²Š ÂUFD!UÐ ¡UŽu!« ú9 • ﻻ
oOFC!« oMF!UÐ UłUłe!« Æw!UG!« ÂUFD!« ÊUCO lM* bFI!« s# ÷dŽ√ ÍuKF!«
ÆWÞdH*« …—«d(« V³Ð d−HMð b8
Æ داﺋﻤﺎ‰UHÞ_« v!« UNzUDŽ≈ q³8 VOK(« Ë√ ‰UHÞ_« WLFÞ_ …—«d(« Wł—œ i׫ •
d−HMð b8 UłUłe!« Êô ¨ Íb¦!« WLKŠ l# ‰UHÞ_« WLFÞ_ UłUł“ s6ð
• ﻻ
Ò
ÆWÞdH*« …—«d(« V³Ð
d−HM*« ÊUOKG!« Àb×¹ b8 ¨n¹ËËdJ¹U*« Êd w UÐËdA*« 56ð ¡UMŁ√ •
Æ¡UŽu!« ‰ËUMð bMŽ W¹UMF!« b6 ¨ «dšQ²#
Æn¹ËËdJ¹U*« Êd w w½bF# a³Þ ¡U½≈ Í√ Âb6²ð ﻻ.١
WO½bF# w½«Ë√ •
WOCH!«Ë WO³¼c!« ·«dÞ_UÐ U³łu!« w½«Ë√ •
a!« ÆÆÆ „«uý√ ¨ bOUHÝ •
ÆÊdH!« w —d{ Àb×¹ b8Ë …—«dA!« Ë√ wzUÐdNJ!« ”uI!« Àb×¹ b8 ∫V³!«
s6ð
ﻻ.٢
Ò
UłUł“ ∫‰U¦*« qO³Ý vKŽ W#u²<« Ë√ ¡«uN!« …œËbL*« U³Þd*«Ë UłUłe!« •
‰UHÞ_« WLFÞ√
¡«uN!« œËb*« ÂUFD!« •
rÞULD!« ¨ …—uAI*« dOž «“u'«Ë UCO³!« ∫‰U¦*« qO³Ý vKŽ
ÆWLFÞ_« Ác¼ —U−H½« v!« ÍœRð b8 jGC!« …œU¹“ ∫V³!«
Æa!« ÆÆÆ ”UO+_«Ë …dAI!« VIŁË …dA8 ‰“«
∫W;
Ætž«d W!UŠ w n¹ËËdJ¹U*« Êd qGAð ﻻ.٣
ÆÊdH!« Ê«—bł w —d{ À«bŠ≈ v!« ÍœR¹ b8 «c¼ ∫V³!«
w ËdJ¹U*« Ułu# h²1 ¡U*«Ë ÆULz«œ ÊdH!« qš«œ ¡U*« s# U½U−M l{
∫W;
ÆU¾łUH# ⁄—U t½« l# ÊdH!« qOGAð W!UŠ
ÆwzUÐdNJ!« —UO²!« pKÝ w —d{ À«bŠ≈ ÂbŽ sŽ —cŠ« .٩
«bOFÐ —UO²!« pKÝ kHŠ«Ë ¡U*UÐ —UO²!« fÐU8 Ë√ WOzUÐdNJ!« —UO²!« pKÝ dLGð ô •
Æ…—«d(« —œUB# sŽ
Æ—UO²!« fÐU8Ë —UO²!« pKÝ w —d{ ÀËbŠ W!UŠ w “UN'« «c¼ qGAð ô •
Æ‚—u!« Ë√ WAL8_UÐ WOHK)« WŠuK!« w W¹uN²!« Uײ wDGð ﻻ.٤
Ãd6¹ sšU!« ¡«uN!« Ê_ ‚«d²Š« À«bŠ≈ v!« ÍœRð b8 ‚«—Ë_« Ë√ WAL8_« ∫V³!«
ÆÊdH!« s#
Æ»U³!« `² bMŽ ÊdH!« s# Ÿ«—c!« ‰uÞ „dð« .١٠
Æ‚«d²Šô« À«bŠ≈ v!« ÍœR¹ b8 »d²*« —U6³!« Ë√ sšU!« ¡«uN!« ∫V³!«
ÆÊdHK! WHOEM!« WOKš«b!« `DÝ_UÐ kH²Š« .١١
l# ÊdH!« X#b6²Ý« UL+ bFÐ «—u n¹ËËdJ¹U*« ÊdH! WOKš«b!« `DÝ_« nE½
Ò
•
qł√ s# tHOEMð q³8 œd³¹ n¹ËËdJ¹U*« Êd „dð« sJ!Ë rŽUM!« nOEM²!« qzUÝ
ÆÕd−Ð p²ÐUm≈ VM&
Ê«—bł bð w²!« …dA²M*« u¹e!« Ë√ ÂUFD!« s# …dOGB!« WFDI!« ∫V³!«
ÊU¼b!UÐ …UDG*« `DÝ_« w —d{ À«bŠ≈ v!« ÍœR¹ b8 ÷—_« Ë√ ÊdH!«
ÆÊdH!« …¡UH+ kHšË
ÆÊdH!« s# o³Þ ëdš≈ bMŽ داﺋﻤﺎÊdH!« “UH8 Âb6²Ý« .٥
v!« ÂUFD!« s# …—«d(« qI²MðË ËdJ¹U*« Ułu# ‚U³Þ_« iFÐ h²9 ∫V³!«
Æ…—«d(« qIMð ‚U³Þ_« ÆULz«œ o³D!«
ÆWOKš«b!« ÊdH!« Ê«—bł Ë√ 56²!« dBMŽ f#öð ﻻ.٦
¡UN²½« bFÐ v²Š ‚d²% WOU+ Wł—bÐ WMšUÝ `³Bð b8 Ê«—b'« Ác¼ ∫V³!«
‰UF²ýö! WKÐUI!« œ«u*« „d²ð ô Æw¼ UL+ dNEð ô …—«d(« Ê√ ržd!UÐ a³D!«
ÆôË√ œd³¹ ÊdH!« UMŽœ ÆÊdHK! WOKš«b!« W³DM*« qšbð
ÆZK¦!« WЫ–≈ WOF{Ë w WmUš ¨qOGA²!« ¡UMŁ√ ¢‚öžù«¢ um —bB¹ b8 .١٢
ÆwFO³Þ d#√ «c¼ Æ uB!« «c¼ lLð b8 ¨WOzUÐdNJ!« W8UD!« dOOGð bMŽ ∫V³!«
∫ÊdH!« n¹u& w ‚«d²Šô« dDš iH) .٧
ÆÊdH!« w ‰UF²ýö! WKÐUI!« œ«u*« kH% ô •
ÆWOJO²Ýö³!« ”UO+_« Ë√ ‚«—Ë_UÐ UÞuÐd# U¹u²K# UJKÝ ‰“« •
∂
C138ST
6
10/17/02, 4:41 PM
A
ﻛﻴﻔﻴﺔ اﺳﺘﺨﺪام ﺗﻌﻠﻴﻤﺎت اﳌﺎﻟﻚ ﻫﺬه
ﻟﺘﺠﻨﺐ إﺣﺘﻤﺎل اﻟﺘﻌﺮﻳﺾ ﻟﻄﺎﻗﺔ اﳌﺎﻳﻜﺮووﻳa
اﻟﺘﺤﺬﻳﺮات
ّ
اﳌﻔﺮﻃﺔ
ﺷﻜﺮا ﻟﻜﻢ ﻋﻠﻰ ﺷﺮاء ﻓﺮن ﻣﺎﻳﻜﺮووﻳ ﻣﻦ ﺳﺎﻣﺴﻮﱋ .وﺗﻌﻠﻴﻤﺎت اﳌﺎﻟﻚ ﲢﺘﻮي ﻋﻠﻰ
اﳌﻌﻠﻮﻣﺎت اﳌﻔﻴﺪة اﻟﻜﺜﻴﺮة ﻋﻦ اﻟﻄﺒﺦ ﺑﻮاﺳﻄﺔ ﻓﺮن اﳌﺎﻳﻜﺮووﻳ.
• ﲢﺬﻳﺮات ﻣﻦ أﺟﻞ اﻟﺴﻼﻣﺔ
• اﳌﻠﺤﻘﺎت وأواﻧﻲ اﻟﻄﺒﺦ اﳌﻨﺎﺳﺒﺔ
• ﶈﺎت اﻟﻄﺒﺦ اﳌﻔﻴﺪة
A
«!—UC!« i¹dF²!« v!« ÍœR¹ b8 WO!U²!« W#ö!« qł√ s# «d¹cײ!« l³ð w qAH
!Æn¹ËËdJ¹U*« W8UD
®√© oKG!UÐ Y³F!« Ë√ ÊdH!« w ¡wý Í√ ÊËbÐ Õu²H*« tÐUÐ l# ÊdH!« qOGAð W!ËU×#
«_włôe#® wKš«b!« w½U#
ﻓﻲ اﻟﻮﺟﻪ اﻟﺪاﺧﻠﻲ ﻟﺼﻔﺤﺔ اﻟﻐﻼف ﲡﺪ اﻟﺪﻟﻴﻞ اﻟﺴﺮﻳﻊ اﻟﻨﻈﺮ اﻟﺬي ﻳﺸﺮح ﺛﻼﺛﺔ ﺗﺸﻐﻴﻼت
اﻟﻄﺒﺦ اﻷﺳﺎﺳﻲ:
• اﻟﻄﺒﺦ )وﺿﻌﻴﺔ اﳌﺎﻳﻜﺮووﻳ(
• إذاﺑﺔ اﻟﺜﻠﺞ
• زﻳﺎدة ٣٠ﺛﺎﻧﻴﺔ إﺿﺎﻓﻴﺔ ,ﻓﻲ ﺣﺎﻟﺔ أن اﻟﻄﻌﺎم ﻻ ﻳﺘﻢ ﻃﺒﺨﻪ ﻛﻤﺎ ﻳﻨﺒﻐﻲ أو
«!w½U#_« oKG!« Uײ v!« ¡wý Í√ ‰Ušœ≈ Ë√ ©»U³
«!ÆwKš«b
®»© …œU# Ë√ ÂUFD!« „d²ð Ë√ w#U#_« tłu!«Ë ÊdH!« »UÐ 5Ð ¡wý Í√ lCð ô
«!`DÝ vKŽ r+«d²ð v²Š nOEM²
«)w WUEM!« vKŽ WEU;« s# b+Qð Ær²
«!s# WFDIÐ ÊdH!« «b6²Ý« bFÐ ôË√ UN×# ‰öš s# »U³!« r²š `DÝ√Ë »U³
«!Æ·U'« rŽUM!« ‘ULI!« s# WFDIÐ rŁ qK*« ‘ULI
®q³8 s# tŠöm≈ r²¹ v²Š tO —d{ ÀËbŠ W!UŠ w n¹ËËdJ¹U*« Êd qGAð ô ©Ã
أﻧﻪ ﻣﻦ اﳌﻄﻠﻮب إﻋﺎدة اﻟﺘﺴﺨﲔ ﳌﺪة إﺿﺎﻓﻴﺔ.
ÆZ²M*« w t³¹—bð - Íc!« n¹ËËdJ¹U*« Êd U#b) h²6# wM
∫ w —d{ ÂbŽË ÂUJŠSÐ ÊdH!« ‚öž≈ «bł rN*« s#
ﻓﻲ اﳉﺰء اﻟﺴﺎﺑﻖ ﻣﻦ ﺗﻌﻠﻴﻤﺎت اﳌﺎﻟﻚ ﲡﺪ رﺳﻮم اﻟﻔﺮن وﻟﻮﺣﺔ اﻟﺘﺤﻜﻢ ذات أﻛﺜﺮ أﻫﻤﻴﺔ ﻣﻨﻄﺒﻘﺔ
ﻋﻠﻰ ﻧﻮع ﻣﻮدﻳﻞ ﻣﻦ ﻓﺮن اﳌﺎﻳﻜﺮووﻳ ﻟﻚ ,ﻓﺘﺠﺪ اﻷزرار ﺑﺴﻬﻮﻟﺔ أﻛﺜﺮ.
®r²)« `DÝ√Ë »U³!« ÂU²š√ ¨»U³!« ©±
®≤© ©ÂUJŠSÐ WÞuÐd# dOž Ë√ …—uJ#® »U³!« öBH#
®≥© —UO²!« pKÝ
ﺗﺴﺘﺨﺪم اﻹﺟﺮاءات ﺧﻄﻮة ﻓﺨﻄﻮة ﺧﻤﺴﺔ رﻣﻮز ﻣﺨﺘﻠﻔﺔ.
®h²6# wM s# ôbÐ h6ý Í√ q³8 s# tŠöm≈ Ë√ ÊdH!« q¹bFð ÂbŽ s# bÐ ô ©œ
)ÆZ²M*« w t³¹—bð - Íc!« n¹ËËdJ¹U*« Êd U#b
☛
ﻫﺎم
ﻣﻼﺣﻈﺔ
µ
10/17/02, 4:41 PM
5
C138ST
اﳌﻠﺤﻘﺎت
ﻓﺮن اﳌﺎﻳﻜﺮووﻳ ﻣﺰود ﺑﺒﻌﺾ اﳌﻠﺤﻘﺎت اﻟﺘﻲ ﳝﻜﻦ اﺳﺘﺨﺪاﻣﻬﺎ ﺑﻄﺮق,ﺣﺴﺐ ﻣﻮدﻳﻞ اﺷﺘﺮﻳﺘﻪ
.ﻣﺨﺘﻠﻔﺔ
Æ…—«Ëb!«
WOMOB!« vKŽ tF{Ë r²¹ ¨ اﻟﻮﻋﺎء اﻟﺰﺟﺎﺟﻲ.٩
Ò
©jI C138STB/C138STF/C139STB/C139STF®
ÆwłUłe!« ¡UŽu!« w tF{Ë r²¹ —«Ëb!«
œuH!« ∫÷dG!«
Ò
ÆÊdH!« …bŽU8 w —uðu*« œuLŽ vKŽ UI³# tF{Ë - ¨ اﳌﻘﺮاﻧﺔ.١
Æ…—«Ëb!«
WOMOB!« —Ëbð
Ê—UI*« ∫÷dG!«
Ò
Ò
…—«Ëb!«
WOMOB!« vKŽ tF{Ë r²¹ ¨ ﺻﺤﻦ اﻟﺘﺤﻤﻴﺮ.١٠
Ò
©jI C138STT/C138STF/C139STT/C139STF®
qJAÐ ÂUFD!« dOLײ! dOLײ!« s×m Âb6²¹ ∫÷dG!«
a³D!« UOF{Ë Ë√ ËdJ¹U*« Ułu# w qC√
Æ«e²O³!« 5−ŽË …dOD kH×¹Ë W¹«uA!UÐ ŸuL:«
ÆÊdH!« jÝË w UNF{Ë r²¹ ¨ ﺣﻠﻘﺔ ﺑﺎﻟﻌﺠﻼت.٢
Æ…—«Ëb!«
WOMOB!« bMð nK*« WIKŠ ∫÷dG!«
Ò
jÝu! rzö# UN½√ l# nK*« WIKŠ vKŽ UNF{Ë r²¹ ¨ اﻟﺼﻴﻨﻴﺔ اﻟﺪوارة.٣
ÆÊ—UI*«
wOzd!« ÂUFD!« a³Þ vKŽ bŽUð …—«Ëb!«
WOMOB!« ∫÷dG!«
Ò
ÆW!uNÐ nOEM²K! t³×Ý pMJ1
vKŽ UNF{Ë r²¹ ¨©iH6M# ·— ¨ lHðd# ·—® اﻟﺮﻓﻮف اﳌﻌﺪﻧﻴﺔ.٤
Æ…—«Ëb!«
WOMOB!«
Ò
5F³D!« a³Þ w t#«b6²Ý« pMJ1 w½bF*« ·d!« ∫÷dG!«
WOMOB!« vKŽ lI¹ b8 dOGm o³Þ ÆX8u!« fH½ w
ﳝﻜﻨﻚÆ·d!« vKŽ lI¹ w½U¦!« o³D!«Ë …—«Ëb!«
Ò
.اﺳﺘﺨﺪام اﻟﺮف اﳌﻌﺪﻧﻲ ﻓﻲ اﻟﺸﻮاﻳﺔ واﻟﻄﺒﺦ اﺠﻤﻟﻤﻮع
Æ·d!« bM# w tF{Ë r²¹ ¨ رف ﻣﻌﺪﻧﻲ ﻣﺮﺑﻊ.٥
Æ ﺑﺎﻻﻧﺘﻘﺎل اﳊﺮاريa³DK! Âb6²¹ lÐd*« w½bF*« ·d!« ∫÷dG!«
©≤∞ W×Hm lł«—®
Æ·d!« bM# w UNF{Ë r²¹ ¨ ﺻﻴﻨﻴﺔ ﻣﻌﺪﻧﻴﺔ ﻣﺮﺑﻌﺔ.٦
‰UI²½ôUÐ a³DK! Âb6²ð WFÐd*« WO½bF*« WOMOB!« ∫÷dG!«
©≤∞ W×Hm lł«—® ÆÍ—«d(«
W×Hm lł«—® ÆÊdH!« —U¹Ë 51 w tF{Ë r²¹ ¨ ﻣﺴﻨﺪ اﻟﺮف.٧
©≤∞
‰UI²½ôUÐ a³DK! Âb6²¹ lÐd*« w½bF*« ·d!« ∫÷dG!«
ÆÍ—«d(«
¡UŽu!« w UNF{Ë r²¹ ¨ ﺳﻔﻮد اﻟﺘﺸﻮﻳﺔ وﻣﻘﺮاﻧﺔ ﺗﺸﻮﻳﺔ اﻟﻠﺤﻢ واﻟﺴﻴﺦ.٨
©jI C138STB/C138STF/C139STB/C139STF® włUłe!«
ÃU²% ô p½ô ¨ ÃUłb!« W¹uA²! `¹d# W¹uA²!« œuHÝ ∫÷dG!«
ŸuL:« a³DK! UN#b6²Ý« pMJ1 ÆÃUłb!« VOKIð v!«
ÆW¹«uA!UÐ
¥
C138ST
4
10/17/02, 4:41 PM
A
ﻟﻮﺣﺔ اﻟﺘﺤﻜﻢ
اﻟﻔﺮن
A
56²!« dBMŽ
W¹uN²!« Uײ
±
»U³!«
·d!« q#UŠ
·d!« q#UŠ
W¹uN²!« Uײ
≤
≥
¥
µ
∂
±≤
±≥
±¥
±µ
∑
∏
±∂
±∑
±∏
i³I#
»U³!«
±π
π
±∞
rJײ!« WŠu!
…—«Ëb!«
WOMOB!«
Ò
W½«dI*«
≤∞
±±
»U³!« Ułôe#
qHIK! ÊU#_« U²×²
wKš«b!«
ö−F!UÐ WIKŠ
≤±
a³D!« w rJײ!« WIKŠ .١٣
n¹ËËdJ¹U*« WOF{Ë .١٤
´ n¹ËËdJ¹U*«®wFL'« a³D!« WOF{Ë .١٥
©W¹«uA!«
W¹«uA!« WOF{Ë .١٦
wFL'« a³D!« WOF{Ë .١٧
©Í—«d(« ‰UI²½ô« ´ n¹ËËdJ¹U*«®
Í—«d(« ‰UI²½ô« WOF{Ë .١٨
q8_«Ød¦+_« —“ .١٩
a³D!« X8Ë j³{ØqOGA²!« —“ .٢٠
X8u!« j³{ l# Ê“u!« —UO²š«Ë
…—«Ëb!«
WOMOB!« ·UI¹≈ØqOGAð —“ .٢١
Ò
÷dF!« .١
—UE²½ô« X8Ë j³{ .٢
WŽU!« j³{ —“ .٣
WK¦!« WЫ–≈ WHOþË WOF{Ë .٤
WOJOðU#uðË_«
dODHJ!« WOF{Ë .٥
WHOH)« U³łu!«ØdGm_« WOF{Ë .٦
56²!« …œUŽ≈ WHOþË WOF{Ë .٧
WOJOðU#uðË_«
wJOðU#uðË_« a³D!« WHOþË WOF{Ë .٨
WOF{u!« —UO²š« —“ .٩
o³*« 56²!« WOF{Ë —UO²š« —“ .١٠
¡UG!ù«Ø·UI¹ù« —“ .١١
WGK!« WOF{Ë —UO²š« —“ .١٢
≥
C138ST
3
10/17/02, 4:41 PM
اﻟﺪﻟﻴﻞ اﻟﺴﺮﻳﻌﺔ اﻟﻨﻈﺮ
. ﺛﺎﻧﻴﺔ إﺿﺎﻓﻴﺔ٣٠ أرﻳﺪ زﻳﺎدة
إذا أردت ﻃﺒﺦ ﺑﻌﺾ اﻷﻃﻌﻤﺔ
ÆÊdH!« w ÂUFD!« „dð«
‰umuK! d¦+√ Ë√ …d# © ® ©WO½UŁ ≥∞ …œU¹“® +30s —“ vKŽ jG{«
ÆUNðœU¹“ b¹dð WOU{≈ WO½UŁ ≥∞ ‡Ð X8u!« v!«
® a اﳌﺎﻳﻜﺮووﻳe#— v!« — ﺣﻠﻘﺔ اﻟﺘﺤﻜﻢ ﻓﻲ اﻟﻄﺒﺦËœ
Ò .١
©
W8UD!« Èu²# ÷dF¹ v²Š ©
ŸUDI½« bFÐ Ë√ ¨ …d# ‰Ë_ —UO²!« Ãd6# v!« —UO²!« fÐU8 qBð U#bMŽ
vKŽ ¢©p²G! d²š«® SELECT YOUR LANGUAGE¢ WKLł dNE𠨡UÐdNJ!«
—UO²š« pMJ1 Æ÷dFK! WG! —UO²š« pMJ1 ¨W!U(« Ác¼ w Æ÷dF!« ÃUł“
¨ WO!UD¹ù« ¨ WO½U³Ýô« ¨ WO½U*_« ¨ WO½dH!« ¨W¹eOK$ô« UGK!« s# WG!
Æ∏ W×Hm lł«— ÆWOÝËd!« ¨ W¹bM!uN!«
® “— اﻻﺧﺘﻴﺎرvKŽ jG{« .٢
ÆVÝUM*«
Æb¹dð UL+ اﳊﻠﻘﺔd¹Ëb²Ð a³D!« X8Ë d²š« .٣
Æ© ® “— اﻟﺘﺸﻐﻴﻞvKŽ jG{« .٤
a³D!UÐ ÊdH!« √b³¹ ∫W−O²M!«
oKDMð ¨a³D!« X8Ë ¡UN²½« bMŽ ◆
Æ «d# lЗ√ ¢0¢ X8u!« i#u¹Ë ÊdH!« s# …—UHm
ÆWIO8œ q+ ÊdH!« s# …—UHm oKDMðË
.أرﻳﺪ إذاﺑﺔ اﻟﺜﻠﺞ ﻓﻲ ﺑﻌﺾ اﻷﻃﻌﻤﺔ
Æ©
ÆÊdH!« w bÒL:« ÂUFD!« l{ .١
® إذاﺑﺔ اﻟﺜﻠﺞe#— v!« — ﺣﻠﻘﺔ اﻟﺘﺤﻜﻢ ﻓﻲ اﻟﻄﺒﺦËœ
Ò
—“ vKŽ jGC!UÐ t6³Þ b¹dð Íc!« ÂUFD!« s# UŽu½ d²š« .٢
ÆÁb¹dð Íc!« ÂUFD!« lMm —UO²š« r²¹ v²Š ¨© ® اﻻﺧﺘﻴﺎر
Æ»uKD# UL+ اﳊﻠﻘﺔd¹Ëb²Ð Ê“u!« d²š« .٣
Æ © ® “— اﻟﺘﺸﻐﻴﻞvKŽ jG{« .٤
ÆZK¦!« WЫ–SÐ ÊdH!« √b³¹ U¼bMŽ ∫W−O²M!«
ÊdH!« s# …—UHm oKDMð ¨a³D!« ¡UN²½« bMŽ ◆
s# …—UHm oKDMðË Æ «d# lЗ√ ¢0¢ i#u¹Ë
ÆWIO8œ q+ …d# ÊdH!«
≤
C138ST
2
10/17/02, 4:41 PM
A
A
aﻓﺮن اﳌﺎﻳﻜﺮووﻳ
≤ ÆÆÆÆÆÆÆÆÆÆÆÆÆÆÆÆÆÆÆÆÆÆÆÆÆÆÆÆÆÆÆÆÆÆÆÆÆÆÆÆÆÆÆÆÆÆÆÆÆÆÆÆÆÆÆÆÆÆÆÆÆÆÆÆÆÆÆÆÆÆÆÆÆÆÆÆÆÆÆÆ dEM!« WF¹d!« qO!b!«
≥ ÆÆÆÆÆÆÆÆÆÆÆÆÆÆÆÆÆÆÆÆÆÆÆÆÆÆÆÆÆÆÆÆÆÆÆÆÆÆÆÆÆÆÆÆÆÆÆÆÆÆÆÆÆÆÆÆÆÆÆÆÆÆÆÆÆÆÆÆÆÆÆÆÆÆÆÆÆÆÆÆÆÆÆÆÆÆÆÆÆÆÆÆÆÆÆÆÆÆÆÆÆÆÆ ÊdH!«
≥ ÆÆÆÆÆÆÆÆÆÆÆÆÆÆÆÆÆÆÆÆÆÆÆÆÆÆÆÆÆÆÆÆÆÆÆÆÆÆÆÆÆÆÆÆÆÆÆÆÆÆÆÆÆÆÆÆÆÆÆÆÆÆÆÆÆÆÆÆÆÆÆÆÆÆÆÆÆÆÆÆÆÆÆÆÆÆÆÆÆÆÆÆÆÆ rJײ!« WŠu!
¥ ÆÆÆÆÆÆÆÆÆÆÆÆÆÆÆÆÆÆÆÆÆÆÆÆÆÆÆÆÆÆÆÆÆÆÆÆÆÆÆÆÆÆÆÆÆÆÆÆÆÆÆÆÆÆÆÆÆÆÆÆÆÆÆÆÆÆÆÆÆÆÆÆÆÆÆÆÆÆÆÆÆÆÆÆÆÆÆÆÆÆÆÆÆÆÆÆÆÆÆ UI×K*«
µ ÆÆÆÆÆÆÆÆÆÆÆÆÆÆÆÆÆÆÆÆÆÆÆÆÆÆÆÆÆÆÆÆÆÆÆÆÆÆÆÆÆÆÆÆÆÆÆÆÆÆÆÆÆÆÆÆÆÆÆÆÆÆ Ác¼ p!U*« ULOKFð «b6²Ý« WOHO+
∂ ÆÆÆÆÆÆÆÆÆÆÆÆÆÆÆÆÆÆÆÆÆÆÆÆÆÆÆÆÆÆÆÆÆÆÆÆÆÆÆÆÆÆÆÆÆÆÆÆÆÆÆÆÆÆÆÆÆÆÆÆÆÆÆÆÆÆÆÆÆÆÆÆÆÆÆÆ W#ö!« qł√ s# «d¹c%
∑ ÆÆÆÆÆÆÆÆÆÆÆÆÆÆÆÆÆÆÆÆÆÆÆÆÆÆÆÆÆÆÆÆÆÆÆÆÆÆÆÆÆÆÆÆÆÆÆÆÆÆÆÆÆÆÆÆÆÆÆÆÆÆÆÆÆÆÆÆÆÆÆÆÆÆÆÆÆ n¹ËËdJ¹U*« Êd VO+dð
∏ ÆÆÆÆÆÆÆÆÆÆÆÆÆÆÆÆÆÆÆÆÆÆÆÆÆÆÆÆÆÆÆÆÆÆÆÆÆÆÆÆÆÆÆÆÆÆÆÆÆÆÆÆÆÆÆÆÆÆÆÆÆÆÆÆÆÆÆÆÆÆÆÆÆÆÆÆÆÆÆÆÆÆÆ ÷dFK! WGK!« —UO²š«
∏ ÆÆÆÆÆÆÆÆÆÆÆÆÆÆÆÆÆÆÆÆÆÆÆÆÆÆÆÆÆÆÆÆÆÆÆÆÆÆÆÆÆÆÆÆÆÆÆÆÆÆÆÆÆÆÆÆÆÆÆÆÆÆÆÆÆÆÆÆÆÆÆÆÆÆÆÆÆÆÆÆÆÆÆÆÆÆÆÆÆÆÆÆÆÆ X8u!« j³{
π ÆÆÆÆÆÆÆÆÆÆÆÆÆÆÆÆÆÆÆÆÆÆÆÆÆÆÆÆÆÆÆÆÆÆÆÆÆÆÆÆÆÆÆÆÆÆÆÆÆÆÆÆÆÆÆÆÆÆÆÆÆÆÆÆÆÆÆÆÆÆÆ n¹ËËdJ¹U*« Êd qLF¹ nO+
π ÆÆÆÆÆÆÆÆÆÆÆÆÆÆÆÆÆÆÆÆÆÆÆÆÆÆÆÆÆÆÆÆÆÆÆÆÆÆÆÆÆÆÆÆÆÆÆÆÆÆÆÆÆÆÆÆÆÆÆÆÆÆÆÆÆ wG³M¹ UL+ ÊdH!« qOGAð s# b+Qð
±∞ ÆÆÆÆÆÆÆÆÆÆÆÆÆÆÆÆÆÆÆÆÆÆÆÆÆÆÆÆÆÆÆÆÆÆÆÆÆÆÆÆÆÆÆ WKJA# ÀËbŠ Ë√ „uJý œułË W!UŠ w qFHð «–U#
±± ÆÆÆÆÆÆÆÆÆÆÆÆÆÆÆÆÆÆÆÆÆÆÆÆÆÆÆÆÆÆÆÆÆÆÆÆÆÆÆÆÆÆÆÆÆÆÆÆÆÆÆÆÆÆÆÆÆÆÆÆÆÆÆÆÆÆÆÆÆÆÆÆÆÆÆÆÆÆ 56²!« …œUŽ≈Øa³D!«
±± ÆÆÆÆÆÆÆÆÆÆÆÆÆÆÆÆÆÆÆÆÆÆÆÆÆÆÆÆÆÆÆÆÆÆÆÆÆÆÆÆÆÆÆÆÆÆÆÆÆÆÆÆÆÆ WHK²<« a³D!« U8Ë√Ë W8UD!« U¹u²#
±≤ ÆÆÆÆÆÆÆÆÆÆÆÆÆÆÆÆÆÆÆÆÆÆÆÆÆÆÆÆÆÆÆÆÆÆÆÆÆÆÆÆÆÆÆÆÆÆÆÆÆÆÆÆÆÆÆÆÆÆÆÆÆÆÆÆÆÆÆÆÆÆÆÆÆÆÆÆÆÆÆÆÆÆÆÆÆÆÆÆÆÆÆÆ a³D!« ·UI¹≈
±≤ ÆÆÆÆÆÆÆÆÆÆÆÆÆÆÆÆÆÆÆÆÆÆÆÆÆÆÆÆÆÆÆÆÆÆÆÆÆÆÆÆÆÆÆÆÆÆÆÆÆÆÆÆÆÆÆÆÆÆÆÆÆÆÆÆÆÆÆÆÆÆÆÆÆÆÆÆÆÆÆÆÆÆÆÆÆ a³D!« X8Ë j³{
±≥ ÆÆÆÆÆÆÆÆÆÆÆÆÆÆÆÆÆÆÆÆÆÆÆÆÆÆÆÆÆÆÆÆÆÆÆÆÆÆÆÆÆÆÆÆÆÆÆÆÆÆÆÆÆÆÆÆÆÆÆ wJOðU#uðË_« a³D!« WHOþË Â«b6²Ý«
±¥ ÆÆÆÆÆÆÆÆÆÆÆÆÆÆÆÆÆÆÆÆÆÆÆÆÆÆÆÆÆÆÆÆÆÆÆÆÆÆÆÆÆÆÆÆÆÆ WOJOðU#uðË_« 56²!« …œUŽ≈ WHOþË Â«b6²Ý«
±µ ÆÆÆÆÆÆÆÆÆÆÆÆÆÆÆÆÆÆÆÆÆÆÆÆÆÆÆÆÆÆÆÆÆÆÆÆÆÆÆÆÆÆÆÆÆÆÆÆÆÆÆÆ WOJOðU#uðË_« ZK¦!« WЫ–≈ WHOþË Â«b6²Ý«
±∂ ÆÆÆÆÆÆÆÆÆÆÆÆÆÆÆÆÆÆÆÆÆÆÆÆÆÆÆÆÆÆÆÆÆÆÆÆÆÆÆÆÆÆÆÆÆÆÆÆÆÆÆÆ WHOH)« U³łu!«ØdGm_« WHOþË Â«b6²Ý«
±∏ ÆÆÆÆÆÆÆÆÆÆÆÆÆÆÆÆÆÆÆÆÆÆÆÆÆÆÆÆÆÆÆÆÆÆÆÆÆÆÆÆÆÆÆÆÆÆÆÆÆÆÆÆÆÆÆÆÆÆÆÆÆÆÆÆÆÆÆÆÆÆÆÆÆÆÆ dODHJ!« WHOþË Â«b6²Ý«
±∏ ÆÆÆÆÆÆÆÆÆÆÆÆÆÆÆÆÆÆÆÆÆÆÆÆÆÆÆÆÆÆÆÆÆÆÆÆÆÆÆÆÆÆÆÆÆÆÆÆÆÆÆÆÆÆÆÆÆÆÆÆÆÆÆÆÆÆÆÆÆÆÆÆÆÆÆÆÆÆÆ dODHJ!« WOF{Ë j³{
±π ÆÆÆÆÆÆÆÆÆÆÆÆÆÆÆÆÆÆÆÆÆÆÆÆÆÆÆÆÆÆÆÆÆÆÆÆÆÆÆÆÆÆÆÆÆÆÆÆÆÆÆÆÆÆÆÆÆÆÆÆÆÆÆÆÆÆÆÆÆÆÆÆÆÆÆ dOLײ!« s×m «b6²Ý«
≤∞ ÆÆÆÆÆÆÆÆÆÆÆÆÆÆÆÆÆÆÆÆÆÆÆÆÆÆÆÆÆÆÆÆÆÆÆÆÆÆÆÆÆÆÆÆÆÆÆÆÆÆÆÆÆÆ lÐd*« w½bF*« ·d!«Ë WOMOB!« «b6²Ý«
≤≤ ÆÆÆÆÆÆÆÆÆÆÆÆÆÆÆÆÆÆÆÆÆÆÆÆÆÆÆÆÆÆÆÆÆÆÆÆÆÆÆÆÆÆÆÆÆÆÆÆÆÆÆÆÆÆÆÆÆÆÆÆÆÆÆÆÆÆÆÆÆÆÆÆÆÆ …œbF²# qŠ«d# vKŽ a³D!«
≤≥ ÆÆÆÆÆÆÆÆÆÆÆÆÆÆÆÆÆÆÆÆÆÆÆÆÆÆÆÆÆÆÆÆÆÆÆÆÆÆÆÆÆÆÆÆÆÆÆÆÆÆÆÆÆÆÆÆÆÆÆÆÆÆÆÆÆÆÆÆÆÆÆÆÆÆÆÆÆÆÆÆÆÆ —UE²½ô« X8Ë j³{
≤≥ ÆÆÆÆÆÆÆÆÆÆÆÆÆÆÆÆÆÆÆÆÆÆÆÆÆÆÆÆÆÆÆÆÆÆÆÆÆÆÆÆÆÆÆÆÆÆÆÆÆÆÆÆÆÆÆÆÆÆÆÆÆÆÆÆÆÆÆÆÆÆÆÆÆÆÆÆÆÆÆÆÆÆÆÆÆÆÆ UI×K*« —UO²š«
≤≥ ÆÆÆÆÆÆÆÆÆÆÆÆÆÆÆÆÆÆÆÆÆÆÆÆÆÆÆÆÆÆÆÆÆÆÆÆÆÆÆÆÆÆÆÆÆÆÆÆÆÆÆÆÆÆÆÆÆÆÆÆÆÆÆÆÆÆÆÆÆÆÆÆÆÆÆÆÆÆÆÆ o³*« ÊdH!« 56ð
≤¥ ÆÆÆÆÆÆÆÆÆÆÆÆÆÆÆÆÆÆÆÆÆÆÆÆÆÆÆÆÆÆÆÆÆÆÆÆÆÆÆÆÆÆÆÆÆÆÆÆÆÆÆÆÆÆÆÆÆÆÆÆÆÆÆÆÆÆÆÆÆÆÆÆÆÆÆÆ Í—«d(« ‰UI²½ôUÐ a³D!«
≤¥ ÆÆÆÆÆÆÆÆÆÆÆÆÆÆÆÆÆÆÆÆÆÆÆÆÆÆÆÆÆÆÆÆÆÆÆÆÆÆÆÆÆÆÆÆÆÆÆÆÆÆÆÆÆÆÆÆÆÆÆÆÆÆÆÆÆÆÆÆÆÆÆÆÆÆÆÆÆÆÆÆÆÆÆÆÆÆÆÆÆÆÆÆÆÆÆÆÆÆ W¹uA²!«
≤µ ÆÆÆÆÆÆÆÆÆÆÆÆÆÆÆÆÆÆÆÆÆÆÆÆÆÆÆÆÆÆÆÆÆÆÆÆÆÆÆÆÆÆÆÆÆÆÆÆÆÆÆÆÆÆÆÆÆÆÆÆÆÆÆÆÆÆÆ 56²!« dBMŽ l{u# —UO²š«
≤µ ÆÆÆÆÆÆÆÆÆÆÆÆÆÆÆÆÆÆÆÆÆÆÆÆÆÆÆÆÆÆÆÆÆÆÆÆÆÆÆÆÆÆÆÆÆÆÆÆÆÆÆÆÆÆÆÆÆÆÆÆÆÆÆÆÆÆÆÆÆÆÆÆÆÆÆÆÆÆÆÆÆÆÆÆÆÆ œuH!UÐ W¹uA²!«
≤∂ ÆÆÆÆÆÆÆÆÆÆÆÆÆÆÆÆÆÆÆÆÆÆÆÆÆÆÆÆÆÆÆÆÆÆÆÆÆÆ ÍœuLŽ qJAÐ …œbF²*« bOUH!UÐ W¹uA²!« «b6²Ý«
≤∂ ÆÆÆÆÆÆÆÆÆÆÆÆÆÆÆÆÆÆÆÆÆÆÆÆÆÆÆÆÆÆÆÆÆÆÆÆÆÆÆÆÆÆÆÆÆ W¹«uA!«Ë n¹ËËdJ¹U*« W8UÞ s# wFL'« a³D!«
≤∑ ÆÆÆÆÆÆÆÆÆÆÆÆÆÆÆÆÆÆÆÆÆÆÆÆÆÆÆÆÆÆÆÆÆÆ Í—«d(« ‰UI²½ô«Ë n¹ËËdJ¹U*« W8UÞ s# wFL'« a³D!«
≤∏ ÆÆÆÆÆÆÆÆÆÆÆÆÆÆÆÆÆÆÆÆÆÆÆÆÆÆÆÆÆÆÆÆÆÆÆÆÆÆÆÆÆÆÆÆÆÆÆÆÆÆÆÆÆÆÆÆÆÆÆÆÆÆ n¹ËËdJ¹U*« ÊdH! w½U#_« ‚öžù«
≤∏ ÆÆÆÆÆÆÆÆÆÆÆÆÆÆÆÆÆÆÆÆÆÆÆÆÆÆÆÆÆÆÆÆÆÆÆÆÆÆÆÆÆÆÆÆÆÆÆÆÆÆÆÆÆÆÆÆÆÆÆÆÆÆÆÆÆÆÆÆÆÆÆÆÆÆÆÆÆÆÆÆÆÆÆÆÆÆÆÆÆÆ ÃdŠb!« WŽdÝ
≤∏ ÆÆÆÆÆÆÆÆÆÆÆÆÆÆÆÆÆÆÆÆÆÆÆÆÆÆÆÆÆÆÆÆÆÆÆÆÆÆÆÆÆÆÆÆÆÆÆÆÆÆÆÆÆÆÆÆÆÆÆÆÆÆÆÆÆÆÆÆÆÆÆÆÆÆÆÆÆÆ …—UHB!« ‚öD½« ·UI¹≈
≤∏ ÆÆÆÆÆÆÆÆÆÆÆÆÆÆÆÆÆÆÆÆÆÆÆÆÆÆÆÆÆÆÆÆÆÆÆÆÆÆÆÆÆÆÆÆÆÆÆÆÆÆÆÆÆÆÆÆÆÆÆ U¹Ëb¹ …—«Ëb!«
WOMOB!« WHOþË ·UI¹≈
Ò
≤π ÆÆÆÆÆÆÆÆÆÆÆÆÆÆÆÆÆÆÆÆÆÆÆÆÆÆÆÆÆÆÆÆÆÆÆÆÆÆÆÆÆÆÆÆÆÆÆÆÆÆÆÆÆÆÆÆÆÆÆÆÆÆÆÆÆÆÆÆÆÆÆÆÆÆÆÆÆÆÆÆÆÆÆÆÆÆÆÆÆÆÆÆ w½«Ë_« qO!œ
≥∞ ÆÆÆÆÆÆÆÆÆÆÆÆÆÆÆÆÆÆÆÆÆÆÆÆÆÆÆÆÆÆÆÆÆÆÆÆÆÆÆÆÆÆÆÆÆÆÆÆÆÆÆÆÆÆÆÆÆÆÆÆÆÆÆÆÆÆÆÆÆÆÆÆÆÆÆÆÆÆÆÆÆÆÆÆÆÆÆÆÆÆÆÆÆ a³D!« qO!œ
¥± ÆÆÆÆÆÆÆÆÆÆÆÆÆÆÆÆÆÆÆÆÆÆÆÆÆÆÆÆÆÆÆÆÆÆÆÆÆÆÆÆÆÆÆÆÆÆÆÆÆÆÆÆÆÆÆÆÆÆÆÆÆÆÆÆÆÆÆÆÆÆÆÆÆÆÆ n¹ËdJ¹U*« Êd nOEMð
¥≤ ÆÆÆÆÆÆÆÆÆÆÆÆÆÆÆÆÆÆÆÆÆÆÆÆÆÆÆÆÆÆÆÆÆÆÆÆÆÆÆÆÆÆÆÆÆÆÆÆÆÆÆÆÆÆÆÆÆÆÆÆÆÆÆÆÆ tŠöm≈Ë n¹ËËdJ¹U*« Êd kHŠ
¥≤ ÆÆÆÆÆÆÆÆÆÆÆÆÆÆÆÆÆÆÆÆÆÆÆÆÆÆÆÆÆÆÆÆÆÆÆÆÆÆÆÆÆÆÆÆÆÆÆÆÆÆÆÆÆÆÆÆÆÆÆÆÆÆÆÆÆÆÆÆÆÆÆÆÆÆÆÆÆÆÆÆÆÆÆÆÆÆ WOMH!« UHm«u*«
ﺗﻌﻠﻴﻤﺎت اﳌﺎﻟﻚ ودﻟﻴﻞ اﻟﻄﺒﺦ
C138ST / C138STB
C138STT / C138STF
C139ST / C139STB
C139STT / C139STF
±
C138ST
1
10/17/02, 4:41 PM